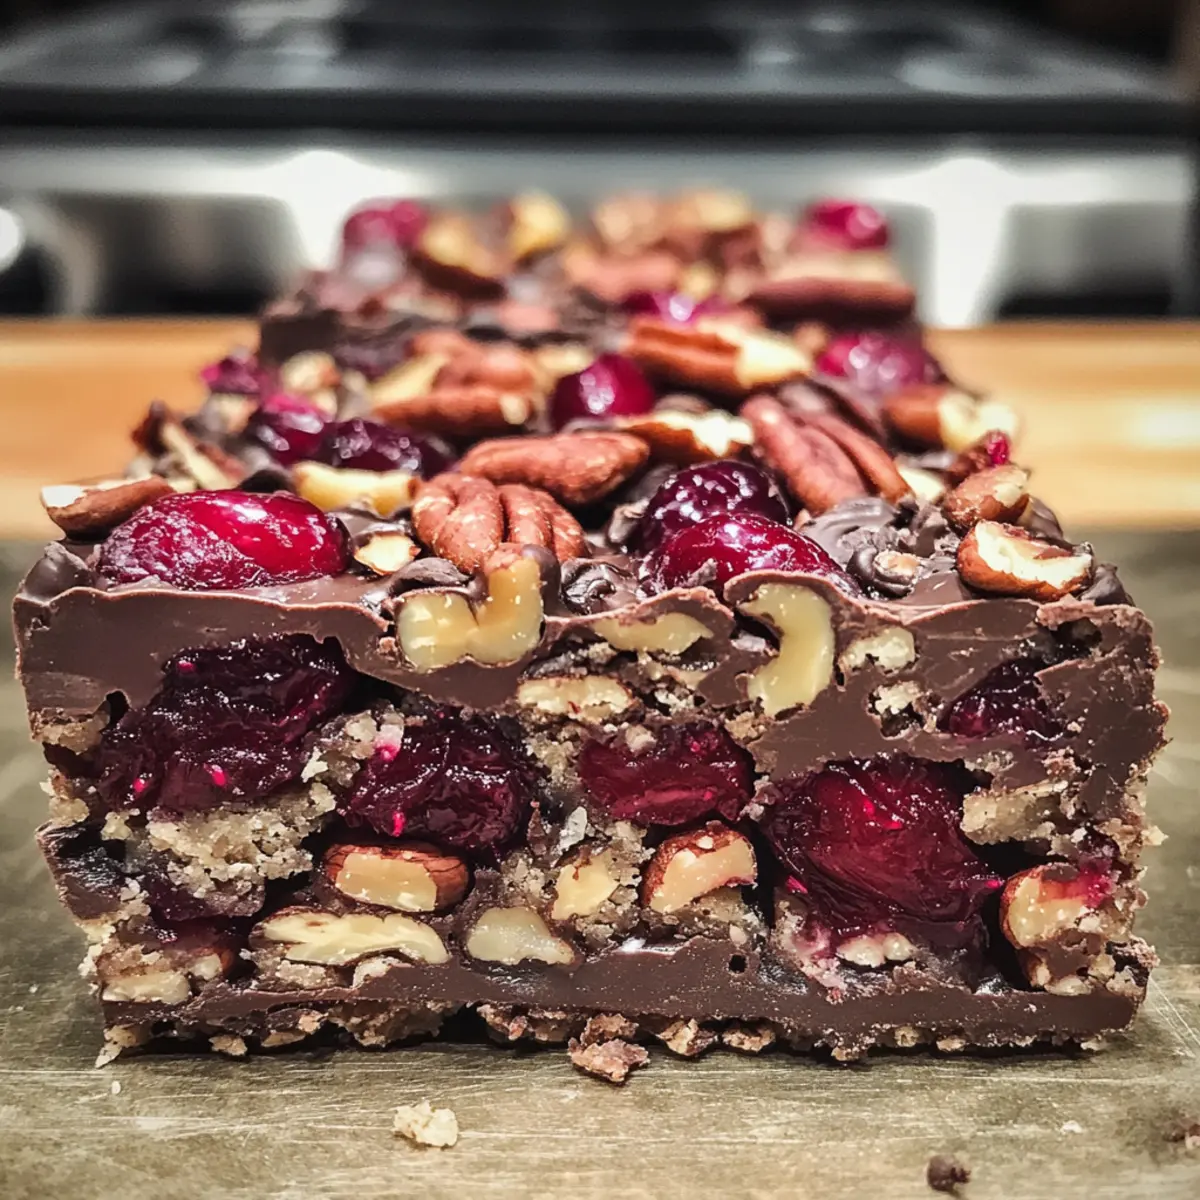
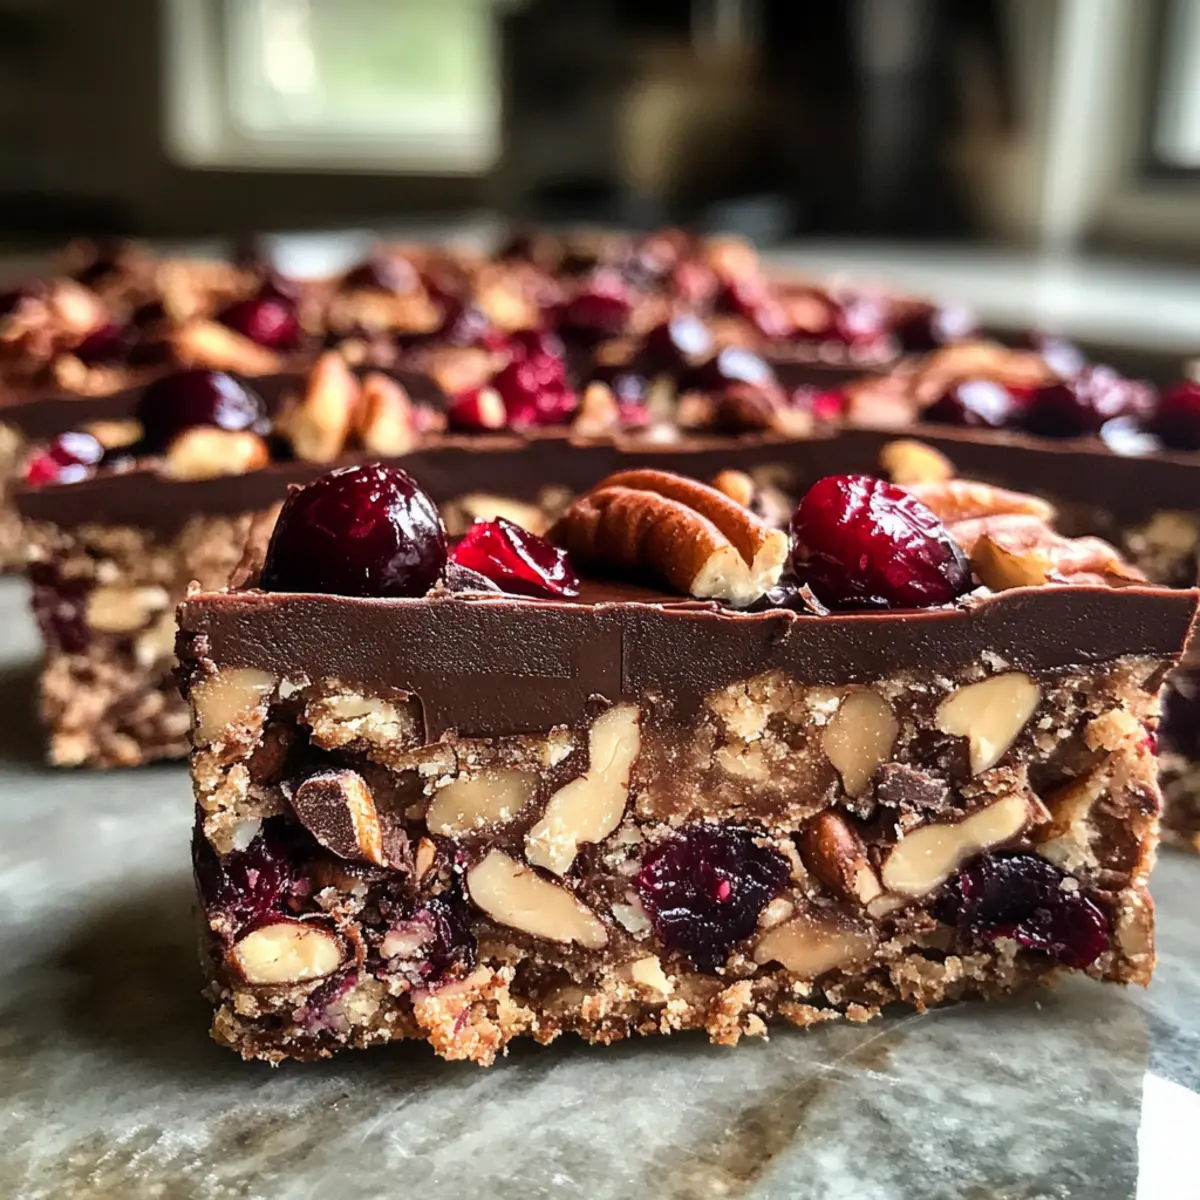
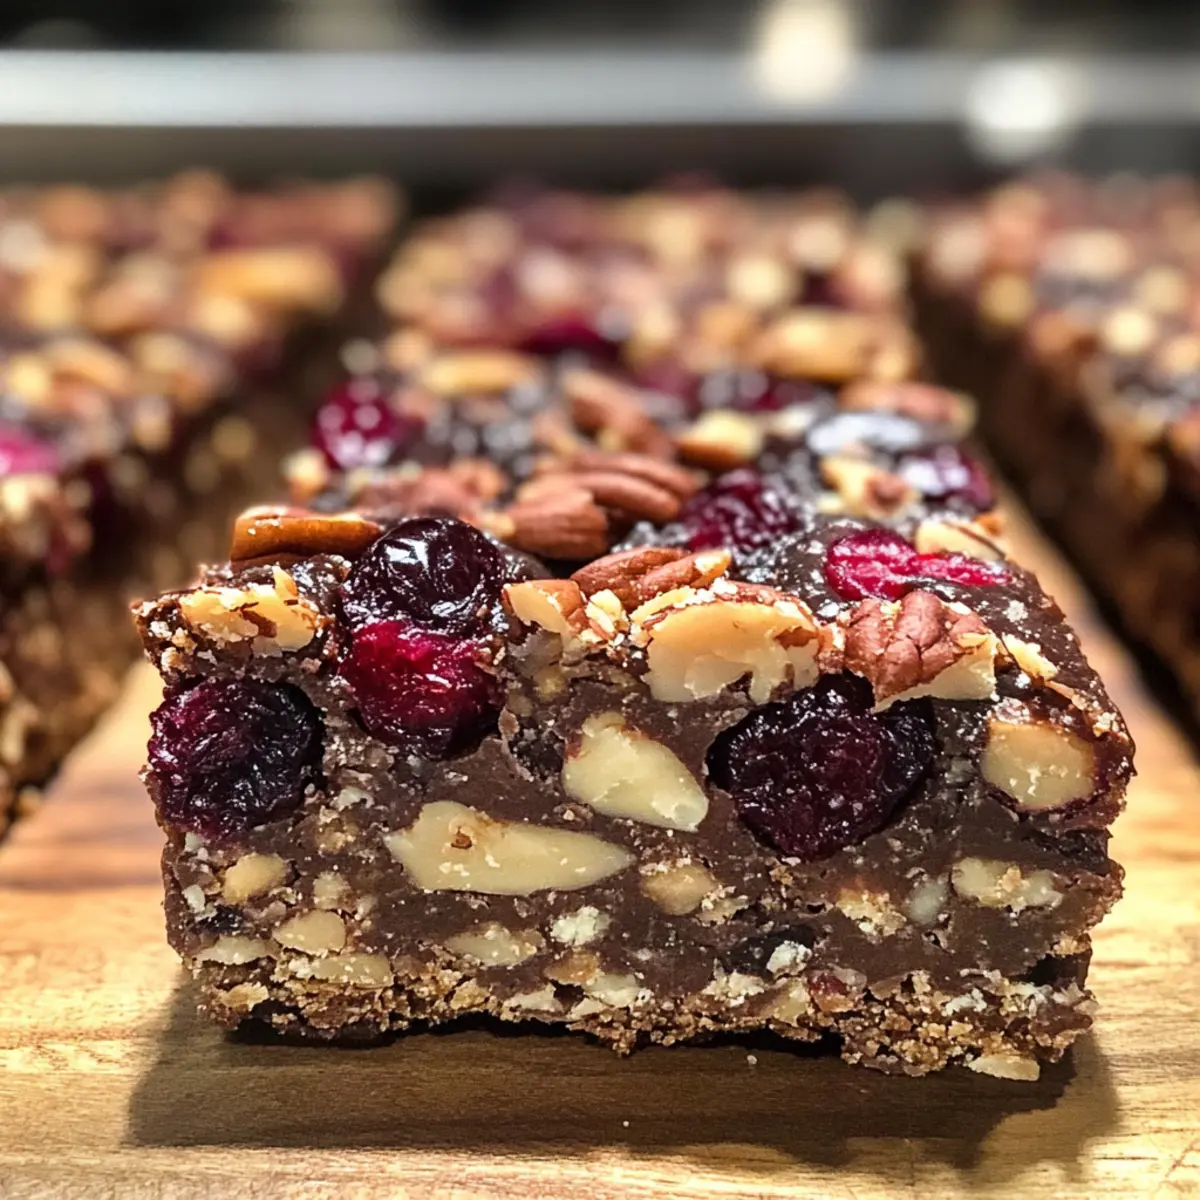
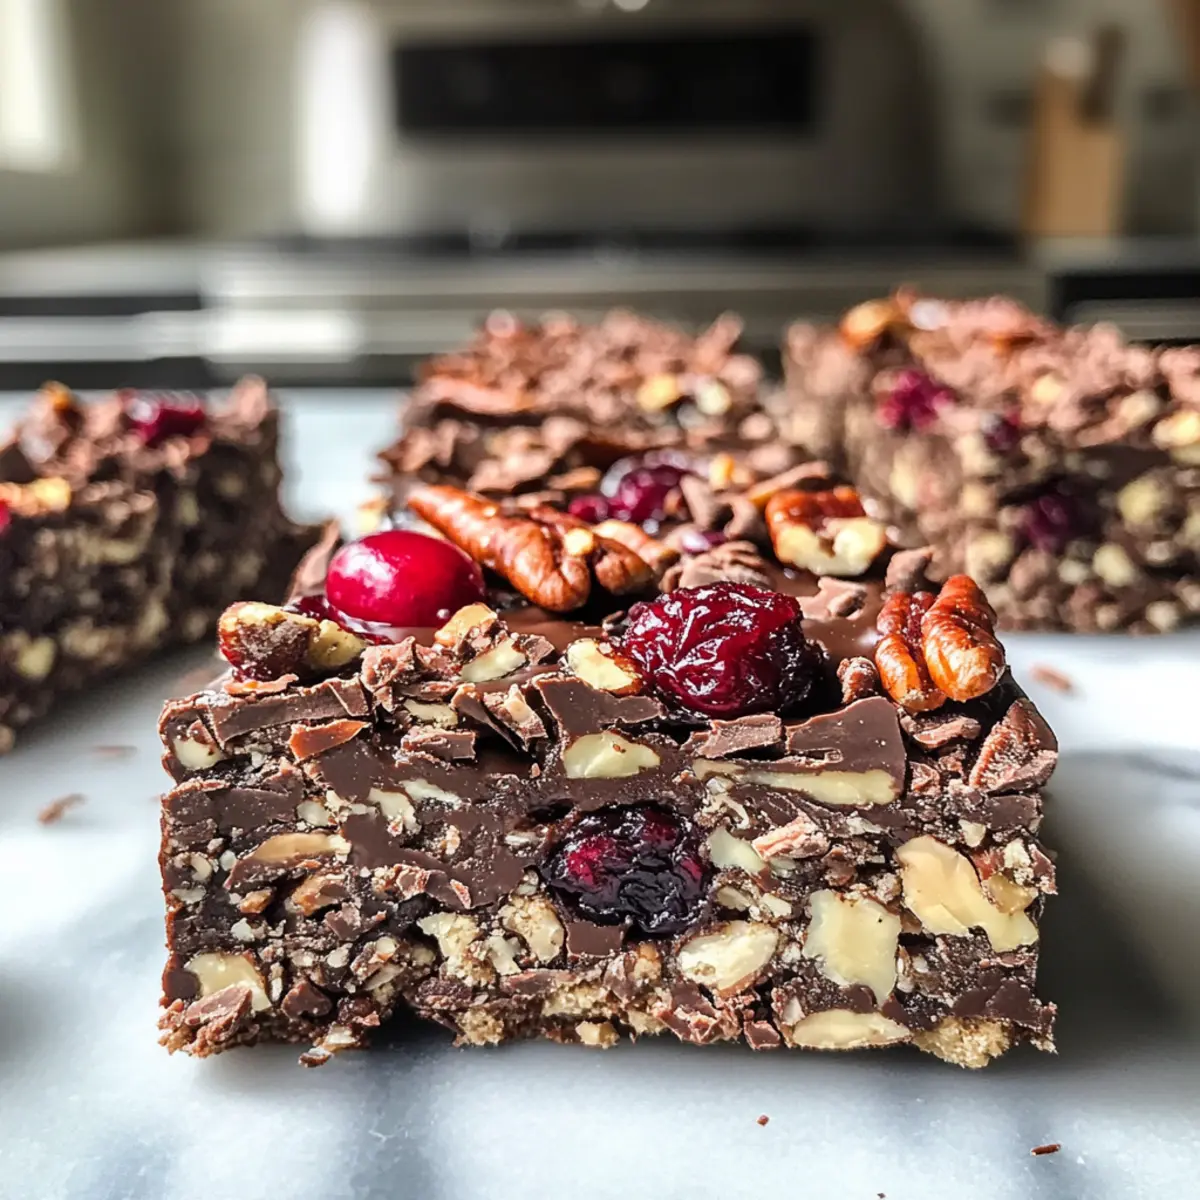
Savory Salmon all’Arrabbiata: A Quick Spicy Delight

As I stood by the stove, the aromatic dance of sautéing garlic and sautéing onions filled the air, already hinting at the flavor explosion to come. I love how a single skillet can simplify cooking while delivering bold taste, and that’s exactly what you’ll find with this One-Skillet Salmon all’Arrabbiata with Spinach. This dish combines perfectly seared salmon with a spicy arrabbiata sauce enriched by anchovies and topped with vibrant spinach, making it a delightful option for quick meals. Ready in just 30 minutes, it’s not only a time-saver but also a healthy way to indulge your cravings without the usual hassle. So, how will you customize this flavor-packed wonder?

Why is Salmon all’Arrabbiata a must-try?

Quick Cooking: With just 30 minutes on the clock, this one-skillet meal is perfect for busy evenings when you crave something delicious yet effortless.

Flavor Explosion: The blend of spicy arrabbiata with the savory anchovy depth creates a taste sensation that pairs beautifully with salmon’s richness.

Nutrient-Rich: Loaded with spinach, this dish not only satisfies your taste buds but also boosts your health with essential vitamins.

Customizable Delight: Easily swap salmon for chicken or tofu, making it adaptable for any dietary preference.

Crowd-Pleaser: Impress family and friends with this vibrant dish that radiates comfort and culinary flair! Consider serving it with a side of crusty bread or over pasta for a wholesome meal.

Salmon all’Arrabbiata Ingredients

For the Sauce

  • Olive Oil – The primary fat for cooking; substitute with avocado oil for a neutral flavor.
  • Unsalted Butter – Adds richness to the dish; can be replaced with additional olive oil for a lactose-free option.
  • Garlic Cloves – Provides aromatic flavor; use garlic powder if fresh is not available (1/8 tsp per clove).
  • Yellow Onion – Offers sweetness and depth; substitute with shallots or leeks for a different flavor profile.
  • Dried Oregano – Herbaceous note; fresh oregano may be substituted (use three times the amount).
  • Dried Sage – Contributes earthiness; thyme can be used in its place.
  • Sweet Paprika – Adds sweetness and color; smoky paprika is an excellent alternative.
  • Fresh Chili (or Red Chili Flakes) – Introduces heat; adjust quantity based on spice tolerance.
  • Anchovy Fillet – Brings umami depth to the sauce; omit for a vegetarian variation or use miso paste for a similar effect.
  • Tomato Paste – Concentrated tomato flavor; can be substituted with extra crushed tomatoes.
  • Chicken Broth – Liquid base for the sauce; vegetable broth works for a vegetarian option.
  • Crushed Tomatoes – Main base of the sauce providing acidity; use fresh tomatoes (crushed) if preferred.

For the Salmon

  • Salmon Fillets – The main protein source delivering omega-3 fatty acids; skin-on fillets can be used if desired.
  • Salt – Enhances all flavors; adjust based on dietary needs or preferences.
  • Black Pepper – Adds spice and warmth; freshly ground is recommended for the best flavor.

For the Finishing Touch

  • Spinach – Adds nutrients and color; kale or Swiss chard can substitute, but adjust cooking time as needed.
  • Grated Parmesan – Enhances richness and flavor; nutritional yeast can be used for a dairy-free option.
  • Chopped Parsley – Fresh garnish providing brightness; basil or cilantro can be used as alternatives.

Step‑by‑Step Instructions for Salmon all’Arrabbiata

Step 1: Prep the Ingredients
Begin by finely chopping the yellow onion and mincing the garlic cloves. Pat the salmon fillets dry with paper towels and season both sides generously with salt and black pepper. This initial step enhances the flavor of your Salmon all’Arrabbiata and sets the stage for a delicious meal.

Step 2: Sear the Salmon
In a large skillet, heat 2 tablespoons of olive oil and 1 tablespoon of unsalted butter over medium heat. Once the butter is sizzling but not burning, carefully add the salmon fillets. Sear for about 3-4 minutes on each side until they are golden brown and cooked through. Remove the salmon from the skillet and set aside on a plate.

Step 3: Make the Sauce
Lower the heat to medium-low and add the chopped onion to the skillet. Sauté for about 2 minutes until it becomes translucent and fragrant, then add the minced garlic. Stir in the anchovy fillet and fresh chili or red chili flakes, allowing them to cook and release their flavors for 1 minute. Finally, mix in the tomato paste to combine well with the aromatics.

Step 4: Deglaze
Pour in 1 cup of chicken broth, using a wooden spoon to scrape up any brown bits stuck to the skillet’s bottom. This adds depth to your Salmon all’Arrabbiata sauce. Allow the mixture to simmer for about 2 minutes, then stir in the crushed tomatoes and bring to a gentle simmer for around 5 minutes until the sauce thickens slightly.

Step 5: Add Spinach
Stir the fresh spinach into the sauce, letting it wilt for about 2 minutes. The vibrant green color will enhance the dish’s visual appeal and nutritional value. Make sure the spinach is well incorporated into the sauce, allowing it to absorb the spicy flavors as it cooks.

Step 6: Combine and Finish Cooking
Gently place the seared salmon back into the skillet, spooning some of the sauce over the top. Add ¼ cup of grated Parmesan and cook for another 3 minutes until the salmon is cooked through and the cheese is melted. If the sauce looks too thick, you can thin it with a splash of additional broth.

Step 7: Serve
Remove the skillet from heat and garnish your Salmon all’Arrabbiata with a sprinkle of red pepper flakes, freshly ground black pepper, and chopped parsley for brightness. Serve your delectable dish warm and enjoy the robust flavors of this comforting one-skillet meal!

Make Ahead Options

These Salmon all’Arrabbiata preparations are perfect for busy weeknights! You can prep the sauce up to 3 days in advance by cooking it fully and refrigerating it in an airtight container. To maintain quality, ensure it’s completely cooled before storage, and reheat gently on the stove when ready to serve. Additionally, you can season the salmon fillets a day ahead, covering and refrigerating them to infuse the flavors. When it’s time to enjoy your meal, simply sear the salmon as instructed, combine it with the reheated sauce, and finish with fresh spinach. You’ll have a delightful dish ready with minimal effort, making family dinners enjoyable again!

What to Serve with Salmon all’Arrabbiata

When it comes to creating a delightful meal, pairing your salmon dish can elevate it to new heights and cater to everyone’s cravings.

  • Creamy Risotto: The creamy consistency of risotto provides a velvety backdrop that balances the spicy flavors of the arrabbiata sauce beautifully.

  • Garlic Bread: The warm, buttery crunch of garlic bread offers a satisfying contrast to the tender salmon and helps soak up the flavorful sauce.

  • Steamed Broccoli: Tender, crisp broccoli adds a fresh crunch and vibrant color to your plate, complementing the richness of the salmon and sauce perfectly.

  • Couscous Salad: Light and fluffy, couscous dressed in lemon and herbs can enhance the Mediterranean essence of your meal. Add veggies for extra freshness!

  • Zesty Lemonade: A refreshing drink, this citrusy beverage will cut through the spice while its brightness complements the bold flavors of the dish.

  • Tiramisu: End the meal on a sweet note with this classic Italian dessert; its rich flavors pair well after enjoying a spicy, savory dish.

Salmon all’Arrabbiata Variations & Substitutions

Feel free to add your unique twist to this vibrant dish, creating a flavor experience that’s truly your own.

  • Different Protein: Swap salmon for other firm fish like swordfish or tuna for a delicious alternative.

  • Vegetarian Delight: Substitute salmon with chickpeas or tofu, packed with protein and satisfying texture.

  • Extra Brininess: Add olives or capers to enrich the sauce, enhancing the flavor and creativity of your dish.

  • Creamy Twist: Stir in a splash of cream or coconut milk for a rich and creamy sauce that redefines indulgence.

  • Hearty Grains: Serve over quinoa or farro instead of pasta for a heartier meal, boosting the nutritional value.

  • Zest it Up: Add a splash of lemon juice right before serving to brighten the flavors and provide a refreshing zing.

  • Heat Adjustment: For those who enjoy a kick, increase the amount of fresh chili or red pepper flakes for an extra fiery experience.

  • Herb Variations: Experiment with fresh herbs like basil or cilantro in place of parsley, providing new flavor profiles that elevate your meal.

Remember, every change can add a new layer of flavor. If you enjoy making your own sauces, try out your favorite homemade arrabbiata sauce for an even more personalized touch.

Expert Tips for Salmon all’Arrabbiata

  • Avoid Overcrowding: When searing the salmon, ensure there’s enough space in the skillet. Crowding will steam the fish instead of searing it, preventing that delightful crust.

  • Timing is Key: Watch the salmon closely while cooking. It should be tender and moist in the center, so avoid overcooking for the best results in your Salmon all’Arrabbiata.

  • Taste the Sauce: Before adjusting salt, remember that anchovies are quite salty. This step is crucial to achieve the right flavor balance in your sauce.

  • Spinach Substitutes: If spinach isn’t available, consider using kale or Swiss chard. Just modify cooking times, as these greens may require a bit longer to wilt properly.

  • Personalize Your Dish: Feel free to customize the heat level! Adjust the quantity of fresh chili or red pepper flakes based on your spice tolerance for a memorable Salmon all’Arrabbiata experience.

Storage Tips for Salmon all’Arrabbiata

Fridge: Store your leftover Salmon all’Arrabbiata in an airtight container for up to 3 days. This will keep it fresh while maintaining the bold flavors of the dish.

Freezer: If you need to keep it longer, you can freeze the salmon for up to 3 months. Make sure to wrap portions tightly in plastic wrap and then in foil for maximum freshness.

Reheating: When ready to enjoy your leftovers, gently reheat them on the stove over low heat, adding a splash of chicken broth to retain moisture and flavor.

Serving Suggestions: Serve your reheated Salmon all’Arrabbiata with a sprinkle of fresh parsley and a dash of red pepper flakes for a delightful touch!

Salmon all’Arrabbiata Recipe FAQs

How do I choose the best salmon fillets?
Absolutely! When selecting salmon fillets, look for bright, moist flesh with a fresh, ocean-like scent. Avoid any fillets with dark spots or an overly fishy smell, as these could indicate spoilage. Choosing skin-on fillets can often enhance flavor and moisture during cooking.

How should I store Salmon all’Arrabbiata leftovers?
You can keep your leftover Salmon all’Arrabbiata in an airtight container in the fridge for up to 3 days. Ensuring the lid is tightly sealed will help preserve its wonderful flavors. For longer storage, you can freeze it for up to 3 months; just make sure to wrap it well with plastic wrap and foil to avoid freezer burn.

Can I freeze Salmon all’Arrabbiata? What’s the best way?
Yes, you can freeze it! To do so, let the dish cool completely. Then, portion it into freezer-safe containers, or wrap individual servings tightly in plastic wrap and foil. Label them with the date. When you’re ready to enjoy, defrost it in the fridge overnight or use a microwave’s defrost setting. Reheat gently on the stove with a splash of broth to keep it moist.

What can I do if my sauce is too salty?
If you find your sauce is too salty, don’t worry—this can sometimes happen due to the anchovies. A great tip is to add a splash of additional chicken broth or a squeeze of fresh lemon juice to help balance the saltiness. Alternatively, you can mix in some fresh, chopped tomatoes, which can help dilute the flavor without compromising the dish.

Are there any dietary considerations with this recipe?
Very! The Salmon all’Arrabbiata recipe contains fish and dairy, so be mindful of any allergies or dietary restrictions. If needed, you can replace the anchovies with miso for a similar umami flavor, and use nutritional yeast instead of Parmesan for a dairy-free option. Always check ingredient labels for potential allergens.

Can I adjust the spice level in the dish?
Definitely! If you prefer a milder flavor, start with a smaller amount of fresh chili or red chili flakes, and taste test as you go. You can always add more spice later, but it’s tricky to tone it down once added. This flexibility lets you tailor the dish perfectly to your heat tolerance.

Salmon all’Arrabbiata

Savory Salmon all’Arrabbiata: A Quick Spicy Delight

A quick and delicious one-skillet meal featuring salmon in a spicy arrabbiata sauce with spinach.
Prep Time 10 minutes
Cook Time 20 minutes
Total Time 30 minutes
Servings: 4 servings
Course: Dinner
Cuisine: Italian
Calories: 350

Ingredients
  

For the Sauce
  • 2 tablespoons Olive Oil Substitute with avocado oil for a neutral flavor.
  • 1 tablespoon Unsalted Butter Can be replaced with additional olive oil for a lactose-free option.
  • 3 cloves Garlic Cloves Use garlic powder if fresh is not available.
  • 1 large Yellow Onion Substitute with shallots or leeks for a different flavor.
  • 1 teaspoon Dried Oregano Use three times the amount if fresh oregano is used.
  • 1 teaspoon Dried Sage Thyme can be used in its place.
  • 1 teaspoon Sweet Paprika Smoky paprika is an excellent alternative.
  • 1 to taste Fresh Chili (or Red Chili Flakes) Adjust quantity based on spice tolerance.
  • 1 fillet Anchovy Fillet Omit for a vegetarian variation or use miso paste.
  • 2 tablespoons Tomato Paste Can be substituted with extra crushed tomatoes.
  • 1 cup Chicken Broth Vegetable broth works for a vegetarian option.
  • 1 can Crushed Tomatoes Use fresh tomatoes if preferred.
For the Salmon
  • 4 fillets Salmon Fillets Skin-on fillets can be used if desired.
  • to taste Salt Adjust based on dietary needs or preferences.
  • to taste Black Pepper Freshly ground is recommended for the best flavor.
For the Finishing Touch
  • 3 cups Spinach Kale or Swiss chard can substitute; adjust cooking time.
  • 1/4 cup Grated Parmesan Nutritional yeast can be used for a dairy-free option.
  • 2 tablespoons Chopped Parsley Basil or cilantro can be used as alternatives.

Equipment

  • Skillet

Method
 

Step-by-Step Instructions for Salmon all’Arrabbiata
  1. Begin by finely chopping the yellow onion and mincing the garlic cloves. Pat the salmon fillets dry with paper towels and season both sides generously with salt and black pepper.
  2. In a large skillet, heat the olive oil and unsalted butter over medium heat. Once sizzling, add the salmon fillets. Sear for about 3-4 minutes on each side until golden brown. Remove and set aside.
  3. Lower the heat and add chopped onion to the skillet. Sauté for about 2 minutes until translucent. Then add garlic, anchovy fillet, and fresh chili, cooking for 1 minute. Mix in tomato paste.
  4. Pour in the chicken broth and scrape up any brown bits. Allow to simmer for about 2 minutes, then stir in the crushed tomatoes and simmer for 5 minutes until slightly thickened.
  5. Stir in the fresh spinach until wilted for about 2 minutes. Make sure it's well incorporated into the sauce.
  6. Gently place the seared salmon back into the skillet, spooning sauce over the top. Add grated Parmesan and cook for 3 minutes until the salmon is cooked through and cheese is melted.
  7. Remove from heat and garnish with red pepper flakes, freshly ground black pepper, and chopped parsley. Serve warm.

Notes

Avoid overcrowding the skillet when searing the salmon for the best results.

Deliciously Festive Christmas Donuts to Brighten Your Holidays

Stepping into the holiday season, I find joy in the little things—like the sweet aroma of freshly baked goods wafting through my kitchen. One of my absolute favorites to whip up are these festive Christmas Donuts, adorned with vibrant red and green frosting that instantly elevates any celebration. Not only are they a showstopper on the dessert table, but they’re also a breeze to make, making them an ideal treat for anyone looking to brighten their holiday mornings. With their soft, moist texture and creamy frosting, these donuts are the perfect guilt-free indulgence that the whole family will love. Are you ready to elevate your festive baking game? Let’s dive into this deliciously easy recipe!

Why are Christmas Donuts so special?

Festive Appeal: These colorful Christmas Donuts are not just a treat; they add vibrant cheer to any holiday celebration. Easy to Make: With simple ingredients and a straightforward process, even novice bakers can whip these up in no time. Delicious Flavor: The combination of fluffy donuts and rich buttercream frosting creates a mouthwatering experience. Creative Fun: Let your creativity shine by decorating with festive sprinkles and unique frosting colors! Family-Friendly: These donuts are perfect for sharing; kids and adults alike will enjoy this festive delight. Serve them warm with a hot cup of cocoa for the ultimate holiday experience!

Christmas Donut Ingredients

For the Donuts
All-purpose flour – Provides structure to the donuts. Can substitute with gluten-free flour blend.
Granulated sugar – Adds sweetness. Coconut sugar can be used for a lower glycemic index.
Baking powder – Acts as a leavening agent, ensuring the donuts rise properly. Ensure freshness for the best rise.
Salt – Enhances flavor. Use sea salt for a more refined taste.
Large egg – Binds ingredients together and adds richness. Can substitute with a flax egg for a vegan option.
Milk – Adds moisture and richness. Almond or oat milk can be used as a dairy-free alternative.
Unsalted butter – Provides flavor and moisture. Melted coconut oil can be a good vegan substitute.
Vanilla bean paste – Enhances flavor profile with a rich vanilla taste. Can substitute with pure vanilla extract, slightly less in quantity.

For the Frosting
Powdered sugar – Used for sweetening the frosting. Can use powdered erythritol for a low-carb option.
Additional milk (for frosting) – Adjust consistency of frosting. Use as needed.
Food coloring (red and green) – For coloring the frosting. Natural food coloring can be used as a healthier alternative.
Assorted sprinkles – For festive decoration. Use edible glitter for an added sparkle.

Step‑by‑Step Instructions for Christmas Donuts

Step 1: Preheat the Oven
Begin by preheating your oven to 350°F (175°C). Meanwhile, prepare your donut pan by generously greasing it with non-stick spray or softened butter. This ensures that your festive Christmas Donuts will release easily once baked. The oven should reach the desired temperature just as you finish mixing the batter to maintain the freshness of the donuts.

Step 2: Combine Dry Ingredients
In a large mixing bowl, whisk together 2 cups of all-purpose flour, 1 cup of granulated sugar, 2 teaspoons of baking powder, and 1/2 teaspoon of salt. This step is essential to evenly distribute the leavening agent, which will help your donuts rise beautifully. Once combined, set this bowl aside while you prepare the wet ingredients for your Christmas Donuts.

Step 3: Mix Wet Ingredients
In a separate bowl, crack one large egg and beat it lightly. Then, add 3/4 cup of milk, 1/4 cup of melted unsalted butter, and 1 tablespoon of vanilla bean paste. Mix these ingredients together until well combined. The wet mixture should be smooth and homogenous, which will contribute to the moist texture of your holiday donuts.

Step 4: Combine Wet and Dry Mixtures
Create a well in the center of your dry ingredients and pour in the wet mixture. Gently fold the ingredients together using a spatula or wooden spoon until just combined. Be cautious not to overmix; a few lumps are perfectly fine. This will ensure your Christmas Donuts stay fluffy and light, making them even more delicious!

Step 5: Fill the Donut Pan
Carefully spoon or pipe the batter into the donut pan cavities, filling them about 3/4 full. This allows room for the donuts to rise without overflowing. Gently tap the pan on the counter to release any air bubbles and ensure an even surface. Now, it’s time to pop the pan into the preheated oven.

Step 6: Bake the Donuts
Bake your donuts in the oven for 15-17 minutes, or until they spring back when pressed lightly. You can also check for a golden-brown color on the edges, which indicates they are ready. Once done, take them out of the oven and let the donut pan cool on a wire rack for 5-7 minutes to avoid burning your fingers when removing them.

Step 7: Cool the Donuts
After a brief cooling period in the pan, gently transfer the donuts onto the cooling rack to cool completely. This is crucial before frosting; otherwise, the heat will melt the delightful decorations. Letting them cool completely allows the texture to set for those festive Christmas Donuts you’re ready to frost!

Step 8: Prepare the Frosting
While your donuts cool, prepare the frosting by beating together 1/2 cup of softened unsalted butter and half of the powdered sugar (about 1 cup) until smooth. This will create a creamy base for your festive decorations. You can start mixing on a low speed to prevent a powdered sugar cloud in your kitchen!

Step 9: Add the Remaining Ingredients
Gradually add the remaining powdered sugar and 1-2 tablespoons of milk until you reach your desired frosting consistency. You want it to be spreadable but thick enough to hold its shape when piped onto the donuts. Achieving this consistency will ensure that the frosting beautifully complements your Christmas Donuts.

Step 10: Color and Decorate
Divide the frosting into two bowls, adding red food coloring to one and green to the other, mixing until fully combined. Using a piping bag or Ziploc bag, pipe the colorful frosting onto each cooled Christmas Donut, creating fun patterns. Finally, sprinkle with festive decorations, allowing your creative spirit to shine!

Step 11: Serve and Enjoy
Your delightful Christmas Donuts are now ready to serve! They are best enjoyed fresh, so gather around the table with family and friends. After spending that cozy time in the kitchen, savor each bite of these cheerful, festive delights warm or at room temperature.

What to Serve with Christmas Donuts?

These festive treats pair beautifully with a variety of delightful accompaniments that elevate your holiday celebrations.

  • Rich Hot Cocoa: Creamy and indulgent, hot cocoa complements the sweet, fluffy donuts and enhances the cozy holiday atmosphere. Add a sprinkle of cinnamon for a spiced twist!

  • Fresh Fruit Salad: A mix of juicy seasonal fruits adds a burst of freshness and color to your table, balancing the sweetness of the donuts.

  • Festive Coffee: Brew a pot of holiday-flavored coffee—like peppermint or hazelnut—for a aromatic pairing that will warm your spirits during chilly mornings.

  • Spiced Chai Tea: This aromatic tea, featuring warming spices, provides a comforting contrast to the rich sweetness of the frosting while adding an exotic flair.

  • Maple Glazed Bacon: The smoky saltiness of this savory treat contrasts beautifully with the sweetness of your Christmas Donuts, making it irresistibly delicious.

  • Holiday Spritzer: A refreshing drink made with sparkling water, cranberry juice, and a splash of lime will be a festive, bubbly accompaniment to your sweet spread.

  • Mini Cheesecakes: Bite-sized cheesecakes topped with berry compote create a delightful variety, offering guests a chance to indulge in different flavors.

  • Gingerbread Cookies: Embrace the season by serving classic gingerbread cookies alongside your donuts, offering another texture and spiced sweetness that feels delightfully festive.

Expert Tips for Christmas Donuts

  • Don’t Overmix: Overmixing the batter can lead to dense donuts. Mix until just combined for a light and fluffy texture.
  • Test for Doneness: Use a toothpick to check if donuts are fully baked. If it comes out clean, they’re ready!
  • Piping Made Easy: Use a piping bag or a Ziploc bag with the corner cut off for perfect frosting application on your Christmas Donuts.
  • Cool Completely: Let the donuts cool completely to prevent the frosting from melting. Patience is key to preserving their festive look!
  • Sprinkle Smartly: Add the sprinkles right after frosting for the best adherence and visual impact.

Christmas Donuts Variations & Substitutions

Feel free to customize these festive donuts and make them truly your own with simple twists!

  • Gluten-Free: Use a gluten-free flour blend to enjoy these donuts without the gluten while keeping the delicious flavor intact.
  • Low-Sugar: Swap granulated sugar for coconut sugar or a sugar substitute like erythritol to reduce the sugar content in your donuts. A lower glycemic option allows more people to indulge guilt-free.
  • Vegan Option: Replace the egg with a flax egg and use almond or oat milk instead of dairy milk, along with coconut oil instead of butter, for a completely vegan holiday treat.
  • Flavor Varieties: Add a few drops of peppermint extract to the frosting for a festive minty twist. This will add a lovely holiday touch that’ll remind you of candy canes!
  • Alternate Frosting: Instead of frosting, drizzle a warm glaze made of powdered sugar and milk over the donuts for a simpler option. The glaze gives a lovely shine and sweetness to your treats.
  • Festive Colors: Play with natural food coloring from beetroot or spirulina powders for a healthier option. These colors bring a fun and lively aesthetic to your treats while being mindful of ingredients.
  • Nutty Touch: Fold in some finely chopped walnuts or pecans into the donut batter for a delightful crunch. They’ll add a lovely texture and flavor depth that perfectly complements the sweetness.
  • Spicy Kick: Add a pinch of cinnamon or nutmeg to the batter for a warm spice flavor. These aromatic spices bring an additional festive note that’ll make your kitchen smell heavenly.

For more ideas, check out these delicious gluten-free options to keep everyone satisfied or explore low-sugar dessert swaps that suit any dietary needs!

Make Ahead Options

These Christmas Donuts are a wonderful option for meal prep during the busy holiday season! You can prepare the donut batter and refrigerate it for up to 24 hours in advance. Simply mix the dry ingredients together, then combine them with the wet ingredients, cover tightly, and store in the fridge. When you’re ready to bake, just give the mixture a gentle stir before filling the donut pan. Additionally, you can bake the donuts a day ahead of time and store them in an airtight container at room temperature. Frost them just before serving to maintain that deliciously fresh taste, ensuring your Christmas Donuts are just as delightful!

How to Store and Freeze Christmas Donuts

Airtight Container: Store your Christmas Donuts in an airtight container at room temperature for up to 3 days. This helps maintain their fresh, fluffy texture without compromising flavor.

Refrigerator: If you want to keep them longer, place the donuts in the fridge for up to 1 week. Allow them to come to room temperature before enjoying, as this revives their delightful taste.

Freezer: For longer storage, freeze the donuts individually wrapped in plastic wrap, then placed in a freezer-safe bag for up to 3 months. Thaw at room temperature before serving.

Frosting Consideration: If you’ve frosted the donuts, it’s best to store them in the refrigerator and consume within a few days for optimal taste.

Christmas Donuts Recipe FAQs

What’s the best way to choose ripe ingredients?
Absolutely! When selecting your ingredients, especially eggs and milk, look for their freshness. For eggs, check the expiration date, and opt for organic or free-range options for quality. The milk should be within its use-by date as well; a fresh look and smell are key indicators!

How should I store my Christmas Donuts?
To keep your Christmas Donuts fresh, store them in an airtight container at room temperature for up to 3 days. If you’d like to enjoy them longer, they can be refrigerated for up to 1 week. Always let them come back to room temperature to recapture that delightful taste and texture!

Can I freeze my Christmas Donuts?
Certainly! To freeze your Christmas Donuts, first cool them completely. Then, wrap each donut individually in plastic wrap and place them in a freezer-safe bag. They’ll keep well for up to 3 months. To thaw, simply take them out and let them sit at room temperature before enjoying – this helps maintain their fluffy texture!

What should I do if my donuts come out dense?
Very good question! If your donuts are dense, there are a few possible culprits: Overmixing the batter can lead to that undesirable texture, so mix gently until just combined. Also, make sure your baking powder is fresh and that you’ve accurately measured all your ingredients. If you’re still troubleshooting, try testing for doneness with a toothpick; a clean pick indicates they’re baked properly.

Are there any dietary considerations for my Christmas Donuts?
Of course! These delicious Christmas Donuts can easily be modified to accommodate various dietary preferences. For a vegan option, substitute eggs with a flax egg (1 tablespoon ground flaxseed mixed with 3 tablespoons water), and replace milk with almond or oat milk. Be sure to check your sprinkles if allergies are a concern and choose brands that are allergen-free for a safe treat!

How can I make the frosting?
Making the frosting is a delight! Begin by beating together 1/2 cup of softened unsalted butter and half of your powdered sugar (about 1 cup) until creamy. Gradually add the remaining powdered sugar while mixing in 1-2 tablespoons of milk until you reach your desired consistency. Finally, divide the frosting to color it red and green. Use a piping bag to create delightful swirls on top of your cooled Christmas Donuts!

Christmas Donuts

Deliciously Festive Christmas Donuts to Brighten Your Holidays

These Christmas Donuts are a sweet treat to elevate your holiday celebrations with vibrant colors and delicious flavor.
Prep Time 20 minutes
Cook Time 17 minutes
Cooling Time 7 minutes
Total Time 44 minutes
Servings: 12 donuts
Course: Dessert
Cuisine: Holiday
Calories: 180

Ingredients
  

For the Donuts
  • 2 cups all-purpose flour Can substitute with gluten-free flour blend.
  • 1 cup granulated sugar Coconut sugar can be used for a lower glycemic index.
  • 2 teaspoons baking powder Ensure freshness for the best rise.
  • 1/2 teaspoon salt Use sea salt for a more refined taste.
  • 1 large egg Can substitute with a flax egg for a vegan option.
  • 3/4 cup milk Almond or oat milk can be used as a dairy-free alternative.
  • 1/4 cup melted unsalted butter Melted coconut oil can be a good vegan substitute.
  • 1 tablespoon vanilla bean paste Can substitute with pure vanilla extract, slightly less in quantity.
For the Frosting
  • 1 cup powdered sugar Can use powdered erythritol for a low-carb option.
  • 1-2 tablespoons milk Use as needed to adjust consistency.
  • red and green food coloring Natural food coloring can be used as a healthier alternative.
  • assorted sprinkles Use edible glitter for an added sparkle.

Equipment

  • Donut pan
  • mixing bowls
  • whisk
  • spatula
  • Piping bag

Method
 

Step-by-Step Instructions
  1. Preheat your oven to 350°F (175°C) and prepare your donut pan by greasing it.
  2. In a large bowl, whisk together the flour, sugar, baking powder, and salt.
  3. In a separate bowl, beat the egg, then mix in the milk, melted butter, and vanilla bean paste until smooth.
  4. Combine the wet and dry mixtures and fold together until just mixed.
  5. Fill the donut pan cavities about 3/4 full and tap to release air bubbles.
  6. Bake for 15-17 minutes until golden brown and springy to the touch.
  7. Cool the donuts in the pan for 5-7 minutes, then transfer to a wire rack to cool completely.
  8. Prepare the frosting by beating the softened butter and half of the powdered sugar until smooth.
  9. Gradually add the remaining powdered sugar and milk until reaching desired consistency.
  10. Divide frosting and color with food coloring; decorate the cooled donuts.
  11. Serve and enjoy your delightful Christmas Donuts!

Notes

These donuts are best enjoyed fresh; serve warm or at room temperature.

Delightful Christmas Mint Candy: Creamy Festive Treats

The aroma of peppermint wafts through the air, instantly transporting me to cozy holiday gatherings filled with laughter and sweet treats. Today, I’m excited to share my favorite recipe for Easy Christmas Mint Candy—a sumptuous, creamy dessert that embodies the spirit of the season. Made with just five simple ingredients, these vibrant red and green bites are not only easy to prepare but also a festive delight that can be customized to suit your holiday vibe. Whether you’re treating yourself or crafting thoughtful gifts for loved ones, these minty confections are sure to impress. Plus, they can be made ahead and stored for last-minute cravings or dessert table additions. Ready to whip up some holiday magic? Let’s dive into the world of these delightful mint candies!

Why is Christmas Mint Candy a Must-Try?

Versatile flavors: These candies can be easily customized with different extracts, allowing you to explore new tastes like lemon or almond that complement the festive look.

Colorful appeal: With vibrant red and green, they add a cheerful pop of color to your dessert table, making them an instant crowd-pleaser at any holiday gathering.

Super simple: Made with just five ingredients, you don’t need to be a pro to create these delightful treats—perfect for home cooks of any skill level looking for an easy recipe to impress guests.

Perfect for gifting: Wrapped in festive packaging, they make thoughtful holiday gifts that show you care, making them a sweet surprise for friends and family.

Make ahead convenience: You can prepare them days in advance, freeing up your time during the busy holiday season—no last-minute scrambling! So, why not make a batch today and enjoy the festive spirit with these scrumptious Christmas Mint Candies?

Christmas Mint Candy Ingredients

• Get ready to create a festive favorite!

For the Candies

  • Cream Cheese – Provides creaminess and structure; make sure it’s softened for easy blending.
  • Butter – Adds a rich flavor and helps bind everything together; remember to use softened butter.
  • Powdered Sugar – Delivers sweetness and a smooth texture; you’ll need a total of 8 cups, split for mixing ease.
  • Peppermint Extract – Gives that classic mint flavor; feel free to swap it with almond or lemon extract for a twist.
  • Green Gel Food Coloring – For a festive presentation, ensuring those holiday hues shine bright.
  • Red Gel Food Coloring – Enhances the aesthetic, making these treats visually enticing for any celebration.

Dive into making these Christmas Mint Candies that are sure to warm the hearts of your loved ones this holiday season!

Step‑by‑Step Instructions for Christmas Mint Candy

Step 1: Mix Base
In a stand mixer, combine 8 ounces of softened cream cheese and ½ cup of softened butter. Beat them on medium speed until the mixture is smooth and creamy, about 2 minutes. This will create a rich base for your Christmas Mint Candy, ensuring that both flavors meld beautifully together.

Step 2: Incorporate Sugar
Gradually add 1 cup of powdered sugar to the mixer while continuing to blend on low speed to avoid clouds of sugar. Mix until fully incorporated, which will take about 2-3 minutes. You should have a thick, fluffy mixture ready to sweeten and flavor your mint candies without any lumps.

Step 3: Flavor and Sweeten
Add 1 teaspoon of peppermint extract to the sugar mixture, then mix well for about 30 seconds to infuse that delightful mint flavor. Continue adding the remaining 6 ½ cups of powdered sugar, one cup at a time, ensuring everything is well combined and the dough is smooth and stiff, which will take approximately 5 minutes.

Step 4: Color Separation
Once your dough is uniform, divide it into three equal sections on a clean surface. Add a few drops of green gel food coloring to one portion and red to another, kneading each until the desired color is achieved. This vibrant coloring will make your Christmas Mint Candy festive and fun, perfect for the holiday season.

Step 5: Chill
Wrap each colored dough in plastic wrap and place them into separate bowls. Refrigerate for at least 2 hours to firm up the dough, making it easier to shape. This step is essential for achieving the perfect texture, ensuring your mint candies hold their delightful form during shaping.

Step 6: Shape Mints
After chilling, remove each dough from the refrigerator. Scoop tablespoon-sized portions of the dough and roll them into balls. Place the balls on a sheet of parchment paper dusted with powdered sugar, then flatten each slightly with a fork, creating a festive design on top of your Christmas Mint Candy.

Step 7: Drying
Allow the shaped mints to sit at room temperature for 4 hours, giving them time to harden up. If any mints remain soft to the touch, flip them over and let them dry longer. Proper drying is crucial for achieving the perfect, melt-in-your-mouth texture of these delightful Christmas Mint Candies.

Step 8: Serve
Once dried and firm, your Christmas Mint Candy is ready to be enjoyed! Serve these festive treats on a platter or package them in decorative boxes as gifts. Their creamy texture and minty flavor will surely impress friends and family during the holiday season.

Expert Tips for Christmas Mint Candy

Softened Ingredients: Ensure your cream cheese and butter are at room temperature. This helps create a smooth mixture and prevents lumps in your Christmas Mint Candy.

Mix Gradually: When adding powdered sugar, do it in stages to avoid sugar clouds and achieve a well-blended, consistent dough.

Coloring Check: To ensure vibrant colors, add gel food coloring gradually and knead until fully incorporated, which will enhance the festive appearance.

Proper Drying: Allow mints to dry at room temperature for at least 4 hours. If they feel soft, flip them for more drying time to retain that perfect texture.

Storage Advice: To prevent sticking, layer mints with parchment paper in the container. They can be frozen for up to three months, ideal for future cravings!

Christmas Mint Candy Variations

Feel free to add your own twist to this delightful recipe and make it even more special for your celebrations!

  • Flavor Boost: Swap peppermint extract for almond or lemon extract for a unique take. This small change can bring a refreshing twist to your candy’s flavor profile.

  • Festive Colors: Use pastel colors for spring celebrations, or mix in blue or purple for birthdays! These mints are perfect for any occasion, allowing creativity to shine through in your dessert table.

  • Nutty Delight: Add finely chopped walnuts or pecans to the mixture for extra crunch. This textural contrast pairs beautifully with the creamy base.

  • Chocolate Drizzle: Melt dark or white chocolate to drizzle over the hardened mints. Not only does this add elegance, but the chocolate complements the minty flavor perfectly!

  • Spicy Kick: For those who enjoy some heat, add a pinch of cayenne pepper to the dough! This surprising twist will awaken the taste buds and introduce an exciting complexity.

  • Coconut Twist: Roll the finished mints in shredded coconut for a tropical touch. The coconut adds both flavor and texture, making each bite a little piece of paradise.

  • Sugar-Free Version: Substitute powdered sugar with your favorite sugar substitute for a low-calorie option. This alteration will allow everyone to indulge without the guilt, making it a more inclusive treat for your holiday gatherings.

  • Mini Mints: Instead of rolling large balls, create mini mints for bite-sized treats that are perfect for snacking! These little delights are great for putting in candy jars or gifting to friends.

Embrace the holiday spirit and customize these Christmas Mint Candies to your liking!

Make Ahead Options

These Christmas Mint Candies are perfect for busy home cooks looking to save time during the hectic holiday season! You can prepare the dough up to 24 hours in advance by mixing all the ingredients and chilling it in the refrigerator. Just make sure to wrap the dough tightly in plastic wrap to maintain its freshness and prevent it from drying out. When you’re ready to shape the mints, simply remove the dough from the fridge, roll, and flatten them as instructed. After shaping, let them dry for about 4 hours at room temperature. This way, you’ll have delightful Christmas Mint Candies ready to impress your guests with minimal last-minute effort!

How to Store and Freeze Christmas Mint Candy

Airtight Container: Keep your Christmas Mint Candy in an airtight container at room temperature for up to 1 week to maintain their fresh texture and flavor.

Fridge: If you prefer a cooler treat, store them in the fridge for up to 2 weeks, but ensure they’re covered to prevent drying out.

Freezer: For longer storage, freeze the candies in layers separated by parchment paper for up to 3 months. Defrost in the fridge before serving for best results.

Reheating: No reheating needed! Just let your frozen Christmas Mint Candy come to room temperature before enjoying to preserve their creamy texture.

What to Serve with Easy Christmas Mint Candy?

The holidays are all about joyful gatherings, and serving these creamy, minty delights calls for the perfect accompaniment to elevate your celebration!

  • Festive Sugar Cookies: Soft and buttery, these cookies provide a delightful contrast to the creamy mint, making them a holiday classic. They’re perfect for creating a sweet platter together.

  • Rich Hot Chocolate: Serve with a steaming cup of hot chocolate topped with whipped cream. The smooth chocolate pairs beautifully with the minty candies for an indulgent treat.

  • Christmas Fruitcake: The dense texture and spiced flavors of fruitcake complement the lightness of the mint candies, creating a well-rounded dessert experience infused with holiday cheer.

  • Spiced Eggnog: Creamy and spiced, eggnog is the ultimate festive drink that harmonizes with the refreshing mint tastes, making each sip feel like a cozy warm hug.

  • Chocolate Dipped Pretzels: The salty crunch of these pretzels balances the sweetness of the candies, adding a delightful texture variation to your dessert spread.

  • Cranberry Spritzer: A fizzy cranberry cocktail or mocktail brings a splash of color and tartness, perfectly cutting through the sweetness of the Christmas Mint Candy.

Enjoy your holiday gatherings with these delightful pairings that will make your homemade mint candies shine even brighter on the dessert table!

Christmas Mint Candy Recipe FAQs

How do I choose the right cream cheese for Christmas Mint Candy?
Absolutely! Look for full-fat cream cheese for the best creamy texture. Ensure it’s softened at room temperature for optimal mixing—this will give your mints a smooth and velvety consistency.

How should I store Christmas Mint Candy?
Keep your Christmas Mint Candy in an airtight container at room temperature for up to 1 week. If you want them to last longer and keep their fresh flavor, you can refrigerate them in a covered container for up to 2 weeks.

Can I freeze Christmas Mint Candy?
Yes! You can freeze these delightful candies for up to 3 months. To freeze, layer them in an airtight container with parchment paper between the layers to prevent sticking. When you’re ready to enjoy, simply thaw them in the fridge overnight.

What if my Christmas Mint Candy is too soft?
If your mints don’t harden properly, they might still be a bit warm from the mixing process. Allow them to sit at room temperature for a few more hours. If they’re still too soft, flip them over and let them dry longer—this extra time will help them firm up nicely!

Are there any dietary considerations for Christmas Mint Candy?
Great question! This recipe contains cream cheese and butter, so it’s suitable for vegetarians but not for vegans. If you’re tailoring for allergies, ensure none of your ingredients include cross-contaminants, especially with gluten or dairy. These candies can also be made nut-free by avoiding flavored extracts with nuts.

How can I customize the colors and flavors of my Christmas Mint Candy?
Very easily! You can add different extracts such as almond or lemon instead of peppermint for a unique twist. Just be sure to use gel food coloring to get vibrant hues—add small amounts until you reach your desired color, kneading the dough well after each addition!

Christmas Mint Candy

Delightful Christmas Mint Candy: Creamy Festive Treats

Easy Christmas Mint Candy is a creamy dessert that embodies the spirit of the season with mint flavor. Perfect for gifting and gatherings.
Prep Time 20 minutes
Chilling Time 2 hours
Total Time 2 hours 20 minutes
Servings: 24 candies
Course: Dessert
Cuisine: American
Calories: 100

Ingredients
  

For the Candies
  • 8 ounces Cream Cheese softened
  • ½ cup Butter softened
  • 8 cups Powdered Sugar split for mixing ease
  • 1 teaspoon Peppermint Extract can substitute with almond or lemon extract
  • a few drops Green Gel Food Coloring for festive presentation
  • a few drops Red Gel Food Coloring enhances aesthetic

Equipment

  • Stand mixer
  • parchment paper
  • plastic wrap

Method
 

Step-by-Step Instructions
  1. In a stand mixer, combine 8 ounces of softened cream cheese and ½ cup of softened butter. Beat until smooth and creamy, about 2 minutes.
  2. Gradually add 1 cup of powdered sugar while blending on low speed. Mix until fully incorporated, about 2-3 minutes.
  3. Add 1 teaspoon of peppermint extract to the mixture and mix well for 30 seconds. Continue adding the remaining 6 ½ cups of powdered sugar, one cup at a time, mixing until smooth and stiff, about 5 minutes.
  4. Divide the dough into three equal sections. Add green food coloring to one section and red to another, kneading until the desired color is achieved.
  5. Wrap each colored dough in plastic wrap and refrigerate for at least 2 hours.
  6. Remove dough from the refrigerator and scoop tablespoon-sized portions, rolling them into balls. Place on parchment paper dusted with powdered sugar, flattening each slightly with a fork.
  7. Allow the shaped mints to sit at room temperature for 4 hours to harden. Flip any that remain soft for additional drying.
  8. Once dried and firm, serve the candies on a platter or package in decorative boxes as gifts.

Notes

Ensure cream cheese and butter are at room temperature for a smooth mixture. Store in an airtight container; they can also be frozen for up to 3 months.

Delicious Christmas Cracker Candy: A Festive Crunch to Savor

“Did you hear? Christmas is just around the corner!” My friend exclaimed, her eyes sparkling with excitement. If there’s one treat that captures the essence of the holidays, it’s the delightful crunch of Christmas Cracker Candy. This classic recipe is not only simple to whip up but also allows for creative variations, making it a go-to for festive gatherings or thoughtful homemade gifts. Imagine the joy of sharing this irresistible holiday treat that combines buttery toffee with a satisfying crisp! What’s more, it’s adaptable for everyone, with gluten-free options and easy vegan substitutions. So, are you ready to engage your kitchen skills and create a batch of this nostalgic candy that will surely leave your loved ones craving more? Let’s dive into the magic of making Christmas Cracker Candy together!

Why is Christmas Cracker Candy a must-try?

Irresistible Crunch: The unique combination of a buttery toffee base and a satisfying crisp makes this treat stand out among holiday sweets.

Endless Variations: From adding crushed peppermint to dipping in chocolate, the options are limitless, catering to all tastes and preferences.

Quick & Easy: With just a handful of ingredients and straightforward steps, this recipe is perfect for both novice cooks and experienced chefs alike.

Festive Appeal: Brighten up your celebrations with a pop of color—consider using festive food coloring to enhance your candy’s visual charm!

Thoughtful Gifting: Packaged beautifully, this candy makes for a lovely homemade gift. Share the joy by wrapping it in cellophane for your loved ones.

Family Tradition: Create lasting memories while passing down this classic recipe, cherished across generations, ensuring the love of Christmas Candies continues for years to come.

Christmas Cracker Candy Ingredients

• Here’s everything you need to make this delightful treat!

For the Toffee

  • Granulated Sugar – Provides the perfect sweetness; avoid alternative sweeteners for proper texture.
  • Unsalted Butter – Adds a rich, creamy texture; feel free to use plant-based butter for a vegan option.
  • Corn Syrup – Prevents crystallization to give a smooth toffee; don’t substitute this for other syrups without affecting flavor.
  • Baking Soda – Creates those signature cracks in the toffee; remember to add it carefully at the right moment.
  • Vanilla Extract – Enhances the flavor profile; you can use pure almond extract for a unique twist.

Optional Add-Ins

  • Festive Food Coloring – Use to add some holiday cheer visually; be quick to mix it in before the toffee cools.
  • Crushed Peppermint – Introduces a festive flavor; a perfect topping to enhance your Christmas Cracker Candy.
  • Melted Chocolate – Dip the pieces for an indulgent twist; consider dark or white chocolate depending on your palate!

These ingredients combine to create a nostalgic holiday treat that everyone will adore!

Step‑by‑Step Instructions for Christmas Cracker Candy

Step 1: Prepare Your Baking Sheet
Start by greasing a large baking sheet with butter or cooking spray to prevent sticking. This crucial first step ensures that your Christmas Cracker Candy will easily release once cooled. Set the greased baking sheet aside while you prepare the toffee mixture, keeping everything organized for a smooth process.

Step 2: Cook the Toffee Mixture
In a medium saucepan, combine granulated sugar, unsalted butter, corn syrup, and a pinch of salt. Place the saucepan over medium heat, stirring continuously until the mixture reaches 300°F on a candy thermometer. This step is critical as you want the toffee to achieve a hard crack stage, resulting in a beautiful crunchy texture for your Christmas Cracker Candy.

Step 3: Add Baking Soda
Once your toffee mixture reaches the desired temperature, promptly remove it from the heat. Carefully stir in the baking soda; expect the mixture to foam and bubble up. This reaction is vital for creating the signature cracks in your candy. Work quickly, as you want to pour it onto the baking sheet while it’s still hot and airy.

Step 4: Pour and Spread the Toffee
Immediately pour the foamy toffee onto the prepared baking sheet, letting it spread naturally. Use a spatula to gently encourage even distribution, but avoid overworking the mixture. The goal is to create a uniform layer approximately 1/4 inch thick. Let it settle for a moment, while the mixture cools slightly, but act swiftly to maintain that perfect texture.

Step 5: Cool the Toffee
Allow your poured toffee to cool at room temperature for 15 to 20 minutes. During this time, it will harden into a delightful crunchy texture. Keep an eye on it as it sets; you’ll know it’s ready when it feels firm to the touch. Once cooled, it’s time to break it into pieces for your Christmas Cracker Candy indulgence.

Step 6: Optional Coloring
If you wish to add a festive touch, consider tinting your Christmas Cracker Candy with food coloring before it fully sets. Drizzle or mix the coloring in quickly with a toothpick for swirls or a marbled appearance, and work swiftly to ensure the color integrates nicely before the toffee hardens completely.

Expert Tips for Christmas Cracker Candy

  • Use a Thermometer: Ensuring your toffee reaches exactly 300°F is crucial for achieving that perfect crunchy texture in your Christmas Cracker Candy.

  • Add Baking Soda Quickly: When you stir in the baking soda, do it immediately after removing the toffee from heat; timing affects the candy’s signature cracks.

  • Avoid Overworking: While spreading the toffee on the baking sheet, don’t manipulate it too much; this can affect the texture and crack formation.

  • Cool at Room Temperature: Let the candy set at room temperature instead of refrigerating; this will keep your Christmas Cracker Candy perfectly crunchy.

  • Experiment with Flavors: Try adding different toppings or flavors like crushed peppermint or nuts to customize your candy and satisfy everyone’s taste buds!

What to Serve with Christmas Cracker Candy?

Elevate your holiday gatherings with delicious accompaniments that bring out the festive charm of this crunchy treat.

  • Hot Cocoa: A warm cup enhances the candy’s sweetness, creating a cozy pairing perfect for chilly nights.
  • Chocolate-Dipped Strawberries: Their fruity freshness beautifully balances the richness of the toffee, offering a delightful contrast.
  • Spiced Apple Cider: This warm beverage adds aromatic spices that complement the buttery toffee and bring holiday cheer.
  • Nuts and Dried Fruits: A mix of crunchy nuts and chewy fruits adds texture, making for a sophisticated snacking option alongside the candy.
  • Vanilla Ice Cream: Serve a scoop as a creamy base that contrasts with the crunchy toffee, creating a decadent dessert experience.
  • Gingerbread Cookies: Their warm spices echo the flavor of the holiday season, making this combo a nostalgic pairing.
  • Cheese Platter: Include cheeses like brie or aged cheddar for a savory contrast that highlights the candy’s sweet richness.
  • Champagne or Sparkling Wine: The effervescence pairs wonderfully with the crunchy candy, adding a touch of celebration to your gathering.
  • Caramel Sauce: Drizzle it over the candy or alongside for an indulgent enhancement that magnifies the flavors of your Christmas Cracker Candy.

Christmas Cracker Candy Variations

Customize your festive treat with these fun twists on Christmas Cracker Candy!

  • Gluten-Free: Substitute regular corn syrup with a gluten-free brand to cater to those with dietary restrictions. You’ll still enjoy that delightful crunch and flavor!

  • Vegan: Swap out the unsalted butter with a plant-based butter for a delicious dairy-free option. This small change keeps the essence while making it accessible to more friends and family.

  • Minty Fresh: Add crushed peppermint directly into the toffee mixture before pouring onto the baking sheet. The vibrant flavor will transport you straight to a winter wonderland!

  • Chocolate Lovers: Dip cooled pieces in melted dark or white chocolate for an indulgent treat. The rich chocolate coats add a layer of decadence and a perfect sweet contrast.

  • Flavorful Flare: Infuse your toffee with different extracts like almond or peppermint for a unique spin. Just imagine the fragrance filling your kitchen!

  • Nutty Crunch: Toss in chopped nuts like pecans or walnuts just before spreading the toffee on the baking sheet. This adds texture and a lovely flavor contrast to the traditional sweetness.

  • Festive Colors: Use different food coloring to define layers or create designs in your candy. Serve them to match holiday decorations for an extra festive flair!

  • Spiced Baker: Sprinkle a pinch of cinnamon or nutmeg into the toffee while cooking for a warm, cozy flavor. These spices evoke the comfort of holiday baking while adding an unexpected twist.

Feel free to mix and match these tips to create your perfect version of Christmas Cracker Candy! From gluten-free adaptations to a delightful chocolate dip, your creativity can shine through this classic recipe. Don’t forget to explore more delicious holiday treats like homemade fudge and spiced nuts to keep the festive spirit alive!

Make Ahead Options

These Christmas Cracker Candy are perfect for busy home cooks looking to save time during the hectic holiday season! You can prepare the toffee mixture up to 24 hours in advance. Simply make the candy according to the original instructions, let it cool to room temperature, and then break it into pieces. Store the broken candy in an airtight container at room temperature to maintain its delightful crunch. When you’re ready to serve, feel free to add festive touches like melted chocolate or crushed peppermint for an extra special treat. With these make-ahead tips, you’ll have an irresistible holiday snack just waiting to be enjoyed!

How to Store and Freeze Christmas Cracker Candy

Room Temperature: Store your Christmas Cracker Candy in an airtight container at room temperature for up to two weeks to maintain its delightful crunch.

Freezer: For longer storage, wrap the candy tightly in plastic wrap and then in aluminum foil. It can be frozen for up to a month without losing its flavor or texture.

Reheating: When ready to enjoy, simply remove from the freezer and let sit at room temperature for a few minutes. No need to heat, as it’s best enjoyed crisp and cool.

Avoid Refrigeration: Storing in the fridge can introduce moisture, making your candy chewy instead of delightfully crunchy.

Christmas Cracker Candy Recipe FAQs

Can I use different types of sugar in the recipe?
Absolutely! While granulated sugar is essential for achieving the right texture, you can experiment with coconut sugar for a refined-sugar-free version. Just keep in mind that alternative sugars may slightly alter the flavor and color of your Christmas Cracker Candy.

How do I store Christmas Cracker Candy to ensure it stays crunchy?
To keep your candy fresh and crunchy, store it in an airtight container at room temperature for up to two weeks. Make sure to avoid refrigerating the candy, as this can introduce moisture, which often leads to a chewy consistency instead of that delightful crunch we love!

Can I freeze Christmas Cracker Candy?
Yes! You can freeze the candy for up to a month. To do this, wrap each piece tightly in plastic wrap, then place them in an airtight container or freezer bag. When you’re ready to enjoy, simply take them out and let them sit at room temperature for a few minutes—no need to heat!

What if my toffee mixture doesn’t reach the hard crack stage?
Very importantly, the perfect texture of your Christmas Cracker Candy hinges on reaching that 300°F hard crack stage. If the mixture doesn’t set as intended, it might not have cooked long enough. To troubleshoot, simply reheat it gently while stirring, and continue cooking until you reach the desired temperature. Remember, patience is key here!

Is there a vegan option for the butter in the recipe?
Yes, you can absolutely use plant-based butter as a substitution in your Christmas Cracker Candy. This way, you can enjoy a delicious treat without the dairy, making it suitable for vegan diets. Just remember to choose a brand that melts well to maintain that rich, buttery flavor.

What variations can I try with my Christmas Cracker Candy?
Endless possibilities await! You can add crushed peppermint for a festive twist, or dip the finished pieces in melted chocolate for an indulgent treat. Mixing in assorted nuts or dried fruits will enhance both the texture and flavor. Don’t forget to get creative with festive food coloring to brighten up your candy!

Christmas Cracker Candy

Delicious Christmas Cracker Candy: A Festive Crunch to Savor

This Christmas Cracker Candy offers a delightful crunch and endless variations, making it a perfect holiday treat.
Prep Time 15 minutes
Cook Time 20 minutes
Cooling Time 20 minutes
Total Time 55 minutes
Servings: 12 pieces
Course: Dessert
Cuisine: American
Calories: 150

Ingredients
  

For the Toffee
  • 1 cup granulated sugar Avoid alternative sweeteners for proper texture.
  • 1/2 cup unsalted butter Feel free to use plant-based butter for a vegan option.
  • 1/4 cup corn syrup Prevents crystallization.
  • 1 teaspoon baking soda Creates signature cracks.
  • 1 teaspoon vanilla extract Can substitute with pure almond extract.
Optional Add-Ins
  • 1 teaspoon festive food coloring Mix in quickly before toffee cools.
  • 1/2 cup crushed peppermint Perfect topping for flavor.
  • 1 cup melted chocolate Dip pieces for an indulgent twist.

Equipment

  • Medium saucepan
  • baking sheet
  • Candy thermometer
  • spatula

Method
 

Preparation Steps
  1. Grease a large baking sheet with butter or cooking spray.
  2. In a medium saucepan, combine granulated sugar, unsalted butter, corn syrup, and a pinch of salt.
  3. Place over medium heat and stir until the mixture reaches 300°F.
  4. Remove from heat and stir in the baking soda.
  5. Pour the foamy toffee onto the prepared baking sheet and spread evenly.
  6. Allow to cool at room temperature for 15 to 20 minutes.
  7. Optionally add food coloring before the toffee is fully set.

Notes

Store in an airtight container at room temperature for up to two weeks. For longer storage, wrap tightly and freeze for up to a month.

Heavenly Vegetarian Mincemeat for Irresistible Mince Pies

Stirring the air with the scent of warm, spiced fruit, I felt the spirit of Christmas envelop me as I prepped my kitchen for a festive baking session. Today, I’m excited to share my go-to recipe for luxurious vegetarian mincemeat for mince pies that’ll add a touch of magic to your holiday festivities. This easy and quick recipe is not just a healthier alternative—it’s bursting with delightful flavors from apples, citrus, and a medley of dried fruits. At around 1.5 kg, it’s perfect for sharing with loved ones or even gifting in cute jars! Whether you serve it in traditional pastries or as a charming tart filling, you’re bound to win hearts (and taste buds) with this treat. Curious how to craft this festive wonder? Let’s dive into the recipe!

Why Choose Vegetarian Mincemeat?

Easy Preparation: The step-by-step process makes this recipe a breeze, perfect for both novice and experienced bakers.

Wholesome Ingredients: Packed with fresh apples, citrus, and a variety of dried fruits, it’s a delightful treat that everyone can enjoy.

Versatile Use: Not only is it perfect for classic mince pies, but it also shines in tarts or as a spoonable dessert—your creativity can run wild!

Perfect for Gifting: Share the festive joy by filling cute jars, making it a heartfelt food gift for your loved ones.

Flavor Depth: With a blend of spices and a splash of brandy, this mincemeat offers a rich, complex taste that elevates any dish it graces.

Seasonal Charm: Bring the spirit of Christmas into your kitchen and create lasting memories by baking together. Enjoy more delightful ideas with Mini Beef Pies or consider a warm and cozy Savor Comforting Broccoli!

Vegetarian Mincemeat Ingredients

For the Mincemeat

  • Apples – Use firm, sweet varieties like Granny Smith for natural sweetness and great texture.
  • Orange Zest – Enhances the fruity flavor; for a twist, substitute with lemon zest.
  • Lemon Zest & Juice – Freshness adds brightness and acidity to the mix.
  • Dried Fruit (sultanas, currants, cranberries, etc.) – Mix to customize the sweetness and chewiness in your vegetarian mincemeat for mince pies.
  • Ground Mixed Spice – This blend adds warmth and complexity; feel free to swap with cinnamon, nutmeg, and ginger.
  • Ground Cinnamon – Brings out the sweetness and deepens flavor, especially if freshly ground.
  • Soft Brown Sugar – Sweetens and adds moisture; coconut sugar can be a great alternative for a deeper flavor.
  • Butter – Infuses richness; for a vegan version, plant-based margarine works beautifully.
  • Brandy – Elevates flavor and acts as a preservative; omit for non-alcoholic mincemeat but store in the fridge.

Step‑by‑Step Instructions for Heavenly Vegetarian Mincemeat for Irresistible Mince Pies

Step 1: Prepare the Fruits
Start by peeling, coring, and finely dicing about six firm apples, such as Granny Smith, ensuring they are evenly cut for uniform cooking. This process typically takes around 10 minutes, and you’ll want the apples to be about the size of small raisins for even distribution in your vegetarian mincemeat for mince pies.

Step 2: Zest and Juice the Citrus
Next, zest the peels of one orange and one lemon, being careful to avoid the bitter white pith. Squeeze the juice from the lemon, and set aside. The citrus zest will infuse a delightful brightness into your mincemeat, enhancing the fruity flavor profile as you combine it with the rest of the ingredients.

Step 3: Combine Ingredients in a Pan
In a large saucepan over low to medium heat, mix together the diced apples, lemon juice, orange zest, lemon zest, a cup of your choice of dried fruits, ground mixed spice, ground cinnamon, and half a cup of soft brown sugar. Once combined, add about 100g of butter, allowing it to melt and coat the fruit, which should take around 5–7 minutes.

Step 4: Cook Until Softened
Stir the mixture regularly, ensuring the apples soften and the dried fruit begins to plump up, which should take about 10-15 minutes. Keep the heat low to avoid burning, and you’ll know it’s ready when the apples are tender, and the aroma of warm spices fills your kitchen, signaling the richness of your vegetarian mincemeat.

Step 5: Cool the Mixture
Once the mixture has heated through and is fragrant, remove it from the heat and let it cool to room temperature. This cooling step is essential, as it allows the flavors to meld beautifully and ensures that the brandy doesn’t evaporate when added later, elevating your mincemeat for mince pies.

Step 6: Add Brandy
Once cooled completely, stir in about 100ml of brandy (or omit for a non-alcoholic version) to enrich the flavor of your mincemeat. This step deepens the complexity, making it ideal for those special festive treats. Mix well to ensure the brandy is evenly distributed throughout the mixture.

Step 7: Store the Mincemeat
Finally, transfer the vegetarian mincemeat into sterilized jars for long-term storage, ensuring they are airtight. This mincemeat can be kept for several months in a cool, dark cupboard or refrigerated for immediate use. The flavors will continue to mature, providing a luxurious filling for your holiday mince pies!

Expert Tips for Vegetarian Mincemeat

  • Sterilization Matters: Ensure your jars are thoroughly sterilized to extend the shelf life of your vegetarian mincemeat for mince pies.

  • Moisture Control: If your mixture becomes too dry, don’t hesitate to add a splash of brandy to restore its luscious consistency.

  • Fruit Variations: Experiment with different dried fruits like figs or apricots to customize the flavor of your vegetarian mincemeat and surprise your taste buds.

  • Spicy Kick: For an extra layer of warmth, consider adding a pinch of nutmeg or allspice to the mix, enhancing the festive character of your mincemeat.

  • Gift-Worthy Jars: Share the love of your homemade vegetarian mincemeat by packaging it in decorative jars—simple labels and ribbons can make it a thoughtful food gift.

Make Ahead Options

These delightful vegetarian mincemeat for mince pies is perfect for meal prep, making your festive baking a breeze! You can prepare the entire mixture up to 3 days in advance. Simply follow the recipe up to the cooling step, then let it cool completely at room temperature before storing it in airtight containers in the refrigerator. This ensures the flavors meld beautifully while keeping the mincemeat fresh and zesty. When you’re ready to use it, just stir in the brandy (if you’re using it, after the three days), and your delicious filling is ready to go! Trust me, you’ll experience just as delightful flavors with minimal prep the day you bake your pies!

What to Serve with Heavenly Vegetarian Mincemeat for Irresistible Mince Pies

Indulge in a festive feast by complementing your delightful mincemeat creation with these delicious pairings.

  • Flaky Pastry: Perfect for encasing the mincemeat, a buttery, flaky pastry enhances the texture and flavor of your pies.

  • Whipped Cream: A dollop of fresh whipped cream adds a light, airy contrast to the sweet and spiced flavors of the mincemeat.

  • Custard: Warm, creamy custard creates a luxurious experience, harmonizing beautifully with the rich fruitiness of your vegetarian mincemeat.

  • Spiced Tea: A hot cup of spiced tea balances the sweetness and brings out the warming notes in your festive pastries. Enjoying them side by side creates a cozy holiday moment.

  • Brandy Sauce: A drizzle of brandy sauce amps up the indulgence, enhancing the festive spirit while tying in the brandy you used in your mincemeat.

  • Cranberry Sauce: The tartness of cranberry sauce cuts through the sweetness, adding a refreshing contrast that elevates your dessert experience.

  • Ice Cream: Serve with a scoop of vanilla or cinnamon ice cream for a delightful, creamy addition that contrasts beautifully with the rich mincemeat flavors.

  • Chocolate Shavings: A sprinkle of dark chocolate shavings on top of your desserts adds a sophisticated twist that elevates every bite.

  • Festive Mulled Wine: A glass of warm, spiced mulled wine adds a festive touch, perfectly complementing the holiday flavors of the pies.

  • Fruitcake: For an extra touch of tradition, serve slices of spiced fruitcake alongside your pies to create a classic holiday spread.

How to Store and Freeze Vegetarian Mincemeat for Mince Pies

Airtight Containers: To keep your vegetarian mincemeat for mince pies fresh, store it in sterilized, airtight jars in a cool, dark cupboard for up to 6 months.

Refrigerator Storage: If using right away, place the mincemeat in the fridge where it will stay fresh for up to 3 weeks. Just ensure the container is well-sealed.

Freezer Friendly: For long-term storage, freeze the mincemeat in suitable containers or freezer bags for up to 12 months. Label them for easy identification!

Thawing and Reheating: When ready to use, thaw overnight in the refrigerator. If needed, gently reheat on the stove over low heat, adding a splash of brandy for extra moisture.

Vegetarian Mincemeat for Mince Pies: Creative Twists

Feel free to explore these delightful variations and make this festive mincemeat truly your own!

  • Dried Fruit Medley: Mix in apricots, figs, or raisins for unique flavor bursts that will keep your taste buds excited.
  • Flavorful Citrus: Swap the orange zest for grapefruit or replace lemon with lime for a fresh twist on the traditional flavor.
  • Vegan Delight: Substitute the butter with coconut oil for a plant-based version that’s just as deliciously rich.
  • Spicy Heat: Add a pinch of chili flakes or ginger to introduce a warm kick, balancing the sweetness with a little heat.
  • Nutty Texture: Stir in some chopped toasted walnuts or pecans for added crunch and depth, creating a beautiful texture contrast.
  • Seasonal Layers: Incorporate a layer of gingerbread spices for a festive spin, perfect for enhancing those holiday flavors.
  • Fruit Juice Alternative: Use fresh apple or orange juice in place of brandy for a non-alcoholic version, ensuring a bright, fruity taste.
  • Dessert Twist: Try blending this mincemeat with stewed fruits for a warm dessert topping or mix into your favorite dessert fillings.

Whether you’re crafting a batch of delightful Mini Beef Pies or savoring a comforting dish like Savor Comforting Broccoli, the options are endless! Customize your mincemeat and enjoy the magic of home cooking this season.

Vegetarian Mincemeat for Mince Pies Recipe FAQs

How do I select the right apples for mincemeat?
Absolutely! For the best flavor and texture in your vegetarian mincemeat for mince pies, choose firm, sweet apple varieties like Granny Smith or Cox. These apples provide the necessary natural sweetness and hold their shape beautifully during cooking. Avoid overripe apples, as they can turn mushy and alter the texture of your mincemeat.

What’s the best way to store vegetarian mincemeat?
Very importantly! Store your vegetarian mincemeat for mince pies in sterilized, airtight jars placed in a cool, dark cupboard for up to 6 months. If you plan to use it sooner, refrigerate it, where it will remain fresh for about 3 weeks. Just make sure your jars are tightly sealed to maintain flavor and prevent spoilage.

Can I freeze vegetarian mincemeat? If so, how?
Absolutely! Freezing is a fantastic option for preserving your vegetarian mincemeat. Simply transfer it into freezer-safe containers or freezer bags, ensuring to label them with the date. It will keep well for up to 12 months. When you’re ready to use it, thaw the mincemeat overnight in the refrigerator for best results. If desired, you can gently reheat it on the stove over low heat, adding a splash of brandy for added moisture.

What should I do if my mincemeat mixture is too dry?
No worries! If you find that your vegetarian mincemeat for mince pies is too dry, simply add a splash of brandy or a bit of freshly squeezed citrus juice to restore moisture. Gently stir it in until evenly distributed and let it simmer for a few more minutes. This not only brings back the desired consistency but also enhances the flavor.

Is there a substitute for brandy in this recipe?
Very much so! If you prefer a non-alcoholic version of your vegetarian mincemeat, you can simply omit the brandy. You might consider adding a little extra lemon or orange juice for acidity and flavor depth. Alternatively, use apple juice or non-alcoholic apple cider which will lend a complementary sweetness to your mincemeat.

Can my pets eat this vegetarian mincemeat?
It’s best to avoid sharing your mincemeat with pets. While the ingredients are vegetarian-friendly, some elements like raisins and certain spices may be harmful to dogs and cats. Always check ingredient safety and consult your vet if you’re ever unsure.

Vegetarian mincemeat for mince pies

Heavenly Vegetarian Mincemeat for Irresistible Mince Pies

This vegetarian mincemeat for mince pies is a delightful blend of spiced fruit, perfect for holiday festivities.
Prep Time 10 minutes
Cook Time 20 minutes
Cooling Time 30 minutes
Total Time 1 hour
Servings: 12 jars
Course: Dessert
Cuisine: Vegetarian
Calories: 120

Ingredients
  

For the Mincemeat
  • 6 pieces firm apples (e.g., Granny Smith) peeled, cored, and finely diced
  • 1 tablespoon orange zest for enhanced fruity flavor
  • 1 tablespoon lemon zest
  • 1 cup dried fruit (sultanas, currants, cranberries, etc.) mix to customize sweetness
  • 1 teaspoon ground mixed spice swap with cinnamon, nutmeg, and ginger if desired
  • 1 teaspoon ground cinnamon preferably freshly ground
  • 0.5 cup soft brown sugar or coconut sugar for deeper flavor
  • 100 grams butter or plant-based margarine for vegan version
  • 100 milliliters brandy omit for non-alcoholic version

Equipment

  • Large saucepan
  • sterilized jars
  • zester
  • Knife
  • Cutting Board

Method
 

Step‑by‑Step Instructions
  1. Peel, core, and finely dice six firm apples, ensuring they are evenly cut for uniform cooking.
  2. Zest the peels of one orange and one lemon, avoiding the bitter white pith. Squeeze the juice from the lemon, and set aside.
  3. In a large saucepan over low to medium heat, mix together diced apples, lemon juice, orange zest, lemon zest, dried fruits, ground mixed spice, ground cinnamon, and soft brown sugar. Add butter and allow it to melt, coating the fruit.
  4. Stir mixture regularly, ensuring apples soften and dried fruit plumps, which should take approximately 10-15 minutes.
  5. Remove from heat and let cool to room temperature, allowing flavors to meld.
  6. Once cooled, stir in brandy to enrich the flavor of the mincemeat, mixing well.
  7. Transfer vegetarian mincemeat into sterilized jars for long-term storage.

Notes

Ensure jars are thoroughly sterilized to extend shelf life. Customize dried fruits and spices as desired and consider using labeled decorative jars for gifting.

Festive Christmas Tree Pizza: Fun, Easy, and Delicious!

As I stood in the kitchen, the scent of warm dough mingling with the sound of holiday music, the idea for our Christmas Tree Pizza struck me like a festive spark. This delightful recipe transforms ordinary mini pizzas into charming trees that kids adore, making mealtime a magical experience. Perfect for the busy holiday season, this easy-to-make dish offers the bonus of customizable toppings, ensuring that every family member can create their ideal slice of joy. Whether you’re looking for a quick dinner solution or a fun surprise for lunchboxes, this Christmas Tree Pizza provides warmth and creativity right on your table. Curious to know how to create these adorable holiday treats? Let’s get started!

Why Is This Pizza a Festive Favorite?

Delightful with its playful shape, this Christmas Tree Pizza transforms everyday meals into festive celebrations. Customizable toppings make it ideal for picky eaters, ensuring everyone gets to personalize their pizza exactly how they like it. Quick and easy to prepare, you can whip this up in a flash—perfect for hectic holiday evenings. Plus, it doubles as a fun craft project for kids! Pair it with our delicious Zucchini Oatmeal Pizza for even more family-friendly pizza options.

Christmas Tree Pizza Ingredients

• Here’s everything you need to create your festive masterpiece.

For the Dough

  • Pizza Dough – The base of the pizza; consider using store-bought for convenience or homemade for a personal touch.

For the Toppings

  • Mozzarella Cheese – Provides a creamy texture and mild flavor; feel free to swap it out for cheddar for extra zest.
  • Mini Pepperoni – Adds flavor and visual appeal; use diced bell peppers or olives for a vegetarian option.
  • Pizza Sauce – Offers a moisture-rich flavor base; homemade sauce or pesto can make it even more special.

Get ready to create your very own delightful Christmas Tree Pizza that’s sure to bring joy to your kitchen!

Step‑by‑Step Instructions for Christmas Tree Pizza

Step 1: Preheat the Oven
Begin by preheating your oven to 350°F (175°C). This will ensure that your Christmas Tree Pizza cooks evenly and thoroughly. Don’t rush this step; waiting for the oven to reach the right temperature is key to achieving that golden, bubbly cheese.

Step 2: Prepare the Dough
On a clean surface, roll out your chosen pizza dough to about ¼ inch thick using a rolling pin. Once it’s evenly spread, take a tree-shaped cookie cutter and press it into the dough to cut out festive shapes. Aim for a few tree cutouts to make a colorful platter.

Step 3: Arrange on a Baking Sheet
Place the tree-shaped dough pieces on a parchment-lined baking sheet, ensuring they have space between them for even cooking. This arrangement keeps the dough from touching each other and makes it easier to remove them later. A little space goes a long way to avoid a messy outcome.

Step 4: Add Pizza Sauce
Using a spoon or brush, spread a thin layer of pizza sauce over each tree cutout. Take care to leave a small border around the edges for the crust. This flavorful base will keep the dough moist while enhancing the overall taste of your Christmas Tree Pizza.

Step 5: Sprinkle the Cheese
Generously sprinkle shredded mozzarella cheese over the sauced trees, covering them neatly but not too thickly. As the cheese melts, it will bubble and create a delightful gooey texture. Visualize the cheesy goodness bubbling upwards once it hits the oven!

Step 6: Top with Mini Pepperoni
Now it’s time to add the mini pepperoni or your preferred toppings! Distribute them evenly atop the melted mozzarella to create an appealing look. The vibrant colors of the pepperoni also lend a festive feel to your Christmas Tree Pizza.

Step 7: Bake the Pizzas
Transfer the baking sheet to the preheated oven. Bake the Christmas Tree Pizzas for about 10 minutes, or until the cheese is bubbly and golden brown. Keep an eye on them to avoid burning; all ovens vary in temperature.

Step 8: Let Cool and Serve
Once baked, carefully remove the pizzas from the oven and allow them to cool for a few minutes. This brief wait will help set the cheese. Serve your delightful Christmas Tree Pizza warm, perhaps with a side of marinara for those fond of dipping!

Christmas Tree Pizza Variations

Feel free to get creative and customize your Christmas Tree Pizza with these fun and tasty variations!

  • Vegetarian Delight: Swap mini pepperoni for an array of colorful diced vegetables like bell peppers, mushrooms, or spinach. It’s a fresh twist that adds a burst of color.

  • Spicy Kick: Add a sprinkle of red pepper flakes or swap pizza sauce for a spicy sriracha blend. This fiery variation will surely please those who love a little heat in their meals.

  • Cheesy Medley: Combine mozzarella with other cheeses like sharp cheddar or creamy gouda for a flavor explosion. It will create a uniquely rich and satisfying experience.

  • Pesto Drizzle: Replace the pizza sauce with pesto for a fragrant and vibrant touch. The herby flavor elevates the pizza to gourmet status; your guests will be raving about it!

  • BBQ Twist: Use barbecue sauce instead of traditional pizza sauce, then top with shredded chicken and red onions. This unexpected flavor will tantalize taste buds and make for a delightful change.

  • Sweet Surprise: Top your pizza with a drizzle of honey or balsamic glaze after baking for a sweet, tangy finish. This dessert-inspired twist is sure to impress your family during the holiday festivities.

  • Festive Shape Play: Try using holiday-themed cookie cutters such as stars or snowflakes. It adds a festive flair that’s perfect for a gathering or party.

  • Gourmet Touch: Add arugula and thinly sliced prosciutto after the pizza comes out of the oven for a sophisticated, gourmet vibe. This twist is perfect for elevating your festive dinner options.

With all these variations, you’ll never get bored! And for more creative pizza inspiration, check out our scrumptious Bread Pizza or try making a delightful Zucchini Oatmeal Pizza for an extra fun twist!

Tips for the Best Christmas Tree Pizza

  • Even Dough Thickness: Ensure the dough is rolled out evenly to guarantee consistent cooking. Uneven dough can lead to overcooked edges and undercooked centers.

  • Colorful Toppings: Customize toppings with a mix of vegetables to enhance visual appeal and nutrition. Think about using bell peppers, olives, or even spinach for festive colors!

  • Watch the Baking Time: Keep a close eye on the oven as baking times can vary. Remove your Christmas Tree Pizza once the cheese is bubbly and golden to prevent burning.

  • Creative Shapes: Use different cookie cutter shapes for variety if desired. Aside from trees, consider stars or ornaments for a whimsical touch!

  • Cooling Time Matters: After baking, let the pizzas rest for a few minutes. This helps the cheese set, making them easier to cut and serve.

Make Ahead Options

These Christmas Tree Pizzas are perfect for meal prep, allowing you to enjoy festive dinners without the stress! You can prepare the tree-shaped dough cutouts and store them in an airtight container in the refrigerator for up to 24 hours. Additionally, you can pre-sauce and assemble the pizzas without baking them, covering them well to prevent drying out. When you’re ready to enjoy your Christmas Tree Pizza, simply preheat the oven and bake as directed, bringing joy and deliciousness with minimal effort. With these make-ahead options, you can savor the delightful flavors of the holiday season while saving precious time!

Storage Tips for Christmas Tree Pizza

Fridge: Store your leftover Christmas Tree Pizza in an airtight container for up to 3 days to keep it fresh and tasty.

Freezer: If you want to save it for later, wrap individual pieces tightly in plastic wrap and then place them in a freezer-safe bag. They can be frozen for up to 2 months.

Reheating: To enjoy your pizza again, reheat in the oven at 350°F (175°C) for about 5-7 minutes until warmed through. This keeps the crust crispy and the cheese bubbly.

What to Serve with Christmas Tree Pizza?

Elevate your festive meal with delightful side dishes that balance flavor and fun!

  • Fresh Garden Salad: A light, crisp salad filled with seasonal greens adds a refreshing crunch to your meal.

  • Garlic Breadsticks: Pillowy and buttery, these sticks are perfect for dipping into marinara and cheese sauce, enhancing your pizza experience.

  • Roasted Veggies: A mix of colorful roasted vegetables brings warmth and earthiness, creating a perfect contrast to the cheesy flavors.

  • Fruit Skewers: Sweet and juicy fruit sticks can be a fun and colorful addition, balancing savory with a burst of natural sweetness.

  • Mini Caprese Skewers: These bite-sized delights of mozzarella, cherry tomatoes, and basil provide a fresh, tangy flavor that complements the richness of the pizza.

  • Hot Cocoa Bar: Offer a cozy drink option! Set up a hot cocoa station with toppings like whipped cream and marshmallows for a sweet ending.

  • Peppermint Brownies: This festive treat adds a chocolatey touch, wrapping up the meal with delicious holiday cheer and a decadent finish.

Christmas Tree Pizza Recipe FAQs

What type of pizza dough should I use?
Absolutely! You can use store-bought dough for convenience, or go the homemade route if you prefer a personal touch. Naan or pre-baked crusts work well too, though homemade pizza dough truly enhances the flavor and texture of your Christmas Tree Pizza.

How should I store leftover Christmas Tree Pizza?
To keep your festive creations fresh, store leftover Christmas Tree Pizza in an airtight container in the refrigerator for up to 3 days. This will help maintain the flavor and prevent the dough from becoming soggy. When you’re ready to enjoy it again, just reheat it in the oven for the best results!

Can I freeze Christmas Tree Pizza?
Certainly! To freeze your Christmas Tree Pizza, first, let it cool completely. Wrap each piece tightly in plastic wrap, then place them in a freezer-safe bag. You can enjoy it later, as it keeps well in the freezer for up to 2 months. Simply reheat in the oven at 350°F (175°C) for about 5-7 minutes when you’re ready to indulge.

What if my pizza dough didn’t rise properly?
If your dough isn’t rising, it might be due to expired yeast or an incorrect water temperature. Ensure the water is warm, around 110°F (43°C), and make sure the yeast is fresh. If all else fails, I recommend rolling out the dough flat and proceeding with your Christmas Tree Pizza as a pizza flatbread. It will still be delicious!

Are there any dietary considerations with the toppings?
Exceedingly! If you’re accommodating dietary restrictions, be sure to choose toppings that suit everyone’s needs. For a vegetarian option, replace mini pepperoni with colorful veggies like bell peppers, mushrooms, or olives. Additionally, check cheese labels for allergens if you’re serving guests with dairy sensitivities. Customization is key to making this festive pizza enjoyable for all!

Christmas Tree Pizza

Festive Christmas Tree Pizza: Fun, Easy, and Delicious!

This Christmas Tree Pizza transforms ordinary mini pizzas into charming trees that kids adore, making mealtime a magical experience.
Prep Time 15 minutes
Cook Time 10 minutes
Cooling Time 5 minutes
Total Time 30 minutes
Servings: 4 pizzas
Course: Dinner
Cuisine: Italian
Calories: 250

Ingredients
  

Dough
  • 1 batch Pizza Dough Store-bought or homemade
Toppings
  • 1 cup Mozzarella Cheese Shredded
  • 1 cup Mini Pepperoni
  • 1 cup Pizza Sauce Homemade or store-bought

Equipment

  • oven
  • Rolling Pin
  • Tree-shaped cookie cutter
  • baking sheet
  • parchment paper

Method
 

Preparation Steps
  1. Preheat your oven to 350°F (175°C).
  2. Roll out your pizza dough to about ¼ inch thick.
  3. Press a tree-shaped cookie cutter into the dough to cut out shapes.
  4. Arrange the tree cutouts on a parchment-lined baking sheet.
  5. Spread a thin layer of pizza sauce over each tree cutout.
  6. Sprinkle shredded mozzarella over the sauced trees.
  7. Add mini pepperoni or your preferred toppings on top.
  8. Bake for about 10 minutes, or until the cheese is bubbly and golden brown.
  9. Let cool for a few minutes before serving.

Notes

Customize toppings with vegetables like bell peppers, olives, or spinach. Store leftovers in an airtight container for up to 3 days.

Delightful Christmas White Chocolate-Dipped Sugar Wafers

As I sifted through the holiday decorations, a sweet thought struck me: what if I could create a treat that not only delights the eyes but also brings everyone together? Enter my Christmas White Chocolate-Dipped Sugar Wafers! These whimsical no-bake treats are a fantastic way to infuse some festive fun into your kitchen without slaving over a hot stove. With their crispy texture wrapped in creamy white chocolate, they’re a treat that kids will love helping to make, and trust me, they will disappear faster than you can say “ho ho ho.” Quick to assemble and endlessly charming, these sugar wafers are the perfect way to elevate your holiday gatherings. Are you ready to unwrap a little joy this season? Let’s dive in!

Why are these Wafers a Holiday Hit?

Crispy Perfection: Each wafer boasts a delightful crunch that contrasts beautifully with the smooth white chocolate coating.
Quick & Easy: This no-bake recipe is a breeze, making it possible for even the busiest home cooks to whip up a festive treat.
Kid-Friendly Fun: Get the little ones involved! They’ll love dipping and decorating, creating wonderful holiday memories together.
Versatile Toppings: From colorful sprinkles to crushed candy canes, you can customize these sugar wafers to match any celebration.
Crowd Pleaser: With their charming appearance and delightful taste, these Christmas White Chocolate-Dipped Sugar Wafers are sure to vanish from your dessert platter.
Elevate your holiday table this season with these sweet treats, and if you’re looking for more festive inspiration, don’t miss my other delightful recipes like the Oat Tiramisu Sugar. You’re in for a real treat!

Christmas White Chocolate-Dipped Sugar Wafers Ingredients

For the Wafer Base
Sugar Wafers – These provide the crunch you crave, and no substitutions are necessary; they come in various delightful flavors!

For the Chocolate Coating
White Chocolate – Melting into a sweet pool of creamy goodness; can be swapped with dark chocolate for a more robust flavor.
Shortening (e.g., Crisco) – Ensures a silky, smooth chocolate consistency; coconut oil works well as a healthier alternative.

For the Festive Touch
Sprinkles/Decorations (optional) – Use these to jazz up your wafers with color and flair; seasonal decorations or nuts add a fun twist!

Step‑by‑Step Instructions for Christmas White Chocolate-Dipped Sugar Wafers

Step 1: Prepare Materials
Begin by gathering all your materials: sugar wafers, white chocolate, and optional decorations like sprinkles or crushed candy canes. Make sure your workspace is clean and organized, as this will help the preparation of your Christmas White Chocolate-Dipped Sugar Wafers flow smoothly. Line a baking sheet with parchment paper for easy cooling later.

Step 2: Melt Chocolate
In a microwave-safe bowl, combine the white chocolate and shortening. Heat in the microwave at 50% power for 15-second intervals, stirring between each session until the mixture is fully melted and smooth. This should take about 1-2 minutes. Ensure it’s velvety to ensure a beautiful coating on your sugar wafers.

Step 3: Dip Wafers
Once your chocolate is melted, it’s time to dip! Take a sugar wafer and immerse it in the warm chocolate mixture. Let any excess chocolate drip off back into the bowl, then carefully place the dipped wafer onto the prepared baking sheet. Work quickly to maintain the chocolate’s softness, especially since you want it to stay smooth and glossy.

Step 4: Decorate
Immediately after dipping, sprinkle your choice of colorful decorations over the wet chocolate on each wafer. This step is fun and allows creativity, so encourage kids to join in! You want the sprinkles to adhere before the chocolate sets, ensuring that your Christmas White Chocolate-Dipped Sugar Wafers look festive and delightful.

Step 5: Cool
Once decorated, leave the sugar wafers at room temperature on the parchment-lined baking sheet for about 15-20 minutes. This will give the chocolate time to harden into a beautiful shell. You’ll know they’re ready when the chocolate appears firm and slightly matte, making them perfect for serving or storing later.

Step 6: Store Safely
After the wafers have cooled, carefully transfer them into an airtight container. If layered, make sure to separate them with parchment paper to prevent sticking. Your Christmas White Chocolate-Dipped Sugar Wafers can be kept fresh for up to two weeks, ensuring your festive treat remains delightful throughout the holiday season!

Expert Tips for Christmas White Chocolate-Dipped Sugar Wafers

  • Melt Carefully: Ensure your white chocolate is fully melted and smooth to achieve a glossy finish. Stir well between heating intervals to avoid burning.
  • Work Quickly: Dip and decorate your wafers in small batches. This prevents the chocolate from hardening and helps the sprinkles stick effectively.
  • Store Properly: Keep your Christmas White Chocolate-Dipped Sugar Wafers in an airtight container at room temperature to maintain their crisp texture.
  • Customize Toppings: Experiment with fun toppings beyond sprinkles. Crushed cookies or dried fruit can add a unique twist to your festive treats!
  • Avoid Overheating: Be mindful not to overheat the chocolate, as this can cause it to seize. A smooth, melted chocolate ensures easy dipping.

How to Store and Freeze Christmas White Chocolate-Dipped Sugar Wafers

  • Room Temperature: Store your Christmas White Chocolate-Dipped Sugar Wafers in an airtight container at room temperature for up to 2 weeks to keep them fresh and crunchy.
  • Fridge: If your home is warm, consider placing the wafers in the refrigerator. Just be sure to let them come to room temperature before serving for the best texture.
  • Freezer: While not tested, you can freeze the wafers by wrapping them tightly in plastic wrap and placing them in a freezer-safe container. They should last up to 3 months.
  • Reheating: If you find the chocolate surface dull after storage, simply place the wafers in a warm oven (200°F) for a few minutes to refresh the glossy look before serving.

Christmas White Chocolate-Dipped Sugar Wafers Variations

Feel free to customize your Christmas White Chocolate-Dipped Sugar Wafers for a unique twist that adds even more festive cheer to your celebrations!

  • Dark Chocolate: Swap white chocolate for dark chocolate for a deliciously rich alternative. It pairs beautifully with the crisp wafers, creating a decadent contrast.
  • Minty Fresh: Add peppermint extract to your melted chocolate for a refreshing holiday flavor. Just a few drops can turn these wafers into a minty delight that will refresh the palate.
  • Coconut Yummy: Use shredded coconut as a topping for a tropical twist! It adds a chewy texture that beautifully contrasts the crunch of the wafer. Plus, it looks festive and fun!
  • Nutty Crunch: Top with finely chopped nuts for added crunch, giving your wafers a delightful and hearty bite! Almonds or walnuts can add a wholesome flavor that just sings of the holidays.
  • Winter Wonderland: Use crushed candy canes as a colorful topping to sprinkle over your chocolate. This adds a sweet crunch and a stunning presentation that will wow your guests!
  • Spicy Chocolate: Introduce a hint of chili powder or cayenne pepper to your melted chocolate for a fun spicy kick. It adds unexpected warmth and flavor to your holiday treat.
  • Decorative Sugar: Sprinkle edible glitter or colored sugar for a dazzling holiday effect. A few sparkles will make your wafers look truly magical on any dessert table!
  • Fruit Festivity: Consider using freeze-dried fruit pieces as an alternative topping. They bring a vibrant color and unique flavor combination to your festive dish.

If you’re looking for more creative ideas, don’t miss my other delightful recipes, such as the Oat Tiramisu Sugar. Happy baking!

Make Ahead Options

These Christmas White Chocolate-Dipped Sugar Wafers are a fantastic option for those looking to save time during the busy holiday season! You can prepare the sugar wafers and dip them in chocolate up to 24 hours in advance; simply store them in an airtight container at room temperature to keep them crisp. To maintain quality, add your decorative sprinkles just before serving to prevent them from becoming soggy. When you’re ready to present, serve them straight from the container, and your festive treats will not only look stunning but remain just as delicious! With a little planning, you can effortlessly impress your guests while enjoying more time with loved ones.

What to Serve with Christmas White Chocolate-Dipped Sugar Wafers

Elevate your holiday festivities with these delightful treats that perfectly blend sweetness with creativity.

  • Festive Fruit Platter: A colorful assortment of fruits adds freshness that balances the sweetness of the wafers. Think vibrant strawberries and juicy oranges for a pop of color!
  • Hot Cocoa Bar: Create a cozy beverage station featuring rich hot cocoa, whipped cream, and sprinkles. This warm drink pairs beautifully with the crunchy elegance of the dipped wafers.
  • Gingerbread Cookies: The spiced flavor of gingerbread complements the creamy sweetness of the white chocolate, creating a harmonious holiday dessert experience. A delightful combo on any table!
  • Peppermint Bark: This vibrant candy delivers a satisfying crunch and refreshing mint flavor that echoes the festive spirit, making it a perfect match for the decadent wafers.
  • Coffee or Tea: Offering a warm drink option, a steaming cup of coffee or herbal tea gives a cozy contrast to the sweet wafers, enhancing the overall experience.
  • Holiday Cheeseboard: Incorporate light cheeses and artisanal crackers for a delightful mix of textures and flavors that create an exciting yet elegant pairing with your Christmas White Chocolate-Dipped Sugar Wafers.

Christmas White Chocolate-Dipped Sugar Wafers Recipe FAQs

How do I choose the best sugar wafers for this recipe?
Selecting sugar wafers can be fun! Look for wafers that are crisp, fresh, and free from any dark spots or broken pieces. Many brands offer a variety of flavors, but classic vanilla works wonderfully for a versatile base. If you prefer a colorful touch, consider varieties that come in different colors for a more festive feel!

What’s the best way to store the wafers?
Absolutely! To keep your Christmas White Chocolate-Dipped Sugar Wafers fresh, store them in an airtight container at room temperature for up to 2 weeks. If your home is particularly warm, the refrigerator is a good alternative; however, make sure to let them sit at room temperature for a while before serving to regain their perfect crunch.

Can I freeze these sugar wafers?
Yes, you can! While not officially tested, you can freeze your Christmas White Chocolate-Dipped Sugar Wafers by tightly wrapping them in plastic wrap and placing them in a freezer-safe container. Ensure they are well-protected from air to avoid freezer burn. They should last up to 3 months in the freezer, and when you’re ready to enjoy them, let them thaw in the fridge or at room temperature.

What should I do if the chocolate coating is too thick or doesn’t coat well?
If you find your chocolate coating is too thick, it’s likely that it hasn’t been melted enough. Make sure to melt the white chocolate and shortening until you achieve a smooth, runny consistency. If this happens, simply return the mixture to the microwave for additional 15-second intervals, stirring well in between until you reach the desired texture. For dipping, ensure you’re working with small batches to keep the coating manageable.

Can pets eat these wafers?
No, these Christmas White Chocolate-Dipped Sugar Wafers are not safe for pets. Chocolate is toxic to dogs and cats, so it’s important to keep these treats out of reach of your furry friends. If you’re looking for a pet-friendly alternative, consider making a batch of dog-safe treats using ingredients like peanut butter and pumpkin instead!

What if I want a healthier version of these wafers?
Very! You can opt for dark chocolate instead of white for a richer flavor and a healthier option. Additionally, consider using coconut oil instead of shortening for a healthier fat alternative. Incorporating toppings like nuts or dried fruits can also add nutritional value while keeping that festive charm alive!

Christmas White Chocolate-Dipped Sugar Wafers

Delightful Christmas White Chocolate-Dipped Sugar Wafers

Delightful Christmas White Chocolate-Dipped Sugar Wafers are whimsical no-bake treats, perfect for festive gatherings, combining crispy wafers with creamy white chocolate.
Prep Time 20 minutes
Cooling Time 20 minutes
Total Time 40 minutes
Servings: 24 wafers
Course: Dessert
Cuisine: Christmas
Calories: 150

Ingredients
  

For the Wafer Base
  • 1 package Sugar Wafers Various flavors
For the Chocolate Coating
  • 2 cups White Chocolate Can substitute with dark chocolate
  • 2 tablespoons Shortening Coconut oil can be used as alternative
For the Festive Touch
  • 1 cup Sprinkles/Decorations Optional, use seasonal decorations or nuts

Equipment

  • microwave-safe bowl
  • baking sheet
  • parchment paper

Method
 

Step-by-Step Instructions
  1. Gather all your materials: sugar wafers, white chocolate, and optional decorations. Line a baking sheet with parchment paper.
  2. Combine the white chocolate and shortening in a microwave-safe bowl. Heat in the microwave at 50% power for 15-second intervals until melted and smooth, about 1-2 minutes.
  3. Dip a sugar wafer into the melted chocolate, letting excess drip back into the bowl, and place it on the prepared baking sheet.
  4. Immediately sprinkle decorations over the wet chocolate on each wafer before it sets.
  5. Let the wafers cool at room temperature for about 15-20 minutes until the chocolate hardens.
  6. Transfer cooled wafers into an airtight container, separating layers with parchment paper if necessary.

Notes

Store in an airtight container for up to 2 weeks. For best texture, allow to come to room temperature before serving if refrigerated.

Spiced Gingerbread Wreath Cake for a Festive Holiday Feast

As the first chill of winter settles in, my kitchen transforms into a haven of warmth and delightful aromas. This Spiced Gingerbread Wreath Cake is the star of the season, offering a heartwarming blend of comforting spices and rich molasses that evoke memories of joyful holiday gatherings. Not only does its charming wreath shape create a festive centerpiece, but the cake itself is unexpectedly simple to prepare, allowing even the busiest home chefs to indulge in a homemade treat. Plus, it’s freezer-friendly, making it perfect for those spontaneous holiday get-togethers. So, are you ready to fill your home with the enticing scent of gingerbread and create lasting memories with every slice?

Why is this cake a holiday favorite?

Cozy and Inviting: The Spiced Gingerbread Wreath Cake wraps your home in the warm, inviting aroma of holiday spices, making it a delightful addition to any gathering.

Effortless to Make: With simple ingredients and straightforward steps, this cake is designed for both novice and experienced bakers. You’ll be amazed at how easy it is to create a stunning centerpiece!

Versatile Flavor Profile: Not only does it shine as a classic gingerbread treat, but you can also explore variations by adding cocoa powder or different spices, ensuring every bite remains exciting.

Impressive Presentation: Its unique wreath shape garnished with fragrant rosemary and star anise elevates your holiday table, leaving guests enchanted.

Make-Ahead Friendly: Baking this cake ahead of time allows you to focus on enjoying the festivities. Just frost it before serving for that fresh-baked charm.

Indulge in this scrumptious cake while enjoying a cup of coffee or tea, just like with our Nutty Vanilla Cake or a slice of Sky Jelly Cake. You’ll love the comforting tastes of the season!

Spiced Gingerbread Wreath Cake Ingredients

For the Cake
All-purpose flour – Provides structure; substitute with a 1:1 gluten-free baking flour blend for a gluten-free version.
Baking soda – Helps the cake rise; no substitutions needed.
Ground ginger – Adds warm, spicy flavor; fresh ginger is a possible substitute, but adjust the quantity.
Ground cinnamon – Contributes to the holiday taste; no substitutions needed.
Ground nutmeg – Enhances the complexity of spices; omit if unavailable.
Salt – Balances sweetness and enhances flavors; necessary for taste.
Dark molasses – Gives a deep, rich flavor; can substitute with dark corn syrup or honey, but flavor will be less intense.
Eggs – Provides moisture and binding; no substitutions advised.
Granulated sugar – Sweetens the cake; can reduce the amount for less sweetness.
Brown sugar – Adds moisture and caramel flavor; light brown sugar is a suitable alternative.
Whole milk – Keeps the cake moist; substitute with plant-based milk for dairy-free versions.
Unsalted butter – Provides flavor and richness; can use coconut oil for a dairy-free option.
Vanilla extract – Enhances overall flavor; no substitutions needed.

For the Frosting
Heavy whipping cream – Used for frosting; can substitute with coconut cream for a dairy-free frosting.
Powdered sugar – Sweetens whipped cream; no substitutions necessary.

For Decoration
Rosemary sprigs, star anise, and cinnamon sticks – Perfect for decoration; can use other fresh herbs or spices for an aesthetic touch.

Dive into the festive spirit with this Spiced Gingerbread Wreath Cake and bring a piece of cozy holiday cheer to your gatherings!

Step‑by‑Step Instructions for Spiced Gingerbread Wreath Cake

Step 1: Preheat and Prepare
Begin by preheating your oven to 350°F (175°C). While it heats, generously grease a Bundt pan with unsalted butter, ensuring all crevices are coated to prevent sticking. Next, dust the pan with flour and tap out the excess. This step is crucial for achieving a beautifully shaped Spiced Gingerbread Wreath Cake.

Step 2: Whisk Dry Ingredients
In a medium bowl, whisk together 2 cups of all-purpose flour, 1 teaspoon of baking soda, 2 teaspoons of ground ginger, 1 teaspoon of ground cinnamon, ½ teaspoon of ground nutmeg, and ½ teaspoon of salt. This mixture forms the spice-infused base of your cake. Ensure the ingredients are well combined, and set the bowl aside for later.

Step 3: Combine Wet Ingredients
In a large mixing bowl, combine ½ cup of softened unsalted butter with ½ cup of granulated sugar and ½ cup of brown sugar. Beat the mixture until creamy and light. Then, add 2 large eggs, ½ cup of dark molasses, ½ cup of whole milk, and 1 teaspoon of vanilla extract. Mix until smooth and fully blended, creating a delightful, fragrant batter.

Step 4: Mix Dry and Wet Ingredients
Gradually introduce the dry ingredient mixture into the wet ingredients, stirring gently with a spatula until a smooth batter forms. Avoid overmixing, as this can affect the lightness of your Spiced Gingerbread Wreath Cake. The batter should be rich and fragrant, with all spice notes well integrated.

Step 5: Bake the Cake
Pour the batter into the prepared Bundt pan, smoothing the top with a spatula. Carefully place the pan in the preheated oven and bake for 35-40 minutes. To check for doneness, insert a toothpick into the center—the cake should come out clean or with a few moist crumbs.

Step 6: Cool the Cake
Once baked, remove the Bundt pan from the oven and let it cool on a wire rack for about 10 minutes. After cooling slightly, invert the cake onto the rack and allow it to cool completely. This step is important for a sturdy base when frosting your Spiced Gingerbread Wreath Cake.

Step 7: Prepare the Frosting
While the cake cools, prepare the frosting by whipping 1 cup of heavy whipping cream with ½ cup of powdered sugar in a chilled bowl. Use electric beaters to whip until soft peaks form. The frosting should be fluffy and hold its shape well, ready to adorn your festive cake.

Step 8: Frost the Cake
Once the cake is completely cooled, spread the whipped cream frosting generously over the top and let it cascade down the sides. Use a spatula to create an appealing texture or swirl. The fluffy frosting will beautifully complement the rich flavors of your Spiced Gingerbread Wreath Cake.

Step 9: Decorate the Cake
To give your cake a festive touch, decorate with sprigs of fresh rosemary, star anise, and cinnamon sticks. Dust the top lightly with additional powdered sugar for an elegant finish. These decorations will enhance the holiday spirit, creating a stunning centerpiece for your gatherings.

Step 10: Serve and Enjoy
Slice your beautiful Spiced Gingerbread Wreath Cake and serve it to your guests. It pairs wonderfully with warm beverages and will be the highlight of your festive table. Enjoy the rich flavors and comforting aromas as you create lasting memories with family and friends!

Expert Tips for Spiced Gingerbread Wreath Cake

  • Chill for Whipped Cream: Before making the frosting, chill your mixing bowl and beaters in the freezer for about 10-15 minutes to ensure that the whipped cream achieves maximum volume and stays light.

  • Room Temperature Molasses: Make sure your molasses is at room temperature before mixing; this will help it blend easily with the other ingredients, avoiding clumps and ensuring a smooth batter for your Spiced Gingerbread Wreath Cake.

  • Baking Time Adjustments: If you use a flat pan instead of a Bundt pan, be mindful that the cake may bake faster. Start checking for doneness around 25 minutes to prevent overbaking.

  • Eggs Matter: For an airy cake, beat your eggs until pale yellow before adding them to the batter. This simple step helps incorporate air, contributing to a lighter texture in your finished cake.

  • Moisture is Key: If you’re looking for a gluten-free version, ensure that you use a quality gluten-free baking flour blend. This will help maintain the cake’s moisture and prevent it from becoming dry.

Spiced Gingerbread Wreath Cake Variations

Feel free to put your own spin on this festive cake and explore these delightful variations.

  • Gluten-Free: Use a 1:1 gluten-free baking flour blend instead of all-purpose flour for a gluten-free version that everyone can enjoy.

  • Dairy-Free: Swap out whole milk for plant-based milk and use coconut oil in place of unsalted butter to create a comfortable dairy-free version.

  • Chocolate Twist: Enhance flavors with a rich chocolatey taste by adding ½ cup of unsweetened cocoa powder to the batter; it’s a unique twist that will surprise your guests!

  • Spice it Up: Experiment with your spice choices by incorporating allspice or cloves for an unexpected flavor depth that elevates the traditional gingerbread experience.

  • Lightened Sweetness: For a less sweet cake, reduce both granulated and brown sugars by a quarter without sacrificing flavor; a clever way to leave room for a little extra frosting!

  • Maple Molasses: Substitute dark molasses with maple syrup for a lighter refresh of flavor; it’ll lend a delightful twist to the classic recipe.

  • Texture Additions: For a crunchy element, fold in chopped nuts like pecans or walnuts to the batter, creating a delightful contrast to the soft cake.

Take a moment to enjoy this cake alongside a warm beverage, just like with our delicious Blueberry and Cream Cheese Cake or our light and airy Matcha Sponge Cake. Experiment, and let your creativity shine in the kitchen!

How to Store and Freeze Spiced Gingerbread Wreath Cake

Fridge: Store leftover slices in an airtight container in the fridge for up to 3 days to maintain freshness and flavor.

Freezer: Wrap individual pieces tightly in plastic wrap and place them in a freezer bag for up to 3 months. Thaw overnight in the fridge before serving.

Reheating: If desired, gently warm slices in the microwave for about 10-15 seconds for a cozy treat, enhancing the gingerbread aroma and texture.

Make-Ahead: Bake your Spiced Gingerbread Wreath Cake in advance and freeze un-frosted. Frost it just before serving to keep it looking fresh and delightful!

Make Ahead Options

These Spiced Gingerbread Wreath Cakes are perfect for busy holiday chefs! You can prepare the cake itself up to 24 hours in advance, allowing the flavors to meld and deepen. Once cooled, wrap the cake tightly in plastic wrap and refrigerate it to maintain its moisture. The whipped cream frosting can be made a day in advance as well; just store it in an airtight container in the fridge until you’re ready to serve. To finish, frost the cake and decorate it with rosemary, star anise, and cinnamon sticks just before serving for that fresh, festive touch. This way, you’ll save time and enjoy a delicious homemade dessert with minimal effort on the day of your celebration!

What to Serve with Spiced Gingerbread Wreath Cake

As the holiday season unfolds, elevate your festive gatherings with delicious pairings that complement every slice of this cozy cake.

  • Creamy Mashed Potatoes:
    Their buttery texture balances the cake’s sweetness, making a delightful contrast that keeps everyone coming back for more.

  • Warm Spiced Apple Cider:
    This traditional drink echoes the cake’s warm spices, bringing a comforting, aromatic experience that warms hearts and hands alike.

  • Vanilla Ice Cream:
    Adding a scoop on the side brings a creamy contrast to the gingerbread flavors, melting beautifully into the cake’s tender crumb.

  • Fresh Fruit Salad:
    A medley of crisp, vibrant fruits introduces a refreshing bite, cutting through the richness of the cake and brightening each forkful.

  • Coffee or Tea:
    A warm cup perfectly enhances the spiced notes of the cake, providing a cozy finish and inviting conversation around the table.

  • Chocolate Drizzle:
    Drizzling melted chocolate over each slice adds a touch of decadence, amplifying the festive mood with its rich flavor.

  • Peppermint Hot Chocolate:
    This indulgent drink with a hint of mint complements the spices in the cake, creating a delightful holiday flavor explosion in every sip.

  • Gingerbread Cookies:
    For a festive touch, serve these alongside the cake to create a gingerbread dream come true, celebrating the season in every bite.

Delight in these pairings and create a memorable spread that showcases the heartwarming spirit of the holidays!

Spiced Gingerbread Wreath Cake Recipe FAQs

How do I select the right ingredients for my Spiced Gingerbread Wreath Cake?
Absolutely! When choosing your ingredients, opt for fresh, high-quality items. For the best flavor, look for dark molasses that’s rich and aromatic. If you’re using ground spices, check their freshness—spices lose potency over time, so consider buying whole spices and grinding them yourself for the brightest flavors. Your flour should be fresh too; staleness can affect the cake’s rise and texture.

What’s the best way to store leftover cake?
Very! To keep your Spiced Gingerbread Wreath Cake fresh, store it in an airtight container in the fridge for up to 3 days. You can also cover it tightly with plastic wrap if you don’t have a suitable container. This will maintain its moisture and flavor beautifully.

Can I freeze my Spiced Gingerbread Wreath Cake?
Absolutely! You can freeze your cake for up to 3 months. Just wrap individual slices tightly in plastic wrap and then place them in a freezer bag to prevent freezer burn. When you’re ready to enjoy a slice, thaw it in the fridge overnight. For an extra touch, warm the slice in the microwave for about 10-15 seconds to enhance that delightful gingerbread aroma!

What should I do if my cake doesn’t rise?
Oh no! If your Spiced Gingerbread Wreath Cake doesn’t rise, it could be due to old baking soda or improper mixing. Always check that your baking soda is fresh—if unsure, drop a little in vinegar to see if it fizzes. Also, ensure you’re not overmixing your batter; this can lead to a dense cake. Mix until just combined to preserve air bubbles for a fluffier texture.

Are there any dietary considerations for this recipe?
Certainly! If you have allergies, note that this recipe contains eggs and dairy. For a gluten-free version, simply replace all-purpose flour with a 1:1 gluten-free blend. Additionally, if you’re seeking dairy-free options, swap whole milk and unsalted butter for plant-based milk and coconut oil respectively. Always double-check the labels to avoid cross-contamination if you’re baking for someone with allergies.

Can I use other spices in this recipe?
Very much! Feel free to experiment! While the classic blend includes ground ginger, cinnamon, and nutmeg, adding allspice or cloves will give your Spiced Gingerbread Wreath Cake an exciting twist. Start by replacing or adding just a teaspoon or two, and taste the batter to find your perfect spice balance before baking!

Spiced Gingerbread Wreath Cake

Spiced Gingerbread Wreath Cake for a Festive Holiday Feast

This Spiced Gingerbread Wreath Cake is a delightful blend of comforting spices, perfect for holiday gatherings.
Prep Time 20 minutes
Cook Time 40 minutes
Cooling Time 10 minutes
Total Time 1 hour 10 minutes
Servings: 12 slices
Course: Dessert
Cuisine: American
Calories: 250

Ingredients
  

For the Cake
  • 2 cups all-purpose flour substitute with gluten-free flour for gluten-free version
  • 1 teaspoon baking soda no substitutions needed
  • 2 teaspoons ground ginger adjust if using fresh ginger
  • 1 teaspoon ground cinnamon no substitutions needed
  • 0.5 teaspoon ground nutmeg omit if unavailable
  • 0.5 teaspoon salt necessary for taste
  • 0.5 cups dark molasses can substitute with dark corn syrup or honey
  • 2 large eggs no substitutions advised
  • 0.5 cups granulated sugar can reduce for less sweetness
  • 0.5 cups brown sugar light brown sugar is suitable alternative
  • 0.5 cups whole milk substitute with plant-based milk for dairy-free
  • 0.5 cups unsalted butter can use coconut oil for dairy-free
  • 1 teaspoon vanilla extract no substitutions needed
For the Frosting
  • 1 cup heavy whipping cream can substitute with coconut cream for dairy-free frosting
  • 0.5 cups powdered sugar no substitutions necessary
For Decoration
  • rosemary sprigs perfect for decoration
  • star anise perfect for decoration
  • cinnamon sticks perfect for decoration

Equipment

  • Bundt pan
  • mixing bowls
  • Electric beaters

Method
 

Cake Preparation
  1. Preheat your oven to 350°F (175°C) and grease a Bundt pan with unsalted butter and flour.
  2. In a medium bowl, whisk together the dry ingredients: flour, baking soda, ground ginger, ground cinnamon, ground nutmeg, and salt.
  3. In a large mixing bowl, combine softened butter, granulated sugar, and brown sugar. Beat until creamy, then add eggs, molasses, milk, and vanilla extract.
  4. Gradually mix in the dry ingredients until a smooth batter forms. Avoid overmixing.
  5. Pour the batter into the prepared Bundt pan and bake for 35-40 minutes, or until a toothpick comes out clean.
  6. Cool the cake in the pan for 10 minutes before inverting onto a wire rack to cool completely.
  7. For the frosting, whip heavy cream with powdered sugar until soft peaks form.
  8. Once the cake is cooled, frost generously with whipped cream.
  9. Decorate with rosemary sprigs, star anise, and cinnamon sticks.
  10. Slice and serve to your guests.

Notes

Store in an airtight container for up to 3 days in the fridge or freeze for up to 3 months.

Christmas Gooey Butter Cookies: Soft, Chewy Holiday Treats

The kitchen filled with the sweet aroma of warmth takes me back to my childhood holiday memories. It’s during this magical time of year that I love sinking my teeth into a deliciously soft Christmas Gooey Butter Cookie. These delightful treats combine the rich creaminess of cream cheese with the ease of a simple cake mix, making them not only a staple for holiday cookie swaps but also an enticing crowd-pleaser. With minimal effort required for maximum joy, you can whip these cookies up in no time, fitting perfectly into even the busiest festive schedules. Imagine the delighted faces as you share these gooey delights, lightly dusted with powdered sugar like a festive snowfall. Ready to make your holiday cookie dreams come true? Let’s get baking!

Why are These Cookies So Irresistible?

Convenience: With just a few simple ingredients, including cake mix, you can have a batch of these festive cookies ready in no time. Unique Texture: They boast a soft, chewy center that melds beautifully with holiday sprinkles, offering a delightful treat for all ages. Versatile Variations: Feel free to swap the cake mix or add in your favorite mix-ins like chocolate chips or crushed candy canes! Crowd-Pleasing Appeal: Perfect for holiday gatherings, you’ll be the star of any cookie exchange. Plus, if you’re looking for more holiday baking inspiration, don’t miss out on our delicious Nutty Apricot Cookies or German Style Cookies.

Christmas Gooey Butter Cookies Ingredients

Get ready to bake these festive delights with ease!

For the Cookie Dough

  • Full-Fat Cream Cheese – Provides a rich, soft texture; be sure it’s softened for smooth mixing.
  • Unsalted Butter – Adds tenderness and flavor; softened butter blends better into the dough.
  • Large Egg – Binds the ingredients together; can be swapped for unsweetened applesauce for a vegan option.
  • Vanilla Extract – Enhances the cookie’s flavor; try peppermint extract for a holiday twist.
  • Yellow Cake Mix (15.25 oz) – The star ingredient for quick preparation; substitute with white or vanilla cake mix if desired.

For the Topping

  • Powdered Sugar – Used to roll the dough balls, giving them a signature look; sanding sugar makes a festive alternative.
  • Holiday Sprinkles – Adds vibrant decoration and holiday cheer; omit if you prefer a simpler look.

Whip up these Christmas Gooey Butter Cookies in no time, and watch as they become a new holiday favorite!

Step‑by‑Step Instructions for Christmas Gooey Butter Cookies

Step 1: Preheat the Oven
Begin by preheating your oven to 350°F (175°C). While the oven heats, line your baking sheets with parchment paper to ensure the Christmas Gooey Butter Cookies don’t stick. This preparation sets the stage for baking perfectly golden cookies that maintain their gooey center.

Step 2: Mix the Wet Ingredients
In a large mixing bowl, beat together 8 oz of softened full-fat cream cheese and ½ cup of softened unsalted butter until smooth and creamy. Add in 1 large egg and 1 teaspoon of vanilla extract, continuing to mix until all ingredients are well combined. The mixture should be fluffy and light, creating a rich base for your cookies.

Step 3: Incorporate the Cake Mix
Gradually stir in one 15.25 oz package of yellow cake mix until a thick, uniform dough forms. Mix with a spatula or a wooden spoon, as it’s important not to overmix at this stage. The dough will be slightly sticky, which is perfect for creating those deliciously gooey centers in your Christmas Gooey Butter Cookies.

Step 4: Add Holiday Cheer
Gently fold in ½ cup of holiday sprinkles into the dough to add a pop of color and festive flair. Be careful to mix just until the sprinkles are evenly distributed; overmixing can affect the lightness of the dough. Your cookie batter is now ready to chill!

Step 5: Chill the Dough
Cover the bowl with plastic wrap and refrigerate the dough for at least 30 minutes. Chilling is key, as it helps the dough firm up, making it easier to handle and preventing the cookies from spreading too much during baking. This little wait will pay off with perfectly shaped cookies!

Step 6: Shape the Cookies
Once chilled, use a cookie scoop or your hands to form balls of dough, about 1.5 inches in diameter. Roll each ball in powdered sugar until fully coated; this creates a lovely dusty finish that enhances the look of your Christmas Gooey Butter Cookies. The sugar will also help achieve that signature snow-like effect!

Step 7: Bake the Cookies
Place the dough balls on your prepared baking sheets, spaced 2 inches apart to allow for spreading. Bake in the preheated oven for 10-12 minutes, or until the edges are set and the centers are slightly soft. The cookies will have a lovely golden edge while remaining gooey in the center for that perfect holiday treat.

Step 8: Cool and Transfer
Remove the cookies from the oven and let them cool on the baking sheet for about 5 minutes. This cooling period helps them firm up slightly without losing their gooey texture. After a short rest, transfer them carefully to a wire rack to cool completely, preparing for a delightful taste of your Christmas Gooey Butter Cookies.

Christmas Gooey Butter Cookies Customization

Feel free to make these cookies uniquely yours with these delightful twists and substitutions!

  • Gluten-Free: Use a gluten-free cake mix to make the recipe suitable for gluten-sensitive guests. They’ll taste just as fabulous!
  • Dairy-Free: Substitute full-fat cream cheese and butter with dairy-free alternatives for a deliciously creamy version that everyone can enjoy.
  • Flavored Cake Mix: Swap the yellow cake mix for chocolate or strawberry for a fun flavor switch. The festive vibes are strong with these options!
  • Add-Ins: Mix in mini chocolate chips, crushed peppermint, or even nuts for added texture and flavor that enhance the cookie experience.
  • Color ‘Em Up: Use vibrant gel food coloring to tint your cookie dough. Surprise everyone with festive green or red cookies!
  • Powdered Sugar Alternatives: Roll the cookies in colored sanding sugar instead of powdered sugar for a dazzling, holiday shimmer.
  • Less Sweet: Cut down on the powdered sugar to make the cookies less sweet if you prefer a more balanced flavor.
  • Decorative Toppings: Drizzle melted chocolate over the cooled cookies for an extra touch of sweetness. Plus, it adds a beautiful finish!

Now that you’ve got these wonderful ideas, why not check out our Nutty Chocolate Date Cookies for a different kind of holiday magic!

Make Ahead Options

These Christmas Gooey Butter Cookies are perfect for busy holiday bakers looking to save time! You can prepare the dough up to 24 hours in advance by mixing all the ingredients up to the chilling step. Simply cover the bowl with plastic wrap and refrigerate it to maintain the dough’s freshness and quality. When you’re ready to bake, use the chilled dough to form the cookie balls and roll them in powdered sugar before placing them on your baking sheets. Bake according to the regular instructions for delightful, gooey cookies that taste just as fresh as if made that day. Save your precious time while still delivering those scrumptious, festive treats!

Storage Tips for Christmas Gooey Butter Cookies

Room Temperature: Store cookies in an airtight container at room temperature for up to 3 days to maintain their soft, chewy texture.

Fridge: If you prefer a cooler option, you can refrigerate the cookies for up to a week. Just ensure they are in an airtight container to prevent them from drying out.

Freezer: Freeze the unbaked cookie dough balls for up to 3 months. Roll them in powdered sugar before freezing for easy baking later. Thaw at room temperature before baking.

Reheating: To enjoy leftover cookies warm, reheat them in the microwave for about 10-15 seconds. This will help revive their gooey center, making your Christmas Gooey Butter Cookies even more delightful!

Expert Tips for Christmas Gooey Butter Cookies

  • Choose Cream Cheese Wisely: Always opt for block-style cream cheese for a rich texture. Tub cream cheese contains more moisture, which can lead to a soupy batter.

  • Monitor Baking Time: Slightly underbaking your cookies is key to that gooey center. Keep an eye on them; they should look set on the edges but soft in the middle.

  • Chill the Dough: Don’t skip the chilling step! This helps the dough firm up, ensuring your Christmas Gooey Butter Cookies hold their shape during baking.

  • Sprinkle with Care: When adding holiday sprinkles, fold them in gently. Overmixing can deflate the dough, affecting the cookie’s texture and appearance.

  • Experiment with Flavors: Feel free to swap the yellow cake mix with vanilla or white for different flavors. This adds a personal touch to your Christmas Gooey Butter Cookies!

What to Serve with Christmas Gooey Butter Cookies

The holiday spirit calls for a feast that delights the senses; these cookies are just the beginning of your festive spread!

  • Rich Hot Cocoa: A warm cup of cocoa enhances the cookie’s sweetness and creates a cozy pairing, perfect for the chilly season.

  • Creamy Vanilla Ice Cream: The cold, smooth texture complements the gooeyness of the cookies, creating a delightful contrast in every bite. Picture the rich cream melting into the sweet cookie for an indulgent treat!

  • Festive Fruit Salad: A vibrant mix of seasonal fruits adds a refreshing, tangy balance to the sweetness, making it a healthier sidekick to your indulgent cookies.

  • Warm Spiced Apple Cider: The aromatic spices in apple cider evoke holiday nostalgia, harmonizing beautifully with the cookie’s rich cream cheese flavor.

  • Chocolate Fudge Brownies: For the chocolate lovers in your life, brownies bring an extra layer of sweetness and richness, making your dessert table truly festive.

  • Pecan Pie Bars: The nutty caramel flavors in pecan pie bars resonate with the warm spices of the season, providing a delightful contrast to the soft, gooey texture of the cookies.

  • Sparkling Water or Lemonade: Light, uplifting beverages refresh the palate and balance the sweetness of the Christmas Gooey Butter Cookies.

  • Peppermint Bark: The cool, minty flavor of peppermint bark introduces a fun crunch and festive touch that pairs nicely with these soft cookies!

  • Holiday Cheesecake Bites: Creamy cheesecake bites add a surprising twist while keeping that festive spirit alive, offering a richer dessert experience.

These combinations will create a joyful atmosphere, inviting your loved ones to indulge and celebrate the season together!

Christmas Gooey Butter Cookies Recipe FAQs

What type of cream cheese should I use?
Always use block-style full-fat cream cheese for the best results. Tub cream cheese has more moisture and can lead to a soupy batter, affecting the texture of your Christmas Gooey Butter Cookies.

How should I store these cookies?
Store your Christmas Gooey Butter Cookies in an airtight container at room temperature for up to 3 days. If you’d like them to last longer, you can refrigerate them for up to a week, ensuring they stay moist and delicious.

Can I freeze the cookies?
Absolutely! You can freeze unbaked cookie dough balls for up to 3 months. Roll them in powdered sugar before freezing for easier baking later. When you’re ready to bake, just let them thaw at room temperature for about 15-20 minutes before placing them in the oven.

Why did my cookies spread too much during baking?
If your cookies spread too much, it’s often due to the dough being too warm. Always ensure to chill the dough for at least 30 minutes before baking, as this helps the cookies hold their shape better in the oven.

Are there any allergy considerations?
Yes! These Christmas Gooey Butter Cookies contain dairy and eggs, making them unsuitable for those with lactose intolerance or egg allergies. For a dairy-free option, consider substituting cream cheese with a dairy-free alternative, and replace the egg with unsweetened applesauce or a flax egg.

What can I use instead of yellow cake mix?
You can easily substitute yellow cake mix with vanilla or white cake mix for different flavors. Additionally, feel free to explore different mix-ins like mini chocolate chips or crushed candy canes to customize your cookies further!

Christmas Gooey Butter Cookies

Christmas Gooey Butter Cookies: Soft, Chewy Holiday Treats

Enjoy the deliciously soft Christmas Gooey Butter Cookies, a crowd-pleasing holiday treat with a gooey center.
Prep Time 30 minutes
Cook Time 12 minutes
Chilling Time 30 minutes
Total Time 1 hour 12 minutes
Servings: 24 cookies
Course: Dessert
Cuisine: American
Calories: 150

Ingredients
  

For the Cookie Dough
  • 8 oz Full-Fat Cream Cheese Softened
  • 0.5 cup Unsalted Butter Softened
  • 1 Large Egg Can swap for unsweetened applesauce
  • 1 tsp Vanilla Extract Or peppermint extract for a twist
  • 15.25 oz Yellow Cake Mix Can substitute with white or vanilla mix
For the Topping
  • 0.5 cup Powdered Sugar For rolling dough balls
  • 0.5 cup Holiday Sprinkles Optional

Equipment

  • mixing bowl
  • Cookie scoop
  • Baking sheets
  • parchment paper
  • Wire rack

Method
 

Step-by-Step Instructions
  1. Preheat your oven to 350°F (175°C) and line baking sheets with parchment paper.
  2. Beat together cream cheese and butter until smooth, then add egg and vanilla and mix until fluffy.
  3. Gradually stir in cake mix until a thick, uniform dough forms.
  4. Fold in holiday sprinkles gently until evenly distributed.
  5. Cover the bowl and refrigerate the dough for at least 30 minutes.
  6. Form dough balls about 1.5 inches in diameter and roll in powdered sugar.
  7. Place dough balls on baking sheets, spaced 2 inches apart, and bake for 10-12 minutes.
  8. Cool on baking sheets for 5 minutes before transferring to a wire rack to cool completely.

Notes

For best results, use block-style cream cheese and monitor baking time closely to maintain a gooey center. Don't skip chilling the dough to ensure cookies hold their shape.

Delicious Honey Pistachio Mooncakes for Easy Homemade Joy

The aroma of toasted pistachios mingled with the sweet hint of honey fills the air, instantly transporting me to the heart of a cozy kitchen during the Mid-Autumn Festival. These Honey Pistachio Mooncakes offer a simple twist on the classic treat, making homemade magic more attainable for everyone. Unlike their traditional counterparts, often burdened by complex fillings, this delectable version highlights the nutty crunch of pistachios while ensuring the preparation is a breeze. Plus, they’re adaptable for those seeking dairy-free and gluten-free options. Whether you’re preparing for a festive gathering or simply want a delightful afternoon snack, these mooncakes are sure to impress and satisfy. Are you ready to impress your loved ones with a flavorful creation that celebrates togetherness?

Why are these mooncakes so special?

Simplicity at its finest: This recipe streamlines the traditional mooncake process, making it approachable for everyone, from novice bakers to seasoned chefs.

Rich, Nutty Flavor: The roasted pistachios deliver a delightful crunch that pairs perfectly with the sweet warmth of honey, elevating every bite.

Versatile and Adaptable: With options for dairy-free and gluten-free diets, these mooncakes can cater to various preferences. If you’re curious about more ideas, check out my Honey Chili Chicken for another engaging meal!

Perfect for Celebrations: Whether for the Mid-Autumn Festival or just a cozy gathering, these mooncakes will impress your guests and create fond memories.

Quick and Easy: You’ll have these delicious treats ready in no time, letting you enjoy more moments with your loved ones.

Honey Pistachio Mooncake Ingredients

For the Dough
Neutral Cooking Oil – Provides moisture and helps with dough structure; substitute with any mild oil like canola or sunflower oil.
Honey – Acts as a sweetener for both dough and filling; you can also use maple syrup or agave nectar as substitutes.
Lye Water (optional) – Enhances color and texture of the mooncake skin; you can omit it if unavailable, as the honey makes the recipe less dependent on it.
Salt – Balances sweetness and enhances flavor; no substitutions needed.
Cake Flour – Essential for a tender texture in the dough; all-purpose flour can be used, but results may vary in texture.

For the Filling
Pistachios – The star ingredient that provides a nutty flavor and crunchy texture; can be substituted with other nuts like almonds or walnuts.
Glutinous Rice Flour – Adds chewiness to the filling; this ingredient is essential, and no direct substitutions are advised.
Granulated Sugar – Sweetens the filling, with brown sugar being a fine alternative for a deeper flavor.
Water – Helps bind the filling ingredients together; adjust as necessary for consistency.

For the Egg Wash
Egg Yolk and Water – Gives a golden color to the finished mooncakes; for a vegan option, use milk instead.

Step‑by‑Step Instructions for Honey Pistachio Mooncakes

Step 1: Prepare the Dough
In a large mixing bowl, combine 1/3 cup neutral cooking oil, 1/4 cup honey, 1 tablespoon of lye water (if using), and a pinch of salt. Whisk the ingredients until well blended. Gradually add 1 1/2 cups of cake flour and mix until a soft dough forms. Cover the bowl with plastic wrap and let it rest at room temperature for 1 to 2 hours to allow the flavors to meld and the dough to relax.

Step 2: Make the Filling
If desired, toast 1 cup of pistachios in a pan for about 5 minutes over medium heat until fragrant. In a separate bowl, chop the pistachios and mix them with 1 cup of glutinous rice flour, 1/4 cup of honey, 3 tablespoons of granulated sugar, and a pinch of salt. Slowly add water until the mixture is crumbly yet workable. This filling should hold together when squeezed, showcasing the key flavors in the Honey Pistachio Mooncakes.

Step 3: Form Mooncakes
Once the dough and filling have rested, divide the dough into equal portions, rolling each into a ball about the size of a golf ball. Take one piece of dough and flatten it with your palm; place a ball of filling in the center, gently folding the dough over it, and pinching the edges to seal it tightly. Repeat this process until all your mooncakes are formed, ensuring a smooth exterior for a delightful presentation.

Step 4: Mold and Bake
Dust a mooncake mold with flour to prevent sticking. Place your filled dough ball into the mold, pressing down firmly to shape it. Carefully remove the mooncake from the mold and arrange them on a baking sheet lined with parchment paper. Preheat your oven to 350°F (175°C) and bake the mooncakes for 10 minutes. Afterward, remove them and brush with an egg wash for a golden finish; bake for an additional 5 to 8 minutes until they reach a beautiful golden color.

Step 5: Cool and Age
Once baked to perfection, allow the Honey Pistachio Mooncakes to cool on a wire rack. After about 10 minutes, transfer them to an airtight container and let them rest for 2 to 3 days at room temperature. This aging process enhances the flavors and softens the texture, making each mooncake an unforgettable treat for your upcoming celebrations.

What to Serve with Honey Pistachio Mooncakes

Nothing sets the mood for a cozy gathering quite like delightful treats served with the perfect sides.

  • Freshly Brewed Green Tea: The subtle bitterness of green tea complements the sweetness of mooncakes, enhancing their rich flavors beautifully.
    With its calming properties, green tea not only refreshes but also elevates the experience.

  • Jasmine Rice Pudding: Creamy and fragrant, this dessert provides a lovely contrast to the nutty texture of the mooncakes, creating a delightful harmony.
    It’s rich yet light, making it an ideal companion for a festive table.

  • Seasonal Fruit Platter: A vibrant assortment of seasonal fruits like mango, lychee, and persimmon adds color and freshness, balancing the sweetness of the mooncakes.
    The natural juiciness revives the palate between bites, ensuring endless enjoyment.

  • Chrysanthemum Tea: This herbal tea’s floral notes echo the flavors in the mooncake and provide a soothing, aromatic experience.
    Perfect for sipping while sharing stories around the table, chrysanthemum tea brightens the mood.

  • Matcha Ice Cream: The grassy notes of matcha ice cream create a sophisticated pairing, introducing a creamy texture to contrast with the crunchy filling.
    A modern twist to traditional flavors, it simply delights the senses.

  • Almond Cookies: These buttery, crunchy cookies bring a nutty richness that pairs beautifully with the mooncakes.
    Enjoy them alongside the mooncakes for a diverse yet complementing dessert experience, making gatherings feel even more special.

  • Sweetened Red Bean Soup: This warm, sweet soup offers a comforting, gentle flavor to round off your meal while enhancing the traditional experience.
    The smoothness of the red beans complements the mooncake’s crunch, making it feel like home.

Make Ahead Options

These Honey Pistachio Mooncakes are perfect for busy home cooks looking to save time during the festive season! You can prepare the dough and filling up to 24 hours in advance. Simply mix and rest the dough as directed, then form the filling, ensuring it’s tightly sealed to maintain moisture. Store both components separately in airtight containers in the refrigerator. When you’re ready to enjoy your mooncakes, let them sit at room temperature for about 30 minutes before assembling and baking as per the recipe instructions. By prepping in advance, you’ll have scrumptious mooncakes ready to impress your guests with minimal last-minute effort!

Helpful Tricks for Honey Pistachio Mooncakes

  • Ingredient Precision: Use weight measurements instead of volume for flour and nuts. This ensures consistency in your Honey Pistachio Mooncakes and avoids heavy or too crumbly textures.

  • Dough Resting: Don’t skip the resting period! Allowing the dough to rest for 1-2 hours is crucial for a tender texture, making the dough easier to work with.

  • Fill Wisely: Avoid large chunks in your pistachio filling. Chopped pistachios should be fine enough for a smooth texture but still provide satisfying crunch.

  • Watch the Oven: Keep an eye on your mooncakes as they bake. Oven temperatures may vary, so adjust baking time accordingly to achieve that perfect golden brown color.

  • Aging for Flavor: Remember, patience is key! Letting your mooncakes sit for 2-3 days enhances the flavors and softens the skin, making for a delightful treat.

Variations & Substitutions for Honey Pistachio Mooncakes

Feel free to explore these delightful twists and personalized options to make your Honey Pistachio Mooncakes even more special!

  • Nut-Free: Use sunflower seeds or pumpkin seeds to create a similar crunch without the nuts.

  • Dairy-Free Delight: Swap the egg wash with a simple soy or almond milk wash for a beautiful golden finish.

  • Gluten-Free Goodness: Opt for gluten-free all-purpose flour instead of cake flour for a gluten-free version. The texture might be slightly different but still delicious!

  • Bold Flavors: Add spices like ground cardamom or ginger to the filling for an aromatic kick that pairs beautifully with the pistachios.

  • Sweet Swaps: Replace honey with maple syrup or coconut nectar for a different sweet profile; it’s delightful!

  • Flavor Fusion: Consider mixing in some cacao nibs with the pistachios for a surprising chocolate crunch. It’s a marvelous blend that will take your mooncakes to the next level!

  • Heat Things Up: For a spicy twist, add crushed red pepper flakes to your filling. A hint of heat balances perfectly with the sweetness.

In case you’re wondering about more culinary inspirations, why not try my Honey Garlic Slow for a delectable meal option? And who can resist some flavor-packed Honey Chili Chicken as well? Happy cooking!

Storage Tips for Honey Pistachio Mooncakes

Room Temperature: Store your Honey Pistachio Mooncakes in an airtight container at room temperature for up to 7 days to maintain their freshness and chewy texture.

Fridge: If you have extra mooncakes, refrigerate them for up to 2 weeks. Just remember to let them come to room temperature before serving for the best flavor and texture.

Freezer: For longer storage, freeze them in a single layer, then transfer to an airtight container or freezer bag for up to 3 months. Thaw in the fridge overnight before enjoying.

Reheating: If you like them warm, you can gently reheat mooncakes in a microwave for about 10-15 seconds or in the oven at 300°F (150°C) for a few minutes. This way, you’ll savor that delightful pistachio filling!

Honey Pistachio Mooncakes Recipe FAQs

What kind of pistachios should I use for the filling?
I recommend using roasted, unsalted pistachios for the best flavor and crunch. If you have salted ones, rinse them lightly to adjust the taste. Make sure the pistachios are finely chopped, as larger pieces can affect the smoothness of the filling.

How should I store my Honey Pistachio Mooncakes?
To maintain their sweetness and chewy texture, store your mooncakes in an airtight container at room temperature for up to 7 days. If you’d like to prolong their shelf life, you can refrigerate them, where they’ll last for about 2 weeks. Just be sure to let them warm up to room temperature before serving for the best experience!

Can I freeze Honey Pistachio Mooncakes?
Absolutely! For long-term storage, freeze your mooncakes in a single layer on a baking sheet first, then transfer them to an airtight container or freezer bag. They can last up to 3 months in the freezer. To enjoy them later, just thaw in the fridge overnight and warm them gently in a microwave or oven!

What should I do if my mooncake dough is too sticky?
If you find your dough too sticky to work with, sprinkle in a small amount of extra cake flour, a tablespoon at a time, until it reaches a manageable consistency. Remember that resting the dough will help too; a well-rested dough is crucial for achieving the right texture for your Honey Pistachio Mooncakes!

Are there any dietary considerations for these mooncakes?
Yes! This recipe is quite versatile. If you’re looking for dairy-free or gluten-free options, use gluten-free flour for the cake flour, and substitute honey with agave nectar for a vegan-friendly approach. Always double-check for allergies, especially with nuts like pistachios!

How long do I need to let the mooncakes rest after baking?
After baking, it’s essential to let your mooncakes cool for about 10 minutes before transferring them to a wire rack. For the best flavor and texture, allow them to rest in an airtight container for 2-3 days at room temperature. This aging process truly enhances their taste and softens the skin!

Honey Pistachio Mooncakes

Delicious Honey Pistachio Mooncakes for Easy Homemade Joy

Delight in these Honey Pistachio Mooncakes that offer a sweet twist on a classic treat, perfect for celebrations and adaptable for various diets.
Prep Time 2 hours
Cook Time 15 minutes
Cooling and Aging Time 3 days
Total Time 8 hours 45 minutes
Servings: 10 mooncakes
Course: Dessert
Cuisine: Asian
Calories: 200

Ingredients
  

For the Dough
  • 1/3 cup Neutral Cooking Oil Can substitute with canola or sunflower oil.
  • 1/4 cup Honey Maple syrup or agave nectar can be used as substitutes.
  • 1 tablespoon Lye Water Optional.
  • 1 pinch Salt No substitutions needed.
  • 1.5 cups Cake Flour All-purpose flour can be used, but texture may vary.
For the Filling
  • 1 cup Pistachios Can substitute with almonds or walnuts.
  • 1 cup Glutinous Rice Flour Essential, no direct substitutions advised.
  • 1/4 cup Granulated Sugar Brown sugar is a fine alternative.
  • Water Water Adjust as necessary for consistency.
For the Egg Wash
  • 1 Egg Yolk
  • 1 tablespoon Water Use milk for a vegan option.

Equipment

  • mixing bowl
  • Mooncake mold
  • baking sheet
  • parchment paper
  • whisk

Method
 

Prepare the Dough
  1. In a large mixing bowl, combine 1/3 cup neutral cooking oil, 1/4 cup honey, 1 tablespoon of lye water (if using), and a pinch of salt. Whisk until well blended. Gradually add 1.5 cups of cake flour and mix until a soft dough forms. Cover and let rest for 1 to 2 hours.
Make the Filling
  1. Toast 1 cup of pistachios in a pan for about 5 minutes until fragrant. Chop the pistachios and mix with 1 cup glutinous rice flour, 1/4 cup honey, 3 tablespoons granulated sugar, and a pinch of salt. Slowly add water until the mixture is crumbly yet workable.
Form Mooncakes
  1. Divide the dough into equal portions, rolling each into a ball. Take one piece and flatten it; place a ball of filling in the center, fold the dough over the filling, and pinch edges to seal. Repeat until all mooncakes are formed.
Mold and Bake
  1. Dust a mooncake mold with flour. Place filled dough into the mold, pressing down firmly. Preheat oven to 350°F (175°C) and bake for 10 minutes. Brush with egg wash and bake for an additional 5 to 8 minutes until golden.
Cool and Age
  1. Allow mooncakes to cool on a wire rack. After 10 minutes, transfer to an airtight container and let rest for 2 to 3 days at room temperature.

Notes

Use weight measurements for flour and nuts for consistency. Allow dough to rest for optimal texture and age mooncakes for enhanced flavors.