Wholesome Oatmeal and Fruit Delight

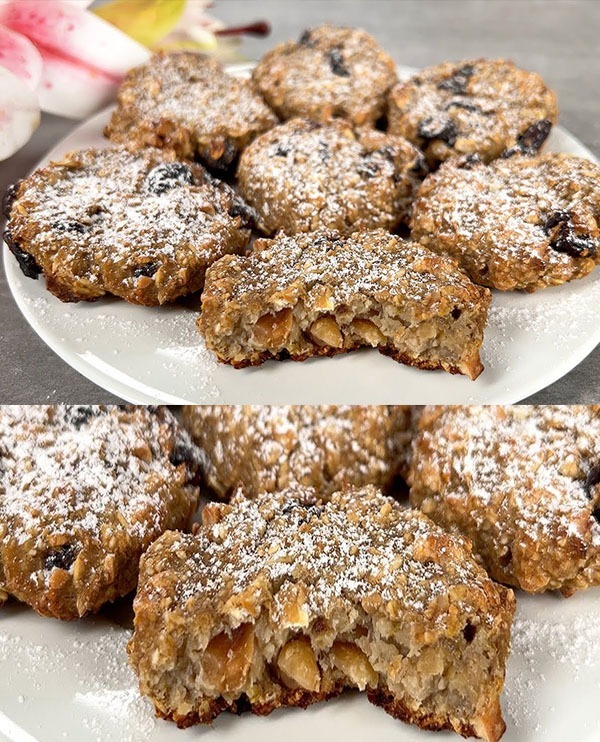
Dive into the world of healthy indulgence with this easy-to-make dessert that’s not only mouthwatering but also aids in your wellness journey. Gather your ingredients and get ready to treat yourself to a scrumptious and nutritious dessert that’s perfect for any day. Here’s how to make your very own Oatmeal and Fruit Delight:

Ingredients:

  • 1 cup of rolled oats
  • 1 tablespoon of natural vanilla extract
  • 30 grams of oat bran
  • 1 ripe banana
  • 1 fresh pear
  • 70 ml of purified water
  • 40 grams of mixed fresh berries (such as strawberries, blueberries, or raspberries)
  • 50 grams of raw peanuts

Instructions:

  1. Preparation: Preheat your oven to 180 degrees Celsius (356 degrees Fahrenheit) to ensure it’s ready for baking.
  2. Mix Dry Ingredients: In a large mixing bowl, combine the rolled oats and oat bran. Add the tablespoon of natural vanilla extract to infuse the oats with a sweet, aromatic flavor.
  3. Prepare the Fruit: Peel and slice the banana and pear into small pieces. This not only adds a natural sweetness to your dessert but also enriches it with vitamins and fiber.
  4. Combine: Add the sliced banana and pear to the oat mixture. Pour in the 70 ml of water to help combine all the ingredients. Gently fold in the mixed fresh berries for a burst of antioxidants and color.
  5. Add Nuts: Roughly chop the raw peanuts and stir them into the mixture for a satisfying crunch and a boost of protein.
  6. Bake: Transfer the mixture to a baking dish, spreading it evenly. Place in the preheated oven and bake for 25 minutes, or until the top is golden brown and the fruits have softened.
  7. Serve: Allow the baked delight to cool slightly before serving. This dish can be enjoyed warm or at room temperature, making it a versatile dessert for any occasion.

Enjoy your Oatmeal and Fruit Delight as a testament to the fact that eating healthy doesn’t mean compromising on taste. It’s a wonderful way to satisfy your sweet tooth while keeping your nutrition in check. Wishing you a delightful and healthful day ahead!

Fluffy Two-Ingredient Omelet

This simple yet delicious omelet recipe is perfect for those seeking a light and healthy meal without the use of fats, flour, or an oven. With only two primary ingredients, this dish is foolproof and guaranteed to be a hit every time. Ideal for breakfast, brunch, or a light dinner, this omelet is not only nutritious but also incredibly satisfying.

Ingredients:

  • 1 cup (approximately 250 ml) of liquid egg mixture, brought to room temperature
  • 1 cup (approximately 250 ml) of milk, also at room temperature
  • A pinch of salt for seasoning

Instructions:

  1. Preparation: Before you begin, ensure that both the liquid egg mixture and the milk are at room temperature. This is crucial for achieving the perfect texture in your omelet.
  2. Mix Ingredients: In a medium mixing bowl, combine the liquid egg mixture and milk. Add a pinch of salt to taste. Whisk the ingredients together until well combined and slightly frothy. This step is key to creating an airy and light omelet.
  3. Cooking the Omelet: a. Heat a non-stick skillet over medium heat. You can use a small pat of butter or a few drops of oil if desired, but this is optional. b. Once the skillet is warm, pour the egg and milk mixture into the skillet. The ideal pan size is around 12 cm in diameter for a thick and fluffy omelet, but you can adjust according to your preference. c. Let the mixture cook undisturbed for a few minutes until the edges start to set. With a spatula, gently lift the edges to allow any uncooked mixture to flow underneath. d. When the top of the omelet is nearly set, gently fold it in half or roll it, depending on your preference. Let it cook for another minute to ensure it is fully set.
  4. Serving: Carefully slide the omelet onto a plate. This dish is delightful on its own, or you can customize it with your favorite toppings such as fresh herbs, cheese, or a light sprinkle of pepper.

Enjoy this effortless yet luxurious two-ingredient omelet, perfect for a quick meal that doesn’t compromise on taste or texture!

Tuscan Chicken Recipe

Creating an enchanting Tuscan Chicken dish brings the rustic charm of Italy right to your dinner table, embodying the warmth and richness of Tuscan cuisine. This dish, characterized by tender chicken breasts nestled in a luscious sauce made with heavy cream, parmesan cheese, sun-dried tomatoes, spinach, and mushrooms, is more than just a meal; it’s a culinary journey to the heart of Tuscany. Whether you’re looking for a quick weeknight dinner that doesn’t compromise on flavor or an elegant dish to impress guests, this Tuscan Chicken recipe offers the perfect balance of simplicity and sophistication. Not only does it pay homage to the traditional flavors of the region, but it also lends itself to creativity, allowing you to add a personal touch to each plate. Prepare yourself for an unforgettable dining experience that celebrates the beauty of Italian cooking, with each bite transporting you to the rolling hills and vineyard-clad landscapes of Tuscany.

Ingredients:

  • 4 boneless, skinless chicken breasts
  • Salt and pepper, to taste
  • 2 tablespoons olive oil
  • 1 cup heavy cream
  • 1/2 cup chicken broth
  • 1 teaspoon garlic powder
  • 1 teaspoon Italian seasoning
  • 1/2 cup Parmesan cheese, grated
  • 1 cup spinach, roughly chopped
  • 1/2 cup sun-dried tomatoes, chopped
  • 1 cup mushrooms, sliced

Instructions:

  1. Preparation of Chicken:
    • Season the chicken breasts with salt and pepper.
    • In a large skillet, heat the olive oil over medium-high heat.
    • Add the chicken and cook until golden brown and cooked through, about 5-7 minutes per side.
    • Remove the chicken from the skillet and set aside.
  2. Creating the Sauce:
    • In the same skillet, add the heavy cream, chicken broth, garlic powder, and Italian seasoning.
    • Stir to combine and bring to a simmer.
    • Add the Parmesan cheese and stir until the cheese has melted and the sauce has thickened slightly, about 2-3 minutes.
  3. Adding Vegetables:
    • To the sauce, add the spinach, sun-dried tomatoes, and mushrooms.
    • Cook until the spinach has wilted and the vegetables are heated through, about 2-4 minutes.
  4. Combining Chicken with Sauce:
    • Return the chicken to the skillet and spoon some of the sauce and vegetables over the top.
    • Cook for an additional 2-3 minutes to ensure the chicken is heated through and coated in the sauce.
  5. Serving:
    • Serve the Tuscan Chicken hot, with extra Parmesan cheese sprinkled on top if desired. This dish pairs beautifully with a side of pasta, rice, or a simple green salad.

This alternative recipe captures the essence of Tuscan Chicken with a creamy sauce, parmesan, mushrooms, sun-dried tomatoes, and spinach, creating a dish that’s both easy to prepare and elegant enough for entertaining. Enjoy your cooking!

Crunchy Nut and Seed Cookies with Dried Plums

Dive into a world of delightful textures and flavors with our Crunchy Nut and Seed Cookies, featuring a unique combination of dried plums and a hearty mix of nuts and seeds. This recipe is a testament to how a few simple ingredients can create a batch of cookies that not only taste incredible but also offer a wholesome twist. Perfect for those afternoons when you crave something sweet yet nutritious, these cookies bring together the richness of nuts, the crunch of seeds, and the natural sweetness of dried plums in every bite. Whether you’re looking for a quick snack, a healthful treat, or a delicious way to satisfy your sweet tooth, these cookies are sure to impress. Let’s get baking and create something that’s as enjoyable to make as it is to eat!

Ingredients:

  • The white of one egg
  • A handful of sunflower seeds
  • A sprinkle of sesame seeds
  • A few almonds, chopped
  • A small amount of dried plums, chopped
  • A handful of peanuts, chopped

Directions:

  1. Preheat the Oven: Begin by setting your oven to preheat at 180°C (350°F), allowing it to warm up while you prepare the cookie mixture.
  2. Mix Dry Ingredients: In a large mixing bowl, combine the sunflower seeds, sesame seeds, chopped almonds, chopped dried plums, and chopped peanuts. Stir these ingredients together to distribute them evenly.
  3. Whip the Egg White: In a separate bowl, take the white of one egg and whip it until it reaches soft peaks. This will act as a natural binder for your cookies, adding lightness to the texture.
  4. Combine Wet and Dry Mixtures: Gently fold the whipped egg white into the bowl of dry ingredients, ensuring that the nuts and seeds are evenly coated. The mixture should start to stick together, forming a sticky dough.
  5. Shape the Cookies: Using a spoon or your hands, form small portions of the mixture into cookie shapes and place them on a baking sheet lined with parchment paper. Make sure to leave some space between each cookie, as they will spread slightly while baking.
  6. Bake: Place the baking sheet in the preheated oven and bake the cookies for about 12-15 minutes, or until they turn golden brown and crispy around the edges.
  7. Cool and Enjoy: Remove the cookies from the oven and allow them to cool on the baking sheet for a few minutes before transferring them to a wire rack to cool completely. The cookies will firm up as they cool, becoming delightfully crunchy.

These Crunchy Nut and Seed Cookies with Dried Plums are a fantastic way to enjoy a guilt-free treat that doesn’t compromise on flavor. Perfect for pairing with your afternoon tea or coffee, these cookies are sure to become a new favorite in your recipe collection.

Banana Oat Tiramisu – A Sugar-Free Delight

Embark on a culinary adventure that marries the classic elegance of Italian tiramisu with the wholesome goodness of oats and bananas in our innovative Banana Oat Tiramisu recipe. This delightful dessert transforms the traditional, offering a guilt-free version that doesn’t skimp on flavor or texture. Imagine layers of tender oats soaked in rich coffee, complemented by the natural sweetness of ripe bananas and a velvety blend of Greek yogurt and mascarpone, all dusted with a fine cocoa powder. It’s a sugar-free treat that promises indulgence without compromise.

Crafted for those who seek the joy of dessert while maintaining a health-conscious lifestyle, this recipe introduces a novel way to enjoy the essence of tiramisu. Whether you’re a devoted fan of the classic dessert or looking for a nutritious alternative to satisfy your sweet cravings, this Banana Oat Tiramisu is designed to delight your palate and elevate your dessert experience. Let’s dive into creating a dessert that’s as nourishing as it is luxurious, perfect for any occasion or simply as a treat to brighten your day.

Ingredients:

  • 1 ripe banana
  • 100 grams of rolled oats
  • 1 tablespoon of unsweetened cocoa powder, plus extra for garnishing
  • 1 teaspoon of instant coffee
  • 100 ml of warm water
  • 2 tablespoons of Greek yogurt
  • 2 tablespoons of mascarpone cheese

Instructions:

  1. Prepare the Coffee Mixture: Dissolve the instant coffee in 100 ml of warm water in a shallow dish. Allow it to cool slightly.
  2. Layer the Oats: In a serving glass or bowl, start by layering half of the rolled oats. Pour half of the coffee mixture over the oats to lightly soak them.
  3. Add Banana and Cocoa: Slice the banana thinly and place a layer over the oats. Sift a layer of unsweetened cocoa powder over the bananas.
  4. Mix Yogurt and Mascarpone: In a small bowl, blend the Greek yogurt and mascarpone cheese together until you achieve a smooth consistency.
  5. Create Layers: Over the cocoa powder, spread a layer of the yogurt and mascarpone mixture. Repeat the layering process with the remaining oats, another layer of sliced bananas, and the remaining coffee mixture.
  6. Top It Off: Finish off the tiramisu by adding another layer of the yogurt and mascarpone mix. For the final touch, sprinkle a generous amount of unsweetened cocoa powder on top.
  7. Chill: Refrigerate the tiramisu for at least an hour, allowing the flavors to meld and the oats to soften, enhancing the overall texture of the dessert.
  8. Serve: Enjoy this unique and healthy twist on the classic Italian dessert, perfect as a guilt-free treat any time of the day.

This Banana Oat Tiramisu offers a delightful sugar-free alternative to the traditional dessert, combining the comforting textures of oats with the rich flavors of coffee, cocoa, and creamy mascarpone. It’s a simple, no-bake dessert that’s not only easy to make but also satisfyingly nutritious.

Crispy Cheese and Chili French Fries

Get ready to elevate your snack game with our Crispy Cheese and Chili French Fries recipe! Perfect for those who love a good crunch with a hint of spice and the delightful taste of cheese, this recipe takes the classic french fry to a whole new level. By incorporating cheese powder and chili powder into the mix, we’re adding layers of flavor that will make your taste buds dance. This two-step frying process ensures that each fry is perfectly crispy on the outside while remaining soft on the inside. Whether you’re hosting a party, movie night, or just craving something savory, these french fries are sure to impress. Let’s dive into making these irresistible treats that are as fun to make as they are to eat!

Ingredients:

  • 500g of potatoes
  • 2 tablespoons of corn flour
  • 1 tablespoon of cheese powder
  • 1 teaspoon of chili powder

Instructions:

  1. Prep the Potatoes: Start by peeling and chopping your potatoes into thin strips. Aim for a consistent size to ensure even cooking.
  2. Boil Briefly: Bring a pot of water to a boil and add your potato strips. Let them boil for 3 minutes. This step starts the cooking process and ensures a soft interior.
  3. Cool Down: Immediately after boiling, transfer the potato strips to a bowl of cold water. This stops the cooking process and helps to crisp up the fries later.
  4. First Fry: Heat your cooking oil to 140°C in a deep fryer or a deep pan. Fry the potato strips in batches for 3 minutes. They won’t be fully cooked yet – this stage is just to start the crisping process.
  5. Cool Again: Remove the fries from the oil and let them cool completely. This rest period allows the interior to cook through without burning the outside.
  6. Second Fry: Once cooled, fry the potatoes again for another 3 minutes. This second dip in the hot oil will give you that golden, crispy exterior.
  7. Season: In a large bowl, mix the corn flour, cheese powder, and chili powder. Add the hot, freshly fried potatoes to the bowl and toss until they are well coated with the seasoning.

Serve your Crispy Cheese and Chili French Fries hot and crispy, with your favorite dipping sauce on the side. This recipe not only delivers on flavor but also brings a satisfying crunch that makes it impossible to have just one. Enjoy the perfect blend of spicy, cheesy, and crispy in each bite!

Classic Cream Puffs with Vanilla Cream Filling

Hello, sweet treat lovers! Today, we’re diving into the world of cream puffs, those delightful little pastries that look like clouds and taste like heaven. If you’ve ever thought making them at home was too complicated, think again! We’ve got an easy recipe that breaks down the process into simple steps. You’ll learn how to make a soft cookie topping, light and airy choux pastry, and a rich, creamy filling that’s just the right amount of sweet. Plus, we’ll share tips on how to keep your cream puffs crispy on the outside and creamy on the inside. Whether you’re a baking newbie or a seasoned pro, this recipe is perfect for adding a bit of sweetness to your day. So, let’s get started and make some delicious cream puffs together!

Ingredients:

For the Cookie Layer:

  • 33g unsalted butter, at room temperature
  • 40g sugar
  • 40g all-purpose flour

For the Choux Pastry:

  • 65g all-purpose flour
  • 65g milk
  • 65g water
  • 60g unsalted butter
  • 2g salt
  • 3 large eggs

For the Cream Filling:

  • 2 egg yolks
  • 35g sugar
  • 10g cornstarch
  • 200g milk
  • 1 tsp vanilla extract (optional)

For the Whipped Cream:

  • 170g heavy cream
  • 17g sugar

Instructions:

Cookie Layer:

  1. In a small bowl, cream together the room-temperature unsalted butter and sugar until light and fluffy. Gradually mix in the all-purpose flour until a soft dough forms. Set aside.

Choux Pastry:

  1. Preheat your oven to the temperature specified for choux pastry. In a medium saucepan, combine milk, water, unsalted butter, and salt. Bring to a boil over medium heat.
  2. Remove the pan from the heat and quickly stir in the all-purpose flour. Return to heat and stir continuously until the dough comes together and pulls away from the sides of the pan.
  3. Transfer the dough to a mixing bowl and let it cool slightly. Beat in the eggs, one at a time, until the mixture is smooth and glossy.
  4. Pipe or spoon the dough onto a baking sheet, leaving enough space between each for expansion.

Cream Filling:

  1. In a saucepan, whisk together egg yolks, sugar, and cornstarch. Gradually whisk in the milk and cook over medium heat, stirring constantly, until the mixture thickens.
  2. Remove from heat, stir in vanilla extract (if using), and let the cream cool completely. In a separate bowl, whip the heavy cream and sugar until stiff peaks form. Gently fold the whipped cream into the cooled cream mixture.

Assembly:

  1. Once the choux pastries are baked and cooled, cut them in half or make a small hole at the bottom. Carefully pipe the cream filling into each pastry.
  2. To maintain the crispness of the choux, fill them with the cream filling just before serving.

Tips:

  • To ensure the choux pastry remains crisp, avoid opening the oven door during baking as this can cause them to collapse.
  • The cream puffs are best enjoyed fresh. If you need to store them, keep the unfilled pastries in an airtight container and the cream filling in the refrigerator, filling them just before you’re ready to serve.

Enjoy these delightful cream puffs, a perfect blend of airy choux pastry and luscious vanilla cream filling, ideal for impressing guests or treating yourself to a sophisticated dessert.

Tuna & Potato Pancakes

Welcome to a recipe that marries simplicity with deliciousness – our Savory Tuna & Potato Patties. This dish is a testament to the magic of combining humble ingredients to create something incredibly satisfying and full of flavor. Whether you’re looking for a new twist on comfort food, a nutritious meal option, or just a way to jazz up your weekly menu, these patties are sure to impress. Made with the hearty goodness of potatoes, the rich taste of tuna, and a hint of fresh parsley and onions, each patty crisps up to golden perfection, offering a delightful crunch with every bite. Ideal for any time of the day, these versatile patties can be served as a hearty breakfast, a light lunch, or a satisfying dinner, making them a true crowd-pleaser. Let’s dive into making these easy-to-prepare, deliciously savory patties that promise to be a hit with family and friends alike!

Ingredients:

  • 2 large potatoes, peeled and grated
  • 1 can of tuna, drained and flaked
  • 2 eggs, beaten
  • 1 small onion, finely chopped
  • A handful of fresh parsley, chopped
  • Salt and pepper, to taste
  • Olive oil, for frying

Instructions:

  1. Prepare the Potato Mixture: Take the grated potatoes and squeeze out as much excess moisture as you can. This step is crucial for getting a nice, crispy pancake.
  2. Mix Ingredients: In a large bowl, combine the grated potatoes, flaked tuna, beaten eggs, finely chopped onion, and chopped parsley. Season with salt and pepper to your liking. Stir everything together until well combined.
  3. Form Patties: With clean hands, take portions of the mixture and form them into patties. If the mixture is too wet, you can add a little flour to help bind it together.
  4. Heat the Pan: Place a large frying pan over medium heat and add a generous amount of olive oil. Wait until the oil is hot, but not smoking.
  5. Cook the Patties: Place the patties in the pan, but don’t overcrowd it. Cook for about 4-5 minutes on each side or until they are golden brown and crispy.
  6. Drain and Serve: Once cooked, transfer the patties to a paper towel-lined plate to drain any excess oil. Serve warm, perhaps with a side of fresh salad or your favorite dipping sauce.

These Tuna & Potato Patties are a delightful twist on traditional pancakes, offering a savory, nutritious option for any meal of the day. The combination of hearty potato and flavorful tuna, along with the freshness of parsley and onions, creates a versatile dish that’s both satisfying and easy to make. Enjoy it as a main dish, a snack, or pack it for a picnic or lunchbox treat!

Zucchini and Potato Fritters with Cheesy Mozzarella

Dive into the world of comfort food with a healthy twist! Our Savory Vegetable Fritters with Cheesy Mozzarella are the perfect recipe for those days when you’re craving something warm, crispy, and utterly satisfying. Made with a blend of fresh zucchini, potato, and carrot, these fritters are not only packed with nutrients but also full of flavor, thanks to the addition of aromatic herbs and spices. The surprise element? A generous amount of melted mozzarella cheese within each fritter that takes them from simple to simply irresistible. Paired with a creamy garlic-parsley sauce for dipping, this dish is a fantastic way to enjoy your vegetables, whether as a delightful starter, a light lunch, or a side dish that steals the show. Let’s get grating and frying to create a meal that’s as fun to make as it is to eat!

Ingredients for Fritters:

  • 1 medium zucchini
  • 1 large potato
  • 2 large eggs
  • A handful of fresh parsley, finely chopped
  • 1 medium carrot
  • 1 clove of garlic, minced
  • 1/2 teaspoon smoked paprika
  • A pinch of black pepper
  • 1/2 teaspoon Herbes de Provence
  • 7 tablespoons of all-purpose flour
  • 4.2 ounces (approximately 1 cup) of mozzarella cheese, shredded
  • Salt to taste
  • Vegetable oil for frying

Ingredients for Creamy Garlic-Parsley Sauce:

  • 2 tablespoons of sour cream
  • 2 tablespoons of mayonnaise
  • A few sprigs of fresh parsley, finely chopped
  • 1 teaspoon of dried garlic powder

Instructions:

  1. Prepare the Vegetables: Grate the zucchini, potato, and carrot into a large mixing bowl. Use a clean kitchen towel to squeeze out excess moisture from the grated zucchini and potato. This will help the fritters become crispy when cooked.
  2. Mix Fritter Ingredients: To the bowl of grated vegetables, add the minced garlic, chopped parsley, eggs, smoked paprika, black pepper, Herbes de Provence, flour, and shredded mozzarella cheese. Season with salt to taste. Stir the mixture until well combined.
  3. Heat the Pan: Place a frying pan over medium heat and add a generous amount of vegetable oil for frying.
  4. Cook the Fritters: Once the oil is hot, scoop portions of the vegetable mixture into the pan. Flatten them slightly to form patties. Fry each side until golden brown and crispy, about 3-4 minutes per side. Remove the fritters and drain on paper towels to remove excess oil.
  5. Prepare the Sauce: In a small bowl, combine the sour cream, mayonnaise, chopped parsley, and dried garlic powder. Mix well until smooth.
  6. Serve: Serve the warm zucchini and potato fritters with the creamy garlic-parsley sauce on the side.

Enjoy this deliciously crispy and cheesy treat as a delightful snack, appetizer, or even a light main course. The combination of vegetables and mozzarella creates a flavorful experience, while the creamy garlic-parsley sauce adds the perfect finishing touch to these savory fritters.

Crunchy Cucumber and Egg Salad

Dive into a dish that’s as delightful to the senses as it is to your health with our Refreshing Crunchy Cucumber and Egg Salad! This recipe brings together the crisp freshness of cucumbers, the sweetness of carrots and apples, and the savory satisfaction of hard-boiled eggs, all tossed with a creamy mayonnaise dressing. It’s a salad that stands out with its array of textures and flavors, from the juicy crunch of fresh produce to the rich, comforting bites of egg. Perfect for those days when you crave something light yet fulfilling, this salad is your go-to for a quick lunch, a side dish, or a healthy snack. Let’s mix up something that’s not only easy to make but also incredibly rewarding to eat!

Ingredients:

  • 2 cucumbers
  • 2 carrots
  • 1 red apple
  • 1 onion
  • 1/4 cup of raisins
  • 7 hard-boiled eggs
  • Mayonnaise to taste

Instructions:

  1. Prepare the Vegetables and Fruit: Begin by washing the cucumbers, carrots, and red apple. Peel the carrots. For a burst of color and texture, dice the cucumbers and carrots into bite-sized pieces. Core the apple and chop it into similar-sized pieces as the vegetables. Finely chop the onion for a bit of sharpness in every bite.
  2. Boil and Chop the Eggs: Place the eggs in a pot of water, bring to a boil, and cook until hard-boiled, about 9-10 minutes. Once cooled, peel the eggs and chop them into chunks. The eggs will add a rich, creamy texture to the salad.
  3. Combine Ingredients: In a large mixing bowl, combine the chopped cucumbers, carrots, apple, onion, and raisins. The raisins will add a sweet contrast to the crunchy vegetables and tangy apple.
  4. Add Eggs and Mayonnaise: Add the chopped eggs to the bowl with the vegetables and fruit. Add mayonnaise according to your preference; use enough to lightly coat the ingredients without overwhelming them. Gently mix everything together until well combined.
  5. Chill and Serve: For the best flavor, let the salad chill in the refrigerator for at least an hour before serving. This allows the flavors to meld together beautifully.

This Crunchy Cucumber and Egg Salad is a refreshing and satisfying dish, perfect for picnics, potlucks, or a light lunch. The combination of fresh, crisp vegetables and fruit with the creaminess of boiled eggs and mayonnaise makes for a delightful contrast of textures and flavors that everyone is sure to enjoy.