Trio of Slimming Vegetable Soups

Welcome to a world of tasty and healthy eating! If you’re looking for a yummy way to eat more veggies and maybe even lose some weight, you’re in the right place. I’ve got three super easy vegetable soup recipes that are perfect for any time. They’re so good, you’ll want to eat them all day and night! Whether you love potatoes, broccoli, or pumpkin, there’s a soup here for you. These soups are not just delicious; they’re also packed with good stuff that can help you feel great. So, let’s get cooking and make some soup that’s good for the body and the soul!

Potato Soup

Ingredients:

  • Potatoes, peeled and diced
  • 1 Onion, chopped
  • 2 cloves Garlic, minced
  • 4 cups Vegetable Broth
  • 1 cup Milk
  • Salt and Pepper, to taste
  • Chives, chopped, for garnish

Instructions:

  1. In a large pot, sauté onion and garlic until translucent.
  2. Add potatoes and vegetable broth, bringing to a boil. Simmer until potatoes are tender.
  3. Blend the soup until smooth, then stir in milk. Season with salt and pepper.
  4. Serve hot, garnished with chives.

Broccoli Soup

Ingredients:

  • Broccoli, chopped
  • 1 Onion, chopped
  • 2 cloves Garlic, minced
  • 4 cups Vegetable Broth
  • 1 cup Milk
  • Salt and Pepper, to taste
  • Nutmeg, a pinch

Instructions:

  1. Sauté onion and garlic in a pot until soft.
  2. Add broccoli and vegetable broth. Cook until broccoli is tender.
  3. Puree the soup in a blender. Return to the pot and mix in milk.
  4. Season with salt, pepper, and a pinch of nutmeg.
  5. Heat through and serve warm.
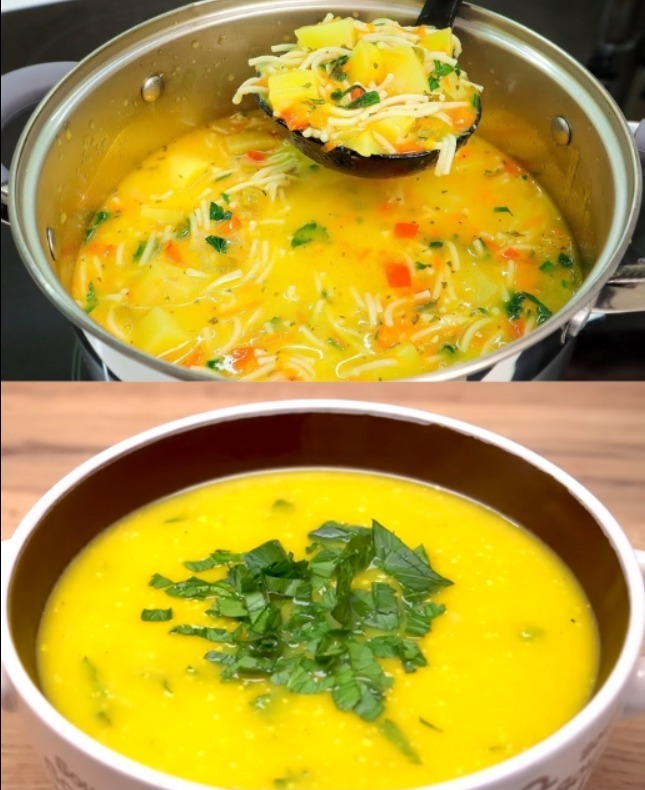
Pumpkin Soup

Ingredients:

  • Pumpkin, peeled and cubed
  • 1 Onion, chopped
  • 2 cloves Garlic, minced
  • 4 cups Vegetable Broth
  • 1 cup Coconut Milk
  • 2 tablespoons Maple Syrup
  • Cinnamon, a dash
  • Nutmeg, a dash
  • Salt and Pepper, to taste

Instructions:

  1. In a large pot, cook onion and garlic until they begin to soften.
  2. Add pumpkin, vegetable broth, cinnamon, and nutmeg. Simmer until pumpkin is soft.
  3. Blend the mixture until smooth. Stir in coconut milk and maple syrup.
  4. Season with salt and pepper, then warm the soup before serving.

These vegetable soup recipes are not just a pathway to weight loss but also a celebration of simple, wholesome ingredients. Each soup offers a unique blend of flavors and health benefits, making them ideal for anyone looking to enjoy a nutritious and delicious meal. Enjoy these soups day or night, and embrace a lighter, healthier you.

Zucchini and Cheese Focaccia: The No-Knead Wonder

Discover the magic of baking with this Zucchini and Cheese Focaccia recipe, a dish that has captivated everyone with its simplicity and mouthwatering flavors. Perfect for those seeking a hassle-free approach to homemade bread, this recipe requires no kneading and keeps your kitchen mess-free. Ideal for a comforting lunch or dinner, this soft, stuffed focaccia is as delightful to make as it is to eat. Let’s dive into creating this easy, yet impressive dish.

Ingredients:

  • Zucchini: Thinly sliced, enough to cover the focaccia
  • Cheese: Your choice (mozzarella, cheddar, or a mix), grated
  • Focaccia Dough: Use a store-bought mix or a simple homemade blend of flour, water, yeast, and olive oil
  • Olive Oil: For drizzling
  • Salt and Pepper: To taste
  • Herbs: Such as rosemary or thyme, for garnish

Instructions:

  1. Prepare the Focaccia Base:
    • If using a homemade dough, mix your focaccia ingredients (flour, water, yeast, and olive oil) in a bowl until combined. There’s no need to knead; just ensure everything is well mixed. For a store-bought mix, follow the package instructions.
  2. Assemble the Focaccia:
    • Lightly oil a baking tray and spread the dough evenly with a spatula or the back of a spoon. Arrange the thinly sliced zucchini over the dough, creating an even layer. Sprinkle generously with grated cheese, and season with salt and pepper.
  3. Add Flavor:
    • Drizzle olive oil over the top and add your choice of herbs for an aromatic touch. This will not only add flavor but also ensure a golden, crispy crust.
  4. Bake to Perfection:
    • Preheat your oven as directed by your dough recipe or mix (usually around 200°C or 400°F). Bake the focaccia until the cheese is bubbly and golden, and the crust is crisp, about 20-25 minutes.
  5. Serve and Enjoy:
    • Let the focaccia cool slightly before cutting into squares or strips. Serve warm for a soft, cheesy, and utterly satisfying meal.

This Zucchini and Cheese Focaccia is a testament to the beauty of simple ingredients coming together to create something extraordinary. With no kneading required and minimal cleanup, it’s the perfect recipe for any home cook looking to impress without the stress. Enjoy the ease of preparation and the joy of sharing this delicious, soft focaccia with friends and family.

Energizing No-Bake Seed and Nut Bars

Dive into the world of healthy snacking with these Energizing No-Bake Seed and Nut Bars. Crafted without sugar, eggs, or gluten, this super energy dessert is the perfect daily snack to boost your vitality. Combining the crunchiness of seeds and nuts with the richness of dark chocolate, these bars are not only nutritious but irresistibly delicious. Let’s get started on these easy-to-make treats that require no baking at all.

Ingredients:

  • Sunflower Seeds: 200g (7 oz), for a nutty flavor and crunch
  • Peanuts: 150g (5.2 oz), roughly chopped for texture
  • Sesame Seeds: 2 tablespoons, adding a subtle crunch
  • Salt: A pinch, to enhance the flavors
  • Honey: 2 teaspoons, for natural sweetness
  • Dark Chocolate (Sugar-Free): 60g (2 oz), melted, for a rich coating

Instructions:

  1. Mix the Dry Ingredients:
    • In a large mixing bowl, combine the sunflower seeds, chopped peanuts, sesame seeds, and a pinch of salt. Mix these ingredients well to ensure an even distribution of flavors.
  2. Bind with Honey:
    • Add the honey to the seed and nut mixture. Stir thoroughly until all the ingredients are well coated and start to stick together. The honey acts as a natural sweetener and binder for the bars.
  3. Shape the Bars:
    • Line a tray or baking dish with parchment paper. Transfer the mixture to the prepared dish, pressing it firmly into an even layer. You can use the back of a spoon or your hands to compact the mixture, which will help the bars hold their shape.
  4. Chill to Set:
    • Place the tray in the refrigerator for at least 1 hour to allow the bars to set and harden. This chilling time is crucial for the bars to become firm enough to cut.
  5. Coat with Chocolate:
    • Once the bars have set, gently melt the dark chocolate in a double boiler or microwave, stirring until smooth. Drizzle or spread the melted chocolate over the top of the set mixture for a decadent finish.
  6. Slice and Serve:
    • After the chocolate has hardened, remove the mixture from the tray and cut it into bars or squares. The size and shape of the bars are up to your preference.
  7. Enjoy:
    • Your Energizing No-Bake Seed and Nut Bars are ready to be enjoyed. Store any leftovers in an airtight container in the refrigerator to keep them fresh.

These bars are a testament to how simple ingredients can be transformed into a powerful snack. Whether you’re in need of a midday pick-me-up or a healthy dessert option, these no-bake bars are sure to satisfy your cravings and boost your energy levels. Enjoy the wholesome goodness packed in every bite!

Ultimate Stuffed Chicken Breast: A Restaurant Secret

Unlock the secret to the most flavorful chicken breast you’ve ever tasted with this recipe, discovered in a restaurant and now brought to your kitchen. This dish elevates the humble chicken breast to new heights with a vibrant stuffing and a rich tomato sauce, all under a blanket of melted cheddar cheese. Let’s embark on this culinary adventure and create a dish that’s sure to impress.

Ingredients for the Chicken:

  • Chicken Breasts: 3 pieces (approximately 900g), butterflied
  • Onion: 1, finely chopped
  • Parsley: A handful, chopped
  • Green Pepper: 1, finely chopped
  • Red Pepper: 1, finely chopped
  • Garlic Cloves: 3, minced
  • Ground Pepper: To taste
  • Black Pepper: To taste
  • Cumin: To taste
  • Mint: To taste
  • Salt: To taste
  • Olive Oil: 1 tablespoon (10ml)

Ingredients for the Filling:

  • Potatoes: 4, boiled and mashed
  • Grated Cheddar Cheese: 50g
  • Salt, Pepper, and Mint: To season the mashed potatoes

Ingredients for the Sauce:

  • Tomato Paste: 1 tablespoon
  • Water: 1 glass (200ml)

For the Topping:

  • Grated Cheddar Cheese: Enough to cover the chicken breasts

Instructions:

  1. Prep the Chicken:
    • Preheat your oven to 220°C (428°F). Take the butterflied chicken breasts and season them with salt, black pepper, cumin, mint, ground pepper, and a drizzle of olive oil. Add in the chopped onions, parsley, green and red peppers, and minced garlic. Mix well to ensure the chicken is fully coated with the seasonings.
  2. Prepare the Filling:
    • Combine the mashed potatoes with grated cheddar cheese, salt, pepper, and mint. Adjust the seasoning to your taste. This creamy mixture will be the heart of your stuffed chicken breasts.
  3. Stuff and Cook:
    • Lay the seasoned chicken breasts flat and spoon a generous amount of the potato filling onto each one. Carefully roll up the chicken breasts to enclose the filling and secure with toothpicks if necessary.
    • Place the stuffed chicken breasts in a baking dish. Mix the tomato paste with water and pour this sauce around the chicken in the dish.
    • Bake in the preheated oven for 45 minutes.
  4. Add Cheese and Finish Cooking:
    • After 45 minutes, take the chicken out of the oven and sprinkle a generous amount of grated cheddar cheese over the top of each breast.
    • Return to the oven and bake for an additional 15 minutes, or until the cheese is melted and bubbly.
  5. Serve Warm:
    • Let the chicken rest for a few minutes after taking it out of the oven. Serve warm, with the tomato sauce spooned over or alongside for extra flavor.

This Ultimate Stuffed Chicken Breast recipe combines tender chicken, a flavorful filling, and a rich sauce, all topped with melted cheese for a truly decadent meal. Whether for a special occasion or a satisfying family dinner, this dish is sure to become a favorite. Enjoy the layers of flavor and texture that make this chicken breast unforgettable.

Savory Potato and Onion Pancakes with Cheese

Discover the delightful flavors of potatoes and onions transformed into savory pancakes, a dish so satisfying it’ll make you question why it took so long to find this recipe. Enhanced with the meltiness of mozzarella and the freshness of ripe tomatoes and dill, these pancakes are a testament to the simple yet profound pleasures of vegetarian cooking. Let’s dive into creating this comforting meal that’s perfect for any time of the day.

Ingredients:

  • Onion: 1 large, grated
  • Eggs: 3
  • Potatoes: 4 medium, grated
  • Salt: To taste
  • Black Pepper: To taste
  • Flour: 4 tablespoons
  • Ripe Tomatoes: 6 small, sliced
  • Dill: A few sprigs, chopped
  • Mozzarella Cheese: 150g, shredded
  • Olive Oil: For frying

Instructions:

  1. Prepare the Batter:
    • In a large mixing bowl, combine the grated onion and potatoes. Add the eggs, salt, pepper, and flour to the mixture. Stir well until all ingredients are thoroughly mixed and the batter has a consistent texture.
  2. Cook the Pancakes:
    • Heat a generous amount of olive oil in a non-stick skillet over medium heat. Once hot, ladle in the batter to form medium-sized pancakes. Flatten them slightly with the back of the ladle for even cooking.
    • Fry each pancake for about 2 minutes on each side, or until they are golden brown and crispy. Repeat with the remaining batter, adding more oil to the skillet as needed.
  3. Prepare the Filling:
    • While the pancakes are cooking, slice the tomatoes and chop the dill. Set aside. Shred the mozzarella cheese if not already done.
  4. Assemble the Pancakes:
    • Once all the pancakes are cooked, divide the filling ingredients into four equal parts. On each pancake, layer the sliced tomatoes and sprinkle with chopped dill and shredded mozzarella cheese.
  5. Bake:
    • Preheat your oven to 200°C (400°F). Transfer the assembled pancakes to a baking dish. If desired, sprinkle additional cheese on top for extra cheesiness.
    • Bake in the preheated oven for about 15 minutes, or until the cheese is melted and bubbly.
  6. Serve Warm:
    • Remove the pancakes from the oven and let them cool slightly before serving. Enjoy these savory pancakes warm, with a side salad or your favorite dipping sauce.

This recipe not only showcases the humble potato in a new light but also creates a dish that’s both nourishing and comforting. Perfect for a cozy dinner or a satisfying brunch, these savory potato and onion pancakes with cheese are sure to become a new favorite in your culinary repertoire.

Milk Cream and Strawberry Jelly Roll Cake

Embark on a baking journey with this exquisite Milk Cream and Strawberry Jelly Roll Cake, where the richness of milk cream beautifully complements the lightness of fruit jelly. Wrapped in a soft and airy vanilla sponge, this cake is a delightful blend of flavors and textures, perfect for any occasion that calls for something special. Let’s dive into the recipe and create a masterpiece that’s as pleasing to the eye as it is to the palate.

Ingredients for the Cake:

  • Eggs: 4 large
  • Granulated Sugar: 100g (1/2 cup)
  • Vanilla Extract: 1 teaspoon
  • All-Purpose Flour: 100g (3/4 cup)
  • Baking Powder: 1 teaspoon
  • Salt: 1/4 teaspoon
  • Powdered Sugar: For dusting

Instructions:

  1. Preheat and Prepare:
    • Begin by preheating your oven to 180°C (356°F). Line a jelly roll pan or a similar shallow baking tray with parchment paper, ensuring it’s well-greased to prevent sticking.
  2. Whisk the Eggs:
    • In a large mixing bowl, beat the eggs with the granulated sugar until the mixture is pale, fluffy, and has doubled in volume. This process may take about 5-7 minutes with an electric mixer on high speed. Add the vanilla extract and mix until just combined.
  3. Combine Dry Ingredients:
    • Sift together the all-purpose flour, baking powder, and salt. Gently fold this into the egg mixture using a spatula, being careful not to deflate the batter. The goal is to maintain as much air as possible for a light and fluffy cake.
  4. Bake the Cake:
    • Pour the batter into the prepared pan, spreading it evenly with a spatula. Bake in the preheated oven for 10-12 minutes, or until the cake is lightly golden and springs back when touched.
  5. Roll and Cool:
    • Dust a clean kitchen towel with powdered sugar. Once the cake is done, immediately turn it out onto the towel. Peel off the parchment paper, then gently roll the cake up with the towel from one short end to the other. Let it cool completely in this rolled-up position.
  6. Prepare the Filling:
    • While the cake is cooling, prepare your milk cream and strawberry jelly as per your favorite recipe or package instructions. The milk cream should be whipped until smooth and creamy, and the jelly should be set but spreadable.
  7. Assemble the Cake:
    • Carefully unroll the cooled cake. Spread a layer of milk cream over the cake, followed by a layer of strawberry jelly. Roll the cake back up, this time without the towel.
  8. Chill and Serve:
    • Wrap the cake roll in plastic wrap and refrigerate for at least an hour to set. Before serving, dust with additional powdered sugar for a beautiful finish.

This Milk Cream and Strawberry Jelly Roll Cake is a testament to the beauty of combining simple ingredients to create a dessert that’s both elegant and delicious. Enjoy the process of making this delightful treat and the joy it brings to those who taste it.

Quick No-Bake Chocolate Biscuit Cake with Icing

Dive into the world of effortless baking with this No-Bake Chocolate Biscuit Cake, a dessert so simple yet so indulgent that it’s guaranteed to impress your family and friends. Whether you’re a novice in the kitchen or simply short on time, this recipe promises a delectable chocolate treat without the need for an oven. Let’s whip up this delightful dessert that’s perfect for any occasion.

Ingredients for the Cake:

  • Biscuits: 600g, crushed into small pieces
  • Sugar: 120g
  • Cocoa Powder: 60g, for that rich chocolate flavor
  • Milk: 250ml
  • Butter: 60g, melted
  • Vanilla: A pinch, for a hint of warmth and flavor

Instructions:

  1. Prepare the Biscuit Mixture:
    • In a large mixing bowl, combine the crushed biscuits with cocoa powder and a pinch of vanilla. Mix these dry ingredients until well combined.
  2. Cook the Sugar Syrup:
    • In a saucepan over medium heat, combine the sugar and milk. Stir continuously until the sugar is completely dissolved and the mixture is just about to boil. Remove from heat and add the melted butter, mixing well until the butter is fully incorporated into the syrup.
  3. Combine and Set:
    • Pour the warm sugar syrup over the biscuit and cocoa mixture. Stir everything together until the biscuits are evenly coated with the chocolate syrup.
    • Transfer the mixture into a cake mold or a lined dish. Press down firmly with the back of a spoon or your hands to compact the mixture into a solid, cake-like form.
  4. Chill:
    • Place the cake in the refrigerator to set for at least 1 hour, or until firm.
  5. Serve and Enjoy:
    • Once set, remove the cake from the mold. Slice and serve as is, or with a dollop of whipped cream or a sprinkle of powdered sugar for an extra touch of sweetness.

This No-Bake Chocolate Biscuit Cake is a testament to the magic of simple ingredients coming together to create something truly special. With no baking required, it’s the perfect last-minute dessert for when you need something sweet and satisfying with minimal effort. Enjoy the rich, chocolatey goodness with every bite!

Simple Chocolate, Nuts, and Oats Bars

Dive into the delightful world of homemade snack bars with this easy-to-follow recipe that combines the rich flavors of chocolate, the crunchiness of nuts, and the wholesomeness of oats. These bars are a hit every time, disappearing before you know it! Perfect for a quick snack or a healthy treat, let’s get started on these irresistible bars.

Ingredients:

  • Chocolate (No Added Sugar): 120g, roughly chopped
  • Oat Flakes: 100g
  • Walnuts: 80g, roughly chopped
  • Dates: 8, pitted and chopped
  • Olive Oil: 2 tablespoons
  • Honey: 2 tablespoons
  • Unsweetened Cocoa Powder: 1 teaspoon

Instructions:

  1. Prepare the Mixture:
    • In a food processor, combine the chopped dates, oat flakes, walnuts, and unsweetened cocoa powder. Pulse until the mixture is coarsely ground and starts to come together.
  2. Melt the Chocolate:
    • Place the chopped chocolate in a heatproof bowl over a pot of simmering water (double boiler method) or melt it in the microwave in 30-second intervals, stirring in between until smooth.
  3. Combine Ingredients:
    • Add the melted chocolate, olive oil, and honey to the oat mixture in the food processor. Pulse a few more times until the mixture is well combined and sticks together when pressed.
  4. Shape the Bars:
    • Line a baking tray or dish with parchment paper. Transfer the mixture to the prepared tray, pressing it down firmly into an even layer. You can use the back of a spoon or your hands to make sure it’s compact.
  5. Chill and Set:
    • Place the tray in the refrigerator for at least an hour, or until the mixture is firm and set.
  6. Cut and Serve:
    • Once set, lift the mixture out of the tray using the edges of the parchment paper. Place it on a cutting board and cut into bars or squares.
  7. Enjoy:
    • Your homemade chocolate, nuts, and oats bars are ready to be enjoyed! Store any leftovers in an airtight container in the refrigerator.

These simple yet delicious bars are the perfect way to satisfy your sweet tooth while indulging in a healthier treat. The combination of chocolate, nuts, and oats not only makes these bars incredibly tasty but also provides a good source of energy and nutrients. Enjoy making and sharing these delightful treats!

Savory Zucchini and Potato mini Pancakes with Suluguni Cheese

Discover the rich flavors and wholesome goodness of these savory pancakes, where zucchini shines as the star ingredient, proving it can indeed be tastier than meat. Paired with the heartiness of potatoes, the sweetness of carrots, and the distinctive taste of Suluguni cheese, this recipe is a celebration of simple, healthy ingredients coming together to create something incredibly delicious. Let’s dive into making these delightful pancakes.

Ingredients:

  • Zucchini: 1, grated
  • Potatoes: 2, grated
  • Carrot: 1, grated
  • Suluguni Cheese: 100g, grated
  • Spring Onion: A handful, finely chopped
  • Eggs: 2
  • Salt: To taste
  • Black Pepper: To taste
  • Garlic: 1 clove, minced
  • Semolina: 2 tablespoons

Instructions:

  1. Prepare the Vegetables:
    • Wash the zucchini, potatoes, and carrot thoroughly. Grate them into a large mixing bowl. To help remove excess moisture, especially from the zucchini and potatoes, squeeze the grated mixture using your hands or a clean kitchen towel.
  2. Combine Ingredients:
    • To the grated vegetables, add the grated Suluguni cheese, finely chopped spring onion, and minced garlic. Crack the eggs into the bowl, sprinkle in the semolina, and season with salt and black pepper to taste. Mix well until all ingredients are evenly distributed.
  3. Form and Cook the Pancakes:
    • Heat a non-stick skillet over medium heat and lightly oil the surface. Scoop a portion of the mixture onto the skillet, flattening it into a pancake shape with the back of your spoon. Cook until the underside is golden brown, then flip to cook the other side. Repeat with the remaining mixture.
  4. Serving:
    • Serve the pancakes hot, either as a standalone dish or accompanied by a fresh salad or your favorite dipping sauce. They make for a satisfying meal any time of the day.

These zucchini and potato pancakes are not just a testament to the versatility of vegetables but also a way to enjoy a meal that’s both nutritious and packed with flavor. The addition of Suluguni cheese adds a delightful creaminess and depth to the pancakes, making them a hit among both adults and children alike. Enjoy the process of creating this dish and the wonderful flavors it brings to your table.

Apple Oatmeal Delight Cookies

Embark on a culinary adventure with these Apple Oatmeal Delight Cookies, a recipe that promises a taste unlike any other. Perfectly blending the wholesome goodness of oatmeal with the natural sweetness of apples, these cookies are a delightful treat for any time of the day. Let’s dive into the recipe that’s sure to become a new favorite in your home.

Ingredients for Approximately 10 Cookies (About 420g):

  • Oatmeal: 110g
  • Butter: 60g, softened
  • Egg: 1, large
  • Sugar: 50g
  • Apple: 1, finely diced
  • Flour: 50g
  • Orange: Zest of 1 orange, for a citrusy twist
  • Baking Powder: 1 teaspoon
  • Vanilla Sugar: 1 teaspoon
  • Raisins and Nuts: 1 tablespoon each, or to taste (optional for added texture and flavor)

Instructions:

  1. Preheat and Prep:
    • Begin by preheating your oven to 180°C (356°F). Line a baking sheet with parchment paper to prevent sticking.
  2. Mix the Dry Ingredients:
    • In a large mixing bowl, combine the oatmeal, flour, baking powder, and vanilla sugar. Stir these dry ingredients together to ensure even distribution.
  3. Combine Wet Ingredients:
    • In a separate bowl, cream together the softened butter and sugar until the mixture is light and fluffy. Beat in the egg until well incorporated. Stir in the zest of one orange for a refreshing citrus note.
  4. Add the Apple:
    • Fold the finely diced apple into the wet mixture, ensuring the pieces are evenly distributed throughout.
  5. Combine Wet and Dry Mixtures:
    • Gradually add the dry oatmeal mixture to the wet ingredients, mixing gently until a cohesive dough forms. If desired, stir in the raisins and nuts at this stage for extra texture and flavor.
  6. Shape and Bake:
    • Using a spoon or your hands, form the dough into small balls and place them on the prepared baking sheet. Flatten each ball slightly with the back of a spoon or your fingers.
    • Bake in the preheated oven for about 15-20 minutes, or until the cookies are golden brown around the edges.
  7. Cool and Enjoy:
    • Allow the cookies to cool on the baking sheet for a few minutes before transferring them to a wire rack to cool completely.
    • Enjoy the delightful combination of oatmeal, apple, and orange zest in these uniquely delicious cookies.

These Apple Oatmeal Delight Cookies are not just a treat to your taste buds but also a healthier alternative to traditional cookie recipes. Whether you’re enjoying them with a cup of tea or as a snack on the go, they’re sure to bring a smile to your face with every bite.