I still remember the day I hit a wall with sugar. I had just come home from a long, exhausting day and opened the pantry, eyes scanning for something sweet—something comforting. A familiar tug pulled me toward the usual: cookies, store-bought granola bars, or some kind of chocolate that promised relief. But that day was different. That day, I hesitated.
I had been trying for months to take care of myself—cleaner meals, more movement, less stress. But the sugar cravings would creep in like shadows just before sunset, catching me when my willpower was weakest. Every time I gave in, I felt a fleeting high, followed by that all-too-familiar crash. The cycle felt unbreakable, and I began to question if I would ever have a healthy relationship with sweet things.
That night, I promised myself I would find a better way. Not a compromise, but a true alternative—a dessert I could eat every day without guilt, without weight gain, and without feeling like I was missing out. What I discovered wasn’t just a recipe. It was freedom. A naturally sweet, rich, satisfying bite made from whole ingredients, free of sugar, oil, milk, or yogurt—yet indulgent enough to feel like a treat.
This recipe isn’t just something I make—it’s something that changed how I think about food, balance, and pleasure.
The Clean Indulgence Philosophy
Let’s be honest: we’ve been conditioned to believe that dessert equals “cheat.” In many diet cultures, sweetness is a forbidden pleasure—something to be earned or punished. But that narrative is tired. It doesn’t serve us anymore.
This dessert defies that logic. It’s sweetened only with nature’s candy—dates—and balanced with fiber, protein, and healthy fats from whole food sources like almond flour and coconut. The absence of sugar, oil, milk, and yogurt isn’t a limitation—it’s a liberation. By stripping away processed ingredients, we’re left with a dessert that’s nourishing, energizing, and safe for daily enjoyment.
This is the kind of treat you can eat at 3 PM without the sugar crash. It’s the kind of bite you sneak after dinner without remorse. And for anyone trying to adopt a cleaner diet, manage blood sugar, or simply stop the binge-restrict cycle, it’s a game changer.
Ingredients
Ingredient
Quantity
Description
Medjool dates
1 cup (about 10)
Pitted; naturally sweet and sticky
Unsweetened shredded coconut
1/2 cup
Adds texture and healthy fats
Almond flour
1/2 cup
Gives structure and a subtle nutty flavor
Chia seeds (optional)
1 tablespoon
For fiber, texture, and nutritional boost
Ground cinnamon
1 teaspoon
Adds warmth and depth
Vanilla extract (optional)
1/2 teaspoon
Enhances natural flavor
Sea salt
A pinch
Balances and elevates the sweetness
Water
2 to 3 tablespoons
Helps with blending if needed
Directions
Prepare the Dates If your dates are firm or dry, soak them in warm water for about 10 minutes. Drain well before using.
Make the Dough In a food processor, combine the dates, almond flour, shredded coconut, cinnamon, vanilla extract (if using), and sea salt. Blend until a sticky dough forms. Add water one tablespoon at a time if the mixture is too dry.
Add Chia Seeds (Optional) Pulse in chia seeds briefly for extra fiber and texture.
Shape the Bites Roll the dough into bite-sized balls or press it into a lined dish and cut into bars.
Chill and Store Refrigerate for at least 30 minutes to firm up. Store in an airtight container in the fridge for up to one week.
Nutritional Information (Per Serving – One Bite)
Nutrient
Amount
Calories
Approximately 90 kcal
Protein
1.5 grams
Fat
4.5 grams
Carbohydrates
11 grams
Fiber
2.2 grams
Natural Sugars
7 grams
Added Sugar
0 grams
Why This Dessert Works: The Power of Each Ingredient
This isn’t just a mix-and-mash of healthy-sounding foods. Each ingredient was chosen with purpose—and that’s why this recipe works not only in flavor and texture, but also in function.
Dates: These are the soul of the recipe. They bring natural sweetness, sticky texture for binding, and a dose of fiber and potassium. They’re low on the glycemic index compared to refined sugar, meaning they provide steady energy without spikes.
Almond Flour: Soft, nutty, and naturally gluten-free, almond flour gives the dessert structure. It also adds healthy fats, vitamin E, and protein to keep you fuller longer.
Unsweetened Shredded Coconut: Light, flaky, and subtly sweet, coconut adds texture and depth. It’s a source of MCTs (medium-chain triglycerides), which have been linked to energy support and fat metabolism.
Chia Seeds (Optional): These tiny powerhouses are rich in fiber, omega-3s, and protein. They help absorb moisture and improve texture while offering digestive support.
Cinnamon and Vanilla: Not just for flavor—these two play an important sensory role. Cinnamon may help regulate blood sugar, while vanilla enhances natural sweetness without adding calories.
Water and Salt: Just enough to help blend and enhance taste without interfering with the clean profile.
Health Benefits That Go Beyond the Plate
Blood Sugar Stability
Unlike traditional desserts, which often spike insulin and lead to energy crashes, this dessert offers sustained energy. Dates, though sweet, are paired with fiber, protein, and fat, which slow digestion and stabilize blood sugar.
Gut-Friendly
The fiber from dates, chia seeds, and coconut helps promote healthy digestion and a happy gut microbiome. If you’re someone who experiences bloating or irregular digestion from sugary or dairy-laden desserts, this is a soothing alternative.
Weight Management Support
This treat is calorie-conscious but nutrient-dense. It satisfies cravings quickly thanks to its richness and fiber content. Most people find they’re satisfied with one or two bites—not because they’re forcing restraint, but because their bodies feel nourished.
Allergy and Intolerance-Friendly
No gluten, no dairy, no added sugar—this recipe is a safe haven for those with food sensitivities or autoimmune concerns. It’s also naturally vegan and paleo-friendly.
Frequently Asked Questions (FAQs)
Can I use other dried fruits instead of dates?
Dates are ideal because of their sticky texture and rich sweetness, but you can substitute with dried figs or raisins. Just note that the texture and flavor will change slightly, and you may need to adjust water levels to ensure it binds properly.
How should I store these?
These bites can be stored in an airtight container in the refrigerator for up to one week. For longer storage, freeze them for up to 2 months. They thaw quickly and taste just as fresh.
Are they safe for kids?
Absolutely. This recipe contains no refined sugar, artificial sweeteners, or allergens like dairy or gluten. It’s a great lunchbox addition or after-school snack for kids.
Can I add protein powder?
Yes. You can replace a portion of the almond flour with your favorite plant-based or whey protein powder. Just ensure the powder doesn’t contain added sugars or artificial ingredients to keep the recipe clean.
What if I don’t have a food processor?
A strong blender can work, though it may require more frequent scraping and small batch blending. If neither is available, try using date paste and mix by hand with the dry ingredients.
How many bites does this recipe make?
Depending on the size of each ball or bar, you’ll get around 12 to 15 servings. They’re rich and satisfying, so one or two pieces typically do the trick.
Is this dessert good for people with diabetes?
Always consult a healthcare professional, but generally speaking, the fiber and fat content in this dessert helps moderate the body’s glycemic response. It’s a better option than processed sweets, but portion control is still key.
Can I use this as a pre- or post-workout snack?
Definitely. The natural sugars in dates provide quick energy, while the fats and protein in almond flour and chia seeds offer sustained fuel. It’s a great bite before or after physical activity.
When Food Becomes a Form of Self-Respect
There’s something deeply healing about creating food that loves you back. In a world saturated with artificial sweeteners, crash diets, and constant calorie counting, this dessert feels like a quiet revolution. It’s not just a recipe—it’s a reminder that sweetness can exist in our lives without shame.
Making these treats has become a ritual in my own kitchen. Every time I roll the dough into little bites, I remember that first night of frustration and determination. I remember how small shifts—like choosing whole food ingredients—can have big emotional impact. And I remember that the best desserts aren’t the ones that leave us feeling bloated and guilty. They’re the ones that nourish us from the inside out.
Conclusion: Redefining Dessert for Good
The beauty of this daily dessert isn’t just in its flavor or nutrition profile—it’s in its simplicity and purpose. It invites us to enjoy sweetness on our own terms, without the baggage of restriction or regret.
So whether you’re on a journey toward cleaner eating, managing health conditions, or simply craving a treat that doesn’t fight your goals, this recipe belongs in your life. It’s more than a dessert—it’s a quiet act of self-care.
Make it once, and you’ll see. Make it often, and it just might change how you think about dessert forever.
There are certain days that seem to blur together—grocery bags in one hand, emails piling up, dinner half-planned. It was on one of those days that I realized I’d forgotten the bread. Again.
Too tired to head back out, too uninspired to start a complicated recipe, I opened my pantry hoping for a miracle. And there they were: water, flour, yeast, olive oil, salt, sugar. The usual suspects.
I remembered reading about a no-knead bread recipe that required nothing more than stirring and resting. I gave it a shot, unsure of what to expect. To my surprise, the dough came together effortlessly. It rose beautifully. It baked into something that looked—and smelled—like real bread. But the true magic happened when I sliced into it.
It was soft. Light. Warm. Slightly chewy with a golden crust. I slathered it with olive oil, handed a piece to my child, and we both looked at each other in disbelief.
Since that day, I haven’t bought bread.
The Easiest Bread You’ll Ever Make
This recipe isn’t revolutionary—it’s restorative. It reminds you that bread doesn’t have to be complicated. You don’t need eggs. You don’t need butter. You don’t even need to knead. All you need is a bowl, a spoon, and about an hour of rise time.
It’s a reminder that cooking can be gentle, forgiving, and wildly satisfying. It’s bread for people who think they’re too busy, too tired, or too intimidated to bake.
And it’s become one of the most reliable, affordable, and beloved recipes in my home.
What Makes This Bread Special?
1. No Kneading, No Problem
Traditional bread recipes rely on kneading to build gluten and give the bread structure. This dough, however, is soft and sticky enough that time does the work for you. As it rests, gluten strands form naturally, developing texture without any effort on your part.
The result? A surprisingly airy, tender crumb that rivals any bakery loaf—with none of the elbow grease.
2. No Eggs or Butter
This bread is naturally vegan and completely dairy-free. It gets its moisture and richness from olive oil, which not only keeps the loaf soft but also infuses it with a subtle depth of flavor.
Without eggs or butter, the recipe becomes both accessible and incredibly cost-effective—perfect for anyone on a budget, dealing with allergies, or simply aiming to simplify their pantry staples.
3. Pantry-Only Ingredients
There are no specialty flours or additives here. This is everyday bread made with everyday ingredients. It’s the kind of recipe that always feels close at hand, like a quiet comfort waiting on the shelf.
Ingredients Table
Ingredient
Quantity
Notes
Water
200 ml (0.85 cup)
Lukewarm, helps activate yeast
Sugar
25 g (2 tbsp)
Feeds the yeast, adds subtle flavor
Yeast
3 g (1 tsp)
Instant or active dry
Bread/Wheat flour
300 g (2 cups)
Preferably bread or all-purpose
Salt
3 g (1/2 tsp)
Balances flavor
Olive oil
20 g (2 tbsp)
Adds moisture and depth
Directions
Mix the Base In a mixing bowl, combine the lukewarm water, sugar, and yeast. Stir and let sit for 5 minutes until bubbles form.
Add Dry Ingredients Add flour and salt into the mixture. Stir until a sticky, shaggy dough forms. No kneading required.
Add Olive Oil Pour in the olive oil and mix it through the dough. Cover the bowl with a cloth or plastic wrap.
Let It Rise Let the dough rest at room temperature for 1 hour, or until doubled in size.
Prepare to Bake Preheat your oven to 190°C (375°F). Grease a small loaf pan or line it with parchment paper.
Transfer & Rest Again Gently transfer the dough to the prepared pan. Let it rest uncovered for 10–15 minutes while the oven finishes heating.
Bake Bake for 25–30 minutes, or until golden brown on top and hollow-sounding when tapped.
Cool & Serve Let the bread cool on a rack for at least 15 minutes before slicing.
Nutritional Information (Per Slice – Approx. 1 of 10)
Nutrient
Amount (Approx.)
Calories
145 kcal
Protein
4 g
Carbohydrates
25 g
Sugars
2.5 g
Fat
3.5 g
Fiber
1.2 g
Sodium
120 mg
A Reliable Recipe for Real Life
The best thing about this bread is how seamlessly it fits into daily routines. You don’t have to schedule your day around it. You don’t even need much space. Just mix, rest, and bake.
It’s the perfect loaf to make when you’re multitasking—checking emails, folding laundry, helping with homework. It doesn’t demand your full attention, but it rewards you with something wholesome and grounding at the end.
It’s also versatile. You can eat it fresh, toast it for breakfast, use it for sandwiches, or tear it apart for dipping into soup or olive oil. Once you get the hang of the base dough, you can build on it with herbs, seeds, or spices for variety.
Serving Suggestions
Here are some of our favorite ways to enjoy this bread once it’s cooled and sliced:
Toasted with olive oil and garlic for a quick bruschetta base
Topped with mashed avocado or hummus for a hearty plant-based snack
Dipped into lentil soup, tomato stew, or a bowl of spiced chickpeas
Grilled with cheese and tomato for a minimalist grilled sandwich
Torn into pieces and used for a rustic bread salad or stuffing
Because the loaf is so neutral and flexible, it can swing savory or sweet with ease. Spread it with peanut butter and honey or a thick slice of feta with a drizzle of lemon. It’s your canvas.
Frequently Asked Questions (FAQs)
How is it different from other homemade bread?
Most bread recipes require either kneading or long fermentation. This one skips both. It’s made for real life—fast, forgiving, and foolproof. And without butter, eggs, or dairy, it’s lighter but still deliciously soft.
Do I need any special equipment?
Not at all. No mixer. No bread machine. Just a bowl, a spoon, a measuring cup, and an oven. You can even mix the dough with your hands if you want a more tactile experience.
Can I use whole wheat flour?
You can, but not as a full replacement. Try substituting up to 30% of the flour with whole wheat for added fiber and a nutty flavor. Keep the rest all-purpose or bread flour to maintain softness.
Can I add herbs, seeds, or other mix-ins?
Absolutely. This recipe is a perfect base. Add rosemary, garlic powder, or dried oregano for an herby loaf. Mix in sesame or sunflower seeds for texture. You can even fold in chopped olives or caramelized onions for something more gourmet.
How long does it last?
Stored in an airtight container or wrapped in foil, the bread stays fresh for 2–3 days at room temperature. You can also refrigerate it for up to 5 days or freeze it (sliced or whole) for up to 2 months.
Is it suitable for people with dietary restrictions?
Yes! This bread is:
Vegan
Egg-free
Dairy-free
Nut-free
Budget-friendly
Just be sure to check your flour and oil for any additives if cooking for someone with severe allergies.
Can kids help make it?
They can—and they should! It’s one of the best starter recipes for kids in the kitchen. Since there’s no kneading or complex shaping, children can help stir, pour, and even transfer the dough to the pan. Watching the dough rise is also a wonderful science lesson in action.
Can I double the recipe?
Yes. This recipe scales beautifully. Simply double all the ingredients and divide the dough between two loaf pans or bake as one large round on a baking sheet.
Why This Bread Belongs in Every Home Baker’s Repertoire
Baking bread at home can feel intimidating. So many rules. So many steps. But this recipe strips away the noise and brings you back to what matters: flour, water, yeast, salt, and time.
It’s not artisan in the way that some sourdoughs are. It’s not crusty like a French baguette. But it’s comforting, simple, and real. It’s bread that doesn’t try to impress—but somehow does anyway.
It reminds us that food can be both easy and rewarding. That there’s power in mastering something so foundational. And that, even on the busiest days, there’s time to make something beautiful from scratch.
Conclusion: A Slice of Simplicity in a Complicated World
In a world full of complexity, this recipe offers relief. It’s gentle. It’s affordable. It’s satisfying. And it proves that the best things in the kitchen are often the simplest.
This no-knead, no-egg, no-butter bread has become a staple in my home—not because it’s fancy, but because it works. Because it makes mornings feel warmer and dinners feel fuller. Because it smells like home.
And once you make it, I think you’ll feel the same.
Let it be your go-to recipe. Let it surprise you. Let it feed more than just your hunger.
I remember the first time I made chicken broth from scratch. Not from a box. Not from a cube. Just a single chicken leg, a few vegetables, and a bit of time.
It was the kind of day where everything felt heavy—the kind where your body is tired and your mind needs something quiet. I didn’t have the energy for a complicated meal, but I wanted something real. Something warm. Something that made the house smell like comfort.
I pulled out what I had: an onion, a few carrots, garlic, some herbs. I filled the pot, placed in a chicken leg, and let it simmer. That’s all. No fancy techniques. No long ingredient list. Just heat, water, and a little patience.
What came out of that pot surprised me. It was rich, golden, and full of flavor—more than any store-bought broth I had ever tasted. The aroma wrapped around the kitchen like a wool blanket. The taste reminded me of family dinners, slow Sundays, and the simple act of taking care of yourself.
Since that day, I’ve made this broth hundreds of times. And each time, it feels like pressing pause on a busy world.
Why This Broth Stands Out
Chicken broth has long been a culinary cornerstone—foundational, versatile, and deeply nourishing. But not all broths are created equal. The difference between a homemade broth and a packaged one is night and day. It’s not just about taste. It’s about texture, depth, and a kind of quiet satisfaction that can’t be replicated in a factory.
This recipe is designed to be minimal, approachable, and deeply flavorful, using just one piece of chicken and a rainbow of simple vegetables. It’s a broth that’s good enough to sip on its own and strong enough to build a soup around.
Ingredients Table
Ingredient
Quantity
Notes
Chicken leg
1 piece
Skin-on for richer flavor
Hot water
150 ml (2/3 cup)
For initial simmering
Onion, finely chopped
1 medium
Adds depth and sweetness
Garlic, minced
3 cloves
Adds aroma and immune-boosting benefits
Kohlrabi, diced
1
Earthy and slightly sweet
Carrots, diced
4
Adds color and natural sweetness
Leek, sliced
1
Use white and light green parts
Bell peppers, diced
2
Any color; brings sweetness and body
Celery root, diced
1
Hearty and aromatic
Celery stalks, chopped
2
Classic broth flavor
Parsley, chopped
2 tablespoons
Stirred in at the end for freshness
Salt
80 g (about 1/3 cup)
Adjust to taste
Directions
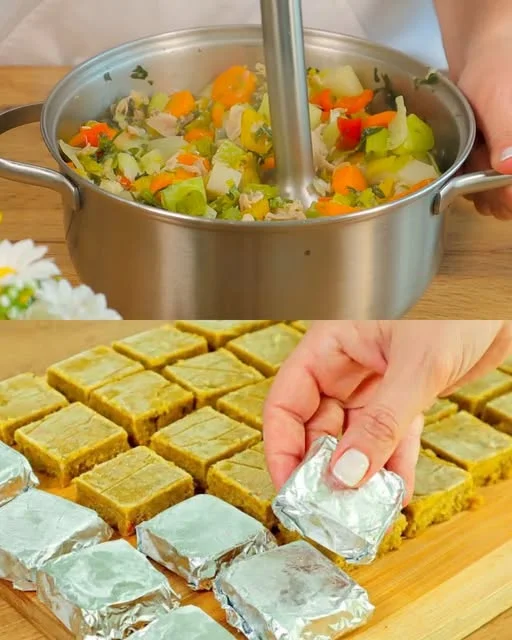
Prepare the Base Place the chicken leg in a large pot with the hot water. Bring to a simmer over medium heat. Skim off any foam that rises to the top.
Add Vegetables Add all the chopped vegetables (onion, garlic, carrots, celery, leek, bell peppers, kohlrabi, and celery root) to the pot.
Simmer Slowly Cover and simmer gently over low heat for 45–60 minutes, or until the vegetables are soft and the chicken is fully cooked and tender.
Season and Finish Add salt to taste and stir in the chopped parsley. Remove the chicken leg, shred the meat (if desired), and return it to the broth or reserve it for another use.
Serve or Store Serve hot as is, or strain to use the broth as a base for other soups and recipes. Store in the refrigerator for up to 4 days, or freeze for up to 3 months.
Nutritional Information (Per Serving – Approx. 1 cup)
Nutrient
Amount (Approx.)
Calories
120 kcal
Protein
9 g
Fat
6 g
Carbohydrates
8 g
Fiber
2 g
Sugars
3 g
Sodium
Varies (based on salt added)
The Beauty of Building Flavor Slowly
At its core, broth is about extraction. Heat draws flavor from bones, vegetables, and herbs—layer by layer. In this recipe, even with just a single chicken leg, the combination of aromatic vegetables and a slow simmer results in a complex, multi-dimensional broth.
Carrots add sweetness. Onion and garlic build aromatic depth. Leek and celery bring a subtle bitterness that balances the sweetness. Kohlrabi and celery root give earthiness. And parsley finishes everything with a fresh, green lift.
Together, these ingredients don’t compete. They collaborate, giving you a broth that tastes like it took hours—but really only needed an hour or so of gentle simmering.
Why You’ll Love Making This at Home
1. It’s Simpler Than You Think
Many people think making broth is a laborious, all-day task. But this recipe proves that you don’t need a full chicken carcass, specialty equipment, or eight hours to make something wonderful. One chicken leg. A handful of vegetables. One pot. That’s it.
2. It’s Better for You
Homemade broth gives you total control. No additives. No preservatives. No excess sodium (unless you choose to add it). Just clean, whole ingredients that nourish you from the inside out.
It’s especially helpful during cold and flu season. Rich in vitamins, minerals, and collagen, this broth soothes sore throats, supports digestion, and hydrates the body better than plain water.
3. It Makes the Whole House Smell Like Home
There’s something timeless about the scent of broth simmering on the stove. It fills the air with comfort. It says someone is cooking with love. Even if you live alone, it makes you feel taken care of. That’s a powerful thing.
4. It’s Freezer-Friendly and Budget-Conscious
Use what you have. Stretch your ingredients. One chicken leg can yield several servings of deeply flavored broth. Make extra and freeze it in jars or ice cube trays for later use. It saves money, reduces waste, and gives future-you something to look forward to.
Ways to Use Homemade Chicken Broth
The possibilities are endless. Here are some of the many ways this broth can shine in your kitchen:
Sip it straight: Ladle it into a mug, sprinkle with sea salt and a squeeze of lemon.
Make a quick soup: Add noodles, rice, or chopped greens for an easy meal.
Use it to cook grains: Swap water for broth when making quinoa, couscous, or rice.
Deglaze pans: Add it to your skillet after searing meat or vegetables for a flavorful sauce.
Boost sauces and stews: Add depth to gravies, curries, and slow-cooked dishes.
Frequently Asked Questions (FAQs)
Can I use chicken breast or another cut instead of a leg?
Yes, but chicken legs or thighs are ideal because they contain both dark meat and bone, which give more flavor and body to the broth. A breast alone can work but will result in a lighter flavor and less richness.
Can I make it in a slow cooker?
Absolutely. Just add all the ingredients to your slow cooker, cover with water, and cook on low for 6–8 hours. You’ll get an even deeper flavor with virtually no effort.
What can I do with the cooked chicken?
Shred it and use it in sandwiches, salads, wraps, or return it to the broth with noodles or vegetables for a quick soup. Nothing goes to waste.
Can I make this broth vegetarian?
Yes. Simply omit the chicken leg and add extra vegetables like mushrooms, tomatoes, and an additional clove of garlic. You won’t get the same collagen or protein, but it will still be rich and flavorful.
How do I store it?
Cool the broth completely before transferring it to airtight containers. Store in the refrigerator for up to 4 days, or freeze for up to 3 months. Be sure to leave room at the top of jars if freezing to prevent cracking.
Can I reduce the salt?
Absolutely. Start with a smaller amount and adjust to your taste at the end. You can also add a splash of soy sauce, tamari, or lemon juice as alternative flavor enhancers without adding more sodium.
What if I want a clearer broth?
After simmering, strain the broth through a fine-mesh sieve or cheesecloth. For ultra-clear broth, avoid stirring while cooking and skim foam off the top during the first 10–15 minutes.
Tips for Perfect Broth Every Time
Use cold water to start (unless you’re pre-blanching bones). In this recipe, hot water works because it’s a small quantity and speeds things up. But starting cold usually draws out more flavor gradually.
Don’t boil—simmer. A gentle simmer allows flavors to develop without emulsifying fat into the broth, which can cloud it.
Let it rest before straining. After turning off the heat, let the broth sit for 10–15 minutes. This helps settle any particles and deepens the flavor.
Adjust seasoning at the end. Broth reduces as it cooks, which concentrates salt. Always taste and adjust after simmering, not before.
A Ritual in a Pot
Making broth might seem old-fashioned in a world of quick meals and convenience. But there’s something restorative about it—about taking the time to turn humble ingredients into something rich, nourishing, and deeply satisfying.
It’s not just about the food. It’s about slowing down. About listening to the soft bubbling of the pot. About filling your home with warmth and your body with comfort.
Whether you’re sipping it alone on a quiet afternoon or using it as the base for a hearty family meal, this broth has a way of anchoring you. Reminding you that good things take time—and that time in the kitchen is never wasted.
Conclusion: The Recipe That Brings You Home
In our fast-paced lives, we need more recipes like this one.
Recipes that don’t demand precision. That don’t require gadgets. That ask only for your presence and your patience. This simple chicken broth is more than a base—it’s a building block, a blank canvas, a cup of comfort.
Once you make it, you’ll see how something so small—a single chicken leg, a few chopped vegetables—can become something far greater. A meal. A medicine. A memory.
So next time your body craves warmth or your kitchen feels a little too quiet, put a pot on the stove. Fill it with what you have. Let it simmer. Let it soothe.
This is the kind of recipe you don’t just make—you live with.
Some recipes don’t just feed the body—they feed the soul. For me, soft milk bread is one of those rare dishes.
I still remember the smell of warm, sweet bread wafting through the air as a child. My grandmother used to make a simple milk bread on Sunday afternoons. She didn’t measure with scales or cups—just by feel, from memory, and always with care. It wasn’t fancy. There were no complicated folds, no glossy cookbook pages guiding the way. Just flour, milk, a bit of sugar, and her patient hands.
When I finally learned to bake on my own, milk bread was the first thing I tried to recreate. I wanted to relive that memory, to replicate the softness, the delicate sweetness, the warmth that made a slice of bread feel like a hug. After a few trials (and a couple of flat loaves), I found this version—and it brought everything back.
This is not just bread. It’s comfort. It’s simplicity. It’s a little piece of home you can bake in under two hours.
What Makes This Soft Milk Bread So Special?
Soft milk bread is known for its pillowy texture, subtle sweetness, and rich flavor. Unlike rustic sourdough or hearty whole wheat loaves, this bread leans into tenderness. It’s slightly sweet, golden on top, and almost cloud-like inside.
It’s often referred to as “Japanese milk bread” or “Hokkaido milk bread” in its fluffier iterations, but the version here is streamlined and accessible for every kitchen—no tangzhong, no kneading machines required.
Let’s explore what sets this recipe apart.
1. The Perfect Texture Without Fuss
This bread delivers a soft, almost melt-in-your-mouth crumb thanks to a combination of milk, powdered sugar, and butter. The addition of milk powder deepens the dairy flavor, and the use of warm milk as the liquid base gives the dough a head start toward becoming beautifully elastic.
You don’t need to be an expert baker to make this dough work. It’s forgiving, easy to handle, and a joy to shape. Once baked, the loaf pulls apart like a dream—no crumbling, no dry center. Just softness in every bite.
2. Balanced Sweetness
The flavor of this bread is gently sweet—not overly sugary like a dessert bread, but enough to make it feel indulgent even when eaten plain. That makes it versatile. You can serve it with jam and butter for breakfast, alongside soup for dinner, or even turn it into a base for sweet buns or French toast.
3. That Golden, Shiny Top
Brushing the top with egg yolk before baking gives the loaf a beautiful, golden-brown finish that feels straight out of a bakery window. It’s one small step that transforms a homemade bread into something that looks and tastes professional.
Ingredients Table – For the Bread
Ingredient
Quantity
Notes
Warm milk
150 ml (⅔ cup)
Around 38–40°C (100°F), not hot
Yeast
6 g (2 teaspoons)
Instant or active dry
Wheat flour
250 g (2 cups)
Use bread flour or all-purpose if needed
Powdered sugar
50 g (¼ cup)
Adds subtle sweetness
Salt
¼ teaspoon
Enhances flavor
Milk powder
10 g (1 tablespoon)
Optional, but adds richness
Unsalted butter
15 g (1 tablespoon)
Softened
Egg yolk
1
For brushing the top before baking
Directions
Activate the Yeast Mix warm milk and yeast in a bowl. Let sit for 5–10 minutes until foamy (if using active dry yeast).
Form the Dough In a large bowl, combine flour, powdered sugar, salt, and milk powder. Add the yeast mixture and mix until a soft dough forms. Knead until smooth and elastic (about 8–10 minutes by hand or 5 minutes with a stand mixer).
Add the Butter Knead in the softened butter until fully absorbed and the dough is smooth and slightly tacky.
First Rise Cover the dough and let it rise in a warm place for about 1 hour, or until doubled in size.
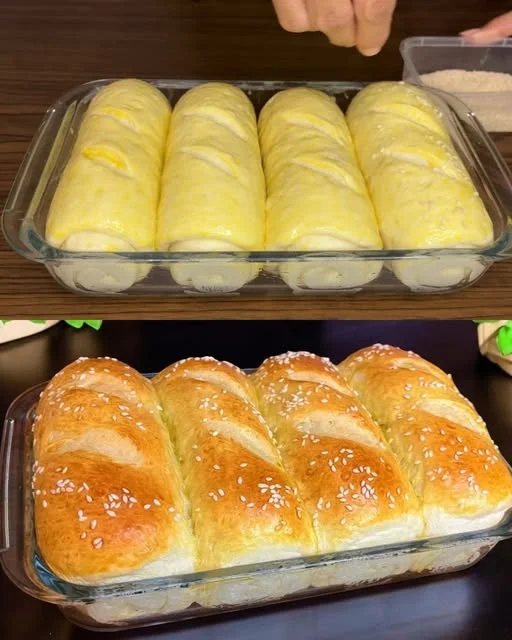
Shape and Proof Punch down the dough, shape into a loaf or rolls, and place into a greased pan. Cover and let rise again for 30–45 minutes.
Brush and Bake Preheat oven to 180°C (350°F). Brush the top with egg yolk. Bake for 20–25 minutes until golden brown and hollow-sounding when tapped.
Cool and Serve Let cool on a wire rack before slicing. Best enjoyed warm or lightly toasted.
Nutritional Information (Per Slice – Approx. 1 of 10 slices)
Nutrient
Amount (Approx.)
Calories
~160 kcal
Protein
4 g
Carbohydrates
26 g
Sugars
5 g
Fat
4 g
Fiber
0.8 g
Sodium
~90 mg
How to Use It: From Breakfast to Dessert
One of the best things about soft milk bread is how many ways you can use it. It’s neutral enough to go sweet or savory, but always feels special. Here are a few ideas to get the most from your loaf:
Breakfast
Toasted and slathered with butter and honey
Topped with avocado and a poached egg
As the base for a breakfast sandwich with scrambled eggs and cheese
Lunch
Sliced thick for grilled cheese
Served with tomato soup or chowder
Pressed into paninis with deli meats and veggies
Snack or Dinner
Used as dinner rolls or buns for sliders
Dipped into olive oil and herbs
Paired with a cheese board or soft dips
Dessert
Made into sweet milk bread pudding
Turned into French toast or stuffed French toast
Layered with whipped cream and fruit for a trifle base
The possibilities are endless. And because this bread stays soft for a couple of days, it’s perfect for making ahead or gifting.
Why It Belongs in Every Home Baker’s Recipe Box
If you’ve ever been intimidated by bread baking, this is the loaf to try. There’s no sourdough starter to feed, no hours-long fermentation to track, and no complicated shaping technique. It’s quick, reliable, and delightfully satisfying.
This is the kind of recipe you’ll reach for again and again—when you want to fill your home with the scent of fresh bread, when you need something soft and lovely for your kids’ lunches, or when you just want to slow down and make something warm with your hands.
It teaches the joy of baking without the stress. And that’s something every kitchen can use.
Frequently Asked Questions (FAQs)
Can I make this bread without milk powder?
Yes. Milk powder is optional, though it adds a rich, creamy note to the dough. If you don’t have it, simply leave it out—your bread will still be soft and flavorful.
Can I use all-purpose flour instead of wheat flour?
Yes, you can use all-purpose flour or bread flour. Whole wheat flour can also be used for a heartier version, but it will make the loaf slightly denser. For the softest crumb, stick with refined wheat or bread flour.
Do I have to use egg yolk on top?
Not necessarily. The egg yolk gives the bread its golden, glossy finish. If you’re avoiding eggs, you can brush the top with milk or a milk + oil mixture instead. It won’t be as glossy, but it will still brown nicely.
How do I know when the bread is done?
The loaf should be golden brown on top and sound hollow when tapped. If using a thermometer, the internal temperature should be about 190°F (88°C). Let it cool on a wire rack before slicing for the best texture.
How long does this bread stay fresh?
Soft milk bread stays fresh for 2–3 days at room temperature when stored in an airtight container or wrapped in a towel. For longer storage, slice and freeze the bread. Reheat in the toaster or oven as needed.
Can I add flavors or fillings?
Yes! This dough is very versatile. Here are a few ideas:
Sweet versions: Add cinnamon, raisins, chocolate chips, or swirl in jam before shaping.
Savory versions: Add shredded cheese, herbs, or chopped olives.
Filled rolls: Divide the dough into smaller pieces and fill with custard, red bean paste, Nutella, or cream cheese for stuffed buns.
Can I knead the dough by hand?
Definitely. It may take a bit more effort—about 8–10 minutes of hand kneading—but it’s a satisfying process and works beautifully. Just knead until the dough is smooth, elastic, and slightly tacky.
Tips for the Best Soft Milk Bread Every Time
Warm your milk, not hot. If it’s too hot, it can kill the yeast. Aim for lukewarm—just warm to the touch.
Let the dough rise fully. Don’t rush it. Wait until the dough has doubled in size during both rises. This is key to the bread’s soft texture.
Use fresh yeast. Expired yeast can prevent your dough from rising properly. Always test if unsure.
Brush just before baking. Applying the egg yolk right before placing the loaf in the oven ensures a rich, shiny finish.
Why I Keep Coming Back to This Recipe
There are days when we crave complexity—multi-step meals, layered flavors, culinary challenges. But there are also days when we just want something pure and comforting. Something that reminds us of warmth and care and home.
This bread is for those days.
It’s the recipe I make when I want my house to feel like a bakery. When I need something soft and grounding. When I want to slow down without stopping completely.
It’s my quiet rebellion against the rush of everyday life.
And it’s also really, really delicious.
Conclusion: Bread That Feeds More Than Hunger
Soft milk bread isn’t just about food—it’s about feeling. It’s about connection, memory, and nourishment in every sense of the word.
This recipe is simple enough for beginners, rewarding enough for seasoned bakers, and comforting enough to become a household staple. Whether you’re baking for your family, your friends, or just for yourself, this loaf brings a little joy with every slice.
So if you’ve ever thought, “I don’t have time to bake,” or “I’m not a bread person,” let this recipe change your mind.
Because once you taste what a handful of ingredients and a warm oven can create—you may never go back to store-bought bread again.
There’s something deeply satisfying about fresh bread—warm, soft, and slightly chewy. The kind that fills the kitchen with that unmistakable homemade aroma and turns an ordinary meal into something memorable.
But let’s be honest. Making bread from scratch often sounds like a project. Rising times, kneading, preheating the oven, hours of waiting—it can feel intimidating or impractical, especially on a busy day.
I used to feel the same. I thought homemade bread was reserved for special occasions, weekends, or people with sourdough starters and a lot of free time.
Then one afternoon, with barely anything in the pantry and no bread in the house, I stumbled upon something that changed the way I cook.
I had flour. I had yogurt. I had a skillet.
And 10 minutes later, I had bread.
The Discovery: Bread in a Skillet?
I didn’t believe it until I tasted it. A simple mix of ingredients—flour, yogurt, water, salt, baking powder—brought together in a bowl, rolled out, and cooked like pancakes. The dough puffed and browned in the pan, transforming into soft, golden rounds with the slightest crisp edge.
I tore off a piece, steam curling up from the middle, and took a bite.
It was soft, slightly tangy from the yogurt, with a warm chew and just the right saltiness. I dipped it in olive oil, then wiped the pan clean with the last piece. That was it. I was hooked.
From that day forward, this skillet bread became my go-to—on lazy mornings, with soups and salads, as a wrap, or just slathered with butter and herbs.
Ingredients Table – For the Bread
Ingredient
Quantity
Notes
Flour
4 cups (480 g)
All-purpose works best
Yogurt
1 cup (220 g)
Plain, unsweetened
Water
1 cup (200 ml)
Room temperature
Baking powder
1 packet (10 g)
For lift and light texture
Salt
1 teaspoon (8 g)
Adjust to taste
Vegetable oil
1 tablespoon (10 ml)
For moisture and soft crumb
Directions
Mix the Dough In a large mixing bowl, combine the flour, baking powder, and salt. Add yogurt, water, and vegetable oil. Stir until a soft dough forms.
Divide and Shape Divide the dough into equal portions (about 6–8 balls). Roll each piece into a flat round, about 1/4-inch thick.
Preheat Your Pan Heat a non-stick skillet or cast iron pan over medium heat. Lightly oil if needed.
Cook the Bread Place one round of dough into the hot pan. Cook for 2–3 minutes on each side, or until golden spots appear and the bread puffs slightly. Repeat with the remaining dough.
Serve Warm Enjoy immediately, or keep warm wrapped in a clean kitchen towel. Pairs beautifully with soups, stews, dips, or as a sandwich wrap.
Nutritional Information (Per Piece – Approx. 1 of 8)
Nutrient
Amount
Calories
~180 kcal
Protein
5 g
Fat
3 g
Carbohydrates
33 g
Fiber
1.2 g
Sodium
~220 mg
Why This Bread Works So Well
This recipe isn’t just a “quick fix.” It’s a genius shortcut that still delivers everything we love about fresh bread—without yeast, without rising time, and without the oven. Let’s break down why it works.
1. No Yeast, No Waiting
The baking powder replaces yeast as the leavening agent, providing just enough rise and airiness without any proofing. The result is a light, pillowy dough that cooks in minutes rather than hours.
2. Yogurt Adds Moisture and Flavor
Yogurt brings moisture, slight tang, and tenderness to the bread. It also helps activate the baking powder and contributes to a more elastic dough, making it easier to roll out and handle.
3. Water and Oil for Balance
Water helps form a soft, pliable dough, while just a touch of oil keeps it moist and enhances the texture. It also prevents the bread from drying out while cooking on the stovetop.
4. Versatile and Forgiving
The beauty of this recipe is its adaptability. You can swap the yogurt for sour cream or buttermilk. You can add garlic, herbs, cheese, or even cinnamon sugar. It’s the kind of recipe that makes you feel like a better cook just by how easily it comes together.
When to Make This Bread (Spoiler: Anytime)
One of the best things about this skillet bread is that it’s not tied to a single meal. It works across breakfast, lunch, dinner, and everything in between.
Breakfast
Serve warm with butter, jam, or honey. Add a side of eggs and fresh fruit for a complete plate.
Lunch
Use as a wrap or flatbread for sandwiches—filled with roasted vegetables, grilled chicken, or hummus.
Dinner
Perfect alongside stews, curries, soups, or grilled meats. It’s also excellent for mopping up sauces.
Snacks or Appetizers
Cut into wedges and serve with dips like tzatziki, baba ganoush, or guacamole. You can even brush with garlic butter or sprinkle with za’atar.
Why This Bread Belongs in Every Kitchen
It’s Foolproof
You don’t need baking skills. You don’t need special tools. You don’t even need an oven. If you can mix, roll, and flip—you can make this bread.
It’s Budget-Friendly
With ingredients you likely already have, this bread is one of the most affordable homemade items you can make. No fancy flour or specialty products required.
It’s Crowd-Pleasing
Everyone loves it. Kids, adults, picky eaters—it’s warm, chewy, and endlessly customizable.
It’s Fast
From start to finish in under 15 minutes. That’s faster than ordering takeout. And a lot more satisfying.
Frequently Asked Questions (FAQs)
Can I make this bread without yogurt?
Yes. You can substitute plain yogurt with an equal amount of sour cream or buttermilk. If you don’t have either, mix milk with a teaspoon of lemon juice or vinegar and let it sit for 5 minutes as a quick buttermilk alternative.
What kind of flour works best?
All-purpose flour is ideal, but you can substitute part of it with whole wheat flour for a nuttier flavor. Just be aware it may result in a slightly denser bread.
Can I make the dough ahead of time?
It’s best when fresh, but you can prepare the dough and store it in the refrigerator (wrapped) for up to 24 hours. Bring it back to room temperature before rolling and cooking.
How do I store leftovers?
Wrap cooled bread in a clean towel or place in an airtight container. It will stay soft for up to 2 days at room temperature. To reheat, place in a warm skillet or toaster oven.
Can I freeze the cooked bread?
Yes! Let the bread cool completely, then wrap and freeze. Reheat from frozen on a skillet or in the oven until warm.
Can I make it gluten-free?
Yes, use a 1:1 gluten-free flour blend. The texture may be slightly different, but it still works well. Add a touch more moisture if the dough feels dry.
What can I add for more flavor?
Try mixing in:
Minced garlic or garlic powder
Chopped fresh herbs like parsley, dill, or rosemary
Grated cheese
Spices like cumin, za’atar, or chili flakes
Sesame or nigella seeds for topping
Tips for Perfect Skillet Bread Every Time
Rest the dough for 5–10 minutes before rolling. This makes it easier to handle and gives the baking powder time to activate.
Don’t over-flour your surface. Too much flour can toughen the dough. Use just enough to keep it from sticking.
Use medium heat. Too hot and it burns before cooking through; too low and it won’t brown properly.
Keep them warm. Stack the cooked breads in a clean kitchen towel to keep them soft until ready to serve.
The Joy of Simple Bread, Made Fast
There’s something empowering about making your own bread. It feels like reclaiming a little piece of tradition—one that’s been passed down through generations, in kitchens with far less equipment than we have today.
This skillet bread takes that heritage and makes it accessible. It honors the act of making bread from scratch but removes the barriers. No yeast. No rising. No waiting. Just warmth, comfort, and something you made with your own hands.
It’s the kind of recipe that brings you back to the basics—in the best way.
Conclusion: No Oven, No Problem—Just Good Bread
In a world full of complicated recipes, fussy ingredients, and fancy techniques, this bread is a breath of fresh air. It reminds us that cooking doesn’t have to be perfect. It just has to be honest.
You don’t need to be a baker. You don’t need hours. You don’t even need an oven.
You just need a skillet, a few simple ingredients, and 10 minutes.
So the next time you find yourself craving bread—or just want to make something that feels warm, real, and surprisingly easy—remember this recipe.
It may just become the tastiest thing you’ve ever eaten.
There are recipes you try once, and there are recipes you carry with you forever. This apple pie—the one that stopped me in my tracks the first time I tasted it—firmly belongs in the second category.
I remember the exact moment it happened. A rainy autumn afternoon, the kind where everything outside is gray and damp, and the only thing that feels right is staying in the kitchen with something warm in the oven. I had just pulled the pie out—its golden meringue peaks glowing under the oven light, the scent of apples and honey curling through the air like a hug.
I wasn’t expecting magic. It was just another attempt to make something comforting. But when I sliced into that pie and took a bite—tender crust, juicy apple filling, the crunch of toasted walnuts, and that airy cloud of sweet meringue—I knew I had found something extraordinary. Something worth remembering, worth sharing.
This isn’t just a dessert. It’s a story. A feeling. A recipe that reminds us why we bake at all.
A Pie Like No Other
So, what makes this apple pie stand out from the hundreds of others?
It starts with the dough—a buttery, delicate base that’s part shortbread, part tart crust. It crumbles just enough to feel luxurious without overpowering the filling. It’s not overly sweet, making it the perfect companion for the richly flavored center.
Then comes the filling. Instead of the usual cinnamon-heavy mix, this version leans into natural apple flavor. Cubed apples are gently cooked down with sugar and honey, bringing out their juices and caramelized sweetness. And just when you think it couldn’t get better, in come the roasted walnuts—adding a nutty crunch that elevates every bite.
Finally, the star of the show: a soft, glossy meringue. Whipped to stiff peaks and baked until golden, it creates a marshmallow-like cloud atop the pie. The result is something between a rustic fruit tart and a patisserie-style showstopper.
In a large bowl, whisk together flour, sugar, baking powder, and vanilla sugar. Add the cold butter in cubes and rub it into the flour with your fingertips until the mixture resembles breadcrumbs. Add the egg and knead just until the dough comes together. Wrap it in plastic wrap and refrigerate for 30 minutes.
2. Make the Apple Filling
While the dough is chilling, peel and core the apples, then cut them into small cubes. Melt butter in a skillet over medium heat, then add the apples, sugar, and honey. Cook for 10–12 minutes, stirring occasionally, until the apples soften slightly and release their juices. Remove from heat and stir in chopped walnuts. Let it cool.
3. Pre-Bake the Crust
Preheat your oven to 180°C (350°F). Roll out the dough on a floured surface and transfer it to a tart or springform pan (about 9 inches/23 cm). Press it evenly into the bottom and sides. Prick the base with a fork and bake for 12–15 minutes or until just golden. Remove and set aside.
4. Add the Filling
Spread the cooled apple mixture evenly over the baked crust. Return to the oven and bake for another 15 minutes to help the flavors meld.
5. Whip the Meringue
In a clean bowl, whisk the egg whites with a pinch of salt until soft peaks form. Gradually add sugar while continuing to beat until stiff, glossy peaks form.
6. Add the Meringue Topping
Spread or pipe the meringue over the hot apple layer, creating peaks or swirls on top. Bake for another 10–12 minutes, or until the meringue is golden brown on the tips.
7. Cool and Serve
Allow the pie to cool completely before slicing. This helps the layers set properly and enhances the overall texture.
Baking Details
Category
Details
Prep Time
45 minutes
Cook Time
35–40 minutes
Total Time
1 hour 20 minutes
Yield
10–12 slices
Method
Baking
Cuisine
European-Inspired
Difficulty
Intermediate
Nutritional Information (Per Slice, Approximate – Based on 12 Servings)
Nutrient
Amount
Calories
290 kcal
Carbohydrates
38 g
Protein
4 g
Fat
14 g
Saturated Fat
7 g
Sugar
24 g
Fiber
2 g
Sodium
60 mg
Why This Pie Works
This recipe isn’t just about flavor—it’s about balance, technique, and a touch of artistry. Each layer serves a purpose:
The crust is chilled before baking to keep it tender and crumbly.
The apples are lightly cooked with honey for a golden, syrupy bite that still retains their shape.
The meringue is added at the end and baked until beautifully golden, giving the dessert a final, luxurious flourish.
It’s a dessert that hits every note: sweet, tart, soft, crisp, light, rich. No one flavor or texture overwhelms the others. Instead, they come together like a symphony.
Frequently Asked Questions
Can I make this pie ahead of time?
Yes—and it’s actually better that way. The pie can be baked the day before and kept at room temperature for several hours (if your kitchen is cool) or stored in the fridge. Let it come to room temperature before serving. The meringue may lose a bit of its texture after refrigeration, but the flavor remains divine.
What apples work best for this recipe?
Use firm, slightly tart apples that hold their shape during cooking. Granny Smith, Honeycrisp, or a mix of Jonagold and Golden Delicious work beautifully. Avoid soft apples like Red Delicious—they’ll turn to mush.
Can I skip the meringue?
While the meringue is a showstopper, you can absolutely skip it for a more rustic take. Simply bake the crust with the apple-walnut filling and dust the cooled pie with powdered sugar before serving. Still delicious—just less dramatic.
Is the pie overly sweet?
Surprisingly, no. The sugar is balanced out by the tartness of the apples and the lightness of the meringue. If your apples are particularly sweet, you can reduce the sugar in the filling slightly to suit your taste.
Can I add spices like cinnamon or nutmeg?
Absolutely. While this version focuses on the natural flavors of apple and honey, a hint of cinnamon or cardamom would work beautifully—especially if you want a more autumnal feel.
Tips for Success
Here are a few secrets I’ve learned after making this pie more times than I can count:
Toast the walnuts. A few minutes in a dry skillet transforms their flavor and adds richness to the filling.
Cool the filling before adding it to the crust. This prevents the crust from getting soggy and helps the layers bake evenly.
Use a glass or ceramic tart pan. It helps ensure even baking and makes for a beautiful presentation.
Watch the meringue. Once it goes into the oven, don’t walk away. A few minutes too long can take it from golden to burned.
Variations to Try
This pie is stunning as-is, but here are a few ideas to adapt it for other seasons and occasions:
Pear and Walnut: Substitute apples with ripe pears for a softer, more floral variation.
Apple-Cranberry: Add a handful of cranberries to the filling for a tart burst of color and flavor.
Apple-Almond: Swap walnuts for slivered almonds and add a dash of almond extract to the crust.
Rustic Version: Instead of a pie pan, press the dough into a sheet pan and build the pie as a slab. It’s perfect for serving a crowd.
Storage and Serving Suggestions
Room Temperature: If you plan to eat the pie the same day, let it sit at room temperature, lightly covered.
Refrigerator: For longer storage, keep it covered in the fridge for up to 3 days. The meringue will soften, but the flavor holds beautifully.
Freezing: This pie isn’t ideal for freezing due to the delicate meringue. However, you can freeze the crust and filling separately, then assemble fresh when needed.
Serve slices plain, or with a dollop of whipped cream or vanilla ice cream if you’re feeling indulgent.
When to Serve This Apple Pie
This pie is wonderfully versatile and fits a range of occasions:
Holiday gatherings: It brings elegance to the dessert table without the need for complex decoration.
Tea-time treat: A thin slice with a hot cup of tea is a match made in heaven.
Birthday alternative: For those who don’t love cake, this pie is a welcome and memorable surprise.
Sunday baking projects: It’s a bit more involved than a basic pie, but absolutely worth the effort.
A Sweet Conclusion
There are few things more comforting than the scent of baked apples in the kitchen. But this pie goes beyond comfort—it’s a celebration of texture, a layering of flavors, a tribute to simplicity done exceptionally well.
If you’ve made plenty of apple pies in your life, this one will still surprise you. And if you’ve never made one before, what a place to start. It’s impressive but approachable, elegant but homey.
The best part? It’s more than just delicious—it creates moments. The kind where someone takes a bite, pauses, and looks at you with wide eyes, asking, “What is this?” That’s the power of a pie like this.
Bake it for someone you love—or for yourself. Either way, don’t be surprised if this becomes the apple pie your family talks about for years to come.
Amal
I Have Never Eaten Such Delicious Apple Pie
This is not your average apple pie. With a tender, buttery crust, a luscious filling of honey-glazed apples and roasted walnuts, and a crown of golden meringue, this dessert is a true showstopper. Light, elegant, and bursting with real fruit flavor, it’s the kind of pie that turns an ordinary afternoon into a warm memory.
Make the Dough: In a large mixing bowl, combine flour, sugar, baking powder, and vanilla sugar. Add cold cubed butter and work it into the flour mixture using your fingertips until it resembles coarse crumbs. Add the egg and mix until a soft dough forms. Wrap the dough in plastic and refrigerate for 30 minutes.
Prepare the Filling: In a large pan, melt the butter. Add the chopped apples, sugar, and honey. Cook over medium heat for 10–12 minutes until the apples are soft but still hold their shape. Stir in the chopped roasted walnuts and set aside to cool.
Blind Bake the Crust: Preheat your oven to 350°F (180°C). Roll out the chilled dough on a floured surface and press it into a tart or pie pan (about 9 inches). Prick the base with a fork and bake for 12–15 minutes or until lightly golden.
Add the Filling: Evenly spread the cooled apple and walnut mixture over the pre-baked crust. Return the pie to the oven and bake for another 15 minutes.
Make the Meringue: In a clean mixing bowl, beat the egg whites with a pinch of salt until soft peaks form. Gradually add sugar and continue beating until stiff, glossy peaks are achieved.
Top and Finish Baking: Spread or pipe the meringue over the apple filling. Bake for an additional 10–12 minutes until the meringue is golden brown on top. Let the pie cool completely before slicing.
Notes
You can toast the walnuts in a dry skillet for 5 minutes to deepen their flavor.
For a more traditional taste, feel free to add 1/2 teaspoon of cinnamon or cardamom to the filling.
The pie is best served the day it’s made, but leftovers can be refrigerated for up to 3 days.
Let the pie cool fully before slicing to help the filling set.
A springform pan also works well for clean edges and easy removal.
When I was a child, my grandmother had a small orange tree in her backyard. It wasn’t the most impressive tree—its branches leaned awkwardly to one side, and it only produced a modest crop each year—but to me, those oranges were magic. Every winter, just before the holidays, we’d go outside with a woven basket and gather the ripe fruit together. Cold air on our cheeks, hands sticky with citrus, and laughter echoing under that crooked tree—those are the memories I treasure the most.
Afterward, she’d take those oranges and make the most heavenly cookies. They were soft, gently golden on the edges, with little bursts of orange in every bite. The warmth of butter, the subtle tang of sour cream, and the bright pop of citrus—it was like wrapping your hands around a cup of sunshine.
Now, every time I make Orange Cookies, I feel a piece of that moment return. They’re not just cookies to me. They’re a time machine. A connection. A way of sharing love through something as simple as sugar and zest.
So today, I invite you to try my version of these cookies. They’re tender, fragrant, and beautifully nostalgic. Whether you’re baking for your family, for a holiday gathering, or just to bring a little light to a grey day—these cookies are guaranteed to deliver joy.
Why Orange Cookies Deserve a Spot in Your Baking Rotation
Orange Cookies are a beautiful twist on traditional fruit-based baked goods. While lemon, cranberry, and chocolate often steal the spotlight, orange brings a unique charm to the dessert world—bold, fragrant, slightly tangy, and wildly underrated.
These cookies are:
Soft and melt-in-your-mouth thanks to the combination of butter and sour cream.
Bright and citrusy from fresh orange zest and pulp.
Simple yet impressive, perfect for novice bakers and seasoned pros alike.
Versatile, easily adapted with different fillings, glazes, or even spices.
They strike that perfect balance between comforting and refreshing—a rare feat in the cookie universe.
Ingredients Spotlight
Ingredient
Amount
Flour
2½ cups (300 g)
Salt
A pinch
Baking Powder
½ tsp
Vanilla Sugar
1 tsp
Butter
5 tbsp (100 g)
Sour Cream
⅔ cup (150 g)
Egg
1 piece
Oranges
2 pcs (450 g)
Sugar
½ cup (100 g)
Cornstarch
2 tbsp (30 g)
Whisk & Zest: Step-by-Step Directions
Prepare the Citrus Base Wash and zest the oranges. Peel and finely chop the flesh, removing seeds. Place in a saucepan with sugar and cook on low heat until soft and slightly thickened (about 10 minutes). Stir in cornstarch and cook 2–3 more minutes until it thickens. Set aside to cool.
Whip the Dough In a large bowl, combine flour, salt, baking powder, and vanilla sugar. Add cold butter and rub into the flour until crumbly. Mix in the sour cream and egg. Knead into a soft dough. Wrap in plastic and chill for 30 minutes.
Shape the Cookies Preheat oven to 180°C (350°F). Roll out the dough on a floured surface to about ⅛ inch (3 mm) thick. Cut into desired shapes using a cookie cutter or glass.
Fill and Fold Place a small spoonful of the orange filling in the center of each round. Fold the edges slightly over the filling or keep them open-faced, depending on your desired look.
Bake to Perfection Line a baking sheet with parchment paper. Arrange cookies and bake for 15–20 minutes or until golden. Let them cool before serving.
Nutrition at a Glance(Per Cookie, Approximate)
Nutrient
Amount
Calories
120 kcal
Carbohydrates
18 g
Protein
2 g
Fat
5 g
Saturated Fat
3 g
Sugar
7 g
Fiber
1 g
The Secret Behind the Texture
What makes these cookies so soft and tender? It comes down to a few key components:
Sour Cream: Acts as a moisture booster and provides a subtle tang that complements the orange beautifully.
Butter: Adds richness and structure while keeping the crumb delicate.
Egg: Binds everything together without making the cookies dense.
Fresh Oranges: Instead of just using zest or juice, incorporating both the zest and flesh adds layers of citrus flavor and a soft, almost jam-like center when cooked.
Combined, these ingredients create a cookie that’s tender on the inside, lightly crisp on the edges, and bursting with flavor.
Frequently Asked Questions
Can I use bottled orange juice instead of fresh oranges?
Technically yes, but it’s not recommended. Fresh oranges provide not just juice but also zest and texture. Bottled juice often lacks the brightness of fresh citrus and can contain additives that affect flavor. For the best results, stick with the real deal.
Can I make these cookies dairy-free?
Absolutely! Swap the butter for a plant-based alternative and use a dairy-free sour cream or yogurt substitute. Just make sure your replacements are full-fat to retain the richness.
Do these cookies need to be refrigerated?
They’re fine at room temperature for a few days, but if you want to keep them soft and fresh for longer, refrigerate them in an airtight container. You can also freeze them for up to 2 months.
Can I add glaze or icing?
Yes! A light orange glaze made with powdered sugar and orange juice is a popular addition. It adds sweetness and an extra pop of citrus. However, they’re just as delicious without it.
How do I know when they’re done?
The cookies should be lightly golden around the edges but still pale on top. They’ll continue to set as they cool, so avoid overbaking them or they’ll lose that melt-in-your-mouth softness.
Creative Twists & Variations
One of the best things about this recipe is how easily it can be personalized. Here are a few ideas to get your creativity flowing:
Chocolate-Dipped Orange Cookies: After cooling, dip one half in dark chocolate and let them set. Orange and chocolate? A match made in heaven.
Orange Spice Cookies: Add a pinch of cinnamon, nutmeg, or cardamom to the dough for a warm, spiced variation.
Filled Orange Thumbprints: Instead of mixing the orange into the dough, create thumbprint cookies and spoon in some homemade orange marmalade before baking.
Coconut-Orange Cookies: Fold in shredded coconut for a tropical twist.
Feel free to experiment based on what you have on hand or your personal preferences.
Tips from My Kitchen
Here are some personal pointers that can help ensure cookie success every time:
Chill the Dough: Don’t skip this step. It makes the dough easier to handle and helps prevent spreading during baking.
Use a Microplane for Zest: It ensures you only get the fragrant outer peel and not the bitter white pith.
Don’t Overmix: As with most baked goods, mixing too much can lead to tough cookies. Mix until just combined.
Taste Your Oranges: Not all oranges are created equal. Some are sweeter, some more tart. Adjust the sugar slightly if your fruit is particularly sour.
Serving Suggestions
These cookies are perfect for:
Holiday platters or cookie exchanges
Afternoon tea or coffee breaks
Spring brunches or baby showers
School lunches or after-school snacks
They also make a wonderful homemade gift, tucked into a jar with a ribbon and a handwritten tag. The scent alone is enough to win someone over.
Storing and Freezing
To keep your Orange Cookies fresh:
At Room Temp: Store in an airtight container for up to 4 days.
In the Fridge: Keep them chilled in a sealed container for up to a week. Let them come to room temperature before serving.
In the Freezer: Freeze baked cookies in a single layer, then transfer to a freezer bag. They’ll keep for up to 2 months. Thaw at room temp or warm slightly in the oven.
You can also freeze the dough before baking. Just shape it into a log or rounds, wrap tightly, and freeze. Slice and bake when needed.
A Cookie That Connects Generations
Baking isn’t just about food—it’s about memories, rituals, and love passed down through time. For me, these Orange Cookies are a bridge between generations. Every time I roll out the dough, I think of my grandmother’s worn hands doing the same. Every bite I take brings back the laughter of childhood and the warmth of family.
I hope you find your own meaning in them. Maybe they’ll become part of your family’s tradition, or maybe they’ll just brighten your day with a burst of citrus. Either way, they’re a small but powerful reminder that joy can be found in the simplest things.
Final Thoughts
In a world of complicated confections and over-the-top desserts, Orange Cookies are a gentle reminder of the beauty in simplicity. They don’t shout for attention—but they quietly impress. From their soft crumb to their vibrant flavor, they’re a comforting treat that deserves more recognition.
Whether you’re an experienced baker or someone just dipping their toes into homemade sweets, this recipe is a sure success. And who knows—maybe they’ll become part of your own cherished memories.
Happy baking, and may your kitchen always be filled with light, laughter, and the scent of oranges.
Amal
A Taste of Sunshine: The Story Behind My Orange Cookies
Bright, tender, and irresistibly soft, these Orange Cookies are infused with real orange zest and a hint of vanilla, then filled with a luscious orange mixture that melts in your mouth. Perfect for holiday baking or a cozy afternoon treat, these cookies are a citrus lover’s dream!
Make the Orange Filling: Peel and finely chop the oranges, removing any seeds. In a saucepan, combine chopped oranges and sugar. Simmer over low heat for about 10 minutes, stirring frequently, until soft and slightly thickened. Stir in cornstarch and cook for 2–3 more minutes until the filling thickens. Set aside to cool completely.
Prepare the Dough: In a mixing bowl, combine flour, salt, baking powder, and vanilla sugar. Add cold butter and rub into the flour until the mixture resembles coarse crumbs. Mix in sour cream and egg. Knead gently until a soft dough forms. Wrap in plastic and refrigerate for 30 minutes.
Assemble the Cookies: Preheat oven to 350°F (180°C). On a floured surface, roll the dough to about ⅛-inch thickness. Cut into rounds or shapes of your choice. Place a small spoonful of the orange filling in the center of each. Fold or leave open-faced, depending on your design preference.
Bake: Arrange on a parchment-lined baking sheet and bake for 15–20 minutes or until edges are golden. Cool on a wire rack.
Notes
The orange filling can be made a day ahead and stored in the fridge.
For a sweeter cookie, drizzle a simple orange glaze (powdered sugar + orange juice) over the top once cooled.
If your oranges are very tart, you can add a bit more sugar to balance the flavor.
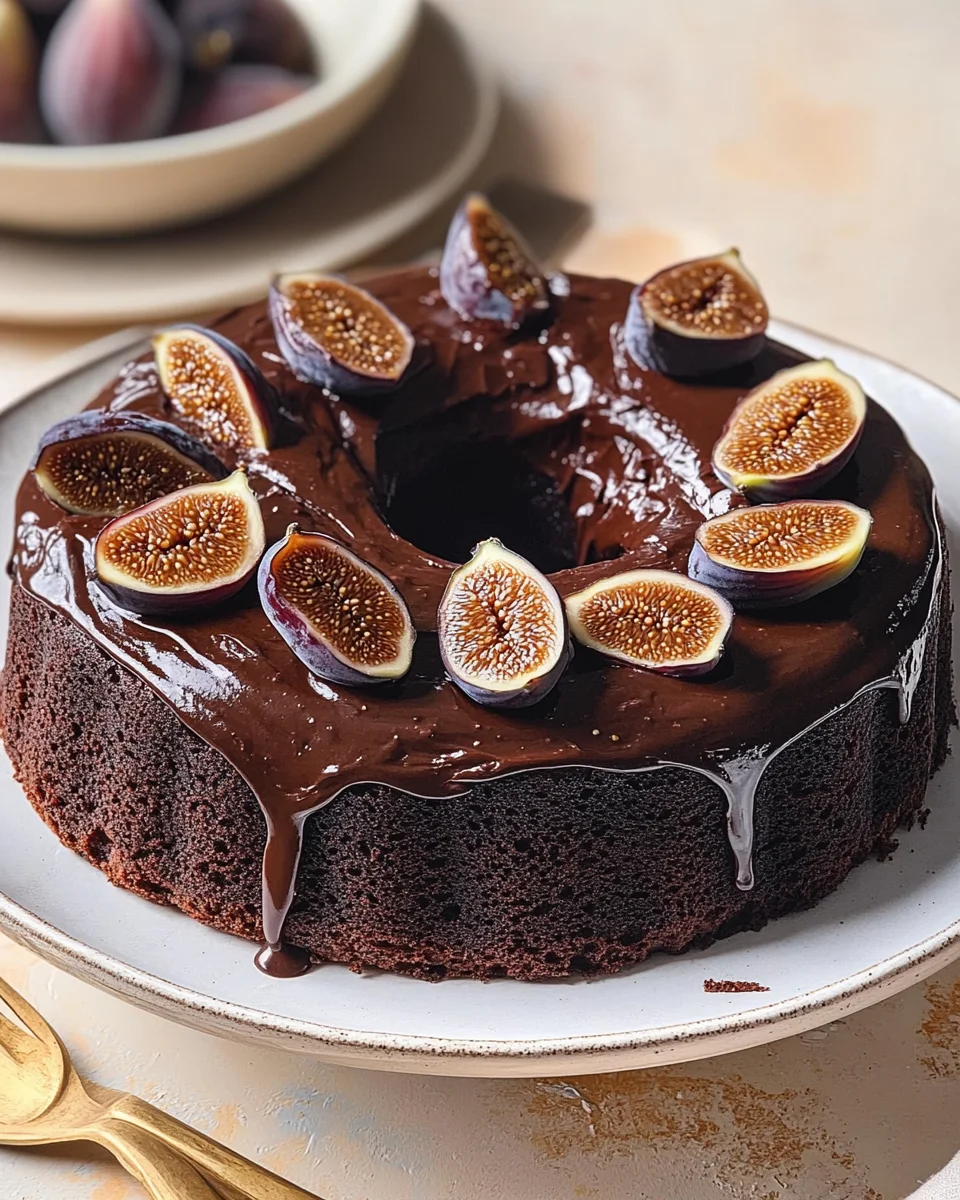
The Chocolate Fig Spice Cake is a delightful blend of rich flavors and textures. This cake combines the deep, luscious taste of chocolate with the natural sweetness of figs. Figs have been enjoyed for centuries, dating back to ancient civilizations. They were often considered a symbol of prosperity and fertility. The use of figs in desserts became popular in various cultures, especially in Mediterranean regions. Over time, bakers began to experiment with figs in cakes, leading to the creation of this unique recipe.
Chocolate, on the other hand, has its own fascinating history. Originating from the cacao bean, chocolate was once a luxury enjoyed by the elite. Today, it is a beloved ingredient in countless desserts worldwide. The combination of chocolate and figs in this cake not only highlights the rich culinary traditions but also brings a modern twist to classic flavors. This cake is perfect for those who appreciate the harmony of sweet and spicy notes in their desserts.
Why You Should Try This Recipe
There are many reasons to try the Chocolate Fig Spice Cake Recipe. First, it’s a crowd-pleaser! The rich chocolate flavor paired with the chewy figs creates a delightful experience for your taste buds. Plus, the warm spices like cinnamon and nutmeg add a cozy touch, making it perfect for any occasion.
Another reason to give this recipe a go is its versatility. You can serve it plain, with a dollop of whipped cream, or even a drizzle of chocolate ganache for an extra indulgence. It’s also easy to adapt. If you have dietary restrictions, you can easily make gluten-free or vegan versions without sacrificing flavor.
Lastly, baking this cake is a fun and rewarding experience. The process of mixing ingredients and watching the cake rise in the oven is satisfying. When you finally slice into the cake and see the beautiful layers, you’ll feel proud of your creation. So, gather your ingredients and get ready to enjoy a slice of this delicious Chocolate Fig Spice Cake!
Ingredients for Chocolate Fig Spice Cake Recipe
To create the delightful Chocolate Fig Spice Cake, you’ll need a selection of ingredients that come together to form a rich and flavorful dessert. Here’s what you’ll need:
2 cups all-purpose flour
1 cup unsweetened cocoa powder
1 teaspoon baking soda
1 teaspoon baking powder
1 teaspoon ground cinnamon
1/2 teaspoon ground nutmeg
1/2 teaspoon ground ginger
1/4 teaspoon salt
1 cup unsalted butter, softened
1 1/2 cups granulated sugar
3 large eggs
1 teaspoon vanilla extract
1 cup buttermilk
1 cup dried figs, chopped
These ingredients are not only essential for the cake’s structure but also contribute to its unique flavor profile. The combination of cocoa powder and spices creates a warm, inviting aroma, while the figs add a natural sweetness and chewy texture. Make sure to gather everything before you start baking to ensure a smooth process!
Step-by-Step Preparation of Chocolate Fig Spice Cake Recipe
Step 1: Prepping Your Ingredients
Before you start baking, it’s important to prep your ingredients. First, gather all the items listed in the ingredients section. This will make the process smoother and more enjoyable. Make sure your butter is softened, as this helps it blend better with the sugar. You can leave it out at room temperature for about an hour. Also, chop your dried figs into small pieces. This ensures they distribute evenly throughout the cake.
Step 2: Mixing the Dry Ingredients
Next, take a medium bowl and whisk together the dry ingredients. Combine the all-purpose flour, cocoa powder, baking soda, baking powder, ground cinnamon, ground nutmeg, ground ginger, and salt. Whisking these ingredients together helps to evenly distribute the leavening agents and spices. Set this bowl aside for later use.
Step 3: Combining Wet Ingredients
In a large mixing bowl, cream the softened butter and granulated sugar together. Use an electric mixer on medium speed for about 3-4 minutes. You want the mixture to become light and fluffy. Then, add the eggs one at a time, mixing well after each addition. This helps to incorporate air into the batter, making your cake light. Finally, stir in the vanilla extract for added flavor.
Step 4: Merging Wet and Dry Mixtures
Now it’s time to combine the wet and dry mixtures. Gradually add the dry ingredients to the butter mixture. Alternate this with the buttermilk, starting and ending with the dry ingredients. Mix until just combined. Be careful not to overmix, as this can make the cake dense. A few lumps are perfectly fine!
Step 5: Adding Figs and Spices
Once your batter is ready, gently fold in the chopped figs. This step is crucial as it ensures the figs are evenly distributed throughout the batter. You want to maintain the light texture of the cake, so be gentle. The figs will add a lovely sweetness and chewy texture to each bite.
Step 6: Baking the Cake
Preheat your oven to 350°F (175°C) if you haven’t done so already. Divide the batter evenly between the two prepared 9-inch round cake pans. Smooth the tops with a spatula for even baking. Bake for 25-30 minutes. To check if the cakes are done, insert a toothpick into the center. If it comes out clean, your cakes are ready!
Step 7: Cooling and Serving
After baking, allow the cakes to cool in the pans for about 10 minutes. This makes it easier to remove them without breaking. Then, transfer the cakes to wire racks to cool completely. Once cooled, you can serve the cake plain, with whipped cream, or a dusting of powdered sugar. Enjoy your delicious Chocolate Fig Spice Cake!
Variations of Chocolate Fig Spice Cake Recipe
Gluten-Free Options
If you or someone you know has a gluten intolerance, don’t worry! You can still enjoy the deliciousness of Chocolate Fig Spice Cake. To make a gluten-free version, simply substitute the all-purpose flour with a gluten-free flour blend. Many brands offer blends that work well in baking, so choose one that you like. Make sure it contains xanthan gum, as this helps mimic the texture of traditional flour.
Additionally, check that your baking powder and baking soda are gluten-free. Most brands are, but it’s always good to double-check. Follow the same steps in the recipe, and you’ll have a delightful gluten-free cake that everyone can enjoy!
Vegan Adaptations
For those following a vegan diet, you can easily adapt the Chocolate Fig Spice Cake Recipe. Start by replacing the eggs with flaxseed meal or applesauce. To make a flax egg, mix 1 tablespoon of flaxseed meal with 2.5 tablespoons of water. Let it sit for about 5 minutes until it thickens. This will act as a binding agent in your cake.
Next, swap the buttermilk with a plant-based alternative. Almond milk, soy milk, or oat milk work great. Just add a teaspoon of vinegar or lemon juice to the milk and let it sit for a few minutes to curdle, creating a vegan buttermilk. Lastly, ensure your butter is replaced with a vegan butter or coconut oil. With these simple swaps, you’ll have a moist and flavorful vegan Chocolate Fig Spice Cake that everyone will love!
Cooking Note for Chocolate Fig Spice Cake Recipe
When preparing the Chocolate Fig Spice Cake, there are a few cooking notes to keep in mind to ensure your cake turns out perfectly every time. First, always measure your ingredients accurately. Baking is a science, and even a small difference in measurements can affect the final product. Use a kitchen scale for the most precise measurements, especially for flour and cocoa powder.
Next, make sure your oven is properly preheated before placing the cake inside. An oven thermometer can help you verify the temperature, as some ovens may not heat evenly. This step is crucial for achieving the right texture and rise in your cake.
Additionally, consider the quality of your ingredients. Using high-quality cocoa powder and fresh dried figs can significantly enhance the flavor of your cake. If possible, opt for organic or premium brands for the best results.
While baking, avoid opening the oven door too often. Each time you open the door, heat escapes, which can lead to uneven baking. Instead, use the oven light to check on your cake’s progress. If you notice that the top is browning too quickly, you can cover it loosely with aluminum foil to prevent burning.
Lastly, patience is key when cooling your cake. Allow it to cool completely before frosting or serving. This helps the cake set properly and makes it easier to slice. Following these cooking notes will help you create a delicious Chocolate Fig Spice Cake that is sure to impress your family and friends!
Serving Suggestions for Chocolate Fig Spice Cake Recipe
Pairing with Beverages
When it comes to enjoying your Chocolate Fig Spice Cake, the right beverage can elevate the experience. A warm cup of coffee is a classic choice. The rich flavors of the cake pair beautifully with the boldness of coffee. You can opt for a dark roast or even a flavored coffee, like hazelnut or mocha, to complement the chocolate.
If you prefer tea, consider a spiced chai or a smooth Earl Grey. The spices in the cake will harmonize with the aromatic notes of the tea. For a non-caffeinated option, a glass of cold milk is always a hit. The creaminess of the milk balances the cake’s richness perfectly.
For those looking for something a bit more festive, try serving the cake with a dessert wine. A sweet port or a fruity dessert wine can enhance the flavors of the figs and chocolate. Whichever beverage you choose, it will surely make your Chocolate Fig Spice Cake experience even more delightful!
Ideal Occasions for Serving
The Chocolate Fig Spice Cake is versatile enough to be served on various occasions. It’s perfect for birthdays, family gatherings, or holiday celebrations. The warm spices and rich chocolate make it a cozy dessert for fall and winter festivities.
Additionally, this cake can be a wonderful treat for afternoon tea or coffee breaks. Its unique flavor profile will impress your guests and spark delightful conversations. You can also serve it at potlucks or bake sales, as it’s sure to be a crowd-pleaser.
Don’t forget about casual get-togethers! Whether it’s a picnic in the park or a movie night at home, this cake adds a touch of sweetness to any occasion. With its delicious taste and beautiful presentation, the Chocolate Fig Spice Cake is a delightful addition to your dessert repertoire!
Tips for Perfecting Your Chocolate Fig Spice Cake Recipe
To ensure your Chocolate Fig Spice Cake turns out perfectly every time, consider these helpful tips. Each step in the baking process is important, and small adjustments can make a big difference in the final result.
First, always use room temperature ingredients. This includes your butter, eggs, and buttermilk. Room temperature ingredients blend more easily, creating a smoother batter. If you forget to take them out ahead of time, you can warm the eggs in a bowl of warm water for a few minutes and microwave the butter in short bursts to soften it.
Next, be mindful of your mixing technique. When combining the wet and dry ingredients, mix until just combined. Overmixing can lead to a dense cake. A few lumps are okay! This will help keep your cake light and fluffy.
Another tip is to check your oven temperature. Ovens can vary, so using an oven thermometer can help ensure your cake bakes at the right temperature. If your oven runs hot, you may need to reduce the baking time slightly to prevent over-baking.
When it comes to the figs, consider soaking them in warm water or tea for about 10 minutes before adding them to the batter. This can enhance their flavor and make them even softer, resulting in a more moist cake.
Lastly, don’t rush the cooling process. Allow your cake to cool completely in the pans before transferring it to a wire rack. This helps prevent it from breaking apart. Once cooled, you can frost or serve it as desired. Following these tips will help you create a Chocolate Fig Spice Cake that is not only delicious but also visually appealing!
Breakdown of Time for Chocolate Fig Spice Cake Recipe
Prep Time
Preparing the Chocolate Fig Spice Cake is a delightful process that doesn’t take too long. You’ll need about 20-30 minutes for prep time. This includes gathering your ingredients, measuring them accurately, and mixing the dry and wet components. Make sure to take your time during this stage, as it sets the foundation for a delicious cake!
Cooking Time
The cooking time for this cake is approximately 25-30 minutes. Once you place the cake pans in the preheated oven, you can relax for a bit. Just keep an eye on the cakes as they bake. You can check for doneness by inserting a toothpick into the center. If it comes out clean, your cakes are ready to be taken out!
Total Time
In total, you can expect to spend about 55-60 minutes from start to finish. This includes both prep and cooking time. Once the cakes are baked, don’t forget to allow them to cool completely before serving. This cooling period is essential for achieving the perfect texture. With this time breakdown, you can plan your baking session efficiently and enjoy the process of creating your Chocolate Fig Spice Cake!
Nutritional Information for Chocolate Fig Spice Cake Recipe
Calories
When indulging in a slice of Chocolate Fig Spice Cake, it’s good to know what you’re consuming. Each serving contains approximately 350 calories. This makes it a delightful treat that can fit into a balanced diet. While it’s important to enjoy desserts in moderation, this cake offers a rich flavor that can satisfy your sweet tooth without going overboard.
Protein Content
In terms of protein, each slice of this delicious cake provides about 5 grams. While this may not seem like a lot, it contributes to your daily protein intake. The eggs and buttermilk in the recipe help boost the protein content, making it a more balanced dessert option. Pairing it with a glass of milk can further enhance the protein benefits!
Sodium Levels
For those watching their sodium intake, the Chocolate Fig Spice Cake contains approximately 200 milligrams of sodium per serving. This level is relatively moderate, especially for a dessert. The salt in the recipe helps to enhance the flavors of the cake without making it overly salty. If you’re concerned about sodium, you can always adjust the amount of salt used in the recipe to suit your dietary needs.
FAQs about Chocolate Fig Spice Cake Recipe
Can I substitute fresh figs with dried figs in the recipe?
Absolutely! In fact, this recipe specifically calls for dried figs. They add a wonderful sweetness and chewy texture to the cake. Fresh figs can be used, but they have a higher moisture content, which may alter the cake’s texture. If you decide to use fresh figs, consider reducing the amount of buttermilk slightly to balance the moisture levels.
How can I store leftover Chocolate Fig Spice Cake?
Storing leftover Chocolate Fig Spice Cake is easy! First, make sure the cake is completely cooled. Then, wrap it tightly in plastic wrap or aluminum foil. You can also place it in an airtight container. Store it at room temperature for up to three days. If you want to keep it longer, consider refrigerating it, where it can last for about a week. Just remember to bring it back to room temperature before serving for the best flavor!
What are some common mistakes to avoid when making this cake?
There are a few common mistakes to watch out for when making your Chocolate Fig Spice Cake. First, avoid overmixing the batter. This can lead to a dense cake instead of a light and fluffy one. Second, ensure your ingredients are at room temperature for better mixing. Lastly, don’t skip the cooling time! Cutting into the cake too soon can cause it to crumble. Following these tips will help you achieve a perfect cake every time.
Can I freeze Chocolate Fig Spice Cake?
Yes, you can freeze Chocolate Fig Spice Cake! To do this, wrap the cooled cake tightly in plastic wrap, then in aluminum foil. This double wrapping helps prevent freezer burn. The cake can be frozen for up to three months. When you’re ready to enjoy it, simply thaw it in the refrigerator overnight. Once thawed, you can frost it or serve it as is. Freezing is a great way to enjoy this delicious cake later!
Conclusion on Chocolate Fig Spice Cake Recipe
In conclusion, the Chocolate Fig Spice Cake Recipe is a delightful treat that combines rich chocolate flavors with the natural sweetness of figs and warm spices. This cake is not only delicious but also versatile, making it suitable for various occasions, from casual gatherings to festive celebrations. Whether you choose to serve it plain, with whipped cream, or a drizzle of chocolate ganache, each slice promises a unique taste experience.
Moreover, the recipe allows for easy adaptations, catering to different dietary needs. With gluten-free and vegan options available, everyone can enjoy this scrumptious dessert. The step-by-step preparation ensures that even novice bakers can create a beautiful cake that impresses family and friends alike.
As you embark on your baking journey, remember the tips shared throughout this article. They will help you achieve the perfect texture and flavor in your Chocolate Fig Spice Cake. So, gather your ingredients, preheat your oven, and get ready to indulge in a slice of this delightful cake. Happy baking!
ating
Chocolate Fig Spice Cake Recipe is a must-try!
This Chocolate Fig Spice Cake is a warm, cozy celebration of rich cocoa, fragrant spices, and sweet figs soaked in coffee (or orange juice!). Topped with a luscious dark chocolate glaze, it’s the perfect centerpiece for holiday gatherings, dinner parties, or a quiet indulgent treat with your favorite drink.
For the Cake:1 cup chopped dried California black mission figs1 cup hot brewed coffeeor hot water or orange juice1 cup unsalted butter, softened1 cup granulated sugar2 large eggs, room temperature2 teaspoons vanilla extract1 tablespoon whisky or brandy (optional)1 cup buttermilk, room temperature1 teaspoon orange zest1 3/4 cups all-purpose flour3/4 cup unsweetened cocoa powder1 1/2 teaspoons ground cinnamon1 teaspoon ground allspice1/4 teaspoon ground cloves1 1/2 teaspoons baking soda1/2 teaspoon baking powder1/4 teaspoon salt1/4 cup chopped candied orange (optional)1 tablespoon cocoa powder (for dusting pan and figs)Fig slices for garnish (optional)
For the Glaze:2/3 cup semisweet or dark chocolate chipsor chopped chocolate1/4 cup heavy cream1 1/2 tablespoons whisky or brandy (optional)1/4 teaspoon vanilla extract1 teaspoon espresso powder or instant coffee (optional)
Method
Preheat and PreparePreheat oven to 350°F (175°C). Grease a 10–12 cup bundt pan and dust with cocoa powder.
Mix the Dry IngredientsIn a medium bowl, whisk together flour, cocoa powder, cinnamon, allspice, cloves, baking soda, baking powder, and salt.
Soak the FigsCombine chopped figs with hot coffee (or juice). Let them soak while you prepare the batter.
Cream the Butter and SugarIn a large mixing bowl, beat the butter and sugar until light and creamy. Add the eggs one at a time, then mix in vanilla and optional brandy or whisky.
Add Buttermilk and ZestSlowly mix in buttermilk and orange zest. The mixture may look slightly curdled—this is normal.
Combine Wet and DryAdd the dry mixture to the wet ingredients gradually, mixing until just combined.
Add Soaking LiquidRemove figs from the coffee and reserve the liquid. Gently stir the coffee (or soaking liquid) into the batter.
Add the FigsPat the figs dry and toss them with cocoa powder (and candied orange, if using). Spoon the batter into the prepared pan and swirl the figs into the batter.
BakeBake for 40–50 minutes, or until a toothpick inserted in the center comes out clean. Let cool in the pan for 10–15 minutes before inverting onto a wire rack. Cool completely (about 1 hour).
Make the GlazeMelt chocolate and cream in a saucepan over low heat, stirring until smooth. Stir in vanilla, espresso powder, and optional liquor. Let cool slightly before drizzling over cooled cake.
Notes
Booze-Free Option: Skip the whisky/brandy and use more vanilla or orange extract.
Flavor Boost: Swap coffee with orange juice for a brighter citrus profile.
Make Ahead: Cake can be baked a day ahead and glazed before serving.
Storage: Store covered at room temperature for 2 days or in the fridge for up to 5.
One-Pot Shrimp Pasta Primavera. This delightful dish combines succulent shrimp, fresh vegetables, and perfectly cooked pasta, all in one pot. It’s not only easy to prepare but also packed with flavor and nutrition.
Imagine a busy weeknight where you want to whip up something special without spending hours in the kitchen. This recipe is your answer! With just a handful of ingredients and minimal cleanup, you can create a satisfying meal that the whole family will love. Plus, it’s versatile enough to adapt to your taste preferences or what you have on hand.
One-Pot Shrimp Pasta Primavera is a breeze. So, let’s dive into the world of flavors and colors that this dish offers!
Ingredients for One-Pot Shrimp Pasta Primavera
One-Pot Shrimp Pasta Primavera, you’ll need a selection of fresh ingredients that come together beautifully. Here’s what you’ll need:
8 ounces of linguine or spaghetti
1 pound of large shrimp, peeled and deveined
1 tablespoon of olive oil
1 small onion, diced
2 cloves of garlic, minced
1 bell pepper, sliced (any color)
1 medium zucchini, sliced
1 cup of cherry tomatoes, halved
1 cup of vegetable or chicken broth
1 teaspoon of Italian seasoning
Salt and pepper to taste
1/4 cup of grated Parmesan cheese
Fresh basil for garnish (optional)
These ingredients not only provide a burst of flavor but also ensure a colorful presentation. The shrimp adds protein, while the vegetables contribute essential vitamins and minerals. You can easily find these ingredients at your local grocery store, making this dish accessible for everyone.
One-Pot Shrimp Pasta Primavera lies in its flexibility, allowing you to customize it to your liking!
Step-by-Step Preparation of One-Pot Shrimp Pasta Primavera
One-Pot Shrimp Pasta Primavera to life! Follow these simple steps to create a delicious meal that’s sure to impress.
Step 1: Preparing the Ingredients
Start by prepping your ingredients. This makes the cooking process smoother. First, peel and devein the shrimp if you haven’t done so already. Next, dice the onion and mince the garlic. Slice the bell pepper and zucchini into thin pieces. Finally, halve the cherry tomatoes. Having everything ready will help you cook efficiently!
Step 2: Cooking the Shrimp
In a large pot or deep skillet, heat the olive oil over medium heat. Once the oil is hot, add the shrimp. Cook them for about 2-3 minutes until they turn pink and opaque. This step is crucial as it ensures the shrimp are perfectly cooked. Once done, remove the shrimp from the pot and set them aside. This will prevent overcooking later.
Step 3: Sautéing the Vegetables
In the same pot, add the diced onion. Sauté for about 3 minutes until it becomes translucent. Then, stir in the minced garlic and cook for an additional 30 seconds until fragrant. Next, add the sliced bell pepper and zucchini. Cook these vegetables for about 3-4 minutes until they start to soften. This step enhances the flavors and adds a lovely texture to your dish.
Step 4: Combining Ingredients
Once the vegetables are sautéed, it’s time to combine everything. Pour in the vegetable or chicken broth, bringing it to a gentle simmer. Then, add the linguine or spaghetti, ensuring it is fully submerged in the liquid. This is where the magic happens! Sprinkle in the Italian seasoning, salt, and pepper to taste. Cover the pot and let it cook for about 10-12 minutes, stirring occasionally.
Step 5: Cooking the Pasta
As the pasta cooks, it will absorb the broth, becoming flavorful and tender. Keep an eye on it to ensure it reaches the perfect al dente texture. This is a great time to check the seasoning. Adjust it if needed, adding more salt or pepper to suit your taste.
Step 6: Final Touches
One-Pot Shrimp Pasta Primavera. Serve immediately, garnished with fresh basil if desired!
Variations of One-Pot Shrimp Pasta Primavera
One-Pot Shrimp Pasta Primavera is its versatility. You can easily customize this dish to suit your taste or dietary needs. Here are some exciting variations to consider:
Adding Different Proteins
One-Pot Shrimp Pasta Primavera a new experience every time!
Incorporating Seasonal Vegetables
Another way to make this dish your own is by incorporating seasonal vegetables. Depending on the time of year, you can add fresh asparagus in the spring, or sweet corn in the summer. In the fall, consider adding roasted butternut squash or Brussels sprouts. Winter vegetables like kale or spinach can also enhance the dish. Not only do these vegetables add flavor, but they also boost the nutritional value. Feel free to mix and match based on what you have on hand or what’s in season!
One-Pot Shrimp Pasta Primavera that suits your preferences. Enjoy the process of making this dish your own!
Cooking Note for One-Pot Shrimp Pasta Primavera
One-Pot Shrimp Pasta Primavera, there are a few cooking notes to keep in mind to ensure your dish turns out perfectly every time. First, the choice of pasta can affect the overall texture and flavor. While linguine or spaghetti works wonderfully, you can also experiment with whole wheat or gluten-free pasta if you prefer. Just remember that cooking times may vary, so check the package instructions for the best results.
Another important aspect is the shrimp. Fresh shrimp is ideal, but frozen shrimp can also be used. If you opt for frozen shrimp, make sure to thaw them completely before cooking. This helps them cook evenly and prevents them from becoming rubbery. Additionally, always check for the shrimp’s quality. Look for a firm texture and a mild ocean scent.
One-Pot Shrimp Pasta Primavera. Stirring occasionally will help achieve the right balance.
Lastly, don’t hesitate to adjust the seasoning to your liking. Everyone’s taste buds are different, so feel free to add more Italian seasoning, salt, or pepper as needed. A splash of lemon juice at the end can also brighten the flavors, giving your dish a fresh twist.
One-Pot Shrimp Pasta Primavera that your family and friends will rave about!
Serving Suggestions for One-Pot Shrimp Pasta Primavera
One-Pot Shrimp Pasta Primavera is ready, it’s time to think about how to serve it. Presentation can elevate your dish, making it even more enjoyable. Here are some delightful serving suggestions to consider:
Garnish with Fresh Herbs: A sprinkle of fresh basil or parsley adds a pop of color and freshness. It enhances the dish’s visual appeal and complements the flavors beautifully.
Pair with a Side Salad: A light side salad can balance the meal. Consider a simple mixed greens salad with a lemon vinaigrette. The acidity will contrast nicely with the creamy pasta.
Serve with Crusty Bread: A slice of crusty bread or garlic bread is perfect for soaking up any leftover sauce. It adds a satisfying crunch and makes the meal feel complete.
Offer Extra Cheese: For cheese lovers, provide additional grated Parmesan on the side. This allows everyone to customize their dish to their liking.
Include a Lemon Wedge: A wedge of lemon on the plate can brighten the flavors. Squeezing fresh lemon juice over the pasta just before eating adds a refreshing zing.
One-Pot Shrimp Pasta Primavera look restaurant-worthy. Whether it’s a family dinner or a gathering with friends, these tips will impress your guests and make the meal memorable.
Feel free to mix and match these ideas based on your preferences and the occasion. The goal is to create a delightful dining experience that everyone will enjoy!
Tips for Perfect One-Pot Shrimp Pasta Primavera
One-Pot Shrimp Pasta Primavera is all about attention to detail and a few handy tips. Here are some essential pointers to ensure your dish turns out delicious every time:
Use Fresh Ingredients: Fresh vegetables and shrimp make a significant difference in flavor. Whenever possible, choose seasonal produce for the best taste and nutrition.
Don’t Overcook the Shrimp: Shrimp cooks quickly. Keep an eye on them, as they only need about 3-5 minutes to turn pink and opaque. Overcooking can make them rubbery.
Adjust the Liquid: Depending on the type of pasta you use, you may need to adjust the amount of broth. Whole wheat or gluten-free pasta may absorb more liquid, so keep an eye on it as it cooks.
Stir Occasionally: Stirring the pasta occasionally while it cooks helps prevent it from sticking together. It also ensures even cooking and flavor distribution.
Season Gradually: Start with a little salt and pepper, then taste as you go. This way, you can adjust the seasoning to your preference without overpowering the dish.
Experiment with Herbs: While Italian seasoning is a great base, feel free to add fresh herbs like thyme or oregano for an extra flavor boost. Fresh herbs can elevate your dish to new heights!
Let It Rest: After cooking, let the dish sit for a few minutes before serving. This allows the flavors to meld together, enhancing the overall taste.
Serve Hot: Enjoy your One-Pot Shrimp Pasta Primavera immediately for the best texture and flavor. The pasta is at its best when served fresh and hot!
One-Pot Shrimp Pasta Primavera. Each step contributes to a delightful meal that’s sure to impress your family and friends!
Breakdown of Time for One-Pot Shrimp Pasta Primavera
One-Pot Shrimp Pasta Primavera can help you plan your meal better. Here’s a simple breakdown of the time involved in each step:
Prep Time
10-15 minutes to gather and prepare all your ingredients. This includes peeling and deveining the shrimp, chopping the vegetables, and measuring out the broth and seasonings. Having everything ready before you start cooking will make the process smoother and more enjoyable!
Cooking Time
15-20 minutes. This includes sautéing the vegetables, cooking the pasta, and adding the shrimp. The key is to keep an eye on the pasta to ensure it reaches that perfect al dente texture. Remember, the shrimp cooks quickly, so you’ll want to add it towards the end of the cooking process.
Total Time
25-35 minutes from start to finish. This makes One-Pot Shrimp Pasta Primavera an excellent choice for a weeknight dinner when you want something delicious without spending hours in the kitchen. With just one pot to clean, you’ll have more time to relax and enjoy your meal!
Nutritional Information for One-Pot Shrimp Pasta Primavera
One-Pot Shrimp Pasta Primavera is not only tasty but also offers a balanced mix of nutrients. Here’s a closer look at the nutritional information per serving:
Calories
One-Pot Shrimp Pasta Primavera contains approximately 400 calories. This makes it a satisfying option for lunch or dinner without being overly heavy. The combination of shrimp, pasta, and vegetables provides a hearty meal that keeps you energized throughout the day.
Protein
30 grams of protein per serving, the shrimp plays a significant role in meeting your daily protein needs. This makes it a great choice for those looking to maintain or build muscle while enjoying a flavorful meal.
Sodium
One-Pot Shrimp Pasta Primavera contains around 600 milligrams per serving. This amount can vary based on the broth used and any additional seasonings you add. If you’re watching your sodium intake, consider using low-sodium broth and adjusting the salt to taste. This way, you can enjoy the dish while keeping your health goals in mind.
One-Pot Shrimp Pasta Primavera is a nutritious meal option that balances calories, protein, and sodium. It’s perfect for anyone looking to enjoy a delicious dish without compromising on health. Whether you’re cooking for yourself or for family and friends, this recipe is sure to please!
FAQs about One-Pot Shrimp Pasta Primavera
Can I use frozen shrimp for One-Pot Shrimp Pasta Primavera?
One-Pot Shrimp Pasta Primavera. Just make sure to thaw them completely before cooking. Thawing can be done overnight in the refrigerator or quickly by placing them in a bowl of cold water for about 15-20 minutes. Once thawed, you can follow the recipe as usual. Using frozen shrimp is a convenient option, especially if you want to keep some on hand for quick meals!
What vegetables work best in One-Pot Shrimp Pasta Primavera?
One-Pot Shrimp Pasta Primavera lies in its versatility with vegetables. You can use a variety of fresh vegetables based on your preferences and what’s in season. Some great options include:
Bell Peppers: Any color adds sweetness and crunch.
Zucchini: Sliced or diced, it cooks quickly and adds moisture.
Cherry Tomatoes: They burst with flavor and add a lovely color.
Broccoli: Adds a nice crunch and is packed with nutrients.
Asparagus: Tender and flavorful, perfect for spring dishes.
Spinach: Wilts down nicely and adds a pop of green.
Feel free to mix and match based on your taste and what you have available. The more colorful your vegetable selection, the more appealing your dish will be!
How can I make One-Pot Shrimp Pasta Primavera gluten-free?
One-Pot Shrimp Pasta Primavera gluten-free is simple! All you need to do is substitute regular pasta with gluten-free pasta. There are many options available, such as rice pasta, quinoa pasta, or chickpea pasta. Just be sure to check the cooking time on the package, as gluten-free pasta may require different cooking times than traditional pasta. Additionally, ensure that your broth is gluten-free, as some brands may contain gluten. With these adjustments, you can enjoy a delicious gluten-free version of this delightful dish!
Conclusion on One-Pot Shrimp Pasta Primavera
One-Pot Shrimp Pasta Primavera is a fantastic dish that combines convenience, flavor, and nutrition. It’s perfect for busy weeknights when you want to prepare a meal that’s both satisfying and quick. With just one pot to clean, you can enjoy a delicious dinner without the hassle of extensive cleanup.
This recipe not only highlights the delightful taste of shrimp but also showcases a variety of colorful vegetables. The combination of fresh ingredients and simple cooking techniques makes it accessible for cooks of all skill levels. Whether you’re a seasoned chef or just starting out, you can easily master this dish and impress your family and friends.
One-Pot Shrimp Pasta Primavera allows you to customize it to your liking. You can experiment with different proteins, seasonal vegetables, and herbs to create a unique version every time. This adaptability ensures that you can enjoy this meal throughout the year, no matter what ingredients you have on hand.
One-Pot Shrimp Pasta Primavera a try? Gather your ingredients, follow the steps, and savor the delightful flavors that come together in just one pot. It’s a meal that promises to bring joy to your table and warmth to your heart. Happy cooking!
ating
One-Pot Shrimp Pasta Primavera is a quick delight!
This One Pot Shrimp Pasta Primavera is a creamy, vibrant dish packed with fresh vegetables, juicy shrimp, and tender pasta—all cooked in one skillet for easy cleanup. Bursting with lemon, garlic, herbs, and Parmesan, it’s a light yet comforting meal that comes together in under 40 minutes!
2tablespoonsextra virgin olive oil1 onionpeeled and diced3 cloves garlic, minced1/4 teaspoon chili flakesSalt, to tasteBlack pepper, to taste2 cups sliced mushrooms (shiitake, white, or cremini)1 1/2 to 2 cups asparagus, trimmed and chopped1 cup green peas (fresh or frozen)1 pint cherry tomatoes, halved1/4 cup chopped fresh basil or parsleyZest of 1 lemon12 ounces penne pasta (or short pasta of choice)11 ounces large shrimp, peeled and deveined (tails on or off)3 cups chicken or vegetable broth (or water)1/2 cup cream or milk (or plant-based alternatives)3 tablespoons unsalted butter3/4 cup grated Parmesan cheese (plus extra for serving)
Method
Sauté the BaseHeat olive oil in a large deep skillet or pot over medium-high heat. Add diced onion and mushrooms. Cook for 2–5 minutes until softened. Stir in garlic, chili flakes, salt, and pepper. Cook for 1 more minute until fragrant.
Add Pasta and SimmerStir in uncooked pasta, broth, and cream. Bring to a boil. Cover, then reduce the heat and simmer uncovered, stirring occasionally, for the pasta’s cook time minus 2–3 minutes.
Add Shrimp and VeggiesWhen 2–3 minutes remain on the pasta, stir in the asparagus, peas, shrimp, and butter. Cover and continue cooking until shrimp is pink and opaque, pasta is al dente, and the sauce has slightly thickened.
Finish with FlavorRemove the pan from heat. Stir in the Parmesan cheese until melted. Fold in lemon zest, cherry tomatoes, and fresh herbs.
ServeSpoon into bowls and top with extra Parmesan and basil if desired. Serve with lemon wedges for brightness.
Notes
Make it Dairy-Free: Use plant-based milk and vegan Parmesan.
Swap Proteins: Try chicken or tofu if you’re out of shrimp.
Add Greens: Spinach or arugula can be stirred in at the end for extra color and nutrients.
Storage: Best served fresh, but leftovers can be stored for up to 2 days in the fridge.
Introduction to Spinach Ricotta Stuffed Chicken Breasts
Spinach Ricotta Stuffed Chicken Breasts. This dish combines tender chicken with a creamy, flavorful filling that is sure to impress your family and friends. Not only is it packed with protein, but it also includes nutritious spinach, making it a well-rounded meal.
Spinach Ricotta Stuffed Chicken Breasts are perfect for any occasion. Whether you’re hosting a dinner party or simply cooking for your family, this recipe is both easy to prepare and visually appealing. The vibrant green spinach peeking out from the golden-brown chicken creates a beautiful presentation on your dinner table.
Moreover, this dish is versatile. You can customize the filling to suit your taste preferences. Add herbs, spices, or even different cheeses to make it your own. The possibilities are endless! Plus, it’s a great way to sneak in some greens for those picky eaters.
In this article, we will guide you through the ingredients, preparation steps, and cooking methods for making the perfect Spinach Ricotta Stuffed Chicken Breasts. You’ll also find tips, variations, and serving suggestions to elevate your dining experience. So, let’s dive into this delightful recipe that is sure to become a family favorite!
Ingredients for Spinach Ricotta Stuffed Chicken Breasts
Spinach Ricotta Stuffed Chicken Breasts, you will need a few simple ingredients. Each component plays a vital role in delivering flavor and texture. Here’s what you’ll need:
2 large boneless, skinless chicken breasts (about 1 pound total)
1 cup fresh spinach, chopped
1 cup ricotta cheese
1/2 cup shredded mozzarella cheese
1/4 cup grated Parmesan cheese
1 teaspoon garlic powder
1 teaspoon onion powder
1/2 teaspoon salt
1/4 teaspoon black pepper
1 tablespoon olive oil
1/2 teaspoon Italian seasoning
1/4 teaspoon red pepper flakes (optional)
These ingredients come together to create a delicious filling that complements the chicken perfectly. The combination of ricotta and mozzarella provides a creamy texture, while the spinach adds a fresh, vibrant flavor. The spices enhance the overall taste, making each bite a delight.
Feel free to adjust the quantities based on your preferences. For instance, if you love cheese, you can add more mozzarella or Parmesan. If you prefer a bit of heat, increase the red pepper flakes. The beauty of this recipe lies in its flexibility, allowing you to tailor it to your liking!
Preparation of Spinach Ricotta Stuffed Chicken Breasts
Spinach Ricotta Stuffed Chicken Breasts. This section will guide you through each step, ensuring that your dish turns out perfectly. Let’s get started!
Step 1: Preparing the Chicken Breasts
First, take your large boneless, skinless chicken breasts. Rinse them under cold water and pat them dry with paper towels. This step is important as it helps the chicken cook evenly. Next, carefully slice a pocket into each chicken breast. Make sure not to cut all the way through; you want to create a nice space to hold the filling. A sharp knife works best for this task. Once done, set the chicken aside while you prepare the filling.
Step 2: Making the Spinach and Ricotta Filling
In a medium bowl, combine the chopped spinach, ricotta cheese, shredded mozzarella, and grated Parmesan cheese. Add the garlic powder, onion powder, salt, black pepper, Italian seasoning, and red pepper flakes if you like a little heat. Mix everything together until well combined. The mixture should be creamy and flavorful, with the spinach evenly distributed throughout. This filling is what makes your chicken breasts so delicious!
Step 3: Stuffing the Chicken Breasts
Now it’s time to stuff the chicken breasts! Take a spoonful of the spinach and ricotta mixture and carefully fill each pocket you created earlier. Don’t overstuff, as the filling may spill out during cooking. If needed, use toothpicks to secure the opening of the chicken breasts. This will help keep the filling inside while cooking, ensuring that every bite is packed with flavor.
Step 4: Cooking the Spinach Ricotta Stuffed Chicken Breasts
Heat the olive oil in an oven-safe skillet over medium heat. Once the oil is hot, add the stuffed chicken breasts. Cook them for about 4-5 minutes on each side, or until they are golden brown. This step adds a nice crust to the chicken, enhancing the overall flavor. After browning, transfer the skillet to your preheated oven. Bake for 20-25 minutes, or until the chicken reaches an internal temperature of 165°F (75°C). Once cooked, remove the skillet from the oven and let the chicken rest for 5 minutes before slicing. This resting period allows the juices to redistribute, making your chicken even juicier!
Variation of Spinach Ricotta Stuffed Chicken Breasts
Spinach Ricotta Stuffed Chicken Breasts recipe is delicious on its own, there are many ways to switch things up! You can explore alternative fillings and different cooking methods to create a unique dish every time. Let’s dive into some exciting variations!
Alternative Fillings for Spinach Ricotta Stuffed Chicken Breasts
One of the best parts about making stuffed chicken breasts is the ability to customize the filling. Here are some tasty alternatives to consider:
Mushroom and Cream Cheese: Sauté chopped mushrooms and mix them with cream cheese for a rich, earthy flavor.
Sun-Dried Tomato and Feta: Combine chopped sun-dried tomatoes with crumbled feta cheese for a Mediterranean twist.
Broccoli and Cheddar: Steam broccoli and mix it with sharp cheddar cheese for a classic combination.
Artichoke and Goat Cheese: Blend artichoke hearts with creamy goat cheese for a tangy and flavorful filling.
Feel free to mix and match ingredients based on your preferences. The key is to ensure that the filling complements the chicken while providing a burst of flavor in every bite!
Cooking Methods for Spinach Ricotta Stuffed Chicken Breasts
Spinach Ricotta Stuffed Chicken Breasts. Each method offers a different texture and flavor profile:
Grilling: For a smoky flavor, grill the stuffed chicken breasts over medium heat. This method adds a delicious char and keeps the chicken juicy.
Slow Cooking: Place the stuffed chicken in a slow cooker with a bit of broth. Cook on low for 4-6 hours for tender, flavorful chicken.
Air Frying: Preheat your air fryer and cook the stuffed chicken breasts for about 15-20 minutes. This method gives you a crispy exterior without much oil.
Pan-Seering: After browning the chicken in a skillet, add a splash of chicken broth and cover to steam. This keeps the chicken moist while cooking.
Experimenting with different cooking methods can lead to delightful surprises. Each technique brings out unique flavors and textures, making your meal even more enjoyable!
Cooking Note for Spinach Ricotta Stuffed Chicken Breasts
Spinach Ricotta Stuffed Chicken Breasts, there are a few important cooking notes to keep in mind. These tips will help ensure that your chicken turns out perfectly every time, making your meal a success!
First, always use a meat thermometer to check the internal temperature of the chicken. The USDA recommends that chicken should reach an internal temperature of 165°F (75°C) to be safe for consumption. This ensures that any harmful bacteria are eliminated, and your chicken is juicy and tender.
Next, consider the thickness of your chicken breasts. If they are particularly thick, you may need to adjust the cooking time. Thicker breasts will require a longer baking time to cook through completely. Conversely, if your chicken breasts are thinner, reduce the cooking time to prevent them from drying out.
Additionally, letting the chicken rest after cooking is crucial. Allowing it to rest for about 5 minutes before slicing helps the juices redistribute throughout the meat. This simple step can make a big difference in the overall juiciness and flavor of your dish.
Lastly, don’t be afraid to experiment with seasonings and marinades. Marinating the chicken in lemon juice or your favorite herbs for 30 minutes before stuffing can add an extra layer of flavor. This is especially helpful if you want to enhance the taste of the chicken itself.
Spinach Ricotta Stuffed Chicken Breasts that are sure to impress everyone at your dinner table!
Serving Suggestions for Spinach Ricotta Stuffed Chicken Breasts
Spinach Ricotta Stuffed Chicken Breasts are cooked to perfection, it’s time to think about how to serve them. The right sides can elevate your meal and create a balanced plate. Here are some delightful serving suggestions that pair wonderfully with this dish:
Garlic Mashed Potatoes: Creamy mashed potatoes with a hint of garlic make a comforting side. Their smooth texture complements the stuffed chicken beautifully.
Roasted Vegetables: A mix of seasonal vegetables, such as carrots, bell peppers, and zucchini, roasted until tender adds color and nutrition to your plate.
Quinoa Salad: A light quinoa salad with cherry tomatoes, cucumber, and a lemon vinaigrette offers a refreshing contrast to the rich filling of the chicken.
Steamed Asparagus: Lightly steamed asparagus drizzled with olive oil and lemon juice provides a crisp and healthy side that enhances the meal.
Cauliflower Rice: For a low-carb option, serve the chicken with cauliflower rice. It’s a great way to add more veggies to your meal without sacrificing flavor.
For a complete dining experience, consider adding a simple salad. A mixed greens salad with a light vinaigrette can cleanse the palate and add freshness to your meal. You can also serve the chicken with a side of marinara sauce for dipping, which adds a delicious Italian flair.
Finally, don’t forget about the drinks! A crisp white wine, such as Pinot Grigio, pairs nicely with the flavors of the stuffed chicken. If you prefer non-alcoholic options, a sparkling water with a slice of lemon can be refreshing.
Spinach Ricotta Stuffed Chicken Breasts will shine on the dinner table, making for a delightful and satisfying meal that everyone will love!
Tips for Perfect Spinach Ricotta Stuffed Chicken Breasts
Spinach Ricotta Stuffed Chicken Breasts turn out perfectly every time, consider these helpful tips. They will enhance the flavor, texture, and overall presentation of your dish, making it a hit at your dinner table!
First, always use fresh ingredients. Fresh spinach and high-quality cheeses will elevate the taste of your filling. If possible, opt for organic chicken breasts. They tend to be juicier and more flavorful.
Next, don’t skip the seasoning! The spices in the filling are crucial for flavor. Feel free to adjust the seasonings to suit your taste. Adding fresh herbs like basil or parsley can also brighten the dish.
When stuffing the chicken, be gentle. Overstuffing can cause the filling to spill out during cooking. A little filling goes a long way, so aim for a generous but manageable amount.
For an extra layer of flavor, consider searing the chicken breasts in a hot skillet before baking. This step creates a beautiful golden crust and locks in moisture, making your chicken even more delicious.
Additionally, let the chicken rest after cooking. This step is essential for juicy chicken. Resting allows the juices to redistribute, ensuring every bite is tender and flavorful.
Lastly, presentation matters! When serving, slice the chicken breasts at an angle to showcase the colorful filling. This not only looks appealing but also makes it easier for your guests to enjoy.
Spinach Ricotta Stuffed Chicken Breasts that are not only delicious but also visually stunning. Your family and friends will be impressed, and you’ll feel proud of your culinary skills!
Breakdown of Time for Spinach Ricotta Stuffed Chicken Breasts
Spinach Ricotta Stuffed Chicken Breasts can help you plan your meal better. Here’s a detailed breakdown of the time you’ll need for preparation and cooking.
Prep Time
The prep time for this delicious dish is approximately 15-20 minutes. During this time, you will gather all your ingredients, prepare the chicken breasts, and make the flavorful spinach and ricotta filling. This step is crucial as it sets the foundation for your meal. Make sure to take your time to ensure everything is ready for cooking!
Cooking Time
Once you’ve prepped your ingredients, the cooking time will take about 25-30 minutes. This includes browning the stuffed chicken breasts in the skillet for about 8-10 minutes and then baking them in the oven for 20-25 minutes. The cooking time may vary slightly depending on the thickness of your chicken breasts, so keep an eye on them to ensure they reach the perfect internal temperature.
Total Time
In total, you can expect to spend around 40-50 minutes from start to finish. This includes both prep and cooking time. With this quick and efficient timeline, you can have a delicious and healthy meal ready in no time. Perfect for busy weeknights or when you want to impress guests without spending hours in the kitchen!
Nutritional Information for Spinach Ricotta Stuffed Chicken Breasts
Spinach Ricotta Stuffed Chicken Breasts not only taste great but also provide a good amount of nutrients. Here’s a breakdown of the key nutritional information per serving:
Calories
Spinach Ricotta Stuffed Chicken Breasts contains approximately 450 calories. This makes it a satisfying option for dinner without going overboard on calories. The combination of chicken and cheese provides a hearty meal that keeps you feeling full and satisfied.
Protein
One of the standout features of this dish is its high protein content. Each serving offers about 45 grams of protein. This is excellent for muscle repair and growth, making it a great choice for those who are active or looking to maintain a healthy lifestyle. The protein from the chicken and cheeses contributes to this impressive total.
Sodium
In terms of sodium, each serving contains around 600 milligrams. While this is a reasonable amount for a flavorful dish, it’s always good to be mindful of your sodium intake, especially if you are watching your salt consumption. You can reduce the sodium by using low-sodium cheese or adjusting the amount of added salt in the recipe.
Spinach Ricotta Stuffed Chicken Breasts provide a nutritious meal option that is rich in protein and relatively low in calories. It’s a delicious way to enjoy a balanced diet while indulging in a flavorful dish!
FAQs about Spinach Ricotta Stuffed Chicken Breasts
Can I use frozen spinach for Spinach Ricotta Stuffed Chicken Breasts?
Spinach Ricotta Stuffed Chicken Breasts. However, it’s important to thaw and drain the spinach thoroughly before using it. Frozen spinach often contains excess water, which can make your filling too watery. To prepare, simply place the frozen spinach in a colander and run it under cold water until thawed. Then, press out any remaining moisture with a clean kitchen towel. This will ensure that your filling remains creamy and flavorful without being soggy!
How do I know when the chicken is cooked through?
Spinach Ricotta Stuffed Chicken Breasts are cooked through is by using a meat thermometer. Insert the thermometer into the thickest part of the chicken breast. It should read 165°F (75°C) to ensure it is safe to eat. If you don’t have a thermometer, you can also cut into the chicken. The meat should be opaque and the juices should run clear, not pink. Always prioritize food safety to enjoy your meal worry-free!
Can I make Spinach Ricotta Stuffed Chicken Breasts ahead of time?
Spinach Ricotta Stuffed Chicken Breasts ahead of time. After stuffing the chicken, cover it tightly and store it in the refrigerator for up to 24 hours before cooking. This can be a great time-saver for busy weeknights or when hosting guests. Just remember to let the chicken sit at room temperature for about 15-20 minutes before cooking. This helps it cook evenly. If you want to freeze them, wrap each stuffed chicken breast tightly in plastic wrap and then place them in a freezer-safe bag. They can be frozen for up to 3 months. Thaw in the refrigerator before cooking!
What sides pair well with Spinach Ricotta Stuffed Chicken Breasts?
Spinach Ricotta Stuffed Chicken Breasts, you have plenty of delicious side options to choose from. Here are some great pairings:
Garlic Mashed Potatoes: Creamy and comforting, they complement the flavors of the chicken.
Roasted Vegetables: A colorful mix of seasonal veggies adds nutrition and vibrancy to your plate.
Quinoa Salad: A light salad with fresh ingredients balances the richness of the stuffed chicken.
Steamed Asparagus: Crisp and healthy, asparagus adds a refreshing touch to your meal.
Cauliflower Rice: A low-carb option that pairs well with the flavors of the chicken.
These sides not only enhance the meal but also create a well-rounded dining experience. Enjoy experimenting with different combinations to find your favorite!
Conclusion on Spinach Ricotta Stuffed Chicken Breasts
Spinach Ricotta Stuffed Chicken Breasts are a delightful and nutritious dish that can easily become a staple in your meal rotation. With their tender chicken exterior and creamy, flavorful filling, they offer a perfect balance of taste and health benefits. This recipe not only provides a satisfying meal but also allows for creativity in the kitchen, as you can customize the filling and cooking methods to suit your preferences.
Whether you’re preparing a weeknight dinner or hosting a special occasion, this dish is sure to impress. The vibrant colors and rich flavors make it visually appealing and delicious. Plus, with the tips and variations provided, you can make each experience unique and exciting.
Spinach Ricotta Stuffed Chicken Breasts turn out perfectly every time.
So, gather your ingredients, roll up your sleeves, and get ready to enjoy a meal that is not only good for you but also bursting with flavor. Your family and friends will thank you for introducing them to this delicious dish, and you’ll feel proud to serve it at your table. Happy cooking!
ating
Spinach Ricotta Stuffed Chicken Breasts are a must-try!
This Ricotta and Spinach Stuffed Chicken is a creamy, cheesy, and flavorful dish that brings comfort and elegance to the table. Juicy chicken breasts are filled with a savory ricotta-spinach blend, then seared, smothered in marinara, and baked to bubbly perfection. A low-carb, high-protein meal that’s easy enough for a weeknight and impressive enough for guests!
4bonelessskinless chicken breasts1 cup ricotta cheese (whole milk preferred)1 cup fresh spinach, chopped1/2 cup grated Parmesan cheese2 cloves garlic, minced1 tablespoon olive oilSalt, to tasteBlack pepper, to taste1 teaspoon Italian seasoning1/2 teaspoon red pepper flakes (optional)1 cup marinara sauce1/2 cup shredded mozzarella cheese
Method
Preheat the OvenPreheat your oven to 375°F (190°C).
Prepare the ChickenSlice each chicken breast horizontally to create a pocket—being careful not to cut all the way through. Season inside and outside with salt and pepper.
Make the FillingIn a mixing bowl, combine ricotta cheese, chopped spinach, Parmesan cheese, minced garlic, Italian seasoning, red pepper flakes (if using), and a pinch of salt and pepper. Stir until well mixed.
Stuff the ChickenFill each chicken pocket with the ricotta mixture. Use toothpicks to secure if needed to keep the filling inside.
Sear the ChickenHeat olive oil in an oven-safe skillet over medium heat. Add the stuffed chicken breasts and sear for 3–4 minutes on each side until golden brown.
Add Sauce and CheesePour marinara sauce over the chicken and sprinkle the mozzarella cheese evenly on top.
BakeTransfer the skillet to the oven and bake for 20–25 minutes, or until the internal temperature of the chicken reaches 165°F (74°C) and the cheese is melted and bubbly.
Rest and ServeLet the chicken rest for 5 minutes before serving. Serve with extra marinara sauce or fresh herbs, if desired.
Notes
Make It Ahead: You can stuff the chicken and refrigerate it for up to 24 hours before cooking.
Add-Ins: Feel free to add fresh herbs like basil or parsley to the filling for extra flavor.
Low-Carb Friendly: This recipe is naturally low in carbohydrates and works well for keto-style meals.
Side Ideas: Serve with zucchini noodles, garlic green beans, or a fresh garden salad.