There’s something universally comforting about bread—the way it rises, the way it fills the house with a scent so warm it feels like a hug. But for me, it’s not just the bread. It’s what hides inside. Melting cheese tucked between folds of soft, golden dough reminds me of Saturday afternoons in my childhood kitchen, when the oven door seemed like a portal and my mother’s hands moved like poetry.
Our family didn’t eat extravagantly, but we always ate with intention. And when cheese-filled bread made its way to the table, it wasn’t just food—it was celebration. It was a reward for a week well done, a peace offering on tense days, and a simple way of saying, I made this for you. My mother would press her fingers into each ball of dough, sealing in the cheese with the same care she used to tie our scarves in winter.
Now, years later, I still make this bread. And every time I press the edges closed around the filling, I feel like I’m reconnecting with that warmth, passing it on, one bite at a time.
Why Cheese-Filled Bread Never Goes Out of Style
In a world where food trends come and go at lightning speed, there’s something incredibly grounding about returning to the basics. Dough. Cheese. Heat. That’s all you need. But in the simplicity lies its genius.
Cheese-filled bread doesn’t chase perfection—it delivers satisfaction. It doesn’t rely on elaborate presentation—it lets flavor do the talking. Whether you’re making it for a casual family breakfast, a hearty side to soup, or a comforting late-night snack, this bread always feels right.
Ingredients
For the Dough:
Ingredient
Amount
Yeast
1 teaspoon (4 g)
Warm water
1.5 cups (300 ml)
All-purpose flour
5 cups (540 g)
Salt
1 teaspoon (5 g)
Directions
Activate the yeast: In a large bowl, dissolve the yeast in the warm water. Let sit for 5–10 minutes until bubbly and foamy.
Form the dough: Gradually mix in the flour and salt, stirring until a dough begins to form. Knead by hand for 8–10 minutes (or with a mixer for 5–6 minutes) until smooth and elastic.
First rise: Cover the dough with a clean towel and let it rise in a warm spot for 1–1.5 hours, or until doubled in size.
Shape and fill: Punch down the dough, divide it into even portions (8–10 pieces), and flatten each slightly. Place a spoonful of your desired cheese in the center and fold the dough around it, pinching to seal.
Second rise: Place filled dough balls seam-side down on a parchment-lined tray. Cover and let rise for 20–30 minutes.
Bake: Preheat oven to 200°C (390°F). Bake the filled breads for 18–22 minutes, or until golden brown on top.
Cool and serve: Allow to cool slightly before serving warm. The cheese inside will be melty and irresistible.
Nutrient Breakdown (Per Filled Bread, approx. 1 of 10 servings without cheese):
Nutrient
Amount
Calories
~185 kcal
Carbohydrates
~36 g
Protein
~5 g
Fat
~1 g
Fiber
~1.2 g
Sodium
~240 mg
The Art of Simplicity in Every Fold
Despite how impressive it may look when pulled apart, cheese-filled bread is rooted in honest, uncomplicated ingredients. The dough itself is a simple blend of flour, salt, yeast, and warm water—nothing extravagant, just pantry staples that work together like old friends.
Once it rises and softens into a supple dough, it becomes a blank canvas. The real magic happens in the filling. Cheese, whether shredded, cubed, or crumbled, is nestled into the center and sealed in like a hidden treasure. And as it bakes, it melts. It bubbles. It transforms into something utterly irresistible.
Filling Inspiration: Not Just Cheese
While cheese is the star, this bread is endlessly customizable. You can tailor it to your mood, your ingredients, or your meal.
Here are a few creative variations:
Garlic Herb Cheese: Mix shredded mozzarella with minced garlic, parsley, and a touch of oregano.
Spinach & Feta: A classic Mediterranean twist with crumbled feta and wilted spinach.
Pepper Jack & Jalapeño: For a spicy kick, perfect for game day or dipping into chili.
Cream Cheese & Sun-Dried Tomato: Smooth, tangy, and luxurious.
Sweet Version: Swap cheese for a dollop of ricotta and honey for a breakfast variation.
This is one of those recipes where “use what you have” actually works. Leftover cheeses, herbs, or cooked vegetables? Fold them in. The dough welcomes them all.
A Recipe That Teaches Patience
This bread isn’t difficult, but it does ask you to slow down. To let yeast do its quiet work. To give the dough time to rest. To resist the urge to skip the second rise, even when you’re hungry.
But in those quiet pauses—waiting for the dough to puff up, watching it brown in the oven—you’ll discover something that goes beyond cooking. It’s the gentle rhythm of handmade food, the reward of taking your time. In a fast-paced world, this recipe is a breath of warm, fragrant air.
Serving Suggestions: Make It a Meal
Cheese-filled bread isn’t just a side. With a few additions, it becomes the main event.
Soup Companion: Serve alongside creamy tomato soup or roasted red pepper bisque.
Salad’s Best Friend: Pair with a crisp green salad with lemon vinaigrette.
Charcuterie Staple: Slice and serve as part of a rustic cheese and meat board.
Lunchbox Favorite: These reheat beautifully and pack well for work or school.
Brunch Upgrade: Serve with eggs, olives, and pickled veggies for a Mediterranean-style brunch.
However you plate it, this bread brings with it a sense of richness that goes far beyond its ingredients.
Frequently Asked Questions (FAQs)
Can I make the dough ahead of time?
Yes. You can make the dough and let it rise overnight in the refrigerator. Just bring it to room temperature before shaping and filling.
What cheese works best?
Mozzarella is a classic for stretch and melt. Feta, cheddar, provolone, and gouda all work beautifully too. You can even mix a few kinds together for deeper flavor.
Can I freeze the dough or the filled bread?
Absolutely. After the first rise, portion and freeze the dough in balls. Or assemble the cheese-filled dough balls, freeze them on a tray, and store them in a bag for quick baking later. You can also freeze the baked bread and reheat as needed.
Why did my dough not rise?
This can happen if your yeast is expired or your water was too hot and killed the yeast. Always use fresh yeast and warm (not hot) water—around 38°C (100°F) is ideal.
Can I use whole wheat flour instead?
You can substitute part of the all-purpose flour with whole wheat flour (up to 50%) for a heartier texture. Just note that it may require a bit more water and will rise slightly less.
Do I need to use a stand mixer?
Not at all. This dough is soft and forgiving. It kneads beautifully by hand, which makes it even more meditative to prepare.
How do I store leftovers?
Keep leftover bread in an airtight container at room temperature for up to 2 days, or refrigerate for up to 4. Reheat in the oven or toaster for the best texture.
The Power of Bread with a Hidden Heart
There’s a certain kind of joy in tearing open a piece of warm bread and discovering the soft, molten cheese tucked inside. It’s a surprise that never gets old, no matter how many times you’ve made it. And maybe that’s the best part—how something so simple can keep surprising you, meal after meal, year after year.
In a way, cheese-filled bread is more than a recipe. It’s a reminder of what’s possible with the most basic things: a little flour, some water, and a filling made from love. Whether you’re making it for your family, your guests, or just yourself on a quiet afternoon, this bread brings more than comfort—it brings connection.
So go ahead. Flour your hands, fold in something cheesy, and let the oven work its magic. One warm, golden bite at a time, you’ll remember what homemade really means.
Amal
Pillows of Joy: The Magic of Cheese-Filled Bread
Golden on the outside, melty on the inside—these cheese-filled bread pillows are everything comfort food should be. Made from a soft, yeast-risen dough, each piece is lovingly wrapped around your favorite cheese, baked until golden, and perfect served warm for any meal or snack.
Some of my most treasured memories begin not in a grand kitchen or under the glow of elegant chandeliers, but in a quiet, modest room with a single wooden table worn smooth by generations of kneading hands. My grandmother didn’t measure wealth in silverware or status, but in the softness of a homemade flatbread, the scent of browning dough on a cast-iron pan, and the way a shared meal could make a hard day disappear.
There was a quiet magic in how she brought something to life from almost nothing: just a bit of flour, a splash of water, a pinch of salt, and a hunk of cold butter. With these, she made dough that stretched like patience, folded like love, and baked into something that never lasted longer than it took to pass it around the table.
This recipe is more than a guide to making dough. It’s a reminder that comfort doesn’t have to be complicated. It’s the story of resilience passed down through a family that didn’t always have much, but always had each other—and a dough that never failed.
Why Simple Dough Still Matters
In today’s world, we’re surrounded by convenience. Ready-made everything, ultra-processed options, and endless distractions have turned many kitchens quiet. But there’s something grounding about returning to basics. This dough—made from just flour, water, salt, and butter—is not just a recipe, but a return to something deeply human.
It reminds us that nourishment doesn’t have to be expensive, exotic, or extreme. Sometimes, the most satisfying dishes are the ones built on simplicity and repetition. This dough offers exactly that.
What Makes This Dough So Special?
Versatility: Use it for flatbreads, hand pies, savory tarts, dumpling wrappers, galettes, or even a quick rustic crust.
Accessible Ingredients: Almost everyone has flour, water, and salt on hand. Add butter, and you have a complete, balanced dough.
No Special Equipment Required: No mixers, processors, or fancy tools—just your hands and a surface to roll on.
Foolproof Process: No yeast, no rising time, no fermentation. Just mix, rest, and use.
Ingredient
Ingredient
Amount
White flour
Less than 4 cups (about 410 g)
Water
1.5 cups (about 300 ml)
Salt
1 teaspoon (about 6 g)
Butter
160 g (cold, diced)
Directions
Start the foundation: In a large mixing bowl, combine the flour and salt. Stir to distribute evenly.
Add the butter: Using your fingers or a pastry cutter, cut the cold butter into the flour mixture until it resembles coarse crumbs. Work quickly to keep the butter cold.
Incorporate the water: Gradually pour in the water while mixing with your hand or a spoon until a rough dough forms. It should be moist but not sticky. Adjust with a sprinkle of flour or splash of water if needed.
Knead briefly: Turn the dough onto a lightly floured surface and knead for 2–3 minutes just until smooth. Avoid overworking to maintain tenderness.
Rest and relax: Cover the dough and let it rest for 15–30 minutes at room temperature before shaping or rolling.
Shape and bake/cook as needed: Use it for flatbreads, hand pies, galettes, or savory turnovers. Bake or pan-cook depending on your chosen dish.
Nutrient Breakdown (Per 1 of 8 servings):
Nutrient
Amount
Calories
~240 kcal
Carbohydrates
~26 g
Protein
~3.5 g
Fat
~14 g
Saturated Fat
~9 g
Sodium
~180 mg
Fiber
~1 g
Sugar
~0.2 g
The Art of Simplicity: Crafting Connection with Your Hands
There’s a unique intimacy in working with dough. It slows you down. It invites you to be present. In a world of instant gratification, this kind of tactile ritual feels almost radical.
This dough doesn’t demand perfection—it rewards patience and care. The cool butter beneath your fingertips, the transformation from coarse to cohesive, the gentle resistance as you knead—all of it teaches you something not just about food, but about life.
Creative Ways to Use This All-Purpose Dough
What you do with this dough is limited only by your imagination. Here are some ideas to inspire your next homemade creation:
1. Stovetop Flatbreads
Roll out small discs, cook them dry or lightly oiled in a skillet, and serve with dips, soups, or warm spreads.
2. Savory Hand Pies
Fill with mashed vegetables, cheese, or leftovers, then bake or fry for an easy snack or lunchbox filler.
3. Quick Rustic Tarts
Shape a galette by piling sliced seasonal vegetables or fruits in the center and folding the edges over.
4. Buttery Crackers
Roll thin, sprinkle with seeds or herbs, and bake until crisp. Great for cheese boards or savory snacking.
5. Pan-Fried Dumpling Wrappers
Cut into rounds, fill with spiced lentils, or shredded chicken and greens, and pan-fry or steam.
A Legacy in Every Fold: Why Butter Matters
The addition of butter in this dough isn’t just for texture—it’s emotional. It’s the richness that makes something humble feel luxurious. Butter makes the dough tender, gives it structure, and adds subtle flavor that no oil or shortening quite replicates.
More importantly, it turns a three-ingredient base into something reminiscent of a pastry—flaky at the edges, soft in the center. And when you bake or toast it just right, it carries that unmistakable home-kitchen aroma that lingers in your memory.
FAQs: All You Need to Know About This Simple Dough
Can I make this dough without butter?
Yes. You can replace the butter with solid coconut oil, lard, or vegan butter. Each alternative will yield a slightly different flavor and texture, but the recipe will still work.
Can I freeze this dough?
Absolutely. After kneading, divide the dough into portions, wrap in cling film, and freeze for up to 2 months. Thaw in the refrigerator before using.
Do I need to rest the dough?
Yes, a short rest of 15–30 minutes is ideal. This relaxes the gluten and makes the dough easier to roll out without shrinking.
Can I use whole wheat flour instead of white flour?
Yes, though it will produce a denser, heartier result. You may need to increase the water slightly. A 50/50 mix of white and whole wheat flour offers a nice balance.
What if I don’t have a rolling pin?
No problem. Use a clean bottle, jar, or even press the dough with your hands. This recipe is rustic and forgiving.
How do I make the dough crispier or flakier?
For extra crispness, roll thinner and cook or bake longer. For a flakier result, keep the butter as cold as possible and avoid overworking the dough.
Can I add flavorings?
Absolutely! Add herbs (like rosemary or thyme), spices (such as cumin or paprika), or even grated cheese or minced garlic directly into the dough for a savory twist.
Is this dough suitable for sweet recipes?
Yes. Add 1–2 tablespoons of sugar or honey to the dough and use it as a base for fruit galettes, hand pies, or turnovers.
How long will this dough last in the fridge?
You can keep the prepared dough in the fridge for up to 3 days, tightly wrapped. Let it come to room temperature before rolling out.
Why This Recipe Belongs in Every Kitchen
This dough is not just useful—it’s transformative. It’s what you make when your cupboards are nearly empty, when you’re craving comfort, or when you’re trying to feed others with whatever you have on hand. It’s a recipe that turns scarcity into abundance, and effort into nourishment.
It’s also an invitation: to slow down, to create with your hands, and to connect to something deeper than just the meal in front of you. Whether you’re rolling it out on a quiet Sunday morning or improvising a weeknight dinner, this dough adapts to your life—quietly, beautifully, and reliably.
Conclusion: The Heart of Home is in the Dough
At its core, this dough is about more than flour, water, salt, and butter. It’s about how much we can do with very little. It’s about learning from those who came before us—the ones who taught us to trust our hands, our instincts, and the process.
So the next time your kitchen feels uninspiring or your fridge feels empty, remember this: if you have flour, water, and salt, you can make something from nothing. And if you add a little butter and a lot of heart, you just might make a memory worth keeping.
Amal
The Dough That Holds Everything Together: Simple Ingredients, Infinite Possibilities
This simple, four-ingredient dough is the foundation of countless homemade creations. Soft, buttery, and versatile, it requires only flour, water, salt, and butter—making it the perfect go-to recipe when your pantry is low but your creativity is high.
I remember the smell before anything else. Long before I could reach the kitchen counter or understand why some foods made me feel better than others, I could always tell when my grandmother was baking. The aroma would curl up the staircase, warm and earthy—apples, oats, and something sweet that didn’t come from sugar. It was comfort, wellness, and history wrapped in one quiet, golden scent.
My grandmother turned 100 this year, and while the world has changed more in her lifetime than most of us can imagine, her values haven’t. She has always believed in simplicity, patience, and listening to your body. She never followed fads. She never counted calories. But she always baked without refined sugar or flour. And now, decades later, science seems to be catching up with her wisdom.
This recipe, what I like to call the Ageless Morning Bake, is a tribute to that philosophy and to the woman who unknowingly taught me that food isn’t just fuel—it’s memory, medicine, and a message passed on through generations.
Back to the Basics: Why This Bake Works
There’s a quiet power in humble ingredients. Apples, carrots, bananas, cottage cheese, oats—none of these are flashy superfoods with marketing campaigns behind them. But together, they create a deeply nourishing and delightfully textured bake that satisfies without overwhelming.
This flourless, sugar-free breakfast cake isn’t just healthy—it’s intentionally designed to support longevity and balance. The natural sweetness from fruits replaces the need for added sugar, and cottage cheese adds protein that makes the dish more filling and metabolically friendly.
Each element plays a role:
Oats offer slow-burning carbohydrates and fiber that promote gut health.
Banana and apple bring in potassium and natural sweetness.
Carrots add beta-carotene for eye and skin health.
Cottage cheese and eggs provide structure and protein for muscle and hormone support.
Coconut oil contributes healthy fats that help absorb fat-soluble nutrients.
Corn starch and baking powder give just enough lift to keep the bake light without flour.
Coconut blossom sugar is used in moderation for depth—it’s low glycemic and mineral-rich.
The result? A moist, tender, slightly sweet bake that doesn’t spike your blood sugar or leave you feeling heavy. It’s something you can eat every day—and in my family, we often do.
Ingredients
Ingredient
Amount
Oatmeal
150 g
Apple
1 (grated)
Carrot
1 (grated)
Eggs
4 total (divided)
Banana
1 (ripe, mashed)
Coconut oil
20 g (melted)
Baking powder
1 teaspoon
Cottage cheese
360 g
Corn starch
20 g
Coconut blossom sugar
30 g
Directions: The Legacy Loaf Method
Preheat the oven to 180°C (350°F) and line a loaf pan or small square baking dish with parchment paper.
Mix the base: In a large bowl, combine oatmeal, grated apple, grated carrot, mashed banana, 2 eggs, melted coconut oil, and baking powder. Stir until well combined.
Prepare the creamy layer: In another bowl, blend cottage cheese with the remaining 2 eggs, corn starch, and coconut blossom sugar until smooth and creamy.
Layer and swirl: Pour the oatmeal mixture into the prepared pan. Spoon the cottage cheese mixture over the top and gently swirl with a knife or skewer for a marbled effect.
Bake for 45–50 minutes, or until the top is golden and set. A toothpick inserted in the center should come out mostly clean.
Cool & serve: Let it cool in the pan for 10 minutes, then transfer to a wire rack. Slice and enjoy warm or chilled — perfect for breakfast or a wholesome snack.
Nutrient Breakdown (Per Serving – Approx. 1 of 8 slices):
Nutrient
Amount
Calories
~180 kcal
Protein
~10 g
Carbohydrates
~18 g
Sugars (natural)
~7 g
Fiber
~3 g
Fat
~8 g
Saturated Fat
~3 g
Calcium
~100 mg
A Wellness Ritual in Disguise
This isn’t just a recipe. It’s a daily ritual that reconnects you with your body’s natural rhythms. Unlike processed cereals or rushed toast, this bake feels intentional. It invites mindfulness. It nourishes rather than numbs.
There’s something almost sacred about slicing into something you’ve made yourself—knowing every ingredient was chosen for your well-being. That’s the difference between eating and nourishing.
And in a world that rushes everything, this kind of baking slows you down just enough to make room for reflection, calm, and joy.
A Bake That Fits Every Lifestyle
Whether you’re following a low-sugar lifestyle, managing diabetes, or just trying to eat more whole foods, this bake fits effortlessly. It’s naturally gluten-free (just be sure to use certified gluten-free oats if you’re sensitive), low in added sugar, and packed with fiber and protein.
It’s also remarkably versatile. Some enjoy it as a quick breakfast with a dollop of Greek yogurt or a spoonful of nut butter. Others serve it as a mid-afternoon pick-me-up or even a guilt-free dessert. It’s filling enough to keep hunger at bay and gentle enough to digest easily—an ideal combination for anyone looking to age gracefully.
Frequently Asked Questions
Can I make this bake vegan?
Absolutely! Replace the eggs with flax eggs (1 tablespoon ground flaxseed + 3 tablespoons water per egg), and use a plant-based cottage cheese alternative or soft tofu blended with lemon juice and a pinch of salt. You’ll still get the creamy, layered texture with a plant-forward twist.
Is this recipe suitable for children?
Yes. In fact, it’s a fantastic way to introduce young children to naturally sweetened baked goods. Since the sugar content is low and the fiber and nutrients are high, it makes a perfect school snack or breakfast option for toddlers and older kids alike.
How do I store it, and can I freeze it?
Once baked and cooled, you can store the slices in an airtight container in the fridge for up to 5 days. It actually gets better after the first day as the flavors continue to meld. For longer storage, wrap individual slices in parchment and freeze for up to 2 months. Reheat in the oven or toaster for best results.
Can I substitute the fruit or vegetables?
Yes. The apple can be replaced with pear or zucchini. The carrot can be swapped for pumpkin or sweet potato puree. Just keep the moisture levels consistent. If your substitutes are too wet (like grated zucchini), be sure to squeeze out the excess water.
Why is this recipe so healthy?
This bake avoids refined sugar and flour, which are common culprits in blood sugar spikes and chronic inflammation. Instead, it relies on whole, fiber-rich ingredients that support digestion, satiety, and long-term health. The combination of protein, healthy fats, and slow-digesting carbs makes it metabolically balanced—ideal for energy without crashes.
What does it taste like?
Think of it as a cross between a baked oatmeal bar, a cheesecake, and a carrot cake—moist, subtly sweet, with occasional bites of fruit and creamy cottage cheese. It doesn’t taste like “health food,” but it’s not indulgent either. It’s comfort food with a purpose.
Adding Your Own Twist: Customizing the Bake
This recipe is meant to be a template, not a rule. My grandmother often changed it based on the season, what was in the pantry, or how she was feeling that day. Here are a few ways you can adapt it:
Add spices: Cinnamon, cardamom, nutmeg, or a dash of vanilla for extra warmth.
Mix in nuts or seeds: Chopped walnuts, sunflower seeds, or flaxseeds for texture and nutrition.
Use seasonal fruits: Blueberries in summer, grated pear in fall, even mashed mango in spring.
Make it savory: Omit the banana and sugar, and add herbs like rosemary or thyme, with sautéed onions and a touch of goat cheese.
The more you personalize it, the more meaningful it becomes—just like any handed-down family recipe.
Longevity on a Plate
My grandmother never called what she did “healthy eating.” She just believed that food should be made from real ingredients, shared with people you love, and never rushed. Her meals were slow. Her hands were steady. And her heart was always in it.
We live in a time of fast everything—fast food, fast results, fast answers. But maybe the secret to longevity isn’t just in the ingredients. Maybe it’s in the pace. Maybe it’s in the ritual. Maybe it’s in the quiet pride of making something with your own two hands that you know is good for you.
This bake is just one example. But it’s a delicious one. And if you’ve ever wanted to eat something your future self will thank you for, this might just be it.
Conclusion: One Slice at a Time
It’s tempting to think we need to overhaul our diets overnight to see real change. But often, it starts with just one small shift—a healthier breakfast, a better snack, a recipe that makes you feel cared for.
The Ageless Morning Bake is more than a recipe. It’s a philosophy passed down from a woman who has seen more than a century of change and has never once stopped baking. Every bite carries a bit of her strength, her warmth, and her intuition.
So if you’re looking for something that’s easy to make, deeply satisfying, and quietly transformative, give this a try. You may just find that what nourishes your body can also feed your spirit.
Amal
The Secret of Ageless Baking: A Legacy in Every Bite
This wholesome, naturally sweet breakfast bake is inspired by a 100-year-old family recipe passed down through generations. Made without refined sugar or flour, it’s packed with oats, apples, carrots, banana, and cottage cheese for a soft, nourishing, and satisfying treat perfect for breakfast or an anytime snack.
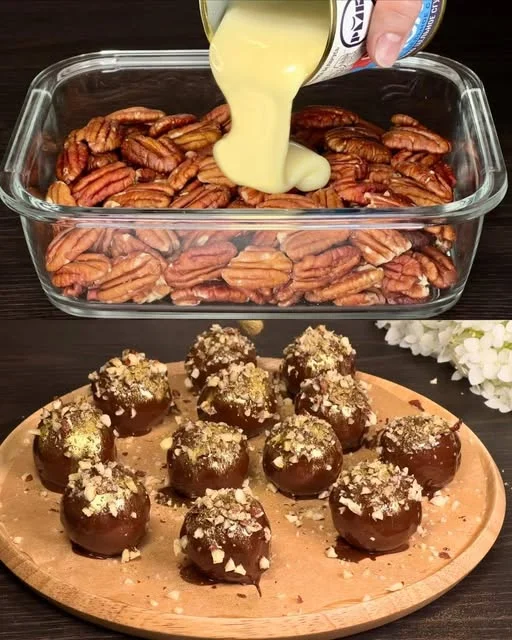
Pecan Pie Cheesecake Bars Recipe is a delightful treat that will impress your family and friends. These bars are perfect for any occasion, whether it’s a holiday gathering, a birthday party, or just a cozy night in.
Imagine a buttery graham cracker crust topped with a smooth cheesecake layer, all crowned with a sweet and crunchy pecan topping. Each bite is a harmonious blend of textures and flavors that will leave you wanting more. Plus, they are easy to make, which means you can whip them up without spending hours in the kitchen.
In this article, we will guide you through the ingredients, preparation steps, and even some variations to make this recipe your own. Whether you’re a seasoned baker or a beginner, you’ll find this recipe straightforward and enjoyable. So, let’s dive into the world of pecan pie cheesecake bars and discover how to create this scrumptious dessert!
Ingredients for Pecan Pie Cheesecake Bars Recipe
Pecan Pie Cheesecake Bars Recipe, you will need a selection of simple yet flavorful ingredients. Each component plays a vital role in achieving that perfect balance of sweetness and creaminess. Here’s what you’ll need:
1 ½ cups graham cracker crumbs
½ cup unsalted butter, melted
¼ cup granulated sugar
2 (8-ounce) packages cream cheese, softened
1 cup brown sugar, packed
2 large eggs
1 teaspoon vanilla extract
1 cup sour cream
1 ½ cups pecans, chopped
¼ cup corn syrup
¼ teaspoon salt
These ingredients come together to create a rich and satisfying dessert. The graham cracker crumbs form a crunchy base, while the cream cheese and sour cream provide a creamy filling. The pecans add a delightful crunch and nutty flavor, making each bite a treat. Don’t forget to gather everything before you start baking, as it will make the process smoother and more enjoyable!
Preparation of Pecan Pie Cheesecake Bars Recipe
Pecan Pie Cheesecake Bars Recipe. This process is simple and fun, allowing you to create a delicious dessert that everyone will love. Follow these steps carefully to ensure your bars turn out perfectly!
Step 1: Prepare the Crust
Start by preheating your oven to 350°F. This step is crucial as it ensures your crust bakes evenly. Next, take a medium bowl and combine the graham cracker crumbs, melted butter, and granulated sugar. Mix them well until the crumbs are fully coated with butter. This mixture will form the base of your cheesecake bars.
Once combined, press the mixture firmly into the bottom of a greased 9×13-inch baking dish. Make sure to spread it evenly to create a solid crust. Bake this crust in the preheated oven for about 10 minutes. After baking, remove it from the oven and let it cool slightly while you prepare the filling.
Step 2: Make the Cheesecake Filling
In a large mixing bowl, beat the softened cream cheese and brown sugar together. Use an electric mixer for a smooth and creamy texture. Mix until there are no lumps left. Then, add the eggs one at a time, mixing well after each addition. This step is important for achieving a light and fluffy filling.
Next, stir in the vanilla extract and sour cream until everything is fully combined. The sour cream adds a nice tanginess that balances the sweetness of the brown sugar. Once your filling is ready, it’s time to pour it over the cooled crust. Spread it evenly to ensure every bite is delicious!
Step 3: Prepare the Pecan Topping
In a separate bowl, mix the chopped pecans, corn syrup, and salt. Stir until the pecans are well coated with the syrup. This mixture will create a sweet and crunchy topping that complements the creamy cheesecake layer beautifully. Make sure the pecans are evenly coated for the best flavor.
Step 4: Assemble the Pecan Pie Cheesecake Bars
Now that you have your crust, filling, and topping ready, it’s time to assemble your bars. Carefully spoon the pecan mixture over the cheesecake layer. Spread it out gently to cover the entire surface. This will create a lovely topping that adds both texture and flavor to your dessert.
Step 5: Bake the Pecan Pie Cheesecake Bars
Place the assembled dish back into the oven and bake for an additional 30-35 minutes. Keep an eye on it! You want the center to be set and the edges to turn a light golden color. Once baked, remove the dish from the oven and let it cool to room temperature. After cooling, refrigerate the bars for at least 2 hours before cutting them into squares. This chilling time helps the flavors meld together and makes cutting easier.
Pecan Pie Cheesecake Bars Recipe is now ready to be enjoyed. These bars are sure to be a hit at any gathering!
Variation of Pecan Pie Cheesecake Bars Recipe
Pecan Pie Cheesecake Bars Recipe is already a delightful treat, you can easily customize it to suit your taste or dietary needs. Here are some fun variations to consider, ensuring that everyone can enjoy these delicious bars!
Alternative Ingredients for Different Flavors
To switch things up, try incorporating alternative ingredients that can add unique flavors to your cheesecake bars. Here are a few ideas:
Chocolate Lovers: Add ½ cup of chocolate chips to the cheesecake filling for a rich chocolate flavor. You can also drizzle melted chocolate on top before serving.
Spiced Up: Mix in 1 teaspoon of cinnamon or nutmeg into the cheesecake filling for a warm, spiced flavor that’s perfect for fall.
Fruit Infusion: Fold in 1 cup of fresh blueberries or raspberries into the cheesecake layer for a fruity twist. This adds a refreshing taste and a pop of color!
Caramel Delight: Drizzle caramel sauce over the pecan topping before baking for an extra layer of sweetness.
Pecan Pie Cheesecake Bars Recipe into something new and exciting, making it a versatile dessert for any occasion!
Gluten-Free Options for Pecan Pie Cheesecake Bars Recipe
Pecan Pie Cheesecake Bars Recipe gluten-free:
Graham Cracker Substitution: Use gluten-free graham cracker crumbs or crushed gluten-free cookies as a base for the crust. There are many options available that taste just as good!
Check Ingredients: Ensure that all other ingredients, like the cream cheese and sour cream, are labeled gluten-free. Most brands are, but it’s always good to double-check.
Pecan Pie Cheesecake Bars Recipe that everyone can enjoy without worry!
Cooking Note for Pecan Pie Cheesecake Bars Recipe
Pecan Pie Cheesecake Bars Recipe, there are a few cooking notes to keep in mind to ensure your dessert turns out perfectly every time. These tips will help you navigate the baking process smoothly and achieve the best results.
First, make sure all your ingredients are at room temperature before you start. This includes the cream cheese and eggs. Room temperature ingredients blend more easily, resulting in a smoother filling. If you forget to take them out ahead of time, you can place the cream cheese in a microwave for about 10-15 seconds to soften it quickly.
Next, be careful not to overmix the cheesecake filling. While you want everything to be well combined, overmixing can introduce too much air into the batter. This can lead to cracks in your cheesecake bars as they bake. Mix just until smooth and creamy, and you’ll be on the right track!
When baking, keep an eye on the edges of your bars. They should be lightly golden, while the center may still have a slight jiggle. This is normal! The bars will continue to set as they cool. If you bake them too long, they may become dry, so it’s better to err on the side of caution.
Lastly, patience is key when it comes to cooling and chilling. Allow your bars to cool completely at room temperature before refrigerating. Chilling them for at least two hours helps the flavors meld and makes cutting easier. If you can, let them chill overnight for the best texture and taste.
Pecan Pie Cheesecake Bars that everyone will love!
Serving Suggestions for Pecan Pie Cheesecake Bars Recipe
Pecan Pie Cheesecake Bars Recipe has chilled and is ready to serve, it’s time to think about how to present this delightful dessert. The way you serve your bars can enhance the overall experience and make them even more enjoyable. Here are some creative serving suggestions to consider:
Classic Presentation: Cut the bars into neat squares and place them on a decorative platter. This simple presentation allows the beautiful layers to shine through, showcasing the creamy cheesecake and crunchy pecan topping.
With Whipped Cream: Serve each bar with a dollop of freshly whipped cream on top. The light and airy texture of the whipped cream complements the richness of the cheesecake, creating a delightful contrast.
Drizzle with Caramel: For an extra touch of sweetness, drizzle warm caramel sauce over the bars just before serving. This adds a beautiful shine and enhances the flavor profile, making each bite even more indulgent.
Garnish with Pecans: Sprinkle some extra chopped pecans on top of the whipped cream or caramel drizzle. This not only adds a nice crunch but also makes the dessert look more appealing.
Pair with Ice Cream: Serve the bars alongside a scoop of vanilla or caramel ice cream. The cold ice cream pairs wonderfully with the warm flavors of the pecan pie cheesecake, creating a delightful dessert experience.
Festive Touch: For special occasions, consider adding seasonal decorations. Use edible flowers or a sprinkle of cinnamon to give your bars a festive flair.
Pecan Pie Cheesecake Bars Recipe and impress your guests. Whether it’s a casual family dinner or a festive celebration, these bars are sure to be a hit!
Tips for Perfecting Your Pecan Pie Cheesecake Bars Recipe
Pecan Pie Cheesecake Bars Recipe turns out perfectly every time, consider these helpful tips. They will guide you through the baking process and help you achieve the best flavor and texture.
Use Quality Ingredients: The quality of your ingredients can make a big difference. Opt for fresh cream cheese and real vanilla extract for the best flavor. Fresh pecans will also enhance the taste and crunch of your topping.
Don’t Skip the Cooling Time: Allow your cheesecake bars to cool completely at room temperature before refrigerating. This step is crucial for setting the bars properly and enhancing the flavors.
Check for Doneness: When baking, gently shake the pan. If the center has a slight jiggle but the edges are set, it’s done. Overbaking can lead to dry bars, so keep an eye on them!
Chill Overnight: For the best texture, let your bars chill overnight. This allows the flavors to meld beautifully and makes cutting easier.
Use a Sharp Knife: When cutting your bars, use a sharp knife for clean edges. Wipe the knife with a damp cloth between cuts to keep the pieces looking neat.
Experiment with Toppings: Feel free to get creative with toppings! Try adding chocolate shavings, a sprinkle of cinnamon, or even a drizzle of peanut butter for a unique twist.
Serve at Room Temperature: For the best flavor, serve your cheesecake bars at room temperature. This enhances the creamy texture and makes them even more enjoyable.
Pecan Pie Cheesecake Bars Recipe. Each bite will be a delightful experience that your family and friends will love!
Breakdown of Time for Pecan Pie Cheesecake Bars Recipe
Pecan Pie Cheesecake Bars Recipe is essential for planning your baking session. Here’s a detailed breakdown of the time you’ll need to prepare, cook, and chill these delicious bars.
Prep Time
Pecan Pie Cheesecake Bars Recipe is approximately 20-25 minutes. This includes gathering your ingredients, preparing the crust, and mixing the cheesecake filling. Make sure to have everything ready before you start, as it will make the process smoother and more enjoyable!
Cooking Time
Once you’ve prepped your ingredients, the cooking time is about 40-45 minutes. This consists of 10 minutes for baking the crust and an additional 30-35 minutes for baking the assembled cheesecake bars. Keep an eye on them to ensure they don’t overbake!
Total Time
Pecan Pie Cheesecake Bars Recipe. However, don’t forget to factor in the chilling time of at least 2 hours after baking. This step is crucial for the flavors to meld and for the bars to set properly. If you can, let them chill overnight for the best results!
By understanding the time breakdown, you can plan your baking session effectively and enjoy the process of creating these delightful cheesecake bars!
Nutritional Information for Pecan Pie Cheesecake Bars Recipe
Pecan Pie Cheesecake Bars Recipe, it’s helpful to know the nutritional information. This way, you can enjoy your dessert while being mindful of your dietary choices. Here’s a breakdown of the key nutritional components per serving:
Calories
Each serving of these delightful cheesecake bars contains approximately 320 calories. This calorie count includes the rich ingredients like cream cheese, butter, and pecans, which contribute to the overall flavor and texture. While they are a treat, enjoying them in moderation is key to maintaining a balanced diet.
Protein
In terms of protein, each bar provides about 5 grams. The protein comes mainly from the cream cheese and eggs used in the recipe. This protein content helps to keep you feeling satisfied after enjoying a piece, making it a delightful dessert option.
Sodium
The sodium content in each serving is approximately 200 milligrams. This amount is relatively moderate, but if you are watching your sodium intake, it’s good to be aware. The sodium primarily comes from the butter and cream cheese, which are essential for achieving that creamy texture and rich flavor.
Pecan Pie Cheesecake Bars Recipe offers a delicious balance of flavors and textures while providing some nutritional benefits. Enjoying these bars as an occasional treat can fit nicely into a well-rounded diet!
FAQs about Pecan Pie Cheesecake Bars Recipe
Can I make Pecan Pie Cheesecake Bars ahead of time?
Pecan Pie Cheesecake Bars Recipe is perfect for making ahead of time. In fact, they taste even better after chilling in the refrigerator for a few hours or overnight. This allows the flavors to meld beautifully. You can prepare the bars a day or two in advance, making them an excellent choice for parties or gatherings. Just remember to store them in an airtight container to keep them fresh!
How do I store leftover Pecan Pie Cheesecake Bars?
Pecan Pie Cheesecake Bars is simple! Once they have cooled and set, cut them into squares and place them in an airtight container. You can keep them in the refrigerator for up to 5 days. If you want to keep them longer, consider freezing them. Just make sure to separate the layers with parchment paper to prevent sticking. This way, you can enjoy a sweet treat whenever you like!
Can I freeze Pecan Pie Cheesecake Bars?
Pecan Pie Cheesecake Bars Recipe! To freeze, first, let the bars cool completely. Then, cut them into squares and wrap each piece tightly in plastic wrap. Place the wrapped bars in a freezer-safe container or bag. They can be frozen for up to 3 months. When you’re ready to enjoy them, simply thaw them in the refrigerator overnight. This way, you’ll have a delicious dessert ready to go whenever you need it!
What can I substitute for cream cheese in the recipe?
Pecan Pie Cheesecake Bars Recipe, there are a few options. You can use mascarpone cheese for a similar creamy texture and flavor. Another option is to use Greek yogurt, which will add a tangy taste. If you prefer a dairy-free option, consider using a vegan cream cheese alternative. Just keep in mind that the flavor and texture may vary slightly, but you’ll still end up with a delicious dessert!
Conclusion on Pecan Pie Cheesecake Bars Recipe
Pecan Pie Cheesecake Bars Recipe is a delightful dessert that beautifully combines the rich flavors of pecan pie with the creamy texture of cheesecake. This recipe is not only easy to follow but also allows for plenty of creativity and customization. Whether you choose to stick with the classic version or experiment with different flavors, these bars are sure to impress your family and friends.
With a buttery graham cracker crust, a smooth cheesecake filling, and a crunchy pecan topping, each bite offers a wonderful blend of textures and tastes. Plus, the ability to make them ahead of time makes them a perfect choice for gatherings, holidays, or simply a sweet treat at home.
Pecan Pie Cheesecake Bars that everyone will love. So, gather your ingredients, preheat your oven, and get ready to enjoy a dessert that is not only delicious but also brings joy to any occasion!
Happy baking!
Paul
Pecan Pie Cheesecake Bars Recipe is a must-try dessert!
These Pecan Pie Cheesecake Bars are the ultimate indulgent dessert mashup—think rich and creamy cheesecake layered over a buttery graham cracker crust, topped with a gooey, caramelized pecan pie topping. A decadent treat perfect for holidays, potlucks, or anytime you want to impress with a bite-sized showstopper!
Prepare the CrustPreheat oven to 350°F (175°C). Line a 13×9-inch baking dish with parchment paper. In a food processor, pulse graham crackers and sugar until finely ground. Add melted butter and blend. Press mixture firmly into the prepared dish to form an even crust.
Make the Cheesecake LayerIn a large mixing bowl, beat the softened cream cheese with sugar, eggs, and vanilla extract until smooth and fluffy, about 3–5 minutes. Pour over the crust and spread evenly.
Prepare the Pecan ToppingIn a saucepan over medium heat, combine brown sugar, corn syrup, cream, butter, and salt. Stir constantly and bring to a gentle boil for 1 minute. Remove from heat and stir in vanilla and chopped pecans. Let the topping cool slightly.
Assemble and BakeCarefully spoon the pecan mixture over the cheesecake layer, spreading it evenly. Bake for 35 minutes or until set. Allow to cool at room temperature.
Chill and SliceRefrigerate for at least 4 hours, or overnight for best results. Lift out using parchment, slice into bars, and serve chilled.
Notes
Make Ahead: These bars are perfect for prepping a day in advance—flavors develop beautifully overnight.
Storage: Store in an airtight container in the refrigerator for up to 5 days.
Crust Variations: Swap graham crackers for vanilla wafers or gingersnaps for a fun twist.
Serving Tip: For clean cuts, dip your knife in hot water and wipe clean between slices.
Crockpot Chicken Nachos are not just any nachos; they are a delightful blend of flavors and textures that make them truly special. First, the use of shredded chicken adds a hearty protein element, making these nachos filling and satisfying. The combination of spices like chili powder, cumin, and garlic powder infuses the chicken with a rich, savory taste. Plus, the addition of black beans and corn brings a burst of color and nutrition. This recipe is perfect for gatherings, game days, or a cozy family dinner. Everyone loves nachos, and this version takes them to a whole new level!
Why Use a Crockpot for Nachos?
Using a crockpot for nachos is a game-changer. It allows the flavors to meld beautifully while keeping the chicken moist and tender. The slow cooking process means you can set it and forget it, freeing up your time for other tasks. Plus, the crockpot keeps everything warm until you’re ready to serve. This method also ensures that the chicken is infused with the salsa and spices, creating a deliciously rich base for your nachos. So, whether you’re hosting a party or just enjoying a quiet night in, the crockpot makes preparing these nachos easy and stress-free!
Ingredients for Crockpot Chicken Nachos Recipe
Essential Ingredients
To create the perfect Crockpot Chicken Nachos, you’ll need a few essential ingredients. These ingredients work together to deliver a delicious and satisfying dish. Here’s what you’ll need:
2 cups cooked, shredded chicken
1 cup salsa
1 teaspoon chili powder
1 teaspoon cumin
1 teaspoon garlic powder
1 bag (12 ounces) tortilla chips
2 cups shredded cheddar cheese
1 cup black beans, drained and rinsed
1 cup corn, drained (canned or frozen)
These ingredients form the base of your nachos. The shredded chicken provides protein, while the salsa adds moisture and flavor. The spices enhance the overall taste, making every bite a delight. The tortilla chips serve as the crunchy foundation, and the cheese melts beautifully, creating a gooey topping that everyone loves.
Optional Toppings and Add-Ins
While the essential ingredients are fantastic on their own, you can elevate your nachos with some optional toppings and add-ins. Here are some ideas to consider:
1 jalapeño, sliced (for a spicy kick)
1 avocado, diced (for creaminess)
1/2 cup sour cream (for a tangy finish)
1/4 cup chopped fresh cilantro (for garnish)
Diced green chilies (for extra heat)
Substitute cheddar cheese with pepper jack (for a zesty flavor)
These toppings not only add flavor but also enhance the visual appeal of your nachos. Feel free to mix and match based on your preferences. The beauty of this recipe is its versatility, allowing you to customize it to suit your taste!
Step-by-Step Preparation of Crockpot Chicken Nachos Recipe
Step 1: Prepare the Chicken
To start, gather your cooked, shredded chicken. If you don’t have any on hand, you can easily cook some chicken breasts in advance. Simply boil or bake them until fully cooked, then shred them using two forks. Once your chicken is ready, place it in the crockpot. Next, add the salsa, chili powder, cumin, and garlic powder. Stir everything together until the chicken is well-coated with the spices and salsa. This step is crucial as it infuses the chicken with flavor, making your nachos delicious!
Step 2: Layer the Ingredients
After preparing the chicken mixture, it’s time to layer the ingredients for your nachos. Preheat your oven to 350°F. On a large baking sheet, spread a generous layer of tortilla chips. Make sure to cover the sheet evenly, as this will be the base of your nachos. Then, spoon the chicken mixture over the chips, ensuring that each chip gets a taste of that flavorful chicken. Next, sprinkle the black beans and corn evenly over the top. Finally, add the shredded cheddar cheese, which will melt beautifully in the oven.
Step 3: Cook in the Crockpot
Now that your ingredients are layered, it’s time to cook them in the crockpot. Cover the crockpot with its lid and set it to cook on low for 4 hours or high for 2 hours. This slow cooking process allows the flavors to meld together, creating a rich and savory dish. The chicken will remain moist, and the spices will permeate every bite. If you’re short on time, the high setting is a great option, but the low setting is ideal for maximum flavor.
Step 4: Assemble the Nachos
Once the cooking time is up, it’s time to assemble your nachos! Carefully remove the crockpot lid and give the chicken mixture a gentle stir. Then, take the baking sheet with the layered ingredients from the oven. Pour the hot chicken mixture over the tortilla chips, black beans, corn, and cheese. If you like a little heat, now is the time to add sliced jalapeños on top. Return the baking sheet to the oven and bake for 10-15 minutes, or until the cheese is melted and bubbly. When it’s done, remove it from the oven and let it cool for a minute before serving. Top with diced avocado, sour cream, and chopped cilantro for a fresh finish!
Variations of Crockpot Chicken Nachos Recipe
Vegetarian Options
If you’re looking for a vegetarian twist on the classic Crockpot Chicken Nachos Recipe, you’re in luck! You can easily swap out the chicken for a variety of delicious plant-based ingredients. Consider using black beans or pinto beans as your protein source. They are not only filling but also packed with nutrients. You can also add sautéed bell peppers, mushrooms, or zucchini for extra flavor and texture. Another great option is to use a meat substitute, like shredded jackfruit or tofu, seasoned with the same spices. This way, you can enjoy the same savory taste without the meat!
Spicy Additions
If you love a little heat, there are plenty of ways to spice up your Crockpot Chicken Nachos Recipe. Start by adding diced green chilies to the chicken mixture before cooking. This will give your nachos a nice kick. You can also use spicy salsa instead of regular salsa for an extra layer of flavor. For those who really enjoy heat, consider topping your nachos with sliced jalapeños or even a drizzle of hot sauce right before serving. These spicy additions will surely satisfy your cravings for something zesty!
Different Cheese Choices
Cheese is a key ingredient in any nacho recipe, and there are many options to choose from! While cheddar cheese is a classic choice, you can experiment with different types of cheese to enhance the flavor of your nachos. Pepper jack cheese adds a spicy twist, while Monterey Jack offers a creamy texture. For a gourmet touch, try crumbled feta or goat cheese. Mixing different cheeses can also create a delightful flavor profile. Just remember to use cheese that melts well for that gooey, delicious topping!
Cooking Note for Crockpot Chicken Nachos Recipe
Tips for Perfectly Cooked Chicken
Getting perfectly cooked chicken is essential for your Crockpot Chicken Nachos Recipe. Here are some helpful tips to ensure your chicken turns out tender and flavorful:
Use Boneless Chicken: Boneless chicken breasts or thighs work best. They cook evenly and stay moist.
Shred After Cooking: Always shred the chicken after it’s cooked. This allows it to soak up the flavors of the salsa and spices.
Don’t Overcook: Keep an eye on the cooking time. Overcooked chicken can become dry. Aim for the recommended times of 4 hours on low or 2 hours on high.
Check for Doneness: If you’re unsure, use a meat thermometer. The internal temperature should reach 165°F for safe consumption.
By following these tips, you’ll ensure that your chicken is perfectly cooked, making your nachos even more delicious!
Adjusting Cooking Times
Cooking times can vary based on your crockpot model and the amount of chicken used. Here are some adjustments to consider:
More Chicken: If you’re using more than 2 cups of chicken, you may need to increase the cooking time by 30 minutes to an hour.
Less Chicken: If you’re using less chicken, reduce the cooking time by about 30 minutes.
High Altitude Cooking: If you live at a high altitude, you may need to cook your nachos a bit longer due to lower boiling points.
Check Periodically: If you’re unsure, check the chicken periodically. It’s better to check early than to overcook!
Adjusting the cooking times based on these factors will help you achieve the best results for your nachos. Enjoy the process and the delicious outcome!
Serving Suggestions for Crockpot Chicken Nachos Recipe
Best Sides to Pair
When serving your Crockpot Chicken Nachos, consider adding some delightful sides to enhance the meal. Here are a few great options:
Mexican Rice: A side of fluffy Mexican rice complements the nachos perfectly. The flavors blend well, making for a satisfying meal.
Refried Beans: Creamy refried beans add a rich texture and flavor. They can be served on the side or even spooned over the nachos.
Guacamole: Fresh guacamole is a must-have! Its creamy texture and zesty flavor pair wonderfully with the crunchy nachos.
Fresh Salad: A light salad with lettuce, tomatoes, and a lime vinaigrette can balance the richness of the nachos.
Fruit Salsa: For a sweet twist, serve a fruit salsa made with diced mango or pineapple. It adds a refreshing contrast to the savory nachos.
These sides not only enhance the flavor but also add variety to your meal. They make your nacho night even more enjoyable!
Creative Serving Ideas
Serving your Crockpot Chicken Nachos can be fun and creative! Here are some ideas to make your presentation stand out:
Individual Portions: Serve nachos in small bowls or on individual plates. This makes it easy for guests to enjoy their own servings.
Nacho Bar: Set up a nacho bar with all the toppings and sides. Let everyone customize their nachos with their favorite ingredients!
Skewers: For a fun twist, thread tortilla chips, chicken, and toppings onto skewers. This makes for a unique and easy-to-eat appetizer.
Layered Dip: Create a layered dip using the same ingredients. Layer the chicken, beans, cheese, and toppings in a clear dish for a beautiful presentation.
Serve with Dipping Sauces: Offer a variety of dipping sauces, like ranch or spicy salsa, for an extra flavor boost.
These creative serving ideas will impress your guests and make your nacho night memorable. Enjoy the deliciousness of your Crockpot Chicken Nachos!
Paul
Crockpot Chicken Nachos Recipe is a must-try dish!
Turn your crockpot into a fiesta machine with these cheesy, saucy Slow Cooker Chicken Nachos! Tender shredded chicken is slow-cooked in salsa and queso, then spooned over crunchy tortilla chips and topped with melty Mexican cheese. Perfect for game day, parties, or an easy weeknight treat.
Set the BasePlace chicken breasts into the slow cooker. Pour in chicken broth and sprinkle taco seasoning evenly over the top.
Start CookingCover and cook on high for 1 hour.
Add the SalsaAfter the first hour, add half of the salsa to the crockpot. Stir gently, cover again, and cook on low for 2 hours, stirring occasionally.
Shred the ChickenUse two forks to shred the cooked chicken directly in the slow cooker.
Make It CreamyStir in the remaining salsa and the Salsa Con Queso until well combined.
Simmer to PerfectionContinue cooking on low for 30–45 minutes. If the mixture is too runny, increase to high heat in 10-minute increments, stirring occasionally until thickened to your liking.
Build Your NachosOn individual plates or a serving platter, lay out 10–15 tortilla chips. Spoon the hot cheesy chicken mixture over the chips.
Top It OffSprinkle with shredded Mexican blend cheese. For gooier nachos, microwave each plate for 30–35 seconds until the cheese is melted.
Notes
All-Day Option: Combine all ingredients in the slow cooker and cook on low for 6–8 hours, then shred and stir before serving.
Topping Ideas: Add sour cream, sliced jalapeños, diced tomatoes, or guacamole for extra flavor.
Make It a Meal: Serve over rice or in a tortilla bowl for a complete dinner.
Storage: Leftovers keep well refrigerated for up to 3 days. Reheat gently before serving.
Tips for Making the Best Crockpot Chicken Nachos Recipe
Ingredient Substitutions
Making the perfect Crockpot Chicken Nachos is all about flexibility. If you find yourself missing an ingredient, don’t worry! Here are some easy substitutions you can make:
Chicken: If you don’t have cooked chicken, you can use rotisserie chicken for convenience. Alternatively, shredded turkey works well too!
Salsa: If you’re out of salsa, try using diced tomatoes with green chilies or even a homemade tomato sauce with spices.
Beans: Black beans are great, but you can also use kidney beans or chickpeas for a different flavor and texture.
Cheese: While cheddar is a classic, feel free to use mozzarella or a blend of cheeses for a unique taste.
Spices: If you don’t have chili powder or cumin, taco seasoning can be a quick alternative. It adds a nice flavor without extra measuring!
These substitutions can help you whip up a delicious batch of nachos, even if you’re low on certain ingredients. Get creative and enjoy the process!
Storage and Reheating Tips
After enjoying your Crockpot Chicken Nachos, you might have some leftovers. Here’s how to store and reheat them properly:
Storage: Allow the nachos to cool completely before storing. Place them in an airtight container and refrigerate for up to 3 days. If you have leftover chicken mixture, store it separately to keep the chips crunchy.
Reheating: To reheat, preheat your oven to 350°F. Spread the nachos on a baking sheet and warm them for about 10 minutes, or until heated through. This helps maintain the crunchiness of the chips.
Microwave Option: If you’re in a hurry, you can microwave the nachos for about 1-2 minutes. However, this may make the chips a bit soggy, so it’s best to use the oven when possible.
Fresh Toppings: When reheating, consider adding fresh toppings like avocado or cilantro afterward. This keeps them vibrant and flavorful!
By following these storage and reheating tips, you can enjoy your delicious nachos even after the main event. They make for a great snack or quick meal!
Breakdown of Time for Crockpot Chicken Nachos Recipe
Prep Time
The prep time for your Crockpot Chicken Nachos Recipe is quite minimal. You’ll spend about 15-20 minutes gathering your ingredients and preparing the chicken mixture. This includes shredding the chicken, measuring out the spices, and mixing everything in the crockpot. It’s a quick and easy process that allows you to get started on your delicious nachos without much hassle!
Cooking Time
Once you’ve prepped your ingredients, the cooking time is where the magic happens. If you set your crockpot to low, it will take about 4 hours for the chicken to cook thoroughly and absorb all the flavors. If you’re short on time, you can switch to the high setting, which will cook the chicken in about 2 hours. Either way, the slow cooking ensures that your nachos will be packed with flavor!
Total Time
In total, you’re looking at around 4 hours and 20 minutes if you choose the low setting, or about 2 hours and 20 minutes if you opt for high. This includes both prep and cooking time. The best part? You can set it and forget it, allowing you to enjoy your day while your delicious nachos cook away. When it’s time to serve, you’ll have a mouthwatering dish ready to impress your family and friends!
Nutritional Information for Crockpot Chicken Nachos Recipe
Calories and Macronutrients
Understanding the nutritional content of your Crockpot Chicken Nachos Recipe is essential for making informed choices. Each serving of these delicious nachos contains approximately 450 calories. This makes them a satisfying option for a meal or snack. Here’s a breakdown of the macronutrients per serving:
Calories: 450
Protein: 30g
Fat: 20g
Net Carbohydrates: 35g
The protein content comes mainly from the shredded chicken and black beans, making these nachos a filling choice. The fat primarily comes from the cheese and any added toppings like avocado or sour cream. The net carbohydrates are mainly from the tortilla chips and corn, providing a good source of energy. This balance of macronutrients makes the dish enjoyable while still being mindful of your dietary needs.
Sodium Content
When enjoying your Crockpot Chicken Nachos, it’s also important to consider the sodium content. Each serving contains about 800mg of sodium. This amount can vary based on the specific brands of salsa, cheese, and tortilla chips you use. If you’re watching your sodium intake, here are a few tips to help manage it:
Choose Low-Sodium Options: Look for low-sodium salsa and cheese to reduce the overall sodium content.
Rinse Canned Ingredients: Rinsing black beans and corn can help remove some of the sodium they contain.
Limit Added Salt: Avoid adding extra salt to the chicken mixture or toppings.
By being mindful of sodium levels, you can enjoy your nachos while keeping your health in check. Remember, moderation is key, and these nachos can be part of a balanced diet!
FAQs About Crockpot Chicken Nachos Recipe
Can I use frozen chicken in this recipe?
Yes, you can use frozen chicken in your Crockpot Chicken Nachos Recipe! However, it’s important to ensure that the chicken cooks thoroughly. If you start with frozen chicken, set your crockpot to cook on high for about 4-5 hours. This will give the chicken enough time to thaw and cook properly. Just remember to check that the internal temperature reaches 165°F for safe consumption. Using frozen chicken can be a convenient option, especially if you’re short on time!
How do I make nachos crispy in the crockpot?
Making crispy nachos in the crockpot can be a bit tricky, as the moisture from the chicken and salsa can make the chips soggy. To keep your nachos crispy, consider these tips:
Layer Wisely: Place the tortilla chips on the bottom of the baking sheet and add the toppings sparingly. This helps prevent the chips from getting too wet.
Use the Oven: After cooking in the crockpot, transfer the nachos to the oven for a few minutes. Baking them at 350°F for 10-15 minutes will help crisp them up.
Serve Immediately: Serve the nachos right after baking. The longer they sit, the soggier they can become.
By following these tips, you can enjoy deliciously crispy nachos that everyone will love!
What are some good toppings for nachos?
When it comes to toppings, the options are endless! Here are some popular and tasty toppings to consider for your Crockpot Chicken Nachos:
Fresh Guacamole: Creamy and flavorful, guacamole adds a delicious touch.
Sour Cream: A dollop of sour cream provides a tangy contrast to the spicy flavors.
Chopped Tomatoes: Fresh diced tomatoes add a burst of freshness and color.
Green Onions: Sliced green onions give a nice crunch and mild onion flavor.
Olives: Sliced black or green olives add a briny flavor that complements the nachos.
Hot Sauce: For those who love heat, a drizzle of hot sauce can elevate the flavor.
Feel free to mix and match these toppings based on your preferences. The beauty of nachos is that you can customize them to suit your taste!
Conclusion on Crockpot Chicken Nachos Recipe
Recap of Key Points
In summary, the Crockpot Chicken Nachos Recipe is a fantastic dish that combines convenience with delicious flavors. You start with tender, shredded chicken mixed with zesty salsa and spices, creating a savory base. Layering tortilla chips, black beans, corn, and cheese on top makes for a delightful crunch. The slow cooking process in the crockpot ensures that every bite is packed with flavor. Plus, the optional toppings like jalapeños, avocado, and sour cream add freshness and variety. Whether you’re hosting a party or enjoying a cozy night in, this recipe is sure to impress!
Encouragement to Try the Recipe
Now that you have all the details, it’s time to roll up your sleeves and give this Crockpot Chicken Nachos Recipe a try! With its simple preparation and mouthwatering results, you’ll find it’s a hit with family and friends. Don’t hesitate to customize it with your favorite toppings or variations. Remember, cooking should be fun and creative! So gather your ingredients, set your crockpot, and enjoy the deliciousness that awaits. Happy cooking!
Cheesy Taco Pasta Recipe combines the comforting flavors of pasta with the zesty taste of tacos. This dish is not only quick to prepare but also packed with cheesy goodness and hearty ingredients. It’s perfect for busy weeknights or casual gatherings with friends.
Imagine a creamy, cheesy pasta dish that brings together the best of both worlds: the classic appeal of macaroni and cheese and the bold flavors of taco night. With just a few simple ingredients, you can whip up a satisfying meal that will have everyone asking for seconds. Plus, it’s versatile! You can easily customize it to suit your taste preferences or dietary needs.
Cheesy Taco Pasta Recipe is sure to become a favorite in your household. So, let’s dive in and get cooking!
Ingredients for Cheesy Taco Pasta Recipe
Cheesy Taco Pasta Recipe, you’ll need a handful of simple ingredients. These items are easy to find at your local grocery store, making this dish both accessible and convenient. Here’s what you’ll need:
8 ounces elbow macaroni
1 pound ground beef
1 tablespoon taco seasoning
1 can (10 ounces) diced tomatoes with green chilies
1 cup beef broth
1 cup shredded cheddar cheese
1 cup shredded Monterey Jack cheese
1/2 cup sour cream
Salt and pepper to taste
Chopped green onions for garnish
These ingredients come together to create a creamy, cheesy delight that’s bursting with flavor. The combination of ground beef and taco seasoning gives it that classic taco taste, while the cheeses and sour cream add a rich creaminess. Don’t forget the diced tomatoes with green chilies, which bring a nice kick to the dish!
Cheesy Taco Pasta Recipe is all about making it your own!
Step-by-Step Preparation of Cheesy Taco Pasta Recipe
Cheesy Taco Pasta Recipe is simple and straightforward, making it perfect for cooks of all skill levels. Follow these easy steps to create a delicious meal that your family will love.
Step 1: Gather Your Ingredients
Before you start cooking, make sure you have everything you need. Gather all the ingredients listed above. Having everything in one place will make the cooking process smoother and more enjoyable. Plus, it helps to avoid any last-minute trips to the store!
Step 2: Cook the Pasta
Begin by cooking the elbow macaroni. Bring a large pot of salted water to a boil. Add the macaroni and cook according to the package instructions until it’s al dente. This usually takes about 7-8 minutes. Once cooked, drain the pasta in a colander and set it aside. Remember, you want it firm enough to hold up in the creamy sauce!
Step 3: Prepare the Taco Meat
Next, heat a large skillet over medium heat. Add the ground beef and cook until it’s browned and fully cooked, which should take about 5-7 minutes. Make sure to break up the meat with a spatula as it cooks. Once done, drain any excess fat to keep the dish from becoming greasy. Now, stir in the taco seasoning, diced tomatoes with green chilies, and beef broth. Bring this mixture to a simmer, allowing the flavors to meld together beautifully.
Step 4: Combine Pasta and Taco Mixture
Once your taco meat is ready, it’s time to combine it with the pasta. Add the cooked elbow macaroni to the skillet with the taco mixture. Stir everything together until the pasta is well coated with the flavorful sauce. This step is crucial as it ensures every bite is packed with deliciousness!
Step 5: Add Cheese and Bake
Cheesy Taco Pasta Recipe gets its rich, comforting texture. Once everything is well combined, you can serve it hot, garnished with chopped green onions for a fresh touch.
And there you have it! A delightful, cheesy dish that’s sure to please everyone at the table. Enjoy your cooking adventure!
Variations of Cheesy Taco Pasta Recipe
Cheesy Taco Pasta Recipe is incredibly versatile, allowing you to customize it to suit your taste or dietary needs. Whether you’re looking for a vegetarian option or want to spice things up, there are plenty of variations to explore. Let’s take a look at two popular alternatives that can add a unique twist to this delicious dish.
Vegetarian Cheesy Taco Pasta Recipe
Cheesy Taco Pasta Recipe is a fantastic choice. Instead of ground beef, you can use black beans or lentils. These ingredients provide a hearty texture and are packed with protein. Here’s how to make it:
Replace the 1 pound of ground beef with 1 can of black beans (drained and rinsed) or 1 cup of cooked lentils.
Use vegetable broth instead of beef broth to keep it vegetarian-friendly.
Follow the same steps for cooking the pasta and combining the ingredients.
Cheesy Taco Pasta Recipe without meat!
Spicy Cheesy Taco Pasta Recipe
Cheesy Taco Pasta Recipe will be right up your alley! Adding some spice can elevate the dish and give it an exciting kick. Here’s how to make it spicy:
Add sliced jalapeños to the taco meat while it simmers. You can adjust the amount based on your heat preference.
Incorporate a dash of hot sauce or a sprinkle of crushed red pepper flakes when mixing in the cheese.
For an extra layer of flavor, consider using pepper jack cheese instead of Monterey Jack.
Cheesy Taco Pasta Recipe can be tailored to fit your cravings!
Cooking Note for Cheesy Taco Pasta Recipe
Cheesy Taco Pasta Recipe, there are a few important cooking notes to keep in mind. These tips will help ensure that your dish turns out perfectly every time, making your cooking experience enjoyable and stress-free.
First, always taste as you go! This is key to achieving the right balance of flavors. After adding the taco seasoning, take a moment to taste the mixture. If you feel it needs more seasoning, don’t hesitate to add a pinch of salt or pepper. Remember, everyone’s taste buds are different, so adjust according to your preference.
Next, be mindful of the cooking time for the pasta. Cooking it until it’s al dente is crucial. If the pasta is overcooked, it can become mushy when mixed with the creamy sauce. Keep an eye on the clock and follow the package instructions closely. A little firmness will help the pasta hold up in the dish.
Additionally, when combining the cheese and sour cream, make sure to stir gently. This will help create a smooth and creamy texture without clumping. If you find the mixture too thick, you can add a splash of beef broth or water to loosen it up. This will ensure that every bite is rich and creamy.
Lastly, don’t forget about the garnishes! Chopped green onions not only add a pop of color but also a fresh flavor that complements the richness of the cheese. You can also consider adding a dollop of sour cream on top when serving for an extra creamy touch.
Cheesy Taco Pasta Recipe that your family will love. Happy cooking!
Serving Suggestions for Cheesy Taco Pasta Recipe
Cheesy Taco Pasta Recipe, it’s time to think about how to serve it! Presentation can elevate your meal, making it even more enjoyable. Here are some fantastic serving suggestions to enhance your dining experience:
Garnish with Fresh Ingredients: After plating, sprinkle chopped green onions on top for a burst of color and flavor. You can also add fresh cilantro or parsley for an extra touch of freshness.
Pair with a Side Salad: A light side salad can balance the richness of the cheesy pasta. Consider a simple green salad with lettuce, tomatoes, and a tangy vinaigrette. This adds a refreshing contrast to the creamy dish.
Serve with Tortilla Chips: For a fun twist, serve your Cheesy Taco Pasta Recipe with crispy tortilla chips on the side. They can be used for scooping up the pasta or enjoyed as a crunchy snack alongside.
Offer Additional Toppings: Set up a toppings bar with options like sliced jalapeños, diced avocados, or extra cheese. This allows everyone to customize their dish to their liking, making it interactive and fun!
Accompany with a Beverage: Pair your meal with a refreshing drink. A cold soda, iced tea, or even a light beer can complement the flavors of the dish beautifully. For a non-alcoholic option, consider a fruity mocktail.
Cheesy Taco Pasta Recipe but also create a delightful dining experience for you and your guests. Enjoy your meal and the smiles it brings to the table!
Tips for Perfecting Your Cheesy Taco Pasta Recipe
Cheesy Taco Pasta Recipe truly shine, consider these helpful tips. They will guide you in creating a dish that’s not only delicious but also visually appealing and satisfying. Let’s explore some key pointers to elevate your cooking experience!
Use Quality Ingredients: The flavor of your Cheesy Taco Pasta Recipe starts with the ingredients. Opt for high-quality ground beef and fresh cheeses. Fresh ingredients can make a noticeable difference in taste.
Don’t Rush the Simmer: When you add the taco seasoning and broth, allow the mixture to simmer for a few minutes. This step helps the flavors meld together, creating a richer taste. Patience pays off!
Experiment with Cheese: While cheddar and Monterey Jack are classic choices, feel free to mix in other cheeses. Try adding gouda for a smoky flavor or cream cheese for extra creaminess. The cheese blend can enhance the overall taste.
Adjust the Spice Level: If you’re cooking for kids or those who prefer milder flavors, adjust the taco seasoning accordingly. You can start with half the amount and add more to taste. This way, everyone can enjoy the dish!
Make it Ahead: If you’re short on time, consider preparing the taco meat and pasta ahead of time. Store them separately in the fridge. When you’re ready to eat, simply combine and heat. This makes weeknight dinners a breeze!
Top with Crunch: For added texture, consider topping your Cheesy Taco Pasta Recipe with crushed tortilla chips or crispy bacon bits. This contrast can make each bite even more enjoyable.
Store Leftovers Properly: If you have leftovers, store them in an airtight container in the fridge. Reheat gently on the stove or in the microwave, adding a splash of broth to keep it creamy.
Cheesy Taco Pasta Recipe. Each suggestion is designed to enhance your cooking process and ensure a delightful meal every time. Happy cooking!
Breakdown of Time for Cheesy Taco Pasta Recipe
Cheesy Taco Pasta Recipe can help you plan your cooking efficiently. Whether you’re preparing this dish for a busy weeknight or a casual gathering, knowing the time breakdown will make your cooking experience smoother. Here’s a detailed look at the time required for each part of the process:
Prep Time
Cheesy Taco Pasta Recipe is approximately 10-15 minutes. During this time, you’ll gather all your ingredients, measure them out, and chop any fresh items like green onions. Having everything ready before you start cooking will make the process much easier and more enjoyable.
Cooking Time
The cooking time for this dish is about 20-25 minutes. This includes:
Cooking the elbow macaroni (7-8 minutes)
Browning the ground beef (5-7 minutes)
Simmering the taco mixture (5-10 minutes)
Combining the pasta and cheese (3-5 minutes)
Each step is quick, allowing you to have a delicious meal ready in no time!
Total Time
Cheesy Taco Pasta Recipe to take about 30-40 minutes from start to finish. This makes it a fantastic option for a weeknight dinner when you want something hearty and satisfying without spending hours in the kitchen. With this time breakdown, you can easily fit this recipe into your busy schedule!
Nutritional Information for Cheesy Taco Pasta Recipe
Cheesy Taco Pasta Recipe is not only delicious but also provides a good mix of nutrients. Here’s a breakdown of the nutritional information per serving, so you can enjoy this dish while being mindful of your dietary needs.
Calories
Cheesy Taco Pasta Recipe contains approximately 550 calories. This makes it a hearty meal that can keep you satisfied for hours. The combination of pasta, beef, and cheese contributes to the calorie count, providing energy for your day. If you’re looking to reduce calories, consider adjusting portion sizes or using leaner meat options.
Protein
One of the standout features of this recipe is its protein content. Each serving offers about 30 grams of protein. This is primarily from the ground beef and cheese, making it a great choice for those looking to increase their protein intake. Protein is essential for muscle repair and growth, making this dish a good option for active individuals.
Sodium
Cheesy Taco Pasta Recipe is approximately 800 milligrams per serving. This amount can vary based on the specific brands of ingredients used, especially the taco seasoning and beef broth. If you’re watching your sodium intake, consider using low-sodium broth and seasoning to help manage the overall salt content. Balancing sodium with fresh ingredients can also enhance the dish without compromising flavor.
Cheesy Taco Pasta Recipe while making informed choices about your diet. Whether you’re cooking for yourself or a family, this dish offers a satisfying blend of flavors and nutrients that everyone will love!
FAQs about Cheesy Taco Pasta Recipe
Can I make Cheesy Taco Pasta Recipe ahead of time?
Cheesy Taco Pasta Recipe can be made ahead of time, making it a great option for busy days. You can prepare the taco meat and pasta separately, then store them in airtight containers in the refrigerator. When you’re ready to eat, simply combine them in a skillet, add the cheese and sour cream, and heat until warm. This way, you can enjoy a delicious meal without the hassle of cooking from scratch every time!
What can I substitute for cheese in Cheesy Taco Pasta Recipe?
Cheesy Taco Pasta Recipe, there are several options. For a dairy-free alternative, you can use vegan cheese or nutritional yeast, which adds a cheesy flavor without the dairy. If you’re simply out of cheese, consider using cream cheese for a creamy texture or a mix of cottage cheese and a bit of shredded cheese for flavor. Just remember that the taste and texture may vary slightly, but it will still be delicious!
How can I make Cheesy Taco Pasta Recipe spicier?
Cheesy Taco Pasta Recipe, there are a few easy ways to spice things up! You can add sliced jalapeños or diced green chilies to the taco meat while it simmers. Another option is to mix in a few dashes of hot sauce or crushed red pepper flakes when combining the cheese. If you want an extra kick, consider using pepper jack cheese instead of Monterey Jack. These additions will give your dish a delightful spicy twist!
Is Cheesy Taco Pasta Recipe suitable for meal prep?
Cheesy Taco Pasta Recipe is perfect for meal prep! It stores well in the refrigerator for up to 3-4 days. You can portion it out into individual containers for easy grab-and-go meals throughout the week. Just reheat in the microwave or on the stove, adding a splash of broth if needed to keep it creamy. This makes it a convenient and satisfying option for lunches or quick dinners!
Conclusion on Cheesy Taco Pasta Recipe
Cheesy Taco Pasta Recipe is a delightful dish that brings together the comforting elements of pasta and the bold flavors of tacos. It’s not only easy to prepare but also offers a variety of options to suit different tastes and dietary needs. Whether you choose to stick with the classic recipe or explore the vegetarian or spicy variations, this dish is sure to please everyone at the table.
Cheesy Taco Pasta Recipe is perfect for busy weeknights or casual gatherings with friends and family. The combination of simple ingredients makes it accessible for cooks of all skill levels, allowing you to create a satisfying meal in no time. Plus, the ability to customize the recipe means you can make it your own, adding your favorite ingredients or adjusting the spice level to fit your preferences.
Cheesy Taco Pasta Recipe. Your family and friends will surely appreciate the effort, and you might just find this dish becoming a staple in your home. Happy cooking!
Paul
Cheesy Taco Pasta Recipe is a family favorite dish!
This Cheesy Taco Pasta is the perfect mashup of taco night and pasta night—boldly seasoned ground beef, tangy salsa, tender shells, and melty cheese all come together in one skillet for a creamy, comforting, and totally crave-worthy dinner the whole family will love!
2tablespoonstaco seasoninguse store-bought or homemade
¾cupwater
1cupjarred salsa
8ouncespastamedium shells are ideal
1cupshredded cheddar cheese
½cupshredded mozzarella cheese
Method
Cook the BeefIn a large skillet over medium-high heat, brown the ground beef until no longer pink. Drain any excess fat.
Season the MeatAdd the taco seasoning and water to the beef. Stir and simmer for 3–4 minutes until the sauce thickens slightly.
Add SalsaStir in the salsa and reduce the heat to low. Let the mixture simmer gently while you cook the pasta.
Boil the PastaIn a separate pot, cook the pasta shells according to package directions until al dente. Drain the pasta.
Combine and MeltAdd the cooked pasta to the skillet with the beef mixture. Sprinkle in the cheddar and mozzarella cheeses. Stir until the cheese melts and the pasta is coated in a creamy, cheesy taco sauce.
ServeSpoon into bowls and serve warm. Garnish with fresh herbs, extra cheese, or your favorite taco toppings if desired.
Notes
Customize It: Add in corn, black beans, or bell peppers for a veggie boost.
Spice Level: Use hot salsa or add a pinch of chili flakes for more heat.
Cheese Variations: Pepper jack or a Mexican blend can be used for extra flavor.
Leftovers: Reheat gently with a splash of milk or water to keep the pasta creamy.
Korean Braised Short Ribs, known as “Galbi Jjim,” is a dish that brings warmth and comfort to any table. This recipe is not just about cooking; it’s about creating a delightful experience that combines rich flavors and tender meat. The unique blend of ingredients makes this dish stand out, offering a taste of Korea right in your kitchen.
What Makes Korean Braised Short Ribs Unique?
What sets Korean Braised Short Ribs apart is the harmonious balance of sweet, savory, and umami flavors. The use of soy sauce, brown sugar, and sesame oil creates a rich sauce that perfectly complements the beef. The slow braising process allows the meat to absorb these flavors, resulting in tender, fall-off-the-bone ribs. Additionally, the inclusion of garlic and ginger adds a fragrant touch, enhancing the overall taste. This dish is not only delicious but also visually appealing, especially when garnished with green onions and sesame seeds.
The Cultural Significance of Short Ribs in Korean Cuisine
Short ribs hold a special place in Korean culture. They are often served during celebrations and family gatherings, symbolizing abundance and togetherness. Traditionally, Galbi Jjim is enjoyed during holidays like Chuseok (Korean Thanksgiving) and Seollal (Lunar New Year). The dish represents love and care, as families come together to share a meal. By preparing this recipe, you’re not just cooking; you’re participating in a rich cultural tradition that has been passed down through generations. Enjoying Korean Braised Short Ribs is a way to connect with the heart of Korean cuisine and its values.
Ingredients for Korean Braised Short Ribs Recipe
Essential Ingredients
To create the perfect Korean Braised Short Ribs, you need a few essential ingredients. These components work together to build the rich flavors that make this dish so special. Here’s what you’ll need:
Beef Short Ribs: 3 pounds of bone-in beef short ribs are the star of the dish. They provide the rich, meaty flavor that is essential for this recipe.
Vegetable Oil: 1 tablespoon is needed for searing the ribs. This helps to lock in the juices and adds a nice crust.
Onion: A medium onion, chopped, adds sweetness and depth to the sauce.
Garlic: 4 cloves of minced garlic bring a wonderful aroma and flavor.
Ginger: A 1-inch piece of grated ginger adds a warm, spicy note that complements the beef.
Soy Sauce: 1 cup of soy sauce provides the salty, umami flavor that is key to the dish.
Brown Sugar: 1 cup of brown sugar balances the saltiness with sweetness.
Rice Wine or Mirin: 1/2 cup adds a touch of acidity and sweetness.
Sesame Oil: 1/4 cup gives a nutty flavor that enhances the overall taste.
Beef Broth: 1 cup of beef broth adds moisture and richness to the braising liquid.
Optional Ingredients for Enhanced Flavor
While the essential ingredients are crucial, you can also add optional ingredients to elevate the dish even further. Here are some ideas:
Gochujang: A tablespoon of this Korean chili paste can add a spicy kick to the sauce, perfect for those who enjoy heat.
Carrots: Adding sliced carrots can introduce a natural sweetness and color to the dish.
Mushrooms: Adding shiitake or button mushrooms can enhance the umami flavor and add texture.
Sesame Seeds: For garnish, sesame seeds not only add a nice crunch but also a nutty flavor.
Green Onions: Sliced green onions make for a fresh and vibrant garnish, adding a pop of color.
With these ingredients, you’re well on your way to creating a delicious Korean Braised Short Ribs dish that will impress your family and friends. The combination of flavors and textures will surely make this meal a memorable one!
Step-by-Step Preparation of Korean Braised Short Ribs Recipe
Step 1: Preparing the Short Ribs
First, you need to prepare the short ribs. Start by rinsing them under cold water. This helps remove any excess blood and impurities. Next, pat them dry with paper towels. This step is important because it helps achieve a nice sear later. After drying, season the ribs generously with salt and pepper. This simple seasoning enhances the natural flavor of the beef.
Step 2: Marinating the Ribs
While marinating is not mandatory, it can add extra flavor. If you have time, consider marinating the short ribs for at least 30 minutes. You can use a mixture of soy sauce, brown sugar, and sesame oil for this. Place the ribs in a large bowl, pour the marinade over them, and cover. Let them sit in the refrigerator. This allows the flavors to penetrate the meat, making it even tastier.
Step 3: Searing the Ribs
Now, it’s time to sear the ribs. Heat 1 tablespoon of vegetable oil in a large Dutch oven over medium-high heat. Once the oil is hot, add the short ribs. Sear them for about 3-4 minutes on each side until they are nicely browned. This step locks in the juices and adds a beautiful crust. After searing, remove the ribs from the pot and set them aside. This will help build layers of flavor in the dish.
Step 4: Braising the Ribs
In the same pot, add the chopped onion, minced garlic, and grated ginger. Sauté these ingredients for about 3-4 minutes until the onion becomes translucent. This step releases their wonderful aromas. Next, stir in the soy sauce, brown sugar, rice wine, sesame oil, and beef broth. Bring this mixture to a gentle simmer. Once simmering, return the short ribs to the pot, ensuring they are submerged in the sauce. Cover the pot with a lid and transfer it to your preheated oven. Braise the ribs for 2.5 to 3 hours. The long cooking time allows the meat to become tender and flavorful.
Step 5: Final Touches and Serving
After braising, carefully remove the pot from the oven. Let it cool slightly before skimming off any excess fat from the surface of the sauce. This will help create a cleaner taste. To serve, place the short ribs over a bed of rice or noodles. Drizzle the rich sauce over the top. Finally, garnish with sliced green onions and sesame seeds for a beautiful presentation. Enjoy your delicious Korean Braised Short Ribs with family and friends!
Variation of Korean Braised Short Ribs Recipe
Alternative Ingredients for Different Flavors
While the traditional Korean Braised Short Ribs recipe is delightful as is, you can easily customize it to suit your taste. Here are some alternative ingredients that can add unique flavors:
Fruit Juices: Consider adding a splash of orange or apple juice to the braising liquid. This will introduce a subtle sweetness and acidity that brightens the dish.
Spices: Experiment with spices like star anise or cinnamon. These spices can add warmth and depth, creating a more complex flavor profile.
Vegetables: Besides carrots, you can add potatoes or parsnips. These vegetables absorb the sauce’s flavors and add heartiness to the meal.
Herbs: Fresh herbs like cilantro or parsley can be sprinkled on top before serving. They add a fresh note that contrasts beautifully with the rich sauce.
Different Sauces: If you want a twist, try using teriyaki sauce instead of soy sauce. This will give the dish a sweeter, more Asian-inspired flavor.
These alternative ingredients can help you create a version of Korean Braised Short Ribs that is uniquely yours. Feel free to mix and match based on what you have on hand or what flavors you enjoy!
Cooking Methods: Slow Cooker vs. Instant Pot
When it comes to cooking Korean Braised Short Ribs, you have options! Both the slow cooker and Instant Pot can yield delicious results, but they do so in different ways.
Slow Cooker: Using a slow cooker is perfect for those who want to set it and forget it. Simply follow the initial steps of searing the ribs and sautéing the aromatics. Then, transfer everything to the slow cooker. Cook on low for 6-8 hours or on high for 4-5 hours. This method allows the flavors to meld beautifully over time, resulting in tender, flavorful ribs.
Instant Pot: If you’re short on time, the Instant Pot is your best friend. After searing the ribs and sautéing the aromatics, add the remaining ingredients to the pot. Seal the lid and cook on high pressure for about 45 minutes. Allow for a natural release for 10-15 minutes before opening. This method significantly reduces cooking time while still producing tender, juicy ribs.
Both methods have their advantages, so choose the one that fits your schedule best. No matter how you cook them, your Korean Braised Short Ribs will be a hit!
Cooking Note for Korean Braised Short Ribs Recipe
Tips for Achieving the Perfect Texture
Getting the texture just right is key to enjoying Korean Braised Short Ribs. Here are some helpful tips to ensure your ribs turn out perfectly tender:
Choose the Right Cut: Always opt for bone-in beef short ribs. The bones add flavor and moisture during cooking, making the meat more tender.
Low and Slow: Braising at a low temperature for a long time is essential. This method breaks down the tough connective tissues in the meat, resulting in a melt-in-your-mouth texture.
Don’t Rush the Searing: Take your time when searing the ribs. A good sear creates a flavorful crust that enhances the overall taste of the dish.
Check for Doneness: The ribs are done when they are fork-tender and the meat easily pulls away from the bone. If they’re not there yet, give them more time.
Rest Before Serving: Allow the ribs to rest for a few minutes after cooking. This helps the juices redistribute, ensuring each bite is juicy and flavorful.
Common Mistakes to Avoid
Even the best cooks can make mistakes! Here are some common pitfalls to avoid when making Korean Braised Short Ribs:
Skipping the Sear: Don’t skip the searing step. It’s crucial for building flavor. Searing locks in juices and adds depth to the dish.
Overcrowding the Pot: If you have too many ribs in the pot, they won’t brown properly. Cook in batches if necessary to ensure even cooking.
Not Enough Liquid: Make sure there’s enough braising liquid to cover the ribs. This helps them cook evenly and prevents them from drying out.
Ignoring the Fat: While some fat is good for flavor, too much can make the dish greasy. Skim off excess fat after cooking for a cleaner taste.
Rushing the Cooking Time: Patience is key! Rushing the cooking time can lead to tough meat. Stick to the recommended braising time for the best results.
By following these tips and avoiding common mistakes, you’ll be well on your way to creating a delicious and satisfying Korean Braised Short Ribs dish that everyone will love!
Serving Suggestions for Korean Braised Short Ribs Recipe
Best Side Dishes to Pair with Short Ribs
When serving Korean Braised Short Ribs, choosing the right side dishes can elevate your meal. Here are some fantastic options that complement the rich flavors of the ribs:
Steamed Rice: A classic choice, steamed white or brown rice absorbs the delicious sauce, making each bite even more satisfying.
Kimchi: This traditional Korean side dish adds a spicy and tangy contrast to the savory ribs. The fermented flavors of kimchi enhance the overall meal.
Pickled Vegetables: Quick-pickled cucumbers or radishes provide a refreshing crunch that balances the richness of the short ribs.
Stir-Fried Vegetables: A mix of colorful vegetables like bell peppers, broccoli, and carrots stir-fried in sesame oil adds both nutrition and flavor.
Potato Salad: A creamy potato salad can offer a comforting side that pairs well with the tender meat.
These side dishes not only complement the Korean Braised Short Ribs but also create a well-rounded meal that your family and friends will love!
Wine and Beverage Pairings
Choosing the right beverage can enhance your dining experience. Here are some excellent wine and beverage pairings for Korean Braised Short Ribs:
Red Wine: A medium-bodied red wine, like Merlot or Pinot Noir, pairs beautifully with the rich flavors of the ribs. The fruitiness of these wines complements the sweetness of the sauce.
White Wine: If you prefer white wine, try a dry Riesling. Its acidity and slight sweetness can balance the savory elements of the dish.
Korean Soju: This traditional Korean spirit is a great match. Its clean taste and smooth finish make it a popular choice with hearty dishes.
Beer: A light lager or a wheat beer can also work well. The crispness of the beer cuts through the richness of the meat.
Non-Alcoholic Options: For a refreshing non-alcoholic choice, consider iced green tea or a sparkling water with a slice of lemon. These drinks cleanse the palate and enhance the meal.
With these serving suggestions, you can create a delightful dining experience that showcases the deliciousness of your Korean Braised Short Ribs. Enjoy your meal with family and friends!
Tips for Perfecting Your Korean Braised Short Ribs Recipe
Storage and Reheating Tips
Storing your Korean Braised Short Ribs properly ensures they stay delicious for later enjoyment. Here are some helpful tips:
Cool Before Storing: Allow the short ribs to cool to room temperature before storing. This prevents condensation, which can make the meat soggy.
Use Airtight Containers: Place the ribs and sauce in airtight containers. This helps maintain freshness and prevents odors from other foods in the fridge.
Refrigeration: Store the short ribs in the refrigerator for up to 3 days. If you want to keep them longer, consider freezing.
Freezing: For longer storage, freeze the ribs in a freezer-safe container. They can last up to 3 months in the freezer. Just make sure to label the container with the date.
Reheating: To reheat, thaw the ribs in the refrigerator overnight if frozen. Then, gently reheat them in a saucepan over low heat. You can also use the microwave, but be careful not to overcook them.
Following these storage and reheating tips will help you enjoy your Korean Braised Short Ribs even after the initial meal!
How to Adjust Spice Levels
Adjusting the spice levels in your Korean Braised Short Ribs can make the dish perfect for your taste. Here’s how to do it:
Start Mild: If you’re unsure about spice levels, start with a small amount of gochujang or other spicy ingredients. You can always add more later!
Balance with Sweetness: If the dish becomes too spicy, add a bit more brown sugar or honey. This will help balance the heat with sweetness.
Use Fresh Ingredients: Fresh ginger and garlic can add flavor without too much heat. Adjust the amounts based on your preference.
Serve with Sides: If the ribs are spicier than expected, serve them with cooling sides like cucumber salad or plain rice. This can help tone down the heat.
Experiment: Don’t be afraid to experiment with different spices. You can try adding a pinch of black pepper or chili flakes for a different flavor profile.
By following these tips, you can easily customize the spice levels in your Korean Braised Short Ribs, making them just right for you and your guests!
Breakdown of Time for Korean Braised Short Ribs Recipe
Prep Time
Preparing Korean Braised Short Ribs is a delightful process that requires some time. The prep time for this recipe is approximately 30 minutes. This includes rinsing and drying the short ribs, chopping the vegetables, and measuring out the ingredients. If you choose to marinate the ribs, you may want to add an additional 30 minutes to 1 hour for that step. Marinating enhances the flavor, making the dish even more delicious!
Cooking Time
The cooking time for Korean Braised Short Ribs is where the magic happens! Once you have seared the ribs and sautéed the aromatics, the braising process takes about 2.5 to 3 hours in the oven. This slow cooking allows the meat to become tender and soak up all the rich flavors from the sauce. If you opt for a slow cooker, the cooking time will be around 6-8 hours on low or 4-5 hours on high. For those using an Instant Pot, the cooking time is significantly reduced to about 45 minutes under high pressure.
Total Time
When you combine the prep time and cooking time, the total time for making Korean Braised Short Ribs is approximately 3 to 4 hours, depending on your cooking method. If you include marinating time, it could extend to about 4 to 5 hours. However, most of this time is hands-off, allowing you to enjoy other activities while the ribs cook to perfection. The end result is a comforting and flavorful dish that is well worth the wait!
Nutritional Information for Korean Braised Short Ribs Recipe
Calories and Macronutrients
Understanding the nutritional content of your meals is essential for maintaining a balanced diet. Each serving of Korean Braised Short Ribs offers a satisfying combination of flavors and nutrients. Here’s a breakdown of the calories and macronutrients per serving:
Calories: 450
Net Carbohydrates: 10g
Protein: 35g
Fat: 30g
This dish is rich in protein, making it a great option for those looking to build muscle or maintain a healthy weight. The fat content comes primarily from the beef, which contributes to the dish’s rich flavor and satisfying texture. The low net carbohydrate count makes it suitable for various dietary preferences, including low-carb diets.
Health Benefits of Short Ribs
Beef short ribs not only provide delicious flavor but also come with several health benefits. Here are some reasons to enjoy this dish:
High in Protein: Short ribs are an excellent source of protein, which is essential for muscle repair and growth. Protein also helps keep you feeling full and satisfied.
Rich in Iron: Beef is a great source of heme iron, which is easily absorbed by the body. Iron is crucial for transporting oxygen in the blood and preventing anemia.
Contains Essential Vitamins: Short ribs provide important vitamins such as B12, which supports nerve function and energy production, and zinc, which is vital for immune health.
Healthy Fats: While short ribs do contain fat, they also provide healthy fats that can support heart health when consumed in moderation. The fat helps with the absorption of fat-soluble vitamins.
Incorporating Korean Braised Short Ribs into your meal plan can be a delicious way to enjoy the benefits of beef while savoring a traditional dish. Just remember to balance your plate with plenty of vegetables and whole grains for a well-rounded meal!
FAQs about Korean Braised Short Ribs Recipe
Can I use a different cut of meat for this recipe?
Yes, you can use different cuts of meat if you prefer! While beef short ribs are traditional, you might consider using chuck roast or brisket. These cuts also become tender when braised. However, keep in mind that the flavor and texture may vary. Short ribs are known for their rich taste and marbling, which adds to the dish’s overall appeal. If you choose another cut, adjust the cooking time accordingly, as some cuts may require less or more time to become tender.
How do I know when the short ribs are done?
Knowing when your short ribs are done is key to achieving that melt-in-your-mouth texture. The best way to check is by using a fork. When the meat is fork-tender, it means it’s ready to enjoy! The meat should easily pull away from the bone without much effort. If it still feels tough, give it more time in the oven. Remember, patience is essential for this dish, as the longer cooking time allows the flavors to develop and the meat to become tender.
Can I make Korean Braised Short Ribs ahead of time?
Absolutely! Making Korean Braised Short Ribs ahead of time is a great idea. In fact, the flavors often improve after sitting for a day. To do this, prepare the dish as directed, then let it cool completely before storing it in the refrigerator. You can keep it for up to three days. When you’re ready to serve, simply reheat it gently on the stovetop or in the oven. Just be sure to add a splash of beef broth or water to keep it moist while reheating.
What can I substitute for soy sauce in this recipe?
If you need a substitute for soy sauce, there are several options available. For a gluten-free alternative, you can use tamari, which has a similar flavor profile. Another option is coconut aminos, which is a soy-free sauce made from coconut sap. It has a slightly sweeter taste but works well in this recipe. If you’re looking for a low-sodium option, consider using low-sodium soy sauce or diluting regular soy sauce with water. Each substitute will bring its unique flavor, so feel free to experiment!
Conclusion on Korean Braised Short Ribs Recipe
Recap of Key Points
Korean Braised Short Ribs, or Galbi Jjim, is a dish that beautifully combines rich flavors and tender meat. Throughout this article, we explored the essential ingredients, step-by-step preparation, and various cooking methods. We also discussed how to enhance the dish with optional ingredients and provided tips for achieving the perfect texture. Additionally, we highlighted the importance of serving suggestions and how to adjust spice levels to suit your taste. With its cultural significance and delightful taste, this recipe is sure to impress anyone who tries it.
Encouragement to Try the Recipe
Now that you have all the information you need, it’s time to roll up your sleeves and try making Korean Braised Short Ribs! Whether you’re cooking for a special occasion or just a cozy family dinner, this dish is bound to be a hit. Don’t be afraid to experiment with flavors and make it your own. Remember, cooking is all about enjoying the process and sharing delicious meals with loved ones. So gather your ingredients, follow the steps, and savor the delightful experience of creating this traditional Korean dish. Happy cooking!
Paul
Korean Braised Short Ribs Recipe is a must-try!
This comforting Korean classic brings fall-apart tender short ribs simmered in a savory, slightly sweet, and garlicky sauce. Perfectly braised with aromatic ginger, scallions, and a hint of chili, it’s a soul-warming dish ideal for a cozy dinner or special occasion.
¼cuplow-sodium soy sauce or Tamari for gluten-free
¼cupbrown sugar
4teaspoonsrice vinegar
For the Short Ribs:
6garlic clovesminced
8scallions or ½ onionchopped
1inchfresh gingerpeeled and grated
3tablespoonsolive oildivided
1½ to 2poundsboneless beef short ribs
¼cupflour or gluten-free flour blend
2cupsbeef brothdivided
¼teaspoonkosher salt
¼teaspoonblack pepper
Method
Preheat OvenPreheat your oven to 350°F (175°C).
Prepare the SauceIn a bowl, whisk together the chili garlic sauce, sesame oil, soy sauce, brown sugar, and rice vinegar. Set aside.
Coat the RibsLightly toss the boneless beef short ribs in flour until evenly coated.
Sear the RibsHeat 1½ tablespoons olive oil in a Dutch oven over medium-high heat. Sear half of the ribs for about 3–4 minutes per side until browned. Repeat with the remaining ribs using another 1½ tablespoons of olive oil. Season both batches with salt and pepper.
Sauté the AromaticsLower the heat to medium. Add garlic, scallions (or onion), and grated ginger to the Dutch oven. Sauté for 2–3 minutes until fragrant.
Build the BraiseReturn the seared ribs to the pot. Pour in the prepared sauce and 1 cup of beef broth. Stir to combine, ensuring the ribs are mostly submerged.
Oven-BraiseCover the Dutch oven and transfer it to the oven. Bake for 1 hour. After the first hour, pour in the remaining 1 cup of beef broth, cover again, and continue baking for another hour. Then uncover and bake for an additional 30 minutes.
ServeWhen the ribs are fork-tender and the sauce has thickened slightly, remove from the oven. Serve hot with rice or mashed potatoes. Garnish with chopped scallions, sesame seeds, or a squeeze of lime if desired.
Notes
Make Ahead: This dish can be made a day in advance; the flavors deepen beautifully overnight. Just reheat gently on the stove or in the oven.
Cut Options: Boneless ribs are easier to serve, but bone-in short ribs offer extra flavor if you prefer.
Serving Ideas: Serve with steamed rice, kimchi, or sautéed greens for a full Korean-inspired meal.
Hibachi chicken with vegetables is a delightful dish that brings the flavors of Japanese cuisine right to your kitchen. This meal is not only delicious but also colorful and nutritious. Imagine tender pieces of chicken, perfectly cooked with a medley of fresh vegetables, all tossed together in a savory sauce. It’s a feast for both the eyes and the taste buds!
Originating from Japan, hibachi cooking is known for its quick preparation and vibrant presentation. The word “hibachi” refers to a traditional Japanese grill, but in many places, it has come to represent a style of cooking that involves grilling meats and vegetables on a flat surface. This method allows for high heat cooking, which seals in flavors and creates a satisfying texture.
In this recipe, we’ll guide you through making hibachi chicken with vegetables that serves four people. It’s perfect for a family dinner or a gathering with friends. Plus, it’s easy to customize based on your preferences. Whether you’re a fan of broccoli, zucchini, or bell peppers, you can mix and match your favorite veggies.
Not only is this dish tasty, but it also packs a nutritional punch. With lean protein from the chicken and a variety of vitamins from the vegetables, it’s a wholesome choice for any meal. So, let’s dive into the ingredients and preparation steps to create this mouthwatering hibachi chicken with vegetables!
Ingredients for Hibachi Chicken with Vegetables
To create a delicious hibachi chicken with vegetables, you’ll need a few simple ingredients. These items are easy to find and can be adjusted based on your taste. Here’s what you’ll need:
These ingredients come together to create a flavorful dish that is both satisfying and healthy. The chicken provides lean protein, while the vegetables add essential vitamins and minerals. The sauces bring a savory depth to the dish, making it a favorite for many. Feel free to experiment with different vegetables or sauces to make this hibachi chicken with vegetables your own!
Preparation of Hibachi Chicken with Vegetables
Now that you have gathered all the ingredients, it’s time to prepare your hibachi chicken with vegetables. This process is straightforward and will have your kitchen smelling amazing in no time. Let’s break it down into easy steps!
Step 1: Marinating the Chicken for Hibachi Chicken with Vegetables
To enhance the flavor of your chicken, marinating is a great first step. In a bowl, combine 1 tablespoon of soy sauce, 1 tablespoon of teriyaki sauce, and a pinch of salt and pepper. Add the bite-sized chicken pieces to the bowl and mix well. Cover the bowl and let it marinate for at least 30 minutes. This allows the chicken to absorb the flavors, making it even tastier when cooked.
Step 2: Preparing the Vegetables for Hibachi Chicken with Vegetables
While the chicken is marinating, it’s time to prepare the vegetables. Wash and chop the broccoli into small florets. Slice the zucchini, bell peppers, and mushrooms into thin pieces. Having everything ready will make the cooking process smoother. Remember, the key to a great hibachi dish is to have your vegetables cut evenly so they cook at the same rate.
Step 3: Cooking the Hibachi Chicken with Vegetables
Once the chicken has marinated, heat a large skillet or wok over medium-high heat. Add 2 tablespoons of vegetable oil and let it get hot. Carefully add the marinated chicken to the skillet. Cook for about 5-7 minutes, stirring occasionally, until the chicken is golden brown and cooked through. Once done, remove the chicken from the skillet and set it aside.
In the same skillet, add the prepared vegetables. Stir-fry them for about 4-5 minutes until they are tender-crisp. Then, add 3 cloves of minced garlic and stir for about 30 seconds until fragrant. This step adds a wonderful aroma to your dish!
Step 4: Final Touches for Hibachi Chicken with Vegetables
Now it’s time to bring everything together! Return the cooked chicken to the skillet with the vegetables. Pour in the remaining soy sauce, teriyaki sauce, and 1 teaspoon of sesame oil. Stir well to combine all the ingredients. Heat everything through for another 2-3 minutes. This final step ensures that all the flavors meld together beautifully.
Your hibachi chicken with vegetables is now ready to be served! Enjoy it over a bed of cooked white or brown rice for a complete meal.
Variation of Hibachi Chicken with Vegetables
While the classic hibachi chicken with vegetables is a favorite, there are many ways to switch things up! You can explore alternative proteins and different vegetable combinations to create a dish that suits your taste. Let’s take a look at some exciting variations!
Alternative Proteins for Hibachi Chicken with Vegetables
If you want to try something different, consider using alternative proteins. Here are a few options:
Beef: Thinly sliced beef, such as sirloin or flank steak, can be a delicious substitute. Just marinate it the same way as the chicken for great flavor.
Shrimp: Shrimp cooks quickly and adds a lovely seafood twist. Use peeled and deveined shrimp, and sauté them for about 3-4 minutes until they turn pink.
Tofu: For a vegetarian option, firm tofu is perfect. Press it to remove excess moisture, then cut it into cubes and sauté until golden brown.
Pork: Thinly sliced pork tenderloin can also work well. It has a nice flavor and pairs beautifully with the vegetables.
These alternative proteins can bring new flavors and textures to your hibachi dish. Feel free to experiment and find your favorite!
Different Vegetable Combinations for Hibachi Chicken with Vegetables
Another way to customize your hibachi chicken with vegetables is by changing up the vegetable mix. Here are some tasty options:
Carrots: Sliced carrots add a sweet crunch. They can be added alongside the other vegetables for a pop of color.
Snap Peas: These sweet and crunchy peas are a great addition. Toss them in during the last few minutes of cooking for a fresh taste.
Onions: Sliced onions can add a savory depth. Use red or yellow onions for a different flavor profile.
Asparagus: Cut asparagus into bite-sized pieces for a unique twist. They cook quickly and add a lovely texture.
Mixing and matching vegetables not only enhances the flavor but also boosts the nutritional value of your meal. So, feel free to get creative and make this hibachi chicken with vegetables your own!
Cooking Note for Hibachi Chicken with Vegetables
When preparing hibachi chicken with vegetables, there are a few cooking notes to keep in mind. These tips will help you achieve the best results and ensure your dish is both delicious and visually appealing.
First, using a large skillet or wok is essential. This allows for even cooking and gives you enough space to stir-fry the ingredients without overcrowding. If the pan is too crowded, the chicken and vegetables may steam instead of sear, which can affect the texture and flavor.
Next, make sure your skillet is hot before adding the oil. A hot pan helps to sear the chicken quickly, locking in moisture and flavor. You can test the heat by sprinkling a few drops of water into the pan; if they sizzle and evaporate quickly, it’s ready for cooking.
Also, remember to cut your chicken and vegetables into uniform sizes. This ensures that everything cooks evenly. For instance, if you cut the chicken into larger pieces, they may take longer to cook than smaller vegetable pieces, leading to uneven doneness.
When stir-frying, keep the ingredients moving. Stirring frequently helps to prevent burning and allows for even cooking. Use a spatula or wooden spoon to toss the ingredients gently but quickly.
Lastly, don’t skip the marinating step! Marinating the chicken not only enhances its flavor but also helps to tenderize the meat. If you have time, marinate it longer for an even richer taste.
By following these cooking notes, you’ll create a hibachi chicken with vegetables that is not only tasty but also beautifully presented. Enjoy the process and the delightful aromas that fill your kitchen!
Serving Suggestions for Hibachi Chicken with Vegetables
Once your hibachi chicken with vegetables is ready, it’s time to think about how to serve it. Presentation can elevate your meal, making it even more enjoyable. Here are some delightful serving suggestions to enhance your dining experience:
Over Rice: Serve the hibachi chicken and vegetables over a generous scoop of cooked white or brown rice. The rice acts as a perfect base, soaking up the delicious sauces.
With Noodles: For a different twist, try serving the dish over cooked noodles. Soba or udon noodles work well and add a nice texture.
Garnish: Add a sprinkle of sesame seeds or chopped green onions on top for a pop of color and extra flavor. This simple touch can make your dish look restaurant-quality.
Side Salad: Pair your hibachi chicken with a fresh side salad. A simple mix of greens, cucumbers, and a light vinaigrette can balance the meal nicely.
Pickled Vegetables: Serve with a side of pickled vegetables for a tangy contrast. This can enhance the overall flavor profile and add a crunchy texture.
Egg Fried Rice: For a more traditional hibachi experience, consider serving it with egg fried rice. The flavors complement each other beautifully.
These serving suggestions not only enhance the visual appeal of your meal but also add variety to your dining experience. Whether you’re hosting a dinner party or enjoying a family meal, these ideas will surely impress your guests and make your hibachi chicken with vegetables a memorable dish!
Tips for Perfect Hibachi Chicken with Vegetables
Creating the perfect hibachi chicken with vegetables is all about attention to detail and a few helpful tips. With these suggestions, you can elevate your dish and impress your family and friends. Let’s explore some essential tips for achieving hibachi perfection!
First, always start with fresh ingredients. Fresh chicken and vibrant vegetables not only taste better but also enhance the overall presentation of your dish. Look for bright colors and firm textures when selecting your produce.
Next, don’t rush the marinating process. Allowing the chicken to marinate for at least 30 minutes is crucial. If you have more time, consider marinating it for a few hours or even overnight. This extra time allows the flavors to penetrate deeply, resulting in a more flavorful chicken.
When cooking, ensure your skillet or wok is preheated properly. A hot pan is key to achieving that delicious sear on the chicken. If the pan isn’t hot enough, the chicken will steam instead of brown, which can lead to a less appealing texture.
Another important tip is to cook in batches if necessary. If you have a lot of chicken or vegetables, cooking them in smaller batches can help maintain the right cooking temperature. This prevents overcrowding, which can lead to uneven cooking.
Don’t forget to season your vegetables! A pinch of salt and pepper can enhance their natural flavors. You can also add a splash of soy sauce or teriyaki sauce while stir-frying for an extra burst of flavor.
Lastly, let your dish rest for a few minutes before serving. This allows the flavors to settle and makes for a more enjoyable eating experience. Plus, it gives you time to prepare your serving dishes and garnishes!
By following these tips, you’ll create a hibachi chicken with vegetables that is not only delicious but also visually stunning. Enjoy the cooking process and the delightful meal that awaits!
Breakdown of Time for Hibachi Chicken with Vegetables
Understanding the time needed for each step in preparing hibachi chicken with vegetables can help you plan your cooking efficiently. Here’s a breakdown of the time required for preparation and cooking, ensuring you can enjoy this delicious meal without any rush!
Prep Time for Hibachi Chicken with Vegetables
The prep time for hibachi chicken with vegetables is approximately 15-20 minutes. This includes:
Gathering all your ingredients and tools.
Marinating the chicken, which takes about 30 minutes (but can be done ahead of time).
Washing and chopping the vegetables into bite-sized pieces.
While the chicken marinates, you can efficiently prepare the vegetables, making the most of your time.
Cooking Time for Hibachi Chicken with Vegetables
The cooking time for hibachi chicken with vegetables is around 15-20 minutes. This includes:
Cooking the marinated chicken for about 5-7 minutes until golden brown.
Stir-frying the vegetables for 4-5 minutes until they are tender-crisp.
Combining everything and heating through for an additional 2-3 minutes.
This quick cooking process ensures that your meal is ready in no time, allowing you to enjoy a fresh and flavorful dish!
Total Time for Hibachi Chicken with Vegetables
In total, the time required to prepare and cook hibachi chicken with vegetables is approximately 45-50 minutes. This includes:
15-20 minutes for prep (including marinating time).
15-20 minutes for cooking.
With this breakdown, you can easily plan your cooking session. Whether you’re making this dish for a weeknight dinner or a special occasion, knowing the time involved helps you stay organized and enjoy the process!
Nutritional Information for Hibachi Chicken with Vegetables
Understanding the nutritional content of your meals is essential for maintaining a balanced diet. Hibachi chicken with vegetables is not only delicious but also offers a variety of nutrients. Let’s break down the key nutritional components of this dish!
Calories in Hibachi Chicken with Vegetables
Each serving of hibachi chicken with vegetables contains approximately 320 calories. This makes it a relatively low-calorie option for a satisfying meal. The combination of chicken and vegetables provides a hearty dish without excessive calories, making it suitable for those watching their intake.
Protein Content in Hibachi Chicken with Vegetables
One of the standout features of hibachi chicken with vegetables is its protein content. Each serving provides about 30 grams of protein. This high protein level is beneficial for muscle repair and growth, making it an excellent choice for active individuals or anyone looking to maintain a healthy diet.
Sodium Levels in Hibachi Chicken with Vegetables
When it comes to sodium, hibachi chicken with vegetables contains around 600 milligrams per serving. While this is a moderate amount, it’s important to be mindful of sodium intake, especially for those with dietary restrictions. You can reduce sodium levels by using low-sodium soy sauce or teriyaki sauce, ensuring a healthier meal without sacrificing flavor.
Overall, hibachi chicken with vegetables is a nutritious option that balances calories, protein, and sodium. It’s a great choice for a wholesome meal that supports your health goals while satisfying your taste buds!
FAQs about Hibachi Chicken with Vegetables
What is Hibachi Chicken with Vegetables?
Hibachi chicken with vegetables is a popular dish that features tender chicken pieces stir-fried with a colorful mix of vegetables. This dish is typically cooked in a hot skillet or wok, allowing the ingredients to sear quickly while retaining their flavors and textures. The chicken is often marinated in savory sauces like soy sauce and teriyaki, which adds depth to the dish. It’s a delightful meal that combines protein and veggies, making it both satisfying and nutritious.
How can I make Hibachi Chicken with Vegetables healthier?
Making hibachi chicken with vegetables healthier is easy! Here are a few tips:
Use leaner cuts: Opt for skinless chicken breasts or thighs to reduce fat content.
Choose low-sodium sauces: Select low-sodium soy sauce and teriyaki sauce to cut down on sodium levels.
Add more vegetables: Increase the variety and quantity of vegetables to boost fiber and nutrient content.
Serve with whole grains: Pair the dish with brown rice or quinoa instead of white rice for added nutrients.
Limit oil: Use less oil when cooking or try a non-stick skillet to reduce fat intake.
By making these simple adjustments, you can enjoy a healthier version of hibachi chicken with vegetables without sacrificing flavor!
Can I use frozen vegetables for Hibachi Chicken with Vegetables?
Yes, you can definitely use frozen vegetables for hibachi chicken with vegetables! Frozen veggies are convenient and can save you time in the kitchen. They are often flash-frozen at their peak freshness, which helps retain their nutrients. Just be sure to thaw them before cooking to ensure even cooking. You may need to adjust the cooking time slightly, as frozen vegetables can release moisture. Stir-fry them until they are heated through and tender-crisp for the best results.
What sides pair well with Hibachi Chicken with Vegetables?
Hibachi chicken with vegetables is versatile and pairs well with various sides. Here are some great options:
Steamed Rice: White or brown rice is a classic choice that complements the flavors of the dish.
Fried Rice: Egg fried rice adds a delicious twist and enhances the hibachi experience.
Salad: A fresh garden salad with a light dressing can balance the meal nicely.
Spring Rolls: Crispy spring rolls make for a tasty appetizer or side dish.
Edamame: Steamed edamame is a healthy and protein-rich side that pairs well with the main dish.
These sides not only enhance the meal but also add variety to your dining experience. Enjoy experimenting with different combinations!
Conclusion on Hibachi Chicken with Vegetables
In conclusion, hibachi chicken with vegetables is a delightful dish that brings the vibrant flavors of Japanese cuisine right to your table. This recipe is not only easy to prepare but also offers a wonderful balance of protein and nutrients, making it a fantastic choice for any meal. With its colorful presentation and savory taste, it’s sure to impress family and friends alike.
By following the steps outlined in this article, you can create a delicious hibachi chicken with vegetables that is both satisfying and healthy. The versatility of this dish allows you to customize it to your liking, whether by choosing different proteins or experimenting with various vegetables. Plus, the cooking tips and serving suggestions provided will help you elevate your dining experience.
As you enjoy your hibachi chicken with vegetables, remember that cooking is not just about the food; it’s also about the joy of sharing a meal with loved ones. So gather around the table, savor the flavors, and create lasting memories with this delightful dish. Happy cooking!
Paul
Hibachi Chicken with Vegetables is a must-try dish!
Bring the sizzle of your favorite Japanese steakhouse to your own kitchen with this flavorful Hibachi Chicken! Juicy marinated chicken, stir-fried veggies, and a creamy-spicy yum yum sauce come together for a delicious and satisfying meal you can whip up at home.
½cupmayonnaiseor Greek yogurt or dairy-free alternative
2teaspoonscoconut aminosor soy sauce
½teaspoongarlic powder
2½tablespoonssriracha sauce
1teaspoonrice vinegar
Optional for Serving:
Cooked rice or cauliflower rice
Chopped green onions
Method
Marinate the ChickenIn a bowl, mix together coconut aminos, ground ginger, rice vinegar, and minced garlic. Add the cubed chicken and toss to coat. Cover and refrigerate for at least 15–30 minutes, or overnight for deeper flavor.
Cook the ChickenHeat a large skillet or wok over medium-high heat. Add sesame oil and cook the marinated chicken for about 10 minutes, until golden brown and cooked through (internal temp of 165°F). Remove and set aside.
Stir-Fry the VegetablesIn the same skillet, add a bit more oil if needed. Stir-fry the onions, carrots, mushrooms, and zucchini until tender but still slightly crisp.
Combine Chicken and VeggiesReturn the chicken to the skillet with the veggies. Add 2 tablespoons of coconut aminos and 1 tablespoon of rice vinegar. Stir to combine and heat for another 2–3 minutes.
Prepare the Yum Yum SauceIn a small bowl, whisk together mayonnaise, coconut aminos, garlic powder, sriracha, and rice vinegar until smooth.
ServePlate the chicken and veggies over rice or cauliflower rice. Drizzle generously with yum yum sauce and sprinkle with sesame seeds. Garnish with green onions if desired.
Notes
Make Ahead Tip: The chicken can be marinated the night before for even more flavor.
Veggie Swap: Feel free to use bell peppers, broccoli, or snap peas depending on what you have.
Heat Level: Adjust the sriracha in the sauce to taste if you prefer it milder or spicier.
Gluten-Free: Use coconut aminos or tamari instead of soy sauce for a gluten-free version.
When I was growing up, my grandmother’s kitchen was a sanctuary, the heart of our family. I can still remember the warm, earthy scent of roasting vegetables that would drift from the oven, a sign that another family meal was coming together. Among the array of dishes she’d create, one always stood out: her simple roasted eggplant. It was a humble dish, but the way the eggplant transformed in the oven, golden and caramelized, with every bite offering a combination of tender softness and savory richness, made it something special. It’s a recipe that’s been passed down through generations, and though the ingredients are modest, the flavors are anything but.
Eggplants have a unique ability to absorb the flavors around them, making them a perfect canvas for spices, herbs, and seasonings. For me, this particular eggplant recipe represents comfort, tradition, and the importance of simplicity in cooking. It’s a dish that reminds me of home, where food was not just about nourishment, but about love and family. And it’s a recipe I now share with others, knowing that it can evoke the same sense of warmth and joy in their homes.
Eggplant: A Versatile Gem in the Vegetable Kingdom
Eggplant, also known as aubergine in some parts of the world, has long been a staple in Mediterranean and Middle Eastern cuisine. Its versatility is what makes it such a beloved vegetable. Whether it’s being grilled, baked, or stuffed, eggplant can easily take on a variety of flavors, making it an essential ingredient in many dishes. While it can sometimes be seen as an unassuming vegetable, its rich, creamy texture and mild flavor are perfect for absorbing the aromas and seasonings that surround it.
In this recipe, we let the eggplant shine by keeping things simple, using only a few ingredients to enhance its natural flavor. The olive oil, garlic, and herbs used in this dish provide just the right balance of richness and freshness. It’s a dish that’s easy to prepare, but one that packs a punch in terms of flavor and satisfaction.
Ingredients
Ingredient
Amount
Eggplants
2
Olive oil
To taste
Garlic
3 cloves, minced
Fresh Dill
To taste, chopped
Salt
To taste
Black Pepper
To taste
Italian Herbs
To taste
Instructions:
Preheat the oven: Start by preheating your oven to 400°F (200°C). This ensures it’s ready for the eggplant once prepped.
Prepare the eggplant: Slice the eggplants into rounds about 1/2-inch thick. You can peel them if you prefer a smoother texture, but the skin adds a beautiful color and extra nutrients.
Season the eggplant: Place the eggplant slices on a baking sheet lined with parchment paper. Drizzle olive oil generously over the slices and rub them in gently. Sprinkle salt, black pepper, and Italian herbs to taste, making sure every slice is well-seasoned.
Garlic infusion: Mince the garlic cloves and sprinkle them over the eggplant. This will add a fragrant aroma and an extra layer of flavor.
Bake: Pop the baking sheet in the oven for about 20-25 minutes, or until the eggplant becomes golden brown and soft in the middle.
Garnish with dill: Once out of the oven, sprinkle freshly chopped dill over the eggplant slices. This gives it a fresh, herbal note that complements the richness of the olive oil and the earthiness of the eggplant.
Nutritional Information
Nutrient
Per Serving (Approx.)
Calories
100-120 kcal
Fat
7-8 g
Carbohydrates
8-10 g
Fiber
4-5 g
Protein
1-2 g
Why This Eggplant Recipe Works
The secret to this recipe’s success lies in the balance of ingredients and the method of cooking. Eggplants can often turn mushy if not prepared properly, but when baked or roasted at the right temperature, they caramelize beautifully, becoming tender with a slightly smoky flavor. The olive oil provides a rich, smooth finish, while the garlic infuses the eggplant with depth and warmth. The combination of fresh dill and Italian herbs elevates the dish, giving it a fragrant, herbaceous touch that complements the eggplant’s natural earthiness.
Health Benefits of Eggplants
Eggplants are not only delicious but also packed with nutrients. They’re a great source of fiber, which aids digestion and promotes heart health. Rich in antioxidants like nasunin, found in the skin, eggplants help protect the body from free radical damage. They also contain vitamins like B6, vitamin C, and folate, which are important for overall health. With their low calorie content, eggplants are a fantastic addition to any diet, especially if you’re looking to maintain or lose weight while still enjoying flavorful meals.
A Perfect Side or Standalone Dish
One of the beautiful things about this eggplant recipe is its versatility. You can serve it as a side dish alongside your favorite protein, like grilled chicken or lamb, or even use it as the main event in a vegetarian meal. It pairs wonderfully with grains like quinoa, couscous, or rice, making it a complete and balanced dish. You could even throw it into a warm pita with some hummus and feta cheese for a Mediterranean-inspired wrap.
FAQ Section
Can I use other herbs besides dill? Absolutely! While dill adds a lovely freshness to this dish, you can easily swap it out for other herbs like basil, oregano, or thyme. Each herb will bring its own distinct flavor profile, allowing you to customize the dish to your tastes.
Can I grill the eggplant instead of baking it? Yes! Grilling eggplant adds a wonderful smoky flavor and texture. Just be sure to brush the slices with olive oil before placing them on the grill to prevent them from sticking.
How do I make this dish vegan? This recipe is already vegan-friendly, as it doesn’t contain any animal products. However, if you want to add a vegan-friendly cheese alternative or drizzle some tahini on top, feel free to do so.
Can I prepare this dish in advance? Yes, this dish is great for meal prep. You can roast the eggplant ahead of time and store it in the fridge for a few days. Simply reheat it in the oven or microwave before serving.
What should I serve with roasted eggplant? Roasted eggplant pairs well with a variety of dishes. Try it with a refreshing cucumber salad, roasted chickpeas, or a grain salad like tabbouleh. It also works wonderfully alongside grilled meats or as part of a mezze platter with hummus and pita.
The Benefits of Simplicity in Cooking
In today’s world, we’re often bombarded with complex recipes and elaborate dishes, sometimes leading us to forget the joy of simple, home-cooked meals. This eggplant recipe serves as a reminder that food doesn’t have to be complicated to be delicious. With just a handful of ingredients and a little time in the oven, you can create a dish that’s not only nutritious but bursting with flavor. It’s proof that the best meals are often the simplest ones, prepared with love and a focus on fresh ingredients.
Conclusion: A Dish Worth Repeating
Whether you’re cooking for yourself, your family, or friends, this eggplant recipe is a surefire way to create something memorable. It’s a dish that brings out the natural beauty of the eggplant and enhances it with a few carefully chosen ingredients. It’s versatile, healthy, and easy to make, making it perfect for any occasion. So, the next time you’re in the kitchen and looking for a meal that’s both comforting and delicious, consider roasting up some eggplant—it’s simple, satisfying, and, most importantly, full of flavor.
Cooking this dish will not only give you a sense of accomplishment but also connect you to a tradition of cooking that’s been passed down through generations. It’s a reminder that even in the busiest of times, we can always find comfort in the kitchen, with a few simple ingredients and a lot of heart.
Amal
A Simple Comfort from the Garden
This roasted eggplant recipe is a perfect balance of savory and earthy flavors. With minimal ingredients, it brings out the natural sweetness of eggplant, enhanced with garlic, olive oil, and fresh herbs. Whether as a side dish or a main, it’s both healthy and satisfying.
When I think about comfort food, one of the first things that come to mind is my grandmother’s kitchen — a warm, inviting space filled with the smells of freshly baked treats, rich chocolate, and the soft, buttery scent of nuts being toasted. Growing up, my siblings and I would eagerly crowd around the kitchen table while she worked, eagerly awaiting the moment when we could dive into one of her delicious creations. Among her many masterpieces, there was one that always stood out: a simple yet indulgent chocolate nut dessert.
What made it so special wasn’t just the layers of crunchy nuts, silky chocolate, and creamy sweetness, but the love and care she put into each batch. It was a recipe she had perfected over the years, passed down from her mother, and later tweaked for her grandchildren. The joy we all felt when biting into those bars — rich, nutty, and absolutely indulgent — became a part of our family tradition. It was a treat that brought us together, made us smile, and reminded us of the importance of family and shared moments.
As I got older, life got busier, and I found myself spending less time in the kitchen. Yet, every now and then, I would crave that familiar treat. That’s when I decided to recreate my grandmother’s recipe, with a few modern twists. These Condensed Milk & Chocolate Nut Bars are my take on that childhood favorite, bringing together the creamy richness of sweetened condensed milk, the crunch of toasted nuts, and the decadence of dark chocolate, creating a simple yet luxurious treat for today’s busy world.
The Perfect Balance of Sweet, Nutty, and Chocolatey
What makes these bars so special is their balance of flavors and textures. The sweetened condensed milk gives them a creamy, melt-in-your-mouth base, while the dark chocolate adds a rich, slightly bitter contrast that enhances the sweetness of the milk. The nuts—pecans, peanuts, and hazelnuts—add the perfect crunch, bringing in a savory balance that prevents the dessert from feeling too rich. Together, they form a heavenly combination that’s both satisfying and indulgent.
These bars are also highly customizable, making them the perfect base for anyone to experiment with. Whether you prefer almonds, cashews, or even a mix of dried fruit, the recipe is versatile enough to allow you to play with the ingredients. The final result is always delicious and always a crowd-pleaser.
Ingredients:
Ingredient
Amount
Pecans (or walnuts)
60g (2.1 oz)
Peanuts
60g (2.1 oz)
Sweetened Condensed Milk
380g (13.4 oz)
Sunflower Oil (for greasing)
As needed
Hazelnuts
15g (0.5 oz)
Dark Chocolate (unsweetened)
100g (3.5 oz)
Kandurin/Golden Glitter (optional)
As desired
Instructions:
Prepare the nuts: Start by roughly chopping the pecans, peanuts, and hazelnuts. Toast them lightly in a dry pan over medium heat for about 5 minutes until aromatic and slightly crisp. Set aside to cool.
Melt the chocolate: Break the dark chocolate into small pieces and place it in a heatproof bowl. Gently melt the chocolate in a double boiler or microwave, stirring until smooth and glossy.
Combine condensed milk and nuts: In a large mixing bowl, pour in the sweetened condensed milk. Add the toasted pecans, peanuts, and hazelnuts, stirring to coat the nuts evenly with the condensed milk.
Mix in melted chocolate: Pour the melted dark chocolate into the nut and condensed milk mixture. Stir thoroughly until all ingredients are evenly combined.
Shape the mixture: Lightly grease a small baking pan or silicone mold with sunflower oil. Pour the mixture into the pan, spreading it evenly. Use a spatula to press it down gently.
Chill and set: Refrigerate for at least 2 hours or until the mixture firms up completely. This will allow the bars to set into a fudgy, nutty chocolate treat.
Optional golden finish: For a festive touch, sprinkle Kandurin or golden glitter on top of the dessert once it has set. This adds a beautiful, shimmering effect, perfect for special occasions.
Serve and enjoy: Once chilled and set, cut into squares or bars and enjoy the rich, creamy, nutty goodness.
Nutrients:
Nutrient
Per Serving (1 bar)
Calories
180 kcal
Total Fat
12g
Saturated Fat
2g
Carbohydrates
15g
Sugars
12g
Protein
3g
Fiber
2g
Sodium
15mg
Why You Should Try This Recipe
1. Simplicity Meets Elegance
One of the things that sets this recipe apart is its simplicity. You don’t need a long list of ingredients or hours of preparation. With just a few pantry staples—sweetened condensed milk, dark chocolate, and a handful of nuts—you can create a treat that tastes like it came straight from a bakery. Whether you’re hosting a dinner party, attending a potluck, or simply craving something sweet, these bars are sure to impress.
2. Perfect for Any Occasion
These bars are incredibly versatile and can fit in any situation. They make the perfect holiday gift, a sweet addition to a picnic, or a simple dessert to enjoy with your family after dinner. Their rich, decadent flavor profile makes them a treat that will be loved by both adults and children alike. Whether you’re celebrating a special occasion or just need a quick sweet fix, these bars are a go-to dessert that never disappoints.
3. Make-Ahead and Easy to Store
Another fantastic feature of these condensed milk and chocolate nut bars is that they’re incredibly easy to store and keep. Unlike traditional baked goods, they don’t require any special storage techniques, and they stay fresh in an airtight container in the fridge for up to a week. This makes them the perfect dessert for those who love having something delicious on hand for whenever the craving strikes. And because they’re made without baking, they can be put together in no time, leaving you more time to enjoy your day.
4. Nutritious Twist with Healthy Nuts
While this dessert is indulgent, it also incorporates the goodness of healthy nuts. Pecans, hazelnuts, and peanuts not only bring in a crunchy texture, but they also add nutritional benefits, including healthy fats, fiber, and protein. By using these nuts, you’re adding an extra layer of nutrition to a treat that would otherwise be a bit more indulgent. Nuts are rich in antioxidants, vitamins, and minerals, making this dessert a bit more guilt-free. Pairing it with dark chocolate only increases its antioxidant content, making it a dessert that offers both flavor and a bit of nutritional value.
Frequently Asked Questions (FAQs)
Can I use different types of nuts?
Yes! This recipe is highly adaptable. You can replace the pecans, peanuts, and hazelnuts with any nuts you prefer, such as almonds, walnuts, or cashews. The key is to toast the nuts to enhance their flavor and provide a satisfying crunch in each bite.
Can I make this recipe without condensed milk?
Sweetened condensed milk is essential to the creamy texture of these bars. However, if you’re looking for a healthier alternative, you can try substituting it with coconut milk and maple syrup for a more natural, dairy-free version. Keep in mind that the texture may vary slightly, but it will still be delicious.
How long do these bars keep?
These bars stay fresh for up to a week if stored in an airtight container in the refrigerator. For longer storage, you can freeze them for up to 3 months. Just make sure to let them cool completely before storing.
Can I use milk chocolate instead of dark chocolate?
You absolutely can! If you prefer a sweeter bar, milk chocolate will work perfectly fine. Dark chocolate gives the bars a richer flavor and slightly bitter contrast to the sweetness, but if you’re looking for a more classic sweet chocolate taste, milk chocolate is a great option.
Can I add flavors like vanilla or coffee?
Yes, feel free to experiment with flavor additions! A splash of vanilla extract or a teaspoon of instant coffee can elevate the chocolate flavor, giving it a more complex, layered taste.
Can I make this recipe vegan?
To make this recipe vegan, substitute the sweetened condensed milk with a plant-based version or use coconut milk and maple syrup. Opt for dairy-free dark chocolate, and ensure the nuts are not roasted in butter.
Conclusion: A Treat that Brings Back Memories
This Condensed Milk & Chocolate Nut Bar recipe is more than just a delicious dessert; it’s a way to bring back the joy of sharing simple pleasures with loved ones. Whether it’s for a family gathering, a special event, or just a sweet treat on a quiet afternoon, these bars are the perfect choice. They remind me of my grandmother’s kitchen, of the love we shared over simple meals and treats.
Today, I’m proud to pass this recipe on, knowing it will continue to create moments of joy for those who try it. The beauty of this dessert lies in its simplicity and versatility—ingredients you likely already have in your pantry, but when combined, create something truly special. It’s the kind of dessert that brings people together, not just for the sweet taste, but for the memories and connections it fosters.
So the next time you’re looking for a dessert that’s both easy and indulgent, reach for this recipe. It’s a timeless treat that will surely become a new favorite in your kitchen, and like my grandmother’s, will one day be passed down as part of your family’s traditions.
Amal
Decadent Condensed Milk & Chocolate Nut Bars: A Sweet Indulgence for Every Occasion
This indulgent dessert brings together the richness of dark chocolate, the creamy sweetness of condensed milk, and a delightful mix of nuts, creating a treat that’s sure to satisfy your sweet tooth. With a touch of golden glitter for an extra dash of elegance, this recipe is perfect for special occasions or simply when you crave something extraordinary.
By Request: Kandurin/Golden GlitterFood Coloring – For a dazzling finish
Method
Prepare the nuts: Begin by roughly chopping the pecans, peanuts, and hazelnuts. Toast them lightly in a dry pan over medium heat for about 5 minutes, ensuring they become aromatic and slightly crisp. Set aside to cool.
Melt the chocolate: Break the dark chocolate into small pieces and place them in a heatproof bowl. Gently melt the chocolate either in a double boiler or in the microwave, stirring occasionally until smooth.
Combine condensed milk and nuts: In a large mixing bowl, pour in the sweetened condensed milk. Add the toasted pecans, peanuts, and hazelnuts, mixing thoroughly to ensure all the nuts are coated with the condensed milk.
Mix in melted chocolate: Pour the melted dark chocolate into the nut and condensed milk mixture. Stir well until everything is evenly combined and you have a rich, thick texture.
Shape the mixture: Grease a small baking pan or a silicone mold with sunflower oil. Pour the mixture into the pan, spreading it out evenly. Use a spatula to press it down gently.
Chill and set: Refrigerate the mixture for at least 2 hours or until it firms up completely. The dessert will set into a fudgy, nutty, chocolatey delight.
Optional golden finish: For a special touch, sprinkle Kandurin (golden glitter) on top once the dessert has set. This adds a beautiful shimmering effect that’s perfect for festive occasions.
Serve and enjoy: Once chilled, cut into squares or bars. Serve chilled and enjoy the delightful combination of creamy, nutty, and chocolate goodness.
Notes
Storage: Store any leftovers in an airtight container in the refrigerator for up to 1 week. These treats make for a great snack or dessert to keep on hand.
Customization: Feel free to substitute the pecans with other nuts such as almonds or cashews for a different flavor profile.
Golden Glitter: If you choose to use Kandurin or any edible glitter, ensure it is food-safe and made for consumption.