Bittersweet Bliss: The Story and Magic of Brazilian Chocolate Truffles

The very first time I had a Brigadeiro, I was six years old, standing barefoot on a tile floor at my aunt’s house in São Paulo. The air smelled like chocolate and rain. I didn’t know then that I was being handed something deeply rooted in Brazilian culture — I just knew it was a tiny, shiny, fudgy ball that made my eyes widen and my heart race with excitement.

That single bite was all it took. I remember the slight resistance of the chocolate sprinkles on the outside, the smooth, rich interior that melted on my tongue, and the way the sweetness didn’t just hit — it lingered, like the final note of a beautiful song.

Years later, I learned how to make Brigadeiros myself, using the same pot my mother used, with the same rhythm of stirring, and the same satisfaction when the mixture finally pulled away from the sides of the pan. What I didn’t know then was that I wasn’t just making a treat — I was building a memory.

Brigadeiro: Brazil’s Most Beloved Bite

Brigadeiro (bree-gah-DAY-ro) is more than just a dessert in Brazil — it’s a cultural icon. Found at virtually every child’s birthday party, school gathering, family celebration, and holiday event, these fudgy chocolate truffles are the soul of Brazilian sweets.

Invented in the 1940s, the dessert is believed to have been named after Brigadeiro Eduardo Gomes, a Brazilian Air Force brigadier who ran for president. His campaign supporters made and sold these treats to raise funds, and they quickly became known as “docinhos do Brigadeiro” — the Brigadier’s little sweets. Though he didn’t win the election, the dessert won the hearts of a nation.

What makes Brigadeiros so beloved is their simplicity: sweetened condensed milk, cocoa powder, butter — and time. That’s it. But within those ingredients lies an experience that feels like home for millions of Brazilians, both in the country and abroad.

Ingredients

IngredientAmount
Sweetened condensed milk1 can (397g / 14 oz)
Butter1 tbsp (about 15g)
Unsweetened cocoa powder¼ cup (about 20g)
Salt (optional, to enhance flavor)A pinch
Chocolate sprinkles (for coating)As needed

How to Craft Fudge You Can Roll

1. Blend the Basics

In a nonstick saucepan over medium heat, add sweetened condensed milk, butter, and cocoa powder. Stir well to fully incorporate the cocoa into the mixture. Add a pinch of salt if desired.

2. Stir Like It Matters

Cook the mixture slowly, stirring constantly with a silicone spatula or wooden spoon. Scrape the bottom and edges to prevent sticking. This step takes about 10 to 12 minutes. You’ll know it’s done when the mixture thickens and starts pulling away from the sides of the pan.

3. Cool Before You Roll

Pour the thick chocolate fudge onto a greased plate or sheet of parchment paper. Let it cool completely at room temperature. You can chill it in the fridge to speed things up, but make sure it’s firm before shaping.

4. Shape the Joy

Once cool, grease your hands lightly with butter. Scoop out small portions (around 1 tablespoon each) and roll them into smooth, round balls.
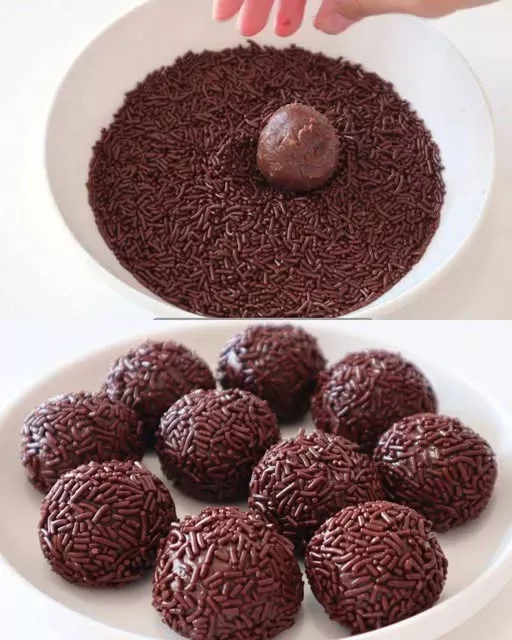
5. Make It Festive

Roll each ball in chocolate sprinkles until completely coated. Place in mini paper cups or on a platter.

6. Serve or Store

Refrigerate for about 15–20 minutes to firm them up before serving, or store in an airtight container at room temperature for up to 2 days.

Nutrition Facts (Per Truffle – Approx. Based on 20 Truffles)

NutrientAmount
Calories~90 kcal
Fat3.5g
Saturated Fat2g
Carbohydrates13g
Sugars11g
Protein1.5g
Sodium25mg
Fiber0.5g

Why We Can’t Get Enough of Them

There’s something about Brigadeiros that goes beyond taste. Sure, they’re rich and chocolatey, but their magic lies in the balance: not quite a truffle, not quite fudge, not too soft, not too firm. Just right.

They’re also incredibly versatile. Want a casual sweet after dinner? Brigadeiros. Need something cute and easy for a party? Brigadeiros. Feeling nostalgic for something warm and homemade? You guessed it.

Unlike cakes or pastries that require precise baking times and temperatures, Brigadeiros are more forgiving. They’re made in a saucepan with constant stirring — a soothing, almost meditative process that encourages you to slow down and be present.

And when they’re done? Rolling them by hand, coating them in sprinkles, placing them in little paper cups — it all feels intentional and joyful.

The Art of Making Brigadeiros: Tips and Tricks

While the ingredients are simple, getting the perfect Brigadeiro takes a little technique. Here are some insider tips:

1. Use a Nonstick Pan

A good nonstick saucepan will save you from burning or sticking. Brigadeiros need constant stirring, and the mixture thickens as it cooks — so a smooth, nonstick surface is essential.

2. Stir Constantly and Mindfully

This isn’t the time to multitask. Use a wooden spoon or silicone spatula and stir the entire time (about 10–12 minutes). Scrape the sides and bottom of the pan continuously.

3. Know When It’s Ready

The mixture should be thick, glossy, and pull away cleanly from the bottom of the pan. You can test it by dragging your spoon through the center — if the gap stays open for a few seconds, it’s done.

4. Cool Before Rolling

Don’t rush the cooling process. Spread the mixture onto a greased plate and let it sit until it reaches room temperature. Refrigerating it for a short time can help if you’re in a hurry.

5. Butter Your Hands

Rolling sticky chocolate into smooth little balls? A little butter on your hands goes a long way. It prevents sticking and gives the truffles a nice finish.

Beyond Chocolate: Creative Variations to Try

Though chocolate Brigadeiros are the most traditional, they’ve evolved into a whole genre of sweets — each with its own twist. Here are some modern spins:

  • White Chocolate Brigadeiro (Beijinho): Made with sweetened condensed milk and shredded coconut.
  • Nutella Brigadeiro: Stir a spoonful of Nutella into the mix for a hazelnut twist.
  • Gourmet Brigadeiros: Roll them in chopped nuts, toasted coconut, freeze-dried raspberries, or crushed cookies.
  • Spiced Brigadeiro: Add a pinch of cinnamon or chili powder for warmth or heat.
  • Boozy Brigadeiro: Add a splash of Baileys, rum, or Kahlúa for an adult version.

With endless topping and flavor options, Brigadeiros can easily be tailored to match holidays, color themes, or flavor profiles.

The Heart of the Celebration

In Brazil, you’ll find Brigadeiros at every celebration — but they hold special importance at children’s birthday parties. Plates filled with dozens of them are arranged alongside cakes and other “docinhos” (little sweets), and it’s not uncommon for people to sneak a few into napkins to take home.

It’s not just about the taste. Making Brigadeiros is often a family activity, with kids helping roll and decorate while parents share stories in the kitchen. It’s a rite of passage, a bonding moment, a tradition passed down generation to generation.

Brigadeiros connect people. They bring comfort to homesick Brazilians abroad. They evoke memories of childhood and joy. And they’re the kind of treat that makes people stop mid-conversation to say, “Oh wow — this is amazing.”

Brigadeiro FAQ: Everything You’ve Wanted to Know

Are Brigadeiros the same as chocolate truffles?

Not exactly. While both are chocolate-based and rolled into balls, traditional truffles are made with chocolate and cream. Brigadeiros use sweetened condensed milk, resulting in a thicker, fudgier texture and a richer, milkier flavor.

Do they need to be refrigerated?

Brigadeiros can be stored at room temperature for up to 2 days, but they last longer in the fridge — up to a week. Just bring them to room temperature before serving for best texture.

Can I freeze Brigadeiros?

Yes! Freeze them in an airtight container with parchment between layers. Thaw in the refrigerator, then bring to room temperature before serving.

What kind of cocoa powder should I use?

Use unsweetened cocoa powder for the best balance of richness and sweetness. Dutch-processed or natural cocoa both work — Dutch gives a smoother, deeper chocolate flavor.

Can I make Brigadeiros in the microwave?

Yes, though the stovetop method gives more control. For a quick version, combine ingredients in a microwave-safe bowl and heat in 30-second increments, stirring each time, until thickened.

What can I use instead of chocolate sprinkles?

Try crushed nuts, desiccated coconut, cookie crumbs, cocoa powder, or even colorful sanding sugar. Just make sure the topping sticks well.

Can I double the recipe?

Absolutely! Just make sure to use a large enough pan and extend the cooking time slightly, stirring constantly to prevent burning.

Why are mine too soft or too hard?

If they’re too soft, they likely needed more time to cook. If they’re too hard or dry, they may have been overcooked. Pay close attention to the consistency as it pulls away from the pan.

A Bite-Sized Memory, Shared Worldwide

Whether you’re from Brazil or just discovering Brigadeiros for the first time, making these chocolate truffles connects you to something timeless. It’s about more than chocolate — it’s about joy, love, and the hands that prepare them.

In a world that often feels too fast, Brigadeiros ask us to slow down: to stir, to share, and to savor. They remind us that sometimes the most meaningful things are the simplest — and that one small bite can carry a lifetime of meaning.

So make a batch. Share them with someone. Tell the story behind them. Because when we cook from the heart, we’re never just making dessert — we’re making connection.

Meatloaf Cupcakes with Mashed Potato Frosting: A Comfort Classic with a Whimsical Twist

The first time I made these meatloaf cupcakes was not for a fancy dinner or holiday party. It was for my son’s fourth birthday. He had never been fond of cake — a strange truth for a toddler — but he loved two things: mashed potatoes and meat. I still remember the way he stared at the little “cupcakes” on his plate, his eyes wide with curiosity, and how he tentatively took a bite before declaring, with potato still clinging to his cheek, “This is the best cake ever!”

That moment wasn’t just heartwarming — it was transformative. I realized that food isn’t just about recipes or ingredients. It’s about surprising someone with something familiar, shaped in an unexpected way. It’s about comfort, joy, playfulness — and, sometimes, making a child believe that dinner is dessert.

That simple experience inspired this recipe, and since then, Meatloaf Cupcakes with Mashed Potato Frosting have become a family staple, a dinner party conversation starter, and a dish that turns skeptics into believers with every bite.

Not Just Adorable — Functional, Too

At first glance, this dish might seem like a novelty. After all, shaping meatloaf into cupcakes and “frosting” them with mashed potatoes isn’t exactly traditional. But don’t let the whimsical presentation fool you — this recipe has serious substance behind the style.

Each individual cupcake serves as a perfectly portioned meal, packed with protein and vegetables, and topped with creamy, comforting mashed potatoes. The cupcake shape isn’t just cute — it also makes them cook faster, hold their shape better, and serve more cleanly. No more uneven meatloaf slices falling apart on the plate.

They’re also fantastic for meal prepping or freezing. Once cooled, you can store them in airtight containers and reheat as needed. Whether you’re planning school lunches, busy weeknights, or freezer-friendly batch cooking, these little wonders make life easier and more delicious.

Ingredients

For the Meatloaf Cupcakes

IngredientAmount
Ground beef (beef mince)1 lb / 500g
Onion, grated (any variety)1 medium
Carrots, grated2 small
Garlic, minced2 cloves
Egg1 large
Breadcrumbs½ cup
Milk¼ cup
Worcestershire sauce1 tbsp
Tomato paste or ketchup2 tbsp
Salt1 tsp
Black pepper½ tsp
Dried oregano (optional)½ tsp

For the Mashed Potato Frosting

IngredientAmount
Potatoes (Yukon or Russet)1.5 lb / 700g
Butter2 tbsp
Milk or cream¼ cup
SaltTo taste
White pepper (optional)A pinch

Step-by-Step Directions

1. Preheat and Prep

Preheat your oven to 375°F (190°C). Lightly grease a 12-cup muffin tin or line with foil cupcake liners for easy removal.

2. Build the Meat Mixture

In a large bowl, combine the ground beef, grated onion, grated carrots, minced garlic, egg, breadcrumbs, milk, Worcestershire sauce, tomato paste, salt, pepper, and oregano. Mix thoroughly using your hands or a fork until just combined — avoid overmixing to keep the texture tender.

3. Fill the Muffin Tin

Divide the meat mixture evenly among the 12 muffin cups, pressing down gently to shape them like cupcakes.

4. Bake to Perfection

Place in the oven and bake for 20–25 minutes, or until the internal temperature reaches 160°F (71°C). Let them rest for 5 minutes before removing.

5. Whip Up the Frosting

While the meatloaf bakes, boil peeled and chopped potatoes in salted water until fork-tender (about 15–20 minutes). Drain and mash with butter, milk/cream, salt, and optional white pepper until smooth.

6. Frost the Cupcakes

Using a piping bag or spoon, frost each meatloaf cupcake with the mashed potatoes. Optional: broil for 2–3 minutes for a lightly golden top.

7. Serve and Impress

Garnish with chopped chives, paprika, or a drizzle of gravy. Serve warm — they’re hearty, fun, and packed with flavor.

Nutritional Snapshot per Cupcake (Approximate)

NutrientAmount
Calories180–220 kcal
Protein14g
Carbohydrates10g
Sugars2g
Fat12g
Saturated Fat4g
Fiber1.5g
Sodium280mg

Winning Over Picky Eaters and Grown-Up Palates Alike

One of the most delightful things about this recipe is its universal appeal. Kids adore the cupcake presentation and creamy “frosting,” especially if you give them a chance to pipe it on themselves. You’d be amazed how quickly vegetables like carrots and onions disappear when they’re tucked into a meatloaf muffin and topped with a swirl of potatoes.

Adults, meanwhile, appreciate the depth of flavor. Between the savory richness of the meat, the sweetness of grated carrots, and the tang of tomato paste or ketchup, every bite hits the comfort food trifecta: warm, flavorful, and deeply satisfying.

Want to elevate it further? You can infuse the mashed potatoes with roasted garlic, a touch of horseradish, or even shredded cheddar for extra decadence. Serve with a drizzle of gravy or a sprinkle of fresh herbs, and you’ve got a dish that’s as sophisticated as it is nostalgic.

The Perfect Party Platter or Potluck Star

Looking for a dish that makes an impression at gatherings? These meatloaf cupcakes are built for sharing. They’re easy to transport, don’t require cutting or utensils for serving, and hold up well at room temperature — making them ideal for potlucks, birthday parties, holiday buffets, or game-day spreads.

Because they’re already portioned, guests can grab one or two without hesitation. And because they’re unique, they always spark conversation. People can’t help but smile when they see “cupcakes” on a savory dinner table — and then they keep smiling after that first bite.

Flexible, Forgiving, and Full of Possibilities

Another beautiful thing about this recipe is how adaptable it is. Whether you’re working with dietary restrictions or just want to clean out the fridge, there’s a version of this dish that will work for you.

  • Gluten-free? Use gluten-free breadcrumbs or even rolled oats.
  • Low-carb? Try mashed cauliflower instead of potatoes.
  • Vegetarian? Use lentils, mushrooms, or plant-based meat alternatives. It works beautifully with the same flavor base.
  • Trying to sneak in more veggies? Shred zucchini, bell pepper, or even spinach right into the meat mixture — it all blends in seamlessly.

You can even swap the beef for turkey or chicken for a lighter version. It’s a forgiving recipe that welcomes experimentation.

Frequently Asked Questions

Can I make these ahead of time?

Absolutely. You can make the meatloaf mixture a day in advance and store it covered in the fridge. You can also bake the cupcakes and refrigerate them for up to 3 days. Just reheat them in the oven or microwave before serving. The mashed potato frosting can also be prepped ahead, though it’s best piped or added fresh.

Can I freeze Meatloaf Cupcakes?

Yes! These freeze wonderfully. Let them cool completely, then wrap individually or store in a freezer-safe container. They’ll keep for up to 3 months. To reheat, thaw overnight in the fridge and warm in a 350°F oven until heated through.

Do I need a muffin tin?

It’s highly recommended, as it helps shape and cook the meat evenly. A standard 12-cup muffin tin works best, though you can also use silicone liners or ramekins if needed. Just be sure to adjust baking time slightly depending on the size.

How do I make the mashed potato frosting look nice?

A piping bag with a star tip makes the mashed potatoes look beautifully swirled, just like real frosting. Don’t have one? A plastic sandwich bag with the corner snipped off works, too — or you can simply spoon the mash on top and smooth it with the back of a spoon for a rustic look.

Can I add cheese?

Yes, please do. Mixing a little shredded cheddar into the mashed potatoes gives them a richer, creamier flavor. You can also sprinkle grated cheese on top of the meatloaf before baking or add a cheesy surprise in the center of each cupcake.

What should I serve with these?

They pair wonderfully with a green salad, steamed veggies, or roasted Brussels sprouts. Since the meat and starch are already in the dish, you don’t need a lot — but a dollop of gravy or a tangy side like coleslaw really rounds out the meal.

How do I make them more festive?

Use food coloring in the mashed potatoes (for themed parties), add bacon bits on top, or drizzle with a balsamic reduction or herbed yogurt sauce. A small sprig of rosemary stuck in the mashed potatoes also gives them a “candle” look for special occasions.

Why This Recipe Matters

In a world where food often feels complicated, filtered, and styled within an inch of its life, Meatloaf Cupcakes bring things back to basics — but with a playful wink. They represent the very best kind of cooking: simple ingredients, nostalgic flavors, and the magic of unexpected presentation.

They remind us that joy doesn’t have to be elaborate. That creativity doesn’t mean complexity. And that the meals we remember aren’t always the ones from five-star restaurants, but the ones eaten with our hands, with laughter, around the kitchen table.

Whether you’re a busy parent trying to sneak vegetables past a picky eater, a college student looking for freezer-friendly meals, or a dinner host trying to break the ice, these cupcakes offer something for everyone. They’re familiar, but surprising. Practical, yet delightful. And most of all, they’re full of love.

In Closing: A Hug in Every Bite

Food is more than fuel — it’s memory, emotion, tradition, and sometimes, a bit of fun. Meatloaf Cupcakes with Mashed Potato Frosting may not be a recipe passed down through generations, but they’ve quickly carved out a spot in the hearts (and dinner tables) of those who try them.

They’re comfort food with a twist — a little quirky, a little clever, and a lot delicious.

So whether you’re making them for your kids, your friends, your partner, or just yourself after a long day, know this: you’re serving up something special. Something that will bring a smile, a moment of pause, and maybe even a story worth telling.

Because sometimes, the best kind of cupcake is the one that tastes like home.

Mediterranean Chicken and Zucchini Bake: A Flavorful Dinner Delight

Introduction to Mediterranean Chicken and Zucchini Bake

Picture this: a bustling kitchen filled with the aroma of fresh herbs and sizzling chicken. That’s the magic of a Mediterranean Chicken and Zucchini Bake. It’s a dish that brings the sun-kissed flavors of the Mediterranean right to your dinner table. Whether you’re a busy mom juggling a million tasks or a professional seeking a quick yet delightful meal, this recipe is your culinary savior. It’s not just a meal; it’s a flavorful escape from the mundane. So, let’s dive into this delightful journey and create a dish that will impress your loved ones!

Why You’ll Love This Mediterranean Chicken and Zucchini Bake

This Mediterranean Chicken and Zucchini Bake is a weeknight wonder! It’s quick to prepare, bursting with vibrant flavors, and healthy to boot. Imagine tender chicken mingling with juicy zucchini and tangy feta, all in one dish. It’s a breeze to make, leaving you more time to relax. Plus, it’s a crowd-pleaser, perfect for family dinners or impressing guests without the fuss!

Ingredients Mediterranean Chicken and Zucchini Bake

Let’s gather the stars of our culinary show! First up, we have zucchinis, sliced into charming half-moons, bringing a fresh, green crunch. Next, boneless chicken breasts, cut into bite-sized pieces, are the protein heroes of this dish. Cherry tomatoes add a burst of sweetness, while red onions offer a subtle zing. Kalamata olives, with their briny goodness, elevate the Mediterranean vibe.

Garlic cloves, minced to perfection, infuse the dish with aromatic depth. Dried oregano and basil sprinkle in a touch of herbal magic. A dash of salt and pepper balances the flavors, while olive oil ties everything together with its silky richness. Crumbled feta cheese adds a creamy, tangy finish, and fresh parsley provides a pop of color and freshness.

For those who love a twist, consider marinating the chicken in lemon juice and herbs for an extra flavor boost. And if you’re feeling adventurous, swap the chicken for shrimp to create a delightful seafood variation. Remember, the exact quantities are at the bottom of the article, ready for printing!

How to Make Mediterranean Chicken and Zucchini Bake

Preheat and Prepare

First things first, let’s get that oven ready. Preheat it to a toasty 400°F. While it warms up, gather your ingredients. This is the perfect time to slice those zucchinis into half-moons and cut the chicken into bite-sized pieces. Trust me, having everything prepped makes the cooking process a breeze!

Mix Ingredients

Now, grab a large mixing bowl. Toss in the zucchini, chicken, cherry tomatoes, red onion, and olives. Add the minced garlic, dried oregano, and basil. Sprinkle with salt and pepper. Drizzle with olive oil. Use your hands or a spatula to mix everything until well coated. This step is where the magic begins, as the flavors start to meld together.

Bake the Dish

Transfer the mixture into a large baking dish. Spread it out evenly, ensuring every bite gets a bit of everything. Pop it into the preheated oven. Let it bake for 25-30 minutes. You’ll know it’s ready when the chicken is cooked through and the veggies are tender. The aroma wafting through your kitchen will be irresistible!

Add the Finishing Touches

Once baked, remove the dish from the oven. Sprinkle the crumbled feta cheese over the top. Return it to the oven for an additional 5 minutes. This allows the feta to melt slightly, adding a creamy, tangy layer. Let it cool for a few minutes before serving. Garnish with fresh parsley for a burst of color and freshness. Enjoy your Mediterranean masterpiece!

Tips for Success

  • Marinate the chicken in lemon juice and herbs for an hour to enhance flavor.
  • Use a sharp knife for precise slicing of zucchinis and chicken.
  • Ensure even coating of ingredients with olive oil for uniform cooking.
  • Check chicken doneness with a meat thermometer; it should read 165°F.
  • Let the dish rest for a few minutes before serving to meld flavors.

Equipment Needed

  • Large mixing bowl – or use a big salad bowl if needed.
  • Baking dish – a casserole dish works perfectly.
  • Sharp knife – essential for precise slicing.
  • Cutting board – any sturdy board will do.
  • Oven mitts – to safely handle hot dishes.

Variations

  • Swap chicken for shrimp to create a seafood twist, adjusting the bake time to 15-20 minutes.
  • For a vegetarian version, replace chicken with chickpeas or tofu for a protein-packed alternative.
  • Add a sprinkle of pine nuts for a nutty crunch and extra texture.
  • Incorporate bell peppers for a pop of color and additional sweetness.
  • Use goat cheese instead of feta for a creamier, tangier flavor profile.
  • Experiment with fresh herbs like rosemary or thyme for a different aromatic touch.

Serving Suggestions

  • Pair with a crisp, chilled glass of Sauvignon Blanc for a refreshing contrast.
  • Serve alongside a warm, crusty baguette to soak up the delicious juices.
  • Complement with a simple green salad drizzled with balsamic vinaigrette.
  • Garnish with lemon wedges for an extra citrusy zing.
  • Present on a large platter for a family-style dining experience.

FAQs about Mediterranean Chicken and Zucchini Bake

Can I prepare this dish ahead of time?

Absolutely! You can prep the ingredients a day in advance. Store them in the fridge, and when you’re ready, just mix and bake. This makes it a perfect option for busy weeknights or when you’re hosting a dinner party.

What can I use instead of feta cheese?

If feta isn’t your thing, try using goat cheese for a creamier texture. Parmesan or mozzarella can also work, offering a different flavor profile while still keeping that cheesy goodness.

How do I store leftovers?

Leftovers can be stored in an airtight container in the refrigerator for up to three days. Reheat in the oven at 350°F until warmed through, or use the microwave for a quicker option.

Can I freeze this Mediterranean Chicken and Zucchini Bake?

Yes, you can freeze it! Allow the dish to cool completely, then transfer to a freezer-safe container. It can be frozen for up to two months. Thaw overnight in the fridge before reheating.

Is this recipe suitable for a low-carb diet?

Indeed, it is! With its focus on lean protein and vegetables, this dish is naturally low in carbohydrates, making it a great choice for those following a low-carb lifestyle.

Final Thoughts

Creating this Mediterranean Chicken and Zucchini Bake is like embarking on a culinary adventure, where each ingredient tells a story of vibrant flavors and wholesome goodness. It’s a dish that not only satisfies the taste buds but also warms the heart. Whether you’re sharing it with family or savoring it solo, the joy it brings is undeniable. The simplicity of preparation, combined with the rich, Mediterranean flavors, makes it a go-to recipe in my kitchen. So, gather your loved ones, set the table, and let this delightful bake be the centerpiece of your next meal. Enjoy every bite!

Mediterranean Chicken and Zucchini Bake
Paul

Mediterranean Chicken and Zucchini Bake: A Flavorful Dinner Delight

A delicious and healthy Mediterranean-inspired dish featuring chicken, zucchini, and a variety of flavorful ingredients, baked to perfection.
Prep Time 15 minutes
Cook Time 35 minutes
Total Time 50 minutes
Servings: 4 servings
Course: Main Course
Cuisine: Mediterranean
Calories: 320

Ingredients
  

  • 2 large zucchinis sliced into half-moons
  • 1 pound boneless skinless chicken breasts, cut into bite-sized pieces
  • 1 cup cherry tomatoes halved
  • 1/2 cup red onion sliced
  • 1/4 cup Kalamata olives pitted and halved
  • 3 cloves garlic minced
  • 1 teaspoon dried oregano
  • 1 teaspoon dried basil
  • 1/2 teaspoon salt
  • 1/4 teaspoon black pepper
  • 3 tablespoons olive oil
  • 1/2 cup feta cheese crumbled
  • Fresh parsley chopped (for garnish)

Method
 

  1. Preheat the oven to 400°F.
  2. In a large mixing bowl, combine the sliced zucchinis, chicken pieces, cherry tomatoes, red onion, olives, garlic, oregano, basil, salt, pepper, and olive oil. Toss everything together until well coated.
  3. Transfer the mixture to a large baking dish, spreading it out evenly.
  4. Bake in the preheated oven for 25-30 minutes, or until the chicken is cooked through and the vegetables are tender.
  5. Remove the dish from the oven and sprinkle the crumbled feta cheese over the top.
  6. Return to the oven and bake for an additional 5 minutes, until the feta is slightly melted.
  7. Let the dish cool for a few minutes before serving.
  8. Garnish with fresh parsley before serving.

Notes

  • For added flavor, marinate the chicken in lemon juice and herbs for an hour before cooking.
  • You can also substitute the chicken with shrimp for a seafood twist.

No-Bake Banana Split Cake Recipe is a must-try dessert!

There’s something magical about summers in my childhood home. The heat would press through the windows, sticky and sweet, but no one complained—because we knew dessert was chilling in the fridge.

It wasn’t just any dessert. My mom had a signature treat that became our unofficial family anthem for summer: the no-bake banana split cake.

The name doesn’t do justice to how it felt to bite into it. Cool, creamy, sweet, fruity, crunchy—it was like sunshine on a plate. She made it for cookouts, birthdays, or just because we begged for it. We didn’t have much back then, but this dessert felt like luxury.

I still remember the rhythm of helping her layer bananas, then gently pressing graham crackers into the pan. I never knew then that these small rituals would one day feel like treasure.

Now, I make it for my own family. And every time I do, my kitchen smells like those warm afternoons again. This recipe isn’t just delicious—it’s generational joy, wrapped in Cool Whip and strawberries.

Why This No-Bake Banana Split Cake is a Crowd-Pleaser

This dessert has the rare ability to feel nostalgic and exciting all at once. It combines the classic banana split flavors—bananas, strawberries, pineapple, chocolate, and whipped cream—with a cheesecake-style filling and buttery graham cracker crust. But it skips the oven entirely, which is exactly what makes it so brilliant for busy or warm-weather days.

Whether you’re hosting a picnic, looking for a make-ahead potluck treat, or simply want to surprise your family after dinner, this dish delivers that “wow” moment without stress.

Secrets to Building the Perfect Layers

While the ingredient list is simple, the magic lies in the method. Here are a few tips to make sure your layers are as dreamy as possible:

1. Chill that crust.
After pressing your graham cracker mixture into the pan, give it at least 30 minutes in the fridge. This helps it hold up once you add the creamy filling.

2. Use room temp cream cheese.
Cold cream cheese can make the filling lumpy. Let it soften at room temperature before mixing for that silky texture.

3. Drain fruit thoroughly.
Pineapple especially holds water—squeeze it through a fine mesh sieve or cheesecloth to keep your layers firm.

4. Slice bananas last.
Bananas brown quickly. Slice them just before assembling, and if you want extra protection, toss them lightly in lemon juice.

5. Gently fold, don’t stir.
When mixing Cool Whip into the cream cheese, fold with a spatula to keep that light, fluffy consistency.

6. Top like a pro.
Drizzle chocolate sauce in zigzags, sprinkle chopped nuts for crunch, and even add a cherry or mint if you’re feeling fancy.

Common Questions About No-Bake Banana Split Cake

Can I make this in advance?
Yes! In fact, it tastes better after resting in the fridge for several hours or overnight. It allows the flavors to meld and the layers to set.

What’s a good substitute for Cool Whip?
You can use stabilized homemade whipped cream. Just make sure it’s firm enough to hold shape, especially if you’re making it ahead of time.

Can I swap out the fruits?
Absolutely. This dessert is flexible. Add blueberries, raspberries, kiwi—or even mango. Just avoid super juicy fruits like watermelon.

What kind of chocolate sauce works best?
Use a good-quality bottled sauce or homemade ganache. Avoid thin syrups—they can run too much and get messy.

Can I make this gluten-free?
Yes, just use gluten-free graham crackers for the crust. Everything else is naturally gluten-free.

Is it freezer-friendly?
It’s not ideal for freezing because of the whipped topping and fresh fruit, which can become watery when thawed. Refrigeration is best.

How do I keep the banana slices from browning?
Slice them just before assembly, and toss lightly in lemon juice. Covering the dessert tightly will also help reduce oxygen exposure.

What if I don’t have hazelnuts?
Use chopped pecans, almonds, walnuts, or skip the nuts entirely. They add great texture, but the dessert is still delicious without them.

How to Store and Serve

Storage:
Cover the pan tightly with plastic wrap or a lid and store in the fridge. It will stay fresh for up to 3 days, though the texture is best in the first two.

Serving Tips:

  • Use a sharp knife to slice neat squares.
  • Wipe the blade clean between each cut to maintain clean layers.
  • Serve chilled straight from the fridge—it tastes best cold.

Want to make it extra fun? Serve individual portions in mason jars or parfait glasses for a cute, party-ready presentation.

Take It from Family Tradition to Fan Favorite

What I love most about this recipe is how adaptable it is. You can make it for kids and dress it up for adults. You can simplify it for weekday treats or glam it up for a holiday buffet.

This dessert also welcomes creativity. Try a chocolate graham cracker crust, a swirl of caramel on top, or even a splash of rum extract in the filling for a grown-up twist. The foundation is solid—you just add your own flair.

Final Thoughts: A Dessert Worth Remembering

In a world that often demands more time, more effort, and more perfection, this cake stands as a quiet rebellion. It’s joy made easy. It’s flavor without stress. It’s memory-making in a 9×13 pan.

And maybe that’s why it endures. Because in the swirl of pineapple and strawberries, under that cloud of whipped cream, is something bigger than dessert—it’s comfort, tradition, and a reminder that love can live in the little things.

Next time you make it, I hope your kitchen fills with laughter and maybe a little nostalgia too. Because that’s what food is meant to do—bring us together, even if just for a chilled, chocolate-drizzled moment.

Garlic Chicken Gnocchi Recipe is a must-try dish!

Introduction to Garlic Chicken Gnocchi Recipe

If you’re looking for a delicious and comforting meal, the Garlic Chicken Gnocchi Recipe is a perfect choice. This dish combines tender chicken, pillowy gnocchi, and vibrant vegetables, all enveloped in a creamy garlic sauce. It’s not just a meal; it’s an experience that brings warmth and satisfaction to your dinner table.

Gnocchi, a type of Italian pasta made from potatoes, pairs beautifully with the savory flavors of garlic and chicken. The addition of cherry tomatoes and spinach adds a burst of color and nutrition, making this dish not only tasty but also visually appealing. Plus, it’s quick to prepare, making it ideal for busy weeknights or special occasions.

In this article, we will guide you through the ingredients, preparation steps, and variations of this delightful recipe. Whether you’re a seasoned cook or a beginner, you’ll find that making Garlic Chicken Gnocchi is straightforward and rewarding. So, roll up your sleeves and get ready to impress your family and friends with this scrumptious dish!

Ingredients for Garlic Chicken Gnocchi Recipe

To create the delightful Garlic Chicken Gnocchi Recipe, you’ll need a selection of fresh and flavorful ingredients. Each component plays a vital role in bringing this dish to life. Here’s what you’ll need:

  • 2 tablespoons olive oil: This will be used for sautéing the chicken and vegetables, adding a rich flavor.
  • 1 pound boneless, skinless chicken breasts: Cut into bite-sized pieces, the chicken provides protein and heartiness.
  • 1 teaspoon salt: Essential for seasoning the chicken and enhancing the overall taste.
  • 1/2 teaspoon black pepper: Adds a touch of spice to the dish.
  • 3 cloves garlic: Minced, garlic is the star ingredient that gives this recipe its name and flavor.
  • 1 cup cherry tomatoes: Halved, these sweet tomatoes add freshness and color.
  • 1 cup baby spinach: This leafy green not only boosts nutrition but also adds a lovely green hue.
  • 1 pound potato gnocchi: The main carbohydrate in this dish, gnocchi is soft and pillowy.
  • 1/2 cup heavy cream: This creates a rich and creamy sauce that ties everything together.
  • 1/2 cup grated Parmesan cheese: Adds a savory, cheesy flavor that complements the dish perfectly.
  • 1 teaspoon Italian seasoning: A blend of herbs that enhances the overall flavor profile.
  • Fresh basil leaves (optional): For garnish, these add a pop of color and a fresh aroma.

Gathering these ingredients will set you on the right path to creating a delicious Garlic Chicken Gnocchi dish. Each item contributes to the overall taste and texture, making it a meal that everyone will love. Now that you have your ingredients ready, let’s move on to the preparation steps!

Preparation of Garlic Chicken Gnocchi Recipe

Now that you have all your ingredients ready, it’s time to dive into the preparation of the Garlic Chicken Gnocchi Recipe. This process is simple and straightforward, ensuring that you can whip up this delightful dish in no time. Let’s break it down into easy steps!

Step 1: Preparing the Chicken

First, heat 2 tablespoons of olive oil in a large skillet over medium-high heat. Once the oil is hot, add the bite-sized pieces of chicken. Season them with 1 teaspoon of salt and 1/2 teaspoon of black pepper. Cook the chicken for about 5-7 minutes, stirring occasionally. You want the chicken to be browned and cooked through. Once done, remove the chicken from the skillet and set it aside on a plate. This step is crucial as it builds the foundation of flavor for your dish.

Step 2: Cooking the Gnocchi

While the chicken is cooking, bring a pot of salted water to a boil. Once boiling, add 1 pound of potato gnocchi. Cook the gnocchi according to the package instructions, which usually takes about 2-3 minutes. You’ll know they’re ready when they float to the surface. This floating indicates that they are perfectly cooked. Drain the gnocchi and set them aside. This step ensures that your gnocchi will be soft and fluffy, complementing the other ingredients beautifully.

Step 3: Making the Garlic Sauce

In the same skillet where you cooked the chicken, add the minced garlic. Sauté the garlic for about 1 minute until it becomes fragrant. Be careful not to burn it, as burnt garlic can taste bitter. Next, add the halved cherry tomatoes and baby spinach to the skillet. Cook these for about 3-4 minutes, stirring occasionally. You want the spinach to wilt and the tomatoes to soften, creating a vibrant and flavorful base for your sauce.

Step 4: Combining Ingredients

Now it’s time to bring everything together! Return the cooked chicken to the skillet. Then, add the drained gnocchi, 1/2 cup of heavy cream, 1/2 cup of grated Parmesan cheese, and 1 teaspoon of Italian seasoning. Stir gently to combine all the ingredients. Heat everything through for another 2-3 minutes, allowing the flavors to meld beautifully. This final step creates a creamy, delicious sauce that envelops the chicken and gnocchi, making every bite a delight.

Once everything is combined and heated, your Garlic Chicken Gnocchi is ready to be served! This dish is not only easy to prepare but also packed with flavor and nutrition. Now, let’s explore some variations you can try to make this recipe your own!

Variation of Garlic Chicken Gnocchi Recipe

While the Garlic Chicken Gnocchi Recipe is delicious as it is, there are many ways to customize it to suit your taste or dietary needs. Whether you want to switch up the protein or make it vegetarian, these variations will keep your meals exciting and flavorful. Let’s explore some alternative proteins and vegetarian options!

Alternative Proteins

If you’re looking to change the protein in your Garlic Chicken Gnocchi Recipe, there are several tasty options. Here are a few ideas:

  • Turkey: Ground turkey or turkey breast can be used instead of chicken. It’s lean and offers a similar texture.
  • Shrimp: For a seafood twist, try adding shrimp. Cook them until they turn pink and tender, which usually takes just a few minutes.
  • Pork: Diced pork tenderloin can add a different flavor profile. Just ensure it’s cooked through before combining with the other ingredients.
  • Tofu: For a plant-based option, use firm tofu. Cube it and sauté until golden brown for a protein-rich alternative.

These alternative proteins can bring new flavors and textures to your dish, making it versatile and enjoyable for everyone at the table.

Vegetarian Options

If you prefer a vegetarian version of the Garlic Chicken Gnocchi Recipe, you can easily make some adjustments. Here are some ideas to create a delicious meat-free meal:

  • Replace Chicken with Vegetables: Use a mix of your favorite vegetables, such as bell peppers, zucchini, or mushrooms. Sauté them until tender for a hearty dish.
  • Chickpeas: Adding canned chickpeas can provide protein and a satisfying texture. Rinse and drain them before adding to the skillet.
  • Vegetable Broth: Instead of heavy cream, consider using vegetable broth and a splash of plant-based milk for a lighter sauce.
  • Vegan Cheese: If you want to keep it dairy-free, substitute Parmesan cheese with a vegan cheese alternative or nutritional yeast for a cheesy flavor.

These vegetarian options not only make the dish suitable for non-meat eaters but also add a variety of flavors and nutrients. Feel free to mix and match these ideas to create your perfect Garlic Chicken Gnocchi Recipe!

Cooking Note for Garlic Chicken Gnocchi Recipe

When preparing the Garlic Chicken Gnocchi Recipe, there are a few cooking notes to keep in mind. These tips will help ensure that your dish turns out perfectly every time. Let’s dive into some essential points to consider!

First, always use a large skillet for this recipe. A spacious skillet allows for even cooking and prevents overcrowding. This way, the chicken can brown nicely, and the vegetables can sauté without steaming. If your skillet is too small, consider cooking in batches.

Next, be mindful of the cooking times. Chicken should be cooked until it reaches an internal temperature of 165°F (75°C). This ensures it’s safe to eat. Use a meat thermometer for accuracy if you have one. For the gnocchi, remember that they only need a few minutes in boiling water. Keep an eye on them, as overcooking can lead to a mushy texture.

When sautéing garlic, watch it closely. Garlic can burn quickly, which can ruin the flavor of your dish. If you notice it starting to brown too much, lower the heat immediately. A fragrant, golden garlic is what you want!

Lastly, feel free to adjust the creaminess of the sauce to your liking. If you prefer a lighter sauce, you can reduce the amount of heavy cream or substitute it with half-and-half. On the other hand, if you love a rich and creamy texture, add a bit more cream or cheese. The beauty of this recipe lies in its flexibility!

By keeping these cooking notes in mind, you’ll be well on your way to creating a delicious Garlic Chicken Gnocchi dish that everyone will enjoy. Now, let’s explore some serving suggestions to elevate your meal even further!

Serving Suggestions for Garlic Chicken Gnocchi Recipe

Once your Garlic Chicken Gnocchi is ready, it’s time to think about how to serve it. Presentation can elevate your dish, making it even more appealing. Here are some delightful serving suggestions to enhance your meal:

  • Garnish with Fresh Herbs: A sprinkle of fresh basil leaves not only adds a pop of color but also enhances the flavor. You can also use parsley or chives for a different twist.
  • Pair with a Side Salad: A light side salad with mixed greens, cherry tomatoes, and a simple vinaigrette complements the richness of the gnocchi. It adds freshness and balances the meal.
  • Serve with Garlic Bread: For garlic lovers, serving the dish with warm garlic bread is a fantastic idea. It’s perfect for soaking up the creamy sauce!
  • Top with Extra Cheese: If you’re a cheese enthusiast, consider adding more grated Parmesan on top just before serving. It melts slightly and adds a deliciously cheesy finish.
  • Drizzle with Olive Oil: A light drizzle of high-quality olive oil over the finished dish can enhance the flavors and add a touch of elegance.

These serving suggestions not only make your Garlic Chicken Gnocchi visually appealing but also enhance the overall dining experience. Feel free to mix and match these ideas based on your preferences and the occasion. Now that you have some great serving ideas, let’s move on to tips for perfecting your Garlic Chicken Gnocchi Recipe!

Tips for Perfect Garlic Chicken Gnocchi Recipe

Creating the perfect Garlic Chicken Gnocchi Recipe is all about attention to detail and a few handy tips. With these suggestions, you can elevate your dish and impress your family and friends. Let’s explore some essential tips to ensure your meal turns out delicious every time!

First, always use fresh ingredients. Fresh garlic, ripe cherry tomatoes, and vibrant spinach will enhance the flavors of your dish. Fresh ingredients not only taste better but also provide more nutrients. When shopping, look for firm tomatoes and bright green spinach to ensure quality.

Next, don’t rush the cooking process. Allow the chicken to brown properly before removing it from the skillet. This step adds depth to the flavor. Similarly, when sautéing garlic, take your time. A minute or two is all it takes for garlic to become fragrant without burning. Patience is key!

Another tip is to season your ingredients at each step. While you’ll season the chicken, consider adding a pinch of salt and pepper to the vegetables as they cook. This layering of flavors will make your dish more complex and satisfying.

When it comes to the gnocchi, avoid overcooking them. As mentioned earlier, they only need a few minutes in boiling water. Once they float, they’re ready! Overcooked gnocchi can become mushy, which can affect the overall texture of your dish.

Lastly, don’t hesitate to experiment with flavors. If you love a bit of heat, add red pepper flakes when cooking the garlic. For a touch of brightness, a squeeze of lemon juice just before serving can elevate the dish. Feel free to adjust the Italian seasoning to suit your taste as well.

By following these tips, you’ll be well on your way to mastering the Garlic Chicken Gnocchi Recipe. Each step contributes to a delicious and satisfying meal that everyone will enjoy. Now, let’s break down the time needed to prepare this delightful dish!

Breakdown of Time for Garlic Chicken Gnocchi Recipe

Understanding the time required for each step of the Garlic Chicken Gnocchi Recipe can help you plan your cooking efficiently. Here’s a detailed breakdown of the time you’ll need for preparation and cooking. This way, you can enjoy a delicious meal without feeling rushed!

Prep Time

The prep time for this Garlic Chicken Gnocchi Recipe is approximately 15 minutes. During this time, you will gather all your ingredients, wash and chop the vegetables, and cut the chicken into bite-sized pieces. Having everything ready before you start cooking will make the process smoother and more enjoyable.

Cooking Time

The cooking time for this recipe is about 20 minutes. This includes browning the chicken, sautéing the garlic and vegetables, and cooking the gnocchi. Each step is quick, allowing you to create a flavorful dish in no time. The key is to keep an eye on the cooking process to ensure everything is cooked perfectly.

Total Time

In total, you can expect to spend around 35 minutes from start to finish. This includes both prep and cooking times. With just a little bit of organization, you can have a delightful Garlic Chicken Gnocchi dish ready to serve in under an hour. It’s a fantastic option for busy weeknights or when you want to impress guests without spending all day in the kitchen!

Now that you have a clear understanding of the time involved, let’s take a look at the nutritional information for this delicious Garlic Chicken Gnocchi Recipe!

Nutritional Information for Garlic Chicken Gnocchi Recipe

Understanding the nutritional information of the Garlic Chicken Gnocchi Recipe is essential for those who are mindful of their diet. This dish is not only delicious but also provides a balanced mix of nutrients. Here’s a closer look at the nutritional breakdown per serving:

Calories

Each serving of the Garlic Chicken Gnocchi Recipe contains approximately 450 calories. This calorie count makes it a satisfying meal that can fit into a balanced diet. The combination of chicken, gnocchi, and vegetables provides energy, making it perfect for a hearty dinner.

Protein

With about 30 grams of protein per serving, this recipe is an excellent source of protein. The chicken and gnocchi contribute to this protein content, helping to support muscle health and keep you feeling full. Protein is essential for growth and repair, making this dish a nutritious choice for everyone.

Sodium

The sodium content in each serving is around 800 milligrams. While this is a reasonable amount for a meal, it’s important to be mindful of your overall sodium intake throughout the day. You can reduce the sodium level by using low-sodium chicken broth or less salt during cooking. This way, you can enjoy the flavors without worrying about excess sodium.

Overall, the Garlic Chicken Gnocchi Recipe offers a well-rounded meal that is both tasty and nutritious. With its balance of calories, protein, and sodium, it’s a great option for a fulfilling dinner. Now that you have a clear understanding of the nutritional aspects, let’s move on to some frequently asked questions about this delightful recipe!

FAQs about Garlic Chicken Gnocchi Recipe

Can I use store-bought gnocchi for this recipe?

Absolutely! Using store-bought gnocchi is a great time-saver. Most grocery stores offer fresh or frozen gnocchi, which can be just as delicious as homemade. Just follow the package instructions for cooking, and you’ll have a delightful dish in no time. This convenience allows you to focus on the other flavors in your Garlic Chicken Gnocchi Recipe without compromising on taste.

What can I substitute for chicken in the Garlic Chicken Gnocchi Recipe?

If you want to substitute chicken, there are plenty of options! You can use turkey, shrimp, or even diced pork for a different flavor. For a vegetarian option, consider using firm tofu or a mix of your favorite vegetables. Chickpeas are also a great protein-rich alternative. Each of these substitutes will bring its unique taste and texture to the dish, making it versatile and enjoyable for everyone.

How can I make the sauce creamier?

To achieve a creamier sauce in your Garlic Chicken Gnocchi Recipe, you can add more heavy cream or even a splash of cream cheese. Another option is to incorporate a bit of sour cream or Greek yogurt for added richness. If you prefer a dairy-free option, try using coconut cream or a plant-based cream alternative. These adjustments will enhance the creaminess and make your dish even more indulgent!

Can I prepare Garlic Chicken Gnocchi Recipe in advance?

Yes, you can prepare parts of the Garlic Chicken Gnocchi Recipe in advance! You can cook the chicken and vegetables ahead of time and store them in the refrigerator. When you’re ready to serve, simply reheat them in a skillet, add the gnocchi, cream, and cheese, and heat through. However, it’s best to cook the gnocchi fresh, as they can become mushy if stored. This way, you can enjoy a delicious meal with minimal effort on busy days!

Conclusion on Garlic Chicken Gnocchi Recipe

In conclusion, the Garlic Chicken Gnocchi Recipe is a delightful dish that brings together the comforting flavors of tender chicken, soft gnocchi, and vibrant vegetables. This recipe is not only easy to prepare but also offers a wonderful balance of taste and nutrition. Whether you’re cooking for your family on a busy weeknight or impressing guests at a dinner party, this dish is sure to please everyone at the table.

With its creamy garlic sauce and the addition of fresh ingredients like cherry tomatoes and spinach, each bite is a burst of flavor. Plus, the versatility of this recipe allows you to customize it to suit your preferences, whether you choose alternative proteins or opt for a vegetarian version. The tips and variations provided throughout this article will help you create a dish that is uniquely yours.

As you embark on your culinary journey with the Garlic Chicken Gnocchi Recipe, remember to enjoy the process. Cooking is not just about the final product; it’s about the joy of creating something delicious. So gather your ingredients, follow the steps, and savor the delightful flavors that come together in this comforting meal.

We hope you find this recipe as enjoyable to make as it is to eat. Happy cooking, and may your Garlic Chicken Gnocchi be a hit at your dinner table!

Creamy Garlic Parmesan Pasta Recipe is a must-try!

Introduction to Creamy Garlic Parmesan Pasta Recipe

Creamy Garlic Parmesan Pasta Recipe is a perfect choice. This dish combines the rich flavors of garlic and Parmesan cheese with the smooth texture of cream, creating a sauce that clings beautifully to your pasta. It’s a simple yet elegant recipe that can impress family and friends alike.

Whether you’re a busy parent, a student, or just someone who loves good food, this recipe is quick and easy to prepare. In just a matter of minutes, you can whip up a satisfying dinner that feels indulgent without requiring hours in the kitchen. Plus, it’s versatile! You can customize it with your favorite proteins or vegetables, making it a go-to meal for any occasion.

In this article, we will guide you through the ingredients, preparation steps, and variations of this delightful dish. So, grab your apron and let’s dive into the world of creamy, garlicky goodness!

Ingredients for Creamy Garlic Parmesan Pasta Recipe

Creamy Garlic Parmesan Pasta Recipe, you’ll need a few simple ingredients. Each component plays a vital role in building the rich and creamy flavor profile that makes this dish so beloved. Here’s what you’ll need:

  • 8 ounces of fettuccine or spaghetti
  • 2 tablespoons of olive oil
  • 4 cloves of garlic, minced
  • 1 cup of heavy cream
  • 1 cup of grated Parmesan cheese
  • 1 teaspoon of salt
  • 1/2 teaspoon of black pepper
  • 1/4 teaspoon of red pepper flakes (optional)
  • 2 tablespoons of chopped fresh parsley (for garnish)

These ingredients come together to create a creamy sauce that perfectly coats your pasta. The garlic adds a wonderful aroma, while the Parmesan cheese brings a savory depth to the dish. Feel free to adjust the seasonings to suit your taste. Now that you have your ingredients ready, let’s move on to the preparation steps!

Step-by-Step Preparation of Creamy Garlic Parmesan Pasta Recipe

Creamy Garlic Parmesan Pasta Recipe to life! Follow these simple steps to create a delicious meal that will delight your taste buds.

Step 1: Cooking the Pasta

8 ounces of fettuccine or spaghetti. Cook according to the package instructions until the pasta is al dente, which usually takes about 8 to 10 minutes. Remember to stir occasionally to prevent sticking. When the pasta is ready, drain it in a colander, but don’t forget to reserve 1/2 cup of the pasta water. This starchy water will help adjust the sauce later!

Step 2: Preparing the Garlic Sauce

2 tablespoons of olive oil over medium heat. Once the oil is hot, add 4 cloves of minced garlic. Sauté the garlic for about 1 minute, just until it becomes fragrant. Be careful not to let it brown, as burnt garlic can taste bitter. This step is crucial for infusing the oil with that delicious garlic flavor!

Step 3: Combining Pasta and Sauce

1 cup of heavy cream into the skillet with the garlic. Allow it to come to a gentle simmer. Then, add the cooked pasta directly into the skillet. Toss the pasta in the creamy sauce, ensuring every strand is coated. If the sauce seems too thick, gradually add some of the reserved pasta water until you reach your desired consistency. This will make the sauce silky and smooth!

Step 4: Adding Parmesan Cheese

1 cup of grated Parmesan cheese. Mix well until the cheese melts and blends into the sauce, creating a rich and creamy texture. Season the pasta with 1 teaspoon of salt, 1/2 teaspoon of black pepper, and 1/4 teaspoon of red pepper flakes if you like a little heat. Give everything a good stir to combine all the flavors. Your creamy garlic Parmesan pasta is almost ready to serve!

Variation of Creamy Garlic Parmesan Pasta Recipe

Creamy Garlic Parmesan Pasta Recipe lies in its versatility. You can easily customize it to suit your taste or dietary needs. Whether you want to add protein or incorporate more vegetables, there are plenty of options to make this dish your own. Let’s explore some delicious variations!

Adding Protein Options

If you’re looking to boost the protein content of your meal, consider adding cooked chicken, shrimp, or even bacon. These additions not only enhance the nutritional value but also add a delightful flavor to the dish.

  • Chicken: Grilled or sautéed chicken breast works wonderfully. Simply slice it and toss it with the pasta before serving.
  • Shrimp: Sauté shrimp in the garlic oil before adding the cream. This will infuse the sauce with a lovely seafood flavor.
  • Bacon: Crispy bacon bits can add a smoky crunch. Cook the bacon first, then use the rendered fat to sauté the garlic.

These protein options can turn your creamy pasta into a hearty meal, perfect for any occasion. Plus, they make it more filling, which is great for hungry diners!

Vegetable Additions for Creamy Garlic Parmesan Pasta Recipe

For those who want to incorporate more veggies, there are many delicious options to consider. Adding vegetables not only enhances the flavor but also boosts the nutritional profile of your dish.

  • Spinach: Fresh spinach wilts beautifully in the creamy sauce. Stir it in just before serving for a pop of color and nutrition.
  • Mushrooms: Sauté sliced mushrooms with the garlic for an earthy flavor that complements the creaminess.
  • Broccoli: Steamed or sautéed broccoli florets add a nice crunch and vibrant color. Toss them in with the pasta for a complete meal.

Creamy Garlic Parmesan Pasta Recipe. The possibilities are endless, and each variation brings its own unique twist to this classic dish!

Cooking Note for Creamy Garlic Parmesan Pasta Recipe

Creamy Garlic Parmesan Pasta Recipe, there are a few important cooking notes to keep in mind. These tips will help ensure that your dish turns out perfectly every time, making it a delightful experience for you and your guests.

First, always use fresh ingredients. Fresh garlic and high-quality Parmesan cheese can significantly enhance the flavor of your pasta. Avoid pre-grated cheese if possible, as it often contains anti-caking agents that can affect the creaminess of your sauce.

Next, be mindful of the heat when cooking the garlic. Sautéing it over medium heat is key. If the garlic cooks too quickly or burns, it can impart a bitter taste to your sauce. Remember, you want it to be fragrant and golden, not brown.

Another important note is to reserve that pasta water! The starchy water is a secret weapon in achieving the perfect sauce consistency. If your sauce is too thick, adding a splash of this water can help loosen it up while also adding flavor.

Lastly, serve your creamy pasta immediately after cooking. The sauce is at its best when fresh and hot. If you let it sit too long, the sauce may thicken and lose its creamy texture. If you do have leftovers, reheat gently on low heat, adding a bit more cream or pasta water to restore its original consistency.

Creamy Garlic Parmesan Pasta Recipe that everyone will love. Enjoy the process and the delightful results!

Serving Suggestions for Creamy Garlic Parmesan Pasta Recipe

Creamy Garlic Parmesan Pasta Recipe, it’s time to think about how to serve it. Presentation can elevate your dish, making it even more enjoyable for you and your guests. Here are some delightful serving suggestions to consider:

  • Garnish with Fresh Herbs: A sprinkle of chopped fresh parsley not only adds a pop of color but also enhances the flavor. You can also use basil or chives for a different twist.
  • Pair with a Side Salad: A light, crisp salad complements the richness of the pasta. Consider a simple mixed greens salad with a lemon vinaigrette to balance the flavors.
  • Serve with Garlic Bread: Nothing pairs better with creamy pasta than warm, buttery garlic bread. It’s perfect for soaking up any leftover sauce!
  • Top with Extra Cheese: For cheese lovers, adding a bit more grated Parmesan on top just before serving can make the dish even more indulgent.
  • Accompany with Wine: A glass of white wine, like Chardonnay or Pinot Grigio, can enhance the dining experience. The acidity in the wine cuts through the creaminess of the pasta.

Creamy Garlic Parmesan Pasta Recipe will surely impress everyone at the table!

Tips for Perfecting Your Creamy Garlic Parmesan Pasta Recipe

Creamy Garlic Parmesan Pasta Recipe, a few tips can make all the difference. These simple yet effective suggestions will help you achieve a dish that is not only delicious but also visually appealing. Let’s explore some key tips to elevate your pasta game!

  • Use Quality Ingredients: The flavor of your dish starts with the ingredients. Opt for fresh garlic and high-quality Parmesan cheese. Freshly grated cheese melts better and enhances the creaminess of the sauce.
  • Don’t Overcook the Pasta: Cooking your pasta to al dente is crucial. This means it should be firm to the bite. Overcooked pasta can become mushy and won’t hold up well in the sauce.
  • Adjust the Sauce Consistency: If your sauce is too thick, don’t hesitate to add more reserved pasta water. This starchy water not only thins the sauce but also helps it cling to the pasta.
  • Season Gradually: When adding salt and pepper, do so gradually. Taste as you go to ensure the flavors are balanced. You can always add more, but it’s hard to fix an overly salty dish!
  • Let the Sauce Simmer: Allowing the sauce to simmer gently after adding the cream helps meld the flavors together. Just a few minutes can make a big difference in taste.
  • Experiment with Flavors: Don’t be afraid to get creative! Add herbs like thyme or oregano for an extra layer of flavor. A squeeze of lemon juice can also brighten the dish.
  • Serve Immediately: For the best experience, serve your pasta right after cooking. The sauce is creamiest when fresh, and the pasta will maintain its perfect texture.

Creamy Garlic Parmesan Pasta Recipe that will impress everyone at your table. Enjoy the cooking process and the delightful results!

Breakdown of Time for Creamy Garlic Parmesan Pasta Recipe

Creamy Garlic Parmesan Pasta Recipe can help you plan your cooking efficiently. Here’s a simple breakdown of the time required for preparation and cooking.

Prep Time

10 minutes to gather your ingredients and prepare them. This includes measuring out the pasta, chopping the garlic, and grating the Parmesan cheese. Having everything ready before you start cooking will make the process smoother and more enjoyable!

Cooking Time

15 minutes. This includes boiling the pasta, sautéing the garlic, and combining everything into a creamy sauce. The quick cooking time makes this recipe perfect for busy weeknights or when you want a delicious meal in a hurry.

Total Time

25 minutes from start to finish. This includes both prep and cooking time. With such a quick turnaround, you can enjoy a comforting and flavorful Creamy Garlic Parmesan Pasta Recipe without spending hours in the kitchen!

Nutritional Information for Creamy Garlic Parmesan Pasta Recipe

Creamy Garlic Parmesan Pasta Recipe not only satisfies your taste buds but also provides valuable nutrients. Here’s a breakdown of the nutritional information per serving:

Calories

550 calories. This calorie count includes the rich flavors from the heavy cream and Parmesan cheese, making it a hearty meal. While it’s indulgent, it’s important to enjoy it in moderation, especially if you’re watching your calorie intake.

Protein

18 grams per serving. The protein comes primarily from the Parmesan cheese, which not only adds flavor but also contributes to your daily protein needs. If you choose to add chicken, shrimp, or other protein sources, this number will increase, making it an even more satisfying meal.

Sodium

800 milligrams per serving. This amount can vary based on the type of Parmesan cheese used and how much salt you add during cooking. If you’re watching your sodium intake, consider using low-sodium cheese or reducing the added salt. Balancing flavors with herbs and spices can also help reduce the need for extra salt.

Creamy Garlic Parmesan Pasta Recipe is a delicious option that provides a good balance of calories, protein, and flavor. By being mindful of portion sizes and ingredient choices, you can enjoy this comforting dish while keeping your nutritional goals in check!

FAQs about Creamy Garlic Parmesan Pasta Recipe

Can I make Creamy Garlic Parmesan Pasta Recipe ahead of time?

Creamy Garlic Parmesan Pasta Recipe ahead of time, but there are a few things to keep in mind. It’s best to cook the pasta and sauce separately. You can store the sauce in the refrigerator for up to three days. When you’re ready to serve, simply reheat the sauce gently on the stove. Cook the pasta fresh to ensure it maintains its perfect texture. If you combine them too early, the pasta may absorb the sauce and become mushy.

What can I substitute for Parmesan cheese in this recipe?

Creamy Garlic Parmesan Pasta Recipe.

How can I make Creamy Garlic Parmesan Pasta Recipe gluten-free?

Creamy Garlic Parmesan Pasta Recipe gluten-free, simply swap out regular pasta for gluten-free pasta. There are many options available, such as rice, quinoa, or chickpea pasta. Just be sure to check the cooking instructions, as gluten-free pasta may require different cooking times. The rest of the recipe remains the same, allowing you to enjoy this creamy dish without gluten!

Can I add more vegetables to the Creamy Garlic Parmesan Pasta Recipe?

Creamy Garlic Parmesan Pasta Recipe is a fantastic way to boost its nutritional value and flavor. You can include vegetables like bell peppers, zucchini, or asparagus. Simply sauté them along with the garlic or steam them before mixing them into the pasta. This not only enhances the dish but also adds color and texture, making it even more appealing!

Conclusion on Creamy Garlic Parmesan Pasta Recipe

Creamy Garlic Parmesan Pasta Recipe is a delightful dish that brings comfort and flavor to your table. With its rich, creamy sauce and the aromatic essence of garlic, this pasta is sure to become a favorite in your household. Whether you’re cooking for a special occasion or a simple weeknight dinner, this recipe is both quick and satisfying.

By following the steps outlined in this article, you can easily create a meal that not only tastes amazing but also allows for personal touches through various protein and vegetable additions. The versatility of this dish means you can adapt it to suit your dietary preferences or the ingredients you have on hand.

Remember to keep the cooking tips in mind for the best results. Using fresh ingredients, adjusting the sauce consistency, and serving immediately will ensure that your pasta is always a hit. Plus, with the nutritional information provided, you can enjoy this creamy delight while being mindful of your dietary goals.

Creamy Garlic Parmesan Pasta Recipe is not just a meal; it’s an experience that brings joy to every bite. Enjoy your cooking adventure and the delicious results that follow!

Chicken Satay Rice Bowls Recipe is a must-try dish!

Introduction to Chicken Satay Rice Bowls Recipe

Are you looking for a delicious and easy meal that brings a taste of Southeast Asia to your kitchen? Look no further than the Chicken Satay Rice Bowls Recipe! This dish combines tender chicken marinated in a rich, flavorful satay sauce, served over fluffy jasmine rice. It’s not just a meal; it’s an experience that tantalizes your taste buds.

What Makes Chicken Satay Rice Bowls Special?

What sets Chicken Satay Rice Bowls apart is the perfect blend of flavors and textures. The marinated chicken is juicy and packed with a savory-sweet taste, thanks to the peanut butter, honey, and lime juice. The crunch of fresh vegetables like cucumber and carrots adds a refreshing contrast, making each bite exciting.

Moreover, this recipe is versatile. You can easily customize it to suit your dietary preferences. Whether you’re a meat lover or a vegetarian, there’s a way to make this dish work for you. Plus, it’s a great option for meal prep, allowing you to enjoy a healthy and satisfying meal throughout the week.

In addition, the vibrant colors of the ingredients make the dish visually appealing. It’s not just about eating; it’s about enjoying a feast for the eyes as well. So, gather your ingredients and get ready to create a delightful Chicken Satay Rice Bowl that will impress your family and friends!

Ingredients for Chicken Satay Rice Bowls Recipe

To create the mouthwatering Chicken Satay Rice Bowls, you’ll need a selection of fresh ingredients that come together to form a delightful meal. Here’s what you’ll need:

  • 2 cups cooked jasmine rice
  • 1 pound boneless, skinless chicken thighs
  • 1/4 cup peanut butter
  • 2 tablespoons soy sauce
  • 2 tablespoons honey
  • 2 tablespoons lime juice
  • 1 tablespoon sesame oil
  • 2 cloves garlic, minced
  • 1 teaspoon ground ginger
  • 1/2 teaspoon red pepper flakes (optional)
  • 1 cup cucumber, sliced
  • 1 cup carrots, shredded
  • 1/4 cup chopped fresh cilantro
  • 1/4 cup chopped peanuts (for garnish)
  • Lime wedges (for serving)

These ingredients not only provide a burst of flavor but also contribute to a balanced meal. The jasmine rice serves as a fluffy base, while the chicken thighs soak up the delicious marinade. The peanut butter adds creaminess, and the fresh vegetables bring crunch and color. Don’t forget the lime wedges; they add a zesty kick that elevates the dish!

Feel free to adjust the ingredients based on your preferences. For instance, if you love a bit of heat, you can increase the red pepper flakes. Or, if you prefer a sweeter taste, add a touch more honey. The beauty of this Chicken Satay Rice Bowls Recipe lies in its flexibility, allowing you to make it your own!

Step-by-Step Preparation of Chicken Satay Rice Bowls Recipe

Now that you have all your ingredients ready, it’s time to dive into the preparation of your Chicken Satay Rice Bowls. This step-by-step guide will help you create a delicious meal that’s sure to impress. Let’s get started!

Step 1: Marinating the Chicken

First, you’ll want to marinate the chicken. This step is crucial for infusing flavor into the meat. Begin by cutting the boneless, skinless chicken thighs into bite-sized pieces. Place them in a medium bowl. Next, take your prepared satay sauce, which we’ll make in the next step, and pour it over the chicken. Make sure every piece is well-coated.

Once the chicken is coated, cover the bowl with plastic wrap or a lid. Let it marinate for at least 30 minutes. If you have more time, marinating for up to 2 hours in the refrigerator will enhance the flavor even more. This waiting period allows the chicken to absorb all those delicious flavors!

Step 2: Preparing the Satay Sauce

While the chicken is marinating, it’s time to prepare the satay sauce. In a separate bowl, combine the peanut butter, soy sauce, honey, lime juice, sesame oil, minced garlic, ground ginger, and red pepper flakes (if using). Whisk these ingredients together until the mixture is smooth and creamy.

This sauce is the heart of your Chicken Satay Rice Bowls. The combination of sweet, savory, and tangy flavors will make your dish truly special. Set the sauce aside for now, as it will be used to cook the chicken later.

Step 3: Cooking the Chicken

Once the chicken has marinated, it’s time to cook it. Heat a large skillet or grill pan over medium-high heat. Add a splash of oil if needed to prevent sticking. When the pan is hot, add the marinated chicken pieces. Cook for about 5-7 minutes, stirring occasionally.

As the chicken cooks, it will turn golden brown and become tender. Make sure it’s cooked through, with no pink remaining in the center. The aroma of the satay sauce will fill your kitchen, making it hard to resist tasting a piece!

Step 4: Assembling the Rice Bowls

Now comes the fun part—assembling your Chicken Satay Rice Bowls! Start by dividing the cooked jasmine rice among four bowls. This fluffy rice will serve as the perfect base for your dish.

Next, top each bowl with the cooked chicken. Then, add the sliced cucumber and shredded carrots for a fresh crunch. Finally, sprinkle chopped cilantro and peanuts on top for added flavor and texture.

Don’t forget to serve lime wedges on the side. A squeeze of lime juice over the top will brighten the flavors even more. Your Chicken Satay Rice Bowls are now ready to be enjoyed!

Variations of Chicken Satay Rice Bowls Recipe

While the traditional Chicken Satay Rice Bowls are delicious, there are many ways to switch things up! Whether you’re looking for vegetarian options or different protein choices, these variations will keep your meals exciting and flavorful.

Vegetarian Options

If you’re a vegetarian or simply want to try something different, you can easily adapt this recipe. One great option is to substitute the chicken with tofu or tempeh. Both of these ingredients absorb flavors well, making them perfect for marinating.

To prepare tofu, press it to remove excess moisture, then cut it into cubes. Marinate the tofu just like you would the chicken. For tempeh, slice it thinly and marinate as well. When cooking, sauté the tofu or tempeh in the same way as the chicken until golden brown. You’ll still enjoy that rich satay flavor!

Additionally, you can add more vegetables to your bowls. Consider using bell peppers, snap peas, or even roasted sweet potatoes. These additions not only enhance the flavor but also boost the nutritional value of your meal.

Different Protein Choices

If you’re not in the mood for chicken, there are plenty of other protein options to explore. Shrimp is a fantastic alternative. Simply marinate the shrimp in the same satay sauce and cook them for just a few minutes until they turn pink and opaque.

Another option is beef. Thinly slice flank steak or sirloin, marinate it, and then grill or sauté it until cooked to your liking. The rich flavors of the beef pair wonderfully with the satay sauce.

For a lighter option, consider using fish like salmon or tilapia. These proteins cook quickly and can be marinated for a short time. Just be careful not to overcook them, as they can become dry.

With these variations, you can enjoy Chicken Satay Rice Bowls in many different ways. Each option brings its own unique taste and texture, ensuring that you never get bored of this delightful dish!

Cooking Note for Chicken Satay Rice Bowls Recipe

When preparing your Chicken Satay Rice Bowls, there are a few cooking notes to keep in mind to ensure the best results. First, always use fresh ingredients. Fresh vegetables and high-quality chicken will enhance the overall flavor of your dish. If possible, choose organic produce and free-range chicken for a healthier meal.

Next, pay attention to the marinating time. While 30 minutes is the minimum, allowing the chicken to marinate for up to 2 hours will deepen the flavors. If you have the time, consider marinating overnight in the refrigerator. This will make the chicken even more tender and flavorful.

When cooking the chicken, make sure your skillet or grill pan is hot before adding the meat. This helps to sear the chicken, locking in moisture and creating a delicious golden crust. Avoid overcrowding the pan, as this can cause the chicken to steam instead of sear. If you have a lot of chicken, cook it in batches.

Lastly, feel free to adjust the cooking time based on the size of your chicken pieces. Smaller pieces will cook faster, while larger ones may need a bit more time. Always check that the internal temperature reaches 165°F (75°C) to ensure it’s safe to eat.

By following these cooking notes, you’ll create Chicken Satay Rice Bowls that are not only delicious but also visually appealing. Enjoy the process and savor the delightful flavors that come together in this wonderful dish!

Serving Suggestions for Chicken Satay Rice Bowls Recipe

When it comes to serving your Chicken Satay Rice Bowls, presentation is key! A well-served dish not only looks appealing but also enhances the dining experience. Here are some delightful serving suggestions to elevate your meal:

  • Garnish Generously: After assembling your bowls, don’t forget to sprinkle extra chopped peanuts and fresh cilantro on top. This adds a pop of color and a burst of flavor that will impress your guests.
  • Colorful Plates: Use vibrant, colorful bowls or plates to serve your Chicken Satay Rice Bowls. The bright colors of the ingredients will stand out beautifully against a contrasting background.
  • Side Dishes: Consider serving your bowls with a side of Asian-inspired slaw or a light cucumber salad. These sides complement the flavors of the satay and add extra crunch.
  • Extra Lime: Place lime wedges on each plate. A squeeze of fresh lime juice right before eating brightens the flavors and adds a refreshing zing.
  • Chili Sauce: For those who enjoy a bit of heat, offer a side of chili sauce or sriracha. This allows everyone to customize their spice level according to their taste.
  • Rice Variations: While jasmine rice is traditional, you can also serve the satay over brown rice, quinoa, or cauliflower rice for a healthier twist.

These serving suggestions will not only make your Chicken Satay Rice Bowls look appetizing but also enhance the overall dining experience. Enjoy sharing this delightful dish with family and friends, and watch as they savor every bite!

Tips for Perfect Chicken Satay Rice Bowls Recipe

Creating the perfect Chicken Satay Rice Bowls is all about attention to detail. Here are some helpful tips to ensure your dish turns out delicious every time:

  • Choose Quality Ingredients: Start with fresh, high-quality chicken and vegetables. Organic options can enhance flavor and nutrition.
  • Marinate Longer: For the best flavor, marinate the chicken for at least 1 hour. If you can, let it sit overnight. This allows the flavors to penetrate deeply.
  • Don’t Rush the Cooking: Cook the chicken over medium-high heat. This helps achieve a nice sear while keeping the meat juicy. Avoid cooking on too high heat, as it can burn the marinade.
  • Use a Meat Thermometer: To ensure your chicken is perfectly cooked, use a meat thermometer. The internal temperature should reach 165°F (75°C).
  • Customize Your Veggies: Feel free to add or substitute vegetables based on your preferences. Bell peppers, snap peas, or even broccoli can add great flavor and texture.
  • Serve Immediately: For the best taste and texture, serve the bowls right after assembling. This keeps the rice fluffy and the veggies crisp.
  • Experiment with Toppings: Don’t hesitate to try different toppings. Sesame seeds, sliced green onions, or even a drizzle of extra satay sauce can elevate your dish.
  • Make It a Meal Prep: These bowls are perfect for meal prep. Prepare the chicken and rice in advance, and assemble the bowls when you’re ready to eat.

By following these tips, you’ll create Chicken Satay Rice Bowls that are not only flavorful but also visually stunning. Enjoy the process and the delightful results!

Breakdown of Time for Chicken Satay Rice Bowls Recipe

Understanding the time needed for each step in the Chicken Satay Rice Bowls Recipe can help you plan your cooking efficiently. Here’s a breakdown of the time required for preparation and cooking:

Prep Time

The prep time for this recipe is approximately 15-20 minutes. This includes gathering your ingredients, cutting the chicken, and preparing the marinade. If you choose to chop your vegetables in advance, it can save you even more time when you’re ready to assemble the bowls.

Cooking Time

Cooking the Chicken Satay Rice Bowls takes about 15-20 minutes. This includes marinating the chicken for at least 30 minutes, but you can extend this time for deeper flavor. Once marinated, cooking the chicken in a skillet or grill pan will take around 5-7 minutes. The jasmine rice typically cooks in about 15 minutes, so you can prepare it simultaneously.

Total Time

In total, you can expect the Chicken Satay Rice Bowls Recipe to take about 1 hour from start to finish. This includes the marinating time, prep, and cooking. If you plan to marinate the chicken longer, such as overnight, you can enjoy a flavorful meal with minimal effort on the day of cooking!

By keeping track of these time frames, you can easily fit this delicious meal into your busy schedule. Enjoy the process and the delightful flavors of your Chicken Satay Rice Bowls!

Nutritional Information for Chicken Satay Rice Bowls Recipe

Understanding the nutritional content of your meals is essential for maintaining a balanced diet. The Chicken Satay Rice Bowls Recipe not only offers delicious flavors but also provides a good mix of nutrients. Here’s a breakdown of the nutritional information per serving:

Calories

Each serving of Chicken Satay Rice Bowls contains approximately 480 calories. This makes it a satisfying meal that can fit well into a balanced diet. The calories come from a combination of protein, healthy fats, and carbohydrates, providing energy for your day.

Protein

With about 28 grams of protein per serving, this dish is an excellent source of this essential nutrient. Protein is vital for muscle repair and growth, making it especially important for active individuals. The chicken thighs contribute significantly to the protein content, ensuring you feel full and satisfied.

Sodium

The sodium content in Chicken Satay Rice Bowls is around 800 milligrams per serving. While this is a moderate amount, it’s important to be mindful of your overall sodium intake throughout the day. You can reduce the sodium level by using low-sodium soy sauce or adjusting the amount of sauce used in the recipe.

Overall, the Chicken Satay Rice Bowls Recipe provides a well-rounded meal that is not only tasty but also nutritious. By being aware of the nutritional information, you can enjoy this dish while keeping your dietary goals in mind!

FAQs about Chicken Satay Rice Bowls Recipe

Can I make Chicken Satay Rice Bowls ahead of time?

Absolutely! You can prepare Chicken Satay Rice Bowls ahead of time, making them perfect for meal prep. To do this, marinate the chicken and cook it as directed. Once cooked, let the chicken cool before storing it in an airtight container in the refrigerator. You can also cook the jasmine rice in advance and store it separately.

When you’re ready to enjoy your meal, simply reheat the chicken and rice in the microwave or on the stovetop. Add fresh vegetables like cucumber and carrots just before serving to keep them crisp. This way, you’ll have a delicious and convenient meal ready to go!

What can I substitute for chicken in this recipe?

If you’re looking for alternatives to chicken, there are plenty of options! For a vegetarian version, tofu or tempeh works wonderfully. Both absorb flavors well and can be marinated just like chicken. If you prefer seafood, shrimp is a fantastic choice. Simply marinate and cook them for a few minutes until they turn pink.

For those who enjoy beef, thinly sliced flank steak or sirloin can be used. Just marinate and cook until your desired doneness. You can even try fish like salmon or tilapia for a lighter option. Each of these substitutes will bring a unique flavor to your Chicken Satay Rice Bowls!

How do I store leftovers of Chicken Satay Rice Bowls?

Storing leftovers of Chicken Satay Rice Bowls is easy! Place any remaining chicken, rice, and vegetables in separate airtight containers. This helps maintain the freshness and texture of each component. Store them in the refrigerator for up to 3 days.

When you’re ready to eat, reheat the chicken and rice in the microwave or on the stovetop. Add fresh vegetables just before serving to keep them crunchy. If you find the rice has dried out, a splash of water or broth can help revive it. Enjoy your delicious leftovers!

Conclusion on Chicken Satay Rice Bowls Recipe

In conclusion, the Chicken Satay Rice Bowls Recipe is a delightful dish that brings together a medley of flavors and textures. With its tender chicken marinated in a rich satay sauce, served over fluffy jasmine rice, this meal is not only satisfying but also visually appealing. The combination of fresh vegetables adds a refreshing crunch, making each bite a joy.

This recipe is incredibly versatile, allowing you to customize it to fit your dietary preferences. Whether you choose to stick with chicken, opt for tofu, or even try shrimp, the satay sauce will elevate the dish to new heights. Plus, the vibrant colors of the ingredients make it a feast for the eyes as well as the palate.

Moreover, the Chicken Satay Rice Bowls are perfect for meal prep. You can prepare the components in advance, making it easy to enjoy a healthy and delicious meal throughout the week. With just a little planning, you can have this delightful dish ready to go whenever hunger strikes.

So, gather your ingredients, follow the steps, and enjoy the process of creating this wonderful meal. Your family and friends will surely be impressed, and you’ll find yourself making this recipe time and time again. Happy cooking!

Crispy Southern Fried Chicken: Ultimate Recipe Revealed!

Introduction to Crispy Southern Fried Chicken

Ah, the irresistible allure of Crispy Southern Fried Chicken! Just the thought of it brings back memories of family gatherings and Sunday dinners. If you’re like me, juggling a busy schedule while trying to whip up something delicious, this recipe is your golden ticket. It’s the perfect blend of ease and flavor, making it a quick solution for those hectic days. Imagine biting into that crunchy coating, with a burst of spices that dance on your taste buds. Whether you’re impressing guests or treating yourself, this dish is sure to become a beloved staple in your kitchen.

Why You’ll Love This Crispy Southern Fried Chicken

This Crispy Southern Fried Chicken is a game-changer for busy moms and professionals alike. It’s not just about the taste—though that’s a winner, too! The ease of preparation and the speed at which it comes together make it a lifesaver on those whirlwind days. Plus, the satisfying crunch and juicy interior will have your family begging for seconds. It’s comfort food at its finest!

Ingredients for Crispy Southern Fried Chicken

Let’s dive into the heart of this Crispy Southern Fried Chicken recipe. Each ingredient plays a crucial role in creating that perfect bite. First, you’ll need chicken pieces—legs, thighs, or breasts work beautifully. Buttermilk is essential for tenderizing the meat, while a splash of hot sauce adds a subtle kick. The flour forms the crispy coating, and spices like paprika, garlic, and onion powder bring depth of flavor. A pinch of salt and pepper enhances everything, and a dash of cayenne pepper is optional for those who love extra heat. Finally, vegetable oil is your frying partner. For exact measurements, scroll to the bottom of the article where you can print the full recipe.

How to Make Crispy Southern Fried Chicken

Marinate the Chicken

Start by giving your chicken a luxurious bath in buttermilk. This step is crucial for tender, juicy meat. In a large bowl, mix the buttermilk with a dash of hot sauce if you like a little zing. Submerge the chicken pieces completely, cover, and let them soak in the fridge for at least four hours. If you can, leave them overnight. Trust me, patience here pays off with flavor-packed, succulent chicken.

Prepare the Coating

While your chicken is marinating, let’s get the coating ready. In a separate bowl, combine the flour with paprika, garlic powder, onion powder, salt, and black pepper. For those who enjoy a spicy kick, add a sprinkle of cayenne pepper. This blend of spices is what gives our fried chicken its signature Southern flair. Once mixed, set it aside until you’re ready to dredge the chicken.

Fry the Chicken

Now, it’s time to fry! Heat about an inch of vegetable oil in a large skillet or Dutch oven over medium-high heat. Aim for a temperature of 350°F. Take the chicken out of the buttermilk, letting the excess drip off. Dredge each piece in the flour mixture, pressing gently to ensure it sticks. Shake off any extra flour. Carefully place the chicken in the hot oil, frying in batches to avoid overcrowding. Cook each side for 12-15 minutes until golden brown and the internal temperature hits 165°F.

Rest and Serve

Once your chicken is perfectly fried, transfer it to a wire rack or paper towels to drain any excess oil. Let it rest for about five minutes. This short wait allows the juices to redistribute, ensuring every bite is as juicy as the last. Serve your crispy Southern fried chicken hot, and watch as it disappears from the plate in no time. Enjoy the crunch and savor the flavors!

Tips for Success

  • Ensure the oil is hot enough before frying; a thermometer is your best friend here.
  • Don’t overcrowd the pan; it lowers the oil temperature and affects crispiness.
  • Double-dip for extra crunch: flour, buttermilk, then flour again.
  • Let the chicken rest on a wire rack to keep it crispy.
  • Experiment with spices to find your perfect flavor blend.

Equipment Needed

  • Large bowl for marinating the chicken; a zip-top bag works too.
  • Mixing bowl for the flour and spices.
  • Deep skillet or Dutch oven for frying; a heavy-bottomed pot is a great alternative.
  • Wire rack for draining; paper towels can substitute in a pinch.
  • Meat thermometer to ensure perfect doneness.

Variations

  • For a gluten-free version, swap the all-purpose flour with a gluten-free flour blend.
  • Try using boneless chicken tenders for a quicker cooking time and kid-friendly option.
  • For a smoky twist, add a teaspoon of smoked paprika to the flour mixture.
  • Experiment with different oils like peanut or canola for a unique flavor profile.
  • For a healthier take, bake the chicken at 400°F for 25-30 minutes instead of frying.

Serving Suggestions

  • Pair with creamy mashed potatoes and gravy for a classic Southern meal.
  • Serve alongside a fresh coleslaw to add a crunchy, tangy contrast.
  • Complement with a chilled glass of sweet iced tea or lemonade.
  • Garnish with fresh parsley for a pop of color and freshness.
  • For a picnic vibe, add cornbread and a side of baked beans.

FAQs about Crispy Southern Fried Chicken

How do I ensure my fried chicken stays crispy?

To keep your Crispy Southern Fried Chicken crunchy, make sure the oil is hot enough before frying. Use a thermometer to maintain a steady 350°F. After frying, let the chicken rest on a wire rack instead of paper towels to prevent sogginess.

Can I make this recipe ahead of time?

Absolutely! You can marinate the chicken in buttermilk up to a day in advance. For the best crunch, fry the chicken just before serving. If you need to reheat, use an oven at 350°F to maintain crispiness.

What’s the best oil for frying Southern fried chicken?

Vegetable oil is a great choice for frying Southern fried chicken due to its high smoke point and neutral flavor. You can also use peanut or canola oil for a slightly different taste.

Can I use an air fryer for this recipe?

Yes, you can adapt this recipe for an air fryer. Preheat the air fryer to 375°F, and cook the chicken in batches for about 25 minutes, flipping halfway through. It won’t be quite the same, but it’s a healthier alternative.

What can I do with leftover fried chicken?

Leftover Crispy Southern Fried Chicken can be repurposed into delicious sandwiches or salads. Simply reheat in the oven to restore some of the crispiness, and enjoy!

Final Thoughts

There’s something truly magical about Crispy Southern Fried Chicken. It’s more than just a meal; it’s an experience that brings warmth and joy to the table. The satisfying crunch, the tender, juicy meat, and the symphony of spices create a dish that’s both comforting and indulgent. Whether you’re sharing it with family or savoring it solo, this recipe is a testament to the power of good food to bring people together. So, roll up your sleeves, embrace the process, and let this Southern classic become a cherished part of your culinary repertoire. Happy cooking!

Crispy Southern Fried Chicken
Paul

Crispy Southern Fried Chicken: Ultimate Recipe Revealed!

This recipe for Crispy Southern Fried Chicken provides a delicious and crunchy coating with a flavorful blend of spices, perfect for a classic Southern meal.
Prep Time 4 hours
Cook Time 30 minutes
Total Time 4 hours 30 minutes
Course: Main Course
Cuisine: Southern
Calories: 400

Ingredients
  

  • 3 pounds of chicken pieces legs, thighs, breasts, or a mix
  • 2 cups buttermilk
  • 2 teaspoons hot sauce optional
  • 2 cups all-purpose flour
  • 1 tablespoon paprika
  • 1 teaspoon garlic powder
  • 1 teaspoon onion powder
  • 1 teaspoon salt
  • 1/2 teaspoon black pepper
  • 1/2 teaspoon cayenne pepper optional for extra heat
  • Vegetable oil for frying

Method
 

  1. In a large bowl, combine the buttermilk and hot sauce. Add the chicken pieces, ensuring they are fully submerged. Cover and refrigerate for at least 4 hours, or overnight for best results.
  2. In a separate bowl, mix together the flour, paprika, garlic powder, onion powder, salt, black pepper, and cayenne pepper.
  3. Remove the chicken from the buttermilk, allowing excess to drip off. Dredge each piece in the flour mixture, pressing lightly to adhere the coating. Shake off any excess flour.
  4. In a large, deep skillet or Dutch oven, heat about 1 inch of vegetable oil over medium-high heat until it reaches 350°F.
  5. Carefully add the chicken pieces to the hot oil, working in batches to avoid overcrowding. Fry for 12-15 minutes per side, or until the chicken is golden brown and cooked through (internal temperature should reach 165°F).
  6. Once cooked, transfer the chicken to a wire rack or paper towels to drain excess oil. Let it rest for 5 minutes before serving.

Notes

  • For extra crunch, double-dip the chicken by returning it to the buttermilk after the first flour coating and then dredging it in flour again.
  • Try adding different spices to the flour mixture, such as dried thyme or oregano, for a unique flavor twist.

Blackberry Bliss Mousse Recipe is a must-try dessert!

A Taste That Brings Time to a Standstill

Some recipes are more than a list of ingredients. They’re memories—stitched together with flavor, scent, and stories that live in the quiet corners of our hearts. I still remember the sun-warmed blackberry bushes behind my grandmother’s garden, their vines climbing wildly, like nature was trying to reclaim the sky. As a child, I would spend what felt like hours under their shade, fingers stained purple, basket half-empty because I couldn’t resist sneaking a few with each pick.

My grandmother had this way of turning the simplest ingredients into something unforgettable. Her blackberry mousse wasn’t just dessert—it was summer in a spoon. Light, velvety, and somehow both indulgent and refreshing, it would melt on the tongue like a soft breeze on a July evening. Years later, I’ve recreated that mousse in my own kitchen, each batch a bridge to those golden afternoons.

That’s the essence of Blackberry Bliss Mousse. It’s not just a dish—it’s an experience.

The Allure of Blackberry Mousse

Why does this mousse hold such timeless appeal? Because it speaks to all the senses. Visually, the rich lavender hue hints at something special even before the first bite. Its aroma—bright, fruity, kissed by lemon—draws you in. But it’s the texture that seals the deal: airy, smooth, a featherlight indulgence that dances across your tongue.

It’s the kind of dessert that manages to be elegant and approachable. Sophisticated enough for a dinner party, yet simple enough to whip up on a quiet Sunday afternoon. It carries a rustic charm but plates like something you’d find in a patisserie.

And blackberries themselves are little miracles—earthy, sweet, tart, and complex. They balance beautifully against the richness of whipped cream, while lemon brings the brightness and sugar smooths out the sharp edges. It’s a harmony of contrasts that somehow feels effortless.

Beyond the Basics: Creative Twists and Serving Ideas

One of the most delightful things about Blackberry Bliss Mousse is how adaptable it is. While it shines on its own, you can elevate it—or reinvent it entirely—depending on the occasion or your mood.

1. Layer It Up

Create a stunning parfait by alternating layers of mousse with crushed graham crackers, shortbread cookies, or even vanilla cake crumbs. The texture contrast adds depth, and visually, it’s a showstopper.

2. Garnish with Flair

A sprig of mint adds freshness. A sprinkle of lemon zest offers a burst of citrus. A drizzle of dark or white chocolate brings richness. Play with color and contrast to match the theme of your meal.

3. Serve It Chilled… and Unexpected

Present it in vintage teacups, mini glass jars, or champagne flutes. Hosting a summer brunch? Pair it with a chilled glass of rosé. Looking for a wintery variation? Try a touch of cinnamon or nutmeg folded into the purée.

4. Explore Flavor Variants

This recipe is a springboard. Try it with raspberries for a brighter bite, blueberries for a deeper flavor, or a mix of all three for a “berry medley mousse.” Want to push boundaries? Add a splash of Chambord or crème de cassis to the purée before folding.

Storage & Make-Ahead Tips

Blackberry mousse is incredibly convenient for entertaining or prepping ahead of time. But to preserve its delicate texture and flavor, a few best practices go a long way.

  • Refrigeration: It keeps beautifully in the fridge for up to 48 hours. Cover the containers with plastic wrap or airtight lids to maintain freshness and prevent absorption of fridge odors.
  • Freezing? Not so much. The mousse’s light structure doesn’t handle freezing well—ice crystals form, and the texture breaks down when thawed. If you need a frozen treat, consider turning it into a semifreddo instead.
  • Fluffing Before Serving: If the mousse has settled or deflated slightly after chilling, a gentle stir with a spoon or whisk can help revive some of its airiness. Be careful not to overmix.
  • Garnish Last Minute: Always wait until right before serving to add berries, chocolate, or herbs—this keeps everything vibrant and crisp.

Here’s the recipe from “Blackberry Bliss: A Mousse That Tastes Like Summer” presented in your requested format, with creative section titles:

Berry Beautiful: Ingredients You’ll Need

  • 2 cups fresh blackberries (plus extra for garnish)
  • ½ cup granulated sugar
  • 1 tablespoon lemon juice
  • 1½ cups heavy cream (chilled)
  • 1 teaspoon vanilla extract
  • 2 tablespoons powdered sugar
  • Fresh mint leaves (optional, for garnish)

Whip It to Bliss: Step-by-Step Directions

1. Blackberry Purée Magic

  • In a saucepan over medium heat, combine blackberries, granulated sugar, and lemon juice.
  • Cook for 5–7 minutes, stirring occasionally, until the berries soften and release juices.
  • Blend the mixture until smooth, then strain through a fine mesh sieve to remove seeds.
  • Let it cool to room temperature.

2. Cloud-Like Cream

  • In a mixing bowl, whip the chilled heavy cream until soft peaks form.
  • Add vanilla extract and powdered sugar. Continue beating until stiff peaks form.

3. Bringing It All Together

  • Gently fold the cooled blackberry purée into the whipped cream, keeping the texture airy.
  • Spoon the mousse into serving glasses or bowls.

4. Chill & Thrill

  • Refrigerate for at least 2 hours to let it set.
  • Garnish with fresh blackberries and mint leaves just before serving.

Nutrition in a Spoon: Per Serving

  • Calories: 260
  • Total Fat: 18g
  • Carbohydrates: 23g
  • Protein: 2g
  • Fiber: 3g

Frequently Asked Questions

Can I use frozen blackberries?

Absolutely. Frozen blackberries work well—just thaw them fully and drain off any excess liquid before cooking them down. You may need a touch more sugar depending on how tart they are.

How can I make this mousse dairy-free?

Try using chilled coconut cream in place of heavy cream. It whips up similarly and adds a subtle tropical note that complements the berries beautifully. There are also several plant-based whipping creams available that hold their structure well.

Is this recipe gluten-free?

Yes! The base mousse is entirely gluten-free. Just be cautious with any toppings or layers you add—stick to gluten-free cookies or cake if needed.

How do I adjust the sweetness?

Taste your blackberries first. If they’re very tart, add 1–2 tablespoons more sugar when making the purée. If they’re super sweet, you can reduce the sugar slightly or leave it as-is for contrast.

What can I pair this with for a full dessert spread?

Think light and crisp: biscotti, vanilla wafers, or almond thins work beautifully. For a romantic evening, serve alongside a sparkling rosé or a splash of dessert wine. For a garden brunch, complement it with lemon tarts or fruit salad.

Can I make this mousse ahead for a dinner party?

Definitely! In fact, it’s ideal. Make it the day before, store it in individual serving cups, and chill. Add toppings just before guests arrive, and you’re golden.

What other berries work in this recipe?

Raspberries are a classic swap, bringing a more intense tartness. Strawberries yield a sweeter, more mellow mousse. Blueberries add richness and a gorgeous deep color. You can even combine all three for a “forest fruit” twist.

The Emotional Undercurrent of Homemade Desserts

Food does more than nourish the body—it connects us to people and places, to laughter and love. This mousse might be quick to make, but it lingers long after the spoon is set down. Every bite carries the warmth of summer, the joy of a shared table, and the quiet intimacy of tradition.

Making Blackberry Bliss Mousse is more than following a recipe. It’s recreating a moment. It’s the giggle of a child sneaking an extra spoonful, the smile of a partner savoring something sweet you made just for them, the silent thanks you whisper to generations past for teaching you how to create love from simple things.

Conclusion: A Blissful End to Any Meal

There’s a reason this mousse has earned its place in both my recipe box and my heart. It’s proof that simplicity can be luxurious, that fruit can be decadent, and that dessert can be both a celebration and a comfort.

So the next time blackberries are in season—or even if they’re waiting in the freezer—let them remind you of sunlit days and stories worth sharing. Whip up a batch of Blackberry Bliss Mousse, serve it with love, and let it carry you (and your guests) to a place where time slows down and every spoonful matters.

Because sometimes, the most unforgettable dishes are the ones that remind us who we are and where we’ve been.

Garlic Parmesan Cheeseburger Bombs Recipe is a must-try!

Introduction to Garlic Parmesan Cheeseburger Bombs Recipe

What Are Garlic Parmesan Cheeseburger Bombs?

Garlic Parmesan Cheeseburger Bombs are a delightful twist on traditional cheeseburgers. Imagine juicy ground beef mixed with savory garlic and rich cheeses, all wrapped in a soft, buttery biscuit. These tasty bites are perfect for parties, game days, or a cozy family dinner. Each bomb is packed with flavor, making them a hit with both kids and adults alike. Plus, they’re easy to make, which means you can whip them up in no time!

Why You’ll Love This Recipe

There are many reasons to love this Garlic Parmesan Cheeseburger Bombs recipe. First, it combines the classic flavors of a cheeseburger with the fun of a finger food. Second, the recipe is simple and quick, making it perfect for busy weeknights. You can even customize the filling to suit your taste. Want a little heat? Add some red pepper flakes! Prefer a vegetarian option? Swap the beef for your favorite veggies. The possibilities are endless!

Moreover, these bombs are not just delicious; they are also satisfying. Each bite is a burst of cheesy goodness, complemented by the garlic flavor. Serve them with your favorite dipping sauce, and you have a meal that everyone will enjoy. So, gather your ingredients and get ready to impress your family and friends with this scrumptious treat!

Ingredients for Garlic Parmesan Cheeseburger Bombs Recipe

To create these mouthwatering Garlic Parmesan Cheeseburger Bombs, you’ll need a few simple ingredients. Each one plays a vital role in delivering that delicious flavor and texture. Here’s what you’ll need:

  • 1 pound ground beef: This is the star of the show! Choose a good quality beef for the best taste.
  • 1 teaspoon garlic powder: Adds a rich garlic flavor that complements the beef perfectly.
  • 1 teaspoon onion powder: Enhances the overall taste with a hint of sweetness.
  • 1 teaspoon salt: Essential for bringing out the flavors in the meat.
  • 1/2 teaspoon black pepper: Adds a touch of heat and depth to the mixture.
  • 1 cup shredded cheddar cheese: This cheese melts beautifully and adds creaminess.
  • 1/2 cup grated Parmesan cheese: Provides a nutty flavor that pairs well with garlic.
  • 1 can (16 ounces) refrigerated biscuit dough: The perfect outer layer that becomes golden and flaky when baked.
  • 2 tablespoons melted butter: Used to brush on top for a rich, buttery finish.
  • 1 tablespoon chopped fresh parsley (optional): For a pop of color and freshness.
  • 1 teaspoon garlic salt: Adds an extra layer of garlic flavor to the topping.

These ingredients come together to create a delightful treat that’s sure to please everyone. Feel free to adjust the quantities based on your preferences or dietary needs. Now that you have everything ready, let’s move on to the next step of preparing these delicious bombs!

Step-by-Step Preparation of Garlic Parmesan Cheeseburger Bombs Recipe

Step 1: Preheat the Oven

First things first, you need to preheat your oven to 375°F. This step is crucial because it ensures that your Garlic Parmesan Cheeseburger Bombs bake evenly. While the oven heats up, you can prepare the other ingredients. This way, you’ll save time and have everything ready to go!

Step 2: Prepare the Beef Mixture

In a large bowl, combine the ground beef, garlic powder, onion powder, salt, and black pepper. Use your hands or a spoon to mix everything together until well combined. Make sure the spices are evenly distributed throughout the meat. Next, add the shredded cheddar cheese and half of the grated Parmesan cheese to the beef mixture. Stir until the cheese is mixed in thoroughly. This cheesy blend will make your bombs extra delicious!

Step 3: Assemble the Bombs

Now it’s time to assemble your bombs! Open the can of refrigerated biscuit dough and separate it into individual biscuits. Flatten each biscuit into a circle about 4 inches in diameter. This will create a nice pocket for your filling. Place a generous tablespoon of the beef and cheese mixture in the center of each biscuit. Carefully fold the edges of the biscuit over the filling and pinch to seal tightly. Make sure there are no gaps, or the filling might leak out while baking!

Step 4: Bake the Bombs

Once all your bombs are assembled, arrange them seam-side down on a baking sheet lined with parchment paper. This will prevent them from sticking and make cleanup easier. Now, pop the baking sheet into your preheated oven and bake for 15-20 minutes. Keep an eye on them! You want the biscuits to turn golden brown and be cooked through. The aroma will fill your kitchen, making it hard to wait!

Step 5: Add the Garlic Parmesan Topping

After baking, remove the bombs from the oven and let them cool for a few minutes. While they cool, mix the melted butter with garlic salt in a small bowl. Brush this mixture over the tops of the biscuit bombs for a rich, buttery finish. Finally, sprinkle the remaining Parmesan cheese on top for that extra cheesy goodness. If you like, you can also add a sprinkle of chopped fresh parsley for a pop of color and freshness!

Variations of Garlic Parmesan Cheeseburger Bombs Recipe

Vegetarian Option

If you’re looking for a meat-free alternative, try a vegetarian version of Garlic Parmesan Cheeseburger Bombs! Instead of ground beef, use a mix of sautéed vegetables like bell peppers, mushrooms, and zucchini. You can also add black beans or lentils for protein. Season the veggie mixture with garlic powder, onion powder, salt, and pepper just like the original recipe. Then, follow the same steps to assemble and bake your delicious vegetarian bombs. They’ll be just as tasty and satisfying!

Spicy Version

For those who love a little heat, a spicy version of Garlic Parmesan Cheeseburger Bombs is a must-try! Simply add a teaspoon of red pepper flakes to the beef mixture in Step 2. You can also mix in some diced jalapeños or hot sauce for an extra kick. This spicy twist will elevate the flavor and make your bombs a hit at any gathering. Just be sure to have some cooling dipping sauces on hand, like ranch or sour cream, to balance the heat!

Cheese Variations

Cheese lovers can have a blast experimenting with different cheese combinations in their Garlic Parmesan Cheeseburger Bombs. While cheddar and Parmesan are delicious, you can also try using mozzarella for a gooey texture or pepper jack for a spicy flavor. Mixing in some crumbled feta or blue cheese can add a unique twist as well. Feel free to get creative and combine your favorite cheeses to make these bombs even more irresistible!

Cooking Note for Garlic Parmesan Cheeseburger Bombs Recipe

When making Garlic Parmesan Cheeseburger Bombs, a few cooking notes can help ensure your dish turns out perfectly every time. First, always use fresh ingredients. Fresh ground beef and cheese will enhance the flavor and texture of your bombs. If possible, choose high-quality beef for the best taste.

Next, be mindful of the baking time. Ovens can vary, so keep an eye on your bombs as they bake. You want them to be golden brown and cooked through, but not overdone. If you notice they are browning too quickly, you can cover them loosely with aluminum foil to prevent burning.

Additionally, let the bombs cool for a few minutes after baking. This cooling time allows the filling to set slightly, making them easier to handle. If you cut into them too soon, the cheesy filling might ooze out, making a mess.

Lastly, don’t hesitate to experiment with the recipe! Cooking is all about creativity. Feel free to adjust the spices, add different toppings, or even try different types of biscuit dough. Whether you use homemade dough or store-bought, the key is to enjoy the process and have fun in the kitchen!

Serving Suggestions for Garlic Parmesan Cheeseburger Bombs Recipe

Dipping Sauces

When it comes to serving Garlic Parmesan Cheeseburger Bombs, the right dipping sauce can elevate the experience. Here are some delicious options to consider:

  • Ketchup: A classic choice that pairs perfectly with the savory flavors of the bombs. Its sweetness balances the richness of the cheese and beef.
  • Ranch Dressing: Creamy and tangy, ranch dressing adds a refreshing contrast to the warm, cheesy bombs. It’s a favorite among many!
  • Barbecue Sauce: For a smoky twist, serve your bombs with barbecue sauce. The sweet and tangy notes complement the garlic and cheese beautifully.
  • Buffalo Sauce: If you love heat, try buffalo sauce! Its spicy kick will add an exciting flavor to each bite.
  • Honey Mustard: This sweet and tangy sauce is another great option. It adds a unique flavor that pairs well with the savory bombs.

Feel free to mix and match these sauces to find your favorite combination. You can even set up a dipping station with several options for your guests to enjoy!

Side Dishes

To make your meal complete, consider serving Garlic Parmesan Cheeseburger Bombs with some tasty side dishes. Here are a few ideas:

  • French Fries: Crispy fries are a classic side that everyone loves. You can serve them plain or with a sprinkle of seasoning for extra flavor.
  • Salad: A fresh garden salad can balance the richness of the bombs. Toss together some greens, cherry tomatoes, and cucumbers for a light and refreshing side.
  • Coleslaw: Creamy coleslaw adds a crunchy texture and a tangy flavor that pairs well with the bombs.
  • Vegetable Platter: For a healthier option, serve a platter of fresh veggies with a dip. Carrots, celery, and bell peppers are great choices.
  • Potato Wedges: Seasoned potato wedges are another delicious side that complements the flavors of the bombs.

These side dishes not only enhance your meal but also provide a variety of flavors and textures. Enjoy your Garlic Parmesan Cheeseburger Bombs with these tasty accompaniments for a satisfying dining experience!

Tips for Perfect Garlic Parmesan Cheeseburger Bombs Recipe

Ingredient Substitutions

Making Garlic Parmesan Cheeseburger Bombs is all about flexibility! If you find yourself missing an ingredient, don’t worry. Here are some easy substitutions you can try:

  • Ground Beef: If you prefer a leaner option, ground turkey or chicken works well. They provide a lighter flavor while still being delicious.
  • Cheese: While cheddar and Parmesan are fantastic, feel free to swap them out. Mozzarella gives a gooey texture, while pepper jack adds a spicy kick.
  • Biscuit Dough: If you want to make your own dough, a simple homemade biscuit recipe can be used. Alternatively, crescent roll dough can add a different flavor and texture.
  • Herbs and Spices: Don’t hesitate to mix in your favorite herbs! Dried oregano, basil, or even Italian seasoning can enhance the flavor profile.
  • Butter: For a healthier option, you can use olive oil instead of melted butter. It will still give a nice finish to your bombs.

These substitutions allow you to customize the recipe to your taste and dietary needs. Experimenting with different ingredients can lead to exciting new flavors!

Storage Tips

After making your Garlic Parmesan Cheeseburger Bombs, you might have some leftovers. Here’s how to store them properly:

  • Refrigeration: Allow the bombs to cool completely before placing them in an airtight container. They can be stored in the fridge for up to 3 days.
  • Freezing: If you want to keep them longer, you can freeze the bombs. Wrap each one tightly in plastic wrap and place them in a freezer-safe bag. They can last up to 2 months in the freezer.
  • Reheating: To reheat, simply place the bombs in the oven at 350°F for about 10-15 minutes, or until heated through. This will help maintain their crispy texture.

By following these storage tips, you can enjoy your Garlic Parmesan Cheeseburger Bombs even after the initial feast. They make for a quick snack or meal option later on!

Breakdown of Time for Garlic Parmesan Cheeseburger Bombs Recipe

Prep Time

Preparing your Garlic Parmesan Cheeseburger Bombs is a breeze! The prep time for this recipe is approximately 20 minutes. This includes gathering your ingredients, mixing the beef and cheese filling, and assembling the biscuit bombs. If you have everything ready, you’ll be amazed at how quickly you can get started!

Cooking Time

Once your bombs are assembled, it’s time to bake! The cooking time is about 15-20 minutes. During this time, the biscuits will rise and turn golden brown, while the filling cooks to perfection. Keep an eye on them to ensure they don’t overbake. You want that perfect golden crust!

Total Time

In total, you can expect to spend around 35-40 minutes from start to finish. This includes both prep and cooking time. With such a quick turnaround, Garlic Parmesan Cheeseburger Bombs are an excellent choice for a weeknight dinner or a last-minute snack. You’ll have a delicious meal ready in no time!

Nutritional Information for Garlic Parmesan Cheeseburger Bombs Recipe

Calories

Each serving of Garlic Parmesan Cheeseburger Bombs contains approximately 250 calories. This makes them a satisfying option for a meal or snack without going overboard on calories. The combination of ground beef, cheese, and biscuit dough provides a hearty bite that keeps you feeling full and energized.

Protein

These tasty bombs pack a protein punch, offering about 14 grams of protein per serving. The ground beef and cheese contribute significantly to this protein content, making them a great choice for those looking to boost their protein intake. Protein is essential for muscle repair and growth, making these bombs a smart option for active individuals.

Sodium

Each serving contains around 500 milligrams of sodium. While sodium is necessary for bodily functions, it’s important to be mindful of your intake. If you’re watching your sodium levels, consider using low-sodium versions of the ingredients or reducing the amount of added salt. This way, you can still enjoy the delicious flavors of Garlic Parmesan Cheeseburger Bombs while keeping your health in check.

FAQs About Garlic Parmesan Cheeseburger Bombs Recipe

Can I make Garlic Parmesan Cheeseburger Bombs ahead of time?

Absolutely! You can prepare Garlic Parmesan Cheeseburger Bombs ahead of time, making them a convenient option for busy days. To do this, assemble the bombs as directed but do not bake them right away. Instead, place the assembled bombs on a baking sheet and cover them with plastic wrap. You can store them in the refrigerator for up to 24 hours before baking. When you’re ready to enjoy them, simply preheat your oven and bake as instructed. This way, you can have a delicious meal ready in no time!

What can I serve with Garlic Parmesan Cheeseburger Bombs?

Garlic Parmesan Cheeseburger Bombs are versatile and pair well with a variety of sides. You can serve them with classic options like crispy French fries or potato wedges for a hearty meal. A fresh garden salad adds a light touch, balancing the richness of the bombs. For a fun twist, consider offering a vegetable platter with dips. This way, you can create a colorful and appealing spread that everyone will enjoy. Don’t forget to include a selection of dipping sauces to enhance the flavors!

How do I store leftovers of Garlic Parmesan Cheeseburger Bombs?

If you have any leftovers, storing them properly is key to keeping them fresh. Allow the Garlic Parmesan Cheeseburger Bombs to cool completely before placing them in an airtight container. They can be stored in the refrigerator for up to 3 days. If you want to keep them longer, consider freezing them. Wrap each bomb tightly in plastic wrap and place them in a freezer-safe bag. They can last up to 2 months in the freezer. When you’re ready to enjoy them again, simply reheat in the oven at 350°F for about 10-15 minutes until warmed through. This way, you can savor the deliciousness even after the initial feast!

Conclusion on Garlic Parmesan Cheeseburger Bombs Recipe

In conclusion, Garlic Parmesan Cheeseburger Bombs are a delightful and versatile dish that brings joy to any meal. With their savory filling and buttery biscuit exterior, these bombs are sure to impress family and friends alike. Whether you’re hosting a party, enjoying a game day, or simply looking for a quick weeknight dinner, this recipe fits the bill perfectly.

Not only are they easy to prepare, but they also allow for endless customization. From vegetarian options to spicy variations, you can tailor the recipe to suit your taste preferences. Plus, the addition of various dipping sauces and side dishes makes for a fun and interactive dining experience.

As you gather your ingredients and follow the simple steps, remember that cooking is all about creativity and enjoyment. Don’t hesitate to experiment with flavors and ingredients to make this recipe your own. With just a little effort, you can create a dish that’s not only delicious but also brings smiles to the table.

So, why wait? Dive into the world of Garlic Parmesan Cheeseburger Bombs and treat yourself to a scrumptious meal that’s sure to become a favorite in your household. Happy cooking!

Stay Connected

Get recipes via email: