Food has a funny way of transporting us—sometimes across oceans, sometimes across time. For me, it was neither a lavish entrée nor a complex dessert that sparked a vivid return to my childhood kitchen. It was a salad.
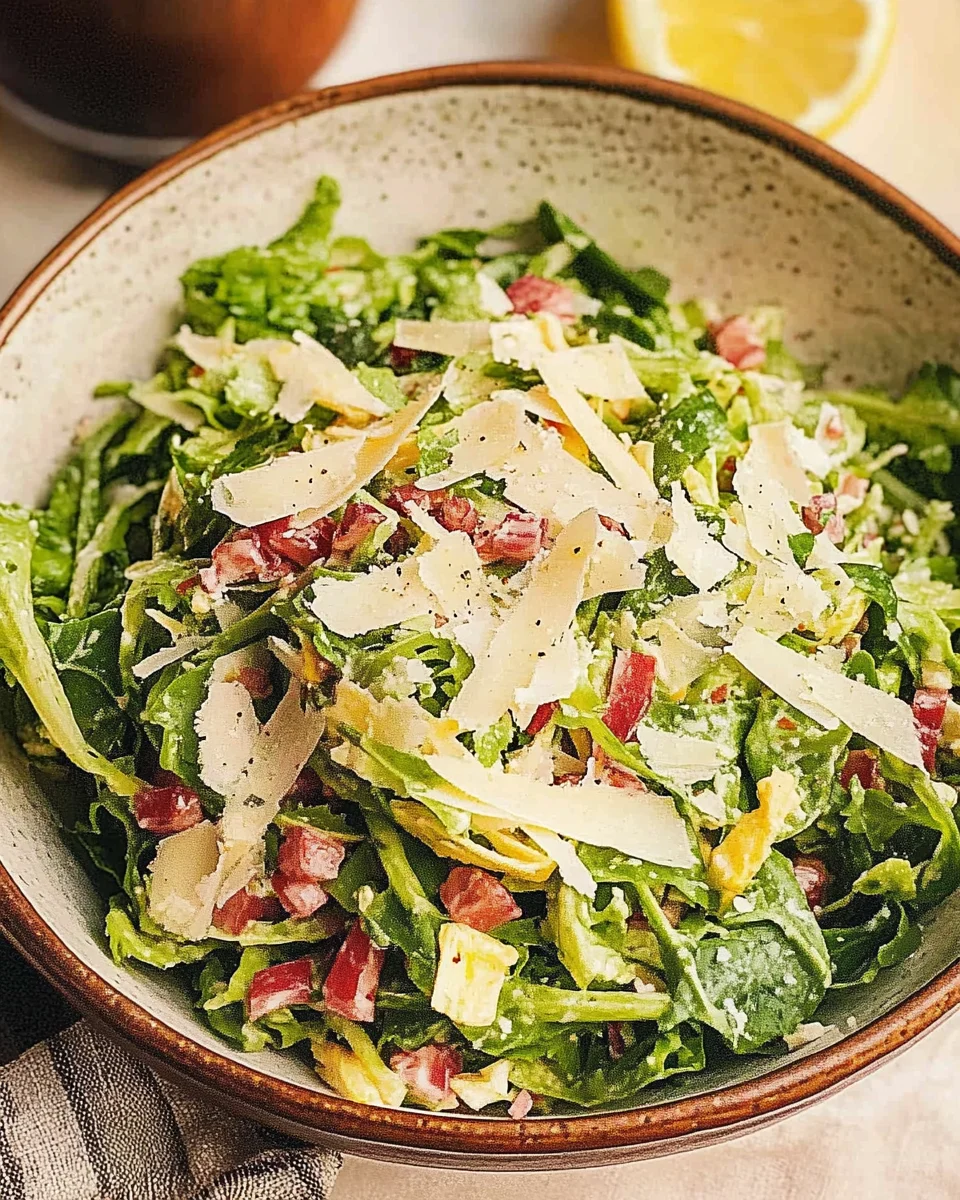
I remember sitting at my grandmother’s kitchen table one breezy summer afternoon. The windows were wide open, the sunlight poured in, and the scent of something tangy and herbaceous filled the room. She placed a large wooden bowl in the center of the table, filled with something green and inviting. Chopped lettuce, tiny cubes of meat, creamy cheese, and chickpeas—simple, yet so beautifully balanced. We didn’t know then that it mirrored a dish adored by Hollywood legends. We just knew it felt like home.
Years later, when I stumbled upon the La Scala Chopped Salad, it felt like rediscovering a piece of my past—polished, elevated, but deeply familiar. It’s a dish that resonates not because of complexity, but because of how effortlessly it blends comfort with sophistication. And like all great food, it brings people together.
The Birthplace of a Legend: La Scala in Beverly Hills
The La Scala Chopped Salad isn’t just a viral sensation or a Pinterest darling—it has a real, storied origin that dates back to the 1950s. Created by Chef Jean Leon, the founder of the iconic La Scala restaurant in Beverly Hills, this dish was born out of a desire to serve something that felt refined but was easy to eat.
Legend has it that Jean Leon wanted to make salad more accessible—less clunky, more composed—so he began chopping all the ingredients finely, ensuring every bite would have a perfect mix of textures and flavors. He brought together crunchy lettuce, rich Italian salami, soft mozzarella, and chickpeas, all tossed in a zesty red wine vinaigrette. The result? A salad that didn’t just satisfy—it captivated.
Over time, La Scala became a magnet for the glitterati. From Elizabeth Taylor and Marilyn Monroe to today’s stars like Kim Kardashian and Leonardo DiCaprio, the salad gained a fanbase that spanned generations. It wasn’t just the allure of the restaurant—it was the simplicity and brilliance of the salad that kept people coming back.
Why This Salad Stands the Test of Time
1. Every Bite Is the Perfect Bite
Unlike traditional salads where ingredients often clump or fall to the bottom, this chopped style ensures every forkful delivers a bit of everything—crunchy lettuce, nutty chickpeas, savory salami, and creamy cheese all mingling in that signature vinaigrette. It’s a design that’s both deliberate and delightful.
2. Simplicity Meets Sophistication
There’s no need for obscure ingredients or labor-intensive steps here. This salad is proof that good food doesn’t have to be complicated. With just a handful of quality ingredients and a bit of chopping, you get something restaurant-worthy in under 15 minutes.
3. It’s Flexible Without Losing Its Soul
Though the original recipe is iconic, it’s also endlessly customizable. Whether you want to make it vegetarian, add grilled chicken, or swap cheeses, it’s easy to tweak without losing the essence of what makes it special.
From Beverly Hills to Home Kitchens: Cultural Relevance
In recent years, the La Scala Chopped Salad has had a resurgence thanks to TikTok, Instagram, and food bloggers everywhere. Its fame has evolved from a secret menu staple among Hollywood elites to a must-have lunch for everyday home cooks.
The modern appeal lies in its freshness, its balance, and its nostalgia. People crave comfort, but they also crave ease—and this dish offers both. As more people lean into meal-prepping and at-home gourmet experiences, the La Scala Chopped Salad feels like the best of both worlds.
It’s also become a sort of social media icon. A search for “La Scala Chopped Salad” on TikTok yields thousands of videos, with home cooks adding their own spins—from vegan versions to spicy takes. It’s no longer just a salad. It’s a canvas.
Customizing Your Chopped Salad Experience
Make It Vegetarian
Swap out the salami for roasted red peppers, artichokes, or even marinated tofu. You’ll still get the savory balance without compromising flavor.
Boost the Protein
Add grilled chicken, shrimp, or even hard-boiled eggs for a more filling main course. This salad holds up well to protein-heavy additions.
Switch Up the Cheese
While mozzarella is classic, you can try provolone for a sharper edge or feta for a briny contrast. Fresh mozzarella balls (bocconcini) also add a creamy twist.
Change the Dressing Vibe
Stick with red wine vinaigrette for tradition, or play around with balsamic or a creamy Italian. Even a lemon-Dijon dressing can give it a Mediterranean flair.
Add Some Crunch
Croutons, sunflower seeds, or even crushed pita chips can bring an unexpected textural element that complements the softness of cheese and salami.
Serving Suggestions: Beyond the Salad Bowl
While this chopped salad can easily stand on its own, it also pairs beautifully with:
Warm Focaccia or Garlic Bread – Perfect for scooping up leftover dressing
Grilled Meats – Think lemon herb chicken or Tuscan-style steak
A Crisp Glass of White Wine – Sauvignon Blanc or Pinot Grigio enhances the tanginess of the dressing
Roasted Vegetables – Add color and earthiness to the meal with roasted carrots, zucchini, or bell peppers
Whip Up the Dressing In a small bowl or jar, combine olive oil, red wine vinegar, minced garlic, Dijon mustard, salt, black pepper, and cheese. Whisk or shake until fully emulsified.
Assemble the Base In a large bowl, toss together shredded iceberg and romaine lettuce, chickpeas, sliced salami, and shredded mozzarella.
Bring It All Together Drizzle the dressing over the salad. Toss thoroughly to coat all the ingredients. Serve immediately for best flavor and texture.
The Nutrition Snapshot (Per Serving)
Calories: 371 kcal
Carbohydrates: 13.8g
Protein: 24.7g
Fat: 24.7g
Cholesterol: 36.5mg
Sodium: 1216mg
Fiber: 4.6g
Sugar: 1.6g
Vitamin A: 136.5 IU
Vitamin C: 1.7mg
Frequently Asked Questions (FAQs)
Can I make the La Scala Chopped Salad ahead of time?
Yes, but with a few caveats. The dressing can be made up to 3 days in advance and stored in the refrigerator. The salad ingredients can be prepped the night before, but for the freshest texture, it’s best to store the chopped lettuce separately from the rest. Toss everything together just before serving.
How long does the salad last once dressed?
Once dressed, the salad is best consumed within 1–2 days. The lettuce will begin to soften from the acidity of the vinaigrette, but the flavor will still be delicious.
Is there a low-sodium version?
Absolutely. Use reduced-sodium or nitrate-free salami, cut back on the cheese, and make your own dressing to control salt levels. You can also add more vegetables to balance out the salty elements.
Can I use canned or dried chickpeas?
Canned chickpeas are most convenient—just drain and rinse. If using dried, cook them thoroughly until soft but not mushy. They add great texture and protein.
What’s the best lettuce to use?
The classic recipe uses a blend of iceberg and romaine. Iceberg adds crunch, while romaine brings a bit of green depth. You can also try butter lettuce or little gems for a softer bite.
What if I don’t eat pork?
You can substitute turkey salami, chicken sausage, or skip the meat altogether and double up on chickpeas or add another protein source like grilled tofu.
Why This Salad Belongs in Your Recipe Rotation
There’s a reason this salad has stood the test of time. It doesn’t rely on trends or fads. Instead, it delivers something deeper: a balance of flavors, an ease of preparation, and a sense of shared history. It feels luxurious without being indulgent, healthy without being restrictive, and above all, satisfying without being heavy.
It’s also a beautiful reminder that good food doesn’t have to be fussy. Sometimes, all it takes is a few fresh ingredients, a sharp knife, and a big bowl.
Conclusion: A Salad That Brings People Together
Whether you’re serving it for a quiet weekday lunch, prepping meals for the week, or setting it out at a summer gathering, the La Scala Chopped Salad brings more than just flavor—it brings connection. With every bite, it carries a whisper of old Hollywood glamour, the warmth of shared meals, and the beauty of simple, intentional cooking.
More than just a recipe, it’s a tradition waiting to be passed on.
Let me know if you want this formatted for a blog post, turned into a printable PDF, or optimized with SEO headings. Happy to help!
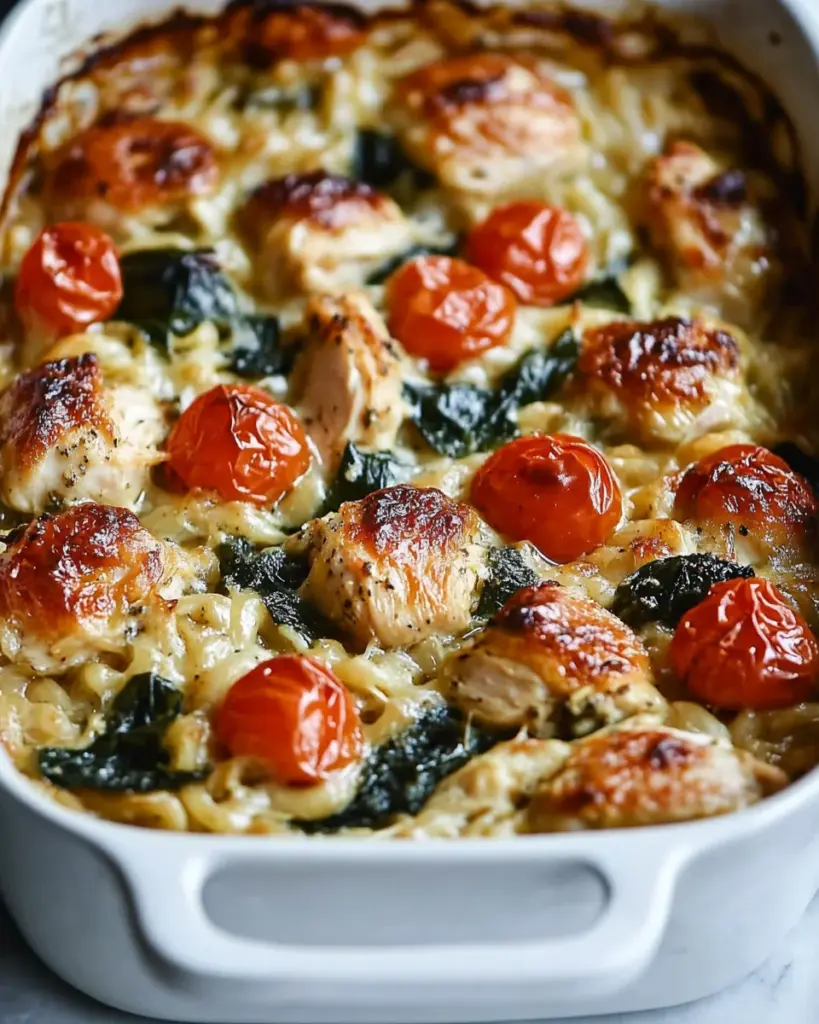
Welcome to the delightful world of the Tuscan Sunset Chicken Bake Recipe! This dish is not just a meal; it’s an experience that brings the flavors of Italy right to your kitchen. With its vibrant colors and rich flavors, this recipe is perfect for family dinners or special occasions. The combination of juicy chicken, fresh vegetables, and melted cheese creates a comforting dish that everyone will love.
What Makes the Tuscan Sunset Chicken Bake Unique?
The Tuscan Sunset Chicken Bake stands out for several reasons. First, it captures the essence of Tuscan cuisine, which is known for its use of fresh, high-quality ingredients. The dish features tender chicken breasts seasoned with aromatic herbs, complemented by the sweetness of cherry tomatoes and the earthiness of baby spinach. The addition of mozzarella and Parmesan cheese adds a creamy texture that ties all the flavors together.
Moreover, this recipe is incredibly versatile. You can easily adjust the ingredients to suit your taste. Whether you prefer a bit of spice or want to make it vegetarian, the Tuscan Sunset Chicken Bake can be customized to fit your needs. Plus, it’s a one-pan meal, making cleanup a breeze!
The Inspiration Behind the Recipe
This recipe draws inspiration from the beautiful landscapes and rich culinary traditions of Tuscany, Italy. The region is famous for its rustic dishes that celebrate seasonal produce and simple cooking techniques. The Tuscan Sunset Chicken Bake embodies this philosophy by using fresh ingredients that are both nutritious and flavorful.
Imagine enjoying this dish while watching the sun set over the rolling hills of Tuscany. The vibrant colors of the tomatoes and spinach mimic the warm hues of a sunset, making it not only a feast for the palate but also for the eyes. This recipe invites you to bring a piece of Tuscany into your home, allowing you to savor the flavors of Italy with every bite.
Ingredients for Tuscan Sunset Chicken Bake Recipe
To create the delicious Tuscan Sunset Chicken Bake, you will need a selection of fresh and flavorful ingredients. Each component plays a vital role in bringing this dish to life. Here’s what you’ll need:
These ingredients come together to create a dish that is not only tasty but also visually appealing. The chicken provides a hearty base, while the tomatoes and spinach add freshness. The cheeses melt beautifully, creating a creamy topping that enhances the overall flavor. Fresh basil adds a burst of aroma, making each bite a delightful experience.
Feel free to experiment with these ingredients! You can add your favorite vegetables or adjust the seasonings to suit your taste. The beauty of the Tuscan Sunset Chicken Bake is its flexibility, allowing you to make it your own.
Step-by-Step Preparation of Tuscan Sunset Chicken Bake Recipe
Now that you have gathered all the ingredients, it’s time to dive into the preparation of your Tuscan Sunset Chicken Bake. This step-by-step guide will help you create a delicious meal that’s sure to impress. Let’s get started!
Step 1: Prepping the Chicken
First, take your boneless, skinless chicken breasts and rinse them under cold water. Pat them dry with paper towels. This step is important as it helps the seasonings stick better. Next, place the chicken breasts on a cutting board. Using a sharp knife, trim any excess fat. This will ensure a leaner dish.
Once trimmed, season both sides of the chicken breasts with salt, black pepper, garlic powder, and Italian seasoning. Make sure to rub the spices in well. This will enhance the flavor of the chicken as it bakes. After seasoning, set the chicken aside while you prepare the vegetables.
Step 2: Preparing the Vegetables
Now, let’s focus on the vegetables. Start by washing the cherry tomatoes thoroughly. Cut each tomato in half and set them aside in a bowl. Next, take the baby spinach and rinse it under cold water. Spinach can hold dirt, so it’s essential to clean it well. After rinsing, gently pat the spinach dry with a paper towel.
With the tomatoes halved and the spinach cleaned, you’re ready to move on to the next step. These fresh vegetables will add color and nutrition to your dish!
Step 3: Assembling the Dish
Now it’s time to assemble your Tuscan Sunset Chicken Bake! Start by drizzling the olive oil evenly across the bottom of a large baking dish. This will prevent the chicken from sticking and add flavor. Place the seasoned chicken breasts in the center of the dish.
Next, scatter the halved cherry tomatoes and baby spinach around the chicken. Make sure to distribute them evenly. This way, every bite will be packed with flavor. Finally, sprinkle the shredded mozzarella and grated Parmesan cheese over the chicken and vegetables. The cheese will melt beautifully, creating a delicious topping.
Step 4: Baking the Chicken
With everything assembled, it’s time to bake! Preheat your oven to 400°F (200°C) if you haven’t done so already. Once the oven is ready, place the baking dish inside. Bake for 25-30 minutes. You’ll know it’s done when the chicken reaches an internal temperature of 165°F (75°C).
During baking, the chicken will absorb the flavors of the tomatoes and spinach, while the cheese melts into a gooey topping. The aroma will fill your kitchen, making it hard to wait!
Step 5: Final Touches and Serving
After baking, carefully remove the dish from the oven. Let it rest for about 5 minutes. This resting time allows the juices to redistribute, keeping the chicken moist. Before serving, garnish the dish with freshly chopped basil. This adds a pop of color and a burst of fresh flavor.
Now, your Tuscan Sunset Chicken Bake is ready to be enjoyed! Serve it warm and watch as your family and friends savor every bite. This dish is not only delicious but also a beautiful centerpiece for any meal.
Variations of Tuscan Sunset Chicken Bake Recipe
The beauty of the Tuscan Sunset Chicken Bake Recipe lies in its versatility. You can easily adapt it to suit different dietary preferences or simply to mix things up. Here are some exciting variations to consider!
Vegetarian Alternatives
If you’re looking for a vegetarian option, you can replace the chicken with hearty vegetables. Consider using eggplant, zucchini, or portobello mushrooms as the main ingredient. These vegetables can absorb the flavors beautifully and provide a satisfying texture.
To prepare, slice the vegetables into thick pieces and season them just like the chicken. You can also add more colorful veggies, such as bell peppers or asparagus, to enhance the dish. The cooking time may vary slightly, so keep an eye on the vegetables to ensure they are tender but not mushy.
For added protein, consider incorporating chickpeas or cannellini beans. They will not only boost the nutritional value but also add a delightful creaminess to the dish. Top it off with the same mozzarella and Parmesan cheese for that cheesy goodness!
Gluten-Free Options
For those following a gluten-free diet, the Tuscan Sunset Chicken Bake Recipe is naturally gluten-free! However, it’s essential to ensure that all your ingredients are certified gluten-free. This includes checking the labels on your seasonings and cheese.
If you want to add a bit of crunch, consider using gluten-free breadcrumbs mixed with the cheese topping. This will create a delightful crust that adds texture to the dish. Simply mix the breadcrumbs with the mozzarella and Parmesan before sprinkling them over the chicken and vegetables.
Another option is to serve the Tuscan Sunset Chicken Bake with a side of gluten-free pasta or quinoa. This will make for a complete meal that everyone can enjoy, regardless of dietary restrictions.
With these variations, you can enjoy the Tuscan Sunset Chicken Bake in many delightful ways. Whether you choose to go vegetarian or gluten-free, the flavors will still shine through, making it a dish everyone will love!
Cooking Note for Tuscan Sunset Chicken Bake Recipe
When preparing the Tuscan Sunset Chicken Bake, there are a few important cooking notes to keep in mind. These tips will help ensure that your dish turns out perfectly every time, making your cooking experience enjoyable and stress-free.
First, always check the freshness of your ingredients. Fresh chicken, vibrant vegetables, and quality cheeses will significantly enhance the flavor of your dish. If possible, opt for organic or locally sourced produce. This not only supports local farmers but also ensures you’re using the best ingredients available.
Next, consider marinating the chicken for extra flavor. If you have time, let the seasoned chicken sit for at least 30 minutes before baking. This allows the spices to penetrate the meat, resulting in a more flavorful dish. You can even marinate it overnight in the refrigerator for an even deeper taste.
Another key point is to monitor the cooking time closely. Ovens can vary in temperature, so it’s wise to check the chicken a few minutes before the suggested cooking time. Use a meat thermometer to ensure the chicken reaches an internal temperature of 165°F (75°C). This guarantees that the chicken is safe to eat while remaining juicy and tender.
Lastly, don’t skip the resting period after baking. Allowing the chicken to rest for about 5 minutes before serving helps retain its juices. This simple step can make a big difference in the overall texture and flavor of your dish.
By following these cooking notes, you’ll be well on your way to creating a delicious Tuscan Sunset Chicken Bake that will impress your family and friends. Enjoy the process and savor the delightful flavors of this Italian-inspired meal!
Serving Suggestions for Tuscan Sunset Chicken Bake Recipe
Once your Tuscan Sunset Chicken Bake is ready, it’s time to think about how to serve it. This dish is not only a feast for the eyes but also pairs wonderfully with various sides and beverages. Here are some ideal serving suggestions to elevate your meal experience!
Ideal Side Dishes
To complement the rich flavors of the Tuscan Sunset Chicken Bake, consider serving it with a few delightful side dishes. Here are some great options:
Garlic Bread: A classic choice, garlic bread is perfect for soaking up the delicious juices from the chicken and vegetables.
Roasted Vegetables: A medley of seasonal vegetables, such as zucchini, bell peppers, and carrots, roasted to perfection adds color and nutrition to your meal.
Caesar Salad: A crisp Caesar salad with romaine lettuce, croutons, and a tangy dressing provides a refreshing contrast to the warm chicken bake.
Quinoa or Rice: Serve the chicken bake over a bed of fluffy quinoa or rice. This adds a hearty element and helps absorb the flavors.
Steamed Asparagus: Lightly steamed asparagus drizzled with lemon juice adds a touch of elegance and a burst of freshness.
These side dishes not only enhance the meal but also create a balanced plate that everyone will enjoy. Feel free to mix and match based on your preferences and what you have on hand!
Wine Pairings
Pairing the right wine with your Tuscan Sunset Chicken Bake can elevate your dining experience. Here are some excellent wine options to consider:
Sauvignon Blanc: This white wine offers crisp acidity and citrus notes that complement the freshness of the tomatoes and spinach.
Chardonnay: A lightly oaked Chardonnay can enhance the creamy texture of the melted cheeses, making it a delightful pairing.
Chianti: For red wine lovers, a Chianti is a classic Italian choice. Its fruity and earthy flavors pair beautifully with the savory chicken and herbs.
Pinot Grigio: This light and refreshing white wine is perfect for balancing the richness of the dish while enhancing the overall flavors.
Rosé: A dry rosé offers a lovely balance of fruitiness and acidity, making it a versatile option for this meal.
Choosing the right wine can enhance the flavors of your Tuscan Sunset Chicken Bake, making your meal even more enjoyable. So, pour a glass and savor the delightful combination of food and drink!
Tips for Perfecting Your Tuscan Sunset Chicken Bake Recipe
To ensure your Tuscan Sunset Chicken Bake turns out perfectly every time, here are some helpful tips. These suggestions will help you avoid common pitfalls and enhance your cooking experience. Let’s dive in!
Common Mistakes to Avoid
Even the best cooks can make mistakes. Here are some common ones to watch out for:
Not Preheating the Oven: Always preheat your oven before baking. This ensures even cooking and helps the chicken bake properly.
Overcrowding the Dish: Avoid placing too many ingredients in the baking dish. This can lead to uneven cooking. Make sure there’s enough space for the heat to circulate.
Skipping the Resting Time: After baking, let the chicken rest for about 5 minutes. This allows the juices to redistribute, keeping the chicken moist and flavorful.
Using Cold Ingredients: For best results, let your chicken and vegetables come to room temperature before cooking. This helps them cook evenly.
Not Checking the Chicken Temperature: Always use a meat thermometer to check the chicken’s internal temperature. It should reach 165°F (75°C) to be safe to eat.
By avoiding these common mistakes, you’ll be on your way to creating a delicious Tuscan Sunset Chicken Bake that impresses everyone!
Storage Tips
If you have leftovers or want to prepare the dish ahead of time, proper storage is key. Here are some tips to keep your Tuscan Sunset Chicken Bake fresh:
Refrigeration: Store any leftovers in an airtight container in the refrigerator. They can last for up to 3 days.
Freezing: If you want to freeze the dish, let it cool completely first. Then, wrap it tightly in plastic wrap and aluminum foil. It can be frozen for up to 3 months.
Reheating: To reheat, thaw in the refrigerator overnight if frozen. Then, warm it in the oven at 350°F (175°C) until heated through. This helps maintain the texture and flavor.
Fresh Garnish: If you plan to store leftovers, wait to add fresh basil until you’re ready to serve. This keeps the basil vibrant and flavorful.
With these storage tips, you can enjoy your Tuscan Sunset Chicken Bake even after the first serving. It’s a great way to savor the flavors of Italy throughout the week!
Breakdown of Time for Tuscan Sunset Chicken Bake Recipe
Understanding the time needed for each step of the Tuscan Sunset Chicken Bake Recipe can help you plan your cooking efficiently. Here’s a detailed breakdown of the time required for preparation and cooking.
Prep Time
The prep time for the Tuscan Sunset Chicken Bake is approximately 15-20 minutes. This includes:
Rinsing and drying the chicken breasts.
Trimming any excess fat from the chicken.
Seasoning the chicken with salt, pepper, garlic powder, and Italian seasoning.
Washing and preparing the cherry tomatoes and baby spinach.
Assembling the ingredients in the baking dish.
Taking your time during the prep phase ensures that each ingredient is ready to shine in the final dish!
Cooking Time
The cooking time for the Tuscan Sunset Chicken Bake is about 25-30 minutes. During this time, the chicken will bake in the oven at 400°F (200°C). It’s essential to check the internal temperature of the chicken to ensure it reaches 165°F (75°C) for safe consumption. The cooking time may vary slightly based on your oven and the thickness of the chicken breasts.
Total Time
In total, you can expect the entire process, from prep to serving, to take around 40-50 minutes. This includes:
15-20 minutes for preparation.
25-30 minutes for cooking.
This makes the Tuscan Sunset Chicken Bake a quick and easy meal option for busy weeknights or special occasions. With just under an hour, you can create a delicious, hearty dish that brings the flavors of Tuscany to your table!
Nutritional Information for Tuscan Sunset Chicken Bake Recipe
Understanding the nutritional content of your meals is essential for maintaining a balanced diet. The Tuscan Sunset Chicken Bake is not only delicious but also packed with nutrients. Here’s a breakdown of the nutritional information per serving, which serves as a great guide for those mindful of their dietary intake.
Calories
Each serving of the Tuscan Sunset Chicken Bake contains approximately 350 calories. This makes it a satisfying yet light option for dinner. The combination of chicken, vegetables, and cheese provides a hearty meal without excessive calories. It’s perfect for those looking to enjoy a flavorful dish while keeping their calorie count in check.
Protein Content
One of the standout features of this recipe is its high protein content. Each serving offers about 40 grams of protein. This is primarily due to the chicken breasts, which are an excellent source of lean protein. Protein is essential for muscle repair and growth, making this dish a great choice for active individuals or anyone looking to maintain a healthy lifestyle.
Sodium Levels
The sodium content in the Tuscan Sunset Chicken Bake is approximately 600 milligrams per serving. While this is a reasonable amount for a flavorful dish, it’s always wise to be mindful of sodium intake, especially for those with dietary restrictions. You can reduce the sodium levels by using low-sodium chicken broth or cheese if desired. This way, you can enjoy the rich flavors without compromising your health.
Overall, the Tuscan Sunset Chicken Bake is a nutritious option that balances calories, protein, and sodium. It’s a meal that not only satisfies your taste buds but also supports your health goals. Enjoy this delightful dish knowing it’s good for you too!
FAQs about Tuscan Sunset Chicken Bake Recipe
Can I make the Tuscan Sunset Chicken Bake ahead of time?
Absolutely! The Tuscan Sunset Chicken Bake is a great dish to prepare ahead of time. You can assemble the entire dish, cover it with plastic wrap, and store it in the refrigerator for up to 24 hours before baking. This allows the flavors to meld together, making it even tastier when you finally bake it. Just remember to remove it from the fridge about 30 minutes before baking to ensure even cooking. If you prefer, you can also freeze the assembled dish. Just make sure to wrap it tightly to prevent freezer burn. When you’re ready to enjoy it, thaw it in the refrigerator overnight and bake as directed.
What can I substitute for chicken in the Tuscan Sunset Chicken Bake Recipe?
If you’re looking for a substitute for chicken, there are several delicious options! For a vegetarian twist, consider using hearty vegetables like eggplant, zucchini, or portobello mushrooms. These can be seasoned and baked just like the chicken. If you want a protein-rich alternative, try using boneless, skinless turkey breasts or even tofu for a plant-based option. Tofu absorbs flavors well, making it a great choice for this recipe. Just be sure to adjust the cooking time as needed, especially for vegetables, to ensure they are tender and flavorful.
How do I know when the chicken is fully cooked?
The best way to ensure your chicken is fully cooked is by using a meat thermometer. Insert the thermometer into the thickest part of the chicken breast. It should read 165°F (75°C) to be safe for consumption. If you don’t have a thermometer, you can also check for doneness by cutting into the chicken. The meat should be opaque and the juices should run clear, not pink. If you see any pink juices, return the chicken to the oven and continue baking until it reaches the proper temperature. This ensures that your Tuscan Sunset Chicken Bake is both delicious and safe to eat!
Conclusion on Tuscan Sunset Chicken Bake Recipe
In conclusion, the Tuscan Sunset Chicken Bake Recipe is a delightful dish that brings the flavors of Italy right to your table. With its vibrant colors, rich flavors, and simple preparation, it’s perfect for any occasion. Whether you’re hosting a family dinner or enjoying a quiet night in, this recipe is sure to impress.
Not only is it delicious, but it’s also versatile. You can easily customize it to fit your dietary needs or personal preferences. From vegetarian alternatives to gluten-free options, the Tuscan Sunset Chicken Bake can be adapted to suit everyone’s taste. Plus, with the tips and variations provided, you can make this dish your own, ensuring that it remains a staple in your kitchen.
As you savor each bite, you’ll appreciate the combination of juicy chicken, fresh vegetables, and melted cheese. The addition of aromatic herbs and spices elevates the dish, making it a true culinary delight. Remember to pair it with your favorite sides and a glass of wine for a complete dining experience.
So, gather your ingredients, follow the steps, and enjoy the process of creating this beautiful meal. The Tuscan Sunset Chicken Bake is not just about the food; it’s about sharing moments with loved ones and creating lasting memories. Bon appétit!
The best recipes don’t always come from cookbooks or meticulously planned menus. Sometimes, they come from those chaotic, beautiful in-between moments — when you’re hosting on short notice, feeding unexpected guests, or simply craving something warm and flaky without the fuss.
That’s exactly how this puff pastry appetizer came to be.
It was late afternoon on a Saturday. The kitchen was a little messy, the kids were building a blanket fort in the living room, and I had friends texting to say they were dropping by in “just a bit.” I had no plans to cook. No elaborate platters or dips chilling in the fridge. I had puff pastry in the freezer, a few sausages from the breakfast we never finished, and an open jar of tomato sauce from the night before.
Out of necessity and instinct, I rolled out the pastry, spread a bit of tomato sauce, added a sausage, rolled it up, and sliced it into pinwheels. I wasn’t aiming for a masterpiece—just something warm, snackable, and a little satisfying. Twenty minutes later, the house smelled incredible. The rolls were golden, bubbling, and slightly crisp at the edges.
To my surprise, they disappeared faster than anything I had cooked in weeks.
Since then, this quick puff pastry appetizer has become my go-to solution for so many situations. Game nights, potlucks, brunches, lazy dinners, or simply those evenings when I want something comforting but don’t want to spend an hour in the kitchen.
It’s a reminder that sometimes, simplicity is the most delicious ingredient of all.
What Makes This Recipe So Special?
It’s easy to fall in love with any recipe that’s done in 30 minutes and requires almost no prep. But this appetizer goes beyond just being convenient. It’s a masterclass in flavor-to-effort ratio — a low-lift recipe that delivers huge results.
Here’s why it works so well:
Minimal ingredients: Just puff pastry, tomato sauce, and sausage — that’s it.
Maximum flavor: The buttery richness of the pastry, the tang of the tomato, and the savory sausage work together like magic.
Unbelievably fast: It takes longer for the oven to preheat than it does to prepare the dish.
Customizable: You can change up the filling to suit your taste, dietary needs, or what’s already in your fridge.
Always a crowd-pleaser: Whether served as a snack, side, or main, people love these crispy, golden bites.
It’s proof that food doesn’t have to be complicated to be memorable.
Ingredients
Ingredient
Quantity
Puff pastry
700 g (25 oz), thawed if frozen
Tomato sauce
60 g (2.1 oz)
Sausages
400 g (14 oz), your favorite type
Directions
Preheat your oven to 375°F (190°C). Line a baking tray with parchment paper.
Roll out the puff pastry sheets on a floured surface if needed.
Spread a thin layer of tomato sauce evenly over the pastry.
Cut sausages to fit the length or width of the pastry sheet and place them on one edge.
Roll the pastry tightly around the sausage, sealing the edges gently.
Slice into bite-sized pieces or keep them as longer rolls.
Place the rolls seam-side down on the baking tray. Optionally, brush with a beaten egg for shine.
Bake for 20–25 minutes or until puffed and golden.
Let cool slightly before serving. Best enjoyed warm.
Nutritional Information (Per Roll — Approx. 12–14 pieces)
Nutrient
Amount
Calories
~210 kcal
Protein
6 g
Carbohydrates
14 g
Fat
14 g
Saturated Fat
5 g
Sodium
320 mg
Frequently Asked Questions
Do I need to cook the sausages before using them in the pastry? If you’re using fully cooked sausages (like smoked, pre-cooked, or breakfast-style links), there’s no need to pre-cook. If you’re using raw sausage or ground meat, it’s best to cook it first to ensure it’s safe to eat and doesn’t release too much moisture into the pastry during baking.
What type of sausage works best? This recipe is very forgiving. You can use anything from smoky kielbasa and spicy chorizo to chicken sausage or even vegetarian options. Just choose a sausage with bold flavor and minimal moisture.
Can I use homemade pastry instead of store-bought puff pastry? Of course! Homemade puff pastry or even rough puff works wonderfully if you have the time. But store-bought is ideal when speed is your priority.
Can I make this recipe vegetarian or vegan? Yes. Use plant-based sausage alternatives and vegan puff pastry (many are naturally dairy-free). Swap tomato sauce for pesto, hummus, or roasted red pepper spread for more plant-based variety.
Can I freeze the rolls before baking? Absolutely. These rolls freeze well both before and after baking. Just assemble them and freeze on a tray until firm, then transfer to a freezer-safe bag. Bake from frozen, adding an extra 5–10 minutes.
Can I serve them cold? They’re best enjoyed warm, fresh out of the oven, but they’re still delicious at room temperature. For parties or potlucks, they hold up well even after a few hours.
Creative Variations to Try
Once you’ve mastered the basic version, there’s a world of flavor waiting inside that flaky puff pastry. Here are some of our favorite variations:
1. Cheesy Sausage Rolls
Add a sprinkle of shredded cheddar, mozzarella, or gouda over the tomato sauce before rolling. The cheese melts beautifully and adds depth.
2. Italian-Style Rolls
Use Italian sausage and replace the tomato sauce with marinara or pesto. Top with a touch of Parmesan before baking for an extra layer of flavor.
3. Spicy Kick
Add a swipe of hot sauce or spicy harissa under the sausage. For extra fire, sprinkle in crushed red pepper flakes or a slice of jalapeño.
4. Breakfast-Inspired
Use breakfast sausage and add a layer of scrambled egg and cheese. These are perfect for make-ahead brunches.
5. Vegetarian Delight
Use sautéed mushrooms, spinach, or caramelized onions as a filling. A touch of crumbled feta or goat cheese makes them irresistible.
Serving Ideas
This puff pastry appetizer is wonderfully flexible when it comes to serving. It can be casual or dressed up, depending on the occasion:
Game day snacks: Serve with a trio of dips — mustard, spicy ketchup, and ranch.
Party platters: Arrange on a board with olives, pickles, cheeses, and small sandwiches.
Brunch side: Pair with a green salad, soft-boiled eggs, or a fruit platter.
Quick lunch: Add a side of soup or a handful of greens, and you’ve got a complete meal.
Serve them fresh from the oven for the best texture, or reheat in the oven to restore that crispiness if making ahead.
Make-Ahead and Storage Tips
To store Keep leftover baked rolls in an airtight container in the refrigerator for up to 3 days. Reheat in the oven at 350°F (175°C) for 5–8 minutes, or until heated through and crisp.
To freeze Freeze baked or unbaked rolls on a tray first, then transfer to a freezer-safe container. They’ll keep for up to one month. Bake frozen rolls straight from the freezer — just extend baking time slightly.
To prepare ahead Assemble the rolls in advance, cover, and refrigerate until you’re ready to bake. Perfect for stress-free entertaining or prepping for busy weekdays.
A Final Thought: Simplicity Wins Every Time
In a world where food can be complicated, curated, and sometimes overwhelming, there’s something refreshing about a recipe like this.
The Fastest Puff Pastry Appetizer isn’t trying to impress with dozens of ingredients or intricate technique. It’s not trying to be viral or trendy. It’s just trying to feed you — well, fast, and deliciously.
And that’s exactly what makes it powerful.
Whether you’re entertaining on the fly, solving the eternal snack dilemma, or just in the mood to bake something warm and comforting, this recipe is here to help. It’s the kind of dish that’s flexible, forgiving, and always welcomed — no matter the time of day or the number of guests.
So keep a sheet of puff pastry in the freezer. Keep your favorite sausage or veggie filling on hand. Because once you know how easy it is to make these, you’ll find yourself turning to them again and again.
And every time someone grabs one and says, “Wait, did you make these yourself?” — you’ll smile, nod, and maybe keep the secret of just how easy they really are.
Some recipes come from cookbooks, others from restaurants or far-off travels. And then there are those that find you in quiet, unexpected moments—moments that don’t ask for perfection, but instead invite simplicity, warmth, and nourishment.
That’s how these Spinach and Cheese Puff Pastry Rolls became a favorite in my home.
It started on a chilly weekend afternoon. I was staring into the fridge, trying to make use of a handful of lingering ingredients: a half-used tub of ricotta, a small bunch of wilting spinach, a leftover puff pastry sheet from a holiday bake, and a wedge of Parmesan I’d been grating over everything for weeks. I wasn’t planning on making anything fancy—just something to fill the house with warmth and the kitchen with the smell of something baking.
As I began mixing the filling—garlicky spinach, soft ricotta, melted cheese—I remembered the way my mother used to fold leftover greens into phyllo dough. Her version was less precise and more instinctive, but it always came out golden and flaky, with steam rising as you pulled it apart.
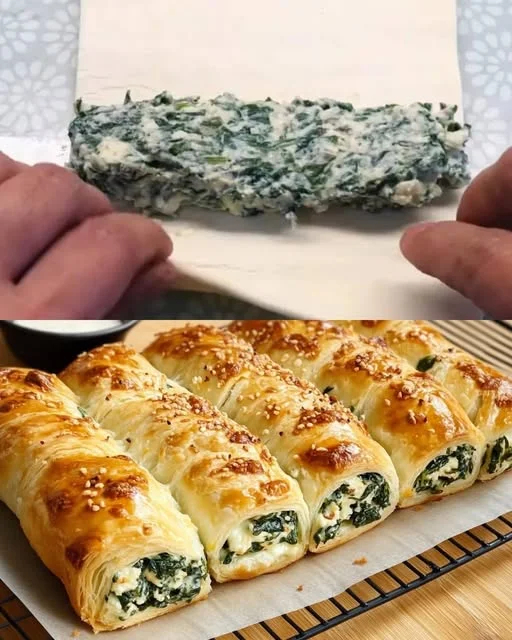
I rolled the pastry, brushed the top with an egg wash, and sprinkled it with sesame seeds the way she did. The scent that filled the kitchen as they baked was so deeply nostalgic I paused mid-cleanup just to breathe it in.
By the time they were out of the oven, puffed and golden, the family had gathered around without being called. We ate them standing up, pulling them apart with our hands. Not a single one made it to the table.
Since then, these rolls have become a regular fixture in my kitchen—not just for their flavor, but for the quiet joy they bring. They’re the kind of recipe that proves you don’t need complexity to create something meaningful. Just a few ingredients, a warm oven, and the willingness to nourish the ones you love.
Why These Rolls Work Every Time
Whether you’re cooking for a weekend brunch, prepping a lunchbox snack, or looking for a crowd-pleasing appetizer, these spinach and cheese rolls always deliver. Here’s what makes them so reliable—and irresistible:
Flaky, buttery layers: Puff pastry brings an unbeatable crispiness without any extra work.
Creamy, savory filling: The combination of ricotta, mozzarella, and Parmesan gives depth, richness, and the perfect melt.
Wholesome and flavorful: Packed with fresh spinach and garlic, it’s a delicious way to enjoy greens.
Versatile: Easily customizable with herbs, spices, or different cheeses.
Elegant yet easy: They look like bakery treats but require minimal effort.
They’re one of those rare recipes that hits all the marks: simple ingredients, big flavor, and endless possibilities.
Ingredients
Ingredient
Quantity
Fresh spinach
300 g
Olive oil
3 tablespoons
Garlic cloves, minced
3
Egg (for filling)
1
Salt
To taste
Black pepper, freshly ground
½ teaspoon
Ricotta cheese
250 g
Mozzarella cheese, shredded
½ cup
Parmesan cheese, grated
½ cup
Puff pastry sheet
1 (thawed if frozen)
Egg + 1 tbsp milk (for egg wash)
1 egg
Sesame seeds (optional)
For sprinkling
Directions
Prepare the Spinach Filling In a skillet over medium heat, add olive oil and sauté minced garlic for 30 seconds. Add chopped spinach and cook until wilted. Season with salt and pepper. Allow to cool slightly.
Mix the Cheesy Filling In a large bowl, combine the cooked spinach with ricotta, mozzarella, Parmesan, and one beaten egg. Mix until fully combined.
Assemble the Rolls Preheat oven to 375°F (190°C). Roll out the puff pastry sheet on a lightly floured surface. Spread the spinach-cheese filling evenly over the pastry, leaving a small border. Roll tightly into a log.
Slice and Brush Slice the log into even rolls (about 1–1.5 inches thick). Place on a parchment-lined baking sheet. Brush the tops with egg wash and sprinkle with sesame seeds if desired.
Bake Until Golden Bake for 20–25 minutes or until golden and puffed. Serve warm or at room temperature.
Nutritional Information (Per 1 roll, approx. based on 10 rolls)
Nutrient
Amount
Calories
~180 kcal
Protein
6 g
Carbohydrates
14 g
Fat
11 g
Saturated Fat
4 g
Fiber
1 g
Sodium
220 mg
Frequently Asked Questions
Can I use frozen spinach instead of fresh? Yes! Frozen spinach works just as well. Be sure to thaw and squeeze out as much moisture as possible before mixing it into the filling to prevent sogginess.
What can I use instead of ricotta cheese? You can substitute with cottage cheese (drained slightly) or crumbled feta. For a richer taste, you could even use cream cheese, but it may make the filling slightly denser.
Can I prepare them in advance? Absolutely. You can assemble the rolls and refrigerate them for a few hours before baking. Alternatively, freeze them unbaked and bake directly from frozen, adding a few extra minutes to the cooking time.
Do I have to use puff pastry? Puff pastry gives the rolls their flaky texture, but you can use phyllo dough or even crescent dough if you prefer. The texture will be different, but still delicious.
Can I make these rolls vegetarian or add more veggies? They are already vegetarian-friendly, but you can easily add finely chopped mushrooms, sautéed leeks, or grated zucchini (just be sure to remove excess moisture). Herbs like dill, parsley, or thyme also make excellent additions.
What if I don’t have sesame seeds? No problem! The sesame seeds are optional and mainly add visual appeal and a slight nutty crunch. You can skip them or replace them with poppy seeds, everything bagel seasoning, or even grated cheese.
Serving Suggestions
These spinach and cheese rolls are as flexible in presentation as they are in preparation. Here are a few ways to enjoy them:
As an Appetizer
Serve them warm on a platter with a side of tangy yogurt dip, tzatziki, or spicy tomato sauce.
For Brunch or Breakfast
Pair with fresh fruit, a boiled egg, and coffee for a satisfying morning meal.
As a Side Dish
These rolls complement soups, especially creamy tomato, lentil, or vegetable chowder. They’re also great alongside a fresh green salad.
As a Snack or Picnic Item
Easy to pack and reheat, these rolls are perfect for picnics, potlucks, or on-the-go lunches.
Dressed Up for a Dinner Party
Slice them into bite-sized rounds, plate with microgreens or a balsamic glaze drizzle, and serve them as elegant hors d’oeuvres.
Variations to Try
This recipe is a canvas. Once you’ve made it once, you’ll see how easily it adapts to your taste and pantry:
1. Spinach and Feta Classic
Swap ricotta for crumbled feta and add a pinch of nutmeg for a more Mediterranean twist.
2. Spicy Spinach Rolls
Add a dash of crushed red pepper flakes or diced chili for heat lovers.
3. Mushroom and Herb
Mix in sautéed mushrooms and chopped thyme or rosemary for a woodsy, earthy flavor.
4. Sun-Dried Tomato and Basil
Add chopped sun-dried tomatoes and a handful of fresh basil to the filling for a vibrant Italian-inspired version.
5. Cheddar and Broccoli
Substitute spinach with finely chopped steamed broccoli and add shredded cheddar for a kid-friendly take.
Storage and Reheating Tips
Refrigerate Store leftovers in an airtight container in the refrigerator for up to 3 days. Reheat in the oven at 350°F (175°C) for 5–7 minutes to restore crispiness.
Freeze Before Baking Place unbaked rolls on a baking sheet, freeze until firm, then transfer to a freezer-safe bag. Bake from frozen, adding 5–10 extra minutes to the original bake time.
Freeze After Baking Allow baked rolls to cool completely, wrap individually, and freeze for up to one month. Reheat in the oven, not microwave, for best texture.
A Final Thought: The Power of a Simple Roll
There’s something comforting about a pastry that doesn’t ask for much—no fancy tools, no complicated techniques, just a few honest ingredients rolled into something golden, flaky, and deeply satisfying.
These Spinach and Cheese Puff Pastry Rolls are more than just a snack. They’re a moment. A memory. A quiet celebration of cooking not to impress, but to nourish. They’re the kind of food you share with friends over coffee, tuck into lunchboxes with love, or eat over the sink because you just couldn’t wait.
And maybe, in a world that so often pushes us toward more—more complexity, more steps, more perfection—these little rolls remind us that sometimes, less really is more.
So the next time you need something quick, cozy, and a little bit special, let this recipe be your go-to. Your home will smell like something’s baking. Your table will be filled with smiles. And your heart? Full.
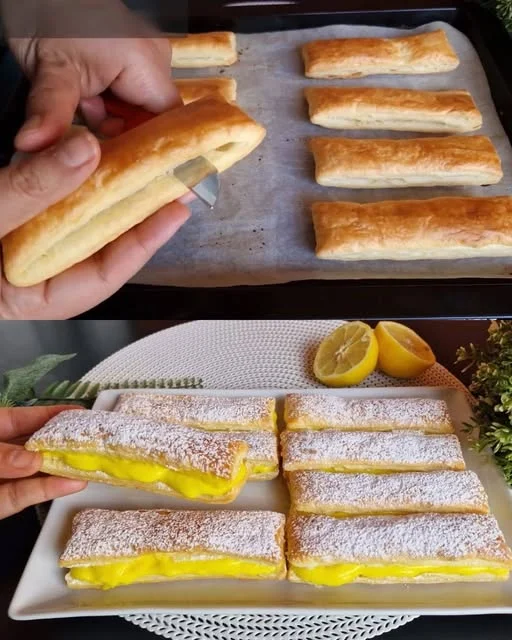
Not whipped cream from a can or store-bought fillings, but real, homemade custard — rich, warm, and silky. I think of my grandmother’s kitchen, where the air always smelled like vanilla and milk simmering gently on the stove. She had a way of making the simplest things feel like magic, and her cream-filled pastry bites were a perfect example.
She didn’t follow trends or fancy food blogs. Her recipes came from memory and instinct, passed down through generations, always measured with her eyes and heart. I remember watching her stir patiently as the custard thickened, never rushing, never letting it burn. I’d sit on a stool beside the counter, trying to steal a spoonful before it had cooled.
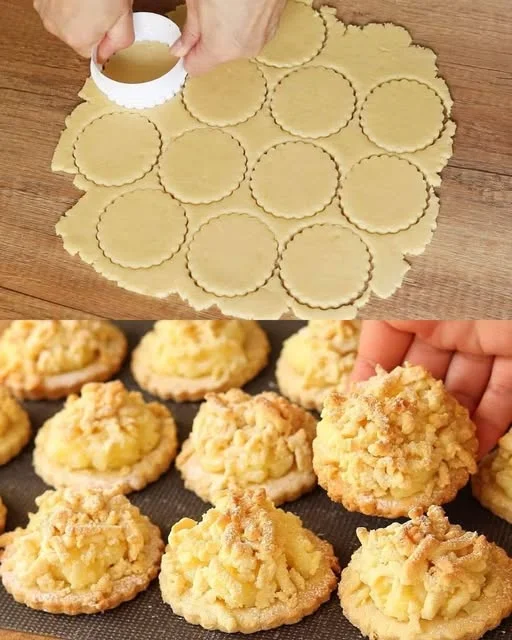
The pastry was never fussy. Sometimes it was folded puff dough, other times soft brioche or thin crepes — whatever she had on hand. But that filling? It was always the same. A velvety, egg-yolk-rich custard made from milk, starch, and just enough sweetness. Lightly flavored with a hint of vanilla or lemon zest, depending on her mood.
When she served them — still warm, slightly dusted with powdered sugar — it felt like a celebration, even on the most ordinary afternoons.
Years later, I still make this cream. I use it for pastry bites, tarts, cakes, or even as a dessert on its own. And every time I do, I feel like I’m preserving something special. Not just a recipe, but a memory. A tradition. A moment of calm in a busy world.
Why These Cream-Filled Pastry Bites Are Irresistible
In a world full of over-the-top desserts and elaborate presentations, this recipe stands out for its elegance and simplicity. It uses a few basic ingredients — things you likely have in your kitchen right now — yet delivers a luxurious, satisfying result.
Here’s what makes it so special:
The texture: Silky, smooth, and spoonable, the custard is both light and rich, melting beautifully into any pastry shell.
The flavor: Not overly sweet, with a delicate dairy richness and the option to add vanilla, citrus zest, or almond for variation.
The versatility: You can use this filling in so many ways — inside pastries, doughnuts, cakes, or simply in a cup with a spoon.
The ease: No special equipment needed. Just a saucepan, a whisk, and a few minutes on the stove.
The nostalgia: It brings back memories of simpler times and classic desserts, the kind passed down through generations.
Whether you’re hosting guests or just craving something homemade and comforting, this is the kind of treat that makes everyone feel at home.
Ingredients
Ingredient
Quantity
Milk
300 ml
Egg yolks
2
Starch (cornstarch or potato starch)
30 g
Sugar (optional, for sweetness)
2–3 tablespoons
Directions
In a small saucepan, whisk the egg yolks with starch until smooth and lump-free.
Slowly add the milk while whisking continuously to combine everything evenly.
Place the saucepan over medium heat and cook the mixture, stirring constantly.
Continue cooking until the mixture thickens to a smooth, custard-like consistency. This should take about 5–7 minutes.
Remove from heat. Optional: Stir in sugar to taste or a drop of vanilla extract for extra flavor.
Let the cream cool slightly before using as a filling for pastry bites, doughnuts, crepes, or cake layers.
Nutritional Information (Per Serving — approx. 1 of 4 servings)
Nutrient
Amount
Calories
~110 kcal
Carbohydrates
12 g
Sugars
4–6 g (with sugar added)
Protein
3 g
Fat
5 g
Saturated Fat
1.5 g
Frequently Asked Questions
Is this the same as pastry cream or custard? Yes, it’s very similar to pastry cream (also known as crème pâtissière). It’s slightly lighter and can be adjusted in thickness depending on how you plan to use it. Some versions use more yolks or added butter, but this one is a classic, minimalist base that can be dressed up or down.
What kind of starch should I use? Both cornstarch and potato starch work well. Cornstarch gives a more classic custard texture, while potato starch creates a slightly smoother, glossier finish. Choose whichever you have on hand.
Can I make it without eggs? Egg yolks give the cream richness and help with thickening. If you need an egg-free version, you can replace them with an extra spoonful of starch and use plant-based milk, but the flavor and texture will be a bit different — more like pudding than custard.
Can I add flavorings? Yes! You can stir in vanilla extract, lemon zest, almond extract, or even a splash of orange blossom water. Just add your flavoring after removing the custard from the heat for the best aroma.
Can I use it in cakes or other pastries? Absolutely. This cream is perfect for layering in sponge cakes, filling choux pastry, spreading inside doughnuts, or piping into eclairs. It also works well in tart shells and layered desserts.
Can I make it ahead of time? Yes. The cream can be made a day or two in advance and stored in the refrigerator. Place plastic wrap directly on the surface to prevent a skin from forming.
How long does it last in the fridge? Stored properly in an airtight container, it will keep for up to 3 days. Beyond that, the texture may change and it’s best to prepare a fresh batch.
Can I freeze it? Freezing is not recommended, as the starch-based custard may become watery or separate when thawed.
Creative Variations to Try
Once you’ve made the base recipe, you’ll quickly see how easy it is to personalize. Here are a few delicious twists you can experiment with:
1. Vanilla Bean Cream
Split a vanilla bean and simmer it with the milk. Remove the pod before adding the starch and yolks for a deep, aromatic flavor.
2. Citrus Custard
Add lemon or orange zest while cooking, then strain before chilling. This gives the cream a bright, fresh note — perfect for spring pastries.
3. Chocolate Custard
Whisk in a tablespoon of cocoa powder with the starch, or stir in melted dark chocolate at the end for a decadent twist.
4. Almond Cream
Replace a splash of milk with almond milk and add almond extract. Serve with puff pastry and toasted sliced almonds.
5. Espresso Cream
Dissolve a teaspoon of instant espresso in the milk for a coffee-flavored cream that pairs beautifully with dark chocolate or hazelnuts.
Serving Suggestions
This versatile cream pairs well with almost anything, but here are some favorite ways to enjoy it:
In puff pastry bites: Pipe the cream into small puff pastry squares or circles and chill until set. Dust with powdered sugar before serving.
In cream puffs or eclairs: Fill with a piping bag, then dip in chocolate glaze for a bakery-style finish.
As a tart filling: Pour into a prebaked tart shell and top with fresh berries or thinly sliced fruit.
In cake layers: Use as a middle layer for sponge cakes or roulades.
Served in a cup: Chill in individual ramekins and top with fruit compote or cookie crumbs for a minimalist dessert.
This cream is also lovely warm — spooned over pound cake, pancakes, or even French toast for a breakfast-meets-dessert moment.
Storage and Reheating Tips
To store: Transfer the custard to a bowl and press plastic wrap directly onto the surface to prevent a skin from forming. Refrigerate for up to 3 days.
To reheat: If you need to use it warm, gently heat over low on the stove while stirring constantly. Do not boil. Add a splash of milk if it thickens too much.
To prepare ahead: Make the custard the day before and keep refrigerated until ready to use. Fill pastries just before serving for best texture.
A Final Note: The Joy of Simple Pleasures
There’s something timeless about recipes like this — simple ingredients, a few quiet minutes at the stove, and a creamy reward that tastes like it came from your favorite bakery.
Cream-Filled Pastry Bites are more than just a dessert. They’re an invitation to slow down, stir with care, and savor something made from scratch. They remind us that elegance doesn’t need to be elaborate and that comfort can come from the most humble of ingredients.
So whether you’re serving them at a special gathering, making a sweet surprise for your family, or enjoying a moment of peace at the end of a long day, this recipe will be ready for you. And each spoonful will carry a little bit of warmth — and maybe even a memory or two.
There are recipes you plan. You shop for them, prep for them, and carve out time to cook them. And then there are the ones that come together because life is moving too fast, your fridge is half-empty, and dinner needs to be on the table in under 30 minutes.
This vegetable and ham skillet dish falls into the second category — and it’s precisely why I love it.
I first made this during one of those weeks when everything felt a little overwhelming. Work was hectic, the kids were cranky, and the “what’s for dinner?” question felt more like a threat than a casual inquiry. I opened the fridge and saw the usual suspects: eggs, a carrot, half an onion, a bit of ham from lunchboxes, and a chunk of cheese.
My first thought? There’s not enough here to make anything. But necessity, as they say, is the mother of invention. I whisked the eggs, grated the carrot, added flour and cheese, seasoned it generously, tossed in the ham, and fried it like a veggie-packed frittata or savory pancake. It wasn’t fancy, but when I served it — hot and golden — everyone ate in silence, then asked for seconds.
That’s when I knew this dish was a keeper.
Since then, this recipe has become a weeknight lifesaver — quick, flexible, and surprisingly satisfying. It’s the kind of food that’s easy enough to cook with one eye on your toddler and hearty enough to fill a table of hungry eaters. And best of all, it’s ready in minutes.
Why This Dish Belongs in Your Weeknight Rotation
What makes this recipe so special isn’t just how easy it is — it’s how much flavor and comfort you get from such simple ingredients. It’s the kind of dish that gives you the joy of home cooking without the mess or stress.
Here’s why it works:
Quick & fuss-free: You can go from prep to plate in about 20 minutes.
Versatile: You can swap out or add whatever veggies or protein you have.
Kid-friendly: Mild flavors and a pancake-style presentation make it appealing to little ones.
Minimal cleanup: One bowl for mixing, one pan for frying — that’s it.
Budget-friendly: Uses basic, everyday staples most people already have on hand.
This is the recipe you’ll come back to after a long day, when delivery feels like too much and you just want something warm, savory, and homemade.
Ingredients
Ingredient
Quantity
Eggs
4
Salt
To taste
Paprika
To taste
Black pepper
To taste
Milk
100 ml (½ cup)
Cheese (shredded)
50 g (⅓ cup)
Flour
130 g (1 cup)
Onion (finely chopped)
1
Carrot (grated)
1
Vegetable oil
For frying and greasing
Ham (optional add-in)
100 g (sliced or chopped)
Directions
In a large bowl, crack the eggs and beat lightly. Add salt, black pepper, and paprika to taste.
Whisk in the milk until combined, then stir in the shredded cheese, chopped onion, and grated carrot.
Add flour gradually and mix until a thick, pancake-like batter forms. Fold in chopped ham (if using).
Heat a non-stick skillet with a little vegetable oil over medium heat.
Spoon portions of the mixture into the skillet and spread slightly into round shapes.
Fry until golden brown on one side (about 2–3 minutes), then flip and cook the other side. Repeat with remaining batter.
Serve warm with sour cream, yogurt, or a simple green salad on the side.
Nutritional Information (Per Serving, based on 4 servings)
Nutrient
Amount
Calories
~280 kcal
Protein
12 g
Carbohydrates
18 g
Fat
16 g
Saturated Fat
5 g
Fiber
2 g
Sodium
Varies by taste
Frequently Asked Questions
Can I make this dish vegetarian? Absolutely. Just omit the ham or replace it with plant-based deli slices, sautéed mushrooms, or cooked lentils. The eggs and vegetables are flavorful enough to hold their own without the meat.
Is this similar to a frittata or omelet? Yes and no. It has elements of both — the egg base and the pan-fried technique — but it includes flour, which gives it more structure and turns it into more of a savory pancake. It’s closer in texture to a Spanish tortilla or even a crustless quiche.
Can I bake it instead of frying? Yes, you can pour the mixture into a greased baking dish or muffin tin and bake at 375°F (190°C) for about 20–25 minutes, or until set and golden on top. This is a great make-ahead option for brunches or packed lunches.
What other vegetables can I use? This dish is incredibly flexible. Zucchini (grated and squeezed dry), bell peppers, spinach, or leftover roasted vegetables work beautifully. The only rule is to avoid very watery vegetables unless you sauté or drain them first.
Can I use other cheeses? Yes. Any meltable cheese will work — mozzarella for mild creaminess, cheddar for a sharper flavor, or gouda for a buttery finish. You can even combine two types for a richer result.
How do I keep it from falling apart when flipping? If you’re frying it like one large pancake or omelet, make sure to cook it slowly over medium heat and use a nonstick or well-oiled pan. You can also divide the batter into smaller pancakes, which are easier to flip and faster to cook.
Can I make this gluten-free? Yes. Substitute the all-purpose flour with a gluten-free flour blend or even chickpea flour (which adds a nutty flavor and extra protein).
Delicious Variations to Try
Once you’ve mastered the base recipe, there are endless ways to make it your own. Here are a few flavor-packed ideas:
1. Mediterranean Style
Add chopped sun-dried tomatoes, crumbled feta, and a pinch of oregano.
2. Southwestern Kick
Mix in diced jalapeños, corn, black beans, and shredded pepper jack cheese.
3. Herb Garden Version
Add a handful of chopped fresh herbs like parsley, chives, dill, or basil for a light and aromatic twist.
4. Brunch Casserole
Pour the mixture into a greased baking dish, top with extra cheese and breadcrumbs, and bake until golden. Serve with sour cream and fresh greens.
5. Asian-Inspired
Swap ham for chopped cooked shrimp or tofu, add scallions, a touch of soy sauce, and sesame oil for a fusion twist.
Perfect Pairings and Serving Suggestions
This dish is a star on its own, but if you’re planning a full meal or want to round it out with sides, here are a few ideas:
Fresh green salad with lemon vinaigrette for a refreshing contrast
Yogurt or sour cream dip with herbs or garlic to drizzle or dollop on top
Roasted or grilled vegetables like zucchini, bell pepper, or cherry tomatoes
Toasted bread or pita for scooping up every last bite
Soup starter, such as tomato basil or lentil, for a cozy two-course meal
You can also slice it into wedges and pack it in lunchboxes — it’s just as tasty cold or at room temperature.
Storage and Reheating Tips
Refrigerate: Store leftovers in an airtight container in the refrigerator for up to 3 days.
Freeze: Let the dish cool completely, slice into portions, and freeze with parchment paper between layers. Reheat from frozen in the oven or microwave.
Reheat: For best texture, reheat on a skillet over low heat or in the oven at 325°F (165°C) until warmed through. Microwaving works too but may soften the edges.
A Final Thought: Simplicity is the Secret Ingredient
This recipe reminds me that food doesn’t need to be elaborate to be special. In fact, it’s often the humble, thrown-together dishes that become the ones we remember — not because they were complex, but because they were exactly what we needed in the moment.
Whether you’re cooking for your family, for yourself, or just trying to use up what’s in the fridge, this vegetable and ham skillet is here to deliver. It’s fast, flexible, and deeply comforting — a reminder that even on your busiest nights, a home-cooked meal is never too far out of reach.
It’s a dish I’ve made in chaotic kitchens and quiet ones, for loud dinners with kids and quiet lunches for one. And every single time, I find myself coming back to that first bite — golden, cheesy, and full of flavor — and thinking: This is what good food feels like.
I had just finished a long day that had been filled with more chaos than calm — deadlines missed, spilled coffee, and the ever-growing laundry mountain glaring at me from the hallway. My fridge was nearly empty, and I didn’t have the energy to bake or cook anything elaborate. But something in me still craved a little comfort — something sweet, simple, and made with love.
That’s when I noticed it: a lone lemon on the counter, bright and unapologetically yellow, as if it had been waiting patiently for this very moment.
I remembered a recipe my grandmother once made — something between a curd and a pudding. It had eggs, sugar, cornstarch, and lemon juice. That was it. I could almost hear her voice in my head: “You don’t need much to make something lovely.” I found myself smiling, cracking an egg into a saucepan, and whisking in sugar and lemon juice with the kind of quiet focus that only comes in these small, stolen moments.
A few minutes later, the kitchen was filled with the scent of citrus and warmth. I poured the thickened lemon mixture into a tiny bowl, let it cool, and took a spoonful. It was soft, silky, and bursting with lemon — the kind of taste that brightens your tongue and your mood at the same time.
That small dish of lemon dessert didn’t just satisfy my sweet tooth. It calmed me. It reminded me that comfort can come from the simplest ingredients, and that cooking — even just for yourself — can be an act of gentle self-care.
Now, this recipe has a permanent spot in my kitchen. I make it when I’m short on time but still want something beautiful. I make it when friends come over unexpectedly, or when I want to teach my kids that cooking doesn’t have to be complicated to be meaningful. I make it when I need a little reminder of sunshine on a cloudy day.
Why This Lemon Dessert Works
There are many lemon desserts out there — lemon bars, lemon cakes, lemon tarts — but this one is in a league of its own because of how effortlessly it comes together. You only need a handful of pantry staples, one lemon, and about 10 minutes of your time.
Here’s why it stands out:
It’s quick: From start to finish, you can be enjoying this dessert in under 30 minutes (including cooling time).
It’s made with basic ingredients: Egg, sugar, cornstarch, lemon — items many of us have on hand.
It’s light but satisfying: Perfect after a rich meal or as an afternoon treat that won’t weigh you down.
It tastes like sunshine: The bright lemon flavor is uplifting, refreshing, and just the right amount of sweet.
It’s versatile: Serve it warm or cold, plain or topped, in a bowl or layered in a trifle.
It’s a humble dish that surprises you with how elegant and satisfying it is. No oven required, no mixers, no stress — just a saucepan and a spoon.
Ingredients
Ingredient
Quantity
Egg
1 large
Cornstarch
2 tablespoons
Sugar
3 tablespoons
Lemon juice (fresh)
Juice of 1 lemon (about 2–3 tbsp)
Water
1/2 cup (120 ml)
Lemon zest (optional)
1/2 teaspoon
Directions
In a small saucepan, whisk together the egg, sugar, and cornstarch until smooth.
Add lemon juice, water, and zest (if using), whisking until fully combined.
Place the saucepan over medium heat and cook, stirring constantly, until the mixture thickens to a pudding-like consistency. This should take 4–6 minutes.
Once thickened, remove from heat. Pour into a small dish or individual serving cups.
Let cool slightly, then chill in the refrigerator for at least 30 minutes.
Serve cold with a sprinkle of lemon zest or a dollop of whipped cream if desired.
Nutritional Information (Per Serving — makes 2 small portions)
Nutrient
Amount
Calories
~90 kcal
Carbohydrates
15 g
Sugars
12 g
Protein
2 g
Fat
2 g
Fiber
0.2 g
Sodium
20 mg
Frequently Asked Questions
Can I use bottled lemon juice instead of fresh? Technically, yes — but fresh lemon juice gives a far superior flavor. The brightness and natural zestiness of fresh lemons are key to making this dessert shine.
Is it a custard, a curd, or a pudding? It’s closest to a lemon pudding. Unlike a curd, which uses more egg yolks and butter, this dessert is a bit lighter and more straightforward. It’s creamier than a custard and a touch looser than traditional pudding.
Can I make this dessert ahead of time? Absolutely. It keeps well in the refrigerator for up to three days. Just cover it tightly with plastic wrap or store in individual ramekins for easy serving.
Is this recipe gluten-free? Yes, cornstarch is naturally gluten-free, so as long as your other ingredients are safe, this dessert is perfect for those avoiding gluten.
Can I double or triple the recipe? Definitely. It scales easily. Just make sure to stir constantly and adjust the cooking time slightly if you’re working with a larger quantity.
Can I make it dairy-free? This particular recipe doesn’t require milk or cream, so it’s naturally dairy-free. That said, you can also add a splash of coconut milk for an extra creamy twist if desired.
Can I use other citrus fruits? Yes! You can substitute lime, orange, or even grapefruit for the lemon. Each one will bring a unique flavor. Lime is tart and tropical, orange is sweet and mellow, and grapefruit adds a slightly bitter edge.
Delicious Ways to Serve It
This dessert is lovely on its own, but you can also dress it up for special occasions or just for fun:
With Whipped Cream: A dollop of freshly whipped cream adds airy richness and balance.
With Berries: Fresh raspberries or blueberries pair beautifully with lemon.
In a Tart Shell: Pour into a baked tart crust, chill, and slice for an elegant treat.
Layered in Parfaits: Alternate layers of lemon dessert with crushed cookies and whipped cream in a glass.
Topped with Meringue: Add a spoonful of meringue and torch it for a lemon meringue effect.
Over Pound Cake: Drizzle warm or chilled lemon pudding over slices of cake for a quick twist on shortcake.
No matter how you serve it, this dessert always feels like something special.
Storage and Make-Ahead Tips
Refrigerate: Store leftovers in an airtight container or cover with plastic wrap directly on the surface to prevent a skin from forming. Chill for up to 3 days.
Freezing: Not recommended — the texture can become grainy or watery after thawing.
Make-ahead tip: You can prepare the dessert a day in advance and refrigerate it until needed. Stir gently before serving if any separation occurs.
Variations to Try
This simple base recipe can easily be turned into other delightful flavors. Here are a few ideas to inspire you:
1. Lemon-Lavender
Add a pinch of dried culinary lavender while cooking, then strain before chilling for a floral twist.
2. Lemon-Coconut Cream
Replace half the water with full-fat coconut milk for a tropical variation.
3. Lemon-Ginger
Add a small piece of fresh ginger during cooking and strain before chilling for a bright and spicy kick.
4. Honey Lemon Delight
Substitute part of the sugar with honey for a rounder, earthy sweetness.
5. Lemon-Rosewater
Add a few drops of rosewater for a Middle Eastern-inspired finish.
The best part? You can keep the same method but create a completely different flavor profile each time.
A Simple Reminder in a Small Bowl
We often think of dessert as something elaborate — the final flourish of a dinner party or the reward for a complicated recipe well executed. But sometimes, the most meaningful desserts are the simplest ones. The ones you make with one egg, a spoonful of sugar, and the juice of a lemon.
Take Lemon and Make This Delicious Dessert isn’t just a recipe — it’s a reminder that beauty can come from simplicity, that sweetness doesn’t have to be extravagant, and that sometimes, the smallest things can bring the greatest comfort.
So the next time you see a lemon sitting on your countertop, don’t overlook it. Don’t wait for the perfect occasion. Just grab a saucepan, whisk up something lovely, and take a moment to savor it.
Because dessert doesn’t have to be fancy to be special. It just has to be made with care — and maybe a little zest.
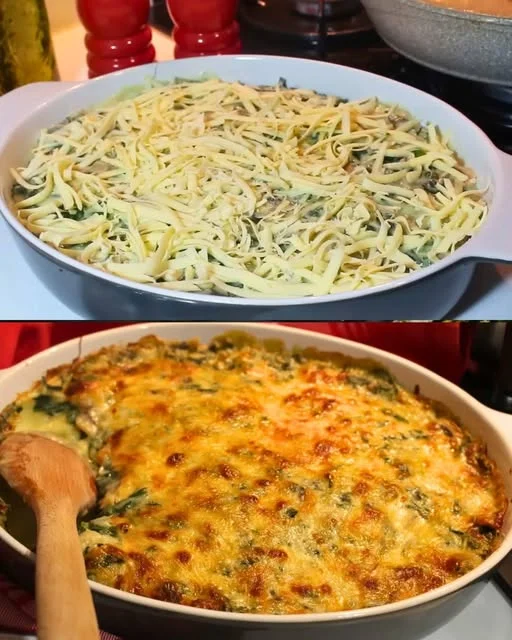
Some of the most cherished recipes don’t start in fancy kitchens or come from glossy cookbooks. They begin in quiet, ordinary moments—like a rainy Sunday afternoon when the fridge holds just a few tired vegetables, but your soul craves warmth. That’s exactly how this Spinach, Mushroom & Potato Purée Casserole came to life in my kitchen.
It was a cool, gray afternoon, the kind where you want something hearty and nourishing to fill the air with comforting smells. I opened my fridge to find a bunch of spinach that needed using, a few mushrooms, and a bowl of leftover mashed potatoes from the night before. Not quite enough of anything to make a full meal—but just enough of everything to create something unexpectedly special.
I started layering—the earthy sautéed mushrooms, the bright green spinach, and finally, that smooth potato purée enriched with butter and milk. It was simple, but as it baked and the flavors mingled, something beautiful happened. It smelled like home. It tasted like love.
That casserole didn’t just feed my family—it fed our spirits. It became one of those recipes I now return to again and again. It’s my answer to busy days, to budget weeks, and to those moments when only comfort food will do.
What Makes This Casserole a Must-Try?
There’s something timeless about casseroles. They’re layered, baked, and always more than the sum of their parts. This one, in particular, shines for a few key reasons:
Balanced flavors: The sweetness of the onions, the savoriness of mushrooms, the slight bitterness of wilted spinach, and the creaminess of the potato purée all complement each other beautifully.
Nutritionally satisfying: Packed with fiber, vitamins, and a balance of carbs and plant-based protein, it’s both filling and good for you.
Budget-friendly: Uses simple, accessible ingredients you likely already have in your pantry or fridge.
Customizable: You can adapt it with cheese, protein, or herbs to suit your preferences or dietary needs.
Comforting texture: The bottom is juicy and savory, while the top is creamy and smooth, with a lightly golden crust from baking.
It’s the kind of dish that doesn’t need fanfare. It speaks for itself the moment you take the first forkful.
Ingredients
For the Potato Purée:
Ingredient
Quantity
Potatoes (large)
5
Butter
2–3 tablespoons
Whole milk
Up to 1 cup (as needed)
Salt
To taste
For the Spinach Mushroom Layer:
Ingredient
Quantity
Onion (large)
1
Olive oil
4 tablespoons
Fresh spinach
500 g (about 1 lb)
Mushrooms (sliced)
300 g (about ⅔ lb)
Salt
To taste
Black pepper
To taste
Red pepper flakes
To taste (optional, for heat)
Directions
Prepare the Potato Purée Peel and boil the potatoes in salted water until fork-tender. Drain and mash them with butter, gradually adding milk until smooth and creamy. Season with salt to taste.
Sauté the Vegetables In a large skillet, heat olive oil over medium heat. Sauté the chopped onion until soft and golden. Add mushrooms and cook until their liquid evaporates and they begin to brown. Add spinach and cook until wilted. Season with salt, black pepper, and red pepper flakes to taste. Remove from heat.
Assemble the Casserole Preheat the oven to 375°F (190°C). In a lightly greased baking dish, spread the spinach-mushroom mixture as the base layer. Top with the creamy potato purée and smooth it evenly with a spatula.
Bake Optional: Add a sprinkle of cheese or breadcrumbs on top for a golden finish. Bake uncovered for 20–25 minutes, or until the top is lightly browned.
Serve Warm Let it cool slightly before slicing. Serve as a hearty main or a satisfying side dish.
Nutritional Information (Per Serving, Approx. 6 servings)
Nutrient
Amount
Calories
~240 kcal
Carbohydrates
25 g
Protein
6 g
Fat
13 g
Saturated Fat
4 g
Fiber
4 g
Sodium
180 mg
Frequently Asked Questions
Can I use frozen spinach instead of fresh? Yes, frozen spinach works perfectly. Just be sure to thaw it and squeeze out as much excess liquid as possible before sautéing to prevent the casserole from becoming watery.
What kind of potatoes are best for the purée? Yukon Gold or Russet potatoes are ideal. Yukon Golds give a naturally buttery flavor and creamy texture, while Russets make for an ultra-smooth mash. Avoid waxy potatoes like red potatoes, as they don’t mash as well.
Can I use plant-based milk or butter? Absolutely. This casserole can easily be made dairy-free by using olive oil or plant-based butter and unsweetened non-dairy milk like oat or soy. Just ensure the milk is neutral in flavor.
Can I add cheese? Yes, cheese is a wonderful addition. Try mixing grated mozzarella, gouda, or sharp cheddar into the potato purée or sprinkle it on top before baking for a golden, bubbly finish.
What other vegetables work in this casserole? You can substitute or add vegetables such as kale, chard, zucchini, or even roasted bell peppers. Just make sure they’re cooked down so the texture remains soft and cohesive.
Can I include a protein? Definitely. For a heartier version, add cooked lentils, shredded chicken, or browned ground turkey or beef to the spinach-mushroom layer.
How long does it keep? This casserole keeps well in the fridge for 3–4 days. It also freezes beautifully for up to 1 month. Let it cool completely before storing, and reheat in the oven for best results.
Creative Variations to Try
Once you’ve tried the original version, here are some fun and flavorful ways to tweak this casserole to suit your tastes or the season:
1. Cheesy Crust
Add a layer of shredded cheese over the top before baking. Parmesan, gruyère, or even feta can add an irresistible golden crust and flavor boost.
2. Spiced Up
Add a pinch of nutmeg to the potato layer or a dash of smoked paprika and cumin to the mushroom mixture for a smoky, earthy twist.
3. Vegan Mediterranean Version
Replace the butter and milk with olive oil and almond milk, add chopped olives, sun-dried tomatoes, and a handful of pine nuts to the spinach mixture.
4. Layered Cottage Pie Style
Add a layer of cooked lentils, mushrooms, and a splash of tomato paste at the bottom for a veggie take on shepherd’s pie.
5. Crunchy Topping
Sprinkle breadcrumbs tossed with olive oil and herbs over the top before baking for added texture.
Perfect Pairings and Serving Ideas
This casserole can stand proudly as a main dish or play a supporting role depending on your meal. Here are a few serving suggestions to complete your table:
As a main: Serve with a crisp green salad and lemon vinaigrette to brighten up the creamy richness. Add crusty bread or roasted carrots on the side.
As a side: Pair with roast chicken, grilled tofu, or baked salmon for a satisfying, well-rounded meal.
Brunch style: Add a poached or fried egg on top and serve it with avocado and roasted tomatoes.
Make it a bowl: Spoon warm casserole into a bowl and top with pickled onions or fresh herbs for a cozy lunch.
It also makes a great option for potlucks or meal trains—it reheats well and feels like a hug in food form.
Storage and Reheating Tips
Refrigerate: Let the casserole cool completely before transferring it to an airtight container. It will stay fresh in the refrigerator for up to 3–4 days.
Freeze: You can freeze the assembled casserole before baking or freeze leftovers. Wrap tightly and label. Thaw overnight in the fridge before reheating.
Reheat: For best results, reheat in the oven at 350°F (175°C) until warmed through (about 15–20 minutes). If you’re in a hurry, you can microwave individual portions, though the top may soften.
A Final Word: Why This Dish Will Always Have a Place in My Kitchen
This casserole is more than just a way to use up spinach and mushrooms or reinvent mashed potatoes—it’s a reminder of how much comfort you can create from very little. It’s not flashy. It’s not complicated. And that’s precisely what makes it so special.
It’s the dish I make when I want to feel grounded. The one I turn to when my fridge is uninspiring but I want to put something truly satisfying on the table. The one I bake when I want to slow down, breathe in the aroma of garlic and onion sizzling in olive oil, and let the oven do the rest.
It’s also the kind of dish that adapts to your life. Whether you’re cooking for one or feeding a family, whether you’re vegan, vegetarian, or just a lover of vegetables—this casserole welcomes everyone. It’s warm. It’s nourishing. It’s real.
So the next time you’re looking for something cozy, healthy-ish, and deeply satisfying, give this recipe a try. It might just become one of those quiet classics in your own kitchen, too—the kind you make without a recipe because your hands already know the way.
It was one of those golden summer afternoons — the kind that stretches on with soft light and the hum of cicadas in the background. We were sitting on the back porch, swapping stories and sipping lemonade, when the topic of snacks came up. Not just any snacks, but those unforgettable, guilty-pleasure kind you get at late-night diners or summer fairs. And someone said, “Remember onion rings?” And then someone else added, “Yeah, but imagine if they were filled with cheese.”
Something clicked in my head right at that moment. I’d had my fair share of onion rings and mozzarella sticks — but never both, together. Could that kind of indulgent, crispy, cheesy dream actually work in my home kitchen?
The answer, I would learn, is yes. A thousand times yes.
That night, I started experimenting. The first few rounds were messy and imperfect. Cheese leaked out. Breadcrumbs didn’t stick. But once I figured out the balance — the chill time before frying, the double-dip breading method — something magical happened. The moment I bit into that golden ring, with its crisp coating and molten center, I knew I had a new favorite recipe.
Now, Mozzarella Onion Rings have become a family tradition. We make them for movie nights, parties, and even as a casual weekend treat. They’re a conversation-starter, a show-stopper, and an instant crowd-pleaser.
What Makes Mozzarella Onion Rings So Special?
At first glance, this might seem like a novelty snack — a fun fusion of two classics. But there’s something deeply satisfying about the contrast in textures and flavors that keeps you coming back for more.
Here’s why this recipe stands out:
Crispy meets gooey: The outer coating is golden and crunchy, while the inside melts into a deliciously stretchy bite of cheese.
Savory onion flavor: The natural sweetness and sharpness of the onion pairs beautifully with the creaminess of mozzarella.
Perfect for dipping: From marinara to ranch to spicy aioli, these rings go with just about any sauce.
No fancy tools required: With a knife, a pan, and a bit of freezer space, anyone can pull this off at home.
Kid and adult approved: It’s the kind of snack that gets devoured — no leftovers, no questions asked.
Whether you’re cooking for a crowd or just treating yourself, Mozzarella Onion Rings strike the perfect balance between indulgent and homemade.
Ingredients
Ingredient
Quantity
Mozzarella cheese
100 g
Onion
1 large
All-purpose flour
50 g
Bread crumbs
100 g
Eggs
2
Cooking oil
For frying
Directions
Prep the Onion and Cheese Slice the onion into thick rings and separate the layers. Cut mozzarella into strips that fit neatly between two onion rings of similar size. Sandwich the cheese between onion rings and gently press to seal.
Set Up Breading Station Prepare three shallow bowls: one with flour, one with beaten eggs, and one with bread crumbs.
Bread the Rings Carefully coat each stuffed ring in flour, dip in the egg, then roll in bread crumbs. For extra crunch, repeat the egg and breadcrumb step once more.
Chill Before Frying Place the breaded rings in the freezer for 20–30 minutes to help them firm up and prevent cheese from oozing out during frying.
Fry Until Golden Heat oil in a deep skillet or saucepan over medium-high heat. Fry the onion rings in batches until golden and crispy (about 2–3 minutes per side). Remove and drain on paper towels.
Serve Hot Enjoy while still warm and melty, paired with your favorite dipping sauce.
Nutritional Information (Per 1–2 rings, Approx. Based on 6 servings)
Nutrient
Amount
Calories
~210 kcal
Protein
7 g
Carbohydrates
16 g
Fat
13 g
Saturated Fat
4.5 g
Fiber
1 g
Sodium
260 mg
Frequently Asked Questions
Do I have to freeze them before frying? Yes — this step is crucial. Chilling the breaded rings helps them hold their shape and prevents the cheese from oozing out too quickly during frying. A 20–30 minute chill in the freezer makes a big difference.
What kind of onion is best for this recipe? Large yellow or white onions work best. They’re mild enough to complement the cheese and hold up well during cooking. Look for onions with wide rings so they’re easier to stuff.
Can I use a different cheese? Mozzarella is ideal because of its meltability and stretch. However, you can experiment with other semi-firm cheeses like Monterey Jack, provolone, or gouda. Just make sure they’re cut to fit snugly inside the onion rings.
What if I don’t have breadcrumbs? Panko breadcrumbs are preferred for maximum crunch, but you can use regular breadcrumbs or even crushed crackers or cornflakes. If using finer crumbs, consider toasting them lightly first for better texture.
Can I bake these instead of frying? Technically, yes — though the result will be less crispy. If baking, place the rings on a greased rack over a baking sheet and spray the tops with oil. Bake at 425°F (220°C) for about 20 minutes or until golden brown.
Can I use an air fryer? Absolutely. Air frying works well and gives a nice crunch with less oil. Air fry at 375°F (190°C) for 8–10 minutes, flipping halfway through.
How do I keep the cheese from leaking out? Make sure the mozzarella fits tightly inside the onion ring. Double-coating with egg and breadcrumbs adds an extra barrier. And again — don’t skip the freezing step.
Can I make them ahead of time? Yes! Assemble and bread the rings, then freeze them in a single layer. Once frozen, transfer to a zip-top bag and store for up to one month. Fry from frozen — just add a minute or two to the cooking time.
Serving Ideas and Pairings
Mozzarella Onion Rings are a statement snack — one that deserves a place at every game night, casual gathering, or family weekend. Here are some creative ways to serve them:
1. Appetizer Platter
Serve them alongside chicken wings, sliders, or veggie sticks for a party platter everyone will love.
2. Movie Night Favorite
Stack them on a tray with dipping sauces in ramekins: classic marinara, smoky chipotle mayo, creamy ranch, or sweet chili sauce.
3. Mini Burger Toppers
Place a cheesy onion ring on top of a slider for the ultimate pub-style bite.
4. Late Night Craving Fix
Sometimes, these are all you need. Fry a small batch, grab a cold drink, and enjoy them straight from the paper towel.
Storage and Reheating Tips
Storing leftovers: If you somehow have any left (unlikely), store them in an airtight container in the fridge for up to 2 days. Lay parchment between layers to keep them from sticking.
Reheating: Reheat in the oven or air fryer to restore crispiness. Avoid microwaving — it tends to make the coating soggy and the cheese too runny.
Freezer prep: These freeze beautifully before frying. Once assembled and breaded, freeze in a single layer. You can fry them directly from frozen when ready.
Make It Your Own: Fun Variations
The beauty of this recipe is that it’s endlessly adaptable. Here are a few ideas for creative twists:
Spicy Mozzarella Rings
Add a pinch of cayenne or smoked paprika to the flour or breadcrumb coating. You can also mix in crushed red pepper flakes for heat lovers.
Italian Style
Add Italian seasoning or dried oregano to the breadcrumbs. Serve with warm marinara and a dusting of parmesan.
Buffalo-Style
Toss the finished rings in buffalo sauce and serve with blue cheese dressing for a bold, tangy twist.
Herbed Rings
Mix chopped fresh parsley, thyme, or basil into the breadcrumbs for added aroma and flavor.
Vegan-Friendly Option
Use vegan mozzarella and a plant-based egg substitute like aquafaba. Coat with dairy-free breadcrumbs and air fry for a satisfying plant-based treat.
A Snack That Brings People Together
Some recipes are more than food. They’re moments. Memories. A reason to pause and gather.
Mozzarella Onion Rings are one of those recipes. They bring joy — not just because they taste amazing (which they do), but because they invite you to share. To gather around the kitchen, take turns frying, and sneak one hot from the pan. To dip, to crunch, to laugh.
They’re snack food, yes. But they’re also celebration food. They’re “we made it through the week” food. They’re “look what I just learned to make” food.
And when you serve them, whether for two or twenty, you’re not just serving cheese and onions — you’re serving comfort, creativity, and connection.
So go ahead — stack them high, pass the sauce, and enjoy every bite.
Everyone remembers the first thing they ever baked. For some, it’s banana bread or cupcakes from a box mix. For me, it was these sugar cookies. Simple, unpretentious, and made with ingredients we always had in the kitchen.
I was ten years old, home on a quiet Saturday afternoon. The house was warm from the late sun streaming through the kitchen windows. My mom was folding laundry, and I was flipping through her handwritten recipe book—a faded notebook filled with smudges, crossed-out notes, and little hearts she drew in the margins.
I wanted to bake something on my own for the first time. Nothing fancy. Just something I could mix, shape, and proudly offer to the family without asking for help. That’s when I found the sugar cookie recipe. No butter. No electric mixer. Just egg, yogurt, oil, sugar, flour, and vanilla. It sounded so simple I almost doubted it would work.
But I followed the steps, clumsily measuring flour and sneaking a few licks of dough when no one was watching. I rolled it out with a drinking glass and used an old metal cutter shaped like a star. I sprinkled each cookie with a little extra sugar and watched through the oven door as they puffed up into golden rounds.
They weren’t the prettiest cookies—but they were mine. Soft, just sweet enough, and gently scented with vanilla. I still remember the smile on my mom’s face when she tried one. That feeling of pride and joy is something I’ve carried with me every time I’ve made them since.
Now, years later, I still bake these sugar cookies regularly. They’re the cookies I make when I want something quick, nostalgic, and comforting. They’re the cookies I make with my kids, letting them take over the mixing bowl and fight over the cookie cutters. They’re timeless. Unfussy. Familiar.
And sometimes, those are the best kind.
Why These Sugar Cookies Work Every Time
There are thousands of sugar cookie recipes out there. Some are crisp and thin. Others are cut-out cookies that need frosting. But this version is all about simplicity and texture—soft, tender, and slightly cakey, with a delicate sweetness that doesn’t overwhelm.
Here’s why these cookies are a staple in so many kitchens:
No butter required: Perfect when your fridge is empty or you’re baking on a whim.
Yogurt or kefir base: Adds moisture and tenderness, giving these cookies a slightly tangy note.
Mildly sweet: They’re not overly sugary, which makes them ideal for snacking or pairing with tea or coffee.
Easy for beginners: No mixer, no chilling time, no stress.
Customizable: The dough is neutral enough to take on added flavors or toppings.
This recipe is the baking equivalent of a warm blanket—soft, familiar, and something you’ll reach for again and again.
Ingredients
Ingredient
Quantity
Egg
1 large
Yogurt or kefir
150 ml (½ cup + 2 tablespoons)
Sugar
2 tablespoons + extra for sprinkling
Vegetable oil
70 ml (5 tablespoons)
Vanilla extract
1 teaspoon
Salt
To taste
Baking powder
1 teaspoon
All-purpose flour
300–320 g (2½ cups)
Instructions
In a medium mixing bowl, whisk together the egg, yogurt (or kefir), sugar, vegetable oil, vanilla extract, and a pinch of salt until fully combined.
Add baking powder and begin incorporating the flour gradually. Stir or knead until you get a soft, non-sticky dough. You may need to adjust the amount of flour slightly depending on the moisture of your yogurt.
Lightly flour your surface and roll out the dough to about ½ inch (1.2 cm) thickness.
Cut out your desired shapes using cookie cutters and place the cookies on a parchment-lined baking tray.
Sprinkle each cookie with a little sugar before baking for a golden, crackly top.
Bake in a preheated oven at 350°F (175°C) for 10–12 minutes, or until the edges are just beginning to turn golden.
Allow the cookies to cool on a wire rack. Serve warm or store at room temperature.
Nutritional Information (Per Cookie, Approx. 1 of 20)
Nutrient
Amount
Calories
~95 kcal
Carbohydrates
12 g
Sugars
3 g
Protein
2 g
Fat
4.5 g
Saturated Fat
0.5 g
Fiber
0.3 g
Sodium
30 mg
Frequently Asked Questions
Can I use butter instead of oil? Yes, but it will change the texture. Oil keeps these cookies soft and tender. Butter will make them slightly crisper and richer. If substituting, use melted butter in equal measure.
Is it better to use yogurt or kefir? Both work beautifully. Yogurt gives a slightly thicker, cake-like texture, while kefir creates a softer, more delicate crumb. Use whichever you have on hand.
Do I need to chill the dough? No. The dough can be rolled out and cut immediately. However, if your kitchen is very warm, a quick 15-minute chill can help make it easier to work with.
What kind of flour is best? All-purpose flour is perfect. If you want a lighter cookie, you can replace up to 20% of the flour with cake flour for a softer texture.
Can I make this recipe vegan? Yes. Use plant-based yogurt or kefir, a flax egg (1 tablespoon ground flax + 3 tablespoons water), and neutral oil. The texture may be slightly different but still delicious.
Why are my cookies spreading too much? If the dough is too soft, try adding a little extra flour. Humidity and brand variations can affect dough consistency. It should be soft but not sticky.
Can I decorate these cookies with frosting or icing? You can, but they are soft and delicate, so light decorations like powdered sugar glaze or a drizzle of chocolate work best. They’re not designed to hold heavy royal icing.
Creative Variations to Try
Once you’ve mastered the base recipe, you’ll find plenty of ways to dress these cookies up or down:
1. Lemon Sugar Cookies
Add the zest of one lemon and a teaspoon of lemon juice to the dough. Sprinkle with lemon sugar before baking.
2. Cinnamon Sugar Twist
Mix cinnamon into the sugar you sprinkle on top before baking. You can also roll the dough balls in cinnamon sugar for a snickerdoodle-style cookie.
3. Almond or Orange Flavor
Swap vanilla extract for almond or orange extract for a bold twist.
4. Chocolate Dipped
Once cooled, dip half of each cookie into melted chocolate and let set on parchment paper.
5. Jam-Filled
Make thumbprint cookies by rolling the dough into balls, pressing a dent in the center, and filling with a bit of jam before baking.
Serving Suggestions
These cookies are perfect on their own, but you can turn them into something extra special depending on the occasion:
With afternoon tea: Serve alongside a pot of black or herbal tea. Their subtle flavor won’t overpower.
Holiday treat platter: Add colored sugar before baking or drizzle with white chocolate and festive sprinkles.
Kid-friendly baking day: Let kids choose cookie cutter shapes and help sprinkle the sugar on top.
Gift idea: Stack a dozen in a cellophane bag, tie with ribbon, and gift as a homemade surprise.
Because they’re so mild, they also pair beautifully with more intense flavors like hot chocolate, spiced cider, or espresso.
Storage and Make-Ahead Tips
Room Temperature: Store in an airtight container for up to 4 days. These cookies stay soft but may lose crisp edges if not sealed properly.
Refrigeration: Not necessary, but can extend freshness by another day or two.
Freezing Dough: The dough can be frozen for up to 1 month. Wrap tightly in plastic wrap and thaw in the refrigerator overnight before rolling and baking.
Freezing Baked Cookies: Cool completely, then freeze in layers with parchment paper between. Thaw at room temperature before serving.
A Final Thought: The Power of Simple Bakes
There are times when baking is about pushing boundaries—layered cakes, experimental flavors, precise techniques. But other times, it’s about returning to the basics. To the kind of recipe that doesn’t ask much of you but gives so much back.
These classic sugar cookies are just that. A recipe that requires only a few ingredients and a little time, but delivers warmth, softness, and that gentle sweetness we all crave. They’re the kind of cookies that remind us of grandparents, childhood kitchens, snow days, and handwritten recipe cards tucked in old books.
They’re not just cookies. They’re memory-makers. And the fact that you can whip them up in under an hour with what’s already in your kitchen? That’s just the icing on the (sugar) cookie.
So the next time your afternoon calls for something cozy and homemade, reach for this recipe. Bake a batch. Share them. Savor one while standing at the counter. Let the smell fill your kitchen. And pass the sweetness forward.