Turkish Bread: A Flavorful Tradition that Brings People Together

The smell of freshly baked bread has always been a comforting part of my life. Growing up, I would visit my grandmother’s home every weekend, and the moment I walked through the door, I knew that something magical was happening in the kitchen. The warm, inviting aroma of freshly baked Turkish bread would fill the air, beckoning me into the heart of the home. My grandmother, always smiling, would hand me a piece of the golden loaf, the crust perfectly crisp and the inside soft and pillowy. There was something about the texture, the warmth, and the comfort of that bread that made me feel like I was wrapped in a hug. Every bite told a story—of family, tradition, and love passed down through generations.

As I got older and moved away from home, I missed the comforting feeling of gathering around the table with loved ones, sharing a warm loaf of Turkish bread. I realized that food has an incredible way of connecting us to our roots. It isn’t just about the ingredients or the techniques—it’s about the emotions and memories that come along with it. This is why I decided to recreate my grandmother’s Turkish bread recipe, to carry forward the traditions that defined my childhood and bring a taste of home to wherever I am. The recipe I now share with you has been passed down, made with love, and baked with memories. It’s more than just bread; it’s an experience, a journey, and a connection to the past.

Why Turkish Bread is a Staple of Warmth and Tradition

Turkish bread, or pide, is more than just a side dish—it’s a cultural symbol that brings people together. Whether served alongside a hearty meal or used to scoop up dips, Turkish bread is the heart and soul of Turkish cuisine. It’s often enjoyed at family gatherings, celebrations, and meals shared with friends, much like how it was present in my own home growing up. Its versatility makes it a perfect companion to a variety of dishes, from meze to grilled meats, stews, or even a simple breakfast.

The beauty of Turkish bread lies in its simplicity. Made with basic ingredients—flour, yeast, salt, and water—this bread requires patience and time to allow the dough to rise and develop its incredible flavor. The result is a golden, soft interior with a beautifully crisp crust. It’s the kind of bread that brings people together, whether you’re pulling off chunks with your fingers at a family dinner or slicing it up for sandwiches. The process of making this bread is as important as the end result. It’s a tradition that has been passed down for generations, and with every loaf, you become a part of that long history.

Ingredients

IngredientQuantity
Flour500g (1 pound)
Warm Milk150ml (5 fl. oz)
Warm Water150ml (5 fl. oz)
Salt1 tsp
Dry Yeast2 tbsp

Directions:

  1. Activate the Yeast:
    In a small bowl, mix the warm milk, warm water, and dry yeast. Stir to dissolve the yeast and allow it to sit for about 5 minutes until it becomes frothy.
  2. Prepare the Dough:
    In a large mixing bowl, combine the flour and salt. Gradually add the yeast mixture to the flour while stirring. Continue mixing until a dough forms.
  3. Knead the Dough:
    Transfer the dough to a floured surface and knead for 10-15 minutes until it becomes smooth and elastic. If the dough feels too sticky, add a small amount of flour as needed.
  4. First Rise:
    Place the dough into a lightly oiled bowl, cover with a damp cloth, and let it rise in a warm place for about 1-1.5 hours, or until it doubles in size.
  5. Shape the Dough:
    Once the dough has risen, punch it down and divide it into two equal portions. Shape each portion into a round or oval loaf, depending on your preference.
  6. Second Rise:
    Place the shaped dough onto a baking sheet lined with parchment paper. Cover and let it rise for another 30-45 minutes until it puffs up.
  7. Preheat the Oven:
    Preheat your oven to 425°F (220°C). If you’d like, you can create a crispy crust by placing a small pan of water in the bottom of the oven during baking.
  8. Bake the Bread:
    Bake the bread for 25-30 minutes, or until the loaves are golden brown and sound hollow when tapped on the bottom.
  9. Cool and Serve:
    Allow the bread to cool on a wire rack before slicing. Serve warm with your favorite dips or alongside a hearty meal.

Nutritional Information (per serving, based on 8 servings):

NutrientAmount per serving
Calories150 kcal
Protein4g
Carbohydrates30g
Fiber2g
Fat1g
Sodium300mg

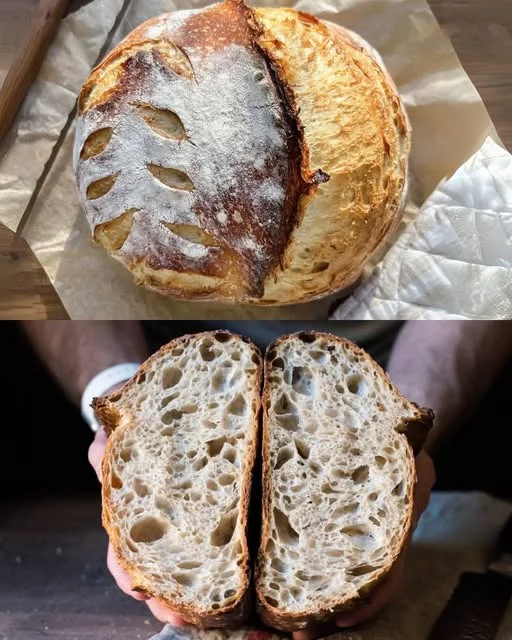
What Makes Turkish Bread So Special?

There’s a distinct charm about Turkish bread that’s hard to replicate. The method of baking, the type of flour used, and the way it’s shaped all contribute to its unique texture and flavor. Turkish bread has a lighter, airier quality compared to some other types of bread, with its slightly chewy interior and perfectly crisp crust. It’s the kind of bread that makes you want to savor every bite.

The warm, soft center of Turkish bread is often paired with a subtle saltiness, making it incredibly satisfying. The exterior is golden brown, with just enough crispiness to provide texture, but it remains light and not overly dense. This balance between soft and crispy is one of the reasons Turkish bread stands out. It can be enjoyed on its own or as a versatile accompaniment to any meal, holding up to rich stews, spicy dips, or even just a slathering of butter.

Baking Turkish Bread: A Labor of Love

While making Turkish bread might seem simple, it’s a process that requires patience and attention to detail. The dough must be given time to rise properly, and shaping the dough into the perfect round or oval form takes a bit of practice. The magic, however, happens during baking. When the dough hits the hot oven, it expands, creating a light, airy texture that is both satisfying and irresistible. The crisp crust, once golden and brown, gives way to the tender, fluffy interior.

For me, baking Turkish bread has become a form of self-care. It’s a quiet, meditative process. From mixing the ingredients to the moment the bread emerges from the oven, there’s a sense of accomplishment in every step. The house fills with the scent of freshly baked bread, reminding me of the comfort I felt as a child. And when the bread finally cools, it’s hard to resist tearing off a piece and enjoying it warm, just as my grandmother once did. The bread might only last for a few hours, but the memories it stirs last much longer.

Frequently Asked Questions (FAQs)

1. Can I use a bread machine to make Turkish bread?
Yes, a bread machine can be used to knead the dough for Turkish bread. However, it’s important to note that the bread machine may not give the same texture and results as hand-kneading. The process of kneading by hand helps develop the gluten in the dough, which contributes to the bread’s airy texture.

2. Can I freeze Turkish bread?
Absolutely! Turkish bread can be frozen once it has cooled. Wrap it tightly in plastic wrap or aluminum foil, then place it in a freezer-safe bag. When you’re ready to eat it, simply thaw it at room temperature or heat it in the oven for a few minutes to refresh its crust.

3. Can I add other ingredients to the dough?
Certainly! While traditional Turkish bread is made with simple ingredients, you can experiment by adding herbs like rosemary or thyme, or even olives for a Mediterranean twist. Garlic and cheese can also make excellent additions to the dough for a more indulgent version of the bread.

4. Why is my Turkish bread too dense?
If your Turkish bread turns out dense, it could be due to under-proofing or overworking the dough. Be sure to give the dough enough time to rise during both the first and second proofing stages. Overworking the dough can also cause it to become dense, so handle it gently.

5. Can I make Turkish bread without a stand mixer?
Yes, you can make Turkish bread without a stand mixer. Simply mix the ingredients by hand in a large bowl, and then knead the dough on a floured surface. It will take a bit more effort, but it’s well worth it for the results.

6. What should I serve with Turkish bread?
Turkish bread pairs wonderfully with a variety of dishes. Serve it with hummus, baba ganoush, or tzatziki for a Mediterranean-inspired meal. It also complements grilled meats, kebabs, soups, or a simple spread of olive oil and herbs. You can even enjoy it with a traditional Turkish breakfast of cheeses, olives, and tomatoes.

Conclusion: A Slice of Tradition

Baking Turkish bread is a beautiful way to honor tradition, share culture, and create memories with your loved ones. Every loaf is a connection to the past, and every slice tells a story. The simple process of mixing flour, yeast, water, and salt becomes an act of love, passed down through generations. Whether you’re baking for your family or sharing the loaf with friends, Turkish bread brings people together in ways that are both delicious and meaningful.

As you bake and share this bread, you’re not just feeding people—you’re nourishing their hearts with the warmth and comfort of a centuries-old tradition. And just as my grandmother’s bread filled my childhood with love and laughter, so too can this simple yet profound recipe enrich your home, one slice at a time.

Amal

Turkish Bread: A Flavorful Tradition that Brings People Together

This Turkish bread, with its soft, pillowy interior and golden, crispy crust, is the perfect companion to any meal. Whether you’re serving it with soups, stews, or using it to scoop up dips, this bread is a true delight. Made from simple ingredients and baked with care, it will soon become a favorite in your kitchen.
Prep Time 20 minutes
Cook Time 30 minutes
Total Time 1 hour 50 minutes
Servings: 2 loaves
Course: Bread
Cuisine: Turkish-Inspired

Ingredients
  

  • 500 g 1 pound flour
  • 150 ml 5 fl. oz warm milk
  • 150 ml 5 fl. oz warm water
  • 1 tsp salt
  • 2 tbsp dry yeast

Method
 

  1. Activate the Yeast: In a small bowl, combine the warm milk, warm water, and dry yeast. Stir to dissolve and let it sit for about 5 minutes until the mixture becomes frothy.
  2. Mix the Dough: In a large mixing bowl, combine the flour and salt. Slowly add the yeast mixture to the flour, stirring continuously to form a dough.
  3. Knead the Dough: Transfer the dough onto a floured surface. Knead for about 10-15 minutes until the dough is smooth and elastic. If needed, add a small amount of flour to prevent stickiness.
  4. First Rise: Place the dough in an oiled bowl, cover with a damp cloth, and let it rise in a warm place for about 1-1.5 hours, or until it has doubled in size.
  5. Shape the Dough: Once the dough has risen, punch it down and divide it into two portions. Shape each portion into a round or oval loaf.
  6. Second Rise: Place the shaped loaves on a baking sheet lined with parchment paper. Cover with a damp cloth and let them rise for another 30-45 minutes.
  7. Preheat the Oven: Preheat the oven to 425°F (220°C). For a crispier crust, place a small pan of water in the bottom of the oven.
  8. Bake the Bread: Bake the bread for 25-30 minutes, or until the loaves are golden brown and sound hollow when tapped on the bottom.
  9. Cool and Serve: Let the bread cool on a wire rack before slicing. Serve warm with your favorite dishes.

Notes

  • For a more rustic flavor, you can experiment by adding a small amount of olive oil to the dough or brushing the bread with olive oil before baking.
  • You can store any leftover bread in an airtight container for up to 2 days. If it begins to harden, warm it in the oven to refresh the crust.
  • This bread is best served fresh, but it can also be frozen once cooled. Just wrap it tightly and freeze it for up to a month. To reheat, place it in the oven for a few minutes.

Crisp and Fresh: The Story Behind Cucumber Salad

There’s something undeniably refreshing about a simple cucumber salad. For me, it’s more than just a side dish—it evokes memories of summer afternoons spent in the kitchen with family. Growing up, my grandmother would often prepare this salad for our family gatherings. The crisp cucumbers, the earthy carrots, the smooth yogurt dressing—each bite was like a burst of freshness that cooled you down after a long day. Even as a child, I could appreciate the way this dish blended simplicity and flavor, something that has stuck with me over the years.

The beauty of cucumber salad lies in its ability to be both light and satisfying. Unlike heavier dishes that leave you feeling weighed down, this salad offers a refreshing, wholesome option that’s both nutritious and delicious. Whether as a side dish at a summer barbecue, a light lunch, or a quick snack, cucumber salad has a way of bringing people together and offering a taste of nostalgia with each bite.

I always felt that food has a way of connecting us to our past. Every time I make this salad, I feel the same joy I did as a child, when my grandmother would place the bowl in front of me and tell me to enjoy. That feeling of sitting around the table with loved ones, sharing food and stories, is something that will always be special to me. Cucumber salad, for all its simplicity, has a way of making ordinary moments feel extraordinary. It’s a reminder that food doesn’t have to be complicated to be comforting.

The Joy of Simple, Fresh Ingredients

One of the most appealing aspects of cucumber salad is its simplicity. The ingredients are basic, yet when combined, they create a dish that feels fresh, vibrant, and full of life. Cucumbers, a key ingredient, are hydrating and light, providing a crisp texture that serves as the perfect base for this salad. Carrots add a subtle sweetness and vibrant color, while eggs provide protein, making the salad more satisfying. The cooked corn offers a touch of warmth and sweetness, rounding out the flavors.

The dressing, made with thick yogurt and mustard, is what elevates this salad. It’s creamy without being heavy, tangy without overpowering the freshness of the vegetables. The mustard adds a slight zing, balancing out the richness of the yogurt. Together, the ingredients create a harmonious blend that is light enough for a hot summer day but satisfying enough to complement any meal.

Ingredients

IngredientQuantity
Cucumbers2
Salt1/3 teaspoon
Eggs3
Carrots1-2
Cooked Corn80g
Green OnionTo taste
ParsleyTo taste
Thick Yogurt3-4 tablespoons
Mustard1 tablespoon

Directions:

  1. Prepare the Ingredients
    Peel the cucumbers and carrots, then slice the cucumbers into thin rounds and grate the carrots. Boil the eggs until hard-boiled, peel them, and chop them into small pieces.
  2. Combine the Vegetables and Eggs
    In a large bowl, add the cucumbers, grated carrots, cooked corn, and chopped eggs. Mix them together gently.
  3. Make the Dressing
    In a small bowl, combine the thick yogurt, mustard, and salt. Whisk until smooth and well-combined.
  4. Toss the Salad
    Pour the yogurt dressing over the salad mixture and toss everything together until evenly coated.
  5. Garnish and Serve
    Sprinkle finely chopped green onion and parsley on top of the salad for extra flavor and a fresh finish. Serve chilled for a refreshing side dish.

Nutritional Information (per serving, based on 4 servings):

NutrientAmount per serving
Calories120 kcal
Protein6g
Carbohydrates14g
Fiber3g
Fat5g
Sodium250mg

Why Cucumber Salad Should Be Part of Your Regular Rotation

If you’re looking for a dish that is quick, easy, and versatile, cucumber salad is your answer. It’s a fantastic option for meal prep, as it keeps well in the refrigerator for a day or two. The best part? It only gets better as the flavors marinate. It’s a great way to use up leftover cooked corn or hard-boiled eggs and can easily be customized to suit your preferences.

In addition to its versatility, cucumber salad is packed with nutrients. Cucumbers are low in calories but high in water content, making them excellent for hydration. Carrots are rich in beta-carotene, which is great for skin health and vision. Eggs provide essential protein, while the yogurt dressing adds a dose of probiotics, supporting gut health. All in all, this is a dish that’s as healthy as it is satisfying.

The Perfect Side for Any Occasion

Cucumber salad is a versatile side dish that pairs wonderfully with a wide variety of main courses. It complements grilled meats like chicken, steak, and pork, adding a light and refreshing contrast to the richness of the meat. It also works well with seafood, providing a cooling effect when paired with spicy or strongly flavored dishes.

This salad can also stand on its own as a light meal. On hot summer days when you don’t want to turn on the stove, cucumber salad is an excellent choice for a quick and refreshing meal. Add a slice of whole-grain bread or a handful of nuts, and you’ve got a complete, nourishing meal.

Frequently Asked Questions (FAQs)

1. Can I make this cucumber salad ahead of time?

Yes! One of the great things about this salad is that it actually tastes better after the flavors have had time to meld together. You can make it a few hours ahead of time or even the night before. Just make sure to store it in an airtight container in the refrigerator. Keep in mind that the cucumbers may release some water as it sits, so you can drain the excess liquid before serving if needed.

2. Can I use a different dressing instead of yogurt?

Absolutely! If you’re not a fan of yogurt, there are several other dressing options you can try. A vinaigrette made with olive oil and vinegar can add a tangy kick, while a creamy dressing with mayonnaise or sour cream would offer a richer texture. You could even experiment with tahini for a nutty flavor or a simple lemon dressing for a fresh, zesty twist.

3. Can I add other vegetables to this salad?

Definitely! Cucumber salad is a fantastic base for adding other vegetables. Feel free to experiment with bell peppers, radishes, or even tomatoes. If you prefer a more robust salad, you could also add some leafy greens like spinach or arugula.

4. How can I make this salad vegan?

To make this salad vegan, you can substitute the eggs for a plant-based protein like chickpeas or tofu. For the dressing, swap the yogurt with a non-dairy alternative like cashew cream or coconut yogurt. The mustard-based dressing is already vegan-friendly, so with a few simple substitutions, you can make this salad suitable for a vegan diet.

5. How do I store leftovers?

Cucumber salad can be stored in an airtight container in the refrigerator for up to two days. However, keep in mind that the cucumbers may become a bit soft as they release moisture. If you have leftovers, you can drain any excess water before serving again.

6. Can I add some protein to this salad for a more filling meal?

Yes! To turn this salad into a more substantial meal, you can add grilled chicken, tofu, or even chickpeas for a plant-based protein. The salad pairs wonderfully with these additions, making it both filling and balanced.

The Simple Pleasure of Cucumber Salad

In a world where we are constantly bombarded with complex recipes and intricate cooking techniques, there’s something beautifully satisfying about returning to the basics. Cucumber salad is a reminder that food doesn’t have to be complicated to be delicious. It’s a dish that can be thrown together quickly, yet it carries with it a depth of flavor that makes every bite special.

Whether you’re serving it at a family gathering, enjoying it as a solo lunch, or pairing it with a main course, cucumber salad brings a refreshing balance to any meal. The joy of this salad is not just in its taste, but in the memories it creates—those moments spent sharing a meal with loved ones, savoring the simplicity of fresh ingredients, and appreciating the comfort that food can bring.

Conclusion: A Timeless Classic

Cucumber salad is more than just a dish—it’s a celebration of simplicity, freshness, and the joy of cooking. It’s the kind of recipe that you’ll find yourself turning to time and time again, whether you’re in need of a quick lunch or a vibrant side dish to complement a larger meal. With its light yet satisfying combination of flavors, this salad has earned its place as a timeless classic in kitchens all over the world.

So, the next time you find yourself craving something refreshing, light, and full of flavor, reach for this easy cucumber salad recipe. With just a few simple ingredients and a little love, you’ll create a dish that’s perfect for any occasion. Enjoy!

Amal

Crisp and Fresh: The Story Behind Cucumber Salad

This light and vibrant cucumber salad is the perfect side dish to accompany any meal. With fresh cucumbers, sweet carrots, boiled eggs, and a creamy yogurt-mustard dressing, it’s a refreshing burst of flavor that’s easy to prepare and even easier to enjoy. Ideal for hot summer days or as a quick meal prep option, this salad is both nutritious and satisfying.
Prep Time 20 minutes
Cook Time 10 minutes
Total Time 30 minutes
Servings: 4 –6 servings
Course: Salad
Cuisine: International

Ingredients
  

  • 2 cucumbers
  • 1/3 teaspoon salt
  • 3 eggs
  • 1-2 carrots
  • 80 g cooked corn
  • Green onion to taste
  • Parsley to taste
  • 3-4 tablespoons thick yogurt
  • 1 tablespoon mustard

Method
 

  1. Prepare the Ingredients: Peel the cucumbers and carrots. Slice the cucumbers into thin rounds and grate the carrots. Boil the eggs, peel them, and chop them into small pieces.
  2. Mix the Vegetables and Eggs: In a large bowl, combine the cucumbers, grated carrots, cooked corn, and chopped eggs.
  3. Prepare the Dressing: In a small bowl, mix the thick yogurt, mustard, and salt until well combined.
  4. Combine and Toss: Pour the yogurt dressing over the vegetable and egg mixture. Toss everything together gently until evenly coated.
  5. Garnish and Serve: Garnish with finely chopped green onions and parsley for a fresh finish. Serve chilled and enjoy!

Notes

  • This salad is best served chilled, making it a perfect dish for summer.
  • You can customize the dressing to your taste by adding a bit of lemon juice or herbs.
  • It can be stored in the refrigerator for up to 2 days, though the cucumbers may release some water after sitting. Drain if needed before serving.

A Slice of Home: The Magic of Homemade Sourdough Bread

There’s something deeply comforting about the smell of freshly baked bread wafting through the kitchen. For me, it’s not just the warmth that fills the room, but the memories attached to the process itself. I remember the first time I decided to make sourdough bread from scratch. I was feeling a little disconnected from the world, longing for something authentic and deeply rooted in tradition. As I mixed the ingredients, kneaded the dough, and watched it rise, I felt a sense of connection not only to the bread but also to generations of bakers who had made this same bread for centuries. Each stretch of the dough felt like a meditation, a moment to focus on something tangible, something nourishing.

Making sourdough isn’t just about the bread; it’s about the process, the patience, and the connection to something bigger than ourselves. It’s about using ingredients that are simple yet magical, allowing nature to do much of the hard work. As the dough rises, so does our appreciation for the art of baking. For me, baking sourdough is a journey—one that takes time, effort, and love, but rewards you with the kind of bread that can transform an ordinary meal into something extraordinary.

The Beauty of Sourdough: Why It’s Worth the Effort

Sourdough bread is unique because it’s made using a naturally fermented starter rather than store-bought yeast. This starter, which is a mixture of flour and water that captures wild yeast and bacteria from the air, transforms into the magical leavening agent that makes sourdough so distinctive. The natural fermentation process is what gives sourdough its signature tangy flavor and chewy texture.

While making sourdough bread may seem intimidating at first glance, it’s actually a wonderfully rewarding process. Once you learn the rhythm of caring for your starter and understand how to knead and shape the dough, you’ll begin to appreciate the subtle art of sourdough. The end result is a loaf with a rich, complex flavor profile and a crispy, golden crust that’s simply irresistible.

Ingredients

IngredientQuantity
Fresh Sourdough Starter200g (1 cup)
Wheat Flour600g (5 cups)
All-Purpose or Bread Flour400g (3¼ cups)

Directions:

  1. Prepare the Dough
    In a large bowl, combine the fresh sourdough starter, wheat flour, and all-purpose flour. Slowly add water (about 400ml), stirring to form a rough dough. Knead the dough on a floured surface for 10-15 minutes until it becomes smooth and elastic.
  2. First Rise
    Place the dough in a lightly oiled bowl, cover with a damp cloth, and let it rise at room temperature for 4-6 hours, or until doubled in size.
  3. Shape the Dough
    Once the dough has risen, turn it out onto a floured surface. Gently deflate the dough and shape it into a round or oval loaf, depending on your preference.
  4. Second Rise
    Transfer the shaped dough to a lightly floured proofing basket or bowl. Cover and let it rise for another 2-3 hours, or until it has noticeably puffed up.
  5. Preheat the Oven
    Preheat your oven to 475°F (245°C) with a Dutch oven or baking stone inside.
  6. Bake the Bread
    Once the oven is hot, carefully transfer the dough to the preheated Dutch oven or baking stone. Cover with the lid or a baking dish and bake for 30 minutes. After 30 minutes, remove the cover and continue baking for another 15-20 minutes, or until the bread is golden brown and sounds hollow when tapped on the bottom.
  7. Cool and Enjoy
    Let the bread cool on a wire rack for at least 30 minutes before slicing.

Nutritional Information (per serving, based on 12 servings):

NutrientAmount per serving
Calories150 kcal
Protein5g
Carbohydrates30g
Fiber2g
Fat0.5g
Sodium5mg

Understanding the Science Behind Sourdough

What makes sourdough bread stand out from other types of bread is its leavening process, which relies on wild yeast and lactic acid bacteria present in the environment. The fermentation process is slow, allowing the natural yeasts to rise and the bacteria to create lactic acid, which gives sourdough its signature tang.

The wild yeast in the sourdough starter is very different from the commercial yeast typically used in quick-rise breads. Wild yeast works more slowly, producing smaller bubbles that create the dense, chewy texture sourdough is known for. This is why sourdough bread often takes longer to rise and bake than other bread types. However, the flavor and texture are well worth the wait.

Tips for Perfect Sourdough Every Time

If you’re new to sourdough, there are a few things you can do to ensure that your loaf turns out just right.

  1. Patience is Key
    The first thing you need to understand about sourdough bread is that it takes time. Sourdough is a slow fermenting bread, and the dough needs to rise and develop over several hours. Don’t rush the process—allowing the dough the time it needs to rise and ferment will result in a better flavor and texture.
  2. Use a Mature Sourdough Starter
    Your starter is the heart and soul of your sourdough bread, and a mature starter will give you better results. Make sure your starter is active and bubbly before using it in your bread recipe. Feed it regularly with fresh flour and water, and it will reward you with delicious, tangy bread.
  3. Don’t Skip the Stretch and Fold
    One of the keys to achieving the perfect sourdough texture is developing gluten properly. During the bulk fermentation phase, you’ll need to periodically stretch and fold the dough. This helps to strengthen the gluten and ensures that the dough rises evenly. It also contributes to the beautiful open crumb that sourdough is known for.
  4. Master the Art of Scoring
    Scoring the dough just before baking helps it rise evenly and allows you to control the way the bread expands in the oven. It also creates a beautiful pattern on the top of the loaf. Use a sharp knife or a bread lame to make a few shallow cuts on the surface of the dough before baking.
  5. Don’t Forget the Steam
    Sourdough loves steam. When baking, steam helps create the crispy, golden crust that everyone loves. If you’re baking your sourdough in a Dutch oven, the lid traps steam, giving you the perfect environment for a crunchy, rustic crust. If you’re baking it on a baking stone, consider adding a pan of hot water to the oven to create steam.

Frequently Asked Questions (FAQs)

1. How long does it take to make sourdough bread?

Making sourdough bread from scratch generally takes between 24 and 48 hours, depending on the environment and the fermentation process. The actual hands-on time is relatively short, but the dough requires several hours to rise and develop flavor. Be prepared for a slow, intentional process—this isn’t a recipe you’ll want to rush.

2. How can I make my sourdough starter more active?

If your sourdough starter isn’t as bubbly as you’d like, it may need more frequent feedings or warmer conditions. Try feeding it once a day and keeping it in a warm, draft-free place. If your starter is sluggish, consider increasing the amount of flour and water you feed it, or leave it in a warmer spot in your kitchen.

3. Can I use all-purpose flour instead of bread flour for sourdough?

Yes, you can use all-purpose flour in place of bread flour, although bread flour has a higher protein content, which contributes to a stronger gluten structure and a chewier texture in the finished loaf. If you use all-purpose flour, you may need to adjust the hydration level of the dough slightly, as all-purpose flour absorbs less water than bread flour.

4. Can I make sourdough without a Dutch oven?

Yes, a Dutch oven is great for trapping steam and producing a crisp, golden crust, but it’s not essential. If you don’t have one, you can bake sourdough on a baking stone or even a regular baking sheet. Just be sure to add steam to the oven—either by spraying water into the oven or placing a pan of hot water on the bottom rack.

5. Why is my sourdough bread dense and heavy?

A dense sourdough loaf can be caused by several factors, including under-fermentation, insufficient gluten development, or using too little starter. Make sure you allow enough time for the dough to rise and develop flavor. Additionally, make sure you are stretching and folding the dough during the bulk fermentation phase to build strength in the gluten.

Sourdough Troubleshooting: Common Mistakes and How to Fix Them

Even the most experienced bakers face challenges when making sourdough, but that’s part of the beauty of it. With a little patience and practice, you’ll learn how to solve any issues that arise.

  • Problem: Flat or misshapen loaf
    Solution: Make sure your dough is well-shaped before the final rise. If your dough is too slack, try adding a little more flour during the mixing phase and be sure to knead it properly to develop the gluten. If your loaf is spreading too much during baking, you may need to reduce the hydration of the dough or increase the flour content slightly.
  • Problem: Sourdough lacks flavor
    Solution: The flavor of your sourdough comes from the fermentation process. If you’re not getting a tangy flavor, your dough may not have fermented long enough. Try allowing the dough to rise for a longer period during the bulk fermentation stage, or use a more active starter.
  • Problem: Crust is too thick or hard
    Solution: A thick, hard crust can happen if your oven is too hot or the dough is over-baked. Ensure your oven is properly preheated, and consider covering the bread with foil in the final stage of baking to prevent over-browning.

Conclusion: The Reward of Slow, Intentional Baking

Sourdough bread is more than just a recipe—it’s an experience, a journey through time and tradition. It’s a process that rewards patience, practice, and a little bit of love. With each loaf, you’ll become more attuned to the art of bread-making and more connected to the generations of bakers who have passed down their knowledge. Whether it’s for a special occasion or simply to enjoy with a bowl of soup, sourdough bread has the power to elevate any meal.

As you embark on your own sourdough journey, remember that perfection comes with time. Each loaf will teach you something new about the process, and with each bake, you’ll get closer to mastering the craft. The joy of sourdough lies not only in the end result but in the act of creating something from scratch, using simple ingredients and your own hands. And that, perhaps, is the most rewarding part of all.

Amal

A Slice of Home: The Magic of Homemade Sourdough Bread

This homemade rustic sourdough bread is the perfect blend of tangy flavor and chewy texture. Made with a simple combination of flour, water, and a well-maintained sourdough starter, this bread is an artisanal delight that you’ll want to make again and again. Whether you’re a beginner or a seasoned baker, this recipe will guide you through the process, resulting in a golden, crusty loaf with a soft, flavorful interior.
Prep Time 20 minutes
Cook Time 45 minutes
Servings: 1 loaf
Course: Bread
Cuisine: International

Ingredients
  

  • 200 g 1 cup fresh sourdough starter
  • 600 g 5 cups wheat flour
  • 400 g 3¼ cups all-purpose or bread flour
  • Water approximately 400ml, adjust as needed
  • Salt around 10g or 1 teaspoon

Method
 

  1. Combine Ingredients: In a large mixing bowl, combine the sourdough starter with the wheat flour and all-purpose flour. Gradually add the water, mixing until a rough dough forms.
  2. Knead the Dough: Transfer the dough to a floured surface and knead it for about 10-15 minutes until it becomes smooth and elastic. The dough should be slightly tacky but not too sticky.
  3. First Rise: Place the dough in an oiled bowl, cover it with a damp cloth, and let it rise for 4-6 hours at room temperature, or until it doubles in size.
  4. Shape the Dough: Once the dough has risen, gently punch it down and transfer it to a floured surface. Shape it into a round or oval loaf, depending on your preference.
  5. Second Rise: Place the shaped dough into a proofing basket or bowl, cover, and let it rise for another 2-3 hours, until the dough puffs up.
  6. Preheat the Oven: Preheat your oven to 475°F (245°C) with a Dutch oven or baking stone inside for at least 30 minutes.
  7. Bake the Bread: Carefully transfer the dough to the preheated Dutch oven or stone. Cover with a lid or baking dish and bake for 30 minutes. Then, remove the cover and continue baking for another 15-20 minutes, until the loaf is golden brown with a crisp crust.
  8. Cool and Slice: Let the bread cool on a wire rack for at least 30 minutes before slicing to allow the flavors to fully develop.

Notes

  • Sourdough Starter: Make sure your sourdough starter is bubbly and well-fed before use. A mature starter gives better results.
  • Steam is Key: For a crispy crust, create steam in the oven by baking the bread inside a covered Dutch oven or by adding a pan of hot water to the oven.
  • Let It Rest: Allow your bread to cool completely before slicing to preserve the texture and flavor.

The Simple Joy of Oatmeal with Bananas

There’s something truly comforting about starting your day with a warm bowl of oatmeal. For many, it evokes memories of early mornings at home, where the smell of oats cooking on the stove mingles with the first rays of sunlight streaming through the kitchen window. I can remember my childhood mornings when my mom would serve us a simple yet wholesome breakfast of oatmeal with fresh fruit. It was a ritual that helped center us for the busy day ahead. While life may have changed since then, the simplicity and nourishing qualities of that breakfast have stayed with me.

One morning, in the midst of a hectic week, I found myself craving that same comforting breakfast. However, I didn’t have much in the fridge except some ripe bananas, a box of oat flakes, and a bit of vanilla extract. The result was nothing short of magical. It took only a few minutes, yet it transported me back to those simpler times. This oatmeal recipe with bananas is a nod to that familiar, nostalgic breakfast, but with a modern twist that’s equally satisfying and delicious.

The Magic of Oats and Bananas: A Perfect Pairing

Oats are often touted for their health benefits, and for good reason. They’re high in fiber, which is great for digestion, and they’re a fantastic source of slow-releasing energy. This makes oatmeal an excellent option for keeping you full throughout the morning. Bananas, on the other hand, bring natural sweetness and potassium to the table. When combined, these two ingredients form the perfect foundation for a hearty and nourishing breakfast.

What makes this recipe even more special is its simplicity. With just a handful of ingredients, this dish is quick to prepare, easy to digest, and can be customized to suit different dietary preferences. Whether you need a quick breakfast before heading out the door or a comforting bowl to enjoy during a leisurely weekend morning, this oatmeal with bananas fits the bill.

Ingredients:

IngredientQuantity
Oat flakes100g (1 cup)
Warm water150 ml (⅔ cup)
Ripe bananas2
Vanilla extract½ teaspoon (or to taste)

Directions:

  1. Prepare the Oats:
    • In a medium-sized pot, bring the warm water to a simmer. Add the oat flakes and stir occasionally. Allow the oats to absorb the water and cook for about 5–7 minutes, or until they reach a creamy consistency.
  2. Mash the Bananas:
    • While the oats are cooking, peel the bananas and mash them in a bowl using a fork until smooth. If you prefer a chunkier texture, you can mash them less.
  3. Combine:
    • Once the oats are cooked, stir in the mashed bananas and vanilla extract. Mix until well combined, and continue to cook on low heat for an additional 2-3 minutes to let the flavors meld together.
  4. Serve:
    • Remove from heat and transfer the oatmeal to bowls. Serve warm, and enjoy a naturally sweet and creamy breakfast!

Nutritional Information (Approximate per serving):

NutrientAmount per serving
Calories180 kcal
Carbohydrates40g
Protein4g
Fat2g
Fiber5g
Sugars12g
Sodium5mg

Why Oatmeal and Bananas Are the Ultimate Comfort Food

The beauty of this oatmeal recipe lies in its versatility. Oats are often thought of as a blank canvas for toppings, and bananas are naturally sweet, providing a perfect balance of flavor without the need for added sugar. Here are some reasons why this combination is so popular:

  1. Nutrient-Rich: Bananas are packed with potassium, fiber, and vitamins such as Vitamin C and Vitamin B6. Oats, on the other hand, are rich in soluble fiber, which helps lower cholesterol and maintain blood sugar levels. This pairing provides a solid nutritional foundation to start your day.
  2. Quick and Easy: With only a few minutes of preparation, this recipe is ideal for those busy mornings when you don’t have much time but still want something healthy and filling.
  3. Satisfying: The fiber content in both oats and bananas ensures you’ll feel full for hours, making this an excellent breakfast option for sustaining energy until lunchtime.
  4. Versatile: While this recipe is delicious on its own, it can be easily adapted. You can add nuts, seeds, or even a spoonful of almond butter for an extra boost of protein and healthy fats. It’s also easily made dairy-free by swapping the milk for a non-dairy alternative like almond or oat milk.

Frequently Asked Questions (FAQs)

1. Can I use instant oats for this recipe?
Yes, instant oats can be used, but they will cook faster and have a slightly different texture. If you use instant oats, reduce the cooking time to about 1-2 minutes. For a creamier texture, you can add a little more milk or water as the oats cook.

2. Can I use frozen bananas?
Frozen bananas work perfectly for this recipe. In fact, they can create a creamier texture when mashed and incorporated into the oatmeal. Just be sure to thaw them for a few minutes before mashing.

3. Can I make this recipe without milk?
Yes, you can make this oatmeal without milk by using water or a dairy-free milk alternative like almond, oat, or soy milk. The flavor will still be delicious and comforting.

4. How can I make this oatmeal sweeter?
If you prefer a sweeter oatmeal, you can add a drizzle of honey, maple syrup, or a sprinkle of brown sugar. Additionally, using very ripe bananas will naturally sweeten the dish.

5. How do I store leftovers?
If you have any leftover oatmeal, store it in an airtight container in the refrigerator for up to 2-3 days. To reheat, simply add a little extra milk or water and heat on the stove or in the microwave until warm.

6. Can I add other fruits to the oatmeal?
Absolutely! This recipe is versatile, and you can add other fruits like berries, apples, or even dried fruit. Experiment with different combinations to suit your taste.

7. Can I prepare this oatmeal the night before?
Yes, you can prepare this oatmeal the night before and store it in the fridge. The oats will absorb the liquid overnight, and the texture will be a bit thicker. In the morning, simply heat it up and enjoy.

Additional Tips and Variations

  1. Add Nuts for Texture: If you like a bit of crunch, try adding chopped nuts like almonds, walnuts, or pecans to the oatmeal. Not only will they add texture, but they will also boost the protein content.
  2. Spices and Flavoring: Spice it up by adding a pinch of cinnamon, nutmeg, or even cardamom for a warm, aromatic twist. Vanilla extract is already a great addition, but you can also use almond extract for a different flavor profile.
  3. Use a Slow Cooker: If you have extra time, try making this oatmeal in a slow cooker. Combine all the ingredients in the slow cooker and cook on low for 4-6 hours for an incredibly creamy and rich oatmeal experience.
  4. Dairy-Free Option: As mentioned earlier, you can make this dish dairy-free by using any plant-based milk, such as almond milk, coconut milk, or oat milk. For added creaminess, coconut milk is a great option.

Conclusion: A Simple Meal with Lasting Benefits

This oatmeal recipe with bananas is more than just a breakfast; it’s a reminder of how simple ingredients can create something nourishing and comforting. Whether you’re trying to simplify your mornings or are looking for a way to fuel your body with wholesome, natural ingredients, this dish has everything you need. Packed with fiber, potassium, and healthy carbohydrates, it will keep you satisfied and energized for the day ahead.

In a world where we often overcomplicate things, it’s refreshing to return to the basics and enjoy a meal that is both nourishing and full of love. Just as I was reminded of the comfort and warmth of my childhood mornings, I hope this recipe brings you the same sense of peace and satisfaction. So the next time you find yourself searching for something simple yet delicious, give this oatmeal with bananas a try. It might just become your new favorite comfort food too.

Amal

The Simple Joy of Oatmeal with Bananas

This oatmeal with bananas is a quick, nutritious, and naturally sweet breakfast that combines the goodness of oats and the creamy sweetness of ripe bananas. Perfect for busy mornings or a cozy weekend breakfast, this recipe is simple to make and filled with heart-healthy ingredients to fuel your day.
Prep Time 5 minutes
Cook Time 10 minutes
Total Time 15 minutes
Servings: 2 -3 servings
Course: Breakfast
Cuisine: American

Ingredients
  

  • 100 g 1 cup oat flakes
  • 150 ml ⅔ cup warm water
  • 2 ripe bananas
  • ½ teaspoon vanilla extract or to taste

Method
 

  1. Cook the Oats: In a medium saucepan, bring the warm water to a simmer. Add the oat flakes, stir, and cook for 5-7 minutes until the oats absorb the water and become creamy. Stir occasionally to avoid sticking.
  2. Mash the Bananas: While the oats are cooking, peel the bananas and mash them in a bowl using a fork until smooth. You can also leave some small chunks for added texture.
  3. Combine and Flavor: Once the oats are cooked, stir in the mashed bananas and vanilla extract. Mix well and let it cook for an additional 2-3 minutes over low heat to blend the flavors together.
  4. Serve: Remove from heat, transfer to bowls, and enjoy this simple, wholesome oatmeal for breakfast.

Notes

  • Sweetness Adjustment: Depending on how ripe your bananas are, you might want to adjust the amount of vanilla extract for a sweeter taste. If you like it sweeter, a drizzle of honey or maple syrup can be added as well.
  • Vegan/Dairy-Free Option: To make this recipe dairy-free, substitute the warm water with a non-dairy milk like almond or oat milk.
  • Customization: Add nuts, seeds, or fresh fruit on top for a more filling breakfast. Berries, chia seeds, or a spoonful of peanut butter would work wonderfully.

The Comfort of Simplicity: A Story Behind a Hearty Vegetable and Ham Dish

For many of us, food is not just about sustenance; it is an experience that brings together memories, emotions, and a sense of belonging. As I reflect on the meals that have shaped my life, one dish that stands out is a humble vegetable and ham creation—a simple recipe my grandmother often prepared for family gatherings. The beauty of this dish lies not just in its flavors but in the joy it brings to the table.

Growing up, I remember her kitchen filled with the warmth of sizzling vegetables and the comforting aroma of ham, perfectly balanced with a touch of spice and cheese. It was a dish that felt like a hug—both hearty and nurturing. My grandmother used to say that the best meals are often the simplest ones. There’s something special about a dish that doesn’t require fancy ingredients or complicated techniques but still manages to bring people together.

This vegetable and ham dish, with its easy preparation and satisfying taste, has become a staple in my own kitchen. Whether for a quick family dinner, brunch with friends, or a filling breakfast, it never fails to bring a sense of warmth and comfort. Over the years, I’ve made a few tweaks here and there, but the core of the dish remains unchanged. It’s a reminder that great food doesn’t need to be complex to be memorable.

Why Simple Ingredients Create the Best Dishes

Simplicity is often the most overlooked aspect of cooking. In today’s world of elaborate recipes and complicated ingredients, we tend to forget that the most satisfying meals often come from the most basic ingredients. This vegetable and ham dish exemplifies that philosophy—just a few simple vegetables, ham, eggs, and cheese combined in the right proportions can create a dish that is both nutritious and incredibly flavorful.

The vegetables used in this dish—carrots, bell peppers, mushrooms, and onions—are common staples in many households. But when they are cooked together with ham, they develop a rich, savory flavor that is perfectly balanced. The addition of eggs and cheese creates a creamy, hearty base, turning these simple ingredients into a comforting meal. It’s this combination of accessible, everyday ingredients that makes this dish so appealing to a wide range of people.

Ingredients

IngredientAmount
Eggs4
SaltTo taste
PaprikaTo taste
Black pepperTo taste
Milk100 ml (½ cup)
Cheese50 g (⅓ cup), shredded
Flour130 g (1 cup)
Onion1, finely chopped
Vegetable oilFor frying and greasing
Carrot1, grated
Bell pepper1, diced
Mushrooms150 g (1 cup), chopped
Garlic cloves2, minced
Ham150 g (1 cup), diced
Green onionsChopped, for garnish

Instructions

  1. Prepare the Vegetables and Ham:
    • Chop the onion, bell pepper, and mushrooms. Grate the carrot and mince the garlic cloves. Dice the ham into small cubes.
  2. Heat the Oil:
    • In a large frying pan, heat a little vegetable oil over medium heat. Once hot, add the onion and garlic, cooking until softened and fragrant.
  3. Add the Vegetables:
    • Add the bell pepper, carrot, and mushrooms to the pan, and sauté for 5–7 minutes, or until the vegetables begin to soften.
  4. Prepare the Egg Mixture:
    • In a bowl, whisk the eggs with milk, salt, paprika, black pepper, and flour until well combined. Stir in the shredded cheese.
  5. Add the Ham:
    • Stir the diced ham into the vegetable mixture in the pan. Let it cook for 2-3 minutes to heat through.
  6. Combine and Cook:
    • Pour the egg mixture into the pan, spreading it evenly over the vegetables and ham. Reduce the heat to low and cover the pan with a lid. Let it cook for 10-15 minutes, or until the eggs are set and cooked through.
  7. Serve:
    • Once cooked, remove the dish from the pan and let it rest for a few minutes. Garnish with freshly chopped green onions and serve warm.

Notes

  • Storage: This dish can be stored in the refrigerator for up to 3 days. Reheat it in a skillet or microwave before serving.
  • Substitutions: You can add other vegetables like spinach or zucchini for more variety, or swap the ham for bacon or sausage.
  • Cheese Options: Feel free to use different cheeses, like cheddar or mozzarella, for a variety of flavors.

Nutritional Information (per serving)

NutrientAmount
Calories240
Protein15g
Carbohydrates20g
Fat12g
Fiber3g
Sodium600mg

The Versatility of This Dish

One of the most remarkable things about this vegetable and ham dish is its versatility. It can be enjoyed for breakfast, lunch, or dinner. The balance of protein from the ham and eggs, along with the fiber and vitamins from the vegetables, makes it a well-rounded meal that can easily be adapted to fit any dietary need.

For breakfast, it can be served alongside toast or fresh fruit, creating a perfect start to the day. For lunch or dinner, it pairs well with a simple green salad or roasted potatoes. Its flexibility allows for a variety of sides, making it a dish that can be served year-round, no matter the occasion.

If you’re trying to make the dish more substantial, you can always add more vegetables or even use a combination of different meats, such as bacon, sausage, or turkey. You can swap the cheese to suit your preferences—sharp cheddar, mozzarella, or a sprinkle of Parmesan can all give this dish a different twist. The options are endless, and that’s one of the things that makes it so enjoyable to make.

Frequently Asked Questions (FAQs)

1. Can I make this dish ahead of time?

Yes! This dish is perfect for meal prep. After cooking, allow the dish to cool, and then store it in an airtight container in the refrigerator for up to three days. Reheat it in the microwave or in a pan over low heat for a quick, satisfying meal.

2. Can I use other vegetables?

Absolutely! This dish is highly versatile, and you can use any vegetables you have on hand. Feel free to experiment with spinach, zucchini, or even sweet potatoes. The key is to use vegetables that will soften and cook well when sautéed.

3. Can I make this dish dairy-free?

Yes, you can easily make this dish dairy-free by using a dairy-free cheese alternative and a non-dairy milk such as almond milk. The dish will still be delicious without the dairy, so feel free to adjust the ingredients to fit your dietary needs.

4. Can I freeze this dish?

While the dish is best enjoyed fresh, it can be frozen for later use. To freeze, let the dish cool completely, then wrap it tightly in plastic wrap and foil before placing it in the freezer. When ready to eat, thaw overnight in the refrigerator and reheat in the oven.

5. What can I serve this dish with?

This vegetable and ham dish pairs wonderfully with a variety of sides. For breakfast, serve it with whole-grain toast, fresh fruit, or a side of yogurt. For lunch or dinner, try pairing it with a side salad, roasted vegetables, or even a bowl of soup.

6. Can I substitute the ham for something else?

Yes, you can use a variety of proteins in place of the ham. Cooked chicken, turkey, sausage, or even plant-based protein options like tofu or tempeh would work well in this dish. Just be sure to adjust cooking times as needed to ensure everything is cooked through.

How This Dish Benefits Your Health

While this vegetable and ham dish is comforting and indulgent, it also offers a range of health benefits. The vegetables provide essential vitamins and minerals, such as vitamin A, vitamin C, and potassium, while the eggs and ham offer a good source of protein. The addition of cheese provides calcium, and the whole dish is balanced in terms of fats and carbohydrates, making it a filling and nutritious option.

By using fresh vegetables, you can easily incorporate fiber into your diet, which is important for digestive health. The variety of vegetables also adds antioxidants, which help protect the body from oxidative stress and inflammation. Additionally, the dish is customizable to your dietary needs, whether you prefer it gluten-free, dairy-free, or with a different protein.

Conclusion: A Meal That Brings Us Together

Food has an incredible ability to bring people together. Whether it’s a family dinner, a brunch with friends, or a meal shared with loved ones, the act of cooking and eating together creates lasting memories. This simple vegetable and ham dish is more than just a recipe—it’s a testament to the power of good, home-cooked meals and the joy they bring.

As I make this dish in my own kitchen, I’m reminded of the love and care my grandmother put into every meal she prepared. Each bite brings me back to those warm, comforting family gatherings, where the conversation flowed just as easily as the food. And now, as I share this dish with my own family and friends, I feel a deep sense of gratitude for the simple pleasures that food can provide.

This dish is proof that you don’t need fancy ingredients or elaborate techniques to create a meal that’s full of love and flavor. It’s a reminder that, sometimes, the simplest dishes are the most meaningful. Whether you’re making it for yourself, your family, or guests, this vegetable and ham dish is sure to become a beloved recipe in your home. It’s more than just a meal—it’s a tradition that will continue to bring people together for years to come.

Amal

The Comfort of Simplicity: A Story Behind a Hearty Vegetable and Ham Dish

This vegetable and ham dish is the perfect comfort food. With a combination of tender sautéed vegetables, savory ham, and cheesy goodness, this dish is simple to prepare yet packed with flavor. It’s great for any meal of the day – breakfast, lunch, or dinner – and is sure to satisfy your hunger and warm your soul. Quick, easy, and full of nutrients, this recipe will become a go-to in your kitchen.
Prep Time 10 minutes
Cook Time 20 minutes
Total Time 30 minutes
Servings: 4 –6 servings
Course: Lunch
Cuisine: American

Ingredients
  

  • 4 large eggs
  • Salt to taste
  • Paprika to taste
  • Black pepper to taste
  • 100 ml ½ cup milk
  • 50 g ⅓ cup shredded cheese
  • 130 g 1 cup all-purpose flour
  • 1 onion finely chopped
  • Vegetable oil for frying and greasing
  • 1 carrot grated
  • 1 bell pepper diced
  • 150 g 1 cup mushrooms, chopped
  • 2 garlic cloves minced
  • 150 g 1 cup diced ham
  • Chopped green onions for garnish

Method
 

  1. Prepare Vegetables and Ham: Start by chopping the onion, bell pepper, and mushrooms. Grate the carrot and mince the garlic. Dice the ham into small cubes.
  2. Heat Oil in the Pan: In a large frying pan, heat a small amount of vegetable oil over medium heat. Once heated, add the onion and garlic, cooking until softened and fragrant.
  3. Sauté Vegetables: Add the diced bell pepper, grated carrot, and chopped mushrooms to the pan. Sauté the mixture for about 5–7 minutes, until the vegetables are tender and the flavors have melded together.
  4. Prepare the Egg Mixture: In a bowl, whisk the eggs with milk, salt, paprika, black pepper, and flour until well combined. Stir in the shredded cheese for added creaminess and flavor.
  5. Add the Ham: Stir the diced ham into the vegetable mixture and let it cook for an additional 2–3 minutes, allowing the ham to warm through and release its savory flavors.
  6. Combine Egg Mixture: Pour the egg mixture over the sautéed vegetables and ham, ensuring it is spread evenly. Reduce the heat to low, cover, and cook for about 10–15 minutes, or until the eggs are set and cooked through.
  7. Serve: Once cooked, remove the dish from the heat and let it rest for a few minutes. Garnish with freshly chopped green onions, then slice and serve warm.

Notes

  • Storage: Leftovers can be stored in the refrigerator for up to 3 days. Reheat in a skillet or microwave when ready to serve.
  • Substitutions: Feel free to swap the ham for cooked chicken, turkey, bacon, or a vegetarian option such as tofu or tempeh.
  • Cheese Variations: Use any cheese you prefer, such as sharp cheddar, mozzarella, or even feta for a tangier flavor.
  • Dairy-Free Option: Use dairy-free cheese and non-dairy milk (such as almond or oat milk) to make this dish dairy-free.

Grandma’s Spinach Quiche: A Recipe Filled with Love and Memories

When I think back to my childhood, there’s one dish that stands out like a beacon of warmth and comfort: Grandma’s spinach quiche. It wasn’t just the flavors that made it special, though. It was the memories tied to it—the smell of the quiche filling the kitchen, the sound of laughter around the dinner table, and the love that was poured into every bite.

Every family has their signature dish, the one that everyone looks forward to, and for our family, it was Grandma’s spinach quiche. I remember her preparing it every holiday season, especially during the cooler months when we gathered together in her cozy kitchen. The earthy aroma of sautéed spinach mixed with the warmth of the eggs and milk created a comforting atmosphere that made our home feel even more inviting.

There was something magical about watching Grandma expertly whisk the eggs, add just the right amount of seasoning, and pour the mixture into the pie crust. The best part was the anticipation as we waited for it to bake, knowing that in just a short while, we’d be treated to the most perfect slice of savory, creamy quiche.

What makes this recipe truly special isn’t just its simplicity or the taste—it’s the connection it fosters. It’s the way it brings people together, creating moments of togetherness and shared joy. I’ve carried this recipe into my own home now, passing it down to my children and making it a part of our family’s traditions. Each time I bake it, I’m reminded of those fond childhood memories, and it fills my heart with the same warmth I felt all those years ago.

This quiche has transcended its role as just a meal. It’s become a symbol of comfort, love, and the kind of simple pleasures that make life so sweet.

The Appeal of a Classic Spinach Quiche

You might wonder what makes a simple spinach quiche stand out. After all, there are so many variations of quiche out there. What sets this one apart?

First, it’s the balance of flavors. The spinach is the star of the show, but it’s complemented by the creaminess of the eggs and the richness of the milk. The combination creates a velvety texture that is both satisfying and light at the same time. It’s not too heavy, but it’s incredibly filling, which makes it the perfect breakfast, brunch, or even dinner option.

The beauty of this spinach quiche is in its versatility. It can be made with fresh spinach, frozen spinach, or a blend of other vegetables if you prefer. You can add cheese for extra flavor, or keep it simple and let the spinach shine. The quiche is also great served warm or at room temperature, which makes it perfect for meal prep or to serve at family gatherings.

This dish is more than just a recipe—it’s an experience. It’s a reminder that sometimes, the best meals are the simplest ones. With just a few ingredients and a little bit of time, you can create a dish that brings people together and fills the house with the kind of warmth that only food can bring.

Ingredients

IngredientQuantity
Fresh spinach (or 10 oz frozen spinach, thawed and squeezed dry)4 cups (or 10 oz frozen spinach)
Large eggs6
Milk (whole or non-dairy for a dairy-free option)1 cup

Directions

  1. Preheat the Oven:
    Preheat your oven to 375°F (190°C).
  2. Prepare the Spinach:
    If you’re using fresh spinach, sauté it in a pan for a few minutes until wilted, then let it cool. Squeeze out any excess water if using frozen spinach.
  3. Beat the Eggs:
    In a mixing bowl, crack the eggs and whisk them together with the milk until well combined. Add salt and pepper to taste, if desired.
  4. Mix the Spinach and Eggs:
    Stir the prepared spinach into the egg mixture. Mix thoroughly to ensure the spinach is evenly distributed throughout.
  5. Pour into a Pie Dish:
    Pour the mixture into a greased pie dish or quiche pan. Spread the spinach evenly in the mixture.
  6. Bake the Quiche:
    Place the quiche in the oven and bake for 30–35 minutes, or until the quiche is set in the center and lightly browned on top.
  7. Cool and Serve:
    Allow the quiche to cool for 10 minutes before slicing. Serve warm, or at room temperature for a delicious breakfast, lunch, or dinner.

Nutritional Information (per serving, assuming 6 servings)

NutrientAmount
Calories~180 kcal
Protein~12 g
Carbohydrates~4 g
Fat~13 g
Saturated Fat~3 g
Cholesterol~215 mg
Sodium~220 mg
Fiber~2 g
Sugars~2 g

Health Benefits of Spinach Quiche

Aside from the rich flavors and comforting memories, this spinach quiche is also packed with nutritional benefits. Spinach is loaded with vitamins and minerals, making it an incredibly healthy addition to any meal. Let’s take a look at why this ingredient, in particular, is so great for you:

Spinach: A Superfood in Disguise

Spinach is a powerhouse of nutrients. It’s rich in iron, which is essential for red blood cell production, and it’s also a great source of vitamin K, which supports bone health. The leafy green is packed with antioxidants like vitamin C and beta-carotene, which help to reduce inflammation and protect the body from harmful free radicals.

But the benefits don’t stop there. Spinach is also high in folate, which is crucial for cell growth and repair. For those watching their weight, spinach is a low-calorie food that’s high in fiber, making it great for digestion and helping to keep you full longer. When added to this quiche, spinach brings a burst of nutrition that enhances both the flavor and health profile of the dish.

Eggs: The Ultimate Source of Protein

Eggs are the base of this quiche, and they provide a substantial amount of protein, which is essential for building and repairing muscles. They also contain a wide array of vitamins and minerals, including vitamin B12, riboflavin, and choline. Plus, eggs are rich in healthy fats, which are important for brain health and maintaining a balanced diet.

With these nutrient-dense ingredients, this spinach quiche is not just a delicious dish; it’s also a great way to start your day or enjoy a light meal that’s both satisfying and good for you.

Why Grandma’s Spinach Quiche Will Become Your New Favorite

The thing that makes this spinach quiche so special is its versatility and simplicity. You don’t need a lot of fancy ingredients or techniques to create something extraordinary. It’s the kind of dish you can whip up in no time, but it’s still impressive enough to serve at a gathering or a special brunch.

You can customize it to your liking, whether you want to add cheese, switch out the spinach for another leafy green, or toss in some extra herbs or seasonings. The recipe is a blank canvas, allowing you to get creative and make it your own. But no matter how you choose to tweak it, the heart of the dish remains the same: a comforting, nutritious, and incredibly flavorful meal that brings people together.

FAQs: Everything You Need to Know About Grandma’s Spinach Quiche

1. Can I make this quiche ahead of time?

Yes, this quiche can be made ahead of time! You can prepare it the night before and store it in the refrigerator until you’re ready to bake it. Alternatively, you can bake it and refrigerate the leftovers for a quick breakfast or lunch throughout the week.

2. Can I use frozen spinach instead of fresh?

Absolutely! Frozen spinach works perfectly in this recipe. Just make sure to thaw it and squeeze out any excess moisture before adding it to the quiche mixture.

3. Can I add cheese to this quiche?

Yes! While the original recipe doesn’t include cheese, you can easily add it for extra creaminess and flavor. Cheddar, Swiss, or feta all work wonderfully in this quiche.

4. How can I make this quiche dairy-free?

To make the quiche dairy-free, simply substitute the milk with a non-dairy option such as almond milk, oat milk, or soy milk. You can also replace the eggs with a vegan egg substitute or use a flaxseed mixture as a binding agent.

5. Can I add other vegetables to the quiche?

Yes, feel free to experiment with different vegetables! Bell peppers, mushrooms, onions, or even zucchini would make a great addition to this quiche.

Conclusion: A Slice of Tradition

Grandma’s spinach quiche is more than just a meal; it’s a tradition. It’s a recipe that’s been passed down through the years, carrying with it the love and memories of family gatherings and shared moments around the table. It’s the perfect dish for anyone looking for a quick, nutritious, and delicious meal that can be enjoyed any time of day.

By making this quiche, you’re not just following a recipe—you’re continuing a tradition of love, comfort, and nourishment. So, the next time you make this dish, take a moment to reflect on the memories it holds and the joy it brings to those who gather to share it. Whether it’s for a quiet family breakfast or a celebratory brunch, Grandma’s spinach quiche is sure to remain a cherished part of your culinary repertoire for years to come.

Amal

Grandma’s Spinach Quiche: A Recipe Filled with Love and Memories

This delicious Grandma’s Spinach Quiche combines the fresh, vibrant flavors of spinach with the creamy richness of eggs and milk. Perfect for any occasion—be it breakfast, brunch, or dinner—this savory quiche is a family favorite that’s sure to impress.
Prep Time 15 minutes
Cook Time 35 minutes
Total Time 50 minutes
Servings: 8 -10 servings
Course: Dinner
Cuisine: American Comfort Food

Ingredients
  

  • 4 cups fresh spinach or 10 oz frozen spinach, thawed and squeezed dry
  • 6 large eggs
  • 1 cup milk whole milk or non-dairy milk for a dairy-free option
  • Salt and pepper to taste
  • 1 pie crust store-bought or homemade

Method
 

  1. Preheat the Oven: Preheat your oven to 375°F (190°C). If using a pre-made pie crust, place it on a baking sheet to avoid any spillage during baking.
  2. Prepare the Spinach: If using fresh spinach, sauté it in a pan until wilted, then allow it to cool. If using frozen spinach, thaw it completely and squeeze out any excess water.
  3. Whisk the Eggs and Milk: In a mixing bowl, whisk together the eggs and milk until smooth. Season with salt and pepper to taste.
  4. Add the Spinach: Stir the prepared spinach into the egg mixture. Mix thoroughly to ensure the spinach is evenly distributed throughout.
  5. Pour into the Pie Crust: Carefully pour the spinach and egg mixture into the pie crust. Spread it out evenly.
  6. Bake the Quiche: Place the pie in the preheated oven and bake for 30–35 minutes or until the quiche is set in the center and the top is golden brown.
  7. Cool and Serve: Let the quiche cool for about 10 minutes before slicing. Serve warm for the best flavor or at room temperature.

Notes

  • Storage: Leftover quiche can be stored in an airtight container in the refrigerator for up to 3 days.
  • Freezing: You can freeze the quiche before or after baking. Wrap it tightly in plastic wrap and foil, and store it in the freezer for up to 1 month. Thaw overnight in the fridge before reheating.
  • Add-ins: Feel free to add cheese, mushrooms, or other veggies to customize your quiche. Cheese like cheddar, Swiss, or feta works wonderfully with spinach.
  • For a Dairy-Free Version: Use a non-dairy milk such as almond or oat milk, and skip the dairy-based crust or use a dairy-free crust.

Healthy Oatmeal Breakfast Cake: A Wholesome Start to Your Day

There’s a special kind of warmth that fills the house on a Sunday morning, one that isn’t just from the sun peeking through the window but from the hustle and bustle in the kitchen. My grandmother used to make something simple, yet extraordinary, every weekend—a cake made from oats, fruit, and a touch of sweetness. It wasn’t a decadent dessert; rather, it was a wholesome breakfast treat, one that smelled so inviting and filled the house with comfort. This was the kind of cake that, despite its simplicity, had the magical ability to make everything feel just right.

Over the years, as I moved away from home and began creating my own family traditions, I kept that memory close. I began experimenting with healthier versions of this cake, keeping the essence of it while improving it with nutritious ingredients. Thus, the Healthy Oatmeal Breakfast Cake was born—a recipe that blends the memories of my grandmother’s love for wholesome, simple food with the modern understanding of balanced, nutritious meals.

This cake, made with oats, fruits, and a handful of other wholesome ingredients, became my go-to breakfast when I wanted to nourish my body and my soul. Whether I was in a rush to get out the door or had time to sit and savor the morning, this cake was my comfort, my reminder of those simpler times in the kitchen.

Why This Recipe is a Game-Changer for Breakfast

There are some dishes that just feel right from the first bite. The Healthy Oatmeal Breakfast Cake is one of them. Its flavors aren’t overpowering or overly sweet, but rather a perfect balance of natural sweetness from the banana and apple. The oatmeal and walnuts provide a hearty, satisfying texture, while the touch of cinnamon adds warmth without being too much. The cake is dense, yet not too heavy—a satisfying, wholesome start to any day.

What makes this breakfast cake unique is its balance of nutrients. It is packed with fiber, vitamins, healthy fats, and protein, making it an ideal choice for breakfast. The oats provide slow-releasing energy, the fruits are full of antioxidants, and the walnuts add crunch and a dose of heart-healthy fats. It’s the kind of food that fills you up without leaving you feeling sluggish, and it keeps you energized throughout the morning.

For anyone looking for a nutritious yet indulgent breakfast, this cake is the perfect solution. You can enjoy it warm from the oven or at room temperature, and it pairs perfectly with a cup of coffee or tea. It’s a great way to start your day off right, and it can easily be adapted to suit your dietary preferences.

Ingredients

IngredientQuantity
Oatmeal1 cup
Milk1 cup
Apple1, peeled and diced
Banana1, mashed
Sweetener (such as honey or maple syrup)To taste
VanillaTo taste
Eggs (room temperature)3
Walnuts60 grams, chopped
Yogurt150 grams
Cinnamon1 teaspoon
Baking powder1 teaspoon

Directions

  1. Preheat the Oven and Prepare Pan:
    Preheat the oven to 180°C (350°F). Grease or line a baking pan with parchment paper.
  2. Mix Wet Ingredients:
    In a large mixing bowl, combine the milk, eggs, vanilla, and sweetener. Whisk together until smooth.
  3. Add the Fruits and Yogurt:
    Add the mashed banana, diced apple, and yogurt to the wet mixture. Stir well to combine.
  4. Add Dry Ingredients:
    In another bowl, combine the oatmeal, cinnamon, and baking powder. Mix them together, then fold the dry ingredients into the wet ingredients. Stir in the walnuts for added crunch and texture.
  5. Bake the Cake:
    Pour the batter into the prepared pan. Bake for 25–30 minutes or until a toothpick inserted into the center comes out clean.
  6. Cool and Serve:
    Let the cake cool for a few minutes before slicing. Serve warm, topped with extra yogurt or fresh fruit if desired.

Nutritional Information (per serving, based on 8 servings)

NutrientAmount
Calories~200 kcal
Protein~6 g
Carbohydrates~30 g
Fat~9 g
Fiber~4 g
Sugars~12 g
Saturated Fat~1 g
Sodium~50 mg

The Versatility of the Healthy Oatmeal Breakfast Cake

One of the best things about this cake is its versatility. It’s a blank canvas for any ingredients you’d like to add or swap. For those who prefer a more decadent breakfast, a handful of chocolate chips can be added to the batter. If you’re in the mood for something a little fresher, try adding berries or dried fruit like raisins or cranberries.

The cake is also easily customizable to meet dietary needs. If you’re vegan, swapping the eggs for flax eggs or chia eggs works perfectly. You can also opt for dairy-free milk and yogurt for those with lactose intolerances. Those following a gluten-free diet can simply substitute the regular oatmeal with gluten-free oats and ensure that the yogurt is also gluten-free. The result? A delicious, guilt-free treat for just about anyone.

Health Benefits You’ll Feel Good About

This recipe doesn’t just taste good; it’s good for you, too. The ingredients come together in a way that provides a range of nutrients to help fuel your body in the morning. Let’s break down the key ingredients and their health benefits:

Oatmeal

Oats are a whole grain rich in fiber, particularly beta-glucan, which has been shown to reduce cholesterol and promote heart health. The fiber also aids in digestion, making this breakfast cake great for maintaining a healthy gut. Additionally, oats are packed with iron and B vitamins, which are essential for energy production.

Banana

Bananas are a powerhouse of potassium, which is crucial for maintaining healthy blood pressure and proper muscle function. They also provide natural sugars, which can give you a quick boost of energy in the morning.

Apple

Apples are loaded with antioxidants and vitamin C, both of which are essential for immune health. The fiber in apples also supports digestion and helps to maintain a healthy weight by promoting fullness.

Walnuts

Walnuts are a rich source of omega-3 fatty acids, which are beneficial for heart health and brain function. They are also packed with protein, fiber, and antioxidants, which make them an excellent addition to any healthy breakfast.

Eggs and Yogurt

Eggs provide high-quality protein and essential nutrients like choline, which supports brain health. Yogurt, on the other hand, is full of probiotics, which help maintain a healthy gut flora. Together, they provide a satisfying, nutrient-dense base for the cake.

FAQs: Everything You Need to Know

1. Can I make this cake ahead of time?

Yes, this cake can be made ahead of time and stored in an airtight container at room temperature for up to 3 days. If you prefer to enjoy it warm, simply reheat individual slices in the microwave or oven. It also freezes well, so you can make a batch and store it for up to a month.

2. Can I add other fruits?

Absolutely! While the banana and apple give the cake a great natural sweetness, you can experiment with other fruits like pears, berries, or even peaches. Just be sure to adjust the quantity if you’re adding juicier fruits, as it may affect the texture.

3. Is this cake gluten-free?

The cake can easily be made gluten-free by using certified gluten-free oats. Additionally, check that the yogurt and any other ingredients you use are gluten-free if you need to adhere to a strict gluten-free diet.

4. Can I replace the sweetener with something else?

If you prefer not to use any sweetener, you can substitute the banana and apple for added natural sweetness. Alternatively, you can use stevia, monk fruit, or maple syrup as a sweetener depending on your preferences.

5. How do I store leftover cake?

Store leftover cake in an airtight container at room temperature for up to 3 days. You can also refrigerate it for up to a week or freeze it for up to a month. Reheat the slices in the microwave for a quick, easy breakfast.

Conclusion: More Than Just a Breakfast Cake

The Healthy Oatmeal Breakfast Cake is more than just a meal; it’s a connection to cherished memories, a way to nourish your body, and a reminder that sometimes the simplest foods are the most satisfying. It’s versatile, customizable, and packed with nutrients to fuel your day. Whether you’re looking for a comforting breakfast or a quick snack, this cake will never disappoint. It’s a wholesome, easy-to-make treat that’s perfect for busy mornings or leisurely weekends.

When you bake this cake, you’re not just making a dish; you’re embracing a tradition of simplicity, health, and nourishment—one that has been passed down through generations and is ready to be enjoyed by you and your loved ones. So, the next time you need a quick, satisfying start to your day, reach for the ingredients, turn on your oven, and let this warm, comforting cake fill your kitchen with love.

Amal

Healthy Oatmeal Breakfast Cake: A Wholesome Start to Your Day

Start your day with a warm, comforting slice of Healthy Oatmeal Breakfast Cake. This nutrient-packed cake is made with wholesome ingredients like oats, fresh fruits, and walnuts. It’s naturally sweetened and full of fiber, protein, and healthy fats, making it the perfect breakfast to fuel your morning.
Prep Time 15 minutes
Cook Time 30 minutes
Total Time 45 minutes
Servings: 8 -10 servings
Course: Snack
Cuisine: American

Ingredients
  

  • 1 cup oatmeal
  • 1 cup milk
  • 1 apple peeled and diced
  • 1 banana mashed
  • Sweetener such as honey or maple syrup, to taste
  • Vanilla to taste
  • 3 eggs room temperature
  • 60 grams walnuts chopped
  • 150 grams yogurt
  • 1 teaspoon cinnamon
  • 1 teaspoon baking powder

Method
 

  1. Preheat the Oven and Prepare the Pan: Preheat your oven to 180°C (350°F). Grease or line a baking pan with parchment paper for easy removal after baking.
  2. Mix Wet Ingredients: In a large bowl, whisk together the milk, eggs, vanilla, and sweetener. Stir until smooth and combined.
  3. Add the Fruits and Yogurt: Stir in the mashed banana, diced apple, and yogurt to the wet mixture. Mix well until everything is evenly distributed.
  4. Combine Dry Ingredients: In a separate bowl, mix the oatmeal, cinnamon, and baking powder. Slowly fold the dry ingredients into the wet mixture until well combined. Stir in the walnuts.
  5. Bake the Cake: Pour the batter into the prepared pan. Bake in the preheated oven for 25–30 minutes, or until the top is golden brown and a toothpick inserted into the center comes out clean.
  6. Cool and Serve: Allow the cake to cool for a few minutes before slicing. Serve warm for a comforting breakfast or enjoy at room temperature.

Notes

  • Storage: The cake can be stored in an airtight container for up to 3 days at room temperature. For longer storage, refrigerate for up to 1 week.
  • Make Ahead: You can prepare the batter the night before and refrigerate it. In the morning, simply pour it into the baking pan and bake for a fresh, warm breakfast.
  • Variations: Add your favorite berries, raisins, or dried cranberries for extra flavor. You can also swap the walnuts with almonds or pecans for a different texture.
  • Dietary Options: This recipe can be made vegan by replacing the eggs with flax eggs or chia eggs and using plant-based milk and yogurt. For a gluten-free version, use certified gluten-free oats.

Golden Garden Veggie Fritters: A Taste of Comfort and Wholesome Flavors

The kitchen was my grandmother’s kingdom. I remember walking in as a young child, overwhelmed by the cozy smell of freshly fried vegetables, and hearing the rhythmic sound of oil sizzling. It wasn’t just food; it was tradition. She always had a way of turning the simplest ingredients into a feast for the senses.

I can still see her smiling as she carefully grates zucchini, the faint hum of the stove in the background. “Don’t waste anything,” she’d often say. “Everything has its place in the meal.” Her words stayed with me as I grew older, inspiring my love for creative yet simple dishes like these Golden Garden Veggie Fritters.

This recipe is my tribute to those cherished memories. It’s a reflection of my grandmother’s wisdom: turning fresh, simple ingredients into something comforting and nourishing. The zucchini, potatoes, and carrots that once seemed so plain now come together in perfect harmony, showcasing how the most basic vegetables can become something magical with a bit of love and care.

As I make these fritters today, I can’t help but think of her in the kitchen, teaching me the art of making something from nothing, of finding joy in every chop, stir, and flip.

Why This Recipe Stands Out: Comfort in Every Bite

What makes the Golden Garden Veggie Fritters special is the balance of flavors and textures they offer. They are crispy on the outside, with a soft, cheesy interior that’s filled with the earthiness of vegetables. With every bite, you experience the gentle sweetness of grated zucchini, the richness of mozzarella cheese, the heartiness of potatoes, and the subtle crunch of oatmeal.

The best part is how versatile they are. These fritters can easily be adjusted to suit your taste and dietary preferences, making them ideal for a variety of occasions, from casual dinners to hearty breakfasts.

A Healthy, Wholesome Dish

These veggie fritters aren’t just indulgent; they are packed with nutrients. By incorporating vegetables like zucchini, carrots, and potatoes, this recipe provides a good amount of fiber, vitamins, and antioxidants. Zucchini, for instance, is rich in vitamin C and potassium, helping to support your immune system. The oatmeal in the fritters is a whole grain, offering added fiber and promoting digestive health.

Not to mention, the mozzarella cheese adds calcium and protein, making these fritters not just tasty, but nourishing as well. They strike the perfect balance between comfort food and nutrition, making them a great choice for anyone looking to enjoy a satisfying meal without compromising on health.

Perfect for Every Meal

Golden Garden Veggie Fritters are incredibly versatile. While they make for a great breakfast or brunch dish, they can also serve as a delicious side dish for dinner, or even a light lunch. Their savory flavors can be paired with a variety of dipping sauces, such as tangy yogurt or a zesty tomato salsa, giving you the freedom to mix things up every time you make them.

Additionally, the fact that they are pan-fried rather than deep-fried ensures that you can enjoy a crispy exterior without the heaviness that deep frying often adds. This allows the natural flavors of the vegetables to shine through while still providing the satisfying crunch you love in a fritter.

Cultural Influence and Comforting Traditions

While this recipe might feel contemporary, its roots go deeper than you might expect. The tradition of making vegetable fritters has a long history in many cultures, where vegetables were preserved or stretched through clever recipes like these. Whether in Mediterranean kitchens or Eastern European homes, fritters have long been a way to turn humble, everyday ingredients into something delicious and filling.

In many ways, making these Golden Garden Veggie Fritters connects me to that heritage. They remind me that food is more than just nourishment; it’s a form of storytelling, a way to preserve traditions, and a means of passing down memories to the next generation. My grandmother’s hands, shaping fritters with love, live on in every bite.

Ingredients

IngredientQuantity
Zucchini1
Potatoes2
Carrot1
Mozzarella cheese100g (grated)
ChivesA small bunch (finely chopped)
Eggs2
SaltTo taste
Black pepperTo taste
Garlic1 clove (minced)
Oatmeal2 tablespoons
Vegetable fat (for frying)As needed

Directions

  1. Prepare the Vegetables:
    Peel and grate the potatoes and carrot. Grate the zucchini as well, then squeeze out the excess moisture from all the vegetables using a clean towel or paper towels to ensure the fritters aren’t too watery.
  2. Combine the Ingredients:
    In a large bowl, mix the grated vegetables with the eggs, mozzarella cheese, chopped chives, minced garlic, oatmeal, salt, and black pepper. Stir everything together until well combined.
  3. Shape and Cook the Fritters:
    Heat vegetable fat in a skillet over medium heat. Shape the mixture into small fritters using your hands or a spoon. Gently flatten each fritter with the back of the spoon and carefully place them in the skillet.
  4. Fry Until Golden:
    Fry the fritters for about 3–4 minutes on each side or until they turn golden brown and crispy. Once cooked, place the fritters on a paper towel-lined plate to absorb any excess oil.
  5. Serve:
    Garnish the fritters with additional chives if desired. Serve warm with a side of yogurt or sour cream for added flavor.

Nutritional Information (per fritter, approximate, based on 8 servings)

NutrientAmount
Calories~110 kcal
Protein~5 g
Carbohydrates~10 g
Fat~6 g
Fiber~2 g
Sugars~1 g
Saturated Fat~2 g
Sodium~150 mg

FAQs: Everything You Need to Know

1. Can I make the fritters ahead of time?

Yes! These fritters can be prepared in advance. Once you’ve made the fritter mixture, you can shape it into patties and store them in the fridge for up to 24 hours. When you’re ready to cook, just heat the pan and fry them as usual. If you have leftover fritters, they can also be refrigerated for up to 2-3 days and reheated in a skillet to retain their crispiness.

2. Can I use other vegetables in the fritters?

Absolutely! While zucchini, potatoes, and carrots create a perfect combination, feel free to experiment with other vegetables you love. Grated sweet potatoes, parsnips, or even cauliflower work beautifully in this recipe. Just be sure to remove any excess moisture from the vegetables before mixing them together.

3. Can I make the fritters gluten-free?

Yes, you can easily make this recipe gluten-free. Instead of using regular flour, simply substitute it with a gluten-free flour blend or additional oatmeal. The texture may vary slightly, but the flavors will remain just as delightful.

4. What can I serve these fritters with?

These fritters are incredibly versatile and can be paired with a wide range of dips and sides. Serve them with a dollop of Greek yogurt or sour cream, a fresh herb dip, or even a tangy salsa. They also make a great side dish to accompany grilled meats, salads, or even a simple tomato soup.

5. Can I bake these fritters instead of frying them?

While pan-frying creates the signature crispy texture, you can bake these fritters for a lighter version. Preheat your oven to 400°F (200°C) and bake the fritters on a parchment-lined baking sheet for about 20 minutes, flipping halfway through. They might not be as crispy, but they will still be delicious.

Conclusion: More Than Just a Meal

Golden Garden Veggie Fritters are more than just a recipe; they are a connection to a time when food was made with care, love, and a deep appreciation for simplicity. As I stand in the kitchen making these fritters, I can’t help but feel a sense of gratitude for the traditions that have shaped my cooking journey. They are a reminder that the best meals don’t always come from complex recipes, but from the thoughtful combination of simple, fresh ingredients.

Whether you’re making these fritters for a cozy weekend breakfast or preparing them for a family dinner, you’re not just creating a meal; you’re making memories. And that, in itself, is the true essence of good food.

As we continue to explore new recipes and experiment with flavors, let’s not forget the importance of those timeless dishes — the ones that carry a bit of history, a touch of nostalgia, and a whole lot of heart.

Amal

Golden Garden Veggie Fritters: A Taste of Comfort and Wholesome Flavors

These crispy Golden Garden Veggie Fritters combine the fresh flavors of zucchini, potatoes, and carrots with mozzarella cheese and a hint of oatmeal. Perfectly crispy on the outside and tender on the inside, these fritters are a healthy, satisfying dish that’s ideal for breakfast, brunch, or as a savory snack. Serve them with your favorite dipping sauce or as a side to your meal!
Prep Time 20 minutes
Cook Time 15 minutes
Total Time 35 minutes
Servings: 2 -3 servings
Course: Snack
Cuisine: Comfort Food

Ingredients
  

  • 1 zucchini
  • 2 potatoes
  • 1 carrot
  • 100 g mozzarella cheese grated
  • A small bunch of chives finely chopped
  • 2 eggs
  • Salt to taste
  • Black pepper to taste
  • 1 clove of garlic minced
  • 2 tablespoons oatmeal
  • Vegetable fat for frying

Method
 

  1. Prepare the Vegetables: Peel and grate the potatoes and carrot. Grate the zucchini as well, and then squeeze out the excess moisture from all the vegetables using a clean towel or paper towels.
  2. Combine the Ingredients: In a large bowl, mix the grated vegetables with the eggs, mozzarella cheese, chopped chives, minced garlic, oatmeal, salt, and black pepper. Stir everything together until well combined.
  3. Shape and Cook the Fritters: Heat vegetable fat in a skillet over medium heat. Shape the mixture into small fritters using your hands or a spoon. Gently flatten each fritter with the back of the spoon and carefully place them in the skillet.
  4. Fry Until Golden: Fry the fritters for about 3–4 minutes on each side or until golden brown and crispy. Once cooked, place the fritters on a paper towel-lined plate to absorb any excess oil.
  5. Serve: Garnish the fritters with additional chives if desired. Serve warm with a side of yogurt or sour cream for added flavor.

Notes

  • Make Ahead: These fritters can be prepped in advance. Once shaped, store them in the fridge for up to 24 hours before frying.
  • Customize the Veggies: Feel free to swap out the zucchini, potatoes, or carrots for other vegetables like sweet potatoes or cauliflower.
  • Gluten-Free Option: Use gluten-free flour or additional oatmeal to make the fritters gluten-free.
  • Storage: Leftovers can be stored in the fridge for up to 2–3 days. Reheat in a skillet to maintain the crisp texture.

Savory Sunrise Tortilla Stacks: A Morning Worth Waking Up For

Some of the best recipes begin in the simplest ways.

It was a slow Sunday morning, and the kitchen light poured in golden like honey. The kind of morning that invites reflection, music, and the urge to make something warm and filling. I had a few things left in the fridge — soft cheese, a single avocado, a tomato, and two eggs. Nothing fancy. Certainly not enough for a traditional brunch spread.

But as I stood there barefoot on the cool tile floor, sipping coffee, I remembered something my grandmother used to say: “With good ingredients and a little love, you can make anything feel like home.”

So I mixed a quick tortilla dough from scratch — something she taught me in childhood — combining flour, cornmeal, olive oil, and water. Then I prepared the toppings: fresh slices of avocado, juicy tomato, smoky meat, soft cheese, and perfectly cooked eggs. Everything stacked neatly between warm, golden tortillas.

That morning, I didn’t just eat. I experienced breakfast. And now, these Savory Sunrise Tortilla Stacks have become a tradition — a dish my family looks forward to, not just for the flavor, but for how it makes them feel: nourished, grounded, and cared for.

Why These Tortilla Stacks Are a Staple in My Kitchen

There’s something beautifully rustic and wholesome about building a meal layer by layer, each ingredient adding both texture and meaning. These tortilla stacks are more than just delicious — they’re nourishing, colorful, and incredibly satisfying.

What makes them special?

  • Freshness from the tomato, cucumber, and avocado.
  • Creaminess from soft cheese.
  • Protein-rich energy from eggs and lean smoked meat.
  • Hearty satisfaction from homemade tortillas.

They check every box: nutritious, simple, filling, and visually beautiful on the plate. The cornmeal in the tortilla adds subtle texture and a golden hue that contrasts beautifully with the colorful toppings.

Whether you’re feeding family, hosting a brunch, or treating yourself to something that feels indulgent but is secretly healthy — this is the kind of dish that delivers.

Ingredients

IngredientQuantity
Soft cheese7 oz (200 g)
Large tomato1
Smoked meat (sliced)1 slice
Cucumber1
Avocado1
Eggs2
Salt and pepperTo taste
Fresh parsleySome (chopped)
Olive oilFor cooking & flavor
Tomato sauceTo taste

For the Tortilla Dough:

IngredientQuantity
All-purpose flour4/5 cup (130 g)
Cornmeal1/5 cup (30 g)
Salt1/4 teaspoon
Sugar1/2 teaspoon
Olive oil2 teaspoons
Hot water1/3 cup (80 ml)

Flavor-Filled Directions

  1. Make the Dough:
    In a bowl, combine flour, cornmeal, salt, and sugar. Stir in olive oil and hot water. Mix and knead into a soft dough. Cover and let it rest for 15 minutes.
  2. Prepare the Fillings:
    Boil or fry the eggs to your liking. Slice tomato, cucumber, avocado, and smoked meat. Crumble or spread the soft cheese.
  3. Cook the Tortillas:
    Divide rested dough into small balls and roll out into flat rounds. Heat a dry skillet over medium heat and cook each tortilla for about 1–2 minutes per side, until golden spots appear.
  4. Assemble the Stack:
    On each warm tortilla, layer the tomato slices, smoked meat, cucumber, avocado, egg, soft cheese, and a drizzle of tomato sauce. Season with salt, pepper, olive oil, and fresh parsley.
  5. Serve Warm:
    Stack, fold, or enjoy open-faced. Perfect for breakfast, lunch, or light dinner.

Nutritional Information (per serving, estimated on 2 tortillas with full toppings)

NutrientAmount
Calories~360 kcal
Protein~14 g
Carbohydrates~28 g
Sugars~4 g
Fat~22 g
Saturated Fat~5 g
Fiber~5 g
Sodium~380 mg

A Balanced Bite: Health and Flavor Together

Let’s talk nutrition for a moment.

What makes this dish such a winner in my book is the balance of macronutrients:

  • Healthy fats from the avocado and olive oil
  • Protein from eggs and smoked meat
  • Fiber and complex carbs from cornmeal and fresh vegetables
  • Calcium and probiotics from soft cheese (especially if using a cultured variety)

Unlike sugary breakfasts that spike your energy and crash you an hour later, these tortilla stacks offer a slow, sustained release of energy — ideal for busy days, long meetings, or school mornings.

They’re also naturally adaptable. Whether you’re eating low-carb, vegetarian, or even dairy-free, the base structure allows for easy modifications without losing integrity.

Layers of Versatility: Make It Yours

One of my favorite things about this recipe is how it invites creativity. You’re not locked into specific toppings. Here are a few ways to personalize it:

  • Vegetarian? Omit the smoked meat and add sautéed mushrooms or grilled zucchini.
  • Low-carb? Use almond flour tortillas or lettuce wraps instead.
  • Spicy? Add jalapeños, hot sauce, or a spicy yogurt drizzle.
  • Mediterranean twist? Swap soft cheese for crumbled feta, and add olives and fresh mint.
  • Breakfast-for-dinner? Top with a fried egg, roasted potatoes, or even lentils.

Every kitchen has its own rhythm, and this recipe harmonizes beautifully with whatever you have on hand.

From Heritage to Hands-On: The Cultural Root of Tortillas

While this dish may feel modern and tailored for today’s health-conscious home cook, its foundation — the humble tortilla — carries deep cultural roots.

In many Latin American homes, tortillas are more than food. They are memory, story, and survival. Made by hand, passed from generation to generation, they represent resilience, care, and creativity. It was my grandmother’s way of teaching us the rhythm of the kitchen — measuring by touch, pressing the dough with fingertips, flipping tortillas over open flame.

By combining traditional tortilla-making with global flavors like avocado, smoked meat, and tomato, this recipe pays homage to that heritage while celebrating modern kitchens and diverse palates.

Frequently Asked Questions

1. Can I make the tortillas ahead of time?
Yes! The tortillas can be made in advance and stored in an airtight container for up to 3 days in the refrigerator. Reheat in a dry skillet before assembling for best results.

2. What kind of soft cheese works best?
Cream cheese, ricotta, goat cheese, or even herbed spreadable cheeses all work well. Just make sure it’s soft enough to spread or crumble easily.

3. Can I use store-bought tortillas?
Absolutely. While homemade adds a special touch, store-bought tortillas can save time and still taste great when warmed properly.

4. How can I make it vegetarian or vegan?
For vegetarian: skip the smoked meat. Add grilled veggies or tofu.
For vegan: use plant-based cheese, omit the eggs, and consider adding a chickpea scramble or lentil spread for protein.

5. What’s the best way to store leftovers?
Store each component separately in the fridge. Tortillas in a ziplock, chopped veggies in containers, and sauces in jars. Assembled stacks can get soggy if kept overnight.

6. Is this a good option for meal prep?
Yes! You can prep all the components ahead and build your stack when you’re ready to eat. Great for lunchboxes or quick weeknight dinners.

7. Can I serve this cold?
It’s best slightly warm or room temperature. Cold tortillas can feel stiff, but if you don’t mind the texture, it’s still flavorful and enjoyable.

8. Is this dish kid-friendly?
Very much so! You can customize toppings based on your child’s preferences — and little hands love helping with the stacking process.

9. What sides go well with this meal?
Pair it with a light side salad, roasted sweet potatoes, or a simple fruit bowl. For drinks, try iced tea, fresh juice, or a smoothie.

10. What if I don’t have cornmeal?
You can make the tortillas with all-purpose flour alone, though you’ll miss a bit of the rustic texture. Polenta or finely ground oats can be a partial substitute in a pinch.

Conclusion: Stack Joy Into Every Meal

There’s something deeply satisfying about food that looks beautiful, tastes incredible, and makes you feel good from the inside out. Savory Sunrise Tortilla Stacks are that kind of dish.

They remind me that nourishment doesn’t have to be complicated. With a little creativity, a few fresh ingredients, and some warmth in the kitchen, you can build more than just a meal — you can build a moment.

Whether you’re feeding your family, hosting brunch for friends, or simply taking time for yourself on a quiet morning, this recipe is a gentle celebration of what’s possible when we give attention to the small things.

Because sometimes, the best way to start your day isn’t with a to-do list… but with a warm tortilla, a fork, and a reminder that food can be both fuel and joy.

Amal

Savory Sunrise Tortilla Stacks: A Morning Worth Waking Up For

A nourishing and vibrant meal that layers fresh vegetables, soft cheese, smoked meat, and eggs over warm homemade tortillas. This colorful stack brings together comfort and flavor in every bite — perfect for breakfast, brunch, or any time you crave something hearty and wholesome.
Prep Time 20 minutes
Cook Time 15 minutes
Total Time 35 minutes
Servings: 2 -3 servings
Course: Breakfast
Cuisine: Mediterranean-Inspired

Ingredients
  

  • 7 oz soft cheese 200 g
  • 1 large tomato sliced
  • 1 slice of smoked meat ham, turkey, or beef
  • 1 cucumber sliced
  • 1 avocado sliced
  • 2 eggs boiled, poached, or fried
  • Salt and pepper to taste
  • Fresh parsley chopped
  • Olive oil for cooking and drizzling
  • Tomato sauce for topping optional
For the tortilla dough:
  • 4/5 cup all-purpose flour 130 g
  • 1/5 cup cornmeal 30 g
  • 1/4 teaspoon salt
  • 1/2 teaspoon sugar
  • 2 teaspoons olive oil
  • 1/3 cup hot water 80 ml

Method
 

  1. In a mixing bowl, combine flour, cornmeal, salt, and sugar. Stir in olive oil and hot water. Knead until a soft dough forms. Let it rest for 15 minutes.
  2. Divide the dough into small balls and roll them into thin circles.
  3. Heat a dry skillet over medium heat and cook each tortilla for 1–2 minutes on each side until lightly golden and puffed. Set aside.
  4. Meanwhile, prepare the fillings. Slice the tomato, cucumber, avocado, and smoked meat. Cook the eggs to your preference (boiled, poached, or fried).
  5. Assemble your stacks: place a tortilla on a plate, layer with slices of tomato, cucumber, smoked meat, avocado, soft cheese, and a cooked egg. Repeat for additional servings.
  6. Season with salt, pepper, drizzle with olive oil, and top with tomato sauce if desired. Garnish with fresh parsley.
  7. Serve warm and enjoy.

Notes

  • Customize with your favorite protein: grilled chicken, chickpeas, or tofu also work well.
  • The tortilla dough can be made ahead and stored in the fridge for up to 2 days.
  • For a lighter version, use egg whites and low-fat cheese.
  • Make it vegetarian by skipping the smoked meat or using a plant-based alternative.
  • Add pickled onions or hot sauce for an extra kick of flavor.

Midnight Mocha Bliss Cups: The Dessert That Tastes Like a Secret

It all started one rainy evening when sleep seemed impossible.

I had just finished a long call with a friend going through a tough time. The rain was tapping gently against the windows, and the house felt still in that way it only does after midnight. I wandered into the kitchen, not particularly hungry but craving something warm, creamy, and a little indulgent. The kind of comfort that doesn’t ask questions — it simply melts on your tongue and says, “You’re safe.”

I didn’t have much. Just some milk, a bit of sugar, a bar of half-used chocolate, and my ever-present jar of Nescafé. On instinct, I mixed them together, not entirely sure what I was creating. A few stirs, a simmer, a dash of memory. What emerged wasn’t just pudding — it was a moment of peace, a dessert born out of quiet and care.

When I took that first spoonful — warm, silky, a touch bitter from the coffee, and sweet in just the right way — I knew this wasn’t going to be a one-time thing. It became my nightly retreat, a tiny ritual of self-kindness I didn’t know I needed.

Now, my husband asks for it regularly. Friends beg for the recipe. And I still make it when I want to feel grounded. “Midnight Mocha Bliss Cups” may sound dramatic, but when something this simple tastes this special, the name fits.


Why “Midnight Mocha Bliss” Deserves a Place in Your Kitchen

This dessert is proof that elegance doesn’t need extravagance. With just a handful of everyday ingredients — milk, instant coffee, sugar, cornstarch, and chocolate — you can create a creamy, café-style pudding that feels both nostalgic and new.

What sets it apart from your average chocolate pudding is the infusion of coffee. That subtle bitterness from the Nescafé balances the sweetness and deepens the flavor, turning it into something more grown-up, more sophisticated, and honestly — more addictive.

It’s perfect for late nights, impromptu dinner guests, or moments when you need a personal pick-me-up. The texture is smooth and velvety, the flavor intense but not overpowering, and it chills beautifully for a make-ahead option. You can also serve it warm for instant coziness.

This isn’t a flashy dessert. It doesn’t need to be. It speaks in a quiet voice and says everything.

Ingredients

Pudding Layer

IngredientQuantity
Sugar3 tablespoons
Cornstarch2 tablespoons
Nescafé1 tablespoon
Milk500 ml
Chocolate50 grams

Coffee Layer

(Note: The pudding forms the base and coffee flavor is incorporated — no separate topping required unless desired. You can optionally dust with instant coffee or cocoa powder for garnish.)


Velvety Directions

  1. Mix the Dry Ingredients:
    In a saucepan, whisk together sugar, cornstarch, and Nescafé until evenly blended.
  2. Add the Milk:
    Slowly pour in the milk while whisking to prevent lumps from forming.
  3. Heat and Stir:
    Place the saucepan over medium heat. Stir constantly until the mixture begins to thicken — about 5–7 minutes.
  4. Add the Chocolate:
    Once thickened, add the chocolate and stir until completely melted and the pudding becomes silky and rich.
  5. Cool and Chill:
    Pour into serving cups. Let cool at room temperature, then refrigerate for at least 1 hour before serving. Serve chilled, optionally dusted with a pinch of Nescafé or cocoa.

Nutritional Information (per serving, based on 4 servings)

NutrientAmount
Calories~160 kcal
Protein~4 g
Carbohydrates~25 g
Sugars~18 g
Fat~5 g
Saturated Fat~2.5 g
Caffeine~30 mg
Fiber~1 g

What Makes This Recipe So Special?

1. It Uses Pantry Staples
There’s something empowering about making a truly delicious dessert without having to run to the store. Everything in this recipe — sugar, cornstarch, instant coffee, milk, chocolate — is probably already sitting in your pantry or fridge.

2. It’s Foolproof
Even if you’ve never made pudding from scratch before, this one is nearly impossible to mess up. It’s a one-pot wonder, with no baking, no water baths, and no complicated techniques.

3. It’s Customizable
Want it extra chocolatey? Add more chocolate. Prefer a sweeter flavor? Increase the sugar slightly. Looking for a dairy-free version? Swap the milk for oat or almond milk, and use dairy-free chocolate. The structure of the recipe holds up beautifully to personal tweaks.

4. It’s Comfort in a Cup
This dessert is more than the sum of its parts. It’s that perfect “I’m home” feeling in edible form. It’s the warmth of a good memory. It’s late-night journaling, soft socks, and your favorite playlist in dessert form.

Frequently Asked Questions

Can I use instant espresso instead of Nescafé?

Absolutely. If you prefer a deeper, stronger coffee flavor, instant espresso will elevate the richness. Just be mindful that espresso is more concentrated than Nescafé, so consider starting with half the amount and adjusting to taste.

What kind of chocolate works best?

You can use any kind of chocolate you love — dark chocolate, semi-sweet, milk chocolate, or even white chocolate for a twist. Dark chocolate gives the deepest flavor and balances the sweetness beautifully, especially with the coffee.

Can I serve this warm?

Yes! While it’s commonly served chilled, enjoying it warm straight from the stovetop is a cozy treat — especially on a rainy evening or a cold night. It thickens slightly as it cools, so warm servings will have a softer, almost lava-like texture.

How long can I store it?

Midnight Mocha Bliss Cups can be stored in the refrigerator in airtight containers or covered ramekins for up to 4 days. If it thickens too much, give it a quick whisk before serving to restore the silky texture.

Is it okay for kids?

Yes — if you’re mindful of the caffeine content. One tablespoon of Nescafé divided among four servings isn’t very much, but if you’re serving this to young children, you can use decaffeinated instant coffee or reduce the quantity.

Can I make it ahead for guests?

Definitely. This dessert chills well and can be made the day before a gathering. Serve it in individual cups or elegant glasses and garnish just before serving with a sprinkle of cocoa powder, a dollop of whipped cream, or a chocolate curl.

Is it gluten-free?

Yes. Cornstarch is naturally gluten-free, which makes this dessert a safe and satisfying option for gluten-sensitive guests or those with celiac disease. Just double-check your chocolate and instant coffee brands to be safe.

Creative Serving Ideas

  • Layer it in parfait glasses with whipped cream and crumbled cookies.
  • Top it with espresso whipped cream and a dusting of cocoa powder for a tiramisu-inspired twist.
  • Serve with biscotti or buttery shortbread on the side.
  • Add a splash of liqueur like Kahlua or Baileys to the pudding mix for a grown-up version.
  • Drizzle with caramel for a mocha-caramel fusion.

When Simple Feels Extraordinary: A Final Thought

Some desserts demand attention — towering layer cakes, soufflés that rise with drama, pies that beg for fanfare. And then there are the quiet ones. The ones that sit in small cups in your fridge, waiting for you. The ones that offer not just taste, but comfort.

Midnight Mocha Bliss Cups are exactly that.

They’re not here to impress anyone — though they certainly will. They’re here to wrap around your senses with every spoonful. To offer a bit of warmth on a tired evening, or a sweet pause during a busy day. They remind us that simplicity, when done right, can be more luxurious than anything complex.

So next time you find yourself with a bit of milk, a spoonful of Nescafé, and a craving for something quietly spectacular… you know what to make.

Amal

Midnight Mocha Bliss Cups: The Dessert That Tastes Like a Secret

This rich, velvety coffee-chocolate pudding comes together in minutes with pantry staples like milk, Nescafé, and a touch of chocolate. It’s the perfect treat for late-night cravings or cozy evenings — indulgent yet incredibly simple.
Prep Time 5 minutes
Cook Time 10 minutes
Total Time 15 minutes
Servings: 4 –6 servings
Course: Dessert
Cuisine: International

Ingredients
  

  • 3 tablespoons sugar
  • 2 tablespoons cornstarch
  • 1 tablespoon Nescafé instant coffee
  • 500 ml milk
  • 50 grams chocolate dark or semi-sweet, chopped

Method
 

  1. In a medium saucepan (off the heat), whisk together the sugar, cornstarch, and Nescafé until evenly combined.
  2. Gradually pour in the milk, whisking constantly to ensure a smooth mixture with no lumps.
  3. Place the saucepan over medium heat. Stir continuously with a whisk or wooden spoon as the mixture begins to heat and thicken.
  4. Once it starts to bubble and reaches a pudding-like consistency (about 5–7 minutes), add the chopped chocolate.
  5. Stir until the chocolate is fully melted and the pudding is glossy and smooth.
  6. Remove from heat and pour the mixture into serving cups or ramekins. Let cool slightly, then refrigerate for at least 1 hour before serving.
  7. Optional: Dust with a pinch of Nescafé or cocoa powder before serving for a touch of flair.

Notes

  • Use high-quality dark chocolate for a more intense flavor.
  • For a creamier texture, whole milk works best.
  • You can make this dessert dairy-free by using oat milk or almond milk and dairy-free chocolate.
  • Serve warm for a cozier dessert, or chilled for a firmer, classic pudding texture.
  • For an extra kick, add a splash of coffee liqueur after cooking.