Bacon & Cream Cheese Stuffed Doritos Recipe: The Ultimate Snack Hack

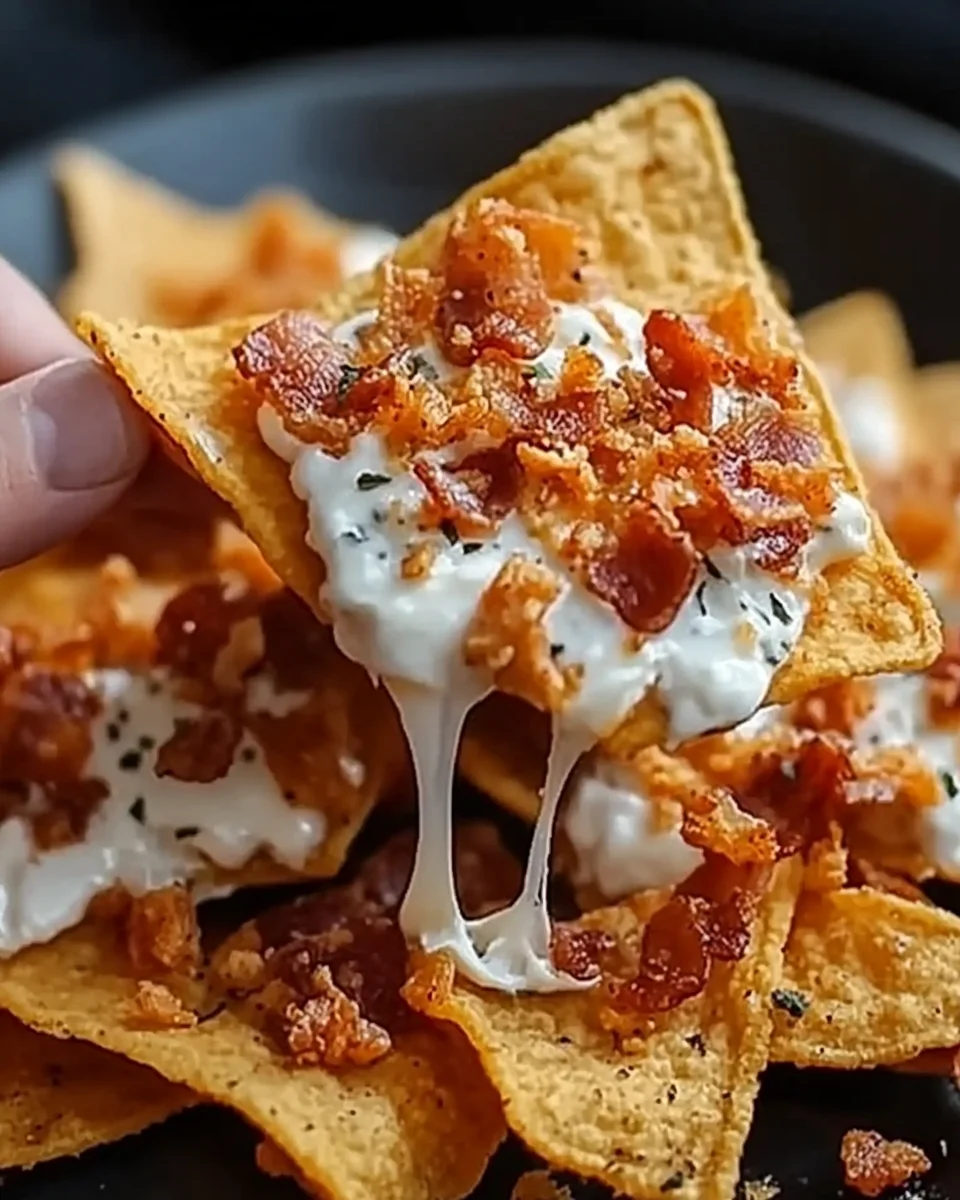
Picture this: crispy, cheesy Doritos filled with a creamy, bacon-loaded filling that melts in your mouth with every bite. Whether you’re hosting a party, looking for a game-day treat, or simply craving a unique snack, this Bacon & Cream Cheese Stuffed Doritos Recipe is the ultimate crowd-pleaser.

The best part? This recipe is easy, quick, and incredibly addictive. You only need a handful of ingredients, and in just a few simple steps, you’ll have an appetizer that disappears as soon as it hits the table.

Ready to make the most irresistible stuffed Doritos you’ve ever tasted? Let’s get started!

Why You’ll Love This Recipe

  • Quick & Easy: You can whip up these cheese-stuffed Doritos in under 30 minutes.
  • Minimal Ingredients: Only a few pantry staples are needed.
  • Ultimate Flavor Bomb: The combination of cheesy, creamy, crunchy, and smoky bacon is unbeatable.
  • Great for Parties: Serve them as an appetizer or snack, and watch them disappear fast!
  • Customizable: You can tweak the flavors with different Dorito varieties and add-ins.

Ingredients for Bacon & Cream Cheese Stuffed Doritos

Here’s what you’ll need to make these delicious stuffed Doritos at home.

Main Ingredients

IngredientQuantityNotes
Nacho Cheese Doritos1 bagAny flavor works (Cool Ranch, Spicy Nacho, etc.)
Cream cheese8 oz, softenedFull-fat for best texture
Shredded cheddar cheese1 cupAdds extra cheesiness
Bacon6 strips, cooked and crumbledProvides a smoky, crispy bite
Green onions2, finely choppedAdds freshness and mild onion flavor
Garlic powder½ tspEnhances the savory taste
Onion powder¼ tspComplements the garlic flavor
Salt & pepperTo tasteAdjust based on preference
Sour cream or ranchOptionalPerfect for dipping

These simple ingredients come together to create the perfect crispy, cheesy bite.

How to Make Bacon & Cream Cheese Stuffed Doritos

Step 1: Prepare the Filling

  1. In a medium bowl, combine cream cheese, shredded cheddar cheese, bacon, green onions, garlic powder, onion powder, salt, and pepper.
  2. Mix well until all ingredients are evenly distributed.
  3. Set aside and let the mixture rest for about 5 minutes to enhance the flavors.

Step 2: Fill the Doritos

  1. Take a Dorito chip and carefully break it open at one of the corners.
  2. Using a small spoon or piping bag, carefully stuff the cheese mixture inside.
  3. Press the chip gently to close it as much as possible.
  4. Repeat the process with the remaining Doritos.

Step 3: Bake or Air Fry (Optional but recommended for extra crispiness)

  • Oven Method: Preheat your oven to 375°F (190°C). Place the stuffed Doritos on a parchment-lined baking sheet and bake for 5–7 minutes, just until warmed through.
  • Air Fryer Method: Preheat the air fryer to 350°F (175°C) and air-fry for 3–5 minutes until crispy.

Step 4: Serve & Enjoy!

  1. Let the stuffed Doritos cool slightly before serving.
  2. Serve with sour cream, ranch dressing, or guacamole for dipping.
  3. Enjoy the perfect balance of crunchy, cheesy, and savory flavors!

Tips for the Best Stuffed Doritos

  • Use thicker Doritos: Flavors like Nacho Cheese or Cool Ranch hold up better when stuffed.
  • Don’t overstuff: Adding too much filling can cause the Doritos to break.
  • Chill the mixture: Refrigerating the filling for 10 minutes makes stuffing easier.
  • Experiment with flavors: Try different Dorito flavors like Flamin’ Hot or Spicy Sweet Chili for a fun twist.
  • Make them ahead: Prepare the filling in advance and assemble just before serving.

Variations and Substitutions

Looking to switch things up? Here are some creative variations:

Make It Spicier

  • Add chopped jalapeños to the filling.
  • Mix in a teaspoon of hot sauce or sriracha.
  • Use Flamin’ Hot Doritos for an extra kick.

Add More Protein

  • Stir in shredded rotisserie chicken for added heartiness.
  • Swap bacon for chopped pepperoni or cooked sausage.

Make It Vegetarian

  • Skip the bacon and add diced bell peppers or black beans for texture.

Cheesy Overload

  • Add a mix of mozzarella and gouda cheese for a creamier texture.

Health Benefits & Nutritional Breakdown

While these Bacon & Cream Cheese Stuffed Doritos are an indulgent treat, you can still enjoy them in moderation.

Nutritional Breakdown (Per Serving, Approximate)

NutrientAmountBenefits
Calories250–300Energy boost
Protein8–10gSupports muscle growth
Carbohydrates20–25gProvides fuel
Fat15–20gIncludes healthy fats from cheese
SodiumModerateWatch portions if on a low-sodium diet

This snack is best enjoyed occasionally, but it’s a fantastic way to treat yourself or impress guests at a party!

Frequently Asked Questions (FAQs)

1. Can I make these ahead of time?

Yes! Prepare the filling and store it in the fridge for up to 2 days. Assemble and heat before serving.

2. Do I have to bake or air-fry them?

No, you can enjoy them as-is, but baking or air-frying makes them crispier and enhances the flavors.

3. What dipping sauces go well with this?

  • Sour cream – Classic and simple.
  • Ranch dressing – Creamy and tangy.
  • Guacamole – Adds a fresh, zesty touch.
  • Chipotle mayo – Spicy and smoky.

4. Can I use different Dorito flavors?

Absolutely! Try Cool Ranch, Spicy Nacho, or Flamin’ Hot for a unique twist.

5. How do I keep the Doritos from breaking?

Be gentle when stuffing and avoid overfilling to prevent cracking.

6. Can I use a different cheese?

Yes! Mozzarella, pepper jack, or smoked gouda work great.

Final Thoughts: Try This Bacon & Cream Cheese Stuffed Doritos Recipe Today!

This Bacon & Cream Cheese Stuffed Doritos Recipe is a game-changer for snack lovers. Whether you’re hosting a party, watching the big game, or just craving a fun, cheesy treat, these crispy, creamy bites are guaranteed to be a hit.

So, why wait? Gather your ingredients and make this easy, mouthwatering snack today!

ating

Bacon & Cream Cheese Stuffed Doritos Recipe: The Ultimate Snack Hack

Get ready for the ultimate snack hack! These Bacon & Cream Cheese Stuffed Doritos are crispy, cheesy, and packed with smoky bacon flavor. Perfect for game-day gatherings, parties, or just a fun treat, this quick and easy recipe will have everyone coming back for more!
Prep Time 10 minutes
Servings: 4 servings
Course: Appetizer, Snack
Cuisine: American

Ingredients
  

Main Ingredients:
  • 1 bag Nacho Cheese Doritos or preferred flavor
  • 8 oz cream cheese softened
  • 1 cup shredded cheddar cheese
  • 6 strips bacon cooked and crumbled
  • 2 green onions finely chopped
  • 1/2 tsp garlic powder
  • 1/4 tsp onion powder
  • Salt & pepper to taste
  • Sour cream or ranch optional, for dipping

Method
 

Prepare the Filling:
  1. In a medium bowl, combine cream cheese, shredded cheddar, bacon, green onions, garlic powder, onion powder, salt, and pepper.
  2. Mix until well combined and let rest for 5 minutes.
Stuff the Doritos:
  1. Take a Dorito chip and carefully break open a corner.
  2. Using a small spoon or piping bag, fill the chip with the cheese mixture.
  3. Gently press to close and repeat with remaining Doritos.
Bake or Air Fry for Extra Crispiness:
  1. Oven Method: Preheat to 375°F (190°C). Place stuffed Doritos on a parchment-lined baking sheet and bake for 5-7 minutes.
  2. Air Fryer Method: Preheat to 350°F (175°C). Air-fry for 3-5 minutes until crispy.
Serve & Enjoy:
  1. Let cool slightly before serving.
  2. Pair with sour cream, ranch dressing, or guacamole for dipping.

Notes

  • Use thicker Doritos flavors like Nacho Cheese or Cool Ranch for better structure.
  • Avoid overstuffing to prevent cracking.
  • Refrigerate the filling for 10 minutes before stuffing for easier handling.
  • Store leftover filling in the fridge for up to 2 days.

Creamy Vegan Broccoli & Shells: A Comforting, Dairy-Free Pasta Dish

There’s something incredibly comforting about a warm, creamy pasta dish that’s rich in flavor and packed with nutrients. If you’re looking for a plant-based meal that’s both indulgent and nourishing, creamy vegan broccoli & shells is the perfect choice.

Imagine tender pasta shells coated in a velvety, dairy-free sauce, combined with fresh broccoli and aromatic spices. It’s the kind of meal that satisfies your cravings without compromising on nutrition. Plus, it’s easy to make, requiring simple ingredients that come together in under an hour.

Ready to whip up this delicious dish? Let’s dive into the details of how to prepare, customize, and enjoy creamy vegan broccoli & shells at home!

Why You’ll Love This Recipe

  • 100% Dairy-Free & Vegan – Made with plant-based milk, cream, and cheese alternatives.
  • Packed with Nutrients – Broccoli adds fiber, vitamins, and antioxidants.
  • Quick & Easy – A simple one-pot meal that comes together in about 30 minutes.
  • Rich & Flavorful – A combination of smoked paprika, fresh thyme, and garlic enhances the taste.
  • Great for Meal Prep – Stores well for leftovers and reheats beautifully.

Ingredients for Creamy Vegan Broccoli & Shells

Here’s everything you’ll need to prepare this delicious dish.

Main Ingredients

IngredientQuantityNotes
Oil2 tbspOlive oil or avocado oil works best
Shallots2, slicedAdds a mild sweetness
Yellow onion1, dicedEnhances depth of flavor
Garlic2 cloves, dicedA must for rich, savory taste
Garlic powder½ tspBoosts the garlic flavor
Onion powder½ tspComplements the shallots and onion
Smoked paprika1 tspAdds a subtle smokiness
Salt & pepperTo tasteAdjust based on preference
Fresh thyme1 tbsp, choppedBrings freshness and aroma
Broccoli florets4 cupsProvides fiber and essential nutrients
Pasta shells (dry)¾ lbAny small pasta shape will work
Broth2 cupsUse vegan chicken broth or vegetable broth
Non-dairy milk1 cupUnsweetened almond, soy, or oat milk is ideal
Non-dairy cream1 cupRipple or coconut cream adds richness
Vegan parmesan½ cupAdds a cheesy, nutty flavor
Vegan cream cheese2 tbspMakes the sauce extra creamy

These ingredients combine to create a silky, satisfying sauce that coats the pasta beautifully.

How to Make Creamy Vegan Broccoli & Shells

Step 1: Prepare the Aromatics

  1. Heat the oil in a large pan over medium heat.
  2. Add the shallots and onion, sautéing for 3–5 minutes until softened.
  3. Stir in the diced garlic, cooking for another 30 seconds until fragrant.

Step 2: Add Spices and Broccoli

  1. Sprinkle in the garlic powder, onion powder, smoked paprika, salt, and pepper.
  2. Stir well to coat the aromatics with seasoning.
  3. Add the fresh thyme and broccoli florets, mixing everything together.

Step 3: Cook the Pasta and Broth

  1. Pour in the vegan broth and bring to a simmer.
  2. Add the pasta shells, ensuring they are fully submerged in the liquid.
  3. Cover and cook for 10–12 minutes, stirring occasionally until the pasta is al dente.

Step 4: Create the Creamy Sauce

  1. Reduce the heat to low and stir in the non-dairy milk and cream.
  2. Add the vegan parmesan and vegan cream cheese, stirring until melted and combined.
  3. Let the sauce thicken for 3–5 minutes, adjusting seasoning as needed.

Step 5: Serve and Enjoy

  1. Remove from heat and let the pasta sit for a couple of minutes to absorb the flavors.
  2. Garnish with extra vegan parmesan and fresh thyme before serving.
  3. Enjoy warm and creamy, straight from the pan!

Tips for the Best Creamy Vegan Broccoli & Shells

  • Use high-quality non-dairy cream – Some brands have a better texture and flavor. Look for one that’s unsweetened and neutral in taste.
  • Cook pasta in broth – This infuses the shells with extra flavor instead of just boiling in water.
  • Adjust thickness – If the sauce is too thick, add more broth or non-dairy milk to reach your preferred consistency.
  • Add nutritional yeast – If you love a cheesier taste, sprinkle in some nutritional yeast.
  • Roast the broccoli – For deeper flavor, roast the broccoli separately and stir it in before serving.

Variations and Substitutions

This dish is super customizable! Here are some easy ways to change it up:

Make It Gluten-Free

  • Use gluten-free pasta shells or substitute with chickpea or lentil pasta for added protein.

Add Extra Protein

  • Stir in crumbled tofu, tempeh, or cooked lentils for a protein boost.

Make It Spicier

  • Add red pepper flakes or a dash of hot sauce to bring some heat.

Try Different Greens

  • Swap out broccoli for kale, spinach, or Swiss chard for variety.

Use Different Pasta Shapes

  • Elbow macaroni, fusilli, or rotini work well if you don’t have shells on hand.

Health Benefits of This Dish

This meal isn’t just delicious—it’s packed with vitamins, minerals, and plant-based goodness.

Nutritional Breakdown (Per Serving, Approximate)

NutrientAmountBenefits
Calories450–500Provides energy and satiety
Protein15–18gEssential for muscle repair
Carbohydrates55–60gA great source of complex carbs
Fiber8–10gSupports digestion and gut health
Healthy Fats12–15gImportant for brain function
Vitamins & MineralsHighRich in calcium, iron, and vitamin C

The combination of broccoli, plant-based dairy alternatives, and pasta creates a well-rounded meal that’s satisfying and nourishing.

Frequently Asked Questions (FAQs)

1. Can I make this dish ahead of time?

Yes! You can prepare it up to 3 days in advance and store it in an airtight container in the refrigerator. Reheat with a splash of broth or non-dairy milk.

2. What’s the best non-dairy cream for this recipe?

Ripple, coconut cream, or cashew cream work best because they have a thick consistency.

3. Can I freeze creamy vegan broccoli & shells?

Freezing isn’t recommended because the sauce may separate when thawed. However, you can freeze the sauce separately and add fresh pasta later.

4. How do I make this dish nut-free?

Use oat or soy milk instead of almond milk, and choose a nut-free vegan cream cheese.

5. What can I serve with this pasta?

Pair it with a side of garlic bread, a fresh salad, or roasted vegetables for a complete meal.

6. Can I add more vegetables?

Absolutely! Mushrooms, bell peppers, or zucchini make great additions.

Final Thoughts: Try This Creamy Vegan Broccoli & Shells Today!

If you’re looking for a rich, comforting, and nutritious pasta dish, creamy vegan broccoli & shells is a must-try. It’s the perfect balance of indulgence and wholesomeness, making it an ideal meal for any night of the week.

So what are you waiting for? Gather your ingredients and make this incredible dish today!

ating

Creamy Vegan Broccoli & Shells: A Comforting, Dairy-Free Pasta Dish

Enjoy a comforting and creamy pasta dish that’s 100% plant-based! This Creamy Vegan Broccoli & Shells recipe features tender pasta shells in a velvety dairy-free sauce, combined with fresh broccoli and flavorful spices. It’s quick, easy, and perfect for a wholesome meal.
Prep Time 10 minutes
Cook Time 20 minutes
Total Time 30 minutes
Servings: 4 servings
Course: Main Dish, Pasta
Cuisine: Comfort Food, Vegan

Ingredients
  

Main Ingredients:
  • 2 tbsp olive oil or avocado oil
  • 2 shallots sliced
  • 1 yellow onion diced
  • 2 cloves garlic diced
  • 1/2 tsp garlic powder
  • 1/2 tsp onion powder
  • 1 tsp smoked paprika
  • Salt and pepper to taste
  • 1 tbsp fresh thyme chopped
  • 4 cups broccoli florets
  • 3/4 lb dry pasta shells
  • 2 cups vegan broth chicken-style or vegetable broth
  • 1 cup unsweetened non-dairy milk almond, soy, or oat milk
  • 1 cup non-dairy cream Ripple, coconut cream, or cashew cream
  • 1/2 cup vegan parmesan
  • 2 tbsp vegan cream cheese

Method
 

Prepare the Aromatics:
  1. Heat oil in a large pan over medium heat.
  2. Add shallots and onion, sauté for 3-5 minutes until softened.
  3. Stir in diced garlic and cook for another 30 seconds until fragrant.
Add Spices and Broccoli:
  1. Sprinkle in garlic powder, onion powder, smoked paprika, salt, and pepper.
  2. Stir well to coat the aromatics with seasoning.
  3. Add fresh thyme and broccoli florets, mixing everything together.
Cook the Pasta and Broth:
  1. Pour in the vegan broth and bring to a simmer.
  2. Add pasta shells, ensuring they are fully submerged in the liquid.
  3. Cover and cook for 10-12 minutes, stirring occasionally, until pasta is al dente.
Create the Creamy Sauce:
  1. Reduce heat to low and stir in non-dairy milk and cream.
  2. Add vegan parmesan and vegan cream cheese, stirring until melted and combined.
  3. Let the sauce thicken for 3-5 minutes, adjusting seasoning as needed.
Serve and Enjoy:
  1. Remove from heat and let pasta sit for a couple of minutes to absorb flavors.
  2. Garnish with extra vegan parmesan and fresh thyme before serving.
  3. Enjoy warm and creamy!

Notes

  • Cook pasta in broth instead of water for extra flavor.
  • Adjust sauce thickness by adding more broth or non-dairy milk as needed.
  • Add nutritional yeast for an extra cheesy taste.
  • Store leftovers in an airtight container for up to 3 days; reheat with a splash of broth or milk.
  • Customize with roasted vegetables, red pepper flakes, or plant-based protein

Stuffed Sweet Potato with Crispy Chickpeas, Spinach, and Tahini: A Nourishing and Flavorful Meal

There’s something magical about the perfect balance of flavors and textures in a well-prepared dish. If you’re looking for a meal that’s hearty, healthy, and incredibly satisfying, stuffed sweet potato with crispy chickpeas, spinach, and tahini is the answer.

Imagine the natural sweetness of roasted sweet potatoes paired with crunchy, spiced chickpeas, fresh sautéed spinach, and a creamy tahini drizzle. It’s a dish that feels indulgent while being packed with nutrients, making it a perfect choice for lunch, dinner, or even meal prep.

Ready to learn how to make this delicious dish? Let’s dive into everything you need to know about stuffed sweet potato with crispy chickpeas, spinach, and tahini, from ingredients to preparation, nutritional benefits, and frequently asked questions.

Why You’ll Love This Dish

  • Simple and wholesome – Made with whole, plant-based ingredients, this dish is packed with nutrients.
  • Perfect for meal prep – You can make multiple servings and enjoy them throughout the week.
  • Flavor-packed – The combination of crispy, creamy, and savory elements makes every bite satisfying.
  • Customizable – Swap out ingredients based on your dietary preferences.

Ingredients for Stuffed Sweet Potato with Crispy Chickpeas, Spinach, and Tahini

Here’s everything you’ll need to prepare this delicious dish.

Main Ingredients

IngredientQuantityNotes
Sweet potatoes2 largePreferably organic for better flavor
Chickpeas (canned or cooked)1 can (15 oz)Drained and rinsed
Fresh spinach2 cupsCan substitute with kale
Tahini¼ cupAdds creamy texture
Olive oil2 tbspFor roasting and sautéing
Garlic powder1 tspEnhances flavor
Paprika1 tspAdds smokiness
Cumin1 tspProvides warmth and depth
Lemon juice1 tbspBrightens up the dish
Salt and pepperTo tasteBalances flavors

These simple yet flavorful ingredients come together to create a well-balanced meal that’s satisfying and nutritious.

How to Make Stuffed Sweet Potato with Crispy Chickpeas, Spinach, and Tahini

Step 1: Roast the Sweet Potatoes

  1. Preheat your oven to 400°F (200°C).
  2. Wash and scrub the sweet potatoes, then poke a few holes in them with a fork.
  3. Place them on a baking sheet and bake for 45–50 minutes, or until they are soft and tender.

Step 2: Prepare the Crispy Chickpeas

  1. While the sweet potatoes are roasting, pat the chickpeas dry with a paper towel to remove excess moisture.
  2. Toss them with olive oil, garlic powder, paprika, cumin, salt, and pepper.
  3. Spread them on a baking sheet and roast at 400°F (200°C) for 20–25 minutes, shaking the tray halfway through for even crispiness.

Step 3: Sauté the Spinach

  1. Heat a small amount of olive oil in a pan over medium heat.
  2. Add the spinach and sauté for 2–3 minutes, until wilted.
  3. Season with salt and a squeeze of lemon juice.

Step 4: Make the Tahini Drizzle

  1. In a small bowl, mix tahini, lemon juice, a little water, and salt until smooth.
  2. Adjust consistency by adding more water if needed.

Step 5: Assemble the Dish

  1. Slice open the roasted sweet potatoes and fluff the insides with a fork.
  2. Fill each potato with sautéed spinach and crispy chickpeas.
  3. Drizzle generously with tahini sauce.
  4. Serve warm and enjoy!

Tips for the Best Stuffed Sweet Potatoes

  • Roast the sweet potatoes properly: Slow roasting enhances their natural sweetness and makes them ultra-tender.
  • Dry the chickpeas thoroughly: This ensures they crisp up in the oven instead of turning mushy.
  • Use high-quality tahini: A good tahini should be smooth and pourable for the perfect drizzle.
  • Adjust seasonings: Customize the spices to match your personal preference.

Variations and Substitutions

One of the best things about this dish is how easy it is to modify based on your dietary needs and taste preferences.

Make It Spicy

  • Add red pepper flakes or a dash of hot sauce to the tahini dressing.
  • Sprinkle some cayenne pepper on the chickpeas before roasting.

Add More Protein

  • Top with grilled tofu or tempeh for extra protein.
  • Sprinkle with hemp seeds or roasted nuts for a protein boost.

Make It Creamier

  • Mix some hummus into the tahini sauce for extra richness.
  • Add a dollop of Greek yogurt (if not vegan) for added creaminess.

Health Benefits of This Dish

This meal isn’t just delicious—it’s packed with nutrients that fuel your body.

Nutritional Breakdown (Per Serving, Approximate)

NutrientAmountBenefits
Calories400–450Provides sustained energy
Protein12–15gSupports muscle repair
Carbohydrates50–55gA great source of complex carbs
Fiber10–12gSupports digestion
Healthy Fats15–18gGood for heart health
Vitamins & MineralsHighRich in iron, vitamin A, and magnesium

This dish is loaded with fiber, plant-based protein, and healthy fats, making it an excellent choice for a balanced meal.

Frequently Asked Questions (FAQs)

1. Can I prepare this meal in advance?

Yes! You can roast the sweet potatoes and chickpeas ahead of time and store them separately in the fridge for up to 3 days. Assemble when ready to eat.

2. How do I store leftovers?

Store components separately in airtight containers in the refrigerator for up to 3 days. Reheat before serving.

3. Can I use canned chickpeas for this recipe?

Absolutely! Just be sure to drain, rinse, and dry them thoroughly before roasting.

4. What can I substitute for tahini?

If you don’t have tahini, you can use almond butter, cashew butter, or even a simple yogurt-based dressing.

5. How do I make the chickpeas extra crispy?

  • Make sure they’re completely dry before roasting.
  • Spread them in a single layer on the baking sheet.
  • Don’t overcrowd the pan—airflow is key!

6. Can I use other greens instead of spinach?

Yes! Kale, Swiss chard, or arugula all work well as substitutes.

Final Thoughts: Try This Stuffed Sweet Potato with Crispy Chickpeas, Spinach, and Tahini Today!

This dish is proof that healthy eating doesn’t have to be boring. With its combination of sweet, savory, crunchy, and creamy elements, stuffed sweet potato with crispy chickpeas, spinach, and tahini is a meal that will keep you coming back for more.

So why wait? Grab your ingredients and give this recipe a try today!

ating

Stuffed Sweet Potato with Crispy Chickpeas, Spinach, and Tahini: A Nourishing and Flavorful Meal

Indulge in the perfect balance of sweet, savory, and creamy flavors with this Stuffed Sweet Potato with Crispy Chickpeas, Spinach, and Tahini! Roasted sweet potatoes are filled with crunchy, spiced chickpeas, sautéed spinach, and a luscious tahini drizzle for a nutritious and satisfying meal.
Prep Time 10 minutes
Cook Time 50 minutes
Total Time 1 hour
Servings: 2 servings
Course: Main Dish
Cuisine: Mediterranean, Plant-Based

Ingredients
  

Main Ingredients:
  • 2 large sweet potatoes preferably organic
  • 1 can 15 oz chickpeas, drained and rinsed
  • 2 cups fresh spinach or kale as a substitute
  • 1/4 cup tahini
  • 2 tbsp olive oil for roasting and sautéing
  • 1 tsp garlic powder
  • 1 tsp paprika
  • 1 tsp cumin
  • 1 tbsp lemon juice
  • Salt and pepper to taste

Method
 

Roast the Sweet Potatoes:
  1. Preheat the oven to 400°F (200°C).
  2. Wash and scrub the sweet potatoes, then poke a few holes with a fork.
  3. Place them on a baking sheet and roast for 45-50 minutes, or until soft and tender.
Prepare the Crispy Chickpeas:
  1. While the sweet potatoes are roasting, pat the chickpeas dry with a paper towel.
  2. Toss them with olive oil, garlic powder, paprika, cumin, salt, and pepper.
  3. Spread them on a baking sheet and roast at 400°F (200°C) for 20-25 minutes, shaking the tray halfway through.
Sauté the Spinach:
  1. Heat a small amount of olive oil in a pan over medium heat.
  2. Add the spinach and sauté for 2-3 minutes, until wilted.
  3. Season with salt and a squeeze of lemon juice.
Make the Tahini Drizzle:
  1. In a small bowl, mix tahini, lemon juice, a little water, and salt until smooth.
  2. Adjust consistency by adding more water if needed.
Assemble the Dish:
  1. Slice open the roasted sweet potatoes and fluff the insides with a fork.
  2. Fill each potato with sautéed spinach and crispy chickpeas.
  3. Drizzle generously with tahini sauce.
  4. Serve warm and enjoy!

Notes

  • Ensure the sweet potatoes are roasted slowly for enhanced natural sweetness.
  • Dry the chickpeas thoroughly before roasting for extra crispiness.
  • Use high-quality tahini for a smooth and creamy drizzle.
  • Store components separately in airtight containers for up to 3 days.
  • Customize seasonings or add extra protein like grilled tofu or tempeh.

Potsticker Soup: A Comforting and Flavorful Bowl for Any Occasion

There’s something truly special about a warm, comforting bowl of potsticker soup. Whether it’s a chilly evening, a quick weekday dinner, or a cozy meal to soothe your soul, this simple yet flavorful soup is an easy way to bring restaurant-quality taste to your kitchen.

Imagine the delightful combination of juicy dumplings, fragrant broth, and fresh vegetables—all coming together in a single bowl. The best part? It’s incredibly easy to make with just a handful of ingredients. Let’s dive into everything you need to know about making potsticker soup, from ingredients to variations, nutritional benefits, and frequently asked questions.

What Is Potsticker Soup?

Potsticker soup is a delightful Asian-inspired dish that combines dumplings (potstickers) with a flavorful broth, aromatic spices, and fresh vegetables. It’s a perfect one-pot meal that balances heartiness with a light, savory broth.

Unlike traditional fried or steamed potstickers, this version submerges them in a delicious broth, allowing them to soak up all the flavors while maintaining their signature chewy texture.

Ingredients for Potsticker Soup

Here’s everything you’ll need to make potsticker soup at home. You can easily customize the ingredients to match your taste preferences or dietary needs.

Main Ingredients

IngredientQuantityNotes
Frozen potstickers12–15Store-bought or homemade
Chicken broth4 cupsSubstitute with vegetable broth for a vegetarian option
Soy sauce1 tbspAdds umami flavor
Sesame oil1 tbspEnhances depth and aroma
Grated ginger2 tspFresh ginger is recommended for best flavor
Garlic, minced2 clovesA must for added richness
Green onions2–3, choppedFor garnish
Mushrooms (optional)½ cup, slicedAdds earthy flavor
Spinach or bok choy (optional)½ cupBoosts nutrition and freshness
Rice vinegar (optional)1 tbspAdds a slight tang
Salt and pepperTo tasteEnhances overall flavor
Chili oil or red pepper flakes (optional)1 tspFor heat lovers

This ingredient list provides a balanced mix of flavors, but you can always tweak it based on what you have at home.

How to Make Potsticker Soup

Making potsticker soup is as easy as boiling water! Follow these simple steps to enjoy a hearty, delicious bowl in no time.

Step 1: Prepare the Broth

  1. In a large pot, heat sesame oil over medium heat.
  2. Add the minced garlic and grated ginger. Sauté for about 30 seconds until fragrant.
  3. Pour in the chicken (or vegetable) broth and bring to a gentle simmer.

Step 2: Add the Potstickers and Vegetables

  1. Carefully add the frozen potstickers to the simmering broth. Let them cook according to the package instructions (usually 5–7 minutes).
  2. If using mushrooms, spinach, or bok choy, add them in the last 2–3 minutes of cooking.

Step 3: Season and Serve

  1. Stir in the soy sauce, rice vinegar (if using), and a pinch of salt and pepper.
  2. Taste the broth and adjust the seasoning as needed.
  3. Ladle the soup into bowls and garnish with chopped green onions.
  4. If you like a spicy kick, drizzle some chili oil or sprinkle red pepper flakes on top.

Tips for the Best Potsticker Soup

Want to take your potsticker soup to the next level? Keep these tips in mind:

  • Use high-quality broth: The broth is the soul of the soup. Opt for homemade or low-sodium store-bought broth for the best flavor.
  • Don’t overcook the potstickers: They should be tender but not falling apart. Follow the package instructions for perfect texture.
  • Add vegetables strategically: Leafy greens like spinach or bok choy should be added at the end to retain their freshness.
  • Customize the flavors: Adjust the soy sauce, vinegar, and spices according to your taste preferences.

Variations and Substitutions

One of the best things about potsticker soup is its versatility. Here are some creative variations:

Vegetarian and Vegan Option

  • Use vegetable broth instead of chicken broth.
  • Choose plant-based potstickers (often filled with tofu, cabbage, and mushrooms).

Protein-Packed Version

  • Add cooked shredded chicken, shrimp, or tofu for extra protein.

Spicy Kick

  • Increase the amount of chili oil or add a spoonful of gochujang (Korean chili paste) for a fiery flavor.

Noodle Addition

  • For a heartier meal, add ramen noodles or udon noodles. Cook them separately and add them to the soup before serving.

Health Benefits of Potsticker Soup

This soup isn’t just delicious—it’s also packed with nutrients!

Nutritional Breakdown (Per Serving, Approximate)

NutrientAmountBenefits
Calories250–350Depends on potstickers and broth used
Protein10–15gHelps build and repair muscles
Carbohydrates30–40gProvides energy
Fiber2–5gSupports digestion
Healthy Fats5–8gGood for heart health
Vitamins & MineralsVariesRich in vitamin A, C, iron, and calcium

Since it’s loaded with ginger, garlic, and greens, this soup is great for boosting immunity and digestion.

Frequently Asked Questions (FAQs)

1. Can I use fresh potstickers instead of frozen ones?

Yes! If using fresh potstickers, reduce the cooking time to 3–5 minutes to avoid overcooking.

2. How do I store and reheat leftover potsticker soup?

Store leftovers in an airtight container in the fridge for up to 2 days. Reheat gently on the stovetop to prevent the dumplings from falling apart.

3. Can I make this soup gluten-free?

Absolutely! Use gluten-free potstickers and tamari instead of soy sauce to keep it gluten-free.

4. What can I serve with potsticker soup?

Pair it with a side of crispy spring rolls, a fresh Asian salad, or steamed rice for a complete meal.

5. Can I freeze this soup?

It’s best to freeze the broth separately and add fresh potstickers when reheating, as dumplings may become mushy when frozen.

6. How can I make this soup more filling?

Adding proteins like shredded chicken, tofu, or an egg drop can make the soup heartier.

Final Thoughts: Try This Delicious Potsticker Soup Today!

If you’re craving a quick, easy, and soul-warming dish, potsticker soup is the perfect choice. Whether you’re making it for a weeknight dinner or a comforting meal on a cold day, this flavorful soup will satisfy your taste buds and warm your heart.

Now it’s time to grab your ingredients and give this recipe a try. Let me know how it turns out or share your own creative variations!

ating

Potsticker Soup: A Comforting and Flavorful Bowl for Any Occasion

A warm, comforting bowl of potsticker soup is perfect for any occasion! This simple yet flavorful dish combines juicy dumplings, fragrant broth, and fresh vegetables for an easy, restaurant-quality meal you can make at home.
Prep Time 5 minutes
Cook Time 15 minutes
Total Time 20 minutes
Servings: 2 -4 servings
Course: Main Dish, Soup
Cuisine: Asian-inspired

Ingredients
  

Main Ingredients:
  • 12-15 frozen potstickers store-bought or homemade
  • 4 cups chicken broth or vegetable broth for vegetarian option
  • 1 tbsp soy sauce
  • 1 tbsp sesame oil
  • 2 tsp grated ginger
  • 2 cloves garlic minced
  • 2-3 green onions chopped (for garnish)
  • 1/2 cup sliced mushrooms optional
  • 1/2 cup spinach or bok choy optional
  • 1 tbsp rice vinegar optional
  • Salt and pepper to taste
  • 1 tsp chili oil or red pepper flakes optional, for spice
  •  

Method
 

Prepare the Broth:
  1. Heat sesame oil in a large pot over medium heat.
  2. Add minced garlic and grated ginger, sauté for about 30 seconds until fragrant.
  3. Pour in the chicken or vegetable broth and bring to a gentle simmer.
Add the Potstickers and Vegetables:
  1. Carefully add the frozen potstickers to the simmering broth and cook according to package instructions (usually 5-7 minutes).
  2. If using mushrooms, spinach, or bok choy, add them in the last 2-3 minutes of cooking.
Season and Serve:
  1. Stir in soy sauce, rice vinegar (if using), and a pinch of salt and pepper.
  2. Taste the broth and adjust the seasoning as needed.
  3. Ladle the soup into bowls and garnish with chopped green onions.
  4. For a spicy kick, drizzle with chili oil or sprinkle red pepper flakes on top

Notes

  • Use high-quality broth for the best flavor.
  • Avoid overcooking potstickers—they should be tender but not falling apart.
  • Add leafy greens at the end to keep them fresh and vibrant.
  • Adjust soy sauce, vinegar, and spices to match your taste preference.
  • Store leftovers in an airtight container in the fridge for up to 2 days.
  • For a heartier meal, add cooked shredded chicken, tofu, or noodles.

Mini Jalapeño Popper Egg Rolls: A Spicy Twist on a Classic Snack

Imagine biting into a crispy, golden-brown egg roll only to be met with a creamy, cheesy, and slightly spicy filling. That’s exactly what you get with Mini Jalapeño Popper Egg Rolls: A Spicy Twist on a Classic Snack!

This recipe takes the best parts of traditional jalapeño poppers—cream cheese, cheddar, spicy jalapeños, and crispy bacon—and wraps them in an egg roll for an extra crunch. Whether you’re hosting a party, looking for the perfect game-day snack, or just craving something delicious, these mini egg rolls are guaranteed to be a hit!

Let’s dive into this spicy, cheesy delight step by step!

Why You’ll Love This Recipe

Crispy, Cheesy & Spicy – The perfect balance of textures and flavors.
Easy to Make – Simple ingredients and a quick cooking process.
Crowd-Pleasing Appetizer – Perfect for parties, game nights, and gatherings.
Customizable – Adjust the spice level or swap ingredients to suit your taste.
Better Than Takeout – Homemade, fresh, and even more flavorful!

Ingredients You’ll Need

Here’s what you need to make Mini Jalapeño Popper Egg Rolls:

Filling Ingredients

IngredientQuantity
Cream cheese (softened)8 oz
Shredded cheddar cheese1 cup
Jalapeños (seeded & diced)4
Cooked bacon bits½ cup
Garlic powder1 tsp
Onion powder1 tsp
Salt½ tsp
Black pepper½ tsp

For Wrapping & Frying

IngredientQuantity
Egg roll wrappers12
Vegetable oil (for frying)As needed

Step-by-Step Instructions

Step 1: Prepare the Filling

  1. In a large mixing bowl, combine cream cheese, shredded cheddar, diced jalapeños, and cooked bacon bits.
  2. Add garlic powder, onion powder, salt, and black pepper, and mix until smooth and well combined.

Step 2: Assemble the Egg Rolls

  1. Lay an egg roll wrapper on a clean, dry surface in a diamond shape (one corner pointing toward you).
  2. Place 1–2 tablespoons of the jalapeño popper filling in the center of the wrapper.
  3. Fold the bottom corner over the filling, tucking it snugly.
  4. Fold in the left and right corners, then roll tightly to seal.
  5. Use a bit of water or egg wash on the top corner to seal the roll completely.

Step 3: Fry Until Golden & Crispy

  1. Heat vegetable oil in a deep skillet or fryer to 350°F (175°C).
  2. Carefully place 3–4 egg rolls into the oil at a time, frying for 2–3 minutes per side until golden brown.
  3. Remove and drain on a paper towel-lined plate.

Step 4: Serve & Enjoy!

  1. Serve hot with your favorite dipping sauces like ranch, sour cream, or spicy sriracha mayo.
  2. Garnish with chopped parsley or extra bacon bits for extra flavor!

Pro Tips for the Best Jalapeño Popper Egg Rolls

1. Adjust the Spice Level

  • If you prefer milder egg rolls, use less jalapeño or replace them with mild green chilies.
  • For extra heat, add red pepper flakes or diced serrano peppers.

2. Get the Perfect Crispiness

  • Always use hot oil (350°F) to prevent soggy egg rolls.
  • Fry in small batches to avoid overcrowding the pan.

3. Try Different Cheeses

  • Swap out cheddar for pepper jack, Monterey Jack, or mozzarella for a different cheesy experience.

4. Best Dipping Sauces to Serve With Egg Rolls

  • Classic Ranch Dressing – A cool contrast to the spice.
  • Spicy Sriracha Mayo – For extra heat and creaminess.
  • Garlic Aioli – Rich and flavorful.

Nutritional Information

NutrientPer Serving (Approx.)
Calories280 kcal
Protein8g
Carbohydrates22g
Fat18g
Sodium450mg

Note: These values are approximate and may vary based on specific ingredients used.

FAQs About Mini Jalapeño Popper Egg Rolls

1. Can I bake these instead of frying?

Yes! Brush them with oil and bake at 400°F (200°C) for 15–20 minutes, flipping halfway.

2. Can I use wonton wrappers instead?

Yes! Wonton wrappers make smaller bites, great for appetizers or finger food.

3. How do I store and reheat leftovers?

  • Store in an airtight container in the fridge for up to 3 days.
  • Reheat in an air fryer or oven at 375°F (190°C) for 5–7 minutes.

4. Can I make these ahead of time?

Yes! Assemble the egg rolls and freeze them before frying. When ready to cook, fry from frozen for an extra 1–2 minutes.

5. What’s the best oil for frying?

Use vegetable oil, canola oil, or peanut oil for the best crispiness.

6. Can I make these vegetarian?

Absolutely! Just omit the bacon and add extra cheese or veggies like mushrooms or bell peppers.

Final Thoughts: Try These Mini Jalapeño Popper Egg Rolls Today!

These Mini Jalapeño Popper Egg Rolls are the ultimate spicy, cheesy snack! Whether you’re serving them as an appetizer, game-day treat, or party favorite, they’re sure to be a crowd-pleaser.

Now It’s Your Turn!

Try this recipe today and let us know how it turned out!

Want More Delicious Recipes?

Stay tuned for more creative and flavorful snacks, and don’t forget to save this recipe for later!

ating

Mini Jalapeño Popper Egg Rolls: A Spicy Twist on a Classic Snack

Crispy, cheesy, and packed with a spicy kick, these Mini Jalapeño Popper Egg Rolls take the classic appetizer to the next level! Combining cream cheese, cheddar, jalapeños, and crispy bacon, this recipe is perfect for parties, game nights, or whenever you’re craving a crunchy, flavorful
Prep Time 15 minutes
Cook Time 10 minutes
Total Time 25 minutes
Servings: 12 mini egg rolls
Course: Appetizer, Snack
Cuisine: American, Fusion

Ingredients
  

Filling Ingredients:
  • 8 oz cream cheese softened
  • 1 cup shredded cheddar cheese
  • 4 jalapeños seeded & diced
  • 1/2 cup cooked bacon bits
  • 1 tsp garlic powder
  • 1 tsp onion powder
  • 1/2 tsp salt
  • 1/2 tsp black pepper
For Wrapping & Frying:
  • 12 egg roll wrappers
  • Vegetable oil for frying

Method
 

Prepare the Filling:
  1. In a mixing bowl, combine cream cheese, shredded cheddar, diced jalapeños, and cooked bacon bits.
  2. Add garlic powder, onion powder, salt, and black pepper. Mix until smooth.
Assemble the Egg Rolls:
  1. Lay an egg roll wrapper on a clean surface in a diamond shape.
  2. Place 1-2 tablespoons of the filling in the center.
  3. Fold the bottom corner over the filling, tuck it in, then fold in the left and right corners.
  4. Roll tightly and seal the top corner with water or egg wash.
Fry Until Golden & Crispy:
  1. Heat vegetable oil in a deep skillet or fryer to 350°F (175°C).
  2. Fry 3-4 egg rolls at a time for 2-3 minutes per side until golden brown.
  3. Remove and drain on a paper towel-lined plate.
Serve & Enjoy:
  1. Serve hot with dipping sauces like ranch, sour cream, or spicy sriracha mayo.
  2. Garnish with extra bacon bits or chopped parsley.

Notes

  • Adjust the spice level by using fewer jalapeños or swapping them for mild green chilies.
  • Bake instead of frying by brushing with oil and baking at 400°F (200°C) for 15-20 minutes, flipping halfway.
  • Store leftovers in an airtight container in the fridge for up to 3 days; reheat in an air fryer at 375°F (190°C) for 5-7 minutes.
  • Freeze uncooked egg rolls and fry from frozen, adding 1-2 extra minutes.

Crispy Air Fryer Sliced Potatoes: The Perfect Crunchy Side Dish

Introduction: A Quick & Delicious Potato Recipe

There’s something truly satisfying about crispy, golden potatoes that are perfectly seasoned and cooked to perfection. Whether you’re craving a healthy snack, an easy side dish, or a crunchy appetizer, Crispy Air Fryer Sliced Potatoes will quickly become your go-to recipe.

Thanks to the air fryer, you can enjoy all the crunch and flavor of fried potatoes—without the excess oil. These potato slices cook faster, crisp up better, and stay light and fluffy on the inside.

Let’s dive into everything you need to know to make the best air-fried potato slices step by step!

Why You’ll Love This Recipe

✔️ Crispy & Golden Brown – Perfect texture every time.
✔️ Healthier Than Deep-Fried – Less oil, same crunch.
✔️ Quick & Easy – Ready in 20 minutes with minimal effort.
✔️ Endlessly Customizable – Use different seasonings and toppings.
✔️ Perfect for Any Occasion – Great for snacks, sides, or appetizers.

Ingredients You’ll Need

Main Ingredients

IngredientQuantity
Potatoes (Russet, Yukon Gold, or Red)2 large
Olive oil1 ½ tablespoons
Garlic powder1 teaspoon
Paprika1 teaspoon
Salt½ teaspoon
Black pepper½ teaspoon
Parmesan cheese (optional)¼ cup
Fresh parsley (chopped, for garnish)1 tablespoon

Essential Kitchen Tools

To make Crispy Air Fryer Sliced Potatoes, you’ll need:

  • Air fryer – Any model works, but basket-style gives even crisping.
  • Sharp knife or mandoline slicer – For evenly sliced potatoes.
  • Mixing bowl – To toss potatoes with seasonings.
  • Tongs – To flip potatoes during cooking.

Step-by-Step Guide to Making Crispy Air Fryer Sliced Potatoes

1. Prep the Potatoes

  • Wash and scrub the potatoes thoroughly.
  • Slice them thinly (about ¼-inch thick) using a knife or mandoline slicer.

2. Soak the Potato Slices (Optional, But Recommended)

  • Place the slices in a bowl of cold water for 10-15 minutes to remove excess starch.
  • Drain and pat them completely dry with a paper towel.

3. Season the Potatoes

  • In a large bowl, toss the potato slices with:
    • Olive oil
    • Garlic powder
    • Paprika
    • Salt and black pepper

4. Arrange in the Air Fryer Basket

  • Preheat your air fryer to 375°F (190°C) for 3 minutes.
  • Spread the potato slices in a single layer in the basket.
  • Do not overcrowd—cook in batches if necessary.

5. Air Fry the Potatoes

  • Cook at 375°F (190°C) for 10 minutes.
  • Shake the basket or flip the potatoes halfway through cooking.
  • Cook for another 5-7 minutes until crispy and golden brown.

6. Serve & Enjoy!

  • Sprinkle with Parmesan cheese and chopped parsley for extra flavor.
  • Serve hot with your favorite dipping sauces.

The Secret to Extra Crispy Potatoes

✔️ Slice potatoes evenly – Thinner slices = crispier texture.
✔️ Soak in cold water – Removes starch for better crisping.
✔️ Don’t overcrowd the air fryer – Ensures even cooking.
✔️ Shake halfway through cooking – Helps all sides crisp up.

Best Seasoning Combinations for Air-Fried Potatoes

SeasoningFlavor Profile
Garlic & ParmesanClassic Italian taste
Cajun SpiceBold and smoky
Ranch SeasoningButtery and herby
Lemon PepperFresh and tangy
Smoked Paprika & Chili PowderSpicy and smoky

Ingredient Substitutions and Variations

IngredientSubstitutes
Olive oilAvocado oil, melted butter
Garlic powderFresh minced garlic
PaprikaSmoked paprika or chili powder
ParmesanCheddar or feta cheese

How to Store and Reheat Leftovers

  • Refrigeration: Store in an airtight container for up to 3 days.
  • Reheating in Air Fryer: Cook at 350°F (175°C) for 3-5 minutes.
  • Reheating in Oven: Bake at 375°F (190°C) for 10 minutes.

Best Dipping Sauces for Air Fryer Potatoes

🍅 Ketchup – A classic favorite.
🧄 Garlic Aioli – Creamy and garlicky.
🌶️ Spicy Sriracha Mayo – A zesty kick.
🥑 Guacamole – A rich and creamy alternative.
🧀 Cheese Sauce – The ultimate indulgence.

Health Benefits of Air Fryer Potatoes

✔️ Less Oil, Fewer Calories – Compared to deep frying.
✔️ Rich in Fiber & Potassium – Supports digestion and heart health.
✔️ Gluten-Free & Vegan-Friendly – Perfect for most diets.

Nutritional Information Breakdown

NutrientAmount per Serving
Calories~180
Protein4g
Carbohydrates28g
Fat6g

Frequently Asked Questions

1. Can I use sweet potatoes instead?

Yes! Follow the same steps but adjust cooking time by adding 2-3 minutes.

2. How do I prevent soggy potatoes?

Make sure to soak and dry the slices properly before air frying.

3. Can I make these ahead of time?

Yes! Reheat them in the air fryer for 3-5 minutes before serving.


Final Thoughts and Call to Action

Now that you know how to make Crispy Air Fryer Sliced Potatoes, it’s time to try them! These golden, crunchy, and perfectly seasoned potatoes are easy to make and perfect for any occasion.

Healthy BLT Chicken Salad – A Low-Carb & Keto-Friendly Meal!

A Guilt-Free, Flavor-Packed Delight

Imagine biting into a creamy, savory, and refreshing chicken salad, loaded with crispy bacon, juicy tomatoes, and fresh lettuce, all tossed in a delicious keto-friendly dressing. If you love BLTs and chicken salad, this recipe combines the best of both worlds while keeping things healthy, low-carb, and absolutely delicious.

This Healthy BLT Chicken Salad is the perfect choice whether you’re on a keto diet, trying to cut carbs, or simply looking for a nutritious meal. It’s high in protein, packed with good fats, and bursting with flavor. Plus, it’s quick and easy to prepare, making it ideal for meal prep, lunch, or a light dinner.

Let’s dive into this ultimate keto-friendly chicken salad recipe and learn how to make it step by step!

Why You’ll Love This Recipe

✔️ Keto-Friendly & Low-Carb – Perfect for maintaining ketosis.
✔️ Protein-Packed & Nutritious – Keeps you full and satisfied.
✔️ Quick & Easy – Ready in 15 minutes with simple ingredients.
✔️ Versatile & Customizable – Enjoy it as a salad, wrap, or dip.
✔️ Meal-Prep Friendly – Stays fresh for days in the fridge.

Ingredients You’ll Need

Here’s everything you need to make this Healthy BLT Chicken Salad:

For the Salad

IngredientQuantity
Cooked chicken breast (shredded or diced)2 cups
Bacon (cooked and crumbled)4 slices
Cherry tomatoes (halved)1 cup
Romaine lettuce (chopped)2 cups
Avocado (diced)1 medium
Cheddar cheese (shredded)½ cup
Green onions (chopped)¼ cup

For the Keto Dressing

IngredientQuantity
Mayonnaise½ cup
Sour cream or Greek yogurt¼ cup
Lemon juice1 tablespoon
Dijon mustard1 teaspoon
Garlic powder½ teaspoon
Onion powder½ teaspoon
Salt & black pepperTo taste

Essential Kitchen Tools

To make this BLT Chicken Salad, you’ll need:

  • Mixing bowls – For tossing ingredients together.
  • Cutting board & knife – To chop veggies and chicken.
  • Measuring cups & spoons – For accurate ingredient portions.
  • Skillet – To cook crispy bacon.

Step-by-Step Guide to Making Healthy BLT Chicken Salad

1. Cook and Prepare the Chicken

  • Option 1: Use pre-cooked rotisserie chicken for convenience.
  • Option 2: Pan-sear or bake chicken breasts and shred them.

2. Cook the Bacon

  • In a skillet over medium heat, cook bacon until crispy.
  • Remove from pan, drain on a paper towel, and crumble.

3. Chop the Vegetables

  • Dice the tomatoes, lettuce, avocado, and green onions.

4. Make the Keto Dressing

  • In a small bowl, whisk together mayonnaise, sour cream, lemon juice, Dijon mustard, garlic powder, onion powder, salt, and black pepper.

5. Assemble the Salad

  • In a large mixing bowl, combine chicken, bacon, tomatoes, lettuce, avocado, cheese, and green onions.
  • Pour the dressing over the salad and gently toss to coat.

6. Serve & Enjoy!

  • Garnish with extra bacon and cheese if desired.

The Secret to the Best BLT Chicken Salad

✔️ Use high-quality, fresh ingredients for the best taste.
✔️ Let the dressing sit for 5 minutes to enhance flavor.
✔️ Crispy bacon adds the perfect crunch—don’t skip it!

How to Make a Keto-Friendly Dressing

  • Use full-fat mayonnaise for extra creaminess.
  • Add a splash of apple cider vinegar for tanginess.
  • Experiment with herbs like parsley or dill for extra flavor.

Ingredient Substitutions and Variations

IngredientSubstitutes
ChickenTurkey or grilled shrimp
BaconTurkey bacon or pancetta
MayonnaiseAvocado mayo or Greek yogurt
Romaine lettuceSpinach or mixed greens

How to Store and Meal Prep This Salad

  • Refrigeration: Store in an airtight container for up to 3 days.
  • Dressing Storage: Keep dressing separate and mix before serving.
  • Meal Prep: Pre-portion into containers for grab-and-go lunches.

Best Ways to Serve BLT Chicken Salad

🥬 Lettuce Wraps – Use butter lettuce for a low-carb wrap.
🥑 Avocado Bowls – Serve inside a halved avocado.
🌮 Low-Carb Tacos – Use cheese or egg wraps.
🍞 Keto Bread Sandwich – Pair with almond flour bread.

Health Benefits of This Keto Chicken Salad

✔️ High in Protein – Supports muscle growth.
✔️ Rich in Healthy Fats – Keeps you full and energized.
✔️ Low in Carbs – Helps maintain ketosis.
✔️ Loaded with Vitamins – Fresh veggies provide essential nutrients.

Nutritional Information Breakdown

NutrientAmount per Serving
Calories~400
Protein35g
Carbohydrates6g
Fat28g

Frequently Asked Questions

1. Can I make this salad ahead of time?

Yes! Just keep the dressing separate until serving.

2. Is this salad gluten-free?

Yes, all ingredients are naturally gluten-free.

3. Can I add more veggies?

Absolutely! Cucumbers or bell peppers work great.

Final Thoughts and Call to Action

Now that you know how to make this Healthy BLT Chicken Salad, it’s time to give it a try!

ating

Healthy BLT Chicken Salad – A Low-Carb & Keto-Friendly Meal!

This Healthy BLT Chicken Salad is the perfect combination of creamy, savory, and fresh flavors. With crispy bacon, juicy cherry tomatoes, tender chicken, and crisp lettuce, this dish delivers all the deliciousness of a classic BLT without the carbs. Tossed in a rich, keto-friendly dressing, this protein-packed salad is perfect for meal prep, a quick lunch, or a light dinner. Whether served in lettuce wraps, as a sandwich filling, or on its own, it’s a satisfying, low-carb meal that’s ready in just 15 minutes!
Prep Time 15 minutes
Cook Time 5 minutes
Total Time 20 minutes
Servings: 4 servings
Course: Salad
Cuisine: American

Ingredients
  

For the Salad:
  • 2 cups cooked chicken breast shredded or diced
  • 4 slices bacon cooked and crumbled
  • 1 cup cherry tomatoes halved
  • 2 cups romaine lettuce chopped
  • 1 medium avocado diced
  • ½ cup cheddar cheese shredded
  • ¼ cup green onions chopped
For the Keto Dressing:
  • ½ cup mayonnaise
  • ¼ cup sour cream or Greek yogurt
  • 1 tablespoon lemon juice
  • 1 teaspoon Dijon mustard
  • ½ teaspoon garlic powder
  • ½ teaspoon onion powder
  • Salt & black pepper to taste

Method
 

1️⃣ Cook the Bacon:
  1. In a skillet over medium heat, cook bacon until crispy.
  2. Remove from the pan, drain on a paper towel, and crumble.
2️⃣ Prepare the Chicken (if needed):
  1. Use pre-cooked rotisserie chicken for convenience.
  2. If cooking fresh chicken, bake or pan-sear, then shred or dice.
3️⃣ Chop the Vegetables:
  1. Dice the cherry tomatoes, lettuce, avocado, and green onions.
4️⃣ Make the Dressing:
  1. In a small bowl, whisk together mayonnaise, sour cream, lemon juice, Dijon mustard, garlic powder, onion powder, salt, and black pepper.
5️⃣ Assemble the Salad:
  1. In a large bowl, combine chicken, bacon, cherry tomatoes, romaine lettuce, avocado, shredded cheese, and green onions.
  2. Pour the dressing over the salad and gently toss to coat.
  3. 6️⃣ Serve & Enjoy!
  4. Garnish with extra bacon and cheese if desired.
  5. Serve immediately or refrigerate for later.

Notes

  • Refrigeration: Store in an airtight container for up to 3 days.
  • Dressing Storage: Keep dressing separate until serving.
  • Meal Prep: Pre-portion into containers for grab-and-go lunches.

Cheesy Garlic Swirl Rolls: The Ultimate Homemade Comfort Food

Warm, Buttery, and Irresistibly Cheesy

Imagine pulling apart a warm, buttery roll, filled with melty cheese and fragrant garlic butter, with golden swirls that are soft on the inside and crispy on the outside. The smell alone is enough to make your mouth water!

These Cheesy Garlic Swirl Rolls are the perfect side dish for pasta, soup, or even as a standalone snack. Whether you’re making them for a family gathering, a holiday dinner, or a cozy night in, this recipe will quickly become a favorite.

Let’s dive into everything you need to know to make these irresistible, homemade Cheesy Garlic Swirl Rolls from scratch!

Why You’ll Love This Recipe

✔️ Soft & Buttery – Light, fluffy rolls with a rich, buttery texture.
✔️ Loaded with Cheese & Garlic – The perfect balance of savory flavors.
✔️ Easy to Make – Simple ingredients and easy steps.
✔️ Great for Any Occasion – Perfect for holidays, potlucks, or weeknight dinners.
✔️ Customizable – Swap out cheeses, add herbs, or experiment with flavors.

Ingredients You’ll Need

For the Dough

IngredientQuantity
Warm milk1 cup
Active dry yeast2 ¼ teaspoons (1 packet)
Granulated sugar2 tablespoons
Unsalted butter (melted)¼ cup
Salt1 teaspoon
Egg1
All-purpose flour3 ½ cups

For the Garlic Butter Filling

IngredientQuantity
Unsalted butter (softened)½ cup
Garlic (minced)3 cloves
Fresh parsley (chopped)2 tablespoons
Parmesan cheese (grated)½ cup
Mozzarella cheese (shredded)1 cup
Italian seasoning1 teaspoon

For the Topping

IngredientQuantity
Butter (melted)2 tablespoons
Parmesan cheese¼ cup
Garlic powder½ teaspoon

Essential Kitchen Tools

To make these Cheesy Garlic Swirl Rolls, you’ll need:

Step-by-Step Guide to Making Cheesy Garlic Swirl Rolls

1. Activate the Yeast

  • Warm the milk to 110°F (45°C).
  • Stir in sugar and yeast, then let it sit for 5-10 minutes until foamy.

2. Prepare the Dough

  • In a large mixing bowl, whisk together melted butter, egg, and salt.
  • Add the yeast mixture and gradually mix in the flour, one cup at a time.
  • Knead for 8-10 minutes until the dough is soft and elastic.

3. Let the Dough Rise

  • Place the dough in a greased bowl and cover it.
  • Let it rise for 1 hour until it doubles in size.

4. Prepare the Garlic Butter Filling

  • Mix together softened butter, minced garlic, parsley, Parmesan cheese, mozzarella, and Italian seasoning in a bowl.

5. Roll Out the Dough

  • Lightly flour a clean surface and roll the dough into a 12×18-inch rectangle.

6. Spread the Filling & Roll

  • Evenly spread the garlic butter mixture over the dough.
  • Roll it tightly into a log from the long side.

7. Cut and Arrange the Rolls

  • Slice into 12 even rolls and place them in a greased 9×13-inch pan.
  • Cover and let them rise for another 30 minutes.

8. Bake the Rolls

  • Preheat oven to 375°F (190°C).
  • Bake for 20-25 minutes until golden brown.

9. Add the Topping

  • Brush with melted butter, sprinkle with Parmesan cheese and garlic powder.
  • Serve warm and enjoy!

The Secret to Soft and Fluffy Rolls

✔️ Use warm (not hot) milk – Helps activate the yeast properly.
✔️ Let the dough rise fully – This ensures a light and airy texture.
✔️ Brush with butter before and after baking – Adds softness and richness.

How to Achieve the Perfect Cheesy Swirl

✔️ Spread the filling evenly – Ensures every bite has flavor.
✔️ Roll the dough tightly – Helps keep the cheese inside.
✔️ Use a sharp knife – Clean cuts prevent squished rolls.

Ingredient Substitutions and Variations

IngredientSubstitutes
MozzarellaCheddar or Gruyère
Fresh garlicGarlic powder
Italian seasoningBasil and oregano mix

How to Store and Reheat Leftovers

  • Refrigeration: Store in an airtight container for up to 3 days.
  • Freezing: Wrap individually and freeze for up to 2 months.
  • Reheating: Warm in the oven at 350°F (175°C) for 5 minutes.

Nutritional Information Breakdown

NutrientAmount per Serving
Calories~320
Protein8g
Carbohydrates35g
Fat15g

Frequently Asked Questions

1. Can I make the dough ahead of time?

Yes! Refrigerate overnight and bake fresh in the morning.

2. Can I use store-bought dough?

Yes, but homemade tastes better!

Final Thoughts and Call to Action

Now that you know how to make Cheesy Garlic Swirl Rolls, it’s time to bake a batch!

ating

Cheesy Garlic Swirl Rolls: The Ultimate Homemade Comfort Food

Warm, buttery, and loaded with melty cheese and fragrant garlic, these Cheesy Garlic Swirl Rolls are the perfect comfort food. With a soft, fluffy texture and a golden, crispy exterior, they make an irresistible side dish or snack for any occasion!
 
Prep Time 15 minutes
Cook Time 25 minutes
Total Time 55 minutes
Servings: 12 Rolls
Course: Bread
Cuisine: American

Ingredients
  

For the Dough:
  • 1 cup warm milk
  • 2 1/4 teaspoons 1 packet active dry yeast
  • 2 tablespoons granulated sugar
  • 1/4 cup unsalted butter melted
  • 1 teaspoon salt
  • 1 egg
  • 3 1/2 cups all-purpose flour
For the Garlic Butter Filling:
  • 1/2 cup unsalted butter softened
  • 3 cloves garlic minced
  • 2 tablespoons fresh parsley chopped
  • 1/2 cup Parmesan cheese grated
  • 1 cup mozzarella cheese shredded
  • 1 teaspoon Italian seasoning
For the Topping:
  • 2 tablespoons butter melted
  • 1/4 cup Parmesan cheese
  • 1/2 teaspoon garlic powder

Method
 

Activate the Yeast:
  1. Warm the milk to 110°F (45°C) and stir in sugar and yeast.
  2. Let sit for 5-10 minutes until foamy.
Prepare the Dough:
  1. In a large bowl, whisk together melted butter, egg, and salt.
  2. Add the yeast mixture and gradually mix in flour, one cup at a time.
  3. Knead for 8-10 minutes until the dough is soft and elastic.
Let the Dough Rise:
  1. Place dough in a greased bowl, cover, and let rise for 1 hour until doubled in size.
Prepare the Garlic Butter Filling:
  1. Mix softened butter, garlic, parsley, Parmesan cheese, mozzarella, and Italian seasoning in a bowl.
Roll Out the Dough:
  1. Lightly flour a clean surface and roll dough into a 12×18-inch rectangle.
Spread the Filling & Roll:
  1. Evenly spread the garlic butter mixture over the dough.
  2. Roll it tightly into a log from the long side.
Cut and Arrange the Rolls:
  1. Slice into 12 even rolls and place in a greased 9×13-inch pan.
  2. Cover and let rise for another 30 minutes.
Bake the Rolls:
  1. Preheat oven to 375°F (190°C).
  2. Bake for 20-25 minutes until golden brown.
Add the Topping:
  1. Brush with melted butter and sprinkle with Parmesan cheese and garlic powder.
  2. Serve warm and enjoy!

Notes

  • Use warm (not hot) milk to activate the yeast properly.
  • Allow the dough to rise fully for a soft and airy texture.
  • Store leftovers in an airtight container for up to 3 days or freeze for up to 2 months.

Tender Garlic Butter Beef Bites & Potatoes: A Hearty and Flavorful One-Pan Meal

A Comforting, Flavorful, and Easy Dinner

Picture this: succulent, juicy beef bites seared to perfection, paired with crispy, golden-brown potatoes, all coated in a rich garlic butter sauce. The combination of buttery tenderness, bold seasonings, and a crisp exterior makes this dish irresistible.

Whether you’re looking for a quick weeknight dinner, a hearty weekend meal, or a one-pan recipe that minimizes cleanup, this Tender Garlic Butter Beef Bites & Potatoes recipe is your perfect choice.

Let’s dive into how to make this easy and satisfying dish step by step!

Why You’ll Love This Recipe

✔️ One-Pan Meal – Less cleanup, more flavor.
✔️ Rich and Buttery – The garlic butter sauce enhances the flavors.
✔️ Crispy on the Outside, Tender on the Inside – Perfectly seared beef and potatoes.
✔️ Quick & Easy – Ready in under 30 minutes.
✔️ Customizable – Swap proteins, adjust seasoning, and add veggies.

Ingredients You’ll Need

Here’s everything you need to make Tender Garlic Butter Beef Bites & Potatoes:

Main Ingredients

IngredientQuantity
Beef sirloin (cut into bite-sized pieces)1 lb
Baby potatoes (halved)1 lb
Butter (unsalted)4 tbsp
Olive oil2 tbsp
Garlic (minced)5 cloves
Fresh parsley (chopped)2 tbsp
Worcestershire sauce1 tbsp
Paprika1 tsp
Italian seasoning1 tsp
Salt & black pepperTo taste

Optional Additions

IngredientPurpose
Red pepper flakesAdds heat
Lemon juiceAdds brightness
Grated ParmesanAdds richness

Essential Kitchen Tools

To make this one-pan beef and potatoes dish, you’ll need:

  • Large skillet or cast iron pan – For even heat distribution.
  • Tongs – For flipping beef bites.
  • Sharp knife & cutting board – For slicing beef and potatoes.
  • Mixing bowls – For seasoning the ingredients.

Step-by-Step Guide to Making Tender Garlic Butter Beef Bites & Potatoes

1. Prepare the Ingredients

  • Wash and cut the baby potatoes in half.
  • Slice the beef sirloin into bite-sized cubes.
  • Mince the garlic and chop the parsley.

2. Season the Potatoes

  • In a mixing bowl, toss the potatoes with:
    • 1 tbsp olive oil
    • Salt, black pepper, and paprika

3. Cook the Potatoes

  • Heat 1 tbsp olive oil in a large skillet over medium heat.
  • Add the potatoes and cook for 12-15 minutes, flipping occasionally until golden and crispy.
  • Transfer to a plate and set aside.

4. Sear the Beef Bites

  • In the same skillet, melt 2 tbsp butter over medium-high heat.
  • Add the beef bites in a single layer and sear for 2-3 minutes per side until browned.
  • Remove from the skillet and set aside.

5. Make the Garlic Butter Sauce

  • Reduce heat to medium-low.
  • Melt the remaining 2 tbsp butter and add minced garlic.
  • Cook for 30 seconds until fragrant.

6. Combine Everything

  • Return the potatoes and beef to the skillet.
  • Add Worcestershire sauce and Italian seasoning, tossing everything together.
  • Sprinkle with fresh parsley before serving.

7. Serve & Enjoy

  • Plate your Tender Garlic Butter Beef Bites & Potatoes.
  • Garnish with extra parsley or Parmesan cheese.

The Secret to Perfectly Tender Beef Bites

✔️ Use high-quality beef – Sirloin or ribeye work best.
✔️ Let the beef rest before cooking – This ensures even cooking.
✔️ Don’t overcrowd the skillet – Gives the beef a proper sear.

How to Achieve Crispy and Flavorful Potatoes

✔️ Dry the potatoes before cooking – Prevents steaming.
✔️ Use a cast iron skillet – Ensures a perfect crust.
✔️ Don’t stir too often – Let them sear properly.

Ingredient Substitutions and Variations

IngredientSubstitutes
Sirloin steakRibeye, filet mignon, or chicken
Baby potatoesRusset or sweet potatoes
Worcestershire sauceSoy sauce or balsamic vinegar

How to Store and Reheat Leftovers

  • Refrigeration: Store in an airtight container for up to 3 days.
  • Freezing: Not recommended (potatoes lose texture).
  • Reheating: Warm in a skillet over medium heat with a little butter.

Best Side Dishes to Serve with This Dish

🥗 Garden Salad – Adds freshness.
🌽 Grilled Corn on the Cob – A sweet and smoky complement.
🍞 Garlic Bread – Perfect for soaking up extra butter sauce.

Nutritional Information Breakdown

NutrientAmount per Serving
Calories~480
Protein35g
Carbohydrates30g
Fat25g

Frequently Asked Questions

1. Can I make this dish in the oven?

Yes! Bake at 400°F (200°C) for 25 minutes.

2. Can I use frozen potatoes?

Yes, but they may not get as crispy.

3. How can I make it spicy?

Add red pepper flakes or sriracha.

Final Thoughts and Call to Action

Now that you know how to make Tender Garlic Butter Beef Bites & Potatoes, it’s time to try it out!

ating

Tender Garlic Butter Beef Bites & Potatoes: A Hearty and Flavorful One-Pan Meal

This one-pan meal features juicy, perfectly seared beef bites and crispy golden potatoes, all coated in a rich garlic butter sauce. A quick and flavorful dinner option that’s easy to make and incredibly satisfying!
Prep Time 10 minutes
Cook Time 20 minutes
Total Time 30 minutes
Servings: 4 servings
Course: Main Dish
Cuisine: American

Ingredients
  

Main Ingredients:
  • 1 lb beef sirloin cut into bite-sized pieces
  • 1 lb baby potatoes halved
  • 4 tbsp unsalted butter
  • 2 tbsp olive oil
  • 5 cloves garlic minced
  • 2 tbsp fresh parsley chopped
  • 1 tbsp Worcestershire sauce
  • 1 tsp paprika
  • 1 tsp Italian seasoning
  • Salt & black pepper to taste
Optional Additions:
  • Red pepper flakes for heat
  • Lemon juice for brightness
  • Grated Parmesan for richness

Method
 

Prepare the Ingredients:
  1. Wash and halve the baby potatoes.
  2. Cut the beef sirloin into bite-sized cubes.
  3. Mince the garlic and chop the parsley.
Season the Potatoes:
  1. In a mixing bowl, toss the potatoes with 1 tbsp olive oil, salt, black pepper, and paprika.
Cook the Potatoes:
  1. Heat 1 tbsp olive oil in a large skillet over medium heat.
  2. Add the potatoes and cook for 12-15 minutes, flipping occasionally until golden and crispy.
  3. Transfer to a plate and set aside.
Sear the Beef Bites:
  1. In the same skillet, melt 2 tbsp butter over medium-high heat.
  2. Add the beef bites in a single layer and sear for 2-3 minutes per side until browned.
  3. Remove from the skillet and set aside.
Make the Garlic Butter Sauce:
  1. Reduce heat to medium-low.
  2. Melt the remaining 2 tbsp butter and add minced garlic.
  3. Cook for 30 seconds until fragrant.
Combine Everything:
  1. Return the potatoes and beef to the skillet.
  2. Add Worcestershire sauce and Italian seasoning, tossing everything together.
  3. Sprinkle with fresh parsley before serving.
Serve & Enjoy:
  1. Plate your Tender Garlic Butter Beef Bites & Potatoes.
  2. Garnish with extra parsley or Parmesan cheese.

Notes

  • Use high-quality beef for the best results (sirloin or ribeye work best).
  • Let the beef rest before cooking to ensure even doneness.
  • Dry potatoes before cooking to get them crispy instead of steaming.
  • Store leftovers in an airtight container in the refrigerator for up to 3 days.

Chicken Ramen Stir Fry: A Flavor-Packed 20-Minute Meal

A Quick and Delicious Asian-Inspired Dish

Sometimes, you crave something fast, flavorful, and satisfying, but you don’t want to settle for instant noodles. This Chicken Ramen Stir Fry is the perfect solution! Imagine tender, juicy chicken, crisp stir-fried vegetables, and chewy ramen noodles, all tossed in a rich, savory sauce made from soy sauce, oyster sauce, sesame oil, and fresh aromatics.

This dish is not only quick and easy to make but also packed with bold, umami flavors that rival your favorite takeout. Plus, it’s customizable, so you can switch up the vegetables or proteins to fit your taste.

Let’s dive into the ultimate guide to making Chicken Ramen Stir Fry—a dish you’ll want to cook again and again!

Why You’ll Love This Recipe

✔️ Quick & Easy – Ready in 30 minutes, perfect for busy weeknights.
✔️ Better Than Takeout – Fresh, homemade ingredients make all the difference.
✔️ Customizable – Swap the protein or veggies based on what you have.
✔️ Budget-Friendly – Uses simple pantry staples.
✔️ Packed with Flavor – A delicious blend of garlic, ginger, and savory sauces.

Ingredients You’ll Need

Here’s everything you need to make this Chicken Ramen Stir Fry:

Main Ingredients

IngredientQuantity
Ramen noodles (seasoning packets discarded)2 packages (6 oz each)
Boneless, skinless chicken thighs1 lb (cut into bite-sized pieces)
Vegetable oil2 tbsp
Red bell pepper (sliced)1
Snap peas1 cup
Carrot (julienned)1
Garlic (minced)3 cloves
Ginger (minced)1 tbsp
Green onions (white and green parts separated)3 (sliced)

For the Stir-Fry Sauce

IngredientQuantity
Soy sauce¼ cup
Oyster sauce2 tbsp
Sesame oil1 tbsp
Sugar1 tsp
White pepper¼ tsp

Essential Kitchen Tools

To make this dish successfully, you’ll need:

  • Large skillet or wok – For stir-frying the chicken and vegetables.
  • Medium saucepan – To cook the ramen noodles.
  • Sharp knife & cutting board – For prepping the chicken and vegetables.
  • Tongs or spatula – For tossing the stir fry.
  • Measuring spoons & cups – For precise ingredient portions.

Step-by-Step Guide to Making Chicken Ramen Stir Fry

1. Prepare the Sauce

  • In a small bowl, whisk together soy sauce, oyster sauce, sesame oil, sugar, and white pepper.
  • Set aside to let the flavors meld.

2. Cook the Ramen Noodles

  • Bring a medium saucepan of water to a boil.
  • Cook ramen noodles according to package directions (usually 2-3 minutes).
  • Drain, rinse under cold water, and toss with a little sesame oil to prevent sticking.

3. Cook the Chicken

  • Heat 1 tbsp vegetable oil in a large skillet or wok over medium-high heat.
  • Add the chicken and cook until golden brown and cooked through (about 5-7 minutes).
  • Remove from skillet and set aside.

4. Stir-Fry the Vegetables

  • In the same skillet, add another tbsp of oil.
  • Toss in the red bell pepper, snap peas, and julienned carrots.
  • Stir-fry for 2-3 minutes, until slightly tender but still crisp.

5. Add the Aromatics

  • Push the vegetables to the side and add garlic, ginger, and the white parts of the green onions.
  • Sauté for 30 seconds, until fragrant.

6. Combine Everything

  • Return the cooked chicken to the skillet.
  • Add the cooked ramen noodles and pour in the stir-fry sauce.
  • Toss everything together for 1-2 minutes, ensuring the sauce coats the noodles evenly.

7. Serve and Enjoy!

  • Garnish with green onion tops and an extra drizzle of sesame oil if desired.
  • Serve hot and enjoy your homemade Chicken Ramen Stir Fry!

The Secret to Perfectly Cooked Ramen in Stir Fry

✔️ Don’t overcook the noodles – They should be slightly firm before stir-frying.
✔️ Rinse with cold water – This stops cooking and removes excess starch.
✔️ Toss with sesame oil – Prevents clumping before adding to the stir fry.

Ingredient Substitutions and Variations

IngredientSubstitutes
Chicken thighsChicken breast, shrimp, or tofu
Ramen noodlesUdon or rice noodles
Oyster sauceHoisin sauce or extra soy sauce
White pepperBlack pepper or chili flakes

How to Store and Reheat Leftovers

  • Refrigeration: Store in an airtight container for up to 3 days.
  • Freezing: Not recommended, as noodles may turn mushy.
  • Reheating: Warm in a skillet over medium heat with a splash of soy sauce.

Best Side Dishes to Serve with Chicken Ramen Stir Fry

🥢 Spring Rolls – A crispy appetizer to complement the stir fry.
🥣 Miso Soup – A warm, light starter.
🥗 Asian Slaw – A crunchy, refreshing side.

Health Benefits of This Dish

✔️ High in Protein – Chicken provides essential muscle-building nutrients.
✔️ Rich in Vitamins – Bell peppers and snap peas add immune-boosting antioxidants.
✔️ Balanced Carbs & Healthy Fats – A great energy-boosting meal.

Nutritional Information Breakdown

NutrientAmount per Serving
Calories~450
Protein35g
Carbohydrates50g
Fat12g

Frequently Asked Questions

1. Can I make this dish vegetarian?

Yes! Replace chicken with tofu or mushrooms.

2. Can I make it spicy?

Add sriracha or red pepper flakes for heat.

3. Can I use instant ramen noodles?

Yes! Just discard the seasoning packets.

Final Thoughts and Call to Action

Now that you know how to make Chicken Ramen Stir Fry, it’s time to cook up this delicious meal!

ating

Chicken Ramen Stir Fry: A Flavor-Packed 20-Minute Meal

This Chicken Ramen Stir Fry is a quick and delicious meal packed with bold flavors and fresh ingredients. Tender chicken, crispy vegetables, and chewy ramen noodles are tossed in a savory stir-fry sauce for an easy 30-minute dinner that’s better than takeout!
Prep Time 10 minutes
Cook Time 10 minutes
Total Time 20 minutes
Servings: 4 servings
Course: Main Dish
Cuisine: Asian-inspired

Ingredients
  

Main Ingredients:
  • 2 packages 6 oz each ramen noodles (seasoning packets discarded)
  • 1 lb boneless skinless chicken thighs (cut into bite-sized pieces)
  • 2 tbsp vegetable oil
  • 1 red bell pepper sliced
  • 1 cup snap peas
  • 1 carrot julienned
  • 3 cloves garlic minced
  • 1 tbsp ginger minced
  • 3 green onions white and green parts separated, sliced
For the Stir-Fry Sauce:
  • 1/4 cup soy sauce
  • 2 tbsp oyster sauce
  • 1 tbsp sesame oil
  • 1 tsp sugar
  • 1/4 tsp white pepper
  •  

Method
 

  1. In a small bowl, whisk together soy sauce, oyster sauce, sesame oil, sugar, and white pepper. Set aside.
Cook the Ramen Noodles:
  1. Bring a medium saucepan of water to a boil.
  2. Cook ramen noodles according to package directions (usually 2-3 minutes).
  3. Drain, rinse under cold water, and toss with a little sesame oil to prevent sticking.
Cook the Chicken:
  1. Heat 1 tbsp vegetable oil in a large skillet or wok over medium-high heat.
  2. Add chicken and cook until golden brown and cooked through (about 5-7 minutes).
  3. Remove from skillet and set aside.
Stir-Fry the Vegetables:
  1. In the same skillet, add the remaining 1 tbsp of oil.
  2. Add bell pepper, snap peas, and julienned carrots. Stir-fry for 2-3 minutes until slightly tender but still crisp.
Add the Aromatics:
  1. Push vegetables to the side and add garlic, ginger, and white parts of the green onions.
  2. Sauté for 30 seconds until fragrant.
Combine Everything:
  1. Return the cooked chicken to the skillet.
  2. Add cooked ramen noodles and pour in the stir-fry sauce.
  3. Toss everything together for 1-2 minutes, ensuring the sauce coats the noodles evenly.
  4. Serve and Enjoy!
  5. Garnish with green onion tops and an extra drizzle of sesame oil if desired.
  6. Serve hot and enjoy your homemade Chicken Ramen Stir Fry!

Notes

  • Avoid overcooking the noodles; they should be slightly firm before stir-frying.
  • Rinse noodles with cold water to stop cooking and remove excess starch.
  • Store leftovers in an airtight container for up to 3 days.
  • Reheat in a skillet with a splash of soy sauce to maintain texture.