Crispy Chicken Parmesan: A Classic Italian Comfort Dish

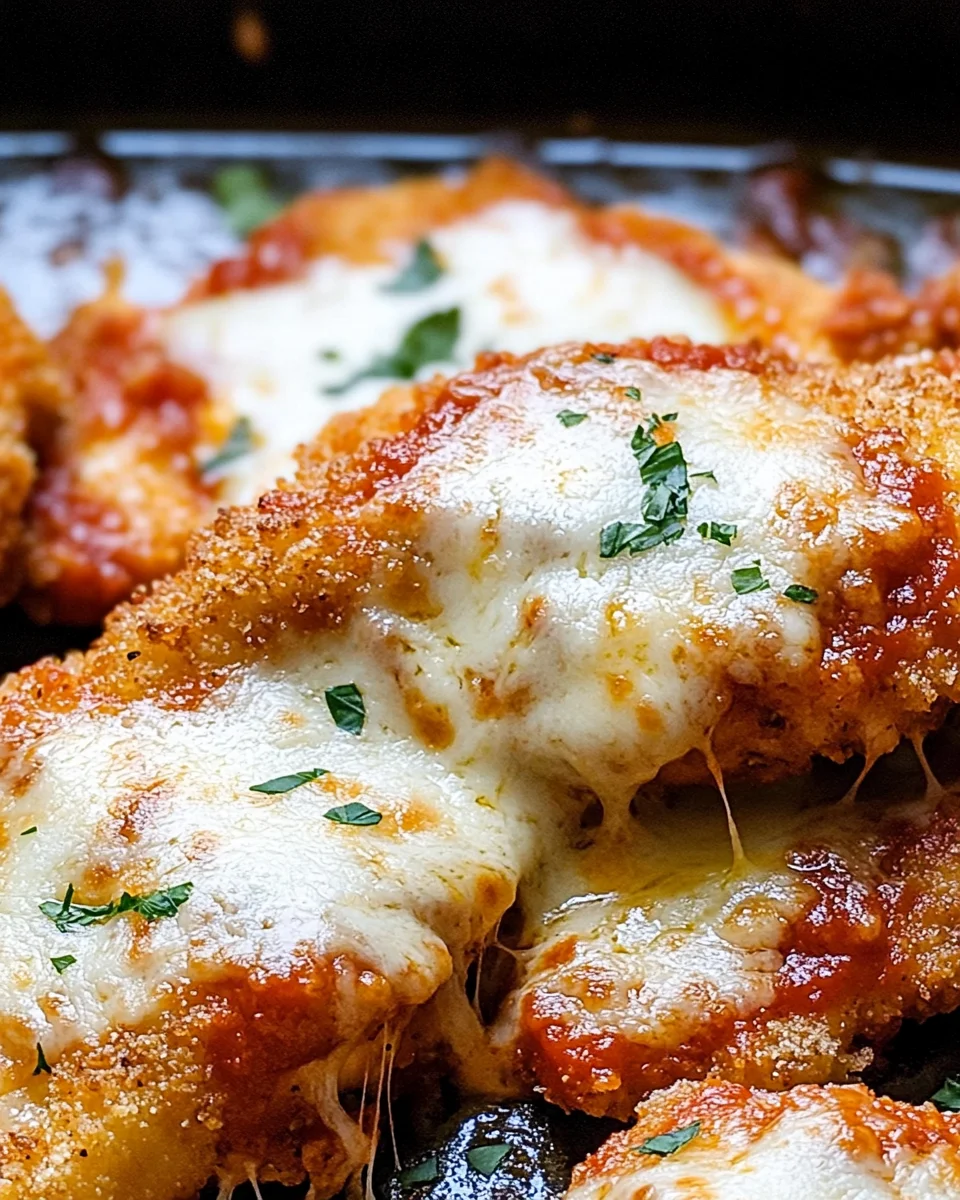
When it comes to classic comfort food, Crispy Chicken Parmesan stands out as a timeless favorite. This dish combines tender chicken cutlets, a golden, crispy crust, savory marinara sauce, and gooey melted cheese. It’s the perfect blend of flavors and textures, making it a hit with everyone from kids to dinner party guests.

Imagine slicing into a perfectly breaded chicken cutlet topped with rich marinara and melted mozzarella. Every bite is a mouthwatering mix of crispy, cheesy, and saucy goodness. Whether you’re preparing a family dinner or treating yourself, this recipe is sure to impress.

Why You’ll Love This Crispy Chicken Parmesan Recipe

This recipe isn’t just delicious—it’s practical and easy to make. Here’s why it’s a must-try:

  • Golden, Crispy Perfection: The combination of panko and Parmesan creates an unbeatable crunch.
  • Bursting with Flavor: Herbs, garlic, and marinara sauce make this dish a flavor-packed delight.
  • Easy to Prepare: Simple steps and common ingredients make it accessible for cooks of all levels.
  • Crowd-Pleasing Classic: It’s perfect for family dinners, romantic meals, or even meal prepping.

Ingredients for Crispy Chicken Parmesan

Here’s what you’ll need to make this delicious recipe.

For the Chicken

IngredientQuantity
Eggs2
Garlic (grated)3 cloves
Parsley (chopped)2 tbsp
Chicken cutlets6
Panko breadcrumbs1 cup
Regular breadcrumbs½ cup
Parmesan cheese (grated)½ cup
Basil1 tsp
Oregano1 tsp
Garlic powder1 tsp
Salt¼ tsp

For Cooking and Topping

IngredientQuantity
Avocado oil½ cup
Marinara sauce24 ounces (1 jar)
Shredded mozzarella½ cup
Fresh basil or parsleyFor garnish

Step-by-Step Instructions for Crispy Chicken Parmesan

1. Preheat Your Oven

  • Preheat your oven to 400°F (200°C).
  • Lightly grease a baking dish or baking sheet to prevent sticking.

2. Marinate the Chicken

  1. In a shallow bowl, whisk together:
    • Eggs
    • Grated garlic
    • Chopped parsley
    • Salt and pepper to taste.
  2. Dip each chicken cutlet into the egg mixture, ensuring it’s fully coated.
  3. Place the coated chicken in a shallow dish and let it marinate for 15–45 minutes.

3. Prepare the Breading Mixture

  1. In another shallow bowl, combine:
    • Panko breadcrumbs
    • Regular breadcrumbs
    • Grated Parmesan cheese
    • Basil
    • Oregano
    • Garlic powder
    • Salt to taste.
  2. Mix well to create a uniform breading.

4. Bread the Chicken

  1. Remove each chicken cutlet from the egg mixture, letting any excess drip off.
  2. Dip the cutlet into the breadcrumb mixture, pressing gently to ensure an even coating.
  3. Repeat with all the chicken cutlets and set them aside.

5. Fry the Chicken

  1. Heat avocado oil in a large skillet over medium-high heat.
  2. Once the oil is hot and shimmering, fry the breaded chicken cutlets for about 5 minutes per side until golden brown.
  3. Transfer the cooked chicken to the prepared baking sheet.

6. Top with Sauce and Cheese

  1. Spoon about ¼ cup of marinara sauce onto each chicken cutlet.
  2. Sprinkle a small handful of shredded mozzarella cheese on top.

7. Bake the Chicken

  1. Bake the chicken in the preheated oven for 17–20 minutes, or until the cheese is melted and bubbly and the chicken is cooked through (internal temperature of 165°F).

8. Garnish and Serve

  1. Remove the chicken from the oven and sprinkle with fresh basil or parsley.
  2. Serve hot with your favorite side dishes, such as pasta, salad, or garlic bread.

Tips for Perfect Crispy Chicken Parmesan

1. Use Thin Cutlets

Thin chicken cutlets cook evenly and ensure a crispy coating without overcooking the meat.

2. Marinate for Flavor

Letting the chicken soak in the egg mixture enhances the flavor and helps the breading adhere better.

3. Fry Before Baking

Frying creates a crispy crust, while baking ensures the chicken is fully cooked and the cheese melts perfectly.

4. Use Fresh Ingredients

Freshly grated Parmesan and high-quality marinara sauce elevate the flavor of the dish.

5. Customize the Seasonings

Adjust the herbs and spices to your taste. Add red pepper flakes for a spicy kick or more garlic powder for extra flavor.

Nutritional Information (Per Serving)

NutrientAmount
Calories450
Protein35 g
Carbohydrates20 g
Fat25 g
Fiber2 g

Creative Variations of Crispy Chicken Parmesan

1. Spicy Chicken Parmesan

Add red pepper flakes or cayenne pepper to the breading mixture for a spicy twist.

2. Gluten-Free Option

Use gluten-free breadcrumbs and almond flour instead of panko and regular breadcrumbs.

3. Low-Carb Version

Replace the breadcrumbs with crushed pork rinds or almond meal.

4. Air Fryer Chicken Parmesan

Cook the breaded chicken in an air fryer at 375°F for 12–15 minutes, flipping halfway through. Add sauce and cheese, then air-fry for an additional 2–3 minutes.

5. Extra Cheesy

Use a blend of mozzarella, provolone, and Gruyere cheese for a rich, cheesy topping.

Frequently Asked Questions (FAQs)

1. Can I make this dish ahead of time?

Yes! Bread and fry the chicken in advance, then refrigerate. Add the marinara and cheese just before baking.

2. Can I freeze leftovers?

Absolutely! Let the chicken cool completely, then freeze in an airtight container for up to 3 months. Reheat in the oven for the best texture.

3. What’s the best way to reheat Crispy Chicken Parmesan?

Reheat in the oven at 350°F until warmed through to maintain the crispy texture. Avoid microwaving, as it can make the breading soggy.

4. Can I use chicken thighs instead of breasts?

Yes, boneless, skinless chicken thighs work well and add extra juiciness.

5. What sides go well with this dish?

Serve with spaghetti, roasted vegetables, Caesar salad, or garlic bread for a complete meal.

6. Can I use homemade marinara sauce?

Definitely! Homemade marinara adds a fresh, flavorful touch to the dish.

A Final Bite: Why You Should Try Crispy Chicken Parmesan

Crispy Chicken Parmesan is a classic for a reason—it’s comforting, flavorful, and satisfying in every way. The crunchy coating, tender chicken, savory marinara, and melted cheese come together to create a dish that feels both indulgent and approachable.

Ready to Cook?

Gather your ingredients, fire up your skillet, and get ready to enjoy the ultimate comfort food. With this foolproof recipe, your Crispy Chicken Parmesan will be the star of any meal!

ating

Crispy Chicken Parmesan: A Classic Italian Comfort Dish

Crispy Chicken Parmesan is a timeless Italian-American classic that combines tender chicken cutlets, a golden, crunchy crust, savory marinara sauce, and gooey melted cheese. Every bite is a delicious harmony of textures and flavors, perfect for weeknight dinners, romantic meals, or impressing dinner guests. This comforting dish is easy to prepare and always a crowd-pleaser.  
Prep Time 20 minutes
Cook Time 30 minutes
Total Time 50 minutes
Servings: 4 servings
Course: Main Dish
Cuisine: Italian-American

Ingredients
  

For the Chicken:
  • 2 large eggs
  • 3 cloves garlic grated
  • 2 tablespoons parsley chopped
  • 6 chicken cutlets
  • 1 cup panko breadcrumbs
  • ½ cup regular breadcrumbs
  • ½ cup Parmesan cheese grated
  • 1 teaspoon basil
  • 1 teaspoon oregano
  • 1 teaspoon garlic powder
  • ¼ teaspoon salt
For Cooking and Topping:
  • ½ cup avocado oil or any neutral oil for frying
  • 24 ounces marinara sauce 1 jar
  • ½ cup shredded mozzarella cheese
  • Fresh basil or parsley for garnish

Method
 

Preheat the Oven:
  1. Preheat your oven to 400°F (200°C).
  2. Lightly grease a baking dish or baking sheet to prevent sticking.
Marinate the Chicken:
  1. In a shallow bowl, whisk together the eggs, grated garlic, chopped parsley, and a pinch of salt and pepper.
  2. Dip each chicken cutlet into the egg mixture, ensuring it’s fully coated.
  3. Place the coated chicken in a shallow dish and let it marinate for 15–45 minutes to enhance flavor and help the breading adhere.
Prepare the Breading Mixture:
  1. In another shallow bowl, combine the panko breadcrumbs, regular breadcrumbs, grated Parmesan cheese, basil, oregano, garlic powder, and salt.
  2. Mix thoroughly to create a uniform breading.
Bread the Chicken:
  1. Remove each chicken cutlet from the egg mixture, letting any excess drip off.
  2. Dip the cutlet into the breadcrumb mixture, pressing gently to ensure an even coating.
  3. Repeat with all the chicken cutlets and set them aside.
Fry the Chicken:
  1. Heat the avocado oil in a large skillet over medium-high heat.
  2. Once the oil is hot and shimmering, fry the breaded chicken cutlets for about 5 minutes per side, until golden brown and crispy.
  3. Transfer the cooked chicken to the prepared baking dish.
Top with Sauce and Cheese:
  1. Spoon about ¼ cup of marinara sauce onto each chicken cutlet.
  2. Sprinkle shredded mozzarella cheese over the sauce.
Bake the Chicken:
  1. Bake the chicken in the preheated oven for 17–20 minutes, or until the cheese is melted and bubbly, and the chicken reaches an internal temperature of 165°F (74°C).
Garnish and Serve:
  1. Remove the chicken from the oven and sprinkle with fresh basil or parsley.
  2. Serve hot with your favorite sides, such as pasta, salad, or garlic bread.

Notes

  • Thin Cutlets: Pound chicken breasts to an even thickness for uniform cooking and a crispy crust.
  • Fry First, Bake Later: Frying ensures a crunchy crust, while baking melts the cheese and cooks the chicken through.
  • Use Fresh Ingredients: Freshly grated Parmesan and high-quality marinara sauce enhance the dish’s flavor.

Shrimp Dirty Rice: A Flavorful Southern Classic

When you’re craving bold flavors and hearty comfort food, Shrimp Dirty Rice is the answer. This dish is a rich combination of savory meats, tender shrimp, aromatic vegetables, and perfectly seasoned rice. It’s a Southern favorite that brings people together with every flavorful bite.

Imagine serving a plate of smoky, spiced rice with juicy shrimp nestled in a savory mix of sausage and ground beef. Whether it’s a casual dinner, a festive gathering, or meal prepping for the week, this dish checks every box.

Why You’ll Love Shrimp Dirty Rice

This recipe has everything you need in a meal:

  • Packed with Flavor: The combination of meats, shrimp, and spices creates a dish bursting with taste.
  • One-Pan Wonder: Minimal cleanup makes it a perfect weeknight dinner.
  • Customizable: Adjust the spices or add your favorite vegetables to make it your own.
  • Authentic Southern Charm: It brings the heart of Southern cooking to your table.

Ingredients for Shrimp Dirty Rice

Here’s what you’ll need to create this mouthwatering dish.

Main Ingredients

IngredientQuantity
Hamburger meat1 lb
Ground pork sausage1 lb
Shrimp (tail-off, deveined)10–12
Cooked rice (long-grain)4 cups
Chicken broth (Better Than Bouillon recommended)2 cups
Mixed onions and bell peppers (chopped)1.5 cups
Vegetable oil3 tbsp
Flour¼ cup

Seasonings and Spices

IngredientQuantity
Seafood seasoning1 tsp
Oregano1 tbsp
Minced garlic3 tsp
Thyme1 tsp
Garlic powder1 tbsp
Onion powder1 tsp
Chili powder1 tsp
Pepper½ tsp
Salt½ tsp
Cayenne pepper (optional)Pinch

Step-by-Step Instructions for Shrimp Dirty Rice

1. Season and Cook the Shrimp

  1. Season the shrimp with seafood seasoning.
  2. Heat 2 tablespoons of vegetable oil in a skillet over medium-high heat.
  3. Cook the shrimp for 2–3 minutes on each side until they turn opaque and slightly golden.
  4. Remove from the skillet and set aside.

2. Brown the Meats and Sauté the Vegetables

  1. In the same skillet, add 1 tablespoon of vegetable oil.
  2. Cook the hamburger meat and ground pork sausage, breaking them up with a spoon, until browned.
  3. Add the chopped onions, bell peppers, and minced garlic.
  4. Sauté until the vegetables are softened and fragrant, about 5 minutes.

3. Add Seasonings and Create a Thick Sauce

  1. Stir in the following seasonings:
    • Oregano
    • Thyme
    • Garlic powder
    • Onion powder
    • Chili powder
    • Pepper
    • Salt
    • Optional: Cayenne pepper for heat.
  2. Sprinkle the flour over the mixture, stirring to coat evenly.
  3. Gradually add the chicken broth, stirring constantly to create a thick, flavorful sauce.
  4. Let the mixture simmer for 5–7 minutes.

4. Combine with Rice and Finish the Dish

  1. Add the cooked rice to the skillet, stirring to combine it with the meat and sauce.
  2. Gently fold in the cooked shrimp, ensuring they are evenly distributed.
  3. Cook for an additional 2–3 minutes until the dish is heated through.

5. Serve and Enjoy

  1. Spoon the Shrimp Dirty Rice onto plates or into bowls.
  2. Garnish with fresh parsley or chopped green onions for a burst of color and freshness.
  3. Serve hot with a side of green salad or crusty bread.

Tips for Perfect Shrimp Dirty Rice

1. Choose the Right Rice

Long-grain rice works best because it stays fluffy and separates well, ensuring the dish doesn’t turn mushy.

2. Use Fresh Shrimp

Fresh shrimp enhances the flavor, but frozen shrimp can also work if thawed and patted dry before cooking.

3. Adjust the Heat

If you love spicy food, add extra cayenne pepper or a dash of hot sauce.

4. Don’t Skip the Browning

Browning the meats and sautéing the vegetables creates a depth of flavor essential to the dish.

Nutritional Information (Per Serving)

NutrientAmount
Calories430
Protein24 g
Carbohydrates35 g
Fat20 g
Fiber2 g

Creative Variations of Shrimp Dirty Rice

1. Cajun Shrimp Dirty Rice

Add Cajun seasoning for a smoky, spicy twist, and include andouille sausage for an authentic Louisiana flavor.

2. Vegetarian Version

Replace the meats and shrimp with plant-based sausage or sautéed mushrooms for a hearty vegetarian option.

3. Seafood Extravaganza

Add crabmeat or crawfish tails along with the shrimp for a seafood-packed version.

4. Herb-Infused

Stir in fresh thyme, parsley, or basil for a fragrant herbaceous touch.

5. Gluten-Free Option

Frequently Asked Questions (FAQs)

1. Can I use pre-cooked shrimp?

Yes! Add pre-cooked shrimp in the final step to avoid overcooking them.

2. How do I store leftovers?

Store leftovers in an airtight container in the refrigerator for up to 3 days. Reheat gently on the stove or in the microwave, stirring occasionally.

3. Can I freeze Shrimp Dirty Rice?

Absolutely! Cool the dish completely, then transfer it to freezer-safe containers. Freeze for up to 3 months and thaw in the refrigerator before reheating.

4. What’s the best way to reheat this dish?

Reheat on the stovetop over medium heat, adding a splash of broth or water to keep it moist.

5. Can I substitute the ground meats?

Of course! Turkey, chicken, or plant-based ground meat are excellent alternatives.

6. What sides pair well with this dish?

A simple green salad, cornbread, or sautéed greens make perfect accompaniments.

A Final Word: Why You Should Try Shrimp Dirty Rice

Shrimp Dirty Rice is more than just a meal—it’s an experience that combines the bold flavors of the South with the comfort of home-cooked goodness. It’s hearty, satisfying, and versatile, making it a great choice for any occasion.

Ready to Cook?

Gather your ingredients, follow the steps, and enjoy the rich, savory flavors of this Southern classic. Your family and friends will thank you for serving up this delicious dish!

ating

Shrimp Dirty Rice: A Flavorful Southern Classic

Shrimp Dirty Rice is a flavorful Southern classic that brings together tender shrimp, savory meats, aromatic vegetables, and perfectly seasoned rice in one hearty dish. With its bold spices and rich taste, this one-pan wonder is perfect for weeknight dinners, festive gatherings, or meal prep. Each bite is a celebration of Southern comfort food at its best.  
Prep Time 15 minutes
Cook Time 30 minutes
Total Time 45 minutes
Servings: 6 servings
Course: Main Dish
Cuisine: Southern

Ingredients
  

Main Ingredients:
  • 1 lb hamburger meat
  • 1 lb ground pork sausage
  • 10 –12 shrimp tail-off, deveined
  • 4 cups cooked long-grain rice
  • 2 cups chicken broth Better Than Bouillon recommended
  • cups mixed onions and bell peppers chopped
  • 3 tablespoons vegetable oil
  • ¼ cup flour
Seasonings and Spices:
  • 1 teaspoon seafood seasoning
  • 1 tablespoon oregano
  • 3 teaspoons minced garlic
  • 1 teaspoon thyme
  • 1 tablespoon garlic powder
  • 1 teaspoon onion powder
  • 1 teaspoon chili powder
  • ½ teaspoon pepper
  • ½ teaspoon salt
  • Pinch of cayenne pepper optional

Method
 

Season and Cook the Shrimp:
  1. Season the shrimp with seafood seasoning.
  2. Heat 2 tablespoons of vegetable oil in a large skillet over medium-high heat.
  3. Cook the shrimp for 2–3 minutes on each side until opaque and slightly golden.
  4. Remove the shrimp from the skillet and set aside.
Brown the Meats and Sauté the Vegetables:
  1. Add the remaining 1 tablespoon of vegetable oil to the skillet.
  2. Cook the hamburger meat and ground pork sausage, breaking them apart with a spoon, until browned and cooked through.
  3. Add the chopped onions, bell peppers, and minced garlic.
  4. Sauté for 5 minutes until the vegetables are softened and aromatic.
Add Seasonings and Create the Sauce:
  1. Stir in oregano, thyme, garlic powder, onion powder, chili powder, pepper, salt, and cayenne pepper (if using).
  2. Sprinkle the flour over the meat mixture and stir until evenly coated.
  3. Gradually add the chicken broth, stirring constantly to create a thick, flavorful sauce.
  4. Let the mixture simmer for 5–7 minutes.
Combine with Rice and Shrimp:
  1. Add the cooked rice to the skillet, stirring to combine it with the meat and sauce.
  2. Gently fold in the cooked shrimp, ensuring they are evenly distributed.
  3. Cook for an additional 2–3 minutes until everything is heated through.
Serve and Enjoy:
  1. Spoon the Shrimp Dirty Rice onto plates or into bowls.
  2. Garnish with fresh parsley or chopped green onions for a burst of color and flavor.
  3. Serve hot with a side of green salad or crusty bread.

Notes

  • Use Fresh Shrimp: Fresh shrimp enhances the flavor, but thawed frozen shrimp also works well.
  • Choose the Right Rice: Long-grain rice stays fluffy and separates easily, preventing a mushy texture.
  • Adjust Heat Levels: Add more cayenne pepper or a splash of hot sauce for extra spice.

Easy Creamy Spinach Mushroom Lasagna: A Vegetarian Delight

Lasagna is the ultimate comfort food, and this Easy Creamy Spinach Mushroom Lasagna takes the classic dish to a whole new level. Imagine layers of tender pasta, a rich and creamy béchamel sauce, hearty spinach and mushroom filling, and gooey cheese. Whether you’re feeding a family, impressing guests, or simply treating yourself, this vegetarian lasagna is the perfect recipe.

Picture yourself serving a warm slice of lasagna, the cheese stretching with every bite and the creamy, flavorful filling melting in your mouth. It’s satisfying, indulgent, and packed with wholesome ingredients.

Why You’ll Love This Recipe

This lasagna has everything you could want:

  • Easy to Prepare: Simple steps and ingredients make it accessible for cooks of all levels.
  • Vegetarian-Friendly: A delicious meatless alternative that doesn’t skimp on flavor.
  • Customizable: Adjust the ingredients to suit your taste or dietary needs.
  • Comfort Food at Its Best: Creamy, cheesy, and full of texture, it’s a crowd-pleaser every time.

Ingredients for Easy Creamy Spinach Mushroom Lasagna

Here’s what you’ll need to make this delicious recipe.

For the Vegetable Filling

IngredientQuantity
Olive oil2 tbsp
Fresh spinach (chopped)3 cups
Mushrooms (sliced)2 cups
Garlic (minced)3 cloves
Salt and pepperTo taste

For the Béchamel Sauce

IngredientQuantity
Butter3 tbsp
All-purpose flour3 tbsp
Milk (warm)3 cups
Ground nutmeg½ tsp
Salt and pepperTo taste

For the Lasagna Layers

IngredientQuantity
Lasagna noodles9 (no-boil or pre-cooked)
Shredded mozzarella cheese2 cups
Grated Parmesan cheese½ cup
Ricotta cheese1 cup

Step-by-Step Instructions for Easy Creamy Spinach Mushroom Lasagna

1. Prepare the Vegetable Filling

  1. Heat olive oil in a large skillet over medium heat.
  2. Add the sliced mushrooms and sauté for about 5 minutes until softened and lightly browned.
  3. Stir in the spinach and minced garlic, cooking until the spinach wilts.
  4. Season with salt and pepper to taste.
  5. Remove from heat and set the mixture aside.

2. Make the Béchamel Sauce

  1. Melt butter in a saucepan over medium heat.
  2. Whisk in the flour and cook for 1–2 minutes to create a smooth paste (roux).
  3. Gradually add warm milk, whisking constantly to avoid lumps.
  4. Bring the mixture to a gentle simmer, stirring until it thickens.
  5. Season with nutmeg, salt, and pepper to taste.
  6. Remove from heat and set aside.

3. Assemble the Lasagna

  1. Preheat your oven to 375°F (190°C).
  2. Spread a thin layer of béchamel sauce on the bottom of a 9×13-inch baking dish.
  3. Place 3 lasagna noodles over the sauce.
  4. Layer ⅓ of the vegetable filling over the noodles.
  5. Add dollops of ricotta, a sprinkle of mozzarella, and a spoonful of béchamel sauce.
  6. Repeat the layers twice more, finishing with a generous layer of béchamel sauce, mozzarella, and Parmesan on top.

4. Bake the Lasagna

  1. Cover the dish with foil and bake for 25 minutes.
  2. Remove the foil and bake for another 15 minutes, or until the cheese is melted and bubbly.
  3. Let the lasagna rest for 10 minutes before slicing and serving.

Tips for the Best Spinach Mushroom Lasagna

1. Use Fresh Ingredients

Fresh spinach, mushrooms, and high-quality cheese make a big difference in flavor and texture.

2. Don’t Overcook the Sauce

The béchamel should be smooth and creamy—avoid letting it boil, as this can cause it to separate.

3. Customize the Layers

  • Add cooked zucchini slices or roasted red peppers for extra veggies.
  • Sprinkle in red pepper flakes for a hint of spice.

4. Let It Rest

Allowing the lasagna to rest after baking helps the layers set and makes slicing easier.

Nutritional Information (Per Serving)

NutrientAmount
Calories360
Protein18 g
Carbohydrates28 g
Fat20 g
Fiber3 g

Creative Variations of Creamy Spinach Mushroom Lasagna

1. Vegan Option

  • Replace ricotta with cashew cream.
  • Use plant-based milk and vegan cheese alternatives.

2. Protein Boost

  • Add cooked, shredded chicken or crumbled sausage to the vegetable filling.

3. Gluten-Free

  • Use gluten-free lasagna noodles and replace the flour in the béchamel with a gluten-free alternative like rice flour.

4. Herb-Infused

  • Stir fresh basil, thyme, or oregano into the béchamel for added depth of flavor.

5. Cheese Lover’s Dream

  • Incorporate additional cheeses like provolone or Gruyere into the layers.

Frequently Asked Questions (FAQs)

1. Can I make this lasagna ahead of time?

Yes! Assemble the lasagna and refrigerate it (unbaked) for up to 24 hours. Bake it straight from the fridge, adding an extra 10 minutes to the cooking time.

2. Can I freeze this lasagna?

Absolutely. Wrap the assembled (unbaked) lasagna tightly in foil and freeze for up to 3 months. Thaw overnight in the fridge before baking.

3. Can I use frozen spinach?

Yes, just thaw and squeeze out excess water before adding it to the filling.

4. What’s the best way to reheat leftovers?

Reheat slices in the oven at 350°F until warmed through, or microwave individual portions.

5. Can I skip the béchamel sauce?

The béchamel is key to the creamy texture, but you can replace it with Alfredo sauce for a richer alternative.

6. What sides go well with this lasagna?

Serve it with a fresh green salad, garlic bread, or roasted vegetables for a complete meal.

A Final Slice: Why You Should Try This Recipe

This Easy Creamy Spinach Mushroom Lasagna is more than just a meal—it’s a celebration of flavors, textures, and wholesome ingredients. It’s perfect for cozy family dinners, vegetarian guests, or anyone craving comfort food with a gourmet touch.

Ready to Bake?

Gather your ingredients, preheat your oven, and create a dish that will have everyone asking for seconds. With its creamy layers and rich flavors, this lasagna is sure to become a family favorite!

ating

Easy Creamy Spinach Mushroom Lasagna: A Vegetarian Delight

Creamy, cheesy, and packed with flavor, this Easy Creamy Spinach Mushroom Lasagna is the ultimate comfort food. Layered with tender pasta, rich béchamel sauce, sautéed spinach and mushrooms, and gooey cheese, this vegetarian lasagna is perfect for family dinners, entertaining guests, or indulging in a gourmet twist on a classic dish.  
Prep Time 20 minutes
Cook Time 40 minutes
Total Time 1 hour
Servings: 6 servings
Course: Main Dish
Cuisine: Italian

Ingredients
  

For the Vegetable Filling:
  • 2 tablespoons olive oil
  • 3 cups fresh spinach chopped
  • 2 cups mushrooms sliced
  • 3 cloves garlic minced
  • Salt and pepper to taste
For the Béchamel Sauce:
  • 3 tablespoons butter
  • 3 tablespoons all-purpose flour
  • 3 cups warm milk
  • ½ teaspoon ground nutmeg
  • Salt and pepper to taste
For the Lasagna Layers:
  • 9 lasagna noodles no-boil or pre-cooked
  • 2 cups shredded mozzarella cheese
  • ½ cup grated Parmesan cheese
  • 1 cup ricotta cheese

Method
 

Prepare the Vegetable Filling:
  1. Heat olive oil in a large skillet over medium heat.
  2. Add the sliced mushrooms and sauté for about 5 minutes until softened and lightly browned.
  3. Stir in the spinach and garlic, cooking until the spinach wilts.
  4. Season with salt and pepper to taste. Remove from heat and set aside.
Make the Béchamel Sauce:
  1. Melt butter in a saucepan over medium heat.
  2. Whisk in the flour and cook for 1–2 minutes to form a smooth paste (roux).
  3. Gradually add the warm milk, whisking constantly to avoid lumps.
  4. Simmer gently, stirring until the sauce thickens.
  5. Add ground nutmeg, salt, and pepper to taste. Remove from heat and set aside.
Assemble the Lasagna:
  1. Preheat your oven to 375°F (190°C).
  2. Spread a thin layer of béchamel sauce on the bottom of a 9×13-inch baking dish.
  3. Place 3 lasagna noodles over the sauce.
  4. Spread ⅓ of the vegetable filling over the noodles.
  5. Add dollops of ricotta, a sprinkle of mozzarella, and a spoonful of béchamel sauce.
  6. Repeat the layers twice more, finishing with a generous layer of béchamel sauce, mozzarella, and Parmesan on top.
Bake the Lasagna:
  1. Cover the baking dish with foil and bake for 25 minutes.
  2. Remove the foil and bake for an additional 15 minutes, or until the cheese is melted and bubbly.
  3. Let the lasagna rest for 10 minutes before slicing and serving.

Notes

  • Fresh Ingredients: Use fresh spinach, mushrooms, and high-quality cheese for the best flavor.
  • Resting Time: Let the lasagna rest after baking to help the layers set and make slicing easier.
  • Customizations: Add roasted red peppers or cooked zucchini for extra veggies, or sprinkle red pepper flakes for a hint of heat.

Sweet Alabama Pecan Bread: A Southern Delight

There’s nothing quite like the comfort of baking a classic Southern recipe. Sweet Alabama Pecan Bread is a rich, moist, and perfectly sweet treat that’s as satisfying as it is easy to make. With its tender crumb and nutty flavor, this dessert (or snack!) will quickly become a favorite in your home.

Picture slicing into a warm loaf, the aroma of vanilla and pecans filling your kitchen, and enjoying a bite of pure comfort. Whether you’re sharing it with family, bringing it to a potluck, or treating yourself on a quiet afternoon, this pecan bread is the ultimate crowd-pleaser.

Why You’ll Love Sweet Alabama Pecan Bread

This recipe is a gem for so many reasons:

  • Simple to Make: No complicated techniques or hard-to-find ingredients.
  • Packed with Flavor: The pecans and vanilla create a rich, irresistible taste.
  • Perfect for Any Occasion: Great for breakfast, dessert, or even as a gift.
  • A Southern Classic: It embodies the warm, sweet flavors of Southern baking.

Ingredients for Sweet Alabama Pecan Bread

Here’s everything you need to make this delightful recipe.

Main Ingredients

IngredientQuantity
Granulated sugar1 cup
Light brown sugar (packed)1 cup
Eggs (large)4
Vegetable oil1 cup
Self-rising flour2 cups
Vanilla extract1 teaspoon
Chopped pecans1 cup

Step-by-Step Instructions for Sweet Alabama Pecan Bread

1. Preheat Your Oven

  • Set your oven to 350°F (175°C).
  • Grease a 9×13-inch baking dish with butter or nonstick spray, ensuring even coverage.

2. Mix the Wet Ingredients

  1. In a large mixing bowl, combine:
    • Granulated sugar
    • Light brown sugar
    • Eggs
    • Vegetable oil
  2. Stir or mix with an electric mixer until smooth and fully combined.

3. Incorporate the Dry Ingredients

  1. Gradually add the self-rising flour to the wet mixture.
  2. Stir gently until just combined—avoid overmixing to keep the bread tender.

4. Add Flavor and Texture

  1. Stir in the vanilla extract to enhance the flavor.
  2. Fold in the chopped pecans, ensuring they are evenly distributed throughout the batter.

5. Bake the Pecan Bread

  1. Pour the batter into the prepared baking dish, spreading it out evenly.
  2. Bake in the preheated oven for 30–35 minutes, or until a toothpick inserted into the center comes out clean.

6. Cool and Serve

  1. Allow the bread to cool in the pan for about 10 minutes.
  2. Slice and serve warm or at room temperature.

Tips for Perfect Sweet Alabama Pecan Bread

1. Use Fresh Pecans

Fresh pecans add a rich, buttery flavor and ensure the best texture in every bite.

2. Don’t Overmix the Batter

Overmixing can make the bread dense. Mix until the ingredients are just combined.

3. Customize the Recipe

  • Add a sprinkle of cinnamon or nutmeg for a warm spice note.
  • Fold in chocolate chips or dried cranberries for extra sweetness.

4. Test for Doneness

Check the bread with a toothpick or cake tester—if it comes out clean, it’s ready.

Nutritional Information (Per Serving)

NutrientAmount
Calories310
Protein4 g
Carbohydrates38 g
Fat17 g
Fiber1 g

Creative Variations of Sweet Alabama Pecan Bread

1. Glazed Pecan Bread

Drizzle a simple glaze made of powdered sugar, milk, and vanilla over the cooled bread for a touch of sweetness.

2. Chocolate Pecan Bread

Add ½ cup of chocolate chips to the batter for a decadent twist.

3. Maple-Infused Pecan Bread

Replace half of the granulated sugar with maple syrup for a rich, earthy flavor.

4. Coconut Pecan Bread

Mix in ½ cup of shredded coconut for a tropical spin.

5. Spiced Pecan Bread

Add 1 teaspoon of cinnamon and ¼ teaspoon of nutmeg to the batter for a warm, spiced version.

Frequently Asked Questions (FAQs)

1. Can I use all-purpose flour instead of self-rising flour?

Yes! For every cup of self-rising flour, use 1 cup of all-purpose flour, 1½ teaspoons of baking powder, and ¼ teaspoon of salt.

2. How do I store Sweet Alabama Pecan Bread?

Store the bread in an airtight container at room temperature for up to 3 days or in the refrigerator for up to a week.

3. Can I freeze this bread?

Absolutely! Wrap the cooled bread tightly in plastic wrap and aluminum foil, then freeze for up to 3 months. Thaw at room temperature before serving.

4. Can I use a different type of nut?

Yes! Walnuts, almonds, or even hazelnuts can be used instead of pecans.

5. How can I make this bread healthier?

Substitute half the oil with unsweetened applesauce, and reduce the sugar slightly if desired.

6. Can I make this recipe gluten-free?

Use a gluten-free flour blend with added leavening agents to replace the self-rising flour.

A Final Bite: Why You Should Try Sweet Alabama Pecan Bread

Sweet Alabama Pecan Bread is more than just a dessert—it’s a slice of Southern comfort that brings people together. With its simple preparation, rich flavor, and endless customizations, this bread is perfect for every occasion, from family gatherings to quiet afternoons.

Ready to Bake?

Gather your ingredients, preheat your oven, and treat yourself to the warm, nutty goodness of this classic recipe. Your kitchen will smell amazing, and your taste buds will thank you!

ating

Sweet Alabama Pecan Bread: A Southern Delight

Sweet Alabama Pecan Bread is a moist, rich, and perfectly sweet Southern classic. Packed with buttery pecans and a tender crumb, this recipe is a delightful treat for any occasion. Whether you’re enjoying it as a dessert, snack, or breakfast, this easy-to-make bread will fill your home with the comforting aroma of Southern baking.  
Prep Time 10 minutes
Cook Time 35 minutes
Total Time 45 minutes
Servings: 12 servings
Course: Dessert, Snack
Cuisine: Southern

Ingredients
  

Main Ingredients:
  • 1 cup granulated sugar
  • 1 cup light brown sugar packed
  • 4 large eggs
  • 1 cup vegetable oil
  • 2 cups self-rising flour
  • 1 teaspoon vanilla extract
  • 1 cup chopped pecans

Method
 

  1. Preheat the Oven
  2. Preheat your oven to 350°F (175°C).
  3. Grease a 9×13-inch baking dish with butter or nonstick spray, ensuring even coverage.
  4. Mix the Wet Ingredients
  5. In a large mixing bowl, combine granulated sugar, light brown sugar, eggs, and vegetable oil.
  6. Stir or use an electric mixer on medium speed until smooth and well combined.
  7. Incorporate the Dry Ingredients
  8. Gradually add the self-rising flour to the wet mixture, mixing gently until just combined.
  9. Avoid overmixing to maintain a tender texture.
  10. Add Flavor and Texture
  11. Stir in the vanilla extract.
  12. Fold in the chopped pecans, ensuring they are evenly distributed throughout the batter.
  13. Bake the Pecan Bread
  14. Pour the batter into the prepared baking dish and spread it evenly with a spatula.
  15. Bake for 30–35 minutes, or until a toothpick inserted into the center comes out clean.
  16. Cool and Serve
  17. Allow the bread to cool in the pan for about 10 minutes.
  18. Slice and serve warm or at room temperature for the best flavor.

Notes

  • Fresh Pecans Matter: Use fresh, high-quality pecans for the best flavor and texture.
  • Avoid Overmixing: Mix just until the ingredients are combined to keep the bread light and tender.
  • Check for Doneness: Use a toothpick or cake tester to ensure the bread is fully baked before removing it from the oven.

Chicken Cordon Bleu: A Timeless Classic

There’s something undeniably elegant and satisfying about Chicken Cordon Bleu. This dish, with its crispy golden crust, tender chicken, savory ham, and gooey melted cheese, is a masterpiece that never fails to impress. Whether you’re hosting a dinner party or simply treating yourself to a special meal, this recipe is sure to become a favorite.

Imagine slicing into a perfectly rolled chicken breast, revealing layers of Swiss cheese and ham, all wrapped in a crunchy breadcrumb coating. Add a rich, cheesy Dijon sauce, and you have a dish that’s both sophisticated and comforting.

Why You’ll Love This Recipe

This Chicken Cordon Bleu recipe is:

  • A Crowd-Pleaser: The combination of flavors and textures makes it universally loved.
  • Perfect for Special Occasions: It looks fancy but is simple enough to make at home.
  • Customizable: You can tweak the cheese, seasonings, or sauce to your liking.

Whether it’s a holiday dinner, a romantic meal, or just a weeknight indulgence, this dish delivers every time.

Ingredients for Chicken Cordon Bleu

Here’s everything you’ll need to create this delicious dish.

For the Chicken

IngredientQuantity
Boneless chicken breastsFour 6–8 oz pieces
Salt1 teaspoon
Black pepper (divided)½ teaspoon
Swiss cheese (thinly sliced)8 ounces
Ham (thinly sliced)8 ounces
All-purpose flour⅓ cup
Eggs (lightly beaten)2 large
Panko breadcrumbs1¼ cups
Garlic powder½ teaspoon
Onion powder½ teaspoon
Vegetable oilFor shallow frying

For the Cheesy Dijon Sauce

IngredientQuantity
Unsalted butter1½ tablespoons
All-purpose flour1½ tablespoons
Milk (warmed)1 cup
Dijon mustard1 teaspoon
Garlic powder¼ teaspoon
Onion powder¼ teaspoon
Salt¼ teaspoon
Black pepper⅛ teaspoon
Gruyere cheese (shredded)¾ cup
Parmesan cheese (grated)¼ cup

Step-by-Step Instructions for Chicken Cordon Bleu

1. Prepare the Chicken

  1. Place a chicken breast between two pieces of plastic wrap on a cutting board.
  2. Use a meat mallet to pound it to about ¼–½ inch thick. Repeat with the remaining chicken breasts.
  3. Lay the pounded chicken flat, and season with ½ teaspoon of salt and ¼ teaspoon of black pepper.

2. Add the Filling and Roll

  1. Place 2 ounces of Swiss cheese and 2 ounces of ham on each chicken breast.
  2. Starting from the smaller end, roll each chicken breast tightly into a log.
  3. Wrap each roll in plastic wrap, twisting the ends to seal.
  4. Refrigerate the chicken logs for 30 minutes to 1 hour to help them hold their shape.

3. Preheat and Prepare the Breading

  1. Preheat your oven to 350°F (175°C). Line a baking sheet with foil.
  2. Set up a breading station:
    • Bowl 1: Add flour.
    • Bowl 2: Lightly beat the eggs.
    • Bowl 3: Combine panko breadcrumbs, ½ teaspoon salt, ¼ teaspoon black pepper, garlic powder, and onion powder.

4. Bread the Chicken

  1. Remove the chicken from the plastic wrap.
  2. Dredge each chicken roll in flour, shaking off the excess.
  3. Dip into the egg, letting any extra drip off.
  4. Coat in the panko mixture, pressing gently to ensure an even layer.

5. Shallow Fry the Chicken

  1. Heat about ½ inch of vegetable oil in a large frying pan over medium heat until it reaches 350°F.
  2. Fry the breaded chicken rolls for about 5 minutes, turning to brown all sides.
  3. Transfer the chicken to the prepared baking sheet.

6. Bake to Perfection

  • Bake the chicken in the preheated oven for 15–20 minutes, or until it reaches an internal temperature of 165°F (74°C).

7. Make the Cheesy Dijon Sauce

  1. In a small saucepan, melt butter over medium heat.
  2. Whisk in flour and cook for 1–2 minutes to remove the raw taste.
  3. Gradually add warm milk, whisking constantly until smooth and thickened.
  4. Stir in Dijon mustard, garlic powder, onion powder, salt, and black pepper.
  5. Add the Gruyere and Parmesan cheese, stirring until melted and creamy.

8. Serve and Enjoy

  1. Slice each chicken roll into rounds for a beautiful presentation.
  2. Drizzle with the cheesy Dijon sauce and garnish with fresh parsley if desired.
  3. Pair with roasted vegetables, mashed potatoes, or a crisp salad for a complete meal.

Tips for the Perfect Chicken Cordon Bleu

1. Pound the Chicken Evenly

This ensures even cooking and makes rolling the chicken easier.

2. Chill the Chicken Rolls

Refrigerating the rolled chicken helps it hold its shape during frying and baking.

3. Use a Meat Thermometer

Check the internal temperature to ensure the chicken is perfectly cooked.

4. Customize the Cheese

Try mozzarella, provolone, or even a smoky Gouda for a unique twist.

Nutritional Information (Per Serving)

NutrientAmount
Calories520
Protein38 g
Carbohydrates24 g
Fat30 g
Fiber1 g

Creative Variations of Chicken Cordon Bleu

1. Bacon-Wrapped

Wrap each chicken roll in bacon before breading for added flavor.

2. Air Fryer Version

Cook the breaded chicken in an air fryer at 375°F for 12–15 minutes.

3. Gluten-Free

Substitute the flour and breadcrumbs with gluten-free alternatives.

4. Mini Cordon Bleu

Use chicken tenders to create bite-sized versions—perfect for appetizers.

5. Vegetarian Twist

Replace the chicken with thin slices of eggplant or zucchini.

Frequently Asked Questions (FAQs)

1. Can I make Chicken Cordon Bleu ahead of time?

Yes! Prepare and bread the chicken rolls, then refrigerate for up to 24 hours before cooking.

2. Can I freeze Chicken Cordon Bleu?

Absolutely. Freeze the breaded chicken rolls before frying. Thaw in the fridge before cooking.

3. What’s the best cheese for this recipe?

Swiss cheese is traditional, but Gruyere, mozzarella, or provolone work well too.

4. Can I bake it without frying?

Yes, but you won’t get the same crispy crust. Spray the breaded chicken with cooking spray and bake at 375°F for 25–30 minutes.

5. How do I reheat leftovers?

Reheat in the oven at 350°F until warmed through to maintain crispiness.

6. What sides go well with Chicken Cordon Bleu?

Try roasted vegetables, creamy mashed potatoes, or a fresh Caesar salad.

A Final Bite: Why You Should Try Chicken Cordon Bleu

Chicken Cordon Bleu is more than just a meal—it’s an experience. From its crispy golden crust to the creamy cheesy filling, every bite is pure comfort and indulgence. Whether you’re cooking for a special occasion or simply want to elevate your dinner, this dish is guaranteed to impress.

Ready to Cook?

Gather your ingredients, follow the steps, and treat yourself to a restaurant-quality dish at home. You’ll love every bite of this timeless classic!

ating

Chicken Cordon Bleu: A Timeless Classic

Chicken Cordon Bleu is the epitome of classic elegance and comfort. Juicy chicken breasts are rolled with savory ham and melty Swiss cheese, coated in golden breadcrumbs, and paired with a creamy, cheesy Dijon sauce. Perfect for special occasions or a decadent dinner, this dish is a showstopper that’s surprisingly simple to make at home.  
Prep Time 10 minutes
Cook Time 40 minutes
Total Time 1 hour
Servings: 4 servings
Course: Main Dish
Cuisine: French

Ingredients
  

For the Chicken:
  • 4 boneless chicken breasts 6–8 oz each
  • 1 teaspoon salt
  • ½ teaspoon black pepper divided
  • 8 ounces Swiss cheese thinly sliced
  • 8 ounces ham thinly sliced
  • cup all-purpose flour
  • 2 large eggs lightly beaten
  • cups panko breadcrumbs
  • ½ teaspoon garlic powder
  • ½ teaspoon onion powder
  • Vegetable oil for shallow frying
For the Cheesy Dijon Sauce:
  • tablespoons unsalted butter
  • tablespoons all-purpose flour
  • 1 cup milk warmed
  • 1 teaspoon Dijon mustard
  • ¼ teaspoon garlic powder
  • ¼ teaspoon onion powder
  • ¼ teaspoon salt
  • teaspoon black pepper
  • ¾ cup Gruyere cheese shredded
  • ¼ cup Parmesan cheese grated

Method
 

Prepare the Chicken:
  1. Place a chicken breast between two pieces of plastic wrap on a cutting board.
  2. Pound it to about ¼–½ inch thick with a meat mallet. Repeat with the remaining chicken breasts.
  3. Lay the chicken flat and season with ½ teaspoon salt and ¼ teaspoon black pepper.
Add the Filling and Roll:
  1. Place 2 ounces of Swiss cheese and 2 ounces of ham on each chicken breast.
  2. Starting from the smaller end, tightly roll each chicken breast into a log.
  3. Wrap each roll in plastic wrap, twisting the ends to secure. Chill in the refrigerator for 30 minutes to 1 hour to help maintain the shape.
Set Up the Breading Station:
  1. Preheat your oven to 350°F (175°C) and line a baking sheet with foil.
Set up three bowls:
  1. Bowl 1: Add flour.
  2. Bowl 2: Beat the eggs lightly.
  3. Bowl 3: Combine panko breadcrumbs, garlic powder, onion powder, ½ teaspoon salt, and ¼ teaspoon black pepper.
Bread the Chicken:
  1. Remove the chicken from the plastic wrap.
  2. Coat each roll in flour, shaking off the excess.
  3. Dip in the beaten eggs, letting excess drip off.
  4. Roll in the breadcrumb mixture, pressing gently to adhere.
Shallow Fry the Chicken:
  1. Heat ½ inch of vegetable oil in a large frying pan over medium heat until it reaches 350°F.
  2. Fry the breaded chicken for about 5 minutes, turning to brown all sides.
  3. Transfer the chicken to the prepared baking sheet.
Bake the Chicken:
  1. Bake the chicken in the preheated oven for 15–20 minutes, or until the internal temperature reaches 165°F (74°C).
Make the Cheesy Dijon Sauce:
  1. Melt butter in a small saucepan over medium heat.
  2. Whisk in flour and cook for 1–2 minutes.
  3. Gradually add the warmed milk, whisking constantly until smooth and thickened.
  4. Stir in Dijon mustard, garlic powder, onion powder, salt, and pepper.
  5. Add Gruyere and Parmesan cheese, whisking until melted and creamy.
Serve and Enjoy:
  1. Slice each chicken roll into rounds for a stunning presentation.
  2. Drizzle with the cheesy Dijon sauce and garnish with fresh parsley if desired.
  3. Serve with sides like roasted vegetables, mashed potatoes, or a crisp salad.

Notes

  • Chill for Shape: Refrigerating the chicken rolls helps them hold their shape during frying and baking.
  • Use a Meat Thermometer: Ensure the internal temperature reaches 165°F for perfectly cooked chicken.
  • Experiment with Cheeses: Gruyere, mozzarella, or even provolone can be substituted for Swiss cheese.

Crock Pot Hamburger Potato Soup: A Comforting One-Pot Wonder

There’s something special about a warm bowl of soup on a chilly day, especially when it’s rich, hearty, and easy to prepare. Crock Pot Hamburger Potato Soup checks all the boxes for a comforting meal that satisfies everyone around the table. This creamy soup combines tender potatoes, savory ground beef, and a blend of seasonings into a flavorful dish you can set and forget.

Imagine coming home to the smell of a simmering soup that’s ready to serve. Whether it’s a cozy family dinner or a meal-prep favorite, this recipe is sure to become a staple in your kitchen.

Why You’ll Love Crock Pot Hamburger Potato Soup

This soup isn’t just delicious—it’s practical too. Here’s why you’ll adore it:

  • Set and Forget: The crock pot does all the work while you go about your day.
  • Budget-Friendly: Uses simple, affordable ingredients that stretch to feed a crowd.
  • Customizable: Add your favorite veggies, cheeses, or spices to make it your own.
  • Comfort Food Classic: Creamy, hearty, and perfect for a satisfying meal.

Ingredients for Crock Pot Hamburger Potato Soup

Here’s everything you’ll need to make this delicious soup.

Main Ingredients

IngredientQuantity
Ground beef1 lb
Small onion (chopped)1
Garlic (minced)2 cloves
Diced potatoes4 cups (about 4 medium potatoes)
Beef broth4 cups
Cream of mushroom soup1 can (15 oz)
Milk (or half-and-half)1 cup
Dried thyme1 teaspoon
Dried parsley1 teaspoon
Salt and pepperTo taste

Optional Toppings and Add-Ins

IngredientQuantity
Shredded cheddar cheese1 cup
Sour cream1/2 cup
Fresh parsley (garnish)As needed

Step-by-Step Instructions for Crock Pot Hamburger Potato Soup

1. Prepare Your Ingredients

  1. Dice the potatoes into bite-sized pieces for even cooking.
  2. Chop the onion and mince the garlic.

2. Cook the Ground Beef

  1. In a skillet over medium heat, brown the ground beef, breaking it up as it cooks.
  2. Add the chopped onion and garlic, sautéing until fragrant and the onion is translucent.
  3. Drain any excess grease before transferring the mixture to your crock pot.

3. Assemble the Soup in the Crock Pot

  1. Add the following to the crock pot:
    • Diced potatoes
    • Beef broth
    • Cream of mushroom soup
    • Dried thyme and parsley
  2. Season with salt and pepper to taste.

4. Cook the Soup

  1. Cover the crock pot and cook on:
    • Low for 6–8 hours
    • High for 3–4 hours
  2. The potatoes should be tender, and the flavors will meld beautifully as the soup simmers.

5. Add the Creamy Elements

  1. About 30 minutes before serving, stir in:
    • Milk or half-and-half
    • Optional: Sour cream for extra creaminess.
  2. Let the soup warm through without boiling to preserve its smooth texture.

6. Serve and Enjoy

  1. Ladle the soup into bowls.
  2. Top with optional garnishes like shredded cheddar cheese, fresh parsley, or a dollop of sour cream.
  3. Pair with crusty bread or a side salad for a complete meal.

Tips for the Best Crock Pot Hamburger Potato Soup

1. Use the Right Potatoes

Yukon Gold or red potatoes hold their shape well during slow cooking and add a creamy texture.

2. Don’t Skip the Sauté

Cooking the ground beef, onion, and garlic before adding them to the crock pot ensures deeper flavor.

3. Customize Your Soup

  • Add veggies like carrots, celery, or corn for more nutrition.
  • Spice it up with a pinch of red pepper flakes or smoked paprika.

4. Check the Consistency

If you prefer a thicker soup, mash some of the potatoes or stir in a slurry of cornstarch and water during the last 30 minutes of cooking.

Nutritional Information (Per Serving)

NutrientAmount
Calories320
Protein20 g
Carbohydrates25 g
Fat15 g
Fiber3 g

Creative Variations of Hamburger Potato Soup

1. Cheese-Lover’s Twist

Add shredded cheddar or Monterey Jack cheese directly into the soup for a gooey, cheesy finish.

2. Spicy Kick

Include diced jalapeños or a dash of hot sauce for a bit of heat.

3. Gluten-Free Option

Use a gluten-free cream of mushroom soup and ensure your broth is gluten-free.

4. Veggie Boost

Add diced carrots, celery, or peas for added color and nutrients.

5. Bacon Upgrade

Sprinkle cooked, crumbled bacon over each bowl for an extra savory touch.

Frequently Asked Questions (FAQs)

1. Can I use frozen potatoes?

Yes! Frozen diced potatoes work well and save prep time. Add them directly to the crock pot without thawing.

2. Can I make this soup ahead of time?

Absolutely. Refrigerate the cooked soup for up to 3 days. Reheat gently on the stovetop or in the microwave.

3. Can I freeze Crock Pot Hamburger Potato Soup?

Yes, but leave out the milk and sour cream, as they may separate when frozen. Add them after reheating.

4. What’s the best substitute for cream of mushroom soup?

You can use cream of chicken soup or make your own by combining milk, broth, and flour to create a creamy base.

5. How can I thicken the soup?

Mash a portion of the cooked potatoes or stir in a slurry of 1 tablespoon cornstarch mixed with 2 tablespoons water.

6. What can I serve with this soup?

Pair it with crusty bread, biscuits, or a fresh green salad for a complete meal.

A Final Note: The Comfort Food You Need

Crock Pot Hamburger Potato Soup is more than just a meal—it’s a warm hug in a bowl. It’s easy to make, endlessly customizable, and perfect for feeding a crowd. Whether it’s a busy weekday or a relaxing weekend, this soup is sure to bring comfort and joy to your table.

Ready to Make It?

Gather your ingredients, fire up your crock pot, and let the magic happen. With minimal effort and maximum flavor, you’ll have a dish everyone will love.

ating

Crock Pot Hamburger Potato Soup: A Comforting One-Pot Wonder

Crock Pot Hamburger Potato Soup is the ultimate comfort food—rich, hearty, and full of flavor. This one-pot wonder combines tender potatoes, savory ground beef, and a creamy, flavorful broth for a meal that’s as satisfying as it is easy to make. Perfect for cozy family dinners or meal prep, this soup is a guaranteed hit!  
Prep Time 15 minutes
Servings: 6 servings
Course: Main Dish
Cuisine: American

Ingredients
  

Main Ingredients:
  • 1 lb ground beef
  • 1 small onion chopped
  • 2 cloves garlic minced
  • 4 cups diced potatoes about 4 medium potatoes
  • 4 cups beef broth
  • 1 can 15 oz cream of mushroom soup
  • 1 cup milk or half-and-half
  • 1 teaspoon dried thyme
  • 1 teaspoon dried parsley
  • Salt and pepper to taste
Optional Toppings and Add-Ins:
  • 1 cup shredded cheddar cheese
  • 1/2 cup sour cream
  • Fresh parsley chopped

Method
 

  1. Prepare the Ingredients
  2. Dice the potatoes into bite-sized pieces for even cooking.
  3. Chop the onion and mince the garlic.
  4. Cook the Ground Beef
  5. In a skillet over medium heat, brown the ground beef, breaking it into small pieces as it cooks.
  6. Add the chopped onion and minced garlic, sautéing until the onion is translucent and fragrant.
  7. Drain excess grease and transfer the mixture to your crock pot.
  8. Assemble the Soup
  9. Add the diced potatoes, beef broth, cream of mushroom soup, dried thyme, and parsley to the crock pot.
  10. Season with salt and pepper to taste. Stir to combine.
  11. Cook the Soup
  12. Cover and cook on low for 6–8 hours or high for 3–4 hours.
  13. The potatoes should be tender, and the flavors will meld beautifully as the soup simmers.
  14. Add the Creamy Elements
  15. About 30 minutes before serving, stir in the milk or half-and-half.
  16. Optional: Add sour cream for an extra creamy texture.
  17. Allow the soup to warm through without boiling.
  18. Serve and Enjoy
  19. Ladle the soup into bowls.
  20. Garnish with shredded cheddar cheese, fresh parsley, or a dollop of sour cream if desired.
  21. Pair with crusty bread or a green salad for a complete meal.

Notes

  • Choose the Right Potatoes: Yukon Gold or red potatoes hold their shape well during cooking and add a creamy texture.
  • Thicker Soup: Mash some of the cooked potatoes or add a cornstarch slurry (1 tablespoon cornstarch + 2 tablespoons water) during the last 30 minutes of cooking.
  • Make Ahead: This soup tastes even better the next day!

Hearty Ground Beef and Sweet Potato Skillet: A One-Pan Wonder

There’s nothing quite like a warm, hearty meal that’s both nutritious and satisfying. Hearty Ground Beef and Sweet Potato Skillet checks all the boxes. This easy, one-pan recipe combines lean ground beef, tender sweet potatoes, and bold spices into a wholesome dish that’s perfect for weeknight dinners or meal prep.

What’s even better? It’s customizable, quick to make, and loaded with flavor. Whether you’re cooking for your family or just for yourself, this skillet meal will quickly become a favorite.

Why You’ll Love This Recipe

  • Nutritious and Balanced: Packed with protein, healthy carbs, and optional veggies for a complete meal.
  • Simple Ingredients: Uses kitchen staples you probably already have.
  • One-Pan Meal: Minimal cleanup makes this recipe ideal for busy nights.
  • Versatile: Easily adapt the recipe to suit your taste or dietary needs.

Ingredients for Hearty Ground Beef and Sweet Potato Skillet

Here’s a breakdown of everything you’ll need for this recipe:

Main Ingredients

IngredientAmountNotes
Lean ground beef1 lbProvides a rich, savory flavor
Sweet potatoes2 mediumPeeled and cubed into ½-inch pieces
Onion1 medium, dicedAdds sweetness and depth
Garlic3 cloves, mincedEnhances the dish’s aroma
Olive oil1 tbspFor sautéing

Spices and Seasonings

IngredientAmountNotes
Ground cumin1 tspAdds warmth and earthiness
Paprika1 tspSweet or smoked, depending on taste
Chili powder½ tspProvides a mild kick
Salt and pepperTo tasteBalances and enhances flavors

Optional Add-Ins

IngredientAmountNotes
Beef broth or waterUp to 1 cupHelps cook and soften the potatoes
Bell pepper1, dicedAdds crunch and color
Black beans1 can (rinsed)Boosts protein and fiber
Shredded cheddar cheese1 cupFor a gooey, cheesy finish

Garnish

IngredientAmountNotes
Fresh cilantro/parsleyFor garnishAdds freshness and a pop of color

Step-by-Step Instructions

1. Prepare Your Ingredients

  • Start by peeling and cubing your sweet potatoes into ½-inch pieces. Dice the onion and mince the garlic. If using bell peppers or other add-ins, prepare those as well.

2. Sauté the Onion and Garlic

  • Heat olive oil in a large skillet over medium-high heat.
  • Add the diced onion and sauté for 3–4 minutes until translucent.
  • Stir in the minced garlic and cook for another 30 seconds until fragrant.

3. Cook the Ground Beef

  • Add the ground beef to the skillet. Use a wooden spoon to break it into small pieces as it cooks.
  • Cook for 5–7 minutes, or until the beef is browned. Drain any excess fat if necessary.

4. Add the Sweet Potatoes and Spices

  • Stir in the cubed sweet potatoes.
  • Sprinkle cumin, paprika, chili powder, salt, and pepper over the mixture. Stir well to ensure the potatoes and beef are evenly coated with the spices.

5. Cook Until Tender

  • If the skillet seems dry or the sweet potatoes are not softening, add up to 1 cup of beef broth or water.
  • Cover the skillet, reduce the heat to medium-low, and simmer for 12–15 minutes. Stir occasionally to prevent sticking.

6. Add Optional Ingredients

  • If using bell peppers or black beans, stir them in during the last 5 minutes of cooking.

7. Finish with Cheese and Garnish

  • Once the sweet potatoes are tender and the liquid has mostly evaporated, sprinkle shredded cheddar cheese over the top (if using). Cover the skillet for 2–3 minutes to melt the cheese.
  • Garnish with fresh cilantro or parsley before serving.

Pro Tips for Success

  1. Cut Sweet Potatoes Evenly: Uniform cubes ensure even cooking.
  2. Adjust the Spice Level: Add more chili powder or red pepper flakes for extra heat.
  3. Use a Large Skillet: A spacious skillet allows everything to cook evenly without overcrowding.
  4. Don’t Overcook: Check the sweet potatoes often; they should be tender but not mushy.
  5. Customize Freely: Feel free to swap ground beef for turkey or add your favorite vegetables.

Serving Suggestions

Hearty Ground Beef and Sweet Potato Skillet is a versatile dish that pairs well with a variety of sides:

  • Fresh Salad: Serve with a simple green salad or coleslaw.
  • Crusty Bread: Use bread to soak up the flavorful juices.
  • Rice or Quinoa: Serve over a bed of rice or quinoa for a heartier meal.
  • Tortilla Chips: Scoop the skillet mixture with tortilla chips for a Tex-Mex twist.

Nutritional Information

NutrientPer Serving (Approx.)
Calories320
Protein25 g
Carbohydrates18 g
Fat18 g
Sodium420 mg

Note: Nutritional values may vary based on optional ingredients and serving sizes.

Variations of Hearty Ground Beef and Sweet Potato Skillet

  1. Tex-Mex Style: Add black beans, corn, and a dash of hot sauce for a Southwestern twist.
  2. Low-Carb Option: Swap sweet potatoes for cauliflower or zucchini.
  3. Vegetarian Version: Use plant-based ground meat or crumbled tofu.
  4. Mediterranean Flair: Add olives, cherry tomatoes, and feta cheese.
  5. Breakfast Skillet: Crack a few eggs over the skillet during the last 5 minutes of cooking. Cover until the eggs are set.

FAQs About Hearty Ground Beef and Sweet Potato Skillet

1. Can I make this recipe ahead of time?

Yes! Prepare the skillet as directed and store it in an airtight container in the refrigerator for up to 3 days. Reheat on the stovetop or in the microwave.

2. Can I freeze this dish?

Absolutely. Let the mixture cool completely, then transfer it to a freezer-safe container. Freeze for up to 3 months. Thaw in the fridge overnight before reheating.

3. What can I use instead of sweet potatoes?

You can substitute regular potatoes, butternut squash, or even parsnips.

4. How do I prevent the sweet potatoes from sticking?

Make sure there’s enough liquid in the skillet and stir occasionally to prevent sticking.

5. Can I make this dish spicy?

Yes! Add extra chili powder, red pepper flakes, or diced jalapeños for more heat.

6. What type of ground beef works best?

Use lean ground beef (80/20 or 85/15) for a balance of flavor and reduced fat.

Conclusion: Try This Hearty Skillet Recipe Today!

Hearty Ground Beef and Sweet Potato Skillet is the perfect solution for a nutritious, delicious, and satisfying meal. With its bold spices, tender sweet potatoes, and customizable options, this one-pan wonder will quickly become a staple in your meal rotation.

ating

Hearty Ground Beef and Sweet Potato Skillet: A One-Pan Wonder

A warm, flavorful, and satisfying one-pan meal, Hearty Ground Beef and Sweet Potato Skillet combines tender sweet potatoes, seasoned ground beef, and bold spices for a quick and nutritious dinner. This easy, customizable recipe is perfect for busy weeknights, meal prep, or whenever you need a hearty and wholesome meal.  
Prep Time 10 minutes
Cook Time 25 minutes
Total Time 35 minutes
Servings: 4 servings
Course: Main Dish
Cuisine: American

Ingredients
  

Main Ingredients:
  • 1 pound lean ground beef
  • 2 medium sweet potatoes peeled and cubed (½-inch pieces)
  • 1 medium onion diced
  • 3 cloves garlic minced
  • 1 tablespoon olive oil
Spices and Seasonings:
  • 1 teaspoon ground cumin
  • 1 teaspoon paprika sweet or smoked
  • ½ teaspoon chili powder
  • Salt and pepper to taste
Optional Add-Ins:
  • Up to 1 cup beef broth or water
  • 1 diced bell pepper
  • 1 can 15 oz black beans, rinsed
  • 1 cup shredded cheddar cheese
Garnish:
  • Fresh cilantro or parsley chopped

Method
 

Prepare Ingredients:
  1. Peel and cube sweet potatoes into ½-inch pieces. Dice the onion and mince the garlic. Prepare optional ingredients like bell peppers or beans, if using.
Sauté the Onion and Garlic:
  1. Heat olive oil in a large skillet over medium-high heat.
  2. Add diced onion and sauté for 3–4 minutes until softened.
  3. Stir in minced garlic and cook for 30 seconds until fragrant.
Cook the Ground Beef:
  1. Add ground beef to the skillet, breaking it into small pieces with a spoon.
  2. Cook for 5–7 minutes, or until browned. Drain any excess fat if necessary.
Add Sweet Potatoes and Spices:
  1. Stir in cubed sweet potatoes.
  2. Sprinkle with cumin, paprika, chili powder, salt, and pepper. Mix well to coat the potatoes and beef evenly.
Cook Until Tender:
  1. If the skillet seems dry, add up to 1 cup of beef broth or water to help the sweet potatoes cook.
  2. Cover the skillet, reduce heat to medium-low, and simmer for 12–15 minutes, stirring occasionally, until sweet potatoes are tender.
Incorporate Optional Ingredients:
  1. Add diced bell pepper or black beans during the last 5 minutes of cooking for extra flavor and texture.
Finish with Cheese and Garnish:
  1. Once the sweet potatoes are tender and the liquid has mostly evaporated, sprinkle shredded cheddar cheese over the top (if using).
  2. Cover the skillet for 2–3 minutes to melt the cheese.
  3. Garnish with fresh cilantro or parsley before serving.

Notes

  • Cut sweet potatoes into uniform pieces for even cooking.
  • Adjust spices to taste—add more chili powder or red pepper flakes for extra heat.
  • A large skillet prevents overcrowding and ensures even cooking.

Easy Cheesy Beef Filled Bites: The Perfect Snack or Party Treat

Imagine biting into a warm, golden-brown pastry that’s filled with flavorful, cheesy ground beef. Easy Cheesy Beef Filled Bites are the ultimate comfort food—perfect for parties, family gatherings, or an indulgent snack. With a crispy exterior, gooey cheese, and savory beef filling, these bites are guaranteed to impress everyone at the table.

In this guide, you’ll learn how to make these crowd-pleasers step by step. Whether you’re an experienced cook or a beginner in the kitchen, this recipe is simple, fun, and delicious!

Why You’ll Love Easy Cheesy Beef Filled Bites

  • Perfect for Any Occasion: These bites are great for parties, movie nights, or quick snacks.
  • Simple to Make: With just a few ingredients and easy steps, you’ll have delicious bites ready in no time.
  • Customizable: You can tweak the flavors and fillings to suit your taste.
  • Kid-Friendly: Kids love the cheesy, beefy goodness wrapped in soft biscuit dough.

Ingredients for Easy Cheesy Beef Filled Bites

Here’s everything you’ll need to create these delicious treats:

Main Components

IngredientAmountNotes
Ground beef1 lbLean ground beef is best
Biscuit dough1 can (16.3 oz)Refrigerated canned biscuit dough

Cheese & Seasonings

IngredientAmountNotes
Garlic (minced)2 clovesAdds depth and aroma to the filling
Parmesan cheese (diced)½ cupAdds a sharp, nutty flavor
Cheddar cheese (cubed)1 cupMelts beautifully in the filling

Finishing Touches

IngredientAmountNotes
Butter (melted)2 tablespoonsCreates a golden, glossy finish
Parsley (chopped)1 tablespoonAdds a pop of color and freshness

Step-by-Step Instructions for Easy Cheesy Beef Filled Bites

1. Preheat Your Oven

  • Set your oven to 375°F (190°C). Line a baking sheet with parchment paper for easy cleanup.

2. Prepare the Beef Filling

  • Heat a skillet over medium heat and cook the ground beef with minced garlic. Stir frequently until the beef is browned and fully cooked.
  • Drain any excess fat from the skillet.
  • Remove the skillet from heat and mix in the Parmesan cheese and cheddar cheese cubes until evenly combined.

3. Flatten the Biscuit Dough

  • Open the can of biscuit dough and separate each biscuit.
  • Using your hands or a rolling pin, flatten each biscuit into a round disc, about 4–5 inches in diameter.

4. Fill and Seal the Bites

  • Place a spoonful of the beef and cheese mixture in the center of each flattened biscuit.
  • Fold the edges up and pinch them together to seal the filling inside, forming a “bomb” shape.
  • Place the sealed bites seam-side down on the prepared baking sheet.

5. Add the Finishing Touches

  • Brush the tops of the bites with melted butter. This will help them bake to a golden-brown perfection.

6. Bake Until Golden

  • Bake the bites in the preheated oven for 12–15 minutes, or until they are golden brown and puffed.
  • Remove them from the oven and let them cool slightly before serving.

7. Garnish and Serve

  • Sprinkle chopped parsley over the baked bites for a touch of color and flavor.
  • Serve warm and enjoy the cheesy, beefy goodness!

Pro Tips for Perfect Beef Filled Bites

  1. Seal Them Well: Make sure the edges are tightly sealed to prevent the filling from spilling out during baking.
  2. Customize the Cheeses: Swap cheddar for mozzarella or pepper jack for a different flavor profile.
  3. Make Ahead: Prepare the bites in advance and refrigerate them until you’re ready to bake.
  4. Extra Garlic Flavor: Sprinkle a little garlic powder on the tops before baking for an extra burst of flavor.
  5. Dip Them: Serve with marinara sauce, ranch dressing, or spicy sriracha mayo for dipping.

Serving Suggestions

Easy Cheesy Beef Filled Bites are versatile and pair well with a variety of sides and dips:

  • Classic Dips: Marinara sauce, barbecue sauce, or queso.
  • Fresh Salad: Pair with a crisp green salad for a lighter contrast.
  • Party Spread: Add them to a charcuterie board or appetizer platter.

Nutritional Information

NutrientPer Bite (Approx)
Calories210
Protein10 g
Carbohydrates14 g
Fat12 g
Sodium350 mg

Note: Nutritional values may vary based on ingredient brands and portion sizes.

Variations of Easy Cheesy Beef Filled Bites

  1. Spicy Beef Bites: Add diced jalapeños or red pepper flakes to the filling for a spicy kick.
  2. Vegetarian Option: Swap the beef for sautéed mushrooms, spinach, or black beans.
  3. Pizza Bites: Use pepperoni and mozzarella as the filling, and serve with marinara sauce.
  4. Breakfast Bites: Replace beef with scrambled eggs and sausage for a morning treat.
  5. Herb-Infused Bites: Add fresh or dried herbs like basil, oregano, or thyme to the filling for added flavor.

FAQs About Easy Cheesy Beef Filled Bites

1. Can I freeze these bites?

Yes! Assemble the bites and freeze them unbaked. When ready to cook, bake directly from frozen, adding a few extra minutes to the baking time.

2. How do I store leftovers?

Store any leftover bites in an airtight container in the refrigerator for up to 3 days. Reheat in the oven or air fryer for best results.

3. Can I use homemade dough instead of canned biscuit dough?

Absolutely! Homemade biscuit or pizza dough works just as well, though it may require slightly longer baking times.

4. What other fillings can I use?

Try ground turkey, shredded chicken, or vegetarian options like sautéed vegetables and cheese.

5. Can I make these gluten-free?

Yes, use a gluten-free biscuit dough or make your own gluten-free dough from scratch.

6. What’s the best way to reheat these bites?

Reheat in an oven at 350°F (175°C) or in an air fryer for 5–7 minutes to restore their crispiness.

Conclusion: Make Easy Cheesy Beef Filled Bites Today!

Easy Cheesy Beef Filled Bites are the ultimate snack for any occasion. With their golden crust, gooey cheese, and savory beef filling, they’re sure to become a favorite in your household. Whether you’re hosting a party, planning a movie night, or just looking for a satisfying treat, this recipe is quick, simple, and utterly delicious.

ating

Easy Cheesy Beef Filled Bites: The Perfect Snack or Party Treat

Golden, flaky, and bursting with cheesy, savory goodness, these Easy Cheesy Beef Filled Bites are the perfect snack or party treat. Filled with flavorful ground beef and gooey melted cheese, these bites are simple to make and guaranteed to impress everyone at the table. Perfect for any occasion, they’ll quickly become your go-to appetizer or snack recipe!  
Prep Time 10 minutes
Cook Time 15 minutes
Total Time 25 minutes
Servings: 15 Bites
Course: Appetizer / Snack
Cuisine: American

Ingredients
  

Main Components:
  • 1 pound ground beef
  • 1 can 16.3 oz refrigerated biscuit dough
Cheese & Seasonings:
  • 2 cloves garlic minced
  • ½ cup Parmesan cheese diced
  • 1 cup cheddar cheese cubed
Finishing Touches:
  • 2 tablespoons melted butter
  • 1 tablespoon chopped parsley

Method
 

Preheat Your Oven:
  1. Preheat your oven to 375°F (190°C).
  2. Line a baking sheet with parchment paper for easy cleanup.
Prepare the Beef Filling:
  1. Heat a skillet over medium heat and cook the ground beef with minced garlic until browned.
  2. Drain any excess fat and remove the skillet from heat.
  3. Stir in Parmesan cheese and cheddar cheese cubes until evenly combined.
Flatten the Biscuit Dough:
  1. Open the can of biscuit dough and separate each biscuit.
  2. Flatten each biscuit into a round disc, approximately 4–5 inches in diameter.
Fill and Seal the Bites:
  1. Place a spoonful of the beef and cheese mixture in the center of each flattened biscuit.
  2. Fold the edges up and pinch them tightly to seal, forming a “bomb” shape.
  3. Place the sealed bites seam-side down on the prepared baking sheet.
Add the Finishing Touches:
  1. Brush the tops of the bites with melted butter.
Bake Until Golden:
  1. Bake the bites for 12–15 minutes, or until they are golden brown and puffed.
  2. Remove from the oven and let cool slightly.
Garnish and Serve:
  1. Sprinkle chopped parsley over the baked bites for a fresh, vibrant finish.
  2. Serve warm with your favorite dipping sauces.

Notes

  • Ensure the edges of the bites are tightly sealed to prevent the filling from leaking out.
  • Experiment with different cheeses like mozzarella or pepper jack for variety.
  • These bites are best enjoyed fresh but can be reheated in the oven or air fryer for a crisp texture.

Homemade Patty Melt with Secret Sauce: A Classic Comfort Food Recipe

There’s something truly special about biting into a warm, gooey, perfectly grilled patty melt. The combination of tender beef, caramelized onions, melted cheese, and crispy rye bread creates a flavor explosion that’s hard to beat. But what takes this dish over the top is the secret sauce—a creamy, tangy spread that ties everything together.

With this recipe, you’ll learn how to make a Homemade Patty Melt with Secret Sauce that’s every bit as good as (if not better than) the ones you’d get at your favorite diner. Whether you’re making lunch for your family or treating yourself to a comfort food classic, this recipe will be your new go-to.

Why You’ll Love This Patty Melt Recipe

  • Perfectly Balanced Flavors: The savory beef, sweet caramelized onions, and tangy secret sauce create a perfect harmony.
  • Easy to Make: With just a few steps, you can recreate this diner classic at home.
  • Customizable: Swap cheeses, adjust seasonings, or tweak the sauce to make it your own.
  • A True Crowd-Pleaser: Everyone loves a patty melt, making it a great choice for any occasion.

Ingredients for Homemade Patty Melt with Secret Sauce

Here’s everything you’ll need to bring this classic to life:

For the Patty Melt

IngredientAmountNotes
Ground beef1 poundUse an 80/20 blend for juicy patties
Onion1 large, thinly slicedCaramelizes for a sweet, savory flavor
Rye bread8 slicesAdds a distinctive, nutty taste
Swiss cheese4 slicesMelts beautifully and adds a creamy texture
Cheddar cheese4 slicesAdds sharpness to balance the flavors
ButterAs neededFor grilling the bread to golden perfection
Salt and pepperTo tasteEssential for seasoning the beef patties

For the Secret Sauce

IngredientAmountNotes
Mayonnaise½ cupForms the creamy base of the sauce
Ketchup2 tablespoonsAdds sweetness and tang
Sweet pickle relish1 tablespoonProvides a touch of texture and flavor
Worcestershire sauce1 teaspoonAdds a savory, umami depth

Step-by-Step Instructions for the Perfect Patty Melt

1. Make the Secret Sauce

  • In a small bowl, combine mayonnaise, ketchup, sweet pickle relish, and Worcestershire sauce.
  • Mix until smooth and well combined.
  • Set the sauce aside to allow the flavors to meld.

2. Caramelize the Onions

  • Melt a small amount of butter in a skillet over medium heat.
  • Add the thinly sliced onions and cook, stirring occasionally, until golden brown and caramelized—this takes 15–20 minutes.
  • Remove the onions from the skillet and set them aside.

3. Prepare the Beef Patties

  • Divide the ground beef into four equal portions and shape each into a thin patty.
  • Season both sides of the patties with salt and pepper.

4. Cook the Beef Patties

  • Heat the skillet over medium-high heat. Add the patties and cook for 3–4 minutes per side, or until fully cooked.
  • Remove the patties from the skillet and set them aside.

5. Assemble the Patty Melts

  • Butter one side of each slice of rye bread.
  • Place four slices of bread butter-side down in the skillet.
  • Layer the following on each slice: one slice of Swiss cheese, a beef patty, a generous scoop of caramelized onions, one slice of cheddar cheese, and another slice of bread butter-side up.

6. Grill the Patty Melts

  • Grill the sandwiches over medium heat for 2–3 minutes per side, pressing lightly with a spatula, until the bread is golden and the cheese has melted.

7. Rest and Serve

  • Let the patty melts rest for 1 minute before cutting them in half.
  • Serve hot with the secret sauce on the side or spread inside the sandwiches.

Pro Tips for the Best Patty Melt

  1. Use Fresh Ingredients: High-quality beef, fresh bread, and flavorful cheese make all the difference.
  2. Don’t Rush the Onions: Caramelizing onions takes time but is essential for their sweet, rich flavor.
  3. Grill Slowly: Cooking the sandwiches over medium heat ensures the bread doesn’t burn before the cheese melts.
  4. Customize Your Cheese: Swap Swiss and cheddar for your favorite cheeses, like provolone or pepper jack.
  5. Experiment with Bread: If you’re not a fan of rye, try sourdough or whole wheat bread.

Serving Suggestions

Patty melts are hearty on their own, but pairing them with the right sides can elevate your meal:

  • Classic Fries: Serve with crispy French fries or sweet potato fries.
  • Fresh Salad: A side of greens balances the richness of the melt.
  • Pickles: Add a tangy crunch with dill pickles or pickled onions.
  • Tomato Soup: A warm bowl of soup makes for a comforting pairing.

Nutritional Information

NutrientPer Serving
Calories620
Protein33 g
Carbohydrates45 g
Fat38 g
Sodium890 mg

Variations of the Homemade Patty Melt

  1. Spicy Patty Melt: Add sliced jalapeños and a dash of hot sauce for extra heat.
  2. Vegetarian Option: Replace the beef with a plant-based patty and use vegan cheese.
  3. Breakfast Patty Melt: Add a fried egg and crispy bacon for a morning twist.
  4. Mushroom Melt: Sautéed mushrooms make an excellent addition to the caramelized onions.
  5. Low-Carb Version: Swap the bread for large lettuce leaves or serve the patty melt open-faced.

FAQs About Homemade Patty Melt with Secret Sauce

1. Can I make the secret sauce ahead of time?

Yes! Prepare the sauce up to three days in advance and store it in an airtight container in the refrigerator.

2. What’s the best way to reheat a patty melt?

Reheat the sandwich in a skillet over low heat or in the oven at 350°F (175°C) to maintain its crispiness.

3. Can I freeze patty melts?

It’s best to freeze the cooked patties and onions separately. Assemble and grill the sandwiches fresh when ready to serve.

4. Is there a substitute for rye bread?

Sourdough, whole wheat, or white sandwich bread are excellent alternatives.

5. Can I use ground turkey instead of beef?

Absolutely! Ground turkey works well and is a leaner option. Adjust the seasoning as needed for flavor.

6. What if I don’t have Worcestershire sauce for the secret sauce?

Soy sauce or a dash of balsamic vinegar can provide a similar umami flavor.

Conclusion: Make Your Own Homemade Patty Melt with Secret Sauce

There’s no need to visit a diner when you can make a Homemade Patty Melt with Secret Sauce right in your kitchen. With its juicy beef patties, caramelized onions, gooey cheese, and crispy bread, this recipe delivers comfort food perfection. And don’t forget the secret sauce—it’s the finishing touch that makes this dish unforgettable.

ating

Homemade Patty Melt with Secret Sauce: A Classic Comfort Food Recipe

Juicy beef patties, sweet caramelized onions, melted cheese, and crispy rye bread come together in this classic comfort food recipe. Add a creamy, tangy secret sauce, and you’ve got the ultimate Homemade Patty Melt that rivals any diner favorite. Perfect for a hearty lunch, dinner, or indulgent treat!  
Prep Time 10 minutes
Cook Time 25 minutes
Total Time 25 minutes
Servings: 4 servings
Course: Main Dish
Cuisine: American

Ingredients
  

For the Patty Melt:
  • 1 pound ground beef 80/20 blend recommended
  • 1 large onion thinly sliced
  • 8 slices rye bread
  • 4 slices Swiss cheese
  • 4 slices cheddar cheese
  • Butter as needed, for grilling
  • Salt and pepper to taste
For the Secret Sauce:
  • ½ cup mayonnaise
  • 2 tablespoons ketchup
  • 1 tablespoon sweet pickle relish
  • 1 teaspoon Worcestershire sauce

Method
 

Prepare the Secret Sauce:
  1. In a small bowl, mix mayonnaise, ketchup, sweet pickle relish, and Worcestershire sauce.
  2. Stir until smooth and set aside to let the flavors meld.
Caramelize the Onions:
  1. Heat a skillet over medium heat and add a small amount of butter.
  2. Add the sliced onions and cook, stirring occasionally, for 15–20 minutes, or until golden and caramelized.
  3. Remove from skillet and set aside.
Prepare the Beef Patties:
  1. Divide the ground beef into four equal portions and shape into thin patties.
  2. Season both sides of each patty with salt and pepper.
Cook the Patties:
  1. Heat the skillet over medium-high heat.
  2. Add the patties and cook for 3–4 minutes per side, or until fully cooked.
  3. Remove from skillet and set aside.
Assemble the Patty Melts:
  1. Butter one side of each slice of rye bread.
  2. Place four slices, butter-side down, in the skillet over medium heat.
  3. Layer each slice with one slice of Swiss cheese, a beef patty, a generous portion of caramelized onions, one slice of cheddar cheese, and a second slice of bread, butter-side up.
Grill the Patty Melts:
  1. Grill each sandwich for 2–3 minutes per side, pressing lightly with a spatula, until the bread is golden and the cheese is melted.
Serve:
  1. Let the sandwiches rest for 1 minute before cutting in half.
  2. Serve with the secret sauce on the side or spread inside the sandwiches.

Notes

  • Take your time caramelizing the onions for the best flavor.
  • Use high-quality rye bread for its nutty, distinctive taste.
  • Customize with your favorite cheeses or bread varieties if preferred.

Cheesy Beefy Burrito Delight: A Comfort Food Classic

Picture this: the cheesy goodness of melted cheddar and mozzarella oozing out of a perfectly rolled burrito filled with seasoned beef, rice, and a touch of salsa. Cheesy Beefy Burrito Delight is the ultimate comfort food that’s simple to make and bursting with flavor. Whether you’re whipping up a weeknight dinner or looking for a satisfying meal to impress your family, this dish has got you covered.

This guide will walk you through everything you need to know to create these irresistible burritos, from the ingredients to tips for making them perfectly cheesy and delicious.

Why You’ll Love Cheesy Beefy Burrito Delight

  • Packed with Flavor: Seasoned ground beef combined with melted cheeses creates a flavor explosion in every bite.
  • Quick and Easy: You can have this dish ready in under 40 minutes, making it ideal for busy evenings.
  • Family-Friendly: Everyone loves burritos, and these are customizable to suit different tastes.
  • Perfect for Leftovers: They reheat beautifully, so you can enjoy them the next day.

Ingredients for Cheesy Beefy Burrito Delight

Here’s what you’ll need to create this satisfying dish:

IngredientAmountNotes
Ground beef1 lbLean ground beef works best
Chopped onion½ cupAdds flavor and a touch of sweetness
Garlic (minced)2 clovesEnhances the savory taste
Taco seasoning1 packet (1 oz)Brings a classic Tex-Mex flavor
Water½ cupHelps thicken the beef mixture
Cooked rice1 cupWhite, brown, or Spanish rice work well
Shredded cheddar cheese1 cupAdds richness and sharpness
Shredded mozzarella cheese1 cupFor a creamy, gooey texture
Flour tortillas4 largeSoft tortillas are perfect for rolling
Salsa1 cupAdds a tangy, slightly spicy layer
Sour cream½ cupFor serving as a cool, creamy topping
Fresh cilantro (chopped)¼ cup (optional)Adds a pop of freshness

Step-by-Step Instructions for the Perfect Burrito Delight

1. Cook the Beef Mixture

  • Heat a skillet over medium heat. Add the ground beef and cook until browned, breaking it apart with a spatula.
  • Drain any excess fat, then stir in the chopped onion and minced garlic. Cook for 2–3 minutes, or until the onion is soft and fragrant.

2. Add Taco Seasoning

  • Sprinkle the taco seasoning over the beef mixture, then pour in the water.
  • Stir well to combine, and let the mixture simmer for about 5 minutes, or until the sauce thickens.

3. Prepare the Tortillas

  • Preheat your oven to 375°F (190°C).
  • Lay the tortillas flat on a clean surface. Divide the cooked rice and beef mixture evenly among the tortillas.

4. Add the Cheese

  • Sprinkle shredded cheddar and mozzarella cheese over the beef and rice mixture on each tortilla.

5. Roll the Burritos

  • Roll up each tortilla tightly, tucking in the sides as you go to form a neat burrito.
  • Place the burritos seam-side down in a baking dish lined with parchment paper.

6. Top with Salsa and Bake

  • Pour salsa evenly over the top of the burritos, spreading it out with a spoon if needed.
  • Sprinkle extra cheese on top for a gooey finish.
  • Bake in the preheated oven for 20 minutes, or until the cheese is melted and bubbly.

7. Garnish and Serve

  • Remove the burritos from the oven and let them cool slightly.
  • Garnish with fresh cilantro and serve with a dollop of sour cream on the side.

Pro Tips for the Best Cheesy Beefy Burrito Delight

  1. Use High-Quality Tortillas: Soft, pliable tortillas make rolling easier and hold the filling better.
  2. Make It Spicy: Add diced jalapeños or a splash of hot sauce for a kick.
  3. Customize the Fillings: Add black beans, corn, or bell peppers for extra flavor and texture.
  4. Prevent Soggy Burritos: Don’t overfill the tortillas, and roll them tightly to keep everything in place.
  5. Experiment with Cheese: Try pepper jack or Monterey Jack for a different cheesy flavor.

Serving Suggestions

Cheesy Beefy Burrito Delight is versatile and pairs well with various sides and toppings:

  • Classic Sides: Serve with tortilla chips and guacamole, or a side of Mexican-style street corn.
  • Dipping Sauces: Offer extra salsa, queso, or a tangy ranch dip for dipping.
  • Beverages: Pair with iced tea, lemonade, or a refreshing lime soda.

Nutritional Information

NutrientPer Burrito
Calories420
Protein22 g
Carbohydrates32 g
Fat22 g
Sodium750 mg

Variations of Cheesy Beefy Burrito Delight

  1. Vegetarian Option: Substitute the ground beef with black beans, lentils, or crumbled tofu seasoned with taco spices.
  2. Breakfast Burritos: Replace the beef with scrambled eggs and breakfast sausage for a morning twist.
  3. Healthier Version: Use whole wheat tortillas, brown rice, and reduced-fat cheese.
  4. Loaded Burritos: Add extra toppings like guacamole, diced tomatoes, or shredded lettuce inside the burrito.

FAQs About Cheesy Beefy Burrito Delight

1. Can I make these burritos ahead of time?

Yes! Assemble the burritos, place them in the baking dish, cover tightly with foil, and refrigerate for up to 24 hours. Bake when ready to serve.

2. Can I freeze leftover burritos?

Absolutely. Wrap each burrito tightly in foil or plastic wrap, then freeze in a freezer-safe bag. Reheat in the oven or microwave.

3. What’s the best way to reheat these burritos?

Reheat in the oven at 350°F (175°C) for about 15 minutes, or microwave for 1–2 minutes.

4. Can I make this recipe gluten-free?

Yes! Use gluten-free tortillas and double-check that your taco seasoning is gluten-free.

5. What type of rice works best?

Any cooked rice works, but Mexican rice or cilantro-lime rice adds extra flavor.

6. Can I use a different type of cheese?

Absolutely. Experiment with Colby Jack, queso fresco, or a spicy pepper jack for different flavor profiles.

Conclusion: Satisfy Your Cravings with Cheesy Beefy Burrito Delight

There’s nothing quite as comforting as a warm, cheesy burrito packed with savory beef and flavorful toppings. Cheesy Beefy Burrito Delight is easy to make, endlessly customizable, and guaranteed to please everyone at the table.

ating

Cheesy Beefy Burrito Delight: A Comfort Food Classic

Packed with seasoned ground beef, fluffy rice, melted cheddar and mozzarella, and a tangy layer of salsa, Cheesy Beefy Burrito Delight is the ultimate comfort food. This easy-to-make recipe is perfect for family dinners, quick weeknight meals, or leftovers that reheat like a dream. Satisfy your cravings with this irresistible burrito!  
Prep Time 10 minutes
Cook Time 30 minutes
Total Time 40 minutes
Servings: 4 burritos
Course: Main Dish
Cuisine: Tex-Mex

Ingredients
  

  • 1 pound ground beef
  • ½ cup chopped onion
  • 2 cloves garlic minced
  • 1 packet 1 oz taco seasoning
  • ½ cup water
  • 1 cup cooked rice white, brown, or Spanish rice
  • 1 cup shredded cheddar cheese
  • 1 cup shredded mozzarella cheese
  • 4 large flour tortillas
  • 1 cup salsa
  • ½ cup sour cream for serving
  • ¼ cup chopped fresh cilantro optional, for garnish

Method
 

Cook the Beef Mixture:
  1. Heat a skillet over medium heat and cook the ground beef until browned, breaking it up with a spatula.
  2. Drain any excess fat and stir in chopped onion and minced garlic. Cook for 2–3 minutes, until the onion is soft.
Season the Beef:
  1. Sprinkle taco seasoning over the beef mixture and pour in water.
  2. Stir well and let simmer for about 5 minutes, until the sauce thickens.
Prepare the Tortillas:
  1. Preheat your oven to 375°F (190°C).
  2. Lay the tortillas flat on a clean surface. Divide the cooked rice and beef mixture evenly among the tortillas.
Add the Cheese:
  1. Sprinkle shredded cheddar and mozzarella cheese over the beef and rice mixture on each tortilla.
Roll the Burritos:
  1. Tightly roll up each tortilla, tucking in the sides as you go to form neat burritos.
  2. Place the burritos seam-side down in a parchment-lined baking dish.
Top and Bake:
  1. Spread salsa evenly over the top of the burritos.
  2. Sprinkle extra cheese on top for a gooey finish.
  3. Bake for 20 minutes, or until the cheese is melted and bubbly.
Serve:
  1. Let the burritos cool slightly before serving.
  2. Garnish with fresh cilantro and serve with sour cream on the side.

Notes

  • For a spicier kick, add diced jalapeños or hot sauce to the beef mixture.
  • Don’t overfill the tortillas to avoid messy rolling.
  • These burritos are best served warm but reheat beautifully in the oven or microwave.