Oven Fried Feta Rolls with Chili Honey: A Crispy, Tangy Delight

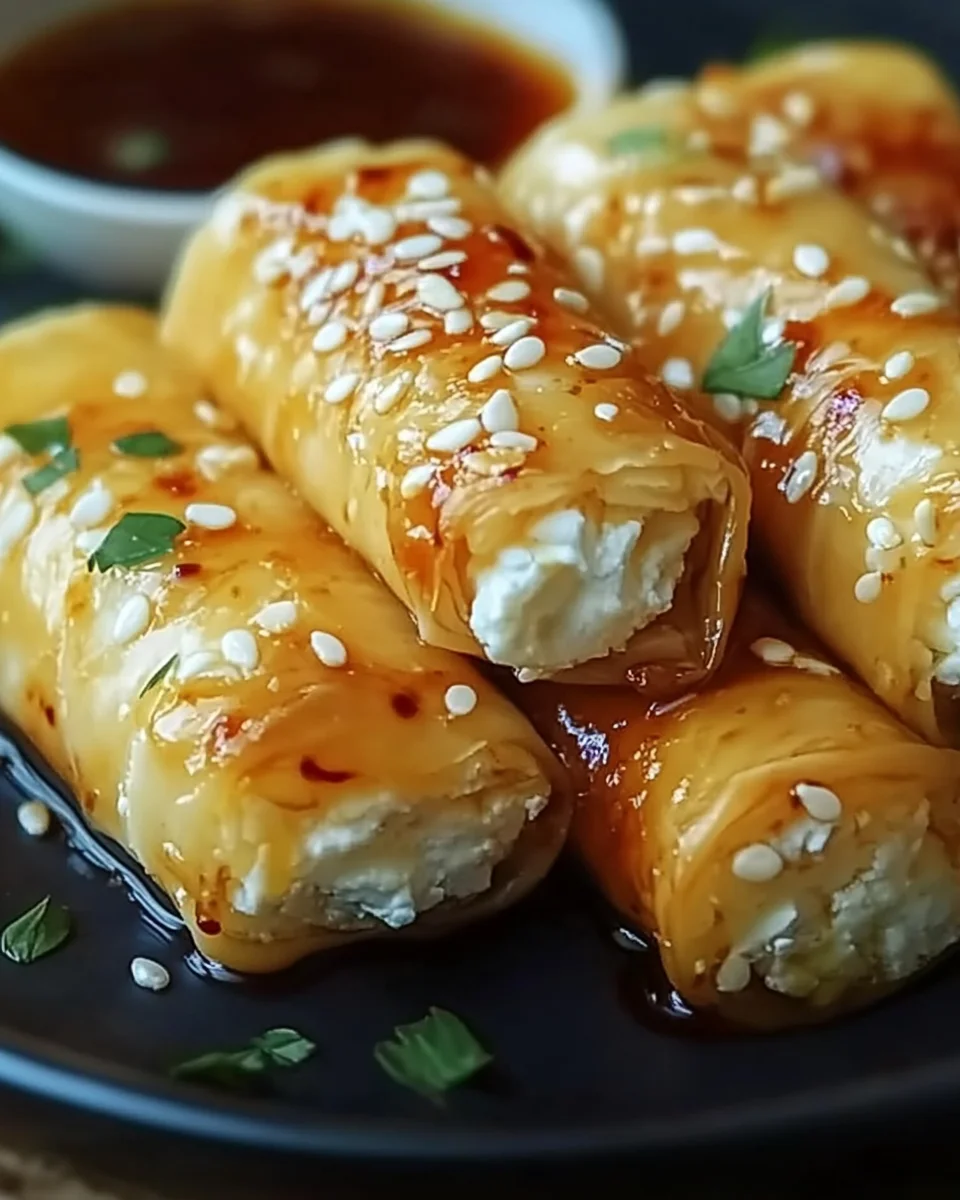
Imagine biting into a golden, flaky roll filled with creamy, tangy cheese and topped with a sweet yet spicy drizzle of chili honey. Oven Fried Feta Rolls with Chili Honey are the ultimate crowd-pleaser—a perfect blend of textures and flavors that will leave you craving more. Whether you’re hosting a dinner party, looking for a unique appetizer, or simply indulging in a creative snack, these rolls are a guaranteed hit.

This step-by-step guide will show you how to make these delicious rolls right in your kitchen. They’re easy to prepare, bake to crispy perfection, and are finished with a drizzle of warm chili honey for an unforgettable flavor punch.

Why You’ll Love Oven Fried Feta Rolls with Chili Honey

  • Perfectly Balanced Flavors: Tangy feta pairs beautifully with creamy ricotta and sweet-spicy honey.
  • Healthier Alternative: These rolls are baked, not fried, giving you a lighter but equally satisfying result.
  • Versatile and Easy: With simple ingredients and minimal prep time, this recipe is both approachable and impressive.
  • Crowd-Friendly: These rolls make an excellent appetizer or snack for gatherings.

Ingredients for Oven Fried Feta Rolls with Chili Honey

Here’s what you’ll need to create this mouthwatering dish:

IngredientAmountNotes
Feta cheese (crumbled)8 ozUse high-quality feta for bold flavor
Ricotta cheese1 cupAdds creaminess to the filling
Fresh thyme leaves (optional)1 tspProvides an earthy touch to the filling
Phyllo pastry6 sheetsThawed, cut in half lengthwise for 12 strips
Melted butter or olive oil¼ cupFor brushing the phyllo, ensuring a crispy texture
Honey¼ cupLight, runny honey for drizzling
Red chili flakes½ tspAdjust based on your preferred spice level

Step-by-Step Instructions for Perfect Feta Rolls

1. Prepare the Cheese Filling

  • In a medium mixing bowl, combine the crumbled feta cheese, ricotta cheese, and fresh thyme leaves (if using).
  • Stir until the mixture is smooth and evenly combined. Set aside.

2. Work with the Phyllo Pastry

  • Unroll the phyllo sheets and cover them with a damp kitchen towel to prevent drying out.
  • Cut each sheet in half lengthwise, creating 12 strips.

3. Assemble the Rolls

  • Preheat your oven to 400°F (200°C) and line a baking sheet with parchment paper.
  • Take one strip of phyllo and lay it on a clean work surface. Lightly brush the strip with melted butter or olive oil.
  • Place about 1 tablespoon of the cheese filling near one end of the phyllo strip.
  • Fold the sides inward and roll tightly to form a neat roll.
  • Place the roll seam-side down on the prepared baking sheet. Repeat with the remaining phyllo and filling.

4. Bake the Rolls

  • Arrange the rolls on the baking sheet, leaving a little space between each one.
  • Brush the tops with more melted butter or olive oil for a golden finish.
  • Bake for 15–20 minutes, or until the rolls are crispy and golden brown.

5. Prepare the Chili Honey

  • While the rolls are baking, warm ¼ cup of honey in a small saucepan over low heat.
  • Stir in ½ teaspoon of red chili flakes and let the mixture infuse for 1–2 minutes.
  • Remove from heat and set aside.

6. Serve and Garnish

  • Once the rolls are done baking, let them cool slightly on the baking sheet.
  • Drizzle the warm chili honey over the rolls or serve it on the side for dipping.
  • Garnish with additional thyme leaves, if desired, for a touch of color and flavor.

Pro Tips for the Best Feta Rolls

  1. Use Quality Ingredients: Opt for fresh, high-quality feta cheese and phyllo pastry for the best results.
  2. Prevent Drying Out: Always cover unused phyllo sheets with a damp towel to keep them from drying out and cracking.
  3. Customize the Spice Level: Adjust the amount of chili flakes in the honey to suit your preference.
  4. Serve Fresh: These rolls are best enjoyed warm and crispy right out of the oven.
  5. Experiment with Garnishes: Add a sprinkle of sesame seeds or chopped parsley for extra texture and flavor.

Serving Suggestions

Oven Fried Feta Rolls with Chili Honey are versatile and pair well with a variety of dishes and beverages:

  • As an Appetizer: Serve with a fresh garden salad or alongside hummus and olives.
  • Snack Option: Perfect for tea time or as a savory snack.
  • Wine Pairing: Enjoy with a crisp white wine or a sparkling rosé for a sophisticated touch.

Nutritional Information

NutrientPer Roll
Calories120
Protein4 g
Carbohydrates6 g
Fat9 g
Sodium180 mg

Variations of Oven Fried Feta Rolls

  1. Herb-Infused Rolls: Add chopped fresh herbs like parsley, dill, or oregano to the cheese filling for extra flavor.
  2. Spicy Kick: Include a pinch of cayenne pepper in the filling for an added heat.
  3. Nutty Delight: Sprinkle chopped nuts like pistachios or almonds inside the rolls for a crunchier texture.
  4. Sweet and Savory Combo: Drizzle the rolls with a mix of honey and balsamic glaze for a unique twist.

FAQs About Oven Fried Feta Rolls with Chili Honey

1. Can I make these rolls ahead of time?

Yes! Assemble the rolls, cover them tightly, and refrigerate for up to 24 hours. Bake them fresh when ready to serve.

2. What can I use instead of phyllo pastry?

You can substitute with spring roll wrappers or puff pastry, but adjust the baking time accordingly.

3. Can I freeze these rolls?

Absolutely. Freeze the unbaked rolls on a baking sheet, then transfer them to a freezer-safe container. Bake directly from frozen, adding a few extra minutes to the cooking time.

4. Is there a dairy-free alternative?

You can try using a plant-based ricotta or feta substitute to make these rolls dairy-free.

5. How can I make the rolls extra crispy?

Brush the phyllo generously with melted butter or olive oil, and ensure your oven is fully preheated before baking.

6. What’s the best way to reheat leftovers?

Reheat the rolls in a 350°F (175°C) oven for 5–7 minutes to restore their crispiness.

Conclusion: Try Oven Fried Feta Rolls with Chili Honey Today!

Oven Fried Feta Rolls with Chili Honey are the perfect mix of crispy, creamy, sweet, and spicy. They’re easy to make, incredibly flavorful, and versatile enough for any occasion. Whether you’re serving them as an appetizer, snack, or party food, these rolls are guaranteed to impress.

ating

Oven Fried Feta Rolls with Chili Honey: A Crispy, Tangy Delight

Crispy, tangy, and drizzled with sweet-spicy chili honey, these Oven Fried Feta Rolls are a delightful treat for any occasion. Filled with a creamy feta and ricotta blend and baked to golden perfection, they’re a lighter, yet equally satisfying alternative to fried rolls. Perfect as a party appetizer, snack, or savory indulgence, these rolls are sure to impress!  
Prep Time 15 minutes
Cook Time 20 minutes
Total Time 35 minutes
Servings: 12 rolls
Course: Appetizer / Snack
Cuisine: Mediterranean

Ingredients
  

  • 8 oz crumbled feta cheese
  • 1 cup ricotta cheese
  • 1 teaspoon fresh thyme leaves optional
  • 6 sheets phyllo pastry thawed and cut in half lengthwise (12 strips total)
  • ¼ cup melted butter or olive oil for brushing
  • ¼ cup honey
  • ½ teaspoon red chili flakes adjust to taste

Method
 

Prepare the Cheese Filling:
  1. In a medium bowl, combine feta cheese, ricotta cheese, and fresh thyme leaves (if using).
  2. Mix until smooth and evenly combined. Set aside.
Prepare the Phyllo Pastry:
  1. Unroll the phyllo sheets and keep them covered with a damp kitchen towel to prevent drying out.
  2. Cut each sheet in half lengthwise to create 12 strips.
Assemble the Rolls:
  1. Preheat your oven to 400°F (200°C) and line a baking sheet with parchment paper.
  2. Place one strip of phyllo on a clean surface and brush lightly with melted butter or olive oil.
  3. Add 1 tablespoon of the cheese filling near one end of the phyllo strip.
  4. Fold the sides inward and roll tightly to form a neat roll.
  5. Place the roll seam-side down on the baking sheet. Repeat with the remaining phyllo and filling.
Bake the Rolls:
  1. Arrange the rolls on the prepared baking sheet, leaving space between each one.
  2. Brush the tops with melted butter or olive oil.
  3. Bake for 15–20 minutes, or until the rolls are crispy and golden brown.
Prepare the Chili Honey:
  1. While the rolls are baking, warm the honey in a small saucepan over low heat.
  2. Stir in red chili flakes and let the mixture infuse for 1–2 minutes. Remove from heat.
Serve:
  1. Let the rolls cool slightly on the baking sheet.
  2. Drizzle with warm chili honey or serve the honey on the side for dipping.
  3. Garnish with additional thyme leaves if desired.

Notes

  • Cover unused phyllo with a damp towel to prevent it from drying out and tearing.
  • Adjust the chili flakes in the honey to suit your spice tolerance.
  • For extra crispiness, brush the phyllo generously with butter or olive oil.
  • These rolls are best served fresh but can be reheated in the oven at 350°F (175°C) for 5–7 minutes.

Creamy Mushroom Chicken

There’s something magical about a dish that feels like it came straight from a gourmet restaurant yet is simple enough for you to make at home. That’s exactly what Creamy Mushroom Chicken offers. With tender, golden chicken breasts smothered in a rich and flavorful mushroom sauce, this dish is a perfect blend of elegance and comfort. Whether you’re preparing dinner for your family or hosting a special gathering, this recipe will become your go-to favorite.

Why You’ll Love This Recipe

  • Rich and Flavorful: The creamy sauce with mushrooms, garlic, and Parmesan is irresistibly delicious.
  • Easy to Make: With just one skillet and simple ingredients, it’s ready in under 30 minutes.
  • Versatile: Pairs wonderfully with mashed potatoes, rice, or pasta.
  • Restaurant-Quality: Impress your family and friends with this sophisticated dish.

Ingredients for Creamy Mushroom Chicken

Let’s take a look at everything you’ll need to create this delightful dish.

For the Chicken

IngredientAmount
Boneless, skinless chicken breasts4 (about 1 1/2 lbs or 700g)
Salt and pepperTo taste
Olive oil or butter2 tablespoons
All-purpose flour (optional)1 tablespoon

For the Mushroom Sauce

IngredientAmount
Sliced mushrooms (white or cremini)2 cups (200g)
Garlic, minced2 cloves
Onion, finely chopped1 small
Chicken broth1 cup (240ml)
Heavy cream or half-and-half1 cup (240ml)
Dried thyme or Italian seasoning1/2 teaspoon
Grated Parmesan cheese (optional)1/4 cup (25g)

For Garnish

IngredientAmount
Fresh parsley, chopped1 tablespoon

Step-by-Step Instructions

1. Prepare the Chicken

  • Season the chicken breasts on both sides with salt and pepper.
  • (Optional) Lightly coat the chicken with flour. This step creates a golden, slightly crispy exterior and helps thicken the sauce.

2. Sear the Chicken

  • Heat the olive oil or butter in a large skillet over medium-high heat.
  • Add the chicken breasts and cook for 4–5 minutes per side, until golden brown but not fully cooked through. Remove the chicken and set it aside.

3. Cook the Mushrooms and Aromatics

  • In the same skillet, add the sliced mushrooms. Sauté for about 5 minutes until they are golden and tender.
  • Add the minced garlic and finely chopped onion, cooking for another 2–3 minutes until fragrant and softened.

4. Make the Sauce

  • Pour in the chicken broth and scrape the bottom of the skillet to deglaze, ensuring all the flavorful bits are incorporated.
  • Stir in the heavy cream and thyme. Bring the sauce to a gentle simmer.
  • Add Parmesan cheese (if using) and stir until the sauce is smooth and slightly thickened.

5. Combine and Cook

  • Return the chicken breasts to the skillet, spooning the creamy mushroom sauce over them.
  • Cover the skillet and let it simmer on low heat for 8–10 minutes, or until the chicken is fully cooked with an internal temperature of 165°F (74°C).

6. Serve and Enjoy

  • Garnish the dish with fresh parsley for a burst of color and freshness.
  • Serve warm with your favorite side dish, such as mashed potatoes, rice, or pasta, to soak up the creamy mushroom sauce.

Tips for Perfect Creamy Mushroom Chicken

  • Choose Fresh Ingredients: Fresh mushrooms, garlic, and herbs will enhance the overall flavor.
  • Don’t Overcook the Chicken: Use a meat thermometer to ensure the chicken stays juicy and tender.
  • Deglaze the Pan: Scraping the bottom of the skillet when adding broth ensures all the flavorful bits are incorporated into the sauce.
  • Add Veggies: You can toss in spinach, sun-dried tomatoes, or asparagus for added texture and color.

Nutritional Information (Per Serving)

NutrientAmount
Calories320–350 kcal
Protein30 g
Carbohydrates6 g
Fat20 g
Saturated Fat10 g
Sodium450 mg

Serving Suggestions

Creamy Mushroom Chicken pairs wonderfully with:

  • Mashed Potatoes: The creamy sauce is perfect for drizzling over fluffy mashed potatoes.
  • Steamed Vegetables: Broccoli, green beans, or carrots add a nutritious and vibrant touch.
  • Pasta or Rice: Serve over pasta or rice to soak up every drop of the delicious sauce.
  • Crusty Bread: Use fresh bread to mop up any remaining sauce on your plate.

FAQs About Creamy Mushroom Chicken

1. Can I use chicken thighs instead of breasts?

Yes! Chicken thighs are juicier and will work beautifully in this recipe. Adjust the cooking time as thighs may take a little longer to cook through.

2. Can I make this dish ahead of time?

Absolutely. You can prepare the chicken and sauce in advance, then reheat them gently on the stovetop before serving.

3. How do I store leftovers?

Store leftovers in an airtight container in the refrigerator for up to 3 days. Reheat gently on the stovetop or in the microwave.

4. Can I freeze Creamy Mushroom Chicken?

Yes, this dish freezes well. Allow it to cool completely, then store in a freezer-safe container for up to 3 months. Thaw in the refrigerator overnight before reheating.

5. What can I use instead of heavy cream?

Half-and-half or whole milk can be used, though the sauce will be slightly less rich. You can also use a dairy-free alternative like coconut cream.

6. What’s the best way to thicken the sauce?

If the sauce is too thin, you can simmer it longer or mix a teaspoon of cornstarch with water and stir it into the sauce.

Conclusion

This Creamy Mushroom Chicken recipe is the perfect balance of hearty and elegant, making it a versatile choice for any occasion. The tender chicken, rich mushroom sauce, and savory seasonings come together to create a dish that’s nothing short of magical.

Now it’s your turn! Gather your ingredients, follow these easy steps, and treat yourself and your loved ones to a restaurant-quality meal at home. Don’t forget to share your experience or add your own twist to the recipe. Happy cooking!

ating

Creamy Mushroom Chicken

Elevate your dinner with this Creamy Mushroom Chicken recipe. Juicy, golden chicken breasts are smothered in a rich mushroom sauce infused with garlic, thyme, and Parmesan. Perfect for family dinners or special occasions, this one-skillet dish is restaurant-quality yet simple to make at home!  
Prep Time 10 minutes
Cook Time 20 minutes
Total Time 30 minutes
Servings: 4 servings
Course: Main Course
Cuisine: American

Ingredients
  

For the Chicken:
  • 4 boneless skinless chicken breasts (about 1 1/2 lbs or 700g)
  • Salt and pepper to taste
  • 2 tablespoons olive oil or butter
  • 1 tablespoon all-purpose flour optional
For the Mushroom Sauce:
  • 2 cups sliced mushrooms white or cremini
  • 2 cloves garlic minced
  • 1 small onion finely chopped
  • 1 cup chicken broth 240ml
  • 1 cup heavy cream or half-and-half 240ml
  • 1/2 teaspoon dried thyme or Italian seasoning
  • 1/4 cup grated Parmesan cheese optional
For Garnish:
  • 1 tablespoon fresh parsley chopped

Method
 

Prepare the Chicken:
  1. Season chicken breasts with salt and pepper on both sides.
  2. (Optional) Lightly coat the chicken with flour for a golden, crispy exterior and a slightly thicker sauce.
Sear the Chicken:
  1. Heat olive oil or butter in a large skillet over medium-high heat.
  2. Add the chicken breasts and cook for 4–5 minutes per side until golden brown but not fully cooked through. Remove and set aside.
Cook the Mushrooms and Aromatics:
  1. In the same skillet, add sliced mushrooms and sauté for about 5 minutes until golden and tender.
  2. Add minced garlic and chopped onion, cooking for another 2–3 minutes until fragrant and softened.
Make the Sauce:
  1. Pour in chicken broth and scrape the bottom of the skillet to deglaze, incorporating all the flavorful bits.
  2. Stir in heavy cream and thyme. Bring to a gentle simmer.
  3. Add Parmesan cheese (if using) and stir until the sauce is smooth and slightly thickened.
Combine and Cook:
  1. Return the chicken breasts to the skillet, spooning the creamy mushroom sauce over them.
  2. Cover and simmer on low heat for 8–10 minutes, or until the chicken is fully cooked (internal temperature of 165°F/74°C).
Serve and Garnish:
  1. Garnish with fresh parsley for a burst of color and freshness.
  2. Serve warm with your favorite sides, such as mashed potatoes, rice, or pasta.

Notes

  • Use Fresh Ingredients: Fresh mushrooms, garlic, and parsley enhance the dish’s flavor.
  • Deglaze the Pan: Scrape the skillet after adding broth to incorporate all the caramelized bits for maximum flavor.
  • Thickening the Sauce: If needed, simmer the sauce longer or add a cornstarch slurry (1 teaspoon cornstarch mixed with 1 tablespoon water).

Cinnamon Roll French Toast Roll-Ups

What’s better than starting your day with the sweet aroma of cinnamon and buttery goodness? Imagine the delightful fusion of two breakfast favorites—cinnamon rolls and French toast—rolled into one irresistible treat. This Cinnamon Roll French Toast Roll-Ups recipe is not just delicious but also easy to prepare, making it perfect for weekend mornings, special occasions, or whenever you crave something extraordinary. Let’s dive into the details and bring this mouthwatering creation to life!

Why You’ll Love This Recipe

  • Fun and Unique: A creative twist on classic breakfast staples.
  • Easy to Make: Simple ingredients and quick preparation make it beginner-friendly.
  • Kid-Approved: Kids will love the sweet, cinnamon flavor and fun roll-up shape.
  • Customizable: Add your favorite fillings or toppings to make it your own.

Ingredients for Cinnamon Roll French Toast Roll-Ups

Here’s a breakdown of what you’ll need for this delectable breakfast treat.

For the Roll-Ups

IngredientAmount
White sandwich bread10 slices
Butter (melted)3 tablespoons
Brown sugar3 tablespoons
Ground cinnamon2 tablespoons

For the French Toast Coating

IngredientAmount
Large eggs3
Milk1 tablespoon
Ground cinnamon1/2 teaspoon
Vanilla extract1/2 teaspoon

For Cooking

IngredientAmount
Butter for frying2–3 tablespoons

Step-by-Step Instructions

1. Prepare the Bread

  • Start by removing the crusts from the slices of white bread.
  • Using a rolling pin, flatten each slice evenly to create a smooth surface for rolling.

2. Make the Cinnamon Spread

  • In a small bowl, mix together the melted butter, brown sugar, and ground cinnamon.
  • Spread a thin, even layer of the mixture onto each slice of flattened bread, leaving a small border around the edges.

3. Roll Up the Bread

  • Carefully roll each slice of bread tightly, sealing the edges with gentle pressure to ensure the roll-up stays intact during cooking.

4. Prepare the French Toast Coating

  • In a shallow bowl, whisk together the eggs, milk, ground cinnamon, and vanilla extract.

5. Cook the Roll-Ups

Heat the Skillet

  • Heat a large skillet over medium heat and add 2–3 tablespoons of butter. Allow the butter to melt and coat the skillet evenly.

Dip and Cook

  • Dip each roll-up in the egg mixture, making sure it’s fully coated.
  • Place the roll-ups seam-side down in the skillet.

Brown All Sides

  • Cook the roll-ups for 2–3 minutes, rotating them frequently to brown all sides evenly.

Tips for Perfect Cinnamon Roll French Toast Roll-Ups

  • Use Fresh Bread: Fresh, soft bread rolls more easily without cracking.
  • Don’t Overfill: Avoid spreading too much cinnamon mixture to prevent it from leaking out during cooking.
  • Cook Slowly: Medium heat ensures the roll-ups cook through without burning.
  • Experiment with Fillings: Add cream cheese, jam, or chocolate spread for an extra layer of flavor.

Serving Suggestions

These roll-ups are delicious on their own, but you can take them to the next level with:

  • Toppings: Drizzle with maple syrup, honey, or powdered sugar.
  • Dips: Serve with vanilla yogurt, cream cheese frosting, or a side of fruit compote.
  • Side Dishes: Pair with fresh fruit or scrambled eggs for a balanced breakfast.

Nutritional Information (Per Roll-Up)

NutrientAmount
Calories120 kcal
Protein3 g
Carbohydrates16 g
Fat5 g
Saturated Fat3 g
Sodium110 mg

Why These Roll-Ups Are Perfect for Breakfast or Brunch

These Cinnamon Roll French Toast Roll-Ups bring together the best parts of breakfast—warm, buttery bread, a sweet cinnamon filling, and a custardy coating. They’re portable, fun to eat, and perfect for sharing, making them a hit for both busy mornings and leisurely brunches.

FAQs About Cinnamon Roll French Toast Roll-Ups

1. Can I use whole wheat bread?

Yes! Whole wheat bread adds a nutty flavor and slightly firmer texture, making it a great alternative.

2. Can I prepare these roll-ups ahead of time?

You can assemble the roll-ups and refrigerate them overnight. When ready to cook, simply dip them in the egg mixture and fry.

3. How do I store leftovers?

Store cooked roll-ups in an airtight container in the refrigerator for up to 2 days. Reheat them in a skillet or toaster oven for the best texture.

4. Can I make these in the oven?

Absolutely! Arrange the roll-ups on a baking sheet and bake at 375°F (190°C) for 10–12 minutes, flipping halfway through.

5. What can I use instead of brown sugar?

White sugar, coconut sugar, or a sugar-free sweetener can be used as substitutes.

6. Can I freeze these roll-ups?

Yes! Flash freeze the uncooked roll-ups on a baking sheet, then transfer them to a freezer bag. Cook directly from frozen, adding a minute or two to the cooking time.

Conclusion

This Cinnamon Roll French Toast Roll-Ups recipe is the ultimate breakfast treat that’s as fun to make as it is to eat. Whether you’re feeding a crowd or treating yourself, these roll-ups deliver big on flavor and creativity.

Ready to give them a try? Gather your ingredients, follow the simple steps, and enjoy a breakfast experience that feels like a warm hug. Don’t forget to share your creation with friends and family—they’ll thank you for it! Happy cooking!

ating

Cinnamon Roll French Toast Roll-Ups

Start your day with these delightful Cinnamon Roll French Toast Roll-Ups! Combining the buttery sweetness of cinnamon rolls with the custardy richness of French toast, these roll-ups are a fun, delicious, and easy-to-make breakfast treat.  
Prep Time 10 minutes
Cook Time 15 minutes
Total Time 25 minutes
Servings: 10 Rolls up
Course: Breakfast
Cuisine: American

Ingredients
  

For the Roll-Ups:
  • 10 slices of white sandwich bread
  • 3 tablespoons melted butter
  • 3 tablespoons brown sugar
  • 2 tablespoons ground cinnamon
For the French Toast Coating:
  • 3 large eggs
  • 1 tablespoon milk
  • 1/2 teaspoon ground cinnamon
  • 1/2 teaspoon vanilla extract
For Cooking:
  • 2 –3 tablespoons butter for frying

Method
 

Prepare the Bread:
  1. Remove the crusts from the bread slices.
  2. Flatten each slice with a rolling pin to create an even surface for rolling.
Make the Cinnamon Spread:
  1. In a small bowl, mix together the melted butter, brown sugar, and ground cinnamon.
  2. Spread a thin, even layer of the cinnamon mixture onto each slice of bread, leaving a small border around the edges.
Roll Up the Bread:
  1. Roll each slice tightly and press gently to seal the edges.
Prepare the French Toast Coating:
  1. In a shallow bowl, whisk together the eggs, milk, cinnamon, and vanilla extract.
Cook the Roll-Ups:
  1. Heat a skillet over medium heat and add 2–3 tablespoons of butter, allowing it to coat the skillet evenly.
  2. Dip each roll-up into the egg mixture, ensuring it’s fully coated.
  3. Place the roll-ups seam-side down in the skillet. Cook for 2–3 minutes, rotating frequently to brown all sides evenly.
Serve:
  1. Remove the roll-ups from the skillet and let them cool slightly. Serve warm with your choice of toppings or dips.

Notes

  • Use Fresh Bread: Soft, fresh bread rolls easily without breaking.
  • Avoid Overfilling: Too much filling may cause the roll-ups to leak during cooking.
  • Cook on Medium Heat: Ensures the roll-ups cook evenly without burning.
  • Customize Fillings: Add cream cheese, jam, or chocolate spread for extra flavor.

Easy Blueberry Cheesecake Swirl Cookie Recipe

Imagine biting into a soft, buttery cookie filled with creamy cheesecake and bursting with a sweet blueberry swirl. Sounds heavenly, doesn’t it? This Easy Blueberry Cheesecake Swirl Cookie Recipe brings together the tangy flavor of cheesecake, the fruity sweetness of blueberries, and the comforting goodness of homemade cookies. Perfect for any occasion, these cookies are easy to make and impossible to resist. Let’s dive into the details so you can whip up this treat in your kitchen!

Why You’ll Love This Recipe

  • Unique and Delicious: Combines cookies, cheesecake, and blueberry flavors into one unforgettable dessert.
  • Simple to Make: With easy-to-follow steps, you don’t need to be a professional baker to succeed.
  • Crowd-Pleasing: These cookies are perfect for parties, holidays, or an everyday indulgence.
  • Customizable: You can experiment with different fruits or flavorings for endless possibilities.

Ingredients for Easy Blueberry Cheesecake Swirl Cookie Recipe

Here’s everything you need to bring this masterpiece to life:

For the Cookies

IngredientAmount
Unsalted butter (softened)1/2 cup
Granulated sugar1/2 cup
Light brown sugar (packed)1/4 cup
Large egg1
Vanilla extract1 tsp
All-purpose flour1 1/4 cups
Baking soda1/2 tsp
Salt1/4 tsp

For the Cheesecake Filling

IngredientAmount
Cream cheese (softened)4 oz
Granulated sugar1/4 cup
Vanilla extract1/2 tsp

For the Blueberry Swirl

IngredientAmount
Fresh or frozen blueberries1/2 cup
Granulated sugar2 tbsp
Cornstarch1 tsp
Water1 tbsp

Step-by-Step Instructions

1. Prepare the Blueberry Swirl

  • Cook the Blueberries: In a small saucepan, combine the blueberries, sugar, cornstarch, and water.
  • Simmer: Cook over medium heat, stirring occasionally, until the mixture thickens (about 5 minutes).
  • Mash and Cool: Mash the blueberries slightly and set the mixture aside to cool completely.

2. Make the Cheesecake Filling

  • In a small bowl, beat the cream cheese, sugar, and vanilla extract until smooth.
  • Set aside the cheesecake filling for later use.

3. Prepare the Cookie Dough

Cream the Butter and Sugars

  • In a large bowl, cream together the softened butter, granulated sugar, and light brown sugar until light and fluffy.

Add the Wet Ingredients

  • Mix in the egg and vanilla extract until well combined.

Incorporate the Dry Ingredients

  • In a separate bowl, whisk together the flour, baking soda, and salt.
  • Gradually add the dry ingredients to the wet mixture, stirring until a soft dough forms.

4. Assemble the Cookies

Form the Cookie Bases

  • Preheat your oven to 350°F (175°C) and line a baking sheet with parchment paper.
  • Scoop 2-tablespoon-sized portions of dough onto the baking sheet, spacing them 2 inches apart.

Create the Wells

  • Use your thumb or the back of a spoon to make a small well in the center of each dough ball.

5. Add the Fillings

Cheesecake Layer

  • Spoon a small amount of the cheesecake filling into each well.

Blueberry Swirl

  • Add a small dollop of the cooled blueberry swirl on top of the cheesecake filling.
  • Use a toothpick or knife to gently swirl the cheesecake and blueberry together for a marbled effect.

6. Bake and Cool

Bake the Cookies

  • Bake the cookies for 12–15 minutes, or until the edges are set and the centers are slightly soft.

Cool Completely

  • Remove the baking sheet from the oven and let the cookies cool for 5 minutes before transferring them to a wire rack to cool completely.

Tips for the Perfect Blueberry Cheesecake Swirl Cookies

  • Use Fresh Ingredients: Fresh blueberries and real vanilla extract will elevate the flavor.
  • Don’t Overfill the Wells: Too much filling can cause the cookies to overflow while baking.
  • Chill the Dough: If the dough is too soft to handle, refrigerate it for 15–20 minutes.
  • Store Properly: Keep cookies in an airtight container in the fridge to maintain freshness.

Nutritional Information (Per Cookie)

NutrientAmount
Calories180-200 kcal
Protein3 g
Carbohydrates20 g
Fat10 g
Saturated Fat6 g
Sodium90 mg

Serving Suggestions

  • Pair with Coffee or Tea: These cookies make a delightful afternoon treat with your favorite hot beverage.
  • Dessert Platter: Include them in a dessert platter for parties or gatherings.
  • Gift Idea: Package them in a decorative tin for a homemade gift that’s sure to impress.

FAQs About Easy Blueberry Cheesecake Swirl Cookie Recipe

1. Can I use frozen blueberries?

Yes! If using frozen blueberries, there’s no need to thaw them. Just follow the recipe as written.

2. What if I don’t have cream cheese?

You can substitute mascarpone or a dairy-free cream cheese alternative if needed.

3. Can I freeze the cookie dough?

Absolutely! Scoop and shape the dough into balls, then freeze on a baking sheet. Once frozen, transfer to a freezer-safe bag. Thaw before baking.

4. How do I store these cookies?

Store them in an airtight container in the refrigerator for up to 5 days. Let them come to room temperature before serving.

5. Can I make these gluten-free?

Yes! Substitute the all-purpose flour with a 1:1 gluten-free baking blend.

6. What other fruits can I use for the swirl?

You can try strawberries, raspberries, or even blackberries for a fun twist.

Conclusion

This Easy Blueberry Cheesecake Swirl Cookie Recipe is a delightful way to combine three beloved desserts into one. With its soft cookie base, creamy cheesecake filling, and fruity blueberry swirl, it’s a treat that’s as beautiful as it is delicious.

Why wait? Gather your ingredients, follow the steps, and bake these show-stopping cookies today. Don’t forget to share them with friends and family or keep them all to yourself—no judgment here! Enjoy your baking adventure!

ating

Easy Blueberry Cheesecake Swirl Cookie Recipe

Indulge in these soft, buttery cookies filled with creamy cheesecake and swirled with a sweet blueberry compote. Perfect for parties, gifts, or simply treating yourself, these cookies are a delightful fusion of cheesecake, cookies, and fruity goodness!  
Prep Time 20 minutes
Cook Time 15 minutes
Total Time 25 minutes
Servings: 12 cookie
Course: Dessert
Cuisine: American

Ingredients
  

For the Cookies:
  • 1/2 cup unsalted butter softened
  • 1/2 cup granulated sugar
  • 1/4 cup light brown sugar packed
  • 1 large egg
  • 1 teaspoon vanilla extract
  • 1 1/4 cups all-purpose flour
  • 1/2 teaspoon baking soda
  • 1/4 teaspoon salt
For the Cheesecake Filling:
  • 4 ounces cream cheese softened
  • 1/4 cup granulated sugar
  • 1/2 teaspoon vanilla extract
For the Blueberry Swirl:
  • 1/2 cup fresh or frozen blueberries
  • 2 tablespoons granulated sugar
  • 1 teaspoon cornstarch
  • 1 tablespoon water

Method
 

Prepare the Blueberry Swirl:
  1. Combine blueberries, sugar, cornstarch, and water in a small saucepan.
  2. Cook over medium heat, stirring occasionally, until the mixture thickens (about 5 minutes).
  3. Mash slightly with a fork and set aside to cool completely.
Make the Cheesecake Filling:
  1. Beat cream cheese, sugar, and vanilla extract in a small bowl until smooth. Set aside.
Prepare the Cookie Dough:
  1. In a large bowl, cream together butter, granulated sugar, and brown sugar until light and fluffy.
  2. Mix in the egg and vanilla extract until combined.
  3. In a separate bowl, whisk together flour, baking soda, and salt. Gradually add the dry ingredients to the wet ingredients, mixing until a soft dough forms.
Assemble the Cookies:
  1. Preheat your oven to 350°F (175°C) and line a baking sheet with parchment paper.
  2. Scoop 2-tablespoon-sized portions of dough onto the baking sheet, spacing them 2 inches apart.
  3. Use your thumb or the back of a spoon to create a well in the center of each dough ball.
Fill and Swirl:
  1. Spoon a small amount of cheesecake filling into each well.
  2. Add a small dollop of blueberry swirl on top of the cheesecake filling.
  3. Use a toothpick or knife to gently swirl the two fillings together for a marbled effect.
Bake the Cookies:
  1. Bake for 12–15 minutes, or until the edges are set and the centers are slightly soft.
  2. Let the cookies cool on the baking sheet for 5 minutes, then transfer to a wire rack to cool completely.

Notes

  • Chill the Dough: If your dough is too soft, refrigerate for 15–20 minutes to make it easier to handle.
  • Don’t Overfill: Use just enough filling to prevent overflow while baking.
  • Experiment with Fruits: Try raspberries, blackberries, or strawberries for different flavors.

Pepperoni Cheese Crisps Recipe

Imagine a snack that’s crispy, cheesy, and loaded with the rich, savory flavor of pepperoni. Whether you’re hosting a game day party, preparing a quick low-carb snack, or just indulging in something delicious, this Pepperoni Cheese Crisps Recipe is your ultimate go-to. Simple to make and utterly satisfying, these crisps deliver bold flavors in every bite. Let’s explore how you can whip them up in no time.

Why You’ll Love This Recipe

  • Quick and Easy: With just a few ingredients and minimal prep, you’ll have a snack ready in minutes.
  • Low-Carb and Keto-Friendly: Perfect for those looking for a tasty treat that fits their dietary needs.
  • Crowd-Pleasing: Great for parties, movie nights, or even as a crunchy side to soups and salads.
  • Customizable: Add your favorite spices or experiment with different cheeses to make it your own.

Ingredients for Pepperoni Cheese Crisps

Here’s what you’ll need to create this irresistible snack:

IngredientAmount
Grated cheddar cheese1/3 cup
Grated mozzarella cheese1/3 cup
Pizza pepperoni slices12 slices

Step-by-Step Instructions

1. Preheat the Oven

Set your oven to 375°F (190°C) and allow it to preheat while you prepare the ingredients. A hot oven ensures the cheese melts evenly and the pepperoni crisps up nicely.

2. Prepare the Muffin Tin

Using a non-stick muffin tin, place one slice of pepperoni at the bottom of each cup. This method keeps the cheese contained, ensuring evenly shaped crisps.

3. Add the Cheese

Evenly divide the grated cheddar and mozzarella cheese over the pepperoni slices. Gently press the cheese down so it adheres to the pepperoni as it bakes.

4. Bake to Perfection

Place the muffin tin in the preheated oven and bake for 8 minutes. You’ll know the crisps are ready when the edges turn golden brown and crispy, while the centers remain slightly soft.

5. Cool and Serve

Remove the muffin tin from the oven and let the crisps cool for 5 minutes before carefully removing them. Cooling allows the cheese to set, giving the crisps their perfect texture. Serve warm or at room temperature.

Tips for the Perfect Pepperoni Cheese Crisps

  • Use a Non-Stick Muffin Tin: This ensures the crisps release easily without breaking.
  • Experiment with Cheeses: Try Parmesan, Monterey Jack, or Gouda for a different flavor profile.
  • Add Seasonings: Sprinkle Italian seasoning, red pepper flakes, or garlic powder on the cheese before baking for extra zest.
  • Watch Closely While Baking: Cheese can burn quickly, so keep an eye on the oven during the last few minutes.

Nutritional Information (Per Crisp)

NutrientAmount
Calories50 kcal
Protein3 g
Fat4 g
Carbohydrates<1 g
Sodium100 mg

Serving Suggestions

  • Snack Time: Serve these crisps as a stand-alone snack for any occasion.
  • Appetizer Platter: Pair with dips like marinara sauce, ranch dressing, or a spicy queso dip.
  • Salad Topping: Crumble the crisps over a Caesar or garden salad for a crunchy twist.
  • Soup Sidekick: Serve alongside tomato or broccoli cheddar soup for an added crunch.

Why These Crisps are Perfect for Low-Carb Diets

If you’re on a low-carb or keto diet, these Pepperoni Cheese Crisps are a fantastic option. They’re high in protein and fat, keeping you full without spiking your carbs. Plus, the combination of cheese and pepperoni satisfies cravings for crunchy, savory snacks.

FAQs About Pepperoni Cheese Crisps Recipe

1. Can I make these without a muffin tin?

Yes! You can use a parchment-lined baking sheet instead. Just place the pepperoni and cheese in small piles, ensuring they’re evenly spaced to prevent spreading.

2. How do I store leftovers?

Store leftover crisps in an airtight container at room temperature for up to 3 days. For longer storage, refrigerate them.

3. Can I reheat these crisps?

Reheat them in a 350°F (175°C) oven for 3–4 minutes to restore their crispiness. Avoid microwaving, as it may make them soggy.

4. What other toppings can I add?

Try adding diced jalapeños, chopped olives, or a sprinkle of bacon bits to customize your crisps.

5. Can I use turkey pepperoni?

Absolutely! Turkey pepperoni is a leaner option and works just as well in this recipe.

6. Are these crisps gluten-free?

Yes! Since they’re made from cheese and pepperoni, they’re naturally gluten-free.

Conclusion

This Pepperoni Cheese Crisps Recipe is a game-changer for snack lovers everywhere. With just three simple ingredients, you can create a crunchy, cheesy, and satisfying treat that’s perfect for any occasion.

Why not give this recipe a try today? Gather your ingredients, follow the steps, and enjoy a snack that’s as easy to make as it is delicious. Don’t forget to share your experience or tweak the recipe to make it your own. Happy snacking!

ating

Pepperoni Cheese Crisps Recipe

Crispy, cheesy, and loaded with the savory flavor of pepperoni, these Pepperoni Cheese Crisps are the ultimate low-carb snack. With just three ingredients and a quick bake time, they’re perfect for any occasion—from game day to movie night!  
Prep Time 5 minutes
Cook Time 8 minutes
Total Time 15 minutes
Servings: 12 crisps
Course: Snack
Cuisine: American

Ingredients
  

  • 1/3 cup grated cheddar cheese
  • 1/3 cup grated mozzarella cheese
  • 12 slices of pizza pepperoni

Method
 

Preheat the Oven:
  1. Set your oven to 375°F (190°C). Preheat while you prepare the crisps for even baking.
Prepare the Muffin Tin:
  1. Use a non-stick muffin tin and place one slice of pepperoni at the bottom of each cup.
Add the Cheese:
  1. Evenly divide the grated cheddar and mozzarella cheese over the pepperoni slices. Press the cheese gently to adhere to the pepperoni.
Bake the Crisps:
  1. Place the muffin tin in the oven and bake for 8 minutes, or until the cheese is melted and the edges are golden brown.
Cool and Serve:
  1. Remove the tin from the oven and allow the crisps to cool for 5 minutes. This helps the cheese set, ensuring the perfect texture. Carefully remove and serve warm or at room temperature.

Notes

  • Non-Stick Essentials: Use a non-stick muffin tin for easy removal and perfect crisps.
  • Cheese Options: Try Parmesan, Gouda, or Monterey Jack for a different flavor twist.
  • Add Seasonings: Sprinkle garlic powder, Italian seasoning, or red pepper flakes for extra zest.
  • Watch Closely: Keep an eye on the oven to prevent burning during the last few minutes of baking.

Garlic Butter Sausage Bites with Creamy Parmesan Pasta

Picture this: a plate filled with savory sausage bites caramelized in rich garlic butter, resting atop a bed of silky, creamy Parmesan pasta. If your mouth is watering already, you’re in for a treat! Garlic Butter Sausage Bites with Creamy Parmesan Pasta combines bold, comforting flavors with the ease of a one-skillet meal. Whether you’re cooking for family or hosting friends, this dish is sure to impress.

Why This Recipe Will Be Your New Favorite

  • Quick and Easy: You can have this dish on the table in under 30 minutes.
  • Packed with Flavor: The garlic butter, Italian seasoning, and Parmesan create a harmonious blend.
  • Family-Friendly: Both kids and adults will love this creamy, hearty meal.
  • Customizable: Adjust the heat, protein, or pasta type to fit your preferences.

Ingredients for Garlic Butter Sausage Bites with Creamy Parmesan Pasta

Here’s everything you need to make this irresistible meal.

For the Garlic Butter Sausage Bites

IngredientAmount
Smoked or Italian sausage1 lb, sliced into bite-sized pieces
Butter2 tablespoons
Olive oil1 tablespoon
Garlic, minced3 cloves
Italian seasoning1 teaspoon
Salt and pepperTo taste
Fresh parsley, choppedFor garnish

For the Creamy Parmesan Pasta

IngredientAmount
Pasta (penne, fettuccine, or your choice)12 oz
Butter2 tablespoons
Heavy cream1 1/2 cups
Parmesan cheese, grated1 cup
Garlic powder1/2 teaspoon
Red pepper flakes (optional)1/2 teaspoon
Salt and black pepperTo taste
Fresh parsley and ParmesanFor garnish (optional)

Step-by-Step Instructions

1. Cook the Sausage Bites

  • Heat 1 tablespoon of olive oil in a large skillet over medium heat.
  • Add the sliced sausage and cook for 4–5 minutes on each side until browned and slightly crispy.
  • Remove the sausage from the skillet and set it aside.

2. Make the Garlic Butter Sauce

  • In the same skillet, melt 2 tablespoons of butter over medium heat.
  • Add the minced garlic and cook for 1–2 minutes until fragrant, stirring frequently to prevent burning.
  • Return the sausage to the skillet, sprinkle with Italian seasoning, and toss to coat. Season with salt and pepper to taste.
  • Set aside the garlic butter sausage bites for later use.

3. Cook the Pasta

  • Bring a large pot of salted water to a boil.
  • Add your choice of pasta and cook according to package instructions until al dente.
  • Reserve 1/2 cup of the pasta water before draining, then set the pasta aside.

4. Prepare the Creamy Parmesan Sauce

  • In a medium saucepan, melt 2 tablespoons of butter over medium heat.
  • Add the heavy cream and garlic powder, stirring constantly as the mixture begins to simmer.
  • Gradually whisk in the Parmesan cheese until the sauce is smooth and creamy.
  • Add salt, black pepper, and red pepper flakes (if desired) to taste.

5. Combine Pasta and Sauce

  • Add the cooked pasta to the Parmesan sauce, tossing to coat evenly.
  • If the sauce is too thick, stir in a little of the reserved pasta water to achieve your desired consistency.

6. Serve and Garnish

  • Plate the creamy Parmesan pasta and top it with the garlic butter sausage bites.
  • Garnish with freshly chopped parsley and an extra sprinkle of Parmesan cheese for a touch of elegance.

Tips for Perfect Garlic Butter Sausage Bites with Creamy Parmesan Pasta

  • Use Fresh Parmesan: Freshly grated Parmesan melts more smoothly than pre-packaged varieties.
  • Don’t Overcrowd the Skillet: Cook the sausage in batches if necessary to ensure even browning.
  • Reserve Pasta Water: A splash of pasta water can make your sauce creamier and help it cling to the pasta.
  • Add Veggies: Toss in spinach, peas, or sun-dried tomatoes for added flavor and nutrition.

Nutritional Information (Per Serving)

NutrientAmount
Calories650–700 kcal
Protein25 g
Carbohydrates45 g
Fat40 g
Saturated Fat20 g
Sodium900 mg

Serving Suggestions

Pair this dish with:

  • Garlic Bread: Perfect for soaking up any leftover sauce.
  • Side Salad: A crisp Caesar salad or mixed greens with balsamic vinaigrette balances the richness.
  • Wine Pairing: A glass of dry white wine like Sauvignon Blanc complements the creamy sauce beautifully.

FAQs About Garlic Butter Sausage Bites with Creamy Parmesan Pasta

1. Can I use a different type of sausage?

Yes! Chicken sausage, turkey sausage, or plant-based sausage work wonderfully in this recipe.

2. What’s the best pasta for this dish?

Penne and fettuccine are classic choices, but any pasta that holds sauce well will work, like rigatoni or linguine.

3. Can I make this dish ahead of time?

While it’s best served fresh, you can cook the sausage and prepare the sauce in advance. Store them separately and combine with freshly cooked pasta when ready to serve.

4. How do I store leftovers?

Refrigerate leftovers in an airtight container for up to 3 days. Reheat gently on the stovetop with a splash of milk or cream to revive the sauce.

5. Can I freeze this dish?

It’s not recommended to freeze creamy pasta dishes, as the sauce may separate upon reheating.

6. How can I make this dish lighter?

Use half-and-half instead of heavy cream and swap the sausage for a leaner protein like grilled chicken.

Conclusion

With its irresistible combination of flavors, Garlic Butter Sausage Bites with Creamy Parmesan Pasta is the ultimate comfort food. The savory sausage, rich garlic butter, and luscious Parmesan sauce make it a meal to remember.

Now it’s your turn! Gather your ingredients, follow these easy steps, and enjoy a restaurant-quality meal at home. Don’t forget to share this recipe with friends or bookmark it for future dinners. Happy cooking!

ating

Garlic Butter Sausage Bites with Creamy Parmesan Pasta

Indulge in the perfect combination of savory sausage bites caramelized in garlic butter and creamy Parmesan pasta. This comforting dish is quick, flavorful, and perfect for family dinners or entertaining guests.  
Prep Time 10 minutes
Cook Time 20 minutes
Total Time 30 minutes
Servings: 4 servings
Course: Main Course
Cuisine: Italian-American

Ingredients
  

For the Garlic Butter Sausage Bites:
  • 1 lb smoked or Italian sausage sliced into bite-sized pieces
  • 2 tablespoons butter
  • 1 tablespoon olive oil
  • 3 cloves garlic minced
  • 1 teaspoon Italian seasoning
  • Salt and pepper to taste
  • Fresh parsley chopped (for garnish)
For the Creamy Parmesan Pasta:
  • 12 oz pasta penne, fettuccine, or your choice
  • 2 tablespoons butter
  • 1 1/2 cups heavy cream
  • 1 cup grated Parmesan cheese
  • 1/2 teaspoon garlic powder
  • 1/2 teaspoon red pepper flakes optional
  • Salt and black pepper to taste
  • Fresh parsley and Parmesan for garnish, optional

Method
 

Cook the Sausage Bites:
  1. Heat olive oil in a large skillet over medium heat.
  2. Add sausage slices and cook for 4–5 minutes per side until browned and slightly crispy. Remove and set aside.
Make the Garlic Butter Sauce:
  1. In the same skillet, melt butter over medium heat.
  2. Add minced garlic and cook for 1–2 minutes until fragrant, stirring frequently to avoid burning.
  3. Return the sausage to the skillet, sprinkle with Italian seasoning, and toss to coat. Season with salt and pepper. Set aside.
Cook the Pasta:
  1. Bring a large pot of salted water to a boil.
  2. Add pasta and cook according to package instructions until al dente.
  3. Reserve 1/2 cup pasta water before draining the pasta.
Prepare the Creamy Parmesan Sauce:
  1. In a medium saucepan, melt butter over medium heat.
  2. Add heavy cream and garlic powder, stirring constantly as it begins to simmer.
  3. Gradually whisk in Parmesan cheese until smooth and creamy.
  4. Add salt, black pepper, and red pepper flakes (if using) to taste.
Combine Pasta and Sauce:
  1. Add cooked pasta to the Parmesan sauce and toss to coat evenly.
  2. If the sauce is too thick, stir in reserved pasta water until desired consistency is achieved.
Assemble and Serve:
  1. Plate the creamy Parmesan pasta and top with garlic butter sausage bites.
  2. Garnish with freshly chopped parsley and additional Parmesan cheese for a restaurant-quality finish.

Notes

  • Use Fresh Parmesan: Grate your Parmesan fresh for the creamiest sauce.
  • Reserve Pasta Water: A splash of pasta water can enhance the sauce’s creaminess and help it cling to the pasta.
  • Add Veggies: Toss in spinach, peas, or sun-dried tomatoes for extra flavor and nutrition.

Slow Cooker Chicken Tortilla Soup: A Comforting, Flavorful Favorite

There’s something heartwarming about coming home to a bowl of delicious, warm soup after a long day. Slow Cooker Chicken Tortilla Soup is the perfect comfort food, offering layers of bold flavors and hearty ingredients that come together effortlessly. Whether you’re feeding a family or meal-prepping for the week, this dish is as convenient as it is satisfying.

Why You’ll Love Slow Cooker Chicken Tortilla Soup

Imagine tender shredded chicken, earthy spices, and the crunch of tortilla strips in every bite. This soup is perfect for chilly nights, busy days, or when you simply want to enjoy a healthy, flavorful meal. Plus, it’s customizable, allowing you to add your favorite toppings and adjust the spice level to your taste.

Ingredients for Slow Cooker Chicken Tortilla Soup

This recipe uses simple, pantry-friendly ingredients that pack a punch of flavor.

Soup Base Ingredients

IngredientQuantity
Low-sodium chicken broth4 1/2 cups
Petite diced tomatoes1 (14.5 oz) can
Yellow onion, finely chopped1 1/4 cups
Garlic, minced3 cloves
Chili powder1 Tbsp
Ground cumin2 tsp
Paprika3/4 tsp
Ground coriander1/2 tsp
Salt and black pepperTo taste

Protein and Add-ins

IngredientQuantity
Boneless, skinless chicken breasts1 1/2 lbs
Black beans, drained and rinsed1 (14.5 oz) can
Frozen corn1 1/2 cups
Fresh lime juice1 Tbsp
Fresh cilantro, chopped1/4 cup

Optional Toppings

  • Tortilla strips or tortilla chips
  • Shredded cheddar or Monterey Jack cheese
  • Diced avocado
  • Sour cream
  • Diced Roma tomatoes

How to Make Slow Cooker Chicken Tortilla Soup

1. Prepare Your Ingredients

Start by finely chopping the onion, mincing the garlic, and measuring your spices. Preparing these elements in advance ensures smooth cooking.

2. Layer the Ingredients in the Slow Cooker

  1. Pour the chicken broth and diced tomatoes into your slow cooker.
  2. Add the onion, garlic, chili powder, cumin, paprika, coriander, salt, and pepper.
  3. Place the chicken breasts on top, ensuring they’re submerged in the liquid.

3. Cook the Soup

Set your slow cooker to LOW and let it cook for 6 hours. This slow cooking method allows the flavors to meld beautifully while keeping the chicken moist and tender.

4. Shred the Chicken

  1. Once the chicken is fully cooked, remove it from the slow cooker.
  2. Use two forks to shred the chicken into bite-sized pieces.
  3. Return the shredded chicken to the slow cooker.

5. Add the Final Ingredients

Stir in the black beans, frozen corn, lime juice, and fresh cilantro. Let the soup cook for an additional 10-15 minutes on LOW until everything is heated through.

6. Serve and Garnish

Why Use a Slow Cooker for This Recipe?

Using a slow cooker for Chicken Tortilla Soup simplifies the process and enhances the flavors. The low-and-slow cooking method tenderizes the chicken while allowing the spices to infuse every bite. Plus, you can set it and forget it, making it perfect for busy days.

Health Benefits of Chicken Tortilla Soup

1. Protein-Packed

The chicken and black beans provide a high-protein base, keeping you full and energized.

2. Rich in Vitamins and Minerals

Ingredients like corn, tomatoes, and cilantro are loaded with essential nutrients like vitamin C, potassium, and antioxidants.

3. Low-Calorie Option

This soup is hearty yet light, making it an excellent choice for those watching their calorie intake.

Tips for the Best Slow Cooker Chicken Tortilla Soup

  1. Finely Chop the Onion: This ensures the onion cooks evenly and blends into the soup without overpowering it.
  2. Don’t Skip the Lime Juice: The acidity brightens the flavors and balances the richness of the broth.
  3. Customize the Heat: Add a diced jalapeño or a dash of hot sauce if you like extra spice.
  4. Make Your Own Tortilla Strips: Slice tortillas into thin strips, bake or fry until crisp, and use them as a garnish.

What to Serve with Chicken Tortilla Soup

  • Bread: Crusty bread or warm cornbread complements the soup beautifully.
  • Salad: A side of mixed greens with a zesty vinaigrette balances the bold flavors.
  • Rice: Serve the soup over a scoop of rice for a heartier meal.

Nutritional Information (Per Serving)

NutrientAmount
Calories~230
Protein~25g
Fat~5g
Carbohydrates~20g
Sodium~550mg

FAQs About Slow Cooker Chicken Tortilla Soup

1. Can I make this recipe in advance?

Yes! This soup reheats beautifully, making it perfect for meal prepping or storing leftovers.

2. Can I freeze Chicken Tortilla Soup?

Absolutely. Let the soup cool completely, then transfer it to a freezer-safe container. It can be frozen for up to 3 months.

3. Can I use chicken thighs instead of breasts?

Yes! Chicken thighs are slightly richer in flavor and work just as well in this recipe.

4. How do I make it spicier?

Add diced jalapeños, cayenne pepper, or a splash of your favorite hot sauce for an extra kick.

5. Can I make this vegetarian?

Of course! Swap the chicken for extra beans, use vegetable broth instead of chicken broth, and enjoy a plant-based version.

6. How long does it take to cook on HIGH?

If you’re short on time, cook the soup on HIGH for 3-4 hours instead of 6 hours on LOW.

Conclusion: Warm Up Your Week with Slow Cooker Chicken Tortilla Soup

Slow Cooker Chicken Tortilla Soup is the ultimate combination of flavor, convenience, and nourishment. Whether you’re cooking for a family dinner or preparing meals for the week, this recipe will quickly become a go-to favorite.

Actionable Tip: Double the recipe and freeze half for those busy nights when you need a delicious, ready-made meal.

It’s time to dust off your slow cooker and start creating a dish that’s as comforting as it is flavorful. Enjoy! 😊

ating

Slow Cooker Chicken Tortilla Soup: A Comforting, Flavorful Favorite

Imagine tender, flaky salmon infused with the vibrant flavors of fresh herbs, roasted garlic, and a hint of lemon. Garlic Herb Roasted Salmon is a dish that’s elegant, healthy, and incredibly easy to prepare. Perfect for weeknight dinners or special occasions, it’s sure to impress your family and guests alike.
Prep Time 10 minutes
Cook Time 15 minutes
Total Time 25 minutes
Servings: 4 servings
Course: Main Course
Cuisine: Mediterranean-Inspired

Ingredients
  

  • 4 portions of salmon fillet ~6 oz each
  • 3 cloves garlic minced
  • 2 tbsp fresh parsley chopped
  • 1 tbsp fresh dill chopped
  • 2 tbsp olive oil
  • 2 tbsp lemon juice
  • 1 tsp kosher salt
  • 1/2 tsp black pepper
  • 4-5 slices of lemon

Method
 

Prepare Your Ingredients:
  1. Preheat your oven to 375°F (190°C).
  2. Mince the garlic and chop the parsley and dill. In a small bowl, combine olive oil, garlic, parsley, dill, lemon juice, salt, and black pepper to create the herb mixture.
Season the Salmon:
  1. Place the salmon fillets skin-side down on a parchment-lined baking sheet or in a greased baking dish.
  2. Brush the herb mixture generously over each fillet, ensuring the tops are fully coated.
  3. Lay thin lemon slices on top of each fillet for added flavor.
Roast the Salmon:
  1. Bake the salmon in the preheated oven for 12-15 minutes, depending on the thickness of the fillets.
  2. Check for doneness by inserting a fork into the thickest part of the salmon. It should flake easily and appear opaque.
Optional Broiling:
  1. For a slightly caramelized finish, switch the oven to broil mode for the last 2-3 minutes of cooking. Watch closely to prevent burning.
Serve and Garnish:
  1. Transfer the roasted salmon to a serving platter and garnish with additional fresh herbs and lemon wedges. Serve immediately.

Notes

  • Freshness Matters: Use fresh salmon fillets for the best flavor and texture.
  • Customize Herbs: Feel free to experiment with other herbs like thyme, rosemary, or cilantro.
  • Avoid Overcooking: Remove the salmon as soon as it flakes easily to keep it tender.
  • Serving Suggestions: Pair with roasted asparagus, quinoa, or a crisp green salad for a balanced meal.
  • Leftovers: Store leftover salmon in an airtight container in the fridge for up to 3 days. Reheat gently to avoid drying out.

How to Make the Best Cheeseburger Casserole: A Comforting Classic

There’s something magical about a hearty, cheesy casserole bubbling in the oven. The way it fills your home with irresistible aromas and brings people together at the dinner table makes it truly special. Cheeseburger Casserole is one of those dishes—simple to make, loaded with flavor, and perfect for feeding your family or a crowd.

This recipe takes the classic flavors of a cheeseburger and transforms them into a warm, comforting casserole that will have everyone asking for seconds.

Why You’ll Love Cheeseburger Casserole

Think of everything you love about a cheeseburger: juicy beef, gooey cheese, savory seasonings, and satisfying pasta. Cheeseburger Casserole combines all those flavors in one easy-to-make dish. It’s budget-friendly, customizable, and perfect for meal prepping or leftovers.

Ingredients You’ll Need for Cheeseburger Casserole

Here’s a quick breakdown of the ingredients. This recipe uses simple, accessible ingredients to create a dish packed with flavor.

Main Ingredients

IngredientQuantity
Dry elbow macaroni12 ounces
Ground beef (80/20 lean-to-fat ratio)1½ pounds
Yellow onion, diced1 small
Tomato paste2 tablespoons
Garlic, minced3 cloves
Italian seasoning2 teaspoons
Chili powder1 teaspoon
Salt1 teaspoon
Ground black pepper½ teaspoon
Heavy cream1½ cups
Beef broth¼ cup
Shredded cheddar cheese2 cups, divided
Shredded mozzarella cheese2 cups, divided
Sliced green onion1 teaspoon (optional)

How to Make Cheeseburger Casserole: Step-by-Step Guide

1. Prepare Your Ingredients

Before you start cooking, make sure you have everything ready:

  • Dice the onion, mince the garlic, and measure out your seasonings.
  • Preheat your oven to 400°F and grease a baking dish to prevent sticking.

2. Cook the Pasta

  1. Bring a large pot of salted water to a boil.
  2. Add the elbow macaroni and cook according to the package directions.
  3. Drain the pasta and set it aside.

3. Brown the Beef and Onion

  1. In a large skillet over medium heat, cook the ground beef and diced onion.
  2. Break up the beef with a spoon as it cooks until it’s no longer pink and the onion turns translucent.

4. Add Flavor with Tomato Paste and Spices

  1. Stir in the tomato paste, garlic, Italian seasoning, chili powder, salt, and pepper.
  2. Cook for 1-2 minutes, letting the spices bloom and the tomato paste darken slightly for richer flavor.

5. Make the Creamy Sauce

  1. Pour the heavy cream and beef broth into the skillet with the beef mixture.
  2. Stir well to combine, scraping up any browned bits from the bottom of the skillet for extra flavor.

6. Combine Pasta and Sauce

  1. Add the cooked macaroni to the skillet, tossing to coat the pasta evenly in the sauce.
  2. Stir in half of the shredded cheddar and mozzarella cheese until melted and creamy.

7. Assemble the Casserole

  1. Transfer the pasta and beef mixture to your prepared baking dish.
  2. Sprinkle the remaining cheddar and mozzarella cheese evenly over the top.

8. Bake Until Golden

  1. Place the casserole in your preheated oven and bake for 15-20 minutes, or until the cheese on top is melted and bubbly.
  2. For an extra golden crust, switch the oven to broil for the last 2-3 minutes.

9. Garnish and Serve

Remove the casserole from the oven and let it rest for a few minutes. Garnish with sliced green onions, if desired, and serve warm.

Why Cheeseburger Casserole Works So Well

  • One-Dish Wonder: It’s a complete meal with protein, carbs, and cheese in every bite.
  • Family-Friendly: Kids and adults alike love the familiar flavors of a cheeseburger in casserole form.
  • Versatile: You can easily swap ingredients to suit your taste or dietary preferences.

Nutritional Information (Per Serving)

NutrientAmount
Calories~450
Protein~28g
Fat~25g
Carbohydrates~30g
Sodium~800mg

Tips for Making the Perfect Cheeseburger Casserole

  1. Choose the Right Cheese: Cheddar and mozzarella melt beautifully, but you can also try Monterey Jack or Colby for a twist.
  2. Cook the Pasta Al Dente: Slightly undercooked pasta absorbs the sauce better and prevents a mushy texture.
  3. Customize the Seasonings: Add smoked paprika, Worcestershire sauce, or hot sauce for extra depth.
  4. Make It Lighter: Use ground turkey or chicken instead of beef, and swap heavy cream for milk.

What to Serve with Cheeseburger Casserole

This hearty casserole pairs well with light, refreshing sides:

  • Salads: A crisp green salad with a tangy vinaigrette balances the richness.
  • Vegetables: Roasted broccoli, green beans, or a medley of sautéed vegetables.
  • Bread: Serve with garlic bread or dinner rolls to scoop up every last bit of sauce.

FAQs About Cheeseburger Casserole

1. Can I make this dish ahead of time?

Yes! Assemble the casserole up to the baking step, cover it tightly, and refrigerate for up to 24 hours. Bake when ready to serve.

2. Can I freeze Cheeseburger Casserole?

Absolutely. Let it cool completely, then transfer to a freezer-safe container. It can be frozen for up to 3 months. Thaw overnight in the fridge before reheating.

3. How do I reheat leftovers?

Reheat individual portions in the microwave or the entire dish in the oven at 350°F until warmed through.

4. Can I add vegetables to the casserole?

Of course! Try adding diced bell peppers, mushrooms, or spinach to the beef mixture.

5. Is there a gluten-free option?

Swap the elbow macaroni for gluten-free pasta and check that all seasonings and ingredients, like broth, are gluten-free.

6. Can I use a different type of meat?

Yes, ground turkey, chicken, or even plant-based meat substitutes work well.

Conclusion: Why You Should Try Cheeseburger Casserole Tonight

Cheeseburger Casserole is the ultimate comfort food—simple, satisfying, and full of flavor. With its cheesy layers and hearty pasta, it’s a dish that brings people together and keeps them coming back for more.

Actionable Tip: Double the recipe and freeze half for busy nights when you need a quick, homemade meal.

Now it’s time to preheat your oven and get cooking! You’ll love how easy this recipe is, and your family will love every bite. 😊

ating

How to Make the Best Cheeseburger Casserole: A Comforting Classic

Cheeseburger Casserole combines all the best parts of a classic cheeseburger—juicy beef, gooey cheese, and savory seasonings—into one hearty, comforting dish. Perfect for family dinners or meal prep, this easy-to-make casserole is a surefire crowd-pleaser that’s as satisfying as it is delicious.
Prep Time 10 minutes
Cook Time 35 minutes
Total Time 45 minutes
Servings: 6 servings
Course: Main Course
Cuisine: American-inspired

Ingredients
  

  • 12 ounces dry elbow macaroni
  • pounds ground beef 80/20 lean-to-fat ratio
  • 1 small yellow onion diced
  • 2 tablespoons tomato paste
  • 3 cloves garlic minced
  • 2 teaspoons Italian seasoning
  • 1 teaspoon chili powder
  • 1 teaspoon salt
  • ½ teaspoon ground black pepper
  • cups heavy cream
  • ¼ cup beef broth
  • 2 cups shredded cheddar cheese divided
  • 2 cups shredded mozzarella cheese divided
  • 1 teaspoon sliced green onion optional garnish

Method
 

Prepare Your Ingredients:
  1. Preheat your oven to 400°F and grease a baking dish to prevent sticking.
  2. Dice the onion, mince the garlic, and measure out your seasonings.
Cook the Pasta:
  1. Bring a large pot of salted water to a boil.
  2. Add the elbow macaroni and cook according to the package directions.
  3. Drain the pasta and set it aside.
Brown the Beef and Onion:
  1. In a large skillet over medium heat, cook the ground beef and diced onion.
  2. Break up the beef with a spoon as it cooks until it’s no longer pink and the onion turns translucent.
Add Tomato Paste and Spices:
  1. Stir in the tomato paste, garlic, Italian seasoning, chili powder, salt, and pepper.
  2. Cook for 1-2 minutes, letting the spices bloom and the tomato paste darken slightly for richer flavor.
Make the Creamy Sauce:
  1. Pour the heavy cream and beef broth into the skillet with the beef mixture.
  2. Stir well to combine, scraping up any browned bits from the bottom of the skillet for extra flavor.
Combine Pasta and Sauce:
  1. Add the cooked macaroni to the skillet, tossing to coat the pasta evenly in the sauce.
  2. Stir in half of the shredded cheddar and mozzarella cheese until melted and creamy.
Assemble the Casserole:
  1. Transfer the pasta and beef mixture to your prepared baking dish.
  2. Sprinkle the remaining cheddar and mozzarella cheese evenly over the top.
Bake Until Golden:
  1. Place the casserole in your preheated oven and bake for 15-20 minutes, or until the cheese on top is melted and bubbly.
  2. For an extra golden crust, switch the oven to broil for the last 2-3 minutes.
Garnish and Serve:
  1. Remove the casserole from the oven and let it rest for a few minutes.
  2. Garnish with sliced green onions, if desired, and serve warm.

Notes

  • Choose the Right Cheese: Cheddar and mozzarella melt beautifully, but feel free to experiment with Monterey Jack or Colby.
  • Cook Pasta Al Dente: Slightly undercooked pasta absorbs the sauce better and prevents a mushy texture.
  • Customize Seasonings: Add smoked paprika, Worcestershire sauce, or hot sauce for extra depth.
  • Make It Lighter: Use ground turkey or chicken instead of beef, and swap heavy cream for milk.
  • Leftovers: Store leftovers in an airtight container in the fridge for up to 3 days. Reheat in the microwave or oven.

How to Make Garlic Herb Roasted Salmon: A Perfectly Flavored Delight

Imagine the aroma of fresh herbs, roasted garlic, and tender salmon wafting through your kitchen. There’s something magical about a dish that’s both elegant and easy to prepare. Garlic Herb Roasted Salmon is one of those recipes that checks all the boxes—healthy, flavorful, and simple. Whether you’re hosting a dinner party or looking to elevate a weeknight meal, this dish is sure to impress.

Why Garlic Herb Roasted Salmon is Perfect for You

If you love meals that are as nutritious as they are delicious, this recipe is a game-changer. Packed with protein, omega-3 fatty acids, and the bold flavors of garlic and herbs, it’s a dish you’ll find yourself making again and again. Plus, it’s incredibly versatile—you can pair it with your favorite sides, from roasted veggies to a fresh salad.

Ingredients for Garlic Herb Roasted Salmon

Here’s a quick breakdown of everything you’ll need to create this culinary masterpiece:

Main Ingredients

IngredientQuantity
Salmon fillet4 portions (~6 oz each)
Garlic, minced3 cloves
Fresh parsley, chopped2 tbsp
Fresh dill, chopped1 tbsp
Olive oil2 tbsp
Lemon juice2 tbsp
Kosher salt1 tsp
Black pepper1/2 tsp
Lemon slices4-5 slices

Step-by-Step Guide to Making Garlic Herb Roasted Salmon

1. Prepare Your Ingredients

Start by gathering all your ingredients and preheating your oven to 375°F (190°C). Make sure your salmon fillets are fresh, deboned, and evenly cut for consistent cooking.

  1. Mince your garlic and chop the parsley and dill.
  2. In a small bowl, mix the olive oil, garlic, parsley, dill, lemon juice, salt, and black pepper.

2. Season the Salmon

Lay the salmon fillets skin-side down on a parchment-lined baking sheet or in a greased baking dish.

  1. Brush the herb mixture generously over each fillet, ensuring the tops are fully coated.
  2. Place thin lemon slices on top of the fillets for extra flavor.

3. Roast the Salmon

  1. Bake the salmon in the preheated oven for 12-15 minutes, depending on the thickness of your fillets.
  2. Check for doneness by inserting a fork into the thickest part. The salmon should flake easily and be opaque in color.
  • Pro Tip: Avoid overcooking! Salmon continues to cook slightly after being removed from the oven.

4. Optional Broiling for Extra Flavor

If you like a slightly caramelized finish, switch your oven to broil mode for the last 2-3 minutes of cooking. Keep a close eye on the salmon to prevent burning.

5. Serve and Garnish

Transfer the roasted salmon to a serving platter and garnish with extra fresh herbs and lemon wedges. Serve immediately for the best flavor and texture.

What to Serve with Garlic Herb Roasted Salmon

This dish pairs beautifully with a variety of sides. Here are some ideas to round out your meal:

  • Vegetables: Roasted asparagus, sautéed spinach, or steamed green beans.
  • Grains: Fluffy quinoa, wild rice, or creamy mashed potatoes.
  • Salads: A crisp mixed greens salad with a tangy vinaigrette.

Health Benefits of Garlic Herb Roasted Salmon

1. High in Omega-3 Fatty Acids

Salmon is a powerhouse of heart-healthy omega-3s, which help reduce inflammation and improve cardiovascular health.

2. Rich in Protein

Each serving of salmon provides a generous amount of protein, essential for muscle repair and energy.

3. Packed with Antioxidants

The herbs and garlic in this recipe add a boost of antioxidants, which can help fight free radicals and support your immune system.

Tips for the Perfect Garlic Herb Roasted Salmon

  • Choose Fresh Salmon: Look for fillets that are bright in color with a fresh, mild smell.
  • Pat It Dry: Before seasoning, pat the salmon dry with paper towels to help the herb mixture stick better.
  • Adjust Seasonings: Feel free to customize the herb mixture with your favorites, like thyme or rosemary.
  • Test for Doneness: Use a meat thermometer to check that the internal temperature reaches 145°F (63°C).

Nutritional Information (Per Serving)

NutrientAmount
Calories~300
Protein~30g
Fat~18g
Carbohydrates~2g
Sodium~400mg

FAQs About Garlic Herb Roasted Salmon

1. Can I use frozen salmon?

Yes! Thaw it completely in the refrigerator before using and pat it dry to remove excess moisture.

2. How do I store leftovers?

Store leftover salmon in an airtight container in the fridge for up to 3 days. Reheat gently to avoid drying it out.

3. Can I make this dish ahead of time?

You can prepare the herb mixture in advance and season the salmon up to a few hours before baking.

4. What herbs work best for this recipe?

While parsley and dill are classics, you can also experiment with cilantro, thyme, or basil.

5. Is this recipe suitable for grilling?

Absolutely! Place the seasoned salmon on a grill over medium heat and cook for 4-6 minutes per side.

6. Can I use this recipe with other types of fish?

Yes, it works well with other mild, flaky fish like trout, halibut, or cod.

Conclusion: Elevate Your Dinner with Garlic Herb Roasted Salmon

Garlic Herb Roasted Salmon is the perfect recipe to add to your repertoire. It’s simple enough for a busy weeknight yet elegant enough for entertaining. With its fresh, vibrant flavors and tender texture, this dish is a surefire hit.

Actionable Tip: Try making a double batch so you can enjoy leftovers for lunch—think salmon salads or wraps!

Now, it’s time to roll up your sleeves and give this recipe a try. Your taste buds (and your loved ones) will thank you! 😊

ating

How to Make Garlic Herb Roasted Salmon: A Perfectly Flavored Delight

  • 4 portions of salmon fillet (~6 oz each)
  • 3 cloves garlic, minced
  • 2 tbsp fresh parsley, chopped
  • 1 tbsp fresh dill, chopped
  • 2 tbsp olive oil
  • 2 tbsp lemon juice
  • 1 tsp kosher salt
  • 1/2 tsp black pepper
  • 4-5 slices of lemon
Prep Time 10 minutes
Cook Time 15 minutes
Total Time 25 minutes
Servings: 4 servings
Course: Main Course
Cuisine: Mediterranean-Inspired

Ingredients
  

  • 4 portions of salmon fillet ~6 oz each
  • 3 cloves garlic minced
  • 2 tbsp fresh parsley chopped
  • 1 tbsp fresh dill chopped
  • 2 tbsp olive oil
  • 2 tbsp lemon juice
  • 1 tsp kosher salt
  • 1/2 tsp black pepper
  • 4-5 slices of lemon

Method
 

Prepare Your Ingredients:
  1. Preheat your oven to 375°F (190°C).
  2. Mince the garlic and chop the parsley and dill. In a small bowl, combine olive oil, garlic, parsley, dill, lemon juice, salt, and black pepper to create the herb mixture.
Season the Salmon:
  1. Place the salmon fillets skin-side down on a parchment-lined baking sheet or in a greased baking dish.
  2. Brush the herb mixture generously over each fillet, ensuring the tops are fully coated.
  3. Lay thin lemon slices on top of each fillet for added flavor.
Roast the Salmon:
  1. Bake the salmon in the preheated oven for 12-15 minutes, depending on the thickness of the fillets.
  2. Check for doneness by inserting a fork into the thickest part of the salmon. It should flake easily and appear opaque.
Optional Broiling:
  1. For a slightly caramelized finish, switch the oven to broil mode for the last 2-3 minutes of cooking. Watch closely to prevent burning.
Serve and Garnish:
  1. Transfer the roasted salmon to a serving platter and garnish with additional fresh herbs and lemon wedges. Serve immediately.

Notes

  • Freshness Matters: Use fresh salmon fillets for the best flavor and texture.
  • Customize Herbs: Feel free to experiment with other herbs like thyme, rosemary, or cilantro.
  • Avoid Overcooking: Remove the salmon as soon as it flakes easily to keep it tender.
  • Serving Suggestions: Pair with roasted asparagus, quinoa, or a crisp green salad for a balanced meal.
  • Leftovers: Store leftover salmon in an airtight container in the fridge for up to 3 days. Reheat gently to avoid drying out.
 

How to Make Baked Vegan General Tso Cauliflower: A Flavorful Twist You’ll Love

When you think of General Tso’s, your mind might immediately wander to a savory-sweet dish with crispy bites drenched in sauce. But what if I told you that you could enjoy all those familiar flavors in a healthier, plant-based way? Baked Vegan General Tso Cauliflower is the answer you’ve been looking for—a dish that’s bold, satisfying, and surprisingly easy to make.

Why You’ll Love This Recipe

This recipe transforms humble cauliflower into a show-stopping dish. By baking instead of frying, you keep it light and guilt-free, while the flavorful sauce ensures every bite is packed with deliciousness. Whether you’re vegan or simply exploring plant-based options, this dish is sure to win over your taste buds.

Ingredients for Baked Vegan General Tso Cauliflower

Here’s everything you need to get started. Divided into two sections—cauliflower and sauce—these ingredients are pantry-friendly and easy to find.

For the Cauliflower

IngredientQuantity
Small head of Cauliflower1, chopped into small florets
Rice flour1/2 cup
Tapioca starch (or cornstarch)3 tbsp
Garlic powder1/2 tsp
Kosher salt1/4 tsp
Soy sauce2 tsp
Oil2 tsp
Water1/2 cup

For the General Tso Sauce

IngredientQuantity
Oil1 tsp
Chopped red bell pepper1/2 cup
Chopped green bell pepper1/2 cup
Garlic, minced3 cloves
Ginger, minced2 tsp
Soy sauce1/3 cup
Brown sugar3-4 tbsp
Rice vinegar3 tbsp
Mirin1 tbsp
Sesame oil2 tsp
Sambal oelek (or other chili sauce)1 tbsp or more
Kosher salt1/4 tsp
Water1/2 cup
Cornstarch1 tbsp

Step-by-Step Instructions to Make Baked Vegan General Tso Cauliflower

1. Prepare the Cauliflower

Start by chopping your cauliflower into small, even-sized florets. This ensures uniform cooking and makes it easier for the batter to coat each piece.

  1. In a mixing bowl, whisk together rice flour, tapioca starch, garlic powder, salt, soy sauce, oil, and water until smooth.
  2. Let the batter sit for a few minutes to thicken. If it’s still too thin, add 1-2 teaspoons of rice flour.
  3. Toss the cauliflower florets into the batter, ensuring each piece is evenly coated.

2. Bake the Cauliflower

  1. Preheat your oven to 400°F (205°C) and line a baking sheet with parchment paper.
  2. Spread the coated cauliflower florets on the sheet, ensuring they don’t overlap.
  3. Bake for 30-35 minutes, flipping halfway through, until they’re golden and crispy.

3. Make the General Tso Sauce

Cooking the Vegetables

  1. Heat 1 teaspoon of oil in a large skillet over medium heat.
  2. Add the chopped red and green bell peppers. Cook until they develop a slight golden color.

Building the Sauce

  1. Add minced garlic and ginger to the skillet, stirring for a few seconds until fragrant.
  2. Stir in soy sauce, brown sugar, rice vinegar, mirin, sesame oil, sambal oelek, and salt.
  3. Cook for 2 minutes, allowing the flavors to combine.

Thicken the Sauce

  1. In a small bowl, whisk cornstarch and water until smooth.
  2. Slowly pour this mixture into the skillet while stirring.
  3. Bring the sauce to a boil, then reduce the heat and simmer for 2-3 minutes until it thickens.

4. Combine the Cauliflower and Sauce

  1. Once the sauce has reached the desired consistency, turn off the heat.
  2. Add the baked cauliflower florets to the skillet and gently toss to coat them evenly in the sauce.

5. Garnish and Serve

  • Sprinkle sesame seeds and sliced green onions on top for a finishing touch.
  • Serve the cauliflower as-is or over steamed rice for a complete meal.

Tips for the Best Vegan General Tso Cauliflower

  • Choose Fresh Cauliflower: Fresh florets hold their texture better during baking and don’t turn soggy.
  • Adjust the Spice Level: If you prefer a milder sauce, reduce the sambal oelek or skip it altogether.
  • Don’t Skip the Batter: The batter creates a crispy layer that holds the sauce beautifully.
  • Use Parchment Paper: It prevents sticking and ensures easy cleanup.

Nutritional Information (Per Serving)

NutrientAmount
Calories~250
Protein~5g
Carbohydrates~40g
Fat~8g
Sodium~800mg

FAQs About Baked Vegan General Tso Cauliflower

1. Can I use frozen cauliflower?

Yes, but it’s best to thaw and pat it dry thoroughly. Frozen cauliflower releases more water, which can affect the batter’s consistency.

2. Can I make this recipe gluten-free?

Absolutely! Swap regular soy sauce with a gluten-free alternative like tamari.

3. What’s a substitute for sambal oelek?

You can use sriracha or any other chili paste. Adjust the quantity to your spice preference.

4. Can I air-fry the cauliflower?

Yes, air-frying is a great alternative. Cook the coated florets at 375°F (190°C) for 15-20 minutes, shaking the basket halfway through.

5. How do I store leftovers?

Store the cauliflower and sauce separately in airtight containers in the fridge for up to 3 days. Reheat gently on the stovetop.

6. Can I double the sauce?

Of course! Doubling the sauce is perfect if you like extra to drizzle over rice or veggies.

Conclusion

With its crispy texture and bold flavors, Baked Vegan General Tso Cauliflower is a dish that brings excitement to any meal. It’s easy to make, healthy, and perfect for satisfying those takeout cravings in a plant-based way. Plus, it’s versatile enough to pair with rice, noodles, or even serve as an appetizer.

Actionable Tip: Make a double batch and share this dish with friends or family—you’ll be amazed at how quickly it disappears!

Now, it’s your turn to bring this recipe to life. Head to your kitchen, gather your ingredients, and create a dish that’s as nourishing as it is delicious. Happy cooking! 😊

ating

How to Make Baked Vegan General Tso Cauliflower: A Flavorful Twist You’ll Love

Transform humble cauliflower into a show-stopping, plant-based dish with this Baked Vegan General Tso Cauliflower recipe. Lightly coated and baked to crispy perfection, the cauliflower is then tossed in a bold, savory-sweet General Tso sauce that’s packed with flavor. Perfect as a main course or appetizer, it’s a healthy, delicious twist on a classic favorite.
Prep Time 10 minutes
Cook Time 35 minutes
Total Time 45 minutes
Servings: 4 servings
Course: Main Course or Appetizer
Cuisine: Asian-inspired

Ingredients
  

For the Cauliflower:
  • 1 small head of cauliflower chopped into small florets
  • 1/2 cup rice flour
  • 3 tbsp tapioca starch or cornstarch
  • 1/2 tsp garlic powder
  • 1/4 tsp kosher salt
  • 2 tsp soy sauce
  • 2 tsp oil
  • 1/2 cup water
For the General Tso Sauce:
  • 1 tsp oil
  • 1/2 cup chopped red bell pepper
  • 1/2 cup chopped green bell pepper
  • 3 cloves garlic minced
  • 2 tsp ginger minced
  • 1/3 cup soy sauce
  • 3-4 tbsp brown sugar
  • 3 tbsp rice vinegar
  • 1 tbsp mirin
  • 2 tsp sesame oil
  • 1 tbsp sambal oelek or other chili sauce
  • 1/4 tsp kosher salt
  • 1/2 cup water
  • 1 tbsp cornstarch

Method
 

Prepare the Cauliflower:
  1. Preheat your oven to 400°F (205°C) and line a baking sheet with parchment paper.
  2. In a mixing bowl, whisk together rice flour, tapioca starch, garlic powder, salt, soy sauce, oil, and water until smooth.
  3. Toss the cauliflower florets into the batter, ensuring each piece is evenly coated.
Bake the Cauliflower:
  1. Spread the coated cauliflower florets on the prepared baking sheet, ensuring they don’t overlap.
  2. Bake for 30-35 minutes, flipping halfway through, until golden and crispy.
Make the General Tso Sauce:
  1. Heat 1 tsp oil in a large skillet over medium heat. Add the chopped red and green bell peppers and sauté until lightly golden.
  2. Stir in minced garlic and ginger, cooking for a few seconds until fragrant.
  3. Add soy sauce, brown sugar, rice vinegar, mirin, sesame oil, sambal oelek, and salt. Cook for 2 minutes to combine flavors.
  4. In a small bowl, whisk cornstarch with water until smooth. Gradually stir this mixture into the skillet.
  5. Bring the sauce to a boil, then reduce heat and simmer for 2-3 minutes until thickened.
Combine and Serve:
  1. Add the baked cauliflower florets to the skillet and gently toss to coat them evenly in the sauce.
  2. Sprinkle with sesame seeds and sliced green onions if desired. Serve as-is or over steamed rice for a complete meal.

Notes

  • Choose Fresh Cauliflower: Fresh florets yield the best texture and avoid becoming soggy.
  • Adjust Spice Level: Add more or less sambal oelek based on your heat preference.
  • Make It Gluten-Free: Use tamari instead of soy sauce.
  • Air-Fry Option: Air fry coated cauliflower at 375°F (190°C) for 15-20 minutes, shaking halfway through.
  • Storing Leftovers: Store cauliflower and sauce separately in airtight containers for up to 3 days. Reheat gently on the stovetop.