Crispy Zucchini Fritters: A Delicious and Easy Recipe to Savor

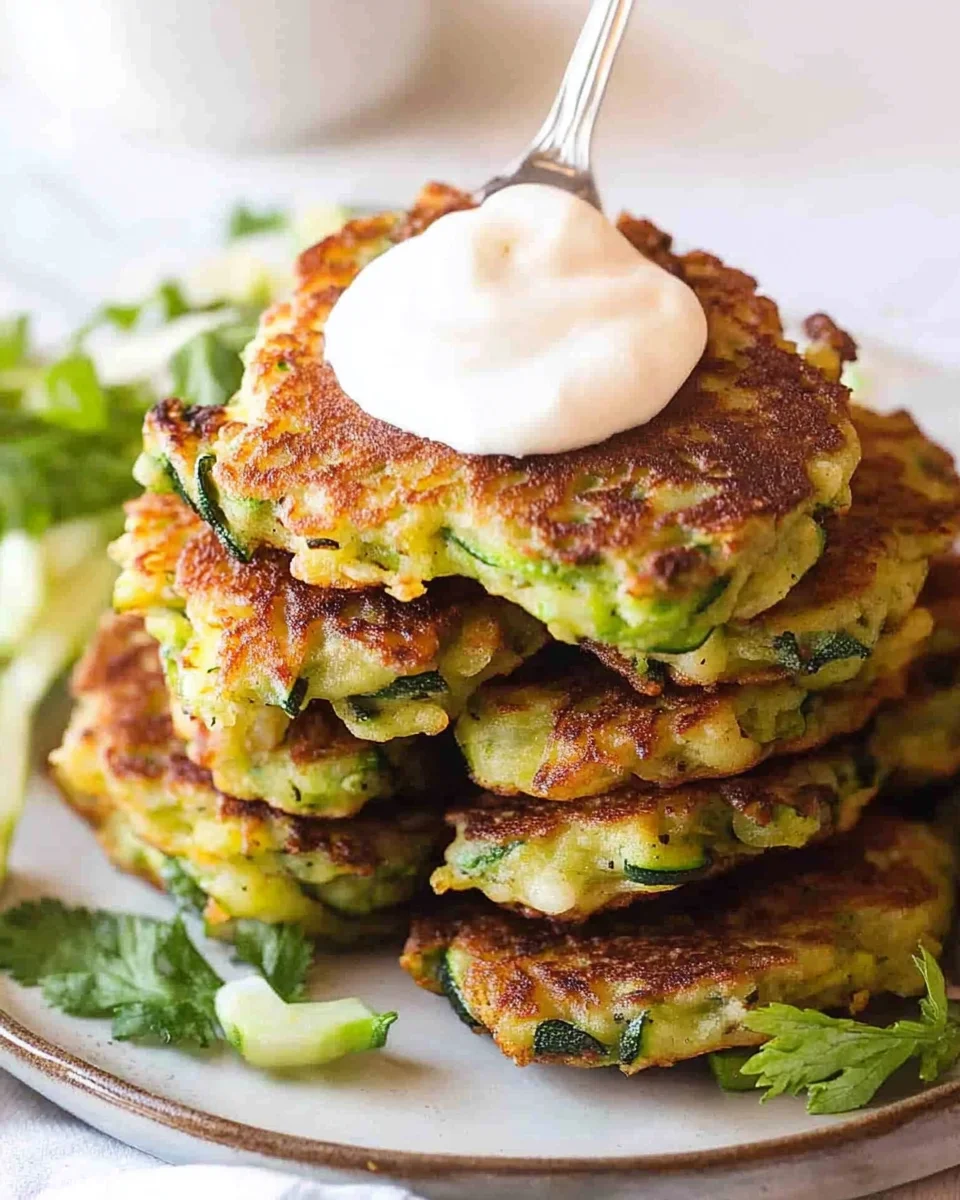
There’s something undeniably satisfying about crispy zucchini fritters. The golden crust, the tender interior, and the burst of flavor with every bite make them irresistible. Whether you’re looking for a quick appetizer, a light lunch, or a way to use up your zucchini stash, these fritters have you covered. By the end of this guide, you’ll have all the tips, tricks, and techniques to make them perfect every time.

Why You’ll Love Crispy Zucchini Fritters

Have you ever found yourself wondering what to do with those extra zucchinis lying in your fridge? Crispy zucchini fritters are the ultimate solution. They’re easy to make, packed with flavor, and offer a versatile base for creativity. Plus, they’re a fantastic way to sneak more vegetables into your meals while enjoying a dish that feels indulgent.

Ingredients for Crispy Zucchini Fritters

Here’s everything you’ll need for this recipe:

IngredientQuantity
Zucchini500g (1 lb) (2 medium)
Salt1 tsp
Egg1 large
Green onions2, finely sliced
Parmesan (grated)¼ cup
Garlic (minced)1 large clove
Flour½ cup (75g)
Baking powder½ tsp
PepperPinch
Olive oil4 tbsp (separated)
For serving:
Yoghurt or sour creamOptional
Chopped green onionsOptional garnish

Step-by-Step Guide to Making Crispy Zucchini Fritters

1. Prepare the Zucchini

  • Grate the zucchini using a box grater. Grating diagonally gives you longer strands, which improve the texture.
  • Place the grated zucchini in a bowl and sprinkle with salt. Mix well and let it sit for at least 10 minutes. The salt draws out the water, ensuring your fritters are crispy.

2. Remove Excess Water

  • After 10 minutes, use your hands or a tea towel to squeeze out as much water as possible. Excess moisture can make your fritters soggy, so don’t skip this step!

3. Mix the Batter

  • In the same bowl, add the squeezed zucchini, egg, green onions, parmesan, and garlic. Mix until combined.
  • Scatter the flour and baking powder over the zucchini mixture, then add a pinch of pepper. Mix gently until just incorporated. The batter should be thick but soft.

4. Cook the Fritters

  • Heat 2 tablespoons of olive oil in a non-stick pan over medium-high heat.
  • Use a ¼ cup measure or ice cream scoop to drop the batter into the pan. Cook 3–4 fritters at a time to avoid overcrowding.
  • Flatten each fritter slightly with a spatula to about 1 cm thick.
  • Cook for 3 minutes on each side, adjusting the heat if necessary to prevent burning.

5. Keep Warm

  • Transfer the cooked fritters to a tray and keep them warm in an oven set at 200°F (100°C).

6. Serve Immediately

  • Serve the fritters with a dollop of yoghurt or sour cream and garnish with extra green onions if desired.

Tips for Perfect Zucchini Fritters

1. Avoid Overmixing the Batter

Overmixing can lead to dense fritters. Mix just enough to combine the ingredients.

2. Use Fresh Zucchini

The fresher the zucchini, the better the flavor and texture.

3. Adjust Cooking Heat

If the fritters brown too quickly, lower the heat slightly. Cooking them at the right temperature ensures a crispy exterior and cooked-through interior.

Creative Ways to Customize Your Zucchini Fritters

1. Add Other Vegetables

  • Try grating carrots, sweet potatoes, or corn kernels into the batter for added flavor and texture.

2. Boost the Flavor

  • Mix in spices like paprika, cumin, or chili flakes for a bold twist.
  • Add fresh herbs such as parsley, dill, or basil for a fragrant kick.

3. Experiment with Cheese

  • Swap parmesan for cheddar, feta, or mozzarella to change the flavor profile.

Healthier Alternatives for Zucchini Fritters

1. Use Whole-Wheat Flour

Swap regular flour with whole-wheat or almond flour for a healthier option.

2. Reduce Oil

Bake the fritters in a preheated oven at 375°F (190°C) on a greased baking sheet. Flip halfway through for even crispiness.

3. Dairy-Free Option

Replace parmesan with nutritional yeast for a cheesy flavor without the dairy.

Serving Suggestions for Zucchini Fritters

  • As a Snack: Pair with a tangy dipping sauce like tzatziki or marinara.
  • For Breakfast: Top with a poached egg and avocado slices.
  • As a Side Dish: Serve alongside grilled chicken or fish for a balanced meal.

Nutritional Information for Zucchini Fritters

NutrientPer Serving (1 Fritter)
Calories~120
Protein~4g
Carbohydrates~9g
Fats~8g
Fiber~1g

Note: Values may vary based on the specific ingredients used.

Frequently Asked Questions (FAQs)

1. Can I make zucchini fritters ahead of time?

Yes! You can prepare the batter a few hours in advance or cook the fritters and reheat them in the oven before serving.

2. How do I store leftover zucchini fritters?

Store leftover fritters in an airtight container in the refrigerator for up to 3 days.

3. Can I freeze zucchini fritters?

Absolutely! Freeze cooked fritters in a single layer on a tray, then transfer them to a freezer-safe bag. Reheat directly from frozen in a skillet or oven.

4. Why are my fritters soggy?

Soggy fritters are usually caused by excess water in the zucchini. Make sure to squeeze out as much moisture as possible.

5. Can I make these fritters gluten-free?

Yes! Substitute the flour with a gluten-free alternative like almond flour or a gluten-free baking mix.

6. What can I serve with zucchini fritters?

Serve them with a side of salad, a dollop of yoghurt or sour cream, or even as part of a mezze platter with hummus and pita bread.

Final Thoughts: Crispy Zucchini Fritters for Every Occasion

Crispy zucchini fritters are a versatile, delicious, and easy recipe that you’ll want to make again and again. Whether you’re serving them as an appetizer, a snack, or a main dish, they’re guaranteed to impress. So grab your zucchini, heat up your pan, and get ready to enjoy the crispy perfection of homemade fritters.

PAUL

Crispy Zucchini Fritters: A Delicious and Easy Recipe to Savor

Golden and crispy on the outside, tender and flavorful on the inside, these Crispy Zucchini Fritters are a delightful way to enjoy your veggies. Perfect as an appetizer, snack, or light meal, they’re easy to make and customizable for any occasion. Enjoy them fresh with a dollop of sour cream or yogurt!
Prep Time 20 minutes
Cook Time 20 minutes
Total Time 40 minutes
Servings: 8 –10 fritters
Course: Appetizer / Snack
Cuisine: Global

Ingredients
  

  • 500 g 1 lb zucchini (about 2 medium)
  • 1 tsp salt
  • 1 large egg
  • 2 green onions finely sliced
  • ¼ cup grated parmesan cheese
  • 1 large garlic clove minced
  • ½ cup 75g all-purpose flour
  • ½ tsp baking powder
  • Pinch of pepper
  • 4 tbsp olive oil divided
For Serving:
  • Yogurt or sour cream optional
  • Chopped green onions optional garnish

Method
 

Prepare the Zucchini:
  1. Grate the zucchini using a box grater, preferably diagonally for longer strands.
  2. Place the grated zucchini in a bowl and sprinkle with salt. Mix well and let sit for at least 10 minutes to draw out moisture.
2. Remove Excess Water:
  1. After 10 minutes, use your hands or a clean tea towel to squeeze out as much water as possible from the zucchini. This step is essential for achieving crispy fritters.
3. Mix the Batter:
  1. In the same bowl, combine the squeezed zucchini, egg, green onions, parmesan, and garlic. Mix until well combined.
  2. Sprinkle the flour and baking powder over the mixture, add a pinch of pepper, and gently mix until just incorporated. The batter should be thick but soft.
4. Cook the Fritters:
  1. Heat 2 tablespoons of olive oil in a non-stick skillet over medium-high heat.
  2. Use a ¼ cup measure or an ice cream scoop to drop portions of batter into the skillet. Flatten each fritter slightly with a spatula to about 1 cm thick.
  3. Cook 3–4 fritters at a time, ensuring the pan isn’t overcrowded.
  4. Cook for 3 minutes on each side, adjusting the heat if necessary to prevent burning, until golden and crispy.
5. Keep Warm:
  1. Transfer cooked fritters to a tray and keep warm in an oven set to 200°F (100°C).
  2. Repeat the process with the remaining batter, adding more oil to the skillet as needed.
6. Serve Immediately:
  1. Serve the fritters hot with a dollop of yogurt or sour cream and garnish with chopped green onions if desired.

Notes

  • Squeeze Out Moisture: Removing excess water from the zucchini is key to achieving a crispy texture.
  • Avoid Overmixing: Mix the batter gently to prevent dense fritters.
  • Cooking Heat: Adjust the heat to ensure the fritters cook evenly without burning.
  • Customizations:
    • Add grated carrots, sweet potatoes, or corn for added flavor and texture.
    • Swap parmesan for cheddar, feta, or mozzarella for a different flavor profile.
    • Mix in spices like paprika, cumin, or chili flakes for a bold twist.

The Ultimate Guide to Shredded Beef Burritos: Delicious, Easy, and Irresistible

Few dishes can match the comforting, mouthwatering perfection of shredded beef burritos. Whether you’re looking for a hearty family meal, a crowd-pleasing party dish, or simply something satisfying for dinner, this recipe has you covered. By the end of this guide, you’ll not only know how to make shredded beef burritos but also master tips to customize, store, and serve them to perfection.

Why Shredded Beef Burritos Are the Perfect Meal

Imagine biting into a burrito filled with tender, flavorful shredded beef, perfectly seasoned rice, melted cheese, and a medley of beans and corn. Every bite is an explosion of textures and tastes. Burritos are not just delicious—they’re convenient, versatile, and great for meal prep. Plus, they freeze well, making them perfect for busy days.

Ingredients You’ll Need for Shredded Beef Burritos

Here’s what you’ll need to create 8 generously filled burritos:

IngredientQuantity
Extra soft flour tortillas (10”/26cm)8 large tortillas
Shredded cheese (e.g., Monterey Jack)1 ½ to 2 cups
Mexican shredded beef with sauce3 to 4 cups
Mexican red rice2 cups
Corn kernels (canned, drained)400g (14 oz)
Black beans (canned, drained)400g (14 oz)

Step-by-Step Instructions for Perfect Shredded Beef Burritos

1. Prepare the Tortillas

Microwave half of your tortillas for about 15 seconds to warm them. This keeps them soft and prevents cracking when rolled. Cover the rest with a clean tea towel to keep them warm.

2. Layer the Ingredients

  • Place a tortilla on a flat surface.
  • Add a layer of shredded cheese down the middle.
  • Spoon ⅓ cup of shredded beef on top of the cheese.
  • Add a few spoonfuls of corn kernels, black beans, and ¼ cup of rice.

3. Roll the Burrito

Fold the sides of the tortilla inward, then roll it tightly from bottom to top. Wrap it in foil to secure it.

4. Heat and Serve

  • If serving immediately, heat a skillet over medium heat. Cook each burrito for 4–5 minutes per side, ensuring the tortilla browns and the filling is heated through.
  • For a crispy finish, use a small amount of oil in the skillet.

How to Store and Reheat Shredded Beef Burritos

Refrigerating Burritos

Wrap your burritos in foil or plastic wrap and place them in an airtight container. Store them in the refrigerator for up to 3 days.

Freezing Burritos

  • Wrap each burrito in foil, then place them in a freezer-safe bag or container.
  • Burritos can be frozen for up to 3 months without losing flavor or texture.

Reheating Options

  1. From Frozen: Bake at 350°F (180°C) with foil on for 40–45 minutes.
  2. From Thawed: Reheat in a skillet as per the initial cooking instructions.
  3. Microwave: Remove the foil and heat until the burrito is warmed through, though this may result in a softer tortilla.

Customizing Your Shredded Beef Burritos

1. Add More Fillings

  • Vegetables: Bell peppers, onions, or avocado slices.
  • Spicy Kick: Add jalapeños, hot sauce, or a sprinkle of cayenne.

2. Choose Your Cheese

Swap Monterey Jack for cheddar, pepper jack, or a Mexican cheese blend.

3. Play with Proteins

Not a fan of shredded beef? Substitute with shredded chicken, pork, or even a vegetarian protein like seasoned tofu or tempeh.

Healthier Alternatives for Burritos

1. Whole-Wheat Tortillas

Opt for whole-wheat tortillas to add fiber and nutrients.

2. Low-Fat Cheese

Use reduced-fat cheese to cut calories without sacrificing flavor.

3. Add Greens

Incorporate fresh spinach or kale for a nutrient boost.

Tips for Hosting a Burrito Bar

Burrito bars are perfect for gatherings. Here’s how to set one up:

  1. Prep Ingredients in Advance: Keep shredded beef, rice, and beans warm in slow cookers.
  2. Offer Toppings: Set out bowls of cheese, sour cream, guacamole, salsa, and chopped cilantro.
  3. Customize to Preferences: Allow guests to assemble their burritos as they like.

Nutritional Information for Shredded Beef Burritos

NutrientPer Serving (1 Burrito)
Calories~420
Protein~25g
Carbohydrates~50g
Fats~12g
Fiber~6g

Note: Values may vary depending on exact ingredients used.

Frequently Asked Questions (FAQs)

1. Can I make shredded beef burritos ahead of time?

Yes! Assemble them and refrigerate or freeze as detailed above. They’re ideal for meal prep.

2. What is the best way to reheat frozen burritos?

The best method is baking them at 350°F (180°C) for about 40–45 minutes while wrapped in foil.

3. Can I use store-bought shredded beef?

Absolutely! Store-bought shredded beef works well if you’re short on time. Just ensure it’s well-seasoned.

4. Are these burritos gluten-free?

Not by default. However, you can use gluten-free tortillas and ensure all other ingredients are gluten-free.

5. How do I prevent burritos from getting soggy?

Avoid overfilling with wet ingredients and eat or store them soon after assembling.

6. What sides go well with shredded beef burritos?

Serve with tortilla chips, guacamole, a fresh salad, or even a bowl of soup for a complete meal.

Final Thoughts: Dive Into Burrito Bliss

There you have it—everything you need to make shredded beef burritos that are both delicious and easy to prepare. Whether you’re cooking for yourself or hosting a party, these burritos are sure to impress. So grab your ingredients, roll up your sleeves, and start rolling those burritos!

ating

The Ultimate Guide to Shredded Beef Burritos: Delicious, Easy, and Irresistible

Indulge in the ultimate comfort food with these Shredded Beef Burritos! Packed with tender, flavorful beef, seasoned rice, melted cheese, and hearty beans, they’re perfect for family dinners, meal prep, or a quick, satisfying lunch. Customize to your taste and enjoy the delicious convenience of these burritos anytime.
Prep Time 15 minutes
Cook Time 15 minutes
Total Time 30 minutes
Servings: 8 serves
Course: Main Dish
Cuisine: Mexican-American

Ingredients
  

Main Ingredients:
  • 8 large extra-soft flour tortillas 10”/26cm
  • 1 ½ to 2 cups shredded cheese e.g., Monterey Jack
  • 3 to 4 cups Mexican shredded beef with sauce
  • 2 cups Mexican red rice
  • 400 g 14 oz corn kernels, canned and drained
  • 400 g 14 oz black beans, canned and drained

Method
 

Prepare the Tortillas:
  1. Microwave half of the tortillas for about 15 seconds to make them pliable. Cover the remaining tortillas with a clean tea towel to keep warm.
2. Layer the Ingredients:
  1. Place a tortilla on a flat surface.
  2. Add a layer of shredded cheese down the middle.
  3. Spoon ⅓ cup of shredded beef on top of the cheese.
  4. Add a few spoonfuls of corn kernels, black beans, and ¼ cup of rice.
3. Roll the Burrito:
  1. Fold the sides of the tortilla inward, then roll it tightly from bottom to top. Wrap the burrito in foil to secure it.
4. Heat and Serve:
  1. For immediate serving, heat a skillet over medium heat. Cook each burrito for 4–5 minutes per side until the tortilla is golden and the filling is heated through.
  2. For a crispier finish, use a small amount of oil in the skillet while cooking.

Notes

  • Storage Tips:
    • Refrigerate burritos wrapped in foil or plastic wrap in an airtight container for up to 3 days.
    • Freeze burritos for up to 3 months. Wrap them individually in foil and place them in a freezer-safe bag or container.
  • Reheating Options:
    • From Frozen: Bake at 350°F (180°C) with foil on for 40–45 minutes.
    • From Thawed: Reheat in a skillet as per the initial cooking instructions.
    • Microwave: Remove foil and heat until warmed through (though the tortilla may soften).
  • Customization Ideas:
    • Add diced bell peppers, jalapeños, or avocado slices.
    • Swap shredded beef for chicken, pork, or seasoned tofu for a vegetarian option.
    • Use whole-wheat tortillas or low-fat cheese for a healthier version.

Cheesy Mexican Beef and Bean Bake: A Comforting Crowd-Pleaser

If you’re craving bold flavors, cheesy goodness, and a dish that’s as versatile as it is delicious, look no further than this cheesy Mexican beef and bean bake. Imagine tender beef, hearty beans, and vibrant spices bubbling together under a blanket of melted cheese—it’s a recipe that feels like a warm hug in every bite. Whether it’s a weeknight dinner or a festive gathering, this dish is sure to steal the spotlight.

Why You’ll Love This Recipe

There’s something magical about Mexican-inspired dishes—they’re full of flavor, simple to make, and bring people together. This cheesy Mexican beef and bean bake combines the best of all worlds: juicy ground beef, zesty spices, and creamy cheese, all baked to perfection. Plus, it’s highly customizable and can be served in so many ways, making it perfect for anyone looking to spice up their meal routine.

Ingredients for Cheesy Mexican Beef and Bean Bake

Here’s a detailed breakdown of what you’ll need:

Main Ingredients

IngredientAmountNotes
Olive oil2 tbspUse extra virgin for a richer flavor.
Red onion1, finely choppedAdds sweetness and depth.
Garlic2 cloves, mincedFresh garlic enhances the aroma.
Green capsicum (bell pepper)1, diced (1cm pieces)Any color works for variety.
Ground beef (mince)500g (1 lb)Use lean beef for a healthier option.
Kidney beans or black beans400g (14 oz) can, drainedSubstitute with pinto or mixed beans.
Tomato passata1 cupProvides a rich tomato base.
Pickled jalapeños1/3 cupAdjust for heat preference.
Colby cheese (shredded)1 1/2 cupsSubstitute with cheddar or Monterey Jack.

Mexican Spice Mix

SpiceAmountNotes
Cumin powder1 1/2 tspAdds earthy, smoky flavor.
Smoked paprika1 1/2 tspSub with regular paprika if unavailable.
Garlic powder1 tspCan swap with onion powder.
Onion powder1 tspEnhances savory depth.
Dried oregano1 tspBalances the spice with herbal notes.
Cayenne pepper1/2 tspSub with black pepper for less heat.
Cooking/kosher salt1 tspAdjust to taste.

Step-by-Step Instructions

Step 1: Preheat Your Oven

  • Preheat your oven to 200°C (400°F) or 180°C for fan-forced ovens.

Step 2: Sauté the Aromatics

  • Heat olive oil in a large oven-proof skillet over medium-high heat.
  • Add the chopped red onion, minced garlic, and diced capsicum. Sauté for about 3 minutes until softened and fragrant.

Step 3: Cook the Beef

  • Add the ground beef to the skillet. Break it up with a spatula as it cooks, ensuring even browning.
  • Once the meat is no longer pink, sprinkle in the Mexican spice mix. Cook for 1 minute to toast the spices and release their aroma.

Step 4: Add Beans and Tomato Base

  • Stir in the drained beans and tomato passata. Mix well and bring the mixture to a gentle simmer.

Step 5: Top with Jalapeños and Cheese

  • Spread the mixture evenly in the skillet. Sprinkle the pickled jalapeños across the surface, then generously top with shredded cheese.

Step 6: Bake to Perfection

  • Place the skillet in the preheated oven and bake uncovered for 15 minutes, or until the cheese is melted and bubbly with golden edges.

Step 7: Serve and Enjoy

  • Remove the skillet from the oven and let it cool slightly. Scoop portions into bowls and serve with tortilla chips, tacos, or your favorite Mexican sides.

Tips for the Best Cheesy Mexican Beef and Bean Bake

  • Use Freshly Shredded Cheese: Pre-shredded cheese contains anti-caking agents that can affect the melt.
  • Customize the Heat: If you love spice, add extra cayenne pepper or use spicier jalapeños. For a milder dish, reduce the amount of jalapeños.
  • Oven-Proof Skillet: If you don’t have a cast-iron skillet, transfer the mixture to a baking dish before adding cheese and baking.
  • Add Extra Veggies: For added nutrition, throw in diced zucchini, corn, or chopped spinach.

Creative Serving Ideas

1. Nacho Style

Serve the bake with a side of crispy tortilla chips for dipping and scooping. It’s a perfect snack for game nights or parties.

2. DIY Tacos

Spoon the cheesy beef and bean mixture into soft tortillas. Add lettuce, salsa, and sour cream for a quick taco dinner.

3. Over Rice

Transform this bake into a hearty meal by serving it over steamed rice or cilantro-lime rice.

4. Stuffed Bell Peppers

Use the beef and bean mixture as a filling for hollowed-out bell peppers. Bake until the peppers are tender for a creative twist.

Nutritional Information

Here’s an approximate breakdown of the nutritional content per serving (based on 6 servings):

NutrientPer Serving
Calories~350 kcal
Protein25g
Fat20g
Carbohydrates15g
Fiber5g

FAQs About Cheesy Mexican Beef and Bean Bake

1. Can I make this dish ahead of time?

Yes! Prepare the beef and bean mixture, store it in the fridge for up to 2 days, and bake with cheese just before serving.

2. Can I freeze leftovers?

Absolutely! Let the bake cool completely, then transfer portions to airtight containers. Freeze for up to 3 months. Reheat in the oven or microwave.

3. What’s the best cheese to use?

Colby cheese melts beautifully, but you can also use cheddar, Monterey Jack, or a blend of Mexican cheeses.

4. How do I make it vegetarian?

Substitute the ground beef with crumbled tofu, tempeh, or additional beans for a vegetarian version.

5. Can I make this spicier?

Add more cayenne pepper or use diced fresh chili peppers for extra heat. You can also drizzle hot sauce over the top.

6. What can I serve with this bake?

Pair it with guacamole, pico de gallo, sour cream, or a fresh green salad for a complete meal.

Make It Tonight!

Cheesy Mexican beef and bean bake is a recipe you’ll want to keep on repeat. Its bold flavors, gooey cheese, and hearty texture make it an irresistible choice for any occasion. So grab your skillet, gather your ingredients, and treat yourself to this comforting, flavorful dish tonight!

ating

Cheesy Mexican Beef and Bean Bake: A Comforting Crowd-Pleaser

This Cheesy Mexican Beef and Bean Bake is a crowd-pleasing dish packed with bold flavors, hearty ingredients, and gooey cheese. Perfect for weeknight dinners or festive gatherings, it’s as versatile as it is delicious.
Prep Time 15 minutes
Cook Time 25 minutes
Total Time 40 minutes
Servings: 6 servings
Course: Main Dish
Cuisine: Mexican-inspired

Ingredients
  

Main Ingredients:
  • 2 tbsp olive oil
  • 1 red onion finely chopped
  • 2 cloves garlic minced
  • 1 green capsicum bell pepper, diced into 1cm pieces
  • 500 g 1 lb ground beef (mince)
  • 1 can 400g / 14 oz kidney beans or black beans, drained
  • 1 cup tomato passata
  • 1/3 cup pickled jalapeños adjust to taste
  • 1 1/2 cups shredded Colby cheese or cheddar, Monterey Jack, etc.
Mexican Spice Mix:
  • 1 1/2 tsp cumin powder
  • 1 1/2 tsp smoked paprika
  • 1 tsp garlic powder
  • 1 tsp onion powder
  • 1 tsp dried oregano
  • 1/2 tsp cayenne pepper optional, for extra heat
  • 1 tsp cooking/kosher salt adjust to taste

Method
 

Preheat Your Oven:
  1. Preheat your oven to 200°C (400°F) or 180°C for fan-forced ovens.
Sauté the Aromatics:
  1. Heat the olive oil in a large oven-proof skillet over medium-high heat.
  2. Add the red onion, garlic, and diced green capsicum. Sauté for about 3 minutes until softened and fragrant.
Cook the Beef:
  1. Add the ground beef to the skillet. Break it up with a spatula as it cooks, ensuring even browning.
  2. Once the meat is no longer pink, sprinkle in the Mexican spice mix. Cook for 1 minute to toast the spices and release their aroma.
Add Beans and Tomato Base:
  1. Stir in the drained beans and tomato passata. Mix well and bring the mixture to a gentle simmer.
Top with Jalapeños and Cheese:
  1. Spread the beef mixture evenly in the skillet.
  2. Sprinkle the pickled jalapeños across the surface, then generously top with shredded cheese.
Bake to Perfection:
  1. Place the skillet in the preheated oven and bake uncovered for 15 minutes, or until the cheese is melted and bubbly with golden edges.
Serve and Enjoy:
  1. Remove the skillet from the oven and let it cool slightly.
  2. Scoop portions into bowls and serve with tortilla chips, tacos, or your favorite Mexican sides.

Notes

  • Freshly shredded cheese melts better than pre-shredded varieties.
  • For extra veggies, add diced zucchini, corn, or chopped spinach to the mixture.
  • Don’t have an oven-proof skillet? Transfer the mixture to a baking dish before topping with cheese and baking.

Cheese Bread (No Knead!): A Deliciously Simple Recipe for Every Baker

Imagine pulling a loaf of freshly baked cheese bread out of your oven. The golden crust is studded with bubbling, gooey cheese, and the aroma fills your kitchen with irresistible warmth. Whether you’re an experienced baker or a total novice, this no-knead cheese bread recipe is your ticket to bakery-level results without the hassle.

Why You’ll Love This Cheese Bread Recipe

There’s something magical about bread baking. It’s therapeutic, rewarding, and incredibly satisfying when you get it just right. But what if you could skip the most challenging part—kneading—and still achieve perfection? That’s where this no-knead cheese bread shines. It’s easy, foolproof, and bursting with cheesy goodness.

Ingredients for Cheese Bread

Here’s everything you’ll need for this simple, flavorful recipe:

IngredientAmountNotes
Bread flour3 cupsAll-purpose flour can work as a substitute.
Instant yeast (rapid rise)2 tspNo need to activate separately.
Cooking/kosher salt1 1/2 tspEnhances flavor.
Very warm tap water1 1/2 cupsEnsures proper yeast activation.
Colby cheese (freshly shredded)2 1/2 cupsOther cheeses like cheddar or Monterey Jack work well too.

How to Make No-Knead Cheese Bread

Step 1: Prepare the Dough

  • In a large mixing bowl, combine the flour, salt, and yeast. Mix with a rubber spatula.
  • Add the warm water and stir until no dry flour remains. The dough will be sticky but manageable.

Step 2: Let It Rise

  • Cover the bowl with cling wrap and leave it in a warm place to rise for 2-3 hours. The dough should double in size and appear bubbly.

Step 3: Preheat the Pot

  • About 30 minutes before the dough is ready, place a heavy pot (like a Dutch oven) with its lid in the oven. Preheat the oven to 240°C/450°F (220°C for fan-forced ovens).

Step 4: Shape the Dough

  • Sprinkle a clean surface with 1 tablespoon of flour and scrape the dough onto it.
  • Gently pat the dough into a disc about 20cm (8 inches) wide.
  • Spread half the cheese over the dough, then fold the edges inward four times, layering with more cheese between folds.

Step 5: Transfer to Baking Paper

  • Flip the dough onto a sheet of parchment paper with the seams down. Shape it into a neat round.
  • Top with the reserved cheese to create a golden crown.

Step 6: Bake the Bread

  • Carefully transfer the dough (on the parchment) into the preheated pot. Cover with the lid and bake for 35 minutes.
  • Remove the lid and bake for an additional 10 minutes to develop a golden, cheesy crust.

Step 7: Cool and Serve

  • Transfer the bread to a cooling rack using the parchment paper. Cool for at least 10 minutes before slicing. Enjoy warm!

Tips for Perfect No-Knead Cheese Bread

  • Choose the Right Cheese: Colby cheese melts beautifully, but feel free to experiment with other options like gouda, mozzarella, or a sharp cheddar.
  • Don’t Skip the Preheated Pot: The hot pot creates steam, which is crucial for achieving that bakery-style crust.
  • Use Fresh Ingredients: Fresh yeast and good-quality cheese make all the difference.

Nutritional Information

Here’s an estimate of the nutritional content per slice (based on 12 slices):

NutrientPer Slice
Calories~200 kcal
Protein8g
Fat8g
Carbohydrates24g
Sodium~320mg

Creative Variations for Cheese Bread

1. Herb and Garlic Cheese Bread

Add 1 teaspoon of dried oregano or Italian seasoning to the dough and mix minced garlic with the cheese for an extra flavor boost.

2. Spicy Jalapeño Cheese Bread

Fold in diced jalapeños along with the cheese for a spicy kick.

3. Sweet and Savory Twist

Combine shredded cheese with a handful of dried cranberries or raisins for a unique flavor contrast.

4. Multigrain Cheese Bread

Replace one cup of bread flour with whole wheat or multigrain flour for a healthier version.

FAQs About Cheese Bread (No Knead!)

1. Can I use all-purpose flour instead of bread flour?

Yes, but bread flour gives a chewier texture. If using all-purpose flour, the bread may be slightly less structured but still delicious.

2. What if I don’t have a Dutch oven?

You can use a heavy baking dish with a tight-fitting lid or an oven-safe pot. Alternatively, place a baking sheet with water at the bottom of the oven to create steam.

3. How do I store leftover cheese bread?

Wrap the bread in foil or store it in an airtight container. It keeps well at room temperature for 2 days or in the refrigerator for up to a week.

4. Can I freeze this bread?

Yes! Slice the bread and freeze it in a resealable bag. To reheat, toast the slices directly from frozen.

5. Why didn’t my bread rise properly?

Ensure your yeast is fresh and your water is warm but not hot (about 110°F or 43°C). If the dough is in a cold spot, the rise will be slower.

6. Can I make this bread gluten-free?

Yes, but you’ll need a gluten-free flour blend specifically designed for bread baking to achieve similar results.

Make Cheese Bread Your New Favorite Recipe

No-knead cheese bread combines simplicity with incredible flavor, making it a staple you’ll return to time and time again. Whether you’re baking for a cozy family dinner or impressing guests, this recipe delivers every single time. So grab your ingredients, roll up your sleeves, and discover the joy of homemade bread!

ating

Cheese Bread (No Knead!): A Deliciously Simple Recipe for Every Baker

This no-knead cheese bread is a simple yet delicious recipe that delivers a bakery-quality loaf with minimal effort. With a golden crust and gooey cheese throughout, it’s perfect for family dinners, potlucks, or as a cozy treat.
Prep Time 10 minutes
Cook Time 45 minutes
Total Time 3 hours 55 minutes
Servings: 1 loaf (12 slices)
Course: Bread
Cuisine: Comfort Food

Ingredients
  

  • 3 cups bread flour all-purpose flour can also be used
  • 2 tsp instant yeast rapid rise
  • 1 1/2 tsp kosher salt
  • 1 1/2 cups very warm tap water
  • 2 1/2 cups freshly shredded Colby cheese or substitute with cheddar, gouda, or Monterey Jack

Method
 

Prepare the Dough:
  1. In a large mixing bowl, combine the bread flour, kosher salt, and instant yeast.
  2. Add the very warm tap water and mix with a rubber spatula until no dry flour remains. The dough will be sticky.
Let It Rise:
  1. Cover the bowl with cling wrap and place it in a warm spot to rise for 2-3 hours. The dough should double in size and become bubbly.
Preheat the Pot:
  1. About 30 minutes before the dough is ready, place a heavy pot (like a Dutch oven) with its lid in the oven.
  2. Preheat the oven to 240°C/450°F (220°C for fan-forced ovens).
Shape the Dough:
  1. Sprinkle 1 tablespoon of flour on a clean surface and scrape the dough onto it.
  2. Gently pat the dough into a disc about 20cm (8 inches) wide.
  3. Spread half the shredded cheese over the dough, then fold the edges inward four times, layering more cheese between folds.
Prepare for Baking:
  1. Flip the dough onto a sheet of parchment paper, seams down, and shape it into a neat round.
  2. Top the dough with the reserved cheese to create a golden crown.
Bake the Bread:
  1. Carefully transfer the dough (on the parchment) into the preheated pot.
  2. Cover with the lid and bake for 35 minutes.
  3. Remove the lid and bake for an additional 10 minutes to develop a golden, cheesy crust.
Cool and Serve:
  1. Transfer the bread to a cooling rack using the parchment paper.
  2. Let it cool for at least 10 minutes before slicing. Enjoy warm!

Notes

  • Use fresh, good-quality cheese for the best flavor.
  • The preheated pot is essential for creating steam, which helps achieve a crispy crust.
  • If you don’t have a Dutch oven, use a heavy baking dish with a tight-fitting lid or place a baking sheet with water at the bottom of the oven to create steam.

Jam Drops (Thumbprint Cookies): A Timeless Treat for All Occasions

When was the last time you savored a treat that took you back to simpler, sweeter days? Jam drops, also known as thumbprint cookies, are that perfect blend of nostalgia and indulgence. These buttery, soft cookies with a dollop of vibrant jam in the center are a delight for all ages. Whether you’re a seasoned baker or just starting, making jam drops is as satisfying as eating them.

Why Jam Drops Are a Beloved Classic

Jam drops are more than just cookies; they’re a reminder of childhood baking sessions with loved ones or special holiday treats. Their simplicity doesn’t take away from their charm. These cookies are the perfect balance of buttery richness and fruity sweetness, making them a versatile dessert for tea parties, festive gatherings, or an everyday snack.

Ingredients for Jam Drops

To make the perfect jam drops, you’ll need a few simple ingredients:

IngredientAmountNotes
Unsalted butter (softened)225g (2 sticks)Essential for a rich, creamy texture.
Caster sugar (superfine sugar)3/4 cupRegular granulated sugar can be used as a substitute.
Vanilla extract2 tspAdds a warm, aromatic flavor.
Large egg1Must be at room temperature for even mixing.
Plain flour (all-purpose)2 1/2 cupsForms the cookie’s structure.
Kosher salt1/4 tspEnhances the overall flavor.
Strawberry or raspberry jam1/2 cupChoose any flavor you love, mixed well to loosen.

Step-by-Step Guide to Making Jam Drops

Step 1: Preheat the Oven

  • Preheat your oven to 180°C (350°F) or 160°C for fan-forced ovens.
  • Line two baking trays with parchment paper for easy cleanup.

Step 2: Cream the Butter and Sugar

  • Using an electric beater or stand mixer, beat the butter and sugar on medium speed for about 1.5 minutes until creamy and fluffy.

Step 3: Mix in Wet Ingredients

  • Add the vanilla extract, egg, and salt to the creamed butter mixture.
  • Beat for 20 seconds until the ingredients are just combined.

Step 4: Incorporate Dry Ingredients

  • Gradually add the flour to the mixture.
  • Beat until no visible white flour remains. The dough will have a crumbly texture.

Step 5: Shape the Cookies

  • Measure out one tablespoon of the dough and pack it tightly.
  • Roll the dough into a smooth ball about 3cm (1.2 inches) in diameter.
  • Flatten each ball into a disc about 1.25cm (0.5 inches) thick, then press your thumb into the center to create an indent.

Step 6: Add the Jam

  • Fill each indent with a slightly heaped 1/2 teaspoon of jam. Be careful not to overfill, as the jam will spread during baking.

Step 7: Bake to Perfection

  • Bake for 14 minutes, placing both trays in the oven simultaneously. Rotate and switch the trays after 10 minutes for even baking.
  • Look for edges that are light golden and surfaces that are pale golden.

Step 8: Cool and Serve

  • Let the cookies cool completely on the tray to allow the bases to set. Then, enjoy your freshly baked jam drops!

Tips for Perfect Jam Drops

  • Avoid Cracks: Roll and shape the dough tightly to prevent cracks when baking.
  • Choose the Right Jam: Use a jam with a thick consistency to prevent it from running out during baking.
  • Room Temperature Ingredients: Ensure the egg and butter are at room temperature for smoother mixing.
  • Don’t Skip the Parchment Paper: It prevents sticking and makes cleanup a breeze.

Nutritional Information

Here’s an approximate breakdown of the nutritional content per cookie:

NutrientPer Cookie
Calories~120 kcal
Protein1.5g
Fat6g
Carbohydrates15g
Sugar~7g

(Note: Values may vary based on portion size and ingredients used.)

Creative Variations of Jam Drops

1. Flavor Swaps

Experiment with different jams like apricot, blueberry, or orange marmalade for a unique twist.

2. Chocolate Lovers’ Jam Drops

Add a drizzle of melted chocolate over the cooled cookies for an extra layer of indulgence.

3. Nutty Touch

Roll the dough balls in finely chopped nuts before flattening them to add a crunchy exterior.

4. Festive Jam Drops

Use red and green jams during the holidays for a festive presentation.

FAQs About Jam Drops (Thumbprint Cookies)

1. Can I freeze jam drops?

Yes! Freeze the unbaked dough balls or baked cookies. Store unbaked balls in an airtight container for up to three months and bake from frozen. Baked cookies can be frozen for two months.

2. Why is my dough crumbly?

The dough naturally starts crumbly but comes together when pressed firmly. Make sure to pack it tightly when rolling.

3. What’s the best way to store jam drops?

Store baked cookies in an airtight container at room temperature for up to five days. They also keep well in the fridge.

4. Can I use a gluten-free flour?

Yes! Substitute plain flour with a gluten-free all-purpose blend. The texture may vary slightly.

5. How do I prevent the jam from running?

Choose a thick jam and avoid overfilling the indents. Chilling the shaped cookies before baking can also help.

6. Are jam drops suitable for kids to make?

Absolutely! Kids love rolling the dough and adding the jam. Just supervise them around the oven.

Make It Your Own

Jam drops are a delightful way to add a homemade touch to any occasion. Whether you’re creating memories with your kids, preparing treats for a bake sale, or simply satisfying your sweet tooth, these cookies are endlessly customizable. So grab your ingredients, preheat that oven, and enjoy the rewarding process of baking these classic treats.

ating

Jam Drops (Thumbprint Cookies): A Timeless Treat for All Occasions

Jam drops, also known as thumbprint cookies, are buttery and soft cookies filled with vibrant, fruity jam. Perfect for tea parties, festive gatherings, or a nostalgic everyday treat, these cookies are simple to make and delightful to eat.
Prep Time 20 minutes
Cook Time 14 minutes
Total Time 34 minutes
Servings: 24 cookies
Course: Dessert
Cuisine: Classic

Ingredients
  

  • 225 g 2 sticks unsalted butter, softened
  • 3/4 cup caster sugar superfine sugar
  • 2 tsp vanilla extract
  • 1 large egg room temperature
  • 2 1/2 cups plain flour all-purpose flour
  • 1/4 tsp kosher salt
  • 1/2 cup strawberry or raspberry jam or your preferred flavor, mixed well to loosen

Method
 

Preheat the Oven:
  1. Preheat your oven to 180°C (350°F) or 160°C for fan-forced ovens.
  2. Line two baking trays with parchment paper.
Cream the Butter and Sugar:
  1. Using an electric beater or stand mixer, beat the butter and sugar on medium speed for about 1.5 minutes until creamy and fluffy.
Mix in Wet Ingredients:
  1. Add the vanilla extract, egg, and salt to the creamed butter mixture. Beat for 20 seconds until just combined.
Incorporate Dry Ingredients:
  1. Gradually add the flour to the mixture, beating until no visible white flour remains. The dough will have a crumbly texture.
Shape the Cookies:
  1. Measure one tablespoon of dough and pack it tightly. Roll into a smooth ball (about 3cm/1.2 inches in diameter).
  2. Flatten each ball into a disc (about 1.25cm/0.5 inches thick) and press your thumb into the center to create an indent.
Add the Jam:
  1. Fill each indent with a slightly heaped 1/2 teaspoon of jam. Avoid overfilling, as the jam will spread during baking.
Bake to Perfection:
  1. Bake for 14 minutes, rotating and switching the trays after 10 minutes for even baking.
  2. The cookies are done when the edges are light golden and the surfaces are pale golden.
Cool and Serve:
  1. Let the cookies cool completely on the tray to allow the bases to set. Serve and enjoy!

Notes

  • Use room-temperature butter and egg for a smoother dough.
  • A jam with a thick consistency works best to prevent spreading.
  • For easier handling, chill the dough if it becomes too soft.

Spicy Asian Zucchini: A Flavor-Packed Side Dish You’ll Love

Spicy Asian zucchini isn’t just a side dish—it’s a culinary experience that will tantalize your taste buds and elevate your meals. With its perfect blend of heat, sweetness, and umami, this dish adds an irresistible zing to any table. Whether you’re a fan of bold flavors or just looking for a creative way to enjoy zucchini, this recipe has got you covered.

Why Spicy Asian Zucchini Is a Must-Try

Think about the crunch of fresh zucchini paired with a spicy, garlicky sauce that’s rich with sesame and soy flavors. It’s simple to prepare but packs a punch, making it perfect for family dinners, potlucks, or even a quick weekday treat. Plus, zucchini is healthy, low in calories, and loaded with nutrients, making this dish a guilt-free indulgence.

Ingredients for Spicy Asian Zucchini

Here’s what you’ll need to create this bold and flavorful dish:

Zucchini and Topping:

IngredientAmountNotes
Zucchini (small/medium)5Cut in half lengthwise.
Canola oil1 tbspOr any neutral cooking oil.
Cooking/kosher salt3/4 tspAdjust to taste.
Crispy fried shallots1/4 cupStore-bought; an Asian pantry staple.
Green onion1 stemFinely sliced for garnish.

Spicy Sauce:

IngredientAmountNotes
Canola oil1 tbspNeutral oil works best.
Garlic3 cloves, finely mincedAdds depth and aroma.
Sambal oelek1 tbspSubstitute sriracha or chili crisp.
Sesame oil (toasted)1 tbspGives the sauce a nutty finish.
Soy sauce (light/all-purpose)1 tbspAvoid dark soy; it can overpower.
Mirin2 tbspCan substitute honey for a sweeter touch.

How to Make Spicy Asian Zucchini

Step 1: Prep the Zucchini

  • Toss the zucchini with oil and sprinkle it with salt, ensuring it’s evenly coated.

Step 2: Cook the Zucchini

  • Heat a large non-stick pan over medium-high heat.
  • Place half the zucchini cut-side down and cook for 3-4 minutes until golden. Flip and cook the skin side for 3 minutes.
  • Transfer to a serving plate and repeat with the remaining zucchini.

Step 3: Make the Spicy Sauce

  • Cool the pan slightly before returning it to medium heat.
  • Heat the oil, then sauté the minced garlic until light golden.
  • Add the sambal oelek, sesame oil, soy sauce, and mirin. Simmer for 30 seconds until the sauce thickens and becomes syrupy.

Step 4: Assemble and Serve

  • Pour the sauce over the cooked zucchini.
  • Top with crispy fried shallots and sliced green onion for extra texture and flavor.

Tips for Perfect Spicy Asian Zucchini

  • Choose the Right Zucchini: Smaller zucchini are tender and absorb flavors better.
  • Don’t Skip the Shallots: The crispy fried shallots add a unique crunch and flavor.
  • Adjust the Heat: If you love spicy food, add more sambal oelek or even a pinch of red chili flakes.
  • Experiment with Substitutions: You can swap zucchini for other vegetables like eggplant or asparagus.

Nutritional Information

Here’s a breakdown of the nutritional value per serving:

NutrientPer Serving
Calories~120 kcal
Protein3g
Fat8g
Carbohydrates10g
Sodium~450mg

(Note: Values are approximate and may vary based on exact ingredients used.)

Creative Serving Ideas for Spicy Asian Zucchini

  • With Rice: Pair this dish with steamed jasmine rice for a complete meal.
  • In Stir-Fries: Toss the cooked zucchini with noodles or fried rice for a spicy twist.
  • As a Topping: Use it as a flavorful addition to grilled meats or seafood.
  • In Salads: Let the zucchini cool and serve it over a bed of mixed greens for a refreshing salad.

FAQs About Spicy Asian Zucchini

1. Can I make Spicy Asian Zucchini ahead of time?

Yes, you can prepare the zucchini and sauce separately, then combine and reheat just before serving.

2. Can I use other vegetables instead of zucchini?

Absolutely! Eggplant, bell peppers, or even green beans work well with this sauce.

3. How do I store leftovers?

Store any leftovers in an airtight container in the refrigerator for up to three days. Reheat in a pan or microwave before serving.

4. Is this recipe vegetarian or vegan?

Yes, as long as you use a vegan-friendly soy sauce and ensure the crispy fried shallots don’t contain animal products.

5. What’s a good substitute for sambal oelek?

You can use sriracha, chili garlic sauce, or even a spicy chili oil.

6. Can I bake the zucchini instead of frying?

Yes, toss the zucchini with oil and salt, then roast at 425°F (220°C) for 15-20 minutes until golden.

Final Thoughts: Make Spicy Asian Zucchini Your Own

Spicy Asian zucchini is a quick, flavorful dish that’s as versatile as it is delicious. Whether you’re cooking for yourself or hosting a dinner party, this recipe is sure to impress. Don’t be afraid to customize it—experiment with different spices, vegetables, or garnishes to make it uniquely yours. So grab your skillet, gather your ingredients, and treat yourself to a bold, tasty adventure in your kitchen!

PAUL

Spicy Asian Zucchini: A Flavor-Packed Side Dish You’ll Love

Spicy Asian Zucchini is a bold, flavorful side dish that pairs tender zucchini with a garlicky, spicy sauce infused with sesame and soy. Perfect for weeknight dinners, potlucks, or a quick snack, this dish is simple to prepare and sure to impress.
Prep Time 10 minutes
Cook Time 10 minutes
Total Time 20 minutes
Servings: 4 servings
Course: Side Dish
Cuisine: Asian-inspired

Ingredients
  

For the Zucchini and Topping:
  • 5 small or medium zucchini cut in half lengthwise
  • 1 tbsp canola oil or any neutral cooking oil
  • 3/4 tsp cooking or kosher salt adjust to taste
  • 1/4 cup crispy fried shallots store-bought
  • 1 stem green onion finely sliced (for garnish)
For the Spicy Sauce:
  • 1 tbsp canola oil neutral oil works best
  • 3 cloves garlic finely minced
  • 1 tbsp sambal oelek or substitute with sriracha or chili crisp
  • 1 tbsp toasted sesame oil
  • 1 tbsp light soy sauce
  • 2 tbsp mirin or substitute with honey for sweetness

Method
 

Prep the Zucchini:
  1. Toss the zucchini halves with 1 tablespoon of canola oil and sprinkle evenly with salt. Ensure all sides are lightly coated.
Cook the Zucchini:
  1. Heat a large non-stick skillet over medium-high heat.
  2. Place half of the zucchini cut-side down and cook for 3–4 minutes until golden brown. Flip and cook the skin side for another 3 minutes.
  3. Transfer to a serving plate and repeat with the remaining zucchini.
Make the Spicy Sauce:
  1. Reduce the heat to medium and allow the pan to cool slightly before adding the oil.
  2. Heat 1 tablespoon of canola oil, then sauté the minced garlic until light golden and aromatic.
  3. Add sambal oelek, sesame oil, soy sauce, and mirin. Simmer the mixture for 30 seconds until slightly thickened and syrupy.
Assemble and Serve:
  1. Drizzle the spicy sauce over the cooked zucchini.
  2. Top with crispy fried shallots and sliced green onion for added texture and flavor.

Notes

  • For a spicier dish, increase the sambal oelek or add a pinch of red chili flakes.
  • Smaller zucchini are more tender and absorb flavors better.
  • The crispy fried shallots provide an essential crunch and flavor; don’t skip them!
  • This dish can also be made with roasted zucchini for a healthier option.

Mexican Cheese Dip: The Ultimate Guide to a Crowd-Pleasing Favorite

Mexican cheese dip is more than just a snack; it’s a deliciously creamy, cheesy, and flavorful experience that brings people together. Whether you’re hosting a game night, throwing a party, or simply indulging in a comfort food craving, this dip is a guaranteed hit. Let’s dive into everything you need to know about making, serving, and enjoying this timeless favorite.

Why Mexican Cheese Dip is a Must-Try

Imagine sitting around with friends, scooping warm, velvety cheese onto crispy tortilla chips. The aroma of roasted chilies and fresh cilantro fills the air, sparking conversation and laughter. This dip isn’t just food; it’s a shared experience that brings joy to any occasion.

Whether you’re a beginner or a seasoned cook, Mexican cheese dip is simple enough to make and versatile enough to impress.

Key Ingredients for the Perfect Mexican Cheese Dip

Here’s what you’ll need to craft this rich and savory delight:

IngredientAmountNotes
Cheddar cheese2 1/2 cups (freshly shredded)Freshly shredded is essential for a smooth texture.
Cornflour (cornstarch)1 tbspHelps thicken the dip.
Unsalted butter1/2 tbsp (10g)Adds richness.
Garlic (finely minced)1 large cloveInfuses deep, aromatic flavor.
White onion (chopped)1/4 small (~1/4 cup)Adds a subtle sweetness.
Evaporated milk375g / 13 oz (1 can)Creates a creamy base.
Tomato (diced)1 small (3/4 cup)Provides freshness and a hint of acidity.
Onion powder, garlic powder, cumin1/4 tsp eachEnhances the dip’s flavor complexity.
Fire-roasted green chilies113g / 4 oz (1 can)Brings smokiness and mild heat.
Fresh cilantro (chopped)1/4 cupAdds a vibrant, herbal finish.
Milk (any type)2–3 tbspAdjusts consistency as needed.
SaltTo tasteAdjust based on the cheese’s saltiness.

How to Make Mexican Cheese Dip

Follow these step-by-step instructions to create the ultimate cheese dip:

Step 1: Prep the Ingredients

  • Toss the shredded cheese with cornflour in a bowl. This prevents clumping and ensures a smooth dip.
  • Mince the garlic, finely chop the onion, and dice the tomato.

Step 2: Sauté the Aromatics

  • Heat the butter in a saucepan over medium heat.
  • Add the garlic and onion, cooking gently for about three minutes until translucent but not browned.
  • Stir in the diced tomato, including its juices, and cook for two minutes until softened.

Step 3: Combine the Base Ingredients

  • Pour in the evaporated milk and stir well.
  • Gradually add the cheese mixture, stirring constantly to prevent lumps.

Step 4: Add Spices and Green Chilies

  • Mix in the onion powder, garlic powder, cumin, and chopped green chilies.
  • Continue stirring until the cheese fully melts into a silky, thick sauce.

Step 5: Adjust Consistency and Flavor

  • Add milk or water a tablespoon at a time to achieve your desired consistency.
  • Stir in chopped cilantro and salt to taste.

Step 6: Serve and Enjoy

  • Serve the dip warm with tortilla chips, vegetables, or even as a topping for nachos. The dip remains scoopable at room temperature.

Pro Tips for the Best Results

  • Use Freshly Shredded Cheese: Pre-shredded cheese contains anti-caking agents that can affect the dip’s smoothness.
  • Don’t Rush the Sautéing Process: Cooking the garlic and onion slowly enhances their sweetness and depth.
  • Adjust Heat Levels: If you prefer a spicier dip, add diced jalapeños or a pinch of cayenne pepper.
  • Reheat Gently: Use the microwave or stovetop with a splash of milk to restore the dip’s creamy texture.

Creative Ways to Enjoy Mexican Cheese Dip

Mexican cheese dip isn’t just for chips! Here are some other creative ways to enjoy it:

  • Taco Topping: Drizzle it over tacos for an extra layer of decadence.
  • Quesadilla Filling: Spread it between tortillas with some cooked chicken or veggies.
  • Loaded Fries: Pour it over crispy fries and garnish with jalapeños and bacon bits.
  • Pasta Sauce: Use it as a base for a cheesy pasta dish.

Nutritional Information

NutrientPer Serving
Calories~150 kcal
Protein6g
Fat11g
Carbohydrates5g
Sodium~250mg

(Note: Values may vary depending on exact ingredients used.)

FAQs About Mexican Cheese Dip

1. Can I make Mexican cheese dip ahead of time?

Yes! Prepare the dip up to three days in advance and store it in the refrigerator. Reheat before serving.

2. Can I freeze Mexican cheese dip?

Absolutely! Freeze the dip in an airtight container for up to three months. Thaw and reheat with a splash of milk to restore its consistency.

3. How do I prevent the dip from becoming grainy?

Using freshly shredded cheese and stirring constantly over low heat ensures a smooth texture.

4. What can I use instead of cheddar cheese?

Monterey Jack, Colby, or a blend of Mexican cheeses work well as substitutes.

5. Is Mexican cheese dip gluten-free?

Yes, as long as you use gluten-free cornflour and double-check any canned ingredients for hidden gluten.

6. What are some good dippers for this cheese dip?

Try tortilla chips, pita bread, pretzels, raw veggies, or even mini tacos.

Final Thoughts: Make It Your Own

Mexican cheese dip is a versatile, crowd-pleasing dish that invites creativity. Whether you stick to the classic recipe or add your own twist, this dip is sure to become a staple at your gatherings. So gather your ingredients, fire up the stove, and get ready to wow your taste buds and your guests!

ating

Mexican Cheese Dip: The Ultimate Guide to a Crowd-Pleasing Favorite

This Mexican Cheese Dip is the ultimate creamy, cheesy, and flavorful appetizer that’s perfect for any occasion. Whether you’re hosting a party or indulging in a snack, this dip will be a hit with everyone. Serve it warm with tortilla chips, veggies, or as a topping for your favorite dishes.
Prep Time 10 minutes
Cook Time 10 minutes
Total Time 20 minutes
Servings: 6 servings
Course: Appetizer
Cuisine: Mexican-inspired

Ingredients
  

  • 2 1/2 cups freshly shredded cheddar cheese
  • 1 tbsp cornflour cornstarch
  • 1/2 tbsp 10g unsalted butter
  • 1 large garlic clove finely minced
  • 1/4 small white onion ~1/4 cup, finely chopped
  • 1 small tomato diced (about 3/4 cup)
  • 1 can 375g / 13 oz evaporated milk
  • 1/4 tsp onion powder
  • 1/4 tsp garlic powder
  • 1/4 tsp ground cumin
  • 1 can 113g / 4 oz fire-roasted green chilies
  • 2 –3 tbsp milk any type, as needed
  • 1/4 cup fresh cilantro chopped
  • Salt to taste

Method
 

Prep the Ingredients:
  1. Toss the shredded cheese with cornflour in a bowl to prevent clumping.
  2. Mince the garlic, finely chop the onion, and dice the tomato.
Sauté the Aromatics:
  1. In a saucepan, melt the butter over medium heat.
  2. Add the minced garlic and chopped onion, cooking gently for about 3 minutes until translucent but not browned.
  3. Stir in the diced tomato, including its juices, and cook for another 2 minutes until softened.
Combine the Base Ingredients:
  1. Pour in the evaporated milk and stir well.
  2. Gradually add the cheese mixture, stirring constantly to prevent lumps.
Add Spices and Green Chilies:
  1. Mix in the onion powder, garlic powder, cumin, and chopped green chilies.
  2. Stir continuously until the cheese is fully melted and the sauce is silky and thick.
Adjust Consistency and Flavor:
  1. Add milk a tablespoon at a time to achieve your desired consistency.
  2. Stir in chopped cilantro and season with salt to taste.
Serve:
  1. Serve the dip warm with tortilla chips, vegetables, or as a topping for nachos. The dip remains scoopable at room temperature.
  2.  

Notes

  • Use freshly shredded cheese for the smoothest texture.
  • Adjust the heat by adding diced jalapeños or a pinch of cayenne pepper if desired.
  • To reheat, use the microwave or stovetop with a splash of milk to restore creaminess.

The Ultimate Recipe for Flavorful Mexican Corn Salad

There’s something irresistibly comforting about a bowl of Mexican Corn Salad. Whether you’re at a summer barbecue, a potluck, or simply craving something delicious, this dish combines the sweetness of corn with tangy lime, creamy dressing, and a touch of spice. It’s a crowd-pleaser, bursting with flavor and so easy to make! If you’re ready to take your side-dish game to the next level, let’s dive into everything you need to know about this delightful recipe.

Why Mexican Corn Salad is a Must-Try Dish

Mexican Corn Salad is more than just a side dish; it’s a celebration of fresh ingredients and bold flavors. With every bite, you’ll taste a mix of smoky, creamy, tangy, and spicy notes. Whether served warm or at room temperature, this salad complements grilled meats, tacos, or even a simple bowl of rice.

Ingredients for Mexican Corn Salad

Here’s what you’ll need to make this vibrant dish:

IngredientQuantity
Corn (cut from the cob or frozen)5 cups (4 large ears)
Butter2 tbsp (30g)
Garlic (minced)2 cloves
Salt and pepper1/2 tsp each
Mayonnaise1/4 cup
Sour cream or yogurt1/4 cup
Parmesan cheese (finely grated)1/2 cup
Jalapeño (deseeded, chopped)1 tbsp (optional)
Cilantro (roughly chopped)1 cup
Green onion (finely sliced)1 cup
Red onion (finely chopped)1/2 cup
Lime juice (fresh)2–3 tbsp

Optional Garnishes

  • Cotija or Feta (crumbled): 60g (2 oz)
  • Jalapeño slices, cilantro leaves, lime wedges

Step-by-Step Instructions for Mexican Corn Salad

1. Prepare the Corn

  • If using fresh corn, cut the kernels off the cob. To avoid a mess, place the cob upright in a large bowl and slice downward.
  • If using frozen corn, there’s no need to thaw—just cook it straight from the freezer.

2. Brown the Corn

  • Melt the butter in a large skillet over high heat.
  • Add minced garlic and sauté for about 10 seconds until fragrant.
  • Toss in the corn and cook for 5 minutes, stirring occasionally, until the kernels are golden brown with caramelized bits.
  • Season with salt and pepper halfway through cooking.

3. Prepare the Dressing

  • In a large bowl, mix mayonnaise, sour cream (or yogurt), lime juice, and Parmesan cheese. The heat from the corn will help the dressing melt into a smooth, creamy consistency.

4. Combine the Ingredients

  • Add the browned corn to the bowl with the dressing.
  • Toss in chopped cilantro, red onion, green onion, and jalapeño (if using). Mix everything until well coated.

5. Serve and Garnish

  • Transfer the salad to a serving dish.
  • Crumble Cotija or Feta on top for an extra layer of flavor, and garnish with lime wedges, cilantro leaves, or jalapeño slices if desired.
  • Serve warm or at room temperature.

Tips for Perfect Mexican Corn Salad

  1. Get the Corn Just Right: Browning the corn adds depth and a slight smoky flavor. Don’t skip this step!
  2. Balance the Dressing: Start with 2 tablespoons of lime juice, then add more to suit your taste.
  3. Customize the Heat: If you’re not a fan of spicy food, skip the jalapeño or reduce the amount. For more heat, leave in some seeds or add chili powder.
  4. Use Fresh Lime: Freshly squeezed lime juice makes a big difference in flavor.

Nutritional Information

NutrientPer Serving (Approx.)
Calories230
Protein6 g
Carbohydrates22 g
Fat15 g
Saturated Fat7 g
Sodium310 mg

Why This Recipe is Versatile and Crowd-Pleasing

One of the best things about Mexican Corn Salad is how versatile it is. You can enjoy it as a side dish, use it as a taco topping, or even eat it on its own as a light meal. Its bold flavors make it stand out, while the creamy and tangy dressing ties everything together beautifully.

Creative Variations of Mexican Corn Salad

1. Grilled Corn Salad

Grill the corn on the cob before cutting off the kernels for a smoky, charred flavor.

2. Vegan Mexican Corn Salad

Replace mayonnaise and sour cream with vegan alternatives and use nutritional yeast instead of Parmesan.

3. Mexican Street Corn Salad

Add a pinch of chili powder and a drizzle of hot sauce for a dish inspired by elote, Mexican street corn.

Common Mistakes to Avoid

  1. Overcooking the Corn: Cooking too long can make the kernels mushy. Aim for caramelized edges but firm kernels.
  2. Skipping the Lime Juice: Lime juice is essential for balancing the rich flavors.
  3. Using Pre-Shredded Cheese: Freshly grated cheese melts better and has a superior texture.

FAQs About Mexican Corn Salad

1. Can I make this salad ahead of time?

Yes! Prepare the salad up to one day in advance, but add the cilantro and garnishes just before serving for maximum freshness.

2. Can I use canned corn?

You can, but fresh or frozen corn provides better flavor and texture. Drain canned corn well and sauté it to remove excess moisture.

3. How do I store leftovers?

Store the salad in an airtight container in the refrigerator for up to 3 days.

4. What can I serve with Mexican Corn Salad?

It pairs perfectly with grilled meats, tacos, enchiladas, or even a simple bowl of rice.

5. Can I adjust the spice level?

Absolutely! Leave out the jalapeño for a milder flavor, or add chili powder or cayenne for more heat.

6. Is there a substitute for Cotija cheese?

Feta is a great substitute, offering a similar salty, crumbly texture.

A Dish for Every Occasion

Whether you’re hosting a summer barbecue, preparing for a potluck, or just looking for a delicious side dish, Mexican Corn Salad is a recipe that never disappoints. Its combination of sweet corn, creamy dressing, and bold flavors makes it a dish you’ll want to make again and again.

Ready to Make Mexican Corn Salad?

Gather your ingredients and give this recipe a try! Share it with friends and family, and watch it become a favorite at every gathering. Once you’ve mastered the basics, experiment with your own variations to make it uniquely yours.

ating

The Ultimate Recipe for Flavorful Mexican Corn Salad

Sweet corn, tangy lime, creamy dressing, and a hint of spice come together in this vibrant and flavorful Mexican Corn Salad. Perfect as a side dish, taco topping, or standalone snack, it’s an easy-to-make dish that’s sure to impress at barbecues, potlucks, or family dinners.
Prep Time 10 minutes
Cook Time 10 minutes
Total Time 20 minutes
Servings: 6 servings
Course: Side Dish
Cuisine: Mexican

Ingredients
  

  • 5 cups corn kernels from 4 large ears or frozen
  • 2 tablespoons butter
  • 2 cloves garlic minced
  • 1/2 teaspoon salt
  • 1/2 teaspoon black pepper
  • 1/4 cup mayonnaise
  • 1/4 cup sour cream or yogurt
  • 1/2 cup Parmesan cheese finely grated
  • 1 tablespoon jalapeño deseeded and chopped (optional)
  • 1 cup cilantro roughly chopped
  • 1 cup green onion finely sliced
  • 1/2 cup red onion finely chopped
  • 2-3 tablespoons lime juice freshly squeezed
Optional Garnishes:
  • 60 g 2 oz Cotija or Feta cheese, crumbled
  • Jalapeño slices
  • Cilantro leaves
  • Lime wedges

Method
 

Prepare the Corn:
  1. If using fresh corn, cut the kernels off the cob. For a mess-free method, stand the cob upright in a large bowl and slice downward.
  2. If using frozen corn, cook straight from the freezer without thawing.
Brown the Corn:
  1. Melt butter in a large skillet over high heat.
  2. Add minced garlic and sauté for about 10 seconds until fragrant.
  3. Toss in the corn and cook for 5 minutes, stirring occasionally, until the kernels are golden brown with caramelized edges. Season with salt and pepper halfway through cooking.
Prepare the Dressing:
  1. In a large mixing bowl, combine mayonnaise, sour cream (or yogurt), lime juice, and Parmesan cheese. Mix well to create a smooth dressing.
Combine Ingredients:
  1. Add the browned corn to the bowl with the dressing.
  2. Toss in chopped cilantro, red onion, green onion, and jalapeño (if using). Stir until the corn is well coated.
Serve and Garnish:
  1. Transfer the salad to a serving dish.
  2. Sprinkle crumbled Cotija or Feta cheese on top, along with any additional garnishes like lime wedges or jalapeño slices.
  3. Serve warm or at room temperature.

Notes

  • Browning the Corn: Caramelizing the corn adds a smoky depth of flavor. Don’t skip this step!
  • Adjust the Lime: Start with 2 tablespoons of lime juice and add more to taste.
  • Spice Level: Customize the heat by adjusting the amount of jalapeño or adding chili powder.
  • Storage: Refrigerate leftovers in an airtight container for up to 3 days.

The Ultimate Recipe for No-Bake Chocolate Chip Cookie Delight

There’s something magical about desserts that don’t require an oven. They’re quick, easy, and perfect for those moments when you want a treat without the hassle. No-Bake Chocolate Chip Cookie Delight takes this concept to a whole new level. With layers of crunchy cookie crust, creamy filling, and rich chocolate, this dessert is as indulgent as it is simple to make. Let’s explore how you can create this no-bake masterpiece step by step.

Why No-Bake Chocolate Chip Cookie Delight Is a Crowd Favorite

This dessert combines the nostalgia of chocolate chip cookies with the luxurious creaminess of layered fillings. It’s perfect for gatherings, potlucks, or just a sweet ending to a family dinner. The best part? No oven is required, making it ideal for warm days or when you’re short on time.

Ingredients for No-Bake Chocolate Chip Cookie Delight

Here’s what you’ll need to create this decadent dessert:

IngredientQuantity
Cream cheese8 ounces
Instant chocolate pudding mix1 (3.9-ounce) package
Cold whole or 2% milk1 1/2 cups
Unsalted butter6 tablespoons (3/4 stick)
Crunchy chocolate chip cookies (e.g., Chips Ahoy)1 (about 13-ounce) package
Kosher salt1/2 teaspoon, divided
Cold heavy cream1 1/2 cups
Packed light or dark brown sugar3/4 cup, divided
Vanilla extract1 teaspoon
Miniature chocolate chips1/3 cup + 2 tablespoons, divided

Step-by-Step Instructions for No-Bake Chocolate Chip Cookie Delight

1. Prepare Your Ingredients

  • Let the cream cheese sit at room temperature for about 45 minutes to soften.
  • Line an 8×8-inch baking pan with two sheets of parchment paper, leaving an overhang on all sides to create a sling.

2. Make the Chocolate Pudding Layer

  • In a large bowl, whisk together the instant chocolate pudding mix and cold milk until dissolved. Let it thicken for about 2 minutes while you prepare the other layers.

3. Create the Cookie Crust

  • Break the chocolate chip cookies into coarse pieces and pulse them in a food processor until fine crumbs form (about 12–15 pulses). Alternatively, crush the cookies in a zip-top bag with a rolling pin.
  • Melt the butter in the microwave (40–60 seconds on HIGH) and drizzle it over the crumbs. Add 1/4 teaspoon of kosher salt and pulse until the mixture resembles wet sand.
  • Press the cookie mixture into the prepared pan, ensuring an even layer that reaches the edges and corners.

4. Whip the Cream

  • In a stand mixer bowl, combine the heavy cream, 1/4 cup brown sugar, and vanilla extract. Whisk on high speed until stiff peaks form (2–4 minutes). Transfer to another bowl.

5. Make the Cream Cheese Layer

  • In the same mixer bowl, combine the cream cheese, remaining 1/2 cup brown sugar, vanilla extract, and remaining 1/4 teaspoon kosher salt. Beat on medium speed until light and fluffy (about 3 minutes).
  • Fold in 1 cup of the whipped cream and 1/3 cup miniature chocolate chips.

6. Assemble the Layers

  • Spread the chocolate pudding over the cookie crust.
  • Layer the cream cheese mixture evenly over the pudding.
  • Top with the remaining whipped cream.

7. Chill the Dessert

  • Cover the pan and refrigerate for at least 4 hours or overnight to allow the layers to set.

8. Add the Final Touches

  • Crumble the reserved cookies over the top and sprinkle with the remaining miniature chocolate chips.

9. Slice and Serve

  • Using the parchment sling, lift the dessert out of the pan and onto a cutting board. Cut into 12 squares, wiping the knife between cuts for clean slices.

Tips for Making the Best No-Bake Chocolate Chip Cookie Delight

  1. Use Room-Temperature Cream Cheese: Softened cream cheese blends more easily, ensuring a smooth filling.
  2. Crush the Cookies Evenly: A uniform cookie crust helps the layers stay intact when sliced.
  3. Don’t Skip the Chill Time: Refrigerating the dessert allows the layers to set, making it easier to cut and serve.

Nutritional Information

NutrientPer Serving (Approx.)
Calories310
Protein3 g
Carbohydrates34 g
Fat20 g
Saturated Fat12 g
Sodium180 mg

Why This Recipe Is Perfect for Any Occasion

Whether it’s a casual family dinner, a birthday party, or a potluck, No-Bake Chocolate Chip Cookie Delight is guaranteed to impress. Its creamy layers and crunchy crust make it a versatile dessert that’s easy to transport and serve.

Variations of No-Bake Chocolate Chip Cookie Delight

1. Peanut Butter Twist

Add a layer of peanut butter between the pudding and cream cheese layers for a nutty twist.

2. Mint Chocolate Delight

Use mint-flavored chocolate chips or add a few drops of peppermint extract to the whipped cream.

3. Oreo Variation

Swap the chocolate chip cookies for crushed Oreos to create a chocolaty base.

Common Mistakes to Avoid

  1. Skipping the Parchment Sling: Without it, removing the dessert from the pan can be challenging.
  2. Overwhipping the Cream: Overwhipped cream turns grainy, so stop as soon as stiff peaks form.
  3. Rushing the Chill Time: Cutting the dessert before it’s fully set can result in messy layers.

FAQs About No-Bake Chocolate Chip Cookie Delight

1. Can I use store-bought whipped cream?

Yes, but homemade whipped cream provides a fresher taste and better texture.

2. How long does this dessert last?

Store it in the refrigerator for up to 3 days. The layers may soften slightly over time.

3. Can I freeze No-Bake Chocolate Chip Cookie Delight?

Freezing isn’t recommended as the texture of the cream layers may change when thawed.

4. What’s the best way to cut clean slices?

Use a sharp knife and wipe it clean between each cut for neat slices.

5. Can I make this dessert gluten-free?

Yes, use gluten-free cookies for the crust and ensure other ingredients are gluten-free.

6. What can I use instead of chocolate pudding?

Vanilla or butterscotch pudding can be used for a different flavor profile.

Indulge in the Sweetness of No-Bake Chocolate Chip Cookie Delight

This easy and irresistible dessert is sure to become a favorite in your recipe collection. With its creamy layers, crunchy crust, and chocolatey goodness, No-Bake Chocolate Chip Cookie Delight is a treat you’ll want to make again and again.

Ready to Make Your No-Bake Delight?

Gather your ingredients and try this recipe today! Whether you’re hosting a party or simply craving a sweet treat, this dessert is sure to satisfy. Share it with loved ones, and watch it disappear in no time!

ating

The Ultimate Recipe for No-Bake Chocolate Chip Cookie Delight

This quick and indulgent dessert layers crunchy chocolate chip cookie crust, creamy filling, and rich chocolate pudding for a treat that’s as easy to make as it is to enjoy. Perfect for any occasion, No-Bake Chocolate Chip Cookie Delight requires no oven and is guaranteed to impress.
Prep Time 20 minutes
Cook Time 4 hours
Total Time 4 hours 20 minutes
Servings: 12 servings
Course: Dessert
Cuisine: American

Ingredients
  

  • 8 ounces cream cheese softened
  • 1 3.9-ounce package instant chocolate pudding mix
  • 1 1/2 cups cold whole or 2% milk
  • 6 tablespoons unsalted butter 3/4 stick, melted
  • 1 about 13-ounce package crunchy chocolate chip cookies (e.g., Chips Ahoy)
  • 1/2 teaspoon kosher salt divided
  • 1 1/2 cups cold heavy cream
  • 3/4 cup packed light or dark brown sugar divided
  • 1 teaspoon vanilla extract
  • 1/3 cup + 2 tablespoons miniature chocolate chips divided

Method
 

Prepare Your Pan:
  1. Let the cream cheese sit at room temperature for about 45 minutes to soften.
  2. Line an 8×8-inch baking pan with parchment paper, leaving overhangs on all sides to create a sling.
Make the Chocolate Pudding:
  1. In a large bowl, whisk together the instant chocolate pudding mix and cold milk until smooth and thickened (about 2 minutes). Set aside.
Create the Cookie Crust:
  1. Break chocolate chip cookies into coarse pieces and pulse them in a food processor until fine crumbs form. Alternatively, crush them in a zip-top bag with a rolling pin.
  2. Mix the crumbs with melted butter and 1/4 teaspoon kosher salt until they resemble wet sand.
  3. Press the cookie mixture evenly into the prepared pan to form a crust.
Whip the Cream:
  1. In a stand mixer bowl, combine heavy cream, 1/4 cup brown sugar, and vanilla extract. Whisk on high speed until stiff peaks form (2–4 minutes). Transfer to another bowl.
Prepare the Cream Cheese Layer:
  1. In the same mixer bowl, combine softened cream cheese, remaining 1/2 cup brown sugar, vanilla extract, and remaining 1/4 teaspoon kosher salt. Beat on medium speed until light and fluffy (about 3 minutes).
  2. Fold in 1 cup of the whipped cream and 1/3 cup miniature chocolate chips.
Assemble the Dessert:
  1. Spread the chocolate pudding evenly over the cookie crust.
  2. Layer the cream cheese mixture over the pudding.
  3. Top with the remaining whipped cream.
Chill the Dessert:
  1. Cover the pan and refrigerate for at least 4 hours or overnight to set.
Add Final Touches and Serve:
  1. Sprinkle the top with reserved cookie crumbles and 2 tablespoons miniature chocolate chips.
  2. Use the parchment sling to lift the dessert out of the pan and onto a cutting board.
  3. Slice into 12 squares and serve.

Notes

  • Room-Temperature Cream Cheese: Softened cream cheese ensures a smoother filling.
  • Crush Cookies Thoroughly: A uniform crust helps maintain stable layers.
  • Chill for Best Results: Ensure layers are fully set before slicing.
  • Storage: Refrigerate leftovers in an airtight container for up to 3 days.

The Ultimate Guide to Cooking Perfect Lemon Thyme Chicken Thighs

There’s something truly comforting about the aroma of roasted chicken filling your kitchen. Add a zesty twist with lemon and a fragrant touch of thyme, and you have a dish that’s simple, flavorful, and elegant. Lemon Thyme Chicken Thighs is a recipe that brings together crispy skin, tender meat, and fresh flavors, making it perfect for family dinners or special occasions. Let’s explore how you can create this delicious meal step by step.

Why Lemon Thyme Chicken Thighs Should Be on Your Menu

The combination of lemon and thyme adds brightness and earthiness to succulent chicken thighs. The crispy skin, paired with juicy meat, ensures every bite is satisfying. Plus, this recipe is easy to prepare yet looks and tastes like it came from a gourmet kitchen.

Ingredients for Lemon Thyme Chicken Thighs

Here’s what you’ll need to make this delightful dish:

IngredientQuantity
Bone-in, skin-on chicken thighs2 pounds (4–6 thighs)
Olive oilAs needed
Kosher saltTo taste
Freshly ground black pepperTo taste
Lemon, thinly sliced1 medium
Fresh thyme sprigs5–6

Step-by-Step Instructions for Lemon Thyme Chicken Thighs

1. Preheat Your Oven

  • Arrange a rack in the middle of your oven and preheat it to 400°F.

2. Prepare the Chicken

  • Pat the chicken thighs dry with paper towels. This helps the skin crisp up during cooking.
  • Drizzle olive oil over the thighs and season generously with kosher salt and freshly ground black pepper.

3. Start in a Cold Cast-Iron Skillet

  • Place the chicken thighs skin-side down in a single layer in a cold cast-iron skillet.
  • Set the skillet over medium heat and let the chicken cook undisturbed for 14–15 minutes. This method renders the fat from the skin, making it crispy and golden brown.

4. Flip and Add Flavors

  • Once the skin is crispy and much of the fat has rendered, flip the thighs so they are skin-side up.
  • Scatter the lemon slices and thyme sprigs over the chicken.

5. Roast to Perfection

  • Transfer the skillet to the preheated oven. Roast until the chicken reaches an internal temperature of 165°F, about 13–15 minutes.
  • Use an instant-read thermometer to ensure the chicken is cooked through.

6. Serve Immediately

  • Remove the skillet from the oven, discard the thyme sprigs, and serve the chicken with the roasted lemon slices.

Tips for the Best Lemon Thyme Chicken Thighs

  1. Use a Cast-Iron Skillet: This ensures even cooking and allows the chicken to go straight from the stovetop to the oven.
  2. Don’t Skip the Cold Skillet: Starting with a cold pan helps render the fat slowly, resulting in perfectly crispy skin.
  3. Let the Chicken Rest: Allow the chicken to rest for a few minutes before serving to lock in the juices.

Nutritional Information

NutrientPer Serving (Approx.)
Calories320
Protein27 g
Carbohydrates1 g
Fat23 g
Saturated Fat6 g
Sodium480 mg

Why Bone-In, Skin-On Chicken Thighs Work Best

  • Flavorful Meat: Bone-in chicken retains moisture and enhances flavor during cooking.
  • Crispy Skin: The skin adds a delightful crunch and helps lock in the juices.
  • Budget-Friendly: Chicken thighs are often more affordable than other cuts of chicken, making this dish economical without compromising on taste.

Serving Suggestions for Lemon Thyme Chicken Thighs

Pair this dish with any of the following sides for a complete meal:

  • Vegetables: Roasted asparagus, sautéed green beans, or steamed broccoli.
  • Grains: Fluffy rice, quinoa, or creamy mashed potatoes.
  • Bread: Crusty baguette slices to soak up the juices.

How to Store and Reheat Leftovers

  • Storage: Place leftover chicken in an airtight container and refrigerate for up to 3 days.
  • Reheating: Warm the chicken in a 350°F oven for 10–15 minutes to maintain its crispy skin and juicy interior.

Variations of Lemon Thyme Chicken Thighs

1. Garlic-Lemon Thyme Chicken

Add minced garlic to the skillet along with the lemon slices for a bolder flavor.

2. Spicy Lemon Thyme Chicken

Sprinkle red pepper flakes over the chicken for a touch of heat.

3. Herb-Infused Chicken Thighs

Experiment with other herbs like rosemary or oregano for a different twist.

Common Mistakes to Avoid

  1. Skipping the Drying Step: Moisture on the chicken skin prevents it from crisping up properly.
  2. Using Too Much Oil: Excess oil can make the dish greasy. Stick to a light drizzle.
  3. Overcrowding the Pan: Ensure the chicken thighs have enough space in the skillet for even cooking.

FAQs About Lemon Thyme Chicken Thighs

1. Can I use boneless, skinless chicken thighs?

Yes, but the cooking time will be shorter, and you’ll miss out on the crispy skin.

2. What can I use instead of a cast-iron skillet?

A heavy-bottomed, oven-safe skillet works well as a substitute.

3. Can I use dried thyme instead of fresh?

Fresh thyme is preferred for its flavor, but you can use 1 teaspoon of dried thyme if fresh is unavailable.

4. How do I know the chicken is cooked through?

Use an instant-read thermometer. The internal temperature should reach 165°F.

5. Can I make this recipe ahead of time?

It’s best served fresh, but you can prepare the chicken up to the roasting step and refrigerate it. Roast it when ready to serve.

6. What other cuts of chicken can I use?

Drumsticks or bone-in breasts work, but you’ll need to adjust the cooking time.

A Dish Worth Sharing

Lemon Thyme Chicken Thighs isn’t just a meal; it’s an experience. From the sizzle of the chicken in the skillet to the burst of citrusy, herby flavors on your plate, this dish delivers on every level.

Ready to Cook Lemon Thyme Chicken Thighs Tonight?

Gather your ingredients and start cooking this flavorful dish. Whether you’re serving it for a family dinner or entertaining guests, it’s sure to impress. Don’t forget to share your creation with loved ones—they’ll thank you for it!

ating

The Ultimate Guide to Cooking Perfect Lemon Thyme Chicken Thighs

Golden, crispy chicken thighs infused with the bright flavors of lemon and the earthiness of fresh thyme. This dish is simple yet elegant, perfect for a comforting family dinner or an impressive meal for guests.
Prep Time 10 minutes
Cook Time 30 minutes
Total Time 40 minutes
Servings: 4 servings
Course: Main Course
Cuisine: American

Ingredients
  

  • 2 pounds 4–6 bone-in, skin-on chicken thighs
  • Olive oil as needed
  • Kosher salt to taste
  • Freshly ground black pepper to taste
  • 1 medium lemon thinly sliced
  • 5 –6 fresh thyme sprigs

Method
 

  1. Preheat the Oven: Preheat your oven to 400°F and arrange a rack in the middle.
Prepare the Chicken:
  1. Pat the chicken thighs dry with paper towels.
  2. Drizzle olive oil over the thighs and season generously with kosher salt and freshly ground black pepper.
Start Cooking in a Cold Skillet:
  1. Place the chicken thighs skin-side down in a cold cast-iron skillet in a single layer.
  2. Set the skillet over medium heat and let the chicken cook undisturbed for 14–15 minutes, rendering fat from the skin and creating a golden, crispy texture.
Add Flavors:
  1. Flip the chicken so it’s skin-side up.
  2. Scatter the lemon slices and thyme sprigs over the chicken.
Roast to Perfection:
  1. Transfer the skillet to the oven and roast for 13–15 minutes, or until the chicken reaches an internal temperature of 165°F. Use an instant-read thermometer for accuracy.
Serve:
  1. Remove the skillet from the oven and discard the thyme sprigs.
  2. Serve the chicken with the roasted lemon slices and enjoy!

Notes

  • For the Crispiest Skin: Always start cooking the chicken in a cold skillet to render the fat slowly.
  • Alternative Cooking Methods: If you don’t have a cast-iron skillet, use any heavy-bottomed, oven-safe skillet.
  • Storage: Leftovers can be refrigerated in an airtight container for up to 3 days.