Spicy Beef Vindaloo Recipe is a must-try dish!

What is Vindaloo?

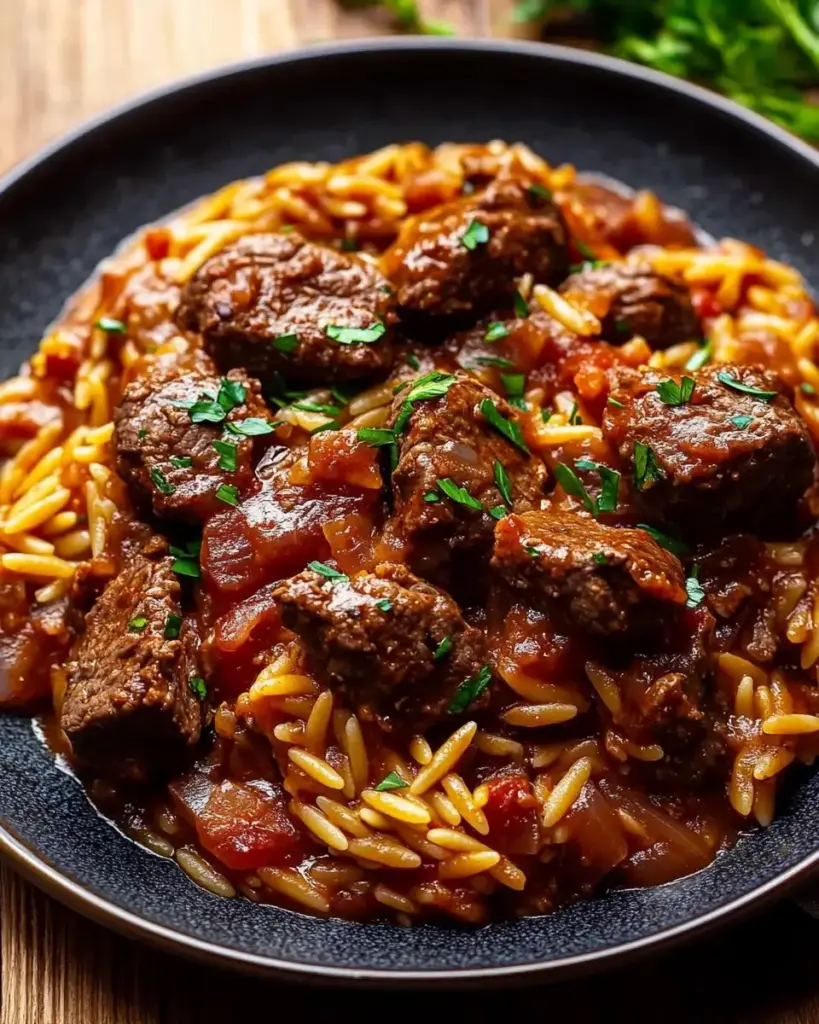
Vindaloo is a popular dish that hails from the Indian subcontinent. It is known for its bold flavors and spicy kick. Traditionally, vindaloo is made with marinated meat, often pork or beef, cooked in a rich, tangy sauce. The dish is characterized by its use of vinegar, spices, and sometimes sugar, which creates a delightful balance of heat and sweetness. The Spicy Beef Vindaloo Recipe we’re exploring today is a perfect example of this delicious culinary tradition.

The Origins of Spicy Beef Vindaloo

The origins of vindaloo can be traced back to the Portuguese colonization of India. The name “vindaloo” comes from the Portuguese dish “carne de vinha d’alhos,” which means meat marinated in wine and garlic. Over time, Indian cooks adapted this recipe, replacing wine with vinegar and adding local spices. This fusion of flavors resulted in the spicy and aromatic dish we know today. The Spicy Beef Vindaloo Recipe showcases this rich history, bringing together various ingredients that create a mouthwatering experience.

Ingredients for Spicy Beef Vindaloo Recipe

To create a delicious Spicy Beef Vindaloo, you’ll need a variety of fresh ingredients that come together to form a rich and flavorful dish. Here’s a list of what you’ll need:

  • 2 pounds beef chuck, cut into 1-inch cubes
  • 2 tablespoons vegetable oil
  • 1 large onion, finely chopped
  • 4 cloves garlic, minced
  • 1 tablespoon fresh ginger, minced
  • 2 tablespoons white vinegar
  • 2 tablespoons tomato paste
  • 2 tablespoons brown sugar
  • 1 tablespoon ground cumin
  • 1 tablespoon ground coriander
  • 1 teaspoon turmeric
  • 1 teaspoon ground cinnamon
  • 1 teaspoon cayenne pepper (adjust to taste)
  • 1 teaspoon black pepper
  • 1 teaspoon salt
  • 1 cup beef broth
  • 1 bay leaf
  • Fresh cilantro, for garnish

These ingredients are essential for achieving the authentic taste of Spicy Beef Vindaloo. The combination of spices, vinegar, and sweetness from brown sugar creates a unique flavor profile. Make sure to gather everything before you start cooking, as this will help streamline the process and ensure you don’t miss any key components.

Step-by-Step Preparation of Spicy Beef Vindaloo Recipe

Step 1: Marinating the Beef

The first step in making a flavorful Spicy Beef Vindaloo is marinating the beef. Start by placing the beef cubes in a large bowl. Add the white vinegar, minced garlic, minced ginger, ground cumin, ground coriander, turmeric, ground cinnamon, cayenne pepper, black pepper, and salt. Mix everything well, ensuring the beef is evenly coated with the spices. This marination process is crucial as it allows the flavors to penetrate the meat. For the best results, let the beef marinate for at least one hour. If you have time, marinating overnight in the refrigerator will enhance the flavor even more.

Step 2: Preparing the Vindaloo Paste

While the beef is marinating, you can prepare the vindaloo paste. In a small bowl, combine the tomato paste and brown sugar. This mixture will add depth and sweetness to the dish. Stir until well blended. The tomato paste not only thickens the sauce but also contributes to the rich color of the dish. Set this aside for later use when you start cooking the beef.

Step 3: Cooking the Beef

Once the beef has marinated, it’s time to cook it. Heat the vegetable oil in a large pot or Dutch oven over medium-high heat. Add the finely chopped onion and sauté until it turns golden brown, which should take about 5-7 minutes. The onions will add sweetness and flavor to the dish. Next, add the marinated beef to the pot. Brown the beef on all sides for about 5-10 minutes. This step is important as it locks in the juices and flavors of the meat.

Step 4: Simmering the Dish

After browning the beef, it’s time to add the vindaloo paste you prepared earlier. Stir in the tomato paste and brown sugar mixture, cooking for another 2 minutes until everything is well combined. Then, pour in the beef broth and add the bay leaf. Bring the mixture to a simmer, then reduce the heat to low. Cover the pot and let it cook for 1.5 to 2 hours. This slow cooking process allows the beef to become tender and absorb all the wonderful flavors of the spices.

Step 5: Final Touches

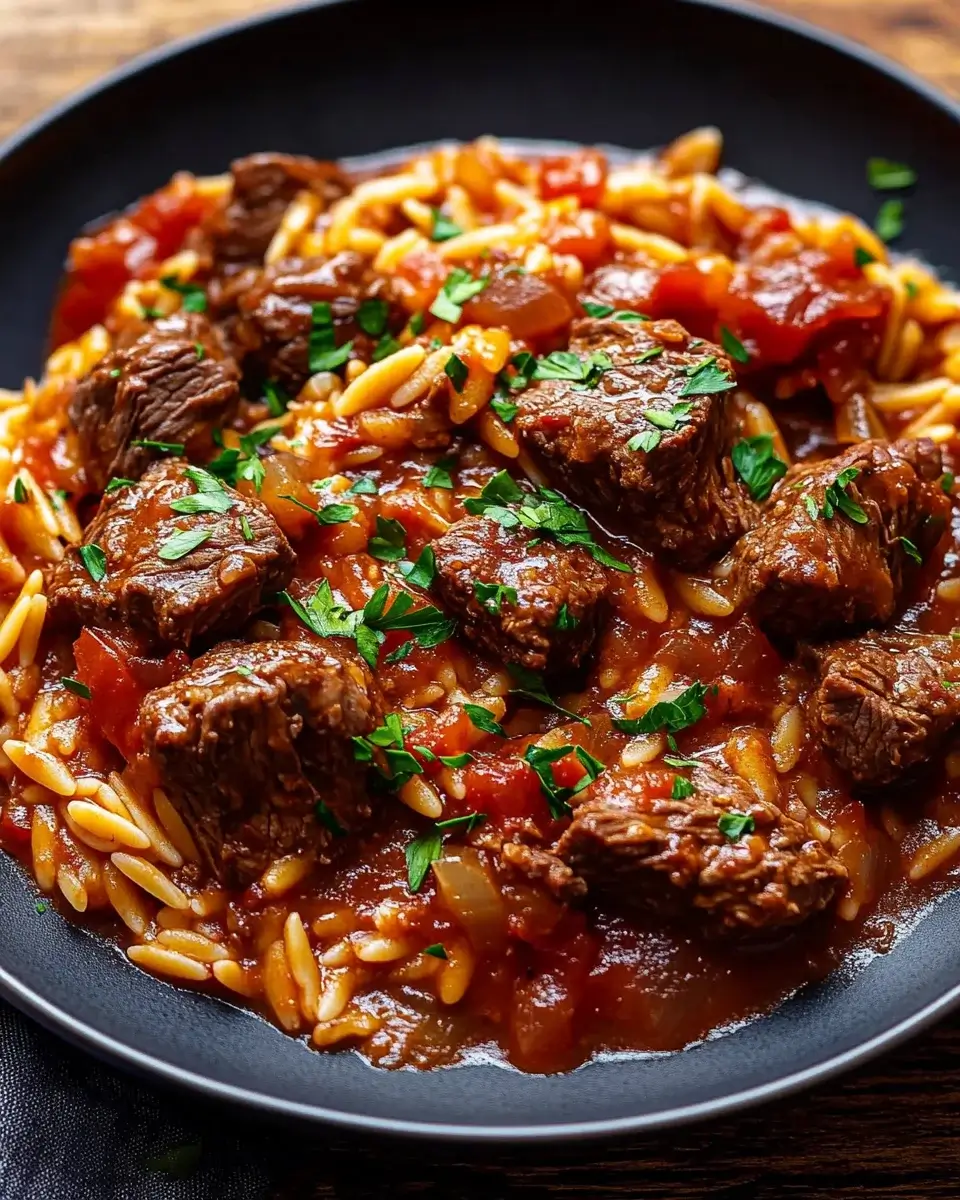
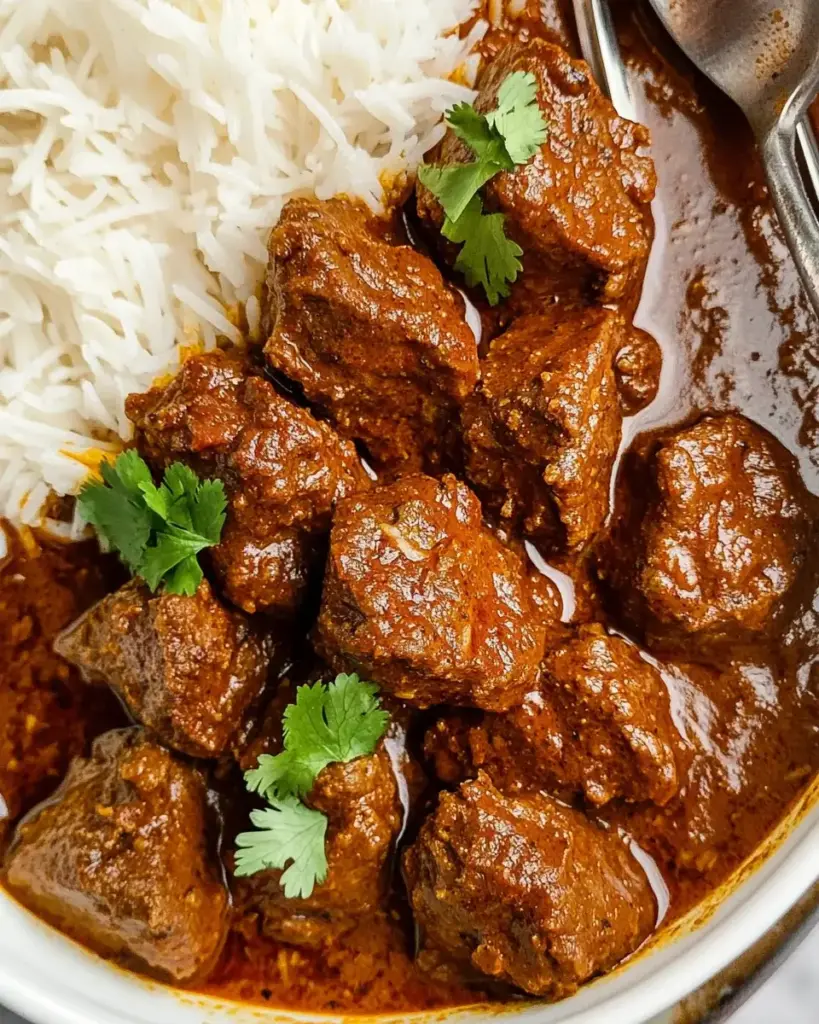
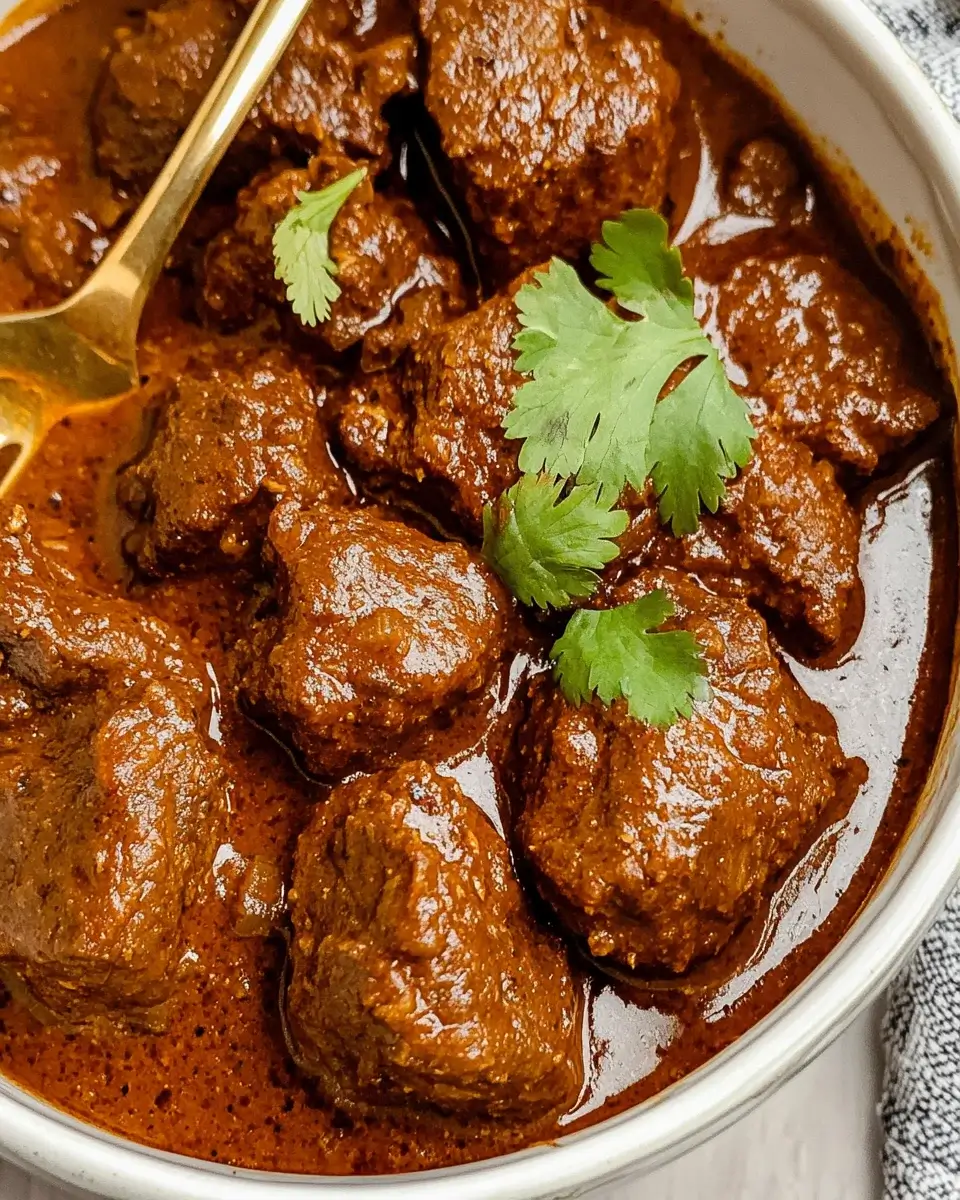
Once the beef is tender, it’s time for the final touches. Taste the dish and adjust the seasoning if necessary. If you prefer a spicier kick, feel free to add more cayenne pepper at this stage. Remember to remove the bay leaf before serving. Garnish your Spicy Beef Vindaloo with fresh cilantro for a pop of color and freshness. Serve it hot, and enjoy the delightful flavors that come together in this amazing dish!

Variations of Spicy Beef Vindaloo Recipe

Vegetarian Alternatives

If you’re looking for a vegetarian twist on the classic Spicy Beef Vindaloo Recipe, you’re in luck! There are several delicious alternatives that can capture the essence of this dish without using meat. One popular option is to substitute the beef with hearty vegetables like cauliflower, potatoes, or chickpeas. These ingredients absorb the spices beautifully, creating a rich and satisfying meal.

To make a vegetarian vindaloo, follow the same marination process using the spices and vinegar. Instead of beef, add your chosen vegetables to the pot after sautéing the onions. Cook them until they are tender, and then proceed with the simmering step. You can also use tofu or tempeh for added protein. This way, you can enjoy a flavorful and spicy dish that caters to vegetarian diets while still being true to the vindaloo spirit.

Different Meat Options

While beef is a traditional choice for vindaloo, you can experiment with various meats to create your own unique version. Pork is another popular option, as it pairs well with the spices and vinegar. Simply replace the beef with pork shoulder or tenderloin, and follow the same preparation steps. The result will be a deliciously tender and flavorful dish.

Chicken is also a great alternative for those who prefer poultry. Use boneless chicken thighs or breasts, and adjust the cooking time accordingly, as chicken cooks faster than beef. For a lighter option, you can even try shrimp or fish. Just be mindful of the cooking time, as seafood cooks quickly. No matter which meat you choose, the Spicy Beef Vindaloo Recipe can easily adapt to suit your taste preferences while still delivering that signature spicy kick!

Cooking Note for Spicy Beef Vindaloo Recipe

When preparing the Spicy Beef Vindaloo Recipe, there are a few important cooking notes to keep in mind. These tips will help you achieve the best flavor and texture for your dish.

First, marination is key. Allowing the beef to marinate for a longer time, ideally overnight, enhances the flavors significantly. The spices and vinegar work together to tenderize the meat, making it more flavorful. If you’re short on time, even an hour will still yield good results.

Next, pay attention to the heat level. The cayenne pepper is adjustable, so feel free to modify it based on your spice tolerance. If you’re unsure, start with less and add more later. Remember, you can always increase the spice, but it’s hard to tone it down once it’s in!

Also, consider the cooking vessel. A heavy-bottomed pot or Dutch oven is ideal for even heat distribution. This prevents the beef from sticking and ensures it cooks evenly. Stir occasionally to avoid any sticking at the bottom.

Lastly, don’t rush the simmering process. Cooking the beef low and slow allows the flavors to meld beautifully. The longer you let it simmer, the more tender the beef will become. Patience is key to a delicious vindaloo!

By following these cooking notes, you’ll be well on your way to creating a mouthwatering Spicy Beef Vindaloo that will impress your family and friends.

Serving Suggestions for Spicy Beef Vindaloo Recipe

Best Accompaniments

When it comes to serving your Spicy Beef Vindaloo, the right accompaniments can elevate the meal to new heights. One of the best options is a side of cooling raita. This yogurt-based condiment, often mixed with cucumber and spices, helps balance the heat of the vindaloo. It adds a refreshing touch that complements the rich flavors of the dish.

Another great accompaniment is a simple salad. A fresh salad made with lettuce, tomatoes, and onions can provide a crunchy contrast to the tender beef. You can also add a squeeze of lemon juice for an extra zing. Additionally, pickles or chutneys can enhance the meal with their tangy flavors, making each bite even more enjoyable.

Ideal Pairings with Rice and Bread

Rice and bread are classic pairings for Spicy Beef Vindaloo, and they serve as the perfect base to soak up the delicious sauce. Basmati rice is a popular choice due to its fragrant aroma and fluffy texture. You can serve it plain or with a hint of saffron for added flavor. Alternatively, coconut rice can add a subtle sweetness that pairs beautifully with the spices in the vindaloo.

If you prefer bread, naan is an excellent option. This soft, pillowy bread is perfect for scooping up the beef and sauce. You can also try serving it with roti or paratha for a different texture. Both options are great for enjoying every last bit of the flavorful vindaloo.

In summary, whether you choose to serve your Spicy Beef Vindaloo with cooling raita, a fresh salad, or alongside rice and bread, these accompaniments will enhance your dining experience. Enjoy the delightful combination of flavors and textures that make this dish truly special!

Tips for Perfecting Your Spicy Beef Vindaloo Recipe

Creating the perfect Spicy Beef Vindaloo requires attention to detail and a few helpful tips. These suggestions will ensure that your dish turns out flavorful and satisfying every time.

First, always use fresh spices. Spices lose their potency over time, so using fresh ones will enhance the flavor of your vindaloo. Check the expiration dates on your spices and replace any that are old. Freshly ground spices can also make a big difference in taste.

Next, consider the cut of beef you use. Beef chuck is ideal for this recipe because it becomes tender and flavorful when slow-cooked. However, you can also experiment with other cuts like brisket or short ribs for a different texture. Just remember that tougher cuts benefit from longer cooking times.

Don’t skip the marination step! Marinating the beef not only infuses it with flavor but also helps tenderize the meat. If you can, let it marinate overnight. This extra time allows the spices to penetrate deeply, resulting in a more robust flavor.

When cooking, be patient. Allow the beef to brown properly before adding the other ingredients. This step creates a rich base for your sauce. Browning the meat adds depth and complexity to the dish, so don’t rush it!

Adjust the spice level to your liking. If you’re unsure about the heat, start with less cayenne pepper. You can always add more later if you want it spicier. Remember, it’s easier to increase the heat than to tone it down!

Lastly, let the dish rest before serving. After cooking, allow the vindaloo to sit for about 10-15 minutes. This resting period helps the flavors meld together, making each bite even more delicious. Plus, it allows the sauce to thicken slightly, enhancing the overall texture.

By following these tips, you’ll be well on your way to mastering the art of making a mouthwatering Spicy Beef Vindaloo that will impress your family and friends!

Breakdown of Time for Spicy Beef Vindaloo Recipe

Prep Time

The prep time for the Spicy Beef Vindaloo Recipe is essential for ensuring that all ingredients are ready to go. This includes marinating the beef and preparing the vindaloo paste. Expect to spend about 15-20 minutes on this step. However, if you choose to marinate the beef overnight, you can save time on the day of cooking. Just remember to plan ahead!

Cooking Time

The cooking time for the Spicy Beef Vindaloo is where the magic happens. After browning the beef and adding the other ingredients, you’ll need to let it simmer. This process takes approximately 1.5 to 2 hours. The slow cooking allows the beef to become tender and soak up all the wonderful flavors from the spices. Patience is key here, as the longer it simmers, the better the taste!

Total Time

When you combine the prep time and cooking time, the total time for making the Spicy Beef Vindaloo Recipe is around 2 to 2.5 hours. If you include the optional overnight marination, you can add an additional 12-24 hours to your timeline. This makes it a great dish to prepare in advance for special occasions or family gatherings. The result is a flavorful and satisfying meal that everyone will love!

Nutritional Information for Spicy Beef Vindaloo Recipe

Calories

When enjoying a serving of Spicy Beef Vindaloo, you can expect to consume approximately 350 calories. This makes it a hearty meal that provides energy without being overly heavy. The balance of spices and ingredients ensures that you get a satisfying dish that is both flavorful and fulfilling. If you’re watching your calorie intake, consider pairing it with lighter sides like a fresh salad or steamed vegetables.

Protein

One of the standout features of the Spicy Beef Vindaloo Recipe is its protein content. Each serving contains about 30 grams of protein, making it an excellent choice for those looking to increase their protein intake. The beef chuck used in this recipe is not only rich in flavor but also provides essential amino acids that are vital for muscle repair and overall health. This makes it a great option for active individuals or anyone looking to maintain a balanced diet.

Sodium

In terms of sodium, the Spicy Beef Vindaloo contains approximately 800 milligrams per serving. This level of sodium is typical for many savory dishes, especially those that include broth and seasonings. If you’re concerned about sodium intake, you can easily adjust the recipe. Consider using low-sodium beef broth and reducing the amount of added salt. This way, you can enjoy the rich flavors of the vindaloo while keeping your sodium levels in check.

FAQs about Spicy Beef Vindaloo Recipe

What makes Vindaloo spicy?

Vindaloo is known for its bold and spicy flavor, primarily due to the use of cayenne pepper and other spices. The combination of spices like cumin, coriander, and black pepper adds depth, while the cayenne pepper provides that signature heat. Additionally, the marination process with vinegar helps to enhance the spiciness, making each bite a flavorful experience. If you enjoy a spicy kick, vindaloo is the perfect dish for you!

Can I make Spicy Beef Vindaloo in advance?

Absolutely! Making Spicy Beef Vindaloo in advance is a great idea. In fact, the flavors often improve after sitting for a day. You can prepare the dish, let it cool, and then store it in the refrigerator. When you’re ready to serve, simply reheat it on the stove. This makes it an excellent option for meal prep or for special occasions when you want to save time. Just remember to store it in an airtight container to maintain freshness.

How can I adjust the spice level in Spicy Beef Vindaloo Recipe?

Adjusting the spice level in your Spicy Beef Vindaloo is easy! If you prefer a milder dish, start by reducing the amount of cayenne pepper. You can also omit it entirely if you want a non-spicy version. On the other hand, if you love heat, feel free to add more cayenne or even include fresh chilies during cooking. Tasting the dish as it cooks will help you find the perfect balance of spice that suits your palate.

What are the best side dishes for Spicy Beef Vindaloo?

When serving Spicy Beef Vindaloo, there are several delicious side dishes that complement its rich flavors. Basmati rice is a classic choice, as it soaks up the sauce beautifully. You can also serve it with naan or roti, which are perfect for scooping up the beef and sauce. Additionally, a refreshing cucumber raita or a simple salad can help balance the heat. Pickles or chutneys can also add a tangy contrast, enhancing the overall dining experience.

Conclusion on Spicy Beef Vindaloo Recipe

In conclusion, the Spicy Beef Vindaloo Recipe is a delightful journey into the world of bold flavors and rich culinary traditions. This dish not only showcases the unique blend of spices but also highlights the importance of marination and slow cooking. By following the steps outlined in this article, you can create a mouthwatering meal that is sure to impress your family and friends.

Whether you choose to stick with the classic beef version or explore variations with different meats or vegetarian options, the essence of vindaloo remains the same. The balance of heat, tanginess, and sweetness makes it a standout dish for any occasion. Plus, with the right accompaniments, you can elevate your dining experience even further.

Remember, cooking is all about experimentation and personal taste. Don’t hesitate to adjust the spice levels or add your favorite ingredients. The beauty of the Spicy Beef Vindaloo Recipe lies in its versatility, allowing you to make it your own.

So, gather your ingredients, roll up your sleeves, and embark on this flavorful adventure. Enjoy the process, savor the aromas, and most importantly, relish every bite of your homemade Spicy Beef Vindaloo. Happy cooking!

Paul

Spicy Beef Vindaloo Recipe is a must-try dish!

Beef Vindaloo is a bold and fiery Indian curry featuring tender chunks of marinated beef slow-simmered in a richly spiced sauce. With layers of flavor from vinegar, garlic, ginger, and a warming blend of spices, this dish is the ultimate comfort food for spice lovers.


Prep Time 15 minutes
Cook Time 2 hours
Total Time 2 hours 15 minutes
Servings: 6 servings
Course: Main Dish
Cuisine: Indian

Ingredients
  

  • For the Marinade:2 tablespoons white vinegar1 tablespoon lemon juice1 tablespoon fresh garlic minced1 tablespoon fresh ginger, grated2 teaspoons paprika1 teaspoon ground cumin1 teaspoon ground coriander1 teaspoon salt½ teaspoon turmeric½ teaspoon ground cinnamon¼ teaspoon cayenne pepper2 pounds beef chuck, cut into 1-inch cubes
  • For Cooking:2 tablespoons avocado oil or other neutral oil1 medium yellow onion diced1 tablespoon tomato paste1 cup beef broth1 bay leaf

Method
 

  1. In a large bowl, combine all marinade ingredients and stir to mix well. Add the cubed beef and toss until fully coated. Cover and refrigerate for at least 1 hour or preferably overnight to deepen the flavor.
  2. In a large pot or Dutch oven, heat oil over medium heat. Add the marinated beef and sear on all sides until browned, about 5 to 6 minutes. Remove the beef from the pot and set aside.
  3. In the same pot, add the diced onion and cook for about 5 minutes until soft and translucent. Stir in the tomato paste and cook for another 1 to 2 minutes.
  4. Return the seared beef to the pot. Add beef broth and bay leaf. Stir well and bring the mixture to a boil.
  5. Reduce the heat to low, cover, and simmer for 1.5 to 2 hours, or until the beef is tender and the sauce has thickened slightly.
  6. Remove the bay leaf, taste, and adjust seasoning with additional salt or pepper if needed. Serve hot over steamed rice or with warm naan bread.

Notes

For best flavor, marinate the beef overnight. Adjust the cayenne pepper to your heat preference or add more if you like it extra spicy. You can also swap beef with lamb or chicken for a different twist. Leftovers taste even better the next day after the flavors meld.

Caribbean Chicken and Rice Recipe is a must-try dish!

Caribbean Chicken and Rice is a delightful dish that brings together the vibrant flavors of the Caribbean islands. This recipe has roots in various cultures, including African, Spanish, and indigenous Caribbean influences. The combination of spices and fresh ingredients reflects the region’s rich culinary heritage. Traditionally, rice and chicken are staples in many Caribbean households, making this dish a beloved comfort food.

In the Caribbean, cooking is often a communal activity, where families gather to enjoy meals together. The use of spices like paprika, thyme, and cayenne pepper adds depth and warmth to the dish. Each island has its unique twist on chicken and rice, showcasing local ingredients and cooking methods. This recipe captures the essence of those traditions, allowing you to experience a taste of the Caribbean right in your kitchen.

Why You Should Try This Recipe

If you’re looking for a meal that’s both satisfying and easy to prepare, this Caribbean Chicken and Rice recipe is perfect for you. Not only is it packed with flavor, but it also offers a wonderful balance of protein, carbs, and vegetables. The combination of tender chicken, fluffy rice, and vibrant veggies makes it a complete meal.

Moreover, this dish is versatile. You can easily customize it to suit your taste preferences. Whether you prefer a milder flavor or a spicy kick, this recipe can adapt to your needs. Plus, it’s a one-pot meal, which means less cleanup for you!

So, gather your ingredients and get ready to embark on a culinary journey to the Caribbean. This recipe is sure to impress your family and friends, making it a great addition to your dinner rotation.

Ingredients for Caribbean Chicken and Rice Recipe

To create a delicious Caribbean Chicken and Rice dish, you’ll need a variety of fresh ingredients. Each component plays a vital role in building the rich flavors that make this recipe so special. Here’s what you’ll need:

  • 2 tablespoons olive oil
  • 1 pound boneless, skinless chicken thighs, cut into bite-sized pieces
  • 1 teaspoon salt
  • 1/2 teaspoon black pepper
  • 1 teaspoon garlic powder
  • 1 teaspoon onion powder
  • 1 teaspoon paprika
  • 1/2 teaspoon cayenne pepper (optional, for those who like it spicy)
  • 1 small onion, diced
  • 2 cloves garlic, minced
  • 1 bell pepper (any color), diced
  • 1 cup long-grain white rice
  • 1 can (14.5 ounces) diced tomatoes, undrained
  • 1 3/4 cups chicken broth
  • 1 teaspoon dried thyme
  • 1 bay leaf
  • 1 cup frozen peas
  • 2 green onions, sliced (for garnish)

These ingredients come together to create a hearty and flavorful meal. The chicken thighs provide a juicy protein base, while the spices and vegetables add depth and color. The rice absorbs all the delicious flavors, making every bite a delight. Don’t forget to have some green onions on hand for a fresh garnish that adds a pop of color and flavor!

Now that you have your ingredients ready, let’s move on to the preparation steps to bring this Caribbean Chicken and Rice recipe to life!

Step-by-Step Preparation of Caribbean Chicken and Rice Recipe

Step 1: Marinating the Chicken

To kick off your Caribbean Chicken and Rice recipe, start by marinating the chicken. This step is crucial for infusing flavor into the meat. In a bowl, combine the chicken pieces with salt, black pepper, garlic powder, onion powder, paprika, and cayenne pepper if you like it spicy. For an extra zing, consider adding a splash of lime juice. Let the chicken marinate for at least 30 minutes. This allows the spices to penetrate the meat, making it tender and flavorful.

Step 2: Preparing the Rice

While the chicken is marinating, you can prepare the rice. Rinse 1 cup of long-grain white rice under cold water until the water runs clear. This step removes excess starch, helping the rice cook evenly and preventing it from becoming sticky. Set the rinsed rice aside. You can also chop your vegetables during this time, making the cooking process smoother.

Step 3: Cooking the Chicken

Once the chicken has marinated, heat 2 tablespoons of olive oil in a large skillet over medium-high heat. Add the marinated chicken pieces to the skillet. Cook them for about 5-7 minutes, stirring occasionally, until they are browned on all sides. This browning adds a delicious depth of flavor. After the chicken is cooked, remove it from the skillet and set it aside. This step ensures the chicken stays juicy while you prepare the rest of the dish.

Step 4: Combining Chicken and Rice

In the same skillet, add the diced onion, minced garlic, and bell pepper. Sauté these vegetables for about 3-4 minutes until they soften. Next, stir in the prepared rice and cook for an additional 2 minutes. This toasting step enhances the rice’s flavor. Now, add the undrained diced tomatoes, chicken broth, dried thyme, and bay leaf. Stir everything together and bring the mixture to a boil. Once boiling, return the browned chicken to the skillet, reduce the heat to low, and cover. Let it simmer for 20 minutes, allowing the rice to absorb all the delicious flavors.

Step 5: Final Touches and Serving

After 20 minutes, check the rice. It should be tender and have absorbed most of the liquid. Remove the bay leaf and stir in 1 cup of frozen peas. Cover the skillet again and let it sit for an additional 5 minutes. This resting time allows the peas to heat through. Finally, fluff the rice with a fork, garnish with sliced green onions, and serve hot. Your Caribbean Chicken and Rice is now ready to be enjoyed!

Variations of Caribbean Chicken and Rice Recipe

Vegetarian Options

If you’re looking for a vegetarian twist on the classic Caribbean Chicken and Rice recipe, you’re in luck! You can easily substitute the chicken with plant-based proteins. Consider using chickpeas, lentils, or even tofu. These options provide a hearty texture and absorb the flavors beautifully.

To make this dish vegetarian, follow the same steps as the original recipe. Start by sautéing your chosen protein in olive oil. Then, add the diced onion, garlic, and bell pepper, just like before. When it comes to the rice, you can use vegetable broth instead of chicken broth for a rich flavor. This way, you still get that comforting, satisfying meal without any meat.

For an extra burst of flavor, add some diced zucchini or carrots to the mix. These vegetables not only enhance the dish’s color but also add nutritional value. With these simple swaps, you can enjoy a delicious vegetarian version of Caribbean Chicken and Rice that everyone will love!

Spicy Versions

If you crave a little heat, there are plenty of ways to spice up your Caribbean Chicken and Rice recipe. Start by increasing the amount of cayenne pepper in the original recipe. You can also add diced jalapeños or serrano peppers when sautéing the vegetables. This will give your dish a fiery kick right from the start!

Another great option is to incorporate hot sauce into the mix. A few dashes of your favorite hot sauce can elevate the flavor profile significantly. If you want to take it a step further, consider adding a pinch of crushed red pepper flakes or a sprinkle of spicy paprika. These additions will not only enhance the heat but also add depth to the overall flavor.

For those who enjoy a smoky flavor, try adding some chipotle peppers in adobo sauce. Just chop them finely and mix them in with the chicken and rice. This will give your dish a unique twist that’s sure to impress anyone who loves spicy food!

Cooking Note for Caribbean Chicken and Rice Recipe

When preparing the Caribbean Chicken and Rice recipe, there are a few important cooking notes to keep in mind. These tips will help ensure that your dish turns out perfectly every time.

First, the quality of your ingredients matters. Fresh vegetables and high-quality chicken will enhance the overall flavor of the dish. If possible, opt for organic chicken and fresh produce. This will not only improve taste but also provide better nutritional value.

Next, pay attention to the cooking times. Each stove and skillet can vary, so keep an eye on the chicken and rice as they cook. If the rice seems too dry before it’s fully cooked, you can add a little more chicken broth or water. This will help achieve that fluffy texture you desire.

Additionally, don’t skip the marinating step. Allowing the chicken to soak in the spices for at least 30 minutes will make a significant difference in flavor. If you have more time, marinating it for a few hours or even overnight will yield even better results.

Lastly, remember to let the dish rest after cooking. This resting period allows the flavors to meld together, making each bite even more delicious. Cover the skillet and let it sit for a few minutes before serving. This small step can elevate your meal from good to great!

By following these cooking notes, you’ll be well on your way to creating a mouthwatering Caribbean Chicken and Rice dish that your family and friends will rave about!

Serving Suggestions for Caribbean Chicken and Rice Recipe

When it comes to serving your Caribbean Chicken and Rice, presentation and pairing can elevate the dining experience. Here are some delightful serving suggestions to consider:

  • Garnish with Fresh Herbs: After fluffing the rice, sprinkle some freshly chopped cilantro or parsley on top. This adds a pop of color and a fresh flavor that complements the dish beautifully.
  • Pair with a Side Salad: A light, refreshing salad can balance the hearty nature of the chicken and rice. Consider a simple green salad with a citrus vinaigrette or a mango avocado salad for a tropical twist.
  • Serve with Plantains: Fried or baked plantains are a classic Caribbean side dish. Their sweetness pairs wonderfully with the savory flavors of the chicken and rice, creating a delightful contrast.
  • Offer Hot Sauce on the Side: For those who enjoy a bit of heat, provide a selection of hot sauces. This allows guests to customize their meal to their spice preference, making it more enjoyable for everyone.
  • Accompany with Lime Wedges: A squeeze of fresh lime juice over the dish can brighten the flavors. It adds a zesty kick that enhances the overall taste of the Caribbean Chicken and Rice.
  • Serve in Colorful Bowls: Presentation matters! Use vibrant bowls or plates to serve the dish. The colorful ingredients will stand out, making the meal visually appealing.

These serving suggestions not only enhance the flavor but also create a festive atmosphere. Whether it’s a family dinner or a gathering with friends, these ideas will make your Caribbean Chicken and Rice recipe a hit. Enjoy your culinary journey to the Caribbean with every bite!

Tips for Perfecting Your Caribbean Chicken and Rice Recipe

To truly master the Caribbean Chicken and Rice recipe, a few tips can help you elevate your dish to new heights. These simple yet effective suggestions will ensure that every bite is bursting with flavor and satisfaction.

  • Use Fresh Ingredients: Fresh herbs, spices, and vegetables make a significant difference in flavor. Whenever possible, choose fresh over dried ingredients. Fresh thyme, for example, can add a vibrant taste that dried thyme simply can’t match.
  • Adjust the Spice Level: Everyone has different spice tolerances. Start with a small amount of cayenne pepper and adjust according to your preference. You can always add more, but it’s hard to take it out once it’s in!
  • Let the Chicken Rest: After cooking, allow the chicken to rest for a few minutes before serving. This helps the juices redistribute, making the chicken even more tender and juicy.
  • Experiment with Broth: For a richer flavor, consider using homemade chicken broth or a high-quality store-bought version. The broth is a key component, so its quality can greatly impact the final dish.
  • Don’t Rush the Cooking: Allow the rice to simmer gently. Cooking it too quickly can lead to unevenly cooked rice. Patience is key to achieving that perfect fluffy texture.
  • Incorporate Seasonal Vegetables: Feel free to add seasonal vegetables to the mix. Zucchini, corn, or even diced carrots can enhance the dish’s nutritional value and add a pop of color.
  • Try Different Rice Varieties: While long-grain white rice is traditional, you can experiment with jasmine or basmati rice for a different flavor profile. Just be sure to adjust the cooking time and liquid accordingly.
  • Make it Ahead: This dish can be made ahead of time and reheated. The flavors often deepen and improve after sitting for a day, making it a great option for meal prep.

By following these tips, you’ll be well on your way to creating a Caribbean Chicken and Rice dish that’s not only delicious but also memorable. Enjoy the process and the delightful flavors that come with it!

Breakdown of Time for Caribbean Chicken and Rice Recipe

Prep Time

Preparing your Caribbean Chicken and Rice recipe is a breeze! The prep time typically takes about 15-20 minutes. This includes gathering your ingredients, marinating the chicken, and chopping the vegetables. If you choose to marinate the chicken for longer, you can adjust this time accordingly. Remember, the more time you give the chicken to soak in those delicious spices, the better the flavor will be!

Cooking Time

The cooking time for this dish is approximately 30-35 minutes. This includes browning the chicken, sautéing the vegetables, and allowing the rice to simmer. It’s important to keep an eye on the skillet during this time to ensure everything cooks evenly. The simmering phase is crucial, as it allows the rice to absorb all the wonderful flavors from the chicken and spices.

Total Time

In total, you can expect to spend about 45-55 minutes from start to finish. This includes both prep and cooking times. With such a quick turnaround, you can have a delicious Caribbean Chicken and Rice meal ready in no time! It’s perfect for busy weeknights or when you want to impress guests without spending hours in the kitchen.

Nutritional Information for Caribbean Chicken and Rice Recipe

Calories

When it comes to enjoying a hearty meal, knowing the calorie content can help you make informed choices. Each serving of this Caribbean Chicken and Rice recipe contains approximately 450 calories. This makes it a satisfying option for lunch or dinner without going overboard on calories. The balance of protein, carbs, and healthy fats ensures that you feel full and energized after your meal.

Protein

Protein is essential for building and repairing tissues, and this recipe delivers! Each serving provides about 30 grams of protein, primarily from the chicken thighs. This high protein content makes it an excellent choice for those looking to maintain or build muscle. Additionally, if you opt for vegetarian protein sources like chickpeas or tofu, you can still achieve a similar protein level while enjoying a plant-based meal.

Sodium

Monitoring sodium intake is important for overall health. This Caribbean Chicken and Rice recipe contains approximately 800 milligrams of sodium per serving. While this is a reasonable amount for a flavorful dish, you can reduce the sodium content by using low-sodium chicken broth and limiting added salt. This way, you can enjoy the rich flavors without compromising your health goals.

FAQs about Caribbean Chicken and Rice Recipe

Can I use brown rice instead of white rice?

Yes, you can use brown rice instead of white rice in this Caribbean Chicken and Rice recipe. However, keep in mind that brown rice takes longer to cook. You will need to adjust the cooking time and the amount of liquid. Typically, brown rice requires about 45-50 minutes to become tender. Make sure to add extra chicken broth or water to ensure the rice cooks properly. The nutty flavor of brown rice can add a delightful twist to the dish!

What can I substitute for chicken in this recipe?

If you’re looking for a substitute for chicken, there are several great options! You can use shrimp, tofu, or even chickpeas for a vegetarian version. Shrimp cooks quickly and adds a seafood twist to the dish. Tofu is a fantastic plant-based protein that absorbs flavors well. If you choose chickpeas, they will provide a hearty texture and a good amount of protein. Just follow the same cooking steps, adjusting the cooking time as needed for your chosen protein.

How can I make this dish spicier?

If you love heat, there are many ways to spice up your Caribbean Chicken and Rice! Start by increasing the amount of cayenne pepper in the recipe. You can also add diced jalapeños or serrano peppers when sautéing the vegetables. For an extra kick, consider mixing in some hot sauce or crushed red pepper flakes. If you want a smoky flavor, try adding chipotle peppers in adobo sauce. These additions will give your dish a fiery twist that spice lovers will enjoy!

Can I prepare Caribbean Chicken and Rice in advance?

Absolutely! This Caribbean Chicken and Rice recipe is perfect for meal prep. You can make it ahead of time and store it in the refrigerator for up to three days. The flavors often deepen and improve after sitting, making it even more delicious. When you’re ready to eat, simply reheat it on the stove or in the microwave. Just be sure to add a splash of chicken broth or water to keep it moist while reheating. Enjoy the convenience of a tasty meal ready to go!

Conclusion on Caribbean Chicken and Rice Recipe

In conclusion, the Caribbean Chicken and Rice recipe is a delightful dish that brings the vibrant flavors of the Caribbean right to your kitchen. With its rich history and cultural significance, this meal not only satisfies your hunger but also offers a taste of the diverse culinary traditions of the islands. The combination of tender chicken, fluffy rice, and colorful vegetables creates a wholesome and balanced meal that is perfect for any occasion.

Whether you’re cooking for your family on a busy weeknight or impressing guests at a dinner party, this recipe is sure to be a hit. Its versatility allows you to customize it to your taste, whether you prefer it mild or spicy, vegetarian or with seafood. Plus, the one-pot nature of the dish means less cleanup, making it a practical choice for any home cook.

As you embark on your culinary journey with this Caribbean Chicken and Rice recipe, remember to enjoy the process. Cooking is not just about the final dish; it’s about the love and care you put into each step. So, gather your ingredients, follow the steps, and savor the delightful flavors that await you. Your taste buds will thank you!

Now that you have all the tools and tips to create this delicious meal, it’s time to get cooking. Embrace the spirit of the Caribbean and enjoy every bite of your homemade Caribbean Chicken and Rice!

Paul

Caribbean Chicken and Rice Recipe is a must-try dish!

This Caribbean Chicken and Rice recipe brings the vibrant flavors of the islands straight to your table. Tender jerk-seasoned chicken thighs are seared and baked with aromatic vegetables and fluffy rice, all in one pan for a flavorful, comforting, and satisfying dish.


Prep Time 15 minutes
Cook Time 45 minutes
Total Time 1 hour
Servings: 6 servings
Course: Main Dish
Cuisine: Caribbean

Ingredients
  

  • For the Chicken:2.5 pounds boneless chicken thighs½ teaspoon kosher salt or to taste½ teaspoon ground black pepper or to taste1 tablespoon dry jerk seasoning¼ cup canola oil
  • For the Rice:1 tablespoon canola oil⅓ cup chopped yellow onions2 carrots diced½ red bell pepper, diced½ green bell pepper, diced1 cup long-grain white rice, washed3 fresh curly parsley sprigs1 tablespoon dry jerk seasoning2½ cups vegetable broth or hot water1 teaspoon kosher salt or to taste½ teaspoon ground black pepper or to taste2 tablespoons rice vinegar

Method
 

  1. Preheat the oven to 350°F (175°C).
  2. Season chicken thighs with salt, pepper, and dry jerk seasoning. Let marinate for at least 30 minutes for deeper flavor.
  3. In a large skillet over medium heat, warm the canola oil. Sear the chicken on both sides until lightly golden. Remove and set aside.
  4. In the same skillet, add another tablespoon of oil and sauté the onions, carrots, and bell peppers for 30 to 45 seconds until fragrant and slightly softened.
  5. Stir in the washed rice, parsley sprigs, remaining dry jerk seasoning, salt, and pepper. Mix well to coat the rice in the seasoning.
  6. Pour in the vegetable broth or hot water and rice vinegar. Stir to combine everything evenly.
  7. Nestle the seared chicken into the rice and veggie mixture. Cover the skillet tightly with foil.
  8. Transfer the skillet to the oven and bake for 35 minutes.
  9. Remove from the oven, fluff the rice gently with a fork, and let sit for a few minutes before serving warm.

Notes

For added heat, use a hot jerk seasoning or add a chopped Scotch bonnet pepper during the sauté step. You can swap chicken thighs for chicken breasts, though thighs remain juicier. This dish makes excellent leftovers—store in the fridge for up to 3 days and reheat gently with a splash of broth or water.

Spicy Beef Black Pepper Udon is a must-try dish!

What is Spicy Beef Black Pepper Udon?

Spicy Beef Black Pepper Udon is a delightful dish that combines the chewy texture of udon noodles with tender slices of beef. This dish is not just about flavor; it’s a celebration of spices and textures. The black pepper adds a warm kick, while the soy and oyster sauces bring a savory depth. Each bite is a perfect balance of heat and umami, making it a favorite among noodle lovers. Whether you’re cooking for family or friends, this dish is sure to impress!

The Origins of Udon Noodles

Udon noodles have a rich history that dates back to Japan. These thick, wheat-based noodles are known for their chewy texture and versatility. Traditionally, udon is served in a hot broth or stir-fried with various ingredients. The origins of udon are believed to trace back to the 9th century, where it was introduced by Chinese travelers. Over the years, it has evolved into a staple in Japanese cuisine. Today, udon is enjoyed in many forms, from hot soups to cold salads, and of course, in delicious stir-fry dishes like Spicy Beef Black Pepper Udon.

Ingredients for Spicy Beef Black Pepper Udon

To create a mouthwatering plate of Spicy Beef Black Pepper Udon, you’ll need a selection of fresh ingredients. Each component plays a vital role in building the dish’s flavor profile. Here’s what you’ll need:

  • 8 ounces udon noodles: These thick, chewy noodles are the star of the dish.
  • 1 tablespoon vegetable oil: This oil is essential for stir-frying the beef and vegetables.
  • 1 pound beef sirloin: Thinly sliced, this tender cut adds richness to the dish.
  • 1 tablespoon black pepper: This spice gives the dish its signature heat.
  • 1 tablespoon soy sauce: A staple in Asian cooking, it adds depth and umami.
  • 1 tablespoon oyster sauce: This sauce enhances the savory flavor of the beef.
  • 2 teaspoons sesame oil: A drizzle of this oil adds a nutty aroma.
  • 2 cloves garlic: Minced garlic brings a fragrant kick to the stir-fry.
  • 1 small onion: Sliced onion adds sweetness and texture.
  • 1 bell pepper: Sliced bell pepper contributes color and crunch.
  • 2 green onions: Chopped green onions are perfect for garnishing.
  • Salt to taste: A pinch of salt enhances all the flavors.

With these ingredients on hand, you’re ready to embark on a culinary adventure. Each item not only adds flavor but also contributes to the overall experience of enjoying Spicy Beef Black Pepper Udon. So, gather your ingredients and get ready to cook!

Step-by-Step Preparation of Spicy Beef Black Pepper Udon

Step 1: Preparing the Ingredients

Before you start cooking, it’s important to prepare all your ingredients. Begin by slicing the beef sirloin into thin strips. This helps the beef cook quickly and evenly. Next, chop the garlic, onion, and bell pepper. Finally, measure out the sauces and oils. Having everything ready will make the cooking process smooth and enjoyable!

Step 2: Cooking the Udon Noodles

Now it’s time to cook the udon noodles. Bring a large pot of water to a boil. Add the udon noodles and cook them according to the package instructions, usually about 8-10 minutes. Once they are tender, drain the noodles and rinse them under cold water. This stops the cooking process and prevents them from becoming mushy. Set the noodles aside for later.

Step 3: Marinating the Beef

For extra flavor, marinate the sliced beef. In a bowl, combine the beef with black pepper, soy sauce, and a dash of sesame oil. Mix well and let it sit for about 10 minutes. This step allows the beef to absorb the flavors, making it even tastier when cooked.

Step 4: Stir-Frying the Beef

Heat a large skillet or wok over medium-high heat. Add the vegetable oil and let it warm up. Once hot, add the marinated beef to the skillet. Stir-fry for about 3-4 minutes until the beef is browned and cooked through. Make sure to keep stirring to avoid burning. Once done, remove the beef from the skillet and set it aside.

Step 5: Combining Ingredients

In the same skillet, add the minced garlic, sliced onion, and bell pepper. Stir-fry these vegetables for 2-3 minutes until they are tender and fragrant. Then, return the cooked beef to the skillet. Add the udon noodles along with the oyster sauce and remaining sesame oil. Toss everything together until well combined and heated through. This is where all the flavors come together!

Step 6: Final Touches

Before serving, taste the dish and season with salt as needed. Once satisfied, garnish with chopped green onions for a fresh touch. Your Spicy Beef Black Pepper Udon is now ready to be enjoyed! Serve it hot and watch everyone dig in with delight.

Variations of Spicy Beef Black Pepper Udon

Vegetarian Alternatives

If you’re looking for a vegetarian twist on Spicy Beef Black Pepper Udon, you’re in luck! There are plenty of delicious alternatives that maintain the dish’s essence. Instead of beef, consider using tofu or tempeh. Both options absorb flavors well and provide a satisfying texture. Simply cube the tofu or tempeh and marinate it in the same sauces as the beef. Stir-fry until golden brown, then follow the same steps as the original recipe.

Another great option is to add a variety of vegetables. You can include mushrooms, broccoli, or snap peas for added nutrition and flavor. These veggies not only enhance the dish but also make it colorful and appealing. With these substitutions, you can enjoy a hearty and flavorful vegetarian version of Spicy Beef Black Pepper Udon!

Different Protein Options

For those who prefer different proteins, Spicy Beef Black Pepper Udon is quite versatile. Chicken is a popular substitute. Simply slice boneless chicken breast or thighs and follow the same marinating and cooking steps as with the beef. The chicken will soak up the flavors beautifully, creating a delightful dish.

If you’re in the mood for seafood, shrimp is another fantastic option. Just peel and devein the shrimp, then stir-fry them until they turn pink and opaque. This quick-cooking protein pairs wonderfully with the udon noodles and adds a fresh taste to the dish.

Lastly, for a unique twist, you can try using seitan, a wheat-based meat alternative. It has a chewy texture similar to meat and works well in stir-fries. Whichever protein you choose, the key is to marinate it well and stir-fry it to perfection. Enjoy experimenting with these variations!

Cooking Note for Spicy Beef Black Pepper Udon

When preparing Spicy Beef Black Pepper Udon, a few cooking notes can enhance your experience. First, ensure that all your ingredients are prepped and ready before you start cooking. This not only saves time but also helps maintain the dish’s freshness. Stir-frying is a quick process, so having everything at hand is crucial.

Next, the heat level is important. Cooking on medium-high heat allows the beef to sear properly, locking in juices and flavor. If your skillet or wok is not hot enough, the beef may steam instead of fry, resulting in a less desirable texture. Always give your skillet a moment to heat up before adding oil.

Another tip is to avoid overcrowding the pan. If you add too much beef or vegetables at once, they will release moisture and steam rather than fry. This can lead to a soggy dish. If necessary, cook in batches to achieve that perfect stir-fry texture.

Lastly, don’t forget to taste as you go! Adjust the seasoning to your preference. If you like it spicier, feel free to add more black pepper or a splash of chili sauce. Cooking is all about personalizing flavors, so make this dish your own!

Serving Suggestions for Spicy Beef Black Pepper Udon

Ideal Pairings

When it comes to serving Spicy Beef Black Pepper Udon, the right pairings can elevate your meal. Consider serving it alongside a light salad. A simple cucumber salad with a splash of rice vinegar adds a refreshing crunch. The coolness of the salad balances the heat of the udon, creating a delightful contrast.

Another great option is to serve it with steamed vegetables. Broccoli, bok choy, or snap peas are excellent choices. These veggies not only add color but also provide extra nutrients. You can lightly season them with soy sauce or sesame oil for added flavor.

If you want to enhance the Asian theme, consider offering some spring rolls or dumplings on the side. These appetizers are perfect for sharing and complement the main dish beautifully. They add variety and make your meal feel more complete.

Presentation Tips

Presentation plays a key role in making your Spicy Beef Black Pepper Udon appealing. Start by using a large, shallow bowl or plate. This allows the noodles and toppings to be displayed beautifully. When serving, twirl the udon noodles into a nest shape for an inviting look.

Garnish your dish with a sprinkle of chopped green onions and a few sesame seeds. This adds a pop of color and texture. You can also place a lime wedge on the side for a zesty touch. A squeeze of lime just before eating brightens the flavors and adds a refreshing twist.

For an extra special touch, consider using chopsticks for serving. This not only enhances the dining experience but also adds an authentic feel to your meal. With these simple serving suggestions and presentation tips, your Spicy Beef Black Pepper Udon will not only taste amazing but also look stunning on the table!

Tips for Perfecting Spicy Beef Black Pepper Udon

Choosing the Right Udon Noodles

When it comes to making Spicy Beef Black Pepper Udon, the type of udon noodles you choose can make a big difference. Fresh udon noodles are often the best option. They have a delightful chewy texture that enhances the dish. You can find them in the refrigerated section of most Asian grocery stores.

If fresh noodles are not available, dried udon noodles are a great alternative. Just be sure to follow the cooking instructions on the package carefully. Overcooking can lead to mushy noodles, which can ruin the dish. Aim for a firm texture that holds up well when stir-fried.

Another tip is to rinse the cooked noodles under cold water after boiling. This helps to remove excess starch and prevents them from sticking together. Keeping the noodles separate ensures they mix well with the beef and vegetables, creating a harmonious dish.

Balancing Spices

Balancing spices is key to achieving the perfect flavor in your Spicy Beef Black Pepper Udon. Start with the black pepper, which is the star of the show. While it adds a nice kick, too much can overpower the other flavors. Begin with the recommended amount and adjust according to your taste.

Consider adding a touch of sweetness to balance the heat. A small amount of sugar or honey can help mellow the spiciness and enhance the overall flavor. Additionally, if you enjoy a bit of tang, a splash of lime juice or rice vinegar can brighten the dish.

Don’t forget about the umami! The soy sauce and oyster sauce provide a savory depth that complements the beef. Taste as you go, and feel free to tweak the amounts of each ingredient. Cooking is all about finding the right balance that suits your palate.

Lastly, if you want to experiment, try adding a hint of chili oil or Sriracha for an extra layer of flavor. This can elevate your dish and give it a unique twist. With these tips, you’ll be well on your way to perfecting your Spicy Beef Black Pepper Udon!

Breakdown of Time for Spicy Beef Black Pepper Udon

Prep Time

Preparing your ingredients is a crucial step in making Spicy Beef Black Pepper Udon. This includes slicing the beef, chopping vegetables, and measuring out sauces. On average, you should set aside about 15-20 minutes for this prep work. Having everything ready will make the cooking process much smoother and more enjoyable!

Cooking Time

The actual cooking time for Spicy Beef Black Pepper Udon is relatively quick. Once your ingredients are prepped, cooking the udon noodles takes about 8-10 minutes. Stir-frying the beef and vegetables will take an additional 10-12 minutes. In total, you can expect the cooking process to take around 20-25 minutes. This means you can have a delicious meal ready in no time!

Total Time

When you combine both prep and cooking times, the total time to make Spicy Beef Black Pepper Udon is approximately 35-45 minutes. This makes it a fantastic option for a weeknight dinner or a quick meal when you’re short on time. With just a little effort, you can enjoy a flavorful and satisfying dish that everyone will love!

Nutritional Information for Spicy Beef Black Pepper Udon

Calories

When it comes to enjoying Spicy Beef Black Pepper Udon, understanding its caloric content is important. Each serving contains approximately 450 calories. This makes it a hearty meal that can satisfy your hunger without going overboard. The balance of protein, carbohydrates, and fats in this dish contributes to its overall caloric value, making it a well-rounded option for lunch or dinner.

Protein

Protein is a vital nutrient, and Spicy Beef Black Pepper Udon delivers on this front. Each serving provides about 30 grams of protein. The beef sirloin is the primary source of this protein, which is essential for muscle repair and growth. Including a good amount of protein in your meals can help keep you feeling full and energized throughout the day.

Sodium

Sodium is another important factor to consider in your diet. In Spicy Beef Black Pepper Udon, the sodium content is around 800 milligrams per serving. This comes from the soy sauce and oyster sauce used in the recipe. While sodium is necessary for bodily functions, it’s wise to monitor your intake, especially if you are watching your salt consumption. You can always adjust the amount of soy sauce to suit your dietary needs.

FAQs about Spicy Beef Black Pepper Udon

Can I make Spicy Beef Black Pepper Udon ahead of time?

Yes, you can prepare Spicy Beef Black Pepper Udon ahead of time! To do this, cook the udon noodles and stir-fry the beef and vegetables as per the recipe. However, it’s best to store the components separately. This way, the noodles won’t become soggy. When you’re ready to eat, simply reheat everything in a skillet over medium heat. Add a splash of water or broth to help steam the noodles and keep them moist. This makes for a quick and delicious meal any day of the week!

What can I substitute for udon noodles?

If you can’t find udon noodles, don’t worry! There are several great substitutes. You can use soba noodles, which are made from buckwheat and have a slightly nutty flavor. Rice noodles are another option, offering a gluten-free alternative. If you prefer a low-carb option, zucchini noodles or shirataki noodles can work well too. Just remember to adjust the cooking time based on the type of noodles you choose, ensuring they are cooked to your liking!

Is Spicy Beef Black Pepper Udon gluten-free?

Traditional udon noodles are made from wheat flour, which means they are not gluten-free. However, you can easily make a gluten-free version of Spicy Beef Black Pepper Udon by using gluten-free noodles. Look for rice noodles or gluten-free udon alternatives available in stores. Additionally, ensure that the soy sauce you use is gluten-free, as many brands contain wheat. With these adjustments, you can enjoy this flavorful dish without gluten!

How can I adjust the spice level?

Adjusting the spice level in Spicy Beef Black Pepper Udon is simple! If you prefer a milder dish, reduce the amount of black pepper used in the recipe. You can also skip any additional spicy ingredients like chili flakes or Sriracha. On the other hand, if you love heat, feel free to add more black pepper or a teaspoon of chili oil during cooking. For an extra kick, consider adding sliced fresh chili peppers or a dash of hot sauce when serving. Tailor the spice to your taste for the perfect balance!

Conclusion on Spicy Beef Black Pepper Udon

In conclusion, Spicy Beef Black Pepper Udon is a delightful dish that brings together the rich flavors of beef, the chewiness of udon noodles, and the warmth of spices. This recipe is not only easy to prepare but also offers a wonderful opportunity to explore various ingredients and flavors. Whether you’re cooking for a family dinner or a casual gathering with friends, this dish is sure to impress.

With its versatility, you can easily adapt the recipe to suit your dietary preferences. From vegetarian options to different protein choices, Spicy Beef Black Pepper Udon can cater to everyone’s taste. Plus, the cooking process is quick, making it a perfect choice for busy weeknights.

As you enjoy this flavorful meal, remember that cooking is all about creativity and personal touch. Feel free to experiment with spices, vegetables, and sauces to make the dish your own. With each bite, you’ll experience a delightful blend of heat and umami that will leave you wanting more.

So, gather your ingredients, follow the steps, and dive into the delicious world of Spicy Beef Black Pepper Udon. Happy cooking!

Paul

Spicy Beef Black Pepper Udon is a must-try dish!

This Black Pepper Beef Udon is a bold and savory stir fry featuring tender marinated beef, chewy udon noodles, crisp vegetables, and a glossy black pepper sauce. It’s a quick weeknight dinner with serious takeout-style flavor—all in one wok!


Prep Time 15 minutes
Cook Time 15 minutes
Total Time 30 minutes
Servings: 2 to 3 servings
Course: Main Dish
Cuisine: Asian Fusion

Ingredients
  

  • 2 packs udon noodles preferably fresh, or dried and cooked as instructed200 grams thinly sliced beef (ribeye or flank steak works well)1 clove garlic, minced1 white onion, thinly sliced1 to 2 cups chopped Chinese cabbage or substitute with bok choy, spinach, or broccoliSalt, to tasteSugar, to taste
  • For the beef marinade:1 clove garlic minced1 teaspoon sesame oil1 tablespoon soy sauce1 teaspoon oyster sauce1 teaspoon Chinese white vinegar1 teaspoon cornstarch mixed with a splash of water (slurry)
  • For the black pepper sauce:3 tablespoons dark soy sauce1 tablespoon oyster sauce2 teaspoons freshly ground black pepper adjust for spice level3 tablespoons water½ teaspoon potato starch

Method
 

  1. In a mixing bowl, whisk together the marinade ingredients. Add the thinly sliced beef and let marinate for at least 10 minutes. For extra flavor and tenderness, marinate up to 30 minutes.
  2. Boil udon noodles until just loosened but still chewy, about 1 to 2 minutes. Drain and set aside.
  3. Heat oil in a large wok or skillet over medium heat. Sauté the garlic and onion until fragrant and softened. Add the chopped Chinese cabbage or greens, stir-fry until wilted. Lightly season with salt and sugar. Remove from pan and set aside.
  4. In the same pan, sear the marinated beef on medium-high heat for 2 to 3 minutes until just browned. Do not overcook. Remove and set aside.
  5. In a small bowl, mix the black pepper sauce ingredients until combined. Pour the sauce into the same pan and cook on low heat until slightly thickened and glossy.
  6. Return the beef and udon noodles to the pan. Toss everything together until well coated in sauce. Add the vegetables back in and mix thoroughly. Serve hot.

Notes

Use fresh udon noodles for the best texture, but frozen or shelf-stable works well too. For extra heat, add more freshly ground black pepper or a pinch of chili flakes. You can substitute Chinese cabbage with other quick-cooking greens like spinach or napa cabbage. Adjust saltiness by using low-sodium soy sauce or reducing oyster sauce.

Strawberry Honeybun Cake with Strawberry Icing delights everyone!

Introduction to Strawberry Honeybun Cake with Strawberry Icing

Strawberry Honeybun Cake with Strawberry Icing. This cake is not just a dessert; it’s a celebration of flavors and textures that will leave your taste buds dancing with joy.

Imagine a soft, moist cake infused with the sweetness of fresh strawberries, complemented by a creamy icing that adds a luscious finish. This cake is perfect for any occasion, whether it’s a family gathering, a birthday party, or simply a cozy afternoon at home. The combination of strawberries and honey creates a delightful harmony that is both refreshing and indulgent.

What makes this cake even more special is its easy preparation. With simple ingredients and straightforward steps, you can whip up this delicious dessert in no time. Plus, the vibrant colors of the strawberries make it visually appealing, making it a showstopper on any dessert table.

Strawberry Honeybun Cake with Strawberry Icing is not only a treat for the palate but also a joy to create. So, roll up your sleeves, gather your ingredients, and let’s get started on making this scrumptious cake that’s sure to impress!

Ingredients for Strawberry Honeybun Cake with Strawberry Icing

Strawberry Honeybun Cake with Strawberry Icing. Having everything ready will make your baking experience smooth and enjoyable. Here’s what you’ll need:

  • For the Cake:
  • 2 cups all-purpose flour
  • 1 ½ cups granulated sugar
  • 1 tablespoon baking powder
  • ½ teaspoon salt
  • 1 cup vegetable oil
  • 4 large eggs
  • 1 cup buttermilk
  • 1 teaspoon vanilla extract
  • 1 cup fresh strawberries, chopped
  • 1 teaspoon ground cinnamon
  • For the Creamy Strawberry Icing:
  • 1 cup powdered sugar
  • 2 tablespoons unsalted butter, softened
  • 2 tablespoons milk
  • 1 teaspoon vanilla extract
  • ¼ cup fresh strawberries, pureed

These ingredients come together to create a cake that is not only delicious but also visually stunning. The fresh strawberries add a burst of flavor, while the creamy icing ties everything together beautifully. Make sure to use ripe strawberries for the best taste!

Now that we have our ingredients ready, we can move on to the next step: preparing the cake batter. Let’s get started!

Step-by-Step Preparation of Strawberry Honeybun Cake with Strawberry Icing

Strawberry Honeybun Cake with Strawberry Icing. Follow these simple steps to create a delicious cake that will impress everyone!

Step 1: Preheat the Oven and Prepare the Baking Dish

First things first, preheat your oven to 350°F (175°C). This ensures that your cake bakes evenly. While the oven is heating up, grab a 9×13-inch baking pan. Grease it with butter or cooking spray, and then dust it with flour. This will help the cake come out easily once it’s baked.

Step 2: Mix the Cake Batter

In a large mixing bowl, whisk together the all-purpose flour, granulated sugar, baking powder, and salt. This dry mixture is the base of your cake. In another bowl, combine the vegetable oil, eggs, buttermilk, and vanilla extract. Mix these wet ingredients well. Now, gradually add the wet mixture to the dry ingredients. Stir gently until just combined. Be careful not to overmix; a few lumps are okay!

Step 3: Create the Cinnamon Swirl

In a small bowl, mix ¼ cup of the cake batter with the ground cinnamon. This will create a delightful cinnamon swirl for your cake. The cinnamon adds a warm flavor that pairs beautifully with the strawberries.

Step 4: Assemble the Cake

Now it’s time to fold in the chopped strawberries into the batter. This adds a burst of fruity goodness to every bite. Pour half of the remaining batter into the prepared baking pan. Then, drizzle the cinnamon mixture over this layer. Next, pour the rest of the batter on top. Use a knife to gently swirl the batter, creating a marbled effect. This step is not only fun but also makes the cake look beautiful!

Step 5: Bake the Cake

Place the cake in the preheated oven and bake for 30-35 minutes. To check if it’s done, insert a toothpick into the center. If it comes out clean, your cake is ready! Once baked, remove it from the oven and let it cool completely in the pan on a wire rack. This cooling step is important for the icing to stick properly later.

Step 6: Prepare the Strawberry Icing

While the cake cools, let’s make the creamy strawberry icing. In a mixing bowl, beat together the powdered sugar, softened butter, milk, vanilla extract, and pureed strawberries. Mix until the icing is smooth and creamy. The fresh strawberry puree adds a lovely flavor and color to the icing.

Step 7: Ice the Cake

Strawberry Honeybun Cake with Strawberry Icing is now ready to be served!

Variations of Strawberry Honeybun Cake with Strawberry Icing

Strawberry Honeybun Cake with Strawberry Icing is delicious as is, there are many fun variations you can try. These tweaks can add new flavors and textures, making your cake even more exciting. Let’s explore some alternative icing options and ways to incorporate fresh strawberries!

Alternative Icing Options

If you want to switch things up, consider trying different icing recipes. Here are a few ideas:

  • Chocolate Ganache: Melt chocolate with heavy cream for a rich, decadent topping. This pairs wonderfully with the fruity cake.
  • Whipped Cream: For a lighter option, top your cake with freshly whipped cream. It adds a fluffy texture that complements the strawberries.
  • Lemon Glaze: Mix powdered sugar with lemon juice for a zesty icing. The tartness of lemon balances the sweetness of the cake beautifully.
  • Cream Cheese Frosting: Blend cream cheese with powdered sugar and vanilla for a tangy, creamy icing. This adds a delightful richness to each bite.

Strawberry Honeybun Cake with Strawberry Icing a new experience every time.

Adding Fresh Strawberries

Fresh strawberries can elevate your cake in many ways. Here are some ideas for incorporating them:

  • Layered Strawberries: After icing the cake, add a layer of sliced strawberries on top. This not only looks beautiful but also adds a fresh burst of flavor.
  • Strawberry Compote: Cook down strawberries with a bit of sugar to create a compote. Drizzle this over the icing for an extra fruity kick.
  • Stuffed Strawberries: Hollow out some strawberries and fill them with whipped cream or icing. Place these on top of the cake for a fun and tasty decoration.
  • Strawberry Puree Swirl: Before icing, swirl some pureed strawberries into the icing for a marbled effect. This adds both color and flavor.

Strawberry Honeybun Cake with Strawberry Icing visually stunning. So, don’t hesitate to get creative!

Cooking Note for Strawberry Honeybun Cake with Strawberry Icing

Strawberry Honeybun Cake with Strawberry Icing, a few cooking notes can help ensure your cake turns out perfectly every time. Here are some tips to keep in mind:

First, always use fresh ingredients. Fresh strawberries are key to achieving the best flavor. If possible, choose strawberries that are ripe and sweet. This will enhance the overall taste of your cake.

Next, make sure to measure your ingredients accurately. Baking is a science, and even a small difference in measurements can affect the outcome. Use measuring cups and spoons for precision. For the flour, spoon it into the measuring cup and level it off with a knife for the best results.

Another important tip is to avoid overmixing the batter. When combining the wet and dry ingredients, mix until just combined. Overmixing can lead to a dense cake, which is not what we want. A few lumps are perfectly fine!

Additionally, keep an eye on the baking time. Ovens can vary, so start checking your cake a few minutes before the recommended time. Insert a toothpick into the center; if it comes out clean, your cake is ready. If it’s not done, give it a few more minutes and check again.

Lastly, allow the cake to cool completely before icing. This step is crucial for the icing to adhere properly. If the cake is warm, the icing may melt and slide off, ruining the beautiful presentation.

Strawberry Honeybun Cake with Strawberry Icing that will impress your family and friends. Happy baking!

Serving Suggestions for Strawberry Honeybun Cake with Strawberry Icing

Strawberry Honeybun Cake with Strawberry Icing is beautifully baked and iced, it’s time to think about how to serve it! This cake is versatile and can be enjoyed in many delightful ways. Here are some serving suggestions to enhance your dessert experience:

  • With Fresh Fruit: Serve slices of the cake alongside a medley of fresh fruits. Strawberries, blueberries, and raspberries complement the flavors beautifully. This adds a refreshing touch and makes for a colorful presentation.
  • With a Scoop of Ice Cream: A scoop of vanilla or strawberry ice cream on the side can take your cake to the next level. The cold ice cream contrasts nicely with the warm cake, creating a delightful treat.
  • As a Breakfast Treat: Enjoy a slice of this cake for breakfast or brunch. It pairs wonderfully with a cup of coffee or tea. The sweetness of the cake makes it a perfect morning indulgence.
  • With Whipped Cream: Top each slice with a dollop of freshly whipped cream. This adds a light and airy texture that balances the richness of the cake and icing.
  • For Special Occasions: Consider serving the cake at celebrations like birthdays or family gatherings. You can decorate it with additional strawberries or edible flowers for a festive touch.

Strawberry Honeybun Cake with Strawberry Icing. Whether you’re enjoying it on a special occasion or as a sweet treat during the week, this cake is sure to impress!

Tips for Perfecting Strawberry Honeybun Cake with Strawberry Icing

Strawberry Honeybun Cake with Strawberry Icing is all about attention to detail. With a few helpful tips, you can ensure that your cake turns out moist, flavorful, and visually appealing. Here are some expert suggestions to help you achieve baking success:

First, always use room temperature ingredients. This includes eggs, buttermilk, and butter. Room temperature ingredients blend more easily, resulting in a smoother batter. If you forget to take them out in advance, you can warm the eggs in a bowl of warm water for a few minutes.

Next, consider sifting your dry ingredients. Sifting flour, baking powder, and salt together not only helps to aerate them but also removes any lumps. This step can lead to a lighter cake texture, which is especially important for a fluffy honeybun cake.

When it comes to strawberries, freshness is key. Choose ripe, sweet strawberries for the best flavor. If you can, buy them from a local farmer’s market. If you’re using frozen strawberries, make sure to thaw and drain them well to avoid excess moisture in the batter.

Another tip is to adjust the baking time based on your oven. Every oven is different, so keep an eye on your cake as it bakes. If you notice it browning too quickly, you can cover it loosely with aluminum foil to prevent burning while it finishes baking.

For the icing, make sure your butter is softened but not melted. This will help create a creamy texture that spreads easily. If your icing is too thick, add a little more milk, one teaspoon at a time, until you reach your desired consistency.

Lastly, let your cake cool completely before icing it. This prevents the icing from melting and sliding off. If you want to speed up the cooling process, you can place the cake in the refrigerator for a short time after it has cooled slightly at room temperature.

Strawberry Honeybun Cake with Strawberry Icing. Each bite will be a delightful experience, and your friends and family will be asking for seconds!

Breakdown of Time for Strawberry Honeybun Cake with Strawberry Icing

Strawberry Honeybun Cake with Strawberry Icing can help you plan your baking session better. Here’s a simple breakdown of the time required for preparation, cooking, and cooling.

Prep Time

The prep time for this delightful cake is approximately 20-25 minutes. During this time, you will gather your ingredients, preheat the oven, and mix the batter. Make sure to have everything ready before you start. This will make the process smoother and more enjoyable!

Cooking Time

Once your cake is in the oven, it will need about 30-35 minutes to bake. Keep an eye on it as it cooks. You can check for doneness by inserting a toothpick into the center. If it comes out clean, your cake is ready to come out of the oven!

Total Time

In total, you should expect to spend around 1 hour to 1 hour and 10 minutes from start to finish. This includes prep time, cooking time, and the cooling period before icing. Remember, patience is key! Allowing the cake to cool completely ensures that the icing will set beautifully.

Strawberry Honeybun Cake with Strawberry Icing into your schedule. Happy baking!

Nutritional Information for Strawberry Honeybun Cake with Strawberry Icing

Strawberry Honeybun Cake with Strawberry Icing can help you enjoy this delicious dessert while keeping your dietary goals in mind. Here’s a breakdown of the key nutritional components per serving:

Calories

Each serving of this delightful cake contains approximately 280 calories. This makes it a satisfying treat without being overly indulgent. The combination of fresh strawberries and creamy icing adds to the flavor while keeping the calorie count reasonable. Enjoying a slice as an occasional dessert can fit nicely into a balanced diet.

Protein

In terms of protein, each serving provides about 3 grams. While this isn’t a high-protein dessert, it does contribute to your daily intake. The eggs in the cake batter help boost the protein content slightly. Pairing your cake with a source of protein, like a dollop of Greek yogurt, can enhance the nutritional value of your dessert.

Sodium

The sodium content in each serving is around 200 milligrams. This is a moderate amount, making it suitable for most diets. However, if you are watching your sodium intake, be mindful of the other meals you consume throughout the day. Using unsalted butter in the icing can help keep the sodium levels lower.

Strawberry Honeybun Cake with Strawberry Icing is a delightful dessert that can be enjoyed in moderation. With its balance of flavors and textures, it’s a treat that can bring joy to any occasion while still being mindful of nutritional content. Enjoy your baking and the delicious results!

FAQs about Strawberry Honeybun Cake with Strawberry Icing

Can I use frozen strawberries for the icing?

Strawberry Honeybun Cake with Strawberry Icing a delightful treat!

How long can I store Strawberry Honeybun Cake with Strawberry Icing?

Strawberry Honeybun Cake with Strawberry Icing at room temperature for up to 3 days. Just make sure to cover it with plastic wrap or keep it in an airtight container to keep it fresh. If you want to store it longer, consider refrigerating it. In the fridge, it can last for about a week. Just remember to bring it back to room temperature before serving for the best taste!

Can I make Strawberry Honeybun Cake with Strawberry Icing ahead of time?

Strawberry Honeybun Cake with Strawberry Icing a day or two in advance. Just bake the cake, let it cool completely, and then store it in an airtight container. You can ice it right before serving to keep the icing fresh and creamy. This makes it a great option for parties or gatherings!

What can I serve with Strawberry Honeybun Cake with Strawberry Icing?

Strawberry Honeybun Cake with Strawberry Icing. Consider pairing it with a scoop of vanilla ice cream or a dollop of whipped cream for added richness. Fresh fruit, like sliced strawberries or berries, can enhance the flavors and add a refreshing touch. You can also serve it with a cup of coffee or tea for a delightful afternoon treat!

Conclusion on Strawberry Honeybun Cake with Strawberry Icing

Strawberry Honeybun Cake with Strawberry Icing is a delightful dessert that brings joy to any occasion. Its soft, moist texture combined with the sweetness of fresh strawberries creates a flavor experience that is simply irresistible. Whether you’re baking for a special event or just treating yourself, this cake is sure to impress.

With its easy preparation and simple ingredients, you can create a stunning dessert that looks as good as it tastes. The creamy strawberry icing adds a luscious finish, making each bite a delightful treat. Plus, the variations and serving suggestions allow you to customize the cake to suit your preferences and occasions.

Strawberry Honeybun Cake with Strawberry Icing will not only be a feast for the eyes but also a sweet memory for you and your loved ones.

So, what are you waiting for? Get baking and indulge in this scrumptious cake that’s sure to become a favorite in your household. Happy baking!

Paul

Strawberry Honeybun Cake with Strawberry Icing delights everyone!

This Strawberry Honeybun Cake blends the nostalgic flavor of a cinnamon-swirled honeybun with the fruity sweetness of strawberries. Ultra-moist, warmly spiced, and topped with a creamy strawberry glaze, it’s the perfect easy dessert for brunches, potlucks, or weeknight treats.
Prep Time 10 minutes
Cook Time 40 minutes
Total Time 50 minutes
Servings: 12 servings
Course: Dessert
Cuisine: American

Ingredients
  

  • For the Cake:1 box strawberry cake mix3/4 cup vegetable oil4 large eggs1 cup sour cream1/2 cup brown sugar1 tablespoon ground cinnamon
  • For the Creamy Strawberry Icing:2 cups powdered sugar3 tablespoons melted butter1 teaspoon vanilla extract2 tablespoons strawberry puree fresh or frozen1 to 2 tablespoons milk (as needed for consistency)

Method
 

  1. Preheat your oven to 350°F (175°C). Grease a 9×13-inch baking dish and set aside.
  2. In a large bowl, mix together the cake mix, oil, eggs, and sour cream until smooth. Do not overmix.
  3. Pour half of the cake batter into the prepared dish. In a small bowl, combine brown sugar and cinnamon. Sprinkle half over the batter.
  4. Add the remaining cake batter, then top with the rest of the cinnamon sugar mixture. Use a knife to gently swirl the layers together.
  5. Bake for 35–40 minutes, or until a toothpick inserted in the center comes out clean. Let the cake cool slightly.
  6. Meanwhile, prepare the icing by whisking together powdered sugar, melted butter, vanilla, strawberry puree, and enough milk to reach a pourable consistency.
  7. Drizzle icing generously over the warm cake and allow it to soak in before serving.

Notes

  • Substitute strawberry puree with strawberry jam for a more intense flavor.
  • Want a layered version? Bake in two round pans and add the icing between layers.
  • Store covered at room temperature for up to 2 days or refrigerate for longer freshness.
  • Add finely chopped strawberries to the batter for even more fruity goodness.

Creamy Sausage and Peppers Pasta Recipe is a must-try!

Creamy Sausage and Peppers Pasta Recipe. This dish combines the rich taste of Italian sausage with the sweetness of bell peppers and the creaminess of a luscious sauce. It’s perfect for a family dinner or a cozy night in.

Imagine twirling your fork around perfectly cooked penne pasta, coated in a creamy sauce that clings to every bite. The savory sausage adds a hearty touch, while the colorful peppers bring a vibrant crunch. This recipe is simple enough for a weeknight meal yet impressive enough to serve at gatherings.

What makes this dish even better is its versatility. You can easily adjust the spice level, swap out ingredients, or add in your favorite vegetables. Whether you prefer a mild flavor or a spicy kick, this creamy pasta can be tailored to your taste. Plus, it’s a great way to sneak in some veggies for the kids!

So, roll up your sleeves and get ready to create a delicious meal that will have everyone asking for seconds. Let’s explore the ingredients you’ll need to whip up this creamy delight!

Ingredients for Creamy Sausage and Peppers Pasta Recipe

Creamy Sausage and Peppers Pasta Recipe, you’ll need a handful of simple yet flavorful ingredients. Here’s what you’ll gather:

  • 8 ounces penne pasta: This pasta shape holds the creamy sauce beautifully.
  • 1 tablespoon olive oil: For sautéing the sausage and vegetables.
  • 1 pound Italian sausage: Choose between mild or spicy, depending on your preference.
  • 1 medium onion: Diced to add sweetness and depth to the dish.
  • 1 red bell pepper: Sliced for a pop of color and sweetness.
  • 1 yellow bell pepper: Adds a lovely contrast and flavor.
  • 3 cloves garlic: Minced for that aromatic touch.
  • 1 teaspoon Italian seasoning: A blend of herbs that enhances the dish.
  • 1/2 teaspoon red pepper flakes: Optional, for those who enjoy a bit of heat.
  • 1 cup heavy cream: This is what makes the sauce rich and creamy.
  • 1/2 cup grated Parmesan cheese: For a cheesy finish that ties everything together.
  • Salt and pepper: To taste, ensuring all flavors shine through.
  • Fresh basil: Optional, for garnish and a fresh touch.

With these ingredients on hand, you’re well on your way to creating a delicious meal that everyone will love. Each component plays a vital role in building layers of flavor, making this dish a true crowd-pleaser. Now that you have your ingredients ready, let’s move on to the step-by-step preparation!

Step-by-Step Preparation of Creamy Sausage and Peppers Pasta Recipe

Creamy Sausage and Peppers Pasta Recipe. Each step is designed to ensure that your dish turns out perfectly creamy and flavorful.

Step 1: Gather Your Ingredients

Before you start cooking, make sure you have everything you need within reach. This will make the cooking process smoother and more enjoyable. Gather your penne pasta, olive oil, Italian sausage, onion, bell peppers, garlic, Italian seasoning, red pepper flakes, heavy cream, Parmesan cheese, salt, and pepper. Don’t forget the fresh basil for garnish!

Step 2: Cook the Sausage

Begin by heating the olive oil in a large skillet over medium heat. Once the oil is hot, add the Italian sausage. Use a wooden spoon to break it up into smaller pieces. Cook the sausage for about 5-7 minutes, or until it’s nicely browned. This step is crucial as it adds a rich flavor to your dish.

Step 3: Sauté the Peppers and Onions

Next, it’s time to add the diced onion and sliced bell peppers to the skillet. Sauté these vegetables for about 5-6 minutes. You want them to become tender and slightly caramelized. The sweetness of the onions and peppers will balance the savory sausage beautifully.

Step 4: Combine Ingredients for the Sauce

Once your vegetables are tender, stir in the minced garlic, Italian seasoning, and red pepper flakes (if you’re using them). Cook for an additional 1-2 minutes until the garlic is fragrant. Then, reduce the heat to low and pour in the heavy cream. Stir well to combine, and add the grated Parmesan cheese. Mix until the cheese melts and the sauce becomes creamy.

Step 5: Cook the Pasta

While you’re preparing the sauce, bring a large pot of salted water to a boil. Add the penne pasta and cook according to the package instructions until al dente. This usually takes about 8-10 minutes. Once cooked, drain the pasta, but remember to reserve 1/2 cup of the pasta water for later use.

Step 6: Mix Everything Together

Creamy Sausage and Peppers Pasta Recipe is now ready to be served!

Variation of Creamy Sausage and Peppers Pasta Recipe

Creamy Sausage and Peppers Pasta Recipe is delicious as is, there are many ways to switch things up! Whether you want to cater to dietary preferences or simply try something new, these variations will keep your meals exciting and flavorful.

Alternative Ingredients

One of the best things about this recipe is its flexibility. Here are some alternative ingredients you can use:

  • Protein Options: Instead of Italian sausage, try using chicken sausage or even ground turkey. These options can lighten the dish while still providing great flavor.
  • Vegetable Choices: Feel free to add other vegetables like zucchini, mushrooms, or spinach. These can enhance the nutritional value and add different textures.
  • Cheese Variations: If you want a different cheese flavor, consider using mozzarella or feta cheese. Each will give a unique twist to the creamy sauce.
  • Gluten-Free Pasta: For a gluten-free version, substitute penne pasta with gluten-free pasta. There are many great options available that taste just as good!

These alternative ingredients can help you customize your dish to suit your taste or dietary needs. Experimenting with different flavors can lead to delightful surprises!

Different Cooking Methods

Creamy Sausage and Peppers Pasta Recipe. Here are a few ideas:

  • One-Pot Method: For an easier cleanup, try cooking everything in one pot. Start by browning the sausage, then add the vegetables, followed by the cream and pasta. This method allows the pasta to absorb all the flavors.
  • Oven-Baked Version: After mixing the pasta with the sauce, transfer it to a baking dish. Top with extra cheese and bake at 350°F for about 20 minutes. This creates a deliciously cheesy crust on top!
  • Slow Cooker: If you have more time, consider using a slow cooker. Brown the sausage and sauté the vegetables first, then combine everything in the slow cooker. Cook on low for 4-6 hours for a rich, melded flavor.

Creamy Sausage and Peppers Pasta Recipe is sure to be a hit!

Cooking Note for Creamy Sausage and Peppers Pasta Recipe

Creamy Sausage and Peppers Pasta Recipe, there are a few important cooking notes to keep in mind. These tips will help ensure that your dish turns out perfectly every time, making it a delightful experience for you and your guests.

First, always use a large skillet for cooking the sausage and vegetables. This allows for even cooking and prevents overcrowding, which can lead to steaming instead of browning. Browning the sausage is key, as it adds depth and richness to the overall flavor of the dish.

Next, when sautéing the onions and bell peppers, be patient. Allow them to cook until they are tender and slightly caramelized. This process enhances their natural sweetness and adds a wonderful layer of flavor to your creamy sauce.

Another important note is to keep an eye on the heat when adding the heavy cream. Reducing the heat to low is crucial to prevent the cream from curdling. Stirring continuously will help create a smooth and creamy sauce that clings beautifully to the pasta.

Lastly, don’t forget to taste your dish as you go! Adjust the seasoning with salt and pepper to suit your preference. If you like a bit more heat, feel free to add extra red pepper flakes. This recipe is all about making it your own!

Creamy Sausage and Peppers Pasta Recipe. Enjoy the process, and savor the delicious results!

Serving Suggestions for Creamy Sausage and Peppers Pasta Recipe

Creamy Sausage and Peppers Pasta Recipe is ready, it’s time to think about how to serve it! Presentation can elevate your dish and make it even more enjoyable. Here are some delightful serving suggestions to consider:

  • Garnish with Fresh Herbs: A sprinkle of fresh basil or parsley on top adds a pop of color and freshness. It also enhances the flavor, making each bite even more delicious.
  • Pair with Garlic Bread: Serve your pasta with warm garlic bread on the side. The crispy, buttery bread is perfect for soaking up the creamy sauce.
  • Include a Side Salad: A light side salad with mixed greens, cherry tomatoes, and a simple vinaigrette complements the richness of the pasta. It adds a refreshing crunch to your meal.
  • Offer Grated Cheese: Set out extra grated Parmesan cheese at the table. Guests can sprinkle more cheese on their pasta, adding a cheesy touch to their serving.
  • Wine Pairing: Consider serving a glass of white wine, like Pinot Grigio or Chardonnay. These wines pair beautifully with creamy dishes and enhance the overall dining experience.

Creamy Sausage and Peppers Pasta Recipe a memorable experience for everyone!

Tips for Perfecting Your Creamy Sausage and Peppers Pasta Recipe

Creamy Sausage and Peppers Pasta Recipe, a few tips can make all the difference. These simple yet effective suggestions will help you elevate your dish, ensuring it’s not only delicious but also visually appealing. Let’s dive into some expert tips that will help you perfect this creamy delight!

  • Choose Quality Ingredients: The flavor of your dish starts with the ingredients. Opt for high-quality Italian sausage and fresh vegetables. Fresh ingredients will enhance the overall taste and make your pasta shine.
  • Don’t Overcook the Pasta: When cooking the penne pasta, aim for al dente. This means it should be firm to the bite. Overcooked pasta can become mushy and won’t hold up well in the creamy sauce.
  • Adjust the Creaminess: If you prefer a lighter sauce, feel free to use half-and-half instead of heavy cream. This will still give you a creamy texture without being too rich.
  • Experiment with Seasoning: Taste your sauce as you go! Adjust the seasoning with salt, pepper, and red pepper flakes to suit your palate. Don’t be afraid to add more Italian seasoning for an extra flavor boost.
  • Let It Rest: After mixing everything together, let the pasta sit for a few minutes before serving. This allows the flavors to meld together, making each bite even more delicious.
  • Save Some Pasta Water: The reserved pasta water is your secret weapon! If your sauce is too thick, adding a splash of this starchy water can help achieve the perfect consistency.
  • Garnish Generously: A sprinkle of fresh basil or parsley not only adds color but also enhances the flavor. Don’t skip this step; it makes a big difference!

Creamy Sausage and Peppers Pasta Recipe that impresses everyone at the table. Enjoy the cooking process, and most importantly, savor the delicious results!

Breakdown of Time for Creamy Sausage and Peppers Pasta Recipe

Creamy Sausage and Peppers Pasta Recipe can help you plan your cooking efficiently. Here’s a simple breakdown of the time you’ll need for preparation and cooking.

Prep Time

The prep time for this delicious pasta dish is approximately 15 minutes. During this time, you’ll gather all your ingredients, chop the vegetables, and measure out the necessary items. Having everything ready before you start cooking will make the process smoother and more enjoyable.

Cooking Time

Creamy Sausage and Peppers Pasta Recipe is about 25 minutes. This includes browning the sausage, sautéing the vegetables, and cooking the pasta. Each step is essential for building flavor, so take your time to ensure everything is cooked to perfection.

Total Time

In total, you can expect to spend around 40 minutes from start to finish. This includes both prep and cooking time. With just a little bit of effort, you’ll have a hearty and creamy pasta dish ready to serve!

Creamy Sausage and Peppers Pasta Recipe is a fantastic choice that won’t take too long to prepare.

Nutritional Information for Creamy Sausage and Peppers Pasta Recipe

Creamy Sausage and Peppers Pasta Recipe not only satisfies your taste buds but also provides a good amount of nutrients. Here’s a breakdown of the nutritional information per serving, so you can enjoy this dish while being mindful of your dietary needs.

Calories

Creamy Sausage and Peppers Pasta Recipe contains approximately 550 calories. This calorie count includes the rich flavors from the Italian sausage, creamy sauce, and pasta. While it’s a hearty meal, it’s important to balance it with lighter options throughout the day.

Protein

In terms of protein, this dish offers about 25 grams per serving. The Italian sausage is a significant source of protein, making this pasta not only filling but also a great option for those looking to increase their protein intake. Pairing it with a side salad can further enhance your meal’s nutritional profile.

Sodium

Creamy Sausage and Peppers Pasta Recipe is around 800 milligrams per serving. This amount can vary based on the type of sausage used and how much salt you add during cooking. If you’re watching your sodium intake, consider using low-sodium sausage and adjusting the salt in the recipe accordingly.

Creamy Sausage and Peppers Pasta Recipe while making informed choices about your overall diet. Remember, moderation is key, and this dish can be part of a balanced meal plan!

FAQs about Creamy Sausage and Peppers Pasta Recipe

Can I use different types of sausage in the recipe?

Creamy Sausage and Peppers Pasta Recipe is quite versatile when it comes to sausage choices. You can use chicken sausage for a lighter option or turkey sausage if you prefer a leaner meat. If you enjoy a bit of spice, consider using spicy Italian sausage. Each type will bring its unique flavor to the dish, so feel free to experiment and find your favorite!

What can I substitute for heavy cream?

If you’re looking for a lighter alternative to heavy cream, there are several options available. Half-and-half is a great substitute that will still give you a creamy texture without being too rich. You can also use whole milk, but keep in mind that the sauce may be less creamy. For a dairy-free option, try using coconut cream or cashew cream. These alternatives will still provide a deliciously creamy sauce for your pasta!

How can I make this recipe gluten-free?

Creamy Sausage and Peppers Pasta Recipe gluten-free is simple! Just swap out the penne pasta for a gluten-free pasta variety. There are many options available, such as rice pasta or chickpea pasta, that work well in this recipe. Be sure to check the packaging for cooking instructions, as gluten-free pasta may have different cooking times. With this small change, you can enjoy a delicious gluten-free meal!

Can I prepare this dish in advance?

Creamy Sausage and Peppers Pasta Recipe in advance! To do this, cook the pasta and sauce separately, then combine them just before serving. If you plan to store leftovers, keep the pasta and sauce in separate containers to prevent the pasta from becoming mushy. When you’re ready to eat, simply reheat the sauce and toss it with the pasta. This makes it a convenient option for meal prep or busy weeknights!

Conclusion on Creamy Sausage and Peppers Pasta Recipe

Creamy Sausage and Peppers Pasta Recipe is a delightful dish that brings together rich flavors and comforting textures. It’s a perfect choice for any occasion, whether you’re hosting a dinner party or enjoying a cozy meal at home. The combination of savory Italian sausage, colorful bell peppers, and a creamy sauce creates a satisfying experience that will leave everyone asking for more.

This recipe is not only easy to prepare but also highly adaptable. You can customize it to suit your taste preferences or dietary needs by swapping ingredients or trying different cooking methods. With just a few simple adjustments, you can create a dish that feels fresh and exciting every time you make it.

Creamy Sausage and Peppers Pasta Recipe is a wonderful way to bring family and friends together, creating lasting memories over a delicious meal.

So, roll up your sleeves, gather your ingredients, and get ready to whip up this creamy delight. Enjoy the process, savor each bite, and most importantly, have fun in the kitchen! Happy cooking!

Paul

Creamy Sausage and Peppers Pasta Recipe is a must-try!

This Creamy Sausage and Peppers Pasta is rich, hearty, and packed with bold Italian flavors. With tender pasta, sizzling sausage, sweet bell peppers, and a silky garlic cream sauce, this one-pan meal is weeknight comfort food at its best.
Prep Time 10 minutes
Cook Time 25 minutes
Total Time 35 minutes
Servings: 4 servings
Course: Pasta
Cuisine: Italian-American

Ingredients
  

  • 8 oz uncooked pasta penne or rigatoni recommended1 tablespoon olive oil10 oz Italian sausage (mild or spicy, casing removed)1 small onion, chopped1 red bell pepper, sliced1 yellow bell pepper, sliced3 cloves garlic, minced1/2 cup chicken broth1 cup heavy cream1/2 teaspoon Italian seasoningSalt and pepper, to tasteFresh parsley, chopped (for garnish)Freshly grated Parmesan cheese (optional)

Method
 

  1. Cook the pasta according to package directions. Drain and set aside.
  2. In a large skillet, heat olive oil over medium heat. Add the sausage and cook until browned, breaking it up with a spoon, about 5–6 minutes.
  3. Add the chopped onion and sliced bell peppers. Sauté for 5–7 minutes, or until vegetables are soft and slightly caramelized.
  4. Stir in the garlic and cook for 30 seconds, just until fragrant.
  5. Add the chicken broth, heavy cream, and Italian seasoning. Stir and let the sauce simmer for 5–7 minutes, until slightly thickened.
  6. Return the cooked pasta to the skillet and toss until evenly coated in the sauce. Season with salt and pepper to taste.
  7. Garnish with chopped parsley and optional Parmesan cheese before serving.
  8.  

Notes

  • For a spicier version, use hot Italian sausage or add a pinch of red pepper flakes.
  • You can substitute the heavy cream with half-and-half or coconut cream for a lighter option.
  • Add spinach or kale during the last few minutes of simmering for extra veggies.
  • This dish reheats well—just add a splash of broth or cream when warming up.

Beef Giouvetsi with Orzo Recipe is a must-try dish!

What is Beef Giouvetsi with Orzo?

Beef Giouvetsi with Orzo is a delightful Greek dish that combines tender beef with orzo pasta in a rich, savory sauce. This hearty meal is perfect for family gatherings or cozy dinners. The beef is slow-cooked until it’s melt-in-your-mouth tender, while the orzo absorbs all the delicious flavors from the sauce. With a blend of spices like oregano and cinnamon, this dish offers a unique taste that warms the heart and satisfies the palate.

The Origins of Beef Giouvetsi

The origins of Beef Giouvetsi can be traced back to traditional Greek cuisine, where it has been enjoyed for generations. The word “Giouvetsi” refers to a method of cooking in a clay pot, which helps to enhance the flavors of the ingredients. This dish is often associated with family gatherings and festive occasions, showcasing the importance of sharing meals in Greek culture. Over time, variations have emerged, but the essence of Giouvetsi remains the same: a comforting, flavorful dish that brings people together.

Ingredients for Beef Giouvetsi with Orzo Recipe

To create a delicious Beef Giouvetsi with Orzo, you will need a selection of fresh and flavorful ingredients. Here’s what you’ll need:

  • 2 pounds beef chuck: Cut into 1-inch cubes for even cooking.
  • 2 tablespoons olive oil: This adds richness and helps brown the beef.
  • 1 large onion: Chopped to provide a sweet base flavor.
  • 4 cloves garlic: Minced for a fragrant kick.
  • 1 can (14.5 ounces) diced tomatoes: Undrained to add moisture and acidity.
  • 1 cup beef broth: Enhances the savory depth of the dish.
  • 1 teaspoon dried oregano: A classic herb that complements the beef.
  • 1 teaspoon ground cinnamon: Adds warmth and a hint of sweetness.
  • 1/2 teaspoon salt: To taste, balancing the flavors.
  • 1/4 teaspoon black pepper: For a touch of heat.
  • 1 cup orzo pasta: The star of the dish, soaking up all the flavors.
  • 1/4 cup fresh parsley: Chopped for garnish, adding freshness.
  • Grated Parmesan cheese: Optional, for serving to enhance the dish.

Gathering these ingredients will set you on the right path to making a delightful Beef Giouvetsi with Orzo. Each component plays a vital role in creating a dish that is not only tasty but also comforting and satisfying.

Step-by-Step Preparation of Beef Giouvetsi with Orzo Recipe

Step 1: Preparing the Ingredients

Before you start cooking, it’s essential to prepare all your ingredients. Begin by cutting the beef chuck into 1-inch cubes. This size ensures even cooking and tenderness. Next, chop the onion and mince the garlic. Having everything ready will make the cooking process smoother and more enjoyable. Remember, a well-prepared kitchen is a happy kitchen!

Step 2: Browning the Beef

Now, it’s time to brown the beef. In a large pot or Dutch oven, heat the olive oil over medium-high heat. Once the oil is hot, add the beef cubes. Brown them on all sides for about 5-7 minutes. This step is crucial as it locks in the flavors. After browning, remove the beef from the pot and set it aside. This will help you build layers of flavor in your dish.

Step 3: Sautéing the Vegetables

In the same pot, add the chopped onion. Sauté it until it becomes translucent, which should take about 5 minutes. The aroma will fill your kitchen! Next, add the minced garlic and cook for an additional minute. This step enhances the flavor base of your Beef Giouvetsi with Orzo, making it even more delicious.

Step 4: Combining Ingredients

Return the browned beef to the pot. Stir in the diced tomatoes, including their juice, and the beef broth. Then, add the dried oregano, ground cinnamon, salt, and black pepper. Mix everything well and bring it to a simmer. This combination of ingredients creates a rich sauce that will infuse the beef and orzo with flavor.

Step 5: Cooking the Orzo

Once the mixture is simmering, cover the pot and reduce the heat to low. Let it cook for about 1.5 to 2 hours. This slow cooking allows the beef to become tender and flavorful. Stir occasionally to prevent sticking. After the beef is tender, stir in the orzo pasta. Cover the pot again and cook for an additional 10-12 minutes. The orzo will absorb the delicious sauce, making it a perfect complement to the beef.

Step 6: Finalizing the Dish

After cooking, remove the pot from heat and let it sit for 5 minutes. This resting time allows the flavors to meld together beautifully. Before serving, garnish your Beef Giouvetsi with fresh parsley. If you like, sprinkle some grated Parmesan cheese on top for an extra touch of flavor. Now, your dish is ready to be enjoyed!

Variations of Beef Giouvetsi with Orzo Recipe

Vegetarian Alternatives

If you’re looking for a vegetarian twist on the classic Beef Giouvetsi with Orzo, there are plenty of delicious options. Instead of beef, you can use hearty vegetables like mushrooms, zucchini, and bell peppers. These veggies add a wonderful texture and flavor to the dish. You can also substitute the beef broth with vegetable broth to keep it vegetarian-friendly. For added protein, consider incorporating chickpeas or lentils. They not only enhance the nutritional value but also make the dish more filling. This vegetarian version is just as comforting and satisfying as the original!

Different Types of Meat

While beef is the star of the traditional Giouvetsi, you can easily switch it up with other meats. Chicken thighs are a great alternative, offering a lighter option that cooks faster. Simply adjust the cooking time to about 30-40 minutes for tender chicken. If you’re feeling adventurous, try using lamb for a richer flavor. Lamb pairs beautifully with the spices in this dish, creating a unique taste experience. No matter which meat you choose, the essence of Giouvetsi remains intact, making it a versatile recipe for any meat lover.

Flavor Enhancements

To elevate your Beef Giouvetsi with Orzo, consider adding some flavor enhancements. A splash of red wine can deepen the sauce’s richness, while a pinch of red pepper flakes can add a delightful kick. Fresh herbs like thyme or rosemary can also be included for an aromatic touch. For a hint of sweetness, toss in some diced carrots or a tablespoon of honey. These enhancements will not only boost the flavor but also make your dish stand out. Experimenting with different spices and ingredients can lead to a personalized version of this classic recipe!

Cooking Note for Beef Giouvetsi with Orzo Recipe

When preparing Beef Giouvetsi with Orzo, there are a few important cooking notes to keep in mind. First, the quality of the beef is crucial. Opt for well-marbled beef chuck, as the fat content will enhance the flavor and tenderness of the meat. Additionally, cutting the beef into uniform 1-inch cubes ensures even cooking, which is key for achieving that melt-in-your-mouth texture.

Another essential tip is to allow the beef to brown properly. This step not only locks in the juices but also creates a rich base for your sauce. Don’t rush this process; take your time to achieve a nice golden-brown color on the beef. It’s worth the wait!

While simmering, keep an eye on the pot. Stir occasionally to prevent sticking and ensure that all ingredients are well combined. If you find the mixture getting too thick, feel free to add a splash more beef broth or water. This will help maintain the right consistency for the sauce.

Lastly, remember that letting the dish rest after cooking is important. This short resting period allows the flavors to meld together beautifully, making each bite even more delicious. Following these cooking notes will help you create a Beef Giouvetsi with Orzo that is not only flavorful but also a true crowd-pleaser!

Serving Suggestions for Beef Giouvetsi with Orzo Recipe

Ideal Side Dishes

When serving Beef Giouvetsi with Orzo, choosing the right side dishes can enhance your meal experience. A fresh Greek salad is a perfect companion. The crisp vegetables and tangy feta cheese provide a refreshing contrast to the rich flavors of the Giouvetsi. You can also serve warm, crusty bread on the side. This is great for soaking up the delicious sauce!

Another excellent option is roasted vegetables. Seasonal veggies like zucchini, bell peppers, and carrots can be tossed with olive oil and herbs, then roasted until tender. This adds a colorful and nutritious element to your meal. For a heartier side, consider serving a creamy potato mash. The smooth texture pairs wonderfully with the beef and orzo, making every bite satisfying.

Wine Pairings

Pairing the right wine with your Beef Giouvetsi can elevate the dining experience. A medium-bodied red wine, such as a Merlot or Chianti, complements the rich flavors of the beef and spices beautifully. These wines have enough acidity to balance the dish without overpowering it.

If you prefer white wine, a crisp Sauvignon Blanc can also work well. Its bright acidity and citrus notes can cut through the richness of the dish, providing a refreshing contrast. For a special touch, consider serving a Greek wine, like Agiorgitiko, which pairs perfectly with traditional Greek flavors.

Whichever wine you choose, remember to serve it slightly chilled for the best taste. Enjoying your Beef Giouvetsi with Orzo alongside the right sides and wine will create a memorable meal that everyone will love!

Tips for Perfecting Beef Giouvetsi with Orzo Recipe

To make your Beef Giouvetsi with Orzo truly exceptional, consider these helpful tips. Each suggestion will enhance the flavors and textures of your dish, ensuring a delightful dining experience.

First, marinate the beef for a few hours or overnight. A simple marinade of olive oil, garlic, and herbs can infuse the meat with extra flavor. This step is especially beneficial if you have time to plan ahead.

Next, don’t skip the browning step! Properly browning the beef creates a rich, caramelized flavor that adds depth to your dish. Make sure your pot is hot enough before adding the beef, and avoid overcrowding the pot. If necessary, brown the beef in batches.

When adding the orzo, stir it gently to prevent clumping. This will help ensure that each piece of pasta is coated in the delicious sauce. If you prefer a creamier texture, consider adding a splash of cream or a dollop of sour cream just before serving.

For an extra layer of flavor, try adding a bay leaf or a sprig of fresh thyme during the simmering process. Just remember to remove them before serving! These herbs can elevate the taste profile of your Beef Giouvetsi.

Lastly, taste and adjust the seasoning before serving. Everyone’s palate is different, so feel free to add more salt, pepper, or herbs to suit your taste. A squeeze of fresh lemon juice can also brighten the flavors, making the dish even more vibrant.

By following these tips, you’ll create a Beef Giouvetsi with Orzo that is not only delicious but also a true reflection of your culinary skills. Enjoy the process and the wonderful meal that awaits!

Breakdown of Time for Beef Giouvetsi with Orzo Recipe

Prep Time

Preparing your ingredients is the first step in making Beef Giouvetsi with Orzo. This includes cutting the beef, chopping the onion, and mincing the garlic. Overall, you should set aside about 15-20 minutes for this prep work. Having everything ready will make the cooking process smoother and more enjoyable.

Cooking Time

The cooking time for Beef Giouvetsi is where the magic happens. After browning the beef and sautéing the vegetables, you will need to let the dish simmer for about 1.5 to 2 hours. This slow cooking allows the beef to become tender and flavorful. After that, you’ll add the orzo and cook it for an additional 10-12 minutes. In total, the cooking time is approximately 1 hour and 45 minutes to 2 hours and 12 minutes.

Total Time

When you combine the prep time and cooking time, the total time to make Beef Giouvetsi with Orzo is around 2 hours to 2 hours and 30 minutes. This includes the time spent preparing the ingredients and the slow cooking process. While it may seem like a lengthy endeavor, the end result is a hearty and delicious meal that is well worth the wait!

Nutritional Information for Beef Giouvetsi with Orzo Recipe

Calories

Each serving of Beef Giouvetsi with Orzo contains approximately 450 calories. This makes it a satisfying meal that provides energy without being overly heavy. The combination of beef and orzo ensures that you feel full and content after enjoying this delicious dish. It’s a great option for a hearty dinner that won’t leave you feeling sluggish.

Protein

Protein is an essential nutrient, and this recipe delivers! With about 30 grams of protein per serving, Beef Giouvetsi with Orzo is an excellent choice for those looking to boost their protein intake. The beef chuck is a rich source of high-quality protein, which is vital for muscle repair and overall health. This makes it a great meal for active individuals or anyone needing a nutritious boost.

Sodium

When it comes to sodium, each serving of Beef Giouvetsi with Orzo contains around 600 milligrams. While this is a reasonable amount for a savory dish, it’s always good to be mindful of your sodium intake. If you’re watching your salt consumption, consider using low-sodium beef broth and reducing the added salt in the recipe. This way, you can enjoy the flavors without worrying too much about sodium levels.

FAQs about Beef Giouvetsi with Orzo Recipe

Can I use a different type of pasta in Beef Giouvetsi?

Absolutely! While orzo is the traditional choice for Beef Giouvetsi, you can experiment with other pasta types. Small pasta shapes like ditalini or even rice can work well. Just keep in mind that cooking times may vary. If you choose a different pasta, be sure to adjust the cooking time accordingly to ensure everything is perfectly cooked.

How can I make Beef Giouvetsi with Orzo Recipe gluten-free?

To make a gluten-free version of Beef Giouvetsi with Orzo, simply substitute the orzo pasta with a gluten-free pasta alternative. Many brands offer gluten-free orzo made from rice or corn. Additionally, check the beef broth to ensure it’s gluten-free. With these simple swaps, you can enjoy this delicious dish without gluten!

What is the best way to store leftovers of Beef Giouvetsi?

Storing leftovers of Beef Giouvetsi is easy! Allow the dish to cool completely before transferring it to an airtight container. It can be stored in the refrigerator for up to 3-4 days. If you want to keep it longer, consider freezing it. Just make sure to use a freezer-safe container. When reheating, add a splash of broth or water to maintain moisture and prevent the orzo from becoming too dry.

Can I prepare Beef Giouvetsi with Orzo in advance?

Yes, you can prepare Beef Giouvetsi with Orzo in advance! This dish actually tastes even better the next day as the flavors meld together. You can cook it a day ahead and store it in the refrigerator. When you’re ready to serve, simply reheat it on the stove over low heat, adding a little broth if needed. This makes it a great option for meal prep or entertaining!

Conclusion on Beef Giouvetsi with Orzo Recipe

In conclusion, Beef Giouvetsi with Orzo is a delightful dish that brings together the rich flavors of tender beef and the comforting texture of orzo pasta. This recipe not only showcases the beauty of Greek cuisine but also offers a wonderful way to gather family and friends around the dinner table. With its aromatic spices and hearty ingredients, it’s a meal that warms the heart and satisfies the appetite.

Whether you’re preparing it for a special occasion or a cozy weeknight dinner, this dish is sure to impress. The step-by-step preparation makes it accessible for cooks of all skill levels, while the variations allow for creativity in the kitchen. From vegetarian alternatives to different types of meat, there’s a version of Beef Giouvetsi for everyone.

As you enjoy this flavorful dish, remember the importance of sharing meals with loved ones. Food has a unique way of bringing people together, and Beef Giouvetsi with Orzo is a perfect example of that. So, gather your ingredients, follow the recipe, and savor the delicious results. Happy cooking!

Paul

Beef Giouvetsi with Orzo Recipe is a must-try dish!

This hearty Beef and Orzo Stew is a rustic one-pot wonder inspired by Greek Giouvetsi. Tender chunks of beef simmer in a richly spiced tomato sauce, finished with orzo pasta for a comforting and flavorful dish that’s perfect for any cozy dinner.
Prep Time 15 minutes
Cook Time 2 hours
Total Time 2 hours 15 minutes
Servings: 6 servings
Course: Main Dish
Cuisine: Greek-Inspired

Ingredients
  

  • 2 lbs beef chuck cut into cubes1 onion, finely chopped3 cloves garlic, minced1 (14 oz) can crushed tomatoes2 tablespoons tomato paste1 teaspoon ground cinnamon1/2 teaspoon ground allspice1/2 teaspoon ground clovesSalt and black pepper, to taste1/2 cup red wine3 cups beef broth1 1/2 cups orzo pastaFresh parsley, chopped (for garnish)Grated kefalotyri or parmesan cheese, for topping (optional)

Method
 

  1. Heat a bit of oil in a large Dutch oven or oven-safe pot. Brown beef cubes in batches until seared on all sides. Remove and set aside.
  2. In the same pot, sauté the chopped onion over medium heat until translucent, about 5 minutes. Add garlic and cook for 1 more minute.
  3. Stir in tomato paste and cook for 2 minutes. Add crushed tomatoes, cinnamon, allspice, cloves, salt, and pepper. Deglaze with red wine and simmer for 5 minutes.
  4. Return beef to the pot. Add beef broth and bring to a boil. Reduce heat, cover, and simmer for 1.5 to 2 hours, or until beef is tender.
  5. Stir in the orzo pasta. Continue simmering uncovered for 15–20 minutes, stirring occasionally, until pasta is cooked and the sauce is slightly thickened.
  6. Remove from heat. Garnish with fresh parsley and grated cheese if desired. Serve hot.

Notes

  • For deeper flavor, brown the tomato paste before adding the liquids.
  • You can bake the dish uncovered at 350°F for 20 minutes after adding the orzo to achieve a traditional baked texture.
  • Substitute red wine with more broth if preferred.
  • Excellent as leftovers—the flavors deepen overnight!

Grilled Chicken Margherita Recipe is a must-try dish!

Grilled Chicken Margherita Recipe. This dish combines the classic flavors of Italian cuisine with the simplicity of grilling, making it a perfect choice for any occasion. The juicy chicken breasts are topped with fresh mozzarella, vibrant cherry tomatoes, and fragrant basil, all drizzled with a sweet balsamic glaze. It’s a feast for both the eyes and the taste buds!

Grilling is not just a cooking method; it’s an experience. The smoky flavor from the grill enhances the taste of the chicken, while the fresh ingredients add a burst of color and flavor. Whether you’re hosting a summer barbecue or preparing a cozy dinner at home, this recipe is sure to be a hit. Plus, it’s healthy and packed with protein, making it a great option for those who want to eat well without sacrificing taste.

In this article, we will guide you through the ingredients, preparation steps, and tips to make your Grilled Chicken Margherita a success. So, fire up your grill and get ready to enjoy a meal that’s not only satisfying but also easy to prepare!

Ingredients for Grilled Chicken Margherita Recipe

Grilled Chicken Margherita Recipe, you will need a few simple yet fresh ingredients. Each component plays a vital role in bringing out the flavors of this delightful dish. Here’s what you’ll need:

  • 2 large boneless, skinless chicken breasts
  • 1 teaspoon salt
  • 1/2 teaspoon black pepper
  • 1 tablespoon olive oil
  • 1 cup cherry tomatoes, halved
  • 8 ounces fresh mozzarella cheese, sliced
  • 1/4 cup fresh basil leaves, chopped
  • 1/4 cup balsamic glaze

These ingredients are not only easy to find but also contribute to the overall taste and presentation of the dish. The chicken breasts serve as a hearty base, while the cherry tomatoes add a juicy sweetness. Fresh mozzarella brings a creamy texture, and the basil leaves provide a fragrant aroma. Finally, the balsamic glaze ties everything together with its rich, tangy flavor.

Feel free to adjust the quantities based on your preferences or the number of servings you need. With these ingredients on hand, you’re well on your way to creating a delicious meal that everyone will love!

Step-by-Step Preparation of Grilled Chicken Margherita Recipe

Grilled Chicken Margherita Recipe. This step-by-step guide will help you create a flavorful dish that’s sure to impress. Let’s get started!

Step 1: Marinating the Chicken

To enhance the flavor of the chicken, marinating is a great first step. Start by seasoning the chicken breasts with salt and black pepper. This simple seasoning will bring out the natural taste of the chicken. Next, drizzle a tablespoon of olive oil over the chicken. The oil not only adds flavor but also helps keep the chicken moist while grilling.

For an extra kick, consider marinating the chicken in Italian dressing for about 30 minutes. This will infuse the chicken with even more flavor. After marinating, your chicken will be ready for grilling!

Step 2: Preparing the Toppings

While the chicken is marinating, you can prepare the toppings. Start by washing the cherry tomatoes and cutting them in half. This will make them easier to place on the chicken later. Next, slice the fresh mozzarella cheese into even pieces. Aim for about a quarter-inch thickness to ensure it melts nicely on the grill.

Finally, chop the fresh basil leaves. The basil will add a burst of freshness to your dish. Set all these toppings aside, and you’ll be ready to grill!

Step 3: Grilling the Chicken

Once your chicken is marinated and your toppings are ready, it’s time to fire up the grill! Preheat your grill to medium-high heat. Place the chicken breasts on the grill and cook for about 6-7 minutes on each side. You want the internal temperature to reach 165°F for safe consumption.

During the last few minutes of grilling, it’s time to add the toppings. Place the sliced mozzarella and halved cherry tomatoes on each chicken breast. Close the grill lid to allow the cheese to melt beautifully. The aroma will be irresistible!

Step 4: Assembling the Dish

After grilling, remove the chicken from the grill and let it rest for about 5 minutes. This resting period allows the juices to redistribute, making the chicken even juicier. Once rested, drizzle the balsamic glaze over the chicken. This adds a sweet and tangy flavor that complements the other ingredients perfectly.

Grilled Chicken Margherita Recipe is now ready to serve! Enjoy this delightful dish with family and friends, and watch them savor every bite.

Variations of Grilled Chicken Margherita Recipe

Grilled Chicken Margherita Recipe is a crowd-pleaser, there are many ways to switch things up! Whether you want to try different proteins or explore vegetarian options, these variations will keep your meals exciting and flavorful. Let’s dive into some delicious alternatives!

Alternative Proteins

If you’re looking to change the protein in your dish, there are several tasty options. Here are a few ideas:

  • Turkey Breasts: Turkey is a leaner alternative to chicken. It cooks similarly and absorbs flavors well. Just be sure to adjust the cooking time as turkey breasts may take a bit longer.
  • Pork Chops: Grilled pork chops can add a different flavor profile. Season them with the same salt and pepper, and follow the same grilling steps for a delightful twist.
  • Fish: For a lighter option, try using firm fish like salmon or swordfish. These proteins grill beautifully and pair well with the fresh toppings.

Each of these proteins can be seasoned and grilled just like the chicken, allowing you to enjoy the same delicious flavors in a new way!

Vegetarian Options

If you’re catering to vegetarians or simply want to enjoy a meat-free meal, there are plenty of delicious alternatives. Here are some ideas:

  • Portobello Mushrooms: These large mushrooms make a great substitute for chicken. Marinate them in olive oil, salt, and pepper, then grill until tender. Top with mozzarella and tomatoes for a hearty dish.
  • Eggplant: Slices of eggplant can be grilled to perfection. They have a meaty texture and absorb flavors well. Just season and grill, then add your toppings!
  • Tofu: For a plant-based option, use firm tofu. Press it to remove excess moisture, then marinate and grill. Tofu takes on the flavors of the toppings beautifully.

These vegetarian options not only provide variety but also ensure that everyone at your table can enjoy a delicious meal. Feel free to experiment with different toppings and seasonings to make these variations your own!

Cooking Note for Grilled Chicken Margherita Recipe

Grilled Chicken Margherita Recipe, there are a few important cooking notes to keep in mind. These tips will help ensure that your dish turns out perfectly every time, enhancing both flavor and presentation.

First, always preheat your grill. This step is crucial for achieving those beautiful grill marks and ensuring even cooking. A hot grill helps to sear the chicken, locking in moisture and flavor. If your grill isn’t hot enough, the chicken may cook unevenly and become dry.

Next, consider using a meat thermometer. This handy tool takes the guesswork out of cooking chicken. Insert the thermometer into the thickest part of the chicken breast. When it reads 165°F, your chicken is safe to eat and perfectly cooked. This ensures that your meal is both delicious and safe for everyone.

Another tip is to let the chicken rest after grilling. This resting period allows the juices to redistribute throughout the meat. If you cut into the chicken too soon, those flavorful juices will escape, leaving you with a drier piece of meat. A five-minute rest is all you need for juicy, tender chicken.

Lastly, feel free to get creative with your toppings! While the classic combination of mozzarella, tomatoes, and basil is delightful, you can add other ingredients to suit your taste. Consider adding a sprinkle of red pepper flakes for heat or a drizzle of olive oil for extra richness. The possibilities are endless!

Grilled Chicken Margherita Recipe to new heights. Enjoy the process, and don’t hesitate to make it your own!

Serving Suggestions for Grilled Chicken Margherita Recipe

Grilled Chicken Margherita Recipe, it’s time to think about how to serve it! Presentation can elevate your meal, making it even more enjoyable for you and your guests. Here are some delightful serving suggestions to consider:

  • On a Bed of Greens: Serve the grilled chicken on a bed of fresh arugula or mixed greens. This adds a refreshing crunch and a pop of color to your plate. Drizzle a little olive oil and lemon juice over the greens for extra flavor.
  • With a Side of Pasta: Pair your chicken with a light pasta dish. A simple spaghetti tossed in olive oil, garlic, and fresh herbs complements the flavors of the chicken beautifully. You can also add a sprinkle of Parmesan cheese for a savory touch.
  • Accompanied by Grilled Vegetables: Grilled vegetables like zucchini, bell peppers, and asparagus make a perfect side. Their smoky flavor pairs well with the chicken, creating a balanced meal.
  • With Crusty Bread: Serve slices of crusty Italian bread on the side. This is perfect for soaking up any leftover balsamic glaze or juices from the chicken. It adds a satisfying texture to your meal.
  • As a Sandwich: For a fun twist, slice the grilled chicken and serve it in a toasted bun. Add some fresh basil and a slice of mozzarella for a delicious chicken sandwich. This is great for casual gatherings or picnics!

Grilled Chicken Margherita Recipe will not only taste amazing but also look stunning on the table. Enjoy your meal with family and friends, and watch them rave about your culinary skills!

Tips for Perfecting Your Grilled Chicken Margherita Recipe

Grilled Chicken Margherita Recipe truly shine, consider these helpful tips. They will ensure that your dish is not only delicious but also visually appealing. Let’s explore some expert advice to elevate your grilling game!

  • Choose Quality Ingredients: The freshness of your ingredients can make a big difference. Opt for high-quality chicken breasts, fresh mozzarella, and ripe cherry tomatoes. The better the ingredients, the tastier your dish will be!
  • Don’t Skip the Marinade: Marinating the chicken is key to infusing flavor. Even a short marination time can enhance the taste. If you have more time, let the chicken marinate for a few hours or overnight for maximum flavor.
  • Use a Grill Basket: If you’re worried about the cherry tomatoes falling through the grill grates, consider using a grill basket. This handy tool keeps your toppings secure while allowing them to cook evenly.
  • Monitor the Temperature: Keep an eye on the grill temperature. Too hot can lead to burnt chicken, while too cool can result in undercooked meat. Aim for a steady medium-high heat for the best results.
  • Experiment with Seasonings: While salt and pepper are classic, don’t hesitate to experiment! Add garlic powder, Italian herbs, or lemon zest to the chicken for an extra flavor boost.
  • Let It Rest: After grilling, always let the chicken rest for a few minutes. This step is crucial for juicy chicken. It allows the juices to redistribute, ensuring every bite is tender and flavorful.
  • Garnish Creatively: Presentation matters! Use fresh basil leaves or a sprinkle of Parmesan cheese as a garnish. A drizzle of balsamic glaze can also enhance the visual appeal and flavor.

Grilled Chicken Margherita Recipe. Each step contributes to a dish that’s not only delicious but also a feast for the eyes. Enjoy the process, and don’t be afraid to make it your own!

Breakdown of Time for Grilled Chicken Margherita Recipe

Grilled Chicken Margherita Recipe can help you plan your meal better. Here’s a simple breakdown of the time you’ll need for preparation and cooking. This will ensure that everything runs smoothly and you can enjoy your delicious dish without any rush!

Prep Time

The prep time for this recipe is approximately 15-20 minutes. This includes gathering your ingredients, marinating the chicken, and preparing the toppings. If you choose to marinate the chicken in Italian dressing, you might want to add an extra 30 minutes to this time. However, the actual hands-on time remains around 15-20 minutes.

Cooking Time

Once you’re ready to grill, the cooking time will take about 12-15 minutes. This includes grilling the chicken for 6-7 minutes on each side. During the last few minutes, you’ll add the mozzarella and cherry tomatoes, allowing them to melt and warm up. Keep an eye on the internal temperature to ensure the chicken reaches 165°F for safe consumption.

Total Time

Grilled Chicken Margherita Recipe a quick and easy option for a weeknight dinner or a weekend gathering. With just a little bit of time, you can create a flavorful and impressive meal that everyone will love!

Nutritional Information for Grilled Chicken Margherita Recipe

Grilled Chicken Margherita Recipe not only delights your taste buds but also provides valuable nutrients. Here’s a closer look at the nutritional information for this delicious dish.

Calories

Grilled Chicken Margherita Recipe contains approximately 320 calories. This makes it a satisfying option without being overly heavy. The combination of lean protein from the chicken and healthy fats from the olive oil and mozzarella contributes to a well-rounded meal. Enjoying this dish can fit nicely into a balanced diet, especially when paired with fresh vegetables or a light salad.

Protein

Grilled Chicken Margherita Recipe a great choice for those looking to maintain or build muscle.

Sodium

In terms of sodium, each serving contains around 600 milligrams. While this is a moderate amount, it’s important to be mindful of your overall sodium intake throughout the day. To reduce sodium levels, consider using low-sodium salt or skipping the added salt during preparation. This way, you can enjoy the flavors of the dish without worrying about excess sodium.

Grilled Chicken Margherita Recipe is a nutritious option that provides a good balance of calories, protein, and sodium. It’s a meal that not only tastes great but also supports your health goals. Enjoy this delightful dish knowing that you’re making a wholesome choice for yourself and your loved ones!

FAQs about Grilled Chicken Margherita Recipe

What can I serve with Grilled Chicken Margherita?

Grilled Chicken Margherita Recipe, there are plenty of delicious options to consider. Here are some great pairings:

  • Fresh Salad: A light salad with mixed greens, cucumbers, and a simple vinaigrette complements the flavors of the chicken beautifully.
  • Garlic Bread: Serve warm garlic bread on the side. It’s perfect for soaking up any leftover balsamic glaze.
  • Roasted Vegetables: Roasted or grilled vegetables like zucchini, bell peppers, and asparagus add color and nutrition to your meal.
  • Pasta Salad: A cold pasta salad with Italian dressing can be a refreshing side dish that pairs well with the grilled chicken.
  • Rice or Quinoa: For a heartier option, serve the chicken over a bed of rice or quinoa. This adds a nice texture and makes the meal more filling.

These sides not only enhance the meal but also create a balanced plate that everyone will enjoy!

Can I make Grilled Chicken Margherita ahead of time?

Grilled Chicken Margherita Recipe ahead of time! Here’s how:

  • Marinate the Chicken: You can marinate the chicken breasts a few hours or even a day in advance. Just keep them in the refrigerator until you’re ready to grill.
  • Prepare Toppings: You can wash and chop the cherry tomatoes and basil ahead of time. Store them in airtight containers in the fridge until you’re ready to use them.
  • Grill and Store: If you have leftovers, you can grill the chicken and store it in the fridge for up to three days. Just reheat it gently before serving.

By preparing in advance, you can save time on busy days while still enjoying a delicious meal!

What is the best way to store leftovers of Grilled Chicken Margherita?

Grilled Chicken Margherita Recipe is easy! Follow these steps for the best results:

  • Cool Down: Allow the grilled chicken to cool to room temperature before storing. This helps prevent condensation in the container.
  • Airtight Container: Place the chicken in an airtight container. If you have any toppings left, store them separately to maintain freshness.
  • Refrigerate: Store the container in the refrigerator. The grilled chicken can last for up to three days.
  • Reheat Properly: When you’re ready to enjoy the leftovers, reheat the chicken in the oven or microwave until it’s warmed through. Avoid reheating multiple times to maintain quality.

Grilled Chicken Margherita Recipe even after the initial meal!

Conclusion on Grilled Chicken Margherita Recipe

Grilled Chicken Margherita Recipe is a delightful dish that brings together fresh ingredients and simple cooking techniques. It’s perfect for any occasion, whether you’re hosting a summer barbecue or enjoying a cozy dinner at home. The combination of juicy chicken, creamy mozzarella, sweet cherry tomatoes, and fragrant basil creates a symphony of flavors that is sure to please everyone at the table.

Not only is this recipe easy to prepare, but it also offers a healthy option packed with protein and essential nutrients. With just a few simple steps, you can create a meal that is both satisfying and visually appealing. Plus, the variations and serving suggestions allow you to customize the dish to suit your taste and dietary preferences.

As you embark on your culinary journey with this recipe, remember to have fun and experiment with different ingredients. Whether you choose to stick to the classic version or try out some of the suggested variations, the key is to enjoy the process of cooking and sharing delicious food with loved ones.

Grilled Chicken Margherita Recipe. Happy grilling!

Paul

Grilled Chicken Margherita Recipe is a must-try dish!

Grilled Chicken Margherita is a fresh and flavorful take on Italian-inspired grilling. Juicy chicken breasts are seasoned, flame-grilled, and topped with gooey mozzarella, sweet tomatoes, fragrant basil, and a drizzle of tangy balsamic glaze. Simple, stunning, and satisfying.
Prep Time 10 minutes
Cook Time 15 minutes
Total Time 25 minutes
Servings: 4 servings
Course: Main Course
Cuisine: Italian-American

Ingredients
  

  • 4 boneless skinless chicken breasts2 tablespoons olive oil1 teaspoon Italian seasoningSalt and pepper to taste4 slices fresh mozzarella cheese2 Roma tomatoes, thinly sliced1/4 cup fresh basil leavesBalsamic glaze, for drizzling

Method
 

  1. Pat chicken breasts dry. Brush with olive oil and season both sides with Italian seasoning, salt, and pepper.
  2. Preheat grill to medium-high heat. Grill chicken for 5 to 7 minutes per side, or until cooked through and grill marks appear.
  3. In the last 2 minutes of grilling, top each chicken breast with a slice of mozzarella and tomato slices. Close the lid to allow the cheese to melt.
  4. Remove chicken from the grill. Sprinkle with fresh basil and drizzle with balsamic glaze.
  5. Serve hot with a fresh salad, pasta, or roasted vegetables.

Notes

  • Substitute mozzarella with burrata or provolone for a twist.
  • Add a thin slice of prosciutto under the cheese for extra richness.
  • Balsamic glaze can be made at home by reducing balsamic vinegar with a bit of honey.
  • Pairs beautifully with herbed couscous or grilled zucchini.

Millionaire Peach Salad Recipe is a must-try delight!

A Taste That Brings Back Summers and Smiles

When I was a child, Sunday afternoons in late July meant one thing: grandma’s back porch and bowls of chilled peach salad. The sunlight would slant just right through the lace curtains, and the table would be laden with the colors of the season—deep reds, golden yellows, and soft creams. But the star was always her Millionaire Peach Salad. Despite its grand name, it wasn’t made with expensive ingredients. Instead, it was a treasure trove of memories, made rich by laughter, stories, and the endless hum of cicadas.

The first spoonful would always be magic: soft peaches, sweet and cool, melting into the creamy fluff of whipped topping and pudding. It was the kind of recipe you didn’t just taste—you felt it. You felt it in the smile of a neighbor asking for seconds, in the way your aunt would sneak another spoonful after declaring she was too full, in the sticky fingers of little cousins trying to steal the marshmallows. It was more than dessert. It was a moment captured in flavor.

That’s the magic of Millionaire Peach Salad.

What Is Millionaire Peach Salad?

Despite its luxurious title, Millionaire Peach Salad is a down-home, retro dessert salad that gained popularity during the mid-20th century. A cousin of the equally famous Watergate Salad and Ambrosia, it typically includes canned peaches, whipped topping, instant pudding, and marshmallows. The ingredients are stirred together to form a creamy, fruit-filled bowl of sweetness that’s often served chilled as a potluck favorite or holiday side.

It reflects the era of “salad” dishes that didn’t necessarily involve greens, but rather invoked convenience, comfort, and sweetness. It’s inexpensive, requires no baking, and can be assembled in just minutes—making it perfect for summer picnics, family reunions, or any gathering where comfort food is king.

The Story Behind the Name

Why “Millionaire”? The name is more about the feeling than the cost. This salad, in all its rich textures and layered sweetness, gives a sense of indulgence. Much like millionaire pie (a no-bake, fruity cream pie with similar ingredients), this dessert gives a little nod to the idea of eating like royalty—without spending like it.

It’s an affectionate reminder that luxury doesn’t have to come with a price tag. Sometimes, all it takes is a can of peaches and a memory of good times shared.

Creative Twists on a Southern Classic

Though the traditional version is a tried-and-true crowd-pleaser, creative cooks have been riffing on the formula for decades. Here are a few variations that can elevate or personalize your salad:

  • Tropical Paradise: Add pineapple chunks, shredded coconut, and a splash of lime juice for a tropical spin.
  • Berry Bliss: Mix in fresh strawberries or blueberries for a tart balance to the sweetness.
  • Nutty Crunch: Pecans or walnuts add a delightful texture contrast, especially when lightly toasted.
  • Low-Sugar Option: Use sugar-free pudding and whipped topping, and opt for peaches in natural juice to cut down on sweetness.
  • Holiday Version: Add cinnamon or nutmeg and swap peaches for canned pears or apples for a festive feel.

Frequently Asked Questions

Can I use fresh peaches instead of canned?

Absolutely! Fresh peaches can offer an even juicier, brighter flavor. Just make sure they’re ripe and slightly soft. You may want to toss them in a bit of lemon juice and sugar to replicate the sweetness and syrupy texture of canned.

Can I make this salad ahead of time?

Yes, in fact, it’s better when it has time to chill. Preparing it 4–6 hours in advance—or even the night before—helps the flavors meld beautifully. Just give it a gentle stir before serving.

Does this need to be refrigerated?

Definitely. The whipped topping and pudding require refrigeration. Keep it cold until serving, especially if you’re bringing it to a picnic or potluck.

Can I make it dairy-free or vegan?

Yes! Swap out traditional whipped topping for a plant-based version, and use non-dairy pudding mixes or homemade coconut cream pudding. Be sure to double-check labels for hidden dairy ingredients.

Why is it called a “salad” when it’s more like a dessert?

This naming convention harks back to mid-century America, where Jell-O, fruit, and whipped topping combos were often served as “salads”—a cultural quirk that lives on in Southern and Midwestern potluck traditions.

Tips for Perfect Results Every Time

  • Drain the fruit well: Extra moisture can thin the pudding mix and affect the creamy consistency.
  • Chill thoroughly: At least an hour in the fridge gives the best texture and flavor.
  • Fold gently: Overmixing can break down the fruit and whipped topping, resulting in a mushy salad.
  • Balance the sweetness: If you’re adding more fruit or sweet ingredients, consider using unsweetened or lightly sweetened versions of the whipped topping or pudding.

The Heart of the Dish

At its core, Millionaire Peach Salad isn’t about following a perfect recipe. It’s about evoking a sense of comfort, joy, and community. It’s the dish that shows up when you need something simple, reliable, and soul-satisfying. The kind of thing you can imagine being passed down through recipe cards stained with peach syrup and scribbled in cursive.

You don’t need a holiday or a potluck to enjoy this salad. Make it on a Tuesday. Make it when you’re feeling nostalgic. Make it because you want to remember what joy tastes like.

Conclusion: A Spoonful of Nostalgia

Millionaire Peach Salad is a reminder of simpler times—of the joy found in everyday ingredients and the memories we wrap around food. It’s the kind of dish that doesn’t need explaining once you’ve tasted it. It speaks in creamy spoonfuls and peachy sweetness. And long after the last bite is gone, it leaves behind something even richer: connection.

So dust off that mixing bowl, open up a can of peaches, and make yourself a million-dollar memory.

Paul

Millionaire Peach Salad Recipe is a must-try delight!

This Millionaire Peach Salad is a dreamy, creamy fruit dessert that’s bursting with juicy peaches, fluffy marshmallows, and whipped vanilla pudding. It’s a no-bake, crowd-pleasing classic that brings the flavor of summer to any table.
Prep Time 10 minutes
Total Time 1 hour 10 minutes
Servings: 6 servings
Course: Dessert
Cuisine: American

Ingredients
  

  • 1 can 15 oz sliced peaches in light syrup, drained1 package (3.4 oz) instant vanilla pudding mix1 container (8 oz) whipped topping (like Cool Whip), thawed1 cup mini marshmallows1/2 cup shredded coconut (optional)1/2 cup chopped pecans or walnuts (optional)1 cup fruit cocktail or pineapple tidbits, drained

Method
 

  1. In a large mixing bowl, stir the pudding mix with the reserved juice from the peaches until thickened and smooth.
  2. Fold in the whipped topping until evenly combined.
  3. Gently stir in the drained peaches, fruit cocktail or pineapple, marshmallows, and optional coconut and nuts.
  4. Cover the bowl and refrigerate for at least 1 hour to let the flavors meld.
  5. Serve chilled and enjoy!

Notes

  • For a tropical twist, use mandarin oranges or mango chunks in place of peaches.
  • Add a splash of vanilla extract or almond extract for extra depth.
  • This salad holds well in the fridge and is perfect for potlucks, BBQs, or summer celebrations.
  • Make it a holiday treat by adding red and green maraschino cherries.

Chocolate Peanut Butter Cupcakes Recipe is a must-try!

Introduction to Chocolate Peanut Butter Cupcakes Recipe

Chocolate Peanut Butter Cupcakes Recipe is a perfect blend of rich chocolate and creamy peanut butter. These cupcakes are not just a dessert; they are a celebration of flavors that will make your taste buds dance with joy!

Imagine biting into a soft, moist chocolate cupcake topped with a luscious peanut butter frosting. It’s a match made in heaven! Whether you’re hosting a birthday party, a family gathering, or simply craving something sweet, these cupcakes are sure to impress everyone.

What makes this recipe even better is its simplicity. With just a few ingredients and easy steps, you can whip up a batch of these delicious cupcakes in no time. Plus, they are perfect for bakers of all skill levels. So, whether you’re a seasoned pro or a beginner, you’ll find joy in creating these delightful treats.

Let’s dive into the ingredients and preparation steps to bring this scrumptious recipe to life. Get ready to enjoy the sweet aroma of baking chocolate and peanut butter wafting through your kitchen!

Ingredients for Chocolate Peanut Butter Cupcakes Recipe

Chocolate Peanut Butter Cupcakes Recipe, you’ll need a few simple ingredients. Each component plays a vital role in achieving that perfect balance of flavors and textures. Here’s what you’ll need:

  • 1 ½ cups all-purpose flour
  • 1 cup granulated sugar
  • ½ cup unsweetened cocoa powder
  • 1 teaspoon baking soda
  • ½ teaspoon salt
  • 1 cup buttermilk
  • ½ cup vegetable oil
  • 2 large eggs
  • 2 teaspoons vanilla extract
  • 1 cup boiling water

For the creamy peanut butter frosting, gather the following ingredients:

  • 1 cup creamy peanut butter
  • ½ cup unsalted butter, softened
  • 3 cups powdered sugar
  • ¼ cup heavy cream
  • 1 teaspoon vanilla extract

These ingredients come together to create a delightful cupcake experience. The combination of rich cocoa and creamy peanut butter will leave you wanting more. Make sure to have everything ready before you start baking. This way, you can enjoy the process without any interruptions!

Preparation of Chocolate Peanut Butter Cupcakes Recipe

Chocolate Peanut Butter Cupcakes Recipe to life! Follow these simple steps to create your delicious cupcakes. Each step is designed to ensure that your cupcakes turn out perfectly every time.

Step 1: Preheat the Oven

First things first, preheat your oven to 350°F (175°C). This step is crucial as it ensures that your cupcakes bake evenly. While the oven is heating up, you can prepare your cupcake pan. Line it with paper liners to make removing the cupcakes easy once they’re baked.

Step 2: Prepare the Cupcake Batter

In a large mixing bowl, combine the dry ingredients. Start with 1 ½ cups of all-purpose flour, 1 cup of granulated sugar, ½ cup of unsweetened cocoa powder, 1 teaspoon of baking soda, and ½ teaspoon of salt. Whisk these ingredients together until they are well blended. This step helps to evenly distribute the baking soda and salt, ensuring your cupcakes rise perfectly.

Next, add the wet ingredients. Pour in 1 cup of buttermilk, ½ cup of vegetable oil, 2 large eggs, and 2 teaspoons of vanilla extract. Mix everything on medium speed until the batter is smooth. It’s important to mix well to incorporate air into the batter, which will help your cupcakes rise.

Step 3: Bake the Cupcakes

Now comes the exciting part! Carefully stir in 1 cup of boiling water into the batter. This will make the batter thin, but don’t worry; that’s how it should be! Pour the batter into the prepared cupcake liners, filling each about 2/3 full. This allows room for the cupcakes to rise without overflowing.

Place the cupcake pan in the preheated oven and bake for 18-20 minutes. To check if they are done, insert a toothpick into the center of a cupcake. If it comes out clean, they are ready! Once baked, allow the cupcakes to cool in the pan for 5 minutes before transferring them to a wire rack to cool completely.

Step 4: Make the Peanut Butter Frosting

While your cupcakes are cooling, it’s time to whip up the creamy peanut butter frosting. In a medium bowl, beat together 1 cup of creamy peanut butter and ½ cup of softened unsalted butter until the mixture is creamy and smooth. This step is essential for achieving a light and fluffy frosting.

Gradually add in 3 cups of powdered sugar, alternating with ¼ cup of heavy cream. Mix until everything is well combined and smooth. Finally, stir in 1 teaspoon of vanilla extract for that extra burst of flavor. Your frosting should be rich and creamy, perfect for topping your cupcakes!

Step 5: Frost the Cupcakes

Once the cupcakes are completely cool, it’s time to frost them generously with the peanut butter frosting. Use a spatula or a piping bag to create beautiful swirls on top of each cupcake. Feel free to get creative with your frosting technique! The more frosting, the better, right?

Chocolate Peanut Butter Cupcakes are ready to be enjoyed. They are perfect for any occasion or just as a sweet treat for yourself. Let’s move on to some variations you can try to make these cupcakes even more exciting!

Variation of Chocolate Peanut Butter Cupcakes Recipe

Chocolate Peanut Butter Cupcakes Recipe is already a hit, there are ways to adapt it to suit different dietary needs and preferences. Whether you’re looking for a gluten-free option or a vegan adaptation, you can still enjoy these delightful treats. Let’s explore how to make these variations!

Gluten-Free Option

If you or someone you know is gluten-sensitive, you can easily make these cupcakes gluten-free. Simply replace the all-purpose flour with a gluten-free flour blend. Many brands offer a 1:1 gluten-free flour that works well in baking. Make sure to check the ingredients to ensure it’s suitable for your needs.

Additionally, you can add a teaspoon of xanthan gum to help bind the ingredients together. This will give your cupcakes the right texture and prevent them from crumbling. Follow the same preparation steps as the original recipe, and you’ll have delicious gluten-free chocolate peanut butter cupcakes that everyone can enjoy!

Vegan Adaptation

For those following a vegan diet, you can still indulge in these scrumptious cupcakes! Start by replacing the eggs with flaxseed meal or applesauce. To make a flax egg, mix 1 tablespoon of flaxseed meal with 2.5 tablespoons of water. Let it sit for about 5 minutes until it thickens. This will act as a great egg substitute.

Next, swap the buttermilk with a plant-based milk, like almond or soy milk, mixed with a teaspoon of vinegar or lemon juice. This will create a similar acidity to buttermilk. For the frosting, use a vegan butter substitute instead of regular butter and ensure your peanut butter is free from added sugars or oils.

Chocolate Peanut Butter Cupcakes Recipe that everyone will love. Enjoy the same rich flavors while sticking to your dietary preferences!

Cooking Note for Chocolate Peanut Butter Cupcakes Recipe

Chocolate Peanut Butter Cupcakes Recipe. Here are some important cooking notes to keep in mind as you embark on your baking adventure:

First, always measure your ingredients accurately. Baking is a science, and even a small difference in measurements can affect the outcome. Use measuring cups and spoons for dry ingredients and a liquid measuring cup for wet ingredients. This ensures that your cupcakes rise beautifully and have the right texture.

Next, make sure your ingredients are at room temperature before mixing. This includes eggs, buttermilk, and butter. Room temperature ingredients blend more easily, resulting in a smoother batter. It also helps the cupcakes bake evenly.

Another important note is to avoid overmixing the batter. Once you combine the wet and dry ingredients, mix just until everything is incorporated. Overmixing can lead to dense cupcakes, which is not what we want! A light hand will yield fluffy, tender cupcakes.

When baking, keep an eye on the time. Ovens can vary, so start checking your cupcakes a few minutes before the recommended baking time. Insert a toothpick into the center of a cupcake; if it comes out clean or with a few moist crumbs, they are done. If it has wet batter on it, give them a few more minutes.

Lastly, allow your cupcakes to cool completely before frosting. This prevents the frosting from melting and sliding off. Patience is key here! Once cooled, you can frost them generously and enjoy the delightful combination of chocolate and peanut butter.

Chocolate Peanut Butter Cupcakes that will impress your family and friends. Happy baking!

Serving Suggestions for Chocolate Peanut Butter Cupcakes Recipe

Chocolate Peanut Butter Cupcakes Recipe, it’s time to think about how to serve them! Presentation can elevate your cupcakes from simple treats to show-stopping desserts. Here are some delightful serving suggestions to make your cupcakes even more enjoyable:

  • Garnish with Chocolate Drizzle: A simple drizzle of melted chocolate over the frosted cupcakes adds a touch of elegance. Just melt some semi-sweet chocolate and use a spoon to create a beautiful pattern on top.
  • Top with Crushed Peanuts: For a crunchy texture, sprinkle crushed peanuts on top of the frosting. This not only adds flavor but also gives a nice visual contrast to the creamy frosting.
  • Serve with Ice Cream: Pair your cupcakes with a scoop of vanilla or chocolate ice cream. The cold ice cream complements the warm, rich flavors of the cupcakes, creating a delightful dessert experience.
  • Use Decorative Cupcake Stands: Present your cupcakes on a decorative stand or platter. This makes them look more appealing and is perfect for parties or gatherings.
  • Offer a Variety: If you’re hosting a party, consider making a variety of flavors. Alongside your chocolate peanut butter cupcakes, you could offer vanilla, red velvet, or even a fruity option. This way, there’s something for everyone!
  • Personalized Toppers: Create fun and personalized cupcake toppers for special occasions. Use themed decorations for birthdays, holidays, or celebrations to make your cupcakes stand out.

Chocolate Peanut Butter Cupcakes but also add an extra layer of enjoyment for your guests. Whether it’s a casual family dinner or a festive celebration, these cupcakes are sure to be a hit!

Tips for Perfecting Your Chocolate Peanut Butter Cupcakes Recipe

Chocolate Peanut Butter Cupcakes Recipe is all about attention to detail and a few helpful tips. With these tricks up your sleeve, you can ensure that your cupcakes turn out moist, fluffy, and bursting with flavor every time. Let’s explore some essential tips to elevate your baking game!

First, always use fresh ingredients. Check the expiration dates on your baking powder, baking soda, and cocoa powder. Fresh ingredients will help your cupcakes rise properly and enhance their flavor. Stale ingredients can lead to flat or bland cupcakes, which is not what you want!

Next, consider using high-quality cocoa powder. The type of cocoa powder you choose can significantly impact the taste of your cupcakes. Opt for a Dutch-processed cocoa for a richer flavor, or use natural cocoa for a more intense chocolate taste. Experimenting with different brands can lead to delightful discoveries!

Another tip is to avoid overfilling your cupcake liners. Filling them about 2/3 full is ideal. This allows enough space for the cupcakes to rise without overflowing. If you overfill, you may end up with messy cupcakes that lose their shape.

When it comes to mixing, remember to fold in the boiling water gently. This step is crucial for achieving a thin batter, which results in moist cupcakes. Stir just until combined; overmixing can lead to dense cupcakes. A light touch is key!

For the frosting, consider chilling your peanut butter before mixing. This can help create a thicker frosting that holds its shape better. If your frosting is too soft, add a bit more powdered sugar until you reach your desired consistency.

Lastly, don’t rush the cooling process. Allow your cupcakes to cool completely before frosting. This prevents the frosting from melting and ensures a beautiful presentation. If you’re in a hurry, you can place the cupcakes in the fridge for a few minutes to speed up the cooling process.

Chocolate Peanut Butter Cupcakes Recipe. Each batch will be a delicious success, leaving everyone wanting more. Happy baking!

Breakdown of Time for Chocolate Peanut Butter Cupcakes Recipe

Chocolate Peanut Butter Cupcakes Recipe can help you plan your baking session better. Here’s a detailed breakdown of the time you’ll need for preparation, cooking, and cooling. This way, you can enjoy the process without feeling rushed!

Prep Time

The prep time for this delightful recipe is approximately 20 minutes. During this time, you’ll gather all your ingredients, measure them accurately, and mix the batter. Make sure to have everything ready before you start. This will make the process smoother and more enjoyable!

Cooking Time

Once your cupcakes are in the oven, the cooking time is about 18-20 minutes. Keep an eye on them as they bake. Ovens can vary, so it’s a good idea to check a few minutes before the timer goes off. You want them to be perfectly baked, with a toothpick coming out clean!

Total Time

In total, you can expect to spend around 40-45 minutes from start to finish. This includes prep time, cooking time, and a short cooling period before frosting. Once the cupcakes are out of the oven, allow them to cool for about 5 minutes in the pan before transferring them to a wire rack. After they cool completely, you can frost them and enjoy your delicious creations!

Chocolate Peanut Butter Cupcakes into your day. Whether it’s a weekend treat or a special occasion, you’ll be ready to impress with your baking skills!

Nutritional Information for Chocolate Peanut Butter Cupcakes Recipe

Chocolate Peanut Butter Cupcakes Recipe can help you enjoy these treats while keeping track of your dietary goals. Here’s a breakdown of the key nutritional information per serving, which is one cupcake. This will give you a clearer picture of what you’re indulging in!

Calories

Each cupcake contains approximately 350 calories. This includes the rich chocolate base and the creamy peanut butter frosting. While they are a delightful treat, it’s good to be mindful of portion sizes, especially if you’re watching your calorie intake. Enjoying one cupcake as a special treat can fit nicely into a balanced diet!

Protein

In terms of protein, each cupcake provides about 6 grams. The protein comes from the eggs and peanut butter, which are both excellent sources. Protein is essential for building and repairing tissues, making these cupcakes not just a sweet indulgence but also a source of nourishment!

Sodium

Each cupcake contains roughly 200 milligrams of sodium. This amount is fairly moderate, especially considering that sodium is often found in many baked goods. If you’re watching your sodium intake, it’s a good idea to enjoy these cupcakes in moderation. Pairing them with fresh fruits or a glass of milk can balance out the flavors and nutrients!

Chocolate Peanut Butter Cupcakes while being aware of their impact on your diet. Remember, it’s all about balance and enjoying treats in moderation. Happy baking and indulging!

FAQs about Chocolate Peanut Butter Cupcakes Recipe

Can I make these cupcakes ahead of time?

Chocolate Peanut Butter Cupcakes Recipe ahead of time. In fact, they can be baked a day or two in advance. Just make sure to store them in an airtight container at room temperature. This will keep them fresh and delicious. If you plan to frost them later, it’s best to wait until they are completely cool before adding the peanut butter frosting. This way, the frosting won’t melt and will stay beautifully on top!

How do I store leftover cupcakes?

Storing leftover cupcakes is easy! Place them in an airtight container to keep them fresh. You can store them at room temperature for up to three days. If you want to keep them longer, consider refrigerating them. Just remember to let them come to room temperature before serving. This will help maintain their soft texture. If you have frosted cupcakes, they can also be stored in the fridge, but be sure to cover them well to prevent drying out.

Can I use other nut butters instead of peanut butter?

Yes, you can definitely use other nut butters in this recipe! Almond butter, cashew butter, or even sunflower seed butter can be great alternatives. Just keep in mind that the flavor will change slightly depending on the nut butter you choose. If you’re using a nut butter that is less sweet than peanut butter, you might want to adjust the sugar in the frosting to maintain the right sweetness level. Enjoy experimenting with different flavors!

What can I substitute for eggs in this recipe?

Chocolate Peanut Butter Cupcakes Recipe, there are several options! You can use 1/4 cup of unsweetened applesauce for each egg. Another great option is to mix 1 tablespoon of flaxseed meal with 2.5 tablespoons of water. Let it sit for about 5 minutes until it thickens. This will act as a perfect binding agent in your cupcakes. Both substitutes will help keep your cupcakes moist and delicious!

Conclusion on Chocolate Peanut Butter Cupcakes Recipe

Chocolate Peanut Butter Cupcakes Recipe is a delightful treat that combines the rich flavors of chocolate and the creamy goodness of peanut butter. These cupcakes are not only easy to make but also perfect for any occasion, whether it’s a birthday party, a family gathering, or simply a sweet indulgence for yourself.

With simple ingredients and straightforward steps, you can create a batch of moist, fluffy cupcakes topped with a luscious peanut butter frosting. The variations, such as gluten-free and vegan options, ensure that everyone can enjoy these delicious treats, regardless of dietary preferences.

Remember to follow the cooking notes and tips provided to achieve the best results. From measuring ingredients accurately to allowing your cupcakes to cool completely before frosting, these small details can make a big difference in your baking experience.

As you serve these delightful cupcakes, consider the presentation tips to elevate their appeal. Whether you choose to garnish with chocolate drizzle or serve them alongside ice cream, your cupcakes are sure to impress your guests.

Chocolate Peanut Butter Cupcakes Recipe, you’re not just baking; you’re creating memories and sharing joy with every bite. Happy baking!

Paul

Chocolate Peanut Butter Cupcakes Recipe is a must-try!

These Chocolate Peanut Butter Cupcakes are rich, decadent, and loaded with everyone’s favorite flavor combo. Moist chocolate cake hides a surprise Reese’s center, topped with fluffy peanut butter frosting and finished with a drizzle of chocolate ganache. Whether for birthdays, bake sales, or midnight cravings, these cupcakes steal the spotlight every time.
Prep Time 25 minutes
Cook Time 17 minutes
Total Time 45 minutes
Servings: 24 cupcakes
Course: Dessert
Cuisine: American

Ingredients
  

  • For the Cupcakes2 cups all-purpose flour2 cups granulated sugar¾ cup Dutch process cocoa powder2 teaspoons baking soda1 teaspoon baking powder1 teaspoon salt½ cup vegetable oil1 cup buttermilk room temperature2 large eggs, room temperature1 tablespoon vanilla extract1 cup hot water24 mini Reese’s cups
  • For the Peanut Butter Frosting18 tablespoons salted butter softened¾ cup creamy peanut butter3¾ cups powdered sugar1 tablespoon vanilla extract6 tablespoons heavy cream12 mini Reese’s cups, halved (for garnish)
  • For the Chocolate Ganache⅓ cup heavy cream½ cup chocolate chips

Method
 

  1. Preheat oven to 350°F (175°C). Line two standard 12-cup muffin pans with paper liners.
  2. In a large mixing bowl, whisk together flour, sugar, cocoa powder, baking soda, baking powder, and salt.
  3. In another bowl, combine oil, buttermilk, eggs, and vanilla. Slowly whisk in hot water.
  4. Pour the wet mixture into the dry ingredients and mix until smooth, about 2–3 minutes.
  5. Fill each cupcake liner ⅓ full. Press a mini Reese’s into the center of each. Add more batter until liners are ⅔ full.
  6. Bake for 14–17 minutes, or until a toothpick inserted around the edge comes out clean. Let cool in the pan for 5–10 minutes, then transfer to a wire rack to cool completely.
  7. To make the frosting, beat butter and peanut butter until smooth and creamy. Add powdered sugar, vanilla, and heavy cream. Beat until light and fluffy, about 2–3 minutes.
  8. For the ganache, heat heavy cream in the microwave until just steaming. Add chocolate chips, let sit for 2–3 minutes, then stir until smooth.
  9. Pipe frosting onto cooled cupcakes. Top with a halved mini Reese’s and drizzle ganache over the top.

Notes

You can use unsalted butter in the frosting—just add a pinch of salt.
Cupcakes can be made a day ahead and frosted the next day. Store in an airtight container.
For extra chocolate, add mini chocolate chips to the batter before baking.
Let ganache cool slightly before drizzling for the best consistency.

French Onion Beef Casserole is a comforting delight.

French Onion Beef Casserole. This recipe combines the rich flavors of ground beef, savory onions, and creamy mushroom soup, all topped with gooey Swiss cheese and crispy French fried onions. It’s a dish that brings together the best of French onion soup and a hearty casserole, making it perfect for family dinners or gatherings with friends.

What makes this casserole truly special is its simplicity. With just a handful of ingredients, you can create a meal that feels indulgent yet is easy to prepare. The layers of flavor meld together beautifully, creating a dish that is both satisfying and delicious. Plus, it’s a great way to use up leftover egg noodles, making it a practical choice for busy weeknights.

French Onion Beef Casserole recipe is sure to impress. So, roll up your sleeves and get ready to create a dish that will have everyone asking for seconds!

Ingredients for French Onion Beef Casserole Recipe

French Onion Beef Casserole, you’ll need a selection of simple yet flavorful ingredients. Here’s what you’ll need:

  • 1 pound ground beef
  • 1 large onion, thinly sliced
  • 2 cloves garlic, minced
  • 1 can (10.5 ounces) cream of mushroom soup
  • 1 cup beef broth
  • 1 teaspoon Worcestershire sauce
  • 1 teaspoon dried thyme
  • Salt and pepper to taste
  • 4 cups cooked egg noodles
  • 1 cup shredded Swiss cheese
  • 1 cup French fried onions

These ingredients come together to create a rich and hearty dish. The ground beef provides protein, while the onions and garlic add depth of flavor. The cream of mushroom soup and beef broth create a creamy base, making every bite delightful. The Swiss cheese melts beautifully, adding a gooey texture, and the French fried onions give a satisfying crunch on top.

French Onion Beef Casserole is its versatility, allowing you to make it your own!

Step-by-Step Preparation of French Onion Beef Casserole Recipe

French Onion Beef Casserole. This step-by-step guide will help you create a delicious meal that everyone will love. Let’s get started!

Step 1: Prepping the Ingredients

First things first, you need to prep your ingredients. Start by measuring out all the items listed in the ingredients section. This makes the cooking process smoother. Next, thinly slice the large onion and mince the garlic cloves. Having everything ready will save you time and make cooking more enjoyable.

Step 2: Cooking the Beef

In a large skillet, heat over medium heat. Add the pound of ground beef to the skillet. Cook it until it’s browned, which usually takes about 5-7 minutes. Make sure to break it apart with a spatula as it cooks. Once the beef is browned, drain any excess fat. This step is important to keep your casserole from being greasy.

Step 3: Sautéing the Onions

French Onion Beef Casserole even more delicious.

Step 4: Combining Ingredients

Once the onions are ready, stir in the cream of mushroom soup, beef broth, Worcestershire sauce, dried thyme, salt, and pepper. Mix everything well and let it simmer for about 5 minutes. This allows the flavors to meld together beautifully. After that, take a large mixing bowl and combine the cooked egg noodles with the beef mixture. Stir until everything is well combined.

Step 5: Baking the Casserole

Now, transfer the mixture into a greased 9×13 inch baking dish. Spread it out evenly. Next, sprinkle the shredded Swiss cheese on top, followed by the French fried onions. These toppings will create a delightful crunch and a cheesy layer. Finally, bake the casserole in your preheated oven at 350°F for 25-30 minutes. You’ll know it’s ready when the cheese is melted and bubbly. Let it cool for about 5 minutes before serving.

French Onion Beef Casserole is ready to be enjoyed. This dish is not only easy to make but also packed with flavor. It’s perfect for any occasion!

Variation of French Onion Beef Casserole Recipe

French Onion Beef Casserole is a hit, there are many ways to switch things up! Whether you want to try different flavors or cater to dietary preferences, these variations will keep your meals exciting. Let’s explore some alternative ingredients and a vegetarian option that everyone can enjoy.

Alternative Ingredients to Consider

French Onion Beef Casserole. Here are some ideas:

  • Cheese Variations: Instead of Swiss cheese, try using cheddar, mozzarella, or even pepper jack for a spicy kick.
  • Meat Options: Ground turkey or chicken can be used as a leaner alternative to beef. You can also add cooked sausage for extra flavor.
  • Vegetables: Consider adding bell peppers, mushrooms, or spinach to the beef mixture for added nutrition and flavor.
  • Herbs and Spices: Experiment with fresh herbs like parsley or basil. You can also add a pinch of cayenne pepper for some heat.

These alternative ingredients can enhance the taste and texture of your casserole, making it a fun dish to customize!

Vegetarian Option for French Onion Beef Casserole Recipe

French Onion Beef Casserole, you can easily make some substitutions. Here’s how:

  • Replace the Beef: Use a plant-based ground meat substitute, like lentils or crumbled tofu, to mimic the texture of ground beef.
  • Vegetable Broth: Swap out the beef broth for vegetable broth to keep the flavors rich and savory.
  • Extra Veggies: Add more vegetables like zucchini, carrots, or peas to boost the nutrition and flavor.
  • Cheese Alternatives: Use a dairy-free cheese option if you want to keep it vegan.

French Onion Beef Casserole is just as hearty and satisfying. It’s a great way to enjoy the same comforting flavors while catering to different dietary needs.

Cooking Note for French Onion Beef Casserole Recipe

French Onion Beef Casserole, there are a few cooking notes to keep in mind. These tips will help ensure that your dish turns out perfectly every time. Let’s dive into some important considerations!

First, always use a large skillet for cooking the beef and onions. This allows for even cooking and prevents overcrowding, which can lead to steaming instead of browning. Browning the beef properly adds depth to the flavor, making your casserole even more delicious.

Next, when sautéing the onions, be patient. Cooking them until they are soft and translucent is key. This step enhances their natural sweetness, which is essential for that classic French onion flavor. If you find that the onions are browning too quickly, reduce the heat to avoid burning.

Another important note is to taste your mixture before baking. Adjust the seasoning as needed. A little extra salt or pepper can make a big difference in flavor. If you prefer a creamier texture, consider adding a dollop of sour cream or cream cheese to the mixture before baking. This will give your casserole a rich and velvety consistency.

Lastly, let your casserole cool for a few minutes after baking. This helps the layers set, making it easier to serve. If you cut into it right away, it may fall apart. Allowing it to rest will ensure that each serving holds its shape beautifully.

French Onion Beef Casserole that is not only tasty but also visually appealing. Enjoy the process and the delightful aroma that fills your kitchen as you cook!

Serving Suggestions for French Onion Beef Casserole Recipe

French Onion Beef Casserole is baked to perfection, it’s time to think about how to serve it. This dish is not only delicious but also versatile, making it a great centerpiece for any meal. Here are some serving suggestions to elevate your dining experience!

First, consider pairing your casserole with a fresh salad. A simple green salad with mixed greens, cherry tomatoes, and a light vinaigrette can provide a refreshing contrast to the rich flavors of the casserole. The crispness of the salad balances the creamy texture, making each bite enjoyable.

Another great option is to serve the casserole with crusty bread or dinner rolls. The bread can be used to scoop up the casserole, adding a delightful crunch. You might even want to toast the bread with a bit of garlic butter for an extra flavor boost!

French Onion Beef Casserole.

For a comforting touch, consider serving the casserole with a side of mashed potatoes. The creamy potatoes can soak up the delicious sauce from the casserole, creating a satisfying meal. You can even mix in some garlic or cheese into the mashed potatoes for added flavor.

Lastly, don’t forget about beverages! A glass of red wine pairs beautifully with the rich flavors of the casserole. If you prefer non-alcoholic options, a sparkling water with a slice of lemon can be refreshing and light.

French Onion Beef Casserole will be a hit at the dinner table. Enjoy the delightful combination of flavors and the smiles on your loved ones’ faces as they dig into this comforting dish!

Tips for Perfecting Your French Onion Beef Casserole Recipe

French Onion Beef Casserole truly exceptional, consider these helpful tips. They will guide you in achieving the best flavor and texture, ensuring that every bite is a delight!

First, choose high-quality ground beef. Opt for lean ground beef to reduce excess fat while still keeping the dish flavorful. If you prefer a richer taste, you can use ground chuck, which has a bit more fat content.

Next, don’t rush the onion sautéing process. Cooking the onions slowly allows their natural sugars to caramelize, enhancing their sweetness. This step is crucial for achieving that classic French onion flavor. If you have the time, consider cooking the onions separately until they are golden brown before adding them to the beef.

For added depth, consider deglazing the skillet after cooking the beef. After draining the fat, pour a splash of beef broth into the hot skillet. Scrape up any browned bits from the bottom. This will add extra flavor to your casserole.

When mixing the ingredients, be gentle. Overmixing can lead to a dense casserole. Stir just until everything is combined, allowing the noodles to remain fluffy and light.

For a crispy topping, add the French fried onions during the last 10 minutes of baking. This will keep them crunchy and prevent them from becoming soggy. You can also sprinkle some extra cheese on top for an even cheesier finish!

Lastly, let your casserole rest for a few minutes after baking. This allows the flavors to settle and makes serving easier. You’ll find that the layers hold together better, giving you beautiful slices to serve.

French Onion Beef Casserole will be a standout dish at any meal. Enjoy the process and the delicious results!

Breakdown of Time for French Onion Beef Casserole Recipe

French Onion Beef Casserole can help you plan your cooking better. Here’s a simple breakdown of the time involved in preparing this delicious dish.

Prep Time

French Onion Beef Casserole is approximately 15-20 minutes. This includes gathering all your ingredients, slicing the onion, and mincing the garlic. Having everything ready before you start cooking will make the process smoother and more enjoyable.

Cooking Time

Once you start cooking, the total cooking time is about 30-35 minutes. This includes browning the ground beef, sautéing the onions, and simmering the mixture. After combining everything, you’ll bake the casserole for 25-30 minutes until the cheese is melted and bubbly. It’s a quick and easy process that results in a hearty meal!

Total Time

French Onion Beef Casserole is perfect for busy weeknights or when you want to impress guests without spending all day in the kitchen.

Now that you know the time breakdown, you can easily fit this delightful dish into your schedule. Enjoy the cooking process and the wonderful aroma that fills your kitchen!

Nutritional Information for French Onion Beef Casserole Recipe

French Onion Beef Casserole is not only delicious but also provides a good mix of nutrients. Here’s a closer look at the nutritional information per serving of this hearty dish.

Calories

French Onion Beef Casserole contains approximately 380 calories. This makes it a satisfying option for dinner without being overly heavy. The combination of ground beef, egg noodles, and cheese contributes to the calorie count, providing energy for your evening activities.

Protein

Protein is an essential nutrient for building and repairing tissues. Each serving of this casserole offers about 22 grams of protein. The ground beef and Swiss cheese are excellent sources of protein, making this dish a great choice for those looking to increase their protein intake. It’s perfect for active individuals or anyone needing a protein boost!

Sodium

When it comes to sodium, each serving contains around 800 milligrams. While this is a reasonable amount for a flavorful dish, it’s important to be mindful of your overall sodium intake throughout the day. If you’re watching your sodium levels, consider using low-sodium beef broth and cream of mushroom soup. This simple adjustment can help reduce the sodium content without sacrificing flavor.

French Onion Beef Casserole is a nutritious meal option that provides a good balance of calories, protein, and flavor. By being aware of the nutritional information, you can enjoy this comforting dish while keeping your dietary goals in mind. Happy cooking!

FAQs about French Onion Beef Casserole Recipe

Can I make French Onion Beef Casserole ahead of time?

French Onion Beef Casserole ahead of time. Simply follow the recipe up to the baking step. After combining all the ingredients in the baking dish, cover it tightly with plastic wrap or aluminum foil. You can store it in the refrigerator for up to 24 hours before baking. When you’re ready to bake, just remove the cover and pop it in the oven. You may need to add a few extra minutes to the baking time if it’s cold from the fridge.

What can I serve with French Onion Beef Casserole?

French Onion Beef Casserole. A fresh green salad with a light vinaigrette is a great choice, as it adds a refreshing contrast to the rich flavors of the casserole. You can also serve it with crusty bread or dinner rolls for a hearty meal. Roasted vegetables, like carrots or broccoli, make a nutritious side dish that complements the casserole beautifully. For a comforting touch, consider mashed potatoes to soak up the delicious sauce!

How do I store leftovers of French Onion Beef Casserole?

French Onion Beef Casserole is easy! Allow the casserole to cool completely before transferring it to an airtight container. You can keep it in the refrigerator for up to 3-4 days. When you’re ready to enjoy it again, simply reheat individual portions in the microwave or warm it in the oven at 350°F until heated through. If you want to keep it longer, consider freezing it!

Can I freeze French Onion Beef Casserole?

French Onion Beef Casserole for later enjoyment! To do this, prepare the casserole as directed but do not bake it. Instead, cover the dish tightly with plastic wrap and then aluminum foil to prevent freezer burn. It can be stored in the freezer for up to 2-3 months. When you’re ready to bake it, thaw it in the refrigerator overnight and then bake as usual. This makes for a convenient meal option on busy days!

Conclusion on French Onion Beef Casserole Recipe

French Onion Beef Casserole is a delightful dish that combines comfort and flavor in every bite. With its rich layers of ground beef, sweet onions, and creamy sauce, topped with melted Swiss cheese and crispy fried onions, it’s no wonder this casserole has become a family favorite. Not only is it easy to prepare, but it also offers versatility, allowing you to customize it to suit your taste preferences.

French Onion Beef Casserole fits seamlessly into your meal planning.

As you explore the variations and serving suggestions, you’ll find that this casserole can adapt to any occasion. Whether you’re serving it with a fresh salad, crusty bread, or roasted vegetables, it’s sure to impress your family and friends. So, gather your ingredients, follow the steps, and enjoy the wonderful flavors of this comforting dish.

French Onion Beef Casserole with your loved ones. Happy cooking!

Paul

French Onion Beef Casserole is a comforting delight.

This French Onion Beef Casserole is the ultimate comfort food—savory, creamy, and irresistibly crunchy on top. Tender egg noodles are combined with seasoned ground beef and a rich, flavorful mix of French onion and mushroom soups, all finished with crispy French fried onions for the perfect golden topping. It’s a family favorite that’s easy to whip up for cozy weeknights or casual gatherings.
Prep Time 15 minutes
Cook Time 25 minutes
Total Time 40 minutes
Servings: 6 servings
Course: Main Dish
Cuisine: American

Ingredients
  

  • 12 ounces egg noodles1 pound ground beef1 tablespoon butter1 10.5 ounce can condensed French onion soup1 (10.5 ounce) can cream of mushroom soup1 cup sour cream1 cup French fried onions (plus more for topping)Salt and pepper to taste

Method
 

  1. Preheat your oven to 350°F (175°C).
  2. Cook the egg noodles according to package directions. Drain and set aside.
  3. In a large skillet over medium heat, melt the butter. Add the ground beef and cook until browned and no longer pink. Season with salt and pepper.
  4. Stir in the French onion soup, cream of mushroom soup, and sour cream. Mix well until everything is heated through and combined.
  5. Add the cooked noodles to the skillet mixture and stir in 1 cup of French fried onions.
  6. Transfer the mixture to a greased 9×13-inch baking dish. Spread it evenly and top with additional French fried onions.
  7. Bake for 25 minutes or until the casserole is bubbly and the topping is golden brown.
  8. Let it rest for a few minutes before serving.

Notes

Use freshly grated cheese as an optional mix-in for an extra rich casserole.
Swap sour cream for Greek yogurt for a lighter option.
This casserole can be assembled in advance—just cover and refrigerate, then bake when ready.
Leftovers reheat well and make a perfect lunch the next day.