Hawaiian Shoyu Chicken Recipe is a must-try dish!

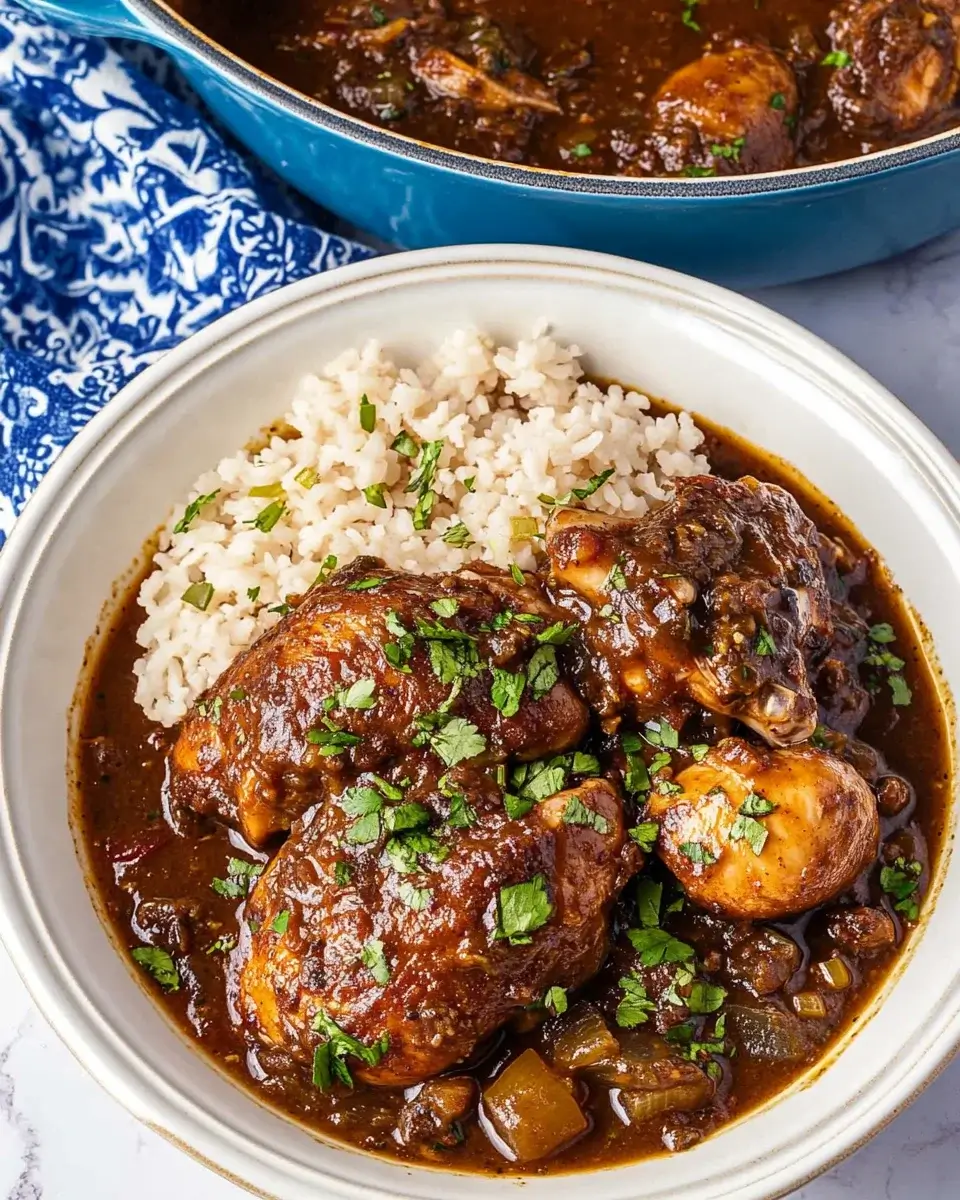
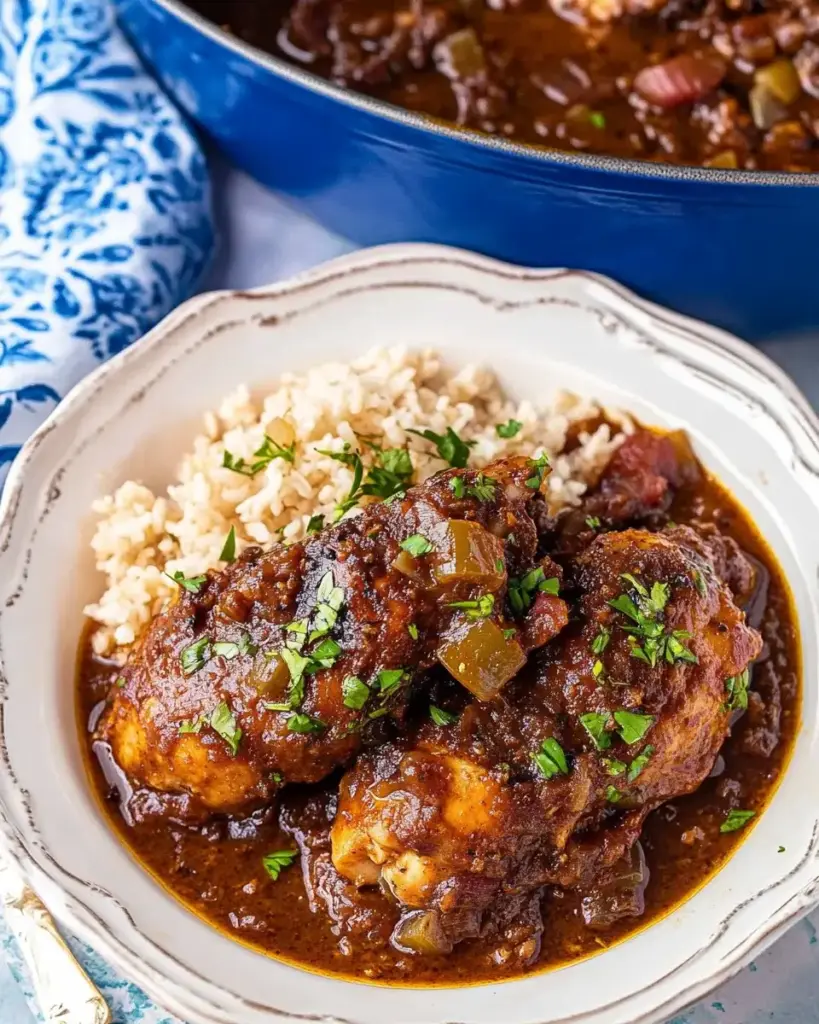
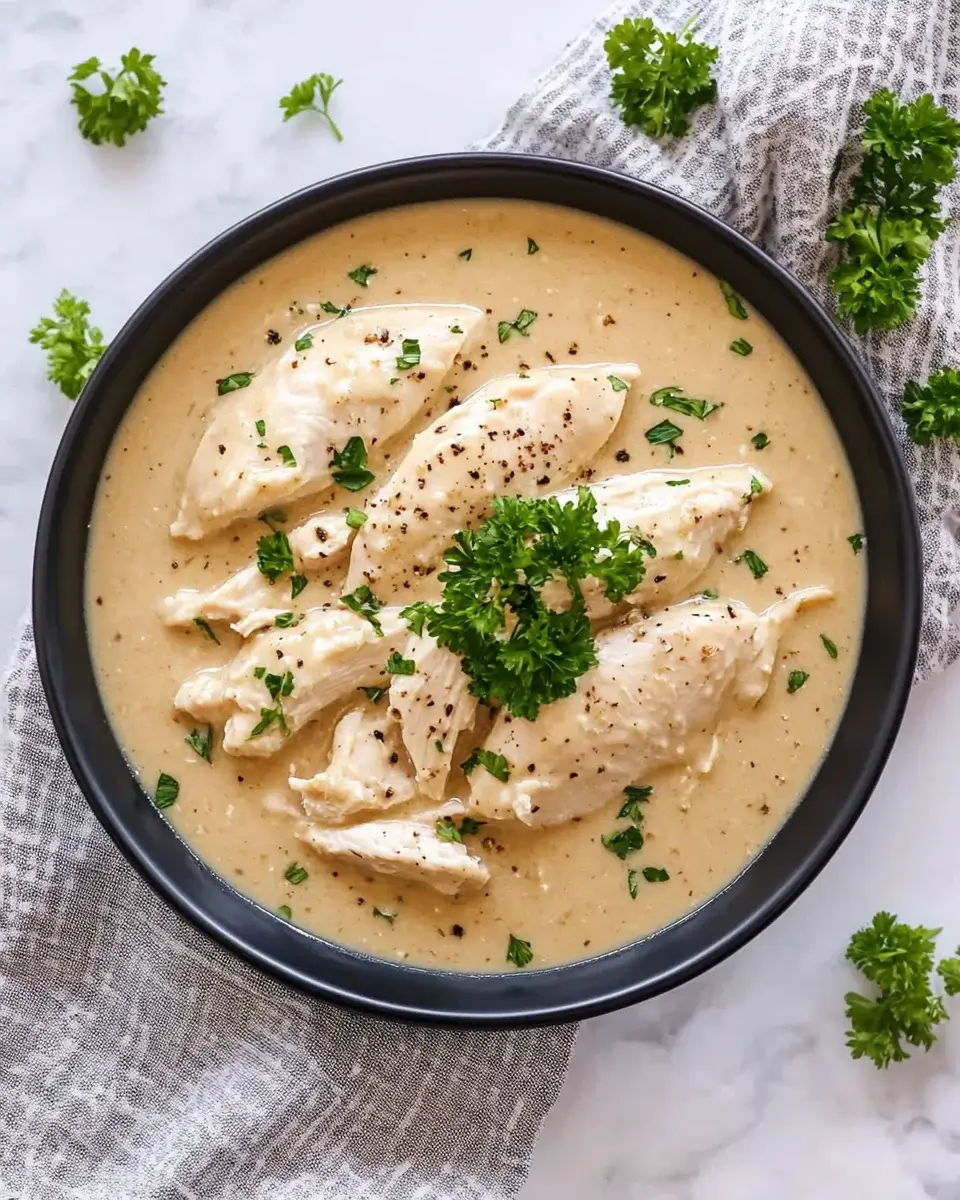
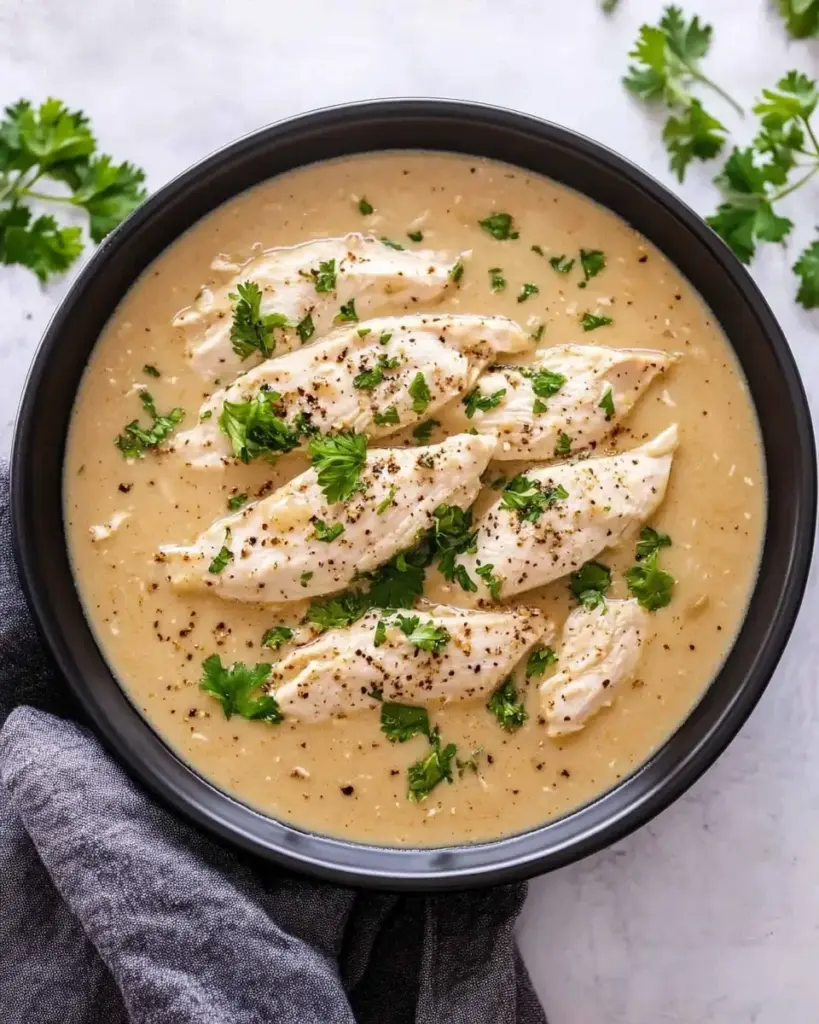
Hawaiian Shoyu Chicken is a delightful dish that brings the flavors of the islands right to your kitchen. This recipe features tender, juicy chicken thighs marinated in a savory blend of soy sauce, brown sugar, and spices. The result is a sweet and salty flavor that is simply irresistible. The chicken is baked to perfection, allowing the marinade to caramelize and create a delicious glaze. It’s a dish that not only satisfies your taste buds but also fills your home with a wonderful aroma.

The Cultural Significance of Hawaiian Shoyu Chicken

This dish is more than just a meal; it represents the rich culinary heritage of Hawaii. Shoyu, which means soy sauce in Japanese, reflects the influence of Asian cultures on Hawaiian cuisine. The combination of flavors in Hawaiian Shoyu Chicken showcases the island’s unique blend of traditions. Families often gather to enjoy this dish during special occasions and celebrations, making it a staple in many Hawaiian households. Sharing a plate of Hawaiian Shoyu Chicken is a way to connect with loved ones and celebrate the spirit of aloha.

Ingredients for Hawaiian Shoyu Chicken Recipe

To create the mouthwatering Hawaiian Shoyu Chicken, you’ll need a few simple yet flavorful ingredients. Each component plays a vital role in achieving that perfect balance of sweet and savory. Here’s what you’ll need:

  • 2 pounds bone-in chicken thighs, skin-on: The chicken thighs provide rich flavor and tenderness.
  • 1 cup soy sauce: This is the base of the marinade, giving the dish its signature umami taste.
  • 1/2 cup brown sugar: Adds sweetness and helps create a beautiful glaze.
  • 1/4 cup rice vinegar: This ingredient adds a touch of acidity, balancing the sweetness of the sugar.
  • 1/4 cup water: Helps to dilute the marinade for even coating.
  • 4 cloves garlic, minced: Garlic brings a wonderful aroma and depth of flavor.
  • 1 tablespoon fresh ginger, grated: Ginger adds a warm, spicy note that complements the other flavors.
  • 1/2 teaspoon black pepper: A pinch of black pepper enhances the overall taste.
  • 1/2 teaspoon sesame oil: This oil adds a nutty flavor that rounds out the dish.
  • 2 green onions, sliced (for garnish): Fresh green onions add a pop of color and freshness.
  • Sesame seeds (for garnish): These seeds provide a delightful crunch and visual appeal.

Gathering these ingredients is the first step toward making a delicious Hawaiian Shoyu Chicken. Each item contributes to the dish’s unique flavor profile, ensuring a delightful dining experience for you and your loved ones.

Step-by-Step Preparation of Hawaiian Shoyu Chicken Recipe

Step 1: Marinating the Chicken

Marinating the chicken is a crucial step in this Hawaiian Shoyu Chicken recipe. Start by whisking together the soy sauce, brown sugar, rice vinegar, water, minced garlic, grated ginger, black pepper, and sesame oil in a large bowl. Make sure the sugar dissolves completely. Once your marinade is ready, add the bone-in chicken thighs. Ensure each piece is well coated with the marinade. Cover the bowl with plastic wrap and refrigerate it for at least one hour. For the best flavor, let it marinate overnight. This allows the chicken to absorb all those delicious flavors.

Step 2: Cooking the Chicken

After marinating, it’s time to cook the chicken. Preheat your oven to 375°F (190°C). While the oven heats up, take the chicken out of the marinade. Place the chicken thighs in a baking dish, skin side up. Make sure they are arranged in a single layer for even cooking. Don’t forget to reserve the marinade for later use. Bake the chicken in the preheated oven for about 30 minutes. This initial cooking time helps to lock in the moisture and flavor.

Step 3: Preparing the Sauce

While the chicken is baking, you can prepare the sauce. Pour the reserved marinade into a saucepan and bring it to a boil over medium-high heat. Once it reaches a boil, reduce the heat and let it simmer for about 10 minutes. This simmering process thickens the sauce and intensifies the flavors. Keep an eye on it to prevent burning. The result will be a rich, flavorful sauce that will enhance your chicken.

Step 4: Combining Ingredients

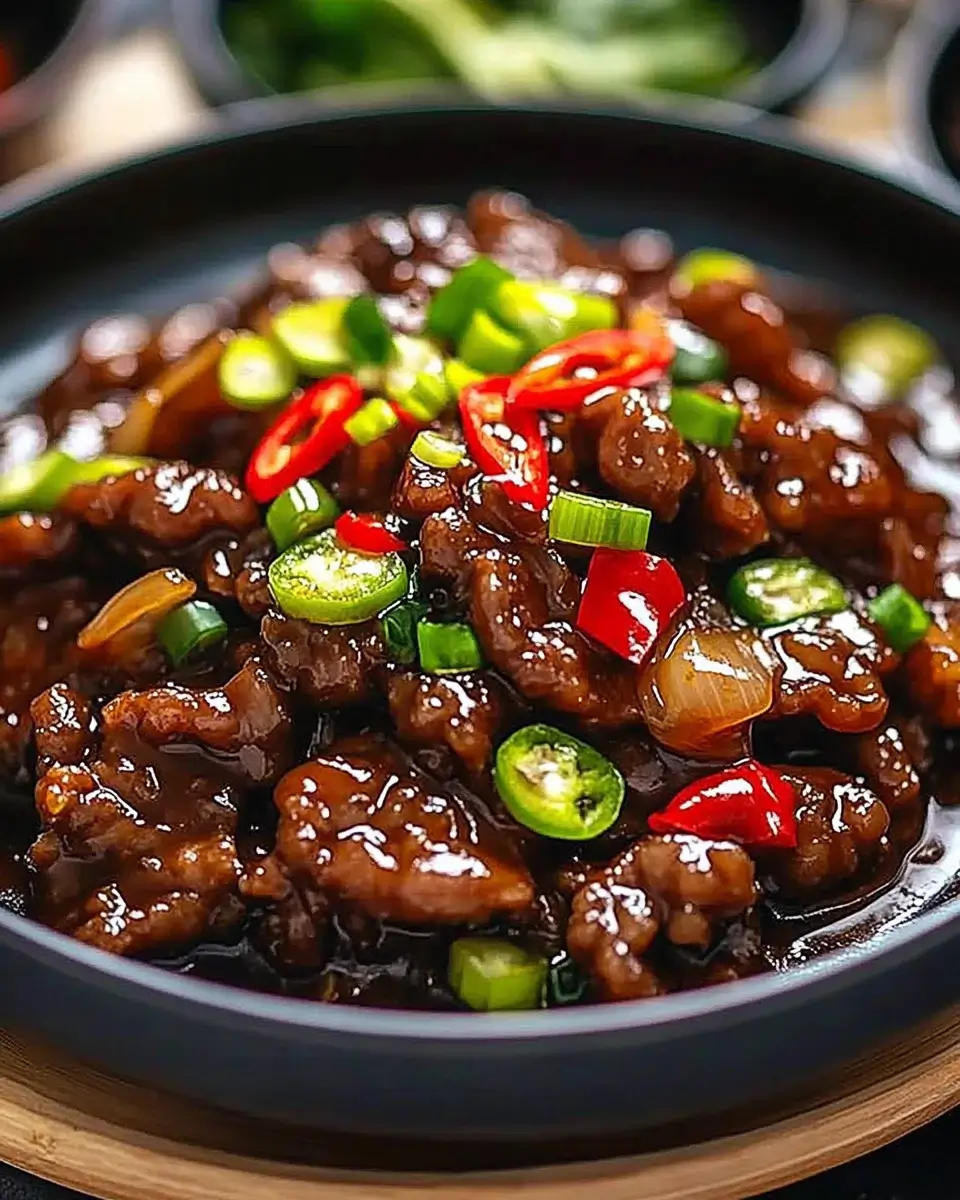
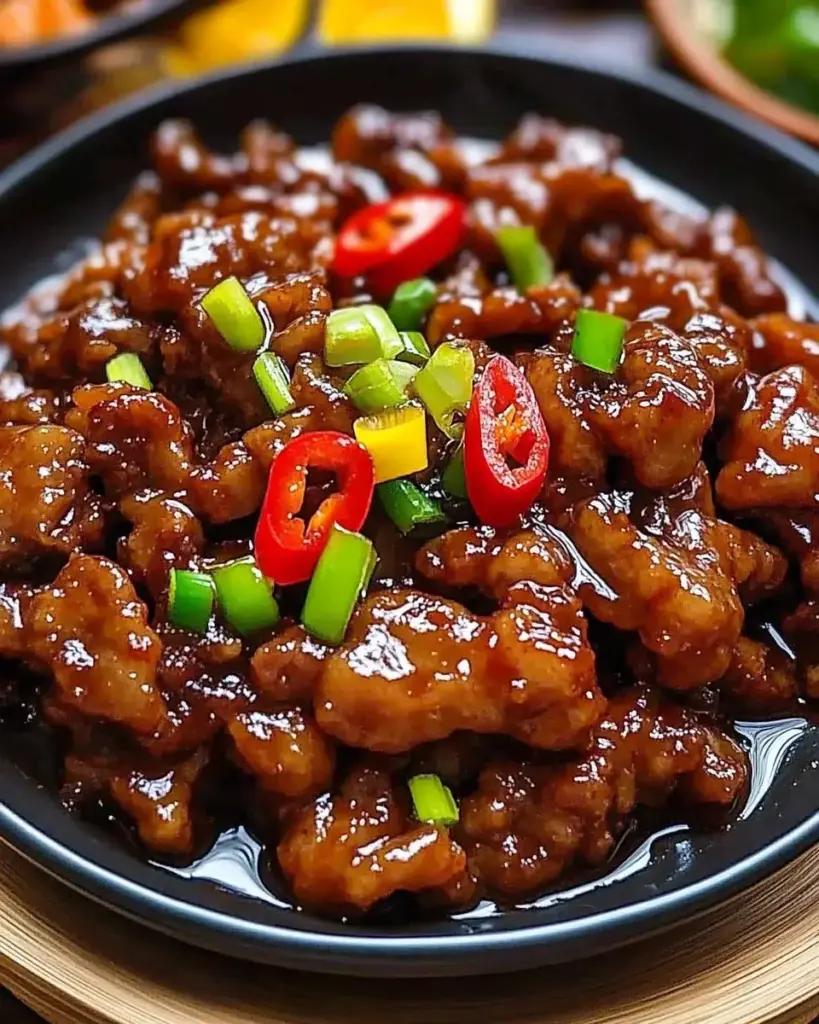
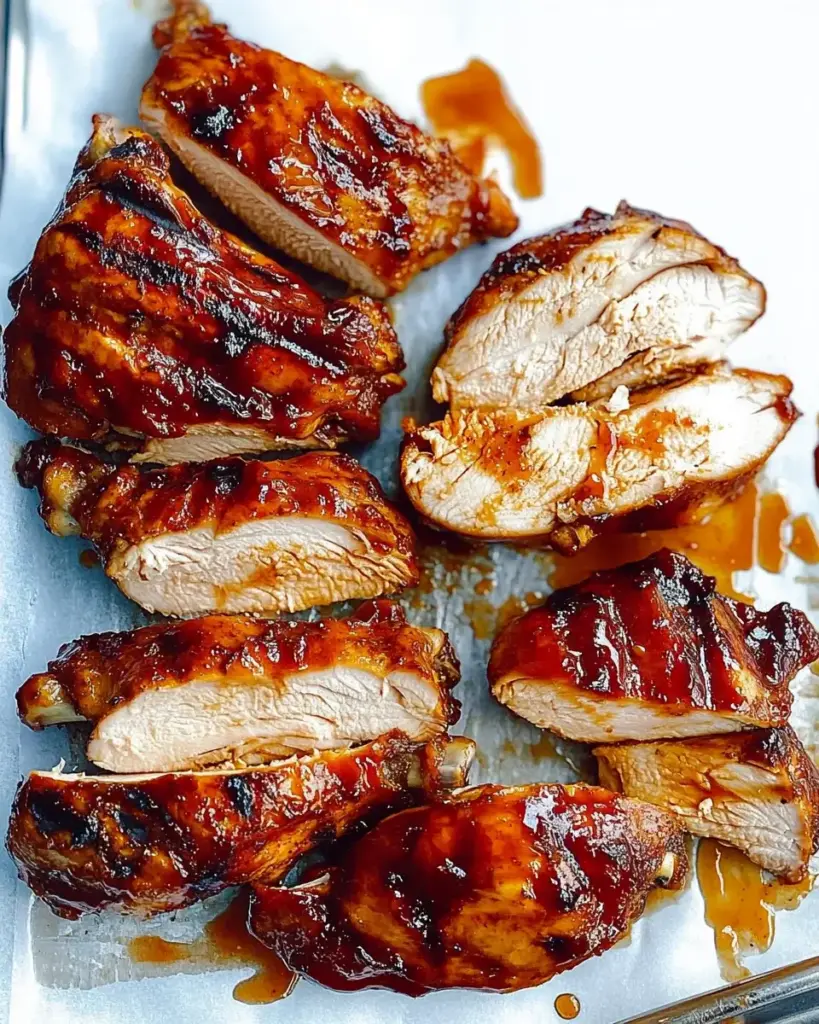
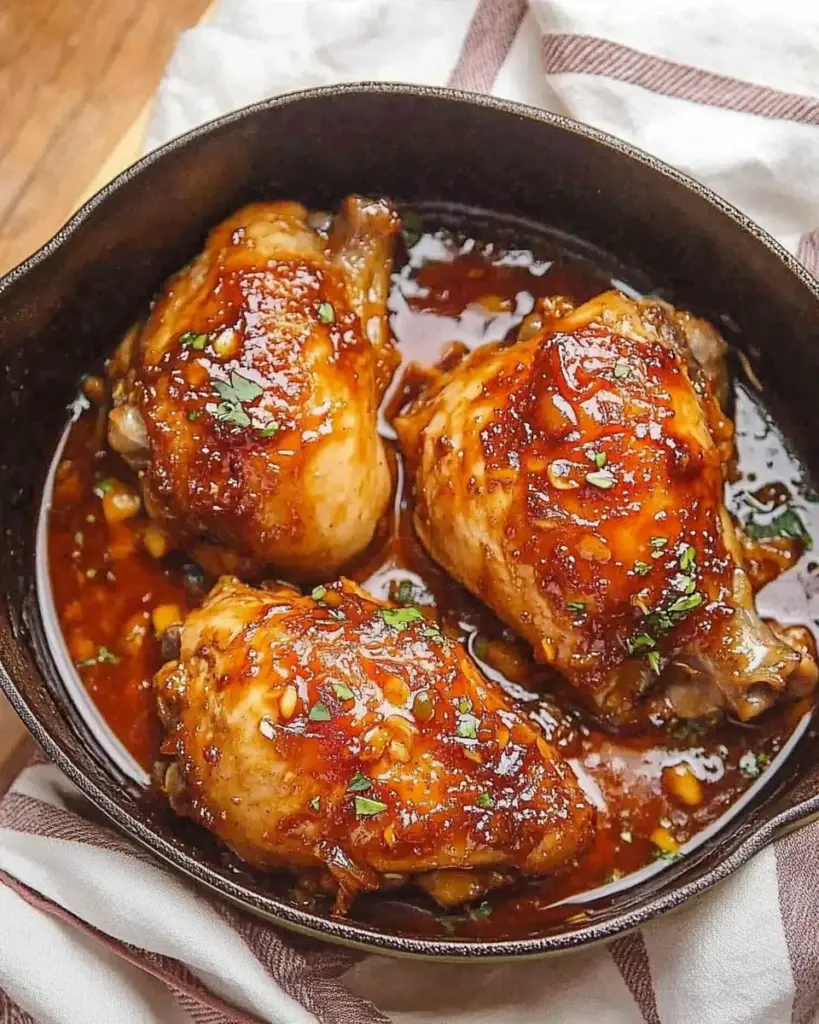
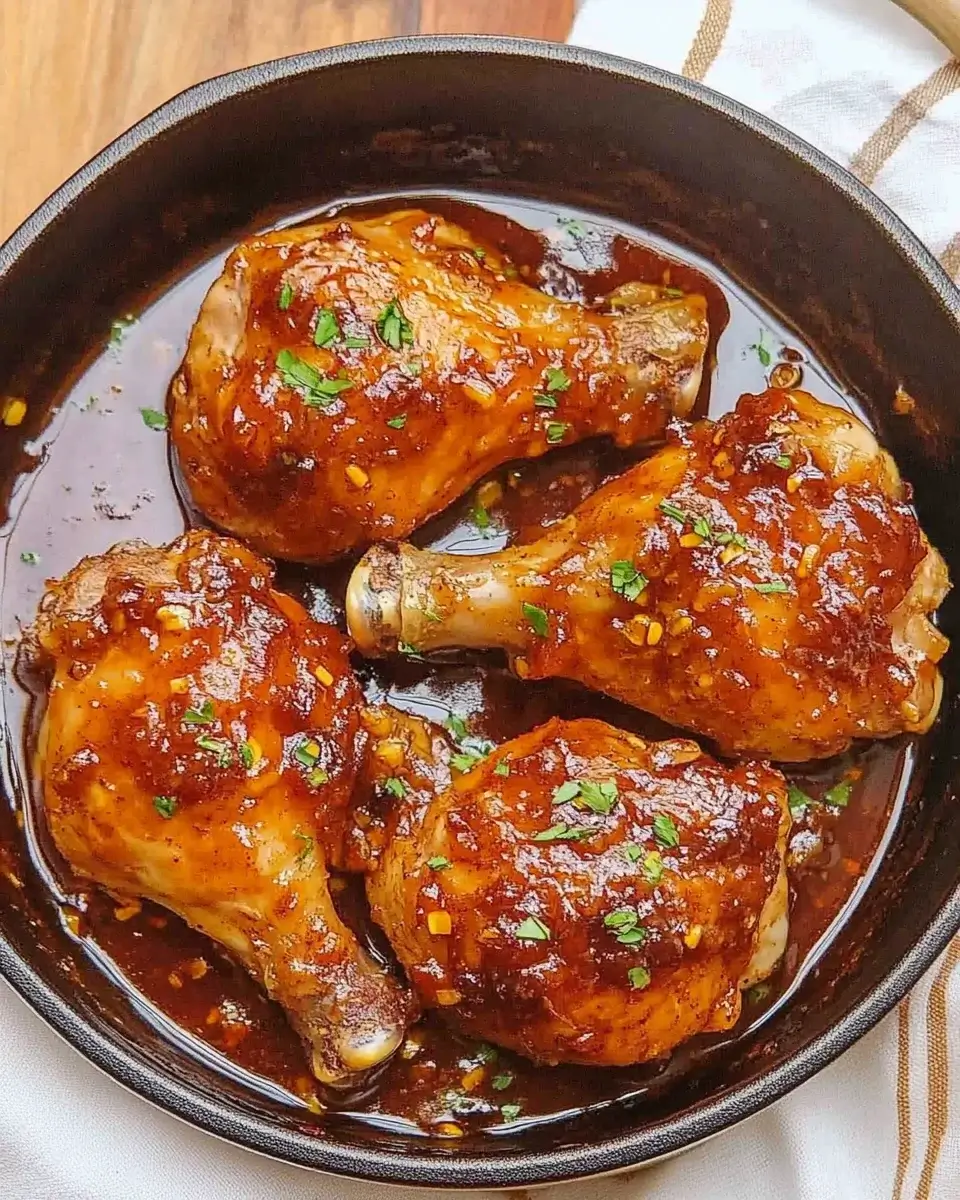
After the chicken has baked for 30 minutes, it’s time to add the sauce. Brush the thickened marinade generously over the chicken thighs. This step adds an extra layer of flavor and helps create a beautiful glaze. Return the chicken to the oven for an additional 15-20 minutes. Make sure the chicken reaches an internal temperature of 165°F (75°C) to ensure it’s fully cooked. The skin should be golden brown and crispy, making it even more appetizing.

Step 5: Serving the Dish

Once the chicken is cooked, remove it from the oven and let it rest for about 5 minutes. This resting period allows the juices to redistribute, keeping the chicken moist. To serve, place the chicken on a platter and garnish it with sliced green onions and sesame seeds. These garnishes not only add color but also a fresh crunch. Serve your Hawaiian Shoyu Chicken with steamed rice or grilled vegetables for a complete meal. Enjoy the delightful flavors and the smiles it brings to your table!

Variations of Hawaiian Shoyu Chicken Recipe

Alternative Ingredients

While the traditional Hawaiian Shoyu Chicken recipe is delicious as is, you can easily customize it to suit your taste. Here are some alternative ingredients you might consider:

  • Chicken Breasts: If you prefer leaner meat, swap the thighs for boneless, skinless chicken breasts. Just remember to adjust the cooking time, as breasts cook faster.
  • Honey or Maple Syrup: For a different sweetener, try using honey or maple syrup instead of brown sugar. This will add a unique flavor twist.
  • Apple Cider Vinegar: If you don’t have rice vinegar, apple cider vinegar can be a great substitute. It adds a fruity note to the marinade.
  • Fresh Herbs: Adding fresh herbs like cilantro or basil can enhance the dish’s freshness. Sprinkle them on top just before serving.
  • Vegetables: You can also add vegetables like bell peppers or snap peas to the baking dish. They will soak up the marinade and add color to your meal.

These alternative ingredients can help you create a Hawaiian Shoyu Chicken that fits your preferences while still delivering that delightful flavor.

Cooking Methods

There are several ways to cook Hawaiian Shoyu Chicken, each offering a unique taste and texture. Here are some popular cooking methods:

  • Grilling: For a smoky flavor, grill the marinated chicken thighs over medium heat. This method gives the chicken a nice char and enhances the overall taste.
  • Slow Cooking: If you have more time, consider using a slow cooker. Place the marinated chicken in the slow cooker and cook on low for 6-8 hours. The result will be incredibly tender chicken that falls off the bone.
  • Stovetop: You can also cook the chicken in a skillet on the stovetop. Heat some oil in a pan, add the chicken, and cook until browned on both sides. Then, pour in the marinade and simmer until cooked through.

Each cooking method brings out different flavors and textures, allowing you to enjoy Hawaiian Shoyu Chicken in various ways. Feel free to experiment and find your favorite!

Cooking Note for Hawaiian Shoyu Chicken Recipe

When preparing Hawaiian Shoyu Chicken, there are a few important cooking notes to keep in mind. These tips will help ensure that your dish turns out perfectly every time.

First, always use bone-in, skin-on chicken thighs for the best flavor and moisture. The bones add richness, while the skin helps to keep the chicken juicy during cooking. If you choose to use boneless or skinless chicken, be aware that the cooking time may need to be adjusted to prevent drying out.

Next, marinating the chicken is essential. The longer you marinate, the more flavorful your chicken will be. If you have the time, aim for an overnight soak. This allows the flavors to penetrate deeply into the meat, resulting in a more delicious dish.

When baking, make sure to arrange the chicken thighs in a single layer in the baking dish. This ensures even cooking and allows the skin to crisp up nicely. If the chicken is crowded, it may steam instead of bake, leading to a less desirable texture.

Lastly, always check the internal temperature of the chicken. Using a meat thermometer is the best way to ensure it reaches 165°F (75°C). This guarantees that the chicken is safe to eat and perfectly cooked. Letting the chicken rest for a few minutes after baking is also crucial. This resting time allows the juices to redistribute, making each bite tender and juicy.

By following these cooking notes, you’ll be well on your way to creating a mouthwatering Hawaiian Shoyu Chicken that will impress your family and friends!

Serving Suggestions for Hawaiian Shoyu Chicken Recipe

When it comes to serving Hawaiian Shoyu Chicken, the options are as delightful as the dish itself. This flavorful chicken pairs beautifully with a variety of sides, enhancing your dining experience. Here are some serving suggestions to consider:

  • Steamed Rice: A classic choice, steamed white or brown rice is perfect for soaking up the delicious sauce. The rice balances the savory flavors of the chicken, making each bite satisfying.
  • Grilled Vegetables: Add a healthy touch by serving the chicken alongside grilled vegetables. Bell peppers, zucchini, and asparagus are great options. Their smoky flavor complements the sweetness of the chicken.
  • Coleslaw: A refreshing coleslaw can provide a crunchy contrast to the tender chicken. The crispness of cabbage and carrots, dressed in a tangy vinaigrette, adds a nice balance to the meal.
  • Pineapple Salsa: For a tropical twist, consider a pineapple salsa. The sweetness of the pineapple, combined with lime juice and cilantro, brightens the dish and adds a burst of flavor.
  • Macaroni Salad: A Hawaiian favorite, macaroni salad is a creamy side that pairs well with the savory chicken. Its rich texture complements the dish perfectly.

Don’t forget to garnish your Hawaiian Shoyu Chicken with sliced green onions and sesame seeds before serving. This not only adds visual appeal but also enhances the flavor profile. Whether you’re hosting a family dinner or a casual gathering, these serving suggestions will elevate your meal and impress your guests. Enjoy the delightful combination of flavors and the spirit of aloha at your table!

Tips for Perfecting Your Hawaiian Shoyu Chicken Recipe

To make your Hawaiian Shoyu Chicken truly unforgettable, consider these helpful tips. Each suggestion will enhance the flavor and texture of your dish, ensuring a delightful experience for everyone at the table.

  • Use Fresh Ingredients: Fresh garlic and ginger can significantly elevate the flavor of your marinade. Opt for fresh over powdered versions whenever possible. The vibrant taste of fresh ingredients will make your dish stand out.
  • Adjust Sweetness: If you prefer a sweeter chicken, feel free to increase the amount of brown sugar or honey in the marinade. Conversely, if you like it less sweet, reduce the sugar. Tailor the recipe to your taste!
  • Marinate Longer: For the best flavor, marinate the chicken overnight. This allows the flavors to penetrate deeply, resulting in a more flavorful dish. If you’re short on time, aim for at least 1 hour.
  • Don’t Skip the Resting Time: After baking, let the chicken rest for about 5 minutes before serving. This resting period allows the juices to redistribute, making the chicken more tender and juicy.
  • Experiment with Garnishes: While green onions and sesame seeds are traditional garnishes, feel free to get creative! Chopped cilantro, crushed peanuts, or even a drizzle of chili oil can add a unique twist to your dish.
  • Serve with a Side of Aloha: Hawaiian Shoyu Chicken is best enjoyed with a warm smile and good company. Share the meal with family and friends to truly embrace the spirit of aloha.

By following these tips, you’ll be well on your way to mastering the art of Hawaiian Shoyu Chicken. Each bite will be bursting with flavor, making it a dish everyone will love. Enjoy the process and the delicious results!

Breakdown of Time for Hawaiian Shoyu Chicken Recipe

Prep Time

The prep time for Hawaiian Shoyu Chicken is quite manageable. You’ll spend about 15 minutes gathering and measuring your ingredients. Then, whisking together the marinade and coating the chicken will take another 10 minutes. In total, you can expect to spend around 25 minutes on preparation. However, remember that marinating the chicken is essential for flavor, so plan to let it sit for at least 1 hour, or ideally overnight.

Cooking Time

Once your chicken is marinated, the cooking time is straightforward. Preheating the oven will take about 10 minutes. After that, the chicken needs to bake for 30 minutes initially. Then, you’ll brush it with the thickened marinade and return it to the oven for an additional 15-20 minutes. In total, the cooking time is approximately 55-60 minutes, including the preheating time.

Total Time

When you combine the prep time and cooking time, the total time for making Hawaiian Shoyu Chicken is around 1 hour and 20 minutes, not including the marinating time. If you choose to marinate overnight, you can prepare the chicken in just over an hour the next day. This makes it a great option for a weeknight dinner or a special occasion. With a little planning, you can enjoy this delicious dish with minimal fuss!

Nutritional Information for Hawaiian Shoyu Chicken Recipe

Calories

When enjoying Hawaiian Shoyu Chicken, it’s good to be aware of its caloric content. Each serving contains approximately 360 calories. This makes it a satisfying option for a meal without being overly heavy. The balance of flavors and nutrients in this dish ensures that you can enjoy a delicious meal while keeping your calorie intake in check.

Protein

Protein is an essential part of any diet, and Hawaiian Shoyu Chicken delivers on this front. Each serving provides about 25 grams of protein. This high protein content is primarily due to the chicken thighs, which are a great source of lean protein. Including protein in your meals helps to keep you feeling full and supports muscle health, making this dish a nutritious choice for any occasion.

Sodium

While Hawaiian Shoyu Chicken is flavorful, it’s important to consider its sodium content. Each serving contains around 1,200 milligrams of sodium. This is largely due to the soy sauce used in the marinade. If you’re watching your sodium intake, you can opt for low-sodium soy sauce to reduce the overall sodium level. Balancing this dish with fresh vegetables or a side of rice can also help manage sodium consumption while still enjoying the rich flavors of this Hawaiian classic.

FAQs about Hawaiian Shoyu Chicken Recipe

Can I use other types of chicken for this recipe?

Absolutely! While the recipe calls for bone-in, skin-on chicken thighs, you can use other types of chicken. Boneless, skinless chicken breasts are a great alternative if you prefer leaner meat. Just remember to adjust the cooking time, as breasts cook faster than thighs. You can also use chicken drumsticks or wings for a fun twist. Each type of chicken will bring its own unique flavor and texture to the dish, so feel free to experiment!

How long should I marinate the chicken?

For the best flavor, marinate the chicken for at least 1 hour. However, if you have the time, letting it sit overnight is ideal. This longer marinating time allows the chicken to absorb all the delicious flavors from the marinade, resulting in a more flavorful dish. Just be sure to keep it covered in the refrigerator while marinating to ensure food safety.

What can I serve with Hawaiian Shoyu Chicken?

Hawaiian Shoyu Chicken pairs wonderfully with a variety of sides. Steamed rice is a classic choice, as it soaks up the savory sauce beautifully. You can also serve it with grilled vegetables for a healthy touch or a refreshing coleslaw for some crunch. For a tropical twist, consider adding pineapple salsa or macaroni salad. These sides will complement the flavors of the chicken and create a well-rounded meal that everyone will enjoy!

Can I make Hawaiian Shoyu Chicken in advance?

Yes, you can make Hawaiian Shoyu Chicken in advance! You can marinate the chicken a day ahead and store it in the refrigerator. When you’re ready to cook, simply follow the baking instructions. If you have leftovers, they can be stored in an airtight container in the fridge for up to 3 days. Reheat gently in the oven or microwave before serving. This makes it a convenient option for meal prep or busy weeknights!

Conclusion on Hawaiian Shoyu Chicken Recipe

In conclusion, the Hawaiian Shoyu Chicken recipe is a delightful way to bring the flavors of Hawaii into your home. This dish is not only easy to prepare but also offers a wonderful balance of sweet and savory tastes that will please any palate. The marinated chicken, baked to perfection, creates a mouthwatering experience that is sure to impress family and friends alike.

As you explore this recipe, remember that the key to success lies in the marination process. Allowing the chicken to soak in the flavorful marinade enhances its taste and tenderness. Additionally, feel free to experiment with alternative ingredients and cooking methods to make the dish your own. Whether you choose to grill, slow cook, or bake, each method brings a unique twist to this classic recipe.

Serving Hawaiian Shoyu Chicken with a variety of sides can elevate your meal even further. From steamed rice to grilled vegetables, the options are endless. Don’t forget to garnish with fresh green onions and sesame seeds for that extra touch of flavor and presentation.

Finally, this dish is not just about the food; it’s about sharing moments with loved ones. The spirit of aloha is captured in every bite, making it a perfect choice for gatherings and celebrations. So, gather your ingredients, follow the steps, and enjoy the deliciousness of Hawaiian Shoyu Chicken. Your taste buds will thank you!

Paul

Hawaiian Shoyu Chicken Recipe is a must-try dish!

This Hawaiian Shoyu Chicken is a sweet and savory island-style dish that’s finger-licking good! Made with juicy bone-in chicken thighs marinated in a soy, ginger, and garlic glaze, then oven-baked until sticky and caramelized, this easy recipe captures the heart of Hawaiian comfort food. Serve it over fluffy rice or with grilled pineapple for a tropical weeknight dinner that brings serious flavor.
Prep Time 10 minutes
Cook Time 35 minutes
Total Time 45 minutes
Servings: 4 servings
Course: Main Dish
Cuisine: Hawaiian

Ingredients
  

  • 5 chicken thighs bone-in and skin-on
  • 3 tablespoons low-sodium soy sauce
  • 2 tablespoons water
  • ¼ cup packed brown sugar
  • 2 cloves garlic minced
  • 1 tablespoon fresh ginger minced
  • ½ yellow onion minced
  • ¼ teaspoon crushed red pepper flakes

Method
 

  1. Marinate the Chicken:In a large bowl or resealable plastic bag, combine the soy sauce, water, brown sugar, garlic, ginger, onion, and red pepper flakes. Add the chicken thighs and turn to coat. Cover and marinate in the refrigerator overnight for best flavor (or at least 2 hours).
  2. Prepare to Bake:Preheat the oven to 375°F (190°C). Transfer the marinated chicken to a baking dish and pour the leftover marinade over the top.
  3. Bake Until Tender:Bake for 30 to 35 minutes, or until the internal temperature of the chicken reaches 165°F (74°C) and the sauce has thickened into a sticky glaze.
  4. Garnish and Serve:Plate the chicken and spoon over the thickened glaze. Garnish with chopped green onions or sesame seeds, if desired. Serve hot with white rice, grilled pineapple, or a fresh green salad.

Notes

  • Marinate Overnight: For maximum flavor, let the chicken sit overnight in the marinade. The longer it soaks, the deeper the taste.
  • Use Boneless Thighs: You can substitute boneless thighs for quicker cooking—reduce the bake time to around 25 minutes.
  • Grill Option: This chicken can also be grilled for a slightly smoky flavor—just brush it with the thickened marinade as it cooks.
  • Make It Spicier: Add extra red pepper flakes or a dash of sriracha to bring up the heat level.

Jamaican Brown Stew Chicken Recipe is a must-try dish!

Jamaican Brown Stew Chicken is more than just a meal; it’s a celebration of flavors and culture. This dish is a staple in Jamaican households, known for its rich, savory taste and vibrant colors. The combination of spices, fresh vegetables, and tender chicken creates a delightful experience for your taste buds. Whether you’re enjoying it at a family gathering or a cozy dinner at home, this recipe brings warmth and joy to the table.

What Makes Jamaican Brown Stew Chicken Unique?

What sets Jamaican Brown Stew Chicken apart from other chicken dishes? It’s all about the marinade and cooking method. The chicken is seasoned with a blend of spices, including garlic, thyme, and allspice, which infuse it with deep flavors. The browning process adds a beautiful color and enhances the taste, making each bite irresistible.

Another unique aspect is the use of Scotch bonnet pepper. This pepper adds a distinct heat that is characteristic of Jamaican cuisine. However, you can control the spice level by adjusting how long you leave the pepper in the stew. The addition of vegetables like bell peppers and carrots not only adds nutrition but also a pop of color, making the dish visually appealing.

In essence, Jamaican Brown Stew Chicken is a perfect blend of spices, heat, and comfort. It’s a dish that tells a story of tradition and love, making it a must-try for anyone looking to explore Caribbean flavors. So, let’s dive into the ingredients and get started on this delicious journey!

Ingredients for Jamaican Brown Stew Chicken Recipe

To create the perfect Jamaican Brown Stew Chicken, you’ll need a variety of fresh ingredients that come together to create a symphony of flavors. Here’s what you’ll need:

  • 2 pounds chicken pieces (bone-in, skin-on preferred for extra flavor)
  • 1 teaspoon salt
  • 1 teaspoon black pepper
  • 1 teaspoon garlic powder
  • 1 teaspoon onion powder
  • 1 teaspoon paprika
  • 1 teaspoon dried thyme
  • 1 tablespoon vegetable oil
  • 1 medium onion, sliced
  • 2 cloves garlic, minced
  • 1 bell pepper, sliced (any color for a vibrant look)
  • 1 carrot, sliced
  • 2 green onions, chopped
  • 1 Scotch bonnet pepper (whole, for that authentic heat)
  • 1 can (14 ounces) diced tomatoes
  • 1 cup chicken broth
  • 2 tablespoons soy sauce
  • 1 tablespoon brown sugar
  • 1 tablespoon vinegar (white or apple cider)
  • 1 teaspoon allspice
  • Fresh parsley for garnish (optional)

These ingredients not only provide flavor but also contribute to the dish’s nutritional value. The chicken serves as a great source of protein, while the vegetables add essential vitamins and minerals. The spices, especially the Scotch bonnet pepper, give the dish its signature kick, making it a delightful experience for your palate.

Now that you have your ingredients ready, let’s move on to the step-by-step preparation of this mouthwatering Jamaican Brown Stew Chicken!

Step-by-Step Preparation of Jamaican Brown Stew Chicken Recipe

Now that you have gathered all your ingredients, it’s time to dive into the cooking process. Each step is crucial for achieving that authentic Jamaican flavor. Follow along as we break down the preparation into easy-to-follow steps!

Step 1: Marinating the Chicken

First things first, marinating the chicken is essential. In a large bowl, combine the chicken pieces with salt, black pepper, garlic powder, onion powder, paprika, and dried thyme. Make sure every piece is well-coated with the spices. This step allows the chicken to absorb all those wonderful flavors. For the best results, let it marinate for at least 30 minutes. However, if you have time, marinating overnight in the refrigerator will deepen the flavor even more.

Step 2: Browning the Chicken

Next, heat the vegetable oil in a large skillet or Dutch oven over medium-high heat. Once the oil is hot, carefully add the marinated chicken pieces. Brown them on all sides for about 5-7 minutes. This step is important as it locks in the juices and adds a beautiful golden color. After browning, remove the chicken from the skillet and set it aside. This will help build layers of flavor in your stew.

Step 3: Sautéing the Vegetables

In the same skillet, it’s time to sauté the vegetables. Add the sliced onion, minced garlic, bell pepper, and carrot. Sauté these for about 5 minutes until they soften. The aroma will fill your kitchen, making it hard to resist! This step not only enhances the flavor but also adds a lovely texture to the dish.

Step 4: Combining Ingredients

Now, return the browned chicken to the skillet. It’s time to bring everything together! Add the whole Scotch bonnet pepper, diced tomatoes, chicken broth, soy sauce, brown sugar, vinegar, and allspice. Stir everything to combine well. The mixture should look vibrant and inviting. This is where the magic happens, as all the flavors meld together.

Step 5: Simmering the Stew

Bring the mixture to a boil, then reduce the heat to low. Cover the skillet and let it simmer for 30-40 minutes. This slow cooking allows the chicken to become tender and soak up all the delicious flavors. Stir occasionally and check if you need to add more broth to prevent sticking. Once the chicken is cooked through, you can remove the Scotch bonnet pepper if you prefer a milder heat.

And there you have it! Your Jamaican Brown Stew Chicken is almost ready to serve. The rich aroma and colorful presentation will surely impress your family and friends. Let’s explore some variations to make this dish even more exciting!

Variations of Jamaican Brown Stew Chicken Recipe

While the traditional Jamaican Brown Stew Chicken is a beloved classic, there are many ways to put a twist on this dish. Whether you want to try different proteins or explore vegetarian options, these variations will keep your meals exciting and flavorful. Let’s take a closer look!

Alternative Proteins

If you’re looking to switch things up, consider using alternative proteins. Here are a few options:

  • Pork: Substitute chicken with pork shoulder or pork chops. The cooking time may vary, so ensure the pork is tender before serving.
  • Beef: Use beef stew meat for a heartier version. Brown the beef just like the chicken and follow the same steps for a delicious twist.
  • Fish: For a lighter option, try using firm fish like snapper or tilapia. Cook the fish for a shorter time to prevent it from breaking apart.

These alternative proteins can bring new flavors and textures to your Jamaican Brown Stew. Each option offers a unique taste while still capturing the essence of the original recipe.

Vegetarian Options

For those who prefer a plant-based meal, there are fantastic vegetarian options to consider. Here are some ideas:

  • Firm Tofu: Replace chicken with firm tofu. Cut it into cubes and marinate just like the chicken. Sauté until golden before adding to the stew.
  • Tempeh: Tempeh is another great substitute. It has a nutty flavor and a firm texture that holds up well in stews.
  • Vegetable Medley: Use a mix of your favorite vegetables, such as zucchini, eggplant, and mushrooms. This will create a colorful and nutritious dish.

These vegetarian variations not only cater to different dietary preferences but also allow you to enjoy the rich flavors of Jamaican cuisine without meat. Feel free to experiment with spices and ingredients to make it your own!

Cooking Note for Jamaican Brown Stew Chicken Recipe

When preparing Jamaican Brown Stew Chicken, there are a few important cooking notes to keep in mind. These tips will help you achieve the best results and ensure that your dish is bursting with flavor.

First, always choose high-quality chicken. Bone-in, skin-on pieces are recommended for their rich flavor and moisture. The bones add depth to the stew, while the skin helps to keep the chicken juicy during cooking.

Next, marinating the chicken is crucial. The longer you let it sit with the spices, the more flavorful it will be. If you can, marinate overnight. This allows the spices to penetrate the meat, resulting in a more delicious dish.

When browning the chicken, make sure not to overcrowd the skillet. If you add too many pieces at once, the chicken will steam instead of brown. This can prevent that beautiful golden color and rich flavor from developing. Brown the chicken in batches if necessary.

As you sauté the vegetables, keep an eye on the heat. You want them to soften without burning. Stirring frequently will help achieve the perfect texture and flavor.

Lastly, don’t rush the simmering process. Allowing the stew to cook slowly helps the flavors meld together beautifully. Stir occasionally and check the liquid level. If it looks too thick, add a splash of chicken broth to keep it from sticking.

By following these cooking notes, you’ll create a Jamaican Brown Stew Chicken that is not only delicious but also a true representation of this beloved dish. Enjoy the process and the wonderful aromas that fill your kitchen!

Serving Suggestions for Jamaican Brown Stew Chicken Recipe

Once your Jamaican Brown Stew Chicken is ready, it’s time to think about how to serve it. This dish is not only flavorful but also versatile, making it a great centerpiece for any meal. Here are some delightful serving suggestions to enhance your dining experience:

  • Rice and Peas: A classic pairing! Serve your stew over a bed of rice and peas. The creamy coconut milk and tender beans complement the savory chicken perfectly.
  • Fried Plantains: Sweet fried plantains add a lovely contrast to the spicy stew. Their sweetness balances the heat from the Scotch bonnet pepper.
  • Coleslaw: A refreshing coleslaw can provide a crunchy texture and a cool contrast to the warm stew. Use a tangy dressing to brighten the flavors.
  • Steamed Vegetables: For a healthier option, serve with a side of steamed vegetables. Broccoli, carrots, and green beans work well and add color to your plate.
  • Flatbreads: Consider serving with warm flatbreads or roti. They are perfect for scooping up the delicious sauce and chicken.

Don’t forget to garnish your Jamaican Brown Stew Chicken with fresh parsley or chopped green onions before serving. This adds a pop of color and freshness to the dish. You can also provide extra Scotch bonnet pepper on the side for those who enjoy an extra kick!

With these serving suggestions, your Jamaican Brown Stew Chicken will not only taste amazing but also look inviting on the table. Enjoy sharing this delightful dish with family and friends, and watch as they savor every bite!

Tips for Perfecting Jamaican Brown Stew Chicken Recipe

To truly master the art of making Jamaican Brown Stew Chicken, a few tips can elevate your dish from good to great. These simple yet effective suggestions will help you achieve the best flavor and texture, ensuring that your stew is a hit every time. Let’s explore some key tips!

First, always use fresh ingredients. Fresh herbs, spices, and vegetables make a significant difference in flavor. For instance, using fresh thyme instead of dried can enhance the aroma and taste of your stew. Similarly, fresh garlic and onions will provide a more robust flavor profile.

Next, don’t skip the marinating step. Marinating the chicken not only infuses it with flavor but also helps to tenderize the meat. If you can, let it marinate overnight. This extra time allows the spices to penetrate deeply, resulting in a more flavorful dish.

When browning the chicken, ensure your skillet is hot enough. A hot skillet will create a nice sear, locking in the juices and adding depth to the flavor. If the chicken sticks to the pan, it’s a sign that it’s not ready to be flipped yet. Patience is key!

Another important tip is to adjust the heat level to your preference. The Scotch bonnet pepper adds a unique heat, but you can control it by how long you leave it in the stew. For a milder flavor, remove it after 10-15 minutes of cooking. If you love spice, feel free to leave it in for the entire simmering time.

Lastly, taste as you go! This is crucial in cooking. As the stew simmers, take a moment to taste it. You can adjust the seasoning by adding more salt, pepper, or even a splash of vinegar for acidity. This will help you achieve a balanced flavor that suits your palate.

By following these tips, you’ll be well on your way to creating a delicious Jamaican Brown Stew Chicken that will impress everyone at your table. Enjoy the cooking process and the delightful aromas that fill your kitchen!

Breakdown of Time for Jamaican Brown Stew Chicken Recipe

Understanding the time required for each step in the Jamaican Brown Stew Chicken recipe can help you plan your cooking efficiently. Here’s a breakdown of the time you’ll need for preparation and cooking:

Prep Time

The prep time for this delicious dish is approximately 40 minutes. This includes:

  • Marinating the Chicken: 30 minutes (or overnight for deeper flavor)
  • Chopping Vegetables: 10 minutes

While marinating, you can use the time to prepare your vegetables and gather all the ingredients. This will make the cooking process smoother and more enjoyable.

Cooking Time

The cooking time for Jamaican Brown Stew Chicken is about 40-50 minutes. This includes:

  • Browning the Chicken: 5-7 minutes
  • Sautéing the Vegetables: 5 minutes
  • Simmering the Stew: 30-40 minutes

During the simmering phase, the chicken becomes tender and absorbs all the wonderful flavors from the spices and vegetables.

Total Time

In total, you can expect to spend around 1 hour and 20 minutes to 1 hour and 30 minutes on this recipe, including both prep and cooking time. If you choose to marinate the chicken overnight, the total time will be longer, but the hands-on cooking time remains the same.

With this time breakdown, you can easily plan your cooking session. Whether you’re preparing a family meal or hosting friends, knowing how long each step takes will help you serve a delicious Jamaican Brown Stew Chicken with confidence!

Nutritional Information for Jamaican Brown Stew Chicken Recipe

Understanding the nutritional content of your meals is essential for maintaining a balanced diet. Jamaican Brown Stew Chicken is not only delicious but also packed with nutrients. Here’s a breakdown of the key nutritional information per serving:

Calories

350 calories. This makes it a satisfying meal that can fit into various dietary plans. The combination of chicken, vegetables, and spices provides a hearty dish without excessive calories.

Protein

28 grams of protein per serving. The chicken serves as an excellent source of high-quality protein, making this dish a great option for those looking to increase their protein intake.

Sodium

600 milligrams per serving. This amount can vary based on the soy sauce and chicken broth used. If you’re watching your sodium intake, consider using low-sodium soy sauce and broth to keep the flavor while reducing the salt content.

Overall, Jamaican Brown Stew Chicken is a nutritious choice that provides a good balance of calories, protein, and essential nutrients. Enjoy this flavorful dish while being mindful of your dietary needs!

FAQs about Jamaican Brown Stew Chicken Recipe

What is the best way to store leftover Jamaican Brown Stew Chicken?

Storing leftover Jamaican Brown Stew Chicken is simple! First, let the stew cool down to room temperature. Then, transfer it to an airtight container. You can keep it in the refrigerator for up to 3-4 days. If you want to store it for a longer period, consider freezing it. Place the stew in a freezer-safe container or bag, and it can last for up to 3 months. When you’re ready to enjoy it again, simply thaw it in the refrigerator overnight and reheat on the stove or in the microwave.

Can I make Jamaican Brown Stew Chicken in advance?

Absolutely! Making Jamaican Brown Stew Chicken in advance is a great idea. In fact, the flavors often improve after sitting for a day. You can prepare the stew a day or two ahead of time and store it in the refrigerator. Just reheat it gently on the stove before serving. If you’re planning to freeze it, make sure to cool it completely before freezing. This way, you can enjoy a delicious homemade meal without the hassle of cooking from scratch on busy days!

What sides pair well with Jamaican Brown Stew Chicken?

Jamaican Brown Stew Chicken is versatile and pairs well with various sides. Here are some popular options:

  • Rice and Peas: This classic combination is a must-try! The creamy coconut rice complements the savory stew perfectly.
  • Fried Plantains: Sweet fried plantains add a delightful contrast to the spicy chicken.
  • Coleslaw: A refreshing coleslaw provides a crunchy texture and balances the flavors of the stew.
  • Steamed Vegetables: Broccoli, carrots, and green beans make for a healthy and colorful side.
  • Flatbreads: Warm flatbreads or roti are perfect for scooping up the delicious sauce.

These sides not only enhance the meal but also create a beautiful presentation on your table!

How spicy is Jamaican Brown Stew Chicken?

The spice level of Jamaican Brown Stew Chicken can vary based on how you use the Scotch bonnet pepper. This pepper is known for its heat, so if you leave it whole in the stew, it will impart a moderate level of spice. If you prefer a milder flavor, you can remove the pepper after 10-15 minutes of cooking. Alternatively, if you love heat, feel free to leave it in for the entire simmering time. Adjusting the amount of pepper and cooking time allows you to customize the spice level to your liking!

Conclusion on Jamaican Brown Stew Chicken Recipe

In conclusion, Jamaican Brown Stew Chicken is a delightful dish that brings together rich flavors, vibrant colors, and a touch of Caribbean culture. This recipe is not just about cooking; it’s about creating a memorable experience for you and your loved ones. The combination of marinated chicken, fresh vegetables, and aromatic spices creates a meal that is both comforting and satisfying.

As you prepare this dish, remember that the key lies in the marination and the slow simmering process. These steps allow the flavors to meld beautifully, resulting in tender chicken that is bursting with taste. Whether you choose to stick to the traditional recipe or explore the various variations, each bite will transport you to the sunny shores of Jamaica.

Moreover, the versatility of Jamaican Brown Stew Chicken makes it suitable for any occasion. Whether it’s a family dinner, a festive gathering, or a cozy night in, this dish is sure to impress. Pair it with your favorite sides, and you have a complete meal that everyone will love.

So, gather your ingredients, roll up your sleeves, and embark on this culinary adventure. Enjoy the process, savor the aromas, and most importantly, share the joy of Jamaican Brown Stew Chicken with those around you. Happy cooking!

Paul

Jamaican Brown Stew Chicken Recipe is a must-try dish!

Bring the soul of the Caribbean to your kitchen with this rich and savory Jamaican Brown Stew Chicken. Marinated in bold spices, then braised until tender in a luscious brown gravy with bell peppers and a hint of Scotch bonnet heat, this one-pot wonder is a comforting, flavor-packed dish perfect for weeknight dinners or special occasions.
Prep Time 15 minutes
Cook Time 1 hour
Total Time 1 hour 15 minutes
Servings: 6 servings
Course: Main Dish
Cuisine: Caribbean, Jamaican

Ingredients
  

For the Chicken Marinade:
  • 3 pounds bone-in chicken thighs and/or drumsticks skin-on or skinless
  • 1 cup chopped onion
  • ½ cup sliced scallions white and green parts
  • 6 cloves garlic minced or grated
  • 1 tablespoon finely minced fresh ginger
  • 1 tablespoon packed brown sugar light or dark
  • 2 teaspoons browning sauce store-bought or homemade
  • teaspoons kosher salt
  • 1 teaspoon paprika
  • ½ teaspoon ground Jamaican allspice
  • ½ teaspoon dried thyme
  • ½ teaspoon ground black pepper
  • 2 bay leaves
For the Brown Stew:
  • 2 tablespoons canola or vegetable oil
  • 2 cups chicken broth or stock
  • 1 red orange, or yellow bell pepper, thinly sliced
  • 1 whole Scotch bonnet or habanero pepper left whole, not cut
  • ¼ cup ketchup

Method
 

  1. Marinate the Chicken:In a large mixing bowl or plastic bag, combine chicken with onion, scallions, garlic, ginger, brown sugar, browning sauce, salt, paprika, allspice, thyme, black pepper, and bay leaves. Toss to coat evenly. Cover and refrigerate for at least 1 hour, or preferably overnight.
  2. Prep for Cooking:Remove chicken from the fridge and allow to sit at room temperature for about 10 minutes. Scrape off most of the marinade (but save it for later).
  3. Brown the Chicken:In a large Dutch oven or heavy-bottomed pot, heat oil over medium-high heat. Brown the chicken on both sides for about 2–3 minutes per side until golden brown. Remove and set aside. Discard any excess fat, leaving about 2 tablespoons in the pot.
  4. Deglaze and Build the Sauce:Add the reserved marinade to the pot and sauté for 1–2 minutes until fragrant. Pour in the chicken broth, scraping up any brown bits. Stir in the sliced bell pepper, whole Scotch bonnet or habanero pepper, and ketchup.
  5. Simmer and Stew:Return the browned chicken to the pot, ensuring it is mostly submerged. Stir to coat, bring to a boil, then reduce heat to low. Cover and simmer for 45 minutes, flipping the chicken occasionally. For a thicker sauce, simmer uncovered for an additional 10–15 minutes.
  6. Final Seasoning:Remove bay leaves and the whole Scotch bonnet pepper before serving. Taste and adjust seasoning if needed. Serve hot with white rice, Jamaican rice and peas, or coconut rice.

Notes

  • Scotch Bonnet Substitute: If you can’t find Scotch bonnet, use habanero for similar heat—or omit it for a milder version.
  • Make It Thicker: Simmering uncovered at the end will help the sauce reduce and intensify the flavors.
  • Marinate Overnight: The longer the chicken marinates, the deeper the flavor—don’t skip it if you want authenticity!
  • Serving Tip: This dish is traditionally served with rice and peas, plantains, or steamed cabbage for a full Jamaican meal experience.

Caprese Stuffed Ground Chicken Recipe is a must-try!

What is Caprese Stuffed Ground Chicken?

Caprese Stuffed Ground Chicken is a delightful dish that combines the classic flavors of a Caprese salad with the heartiness of ground chicken. This recipe features juicy chicken patties filled with fresh ingredients like cherry tomatoes, mozzarella, and basil. The result is a flavorful meal that is both satisfying and healthy.

This dish is perfect for family dinners or gatherings with friends. It’s easy to prepare and can be on your table in no time. The combination of fresh ingredients not only makes it delicious but also adds a vibrant touch to your plate. Plus, it’s a great way to sneak in some extra veggies!

Whether you’re a seasoned cook or just starting out, this Caprese Stuffed Ground Chicken recipe is simple to follow. With just a few steps, you can create a meal that impresses everyone. So, let’s dive into the ingredients and get cooking!

Ingredients for Caprese Stuffed Ground Chicken Recipe

To create the delicious Caprese Stuffed Ground Chicken, you’ll need a few fresh ingredients. Here’s a complete list to help you gather everything you need:

  • 1 pound ground chicken: This is the main protein for your dish. Ground chicken is lean and cooks quickly.
  • 1 cup cherry tomatoes, halved: These sweet tomatoes add a burst of flavor and color.
  • 1 cup fresh mozzarella balls, halved: Creamy mozzarella brings a delightful texture and taste.
  • 1/2 cup fresh basil leaves, chopped: Basil adds a fragrant, herbal note that complements the other ingredients.
  • 2 cloves garlic, minced: Garlic enhances the overall flavor with its aromatic qualities.
  • 1 teaspoon dried oregano: This herb adds a warm, earthy flavor to the chicken.
  • 1 teaspoon salt: Salt is essential for bringing out the flavors in your dish.
  • 1/2 teaspoon black pepper: A little pepper adds a hint of spice.
  • 2 tablespoons balsamic glaze: This sweet and tangy glaze is drizzled on top for a finishing touch.
  • 1 tablespoon olive oil: Olive oil is used for cooking the patties and adds richness.

These ingredients come together to create a mouthwatering meal that is sure to please everyone at the table. Make sure to use fresh ingredients for the best flavor. Now that you have everything ready, let’s move on to the preparation steps!

Step-by-Step Preparation of Caprese Stuffed Ground Chicken Recipe

Step 1: Preparing the Ground Chicken Mixture

To start, grab a large mixing bowl. Add the pound of ground chicken to the bowl. Next, toss in the minced garlic, dried oregano, salt, and black pepper. Using your hands or a spoon, mix everything together until well combined. Make sure the spices are evenly distributed throughout the chicken. This step is crucial as it sets the flavor base for your patties. Once mixed, you can move on to the next step!

Step 2: Making the Caprese Filling

Now, let’s prepare the delicious Caprese filling. In a separate bowl, combine the halved cherry tomatoes, mozzarella balls, and chopped basil leaves. Gently stir the mixture to ensure the ingredients are well mixed. This filling is what makes your stuffed chicken so special. The fresh tomatoes and mozzarella will melt beautifully, creating a delightful surprise inside each patty. Once your filling is ready, it’s time to stuff the chicken!

Step 3: Stuffing the Chicken

Take the ground chicken mixture and divide it into four equal portions. Shape each portion into a patty, making sure they are about the same size. Now, create a small indentation in the center of each patty. Spoon a generous amount of the Caprese filling into the indentation. Carefully fold the edges of the patty over the filling to seal it. Make sure there are no gaps, as this will keep the filling from leaking out during cooking. Repeat this process for all the patties. Your stuffed chicken is almost ready!

Step 4: Cooking the Stuffed Chicken

Heat the olive oil in an oven-safe skillet over medium heat. Once the oil is hot, gently place the stuffed patties in the skillet. Cook them for about 4-5 minutes on each side until they are nicely browned. This step adds a lovely color and flavor to the chicken. After browning, drizzle the balsamic glaze over the patties. Then, transfer the skillet to your preheated oven. Bake for 15-20 minutes, or until the internal temperature reaches 165°F. This ensures your chicken is fully cooked and safe to eat. Once done, let the patties rest for a few minutes before serving. Enjoy your delicious Caprese Stuffed Ground Chicken!

Variations of Caprese Stuffed Ground Chicken Recipe

Alternative Fillings for Caprese Stuffed Ground Chicken

If you want to mix things up, there are plenty of alternative fillings you can try for your Caprese Stuffed Ground Chicken. Here are a few ideas:

  • Spinach and Feta: Swap out the tomatoes and mozzarella for fresh spinach and crumbled feta cheese. This combination adds a Mediterranean twist to your dish.
  • Pesto and Sun-Dried Tomatoes: Use pesto sauce instead of garlic and oregano, and add chopped sun-dried tomatoes for a burst of flavor.
  • Mushroom and Swiss: Sauté some mushrooms and mix them with Swiss cheese for a rich, earthy filling that pairs well with chicken.
  • Roasted Red Peppers and Goat Cheese: For a tangy flavor, try roasted red peppers with creamy goat cheese. This combination is sure to impress!

Feel free to get creative! You can mix and match ingredients based on your preferences. The key is to maintain a balance of flavors and textures. Each variation will give your Caprese Stuffed Ground Chicken a unique twist, making it a versatile dish for any occasion.

Different Cooking Methods for Caprese Stuffed Ground Chicken

While the oven method is popular, there are other cooking techniques you can use to prepare your Caprese Stuffed Ground Chicken. Here are a few options:

  • Grilling: For a smoky flavor, grill the stuffed patties on a barbecue. Just make sure to keep an eye on them to prevent flare-ups.
  • Air Frying: If you have an air fryer, this is a great option! Cook the stuffed patties at 375°F for about 12-15 minutes, flipping halfway through.
  • Slow Cooking: For a hands-off approach, place the stuffed patties in a slow cooker with some marinara sauce. Cook on low for 4-6 hours for tender, flavorful chicken.
  • Pan-Frying: Instead of baking, you can pan-fry the patties in a skillet until cooked through. This method gives a crispy exterior while keeping the inside juicy.

Each cooking method brings out different flavors and textures in the chicken. Choose the one that best fits your cooking style and enjoy a delicious meal!

Cooking Note for Caprese Stuffed Ground Chicken Recipe

When preparing your Caprese Stuffed Ground Chicken, there are a few important cooking notes to keep in mind. These tips will help ensure that your dish turns out perfectly every time.

First, always check the freshness of your ingredients. Fresh basil, ripe cherry tomatoes, and high-quality mozzarella will enhance the overall flavor of your dish. Using fresh ingredients not only improves taste but also adds nutritional value.

Next, be mindful of the cooking temperature. Ground chicken should be cooked to an internal temperature of 165°F to ensure it is safe to eat. Using a meat thermometer can help you accurately check the temperature without cutting into the patties.

Additionally, if you find that your patties are falling apart while cooking, consider adding a binding agent. A beaten egg or some breadcrumbs can help hold the mixture together, making it easier to handle.

Lastly, let the stuffed chicken rest for a few minutes after cooking. This allows the juices to redistribute, making each bite tender and juicy. It also gives the balsamic glaze a moment to set, enhancing the flavor profile of your dish.

By following these cooking notes, you’ll create a delicious Caprese Stuffed Ground Chicken that is sure to impress your family and friends!

Serving Suggestions for Caprese Stuffed Ground Chicken Recipe

Once your Caprese Stuffed Ground Chicken is ready, it’s time to think about how to serve it. This dish is not only delicious but also visually appealing, making it perfect for any occasion. Here are some serving suggestions to elevate your meal:

  • Fresh Salad: Pair your stuffed chicken with a light salad. A simple arugula or mixed greens salad with a lemon vinaigrette complements the flavors beautifully.
  • Garlic Bread: Serve with warm garlic bread on the side. The crispy texture and buttery flavor make a delightful addition to the meal.
  • Roasted Vegetables: Consider roasting seasonal vegetables like zucchini, bell peppers, or asparagus. Their natural sweetness pairs well with the savory chicken.
  • Pasta: A side of pasta tossed in olive oil and garlic can be a hearty accompaniment. You can also add some cherry tomatoes and basil for a cohesive flavor.
  • Quinoa or Rice: For a healthy option, serve the stuffed chicken over a bed of quinoa or brown rice. This adds a nutritious element to your plate.
  • Caprese Salad: For a true Caprese experience, serve a side of Caprese salad with fresh mozzarella, tomatoes, and basil drizzled with balsamic glaze.

Don’t forget to drizzle a little extra balsamic glaze over the stuffed chicken before serving. This adds a beautiful finish and enhances the dish’s flavor. With these serving suggestions, your Caprese Stuffed Ground Chicken will be a hit at any dinner table!

Tips for Perfecting Your Caprese Stuffed Ground Chicken Recipe

To make your Caprese Stuffed Ground Chicken truly shine, consider these helpful tips. They will ensure that your dish is not only delicious but also visually appealing and satisfying.

  • Use Fresh Ingredients: Always opt for fresh basil, ripe cherry tomatoes, and high-quality mozzarella. Fresh ingredients enhance the flavor and nutritional value of your dish.
  • Don’t Overmix: When combining the ground chicken with spices, mix just until combined. Overmixing can lead to tough patties. You want them to be tender and juicy!
  • Chill the Mixture: If you have time, chill the stuffed patties in the refrigerator for about 30 minutes before cooking. This helps them hold their shape better during cooking.
  • Experiment with Seasonings: Feel free to add your favorite herbs and spices to the ground chicken mixture. A pinch of red pepper flakes can add a nice kick!
  • Check for Doneness: Use a meat thermometer to ensure the internal temperature reaches 165°F. This guarantees that your chicken is safe to eat and perfectly cooked.
  • Let It Rest: After cooking, let the stuffed chicken rest for a few minutes. This allows the juices to redistribute, making each bite more flavorful and juicy.
  • Presentation Matters: When serving, slice the stuffed chicken in half to reveal the colorful filling. This not only looks great but also showcases the delicious ingredients inside.
  • Pair with the Right Sauce: Consider serving your Caprese Stuffed Ground Chicken with a side of marinara or pesto sauce for dipping. This adds an extra layer of flavor.

By following these tips, you’ll elevate your Caprese Stuffed Ground Chicken to a whole new level. Your family and friends will be impressed with your culinary skills, and you’ll enjoy a delightful meal every time!

Breakdown of Time for Caprese Stuffed Ground Chicken Recipe

Prep Time

Preparing your Caprese Stuffed Ground Chicken is quick and easy! The prep time for this recipe is approximately 15-20 minutes. During this time, you will gather all your ingredients, mix the ground chicken with spices, and prepare the delicious Caprese filling. This step is essential for ensuring that everything is ready for cooking. So, take your time to chop the tomatoes, basil, and mozzarella, as fresh ingredients make all the difference!

Cooking Time

Once your ingredients are prepped, the cooking time is about 25-30 minutes. This includes browning the stuffed patties in the skillet for about 8-10 minutes and then baking them in the oven for 15-20 minutes. The combination of these cooking methods ensures that your chicken is perfectly cooked and full of flavor. Remember to check the internal temperature to ensure it reaches 165°F for safe consumption.

Total Time

In total, you can expect to spend around 45-50 minutes from start to finish. This includes both prep and cooking time. With such a quick turnaround, you can enjoy a delicious and healthy meal without spending hours in the kitchen. Whether it’s a weeknight dinner or a special occasion, this Caprese Stuffed Ground Chicken recipe is a fantastic choice that fits into your busy schedule!

Nutritional Information for Caprese Stuffed Ground Chicken Recipe

Calories

When it comes to enjoying a delicious meal, knowing the calorie content can help you make informed choices. Each serving of the Caprese Stuffed Ground Chicken contains approximately 320 calories. This makes it a satisfying option that won’t weigh you down. The balance of protein and healthy fats in this dish provides energy while keeping you feeling full and satisfied.

Protein

Protein is an essential nutrient that supports muscle growth and repair. In this recipe, each serving boasts an impressive 34 grams of protein. Ground chicken is a lean source of protein, making it a great choice for those looking to maintain or build muscle. Pairing it with fresh ingredients like mozzarella and basil not only enhances the flavor but also adds nutritional value to your meal.

Sodium

Monitoring sodium intake is important for maintaining heart health. Each serving of the Caprese Stuffed Ground Chicken contains about 600 milligrams of sodium. This amount is reasonable for a flavorful dish, especially considering the use of salt and balsamic glaze. If you’re watching your sodium levels, you can easily adjust the recipe by using low-sodium options for the glaze or reducing the added salt.

Overall, this Caprese Stuffed Ground Chicken recipe is a nutritious choice that fits well into a balanced diet. With its combination of protein, healthy fats, and fresh ingredients, it’s a meal that you can feel good about serving to your family and friends!

FAQs about Caprese Stuffed Ground Chicken Recipe

Can I use turkey instead of chicken for this recipe?

Absolutely! You can use ground turkey instead of ground chicken for this Caprese Stuffed Ground Chicken recipe. Turkey is a lean protein option that works well in this dish. Just keep in mind that turkey may have a slightly different flavor and texture. However, it will still be delicious when combined with the fresh ingredients like tomatoes, mozzarella, and basil. Feel free to make the swap and enjoy a tasty meal!

What can I serve with Caprese Stuffed Ground Chicken?

There are many delightful options to serve alongside your Caprese Stuffed Ground Chicken. A fresh salad, like arugula or mixed greens, pairs beautifully with the flavors of the dish. You can also consider serving garlic bread for a comforting touch. Roasted vegetables or a side of pasta tossed in olive oil and garlic can complement the meal nicely. For a healthy option, quinoa or brown rice works well too. Don’t forget to drizzle some extra balsamic glaze over the chicken for added flavor!

How do I store leftovers of Caprese Stuffed Ground Chicken?

Storing leftovers of your Caprese Stuffed Ground Chicken is easy! Allow the chicken to cool completely before placing it in an airtight container. You can store it in the refrigerator for up to 3-4 days. If you want to keep it longer, consider freezing the stuffed chicken. Wrap each patty tightly in plastic wrap and then place them in a freezer-safe bag. They can be frozen for up to 3 months. When you’re ready to enjoy them again, simply thaw in the refrigerator overnight and reheat in the oven or microwave until warmed through.

Conclusion on Caprese Stuffed Ground Chicken Recipe

In conclusion, the Caprese Stuffed Ground Chicken recipe is a fantastic way to enjoy a healthy and flavorful meal. With its combination of fresh ingredients and simple preparation, this dish is perfect for any occasion. Whether you’re cooking for your family on a busy weeknight or impressing guests at a dinner party, this recipe is sure to be a hit.

The juicy ground chicken, paired with the vibrant flavors of cherry tomatoes, creamy mozzarella, and fragrant basil, creates a delightful experience for your taste buds. Plus, the versatility of this recipe allows you to experiment with different fillings and cooking methods, making it a staple in your kitchen.

Remember to use fresh ingredients for the best flavor and nutritional value. With just a few tips and tricks, you can elevate your Caprese Stuffed Ground Chicken to new heights. So, gather your ingredients, follow the steps, and enjoy a delicious meal that everyone will love!

We hope you give this recipe a try and share it with your loved ones. Happy cooking!

Paul

Caprese Stuffed Ground Chicken Recipe is a must-try!

This Ground Chicken Caprese skillet is a quick and flavorful one-pan meal that brings together the savory richness of seasoned ground chicken, gooey mozzarella, and sweet blistered cherry tomatoes. Finished with fresh basil and a drizzle of balsamic glaze, it’s a 15-minute masterpiece perfect for busy weeknights or casual entertaining.
Prep Time 5 minutes
Cook Time 10 minutes
Total Time 15 minutes
Servings: 4 –6 servings
Course: Main Dish
Cuisine: Italian-American

Ingredients
  

  • 1 tablespoon olive oil
  • ½ cup diced onion
  • 1 tablespoon chopped garlic
  • 2 pounds ground chicken
  • 1 teaspoon kosher salt
  • ½ teaspoon dried oregano
  • ½ teaspoon dried basil
  • ½ teaspoon dried parsley
  • 8 ounces tomato sauce or marinara
  • 1 tablespoon balsamic vinegar
  • 8 ounces mozzarella pearls or torn fresh mozzarella
  • 10 ounces cherry tomatoes halved
  • Fresh chopped basil for garnish
  • Balsamic glaze for garnish
  • Grated parmesan cheese for garnish

Method
 

  1. Preheat Oven:Set your oven to 500°F to prepare for broiling.
  2. Cook Aromatics:Heat olive oil in a large oven-safe skillet over medium heat. Add the diced onion and sauté for about 5 minutes until softened. Stir in chopped garlic and cook for an additional minute.
  3. Brown the Chicken:Add ground chicken to the skillet. Break it apart with a spoon and cook until fully browned and cooked through. Drain any excess liquid if necessary.
  4. Season and Simmer:Sprinkle in salt, oregano, basil, and parsley. Stir well. Add tomato sauce and balsamic vinegar, mixing to combine everything evenly.
  5. Add Toppings:Scatter mozzarella pearls and halved cherry tomatoes across the top of the ground chicken mixture.
  6. Bake Until Bubbling:Transfer the skillet to the preheated oven. Bake for 7–8 minutes until the cheese is melted and the tomatoes are blistered.
  7. Finish and Serve:Remove from oven and top with freshly chopped basil, a generous drizzle of balsamic glaze, and grated parmesan. Serve hot straight from the skillet or over pasta, rice, or toasted bread.

Notes

  • This dish is low-carb as-is and can be served without pasta.
  • Try adding baby spinach or arugula for extra greens.
  • Mozzarella pearls melt quickly, but torn fresh mozzarella works just as well.
  • Balsamic glaze adds a sweet-savory finish—don’t skip it!
  • Leftovers reheat well and are great in a wrap or sandwich.

Matcha Green Tea Pound Cake is a must-try dessert!

Introduction to Matcha Pound Cake Recipe

What is Matcha?

Matcha is a special type of green tea that comes from Japan. Unlike regular green tea, matcha is made from finely ground tea leaves. This means you get all the nutrients from the leaves, making it a superfood! It has a vibrant green color and a unique, earthy flavor. Many people enjoy matcha for its health benefits, which include boosting energy and improving focus. Plus, it’s rich in antioxidants, which are great for your body. When used in baking, like in our matcha pound cake recipe, it adds a lovely color and a delicious taste.

The Origin of Pound Cake

Pound cake has a long and interesting history. It dates back to the 1700s in Europe. The name “pound cake” comes from the original recipe, which called for a pound each of flour, butter, sugar, and eggs. This simple recipe made it easy for anyone to remember. Over time, bakers started to add different flavors and ingredients, leading to many variations. Today, pound cake is loved around the world for its rich, buttery flavor and dense texture. Our matcha pound cake recipe takes this classic dessert and gives it a modern twist with the addition of matcha, making it both tasty and visually appealing.

Ingredients for Matcha Pound Cake Recipe

To create a delightful matcha pound cake, you will need a few simple ingredients. Each one plays a vital role in achieving the perfect texture and flavor. Here’s what you’ll need:

  • 2 cups all-purpose flour: This is the base of your cake, providing structure.
  • 1 teaspoon baking powder: This helps the cake rise, making it light and fluffy.
  • 1/2 teaspoon salt: A pinch of salt enhances the flavors in the cake.
  • 1 tablespoon matcha green tea powder: This gives the cake its beautiful green color and unique flavor.
  • 1 cup unsalted butter, softened: Butter adds richness and moisture to the cake.
  • 1 1/2 cups granulated sugar: Sugar sweetens the cake and helps with its texture.
  • 4 large eggs: Eggs provide structure and moisture, making the cake tender.
  • 1 teaspoon vanilla extract: This adds a lovely aroma and flavor to the cake.
  • 1/2 cup milk: Milk keeps the cake moist and adds a bit of richness.

These ingredients come together to create a delicious matcha pound cake that is sure to impress your family and friends. Feel free to experiment with the ingredients, like substituting half of the all-purpose flour with almond flour for a lighter texture. You can also add a citrus twist by incorporating the zest of a lemon or orange into the batter. The possibilities are endless!

Step-by-Step Preparation of Matcha Pound Cake Recipe

Step 1: Preheat the Oven

First things first, preheat your oven to 350°F (175°C). This step is crucial because it ensures that your cake bakes evenly. A hot oven helps the cake rise properly, giving it that lovely fluffy texture we all love. While the oven heats up, you can move on to the next steps.

Step 2: Prepare the Baking Pan

Next, grab a 9×5-inch loaf pan. Grease it with some butter or cooking spray, then dust it with flour. This will prevent the cake from sticking to the pan. You want to make sure that when it’s time to serve, your beautiful matcha pound cake comes out easily. A well-prepared pan is key to a successful bake!

Step 3: Mix Dry Ingredients

In a medium bowl, whisk together the all-purpose flour, baking powder, salt, and matcha green tea powder. Mixing these dry ingredients first helps to evenly distribute the baking powder and matcha. This way, every bite of your cake will have that delightful matcha flavor. Set this bowl aside for now.

Step 4: Cream Butter and Sugar

Now, in a large bowl, cream the softened unsalted butter and granulated sugar together. Use an electric mixer on medium speed for about 3-5 minutes. You want the mixture to become light and fluffy. This step is important because it incorporates air into the batter, making your cake rise beautifully.

Step 5: Incorporate Eggs

Once your butter and sugar are fluffy, it’s time to add the eggs. Add them one at a time, mixing well after each addition. This ensures that each egg is fully incorporated before adding the next. Don’t forget to add the teaspoon of vanilla extract at this stage for that lovely aroma!

Step 6: Combine Dry and Wet Ingredients

Now, it’s time to bring everything together. Gradually add the dry mixture to the wet mixture. Alternate this with the milk, starting and ending with the flour mixture. Mix until just combined. Be careful not to overmix, as this can make your cake dense. You want a smooth batter, but a few lumps are okay!

Step 7: Add Matcha

Even though you’ve already added matcha in the dry ingredients, you can enhance its flavor by gently folding in a little extra matcha powder at this stage if you like. This will give your cake a more vibrant green color and a stronger matcha taste. Just be sure to mix it in gently.

Step 8: Bake the Cake

Pour the batter into your prepared loaf pan. Smooth the top with a spatula for an even bake. Place the pan in the preheated oven and bake for 60-70 minutes. To check if it’s done, insert a toothpick into the center. If it comes out clean, your cake is ready!

Step 9: Cool and Serve

Once baked, allow the cake to cool in the pan for about 10 minutes. This helps it set and makes it easier to remove. After that, transfer the cake to a wire rack to cool completely. Once cooled, slice it up and enjoy your delicious matcha pound cake!

Variations of Matcha Pound Cake Recipe

Adding Citrus Zest

If you want to give your matcha pound cake a refreshing twist, consider adding citrus zest. The zest of a lemon or orange can brighten the flavor of the cake. Simply grate the outer peel of the fruit and mix it into the batter during the wet ingredient stage. This addition not only enhances the taste but also adds a lovely aroma. The citrus notes pair beautifully with the earthy flavor of matcha, creating a delightful balance. Plus, it makes your cake even more appealing to the senses!

Incorporating Nuts or Chocolate Chips

Another fun way to customize your matcha pound cake is by incorporating nuts or chocolate chips. Chopped walnuts, almonds, or pecans can add a nice crunch and nutty flavor. Simply fold in about half a cup of your chosen nuts into the batter before pouring it into the loaf pan. If you’re a chocolate lover, consider adding chocolate chips instead. Dark chocolate chips can create a rich contrast to the matcha, making each bite a delightful surprise. Just remember to adjust the sugar slightly if you add sweet chocolate chips to keep the balance right!

Cooking Note for Matcha Pound Cake Recipe

When baking your matcha pound cake, there are a few important cooking notes to keep in mind. These tips will help ensure that your cake turns out perfectly every time.

  • Use Room Temperature Ingredients: For the best results, make sure your butter, eggs, and milk are at room temperature. This helps them blend together smoothly, creating a uniform batter.
  • Measure Ingredients Accurately: Baking is a science, so measuring your ingredients accurately is crucial. Use a kitchen scale for precise measurements, especially for flour and sugar.
  • Don’t Overmix: When combining the wet and dry ingredients, mix until just combined. Overmixing can lead to a dense cake, which is not what you want for a light and fluffy pound cake.
  • Check for Doneness: Ovens can vary in temperature, so keep an eye on your cake as it bakes. Start checking for doneness a few minutes before the recommended baking time. A toothpick inserted into the center should come out clean or with a few moist crumbs.
  • Cool Properly: Allow the cake to cool in the pan for about 10 minutes before transferring it to a wire rack. This helps prevent it from breaking apart. Cooling completely before slicing is also important for the best texture.

By following these cooking notes, you’ll be well on your way to creating a delicious matcha pound cake that everyone will love. Happy baking!

Serving Suggestions for Matcha Pound Cake Recipe

Pairing with Tea or Coffee

One of the best ways to enjoy your matcha pound cake is by pairing it with a warm cup of tea or coffee. The earthy flavor of matcha complements the rich notes of coffee beautifully. A light green tea, like jasmine or sencha, can enhance the matcha experience, creating a harmonious blend of flavors. If you prefer coffee, a smooth latte or cappuccino works wonders. The creaminess of the milk in these drinks balances the cake’s sweetness, making each bite even more delightful. So, brew your favorite beverage and savor the moment with a slice of matcha pound cake!

Serving with Fresh Fruits

Fresh fruits are another fantastic way to elevate your matcha pound cake. Slices of strawberries, blueberries, or raspberries add a burst of color and freshness. The natural sweetness and acidity of the fruits contrast nicely with the dense, buttery cake. You can serve the fruits on the side or even top the cake with them for a beautiful presentation. For an extra touch, consider drizzling a bit of honey or a light glaze over the fruits. This not only enhances the flavor but also makes your dessert look stunning. Enjoying matcha pound cake with fresh fruits is a delightful way to celebrate the flavors of the season!

Tips for Perfecting Your Matcha Pound Cake Recipe

Choosing the Right Matcha

When it comes to making a delicious matcha pound cake, the quality of your matcha green tea powder is essential. Not all matcha is created equal, and choosing the right one can make a big difference in flavor and color. Here are some tips to help you select the best matcha:

  • Look for Culinary Grade Matcha: For baking, culinary grade matcha is perfect. It’s less expensive than ceremonial grade but still offers great flavor and color.
  • Check the Color: High-quality matcha should have a vibrant green color. Dull or yellowish matcha may indicate lower quality.
  • Smell the Matcha: Fresh matcha has a sweet, grassy aroma. If it smells stale or bitter, it’s best to choose another brand.
  • Read Reviews: Before purchasing, check online reviews or ask friends for recommendations. This can help you find a reliable brand.

By choosing the right matcha, you’ll enhance the flavor and appearance of your matcha pound cake, making it even more enjoyable for everyone!

Storage Tips

To keep your matcha pound cake fresh and delicious, proper storage is key. Here are some helpful tips:

  • Cool Completely: Always allow your cake to cool completely before storing it. This prevents moisture buildup, which can make the cake soggy.
  • Wrap It Up: Use plastic wrap or aluminum foil to tightly wrap the cake. This helps keep it moist and prevents it from absorbing odors from the fridge.
  • Store in an Airtight Container: If you prefer, you can place the wrapped cake in an airtight container. This adds an extra layer of protection against air exposure.
  • Refrigerate or Freeze: For longer storage, you can refrigerate the cake for up to a week. If you want to keep it for a longer time, consider freezing it. Just make sure to wrap it well to prevent freezer burn.

Following these storage tips will help maintain the deliciousness of your matcha pound cake, allowing you to enjoy it for days to come!

Breakdown of Time for Matcha Pound Cake Recipe

Prep Time

Preparing your matcha pound cake is a breeze! The prep time typically takes about 20-30 minutes. This includes gathering your ingredients, measuring them out, and mixing everything together. Make sure to take your time during this stage to ensure everything is well-prepared. A little extra care now will lead to a delicious cake later!

Cooking Time

Once your batter is ready, it’s time to bake! The cooking time for your matcha pound cake is approximately 60-70 minutes. Keep an eye on it as it bakes, and remember to check for doneness with a toothpick. If it comes out clean, your cake is ready to be enjoyed!

Total Time

In total, you can expect to spend about 80-100 minutes from start to finish. This includes both prep and cooking time. Once your cake is baked, don’t forget to allow it to cool for about 10 minutes in the pan before transferring it to a wire rack. After that, let it cool completely before slicing. The wait will be worth it when you take that first delicious bite of your matcha pound cake!

Nutritional Information for Matcha Pound Cake Recipe

Calories

When enjoying a slice of matcha pound cake, it’s good to know what you’re consuming. Each serving contains approximately 250 calories. This makes it a delightful treat that can fit into a balanced diet. While it’s not a low-calorie dessert, the unique flavors and health benefits of matcha make it a worthwhile indulgence. Remember, moderation is key, and savoring each bite can make your experience even more enjoyable!

Protein

In terms of protein, each slice of matcha pound cake provides about 4 grams. While this isn’t a high-protein dessert, it does contribute to your daily intake. The eggs and butter in the recipe help provide this protein content. Pairing your cake with a protein-rich beverage, like a glass of milk or a protein shake, can enhance your overall nutrition while enjoying this delicious treat.

Sodium

For those watching their sodium intake, each serving of matcha pound cake contains around 150 milligrams of sodium. This is a moderate amount, especially considering that most people consume much more sodium in their daily diets. The salt in the recipe helps to enhance the flavors of the cake without making it overly salty. If you’re concerned about sodium, you can always adjust the amount of salt used in the recipe to suit your dietary needs.

FAQs about Matcha Pound Cake Recipe

Can I use regular green tea instead of matcha?

While you might be tempted to use regular green tea, it’s not a great substitute for matcha in this recipe. Matcha is finely ground and has a unique flavor that regular green tea lacks. Using matcha gives your pound cake its vibrant color and distinct taste. If you want that rich matcha experience, stick with matcha green tea powder for the best results!

How do I store leftover matcha pound cake?

Storing your leftover matcha pound cake is easy! First, make sure it’s completely cooled. Then, wrap it tightly in plastic wrap or aluminum foil. This helps keep it fresh and moist. You can also place it in an airtight container for extra protection. If you want to keep it longer, consider refrigerating it for up to a week or freezing it for a few months. Just remember to thaw it in the fridge before enjoying it again!

Can I make this recipe gluten-free?

Yes, you can make a gluten-free version of matcha pound cake! To do this, simply substitute the all-purpose flour with a gluten-free flour blend. Make sure the blend you choose is suitable for baking. You might also want to add a bit of xanthan gum to help with the texture. This way, you can enjoy a delicious matcha pound cake without gluten!

What can I substitute for butter in the matcha pound cake recipe?

If you need a butter substitute, there are several options! You can use coconut oil, which adds a subtle flavor and keeps the cake moist. Another option is unsweetened applesauce, which can make the cake lighter. If you prefer a dairy-free option, try using a plant-based butter or margarine. Just remember that each substitute may slightly change the flavor and texture of your cake, so choose one that fits your taste!

Conclusion on Matcha Pound Cake Recipe

In conclusion, the matcha pound cake recipe is a delightful way to enjoy the unique flavors of matcha while indulging in a classic dessert. This cake is not only visually appealing with its vibrant green hue, but it also offers a rich, buttery taste that is sure to please anyone who takes a bite. Whether you’re baking for a special occasion or simply treating yourself, this recipe is easy to follow and yields delicious results.

By incorporating matcha, you’re not just adding flavor; you’re also introducing a host of health benefits. The antioxidants found in matcha can help boost your energy and improve your overall well-being. Plus, with the option to customize your cake with citrus zest or nuts, you can make it your own. Each variation adds a personal touch, making it a versatile dessert for any palate.

As you embark on your baking journey, remember the tips and tricks shared throughout this article. From choosing the right matcha to proper storage methods, these insights will help you create the perfect matcha pound cake every time. So, gather your ingredients, preheat that oven, and get ready to enjoy a slice of this delightful treat. Happy baking!

Paul

Matcha Green Tea Pound Cake is a must-try dessert!

Earthy, elegant, and irresistibly moist—this Matcha Pound Cake is a tea-lover’s dream. Made with premium green tea powder and rich butter, it delivers a tender crumb, balanced sweetness, and a stunning natural hue in every slice. Perfect for pairing with a cup of green tea or gifting as a refined treat.
Prep Time 15 minutes
Cook Time 1 hour
Total Time 1 hour 15 minutes
Servings: 10 slices
Course: Dessert
Cuisine: Japanese-Inspired / Western Fusion

Ingredients
  

  • 245 grams cake flour
  • 1 tablespoon matcha powder
  • ¼ teaspoon salt
  • 1 teaspoon baking powder
  • 285 grams granulated sugar
  • 255 grams unsalted butter softened
  • 4 large eggs plus 2 egg yolks total 266 grams
  • 60 milliliters milk
  • 1 teaspoon vanilla extract

Method
 

  1. Preheat oven to 150°C (300°F). Line a 9×5-inch loaf pan with parchment paper and set aside.
  2. In a small bowl, whisk together the eggs, milk, and vanilla extract until well combined.
  3. In a large mixing bowl, sift the cake flour, matcha powder, salt, and baking powder. Add the sugar and whisk until evenly combined.
  4. Add the softened butter to the flour mixture and beat with a paddle attachment or hand mixer until the mixture becomes light and fluffy. Scrape the bowl to ensure everything is incorporated.
  5. Slowly add the egg mixture in three separate additions, mixing on low speed and scraping the bowl between each. Mix just until smooth.
  6. Pour the batter into the prepared loaf pan and smooth the top.
  7. Bake for 60 to 65 minutes, or until a toothpick inserted into the center comes out clean.
  8. Let the cake cool in the pan for 10 minutes before transferring to a wire rack to cool completely.

Notes

  • Use high-quality matcha for vibrant color and flavor—ceremonial or premium culinary grade is best.
  • For a more intense matcha flavor, replace 1 teaspoon of flour with an additional teaspoon of matcha powder.
  • This pound cake can be stored at room temperature for 2–3 days or wrapped and frozen for up to 2 months.
  • Serve plain or with a dusting of powdered sugar, white chocolate glaze, or whipped cream.

Crispy Shrimp Balls Recipe: A Delicious Snack Idea!

What Are Crispy Shrimp Balls?

Crispy shrimp balls are delightful bite-sized treats made from fresh shrimp and a mix of flavorful ingredients. These savory morsels are typically deep-fried until golden brown, creating a crunchy exterior that perfectly contrasts with the tender shrimp inside. The combination of herbs, spices, and seasonings adds a burst of flavor, making them a popular choice for appetizers or snacks. Whether served at a party or enjoyed as a family meal, crispy shrimp balls are sure to impress everyone at the table.

Why You Should Try This Crispy Shrimp Balls Recipe

There are many reasons to try this crispy shrimp balls recipe. First, it’s simple and quick to prepare, making it perfect for both novice cooks and seasoned chefs. The ingredients are easy to find, and the cooking process is straightforward. Plus, you can customize the recipe to suit your taste. Want a little heat? Add more red pepper flakes! Prefer a milder flavor? Skip the spice altogether. This flexibility allows you to create a dish that everyone will love.

Moreover, crispy shrimp balls are not just delicious; they are also nutritious. Packed with protein and low in carbs, they make a satisfying snack without the guilt. You can even bake them for a healthier option, which still delivers on taste. So, gather your ingredients and get ready to enjoy a delightful culinary experience with this crispy shrimp balls recipe!

Ingredients for Crispy Shrimp Balls Recipe

To create the perfect crispy shrimp balls, you’ll need a selection of fresh ingredients that come together to form a delicious treat. Here’s what you’ll need:

  • 1 pound raw shrimp: Make sure they are peeled and deveined for the best texture.
  • 1 cup breadcrumbs: This will give your shrimp balls that delightful crunch.
  • 1/2 cup green onions: Finely chopped, these add a fresh flavor.
  • 1/4 cup fresh cilantro: Chopped, for a burst of herbal goodness.
  • 2 cloves garlic: Minced, to enhance the overall taste.
  • 1 teaspoon ginger: Grated, for a hint of warmth and spice.
  • 1 teaspoon salt: To season the mixture perfectly.
  • 1/2 teaspoon black pepper: For a touch of mild heat.
  • 1/2 teaspoon red pepper flakes: Optional, for those who enjoy a spicy kick.
  • 1 large egg: This helps bind the ingredients together.
  • Vegetable oil: For frying, ensuring your shrimp balls are crispy and golden.

These ingredients come together to create a delightful flavor profile that is both savory and satisfying. Feel free to adjust the quantities based on your preferences. For instance, if you love cilantro, add a bit more! The beauty of this crispy shrimp balls recipe lies in its versatility.

Step-by-Step Preparation of Crispy Shrimp Balls Recipe

Step 1: Preparing the Shrimp

To start, you need to prepare the shrimp. First, ensure that your shrimp are raw, peeled, and deveined. This step is crucial for achieving the best texture. If you have whole shrimp, simply remove the shells and tails. Then, rinse them under cold water to clean. Pat them dry with a paper towel. This will help the mixture stick together better later on. Once your shrimp are ready, you can move on to the next step!

Step 2: Mixing the Ingredients

Now it’s time to mix everything together! In a food processor, combine the prepared shrimp, breadcrumbs, green onions, cilantro, garlic, ginger, salt, black pepper, and red pepper flakes if you’re using them. Pulse the mixture until it’s well combined but still slightly chunky. This texture is important for the final product. You want to maintain some shrimp pieces for that delightful bite. Once mixed, transfer the mixture to a bowl.

Step 3: Forming the Balls

After mixing, it’s time to form the shrimp balls. Add the large egg to the shrimp mixture and stir until fully incorporated. This will help bind the ingredients together. Now, using your hands, take a small amount of the mixture and roll it into a ball about 1 inch in diameter. Make sure to pack it tightly so they hold their shape while cooking. Repeat this process until all the mixture is used up. You should have a nice batch of shrimp balls ready for frying!

Step 4: Coating the Shrimp Balls

While not necessary, you can add an extra layer of crunch by coating the shrimp balls. To do this, simply roll each ball in additional breadcrumbs before frying. This step will give your crispy shrimp balls an even crunchier exterior. If you prefer a lighter version, you can skip this step. Either way, your shrimp balls will still be delicious!

Step 5: Frying the Shrimp Balls

Now comes the exciting part—frying! Heat about 2 inches of vegetable oil in a deep pot over medium heat. You want the oil to reach 350°F for the best frying results. Carefully drop the shrimp balls into the hot oil in batches. Fry them for about 3-4 minutes or until they turn golden brown and are cooked through. Use a slotted spoon to remove the shrimp balls from the oil and drain them on paper towels. This will help absorb any excess oil, keeping your shrimp balls crispy and light!

Variations of Crispy Shrimp Balls Recipe

Spicy Crispy Shrimp Balls

If you love a little heat, then spicy crispy shrimp balls are the perfect variation for you! To make them, simply increase the amount of red pepper flakes in the original recipe. You can also add a dash of hot sauce or a teaspoon of sriracha to the mixture for an extra kick. Another great option is to include finely chopped jalapeños or other hot peppers. This will not only enhance the flavor but also add a delightful crunch. Serve these spicy shrimp balls with a cooling dipping sauce, like ranch or yogurt-based sauce, to balance the heat. Your guests will love the fiery twist!

Baked Crispy Shrimp Balls

For a healthier alternative, try baking your crispy shrimp balls instead of frying them. Preheat your oven to 400°F. After forming the shrimp balls, place them on a baking sheet lined with parchment paper. Lightly spray or brush them with vegetable oil to help them crisp up in the oven. Bake for about 20-25 minutes, flipping them halfway through to ensure even cooking. The result will be deliciously crispy shrimp balls with less oil. This baked version is perfect for those who want to enjoy the same great taste while keeping it lighter. Pair them with a zesty dipping sauce for a delightful snack!

Cooking Note for Crispy Shrimp Balls Recipe

When preparing crispy shrimp balls, there are a few important cooking notes to keep in mind. First, ensure that your oil is at the right temperature before frying. If the oil is too hot, the outside will burn while the inside remains raw. Conversely, if the oil is not hot enough, the shrimp balls will absorb too much oil and become greasy. A thermometer can be a handy tool to achieve the perfect frying temperature of 350°F.

Additionally, avoid overcrowding the pot when frying. Frying too many shrimp balls at once can lower the oil temperature, leading to uneven cooking. Instead, fry them in small batches. This will help maintain that crispy texture you desire.

Another tip is to let the shrimp balls rest on paper towels after frying. This step is crucial as it allows excess oil to drain off, keeping your shrimp balls light and crispy. If you want to keep them warm while frying the remaining batches, place them on a baking sheet in a low oven (around 200°F) until ready to serve.

Lastly, feel free to experiment with different herbs and spices in your shrimp mixture. Adding a pinch of lime zest or a splash of soy sauce can elevate the flavor profile. Cooking is all about creativity, so don’t hesitate to make this crispy shrimp balls recipe your own!

Serving Suggestions for Crispy Shrimp Balls Recipe

Once your crispy shrimp balls are perfectly cooked, it’s time to think about how to serve them. These delightful bites are versatile and can be enjoyed in many ways. Here are some serving suggestions to elevate your dining experience:

  • With Dipping Sauces: One of the best ways to enjoy crispy shrimp balls is with a variety of dipping sauces. Consider serving them with sweet chili sauce for a touch of sweetness, or a tangy soy sauce for a savory kick. You can also try a creamy garlic aioli or a zesty lemon herb sauce to complement the flavors.
  • As an Appetizer: Serve crispy shrimp balls as a starter at your next gathering. Arrange them on a platter with toothpicks for easy serving. This makes them perfect for parties, game days, or family gatherings. Guests will love grabbing these tasty bites!
  • On a Salad: For a lighter meal, place crispy shrimp balls on a bed of mixed greens. Add some sliced cucumbers, cherry tomatoes, and avocado for a refreshing salad. Drizzle with a light vinaigrette or your favorite dressing to enhance the flavors.
  • In a Wrap: Create a delicious wrap by placing crispy shrimp balls in a tortilla with fresh veggies, like lettuce, carrots, and bell peppers. Add a drizzle of sauce or a spread of hummus for extra flavor. This makes for a fun and filling lunch option!
  • With Rice or Noodles: Pair crispy shrimp balls with steamed rice or noodles for a complete meal. You can toss them in a stir-fry with vegetables and a savory sauce for a delightful dish that’s both satisfying and nutritious.

These serving suggestions not only enhance the flavor of your crispy shrimp balls but also make them a versatile dish suitable for any occasion. Whether you’re hosting a party or enjoying a quiet dinner at home, these ideas will surely impress your family and friends!

Tips for Perfect Crispy Shrimp Balls Recipe

Creating the perfect crispy shrimp balls requires a few handy tips to ensure they turn out delicious every time. Here are some essential tips to help you achieve that ideal texture and flavor:

  • Use Fresh Shrimp: Always opt for fresh shrimp when making this recipe. Fresh shrimp not only taste better but also provide a firmer texture. If using frozen shrimp, make sure to thaw them completely and pat them dry before mixing.
  • Don’t Overmix: When combining the ingredients in the food processor, be careful not to overmix. You want the mixture to be well combined but still slightly chunky. This will give your shrimp balls a nice bite and prevent them from becoming mushy.
  • Chill the Mixture: After mixing, refrigerate the shrimp mixture for at least 30 minutes. Chilling helps the mixture firm up, making it easier to shape into balls. It also helps the flavors meld together, enhancing the overall taste.
  • Check Oil Temperature: Use a thermometer to ensure your oil is at the right temperature (350°F) before frying. This is crucial for achieving that crispy exterior. If you don’t have a thermometer, you can test the oil by dropping a small piece of the mixture in; if it sizzles and rises to the surface, the oil is ready.
  • Fry in Batches: Avoid overcrowding the pot when frying. Frying too many shrimp balls at once can lower the oil temperature, resulting in greasy balls. Fry them in small batches to maintain that perfect crispiness.
  • Drain Properly: After frying, let the shrimp balls drain on paper towels. This step is essential to remove excess oil, keeping your shrimp balls light and crispy. If you want to keep them warm, place them in a low oven while you finish frying the rest.
  • Experiment with Flavors: Don’t hesitate to get creative! Add different herbs, spices, or even a splash of citrus juice to the mixture. This can elevate the flavor profile and make your crispy shrimp balls unique.
  • Serve Immediately: For the best taste and texture, serve your crispy shrimp balls right after frying. They are at their crispiest when fresh out of the oil. If you need to prepare them in advance, consider baking them instead for a healthier option.

By following these tips, you’ll be well on your way to making perfect crispy shrimp balls that are sure to impress your family and friends. Enjoy the process and happy cooking!

Breakdown of Time for Crispy Shrimp Balls Recipe

Prep Time

The prep time for this crispy shrimp balls recipe is approximately 15-20 minutes. This includes gathering your ingredients, preparing the shrimp, and mixing everything together. If you choose to chill the mixture for better texture, add an additional 30 minutes to this time. This step is essential for achieving the perfect consistency when forming the balls.

Cooking Time

Once your shrimp mixture is ready, the cooking time will take about 10-15 minutes. This includes heating the oil and frying the shrimp balls in batches. Each batch will take around 3-4 minutes to cook until they are golden brown and crispy. Remember, frying in small batches helps maintain the oil temperature, ensuring even cooking.

Total Time

In total, you can expect the entire process to take about 55-65 minutes, including prep and cooking time. If you include the chilling time, the total will be around 1 hour and 25 minutes. This makes it a quick and enjoyable recipe to prepare, perfect for a weeknight dinner or a fun gathering with friends and family!

Nutritional Information for Crispy Shrimp Balls Recipe

Calories

Each serving of crispy shrimp balls contains approximately 250 calories. This makes them a satisfying snack or appetizer without being overly heavy. The balance of protein and healthy fats contributes to the overall calorie count, allowing you to enjoy these delicious bites without guilt. If you’re watching your calorie intake, consider serving smaller portions or pairing them with a light salad.

Protein

One of the standout features of this crispy shrimp balls recipe is its protein content. Each serving provides around 20 grams of protein. This high protein content is beneficial for muscle repair and growth, making these shrimp balls a great option for those looking to maintain a healthy diet. The shrimp itself is a lean source of protein, which helps keep you feeling full and satisfied.

Sodium

In terms of sodium, each serving contains approximately 600 milligrams. This amount is relatively moderate, but it’s essential to be mindful if you are on a low-sodium diet. You can reduce the sodium content by using low-sodium soy sauce or omitting added salt in the recipe. Additionally, fresh herbs and spices can enhance flavor without the need for extra salt, making your crispy shrimp balls both tasty and healthier.

FAQs About Crispy Shrimp Balls Recipe

Can I use frozen shrimp for this recipe?

Yes, you can use frozen shrimp for this crispy shrimp balls recipe! Just make sure to thaw them completely before using. To do this, place the frozen shrimp in the refrigerator overnight or run them under cold water for a quicker thaw. After thawing, be sure to pat them dry with a paper towel. This step is important as it helps the mixture hold together better. Using frozen shrimp can be a convenient option, especially if fresh shrimp are not available.

How do I store leftover crispy shrimp balls?

If you have any leftover crispy shrimp balls, store them in an airtight container in the refrigerator. They can last for up to 2 days. To keep them crispy, avoid stacking them on top of each other. Instead, place a layer of paper towels between layers to absorb moisture. When you’re ready to enjoy them again, reheat in the oven at 350°F for about 10 minutes. This will help restore their crispiness. Avoid microwaving, as this can make them soggy.

What dipping sauces pair well with crispy shrimp balls?

Crispy shrimp balls are delicious on their own, but they taste even better with dipping sauces! Here are some great options:

  • Sweet Chili Sauce: This sauce adds a sweet and spicy kick that complements the shrimp perfectly.
  • Garlic Aioli: A creamy garlic aioli provides a rich flavor that pairs well with the crispy texture.
  • Soy Sauce: A classic choice, soy sauce adds a savory touch that enhances the shrimp’s natural flavor.
  • Spicy Mayo: Mix mayonnaise with sriracha for a creamy and spicy dip that your guests will love.
  • Lemon Herb Sauce: A zesty lemon herb sauce can brighten up the dish and add freshness.

Feel free to mix and match these sauces to find your favorite combination!

Can I make crispy shrimp balls in advance?

Yes, you can prepare crispy shrimp balls in advance! To do this, follow the recipe up to the frying step. Once you’ve formed the balls, place them on a baking sheet lined with parchment paper and freeze them for about 1-2 hours. Once frozen, transfer the shrimp balls to an airtight container or freezer bag. They can be stored in the freezer for up to 2 months. When you’re ready to cook them, simply fry them straight from the freezer, adding a minute or two to the cooking time. This way, you can enjoy fresh crispy shrimp balls whenever you want!

Conclusion on Crispy Shrimp Balls Recipe

In conclusion, the crispy shrimp balls recipe is a delightful addition to any meal or gathering. With its simple preparation and delicious flavor, it’s no wonder this dish has become a favorite among many. The combination of fresh shrimp, herbs, and spices creates a mouthwatering treat that is both satisfying and nutritious.

Whether you choose to fry or bake them, these shrimp balls offer versatility that can cater to various tastes and dietary preferences. You can easily adjust the spice level or even substitute shrimp with other seafood, making it a customizable dish for everyone to enjoy. Plus, serving them with a variety of dipping sauces adds an extra layer of fun and flavor.

As you embark on your culinary journey with this crispy shrimp balls recipe, remember to embrace creativity. Experiment with different ingredients and flavors to make this dish your own. With a little practice, you’ll master the art of making crispy shrimp balls that will impress your family and friends.

So, gather your ingredients, follow the steps, and enjoy the delightful experience of cooking and sharing these crispy shrimp balls. They are sure to become a beloved staple in your kitchen, perfect for any occasion. Happy cooking!

Paul

Crispy Shrimp Balls Recipe: A Delicious Snack Idea!

Crispy on the outside, juicy and savory on the inside—these Golden Shrimp Balls are the ultimate bite-sized seafood snack. Infused with garlic, ginger, and a touch of sesame, they’re quick to make and even quicker to disappear. Serve them as a party appetizer or weeknight treat with your favorite dipping sauce.
Prep Time 15 minutes
Cook Time 10 minutes
Total Time 25 minutes
Servings: 20 –25 shrimp balls
Course: Appetizer / Snack
Cuisine: Asian-Inspired / Seafood

Ingredients
  

  • 1 lb raw shrimp peeled and deveined
  • ½ cup panko breadcrumbs
  • 1 egg beaten
  • ¼ cup green onions finely chopped
  • 2 cloves garlic minced
  • 1 tablespoon fresh ginger grated
  • 1 tablespoon soy sauce
  • 1 teaspoon sesame oil
  • ½ teaspoon salt
  • ½ teaspoon black pepper
  • ¼ cup chopped cilantro optional
  • 1 tablespoon cornstarch optional, for extra binding
  • Vegetable oil for frying

Method
 

  1. Roughly chop the shrimp with a knife or pulse in a food processor until finely minced but not pasty.
  2. In a large bowl, combine the chopped shrimp with breadcrumbs, egg, green onions, garlic, ginger, soy sauce, sesame oil, salt, and pepper. Mix well.
  3. If the mixture feels too wet, stir in cornstarch to help bind.
  4. With slightly wet hands, shape the mixture into 1 to 1.5-inch balls. You should get around 20 to 25 balls.
  5. Heat about ½ inch of vegetable oil in a skillet over medium-high heat. Once hot, fry the shrimp balls in batches for 3–4 minutes per side until golden brown and cooked through.
  6. Remove and place on a paper towel-lined plate to drain excess oil.
  7. Garnish with cilantro or sesame seeds if desired. Serve hot with dipping sauces like sweet chili sauce, soy sauce, or lemon garlic aioli.

Notes

  • Do not overprocess the shrimp if using a food processor—texture is key!
  • These shrimp balls can also be baked at 400°F (200°C) for 12–15 minutes, flipping halfway through, for a lighter option.
  • To freeze, shape the raw shrimp balls and freeze on a tray before transferring to a freezer bag. Cook from frozen by adding a few extra minutes to the cooking time.
  • Great for party platters, bento boxes, or as a main dish with steamed rice and vegetables.

Crispy Air Fryer Salmon is a quick, tasty delight!

Crispy Air Fryer Salmon Recipe is here to save the day. This recipe not only delivers a delightful crunch but also keeps the salmon moist and flavorful. With just a few simple ingredients, you can whip up a meal that impresses your family and friends.

Why Choose Air Fryer for Salmon?

Using an air fryer for salmon is a game-changer. First, it cooks the fish evenly, ensuring that every bite is tender and juicy. Second, the air fryer circulates hot air around the salmon, creating a crispy exterior without the need for excessive oil. This method is healthier than traditional frying, making it a great choice for those who want to enjoy delicious food without the guilt.

Moreover, air fryers are incredibly convenient. They preheat quickly and cook faster than conventional ovens. This means you can have a tasty dinner on the table in no time. Plus, cleanup is a breeze! Most air fryer baskets are non-stick and dishwasher safe, making post-meal chores less of a hassle.

Benefits of the Crispy Air Fryer Salmon Recipe

Crispy Air Fryer Salmon Recipe offers numerous benefits. First and foremost, it’s packed with protein, making it a perfect choice for a healthy diet. Each serving contains about 34 grams of protein, which is essential for muscle repair and growth.

Additionally, this recipe is low in carbohydrates, making it suitable for various dietary preferences, including keto and paleo diets. The use of fresh ingredients, like lemon and herbs, adds flavor without unnecessary calories. You can also customize the seasoning to suit your taste, making it versatile for any palate.

Finally, this recipe is perfect for busy weeknights or special occasions. It’s quick, easy, and sure to impress. So, let’s dive into the ingredients and get started on this delightful dish!

Ingredients for the Crispy Air Fryer Salmon Recipe

Crispy Air Fryer Salmon Recipe, you will need a few simple ingredients. These items are easy to find and will help you achieve that perfect crispy texture while keeping the salmon moist and flavorful. Here’s what you’ll need:

  • 1 pound salmon fillets (skin-on or skinless)
  • 2 tablespoons olive oil
  • 1 teaspoon garlic powder
  • 1 teaspoon paprika
  • 1 teaspoon dried oregano
  • 1 teaspoon salt
  • ½ teaspoon black pepper
  • 1 lemon, sliced

These ingredients come together to create a deliciously seasoned salmon that is sure to please everyone at the table. The olive oil helps the spices stick to the fish while also adding healthy fats. Garlic powder and paprika provide a wonderful flavor, while oregano adds a hint of earthiness. The salt and pepper enhance the overall taste, and the lemon slices add a refreshing touch.

Feel free to adjust the quantities based on your preferences. If you love garlic, add a bit more garlic powder. If you prefer a spicier kick, consider adding a pinch of cayenne pepper. The beauty of this recipe lies in its flexibility, allowing you to make it your own!

Step-by-Step Preparation of the Crispy Air Fryer Salmon Recipe

Crispy Air Fryer Salmon Recipe. Follow these simple steps to ensure your salmon turns out perfectly every time. Let’s get started!

Step 1: Preparing the Salmon

First, take your salmon fillets out of the packaging. If they are frozen, make sure to thaw them completely. Pat the salmon dry with paper towels. This step is crucial because removing excess moisture helps achieve that crispy texture. If you’re using skin-on fillets, place them skin side down on your work surface. This will help the skin crisp up nicely during cooking.

Step 2: Seasoning the Salmon

Next, it’s time to season your salmon. In a small bowl, mix together the olive oil, garlic powder, paprika, oregano, salt, and black pepper. Use a brush or your hands to evenly coat the salmon fillets with this flavorful mixture. Make sure to cover all sides, as this will enhance the taste. If you want to add a touch of sweetness, consider drizzling a little honey or maple syrup over the fillets at this stage.

Step 3: Preheating the Air Fryer

Before cooking, preheat your air fryer to 400°F. Preheating is essential as it helps the salmon cook evenly and achieve that desired crispiness. Most air fryers heat up quickly, so this step won’t take long. While the air fryer is preheating, you can prepare the lemon slices to place on top of the salmon.

Step 4: Cooking the Salmon

Once the air fryer is ready, place the seasoned salmon fillets in the basket. If your fillets have skin, make sure they are skin side down. Arrange the lemon slices on top of the salmon for added flavor. Cook the salmon for 8-10 minutes, depending on the thickness of the fillets. For extra crispiness, you can cook for an additional 1-2 minutes. Keep an eye on it to avoid overcooking.

Step 5: Checking for Doneness

After the cooking time is up, it’s time to check if your salmon is done. The fish should flake easily with a fork and have an internal temperature of 145°F. If it’s not quite there, you can return it to the air fryer for another minute or two. Once cooked, let the salmon rest for a few minutes before serving. This allows the juices to redistribute, making it even more delicious!

Now that you’ve prepared your crispy air fryer salmon, you’re ready to enjoy a delightful meal. Let’s explore some variations and serving suggestions to elevate your dining experience!

Variations of the Crispy Air Fryer Salmon Recipe

Crispy Air Fryer Salmon Recipe is not only delicious but also versatile. You can easily switch up the flavors to keep things exciting. Here are some variations to consider that will enhance your salmon experience.

Different Seasoning Options

One of the best things about cooking salmon is the variety of seasonings you can use. If you want to try something different, consider these options:

  • Lemon Dill: Replace the oregano with fresh or dried dill. Add lemon zest for an extra citrusy kick.
  • Spicy Cajun: Use Cajun seasoning instead of the garlic powder and paprika. This will give your salmon a nice heat.
  • Asian-Inspired: Swap the olive oil for sesame oil and add soy sauce, ginger, and green onions for a unique twist.
  • Herb Blend: Mix in fresh herbs like parsley, thyme, or basil for a garden-fresh flavor.

Feel free to experiment with different spices and herbs. The key is to find combinations that you enjoy. Each variation can bring a new taste to your crispy salmon!

Cooking with Marinades

Marinating your salmon before cooking can add depth to the flavor. Here are a couple of easy marinade ideas:

  • Honey Soy Marinade: Combine 2 tablespoons of soy sauce, 1 tablespoon of honey, and 1 teaspoon of minced garlic. Marinate the salmon for 30 minutes before cooking.
  • Mustard Maple Marinade: Mix 2 tablespoons of Dijon mustard with 1 tablespoon of maple syrup. Let the salmon soak in this mixture for about 20 minutes.

After marinating, simply follow the same cooking steps as before. The result will be a flavorful, crispy salmon that’s sure to impress!

Crispy Air Fryer Salmon Recipe in many delightful ways. Now, let’s move on to some cooking notes to ensure your salmon turns out perfectly every time.

Cooking Note for the Crispy Air Fryer Salmon Recipe

Crispy Air Fryer Salmon Recipe, a few cooking notes can help you achieve the best results. These tips will ensure that your salmon is not only delicious but also cooked to perfection.

First, always choose fresh salmon when possible. Fresh fish has a better flavor and texture compared to frozen options. If you do use frozen salmon, make sure to thaw it completely before cooking. This will help it cook evenly and prevent any rubbery texture.

Next, consider the thickness of your salmon fillets. Thicker fillets will require a longer cooking time, while thinner ones will cook faster. If you’re unsure, it’s always a good idea to check the internal temperature. Salmon should reach an internal temperature of 145°F to be safe for consumption.

Another important note is to avoid overcrowding the air fryer basket. If you place too many fillets at once, they may not cook evenly. Instead, cook in batches if necessary. This will allow the hot air to circulate properly, giving you that crispy exterior you desire.

Lastly, let your salmon rest for a few minutes after cooking. This resting period allows the juices to redistribute throughout the fish, making it more flavorful and moist. Trust us, this small step can make a big difference in your final dish!

Crispy Air Fryer Salmon Recipe. Now, let’s explore some serving suggestions to complement your delicious salmon dish!

Serving Suggestions for the Crispy Air Fryer Salmon Recipe

Crispy Air Fryer Salmon Recipe, it’s time to think about how to serve it. Pairing your salmon with the right side dishes and sauces can elevate your meal to a whole new level. Here are some delightful suggestions to consider!

Pairing with Side Dishes

Choosing the right side dishes can enhance the flavors of your salmon. Here are some tasty options:

  • Roasted Vegetables: A mix of seasonal vegetables like asparagus, broccoli, or bell peppers roasted in the air fryer complements the salmon beautifully. The slight char adds a wonderful flavor.
  • Quinoa Salad: A light quinoa salad with cherry tomatoes, cucumber, and a lemon vinaigrette pairs well with the richness of the salmon.
  • Garlic Mashed Potatoes: Creamy mashed potatoes with a hint of garlic provide a comforting side that balances the crispy salmon.
  • Steamed Rice: Fluffy white or brown rice can soak up the juices from the salmon, making each bite delicious.

Feel free to mix and match these sides based on your preferences. The goal is to create a balanced plate that complements the flavors of the crispy salmon.

Serving with Sauces

Crispy Air Fryer Salmon Recipe to the next level. Here are some sauce ideas that pair perfectly:

  • Lemon Butter Sauce: A simple sauce made with melted butter, lemon juice, and fresh herbs adds a rich, zesty flavor to the salmon.
  • Tartar Sauce: A classic choice, tartar sauce provides a creamy and tangy contrast to the crispy fish.
  • Chimichurri: This vibrant sauce made with parsley, garlic, vinegar, and olive oil adds a fresh and zesty kick.
  • Honey Mustard Glaze: A mix of honey and Dijon mustard drizzled over the salmon can enhance its sweetness and flavor.

These sauces not only add flavor but also create a beautiful presentation. Choose one or two to serve alongside your salmon for a delightful dining experience.

Crispy Air Fryer Salmon Recipe will shine on the dinner table. Now, let’s move on to some tips for perfecting this delicious dish!

Tips for Perfecting the Crispy Air Fryer Salmon Recipe

Crispy Air Fryer Salmon Recipe, a few tips can help you achieve the best results. These insights will ensure that your salmon is not only delicious but also perfectly cooked every time. Let’s dive into some essential tips!

Choosing the Right Salmon

When it comes to salmon, quality matters. Opt for fresh, wild-caught salmon whenever possible. Wild salmon tends to have a richer flavor and firmer texture compared to farmed varieties. If you can’t find fresh salmon, frozen salmon is a good alternative. Just make sure to thaw it completely before cooking.

Look for fillets that are bright in color and have a moist appearance. Avoid any that look dull or have brown spots. If you’re unsure, ask your fishmonger for recommendations. They can guide you to the best options available.

Additionally, consider the cut of salmon. Salmon fillets come in various cuts, such as center-cut or tail-end. Center-cut fillets are thicker and cook more evenly, while tail-end pieces are thinner and may cook faster. Choose based on your preference and cooking time.

Ensuring Crispiness

Crispy Air Fryer Salmon Recipe. Here are some tips to ensure your salmon comes out crispy every time:

  • Pat Dry: Always pat your salmon dry with paper towels before seasoning. Removing excess moisture is crucial for crispiness.
  • Use Enough Oil: Don’t skimp on the olive oil. It helps the seasoning stick and promotes browning. A light brush or drizzle is all you need.
  • Preheat the Air Fryer: Preheating your air fryer is essential. It ensures that the salmon starts cooking immediately, helping to create that crispy texture.
  • Avoid Overcrowding: Cook in batches if necessary. Overcrowding the basket can trap steam and prevent the salmon from crisping up.
  • Check for Doneness: Keep an eye on the cooking time. If your salmon is thick, it may need a bit longer. For extra crispiness, you can add a minute or two to the cooking time.

Crispy Air Fryer Salmon Recipe. Now, let’s break down the time needed for this delicious dish!

Breakdown of Time for the Crispy Air Fryer Salmon Recipe

Crispy Air Fryer Salmon Recipe is essential for planning your meal. Here’s a simple breakdown of the time required for preparation and cooking. This will help you manage your kitchen time effectively and ensure that your salmon is ready to serve when you want it.

Prep Time

The prep time for this recipe is quite short. You’ll need about 10-15 minutes to gather your ingredients and prepare the salmon. This includes:

  • Thawing the salmon if it’s frozen.
  • Patting the salmon dry.
  • Mixing the seasoning and applying it to the fillets.
  • Prepping the lemon slices.

With everything ready, you’ll be set to move on to the cooking stage!

Cooking Time

Crispy Air Fryer Salmon Recipe is approximately 8-10 minutes. This can vary slightly based on the thickness of your salmon fillets. Here’s a quick overview:

  • Cook for 8-10 minutes at 400°F.
  • If you prefer extra crispiness, you can add an additional 1-2 minutes.

Always check for doneness to ensure your salmon is perfectly cooked.

Total Time

In total, you can expect the entire process to take about 20-25 minutes. This includes both prep and cooking time. Here’s a quick summary:

  • Prep Time: 10-15 minutes
  • Cooking Time: 8-10 minutes
  • Total Time: 20-25 minutes

Crispy Air Fryer Salmon Recipe an excellent choice for busy weeknights or when you want to impress guests without spending hours in the kitchen. Now that you know the timing, let’s dive into the nutritional information for this delightful dish!

Nutritional Information for the Crispy Air Fryer Salmon Recipe

Crispy Air Fryer Salmon Recipe is essential for those who are health-conscious or following specific dietary plans. This dish is not only delicious but also packed with nutrients that can benefit your overall health. Let’s break down the key nutritional components of this recipe.

Calories

Crispy Air Fryer Salmon Recipe contains approximately 320 calories. This makes it a satisfying yet light option for dinner. The calorie count is primarily derived from the healthy fats in the salmon and olive oil, which provide energy while also being beneficial for heart health.

Protein

One of the standout features of this recipe is its high protein content. Each serving offers about 34 grams of protein. Protein is essential for muscle repair, growth, and overall body function. Including salmon in your diet can help you meet your daily protein needs while enjoying a tasty meal.

Sodium

Crispy Air Fryer Salmon Recipe is around 500 milligrams per serving. This amount is reasonable, especially considering that salmon is naturally low in sodium. However, if you are watching your sodium intake, you can adjust the salt in the seasoning mix to suit your dietary needs. Using fresh herbs and spices can also enhance flavor without adding extra sodium.

Crispy Air Fryer Salmon Recipe is a nutritious choice that fits well into a balanced diet. With its combination of healthy fats, high protein, and moderate calorie content, it’s a meal you can feel good about serving to your family and friends. Now, let’s address some frequently asked questions about this delightful dish!

FAQs about the Crispy Air Fryer Salmon Recipe

How do I know when the salmon is done?

Knowing when your salmon is perfectly cooked is essential for a delicious meal. The best way to check is by using a fork. Gently flake the salmon with a fork; if it flakes easily, it’s done! Additionally, the internal temperature should reach 145°F. If you don’t have a thermometer, just keep an eye on the color. Cooked salmon will change from a translucent pink to a more opaque color. If it still looks raw in the center, give it another minute or two in the air fryer.

Can I use frozen salmon for this recipe?

Crispy Air Fryer Salmon Recipe. However, it’s important to thaw it completely before cooking. You can do this by placing the salmon in the refrigerator overnight or using the defrost setting on your microwave. Once thawed, pat it dry and follow the recipe as usual. Just remember that cooking times may vary slightly, so keep an eye on it to ensure it cooks evenly.

What can I serve with crispy air fryer salmon?

Crispy Air Fryer Salmon. Consider pairing it with roasted vegetables, a light quinoa salad, or creamy garlic mashed potatoes. Steamed rice or a fresh green salad also make great accompaniments. The key is to choose sides that complement the flavors of the salmon while providing a balanced meal. Feel free to mix and match based on your preferences!

How do I store leftovers of the crispy air fryer salmon?

Crispy Air Fryer Salmon Recipe, storing them properly is important to maintain freshness. Allow the salmon to cool completely, then place it in an airtight container. You can store it in the refrigerator for up to 3 days. If you want to keep it longer, consider freezing it. Wrap the salmon tightly in plastic wrap and then place it in a freezer-safe bag. It can last up to 3 months in the freezer. When ready to eat, thaw it in the refrigerator overnight and reheat in the air fryer for a few minutes to regain that crispy texture.

Conclusion on the Crispy Air Fryer Salmon Recipe

Crispy Air Fryer Salmon Recipe is a fantastic way to enjoy a healthy and delicious meal without spending hours in the kitchen. With its simple ingredients and quick cooking time, this recipe is perfect for busy weeknights or special occasions. The air fryer not only ensures a crispy exterior but also keeps the salmon moist and flavorful, making it a favorite among seafood lovers.

By following the steps outlined in this article, you can create a dish that is not only nutritious but also packed with flavor. The versatility of this recipe allows you to experiment with different seasonings and marinades, ensuring that you never get bored. Whether you choose to serve it with roasted vegetables, a refreshing salad, or a zesty sauce, your crispy salmon will surely impress your family and friends.

Remember, the key to perfecting this dish lies in choosing high-quality salmon, ensuring proper seasoning, and monitoring the cooking time. With a little practice, you’ll master the art of making crispy air fryer salmon that is both satisfying and healthy.

Crispy Air Fryer Salmon Recipe brings to your table!

Paul

Crispy Air Fryer Salmon is a quick, tasty delight!

This golden-glazed salmon is a 15-minute flavor bomb. Sweet honey, tangy Dijon, and savory soy come together in an irresistibly sticky glaze that caramelizes beautifully in the air fryer. It’s healthy, fast, and packed with bold, satisfying flavor.
Prep Time 5 minutes
Cook Time 10 minutes
Total Time 15 minutes
Servings: 4 servings
Course: Main Course
Cuisine: American / Healthy

Ingredients
  

  • 4 salmon fillets about 6 oz each
  • 2 tablespoons honey or a keto honey substitute
  • tablespoons Dijon mustard
  • 2 tablespoons olive oil
  • 1 tablespoon low sodium soy sauce or Tamari/Coconut Aminos for gluten-free
  • 1 teaspoon garlic powder
  • Salt and pepper to taste

Method
 

  1. Preheat the air fryer to 400°F (200°C) and lightly spray the basket with oil to prevent sticking.
  2. Pat the salmon fillets dry with paper towels to remove excess moisture—this helps achieve a crisper exterior.
  3. In a small bowl, whisk together honey, Dijon mustard, olive oil, soy sauce, and garlic powder until well combined.
  4. Season the salmon with salt and pepper, then brush both sides generously with the prepared glaze.
  5. Place the salmon fillets skin-side down in the air fryer basket in a single layer.
  6. Air fry for 8 to 10 minutes, or until the internal temperature reaches 145°F (63°C) and the edges are slightly crispy.
  7. Serve immediately with your choice of side—steamed vegetables, salad, or mashed cauliflower work wonderfully.

Notes

  • Cooking time may vary slightly depending on the thickness of your salmon fillets—check for doneness around the 8-minute mark.
  • For a spicy twist, add a pinch of red pepper flakes to the glaze.
  • Leftovers can be stored in the fridge for up to 2 days and reheated in the air fryer or a skillet over medium heat.
  • You can also bake this recipe at 400°F for about 12–15 minutes if you don’t have an air fryer.

Slow Cooker Chicken Breasts with Gravy Recipe is easy!

Slow Cooker Chicken Breasts with Gravy Recipe is a fantastic choice. This dish is not only simple to prepare, but it also fills your home with a warm, inviting aroma as it cooks. Imagine coming home after a long day to a tender, flavorful chicken dinner waiting for you!

This recipe is perfect for busy weeknights or lazy weekends. With just a few ingredients, you can create a hearty meal that is both satisfying and nutritious. The slow cooker does all the work, allowing you to spend more time with your loved ones. Plus, the gravy is rich and creamy, making it a delightful addition to the chicken.

Whether you’re a seasoned cook or a beginner in the kitchen, this recipe is easy to follow. You can customize it to suit your taste by adding your favorite vegetables or spices. So, grab your slow cooker and let’s dive into this mouthwatering recipe that will surely become a family favorite!

Ingredients for Slow Cooker Chicken Breasts with Gravy Recipe

Slow Cooker Chicken Breasts with Gravy Recipe, you’ll need a handful of simple ingredients. Each one plays a vital role in building flavor and ensuring your dish turns out delicious. Here’s what you’ll need:

  • 4 boneless, skinless chicken breasts (about 1.5 pounds)
  • 1 teaspoon salt
  • 1 teaspoon black pepper
  • 1 teaspoon garlic powder
  • 1 teaspoon onion powder
  • 1 can (10.5 ounces) cream of chicken soup
  • 1 cup chicken broth
  • 1 tablespoon Worcestershire sauce
  • 1 tablespoon olive oil
  • 1 cup sliced mushrooms (optional)
  • 1 cup chopped onions (optional)
  • 1 cup frozen peas (optional)

These ingredients come together to create a savory gravy that perfectly complements the tender chicken. The optional ingredients, like mushrooms and onions, add extra depth and flavor. Feel free to mix and match based on your preferences. For instance, you can add carrots or bell peppers for a colorful twist!

Gather these ingredients, and you’re ready to start cooking. The next step is to prepare the chicken, which will set the stage for a delightful meal.

Step-by-Step Preparation of Slow Cooker Chicken Breasts with Gravy Recipe

Slow Cooker Chicken Breasts with Gravy Recipe. This process is straightforward and will guide you through each stage, ensuring a delicious outcome. Let’s get started!

Step 1: Preparing the Chicken

First, take your boneless, skinless chicken breasts and place them on a clean cutting board. Sprinkle salt, black pepper, garlic powder, and onion powder evenly on both sides. This seasoning will enhance the chicken’s flavor, making it more delicious. Once seasoned, set the chicken aside for a few minutes to let the flavors soak in.

Step 2: Making the Gravy Mixture

Next, grab a medium-sized bowl. In this bowl, combine the cream of chicken soup, chicken broth, and Worcestershire sauce. Stir the mixture well until it’s smooth and creamy. This gravy will be the star of the dish, adding richness to the chicken. If you want a thicker gravy, you can adjust the amount of chicken broth to your liking.

Step 3: Combining Ingredients in the Slow Cooker

Now, it’s time to bring everything together! If you’re using optional ingredients like sliced mushrooms and chopped onions, add them to the bottom of the slow cooker. Then, pour the gravy mixture over the vegetables. Finally, place the seasoned chicken breasts on top of the gravy. This layering helps the chicken absorb all the delicious flavors as it cooks.

Step 4: Cooking the Chicken Breasts

Cover the slow cooker with its lid and set it to cook. You can choose to cook on low for 6-7 hours or on high for 3-4 hours. The slow cooking process allows the chicken to become tender and juicy. As it cooks, the chicken will soak up the gravy, making it even more flavorful. It’s a great time to relax or tackle other tasks around the house!

Step 5: Shredding and Serving the Chicken

Once the cooking time is up, carefully remove the lid. The chicken should be cooked through and tender. Using two forks, shred the chicken right in the slow cooker. Mix it well with the gravy to ensure every bite is packed with flavor. Serve the chicken hot, and enjoy the delightful meal you’ve created!

Variations of Slow Cooker Chicken Breasts with Gravy Recipe

Slow Cooker Chicken Breasts with Gravy Recipe is versatile and can be customized to suit your taste. By adding different ingredients or flavors, you can create a unique dish every time. Let’s explore some exciting variations that will keep your meals fresh and delicious!

Adding Vegetables to the Slow Cooker

One of the easiest ways to enhance your slow cooker chicken is by adding vegetables. Not only do they add flavor, but they also boost the nutritional value of your meal. Here are some great options:

  • Carrots: Slice them into rounds or sticks. They add a natural sweetness and pair well with the gravy.
  • Bell Peppers: Chop them into bite-sized pieces. They bring a pop of color and a slight crunch.
  • Green Beans: Add fresh or frozen green beans for a crisp texture and vibrant color.
  • Potatoes: Cut them into cubes for a hearty addition. They soak up the gravy beautifully!

Feel free to mix and match these vegetables based on what you have on hand. Just remember to add them to the slow cooker before the chicken, so they cook evenly. This way, you’ll have a complete meal in one pot!

Different Gravy Flavors for Slow Cooker Chicken Breasts

If you want to switch up the flavor profile of your gravy, there are plenty of options to explore. Here are some ideas to inspire you:

  • Herb-Infused Gravy: Add dried herbs like thyme, rosemary, or oregano to the gravy mixture for a fragrant twist.
  • Spicy Gravy: Mix in a teaspoon of red pepper flakes or a dash of hot sauce for a kick of heat.
  • BBQ Gravy: Substitute some of the chicken broth with your favorite barbecue sauce for a smoky flavor.
  • Mushroom Gravy: Use cream of mushroom soup instead of cream of chicken for a rich, earthy taste.

Slow Cooker Chicken Breasts with Gravy Recipe feel new and exciting. Don’t hesitate to get creative and find the combinations that your family loves best!

Cooking Note for Slow Cooker Chicken Breasts with Gravy Recipe

Slow Cooker Chicken Breasts with Gravy Recipe, there are a few important cooking notes to keep in mind. These tips will help ensure that your dish turns out perfectly every time. Let’s take a closer look!

First, always use boneless, skinless chicken breasts for this recipe. They cook evenly and stay tender throughout the slow cooking process. If you prefer, you can also use chicken thighs, which are slightly richer in flavor and can add a different texture to the dish.

Next, searing the chicken before placing it in the slow cooker is a crucial step. This process locks in the juices and adds a beautiful golden color. It also enhances the overall flavor of the chicken. Make sure your skillet is hot enough before adding the chicken to achieve that perfect sear.

Another important note is to avoid overcooking the chicken. While slow cooking is forgiving, leaving the chicken in for too long can lead to dry meat. Always check for doneness around the end of the cooking time. The chicken should reach an internal temperature of 165°F (75°C) to be safe for consumption.

Lastly, if you want to make the gravy even richer, consider adding a splash of heavy cream or sour cream just before serving. This addition will create a creamier texture and enhance the flavor profile of the dish.

By following these cooking notes, you’ll be well on your way to creating a delicious and satisfying meal that your family will love. Enjoy the process and the delightful aroma that fills your kitchen!

Serving Suggestions for Slow Cooker Chicken Breasts with Gravy Recipe

Slow Cooker Chicken Breasts with Gravy Recipe is ready, it’s time to think about how to serve this delicious dish. The right sides can elevate your meal and create a well-rounded dining experience. Here are some fantastic serving suggestions that pair beautifully with the savory chicken and gravy.

  • Mashed Potatoes: Creamy mashed potatoes are a classic choice. They soak up the rich gravy perfectly, making each bite delightful.
  • Rice: Serve the chicken over a bed of fluffy white or brown rice. The rice will absorb the gravy, adding flavor to every spoonful.
  • Egg Noodles: Cooked egg noodles are another great option. They provide a comforting base for the chicken and gravy.
  • Steamed Vegetables: For a healthier side, consider steamed broccoli, green beans, or carrots. They add color and nutrition to your plate.
  • Crusty Bread: A slice of warm, crusty bread is perfect for dipping into the gravy. It adds a satisfying crunch to your meal.

Don’t forget to garnish your dish! A sprinkle of fresh parsley or chives can add a pop of color and freshness. This simple touch makes your meal look even more appetizing.

Slow Cooker Chicken Breasts with Gravy Recipe!

Tips for Perfect Slow Cooker Chicken Breasts with Gravy Recipe

Slow Cooker Chicken Breasts with Gravy Recipe turns out perfectly every time, here are some helpful tips. These suggestions will enhance the flavor and texture of your dish, making it a family favorite!

First, always start with high-quality chicken. Fresh, boneless, skinless chicken breasts will yield the best results. If possible, choose organic or free-range chicken for a richer flavor. This small change can make a big difference in your dish.

Next, don’t skip the seasoning! Properly seasoning the chicken before cooking is crucial. The blend of salt, pepper, garlic powder, and onion powder creates a flavorful base. Feel free to adjust the seasonings to match your taste preferences. A little extra garlic or a pinch of paprika can add a delightful twist!

Another tip is to layer your ingredients wisely. Place the vegetables at the bottom of the slow cooker, followed by the gravy mixture, and then the chicken on top. This layering allows the chicken to absorb all the flavors while keeping the veggies tender. It’s a simple trick that enhances the overall taste.

When it comes to cooking time, be mindful of your slow cooker settings. If you’re short on time, cooking on high for 3-4 hours is perfectly fine. However, for the best flavor and tenderness, cooking on low for 6-7 hours is ideal. The longer cooking time allows the chicken to become incredibly tender and soak up the gravy.

Lastly, don’t forget to taste and adjust! Before serving, give the gravy a quick taste. If it needs a little more flavor, consider adding a splash of soy sauce or a dash of lemon juice. These small adjustments can elevate your dish to new heights.

Slow Cooker Chicken Breasts with Gravy Recipe that your family will love. Enjoy the cooking process and the delightful meal that awaits you!

Breakdown of Time for Slow Cooker Chicken Breasts with Gravy Recipe

Slow Cooker Chicken Breasts with Gravy Recipe is essential for planning your meal. Here’s a simple breakdown of the time involved in preparing and cooking this delicious dish. Knowing these times will help you manage your schedule and ensure everything is ready when you want to eat!

Prep Time

The prep time for this recipe is quite short, making it perfect for busy days. You’ll need about 15-20 minutes to gather your ingredients and prepare the chicken. This includes seasoning the chicken breasts and mixing the gravy ingredients. It’s a quick process that allows you to get everything ready without much hassle!

Cooking Time

Once you’ve prepped your ingredients, the cooking time is where the magic happens. You can choose to cook the chicken on low for 6-7 hours or on high for 3-4 hours. The slow cooking method ensures that the chicken becomes tender and flavorful. It’s a great way to let the flavors meld together while you go about your day!

Total Time

In total, you’re looking at about 6 hours and 15 minutes to 7 hours and 20 minutes from start to finish, depending on your cooking method. This includes both the prep and cooking times. With such a minimal hands-on time, you can enjoy a delicious meal without spending all day in the kitchen!

Slow Cooker Chicken Breasts with Gravy Recipe into your busy schedule. It’s a fantastic way to enjoy a home-cooked meal with minimal effort!

Nutritional Information for Slow Cooker Chicken Breasts with Gravy Recipe

Slow Cooker Chicken Breasts with Gravy Recipe not only offers great taste but also provides a balanced meal option. Let’s break down the nutritional information to help you understand what’s in this delicious dish.

Calories

Slow Cooker Chicken Breasts with Gravy Recipe contains approximately 320 calories. This makes it a satisfying yet light option for dinner. The calorie count is reasonable, especially considering the rich flavors and comforting nature of the dish. It’s a great choice for those looking to enjoy a hearty meal without overindulging.

Protein

One of the standout features of this recipe is its high protein content. Each serving provides about 30 grams of protein. Chicken breasts are an excellent source of lean protein, which is essential for muscle repair and overall health. Including protein in your meals can help keep you feeling full and satisfied, making this dish a smart choice for any diet.

Sodium

The sodium content in this recipe is approximately 800 milligrams per serving. While this is a reasonable amount for a savory dish, it’s always good to be mindful of sodium intake, especially for those watching their salt consumption. You can reduce the sodium level by using low-sodium chicken broth and cream of chicken soup. This simple adjustment allows you to enjoy the flavors without compromising your health goals.

Slow Cooker Chicken Breasts with Gravy Recipe is a nutritious option that balances calories, protein, and sodium. It’s a meal that not only tastes great but also supports a healthy lifestyle. Enjoy this comforting dish knowing it’s good for you too!

FAQs about Slow Cooker Chicken Breasts with Gravy Recipe

Can I use frozen chicken breasts for this recipe?

Slow Cooker Chicken Breasts with Gravy Recipe. However, it’s important to note that cooking times will vary. If you start with frozen chicken, you should cook it on high for about 4-5 hours instead of the usual 3-4 hours. Always ensure the chicken reaches an internal temperature of 165°F (75°C) for safe consumption. Using frozen chicken can be a convenient option, especially when you forget to thaw your meat ahead of time!

How can I thicken the gravy for Slow Cooker Chicken Breasts?

If you prefer a thicker gravy, there are a few easy methods to achieve that. One option is to mix a tablespoon of cornstarch with a tablespoon of cold water to create a slurry. Stir this mixture into the gravy during the last 30 minutes of cooking. Another method is to remove some of the gravy, let it cool slightly, and whisk in a bit of flour or cornstarch before returning it to the slow cooker. This will help thicken the gravy without clumping. You can also let the gravy simmer uncovered for a bit to reduce it and thicken naturally!

What sides pair well with Slow Cooker Chicken Breasts with Gravy?

Slow Cooker Chicken Breasts with Gravy Recipe. Here are some great options:

  • Mashed Potatoes: Creamy mashed potatoes are a classic pairing, soaking up the rich gravy.
  • Rice: Fluffy white or brown rice makes a great base for the chicken and gravy.
  • Egg Noodles: Tender egg noodles provide a comforting texture that pairs well with the dish.
  • Steamed Vegetables: Fresh steamed broccoli or green beans add color and nutrition to your plate.
  • Crusty Bread: A slice of warm bread is perfect for dipping into the savory gravy.

These sides not only enhance the meal but also create a well-rounded dining experience!

Can I make this recipe ahead of time?

Slow Cooker Chicken Breasts with Gravy Recipe is perfect for meal prep. You can prepare the ingredients the night before and store them in the refrigerator. In the morning, simply transfer everything to the slow cooker and set it to cook. If you want to make it even easier, you can cook the chicken and gravy ahead of time, then store it in an airtight container in the fridge for up to 3 days. Reheat it on the stove or in the microwave before serving. This makes it a convenient option for busy weeknights!

Conclusion on Slow Cooker Chicken Breasts with Gravy Recipe

Slow Cooker Chicken Breasts with Gravy Recipe is a delightful and easy meal that brings comfort to your dinner table. With its simple preparation and rich flavors, it’s no wonder this dish has become a family favorite. The slow cooker does all the hard work, allowing you to enjoy a tender, juicy chicken dish without spending hours in the kitchen.

This recipe is not only versatile but also customizable. You can add your favorite vegetables or experiment with different gravy flavors to suit your taste. Whether you prefer a classic creamy gravy or a spicy twist, the possibilities are endless. Plus, the nutritional benefits make it a smart choice for anyone looking to maintain a balanced diet.

As you gather around the table to enjoy this meal, you’ll appreciate the warmth and love that comes from home-cooked food. The aroma of the chicken and gravy will fill your home, creating a cozy atmosphere that invites everyone to sit down and share a meal together. So, don’t hesitate to try this recipe and make it your own!

Slow Cooker Chicken Breasts with Gravy Recipe.

Paul

Slow Cooker Chicken Breasts with Gravy Recipe is easy!

Creamy, comforting, and effortless—this Slow Cooker Chicken and Gravy is the ultimate cozy meal. Tender chicken simmers low and slow in a rich, savory gravy that’s finished with a touch of sour cream for a velvety texture. Serve it over mashed potatoes, rice, or buttered noodles for pure comfort food bliss.
Prep Time 5 minutes
Cook Time 4 hours
Total Time 4 hours 5 minutes
Servings: 4 servings
Course: Main Course
Cuisine: American Comfort Food

Ingredients
  

  • cups water or chicken broth for more flavor
  • 2 packets chicken gravy mix
  • cups condensed cream of chicken soup do not dilute
  • 1 teaspoon garlic powder
  • ½ teaspoon kosher salt
  • ½ teaspoon paprika
  • ¼ teaspoon coarse ground black pepper
  • 3 boneless skinless chicken breasts (about 1 pound total)
  • ½ cup sour cream

Method
 

  1. Season the chicken breasts on both sides with garlic powder, salt, and black pepper.
  2. In the slow cooker, whisk together the water (or broth), gravy mix, cream of chicken soup, garlic powder, paprika, and remaining salt and pepper until smooth.
  3. Place the seasoned chicken into the slow cooker and flip to fully coat with the gravy mixture.
  4. Cover and cook on low for 4 to 5 hours, or until the chicken is cooked through and tender.
  5. Remove the chicken and shred or slice it as preferred.
  6. Stir the sour cream into the gravy in the slow cooker until smooth and creamy.
  7. Return the chicken to the slow cooker or serve the gravy spooned over the chicken.
  8. Serve hot over mashed potatoes, rice, noodles, or even thick-cut toast.

Notes

    • Using chicken broth instead of water enhances the savory depth of the gravy.
    • For extra richness, add a tablespoon of butter when whisking the gravy base.
    • Leftovers reheat beautifully and make a great next-day sandwich or wrap.
    • You can swap chicken breasts for thighs if you prefer darker meat.

Crispy Chili Beef Recipe is a must-try dish!

Welcome to the delightful world of Crispy Chili Beef! This dish is not just a meal; it’s an experience that tantalizes your taste buds. Imagine tender beef, perfectly crispy on the outside, coated in a savory and slightly spicy sauce. It’s a dish that brings together the best of textures and flavors, making it a favorite for many.

What Makes the Crispy Chili Beef Recipe Special?

What sets this Crispy Chili Beef Recipe apart? First, it’s all about the crunch! The beef is coated in a special blend of cornstarch and flour, which creates a crispy exterior when fried. This crunchiness contrasts beautifully with the tender meat inside. Moreover, the sauce is a harmonious blend of sweet, salty, and spicy flavors. The combination of soy sauce, rice vinegar, and chili paste creates a mouthwatering glaze that clings to each piece of beef.

Another reason this recipe shines is its versatility. You can easily adjust the spice level to suit your taste. Whether you prefer a mild kick or a fiery punch, this recipe can accommodate your preferences. Plus, it’s quick to prepare, making it perfect for busy weeknights or special occasions.

In addition, this dish can be customized with various vegetables, adding nutrition and color. Bell peppers, broccoli, or snap peas can be tossed in for a delightful crunch and extra vitamins. This way, you can enjoy a balanced meal that satisfies your cravings.

So, whether you’re cooking for family or hosting friends, this Crispy Chili Beef Recipe is sure to impress. Let’s dive into the ingredients and get started on this culinary adventure!

Ingredients for Crispy Chili Beef Recipe

To create the perfect Crispy Chili Beef, you’ll need a selection of fresh ingredients that come together to make this dish truly special. Here’s what you’ll need:

  • 1 pound flank steak: Thinly sliced against the grain for tenderness.
  • 1/2 cup cornstarch: This is key for achieving that crispy texture.
  • 1/4 cup all-purpose flour: Helps to bind the coating and adds crunch.
  • 1 teaspoon salt: Enhances the flavor of the beef.
  • 1/2 teaspoon black pepper: Adds a mild kick.
  • 1/2 teaspoon garlic powder: For a hint of garlic flavor.
  • 1/2 teaspoon onion powder: Complements the garlic and adds depth.
  • 1/4 cup vegetable oil: Essential for frying the beef to golden perfection.

For the sauce, gather the following ingredients:

  • 1/4 cup soy sauce: Provides a savory base.
  • 2 tablespoons rice vinegar: Adds a tangy flavor.
  • 2 tablespoons brown sugar: Balances the saltiness with sweetness.
  • 1 tablespoon chili paste: Adjust this to control the heat level.
  • 1 tablespoon sesame oil: Adds a nutty aroma.
  • 1 teaspoon grated fresh ginger: For a zesty kick.
  • 2 cloves garlic, minced: Fresh garlic enhances the sauce.
  • 1/4 cup green onions, chopped: For garnish and freshness.
  • 1 tablespoon sesame seeds (optional): Adds a nice crunch and visual appeal.

With these ingredients on hand, you’re ready to embark on your cooking journey. Each component plays a vital role in creating the delicious flavors and textures that make this Crispy Chili Beef Recipe a standout dish. Now, let’s move on to the step-by-step preparation!

Step-by-Step Preparation of Crispy Chili Beef Recipe

Now that you have all your ingredients ready, it’s time to dive into the step-by-step preparation of this mouthwatering Crispy Chili Beef Recipe. Follow these simple steps to create a dish that will leave everyone asking for seconds!

Step 1: Preparing the Beef

Start by taking your flank steak and slicing it thinly against the grain. This technique ensures that the meat remains tender and easy to chew. Aim for slices about 1/4 inch thick. Once sliced, place the beef in a large bowl. This is where the magic begins!

Step 2: Marinating the Beef

While marinating isn’t a must for this recipe, it can enhance the flavor. If you choose to marinate, add a splash of soy sauce and a sprinkle of black pepper to the beef. Let it sit for about 15-30 minutes. This step allows the flavors to penetrate the meat, making it even more delicious.

Step 3: Coating the Beef

Next, it’s time to coat the beef. In a large bowl, combine the cornstarch, all-purpose flour, salt, black pepper, garlic powder, and onion powder. Mix well. Then, take each slice of beef and toss it in the mixture until it’s fully coated. This coating is what gives the beef its signature crunch!

Step 4: Frying the Beef

Heat the vegetable oil in a large skillet or wok over medium-high heat. Once the oil is hot, carefully add the coated beef in batches. Fry each batch for about 3-4 minutes, or until golden brown and crispy. Remember not to overcrowd the pan, as this can lower the oil temperature and affect the crispiness. Once done, remove the beef and let it drain on paper towels.

Step 5: Making the Chili Sauce

In a separate bowl, whisk together the soy sauce, rice vinegar, brown sugar, chili paste, sesame oil, grated ginger, and minced garlic. This sauce is the heart of the dish, bringing all the flavors together. Pour the sauce into the same skillet over medium heat and bring it to a gentle simmer. The aroma will be irresistible!

Step 6: Combining Beef and Sauce

Finally, add the crispy beef back into the skillet with the sauce. Toss everything together, ensuring that each piece of beef is evenly coated. Cook for an additional 2-3 minutes until everything is heated through. The sauce will cling beautifully to the crispy beef, creating a delightful dish.

And there you have it! Your Crispy Chili Beef is ready to be served. The combination of crispy beef and flavorful sauce is sure to impress anyone who tries it. Let’s move on to some variations you can try!

Variations of Crispy Chili Beef Recipe

While the classic Crispy Chili Beef Recipe is a hit on its own, there are many ways to switch things up! Whether you want to try different proteins or explore vegetarian options, these variations will keep your meals exciting and delicious.

Alternative Proteins

If you’re looking to change the protein in your Crispy Chili Beef, there are several tasty alternatives. Here are a few options:

  • Chicken: Thinly sliced chicken breast or thighs can be used instead of beef. The cooking method remains the same, and you’ll still achieve that crispy texture.
  • Pork: Pork tenderloin is another great choice. Slice it thinly and follow the same steps for coating and frying. The flavor pairs wonderfully with the chili sauce.
  • Tofu: For a plant-based option, firm tofu works well. Press the tofu to remove excess moisture, then slice and coat it just like the beef. Fry until golden and crispy for a delightful crunch.

These alternative proteins not only provide variety but also allow you to cater to different dietary preferences. Each option brings its unique flavor, making your Crispy Chili dish versatile and fun!

Vegetarian Options

If you’re looking for a vegetarian twist on the Crispy Chili Beef Recipe, you can easily create a delicious meat-free version. Here are some ideas:

  • Cauliflower: Cauliflower florets can be coated and fried just like the beef. The texture becomes crispy, and it absorbs the flavors of the sauce beautifully.
  • Seitan: This wheat-based protein mimics the texture of meat. Slice it thinly, coat it, and fry it for a satisfying vegetarian alternative.
  • Mushrooms: Use portobello or shiitake mushrooms for a rich, umami flavor. Slice them, coat, and fry until crispy. They add a wonderful depth to the dish.

These vegetarian options not only make the dish accessible to more people but also add a delightful twist to the traditional recipe. You can enjoy the same crispy texture and flavorful sauce while keeping it meat-free!

With these variations, you can customize your Crispy Chili Beef Recipe to suit your taste and dietary needs. Now, let’s explore some cooking notes to ensure your dish turns out perfectly every time!

Cooking Note for Crispy Chili Beef Recipe

Cooking the perfect Crispy Chili Beef requires attention to detail and a few helpful tips. These notes will guide you through the process, ensuring that your dish turns out delicious every time. Let’s dive into some essential cooking notes!

First, the choice of meat is crucial. Flank steak is ideal for this recipe due to its tenderness and flavor. However, if you can’t find flank steak, you can substitute it with sirloin or ribeye. Just remember to slice against the grain for the best texture.

Next, the coating is key to achieving that crispy exterior. Make sure to coat each piece of beef evenly in the cornstarch and flour mixture. This step is vital for creating a crunchy texture. If you find the coating isn’t sticking well, you can lightly dampen the beef with water before tossing it in the mixture.

When frying, ensure the oil is hot enough. A good test is to drop a small piece of the coated beef into the oil. If it sizzles immediately, you’re ready to go! Frying in batches is important; overcrowding the pan can lower the oil temperature, resulting in soggy beef instead of crispy perfection.

After frying, let the beef drain on paper towels. This step helps remove excess oil, keeping your dish light and crispy. If you prefer a healthier option, consider air frying the beef. It can still achieve a delightful crunch with less oil.

Lastly, when combining the beef with the sauce, be gentle. Toss the beef carefully to avoid breaking the crispy coating. The goal is to coat each piece without losing that satisfying crunch. Serve immediately for the best experience, as the crispy texture is most enjoyable fresh.

By following these cooking notes, you’ll be well on your way to mastering the Crispy Chili Beef Recipe. Each tip is designed to enhance your cooking experience and ensure a delicious outcome. Now, let’s move on to some serving suggestions to elevate your meal even further!

Serving Suggestions for Crispy Chili Beef Recipe

Now that your Crispy Chili Beef is ready, it’s time to think about how to serve it! The way you present this dish can enhance the overall dining experience. Here are some delightful serving suggestions that will make your meal even more enjoyable.

First, consider serving your Crispy Chili Beef over a bed of fluffy rice. Steamed white rice or jasmine rice works wonderfully, as it absorbs the flavorful sauce. For a healthier option, brown rice or cauliflower rice can be used. This combination not only adds texture but also balances the dish with a wholesome base.

Another great option is to pair the beef with stir-fried vegetables. Colorful bell peppers, snap peas, and broccoli not only add nutrition but also create a vibrant plate. Simply sauté the vegetables in a bit of oil and season with salt and pepper. This adds a fresh crunch that complements the crispy beef perfectly.

If you’re looking for a fun twist, consider serving the Crispy Chili Beef in lettuce wraps. Use large lettuce leaves, such as romaine or butter lettuce, to create a fresh and crunchy wrap. Fill each leaf with the beef and top with chopped green onions and sesame seeds. This makes for a light and interactive meal that everyone will love!

For those who enjoy a bit of heat, serve the dish with extra chili paste or hot sauce on the side. This allows guests to customize their spice level, making it a hit for everyone at the table. You can also offer a side of pickled vegetables for a tangy contrast to the rich flavors of the beef.

Lastly, don’t forget about garnishing! A sprinkle of chopped green onions and sesame seeds adds a beautiful finishing touch. Not only does it enhance the visual appeal, but it also adds a burst of flavor and texture. Serve your Crispy Chili Beef hot and fresh for the best experience.

With these serving suggestions, you can elevate your Crispy Chili Beef Recipe into a memorable meal. Whether you choose rice, vegetables, or creative wraps, each option brings something special to the table. Now, let’s explore some tips for perfecting your Crispy Chili Beef Recipe!

Tips for Perfecting Your Crispy Chili Beef Recipe

To truly master the Crispy Chili Beef Recipe, a few tips can make all the difference. These suggestions will help you achieve that perfect balance of flavor and texture, ensuring your dish is a hit every time. Let’s explore some essential tips for perfecting your cooking!

First, always slice the beef against the grain. This technique is crucial for tenderness. When you cut against the grain, you shorten the muscle fibers, making the beef easier to chew. Aim for thin slices, about 1/4 inch thick, for the best results.

Next, don’t skip the coating process. The combination of cornstarch and flour is what gives the beef its signature crunch. Make sure each piece is evenly coated. If you find the coating isn’t sticking well, you can lightly dampen the beef with water before tossing it in the mixture. This helps the coating adhere better.

When frying, ensure the oil is at the right temperature. If the oil is too cool, the beef will absorb excess oil and become greasy. A good test is to drop a small piece of the coated beef into the oil. If it sizzles immediately, you’re ready to fry! Fry in small batches to maintain the oil temperature and achieve that crispy texture.

After frying, let the beef drain on paper towels. This step is essential for removing excess oil, keeping your dish light and crispy. If you prefer a healthier option, consider air frying the beef. It can still achieve a delightful crunch with less oil, making it a great alternative.

When combining the beef with the sauce, be gentle. Toss the beef carefully to avoid breaking the crispy coating. The goal is to coat each piece without losing that satisfying crunch. Serve immediately for the best experience, as the crispy texture is most enjoyable fresh.

Lastly, feel free to experiment with the sauce. Adjust the chili paste to suit your spice preference. You can also add a splash of lime juice for a zesty kick or a dash of hoisin sauce for extra sweetness. These small tweaks can elevate the flavor profile of your dish.

By following these tips, you’ll be well on your way to perfecting your Crispy Chili Beef Recipe. Each suggestion is designed to enhance your cooking experience and ensure a delicious outcome. Now, let’s break down the time needed for this delightful dish!

Breakdown of Time for Crispy Chili Beef Recipe

Understanding the time required for each step of the Crispy Chili Beef Recipe can help you plan your cooking efficiently. Here’s a breakdown of the time you’ll need for preparation and cooking, ensuring you can enjoy this delicious dish without any rush!

Prep Time

The prep time for this Crispy Chili Beef Recipe is approximately 30 minutes. This includes:

  • Slicing the flank steak (about 10 minutes).
  • Marinating the beef (optional, about 15-30 minutes).
  • Coating the beef with the cornstarch and flour mixture (about 5 minutes).

Keep in mind that if you choose to marinate the beef, the total prep time may extend slightly. However, this step can enhance the flavor, making it worth the wait!

Cooking Time

The cooking time for the Crispy Chili Beef is around 15-20 minutes. This includes:

  • Frying the beef in batches (about 10-12 minutes).
  • Making the chili sauce (about 5 minutes).
  • Combining the beef with the sauce (about 2-3 minutes).

Frying in batches is essential to achieve that perfect crispiness, so be patient and allow each batch to cook thoroughly.

Total Time

In total, you can expect the entire process to take about 45-50 minutes, including both prep and cooking time. This makes the Crispy Chili Beef Recipe a quick and satisfying option for dinner, especially when you want something delicious without spending hours in the kitchen.

With this time breakdown, you can easily plan your cooking session and enjoy a delightful meal with family or friends. Now that you know how to manage your time, let’s take a look at the nutritional information for this tasty dish!

Nutritional Information for Crispy Chili Beef Recipe

Understanding the nutritional content of your meals is essential for maintaining a balanced diet. The Crispy Chili Beef Recipe not only satisfies your taste buds but also provides valuable nutrients. Here’s a breakdown of the nutritional information per serving, so you can enjoy this dish while keeping your health in mind.

Calories

Each serving of Crispy Chili Beef contains approximately 350 calories. This calorie count includes the crispy beef, the flavorful sauce, and any optional garnishes. While this dish is rich in flavor, it’s important to enjoy it in moderation, especially if you’re watching your calorie intake. Pairing it with a side of vegetables or rice can help create a more balanced meal.

Protein

Protein is a vital nutrient for building and repairing tissues, and this Crispy Chili Beef Recipe delivers! Each serving provides about 25 grams of protein. The flank steak is an excellent source of high-quality protein, making this dish a great option for those looking to increase their protein intake. Whether you’re an athlete or just someone who wants to maintain muscle health, this recipe can help you meet your protein needs.

Sodium

When it comes to sodium, each serving of Crispy Chili Beef contains around 800 milligrams. This amount can vary based on the soy sauce used and any additional seasonings you might add. While sodium is necessary for bodily functions, it’s essential to monitor your intake, especially if you have dietary restrictions. To reduce sodium levels, consider using low-sodium soy sauce or adjusting the amount of sauce you use in the recipe.

In summary, the Crispy Chili Beef Recipe offers a delicious balance of calories, protein, and sodium. By being mindful of portion sizes and pairing it with healthy sides, you can enjoy this dish as part of a nutritious meal plan. Now, let’s address some frequently asked questions about this delightful recipe!

FAQs about Crispy Chili Beef Recipe

Can I make the Crispy Chili Beef Recipe ahead of time?

Yes, you can prepare some components of the Crispy Chili Beef Recipe ahead of time! You can slice and marinate the beef a few hours in advance. However, for the best texture, it’s recommended to fry the beef just before serving. If you fry it ahead of time, the beef may lose its crispiness. To keep it fresh, store the fried beef in an airtight container and reheat it in the oven to regain some crunch.

What can I serve with Crispy Chili Beef?

There are many delicious options to serve alongside your Crispy Chili Beef! A bed of steamed rice, whether white, brown, or cauliflower rice, makes a great base. You can also pair it with stir-fried vegetables like bell peppers, broccoli, or snap peas for added nutrition. For a fun twist, consider serving it in lettuce wraps, allowing everyone to create their own fresh and crunchy bites!

How do I store leftovers of Crispy Chili Beef Recipe?

To store leftovers of your Crispy Chili Beef, place it in an airtight container and refrigerate. It’s best to consume the leftovers within 2-3 days for optimal freshness. When reheating, use an oven or air fryer to help restore some of the crispiness. Avoid using a microwave, as it can make the beef soggy.

Can I adjust the spiciness of the Crispy Chili Beef Recipe?

Absolutely! You can easily adjust the spiciness of the Crispy Chili Beef Recipe to suit your taste. If you prefer a milder flavor, reduce the amount of chili paste in the sauce. Alternatively, if you enjoy a spicier kick, feel free to add more chili paste or even some crushed red pepper flakes. Taste the sauce as you go to find the perfect balance for your palate!

Conclusion on Crispy Chili Beef Recipe

In conclusion, the Crispy Chili Beef Recipe is a delightful dish that combines flavor, texture, and versatility. With its crispy exterior and savory sauce, it’s no wonder this recipe has become a favorite for many home cooks. Whether you’re preparing it for a family dinner or a special gathering, this dish is sure to impress.

Throughout this article, we’ve explored the essential ingredients, step-by-step preparation, and various ways to customize the recipe. From alternative proteins to vegetarian options, there’s something for everyone. Plus, the cooking notes and tips provided will help you achieve that perfect crunch every time you make it.

As you serve your Crispy Chili Beef, remember to pair it with delicious sides like rice or stir-fried vegetables. These accompaniments not only enhance the meal but also add nutritional value. Don’t forget to garnish with fresh green onions and sesame seeds for that extra touch of flavor and presentation.

So, gather your ingredients, follow the steps, and enjoy the process of creating this mouthwatering dish. With a little practice, you’ll master the Crispy Chili Beef Recipe and make it a staple in your kitchen. Happy cooking!

Paul

Crispy Chili Beef Recipe is a must-try dish!

This Crispy Chilli Beef is a flavor-packed Chinese takeaway classic made at home! Thin strips of beef are coated, fried until golden and crunchy, then tossed in a sticky, sweet-spicy sauce. It’s the perfect combo of crispy, saucy, and irresistibly bold.
Prep Time 20 minutes
Cook Time 20 minutes
Total Time 40 minutes
Servings: 4 servings
Course: Main Dish
Cuisine: Chinese-Inspired

Ingredients
  

For the Beef:
  • ¾ lb sirloin steak thinly sliced against the grain
  • 1 small egg
  • 4 tablespoons cornflour cornstarch
  • ¼ teaspoon salt
  • ¼ teaspoon black pepper
  • teaspoon white pepper
  • tablespoons sunflower oil divided
For the Sauce:
  • 1 medium onion thinly sliced
  • 1 red chili finely sliced (deseed for less heat)
  • 1 teaspoon minced ginger
  • 3 garlic cloves minced
  • 2 tablespoons rice vinegar
  • 3 tablespoons dark soy sauce
  • 2 tablespoons tomato puree
  • 6 tablespoons caster sugar
  • 2 tablespoons tomato ketchup
  • 2 tablespoons sweet chili sauce

Method
 

  1. Place the steak in the freezer for 30 minutes to make slicing easier. Then cut into thin ¼-inch strips.
  2. In a bowl, beat the egg and mix it with the sliced beef. Add cornflour, salt, black pepper, and white pepper. Toss until the beef is well coated.
  3. Heat 3 tablespoons of sunflower oil in a large wok or frying pan over high heat. Fry half the beef for 5–6 minutes until dark brown and crispy. Do not stir constantly—let it crisp. Remove and drain on paper towels.
  4. Repeat with the second batch of beef using 1 tablespoon of oil.
  5. Add the remaining ½ tablespoon of oil to the pan. Lower heat to medium and sauté the onion for 2 minutes.
  6. Stir in the sliced chili, minced garlic, and ginger. Cook for 30 seconds until fragrant.
  7. Add rice vinegar, dark soy sauce, tomato puree, caster sugar, ketchup, and sweet chili sauce. Stir and simmer until the sauce thickens slightly, about 1–2 minutes.
  8. Return the crispy beef to the pan and toss to coat evenly in the sauce. Heat through for 1–2 minutes.
  9. Serve immediately with rice or noodles.

Notes

  • Partially freezing the beef makes it easier to slice thinly and evenly.
  • For extra crispy beef, avoid overcrowding the pan while frying.
  • Want it hotter? Add extra red chili or a splash of sriracha.
  • This dish is best served fresh to preserve the crunch.

Raspberry Chocolate Chip Cookies Recipe is a must-try!

Introduction to Raspberry Chocolate Chip Cookies Recipe

Raspberry Chocolate Chip Cookies Recipe is not just a treat; it’s an experience that brings joy to any occasion. Whether you’re celebrating a birthday, hosting a gathering, or simply indulging in a sweet craving, these cookies are sure to impress.

The Perfect Treat for Any Occasion

Imagine biting into a warm cookie, where the gooey chocolate chips melt in your mouth, and the burst of raspberry flavor dances on your taste buds. Sounds heavenly, right? These cookies are perfect for sharing with friends and family or enjoying all by yourself. They are easy to make and require simple ingredients that you likely already have in your kitchen.

Raspberry Chocolate Chip Cookies Recipe is a must-try!

Let’s get started on this delicious journey. Gather your ingredients, and prepare to create a batch of cookies that will leave everyone asking for more!

Ingredients for Raspberry Chocolate Chip Cookies Recipe

Raspberry Chocolate Chip Cookies Recipe. Having everything ready will make your baking experience smooth and enjoyable. Here’s what you’ll need:

  • 1 cup unsalted butter, softened
  • 1 cup granulated sugar
  • 1 cup packed brown sugar
  • 2 large eggs
  • 2 teaspoons vanilla extract
  • 3 cups all-purpose flour
  • 1 teaspoon baking soda
  • 1/2 teaspoon salt
  • 1 cup semi-sweet chocolate chips
  • 1 cup fresh raspberries, gently mashed

These ingredients come together to create a delightful cookie that balances sweetness and tartness perfectly. The unsalted butter adds richness, while the sugars provide that classic cookie sweetness. Eggs and vanilla extract contribute to the overall flavor and texture, making the cookies soft and chewy.

The all-purpose flour, baking soda, and salt form the base of the dough, ensuring the cookies rise beautifully. Finally, the star ingredients—chocolate chips and fresh raspberries—bring the whole recipe to life. The chocolate chips melt into gooey pockets of sweetness, while the raspberries add a refreshing burst of flavor.

Now that you have your ingredients ready, let’s move on to the next step of preparing these delicious cookies!

Step-by-Step Preparation of Raspberry Chocolate Chip Cookies Recipe

Raspberry Chocolate Chip Cookies Recipe. Follow these simple steps to ensure your cookies turn out perfectly every time!

Step 1: Preheat the Oven

First things first, preheat your oven to 350°F (175°C). This step is crucial as it ensures that your cookies bake evenly. A properly preheated oven helps achieve that golden-brown color and soft texture we all love. While the oven heats up, you can move on to the next step.

Step 2: Prepare the Dough

In a large mixing bowl, cream together the softened butter, granulated sugar, and brown sugar. Use an electric mixer or a sturdy wooden spoon to mix until the mixture is light and fluffy. This process usually takes about 2-3 minutes. Next, add the eggs one at a time, mixing well after each addition. Then, stir in the vanilla extract. This will add a lovely aroma to your cookie dough!

In a separate bowl, whisk together the all-purpose flour, baking soda, and salt. Gradually add this dry mixture to the wet ingredients. Mix until just combined. Be careful not to overmix, as this can lead to tough cookies.

Step 3: Fold in the Chocolate Chips and Raspberries

Now comes the fun part! Gently fold in the semi-sweet chocolate chips and the gently mashed raspberries. Use a spatula to combine everything, ensuring the chocolate and raspberries are evenly distributed throughout the dough. Remember, the key is to be gentle to keep the raspberries intact and avoid turning the dough pink!

Step 4: Scoop and Shape the Cookies

Using a tablespoon or a cookie scoop, drop rounded tablespoons of dough onto ungreased baking sheets. Make sure to space them about 2 inches apart. This spacing allows the cookies to spread while baking without merging into one another. If you like, you can slightly flatten the tops for a more uniform shape.

Step 5: Bake the Cookies

It’s time to bake! Place the baking sheets in the preheated oven and bake for 10-12 minutes. Keep an eye on them; you want the edges to be lightly golden while the centers remain soft. Once done, remove the cookies from the oven and let them cool on the baking sheets for about 5 minutes. After that, transfer them to wire racks to cool completely. This cooling time helps them set perfectly!

Raspberry Chocolate Chip Cookies Recipe is now ready to be enjoyed. The combination of chocolate and raspberry is sure to delight your taste buds!

Variations of Raspberry Chocolate Chip Cookies Recipe

Raspberry Chocolate Chip Cookies Recipe but have specific dietary needs, don’t worry! There are plenty of variations you can try. Whether you’re looking for a gluten-free option or a vegan adaptation, these tweaks will ensure everyone can enjoy these delicious cookies.

Gluten-Free Option

For those who need to avoid gluten, making gluten-free raspberry chocolate chip cookies is simple! Just substitute the all-purpose flour with a gluten-free flour blend. Many brands offer a 1:1 gluten-free flour that works perfectly in cookie recipes. Additionally, make sure your baking soda is gluten-free, as some brands may contain traces of gluten.

When using gluten-free flour, the texture may vary slightly. To enhance the chewiness, consider adding a tablespoon of cornstarch to the mix. This will help mimic the texture of traditional cookies. Follow the same steps in the original recipe, and you’ll have a delightful batch of gluten-free cookies that everyone can enjoy!

Vegan Adaptation

Raspberry Chocolate Chip Cookies Recipe, it’s quite easy to make! Start by replacing the eggs with flax eggs. To make a flax egg, mix 1 tablespoon of ground flaxseed with 2.5 tablespoons of water. Let it sit for about 5 minutes until it thickens. This will act as a binding agent in your cookie dough.

Next, swap the unsalted butter for a plant-based butter or coconut oil. Ensure that the chocolate chips you use are dairy-free to keep the recipe vegan-friendly. Follow the same preparation steps, and you’ll have a batch of vegan cookies that are just as delicious as the original!

These variations allow everyone to enjoy the delightful taste of raspberry and chocolate in cookie form. No matter your dietary preference, these adaptations ensure that the joy of baking and sharing cookies remains accessible to all!

Cooking Note for Raspberry Chocolate Chip Cookies Recipe

Raspberry Chocolate Chip Cookies Recipe. Here are some essential cooking notes to keep in mind:

  • Ingredient Temperature: Make sure your butter is softened but not melted. This helps create a light and fluffy texture. If you forget to take it out of the fridge, you can cut it into small pieces and let it sit at room temperature for about 15 minutes.
  • Measuring Flour: For the best results, spoon the flour into your measuring cup and level it off with a knife. Avoid scooping directly from the bag, as this can pack the flour and lead to dry cookies.
  • Mixing Technique: When combining the wet and dry ingredients, mix until just combined. Overmixing can lead to tough cookies. A few flour streaks are okay; they will incorporate as you fold in the chocolate chips and raspberries.
  • Cooling Time: Allowing the cookies to cool on the baking sheet for a few minutes is crucial. This helps them set and makes them easier to transfer to wire racks without breaking.
  • Storage: If you have leftovers (which is rare!), store the cookies in an airtight container at room temperature. They will stay fresh for up to a week. You can also freeze them for longer storage; just make sure to separate layers with parchment paper.

Raspberry Chocolate Chip Cookies Recipe turns out perfectly every time. Happy baking!

Serving Suggestions for Raspberry Chocolate Chip Cookies Recipe

Raspberry Chocolate Chip Cookies, it’s time to think about how to serve them! These cookies are not only tasty but also versatile. Here are some delightful serving suggestions to elevate your cookie experience:

  • With a Glass of Milk: There’s nothing quite like enjoying warm cookies with a cold glass of milk. The creamy texture of milk complements the rich chocolate and tart raspberry flavors perfectly.
  • Ice Cream Sandwiches: For a fun twist, use two cookies to create an ice cream sandwich. Choose your favorite ice cream flavor, like vanilla or raspberry sorbet, and scoop it between two cookies. This makes for a refreshing treat, especially on warm days!
  • On a Dessert Platter: Arrange your cookies on a beautiful dessert platter alongside other treats. Pair them with brownies, fruit tarts, or mini cheesecakes for a delightful dessert spread at parties or gatherings.
  • With Fresh Berries: Serve your cookies with a side of fresh berries. The additional fruit enhances the raspberry flavor and adds a pop of color to your plate. Strawberries, blueberries, or even more raspberries work wonderfully!
  • Drizzled with Chocolate: For an extra touch of indulgence, melt some chocolate and drizzle it over the cookies. This adds a beautiful finish and enhances the chocolate flavor, making them even more irresistible.

Raspberry Chocolate Chip Cookies Recipe more enjoyable but also impress your guests. Whether you’re hosting a gathering or simply treating yourself, these ideas will elevate your cookie experience to new heights!

Tips for Perfect Raspberry Chocolate Chip Cookies Recipe

Raspberry Chocolate Chip Cookies Recipe turns out perfectly every time, here are some handy tips to keep in mind. These simple tricks can elevate your baking game and help you create cookies that are not only delicious but also visually appealing.

  • Use Fresh Ingredients: Always use fresh raspberries and high-quality chocolate chips. Fresh ingredients enhance the flavor and texture of your cookies. Check the expiration dates on your baking soda and flour to ensure they are still effective.
  • Chill the Dough: For chewier cookies, consider chilling the dough for at least 30 minutes before baking. This helps the flavors meld together and prevents the cookies from spreading too much in the oven.
  • Don’t Overmix: When combining the wet and dry ingredients, mix until just combined. Overmixing can lead to tough cookies. A few lumps are perfectly fine; they will smooth out as you fold in the chocolate chips and raspberries.
  • Experiment with Add-Ins: Feel free to get creative! You can add nuts, like chopped walnuts or pecans, for extra crunch. Alternatively, try using white chocolate chips or even a sprinkle of sea salt on top before baking for a sweet and salty contrast.
  • Watch the Baking Time: Keep a close eye on your cookies as they bake. Every oven is different, so start checking them at the 10-minute mark. You want the edges to be golden while the centers remain soft. They will continue to cook slightly after being removed from the oven.
  • Let Them Cool: Allow the cookies to cool on the baking sheet for a few minutes before transferring them to wire racks. This cooling time helps them set and makes them easier to handle without breaking.
  • Store Properly: To keep your cookies fresh, store them in an airtight container at room temperature. If you want to keep them longer, consider freezing them. Just make sure to separate layers with parchment paper to prevent sticking.

Raspberry Chocolate Chip Cookies Recipe. Enjoy the process, and happy baking!

Breakdown of Time for Raspberry Chocolate Chip Cookies Recipe

Raspberry Chocolate Chip Cookies Recipe can help you plan your baking session better. Here’s a simple breakdown of the time required for preparation and cooking:

Prep Time

The prep time for this delightful cookie recipe is approximately 15-20 minutes. This includes gathering your ingredients, creaming the butter and sugars, mixing in the eggs and vanilla, and preparing the dough. If you choose to chill the dough for a chewier texture, add an additional 30 minutes to this time.

Cooking Time

The cooking time for the cookies is about 10-12 minutes. Keep an eye on them as they bake, ensuring the edges turn lightly golden while the centers remain soft. Remember, every oven is different, so it’s wise to check them a minute or two before the timer goes off.

Total Time

Raspberry Chocolate Chip Cookies Recipe a quick and easy treat to whip up, perfect for any occasion!

Nutritional Information for Raspberry Chocolate Chip Cookies Recipe

Raspberry Chocolate Chip Cookies Recipe can help you enjoy them in moderation. Here’s a breakdown of the key nutritional information for each cookie, based on the recipe provided. This will give you a clearer picture of what you’re indulging in!

Calories

Each cookie contains approximately 180 calories. This makes them a delightful treat without being overly indulgent. Enjoying one or two cookies can satisfy your sweet tooth while keeping your calorie intake in check. Pair them with a healthy snack or a glass of milk for a balanced treat!

Protein

In terms of protein, each cookie offers about 2 grams. While this isn’t a high protein snack, it does contribute to your daily intake. The eggs and chocolate chips provide some protein, making these cookies a tasty option when you need a little energy boost.

Sodium

Each cookie contains roughly 100 mg of sodium. This amount is relatively low, especially considering the average daily recommended intake for adults is around 2,300 mg. Keeping an eye on sodium levels is important, but these cookies can fit into a balanced diet without worry.

Raspberry Chocolate Chip Cookies Recipe offers a delightful balance of flavors and nutrition. Enjoy them as a treat, and remember that moderation is key to enjoying your favorite sweets!

FAQs about Raspberry Chocolate Chip Cookies Recipe

Can I use frozen raspberries in the Raspberry Chocolate Chip Cookies Recipe?

Raspberry Chocolate Chip Cookies Recipe. However, there are a few things to keep in mind. First, make sure to thaw the raspberries and gently pat them dry with a paper towel. This helps prevent excess moisture from making your cookie dough too wet. Also, be aware that frozen raspberries may break apart more easily, so handle them gently when folding into the dough. The flavor will still be delicious, and your cookies will turn out great!

How do I store leftover Raspberry Chocolate Chip Cookies?

Raspberry Chocolate Chip Cookies fresh, store them in an airtight container at room temperature. This will help maintain their soft texture and flavor. If you want to keep them for a longer period, consider freezing them. To freeze, place the cookies in a single layer on a baking sheet and freeze until solid. Then, transfer them to a freezer-safe bag or container, separating layers with parchment paper. They can be stored in the freezer for up to three months. When you’re ready to enjoy them, simply thaw at room temperature or warm them in the oven for a few minutes!

Can I substitute chocolate chips with other types of chocolate in the Raspberry Chocolate Chip Cookies Recipe?

Raspberry Chocolate Chip Cookies Recipe. For a different flavor profile, try using white chocolate chips, which pair wonderfully with raspberries. You can also use dark chocolate chips for a richer taste. If you’re feeling adventurous, consider adding chopped chocolate bars or even a mix of different chocolates for a unique twist. Just remember to adjust the amount based on your preference, and enjoy experimenting with flavors!

Conclusion on Raspberry Chocolate Chip Cookies Recipe

Raspberry Chocolate Chip Cookies Recipe is a delightful treat that combines the sweetness of chocolate with the tartness of fresh raspberries. This recipe is not only easy to follow but also allows for creativity with variations to suit different dietary needs. Whether you choose to make them gluten-free or vegan, the essence of these cookies remains the same—deliciousness!

As you bake these cookies, remember that the joy of cooking comes from sharing your creations with others. The vibrant colors and mouthwatering flavors make these cookies a perfect addition to any gathering or a sweet surprise for yourself. Plus, with the tips and variations provided, you can customize your cookies to make them uniquely yours.

Raspberry Chocolate Chip Cookies, and happy baking!

Paul

Raspberry Chocolate Chip Cookies Recipe is a must-try!

These Raspberry Chocolate Chip Cookies are buttery, sweet, and bursting with juicy raspberries and gooey chocolate chips. The perfect balance of rich and fruity, they’re soft in the middle with golden edges—a bakery-style treat made right at home!
Prep Time 15 minutes
Cook Time 12 minutes
Total Time 27 minutes
Course: Dessert
Cuisine: American

Ingredients
  

  • 1 cup unsalted butter softened (2 sticks)
  • 1 cup granulated sugar
  • ½ cup packed brown sugar
  • 2 large eggs
  • 1 teaspoon pure vanilla extract
  • 3 cups all-purpose flour
  • ½ teaspoon baking soda
  • ¼ teaspoon salt
  • 1 cup fresh raspberries chopped
  • cups semi-sweet chocolate chips

Method
 

  1. Preheat the Oven:Preheat oven to 350°F (175°C). Line two baking sheets with parchment paper.
  2. Cream the Butter and Sugars:In a large mixing bowl, beat together the softened butter, granulated sugar, and brown sugar until light and fluffy.
  3. Add Eggs and Vanilla:Mix in the eggs one at a time, then stir in the vanilla extract.
  4. Mix Dry Ingredients:In a separate bowl, whisk together the flour, baking soda, and salt.
  5. Combine Wet and Dry:Gradually stir the dry ingredients into the butter mixture just until combined.
  6. Add the Goodies:Gently fold in the chopped raspberries and chocolate chips. Be careful not to mash the berries.
  7. Scoop and Space:Scoop dough onto the prepared baking sheets, leaving about 2 inches between cookies.
  8. Bake to Perfection:Bake for 10–12 minutes, or until the edges are lightly golden and the centers are just set.
  9. Cool and Enjoy:Let cookies cool on the baking sheet for a few minutes before transferring to a wire rack to finish cooling.

Notes

  • Chill the dough for 30 minutes before baking if you want a thicker, chewier cookie.
  • Use fresh raspberries, not frozen—they release less moisture and won’t make the dough soggy.
  • Add a light sprinkle of sea salt on top before baking for a delicious contrast of flavors.
  • These cookies are best enjoyed the same day but can be stored in an airtight container for 2–3 days.

Honey Garlic BBQ Chicken is a must-try recipe!

Are you ready to elevate your grilling game? Honey Garlic BBQ Chicken is a delightful dish that combines sweet and savory flavors, making it a favorite for many. This recipe is not just about cooking chicken; it’s about creating a memorable meal that brings family and friends together. The combination of honey, garlic, and barbecue sauce creates a mouthwatering glaze that caramelizes beautifully on the grill.

What Makes Honey Garlic BBQ Chicken Special?

What sets Honey Garlic BBQ Chicken apart from other grilled chicken recipes? First, the unique blend of ingredients. Honey adds a natural sweetness, while garlic provides a robust flavor that enhances the overall taste. The barbecue sauce ties everything together, creating a sticky, delicious coating that you can’t resist.

Moreover, this dish is incredibly versatile. You can easily adjust the sweetness or spice level to suit your taste. Whether you prefer a mild flavor or a spicy kick, this recipe can accommodate your preferences. Plus, it’s perfect for any occasion, from casual family dinners to summer barbecues.

Another reason to love Honey Garlic BBQ Chicken is its simplicity. With just a few ingredients and straightforward steps, you can whip up a fantastic meal in no time. This makes it an excellent choice for busy weeknights or last-minute gatherings.

In summary, Honey Garlic BBQ Chicken is not just a meal; it’s an experience. The delightful flavors, ease of preparation, and versatility make it a must-try for anyone who enjoys good food. So, let’s dive into the ingredients and get started on this delicious journey!

Ingredients for Honey Garlic BBQ Chicken

To create the perfect Honey Garlic BBQ Chicken, you’ll need a few key ingredients. Each one plays a vital role in building the rich flavors that make this dish so special. Here’s what you’ll need:

  • 2 pounds bone-in, skin-on chicken thighs: These provide juicy meat and crispy skin, perfect for grilling.
  • 1 cup barbecue sauce: Choose your favorite brand or homemade version for the best flavor.
  • 2 tablespoons honey: This adds a natural sweetness that balances the savory elements.
  • 3 cloves garlic, minced: Fresh garlic gives a robust flavor that enhances the dish.
  • 1 teaspoon smoked paprika: This adds a subtle smokiness that complements the barbecue sauce.
  • 1 teaspoon salt: Essential for bringing out the flavors in the chicken.
  • 1/2 teaspoon black pepper: A touch of spice to elevate the taste.
  • 1 tablespoon olive oil: Helps to keep the chicken moist while grilling.
  • 1 tablespoon apple cider vinegar: Adds a tangy note that brightens the overall flavor.
  • 1 teaspoon Worcestershire sauce: This adds depth and umami to the marinade.

These ingredients come together to create a delicious marinade that infuses the chicken with flavor. Feel free to experiment with different barbecue sauces or add spices to suit your taste. The beauty of Honey Garlic BBQ Chicken lies in its adaptability, allowing you to make it your own!

Preparation of Honey Garlic BBQ Chicken

Now that you have all the ingredients ready, it’s time to prepare your Honey Garlic BBQ Chicken. This process is simple and straightforward, ensuring that you can enjoy a delicious meal without any hassle. Let’s break it down into easy steps.

Step 1: Marinating the Chicken

Marinating the chicken is a crucial step that enhances the flavor. Start by patting the chicken thighs dry with paper towels. This helps the marinade stick better. Next, place the chicken in a large bowl. Pour half of the prepared barbecue mixture over the chicken, making sure each piece is well coated. This will infuse the chicken with all those wonderful flavors.

For the best results, let the chicken marinate for at least one hour. If you have more time, marinating overnight in the refrigerator is even better. This allows the flavors to penetrate deeply into the meat, making it even tastier.

Step 2: Preparing the Honey Garlic Sauce

While the chicken is marinating, you can prepare the honey garlic sauce. In a small bowl, whisk together the remaining barbecue mixture. This will be used for basting the chicken while it cooks. Make sure it’s well combined, so every bite of chicken is packed with flavor. Set it aside until you’re ready to grill.

Step 3: Grilling the Chicken

Once the chicken has marinated, it’s time to fire up the grill! Preheat your grill to medium-high heat, around 375°F to 400°F. If you’re using a charcoal grill, prepare the coals for direct grilling. When the grill is hot, place the chicken thighs skin-side down. Grill them for about 5-7 minutes. This will help achieve that crispy skin we all love.

After the first side is nicely browned, flip the chicken and grill for another 5-7 minutes. Keep an eye on the chicken to prevent burning. The goal is to get a beautiful char while keeping the inside juicy.

Step 4: Basting and Finishing Touches

Now comes the fun part—basting! Brush the reserved honey garlic sauce over the chicken. This adds an extra layer of flavor and helps create a sticky glaze. Continue grilling for an additional 10-15 minutes, turning the chicken occasionally. You want to ensure it cooks evenly and reaches an internal temperature of 165°F.

Once done, remove the chicken from the grill and let it rest for about 5 minutes. This resting period allows the juices to redistribute, making each bite tender and juicy. Now, you’re ready to serve your delicious Honey Garlic BBQ Chicken!

Variation of Honey Garlic BBQ Chicken

While the classic Honey Garlic BBQ Chicken recipe is a hit, there are many ways to switch things up. Variations can enhance flavors and cater to different dietary preferences. Let’s explore some alternative ingredients and cooking methods that can make this dish even more exciting!

Alternative Ingredients for Different Flavors

One of the best things about Honey Garlic BBQ Chicken is its versatility. You can easily swap out ingredients to create new flavor profiles. Here are some ideas:

  • Different Cuts of Chicken: While thighs are juicy, you can use chicken breasts for a leaner option. Just remember to adjust the cooking time, as breasts cook faster.
  • Spicy Kick: If you love heat, add some cayenne pepper or hot sauce to the marinade. This will give your chicken a fiery twist!
  • Herbs and Spices: Fresh herbs like rosemary or thyme can add a fragrant touch. You can also experiment with different spices like cumin or chili powder for a unique flavor.
  • Fruit Additions: For a fruity twist, consider adding pineapple or peach slices to the grill. They caramelize beautifully and pair well with the honey garlic sauce.

These alternatives allow you to customize your Honey Garlic BBQ Chicken to suit your taste buds. Feel free to get creative and make it your own!

Cooking Methods: Oven vs. Grill

While grilling is a popular method for cooking Honey Garlic BBQ Chicken, you can also achieve delicious results in the oven. Here’s a quick comparison of both methods:

  • Grilling: This method gives the chicken a smoky flavor and crispy skin. It’s perfect for outdoor gatherings and summer barbecues. Just keep an eye on the temperature to avoid overcooking.
  • Oven Baking: If the weather isn’t suitable for grilling, baking is a great alternative. Preheat your oven to 400°F. Place the marinated chicken on a baking sheet lined with parchment paper. Bake for about 30-35 minutes, basting halfway through. This method ensures juicy chicken with less hands-on time.

Both methods yield tasty results, so choose the one that fits your situation best. Whether you grill or bake, your Honey Garlic BBQ Chicken will be a crowd-pleaser!

Cooking Note for Honey Garlic BBQ Chicken

When preparing Honey Garlic BBQ Chicken, a few cooking notes can help ensure your dish turns out perfectly every time. These tips will guide you through the process, making it easier to achieve that delicious, mouthwatering flavor.

First, always check the freshness of your ingredients. Fresh chicken and high-quality barbecue sauce can significantly enhance the taste of your dish. If possible, opt for organic or free-range chicken for better flavor and texture.

Next, marinating is key. As mentioned earlier, letting the chicken sit in the marinade for at least an hour is essential. However, if you can plan ahead, marinating overnight will yield even better results. This allows the flavors to penetrate deeply into the meat, making it more flavorful and tender.

Temperature control is crucial when grilling. Make sure your grill is preheated to the right temperature before placing the chicken on it. This helps to sear the chicken quickly, locking in the juices and creating that crispy skin we all love. Use a meat thermometer to check the internal temperature, ensuring it reaches 165°F for safe consumption.

Lastly, don’t rush the resting period after grilling. Allowing the chicken to rest for about 5 minutes before serving is vital. This step helps the juices redistribute throughout the meat, resulting in a juicier and more flavorful bite.

By following these cooking notes, you’ll be well on your way to mastering Honey Garlic BBQ Chicken. Enjoy the process, and don’t forget to share your delicious creation with family and friends!

Serving Suggestions for Honey Garlic BBQ Chicken

Once your Honey Garlic BBQ Chicken is grilled to perfection, it’s time to think about how to serve it. The right side dishes and presentation can elevate your meal, making it even more enjoyable. Let’s explore some delicious side dishes that pair well with this flavorful chicken and some tips for presenting your dish beautifully.

Side Dishes that Pair Well

Choosing the right side dishes can enhance the overall dining experience. Here are some tasty options that complement Honey Garlic BBQ Chicken:

  • Coleslaw: A refreshing coleslaw adds crunch and balances the sweetness of the chicken. You can make a classic cabbage slaw or try a fruity version with apples or pineapple.
  • Grilled Vegetables: Seasonal vegetables like zucchini, bell peppers, and corn are perfect for grilling. Toss them in olive oil and seasonings for a colorful and healthy side.
  • Rice or Quinoa: A side of fluffy rice or quinoa can soak up the delicious barbecue sauce. Consider adding herbs or spices to the grains for extra flavor.
  • Potato Salad: Creamy potato salad is a classic barbecue side. It’s filling and pairs well with the sweet and savory notes of the chicken.
  • Baked Beans: Sweet and smoky baked beans are a hearty option that complements the flavors of Honey Garlic BBQ Chicken beautifully.

These side dishes not only taste great but also add variety to your meal. Feel free to mix and match based on your preferences and what you have on hand!

Presentation Tips for Serving

Presentation is key when serving your Honey Garlic BBQ Chicken. A well-presented dish can make your meal feel special. Here are some tips to make your chicken shine:

  • Use a Platter: Serve the chicken on a large platter to create an inviting display. Arrange the pieces neatly, and consider garnishing with fresh herbs like parsley or cilantro for a pop of color.
  • Drizzle with Sauce: Before serving, drizzle some of the reserved honey garlic sauce over the chicken. This adds a glossy finish and highlights the flavors.
  • Accompany with Sides: Arrange your chosen side dishes around the chicken on the platter. This creates a beautiful spread that encourages sharing.
  • Use Colorful Dishes: If you’re serving individual plates, use colorful dishes to make the meal visually appealing. Bright colors can enhance the overall dining experience.
  • Garnish with Lemon or Lime: Adding lemon or lime wedges to the platter not only looks great but also offers a fresh squeeze of citrus for those who enjoy a tangy kick.

By following these presentation tips, you’ll create a stunning meal that’s sure to impress your guests. Enjoy your Honey Garlic BBQ Chicken with pride, knowing you’ve put together a delicious and visually appealing feast!

Tips for Perfect Honey Garlic BBQ Chicken

To ensure your Honey Garlic BBQ Chicken turns out perfectly every time, it’s essential to keep a few tips in mind. These pointers will help you avoid common pitfalls and enhance the flavor of your dish. Let’s dive into some common mistakes to avoid and how to achieve the best flavor.

Common Mistakes to Avoid

Even the best cooks can make mistakes. Here are some common errors to watch out for when preparing Honey Garlic BBQ Chicken:

  • Skipping the Marinade: One of the biggest mistakes is not marinating the chicken long enough. Marinating for at least one hour is crucial for flavor. If you can, let it sit overnight for the best results.
  • Overcooking the Chicken: Cooking chicken for too long can lead to dry meat. Always use a meat thermometer to check for doneness. The internal temperature should reach 165°F for safe consumption.
  • Not Preheating the Grill: Placing chicken on a cold grill can result in uneven cooking. Always preheat your grill to the right temperature before adding the chicken.
  • Using Too Much Sauce Too Early: Applying all the sauce at the beginning can cause it to burn. Reserve some for basting and serving to keep the flavors fresh and vibrant.
  • Ignoring Resting Time: Cutting into the chicken right after grilling can cause juices to escape. Letting it rest for about 5 minutes allows the juices to redistribute, ensuring a juicy bite.

How to Achieve the Best Flavor

Flavor is key to a delicious Honey Garlic BBQ Chicken. Here are some tips to enhance the taste:

  • Use Fresh Ingredients: Fresh garlic and high-quality barbecue sauce can make a significant difference. Opt for organic or homemade sauces when possible.
  • Experiment with Spices: Don’t hesitate to add your favorite spices to the marinade. A pinch of cayenne or a dash of chili powder can elevate the flavor profile.
  • Incorporate Fresh Herbs: Adding fresh herbs like rosemary or thyme to the marinade can introduce a delightful aroma and taste. They pair beautifully with the sweetness of honey.
  • Try Different Barbecue Sauces: Different brands or homemade sauces can change the flavor dramatically. Experiment to find your favorite combination.
  • Consider Wood Chips for Smoking: If you’re using a grill, adding wood chips can infuse a smoky flavor into the chicken. Soak the chips in water for 30 minutes before placing them on the grill.

By avoiding common mistakes and following these flavor-enhancing tips, you’ll be well on your way to creating the perfect Honey Garlic BBQ Chicken. Enjoy the process and the delicious results!

Breakdown of Time for Honey Garlic BBQ Chicken

Understanding the time required for each step in preparing Honey Garlic BBQ Chicken can help you plan your cooking efficiently. Here’s a breakdown of the time you’ll need for preparation, cooking, and the total time involved in making this delicious dish.

Prep Time

The prep time for Honey Garlic BBQ Chicken is relatively short. You’ll need about 15-20 minutes to gather your ingredients and prepare the marinade. This includes:

  • Measuring and mixing the ingredients for the marinade.
  • Patting the chicken dry and placing it in a bowl.
  • Coating the chicken with the marinade.

Additionally, if you choose to marinate the chicken for at least one hour or overnight, this will add to the overall time but is essential for flavor.

Cooking Time

The cooking time for Honey Garlic BBQ Chicken on the grill is approximately 25-30 minutes. Here’s how it breaks down:

  • Grilling the chicken thighs skin-side down for 5-7 minutes.
  • Flipping the chicken and grilling for another 5-7 minutes.
  • Basting with the reserved sauce and grilling for an additional 10-15 minutes until fully cooked.

Always ensure the internal temperature reaches 165°F for safe consumption.

Total Time

When you combine the prep time and cooking time, the total time for making Honey Garlic BBQ Chicken is about 40-50 minutes, not including marinating time. If you opt for marinating overnight, the total time will extend to the next day, but the hands-on time remains the same.

In summary, you can enjoy a flavorful and satisfying meal in under an hour, making Honey Garlic BBQ Chicken a fantastic choice for busy weeknights or weekend gatherings!

Nutritional Information for Honey Garlic BBQ Chicken

Understanding the nutritional content of your meals is essential for maintaining a balanced diet. Honey Garlic BBQ Chicken not only satisfies your taste buds but also provides valuable nutrients. Let’s break down the nutritional information for this delicious dish.

Calories

Each serving of Honey Garlic BBQ Chicken contains approximately 350 calories. This makes it a hearty option for dinner without being overly heavy. The combination of chicken and the flavorful marinade contributes to the calorie count, ensuring you enjoy a fulfilling meal.

Protein Content

Protein is vital for muscle repair and overall health. In each serving of Honey Garlic BBQ Chicken, you’ll find about 25 grams of protein. This high protein content makes it an excellent choice for those looking to build muscle or maintain a healthy diet. Chicken thighs are particularly rich in protein, making this dish both nutritious and satisfying.

Sodium Levels

When it comes to sodium, each serving contains around 800 milligrams. While this is a reasonable amount for a flavorful dish, it’s essential to be mindful of your overall sodium intake throughout the day. If you’re watching your sodium levels, consider using low-sodium barbecue sauce or adjusting the salt in the marinade to suit your dietary needs.

In summary, Honey Garlic BBQ Chicken is a delicious and nutritious option for your meals. With a good balance of calories, protein, and sodium, it can fit well into a healthy eating plan. Enjoy this dish knowing you’re treating yourself to something both tasty and beneficial!

FAQs about Honey Garlic BBQ Chicken

Can I use chicken thighs instead of breasts?

Absolutely! Chicken thighs are a fantastic choice for Honey Garlic BBQ Chicken. They are juicy and flavorful, making them perfect for grilling. If you prefer a leaner option, you can use chicken breasts. Just keep in mind that breasts cook faster, so adjust your grilling time accordingly to avoid drying them out.

How long should I marinate the chicken?

For the best flavor, marinate the chicken for at least one hour. However, if you have the time, letting it sit overnight in the refrigerator is even better. This allows the marinade to penetrate the meat deeply, resulting in a more flavorful and tender chicken. Just remember to keep it covered in the fridge!

What can I substitute for honey in the recipe?

If you need a substitute for honey, there are several options you can try. Maple syrup is a great alternative that provides a similar sweetness. Agave nectar is another option that works well. If you prefer a sugar-free option, consider using a sugar substitute like stevia or erythritol. Just keep in mind that the flavor may vary slightly with these substitutes.

Is Honey Garlic BBQ Chicken suitable for meal prep?

Yes, Honey Garlic BBQ Chicken is perfect for meal prep! You can marinate the chicken ahead of time and store it in the refrigerator for up to 24 hours. After grilling, you can portion the chicken into containers for easy lunches or dinners throughout the week. It reheats well, making it a convenient and delicious option for busy days!

Conclusion on Honey Garlic BBQ Chicken

In conclusion, Honey Garlic BBQ Chicken is a delightful dish that brings together sweet and savory flavors in a way that is sure to please everyone at your table. With its simple preparation and versatile ingredients, this recipe is perfect for both novice cooks and seasoned chefs alike. Whether you’re hosting a summer barbecue or enjoying a cozy family dinner, this dish is bound to impress.

By following the steps outlined in this article, you can create a mouthwatering meal that not only tastes great but also nourishes your body. The combination of juicy chicken thighs, a flavorful marinade, and the smoky essence from the grill makes for an unforgettable dining experience. Plus, with the option to customize the recipe to suit your taste, the possibilities are endless!

Remember to take your time with the marinating process, as it is key to achieving that deep, rich flavor. Don’t forget to experiment with different side dishes and presentation styles to make your meal even more enjoyable. With a little creativity, you can turn a simple recipe into a culinary masterpiece.

So, gather your ingredients, fire up the grill, and get ready to savor the deliciousness of Honey Garlic BBQ Chicken. Your taste buds will thank you, and your family and friends will be asking for seconds. Happy cooking!

Paul

Honey Garlic BBQ Chicken is a must-try recipe!

This juicy grilled BBQ chicken is a backyard classic made easy. With just a few pantry staples and your favorite BBQ sauce, these flame-kissed chicken breasts turn out tender, smoky, and packed with flavor—perfect for summer cookouts or weeknight dinners alike!
Prep Time 5 minutes
Cook Time 15 minutes
Total Time 20 minutes
Course: Main Dish
Cuisine: American

Ingredients
  

  • 4 boneless skinless chicken breasts
  • Extra virgin olive oil for drizzling
  • Kosher salt to taste
  • Freshly ground black pepper to taste
  • ½ cup BBQ sauce your favorite brand – Sweet Baby Ray’s and Stubbs are great options

Method
 

Grill Method (Recommended):
  1. Preheat your grill to high (around 450°F) and clean the grates well.
  2. Drizzle chicken breasts with olive oil, rub it in, and season both sides with salt and pepper.
  3. Place chicken on the hot grill, cover, and cook for 5–6 minutes until they naturally release from the grates.
  4. Flip and cook for another 4–5 minutes on the other side.
  5. Brush one side with BBQ sauce, flip, and grill for 2 minutes. Repeat on the other side with more sauce.
  6. Grill until internal temperature reaches 160°F. Remove from heat and let rest for 5 minutes—chicken will rise to a safe 165°F as it rests.
  7. Serve with additional BBQ sauce if desired.
Oven Method (Alternative):
  1. Preheat oven to 450°F.
  2. Drizzle chicken with olive oil, season with salt and pepper, and place on a foil-lined baking sheet.
  3. Bake for 15 minutes, then brush tops with BBQ sauce.
  4. Return to oven and bake an additional 5–8 minutes, until sauce is bubbly and internal temp reaches 160°F.
  5. Let rest for 5 minutes before serving.

Notes

  • For juicier chicken, lightly pound the breasts to even thickness before grilling.
  • Want more flavor? Marinate the chicken in BBQ sauce and olive oil for 30 minutes before cooking.
  • Use a meat thermometer for perfect doneness—overcooked chicken dries out fast!
  • Pair with grilled corn, coleslaw, or potato salad for a full BBQ feast.