
Pan-Fried Scallion and Toasted Sesame Buns: A Crispy, Fluffy Delight

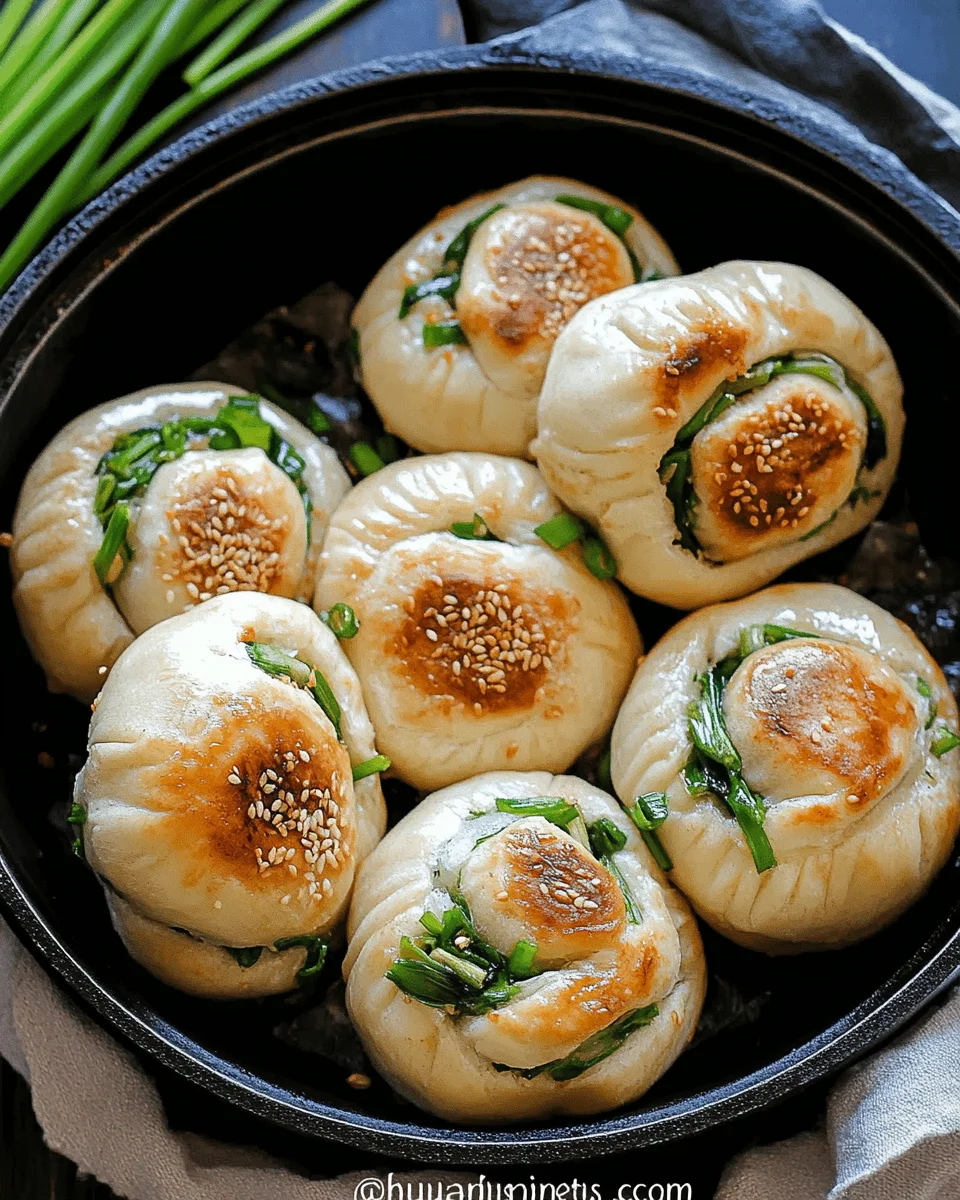
If you’re a fan of crispy-yet-fluffy buns packed with layers of flavor, Pan-Fried Scallion and Toasted Sesame Buns, also known as Hua Juan (花卷) or Flower Buns, are a must-try. These buns have a light and airy texture on the inside, a golden-brown crisp on the bottom, and a savory, aromatic filling of scallions, sesame seeds, and five-spice powder.

Unlike traditional steamed buns, these pan-fried delights bring together the best of both worlds: the softness of a steamed bun and the satisfying crunch of a crispy-bottomed dumpling. They are vegan-friendly, incredibly versatile, and easy to customize. Whether you serve them as a snack, side dish, or part of a larger meal, these buns are sure to impress.

In this article, we will explore the history of Hua Juan, expert tips for making the perfect batch, exciting variations, serving suggestions, and answers to frequently asked questions.

The Origins of Hua Juan (花卷) – The Beautifully Twisted Bun

Hua Juan, which translates to “flower roll” or “flower bun”, is a traditional Chinese steamed bun that gets its name from its distinctive twisted shape. These buns originated in Northern China, where wheat-based dishes like dumplings, noodles, and steamed buns are dietary staples. Unlike plain mantou (steamed bread), Hua Juan is layered with flavor, thanks to ingredients like scallions, sesame, and spices.

While steamed Hua Juan is the classic version, this pan-fried adaptation adds a delightful crispiness, making it even more appealing. Similar cooking techniques are used for Sheng Jian Bao (pan-fried soup dumplings), where a doughy bun is first pan-fried, then steamed to perfection.

This pan-fried variation has become popular in many Chinese and Taiwanese households, offering a crispy twist on a soft, pillowy favorite.

Why You’ll Love These Buns

1. Incredible Texture Contrast

  • The crispy, golden-brown bottom gives way to a soft, airy interior, making each bite satisfying.

2. Packed with Flavor

  • The combination of fresh scallions, nutty sesame seeds, and warm five-spice powder creates a deeply savory and aromatic experience.

3. Simple Yet Impressive

  • While the twisted shaping technique might look complicated, it’s surprisingly easy to master. Plus, these buns look absolutely gorgeous on a plate.

4. Vegan and Customizable

  • These buns are entirely plant-based, but they can be customized with additional fillings like mushrooms, tofu, or even chili oil for extra flavor.

5. A Perfect Side Dish or Snack

  • Enjoy them on their own, with a dip, or alongside soups, stir-fries, and noodle dishes.

Expert Tips for Perfect Pan-Fried Scallion Buns

1. Mastering the Dough

  • Use warm soy milk or water to activate the yeast properly. Cold liquid will slow the rise, while overly hot liquid can kill the yeast.
  • Let the dough rest adequately—this helps develop gluten, making it easier to roll and shape.

2. Creating an Ultra-Fragrant Filling

  • Toast the sesame seeds before using them. This enhances their nutty aroma and deepens their flavor.
  • Heat the oil before mixing it with scallions to create a sizzling effect, which intensifies the oniony aroma.

3. Shaping the Buns Like a Pro

  • Rolling out the dough evenly ensures that every bun has a consistent texture.
  • Twisting the dough strips adds more layers, which means more spots for the filling to infuse its flavor.

4. The Secret to Perfect Pan-Frying

  • Cook the buns in batches to avoid overcrowding the pan, which can lead to uneven cooking.
  • After pan-frying the bottoms, add a splash of water and cover the pan—this steaming step ensures the buns cook through without burning.

Delicious Variations to Try

1. Spicy Sichuan-Style Buns

  • Add chili oil and crushed red pepper flakes to the filling for a fiery kick.

2. Garlic & Ginger Infused Buns

  • Mix finely minced garlic and ginger into the scallion-sesame filling for an extra punch of flavor.

3. Cheesy Scallion Buns

  • Sprinkle a layer of vegan cheese or grated parmesan over the filling before rolling the buns.

4. Mushroom & Scallion Buns

  • Sauté finely chopped shiitake mushrooms and mix them with the scallions for an earthy umami flavor.

5. Sweet-Savory Honey Glazed Buns

  • After frying, brush the buns with a light honey-soy glaze for a subtle sweetness.

How to Serve Pan-Fried Scallion Buns

These buns are incredibly versatile and can be enjoyed in many ways:

1. Classic Style

  • Eat them as they are, straight from the pan, while they’re crispy and warm.

2. Dipping Sauce Pairings

  • Serve with a soy sauce-vinegar dip, chili oil, or a sesame-ginger dressing.

3. As a Side Dish

  • Pair with hot and sour soup, miso soup, or noodle stir-fries.

4. Breakfast or Tea-Time Snack

  • Enjoy these buns with a cup of green tea, oolong, or a warm soy milk drink.

5. Sandwich It

  • Slice the bun in half and fill it with grilled tofu, avocado, or pickled vegetables for a mini scallion bun sandwich.

Aromatic & Crispy: Ingredients

For the Dough

  • All-purpose flour
  • Dry yeast
  • Warm soy milk
  • Neutral oil

For the Filling

  • Scallions, finely chopped
  • Toasted sesame seeds
  • Five-spice powder
  • Salt
  • Hot oil

For Pan-Frying

  • Neutral oil
  • Water for steaming

From Dough to Perfection: Directions

Step 1: Prepare the Dough

  1. Mix the dry ingredients, then gradually add warm soy milk and oil.
  2. Knead into a smooth, elastic dough and let it rest for 45-60 minutes until doubled in size.

Step 2: Make the Filling

  1. Combine chopped scallions, sesame seeds, five-spice powder, and salt in a bowl.
  2. Pour in hot oil, mix well, and set aside.

Step 3: Shape the Buns

  1. Roll out the dough into a thin rectangular sheet.
  2. Spread the filling evenly across the surface.
  3. Slice into strips, twist, and shape them into flower-like buns.

Step 4: Pan-Fry and Steam

  1. Heat oil in a non-stick pan and add the buns, cooking until the bottoms turn golden brown.
  2. Pour in water and cover the pan, allowing the buns to steam until the water evaporates.
  3. Remove the lid and cook for another minute or two to crisp up the bottoms.

A Bite of Goodness: Nutritional Information

  • Serving Size: 1 bun
  • Calories: 66 kcal
  • Carbohydrates: 1g
  • Protein: 1g
  • Fat: 7g
  • Sodium: 194mg
  • Fiber: 1g

These Pan-Fried Scallion and Sesame Buns are a delightful fusion of soft, fluffy dough and crispy, aromatic flavors. They pair well with soups, stir-fries, or even a simple dipping sauce. Enjoy them hot and fresh for the ultimate experience!

Frequently Asked Questions (FAQs)

1. Can I Steam These Buns Instead of Pan-Frying?

Yes! To make traditional steamed Hua Juan, simply place them in a bamboo steamer or steaming basket for 10-12 minutes instead of pan-frying.

2. How Do I Store and Reheat Leftovers?

  • Refrigerate: Store in an airtight container for up to 5 days.
  • Freeze: Freeze the cooked buns for up to 2 months and steam or pan-fry to reheat.
  • Reheating: Pan-fry again with a splash of water to bring back the crispy texture, or microwave with a damp towel to retain moisture.

3. Can I Use Black Sesame Seeds Instead of White?

Yes! Black sesame seeds have a slightly stronger, earthier flavor, but they work just as well.

4. What’s the Best Flour to Use?

All-purpose flour works best, but you can substitute with bread flour for a chewier texture.

5. Can I Prepare the Dough in Advance?

Absolutely! Refrigerate the dough overnight and let it come to room temperature before rolling and shaping.

Final Thoughts: Why You Should Try These Buns

Pan-Fried Scallion and Toasted Sesame Buns offer the perfect balance of crispy, soft, and aromatic flavors in every bite. Whether you’re a fan of Chinese cuisine or simply love experimenting with homemade bread, these buns are a must-try.

Not only are they vegan and versatile, but they also provide a wonderful opportunity to practice traditional bun-making techniques. The twisting and shaping process may take a little practice, but once you get the hang of it, you’ll be making bakery-quality buns at home.

If you’re looking for a savory, satisfying, and slightly indulgent treat, these buns are the perfect addition to your recipe collection. Make a batch today and enjoy them fresh, crispy, and full of delicious scallion-sesame goodness!
aiting

Pan-Fried Scallion and Toasted Sesame Buns: A Crispy, Fluffy Delight

Pan-Fried Scallion and Toasted Sesame Buns, also known as Hua Juan (花卷) or Flower Buns, are a classic Chinese-style bun that combines the light, fluffy texture of steamed dough with the crispy, golden bottom of pan-fried dumplings. Infused with the aromatic flavors of scallions, toasted sesame seeds, and five-spice powder, these buns offer a perfect balance of savory, nutty, and slightly sweet notes.
Prep Time 1 hour
Cook Time 15 minutes
Total Time 1 hour 15 minutes
Servings: 12 Buns
Course: Side Dish, Snack
Cuisine: Chinese

Ingredients
  

For the Dough:
  • All-purpose flour
  • Dry yeast
  • Warm soy milk
  • Neutral oil
For the Filling:
  • Scallions finely chopped
  • Toasted sesame seeds
  • Five-spice powder
  • Salt
  • Hot oil
For Pan-Frying:
  • Neutral oil
  • Water for steaming

Method
 

  1. Step 1: Prepare the Dough
  2. Mix the dry ingredients, then gradually add warm soy milk and oil.
  3. Knead into a smooth, elastic dough and let it rest for 45-60 minutes until doubled in size.
  4. Step 2: Make the Filling
  5. Combine chopped scallions, sesame seeds, five-spice powder, and salt in a bowl.
  6. Pour in hot oil, mix well, and set aside.
  7. Step 3: Shape the Buns
  8. Roll out the dough into a thin rectangular sheet.
  9. Spread the filling evenly across the surface.
  10. Slice into strips, twist, and shape them into flower-like buns.
  11. Step 4: Pan-Fry and Steam
  12. Heat oil in a non-stick pan and add the buns, cooking until the bottoms turn golden brown.
  13. Pour in water and cover the pan, allowing the buns to steam until the water evaporates.
  14. Remove the lid and cook for another minute or two to crisp up the bottoms

Notes

  • Use a well-heated pan to ensure a crisp bottom without burning.
  • Serve with soy sauce or chili oil for extra flavor.
  • Leftover buns can be reheated by lightly pan-frying or steaming them again.
Quick Italian Cream Cake: A Classic Dessert Made Easy

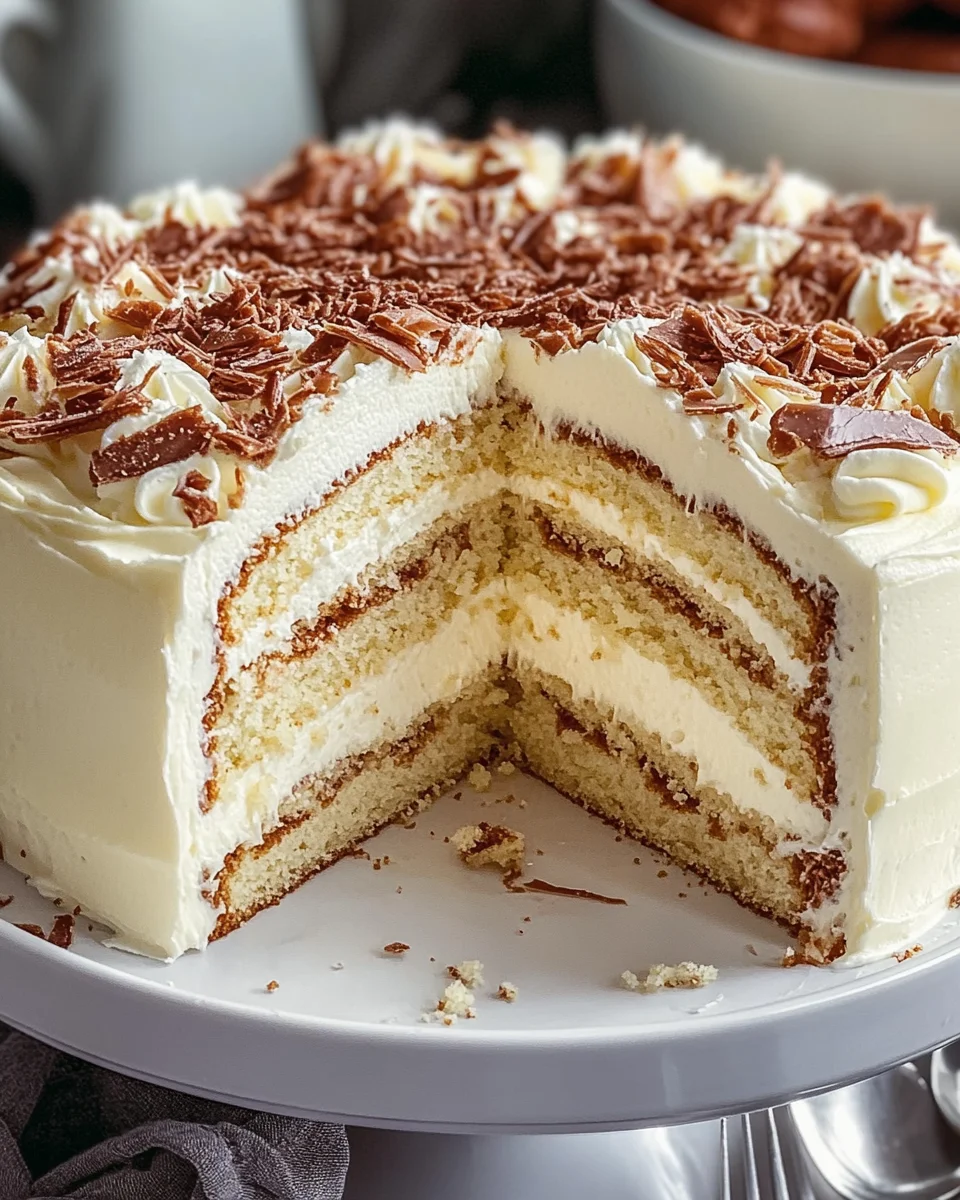
Italian Cream Cake is a timeless dessert that combines a rich, buttery cake with a light and fluffy texture, enhanced by the flavors of coconut, toasted pecans, and smooth cream cheese frosting. Traditionally, this cake is made from scratch, requiring careful mixing and baking techniques. However, this Quick Italian Cream Cake simplifies the process, allowing home bakers to create a bakery-quality dessert with minimal effort.

Whether you’re celebrating a special occasion or simply craving a slice of something sweet, this cake is a perfect balance of elegance and indulgence. The buttermilk ensures a moist crumb, the pecans add a delightful crunch, and the coconut provides a subtle chewiness that enhances the cake’s overall texture. Finished with a velvety cream cheese frosting, this cake is both visually stunning and irresistibly delicious.

In this article, we’ll explore the origins of Italian Cream Cake, expert tips for making it, variations to try, serving suggestions, and answers to frequently asked questions.

The Story Behind Italian Cream Cake

Despite its name, Italian Cream Cake is not originally from Italy. This cake is believed to have Southern American roots, gaining popularity in Texas before spreading across the country. Some theories suggest that the cake’s name comes from its use of rich ingredients like cream cheese, buttermilk, and coconut, which are often associated with European baking traditions.

The earliest recorded recipes for Italian Cream Cake appeared in Southern community cookbooks, where it was commonly made for birthdays, weddings, and holiday celebrations. The combination of sweet and tangy flavors in the cake and frosting became an instant hit, making it a Southern classic that continues to be enjoyed today.

Why You Will Love This Cake

1. Simple Yet Impressive

This quick version of Italian Cream Cake allows you to achieve the same rich flavors and tender crumb as the traditional version, but with fewer steps and ingredients.

2. Perfect for Any Occasion

Whether it’s a birthday, anniversary, holiday gathering, or afternoon treat, this cake always delivers. Its elegant appearance and sophisticated flavors make it a showstopper at any event.

3. Bakery-Quality Results at Home

Even if you’re not an experienced baker, this recipe is designed to be easy to follow, ensuring a soft, moist cake and smooth, creamy frosting every time.

4. A Beautiful Balance of Textures

  • Soft & Moist Cake: The buttermilk keeps the cake light and tender.
  • Nutty Crunch: Toasted pecans provide a delicious contrast to the soft crumb.
  • Creamy Frosting: The thick cream cheese frosting adds a smooth, luscious finish.
  • Chewy Coconut: Shredded coconut blends perfectly into the cake, adding a subtle sweetness.

A Decadent Symphony: Ingredients

For the Cake

  • White cake mix
  • Large eggs
  • Buttermilk
  • Vegetable oil
  • Shredded coconut
  • Toasted pecans, chopped
  • Rum (optional)

For the Cream Cheese Frosting

  • Cream cheese
  • Butter
  • Powdered sugar
  • Vanilla extract
  • Toasted pecans, chopped

From Batter to Bliss: Directions

Step 1: Mixing the Batter

  1. In a large bowl, combine cake mix, eggs, buttermilk, and oil. Beat with an electric mixer for 2 minutes until smooth.
  2. Fold in shredded coconut and chopped pecans.

Step 2: Baking the Cake Layers

  1. Grease three cake pans and evenly divide the batter.
  2. Bake at 350°F for 15-17 minutes or until a toothpick inserted in the center comes out clean.
  3. Let the cakes cool in the pans for 10 minutes, then transfer to wire racks.

Step 3: Adding a Touch of Flavor

  1. If using rum, brush a light layer over each cake layer. Let them sit for 10 minutes.

Step 4: Preparing the Frosting

  1. Beat cream cheese and butter until smooth.
  2. Gradually add powdered sugar, beating until fluffy.
  3. Mix in vanilla and chopped pecans.

Step 5: Assembling the Cake

  1. Spread frosting between each layer, then cover the top and sides.
  2. Chill the cake for at least 2 hours before slicing.

A Slice of Sweetness: Nutritional Information

  • Serving Size: 1 slice
  • Calories: ~450 kcal
  • Carbohydrates: 55g
  • Protein: 5g
  • Fat: 22g
  • Sugar: 40g
  • Sodium: 280mg

This Quick Italian Cream Cake is a delightful dessert that blends creamy, nutty, and coconut-infused flavors into every bite. Whether served fresh or chilled, it’s guaranteed to be a hit at any gathering!

Expert Tips for the Best Italian Cream Cake

1. Ensuring a Moist and Fluffy Cake

  • Use buttermilk: This is key to achieving a light, tender crumb. Buttermilk also enhances the flavor and makes the cake extra moist.
  • Don’t overmix the batter: Overmixing can lead to a dense texture instead of the desired light and airy consistency.
  • Let the layers cool completely: This prevents the frosting from melting when assembling the cake.

2. Mastering the Perfect Cream Cheese Frosting

  • Use softened butter and cream cheese: This ensures a smooth, lump-free frosting.
  • Sift the powdered sugar: This helps create a silky, creamy consistency.
  • Chill before frosting: A brief chill in the fridge makes the frosting easier to spread and helps it hold its shape.

3. Toasting the Pecans for Extra Flavor

  • Lightly toast pecans in a dry pan over medium heat for 2-3 minutes until fragrant. This brings out their natural oils and intensifies their nutty flavor.
  • Let them cool before adding to the cake to prevent them from softening the frosting.

4. Layering for a Stunning Presentation

  • Brush cake layers with rum (optional): This adds a subtle depth of flavor and keeps the cake moist.
  • Apply a crumb coat: This is a thin layer of frosting that seals in crumbs before applying the final, smooth coat.
  • Decorate with extra pecans and coconut: Sprinkle the top with toasted pecans or shredded coconut for a beautiful finish.

Delicious Variations to Try

While the classic Italian Cream Cake is undeniably delicious, here are a few creative variations to switch things up:

1. Chocolate Italian Cream Cake

  • Add 2 tablespoons of cocoa powder to the batter for a chocolate twist.
  • Replace half of the pecans with mini chocolate chips for extra decadence.

2. Lemon Italian Cream Cake

  • Add zest from one lemon to the batter for a citrusy kick.
  • Mix lemon juice into the frosting for a refreshing, tangy flavor.

3. Italian Cream Cupcakes

  • Bake the batter in cupcake liners for a portable, single-serving treat.
  • Pipe the frosting onto each cupcake and top with a pecan half.

4. No-Bake Italian Cream Cake

  • Use graham cracker layers instead of cake for a quick, chilled dessert.
  • Layer with whipped cream, cream cheese frosting, and toasted coconut.

How to Serve Italian Cream Cake

This cake is delicious on its own, but pairing it with the right drinks or side treats can elevate the experience:

Best Pairings

  • Hot Coffee or Espresso: The slight bitterness of coffee balances the cake’s sweetness.
  • Sweet Dessert Wine: A sip of Moscato or Riesling enhances the flavors.
  • Vanilla Ice Cream: A scoop of ice cream adds an extra layer of indulgence.

Serving Tips

  • Let the cake chill for at least 2 hours before serving for the best texture.
  • Use a sharp knife warmed under hot water for clean slices.

Frequently Asked Questions (FAQs)

1. Can I Make Italian Cream Cake Ahead of Time?

Yes! This cake actually tastes better the next day because the flavors meld together. Store it in the refrigerator until ready to serve.

2. How Do I Store Leftover Cake?

  • Refrigerate: Keep it in an airtight container for up to 5 days.
  • Freeze: Wrap slices individually and freeze for up to 3 months.

3. Do I Have to Use Coconut?

No, you can omit the coconut if you prefer. However, it adds a nice texture and sweetness to the cake.

4. Can I Use a Different Frosting?

Yes! While cream cheese frosting is traditional, you can also try:

  • Buttercream frosting for a lighter texture.
  • Mascarpone frosting for a more delicate, Italian-style flavor.

5. Why Did My Cake Turn Out Dense?

This usually happens if:

  • The batter was overmixed, causing it to lose air.
  • The eggs weren’t at room temperature, which can prevent proper incorporation.
  • The oven temperature was too low, leading to uneven rising.

Final Thoughts: Why You Need to Try This Cake

Italian Cream Cake is a timeless classic that combines simple ingredients into a rich, flavorful masterpiece. Whether you follow the quick version or take the traditional route, this cake is always a crowd-pleaser.

From its soft, buttery layers to its silky frosting and crunchy pecans, every bite is a delightful combination of textures and flavors. Whether you serve it at a family gathering, special occasion, or casual dessert night, this cake is guaranteed to impress.

If you love making desserts that look as good as they taste, this Quick Italian Cream Cake is a must-try. Gather your ingredients, whip up a batch, and enjoy a slice of sweet perfection!

aiting

Quick Italian Cream Cake: A Classic Dessert Made Easy

Italian Cream Cake is a rich, elegant dessert that perfectly balances moist, fluffy layers with a luscious cream cheese frosting. This Quick Italian Cream Cake simplifies the traditional recipe, making it easy for home bakers to achieve bakery-quality results with minimal effort. With a delightful combination of flaked coconut, toasted pecans, and a hint of rum, this cake is a showstopper at any gathering, whether it’s a birthday, tea party, or holiday celebration.
 
Prep Time 20 minutes
Cook Time 17 minutes
Total Time 27 minutes
Servings: 12 slices
Course: Dessert
Cuisine: Italian-American

Ingredients
  

For the Cake:
  • White cake mix
  • Large eggs
  • Buttermilk
  • Vegetable oil
  • Shredded coconut
  • Toasted pecans chopped
  • Rum optional
For the Cream Cheese Frosting:
  • Cream cheese
  • Butter
  • Powdered sugar
  • Vanilla extract
  • Toasted pecans chopped

Method
 

  1. Step 1: Mixing the Batter
  2. In a large bowl, combine cake mix, eggs, buttermilk, and oil. Beat with an electric mixer for 2 minutes until smooth.
  3. Fold in shredded coconut and chopped pecans.
  4. Step 2: Baking the Cake Layers
  5. Grease three cake pans and evenly divide the batter.
  6. Bake at 350°F for 15-17 minutes or until a toothpick inserted in the center comes out clean.
  7. Let the cakes cool in the pans for 10 minutes, then transfer to wire racks.
  8. Step 3: Adding a Touch of Flavor
  9. If using rum, brush a light layer over each cake layer. Let them sit for 10 minutes.
  10. Step 4: Preparing the Frosting
  11. Beat cream cheese and butter until smooth.
  12. Gradually add powdered sugar, beating until fluffy.
  13. Mix in vanilla and chopped pecans.
  14. Step 5: Assembling the Cake
  15. Spread frosting between each layer, then cover the top and sides.
  16. Chill the cake for at least 2 hours before slicing.

Notes

  • Toast the pecans for a deeper, nuttier flavor.
  • Refrigerate leftover cake to maintain freshness.
  • Serve with a cup of coffee or tea for a delightful pairing.