Orange Creamsicle Milkshake: A Nostalgic Sip of Summer

Few flavors evoke childhood memories quite like the classic combination of orange and vanilla. The Orange Creamsicle Milkshake takes this timeless pairing and transforms it into a creamy, frothy indulgence that feels like a sip of summer in a glass. Whether you’re looking for a refreshing way to cool down on a hot day or simply craving something sweet and satisfying, this milkshake delivers zesty citrus notes balanced by smooth, velvety vanilla in every sip.

From its vibrant color and luscious texture to its irresistible flavor, this shake is a favorite among both kids and adults. In this guide, we’ll explore why this milkshake is a must-try, how to serve and store it, fun variations to customize it, and frequently asked questions to help you perfect the recipe.

Why This Milkshake Stands Out

1. A Taste of Nostalgia

The Orange Creamsicle Milkshake is inspired by the classic orange creamsicle popsicle—a childhood favorite known for its citrusy outer layer and creamy vanilla core. This shake captures that nostalgic flavor, offering a delicious way to relive warm summer afternoons spent chasing after the ice cream truck.

2. The Perfect Balance of Flavors

Orange and vanilla might seem like an unlikely pairing, but together they create a harmonious blend of tangy and sweet. The slight acidity from the orange soda and sherbet cuts through the richness of the ice cream, resulting in a milkshake that’s both refreshing and indulgent.

3. Quick and Easy to Make

With just a handful of ingredients and a blender, you can whip up this milkshake in minutes. Unlike complicated desserts that require baking or setting time, this recipe is simple, foolproof, and perfect for spontaneous cravings.

4. Versatile and Customizable

This milkshake serves as a great base for creative variations. You can adjust the flavor profile by switching out the type of soda, ice cream, or sherbet. Whether you prefer a tropical twist, a dairy-free version, or a boozy upgrade for adults, this shake is easily adaptable to your preferences.

Serving Suggestions: Elevate Your Milkshake Experience

1. Chill Your Glasses for an Extra Cool Touch

For a refreshing, frostier experience, place your serving glasses in the freezer for 10-15 minutes before pouring the milkshake. The chilled glass helps keep the shake colder for longer.

2. Add a Fun Straw for Presentation

A playful, striped straw or a decorative glass can make the experience even more enjoyable. If serving at a gathering, consider using paper straws in orange and white to match the theme.

3. Experiment with Toppings

While whipped cream and a cherry are classic additions, there are plenty of ways to customize the final presentation:

  • Crushed graham crackers for a subtle crunch
  • A drizzle of honey or caramel for added sweetness
  • Sprinkles or white chocolate shavings for a festive touch

4. Pair It with a Dessert for the Ultimate Treat

While this milkshake is a delicious treat on its own, pairing it with the right dessert can enhance the experience. Try serving it with:

  • A slice of vanilla pound cake
  • Soft, chewy sugar cookies
  • A light, fluffy coconut cake

Storage Tips: Keeping It Fresh

1. Enjoy It Fresh

Milkshakes are best consumed immediately after blending for the smoothest, creamiest consistency. The longer they sit, the more they will begin to separate and melt.

2. Prepping Ingredients in Advance

If you’re making multiple milkshakes for a group, you can save time by pre-measuring and freezing the ingredients:

  • Scoop out the ice cream and sherbet onto a lined baking sheet, freeze them individually, and store them in an airtight container.
  • Chill the orange soda in the fridge so it’s cold and ready to use.

3. Can You Store Leftover Milkshake?

While it’s best to drink the shake fresh, if you have leftovers, you can store it in the freezer for up to 1 hour. Before drinking, stir or re-blend it to bring back the creamy consistency.

Creative Variations: Customize Your Shake

1. Tropical Creamsicle Delight

Swap out the orange soda for pineapple soda and the orange sherbet for mango sorbet to create a tropical-inspired milkshake bursting with island flavors.

2. Chocolate Orange Indulgence

For a richer, more decadent twist, add a tablespoon of cocoa powder or a drizzle of chocolate syrup before blending. The chocolate-orange combination is a well-loved classic that adds depth to the flavor profile.

3. Dairy-Free Dream

Want to enjoy this milkshake without dairy? Replace the ice cream and sherbet with coconut-based alternatives, and use sparkling orange juice instead of soda for a naturally sweet and creamy result.

4. Boozy Adult Version

For a fun, grown-up twist, add a splash of vanilla vodka or orange liqueur to transform this childhood favorite into a refreshing cocktail.

5. Berry Citrus Fusion

Blend in a handful of frozen strawberries or raspberries to add a berry-infused tartness that complements the citrus flavor beautifully.

Ingredients – A Burst of Citrus and Cream

  • ¾ cup orange soda – Provides a fizzy citrus kick
  • ⅔ cup vanilla ice cream (about 2 scoops) – Brings in creamy richness
  • ⅔ cup orange sherbet (about 2 scoops) – Enhances the tangy orange flavor
  • 3 tbsp whipped cream – For a fluffy topping
  • Orange slice and cherry (optional) – Adds a decorative touch

Directions – Blending Up Nostalgia

1. Pour the Foundation

Start by pouring ¾ cup of chilled orange soda into a blender. The soda adds a light, bubbly texture to the milkshake.

2. Add the Creamy Elements

Drop in 2 scoops of vanilla ice cream to create a smooth and creamy base.

3. Bring the Zest

Follow up with 2 generous scoops of orange sherbet to elevate the citrusy flavor and add a refreshing tang.

4. Blend to Perfection

Blend all the ingredients until the mixture reaches a silky, uniform texture. Make sure there are no lumps for the smoothest sip.

5. Serve in Style

Carefully pour the milkshake into a tall, chilled glass, leaving space at the top for toppings.

6. Top It Off

Finish with a dollop of whipped cream, swirling it into a fluffy cloud. For an extra decorative touch, garnish with an orange slice and a cherry.

7. Adjust to Your Liking

If you prefer a thicker consistency, simply add an extra scoop of ice cream before blending again.

Nutritional Breakdown – Sipping Sweetness

(Per serving, approximate values)

  • Calories: ~250
  • Carbohydrates: ~40g
  • Protein: ~4g
  • Fat: ~8g
  • Saturated Fat: ~5g
  • Sugar: ~30g
  • Sodium: ~70mg

Enjoy this creamy, citrus-infused delight as a refreshing summer treat or a nostalgic indulgence anytime!

Frequently Asked Questions (FAQs)

1. Can I Make This Milkshake Without a Blender?

Yes! If you don’t have a blender, you can mash the ice cream and sherbet together in a bowl using a spoon or whisk, then slowly stir in the soda until fully mixed. The texture might not be as smooth, but the flavor will be just as delicious.

2. Can I Use Fresh Orange Juice Instead of Orange Soda?

Absolutely! Freshly squeezed orange juice can be a great alternative if you want a more natural, less carbonated version of the milkshake.

3. How Do I Make It Thicker?

If you prefer a thicker, creamier milkshake, simply add an extra scoop of ice cream before blending. You can also reduce the amount of orange soda slightly for a denser texture.

4. Can I Make This Vegan?

Yes! Use dairy-free vanilla ice cream and sherbet, and replace the whipped cream with coconut whipped topping for a fully vegan version.

5. Can I Use a Different Type of Soda?

Definitely! Some great alternatives include:

  • Cream soda for a softer vanilla taste
  • Ginger ale for a mild citrus contrast
  • Lemon-lime soda for a tangier kick

6. Can I Add Protein Powder to This Milkshake?

Yes, you can add a scoop of vanilla or orange-flavored protein powder for an added nutritional boost. Just be sure to blend thoroughly for a smooth consistency.

Conclusion: A Classic Treat Worth Savoring

The Orange Creamsicle Milkshake is more than just a drink—it’s a nostalgic experience that brings together refreshing citrus flavors and creamy vanilla goodness in perfect harmony. Whether you enjoy it on a warm summer day, as a special dessert, or with friends and family at a gathering, this milkshake is guaranteed to be a crowd-pleaser.

With its quick preparation, endless customization options, and irresistible flavor, this is one recipe that deserves a spot in your collection. So grab your blender, pour in the ingredients, and indulge in this creamy, dreamy treat. One sip, and you’ll be transported back to those carefree summer days!

aiting

Orange Creamsicle Milkshake: A Nostalgic Sip of Summer

This Orange Creamsicle Milkshake is the perfect blend of tangy orange soda, creamy vanilla ice cream, and refreshing orange sherbet. It’s a nostalgic treat that delivers a burst of citrus and cream in every sip!
Prep Time 5 minutes
Total Time 5 minutes
Servings: 1 serving
Course: Beverage, Dessert
Cuisine: American

Ingredients
  

  • ¾ cup orange soda
  • cup vanilla ice cream about 2 scoops
  • cup orange sherbet about 2 scoops
  • 3 tbsp whipped cream
  • Orange slice and cherry optional, for garnish

Method
 

  1. Pour the Base
  2. Pour ¾ cup of chilled orange soda into a blender to create a bubbly texture.
2. Add the Ice Cream
  1. Drop in 2 scoops of vanilla ice cream to add creaminess.
3. Enhance the Citrus Flavor
  1. Add 2 scoops of orange sherbet for a tangy, refreshing kick.
4. Blend Until Smooth
  1. Blend all ingredients until the mixture is silky and uniform with no lumps.
5. Serve in a Chilled Glass
  1. Carefully pour the milkshake into a tall glass, leaving space for toppings.
6. Garnish & Enjoy
  1. Top with whipped cream, and optionally garnish with an orange slice and cherry.
7. Customize the Consistency
  1. For a thicker shake, add an extra scoop of ice cream and blend again.

Notes

  • For Extra Fizz: Add a splash of club soda before blending.
  • Healthier Alternative: Use low-fat ice cream or frozen yogurt.
  • Try Different Flavors: Swap orange soda with pineapple or mango soda for a tropical twist.
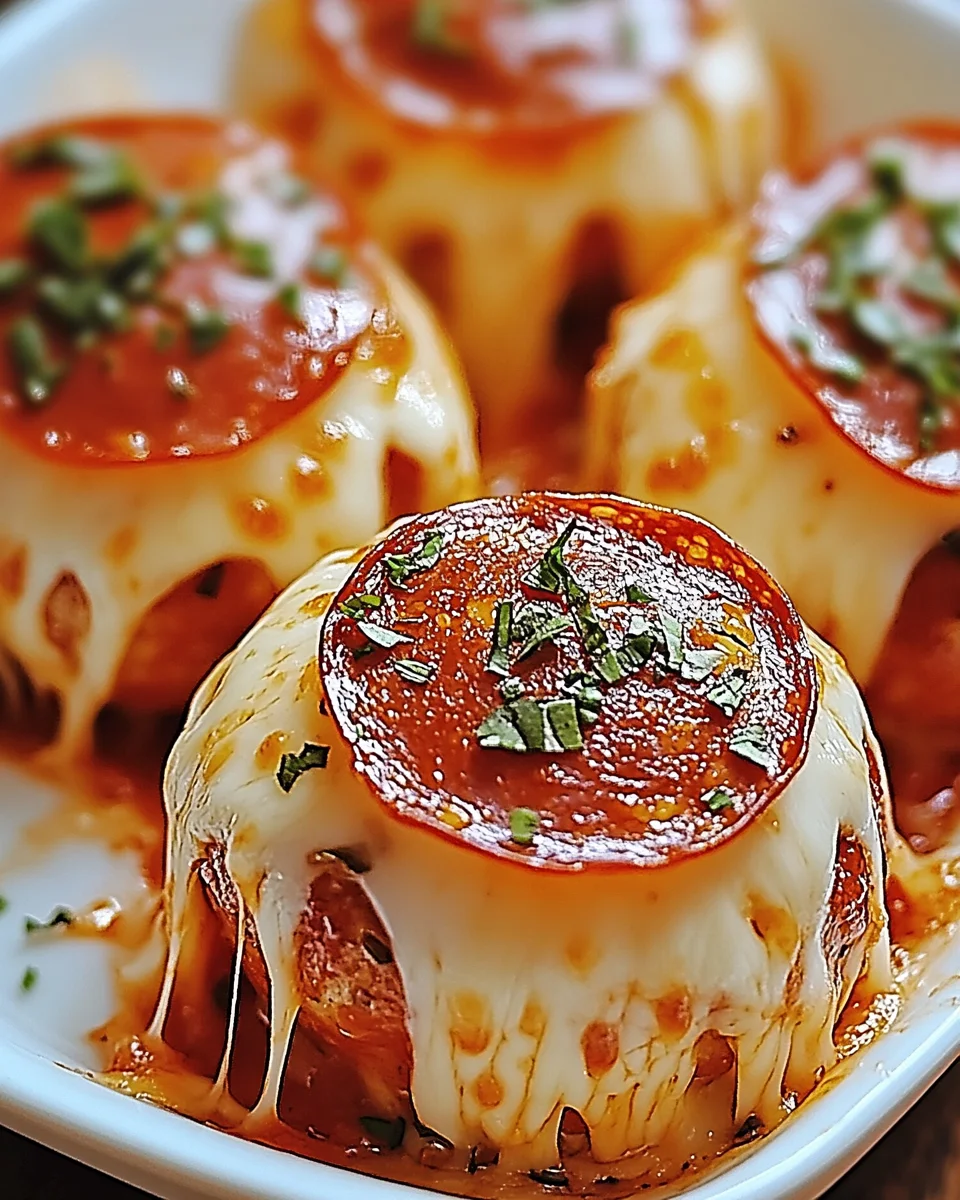
Cheesy Pepperoni Pizza Bombs: A Bite-Sized Delight for Every Occasion

Pizza lovers, rejoice! If you’re looking for a snack that delivers all the cheesy, savory goodness of a classic pizza in a compact, mess-free form, Cheesy Pepperoni Pizza Bombs are your new go-to recipe. These golden, bite-sized delights pack a punch of flavor, with gooey mozzarella, rich marinara sauce, and spicy pepperoni wrapped in a warm, buttery crust.

Whether you’re hosting a game night, planning a family-friendly dinner, or simply craving a quick snack, these pizza bombs are an irresistible treat. Their versatility allows for endless customization, making them suitable for different dietary preferences. Let’s dive deeper into what makes these mini pizza bites so special.

Why Pizza Bombs Are a Must-Try

1. Perfectly Portable and Mess-Free

Unlike traditional pizza slices that can drip sauce and toppings everywhere, these pizza bombs are neatly packed into a sealed dough pocket. This makes them ideal for parties, picnics, or road trips, as they can be eaten on the go without worrying about messy hands.

2. Quick and Easy to Make

You don’t need to be a master chef to whip up a batch of these delicious bites. With just a few simple ingredients and minimal prep time, Cheesy Pepperoni Pizza Bombs can be ready in under 30 minutes. Using store-bought dough simplifies the process even further, though homemade dough can take them to the next level.

3. Completely Customizable

While pepperoni and mozzarella are classic choices, these pizza bombs can easily be tailored to suit individual tastes. Swap out the pepperoni for mushrooms, sausage, or even a vegetarian mix of bell peppers and olives. Try experimenting with different cheeses like cheddar, gouda, or provolone for unique flavor combinations.

4. Kid-Friendly and Fun to Eat

If you have picky eaters at home, these pizza bombs might just become a staple in your kitchen. Their small size and familiar flavors make them a favorite among children, and they’ll love helping to assemble and fill their own pizza bombs with toppings of their choice.

Serving Suggestions: Elevate the Experience

Pair with the Perfect Dipping Sauce

While classic marinara or pizza sauce is the obvious choice, why not mix things up? Here are some delicious dipping options:

  • Garlic Butter Sauce – Adds richness and enhances the buttery crust.
  • Ranch Dressing – A tangy contrast to the cheesy filling.
  • Spicy Buffalo Sauce – Perfect for those who love a bit of heat.
  • Pesto Sauce – Brings in a fresh and herby twist.

Turn It Into a Full Meal

Though they make a great snack, you can also serve Cheesy Pepperoni Pizza Bombs as part of a complete meal. Pair them with:

  • A crisp Caesar salad for a refreshing contrast.
  • Roasted or grilled vegetables to add a nutritious balance.
  • A warm bowl of tomato soup for a cozy comfort meal.

Presentation Matters

For a gathering or party, serve the pizza bombs on a platter with an assortment of dipping sauces in small bowls. Sprinkle fresh basil or parsley on top for a touch of color and extra flavor.

Storage and Reheating Tips

Keeping Leftovers Fresh

If you somehow manage not to eat them all in one sitting, store leftovers properly to keep them tasting fresh.

  • Refrigeration: Store pizza bombs in an airtight container in the fridge for up to 3 days.
  • Freezing: Arrange the bombs on a baking sheet and freeze for 1-2 hours before transferring them to a freezer-safe bag. They will keep for up to 3 months.

How to Reheat for Best Results

  • Oven Method (Best Choice): Preheat to 350°F (175°C) and bake for 8-10 minutes to restore crispiness.
  • Air Fryer: Heat at 350°F for 5-7 minutes.
  • Microwave (Quickest, but Softens Crust): Heat in 15-second intervals until warm.

Ingredients – A Flavor Explosion in Every Bite

  • Pizza Dough – Store-bought or homemade
  • Mozzarella Cheese – Shredded for ultimate meltiness
  • Pepperoni Slices – Or substitute with your favorite topping
  • Pizza Sauce – For dipping and extra flavor
  • Italian Seasoning (optional) – Adds a touch of zest
  • Butter – Melted, for brushing the tops
  • Garlic Powder (optional) – For an extra kick
  • Parmesan Cheese (optional) – For sprinkling on top

Directions – Step Into Pizza Heaven

1. Preheat for Perfection

Preheat your oven to 375°F (190°C) to ensure even baking and a golden crust.

2. Prep the Dough

  • If using store-bought dough, roll it out on a floured surface.
  • Cut into small squares (around 2×2 inches).
  • If making homemade dough, roll it out accordingly.

3. Fill with Flavor

  • Place a slice of pepperoni and a spoonful of mozzarella cheese in the center of each dough square.
  • Sprinkle Italian seasoning for extra flavor.

4. Seal the Bombs

  • Fold the edges over the filling and pinch tightly to seal completely (to prevent leaks while baking).

5. Butter Up & Season

  • Place the pizza bombs seam-side down on a baking sheet.
  • Brush the tops with melted butter and sprinkle with garlic powder and Parmesan cheese if desired.

6. Bake to Golden Bliss

  • Bake for 12-15 minutes or until golden brown and cheese is melted inside.

7. Serve & Savor

  • Let them cool slightly, then serve warm with pizza sauce for dipping.

Nutritional Breakdown – Indulgence with a Twist

(Approximate per serving)

  • Calories: ~180
  • Carbohydrates: ~20g
  • Protein: ~6g
  • Fat: ~8g
  • Saturated Fat: ~3g
  • Sodium: ~350mg

Tips & Tricks for the Ultimate Pizza Bombs

Get Creative – Swap pepperoni for sausage, mushrooms, or bell peppers!
Use a Pizza Stone – For a crispier crust.
Avoid Overstuffing – Too much filling makes sealing tricky.
Best Served Fresh – Enjoy them warm for the perfect cheese pull!

Enjoy your Cheesy Pepperoni Pizza Bombs – a bite-sized burst of pizza perfection! 🍕🔥

Frequently Asked Questions (FAQs)

1. Can I Make These Pizza Bombs Ahead of Time?

Yes! You can assemble the pizza bombs and store them in the refrigerator for up to 24 hours before baking. If freezing, bake directly from frozen and add a few extra minutes to the cooking time.

2. What Other Fillings Can I Use?

There are endless possibilities when it comes to stuffing these bombs. Some popular alternatives include:

  • Meat lovers – Add crumbled sausage, bacon, or ham.
  • Vegetarian delight – Fill with mushrooms, spinach, or bell peppers.
  • Cheese explosion – Mix in ricotta, feta, or gouda for extra richness.

3. How Do I Prevent the Cheese from Leaking Out?

To ensure the cheese stays inside, make sure to:

  • Pinch the dough tightly when sealing the edges.
  • Avoid overfilling, as too much cheese can cause bursting.
  • Bake seam-side down to help keep everything sealed in.

4. Can I Make These Gluten-Free?

Absolutely! Simply use a gluten-free pizza dough or biscuit dough alternative. Just be sure to check that all other ingredients, like pepperoni and cheese, are gluten-free as well.

5. Can I Cook These in an Air Fryer Instead of an Oven?

Yes! Air frying gives them a crispy texture while keeping the inside gooey. Set your air fryer to 350°F (175°C) and cook for 8-10 minutes, shaking the basket halfway through.

6. What’s the Best Cheese for Melting Inside the Bombs?

Mozzarella is the classic choice due to its stretchy, melty consistency, but you can also experiment with:

  • Cheddar – Adds a sharp bite.
  • Provolone – Offers a mild and creamy flavor.
  • Pepper Jack – Brings a little heat to the mix.

Why You’ll Love This Recipe

A Crowd-Pleasing Favorite

Few things can rival the universal appeal of pizza, and these bite-sized bombs take that love to a whole new level. They are easy to make, deliciously cheesy, and completely customizable, ensuring that there’s a version for everyone.

Great for Any Occasion

Whether you need an after-school snack, a quick appetizer, or a creative dinner idea, Cheesy Pepperoni Pizza Bombs fit the bill. They’re especially popular for:

  • Game nights
  • Movie marathons
  • Kids’ birthday parties
  • Holiday gatherings

Simple Ingredients, Big Flavor

Despite requiring only a handful of ingredients, these pizza bombs deliver a powerful punch of flavor. The combination of warm dough, melted cheese, and savory pepperoni is a match made in culinary heaven.

Final Thoughts: A Recipe Worth Keeping

Cheesy Pepperoni Pizza Bombs are more than just a snack—they’re an experience. With their crispy exterior, gooey center, and endless customization options, they’re sure to become a staple in your kitchen. Whether you’re making them for yourself or serving them at a party, they always bring smiles to the table.

So next time you’re craving pizza, skip the takeout and try these homemade pizza bombs instead. They’re easy, fun, and absolutely delicious. Happy cooking!

aiting

Cheesy Pepperoni Pizza Bombs: A Bite-Sized Delight for Every Occasion

Craving pizza but want something fun, easy, and snackable? These Cheesy Pepperoni Pizza Bombs are the perfect solution! Loaded with gooey cheese and savory pepperoni, wrapped in soft golden dough, and brushed with a buttery garlic topping—each bite is pure pizza perfection.
Prep Time 10 minutes
Cook Time 15 minutes
Total Time 25 minutes
Servings: 12 pizza bombs
Course: Appetizer, Snack
Cuisine: Italian-American

Ingredients
  

  • Pizza Dough store-bought or homemade
  • Mozzarella Cheese shredded
  • Pepperoni Slices
  • Pizza Sauce for dipping
  • Italian Seasoning optional
  • Butter melted (for brushing)
  • Garlic Powder optional
  • Parmesan Cheese optional, for topping

Method
 

  1. Preheat the Oven
  2. Preheat your oven to 375°F (190°C) for even baking.
2. Prepare the Dough
  1. Roll out store-bought or homemade pizza dough on a lightly floured surface.
  2. Cut the dough into small squares (about 2×2 inches).
3. Add the Fillings
  1. Place a slice of pepperoni and a generous amount of mozzarella cheese in the center of each dough square.
  2. Sprinkle Italian seasoning for extra flavor.
4. Seal the Bombs
  1. Fold the dough around the filling and pinch the edges to seal completely.
  2. Ensure a tight seal to prevent cheese leakage while baking.
5. Brush and Season
  1. Arrange the pizza bombs seam-side down on a baking sheet.
  2. Brush with melted butter and sprinkle garlic powder and Parmesan cheese on top if desired.
6. Bake to Perfection
  1. Bake for 12-15 minutes or until golden brown.
  2. Cheese should be perfectly melted inside.
7. Serve and Enjoy
  1. Let them cool for a few minutes before serving.
  2. Dip in pizza sauce and enjoy!

Notes

  • Customize Your Fillings: Swap pepperoni for sausage, mushrooms, or bell peppers for variety.
  • Use a Pizza Stone: This helps create an even, crispy crust.
  • Seal Well: Prevent cheese from oozing out by ensuring a tight seal.
  • Best When Fresh: Enjoy warm for the perfect cheese pull!

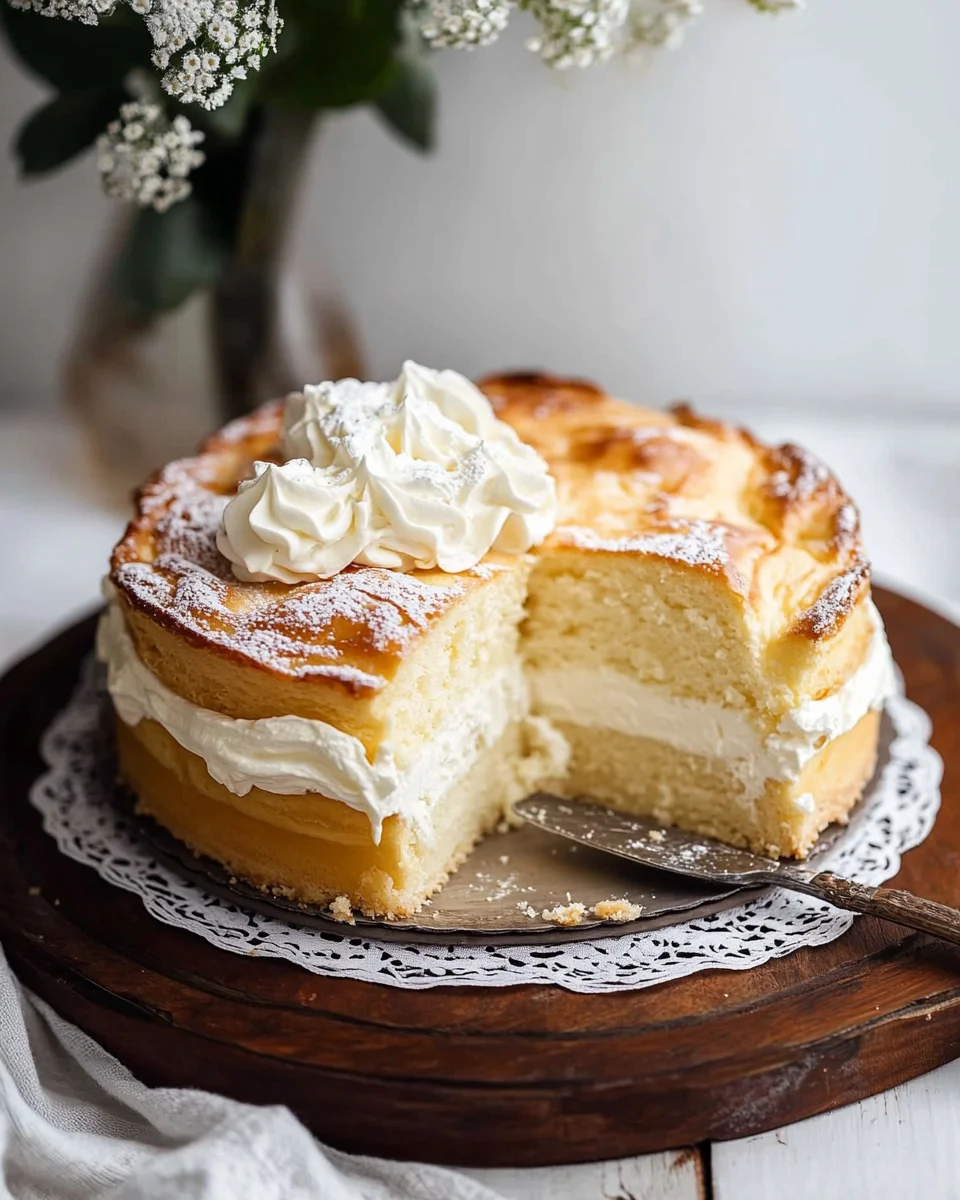
Karpatka: The Polish Carpathian Cream Cake

A Cake as Beautiful as the Carpathian Mountains

Karpatka is a beloved Polish dessert known for its light, crispy choux pastry layers and luscious vanilla custard filling. Its name, meaning “Carpathian Cake,” is inspired by the rustic, mountainous appearance of the choux pastry, which puffs up in the oven, creating peaks and valleys reminiscent of Poland’s Carpathian mountain range.

This cake is a homey yet elegant dessert that combines French baking techniques with Eastern European flavors. Often compared to Napoleon cake or cream puffs, Karpatka offers a delicate crispiness from the baked pastry, followed by a smooth and rich vanilla cream filling that melts in your mouth.

Whether you’re making it for a holiday gathering, family dessert, or special celebration, Karpatka is a true showstopper that is as visually stunning as it is delicious.

A Brief History: The Origins of Karpatka

Karpatka originated in Poland, where it has long been a staple in traditional home baking. Though it shares similarities with French profiteroles and Italian zeppole, Karpatka distinguishes itself with its signature mountain-like appearance and thicker layers of custard cream.

Historically, Polish bakers perfected the art of pâte à choux (choux pastry), using it to create both savory and sweet pastries. Over time, they adapted the French pastry technique into a cake-like form, layering puffed pastry with creamy, vanilla-infused fillings.

The name Karpatka became widely used due to its resemblance to the peaks of the Carpathian Mountains, giving it both a cultural and geographical significance in Polish cuisine.

What Makes Karpatka So Special?

1. Unique Texture Combination

  • The choux pastry bakes into a light, airy, and crisp structure, creating an enjoyable contrast with the rich filling.
  • The creamy vanilla custard is thick, smooth, and indulgent, making each bite silky and satisfying.

2. Simple Yet Elegant

  • While Karpatka looks impressive and elaborate, it’s made from basic pantry ingredients and is relatively simple to prepare.
  • No intricate decoration is needed—its naturally rugged, golden-brown peaks are its signature look.

3. Nostalgic and Comforting

  • This dessert is deeply rooted in Polish tradition, often made for family gatherings, birthdays, and celebrations.
  • The sweet vanilla aroma and buttery choux pastry create a sense of warmth and nostalgia.

How to Serve Karpatka: The Best Ways to Enjoy It

1. Classic Polish Style

  • Serve Karpatka chilled, dusted generously with powdered sugar to enhance its snow-capped mountain look.
  • Enjoy it on its own or alongside a cup of hot tea or coffee.

2. Paired with Fresh Fruits

  • Add a side of berries, orange slices, or poached pears for a refreshing balance.
  • A drizzle of berry compote can add a fruity contrast to the creamy filling.

3. Topped with Whipped Cream

  • A light dollop of whipped cream can complement the rich custard filling without overpowering it.
  • Sprinkle with toasted almonds or pistachios for added texture.

4. With a Chocolate Drizzle

  • For a modern twist, drizzle melted dark chocolate over the top for a deeper, slightly bitter contrast.
  • A white chocolate drizzle can also enhance the vanilla flavors beautifully.

Creative Variations: Put Your Own Spin on Karpatka

While the classic Karpatka is already delicious, there are plenty of ways to customize it based on your preferences.

1. Chocolate Karpatka

  • Add cocoa powder to the choux pastry for a chocolatey version.
  • Mix melted dark chocolate into the custard filling for extra decadence.

2. Citrus-Infused Karpatka

  • Add lemon zest, orange zest, or a hint of lime to the custard for a bright, citrusy twist.
  • Serve with candied orange slices for extra flair.

3. Coffee or Espresso Karpatka

  • Infuse the custard with espresso or instant coffee powder for a subtle mocha flavor.
  • Dust with cocoa powder instead of powdered sugar for a tiramisu-inspired take.

4. Berry-Filled Karpatka

  • Layer the custard with fresh raspberries, strawberries, or blueberries for a fruity variation.
  • A raspberry coulis drizzle on top enhances the berry flavors.

5. Nutty Karpatka

  • Sprinkle crushed hazelnuts, almonds, or walnuts over the custard for a nutty crunch.
  • Infuse the custard with almond extract for a subtle, nutty aroma.

Ingredients: A Symphony of Choux and Cream

For the Choux Pastry

  • Water – Helps create steam for the pastry to puff
  • Unsalted butter – Adds richness and flavor
  • Salt – Enhances taste
  • All-purpose flour – Provides structure
  • Eggs – Essential for binding and texture

For the Creamy Vanilla Filling (Crème Mousseline)

  • Egg yolks – Thicken the custard and add richness
  • Sugar – Sweetens the filling
  • Potato starch (or cornstarch) – Thickens the custard
  • Whole milk – Ensures a creamy texture
  • Salt – Balances sweetness
  • Vanilla extract & vanilla bean paste – Infuses deep flavor
  • Unsalted butter – Creates a smooth, silky texture

For Assembly

  • Powdered sugar – Dusting for a snow-capped mountain effect

Directions: Crafting the Perfect Mountainous Cake

Step 1: Make the Cream Filling

  1. Whisk egg yolks and sugar until pale.
  2. Heat milk, salt, and vanilla, then temper the egg mixture.
  3. Cook until thick, then cool and whip with butter.

Step 2: Prepare the Choux Pastry

  1. Boil water, butter, and salt, then mix in flour.
  2. Cook until dough forms a ball, then cool.
  3. Beat in eggs one at a time until smooth.

Step 3: Bake the Choux Layers

  1. Spread dough into two springform pans, creating peaks and valleys.
  2. Bake at 380°F (193°C) for 25-28 minutes until golden.

Step 4: Assemble the Cake

  1. Layer one choux pastry, spread the cream filling, and top with the second pastry.
  2. Chill for at least 1 hour, then dust with powdered sugar before serving.

Nutritional Breakdown: A Decadent Slice of Poland

  • Calories: ~346 kcal per serving
  • Carbohydrates: 26g
  • Protein: 6g
  • Fat: 24g
  • Sugar: 16g
  • Sodium: 118mg

This Karpatka Cake is a light, creamy, and visually stunning dessert, perfect for any occasion. A true Polish classic that delivers the nostalgic flavors of vanilla custard and crisp choux pastry in every bite!

Frequently Asked Questions (FAQs)

1. Why Did My Choux Pastry Not Puff Up?

  • Make sure your oven is preheated properly before baking.
  • Avoid opening the oven door while baking, as temperature fluctuations can cause collapse.
  • Beat the eggs into the dough one at a time, ensuring the batter isn’t too wet.

2. Can I Make Karpatka Ahead of Time?

Yes! Karpatka tastes even better the next day as the flavors meld together. Prepare it up to 24 hours in advance and store it in the refrigerator.

3. How Should Karpatka Be Stored?

  • Keep it refrigerated in an airtight container for up to 3 days.
  • Let it sit at room temperature for 10 minutes before serving for the best texture.

4. Can I Freeze Karpatka?

  • The choux pastry layers can be baked and frozen for up to 1 month.
  • The custard filling is best made fresh, as freezing can affect its texture.

5. What’s the Best Way to Slice Karpatka?

  • Use a sharp knife or a serrated knife to prevent crushing the layers.
  • Wipe the knife clean between slices for neater presentation.

Conclusion: Why Karpatka Deserves a Place in Your Baking Repertoire

Karpatka is more than just a dessert—it’s a symbol of Polish heritage, home baking, and nostalgic flavors. With its airy, crisp choux pastry and velvety vanilla cream, it’s a cake that impresses both visually and in taste.

Whether you’re making it for a holiday celebration, family gathering, or simply to satisfy a sweet craving, Karpatka delivers a beautiful balance of textures and flavors. The best part? It’s surprisingly simple to make and easier than it looks.

So why not try baking Karpatka today? With its mountainous peaks, delicate sweetness, and luxurious cream filling, it’s a dessert that will transport you straight to the heart of Poland with every bite.


aiting

Karpatka: The Polish Carpathian Cream Cake

Experience the delight of Karpatka, a classic Polish dessert that combines light, airy choux pastry with a lusciously creamy vanilla filling. With its signature mountain-like ridges and a dusting of powdered sugar, this cake is as visually stunning as it is delicious!
Prep Time 25 minutes
Cook Time 30 minutes
Total Time 2 hours
Course: Dessert
Cuisine: Polish

Ingredients
  

  • For the Choux Pastry
  • Water creates steam for the pastry to puff
  • Unsalted butter adds richness and flavor
  • Salt enhances taste
  • All-purpose flour provides structure
  • Eggs essential for binding and texture
For the Creamy Vanilla Filling (Crème Mousseline)
  • Egg yolks thicken the custard and add richness
  • Sugar sweetens the filling
  • Potato starch or cornstarch thickens the custard
  • Whole milk ensures a creamy texture
  • Salt balances sweetness
  • Vanilla extract & vanilla bean paste infuses deep flavor
  • Unsalted butter creates a smooth, silky texture
For Assembly
  • Powdered sugar dusting for a snow-capped mountain effect

Method
 

  1. Make the Cream Filling: Whisk egg yolks and sugar until pale. Heat milk, salt, and vanilla, then temper the egg mixture. Cook until thick, then cool and whip with butter.
  2. Prepare the Choux Pastry: Boil water, butter, and salt, then mix in flour. Cook until dough forms a ball, then cool. Beat in eggs one at a time until smooth.
  3. Bake the Choux Layers: Spread dough into two springform pans, creating peaks and valleys. Bake at 380°F (193°C) for 25-28 minutes until golden.
  4. Assemble the Cake: Layer one choux pastry, spread the cream filling, and top with the second pastry. Chill for at least 1 hour, then dust with powdered sugar before serving.

Notes

  • Storage: Keep refrigerated for up to 3 days in an airtight container.
  • Serving Tip: Best enjoyed chilled with a dusting of powdered sugar just before serving.
  • Variations: Add a hint of lemon zest to the filling for a citrusy twist.

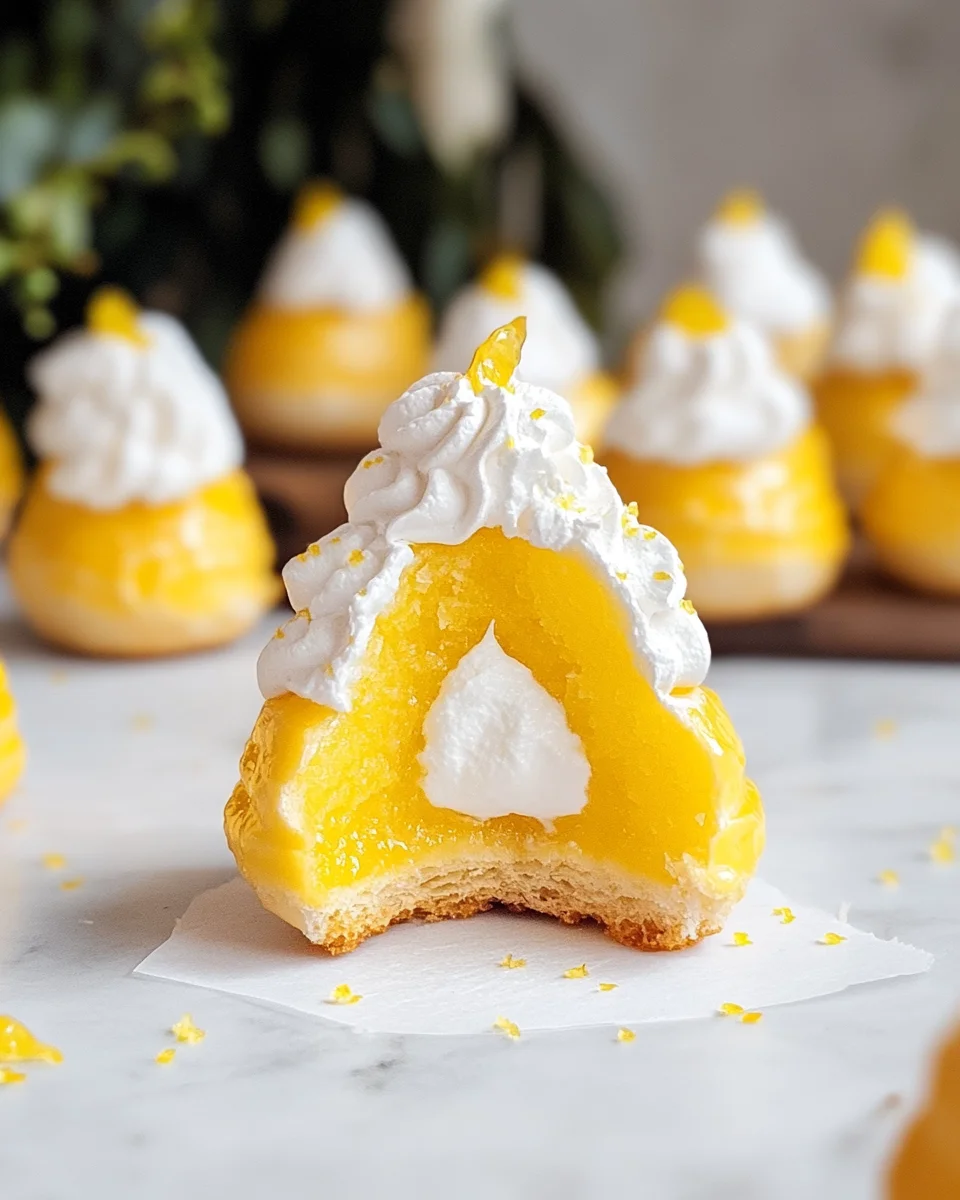
Lemon Cream Puffs: A Delicate Dessert with a Citrusy Twist

The Perfect Blend of Light, Creamy, and Zesty

Lemon cream puffs are a delightful combination of crisp, airy pastry, luscious lemon curd, and fluffy marshmallow filling, all encased in a delicate chocolate shell. With their bright citrus flavor and smooth, creamy texture, they make for an elegant and refreshing dessert perfect for any occasion.

Rooted in classic French pastry techniques, these flødeboller-style cream puffs take inspiration from traditional choux pastry desserts while incorporating a modern twist with lemon and a marzipan base. Whether you’re serving them for a tea party, a springtime gathering, or a holiday treat, lemon cream puffs are a show-stopping dessert that offers a perfect balance of sweetness, tartness, and richness.

In this article, we’ll explore the history of cream puffs, the best ways to serve them, creative variations, FAQs, and expert storage tips to help you perfect this elegant dessert.

The History of Cream Puffs: A French Classic with a Modern Twist

Cream puffs trace their origins back to 16th-century France, where chefs experimented with pâte à choux (choux pastry), a light dough that puffs up in the oven. By the 19th century, pastry chefs were filling these delicate pastries with sweet creams and custards, leading to the birth of the modern cream puff.

The Scandinavian version, flødeboller, inspired the addition of marshmallow fluff and chocolate coatings, making these treats even more indulgent. With the addition of lemon curd, this version of cream puffs offers a tangy, vibrant contrast to the sweet marshmallow and rich chocolate, elevating the traditional dessert to new heights of flavor.

Why You’ll Love Lemon Cream Puffs

1. A Perfect Balance of Flavors

  • The tangy lemon curd contrasts beautifully with the sweet marshmallow filling.
  • A rich chocolate shell encases the cream puffs, adding texture and depth.
  • The marzipan base gives a subtle nutty, almond-like sweetness to complement the citrusy notes.

2. Light and Airy Yet Indulgent

  • The fluffy marshmallow center keeps each bite light and airy.
  • The smooth, creamy lemon curd adds a burst of freshness without being too heavy.

3. A Stunning Dessert for Any Occasion

  • Perfect for spring and summer celebrations, Easter, baby showers, or afternoon tea.
  • Elegant enough for a wedding or fine dining experience, yet simple enough to make at home.

How to Serve Lemon Cream Puffs: Best Pairings and Presentations

These elegant cream puffs are best served chilled or at room temperature, depending on the desired texture. Here are a few ways to elevate them:

1. As a Standalone Treat

  • Serve on a beautiful dessert platter with a dusting of powdered sugar for an elegant finish.
  • Garnish with edible gold leaf or lemon zest to highlight the citrus flavor.

2. Paired with Beverages

  • Tea Pairing – A perfect match with Earl Grey, chamomile, or jasmine tea.
  • Coffee Pairing – Complements espresso, cappuccino, or a vanilla latte.
  • Sparkling Wine or Champagne – The acidity of the lemon balances beautifully with the bubbles.

3. As Part of a Dessert Platter

  • Pair with macarons, fruit tarts, and madeleines for an elegant French-inspired dessert spread.
  • Serve alongside fresh berries and whipped cream for a refreshing touch.

Creative Variations: Customizing Your Lemon Cream Puffs

While the classic lemon cream puff is a perfect dessert, you can also experiment with different flavors and textures.

1. Berry-Infused Lemon Cream Puffs

  • Add raspberry or blueberry compote inside the marshmallow fluff for a fruity burst.
  • Drizzle with white chocolate and berry coulis for a colorful presentation.

2. Coconut Lemon Cream Puffs

  • Replace part of the marshmallow fluff with coconut cream for a tropical twist.
  • Sprinkle toasted coconut flakes on top for added texture.

3. Chocolate Lemon Cream Puffs

  • Use dark chocolate instead of white chocolate for a richer flavor.
  • Add a chocolate ganache drizzle on top for extra indulgence.

4. Spiced Lemon Cream Puffs

  • Infuse the lemon curd with ginger or cardamom for a subtle warmth.
  • Garnish with a cinnamon-dusted chocolate shell.

5. Nutty Variations

  • Swap out the marzipan base for pistachio or hazelnut praline.
  • Sprinkle crushed almonds or hazelnuts over the chocolate shell.

Ingredients: A Symphony of Citrus and Sweetness

Lemon Curd Filling

  • Fresh lemon juice – Provides the perfect tangy flavor
  • Granulated sugar – Balances the tartness of the lemon
  • Egg & egg yolk – Creates a creamy, luscious texture
  • Cold butter – Adds richness and smoothness

Chocolate Shell

  • White chocolate – For a sweet and creamy outer shell
  • Yellow chocolate coloring – Gives the signature golden hue

Marshmallow Fluff (Flødeboller Skum)

  • Granulated sugar – Sweetens and stabilizes the fluff
  • Glucose syrup – Ensures a smooth and glossy texture
  • Egg whites – Whipped into a light, airy meringue
  • Vanilla paste – Infuses a warm, aromatic depth

Marzipan Base

  • Marzipan – A soft, nutty almond layer to contrast the creamy filling

Decoration

  • Edible gold leaf (optional) – Adds a luxurious finishing touch

Directions: Crafting the Ultimate Lemon Cream Puffs

Step 1: Make the Lemon Curd

  1. Cook lemon juice, sugar, and eggs until thickened.
  2. Strain and blend with cold butter for a silky-smooth finish.

Step 2: Prepare the Chocolate Shell

  1. Melt white chocolate, tint with yellow coloring, and coat the molds.

Step 3: Whip Up the Marshmallow Fluff

  1. Heat sugar and glucose syrup, then whip into fluffy meringue.

Step 4: Assemble the Cream Puffs

  1. Pipe marshmallow fluff into the chocolate shells.
  2. Add a generous swirl of lemon curd in the center.
  3. Seal with a marzipan base and coat the bottom with more chocolate.

Step 5: Final Touches

  1. Freeze for 5 minutes to set, then carefully unmold and decorate.

Nutritional Breakdown: A Delightful Indulgence

  • Calories: ~320 per cream puff
  • Carbohydrates: 65g
  • Protein: 12g
  • Fat: 19g
  • Sugar: 59g
  • Sodium: 175mg

These Lemon Cream Puffs are a heavenly balance of citrusy brightness, creamy marshmallow, and a crunchy chocolate shell—perfect for a special occasion or a sweet pick-me-up!

Frequently Asked Questions (FAQs)

1. Can I Make These Ahead of Time?

Yes! Lemon cream puffs can be prepared in advance and stored in the fridge for up to 2 days. Keep them in an airtight container to maintain freshness.

2. Can I Use Store-Bought Lemon Curd?

Absolutely! While homemade lemon curd offers a fresher, tangier flavor, store-bought versions work well in a pinch.

3. What Is the Best Way to Temper Chocolate for the Shell?

To achieve a smooth and glossy finish, temper white chocolate by melting two-thirds of it, then stirring in the remaining third until fully melted. This method prevents the chocolate from becoming too soft or brittle.

4. How Do I Prevent the Marshmallow Fluff from Collapsing?

  • Ensure you whip the egg whites to stiff peaks before adding the sugar syrup.
  • Let the fluff fully set in the mold before removing to maintain its shape.

5. Can I Freeze Lemon Cream Puffs?

Yes! These cream puffs freeze well for up to one month. Allow them to thaw in the fridge for a few hours before serving.

6. How Do I Achieve the Perfect Balance of Sweet and Tart?

If your lemon curd is too tart, add a bit more sugar or mix in a touch of honey or vanilla extract to round out the flavor.

Conclusion: Why You Should Try Lemon Cream Puffs

Lemon cream puffs are a delightful combination of crisp chocolate, fluffy marshmallow, and silky lemon curd, making them an irresistible dessert for any occasion. Their balance of sweet and tart flavors, airy yet indulgent texture, and elegant presentation make them a standout treat that’s as fun to make as it is to eat.

Whether you’re serving them for a special celebration, afternoon tea, or simply as a sweet treat, these zesty, creamy puffs will impress anyone who takes a bite.

So why not try baking a batch today? With their bright citrus flavor, light and airy texture, and beautiful chocolate shell, these Lemon Cream Puffs are sure to become a new favorite in your dessert repertoire!

aiting

Lemon Cream Puffs: A Delicate Dessert with a Citrusy Twist

These Lemon Cream Puffs are the perfect balance of light, airy pastry and creamy, citrusy filling. With a crisp choux shell and a luscious lemon curd-marshmallow fluff filling, they make an elegant dessert for any occasion!
Prep Time 20 minutes
Cook Time 30 minutes
Total Time 50 minutes
Servings: 6 -8 serves
Course: Dessert
Cuisine: French

Ingredients
  

For the Choux Pastry:
  • Water
  • Unsalted butter
  • All-purpose flour
  • Salt
  • Eggs
For the Lemon Filling:
  • Fresh lemon juice
  • Lemon zest
  • Granulated sugar
  • Egg yolks
  • Unsalted butter
  • Marshmallow fluff
For Assembly:
  • Powdered sugar for dusting
  • Whipped cream optional for garnish

Method
 

  1. Prepare the Choux Pastry: In a saucepan, heat water, butter, and salt until boiling. Add flour and stir continuously until the dough pulls away from the sides. Remove from heat and let cool slightly.
  2. Incorporate Eggs: Add eggs one at a time, mixing well after each addition, until the dough is smooth and glossy.
  3. Bake the Shells: Pipe small rounds of dough onto a baking sheet and bake at 375°F (190°C) for 25-30 minutes, until golden and puffed.
  4. Prepare the Lemon Filling: In a saucepan, whisk together lemon juice, zest, sugar, and egg yolks over low heat. Cook until thickened, then remove from heat and stir in butter and marshmallow fluff.
  5. Assemble the Cream Puffs: Slice the cooled pastry shells in half, fill with the lemon mixture, and dust with powdered sugar.
  6. Serve and Enjoy: Optionally, top with a dollop of whipped cream for extra indulgence!

Notes

  • Storage: Keep leftovers in an airtight container in the refrigerator for up to 2 days.
  • Reheating: Best enjoyed fresh, but you can crisp up the shells in a low oven if needed.
  • Variations: Swap lemon curd for vanilla or chocolate custard for a different twist.

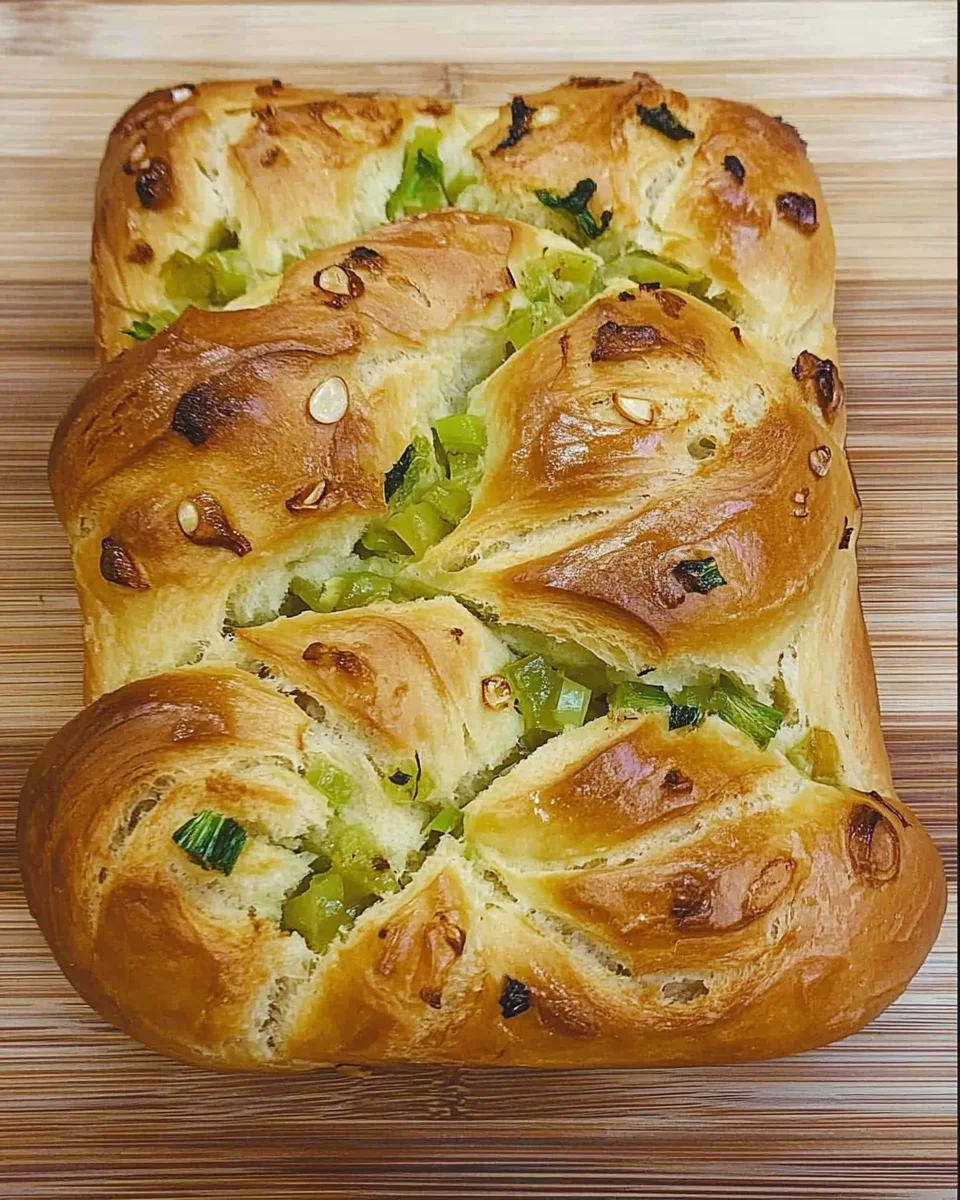
Green Onion Garlic Butter Bread: A Savory Delight with an Aromatic Twist

A Bread That Combines Comfort and Bold Flavor

Few things in the culinary world can rival the aroma of freshly baked bread—except when that bread is infused with garlic, butter, and fragrant green onions. Green Onion Garlic Butter Bread takes the classic comfort of garlic bread and elevates it with a soft, fluffy interior, a crisp golden crust, and layers of rich, savory goodness.

This bread is a perfect fusion of Western-style garlic bread and the Eastern love for scallion-infused baked goods. It’s reminiscent of Chinese scallion pancakes, Korean milk bread, and classic European butter rolls, bringing together the best of both worlds. Whether enjoyed on its own, paired with a hearty soup, or used as a sandwich base, this buttery, garlicky loaf is guaranteed to be a household favorite.

In this article, we’ll dive into the history of this delicious bread, its best pairings, creative variations, expert tips, FAQs, and how to store it for lasting freshness.

A Brief History: The Inspiration Behind This Bread

Green onions, also known as scallions or spring onions, have been a staple in Asian cooking for centuries. They are frequently used in dumplings, savory pancakes, stir-fries, and even baked goods. The mild, sweet onion flavor adds a subtle depth that complements rich and buttery elements perfectly.

On the other hand, garlic bread has been a long-standing favorite in European and American cuisine, often served as a side to pasta dishes, soups, or grilled meats. By combining these two iconic flavors, Green Onion Garlic Butter Bread offers a fusion that is both unique and familiar—a comforting loaf that feels at home in any cuisine.

What Makes This Bread So Irresistible?

1. A Perfect Balance of Soft and Crispy

  • The interior is light, fluffy, and tender, thanks to a special technique called Tangzhong (a water roux that helps create extra softness).
  • The exterior is golden and crisp, enhanced by a buttery garlic coating.

2. Rich, Savory Flavor in Every Bite

  • The butter and garlic mixture seeps into every layer, ensuring deep, roasted garlic flavor.
  • Green onions provide freshness and a hint of sweetness, balancing out the richness.

3. Versatile and Perfect for Any Occasion

  • Enjoy it warm out of the oven as a standalone snack.
  • Serve it as a side to soups, pasta, or grilled meats.
  • Use it as a sandwich bread for an extra burst of flavor.

How to Serve Green Onion Garlic Butter Bread: The Best Pairings

While this bread is delicious on its own, pairing it with complementary dishes enhances its flavors even further.

1. Pair It with Hearty Soups and Stews

  • Creamy Tomato Soup – The acidity cuts through the richness of the bread.
  • Potato Leek Soup – Enhances the onion flavors in the bread.
  • Beef Stew or Chicken Noodle Soup – A comforting pairing that soaks up the flavors.

2. Make It a Side Dish for Main Courses

  • Grilled Steak or Roast Chicken – A hearty main that pairs well with garlic butter flavors.
  • Pasta Dishes – Complements creamy Alfredo, marinara, or pesto pasta.
  • BBQ Ribs or Smoked Meats – The garlic and butter add a fantastic contrast to smoky flavors.

3. Transform It into a Sandwich or Toast

  • Grilled Cheese Sandwich – The garlic butter takes it to another level.
  • Avocado Toast with a Fried Egg – A luxurious breakfast upgrade.
  • Pulled Pork or Chicken Sliders – A unique sandwich base with a flavorful twist.

Creative Variations: Make It Your Own

One of the best things about Green Onion Garlic Butter Bread is how easily it can be customized. Here are some fun variations to try:

1. Cheese Lover’s Edition

  • Add a generous sprinkle of shredded mozzarella, cheddar, or Parmesan into the garlic butter spread.
  • Bake until the cheese melts into a gooey, golden topping.

2. Spicy Kick Version

  • Add a pinch of red pepper flakes or diced jalapeños to the garlic butter mix.
  • Drizzle with spicy honey or sriracha butter before serving.

3. Herb-Infused Bread

  • Incorporate rosemary, thyme, or oregano for an aromatic twist.
  • A touch of lemon zest can add brightness to the flavor profile.

4. Whole Wheat or Healthier Alternative

  • Swap some of the bread flour for whole wheat flour for added fiber.
  • Reduce the butter and add a dollop of Greek yogurt for moisture.

5. Asian-Inspired Sweet & Savory Version

  • Sprinkle a bit of black sesame seeds for nuttiness.
  • Brush with honey butter instead of egg wash for a touch of sweetness.

Ingredients: A Fusion of Aromatic Goodness

Tangzhong (For a Soft, Fluffy Texture)

  • Water
  • Bread flour

Dough Base

  • Bread flour – Provides the perfect chewiness
  • White granulated sugar – Adds a touch of sweetness
  • Table salt – Enhances the overall flavor
  • Instant yeast – Helps the bread rise
  • Milk powder – Adds richness and softness
  • Egg – Contributes to a tender crumb
  • Milk – For moisture and depth
  • Unsalted butter – Gives a rich and buttery texture

Garlic Butter Filling

  • Unsalted butter – The foundation of the spread
  • Fresh garlic cloves – Brings a bold, roasted garlic flavor
  • Table salt – Balances the richness
  • Green onions – Adds a fresh, slightly sweet oniony bite

Egg Wash (For a Golden Crust)

  • Egg
  • Milk

Directions: Baking the Ultimate Savory Bread

Step 1: Prepare the Tangzhong

  1. Cook bread flour and water into a thick paste and let it cool.

Step 2: Knead the Dough

  1. Combine flour, yeast, milk powder, sugar, and salt.
  2. Mix in the egg, milk, and cooled tangzhong.
  3. Knead in butter until smooth and elastic.

Step 3: Let It Rise

  1. Place dough in a warm area to double in size.

Step 4: Make the Garlic Butter Spread

  1. Mix softened butter with minced garlic, salt, and chopped green onions.

Step 5: Shape and Fill the Dough

  1. Roll out the dough, spread the garlic butter filling, and sprinkle with green onions.
  2. Roll and braid the dough, then place it in a loaf pan.

Step 6: Final Rise and Bake

  1. Let the dough rise again, brush with egg wash, and bake at 350°F (180°C) for 25-30 minutes.

Nutritional Breakdown: A Deliciously Balanced Bite

  • Calories: ~250 per slice
  • Carbohydrates: 35g
  • Protein: 6g
  • Fat: 10g
  • Sodium: Moderate, varies based on added salt

This Green Onion Garlic Butter Bread is a fluffy, buttery, and flavorful twist on classic garlic bread. Perfect as a side dish, snack, or centerpiece for any meal!

Frequently Asked Questions (FAQs)

1. Can I Use Active Dry Yeast Instead of Instant Yeast?

Yes! However, you need to proof active dry yeast first by mixing it with warm milk and sugar before adding it to the dough.

2. How Do I Ensure My Dough Rises Properly?

  • Make sure your yeast is fresh and active.
  • Allow the dough to rise in a warm, draft-free space.
  • If your kitchen is cold, place the dough in an oven with the light turned on.

3. How Long Can I Store This Bread?

  • At Room Temperature: Up to 2 days in an airtight container.
  • In the Refrigerator: Up to 5 days, but reheat before serving.
  • In the Freezer: Wrap tightly and store for up to 3 months.

4. How Do I Reheat the Bread Without Drying It Out?

  • Oven Method: Warm at 300°F (150°C) for 5-10 minutes for a crispy crust.
  • Microwave: Wrap in a damp paper towel and heat for 15-20 seconds.

5. Can I Make This Bread Without a Stand Mixer?

Yes! You can knead the dough by hand, but it will take longer (about 12-15 minutes). The dough is sticky, so oil your hands lightly to prevent sticking.

Conclusion: Why You Should Try Green Onion Garlic Butter Bread

This Green Onion Garlic Butter Bread is a beautiful fusion of rich butter, fragrant garlic, and fresh green onions, all wrapped up in a soft and fluffy loaf. Whether you’re a seasoned baker or just starting out, this recipe is simple, foolproof, and rewarding.

With endless customization options, you can make it your own—whether you want it cheesy, spicy, extra garlicky, or subtly sweet. Plus, it’s the perfect bread for sharing with family and friends at gatherings, holidays, or cozy nights at home.

So why not bake a loaf today? Your kitchen will be filled with the irresistible aroma of garlic and butter, and your taste buds will thank you!


aiting

Green Onion Garlic Butter Bread: A Savory Delight with an Aromatic Twist

This Green Onion Garlic Butter Bread is an irresistible combination of fluffy, buttery, and aromatic goodness. A perfect fusion of soft, tender bread with a rich garlic butter filling, it’s a delightful treat as a side dish, snack, or centerpiece for any meal!
Prep Time 20 minutes
Cook Time 30 minutes
Total Time 2 hours
Servings: 6 –8 servings
Course: Bread
Cuisine: Fusion

Ingredients
  

  • Tangzhong For a Soft, Fluffy Texture
  • Water
  • Bread flour
Dough Base
  • Bread flour for perfect chewiness
  • White granulated sugar adds a touch of sweetness
  • Table salt enhances flavor
  • Instant yeast helps the bread rise
  • Milk powder adds richness and softness
  • Egg contributes to a tender crumb
  • Milk for moisture and depth
  • Unsalted butter gives a rich and buttery texture
Garlic Butter Filling
  • Unsalted butter the foundation of the spread
  • Fresh garlic cloves brings a bold, roasted garlic flavor
  • Table salt balances the richness
  • Green onions adds a fresh, slightly sweet oniony bite
Egg Wash (For a Golden Crust)
  • Egg
  • Milk

Method
 

  1. Prepare the Tangzhong: Cook bread flour and water into a thick paste and let it cool.
  2. Knead the Dough: Combine flour, yeast, milk powder, sugar, and salt. Mix in the egg, milk, and cooled tangzhong. Knead in butter until smooth and elastic.
  3. Let It Rise: Place dough in a warm area to double in size.
  4. Make the Garlic Butter Spread: Mix softened butter with minced garlic, salt, and chopped green onions.
  5. Shape and Fill the Dough: Roll out the dough, spread the garlic butter filling, and sprinkle with green onions. Roll and braid the dough, then place it in a loaf pan.
  6. Final Rise and Bake: Let the dough rise again, brush with egg wash, and bake at 350°F (180°C) for 25-30 minutes.

Notes

  • Storage: Store leftovers in an airtight container at room temperature for up to 3 days.
  • Reheating: Warm in a 300°F oven for 5 minutes to restore freshness.
  • Variations: Add shredded cheese for extra richness or swap green onions for chives.
 

Gochujang Fried Rice: A Bold and Flavorful Korean Classic

Introduction: A Spicy and Satisfying One-Pan Dish

If you’re a fan of bold, umami-packed dishes, Gochujang Fried Rice is about to become your new favorite meal. This Korean-inspired fried rice takes a classic comfort dish and elevates it with the deep, rich, and slightly smoky heat of gochujang, Korea’s famous fermented red chili paste.

Fried rice is already a beloved dish across various cuisines, prized for its simplicity, versatility, and ability to use up leftovers. Adding gochujang to the mix transforms this dish into something truly addictive—spicy, slightly sweet, and packed with umami depth. Whether you’re making it as a quick weeknight meal or as a base for a more elaborate dish, gochujang fried rice offers restaurant-quality flavors in under 30 minutes.

In this guide, we’ll explore the history of gochujang, serving suggestions, creative variations, frequently asked questions, and expert tips to help you perfect this irresistible dish.

What Is Gochujang? A Deep Dive into Korea’s Iconic Ingredient

Gochujang is a fermented Korean chili paste made from a blend of red chili powder, fermented soybeans, glutinous rice, and salt. The result is a deep red, thick paste with a spicy, slightly sweet, and umami-packed flavor.

Why Is Gochujang So Special?

  • Complex Flavor – Unlike simple hot sauces, gochujang has layers of spice, sweetness, and savoriness thanks to its fermentation process.
  • Versatile Ingredient – Used in everything from bibimbap and tteokbokki to marinades and stir-fries.
  • Health Benefits – Contains probiotics from fermentation and is rich in vitamins and antioxidants.

In this fried rice recipe, gochujang acts as the flavor powerhouse, bringing a deep, smoky heat that makes every bite rich and satisfying.

Why You’ll Love Gochujang Fried Rice

1. It’s a Flavor Bomb

Unlike traditional fried rice, which relies on soy sauce for saltiness, gochujang adds an entirely new layer of complexity. The combination of spice, mild sweetness, and umami makes it irresistible.

2. Quick and Easy to Make

  • Ready in under 30 minutes, perfect for busy weeknights.
  • Uses leftover rice, reducing food waste.
  • Requires minimal ingredients but delivers maximum flavor.

3. Customizable to Your Taste

  • Want extra heat? Add more gochujang or chili flakes.
  • Prefer a milder version? Adjust the amount of paste and balance with more soy sauce.
  • Need more protein? Add chicken, shrimp, tofu, or a fried egg on top.

4. Pairs Well with Many Dishes

Gochujang fried rice can be a standalone meal, but it also pairs beautifully with:

  • Korean BBQ – Serve alongside grilled bulgogi or spicy pork.
  • Kimchi – Adds extra tang and spice.
  • Pickled Vegetables – Balances the richness with acidity.

How to Serve Gochujang Fried Rice: The Best Pairings

While this dish is incredible on its own, pairing it with complementary side dishes can make it even more exciting.

1. Classic Korean Pairings

  • Kimchi – The fermented tanginess of kimchi balances the richness of the rice.
  • Korean BBQ meats – Bulgogi (beef), samgyeopsal (pork belly), or dak-galbi (spicy chicken) make fantastic additions.

2. Add Some Crunch and Refreshing Contrast

  • Cucumber salad – A cool and crisp side to balance the spice.
  • Pickled radish – The sweetness and acidity cut through the richness.

3. Elevate It with a Protein Boost

  • Top with a fried egg – The creamy yolk creates a delicious sauce that coats the rice.
  • Add tofu, shrimp, or chicken for a heartier meal.

4. Drizzle on Some Extra Flavor

  • Sesame oil – Adds a nutty, aromatic finish.
  • Sriracha or extra gochujang – If you love more heat.

Creative Variations: Make It Your Own

One of the best things about fried rice is how adaptable it is. Here are some ways to switch up your gochujang fried rice:

1. Protein-Packed Gochujang Fried Rice

  • Chicken or shrimp – Sauté bite-sized pieces before adding the rice.
  • Tofu or tempeh – A great vegetarian option that soaks up the spicy sauce.

2. Extra Veggie Loaded Version

  • Toss in spinach, mushrooms, bok choy, zucchini, or bell peppers for added nutrition.

3. Kimchi Gochujang Fried Rice

  • Stir in chopped kimchi for an extra punch of fermented tang and umami.

4. Low-Carb Version

  • Swap rice for cauliflower rice or quinoa for a healthier twist.

5. Sweet and Spicy Fusion

  • Add a teaspoon of honey or maple syrup to balance the spice with a touch of sweetness.

Spicy Gochujang Fried Rice: A Flavor-Packed Korean Classic

Ingredients: The Perfect Blend of Heat and Umami

  • Day-old cooked rice – The key to achieving the perfect fried rice texture
  • Vegetable oil – High smoke point oils like peanut or avocado work best
  • Onion and garlic – Adds a deep aromatic base
  • Frozen peas and carrots – A convenient and colorful addition
  • Unsalted butter – Enhances richness and depth
  • Soy sauce – Provides umami and saltiness
  • Gochujang (Korean red chili paste) – The star ingredient, delivering spice and umami
  • Sesame oil – Adds nutty complexity
  • Eggs – Fried or scrambled, adding creaminess and protein
  • Sesame seeds and green onions – For garnish and extra crunch

Directions: Bringing the Heat to Your Kitchen

Step 1: Prep the Ingredients

  1. Ensure your rice is day-old and cold to prevent it from turning mushy.

Step 2: Sauté the Aromatics

  1. Heat vegetable oil in a pan and sauté onion and garlic until fragrant.

Step 3: Fry the Rice

  1. Add rice in batches, pressing it into the pan to get crispy edges.

Step 4: Mix in the Flavor

  1. Stir in peas, carrots, soy sauce, gochujang, and butter until evenly coated.

Step 5: The Finishing Touch

  1. Fry eggs separately and serve them on top of the rice.
  2. Garnish with sesame seeds and green onions.

Nutritional Breakdown: A Balanced Bite

  • Calories: 429 kcal
  • Carbohydrates: 44g
  • Protein: 12g
  • Fat: 23g
  • Sodium: 393mg
  • Fiber: 2g

This Gochujang Fried Rice is the perfect balance of spice, sweetness, and umami, making it a must-try for fans of bold flavors!

Frequently Asked Questions About Gochujang Fried Rice

1. What Does Gochujang Taste Like?

Gochujang has a spicy, slightly sweet, and deeply umami flavor with a fermented tang. It’s not just heat—it’s complex and flavorful.

2. How Spicy Is This Dish?

This dish has a medium spice level, but it can be adjusted:

  • For more spice: Add extra gochujang or chili flakes.
  • For less spice: Use less gochujang and balance with more soy sauce.

3. Can I Use Fresh Rice Instead of Day-Old Rice?

It’s highly recommended to use day-old rice because fresh rice is too moist and can become mushy. If you must use fresh rice, spread it out on a tray and refrigerate it for an hour before cooking.

4. Where Can I Buy Gochujang?

Gochujang is available at Asian grocery stores, international aisles in supermarkets, or online (Amazon, Walmart, etc.). Look for brands like Chung Jung One or Sempio.

5. How Long Does Leftover Fried Rice Last?

Gochujang fried rice can be stored in an airtight container in the fridge for 4-5 days. Reheat in a pan over medium heat for the best texture.

6. Can I Freeze Gochujang Fried Rice?

Yes! Freeze portions in airtight containers for up to 2 months. Thaw overnight in the fridge and reheat on the stove with a little oil.

Conclusion: Why You Should Try Gochujang Fried Rice

Gochujang Fried Rice is more than just a quick and easy dish—it’s a celebration of bold flavors, rich umami, and the magic of Korean cuisine. Whether you’re craving something spicy and satisfying, looking for a way to use up leftovers, or simply want to explore new flavors, this dish is a must-try.

With its customizable ingredients, quick cooking time, and unbeatable depth of flavor, gochujang fried rice is the perfect addition to your weekly meal rotation.

So why wait? Grab your day-old rice, a spoonful of gochujang, and start frying up a meal that’s as comforting as it is exciting!

aiting

Gochujang Fried Rice: A Bold and Flavorful Korean Classic

This Spicy Gochujang Fried Rice is a quick and delicious Korean-inspired dish packed with bold flavors, spice, and umami. Made with day-old rice, gochujang, and crispy vegetables, it’s an easy way to elevate your weeknight meal with minimal effort!
Prep Time 10 minutes
Cook Time 15 minutes
Total Time 25 minutes
Servings: 2 -3 servings
Course: Main Dish
Cuisine: Korean

Ingredients
  

  • Day-old cooked rice the key to achieving the perfect fried rice texture
  • Vegetable oil high smoke point oils like peanut or avocado work best
  • Onion and garlic adds a deep aromatic base
  • Frozen peas and carrots a convenient and colorful addition
  • Unsalted butter enhances richness and depth
  • Soy sauce provides umami and saltiness
  • Gochujang Korean red chili paste, the star ingredient delivering spice and umami
  • Sesame oil adds nutty complexity
  • Eggs fried or scrambled, adding creaminess and protein
  • Sesame seeds and green onions for garnish and extra crunch

Method
 

  1. Prep the Ingredients: Ensure your rice is day-old and cold to prevent it from turning mushy.
  2. Sauté the Aromatics: Heat vegetable oil in a pan and sauté onion and garlic until fragrant.
  3. Fry the Rice: Add rice in batches, pressing it into the pan to get crispy edges.
  4. Mix in the Flavor: Stir in peas, carrots, soy sauce, gochujang, and butter until evenly coated.
  5. The Finishing Touch: Fry eggs separately and serve them on top of the rice. Garnish with sesame seeds and green onions.

Notes

  • Adjust Spice Level: Reduce gochujang for a milder dish.
  • Add Protein: Toss in tofu, shrimp, or chicken for extra variety.
  • Storage: Store leftovers in an airtight container in the refrigerator for up to 3 days.
  • Reheating: Warm in a pan over low heat, adding a splash of water if needed.

Cajun Sausage and Rice Skillet: A One-Pan Flavor Explosion

Got it! Here’s a detailed and engaging article about Cajun Sausage and Rice Skillet for your website.

Bold, Spicy, and Easy to Make

If you’re looking for a meal that packs a punch of bold flavors, is easy to make, and requires minimal cleanup, then look no further than Cajun Sausage and Rice Skillet. This one-pan wonder is the perfect balance of spice, smokiness, and comfort, making it an ideal weeknight dinner for busy families or anyone who loves rich, Southern flavors.

The combination of smoky sausage, tender rice, bell peppers, onions, and aromatic Cajun seasoning creates an irresistible dish that’s not only filling but also incredibly satisfying. Whether you’re a fan of spicy cuisine or just need a quick, delicious meal, this dish is sure to become a staple in your kitchen.

The Southern Roots of Cajun Cuisine

Cajun cuisine is deeply rooted in Louisiana’s history, influenced by French, Spanish, and African cooking traditions. The Cajun people, descendants of French-speaking Acadians, settled in Louisiana in the 18th century, bringing with them a love for bold spices, hearty dishes, and one-pot meals.

This rustic and flavorful cooking style relies on simple ingredients, emphasizing smoked meats, rice, and fresh vegetables. The Cajun Sausage and Rice Skillet embodies the essence of Southern comfort food—warm, hearty, and packed with spices that awaken the senses.

What Makes This Dish So Irresistible?

1. One-Pan Simplicity

  • Everything is cooked in a single skillet, making cleanup a breeze.
  • Perfect for quick weeknight dinners with minimal effort.

2. Smoky, Spicy, and Savory

  • Smoked sausage brings a deep, rich flavor.
  • Cajun seasoning adds just the right amount of heat and complexity.
  • Rice absorbs all the flavors, making every bite satisfying.

3. Highly Versatile and Customizable

  • Works with different proteins, grains, and spice levels.
  • Can be made mild or extra spicy depending on your taste.
  • Pairs well with a variety of side dishes and toppings.

Best Ways to Serve Cajun Sausage and Rice Skillet

While this dish is fantastic on its own, pairing it with the right sides and garnishes can elevate the flavors even more.

1. Classic Southern Pairings

  • Cornbread – A slightly sweet, crumbly side that balances the spice.
  • Collard greens – Adds an earthy, nutritious contrast.
  • Steamed broccoli or green beans – A fresh, healthy addition to the plate.

2. Garnishes for an Extra Flavor Boost

  • Chopped green onions – Adds a bright, fresh finish.
  • Fresh parsley – Enhances the dish with a hint of herbaceousness.
  • A squeeze of fresh lemon – Brings a subtle tang to balance the spices.
  • A drizzle of hot sauce – For those who love an extra fiery kick.

3. Transform It into Another Dish

  • Stuff it into bell peppers – Bake for a fun, meal-prep-friendly option.
  • Use it as a taco filling – Wrap in a warm tortilla with cheese and sour cream.
  • Turn it into a burrito bowl – Serve over lettuce with avocado and salsa.

Customizing Your Cajun Skillet: Exciting Variations

One of the best things about Cajun Sausage and Rice Skillet is its versatility. You can tweak the recipe to suit different dietary needs or flavor preferences.

1. Protein Swaps

  • Shrimp & Sausage – A surf-and-turf twist that adds even more Cajun flair.
  • Chicken & Sausage – A hearty, lean alternative.
  • Plant-Based Sausage – A great option for vegetarians.

2. Spice Level Adjustments

  • For mild spice, use less Cajun seasoning and opt for a mild smoked sausage.
  • For extra heat, add cayenne pepper, red pepper flakes, or jalapeños.

3. Alternative Grains

  • Brown rice – A more fibrous, hearty option (just adjust the cooking time).
  • Quinoa – A protein-packed alternative that pairs well with Cajun flavors.
  • Cauliflower rice – A low-carb version for a lighter meal.

Spicy & Savory: Cajun Sausage and Rice Skillet

Ingredients: Bold Flavors in Every Bite

  • Smoked Sausage – Andouille or kielbasa for a deep, smoky flavor
  • Long-Grain White Rice – The perfect base to absorb the Cajun spices
  • Bell Peppers – A mix of red and green for sweetness and crunch
  • Onion – Yellow or white for a subtle, caramelized depth
  • Garlic – Fresh and aromatic to enhance the dish
  • Cajun Seasoning – A flavorful blend of paprika, cayenne, thyme, and garlic powder
  • Chicken Broth – Adds moisture and infuses the rice with rich flavor
  • Olive Oil – For sautéing and bringing out the best in the ingredients
  • Optional Garnishes – Fresh parsley, green onions, or a splash of hot sauce

Directions: One Skillet, Maximum Flavor

Step 1: Prep the Ingredients

  1. Slice the smoked sausage into rounds and dice the bell peppers, onion, and garlic.
  2. Rinse the rice under cold water until the water runs clear.

Step 2: Brown the Sausage

  1. Heat olive oil in a large skillet over medium heat.
  2. Add the sliced sausage and cook until browned and crispy, then set aside.

Step 3: Sauté the Veggies

  1. In the same skillet, add the onions, bell peppers, and garlic.
  2. Sauté until softened and fragrant.

Step 4: Toast the Rice

  1. Stir in the rinsed rice, coating it in the oil and letting it toast for 2 minutes.

Step 5: Simmer to Perfection

  1. Pour in the chicken broth and Cajun seasoning, stirring well.
  2. Bring to a boil, reduce the heat, cover, and simmer for 15-20 minutes until the rice is tender.

Step 6: Bring It All Together

  1. Return the sausage to the skillet, stirring to combine.
  2. Let cook for another 3-5 minutes to blend flavors.

Step 7: Serve and Enjoy

  1. Garnish with parsley, green onions, or a dash of hot sauce for extra zest.

Nutritional Breakdown: A Hearty, Flavorful Meal

  • Calories: ~450 per serving
  • Carbohydrates: 50g
  • Protein: 18g
  • Fat: 20g
  • Sodium: Varies based on seasoning and sausage choice

This Cajun Sausage and Rice Skillet is a one-pan wonder, delivering bold, smoky flavors with minimal effort. Perfect for weeknight dinners, meal prep, or when you need comfort food with a kick!

Frequently Asked Questions

1. Can I use a different type of sausage?

Yes! While Andouille or kielbasa are traditional choices, you can also use:

  • Chicken sausage – A leaner alternative.
  • Turkey sausage – Lower in fat but still flavorful.
  • Plant-based sausage – A great option for vegetarians.

2. What if I don’t have Cajun seasoning?

You can make a simple homemade Cajun seasoning blend with:

  • Paprika, garlic powder, onion powder, cayenne, thyme, and oregano.

3. Can I use brown rice instead of white rice?

Yes, but it requires more liquid and a longer cooking time (about 35-40 minutes instead of 15-20).

4. Can I meal prep this dish?

Absolutely! This dish stores well for up to 4 days in the fridge, making it perfect for meal prep.

5. How do I reheat leftovers without drying them out?

  • Microwave – Add a splash of chicken broth and heat in 30-second intervals.
  • Stovetop – Reheat over low heat, stirring occasionally, with a bit of broth.

6. Can I freeze this dish?

Yes! Store it in an airtight container for up to 2 months. Let it thaw in the fridge overnight before reheating.

Conclusion: Why Cajun Sausage and Rice Skillet Deserves a Spot on Your Table

There’s a reason why Cajun Sausage and Rice Skillet has become a household favorite—it’s a dish that’s easy, flavorful, and endlessly customizable. Whether you’re looking for a quick dinner, a meal-prep solution, or a cozy, comforting dish, this one-pan meal delivers every time.

With its bold spices, smoky sausage, and perfectly seasoned rice, this dish captures the essence of Southern comfort food while remaining effortless to make. Plus, with so many variations and serving options, you’ll never get bored of it.

So why not give it a try tonight? One bite, and you’ll see why this Cajun classic deserves a permanent place in your recipe collection.

aiting

Cajun Sausage and Rice Skillet: A One-Pan Flavor Explosion

This Cajun Sausage and Rice Skillet is a one-pan wonder packed with bold, smoky flavors and a kick of Cajun spice. With juicy smoked sausage, colorful bell peppers, and perfectly seasoned rice, this dish is both easy to make and incredibly satisfying. Perfect for a weeknight meal or meal prep!
Prep Time 10 minutes
Cook Time 25 minutes
Total Time 35 minutes
Servings: 4 -6 servings
Course: Main Dish
Cuisine: Cajun

Ingredients
  

  • Smoked sausage Andouille or kielbasa for a deep, smoky flavor
  • Long-grain white rice absorbs the Cajun spices beautifully
  • Bell peppers a mix of red and green for sweetness and crunch
  • Onion yellow or white for a caramelized depth
  • Garlic fresh and aromatic to enhance the dish
  • Cajun seasoning a flavorful blend of paprika, cayenne, thyme, and garlic powder
  • Chicken broth adds moisture and infuses the rice with rich flavor
  • Olive oil for sautéing and enhancing flavors
  • Optional garnishes: fresh parsley green onions, or a splash of hot sauce

Method
 

  1. Prep the Ingredients: Slice the smoked sausage into rounds and dice the bell peppers, onion, and garlic. Rinse the rice under cold water until the water runs clear.
  2. Brown the Sausage: Heat olive oil in a large skillet over medium heat. Add the sliced sausage and cook until browned and crispy, then set aside.
  3. Sauté the Veggies: In the same skillet, add the onions, bell peppers, and garlic. Sauté until softened and fragrant.
  4. Toast the Rice: Stir in the rinsed rice, coating it in the oil and letting it toast for 2 minutes.
  5. Simmer to Perfection: Pour in the chicken broth and Cajun seasoning, stirring well. Bring to a boil, reduce the heat, cover, and simmer for 15-20 minutes until the rice is tender.
  6. Bring It All Together: Return the sausage to the skillet, stirring to combine. Let cook for another 3-5 minutes to blend flavors.
  7. Serve and Enjoy: Garnish with parsley, green onions, or a dash of hot sauce for extra zest.

Notes

  • Adjust the Spice Level: Reduce the Cajun seasoning for a milder dish.
  • Protein Swap: Substitute sausage with shrimp or chicken for variety.
  • Storage: Store leftovers in an airtight container in the refrigerator for up to 4 days.
  • Reheating: Warm in a skillet over low heat, adding a splash of broth if needed.
 

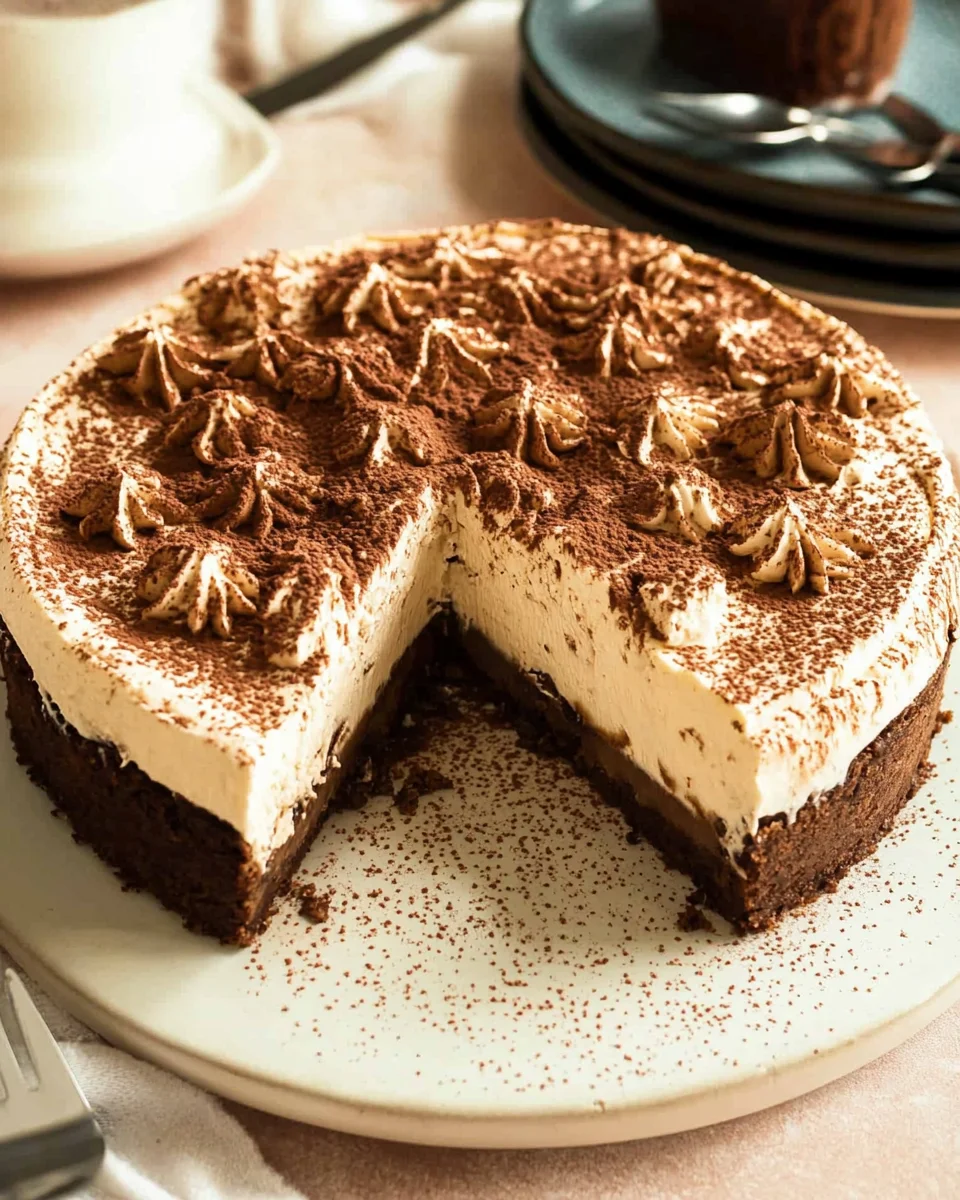
Ultimate Guide to No-Bake Tiramisu Cheesecake

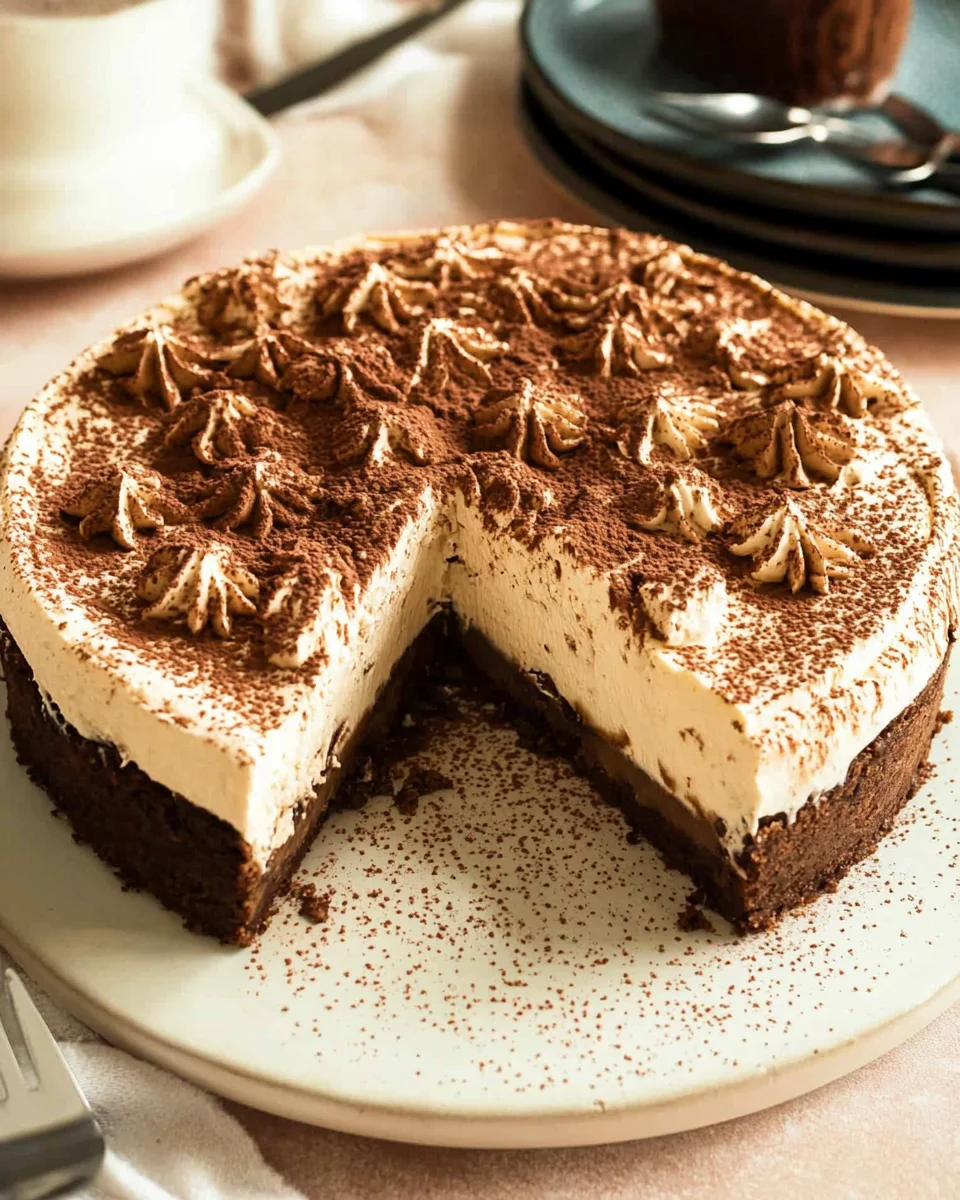
Tiramisu and cheesecake are two of the most beloved desserts in the world. Combining the best of both, this No-Bake Tiramisu Cheesecake is the ultimate indulgence for coffee lovers and dessert enthusiasts alike. With a rich mascarpone filling, espresso-soaked ladyfingers, and a buttery Oreo crust, each bite delivers a luscious blend of creamy, chocolaty, and coffee-infused flavors.

Whether you’re looking for a show-stopping dessert for a special occasion or simply want to satisfy your sweet tooth, this recipe is the perfect balance of elegance and ease. Plus, since it’s a no-bake recipe, you can prepare it ahead of time without ever turning on the oven.

In this guide, we’ll explore what makes this cheesecake special, tips for achieving the perfect texture, storage options, and frequently asked questions to ensure your dessert turns out flawless.

Why This No-Bake Tiramisu Cheesecake Stands Out

A Perfect Marriage of Flavors

Traditional tiramisu is known for its bold espresso flavor and airy mascarpone filling, while cheesecake is famous for its creamy richness and decadent texture. This recipe seamlessly blends the two, offering the best of both worlds. The deep coffee notes from the espresso-soaked ladyfingers cut through the sweetness, while the mascarpone and cream cheese filling provides an irresistibly smooth contrast.

No-Bake Simplicity

Unlike traditional cheesecakes that require baking and careful monitoring to prevent cracks, this no-bake version is stress-free. The filling sets beautifully in the refrigerator, allowing all the flavors to meld together while maintaining a velvety consistency.

A Dreamy Texture

One of the standout elements of this dessert is its layered texture. The Oreo crust adds a firm yet slightly crunchy base, while the mascarpone filling is luxuriously creamy. The soaked ladyfingers in the center bring a soft, sponge-like consistency, ensuring that every bite is a delightful combination of textures.

A Stunning Presentation

This cheesecake is not just a treat for the taste buds but also a visual delight. Topped with a generous dusting of cocoa powder and delicate piping, it looks like a dessert straight out of a high-end patisserie. It’s a guaranteed crowd-pleaser for birthdays, holidays, or dinner parties.

Expert Tips for a Perfect Tiramisu Cheesecake

1. Use High-Quality Ingredients

Since this dessert relies on just a few core ingredients, using high-quality mascarpone cheese, real vanilla extract, and freshly brewed espresso makes all the difference. The better the ingredients, the richer and more authentic the final flavor.

2. Keep Your Dairy Ingredients at the Right Temperature

  • Mascarpone and cream cheese should be room temperature to prevent lumps in the filling.
  • Heavy cream should be cold when whipping to achieve a stable and fluffy texture.

3. Dip Ladyfingers Quickly

Ladyfingers soak up liquid extremely fast. A quick dip (less than a second) is enough to infuse them with espresso flavor without making them soggy. Over-soaked ladyfingers can lead to a mushy cheesecake.

4. Allow Proper Chilling Time

Patience is key with a no-bake cheesecake. Refrigerate for at least 4 hours, but preferably overnight, to let the flavors develop and the filling set properly.

5. Don’t Overmix the Filling

Overmixing can cause the mascarpone and cream cheese to break down, resulting in a grainy texture instead of a silky smooth filling. Mix just until the ingredients are combined.

6. Use a Springform Pan for Easy Removal

A springform pan ensures a neat release, preventing any damage to the cheesecake’s layers. Lining the base with parchment paper also helps for a cleaner presentation.

Ingredients: A Symphony of Flavor

For the Crust:

  • 30 Oreo cookies (crushed into fine crumbs)
  • 7 tbsp unsalted butter (melted)
  • ½ tsp espresso powder

For the Cheesecake Filling:

  • 20.1 oz full-fat cream cheese (room temperature)
  • 10.5 oz mascarpone cheese (room temperature)
  • 1 ¼ cup heavy cream (cold)
  • 1 ⅓ cup powdered sugar
  • 2 tsp vanilla extract
  • 2 tbsp instant vanilla pudding mix
  • ⅓ cup sour cream

For the Assembly:

  • 10 ladyfingers
  • 1 cup espresso coffee
  • 1 tbsp Kahlua (optional; substitute with more espresso if avoiding alcohol)
  • 1-2 tbsp cocoa powder (for dusting)

Directions: A Step-by-Step Guide to Indulgence

1. Crafting the Perfect Crust

  1. Crush the Oreo cookies into fine crumbs using a food processor or by placing them in a ziplock bag and crushing them with a rolling pin.
  2. In a mixing bowl, combine the crushed Oreos with espresso powder and melted butter. Mix until well coated.
  3. Press the mixture evenly into a 9-inch springform pan lined with parchment paper.
  4. Place the crust in the freezer while you prepare the filling.

2. Preparing the Creamy Cheesecake Filling

  1. In a large mixing bowl, beat the softened cream cheese, mascarpone cheese, sour cream, cold heavy cream, powdered sugar, vanilla extract, and instant pudding mix using an electric hand mixer.
  2. Mix until the batter is smooth, creamy, and fully combined.

3. Assembling the Tiramisu Layers

  1. Remove the crust from the freezer and spread ⅓ of the cheesecake filling evenly over it.
  2. Quickly dip the ladyfingers in espresso (and Kahlua if using), ensuring they are soaked for less than a second to avoid sogginess.
  3. Arrange the soaked ladyfingers in a single layer over the cheesecake filling.
  4. Spread a thin layer of cheesecake filling over the ladyfingers and smooth it out with a spatula.
  5. Transfer the remaining cheesecake filling to a piping bag with a star tip and pipe decorative dollops over the top.

4. Chilling & Finishing Touches

  1. Cover the cheesecake with plastic wrap and refrigerate for at least 4 hours (or overnight for best results).
  2. Before serving, remove from the pan and generously dust the top with cocoa powder.

Nutritional Information: A Guilt-Free Indulgence?

  • Calories: 627 kcal
  • Carbohydrates: 48g
  • Protein: 8g
  • Fat: 51g
  • Saturated Fat: 29g
  • Cholesterol: 143mg
  • Sodium: 374mg
  • Sugar: 18g
  • Calcium: 118mg
  • Iron: 4mg

Enjoy this heavenly no-bake tiramisu cheesecake, where the richness of mascarpone meets the boldness of espresso in a dessert that melts in your mouth!

Storage and Make-Ahead Tips

Refrigeration

This tiramisu cheesecake should be stored in the refrigerator, covered with plastic wrap or in an airtight container, for up to 4 days. The flavors continue to develop over time, making it even more delicious the next day.

Freezing Instructions

If you want to make this cheesecake in advance, it freezes beautifully:

  1. Let the cheesecake set completely in the fridge for at least 4-6 hours before freezing.
  2. Wrap the entire cheesecake (still in the pan) tightly with plastic wrap and then aluminum foil to prevent freezer burn.
  3. Label it with the date and freeze for up to 3 months.
  4. To serve, thaw it overnight in the refrigerator.

Make-Ahead Option

For special occasions, this dessert can be made 1-2 days in advance. Simply dust with cocoa powder right before serving to keep the topping fresh and vibrant.

Frequently Asked Questions

1. What is Tiramisu Cheesecake Made Of?

Tiramisu cheesecake combines elements of both traditional cheesecake and classic tiramisu. It consists of an Oreo crust, a mascarpone and cream cheese filling, a layer of coffee-soaked ladyfingers, and a cocoa-dusted top.

2. Can I Make This Without Alcohol?

Yes! While some tiramisu recipes include coffee liqueur (like Kahlua or Baileys), it is completely optional. You can substitute it with additional espresso for a completely alcohol-free version.

3. What Can I Use Instead of Mascarpone?

If you don’t have mascarpone, you can substitute it with an equal amount of cream cheese mixed with heavy cream. However, mascarpone has a richer, more buttery texture that makes a noticeable difference in taste.

4. Can I Use Instant Coffee Instead of Espresso?

Yes! If you don’t have an espresso machine, dissolve 1-2 tablespoons of instant coffee in hot water to create a strong coffee substitute.

5. Can I Use a Different Crust?

Absolutely! While Oreo cookies add a deep chocolate flavor, you can swap them for graham crackers, digestive biscuits, vanilla wafers, or even a store-bought chocolate crust.

6. Can I Use Homemade Ladyfingers?

Yes! If you prefer making everything from scratch, homemade ladyfingers will work wonderfully in this recipe. They tend to be softer than store-bought versions, so be extra careful not to oversoak them in coffee.

7. What’s the Best Way to Slice This Cheesecake?

For clean, beautiful slices:

  • Use a sharp knife and wipe it clean after each cut.
  • Run the knife under hot water before slicing to glide through the cheesecake smoothly.

8. Can I Add a Chocolate Twist?

If you’re a chocolate lover, you can:

  • Drizzle melted chocolate over the top before serving.
  • Mix cocoa powder into the cheesecake filling for a deeper chocolate flavor.
  • Add chocolate shavings on top for an elegant finish.

Conclusion: The Ultimate Dessert for Any Occasion

No-bake tiramisu cheesecake is more than just a dessert—it’s an experience. From its creamy mascarpone filling to its rich espresso-infused center, every bite is a perfect blend of flavors and textures. Whether you’re celebrating a special occasion or simply indulging in a sweet treat, this cheesecake is guaranteed to impress.

Its easy, no-bake method makes it a fail-proof recipe, perfect for beginners and seasoned bakers alike. Plus, with its ability to be made ahead of time, it’s an ideal dessert for dinner parties, holidays, or even just a weekend indulgence.

Now that you know all the tips, tricks, and secrets to making this show-stopping tiramisu cheesecake, it’s time to get in the kitchen and create your own masterpiece. Enjoy!


aiting

Ultimate Guide to No-Bake Tiramisu Cheesecake

This no-bake tiramisu cheesecake is the ultimate fusion of two classic desserts—rich, creamy cheesecake and bold, coffee-infused tiramisu. With an Oreo crust, velvety mascarpone filling, and espresso-soaked ladyfingers, each bite is a perfect blend of textures and flavors. The best part? No oven required! Perfect for special occasions or an indulgent treat, this dessert will impress every time.
Prep Time 25 minutes
Cook Time 4 hours
Total Time 4 hours 25 minutes
Servings: 10 -12 Slices
Course: Dessert
Cuisine: Italian-American

Ingredients
  

For the Crust:
  • 30 Oreo cookies crushed into fine crumbs
  • 7 tbsp unsalted butter melted
  • ½ tsp espresso powder
For the Cheesecake Filling:
  • 20.1 oz full-fat cream cheese room temperature
  • 10.5 oz mascarpone cheese room temperature
  • 1 ¼ cup heavy cream cold
  • 1 ⅓ cup powdered sugar
  • 2 tsp vanilla extract
  • 2 tbsp instant vanilla pudding mix
  • cup sour cream
For the Assembly:
  • 10 ladyfingers
  • 1 cup espresso coffee
  • 1 tbsp Kahlua optional; substitute with more espresso if avoiding alcohol
  • 1-2 tbsp cocoa powder for dusting

Method
 

  1. Step 1: Crafting the Perfect Crust
  2. Crush the Oreo cookies into fine crumbs using a food processor or by placing them in a ziplock bag and crushing them with a rolling pin.
  3. In a mixing bowl, combine the crushed Oreos with espresso powder and melted butter. Mix until well coated.
  4. Press the mixture evenly into a 9-inch springform pan lined with parchment paper.
  5. Place the crust in the freezer while you prepare the filling.
  6. Step 2: Preparing the Creamy Cheesecake Filling
  7. In a large mixing bowl, beat the softened cream cheese, mascarpone cheese, sour cream, cold heavy cream, powdered sugar, vanilla extract, and instant pudding mix using an electric hand mixer.
  8. Mix until the batter is smooth, creamy, and fully combined.
  9. Step 3: Assembling the Tiramisu Layers
  10. Remove the crust from the freezer and spread ⅓ of the cheesecake filling evenly over it.
  11. Quickly dip the ladyfingers in espresso (and Kahlua if using), ensuring they are soaked for less than a second to avoid sogginess.
  12. Arrange the soaked ladyfingers in a single layer over the cheesecake filling.
  13. Spread a thin layer of cheesecake filling over the ladyfingers and smooth it out with a spatula.
  14. Transfer the remaining cheesecake filling to a piping bag with a star tip and pipe decorative dollops over the top.
  15. Step 4: Chilling & Finishing Touches
  16. Cover the cheesecake with plastic wrap and refrigerate for at least 4 hours (or overnight for best results).
  17. Before serving, remove from the pan and generously dust the top with cocoa powder.

Notes

  • Use high-quality espresso for the best coffee flavor.
  • Let the cheesecake chill overnight for an even firmer texture.
  • Store leftovers in an airtight container in the fridge for up to 3 days.

Hot Honey Fried Shrimp: Crispy, Sweet, and Spicy Perfection

Few dishes strike the perfect balance of crunch, heat, and sweetness quite like Hot Honey Fried Shrimp. This recipe takes golden, crispy shrimp and coats them in a sticky, spicy-sweet glaze, making each bite irresistibly delicious. The shrimp are first marinated in buttermilk for tenderness, then dredged in a spiced flour coating before being deep-fried to a light, crispy texture. The final touch is a generous drizzle or toss in hot honey, bringing a bold contrast of heat and sweetness that will keep you coming back for more.

This dish is perfect for appetizers, main courses, or party platters, offering restaurant-quality results right from your kitchen. Whether you serve them with rice, in tacos, or on a salad, these shrimp are versatile and packed with bold, dynamic flavors.

In this article, we’ll explore the origins of hot honey, expert tips for frying shrimp, serving ideas, creative variations, and answers to frequently asked questions. If you’re ready to elevate your seafood game, this Hot Honey Fried Shrimp recipe is a must-try!

The Rise of Hot Honey: A Flavor Revolution

While fried shrimp is a classic dish found in Southern, Cajun, and Asian cuisines, the addition of hot honey gives it a modern, gourmet twist. Hot honey has skyrocketed in popularity over the past decade, appearing on fried chicken, pizza, roasted vegetables, and now seafood.

What is hot honey?
Hot honey is simply honey infused with chili peppers or red pepper flakes, giving it a sweet heat that pairs beautifully with savory foods. While store-bought versions are available, homemade hot honey allows you to control the spice level and adjust it to your preference.

The combination of crispy fried shrimp and sticky hot honey creates a perfect contrast—the heat from the honey enhances the spices in the crispy coating, while the sweetness balances out the savory flavors.

Why You’ll Love This Recipe

1. The Perfect Contrast of Flavors

  • The spicy-sweet glaze enhances the crispy, savory shrimp, making each bite explosive in flavor.

2. Restaurant-Quality at Home

  • This dish delivers the same crunch and flavor as high-end seafood restaurants, but it’s easy to make in your own kitchen.

3. Versatile and Customizable

  • Serve these shrimp as an appetizer, in tacos, on salads, or over rice—the possibilities are endless.
  • Adjust the spice level by tweaking the amount of red pepper flakes in the hot honey.

4. Irresistible Crunch

  • The seasoned flour coating creates a light, crispy exterior without being too heavy.
  • Frying at the perfect temperature (350°F) ensures a golden, crunchy crust.

5. Quick and Easy to Make

  • With a marinating time of just 15 minutes and a frying time of only 3 minutes per batch, this dish comes together faster than takeout.

Crispy, Sticky, and Irresistible: Ingredient

For the Shrimp

  • Large shrimp, peeled and deveined
  • Buttermilk
  • All-purpose flour
  • Paprika
  • Garlic powder
  • Onion powder
  • Salt and black pepper
  • Cayenne pepper
  • Vegetable oil for frying

For the Hot Honey Glaze

  • Hot honey (homemade or store-bought)
  • Red pepper flakes (for extra heat)
  • Chopped parsley (for garnish)

From Fryer to Flavor Explosion: Directions

Step 1: Marinate the Shrimp

  1. Soak the shrimp in buttermilk for 15 minutes to tenderize and enhance flavor.

Step 2: Coat the Shrimp

  1. Dredge the marinated shrimp in a seasoned flour mixture.
  2. Ensure each shrimp is fully coated for a crispy texture.

Step 3: Fry to Perfection

  1. Heat oil to 350°F and fry shrimp in batches for 2-3 minutes until golden brown.
  2. Drain on a paper towel.

Step 4: Drizzle with Hot Honey

  1. Toss the shrimp in warm hot honey or drizzle it over the top.
  2. Garnish with chopped parsley and extra red pepper flakes.

A Spicy-Sweet Bite: Nutritional Information

  • Serving Size: 1 portion
  • Calories: ~904 kcal
  • Carbohydrates: 35g
  • Protein: 40g
  • Fat: 65g
  • Sodium: 800mg

These Hot Honey Fried Shrimp are crispy, juicy, and packed with bold flavor. Serve them with rice, on a salad, or as a spicy snack—no matter how you enjoy them, they’re sure to impress!

Expert Tips for Perfect Hot Honey Fried Shrimp

1. Choose the Right Shrimp

  • Use large or jumbo shrimp for the best texture and bite.
  • Keep the tails on for easier handling and an elegant presentation.

2. The Secret to Extra Crispy Shrimp

  • Let the shrimp rest after dredging in flour to ensure the coating sticks.
  • Shake off excess flour before frying to prevent a heavy, doughy texture.
  • Fry in small batches to maintain even cooking and crispiness.

3. How to Control the Heat in the Hot Honey

  • Add more red pepper flakes for a spicier kick.
  • Use mild honey to balance the heat if you prefer a less intense spice level.

4. Frying Temperature Matters

  • Heat oil to 350°F before frying—this ensures a golden, crispy texture without being greasy.
  • Let the oil return to temperature between batches to maintain consistency.

5. The Best Way to Coat the Shrimp in Hot Honey

  • For a light glaze, drizzle the hot honey over the shrimp right before serving.
  • For a sticky, bold coating, toss the shrimp in a bowl with hot honey while still warm.

Delicious Variations to Try

1. Spicy Garlic Hot Honey Shrimp

  • Add minced garlic and a dash of soy sauce to the hot honey for a bold, garlicky flavor.

2. Cajun-Style Hot Honey Shrimp

  • Season the flour with Cajun seasoning for a smoky, Southern-inspired twist.

3. Air Fryer Hot Honey Shrimp

  • Instead of frying, coat shrimp lightly in oil and air-fry at 400°F for 8-10 minutes, flipping halfway through.

4. Korean-Inspired Gochujang Honey Shrimp

  • Replace red pepper flakes with gochujang (Korean chili paste) for a deep, umami-packed heat.

5. Hot Honey Shrimp Tacos

  • Serve the shrimp in warm tortillas with coleslaw, avocado, and a squeeze of lime for a next-level taco experience.

How to Serve Hot Honey Fried Shrimp

1. As an Appetizer

  • Serve on a platter with toothpicks and extra hot honey for dipping.
  • Garnish with fresh parsley, scallions, or sesame seeds for a pop of color.

2. Over Rice or Noodles

  • Pair with steamed jasmine rice or garlic butter noodles for a complete meal.
  • Add a side of roasted vegetables for balance.

3. In Tacos or Wraps

  • Fill soft tortillas with shrimp, shredded cabbage, avocado, and a squeeze of lime.
  • Drizzle with extra hot honey or a creamy sriracha sauce.

4. On a Salad

  • Add shrimp to a bed of mixed greens, cherry tomatoes, cucumbers, and crispy wonton strips.
  • Top with a citrus vinaigrette for a refreshing contrast.

5. Paired with a Cooling Side

  • Serve with coleslaw, cornbread, or a fresh mango salsa to balance the heat.

Frequently Asked Questions (FAQs)

1. Can I Use Frozen Shrimp?

Yes! Just thaw them completely and pat them dry before marinating to avoid excess moisture.

2. How Do I Store Leftovers?

  • Let shrimp cool and store in an airtight container in the fridge for up to 2 days.
  • Reheat in an air fryer or oven at 350°F for 5 minutes to regain crispiness.

3. Can I Make This Recipe Without Frying?

Yes! Try:

  • Air-frying at 400°F for 8-10 minutes
  • Baking at 425°F for 15-20 minutes, flipping halfway through

4. Is Hot Honey Store-Bought or Homemade?

You can use either! Store-bought hot honey is convenient, but homemade allows you to control the heat level.

5. What Oil Is Best for Frying?

Use vegetable oil, canola oil, or peanut oil for a neutral flavor and high smoke point.

Final Thoughts: Why You Need to Try Hot Honey Fried Shrimp

Hot Honey Fried Shrimp is the ultimate combination of crispy, sticky, sweet, and spicy. This dish delivers restaurant-quality flavors with simple ingredients and a quick cooking process.

Whether you drizzle or toss the shrimp in hot honey, the balance of textures and flavors makes it irresistible. From tacos to rice bowls, party platters to salads, these shrimp are versatile, bold, and packed with unforgettable flavor.

Make a batch today and experience the magic of hot honey and crispy fried shrimp—it’s a dish you’ll want to make again and again!

aiting

Hot Honey Fried Shrimp: Crispy, Sweet, and Spicy Perfection

he Perfect Balance of Sweet and Spicy!
Hot Honey Fried Shrimp is an irresistible dish that delivers crispy, golden shrimp coated in a sticky, sweet, and spicy honey glaze. This restaurant-quality recipe combines deep-fried shrimp with homemade hot honey, creating a perfect contrast of crunchy texture and bold flavors.
Prep Time 10 minutes
Cook Time 20 minutes
Total Time 30 minutes
Servings: 4 servings
Course: Appetizer, Main Course
Cuisine: American, Southern

Ingredients
  

For the Shrimp:
  • Large shrimp peeled and deveined
  • Buttermilk
  • All-purpose flour
  • Paprika
  • Garlic powder
  • Onion powder
  • Salt and black pepper
  • Cayenne pepper
  • Vegetable oil for frying
For the Hot Honey Glaze:
  • Hot honey homemade or store-bought
  • Red pepper flakes for extra heat
  • Chopped parsley for garnish

Method
 

  1. Step 1: Marinate the Shrimp
  2. Soak the shrimp in buttermilk for 15 minutes to tenderize and enhance flavor.
  3. Step 2: Coat the Shrimp
  4. Dredge the marinated shrimp in a seasoned flour mixture.
  5. Ensure each shrimp is fully coated for a crispy texture.
  6. Step 3: Fry to Perfection
  7. Heat oil to 350°F and fry shrimp in batches for 2-3 minutes until golden brown.
  8. Drain on a paper towel.
  9. Step 4: Drizzle with Hot Honey
  10. Toss the shrimp in warm hot honey or drizzle it over the top.
  11. Garnish with chopped parsley and extra red pepper flakes.

Notes

  • Serve with a side of ranch or blue cheese dressing for a cooling contrast.
  • Adjust the spice level by adding more or less red pepper flakes.
  • Best enjoyed fresh, but leftovers can be reheated in an air fryer for extra crispiness.

Beef and Cheese Empanadas: A Crispy, Savory Latin American Classic

Beef and Cheese Empanadas are golden, flaky pastries filled with a rich and flavorful combination of seasoned ground beef and melted cheese. These handheld delights are a staple in Latin American cuisine, where they are enjoyed as a snack, appetizer, or even a main course. Their versatility, portability, and incredible taste make them a favorite for everything from casual meals to special celebrations.

Whether you prefer them baked or fried, empanadas offer a perfect balance of crispy crust and gooey, cheesy filling. The seasoned beef is enhanced with aromatic spices, onions, and garlic, while the dough creates a delightful crunch with every bite. Pair them with a tangy dipping sauce, a side of fresh salad, or a simple salsa to elevate the experience.

In this article, we’ll explore the history of empanadas, expert tips for perfecting them, creative variations, serving suggestions, and frequently asked questions to help you master this classic dish.

The Origins of Empanadas

Empanadas have a rich and fascinating history that traces back to Spain and Portugal, where they were inspired by Arabic pastries introduced during the Moorish rule. The name “empanada” comes from the Spanish verb “empanar,” which means “to coat or wrap in bread.”

When Spanish and Portuguese explorers traveled to Latin America, they brought the concept of empanadas with them. Over time, different regions adapted the recipe, incorporating local ingredients and cooking methods. Today, empanadas are a beloved dish in many countries, including Argentina, Mexico, Colombia, Chile, and the Dominican Republic, each with its own signature twist.

While some regions favor baked empanadas, others prefer them deep-fried for extra crispiness. The fillings also vary—from beef and cheese to chicken, seafood, and even sweet options like guava and cream cheese.

Why You’ll Love This Recipe

1. The Perfect Handheld Treat

Empanadas are easy to eat on the go or serve as a party appetizer, making them perfect for any occasion.

2. A Crispy, Buttery Crust

The dough is flaky, golden, and crisp, providing the perfect contrast to the savory, cheesy filling inside.

3. Packed with Flavor

The filling is seasoned with aromatic spices like cumin, paprika, and garlic, giving each bite an authentic Latin flavor.

4. Easily Customizable

From different meats and cheeses to vegetarian and spicy options, you can adapt empanadas to your taste preferences.

5. Make Them Ahead of Time

Empanadas can be assembled and frozen, making them a fantastic make-ahead meal or snack.

Savory & Satisfying: Ingredients

For the Filling

  • Ground beef
  • Onion, finely chopped
  • Garlic, minced
  • Ground cumin
  • Smoked paprika
  • Salt and black pepper
  • Green olives, chopped (optional)
  • Raisins (optional, for a sweet contrast)
  • Shredded cheddar or mozzarella cheese

For the Dough

  • All-purpose flour
  • Salt
  • Cold unsalted butter, cubed
  • Cold water
  • Egg (for egg wash)

Golden Perfection: Directions

Step 1: Prepare the Filling

  1. Sauté onions and garlic until fragrant.
  2. Add ground beef and cook until browned.
  3. Season with cumin, paprika, salt, and pepper.
  4. Stir in chopped olives and raisins (if using).
  5. Remove from heat and mix in shredded cheese.

Step 2: Make the Dough

  1. Combine flour and salt in a bowl.
  2. Cut in cold butter until the mixture resembles coarse crumbs.
  3. Gradually add cold water and mix until a smooth dough forms.
  4. Chill the dough for 30 minutes.

Step 3: Assemble the Empanadas

  1. Roll out the dough and cut into 4-inch circles.
  2. Spoon the beef and cheese mixture onto each dough round.
  3. Fold into a half-moon shape and crimp edges with a fork.

Step 4: Baking or Frying

Baking Method:

  1. Preheat oven to 375°F (190°C).
  2. Brush empanadas with beaten egg for a golden finish.
  3. Bake for 20-25 minutes until crispy and golden brown.

Frying Method:

  1. Heat oil to 350°F (175°C).
  2. Fry empanadas for 3-4 minutes per side, until crispy and golden.
  3. Drain on paper towels.

A Bite of Comfort: Nutritional Information

  • Serving Size: 1 empanada
  • Calories: ~250 kcal
  • Carbohydrates: 22g
  • Protein: 9g
  • Fat: 14g
  • Sodium: 320mg

Crispy, cheesy, and packed with bold Latin flavors, these Beef and Cheese Empanadas are a crowd-pleaser. Whether served fresh from the oven or pan, they are best enjoyed warm and dipped into your favorite sauce!

Expert Tips for Perfect Empanadas

1. Achieving the Best Dough Texture

  • Use cold butter to create a flakier crust.
  • Don’t overwork the dough—kneading too much can make it tough.
  • Chill the dough before rolling it out to make shaping easier.

2. Creating a Flavorful Filling

  • Brown the beef well to develop deep, savory flavors.
  • Sauté onions and garlic until fragrant before adding the beef.
  • Let the filling cool before assembling to prevent the dough from softening.

3. Sealing the Empanadas Properly

  • Press the edges firmly to avoid leakage during baking or frying.
  • Use a fork to crimp the edges or create a decorative rope pattern by twisting the dough.
  • Chill assembled empanadas for 15 minutes before cooking to help them hold their shape.

4. Choosing Between Baking and Frying

  • For a healthier option, bake the empanadas until golden brown.
  • For a crispy, traditional texture, fry them in hot oil until golden and crunchy.
  • Brush with egg wash before baking to achieve a beautiful golden crust.

Creative Variations to Try

1. Spicy Beef and Cheese Empanadas

  • Add diced jalapeños or red pepper flakes for an extra kick.
  • Serve with spicy salsa or chipotle mayo for a bold flavor.

2. Chicken and Cheese Empanadas

  • Swap out the beef for shredded or ground chicken seasoned with cumin and garlic.
  • Use pepper jack cheese for an added depth of flavor.

3. Vegetarian Empanadas

  • Replace the beef with a filling of sautéed mushrooms, black beans, corn, and cheese.
  • Add a hint of lime juice and cilantro for extra freshness.

4. Sweet and Savory Empanadas

  • Add raisins or dried apricots to the beef mixture for a sweet contrast.
  • Try a honey drizzle over the baked empanadas for a surprising twist.

5. Cheesy Pizza Empanadas

  • Fill with a mix of mozzarella, marinara sauce, and pepperoni for a fun twist on a classic.
  • Serve with extra pizza sauce for dipping.

How to Serve Beef and Cheese Empanadas

1. With Dipping Sauces

Empanadas taste even better with a delicious sauce on the side. Try them with:

  • Spicy salsa for a fresh and tangy kick.
  • Guacamole for a creamy contrast.
  • Sour cream or chipotle mayo for a cooling effect.

2. As a Main Course

Pair your empanadas with:

  • A simple green salad with a citrus vinaigrette.
  • A side of Mexican rice and beans for a hearty meal.
  • Grilled vegetables to balance the richness.

3. As a Party Snack or Appetizer

  • Serve them on a platter with multiple dips for a fun appetizer spread.
  • Make mini empanadas for easy finger food at gatherings.

Frequently Asked Questions (FAQs)

1. Can I Use a Different Type of Meat?

Yes! While ground beef is traditional, you can use ground chicken, turkey, or pork. You can also try seafood or vegetarian fillings like beans and roasted vegetables.

2. Can I Make the Dough in Advance?

Absolutely! Prepare the dough and store it in the refrigerator for up to 2 days or freeze it for up to 3 months.

3. Can I Bake Empanadas Instead of Frying?

Yes! Baking is a healthier option. Simply brush them with an egg wash before baking to ensure a crispy, golden-brown crust.

4. How Do I Store Leftover Empanadas?

Store cooked empanadas in an airtight container in the refrigerator for up to 3 days. To reheat, bake them at 350°F for 10 minutes or air-fry them for a few minutes until crisp.

5. Can I Freeze Empanadas?

Yes! Assemble them but don’t bake or fry. Lay them on a baking sheet, freeze until solid, then transfer to a freezer bag. Bake from frozen at 375°F for 25-30 minutes or fry directly from frozen.

Final Thoughts: Why You Should Try Beef and Cheese Empanadas

Beef and Cheese Empanadas are a delicious, satisfying, and versatile dish that bring people together. Whether baked or fried, these handheld pastries deliver the perfect combination of flaky crust, cheesy filling, and savory spices.

Their rich history, endless variations, and ease of preparation make them a must-have in any home cook’s repertoire. Plus, they store and reheat beautifully, making them ideal for meal prep or party snacks.

So why not give them a try? Once you make your first batch of homemade empanadas, they’re sure to become a staple in your kitchen!

aiting

Beef and Cheese Empanadas: A Crispy, Savory Latin American Classic

Empanadas are savory, golden-brown hand pies packed with a delicious filling and wrapped in a flaky, buttery crust. Beef and Cheese Empanadas are a classic Latin American favorite, bringing together well-seasoned ground beef, melted cheese, and aromatic spices inside a crispy shell. Whether baked for a healthier option or fried for extra crunch, these empanadas make for an irresistible snack, appetizer, or main dish.
Prep Time 40 minutes
Cook Time 25 minutes
Total Time 1 hour 5 minutes
Servings: 12 empanadas
Course: Appetizer, Snack
Cuisine: Latin American

Ingredients
  

For the Filling:
  • Ground beef
  • Onion finely chopped
  • Garlic minced
  • Ground cumin
  • Smoked paprika
  • Salt and black pepper
  • Green olives chopped (optional)
  • Raisins optional, for a sweet contrast
  • Shredded cheddar or mozzarella cheese
For the Dough:
  • All-purpose flour
  • Salt
  • Cold unsalted butter cubed
  • Cold water
  • Egg for egg wash

Method
 

  1. Step 1: Prepare the Filling
  2. Sauté onions and garlic until fragrant.
  3. Add ground beef and cook until browned.
  4. Season with cumin, paprika, salt, and pepper.
  5. Stir in chopped olives and raisins (if using).
  6. Remove from heat and mix in shredded cheese.
  7. Step 2: Make the Dough
  8. Combine flour and salt in a bowl.
  9. Cut in cold butter until the mixture resembles coarse crumbs.
  10. Gradually add cold water and mix until a smooth dough forms.
  11. Chill the dough for 30 minutes.
  12. Step 3: Assemble the Empanadas
  13. Roll out the dough and cut into 4-inch circles.
  14. Spoon the beef and cheese mixture onto each dough round.
  15. Fold into a half-moon shape and crimp edges with a fork.
  16. Step 4: Baking or Frying
Baking Method:
  1. Preheat oven to 375°F (190°C).
  2. Brush empanadas with beaten egg for a golden finish.
  3. Bake for 20-25 minutes until crispy and golden brown.
Frying Method:
  1. Heat oil to 350°F (175°C).
  2. Fry empanadas for 3-4 minutes per side, until crispy and golden.
  3. Drain on paper towels.
  4.  

Notes

  • For extra flaky dough, use ice-cold water.
  • Let the filling cool slightly before assembling to prevent soggy dough.
  • Serve with salsa, guacamole, or a sour cream dip for extra flavor.