Creamy Southern Black-Eyed Peas That Bring Comfort Home

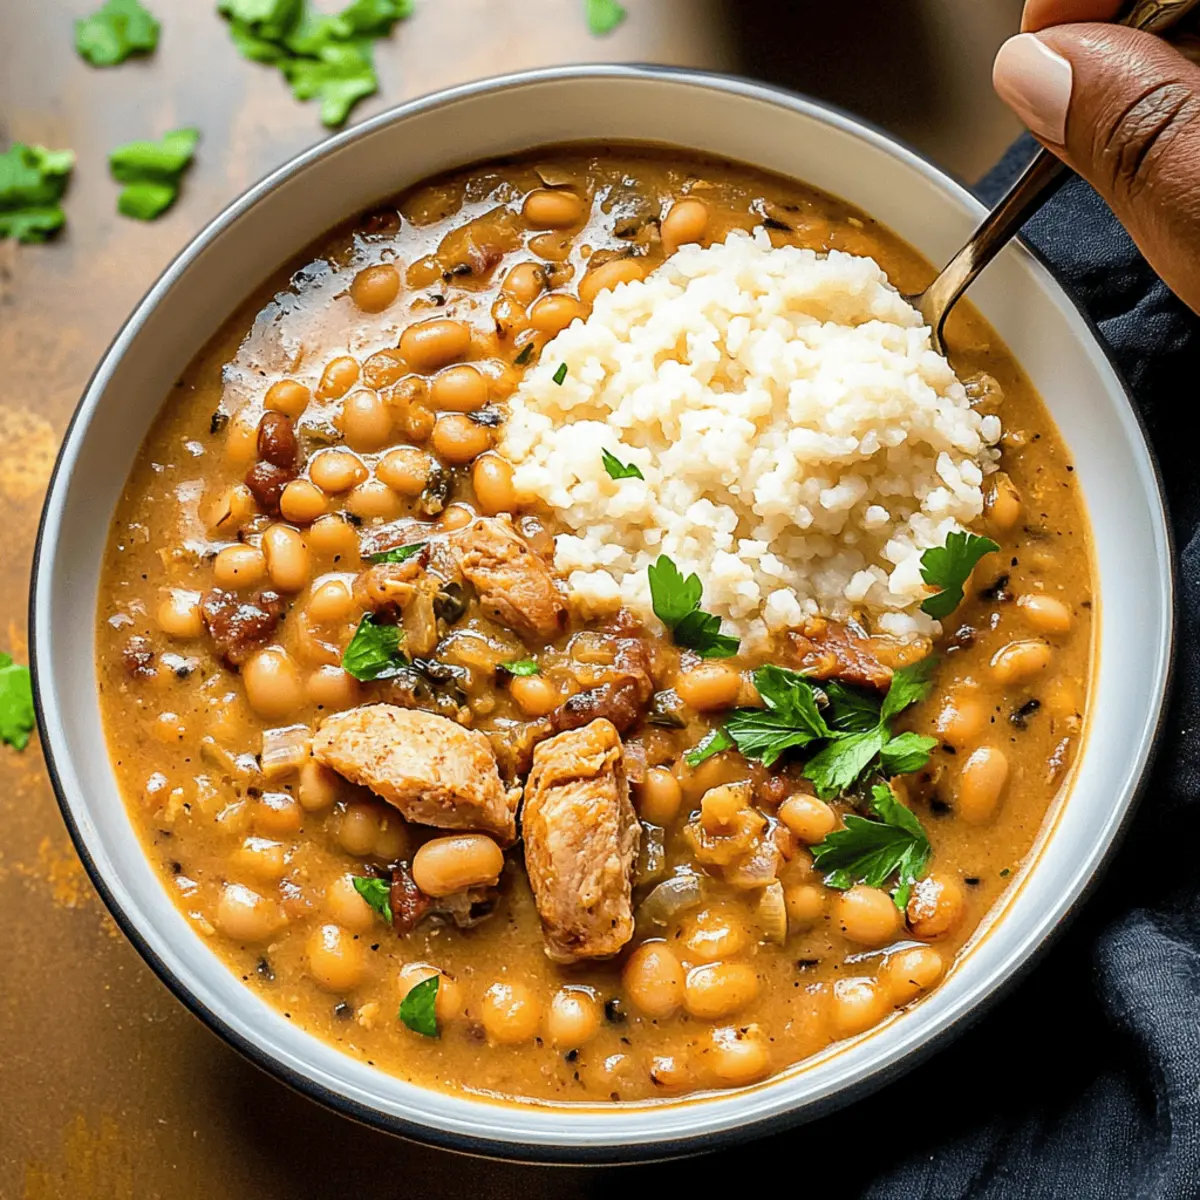
There’s something undeniably comforting about a steaming bowl of Southern Black-Eyed Peas, especially when they’re infused with savory smoked turkey and a touch of Cajun spice. As a passionate home cook, I can’t help but feel a surge of warmth just knowing this dish can be ready in a fraction of the time using an Instant Pot. This recipe for Creamy Southern Black-Eyed Peas truly embodies the richness of soul food while offering the perk of a no-soak method, perfect for those busy weeknights or family gatherings. Not only is it gluten-free, but these creamy peas are also a wholesome way to enjoy a hearty meal that has deep cultural roots. Are you ready to explore the flavors of the South and whip up a dish that will have everyone asking for seconds? Let’s get cooking!

Why are Black-Eyed Peas so irresistible?

Comforting: A steaming bowl of these Creamy Southern Black-Eyed Peas wraps you in warmth, making them a staple for any meal.

Versatile: They pair beautifully with cornbread or rice, transforming this dish into a hearty centerpiece or a delightful side for family gatherings.

Quick and Easy: With the Instant Pot, you’ll have tender, creamy peas ready in no time—no soaking required! This is a game-changer on those busy weeknights.

Flavorful Depth: The smoky richness from the turkey and the zing of cajun spices create a deliciously complex flavor profile that everyone will love.

Cultural Tradition: Not only are they a delightful treat, but they hold a special place in Southern culture, often symbolizing good luck—perfect for adding a dose of tradition to your meals.

So why not try pairing them with some Homemade Pastry or whip up a batch of Vanilla Pudding for dessert? Your taste buds will thank you!

Creamy Southern Black-Eyed Peas Ingredients

For the Peas
Black-Eyed Peas – These creamy legumes are the star of your dish, bringing protein and fiber without the need for soaking in the Instant Pot.
Smoked Turkey – Adds a depth of flavor and silky richness; feel free to swap in ham hocks for a traditional taste.
Cajun Spice Blend – Imparts a beautiful kick; adjust the amount based on your preference for spice.

For the Aromatics
Onion – Essential for building the flavor base; use fresh for the best results.
Garlic – Adds aromatic intensity; fresh is preferred, but garlic powder can be a handy substitute if needed.
Bell Pepper – Offers sweetness and color; any variety will work, but red or green is most common.

For the Liquid
Chicken or Vegetable Broth – This enhances flavor and serves as the cooking liquid; opt for low-sodium for a healthier choice.

For Seasoning
Salt and Pepper – Elevate the overall taste; always adjust to your liking.

This delightful combination will lead you to a comforting serving of Creamy Southern Black-Eyed Peas that’s perfect for sharing with loved ones!

Step‑by‑Step Instructions for Creamy Southern Black Eyed Peas

Step 1: Rinse the Peas
Begin by rinsing and draining 1 pound of black-eyed peas under cold running water to remove any dirt or impurities. This step is crucial for achieving the best flavor in your Creamy Southern Black-Eyed Peas. Once clean, set them aside in a colander while you prepare the other ingredients.

Step 2: Sauté the Aromatics
In your Instant Pot, select the sauté function and heat a splash of oil over medium heat. Add 1 diced onion, 2 minced garlic cloves, and 1 chopped bell pepper, sautéing for about 5-7 minutes until they are softened and fragrant. This aromatic base will ensure that your black-eyed peas are packed with delicious flavor.

Step 3: Combine All Ingredients
With the aromatics ready, it’s time to assemble your dish. Pour in the rinsed black-eyed peas, 2 cups of chicken or vegetable broth, 1-2 cups of smoked turkey, and a tablespoon of cajun spice blend into the pot. Stir everything together, ensuring the peas are well mixed with the broth and seasonings for rich, cohesive flavor.

Step 4: Pressure Cook the Peas
Secure the lid on your Instant Pot and set it to cook on high pressure for 30-35 minutes. Make sure the valve is sealing. When the cooking time is complete, allow for a natural release for about 10 minutes before carefully switching the valve to venting. This method releases pressure gradually, keeping your Creamy Southern Black-Eyed Peas tender and creamy.

Step 5: Adjust Seasoning and Serve
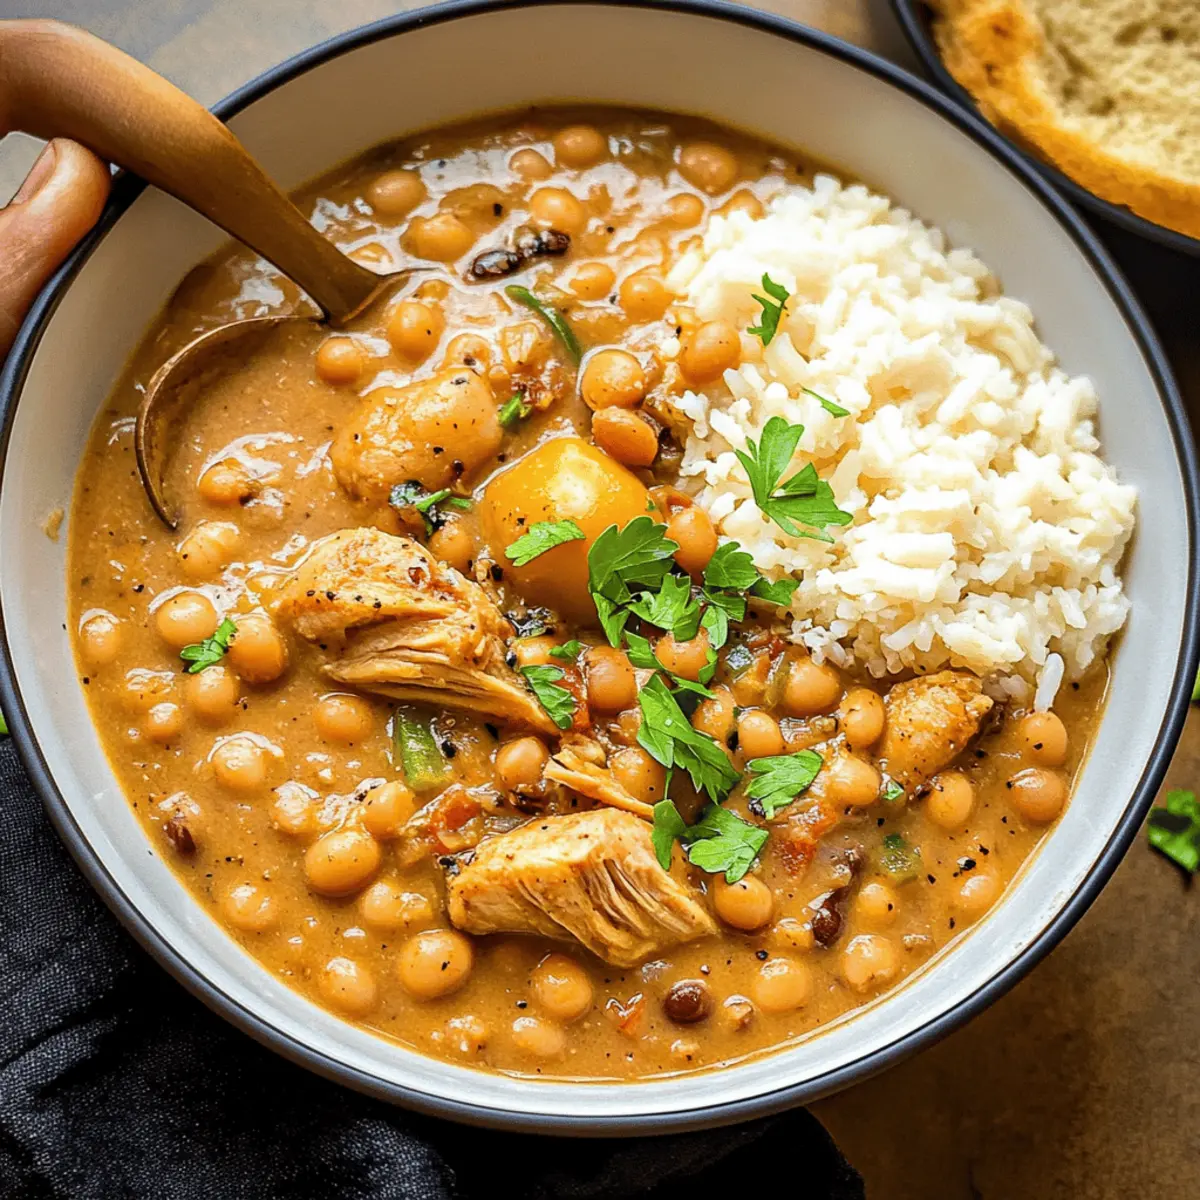
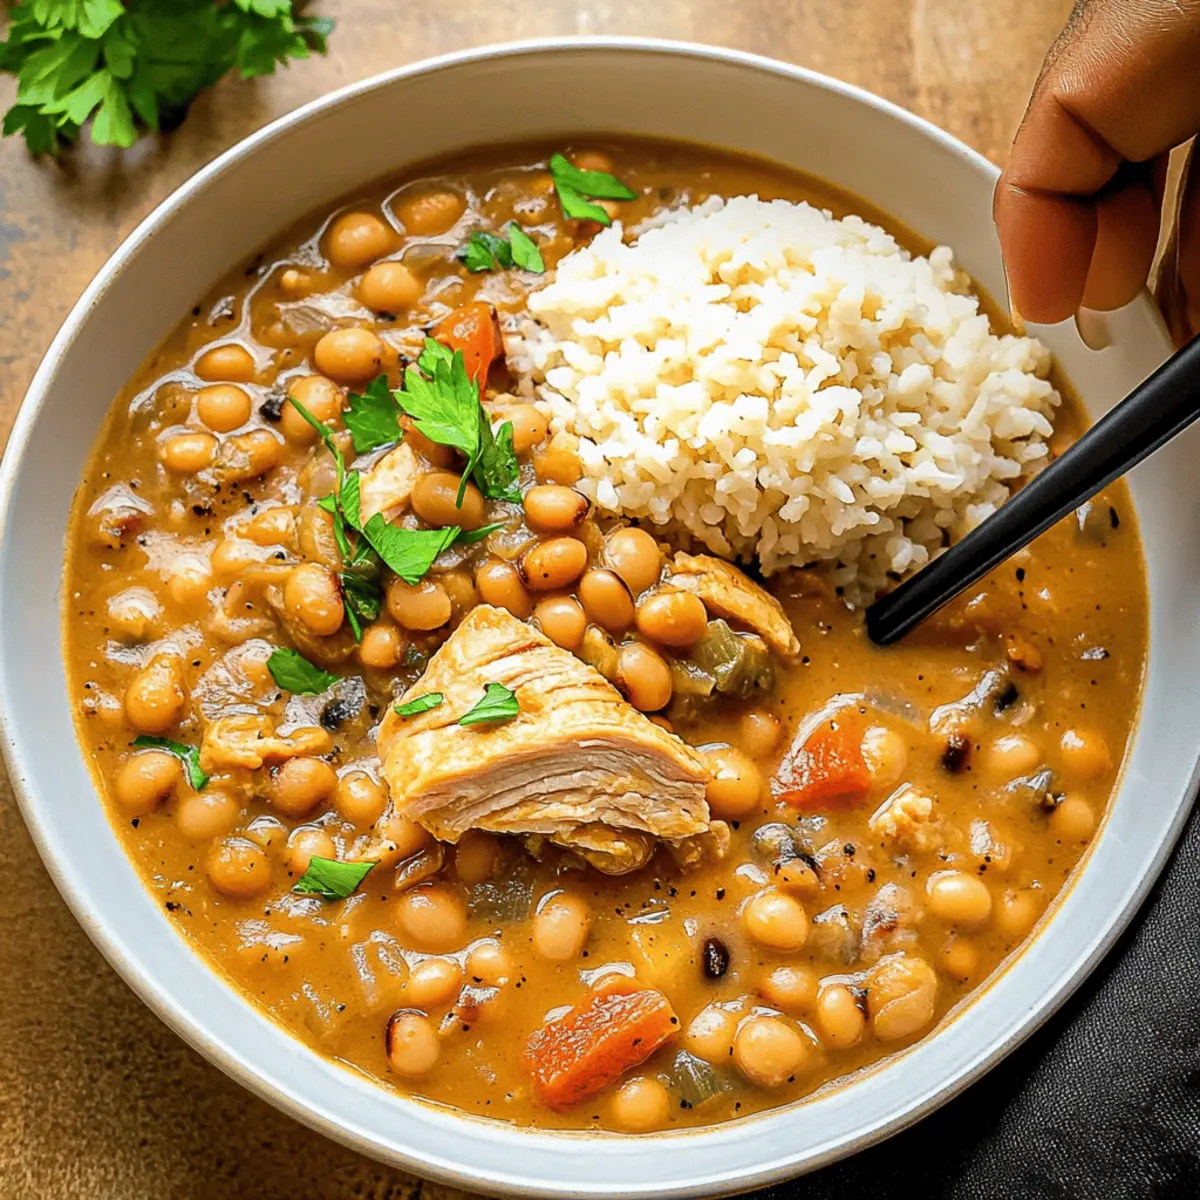
After releasing the pressure, carefully open the lid and stir the peas. Taste and adjust seasoning with salt and pepper as needed. The final consistency should be creamy and rich, perfect for serving. Ladle the peas into bowls, optionally pairing them with warm cornbread or over a bed of fluffy rice for a comforting Southern meal.

Step 6: Stovetop Option
If using the stovetop method, begin by soaking the black-eyed peas overnight in water. Drain and add them to a large pot along with the sautéed aromatics. Pour in the broth, turkey, and spices, cooking over medium heat for 45 minutes to 1 hour, stirring occasionally. Make sure to check liquid levels to keep the dish from sticking to the pot. This alternative method will yield equally delicious Creamy Southern Black-Eyed Peas!

What to Serve with Creamy Southern Black-Eyed Peas

Cozy up to a Southern feast that complements your creamy black-eyed peas and warms the heart.

  • Cornbread: The sweet, fluffy texture of cornbread is perfect for soaking up the creamy sauce of your black-eyed peas.

  • Collard Greens: These tender greens bring an earthy balance and are a traditional pairing with black-eyed peas, providing nutrition and flavor in every bite.

  • Fried Catfish: Crispy fried catfish adds a savory crunch to your plate, creating a delightful harmony between textures.

  • Rice: Serve your creamy black-eyed peas over a bed of fluffy white rice for a filling meal that ties the flavors together beautifully.

  • Southern-Style Coleslaw: A tangy coleslaw brings a refreshing crunch, perfectly contrasting the rich creaminess of the peas.

  • Pickled Vegetables: Bright, tangy pickles add a burst of flavor, cutting through the creaminess and enhancing the overall dish.

For the drink, consider pairing with a Sweet Tea to elevate the Southern experience or finish off your meal with a slice of Pecan Pie for a touch of sweetness that will leave your guests begging for more.

How to Store and Freeze Creamy Southern Black-Eyed Peas

Fridge: Store leftovers in an airtight container for up to 3 days. This will keep your Creamy Southern Black-Eyed Peas fresh and flavorful.

Freezer: For longer storage, freeze the dish in an airtight container for up to 3 months. Be sure to leave some space for the peas to expand as they freeze.

Reheating: When you’re ready to enjoy again, reheating is simple! Thaw overnight in the refrigerator, then warm on the stovetop or in the microwave until heated through. Add a splash of broth if needed to regain creaminess.

Portioning: Consider portioning out your frozen peas into single servings before freezing for convenient, quick meals later.

Expert Tips for Creamy Southern Black-Eyed Peas

  • Check Liquid Levels: Always monitor the liquid while cooking on the stovetop to prevent sticking or burning. Adding more broth as needed will keep your creamy black-eyed peas moist.

  • Adjust Spice to Taste: Start with less cajun spice and add more gradually. This allows you to customize the heat level of your Creamy Southern Black-Eyed Peas to suit your family’s taste.

  • Sauté Right: Properly sautéing your aromatics enhances flavor. Ensure they’re softened and fragrant before adding the peas for maximum depth.

  • Natural Release: When using the Instant Pot, allow for natural pressure release. This method keeps your peas tender and prevents mushiness, resulting in the perfect creamy texture.

  • Coin for Luck: If you’d like to follow tradition, consider adding a cleaned coin. Just remember to inform your guests it’s there before serving!

Make Ahead Options

These Creamy Southern Black-Eyed Peas are perfect for meal prep enthusiasts! You can rinse and drain the black-eyed peas up to 24 hours in advance, storing them in an airtight container in the refrigerator to keep them fresh. Additionally, the sautéed aromatics (onion, garlic, and bell pepper) can be prepped and stored in the fridge for up to 3 days. When you’re ready to serve, simply combine the peas with the prepared aromatics, smoked turkey, cajun spices, and broth in the Instant Pot or a large pot on the stovetop. This way, you achieve the same delicious flavor while saving valuable time on busy weeknights!

Creamy Southern Black-Eyed Peas Variations

Explore your culinary creativity with these delightful twists to our Creamy Southern Black-Eyed Peas recipe!

  • Smoked Turkey Swap: Use ham hocks or crispy bacon for a savory twist. Each option brings a different smoky depth to the peas.

  • Vegetarian Delight: Substitute smoked turkey with sautéed mushrooms or jackfruit, offering a hearty texture without meat. It’s a wonderful way to enjoy Southern flavors while keeping it plant-based.

  • Spice It Up: Boost the heat with jalapeños or a dash of cayenne pepper. This little kick can transform the dish into a spicy sensation that will warm you from the inside out.

  • Herb Infusion: Add fresh thyme or bay leaves during cooking for an aromatic lift that complements the earthy flavors of the peas. This simple addition provides delightful herbaceous notes.

  • Creamy Texture: For an ultra-creamy finish, stir in a splash of coconut milk or a dollop of sour cream just before serving. It adds richness that pairs beautifully with the spices.

  • Veggie Boost: Toss in diced carrots, celery, or even spinach for added nutrients and vibrant color. These veggies not only enhance health benefits but also bring lovely textures to your dish.

  • Lemon Zest: Brighten the flavor profile with a sprinkle of lemon zest before serving. This fresh touch adds brightness that balances the richness beautifully.

Feeling inspired? Pair your enhanced black-eyed peas with some delicious Coconut Chocolate Rolls for dessert or round out your meal with a side of savory Vanilla Cake Filling!

Creamy Southern Black-Eyed Peas Recipe FAQs

How do I choose the best black-eyed peas?
Absolutely! When selecting black-eyed peas, look for ones that are uniform in size and free from dark spots or blemishes. They should have a light beige color and feel firm to the touch. If you’re purchasing dried peas, make sure they are fresh to avoid any off flavors.

How can I store leftover black-eyed peas?
Very simple! Store your Creamy Southern Black-Eyed Peas in an airtight container in the refrigerator for up to 3 days. Ensure they completely cool down before sealing to maintain their creamy consistency during storage. This way, you can enjoy the flavors for your next meal without a hitch!

Can I freeze homemade black-eyed peas?
Absolutely! For freezing, allow your peas to cool completely, then transfer them to an airtight container or freezer-safe bags. They can be stored for up to 3 months. Make sure to leave some room in the container for expansion. When you’re ready to enjoy, thaw them overnight in the fridge and reheat gently on the stove.

What if my black-eyed peas turn out too mushy?
A common issue! If your peas are mushy, it could be that they’ve overcooked or had too much liquid. To remedy this, you may want to reduce the cooking time next time or check your broth measurements. Alternatively, you can mash some of the peas to create a creamier texture, then add them back to the pot for a delicious twist!

Are black-eyed peas safe for pets?
Very! In small quantities, cooked black-eyed peas can be a safe and healthy snack for dogs. Just make sure they are plain, without added spices or seasonings. However, always consult your veterinarian before introducing any new food to your pet’s diet.

How do I adjust the spice level in my black-eyed peas?
For personal taste! If you want to control the heat, start with a smaller quantity of cajun spice blend and gradually add more until you reach your desired flavor. Remember, it’s easier to add spice than to take it away, so always taste as you go to ensure it suits everyone’s palate!

Creamy Southern Black Eyed Peas

Creamy Southern Black-Eyed Peas That Bring Comfort Home

Creamy Southern Black-Eyed Peas are a comforting and flavorful dish with smoked turkey and Cajun spice, perfect for busy weeknights.
Prep Time 10 minutes
Cook Time 35 minutes
Total Time 45 minutes
Servings: 6 servings
Course: Dinner
Cuisine: Southern
Calories: 220

Ingredients
  

For the Peas
  • 1 pound Black-Eyed Peas
  • 1-2 cups Smoked Turkey Can substitute with ham hocks
  • 1 tablespoon Cajun Spice Blend Adjust based on preference
For the Aromatics
  • 1 medium Onion Diced
  • 2 cloves Garlic Minced
  • 1 medium Bell Pepper Chopped
For the Liquid
  • 2 cups Chicken or Vegetable Broth Opt for low-sodium
For Seasoning
  • to taste Salt
  • to taste Pepper

Equipment

  • Instant Pot

Method
 

Step-by-Step Instructions for Creamy Southern Black Eyed Peas
  1. Rinse and drain 1 pound of black-eyed peas under cold water, then set aside.
  2. Select the sauté function on your Instant Pot and heat oil. Add a diced onion, minced garlic, and chopped bell pepper, sauté for 5-7 minutes.
  3. Add rinsed black-eyed peas, chicken or vegetable broth, smoked turkey, and cajun spice. Stir to mix well.
  4. Secure the lid and set to high pressure for 30-35 minutes. Allow a natural release for 10 minutes before venting.
  5. Open the lid, stir the peas, and adjust seasoning with salt and pepper. Serve warm with cornbread or rice.
  6. For stovetop, soak peas overnight, combine with sautéed aromatics and other ingredients in a large pot, cook for 45 minutes to 1 hour.

Notes

Check liquid levels while cooking, adjust spice to taste, and consider adding a cleaned coin for tradition.

Mouthwatering Stuffed Mushrooms for the Ultimate Party Bite

You know that moment when the oven timer dings, and you’re met with the unmistakable aroma of crisp bacon and bubbling cream cheese? That’s exactly what you can expect with these Mouthwatering Stuffed Mushrooms! This crowd-pleasing appetizer is not only super easy to make, but it also brings a delightful twist to classic American cuisine, perfect for gatherings or a cozy night in. With juicy mushroom caps filled with a savory, creamy mixture that even non-mushroom lovers will adore, they are a guaranteed hit. Plus, they can be prepped in no time, making them an ideal choice for last-minute entertaining. Are you ready to impress your friends and family with this irresistible recipe? Let’s dive in!

Why Are These Stuffed Mushrooms Irresistible?

Irresistible Flavor: The combination of crispy bacon and creamy cheese creates a savory explosion in every bite.
Easy to Make: This recipe is perfect for home cooks of any skill level, requiring minimal prep time.
Crowd-Pleaser: Great for parties, these mushrooms will satisfy both mushroom aficionados and skeptics alike!
Versatile Options: Customize with herbs or vegetables, ensuring there’s a variation for everyone.
Quick to Prepare: Ready in just 30 minutes, making them a fantastic last-minute appetizer option for gatherings.

Mouthwatering Stuffed Mushrooms Ingredients

For the Filling

  • Mushrooms – Fresh whole mushrooms provide the base and natural flavor; ensure they are cleaned properly.
  • Bacon – Adds savory depth and crunch; substitute with turkey bacon for a lighter option.
  • Cream Cheese – Softened to create a creamy, smooth filling; can be replaced with Greek yogurt for a lighter version.
  • Seasoned Dry Breadcrumbs – Provides texture and helps bind the mixture; use gluten-free breadcrumbs if needed.
  • Grated Parmesan Cheese – Adds richness and umami; swap for nutritional yeast for a dairy-free version.
  • Onion Powder – Offers aromatic flavor; fresh onions can also be sautéed and used for a stronger taste.
  • Ground Cayenne Pepper – Adds a hint of heat; omit for a milder version.

For the Topping

  • Black Pepper – Enhances flavor; adjust to taste.
  • Olive Oil – Used to brush mushroom caps; any neutral oil can be used.

Now you have all the ingredients you need for these Mouthwatering Stuffed Mushrooms, ready to create that delicious crowd-pleasing appetizer!

Step‑by‑Step Instructions for Mouthwatering Stuffed Mushrooms

Step 1: Preheat Your Oven
Begin by preheating your oven to 350°F (175°C). This will ensure it’s hot and ready for baking your delicious Mouthwatering Stuffed Mushrooms. While the oven heats up, gather your ingredients and prepare your baking sheet by greasing it lightly to prevent sticking.

Step 2: Prepare the Mushrooms
Carefully clean the fresh mushrooms with a damp cloth to remove any dirt. Remove the stems gently, creating a hollow cavity in each mushroom cap. This step is essential as it creates the perfect vessel for the savory filling. Set the prepared mushroom caps aside, ready to be stuffed.

Step 3: Cook the Bacon
In a skillet over medium heat, cook the bacon pieces until they are crisp and golden, which should take about 5-7 minutes. Stir occasionally to ensure even cooking. Once cooked, transfer the bacon to a paper towel to drain excess grease, then crumble it into small pieces for mixing into your filling.

Step 4: Mix the Filling
In a mixing bowl, combine the softened cream cheese, crumbled bacon, 1/3 cup of seasoned dry breadcrumbs, grated Parmesan cheese, black pepper, onion powder, and cayenne pepper. Use a spatula to blend the ingredients until they are well combined and creamy. This mouthwatering mixture is the star of your stuffed mushrooms!

Step 5: Stuff the Mushrooms
Using a spoon or a small ice cream scoop, generously fill each mushroom cap with the cream cheese mixture. Be careful not to overfill, as this can cause the filling to spill out during baking. Make sure each cap is packed with flavor, ensuring a delightful bite in every Mushroom.

Step 6: Add Breadcrumb Topping
Dip the tops of the filled mushrooms into the remaining breadcrumbs to create a crispy crust. This step adds an extra layer of texture and flavor to your Mouthwatering Stuffed Mushrooms. Ensure they are well-coated for optimal crunchiness when baked.

Step 7: Bake the Stuffed Mushrooms
Arrange the stuffed mushrooms on the greased baking sheet, making sure they are evenly spaced. Place them in the preheated oven and bake for 25-30 minutes, or until the mushrooms are hot, bubbling, and golden on top. You will know they’re ready when they emit a tantalizing aroma.

Step 8: Let Them Cool
Once baked to perfection, remove the stuffed mushrooms from the oven and allow them to cool for about 10 minutes. This cooling period helps the filling set slightly, making them easier to handle and preventing burns when you take a bite.

Step 9: Serve and Enjoy
After cooling, your Mouthwatering Stuffed Mushrooms are ready to be served. Place them on a lovely platter, and watch as the crowd gathers around to enjoy this irresistibly creamy, crunchy appetizer. Ideal for parties or cozy nights in!

Make Ahead Options

These Mouthwatering Stuffed Mushrooms are perfect for meal prep enthusiasts! You can prepare the stuffing mixture up to 24 hours in advance; just refrigerate it in an airtight container. Additionally, the mushrooms can be cleaned and left uncooked in the fridge for up to 3 days. To assemble, simply fill the mushroom caps with the prepared cream cheese mixture and dip the tops in breadcrumbs right before baking. This method not only saves you valuable time during busy weeknights but also ensures that the flavors meld beautifully, making them just as delicious as when made fresh. When you’re ready to serve, bake them directly from the fridge for 25-30 minutes until hot and bubbling!

Expert Tips for Mouthwatering Stuffed Mushrooms

  • Avoid Overfilling: Be careful not to pack too much filling into the mushroom caps, as this may lead to overflow during baking.
  • Cool Slightly: Allow the stuffed mushrooms to cool for about 10 minutes before serving; this helps prevent burns from the bubbling hot filling.
  • Use Fresh Ingredients: Opt for fresh mushrooms and meats to enhance the overall flavor of your Mouthwatering Stuffed Mushrooms. Fresh ingredients make a noticeable difference!
  • Breadcrumb Choice: For a gluten-free option, choose gluten-free breadcrumbs; they will still provide the perfect crunch on top.
  • Customize the Filling: Feel free to add herbs or spices to the mixture for a personalized flavor twist, ensuring your stuffed mushrooms are tailored to your taste.

How to Store and Freeze Mouthwatering Stuffed Mushrooms

Fridge: Store leftover stuffed mushrooms in an airtight container in the refrigerator for up to 3 days. This helps retain their flavor while keeping them fresh.

Freezer: For longer storage, place stuffed mushrooms in a single layer on a baking sheet and freeze until solid, then transfer to a freezer-safe bag. They can be kept for up to 3 months.

Reheating: To enjoy them again, reheat in the oven at 350°F (175°C) for 15-20 minutes until heated through. This ensures they regain their crispy texture and gooey filling.

Airtight Guidance: Always ensure your storage containers are airtight to prevent moisture from ruining your delicious Mouthwatering Stuffed Mushrooms!

Mouthwatering Stuffed Mushrooms Variations

Feel free to let your creativity shine and customize these stuffed mushrooms to suit your taste buds!

  • Vegetarian Delight: Swap bacon for sautéed vegetables like spinach or bell peppers for a refreshing twist. This not only keeps the dish vibrant but also adds unique flavors to enjoy.

  • Herb-Infused: Add fresh herbs such as thyme, rosemary, or parsley to the filling for a burst of aromatic goodness. A hint of herbs goes a long way in elevating the overall taste.

  • Cheesy Variations: Experiment with various cheese options like cheddar, gouda, or feta for a different flavor profile every time. Cheese lovers will rejoice at such delightful combinations!

  • Spice Up the Heat: For those who crave a touch of spiciness, add diced jalapeños or a sprinkle of crushed red pepper flakes to the filling. It’s a tasty way to give your mushrooms a kick.

  • Nutty Crunch: Incorporate chopped walnuts or pecans into the filling for added crunch and depth. This unexpected twist enhances both the texture and nutrition of your appetizer.

  • Sweet & Savory: Introduce caramelized onions or even chopped sun-dried tomatoes to the filling. The sweetness pairs beautifully with the savory cream cheese and adds complexity.

  • Dairy-Free Delight: Replace the cream cheese with a creamy nut-based cheese or Greek yogurt for a dairy-free option. Keeping it lighter doesn’t mean sacrificing flavor!

  • Gluten-Free: Opt for gluten-free breadcrumbs or crushed nuts instead of traditional breadcrumbs. This ensures everyone, regardless of dietary restrictions, can enjoy this delicious appetizer.

With these variations, your Mouthwatering Stuffed Mushrooms will always remain new and exciting! If you love this recipe, consider trying it alongside a refreshing side salad or on a beautiful charcuterie board to really impress your guests.

What to Serve with Mouthwatering Stuffed Mushrooms

A harmonious meal should always pair beautifully, and these stuffed mushrooms are no exception.

  • Crispy Garlic Bread: The buttery, garlicky flavor complements the savory mushrooms, making for a delightful contrast in textures.

  • Fresh Caesar Salad: A light Caesar salad adds crispness and a tangy note that balances the richness of the stuffed mushrooms. The crunch of romaine pairs perfectly!

  • Roasted Vegetables: Seasonal veggies, like zucchini and bell peppers, provide freshness and color, enhancing the overall presentation while offering health benefits.

  • Creamy Coleslaw: This sweet and tangy slaw rounds out the meal, adding a refreshing crunch that pairs wonderfully with the creamy filling.

  • Red Wine: A nice glass of medium-bodied red wine, such as Pinot Noir, enhances the savory flavors of the mushrooms and adds a touch of elegance.

  • Cheesy Risotto: A creamy risotto can create a luxurious feel to your meal, making every bite feel indulgent. Its comforting texture contrasts perfectly with the stuffed mushrooms.

  • Chocolate Mousse: For dessert, a rich and airy chocolate mousse can satisfy your sweet tooth, rounding out a delicious evening with a bit of decadence. This classic treat will leave guests impressed.

Mouthwatering Bacon & Cream Cheese Stuffed Mushrooms Recipe FAQs

What type of mushrooms should I use for the best flavor?
When choosing mushrooms, opt for fresh, whole button or cremini mushrooms. Look for firm caps with no dark spots or wrinkles, indicating freshness. These types of mushrooms have a great flavor and texture that complements the creamy filling well.

How should I store leftover stuffed mushrooms?
Store any leftover stuffed mushrooms in an airtight container in the refrigerator for up to 3 days. If the mushrooms are properly sealed, they will maintain their flavor and freshness. To enjoy them again, simply reheat in the oven at 350°F (175°C) for about 15-20 minutes until warm.

Can I freeze stuffed mushrooms, and if so, how?
Absolutely! To freeze your Mouthwatering Stuffed Mushrooms, first, place them in a single layer on a baking sheet and flash-freeze for about 1-2 hours until solid. After freezing, transfer them to a freezer-safe bag, keeping as much air out as possible. They can be stored for up to 3 months. When you’re ready to eat, bake them directly from frozen at 350°F (175°C) for 25-30 minutes or until heated through.

What if my cream cheese mixture is too thick?
If the cream cheese mixture seems too thick to easily stuff into the mushrooms, try adding a tablespoon of milk or a splash of sour cream to loosen it up. Mix until the consistency is creamy but still holds its shape, allowing for easy stuffing into mushroom caps without overflow.

Are these stuffed mushrooms suitable for a gluten-free diet?
Yes! To make a gluten-free version of these Mouthwatering Stuffed Mushrooms, simply substitute regular breadcrumbs with gluten-free breadcrumbs. This adjustment allows everyone to enjoy this tasty appetizer without concerns over gluten intolerance.

Can I add vegetables to the filling for extra nutrition?
Very! You can absolutely enhance the filling by adding sautéed vegetables such as spinach, bell peppers, or diced zucchini. This not only boosts the nutritional value but also adds delightful flavors and textures to the stuffed mushrooms. Just be sure to sauté the vegetables before mixing them into the filling, so they don’t release too much moisture during baking.

Mouthwatering Stuffed Mushrooms

Mouthwatering Stuffed Mushrooms for the Ultimate Party Bite

Delicious Mouthwatering Stuffed Mushrooms, an easy crowd-pleaser, perfect for parties or cozy nights in.
Prep Time 10 minutes
Cook Time 30 minutes
Total Time 40 minutes
Servings: 4 mushrooms
Course: Other
Cuisine: American
Calories: 120

Ingredients
  

For the Filling
  • 12 whole Fresh Mushrooms Cleaned properly
  • 4 slices Bacon Substitute with turkey bacon for a lighter option
  • 8 oz Cream Cheese Softened; can be replaced with Greek yogurt for a lighter version
  • 1/3 cup Seasoned Dry Breadcrumbs Use gluten-free breadcrumbs if needed
  • 1/4 cup Grated Parmesan Cheese Swap for nutritional yeast for a dairy-free version
  • 1 teaspoon Onion Powder Fresh onions can be sautéed and used for a stronger taste
  • 1/4 teaspoon Ground Cayenne Pepper Omit for a milder version
For the Topping
  • 1 teaspoon Black Pepper Adjust to taste
  • 1 tablespoon Olive Oil Used to brush mushroom caps

Equipment

  • Skillet
  • mixing bowl
  • baking sheet
  • spatula
  • Spoon or Ice Cream Scoop

Method
 

Step-by-Step Instructions
  1. Preheat your oven to 350°F (175°C) and prepare a greased baking sheet.
  2. Clean the mushrooms and remove the stems to create a hollow cavity.
  3. Cook the bacon in a skillet until crisp, then crumble.
  4. Mix cream cheese, bacon, breadcrumbs, Parmesan, black pepper, onion powder, and cayenne in a bowl.
  5. Stuff each mushroom cap with the mixture.
  6. Dip the tops of the mushrooms in remaining breadcrumbs.
  7. Bake for 25-30 minutes until hot and golden.
  8. Cool for 10 minutes before serving.

Notes

Ensure not to overfill the mushrooms and use fresh ingredients for best flavor.

Thor Jane Foster’s Pop-Tart Parfait: A Fun Breakfast Treat

As I took my first sip, the vibrant green hue of Gamora’s Deadliest Woman Green Smoothie instantly caught my eye, and I could feel my energy levels zooming higher. This nutrient-dense gem is not just a feast for the senses; it’s a ticket to supercharge your mornings! Packed with the goodness of leafy greens and the natural sweetness of fruits, this smoothie serves as an effortless breakfast solution for anyone looking to break free from the fast-food frenzy. Not only does it deliver a refreshing burst of flavor, but it also supports your health goals with every frothy sip. Ready to whip up your own batch of this superhero-inspired delight? Let’s dive into the recipe that will transform your morning routine!

Why Is This Smoothie a Must-Try?

Energizing Kick: This smoothie doesn’t just look good; it gives you a powerful boost that can rival your morning coffee. Nutritious Ingredients: Packed with spinach, bananas, and chia seeds, it’s a nutrient-dense drink that supports your health goals. Quick and Easy: Whip it up in under 5 minutes—perfect for those busy mornings! Flavorful and Fresh: The balance of earthy greens with sweet fruits makes every sip enjoyable. Customizable Options: Want to mix it up? Try adding different fruits or protein powder for extra benefits. Your taste buds and body will thank you!

Gamora’s Deadliest Woman Green Smoothie Ingredients

For the Smoothie

  • Spinach – A nutrient boost; use kale for a bolder flavor.
  • Banana – Adds natural sweetness and creaminess; substitute with avocado for a creamier texture.
  • Apple – Provides freshness and fiber; choose any sweet variety, like Fuji or Honeycrisp.
  • Chia Seeds – Great source of fiber and omega-3s; can substitute with flax seeds for a similar effect.
  • Almond Milk – Acts as the liquid base; any plant-based milk can be used (e.g., coconut, oat).
  • Peanut Butter – Adds creaminess and protein; almond butter or sunflower seed butter can serve as alternatives.

Step‑by‑Step Instructions for Gamora’s Deadliest Woman Green Smoothie

Step 1: Prepare the Ingredients
Begin by gathering all your ingredients for Gamora’s Deadliest Woman Green Smoothie. Rinse one cup of fresh spinach thoroughly to remove any dirt and pat dry. Peel and slice a ripe banana, and core an apple before chopping it into chunks. Measure out two tablespoons of chia seeds and have your almond milk and peanut butter ready for blending.

Step 2: Blend the Greens and Fruits
In a blender, add the prepared spinach, banana slices, apple chunks, and chia seeds. Blend on high for about 30 seconds until the greens are pulverized and the mixture starts to obtain a vibrant hue. Keep an eye on the consistency; you want it to be smooth and well-combined without any chunks.

Step 3: Add the Liquid and Creaminess
Next, pour in one cup of almond milk to achieve the perfect liquid base for your smoothie. Add two tablespoons of peanut butter for that creamy texture. Blend again on high for an additional 30 seconds, until the mixture is frothy and well-blended. You should see a smooth, thick consistency that’s beautifully green.

Step 4: Taste and Sweeten
Once blended, taste your smooth blend and decide if you’d like to boost the sweetness. If desired, add a drizzle of honey or maple syrup, blending for a few more seconds to incorporate. This step allows you to customize the flavor of your Gamora’s Deadliest Woman Green Smoothie to your liking.

Step 5: Serve with Style
Pour the smoothie into chilled glasses for an extra refreshing touch. The vibrant green color should catch your eye and excite your taste buds. Optionally, garnish with a sprinkle of chia seeds on top or a slice of apple on the rim for an appealing presentation.

What to Serve with Gamora’s Deadliest Woman Green Smoothie

To elevate your smoothie experience into a delightful meal, consider these complementary dishes that enhance flavors and textures.

  • Whole-Grain Toast: Perfectly crisped, the nutty flavor of whole-grain toast pairs beautifully with the freshness of the smoothie. Add avocado spread for an extra creamy touch!
  • Greek Yogurt Parfait: Creamy and tangy, Greek yogurt layered with granola and berries makes a wholesome pairing that mirrors the smoothie’s nutrient density. The contrast of textures will leave you satisfied!
  • Chia Seed Pudding: Echoing the chia seeds in your smoothie, this pudding offers a delightful crunch and an indulgent, sweet finish that brightens your breakfast table.
  • Fruit Salad: A colorful medley of fresh seasonal fruits adds sweetness and vibrancy next to your rich green smoothie. Each bite will feel like a cheerful celebration of flavors.
  • Nut Butter Oatmeal: Creamy oatmeal topped with your favorite nut butter complements the smooth richness of the smoothie while providing wholesome fiber and protein to keep you energized.
  • Herbal Tea: A soothing cup of herbal tea, like peppermint or chamomile, creates a lovely, calming balance to the morning hustle, enhancing your refreshing smoothie experience.
  • Protein Pancakes: Fluffy protein-packed pancakes add substance, making your breakfast feel brunch-worthy while beautifully contrasting with the smoothie’s refreshing qualities.
  • Dark Chocolate Squares: For a sweet indulgence, enjoy a small piece of dark chocolate alongside the smoothie; the rich flavor pairs marvelously with the fruitiness of your drink for a touch of decadence.

Make Ahead Options

These Gamora’s Deadliest Woman Green Smoothies are perfect for busy home cooks looking to save time in their mornings! You can prep the fruits and spinach up to 24 hours in advance by washing, chopping, and storing them in an airtight container in the refrigerator. To maintain quality and prevent browning, squeeze a bit of lemon juice over the cut apple. When you’re ready to enjoy, simply add the prepped ingredients to the blender with the almond milk, peanut butter, and chia seeds, then blend as directed. By preparing ahead, you can enjoy a nutrient-dense smoothie with minimal effort—perfect for energizing your day!

Expert Tips for Gamora’s Deadliest Woman Green Smoothie

  • Choose Ripe Fruits: Using overripe bananas enhances sweetness naturally, eliminating the need for excessive added sugars.
  • Adjust Consistency: If your smoothie turns out too thick, gradually add more almond milk until the perfect creamy texture is achieved.
  • Freeze for Chill: For a refreshing experience, freeze your banana overnight or add ice cubes while blending for a chilled smoothie.
  • Flavor Variations: Explore flavor profiles by substituting fruits or greens; try pineapple or romaine for a different twist on this smoothie.
  • Keep It Fresh: Enjoy your smoothie immediately for the best flavor and nutritional value; however, you can store it in the fridge for up to 24 hours.

How to Store and Freeze Gamora’s Deadliest Woman Green Smoothie

  • Fridge: Store any leftovers in an airtight container for up to 24 hours. Shake well before consuming to redistribute the ingredients.
  • Freezer: For longer storage, pour the smoothie into ice cube trays or freezer-safe containers for up to 3 months. Blend again after thawing for a fresh taste.
  • Make-Ahead: Pre-prepare the ingredients and freeze them in a bag. Just add almond milk and blend for a quick, nutrient-dense breakfast when you need it.
  • Reheating: Smoothies are best enjoyed cold; however, if you prefer a warm option, gently heat on low while stirring—keep in mind this may alter the texture.

Variations & Substitutions for Gamora’s Deadliest Woman Green Smoothie

Customize your smoothie adventure with these delightful tweaks and swaps, each one like an exciting new chapter in your breakfast story!

  • Dairy-Free: Use coconut or oat milk instead of almond milk for a creamy, dairy-free finish.
  • Tropical Twist: Swap the apple for pineapple and add a splash of coconut water to elevate your smoothie to paradise! Pineapple lends a juicy sweetness that pairs beautifully with spinach.
  • Nut-Free: Replace peanut butter with sunflower seed butter to keep it nut-free without losing that satisfying creaminess. This keeps your smoothie accessible while still delivering a protein punch.
  • Superfood Boost: Add a tablespoon of spirulina or a handful of blueberries for an antioxidant kick. Both options will amp up the nutrient density and offer unique flavor profiles!
  • Protein-Packed: Include a scoop of your favorite protein powder for an extra boost, perfect for post-workout recovery. This will help you feel fuller longer and power through your day.
  • Herbal Infusion: Try adding fresh mint or basil for an herbal zest. Just a few leaves can invigorate your smoothie with a refreshing touch!
  • Spicy Kick: For the adventurous, toss in a pinch of cayenne pepper or ginger to give your smoothie a warming heat. It’s a surprising yet delightful contrast to the sweetness of the fruits.
  • Sweet Swaps: If you’re looking for a different kind of sweetness, consider using dates or stevia instead of honey or maple syrup. These options can provide a unique flavor twist while keeping things healthy.

Don’t forget, all these variations can turn your daily smoothie into a vibrant experience! And if you want to explore even more breakfast options, check out Thor Jane Foster’s Pop-Tart Parfait. You’ll be surprised at how deliciously creative breakfast can be!

Gamora’s Deadliest Woman Green Smoothie Recipe FAQs

How do I choose the right spinach for this smoothie?
Absolutely! When selecting spinach, look for vibrant, dark green leaves that are fresh and crisp. Avoid any leaves with yellowing or wilting as they can affect the taste. Baby spinach is particularly tender and delicious, making it a great choice for smoothies.

How long can I store leftovers of the smoothie?
Very! You can store leftover Gamora’s Deadliest Woman Green Smoothie in an airtight container in the fridge for up to 24 hours. Just remember to give it a good shake before drinking, as the ingredients may settle.

Can I freeze the smoothie for later?
Of course! To freeze your Gamora’s Deadliest Woman Green Smoothie, pour it into ice cube trays or freezer-safe containers. It can be stored for up to 3 months. When you’re ready to enjoy it, simply thaw overnight in the fridge and blend again for that fresh taste!

What should I do if my smoothie is too thick?
Great question! If you find your smoothie is too thick for your liking, simply add more almond milk or a splash of water, then blend again until you reach your desired consistency. This ensures it’s smooth and easy to sip, just as you’d want it!

Is this smoothie safe for people with nut allergies?
Certainly! If you or anyone consuming the smoothie has a nut allergy, you can easily substitute almond milk with oat or coconut milk and use sunflower seed butter instead of peanut butter. These alternatives maintain the creamy texture without the allergens.

Can I make this smoothie ahead of time?
Absolutely! For a make-ahead option, prepare your smoothie ingredients (spinach, banana, apple, chia seeds, etc.) and freeze them in a resealable bag. In the morning, simply blend them with the almond milk and peanut butter for a quick and delicious breakfast that’s ready in minutes!

Thor Jane Foster’s Pop-Tart Parfait

Thor Jane Foster’s Pop-Tart Parfait: A Fun Breakfast Treat

Discover Thor Jane Foster’s Pop-Tart Parfait, a deliciously fun breakfast treat that energizes your morning.
Prep Time 5 minutes
Total Time 5 minutes
Servings: 2 parfaits
Course: Breakfast
Cuisine: American
Calories: 250

Ingredients
  

Smoothie Base
  • 1 cup Fresh spinach Rinse thoroughly
  • 1 Banana Peeled and sliced
  • 1 Apple Cored and chopped
  • 2 tablespoons Chia seeds
  • 1 cup Almond milk Any plant-based milk can be used
  • 2 tablespoons Peanut butter Substitute with almond or sunflower seed butter if desired

Equipment

  • Blender
  • Measuring cups
  • Measuring spoons
  • chilled glasses

Method
 

Preparation Steps
  1. Begin by gathering all your ingredients for Gamora’s Deadliest Woman Green Smoothie. Rinse one cup of fresh spinach thoroughly to remove any dirt and pat dry. Peel and slice a ripe banana, and core an apple before chopping it into chunks. Measure out two tablespoons of chia seeds and have your almond milk and peanut butter ready for blending.
  2. In a blender, add the prepared spinach, banana slices, apple chunks, and chia seeds. Blend on high for about 30 seconds until the greens are pulverized and the mixture starts to obtain a vibrant hue.
  3. Next, pour in one cup of almond milk to achieve the perfect liquid base for your smoothie. Add two tablespoons of peanut butter for that creamy texture. Blend again on high for an additional 30 seconds, until you achieve a smooth consistency.
  4. Once blended, taste your smoothie and decide if you'd like to boost the sweetness by adding honey or maple syrup, blending again to incorporate.
  5. Pour the smoothie into chilled glasses. Optionally, garnish with a sprinkle of chia seeds on top or a slice of apple for an appealing presentation.

Notes

For best results, serve immediately and enjoy the nutritional benefits fresh.

Korean-Inspired Kimchi Bulgogi Cheesesteak for Bold Flavors

As I stood in my kitchen, the scent of sizzling beef enveloped me, instantly transporting me to the bustling streets of Seoul. This Korean-Inspired Kimchi Bulgogi Cheesesteak combines those beloved flavors into a comforting and hearty sandwich that everyone will crave. With marinated bulgogi-style ribeye grilled to perfection and the creamy kick of kimchi aioli, this dish is not only a crowd-pleaser but also a quick prep solution for busy weeknights. Each bite features the delightful crunch of toasted hoagie rolls, offering an exciting twist on a classic favorite. Ready to elevate your meal game with this scrumptious blend of Korean and American culinary traditions? Let’s dive into the details of how to create this irresistible sandwich masterpiece!

Why is this sandwich so irresistible?

Bold flavors abound in this Korean-Inspired Kimchi Bulgogi Cheesesteak, making it the perfect choice for those tired of ordinary meals. Quick and easy to prepare, this sandwich fits seamlessly into busy weeknights without sacrificing flavor. Unique taste profiles from marinated ribeye and zesty kimchi aioli keep each bite exciting. Customizable options allow everyone to create their ideal sandwich, whether veggie enthusiasts or spice seekers. Comfort food never tasted so good! Pair it with crispy fries or an Asian-style salad for an unbeatable meal.

Korean-Inspired Kimchi Bulgogi Cheesesteak Ingredients

Get ready for a flavor explosion!

For the Sandwich

  • Hoagie Rolls – The sturdy base for our sandwich; toast them for extra crunch!
  • Marinated Bulgogi-Style Shaved Ribeye – Provides that rich, savory beef flavor; chicken or tofu works too if you’re feeling adventurous!
  • Provolone Cheese – Melts beautifully for creamy goodness; substitute with mozzarella or cheddar for a twist.
  • Scallions – Adds a fresh, crunchy element; chives or green onions can be used as alternatives.

For the Aioli and Sauce

  • Kewpie Mayonnaise – Creates a rich and creamy aioli base; Greek yogurt makes a lighter substitute.
  • Kimchi – Brings heat and tang; finely chopped pickles are a great non-spicy alternative.
  • Gochujang Sauce – Adds a sweet and spicy kick; sriracha can be used for milder flavor.

For the Veggie Medley

  • Bell Pepper – Offers sweetness and crunch; feel free to mix colors for visual appeal!
  • Onion – Provides sweetness and aroma; shallots can be a milder substitute.
  • Mushrooms – Earthy taste that enhances umami; cremini or shiitake mushrooms are delightful choices.

For Cooking

  • Garlic (4 cloves, grated) – Imparts aromatic depth; garlic powder is a quick alternative.
  • Neutral Oil – Essential for sautéing; olive oil or sesame oil adds an extra flavor boost.
  • Salt & Pepper – The magic touch that balances it all; don’t skimp on these basics!

Step‑by‑Step Instructions for Korean-Inspired Kimchi Bulgogi Cheesesteak

Step 1: Marinate the Ribeye
In a mixing bowl, combine grated garlic, chopped scallions, and marinade ingredients suitable for bulgogi-style flavor. Thinly slice the ribeye and add it to the marinade, ensuring each piece is well coated. Cover and refrigerate for at least 1 hour, allowing the flavors to meld beautifully. For best results, marinating overnight will deepen the savory notes of your Korean-Inspired Kimchi Bulgogi Cheesesteak.

Step 2: Prepare the Aioli
In a separate bowl, blend 1 cup of Kewpie mayonnaise with finely chopped kimchi, mixing until smooth. This tangy and creamy aioli will be the perfect spread for your sandwich. Set it aside to let the flavors marry while you prepare the other components of your Korean-Inspired Kimchi Bulgogi Cheesesteak, ensuring every bite is packed with deliciousness.

Step 3: Cook the Vegetables
Heat a tablespoon of neutral oil in a skillet over medium heat. Once the oil shimmers, add thinly sliced bell peppers, onions, and mushrooms. Sauté for 5–7 minutes, stirring occasionally, until the vegetables are tender and slightly caramelized. Remove them from the skillet and set aside; their sweetness will beautifully complement the savory beef in your Korean-Inspired Kimchi Bulgogi Cheesesteak.

Step 4: Cook the Ribeye
In the same skillet, increase the heat to medium-high after removing the vegetables. Add the marinated ribeye, ensuring it’s in a single layer. Stir-fry for 4–6 minutes, or until the meat is cooked through and caramelized with a nice brown crust. The sizzling sound will signal it’s ready; this juicy ribeye is the star of your Korean-Inspired Kimchi Bulgogi Cheesesteak.

Step 5: Assemble the Sandwich
To assemble your delicious creation, toast hoagie rolls until golden brown for that satisfying crunch. Layer the cooked ribeye on the bottom half, followed by slices of provolone cheese. Next, add the sautéed vegetables and charred scallions. Finish off this masterpiece with a generous dollop of kimchi aioli and a drizzle of gochujang sauce on top before closing the sandwich. Enjoy the burst of flavors!

Make Ahead Options

These Korean-Inspired Kimchi Bulgogi Cheesesteaks are a lifesaver for busy home cooks looking to streamline their meal prep! You can marinate the ribeye for up to 24 hours in advance, allowing the flavors to develop and deepen. Additionally, prepare the kimchi aioli and sauté the vegetables a day ahead; simply refrigerate them in airtight containers. When ready to serve, heat the sautéed veggies and stir-fry the marinated ribeye in a hot skillet—just 4-6 minutes to achieve that perfect caramelization. Toast your hoagie rolls and assemble, and you’ll enjoy a delicious, satisfying meal with minimal effort, reminding you that homemade doesn’t have to mean time-consuming!

What to Serve with Korean-Inspired Kimchi Bulgogi Cheesesteak

Transform your delightful sandwich into a complete meal with these flavorful accompaniments that will excite your palate!

  • Crispy French Fries: The classic choice, golden fries offer a satisfying crunch that pairs beautifully with the spicy sandwich.

  • Asian Slaw: A bright mix of cabbage and carrots dressed in sesame vinaigrette provides a refreshing, crunchy contrast to the rich flavors.

  • Sweet Potato Chips: Their natural sweetness and crunch complement the savory ribeye, adding a delightful twist to your meal.

  • Pickled Vegetables: A tangy side of pickled radishes or cucumbers enhances the umami of the cheesesteak, balancing the flavors perfectly.

  • Korean Spicy Rice: Serving with a side of stir-fried rice spiced with gochujang brings a complete flavor experience, echoing the savory notes of the sandwich.

  • Chilled Soju: For a refreshing beverage, enjoyed chilled, soju elevates the meal with its smoothness, making it the perfect pairing for this flavorful sandwich.

  • Green Salad: A simple mixed green salad drizzled with sesame dressing adds freshness and lightness, creating a balanced plate.

Each pairing not only complements the Korean-Inspired Kimchi Bulgogi Cheesesteak but also enhances the overall dining experience, inviting your family and friends to savor every bite.

Tips for the Best Korean-Inspired Kimchi Bulgogi Cheesesteak

  • Marinade Magic: The longer you marinate the ribeye, the more flavorful it becomes. Aim for at least 1 hour, but overnight is best for optimal taste in your Korean-Inspired Kimchi Bulgogi Cheesesteak.

  • Heat Control: Make sure your skillet is hot before adding the ribeye. A hot pan helps achieve a perfect sear and caramelization, enhancing flavor.

  • Perfectly Toasted Rolls: For the best texture, toast your hoagie rolls until they’re golden and crispy. This adds a delightful crunch that contrasts with the tender beef and creamy cheese.

  • Veggie Variations: Feel free to mix and match vegetables in your Korean-Inspired Kimchi Bulgogi Cheesesteak. Zucchini or carrots can offer a sweet addition while providing vibrant color.

  • Cheese Choice: While provolone is creamy and delicious, don’t hesitate to experiment! Cheese like pepper jack brings an extra kick, complementing the spicy kimchi aioli beautifully.

Korean-Inspired Kimchi Bulgogi Cheesesteak Variations

Customize your Korean-Inspired Kimchi Bulgogi Cheesesteak for a delightful twist on this classic dish!

  • Veggie Option: Swap the beef for marinated tempeh or portobello mushrooms for a hearty plant-based twist.
  • Cheese Alternatives: Try using blue cheese for a sharp, bold flavor or pepper jack for an extra kick of heat.
  • Spicy Additions: Add slices of jalapeños for a fiery touch, elevating the spice level of your sandwich.
  • Avocado Bliss: Incorporate creamy avocado slices inside for a smooth texture that balances the spice of the aioli.
  • Sweet Crunch: Toss in thinly sliced cucumbers for a refreshing crunch that complements the rich flavors perfectly.
  • Different Proteins: Substitute marinated ribeye with grilled chicken or even shrimp for diverse protein profiles.
  • Gochujang Swap: Use a splash of sriracha instead of gochujang for milder spice but still plenty of flavor.
  • Saucy Boost: Drizzle sesame oil over the veggies before sautéing for an added nutty flavor that enhances each bite.

Feel free to explore these variations to fit your taste preferences. Whether you’re looking to spice things up or accommodate different dietary needs, there’s a delicious option for everyone! For creative sides, consider serving refreshing Asian-style salads or crispy fries alongside your sandwich.

Storage Tips for Korean-Inspired Kimchi Bulgogi Cheesesteak

Fridge: Store any leftovers in an airtight container in the refrigerator for up to 2 days. This will help keep the flavors fresh and the sandwich from getting soggy.

Freezer: For longer storage, freeze the assembled sandwich (without the aioli and gochujang) wrapped tightly in plastic wrap for up to 3 months. Thaw in the fridge before reheating.

Reheating: To reheat, it’s best to use an oven or toaster oven at 350°F (175°C) for about 10-15 minutes. This ensures the bread stays crispy while the filling warms through.

Airtight Storage: If storing components separately, keep the marinated ribeye, cooked veggies, and breads individually sealed to maintain optimal freshness for your Korean-Inspired Kimchi Bulgogi Cheesesteak.

Korean-Inspired Kimchi Bulgogi Cheesesteak Recipe FAQs

How do I choose the right ribeye for the bulgogi?
Absolutely! Look for marbled ribeye; the marbling ensures tenderness and rich flavor. If you see light pink or rosy-red color, that’s indicative of freshness. Avoid any pieces with dark spots or excessive gristle. For a unique twist, try using thinly sliced sirloin or flank steak instead.

What’s the best way to store leftovers?
Very! Store any leftover Korean-Inspired Kimchi Bulgogi Cheesesteak in an airtight container in the refrigerator for up to 2 days. This keeps the flavors intact and prevents sogginess. If you prefer, you can separate the ingredients in their original forms to preserve each element’s texture.

Can I freeze my cheesesteak?
Absolutely! To freeze, wrap the assembled sandwich tightly in plastic wrap or aluminum foil (make sure you don’t include the aioli or gochujang). It can stay frozen for up to 3 months. When you’re ready to enjoy, thaw it overnight in the fridge, then reheat in the oven at 350°F (175°C) for about 10-15 minutes for that crispiness we all love!

What should I do if my vegetables are soggy?
Oh no! The key to avoiding soggy veggies is to ensure they’re cooked until just tender and not overcooked. Start with a hot skillet and sauté them for 5–7 minutes, stirring occasionally. You want them to be vibrant and slightly caramelized, adding both crunch and flavor without turning mushy!

Is this recipe safe for my dog?
While some components could be safe, it’s best to avoid sharing the sandwich directly with your dog. Onions and garlic can be harmful to pets, so it’s wise to keep the Korean-Inspired Kimchi Bulgogi Cheesesteak for yourself! Consider making a separate bland version for your furry friend using plain, cooked meats and veggies.

Can I make this dish spicy for heat lovers?
The more the merrier! If you crave more heat, just add extra gochujang to the aioli or use spicy pepper jack cheese instead of provolone. You can also toss in some sliced jalapeños for an added kick, tailoring the flavor to please even the most fiery taste buds!

Korean-Inspired Kimchi Bulgogi Cheesesteak

Korean-Inspired Kimchi Bulgogi Cheesesteak for Bold Flavors

This Korean-Inspired Kimchi Bulgogi Cheesesteak combines savory marinated ribeye, creamy kimchi aioli, and toasted hoagie rolls for a flavorful twist on a classic sandwich.
Prep Time 30 minutes
Cook Time 20 minutes
Marinating Time 1 hour
Total Time 1 hour 50 minutes
Servings: 4 sandwiches
Course: Lunch
Cuisine: Korean
Calories: 600

Ingredients
  

For the Sandwich
  • 4 pieces Hoagie Rolls Toast for extra crunch.
  • 1 pound Marinated Bulgogi-Style Shaved Ribeye Chicken or tofu can be substituted.
  • 8 ounces Provolone Cheese Can substitute with mozzarella or cheddar.
  • 4 stalks Scallions Chives or green onions can be used.
For the Aioli and Sauce
  • 1 cup Kewpie Mayonnaise Greek yogurt can be a lighter substitute.
  • 1 cup Kimchi Use finely chopped pickles for a non-spicy alternative.
  • 2 tablespoons Gochujang Sauce Sriracha can be used for milder flavor.
For the Veggie Medley
  • 1 medium Bell Pepper Mix colors for visual appeal.
  • 1 medium Onion Shallots can be a milder substitute.
  • 8 ounces Mushrooms Cremini or shiitake mushrooms are delightful choices.
For Cooking
  • 4 cloves Garlic, grated Garlic powder can be a quick alternative.
  • 1 tablespoon Neutral Oil Olive oil or sesame oil can be used.
  • to taste Salt & Pepper Don't skimp on these basics.

Equipment

  • Skillet
  • mixing bowl

Method
 

Step-by-Step Instructions
  1. In a mixing bowl, combine grated garlic, chopped scallions, and marinade ingredients suitable for bulgogi-style flavor. Thinly slice the ribeye and add it to the marinade, ensuring each piece is well coated. Cover and refrigerate for at least 1 hour.
  2. In a separate bowl, blend Kewpie mayonnaise with finely chopped kimchi, mixing until smooth. Set it aside to let the flavors marry.
  3. Heat neutral oil in a skillet over medium heat. Add thinly sliced bell peppers, onions, and mushrooms. Sauté for 5–7 minutes until tender and slightly caramelized.
  4. In the same skillet, increase heat to medium-high. Add the marinated ribeye in a single layer. Stir-fry for 4–6 minutes until cooked through and caramelized.
  5. Toast hoagie rolls until golden brown. Layer the cooked ribeye, provolone cheese, sautéed vegetables, and kimchi aioli. Drizzle with gochujang sauce before closing the sandwich.

Notes

Marinating for longer enhances flavor. Ensure skillet is hot for searing the ribeye. Toast hoagie rolls for the best texture.

Spinach Pesto Butter Bean Lentil Quinoa Bowls with Sun-Dried Tomatoes Delight

As I stood in my kitchen, surrounded by fresh greens and vibrant colors, I felt an almost magnetic pull towards creating something truly special. That’s how these Spinach Pesto Butter Bean Lentil Quinoa Bowls with Sun-Dried Tomatoes came to life—an all-star dish that’s as wholesome as it is delicious! Combining creamy butter beans and protein-packed lentils with a homemade spinach pesto, this recipe is perfect for anyone craving a quick meal that doesn’t skimp on flavor. In just 30 minutes, you can whip up a nut-free, vegan delight that’s not only satisfying for adults but also a hit with the kids. Whether it becomes a weeknight staple or a crowd-pleaser at gatherings, this dish promises a nourishing experience. Curious about how to make this vibrant bowl of goodness? Let’s dive into the recipe together!

Why choose this nutritious recipe?

Vegan Goodness: Packed with plant protein and fiber, these bowls are a powerhouse of nutrition, making them perfect for anyone embracing a plant-based diet.

Quick Preparation: Whip up this dish in just 30 minutes—ideal for busy weeknights when you crave something healthy yet delicious.

Flavor Explosion: With vibrant spinach pesto and savory sun-dried tomatoes, each bite bursts with fresh, herbaceous flavors that will delight your taste buds.

Versatile Options: Customize with your choice of grains or add roasted veggies for an extra nutrient boost, ensuring everyone finds their favorite variation.

Family-Friendly: This recipe is not only nutritious but also appeals to all ages, making it a great option for family meals or gatherings. Serving it alongside some Garlic Butter French fries adds a delightful side that everyone will love!

Spinach Pesto Butter Bean Lentil Quinoa Bowls Ingredients

• Dive into the vibrant flavors with these nourishing bowls!

For the Base

  • Quinoa – a protein-rich grain that serves as the hearty foundation for this dish.
  • Butter Beans – lend a creamy texture and boost plant-based protein levels; use canned for ease.
  • Canned Lentils – packed with fiber and protein, these convenient lentils cut down prep time significantly.
  • Sun-Dried Tomatoes – these sweet-tart gems impart a unique flavor that complements the creamy beans beautifully.

For the Pesto

  • Extra Virgin Olive Oil – a high-quality oil provides richness; it’s essential for creating a smooth pesto.
  • Fresh Spinach – the main base for your pesto; fresh is ideal, but thawed frozen spinach works too.
  • Fresh Basil – vital for traditional pesto flavor; feel free to experiment with other herbs if needed.
  • Fresh Parsley – brightens up the flavor profile; you can choose between Italian or curly types.
  • Raw Sunflower Seeds – serve as a nut-free base for the pesto, providing a satisfying crunch.
  • Nutritional Yeast – offers a cheesy taste, perfect for a vegan twist without dairy on your Spinach Pesto Butter Bean Lentil Quinoa Bowls.
  • Minced Garlic – a must for a flavor punch; fresh garlic is preferred, but jarred can do in a pinch.
  • Lemon Juice – adds a refreshing zing; fresh juice is most effective, but bottled works too.
  • Salt – to harmonize all the flavors; adjust to your personal taste.
  • Pepper – add a dash for a light kick, depending on your preference.

Step‑by‑Step Instructions for Spinach Pesto Butter Bean Lentil Quinoa Bowls with Sun-Dried Tomatoes

Step 1: Cook the Quinoa
Begin by rinsing 1 cup of quinoa under cold water. In a medium saucepan, combine the quinoa with 2 cups of water and a pinch of salt. Bring to a boil over medium-high heat, then reduce to a simmer, cover, and cook for 15 minutes until the water is absorbed. Fluff the quinoa with a fork before setting it aside to cool slightly; it will be the perfect base for your bowls.

Step 2: Prepare the Beans and Lentils
While the quinoa cooks, rinse and drain one can each of butter beans and lentils in a colander under cold water. Transfer them to a large mixing bowl and combine gently to keep the beans intact. This creamy mixture will create a delightful texture against the chewy quinoa and will be the star of your Spinach Pesto Butter Bean Lentil Quinoa Bowls.

Step 3: Make the Spinach Pesto
In a food processor, add ½ cup of extra virgin olive oil, 2 cups of fresh spinach, ½ cup of fresh basil, and ½ cup of chopped parsley. Include ⅓ cup of raw sunflower seeds, ¼ cup of nutritional yeast, 2 cloves of minced garlic, the juice of one lemon, and salt and pepper to taste. Blend until the mixture is smooth yet slightly textured, resembling a vibrant green paste that will enrich your bowls with flavor.

Step 4: Combine the Ingredients
In the large bowl with the butter beans and lentils, add in the prepared quinoa and ½ cup of chopped sun-dried tomatoes. Now, pour your homemade spinach pesto over this mixture. Use a spatula to gently fold everything together until well combined, ensuring that the pesto coats the quinoa and legumes evenly for every bite of the Spinach Pesto Butter Bean Lentil Quinoa Bowls.

Step 5: Serve and Enjoy
Once your Spinach Pesto Butter Bean Lentil Quinoa Bowls are mixed, serve immediately in large bowls. Optionally, pair them with grilled gluten-free bread or naan for a satisfying meal. The enticing colors and flavors of this dish not only look beautiful but promise a nutritious delight that is bound to please your family and friends!

How to Store and Freeze Spinach Pesto Butter Bean Lentil Quinoa Bowls

Fridge: Store any leftover Spinach Pesto Butter Bean Lentil Quinoa Bowls in an airtight container for up to 3 days. This keeps the flavors fresh while preventing spoilage.

Freezer: For longer storage, portion out the bowls into freezer-safe containers and freeze for up to 3 months. Allow to cool completely before sealing to avoid ice crystals.

Reheating: When ready to enjoy, thaw overnight in the fridge, then reheat in the microwave or on the stovetop until warmed through. You might want to add a splash of water to keep it moist.

Pesto Storage: If you have extra pesto, store it separately in an airtight container in the fridge for up to a week. This ensures your pesto retains its vibrant color and flavor!

What to Serve with Spinach Pesto Butter Bean Lentil Quinoa Bowls with Sun-Dried Tomatoes

Elevate your dining experience by complementing these vibrant quinoa bowls with the perfect sides, adding layers of flavor and texture.

  • Garlic Herb Naan: Soft and pillowy, it’s perfect for soaking up the flavorful pesto and adds a lovely, warm touch to your meal.
  • Crispy Roasted Vegetables: Roasted zucchini and bell peppers bring a delightful sweetness and crunch, enhancing the fresh ingredients in your bowls.
  • Simple Green Salad: A light salad with mixed greens, cucumber, and a lemon vinaigrette balances the richness of the pesto and adds a refreshing element.
  • Grilled Corn on the Cob: Sweet and smoky, this summer classic adds a fun texture alongside the creamy beans, appealing to both kids and adults.
  • Lemon-Dill Quinoa Salad: A lighter, zesty side dish that echoes the flavors in the main bowl, offering a bright contrast to the hearty ingredients.
  • Chilled Gazpacho: This refreshing cold soup brings a burst of fresh vegetable flavor, a perfect match for the savory and rich quinoa bowls.
  • Sparkling Lemonade: This bright, refreshing drink elevates the meal, providing a delicious contrast to the richness of the spinach pesto and beans.
  • Dark Chocolate Avocado Mousse: Indulge in a smooth, creamy dessert that’s dairy-free and complements the wholesome meal beautifully without being overly sweet.

Expert Tips for Spinach Pesto Butter Bean Lentil Quinoa Bowls

  • Use a Food Processor: Ensure your pesto is silky smooth by starting with the olive oil and then adding the greens and seeds—it makes blending easier!

  • Adjust the Pesto Amount: Make extra spinach pesto for future meals. It keeps well in the fridge; just store it separately to maintain freshness.

  • Mind the Texture: Avoid over-blending your pesto! Keeping a little texture in the seeds and herbs enhances the overall experience of your Spinach Pesto Butter Bean Lentil Quinoa Bowls.

  • Rinse Canned Ingredients: Make sure to rinse your canned butter beans and lentils well to reduce extra sodium and improve their flavor in the dish.

  • Mix and Match Grains: Feel free to switch quinoa for brown rice or couscous to add variety. Each grain brings its unique taste and texture.

  • Play with Flavor: Don’t hesitate to add extra roasted veggies or herbs to the mix. It’s a wonderful way to personalize your Spinach Pesto Butter Bean Lentil Quinoa Bowls!

Spinach Pesto Butter Bean Lentil Quinoa Bowls Variations

Let your creativity shine by customizing the Spinach Pesto Butter Bean Lentil Quinoa Bowls to match your taste buds or dietary needs!

  • Grain Swap: Replace quinoa with brown rice or couscous for a different texture. Each grain adds its own delightful flavor to your bowl.

  • Roasted Vegetables: Toss in roasted zucchini, bell peppers, or carrots to add color and extra nutrients. The caramelization brings a sweet depth that balances the pesto beautifully.

  • Legume Change: Swap butter beans for chickpeas or black beans for a protein boost. This simple switch gives your bowls a new flavor profile while keeping it hearty.

  • Greens Variation: Try using kale or arugula in your pesto for a slightly different taste. Each green contributes its unique essence, making your meal even more special.

  • Extra Flavor: Add a pinch of red pepper flakes for a welcome kick of heat. Just a dash can elevate the whole experience for spice lovers!

  • Creamy Twist: For added creaminess, incorporate some avocado slices on top. It not only enhances the texture but also brings a rich flavor to the dish.

  • Saucy Style: Drizzle a balsamic glaze over the bowls before serving for a touch of sweetness and acidity. This final touch will invigorate your bowls—pure magic!

  • Pesto Personalization: Experiment with different seeds like pumpkin or use a combination of herbs in your pesto. The twists will keep your taste buds guessing on every delightful spoonful!

Pair your custom bowls with a refreshing Cucumber Carrot Salad to create a vibrant, balanced meal that’s as nourishing as it is delicious!

Make Ahead Options

These Spinach Pesto Butter Bean Lentil Quinoa Bowls with Sun-Dried Tomatoes are perfect for meal prep enthusiasts! You can cook the quinoa and prepare the pesto up to 24 hours in advance, storing them in separate airtight containers in the refrigerator to maintain freshness. The beans and lentils can also be rinsed and combined beforehand; just refrigerate them together for convenience. When you’re ready to serve, simply mix the cold quinoa, beans, lentils, and sun-dried tomatoes with the fresh pesto, and enjoy a nourishing meal in minutes. This way, you save valuable time during your busy weeknights without sacrificing quality or flavor!

Spinach Pesto Butter Bean Lentil Quinoa Bowls with Sun-Dried Tomatoes Recipe FAQs

How do I choose ripe and fresh ingredients for this recipe?
Absolutely! For the best spinach, look for vibrant green leaves that are firm and crisp, avoiding any that appear wilted or yellowed. For sun-dried tomatoes, opt for those without dark spots, as they indicate spoilage. When selecting canned beans and lentils, check for no bulging or dents on the can, and make sure the expiration date is current. As for quinoa, choose a variety that is clean with no unusual odors.

What are the best storage methods and how long can I keep leftovers?
Very! Store any leftover Spinach Pesto Butter Bean Lentil Quinoa Bowls in an airtight container in the fridge for up to 3 days. This will keep your meal fresh and delicious. Make sure to leave some space at the top of the container so that the flavors can breathe. If you’re a fan of meal prepping, this dish is perfect for batch cooking!

Can I freeze Spinach Pesto Butter Bean Lentil Quinoa Bowls?
Of course! To freeze, divide your Spinach Pesto Butter Bean Lentil Quinoa Bowls into individual portions in freezer-safe containers. Freeze for up to 3 months. Make sure they cool completely before sealing to prevent ice crystals from forming. When you’re ready to enjoy, simply thaw them overnight in the refrigerator and reheat in the microwave or on the stovetop, adding a splash of water to keep everything moist.

What should I do if my pesto turns out too thick?
If you find your pesto a little thicker than desired, don’t worry! Just add a tablespoon of warm water or extra olive oil to the mixture and blend it again until you reach your desired consistency. You want your spinach pesto to be smooth but still have some lovely texture from the sunflower seeds. Taste and feel free to adjust the seasoning as well; it’s all about making it perfect for your taste!

Are there any dietary considerations I should be aware of?
Great question! This recipe is vegan, nut-free, and gluten-free, making it suitable for a variety of dietary needs. However, do check for individual ingredient sensitivities, especially with sunflower seeds or nutritional yeast. If you’re cooking for kids or those with allergies, always confirm that the canned ingredients are free from any cross-contamination with allergens.

Can I use alternative ingredients in this recipe?
Absolutely! The Spinach Pesto Butter Bean Lentil Quinoa Bowls are wonderfully versatile. You can replace quinoa with brown rice, couscous, or even cauliflower rice for a lower-carb option. Feel free to swap butter beans for chickpeas or other legumes based on your preference. For the pesto, mixing in different greens like kale or arugula can create a delightful twist! Enjoy experimenting with variations!

Spinach Pesto Butter Bean Lentil Quinoa Bowls with Sun-Dried Tomatoes

Spinach Pesto Butter Bean Lentil Quinoa Bowls with Sun-Dried Tomatoes Delight

Delight in these Spinach Pesto Butter Bean Lentil Quinoa Bowls with Sun-Dried Tomatoes, a wholesome vegan dish packed with nutrition.
Prep Time 10 minutes
Cook Time 15 minutes
Total Time 30 minutes
Servings: 4 bowls
Course: Lunch
Cuisine: Vegan
Calories: 350

Ingredients
  

Base
  • 1 cup Quinoa rinsed
  • 1 can Butter Beans drained and rinsed
  • 1 can Canned Lentils drained and rinsed
  • ½ cup Sun-Dried Tomatoes chopped
Pesto
  • ½ cup Extra Virgin Olive Oil
  • 2 cups Fresh Spinach can use thawed frozen
  • ½ cup Fresh Basil
  • ½ cup Fresh Parsley can use Italian or curly
  • cup Raw Sunflower Seeds
  • ¼ cup Nutritional Yeast
  • 2 cloves Minced Garlic fresh preferred
  • 1 tbsp Lemon Juice fresh preferred
  • to taste Salt
  • to taste Pepper

Equipment

  • Medium saucepan
  • Colander
  • Large mixing bowl
  • Food Processor

Method
 

Cooking Instructions
  1. Rinse quinoa under cold water, combine with water and salt in a saucepan, boil, then simmer covered for 15 minutes.
  2. Rinse and drain butter beans and lentils, combine gently in a bowl.
  3. Blend pesto ingredients in a food processor until smooth yet slightly textured.
  4. In the bowl, combine cooked quinoa, beans, lentils, and sun-dried tomatoes, then fold in the pesto until mixed well.
  5. Serve immediately in bowls, optionally pair with grilled gluten-free bread or naan.

Notes

This dish is versatile; feel free to customize with roasted veggies or different grains like brown rice or couscous.

Bourbon Blackberry Chicken: A Sweet and Savory Feast

As the evening sun begins to set, the aroma of Bourbon Blackberry Chicken wafts through my kitchen, wrapping around me like a warm embrace. This comforting dish transforms ordinary chicken thighs into a flavorful masterpiece, where sweet blackberries meet the rich notes of bourbon for an unforgettable twist on dinner. Perfect for both casual family gatherings or special occasions, this recipe offers a delightful balance of sweet and savory, making it a sure-fire crowd-pleaser that everyone will love. Not only is it a breeze to prepare, but it also delivers that coveted homemade touch that can rival any restaurant meal. Ready to create a memorable dining experience that will leave your guests wanting more? Let’s dive into this culinary adventure together!

Why is Bourbon Blackberry Chicken a Must-Try?

Irresistible Flavor: The blend of bourbon and blackberries creates a unique sweet and savory experience that tantalizes the taste buds.
Effortlessly Impressive: This dish looks and tastes gourmet but requires minimal effort, making it perfect for impressing guests with your culinary skills.
Versatile Pairing: Serve it alongside creamy mashed potatoes or a vibrant salad, like our Savory Chicken Cheesy, to balance the flavors perfectly.
Comforting Appeal: With its rich aroma and succulent chicken, this recipe epitomizes comfort food, perfect for both cozy family dinners and festive gatherings.
Make-Ahead Friendly: Prep in advance for an even richer flavor, ensuring that your cooking is stress-free come mealtime, much like the delightful Homemade Chicken Pot you love.

Bourbon Blackberry Chicken Ingredients

  • For the Marinade
    Bourbon Whiskey – ½ cup tenderizes the chicken and adds a smooth, robust flavor that’s essential for the sauce.
    Soy Sauce – ¼ cup enhances umami, giving depth and an appealing saltiness to the dish.
    Honey – ¼ cup balances out the tartness of the blackberries, contributing to a beautiful caramelization.
    Minced Garlic – 3 cloves add aromatic complexity, harmonizing perfectly with the sweet and savory aspects.
    Olive Oil – 2 tablespoons to prevent sticking and ensure even cooking.

  • For the Chicken
    Chicken Thighs – Use bone-in for juicier, tastier results, soaking up the flavor of the bourbon blackberry sauce.
    Salt and Pepper – To taste, enhancing the overall seasoning of your Bourbon Blackberry Chicken.

  • For the Blackberries
    Fresh Blackberries – 1 cup not only contributes natural sweetness and acidity but also adds a vibrant color to the dish; use fresh for optimal flavor.

This Bourbon Blackberry Chicken is sure to impress your family and friends while satisfying your craving for homemade goodness!

Step‑by‑Step Instructions for Bourbon Blackberry Chicken

Step 1: Prepare Marinade
In a medium bowl, whisk together ½ cup bourbon, ¼ cup soy sauce, ¼ cup honey, 3 minced garlic cloves, and 2 tablespoons olive oil. Sprinkle in salt and pepper to taste, ensuring all ingredients are well combined. This marinade will create a flavorful base for the Bourbon Blackberry Chicken, infusing the meat with a rich, savory essence.

Step 2: Marinate Chicken
Place 4 bone-in chicken thighs in a large resealable bag or a shallow dish, pouring the prepared marinade over the chicken. Seal the bag or cover the dish, ensuring the chicken is well coated. Refrigerate for at least 1 hour, but ideally overnight, to allow the flavors to penetrate deeply, resulting in more succulent Bourbon Blackberry Chicken.

Step 3: Preheat Oven
Set your oven to 400°F (200°C) to preheat while you prepare the chicken. This temperature is perfect for roasting the Bourbon Blackberry Chicken to achieve that coveted caramelized skin and juicy interior. Preheating is crucial for proper cooking, ensuring even heat distribution when the chicken goes in.

Step 4: Sear Chicken
In an oven-safe skillet, heat 2 tablespoons of olive oil over medium-high heat. Once hot, add the marinated chicken thighs skin-side down, searing them for 5-7 minutes until they turn golden brown and develop a crispy texture. This step enhances the flavor and gives a beautiful color to your Bourbon Blackberry Chicken.

Step 5: Add Blackberries
After searing, carefully scatter 1 cup of fresh blackberries around the chicken in the skillet. Their sweet and tart flavor complements the savory chicken beautifully. The blackberries will soften and release their juices as they cook, creating a luscious sauce that pairs perfectly with your Bourbon Blackberry Chicken.

Step 6: Bake
Transfer the skillet to the preheated oven and bake for 25-30 minutes, or until the chicken reaches an internal temperature of 165°F (75°C). To ensure even cooking, check that the juices run clear when pierced. This final step allows the Bourbon Blackberry Chicken to soak up all the wonderful flavors, while the sauce thickens beautifully.

Step 7: Baste & Rest
Halfway through baking, spoon some of the pan juices over the chicken to keep it moist and flavorful. Once done, remove the skillet from the oven and let the Bourbon Blackberry Chicken rest for 5 minutes before serving. This resting period allows the juices to redistribute, ensuring each bite is tender and juicy.

How to Store and Freeze Bourbon Blackberry Chicken

  • Fridge: Store leftovers in an airtight container for up to 3 days. Make sure the chicken is fully cooled before sealing to maintain freshness.
  • Freezer: You can freeze Bourbon Blackberry Chicken for up to 3 months. Wrap tightly in plastic wrap and aluminum foil to prevent freezer burn.
  • Thawing: To enjoy this dish later, thaw overnight in the fridge. This method helps maintain its juicy texture once reheated.
  • Reheating: Reheat gently in the oven at 350°F (175°C) for about 15-20 minutes, or until warmed through. Add a splash of water or chicken broth to keep it moist.

Bourbon Blackberry Chicken Variations

Feel free to let your creativity shine and customize this dish to match your taste buds!

  • Chicken Breasts: Swap chicken thighs for breasts for a leaner option, though keep an eye on cooking time to maintain moisture.
  • Herb-Infused: Add fresh herbs like thyme or rosemary to the marinade for a floral aroma that elevates the dish. You can even toss in a bay leaf during baking for an aromatic twist!
  • Heat Boost: Sprinkle in red pepper flakes or cayenne pepper to bring a spicy kick, balancing the sweet and savory notes beautifully.
  • Berry Mix: Substitute blackberries with blueberries or raspberries for a different berry twist, creating a vibrant and tangy flavor profile. A mixed berry blend can also add an exciting dimension to the sauce!
  • Honey Alternatives: Use maple syrup or agave nectar in place of honey for a unique sweetness that pairs beautifully with the bourbon. Adjust to taste, ensuring it complements the overall flavor.
  • Vegan Delight: Replace chicken with firm tofu or seitan and marinate the same way, allowing for a delightful vegan twist on this beloved dish. Simply sauté until golden!
  • Sauce Extensions: Add a splash of balsamic vinegar or apple cider vinegar to the sauce for a touch of acidity; this will elevate the overall brightness of the dish.
  • Slow Cooker Version: For a hassle-free approach, prepare everything in a slow cooker. Combine all ingredients and cook on low for 6-8 hours for tender, flavorful chicken that falls off the bone.

Whichever variation you choose, this versatile Bourbon Blackberry Chicken will surprise and delight, showing just how adaptable comfort food can be! If you’re looking for other tasty chicken options, you might also enjoy our Tropical Chicken Pineapple or Honey Chili Chicken recipes for more delicious inspiration!

What to Serve with Bourbon Blackberry Chicken

As you savor the delightful flavors of Bourbon Blackberry Chicken, consider complementing your meal with these delicious side dishes that add variety and balance to this sweet and savory feast.

  • Creamy Mashed Potatoes: The velvety texture of mashed potatoes provides a rich backdrop for the savory chicken sauce, making each bite a comforting experience.
  • Sautéed Spinach: This vibrant green side not only adds freshness but also balances the sweetness of the dish with its earthy notes. A squeeze of lemon brightens it all up beautifully!
  • Roasted Brussels Sprouts: Their crispness and slight bitterness enhance the overall flavor profile, creating a wonderful contrast to the sweetness of the bourbon and blackberries.
  • Quinoa Salad: A hearty quinoa salad with fresh veggies and a lemon vinaigrette adds a nutritious pop to your table, making for a well-rounded meal.
  • French Baguette: Serve warm, crusty baguette slices to soak up the rich bourbon and blackberry sauce; it adds a delightful textural contrast to the dish.
  • Chilled White Wine: A glass of chilled Sauvignon Blanc or Pinot Grigio brings out the fruity notes in the chicken, while its acidity cuts through the richness, refreshing your palate after each bite.
  • Chocolate Mousse: For dessert, indulge in a light and airy chocolate mousse that provides a sweet ending to a savory meal without overpowering traditional flavors.

Expert Tips for Bourbon Blackberry Chicken

  • Choose Fresh Blackberries: Using fresh blackberries enhances the flavor significantly; avoid frozen ones as they may release excess moisture, diluting the sauce.

  • Perfect Your Marinade: Marinate the chicken for at least one hour, though overnight yields richer flavors. This step is essential for making your Bourbon Blackberry Chicken truly memorable.

  • Use a Meat Thermometer: Ensure your chicken reaches 165°F (75°C) to prevent overcooking. This guarantees juicy and tender results every time.

  • Thicken the Sauce: Simmer the leftover marinade in the skillet for a thicker sauce that clings beautifully to the chicken, enhancing its flavor profile.

  • Consider Cooking Techniques: For a deeper flavor, use a cast-iron skillet when searing the chicken; it retains heat and gives a great sear while cooking evenly.

Make Ahead Options

These Bourbon Blackberry Chicken thighs are perfect for busy cooks looking to streamline meal prep! You can marinate the chicken in the bourbon and blackberry sauce up to 24 hours in advance, allowing the flavors to deeply penetrate the meat. Simply seal the chicken in a resealable bag with the marinade and refrigerate. For even more convenience, you can prepare the marinade itself up to 3 days ahead and store it in an airtight container. When you’re ready to serve, just preheat your oven to 400°F (200°C), sear the marinated chicken as directed, scatter the fresh blackberries, and bake until beautifully caramelized. This way, your Bourbon Blackberry Chicken will be just as delicious, and you’ll save precious cooking time!

Bourbon Blackberry Chicken Recipe FAQs

What is the best way to select blackberries for this recipe?
When choosing blackberries, look for firm, plump berries that are deep purple or black in color. Avoid any with dark spots or mold. Fresh blackberries will give your Bourbon Blackberry Chicken the optimal flavor and sweetness; frozen blackberries may release too much moisture during cooking, leading to a less flavorful sauce.

How should I store leftovers of Bourbon Blackberry Chicken?
Store any leftovers in an airtight container in the refrigerator for up to 3 days. Make sure the chicken is fully cooled before sealing to help maintain its freshness. For longer storage, place the chicken in a freezer-safe container or wrap it tightly in plastic wrap and aluminum foil to prevent freezer burn.

Can I freeze Bourbon Blackberry Chicken?
Absolutely! You can freeze Bourbon Blackberry Chicken for up to 3 months. Just be sure to allow it to cool completely before freezing. To reheat, thaw the chicken overnight in the fridge, then gently reheat it in the oven at 350°F (175°C) for about 15-20 minutes, adding a splash of water or chicken broth to keep it moist.

What can I do if my chicken is overcooked?
If you accidentally overcook your chicken, don’t panic! You can slice it and add it to a moist sauce or broth before serving. This helps the chicken absorb some moisture. Additionally, ensure you’re using a meat thermometer to avoid overcooking in the future; chicken should reach an internal temperature of 165°F (75°C) for perfect juiciness.

Is this recipe suitable for special diets?
While Bourbon Blackberry Chicken is generally a crowd-pleaser, those with alcohol sensitivities may want to replace the bourbon with a non-alcoholic substitute, like apple cider vinegar or a bourbon-flavored extract. Additionally, be mindful of allergies to soy or garlic if you have guests with dietary restrictions. Always check your ingredients to suit your guests’ needs!

Bourbon Blackberry Chicken

Bourbon Blackberry Chicken: A Sweet and Savory Feast

Bourbon Blackberry Chicken transforms chicken thighs into a flavorful masterpiece with sweet blackberries and rich bourbon.
Prep Time 20 minutes
Cook Time 30 minutes
Resting Time 5 minutes
Total Time 55 minutes
Servings: 4 servings
Course: Chicken
Cuisine: American
Calories: 360

Ingredients
  

For the Marinade
  • 0.5 cup Bourbon Whiskey tenderizes the chicken and adds flavor
  • 0.25 cup Soy Sauce enhances umami
  • 0.25 cup Honey balances tartness
  • 3 cloves Minced Garlic adds aromatic complexity
  • 2 tablespoons Olive Oil prevents sticking
For the Chicken
  • 4 pieces Bone-in Chicken Thighs juicier results
  • Salt and Pepper to taste
For the Blackberries
  • 1 cup Fresh Blackberries use fresh for optimal flavor

Equipment

  • oven-safe skillet

Method
 

Step-by-Step Instructions
  1. In a medium bowl, whisk together bourbon, soy sauce, honey, minced garlic, and olive oil. Sprinkle in salt and pepper to taste.
    Bourbon Blackberry Chicken
  2. Place chicken thighs in a resealable bag or shallow dish, pour the marinade over the chicken, seal, and refrigerate for at least 1 hour.
    Bourbon Blackberry Chicken
  3. Preheat your oven to 400°F (200°C).
    Bourbon Blackberry Chicken
  4. Heat olive oil in an oven-safe skillet over medium-high heat. Sear chicken thighs skin-side down for 5-7 minutes until golden brown.
    Bourbon Blackberry Chicken
  5. Scatter fresh blackberries around the chicken in the skillet.
    Bourbon Blackberry Chicken
  6. Transfer the skillet to the oven and bake for 25-30 minutes until chicken reaches an internal temperature of 165°F (75°C).
    Bourbon Blackberry Chicken
  7. Halfway through baking, baste the chicken with pan juices. Let rest for 5 minutes before serving.
    Bourbon Blackberry Chicken

Notes

Using fresh blackberries is essential for optimal flavor. Marinate chicken overnight for richer flavors.

Delicious Hobbit Beorn’s Honey Cakes for Cozy Gatherings

As the sun dips below the hills, casting a golden glow across the kitchen, the sweet scent of Beorn’s Honey Cakes fills the air. This enchanting recipe, inspired by the beloved world of Middle-earth, brings a touch of whimsy to any gathering or cozy afternoon. With its moist texture and delightful sweetness from pure honey, these cakes are not only a comforting treat but also simple to whip up, making them a perfect choice for both veteran bakers and those just starting their culinary journey. Plus, they’re versatile enough to impress a crowd or serve as a personal indulgence! Ready to embark on a baking adventure that will transport you straight to Hobbiton? Let’s dive into the magic of Beorn’s Honey Cakes and discover how easy it is to create something truly special.

Why Are Beorn’s Honey Cakes So Irresistible?

Magical Flavors: Bringing a slice of Middle-earth to your kitchen, these cakes are infused with the rich sweetness of honey, making every bite a delightful experience.

Simple to Make: Even if you’re new to baking, this straightforward recipe requires only basic ingredients and techniques, ensuring that you can impress family and friends with ease.

Versatility at Its Best: Whether you prefer them plain or packed with nuts, dried fruits, or a sweet drizzle, Beorn’s Honey Cakes adapt beautifully to your taste.

Perfect for Any Occasion: Ideal for cozy gatherings or a lovely afternoon tea, these cakes are sure to please both your guests and yourself! Pair them with a comforting cup of tea, just like you would with a batch of Savory Zucchini Pancakes, and enjoy a delightful afternoon.

Keep Them Fresh: Storing these cakes is hassle-free! With proper storage, you can enjoy them for days or freeze for future indulgence, ensuring that the magic lingers.

Dive into the world of baking with Beorn’s Honey Cakes and create your own sweet memories!

Hobbit Beorn’s Honey Cakes Ingredients

• Let’s gather what you need to create this enchanting treat!

For the Cakes

  • All-purpose flour – Provides structure and texture; substitute with gluten-free flour blend for a gluten-free option.
  • Granulated sugar – Adds sweetness; you can reduce it or substitute with honey for a more intense flavor.
  • Baking powder – A leavening agent that helps the cakes rise; ensure it’s fresh for the best results.
  • Unsalted butter – Contributes moisture and flavor; replace with coconut oil for a dairy-free option.
  • Honey – The main flavoring ingredient providing sweetness; maple syrup may be used for a distinct taste.
  • Milk – Adds moisture and richness; use almond milk or any non-dairy milk as a substitute.
  • Large eggs – Binds ingredients and provides moisture; for an egg-free version, use flax eggs or unsweetened applesauce.
  • Vanilla extract – Enhances flavor; though optional, it’s recommended for a deeper taste.
  • Salt – Balances sweetness and enhances flavor; essential in small amounts.

Step‑by‑Step Instructions for Hobbit Beorn’s Honey Cakes

Step 1: Preheat the Oven
Begin by preheating your oven to 350°F (175°C). While the oven warms up, grease a baking dish with a little butter or cooking spray to prevent the cakes from sticking. A well-prepared dish ensures your Hobbit Beorn’s Honey Cakes bake evenly and release easily, making cleanup a breeze.

Step 2: Mix the Dry Ingredients
In a large mixing bowl, combine your all-purpose flour, granulated sugar, baking powder, and salt. Whisk these dry ingredients together thoroughly until well blended, allowing for an even distribution of flavors throughout the batter. The mixture will appear light and fluffy, ready to welcome the wet ingredients in the next step.

Step 3: Prepare the Wet Ingredients
In a separate bowl, melt the unsalted butter and let it cool slightly. Then, whisk in the honey, milk, large eggs, and vanilla extract until the mixture is smooth and well blended. This step is crucial for creating the moist texture of the Hobbit Beorn’s Honey Cakes, enhancing their delightful sweetness with rich flavors.

Step 4: Combine Wet and Dry Mixtures
Gradually pour the wet ingredient mixture into the bowl of dry ingredients. Gently fold the batters together until just combined, being careful not to overmix. You want a smooth batter with a few lumps for fluffy cakes. This blend will soon transform into the scrumptious Hobbit Beorn’s Honey Cakes, ready to bake.

Step 5: Pour the Batter
Carefully pour the batter into your prepared baking dish, ensuring even distribution across the pan. Smooth out the top with a spatula if needed, to create a nice surface for even baking. Watching the batter settle creates a sense of anticipation for those sweet Hobbit Beorn’s Honey Cakes.

Step 6: Bake the Cakes
Place the baking dish in your preheated oven and bake for 25-30 minutes. Check for doneness by inserting a toothpick into the center of the cakes; it should come out clean. The cakes should be golden brown and slightly puffed, filling your kitchen with the irresistible aroma of honey.

Step 7: Cool Before Serving
Once baked, remove the dish from the oven and allow the cakes to cool in the dish for about 10 minutes. This will help them set properly. Then, gently transfer them to a wire rack to cool completely before serving, ensuring the texture remains light and fluffy in every bite of your delightful Hobbit Beorn’s Honey Cakes.

Expert Tips for Hobbit Beorn’s Honey Cakes

Ingredient Room Temperature: Ensure all ingredients, especially eggs and butter, are at room temperature for seamless mixing and optimal rise.

Avoid Overmixing: Mix your batter gently until just combined; overmixing can lead to tough Hobbit Beorn’s Honey Cakes instead of light and fluffy ones.

Fresh Baking Powder: Always check the freshness of your baking powder—expired powder can ruin your cakes, preventing them from rising properly.

Keep a Close Eye: Ovens can vary; start checking your cakes a few minutes early to avoid overbaking, which can dry them out.

Spice It Up: For a cozy twist, consider adding warm spices like cinnamon or nutmeg to the batter, giving your honey cakes an extra layer of flavor.

How to Store and Freeze Hobbit Beorn’s Honey Cakes

Room Temperature: Store your honey cakes in an airtight container at room temperature for up to 3 days to keep them fresh and moist.

Fridge: For longer storage, you can refrigerate them in a tightly sealed container, which will keep them good for up to a week, but may slightly alter the texture.

Freezer: If you want to enjoy your Hobbit Beorn’s Honey Cakes later, freeze them wrapped tightly in plastic wrap and then foil for up to 3 months.

Thawing: When you’re ready to indulge, simply thaw at room temperature for a few hours. Enjoy the delightful sweetness of these cakes across several moments!

Hobbit Beorn’s Honey Cakes Variations

Feel free to get creative with Beorn’s Honey Cakes! With a little imagination, every bite can be a new surprise.

  • Gluten-Free: Substitute all-purpose flour with a gluten-free flour blend for a delicious alternative without sacrificing flavor or texture.
  • Dairy-Free: Replace unsalted butter with coconut oil and milk with almond milk for a delightful dairy-free version. The coconut oil adds a subtle sweetness that complements the honey beautifully.
  • Sweetness Boost: For an extra touch of sweetness, use honey in place of granulated sugar or sprinkle in more dried fruits. Dried figs or dates can bring a rich, chewy texture to the mix, making each bite even more delightful.
  • Nutty Crunch: Add chopped nuts like walnuts or pecans to the batter for a fantastic crunchy texture. Imagine biting into the soft cake and discovering a pleasing crunch!
  • Fruity Twist: Fold in dried fruits such as raisins or cranberries for a fruity burst. It’s like adding a little treasure in each slice.
  • Spicy Warmth: Incorporate cozy spices like cinnamon or nutmeg for a warming flavor that evokes joyous gatherings. Just a pinch can elevate the sweetness and create a comforting aroma.
  • Elegant Topping: Drizzle with honey or dust with powdered sugar before serving for a presentation that’s as sweet as the taste. It’s a lovely touch for special occasions!
  • Ice Cream Ensemble: Serve warm slices topped with a scoop of vanilla ice cream for an indulgent dessert that’s sure to impress. The cake’s warmth paired with cool ice cream creates a delightful contrast that brings comfort on a chilly evening.

Whichever variations you choose, you can always count on these Honey Cakes to bring a taste of Middle-earth to your table. For more delicious ideas, check out the wonders of Honey Garlic Slow and feel free to explore other delightful recipes. Happy baking!

Make Ahead Options

These Hobbit Beorn’s Honey Cakes are perfect for busy home cooks looking to save time on meal prep! You can prepare the batter up to 24 hours in advance by mixing your dry ingredients in one bowl and wet ingredients in another; simply combine them when you’re ready to bake. For the best results, refrigerate the wet mixture to keep it fresh. Alternatively, the baked cakes can be stored in an airtight container at room temperature for up to 3 days or wrapped tightly and frozen for up to 3 months. Just thaw them at room temperature before serving. With these make-ahead tips, you’ll enjoy fresh, delicious Hobbit Beorn’s Honey Cakes with minimal effort!

What to Serve with Beorn’s Honey Cakes?

As you savor each mouthful of honey-infused goodness, consider elevating your mealtime experience with delightful pairings that complement these sweet treats.

  • Creamy Whipped Cream:
    Light and airy, a dollop of whipped cream adds a luscious touch and balances the honey’s sweetness perfectly.

  • Refreshing Herbal Tea:
    A warm cup of chamomile or mint tea enhances the cake’s comforting qualities, making every sip a soothing delight.

  • Fruit Compote:
    A vibrant berry or stone fruit compote introduces a tangy burst, contrasting beautifully with the honey cakes’ sweetness while adding a colorful flair.

  • Rich Vanilla Ice Cream:
    Serve a scoop of velvety vanilla ice cream alongside for a luxurious treat that melts blissfully into the warm cakes, creating a decadent dessert.

  • Cinnamon Sugar Dusting:
    A light sprinkle of cinnamon sugar not only adds warmth but also brings an enticing aroma that elevates the homey charm of the honey cakes.

Indulge in these delightful pairings to turn each bite of Hobbit Beorn’s Honey Cakes into a truly unforgettable experience!

Hobbit Beorn’s Honey Cakes Recipe FAQs

What type of honey should I use for Beorn’s Honey Cakes?
Absolutely, the choice of honey can enhance the flavor of your cakes! I recommend using pure, raw honey for the best taste. However, any good-quality honey will work. You can even experiment with flavored honey like clover or wildflower to create a unique twist.

How should I store leftover Beorn’s Honey Cakes?
To keep your Hobbit Beorn’s Honey Cakes fresh, store them in an airtight container at room temperature for up to 3 days. If you have more than you can munch on right away, wrapping them tightly in plastic wrap and then in foil will preserve their moisture, letting you enjoy them later on in the freezer for up to 3 months.

Can I freeze Beorn’s Honey Cakes?
Yes, you can freeze your honey cakes! After baking, let them cool completely. Wrap each cake tightly in plastic wrap, then in aluminum foil. This double-wrapping helps prevent freezer burn. When you’re ready to enjoy them, simply thaw at room temperature for a few hours, and they’ll be just like fresh!

What can I do if my Beorn’s Honey Cakes came out too dense?
If your cakes turned out dense, it might be due to overmixing the batter or using cold ingredients. Make sure to mix until just combined without any streaks of flour. I also suggest checking that your baking powder is fresh—if it’s expired, it won’t be able to provide that necessary lift for light, fluffy cakes!

Can I substitute ingredients in Beorn’s Honey Cakes?
Very much so! For a gluten-free option, swap the all-purpose flour for a gluten-free flour blend. If you need a dairy-free version, coconut oil can replace the butter, and almond milk or any non-dairy substitute can stand in for regular milk. You can even use flax eggs or applesauce in place of regular eggs if you’re looking for an egg-free treat!

Is there anything I should avoid in Beorn’s Honey Cakes if I have allergies?
Certainly! If you have specific allergies, be cautious with substitutions. For those with nut allergies, ensure any milk alternative is nut-free, like oat milk. If egg allergies are a concern, flax eggs are a great alternative. Always check labels on products to ensure they’re free of allergens. Happy baking!

Hobbit Beorn’s Honey Cakes

Delicious Hobbit Beorn’s Honey Cakes for Cozy Gatherings

Delight in the enchanting flavors of Hobbit Beorn's Honey Cakes, perfect for cozy gatherings.
Prep Time 15 minutes
Cook Time 30 minutes
Cooling Time 10 minutes
Total Time 55 minutes
Servings: 12 cakes
Course: Dessert
Cuisine: Middle-earth
Calories: 180

Ingredients
  

For the Cakes
  • 2 cups all-purpose flour Substitute with gluten-free flour blend if needed.
  • 1 cup granulated sugar Can reduce or substitute with honey for more flavor.
  • 2 teaspoons baking powder Ensure it's fresh.
  • 1/2 cup unsalted butter Can replace with coconut oil for dairy-free.
  • 1/2 cup honey Main flavor; maple syrup can be used for a different taste.
  • 1 cup milk Use almond or any non-dairy milk as a substitute.
  • 3 large eggs For egg-free version, use flax eggs or applesauce.
  • 1 teaspoon vanilla extract Optional, but recommended for flavor.
  • 1/4 teaspoon salt Essential for flavor balance.

Equipment

  • mixing bowls
  • whisk
  • Baking Dish

Method
 

Step-by-Step Instructions
  1. Preheat the oven to 350°F (175°C) and grease a baking dish.
  2. In a large bowl, whisk together flour, sugar, baking powder, and salt.
  3. In another bowl, melt the butter and mix in the honey, milk, eggs, and vanilla extract.
  4. Pour the wet ingredients into the dry and gently fold until just combined.
  5. Pour the batter into the prepared baking dish.
  6. Bake for 25-30 minutes and check for doneness with a toothpick.
  7. Cool for 10 minutes in the dish before transferring to a wire rack to cool completely.

Notes

Ensure ingredients are at room temperature for best results. Avoid overmixing the batter to keep cakes fluffy.

Heavenly Blueberry Butter You Can Make at Home

As I stirred the pot, the sweet aroma of blueberries wafted through my kitchen, instantly transporting me to summer orchards bustling with ripe fruit. This Slow Cooker Homemade Blueberry Butter is not just a simple spread; it’s a creamy delight that transforms your breakfast routine with just a handful of ingredients. Using frozen blueberries makes this recipe both accessible and perfect for year-round enjoyment, giving you a delicious homemade option that’s ready with minimal effort. Whether you’re slathering it on warm toast or dolloping it atop ice cream, this comforting treat adds a homemade touch to any dish. Plus, it’s freezer-friendly, allowing you to savor the taste of summer whenever the craving hits. Ready to create a fruity sensation that will elevate your meals?

Why Is Blueberry Butter So Special?

Irresistible Flavor: Each bite bursts with the sweet tang of blueberries, enhanced by warm spices like cinnamon and nutmeg that elevate the overall taste.

Effortless Cooking: A slow cooker does all the hard work for you, making this a simple recipe ideal for beginners or busy chefs alike.

Year-Round Access: With the option to use frozen blueberries, you can enjoy this delicious treat any time of year, no need to wait for summer!

Versatile Use: Spread it on scones or pancakes, or blend it into yogurt—the possibilities are endless. It also pairs beautifully with the comforting flavors of Garlic Butter French fries for a unique twist.

Freezer-Friendly: Make a big batch, store it in mason jars, and freeze for future indulgences. Homemade goodness awaits!

Transform your meals with this delightful blueberry butter that’s perfectly suited for any occasion!

Blueberry Butter Ingredients

• Here’s what you need to make delectable blueberry butter!

For the Butter

  • Blueberries – Fresh or frozen, these are the primary flavor source for your blueberry butter.
  • Light Brown Sugar – Adds a caramel-like sweetness; adjust to taste for a lower sugar option.
  • Fresh Lemon Juice – Essential for brightness; always choose fresh over bottled for best results.
  • Ground Cinnamon – Infuses warmth and depth; optional if you prefer a lighter taste.
  • Ground Nutmeg – Offers a gentle spice that complements the blueberries; adjust based on preference.

For the Final Touch

  • Mason Jars – Perfect for storing your blueberry butter; freeze for long-term enjoyment!

This homemade blueberry butter is not only a delightful treat but also incredibly simple to make with ingredients you likely have on hand. Enjoy!

Step‑by‑Step Instructions for Blueberry Butter

Step 1: Combine Ingredients
In your slow cooker, start by adding 2 cups of blueberries, 1 cup of light brown sugar, 2 tablespoons of fresh lemon juice, 1 teaspoon of ground cinnamon, and 1/4 teaspoon of ground nutmeg. Stir all the ingredients together until the blueberries are well-coated and the brown sugar is evenly distributed. You’ll see the beautiful mix of colors starting to develop, setting the stage for delicious blueberry butter.

Step 2: Cook the Mixture
Cover the slow cooker and set it to HIGH. Let the mixture cook for 2 hours, stirring occasionally to ensure even cooking and prevent sticking. You’ll notice the blueberries beginning to break down and release their juices, creating a lovely aroma that fills your kitchen. This process helps develop the rich flavors essential for your blueberry butter.

Step 3: Blend to Smoothness
After the initial cooking time, carefully transfer the blueberry mixture to a blender or use an immersion blender directly in the slow cooker. Blend the mixture until it’s completely smooth and velvety, ensuring all the blueberries are well incorporated. This step is crucial for achieving that creamy texture you want in your blueberry butter.

Step 4: Final Cooking
Return the blended blueberry mixture back to the slow cooker, leaving the lid off this time. Continue to cook on HIGH for an additional hour, stirring occasionally. This final cooking stage allows excess moisture to evaporate and helps thicken the mixture, giving your blueberry butter the perfect spreadable consistency. Keep an eye on it as it cooks to enhance the delightful flavors even more.

Step 5: Cool and Store
Once the cooking is complete, remove the slow cooker from the heat and let the blueberry butter cool for a few minutes. Then, spoon it into clean mason jars, leaving some space at the top for expansion if you plan to freeze. Once cooled, store your homemade blueberry butter in the refrigerator for up to 2-3 weeks, or freeze for longer storage. Enjoy the luscious homemade blueberry butter on your favorite treats!

Make Ahead Options

These Slow Cooker Homemade Blueberry Butter preparations are perfect for busy home cooks looking to save time! You can prepare the mixture up to 24 hours in advance by combining the blueberries, brown sugar, lemon juice, cinnamon, and nutmeg in your slow cooker, covering, and refrigerating it overnight. This not only enhances the flavors but also streamlines your cooking process. When you’re ready to cook, simply take it out of the fridge, set your slow cooker to HIGH, and proceed with the cooking instructions. For longer storage, your blueberry butter can be refrigerated for up to 2-3 weeks or frozen in labeled jars for future use. With these easy make-ahead options, you’ll enjoy delicious homemade blueberry butter whenever you like!

Blueberry Butter Variations

Feel free to personalize your blueberry butter with these delightful twists and substitutions that enhance flavor and texture.

  • Frozen Blueberries: Use frozen instead of fresh blueberries to enjoy this treat year-round without sacrificing flavor.

  • Spice it Up: Ginger or Allspice: Add a sprinkle of ginger or allspice for a spicy kick that gives your blueberry butter an exciting twist. These spices bring warmth and earthiness, making each spread even more compelling.

  • Sweetener Swap: Maple Syrup: Replace light brown sugar with maple syrup for a deeper, more complex sweetness that pairs beautifully with blueberries. This option is not only delicious but also gives your butter a hint of fall.

  • Zesty Twist: Orange Zest: Incorporate a bit of finely grated orange zest in place of some lemon juice to brighten the flavor profile. This adds a refreshing note that elevates the overall taste.

  • Nutty Indulgence: Chopped Nuts: Stir in some chopped walnuts or pecans for a delightful crunch. This adds texture and nutty flavors that complement the creaminess of the butter.

  • Chili Heat: Cayenne Pepper: For those who love a bit of heat, add a pinch of cayenne pepper to your blueberry butter. It creates a surprising yet delightful combination of sweet and spicy.

  • Berry Fusion: Fruit Mix-ins: Combine blueberries with other fruits like raspberries or strawberries for a berry medley that tantalizes the taste buds. This variation invites you to enjoy a range of fruity flavors in each bite. For lighter options, you might even explore a tart like the Blueberry Cream Cheese dessert!

Customize your blueberry butter to suit your tastes; it’s a fun way to bring your unique touch to this simple yet delightful spread. Enjoy the deliciousness!

How to Store and Freeze Blueberry Butter

Fridge: Store your homemade blueberry butter in clean mason jars; it will last in the refrigerator for up to 2-3 weeks, keeping its delightful flavor intact.

Freezer: For longer storage, freeze blueberry butter in airtight containers or freezer bags labeled with the date. It can last up to 6 months in the freezer, maintaining its creamy texture.

Thawing: To enjoy your frozen blueberry butter, transfer it to the fridge to thaw overnight or remove the desired portion and let it sit at room temperature for 1-2 hours before using.

Reheating: If you prefer a warm treat, gently heat the blueberry butter in a saucepan over low heat, stirring frequently until warmed through.

What to Serve with Slow Cooker Homemade Blueberry Butter

Savor the warmth and sweetness of blueberry butter with a variety of delicious accompaniments that elevate every meal.

  • Buttermilk Pancakes: Fluffy and warm, these pancakes create a lovely contrast with the creamy blueberry butter, making breakfast feel extra special.
  • Toasted Sourdough Bread: The crunchy texture of sourdough contrasts beautifully with the smooth blueberry spread, perfect for a hearty brunch.
  • Greek Yogurt Parfait: Layer blueberry butter with yogurt and granola for a delightful breakfast, adding creamy and crunchy textures that will leave you satisfied.
  • Cheesecake: Use blueberry butter as a unique topping on cheesecake; its fruitiness will enhance the rich creaminess of the dessert for an indulgent finish.
  • Warm Biscuits: Serve biscuits straight from the oven, and let them melt under the blueberry butter; it’s a sweet sidekick that will steal the show!
  • Savory Cheese Platter: A cheese board with brie or goat cheese paired with blueberry butter offers a delightful sweet-savory experience that stuns the palate.
  • Sparkling Water with Mint: Refreshing sparkling water, garnished with mint and a splash of lemon, can cleanse your palate beautifully after enjoying rich blueberry butter dishes.
  • Ice Cream Sundae: Swirl blueberry butter over vanilla ice cream for a summer treat that brings a fruity freshness to your dessert.
  • Crispy Waffles: The sweetness of blueberry butter drizzled over warm waffles creates a comforting breakfast sensation that’s hard to resist!

Expert Tips for Blueberry Butter

  • Choose the Right Berries: Fresh berries are ideal, but frozen blueberries work wonderfully too. Ensure they are unsweetened and unflavored for the best blueberry butter.

  • Sugar Adjustments: Start with the recommended amount of light brown sugar, but feel free to adjust it based on your taste preferences for a sweeter or less sweet treat.

  • Fresh Lemon Juice: Always opt for fresh lemon juice over bottled. The bright acidity of fresh juice significantly enhances the flavor of your blueberry butter.

  • Blending Process: For a smoother texture, blend the mixture thoroughly after initial cooking. Don’t rush this step—the creaminess is key to delicious blueberry butter!

  • Texture Troubles: If your blueberry butter is too runny after final cooking, continue cooking without the lid for extra time to evaporate moisture.

  • Storage Tips: Store in mason jars in the fridge for up to 2-3 weeks, or freeze for longer-lasting blueberry butter. Label containers for easy identification!

Homemade Blueberry Butter Recipe FAQs

How do I select ripe blueberries?
Absolutely! When choosing fresh blueberries, look for plump, firm berries with a rich blue color. Avoid any that have dark spots all over or are shriveled, as these indicate overripeness. If you’re using frozen blueberries, check that they’re unsweetened and unflavored to keep your blueberry butter pure and delicious.

What is the best way to store homemade blueberry butter?
You can store your homemade blueberry butter in clean mason jars, where it will last for up to 2-3 weeks in the refrigerator. Ensure the jars are tightly sealed to keep out air. If you want to enjoy it beyond that timeframe, transfer it to airtight containers and freeze it for up to 6 months, maintaining its lovely creamy texture.

Can I freeze blueberry butter, and how should I do it?
Yes! Freezing blueberry butter is a great idea. Spoon your cooled blueberry butter into labeled airtight containers or freezer bags, leaving some space at the top for expansion. Seal them tightly and place in the freezer. When you’re ready to use it, thaw overnight in the fridge or allow it to sit at room temperature for 1-2 hours.

What should I do if my blueberry butter is too runny?
Very! If your blueberry butter isn’t thickening as desired, don’t worry. Simply return the mixture to the slow cooker and continue to cook without the lid for an additional 30 minutes to an hour on HIGH. Stir occasionally to prevent sticking. This method will help evaporate excess moisture, giving you that creamy, spreadable consistency.

Is this blueberry butter suitable for my dog?
It’s wonderful to think about your pets! While blueberries are safe and healthy for dogs in small amounts, be cautious about the sugar content in the butter. It’s best to share only a tiny, unsweetened amount with them. For more dog-friendly treats, consider making plain, fresh blueberry snacks or whole fruit alternatives.

Can I adjust the sugar in the blueberry butter recipe?
Absolutely! If you’re looking to reduce sweetness, start with less light brown sugar (perhaps half a cup) and taste the mixture before the final cooking stage. You can always adjust and add more to suit your preference. It’s all about tailoring the flavors to what you enjoy, and that’s part of the fun in cooking!

Blueberry Butter

Heavenly Blueberry Butter You Can Make at Home

This homemade blueberry butter transforms breakfast with the sweet tang of blueberries and warm spices.
Prep Time 10 minutes
Cook Time 2 hours
Cooling Time 15 minutes
Total Time 2 hours 25 minutes
Servings: 16 ounces
Course: Breakfast
Cuisine: American
Calories: 45

Ingredients
  

For the Butter
  • 2 cups Blueberries Fresh or frozen
  • 1 cup Light Brown Sugar Adjust to taste
  • 2 tablespoons Fresh Lemon Juice Always fresh
  • 1 teaspoon Ground Cinnamon Optional
  • 1/4 teaspoon Ground Nutmeg Adjust to preference
For the Final Touch
  • Mason Jars For storage

Equipment

  • Slow Cooker
  • Blender
  • Mason Jars

Method
 

Step-by-Step Instructions
  1. Combine 2 cups of blueberries, 1 cup of light brown sugar, 2 tablespoons of fresh lemon juice, 1 teaspoon of ground cinnamon, and 1/4 teaspoon of ground nutmeg in a slow cooker.
  2. Cook on HIGH for 2 hours, stirring occasionally.
  3. Blend the mixture until smooth, then return to the slow cooker.
  4. Cook uncovered on HIGH for an additional hour.
  5. Cool, then store in mason jars.

Notes

Blueberry butter can last in the fridge for 2-3 weeks or be frozen for up to 6 months. Adjust sugar levels based on taste preference.

Healthy Biscuits and Gravy with Maple Sausage Gravy Bliss

As I stood in my kitchen, the sun pouring in through the window, an aromatic waft of maple and savory sausage filled the air, instantly transporting me to a cozy Southern diner. What if I told you that you could enjoy this comforting experience at home—without feeling guilty? That’s where these Healthy Biscuits and Gravy with Maple Sausage Gravy come into play. This easy-to-make dish takes classic comfort food and gives it a wholesome twist with fluffy whole wheat biscuits, all topped with a rich maple turkey sausage gravy that balances savory and slightly sweet flavors perfectly. Not only is it adaptable for any occasion from brunch to weeknight dinners, but it also packs a nutritious punch, making it a meal you can feel good about. So, are you ready to elevate your comfort food game? Let’s get cooking!

Why are biscuits and gravy so beloved?

Nostalgic Comfort: This dish is a cherished part of many Southern tables, evoking memories of family gatherings and lazy weekend breakfasts. Nutritious Twist: Enjoy a healthier version with whole wheat biscuits and turkey sausage, making it both delicious and guilt-free. Versatile Delight: Perfect as a brunch showstopper or a quick weeknight meal, you can customize it to fit any palate. Consider serving it alongside a fresh Refreshing Cucumber Twist for a well-rounded meal. Time-Saving: Whip this up in under 40 minutes—great for busy days when you still crave comfort. Crowd-Pleasing: It’s one of those dishes that everyone, from kids to adults, can appreciate, leaving plates clean and hearts full!

Biscuits and Gravy with Maple Sausage Gravy Ingredients

For the Biscuits
Whole Wheat Flour – Adds structure and fiber; feel free to use all-purpose flour for a gluten-rich version.
Baking Powder – A crucial leavening agent for light, fluffy biscuits; make sure it’s fresh for the best rise.
Salt – Enhances the overall flavor; adjust to your taste preference.
Almond Milk – Provides moisture and a creamy texture; substitute with any milk of your choice for delicious results.

For the Gravy
Turkey Sausage – A leaner, flavorful alternative to traditional sausage that keeps this dish healthy; you can swap it for pork sausage if preferred.
Maple Syrup – Adds a delightful sweetness and depth to the gravy; honey works well as a substitute too.
Pepper – A simple seasoning to enhance flavor; adjust to achieve your desired spice level.
Whole Wheat Flour – This will be used to thicken your gravy; it ties the flavors together and keeps it nutritious.

Enjoy crafting these Biscuits and Gravy with Maple Sausage Gravy that are not only satisfying but also wholesome!

Step‑by‑Step Instructions for Healthy Biscuits and Gravy with Maple Sausage Gravy

Step 1: Prepare the Biscuit Dough
In a large mixing bowl, combine whole wheat flour, baking powder, and salt, whisking together until well mixed. Gradually pour in almond milk, mixing with a wooden spoon until a soft dough forms. Avoid overmixing to ensure tender biscuits. Once formed, let the dough rest for a few minutes while you preheat your oven to 425°F (220°C).

Step 2: Shape and Bake the Biscuits
On a floured surface, gently knead the biscuit dough for a few seconds, then pat it to about 1-inch thick. Use a round cutter to cut out biscuits and place them on a lined baking sheet, spacing them slightly apart. Bake the biscuits in your preheated oven for about 10-12 minutes until they are golden brown on top and fluffy.

Step 3: Brown the Turkey Sausage
While the biscuits bake, heat a large skillet over medium heat. Add the turkey sausage, cooking thoroughly until browned and crumbly, approximately 5-7 minutes, stirring occasionally. Ensure it is fully cooked, and then transfer the sausage to a plate while leaving the drippings in the skillet to enhance the flavor of your gravy.

Step 4: Make the Maple Gravy
In the same skillet with the drippings from the turkey sausage, sprinkle in whole wheat flour while stirring constantly for about 1 minute to form a roux. Slowly whisk in almond milk and maple syrup, stirring continuously until the mixture reaches a smooth and thick consistency, usually around 3-5 minutes. Adjust the seasoning with pepper to taste.

Step 5: Serve with Biscuits
Once the biscuits are baked to perfection, carefully split them open. Generously ladle the warm maple sausage gravy over the biscuits. Serve immediately while everything is hot and steaming, enjoying a comforting dish of Biscuits and Gravy with Maple Sausage Gravy that everyone can savor.

What to Serve with Healthy Biscuits and Gravy with Maple Sausage Gravy

Treat your family to a delightful spread that complements the heartwarming flavors of this classic dish and elevates your dining experience.

  • Fresh Fruit Salad: A light and refreshing side that balances the richness of the gravy with vibrant, sweet flavors.

  • Crispy Roasted Potatoes: The golden exterior and fluffy interior of these potatoes add a satisfying crunch that contrasts beautifully with the creamy gravy.

  • Simple Garden Salad: Tossed greens with a zesty dressing complement the dish’s richness and offer a burst of freshness on the plate.

  • Sautéed Greens: Lightly sautéed spinach or kale provide nutrients and a vibrant color that invigorates your meal—plus, they add a lovely peppery note!

  • Cold Brew Coffee: A smooth, chilled coffee pairs well, cutting through the hearty dish with its refreshing depth and subtle acidity.

  • Maple Cinnamon Muffins: Extend the maple theme with these sweet muffins that echo the flavors of the gravy, making a perfect sweet counterpart for brunch.

  • Herb-Infused Tea: A soothing herbal tea, like chamomile or peppermint, provides a calming finish to your hearty meal, enhancing the overall dining experience.

With these pairings, you’ll create a memorable meal that your family will love!

How to Store and Freeze Biscuits and Gravy with Maple Sausage Gravy

Fridge: Store leftover biscuits and gravy in an airtight container for up to 3 days. To keep biscuits soft, avoid stacking them directly on top of one another.

Freezer: For longer storage, place biscuits in a freezer-safe bag or container, separating layers with parchment paper, and freeze for up to 2 months. Gravy can also be frozen in a separate container.

Reheating: When ready to enjoy, thaw in the fridge overnight and reheat the biscuits in a warm oven at 350°F (175°C) for about 10 minutes. Reheat gravy on the stovetop, adding a splash of almond milk to bring back creaminess.

Meal Prep: You can prepare the biscuits and gravy ahead of time, making it an easy heat-and-serve option for busy mornings or comforting weeknight dinners!

Biscuits and Gravy with Maple Sausage Gravy Variations

Feel free to get creative and personalize this comforting dish to suit your taste buds!

  • Meat-Free Delight: Substitute turkey sausage for a plant-based sausage or mushrooms for a flavorful vegetarian option. It’s a delicious way to enjoy the classic gravy without meat!
  • Whole Wheat Alternatives: Experiment with different flours like spelt or oat flour for a unique twist on the biscuit texture while keeping it healthy. Each flour brings its own charm!
  • Maple Flavor Boost: Add an extra drizzle of maple syrup to the gravy for a more pronounced sweetness, enhancing that delightful contrast with the savory sausage.
  • Herbed Gravy: Toss in fresh herbs like sage or rosemary into the gravy for an aromatic, earthy flavor. This little change can elevate your dish to a new level of deliciousness!
  • Cheesy Addition: Stir in some shredded cheddar or Parmesan cheese to the warm gravy for a creamy, savory addition that takes it to the next level.
  • Spicy Twist: For those who enjoy heat, add a pinch of cayenne pepper or some diced jalapeños to the sausage while cooking. It’s an exciting way to bring some zing to your plate!
  • Creamy Variations: Use coconut milk or cashew milk instead of almond milk for a rich, exotic flavor that pairs beautifully with the gravy.
  • Savory Add-Ins: Consider adding sautéed onions or bell peppers to the sausage while cooking for added texture and flavor. You’ll be amazed at how much it enhances the dish!

Whether you’re opting for a healthier version or simply want to boost the flavors, there’s no end to the delicious ways you can customize your Biscuits and Gravy with Maple Sausage Gravy. Enjoy exploring these fun variations, and consider pairing your biscuits with a side of Crisp Cabbage Cucumber for a refreshing crunch!

Expert Tips for Biscuits and Gravy

  • Avoid Overmixing: When preparing your biscuit dough, mix just until combined. Overmixing can lead to tough biscuits, so handle gently!

  • Fresh Baking Powder: Ensure your baking powder is fresh for light and fluffy biscuits. Old baking powder can compromise the rise, making them dense.

  • Simmer for Thickness: If you prefer thicker gravy, let it simmer longer before serving. For thinner gravy, gradually add more almond milk, whisking until you reach the desired consistency.

  • Seasoning Adjustments: Taste while cooking! Adjust the salt and pepper as needed to enhance the flavors of your Biscuits and Gravy with Maple Sausage Gravy.

  • Herb Enhancements: For a delightful depth of flavor, consider adding fresh herbs like thyme or sage to the gravy. They beautifully complement the turkey sausage.

Make Ahead Options

These Healthy Biscuits and Gravy with Maple Sausage Gravy are truly perfect for meal prep enthusiasts! You can prepare the biscuit dough up to 24 hours in advance by mixing the dry ingredients and wet ingredients separately, then combining them just before baking to ensure they stay light and fluffy. The gravy can also be made ahead and stored in the refrigerator for up to 3 days; just reheat it over low heat, adding a splash of almond milk to maintain its creamy consistency. When ready to serve, bake the biscuits and warm the gravy for a delightful, comforting dish that saves you time on busy mornings without sacrificing flavor!

Biscuits and Gravy with Maple Sausage Gravy Recipe FAQs

What type of flour should I use for the biscuits?
For the healthiest option, I recommend using whole wheat flour as it adds fiber and nutrition. However, if you’re looking for fluffier biscuits, you can use all-purpose flour instead. Both options yield delicious results, so feel free to adapt based on your dietary preferences!

How should I store leftover biscuits and gravy?
Store leftover biscuits and gravy in airtight containers in the fridge for up to 3 days. To keep those biscuits soft, I suggest avoiding stacking them directly on each other. Instead, you can layer them with parchment paper or simply keep them in their own container.

Can I freeze the biscuits and gravy?
Absolutely! You can freeze the biscuits for up to 2 months. Place them in a freezer-safe bag, separating layers with parchment paper to prevent sticking. The gravy can also be frozen separately in a container. Just remember to label them with the date for easy identification!

What should I do if my gravy turns out too thick?
If your gravy ends up thicker than you’d like, no worries! Simply add a splash of almond milk while reheating, stirring until you achieve your desired consistency. If you have time, you can also let it simmer on low heat with a bit more liquid for several minutes, stirring gently.

Can I make this recipe gluten-free?
Yes, you can! Substitute the whole wheat flour with a gluten-free all-purpose flour blend to create a gluten-free version of these biscuits. Make sure the baking powder is also labeled gluten-free to keep everything in check.

Are there any dietary considerations for pets or allergies?
Definitely be cautious with the ingredients! Turkey sausage and almond milk are safe for most diets, but should not be given to pets. Always check for allergies related to nuts or specific ingredients used. If unsure, it’s best to consult with a healthcare professional.

Biscuits and Gravy with Maple Sausage Gravy

Healthy Biscuits and Gravy with Maple Sausage Gravy Bliss

This Healthy Biscuits and Gravy with Maple Sausage Gravy provides a comforting experience with fluffy whole wheat biscuits and rich maple turkey sausage gravy.
Prep Time 15 minutes
Cook Time 25 minutes
Resting Time 5 minutes
Total Time 40 minutes
Servings: 4 servings
Course: Breakfast
Cuisine: Southern
Calories: 350

Ingredients
  

For the Biscuits
  • 2 cups Whole Wheat Flour Feel free to use all-purpose flour for a gluten-rich version.
  • 1 tbsp Baking Powder Make sure it’s fresh for the best rise.
  • 1 tsp Salt Adjust to your taste preference.
  • 3/4 cups Almond Milk Substitute with any milk of your choice.
For the Gravy
  • 1 lb Turkey Sausage Can swap for pork sausage if preferred.
  • 1/4 cups Maple Syrup Honey works well as a substitute too.
  • 1 tsp Pepper Adjust to achieve your desired spice level.
  • 1/4 cups Whole Wheat Flour Used to thicken your gravy.

Equipment

  • mixing bowl
  • Wooden Spoon
  • oven
  • baking sheet
  • Skillet

Method
 

Preparation
  1. In a large mixing bowl, combine whole wheat flour, baking powder, and salt, whisking together until well mixed. Gradually pour in almond milk, mixing with a wooden spoon until a soft dough forms.
  2. On a floured surface, gently knead the biscuit dough for a few seconds, then pat it to about 1-inch thick. Use a round cutter to cut out biscuits and place them on a lined baking sheet.
  3. Bake the biscuits in your preheated oven for about 10-12 minutes until they are golden brown on top.
  4. While the biscuits bake, heat a large skillet over medium heat. Add turkey sausage, cooking thoroughly until browned and crumbly, about 5-7 minutes.
  5. In the same skillet, sprinkle in whole wheat flour while stirring for about 1 minute to form a roux. Slowly whisk in almond milk and maple syrup, stirring continuously until smooth and thick, about 3-5 minutes.
  6. Once the biscuits are baked, split them open and ladle the warm maple sausage gravy over the biscuits. Serve immediately.

Notes

Avoid overmixing for tender biscuits. Adjust seasonings to taste while cooking.

Creamy Sun Dried Tomato Pesto Dip for Guilt-Free Snacking

As I rummaged through my pantry the other day, I stumbled upon a treasure trove of sun-dried tomatoes, just begging to be used. That moment ignited a spark of creativity, leading me to whip up a Creamy Sun Dried Tomato Pesto Dip that’s both a skinny snack and a party favorite. Perfectly balanced with Greek yogurt and cream cheese, this dip lets you savor every bite guilt-free. It’s the kind of whisper-quiet indulgence that transforms any gathering into a spectacular spread. Whether it’s a casual get-together or a festive soirée, this recipe is quick to prepare and offers a delightful burst of flavor that keeps guests coming back for more. Wouldn’t you love to impress your friends with a dip that’s both decadent and light?

Why is this dip a must-try?

Creamy Perfection: This dip combines Greek yogurt and cream cheese for a smooth texture that everyone will love.

Flavor Explosion: The sun-dried tomatoes and basil pesto create a vibrant taste that elevates any snacking experience.

Quick & Easy: With just a few simple steps, you can whip up this delicious dip in no time, making it ideal for last-minute parties.

Healthy Twist: Made with low-calorie ingredients, you can indulge without the guilt, ensuring all your health-conscious friends will approve.

Versatile Snacking: Pair it with toasted baguette slices, pita chips, or crunchy veggie sticks for a blend of flavors and textures that cater to everyone’s taste buds. Add a variety of dips to your spread with this Nut Seed Cookies as a sweet option.

Sun Dried Tomato Pesto Dip Ingredients

For the Base
Cream Cheese – Provides a creamy base; light cream cheese can be used for a lower-calorie option.
Greek Yogurt – Lightens the dip without sacrificing creaminess; make sure to use plain Greek yogurt for the best flavor.
Mozzarella – Delivers delightful stretch and creaminess; feel free to substitute with low-fat mozzarella if desired.

For the Flavor
Basil Pesto – This key ingredient adds a burst of flavor; both fresh and jarred pesto options work beautifully.
Sun Dried Tomatoes – Offers sweet tanginess and a chewy texture; opt for oil-packed sun-dried tomatoes to amplify flavor.

For Serving
Whole Grain Baguette – Perfect for dipping; consider replacing it with pita chips, garlic bread, or crispy sturdy crackers for a delightful variation.

Step‑by‑Step Instructions for Creamy Sun Dried Tomato Pesto Dip

Step 1: Preheat the Oven
Begin by preheating your oven to 350°F (175°C). While the oven warms up, take a small oval baking dish and lightly grease it with cooking spray or olive oil. This ensures that your Creamy Sun Dried Tomato Pesto Dip comes out easily after baking, making it perfect for your gathering.

Step 2: Mix the Base
In a medium mixing bowl, combine 8 ounces of cream cheese, ½ cup of shredded mozzarella, ½ cup of plain Greek yogurt, half of the basil pesto, and chopped sun-dried tomatoes. Use a hand mixer or a sturdy spatula to blend the ingredients thoroughly until you achieve a smooth, creamy mixture that showcases the vibrant colors of the sun-dried tomatoes.

Step 3: Transfer to Baking Dish
Pour the prepared mixture into the greased baking dish, using a spatula to spread it evenly across the bottom. Ensure that the edges are slightly flat for uniform heat distribution. This layering will contribute to the creamy richness of your Creamy Sun Dried Tomato Pesto Dip as it bakes.

Step 4: Top with Cheese
Sprinkle the remaining ½ cup of shredded mozzarella over the dip, creating a beautiful cheesy layer that will melt and bubble. The mozzarella not only enhances the flavor but also gives your dip that enticing golden appearance once baked.

Step 5: Bake to Perfection
Place the baking dish in the preheated oven and let the dip bake for about 20 minutes. Watch closely as the cheese melts and starts to turn golden and bubbly—this is the cue that your Creamy Sun Dried Tomato Pesto Dip is nearly ready to be enjoyed.

Step 6: Add Final Touches
After baking, carefully remove the dish from the oven. Spoon the remaining basil pesto over the top, adding a fresh burst of flavor and color. Let the dip sit for a few minutes to cool slightly before serving, allowing the flavors to meld beautifully for your guests to savor.

Expert Tips for Sun Dried Tomato Pesto Dip

  • Prep Ahead: Preparing your Sun Dried Tomato Pesto Dip in advance allows flavors to deepen. Assemble the dip, store in the fridge, and bake just before serving.

  • Control the Creaminess: For a lighter version, opt for low-fat cream cheese and mozzarella. This keeps the dip creamy while staying in the skinny recipe zone.

  • Flavor Boost: If you’re using jarred pesto, taste it first! Some brands can vary widely in flavor; choose one that enhances your dip beautifully.

  • Avoid Overheating: Reheat leftover dip gently in the microwave, using short intervals. This prevents it from becoming too hot, which can ruin the creamy texture.

  • Watch the Time: Baking times can vary by oven. Start checking your dip a few minutes early; you want a bubbly top but not burnt cheese.

What to Serve with Creamy Sun Dried Tomato Pesto Dip

Looking to create a complete meal that dazzles the taste buds while perfectly complementing your creamy dip?

  • Toasted Baguette Slices: These crispy and warm slices provide the perfect canvas for the dip, encouraging scoops that are a delight with every bite.
  • Pita Chips: Light and crunchy, pita chips offer a satisfying contrast to the smoothness of the dip while remaining a healthier option.
  • Veggie Sticks: Fresh carrots, celery, and bell peppers add a refreshing crunch that enhances the flavors of the dip, making it both nutritious and colorful.
  • Garlic Bread: Imagine the aromatic garlic mingling with the rich flavors of the dip, creating an enticing pairing that’s hard to resist.
  • Herbed Crackers: Opt for whole grain or seed-based crackers for an earthy twist; they provide a wonderful texture while adding subtle flavor notes to each scoop.
  • Sparkling Wine: A light, bubbly wine cuts through the richness of the dip, offering a refreshing balance that makes your snack feel special.
  • Fresh Salad: Pair with a light arugula or spinach salad dressed in lemon vinaigrette; the acidity will brighten the whole meal, making it elegantly satisfying.
  • Chocolate Covered Strawberries: For dessert, these add a sweet contrast; their berries’ freshness and chocolate richness linger deliciously, rounding out your gathering.

How to Store and Freeze Sun Dried Tomato Pesto Dip

Fridge: Store any leftover dip in an airtight container for up to 3 days. Make sure it’s fully cooled before sealing it to preserve flavor and texture.

Make-Ahead: You can assemble the dip in advance and keep it covered in the refrigerator for about 24 hours. Just bake it before serving for the best results.

Freezer: To freeze, place the dip in a freezer-safe container, leaving some space for expansion. It will last for up to 2 months. Thaw in the fridge before reheating.

Reheating: When ready to enjoy, reheat in the microwave or oven until warmed through. For best results, use short intervals to avoid overheating and maintain the dip’s creamy consistency.

Sun Dried Tomato Pesto Dip Variations

Feel free to get creative with this dip and make it your own with these delightful twists!

  • Vegan Option: Substitute cream cheese with a vegan cream cheese alternative and use nutritional yeast for a cheesy flavor.
    Going plant-based doesn’t mean you sacrifice creaminess. Enjoy the same luscious texture with vegan-friendly ingredients!

  • Roasted Red Peppers: Replace sun-dried tomatoes with roasted red peppers for a sweet and smoky flavor.
    This change adds a lovely warmth to the dip, perfect for those who crave a different taste while retaining the creamy goodness.

  • Spicy Kick: Add a pinch of red pepper flakes or a tablespoon of sriracha for a touch of heat.
    Spice lovers will appreciate this delightful addition that transforms the dip into a flavorsome adventure, catering to those who enjoy a little heat.

  • Add Protein: Mix in shredded cooked chicken or turkey for a heartier appetizer.
    This variation not only boosts the protein content but also makes your dip even more satisfying for those who enjoy a fuller snack.

  • Herb Infusion: Incorporate fresh herbs like thyme or oregano for an aromatic twist.
    Enhance the flavor profile even further! Fresh herbs can elevate your dip and make it sing with freshness, perfect for impressing your guests.

  • Nutty Flavor: Stir in some finely chopped walnuts or pine nuts for added texture and richness.
    This will give your dip a delightful crunch, complementing the creamy elements beautifully, and making every bite an exciting experience.

  • Cucumber Greek Yogurt Dip: Swap Greek yogurt for a cucumber-based Greek yogurt for a refreshing twist.
    This variation brings a light, coolness to your dip, perfect for summer gatherings where every bite should feel refreshing.

This Sun Dried Tomato Pesto Dip can adapt to whatever flavor journey you want, making it an exciting addition to any table. Pair it with some delicious sides like the Refreshing Avocado Tomato salad or some homemade crackers from my Homemade Bread with Sunflower Seed Oil recipe to elevate your snacking experience!

Make Ahead Options

These Creamy Sun Dried Tomato Pesto Dips are perfect for busy home cooks who want to save time while impressing guests! You can assemble the entire dip up to 48 hours in advance and store it covered in the refrigerator. To maintain its creamy texture and delightful taste, just make sure to tightly seal it in an airtight container. When you’re ready to serve, preheat your oven to 350°F (175°C) and bake the dip for about 20-25 minutes, allowing for a few extra minutes if it’s been chilled. This way, you’ll have a stunning appetizer that’s just as delicious and ready to enjoy, with minimal last-minute effort!

Sun Dried Tomato Pesto Dip Recipe FAQs

What kind of sun-dried tomatoes should I use?
Absolutely! I recommend using oil-packed sun-dried tomatoes for this recipe. They’re not only tastier but also easier to blend, giving your dip that rich and tangy flavor. Look for those that appear plump and vibrant in color—avoid any with dark spots or a dry texture.

How long can I store the dip in the refrigerator?
You can store any leftover dip in an airtight container for up to 3 days. Just make sure it’s fully cooled before sealing it up—this will help preserve its creamy texture and delicious flavor.

Can I make this dip ahead of time?
Very! You can easily assemble the Sun Dried Tomato Pesto Dip up to 24 hours in advance. Just cover it tightly and store it in the fridge. When you’re ready to impress your guests, pop it in the oven for baking just before serving!

How do I freeze the Sun Dried Tomato Pesto Dip?
For freezing, place the dip in a freezer-safe container, leaving a bit of space at the top for expansion. This dip will keep well for up to 2 months. When you’re ready to enjoy, transfer it to the fridge overnight to thaw and then reheat in the oven or microwave until warmed through for the best results.

What if my dip is too thick after baking?
If you find your dip too thick after baking, don’t worry! Simply add a splash of milk or additional Greek yogurt, stirring it in until you reach your desired creaminess. This can salvage the texture beautifully, making it perfect for dipping.

Is this dip suitable for those with dairy allergies?
For a dairy-free version, you can substitute cream cheese with a vegan cream cheese alternative and use dairy-free mozzarella. This way, everyone can enjoy your delicious Sun Dried Tomato Pesto Dip without worry.

Sun Dried Tomato Pesto Dip

Creamy Sun Dried Tomato Pesto Dip for Guilt-Free Snacking

Discover the Creamy Sun Dried Tomato Pesto Dip, a guilt-free delight featuring Greek yogurt and cream cheese for a perfect party snack.
Prep Time 10 minutes
Cook Time 20 minutes
Total Time 30 minutes
Servings: 6 portion
Course: Other
Cuisine: Mediterranean
Calories: 150

Ingredients
  

For the Base
  • 8 ounces cream cheese light cream cheese can be used for lower-calorie option
  • ½ cup shredded mozzarella can substitute with low-fat mozzarella
  • ½ cup plain Greek yogurt use for best flavor
For the Flavor
  • ½ cup basil pesto both fresh and jarred work
  • ½ cup chopped sun-dried tomatoes opt for oil-packed for better flavor
For Serving
  • 1 whole whole grain baguette can replace with pita chips or crackers

Equipment

  • mixing bowl
  • Baking Dish
  • spatula
  • hand mixer

Method
 

Step-by-Step Instructions
  1. Preheat the oven to 350°F (175°C) and lightly grease a small oval baking dish.
  2. Mix 8 ounces of cream cheese, ½ cup of shredded mozzarella, ½ cup of plain Greek yogurt, half of the basil pesto, and chopped sun-dried tomatoes in a mixing bowl until smooth.
  3. Transfer the mixture to the greased baking dish, spreading evenly.
  4. Top with the remaining ½ cup of mozzarella.
  5. Bake for about 20 minutes until the cheese is melted and bubbly.
  6. Spoon the remaining basil pesto over the top and let it sit for a few minutes before serving.

Notes

Prep ahead for deeper flavors. Reheat leftovers gently to maintain texture.