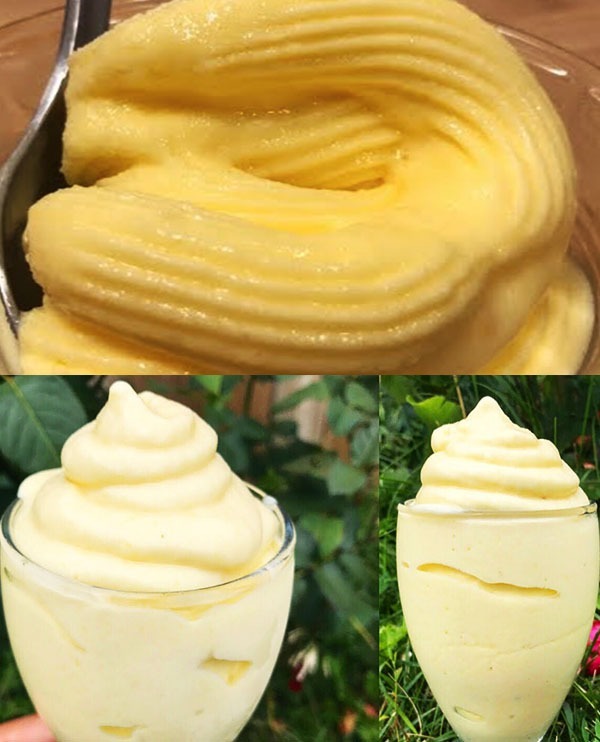
Tropical Pineapple Soft Serve

Create your own slice of paradise with this homemade tropical pineapple soft serve. A creamy, dreamy treat that’s incredibly simple to make, this recipe will transport your taste buds to a sunny beach, no matter where you are.

Ingredients:

  • 4 cups of frozen pineapple, chopped
  • 1/2 cup of milk
  • 1/2 cup of sweetened condensed milk

Preparation Steps:

  1. Combine Ingredients: In a high-powered blender, add the frozen chopped pineapple, milk, and sweetened condensed milk.
  2. Blend to Perfection: Blend the mixture on high until it reaches a creamy and smooth consistency. You may need to stop and scrape down the sides of the blender a few times to ensure all the pineapple pieces are fully blended.
  3. Serve Immediately: Once blended to a soft serve texture, serve the pineapple soft serve immediately in bowls or cones for a refreshing treat.
  4. Optional: If you prefer a firmer texture, you can transfer the blended soft serve to a freezer-safe container and freeze for an additional 1-2 hours, then scoop and serve.

This tropical pineapple soft serve is the perfect dessert for a hot day, combining the natural sweetness of pineapple with the creamy richness of milk and condensed milk. It’s a delightful, guilt-free way to indulge your sweet tooth while enjoying the flavors of summer.

Tender Honey-Garlic Slow-Cooked Ribs

Discover the magic of slow cooking with our Tender Honey-Garlic Slow-Cooked Ribs recipe, a dish that promises not only to satisfy your cravings but also to transform your mealtime into a celebration of flavors. Slow cooking has the remarkable ability to enhance the natural flavors of ingredients, melding them together in a symphony of taste that’s both complex and comforting. This recipe takes advantage of this method, combining the rich sweetness of honey, the umami depth of soy sauce, and a blend of spices that bring warmth and a gentle kick, creating a dish that’s irresistibly tender and bursting with flavor.

Designed for ease and convenience, this recipe requires minimal preparation, making it perfect for busy weekdays or relaxing weekends. Whether you’re a seasoned chef or a novice in the kitchen, the detailed instructions ensure a foolproof path to a delectable dish that will have everyone asking for seconds. Let’s embark on this culinary journey together, where the slow cooker does most of the work, and you get to enjoy the rewards—a plate of ribs so tender they fall off the bone, coated in a sticky, sweet, and slightly spicy sauce that’s truly unforgettable.

Ingredients

  • 3.5 to 4 pounds of ribs

For the Spice Mix:

  • 3 tablespoons of brown sugar
  • 2 teaspoons of chili powder
  • 2 teaspoons of paprika
  • 1 teaspoon of garlic powder
  • 1 teaspoon of dried thyme
  • ½ teaspoon of red pepper flakes
  • Salt and freshly ground black pepper, to taste

For the Honey-Garlic Sauce:

  • 1 cup of honey
  • 4 tablespoons of soy sauce
  • ½ cup of sweet chili sauce
  • 6 large cloves of garlic, minced
  • ½ tablespoon of fresh ginger, grated
  • 1 tablespoon of Dijon mustard

Additional:

  • 1 large onion, thinly sliced

Instructions:

  1. Begin by preparing your ribs: remove the membrane from the back of the ribs with a knife and paper towel for better grip. Dry the ribs with paper towels and cut them in half to ensure they fit into your slow cooker.
  2. In a bowl, combine the brown sugar, chili powder, paprika, garlic powder, dried thyme, red pepper flakes, salt, and black pepper. Mix these spices thoroughly to create your rub.
  3. Apply the spice mix liberally on both sides of each rib section, ensuring they are well-coated.
  4. For the honey-garlic sauce, whisk together honey, soy sauce, sweet chili sauce, minced garlic, grated ginger, and Dijon mustard in a separate bowl until the mixture is homogeneous.
  5. Layer the bottom of your slow cooker with the thinly sliced onions. Place one half of the seasoned ribs on top of the onions.
  6. Pour half of the prepared honey-garlic sauce over the first layer of ribs, making sure they are nicely covered.
  7. Add the second half of the ribs to the slow cooker and drench them with the remaining sauce, ensuring they are thoroughly coated.
  8. Cover the slow cooker and set it to cook on low for about 6 hours. The ribs should be tender and easily fall off the bone when they’re done.

Serve these deliciously tender ribs with your favorite side dishes for a meal that’s sure to delight your family and friends. Enjoy the melding of sweet, spicy, and savory flavors that make these slow-cooked ribs a memorable dish.

Homemade Chicken Rolls and Fresh Salad

Elevate your mealtime with this straightforward yet utterly delicious recipe for chicken rolls, accompanied by a vibrant, fresh salad. Perfect for a nutritious and satisfying family dinner or a special occasion, this dish combines tender chicken with the rich taste of mozzarella and a symphony of vegetables. Here’s how to make it:

Chicken Rolls Ingredients:

  • 700 grams of chicken breast
  • 7 grams of freshly ground black pepper
  • 10 grams of salt
  • 150 grams of mozzarella cheese, sliced (for stuffing)
  • 100 grams of mozzarella cheese, grated (for topping)
  • 150 grams of carrots, thinly sliced
  • 15 grams of fresh parsley, finely chopped
  • 150 grams of plain yogurt

For the Salad:

  • 200 grams of green cabbage, thinly sliced
  • 200 grams of red cabbage, thinly sliced
  • 2 cucumbers, sliced
  • 150 grams of cherry tomatoes, halved
  • 100 grams of canned corn, drained
  • 30 grams of mayonnaise
  • 8 grams of salt
  • 10 grams of garlic, minced

Instructions:

Chicken Rolls:

  1. Prepare the Chicken: Flatten the chicken breasts to about 1/4 inch thickness by pounding them gently. This helps in even cooking and easy rolling.
  2. Season: Sprinkle both sides of the chicken breasts with salt and black pepper for flavor.
  3. Stuff: Place slices of mozzarella cheese and thinly sliced carrots on one end of each chicken breast. Sprinkle with chopped parsley for an added burst of freshness.
  4. Roll: Carefully roll up the chicken breasts, securing them with toothpicks if necessary to keep the filling inside.
  5. Cook: In a large skillet, heat a bit of plant oil over medium heat. Add the chicken rolls, cooking until they’re golden brown on all sides and cooked through, approximately 7-10 minutes per side.
  6. Top and Bake: Preheat your oven to 180°C (356°F). Place the cooked chicken rolls in a baking dish, top with grated mozzarella, and bake until the cheese is melted and bubbly, about 10 minutes.

Fresh Salad:

  1. Combine Vegetables: In a large salad bowl, mix together thinly sliced green and red cabbage, sliced cucumbers, halved cherry tomatoes, and drained canned corn.
  2. Dressing: In a small bowl, whisk together mayonnaise, minced garlic, and salt until well combined.
  3. Toss: Pour the dressing over the salad and toss until the vegetables are well coated. Adjust seasoning to taste.

To Serve:

Arrange the chicken rolls on a platter and serve alongside the fresh salad. This meal not only offers a delightful combination of flavors and textures but also brings a colorful presentation to your table. The creamy, stuffed chicken rolls paired with the crisp, tangy salad create a perfectly balanced and wholesome meal. Enjoy the homemade goodness of every bite!

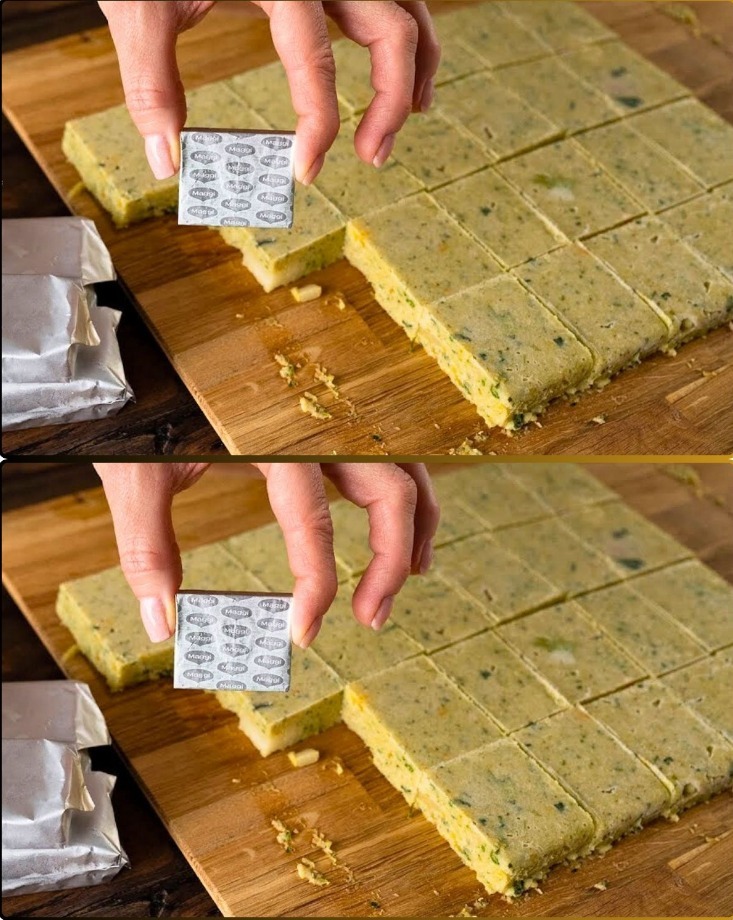
Pure and Nourishing Chicken Broth

Discover the essence of homemade comfort with this pure chicken broth recipe, free from any artificial additives. Using fresh, preferably organic ingredients, this broth serves as a perfect base for soups, stews, or enjoyed on its own. Follow these steps to prepare a heartwarming and healthful chicken broth.

Ingredients:

  • 1 chicken leg, ideally organic for the best flavor and health benefits
  • 1 large onion, peeled
  • 3 cloves of garlic, lightly crushed
  • Half a kohlrabi, peeled and quartered
  • 4 medium carrots, cleaned and halved
  • 2 parsley roots, scrubbed
  • 2 parsnip roots, cleaned
  • 1/2 of a small celery root, peeled and cut into chunks
  • 4 stalks of celery, including the leaves, chopped
  • A generous bunch of fresh parsley, roughly chopped
  • 80 grams of salt, adjust to taste
  • A drizzle of plant oil

Preparation:

  1. Clean the Chicken: Begin by thoroughly rinsing the chicken leg under cold water. Pat dry with paper towels.
  2. Prepare Vegetables: Ensure all the vegetables are cleaned, peeled, and cut as specified. This helps them to cook evenly and release their flavors into the broth.
  3. Heat the Pot: In a large pot, heat a drizzle of plant oil over medium heat. Add the onion and garlic, sautéing until they start to become translucent, adding a layer of flavor to the base of your broth.
  4. Brown the Chicken: Place the chicken leg in the pot and let it brown slightly on all sides. This step enhances the depth of flavor in the broth.
  5. Add Water and Vegetables: Cover the chicken with enough water so that there is about 2 inches of water above the chicken and vegetables. Add the kohlrabi, carrots, parsley roots, parsnip roots, celery root, and celery stalks to the pot.
  6. Season: Sprinkle the salt into the pot. Adjust the amount according to your preference and dietary needs.
  7. Simmer: Bring the mixture to a boil, then reduce the heat to a low simmer. Allow the broth to gently simmer, uncovered, for at least 2 hours. Skim off any foam or impurities that rise to the surface during the initial boiling phase.
  8. Add Fresh Parsley: About 10 minutes before the end of cooking, add the fresh parsley to infuse the broth with its vibrant flavor.
  9. Strain: Once the broth has finished cooking, remove it from heat. Strain the broth through a fine sieve or cheesecloth to remove the solids, ensuring a clear and smooth liquid.
  10. Cool and Store: Allow the broth to cool slightly before transferring it to storage containers. It can be refrigerated for up to 5 days or frozen for longer storage.

Serving Suggestions:

Enjoy this homemade chicken broth as a warm, soothing drink, or use it as a nutritious base for your favorite soups and stews. Its rich flavor and wholesome ingredients make it a versatile kitchen staple that nourishes the body and soul.

Relish the simple pleasure of a recipe passed down through generations, now in your hands, providing comfort and health in every spoonful.

Nutritious Oatmeal Pancake Recipe

Dive into a healthier alternative that rivals the flavors of pizza with this oatmeal pancake recipe. Perfect for those seeking a clean, nutritious meal without sacrificing taste. Gather these simple ingredients and get ready to whip up a dish that will become a new favorite in your kitchen.

Ingredients:

  • 1 cup of oatmeal
  • 1 small onion, very finely chopped
  • 2 large eggs
  • 2 tablespoons of plain yogurt
  • 1 teaspoon of salt, or to taste
  • Thyme, finely chopped (adjust according to preference)
  • 100 ml of water, divided into two portions
  • Cooking oil, for pan-frying
  • Shredded mozzarella cheese (optional, for topping)

Instructions:

Prepare the Batter:

  1. Blend Oatmeal: Begin by processing the oatmeal in a blender until you have a coarse flour. This will be the base of your pancakes.
  2. Mix Ingredients: In a large mixing bowl, combine the ground oatmeal, finely chopped onion, eggs, yogurt, salt, and thyme. Stir thoroughly to incorporate.
  3. Hydrate: Gradually add the first 50 ml of water to the mixture, stirring until you achieve a thick yet pourable consistency. If the batter seems too thick, slowly mix in the additional 50 ml of water until it’s just right.

Cooking:

  1. Heat the Pan: Place a non-stick frying pan over medium heat and add a small amount of oil to lightly coat the bottom.
  2. Cook Pancakes: Once the pan is hot, pour in portions of the batter to form pancakes. Spread them out slightly with the back of a spoon if necessary.
  3. Golden and Fluffy: Cook each pancake until bubbles form on the surface and the edges look set, about 2-3 minutes. Flip carefully and cook for another 2 minutes on the other side, or until golden brown.
  4. Add Cheese: If using mozzarella cheese, sprinkle some on top of each pancake while the second side is cooking. Cover the pan for a minute to allow the cheese to melt.

Serving:

Serve these savory oatmeal pancakes hot, straight from the pan. They’re fantastic on their own or with a side salad for a complete meal. The optional mozzarella topping adds a delightful cheese pull and a hint of pizza-like indulgence, making these pancakes not just nutritious but also incredibly satisfying.

Enjoy your wholesome meal, knowing you’ve chosen a healthy yet delicious option that doesn’t compromise on flavor. Whether for breakfast, lunch, or dinner, these oatmeal pancakes are sure to impress.

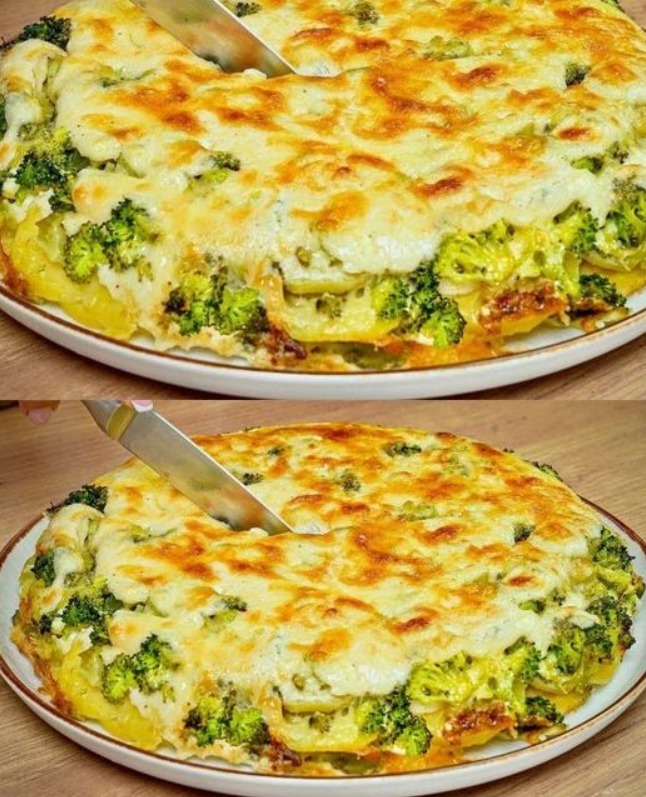
Savor a Comforting Broccoli and Potato Bake

Delight in the warmth and richness of a home-cooked meal with this broccoli and potato bake, adorned with creamy bechamel sauce and a generous blend of cheeses. This versatile recipe can easily be adapted with cauliflower, offering a delightful twist on a classic favorite. Here’s how to create this comforting dish from scratch.

Ingredients:

  • 1 head of broccoli
  • 500 grams of potatoes
  • 40 grams of grated Parmesan cheese
  • 40 grams of grated mozzarella cheese

For the Bechamel Sauce:

  • 2 tablespoons of butter
  • 2 tablespoons of all-purpose flour
  • 500 ml (2 cups) of whole milk
  • 1 teaspoon of pink Himalayan salt
  • A pinch of ground nutmeg
  • 20 grams of grated Parmesan cheese for the sauce

Directions:

Preparing the Vegetables:

  1. Preheat your oven to 180°C (356°F) to ensure it’s ready for baking.
  2. Prepare the Broccoli: Cut the broccoli into florets and steam until just tender. Set aside to cool.
  3. Boil the Potatoes: Peel and slice the potatoes into thin rounds. Boil them in salted water until they are just soft, then drain.

Making the Bechamel Sauce:

  1. Melt Butter: In a saucepan, melt the butter over medium heat.
  2. Add Flour: Sprinkle in the flour, whisking continuously to prevent lumps, until the mixture turns golden brown.
  3. Incorporate Milk: Gradually add the milk, continuing to whisk to ensure a smooth sauce. Add the pink Himalayan salt and a pinch of nutmeg for flavor.
  4. Thicken the Sauce: Continue cooking and stirring until the sauce thickens enough to coat the back of a spoon.
  5. Add Cheese: Remove from heat and stir in the 20 grams of grated Parmesan cheese until melted and incorporated.

Assembling the Bake:

  1. Layer Potatoes: In a greased baking dish, arrange a layer of boiled potato slices at the bottom.
  2. Add Broccoli: Spread the steamed broccoli florets over the potatoes.
  3. Pour Bechamel Sauce: Cover the vegetables with the bechamel sauce, ensuring even distribution.
  4. Top with Cheese: Sprinkle the grated Parmesan and mozzarella cheeses evenly over the top.

Baking:

  1. Bake: Place the dish in the preheated oven and bake for about 20-25 minutes, or until the top is golden and bubbly.
  2. Broil (optional): For an extra crispy cheese topping, broil for the last few minutes of baking.

Serving:

Let the bake cool slightly before serving. This dish is a wonderful standalone meal or can be paired with a light salad for added freshness. The combination of creamy sauce, tender vegetables, and a cheesy crust creates a symphony of flavors and textures that’s sure to comfort and satisfy.

Whether you stick with broccoli or opt for cauliflower, this versatile bake promises a deliciously warming experience with every bite. Enjoy the process of creating and sharing this dish with loved ones.

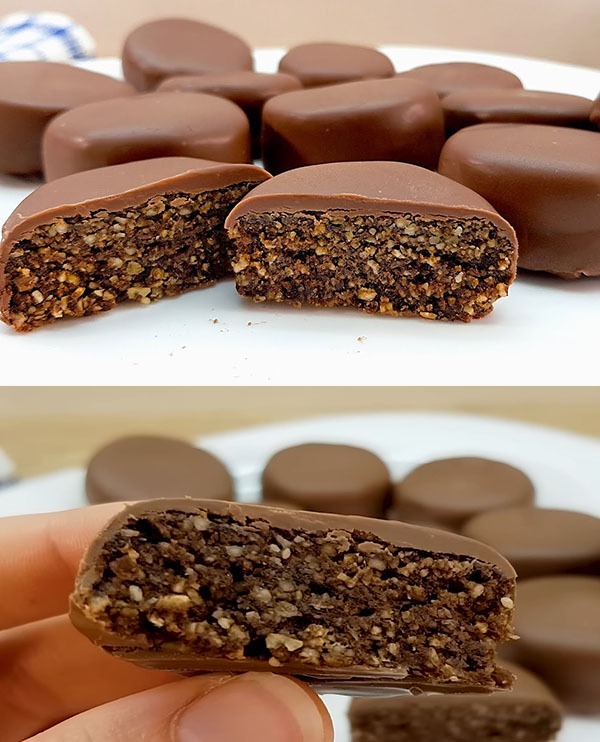
Grandma’s Homemade No-Bake Chocolate Oat Bites

Savor the simplicity and deliciousness of a cherished family recipe with these no-bake chocolate oat bites, lovingly prepared by grandma three times a week. Combining the wholesomeness of oats, the richness of nuts, and the sweetness of dates and honey, these treats are not only easy to make but also a healthier option for satisfying your sweet cravings. Here’s how to create these delightful morsels at home.

Ingredients:

  • 80 grams of rolled oats
  • 100 grams of walnuts, roughly chopped
  • 150 grams of pitted dates, finely chopped
  • 10-15 grams of unsweetened cocoa powder
  • 2 tablespoons of honey
  • 150 grams of your choice of chocolate, chopped
  • 30 ml of vegetable oil

Instructions:

For the Oat Mixture:

  1. Combine Dry Ingredients: In a large mixing bowl, add the rolled oats, chopped walnuts, finely chopped pitted dates, and cocoa powder. Mix these dry ingredients well until everything is evenly distributed.
  2. Add Honey: Drizzle the honey over the dry mixture. Using a spoon or your hands, mix well until the ingredients are thoroughly combined and the mixture sticks together when pressed.

For the Chocolate Coating:

  1. Melt Chocolate: Take the chopped chocolate and place it in a microwave-safe bowl with the vegetable oil. Melt the chocolate in the microwave in 30-second intervals, stirring in between, until smooth and fully melted. Alternatively, you can use a double boiler on the stove if you prefer.

Assembling the Bites:

  1. Shape the Bites: Take small portions of the oat mixture and roll them into balls or press them into small molds if you desire a specific shape.
  2. Coat with Chocolate: Once all the bites are formed, dip each one into the melted chocolate, ensuring they are evenly coated. Use a fork to help drain any excess chocolate and place the coated bites on a parchment-lined tray.
  3. Chill: Transfer the tray to the refrigerator and let the chocolate oat bites chill until the chocolate is set, usually about 30 minutes to 1 hour.

Serving:

Once the chocolate is firm and the bites are chilled, they are ready to be enjoyed. Serve these delectable no-bake chocolate oat bites as a treat during family gatherings, or whenever you need a quick and healthy sweet fix.

These chocolate oat bites not only embody the love and care of grandma’s cooking but also offer a delightful way to enjoy something sweet and nutritious. Whether you’re making them for a special occasion or as a regular treat, they’re sure to be a hit with friends and family alike.

Lemon and Caramel Cream Cake

Embark on a culinary journey with this exquisite lemon and caramel cream cake recipe. Combining the zesty allure of lemon with the smooth, comforting taste of caramel and cream cheese, this cake is a testament to the magic of simple ingredients transforming into a delightful dessert.

For the Cake:

Ingredients:

  • 4 whole eggs
  • A dash of salt
  • 120 grams of granulated sugar
  • 4 egg yolks (additional to the whole eggs)
  • 120 grams of all-purpose flour
  • 4 grams of baking powder
  • Zest of 1 lemon
  • 30 ml of water
  • 40 ml of fresh lemon juice

Directions:

  1. Preheat your oven to 175°C (347°F). Line a cake tin with parchment paper.
  2. Mix Eggs and Sugar: Whisk the 4 whole eggs with the pinch of salt and 120 grams of sugar until pale and voluminous.
  3. Add Yolks: Incorporate the additional 4 egg yolks into the mixture, blending until smooth.
  4. Dry Ingredients: Sift together the flour and baking powder, then gently fold into the egg mixture along with the lemon zest, ensuring not to deflate the mixture.
  5. Liquids: Mix the water and lemon juice, then fold into the batter until just combined.
  6. Bake: Pour the batter into the prepared tin and bake for 25 minutes or until a skewer comes out clean. Cool before assembling.

For the Cream Cheese Frosting:

Ingredients:

  • 300 grams of soft cream cheese
  • 75 grams of powdered sugar

Directions:

  1. Combine: In a mixing bowl, beat the cream cheese until smooth. Gradually add the powdered sugar and beat until creamy and spreadable.

For the Lemon Filling:

Ingredients:

  • 3 eggs
  • 190 grams of granulated sugar
  • Zest of 1 lemon
  • 10 grams of cornstarch
  • 130 ml of fresh lemon juice

Directions:

  1. Cook: In a saucepan, whisk together eggs, sugar, lemon zest, cornstarch, and lemon juice. Cook over medium heat, stirring constantly, until the mixture thickens.
  2. Cool: Remove from heat and let it cool completely. The filling will thicken further as it cools.

Assembly:

  1. Layer Cake: Slice the cooled cake horizontally to create layers.
  2. Lemon Filling: Spread a generous amount of lemon filling on the first layer.
  3. Cream Cheese Frosting: Spread a layer of cream cheese frosting over the lemon filling. Place the next layer of cake on top and repeat the layers as desired.
  4. Chill: Refrigerate the cake for at least an hour to set.

Slice into this heavenly cake to discover a luscious combination of sweet and tangy flavors, enveloped in a creamy, velvety texture. It’s a show-stopping dessert that’s sure to impress at any gathering. Enjoy the delightful interplay of flavors and the satisfaction of creating a masterpiece from scratch.

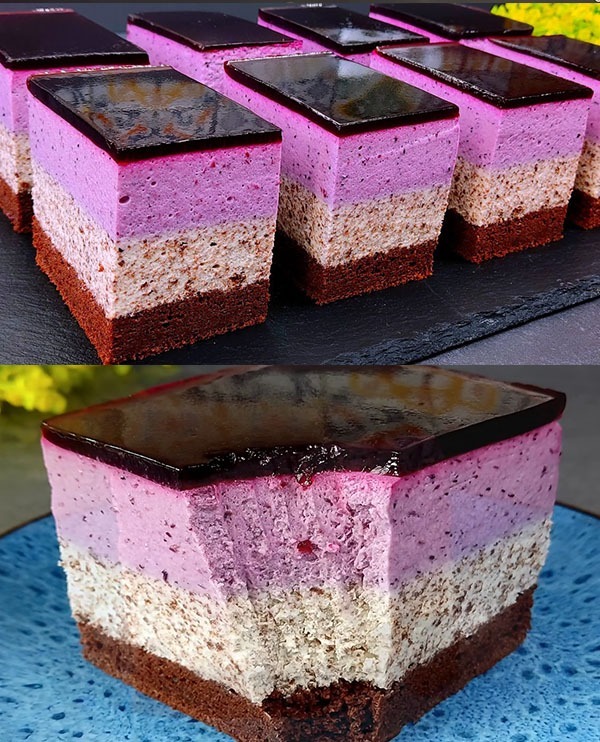
Blueberry and Cream Cheese Cake

Experience the delight of homemade decadence with this exquisite blueberry and cream cheese cake, perfect for any occasion. Rich in flavor and texture, this recipe combines the airy softness of sponge cake with the creamy tang of blueberry-infused cheese cream. Follow these detailed steps to create a dessert that’s as impressive in taste as it is in appearance.

For the Sponge Cake:

Ingredients:

  • 5 egg yolks
  • A dash of salt
  • 60 grams of granulated sugar
  • 40 grams of unsweetened cocoa powder
  • 45 grams of water
  • 80 grams of all-purpose flour
  • 1 tablespoon of cornstarch
  • 1 teaspoon of baking powder
  • 5 egg whites
  • An additional 60 grams of granulated sugar

Equipment:

  • A 28×18 cm baking dish

Method:

  1. Prepare: Preheat your oven to 180℃ (356℉). Line the baking dish with parchment paper.
  2. Yolk Mixture: Beat the egg yolks with a dash of salt and 60 grams of sugar until light and fluffy. Incorporate the cocoa and water smoothly, followed by sifting in the flour, cornstarch, and baking powder.
  3. Egg Whites: In a separate bowl, whisk the egg whites to soft peaks, gradually adding 60 grams of sugar until stiff peaks form.
  4. Combine: Gently fold the egg whites into the yolk mixture to maintain airiness.
  5. Bake: Pour the batter into the prepared dish, smoothing the top. Bake for 25 minutes. Let cool before assembling.

For the Blueberry Cream Cheese Filling:

Ingredients:

  • 18 grams of gelatin powder
  • 120 grams of cold water (for gelatin)
  • 600 grams of cream cheese, softened
  • 240 grams of powdered sugar
  • 500 grams of fresh blueberries
  • 60 grams of granulated sugar
  • 2 tablespoons of fresh lemon juice
  • 500 grams of heavy cream (33% fat content)
  • An additional 3 grams of gelatin
  • 20 grams of cold water (for the additional gelatin)

Method:

  1. Gelatin Prep: Sprinkle the gelatin over the cold water in two separate bowls (18g for the cheese mixture, 3g for the cream) and let it bloom for about 5 minutes.
  2. Cheese Mixture: Whip the cream cheese and powdered sugar until smooth. Gently warm the first gelatin mixture until dissolved and mix into the cheese along with the lemon juice.
  3. Blueberry Blend: In a saucepan, combine blueberries, 60 grams of sugar, and cook until the berries begin to burst. Allow to cool slightly, then blend into the cheese mixture.
  4. Whipped Cream: Whip the heavy cream to soft peaks. Warm the additional gelatin mixture and incorporate into the whipped cream.
  5. Fold: Gently fold the whipped cream into the blueberry cheese mixture for a light, airy filling.

Assembly:

Spread the blueberry cream mixture over the cooled sponge cake base. Chill in the refrigerator for at least 3 hours to set.

To Serve:

Slice the cake into generous pieces and serve chilled. Each bite promises a harmonious blend of velvety cream cheese, bursting blueberries, and chocolatey sponge cake. Enjoy this divine creation that’s sure to bring a smile to anyone’s face. Bon appétit!

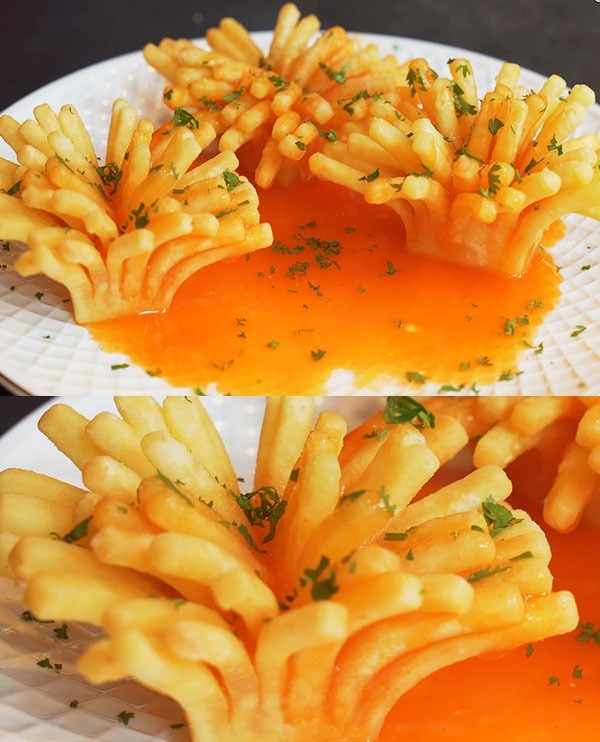
Homemade Crispy French Fries with Chili Sauce

Indulge in the ultimate comfort food with this easy-to-follow recipe for crispy homemade French fries complemented by a spicy chili sauce. Perfect as a snack or side dish, these fries are sure to be a hit with everyone.

Ingredients for French Fries:

  • 4 large potatoes
  • 1 teaspoon salt
  • Cooking oil, for frying

For the Chili Sauce:

  • 2 tablespoons chili sauce
  • 50 ml water
  • 1 tablespoon sugar
  • Fresh coriander, chopped, for garnish

Instructions:

  1. Prepare the Potatoes:
    • Start by peeling the potatoes and cutting them into thin, even strips to ensure they cook evenly and get that perfect crispiness.
    • Rinse the potato strips under cold water to remove excess starch, then pat them dry with a clean kitchen towel.
  2. Seasoning:
    • Toss the potato strips in a bowl with 1 teaspoon of salt, making sure they are evenly coated.
  3. Frying the Potatoes:
    • Heat a generous amount of cooking oil in a deep fryer or a deep skillet over medium-high heat. The oil is ready when a small piece of potato sizzles upon contact.
    • Carefully add the potato strips to the hot oil in batches, avoiding overcrowding to ensure they crisp up nicely.
    • Fry the potatoes for about 10 minutes or until they are golden brown and crispy. Adjust the time based on your preference for crispiness.
    • Remove the fries from the oil using a slotted spoon and drain them on a paper towel to remove excess oil.
  4. Making the Chili Sauce:
    • In a small saucepan, combine the chili sauce, water, and sugar. Bring the mixture to a simmer over low heat, stirring until the sugar dissolves.
    • Cook the sauce for a few minutes until it slightly thickens to your desired consistency.
  5. Serving:
    • Place the crispy French fries on a serving plate. Drizzle or serve the warm chili sauce on the side for dipping.
    • Garnish with chopped coriander for a fresh, aromatic touch.

Enjoy your homemade crispy French fries with a tantalizing chili sauce, a perfect treat for any occasion!