Energizing Nut and Seed Delight

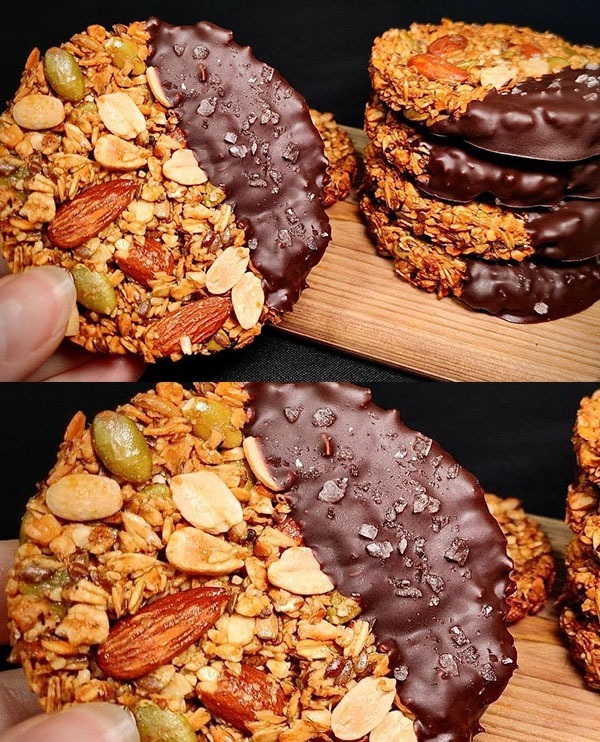
Welcome to our special recipe for a super healthy snack! If you’re looking for something sweet but don’t want sugar, eggs, or gluten, you’re in the right place. Our snack is full of good stuff like nuts, seeds, and oats. It’s perfect for giving you energy without any of the bad stuff. Plus, it’s really easy to make and you don’t even need to bake it! Let’s get started on making this delicious treat that’s good for you and tastes great too.

A Wholesome Treat Free from Sugar, Eggs, and Gluten

Ingredients for the Dessert:

  • Peanuts (crushed) – 100 grams (3.5 ounces)
  • Rolled Oats – 200 grams (7 ounces)
  • Pumpkin Seeds – 30 grams (1 ounce)
  • Sunflower Seeds – 30 grams (1 ounce)
  • Almonds (chopped) – 40 grams (1.4 ounces)
  • Ground Flaxseeds – 1 tablespoon
  • Natural Honey – 2 tablespoons (adjust to taste)
  • Unsweetened Dark Chocolate (chopped) – 50 grams (1.7 ounces)
  • Sea Salt Flakes – a pinch

Additional Ingredients for the No-Bake Version:

  • Coconut Oil – 1 tablespoon
  • Shredded Coconut – 15 grams (0.5 ounce)

Instructions:

  1. Prepare the Mixture:
    • In a large mixing bowl, combine the crushed peanuts, rolled oats, pumpkin seeds, sunflower seeds, chopped almonds, and ground flaxseeds. Mix these dry ingredients well to ensure an even distribution.
  2. Sweeten and Bind:
    • Warm the honey slightly to make it easier to mix. Pour it over the dry ingredients along with the coconut oil. Stir thoroughly until all components are nicely coated and start to stick together.
  3. Add Chocolate and Season:
    • Fold in the chopped unsweetened dark chocolate, ensuring pieces are evenly distributed throughout the mixture. Sprinkle a pinch of sea salt flakes to enhance the flavors.
  4. Forming the Dessert:
    • For a no-bake version, line a tray or dish with parchment paper. Transfer the mixture into the tray, pressing it down firmly and evenly. Sprinkle the top with shredded coconut for an extra layer of texture and flavor.
  5. Chill and Set:
    • Place the tray in the refrigerator for at least an hour, allowing the mixture to firm up. This step is crucial for the dessert to hold its shape.
  6. Serving:
    • Once set, cut the dessert into bars or squares. These can be served immediately or stored in an airtight container in the fridge for quick, energizing snacks throughout the week.

Enjoy this guilt-free, energizing treat that’s perfect for satisfying your sweet tooth while providing a nutritious boost to your day!

Crispy Mini Beef Pies

Indulge in the delightful world of homemade mini fried beef pies, a recipe that transforms simple ingredients into bite-sized treasures of savory goodness. Perfect for appetizers, snacks, or a unique addition to your mealtime spread, these pies combine the rich flavor of beef with a golden, crispy exterior. Let’s embark on a culinary adventure to create these miniature delights, where every bite is a blend of comforting flavors and textures.

Crispy Mini Beef Pies

Ingredients:

  • For the Filling:
    • 1/2 pound ground beef
    • 1 small onion, finely diced
    • 2 cloves garlic, minced
    • 1 teaspoon paprika
    • 1/2 teaspoon ground cumin
    • Salt and pepper, to taste
    • 1/4 cup beef broth
    • 2 tablespoons tomato paste
    • 1/4 cup fresh parsley, chopped
  • For the Dough:
    • 2 cups all-purpose flour
    • 1/2 teaspoon salt
    • 1/2 cup unsalted butter, cold and cubed
    • 4-6 tablespoons ice water
  • For Frying:
    • Vegetable oil, for deep frying

Instructions:

  1. Prepare the Filling:
    • In a skillet over medium heat, cook the ground beef, breaking it apart with a spoon, until browned.
    • Add the onion and garlic to the skillet and cook until soft and fragrant.
    • Stir in the paprika, cumin, salt, and pepper.
    • Mix in the beef broth and tomato paste, simmering until the mixture thickens. Remove from heat and stir in the fresh parsley. Let the filling cool.
  2. Make the Dough:
    • In a large bowl, whisk together the flour and salt.
    • Using a pastry cutter or your fingers, cut the butter into the flour until the mixture resembles coarse crumbs.
    • Gradually add ice water, stirring until the dough comes together. Form into a ball, wrap in plastic, and chill for at least 30 minutes.
  3. Assemble the Pies:
    • On a floured surface, roll out the dough to about 1/8-inch thickness. Cut out circles using a small round cutter.
    • Place a small spoonful of the beef filling in the center of each dough circle. Fold the dough over the filling to create a half-moon shape. Press the edges together to seal, then crimp with a fork.
  4. Fry the Pies:
    • Heat vegetable oil in a deep fryer or a deep skillet to 375°F (190°C).
    • Fry the pies in batches until golden and crispy, about 2-3 minutes per side.
    • Transfer to a paper towel-lined plate to drain any excess oil.
  5. Serve: Enjoy your mini fried beef pies warm, perhaps with a side of your favorite dipping sauce or a fresh salad for a complete snack or meal.

This recipe invites you to experience the joy of cooking from scratch, promising a delightful result that’s sure to impress. Whether you’re hosting a party or simply craving something uniquely delicious, these mini fried beef pies will not disappoint.

Savory Chicken and Veggie Strips

Dive into a wholesome and vibrant dish: Chicken and Vegetable Strips featuring broccoli and carrots. This recipe is a celebration of lean protein paired with the crunch and color of fresh vegetables, creating a meal that’s both nutritious and satisfying. Perfect for a weeknight dinner or a healthy meal prep option, this dish brings together the savory goodness of chicken with the natural sweetness of carrots and the earthy tones of broccoli. Let’s embark on creating this delightful meal, blending flavors and textures for a truly enjoyable eating experience.

Savory Chicken and Veggie Strips

Ingredients:

  • For the Chicken:
    • 1 pound boneless, skinless chicken breasts, sliced into thin strips
    • 2 tablespoons olive oil
    • 1 teaspoon garlic powder
    • Salt and freshly ground black pepper, to taste
  • For the Vegetables:
    • 2 cups broccoli florets
    • 2 cups carrots, julienned
    • 1 tablespoon sesame oil
    • Salt and pepper, to taste

Instructions:

  1. Season the Chicken: In a medium bowl, toss the chicken strips with olive oil, garlic powder, salt, and pepper until evenly coated.
  2. Cook the Chicken: Heat a large skillet over medium-high heat. Add the chicken strips in a single layer, working in batches if necessary, and sauté until golden brown and cooked through, about 3-4 minutes per side. Remove the chicken from the skillet and set aside.
  3. Prepare the Vegetables: In the same skillet, add sesame oil and heat over medium heat. Add the broccoli and carrots, seasoning with a bit more salt and pepper. Stir-fry the vegetables until they are tender-crisp, about 5-7 minutes, adjusting the heat as necessary to avoid burning.
  4. Combine Chicken and Vegetables: Return the cooked chicken strips to the skillet with the vegetables. Stir everything together and cook for an additional 2 minutes to allow the flavors to meld.
  5. Serve: Transfer the chicken and vegetable strips to a serving platter. Optionally, you can sprinkle sesame seeds or drizzle a sauce of your choice over the top for extra flavor.

Enjoy this simple yet flavorful dish that brings the best out of its ingredients, offering a delightful combination of textures and tastes. Whether you’re looking to impress guests or just treating yourself to a healthy and delicious meal, this chicken and veggie strip recipe is sure to please.

Hearty Spaghetti with Homemade Meatballs

Embark on a culinary journey with a timeless classic that warms the heart and soothes the soul: Spaghetti with Meatballs. This dish, an epitome of comfort food, has been cherished through generations, transcending borders with its simplicity and depth of flavor. Here, we reimagine this beloved dish, offering a step-by-step guide to creating a version that’s both familiar and freshly inviting. Gather your ingredients and let’s create magic in the kitchen, transforming simple components into a meal that speaks of home, heritage, and the simple joy of a deliciously hearty plate.

Ingredients:

  • For the Meatballs:
    • 1 pound ground beef (a mix of beef and pork works well too)
    • 1/2 cup breadcrumbs (consider using panko for a lighter texture)
    • 1/4 cup freshly grated Parmesan cheese
    • 1/4 cup milk
    • 1 large egg, lightly beaten
    • 2 cloves garlic, minced
    • 1/2 teaspoon dried oregano
    • Salt and freshly ground black pepper, to taste
    • 2 tablespoons fresh parsley, finely chopped
  • For the Spaghetti and Sauce:
    • 1 pound spaghetti
    • 2 tablespoons olive oil
    • 1 onion, finely chopped
    • 2 cloves garlic, minced
    • 1 can (28 ounces) crushed tomatoes
    • 1 teaspoon sugar (optional, to balance acidity)
    • 1 teaspoon dried basil
    • Salt and freshly ground black pepper, to taste
    • Fresh basil leaves, for garnishing
    • Extra grated Parmesan cheese, for serving

Instructions:

  1. Prep the Meatballs: In a large bowl, combine ground meat, breadcrumbs, Parmesan, milk, egg, minced garlic, oregano, salt, pepper, and parsley. Mix until just combined—avoid overworking to keep the meatballs tender. Form into 1-inch balls.
  2. Brown the Meatballs: Heat a large skillet over medium heat. Add meatballs in batches, turning to brown on all sides. They don’t need to be cooked through at this point. Once browned, transfer them to a plate.
  3. Sauté the Aromatics for the Sauce: In the same skillet, add olive oil and sauté the onion and garlic until translucent.
  4. Simmer the Sauce: Add the crushed tomatoes, sugar (if using), basil, salt, and pepper to the skillet. Bring to a simmer, then return the meatballs to the skillet, covering them with the sauce. Cover and simmer on low heat for about 30 minutes, until the meatballs are cooked through.
  5. Cook the Spaghetti: While the sauce simmers, bring a large pot of salted water to a boil. Cook the spaghetti according to package instructions until al dente. Drain.
  6. Combine and Serve: Serve the cooked spaghetti topped with meatballs and sauce. Garnish with fresh basil leaves and a generous sprinkle of Parmesan cheese.

This Spaghetti with Meatballs recipe not only fills the kitchen with inviting aromas but also brings a sense of comfort and nostalgia to the table. It’s a dish that celebrates the joy of cooking and the pleasure of sharing good food with loved ones. Enjoy this hearty, flavorful meal that’s sure to become a cherished addition to your culinary repertoire.

Mini fluffy pancakes

Creating a delightful twist on a classic breakfast favorite, this recipe guides you through making mini fluffy pancakes that are sure to brighten any morning. Perfect for gatherings, special occasions, or when you’re simply in the mood for something sweet and comforting, these bite-sized treats pack all the flavor and fluffiness of traditional pancakes in a fun, petite package. Let’s embark on this culinary adventure together, whipping up a batch of mini pancakes that will become a new favorite in your recipe collection.

Bite-Sized Fluffy Pancakes

Ingredients:

  • 1 cup all-purpose flour: The base of our pancakes, providing structure.
  • 2 tablespoons sugar: Just enough sweetness to tantalize your taste buds.
  • 1 tablespoon baking powder: The secret to that sought-after fluffiness.
  • A pinch of salt: To balance and enhance the flavors.
  • 1 cup milk: Adds moisture and tenderness to the batter.
  • 1 large egg: Binds the ingredients together and contributes to the richness.
  • 2 tablespoons melted unsalted butter: For a tender crumb and a hint of richness.
  • 1 teaspoon vanilla extract: A dash of vanilla to infuse the pancakes with warm, aromatic flavors.

Instructions:

  1. Mix Dry Ingredients: In a large mixing bowl, whisk together the flour, sugar, baking powder, and salt until well combined.
  2. Combine Wet Ingredients: In a separate bowl, beat the egg lightly and mix it with the milk, melted butter, and vanilla extract.
  3. Create the Batter: Pour the wet ingredients into the dry ingredients. Stir gently until just combined. Remember, a few lumps are okay; overmixing can lead to dense pancakes.
  4. Preheat the Pan: Heat a non-stick skillet or griddle over medium heat. You might want to brush it lightly with butter or oil to ensure the pancakes don’t stick.
  5. Cook the Pancakes: For mini pancakes, use about 1 tablespoon of batter for each pancake. Pour it onto the hot skillet, and when you see bubbles forming on the surface, flip them carefully. Cook until both sides are golden brown.
  6. Serve Warm: Stack your mini pancakes high and serve them warm. They’re delightful with a drizzle of maple syrup, a dollop of whipped cream, or your favorite fruits on top.

These mini fluffy pancakes are not just a treat for the palate but also a feast for the eyes, making any meal feel a little more special. Whether it’s breakfast, brunch, or even a whimsical dinner, these pancakes are sure to bring smiles all around. Enjoy the process of making them and the joy of sharing them with loved ones.

Savory Cabbage & Oat Flake Bake

Embarking on a culinary journey to craft a dish that intertwines the wholesome essence of simple ingredients with a touch of creativity, we explore a unique recipe that marries the rustic charm of white cabbage with the heartiness of oat flakes. This dish, a testament to the beauty of blending textures and flavors, promises a delightful experience for both the maker and the taster. Infused with the warmth of milk, the richness of hard cheese, and the subtle yet impactful seasonings of black pepper and oregano, it transforms everyday ingredients into a comforting, nutritious creation.

The addition of eggs and baking powder ensures a lightness and depth that elevate the dish, making it a versatile option for any meal. Whether you’re seeking to indulge in a new breakfast favorite, a side dish with a twist, or a savory snack, this recipe stands as an invitation to explore the harmony of flavors and the joy of cooking with intention and joy. Let’s delve into the art of combining these elements to create a dish that is as nourishing as it is flavorful, inviting a moment of culinary bliss into our busy lives.

Ingredients:

  • White Cabbage: 400 grams, finely shredded
  • Oat Flakes: 100 grams, quick-cooking type preferred
  • Milk: 150 ml, any variety (dairy or plant-based)
  • Ground Black Pepper: Adjust to your taste
  • Oregano: 1 teaspoon, dried
  • Eggs: 3, large
  • Baking Powder: 1 teaspoon
  • Salt: 1 teaspoon
  • Hard Cheese: 40 grams, grated (choose your favorite variety for a personal touch)

Instructions:

  1. Preheat Oven: Begin by preheating your oven to 350°F (180°C). Prepare a baking dish by lightly greasing it with a bit of oil or butter.
  2. Soak Oat Flakes: In a medium bowl, combine the oat flakes with milk. Let them soak for about 10 minutes, until they’ve absorbed the milk and softened slightly.
  3. Prepare Cabbage: While the oats are soaking, take the shredded white cabbage and give it a quick steam or blanch for about 2-3 minutes. This will slightly soften the cabbage, making it more digestible and blending its flavors more seamlessly into the bake.
  4. Mix Ingredients: In a large mixing bowl, combine the softened oat flakes and milk mixture with the blanched cabbage. Crack the eggs into the bowl, adding the baking powder, salt, ground black pepper, and dried oregano. Mix well until all ingredients are evenly distributed.
  5. Add Cheese: Stir in most of the grated hard cheese into the mixture, reserving a small portion to sprinkle on top before baking.
  6. Bake: Pour the mixture into your prepared baking dish, smoothing the top with a spatula. Sprinkle the remaining cheese over the top for a golden, cheesy crust.
  7. Cooking Time: Bake in the preheated oven for about 35-40 minutes, or until the top is golden brown and the center is set.
  8. Serving: Allow the bake to cool for a few minutes before slicing. This dish can be served warm as a main course or a side dish, perfect alongside a light salad or your favorite protein.

This savory cabbage and oat flake bake combines the hearty, comforting textures of baked oats and cheese with the nutritional goodness of white cabbage, all seasoned to perfection with herbs and spices. It’s a versatile dish that can be enjoyed at any meal, offering a satisfying and wholesome option for those looking for something different in their cooking repertoire. Enjoy!

Rustic Vegetable Gratin

Creating a recipe from a list of ingredients can be an adventure in taste, texture, and creativity. It’s like being given a palette of colors and asked to paint a landscape; the outcome depends on how you combine them. The following recipe is a testament to the versatility and richness of vegetables, eggs, and herbs, transformed into a comforting, nourishing dish. This isn’t just any recipe—it’s a culinary journey that turns everyday ingredients into a celebration of flavors. Whether you’re a seasoned chef or a novice in the kitchen, this guide promises to walk you through creating something delightful and satisfying.

With a focus on simplicity and the wholesome goodness of its components, we’re about to embark on a delightful culinary adventure that highlights the best of what these ingredients have to offer, crafting a dish that’s both familiar and wonderfully novel. Welcome to the creation of a rustic vegetable gratin, a dish that perfectly encapsulates the joy of cooking with fresh, vibrant produce and the comfort of a meal made with love.

Ingredients:

  • Mixed Vegetables: Approximately 0.8 pounds in total of carrots, potatoes, and zucchini. Ensure they’re scrubbed and clean.
  • Onions: About 5.5 ounces, peeled and finely sliced.
  • Eggs: 3 large, to help bind the gratin together.
  • Garlic: 2 to 3 cloves, depending on your preference, finely minced.
  • Vegetable Oil: 2 tablespoons, plus a little extra for greasing the baking dish.
  • Seasoning: 1 teaspoon of salt and freshly ground pepper, adjusted to taste.
  • Herbs: A mix of fresh herbs (such as thyme, rosemary, or basil), chopped, to infuse the gratin with aromatic flavors.
  • Breading Topping: Either 3 tablespoons of store-bought breadcrumbs or 2 slices of bran bread crumbled finely, to give a crunchy top layer to the gratin.

Directions:

  1. Preheat and Prepare: Begin by preheating your oven to 375°F (190°C). Lightly grease a medium-sized baking dish with a bit of vegetable oil.
  2. Slice the Vegetables: Thinly slice the carrots, potatoes, and zucchini into even rounds. This ensures they cook uniformly.
  3. Sauté Onions and Garlic: In a skillet over medium heat, warm 1 tablespoon of vegetable oil. Add the sliced onions and minced garlic, sautéing until they are soft and translucent, about 5 minutes.
  4. Layering: In the prepared baking dish, create a base layer with half of the sliced vegetables. Sprinkle half of the sautéed onions and garlic over them, along with a bit of salt, pepper, and half of the chopped herbs. Repeat with the remaining vegetables, onions, garlic, and herbs.
  5. Egg Mixture: In a bowl, beat the eggs lightly with the remaining teaspoon of salt and a dash of pepper. Pour this mixture evenly over the layered vegetables in the dish.
  6. Breading Topping: Combine your choice of breadcrumbs or crumbled bran bread with the remaining tablespoon of vegetable oil; this helps the topping get that desirable golden color and crisp texture. Sprinkle this mixture over the top of the gratin.
  7. Bake: Place the dish in the oven and bake for about 45-50 minutes, or until the top is golden and crispy, and the vegetables are tender when pierced with a fork.
  8. Serving: Let the gratin cool slightly before slicing. This dish is best served warm, offering a crispy top layer with soft, flavorful vegetables underneath.

This rustic vegetable gratin stands out with its layers of thinly sliced vegetables, aromatic herbs, and a crunchy, golden topping. It’s a versatile dish that can serve as a hearty side or a vegetarian main course. Enjoy your cooking!

Sizzling Rice-Wrapped Hotdogs with Cheese and Seaweed

Elevate your breakfast game with these unique and delicious grilled rice hotdogs. A creative twist on traditional hotdogs, these treats ditch the flour and frying for a healthier, yet irresistibly tasty alternative. Wrapped in a savory rice blanket, infused with cheese, and finished with a hint of seaweed, each bite delivers a perfect blend of flavors and textures.

Ingredients:

  • 4 Sausages
  • 2 Bowls of Cooked Rice (enough to wrap around each sausage)
  • Cheese (slices or shredded, as preferred)
  • Dried Seaweed, finely chopped or shredded
  • For the Sauce:
    • 1 TBSP Soy Sauce
    • 2/3 TBSP Mirin (Cooking Wine)
    • 2/3 TBSP Corn Syrup or Honey

Instructions:

  1. Prep the Sausages: Start by gently scoring the sausages or poking them with a fork. This helps them cook evenly and absorb the flavors of the sauce.
  2. Mix the Sauce: In a small bowl, combine the soy sauce, mirin, and corn syrup (or honey) to create your glazing sauce. Stir until well mixed.
  3. Wrap the Sausages: Take about 1/2 bowl of cooked rice for each sausage. Flatten the rice on your palm or a piece of cling film, placing a slice or sprinkle of cheese in the center. Lay a sausage on top of the cheese, then carefully wrap the rice around the sausage, ensuring it’s fully covered. Repeat this process for each sausage.
  4. Apply the Sauce: Brush the rice-wrapped sausages with the prepared sauce, ensuring they are evenly coated.
  5. Grill the Hotdogs: Heat a grill pan over medium heat and place the rice-wrapped sausages on it. Grill each side until the rice is slightly crispy and golden brown, turning them occasionally for even cooking.
  6. Add Seaweed: Just before removing the hotdogs from the grill, sprinkle them with dried seaweed for an extra layer of flavor and a touch of color.
  7. Serve Hot: Enjoy your grilled rice hotdogs warm, with additional sauce on the side if desired.

These grilled rice hotdogs offer a delightful departure from the usual breakfast fare, combining the comfort of hotdogs with the wholesomeness of rice and the richness of cheese. Perfect for those mornings when you’re craving something different yet satisfying, this dish promises to start your day on a delicious note.

Quick Asian-Inspired Cabbage and Egg Stir-Fry

Whip up a delicious and hearty meal in just 25 minutes with this Asian-inspired cabbage and egg stir-fry. Combining the crunchiness of fresh vegetables with the softness of scrambled eggs, all beautifully flavored with soy and teriyaki sauce, this dish is a quick, nutritious dinner option that’s sure to please.

Ingredients:

  • Green Cabbage (ideally spring cabbage) – 20 oz (about 600g), shredded
  • Carrot – 2 oz (about 70g), julienned
  • Eggs – 3, beaten
  • Scallion – 1 oz (about 20g), finely chopped
  • Garlic – 1 clove, minced
  • Vegetable Oil – 2.5 tbsp
  • Soy Sauce – 2 tbsp
  • Teriyaki Sauce – 2 tbsp

Instructions:

  1. Prep the Vegetables: Begin by shredding the cabbage and julienning the carrot. Finely chop the scallion and mince the garlic for added flavor.
  2. Sauté the Veggies: Heat 1 tablespoon of vegetable oil in a large skillet or wok over medium heat. Add the minced garlic and sauté for about 30 seconds until fragrant. Then, add the shredded cabbage and julienned carrot to the skillet. Stir-fry the vegetables for 5-7 minutes until they are slightly softened but still crisp.
  3. Scramble the Eggs: Push the vegetables to one side of the skillet. Add the remaining 1.5 tablespoons of vegetable oil to the empty side of the skillet and pour in the beaten eggs. Let the eggs sit for a few seconds before gently scrambling them until fully cooked.
  4. Combine and Flavor: Once the eggs are cooked, mix them with the vegetables. Add the soy sauce and teriyaki sauce to the skillet. Toss everything together to ensure the vegetables and eggs are evenly coated with the sauces. Stir-fry for an additional 2-3 minutes, allowing the flavors to meld.
  5. Garnish and Serve: Just before serving, sprinkle the finely chopped scallion over the stir-fry for a burst of freshness. Give everything a final quick mix.

Serve this comforting cabbage and egg stir-fry hot, straight from the skillet. It’s a versatile dish that pairs well with rice or noodles, making for a satisfying and complete meal. The combination of savory sauces with the natural sweetness of the vegetables and the richness of the eggs creates a delightful symphony of flavors that can be enjoyed any night of the week.

Heirloom Beef Pancakes

Dive into a family tradition that spans decades with this recipe for Heirloom Beef Pancakes. Crafted with love and simplicity, these savory pancakes have been a cherished delight, combining the heartiness of beef with the subtle freshness of chives or green onions, all wrapped in a homemade dough.

Dough Ingredients:

  • 350g Flour
  • 3g Salt
  • 100g Hot Water (80℃ or 176°F)
  • 110g Cold Water
  • 10g Oil (vegetable or canola)

Filling Ingredients:

  • 250g Ground Beef
  • 150g Chives or Green Onions, finely chopped
  • 10g Sesame Oil or Olive Oil
  • 2g Salt
  • 10g Soy Sauce
  • A pinch of Cinnamon Powder
  • 1g Black Pepper Powder

Instructions:

  1. Prepare the Dough: In a mixing bowl, combine the flour and salt. Gradually add the hot water, stirring continuously, followed by the cold water. Mix until a soft dough forms. Knead the dough on a lightly floured surface until smooth. Drizzle with 10g of oil, cover, and let it rest while preparing the filling.
  2. Make the Filling: In a separate bowl, mix the ground beef with chopped chives or green onions, sesame oil (or olive oil), salt, soy sauce, cinnamon powder, and black pepper powder. Combine thoroughly to ensure the flavors meld together.
  3. Assemble the Pancakes: Divide the rested dough into equal portions. Roll each piece into a thin circle. Place a portion of the beef filling in the center of each circle. Fold and seal the edges to enclose the filling completely, forming a pancake.
  4. Cook the Pancakes: Heat a skillet over medium heat and lightly oil it. Place the beef pancakes in the skillet, cooking them for about 3-4 minutes on each side until golden brown and the beef is cooked through.
  5. Serve Warm: Enjoy these hearty beef pancakes hot, ideally with a side of soy sauce for dipping or any sauce of your choice.

These Heirloom Beef Pancakes offer a taste of tradition and comfort with every bite. The recipe is a testament to the simple, yet profound joy that cooking and sharing a family meal can bring. Whether for a special occasion or a regular weekday dinner, these pancakes are sure to warm hearts and satisfy appetites.