It started with a half-used pack of spaghetti, a small piece of pork from the back of the freezer, and very little inspiration.
I was tired. It had been a long week—the kind where laundry piles up, emails go unanswered, and the idea of cooking feels more like a chore than a joy. My kids were already asking what was for dinner, and I could sense the slow spiral of takeout temptation taking hold.
But then I remembered something my grandmother used to say: “A full table isn’t about what you serve, it’s about how you serve it.”
So I reached for the pasta, softened the pork in a skillet, and started building a creamy, cheesy sauce with garlic, paprika, and whatever cheese was left in the fridge. I tossed it all together, finished it with a handful of fresh parsley and dill, and called everyone to the table.
And something happened. The mood changed.
We weren’t eating fast food in front of the TV. We were laughing. Talking about our day. My youngest had cheese on her chin, my oldest was asking for seconds, and my partner raised an eyebrow in surprise after the first bite—because despite the humble ingredients, the dish tasted incredible.
From that night on, this recipe has been more than just dinner. It’s been a solution, a comfort, and a reminder that even when life feels hectic, you can still put something warm and homemade on the table.
What Makes This Recipe So Special?
This dish doesn’t rely on exotic ingredients or complicated techniques. Its beauty lies in its simplicity. It’s quick, customizable, family-friendly, and deeply satisfying.
Spaghetti acts as the perfect canvas, soaking up the rich, velvety sauce.
Pork breast, thinly sliced and seared, adds heartiness without being heavy.
Garlic, paprika, and black pepper give it bold, aromatic flavor.
Cheese and milk create a creamy, comforting sauce that clings to every bite.
Fresh herbs bring brightness and balance.
The result is a dish that feels like it took hours to make but comes together in less than 30 minutes. It’s the kind of meal that turns a regular Tuesday into something memorable.
Hearty Ingredients for a Crowd-Pleasing Dish
Ingredient
Quantity
Spaghetti
250 g
Pork breast (sliced)
200 g
Garlic (minced)
2 cloves
Olive oil
1 tablespoon
Butter
40 g
Salt
To taste
Black pepper
To taste
All-purpose flour
1 tablespoon
Milk
300 ml
Cheese (grated)
100 g (cheddar or mozzarella)
Paprika
1 teaspoon
Fresh parsley & dill
For garnish
How to Make This Family-Favorite Pasta
Step 1: Cook the Spaghetti
Bring a large pot of salted water to a boil. Add spaghetti and cook until al dente according to package instructions. Drain and set aside.
Step 2: Sear the Pork
In a large skillet, heat olive oil over medium-high heat. Add the sliced pork breast and cook until golden brown and cooked through. Season with salt, pepper, and paprika. Remove and set aside.
Step 3: Build the Sauce
In the same skillet, melt the butter. Add the minced garlic and sauté until fragrant. Stir in the flour and cook for 1 minute to create a roux.
Gradually whisk in the milk to form a smooth, creamy sauce. Reduce heat to low and stir in the grated cheese until melted and smooth.
Step 4: Combine and Serve
Return the cooked pork to the skillet, then add the drained spaghetti. Toss everything together until well coated in the creamy sauce.
Sprinkle with chopped parsley and dill before serving. Enjoy immediately while hot and melty.
Nutritional Breakdown (Per Serving, based on 3 servings)
Nutrient
Amount
Calories
~590 kcal
Protein
30 g
Carbohydrates
50 g
Sugars
6 g
Fat
30 g
Saturated Fat
14 g
Fiber
2 g
Sodium
420 mg
Frequently Asked Questions
Can I use a different type of pasta? Absolutely. While spaghetti works beautifully here, you can swap in penne, fettuccine, or even short pastas like rigatoni or rotini. Just adjust cooking times accordingly and make sure the sauce coats the pasta well.
What cut of pork is best? Pork breast is ideal because it’s tender and cooks quickly. However, you can also use pork loin, tenderloin, or even leftover roast pork sliced thin. Just avoid cuts that require long cooking times unless they’ve been pre-cooked.
Can I substitute the pork with another protein? Yes. Chicken breast or thigh works well, as does ground meat like beef, turkey, or even sausage. For a pescatarian version, try shrimp. And for a vegetarian spin, sautéed mushrooms or tofu can stand in.
Is it possible to make this recipe gluten-free? Of course. Simply use gluten-free pasta and substitute the flour with a gluten-free thickener such as cornstarch or a gluten-free flour blend. Be sure to check your cheese and seasonings for gluten as well.
Can I make it ahead of time? This dish is best served fresh, but you can make the sauce and pork a few hours in advance and keep them warm. Cook the pasta fresh and toss everything together just before serving for the best texture.
Does it reheat well? Yes. Store leftovers in an airtight container in the refrigerator for up to 3 days. Reheat gently on the stove or in the microwave, adding a splash of milk to loosen the sauce if needed.
Can I make this recipe without cheese? Yes, but the cheese is key to the creamy texture and rich flavor. If you’re avoiding cheese for dietary reasons, you could use a plant-based cheese alternative or add a tablespoon of nutritional yeast for a subtle cheesy flavor.
Creative Variations
Once you’ve mastered the base version, this dish becomes a playground for creativity. Here are a few easy variations:
1. Spicy Kick
Add red chili flakes or diced fresh chilies to the garlic for some heat. Smoked paprika can also add a smoky warmth.
2. Mushroom Lover’s Version
Sauté mushrooms alongside the pork for an earthy, umami-rich variation. Button mushrooms, cremini, or even wild varieties work beautifully.
3. Lemon Herb Twist
Add a squeeze of fresh lemon juice and a bit of lemon zest before serving to brighten the sauce. Swap dill for thyme or basil for a more summery flavor.
4. Double Cheese Deluxe
Use a mix of cheeses for extra richness—cheddar for sharpness, mozzarella for meltiness, and a touch of parmesan for depth.
5. Bacon Upgrade
Add chopped cooked bacon or pancetta for a salty, smoky twist that kids and adults alike will love.
Serving Suggestions
This dish is so versatile that it can be dressed up or down depending on the occasion.
Weeknight Dinner: Serve with a simple green salad and crusty bread for a complete meal.
Brunch Table Favorite: Top with a poached or fried egg for a decadent brunch plate.
Family Gathering: Make a large batch and serve from a big platter with fresh herbs and extra cheese on the side.
Lunchbox Hero: Pack it in a thermos for a warm, satisfying lunch at school or the office.
Pair it with a glass of crisp white wine for adults, or a splash of sparkling water with lemon for a refreshing, kid-friendly drink.
Storage and Reheating Tips
Refrigerator: Store any leftovers in an airtight container for up to 3 days. Be sure to let it cool completely before sealing to prevent moisture buildup.
Freezer: While best fresh, this dish can be frozen. Freeze in individual portions for easy reheating. Defrost in the fridge overnight and warm on the stovetop with a bit of extra milk to refresh the sauce.
Reheating: Reheat in a pan over low heat, stirring gently and adding a bit of milk or cream to keep the sauce silky. You can also microwave in short bursts, stirring between each.
A Final Word: Pasta That Nourishes More Than Hunger
There’s something incredibly grounding about this dish. It doesn’t try to be fancy. It doesn’t come with a long shopping list or hours of prep. But it shows up when you need it most—on the days when your energy is low, your time is short, but your desire to feed the people you love remains strong.
Pasta for the Whole Family in Minutes isn’t just a catchy name. It’s a reminder that you can make something special with what you have. That a warm bowl of creamy spaghetti and tender pork can quiet the chaos, spark conversation, and bring everyone to the table—even if just for a few minutes.
So whether you’re cooking for toddlers or teenagers, roommates or relatives, or just yourself on a quiet evening, I hope this recipe becomes part of your kitchen story too. The kind of dish you turn to again and again—not because it’s trendy, but because it’s dependable, delicious, and made with love.
The first time I made this snack, I wasn’t chasing trends or trying to recreate something from the internet. I just wanted a warm, comforting bite of something savory and nostalgic—something that felt like sitting at a kitchen table, even if I was halfway through a stressful day.
It was a rainy afternoon, and I had a sheet of puff pastry in the freezer, a lonely tomato on the counter, and a few slices of ham and cheese in the fridge. Nothing fancy. Nothing special. But when I combined them—layering mustard, cheese, tomato, and a sprinkle of Parmesan on that buttery pastry—it felt like alchemy. The smell alone was enough to pull everyone in the house toward the oven.
It wasn’t just good. It was addictive. Flaky on the outside, warm and gooey in the middle, with the perfect balance of savory richness and acidic brightness from the tomato. We finished the tray in minutes. From that day forward, it became “the snack.” The one that was requested for family movie nights, weekend lunches, quick brunches, and every “what can I make fast?” moment in between.
A few months later, I saw a variation of this simple tomato puff pastry recipe trending online. Different names, different fillings—but the same idea. A flaky pastry layered with bold, melty ingredients. Apparently, the world had caught on to what I had discovered in my own kitchen: this snack is irresistible.
Now known across social platforms as the tomato puff pastry that’s driving people mad, this easy dish has become a global hit. But for me, it’s not about going viral. It’s about sharing something I love, something that feeds more than just hunger—it feeds connection, comfort, and joy.
Why This Recipe Became a Viral Favorite
There are plenty of recipes that grab attention for being flashy or over-the-top, but this one stands out for a different reason: it’s relatable. Anyone can make it. You don’t need a culinary degree, specialty tools, or a rare list of ingredients. And yet, it delivers like a showstopper every single time.
Here’s why this tomato puff pastry snack has captured hearts (and stomachs) around the world:
It’s quick. You can prep and bake it in under 30 minutes.
It uses everyday ingredients. Tomato, cheese, ham, mustard, puff pastry—these are pantry and fridge staples.
It’s adaptable. You can tweak it based on what you have.
It’s visually appealing. The golden pastry, red tomatoes, and bubbling cheese create a picture-perfect result.
It satisfies. Whether as a snack, light meal, or party appetizer, it hits the spot.
In a time when people crave food that feels comforting and joyful, this dish ticks all the boxes—and then some.
What You’ll Need to Recreate the Craze
Ingredient
Quantity
Puff pastry
500 g
Mustard
To taste
Ham
100 g
Cheese (cheddar, mozzarella, etc.)
100 g
Tomatoes (sliced)
1–2
Ground black pepper
To taste
Egg (for egg wash)
1
Grated Parmesan
30 g
How to Make This Viral Tomato Puff Pastry Sensation
Step 1: Prep the Puff Pastry
Preheat your oven to 375°F (190°C). If using frozen puff pastry, let it thaw according to the package instructions. Roll it out gently on a lightly floured surface.
Step 2: Add the Layers of Flavor
Spread a thin layer of mustard across the surface of the pastry. Lay down the slices of ham evenly, followed by your cheese of choice. Place tomato slices over the top. Season with black pepper.
Step 3: Fold or Roll
You can either fold the puff pastry over into a rectangle or roll it into a log and slice into rounds for pinwheels. Choose your preferred style depending on how you’d like to serve it.
Step 4: Egg Wash and Top
Place the shaped pastries onto a baking sheet lined with parchment paper. Beat the egg and brush the tops of the pastries. Sprinkle generously with grated Parmesan.
Step 5: Bake to Perfection
Bake for 20–25 minutes, or until the pastry is puffed and golden brown and the cheese is melted and bubbly.
Step 6: Cool Slightly and Serve
Let cool for 5 minutes before serving. Enjoy warm for the full melt-in-your-mouth experience.
Nutritional Snapshot (Per Serving, Based on 6 Servings)
Nutrient
Amount
Calories
~320 kcal
Protein
10 g
Carbohydrates
22 g
Sugars
2 g
Fat
22 g
Saturated Fat
10 g
Fiber
1 g
Sodium
460 mg
Frequently Asked Questions
Can I use store-bought puff pastry? Absolutely. In fact, most people do. Look for all-butter puff pastry for the flakiest, most flavorful result. Just make sure it’s thawed properly if frozen.
What kind of cheese works best? Mozzarella is a go-to for meltiness, cheddar adds sharpness, and gouda or fontina give it a buttery depth. A blend is ideal. Use what you love or what you have.
Do I need to cook the tomatoes first? No, sliced raw tomatoes work beautifully and soften during baking. For very juicy tomatoes, you can pat them dry slightly before adding to the pastry to avoid excess moisture.
Is mustard essential? It’s optional—but it adds a tangy depth that really enhances the overall flavor. You can use Dijon, whole grain, or even spicy brown mustard, depending on your taste.
Can I make this vegetarian? Easily. Just skip the ham or replace it with sautéed mushrooms, spinach, or caramelized onions. You won’t miss the meat.
Can I prepare it ahead of time? You can assemble the puff pastry up to 4 hours in advance and keep it in the fridge. Bake it fresh when ready for the best texture.
Can I freeze leftovers? While it’s best eaten fresh, leftovers can be frozen. Wrap tightly and freeze for up to one month. Reheat in the oven to restore crispness.
Ways to Customize It
One of the best things about this recipe is how easily it adapts to your cravings, pantry, or occasion. Here are some creative twists to try:
1. Herbed Delight
Add chopped fresh basil, oregano, or thyme for a Mediterranean flair. A drizzle of olive oil before baking gives it a rustic edge.
2. Spicy Version
Use pepper jack cheese and add thinly sliced jalapeños or a pinch of chili flakes to bring the heat.
3. Caprese-Inspired
Swap mustard for pesto, skip the ham, and add fresh mozzarella and sliced cherry tomatoes. Garnish with fresh basil after baking.
4. Breakfast Style
Add scrambled eggs or cooked bacon to the filling. Serve with a dollop of sour cream or sriracha for a brunch-friendly option.
5. Mini Puff Bites
Cut the puff pastry into smaller squares and make bite-sized versions—perfect for parties or appetizer platters.
Serving Ideas
This puff pastry tomato snack is as versatile as it is delicious. Serve it as:
A midday snack alongside a cup of tea or a cold drink.
A quick lunch with a side salad or soup.
A brunch table centerpiece with eggs, fruit, and coffee.
A party appetizer—slice it into squares and serve with toothpicks.
A comfort meal when you want something warm, cheesy, and nostalgic.
And don’t forget the dips. A garlic yogurt sauce, a dash of hot honey, or a spoonful of balsamic glaze on the side can take it to another level.
How to Store and Reheat
If by some miracle you have leftovers, here’s how to keep them fresh:
Refrigerate in an airtight container for up to 3 days.
To reheat, use a toaster oven or conventional oven at 350°F (175°C) for 8–10 minutes until the pastry re-crisps. Avoid the microwave, which makes the crust soggy.
Freeze for up to 1 month. Wrap tightly in foil or a freezer-safe bag. Bake directly from frozen at 375°F (190°C) until hot.
A Final Thought: Sometimes the Best Things Are the Simplest
There’s something wonderfully universal about this snack. It doesn’t rely on trendiness or technique—it just tastes good. It brings people together around the table, around the screen, and around the world. It proves that simple food, when made with care and good ingredients, can be just as satisfying as anything fancy.
For me, this snack will always be more than a recipe. It’s a reminder that small things—like a sheet of pastry, a ripe tomato, and a sprinkle of cheese—can bring big joy. That the best meals don’t always require a plan, just a moment of inspiration.
So whether you’re making this for the first time or the fiftieth, whether you’re eating it in your pajamas or plating it for guests, know that you’re participating in something bigger. A global moment of shared taste, born from a humble tomato and a bit of puff pastry.
And trust me—you’ll want to make it again and again.
Some of the most comforting meals come from the humblest ingredients. They aren’t plated with tweezers or topped with microgreens. They don’t need to be. These are the meals you make when your fridge is half-empty, your budget is tight, or your heart simply needs something warm and familiar.
This eggplant recipe is exactly that kind of dish.
I discovered it during a season of my life when I was learning how to cook for one. I had just moved into my first apartment, a tiny space with squeaky floorboards and a stove that always leaned slightly to the left. It was far from glamorous, but I loved every creaky inch of it. I was a student, juggling part-time jobs and late-night essays, and I didn’t have much money to spend on food. What I did have was a craving for something nourishing, something baked, and something that felt like a small act of care at the end of a long day.
One evening, with only a couple of eggplants and some leftover cheese in the fridge, I decided to improvise. I roasted the eggplants, sautéed some onions and carrots, tossed in a handful of cherry tomatoes and olives, and topped it all with whatever shredded cheese I had. I baked everything until golden and bubbly, then sat down on the floor with the dish and a fork.
I didn’t even make it to the table.
It was perfect. The creamy texture of roasted eggplant, the sweetness of the tomatoes, the briny bite of olives, and the melty mozzarella on top—it was the kind of meal that made me feel like everything was going to be okay. Since that day, it’s become a staple in my kitchen, a go-to dish that never disappoints.
Years later, I still make it regularly. I’ve shared it with friends during casual dinners, made it for my family on weeknights, and even served it as a side dish at potlucks. And no matter how many times I’ve baked it, the same thing always happens: the tray empties, and someone asks, “Can I get the recipe?”
This isn’t just a recipe—it’s a little piece of calm, a dependable comfort, and a reminder that good food doesn’t have to be complicated.
Why This Recipe Works So Well
What makes this recipe a keeper is its perfect balance of flavor, texture, and simplicity. Each component brings something important to the dish:
Roasted eggplant becomes tender and creamy, providing the perfect base to hold all the toppings.
Onions and carrots build a subtle sweetness and earthy depth.
Cherry tomatoes burst with juicy flavor, while olives add briny sharpness and richness.
Mozzarella binds everything together, melting into a golden, bubbling topping that’s impossible to resist.
The beauty lies in how all of these ingredients, though inexpensive and easy to find, come together to create something truly satisfying.
Plus, it’s a dish that looks as good as it tastes. The colors—the deep purple of the eggplant skin, the reds and greens of the filling, the golden cheese—make it a vibrant centerpiece, even on the simplest table.
Wholesome Ingredients, Big Flavor
Ingredient
Quantity
Eggplants (medium-sized)
2
Salt
1 teaspoon (for rubbing)
Vegetable oil
2 tablespoons (for brushing)
Onion
1, finely chopped
Carrot
1, grated or finely chopped
Cherry tomatoes
10–12, halved
Olives (green or black)
¼ cup, pitted and halved
Black pepper
To taste
Garlic
2 cloves, minced
Mozzarella
150 grams, shredded
How to Make This Addictive Eggplant Bake
Step 1: Prep the Eggplants
Slice the eggplants lengthwise and rub the flesh with salt. Let them sit for 15–20 minutes to release bitterness, then pat dry with a paper towel. Brush both sides lightly with vegetable oil.
Step 2: Roast
Place the eggplant halves on a baking tray lined with parchment paper. Roast in a preheated oven at 400°F (200°C) for 20–25 minutes, or until soft and slightly golden.
Step 3: Sauté the Filling
While the eggplants roast, heat a pan over medium heat with a small splash of oil. Sauté the onions until soft, then add the grated carrot and cook for a few more minutes. Add garlic, cherry tomatoes, and olives. Cook until tomatoes soften slightly. Season with black pepper to taste.
Step 4: Fill and Bake
Remove eggplants from the oven. Scoop out a bit of the center flesh if needed to create space, then spoon the sautéed veggie mixture into each half. Top with shredded mozzarella.
Step 5: Final Bake
Return the filled eggplants to the oven and bake for another 10–12 minutes, or until the cheese is melted and lightly golden.
Step 6: Serve
Let cool slightly before serving. Enjoy warm with fresh herbs or a simple salad on the side.
Nutritional Breakdown (Per Serving, based on 4 servings)
Nutrient
Amount
Calories
~190 kcal
Protein
7 g
Carbohydrates
14 g
Sugars
6 g
Fat
12 g
Saturated Fat
4 g
Fiber
5 g
Sodium
310 mg
Frequently Asked Questions
Can I use large eggplants instead of medium ones? Yes, you can. Just be sure to adjust the roasting time accordingly. Larger eggplants may need a few more minutes in the oven to become soft enough to scoop and fill.
Do I have to salt the eggplants before roasting? Salting helps draw out bitterness and excess moisture, especially in older or larger eggplants. While not always essential with fresh young eggplants, it’s a useful step to ensure the final dish doesn’t turn soggy or overly watery.
Can I make this ahead of time? Absolutely. You can prepare the roasted eggplants and vegetable filling a day in advance. Store them separately in the fridge and assemble with cheese just before baking. This is a great strategy if you’re cooking for a crowd or planning meals for the week.
Is there a vegan version of this recipe? Yes! Just replace the mozzarella with a dairy-free shredded cheese or nutritional yeast, or simply skip the cheese altogether. The flavors from the vegetables and olives are bold enough to carry the dish.
Can I use canned tomatoes instead of fresh cherry tomatoes? Yes, though cherry tomatoes bring a lovely burst of flavor and texture. If using canned diced tomatoes, drain them well before adding them to the sauté pan to avoid excess moisture.
What type of olives work best? You can use either green or black olives. Green olives tend to be saltier and more robust in flavor, while black olives are milder and more subtle. Use whichever you prefer—or mix both for a balanced taste.
Can this be frozen? The dish is best enjoyed fresh, but leftovers can be frozen. Allow it to cool completely, then wrap tightly and freeze for up to one month. Reheat in the oven until warmed through.
Delicious Ways to Customize It
This eggplant bake is endlessly flexible. Once you’ve made the base version, you’ll find yourself thinking of all kinds of ways to make it your own. Here are a few suggestions to spark your creativity:
1. Add Grains
For a heartier version, mix in cooked quinoa, bulgur, or rice to the vegetable filling before stuffing the eggplants. It turns the dish into a complete meal.
2. Make It Spicy
Add a pinch of red pepper flakes or a chopped chili to the sautéed vegetables for a little kick.
3. Try Different Cheeses
While mozzarella is classic, feel free to experiment. Feta adds a tangy note, while goat cheese adds richness. A sprinkle of parmesan on top also adds depth and a crispy edge.
4. Bulk It Up with Beans
Toss in cooked lentils or chickpeas with the filling for added protein and texture. This is a great option for vegetarians looking for a more filling version.
5. Mediterranean-Inspired
Add fresh herbs like parsley or basil before serving, and drizzle with a little olive oil and lemon juice for brightness.
Serving Suggestions
This dish can be served in many ways, depending on the occasion. It’s light enough to enjoy as a side dish, but satisfying enough to stand alone as a main.
Weeknight Dinner: Serve warm with a side of couscous, rice, or a crusty piece of bread.
Lunch: Pair with a crisp green salad and a drizzle of vinaigrette.
Appetizer: Slice the eggplants into smaller portions and serve on a platter for gatherings or potlucks.
Meal Prep: Make a batch and enjoy it throughout the week. It reheats well and tastes just as delicious the next day.
It’s a recipe that adapts to your schedule and mood—whether you’re cooking for yourself or feeding a table full of hungry guests.
Storage and Leftover Tips
Refrigerator: Store leftovers in an airtight container in the fridge for up to 3 days. Reheat in the oven or microwave.
Freezer: Wrap individual portions tightly in foil or place in freezer-safe containers. Freeze for up to 1 month. Thaw overnight and reheat before serving.
To Refresh: If the eggplant skin becomes too soft after storing, a quick reheat in the oven at 350°F (175°C) can help bring back a bit of structure and crisp the cheese topping again.
A Final Bite of Gratitude
This recipe reminds me that sometimes, the best food doesn’t come from fancy ingredients or elaborate techniques. It comes from what we already have—on our shelves, in our fridge, and in our hearts.
I can eat these delicious eggplants every day not just because they’re affordable, simple, and satisfying—but because they remind me of what cooking is really about: nurturing ourselves and others, even in the smallest ways. They bring warmth to the table, comfort to the soul, and joy to the everyday routine.
So whether you’re a student on a budget, a parent trying to make something healthy and tasty, or simply someone craving a wholesome bite after a long day, I hope this recipe finds its way into your kitchen. And I hope it brings you the same sense of peace, nourishment, and happiness that it brought me—back in that tiny apartment, with a fork in one hand and no worries in the world.
Some recipes aren’t just meals—they’re memories. This Cheesy Bacon Puff Pastry Bake was born not from a cookbook but from the kind of moments that happen when you need to use what you have, when comfort takes precedence over presentation, and when you’re feeding people you love.
The first time I made this bake, it wasn’t planned. It was one of those lazy weekend mornings when the fridge looked uninspired, but the mood in the kitchen was hopeful. My kids were still in pajamas, the coffee was brewing, and I needed something hearty but effortless—something with warmth in every bite.
I found a sheet of puff pastry in the freezer and some bacon tucked behind a jar of pickles. There were scallions wilting just slightly in the crisper drawer, and half a block of cheese that had seen better days. Somehow, with those unassuming ingredients and a bit of improvisation, the dish came together like magic.
We sat around the kitchen island as it baked, drawn in by the buttery scent filling the room, the promise of something crispy and savory. When it came out of the oven—golden, bubbling, and just slightly messy—we cut into it while it was still steaming. The layers flaked perfectly. The cheese stretched in ribbons. The bacon added that familiar, smoky bite, and the tangy sauce underneath tied it all together in a way I hadn’t expected.
Now, it’s a regular in our kitchen—not just for breakfast, but for brunches, casual dinners, or even sliced thinly for party appetizers. It’s a humble, indulgent bake that reminds me that the best recipes aren’t always planned. They’re created in a moment, shared in good company, and remembered because of how they made us feel.
Why This Recipe Works
There’s a reason this bake has become a crowd favorite. It checks every box for comfort food: it’s buttery, cheesy, smoky, and crisp. And despite its simplicity, it delivers layers of texture and flavor.
The puff pastry provides that unbeatable, flaky crunch—a golden contrast to the soft, rich filling. The cheese melts into the bacon and green onions, creating gooey, savory ribbons of flavor with every bite. The sauce—made with ketchup, mayonnaise, and mustard—adds just enough tang and creaminess to balance the richness without overpowering.
It’s also beautifully adaptable. Want it spicier? Add chili flakes. Need to use up ham or cooked chicken? Swap them in. It’s a recipe that invites flexibility, not perfection. And that’s part of its charm.
Ingredients
Ingredient
Quantity
Puff pastry (thawed if frozen)
800 g (about 28 oz)
Ketchup
2 tablespoons
Mayonnaise
2 tablespoons
French mustard
1 tablespoon
Bacon (chopped)
200 g (about 7 oz)
Green onions (chopped)
2–3 stalks
Cheese (grated)
200 g (about 7 oz), Cheddar or preferred type
Salt
To taste
Black pepper
To taste
Egg (for egg wash)
1, beaten
Simple Steps to Buttery, Cheesy Perfection
Step 1: Prep the Oven and Pastry
Preheat your oven to 375°F (190°C). Lightly flour your work surface and roll out the puff pastry if needed to fit your baking dish or desired shape (rectangle or square works best).
Step 2: Mix the Sauce
In a small bowl, combine ketchup, mayonnaise, and French mustard. Mix until smooth. This forms the flavorful base spread that ties everything together.
Step 3: Assemble the Layers
Place the pastry on a parchment-lined baking sheet or baking dish. Spread the sauce evenly over the surface, leaving a small border around the edges.
Top with chopped bacon, followed by green onions and grated cheese. Season with salt and black pepper to taste.
Step 4: Fold and Seal
If you’re making a roll, fold over the edges or roll the pastry into a log and pinch the seams to seal. Alternatively, you can lay another sheet of pastry on top and crimp the edges. Brush the top with beaten egg for that golden finish.
Step 5: Bake to Golden Glory
Bake for 25–30 minutes or until the pastry is puffed and golden brown, and the cheese is bubbling. Let cool for a few minutes before slicing.
Nutritional (Per Serving, Approx. 1 of 8 slices)
Nutrient
Amount
Calories
~390 kcal
Protein
11 g
Carbohydrates
24 g
Sugars
2 g
Fat
28 g
Saturated Fat
11 g
Fiber
1 g
Sodium
620 mg
Frequently Asked Questions
Can I make this with homemade puff pastry? Yes, you absolutely can use homemade puff pastry if you’re comfortable with it. But store-bought puff pastry (especially the all-butter variety) is convenient and works beautifully for this bake.
Do I need to cook the bacon beforehand? It’s best to slightly pre-cook the bacon so it renders some fat before going into the bake. Otherwise, it might remain too chewy or release too much grease into the pastry.
Can I use a different kind of cheese? Definitely. Cheddar melts well and adds a sharp contrast, but you can try mozzarella for extra gooeyness, gouda for a smoky flavor, or even feta if you want a salty bite. A combination of cheeses also works wonderfully.
What’s a good substitute for green onions? If you don’t have green onions, try finely chopped leeks, chives, or even sautéed shallots. You want something mildly oniony to cut through the richness.
Can I make this bake ahead of time? Yes. You can assemble the bake, cover it, and refrigerate it for up to 12 hours before baking. For best results, let it come to room temperature before placing it in the oven.
Can this be made vegetarian? Absolutely. Just omit the bacon and consider adding sautéed mushrooms, sun-dried tomatoes, or spinach instead. You’ll still get a rich, delicious bake.
Can it be frozen? Yes. After baking, let it cool completely, then wrap tightly and freeze for up to 2 months. Reheat in the oven at 350°F (175°C) until warmed through. The crust will re-crisp nicely.
Creative Variations
The base recipe is incredibly versatile. Here are a few ideas to make it your own:
1. Breakfast Style
Crack a few eggs on top just before baking and let them cook until the whites are set. Sprinkle with fresh herbs after baking.
2. Mediterranean Twist
Swap bacon for chopped olives and sun-dried tomatoes. Use crumbled feta and a touch of oregano for a bold, salty variation.
3. Spicy Kick
Add chopped jalapeños or a sprinkle of red pepper flakes. Use pepper jack cheese instead of cheddar.
4. Mushroom and Thyme
Sauté mushrooms with garlic and thyme and use in place of bacon for a woodsy, savory version.
5. Mini Pastry Bites
Instead of one large bake, cut the puff pastry into smaller squares, fill each one, and fold over to make hand pies. Great for entertaining or meal prep.
Serving Suggestions
This dish can play multiple roles depending on the occasion. It’s casual enough for a family brunch, indulgent enough for holiday mornings, and elegant enough to serve at a gathering. Here are a few pairing ideas:
Brunch Buffet: Serve alongside fresh fruit, a leafy green salad, and mimosas or fresh juice.
Lunch Plate: Pair with tomato soup or a crisp slaw for a warm, comforting midday meal.
Appetizer Tray: Slice into small squares or triangles and serve warm on a platter with cocktail picks.
Dinner Side or Main: Serve it next to roasted vegetables or a light soup. It also makes a great meat-and-cheese option on a cozy dinner spread.
However you serve it, this puff pastry bake will always stand out as the golden, flaky centerpiece on the table.
Storage and Leftover Tips
Refrigerate leftovers in an airtight container for up to 3–4 days. To reheat, place in a preheated oven at 350°F (175°C) for 10–12 minutes, or until warmed through. This preserves the crispness much better than the microwave.
Freezing is also an option. Wrap cooled slices in foil or freezer-safe bags and store for up to 2 months. Reheat directly from frozen in the oven.
Avoid sogginess by storing it uncovered until it fully cools before refrigerating. Excess steam can cause the pastry to lose its crunch.
A Dish to Remember
There’s a kind of joy that comes with baking something that feels impressive but doesn’t require hours of effort or complicated steps. That’s the gift of this Cheesy Bacon Puff Pastry Bake. It brings big flavor with minimal fuss, and it delivers the kind of comfort that lingers long after the last bite.
It’s not about perfect edges or artisan techniques. It’s about the crispy crackle when the knife cuts through, the golden hue that makes your mouth water, the way melted cheese stretches as you lift a piece onto your plate. It’s the kind of dish that feels homemade in the most heartfelt way—unpretentious, satisfying, and full of love.
So whether you’re baking it for breakfast, brunch, or just because it’s been one of those weeks, this dish will always show up with warmth. And maybe, like it did for me, it will turn an ordinary day into a new family memory.
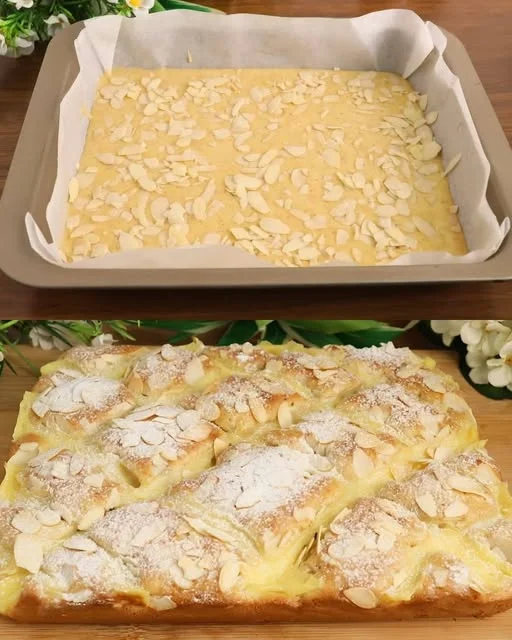
There’s a certain kind of comfort that only comes from a dessert baked not just with ingredients, but with love. For me, that dessert is what we now call the Vanilla Cloud Cake. Soft, pillowy, subtly nutty with a whisper of almond, and laced with a creamy homemade vanilla custard—this cake is more than a sweet treat. It’s a thread that ties generations together.
I remember coming home from school to the scent of something warm and inviting wafting from the kitchen. My mother would be standing at the stove, gently whisking custard in her old enamel pot, while a golden cake rose in the oven. The custard was never made with shortcuts—no instant mixes, no condensed milk. Just eggs, sugar, milk, and patience. She said that you could taste the care in every bite. And she was right.
The Vanilla Cloud Cake became our family’s go-to for celebrations that weren’t quite formal enough for frosted layer cakes, but far too special for store-bought cookies. It was the cake that made ordinary days feel memorable: a Tuesday night with tea, a rainy Saturday afternoon, a quick dessert for unexpected guests. And now, I’ve passed it on to my own children—watching them swirl the custard and laugh when the batter sticks to their fingers. It’s still magic.
This cake is for everyone who believes in the power of homemade comfort. It’s quick, approachable, and incredibly forgiving. And best of all? You don’t need condensed milk or fancy techniques—just your hands, a whisk, and a little time.
What Makes Vanilla Cloud Cake So Special?
While the recipe might look simple, it’s the subtle harmony of textures and flavors that makes this cake shine.
The cake base is light but moist, thanks to the addition of ground almonds and oil. It’s not overly rich, which makes it ideal for layering or pairing with tea. The custard filling is smooth, velvety, and just sweet enough to feel indulgent without being heavy. Together, they create a cake that tastes elegant but feels like a warm hug.
This dessert is also incredibly versatile. It can be served warm or chilled, dressed up with fruit, or enjoyed exactly as it is. It holds its structure beautifully, yet melts in the mouth—earning its “cloud” nickname honestly.
Ingredients Overview
Vanilla Custard Filling
Ingredient
Quantity
Medium egg
1
Granulated sugar
¼ cup (50 g)
Vanilla sugar
8 g (or 1 teaspoon extract)
Cornstarch
2 tablespoons (15 g)
Milk
1 cup (250 ml)
Almond-Infused Cake Batter
Ingredient
Quantity
Large eggs
2
Salt
A pinch
Granulated sugar
½ cup (100 g)
Milk
½ cup (100 ml)
Vegetable oil
¼ cup (50 ml), added gradually
Ground almonds
½ cup (50 g)
All-purpose flour
1½ cups (180 g)
Baking powder
½ tablespoon (8 g)
Preparation Steps
Step 1: Prepare the Vanilla Custard
In a small saucepan, whisk together the egg, granulated sugar, and vanilla sugar or extract until smooth.
Add the cornstarch and whisk until no lumps remain.
Gradually pour in the milk while stirring continuously.
Heat over medium, stirring constantly, until the mixture thickens into a smooth custard.
Once thickened, remove from heat and let cool slightly.
Step 2: Mix the Cake Batter
In a mixing bowl, beat the eggs with a pinch of salt until foamy.
Add granulated sugar and whisk until the mixture is pale and airy.
Stir in the milk.
Gradually add the vegetable oil while continuing to whisk.
Mix in the ground almonds.
Sift in the all-purpose flour and baking powder, then fold gently until just combined.
Step 3: Assemble and Bake
Preheat your oven to 350°F (175°C).
Lightly grease a baking dish or line it with parchment paper.
Pour half of the cake batter into the prepared dish and spread it evenly.
Spoon or pipe the vanilla custard over the first layer of batter.
Cover with the remaining cake batter.
Bake for 25 to 30 minutes, or until the top is golden and a toothpick inserted into the center comes out clean.
Allow the cake to cool slightly before slicing. Serve warm or chilled.
Nutritional Information (Approximate, Per Serving — Based on 8 Servings)
Nutrient
Amount
Calories
~230 kcal
Protein
5 g
Carbohydrates
28 g
Sugars
15 g
Fat
10 g
Saturated Fat
1.5 g
Fiber
1.2 g
Sodium
55 mg
Frequently Asked Questions
Can I use store-bought custard?
Technically, yes. But part of the charm of this cake is the homemade custard. It only takes a few ingredients and minutes to make from scratch, and the payoff in flavor and texture is significant.
What kind of almonds should I use?
Ground almonds or almond meal works best. If you only have whole almonds, you can pulse them in a food processor until fine. Just avoid almond flour made from blanched almonds if it’s too powdery—it won’t give the same body.
Can I make it dairy-free?
Yes. Swap the milk in both the cake and the custard with unsweetened almond, oat, or soy milk. The flavor will change slightly, but it still works beautifully. Just be sure your plant-based milk can handle gentle heating without separating.
Is this recipe freezer-friendly?
You can freeze the baked cake (without custard) for up to a month. However, the custard texture may suffer if frozen. For best results, prepare the custard fresh when serving.
Why is there no butter in the cake?
The cake uses oil instead, which creates a lighter, moister crumb. It also helps the cake stay soft even when refrigerated.
Customizations and Creative Variations
This base recipe is incredibly adaptable. Whether you’re in the mood for something fruity, spiced, or extra decadent, there’s a way to make it your own.
1. Lemon Zest and Blueberries
Add the zest of one lemon to the cake batter, and fold in a handful of fresh or frozen blueberries. The lemon brightens the flavor, and the berries add juicy pockets of color and taste.
2. Spiced Autumn Version
Mix a pinch of cinnamon and nutmeg into the batter and top with thin slices of pear or apple before baking. Serve warm with a drizzle of maple syrup.
3. Chocolate Swirl
For a twist, add a tablespoon of cocoa powder to part of the batter and swirl it in before baking. You could even drizzle with a light chocolate glaze post-bake.
4. Coconut Custard
Replace half of the milk in the custard with canned coconut milk and add a tablespoon of shredded coconut. This adds a tropical depth while maintaining the creamy texture.
Serving Suggestions
The Vanilla Cloud Cake is best enjoyed slightly warm or completely cooled. It pairs wonderfully with:
A dusting of powdered sugar and a few fresh berries
Lightly whipped cream or crème fraîche
A simple fruit compote (like warm raspberries or caramelized bananas)
Hot beverages like earl grey tea, spiced chai, or even black coffee
If you’re serving it at a dinner party, try cutting it into small squares and topping each with a decorative mint leaf or a dollop of cream. It also makes a delightful addition to brunch spreads or afternoon tea trays.
Make-Ahead and Storage Tips
This cake can be made ahead of time, which makes it perfect for busy households or when entertaining.
Storage: Keep the cake refrigerated in an airtight container for up to 3 days. The custard layer helps retain moisture, so it won’t dry out.
Reheating: If you’d like to serve it warm, place a slice in the microwave for 10–15 seconds or warm it gently in the oven.
Transporting: This cake travels well. If you’re bringing it to a gathering, bake it in a disposable foil tray and cover once cool.
Custard Tip: If making ahead, place plastic wrap directly on the surface of the custard as it cools to prevent a skin from forming.
Why This Cake Resonates With So Many
In a world that often demands complicated or trend-driven desserts, this recipe is refreshingly grounded. It’s not trying to be viral—it’s trying to be remembered. The Vanilla Cloud Cake feels like something you’ve had before in your childhood, even if you haven’t.
That’s what makes it so beloved across generations. There’s something about the balance of textures, the familiar notes of vanilla and almond, and the satisfaction of a home-baked custard that turns this simple cake into something unforgettable.
You don’t need an occasion to bake it. You just need a craving for warmth, softness, and sweetness that feels earned, not overwhelming.
A Final Word: The Sweetness of Shared Simplicity
In our family, baking this cake has always been more than just a culinary task—it’s been a shared ritual. A reminder that the best desserts aren’t always elaborate or expensive. They’re made in familiar kitchens, passed from one generation to the next, created with love, and shared around a table.
The Vanilla Cloud Cake isn’t just a recipe. It’s a memory waiting to happen. A simple act of care you can offer to yourself and to the people you love.
So whether you bake it for a birthday, a rainy afternoon, or just because your heart needs a little soft sweetness, this cake will be ready for you—light, tender, and wrapped in vanilla.
It happened on one of those mornings that start in a hurry — a forgotten alarm, missing socks, and sleepy kids dragging their feet to the breakfast table. I stood in the kitchen, half awake, staring at the contents of my fridge. Not much: a couple of tortillas, a few leftover potatoes, and a small block of mozzarella that needed using. But I had a family to feed and less than thirty minutes to do it.
So I improvised.
I tossed the potatoes into a pot to boil, grabbed a handful of frozen peas, chopped a couple of green onions, and rolled it all into a tortilla with some shredded cheese. A quick toast in the skillet, a little slice down the middle — and just like that, breakfast was done.
What surprised me wasn’t how fast it was. It was how much my kids loved it. “Is there more?” they asked, mid-bite. My husband took his second piece to go, and I caught myself stealing the crispy edge from the last wrap as I packed lunches.
From that morning on, these Wholesome Morning Wraps became a family staple. They’re easy, filling, and feel just the right amount of indulgent — even though they’re packed with vegetables. They’ve seen us through rushed school mornings, lazy Sunday brunches, and even those days when dinner needed to be breakfast all over again.
Why These Breakfast Wraps Just Work
There are a few magical things happening in this recipe, and they all come together with simplicity at their core. The beauty of these wraps isn’t in their complexity — it’s in how effortlessly they meet the needs of the morning.
1. Nutrient-Packed Without Trying Too Hard
These wraps include two humble but powerful vegetables: potatoes and green peas. Potatoes provide comforting carbs and natural energy, while peas offer a good dose of fiber and protein. Add in green onions for brightness and mozzarella for richness, and you have a well-balanced, satisfying start to the day.
2. Customizable to Infinity
Once you have the basic formula down, the variations are endless. You can add scrambled eggs, swap in different vegetables, or use whole wheat tortillas. Want to go vegan? Use plant-based cheese and avocado. Want more protein? Toss in chickpeas or cooked lentils. It’s the kind of recipe that adapts with your fridge and your taste.
3. Kid-Friendly and Parent-Approved
The soft texture, melted cheese, and mild flavors make this an easy yes for kids — even picky eaters. And for parents? It’s a five-star solution that checks all the boxes: quick, healthy, portable, and cleanup-friendly.
4. No Fancy Ingredients, No Special Equipment
You don’t need a food processor or a fancy toaster oven. Just a pot, a pan, and a spatula. Everything in the recipe is likely already in your kitchen, which makes this a go-to option on those “what do I even make?” mornings.
Ingredients
Ingredient
Quantity
Potatoes
2 medium, peeled and diced
Water
Enough to boil the potatoes
Green onions
2–3 stalks, chopped
Frozen green peas
1 cup (about 150 g)
Mozzarella cheese
100 g (about 3.5 oz), grated
Tortillas
2 large
Salt
To taste
Black pepper
To taste
Directions:
Cook the Potatoes Boil diced potatoes in salted water until tender (about 10–12 minutes). Drain and let cool slightly.
Mix the Filling In a bowl, combine cooked potatoes, green peas, green onions, and grated mozzarella. Season with salt and black pepper. Stir gently to combine.
Assemble the Wraps Lay out each tortilla and spoon half of the filling down the center. Fold the sides over and roll tightly into a wrap.
Toast to Perfection Heat a skillet over medium heat. Place each wrap seam-side down and toast for 2–3 minutes per side, until golden and crisp.
Serve and Enjoy Let cool slightly, slice if desired, and serve warm for a fast, nutritious meal.
Nutritional (Per Wrap)
Nutrient
Amount
Calories
~320 kcal
Protein
~10 g
Carbohydrates
~35 g
Fat
~14 g
Fiber
~4 g
Sodium
~380 mg
When to Serve These Morning Wraps
While they’re perfect as a morning meal, these wraps have a way of finding their place throughout the day.
Weekday breakfast – Fast to prep and easy to eat with one hand.
Weekend brunch – Pair with fruit or fresh juice for a full plate.
After-school snack – Slice into smaller pieces and serve warm or cold.
Quick lunch or dinner – Add a protein and salad for a full meal.
Meal prep – Make ahead, wrap in foil, and reheat as needed.
Their versatility makes them more than a breakfast — they’re a mealtime solution.
Tips for Making the Best Wraps Every Time
A great wrap is all about texture, timing, and balance. Here’s how to take your breakfast wrap game to the next level:
Don’t Overcook the Potatoes
You want them tender but still holding shape. Mushy potatoes can make the wrap soggy, especially if you’re storing leftovers.
Season Thoughtfully
Salt and pepper go a long way here. Taste the filling before wrapping to ensure it’s flavorful.
Use Just Enough Cheese
Mozzarella melts beautifully and binds everything together. Too much, and it might spill out the sides; too little, and you lose that creamy finish.
Toast Low and Slow
Medium heat is ideal to get a crispy, golden tortilla without burning it before the cheese melts inside.
Wrap Tightly
Fold in the sides first, then roll firmly. If the wrap is loose, it may fall apart in the pan.
Creative Variations to Try
These wraps are an ideal canvas for creativity. Here are some ideas to keep breakfast exciting:
Protein Boost
Add scrambled eggs, cooked quinoa, tofu crumbles, or chickpeas for an extra filling option.
Spice It Up
Add chili flakes, cumin, or smoked paprika to the filling. Serve with a drizzle of hot sauce or sriracha for heat lovers.
Vegan Version
Swap out mozzarella for vegan cheese or mashed avocado. You can also use hummus as a creamy spread alternative.
Mini Wraps for Little Hands
Use small tortillas and make tiny wraps for toddlers and lunchboxes.
Sweet & Savory Combo
Throw in roasted sweet potatoes, caramelized onions, or even a spoonful of corn for a touch of natural sweetness.
Frequently Asked Questions
Can I make these wraps ahead of time?
Yes. Assemble and toast the wraps, then refrigerate them in an airtight container. Reheat in a skillet or oven for best texture. Avoid microwaving if you want to keep them crispy.
Can I freeze them?
You can, although fresh is best. If freezing, wrap each cooled wrap tightly in foil or parchment and store in a freezer bag. Thaw overnight and reheat in a skillet.
Are they good cold?
Surprisingly, yes. While toasting adds texture, these wraps also hold up well at room temperature — making them great for lunchboxes or picnics.
Can I use other cheeses?
Absolutely. Try cheddar, gouda, feta, or a plant-based meltable cheese. Just make sure it complements the veggies.
Can I substitute the potatoes?
Sure. Try mashed sweet potato, roasted squash, or even cooked cauliflower for a lower-carb option.
How do I keep the wrap from falling apart?
Don’t overfill, fold tightly, and always toast seam-side down first to seal it. You can also secure it with a toothpick if serving immediately.
What’s the best way to serve them?
Slice diagonally for presentation and serve with a dip — like plain yogurt, herbed sour cream, or a tangy tahini sauce.
A Breakfast Built for Real Life
Not every morning is calm and quiet. Some are chaotic, some are sleepy, and some are simply too short. These Wholesome Morning Wraps don’t demand much — but they offer a lot in return.
They’re warm, comforting, customizable, and made from real ingredients that nourish without fuss. They’re also a reminder that healthy food doesn’t need to be complicated, expensive, or time-consuming. Sometimes, the best meals are the ones made from what you already have, with a little creativity and a lot of love.
Conclusion: The Kind of Breakfast That Stays With You
This recipe began as an improvisation. A quick fix for a hectic day. But it became something more — a reliable favorite that brings ease and comfort to our table time and again. These wraps are simple, yes. But they’re also delicious, adaptable, and built for real life.
So whether you’re rushing out the door, sitting down to a slow Sunday breakfast, or handing your child a warm bite on the way to school, know that this small, savory wrap carries something bigger: a moment of connection, nourishment, and care.
Because sometimes, that’s exactly what we need from our food.
Every home cook has that one recipe they didn’t see coming—the one that appeared on a whim, took only a handful of ingredients, and somehow managed to steal the spotlight from everything else they’ve made. For me, it was this no-yeast herb bread.
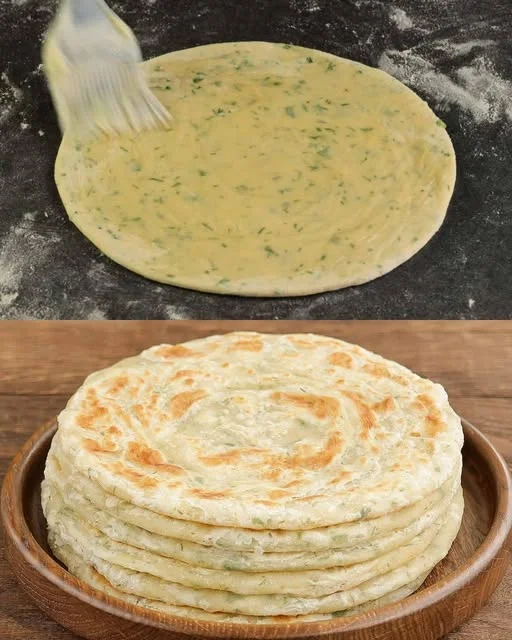
It started with a craving for something warm, buttery, and bread-like on a quiet Sunday afternoon. I had no yeast in the pantry, no intention of waiting hours for dough to rise, and very little patience. But I had flour, butter, water, and a bundle of fresh herbs that needed using up. I remembered a simple flatbread-style recipe I’d seen shared online, tweaked it with what I had, and hoped for the best.
What came out of the oven 35 minutes later stopped me in my tracks.
The crust was golden, the inside pillowy and soft, and the aroma of butter and fresh dill made my kitchen smell like a bakery tucked into a garden. I tore off a piece, dipped it in olive oil and sea salt, and immediately knew: this bread was a keeper. That’s when it earned its unofficial title in my house: “The Bread That’s Driving the World Crazy.” No yeast, no waiting, and no one could stop eating it.
Why Everyone’s Obsessed With This No-Yeast Bread
There’s a reason this bread is going viral—not just in social feeds, but in real-life kitchens. It checks all the boxes: easy, fast, flavorful, and deeply satisfying. Let’s take a closer look at what makes this recipe such a game-changer.
1. No Yeast, No Problem
Yeast is often a barrier for new bakers. It requires precision, patience, and warm environments. This bread skips the yeast entirely but still delivers a soft, chewy interior thanks to clever hydration and the richness of butter and oil.
2. Ready in Under an Hour
From mixing the dough to slicing your first warm piece, this recipe comes together fast. You don’t need to proof the dough or wait for it to double in size. The only resting time is 20–30 minutes—just enough for the flour to relax and the herbs to infuse.
3. Uses Pantry Staples
You’re likely to have most of the ingredients on hand already. There’s no need for special tools or obscure ingredients—just a bowl, a spoon, and a little faith.
4. Infused with Real Flavor
What sets this bread apart is the flavor. Fresh herbs like dill and parsley bring brightness, while melted butter gives it a rich, satisfying taste that stands on its own—no need for additional toppings (though you won’t regret adding some).
5. Versatile for Any Meal
This bread works as a side, snack, sandwich base, or dipping vehicle. Serve it warm with soup, slice it for breakfast toast, or use it as a rustic flatbread with Mediterranean spreads.
Ingredients
Ingredient
Quantity
All-purpose flour
700 g (25 oz), sifted
Warm water
500 ml (2 cups)
Salt
8 g (1½ tsp)
Sugar
5 g (1 tsp)
Butter (melted)
150 g (5 oz)
Vegetable oil
45 ml (3 tbsp)
Fresh dill & parsley
50 g (2 oz), finely chopped
Directions
Mix the Dough In a large bowl, whisk together warm water, salt, sugar, melted butter, and vegetable oil. Gradually add sifted flour, mixing continuously until a soft dough forms.
Incorporate the Herbs Fold in the finely chopped dill and parsley. Knead the dough briefly (3–5 minutes) until smooth and elastic. It should be soft but not sticky. Add a bit more flour if needed.
Rest and Shape Cover the dough with a towel and let it rest at room temperature for 20–30 minutes (this helps the gluten relax, even without yeast). Divide and shape into round loaves, rolls, or a single large flatbread.
Bake to Perfection Preheat oven to 400°F (200°C). Place the bread onto a parchment-lined baking sheet. Optionally, brush the top with a little extra melted butter or oil. Bake for 30–35 minutes, or until golden and crisp on the outside.
Cool & Serve Let the bread cool slightly before slicing. Serve warm with butter, dips, soup, or use as sandwich bread.
Nutritional (Per Serving – based on 10 slices)
Nutrient
Amount
Calories
~220 kcal
Carbohydrates
~30 g
Protein
~4 g
Fat
~10 g
Fiber
~1 g
Sodium
~280 mg
When to Make This Bread
This isn’t a once-in-a-while, special occasion recipe. It’s an everyday kind of bread—the one you can turn to when you’re out of store-bought loaves or just need something comforting and homemade.
Weeknight Wonder
Whip it up alongside pasta or roasted vegetables for a warm, homemade touch.
Weekend Brunch Staple
Slice and top with cream cheese, avocado, or poached eggs.
Holiday Table Hero
Rustic enough to serve with soup and salad, but pretty enough to place on a festive table.
Emergency Bread Backup
No yeast? No problem. You can make this any time, even in a pinch.
Expert Tips for Bread Success
Even though this bread is practically foolproof, a few smart moves can elevate your results:
Sift the Flour
Sifting ensures your flour is light and lump-free, which gives you a better texture and helps avoid a dense loaf.
Use Warm Water, Not Hot
Lukewarm water helps hydrate the dough properly. Too hot, and it can cook the flour or melt the butter too quickly.
Resting Time Matters
While this is a no-yeast bread, letting the dough rest for 20–30 minutes helps develop flavor and a tender crumb.
Adjust the Herbs to Taste
Dill and parsley are fresh and vibrant, but you can swap in rosemary, thyme, or chives depending on what you have or prefer.
Butter Before and After Baking
Brushing the top with butter before baking adds a gorgeous golden hue. Brushing it again right out of the oven adds shine and flavor.
Tasty Variations to Try
This recipe is endlessly adaptable. Once you’ve mastered the base, try these flavor twists:
Cheese-Loaded Version
Add shredded cheddar, mozzarella, or feta to the dough for a cheesy pull-apart texture.
Garlic & Herb Upgrade
Add minced garlic or garlic powder to the dough or butter for a punchier flavor.
Spicy Flatbread
Mix in red pepper flakes, chili powder, or za’atar for a spicy or earthy variation.
Sweet Herb Bread
Skip the salt and herbs, and add honey, cinnamon, or cardamom to the dough for a lightly sweet breakfast version.
Frequently Asked Questions
Can I make this bread without herbs?
Absolutely. The herbs add flavor and color, but the bread is still delicious as a plain butter loaf.
Is this bread crispy or soft?
It’s both! The crust bakes up golden and crisp, while the inside stays soft and fluffy.
Can I use whole wheat flour?
You can substitute up to half the flour with whole wheat. The texture will be slightly denser but still tasty.
Can I make it gluten-free?
Yes, with a 1:1 gluten-free flour blend. Be sure to monitor the texture of the dough and add more flour if it’s too sticky.
Can I store the leftovers?
Yes. Store wrapped in foil or an airtight container at room temperature for up to 2 days. For longer storage, freeze for up to a month.
Can I make the dough in advance?
You can mix and shape the dough, then refrigerate it for a few hours before baking. Let it come back to room temperature before putting it in the oven.
Can I cook it in a skillet instead of baking?
Yes! Form the dough into smaller flat rounds and cook over medium heat in a covered, greased skillet until golden on both sides.
From Viral Trend to Kitchen Essential
What started as a spur-of-the-moment experiment has turned into a household favorite. And judging by the response online—and in kitchens around the world—it’s not just my home that’s hooked on this bread.
It’s not the flashiest, most technical recipe. It doesn’t have artisan-style air bubbles or sourdough tang. But it has something arguably better: consistency, flavor, and heart.
Whether you’re a beginner baker or a seasoned pro, this no-yeast herb bread is the kind of recipe that makes you feel like a culinary genius with very little effort. And sometimes, that’s exactly the kind of recipe we need.
Final Thoughts: The Bread That Brings People Together
In a time when we’re constantly told to slow down, to simplify, to savor — this bread quietly delivers on all three.
It brings warmth to your kitchen. It fills the air with real, fresh aromas. It doesn’t require you to wait for yeast to rise or to knead for 20 minutes. It just shows up, does its job, and makes people happy.
So the next time you find yourself wondering what to bake — whether you’re out of bread, craving something homemade, or just looking for a small victory in the kitchen — remember this recipe. It may just drive you a little crazy too… in the best way.
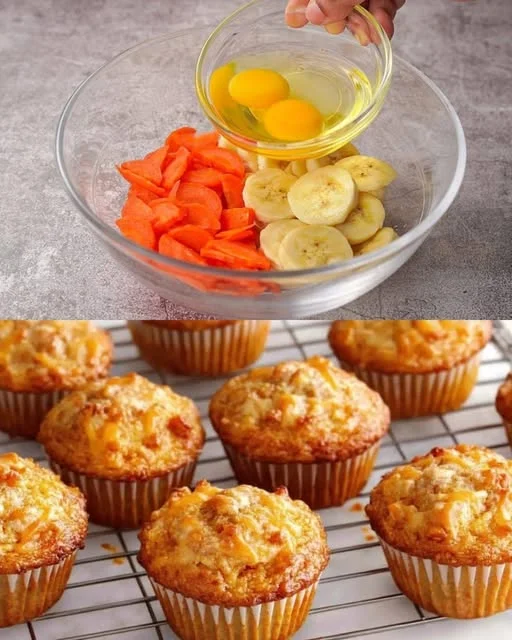
Some of the best recipes don’t come from cookbooks. They come from our own kitchens — improvised, adjusted, handed down, and made better over time. That’s exactly how these Ultimate Banana Carrot Muffins came into my life.
When I was younger, Sunday mornings in my childhood home meant slow breakfasts and the scent of something sweet baking in the oven. My mother had a way of turning simple ingredients into comfort. Overripe bananas on the counter? That meant banana bread. A leftover carrot or two? Those found their way into pancakes, muffins, or soups. And sometimes — when the timing was just right — she combined them.
The first time she made banana carrot muffins, it was a total experiment. A way to clean out the fridge before grocery day. But what came out of the oven was magic: moist, subtly spiced muffins with golden tops, sweet but not too sweet, soft but with a bit of bite from the carrots. She scribbled the recipe on the back of a receipt and taped it inside a kitchen cabinet.
Years later, I adapted her notes into something I now call the Ultimate Banana Carrot Muffins — because they deserve that title. They’re not just nostalgic. They’re delicious, wholesome, easy to make, and hard to forget.
Why These Muffins Are Truly “Ultimate”
These muffins aren’t just about flavor (although they have plenty). They’re about balance — between sweetness and spice, softness and structure, indulgence and nourishment. Let’s break down what makes them shine:
1. Moisture from Natural Ingredients
Bananas and carrots aren’t just healthy — they provide natural moisture, which keeps these muffins soft and tender without the need for lots of butter or dairy. Overripe bananas are key here, offering sweetness and richness.
2. Warm Spice Notes
A touch of cinnamon brings cozy warmth to the flavor profile without overpowering the natural taste of the fruit and vegetables. You can also add nutmeg or cardamom for extra depth.
3. One-Bowl Simplicity
These muffins come together with minimal cleanup. No fancy tools. No complicated techniques. Just stir the dry into the wet, scoop, and bake.
4. Make-Ahead Friendly
They store well, freeze well, and travel well. You can bake them on a Sunday and enjoy them all week long — at breakfast, as a snack, or even dessert.
5. Customizable for Every Craving
Add chopped nuts for crunch. Stir in raisins or coconut for texture. Top with oats or a sprinkle of brown sugar before baking for a bakery-style finish.
Ingredients
Ingredient
Quantity
All-purpose flour
1¼ cups (163 g)
Brown sugar
½ cup, lightly packed
Baking powder
1 teaspoon
Ground cinnamon
1 teaspoon
Baking soda
¾ teaspoon
Salt
¼ teaspoon
Ripe bananas (mashed)
2 medium
Grated carrots
1 cup (about 2 medium)
Eggs
2
Vegetable oil
⅓ cup
Vanilla extract
1 teaspoon
Optional add-ins
Chopped walnuts, raisins, or coconut flakes
Directions
Preheat & Prep Preheat your oven to 350°F (175°C). Line a muffin tin with paper liners or lightly grease with oil.
Mix Dry Ingredients In a large bowl, whisk together flour, brown sugar, baking powder, baking soda, cinnamon, and salt.
Mix Wet Ingredients In another bowl, beat the eggs, then mix in mashed bananas, grated carrots, oil, and vanilla extract.
Combine Pour the wet mixture into the dry ingredients and stir just until combined. Fold in any optional add-ins like walnuts or raisins.
Fill & Bake Divide the batter evenly into muffin cups. Bake for 20–25 minutes or until a toothpick inserted in the center comes out clean.
Cool & Enjoy Let muffins cool in the tin for 5 minutes, then transfer to a wire rack to cool completely.
Nutritional (Per Muffin – Approximate, based on 12 muffins)
Nutrient
Amount
Calories
~180 kcal
Protein
~3 g
Carbohydrates
~24 g
Sugars
~11 g
Fat
~8 g
Fiber
~2 g
Sodium
~160 mg
Perfect for Any Occasion
Whether you’re baking for your family or just for yourself, these muffins find their place in all kinds of settings:
Breakfast-on-the-go: Easy to pack, not too messy, and filling enough to fuel your morning.
After-school snack: Kid-approved, especially if you throw in a few chocolate chips.
Brunch spread: They pair beautifully with fresh fruit, yogurt, and a hot cup of coffee.
Meal prep: Make a big batch and freeze them — they defrost quickly and taste freshly baked.
Gifting: Wrap them in parchment and tie with twine for a heartfelt homemade treat.
Tips for Muffin Mastery
Even a simple muffin can be perfected with the right techniques. Here are a few insider tips to make your banana carrot muffins truly unforgettable:
Use Very Ripe Bananas
The darker the peel, the sweeter and softer the banana. Overripe bananas mash easily and add more moisture to your muffins.
Grate Carrots Finely
Finely grated carrots blend into the batter and cook more evenly. Coarser shreds can leave stringy textures.
Don’t Overmix the Batter
Once you combine wet and dry ingredients, stir just until combined. Overmixing can lead to dense muffins.
Fill Muffin Cups Evenly
Use an ice cream scoop or measuring cup to portion batter evenly, ensuring consistent baking and uniform size.
Let Them Cool in the Tin First
Allow muffins to rest in the pan for 5–10 minutes before transferring to a cooling rack. This prevents them from breaking apart.
Fun Add-Ins and Flavor Variations
The base recipe is wonderfully flexible. Here are some ways to switch it up without compromising its signature texture:
Add Nuts
Chopped walnuts or pecans add crunch and a toasty depth of flavor.
Make it Tropical
Add shredded coconut and a splash of pineapple juice or zest for a tropical twist.
Include Chocolate Chips
For a sweeter touch, mini or dark chocolate chips are a great addition — especially if serving kids (or sweet-toothed adults).
Boost the Nutrition
Swap part of the flour with whole wheat flour or oat flour, and add chia or flax seeds for extra fiber.
Top with a Crumb Topping
Mix brown sugar, cinnamon, and a bit of flour and butter for a streusel-style topping.
Frequently Asked Questions (FAQs)
Can I make these muffins dairy-free?
Yes. This recipe can be made entirely dairy-free by using a neutral oil (like sunflower or avocado oil) and skipping any dairy-based mix-ins.
Can I make them gluten-free?
Absolutely. Use a gluten-free flour blend (1:1 ratio) that includes xanthan gum. Almond flour or oat flour may also work, though the texture may vary slightly.
Do I need to peel the carrots?
It’s recommended to peel them, especially if you’re not using organic carrots. The skin can be a bit bitter or tough.
How long do they last?
Stored in an airtight container at room temperature, they’ll last 2–3 days. Refrigerated, they’ll keep for up to 5 days. Frozen, they last for 2–3 months.
Can I make mini muffins?
Yes! Simply reduce the baking time to 12–14 minutes and use a mini muffin tin. Keep a close eye on them — they bake fast.
Are these muffins suitable for toddlers or baby-led weaning?
They can be! Just reduce the sugar, skip any nuts or potential choking hazards, and use a silicone mini muffin tray for easy portioning.
Can I use applesauce instead of oil?
Yes. Applesauce can replace oil 1:1, though it may make the muffins slightly more dense. Great for a lower-fat version.
More Than Just Muffins
There’s a reason this recipe has become a favorite in so many kitchens. It’s not just about the flavor — though that’s certainly a reason to make them again and again. It’s about what they represent: simplicity, nourishment, and a little bit of nostalgia.
There’s comfort in knowing that something as humble as a banana and a carrot can come together to create something so satisfying. There’s joy in making something that feels indulgent but is packed with real ingredients. And there’s pride in serving a muffin that you know is both homemade and wholesome.
These muffins don’t try to be trendy or flashy. They’re not loaded with syrups or layered with frosting. Instead, they’re soft, honest, and made to be shared.
Final Thoughts: A Muffin That Feels Like Home
Not every recipe has to be groundbreaking. Some of the best ones are the ones we return to again and again — the ones we know by heart. These Ultimate Banana Carrot Muffins are that kind of recipe.
They fit effortlessly into your life. They make mornings easier, afternoons tastier, and snack time more comforting. Whether you’re baking for your family, your friends, or just yourself on a quiet Sunday morning, they’re a reminder that real food — honest food — doesn’t have to be complicated.
All it takes is a couple of ripe bananas, a carrot or two, and a little love.
I didn’t grow up in a family that celebrated cabbage.
In fact, for most of my life, cabbage was the sad afterthought at the dinner table — boiled too long, barely seasoned, and usually ignored. It wasn’t until I visited my grandmother’s small countryside home that I saw cabbage transformed into something magical. She didn’t boil it. She didn’t steam it. She folded it into fluffy, tangy kefir pancakes and served it piping hot with a dollop of sour cream.
And let me tell you something: I didn’t miss the meat.
It was my first real lesson in the idea that vegetables, when given the right treatment, could sing louder than steak. The cabbage added sweetness and body, while the kefir batter gave the pancakes a light but satisfying texture. They were crispy on the edges, soft in the middle, and impossibly comforting. I didn’t just ask for seconds. I asked for the recipe — and I’ve been making it ever since.
Today, this dish is more than just a clever way to use up cabbage. It’s a reminder that comfort food doesn’t have to be complicated, expensive, or meat-heavy to be deeply satisfying. This recipe has become a staple in my kitchen, and I hope it finds a place in yours too.
Why Kefir Pancakes with Cabbage Deserve a Spot at Your Table
It’s easy to overlook a pancake recipe that doesn’t involve syrup or fruit. But these savory kefir pancakes offer something different — something heartier, healthier, and perhaps even more versatile.
Let’s explore why this recipe is so special:
1. Kefir: The Secret Ingredient for Perfect Pancake Texture
Kefir is a fermented milk product similar to yogurt but thinner and tangier. When combined with baking soda, it reacts beautifully, giving the pancakes lift and lightness without any yeast or long resting time. The result is a batter that creates soft, airy pancakes with crispy edges — even when loaded with hearty cabbage.
2. Cabbage: From Underrated to Unforgettable
Shredded and lightly sautéed, cabbage adds both flavor and structure. It becomes slightly sweet when cooked and softens into the batter in a way that feels indulgent — almost like a filling. If you’ve ever doubted cabbage, this recipe will convert you.
3. Quick and Budget-Friendly
The ingredients are all affordable and accessible, and the batter comes together in minutes. There’s no rising time, no special equipment, and no tricky techniques. It’s the perfect recipe for a busy night or a last-minute lunch.
4. Healthy and Satisfying
With a mix of protein, fiber, and gut-friendly kefir, these pancakes are nourishing as well as filling. They’re naturally vegetarian, and easy to make gluten-free or dairy-free with a few substitutions.
Ingredients
Ingredient
Quantity
Eggs
2 pcs
Salt
To taste
Kefir
450 ml
Baking soda
1 teaspoon
Flour
200 g + 100 g
Olive oil
As needed (for frying or batter)
Cabbage (optional)*
~300–400 g, finely shredded and lightly sautéed
Directions
Make the Batter In a bowl, beat the eggs with a pinch of salt. Stir in kefir and baking soda, then gradually add 200 g of flour. If the batter feels too thin, add the remaining 100 g as needed to achieve a thick but pourable consistency.
Add the Cabbage (Optional but Delicious) For savory cabbage pancakes, sauté shredded cabbage in a little olive oil until soft and golden. Fold it into the batter once cooled.
Pan-Fry to Golden Goodness Heat a non-stick skillet with a touch of olive oil over medium heat. Pour a ladle of batter into the pan and cook for 2–3 minutes per side until puffed and golden brown.
Serve Hot Enjoy your pancakes warm, plain or with sour cream, herbs, or a garlic-yogurt dip.
Nutritional (Per Pancake – Approximate, with cabbage)
Nutrient
Amount
Calories
~110 kcal
Protein
~4 g
Carbohydrates
~12 g
Fat
~5 g
Fiber
~1 g
Sodium
~180 mg
When and How to Serve Them
One of the joys of these kefir pancakes is their adaptability. They fit into almost any meal scenario:
Weeknight Dinner: Serve with a side salad and a dollop of yogurt or sour cream for a no-fuss vegetarian main dish.
Weekend Brunch: Add a poached egg or drizzle of garlic sauce for something a little more indulgent.
Lunchbox Friendly: Pack them cold with a dipping sauce — they hold up well and don’t need reheating.
Snack or Appetizer: Make them smaller and serve as finger food or party bites.
Light Breakfast: They pair wonderfully with tea, especially when reheated and crisped up in a pan.
Tips to Make Your Pancakes Perfect
Even a simple recipe has its tricks. Here’s how to make your kefir cabbage pancakes the best they can be:
Use Fresh, Tangy Kefir
The acidity of the kefir is what reacts with the baking soda to give the batter its rise. If your kefir is flat or expired, the pancakes may not be as fluffy.
Don’t Skip the Sauté
While raw cabbage can be used in a pinch, sautéing it first helps remove excess moisture, concentrates its flavor, and gives the pancakes a better texture.
Watch Your Batter Consistency
The batter should be thick enough to hold its shape on a spoon but still pourable. If it’s too thin, the pancakes will spread and become flat. Too thick, and they won’t cook evenly inside.
Cook Over Medium Heat
Too hot and the outside will burn before the inside is done. Too low and they’ll dry out. Medium heat allows for golden-brown edges and a soft interior.
Rest Before Serving
Let the pancakes rest for a few minutes after frying — it helps the crumb set and makes them easier to handle or stack.
Creative Variations to Explore
Once you master the base recipe, you’ll find yourself playing with variations depending on your cravings and pantry.
Cheese-Stuffed Version
Add a pinch of grated cheese into the batter or even in the center of the pancakes for melty, gooey bites.
Herb-Infused Pancakes
Mix in chopped dill, parsley, or scallions for added freshness and visual appeal.
Spicy Kick
Add chili flakes, black pepper, or a touch of smoked paprika to the batter for a bit of heat.
Gluten-Free Option
Substitute the flour with your favorite gluten-free blend. Just be sure to adjust liquid amounts as needed, since GF flours can vary in absorption.
Dairy-Free Alternative
Use a dairy-free kefir or plain, unsweetened plant-based yogurt thinned with water. Opt for olive oil instead of butter.
Frequently Asked Questions (FAQs)
Can I make these pancakes ahead of time?
Yes! They reheat very well. Store them in the refrigerator for up to 3 days and reheat in a skillet over low heat to restore crispness.
Can I freeze them?
Absolutely. Let the pancakes cool completely, then place parchment between them and freeze in a sealed bag or container. Reheat from frozen in the oven or skillet.
Is kefir necessary, or can I use something else?
Kefir provides the unique tang and rise, but you can substitute with buttermilk or plain yogurt thinned with water. You want the same consistency and acidity.
Can I use red cabbage instead of green?
You can, though it may change the color of the pancakes and give them a slightly different flavor. Green or Savoy cabbage is typically sweeter and softer when cooked.
Can I make these sweet instead of savory?
Yes! Omit the cabbage, add a bit of sugar or vanilla to the batter, and serve with honey, jam, or fruit. It becomes a totally different dish — still delicious.
What do I serve them with?
Sour cream, Greek yogurt, garlicky aioli, herb butter, or even hot sauce all pair beautifully. For a full meal, serve with a side salad or roasted vegetables.
Are they kid-friendly?
Very much so! The mild flavor, soft texture, and slightly sweet cabbage make these pancakes easy to enjoy — especially with a cheesy or creamy dip.
A Recipe That Redefines Comfort Food
There’s something deeply satisfying about taking an overlooked ingredient and turning it into something crave-worthy. In a world where meat is often seen as the center of the plate, these Kefir Cabbage Pancakes remind us that vegetables — when treated with care and creativity — can be just as hearty and soul-satisfying.
They’re budget-friendly, nourishing, and rooted in tradition, but flexible enough to adapt to modern tastes and dietary needs. You can serve them at a fancy brunch, eat them on the go, or enjoy them cold with a dollop of something creamy. They’re the kind of food that feels good — both to cook and to eat.
Final Thoughts: The Power of Simple Things
Not every meal needs to be complicated to be meaningful. Sometimes, the most powerful flavors come from the humblest ingredients. And sometimes, cabbage — yes, cabbage — really does taste better than meat.
This recipe is proof of that.
So the next time you’re staring at that head of cabbage in your fridge, wondering what to do with it, remember this: With a little kefir, a couple of eggs, and a hot pan, you can make something wonderful. Something warm. Something worth remembering.
Because food is more than fuel — it’s memory, tradition, and a little bit of magic folded into every bite.
Introduction to Cottage Cheese Cheesecake Bites Recipe
Cottage Cheese Cheesecake Bites Recipe is a fantastic treat that combines the creamy goodness of cottage cheese with the rich flavors of cheesecake. These bites are not only easy to make but also packed with protein, making them a perfect snack or dessert option for any occasion.
What Makes Cottage Cheese Cheesecake Bites Unique?
What sets these cheesecake bites apart is their unique ingredient: cottage cheese. This ingredient adds a creamy texture while keeping the bites light and fluffy. Unlike traditional cheesecakes, which can be heavy and rich, these bites offer a refreshing twist. The use of Greek yogurt enhances the creaminess and adds a tangy flavor that perfectly complements the sweetness of honey or maple syrup. Plus, they are lower in calories and carbs compared to regular cheesecake, making them a guilt-free indulgence!
Why You Should Try This Recipe
Cottage Cheese Cheesecake Bites Recipe a try. First, they are incredibly simple to prepare, requiring just a few ingredients and minimal effort. Whether you’re a seasoned baker or a beginner, you’ll find this recipe easy to follow. Second, these bites are versatile! You can customize them with your favorite flavors, such as adding fresh fruits or chocolate chips. Lastly, they are perfect for meal prep. You can make a batch ahead of time and enjoy them throughout the week. So, why not treat yourself to a healthy dessert that satisfies your sweet tooth? You won’t regret it!
Ingredients for Cottage Cheese Cheesecake Bites Recipe
Cottage Cheese Cheesecake Bites, you’ll need a handful of simple ingredients. Each one plays a vital role in achieving the perfect texture and flavor. Here’s what you’ll need:
1 cup cottage cheese
1/2 cup Greek yogurt
1/4 cup honey or maple syrup
2 large eggs
1 teaspoon vanilla extract
1/2 teaspoon baking powder
1/4 teaspoon salt
1/2 cup almond flour
1/4 cup chocolate chips (optional)
These ingredients come together to create a creamy, delicious treat that’s both satisfying and nutritious. The cottage cheese and Greek yogurt provide a protein boost, while the honey or maple syrup adds just the right amount of sweetness. The almond flour gives the bites a lovely texture, making them a delightful snack or dessert.
Feel free to experiment with the ingredients! You can swap the almond flour for oat flour or all-purpose flour if you prefer. Additionally, adding fresh fruits or chocolate chips can elevate the flavor even more. The possibilities are endless!
Step-by-Step Preparation of Cottage Cheese Cheesecake Bites Recipe
Cottage Cheese Cheesecake Bites Recipe. Follow these simple steps to create a delicious treat that everyone will love!
Step 1: Preparing the Base
First, preheat your oven to 350°F (175°C). This step is crucial as it ensures your cheesecake bites bake evenly. While the oven heats up, line a muffin tin with paper liners or lightly grease it. This will help prevent sticking and make it easier to remove the bites later.
Step 2: Making the Cheesecake Mixture
Next, grab your blender or food processor. In it, combine the cottage cheese, Greek yogurt, honey (or maple syrup), eggs, vanilla extract, baking powder, and salt. Blend everything together until the mixture is smooth and creamy. This step is important because it creates the rich texture that makes these bites so delightful!
Step 3: Assembling the Bites
Once your cheesecake mixture is ready, it’s time to mix in the dry ingredients. In a separate mixing bowl, combine the almond flour with the blended mixture. Stir until everything is well combined. If you’re feeling adventurous, fold in the chocolate chips at this stage for an extra treat. This adds a lovely chocolatey flavor that pairs perfectly with the creamy cheesecake.
Step 4: Baking the Cheesecake Bites
Now, it’s time to fill the muffin tin! Divide the batter evenly among the cups, filling each about 3/4 full. This allows room for the bites to rise while baking. Place the muffin tin in the preheated oven and bake for 20-25 minutes. You’ll know they’re done when the edges are set and the tops are lightly golden. A toothpick inserted into the center should come out clean, indicating they are perfectly baked.
Step 5: Cooling and Serving
After baking, allow the cheesecake bites to cool in the pan for about 10 minutes. This helps them firm up a bit. Then, carefully transfer them to a wire rack to cool completely. For the best flavor and texture, refrigerate the bites for at least 1 hour before serving. This chilling time allows the flavors to meld beautifully, making each bite even more delicious!
Cottage Cheese Cheesecake Bites are ready to be enjoyed. They make a perfect snack or dessert for any occasion. Enjoy your creation!
Variations of Cottage Cheese Cheesecake Bites Recipe
Cottage Cheese Cheesecake Bites Recipe is its versatility. You can easily customize these bites to suit your taste preferences or dietary needs. Here are some exciting variations to consider:
Flavor Variations
Why stick to just one flavor when you can explore many? Here are some fun ideas to enhance your cheesecake bites:
Berry Bliss: Add 1/2 cup of fresh berries, like blueberries or raspberries, to the batter. This will give your bites a fruity twist and a pop of color.
Chocolate Lovers: Mix in 1/4 cup of cocoa powder along with the almond flour for a rich chocolate flavor. You can also add chocolate chips for extra indulgence!
Banana Nut: Mash one ripe banana and fold it into the batter. Add a handful of chopped walnuts for a delightful crunch.
Coconut Dream: Stir in 1/4 cup of shredded coconut for a tropical flair. This pairs wonderfully with a hint of almond extract instead of vanilla.
Spiced Pumpkin: For a seasonal treat, add 1/2 cup of pumpkin puree and 1 teaspoon of pumpkin spice. This variation is perfect for fall!
Feel free to mix and match these flavors to create your own unique bites. The possibilities are endless, and each variation brings a new taste experience!
Dietary Modifications
Cottage Cheese Cheesecake Bites Recipe to fit your lifestyle. Here are some suggestions:
Gluten-Free: Substitute almond flour with a gluten-free flour blend or oat flour. This will keep your bites gluten-free while maintaining a delicious texture.
Dairy-Free: Use dairy-free yogurt and a plant-based cream cheese alternative. This way, you can enjoy the bites without dairy.
Low-Carb/Keto: Replace honey or maple syrup with a low-carb sweetener like erythritol or stevia. This will help keep the carb count low while still satisfying your sweet tooth.
Vegan: To make these bites vegan, use flax eggs instead of regular eggs and opt for a plant-based yogurt. You can also use maple syrup as a sweetener.
Cottage Cheese Cheesecake Bites, regardless of their dietary preferences. So, get creative and make these bites your own!
Cooking Note for Cottage Cheese Cheesecake Bites Recipe
Cottage Cheese Cheesecake Bites Recipe, there are a few important cooking notes to keep in mind. These tips will help you achieve the best results and ensure your bites turn out perfectly every time.
First, always preheat your oven. This step is crucial for even baking. If the oven isn’t hot enough, your cheesecake bites may not rise properly, leading to a dense texture. A well-preheated oven helps create that light and fluffy consistency we all love.
Next, be mindful of the blending process. When mixing the cottage cheese and Greek yogurt, ensure that the mixture is completely smooth. Any lumps can affect the texture of your cheesecake bites. A high-speed blender or food processor works best for this task. If you don’t have one, you can use a hand mixer, but it may take a bit longer to achieve the desired creaminess.
Additionally, when filling the muffin tin, avoid overfilling the cups. Filling them about 3/4 full allows the bites to rise without spilling over. This will help maintain their shape and make for a more appealing presentation.
Lastly, keep an eye on the baking time. Ovens can vary, so it’s a good idea to check your bites a few minutes before the recommended time. If the tops are golden and a toothpick comes out clean, they’re ready to come out. Overbaking can lead to dry bites, so it’s better to err on the side of caution.
Cottage Cheese Cheesecake Bites that are sure to impress your family and friends. Happy baking!
Serving Suggestions for Cottage Cheese Cheesecake Bites Recipe
Cottage Cheese Cheesecake Bites are perfectly baked and cooled, it’s time to think about how to serve them. These delightful bites are versatile and can be enjoyed in various ways. Here are some serving suggestions to elevate your dessert experience:
Fresh Fruit Topping: Top each cheesecake bite with a dollop of fresh whipped cream and a few slices of strawberries, blueberries, or raspberries. This adds a burst of color and flavor, making your bites even more appealing.
Drizzle of Honey or Chocolate: For an extra touch of sweetness, drizzle honey or melted chocolate over the bites just before serving. This not only enhances the flavor but also makes for a beautiful presentation.
Nutty Crunch: Sprinkle some chopped nuts, like almonds or walnuts, on top of the cheesecake bites. This adds a delightful crunch and complements the creamy texture of the bites.
Yogurt Dip: Serve the bites with a side of Greek yogurt mixed with a bit of honey and vanilla extract. This makes for a delicious dip that pairs wonderfully with the cheesecake flavor.
Mini Dessert Platter: Arrange the cheesecake bites on a platter alongside other mini desserts, such as fruit tarts or chocolate truffles. This creates a lovely dessert spread for parties or gatherings.
Cottage Cheese Cheesecake Bites but also make them visually appealing. Whether you’re hosting a gathering or enjoying a quiet evening at home, these bites are sure to impress!
Tips for Perfecting Your Cottage Cheese Cheesecake Bites Recipe
Cottage Cheese Cheesecake Bites Recipe turns out perfectly every time, consider these helpful tips. They will guide you through the process and help you achieve the best flavor and texture.
First, use fresh ingredients. Fresh cottage cheese and Greek yogurt will enhance the taste and creaminess of your bites. Check the expiration dates on your dairy products to ensure they are at their best.
Next, blend thoroughly. When mixing the cottage cheese and Greek yogurt, make sure to blend until the mixture is completely smooth. This step is crucial for a creamy texture. If you notice any lumps, your bites may not have the desired consistency.
Also, don’t skip the chilling time. After baking, allow your cheesecake bites to cool completely before refrigerating. Chilling them for at least an hour helps the flavors meld together and improves the overall taste. It also makes them easier to slice and serve.
Another tip is to experiment with baking times. Ovens can vary, so keep an eye on your bites as they bake. Start checking them a few minutes before the recommended time. If they look golden and a toothpick comes out clean, they’re ready to come out of the oven.
Lastly, consider portion control. If you’re serving these bites at a gathering, cut them into smaller pieces. This way, guests can enjoy a taste without overindulging. Plus, smaller bites are perfect for sampling different flavors if you’ve made variations!
Cottage Cheese Cheesecake Bites that everyone will love. Happy baking!
Breakdown of Time for Cottage Cheese Cheesecake Bites Recipe
Cottage Cheese Cheesecake Bites Recipe is essential for planning. Here’s a simple breakdown of the time you’ll need for each step, so you can enjoy these delicious bites without any stress!
Prep Time
The prep time for this recipe is quite short, making it perfect for busy days. You’ll need about 15 minutes to gather your ingredients and prepare the cheesecake mixture. This includes measuring, mixing, and getting everything ready for baking. It’s a quick and easy process that anyone can manage!
Cooking Time
Once your mixture is ready, the cooking time is approximately 20-25 minutes. During this time, the bites will bake in the oven, transforming into delicious little treats. Keep an eye on them as they bake, and remember to check for doneness with a toothpick. If it comes out clean, they’re ready!
Total Time
In total, you can expect to spend about 35-40 minutes from start to finish. This includes both prep and cooking time. However, don’t forget to factor in the cooling and chilling time! For the best flavor and texture, it’s recommended to refrigerate the bites for at least 1 hour before serving. So, while the active time is short, plan for a little extra time to let them chill.
Cottage Cheese Cheesecake Bites Recipe into your schedule. Whether you’re making them for a special occasion or just a tasty snack, you’ll find that the effort is well worth it!
Nutritional Information for Cottage Cheese Cheesecake Bites Recipe
Cottage Cheese Cheesecake Bites Recipe is essential for making informed choices about your diet. These bites are not only delicious but also provide a good balance of nutrients. Here’s a closer look at the nutritional information per serving:
Calories
Each serving of these delightful cheesecake bites contains approximately 90 calories. This makes them a great option for a light snack or dessert without the guilt. The relatively low calorie count allows you to enjoy a sweet treat while keeping your overall caloric intake in check.
Protein
Cottage Cheese Cheesecake Bites is their protein content. Each bite offers about 6 grams of protein. This is thanks to the cottage cheese and Greek yogurt, both of which are excellent sources of protein. Including protein in your snacks can help keep you feeling full and satisfied, making these bites a smart choice for any time of day.
Sodium
In terms of sodium, each serving contains around 100 milligrams. This is a moderate amount, especially considering that the recommended daily intake of sodium is about 2,300 milligrams for most adults. Keeping sodium levels in check is important for maintaining heart health, and these bites fit well within a balanced diet.
Cottage Cheese Cheesecake Bites Recipe provides a nutritious option that is both satisfying and delicious. With their low calorie count, high protein content, and moderate sodium levels, these bites are a fantastic addition to your healthy eating plan. Enjoy them guilt-free!
FAQs about Cottage Cheese Cheesecake Bites Recipe
Can I use low-fat cottage cheese for this recipe?
Cottage Cheese Cheesecake Bites Recipe. It will still provide the creamy texture and protein you need. Just keep in mind that the flavor might be slightly different, but it will still be delicious. Low-fat options can help reduce calories while maintaining a satisfying taste!
How do I store leftover cheesecake bites?
Cottage Cheese Cheesecake Bites is easy! Simply place them in an airtight container and refrigerate. They can last for up to 5 days in the fridge. If you want to keep them fresh for longer, consider freezing them. Just make sure to wrap each bite individually in plastic wrap before placing them in a freezer-safe bag. This way, you can enjoy them later without losing flavor or texture!
Can I freeze Cottage Cheese Cheesecake Bites?
Cottage Cheese Cheesecake Bites! Freezing is a great way to preserve their freshness. To do this, allow the bites to cool completely after baking. Then, wrap each one in plastic wrap and place them in a freezer-safe container or bag. They can be frozen for up to 3 months. When you’re ready to enjoy them, simply thaw them in the refrigerator overnight or at room temperature for a few hours.
What can I substitute for sugar in this recipe?
Cottage Cheese Cheesecake Bites Recipe, there are several great alternatives! You can use natural sweeteners like honey or maple syrup, as mentioned in the recipe. For a low-calorie option, consider using stevia, erythritol, or monk fruit sweetener. These substitutes can provide sweetness without the added calories. Just remember to adjust the quantity according to the sweetness level of the substitute you choose!
Conclusion on Cottage Cheese Cheesecake Bites Recipe
Cottage Cheese Cheesecake Bites Recipe is a delightful and nutritious treat that everyone can enjoy. With their creamy texture and rich flavors, these bites are perfect for satisfying your sweet cravings without the guilt. They are easy to make, versatile, and can be customized to fit various dietary needs. Whether you’re looking for a quick snack, a healthy dessert, or a fun addition to a gathering, these cheesecake bites are sure to impress.
By following the simple steps outlined in this recipe, you can create a batch of delicious bites that are not only tasty but also packed with protein. The use of cottage cheese and Greek yogurt ensures that you’re getting a nutritious option that supports your health goals. Plus, with the ability to experiment with different flavors and ingredients, you can make these bites your own!
Cottage Cheese Cheesecake Bites. Enjoy them fresh out of the oven or chilled from the fridge. No matter how you serve them, these bites are bound to become a favorite in your household. Happy baking!