Welcome to the delightful world of Crispy Chili Beef! This dish is not just a meal; it’s an experience that tantalizes your taste buds. Imagine tender beef, perfectly crispy on the outside, coated in a savory and slightly spicy sauce. It’s a dish that brings together the best of textures and flavors, making it a favorite for many.
What Makes the Crispy Chili Beef Recipe Special?
What sets this Crispy Chili Beef Recipe apart? First, it’s all about the crunch! The beef is coated in a special blend of cornstarch and flour, which creates a crispy exterior when fried. This crunchiness contrasts beautifully with the tender meat inside. Moreover, the sauce is a harmonious blend of sweet, salty, and spicy flavors. The combination of soy sauce, rice vinegar, and chili paste creates a mouthwatering glaze that clings to each piece of beef.
Another reason this recipe shines is its versatility. You can easily adjust the spice level to suit your taste. Whether you prefer a mild kick or a fiery punch, this recipe can accommodate your preferences. Plus, it’s quick to prepare, making it perfect for busy weeknights or special occasions.
In addition, this dish can be customized with various vegetables, adding nutrition and color. Bell peppers, broccoli, or snap peas can be tossed in for a delightful crunch and extra vitamins. This way, you can enjoy a balanced meal that satisfies your cravings.
So, whether you’re cooking for family or hosting friends, this Crispy Chili Beef Recipe is sure to impress. Let’s dive into the ingredients and get started on this culinary adventure!
Ingredients for Crispy Chili Beef Recipe
To create the perfect Crispy Chili Beef, you’ll need a selection of fresh ingredients that come together to make this dish truly special. Here’s what you’ll need:
- 1 pound flank steak: Thinly sliced against the grain for tenderness.
- 1/2 cup cornstarch: This is key for achieving that crispy texture.
- 1/4 cup all-purpose flour: Helps to bind the coating and adds crunch.
- 1 teaspoon salt: Enhances the flavor of the beef.
- 1/2 teaspoon black pepper: Adds a mild kick.
- 1/2 teaspoon garlic powder: For a hint of garlic flavor.
- 1/2 teaspoon onion powder: Complements the garlic and adds depth.
- 1/4 cup vegetable oil: Essential for frying the beef to golden perfection.
For the sauce, gather the following ingredients:
- 1/4 cup soy sauce: Provides a savory base.
- 2 tablespoons rice vinegar: Adds a tangy flavor.
- 2 tablespoons brown sugar: Balances the saltiness with sweetness.
- 1 tablespoon chili paste: Adjust this to control the heat level.
- 1 tablespoon sesame oil: Adds a nutty aroma.
- 1 teaspoon grated fresh ginger: For a zesty kick.
- 2 cloves garlic, minced: Fresh garlic enhances the sauce.
- 1/4 cup green onions, chopped: For garnish and freshness.
- 1 tablespoon sesame seeds (optional): Adds a nice crunch and visual appeal.
With these ingredients on hand, you’re ready to embark on your cooking journey. Each component plays a vital role in creating the delicious flavors and textures that make this Crispy Chili Beef Recipe a standout dish. Now, let’s move on to the step-by-step preparation!
Step-by-Step Preparation of Crispy Chili Beef Recipe
Now that you have all your ingredients ready, it’s time to dive into the step-by-step preparation of this mouthwatering Crispy Chili Beef Recipe. Follow these simple steps to create a dish that will leave everyone asking for seconds!
Step 1: Preparing the Beef
Start by taking your flank steak and slicing it thinly against the grain. This technique ensures that the meat remains tender and easy to chew. Aim for slices about 1/4 inch thick. Once sliced, place the beef in a large bowl. This is where the magic begins!
Step 2: Marinating the Beef
While marinating isn’t a must for this recipe, it can enhance the flavor. If you choose to marinate, add a splash of soy sauce and a sprinkle of black pepper to the beef. Let it sit for about 15-30 minutes. This step allows the flavors to penetrate the meat, making it even more delicious.
Step 3: Coating the Beef
Next, it’s time to coat the beef. In a large bowl, combine the cornstarch, all-purpose flour, salt, black pepper, garlic powder, and onion powder. Mix well. Then, take each slice of beef and toss it in the mixture until it’s fully coated. This coating is what gives the beef its signature crunch!
Step 4: Frying the Beef
Heat the vegetable oil in a large skillet or wok over medium-high heat. Once the oil is hot, carefully add the coated beef in batches. Fry each batch for about 3-4 minutes, or until golden brown and crispy. Remember not to overcrowd the pan, as this can lower the oil temperature and affect the crispiness. Once done, remove the beef and let it drain on paper towels.
Step 5: Making the Chili Sauce
In a separate bowl, whisk together the soy sauce, rice vinegar, brown sugar, chili paste, sesame oil, grated ginger, and minced garlic. This sauce is the heart of the dish, bringing all the flavors together. Pour the sauce into the same skillet over medium heat and bring it to a gentle simmer. The aroma will be irresistible!
Step 6: Combining Beef and Sauce
Finally, add the crispy beef back into the skillet with the sauce. Toss everything together, ensuring that each piece of beef is evenly coated. Cook for an additional 2-3 minutes until everything is heated through. The sauce will cling beautifully to the crispy beef, creating a delightful dish.
And there you have it! Your Crispy Chili Beef is ready to be served. The combination of crispy beef and flavorful sauce is sure to impress anyone who tries it. Let’s move on to some variations you can try!
Variations of Crispy Chili Beef Recipe
While the classic Crispy Chili Beef Recipe is a hit on its own, there are many ways to switch things up! Whether you want to try different proteins or explore vegetarian options, these variations will keep your meals exciting and delicious.
Alternative Proteins
If you’re looking to change the protein in your Crispy Chili Beef, there are several tasty alternatives. Here are a few options:
- Chicken: Thinly sliced chicken breast or thighs can be used instead of beef. The cooking method remains the same, and you’ll still achieve that crispy texture.
- Pork: Pork tenderloin is another great choice. Slice it thinly and follow the same steps for coating and frying. The flavor pairs wonderfully with the chili sauce.
- Tofu: For a plant-based option, firm tofu works well. Press the tofu to remove excess moisture, then slice and coat it just like the beef. Fry until golden and crispy for a delightful crunch.
These alternative proteins not only provide variety but also allow you to cater to different dietary preferences. Each option brings its unique flavor, making your Crispy Chili dish versatile and fun!
Vegetarian Options
If you’re looking for a vegetarian twist on the Crispy Chili Beef Recipe, you can easily create a delicious meat-free version. Here are some ideas:
- Cauliflower: Cauliflower florets can be coated and fried just like the beef. The texture becomes crispy, and it absorbs the flavors of the sauce beautifully.
- Seitan: This wheat-based protein mimics the texture of meat. Slice it thinly, coat it, and fry it for a satisfying vegetarian alternative.
- Mushrooms: Use portobello or shiitake mushrooms for a rich, umami flavor. Slice them, coat, and fry until crispy. They add a wonderful depth to the dish.
These vegetarian options not only make the dish accessible to more people but also add a delightful twist to the traditional recipe. You can enjoy the same crispy texture and flavorful sauce while keeping it meat-free!
With these variations, you can customize your Crispy Chili Beef Recipe to suit your taste and dietary needs. Now, let’s explore some cooking notes to ensure your dish turns out perfectly every time!
Cooking Note for Crispy Chili Beef Recipe
Cooking the perfect Crispy Chili Beef requires attention to detail and a few helpful tips. These notes will guide you through the process, ensuring that your dish turns out delicious every time. Let’s dive into some essential cooking notes!
First, the choice of meat is crucial. Flank steak is ideal for this recipe due to its tenderness and flavor. However, if you can’t find flank steak, you can substitute it with sirloin or ribeye. Just remember to slice against the grain for the best texture.
Next, the coating is key to achieving that crispy exterior. Make sure to coat each piece of beef evenly in the cornstarch and flour mixture. This step is vital for creating a crunchy texture. If you find the coating isn’t sticking well, you can lightly dampen the beef with water before tossing it in the mixture.
When frying, ensure the oil is hot enough. A good test is to drop a small piece of the coated beef into the oil. If it sizzles immediately, you’re ready to go! Frying in batches is important; overcrowding the pan can lower the oil temperature, resulting in soggy beef instead of crispy perfection.
After frying, let the beef drain on paper towels. This step helps remove excess oil, keeping your dish light and crispy. If you prefer a healthier option, consider air frying the beef. It can still achieve a delightful crunch with less oil.
Lastly, when combining the beef with the sauce, be gentle. Toss the beef carefully to avoid breaking the crispy coating. The goal is to coat each piece without losing that satisfying crunch. Serve immediately for the best experience, as the crispy texture is most enjoyable fresh.
By following these cooking notes, you’ll be well on your way to mastering the Crispy Chili Beef Recipe. Each tip is designed to enhance your cooking experience and ensure a delicious outcome. Now, let’s move on to some serving suggestions to elevate your meal even further!
Serving Suggestions for Crispy Chili Beef Recipe
Now that your Crispy Chili Beef is ready, it’s time to think about how to serve it! The way you present this dish can enhance the overall dining experience. Here are some delightful serving suggestions that will make your meal even more enjoyable.
First, consider serving your Crispy Chili Beef over a bed of fluffy rice. Steamed white rice or jasmine rice works wonderfully, as it absorbs the flavorful sauce. For a healthier option, brown rice or cauliflower rice can be used. This combination not only adds texture but also balances the dish with a wholesome base.
Another great option is to pair the beef with stir-fried vegetables. Colorful bell peppers, snap peas, and broccoli not only add nutrition but also create a vibrant plate. Simply sauté the vegetables in a bit of oil and season with salt and pepper. This adds a fresh crunch that complements the crispy beef perfectly.
If you’re looking for a fun twist, consider serving the Crispy Chili Beef in lettuce wraps. Use large lettuce leaves, such as romaine or butter lettuce, to create a fresh and crunchy wrap. Fill each leaf with the beef and top with chopped green onions and sesame seeds. This makes for a light and interactive meal that everyone will love!
For those who enjoy a bit of heat, serve the dish with extra chili paste or hot sauce on the side. This allows guests to customize their spice level, making it a hit for everyone at the table. You can also offer a side of pickled vegetables for a tangy contrast to the rich flavors of the beef.
Lastly, don’t forget about garnishing! A sprinkle of chopped green onions and sesame seeds adds a beautiful finishing touch. Not only does it enhance the visual appeal, but it also adds a burst of flavor and texture. Serve your Crispy Chili Beef hot and fresh for the best experience.
With these serving suggestions, you can elevate your Crispy Chili Beef Recipe into a memorable meal. Whether you choose rice, vegetables, or creative wraps, each option brings something special to the table. Now, let’s explore some tips for perfecting your Crispy Chili Beef Recipe!

Tips for Perfecting Your Crispy Chili Beef Recipe
To truly master the Crispy Chili Beef Recipe, a few tips can make all the difference. These suggestions will help you achieve that perfect balance of flavor and texture, ensuring your dish is a hit every time. Let’s explore some essential tips for perfecting your cooking!
First, always slice the beef against the grain. This technique is crucial for tenderness. When you cut against the grain, you shorten the muscle fibers, making the beef easier to chew. Aim for thin slices, about 1/4 inch thick, for the best results.
Next, don’t skip the coating process. The combination of cornstarch and flour is what gives the beef its signature crunch. Make sure each piece is evenly coated. If you find the coating isn’t sticking well, you can lightly dampen the beef with water before tossing it in the mixture. This helps the coating adhere better.
When frying, ensure the oil is at the right temperature. If the oil is too cool, the beef will absorb excess oil and become greasy. A good test is to drop a small piece of the coated beef into the oil. If it sizzles immediately, you’re ready to fry! Fry in small batches to maintain the oil temperature and achieve that crispy texture.
After frying, let the beef drain on paper towels. This step is essential for removing excess oil, keeping your dish light and crispy. If you prefer a healthier option, consider air frying the beef. It can still achieve a delightful crunch with less oil, making it a great alternative.
When combining the beef with the sauce, be gentle. Toss the beef carefully to avoid breaking the crispy coating. The goal is to coat each piece without losing that satisfying crunch. Serve immediately for the best experience, as the crispy texture is most enjoyable fresh.
Lastly, feel free to experiment with the sauce. Adjust the chili paste to suit your spice preference. You can also add a splash of lime juice for a zesty kick or a dash of hoisin sauce for extra sweetness. These small tweaks can elevate the flavor profile of your dish.
By following these tips, you’ll be well on your way to perfecting your Crispy Chili Beef Recipe. Each suggestion is designed to enhance your cooking experience and ensure a delicious outcome. Now, let’s break down the time needed for this delightful dish!
Breakdown of Time for Crispy Chili Beef Recipe
Understanding the time required for each step of the Crispy Chili Beef Recipe can help you plan your cooking efficiently. Here’s a breakdown of the time you’ll need for preparation and cooking, ensuring you can enjoy this delicious dish without any rush!
Prep Time
The prep time for this Crispy Chili Beef Recipe is approximately 30 minutes. This includes:
- Slicing the flank steak (about 10 minutes).
- Marinating the beef (optional, about 15-30 minutes).
- Coating the beef with the cornstarch and flour mixture (about 5 minutes).
Keep in mind that if you choose to marinate the beef, the total prep time may extend slightly. However, this step can enhance the flavor, making it worth the wait!
Cooking Time
The cooking time for the Crispy Chili Beef is around 15-20 minutes. This includes:
- Frying the beef in batches (about 10-12 minutes).
- Making the chili sauce (about 5 minutes).
- Combining the beef with the sauce (about 2-3 minutes).
Frying in batches is essential to achieve that perfect crispiness, so be patient and allow each batch to cook thoroughly.
Total Time
In total, you can expect the entire process to take about 45-50 minutes, including both prep and cooking time. This makes the Crispy Chili Beef Recipe a quick and satisfying option for dinner, especially when you want something delicious without spending hours in the kitchen.
With this time breakdown, you can easily plan your cooking session and enjoy a delightful meal with family or friends. Now that you know how to manage your time, let’s take a look at the nutritional information for this tasty dish!
Nutritional Information for Crispy Chili Beef Recipe
Understanding the nutritional content of your meals is essential for maintaining a balanced diet. The Crispy Chili Beef Recipe not only satisfies your taste buds but also provides valuable nutrients. Here’s a breakdown of the nutritional information per serving, so you can enjoy this dish while keeping your health in mind.
Calories
Each serving of Crispy Chili Beef contains approximately 350 calories. This calorie count includes the crispy beef, the flavorful sauce, and any optional garnishes. While this dish is rich in flavor, it’s important to enjoy it in moderation, especially if you’re watching your calorie intake. Pairing it with a side of vegetables or rice can help create a more balanced meal.
Protein
Protein is a vital nutrient for building and repairing tissues, and this Crispy Chili Beef Recipe delivers! Each serving provides about 25 grams of protein. The flank steak is an excellent source of high-quality protein, making this dish a great option for those looking to increase their protein intake. Whether you’re an athlete or just someone who wants to maintain muscle health, this recipe can help you meet your protein needs.
Sodium
When it comes to sodium, each serving of Crispy Chili Beef contains around 800 milligrams. This amount can vary based on the soy sauce used and any additional seasonings you might add. While sodium is necessary for bodily functions, it’s essential to monitor your intake, especially if you have dietary restrictions. To reduce sodium levels, consider using low-sodium soy sauce or adjusting the amount of sauce you use in the recipe.
In summary, the Crispy Chili Beef Recipe offers a delicious balance of calories, protein, and sodium. By being mindful of portion sizes and pairing it with healthy sides, you can enjoy this dish as part of a nutritious meal plan. Now, let’s address some frequently asked questions about this delightful recipe!
FAQs about Crispy Chili Beef Recipe
Can I make the Crispy Chili Beef Recipe ahead of time?
Yes, you can prepare some components of the Crispy Chili Beef Recipe ahead of time! You can slice and marinate the beef a few hours in advance. However, for the best texture, it’s recommended to fry the beef just before serving. If you fry it ahead of time, the beef may lose its crispiness. To keep it fresh, store the fried beef in an airtight container and reheat it in the oven to regain some crunch.
What can I serve with Crispy Chili Beef?
There are many delicious options to serve alongside your Crispy Chili Beef! A bed of steamed rice, whether white, brown, or cauliflower rice, makes a great base. You can also pair it with stir-fried vegetables like bell peppers, broccoli, or snap peas for added nutrition. For a fun twist, consider serving it in lettuce wraps, allowing everyone to create their own fresh and crunchy bites!
How do I store leftovers of Crispy Chili Beef Recipe?
To store leftovers of your Crispy Chili Beef, place it in an airtight container and refrigerate. It’s best to consume the leftovers within 2-3 days for optimal freshness. When reheating, use an oven or air fryer to help restore some of the crispiness. Avoid using a microwave, as it can make the beef soggy.
Can I adjust the spiciness of the Crispy Chili Beef Recipe?
Absolutely! You can easily adjust the spiciness of the Crispy Chili Beef Recipe to suit your taste. If you prefer a milder flavor, reduce the amount of chili paste in the sauce. Alternatively, if you enjoy a spicier kick, feel free to add more chili paste or even some crushed red pepper flakes. Taste the sauce as you go to find the perfect balance for your palate!
Conclusion on Crispy Chili Beef Recipe
In conclusion, the Crispy Chili Beef Recipe is a delightful dish that combines flavor, texture, and versatility. With its crispy exterior and savory sauce, it’s no wonder this recipe has become a favorite for many home cooks. Whether you’re preparing it for a family dinner or a special gathering, this dish is sure to impress.
Throughout this article, we’ve explored the essential ingredients, step-by-step preparation, and various ways to customize the recipe. From alternative proteins to vegetarian options, there’s something for everyone. Plus, the cooking notes and tips provided will help you achieve that perfect crunch every time you make it.
As you serve your Crispy Chili Beef, remember to pair it with delicious sides like rice or stir-fried vegetables. These accompaniments not only enhance the meal but also add nutritional value. Don’t forget to garnish with fresh green onions and sesame seeds for that extra touch of flavor and presentation.
So, gather your ingredients, follow the steps, and enjoy the process of creating this mouthwatering dish. With a little practice, you’ll master the Crispy Chili Beef Recipe and make it a staple in your kitchen. Happy cooking!
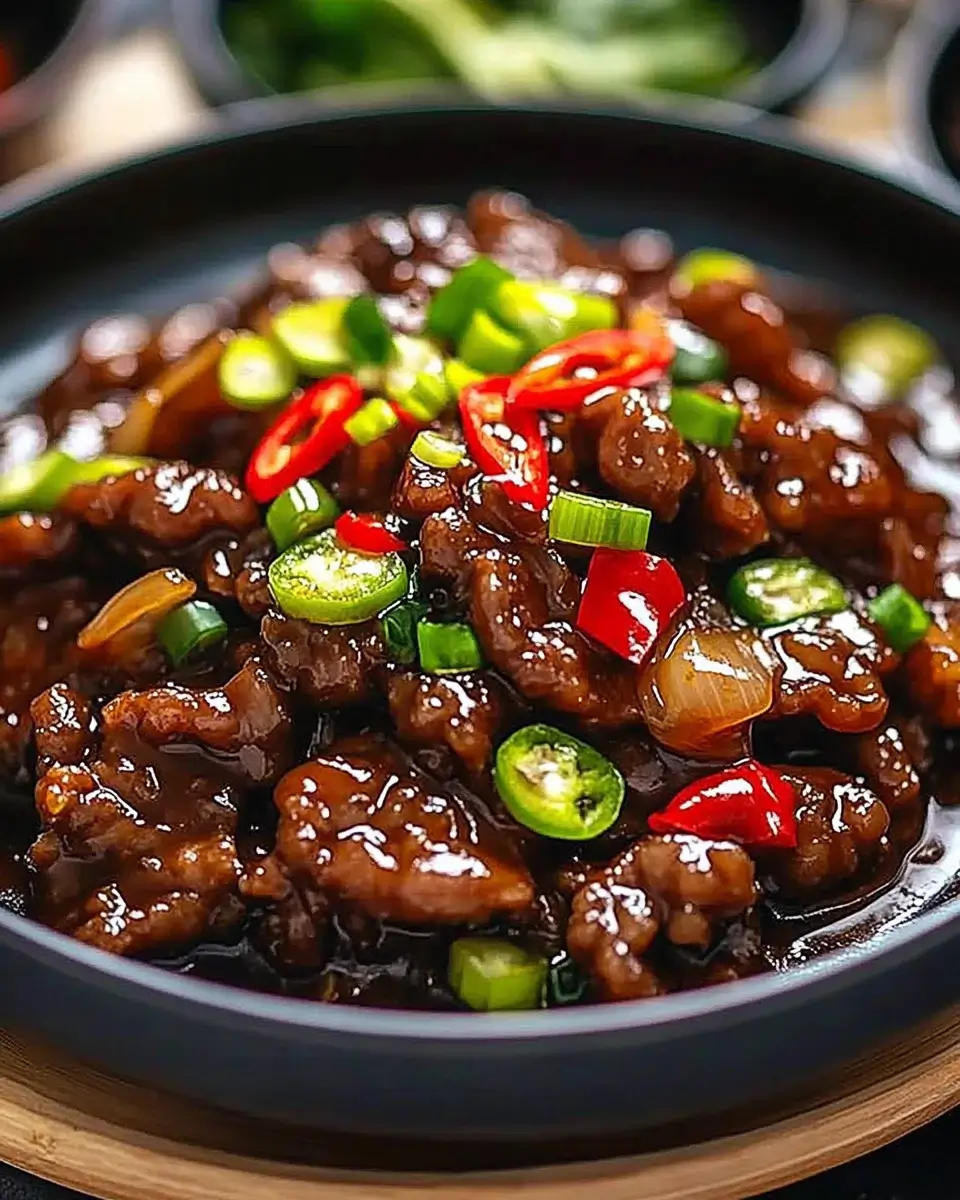
Crispy Chili Beef Recipe is a must-try dish!
Ingredients
Method
- Place the steak in the freezer for 30 minutes to make slicing easier. Then cut into thin ¼-inch strips.
- In a bowl, beat the egg and mix it with the sliced beef. Add cornflour, salt, black pepper, and white pepper. Toss until the beef is well coated.
- Heat 3 tablespoons of sunflower oil in a large wok or frying pan over high heat. Fry half the beef for 5–6 minutes until dark brown and crispy. Do not stir constantly—let it crisp. Remove and drain on paper towels.
- Repeat with the second batch of beef using 1 tablespoon of oil.
- Add the remaining ½ tablespoon of oil to the pan. Lower heat to medium and sauté the onion for 2 minutes.
- Stir in the sliced chili, minced garlic, and ginger. Cook for 30 seconds until fragrant.
- Add rice vinegar, dark soy sauce, tomato puree, caster sugar, ketchup, and sweet chili sauce. Stir and simmer until the sauce thickens slightly, about 1–2 minutes.
- Return the crispy beef to the pan and toss to coat evenly in the sauce. Heat through for 1–2 minutes.
- Serve immediately with rice or noodles.
Notes
- Partially freezing the beef makes it easier to slice thinly and evenly.
- For extra crispy beef, avoid overcrowding the pan while frying.
- Want it hotter? Add extra red chili or a splash of sriracha.
- This dish is best served fresh to preserve the crunch.