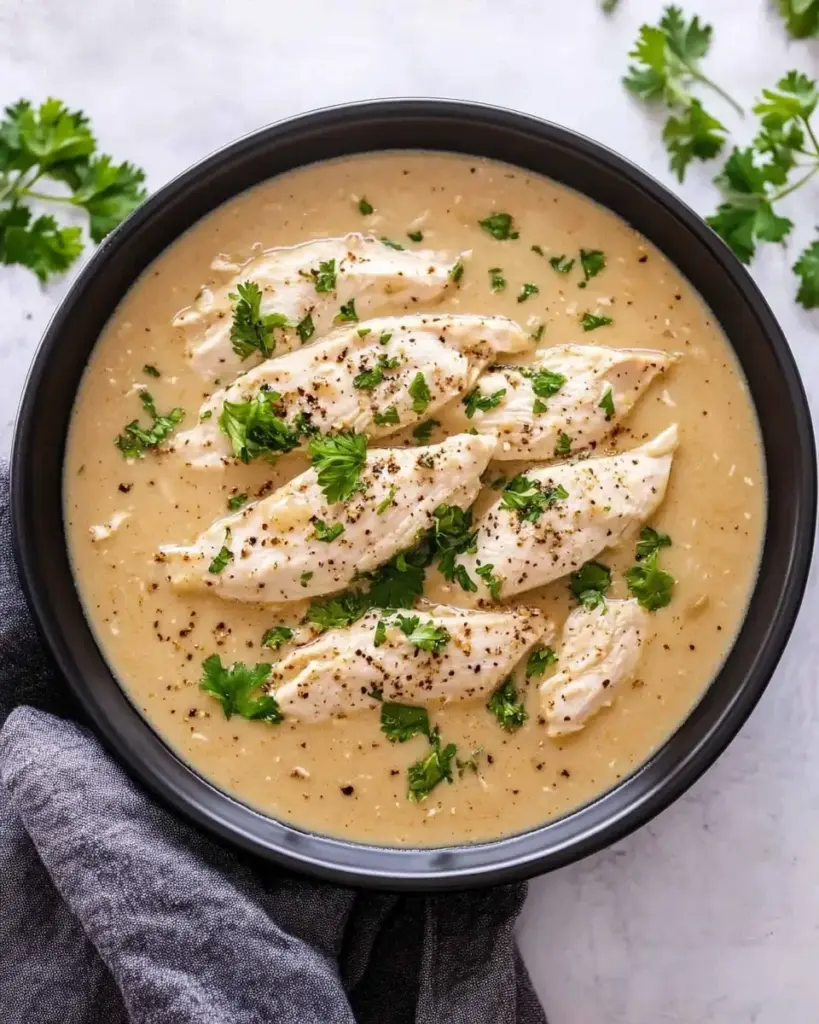
Sometimes, the simplest meals hold the most power to make a difference in our day. For me, one of those moments came on a particularly hectic morning when I was running late for work, barely awake, and struggling to put together a nutritious breakfast. The thought of spending time preparing something complex felt overwhelming, but I didn’t want to skip the most important meal of the day. That’s when I remembered a quick and comforting recipe my grandmother used to make. It was something so simple, yet so satisfying: a slice of crispy bacon, melted cheese, and a perfectly fried egg sandwiched between toasted bread.
In those moments of chaos, there’s something truly special about food that can ground you. This breakfast is more than just a combination of ingredients; it’s a reminder of how little moments of care can make all the difference. A few minutes in the kitchen, a dash of salt, and the joy of knowing you’re starting your day off right—this recipe became a lifesaver that morning, and it’s continued to be my go-to breakfast when I need something fast but still full of flavor and nutrition.
The Beauty of Simplicity
At its core, this breakfast is built around one of the most basic and beloved comfort food combinations: bread, bacon, cheese, and eggs. But sometimes, the simplest dishes are the ones that deliver the most satisfaction. The crispy bacon provides a satisfying crunch, the gooey melted cheese adds a rich creaminess, and the perfectly fried egg with its silky yolk offers a touch of indulgence. Together, these elements come together to create a meal that’s not only easy to make but is surprisingly filling and flavorful.
The best part? It only takes five minutes from start to finish, which means you can enjoy a hearty breakfast even on the busiest of mornings. In a world where time seems to be constantly slipping away, it’s a small but powerful reminder that you don’t need to spend hours in the kitchen to eat something delicious.
Ingredients:
Ingredient
Quantity
Slices of bread
6
Slices of cheese
6
Slices of bacon
6
Eggs
4
Salt
To taste
Black pepper
To taste
Parsley
For garnish
Green onion
For garnish
Directions:
Cook the Bacon: In a pan over medium heat, cook the bacon slices until they are crispy and golden. Remove from the pan and set aside on paper towels to drain excess fat.
Prepare the Toast: In the same pan, toast the slices of bread for about 1-2 minutes on each side until they are golden brown. You can also use a toaster if preferred.
Fry the Eggs: While the bread is toasting, crack the eggs into the pan and cook them sunny-side up or to your desired doneness. Season with salt and black pepper.
Assemble the Breakfast: Place a slice of cheese on each piece of toast. Add a slice of bacon on top of the cheese, and then carefully place a fried egg on top of the bacon. Season with a pinch more salt and pepper, if desired.
Garnish and Serve: Sprinkle with freshly chopped parsley and green onions for added flavor and color. Serve immediately!
Nutritional Information (per serving):
Nutrient
Amount
Calories
400 kcal
Protein
23 g
Carbohydrates
32 g
Fat
23 g
Fiber
2 g
Sugars
2 g
Quick, Nourishing, and Energizing
When you’re pressed for time, one of the biggest challenges is finding something that will keep you full and energized throughout the morning. This breakfast does just that. The eggs provide a great source of protein, which helps keep you feeling full and satisfied. The bacon adds healthy fats, while the cheese adds a creamy texture and a savory bite. The bread offers carbohydrates to give you that quick energy boost you need to get through the day.
Because it’s so well-balanced, this breakfast is not only quick but also nourishing. Unlike a sugary cereal or processed snack, it provides a steady release of energy without leaving you feeling sluggish or crashing later. Whether you’re heading out the door to tackle a busy workday or preparing for a weekend of errands, this meal is a great way to fuel your body.
Why Bacon, Eggs, and Cheese?
There’s a reason the combination of bacon, eggs, and cheese has been a breakfast staple for so long—it’s because it just works. These ingredients, when paired together, create a harmonious balance of flavors and textures. The salty, crispy bacon contrasts perfectly with the smooth, velvety eggs, while the cheese adds a rich and indulgent element to the dish. The bread acts as the perfect vessel to hold everything together, adding a satisfying crunch with every bite.
This combination also appeals to a wide variety of tastes, making it a versatile choice for just about anyone. If you prefer a different type of cheese, you can easily substitute cheddar, mozzarella, or even a slice of creamy Swiss. For those who want to reduce their meat intake, turkey bacon or a vegetarian alternative can also work perfectly. This dish offers endless possibilities for customization, making it a reliable go-to for whatever you have in your fridge.
How This Recipe Can Fit Into Your Routine
The beauty of this quick breakfast is that it’s not only fast but also adaptable. You can enjoy it as part of your morning routine or even turn it into a snack later in the day. On weekends, when you have a bit more time, you can turn it into a more elaborate meal by adding some fresh herbs, sautéed vegetables, or a drizzle of hot sauce to give it an extra kick.
For those with dietary restrictions or preferences, this recipe is easily customizable. Want to make it gluten-free? Simply swap the bread for a gluten-free alternative. Looking for a lower-fat option? Opt for leaner bacon or skip the cheese entirely. The versatility of this meal makes it perfect for anyone, no matter their taste or dietary needs.
Frequently Asked Questions
1. Can I make this breakfast in advance?
While this breakfast is best served fresh and hot, there are ways to prepare parts of it ahead of time to make the process even faster in the morning. You can cook the bacon and store it in the refrigerator for up to 3 days. Similarly, you can fry the eggs in advance, store them in the fridge, and reheat them in the microwave. Toast the bread fresh in the morning for the best texture.
2. Can I use a different type of bread?
Absolutely! The choice of bread is entirely up to you. While traditional white or whole wheat bread works wonderfully, you can opt for sourdough, rye, or even a bagel for added texture and flavor. The key is to pick a bread that will hold up well to the bacon, cheese, and egg without becoming soggy.
3. Is there a way to make this recipe healthier?
There are plenty of ways to make this breakfast lighter if you’re looking for a healthier version. You can switch out the bacon for turkey bacon or a vegetarian option, use a lower-fat cheese, or opt for a whole grain or low-carb bread. You could also skip the cheese entirely for a lower-calorie option and still enjoy the rich flavors of the eggs and bacon.
4. Can I freeze this breakfast for later?
While the toast and bacon can be frozen and reheated, eggs generally don’t freeze well in their cooked form without altering the texture. However, you can freeze cooked bacon and toast the bread separately, and then reassemble and heat up the eggs on the day you plan to eat it.
5. Can I add vegetables to this recipe?
Definitely! If you want to add more nutrients or simply love the combination of vegetables with your eggs, feel free to include some sautéed spinach, mushrooms, tomatoes, or avocado slices. These additions will not only increase the flavor but also boost the nutritional value of your breakfast.
Conclusion: The Power of a Simple Breakfast
In a world that often feels rushed and chaotic, sometimes the simplest meals can have the biggest impact. This breakfast of bacon, cheese, eggs, and toast has saved me on more mornings than I can count. It’s quick, satisfying, and full of flavor—just what you need to start your day right. Whether you’re looking to fuel up for a busy day ahead or just need a quick pick-me-up, this recipe is a perfect reminder that food doesn’t have to be complicated to be amazing.
The next time you find yourself scrambling for time and need a meal that will keep you going, remember that the perfect breakfast doesn’t need to be a time-consuming endeavor. With just a few ingredients and a little creativity, you can whip up a delicious meal in minutes and still enjoy the simple pleasure of a hearty, comforting breakfast.
Amal
Recipe That Saved My Morning! Breakfast in 5 Minutes
If you’re looking for a quick, delicious, and satisfying breakfast, this recipe is the answer! A combination of crispy bacon, melted cheese, and a perfectly fried egg sandwiched between toasted bread, all prepared in just 5 minutes. This meal is not only quick but also packs a punch in terms of flavor and nutrition, making it the perfect way to start your day!
Cook the Bacon: In a pan over medium heat, cook the bacon until crispy. Once cooked, remove from the pan and set aside on paper towels to drain excess fat.
Toast the Bread: In the same pan, toast the bread for 1-2 minutes on each side until golden brown. Alternatively, you can use a toaster for a quicker option.
Fry the Eggs: While the bread is toasting, crack the eggs into the pan and cook to your preferred doneness (sunny-side-up, scrambled, etc.). Season with salt and black pepper.
Assemble the Breakfast: Place a slice of cheese on each piece of toasted bread. Add a slice of bacon on top of the cheese, followed by a fried egg. Season with additional salt and pepper if desired.
Garnish and Serve: Garnish with freshly chopped parsley and green onion. Serve immediately for a quick, satisfying breakfast.
Notes
If you’re short on time, pre-cook the bacon in advance and store it in the fridge for up to 3 days.
You can use any type of cheese you prefer, such as cheddar, mozzarella, or Swiss, depending on your taste.
For a healthier version, consider using turkey bacon or a low-fat cheese option.
You can easily make this breakfast gluten-free by using a gluten-free bread substitute.
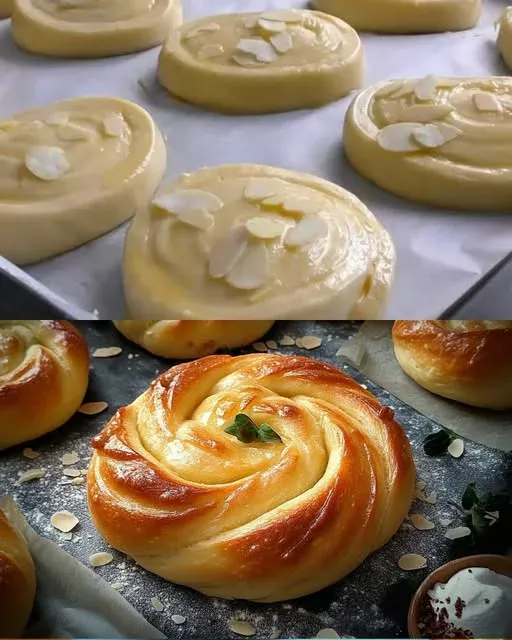
There’s something magical about the way certain foods can transport us back to a simpler time, evoke memories of laughter, and fill our hearts with warmth. For me, the smell of freshly baked custard cream-filled rose rolls takes me back to my childhood, sitting at my grandmother’s kitchen table, surrounded by the rich aromas of vanilla, butter, and freshly baked dough. My grandmother’s kitchen was always a place of solace. The rolling pin would gently glide over the dough, the rhythmic sound of it filling the room, and the act of stirring the custard over the stove felt like a loving ritual. She would hum a gentle tune as she poured the creamy custard into freshly baked rolls, crafting them into perfect rose shapes with such ease that it seemed like magic. It was in these moments that I learned that food isn’t just about taste – it’s about the love and intention poured into each step.
As I grew older, the significance of these small moments stayed with me, and I realized how much joy simple recipes could bring to the people around me. The custard cream-filled rose rolls, with their perfect balance of a crispy, golden crust and the delicate, creamy filling, became a symbol of comfort and love. It’s not just the recipe itself but the stories it carries that make it unforgettable. This recipe, just like my grandmother’s kitchen, is a space where memories are made, and the sweet scents of nostalgia fill the air.
The Beauty of the Rose Roll Shape
One of the most distinctive aspects of these custard cream-filled rose rolls is their shape. The elegant spirals of dough mimic the soft petals of a blooming rose, making them a feast for both the eyes and the palate. This visually striking formation isn’t just for show; it enhances the eating experience. The way the custard cream seeps into the layers of dough creates a beautiful contrast between the slightly crisp outer layers and the smooth, rich custard within.
When preparing these rolls, the dough is rolled, folded, and nestled into a spiral, which results in a delicate, almost ethereal texture. The rolls bake to a perfect golden brown, and when you pull them apart, you see the custard cream spill out, making each bite more indulgent than the last. The shape is symbolic of the beauty of simplicity — a reminder that the best things in life are often the most uncomplicated.
Ingredients:
Ingredient
Quantity
Milk
500 ml (2 cups)
Eggs
2
Sugar
100 g (1/2 cup)
Cornstarch
30 g (3 1/2 tbsp)
Salt
A pinch
Vanilla extract
2 tsp
Directions:
Prepare the Custard: In a medium saucepan, whisk together the milk, eggs, sugar, cornstarch, and salt until smooth. Place the saucepan over medium heat and continue to whisk constantly as the mixture begins to thicken. Once thickened to a creamy consistency, remove from heat and stir in the vanilla extract. Let it cool slightly.
Make the Rose Rolls: Roll out your dough to a flat sheet, then spoon a generous amount of custard in the center of each dough portion. Fold the dough around the custard to form a roll. Place the rolls in a greased baking dish, ensuring they are snugly fit together.
Baking: Preheat your oven to 350°F (175°C). Bake the rolls for 25-30 minutes or until golden brown and puffed. The rolls should be lightly crispy on the outside with a soft, custardy interior.
Cool & Serve: Let the rolls cool slightly before serving. You can drizzle with extra custard or dust with powdered sugar for an extra touch.
Nutritional Information (per serving):
Nutrient
Amount
Calories
220 kcal
Protein
5 g
Carbohydrates
30 g
Fat
9 g
Fiber
1 g
Sugars
15 g
Why Custard?
Custard is a classic dessert filling that never goes out of style. The combination of eggs, milk, and sugar creates a rich, velvety texture that perfectly complements the fluffy, soft dough of the rolls. It’s a flavor that evokes nostalgia, yet still feels fresh and indulgent. Custard has been a staple in many cultures for centuries, and its versatility knows no bounds. It can be used in everything from tarts and pies to puddings and cakes. However, it’s in these rose rolls that custard truly shines — as the creamy center that takes each bite to a new level of decadence.
The beauty of custard is that it’s not too sweet but has just enough richness to make it feel like a treat. Its smoothness pairs beautifully with the airy, slightly chewy texture of the dough, while the vanilla extract adds a depth of flavor that ties it all together. The result is a delicate dessert that feels luxurious without being overwhelming.
A Timeless Recipe for Every Occasion
Custard cream-filled rose rolls are not only a nostalgic treat; they’re versatile enough to serve on any occasion. Whether you’re preparing a special dessert for a family gathering, celebrating a holiday, or simply treating yourself on a Sunday afternoon, these rolls are sure to impress. Their beauty makes them a perfect centerpiece for a dessert table, and their delightful flavor will leave your guests asking for more.
The rolls can be enjoyed at any time of the day, whether as a sweet breakfast treat with a cup of coffee or as an after-dinner indulgence. The combination of delicate dough and rich custard provides the perfect balance between lightness and indulgence. If you’re looking to add a bit of elegance to a special meal, these rolls are the way to go.
Frequently Asked Questions
1. Can I use store-bought dough for this recipe?
Yes, you can absolutely use store-bought dough if you’re looking for a quicker option. However, making the dough from scratch adds an extra layer of satisfaction and allows you to control the texture and flavor. If you opt for store-bought dough, ensure it’s a dough meant for sweet pastries to maintain the flavor balance of the custard.
2. Can I make the custard ahead of time?
Yes, the custard can be made ahead of time. In fact, making the custard the day before you bake the rolls allows the flavors to meld together and creates a richer, deeper taste. Once made, store the custard in an airtight container in the refrigerator for up to two days. When you’re ready to use it, let it come to room temperature before adding it to the dough.
3. Can I freeze the custard cream-filled rose rolls?
Yes, you can freeze the rolls either before or after baking. To freeze them before baking, prepare the rolls as instructed, place them on a baking sheet, and freeze them for about an hour. Once frozen, transfer them to an airtight container or freezer bag and store for up to three months. When you’re ready to bake, simply place them on a baking sheet, thaw them for 30 minutes, and bake as instructed.
If you choose to freeze them after baking, ensure they are completely cooled before wrapping them tightly in plastic wrap or storing them in an airtight container. Reheat them in a 350°F (175°C) oven for about 10-15 minutes to restore their crispness.
4. Can I add fruit or other flavors to the custard?
Absolutely! While custard on its own is already delicious, you can get creative with your flavorings. Adding a hint of lemon zest or a splash of almond extract can elevate the flavor. For a fruity twist, consider adding a dollop of raspberry or strawberry jam to the center of the custard before rolling up the dough. Fresh fruit like berries also pairs wonderfully with custard.
5. What if my rolls don’t rise properly?
There are several reasons your rolls might not rise as expected. The most common reasons are either the yeast is old or the dough wasn’t allowed to rise in a warm enough environment. Ensure you’re using fresh yeast, and try letting the dough rise in a warm spot, such as near the oven or in a turned-off oven with the light on. The dough should double in size before baking.
6. Can I make these rolls gluten-free?
Yes, you can make a gluten-free version of these rolls by using a gluten-free all-purpose flour blend in place of the regular flour. Be sure to also use gluten-free cornstarch in the custard. While the texture may differ slightly from the original, it should still be delicious!
The Perfect Finish: Why These Rolls Are So Special
The beauty of these custard cream-filled rose rolls lies in their simplicity. Despite being relatively easy to make, they give off an air of sophistication that makes them feel like a special treat. The combination of delicate dough, smooth custard, and the sweet aroma that fills the kitchen while they bake creates an experience that is about more than just the food itself. It’s a celebration of comfort, nostalgia, and the joy that simple pleasures bring.
Food has a unique way of connecting us to our past, and these rolls, much like my grandmother’s kitchen, are an invitation to slow down, enjoy the process, and savor each bite. They remind us that no matter how fast-paced our lives get, there is always room for a moment of sweetness.
Conclusion: A Recipe for Making Memories
There are a few recipes that stay with us, passed down through generations, serving as a touchstone to memories that span years or even decades. Custard cream-filled rose rolls are more than just a dessert; they’re a reflection of love, tradition, and the joy that comes from creating something beautiful with your own hands. Whether you’re baking these rolls for a special occasion or simply because you want to indulge in something that feels like a warm hug, they carry with them a sense of timelessness.
As you take the time to craft these rolls and experience their delicious flavors, I hope you’ll find that they’re more than just a treat — they’re a way to connect with those who came before you and to create new memories with those you love. Because, at the end of the day, the best recipes are the ones that leave a lasting impression on both your taste buds and your heart.
Amal
Custard Cream Filled Rose Rolls: A Journey of Sweet Comfort
Indulge in the delicate, sweet comfort of these custard cream-filled rose rolls. With a golden, flaky exterior and a rich, creamy custard center, they offer the perfect balance of lightness and decadence. Shaped into beautiful rose spirals, these rolls are not just a treat for the taste buds but a feast for the eyes as well.
Make the Custard: In a medium saucepan, whisk together the milk, eggs, sugar, cornstarch, and salt until smooth. Place the saucepan over medium heat and cook, whisking constantly, until the custard thickens. Once it reaches a creamy consistency, remove from heat and stir in the vanilla extract. Let it cool slightly.
Prepare the Dough: Roll out your dough on a lightly floured surface to about 1/4 inch thickness. Cut into even strips or squares.
Assemble the Rolls: Place a spoonful of the cooled custard mixture in the center of each piece of dough. Roll up the dough to encase the custard, creating a rose shape. Place the rolls in a greased baking dish.
Bake the Rolls: Preheat your oven to 350°F (175°C). Bake the rolls for 25-30 minutes or until golden brown and puffed.
Cool and Serve: Allow the rolls to cool slightly before serving. Optionally, dust with powdered sugar or drizzle with extra custard for an added touch of sweetness.
Notes
If you’re short on time, you can use store-bought dough, though making the dough from scratch gives the rolls a more authentic texture and flavor.
For a more intense vanilla flavor, feel free to increase the amount of vanilla extract slightly.
These rolls are best served warm but can be stored in an airtight container for up to two days.
You can also freeze the rolls after baking and reheat them in the oven when needed for a quick treat.
I have fond memories of childhood mornings spent in my grandmother’s kitchen, where the smell of freshly baked bread would fill the house. My grandmother, a woman of grace and patience, was a master in the art of bread-making. I remember her hands, worn from years of baking, moving effortlessly across the dough as she worked with practiced ease. But there was one thing she always told me: “The simplest recipes often bring the greatest joy.” This No-Oven Turkish Bread is a perfect example of that sentiment.
There’s something magical about baking bread, especially without an oven. The process feels intimate, like you’re connecting with generations of bakers who made do with what they had. I remember watching my grandmother make her bread, kneading it with love, then cooking it on a simple stovetop. It was soft, golden brown, and perfect with a dollop of honey or a smear of butter. This recipe was a cherished memory passed down over the years, and today, it still takes me back to those mornings in her kitchen.
While many associate bread baking with the complicated process of using an oven, this No-Oven Turkish Bread keeps the spirit of simplicity and tradition alive. It’s a comforting recipe that anyone can make, even if they don’t have an oven or much baking experience. The best part? It requires minimal ingredients, and you can prepare it in a fraction of the time it takes for a traditional oven-baked loaf.
Why Choose No-Oven Turkish Bread?
The appeal of this No-Oven Turkish Bread lies in its ease of preparation and the incredible softness it offers. Unlike some bread recipes that can feel dense or heavy, this one produces a fluffy, tender loaf that’s perfect for any occasion. And unlike traditional breads that take hours of kneading, rising, and baking, this bread is ready in about an hour, making it an ideal choice for busy individuals or those just getting started in the kitchen.
A Versatile Recipe for All Occasions
No-Oven Turkish Bread is incredibly versatile. You can enjoy it fresh from the pan for breakfast, serve it as a side with soup or stew, or use it for sandwiches. It’s soft enough to pull apart, making it great for dipping into olive oil or hummus. You can also add a variety of toppings or fillings, such as herbs, garlic, or cheese, to make it your own.
Here are a few ideas for how to enjoy it:
Breakfast: Serve with a smear of butter or jam for a comforting start to your day.
With Dips: Pair with hummus, baba ganoush, or a simple olive oil dip for a healthy snack.
As a Side: This bread complements soups and stews beautifully, offering a perfect balance to rich, hearty dishes.
For Sandwiches: It’s the perfect texture for making wraps or sandwiches, especially when paired with your favorite fillings.
Why It Works Without an Oven
Traditional Turkish bread, or “pide,” is usually baked in a brick oven, giving it that characteristic soft, fluffy texture with a slightly crispy exterior. However, this no-oven method achieves the same result without the need for a large oven. The stovetop method allows the dough to steam and cook from both sides, resulting in a light, pillowy texture that’s just as satisfying as the baked version.
Using a skillet or a non-stick pan mimics the effect of an oven, providing enough heat to cook the bread evenly without drying it out. The addition of a little oil or butter for brushing at the end gives the bread a rich flavor and a slight crispness on the outside, making it irresistible.
Ingredients
Ingredient
Amount
All-Purpose Flour
3 ½ cups (450g)
Warm Water
1 cup (250ml)
Dry Yeast
2 tsp (7g)
Salt
1 tsp
Vegetable Oil or Olive Oil
2 tbsp
Greek Yogurt (optional for softness)
2 tbsp
Butter or Olive Oil (for brushing)
2 tbsp
Directions
Prepare the Dough: In a large bowl, combine the warm water, dry yeast, and a pinch of sugar. Let it sit for 5–10 minutes until it becomes frothy.
Mix in the Ingredients: Add the flour, salt, vegetable oil, and Greek yogurt (if using) to the yeast mixture. Mix together until the dough begins to form.
Knead the Dough: Transfer the dough onto a floured surface and knead for about 5–7 minutes until it’s smooth and elastic. Add a little more flour if needed.
Let the Dough Rise: Place the dough back into the bowl and cover it with a damp cloth. Let it rise in a warm place for 1–1.5 hours, or until it has doubled in size.
Shape the Dough: Punch down the risen dough and divide it into equal portions. Roll each portion into a ball and flatten them into round discs about 1/2-inch thick.
Cook the Bread: Heat a skillet or non-stick pan over medium heat. Brush it lightly with butter or olive oil. Place the dough discs into the pan and cook for 2–3 minutes on each side, until golden brown and cooked through.
Brush and Serve: Once cooked, remove the bread from the pan and brush it with more melted butter or olive oil for a soft, flavorful finish.
Nutritional Information (Per Serving)
Nutrient
Amount
Calories
150 kcal
Protein
4 g
Fat
5 g
Carbohydrates
22 g
Fiber
1 g
Sugar
1 g
Tips for Perfecting Your No-Oven Turkish Bread
While this recipe is simple, there are a few tips that can help you make the perfect loaf every time:
1. Use Warm Water for Yeast Activation
For the yeast to bloom properly, make sure you use warm water (about 110°F or 45°C). If the water is too hot, it will kill the yeast, and if it’s too cold, the yeast won’t activate properly. When mixed with sugar, the yeast will start to bubble and froth, signaling that it’s ready to work its magic.
2. Let the Dough Rise in a Warm Place
While you don’t need to wait for hours like you would with traditional bread, allowing the dough to rise for 1 to 1.5 hours is crucial for achieving that soft, airy texture. Place the dough in a warm area, away from drafts, to encourage the yeast to do its work.
3. Don’t Over-Knead the Dough
Kneading helps develop the gluten in the dough, but over-kneading can make the bread dense and tough. Aim to knead the dough for about 5–7 minutes, or until it becomes smooth and elastic.
4. Cook on Medium Heat
When cooking the bread on the stovetop, be sure to keep the heat at medium. Too high of a heat can burn the bread before it cooks through, while too low of heat can result in a soggy, undercooked loaf. Medium heat provides the perfect balance for golden-brown perfection.
5. Experiment with Flavors
While the classic Turkish bread is delicious on its own, feel free to get creative. Add a handful of chopped herbs (like rosemary or thyme) into the dough for extra flavor. You can also experiment with adding a bit of garlic or onion powder for a savory twist.
Frequently Asked Questions (FAQs)
Can I use a different type of flour?
Yes! While all-purpose flour is the most common for this recipe, you can experiment with whole wheat flour or a gluten-free flour blend. Keep in mind that using a different type of flour may alter the texture slightly, so adjust the water accordingly if needed.
Can I skip the Greek yogurt?
Greek yogurt is optional in this recipe and is typically added for extra softness. If you prefer a dairy-free version or just don’t have yogurt on hand, you can omit it, and the bread will still turn out beautifully.
What should I serve with No-Oven Turkish Bread?
This bread pairs wonderfully with hummus, baba ganoush, or any variety of dips. It’s also great as a side for soups, stews, or grilled meats, or you can use it as the base for a delicious sandwich.
How long can I store this bread?
This bread is best enjoyed fresh, but you can store leftovers in an airtight container for up to 2 days at room temperature. For longer storage, wrap it in plastic wrap and freeze it. When ready to use, simply reheat it in a skillet or microwave for a few seconds.
Can I make this bread without yeast?
While yeast helps the dough rise and gives it a soft, airy texture, you can try making this bread with baking powder instead. Keep in mind that the texture will be different, but it will still result in a delicious, pillowy flatbread.
Conclusion: A Bread for All Occasions
Making this No-Oven Turkish Bread is not only a simple and satisfying experience, but it also connects us to an age-old tradition of bread-making. With its soft, airy texture and the rich flavor from olive oil or butter, it’s a recipe that’s sure to become a staple in your kitchen. Whether you’re a beginner baker or a seasoned pro, this bread is a reminder that sometimes, the simplest things are the most delicious. So, roll up your sleeves, heat up your pan, and enjoy the taste of homemade bread — no oven required.
Amal
The Heart of the Kitchen: Memories of Turkish Bread
This No-Oven Turkish Bread is quick, easy, and incredibly soft! Made with a few simple ingredients and cooked right on the stovetop, it’s the perfect bread for any occasion—no oven required.
Prepare the Dough: In a bowl, combine the warm water, dry yeast, and a pinch of sugar. Let it sit for 5–10 minutes until it becomes frothy.
Add Flour and Mix: Add the flour, salt, and vegetable oil (and yogurt, if using) to the yeast mixture. Stir until a dough begins to form.
Knead: Transfer the dough to a floured surface and knead for 5–7 minutes until smooth and elastic.
Let It Rise: Place the dough in a lightly oiled bowl, cover it with a damp cloth, and let it rise for 1–1.5 hours or until doubled in size.
Shape the Dough: Punch the dough down and divide it into small balls. Flatten each ball into a disc, about 1/2 inch thick.
Cook the Bread: Heat a non-stick skillet over medium heat. Brush with butter or olive oil. Place the dough discs into the skillet and cook each side for 2–3 minutes, until golden and cooked through.
Serve: Brush the bread with extra butter or olive oil for a soft, flavorful finish.
Notes
Topping Ideas: Try adding herbs like rosemary or thyme to the dough for extra flavor. You can also top it with sesame seeds before cooking.
Storage: Keep leftovers in an airtight container for up to 3 days at room temperature. You can also freeze the bread for up to a month.
Tip for Softness: Greek yogurt in the dough adds a deliciously soft texture, but it’s optional.
It’s funny how some recipes hold more meaning than others. For me, this Super Simple Yogurt Cake brings back memories of early mornings spent baking with my grandmother in her cozy kitchen. I remember her standing at the counter, effortlessly combining ingredients as if she knew magic. She wasn’t one for complicated desserts — she believed in the power of simplicity, of allowing each ingredient to shine.
I was only a child then, but I remember how the aroma of that soft, sweet cake would fill the house. The texture was light as air, the flavor just tangy enough to leave a lingering comfort. The best part? It only took minutes to prepare. I used to wonder how something so delicious could come from such a simple combination of eggs, yogurt, and flour.
Now, whenever I make this yogurt cake, I’m transported back to those mornings. It reminds me that we don’t always need complexity to create something special. This cake is a testament to the power of simplicity — a small indulgence that turns an ordinary day into something extraordinary.
Why This Yogurt Cake Will Steal Your Heart
There’s something about the combination of yogurt and eggs that makes this cake so unique. It’s light, fluffy, and subtly tangy, with the perfect balance of sweetness. But beyond the flavors, this cake represents a philosophy I believe in deeply: simplicity is often the most beautiful solution.
A Versatile Cake for Any Occasion
One of the best things about this cake is its versatility. It’s the kind of recipe you can turn to when you need something quick and satisfying, but it’s also elegant enough to serve at a special gathering. Whether you’re hosting a brunch, celebrating a birthday, or just treating yourself to a moment of indulgence, this yogurt cake delivers.
Here are just a few ways you can enjoy it:
Breakfast Delight: Slice it up with a cup of coffee or tea. Its mild sweetness is the perfect way to start the day without overwhelming your senses.
Dessert Option: Serve it after a light dinner for an easy but impressive dessert. A sprinkle of powdered sugar or a dollop of whipped cream elevates it beautifully.
For the Family: Bake it over the weekend and watch your kids (and partner) enjoy it as a cozy afternoon snack.
It’s also a great base for flavor variations. You can easily add vanilla extract, citrus zest, or even a bit of cocoa powder for a chocolate version. Top it with fresh berries, a drizzle of honey, or even a smear of fruit preserves for extra flair.
Ingredients
Ingredient
Amount
Plain or Greek Yogurt
2 cups (500 g)
Eggs (separated into whites and yolks)
4 large
Flour (All-Purpose or Self-Rising)
1/2 cup (65 g)
Directions
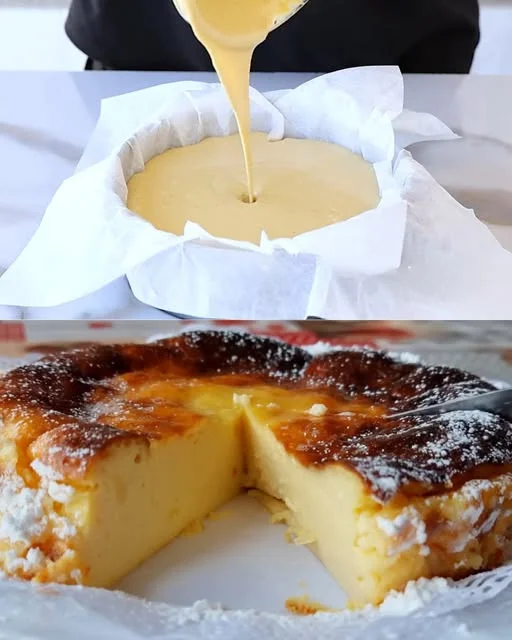
Preheat the Oven: Set your oven to 170°C (340°F) and line a small round or loaf baking pan with parchment paper.
Mix the Yolks and Yogurt: In a large bowl, whisk together the egg yolks and yogurt until smooth. Sift in the flour and stir until just combined.
Whip the Egg Whites: In a separate clean bowl, beat the egg whites until stiff peaks form. This gives the cake its fluffy texture.
Fold Gently: Carefully fold the whipped egg whites into the yogurt mixture in three parts, using a spatula. Don’t overmix — a light hand keeps the cake airy.
Bake to Perfection: Pour the batter into your prepared pan and bake for 35–40 minutes, or until golden and a toothpick inserted in the center comes out clean.
Cool & Serve: Let the cake cool in the pan for 10 minutes before transferring to a wire rack. Enjoy warm or chilled with a dusting of powdered sugar or fresh fruit.
Nutritional Breakdown (Per Serving, based on 8 servings)
Nutrient
Amount
Calories
120–140 kcal
Protein
6–8 g
Fat
5–6 g
Carbohydrates
10–12 g
Fiber
0–1 g
Sugar (natural from yogurt)
3–5 g
The Secrets Behind the Simple Ingredients
While this yogurt cake seems like an ordinary recipe at first glance, it’s the simplicity of the ingredients that makes it extraordinary. Each one plays a crucial role in creating the texture, flavor, and richness.
Greek Yogurt: The Unsung Hero
Yogurt is the backbone of this recipe. Greek yogurt, in particular, is thick and creamy, lending moisture and richness to the cake. Its tangy flavor adds a slight depth, keeping the cake from being overly sweet. If you use regular yogurt, you’ll still get a delicious result, but Greek yogurt brings that extra level of creaminess that makes this cake so indulgent.
Eggs: The Binding Force
Eggs do more than just bind the ingredients together; they provide structure and lift. The egg whites, when whipped to stiff peaks, help the cake rise and stay fluffy. Meanwhile, the egg yolks contribute to the cake’s golden color and rich, soft crumb. The balance of eggs is what gives this cake its texture — tender and delicate but not too airy.
Flour: The Foundation
All-purpose flour serves as the base that holds everything together. It provides structure without being too heavy. Since we’re using just half a cup, the flour doesn’t overwhelm the other ingredients. It’s the glue that binds everything, allowing the yogurt and eggs to truly shine.
The Art of Making This Cake Perfect Every Time
While this yogurt cake is undeniably simple, there are still a few tips and tricks to ensure it turns out perfect every time.
Tip 1: Don’t Overmix the Batter
The beauty of this cake lies in its delicate texture. To achieve this, it’s important not to overmix the batter. Once you combine the wet and dry ingredients, stir gently until they’re just combined. Overmixing will cause the cake to become dense and heavy, so a light hand is essential.
Tip 2: Be Patient with the Eggs
Whipping the egg whites to stiff peaks is a crucial step. This is what makes the cake rise and gives it that light, fluffy texture. If you don’t have an electric mixer, use a whisk — just be prepared for a workout! If your egg whites don’t hold their shape, the cake will be flat rather than airy.
Tip 3: Baking Time is Key
As with most cakes, the exact baking time may vary depending on your oven and the size of your pan. To check for doneness, insert a toothpick into the center of the cake. If it comes out clean or with just a few crumbs, the cake is ready. If it comes out wet, give it a few more minutes.
FAQs: Answering Your Yogurt Cake Questions
Can I use a different type of yogurt?
Yes, you can substitute Greek yogurt with regular yogurt. However, keep in mind that Greek yogurt has a thicker consistency, which contributes to the cake’s texture. If you use regular yogurt, you may need to adjust the baking time slightly.
Can I add flavorings to this cake?
Absolutely! This yogurt cake is incredibly versatile. You can add vanilla extract, lemon zest, or even a bit of cinnamon to the batter. For a chocolate version, you could mix in cocoa powder. Fresh fruit, like berries, also makes a great addition — either mixed into the batter or as a topping.
Is this cake suitable for special diets?
This cake can be adapted for different dietary needs:
For a gluten-free version, use a gluten-free all-purpose flour blend.
For a dairy-free option, use a dairy-free yogurt and a plant-based egg replacer.
How can I store this cake?
Store your yogurt cake in an airtight container at room temperature for up to 3 days. It also freezes well for up to a month. Simply wrap it in plastic wrap and aluminum foil, then place it in a freezer-safe bag. Thaw it at room temperature before serving.
Can I make this cake ahead of time?
Yes, this cake actually improves with a little resting time. The flavors develop, and the texture becomes even more tender. You can easily bake it the day before and store it covered.
Conclusion: Embrace the Simple Joy of Baking
This Super Simple Yogurt Cake is more than just a recipe; it’s a lesson in the power of simplicity. Sometimes, the best things in life don’t require complex techniques or hard-to-find ingredients. With just a few pantry staples, you can create a dessert that feels special and comforting — something that will be loved by everyone at the table.
When I make this cake, I’m reminded of the joy of cooking for those I love, and how sometimes, the simplest things can make the biggest impact. So, go ahead — give it a try. Whether you’re baking for yourself, for your family, or for someone special, this cake will undoubtedly bring a smile to your face. Happy baking!
Amal
A Slice of Comfort: The Journey to Simplicity in the Kitchen
This Super Simple Yogurt Cake is a light and fluffy dessert that’s quick to prepare yet indulgent enough to satisfy your sweet cravings. With just a handful of ingredients, it’s a perfect treat for any time of day.
Preheat the Oven: Preheat your oven to 170°C (340°F). Grease a small round or loaf pan, or line it with parchment paper.
Mix Yogurt and Egg Yolks: In a large bowl, whisk together the egg yolks and yogurt until smooth. Add in the flour and stir until combined.
Whip the Egg Whites: In a separate bowl, beat the egg whites until stiff peaks form.
Combine Mixtures: Gently fold the whipped egg whites into the yogurt mixture. Be careful not to overmix — just fold until combined.
Bake: Pour the batter into the prepared pan and smooth the top. Bake for 35–40 minutes, or until the cake is golden brown and a toothpick inserted into the center comes out clean.
Cool and Serve: Let the cake cool for 10 minutes in the pan before transferring it to a wire rack. Slice and serve warm or at room temperature.
Notes
Flavor Variations: You can add vanilla extract, lemon zest, or even a bit of cocoa powder to change up the flavor profile.
Topping Ideas: Serve the cake with powdered sugar, whipped cream, or fresh berries to elevate its flavor and presentation.
Storage: Store leftovers in an airtight container for up to 3 days at room temperature or refrigerate for longer freshness.
I never expected a simple baking day to change the atmosphere in our home — but it did. It was a rainy Tuesday, one of those grey afternoons where nothing seems to move. My daughter had come home from school unusually quiet, not angry or upset, just… distant. I asked if she wanted to help me in the kitchen, half expecting her to say no. But she nodded and tied on one of my aprons, far too big for her shoulders.
I handed her the rolling pin and a bowl of flour, and together we began mixing dough, giggling when we accidentally flung flour across the counter. As the dough rose on the windowsill, we shared stories — silly ones, tender ones. And when we folded in the cheese, something shifted. Her eyes lit up. The quiet melted away.
When the rolls came out of the oven, golden and bubbling with warm mozzarella, the whole house smelled like comfort. We sat at the table, our hands still dusted in flour, and tore them open — the cheese stretching like ribbon between us. That moment, with warm bread and a warm smile, stitched something invisible back together.
Ever since, these cheese rolls have become more than a recipe. They’re a reminder of what’s possible when we slow down, bake something from the heart, and simply share it.
Why These Cheese Rolls Are Worth the Whisk
Let’s talk about what makes these Golden Melt Cheese Rolls so special — aside from their sentimental magic. They’re soft on the outside, gooey on the inside, and completely versatile. Made with a simple dough using pantry staples, the texture strikes a perfect balance between fluffy bread and melted richness.
Whether you use mozzarella, cheddar, or even a mix of both, the cheese takes center stage in every bite. The exterior has that satisfying golden sheen thanks to a light egg yolk glaze, while the inside remains pillowy with pockets of molten cheese.
And here’s the best part: it doesn’t take all day. From start to finish, you’re looking at just over an hour — including proofing and baking — which makes these a perfect choice for weekday bakes, impromptu brunches, or that last-minute craving for something warm and indulgent.
Ingredients
Ingredient
Amount
Warm milk
400 ml
Sugar
15 grams
Dry yeast
10 grams
Wheat flour
480 grams
Salt
8 grams
Olive oil
20 grams
Mozzarella or cheddar cheese
200 grams
Egg yolk
1
Vegetable oil (for greasing)
As needed
Directions
Activate the Yeast: In a large mixing bowl, combine warm milk, sugar, and dry yeast. Let sit for 5–10 minutes until frothy.
Make the Dough: Add wheat flour, salt, and olive oil to the yeast mixture. Mix and knead until a soft dough forms. Cover and let it rise in a warm place for 30–40 minutes.
Shape & Fill: Divide the dough into equal pieces. Flatten each and fill with mozzarella or cheddar. Pinch closed and shape into rolls.
Brush & Bake: Place rolls on a greased baking tray. Brush tops with egg yolk for a golden finish. Bake in a preheated oven at 180°C (350°F) for 18–22 minutes or until golden brown.
Cool Slightly & Serve Warm: Let cool for 5 minutes and enjoy while the cheese is still melty.
Nutritional Highlights (Per Roll, approx.)
Nutrient
Amount
Calories
~210 kcal
Protein
~8 g
Carbohydrates
~25 g
Fat
~9 g
Saturated Fat
~3.5 g
Fiber
~1.2 g
Sodium
~260 mg
Sugar
~2 g
Not Just for Snacking: How to Serve and Enjoy
These rolls are incredibly adaptable. While they’re delicious fresh from the oven, they can also be repurposed or dressed up depending on your mood or mealtime:
With Soup: Pair them with tomato soup, creamy pumpkin bisque, or a hearty lentil stew.
Lunch Box Hero: Pack them as a midday snack for school or work — they’re just as tasty at room temperature.
Brunch Basket Addition: Serve them in a bread basket alongside boiled eggs, olives, and sliced fruit for a Mediterranean-style breakfast spread.
Mini Sandwiches: Slice them in half and add turkey, avocado, or even hummus for a creative slider.
On the Go: Wrap them up and take them on a picnic or road trip. They’re mess-free and totally portable.
Tips for a Golden Finish Every Time
While the recipe itself is forgiving, a few small adjustments and techniques can take these rolls from good to bakery-worthy:
Warm, Not Hot, Milk: Make sure your milk is warm to the touch, not scalding. Too hot and it will kill the yeast; too cold and it won’t activate properly.
Don’t Skip the Proof: Allowing your dough to rise in a warm, draft-free spot ensures light, fluffy rolls. Rushing this step often leads to denser results.
Cheese Matters: Use cheese that melts well — mozzarella offers a stretchy pull, while cheddar brings more bold flavor. You can even mix in a little parmesan for extra depth.
Egg Yolk Glaze: A single egg yolk brushed over the top creates that irresistible golden shine. You can also sprinkle sesame or nigella seeds for added texture and style.
Bake on Middle Rack: This helps the rolls cook evenly without burning the bottoms before the tops are done.
Storage and Reheating Tips
These cheese rolls store beautifully, making them an excellent prep-ahead option.
To Store: Place cooled rolls in an airtight container and refrigerate for up to 4 days.
To Freeze: Freeze individually on a tray, then transfer to a zip-top bag for up to 2 months. Thaw overnight in the fridge or pop into a low oven straight from frozen.
To Reheat: Warm in a preheated oven at 160°C (320°F) for 5–7 minutes or microwave in 10-second bursts if you’re short on time.
They reheat beautifully, restoring the cheese to its melty glory with minimal effort.
Frequently Asked Questions
Can I use whole wheat flour instead of white flour? Yes, you can substitute whole wheat flour for up to half the amount to add a nutty flavor and more fiber. Keep in mind, the texture may be slightly denser.
What if I don’t have dry yeast? You can use fresh yeast if you have it. Substitute with about 20–25 grams of fresh yeast, and crumble it directly into the warm milk and sugar mixture.
Can I stuff these with other fillings? Absolutely. Try sautéed mushrooms, cooked spinach, or even finely chopped sun-dried tomatoes. Just make sure the fillings aren’t too wet, or they’ll compromise the dough.
How do I make this recipe vegan? Replace the milk with plant-based milk (like soy or almond), use olive oil instead of egg yolk for brushing, and swap the cheese for a meltable vegan cheese alternative.
Do I need a mixer to make the dough? Not at all. While a stand mixer with a dough hook makes it easier, this dough comes together well by hand with just a bit of elbow grease.
Can kids help make these? Yes, and they’ll love it. Let them help with shaping the rolls or stuffing in the cheese — it’s a fun, hands-on way to get them involved in the kitchen.
Why This Recipe Stands Out
In a world filled with fast food and overly complicated baking projects, these Golden Melt Cheese Rolls strike a perfect balance: simple to make, satisfying to eat, and rich with possibility. They are humble, yes — but they bring people together. That’s something worth celebrating.
You won’t find artificial flavors here, or complicated techniques. What you’ll find is warmth. A golden crust. A gooey center. And the joy of making something from scratch with your hands.
And isn’t that what good food is all about?
A Final Thought: More Than Bread
These cheese rolls might not solve every problem, but they remind us of something important — that nourishment isn’t just physical. It’s emotional. It’s connective. A soft, warm roll shared between people, especially when made with intention, is a form of love.
So whether you’re baking them for your family, bringing them to a friend, or enjoying them alone with a cup of tea, know that you’re not just making bread. You’re making a moment.
And that — just like the cheese inside — is the best kind of melt.
Amal
The Warmth Between the Cracks: A Story About Cheese Rolls and Second Chances
These soft, golden rolls are filled with gooey mozzarella or cheddar, baked to perfection with a glossy finish. Quick to prepare and irresistibly cheesy, they’re ideal for lunchboxes, gatherings, or cozy weekend baking.
There’s something about the scent of roasted vegetables wafting through the kitchen that takes me back to my grandmother’s sun-drenched home. Her garden, a mosaic of colors and textures, overflowed with homegrown broccoli, peppers, and herbs that she nurtured like her own children. Every Sunday, she would prepare a humble casserole, using whatever the garden offered that week — it was never fancy, but it was always made with love.
I remember sitting on the counter, swinging my legs while she chopped vegetables, telling me stories about how food wasn’t just nourishment — it was memory, identity, and healing. The casserole, warm from the oven and packed with garden-fresh goodness, was her love language. And now, decades later, I find myself recreating those flavors with a modern, healthier twist: a broccoli and cauliflower veggie bake that’s both comforting and wholesome.
This recipe is not just about food. It’s a reconnection. To the past, to loved ones, and to the simplicity of real ingredients that speak for themselves. Whether you’re trying to eat more veggies, planning for meal prep, or looking for a satisfying dish that doesn’t weigh you down — this recipe is the one you’ll come back to again and again.
Why This Veggie Bake Deserves a Place at Your Table
The Garden Glow Veggie Bake is a celebration of color, texture, and balance. While most casseroles are heavy, cheesy, and carb-loaded, this version feels lighter — yet deeply satisfying. The contrast between the tender broccoli, cauliflower florets, the burst of sweet cherry tomatoes, and the gentle custard-like filling of eggs and cream creates a beautiful harmony in every bite.
It’s naturally gluten-free, rich in fiber and antioxidants, and a great way to make vegetables the star of your plate — not just a sidekick. It’s ideal for vegetarians, for anyone on a low-carb diet, or for those simply trying to make better choices without sacrificing flavor.
Ingredients
Ingredient
Amount
Cauliflower, chopped into florets
350 g
Broccoli, chopped into florets
350 g
Sweet Pepper, diced
1
Cherry Tomatoes, halved
100 g
Eggs
4
Heavy Cream
180 ml
Salt
To taste
Black Pepper
To taste
Dried Oregano
To taste
Directions
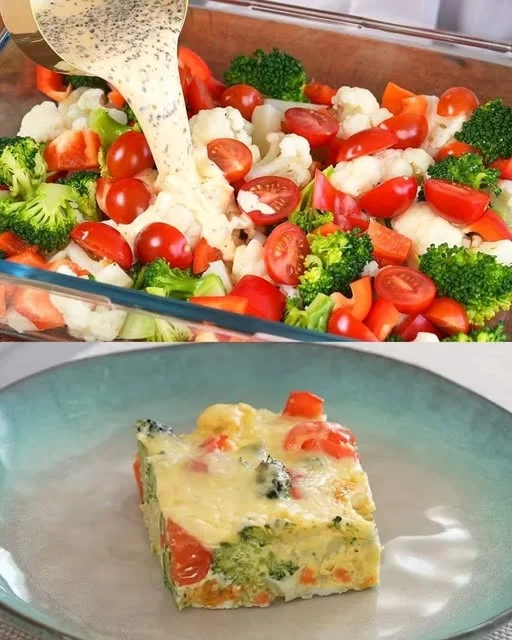
Preheat & Prep: Preheat your oven to 180°C (350°F). Lightly grease a baking dish or line it with parchment paper.
Blanch the Base: Bring a pot of salted water to a boil. Blanch the cauliflower and broccoli florets for 2–3 minutes, then drain and rinse under cold water to stop the cooking process.
Layer the Goodness: In your prepared dish, spread the blanched broccoli and cauliflower evenly. Add diced sweet pepper and halved cherry tomatoes over the top.
Whisk the Creamy Blend: In a bowl, whisk together the eggs and heavy cream. Season with salt, black pepper, and a pinch of oregano for a Mediterranean flair.
Pour & Bake: Pour the egg mixture over the vegetables, making sure it seeps through the layers. Bake in the oven for 30–35 minutes or until the top is golden and the center is set.
Cool & Serve: Let it cool for 5–10 minutes before slicing. Serve warm or at room temperature with a side salad or crusty bread.
Whether you’re hosting a weekend brunch, prepping lunches for the week, or simply craving something warm and nourishing on a chilly evening, this bake fits in effortlessly:
Weeknight Dinner: Pair with a green salad and some crusty whole grain bread.
Meal Prep Favorite: Divide into containers for easy, grab-and-go lunches.
Brunch Staple: Serve alongside fresh fruit and herbal tea for a lighter take on a classic egg bake.
Potluck Hero: Transport easily, and reheats beautifully — no soggy leftovers here.
The Nutritional Edge: Why Your Body Will Thank You
This isn’t just comfort food; it’s food that fuels. Let’s look at what’s happening behind the scenes:
Broccoli & Cauliflower: Both cruciferous vegetables are packed with Vitamin C, Vitamin K, and compounds that support liver detoxification and cancer prevention. Cauliflower offers a gentle texture while broccoli adds a slightly earthy depth.
Sweet Peppers: High in Vitamin A and antioxidants like beta-carotene. They also add natural sweetness without sugar.
Cherry Tomatoes: Rich in lycopene, an antioxidant known for its heart-protective and anti-inflammatory properties.
Eggs: A complete source of protein, with all 9 essential amino acids. Also a good source of choline, crucial for brain health.
Heavy Cream: While indulgent, it adds richness and helps carry fat-soluble nutrients. You can also substitute with half-and-half or dairy-free alternatives if desired.
This combination makes the bake not just tasty but a smart choice for sustained energy, digestive health, and even immune support.
Flavor Variations to Keep It Fresh
One of the best parts of this recipe is how adaptable it is. You can change it up based on what’s in season, what’s in your fridge, or just what you’re in the mood for:
Cheesy Twist: Add a sprinkle of sharp cheddar or crumbled feta on top before baking.
Herb Garden Version: Try fresh thyme, basil, or rosemary for a fragrant variation.
Low-Dairy Swap: Replace the heavy cream with coconut milk or oat cream for a dairy-free version.
Add a Protein Boost: Mix in some cooked quinoa, shredded rotisserie chicken, or white beans for added substance.
Make-Ahead Tips & Storage Magic
This dish is an absolute star when it comes to planning ahead:
Make Ahead: Prepare the entire bake, cover, and refrigerate overnight. Simply bake fresh when ready to serve.
Freeze It: Once baked and cooled, slice into portions and freeze in airtight containers. Reheat in the oven or microwave.
Leftovers: Keeps well in the fridge for 3–4 days. It reheats beautifully and even tastes better the next day as the flavors meld.
Frequently Asked Questions
Can I use frozen vegetables instead of fresh?
Yes — frozen broccoli and cauliflower can be used. Just thaw and pat dry before layering to avoid excess moisture that can water down the custard.
Is there a dairy-free option for this bake?
Absolutely. Swap the heavy cream for full-fat coconut milk, almond cream, or oat cream. You can also use a dairy-free cheese alternative for extra flavor.
What’s the best pan to use for baking this?
An 8×8-inch or 9×9-inch glass or ceramic dish works perfectly. If doubling the recipe, go for a 9×13-inch dish and increase baking time by about 10–15 minutes.
How do I know when it’s fully cooked?
The edges should be golden and set, and the center should no longer jiggle. A knife inserted in the center should come out clean. It typically takes about 30–35 minutes at 180°C (350°F).
Can I make this keto-friendly?
Yes! This recipe is already low-carb and keto-friendly. Just ensure your cream is full-fat and avoid starchy add-ins like potatoes or beans.
What herbs go best in this dish?
Dried oregano is a classic, but you can also try parsley, thyme, dill, or even a pinch of smoked paprika for depth.
Can I add cheese to this recipe?
Definitely. While the base recipe keeps it light and creamy, feel free to sprinkle grated parmesan, sharp cheddar, or crumbled goat cheese on top before baking for extra richness.
A Wholesome Comfort Dish that Speaks to the Soul
Cooking isn’t just about filling our stomachs — it’s about feeding our memories, connecting with tradition, and creating moments of joy around the table. This broccoli and cauliflower bake brings together the warmth of old-fashioned casseroles with the freshness and vitality of modern, plant-forward cooking.
Whether you’re trying it for the first time or making it part of your weekly ritual, let it be more than just a meal — let it be a moment. A reminder that food can be simple, nourishing, and full of heart.
And as the aroma rises from the oven and wraps around your kitchen, may it remind you — as it reminds me — that sometimes, the most beautiful dishes are the ones rooted in love, memory, and a few good vegetables.
Amal
The Warmth of the Oven: A Family Tradition Reimagined
A vibrant, oven-baked dish loaded with roasted broccoli, cauliflower, sweet peppers, and cherry tomatoes nestled in a rich, herbed egg and cream mixture. Perfect for a light, satisfying meal that delivers both comfort and nourishment.
Preheat the oven to 180°C (350°F). Lightly grease a baking dish or line with parchment paper.
Bring a pot of salted water to a boil. Blanch the cauliflower and broccoli florets for 2–3 minutes until slightly tender but still crisp. Drain and rinse under cold water to stop the cooking.
Layer the blanched cauliflower and broccoli in the prepared baking dish. Scatter diced sweet pepper and cherry tomatoes evenly over the top.
In a separate bowl, whisk the eggs and heavy cream together until smooth. Season with salt, black pepper, and dried oregano.
Pour the egg mixture evenly over the vegetables in the baking dish.
Bake in the preheated oven for 30–35 minutes, or until the top is golden and the center is set.
Let cool slightly before slicing and serving.
Notes
For a dairy-free version, substitute the heavy cream with unsweetened coconut milk or a plant-based cream alternative.
Add a sprinkle of grated Parmesan or feta before baking for extra flavor.
This dish stores well in the fridge for up to 3 days and can be reheated in the oven or microwave.
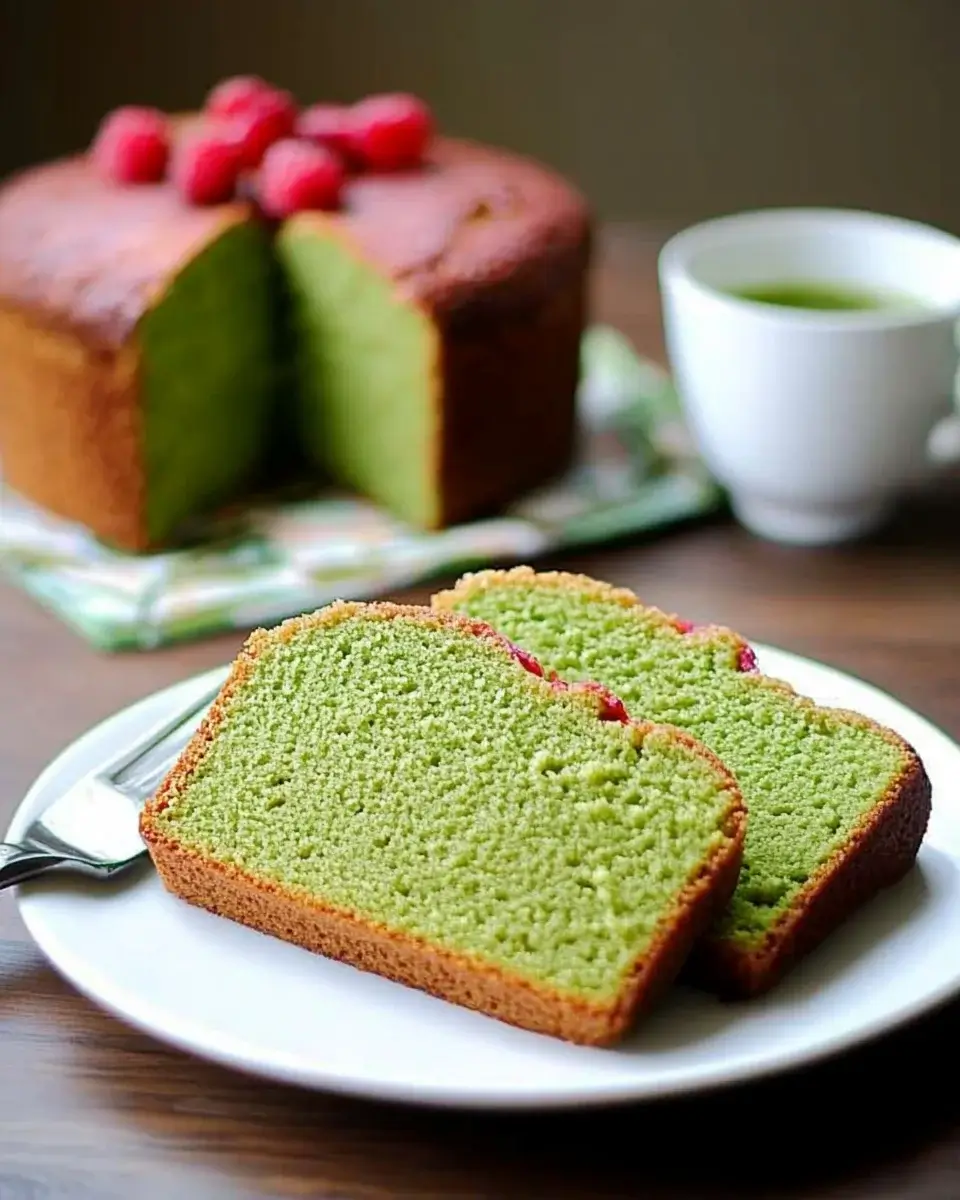
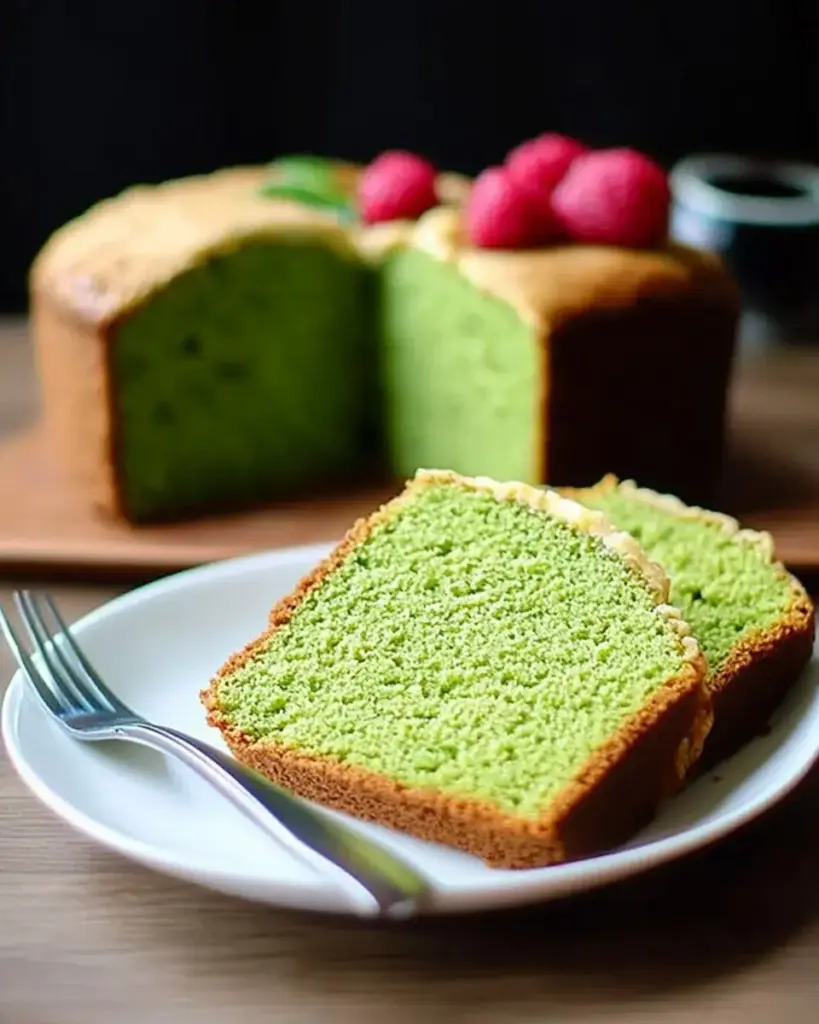
Matcha is a special type of green tea that comes from Japan. Unlike regular green tea, matcha is made from finely ground tea leaves. This means you get all the nutrients from the leaves, making it a superfood! It has a vibrant green color and a unique, earthy flavor. Many people enjoy matcha for its health benefits, which include boosting energy and improving focus. Plus, it’s rich in antioxidants, which are great for your body. When used in baking, like in our matcha pound cake recipe, it adds a lovely color and a delicious taste.
The Origin of Pound Cake
Pound cake has a long and interesting history. It dates back to the 1700s in Europe. The name “pound cake” comes from the original recipe, which called for a pound each of flour, butter, sugar, and eggs. This simple recipe made it easy for anyone to remember. Over time, bakers started to add different flavors and ingredients, leading to many variations. Today, pound cake is loved around the world for its rich, buttery flavor and dense texture. Our matcha pound cake recipe takes this classic dessert and gives it a modern twist with the addition of matcha, making it both tasty and visually appealing.
Ingredients for Matcha Pound Cake Recipe
To create a delightful matcha pound cake, you will need a few simple ingredients. Each one plays a vital role in achieving the perfect texture and flavor. Here’s what you’ll need:
2 cups all-purpose flour: This is the base of your cake, providing structure.
1 teaspoon baking powder: This helps the cake rise, making it light and fluffy.
1/2 teaspoon salt: A pinch of salt enhances the flavors in the cake.
1 tablespoon matcha green tea powder: This gives the cake its beautiful green color and unique flavor.
1 cup unsalted butter, softened: Butter adds richness and moisture to the cake.
1 1/2 cups granulated sugar: Sugar sweetens the cake and helps with its texture.
4 large eggs: Eggs provide structure and moisture, making the cake tender.
1 teaspoon vanilla extract: This adds a lovely aroma and flavor to the cake.
1/2 cup milk: Milk keeps the cake moist and adds a bit of richness.
These ingredients come together to create a delicious matcha pound cake that is sure to impress your family and friends. Feel free to experiment with the ingredients, like substituting half of the all-purpose flour with almond flour for a lighter texture. You can also add a citrus twist by incorporating the zest of a lemon or orange into the batter. The possibilities are endless!
Step-by-Step Preparation of Matcha Pound Cake Recipe
Step 1: Preheat the Oven
First things first, preheat your oven to 350°F (175°C). This step is crucial because it ensures that your cake bakes evenly. A hot oven helps the cake rise properly, giving it that lovely fluffy texture we all love. While the oven heats up, you can move on to the next steps.
Step 2: Prepare the Baking Pan
Next, grab a 9×5-inch loaf pan. Grease it with some butter or cooking spray, then dust it with flour. This will prevent the cake from sticking to the pan. You want to make sure that when it’s time to serve, your beautiful matcha pound cake comes out easily. A well-prepared pan is key to a successful bake!
Step 3: Mix Dry Ingredients
In a medium bowl, whisk together the all-purpose flour, baking powder, salt, and matcha green tea powder. Mixing these dry ingredients first helps to evenly distribute the baking powder and matcha. This way, every bite of your cake will have that delightful matcha flavor. Set this bowl aside for now.
Step 4: Cream Butter and Sugar
Now, in a large bowl, cream the softened unsalted butter and granulated sugar together. Use an electric mixer on medium speed for about 3-5 minutes. You want the mixture to become light and fluffy. This step is important because it incorporates air into the batter, making your cake rise beautifully.
Step 5: Incorporate Eggs
Once your butter and sugar are fluffy, it’s time to add the eggs. Add them one at a time, mixing well after each addition. This ensures that each egg is fully incorporated before adding the next. Don’t forget to add the teaspoon of vanilla extract at this stage for that lovely aroma!
Step 6: Combine Dry and Wet Ingredients
Now, it’s time to bring everything together. Gradually add the dry mixture to the wet mixture. Alternate this with the milk, starting and ending with the flour mixture. Mix until just combined. Be careful not to overmix, as this can make your cake dense. You want a smooth batter, but a few lumps are okay!
Step 7: Add Matcha
Even though you’ve already added matcha in the dry ingredients, you can enhance its flavor by gently folding in a little extra matcha powder at this stage if you like. This will give your cake a more vibrant green color and a stronger matcha taste. Just be sure to mix it in gently.
Step 8: Bake the Cake
Pour the batter into your prepared loaf pan. Smooth the top with a spatula for an even bake. Place the pan in the preheated oven and bake for 60-70 minutes. To check if it’s done, insert a toothpick into the center. If it comes out clean, your cake is ready!
Step 9: Cool and Serve
Once baked, allow the cake to cool in the pan for about 10 minutes. This helps it set and makes it easier to remove. After that, transfer the cake to a wire rack to cool completely. Once cooled, slice it up and enjoy your delicious matcha pound cake!
Variations of Matcha Pound Cake Recipe
Adding Citrus Zest
If you want to give your matcha pound cake a refreshing twist, consider adding citrus zest. The zest of a lemon or orange can brighten the flavor of the cake. Simply grate the outer peel of the fruit and mix it into the batter during the wet ingredient stage. This addition not only enhances the taste but also adds a lovely aroma. The citrus notes pair beautifully with the earthy flavor of matcha, creating a delightful balance. Plus, it makes your cake even more appealing to the senses!
Incorporating Nuts or Chocolate Chips
Another fun way to customize your matcha pound cake is by incorporating nuts or chocolate chips. Chopped walnuts, almonds, or pecans can add a nice crunch and nutty flavor. Simply fold in about half a cup of your chosen nuts into the batter before pouring it into the loaf pan. If you’re a chocolate lover, consider adding chocolate chips instead. Dark chocolate chips can create a rich contrast to the matcha, making each bite a delightful surprise. Just remember to adjust the sugar slightly if you add sweet chocolate chips to keep the balance right!
Cooking Note for Matcha Pound Cake Recipe
When baking your matcha pound cake, there are a few important cooking notes to keep in mind. These tips will help ensure that your cake turns out perfectly every time.
Use Room Temperature Ingredients: For the best results, make sure your butter, eggs, and milk are at room temperature. This helps them blend together smoothly, creating a uniform batter.
Measure Ingredients Accurately: Baking is a science, so measuring your ingredients accurately is crucial. Use a kitchen scale for precise measurements, especially for flour and sugar.
Don’t Overmix: When combining the wet and dry ingredients, mix until just combined. Overmixing can lead to a dense cake, which is not what you want for a light and fluffy pound cake.
Check for Doneness: Ovens can vary in temperature, so keep an eye on your cake as it bakes. Start checking for doneness a few minutes before the recommended baking time. A toothpick inserted into the center should come out clean or with a few moist crumbs.
Cool Properly: Allow the cake to cool in the pan for about 10 minutes before transferring it to a wire rack. This helps prevent it from breaking apart. Cooling completely before slicing is also important for the best texture.
By following these cooking notes, you’ll be well on your way to creating a delicious matcha pound cake that everyone will love. Happy baking!
Serving Suggestions for Matcha Pound Cake Recipe
Pairing with Tea or Coffee
One of the best ways to enjoy your matcha pound cake is by pairing it with a warm cup of tea or coffee. The earthy flavor of matcha complements the rich notes of coffee beautifully. A light green tea, like jasmine or sencha, can enhance the matcha experience, creating a harmonious blend of flavors. If you prefer coffee, a smooth latte or cappuccino works wonders. The creaminess of the milk in these drinks balances the cake’s sweetness, making each bite even more delightful. So, brew your favorite beverage and savor the moment with a slice of matcha pound cake!
Serving with Fresh Fruits
Fresh fruits are another fantastic way to elevate your matcha pound cake. Slices of strawberries, blueberries, or raspberries add a burst of color and freshness. The natural sweetness and acidity of the fruits contrast nicely with the dense, buttery cake. You can serve the fruits on the side or even top the cake with them for a beautiful presentation. For an extra touch, consider drizzling a bit of honey or a light glaze over the fruits. This not only enhances the flavor but also makes your dessert look stunning. Enjoying matcha pound cake with fresh fruits is a delightful way to celebrate the flavors of the season!
Tips for Perfecting Your Matcha Pound Cake Recipe
Choosing the Right Matcha
When it comes to making a delicious matcha pound cake, the quality of your matcha green tea powder is essential. Not all matcha is created equal, and choosing the right one can make a big difference in flavor and color. Here are some tips to help you select the best matcha:
Look for Culinary Grade Matcha: For baking, culinary grade matcha is perfect. It’s less expensive than ceremonial grade but still offers great flavor and color.
Check the Color: High-quality matcha should have a vibrant green color. Dull or yellowish matcha may indicate lower quality.
Smell the Matcha: Fresh matcha has a sweet, grassy aroma. If it smells stale or bitter, it’s best to choose another brand.
Read Reviews: Before purchasing, check online reviews or ask friends for recommendations. This can help you find a reliable brand.
By choosing the right matcha, you’ll enhance the flavor and appearance of your matcha pound cake, making it even more enjoyable for everyone!
Storage Tips
To keep your matcha pound cake fresh and delicious, proper storage is key. Here are some helpful tips:
Cool Completely: Always allow your cake to cool completely before storing it. This prevents moisture buildup, which can make the cake soggy.
Wrap It Up: Use plastic wrap or aluminum foil to tightly wrap the cake. This helps keep it moist and prevents it from absorbing odors from the fridge.
Store in an Airtight Container: If you prefer, you can place the wrapped cake in an airtight container. This adds an extra layer of protection against air exposure.
Refrigerate or Freeze: For longer storage, you can refrigerate the cake for up to a week. If you want to keep it for a longer time, consider freezing it. Just make sure to wrap it well to prevent freezer burn.
Following these storage tips will help maintain the deliciousness of your matcha pound cake, allowing you to enjoy it for days to come!
Breakdown of Time for Matcha Pound Cake Recipe
Prep Time
Preparing your matcha pound cake is a breeze! The prep time typically takes about 20-30 minutes. This includes gathering your ingredients, measuring them out, and mixing everything together. Make sure to take your time during this stage to ensure everything is well-prepared. A little extra care now will lead to a delicious cake later!
Cooking Time
Once your batter is ready, it’s time to bake! The cooking time for your matcha pound cake is approximately 60-70 minutes. Keep an eye on it as it bakes, and remember to check for doneness with a toothpick. If it comes out clean, your cake is ready to be enjoyed!
Total Time
In total, you can expect to spend about 80-100 minutes from start to finish. This includes both prep and cooking time. Once your cake is baked, don’t forget to allow it to cool for about 10 minutes in the pan before transferring it to a wire rack. After that, let it cool completely before slicing. The wait will be worth it when you take that first delicious bite of your matcha pound cake!
Nutritional Information for Matcha Pound Cake Recipe
Calories
When enjoying a slice of matcha pound cake, it’s good to know what you’re consuming. Each serving contains approximately 250 calories. This makes it a delightful treat that can fit into a balanced diet. While it’s not a low-calorie dessert, the unique flavors and health benefits of matcha make it a worthwhile indulgence. Remember, moderation is key, and savoring each bite can make your experience even more enjoyable!
Protein
In terms of protein, each slice of matcha pound cake provides about 4 grams. While this isn’t a high-protein dessert, it does contribute to your daily intake. The eggs and butter in the recipe help provide this protein content. Pairing your cake with a protein-rich beverage, like a glass of milk or a protein shake, can enhance your overall nutrition while enjoying this delicious treat.
Sodium
For those watching their sodium intake, each serving of matcha pound cake contains around 150 milligrams of sodium. This is a moderate amount, especially considering that most people consume much more sodium in their daily diets. The salt in the recipe helps to enhance the flavors of the cake without making it overly salty. If you’re concerned about sodium, you can always adjust the amount of salt used in the recipe to suit your dietary needs.
FAQs about Matcha Pound Cake Recipe
Can I use regular green tea instead of matcha?
While you might be tempted to use regular green tea, it’s not a great substitute for matcha in this recipe. Matcha is finely ground and has a unique flavor that regular green tea lacks. Using matcha gives your pound cake its vibrant color and distinct taste. If you want that rich matcha experience, stick with matcha green tea powder for the best results!
How do I store leftover matcha pound cake?
Storing your leftover matcha pound cake is easy! First, make sure it’s completely cooled. Then, wrap it tightly in plastic wrap or aluminum foil. This helps keep it fresh and moist. You can also place it in an airtight container for extra protection. If you want to keep it longer, consider refrigerating it for up to a week or freezing it for a few months. Just remember to thaw it in the fridge before enjoying it again!
Can I make this recipe gluten-free?
Yes, you can make a gluten-free version of matcha pound cake! To do this, simply substitute the all-purpose flour with a gluten-free flour blend. Make sure the blend you choose is suitable for baking. You might also want to add a bit of xanthan gum to help with the texture. This way, you can enjoy a delicious matcha pound cake without gluten!
What can I substitute for butter in the matcha pound cake recipe?
If you need a butter substitute, there are several options! You can use coconut oil, which adds a subtle flavor and keeps the cake moist. Another option is unsweetened applesauce, which can make the cake lighter. If you prefer a dairy-free option, try using a plant-based butter or margarine. Just remember that each substitute may slightly change the flavor and texture of your cake, so choose one that fits your taste!
Conclusion on Matcha Pound Cake Recipe
In conclusion, the matcha pound cake recipe is a delightful way to enjoy the unique flavors of matcha while indulging in a classic dessert. This cake is not only visually appealing with its vibrant green hue, but it also offers a rich, buttery taste that is sure to please anyone who takes a bite. Whether you’re baking for a special occasion or simply treating yourself, this recipe is easy to follow and yields delicious results.
By incorporating matcha, you’re not just adding flavor; you’re also introducing a host of health benefits. The antioxidants found in matcha can help boost your energy and improve your overall well-being. Plus, with the option to customize your cake with citrus zest or nuts, you can make it your own. Each variation adds a personal touch, making it a versatile dessert for any palate.
As you embark on your baking journey, remember the tips and tricks shared throughout this article. From choosing the right matcha to proper storage methods, these insights will help you create the perfect matcha pound cake every time. So, gather your ingredients, preheat that oven, and get ready to enjoy a slice of this delightful treat. Happy baking!
Paul
Matcha Green Tea Pound Cake is a must-try dessert!
Earthy, elegant, and irresistibly moist—this Matcha Pound Cake is a tea-lover’s dream. Made with premium green tea powder and rich butter, it delivers a tender crumb, balanced sweetness, and a stunning natural hue in every slice. Perfect for pairing with a cup of green tea or gifting as a refined treat.
Preheat oven to 150°C (300°F). Line a 9×5-inch loaf pan with parchment paper and set aside.
In a small bowl, whisk together the eggs, milk, and vanilla extract until well combined.
In a large mixing bowl, sift the cake flour, matcha powder, salt, and baking powder. Add the sugar and whisk until evenly combined.
Add the softened butter to the flour mixture and beat with a paddle attachment or hand mixer until the mixture becomes light and fluffy. Scrape the bowl to ensure everything is incorporated.
Slowly add the egg mixture in three separate additions, mixing on low speed and scraping the bowl between each. Mix just until smooth.
Pour the batter into the prepared loaf pan and smooth the top.
Bake for 60 to 65 minutes, or until a toothpick inserted into the center comes out clean.
Let the cake cool in the pan for 10 minutes before transferring to a wire rack to cool completely.
Notes
Use high-quality matcha for vibrant color and flavor—ceremonial or premium culinary grade is best.
For a more intense matcha flavor, replace 1 teaspoon of flour with an additional teaspoon of matcha powder.
This pound cake can be stored at room temperature for 2–3 days or wrapped and frozen for up to 2 months.
Serve plain or with a dusting of powdered sugar, white chocolate glaze, or whipped cream.
Crispy shrimp balls are delightful bite-sized treats made from fresh shrimp and a mix of flavorful ingredients. These savory morsels are typically deep-fried until golden brown, creating a crunchy exterior that perfectly contrasts with the tender shrimp inside. The combination of herbs, spices, and seasonings adds a burst of flavor, making them a popular choice for appetizers or snacks. Whether served at a party or enjoyed as a family meal, crispy shrimp balls are sure to impress everyone at the table.
Why You Should Try This Crispy Shrimp Balls Recipe
There are many reasons to try this crispy shrimp balls recipe. First, it’s simple and quick to prepare, making it perfect for both novice cooks and seasoned chefs. The ingredients are easy to find, and the cooking process is straightforward. Plus, you can customize the recipe to suit your taste. Want a little heat? Add more red pepper flakes! Prefer a milder flavor? Skip the spice altogether. This flexibility allows you to create a dish that everyone will love.
Moreover, crispy shrimp balls are not just delicious; they are also nutritious. Packed with protein and low in carbs, they make a satisfying snack without the guilt. You can even bake them for a healthier option, which still delivers on taste. So, gather your ingredients and get ready to enjoy a delightful culinary experience with this crispy shrimp balls recipe!
Ingredients for Crispy Shrimp Balls Recipe
To create the perfect crispy shrimp balls, you’ll need a selection of fresh ingredients that come together to form a delicious treat. Here’s what you’ll need:
1 pound raw shrimp: Make sure they are peeled and deveined for the best texture.
1 cup breadcrumbs: This will give your shrimp balls that delightful crunch.
1/2 cup green onions: Finely chopped, these add a fresh flavor.
1/4 cup fresh cilantro: Chopped, for a burst of herbal goodness.
2 cloves garlic: Minced, to enhance the overall taste.
1 teaspoon ginger: Grated, for a hint of warmth and spice.
1 teaspoon salt: To season the mixture perfectly.
1/2 teaspoon black pepper: For a touch of mild heat.
1/2 teaspoon red pepper flakes: Optional, for those who enjoy a spicy kick.
1 large egg: This helps bind the ingredients together.
Vegetable oil: For frying, ensuring your shrimp balls are crispy and golden.
These ingredients come together to create a delightful flavor profile that is both savory and satisfying. Feel free to adjust the quantities based on your preferences. For instance, if you love cilantro, add a bit more! The beauty of this crispy shrimp balls recipe lies in its versatility.
Step-by-Step Preparation of Crispy Shrimp Balls Recipe
Step 1: Preparing the Shrimp
To start, you need to prepare the shrimp. First, ensure that your shrimp are raw, peeled, and deveined. This step is crucial for achieving the best texture. If you have whole shrimp, simply remove the shells and tails. Then, rinse them under cold water to clean. Pat them dry with a paper towel. This will help the mixture stick together better later on. Once your shrimp are ready, you can move on to the next step!
Step 2: Mixing the Ingredients
Now it’s time to mix everything together! In a food processor, combine the prepared shrimp, breadcrumbs, green onions, cilantro, garlic, ginger, salt, black pepper, and red pepper flakes if you’re using them. Pulse the mixture until it’s well combined but still slightly chunky. This texture is important for the final product. You want to maintain some shrimp pieces for that delightful bite. Once mixed, transfer the mixture to a bowl.
Step 3: Forming the Balls
After mixing, it’s time to form the shrimp balls. Add the large egg to the shrimp mixture and stir until fully incorporated. This will help bind the ingredients together. Now, using your hands, take a small amount of the mixture and roll it into a ball about 1 inch in diameter. Make sure to pack it tightly so they hold their shape while cooking. Repeat this process until all the mixture is used up. You should have a nice batch of shrimp balls ready for frying!
Step 4: Coating the Shrimp Balls
While not necessary, you can add an extra layer of crunch by coating the shrimp balls. To do this, simply roll each ball in additional breadcrumbs before frying. This step will give your crispy shrimp balls an even crunchier exterior. If you prefer a lighter version, you can skip this step. Either way, your shrimp balls will still be delicious!
Step 5: Frying the Shrimp Balls
Now comes the exciting part—frying! Heat about 2 inches of vegetable oil in a deep pot over medium heat. You want the oil to reach 350°F for the best frying results. Carefully drop the shrimp balls into the hot oil in batches. Fry them for about 3-4 minutes or until they turn golden brown and are cooked through. Use a slotted spoon to remove the shrimp balls from the oil and drain them on paper towels. This will help absorb any excess oil, keeping your shrimp balls crispy and light!
Variations of Crispy Shrimp Balls Recipe
Spicy Crispy Shrimp Balls
If you love a little heat, then spicy crispy shrimp balls are the perfect variation for you! To make them, simply increase the amount of red pepper flakes in the original recipe. You can also add a dash of hot sauce or a teaspoon of sriracha to the mixture for an extra kick. Another great option is to include finely chopped jalapeños or other hot peppers. This will not only enhance the flavor but also add a delightful crunch. Serve these spicy shrimp balls with a cooling dipping sauce, like ranch or yogurt-based sauce, to balance the heat. Your guests will love the fiery twist!
Baked Crispy Shrimp Balls
For a healthier alternative, try baking your crispy shrimp balls instead of frying them. Preheat your oven to 400°F. After forming the shrimp balls, place them on a baking sheet lined with parchment paper. Lightly spray or brush them with vegetable oil to help them crisp up in the oven. Bake for about 20-25 minutes, flipping them halfway through to ensure even cooking. The result will be deliciously crispy shrimp balls with less oil. This baked version is perfect for those who want to enjoy the same great taste while keeping it lighter. Pair them with a zesty dipping sauce for a delightful snack!
Cooking Note for Crispy Shrimp Balls Recipe
When preparing crispy shrimp balls, there are a few important cooking notes to keep in mind. First, ensure that your oil is at the right temperature before frying. If the oil is too hot, the outside will burn while the inside remains raw. Conversely, if the oil is not hot enough, the shrimp balls will absorb too much oil and become greasy. A thermometer can be a handy tool to achieve the perfect frying temperature of 350°F.
Additionally, avoid overcrowding the pot when frying. Frying too many shrimp balls at once can lower the oil temperature, leading to uneven cooking. Instead, fry them in small batches. This will help maintain that crispy texture you desire.
Another tip is to let the shrimp balls rest on paper towels after frying. This step is crucial as it allows excess oil to drain off, keeping your shrimp balls light and crispy. If you want to keep them warm while frying the remaining batches, place them on a baking sheet in a low oven (around 200°F) until ready to serve.
Lastly, feel free to experiment with different herbs and spices in your shrimp mixture. Adding a pinch of lime zest or a splash of soy sauce can elevate the flavor profile. Cooking is all about creativity, so don’t hesitate to make this crispy shrimp balls recipe your own!
Serving Suggestions for Crispy Shrimp Balls Recipe
Once your crispy shrimp balls are perfectly cooked, it’s time to think about how to serve them. These delightful bites are versatile and can be enjoyed in many ways. Here are some serving suggestions to elevate your dining experience:
With Dipping Sauces: One of the best ways to enjoy crispy shrimp balls is with a variety of dipping sauces. Consider serving them with sweet chili sauce for a touch of sweetness, or a tangy soy sauce for a savory kick. You can also try a creamy garlic aioli or a zesty lemon herb sauce to complement the flavors.
As an Appetizer: Serve crispy shrimp balls as a starter at your next gathering. Arrange them on a platter with toothpicks for easy serving. This makes them perfect for parties, game days, or family gatherings. Guests will love grabbing these tasty bites!
On a Salad: For a lighter meal, place crispy shrimp balls on a bed of mixed greens. Add some sliced cucumbers, cherry tomatoes, and avocado for a refreshing salad. Drizzle with a light vinaigrette or your favorite dressing to enhance the flavors.
In a Wrap: Create a delicious wrap by placing crispy shrimp balls in a tortilla with fresh veggies, like lettuce, carrots, and bell peppers. Add a drizzle of sauce or a spread of hummus for extra flavor. This makes for a fun and filling lunch option!
With Rice or Noodles: Pair crispy shrimp balls with steamed rice or noodles for a complete meal. You can toss them in a stir-fry with vegetables and a savory sauce for a delightful dish that’s both satisfying and nutritious.
These serving suggestions not only enhance the flavor of your crispy shrimp balls but also make them a versatile dish suitable for any occasion. Whether you’re hosting a party or enjoying a quiet dinner at home, these ideas will surely impress your family and friends!
Tips for Perfect Crispy Shrimp Balls Recipe
Creating the perfect crispy shrimp balls requires a few handy tips to ensure they turn out delicious every time. Here are some essential tips to help you achieve that ideal texture and flavor:
Use Fresh Shrimp: Always opt for fresh shrimp when making this recipe. Fresh shrimp not only taste better but also provide a firmer texture. If using frozen shrimp, make sure to thaw them completely and pat them dry before mixing.
Don’t Overmix: When combining the ingredients in the food processor, be careful not to overmix. You want the mixture to be well combined but still slightly chunky. This will give your shrimp balls a nice bite and prevent them from becoming mushy.
Chill the Mixture: After mixing, refrigerate the shrimp mixture for at least 30 minutes. Chilling helps the mixture firm up, making it easier to shape into balls. It also helps the flavors meld together, enhancing the overall taste.
Check Oil Temperature: Use a thermometer to ensure your oil is at the right temperature (350°F) before frying. This is crucial for achieving that crispy exterior. If you don’t have a thermometer, you can test the oil by dropping a small piece of the mixture in; if it sizzles and rises to the surface, the oil is ready.
Fry in Batches: Avoid overcrowding the pot when frying. Frying too many shrimp balls at once can lower the oil temperature, resulting in greasy balls. Fry them in small batches to maintain that perfect crispiness.
Drain Properly: After frying, let the shrimp balls drain on paper towels. This step is essential to remove excess oil, keeping your shrimp balls light and crispy. If you want to keep them warm, place them in a low oven while you finish frying the rest.
Experiment with Flavors: Don’t hesitate to get creative! Add different herbs, spices, or even a splash of citrus juice to the mixture. This can elevate the flavor profile and make your crispy shrimp balls unique.
Serve Immediately: For the best taste and texture, serve your crispy shrimp balls right after frying. They are at their crispiest when fresh out of the oil. If you need to prepare them in advance, consider baking them instead for a healthier option.
By following these tips, you’ll be well on your way to making perfect crispy shrimp balls that are sure to impress your family and friends. Enjoy the process and happy cooking!
Breakdown of Time for Crispy Shrimp Balls Recipe
Prep Time
The prep time for this crispy shrimp balls recipe is approximately 15-20 minutes. This includes gathering your ingredients, preparing the shrimp, and mixing everything together. If you choose to chill the mixture for better texture, add an additional 30 minutes to this time. This step is essential for achieving the perfect consistency when forming the balls.
Cooking Time
Once your shrimp mixture is ready, the cooking time will take about 10-15 minutes. This includes heating the oil and frying the shrimp balls in batches. Each batch will take around 3-4 minutes to cook until they are golden brown and crispy. Remember, frying in small batches helps maintain the oil temperature, ensuring even cooking.
Total Time
In total, you can expect the entire process to take about 55-65 minutes, including prep and cooking time. If you include the chilling time, the total will be around 1 hour and 25 minutes. This makes it a quick and enjoyable recipe to prepare, perfect for a weeknight dinner or a fun gathering with friends and family!
Nutritional Information for Crispy Shrimp Balls Recipe
Calories
Each serving of crispy shrimp balls contains approximately 250 calories. This makes them a satisfying snack or appetizer without being overly heavy. The balance of protein and healthy fats contributes to the overall calorie count, allowing you to enjoy these delicious bites without guilt. If you’re watching your calorie intake, consider serving smaller portions or pairing them with a light salad.
Protein
One of the standout features of this crispy shrimp balls recipe is its protein content. Each serving provides around 20 grams of protein. This high protein content is beneficial for muscle repair and growth, making these shrimp balls a great option for those looking to maintain a healthy diet. The shrimp itself is a lean source of protein, which helps keep you feeling full and satisfied.
Sodium
In terms of sodium, each serving contains approximately 600 milligrams. This amount is relatively moderate, but it’s essential to be mindful if you are on a low-sodium diet. You can reduce the sodium content by using low-sodium soy sauce or omitting added salt in the recipe. Additionally, fresh herbs and spices can enhance flavor without the need for extra salt, making your crispy shrimp balls both tasty and healthier.
FAQs About Crispy Shrimp Balls Recipe
Can I use frozen shrimp for this recipe?
Yes, you can use frozen shrimp for this crispy shrimp balls recipe! Just make sure to thaw them completely before using. To do this, place the frozen shrimp in the refrigerator overnight or run them under cold water for a quicker thaw. After thawing, be sure to pat them dry with a paper towel. This step is important as it helps the mixture hold together better. Using frozen shrimp can be a convenient option, especially if fresh shrimp are not available.
How do I store leftover crispy shrimp balls?
If you have any leftover crispy shrimp balls, store them in an airtight container in the refrigerator. They can last for up to 2 days. To keep them crispy, avoid stacking them on top of each other. Instead, place a layer of paper towels between layers to absorb moisture. When you’re ready to enjoy them again, reheat in the oven at 350°F for about 10 minutes. This will help restore their crispiness. Avoid microwaving, as this can make them soggy.
What dipping sauces pair well with crispy shrimp balls?
Crispy shrimp balls are delicious on their own, but they taste even better with dipping sauces! Here are some great options:
Sweet Chili Sauce: This sauce adds a sweet and spicy kick that complements the shrimp perfectly.
Garlic Aioli: A creamy garlic aioli provides a rich flavor that pairs well with the crispy texture.
Soy Sauce: A classic choice, soy sauce adds a savory touch that enhances the shrimp’s natural flavor.
Spicy Mayo: Mix mayonnaise with sriracha for a creamy and spicy dip that your guests will love.
Lemon Herb Sauce: A zesty lemon herb sauce can brighten up the dish and add freshness.
Feel free to mix and match these sauces to find your favorite combination!
Can I make crispy shrimp balls in advance?
Yes, you can prepare crispy shrimp balls in advance! To do this, follow the recipe up to the frying step. Once you’ve formed the balls, place them on a baking sheet lined with parchment paper and freeze them for about 1-2 hours. Once frozen, transfer the shrimp balls to an airtight container or freezer bag. They can be stored in the freezer for up to 2 months. When you’re ready to cook them, simply fry them straight from the freezer, adding a minute or two to the cooking time. This way, you can enjoy fresh crispy shrimp balls whenever you want!
Conclusion on Crispy Shrimp Balls Recipe
In conclusion, the crispy shrimp balls recipe is a delightful addition to any meal or gathering. With its simple preparation and delicious flavor, it’s no wonder this dish has become a favorite among many. The combination of fresh shrimp, herbs, and spices creates a mouthwatering treat that is both satisfying and nutritious.
Whether you choose to fry or bake them, these shrimp balls offer versatility that can cater to various tastes and dietary preferences. You can easily adjust the spice level or even substitute shrimp with other seafood, making it a customizable dish for everyone to enjoy. Plus, serving them with a variety of dipping sauces adds an extra layer of fun and flavor.
As you embark on your culinary journey with this crispy shrimp balls recipe, remember to embrace creativity. Experiment with different ingredients and flavors to make this dish your own. With a little practice, you’ll master the art of making crispy shrimp balls that will impress your family and friends.
So, gather your ingredients, follow the steps, and enjoy the delightful experience of cooking and sharing these crispy shrimp balls. They are sure to become a beloved staple in your kitchen, perfect for any occasion. Happy cooking!
Paul
Crispy Shrimp Balls Recipe: A Delicious Snack Idea!
Crispy on the outside, juicy and savory on the inside—these Golden Shrimp Balls are the ultimate bite-sized seafood snack. Infused with garlic, ginger, and a touch of sesame, they’re quick to make and even quicker to disappear. Serve them as a party appetizer or weeknight treat with your favorite dipping sauce.
Roughly chop the shrimp with a knife or pulse in a food processor until finely minced but not pasty.
In a large bowl, combine the chopped shrimp with breadcrumbs, egg, green onions, garlic, ginger, soy sauce, sesame oil, salt, and pepper. Mix well.
If the mixture feels too wet, stir in cornstarch to help bind.
With slightly wet hands, shape the mixture into 1 to 1.5-inch balls. You should get around 20 to 25 balls.
Heat about ½ inch of vegetable oil in a skillet over medium-high heat. Once hot, fry the shrimp balls in batches for 3–4 minutes per side until golden brown and cooked through.
Remove and place on a paper towel-lined plate to drain excess oil.
Garnish with cilantro or sesame seeds if desired. Serve hot with dipping sauces like sweet chili sauce, soy sauce, or lemon garlic aioli.
Notes
Do not overprocess the shrimp if using a food processor—texture is key!
These shrimp balls can also be baked at 400°F (200°C) for 12–15 minutes, flipping halfway through, for a lighter option.
To freeze, shape the raw shrimp balls and freeze on a tray before transferring to a freezer bag. Cook from frozen by adding a few extra minutes to the cooking time.
Great for party platters, bento boxes, or as a main dish with steamed rice and vegetables.
Crispy Air Fryer Salmon Recipe is here to save the day. This recipe not only delivers a delightful crunch but also keeps the salmon moist and flavorful. With just a few simple ingredients, you can whip up a meal that impresses your family and friends.
Why Choose Air Fryer for Salmon?
Using an air fryer for salmon is a game-changer. First, it cooks the fish evenly, ensuring that every bite is tender and juicy. Second, the air fryer circulates hot air around the salmon, creating a crispy exterior without the need for excessive oil. This method is healthier than traditional frying, making it a great choice for those who want to enjoy delicious food without the guilt.
Moreover, air fryers are incredibly convenient. They preheat quickly and cook faster than conventional ovens. This means you can have a tasty dinner on the table in no time. Plus, cleanup is a breeze! Most air fryer baskets are non-stick and dishwasher safe, making post-meal chores less of a hassle.
Benefits of the Crispy Air Fryer Salmon Recipe
Crispy Air Fryer Salmon Recipe offers numerous benefits. First and foremost, it’s packed with protein, making it a perfect choice for a healthy diet. Each serving contains about 34 grams of protein, which is essential for muscle repair and growth.
Additionally, this recipe is low in carbohydrates, making it suitable for various dietary preferences, including keto and paleo diets. The use of fresh ingredients, like lemon and herbs, adds flavor without unnecessary calories. You can also customize the seasoning to suit your taste, making it versatile for any palate.
Finally, this recipe is perfect for busy weeknights or special occasions. It’s quick, easy, and sure to impress. So, let’s dive into the ingredients and get started on this delightful dish!
Ingredients for the Crispy Air Fryer Salmon Recipe
Crispy Air Fryer Salmon Recipe, you will need a few simple ingredients. These items are easy to find and will help you achieve that perfect crispy texture while keeping the salmon moist and flavorful. Here’s what you’ll need:
1 pound salmon fillets (skin-on or skinless)
2 tablespoons olive oil
1 teaspoon garlic powder
1 teaspoon paprika
1 teaspoon dried oregano
1 teaspoon salt
½ teaspoon black pepper
1 lemon, sliced
These ingredients come together to create a deliciously seasoned salmon that is sure to please everyone at the table. The olive oil helps the spices stick to the fish while also adding healthy fats. Garlic powder and paprika provide a wonderful flavor, while oregano adds a hint of earthiness. The salt and pepper enhance the overall taste, and the lemon slices add a refreshing touch.
Feel free to adjust the quantities based on your preferences. If you love garlic, add a bit more garlic powder. If you prefer a spicier kick, consider adding a pinch of cayenne pepper. The beauty of this recipe lies in its flexibility, allowing you to make it your own!
Step-by-Step Preparation of the Crispy Air Fryer Salmon Recipe
Crispy Air Fryer Salmon Recipe. Follow these simple steps to ensure your salmon turns out perfectly every time. Let’s get started!
Step 1: Preparing the Salmon
First, take your salmon fillets out of the packaging. If they are frozen, make sure to thaw them completely. Pat the salmon dry with paper towels. This step is crucial because removing excess moisture helps achieve that crispy texture. If you’re using skin-on fillets, place them skin side down on your work surface. This will help the skin crisp up nicely during cooking.
Step 2: Seasoning the Salmon
Next, it’s time to season your salmon. In a small bowl, mix together the olive oil, garlic powder, paprika, oregano, salt, and black pepper. Use a brush or your hands to evenly coat the salmon fillets with this flavorful mixture. Make sure to cover all sides, as this will enhance the taste. If you want to add a touch of sweetness, consider drizzling a little honey or maple syrup over the fillets at this stage.
Step 3: Preheating the Air Fryer
Before cooking, preheat your air fryer to 400°F. Preheating is essential as it helps the salmon cook evenly and achieve that desired crispiness. Most air fryers heat up quickly, so this step won’t take long. While the air fryer is preheating, you can prepare the lemon slices to place on top of the salmon.
Step 4: Cooking the Salmon
Once the air fryer is ready, place the seasoned salmon fillets in the basket. If your fillets have skin, make sure they are skin side down. Arrange the lemon slices on top of the salmon for added flavor. Cook the salmon for 8-10 minutes, depending on the thickness of the fillets. For extra crispiness, you can cook for an additional 1-2 minutes. Keep an eye on it to avoid overcooking.
Step 5: Checking for Doneness
After the cooking time is up, it’s time to check if your salmon is done. The fish should flake easily with a fork and have an internal temperature of 145°F. If it’s not quite there, you can return it to the air fryer for another minute or two. Once cooked, let the salmon rest for a few minutes before serving. This allows the juices to redistribute, making it even more delicious!
Now that you’ve prepared your crispy air fryer salmon, you’re ready to enjoy a delightful meal. Let’s explore some variations and serving suggestions to elevate your dining experience!
Variations of the Crispy Air Fryer Salmon Recipe
Crispy Air Fryer Salmon Recipe is not only delicious but also versatile. You can easily switch up the flavors to keep things exciting. Here are some variations to consider that will enhance your salmon experience.
Different Seasoning Options
One of the best things about cooking salmon is the variety of seasonings you can use. If you want to try something different, consider these options:
Lemon Dill: Replace the oregano with fresh or dried dill. Add lemon zest for an extra citrusy kick.
Spicy Cajun: Use Cajun seasoning instead of the garlic powder and paprika. This will give your salmon a nice heat.
Asian-Inspired: Swap the olive oil for sesame oil and add soy sauce, ginger, and green onions for a unique twist.
Herb Blend: Mix in fresh herbs like parsley, thyme, or basil for a garden-fresh flavor.
Feel free to experiment with different spices and herbs. The key is to find combinations that you enjoy. Each variation can bring a new taste to your crispy salmon!
Cooking with Marinades
Marinating your salmon before cooking can add depth to the flavor. Here are a couple of easy marinade ideas:
Honey Soy Marinade: Combine 2 tablespoons of soy sauce, 1 tablespoon of honey, and 1 teaspoon of minced garlic. Marinate the salmon for 30 minutes before cooking.
Mustard Maple Marinade: Mix 2 tablespoons of Dijon mustard with 1 tablespoon of maple syrup. Let the salmon soak in this mixture for about 20 minutes.
After marinating, simply follow the same cooking steps as before. The result will be a flavorful, crispy salmon that’s sure to impress!
Crispy Air Fryer Salmon Recipe in many delightful ways. Now, let’s move on to some cooking notes to ensure your salmon turns out perfectly every time.
Cooking Note for the Crispy Air Fryer Salmon Recipe
Crispy Air Fryer Salmon Recipe, a few cooking notes can help you achieve the best results. These tips will ensure that your salmon is not only delicious but also cooked to perfection.
First, always choose fresh salmon when possible. Fresh fish has a better flavor and texture compared to frozen options. If you do use frozen salmon, make sure to thaw it completely before cooking. This will help it cook evenly and prevent any rubbery texture.
Next, consider the thickness of your salmon fillets. Thicker fillets will require a longer cooking time, while thinner ones will cook faster. If you’re unsure, it’s always a good idea to check the internal temperature. Salmon should reach an internal temperature of 145°F to be safe for consumption.
Another important note is to avoid overcrowding the air fryer basket. If you place too many fillets at once, they may not cook evenly. Instead, cook in batches if necessary. This will allow the hot air to circulate properly, giving you that crispy exterior you desire.
Lastly, let your salmon rest for a few minutes after cooking. This resting period allows the juices to redistribute throughout the fish, making it more flavorful and moist. Trust us, this small step can make a big difference in your final dish!
Crispy Air Fryer Salmon Recipe. Now, let’s explore some serving suggestions to complement your delicious salmon dish!
Serving Suggestions for the Crispy Air Fryer Salmon Recipe
Crispy Air Fryer Salmon Recipe, it’s time to think about how to serve it. Pairing your salmon with the right side dishes and sauces can elevate your meal to a whole new level. Here are some delightful suggestions to consider!
Pairing with Side Dishes
Choosing the right side dishes can enhance the flavors of your salmon. Here are some tasty options:
Roasted Vegetables: A mix of seasonal vegetables like asparagus, broccoli, or bell peppers roasted in the air fryer complements the salmon beautifully. The slight char adds a wonderful flavor.
Quinoa Salad: A light quinoa salad with cherry tomatoes, cucumber, and a lemon vinaigrette pairs well with the richness of the salmon.
Garlic Mashed Potatoes: Creamy mashed potatoes with a hint of garlic provide a comforting side that balances the crispy salmon.
Steamed Rice: Fluffy white or brown rice can soak up the juices from the salmon, making each bite delicious.
Feel free to mix and match these sides based on your preferences. The goal is to create a balanced plate that complements the flavors of the crispy salmon.
Serving with Sauces
Crispy Air Fryer Salmon Recipe to the next level. Here are some sauce ideas that pair perfectly:
Lemon Butter Sauce: A simple sauce made with melted butter, lemon juice, and fresh herbs adds a rich, zesty flavor to the salmon.
Tartar Sauce: A classic choice, tartar sauce provides a creamy and tangy contrast to the crispy fish.
Chimichurri: This vibrant sauce made with parsley, garlic, vinegar, and olive oil adds a fresh and zesty kick.
Honey Mustard Glaze: A mix of honey and Dijon mustard drizzled over the salmon can enhance its sweetness and flavor.
These sauces not only add flavor but also create a beautiful presentation. Choose one or two to serve alongside your salmon for a delightful dining experience.
Crispy Air Fryer Salmon Recipe will shine on the dinner table. Now, let’s move on to some tips for perfecting this delicious dish!
Tips for Perfecting the Crispy Air Fryer Salmon Recipe
Crispy Air Fryer Salmon Recipe, a few tips can help you achieve the best results. These insights will ensure that your salmon is not only delicious but also perfectly cooked every time. Let’s dive into some essential tips!
Choosing the Right Salmon
When it comes to salmon, quality matters. Opt for fresh, wild-caught salmon whenever possible. Wild salmon tends to have a richer flavor and firmer texture compared to farmed varieties. If you can’t find fresh salmon, frozen salmon is a good alternative. Just make sure to thaw it completely before cooking.
Look for fillets that are bright in color and have a moist appearance. Avoid any that look dull or have brown spots. If you’re unsure, ask your fishmonger for recommendations. They can guide you to the best options available.
Additionally, consider the cut of salmon. Salmon fillets come in various cuts, such as center-cut or tail-end. Center-cut fillets are thicker and cook more evenly, while tail-end pieces are thinner and may cook faster. Choose based on your preference and cooking time.
Ensuring Crispiness
Crispy Air Fryer Salmon Recipe. Here are some tips to ensure your salmon comes out crispy every time:
Pat Dry: Always pat your salmon dry with paper towels before seasoning. Removing excess moisture is crucial for crispiness.
Use Enough Oil: Don’t skimp on the olive oil. It helps the seasoning stick and promotes browning. A light brush or drizzle is all you need.
Preheat the Air Fryer: Preheating your air fryer is essential. It ensures that the salmon starts cooking immediately, helping to create that crispy texture.
Avoid Overcrowding: Cook in batches if necessary. Overcrowding the basket can trap steam and prevent the salmon from crisping up.
Check for Doneness: Keep an eye on the cooking time. If your salmon is thick, it may need a bit longer. For extra crispiness, you can add a minute or two to the cooking time.
Crispy Air Fryer Salmon Recipe. Now, let’s break down the time needed for this delicious dish!
Breakdown of Time for the Crispy Air Fryer Salmon Recipe
Crispy Air Fryer Salmon Recipe is essential for planning your meal. Here’s a simple breakdown of the time required for preparation and cooking. This will help you manage your kitchen time effectively and ensure that your salmon is ready to serve when you want it.
Prep Time
The prep time for this recipe is quite short. You’ll need about 10-15 minutes to gather your ingredients and prepare the salmon. This includes:
Thawing the salmon if it’s frozen.
Patting the salmon dry.
Mixing the seasoning and applying it to the fillets.
Prepping the lemon slices.
With everything ready, you’ll be set to move on to the cooking stage!
Cooking Time
Crispy Air Fryer Salmon Recipe is approximately 8-10 minutes. This can vary slightly based on the thickness of your salmon fillets. Here’s a quick overview:
Cook for 8-10 minutes at 400°F.
If you prefer extra crispiness, you can add an additional 1-2 minutes.
Always check for doneness to ensure your salmon is perfectly cooked.
Total Time
In total, you can expect the entire process to take about 20-25 minutes. This includes both prep and cooking time. Here’s a quick summary:
Prep Time: 10-15 minutes
Cooking Time: 8-10 minutes
Total Time: 20-25 minutes
Crispy Air Fryer Salmon Recipe an excellent choice for busy weeknights or when you want to impress guests without spending hours in the kitchen. Now that you know the timing, let’s dive into the nutritional information for this delightful dish!
Nutritional Information for the Crispy Air Fryer Salmon Recipe
Crispy Air Fryer Salmon Recipe is essential for those who are health-conscious or following specific dietary plans. This dish is not only delicious but also packed with nutrients that can benefit your overall health. Let’s break down the key nutritional components of this recipe.
Calories
Crispy Air Fryer Salmon Recipe contains approximately 320 calories. This makes it a satisfying yet light option for dinner. The calorie count is primarily derived from the healthy fats in the salmon and olive oil, which provide energy while also being beneficial for heart health.
Protein
One of the standout features of this recipe is its high protein content. Each serving offers about 34 grams of protein. Protein is essential for muscle repair, growth, and overall body function. Including salmon in your diet can help you meet your daily protein needs while enjoying a tasty meal.
Sodium
Crispy Air Fryer Salmon Recipe is around 500 milligrams per serving. This amount is reasonable, especially considering that salmon is naturally low in sodium. However, if you are watching your sodium intake, you can adjust the salt in the seasoning mix to suit your dietary needs. Using fresh herbs and spices can also enhance flavor without adding extra sodium.
Crispy Air Fryer Salmon Recipe is a nutritious choice that fits well into a balanced diet. With its combination of healthy fats, high protein, and moderate calorie content, it’s a meal you can feel good about serving to your family and friends. Now, let’s address some frequently asked questions about this delightful dish!
FAQs about the Crispy Air Fryer Salmon Recipe
How do I know when the salmon is done?
Knowing when your salmon is perfectly cooked is essential for a delicious meal. The best way to check is by using a fork. Gently flake the salmon with a fork; if it flakes easily, it’s done! Additionally, the internal temperature should reach 145°F. If you don’t have a thermometer, just keep an eye on the color. Cooked salmon will change from a translucent pink to a more opaque color. If it still looks raw in the center, give it another minute or two in the air fryer.
Can I use frozen salmon for this recipe?
Crispy Air Fryer Salmon Recipe. However, it’s important to thaw it completely before cooking. You can do this by placing the salmon in the refrigerator overnight or using the defrost setting on your microwave. Once thawed, pat it dry and follow the recipe as usual. Just remember that cooking times may vary slightly, so keep an eye on it to ensure it cooks evenly.
What can I serve with crispy air fryer salmon?
Crispy Air Fryer Salmon. Consider pairing it with roasted vegetables, a light quinoa salad, or creamy garlic mashed potatoes. Steamed rice or a fresh green salad also make great accompaniments. The key is to choose sides that complement the flavors of the salmon while providing a balanced meal. Feel free to mix and match based on your preferences!
How do I store leftovers of the crispy air fryer salmon?
Crispy Air Fryer Salmon Recipe, storing them properly is important to maintain freshness. Allow the salmon to cool completely, then place it in an airtight container. You can store it in the refrigerator for up to 3 days. If you want to keep it longer, consider freezing it. Wrap the salmon tightly in plastic wrap and then place it in a freezer-safe bag. It can last up to 3 months in the freezer. When ready to eat, thaw it in the refrigerator overnight and reheat in the air fryer for a few minutes to regain that crispy texture.
Conclusion on the Crispy Air Fryer Salmon Recipe
Crispy Air Fryer Salmon Recipe is a fantastic way to enjoy a healthy and delicious meal without spending hours in the kitchen. With its simple ingredients and quick cooking time, this recipe is perfect for busy weeknights or special occasions. The air fryer not only ensures a crispy exterior but also keeps the salmon moist and flavorful, making it a favorite among seafood lovers.
By following the steps outlined in this article, you can create a dish that is not only nutritious but also packed with flavor. The versatility of this recipe allows you to experiment with different seasonings and marinades, ensuring that you never get bored. Whether you choose to serve it with roasted vegetables, a refreshing salad, or a zesty sauce, your crispy salmon will surely impress your family and friends.
Remember, the key to perfecting this dish lies in choosing high-quality salmon, ensuring proper seasoning, and monitoring the cooking time. With a little practice, you’ll master the art of making crispy air fryer salmon that is both satisfying and healthy.
Crispy Air Fryer Salmon Recipe brings to your table!
Paul
Crispy Air Fryer Salmon is a quick, tasty delight!
This golden-glazed salmon is a 15-minute flavor bomb. Sweet honey, tangy Dijon, and savory soy come together in an irresistibly sticky glaze that caramelizes beautifully in the air fryer. It’s healthy, fast, and packed with bold, satisfying flavor.
Slow Cooker Chicken Breasts with Gravy Recipe is a fantastic choice. This dish is not only simple to prepare, but it also fills your home with a warm, inviting aroma as it cooks. Imagine coming home after a long day to a tender, flavorful chicken dinner waiting for you!
This recipe is perfect for busy weeknights or lazy weekends. With just a few ingredients, you can create a hearty meal that is both satisfying and nutritious. The slow cooker does all the work, allowing you to spend more time with your loved ones. Plus, the gravy is rich and creamy, making it a delightful addition to the chicken.
Whether you’re a seasoned cook or a beginner in the kitchen, this recipe is easy to follow. You can customize it to suit your taste by adding your favorite vegetables or spices. So, grab your slow cooker and let’s dive into this mouthwatering recipe that will surely become a family favorite!
Ingredients for Slow Cooker Chicken Breasts with Gravy Recipe
Slow Cooker Chicken Breasts with Gravy Recipe, you’ll need a handful of simple ingredients. Each one plays a vital role in building flavor and ensuring your dish turns out delicious. Here’s what you’ll need:
These ingredients come together to create a savory gravy that perfectly complements the tender chicken. The optional ingredients, like mushrooms and onions, add extra depth and flavor. Feel free to mix and match based on your preferences. For instance, you can add carrots or bell peppers for a colorful twist!
Gather these ingredients, and you’re ready to start cooking. The next step is to prepare the chicken, which will set the stage for a delightful meal.
Step-by-Step Preparation of Slow Cooker Chicken Breasts with Gravy Recipe
Slow Cooker Chicken Breasts with Gravy Recipe. This process is straightforward and will guide you through each stage, ensuring a delicious outcome. Let’s get started!
Step 1: Preparing the Chicken
First, take your boneless, skinless chicken breasts and place them on a clean cutting board. Sprinkle salt, black pepper, garlic powder, and onion powder evenly on both sides. This seasoning will enhance the chicken’s flavor, making it more delicious. Once seasoned, set the chicken aside for a few minutes to let the flavors soak in.
Step 2: Making the Gravy Mixture
Next, grab a medium-sized bowl. In this bowl, combine the cream of chicken soup, chicken broth, and Worcestershire sauce. Stir the mixture well until it’s smooth and creamy. This gravy will be the star of the dish, adding richness to the chicken. If you want a thicker gravy, you can adjust the amount of chicken broth to your liking.
Step 3: Combining Ingredients in the Slow Cooker
Now, it’s time to bring everything together! If you’re using optional ingredients like sliced mushrooms and chopped onions, add them to the bottom of the slow cooker. Then, pour the gravy mixture over the vegetables. Finally, place the seasoned chicken breasts on top of the gravy. This layering helps the chicken absorb all the delicious flavors as it cooks.
Step 4: Cooking the Chicken Breasts
Cover the slow cooker with its lid and set it to cook. You can choose to cook on low for 6-7 hours or on high for 3-4 hours. The slow cooking process allows the chicken to become tender and juicy. As it cooks, the chicken will soak up the gravy, making it even more flavorful. It’s a great time to relax or tackle other tasks around the house!
Step 5: Shredding and Serving the Chicken
Once the cooking time is up, carefully remove the lid. The chicken should be cooked through and tender. Using two forks, shred the chicken right in the slow cooker. Mix it well with the gravy to ensure every bite is packed with flavor. Serve the chicken hot, and enjoy the delightful meal you’ve created!
Variations of Slow Cooker Chicken Breasts with Gravy Recipe
Slow Cooker Chicken Breasts with Gravy Recipe is versatile and can be customized to suit your taste. By adding different ingredients or flavors, you can create a unique dish every time. Let’s explore some exciting variations that will keep your meals fresh and delicious!
Adding Vegetables to the Slow Cooker
One of the easiest ways to enhance your slow cooker chicken is by adding vegetables. Not only do they add flavor, but they also boost the nutritional value of your meal. Here are some great options:
Carrots: Slice them into rounds or sticks. They add a natural sweetness and pair well with the gravy.
Bell Peppers: Chop them into bite-sized pieces. They bring a pop of color and a slight crunch.
Green Beans: Add fresh or frozen green beans for a crisp texture and vibrant color.
Potatoes: Cut them into cubes for a hearty addition. They soak up the gravy beautifully!
Feel free to mix and match these vegetables based on what you have on hand. Just remember to add them to the slow cooker before the chicken, so they cook evenly. This way, you’ll have a complete meal in one pot!
Different Gravy Flavors for Slow Cooker Chicken Breasts
If you want to switch up the flavor profile of your gravy, there are plenty of options to explore. Here are some ideas to inspire you:
Herb-Infused Gravy: Add dried herbs like thyme, rosemary, or oregano to the gravy mixture for a fragrant twist.
Spicy Gravy: Mix in a teaspoon of red pepper flakes or a dash of hot sauce for a kick of heat.
BBQ Gravy: Substitute some of the chicken broth with your favorite barbecue sauce for a smoky flavor.
Mushroom Gravy: Use cream of mushroom soup instead of cream of chicken for a rich, earthy taste.
Slow Cooker Chicken Breasts with Gravy Recipe feel new and exciting. Don’t hesitate to get creative and find the combinations that your family loves best!
Cooking Note for Slow Cooker Chicken Breasts with Gravy Recipe
Slow Cooker Chicken Breasts with Gravy Recipe, there are a few important cooking notes to keep in mind. These tips will help ensure that your dish turns out perfectly every time. Let’s take a closer look!
First, always use boneless, skinless chicken breasts for this recipe. They cook evenly and stay tender throughout the slow cooking process. If you prefer, you can also use chicken thighs, which are slightly richer in flavor and can add a different texture to the dish.
Next, searing the chicken before placing it in the slow cooker is a crucial step. This process locks in the juices and adds a beautiful golden color. It also enhances the overall flavor of the chicken. Make sure your skillet is hot enough before adding the chicken to achieve that perfect sear.
Another important note is to avoid overcooking the chicken. While slow cooking is forgiving, leaving the chicken in for too long can lead to dry meat. Always check for doneness around the end of the cooking time. The chicken should reach an internal temperature of 165°F (75°C) to be safe for consumption.
Lastly, if you want to make the gravy even richer, consider adding a splash of heavy cream or sour cream just before serving. This addition will create a creamier texture and enhance the flavor profile of the dish.
By following these cooking notes, you’ll be well on your way to creating a delicious and satisfying meal that your family will love. Enjoy the process and the delightful aroma that fills your kitchen!
Serving Suggestions for Slow Cooker Chicken Breasts with Gravy Recipe
Slow Cooker Chicken Breasts with Gravy Recipe is ready, it’s time to think about how to serve this delicious dish. The right sides can elevate your meal and create a well-rounded dining experience. Here are some fantastic serving suggestions that pair beautifully with the savory chicken and gravy.
Mashed Potatoes: Creamy mashed potatoes are a classic choice. They soak up the rich gravy perfectly, making each bite delightful.
Rice: Serve the chicken over a bed of fluffy white or brown rice. The rice will absorb the gravy, adding flavor to every spoonful.
Egg Noodles: Cooked egg noodles are another great option. They provide a comforting base for the chicken and gravy.
Steamed Vegetables: For a healthier side, consider steamed broccoli, green beans, or carrots. They add color and nutrition to your plate.
Crusty Bread: A slice of warm, crusty bread is perfect for dipping into the gravy. It adds a satisfying crunch to your meal.
Don’t forget to garnish your dish! A sprinkle of fresh parsley or chives can add a pop of color and freshness. This simple touch makes your meal look even more appetizing.
Slow Cooker Chicken Breasts with Gravy Recipe!
Tips for Perfect Slow Cooker Chicken Breasts with Gravy Recipe
Slow Cooker Chicken Breasts with Gravy Recipe turns out perfectly every time, here are some helpful tips. These suggestions will enhance the flavor and texture of your dish, making it a family favorite!
First, always start with high-quality chicken. Fresh, boneless, skinless chicken breasts will yield the best results. If possible, choose organic or free-range chicken for a richer flavor. This small change can make a big difference in your dish.
Next, don’t skip the seasoning! Properly seasoning the chicken before cooking is crucial. The blend of salt, pepper, garlic powder, and onion powder creates a flavorful base. Feel free to adjust the seasonings to match your taste preferences. A little extra garlic or a pinch of paprika can add a delightful twist!
Another tip is to layer your ingredients wisely. Place the vegetables at the bottom of the slow cooker, followed by the gravy mixture, and then the chicken on top. This layering allows the chicken to absorb all the flavors while keeping the veggies tender. It’s a simple trick that enhances the overall taste.
When it comes to cooking time, be mindful of your slow cooker settings. If you’re short on time, cooking on high for 3-4 hours is perfectly fine. However, for the best flavor and tenderness, cooking on low for 6-7 hours is ideal. The longer cooking time allows the chicken to become incredibly tender and soak up the gravy.
Lastly, don’t forget to taste and adjust! Before serving, give the gravy a quick taste. If it needs a little more flavor, consider adding a splash of soy sauce or a dash of lemon juice. These small adjustments can elevate your dish to new heights.
Slow Cooker Chicken Breasts with Gravy Recipe that your family will love. Enjoy the cooking process and the delightful meal that awaits you!
Breakdown of Time for Slow Cooker Chicken Breasts with Gravy Recipe
Slow Cooker Chicken Breasts with Gravy Recipe is essential for planning your meal. Here’s a simple breakdown of the time involved in preparing and cooking this delicious dish. Knowing these times will help you manage your schedule and ensure everything is ready when you want to eat!
Prep Time
The prep time for this recipe is quite short, making it perfect for busy days. You’ll need about 15-20 minutes to gather your ingredients and prepare the chicken. This includes seasoning the chicken breasts and mixing the gravy ingredients. It’s a quick process that allows you to get everything ready without much hassle!
Cooking Time
Once you’ve prepped your ingredients, the cooking time is where the magic happens. You can choose to cook the chicken on low for 6-7 hours or on high for 3-4 hours. The slow cooking method ensures that the chicken becomes tender and flavorful. It’s a great way to let the flavors meld together while you go about your day!
Total Time
In total, you’re looking at about 6 hours and 15 minutes to 7 hours and 20 minutes from start to finish, depending on your cooking method. This includes both the prep and cooking times. With such a minimal hands-on time, you can enjoy a delicious meal without spending all day in the kitchen!
Slow Cooker Chicken Breasts with Gravy Recipe into your busy schedule. It’s a fantastic way to enjoy a home-cooked meal with minimal effort!
Nutritional Information for Slow Cooker Chicken Breasts with Gravy Recipe
Slow Cooker Chicken Breasts with Gravy Recipe not only offers great taste but also provides a balanced meal option. Let’s break down the nutritional information to help you understand what’s in this delicious dish.
Calories
Slow Cooker Chicken Breasts with Gravy Recipe contains approximately 320 calories. This makes it a satisfying yet light option for dinner. The calorie count is reasonable, especially considering the rich flavors and comforting nature of the dish. It’s a great choice for those looking to enjoy a hearty meal without overindulging.
Protein
One of the standout features of this recipe is its high protein content. Each serving provides about 30 grams of protein. Chicken breasts are an excellent source of lean protein, which is essential for muscle repair and overall health. Including protein in your meals can help keep you feeling full and satisfied, making this dish a smart choice for any diet.
Sodium
The sodium content in this recipe is approximately 800 milligrams per serving. While this is a reasonable amount for a savory dish, it’s always good to be mindful of sodium intake, especially for those watching their salt consumption. You can reduce the sodium level by using low-sodium chicken broth and cream of chicken soup. This simple adjustment allows you to enjoy the flavors without compromising your health goals.
Slow Cooker Chicken Breasts with Gravy Recipe is a nutritious option that balances calories, protein, and sodium. It’s a meal that not only tastes great but also supports a healthy lifestyle. Enjoy this comforting dish knowing it’s good for you too!
FAQs about Slow Cooker Chicken Breasts with Gravy Recipe
Can I use frozen chicken breasts for this recipe?
Slow Cooker Chicken Breasts with Gravy Recipe. However, it’s important to note that cooking times will vary. If you start with frozen chicken, you should cook it on high for about 4-5 hours instead of the usual 3-4 hours. Always ensure the chicken reaches an internal temperature of 165°F (75°C) for safe consumption. Using frozen chicken can be a convenient option, especially when you forget to thaw your meat ahead of time!
How can I thicken the gravy for Slow Cooker Chicken Breasts?
If you prefer a thicker gravy, there are a few easy methods to achieve that. One option is to mix a tablespoon of cornstarch with a tablespoon of cold water to create a slurry. Stir this mixture into the gravy during the last 30 minutes of cooking. Another method is to remove some of the gravy, let it cool slightly, and whisk in a bit of flour or cornstarch before returning it to the slow cooker. This will help thicken the gravy without clumping. You can also let the gravy simmer uncovered for a bit to reduce it and thicken naturally!
What sides pair well with Slow Cooker Chicken Breasts with Gravy?
Slow Cooker Chicken Breasts with Gravy Recipe. Here are some great options:
Mashed Potatoes: Creamy mashed potatoes are a classic pairing, soaking up the rich gravy.
Rice: Fluffy white or brown rice makes a great base for the chicken and gravy.
Egg Noodles: Tender egg noodles provide a comforting texture that pairs well with the dish.
Steamed Vegetables: Fresh steamed broccoli or green beans add color and nutrition to your plate.
Crusty Bread: A slice of warm bread is perfect for dipping into the savory gravy.
These sides not only enhance the meal but also create a well-rounded dining experience!
Can I make this recipe ahead of time?
Slow Cooker Chicken Breasts with Gravy Recipe is perfect for meal prep. You can prepare the ingredients the night before and store them in the refrigerator. In the morning, simply transfer everything to the slow cooker and set it to cook. If you want to make it even easier, you can cook the chicken and gravy ahead of time, then store it in an airtight container in the fridge for up to 3 days. Reheat it on the stove or in the microwave before serving. This makes it a convenient option for busy weeknights!
Conclusion on Slow Cooker Chicken Breasts with Gravy Recipe
Slow Cooker Chicken Breasts with Gravy Recipe is a delightful and easy meal that brings comfort to your dinner table. With its simple preparation and rich flavors, it’s no wonder this dish has become a family favorite. The slow cooker does all the hard work, allowing you to enjoy a tender, juicy chicken dish without spending hours in the kitchen.
This recipe is not only versatile but also customizable. You can add your favorite vegetables or experiment with different gravy flavors to suit your taste. Whether you prefer a classic creamy gravy or a spicy twist, the possibilities are endless. Plus, the nutritional benefits make it a smart choice for anyone looking to maintain a balanced diet.
As you gather around the table to enjoy this meal, you’ll appreciate the warmth and love that comes from home-cooked food. The aroma of the chicken and gravy will fill your home, creating a cozy atmosphere that invites everyone to sit down and share a meal together. So, don’t hesitate to try this recipe and make it your own!
Slow Cooker Chicken Breasts with Gravy Recipe.
Paul
Slow Cooker Chicken Breasts with Gravy Recipe is easy!
Creamy, comforting, and effortless—this Slow Cooker Chicken and Gravy is the ultimate cozy meal. Tender chicken simmers low and slow in a rich, savory gravy that’s finished with a touch of sour cream for a velvety texture. Serve it over mashed potatoes, rice, or buttered noodles for pure comfort food bliss.
Season the chicken breasts on both sides with garlic powder, salt, and black pepper.
In the slow cooker, whisk together the water (or broth), gravy mix, cream of chicken soup, garlic powder, paprika, and remaining salt and pepper until smooth.
Place the seasoned chicken into the slow cooker and flip to fully coat with the gravy mixture.
Cover and cook on low for 4 to 5 hours, or until the chicken is cooked through and tender.
Remove the chicken and shred or slice it as preferred.
Stir the sour cream into the gravy in the slow cooker until smooth and creamy.
Return the chicken to the slow cooker or serve the gravy spooned over the chicken.
Serve hot over mashed potatoes, rice, noodles, or even thick-cut toast.
Notes
Using chicken broth instead of water enhances the savory depth of the gravy.
For extra richness, add a tablespoon of butter when whisking the gravy base.
Leftovers reheat beautifully and make a great next-day sandwich or wrap.
You can swap chicken breasts for thighs if you prefer darker meat.