There is something magical about the aroma of freshly baked puff pastry mingling with the sweet scent of warm apricot jam. It transports me back to my grandmother’s kitchen, where the golden hues of summer fruits filled every corner. She had a way of turning the simplest ingredients into something extraordinary, and this cake—light, flaky, and bursting with the natural sweetness of apricots—was one of her masterpieces.
Growing up, summer afternoons meant picking apricots from the tree in our backyard. We would gather them in a woven basket, their sun-kissed skins warm to the touch. My grandmother always said that the best desserts were the ones that didn’t try too hard—just a handful of good ingredients, patience, and love.
Now, every time I make this cake, I feel as if I’m preserving a tradition. It’s a celebration of simplicity, a testament to how a few humble components can come together to create something unforgettable. Whether you’re baking it for a special occasion or simply to treat yourself, this cake carries a warmth that lingers long after the last bite.
Why You’ll Love This Cake
Effortless Elegance – This cake is stunning in its simplicity. It doesn’t require elaborate techniques, yet the result looks and tastes like something from a high-end bakery.
Perfect Balance of Flavors – The crisp, buttery layers of puff pastry contrast beautifully with the sweet, slightly tangy apricot jam.
Minimal Ingredients, Maximum Impact – With just a handful of pantry staples, you can create a dessert that feels indulgent and special.
A Versatile Treat – Serve it warm with a scoop of vanilla ice cream, enjoy it with afternoon tea, or even dress it up with a drizzle of honey and crushed nuts.
Nostalgic and Comforting – This cake brings back memories of childhood kitchens and family gatherings, making every bite a journey through time.
Ingredients
For the Cake
Ingredient
Quantity
Puff pastry
2 rolls (275g each)
Cake ring
22 cm
Water (for brushing)
As needed
Sugar (for sprinkling)
As needed
For the Apricot Jam
Ingredient
Quantity
Apricots
500g
Water
60ml (4 tbsp)
Sugar
100g (1/2 cup)
Cornstarch
25g (2 tbsp)
Water (for cornstarch mix)
50ml (1/5 cup)
Step-by-Step Directions
1. Preparing the Pastry
Preheat your oven to 200°C (392°F).
Roll out the puff pastry and use a 22cm cake ring to cut out two circles.
Place one circle on a lined baking tray.
Lightly brush with water and sprinkle with sugar.
Prick the surface with a fork to prevent excessive puffing.
Bake for 15 minutes, or until golden brown.
Repeat with the second pastry circle. Let both cool completely.
2. Making the Apricot Jam
Wash and halve the apricots, removing the pits.
In a saucepan, combine apricots and 60ml of water.
Cook over medium heat for about 10 minutes, stirring occasionally.
Add sugar and continue cooking for another 5 minutes.
In a small bowl, mix cornstarch with 50ml of water until smooth.
Gradually pour the cornstarch mixture into the simmering apricots, stirring continuously.
Cook for another 2 minutes, until the jam thickens.
Remove from heat and let it cool slightly.
3. Assembling the Cake
Spread a generous layer of warm apricot jam over one pastry circle.
Place the second pastry layer on top.
Lightly press down and dust with powdered sugar for a final touch.
Let the cake set for 30 minutes before slicing.
Nutritional Information (Per Serving, Approximate)
Nutrient
Amount
Calories
320 kcal
Carbohydrates
45g
Protein
4g
Fat
15g
Sugar
18g
Fiber
3g
The Magic of Puff Pastry and Apricot Jam
This cake is a true celebration of textures. The puff pastry bakes into golden, flaky perfection, creating delicate layers that melt in your mouth. But the real star of the show is the apricot jam.
Apricots have a naturally rich flavor, a blend of sweetness with a hint of tartness that balances beautifully against the buttery pastry. When cooked down into a jam, they become intensely aromatic, their essence concentrated into a spread that’s both smooth and vibrant.
If you’ve never made jam from scratch before, this recipe is the perfect place to start. It’s quick, simple, and requires no special equipment. Plus, homemade jam allows you to control the sweetness and texture, ensuring that every bite of this cake is bursting with fresh, natural fruit flavor.
Frequently Asked Questions
Can I Use Store-Bought Apricot Jam?
Absolutely! While homemade apricot jam enhances the flavor with its freshness and depth, a high-quality store-bought version works just as well. Look for a jam with minimal additives and a high fruit content for the best results.
Can I Substitute Other Fruits?
Yes! This cake is incredibly adaptable. You can use peaches, plums, or even berries to create your own version of this dessert. If using a more tart fruit, consider adjusting the sugar content in the jam to balance the flavors.
How Do I Keep the Puff Pastry from Becoming Soggy?
A key trick is to bake the pastry layers separately before assembling the cake. This ensures that they stay crisp. Additionally, allowing the jam to cool slightly before spreading it over the pastry helps prevent excess moisture from soaking in too quickly.
Can I Make This Cake Ahead of Time?
Yes! You can prepare the apricot jam a day or two in advance and store it in the refrigerator. The pastry layers can also be baked ahead of time and kept in an airtight container at room temperature. However, for the best texture, it’s recommended to assemble the cake just before serving.
What’s the Best Way to Serve This Cake?
This cake is delicious on its own, but you can elevate it with a few simple additions:
A dusting of powdered sugar for an elegant finish
A scoop of vanilla or almond ice cream for a creamy contrast
A dollop of whipped cream for extra indulgence
A drizzle of honey and a sprinkle of crushed nuts for added texture
Can I Use Frozen Puff Pastry?
Yes! Just make sure to fully thaw it in the refrigerator before using. Trying to work with frozen pastry can lead to cracks and uneven baking.
How Should I Store Leftovers?
If you have any leftovers (which is rare with this cake!), store them in an airtight container at room temperature for up to two days. If you want to keep it longer, refrigerate it, but be aware that the pastry may lose some of its crispness. A quick reheat in the oven can help restore its texture.
A Dessert for Every Occasion
One of the greatest things about this cake is its versatility. It fits seamlessly into so many moments:
A Cozy Weekend Treat – Perfect for those lazy Sunday afternoons when you crave something sweet but don’t want to spend hours in the kitchen.
A Dinner Party Showstopper – It’s elegant enough to impress guests, yet simple enough that you don’t have to stress about making it.
A Family Tradition in the Making – This is the kind of recipe that can be passed down through generations, creating cherished memories along the way.
No matter when or why you make it, this cake has a way of making any moment feel a little more special.
Final Thoughts – A Cake to Remember
Some desserts are more than just food—they’re stories, traditions, and memories wrapped in layers of flavor. This Golden Apricot Bliss Cake is one of those special creations. It’s a tribute to the beauty of simplicity, to the joy of baking something with love, and to the irreplaceable warmth of a home filled with the scent of something wonderful in the oven.
Whether you’re reliving childhood memories or creating new ones, this cake is bound to become a favorite. It’s proof that sometimes, the best things in life don’t have to be complicated. They just need a little sweetness, a little care, and a whole lot of heart.
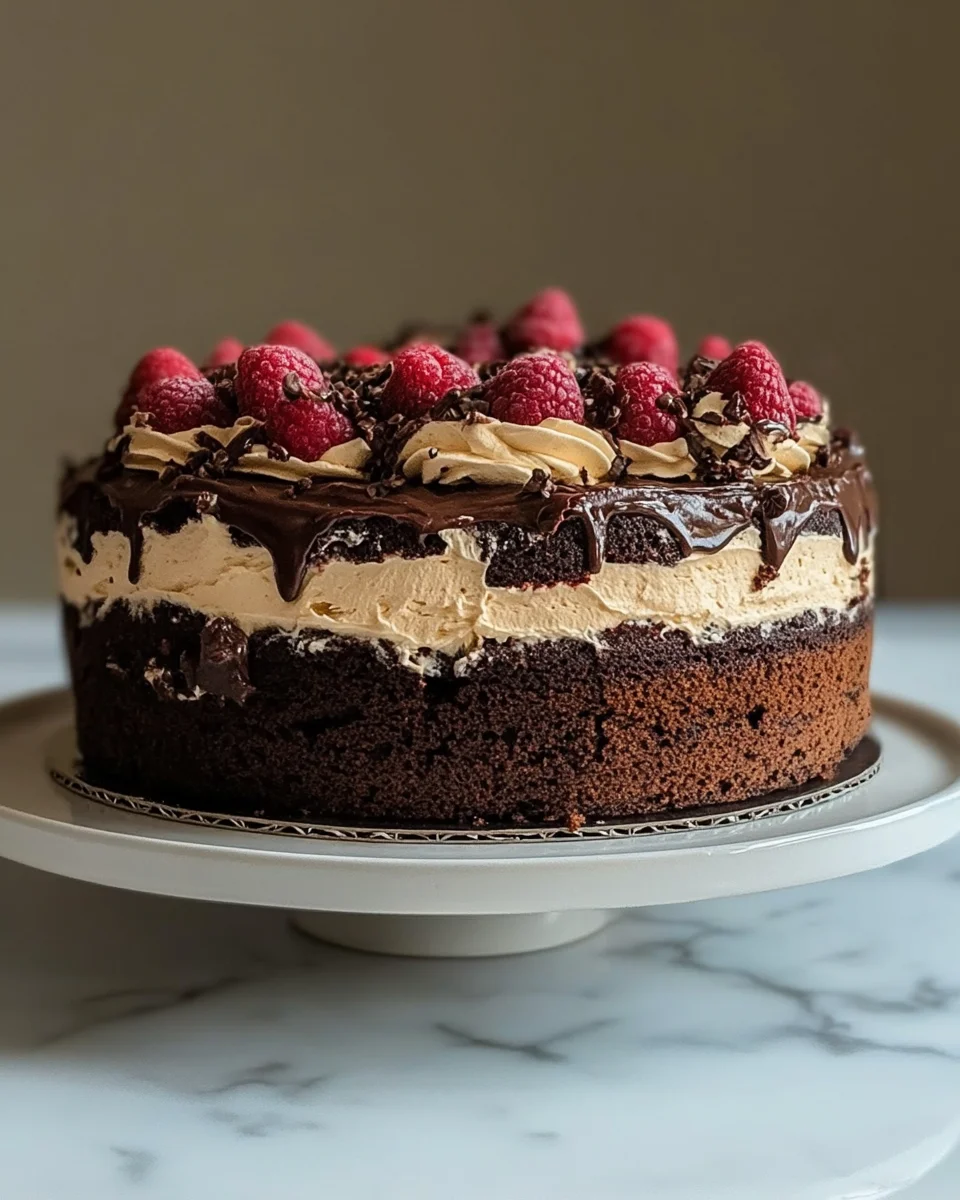
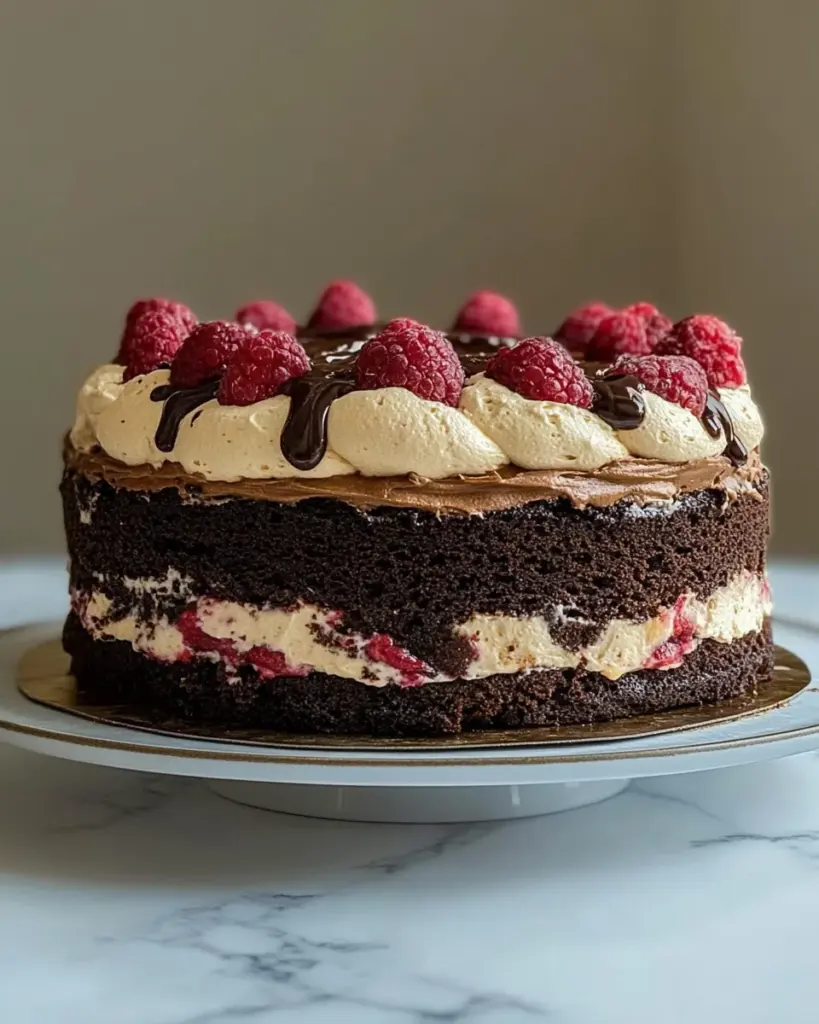
Black Forest Cake is a delightful dessert that combines rich chocolate layers with sweet cherries and fluffy whipped cream. This cake is not just a treat for the taste buds; it’s also a feast for the eyes. The deep, dark chocolate layers are often adorned with a glossy chocolate ganache and topped with vibrant red cherries, making it a showstopper at any gathering. Traditionally, this cake is known for its moist texture and the perfect balance of flavors, making it a favorite among chocolate lovers.
The History of Black Forest Cake
The origins of Black Forest Cake trace back to the Black Forest region in Germany, known as Schwarzwald. This area is famous for its cherry orchards and the production of Kirschwasser, a cherry schnapps. The cake itself, known as Schwarzwälder Kirschtorte in German, was first created in the early 20th century. It reflects the local ingredients and traditions of the region. Over the years, this cake has gained popularity worldwide, becoming a beloved dessert in many cultures. Its unique combination of chocolate, cherries, and cream has made it a classic choice for celebrations, birthdays, and special occasions.
Ingredients for Black Forest Cake Recipe
To create a delicious Black Forest Cake, you will need a variety of ingredients that come together to form its rich layers and delightful flavors. Here’s a complete list of what you’ll need:
For the Chocolate Cake:
2 cups all-purpose flour
1 ¾ cups granulated sugar
¾ cup unsweetened cocoa powder
1 ½ teaspoons baking powder
1 ½ teaspoons baking soda
1 teaspoon salt
2 large eggs
1 cup whole milk
½ cup vegetable oil
2 teaspoons vanilla extract
1 cup boiling water
For the Cherry Filling:
1 cup cherry pie filling (plus extra for garnish)
For the Whipped Cream:
2 cups heavy whipping cream
¼ cup powdered sugar
8 ounces mascarpone cheese
1 teaspoon vanilla extract (for whipped cream)
For the Ganache:
4 ounces dark chocolate
½ cup heavy cream
These ingredients will help you create a cake that is not only visually stunning but also bursting with flavor. The combination of chocolate, cherries, and cream is what makes this Black Forest Cake recipe so special. Make sure to gather everything before you start baking to ensure a smooth preparation process!
Step-by-Step Preparation of Black Forest Cake Recipe
Step 1: Preparing the Chocolate Cake Layers
To start, preheat your oven to 350°F (175°C). This ensures that your cake bakes evenly. Next, grease and flour two 9-inch round cake pans. This step is crucial to prevent the cake from sticking. In a large mixing bowl, combine the all-purpose flour, granulated sugar, unsweetened cocoa powder, baking powder, baking soda, and salt. Whisk these dry ingredients together until they are well blended. This mixture forms the base of your cake.
Now, add the eggs, whole milk, vegetable oil, and vanilla extract to the dry ingredients. Beat the mixture on medium speed for about 2 minutes until it becomes smooth. The batter will be quite thin, which is normal. Carefully stir in the boiling water, ensuring everything is well combined. Pour the batter evenly into the prepared cake pans. Bake for 30-35 minutes. To check if they are done, insert a toothpick in the center; it should come out clean. Once baked, let the cakes cool in the pans for 10 minutes before transferring them to wire racks to cool completely.
Step 2: Making the Cherry Filling
While your cakes are cooling, it’s time to prepare the cherry filling. If you’re using store-bought cherry pie filling, you can skip this step. However, if you want to make your own, simply pit fresh cherries and cook them with a bit of sugar and cornstarch until thickened. This will give you a fresh and delicious filling. Set the cherry filling aside to cool. If you prefer, you can also use frozen cherries, just make sure to thaw and drain them before use.
Step 3: Whipping the Cream
Next, let’s whip the cream! In a large bowl, pour in the heavy whipping cream, powdered sugar, and vanilla extract. Using an electric mixer, beat the mixture on high speed until stiff peaks form. This means the cream should hold its shape well. Once you achieve this, gently fold in the mascarpone cheese. This addition makes the whipped cream richer and creamier, perfect for layering in your cake.
Step 4: Assembling the Black Forest Cake
Now that everything is ready, it’s time to assemble your cake. Place one layer of the cooled chocolate cake on a serving plate. Spread half of the mascarpone mixture over the top. Then, spoon half of the cherry filling over the mascarpone. This layering creates a delightful combination of flavors. Next, place the second cake layer on top and repeat the process with the remaining mascarpone mixture and cherry filling. Make sure to spread evenly for a beautiful presentation.
Step 5: Decorating the Cake
Finally, it’s time to decorate your Black Forest Cake! For the ganache, heat ½ cup of heavy cream in a small saucepan until it simmers. Remove it from the heat and add the dark chocolate, stirring until it melts and becomes smooth. Allow the ganache to cool slightly before drizzling it over the top of the cake. Let it drip down the sides for a stunning effect. For the finishing touch, garnish with additional cherry pie filling on top. This not only adds flavor but also enhances the visual appeal of your cake.
Once decorated, chill the cake in the refrigerator for at least 30 minutes before serving. This helps set the layers and makes it easier to slice. Enjoy your homemade Black Forest Cake!
Variations of Black Forest Cake Recipe
Alternative Ingredients for a Healthier Version
If you’re looking to enjoy a lighter version of the classic Black Forest Cake, there are several alternative ingredients you can use. For instance, consider substituting half of the mascarpone cheese with Greek yogurt. This swap reduces the fat content while still providing a creamy texture. Additionally, you can use whole wheat flour instead of all-purpose flour. This change adds fiber and nutrients to your cake.
Another great option is to replace granulated sugar with natural sweeteners like honey or maple syrup. These alternatives can enhance the flavor while lowering the glycemic index. If you want to cut down on calories, you can also use unsweetened applesauce in place of vegetable oil. This will keep your cake moist without the extra fat.
For a fresher taste, consider using fresh cherries instead of cherry pie filling. Fresh cherries not only taste better but also add a burst of color and nutrition. You can also add a sprinkle of nuts, like chopped almonds or walnuts, between the layers for added crunch and flavor. These small changes can make your Black Forest Cake healthier without sacrificing taste!
Different Flavor Combinations
While the traditional Black Forest Cake is a chocolate and cherry delight, you can experiment with different flavor combinations to create your own unique version. For example, try adding a hint of orange zest to the cake batter for a citrusy twist. The bright flavor of orange pairs beautifully with chocolate and cherries.
Another fun idea is to incorporate coffee into your cake. You can replace some of the boiling water with brewed coffee. This will enhance the chocolate flavor and add a rich depth to your cake. If you’re feeling adventurous, consider using raspberry or strawberry filling instead of cherries. These berries provide a sweet and tangy contrast to the chocolate layers.
Lastly, you can play with the type of chocolate used in the ganache. Dark chocolate is classic, but you could also try milk chocolate or even white chocolate for a different taste experience. Each variation offers a new way to enjoy this beloved dessert, making it perfect for any occasion!
Cooking Note for Black Forest Cake Recipe
When preparing your Black Forest Cake, there are a few important cooking notes to keep in mind. These tips will help ensure that your cake turns out perfectly every time. First, always measure your ingredients accurately. Baking is a science, and even a small difference in measurements can affect the final result. Use a kitchen scale for precise measurements, especially for flour and sugar.
Next, make sure your ingredients are at room temperature before you start mixing. This includes eggs, milk, and mascarpone cheese. Room temperature ingredients blend more easily, resulting in a smoother batter. Additionally, when mixing the batter, avoid overmixing. This can lead to a dense cake instead of a light and fluffy one. Mix just until the ingredients are combined.
Another key point is to check your oven temperature. Ovens can vary, so it’s a good idea to use an oven thermometer to ensure it’s accurate. If your oven runs hot, your cake may bake too quickly, leading to a dry texture. Conversely, if it’s too cool, the cake may not rise properly.
Lastly, allow your cakes to cool completely before assembling. If the layers are warm, the whipped cream and cherry filling can melt, making a mess. Patience is key! Following these cooking notes will help you create a stunning and delicious Black Forest Cake that everyone will love.
Serving Suggestions for Black Forest Cake Recipe
When it comes to serving your Black Forest Cake, presentation and pairing can elevate the experience. Here are some delightful serving suggestions to consider:
Slice and Serve: Cut the cake into generous slices. Each slice should showcase the beautiful layers of chocolate, cream, and cherries. Serve on elegant dessert plates for a special touch.
Accompany with Fresh Fruits: Fresh fruits like strawberries or raspberries can complement the rich flavors of the cake. Their tartness balances the sweetness, making each bite even more enjoyable.
Pair with Ice Cream: A scoop of vanilla or cherry ice cream alongside the cake adds a creamy texture and a refreshing contrast. The cold ice cream melts slightly against the warm cake, creating a delightful combination.
Drizzle with Chocolate Sauce: For chocolate lovers, a drizzle of chocolate sauce over the top of each slice can enhance the indulgence. This extra touch makes the dessert even more decadent.
Garnish with Mint Leaves: A sprig of fresh mint on top of each slice adds a pop of color and a hint of freshness. It’s a simple yet effective way to elevate the presentation.
Serve with Coffee or Tea: Pairing your cake with a cup of coffee or tea can enhance the flavors. The warmth of the beverage complements the richness of the cake, making it a perfect afternoon treat.
These serving suggestions not only enhance the visual appeal of your Black Forest Cake but also create a delightful experience for your guests. Whether it’s a birthday celebration, a holiday gathering, or just a sweet treat for yourself, these ideas will make your cake shine!
Tips for Perfecting Your Black Forest Cake Recipe
Creating the perfect Black Forest Cake requires attention to detail and a few handy tips. Here are some essential suggestions to help you achieve a delicious and visually stunning cake:
Use Quality Ingredients: The flavor of your cake greatly depends on the quality of your ingredients. Opt for high-quality cocoa powder and fresh cherries if possible. This will enhance the overall taste and texture of your cake.
Don’t Skip the Cooling Time: Allow your cake layers to cool completely before assembling. If they are even slightly warm, the whipped cream can melt, leading to a messy cake. Patience is key!
Layer Evenly: When assembling your cake, ensure that each layer is spread evenly. This not only looks better but also ensures that every bite has a balanced flavor of chocolate, cream, and cherries.
Chill the Whipped Cream: For a firmer whipped cream, chill your mixing bowl and beaters before whipping. This helps the cream whip up faster and hold its shape better when layered in the cake.
Experiment with Flavors: Don’t hesitate to try different flavor combinations. Adding a splash of almond extract or a hint of coffee can elevate the taste of your cake. Be creative!
Use a Cake Leveler: If you want perfectly even layers, consider using a cake leveler. This tool helps you trim the tops of your cake layers, ensuring they stack neatly.
Store Properly: If you have leftovers, store your cake in an airtight container in the refrigerator. This keeps it fresh and prevents the whipped cream from wilting.
Practice Makes Perfect: Don’t be discouraged if your first attempt isn’t perfect. Baking is a skill that improves with practice. Each time you make the cake, you’ll learn something new!
By following these tips, you’ll be well on your way to mastering the art of making a Black Forest Cake. Each step you take will bring you closer to creating a dessert that not only tastes amazing but also impresses everyone who sees it!
Breakdown of Time for Black Forest Cake Recipe
Prep Time
Preparing your Black Forest Cake is an exciting process! The prep time typically takes about 30 minutes. This includes gathering all your ingredients, measuring them accurately, and mixing the batter. Make sure to set aside enough time to ensure everything is done correctly. Remember, a well-prepared cake starts with a well-organized kitchen!
Cooking Time
The cooking time for the cake layers is around 30-35 minutes. During this time, your kitchen will fill with the delightful aroma of baking chocolate. Keep an eye on the cakes as they bake, and use a toothpick to check for doneness. Once they are baked to perfection, allow them to cool in the pans for 10 minutes before transferring them to wire racks.
Total Time
In total, you should expect to spend about 1 hour and 15 minutes to 1 hour and 20 minutes on your Black Forest Cake. This includes both prep and cooking time. If you factor in the chilling time after decorating, which is at least 30 minutes, the overall time will be around 1 hour and 50 minutes. This cake is worth every minute spent, as it will surely impress your family and friends!
Nutritional Information for Black Forest Cake Recipe
Calories
When indulging in a slice of Black Forest Cake, it’s important to be aware of its caloric content. Each serving contains approximately 480 calories. This number can vary slightly based on the specific ingredients used and portion sizes. While this cake is a delightful treat, moderation is key, especially if you’re watching your calorie intake. Enjoying a small slice can satisfy your sweet tooth without overindulging.
Protein
In terms of protein, a slice of Black Forest Cake provides about 6 grams. This protein content comes from the eggs, milk, and mascarpone cheese used in the recipe. While it may not be a significant source of protein, it does contribute to the overall nutritional profile of the cake. Pairing your cake with a glass of milk can enhance the protein intake, making it a more balanced dessert option.
Sodium
The sodium content in a serving of Black Forest Cake is approximately 300 milligrams. This amount is primarily from the baking powder and salt used in the cake layers. For those monitoring their sodium intake, it’s good to keep this in mind. However, this cake can still fit into a balanced diet when enjoyed occasionally. Always consider your overall daily sodium consumption when indulging in treats like this.
FAQs about Black Forest Cake Recipe
Can I make Black Forest Cake ahead of time?
Absolutely! You can prepare your Black Forest Cake ahead of time. In fact, making it a day in advance can enhance the flavors as they meld together. Just be sure to store the cake in the refrigerator after decorating. This keeps it fresh and delicious. If you plan to make it even earlier, consider baking the cake layers and freezing them. Wrap them tightly in plastic wrap and foil. When you’re ready to assemble, simply thaw the layers and proceed with the whipped cream and cherry filling.
What can I substitute for cherries in Black Forest Cake?
If cherries aren’t your favorite or you can’t find them, there are several tasty substitutes. You can use other fruits like raspberries or strawberries for a different flavor profile. These berries add a nice tartness that complements the chocolate well. Alternatively, you can use canned peaches or even a mixed berry filling. Just make sure to adjust the sweetness if needed, as different fruits have varying levels of natural sugar.
How do I store leftover Black Forest Cake?
To keep your leftover Black Forest Cake fresh, store it in an airtight container in the refrigerator. This helps maintain the cake’s moisture and prevents the whipped cream from wilting. If you have a large piece, you can cover it with plastic wrap. It’s best to consume the cake within 3-4 days for optimal taste. If you notice any excess moisture, you can place a paper towel inside the container to absorb it.
Can I use a different type of cream for the frosting?
Yes, you can use different types of cream for the frosting if you prefer! While heavy whipping cream is traditional, you can substitute it with light whipping cream for a lighter option. If you want a dairy-free alternative, consider using coconut cream. Just chill a can of coconut milk overnight, then scoop out the solid cream. Whip it up just like you would with regular cream. Each option will give your Black Forest Cake a unique twist while still being delicious!
Conclusion on Black Forest Cake Recipe
In conclusion, the Black Forest Cake is a timeless dessert that brings joy to any occasion. Its rich chocolate layers, sweet cherry filling, and fluffy whipped cream create a delightful harmony of flavors and textures. Whether you’re celebrating a birthday, hosting a gathering, or simply treating yourself, this cake is sure to impress.
By following the steps outlined in this recipe, you can create a stunning cake that not only looks beautiful but also tastes incredible. Remember, the key to a perfect Black Forest Cake lies in using quality ingredients, allowing your cake layers to cool completely, and taking your time during assembly. With a little patience and practice, you’ll master this classic dessert.
Feel free to experiment with variations and substitutions to make the recipe your own. Whether you choose to lighten it up with Greek yogurt or add a twist with different fruits, the possibilities are endless. Each version offers a unique take on this beloved cake, ensuring that it remains a favorite for years to come.
So, gather your ingredients, roll up your sleeves, and get ready to bake! Your homemade Black Forest Cake awaits, ready to bring smiles and sweet memories to your table. Enjoy every slice, and don’t forget to share the love with family and friends!
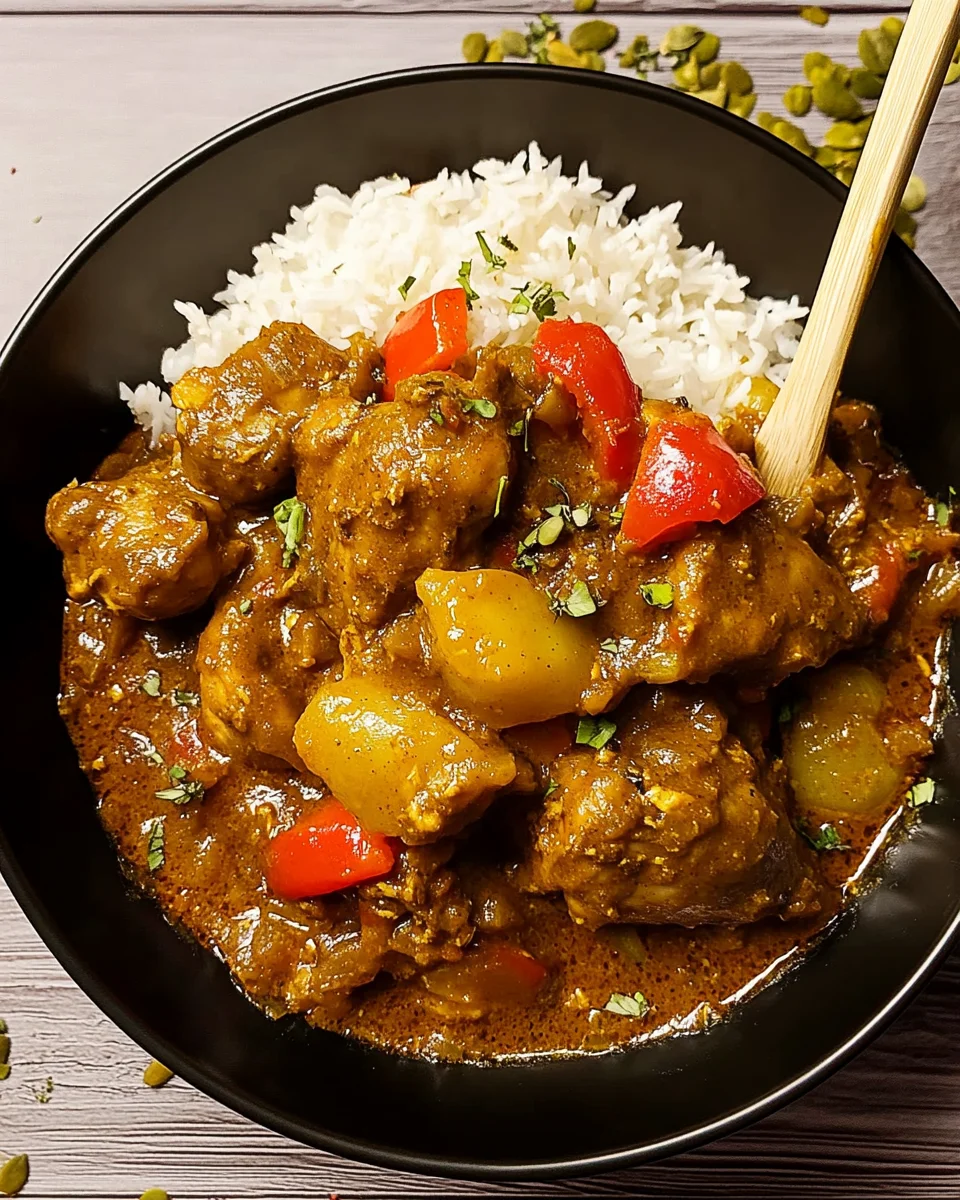
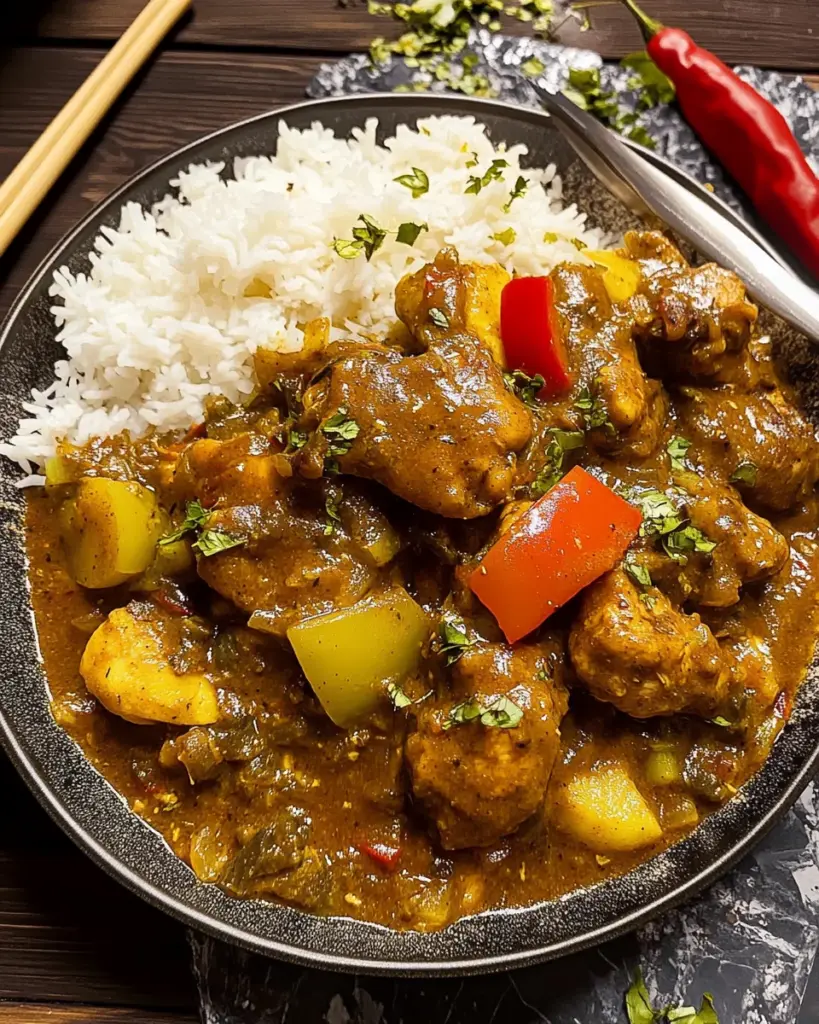
Jamaican Curry Chicken is a delightful dish that stands out for its vibrant flavors and rich history. The unique blend of spices, especially Jamaican curry powder, gives this dish its signature taste. Unlike other curries, Jamaican curry is often less spicy but packed with aromatic herbs and spices. The use of coconut milk adds a creamy texture, making each bite a comforting experience. The combination of tender chicken, colorful vegetables, and fragrant spices creates a dish that is both satisfying and nourishing.
The Cultural Significance of Jamaican Curry Chicken
Jamaican Curry Chicken is more than just a meal; it is a symbol of the island’s diverse culture. The dish reflects the influence of various cultures, including African, Indian, and British. Each group has contributed to the culinary landscape of Jamaica, making it a melting pot of flavors. Traditionally, this dish is enjoyed during family gatherings and celebrations, showcasing the importance of food in bringing people together. Sharing a plate of Jamaican Curry Chicken is a way to connect with loved ones and celebrate heritage. This dish not only fills the stomach but also warms the heart, making it a cherished part of Jamaican cuisine.
Ingredients for Jamaican Curry Chicken Recipe
Essential Ingredients
To create a delicious Jamaican Curry Chicken, you’ll need a few essential ingredients. These components work together to build the dish’s rich flavor profile. Here’s what you’ll need:
2 pounds chicken thighs: Skinless and boneless, cut into bite-sized pieces for easy cooking.
2 tablespoons Jamaican curry powder: This is the star of the dish, providing that unique flavor.
1 teaspoon allspice: Adds warmth and depth to the curry.
1 teaspoon garlic powder: Enhances the overall taste with a hint of garlic.
1 teaspoon onion powder: Complements the garlic and adds sweetness.
1 teaspoon salt: Essential for bringing out the flavors.
1/2 teaspoon black pepper: Adds a mild heat and enhances the spices.
1/4 teaspoon cayenne pepper: Optional for those who enjoy a bit of heat.
2 tablespoons vegetable oil: Used for cooking the chicken and vegetables.
1 medium onion: Chopped to add sweetness and texture.
3 cloves garlic: Minced for a fresh garlic flavor.
1 inch piece of ginger: Grated to add a zesty kick.
1 bell pepper: Chopped, any color will do, for added crunch and color.
2 medium carrots: Sliced for sweetness and nutrition.
1 can (14 ounces) coconut milk: Provides creaminess and balances the spices.
1 cup chicken broth: Adds depth and moisture to the dish.
2 green onions: Chopped for garnish, adding a fresh touch.
Optional Ingredients for Extra Flavor
While the essential ingredients create a fantastic base, you can enhance your Jamaican Curry Chicken with a few optional ingredients. These additions can elevate the dish even further:
Fresh cilantro: Chopped for garnish, it adds a burst of freshness.
Diced potatoes or sweet potatoes: For a heartier meal, these can be added to the curry.
Chickpeas or tofu: Great substitutes for a vegetarian version of the dish.
Additional spices: Consider adding turmeric or cumin for extra depth.
With these ingredients, you’re well on your way to making a flavorful Jamaican Curry Chicken that will impress your family and friends!
Step-by-Step Preparation of Jamaican Curry Chicken Recipe
Step 1: Marinating the Chicken
Marinating the chicken is a crucial step in this Jamaican Curry Chicken recipe. Start by placing the bite-sized chicken pieces in a large bowl. Then, sprinkle the Jamaican curry powder, allspice, garlic powder, onion powder, salt, black pepper, and cayenne pepper over the chicken. Mix everything well, ensuring each piece is coated evenly with the spices. This step not only enhances the flavor but also tenderizes the chicken. For the best results, let the chicken marinate for at least 30 minutes. If you have more time, marinating overnight in the refrigerator will deepen the flavors even further.
Step 2: Preparing the Vegetables
While the chicken marinates, it’s time to prepare the vegetables. Start by chopping the medium onion, mincing the garlic cloves, and grating the ginger. Next, chop the bell pepper into bite-sized pieces and slice the carrots into thin rounds. Having all your vegetables ready will make the cooking process smoother. This step is essential as the vegetables add texture and nutrition to the dish, complementing the chicken beautifully.
Step 3: Cooking the Chicken
Now, let’s get cooking! Heat the vegetable oil in a large skillet or Dutch oven over medium heat. Once the oil is hot, add the marinated chicken to the skillet. Cook the chicken for about 5-7 minutes, turning occasionally until it is browned on all sides. This browning process adds a rich flavor to the chicken. After the chicken is nicely browned, remove it from the skillet and set it aside. This step ensures that the chicken retains its juiciness while you prepare the rest of the dish.
Step 4: Adding the Curry and Simmering
In the same skillet, add the chopped onion, minced garlic, and grated ginger. Sauté these ingredients for about 3-4 minutes until the onion becomes translucent. This step releases the aromatic flavors of the garlic and ginger, creating a fragrant base for your curry. Next, add the chopped bell pepper and sliced carrots to the skillet. Cook for another 3-4 minutes until the vegetables are slightly softened. Now, return the browned chicken to the skillet. Pour in the coconut milk and chicken broth, stirring everything together. Bring the mixture to a gentle simmer, allowing the flavors to meld beautifully.
Step 5: Final Touches and Serving
Reduce the heat to low and cover the skillet. Let the curry cook for 25-30 minutes, stirring occasionally. This slow cooking allows the chicken to become tender and absorb all the delicious flavors. After the cooking time, taste the curry and adjust the seasoning if needed. If you prefer a thicker sauce, simply remove the lid and let it simmer for an additional 10 minutes. Once done, serve the Jamaican Curry Chicken hot, garnished with chopped green onions and fresh cilantro if desired. Enjoy this delightful dish with your favorite side!
Variations of Jamaican Curry Chicken Recipe
Vegetarian Alternatives
If you’re looking for a vegetarian option, you can easily adapt the Jamaican Curry Chicken recipe. One popular alternative is to use chickpeas or tofu instead of chicken. Chickpeas provide a hearty texture and are packed with protein, while tofu absorbs the flavors of the spices beautifully. To make this variation, simply replace the chicken with 2 cans of drained chickpeas or 1 pound of firm tofu, cut into cubes. Follow the same marinating and cooking steps, ensuring that the chickpeas or tofu are well-coated with the spices. You can also add diced potatoes or sweet potatoes for extra heartiness. This vegetarian version is just as flavorful and satisfying!
Spicy Versions of Jamaican Curry Chicken
If you love heat, you can spice up your Jamaican Curry Chicken! Start by increasing the amount of cayenne pepper in the recipe. Instead of just 1/4 teaspoon, try adding 1/2 teaspoon or more, depending on your heat preference. You can also include fresh chopped Scotch bonnet peppers, which are a staple in Jamaican cuisine. Just be cautious, as these peppers are quite hot! Another option is to add a dash of hot sauce during the cooking process for an extra kick. These spicy variations will give your dish a fiery twist while still maintaining the rich flavors of the traditional recipe. Enjoy the heat!
Cooking Note for Jamaican Curry Chicken Recipe
Tips for Achieving the Perfect Flavor
To make your Jamaican Curry Chicken truly unforgettable, consider these helpful tips. First, always use fresh spices. Fresh spices have a stronger flavor and aroma, enhancing your dish significantly. When measuring your Jamaican curry powder, ensure it’s a high-quality brand for the best taste. Next, marinating the chicken is key. The longer you let it sit, the more flavorful it becomes. If possible, marinate overnight in the refrigerator.
Another tip is to balance the flavors. If your curry tastes too spicy, add a bit more coconut milk to mellow it out. On the other hand, if it’s too mild, a pinch of salt or a dash of cayenne can elevate the taste. Lastly, don’t rush the cooking process. Allowing the chicken to simmer gently helps it become tender and absorb all the delicious flavors. Enjoy the process, and your dish will shine!
Common Mistakes to Avoid
While making Jamaican Curry Chicken, there are a few common mistakes to watch out for. One frequent error is not marinating the chicken long enough. Skipping this step can lead to bland flavors. Another mistake is overcrowding the skillet when browning the chicken. If the pieces are too close together, they will steam instead of brown, resulting in a less flavorful dish.
Additionally, be cautious with the heat level. If you add too much cayenne or hot peppers at once, it can overpower the dish. Start with a small amount and adjust to your taste. Lastly, avoid overcooking the chicken. Cooking it for too long can make it dry and tough. Aim for tender, juicy chicken that melts in your mouth. By avoiding these pitfalls, you’ll create a delicious Jamaican Curry Chicken that everyone will love!
Serving Suggestions for Jamaican Curry Chicken Recipe
Best Side Dishes to Pair
When it comes to serving Jamaican Curry Chicken, the right side dishes can elevate your meal to new heights. Here are some fantastic options to consider:
Rice and Peas: This classic Jamaican side dish is a perfect match. The creamy coconut milk and spices in the rice complement the curry beautifully.
Fried Plantains: Sweet and crispy fried plantains add a delightful contrast to the savory curry. Their sweetness balances the spices perfectly.
Coleslaw: A refreshing coleslaw made with cabbage and carrots can provide a crunchy texture and a cool contrast to the warm curry.
Steamed Vegetables: Lightly steamed broccoli, green beans, or mixed vegetables can add color and nutrition to your plate.
Quinoa: For a healthier option, serve the curry over quinoa. It’s packed with protein and has a nutty flavor that pairs well with the dish.
These side dishes not only enhance the meal but also create a well-rounded dining experience. Choose one or more to complement your Jamaican Curry Chicken!
Creative Serving Ideas
Serving Jamaican Curry Chicken can be a fun and creative process. Here are some ideas to make your presentation stand out:
In a Coconut Shell: For a tropical touch, serve the curry in a hollowed-out coconut shell. It adds a unique flair and keeps the dish warm.
On a Bed of Greens: Serve the curry over a bed of fresh spinach or mixed greens. The greens will wilt slightly from the heat, adding a fresh element to the dish.
With Naan or Roti: Instead of traditional rice, serve the curry with warm naan or roti. These flatbreads are perfect for scooping up the delicious sauce.
In a Bowl with Toppings: Create a curry bowl by adding toppings like avocado slices, chopped cilantro, and a squeeze of lime. This adds freshness and visual appeal.
Family Style: For a casual gathering, serve the curry in a large bowl at the center of the table. Let everyone help themselves, creating a warm and inviting atmosphere.
These creative serving ideas will not only impress your guests but also make your Jamaican Curry Chicken a memorable meal. Enjoy the flavors and the company!
Tips for Making the Best Jamaican Curry Chicken Recipe
Ingredient Substitutions
Sometimes, you may not have all the ingredients on hand. No worries! Here are some helpful substitutions to keep your Jamaican Curry Chicken delicious:
Chicken: If you don’t have chicken thighs, you can use chicken breasts. They are leaner but will still work well in this recipe.
Coconut Milk: For a lighter option, use light coconut milk or substitute with unsweetened almond milk. Just keep in mind that the flavor will be slightly different.
Vegetable Oil: You can replace vegetable oil with olive oil or coconut oil for a different flavor profile.
Allspice: If you don’t have allspice, a mix of cinnamon and nutmeg can mimic its warm flavor.
Vegetables: Feel free to swap in any vegetables you have on hand. Zucchini, peas, or even spinach can add a nice touch to the dish.
These substitutions will help you create a tasty Jamaican Curry Chicken, even if you’re missing a few ingredients. Get creative and enjoy the cooking process!
Storage and Reheating Tips
After enjoying your Jamaican Curry Chicken, you may have leftovers. Here’s how to store and reheat them properly:
Storage: Allow the curry to cool completely before transferring it to an airtight container. It can be stored in the refrigerator for up to 3-4 days.
Freezing: If you want to keep it longer, you can freeze the curry. Place it in a freezer-safe container and it will last for up to 3 months. Just remember to label it with the date!
Reheating: To reheat, simply thaw the curry overnight in the refrigerator if frozen. Then, heat it in a saucepan over medium heat, stirring occasionally until warmed through. You can also use the microwave, heating in short intervals and stirring in between.
Adding Moisture: If the curry seems too thick after reheating, add a splash of chicken broth or coconut milk to bring back its creamy texture.
By following these storage and reheating tips, you can enjoy your Jamaican Curry Chicken even days later, without losing its delicious flavor!
Breakdown of Time for Jamaican Curry Chicken Recipe
Prep Time
Preparing your Jamaican Curry Chicken is a straightforward process. The prep time mainly involves marinating the chicken and chopping the vegetables. Here’s a quick breakdown:
Marinating the Chicken: 30 minutes (or overnight for deeper flavor)
Chopping Vegetables: 10-15 minutes
In total, you can expect about 40-45 minutes of prep time if you marinate for 30 minutes. If you choose to marinate overnight, the prep time will be significantly shorter the next day.
Cooking Time
The cooking time for Jamaican Curry Chicken is where the magic happens. Here’s how it breaks down:
Browning the Chicken: 5-7 minutes
Sautéing Vegetables: 6-8 minutes
Simmering the Curry: 25-30 minutes
Overall, the cooking time will take about 36-45 minutes. This allows the chicken to become tender and the flavors to meld beautifully.
Total Time
When you combine both prep and cooking times, the total time for making Jamaican Curry Chicken is:
With 30-minute marination: Approximately 1 hour and 15 minutes
With overnight marination: Approximately 45 minutes
This makes Jamaican Curry Chicken a great option for a weeknight dinner or a special occasion. With a little planning, you can enjoy this flavorful dish in no time!
Nutritional Information for Jamaican Curry Chicken Recipe
Calories and Macronutrients
Understanding the nutritional content of your meals is essential for maintaining a balanced diet. Each serving of Jamaican Curry Chicken provides a satisfying mix of calories and macronutrients. Here’s a breakdown of the nutritional information per serving:
Calories: 380
Net Carbs: 8g
Protein: 28g
Fat: 28g
This dish is rich in protein, making it a great option for those looking to build muscle or maintain a healthy weight. The moderate fat content primarily comes from the coconut milk and chicken, providing a creamy texture while still being nutritious. The low net carbs make it suitable for various dietary preferences, including low-carb diets.
Health Benefits of Ingredients
Jamaican Curry Chicken is not only delicious but also packed with health benefits thanks to its wholesome ingredients. Here are some key components and their benefits:
Chicken Thighs: A great source of protein, chicken thighs are rich in essential amino acids, which are vital for muscle repair and growth. They also contain important vitamins and minerals, such as B vitamins and iron.
Coconut Milk: This creamy ingredient is high in healthy fats, particularly medium-chain triglycerides (MCTs), which can provide quick energy and support weight management. Coconut milk also contains antioxidants that can help reduce inflammation.
Vegetables: The bell peppers and carrots add a wealth of vitamins, such as vitamin C and beta-carotene. These nutrients support immune function and promote healthy skin. Additionally, the fiber from the vegetables aids digestion and helps maintain a healthy gut.
Spices: Jamaican curry powder, garlic, and ginger are not just flavor enhancers; they also offer numerous health benefits. For instance, ginger has anti-inflammatory properties, while garlic is known for its immune-boosting effects.
Incorporating Jamaican Curry Chicken into your diet can provide a delicious way to enjoy a variety of nutrients. This dish not only satisfies your taste buds but also supports your overall health!
FAQs about Jamaican Curry Chicken Recipe
What type of chicken is best for Jamaican Curry Chicken?
When it comes to Jamaican Curry Chicken, chicken thighs are the best choice. They are juicy and flavorful, making them perfect for this dish. Thighs have more fat than chicken breasts, which helps keep the meat tender during cooking. However, if you prefer a leaner option, you can use chicken breasts. Just remember that they may cook faster, so keep an eye on them to avoid drying out.
Can I make Jamaican Curry Chicken in advance?
Absolutely! Jamaican Curry Chicken is a great dish to make in advance. In fact, the flavors often improve after sitting for a day. You can prepare the curry and store it in an airtight container in the refrigerator for up to 3-4 days. If you want to keep it longer, consider freezing it. Just make sure to let it cool completely before transferring it to a freezer-safe container. When you’re ready to enjoy it, simply thaw and reheat!
How spicy is Jamaican Curry Chicken?
The spice level of Jamaican Curry Chicken can vary based on your preferences. Traditional Jamaican curry is flavorful but not overly spicy. If you enjoy heat, you can easily adjust the spice level by adding more cayenne pepper or including fresh Scotch bonnet peppers. Start with a small amount and taste as you go to find the perfect balance for your palate. Remember, you can always add more spice, but it’s hard to take it away!
What can I serve with Jamaican Curry Chicken?
Jamaican Curry Chicken pairs wonderfully with a variety of side dishes. Some popular options include:
Rice and Peas: This classic dish complements the curry perfectly.
Fried Plantains: Their sweetness balances the savory flavors of the curry.
Coleslaw: A refreshing side that adds crunch and coolness.
Quinoa: A healthy alternative that adds protein and fiber.
Feel free to mix and match these sides to create a delicious and satisfying meal!
Conclusion on Jamaican Curry Chicken Recipe
Recap of Key Points
In summary, Jamaican Curry Chicken is a delightful dish that combines rich flavors and cultural significance. The essential ingredients, including chicken thighs, Jamaican curry powder, and coconut milk, work together to create a comforting meal. The step-by-step preparation ensures that even novice cooks can achieve delicious results. With variations available for vegetarians and those who enjoy a spicy kick, this recipe is versatile and adaptable to different tastes. Additionally, the nutritional benefits of the ingredients make it a wholesome choice for any dinner table.
Encouragement to Try the Recipe
Now that you have all the information you need, it’s time to roll up your sleeves and try making Jamaican Curry Chicken! Whether you’re cooking for family, friends, or just for yourself, this dish is sure to impress. Don’t be afraid to experiment with the spices and ingredients to make it your own. Enjoy the process, savor the flavors, and share the joy of this wonderful meal with others. Happy cooking!
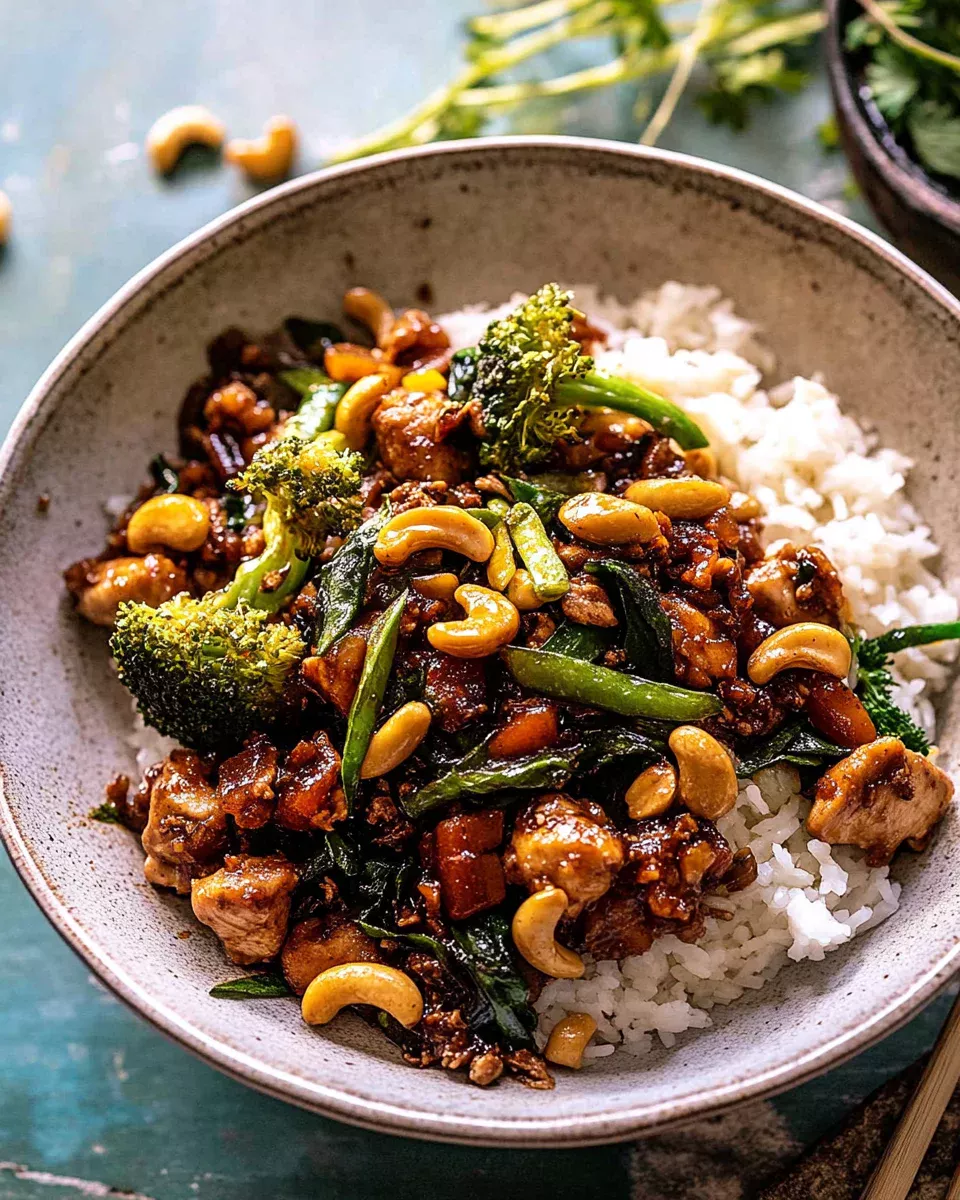
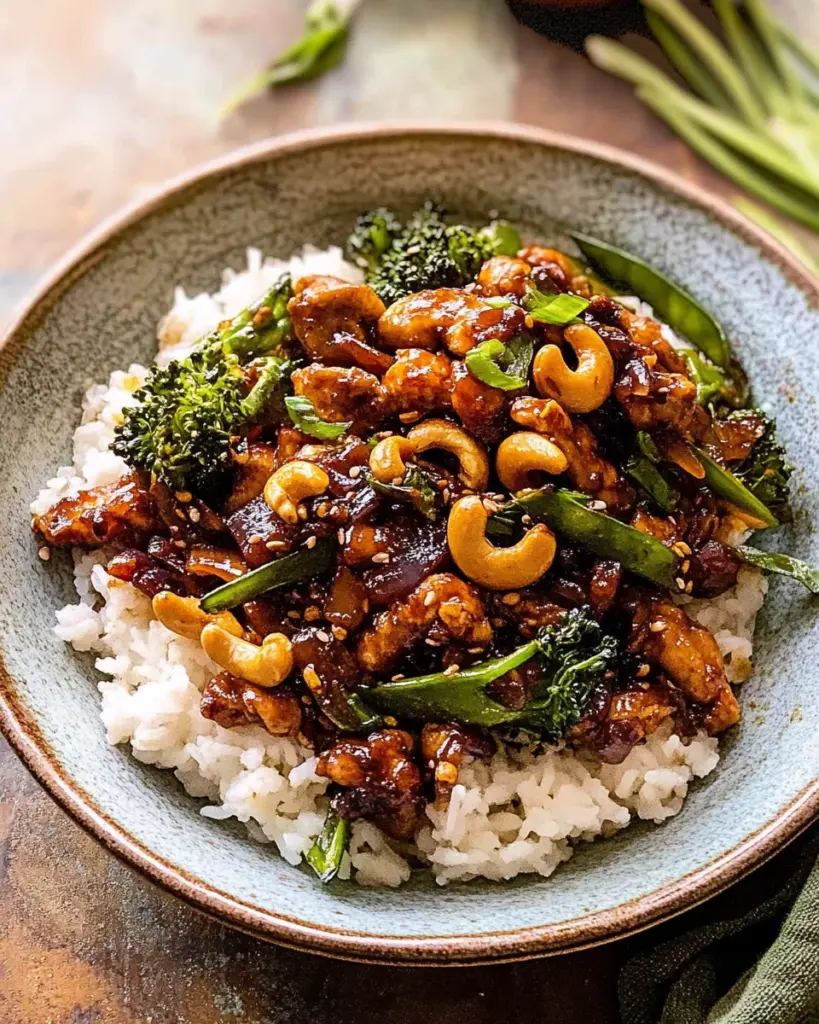
Cashew Chicken Stir-Fry is a delightful dish that brings together tender chicken, crunchy vegetables, and the rich flavor of cashews. This recipe is not just about taste; it’s also about texture. The combination of crispy veggies and juicy chicken creates a satisfying meal that pleases the palate. The savory soy sauce, sweet honey, and nutty sesame oil blend perfectly, making each bite a burst of flavor. Plus, it’s quick to prepare, making it an ideal choice for busy weeknights.
The Origins of Cashew Chicken Stir-Fry
Cashew Chicken has roots in Chinese cuisine, but it has become popular worldwide, especially in American Chinese restaurants. The dish is believed to have originated in the 20th century, with its first known recipes appearing in the 1950s. It showcases the use of cashews, which are native to Brazil but are now widely used in Asian cooking. The stir-fry method allows for quick cooking, preserving the nutrients and flavors of the ingredients. This dish has evolved over time, with many variations emerging, but the core elements remain the same: chicken, cashews, and vibrant vegetables.
Ingredients for Cashew Chicken Stir-Fry Recipe
Essential Ingredients
To create a delicious Cashew Chicken Stir-Fry, you’ll need a few key ingredients. These essentials ensure that your dish is flavorful and satisfying. Here’s what you’ll need:
1 pound boneless, skinless chicken breasts: Cut into bite-sized pieces for quick cooking.
1/4 cup soy sauce: This adds a savory depth to the dish.
2 tablespoons cornstarch: Helps to tenderize the chicken and create a nice coating.
2 tablespoons vegetable oil: Used for stir-frying the chicken and vegetables.
1 cup cashews: These provide a crunchy texture and nutty flavor.
1 red bell pepper: Sliced for sweetness and color.
1 cup broccoli florets: Adds nutrition and a vibrant green color.
1 cup snap peas: These add a crisp texture and sweetness.
3 green onions: Chopped for garnish and flavor.
2 cloves garlic: Minced for aromatic flavor.
1 tablespoon fresh ginger: Grated for a zesty kick.
1 tablespoon honey: Balances the savory flavors with sweetness.
1 tablespoon rice vinegar: Adds a tangy note to the dish.
1 teaspoon sesame oil: Enhances the nutty flavor profile.
Salt and pepper: To taste, for seasoning.
Cooked rice or noodles: For serving, making the meal complete.
Optional Ingredients for Customization
While the essential ingredients create a fantastic dish, you can customize your Cashew Chicken Stir-Fry to suit your taste. Here are some optional ingredients you might consider:
Red pepper flakes: For those who enjoy a spicy kick.
Sriracha: A great addition for heat and flavor.
Tofu or shrimp: Substitute for chicken to cater to different dietary preferences.
Other vegetables: Feel free to add carrots, bell peppers, or zucchini for variety.
Peanut butter: A spoonful can add creaminess and depth to the sauce.
These optional ingredients allow you to make the dish your own while still keeping the essence of the Cashew Chicken Stir-Fry Recipe intact. Enjoy experimenting!
Preparation of Cashew Chicken Stir-Fry Recipe
Step 1: Preparing the Chicken
First, you need to prepare the chicken. Start by cutting the boneless, skinless chicken breasts into bite-sized pieces. This helps them cook evenly and quickly. Next, place the chicken pieces in a medium bowl. Add the soy sauce and cornstarch to the bowl. Mix everything well until the chicken is fully coated. Let it marinate for at least 15 minutes. This step is crucial as it enhances the flavor and tenderness of the chicken.
Step 2: Chopping the Vegetables
While the chicken is marinating, it’s time to chop the vegetables. Slice the red bell pepper into thin strips. This adds a pop of color and sweetness to your dish. Next, cut the broccoli into small florets. Make sure they are bite-sized for easy eating. Then, rinse the snap peas and set them aside. Finally, chop the green onions, separating the white parts from the green tops. The white parts will be used in the stir-fry, while the green tops will be for garnish later.
Step 3: Making the Stir-Fry Sauce
Now, let’s make the stir-fry sauce. In a small bowl, combine the honey, rice vinegar, and sesame oil. Stir well until the honey is fully dissolved. This sauce will add a wonderful balance of sweet and tangy flavors to your dish. You can also add a pinch of salt and pepper to enhance the taste. Set this sauce aside for later use.
Step 4: Cooking the Chicken
Next, it’s time to cook the chicken. Heat 1 tablespoon of vegetable oil in a large skillet or wok over medium-high heat. Once the oil is hot, add the marinated chicken pieces. Cook them for about 5-7 minutes, stirring occasionally. You want the chicken to be browned and cooked through. Once done, remove the chicken from the skillet and set it aside. This step ensures that the chicken remains juicy and flavorful.
Step 5: Adding Vegetables and Sauce
In the same skillet, add the remaining tablespoon of vegetable oil. Then, toss in the minced garlic and grated ginger. Stir-fry for about 30 seconds until fragrant. Next, add the sliced red bell pepper and cook for 2-3 minutes until they are tender-crisp. After that, add the broccoli florets and snap peas. Stir everything together and cook for another 2-3 minutes. Finally, return the cooked chicken to the skillet and pour in the stir-fry sauce. Mix everything well, ensuring that the chicken and vegetables are coated in the sauce.
Step 6: Final Touches with Cashews
For the final touch, add the cashews to the skillet. Stir everything together for another minute or two, allowing the cashews to warm up. This step adds a delightful crunch to your dish. Once everything is heated through, taste and adjust the seasoning with salt and pepper if needed. Your Cashew Chicken Stir-Fry is now ready to be served!
Variation of Cashew Chicken Stir-Fry Recipe
Vegetarian Alternatives
If you’re looking for a vegetarian option, you can easily adapt the Cashew Chicken Stir-Fry Recipe. Instead of chicken, use tofu or tempeh. Both options provide a great source of protein and absorb flavors well. Start by pressing the tofu to remove excess moisture, then cut it into bite-sized cubes. Marinate the tofu in soy sauce and cornstarch just like you would with chicken. This will help it develop a nice texture when cooked.
In addition to tofu, you can add more vegetables to enhance the dish. Consider using mushrooms, bell peppers, or even zucchini. These vegetables not only add flavor but also increase the nutritional value of your meal. The cooking process remains the same, ensuring that your vegetarian stir-fry is just as delicious and satisfying as the original.
Gluten-Free Options
For those who need a gluten-free version of the Cashew Chicken Stir-Fry Recipe, it’s simple to make adjustments. Start by substituting regular soy sauce with gluten-free soy sauce or tamari. This will maintain the savory flavor without the gluten. Additionally, ensure that the cornstarch you use is certified gluten-free, as some brands may contain traces of gluten.
You can also explore using rice noodles instead of traditional noodles, which are often made with wheat. Rice noodles are a fantastic gluten-free alternative that pairs well with stir-fry dishes. By making these small changes, you can enjoy a delicious and safe meal that everyone can savor.
Cooking Note for Cashew Chicken Stir-Fry Recipe
Tips for Perfect Stir-Frying
Stir-frying is a quick cooking method that requires some attention to detail. Here are some tips to ensure your Cashew Chicken Stir-Fry turns out perfectly every time:
Prep Everything First: Before you start cooking, make sure all your ingredients are prepped and ready. This includes chopping vegetables, marinating the chicken, and measuring out sauces. Stir-frying happens fast, so having everything on hand is crucial.
Use High Heat: Stir-frying works best at high temperatures. This helps to sear the ingredients quickly, locking in flavors and moisture. Make sure your skillet or wok is hot before adding oil.
Don’t Overcrowd the Pan: If you add too many ingredients at once, they will steam instead of fry. Cook in batches if necessary to ensure even cooking and a nice sear.
Keep It Moving: Stir-frying requires constant movement. Use a spatula to toss the ingredients frequently. This ensures even cooking and prevents burning.
Finish with a Sauce: Adding the sauce at the end allows the flavors to coat the ingredients without overcooking them. This keeps your vegetables crisp and vibrant.
Common Mistakes to Avoid
Even the best cooks can make mistakes. Here are some common pitfalls to watch out for when making your Cashew Chicken Stir-Fry:
Not Marinating Long Enough: Marinating the chicken for at least 15 minutes is essential. This step enhances flavor and tenderness. Don’t skip it!
Using Cold Ingredients: Cold chicken or vegetables can lower the temperature of the pan, leading to uneven cooking. Make sure your ingredients are at room temperature before cooking.
Ignoring the Order of Cooking: Always cook proteins first, followed by vegetables. This ensures that everything is cooked properly and maintains the right texture.
Overcooking the Vegetables: Vegetables should be tender-crisp, not mushy. Keep an eye on them and remove them from the heat as soon as they are bright and tender.
Skipping the Cashews: Cashews add a delightful crunch and flavor. Don’t forget to include them in your stir-fry for that perfect finish!
Serving Suggestions for Cashew Chicken Stir-Fry Recipe
Best Side Dishes to Pair
When serving your Cashew Chicken Stir-Fry, consider pairing it with side dishes that complement its flavors and textures. Here are some excellent options:
Steamed Rice: A classic choice, steamed white or brown rice absorbs the savory sauce beautifully, making each bite delightful.
Fried Rice: For a twist, serve your stir-fry with fried rice. The added vegetables and eggs in fried rice enhance the meal’s flavor.
Noodles: Lo mein or rice noodles can be a great alternative. They add a different texture and soak up the sauce well.
Spring Rolls: These crispy rolls filled with vegetables or shrimp make a great appetizer or side, adding crunch to your meal.
Asian Slaw: A fresh slaw made with cabbage, carrots, and a tangy dressing can provide a refreshing contrast to the warm stir-fry.
These side dishes not only enhance the overall dining experience but also add variety to your plate, making your meal more enjoyable.
Presentation Tips
Presentation plays a key role in making your Cashew Chicken Stir-Fry appealing. Here are some tips to elevate your dish:
Use a Colorful Plate: Choose a vibrant plate to make the colors of your stir-fry pop. A white plate can also work well to highlight the dish’s colors.
Garnish Generously: Sprinkle chopped green onions or sesame seeds on top of the stir-fry for a fresh look. This adds a nice touch and enhances flavor.
Layer Your Ingredients: When serving, layer the rice or noodles first, then top with the stir-fry. This creates height and visual interest.
Serve in Bowls: Consider serving the stir-fry in individual bowls. This makes it easy for guests to enjoy and adds a cozy feel to the meal.
Include a Lime Wedge: A lime wedge on the side not only adds a pop of color but also allows guests to squeeze fresh juice over their dish for added flavor.
By following these presentation tips, you can turn your Cashew Chicken Stir-Fry into a feast for the eyes as well as the taste buds. Enjoy your delicious creation!
Tips for Making Cashew Chicken Stir-Fry Recipe
Ingredient Substitutions
Making the Cashew Chicken Stir-Fry Recipe is flexible, allowing you to swap ingredients based on your preferences or what you have on hand. Here are some great substitutions:
Chicken: If you don’t have chicken, try using turkey or even beef. Both options will work well with the stir-fry method.
Cashews: If you’re allergic to nuts, sunflower seeds or pumpkin seeds can provide a similar crunch without the allergens.
Vegetables: Feel free to use any vegetables you enjoy. Carrots, bell peppers, or even spinach can add flavor and nutrition.
Honey: Maple syrup or agave nectar can be used as a sweetener if you prefer a different taste.
Rice Vinegar: Apple cider vinegar or white vinegar can be good alternatives if you don’t have rice vinegar on hand.
These substitutions can help you create a dish that suits your taste while still keeping the essence of the Cashew Chicken Stir-Fry Recipe intact.
Storage and Reheating Tips
After enjoying your Cashew Chicken Stir-Fry, you might have some leftovers. Here’s how to store and reheat them properly:
Storage: Allow the stir-fry to cool completely before transferring it to an airtight container. It can be stored in the refrigerator for up to 3 days.
Freezing: If you want to keep it longer, consider freezing the stir-fry. Place it in a freezer-safe container, and it can last for up to 2 months.
Reheating: To reheat, simply warm it in a skillet over medium heat until heated through. You can also use the microwave, but be sure to cover it to prevent drying out.
Adding Freshness: When reheating, consider adding a splash of soy sauce or a sprinkle of fresh green onions to revive the flavors.
By following these storage and reheating tips, you can enjoy your Cashew Chicken Stir-Fry even after the first serving!
Breakdown of Time for Cashew Chicken Stir-Fry Recipe
Prep Time
Preparing your Cashew Chicken Stir-Fry is quick and easy. The prep time typically takes about 20 minutes. This includes cutting the chicken into bite-sized pieces, marinating it, and chopping all the vegetables. Having everything ready before you start cooking is essential for a smooth cooking experience. So, take your time during this step to ensure you have all your ingredients prepped and organized.
Cooking Time
The cooking time for the Cashew Chicken Stir-Fry is approximately 15 minutes. This includes cooking the marinated chicken until it’s browned and cooked through, stir-frying the vegetables, and combining everything with the sauce. Stir-frying is a fast cooking method, so be prepared to keep an eye on your ingredients to avoid overcooking. The quick cooking time helps retain the vibrant colors and nutrients of the vegetables.
Total Time
In total, you can expect the entire process of making Cashew Chicken Stir-Fry to take about 35 minutes. This includes both the prep and cooking times. With such a short time commitment, this dish is perfect for busy weeknights when you want a delicious and nutritious meal without spending hours in the kitchen. Enjoy the process and the delightful flavors that come together in this quick stir-fry!
Nutritional Information for Cashew Chicken Stir-Fry Recipe
Calories and Macronutrients
Understanding the nutritional content of your meals is essential for maintaining a balanced diet. The Cashew Chicken Stir-Fry is not only delicious but also provides a good mix of macronutrients. Here’s a breakdown of the nutritional information per serving:
Calories: 400
Net Carbs: 20g
Protein: 30g
Fat: 22g
This dish offers a healthy balance of protein, fats, and carbohydrates, making it a great option for a satisfying meal. The protein from chicken and cashews helps in muscle repair and growth, while the healthy fats provide energy and support overall health.
Health Benefits of Ingredients
The ingredients in Cashew Chicken Stir-Fry not only contribute to its delicious flavor but also offer numerous health benefits:
Chicken: A lean source of protein, chicken is low in fat and rich in essential nutrients like B vitamins, which are vital for energy production.
Cashews: These nuts are packed with healthy fats, protein, and minerals like magnesium and zinc. They support heart health and can help lower cholesterol levels.
Broccoli: This green vegetable is high in vitamins C and K, fiber, and antioxidants. It promotes healthy digestion and boosts the immune system.
Red Bell Pepper: Rich in vitamin A and antioxidants, red bell peppers help improve eye health and reduce inflammation.
Garlic: Known for its immune-boosting properties, garlic can help lower blood pressure and improve heart health.
Ginger: This spice is known for its anti-inflammatory effects and can aid in digestion and reduce nausea.
Green Onions: These add flavor and are a good source of vitamins A and C, as well as antioxidants.
By incorporating these nutritious ingredients, your Cashew Chicken Stir-Fry not only satisfies your taste buds but also supports your overall health. Enjoy this meal knowing it’s good for you!
FAQs about Cashew Chicken Stir-Fry Recipe
Can I use other nuts instead of cashews?
Absolutely! While cashews are a key ingredient in this dish, you can easily substitute them with other nuts. Almonds, peanuts, or even walnuts can work well. Each nut brings its unique flavor and texture, so feel free to experiment. Just remember to adjust the cooking time slightly, as different nuts may toast at different rates. Enjoy the variety!
How can I make this dish spicier?
If you love a bit of heat, there are several ways to spice up your Cashew Chicken Stir-Fry. You can add red pepper flakes or sriracha to the stir-fry sauce for an extra kick. Another option is to include sliced fresh chili peppers during the cooking process. Start with a small amount and adjust to your taste. This way, you can enjoy a flavorful dish that suits your spice preference!
Is it possible to make Cashew Chicken Stir-Fry Recipe ahead of time?
Yes, you can prepare parts of the Cashew Chicken Stir-Fry ahead of time! You can marinate the chicken and chop the vegetables a few hours in advance. Just store them separately in the refrigerator until you’re ready to cook. However, for the best taste and texture, it’s recommended to cook the stir-fry fresh. If you have leftovers, they can be stored in an airtight container for up to three days.
What can I serve with Cashew Chicken Stir-Fry Recipe?
Cashew Chicken Stir-Fry pairs wonderfully with various side dishes. Steamed rice or fried rice is a classic choice, as it complements the flavors perfectly. You can also serve it with noodles, like lo mein or rice noodles, for a different twist. For a refreshing contrast, consider adding a side of Asian slaw or spring rolls. These options will enhance your meal and make it even more enjoyable!
Conclusion on Cashew Chicken Stir-Fry Recipe
Recap of Key Points
In summary, the Cashew Chicken Stir-Fry is a delightful dish that combines tender chicken, crunchy vegetables, and the rich flavor of cashews. With its quick preparation and cooking time, it’s perfect for busy weeknights. The essential ingredients, such as soy sauce, honey, and fresh vegetables, create a harmonious blend of flavors that is both satisfying and nutritious. Additionally, the recipe offers flexibility, allowing for various substitutions and adaptations to suit different dietary needs. Whether you choose to make it vegetarian or gluten-free, the essence of this dish remains intact, ensuring a delicious meal every time.
Encouragement to Try the Recipe
We encourage you to try making the Cashew Chicken Stir-Fry at home. It’s not only a fun cooking experience but also a chance to enjoy a meal that is both healthy and flavorful. Gather your ingredients, follow the steps, and watch as your kitchen fills with delightful aromas. Whether you’re cooking for yourself, family, or friends, this dish is sure to impress. So, roll up your sleeves and get ready to create a delicious stir-fry that will have everyone asking for seconds!
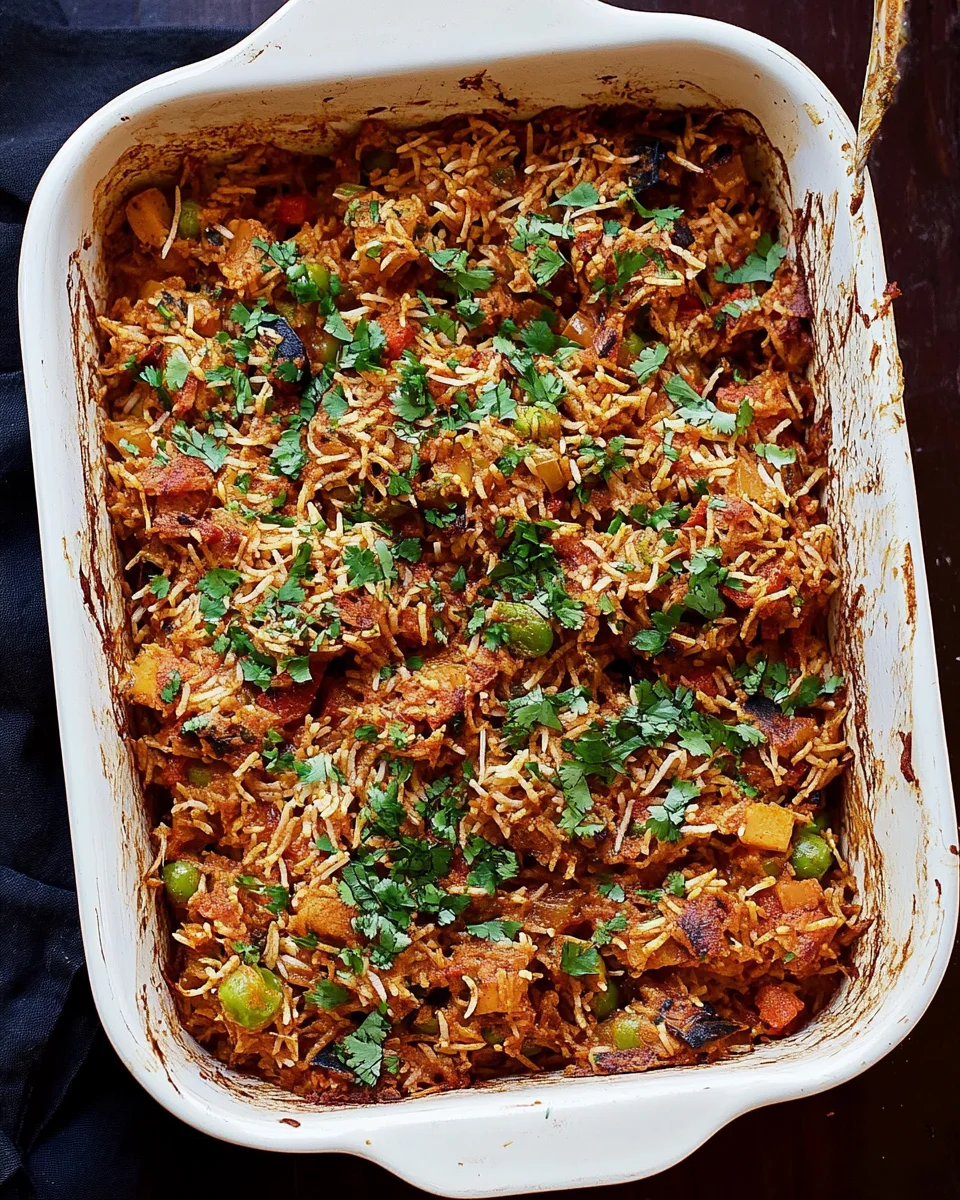
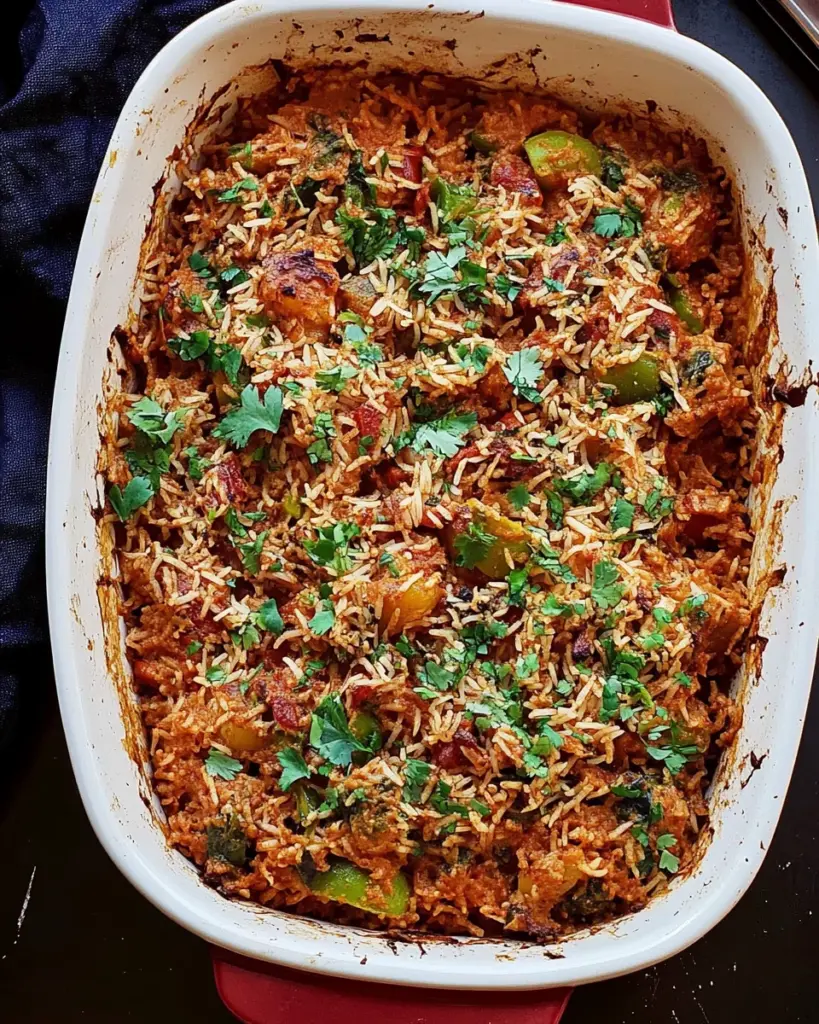
Introduction to Creamy Tikka Masala Rice Bake Recipe
Are you looking for a delicious and comforting dish that’s easy to prepare? Look no further than the Creamy Tikka Masala Rice Bake Recipe! This dish combines the rich flavors of tikka masala with the heartiness of rice, making it a perfect meal for any occasion. Whether you’re cooking for family or friends, this recipe is sure to impress.
What is Tikka Masala?
Tikka masala is a popular Indian dish known for its creamy tomato-based sauce and aromatic spices. Traditionally, it features marinated meat, often chicken, cooked in a spiced sauce. However, this recipe takes a delightful twist by incorporating chickpeas and rice, making it vegetarian-friendly. The blend of spices, including cumin, coriander, and garam masala, creates a warm and inviting flavor profile that tantalizes the taste buds. With its vibrant colors and rich taste, tikka masala has become a favorite in many households around the world.
Why Choose a Rice Bake?
Rice bakes are a fantastic choice for several reasons. First, they are incredibly versatile. You can easily customize them with your favorite ingredients, making them suitable for various dietary preferences. Second, they are perfect for meal prep. You can make a large batch and enjoy leftovers throughout the week. Lastly, rice bakes are simple to prepare. Just mix your ingredients, pop them in the oven, and let the magic happen! This Creamy Tikka Masala Rice Bake Recipe is not only easy to make but also a comforting dish that brings warmth to your table.
Ingredients for Creamy Tikka Masala Rice Bake Recipe
To create the delightful Creamy Tikka Masala Rice Bake, you’ll need a variety of fresh and pantry ingredients. Each component plays a crucial role in building the rich flavors and creamy texture that make this dish so special. Here’s what you’ll need:
2 cups cooked basmati rice: This fluffy rice serves as the base of the dish, soaking up all the delicious flavors.
1 tablespoon olive oil: Used for sautéing the vegetables, olive oil adds a healthy fat and enhances the overall taste.
1 medium onion, diced: Onions provide a sweet and savory foundation for the dish.
3 cloves garlic, minced: Garlic adds a fragrant aroma and depth of flavor.
1 tablespoon fresh ginger, grated: Ginger brings a warm, spicy note that complements the tikka masala.
1 bell pepper, diced (any color): Bell peppers add a pop of color and sweetness.
1 can (15 oz) chickpeas, drained and rinsed: Chickpeas are a great source of protein and add a hearty texture.
1 can (14 oz) coconut milk: Coconut milk provides creaminess and a subtle sweetness.
1 cup tomato sauce: This forms the base of the tikka masala sauce, adding acidity and richness.
2 tablespoons tikka masala spice blend: This blend is essential for achieving that authentic tikka masala flavor.
1 teaspoon salt: Salt enhances all the flavors in the dish.
1/2 teaspoon black pepper: Black pepper adds a hint of heat.
1 cup frozen peas: Peas add a burst of color and sweetness, making the dish more vibrant.
1/2 cup fresh cilantro, chopped (for garnish): Cilantro adds freshness and a lovely finishing touch.
1/2 cup shredded vegan cheese (optional): For those who enjoy a cheesy topping, this is a great addition.
Gathering these ingredients will set you on the path to creating a delicious and satisfying meal. Each item contributes to the overall flavor and texture, making this Creamy Tikka Masala Rice Bake a dish you’ll want to make again and again!
Step-by-Step Preparation of Creamy Tikka Masala Rice Bake Recipe
Now that you have all your ingredients ready, it’s time to dive into the preparation of your Creamy Tikka Masala Rice Bake. This step-by-step guide will help you create a delicious dish that’s sure to impress. Let’s get started!
Step 1: Prepping the Ingredients
First things first, you need to prep your ingredients. Start by dicing the onion and bell pepper. Mince the garlic and grate the ginger. Having everything ready will make the cooking process smooth and enjoyable. Remember, fresh ingredients make a big difference in flavor!
Step 2: Cooking the Rice
If you haven’t cooked your basmati rice yet, now is the time! Rinse the rice under cold water until the water runs clear. This helps remove excess starch. Then, cook it according to the package instructions. Once done, fluff it with a fork and set it aside. The fluffy rice will soak up all the delicious tikka masala flavors later.
Step 3: Making the Tikka Masala Sauce
In a large skillet, heat the olive oil over medium heat. Add the diced onion and sauté for about 5 minutes until it becomes translucent. Next, stir in the minced garlic and grated ginger, cooking for an additional minute until fragrant. Then, toss in the diced bell pepper and chickpeas, cooking for another 3-4 minutes until the bell pepper softens. Now, pour in the coconut milk and tomato sauce. Add the tikka masala spice blend, salt, and black pepper. Stir well and let it simmer for 5 minutes. This sauce is where all the magic happens!
Step 4: Combining Ingredients
In a large mixing bowl, combine the cooked basmati rice with the chickpea-tikka masala mixture. Gently fold in the frozen peas, ensuring everything is well mixed. This step is crucial as it allows the rice to absorb the flavors of the sauce. The combination of textures and tastes will make your dish truly delightful!
Step 5: Baking the Dish
Now it’s time to transfer the rice mixture to a greased 9×13 inch baking dish. If you’re using shredded vegan cheese, sprinkle it on top for a cheesy finish. Cover the dish with aluminum foil and bake it in a preheated oven at 375°F for 25 minutes. After that, remove the foil and bake for an additional 10-15 minutes until it’s heated through and slightly golden on top. The aroma will fill your kitchen, making it hard to wait!
Once baked, garnish with fresh cilantro before serving. Your Creamy Tikka Masala Rice Bake is now ready to be enjoyed!
Variations of Creamy Tikka Masala Rice Bake Recipe
The Creamy Tikka Masala Rice Bake is a versatile dish that can be easily adapted to suit different tastes and dietary needs. Whether you’re looking to switch things up or cater to specific preferences, there are plenty of variations to explore. Let’s dive into some exciting options!
Vegetarian Options
If you want to keep your dish vegetarian, there are many delicious alternatives to consider. Instead of chickpeas, you can use cooked lentils, which provide a similar texture and protein content. Another great option is to add a variety of vegetables, such as zucchini, spinach, or mushrooms. These veggies not only enhance the flavor but also add nutritional value. You can also experiment with different grains, like quinoa or farro, for a unique twist on the classic rice bake.
Protein Additions
For those who want to boost the protein content, consider adding cooked chicken, tofu, or tempeh. If you choose chicken, make sure to cook it thoroughly before mixing it with the tikka masala sauce. Tofu and tempeh can be marinated in the tikka masala spices before cooking to infuse them with flavor. These protein additions will make your Creamy Tikka Masala Rice Bake even heartier and satisfying!
Spice Level Adjustments
Do you love a little heat in your dishes? You can easily adjust the spice level of your Creamy Tikka Masala Rice Bake. For a milder flavor, simply reduce the amount of tikka masala spice blend. If you prefer a spicier kick, add chopped green chilies or a pinch of cayenne pepper to the skillet while cooking. You can also serve the dish with a side of spicy chutney for an extra burst of flavor. Tailoring the spice level to your liking will make this dish even more enjoyable!
With these variations, you can create a Creamy Tikka Masala Rice Bake that suits your taste and dietary preferences. Feel free to get creative and make it your own!
Cooking Note for Creamy Tikka Masala Rice Bake Recipe
When preparing the Creamy Tikka Masala Rice Bake, there are a few important cooking notes to keep in mind. These tips will help ensure that your dish turns out perfectly every time, enhancing both flavor and texture.
First, always use fresh ingredients whenever possible. Fresh vegetables, herbs, and spices can significantly elevate the taste of your dish. For instance, using fresh ginger instead of powdered ginger will provide a more vibrant flavor. Similarly, fresh cilantro as a garnish adds a burst of freshness that complements the creamy sauce.
Next, be mindful of the cooking time. Overcooking the rice can lead to a mushy texture, which is not ideal for a bake. Make sure to cook the basmati rice according to the package instructions, and fluff it gently with a fork once it’s done. This will help maintain its light and fluffy texture, allowing it to absorb the tikka masala sauce beautifully.
Additionally, when combining the ingredients, be gentle. Folding the rice into the sauce mixture should be done carefully to avoid breaking the grains. This will help keep the dish looking appealing and ensure that each bite is filled with flavor.
Lastly, if you’re using frozen peas, there’s no need to thaw them before adding them to the mixture. They will cook perfectly in the oven, adding a lovely pop of color and sweetness to your bake. Just remember to mix them in gently to distribute them evenly throughout the dish.
By following these cooking notes, you’ll create a Creamy Tikka Masala Rice Bake that is not only delicious but also visually appealing. Enjoy the process and savor the delightful flavors that come together in this comforting dish!
Serving Suggestions for Creamy Tikka Masala Rice Bake Recipe
Once your Creamy Tikka Masala Rice Bake is ready, it’s time to think about how to serve it. This dish is not only delicious on its own, but it also pairs wonderfully with various sides and beverages. Here are some suggestions to elevate your meal experience!
Ideal Side Dishes
To complement the rich flavors of the Creamy Tikka Masala Rice Bake, consider serving it with some delightful side dishes. Here are a few ideas:
Garlic Naan: This soft, pillowy bread is perfect for scooping up the creamy rice bake. The garlic flavor adds an extra layer of taste.
Simple Green Salad: A fresh salad with mixed greens, cucumbers, and a light vinaigrette can balance the richness of the bake. The crunchiness of the veggies adds a nice contrast.
Raita: This yogurt-based side dish, often mixed with cucumber and mint, provides a cooling effect that pairs well with the spices in the tikka masala.
Roasted Vegetables: A medley of roasted seasonal vegetables can add color and nutrition to your meal. The caramelized flavors will enhance the overall dining experience.
These side dishes not only enhance the meal but also add variety to your plate, making it visually appealing and satisfying.
Pairing with Beverages
Choosing the right beverage can elevate your dining experience even further. Here are some beverage options that pair beautifully with the Creamy Tikka Masala Rice Bake:
Mango Lassi: This sweet and creamy yogurt drink is a classic Indian beverage. Its fruity flavor complements the spices in the dish perfectly.
Chai Tea: A warm cup of spiced chai tea can enhance the meal’s flavors. The aromatic spices in chai echo the tikka masala spices.
Light Beer: A light lager or wheat beer can be refreshing and help cleanse the palate between bites.
Sparkling Water: For a non-alcoholic option, sparkling water with a slice of lemon or lime can be a refreshing choice that doesn’t overpower the dish.
By thoughtfully selecting side dishes and beverages, you can create a well-rounded meal that highlights the deliciousness of your Creamy Tikka Masala Rice Bake. Enjoy the delightful flavors and the company of your loved ones!
Tips for Perfecting Your Creamy Tikka Masala Rice Bake Recipe
To ensure your Creamy Tikka Masala Rice Bake turns out perfectly every time, consider these helpful tips. They will enhance the flavors and textures, making your dish even more delightful!
First, always taste as you go. This is key to achieving the perfect balance of flavors. After adding the tikka masala spice blend, take a moment to taste the sauce. If you feel it needs more seasoning, don’t hesitate to adjust with a pinch of salt or extra spices. Remember, everyone’s palate is different!
Next, consider the texture of your rice. For the best results, use freshly cooked basmati rice. If you have leftover rice, make sure it’s not too dry. You can add a splash of water or coconut milk to moisten it before mixing it with the sauce. This will help the rice absorb the flavors better.
Another tip is to let the dish rest for a few minutes after baking. This allows the flavors to meld together and makes serving easier. If you cut into the bake right away, it may fall apart. A little patience goes a long way!
Don’t forget about garnishing! Fresh cilantro adds a burst of color and flavor. You can also sprinkle some toasted nuts or seeds on top for added crunch. This not only enhances the presentation but also adds a delightful texture contrast.
Lastly, experiment with different toppings. If you’re feeling adventurous, try adding a dollop of vegan yogurt or a drizzle of tahini before serving. These additions can elevate the dish and provide a unique twist to your Creamy Tikka Masala Rice Bake.
By following these tips, you’ll create a Creamy Tikka Masala Rice Bake that’s not only delicious but also visually stunning. Enjoy the process and the wonderful flavors that come together in this comforting dish!
Breakdown of Time for Creamy Tikka Masala Rice Bake Recipe
Understanding the time required for each step of the Creamy Tikka Masala Rice Bake Recipe can help you plan your cooking efficiently. Here’s a detailed breakdown of the time you’ll need for preparation and cooking.
Prep Time
The prep time for this delicious dish is approximately 15-20 minutes. During this time, you will gather all your ingredients, dice the vegetables, and prepare the rice. Having everything ready before you start cooking will make the process smoother and more enjoyable. Remember, the fresher your ingredients, the better your dish will taste!
Cooking Time
The cooking time for the Creamy Tikka Masala Rice Bake is about 40-45 minutes. This includes:
Sautéing the vegetables and making the tikka masala sauce: Approximately 10-15 minutes.
Baking the dish: 25 minutes covered with foil, followed by an additional 10-15 minutes uncovered to achieve a golden top.
During this time, your kitchen will fill with the wonderful aroma of spices, making it hard to resist!
Total Time
In total, you can expect to spend about 55-65 minutes from start to finish. This includes both prep and cooking time. With this manageable time frame, you can easily whip up a comforting and flavorful meal that serves six people. It’s perfect for a weeknight dinner or a gathering with friends and family!
Nutritional Information for Creamy Tikka Masala Rice Bake Recipe
Understanding the nutritional content of your meals is essential for maintaining a balanced diet. The Creamy Tikka Masala Rice Bake is not only delicious but also provides a good mix of nutrients. Here’s a breakdown of the nutritional information per serving:
Calories
Each serving of the Creamy Tikka Masala Rice Bake contains approximately 320 calories. This makes it a satisfying meal option without being overly heavy. The combination of basmati rice, chickpeas, and coconut milk contributes to the calorie count while providing essential energy for your day.
Protein
In terms of protein, this dish offers about 10 grams per serving. The chickpeas are a fantastic source of plant-based protein, making this recipe a great choice for vegetarians and vegans. If you choose to add additional protein, such as chicken or tofu, you can easily increase the protein content to meet your dietary needs.
Sodium
The sodium content in each serving is around 500 milligrams. This amount is reasonable for a flavorful dish, but if you are watching your sodium intake, consider using low-sodium tomato sauce and coconut milk. Adjusting the salt in the recipe can also help you manage the sodium levels while still enjoying the rich flavors of the tikka masala.
Overall, the Creamy Tikka Masala Rice Bake is a nutritious and balanced meal option. It provides a good mix of carbohydrates, protein, and healthy fats, making it a great choice for lunch or dinner. Enjoy this delightful dish while being mindful of your nutritional goals!
FAQs about Creamy Tikka Masala Rice Bake Recipe
Can I make this dish ahead of time?
Absolutely! The Creamy Tikka Masala Rice Bake is perfect for making ahead of time. You can prepare the entire dish, cover it tightly, and store it in the refrigerator for up to 2 days before baking. When you’re ready to enjoy it, simply pop it in the oven. You may need to add a few extra minutes to the baking time if it’s coming straight from the fridge. This makes it a great option for busy weeknights or meal prepping for the week!
What can I substitute for rice?
If you’re looking for alternatives to rice, there are several options you can try! Quinoa is a fantastic substitute, offering a nutty flavor and extra protein. Cauliflower rice is another great low-carb option that will still soak up the delicious tikka masala sauce. You can also use farro or barley for a hearty texture. Each of these substitutes will give your Creamy Tikka Masala Bake a unique twist while maintaining the dish’s comforting essence.
Is this recipe suitable for meal prep?
Yes, this recipe is excellent for meal prep! The Creamy Tikka Masala Rice Bake can be made in advance and stored in individual portions. Just divide the baked dish into meal prep containers and refrigerate. It will stay fresh for up to 4 days. When you’re ready to eat, simply reheat in the microwave or oven. This makes it a convenient and delicious option for lunches or quick dinners throughout the week!
How can I make it spicier?
If you love a spicy kick, there are several ways to amp up the heat in your Creamy Tikka Masala Rice Bake. You can add chopped green chilies or a pinch of cayenne pepper to the skillet while cooking the vegetables. Another option is to use a spicier tikka masala spice blend. If you want to take it up a notch, serve the dish with a side of spicy chutney or hot sauce. Adjusting the spice level to your preference will make this dish even more enjoyable!
Conclusion on Creamy Tikka Masala Rice Bake Recipe
In conclusion, the Creamy Tikka Masala Rice Bake is a delightful dish that brings together the rich flavors of tikka masala with the comforting texture of rice. This recipe is not only easy to prepare but also offers a wonderful opportunity to customize it according to your taste preferences. Whether you choose to keep it vegetarian, add protein, or adjust the spice level, the possibilities are endless!
This dish is perfect for family dinners, gatherings with friends, or even meal prep for busy weekdays. With its vibrant colors and mouthwatering aroma, it’s sure to impress anyone who tries it. Plus, the nutritional benefits make it a wholesome choice for any meal.
As you embark on your cooking journey, remember to enjoy the process. Cooking is not just about the final dish; it’s about the love and creativity you put into it. So gather your ingredients, follow the steps, and savor the delightful flavors of your Creamy Tikka Masala Rice Bake. Happy cooking!
Introduction to Pho Ga Vietnamese Chicken Noodle Soup
What is Pho Ga Vietnamese Chicken Noodle Soup?
Pho Ga Vietnamese Chicken Noodle Soup is a delightful dish that warms the heart and soul. This traditional Vietnamese soup features tender chicken, aromatic herbs, and flavorful rice noodles. The broth is the star of the show, simmered to perfection with spices like star anise and cinnamon. Each bowl is a comforting blend of flavors that brings a taste of Vietnam right to your kitchen.
Pho Ga is not just a meal; it’s an experience. The combination of fresh ingredients and fragrant spices creates a dish that is both nourishing and satisfying. Whether enjoyed for breakfast, lunch, or dinner, Pho Ga is a beloved staple in Vietnamese cuisine. It’s often served with a variety of garnishes, allowing each person to customize their bowl to their liking.
The Cultural Significance of Pho Ga
Pho Ga holds a special place in Vietnamese culture. It is more than just food; it represents family, tradition, and community. Many families have their own recipes passed down through generations, making it a cherished dish during gatherings and celebrations. In Vietnam, you can find Pho Ga at street stalls, restaurants, and homes alike, showcasing its popularity and versatility.
This soup is often enjoyed during special occasions, but it is also a comfort food for everyday life. The act of sharing a bowl of Pho Ga brings people together, fostering connections and creating memories. As you savor each spoonful, you’re not just tasting a delicious meal; you’re partaking in a rich cultural heritage that celebrates the joy of food and togetherness.
Ingredients for Pho Ga Vietnamese Chicken Noodle Soup
To create a delicious bowl of Pho Ga Vietnamese Chicken Noodle Soup, you’ll need a variety of fresh and flavorful ingredients. Each component plays a vital role in building the rich taste of this beloved dish. Here’s what you’ll need:
3 quarts chicken broth: This serves as the base of your soup, providing depth and flavor.
1 whole chicken (about 3-4 pounds): The star of the dish, offering tender meat and enhancing the broth.
1 medium onion, halved: Adds sweetness and aroma to the broth.
1 piece of ginger (about 2 inches), sliced: Infuses the soup with a warm, spicy flavor.
4 star anise: A key spice that gives Pho Ga its distinctive taste.
3 cloves: Adds a hint of warmth and sweetness.
1 cinnamon stick: Provides a comforting, aromatic flavor.
2 tablespoons fish sauce: Enhances the umami flavor of the broth.
1 tablespoon sugar: Balances the savory and spicy notes.
1 teaspoon salt: Essential for seasoning the broth.
8 ounces rice noodles: The perfect vehicle for the broth and chicken.
Fresh herbs (basil, cilantro, mint): For garnishing and adding freshness.
Lime wedges: A zesty addition that brightens the flavors.
Sliced jalapeños: For those who enjoy a spicy kick.
Gathering these ingredients will set you on the right path to making a delightful Pho Ga. Each item contributes to the overall flavor profile, ensuring that your soup is both authentic and satisfying. Now that you have everything ready, you can move on to the preparation steps!
Step-by-Step Preparation of Pho Ga Vietnamese Chicken Noodle Soup
Step 1: Preparing the Broth
To start, you’ll want to create a rich and flavorful broth. In a large pot, combine the chicken broth, whole chicken, halved onion, sliced ginger, star anise, cloves, and cinnamon stick. Add the fish sauce, sugar, and salt to enhance the taste. Bring this mixture to a boil over medium-high heat. Once it reaches a boil, reduce the heat to low and cover the pot. Let it simmer for about 30-40 minutes. This slow cooking allows the flavors to meld beautifully, creating a delicious base for your Pho Ga.
Step 2: Cooking the Chicken
After the broth has simmered, it’s time to focus on the chicken. Carefully remove the chicken from the pot and set it aside to cool. This step is crucial as it allows the chicken to be shredded easily later. While the chicken cools, strain the broth through a fine-mesh sieve to remove the solids. This will leave you with a clear, aromatic broth that is perfect for your soup.
Step 3: Preparing the Noodles
While the broth is simmering, you can prepare the rice noodles. Follow the package instructions for cooking them. Typically, this involves boiling them in water for a few minutes until they are tender. Once cooked, drain the noodles and set them aside. This step ensures that your noodles are ready to soak up the delicious broth when it’s time to serve.
Step 4: Assembling the Soup
Now comes the fun part—assembling your Pho Ga! In a bowl, place a portion of the cooked rice noodles. Top it with the shredded chicken, which you can prepare by pulling apart the cooled chicken into bite-sized pieces. Finally, ladle the hot, fragrant broth over the noodles and chicken. This step brings everything together, creating a warm and inviting dish.
Step 5: Garnishing the Pho Ga
To finish off your Pho Ga, it’s time to add some fresh garnishes. Sprinkle a handful of fresh herbs like basil, cilantro, and mint on top. These herbs not only add color but also enhance the flavor of the soup. Serve with lime wedges and sliced jalapeños on the side, allowing everyone to customize their bowl to their liking. The bright lime juice and spicy jalapeños elevate the dish, making it even more enjoyable.
Variations of Pho Ga Vietnamese Chicken Noodle Soup
Regional Variations
Pho Ga is a beloved dish across Vietnam, and each region has its own unique twist on this classic soup. In the north, the broth tends to be lighter and more aromatic, focusing on the natural flavors of the chicken and spices. Here, you might find a more pronounced taste of ginger and a simpler garnish of herbs.
In contrast, southern Vietnam offers a richer and bolder version of Pho Ga. This variation often includes a wider array of garnishes, such as bean sprouts, lime, and even fried shallots. The southern style embraces a more robust flavor profile, making it a favorite among those who enjoy a heartier meal.
Central Vietnam also adds its flair to Pho Ga. Here, you may encounter a spicier broth, with more chili peppers and a variety of local herbs. This regional twist highlights the diverse culinary landscape of Vietnam, showcasing how Pho Ga can adapt to local tastes and ingredients.
Alternative Ingredients for Pho Ga
While the traditional recipe for Pho Ga is delicious, there are many ways to customize it to suit your preferences. For instance, if you’re looking for a lighter option, consider using boneless, skinless chicken breasts instead of a whole chicken. This will reduce the cooking time and make the dish a bit healthier.
Vegetarians can also enjoy a version of Pho Ga by substituting chicken with tofu or mushrooms. Use vegetable broth instead of chicken broth, and add extra spices to enhance the flavor. This alternative allows everyone to savor the comforting essence of Pho Ga, regardless of dietary preferences.
Additionally, feel free to experiment with different herbs and spices. Some people enjoy adding a splash of hoisin sauce or sriracha for an extra kick. Others might include fresh bean sprouts or sliced radishes for added crunch. The beauty of Pho Ga lies in its versatility, allowing you to create a bowl that is uniquely yours.
Cooking Note for Pho Ga Vietnamese Chicken Noodle Soup
When preparing Pho Ga Vietnamese Chicken Noodle Soup, attention to detail can make all the difference. Here are some essential cooking notes to ensure your soup turns out perfectly every time.
First, the quality of your chicken broth is crucial. If possible, use homemade chicken broth for the best flavor. Store-bought broth can work in a pinch, but it may lack the depth and richness that homemade offers. If you have time, consider simmering chicken bones with water, onions, and spices to create a flavorful base.
Next, the cooking time for the chicken is important. Overcooking can lead to dry meat, while undercooking can be unsafe. Aim for a cooking time of 30-40 minutes, checking the chicken for doneness. The meat should be tender and easily shred with a fork.
Another tip is to let the broth cool slightly before straining. This allows the flavors to settle, making it easier to separate the solids from the liquid. Use a fine-mesh sieve to ensure a clear broth, free from any bits of spices or chicken.
When it comes to the rice noodles, be careful not to overcook them. They should be tender but still have a slight bite. If you’re preparing the noodles ahead of time, rinse them under cold water after draining to stop the cooking process. This will help maintain their texture when added to the hot broth.
Lastly, don’t rush the garnishing process. Fresh herbs, lime, and jalapeños are not just for decoration; they enhance the overall flavor of the soup. Encourage your guests to customize their bowls with their favorite toppings, making each serving a personal experience.
By following these cooking notes, you’ll create a delicious and authentic Pho Ga that captures the essence of Vietnamese cuisine. Enjoy the process, and savor the delightful flavors that come together in this comforting bowl of soup!
Serving Suggestions for Pho Ga Vietnamese Chicken Noodle Soup
Serving Pho Ga Vietnamese Chicken Noodle Soup is an art in itself. The way you present this dish can enhance the overall dining experience. Here are some delightful serving suggestions to make your Pho Ga even more enjoyable.
First, consider using large, shallow bowls. These allow for ample space for the noodles, chicken, and broth, making it easy to mix everything together. The presentation is important, and a wide bowl showcases the vibrant colors of the fresh herbs and garnishes.
Next, serve the soup hot. Pho Ga is best enjoyed steaming, as the warmth brings out the flavors of the broth and the spices. You can keep the broth hot in a separate pot on the stove, allowing guests to ladle it over their noodles and chicken as they serve themselves.
For a complete meal, pair your Pho Ga with a side of crispy spring rolls or banh mi sandwiches. These dishes complement the soup beautifully and add variety to the meal. The crunch of the spring rolls contrasts nicely with the soft noodles, creating a delightful texture experience.
Don’t forget about beverages! A refreshing drink can elevate your dining experience. Iced Vietnamese coffee or a light herbal tea pairs wonderfully with Pho Ga. These drinks balance the flavors of the soup and provide a refreshing contrast.
Lastly, encourage your guests to customize their bowls. Provide a variety of garnishes, such as bean sprouts, sliced radishes, and hoisin sauce. This allows everyone to tailor their Pho Ga to their taste, making the meal more interactive and enjoyable.
By following these serving suggestions, you’ll create a memorable dining experience centered around your delicious Pho Ga Vietnamese Chicken Noodle Soup. Enjoy the warmth, flavors, and the joy of sharing this wonderful dish with family and friends!
Tips for Making the Perfect Pho Ga Vietnamese Chicken Noodle Soup
Creating the perfect Pho Ga Vietnamese Chicken Noodle Soup is an art that combines fresh ingredients, careful preparation, and a touch of love. Here are some valuable tips to help you achieve a delicious and authentic bowl of Pho Ga every time.
First, always start with high-quality ingredients. Fresh herbs, a good chicken, and flavorful broth are essential. If you can, opt for organic chicken. This will enhance the taste of your soup significantly. Fresh herbs like basil, cilantro, and mint should be vibrant and fragrant, as they add a burst of flavor to your dish.
Next, don’t rush the simmering process. Allow the broth to simmer gently for at least 30-40 minutes. This slow cooking extracts the flavors from the chicken and spices, resulting in a rich and aromatic broth. If you have time, consider simmering the broth even longer for an even deeper flavor.
Another tip is to roast the onion and ginger before adding them to the broth. This simple step adds a smoky depth to the flavor, making your Pho Ga even more delicious. Just place them in the oven until they are slightly charred, then add them to the pot.
When it comes to the rice noodles, be mindful of the cooking time. Overcooked noodles can become mushy and lose their texture. Follow the package instructions closely, and rinse them under cold water after draining to stop the cooking process. This will help them maintain their firmness when served in the hot broth.
Lastly, don’t forget the garnishes! Fresh herbs, lime wedges, and sliced jalapeños are not just for decoration; they elevate the flavors of your Pho Ga. Encourage everyone to customize their bowls with their favorite toppings. This interactive element makes the meal more enjoyable and personal.
By following these tips, you’ll be well on your way to making a perfect Pho Ga Vietnamese Chicken Noodle Soup that will impress your family and friends. Enjoy the process, and savor the delightful flavors that come together in this comforting dish!
Breakdown of Time for Pho Ga Vietnamese Chicken Noodle Soup
Prep Time
Preparing Pho Ga Vietnamese Chicken Noodle Soup is a delightful process that requires some initial setup. The prep time typically takes about 15-20 minutes. During this time, you will gather all your ingredients, chop the onion and ginger, and measure out the spices. This step is essential for ensuring a smooth cooking experience. Having everything ready will make the cooking process much more enjoyable and efficient.
Cooking Time
The cooking time for Pho Ga is where the magic happens! Once you start simmering the broth, it usually takes around 30-40 minutes for the chicken to cook through and for the flavors to meld beautifully. After removing the chicken, you’ll need an additional 5-10 minutes to strain the broth and prepare the rice noodles. Overall, the cooking time will be approximately 40-50 minutes, depending on how long you let the broth simmer for maximum flavor.
Total Time
In total, you can expect to spend about 1 hour to 1 hour and 10 minutes from start to finish when making Pho Ga Vietnamese Chicken Noodle Soup. This includes both the prep and cooking times. It’s a relatively quick dish to prepare, especially considering the rich flavors you’ll achieve. Once you’ve mastered the process, you’ll find that making this comforting soup can easily fit into your busy schedule!
Nutritional Information for Pho Ga Vietnamese Chicken Noodle Soup
Calories
When it comes to enjoying Pho Ga Vietnamese Chicken Noodle Soup, you can feel good about its nutritional profile. Each serving contains approximately 350 calories. This makes it a satisfying yet light meal option. The balance of ingredients ensures that you’re not just filling up on empty calories. Instead, you’re nourishing your body with wholesome ingredients that provide energy and comfort.
Protein
Protein is an essential part of any diet, and Pho Ga delivers on this front. Each serving offers around 30 grams of protein. The chicken is the primary source of this protein, making it a great choice for those looking to maintain or build muscle. Additionally, the rice noodles contribute a small amount of protein, rounding out the dish. This high protein content helps keep you feeling full and satisfied for longer.
Sodium
Sodium is an important consideration when it comes to any soup. Pho Ga contains about 800 milligrams of sodium per serving. While this is a reasonable amount for a flavorful broth, it’s always good to be mindful of your sodium intake. If you’re watching your salt consumption, consider using low-sodium chicken broth or adjusting the amount of fish sauce and salt in the recipe. This way, you can enjoy your Pho Ga without compromising your dietary needs.
FAQs about Pho Ga Vietnamese Chicken Noodle Soup
What is the best type of chicken to use for Pho Ga?
When it comes to making Pho Ga Vietnamese Chicken Noodle Soup, the best type of chicken to use is a whole chicken. A whole chicken, typically weighing between 3 to 4 pounds, provides the most flavor and richness to the broth. The bones and skin contribute to a deeper, more aromatic broth, which is essential for an authentic Pho Ga experience. If you prefer a leaner option, you can also use bone-in chicken thighs or breasts, but keep in mind that the flavor may not be as robust.
Can I make Pho Ga in advance?
Absolutely! Pho Ga can be made in advance, making it a convenient option for meal prep. You can prepare the broth and cook the chicken ahead of time. Once the soup is ready, let it cool and store it in the refrigerator for up to 3 days. When you’re ready to serve, simply reheat the broth and add freshly cooked rice noodles. This way, you can enjoy a delicious bowl of Pho Ga without the hassle of starting from scratch each time.
What are the traditional garnishes for Pho Ga?
Traditional garnishes for Pho Ga include a variety of fresh herbs and condiments that enhance the soup’s flavor. Common garnishes are fresh basil, cilantro, and mint, which add a burst of freshness. Lime wedges are also essential, as a squeeze of lime juice brightens the dish. For those who enjoy a bit of heat, sliced jalapeños are a popular addition. Some people also like to add bean sprouts or hoisin sauce for extra texture and flavor. These garnishes allow each person to customize their bowl to their liking.
Is Pho Ga gluten-free?
Yes, Pho Ga can be gluten-free, but it depends on the ingredients you use. The rice noodles are naturally gluten-free, making them a great choice for those with gluten sensitivities. However, be cautious with the fish sauce, as some brands may contain gluten. Always check the label to ensure it is gluten-free. Additionally, if you choose to add any sauces or condiments, verify that they are also gluten-free. By selecting the right ingredients, you can enjoy a delicious and safe bowl of Pho Ga!
Conclusion on Pho Ga Vietnamese Chicken Noodle Soup
Pho Ga Vietnamese Chicken Noodle Soup is more than just a meal; it’s a celebration of flavors, culture, and togetherness. This comforting dish brings warmth to the table, making it a favorite for many. With its rich broth, tender chicken, and fresh herbs, Pho Ga offers a delightful experience that can be enjoyed any time of the day.
As you embark on your journey to create this delicious soup, remember that the key lies in the quality of your ingredients and the love you put into the preparation. Each step, from simmering the broth to garnishing the final bowl, contributes to the overall experience. Whether you’re sharing it with family or enjoying a quiet moment alone, Pho Ga has a way of bringing joy and comfort.
Don’t hesitate to explore the variations and personal touches that make this dish your own. From regional twists to alternative ingredients, Pho Ga can adapt to your tastes and preferences. The beauty of this soup lies in its versatility, allowing you to create a bowl that reflects your culinary style.
So, gather your ingredients, follow the steps, and savor the delightful flavors of Pho Ga Vietnamese Chicken Noodle Soup. With each spoonful, you’ll not only nourish your body but also connect with a rich cultural heritage that celebrates the joy of food and community. Enjoy your cooking adventure, and may your Pho Ga bring warmth and happiness to your table!
It’s a rainy Sunday afternoon, the kind where the sky seems to stretch endlessly in shades of gray. The sound of raindrops against the window creates a soothing rhythm, and it’s in these moments that I find myself reaching for ingredients that don’t require perfection, just comfort. There’s something about baking on days like these that feels like an invitation to slow down and embrace simplicity.
This is how I came across the idea for this flourless cake – a recipe so uncomplicated and so satisfying that it became my go-to during moments when I needed something quick, yet incredibly delicious. It doesn’t require complicated tools or intricate techniques, making it perfect for anyone, no matter their baking experience.
I remember the first time I made this cake. It was a spontaneous decision after a long week of work, with a need for something to sweeten the day. The recipe caught my eye because it didn’t require flour – something I didn’t have at the moment. What I did have, however, were eggs, sugar, yoghurt, and a few pantry staples. The result was magical. The cake was light yet decadent, creamy yet airy, and I realized I had found something extraordinary in its simplicity.
Why Flourless Cake is the Perfect Dessert
In a world of complex recipes and extravagant desserts, sometimes the simplest ones hold the most joy. This flourless cake embodies that sentiment. It’s a dessert that anyone can make, even with limited ingredients. It’s a dessert that doesn’t require special tools or skills but still delivers a mouthwatering result.
The beauty of this cake lies in its texture – it’s soft, light, and delicately sweet. It doesn’t rely on the richness of butter or the heaviness of flour. Instead, it leans into the natural creaminess of yoghurt and the airy fluffiness of whipped egg whites. The result is a cake that feels indulgent without feeling overly rich or heavy. This makes it the perfect dessert to enjoy after a meal without feeling overwhelmed.
Additionally, the cake’s simplicity makes it highly versatile. You can easily adjust the flavor profile by adding vanilla, citrus zest, or spices. It’s also a wonderful base for topping with fresh berries, a dusting of powdered sugar, or a drizzle of chocolate sauce. The possibilities are endless, and the best part is that the cake is naturally gluten-free, making it an excellent choice for those with dietary restrictions.
Ingredients
Ingredient
Amount
Egg yolks
4
Natural yoghurt
400g
Sugar
40g
Corn starch
50g
Baking powder
2g
Egg whites
4
Pinch of salt
1
Sugar (for egg whites)
40g
Directions
Prepare the Ingredients: Preheat your oven to 180°C (350°F). Grease and line a cake pan.
Whisk Egg Yolks and Sugar: In a large bowl, whisk the egg yolks with 40g of sugar until the mixture becomes pale and slightly fluffy.
Add the Wet Ingredients: Add the natural yoghurt and mix until smooth. Gradually incorporate the corn starch and baking powder into the mixture until fully combined.
Whisk Egg Whites: In a separate clean bowl, whisk the egg whites with a pinch of salt until stiff peaks form. Gradually add 40g of sugar and continue whisking until glossy.
Combine Mixtures: Gently fold the egg whites into the yolk mixture. Be careful not to deflate the mixture. Stir until fully incorporated.
Bake: Pour the batter into the prepared cake pan and bake for 30-35 minutes, or until a toothpick comes out clean when inserted into the center.
Cool and Serve: Let the cake cool in the pan for 10 minutes before transferring it to a wire rack. Serve and enjoy!
Nutritional Information (Per Serving)
Nutrient
Amount
Calories
120 kcal
Protein
7g
Carbohydrates
16g
Fat
5g
Fiber
0g
Sugar
15g
Frequently Asked Questions
1. Can I make this cake without egg whites?
Unfortunately, egg whites are a key component in giving this cake its light and fluffy texture. If you are allergic to eggs or prefer a vegan version, you can experiment with egg substitutes like aquafaba (the liquid from canned chickpeas). While it may not be an exact replica, it will give you a similar airy texture.
2. Can I replace the natural yoghurt with something else?
Yes! While natural yoghurt adds a rich creaminess to the cake, you can substitute it with buttermilk, sour cream, or even a dairy-free alternative like coconut yogurt. Keep in mind that the flavor and texture may vary slightly, but the cake will still be delicious.
3. How can I store this cake?
The flourless cake can be stored in an airtight container at room temperature for up to 3 days. If you want to keep it for longer, you can refrigerate it for up to a week. Just make sure to let it come to room temperature before serving for the best texture and flavor.
4. Can I freeze this cake?
Yes, this cake freezes well! Allow it to cool completely, then wrap it tightly in plastic wrap and foil before placing it in the freezer. It can be frozen for up to 3 months. To enjoy, simply thaw at room temperature or warm it in the oven.
5. Can I add flavors to this cake?
Absolutely! This flourless cake is a great base for flavor experimentation. You can add vanilla extract, citrus zest (lemon, orange), or even a bit of cinnamon or nutmeg. For a richer taste, you can also mix in a bit of melted chocolate or cocoa powder.
6. How do I know when the cake is done baking?
The cake is done when it has set and is slightly golden on top. A toothpick inserted into the center should come out clean or with just a few crumbs. The cake will continue to set as it cools, so don’t worry if it’s a little soft when you first take it out of the oven.
7. Can I make this cake ahead of time?
Yes, this cake is a great make-ahead option. It’s best when allowed to cool completely before serving, and it actually improves in flavor after a day or two. You can make it ahead of time and store it for later.
Why This Cake is Perfect for Every Day
We live in a world where everything is constantly moving. With the hustle and bustle of life, there’s little room for overly complicated tasks, including baking. This cake doesn’t demand precision or too much time. With just a few simple ingredients, it offers a quick solution to satisfy any dessert cravings, while also being light enough for any occasion. Whether it’s an afternoon treat with coffee, an after-dinner delight, or a dessert for a weekend family gathering, this cake fits in perfectly.
What makes it even more special is its versatility. You can adjust the sweetness to your liking, add fruits, or enjoy it on its own. It’s also a great way to use up ingredients that might otherwise go to waste, like extra egg yolks or yoghurt nearing its expiration date.
As a home cook, there’s nothing more satisfying than baking a cake that comes together effortlessly, but tastes as though you’ve slaved over it for hours. It’s a beautiful reminder that simplicity doesn’t mean sacrificing quality. Sometimes, the best things in life are the ones that are uncomplicated and come straight from the heart.
Conclusion: A Cake to Cherish
This flourless cake is a treasure that offers more than just sweetness. It’s a recipe that embodies the essence of comfort food – simple, nourishing, and satisfying. It’s a cake that invites you to pause and savor each bite, while also reminding us of the joy in simplicity.
Whether you make it for yourself on a quiet evening or share it with friends and family, this cake will never disappoint. It’s the perfect balance of lightness and indulgence, offering a moment of sweetness amidst the chaos of everyday life. So the next time you need a quick dessert or something to brighten your day, let this flourless cake be your go-to recipe. It’s sure to become a favorite in your baking repertoire, just like it has for so many others.
There’s something truly magical about the scent of freshly baked bread that fills a home. It’s a scent that brings a sense of warmth, comfort, and nostalgia—a smell that can transform even the most ordinary kitchen into a sanctuary. I remember the first time I made bread with my grandmother. Her kitchen, always bustling with activity, would be filled with laughter and the hum of the oven. The rhythm of kneading dough and the joy of watching it rise was a dance she had perfected over the years. There was a simple, yet profound beauty in that process—mixing humble ingredients into something extraordinary.
As I grew older, I lost touch with the art of bread making, but that feeling of connection to the past and to my roots always stayed with me. One day, I decided to revisit this lost art. This “Secret Bread Recipe” is my homage to those cherished memories. It’s a recipe that encapsulates the simplicity and joy of baking, while also offering a few secrets of its own. The result is a loaf that is light, soft, and golden, with a satisfying, buttery flavor that transports you right back to those cozy afternoons spent in my grandmother’s kitchen.
This bread is more than just a recipe—it’s an invitation to create something special, to gather your loved ones around the table, and to experience the joy of baking. Whether you’re a seasoned baker or just beginning your journey into the world of homemade bread, this recipe will guide you every step of the way. It’s a bread that tells a story—a story that starts in the kitchen, where simple ingredients come together to form something greater than the sum of their parts.
Why You Should Try This Secret Bread Recipe
There’s an art to bread making. It’s not just about following a recipe—it’s about understanding the relationship between yeast, flour, water, and time. This bread recipe is designed to bring you that perfect balance: the perfect amount of rise, a beautifully soft texture, and a golden crust that you’ll want to break into with both hands. Here’s why this bread recipe stands out:
The Simplicity of Ingredients: It uses pantry staples—flour, yeast, milk, butter, eggs—ingredients that you likely already have in your kitchen. The real secret is how these ingredients come together to create something that feels like magic.
The Perfect Balance of Fluff and Structure: The combination of egg whites and yeast gives this bread an airy texture while maintaining enough structure to hold up to your favorite spreads or sandwiches. It’s soft enough to melt in your mouth yet firm enough to hold up as a base for toppings.
Buttery Finish with a Fresh Herb Twist: The addition of butter at the end and a sprinkle of chopped parsley elevates this bread from basic to exceptional. The butter enhances the flavor, while the parsley adds a touch of freshness and color.
Versatility for Every Meal: Whether you’re enjoying it as a warm, crusty side for soup, using it for sandwiches, or simply slathering it with jam and butter, this bread is a versatile addition to any meal. It’s a comforting staple that can easily become the star of the table.
Ingredients
Ingredient
Amount
Sugar
1 tablespoon (20 grams)
Dry Yeast
1 packet (10 grams)
Warm Milk
2 cups (400 ml)
Egg Whites
2
Oil
1 tea glass (100 ml)
Flour
6 cups (720 grams)
Salt
1 teaspoon (8 grams)
Chopped Parsley
A pinch
Butter
100 grams
Directions
Activate the Yeast: In a small bowl, combine the warm milk and sugar. Sprinkle the dry yeast over the top and let it sit for 5-10 minutes until the yeast begins to foam.
Mix Wet Ingredients: In a large bowl, whisk together the egg whites and oil. Add the yeast mixture once it is activated and stir well.
Combine Dry Ingredients: In another bowl, mix the flour and salt together. Gradually add the dry ingredients into the wet mixture, stirring to combine until a dough begins to form.
Knead the Dough: Transfer the dough onto a floured surface and knead for about 8-10 minutes, until the dough is smooth and elastic.
First Rise: Place the dough in a lightly oiled bowl, cover it with a clean kitchen towel, and allow it to rise for 1-2 hours, or until it has doubled in size.
Shape the Dough: Once the dough has risen, punch it down to release air. Divide it into smaller pieces or shape it into one large loaf, depending on your preference.
Second Rise: Place the shaped dough onto a greased baking tray and cover it again. Let it rise for another 30 minutes.
Prepare the Topping: While the dough rises, whisk the egg yolks in a small bowl. After the second rise, brush the dough with the egg yolks for a golden finish.
Bake: Preheat your oven to 180°C (350°F). Place the dough into the oven and bake for 25-30 minutes, or until the bread is golden brown and sounds hollow when tapped on the bottom.
Finish: Remove the bread from the oven, brush it with melted butter, and sprinkle the chopped parsley on top for a fresh, aromatic finish.
Nutritional Information (per serving)
Nutrient
Amount
Calories
220 kcal
Carbohydrates
35g
Protein
6g
Fat
8g
Fiber
2g
Sodium
200mg
FAQs About the Secret Bread Recipe
1. What makes this bread “secret”? The secret behind this bread is in the simplicity and combination of ingredients that work in harmony to create the perfect loaf. The use of both egg whites and yeast gives it a light texture without compromising on structure, while the final step of brushing the bread with butter and parsley adds a touch of richness and a fresh, herby aroma that elevates the flavor profile.
2. Can I substitute the dry yeast with fresh yeast? Yes! If you’re using fresh yeast, use about 30 grams of fresh yeast to replace the 10 grams of dry yeast in the recipe. You’ll need to activate it in warm milk just as you would with the dry yeast, but fresh yeast might require a slightly longer time to bloom.
3. Can I make this bread without eggs? While eggs help create a tender crumb and rich texture, you can replace them with an egg substitute if needed. For example, use flaxseed meal as a vegan alternative (1 tablespoon flaxseed meal mixed with 3 tablespoons water for each egg). However, keep in mind that the texture may vary slightly.
4. How can I store this bread? This bread is best enjoyed fresh out of the oven, but you can store it for up to 2-3 days in an airtight container. To keep it fresh for longer, consider freezing it in slices. When you’re ready to enjoy, just pop it in the toaster or warm it up in the oven.
5. Can I add other herbs or ingredients to this bread? Absolutely! Feel free to experiment with herbs and spices to suit your taste. Rosemary, thyme, or garlic would all make excellent additions to this bread. You could even mix in some cheese or olives for a savory twist.
6. Can I make this bread without using milk? If you don’t want to use milk, you can substitute it with water, almond milk, or another plant-based milk of your choice. Keep in mind that this might slightly affect the flavor, but the bread will still be delicious.
The Process of Making the Secret Bread: A Lesson in Patience
While baking bread can seem like a daunting task, the beauty of this recipe lies in its simplicity. The time you spend allowing the dough to rise and develop flavor is crucial. Yeast needs time to work its magic—transforming simple ingredients into something extraordinary.
Bread making is as much about patience as it is about technique. The first rise, where the dough expands and becomes airy, is a moment of quiet anticipation. This is where the dough becomes something more than flour and water; it becomes the foundation for a meal, a tradition, and a connection to the past. As the dough rises, you’re reminded that good things take time—and the results are worth the wait.
Conclusion: The Legacy of Homemade Bread
In today’s fast-paced world, it’s easy to forget the joy and satisfaction that comes from making something from scratch. This Secret Bread Recipe brings you back to the basics—using simple ingredients and a little bit of time to create something extraordinary. Whether you’re baking it for a special occasion, a family meal, or just to enjoy the comfort of a warm loaf at home, this bread has the power to transform your kitchen into a place of magic.
As you knead the dough, let it rise, and finally take that first bite of fresh, homemade bread, you’ll realize that baking is more than just a task—it’s a tradition. It’s a way to nourish not only your body but also your soul. Each loaf tells a story, and this one will certainly become a story of your own—a story of warmth, comfort, and the joy of creating something meaningful from scratch.
So, gather your ingredients, get your hands a little floury, and let the magic of homemade bread fill your kitchen. This Secret Bread Recipe is sure to become a family favorite, passed down through generations, just like the stories that came before it.
There’s something about a hearty breakfast that makes the day feel right from the very start. As a child, I remember my mom in the kitchen, early mornings filled with the warm smells of fresh cooking. But one dish that always stood out to me was her version of savory oatmeal, which she would make when we had just a few ingredients left in the pantry. Little did I know at the time, this “scrap meal” would soon become my favorite go-to recipe for starting my day.
Over the years, I’ve added my own twist to it, taking it beyond the basic oatmeal and exploring the flavors of tomatoes, herbs, and eggs. The beauty of this dish lies in its versatility and comfort, with just a few key ingredients that come together to create a satisfying, nutritious breakfast. This savory oatmeal is packed with flavor, hearty enough to fuel your day, and light enough to feel fresh and energized.
It’s perfect for those mornings when you want something different from the usual sweet oatmeal, yet still need that warm, comforting start to the day. The combination of oatmeal’s rich texture with the tangy flavor of tomatoes and the richness of mozzarella makes it a meal that leaves you feeling full and content. This recipe is easy to make, flexible with ingredients, and a great way to switch things up on a busy morning.
The Savory Oatmeal Journey: Why You Should Try It
When most people think of oatmeal, they picture a sweet breakfast—something along the lines of cinnamon, sugar, or fruits like bananas or berries. While these traditional oatmeal variations are delicious, savory oatmeal has its own appeal. It’s a creative departure from the norm, offering a meal that’s equally satisfying, but with a balance of flavors that you wouldn’t expect.
This oatmeal isn’t just for breakfast either. It’s a versatile meal that can easily work as a lunch or dinner dish when you’re looking for something light but filling. The combination of oat flakes, eggs, tomatoes, and mozzarella is both comforting and healthy. Oats are rich in fiber, which promotes digestive health, and the tomatoes add a fresh, juicy element, while eggs provide protein to keep you satisfied longer.
In fact, savory oatmeal dishes are gaining popularity across the world for their ability to be both customizable and nutritious. The key is to balance savory, acidic, and umami flavors to create a satisfying meal. In this recipe, tomatoes and mozzarella provide the perfect contrast to the base of oats. Add a sprinkle of herbs and a dash of lemon juice, and you’ve got a bowl of savory, cheesy goodness.
Ingredients
Ingredient
Amount
Oatmeal
1 cup
Yogurt
3 tablespoons
Lemon juice
1 teaspoon
Provencal herbs
1 teaspoon
Salt
1 teaspoon
Eggs
2
Tomatoes (diced)
1-2
Mozzarella cheese, shredded
To taste
Avocado oil (for frying)
As needed
Instructions
Prepare the Oatmeal Base: In a small bowl, mix together the oatmeal, yogurt, lemon juice, Provencal herbs, and salt. Stir until the mixture is well combined.
Cook the Oatmeal: Heat a non-stick skillet over medium heat and add a little avocado oil for frying. Once the pan is hot, pour in the oatmeal mixture, spreading it evenly.
Add the Eggs: Crack the two eggs directly onto the oatmeal mixture. Cover the skillet with a lid and let the eggs cook for about 3-4 minutes, or until the yolks are cooked to your preference.
Add the Tomatoes: While the eggs are cooking, dice the tomatoes and sprinkle them over the cooking oatmeal. Allow them to soften slightly as the dish continues to cook.
Finish with Cheese: Once the eggs are done to your liking, sprinkle shredded mozzarella cheese on top and cover the skillet for 1-2 minutes, just long enough to melt the cheese.
Serve and Enjoy: Once everything is cooked through, carefully transfer the oatmeal to plates and serve warm. Optionally, drizzle a bit more avocado oil on top for extra richness.
Nutritional Information (per serving)
Nutrient
Amount
Calories
290 kcal
Carbohydrates
25g
Protein
14g
Fat
18g
Fiber
5g
Sugar
5g
Sodium
350mg
Ingredients That Make This Dish Special
Oats form the base of this recipe, but what truly elevates it are the supporting ingredients. A few eggs add richness, while fresh tomatoes offer a natural sweetness and acidity. Mozzarella cheese gives a creamy, melt-in-your-mouth texture, and the avocado oil for frying adds a smooth, healthy fat that ties everything together.
What I love most about this dish is that it uses ingredients most of us already have in our kitchens. Oats are an incredibly versatile pantry staple, but when combined with fresh ingredients like tomatoes and mozzarella, they transform into something special. And if you’re looking for ways to make it even more exciting, feel free to add extra vegetables, herbs, or different cheeses.
Frequently Asked Questions
1. Can I make this recipe vegan?
Absolutely! You can substitute the eggs with a plant-based egg alternative, such as a flax egg (made from ground flaxseed and water) or tofu scramble for a similar texture. As for the cheese, you can use any dairy-free cheese alternative you like. The key to this recipe is the versatility of the ingredients, allowing for creative substitutions that maintain the dish’s delicious balance.
2. What can I substitute if I don’t have mozzarella cheese?
Mozzarella is a mild and melty cheese, but you can easily substitute it with other cheeses like cheddar, goat cheese, or even feta. If you prefer something less creamy, a harder cheese like Parmesan would also work well and add a more intense flavor.
3. Is it possible to make this recipe gluten-free?
Yes! This recipe is naturally gluten-free as it uses only oats, which are gluten-free if you choose certified gluten-free oats. Just be sure to double-check that all your other ingredients are gluten-free, especially the cheese, if you’re using any processed varieties that may contain gluten.
4. Can I add other vegetables to this recipe?
Definitely! Feel free to add other vegetables to boost the flavor and nutritional value of the dish. Bell peppers, spinach, mushrooms, or even roasted sweet potatoes would all be excellent additions. The beauty of this recipe is that you can adjust the ingredients to suit your tastes and dietary preferences.
5. Can I meal prep this recipe?
Yes! This recipe can be made ahead of time and stored in an airtight container in the refrigerator for up to 2-3 days. To reheat, simply place it in the microwave or on the stovetop with a little splash of water or broth to loosen it up. This makes it a perfect meal prep option for busy mornings.
6. What can I serve this dish with?
This savory oatmeal pairs beautifully with a variety of sides. For a complete meal, you can serve it alongside a simple side salad with fresh greens or some avocado slices for added creaminess. For extra protein, consider adding a side of grilled chicken or a piece of whole-grain toast.
A Meal for Every Mood
While this savory oatmeal dish is perfect for breakfast, it’s not just confined to mornings. I’ve found that it makes for an excellent lunch when I’m craving something light but filling. It’s the kind of meal that doesn’t feel heavy, but it’s still substantial enough to satisfy you for hours. The addition of fresh tomatoes and eggs makes it a great balance of carbs, protein, and fats.
I also appreciate how customizable it is. Whether you’re using leftover tomatoes or fresh mozzarella, or even changing the herbs, each variation makes the dish feel new. The best part is how simple it is to prepare—sometimes, I throw everything into the pan and let it cook while I sip my coffee. It’s a low-effort, high-reward meal.
Conclusion: The Ultimate Comfort Food
Savory oatmeal with tomatoes, eggs, and mozzarella is a dish that brings comfort to the table. Whether it’s the middle of winter or a warm summer morning, this meal has a way of satisfying both body and soul. It’s a recipe that feels familiar and nourishing, while still being bold and flavorful. With just a few ingredients, you can create something that tastes like it came straight from a gourmet kitchen.
This dish is a celebration of simple ingredients brought together in a way that feels exciting and satisfying. It’s perfect for those who want something different from the usual sweet oatmeal or those looking for a savory breakfast or lunch option. The combination of oats, eggs, tomatoes, and cheese makes it a comforting, filling meal, while the addition of fresh herbs and spices keeps it light and refreshing.
Give this recipe a try next time you’re craving a meal that’s both wholesome and delicious, and enjoy a new twist on your regular oatmeal routine!
There’s something special about the first meal of the day. It sets the tone, fuels your body, and, if done right, can feel like a comforting ritual rather than just another task. For me, that ritual has always been tied to oatmeal. Growing up, my grandmother would make the most delicious, heartwarming bowls of oatmeal, filling the kitchen with the sweet aroma of cinnamon and baked apples. It wasn’t just about eating; it was about feeling cared for, about knowing that something as simple as a bowl of oats could provide warmth, comfort, and energy for the day ahead.
Even now, as I prepare my own morning meals, I still find myself drawn to those same flavors. This Nutty Apple Oatmeal Delight is inspired by those childhood mornings. It’s a perfect balance of creamy oats, the natural sweetness of banana and apple, and the rich crunch of nuts. The cinnamon ties everything together, offering a depth of flavor that is both familiar and satisfying. Whether you’re looking for a nutritious breakfast or simply a moment of warmth in your busy day, this oatmeal recipe is the perfect choice.
Why This Oatmeal Recipe Stands Out
Oatmeal has long been considered one of the healthiest breakfasts you can have. But what makes this version extra special is the combination of flavors and textures that elevate it from a simple bowl of oats to a gourmet experience. Here’s what makes this Nutty Apple Oatmeal Delight unique:
A Natural Sweetness Without Added Sugar – The mashed banana and apple provide a natural sweetness that eliminates the need for added sugars, making this dish a healthier choice.
A Perfect Balance of Textures – The mix of ground oats and whole oat flakes ensures a creamy yet slightly chewy consistency, while the chopped nuts add a delightful crunch.
Aromatic and Comforting Flavors – Cinnamon, apples, and nuts create an inviting aroma and deep, cozy flavors that make this meal feel extra special.
Rich in Fiber and Nutrients – Oats are packed with fiber, which supports digestion and keeps you feeling full, while the nuts provide healthy fats and protein.
Customizable and Versatile – You can swap the nuts for seeds, use different fruits, or add extra toppings to make it your own.
Ingredients
Ingredient
Amount
Oat flakes, ground
100g (1 cup)
Oat flakes
50g (1/2 cup)
Cinnamon
1 teaspoon
Apple, chopped
1
Banana, mashed
1
Coconut oil (or preferred oil)
2 tablespoons
Nuts or almonds
25g (1/4 cup)
Step-by-Step Directions for the Perfect Bowl of Oatmeal
Prepare the Base – Start by grinding half of the oats to create a fine oat flour. This step ensures a creamier texture while still maintaining some chewy whole oats.
Combine the Ingredients – In a pot, mix the ground oats, whole oats, and cinnamon. Add milk or water and stir well.
Simmer to Perfection – Heat the mixture over medium heat, stirring occasionally, until it thickens and becomes creamy.
Incorporate the Fruits – Once the oats have softened, stir in the mashed banana and chopped apple. Let them cook for a couple of minutes to release their natural sweetness.
Add the Final Touches – Stir in the coconut oil for a rich, smooth texture. Sprinkle in the nuts for crunch.
Serve and Enjoy – Pour the oatmeal into a bowl, top with extra apple slices or nuts if desired, and enjoy while warm.
Nutritional Information (Per Serving)
Nutrient
Amount
Calories
~250-300 kcal
Carbohydrates
~35g
Protein
~6g
Fat
~12g
Fiber
~5gStart your day with a bowl of Nutty Apple Oatmeal Delight! This easy-to-make recipe combines fiber-rich oats with the sweetness of banana and apple, enhanced with a warm touch of cinnamon and a satisfying crunch from nuts. Perfect for a healthy, filling breakfast that will keep you energized all day long. A cozy meal that brings comfort, nutrition, and a smile with every spoonful.
FAQs: Everything You Need to Know About This Oatmeal Recipe
1. Can I use instant oats instead of rolled oats? Yes, but keep in mind that instant oats cook faster and may result in a softer texture. If you prefer a heartier consistency, stick with rolled or old-fashioned oats.
2. What can I use instead of banana for natural sweetness? You can substitute mashed pumpkin, unsweetened applesauce, or blended dates for a similar sweetness without added sugars.
3. Can I prepare this oatmeal the night before? Absolutely! You can make overnight oats by mixing all the ingredients in a jar and letting them sit in the fridge overnight. In the morning, just give them a quick stir and enjoy.
4. What are some additional toppings I can use? Try adding Greek yogurt, flaxseeds, chia seeds, shredded coconut, or a drizzle of honey for an extra layer of flavor.
5. Is this recipe suitable for meal prep? Yes! You can make a batch and store it in airtight containers in the refrigerator for up to 3 days. Simply reheat with a splash of milk or water before serving.
Conclusion: A Simple Recipe with Big Benefits
A bowl of Nutty Apple Oatmeal Delight is more than just breakfast—it’s a nourishing, flavorful start to your day. Whether you’re looking for a quick weekday meal or a slow, comforting weekend breakfast, this recipe delivers in both taste and nutrition. Packed with fiber, natural sweetness, and healthy fats, it keeps you full, energized, and satisfied for hours.
So the next time you’re looking for a breakfast that’s easy to make yet packed with goodness, give this oatmeal recipe a try. It’s a small, simple way to start your day with a moment of warmth, nourishment, and joy.