Coconut Shrimp Soup Recipe is a must-try delight!

What Makes Coconut Shrimp Soup Special?

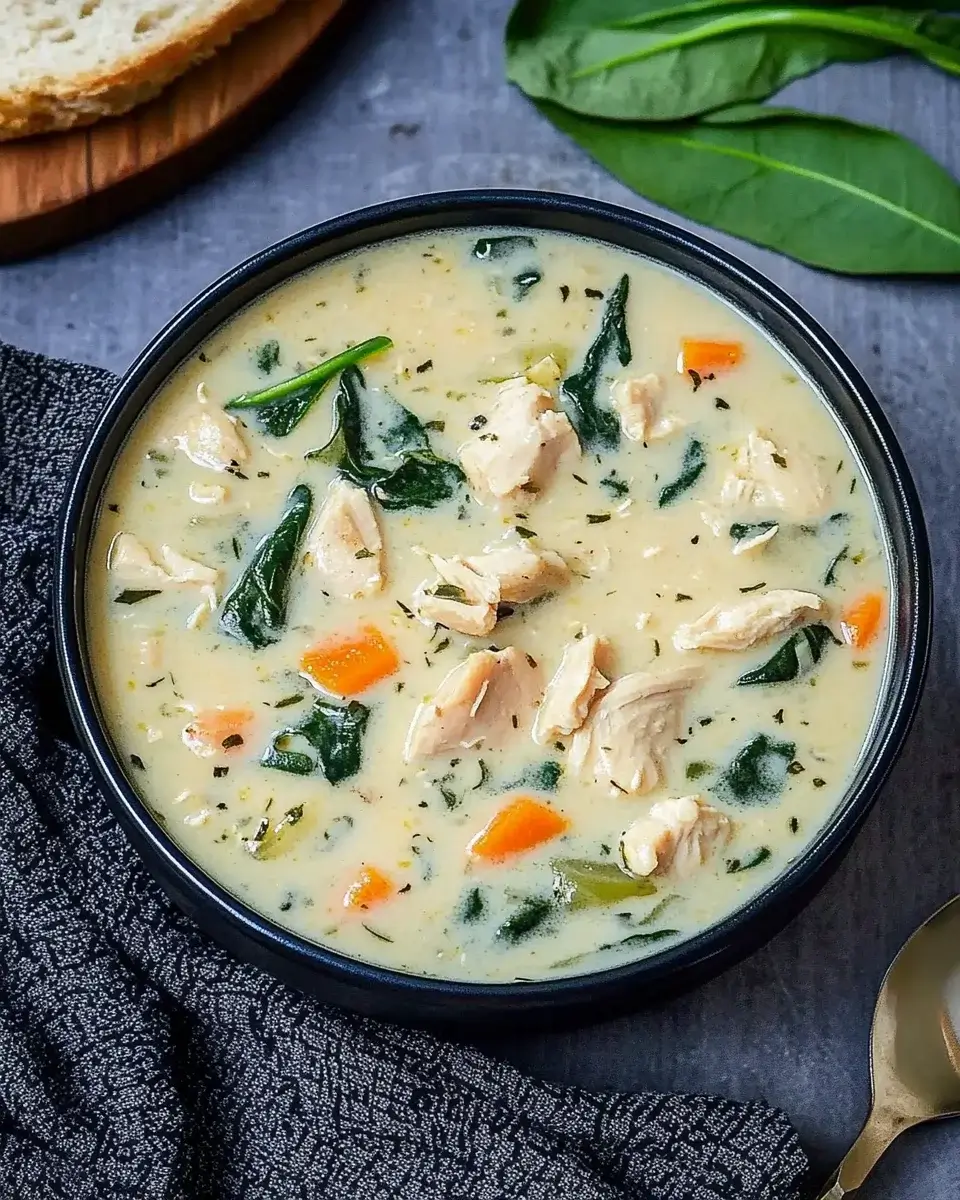
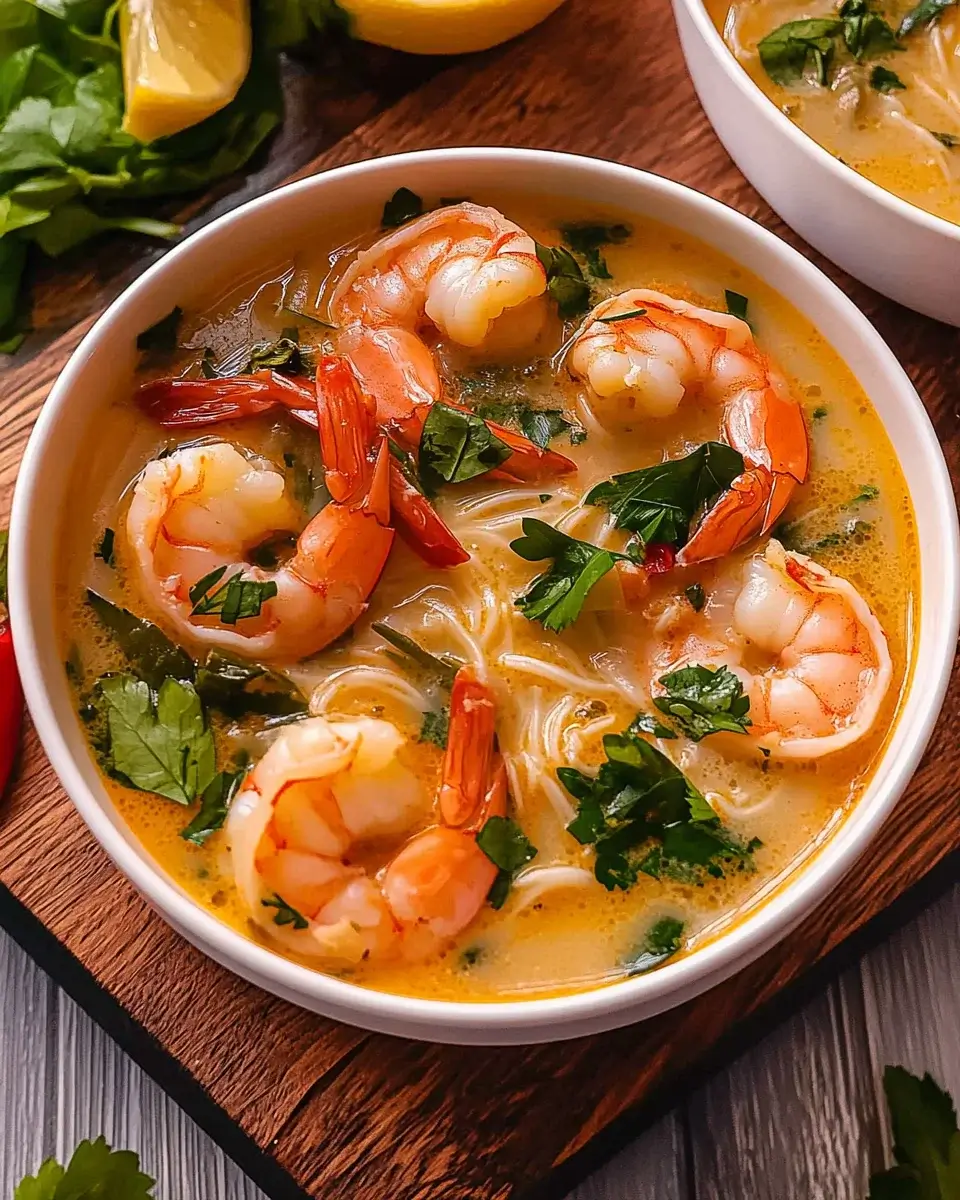
Coconut Shrimp Soup is a delightful dish that brings together the rich flavors of coconut milk and fresh shrimp. This soup is not just a meal; it’s an experience. The creamy texture of coconut milk pairs perfectly with the tender shrimp, creating a comforting bowl that warms the soul. The addition of fresh vegetables like snap peas and spinach adds a vibrant touch, making it both nutritious and visually appealing.

What truly sets this soup apart is its balance of flavors. The sweetness of the coconut milk is beautifully complemented by the tangy lime juice and savory fish sauce. Each spoonful offers a burst of flavor that transports you to a tropical paradise. Whether you’re enjoying it on a chilly evening or serving it at a gathering, Coconut Shrimp Soup is sure to impress your guests and family alike.

A Brief History of Coconut Shrimp Soup

The origins of Coconut Shrimp Soup can be traced back to Southeast Asia, where coconut milk is a staple ingredient in many dishes. Countries like Thailand and Vietnam have long embraced the use of coconut in their culinary traditions. Over time, this delicious soup has made its way around the world, gaining popularity for its unique taste and versatility.

In many cultures, coconut milk is celebrated for its health benefits and rich flavor. As a result, Coconut Shrimp Soup has evolved, with various regions adding their own twist. Today, you can find numerous variations, each reflecting local ingredients and preferences. This soup not only showcases the beauty of coconut and shrimp but also highlights the creativity of home cooks everywhere.

Ingredients for Coconut Shrimp Soup Recipe

Essential Ingredients

To create a delicious Coconut Shrimp Soup, you’ll need a few key ingredients. These essentials work together to build the rich and creamy base of the soup. Here’s what you’ll need:

  • Vegetable oil: This is used for sautéing the aromatics, giving the soup a flavorful start.
  • Onion: A small onion, diced, adds sweetness and depth to the soup.
  • Garlic: Two cloves of minced garlic bring a wonderful aroma and taste.
  • Fresh ginger: One tablespoon of grated ginger adds a zesty kick.
  • Red bell pepper: Diced red bell pepper contributes color and sweetness.
  • Coconut milk: A can of coconut milk is the star ingredient, providing creaminess.
  • Chicken broth: Three cups of chicken broth enhance the soup’s flavor.
  • Fish sauce: One tablespoon of fish sauce adds a savory umami taste.
  • Lime juice: A tablespoon of lime juice brightens the flavors.
  • Sugar: A teaspoon of sugar balances the flavors.
  • Shrimp: One pound of large shrimp, peeled and deveined, is essential for protein.
  • Snap peas: One cup of snap peas adds crunch and freshness.
  • Baby spinach: One cup of baby spinach provides nutrients and color.
  • Salt and pepper: To taste, these seasonings enhance all the flavors.
  • Cilantro: Fresh cilantro is used for garnish, adding a burst of freshness.
  • Lime wedges: Serve with lime wedges for an extra zing.

Optional Ingredients for Added Flavor

While the essential ingredients create a fantastic Coconut Shrimp Soup, you can enhance the flavor even more with some optional ingredients. Here are a few ideas:

  • Jalapeños: For those who enjoy heat, adding sliced jalapeños during the sautéing process can spice things up.
  • Red pepper flakes: A dash of red pepper flakes can also add a kick to the soup.
  • Chicken or tofu: If you prefer a different protein, substitute shrimp with chicken or tofu, adjusting the cooking time as needed.
  • Herbs: Fresh herbs like basil or mint can be added for a unique twist.
  • Vegetable broth: For a vegetarian version, replace chicken broth with vegetable broth.

These optional ingredients allow you to customize your Coconut Shrimp Soup to suit your taste preferences. Feel free to experiment and make it your own!

Preparation of Coconut Shrimp Soup Recipe

Step 1: Preparing the Shrimp

Before diving into the cooking process, it’s essential to prepare the shrimp. Start by rinsing the shrimp under cold water. This helps remove any residual grit. Next, peel and devein the shrimp if you haven’t done so already. This step is crucial as it ensures a clean and pleasant eating experience. Once cleaned, pat the shrimp dry with a paper towel. This will help them sear nicely when added to the soup.

Step 2: Sautéing the Aromatics

Now, let’s get cooking! In a large pot, heat one tablespoon of vegetable oil over medium heat. Once the oil is hot, add the diced onion. Sauté the onion for about 3-4 minutes until it becomes translucent. This step builds a flavorful base for your soup. Next, stir in the minced garlic and grated ginger. Cook for an additional 1-2 minutes until fragrant. The aroma will fill your kitchen, making it hard to resist the deliciousness to come!

Step 3: Adding the Coconut Milk

After the aromatics are ready, it’s time to add the star of the show: coconut milk! Pour in the can of coconut milk, stirring gently to combine it with the sautéed onion, garlic, and ginger. The creamy texture of the coconut milk will start to create a rich base for your soup. Then, add the chicken broth. This combination will give your soup a wonderful depth of flavor.

Step 4: Combining Ingredients

Once the coconut milk and chicken broth are well mixed, it’s time to add the other flavor enhancers. Stir in the fish sauce, lime juice, and sugar. These ingredients will balance the sweetness of the coconut milk with savory and tangy notes. Bring the mixture to a gentle simmer. This is where the magic happens, as all the flavors meld together beautifully.

Step 5: Simmering the Soup

Now that your soup is simmering, it’s time to add the shrimp and snap peas. Carefully drop them into the pot and cook for about 5-7 minutes. You’ll know the shrimp are done when they turn pink and opaque. This is a crucial step, as overcooking can make shrimp tough. Keep an eye on them to ensure they stay tender and juicy!

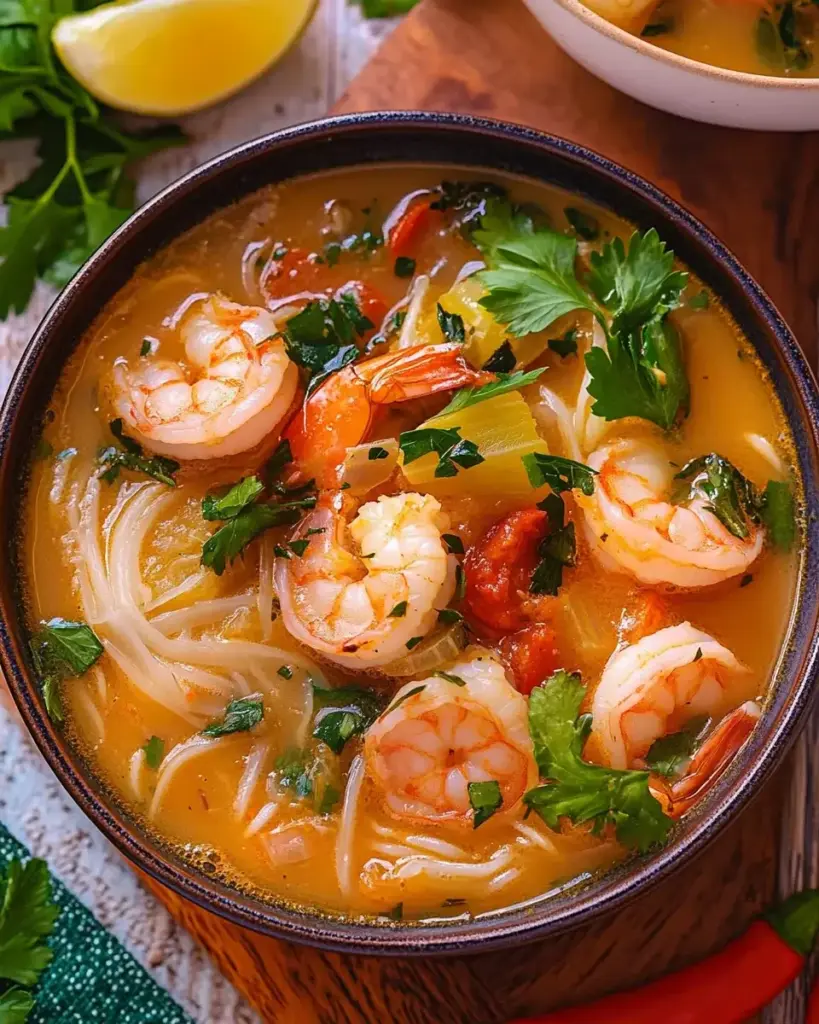
Step 6: Final Touches and Serving

As the shrimp and snap peas finish cooking, stir in the baby spinach. Cook for an additional 1-2 minutes until the spinach wilts. This adds a lovely green color and extra nutrients to your soup. Finally, season with salt and pepper to taste. Once everything is perfectly seasoned, it’s time to serve! Ladle the soup into bowls and garnish with fresh cilantro. Don’t forget to add lime wedges on the side for an extra burst of flavor. Enjoy your delicious Coconut Shrimp Soup!

Variations of Coconut Shrimp Soup Recipe

Spicy Coconut Shrimp Soup Variation

If you love a little heat in your dishes, this Spicy Coconut Shrimp Soup variation is perfect for you! To add some spice, consider incorporating sliced jalapeños or a sprinkle of red pepper flakes during the sautéing process. This will infuse the soup with a delightful kick that complements the sweetness of the coconut milk.

Another option is to add a splash of sriracha or chili paste when you mix in the fish sauce and lime juice. This not only enhances the flavor but also gives the soup a beautiful, vibrant color. Adjust the amount of spice to your liking, and enjoy a warm bowl of Coconut Shrimp Soup that packs a punch!

Vegetarian Coconut Soup Alternative

For those who prefer a meat-free option, a Vegetarian Coconut Soup is a fantastic alternative. Simply replace the shrimp with tofu or a medley of your favorite vegetables. Consider using mushrooms, zucchini, or bell peppers for added texture and flavor. Make sure to cut the vegetables into bite-sized pieces for even cooking.

Additionally, swap the chicken broth for vegetable broth to keep the soup vegetarian-friendly. The coconut milk will still provide that creamy richness, while the fresh vegetables will add color and nutrients. This variation is not only delicious but also a great way to enjoy a healthy, plant-based meal!

Cooking Note for Coconut Shrimp Soup Recipe

Tips for Perfecting Your Soup

Creating the perfect Coconut Shrimp Soup is all about attention to detail. Here are some tips to ensure your soup turns out delicious every time:

  • Use Fresh Ingredients: Fresh shrimp and vegetables make a big difference in flavor. Always opt for the freshest ingredients available.
  • Don’t Overcook the Shrimp: Keep an eye on the shrimp while they cook. They only need about 5-7 minutes to become tender. Overcooking can lead to a rubbery texture.
  • Adjust Seasoning: Taste your soup before serving. You can always add more salt, pepper, or lime juice to enhance the flavors.
  • Let It Simmer: Allow the soup to simmer gently. This helps the flavors meld together beautifully, creating a rich and satisfying dish.
  • Garnish Generously: Don’t skip the fresh cilantro and lime wedges. They add a burst of freshness that elevates the entire dish.

Common Mistakes to Avoid

Even the best cooks can make mistakes. Here are some common pitfalls to watch out for when making Coconut Shrimp Soup:

  • Skipping the Aromatics: Sautéing the onion, garlic, and ginger is crucial for building flavor. Don’t rush this step!
  • Using Low-Quality Coconut Milk: The quality of coconut milk can vary. Choose a brand that is creamy and rich for the best results.
  • Not Prepping Ingredients: Make sure to have all your ingredients prepped and ready before you start cooking. This will make the process smoother and more enjoyable.
  • Ignoring Texture: Balance is key. Ensure you have a mix of textures by including crunchy snap peas and tender spinach.
  • Forgetting to Adjust for Spice: If you’re adding heat, start with a small amount and gradually increase. It’s easier to add more spice than to tone it down!

Serving Suggestions for Coconut Shrimp Soup Recipe

Best Accompaniments

When it comes to serving Coconut Shrimp Soup, the right accompaniments can elevate your meal. Here are some delightful options to consider:

  • Crusty Bread: A warm, crusty baguette or sourdough bread is perfect for dipping into the creamy soup. The bread absorbs the flavors beautifully.
  • Rice: Serve the soup over a bed of jasmine or basmati rice. This adds a hearty element and makes the meal more filling.
  • Salad: A light, refreshing salad with mixed greens, cucumber, and a citrus vinaigrette pairs well. It balances the richness of the soup.
  • Spring Rolls: Fresh or fried spring rolls make a great side dish. They add a crunchy texture and can be filled with shrimp or vegetables.
  • Chips: Serve with crispy tortilla chips or plantain chips for a fun crunch. They can be enjoyed alongside or crumbled on top of the soup.

Presentation Ideas

Presentation is key to making your Coconut Shrimp Soup visually appealing. Here are some creative ideas to impress your guests:

  • Colorful Bowls: Use vibrant bowls to serve the soup. Bright colors can enhance the overall dining experience.
  • Garnish Generously: Top each bowl with a generous sprinkle of fresh cilantro and a slice of lime. This adds a pop of color and freshness.
  • Layered Ingredients: When serving, layer the shrimp, snap peas, and spinach in the bowl before adding the soup. This creates an inviting look.
  • Serve with Lime Wedges: Place lime wedges on the side of each bowl. This allows guests to add a splash of lime juice to their liking.
  • Chili Oil Drizzle: For an extra touch, drizzle a bit of chili oil on top before serving. It adds a beautiful sheen and hints at the soup’s spiciness.

With these serving suggestions and presentation ideas, your Coconut Shrimp Soup will not only taste amazing but also look stunning on the table. Enjoy your culinary creation!

Tips for Making the Best Coconut Shrimp Soup Recipe

Ingredient Substitutions

Making Coconut Shrimp Soup is all about flexibility. If you find yourself missing an ingredient, don’t worry! Here are some great substitutions to keep your soup delicious:

  • Vegetable Oil: You can use olive oil or coconut oil instead. Both will add a unique flavor to your soup.
  • Chicken Broth: If you want a lighter option, vegetable broth works perfectly. It keeps the soup flavorful without meat.
  • Shrimp: If shrimp isn’t available, try using chicken, tofu, or even fish. Just adjust the cooking time to ensure everything is cooked properly.
  • Coconut Milk: In a pinch, you can use almond milk or cashew cream. However, the flavor will differ slightly.
  • Fish Sauce: Soy sauce or tamari can be used as a substitute for a vegetarian option. It will still provide that umami flavor.

These substitutions allow you to customize your Coconut Shrimp Soup to fit your pantry and dietary needs. Feel free to experiment and find what works best for you!

Storage Tips for Leftovers

Leftover Coconut Shrimp Soup can be a delightful treat for the next day. Here are some tips to store it properly:

  • Cool Before Storing: Allow the soup to cool to room temperature before transferring it to an airtight container. This helps prevent condensation.
  • Refrigerate: Store the soup in the refrigerator for up to 3 days. Make sure the container is sealed tightly to keep it fresh.
  • Freeze for Longer Storage: If you want to keep it longer, consider freezing the soup. Use freezer-safe containers and leave some space at the top for expansion. It can last up to 3 months in the freezer.
  • Reheat Gently: When you’re ready to enjoy your leftovers, reheat the soup on the stove over low heat. Stir occasionally to ensure even heating. If it’s too thick, add a splash of broth or water to loosen it up.

By following these storage tips, you can enjoy your Coconut Shrimp Soup even after the first serving. It’s a great way to savor the flavors again!

Breakdown of Time for Coconut Shrimp Soup Recipe

Prep Time

Preparing your Coconut Shrimp Soup is a breeze! The prep time typically takes about 15-20 minutes. During this time, you’ll gather all your ingredients, chop the vegetables, and prepare the shrimp. Having everything ready before you start cooking makes the process smoother and more enjoyable. So, take a moment to set up your workspace and get organized!

Cooking Time

The cooking time for this delicious soup is around 20-25 minutes. This includes sautéing the aromatics, simmering the soup, and cooking the shrimp and vegetables. It’s a quick process that allows you to enjoy a warm, comforting meal in no time. Just keep an eye on the shrimp to ensure they don’t overcook!

Total Time

In total, you can expect to spend about 35-45 minutes from start to finish. This includes both prep and cooking time. With such a short time commitment, Coconut Shrimp Soup is perfect for a weeknight dinner or a cozy weekend meal. You’ll have a flavorful dish ready to serve in no time!

Nutritional Information for Coconut Shrimp Soup Recipe

Calories and Macronutrients

Understanding the nutritional content of your Coconut Shrimp Soup is essential for maintaining a balanced diet. Each serving of this delightful soup contains approximately 320 calories. Here’s a breakdown of the macronutrients:

  • Calories: 320
  • Net Carbohydrates: 8g
  • Protein: 25g
  • Fat: 20g

This soup is a great source of protein, primarily from the shrimp, making it a filling option. The healthy fats from coconut milk contribute to its creamy texture while providing essential nutrients. With low net carbs, it’s suitable for those watching their carbohydrate intake.

Health Benefits of Coconut and Shrimp

Coconut Shrimp Soup not only delights your taste buds but also offers several health benefits. Here’s a closer look at the key ingredients:

  • Coconut Milk: Rich in medium-chain triglycerides (MCTs), coconut milk can boost energy levels and support weight management. It also contains lauric acid, which has antimicrobial properties.
  • Shrimp: Shrimp is a low-calorie source of high-quality protein. It’s packed with essential nutrients like selenium, vitamin B12, and iodine, which are vital for overall health.
  • Vegetables: The addition of snap peas and spinach provides fiber, vitamins, and minerals. These vegetables contribute to digestive health and help maintain a healthy immune system.
  • Lime Juice: Adding lime juice not only enhances flavor but also provides vitamin C, which is important for skin health and immune function.

Incorporating Coconut Shrimp Soup into your diet can be a delicious way to enjoy a nutritious meal. With its balance of protein, healthy fats, and vitamins, it’s a wholesome choice for any occasion!

FAQs about Coconut Shrimp Soup Recipe

Can I use frozen shrimp for this recipe?

Yes, you can absolutely use frozen shrimp for your Coconut Shrimp Soup! Just make sure to thaw them before cooking. You can do this by placing the shrimp in the refrigerator overnight or by running them under cold water for a few minutes. Once thawed, follow the recipe as usual. Using frozen shrimp can be a convenient option, and they will still taste delicious in your soup!

How can I make Coconut Shrimp Soup spicier?

If you love a spicy kick, there are several ways to heat up your Coconut Shrimp Soup. One simple method is to add sliced jalapeños or a sprinkle of red pepper flakes while sautéing the onions. You can also mix in a splash of sriracha or chili paste when you add the fish sauce and lime juice. Start with a small amount and adjust to your taste. This way, you can enjoy a bowl of soup that’s perfectly tailored to your spice preference!

What can I substitute for coconut milk?

If you don’t have coconut milk on hand, there are a few alternatives you can use. Almond milk or cashew cream can work in a pinch, but keep in mind that the flavor will differ slightly. For a richer texture, you might consider using heavy cream or half-and-half. However, if you want to maintain a dairy-free option, stick with plant-based milks. Just remember that the unique taste of coconut milk is what makes this soup special!

How long does Coconut Shrimp Soup last in the fridge?

Your Coconut Shrimp Soup can be stored in the refrigerator for up to 3 days. Make sure to keep it in an airtight container to maintain freshness. If you want to enjoy it later, consider freezing the soup for longer storage. It can last up to 3 months in the freezer. Just remember to cool it down before storing and reheat gently when you’re ready to enjoy it again!

Conclusion on Coconut Shrimp Soup Recipe

Recap of Key Points

In summary, Coconut Shrimp Soup is a delightful dish that combines the creamy richness of coconut milk with the tender, juicy shrimp. The essential ingredients, including fresh vegetables and aromatic spices, create a flavorful experience that is both comforting and satisfying. With a quick preparation and cooking time, this soup is perfect for busy weeknights or special gatherings.

We explored various ways to customize the recipe, from adding spice to creating a vegetarian alternative. The tips for perfecting your soup and avoiding common mistakes ensure that you can create a delicious bowl every time. Plus, the nutritional benefits of coconut and shrimp make this dish not only tasty but also a healthy choice.

Encouragement to Try the Recipe

Now that you have all the information you need, it’s time to roll up your sleeves and try making Coconut Shrimp Soup! Whether you’re a seasoned cook or a beginner, this recipe is approachable and rewarding. Don’t hesitate to experiment with flavors and ingredients to make it your own. Your family and friends will surely be impressed by your culinary skills!

So gather your ingredients, follow the steps, and enjoy a warm bowl of Coconut Shrimp Soup. It’s a dish that brings joy and comfort, perfect for any occasion. Happy cooking!

Paul

Coconut Shrimp Soup Recipe is a must-try delight!

This Coconut Shrimp Soup brings tropical flavors to your table with creamy coconut milk, bold Thai red curry, and tender shrimp. It’s packed with veggies, vibrant spices, and slurp-worthy noodles—perfect for cozy dinners or exotic meal prep days.
Prep Time 15 minutes
Cook Time 25 minutes
Total Time 40 minutes
Servings: 4 servings
Course: Soup
Cuisine: Thai-Inspired / Fusion

Ingredients
  

  • 8 oz raw shrimp peeled and deveined1 tablespoon coconut oil¼ teaspoon salt7 oz rice noodles or alternative (ramen, glass noodles, or mung bean vermicelli)1 small shallot, finely chopped3 tablespoons Thai red curry paste3 cloves garlic, minced1-inch piece of fresh ginger, grated4 cups chicken or seafood broth14 oz can unsweetened coconut milk1 tablespoon fish sauce1 tablespoon brown sugar¼ teaspoon red chili flakes, optional1 medium red bell pepper, thinly sliced5 oz cremini mushrooms, sliced1 tablespoon lime juice2 cups baby spinachFresh cilantro, for garnishLime wedges, for serving

Method
 

  1. Soak the rice noodles or mung bean vermicelli in a large bowl of warm water for 10 to 15 minutes until softened. Drain and set aside.
  2. Heat coconut oil in a large pot over medium-high heat. Season shrimp with salt and sear for 1 to 2 minutes per side until just browned. Remove and set aside.
  3. In the same pot, sauté the chopped shallot for 1 minute. Stir in garlic, grated ginger, and red curry paste. Cook for 2 minutes until aromatic.
  4. Pour in broth and coconut milk. Stir in fish sauce, brown sugar, and red chili flakes. Bring to a gentle simmer.
  5. Add sliced red bell pepper and mushrooms. Simmer for 5 minutes until tender.
  6. Add baby spinach and cook for 30 seconds until wilted. Stir in lime juice.
  7. Divide the softened noodles between serving bowls. Ladle hot soup over the noodles, top with shrimp, garnish with fresh cilantro, and serve with lime wedges on the side.

Notes

Use seafood broth for a deeper coastal flavor or vegetable broth for a vegetarian twist.
Swap shrimp with tofu or tempeh for a plant-based variation.
Coconut milk adds creaminess—use full-fat for a richer texture.
Add extra red chili flakes or sliced Thai chili if you love it spicy.

Three Bean Pasta Salad Recipe for a Healthy Meal

There are dishes that simply taste like memories—bowls of comfort that bring you back to sticky summer evenings and long tables set up in the backyard, where cousins chased fireflies and the smell of grilled corn hung heavy in the humid air. For me, that dish is this 3-Bean Pasta Salad.

Every Fourth of July, my aunt Judy would arrive with a massive turquoise Tupperware container, packed to the brim with her signature salad. It was creamy, tangy, colorful, and somehow always ice-cold, no matter how hot the day was. She never followed a strict recipe, but the flavors were always the same—three types of beans for body and earthiness, bell peppers for a satisfying crunch, and a creamy, zippy dressing that tied everything together. I remember sitting at the kids’ table, balancing a paper plate on my knees, fork in one hand and a red cup of lemonade in the other, feeling like nothing else in the world mattered.

This updated version of that beloved dish brings the same comfort and nostalgia but with a little more polish. It’s made to please a crowd, easy to whip together in under 30 minutes, and flexible enough to suit nearly any palate or dietary need.

Why This Salad Wins Every Time

Pasta salads are the ultimate make-ahead dish, but this one has something extra going for it: beans. Packed with protein and fiber, they elevate this salad from a simple side to something a bit more substantial. It’s got texture, color, tang, and a whisper of sweetness from the honey in the dressing. Whether you’re bringing it to a picnic, packing it for lunch, or keeping it in the fridge for a snack, it’s a dish that always feels generous.

Frequently Asked Questions About 3-Bean Pasta Salad

What are the best beans to use?

Traditionally, this salad uses green beans, kidney beans, and northern (or cannellini) beans. These offer a nice variety of texture and flavor: crisp, meaty, and creamy. But it’s a very forgiving recipe—black beans, chickpeas, pinto beans, or even edamame can all step in without throwing off the balance.

Can I make this salad vegan?

Absolutely. Just swap out the mayonnaise in the dressing for a vegan alternative or use a homemade cashew cream for richness. The rest of the ingredients are naturally plant-based.

How long can it sit out at room temperature?

Because it contains mayo, it’s best to limit the time this salad spends outside to under two hours, especially on warm days. If serving at a picnic or cookout, try placing the serving bowl over a bed of ice.

Can I make this salad ahead of time?

Yes—in fact, you should. Letting it chill for at least an hour (or even overnight) deepens the flavors. Just give it a stir before serving, and if it seems dry, add a splash of vinegar or a spoonful of dressing to wake it up.

What pasta works best?

While elbow macaroni is the go-to for its classic look and bite, other shapes like cavatappi, farfalle, or shells work beautifully too. Choose a pasta that holds onto dressing well.

Can I add protein to make it a full meal?

Sure! Add in grilled chicken, tuna, or even diced hard-boiled eggs. For plant-based options, chopped tempeh, smoked tofu, or roasted chickpeas add heartiness and extra crunch.

Serving Suggestions: What Goes With 3-Bean Pasta Salad?

This salad is a natural at backyard cookouts, but it doesn’t stop there. Here are some of our favorite pairings:

  • Burgers & Hot Dogs – It’s the perfect creamy counterpoint to rich grilled meats.
  • Grilled Veggies or Kebabs – A colorful, healthy meal.
  • Fried Chicken – Classic Southern flavors meet refreshing texture.
  • Cold Sandwiches – Especially good with deli meats, egg salad, or grilled cheese.
  • Roast Chicken or Turkey – Great for next-day leftovers as a side.

And let’s not overlook this salad’s meal-prep potential—it holds up in the fridge for days, making it a solid choice for lunchboxes and busy weeks.

Tweak It Your Way: Customization Tips

The beauty of this recipe is how endlessly customizable it is. Whether you’re cleaning out the fridge or cooking for someone with dietary restrictions, here are a few ideas:

Crunchy Add-Ins:

  • Chopped pickles or banana peppers
  • Sunflower seeds or chopped walnuts
  • Shredded carrots or cabbage

Fresh Herbs:

  • Dill or basil for a summer flavor twist
  • Chives or scallions for mild oniony depth

Cheese, Please:

  • Crumbled feta
  • Cubes of sharp cheddar
  • Shavings of parmesan

Make It Sweet & Savory:

  • Toss in some dried cranberries
  • Add chopped apples or grapes

The creamy, tangy dressing is versatile enough to support a whole range of flavors, so don’t be afraid to get creative.

Storage & Leftovers: A Love That Lasts

This salad is a meal prep champion. Store it in an airtight container in the refrigerator for 3 to 4 days. As it sits, the pasta tends to absorb the dressing. If it feels a little dry the next day, just stir in a spoonful of mayo, a drizzle of oil, or even a dash of vinegar to revive it.

You can also freeze the dressing separately if you’re making a big batch, but freezing the fully assembled salad is not recommended—the pasta and beans lose their texture once thawed.

For Every Table, Every Time

This 3-Bean Pasta Salad has earned its place as a staple at any table—from holiday potlucks to weekday lunches. It brings people together, not just because it’s delicious, but because it’s so familiar. There’s something inherently welcoming about a big bowl of pasta salad. It says, “There’s enough here for everyone. Pull up a chair.”

And maybe that’s the heart of it: a good recipe doesn’t just feed you. It feeds your memories, your joy, and your sense of home. It takes the simplest ingredients and turns them into a story—a tradition in the making.

So whether you’re reviving a childhood classic like I did, or making this dish for the first time, I hope it becomes one of those recipes you return to again and again. The kind that makes people smile when they see it on the table. The kind you’ll be proud to call your own.

Paul

Three Bean Pasta Salad Recipe for a Healthy Meal

This 3-Bean Pasta Salad is the ultimate side dish for potlucks, BBQs, or weekday lunches. Loaded with tender pasta, three types of beans, crisp veggies, and a creamy tangy dressing, it’s hearty, flavorful, and ready to impress—served chilled and tossed to perfection.
Prep Time 20 minutes
Cook Time 10 minutes
Total Time 1 hour 30 minutes
Servings: 8 servings
Course: Salad
Cuisine: American

Ingredients
  

  • 12 oz large elbow pasta1 can 14.5 oz green beans, drained1 can (14.5 oz) kidney beans, rinsed and drained1 can (14.5 oz) northern beans, rinsed and drained2 ribs celery, diced½ medium red onion, diced1 red bell pepper, diced2 tablespoons chopped parsley¼ cup red wine vinegar¼ cup mayonnaise3 tablespoons Dijon mustard1 tablespoon honey¼ teaspoon salt, or to taste¼ teaspoon black pepper⅓ cup vegetable or canola oil

Method
 

  1. Cook the elbow pasta in salted boiling water according to package directions. Drain and let cool slightly.
  2. In a large mixing bowl, whisk together red wine vinegar, mayonnaise, Dijon mustard, honey, salt, pepper, and oil until smooth and well combined.
  3. Add the cooked pasta, green beans, kidney beans, northern beans, diced celery, red onion, bell pepper, and chopped parsley to the bowl. Toss everything until evenly coated in the dressing.
  4. Cover the salad and refrigerate for at least 1 hour before serving to allow the flavors to blend.

Notes

You can substitute elbow pasta with rotini or penne for extra texture.
Use fresh green beans for added crunch if preferred—just steam and cool before adding.
Add a sprinkle of feta or crumbled bacon for a twist on the classic.
Best served chilled, and keeps well in the fridge for up to 3 days.

Tuna Salad Recipe with a Twist for a Delicious Meal

Tuna Salad Recipe with a Twist comes in! This recipe takes the traditional tuna salad and adds exciting flavors and textures. It’s perfect for lunch, dinner, or even a picnic.

What Makes This Tuna Salad Recipe Unique?

What sets this tuna salad apart? First, it includes a mix of fresh ingredients like celery, red onion, and dill pickles. These add crunch and a burst of flavor. The addition of Dijon mustard and lemon juice gives it a zesty kick that elevates the dish. Plus, you can customize it with optional ingredients like fresh herbs or avocado for extra creaminess.

This recipe is not just about taste; it’s also about nutrition. With low net carbs and high protein, it fits well into many diets. Whether you’re looking for a quick meal or a healthy snack, this tuna salad is a fantastic choice. So, let’s dive into the ingredients and get started on making this delicious dish!

Ingredients for Tuna Salad Recipe with a Twist

Tuna Salad Recipe with a Twist, you’ll need a few simple yet flavorful ingredients. Each component plays a vital role in enhancing the taste and texture of the salad. Here’s what you’ll need:

  • 1 can (12 oz) tuna, drained
  • 1/4 cup mayonnaise
  • 1 tablespoon Dijon mustard
  • 1/4 cup celery, finely chopped
  • 1/4 cup red onion, finely chopped
  • 1/4 cup dill pickles, chopped
  • 1 tablespoon lemon juice
  • Salt and pepper to taste
  • 1 tablespoon fresh dill or parsley, chopped (optional)
  • 4 cups mixed greens (for serving)
  • 4 slices whole grain bread (optional for sandwiches)

These ingredients come together to create a delightful blend of flavors. The tuna provides a hearty base, while the mayonnaise and Dijon mustard add creaminess and tang. Fresh vegetables like celery and red onion contribute crunch, and dill pickles bring a touch of sweetness. The lemon juice brightens the dish, making it refreshing and enjoyable.

Feel free to experiment with the ingredients! You can add your favorite herbs or even some diced avocado for a creamy twist. The beauty of this recipe lies in its versatility, allowing you to make it your own.

Step-by-Step Preparation of Tuna Salad Recipe with a Twist

Tuna Salad Recipe with a Twist. Follow these simple steps to create a delicious and satisfying dish that everyone will love!

Step 1: Gather Your Ingredients

Before you start, make sure you have everything you need. Gather your tuna, mayonnaise, Dijon mustard, celery, red onion, dill pickles, lemon juice, and any optional ingredients like fresh herbs. Having everything in one place makes the process smoother and more enjoyable.

Step 2: Prepare the Base of the Salad

In a medium bowl, add the drained tuna. Use a fork to break it up into smaller pieces. This helps the tuna mix well with the other ingredients. Next, add the mayonnaise and Dijon mustard. Mix these together until they are well combined. This creamy base is what makes your salad rich and flavorful.

Step 3: Add the Twist to Your Tuna Salad

Now it’s time to add the twist! Incorporate the finely chopped celery, red onion, and dill pickles into the bowl. These ingredients add crunch and a burst of flavor. Don’t forget the lemon juice! It brightens the dish and balances the creaminess. Stir everything together until it’s evenly mixed.

Step 4: Mix and Combine Ingredients

Once all the ingredients are in the bowl, it’s time to season your salad. Add salt and pepper to taste. If you’re using fresh dill or parsley, fold it in gently. This adds a fresh touch to your salad. Make sure everything is well combined, so each bite is packed with flavor.

Step 5: Chill and Serve

For the best flavor, cover the bowl and refrigerate your tuna salad for at least 30 minutes. Chilling allows the flavors to meld together beautifully. When you’re ready to serve, you can enjoy it over a bed of mixed greens or as a sandwich on whole grain bread. Either way, it’s sure to be a hit!

Variations of Tuna Salad Recipe with a Twist

Tuna Salad Recipe with a Twist is delicious on its own, there are many ways to customize it. Here are some exciting variations that can add new flavors and textures to your dish. Each option brings its own unique flair, making your tuna salad even more enjoyable!

Mediterranean-Inspired Tuna Salad

If you love Mediterranean flavors, this variation is for you! Start by adding ingredients like chopped olives, sun-dried tomatoes, and feta cheese to your tuna salad. These ingredients bring a salty, savory taste that pairs wonderfully with the tuna. You can also include fresh herbs like basil or oregano for an aromatic touch. Serve this salad on a bed of arugula or in a pita pocket for a delightful meal.

Spicy Tuna Salad Variation

For those who enjoy a little heat, try this spicy twist! Mix in some diced jalapeños or a dash of hot sauce to your tuna salad. You can also add a sprinkle of cayenne pepper for an extra kick. To balance the spice, consider adding diced avocado or a dollop of sour cream. This spicy tuna salad is perfect for those who love bold flavors and can be served on crackers or in lettuce wraps for a fun appetizer.

Tuna Salad with Fruits and Nuts

For a sweet and crunchy twist, consider adding fruits and nuts to your tuna salad. Diced apples or grapes can add a refreshing sweetness, while chopped walnuts or almonds provide a satisfying crunch. This combination not only enhances the flavor but also adds a variety of textures. Serve this fruity tuna salad on whole grain bread or over a bed of spinach for a nutritious and delicious meal.

Tuna Salad Recipe with a Twist allow you to explore different flavors and ingredients. Feel free to mix and match based on your preferences. The possibilities are endless, making this dish a versatile option for any occasion!

Cooking Note for Tuna Salad Recipe with a Twist

Tuna Salad Recipe with a Twist, there are a few cooking notes to keep in mind. These tips will help you achieve the best flavor and texture, ensuring your salad is a hit every time!

First, always choose high-quality tuna. Canned tuna comes in various types, such as chunk light or solid white albacore. Solid white albacore tends to have a firmer texture and richer flavor, making it a great choice for salads. However, chunk light tuna is often more affordable and still delicious.

Next, consider the freshness of your ingredients. Fresh vegetables like celery and red onion can make a big difference in taste. Always opt for crisp, vibrant produce. If you can, chop your vegetables just before mixing them into the salad. This keeps them crunchy and flavorful.

Another important note is to adjust the seasoning to your liking. Everyone has different taste preferences, so feel free to add more salt, pepper, or lemon juice as needed. Taste your salad before serving to ensure it has the right balance of flavors.

Lastly, if you plan to store your tuna salad, keep it in an airtight container in the refrigerator. It’s best enjoyed within 2-3 days. The flavors will continue to develop, but be cautious of the freshness of the ingredients, especially if you’ve added items like avocado or fruits.

Tuna Salad Recipe with a Twist that everyone will love. Enjoy the process and feel free to get creative with your ingredients!

Serving Suggestions for Tuna Salad Recipe with a Twist

Tuna Salad Recipe with a Twist, it’s time to think about how to serve it. This dish is versatile and can be enjoyed in many ways. Here are some great serving suggestions that will enhance your meal and impress your guests!

Best Accompaniments for Your Tuna Salad

Pairing your tuna salad with the right accompaniments can elevate the dining experience. Here are some tasty options:

  • Whole Grain Crackers: These add a delightful crunch and are perfect for scooping up the salad.
  • Fresh Veggies: Serve with carrot sticks, cucumber slices, or bell pepper strips for a refreshing crunch.
  • Fruit Salad: A light fruit salad can balance the savory flavors of the tuna salad, making for a well-rounded meal.
  • Chips: Whole grain or veggie chips can add a fun twist and a satisfying crunch.
  • Soup: A light vegetable or tomato soup pairs wonderfully with tuna salad, creating a comforting meal.

These accompaniments not only complement the flavors of your tuna salad but also add variety to your plate. Feel free to mix and match based on your preferences!

Creative Ways to Serve Tuna Salad

Tuna Salad Recipe with a Twist can be just as fun as making it! Here are some creative ideas to present your dish:

  • Stuffed Avocados: Halve ripe avocados and fill them with tuna salad for a healthy and visually appealing option.
  • In Lettuce Wraps: Use large lettuce leaves as wraps for a low-carb alternative. This makes for a fresh and crunchy bite.
  • On a Bed of Greens: Serve the salad over a mix of greens like spinach, arugula, or kale for a nutritious salad bowl.
  • As a Sandwich: Spread the tuna salad between slices of whole grain bread for a classic sandwich. Add some lettuce and tomato for extra flavor.
  • In a Pita Pocket: Fill pita pockets with tuna salad and add your favorite veggies for a fun and portable meal.

These creative serving ideas not only make your meal more exciting but also allow you to cater to different dietary preferences. Enjoy experimenting with how you serve your tuna salad!

Tips for Perfecting Your Tuna Salad Recipe with a Twist

Tuna Salad Recipe with a Twist truly shine, consider these helpful tips. They will ensure that your salad is not only delicious but also visually appealing and satisfying. Let’s dive into some expert advice!

First, always taste as you go. This is key to achieving the perfect balance of flavors. After mixing your ingredients, take a small spoonful and see if it needs more salt, pepper, or lemon juice. Adjusting the seasoning can make a big difference in the final taste.

Next, don’t be afraid to experiment with textures. Adding crunchy elements like nuts or seeds can enhance the overall experience. Consider tossing in some sunflower seeds or slivered almonds for an extra crunch. This will make each bite more interesting!

Another tip is to let your salad sit for a while before serving. Chilling it in the refrigerator for at least 30 minutes allows the flavors to meld together beautifully. This resting time can elevate the taste, making it even more enjoyable.

When it comes to presentation, consider using colorful ingredients. Brightly colored vegetables like bell peppers or cherry tomatoes can make your salad visually appealing. A beautiful presentation can make your dish more inviting and appetizing.

Lastly, always store your tuna salad properly. If you have leftovers, keep them in an airtight container in the fridge. This will help maintain freshness and flavor. Remember, it’s best to consume your salad within 2-3 days for optimal taste.

Tuna Salad Recipe with a Twist that is not only delicious but also a feast for the eyes. Enjoy the process and have fun experimenting with different flavors and textures!

Breakdown of Time for Tuna Salad Recipe with a Twist

Tuna Salad Recipe with a Twist can help you plan your meals better. Here’s a simple breakdown of the time involved in making this delicious dish. Whether you’re in a hurry or have some time to spare, this guide will help you manage your cooking schedule effectively.

Prep Time

The prep time for this tuna salad is quite short. You’ll need about 10 to 15 minutes to gather your ingredients and chop the vegetables. This includes draining the tuna and measuring out the mayonnaise and mustard. If you’re adding optional ingredients like fresh herbs or avocado, factor in a few extra minutes for chopping. Overall, you can expect to spend around 15 minutes on preparation.

Cooking Time

Interestingly, there’s no actual cooking involved in this recipe! The only time you’ll need is for mixing the ingredients together. This step takes about 5 minutes. However, if you choose to chill the salad for enhanced flavor, you should allow at least 30 minutes in the refrigerator. This chilling time is essential for letting the flavors meld together beautifully.

Total Time

Tuna Salad Recipe with a Twist comes to about 45 minutes. This includes 15 minutes of preparation and 30 minutes of chilling. If you’re in a rush, you can skip the chilling step, but for the best flavor, it’s worth the wait!

In summary, you can whip up this tasty tuna salad in under an hour. It’s a quick and easy meal option that’s perfect for busy days. Enjoy your cooking and the delightful flavors of your tuna salad!

Nutritional Information for Tuna Salad Recipe with a Twist

Tuna Salad Recipe with a Twist is essential for making informed choices about your meals. This salad is not only delicious but also packed with nutrients. Here’s a breakdown of the key nutritional components per serving, so you can enjoy it guilt-free!

Calories

Each serving of this tasty tuna salad contains approximately 250 calories. This makes it a great option for a light lunch or dinner. With a balanced mix of protein and healthy fats, it provides energy without being overly heavy. You can enjoy this salad while keeping your calorie intake in check!

Protein Content

Tuna Salad Recipe with a Twist is its high protein content. Each serving offers about 22 grams of protein. Tuna is an excellent source of lean protein, which is essential for muscle repair and overall health. This makes the salad a fantastic choice for those looking to boost their protein intake.

Sodium Levels

When it comes to sodium, this tuna salad contains around 400 mg per serving. While this is a reasonable amount, it’s important to be mindful of your overall sodium intake, especially if you’re watching your salt consumption. You can reduce sodium levels by choosing low-sodium tuna or adjusting the amount of added salt in the recipe.

Tuna Salad Recipe with a Twist is a nutritious option that provides a good balance of calories, protein, and sodium. It’s perfect for anyone looking to enjoy a healthy meal without sacrificing flavor. So go ahead, indulge in this delightful dish while keeping your health goals in mind!

FAQs about Tuna Salad Recipe with a Twist

Can I use fresh tuna instead of canned?

Tuna Salad Recipe with a Twist. Just make sure to cook the fresh tuna first. Grilling or searing it lightly will give you a delicious flavor. Once cooked, let it cool before mixing it with the other ingredients. Fresh tuna can add a lovely texture and taste to your salad, making it even more special!

How long can I store tuna salad in the fridge?

Your tuna salad can be stored in the fridge for about 2 to 3 days. Make sure to keep it in an airtight container to maintain freshness. If you’ve added ingredients like avocado or fruits, it’s best to consume the salad within a day or two. Always check for any changes in smell or appearance before eating leftovers. Enjoy your salad while it’s fresh for the best taste!

What are some good substitutes for mayonnaise in tuna salad?

Tuna Salad Recipe with a Twist healthier while still being delicious!

Is this tuna salad recipe suitable for meal prep?

Tuna Salad Recipe with a Twist is perfect for meal prep! It’s easy to make in larger batches and can be stored in the fridge for a few days. Just remember to keep it in an airtight container. You can portion it out for lunches or snacks throughout the week. This makes it a convenient and nutritious option for busy days!

Conclusion on Tuna Salad Recipe with a Twist

Tuna Salad Recipe with a Twist is a delightful and versatile dish that brings a fresh perspective to a classic favorite. With its combination of creamy textures, crunchy vegetables, and zesty flavors, this salad is sure to please everyone at the table. Whether you enjoy it on a bed of greens, in a sandwich, or as a fun appetizer, the possibilities are endless.

This recipe not only satisfies your taste buds but also provides a nutritious meal option. With high protein content and low net carbs, it fits well into various dietary preferences. Plus, the variations allow you to customize the salad to suit your mood or the ingredients you have on hand. From Mediterranean-inspired flavors to fruity additions, you can make this dish uniquely yours.

Tuna Salad Recipe with a Twist, remember to have fun and experiment with different ingredients. Don’t hesitate to adjust the seasonings to your liking and try out new combinations. The joy of cooking lies in creativity, and this recipe is a perfect canvas for your culinary imagination.

So, gather your ingredients, follow the steps, and enjoy the process of making this delicious salad. Whether it’s for a quick lunch, a picnic, or a family dinner, your tuna salad will surely be a hit. Happy cooking!

Paul

Tuna Salad Recipe with a Twist for a Delicious Meal

This Apple Tuna Salad is a fresh twist on a lunchtime classic—creamy, crunchy, and packed with protein. With sweet tart apple, creamy avocado, toasted almonds, and a lemon-kissed mayo dressing, this recipe is a flavor and texture explosion that’s perfect in sandwiches, lettuce wraps, or straight from the bowl.
Prep Time 15 minutes
Cook Time 5 minutes
Total Time 20 minutes
Servings: 6 servings
Course: Salad
Cuisine: American

Ingredients
  

  • 20 oz canned tuna in water well-drained (four 5-oz cans)1 medium onion, finely diced (about 1⅓ cups)1 medium Granny Smith apple, seeded and diced1 ripe avocado, pitted, peeled, and diced¾ cup real mayonnaise, or to taste½ teaspoon fresh lemon juice, or to taste½ cup sliced almonds or chopped walnuts, toasted⅛ teaspoon black pepper, or to taste

Method
 

  1. Toast the sliced almonds (or walnuts) in a dry skillet over medium heat until golden and fragrant. Set aside to cool.
  2. Drain the canned tuna thoroughly by pressing the lid to remove excess water.
  3. In a large mixing bowl, combine the tuna, diced onion, diced apple, diced avocado, toasted nuts, and mayonnaise.
  4. Stir in fresh lemon juice and black pepper. Mix well until creamy and evenly coated.
  5. Taste and adjust with additional mayo or lemon juice, if desired.
  6. Serve immediately in sandwiches, wraps, lettuce cups, or halved avocados—or simply enjoy on its own.

Notes

Use a tart apple like Granny Smith to balance the richness of the mayo and tuna.
Toast the nuts fresh for best flavor and crunch.
If prepping ahead, add the avocado just before serving to prevent browning.
You can substitute Greek yogurt for part of the mayo for a lighter option.

Chocolate Chip Pretzel Peanut Butter Cookies Recipe is easy!

Introduction to Chocolate Chip Pretzel Peanut Butter Cookies Recipe

Welcome to the delightful world of baking! Today, we’re diving into a scrumptious treat that combines the best of both sweet and salty flavors: Chocolate Chip Pretzel Peanut Butter Cookies. This recipe is perfect for anyone who loves the rich taste of chocolate and the crunch of pretzels, all wrapped up in a soft, chewy cookie.

Imagine biting into a warm cookie, where the creamy peanut butter meets the sweetness of chocolate chips, and the salty pretzel pieces add a delightful crunch. It’s a flavor explosion that will leave your taste buds dancing with joy! Whether you’re baking for a special occasion, a family gathering, or just to satisfy your sweet tooth, these cookies are sure to impress.

Not only are these cookies delicious, but they are also easy to make. With simple ingredients that you likely already have in your pantry, you can whip up a batch in no time. Plus, the combination of textures makes each bite an adventure. So, roll up your sleeves and get ready to create a batch of Chocolate Chip Pretzel Peanut Butter Cookies that everyone will love!

Let’s get started on this fun baking journey!

Ingredients for Chocolate Chip Pretzel Peanut Butter Cookies Recipe

Before we dive into the baking process, let’s gather all the ingredients you’ll need for these delightful Chocolate Chip Pretzel Peanut Butter Cookies. Having everything ready will make your baking experience smooth and enjoyable. Here’s what you’ll need:

  • 1 cup all-purpose flour
  • 1/2 teaspoon baking soda
  • 1/4 teaspoon salt
  • 1/2 cup unsalted butter, softened
  • 1/2 cup creamy peanut butter
  • 1/2 cup brown sugar, packed
  • 1/4 cup granulated sugar
  • 1 large egg
  • 1 teaspoon vanilla extract
  • 1 cup semi-sweet chocolate chips
  • 1 cup pretzel pieces (roughly crushed)

These ingredients come together to create a cookie that is not only tasty but also has a wonderful texture. The creamy peanut butter and chocolate chips provide a rich flavor, while the pretzel pieces add a satisfying crunch. Make sure to use unsalted butter for the best results, as it allows you to control the saltiness of the cookies.

Once you have all your ingredients measured and ready, you’ll be one step closer to enjoying these amazing cookies. Let’s move on to the next part of our baking adventure!

Step-by-Step Preparation of Chocolate Chip Pretzel Peanut Butter Cookies Recipe

Now that we have our ingredients ready, it’s time to roll up our sleeves and start baking! Follow these simple steps to create your delicious Chocolate Chip Pretzel Peanut Butter Cookies. Each step is designed to guide you through the process, ensuring that your cookies turn out perfectly every time.

Step 1: Preheat the Oven

First things first, preheat your oven to 350°F (175°C). This step is crucial as it ensures that your cookies bake evenly. While the oven heats up, you can prepare the rest of your ingredients. It’s a great way to save time!

Step 2: Mix the Dry Ingredients

In a medium bowl, whisk together the all-purpose flour, baking soda, and salt. Mixing these dry ingredients first helps to evenly distribute the baking soda and salt throughout the flour. Set this bowl aside for now; we’ll come back to it shortly.

Step 3: Cream the Butter and Sugars

In a large bowl, take your softened unsalted butter and add both the brown sugar and granulated sugar. Using a hand mixer or a whisk, beat the mixture until it becomes creamy and well combined. This step is important as it incorporates air into the mixture, making your cookies light and fluffy.

Step 4: Add Peanut Butter and Eggs

Next, add the creamy peanut butter to the butter and sugar mixture. Beat it in until it’s fully combined. Then, crack in the large egg and pour in the vanilla extract. Mix everything together until the batter is smooth and creamy. The peanut butter adds a rich flavor that pairs perfectly with the other ingredients.

Step 5: Combine Wet and Dry Ingredients

Now it’s time to bring the two mixtures together! Gradually add the dry ingredients to the wet mixture. Stir gently until just combined. Be careful not to overmix, as this can make your cookies tough. You want a nice, soft dough that’s ready for the next step!

Step 6: Fold in Chocolate Chips and Pretzels

With your dough ready, it’s time to add the fun part! Fold in the semi-sweet chocolate chips and the roughly crushed pretzel pieces. Make sure they are evenly distributed throughout the dough. This is where the magic happens, as the sweet and salty flavors come together beautifully!

Step 7: Scoop and Shape the Cookies

Using a tablespoon, scoop out portions of dough and place them onto your prepared baking sheet. Make sure to space them about 2 inches apart. This allows room for the cookies to spread while baking. If you like, you can shape them into balls for a more uniform look.

Step 8: Bake the Cookies

Finally, pop the baking sheet into your preheated oven. Bake the cookies for 10-12 minutes, or until the edges are lightly golden. Once they’re done, remove them from the oven and let them cool on the baking sheet for about 5 minutes. Then, transfer them to a wire rack to cool completely. Enjoy the wonderful aroma filling your kitchen!

And there you have it! A step-by-step guide to making your very own Chocolate Chip Pretzel Peanut Butter Cookies. Each step is simple and fun, making this recipe perfect for bakers of all skill levels. Now, let’s explore some variations to make these cookies even more exciting!

Variation of Chocolate Chip Pretzel Peanut Butter Cookies Recipe

While the classic Chocolate Chip Pretzel Peanut Butter Cookies are already a delightful treat, there are many fun variations you can try to make them even more exciting! Here are some creative ideas to switch things up and add your personal touch to this beloved recipe.

  • Nutty Delight: Add 1/2 cup of chopped nuts, such as walnuts or pecans, to the dough. This will give your cookies an extra crunch and a rich, nutty flavor that pairs beautifully with the peanut butter.
  • Chocolate Lovers: For a double chocolate experience, substitute half of the all-purpose flour with cocoa powder. This will create a chocolatey base that complements the chocolate chips perfectly.
  • Different Chocolate Types: Experiment with various types of chocolate chips! Try using dark chocolate, white chocolate, or even a mix of all three for a colorful and flavorful twist.
  • Caramel Surprise: Add a few caramel bits to the dough for a gooey surprise in every bite. The sweet caramel will melt slightly during baking, creating a delicious contrast with the salty pretzels.
  • Spicy Kick: If you enjoy a bit of heat, sprinkle in a pinch of cayenne pepper or cinnamon. This unexpected flavor will add a unique twist to your cookies that will surprise and delight your taste buds.
  • Gluten-Free Option: Substitute the all-purpose flour with a gluten-free flour blend. This way, everyone can enjoy these tasty cookies, regardless of dietary restrictions.

These variations not only enhance the flavor but also allow you to customize the cookies to suit your preferences. Feel free to mix and match these ideas or come up with your own unique combinations. The possibilities are endless, and that’s what makes baking so much fun!

Now that you have some exciting variations in mind, let’s move on to some important cooking notes to ensure your cookies turn out perfectly every time.

Cooking Note for Chocolate Chip Pretzel Peanut Butter Cookies Recipe

When it comes to baking, a few key tips can make all the difference in achieving the perfect Chocolate Chip Pretzel Peanut Butter Cookies. Here are some important cooking notes to keep in mind as you embark on your baking adventure:

  • Room Temperature Ingredients: Make sure your butter and egg are at room temperature before you start. This helps them blend more easily, creating a smooth and creamy dough.
  • Measuring Flour: To avoid dense cookies, measure your flour correctly. Use the spoon-and-level method: spoon the flour into your measuring cup and level it off with a knife. Avoid scooping directly from the bag, as this can pack the flour and lead to too much in your recipe.
  • Chilling the Dough: For chewier cookies, consider chilling the dough for about 30 minutes before baking. This helps the flavors meld together and can prevent the cookies from spreading too much in the oven.
  • Watch the Baking Time: Every oven is different, so keep an eye on your cookies as they bake. They should be lightly golden around the edges but still soft in the center. They will continue to firm up as they cool.
  • Cooling Time: Allow the cookies to cool on the baking sheet for a few minutes before transferring them to a wire rack. This helps them set and makes them easier to move without breaking.
  • Storage Tips: Store your cookies in an airtight container at room temperature. They will stay fresh for up to a week. For longer storage, consider freezing them. Just make sure to separate layers with parchment paper to prevent sticking.

By following these cooking notes, you’ll set yourself up for success in creating delicious Chocolate Chip Pretzel Peanut Butter Cookies. Each tip is designed to enhance your baking experience and ensure that your cookies turn out perfectly every time. Now, let’s explore some serving suggestions to make your cookie experience even more enjoyable!

Serving Suggestions for Chocolate Chip Pretzel Peanut Butter Cookies Recipe

Now that you’ve baked a batch of delicious Chocolate Chip Pretzel Peanut Butter Cookies, it’s time to think about how to serve them! These cookies are not only tasty but also versatile, making them perfect for various occasions. Here are some delightful serving suggestions to elevate your cookie experience:

  • With a Glass of Milk: There’s nothing quite like enjoying cookies with a cold glass of milk. The creamy texture of milk complements the rich flavors of peanut butter and chocolate, making each bite even more satisfying.
  • Ice Cream Sandwiches: For a fun twist, turn your cookies into ice cream sandwiches! Simply place a scoop of your favorite ice cream between two cookies. This treat is perfect for warm days and will surely impress your family and friends.
  • Cookie Platter: Arrange your cookies on a beautiful platter for a stunning presentation. You can mix in other types of cookies for variety. This makes for a lovely dessert table at parties or gatherings.
  • With Coffee or Tea: Pair your cookies with a warm cup of coffee or tea. The flavors of the cookies will enhance your beverage, creating a cozy and delightful snack time.
  • Gift Them: Pack your cookies in a decorative box or jar and give them as gifts. Homemade cookies are a heartfelt gesture for birthdays, holidays, or just to show someone you care.
  • Top with Sea Salt: For an extra touch, sprinkle a tiny pinch of sea salt on top of the cookies right after they come out of the oven. This enhances the sweet and salty flavor profile, making each bite even more delicious.

These serving suggestions not only enhance the enjoyment of your Chocolate Chip Pretzel Peanut Butter Cookies but also allow you to share the joy of baking with others. Whether you’re indulging alone or celebrating with friends and family, these cookies are sure to be a hit. Now that you have some great ideas for serving, let’s move on to tips for perfecting your cookie-making skills!

Tips for Perfect Chocolate Chip Pretzel Peanut Butter Cookies Recipe

Creating the perfect batch of Chocolate Chip Pretzel Peanut Butter Cookies is an art! With a few helpful tips, you can ensure that your cookies turn out delicious every time. Here are some expert suggestions to elevate your baking game:

  • Use Quality Ingredients: The quality of your ingredients can greatly affect the taste of your cookies. Opt for high-quality chocolate chips and fresh peanut butter for the best flavor. Organic or natural peanut butter can add a richer taste.
  • Don’t Overmix: When combining the wet and dry ingredients, mix just until combined. Overmixing can lead to tough cookies. You want a soft dough that holds together without being overly worked.
  • Experiment with Texture: If you prefer a softer cookie, bake them for a shorter time. For a crunchier texture, leave them in the oven a minute or two longer. Adjusting the baking time can help you achieve your desired cookie consistency.
  • Chill the Dough: As mentioned earlier, chilling the dough for about 30 minutes can enhance the flavor and texture. It helps the cookies maintain their shape while baking, resulting in a thicker cookie.
  • Use Parchment Paper: Lining your baking sheet with parchment paper prevents sticking and makes cleanup a breeze. It also helps the cookies bake evenly, giving you a perfect golden color.
  • Test for Doneness: Keep an eye on your cookies as they bake. They should be golden around the edges but still soft in the center. Remember, they will continue to cook slightly after being removed from the oven.
  • Let Them Cool: Allow your cookies to cool on the baking sheet for a few minutes before transferring them to a wire rack. This helps them set and makes them easier to handle without breaking.
  • Store Properly: To keep your cookies fresh, store them in an airtight container. You can also freeze them for longer storage. Just make sure to separate layers with parchment paper to prevent sticking.

By following these tips, you’ll be well on your way to baking the perfect Chocolate Chip Pretzel Peanut Butter Cookies. Each suggestion is designed to enhance your baking experience and ensure that your cookies are a hit with everyone who tries them. Now, let’s break down the time it takes to make these delicious treats!

Breakdown of Time for Chocolate Chip Pretzel Peanut Butter Cookies Recipe

Understanding the time it takes to prepare and bake your Chocolate Chip Pretzel Peanut Butter Cookies is essential for planning your baking session. Here’s a simple breakdown of the time involved in each step, so you can manage your time effectively and enjoy the process!

Prep Time

The prep time for these delightful cookies is approximately 15-20 minutes. This includes gathering your ingredients, measuring them out, and mixing the dough. If you choose to chill the dough for a chewier texture, you may want to add an additional 30 minutes to this time. However, the wait is well worth it for that perfect cookie consistency!

Cooking Time

Once your dough is ready, the cooking time is quite quick! You’ll need about 10-12 minutes to bake the cookies in your preheated oven. Keep an eye on them as they bake, ensuring they turn a lovely golden brown around the edges while remaining soft in the center. This short baking time makes it easy to whip up a batch whenever you crave something sweet!

Total Time

In total, you can expect to spend around 25-32 minutes from start to finish, not including any chilling time for the dough. This makes the Chocolate Chip Pretzel Peanut Butter Cookies a fantastic option for a quick and satisfying treat. Whether you’re baking for yourself or sharing with friends, you’ll have delicious cookies ready in no time!

Now that you have a clear understanding of the time involved, you can confidently plan your baking session. Let’s move on to the nutritional information for these tasty cookies!

Nutritional Information for Chocolate Chip Pretzel Peanut Butter Cookies Recipe

Understanding the nutritional content of your treats is essential, especially if you’re mindful of your diet. Here’s a breakdown of the nutritional information for each serving of these delightful Chocolate Chip Pretzel Peanut Butter Cookies. This will help you enjoy your cookies while keeping track of your intake.

Calories

Each cookie contains approximately 180 calories. This makes them a satisfying treat without being overly indulgent. Enjoying one or two cookies can fit nicely into a balanced diet, especially when paired with a healthy meal or snack.

Protein

These cookies provide about 3 grams of protein per serving. The protein comes mainly from the peanut butter and egg, contributing to a feeling of fullness. This makes them a great option for a quick energy boost, especially after a workout or during a busy day.

Sodium

Each cookie has around 100 milligrams of sodium. This amount is relatively low, especially considering the delicious salty pretzel pieces included in the recipe. Keeping sodium levels in check is important, and these cookies offer a tasty way to enjoy a treat without excessive salt.

In summary, these Chocolate Chip Pretzel Peanut Butter Cookies are not only delicious but also provide a reasonable balance of calories, protein, and sodium. Enjoy them as part of a varied diet, and feel good about indulging in this delightful treat! Now, let’s address some frequently asked questions about this recipe to help you bake with confidence.

FAQs about Chocolate Chip Pretzel Peanut Butter Cookies Recipe

Can I use different types of chocolate chips in this recipe?

Absolutely! One of the best things about baking is the ability to customize your treats. You can use dark chocolate, white chocolate, or even a mix of different types of chocolate chips. Each type will bring its unique flavor to the cookies, making them even more delightful. Feel free to experiment and find your favorite combination!

How do I store leftover cookies?

To keep your cookies fresh, store them in an airtight container at room temperature. This will help maintain their chewy texture and delicious flavor. If you want to keep them for a longer time, consider freezing them. Just make sure to separate layers with parchment paper to prevent sticking. When you’re ready to enjoy them, simply thaw at room temperature or pop them in the microwave for a few seconds!

Can I make these cookies gluten-free?

Yes, you can! To make these Chocolate Chip Pretzel Peanut Butter Cookies gluten-free, simply substitute the all-purpose flour with a gluten-free flour blend. Many brands offer great alternatives that work well in cookie recipes. Just be sure to check the packaging for any specific instructions, as some gluten-free flours may require additional ingredients or adjustments.

What can I substitute for peanut butter?

If you need a peanut butter substitute, there are several options available. Almond butter, cashew butter, or sunflower seed butter can work well in this recipe. Each alternative will bring its unique flavor, so choose one that you enjoy. Just keep in mind that the texture and taste may vary slightly, but you’ll still end up with delicious cookies!

These FAQs should help you navigate any questions you might have while baking your Chocolate Chip Pretzel Peanut Butter Cookies. Remember, baking is all about having fun and experimenting, so don’t hesitate to try new things! Now, let’s wrap up our cookie adventure with a conclusion that highlights the joy of baking these delightful treats.

Conclusion on Chocolate Chip Pretzel Peanut Butter Cookies Recipe

In conclusion, the Chocolate Chip Pretzel Peanut Butter Cookies recipe is a delightful blend of flavors and textures that brings joy to any baking session. With their perfect balance of sweet and salty, these cookies are sure to become a favorite in your household. Whether you’re baking for a special occasion or simply treating yourself, this recipe is easy to follow and yields delicious results.

As you’ve seen, the process is straightforward, making it accessible for bakers of all skill levels. From gathering your ingredients to enjoying the warm cookies fresh from the oven, each step is filled with excitement and anticipation. Plus, the variations and tips provided allow you to customize the recipe to suit your taste, ensuring that every batch is unique and special.

Remember, baking is not just about the end product; it’s about the experience and the memories created along the way. So, gather your loved ones, roll up your sleeves, and embark on this baking adventure together. Share the joy of these Chocolate Chip Pretzel Peanut Butter Cookies with family and friends, and watch as smiles light up their faces with every bite.

So, what are you waiting for? Grab your apron, preheat that oven, and start baking! You’re just a few simple steps away from creating a batch of cookies that will delight everyone. Happy baking!

Paul

Chocolate Chip Pretzel Peanut Butter Cookies Recipe is easy!

Soft and chewy with crisp edges, these cookies bring together melty dark chocolate, creamy peanut butter, and crunchy salted pretzels in every bite. They’re the ultimate salty-sweet indulgence—and they bake up in under 15 minutes!
Prep Time 15 minutes
Cook Time 12 minutes
Total Time 27 minutes
Servings: 7 –8 large cookies
Course: Dessert
Cuisine: American

Ingredients
  

  • Dry Ingredients:210 grams all-purpose flour or gluten-free flour blend1/2 teaspoon baking powder1/4 teaspoon baking soda1/2 teaspoon saltCoarse salt, for topping
  • Wet Ingredients:50 grams unsalted butter at room temperature (or 40 grams coconut oil or vegan butter for dairy-free)75 grams smooth peanut butter (preferably natural)150 grams dark brown sugar1 teaspoon vanilla extract1 large egg
  • Mix-Ins & Toppings:200 grams chopped dark chocolate or chocolate chipsSalted pretzels for topping (gluten-free if needed)

Method
 

  1. Preheat the oven to 190°C (375°F) and line a baking tray with parchment paper.
  2. In a stand mixer fitted with the paddle attachment, beat together the butter, peanut butter, dark brown sugar, vanilla extract, and salt until creamy.
  3. Add the egg and beat again until fully incorporated.
  4. Scrape down the sides of the bowl. Add the flour, baking powder, and baking soda, then mix until a soft dough forms. Fold in most of the chocolate, reserving some for topping.
  5. Roll the dough into large balls and slightly flatten. Place on the prepared baking tray. Top each with a few pretzel pieces and the reserved chocolate. Sprinkle with coarse salt.
  6. Bake for 8–12 minutes, or until the edges are golden and the centers are soft but set.
  7. Let cool for a few minutes on the tray before transferring to a wire rack. Serve warm for the best gooey texture.

Notes

Keep cookies large for ideal texture—crispy edges and soft centers.
Store in an airtight container for up to 3 days. Reheat briefly for that fresh-from-the-oven taste.
Freeze baked cookies for up to 1 month.
Optional add-ins: chopped peanuts or roasted nuts for extra crunch.

Creamy Chicken Florentine Soup is a must-try recipe!

What is Creamy Chicken Florentine Soup?

Creamy Chicken Florentine Soup is a delightful dish that combines tender chicken, fresh vegetables, and a rich, creamy broth. This soup is inspired by the classic Florentine style, which often features spinach and creamy sauces. The combination of flavors creates a comforting meal that warms you from the inside out. With its vibrant colors and hearty ingredients, this soup is not only delicious but also visually appealing.

Why You Should Try This Recipe

There are many reasons to try this Creamy Chicken Florentine Soup Recipe. First, it’s incredibly easy to make, even for beginner cooks. The step-by-step instructions guide you through the process, ensuring a successful outcome every time. Second, this soup is packed with nutrients. The fresh spinach, carrots, and celery provide essential vitamins and minerals, making it a healthy choice for your family.

Moreover, the creamy texture and savory flavors make it a crowd-pleaser. Whether you’re serving it for a cozy family dinner or a gathering with friends, everyone will love it. Plus, it’s versatile! You can easily customize the recipe by adding your favorite vegetables or proteins. So, if you’re looking for a comforting and satisfying meal, this Creamy Chicken Florentine Soup is a must-try!

Ingredients for Creamy Chicken Florentine Soup Recipe

To create a delicious bowl of Creamy Chicken Florentine Soup, you’ll need a variety of fresh ingredients. Here’s a complete list to help you gather everything you need:

  • 2 tablespoons olive oil
  • 1 medium onion, diced
  • 2 cloves garlic, minced
  • 1 pound boneless, skinless chicken breasts, cut into bite-sized pieces
  • 4 cups chicken broth
  • 1 cup heavy cream
  • 1 teaspoon dried thyme
  • 1 teaspoon dried basil
  • Salt and pepper to taste
  • 4 cups fresh spinach, roughly chopped
  • 1 cup carrots, diced
  • 1 cup celery, diced
  • 1 cup frozen peas
  • 1 tablespoon lemon juice
  • 1/4 cup grated Parmesan cheese

These ingredients come together to create a rich and creamy soup that is both satisfying and nutritious. The chicken provides a hearty protein source, while the vegetables add color and essential nutrients. The heavy cream and Parmesan cheese give the soup its signature creaminess, making each spoonful a delight.

For those looking to make adjustments, consider substituting half of the heavy cream with low-fat milk or a dairy-free alternative. This way, you can enjoy a lighter version without sacrificing flavor. Additionally, feel free to add cooked pasta or rice for a more filling meal. The possibilities are endless!

Step-by-Step Preparation of Creamy Chicken Florentine Soup Recipe

Step 1: Gather Your Ingredients

Before you start cooking, it’s important to gather all your ingredients. This makes the cooking process smoother and more enjoyable. Make sure you have everything listed in the ingredients section. Having your olive oil, chicken, vegetables, and seasonings ready will help you stay organized. Plus, it’s always nice to see all the colorful ingredients laid out on your counter!

Step 2: Prepare the Chicken

Now, let’s get to the chicken! Start by cutting your boneless, skinless chicken breasts into bite-sized pieces. This helps them cook evenly and makes them easy to eat. Once cut, set the chicken aside. You’ll want to ensure it’s ready to go when you start cooking. This step is crucial for a delicious soup, as the chicken is the star of the show!

Step 3: Sauté the Vegetables

Next, it’s time to sauté the vegetables. In a large pot, heat the olive oil over medium heat. Add the diced onion and cook until it becomes translucent, which should take about 5 minutes. Then, stir in the minced garlic and cook for another minute. The aroma will fill your kitchen, making it hard to resist! This step builds a flavorful base for your soup.

Step 4: Create the Creamy Base

Once your vegetables are sautéed, it’s time to add the chicken. Toss in the bite-sized chicken pieces and cook until they are no longer pink, which should take about 5-7 minutes. After that, pour in the chicken broth and bring the mixture to a boil. This is where the magic begins! Reduce the heat and let it simmer for about 10 minutes. This allows the flavors to meld beautifully.

Step 5: Combine Ingredients

Now, let’s make it creamy! Stir in the heavy cream, dried thyme, dried basil, salt, and pepper. The cream will give your soup that rich texture everyone loves. After that, add the chopped spinach, diced carrots, diced celery, and frozen peas. Cook everything together for another 5-7 minutes until the vegetables are tender. This is when your soup starts to look and smell amazing!

Step 6: Simmer and Serve

Finally, remove the pot from heat. Stir in the lemon juice and grated Parmesan cheese. This adds a nice zing and enhances the flavor. Taste your soup and adjust the seasoning if needed. Now, it’s time to serve! Ladle the soup into bowls and garnish with extra Parmesan if you like. Enjoy your warm, comforting bowl of Creamy Chicken Florentine Soup!

Variations of Creamy Chicken Florentine Soup Recipe

Adding Different Vegetables

One of the best things about the Creamy Chicken Florentine Soup Recipe is its versatility. You can easily add different vegetables to suit your taste or use what you have on hand. For instance, consider adding bell peppers for a sweet crunch or zucchini for a mild flavor. Mushrooms can also bring an earthy taste that complements the chicken beautifully. If you enjoy a bit of spice, try adding diced jalapeños or a sprinkle of red pepper flakes. The options are endless, and each addition can create a unique twist on this classic soup!

Making it Dairy-Free

If you’re looking for a dairy-free version of this Creamy Chicken Florentine Soup, you’re in luck! Simply substitute the heavy cream with a dairy-free alternative, such as coconut milk or almond milk. These options will still provide a creamy texture without the dairy. Additionally, you can use nutritional yeast instead of Parmesan cheese for a cheesy flavor. This way, you can enjoy a delicious bowl of soup that fits your dietary needs while still being rich and satisfying.

Using Alternative Proteins

While chicken is the star of this soup, you can easily switch it up with alternative proteins. For a lighter option, try using turkey instead of chicken. It will give you a similar taste with fewer calories. If you prefer plant-based proteins, consider adding chickpeas or lentils. These options not only add protein but also enhance the soup’s texture. You can even use shrimp or fish for a seafood twist. Each protein brings its own unique flavor, making this soup adaptable to your preferences!

Cooking Note for Creamy Chicken Florentine Soup Recipe

When preparing your Creamy Chicken Florentine Soup, there are a few cooking notes to keep in mind to ensure the best results. First, always use fresh ingredients whenever possible. Fresh vegetables and herbs will enhance the flavor and nutritional value of your soup. If you can, opt for organic produce to avoid pesticides and chemicals.

Next, be mindful of the cooking times. Overcooking the chicken can lead to a dry texture, while undercooking can pose health risks. Make sure the chicken is cooked through and no longer pink. Additionally, when adding the spinach and other vegetables, keep an eye on their cooking time. You want them to be tender but still vibrant in color and full of nutrients.

Another tip is to adjust the thickness of your soup. If you prefer a thicker consistency, you can blend a portion of the soup using an immersion blender. This will create a creamy texture while still leaving some chunks for added bite. On the other hand, if you like a lighter soup, feel free to add more chicken broth or reduce the amount of heavy cream.

Lastly, don’t forget to taste as you go! Adjusting the seasoning is key to achieving the perfect flavor. A little extra salt, pepper, or lemon juice can make a big difference. Enjoy the process, and remember that cooking is all about experimenting and finding what works best for you!

Serving Suggestions for Creamy Chicken Florentine Soup Recipe

Best Accompaniments

When it comes to serving your Creamy Chicken Florentine Soup, the right accompaniments can elevate the meal. A warm, crusty bread is a classic choice. It’s perfect for dipping into the creamy soup, soaking up all the delicious flavors. Consider a fresh baguette or a slice of sourdough for a delightful contrast in texture.

Another great option is a simple side salad. A light green salad with mixed greens, cherry tomatoes, and a tangy vinaigrette can balance the richness of the soup. You might also enjoy pairing it with garlic bread or cheesy breadsticks for a comforting touch.

If you want to add a bit of crunch, try serving some roasted vegetables on the side. Roasted broccoli or Brussels sprouts can provide a nice contrast to the creamy soup. For a heartier meal, consider adding a side of pasta or rice. This will make your dinner more filling and satisfying.

Ideal Serving Temperature

Serving temperature is key to enjoying your Creamy Chicken Florentine Soup. Ideally, the soup should be served hot, around 165°F (74°C). This temperature not only enhances the flavors but also ensures that the soup is safe to eat. To check the temperature, you can use a food thermometer or simply taste a spoonful to see if it’s warm enough.

When serving, ladle the soup into bowls and let it sit for a minute or two. This allows the heat to distribute evenly. If you’re serving it in a large pot, keep it on low heat to maintain warmth while everyone helps themselves. Remember, a hot bowl of soup is comforting and inviting, making it the perfect dish for any occasion!

Tips for Perfecting Your Creamy Chicken Florentine Soup Recipe

Storage Tips

Storing your Creamy Chicken Florentine Soup properly is essential for maintaining its delicious flavor and texture. First, allow the soup to cool completely before transferring it to an airtight container. This helps prevent condensation, which can make the soup watery. You can store the soup in the refrigerator for up to 3-4 days. Just make sure to label the container with the date so you know when it was made.

If you want to keep the soup for a longer period, consider freezing it. To do this, pour the cooled soup into freezer-safe containers or heavy-duty freezer bags. Leave some space at the top of the container, as the soup will expand when frozen. You can freeze the soup for up to 3 months. When you’re ready to enjoy it again, simply thaw it in the refrigerator overnight before reheating.

Reheating Instructions

Reheating your Creamy Chicken Florentine Soup is easy and can be done on the stovetop or in the microwave. If using the stovetop, pour the desired amount of soup into a pot and heat over medium-low heat. Stir occasionally to ensure even heating. This method helps maintain the soup’s creamy texture. Heat until it reaches a temperature of 165°F (74°C).

If you prefer the microwave, transfer the soup to a microwave-safe bowl. Cover it loosely with a microwave-safe lid or plate to prevent splatters. Heat on high for 1-2 minutes, stirring halfway through. Keep an eye on it to avoid overheating, as this can cause the cream to separate. Once heated through, give it a good stir and enjoy your comforting bowl of soup!

Breakdown of Time for Creamy Chicken Florentine Soup Recipe

Prep Time

Preparing your Creamy Chicken Florentine Soup is a breeze! The prep time typically takes about 15-20 minutes. This includes gathering your ingredients, chopping the vegetables, and cutting the chicken into bite-sized pieces. Having everything ready before you start cooking will make the process smoother and more enjoyable. So, take your time to get organized, and you’ll be on your way to a delicious meal!

Cooking Time

The cooking time for this delightful soup is around 25-30 minutes. This includes sautéing the vegetables, cooking the chicken, and allowing the soup to simmer. The key is to let the flavors meld together while ensuring the chicken is cooked through. Keep an eye on the pot, and you’ll have a warm, creamy soup ready in no time!

Total Time

In total, you can expect to spend about 40-50 minutes from start to finish. This includes both prep and cooking time. It’s a quick and satisfying recipe that’s perfect for busy weeknights or a cozy weekend meal. With just a little time and effort, you’ll have a hearty bowl of Creamy Chicken Florentine Soup to enjoy!

Nutritional Information for Creamy Chicken Florentine Soup Recipe

Calories

When it comes to enjoying a comforting bowl of Creamy Chicken Florentine Soup, knowing the calorie content can help you make informed choices. Each serving of this delicious soup contains approximately 320 calories. This makes it a satisfying option for lunch or dinner without overwhelming your daily caloric intake. The balance of ingredients ensures that you get a hearty meal while keeping the calorie count reasonable.

Protein

Protein is an essential nutrient, and this Creamy Chicken Florentine Soup delivers! Each serving provides about 28 grams of protein. The chicken is the primary source of this protein, making it a great choice for those looking to maintain or build muscle. Additionally, the protein content helps keep you feeling full and satisfied, making it an excellent option for a nutritious meal.

Sodium

Sodium levels are important to consider, especially for those monitoring their intake. This Creamy Chicken Florentine Soup contains approximately 800 mg of sodium per serving. While this is a reasonable amount for a soup, you can always adjust it to fit your dietary needs. To lower the sodium content, consider using low-sodium chicken broth or reducing the amount of added salt. This way, you can enjoy the flavors without compromising your health goals.

FAQs about Creamy Chicken Florentine Soup Recipe

Can I make Creamy Chicken Florentine Soup ahead of time?

Absolutely! Making Creamy Chicken Florentine Soup ahead of time is a great idea. In fact, the flavors often improve after sitting for a while. You can prepare the soup and store it in the refrigerator for up to 3-4 days. Just remember to let it cool completely before transferring it to an airtight container. When you’re ready to enjoy it, simply reheat on the stovetop or in the microwave until hot. This makes it perfect for meal prep or busy weeknights!

What can I substitute for heavy cream in this recipe?

If you’re looking for a substitute for heavy cream, there are several options available. You can use half-and-half for a lighter version that still maintains creaminess. Alternatively, low-fat milk can work, but it may result in a thinner soup. For a dairy-free option, consider using coconut milk or almond milk. These alternatives will provide a creamy texture without the dairy. Just keep in mind that each substitute may slightly alter the flavor, so choose one that suits your taste!

Is Creamy Chicken Florentine Soup healthy?

Creamy Chicken Florentine Soup can be a healthy choice, especially when made with fresh ingredients. It contains lean protein from the chicken and plenty of vegetables, which provide essential vitamins and minerals. However, the heavy cream does add calories and fat. To make it healthier, you can reduce the amount of cream or use lighter alternatives. Additionally, adding more vegetables can boost the nutritional value. Overall, it can be a balanced meal when enjoyed in moderation!

Can I freeze Creamy Chicken Florentine Soup?

Yes, you can freeze Creamy Chicken Florentine Soup! To do this, allow the soup to cool completely before transferring it to freezer-safe containers. Make sure to leave some space at the top, as the soup will expand when frozen. It can be stored in the freezer for up to 3 months. When you’re ready to enjoy it, thaw it in the refrigerator overnight and reheat on the stovetop or microwave. Just be aware that the cream may change texture slightly after freezing, but it will still be delicious!

Conclusion on Creamy Chicken Florentine Soup Recipe

In conclusion, Creamy Chicken Florentine Soup is a delightful dish that brings warmth and comfort to any meal. With its rich flavors and creamy texture, it’s a perfect choice for family dinners or gatherings with friends. The combination of tender chicken, fresh vegetables, and aromatic herbs creates a satisfying experience that is both nutritious and delicious.

This recipe is not only easy to follow but also allows for plenty of customization. Whether you choose to add different vegetables, make it dairy-free, or switch up the protein, the possibilities are endless. Each variation can bring a new twist to this classic soup, making it a versatile addition to your recipe collection.

Moreover, the nutritional benefits of this soup make it a smart choice for those looking to maintain a balanced diet. With a good amount of protein and essential vitamins from the vegetables, it’s a meal that can keep you feeling full and energized.

So, why not give this Creamy Chicken Florentine Soup a try? Gather your ingredients, follow the simple steps, and enjoy a warm bowl of comfort. Whether you’re cooking for yourself or sharing with loved ones, this soup is sure to impress. Happy cooking!

Paul

Creamy Chicken Florentine Soup is a must-try recipe!

This cozy Chicken Florentine Soup blends tender chicken, fresh spinach, and a creamy Parmesan-kissed broth into the ultimate comfort food. It’s a nourishing, flavorful hug in a bowl—perfect for chilly nights or whenever you need a satisfying pick-me-up.
Prep Time 15 minutes
Cook Time 30 minutes
Total Time 45 minutes
Servings: 4 servings
Course: Soup
Cuisine: American

Ingredients
  

  • 1 tablespoon olive oil2 tablespoons butter1 pound chicken breast cut into bite-sized pieces1 medium onion, diced2 medium carrots, diced2 celery stalks, diced4 garlic cloves, finely chopped1 tablespoon fresh thyme, finely chopped1/4 teaspoon red chili flakes1/4 cup dry white wine1/4 cup all-purpose flour4 cups low-sodium chicken stock2 bay leaves1 cup half and half (or single cream)3 cups baby spinach1/3 cup Parmesan cheese, gratedSalt and freshly ground black pepper, to taste

Method
 

  1. In a large pot over medium heat, heat the olive oil and butter. Add the chicken, season with salt and pepper, and cook for 5–6 minutes until golden and just cooked through. Remove from the pot and set aside.
  2. In the same pot, add the diced onion, carrots, and celery. Sauté for 6–7 minutes until softened. Add garlic, thyme, and red chili flakes, cooking for 1 more minute until fragrant.
  3. Pour in the white wine and let it bubble for 2–3 minutes, scraping any browned bits from the bottom of the pot.
  4. Sprinkle in the flour and stir continuously for 1–2 minutes to form a roux. Gradually whisk in the chicken stock until smooth. Add bay leaves.
  5. Return the chicken to the pot and bring to a simmer. Cook for 10–12 minutes to thicken the soup and blend flavors.
  6. Stir in the half and half and baby spinach. Warm gently for 2–3 minutes until the spinach wilts. Remove the bay leaves.
  7. Stir in the Parmesan cheese and season with salt and pepper to taste. Serve hot with additional Parmesan if desired.

Notes

This soup is easily adaptable—use rotisserie chicken to save time or add mushrooms for extra umami.
Swap half and half with heavy cream for a richer result, or use whole milk for a lighter version.
Great for meal prep—store in the fridge for up to 4 days or freeze for up to 2 months (minus the cream and spinach).

Creamy Scalloped Potatoes and Ham is a must-try dish!

Absolutely! Here is a sample full-length article (around 1500+ words) for your website based on the Scalloped Potatoes with Ham recipe. It includes a personal introduction, FAQs, expert tips, variations, storage advice, and a heartfelt conclusion—all without the actual ingredients list or step-by-step instructions.

From Leftovers to Love: Why Scalloped Potatoes with Ham Feels Like Home

Growing up, my mother never wasted a single bite of food. Leftover ham from a holiday roast? That was gold. She’d pull out her battered casserole dish, layer potatoes like pages in an old family storybook, and pour over a creamy cheese sauce that smelled like every comfort I’d ever known. As the dish baked, our small kitchen filled with warmth—not just from the oven, but from the anticipation of something simple, hearty, and soul-hugging.

Scalloped potatoes with ham aren’t just a recipe; they’re a ritual. A way to bring together what’s leftover and make it feel like a brand new memory. This dish takes the unassuming—potatoes, cheese, and ham—and transforms it into a bubbling, golden hug on a plate. Whether you’re feeding a crowd after the holidays or simply craving something indulgent on a chilly evening, this casserole delivers nostalgia, comfort, and richness in every forkful.

Layers of Comfort: Why This Dish Works

There’s something magical about the harmony in this dish. Tender, starchy potatoes act as a canvas, soaking in a luscious cheese sauce enriched by savory ham and sweet, caramelized onions. The topping—browned, bubbling, and flecked with flecks of thyme—adds a layer of rustic elegance.

Unlike traditional potato gratins, this version elevates the flavor with three kinds of cheese (cheddar, Gruyere, and red Leicester) and the umami punch of smoky leftover ham. It’s simple to make, but the flavor depth makes it feel like you’ve labored all afternoon.

Your Questions, Answered: Scalloped Potato FAQ

Can I use pre-cooked or canned potatoes?

Technically yes, but fresh, thinly sliced raw potatoes are what create that tender, melt-in-your-mouth texture. Pre-cooked potatoes may break apart or become overly mushy during the long baking process.

Is it possible to make this without ham?

Absolutely. You can skip the ham for a vegetarian version, or replace it with sautéed mushrooms or smoked tofu for a similar depth of flavor. For a different protein twist, bacon, chorizo, or even shredded rotisserie chicken can work beautifully.

What kind of potatoes work best?

Floury potatoes like Russet, Rooster, Yukon Gold, or Maris Piper are ideal because their natural starch helps thicken the sauce and creates that perfect layered structure.

How do I keep the cream from curdling?

Curdling happens when cream separates due to high heat or acidity. Using full-fat cream and milk helps, as does avoiding high oven temperatures. Also, this recipe incorporates a flour-based roux, which acts as a stabilizer—an extra insurance policy against sauce mishaps.

Chef’s Notebook: Pro Tips for a Perfect Bake

Slice Uniformly, Always

Consistent potato thickness is key to even cooking. A mandoline slicer or the slicing attachment on a food processor will save time and your fingertips.

Don’t Rush the Bake

It can be tempting to pull the casserole out early, especially when the top looks so golden. But the magic happens in the last 15–20 minutes, when the sauce thickens properly, and the potatoes become buttery-soft.

Let It Rest

This is crucial. Just like lasagna, the dish needs 5–10 minutes after coming out of the oven to settle. This helps the sauce thicken and makes serving cleaner.

Playing with Flavor: Variations to Try

Sweet & Savory

Swap out half the potatoes with thinly sliced sweet potatoes or butternut squash. Their natural sweetness creates a lovely contrast with the salty ham and robust cheese.

Spicy Kick

Add thinly sliced jalapeños or a sprinkle of chili flakes between layers. A pinch of cayenne in the cheese sauce can also add warmth.

Herb Garden Upgrade

While thyme is traditional, rosemary, chives, or even sage can introduce different aromatic profiles. Add fresh herbs just before baking to avoid bitterness.

Global Twist

Craving something different? Add a sprinkle of curry powder or smoked paprika to the sauce. Or substitute some cheddar with fontina or Comté for a more European vibe.

Making It Ahead: Your New Best Friend for Gatherings

Scalloped potatoes with ham is a dream when made in advance. You can prepare the entire dish, cover, and refrigerate for up to two days before baking. Just allow it to sit at room temperature for 30 minutes before it goes in the oven. If baking from chilled, you may need to add 10–15 minutes to the cooking time.

Another approach? Fully cook it, let it cool, and reheat gently (covered with foil) at 180°C/350°F for 30–35 minutes. The flavors only deepen after a day in the fridge, making it even better the next day.

Storage Tips: Don’t Let the Goodness Go to Waste

  • Refrigerator: Store leftovers in an airtight container for up to 3 days. Reheat in the oven or microwave, covered to retain moisture.
  • Freezer: While it can be frozen, the texture of potatoes may become slightly grainy. If you do freeze it, cool the casserole completely, wrap tightly, and freeze for up to 2 months. Defrost overnight in the fridge and reheat as above.
  • Portion Planning: This dish is rich and hearty. For a side dish, it serves 6–8; as a main with a light salad, 4–6 is more realistic.

What to Serve With It: Building the Meal

This dish is a showstopper in its own right, but if you’re looking to create a full plate, try these combinations:

  • Green beans with lemon zest — for freshness
  • Simple arugula salad — the peppery notes cut through the richness
  • Sautéed mushrooms or broccoli — keeps the dish grounded
  • Crusty bread or dinner rolls — because more carbs are always welcome

For drinks, a crisp white wine (like Sauvignon Blanc) or a light-bodied red (like Pinot Noir) can complement the creaminess without overpowering the flavors.

In the End, It’s More Than Just Potatoes

At its heart, scalloped potatoes with ham is about making something beautiful from what you have. It’s a dish born from leftovers and gratitude. Each layer speaks to the power of home cooking—how we can take simple ingredients and, with a little love and time, turn them into something extraordinary.

Whether you’re trying to impress guests, feed a hungry family, or recreate a taste of home on a quiet evening, this dish delivers on all fronts. It’s food with a memory, flavor with a story.

And maybe that’s why, whenever I make it, I always set an extra place at the table. Not for a guest—but for the part of myself that remembers where it all began.

Paul

Creamy Scalloped Potatoes and Ham is a must-try dish!

This rich and creamy Scalloped Potatoes with Ham recipe layers thinly sliced potatoes, savory onions, and smoky ham in a decadent three-cheese sauce. Baked to golden perfection, it’s the ultimate comfort food—perfect for holidays, potlucks, or cozy weeknights.
Prep Time 20 minutes
Cook Time 1 hour 45 minutes
Total Time 2 hours 5 minutes
Servings: 6 servings
Course: Casserole
Cuisine: American

Ingredients
  

  • For the potato and ham layers:2 tablespoons unsalted butter1 large onion thinly sliced2 cloves garlic, minced1/2 teaspoon salt1/2 teaspoon black pepper1/4 teaspoon garlic salt200 grams cooked ham, cubed4 red-skinned potatoes, peeled and thinly sliced
  • For the cheese sauce:4 tablespoons unsalted butter6 tablespoons all-purpose flour560 milliliters full-fat milk180 milliliters heavy cream150 grams mature cheddar cheese grated50 grams Gruyere cheese, grated50 grams Red Leicester cheese, grated1 tablespoon fresh thyme, chopped (for garnish)

Method
 

  1. Preheat the oven to 180°C (350°F) fan. Grease a 9×12 inch baking dish about 2.4 inches deep.
  2. In a skillet, melt 2 tablespoons of butter over medium-high heat. Add the sliced onion, minced garlic, 1/4 teaspoon salt, 1/4 teaspoon black pepper, and garlic salt. Cook for 5–6 minutes until softened and lightly browned. Remove from heat.
  3. In a separate saucepan, melt 4 tablespoons of butter. Stir in flour to create a roux and cook for 1 minute. Gradually whisk in the milk until smooth. Stir in the cream and 3/4 of the cheddar cheese. Mix until melted and smooth.
  4. Layer half of the sliced potatoes in the baking dish. Top with half the onion mixture and half of the cubed ham. Season with 1/4 teaspoon salt and 1/4 teaspoon pepper. Pour over half of the cheese sauce.
  5. Repeat the layering with the remaining potatoes, onion, ham, and cheese sauce. Top with the remaining cheddar, Gruyere, and Red Leicester cheese.
  6. Cover the dish with foil and bake for 75–90 minutes until the potatoes are fork-tender. Remove the foil and bake uncovered for an additional 15–20 minutes, or until the top is golden and bubbling.
  7. Let rest for 5 minutes before garnishing with fresh thyme and serving warm.

Notes

Use floury potatoes like Rooster, Maris Piper, or Yukon Gold for the best creamy texture.
Feel free to switch up the cheese combo with whatever melty cheeses you have on hand.
This dish can be made ahead—just reheat covered in the oven until hot throughout.

Lemon Herb Chicken Piccata is a flavorful delight!

Lemon Herb Chicken Piccata is a delightful dish that brings a burst of flavor to your dinner table. This recipe combines the juicy tenderness of roast chicken with the zesty brightness of lemon and the savory notes of fresh herbs. It’s a perfect meal for family gatherings or special occasions, and it’s surprisingly easy to prepare.

The origins of Chicken Piccata can be traced back to Italy, where the dish traditionally features thinly sliced chicken cooked in a lemony sauce. However, this version takes it a step further by roasting a whole chicken, allowing the flavors to meld beautifully as it cooks. The result is a succulent bird with crispy skin, infused with the aromatic essence of garlic, capers, and herbs.

Not only is Lemon Herb Chicken Piccata delicious, but it also offers a healthy option for those looking to enjoy a hearty meal without the guilt. With minimal carbohydrates and a good amount of protein, it fits well into various dietary plans. Plus, the vibrant presentation makes it a feast for the eyes as well as the palate.

In this article, we will guide you through the ingredients, preparation steps, and tips to ensure your Lemon Herb Chicken Piccata turns out perfectly every time. Whether you’re a seasoned cook or a beginner, you’ll find this recipe approachable and rewarding. So, let’s dive into the world of flavors and aromas that this dish has to offer!

Ingredients for Lemon Herb Chicken Piccata

To create a mouthwatering Lemon Herb Chicken Piccata, you’ll need a selection of fresh and flavorful ingredients. Each component plays a vital role in building the dish’s unique taste. Here’s what you’ll need:

  • 3 pounds whole chicken, cleaned and patted dry
  • 1 teaspoon salt
  • 1 teaspoon black pepper
  • 2 tablespoons olive oil
  • 4 cloves garlic, minced
  • 1 cup chicken broth
  • 1/2 cup fresh lemon juice (about 2-3 lemons)
  • 1/4 cup capers, rinsed and drained
  • 1/4 cup fresh parsley, chopped
  • 1 teaspoon dried oregano
  • 1 teaspoon dried thyme
  • 1/2 teaspoon red pepper flakes (optional)
  • Lemon slices for garnish

These ingredients come together to create a dish that is not only flavorful but also visually appealing. The whole chicken serves as the star of the show, while the lemon juice and capers add a refreshing zing. Fresh herbs like parsley, oregano, and thyme enhance the overall aroma, making your kitchen smell divine as you cook.

When selecting your chicken, opt for a high-quality, organic bird if possible. This choice can significantly impact the flavor and texture of your dish. Fresh herbs are also recommended over dried ones for a more vibrant taste. With these ingredients in hand, you’re well on your way to preparing a delightful Lemon Herb Chicken Piccata that your family and friends will love!

Preparation of Lemon Herb Chicken Piccata

Now that you have gathered all the ingredients, it’s time to prepare your Lemon Herb Chicken Piccata. This section will guide you through each step, ensuring that your chicken turns out juicy and flavorful. Let’s get started!

Step 1: Preparing the Chicken

First, you need to prepare the chicken. Start by preheating your oven to 425°F (220°C). This high temperature will help achieve that crispy skin we all love. Next, take your whole chicken and clean it thoroughly. Pat it dry with paper towels. This step is crucial as it helps the skin crisp up during cooking.

Once the chicken is dry, season it generously inside and out with salt and black pepper. This simple seasoning enhances the chicken’s natural flavors. Make sure to rub the salt and pepper into the skin for an even distribution. Now, your chicken is ready for the next step!

Step 2: Making the Lemon Herb Sauce

In this step, you will create the delicious lemon herb sauce that will elevate your chicken. Take a large oven-safe skillet and heat 2 tablespoons of olive oil over medium-high heat. Once the oil is hot, carefully place the chicken in the skillet, breast side down. Sear it for about 5-7 minutes until it turns golden brown. This browning adds depth to the flavor.

After searing one side, flip the chicken and sear the other side for another 5-7 minutes. Once both sides are beautifully browned, remove the chicken from the skillet and set it aside on a plate. In the same skillet, add 4 cloves of minced garlic and sauté for about 1 minute until fragrant. The aroma will fill your kitchen!

Next, pour in 1 cup of chicken broth and 1/2 cup of fresh lemon juice. Make sure to scrape up any browned bits from the bottom of the skillet. These bits are packed with flavor! Stir in 1/4 cup of rinsed capers, 1/4 cup of chopped fresh parsley, 1 teaspoon of dried oregano, 1 teaspoon of dried thyme, and 1/2 teaspoon of red pepper flakes if you like a little heat. This sauce is what makes your Lemon Herb Chicken Piccata truly special.

Step 3: Cooking the Chicken

Now it’s time to cook the chicken! Return the seared chicken to the skillet, breast side up. Spoon some of the delicious sauce over the chicken to infuse it with flavor. This step is essential as it allows the chicken to absorb the zesty lemon and herb notes.

Carefully transfer the skillet to your preheated oven. Roast the chicken for about 1 hour, or until the internal temperature reaches 165°F (75°C). To keep the chicken moist and flavorful, baste it with the sauce halfway through cooking. This will ensure that every bite is juicy and packed with flavor.

Step 4: Combining Chicken and Sauce

Once the chicken is cooked, remove it from the oven and let it rest for about 10 minutes. This resting period allows the juices to redistribute, making the chicken even more tender. After resting, carve the chicken and serve it with lemon slices for garnish. Drizzle the pan sauce over the chicken for an extra burst of flavor.

And there you have it! Your Lemon Herb Chicken Piccata is ready to be enjoyed. The combination of crispy skin, juicy meat, and zesty sauce will surely impress your family and friends.

Variation of Lemon Herb Chicken Piccata

While the classic Lemon Herb Chicken Piccata is a delightful dish on its own, there are many ways to switch things up. Whether you want to try different ingredients or explore various cooking methods, these variations can add a unique twist to your meal. Let’s dive into some alternative ingredients and cooking methods that can enhance your Lemon Herb Chicken Piccata experience!

Alternative Ingredients for Lemon Herb Chicken Piccata

Sometimes, you might want to experiment with different flavors or use what you have on hand. Here are some alternative ingredients you can consider:

  • Herbs: Instead of parsley, try using fresh basil or cilantro for a different flavor profile. These herbs can add a fresh twist to your dish.
  • Chicken: If you prefer, you can use chicken thighs or drumsticks instead of a whole chicken. These cuts are often juicier and can absorb the flavors beautifully.
  • Broth: Swap out chicken broth for vegetable broth for a lighter option. This change can also make the dish suitable for vegetarians if you use plant-based chicken alternatives.
  • Capers: If you’re not a fan of capers, try using green olives or sun-dried tomatoes. Both options will add a unique flavor to the sauce.
  • Lemon Zest: For an extra zing, add lemon zest to the sauce. This will enhance the lemon flavor and make the dish even more aromatic.

These alternative ingredients can help you customize your Lemon Herb Chicken Piccata to suit your taste preferences or dietary needs. Feel free to mix and match to create your perfect version!

Different Cooking Methods for Lemon Herb Chicken Piccata

In addition to ingredient variations, you can also explore different cooking methods to prepare your Lemon Herb Chicken Piccata. Here are a few options:

  • Grilling: For a smoky flavor, consider grilling the chicken instead of roasting it. Marinate the chicken in the lemon herb sauce before grilling for added flavor.
  • Slow Cooking: If you have more time, use a slow cooker. Place the seasoned chicken and sauce ingredients in the slow cooker and cook on low for 6-8 hours. This method will yield incredibly tender chicken.
  • Instant Pot: For a quick meal, use an Instant Pot. Sear the chicken first, then add the sauce ingredients and cook on high pressure for about 25 minutes. This method locks in moisture and flavor.
  • Stovetop: If you prefer a quicker method, you can cook the chicken entirely on the stovetop. After searing, cover the skillet and let it simmer in the sauce until cooked through.

These cooking methods can help you adapt the Lemon Herb Chicken Piccata to your schedule and preferences. Each method brings out different flavors and textures, making your meal exciting every time!

Cooking Note for Lemon Herb Chicken Piccata

When preparing Lemon Herb Chicken Piccata, a few cooking notes can help ensure your dish turns out perfectly every time. Understanding the nuances of cooking can elevate your culinary experience and enhance the flavors of this delightful recipe.

First, always check the freshness of your ingredients. Fresh herbs, lemons, and high-quality chicken can significantly impact the taste of your dish. Fresh herbs provide a vibrant flavor that dried herbs simply cannot match. Similarly, using fresh lemons will give you the best juice and zest, enhancing the overall brightness of the sauce.

Next, pay attention to the searing process. Searing the chicken properly is crucial for achieving that golden-brown skin. Make sure your skillet is hot enough before adding the chicken. If the oil is not hot, the chicken will stick to the pan and won’t develop that beautiful crust. A well-seared chicken not only looks appealing but also locks in moisture, keeping the meat juicy.

Another important note is to monitor the internal temperature of the chicken. Using a meat thermometer is the best way to ensure your chicken is cooked through without drying it out. The ideal internal temperature for cooked chicken is 165°F (75°C). This ensures that the meat is safe to eat while remaining tender and juicy.

Lastly, don’t skip the resting period after cooking. Allowing the chicken to rest for about 10 minutes before carving is essential. This step lets the juices redistribute throughout the meat, resulting in a more flavorful and moist chicken. If you cut into it too soon, you risk losing those delicious juices, leading to a drier dish.

By keeping these cooking notes in mind, you can master the art of making Lemon Herb Chicken Piccata. With a little attention to detail, you’ll create a dish that is not only delicious but also a joy to serve to family and friends!

Serving Suggestions for Lemon Herb Chicken Piccata

Once your Lemon Herb Chicken Piccata is ready, it’s time to think about how to serve it. The right accompaniments can elevate your meal and create a delightful dining experience. Here are some serving suggestions that pair beautifully with this flavorful dish:

  • Roasted Vegetables: A side of roasted vegetables adds color and nutrition to your plate. Consider using seasonal veggies like carrots, zucchini, and bell peppers. Toss them in olive oil, salt, and pepper, and roast them alongside the chicken for a harmonious meal.
  • Garlic Mashed Potatoes: Creamy garlic mashed potatoes are a classic pairing. The rich, buttery flavor complements the zesty chicken perfectly. You can also add some lemon zest to the potatoes for a cohesive flavor profile.
  • Pasta: Serve the chicken over a bed of pasta, such as angel hair or fettuccine. The pasta will soak up the delicious lemon herb sauce, making every bite a burst of flavor. A sprinkle of Parmesan cheese on top can add an extra layer of taste.
  • Quinoa or Rice: For a healthier option, consider serving the chicken with quinoa or brown rice. These grains are nutritious and will absorb the sauce beautifully, making for a satisfying meal.
  • Fresh Salad: A light, fresh salad can balance the richness of the chicken. Use mixed greens, cherry tomatoes, and a simple vinaigrette. Adding slices of avocado or nuts can enhance the texture and flavor.
  • Bread: Don’t forget about bread! A crusty baguette or garlic bread is perfect for soaking up the flavorful sauce. It adds a comforting element to the meal.

When serving Lemon Herb Chicken Piccata, consider garnishing the dish with fresh lemon slices and additional chopped parsley. This not only enhances the presentation but also adds a fresh touch. With these serving suggestions, your meal will be a delightful feast that everyone will enjoy!

Tips for Perfect Lemon Herb Chicken Piccata

Creating the perfect Lemon Herb Chicken Piccata is all about attention to detail and a few helpful tips. With these suggestions, you can ensure that your dish turns out flavorful, juicy, and visually appealing every time. Let’s explore some essential tips to elevate your cooking experience!

  • Choose the Right Chicken: Opt for a high-quality, organic whole chicken. This choice can significantly enhance the flavor and texture of your dish. Fresh chicken will yield a juicier and more tender result.
  • Season Generously: Don’t be shy with the salt and pepper! Seasoning the chicken inside and out is crucial for building flavor. A well-seasoned chicken will taste much better than one that is under-seasoned.
  • Let the Chicken Rest: After cooking, allow the chicken to rest for about 10 minutes before carving. This resting period helps the juices redistribute, resulting in a more succulent chicken.
  • Use Fresh Ingredients: Fresh herbs, lemons, and garlic make a big difference in flavor. Whenever possible, choose fresh over dried ingredients for a more vibrant taste.
  • Monitor Cooking Time: Keep an eye on the cooking time and use a meat thermometer to check the internal temperature. Aim for 165°F (75°C) to ensure the chicken is cooked through without drying it out.
  • Baste for Moisture: Basting the chicken with the pan sauce halfway through cooking helps keep it moist and flavorful. This step is essential for achieving that juicy texture.
  • Experiment with Flavors: Don’t hesitate to try different herbs or spices. Adding a pinch of smoked paprika or a splash of white wine can create a unique twist on the classic recipe.
  • Presentation Matters: When serving, garnish with fresh lemon slices and chopped parsley. A beautiful presentation can make your dish even more appetizing and enjoyable.

By following these tips, you’ll be well on your way to mastering Lemon Herb Chicken Piccata. Each step contributes to a dish that is not only delicious but also a joy to share with family and friends. Happy cooking!

Breakdown of Time for Lemon Herb Chicken Piccata

Understanding the time required for each step in preparing Lemon Herb Chicken Piccata can help you plan your cooking efficiently. Here’s a detailed breakdown of the time you’ll need for preparation and cooking:

Prep Time

The prep time for Lemon Herb Chicken Piccata is approximately 20-30 minutes. This includes:

  • Cleaning and patting dry the chicken.
  • Seasoning the chicken with salt and pepper.
  • Chopping the garlic, parsley, and measuring out the other ingredients.
  • Preparing the skillet and preheating the oven.

Taking your time during the prep phase ensures that everything is ready when you start cooking, making the process smoother and more enjoyable.

Cooking Time

The cooking time for Lemon Herb Chicken Piccata is about 1 hour. This includes:

  • Searing the chicken on both sides for about 10-14 minutes.
  • Roasting the chicken in the oven for approximately 45-60 minutes until it reaches the safe internal temperature of 165°F (75°C).

During the roasting phase, remember to baste the chicken halfway through to keep it moist and flavorful.

Total Time

In total, you can expect to spend around 1 hour and 20-30 minutes from start to finish. This includes both prep and cooking time. Here’s a quick summary:

  • Prep Time: 20-30 minutes
  • Cooking Time: 1 hour
  • Total Time: 1 hour 20-30 minutes

With this time breakdown, you can easily plan your meal and enjoy the delightful process of making Lemon Herb Chicken Piccata. Happy cooking!

Nutritional Information for Lemon Herb Chicken Piccata

Understanding the nutritional content of your meals is essential for maintaining a balanced diet. Lemon Herb Chicken Piccata not only delights your taste buds but also offers a nutritious option for dinner. Here’s a breakdown of the key nutritional components per serving:

Calories

Each serving of Lemon Herb Chicken Piccata contains approximately 360 calories. This makes it a satisfying yet moderate choice for those watching their caloric intake. The combination of protein from the chicken and healthy fats from the olive oil contributes to the overall calorie count, providing energy without excessive amounts.

Protein

One of the standout features of this dish is its protein content. Each serving provides about 30 grams of protein. This high protein level is beneficial for muscle repair and growth, making it an excellent option for active individuals or anyone looking to maintain a healthy lifestyle. The chicken serves as a fantastic source of lean protein, helping you feel full and satisfied.

Sodium

The sodium content in Lemon Herb Chicken Piccata is approximately 600 milligrams per serving. While this is a reasonable amount, it’s essential to be mindful of your overall sodium intake, especially if you are watching your salt consumption. Using low-sodium chicken broth can help reduce the sodium level without sacrificing flavor. This way, you can enjoy your meal while keeping your dietary needs in check.

In summary, Lemon Herb Chicken Piccata is not only a delicious dish but also a nutritious one. With a good balance of calories, protein, and sodium, it fits well into a healthy eating plan. Enjoy this flavorful meal knowing that it supports your health and well-being!

FAQs about Lemon Herb Chicken Piccata

What is the origin of Chicken Piccata?

Chicken Piccata has its roots in Italian cuisine, where it traditionally features thinly sliced chicken cooked in a lemony sauce. The word “piccata” means “to slice” in Italian, referring to the method of preparing the chicken. Over time, this dish has evolved, and many variations have emerged, including the Lemon Herb Chicken Piccata we enjoy today. This version celebrates the classic flavors while adding a delightful twist by roasting a whole chicken, allowing the flavors to meld beautifully.

Can I make Lemon Herb Chicken Piccata ahead of time?

Yes, you can prepare Lemon Herb Chicken Piccata ahead of time! To do this, you can season the chicken and prepare the sauce in advance. Store the seasoned chicken in the refrigerator for up to 24 hours before cooking. When you’re ready to cook, simply follow the roasting instructions. If you have leftovers, they can be stored in an airtight container in the refrigerator for up to three days. Reheat gently in the oven or on the stovetop to maintain the chicken’s moisture and flavor.

What can I serve with Lemon Herb Chicken Piccata?

Lemon Herb Chicken Piccata pairs wonderfully with a variety of side dishes. Some popular options include:

  • Roasted vegetables for a colorful and nutritious addition.
  • Creamy garlic mashed potatoes to complement the zesty chicken.
  • Pasta, such as fettuccine or angel hair, to soak up the delicious sauce.
  • Quinoa or brown rice for a healthy grain option.
  • A fresh salad to balance the richness of the dish.

Feel free to mix and match these sides to create a well-rounded meal that everyone will enjoy!

Is Lemon Herb Chicken Piccata gluten-free?

Yes, Lemon Herb Chicken Piccata is naturally gluten-free! The recipe does not include any wheat-based ingredients, making it a safe choice for those with gluten sensitivities or celiac disease. However, always double-check the labels of any store-bought ingredients, such as chicken broth, to ensure they are gluten-free. Enjoy this flavorful dish without worry!

Conclusion on Lemon Herb Chicken Piccata

In conclusion, Lemon Herb Chicken Piccata is a delightful dish that combines the juicy goodness of roast chicken with the bright flavors of lemon and fresh herbs. This recipe not only showcases the beauty of simple ingredients but also highlights the joy of cooking at home. With its easy preparation and impressive presentation, it’s perfect for family dinners, special occasions, or even a cozy night in.

As you’ve seen throughout this article, the steps to create this dish are straightforward, making it accessible for cooks of all skill levels. From the initial preparation to the final garnishing, each step contributes to a meal that is both satisfying and nutritious. The high protein content and low carbohydrate count make it a great option for those looking to maintain a healthy lifestyle.

Moreover, the versatility of Lemon Herb Chicken Piccata allows you to experiment with different ingredients and cooking methods. Whether you choose to grill, slow cook, or roast, the essence of this dish remains intact, providing a delicious experience every time. Don’t hesitate to try out the variations and serving suggestions to make it your own!

So, gather your ingredients, roll up your sleeves, and embark on this culinary adventure. Your family and friends will surely be impressed by the flavors and aromas that fill your kitchen. Enjoy the process, and most importantly, savor every bite of your homemade Lemon Herb Chicken Piccata!

Paul

Lemon Herb Chicken Piccata is a flavorful delight!

Roast Chicken Piccata takes your classic lemon-caper sauce and elevates it with golden-crisp spatchcocked chicken. It’s equal parts rustic and refined—a skillet-to-oven masterpiece bursting with flavor from fresh lemon, butter, and herbs.
Prep Time 20 minutes
Cook Time 20 minutes
Total Time 1 hour 15 minutes
Servings: 6 servings
Course: Dinner
Cuisine: Italian-American

Ingredients
  

  • 1 whole chicken 4–5 lbs2 tablespoons neutral oil (canola, grapeseed, sunflower, etc.)Kosher salt and freshly cracked black pepper, to taste1 lemon, cut into thick slices6 tablespoons unsalted butter, cold and diced1 large shallot, minced3 tablespoons capers, minced2/3 cup dry white wine or chicken stock1 tablespoon lemon zest1/4 cup freshly squeezed lemon juice1/4 cup fresh parsley and chives, minced

Method
 

  1. Spatchcock the chicken by removing the backbone with kitchen shears and pressing down to flatten. Pat dry and season generously with salt and pepper under and over the skin. Place on a foil-lined tray in the fridge, uncovered, for at least 4 hours or up to 48 hours.
  2. Preheat the oven to 400°F (204°C). Heat neutral oil in a large cast iron skillet over medium heat. Place the chicken skin side down and weigh it down with another skillet. Sear for 10–12 minutes until the skin is golden brown.
  3. Flip the chicken so it’s skin side up. Tuck the lemon slices under and around the bird. Transfer the skillet to the oven and roast for 35–40 minutes, until the internal temperature reaches 165°F (74°C).
  4. Transfer the chicken to a cutting board to rest. Place the skillet back over medium heat. Add 2 tablespoons of butter and the shallots. Sauté for 2–3 minutes until softened.
  5. Stir in the capers and cook for 1 more minute. Add the wine and lemon juice, scraping up the browned bits. Let the mixture reduce slightly.
  6. Whisk in the remaining butter one tablespoon at a time until the sauce is glossy and emulsified. Stir in lemon zest and fresh herbs.
  7. Slice the rested chicken and arrange on a serving platter. Spoon the lemon-caper sauce over the top and garnish with extra herbs and lemon wedges.

Notes

You can prep the chicken up to two days in advance by dry brining in the fridge.
For a non-alcoholic version, substitute wine with low-sodium chicken broth.
Use Meyer lemons for a sweeter citrus profile.
This dish pairs beautifully with roasted potatoes, orzo, or a simple arugula salad.

Cheesy Chicken and Rice Bake Recipe is a must-try!

Cheesy Chicken and Rice Bake Recipe is a dish that brings warmth and joy to any table. It’s not just a meal; it’s a hug in a casserole dish. This recipe combines tender chicken, creamy sauce, and cheesy goodness, all baked to perfection. Whether you’re feeding a family or hosting friends, this dish is sure to impress.

What Makes the Cheesy Chicken and Rice Bake Recipe Special?

What sets this recipe apart? First, it’s incredibly easy to make. With just a few simple ingredients, you can whip up a hearty meal in no time. The combination of cooked rice and shredded chicken creates a satisfying base. Plus, the addition of broccoli adds a pop of color and nutrition.

Another highlight is the creamy texture from the cream of chicken soup and milk. This makes every bite rich and flavorful. And let’s not forget the melted cheddar cheese on top! It adds a deliciously gooey finish that everyone loves.

Moreover, this recipe is versatile. You can easily customize it to suit your taste. Want to add some spice? Toss in jalapeños! Prefer a different veggie? Swap broccoli for spinach or peas. The possibilities are endless!

Cheesy Chicken and Rice Bake Recipe is a perfect blend of convenience, flavor, and comfort. It’s a dish that not only fills your stomach but also warms your heart. So, let’s dive into the ingredients and get cooking!

Ingredients for Cheesy Chicken and Rice Bake Recipe

Cheesy Chicken and Rice Bake Recipe, you’ll need a handful of simple ingredients. Each one plays a vital role in making this dish flavorful and satisfying. Here’s what you’ll need:

  • 2 cups cooked white rice
  • 2 cups cooked, shredded chicken
  • 1 cup broccoli florets (fresh or frozen)
  • 1 can (10.5 ounces) cream of chicken soup
  • 1 cup shredded cheddar cheese
  • 1/2 cup milk
  • 1 teaspoon garlic powder
  • 1 teaspoon onion powder
  • 1/2 teaspoon black pepper
  • 1/2 teaspoon salt
  • 1/2 cup breadcrumbs
  • 2 tablespoons olive oil

These ingredients come together to create a comforting and hearty meal. The cooked white rice serves as a perfect base, while the shredded chicken adds protein. Broccoli not only enhances the dish’s nutrition but also adds a lovely crunch. The cream of chicken soup and milk create a creamy texture that binds everything together.

Don’t forget the spices! Garlic powder and onion powder bring out the flavors, while salt and pepper add just the right amount of seasoning. Finally, the breadcrumbs mixed with olive oil provide a crispy topping, and the cheddar cheese melts beautifully, making every bite irresistible.

Cheesy Chicken and Rice Bake Recipe.

Step-by-Step Preparation of Cheesy Chicken and Rice Bake Recipe

Cheesy Chicken and Rice Bake Recipe. This step-by-step guide will help you create a delicious meal that everyone will love. Let’s get started!

Step 1: Prepping the Chicken for Cheesy Chicken and Rice Bake Recipe

First, you need to prepare the chicken. If you have leftover chicken, that’s perfect! Just shred it into bite-sized pieces. If you’re starting with raw chicken, cook it thoroughly. You can boil, bake, or sauté it until it’s no longer pink inside. Once cooked, let it cool for a few minutes before shredding. This will make it easier to handle.

Shredded chicken adds a wonderful texture to the dish. It absorbs the flavors of the sauce and spices, making every bite delightful. If you want to save time, consider using a rotisserie chicken from the store. It’s already cooked and ready to go!

Step 2: Cooking the Rice for Cheesy Chicken and Rice Bake Recipe

Next, let’s cook the rice. If you’re using white rice, follow the package instructions. Typically, you’ll need to rinse the rice first, then combine it with water in a pot. Bring it to a boil, then reduce the heat and cover. Let it simmer until the rice is tender and fluffy.

Cooking rice is simple, but it’s essential to get it right. Overcooked rice can become mushy, while undercooked rice will be hard. Once the rice is ready, fluff it with a fork and set it aside to cool slightly. This will help it mix better with the other ingredients.

Step 3: Combining Ingredients for Cheesy Chicken and Rice Bake Recipe

Now comes the fun part—combining all the ingredients! In a large mixing bowl, add the cooked rice, shredded chicken, and broccoli florets. Then, pour in the cream of chicken soup and milk. Sprinkle in the garlic powder, onion powder, salt, and black pepper. Stir everything together until well combined.

Cheesy Chicken and Rice Bake Recipe is packed with flavor. The creamy soup will bind everything together, creating a delicious mixture that’s ready for baking.

Step 4: Baking the Dish to Perfection

Finally, it’s time to bake! Preheat your oven to 350°F (175°C) if you haven’t already. Transfer the mixture into a greased 9×13 inch baking dish, spreading it out evenly. In a small bowl, mix the breadcrumbs with olive oil until they are well coated. Sprinkle this breadcrumb mixture over the top of the chicken and rice mixture.

Don’t forget to add the shredded cheddar cheese on top! This will melt beautifully and create a golden, bubbly crust. Place the dish in the oven and bake for 25-30 minutes. You’ll know it’s done when the cheese is melted and the breadcrumbs are golden brown.

Cheesy Chicken and Rice Bake Recipe!

Variations of Cheesy Chicken and Rice Bake Recipe

Cheesy Chicken and Rice Bake Recipe is a fantastic base that allows for many variations. Whether you want to make it healthier or cater to vegetarian preferences, there are plenty of options to explore. Let’s dive into some exciting variations that can elevate your dish!

Healthy Alternatives for Cheesy Chicken and Rice Bake Recipe

Cheesy Chicken and Rice Bake Recipe, there are several easy swaps you can make. First, consider using brown rice instead of white rice. Brown rice is a whole grain and offers more fiber, which is great for digestion.

Next, you can replace the cream of chicken soup with a homemade version or a low-fat alternative. Simply mix together some low-sodium chicken broth with a bit of cornstarch to thicken it. This will cut down on calories while still providing that creamy texture.

Another healthy option is to add more vegetables. You can include carrots, bell peppers, or zucchini. These veggies not only boost the nutrition but also add vibrant colors to your dish. Lastly, opt for reduced-fat cheese to lower the fat content without sacrificing flavor.

Vegetarian Options for Cheesy Chicken and Rice Bake Recipe

Cheesy Chicken and Rice Bake Recipe is simple and delicious. Start by omitting the chicken and replacing it with plant-based protein. You can use chickpeas, lentils, or even tofu for a hearty texture.

Additionally, you can enhance the flavor by adding more vegetables. Spinach, mushrooms, and corn work wonderfully in this dish. They not only add nutrition but also create a colorful and appealing meal.

Cheesy Chicken and Rice Bake Recipe that everyone can enjoy!

Cheesy Chicken and Rice Bake Recipe can easily adapt to suit your taste. Now, let’s move on to some cooking notes to ensure your dish turns out perfectly!

Cooking Note for Cheesy Chicken and Rice Bake Recipe

Cheesy Chicken and Rice Bake Recipe, a few cooking notes can help you achieve the best results. These tips will ensure that your dish is not only delicious but also visually appealing and satisfying.

First, always use cooked rice. If you use uncooked rice, it won’t have enough time to cook through in the oven. This could lead to a crunchy texture that’s not pleasant. If you’re short on time, consider using leftover rice or even microwaveable rice packets. They’re quick and convenient!

Next, ensure your chicken is fully cooked and shredded evenly. This allows the flavors to meld beautifully. If you’re using frozen broccoli, make sure to thaw it first. This prevents excess moisture from making your dish watery. You can quickly thaw it in the microwave or let it sit at room temperature for a bit.

Another important note is to grease your baking dish well. This helps prevent sticking and makes serving easier. You can use cooking spray or a light coating of olive oil. This small step can save you a lot of hassle later!

Lastly, keep an eye on the baking time. Ovens can vary, so check your dish a few minutes before the recommended time. You want the cheese to be melted and bubbly, and the breadcrumbs to be golden brown. If the top is browning too quickly, you can cover it loosely with aluminum foil to prevent burning.

Cheesy Chicken and Rice Bake Recipe. Now, let’s explore some serving suggestions to make your meal even more delightful!

Serving Suggestions for Cheesy Chicken and Rice Bake Recipe

Cheesy Chicken and Rice Bake Recipe is out of the oven, it’s time to think about how to serve it. This dish is not only delicious but also versatile, making it perfect for various occasions. Here are some serving suggestions to enhance your meal experience!

First, consider pairing your bake with a fresh salad. A simple green salad with mixed greens, cherry tomatoes, and a light vinaigrette can add a refreshing contrast to the creamy casserole. The crunch of the salad complements the soft texture of the bake beautifully.

Another great option is to serve it with garlic bread or dinner rolls. The warm, buttery bread is perfect for soaking up any extra sauce from the dish. Plus, it adds a comforting touch to your meal.

Cheesy Chicken and Rice Bake Recipe with a side of pickled vegetables or a tangy coleslaw. The acidity from these sides can balance the richness of the cheese and cream, making each bite even more enjoyable.

For a heartier meal, consider adding a side of roasted vegetables. Carrots, zucchini, or bell peppers roasted with a drizzle of olive oil and herbs can bring extra flavor and nutrition to your plate. They also add a pop of color, making your meal visually appealing.

Lastly, don’t forget about garnishing! A sprinkle of fresh parsley or chives on top of the bake before serving can elevate the dish. It adds a touch of freshness and makes it look even more inviting.

Cheesy Chicken and Rice Bake Recipe will be a hit at any gathering. Whether it’s a family dinner or a potluck with friends, these ideas will help you create a memorable meal that everyone will love!

Tips for Perfecting Your Cheesy Chicken and Rice Bake Recipe

Cheesy Chicken and Rice Bake Recipe truly shine, a few tips can help you achieve perfection. These simple suggestions will enhance the flavor, texture, and overall presentation of your dish. Let’s explore some helpful tips!

First, always taste your mixture before baking. This is your chance to adjust the seasoning. If you feel it needs more flavor, add a pinch of salt or a dash of pepper. You can also mix in some hot sauce or spices for an extra kick. Remember, the flavors will intensify as it bakes, so don’t be afraid to season generously!

Next, consider the cheese. While cheddar is a classic choice, mixing different cheeses can elevate your dish. Try adding mozzarella for extra stretchiness or pepper jack for a spicy twist. Combining cheeses can create a more complex flavor profile that everyone will love.

Another tip is to let your bake rest after removing it from the oven. Allowing it to cool for about 5-10 minutes helps the dish set. This makes it easier to serve and ensures that each portion holds its shape. Plus, it gives the flavors a moment to meld together even more.

Cheesy Chicken and Rice Bake Recipe a delightful golden crust that adds texture and visual appeal.

Lastly, don’t hesitate to get creative with your toppings. Before serving, sprinkle some fresh herbs like parsley or basil on top. This not only adds a pop of color but also a fresh flavor that brightens the dish. You can also add a squeeze of lemon juice for a zesty finish.

Cheesy Chicken and Rice Bake Recipe. Each bite will be bursting with flavor, and your dish will impress everyone at the table. Now, let’s break down the time needed for this delicious recipe!

Breakdown of Time for Cheesy Chicken and Rice Bake Recipe

Cheesy Chicken and Rice Bake Recipe can help you plan your meal better. Here’s a simple breakdown of the time required for each step, so you can enjoy this delicious dish without any stress.

Prep Time for Cheesy Chicken and Rice Bake Recipe

The prep time for this recipe is quite manageable. You’ll need about 15-20 minutes to gather and prepare all your ingredients. This includes cooking the rice and chicken if they aren’t already cooked. Shredding the chicken and chopping any vegetables will also take place during this time. If you use leftover chicken or pre-cooked rice, you can cut this time down significantly!

Cooking Time for Cheesy Chicken and Rice Bake Recipe

Cheesy Chicken and Rice Bake Recipe requires about 25-30 minutes in the oven. During this time, the cheese will melt, and the breadcrumbs will turn golden brown. Keep an eye on it to ensure it doesn’t overcook, as ovens can vary in temperature.

Total Time for Cheesy Chicken and Rice Bake Recipe

Cheesy Chicken and Rice Bake Recipe!

Nutritional Information for Cheesy Chicken and Rice Bake Recipe

Cheesy Chicken and Rice Bake Recipe is essential for making informed choices about your meals. This dish is not only delicious but also provides a good balance of nutrients. Let’s break down the key nutritional components to give you a clearer picture of what’s in this comforting casserole.

Calories in Cheesy Chicken and Rice Bake Recipe

Cheesy Chicken and Rice Bake Recipe contains approximately 350 calories. This makes it a satisfying option for lunch or dinner without being overly heavy. The calorie content comes from a combination of ingredients, including the rice, chicken, cheese, and cream of chicken soup. It’s a great way to enjoy a hearty meal while keeping your calorie intake in check.

Protein Content in Cheesy Chicken and Rice Bake Recipe

Protein is an essential nutrient, and this recipe delivers! Each serving provides about 25 grams of protein. The shredded chicken is the primary source of protein, making this dish a great choice for those looking to increase their protein intake. Protein is vital for muscle repair and growth, and it helps keep you feeling full longer. So, you can enjoy this bake knowing it supports your dietary needs!

Sodium Levels in Cheesy Chicken and Rice Bake Recipe

Cheesy Chicken and Rice Bake Recipe contains around 600 milligrams. While this is a reasonable amount for a comforting dish, it’s always good to be mindful of your sodium intake, especially if you’re watching your salt consumption. To reduce sodium levels, consider using low-sodium versions of the cream of chicken soup and chicken broth. This way, you can enjoy the flavors without the extra salt!

Cheesy Chicken and Rice Bake Recipe offers a balanced meal with a good mix of calories, protein, and sodium. It’s a delicious option that can fit into a healthy diet, especially when paired with fresh vegetables or a light salad. Now that you know the nutritional benefits, let’s move on to some frequently asked questions about this delightful dish!

FAQs about Cheesy Chicken and Rice Bake Recipe

Can I use brown rice in the Cheesy Chicken and Rice Bake Recipe?

Cheesy Chicken and Rice Bake Recipe. Brown rice is a healthier option as it contains more fiber and nutrients compared to white rice. However, keep in mind that brown rice takes longer to cook. Make sure to cook it according to the package instructions before mixing it with the other ingredients. This way, you’ll have a delicious and nutritious meal that everyone will enjoy!

How can I make the Cheesy Chicken and Rice Bake Recipe spicier?

Cheesy Chicken and Rice Bake Recipe, there are several ways to do so! One simple method is to mix in some diced jalapeños or green chilies into the chicken and rice mixture. You can also sprinkle in some red pepper flakes or cayenne pepper for an extra kick. If you prefer a spicier cheese, consider using pepper jack cheese instead of cheddar. These additions will give your dish a delightful spicy twist that spice lovers will appreciate!

What can I substitute for cheese in the Cheesy Chicken and Rice Bake Recipe?

Cheesy Chicken and Rice Bake Recipe, there are several options available. For a dairy-free alternative, you can use nutritional yeast, which has a cheesy flavor and is packed with nutrients. Another option is to use a plant-based cheese that melts well, such as cashew cheese or almond cheese. If you’re looking for a lower-fat option, consider using cottage cheese or ricotta cheese. These substitutes will still provide a creamy texture while catering to your dietary needs!

How long can I store leftovers of the Cheesy Chicken and Rice Bake Recipe?

Cheesy Chicken and Rice Bake Recipe can be stored in the refrigerator for up to 3-4 days. Make sure to place the leftovers in an airtight container to keep them fresh. If you want to store them for a longer period, you can freeze the bake. Just make sure to let it cool completely before transferring it to a freezer-safe container. It can last in the freezer for about 2-3 months. When you’re ready to enjoy it again, simply thaw it in the refrigerator overnight and reheat it in the oven or microwave!

Conclusion on Cheesy Chicken and Rice Bake Recipe

Cheesy Chicken and Rice Bake Recipe is a delightful dish that combines comfort, flavor, and convenience. It’s perfect for busy weeknights or special gatherings, offering a satisfying meal that everyone will love. With its creamy texture, tender chicken, and gooey cheese, this recipe is sure to become a family favorite.

Not only is it easy to prepare, but it also allows for endless customization. Whether you want to make it healthier, add more veggies, or even create a vegetarian version, the possibilities are truly endless. This flexibility makes it a versatile option for various dietary preferences and tastes.

Cheesy Chicken and Rice Bake Recipe that suits your needs. From cooking notes to serving suggestions, each detail contributes to a delicious outcome.

Cheesy Chicken and Rice Bake Recipe is not just a dish; it’s an experience filled with love and flavor. Happy cooking!

Paul

Cheesy Chicken and Rice Bake Recipe is a must-try!

A cozy, creamy casserole that’s packed with pantry staples and big on flavor. This Chicken & Rice Bake combines tender chicken, creamy soups, fluffy rice, and melty butter for a one-dish dinner that satisfies the whole family.
Prep Time 10 minutes
Cook Time 1 hour
Total Time 1 hour 10 minutes
Servings: 6 servings
Course: Dinner
Cuisine: American

Ingredients
  

  • 2 large boneless skinless chicken breasts, cut into 1-inch cubes (uncooked)1 can (10.5 oz) cream of mushroom soup1 can (10.5 oz) cream of chicken soup1 can (10.5 oz) cream of celery soup1 teaspoon salt1 teaspoon garlic powder1/4 teaspoon black pepper2 cups cooked white rice1 cup chicken broth1/4 cup butter, cut into small pats

Method
 

  1. Preheat the oven to 400°F and lightly grease a 9×13-inch baking dish.
  2. In a large bowl, combine the uncooked chicken cubes, all three soups, salt, garlic powder, pepper, cooked rice, and chicken broth. Mix well until everything is evenly combined.
  3. Spread the mixture evenly into the prepared baking dish.
  4. Dot the top with pats of butter for added richness.
  5. Bake uncovered for 60 minutes, until bubbling and the chicken is cooked through.

Notes

Add shredded cheddar or pepper jack cheese during the last 5 minutes of baking for a cheesy topping.
You can substitute cream of celery soup with cream of broccoli, asparagus, or cheddar cheese soup.
Feel free to add chopped vegetables like broccoli or mushrooms for extra nutrition and flavor.
For added seasoning, try onion powder or a dash of Italian herbs.

Cookie Monster Ice Cream Sandwich Cake is a must-try!

Introduction to Cookie Monster Ice Cream Sandwich Cake

What is Cookie Monster Ice Cream Sandwich Cake?

The Cookie Monster Ice Cream Sandwich Cake is a delightful dessert that combines the best of both worlds: cookies and ice cream. Imagine layers of soft, chewy chocolate chip cookie dough paired with creamy blue vanilla ice cream. This cake is not just a treat for your taste buds; it’s also a feast for your eyes! The vibrant blue color and fun toppings make it a perfect dessert for parties, birthdays, or any celebration. With its unique combination of flavors and textures, this cake is sure to impress both kids and adults alike.

Why You Should Try Cookie Monster Ice Cream Sandwich Cake

There are countless reasons to whip up a Cookie Monster Ice Cream Sandwich Cake. First, it’s incredibly easy to make, even for novice bakers. You can use store-bought cookie dough and ice cream, saving you time and effort. Second, this dessert is highly customizable. You can switch up the ice cream flavors or add your favorite candies for a personal touch. Plus, it’s a crowd-pleaser! The combination of cookies and ice cream is universally loved, making it a hit at any gathering. Lastly, it’s a fun way to bring a little whimsy to your dessert table. Who wouldn’t want to dig into a cake that looks like it came straight from a cartoon? So, gather your ingredients and get ready to create a dessert that will leave everyone smiling!

Ingredients for Cookie Monster Ice Cream Sandwich Cake

To create the delightful Cookie Monster Ice Cream Sandwich Cake, you’ll need a few simple ingredients. Here’s what you’ll need to gather:

  • 2 cups chocolate chip cookie dough (you can use store-bought or homemade)
  • 1 quart blue vanilla ice cream
  • 1 cup crushed chocolate sandwich cookies
  • 1 cup whipped topping
  • 1/2 cup mini chocolate chips
  • 1/2 cup blue sprinkles

These ingredients come together to create a deliciously fun dessert. The chocolate chip cookie dough provides a chewy base, while the blue vanilla ice cream adds a creamy texture. The crushed chocolate sandwich cookies give a delightful crunch, and the whipped topping, mini chocolate chips, and blue sprinkles add the perfect finishing touches. With these ingredients, you’re all set to make a cake that’s not only tasty but also visually appealing!

Step-by-Step Preparation of Cookie Monster Ice Cream Sandwich Cake

Step 1: Gather Your Ingredients

Before you start baking, it’s important to gather all your ingredients. This makes the process smoother and more enjoyable. Make sure you have:

  • 2 cups of chocolate chip cookie dough
  • 1 quart of blue vanilla ice cream
  • 1 cup of crushed chocolate sandwich cookies
  • 1 cup of whipped topping
  • 1/2 cup of mini chocolate chips
  • 1/2 cup of blue sprinkles

Having everything ready will help you follow the recipe without any interruptions. Plus, it’s always fun to see all the colorful ingredients laid out!

Step 2: Prepare the Cookie Base

Now it’s time to create the cookie base. Start by preheating your oven to 350°F. Next, line a 9×13-inch baking dish with parchment paper. Make sure to leave some overhang. This will help you lift the cake out later.

Take half of the cookie dough and press it evenly into the bottom of the prepared baking dish. Bake it for 15-18 minutes, or until it turns lightly golden. Once it’s done, remove it from the oven and let it cool completely in the pan. This step is crucial, as a warm base can melt the ice cream!

Step 3: Assemble the Ice Cream Layers

Once your cookie layer is cool, it’s time to add the ice cream. Take the quart of blue vanilla ice cream and spread it evenly over the cooled cookie layer. Use a spatula to make it smooth and even. Next, sprinkle the crushed chocolate sandwich cookies on top of the ice cream. Gently press them into the ice cream to ensure they stick.

Step 4: Create the Sandwich Cake

Now, it’s time to add the final layer. Take the remaining cookie dough and spread it over the crushed cookies. Make sure to cover the ice cream completely. This will create a delicious sandwich effect. Once you’ve done this, return the dessert to the freezer. Let it firm up for at least 2 hours. This step is important for the perfect slice!

Step 5: Freeze and Set

After the cake has been in the freezer for a couple of hours, it’s time to finish it off. Carefully remove the cake from the pan using the parchment overhang. Spread the whipped topping over the top of the cake. Then, sprinkle mini chocolate chips and blue sprinkles for that extra fun touch. Slice into squares and serve immediately. If you have any leftovers, store them in the freezer for later!

Variations of Cookie Monster Ice Cream Sandwich Cake

Different Ice Cream Flavors

One of the best things about the Cookie Monster Ice Cream Sandwich Cake is its versatility. You can easily switch up the ice cream flavors to create a new experience each time. For instance, try using cookies and cream ice cream for a classic twist. The chocolate cookie bits will blend perfectly with the cookie layers.

If you’re feeling adventurous, mint chocolate chip ice cream can add a refreshing flavor. The cool mint combined with chocolate cookies creates a delightful contrast. You could also opt for strawberry or raspberry ice cream for a fruity touch. The vibrant colors will make your cake even more eye-catching!

Don’t forget about seasonal flavors! Pumpkin spice ice cream in the fall or peppermint ice cream during the winter holidays can make your dessert festive. The possibilities are endless, so feel free to experiment with your favorite flavors!

Alternative Cookie Recipes

While chocolate chip cookie dough is a classic choice, you can explore other cookie recipes to change things up. For example, oatmeal raisin cookie dough can add a chewy texture and a hint of cinnamon. This variation pairs wonderfully with vanilla or caramel ice cream.

If you prefer a nutty flavor, consider using peanut butter cookie dough. The rich taste of peanut butter complements chocolate ice cream beautifully. You can even mix in some crushed peanuts for added crunch!

For a gluten-free option, try using almond flour or gluten-free cookie mixes. This way, everyone can enjoy the deliciousness of your Cookie Monster Ice Cream Sandwich Cake. No matter which cookie recipe you choose, the key is to have fun and make it your own!

Cooking Note for Cookie Monster Ice Cream Sandwich Cake

When making the Cookie Monster Ice Cream Sandwich Cake, there are a few important cooking notes to keep in mind. These tips will help ensure your dessert turns out perfectly every time.

First, always check the expiration dates on your ingredients. Fresh ingredients will enhance the flavor and texture of your cake. If you’re using store-bought cookie dough or ice cream, make sure they are at the right temperature. For best results, let the ice cream sit out for a few minutes before spreading it. This will make it easier to work with.

Next, be mindful of the baking time for the cookie base. Every oven is different, so keep an eye on your cookies as they bake. You want them to be lightly golden but not overcooked. An undercooked base can lead to a gooey mess, while an overcooked one may become too hard.

When layering the ice cream and cookie dough, take your time. Spreading the ice cream evenly is key to achieving a beautiful presentation. Use a spatula to smooth out the layers, ensuring they are well-distributed. This will help each slice look appealing and make it easier to serve.

Lastly, remember to let the cake freeze for the recommended time. This step is crucial for the layers to set properly. If you try to cut into the cake too soon, it may fall apart. Patience is key! Once it’s fully frozen, you’ll be rewarded with a deliciously fun dessert that everyone will love.

By following these cooking notes, you’ll be well on your way to creating a stunning Cookie Monster Ice Cream Sandwich Cake that’s sure to impress your family and friends!

Serving Suggestions for Cookie Monster Ice Cream Sandwich Cake

When it comes to serving your Cookie Monster Ice Cream Sandwich Cake, presentation is key! Here are some fun and creative ways to serve this delightful dessert that will surely impress your guests.

First, consider using colorful plates or bowls to enhance the visual appeal. Bright colors can make the blue ice cream pop even more. You can also serve the cake on a large platter, allowing everyone to help themselves. This creates a casual and inviting atmosphere.

For an extra touch, add a scoop of extra blue vanilla ice cream on the side of each slice. This not only looks great but also gives your guests the option to enjoy more of that delicious flavor. You can even drizzle some chocolate or caramel sauce over the ice cream for added sweetness.

Another fun idea is to create a dessert bar. Set up a station with various toppings like crushed cookies, sprinkles, and whipped cream. Let your guests customize their slices with their favorite toppings. This interactive element makes serving the cake even more enjoyable!

If you’re serving the cake at a party, consider pairing it with themed drinks. For example, blue raspberry lemonade or milkshakes can complement the cake beautifully. These drinks will add to the festive atmosphere and keep everyone refreshed.

Lastly, don’t forget to have fun with your serving style! Use cookie cutters to create fun shapes from the cake. This can be especially appealing for kids. You can also serve the cake in individual cups for a more personal touch. Each guest will feel special with their own little dessert!

With these serving suggestions, your Cookie Monster Ice Cream Sandwich Cake will not only taste amazing but also look fantastic on your dessert table. Enjoy the smiles and compliments that come your way!

Tips for Perfecting Your Cookie Monster Ice Cream Sandwich Cake

Creating the perfect Cookie Monster Ice Cream Sandwich Cake is all about attention to detail. Here are some helpful tips to ensure your dessert turns out delicious and visually appealing every time.

First, always use high-quality ingredients. Fresh chocolate chip cookie dough and creamy blue vanilla ice cream will make a noticeable difference in flavor. If you’re making your cookie dough from scratch, consider chilling it for about 30 minutes before baking. This helps the cookies maintain their shape and prevents them from spreading too much.

Next, when baking the cookie base, keep an eye on the time. Ovens can vary, so check for that light golden color. If you overbake, the base may become too hard, making it difficult to slice later. A slightly underbaked base can be perfect, as it will firm up in the freezer.

When spreading the ice cream, use a spatula dipped in warm water. This technique makes it easier to spread the ice cream evenly without tearing the cookie layer underneath. If the ice cream is too hard, let it sit at room temperature for a few minutes to soften slightly.

For the cookie dough layer on top, you can use a spoon to dollop it over the ice cream. Then, gently spread it out with your fingers or a spatula. This method helps to avoid disturbing the ice cream layer beneath.

After assembling the cake, be patient while it freezes. Allowing it to set for at least two hours ensures that the layers meld together nicely. If you’re in a hurry, you can freeze it for a shorter time, but the texture may not be as perfect.

Finally, when serving, use a sharp knife that has been warmed under hot water. This will help you cut through the layers smoothly without squishing the cake. Wipe the knife clean between cuts for neat slices.

By following these tips, you’ll be well on your way to mastering the art of the Cookie Monster Ice Cream Sandwich Cake. Your friends and family will be amazed at your baking skills!

Breakdown of Time for Cookie Monster Ice Cream Sandwich Cake

Prep Time

The prep time for the Cookie Monster Ice Cream Sandwich Cake is quite manageable. You’ll need about 15-20 minutes to gather your ingredients and prepare the cookie base. This includes measuring out the cookie dough, lining the baking dish, and getting everything ready for baking. If you’re using store-bought cookie dough and ice cream, this time can be even shorter!

Cooking Time

Once you have everything prepped, the cooking time is approximately 15-18 minutes for the cookie base. Keep an eye on it as it bakes to ensure it reaches that perfect light golden color. After baking, you’ll need to let the cookie layer cool completely, which can take about 30 minutes. This cooling time is essential to prevent the ice cream from melting when you add it.

Total Time

In total, you should expect to spend around 2.5 to 3 hours to make the Cookie Monster Ice Cream Sandwich Cake. This includes prep time, cooking time, and the necessary freezing time of at least 2 hours. While it may seem like a lengthy process, most of that time is hands-off, allowing you to relax while your cake sets in the freezer. The end result is a fun and delicious dessert that’s well worth the wait!

Nutritional Information for Cookie Monster Ice Cream Sandwich Cake

Calories

When indulging in a slice of Cookie Monster Ice Cream Sandwich Cake, it’s good to know what you’re consuming. Each serving contains approximately 320 calories. This makes it a delightful treat, but it’s wise to enjoy it in moderation. The combination of cookie dough and ice cream contributes to the calorie count, so be mindful of portion sizes if you’re watching your intake.

Protein

In terms of protein, each serving of this delicious cake offers about 4 grams. While this isn’t a high-protein dessert, it does provide a small boost. The protein mainly comes from the chocolate chip cookie dough. If you’re looking to increase the protein content, consider adding some nuts or using a protein-enriched cookie dough recipe. This way, you can enjoy your dessert while also getting a bit more nutrition!

Sodium

Each serving of Cookie Monster Ice Cream Sandwich Cake contains around 200 mg of sodium. This amount is fairly standard for desserts that include processed ingredients like cookie dough and whipped topping. If you’re concerned about sodium intake, you can opt for low-sodium versions of these ingredients. This small adjustment can help you enjoy your cake without worrying too much about sodium levels.

FAQs about Cookie Monster Ice Cream Sandwich Cake

Can I make Cookie Monster Ice Cream Sandwich Cake ahead of time?

Absolutely! The Cookie Monster Ice Cream Sandwich Cake is perfect for making ahead of time. In fact, it’s best when allowed to freeze for several hours or even overnight. This way, the layers set nicely, and the flavors meld together. Just be sure to cover it well with plastic wrap or foil to prevent freezer burn. When you’re ready to serve, simply remove it from the freezer, slice, and enjoy!

What are the best toppings for Cookie Monster Ice Cream Sandwich Cake?

When it comes to toppings, the sky’s the limit! Some popular choices include whipped cream, mini chocolate chips, and colorful sprinkles. You can also add crushed cookies or candy pieces for extra crunch. If you want to get creative, consider drizzling chocolate or caramel sauce over the top. Fresh fruit, like strawberries or blueberries, can add a refreshing touch as well. Choose your favorites to make each slice even more delightful!

How do I store leftover Cookie Monster Ice Cream Sandwich Cake?

To store any leftover Cookie Monster Ice Cream Sandwich Cake, simply cover it tightly with plastic wrap or aluminum foil. You can also place it in an airtight container. Keep it in the freezer to maintain its texture and flavor. It’s best enjoyed within a week, but it can last longer if stored properly. Just remember to let it sit at room temperature for a few minutes before slicing, as it may become quite firm in the freezer.

Can I use gluten-free cookies for Cookie Monster Ice Cream Sandwich Cake?

Yes, you can definitely use gluten-free cookies for your Cookie Monster Ice Cream Sandwich Cake! There are many gluten-free cookie dough options available in stores, or you can make your own using gluten-free flour. This way, everyone can enjoy this delicious dessert, regardless of dietary restrictions. Just ensure that all other ingredients, like ice cream and toppings, are also gluten-free to keep the cake safe for those with gluten sensitivities.

Conclusion on Cookie Monster Ice Cream Sandwich Cake

The Cookie Monster Ice Cream Sandwich Cake is more than just a dessert; it’s a delightful experience that brings joy to any occasion. With its layers of chewy cookie dough and creamy blue vanilla ice cream, this cake is sure to be a hit with both kids and adults. The vibrant colors and fun toppings make it visually appealing, while the delicious flavors keep everyone coming back for more.

Whether you’re celebrating a birthday, hosting a party, or simply looking for a sweet treat, this cake is an excellent choice. It’s easy to make, highly customizable, and perfect for sharing. Plus, with the tips and variations provided, you can create your own unique version that suits your taste preferences.

So, gather your ingredients and get ready to whip up this fun and tasty dessert. The smiles and compliments you’ll receive will make all the effort worthwhile. Enjoy every bite of your Cookie Monster Ice Cream Sandwich Cake, and don’t forget to share the joy with family and friends!

Paul

Cookie Monster Ice Cream Sandwich Cake is a must-try!

This Cookie Monster Ice Cream Sandwich Cake is a no-bake dessert that’s as fun to make as it is to eat. Stacked layers of creamy whipped topping, iconic blue color, soft ice cream sandwiches, and a cookie crumble topping make this frozen treat the perfect monster-approved party hit. It’s sweet, easy, and always a crowd-pleaser!
Prep Time 15 minutes
Cook Time 4 hours
Servings: 12 servings
Course: Dessert
Cuisine: American

Ingredients
  

  • 24 ice cream sandwiches
  • 16 ounces frozen whipped topping thawed
  • Blue gel food coloring or full bottle of regular blue food coloring
  • 12 chocolate chip cookies chopped (such as Chips Ahoy)
  • 12 Oreo cookies chopped

Method
 

  1. Color the WhipIn a large bowl, combine the whipped topping with blue food coloring until it reaches the bright Cookie Monster shade you love.
  2. Build the First LayerLine 12 ice cream sandwiches across the bottom of a 9×13-inch dish. Trim one or two sandwiches as needed to fit.
  3. Add the FrostingSpread half of the blue whipped topping over the sandwiches evenly.
  4. Cookie SprinkleSprinkle half of the chopped chocolate chip cookies and Oreos over the whipped topping layer.
  5. Repeat the LayersAdd another 12 ice cream sandwiches, followed by the rest of the blue whipped topping. Finish with the remaining chopped cookies.
  6. FreezeCover the dish loosely with foil and freeze for 3 to 4 hours until firm.
  7. ServeSlice into squares and serve immediately. Store leftovers in the freezer.

Notes

  • You can swap the whipped topping for homemade stabilized whipped cream if desired.
  • For added fun, mix mini M&Ms or cookie dough bites into the whipped topping.
  • Serve with a drizzle of chocolate syrup or a scoop of vanilla ice cream for extra decadence.
  • Great for birthdays, summer parties, or any dessert emergency!

Creamy Chicken, Bacon, and Spinach Spaghetti is delicious!

Are you looking for a delicious and comforting meal that’s easy to prepare? Look no further than Creamy Chicken, Bacon, and Spinach Spaghetti! This dish combines tender chicken, crispy bacon, and fresh spinach, all enveloped in a rich and creamy sauce. It’s a perfect choice for family dinners or a cozy night in. Plus, it’s packed with flavor and nutrients, making it a well-rounded meal.

What Makes Creamy Chicken, Bacon, and Spinach Spaghetti Special?

What sets this dish apart is its delightful blend of textures and flavors. The spaghetti serves as a hearty base, while the chicken adds protein and substance. The crispy bacon brings a savory crunch, and the spinach contributes a fresh, vibrant touch. Together, they create a symphony of taste that’s hard to resist.

Moreover, the creamy sauce made from heavy cream and Parmesan cheese elevates the dish to a whole new level. It coats the pasta beautifully, ensuring every bite is rich and satisfying. This recipe is not just about filling your stomach; it’s about enjoying a meal that warms your heart.

Whether you’re cooking for a special occasion or just a regular weeknight, Creamy Chicken, Bacon, and Spinach Spaghetti is sure to impress. It’s a dish that brings people together, making it a wonderful addition to your culinary repertoire. So, let’s dive into the ingredients and get started on this delightful journey!

Ingredients for Creamy Chicken, Bacon, and Spinach Spaghetti

To create the mouthwatering Creamy Chicken, Bacon, and Spinach Spaghetti, you’ll need a few simple yet flavorful ingredients. Each component plays a vital role in building the dish’s rich taste and satisfying texture. Here’s what you’ll need:

  • 8 ounces spaghetti: This serves as the base of the dish, providing a hearty foundation.
  • 1 tablespoon olive oil: Used for cooking, it adds a subtle flavor and helps prevent sticking.
  • 4 slices bacon, chopped: The crispy bacon adds a savory crunch that enhances the overall flavor.
  • 1 pound boneless, skinless chicken breasts, cut into bite-sized pieces: This lean protein is essential for a filling meal.
  • 1 teaspoon garlic powder: A sprinkle of garlic powder brings a warm, aromatic flavor to the dish.
  • Salt and pepper, to taste: These basic seasonings enhance the flavors of all the ingredients.
  • 2 cups fresh spinach: This leafy green adds color, nutrients, and a fresh taste.
  • 1 cup heavy cream: The star of the sauce, it creates a rich and creamy texture.
  • 1 cup grated Parmesan cheese: This cheese adds a salty, nutty flavor that complements the cream.
  • 1 teaspoon Italian seasoning: A blend of herbs that brings an aromatic touch to the dish.

With these ingredients on hand, you’re ready to whip up a delightful meal that’s sure to please everyone at the table. The combination of chicken, bacon, and spinach not only makes for a delicious dish but also provides a good balance of protein and greens. Now that you have your ingredients ready, let’s move on to the step-by-step preparation!

Step-by-Step Preparation of Creamy Chicken, Bacon, and Spinach Spaghetti

Now that you have gathered all your ingredients, it’s time to dive into the cooking process! Follow these simple steps to create your Creamy Chicken, Bacon, and Spinach Spaghetti. Each step is designed to ensure that your dish turns out perfectly delicious.

Step 1: Preparing the Ingredients

Before you start cooking, it’s important to prepare all your ingredients. Begin by measuring out 8 ounces of spaghetti. Next, chop 4 slices of bacon into small pieces. Then, cut 1 pound of boneless, skinless chicken breasts into bite-sized pieces. Finally, wash and dry 2 cups of fresh spinach. Having everything ready will make the cooking process smooth and enjoyable!

Step 2: Cooking the Chicken

In a large skillet, heat 1 tablespoon of olive oil over medium heat. Once the oil is hot, add the chicken pieces. Season them with 1 teaspoon of garlic powder, along with salt and pepper to taste. Cook the chicken for about 6-8 minutes, stirring occasionally. You want the chicken to be browned and cooked through. This step is crucial as it adds flavor and texture to your dish.

Step 3: Adding the Bacon

After the chicken is cooked, it’s time to add the bacon. In the same skillet, add the chopped bacon. Cook it for about 5-7 minutes until it becomes crispy. Once done, remove the bacon from the skillet and place it on paper towels to drain excess grease. This will keep the bacon crispy and delicious!

Step 4: Incorporating Spinach

Now, it’s time to add the fresh spinach to the skillet. With the heat still on low, toss in the 2 cups of spinach. Cook it for about 2 minutes, or until it wilts down. The spinach will add a lovely color and a boost of nutrients to your dish. Stir it gently to combine with the chicken and bacon.

Step 5: Creating the Creamy Sauce

Next, reduce the heat to low and pour in 1 cup of heavy cream. Stir in 1 cup of grated Parmesan cheese and 1 teaspoon of Italian seasoning. Mix everything well and let it cook for another 2-3 minutes. The sauce should be heated through and slightly thickened. This creamy sauce is what makes your dish so special!

Step 6: Combining with Spaghetti

Finally, it’s time to bring everything together! Add the cooked spaghetti to the skillet with the creamy chicken mixture. Toss everything gently until the spaghetti is well coated with the sauce. Don’t forget to add the crispy bacon back into the skillet. Mix it all together, and your Creamy Chicken, Bacon, and Spinach Spaghetti is ready to serve!

Now that you’ve prepared this delightful dish, let’s explore some variations to make it even more exciting!

Variations of Creamy Chicken, Bacon, and Spinach Spaghetti

While the classic Creamy Chicken, Bacon, and Spinach Spaghetti is a hit on its own, there are plenty of ways to mix things up! Whether you want to try different proteins or explore vegetarian options, these variations will keep your meals exciting and flavorful. Let’s take a look at some delicious alternatives!

Alternative Proteins

If you’re looking to switch up the protein in your dish, there are several tasty options to consider. Here are a few ideas:

  • Turkey: Ground turkey is a leaner alternative to chicken. It cooks quickly and absorbs flavors well, making it a great substitute.
  • Shrimp: For a seafood twist, try adding shrimp. Cook them until they turn pink and tender, then mix them into the creamy sauce.
  • Tofu: For a plant-based option, use firm tofu. Press it to remove excess moisture, then cube and sauté until golden brown.
  • Salmon: Flaky salmon can add a rich flavor. Cook it separately and flake it into the dish just before serving.

These alternative proteins not only change the flavor profile but also provide different nutritional benefits. Feel free to experiment and find your favorite combination!

Vegetarian Options

If you want to make a vegetarian version of Creamy Chicken, Bacon, and Spinach Spaghetti, you can easily do so without sacrificing flavor. Here are some ideas:

  • Mushrooms: Use a mix of mushrooms like cremini or shiitake for a meaty texture. Sauté them until they are golden brown before adding to the sauce.
  • Chickpeas: Canned chickpeas are a great source of protein. Rinse and drain them, then add them to the skillet for a hearty addition.
  • Vegetable Broth: Instead of heavy cream, use vegetable broth and a plant-based cream alternative to create a lighter sauce.
  • Peas: Fresh or frozen peas can add a pop of color and sweetness. Stir them in during the last few minutes of cooking.

These vegetarian options not only make the dish suitable for non-meat eaters but also add a variety of flavors and textures. Enjoy the creativity of cooking while making this dish your own!

Cooking Note for Creamy Chicken, Bacon, and Spinach Spaghetti

When preparing Creamy Chicken, Bacon, and Spinach Spaghetti, there are a few important cooking notes to keep in mind. These tips will help ensure that your dish turns out perfectly every time. Let’s explore some key points to consider while cooking!

First, always use a large skillet. This allows enough space for all the ingredients to cook evenly without overcrowding. Overcrowding can lead to steaming instead of browning, which affects the flavor and texture of your dish.

Next, be mindful of the heat. Cooking the chicken over medium heat helps it brown nicely without burning. If the heat is too high, the outside may cook too quickly while the inside remains undercooked. Always check that the chicken is cooked through, reaching an internal temperature of 165°F (75°C).

When adding the spinach, remember that it wilts down significantly. So, don’t be alarmed if it seems like a lot at first! It will reduce in size, adding a lovely green color and nutrients to your dish.

For the creamy sauce, stirring continuously while adding the heavy cream and cheese is essential. This helps prevent the cheese from clumping and ensures a smooth, velvety sauce. If the sauce becomes too thick, you can add a splash of pasta water to loosen it up.

Lastly, taste as you go! Adjust the seasoning with salt and pepper according to your preference. This step is crucial for achieving a well-balanced flavor in your Creamy Chicken, Bacon, and Spinach Spaghetti.

By keeping these cooking notes in mind, you’ll create a delicious and satisfying meal that everyone will love. Now, let’s move on to some serving suggestions to elevate your dining experience!

Serving Suggestions for Creamy Chicken, Bacon, and Spinach Spaghetti

Once you’ve prepared your Creamy Chicken, Bacon, and Spinach Spaghetti, it’s time to think about how to serve it. Presentation can enhance the dining experience, making your meal even more enjoyable. Here are some delightful serving suggestions to elevate your dish:

  • Garnish with Fresh Herbs: A sprinkle of fresh parsley or basil on top adds a pop of color and freshness. It also enhances the flavor, making each bite more aromatic.
  • Serve with Garlic Bread: Pair your spaghetti with warm garlic bread. The crispy, buttery bread complements the creamy sauce perfectly and is great for soaking up any leftover sauce.
  • Include a Side Salad: A light side salad with mixed greens, cherry tomatoes, and a simple vinaigrette can balance the richness of the pasta. It adds a refreshing crunch to your meal.
  • Offer Extra Parmesan: Place a bowl of grated Parmesan cheese on the table. Guests can add more cheese to their liking, enhancing the dish’s flavor.
  • Wine Pairing: Consider serving a glass of white wine, such as Chardonnay or Pinot Grigio. These wines complement the creamy sauce and enhance the overall dining experience.

These serving suggestions not only make your Creamy Chicken, Bacon, and Spinach Spaghetti look appealing but also create a well-rounded meal. Whether it’s a family dinner or a gathering with friends, these tips will help you impress your guests and make the occasion special.

Now that you know how to serve this delicious dish, let’s explore some tips for perfecting your Creamy Chicken, Bacon, and Spinach Spaghetti!

Tips for Perfecting Creamy Chicken, Bacon, and Spinach Spaghetti

To make your Creamy Chicken, Bacon, and Spinach Spaghetti truly exceptional, consider these helpful tips. Each suggestion is designed to enhance the flavors and textures of your dish, ensuring a delightful dining experience. Let’s dive into some expert advice!

  • Use Fresh Ingredients: Whenever possible, opt for fresh spinach and high-quality chicken. Fresh ingredients not only taste better but also provide more nutrients. Freshly grated Parmesan cheese melts more smoothly than pre-grated options, giving your sauce a creamier texture.
  • Cook Pasta Al Dente: Follow the package instructions for cooking spaghetti, but aim for al dente. This means the pasta should be firm to the bite. It will continue to cook slightly when mixed with the sauce, preventing it from becoming mushy.
  • Reserve Pasta Water: Before draining your spaghetti, save a cup of the pasta water. This starchy water can be added to the sauce if it becomes too thick. It helps to create a silky texture and ensures the sauce clings to the pasta perfectly.
  • Adjust Seasoning: Taste your sauce before serving. You may want to add more salt, pepper, or Italian seasoning to suit your palate. Remember, seasoning is key to bringing out the flavors of each ingredient.
  • Let It Rest: After combining the spaghetti with the sauce, let it sit for a few minutes before serving. This allows the flavors to meld together, making each bite even more delicious.
  • Experiment with Add-Ins: Don’t hesitate to get creative! Consider adding sun-dried tomatoes, artichokes, or even a splash of lemon juice for brightness. These additions can elevate your dish and make it unique.
  • Serve Immediately: Creamy Chicken, Bacon, and Spinach Spaghetti is best enjoyed fresh. The longer it sits, the creamier the sauce can become, which may not be to everyone’s liking. Serve it hot for the best experience!

By following these tips, you’ll be well on your way to creating a mouthwatering Creamy Chicken, Bacon, and Spinach Spaghetti that will impress your family and friends. Now that you have the tools to perfect this dish, let’s break down the time needed for preparation and cooking!

Breakdown of Time for Creamy Chicken, Bacon, and Spinach Spaghetti

Understanding the time required for each step in preparing Creamy Chicken, Bacon, and Spinach Spaghetti can help you plan your cooking efficiently. Here’s a breakdown of the time you’ll need for preparation and cooking:

Prep Time

Getting everything ready is the first step to a smooth cooking experience. The prep time for this dish is approximately 15 minutes. During this time, you will:

  • Measure out the spaghetti.
  • Chop the bacon and chicken.
  • Wash and dry the spinach.

Having all your ingredients prepped and organized will make the cooking process much easier and more enjoyable!

Cooking Time

The cooking time for Creamy Chicken, Bacon, and Spinach Spaghetti is about 25 minutes. Here’s how that breaks down:

  • Cooking the spaghetti: 8-10 minutes (follow package instructions).
  • Cooking the chicken: 6-8 minutes.
  • Cooking the bacon: 5-7 minutes.
  • Incorporating spinach and creating the sauce: 5-7 minutes.

This efficient cooking time allows you to enjoy a delicious meal without spending hours in the kitchen!

Total Time

When you combine both prep and cooking times, the total time to make Creamy Chicken, Bacon, and Spinach Spaghetti is approximately 40 minutes. This makes it a perfect option for a weeknight dinner or a quick meal when you’re short on time. With just a little planning, you can have a delightful dish ready to serve in no time!

Nutritional Information for Creamy Chicken, Bacon, and Spinach Spaghetti

Understanding the nutritional content of your meals is essential for maintaining a balanced diet. Creamy Chicken, Bacon, and Spinach Spaghetti not only satisfies your taste buds but also provides a good mix of nutrients. Here’s a breakdown of the nutritional information per serving, so you can enjoy this dish while being mindful of your dietary needs.

Calories

Each serving of Creamy Chicken, Bacon, and Spinach Spaghetti contains approximately 600 calories. This calorie count includes the hearty ingredients like chicken, bacon, and pasta, along with the rich creamy sauce. While it’s a filling meal, it’s important to enjoy it in moderation, especially if you’re watching your calorie intake.

Protein

This dish is a great source of protein, providing about 30 grams per serving. The protein comes primarily from the chicken and bacon, making it a satisfying option for those looking to boost their protein intake. Protein is essential for muscle repair and growth, making this meal a good choice after a workout or a long day.

Sodium

Each serving contains around 800 milligrams of sodium. This amount can vary based on the type of bacon and cheese used. While sodium is necessary for bodily functions, it’s wise to keep an eye on your intake, especially if you have dietary restrictions. To reduce sodium, consider using low-sodium bacon or cheese alternatives.

Overall, Creamy Chicken, Bacon, and Spinach Spaghetti offers a balanced mix of calories, protein, and sodium. It’s a delicious meal that can fit into a healthy diet when enjoyed in moderation. Now that you know the nutritional information, let’s address some frequently asked questions about this delightful dish!

FAQs about Creamy Chicken, Bacon, and Spinach Spaghetti

Can I make Creamy Chicken, Bacon, and Spinach Spaghetti ahead of time?

Yes, you can prepare Creamy Chicken, Bacon, and Spinach Spaghetti ahead of time! To do this, cook the dish as directed, but stop just before combining the spaghetti with the sauce. Store the chicken, bacon, spinach, and sauce in an airtight container in the refrigerator. When you’re ready to serve, simply reheat the sauce in a skillet, cook the spaghetti, and then combine everything. This method helps maintain the dish’s flavors and textures, making it a convenient option for busy days.

What can I substitute for bacon in Creamy Chicken, Bacon, and Spinach Spaghetti?

If you’re looking for a substitute for bacon, there are several tasty options! You can use turkey bacon for a leaner alternative that still provides a smoky flavor. Alternatively, consider using pancetta or prosciutto for a similar taste. For a vegetarian option, try smoked tempeh or mushrooms sautéed in olive oil. These substitutes will add a unique twist to your Creamy Chicken, Bacon, and Spinach Spaghetti while keeping it delicious!

Is Creamy Chicken, Bacon, and Spinach Spaghetti suitable for meal prep?

Absolutely! Creamy Chicken, Bacon, and Spinach Spaghetti is perfect for meal prep. You can make a large batch and divide it into individual portions. Store them in airtight containers in the refrigerator for up to four days. When you’re ready to eat, simply reheat in the microwave or on the stovetop. This makes it a great option for quick lunches or dinners throughout the week. Just remember that the pasta may absorb some sauce as it sits, so you might want to add a splash of cream or pasta water when reheating to keep it creamy!

Conclusion on Creamy Chicken, Bacon, and Spinach Spaghetti

In conclusion, Creamy Chicken, Bacon, and Spinach Spaghetti is a delightful dish that brings together rich flavors and comforting textures. This recipe is not only easy to prepare but also offers a satisfying meal that can please even the pickiest eaters. With its combination of tender chicken, crispy bacon, and fresh spinach, all enveloped in a creamy sauce, it’s a dish that’s sure to become a family favorite.

Whether you’re cooking for a special occasion or just a cozy weeknight dinner, this spaghetti dish is versatile enough to adapt to your preferences. You can easily switch up the proteins or make it vegetarian, ensuring that everyone at the table can enjoy it. Plus, with the tips and variations provided, you can customize it to suit your taste and dietary needs.

As you gather around the table to enjoy this delicious meal, remember that cooking is not just about the food; it’s about creating memories with loved ones. So, take the time to savor each bite and share stories as you indulge in this creamy delight. With its rich flavors and comforting nature, Creamy Chicken, Bacon, and Spinach Spaghetti is more than just a meal; it’s an experience that brings people together.

Now that you have all the tools and knowledge to make this dish, it’s time to roll up your sleeves and get cooking! Enjoy the process, and most importantly, enjoy the delicious results. Happy cooking!

Paul

Creamy Chicken, Bacon, and Spinach Spaghetti is delicious!

This Chicken Bacon & Spinach Spaghetti is creamy, savory, and bursting with flavor in every forkful. Juicy seared chicken, crispy bacon, sweet cherry tomatoes, and fresh spinach are tossed in a rich Parmesan cream sauce over perfectly cooked spaghetti. A comforting weeknight pasta dish with restaurant-level taste—easy to make, hard to forget.
Prep Time 15 minutes
Cook Time 30 minutes
Total Time 45 minutes
Servings: 4 servings
Course: Dinner, Pasta
Cuisine: American, Italian-inspired

Ingredients
  

  • 12 ounces spaghetti
  • 1 tablespoon extra-virgin olive oil
  • 3 boneless skinless chicken breasts (about 1¼ pounds)
  • Kosher salt to taste
  • Freshly ground black pepper to taste
  • 6 slices bacon
  • 2 cloves garlic minced
  • 2 cups cherry tomatoes halved
  • ½ cup heavy cream
  • cup freshly grated Parmesan cheese
  • 3 cups packed baby spinach
  • Freshly torn basil for garnish

Method
 

  1. Preheat OvenSet oven to 350°F (175°C) and place the rack in the center position.
  2. Cook the PastaBoil spaghetti in salted water according to package instructions. Drain and reserve 1 cup of the pasta water.
  3. Cook the ChickenHeat olive oil in a large skillet over medium-high heat. Season the chicken with salt and pepper. Sear each side for about 5 minutes until golden. Transfer to a baking sheet and bake for 5–10 minutes, or until cooked through. Let rest 10 minutes before slicing thinly.
  4. Crisp the BaconIn the same skillet, cook the bacon until crispy, about 8 minutes. Transfer to a paper towel-lined plate and chop once cool.
  5. Sauté Garlic and TomatoesAdd garlic and cherry tomatoes to the bacon drippings. Cook for about 2 minutes until fragrant and slightly wilted. Season lightly with salt and pepper.
  6. Make the Cream SauceAdd the heavy cream, Parmesan, and ½ cup reserved pasta water. Simmer for 3 minutes until slightly thickened. Stir in the spinach and cook until wilted, about 1 minute.
  7. Combine EverythingAdd the cooked pasta to the skillet and toss until well coated. Stir in the sliced chicken and chopped bacon. Add more pasta water as needed to loosen the sauce.
  8. Finish and ServeGarnish with freshly torn basil and serve hot.

Notes

  • Substitute half-and-half for a lighter sauce, or use whole milk with extra Parmesan for richness.
  • Add red pepper flakes for a spicy kick.
  • Leftovers keep well refrigerated for up to 3 days. Reheat gently with a splash of water or cream.
  • Great with gluten-free pasta or zucchini noodles for a low-carb option.