I still remember the first time I made this soup — it was a cold, gray afternoon deep in October, when the wind pressed leaves against the windows like nature’s own mosaic. My hands were cold from running errands in the chill, and I craved something simple, warm, and grounding. My pantry was humble that day: a few potatoes, some mushrooms begging to be used, half a bag of noodles, and just enough broth to make something out of nothing.
As I began to cook, something unexpected happened. The aroma of garlic and mushrooms filled the kitchen with a quiet magic. The bubbling pot felt like it was telling stories of woodland walks, rainy afternoons, and moments of silence that somehow speak the loudest. What emerged from that pot wasn’t just soup — it was comfort in a ladle. Since then, this mushroom noodle soup has become more than a recipe. It’s a ritual.
If you’re looking for a way to warm both body and spirit, this bowl delivers in full.
A Flavorful Embrace in Every Spoonful
There’s a reason why this recipe resonates with so many. Mushroom noodle soup hits that rare culinary intersection where rustic charm meets nourishing satisfaction. The mushrooms bring an earthy depth, potatoes add creaminess, noodles offer softness and substance, and herbs like basil and garlic infuse aroma and warmth.
Unlike richer, cream-based mushroom soups, this one leans toward a lighter broth — making it equally suitable for lunch or dinner. Yet, don’t mistake it for bland. The layers of texture and taste create a satisfying experience, especially when the broth has simmered long enough to allow the vegetables to release their sweetness and the mushrooms to deepen the flavor.
Ingredients
Ingredient
Amount
Onion
1, chopped
Carrot
1, chopped
Garlic
3 cloves, minced
Mushrooms
100 g, sliced
Potatoes
2, peeled and diced
Corn (fresh or canned)
100 g, drained
Salt
To taste
Black pepper
To taste
Basil
To taste
Vegetable broth
1 liter
Noodles
50 g
Directions to a Steaming Bowl
Sauté the Base: In a large pot over medium heat, add a splash of oil. Sauté the chopped onion, carrot, and garlic until softened and fragrant—about 5 minutes.
Build the Flavor: Add the sliced mushrooms and cook for another 3–4 minutes until they release their juices.
Hearty Additions: Stir in the diced potatoes and corn. Cook for 2 more minutes to blend the flavors.
Pour and Simmer: Add the vegetable broth and bring everything to a boil. Reduce heat, cover, and simmer for 15 minutes, or until potatoes are just tender.
Noodle Time: Add the noodles and cook according to package instructions (usually 7–10 minutes), or until they are soft but not mushy.
Season to Finish: Stir in salt, black pepper, and basil to taste. Adjust the seasoning as desired.
Serve Hot: Ladle into bowls and serve warm. Garnish with fresh herbs or a drizzle of olive oil if desired.
Nutrient Profile per Serving (approx. 4 servings)
Nutrient
Amount (per serving)
Calories
180–200 kcal
Protein
5–6 g
Carbohydrates
30–35 g
Fats
4–5 g
Fiber
4–5 g
Sodium
Depends on broth
Vitamin A
High (from carrots)
Iron
Moderate
Potassium
Good source
Why This Soup Stands Out
1. Plant-Based and Nutrient-Rich
This soup is fully vegetarian, even vegan when made with egg-free noodles. It features whole vegetables, is low in fat, and provides a good mix of fiber, vitamins, and minerals. The mushrooms contribute B vitamins and antioxidants, while potatoes add potassium and slow-digesting carbs. Corn gives a hint of sweetness, and garlic is a well-known immune booster.
2. Flexible and Forgiving
Whether you’re working with what’s left in the fridge or planning a weeknight dinner, this soup adapts to you. Out of carrots? Add celery or parsnips. No noodles? Toss in rice, quinoa, or even barley. It’s the kind of recipe that forgives substitutions — and often benefits from them.
3. Minimal Equipment, Maximum Reward
All you need is one sturdy pot and a spoon to stir. This simplicity makes it ideal for small kitchens, student apartments, or anyone looking to cook without a mountain of cleanup afterward.
The Secret Ingredient: Memory
Soup is one of those dishes that transcends ingredients. It’s not just about nourishment — it’s about nostalgia. Maybe it reminds you of your grandmother’s kitchen, or of snow days spent bundled under blankets with a steaming bowl in your lap. This mushroom noodle soup has that kind of memory-making quality.
Its scent alone — earthy mushrooms mingled with onion and garlic — can transport you to a cabin in the woods or a quiet rainy Sunday. It invites slowness. You’ll find that people linger a little longer at the table when this is served.
Frequently Asked Questions
Can I use dried mushrooms instead of fresh?
Absolutely. Dried mushrooms have a concentrated flavor that can even enhance the richness of the broth. If using them, soak in warm water for about 20 minutes first. Don’t discard the soaking liquid — strain it and add it to your broth for an extra layer of umami.
Is this soup freezer-friendly?
Yes, but with a note: noodles can become a bit soft after freezing. If you plan to freeze it, consider cooking the noodles separately and adding them fresh when reheating. The vegetables and broth freeze beautifully and can be stored for up to 3 months.
What type of noodles work best?
You can use just about any variety — egg noodles, fusilli, rice noodles, or even broken spaghetti. Short noodles tend to hold up better and make for easier scooping. Whole grain options also work well if you’re looking to boost fiber.
Can I make this in a slow cooker?
Yes. Simply sauté the onions, garlic, and mushrooms beforehand to bring out their flavor, then transfer everything except the noodles to a slow cooker. Cook on low for 6–8 hours or on high for 3–4 hours. Add the noodles in the last 30 minutes of cooking.
How can I make this heartier for a full meal?
This soup is satisfying as-is, but you can easily bulk it up by adding canned chickpeas, lentils, or cubed tofu. A slice of crusty bread or a grilled sandwich on the side also makes it feel more like a full meal.
Is this recipe gluten-free?
As written, it contains regular noodles, but you can swap them out for gluten-free pasta or rice. Always check your broth to ensure it’s gluten-free as well.
Tips to Elevate Your Soup Game
Caramelize Your Mushrooms: Take the time to really sauté them until golden. It adds incredible depth.
Herb it Up: A sprig of thyme or rosemary while simmering can bring a savory edge. Remove before serving.
Finish with Brightness: A squeeze of lemon juice or a splash of apple cider vinegar at the end sharpens the flavor and balances the sweetness of the corn and carrots.
Garnish Wisely: A sprinkle of chopped fresh parsley, cracked black pepper, or even a dusting of nutritional yeast can take it from simple to spectacular.
Ideal Moments for This Soup
After a long walk on a crisp day
When you’re feeling under the weather and want something gentle
As a starter for a dinner party — served in small bowls with herbed croutons
A quiet lunch break when the world feels a bit too loud
It’s a dish that soothes, anchors, and reminds us that food can be both functional and poetic.
A Final Note from the Kitchen
This mushroom noodle soup is more than just a recipe — it’s an invitation. An invitation to slow down, to savor, to warm your hands on a bowl and your heart with the memory it creates. It’s for the moments when you want simplicity without sacrifice, comfort without compromise.
In a world that’s always rushing forward, this soup gently suggests: stay a little longer, breathe a little deeper, and maybe go back for seconds.
Let it nourish you in ways beyond the physical — because sometimes, the best meals are the ones that feel like coming home.
Amal
Whispers from the Forest: A Bowl Full of Comfort
A heartwarming and earthy mushroom noodle soup made with simple vegetables, tender noodles, and aromatic herbs. Perfect for cozy nights and comforting meals, this one-pot wonder is nourishing, plant-based, and packed with flavor.
strawberry cheesecake recipe is just what you need. This classic dessert is loved by many for its smooth texture and delicious taste. It’s perfect for any occasion, whether it’s a birthday party, a family gathering, or just a cozy night in.
Imagine a buttery graham cracker crust, topped with a velvety cheesecake filling, and finished off with luscious strawberries. Each bite is a heavenly experience that brings joy to your taste buds. Plus, making this cheesecake is easier than you might think! With simple ingredients and straightforward steps, you can create a dessert that looks and tastes like it came from a fancy bakery.
In this article, we will guide you through the entire process of making your very own strawberry cheesecake. From gathering the ingredients to serving it up, we’ll cover everything you need to know. So, roll up your sleeves and get ready to impress your friends and family with this delightful strawberry cheesecake recipe!
Ingredients for Strawberry Cheesecake Recipe
strawberry cheesecake recipe requires a mix of sweet and creamy components that come together to create a delightful dessert. Here’s what you’ll need:
These ingredients are easy to find at your local grocery store. The graham cracker crumbs will form a delicious crust, while the cream cheese and sour cream create a rich filling. Fresh strawberries add a burst of flavor and color, making this cheesecake not only tasty but also visually appealing.
Once you have everything ready, you’ll be all set to start making your strawberry cheesecake. The combination of these ingredients will ensure that your dessert is creamy, sweet, and utterly delightful. So, let’s move on to the next step and prepare for the fun of baking!
Step-by-Step Preparation of Strawberry Cheesecake Recipe
strawberry cheesecake recipe. Follow these simple steps to create a delicious dessert that will impress everyone!
Step 1: Preparing the Crust
Start by making the crust, which is the foundation of your cheesecake. In a medium bowl, combine the graham cracker crumbs, ⅓ cup of granulated sugar, and melted butter. Mix everything together until it resembles wet sand. This mixture should hold together when pressed.
Next, take a 9-inch springform pan and firmly press the crumb mixture into the bottom. Make sure it’s even and compact. This will help create a sturdy base for your cheesecake. Once done, bake the crust in a preheated oven at 325°F for about 10 minutes. After baking, remove it from the oven and let it cool completely.
Step 2: Making the Cheesecake Filling
While the crust cools, it’s time to prepare the creamy filling. In a large mixing bowl, beat the softened cream cheese using an electric mixer. Mix until it’s smooth and free of lumps. Gradually add in the powdered sugar and vanilla extract, continuing to mix until everything is well combined.
Next, add the sour cream, lemon juice, and cornstarch to the bowl. Mix again until the filling is creamy and smooth. This mixture will be rich and delicious, making your cheesecake irresistible!
Step 3: Preparing the Strawberry Topping
Now, let’s get the strawberries ready! Take your fresh strawberries and hull them, removing the green tops. Then, slice them into thin pieces. You can toss the sliced strawberries with a tablespoon of lemon juice to enhance their flavor and prevent browning. Set them aside while you finish the cheesecake.
Step 4: Assembling the Strawberry Cheesecake
With the crust cooled and the filling ready, it’s time to assemble your cheesecake. Pour the cream cheese mixture over the cooled crust. Use a spatula to spread it evenly across the top. This will create a smooth layer that will hold the strawberries beautifully.
Once the filling is spread out, gently place the sliced strawberries on top. You can arrange them in a decorative pattern or simply scatter them for a more casual look. Either way, they will add a pop of color and flavor to your cheesecake!
Step 5: Baking the Cheesecake
Now, it’s time to bake your cheesecake! Place the assembled cheesecake in the oven and bake for 50-60 minutes. You want the center to be set but still slightly jiggly. This ensures a creamy texture. Once baked, turn off the oven and leave the cheesecake inside for an additional hour. This gradual cooling helps prevent cracks on the surface.
Step 6: Cooling and Chilling
After the hour is up, remove the cheesecake from the oven and let it cool completely at room temperature. Once cooled, cover it with plastic wrap and refrigerate for at least 4 hours, or overnight if you can wait! Chilling allows the flavors to meld together and makes slicing easier.
And there you have it! You’ve successfully prepared your strawberry cheesecake. The next steps will be to whip up some cream and serve it, but first, let’s explore some variations you can try!
Variation of Strawberry Cheesecake Recipe
strawberry cheesecake recipe is a favorite for many, there are exciting variations you can try! These alternatives allow you to enjoy the same delicious flavors while catering to different preferences or dietary needs. Let’s explore two popular variations: the no-bake strawberry cheesecake and the gluten-free strawberry cheesecake.
No-Bake Strawberry Cheesecake Variation
If you’re looking for a quicker and easier option, the no-bake strawberry cheesecake is perfect for you! This version skips the oven, making it a great choice for hot days or when you want to save time.
To make a no-bake cheesecake, start with the same graham cracker crust. However, instead of baking it, simply chill it in the refrigerator for about 30 minutes to firm up. For the filling, beat together softened cream cheese, powdered sugar, and vanilla extract until smooth. Then, fold in whipped cream instead of sour cream. This will give your cheesecake a light and airy texture.
Once your filling is ready, pour it over the chilled crust. Top with sliced strawberries and refrigerate for at least 4 hours, or until set. This no-bake version is just as creamy and delicious, with the added benefit of being super simple to prepare!
Gluten-Free Strawberry Cheesecake Variation
For those who need to avoid gluten, making a gluten-free strawberry cheesecake is easy and just as tasty! The key is to use gluten-free graham crackers or almond flour for the crust.
To create the crust, crush gluten-free graham crackers or mix almond flour with melted butter and a bit of sugar. Press this mixture into the bottom of your springform pan, just like in the original recipe. Bake it for about 10 minutes, or chill it if you’re making the no-bake version.
For the filling, you can use the same ingredients as the classic recipe. Just ensure that your cream cheese and other components are gluten-free. Once assembled, bake or chill as directed. This gluten-free variation allows everyone to enjoy a slice of delicious strawberry cheesecake without worry!
These variations not only cater to different dietary needs but also add a fun twist to the traditional recipe. Whether you choose to bake or go for a no-bake option, your strawberry cheesecake will surely be a hit!
Cooking Note for Strawberry Cheesecake Recipe
strawberry cheesecake recipe, a few cooking notes can help ensure your dessert turns out perfectly every time. Here are some important tips to keep in mind:
Room Temperature Ingredients: Make sure your cream cheese and sour cream are at room temperature before mixing. This helps create a smooth and creamy filling without lumps.
Don’t Overmix: While mixing the filling, avoid overmixing once you add the eggs (if using). Overmixing can incorporate too much air, leading to cracks in your cheesecake.
Water Bath Method: For an even creamier texture, consider using a water bath. Wrap the bottom of your springform pan in aluminum foil and place it in a larger pan filled with hot water. This helps regulate the temperature while baking.
Check for Doneness: Keep an eye on your cheesecake as it bakes. The edges should be set, while the center remains slightly jiggly. This ensures a creamy texture once cooled.
Cooling Gradually: Allow your cheesecake to cool gradually in the oven after baking. This step helps prevent cracks from forming on the surface.
Chill Time: Be patient! Chilling your cheesecake for at least 4 hours, or overnight, allows the flavors to meld and the texture to firm up.
Fresh Toppings: For the best flavor, use fresh strawberries for the topping. They add a burst of sweetness and color that enhances the overall dessert.
By following these cooking notes, you’ll be well on your way to creating a stunning and delicious strawberry cheesecake. Each step is crucial in achieving that perfect balance of flavors and textures. So, get ready to impress your family and friends with your baking skills!
Serving Suggestions for Strawberry Cheesecake Recipe
strawberry cheesecake recipe, it’s time to think about how to serve it! Presentation can elevate your dessert, making it even more appealing. Here are some delightful serving suggestions to consider:
Classic Slice: Serve a generous slice of cheesecake on a dessert plate. Add a dollop of whipped cream on top and a few fresh strawberry slices for a classic look.
Chocolate Drizzle: For chocolate lovers, drizzle some melted chocolate or chocolate ganache over the cheesecake before serving. This adds a rich flavor that pairs wonderfully with strawberries.
Berry Compote: Create a quick berry compote by simmering mixed berries with a bit of sugar and lemon juice. Spoon this warm mixture over each slice for an extra fruity kick.
Garnish with Mint: Fresh mint leaves can add a pop of color and a refreshing taste. Place a sprig on top of each slice for a beautiful presentation.
Mini Cheesecakes: For a fun twist, consider making mini cheesecakes in muffin tins. This way, everyone can enjoy their own individual serving!
Pair with Beverages: Serve your cheesecake with a side of coffee, tea, or even a glass of dessert wine. These beverages complement the rich flavors of the cheesecake beautifully.
These serving suggestions not only enhance the visual appeal of your strawberry cheesecake but also add exciting flavors and textures. Whether you keep it simple or get creative, your cheesecake will surely impress your guests. Enjoy every delicious bite!
Tips for Perfecting Your Strawberry Cheesecake Recipe
strawberry cheesecake recipe can be a delightful journey. With a few helpful tips, you can elevate your cheesecake to a whole new level. Here are some expert suggestions to ensure your dessert turns out beautifully every time:
Use Quality Ingredients: The flavor of your cheesecake greatly depends on the quality of your ingredients. Opt for high-quality cream cheese and fresh strawberries. This will enhance the overall taste and texture of your cheesecake.
Don’t Skip the Chilling: Chilling your cheesecake is crucial. Allow it to set in the refrigerator for at least 4 hours, or overnight if possible. This helps the flavors meld and gives the cheesecake a firmer texture.
Experiment with Flavors: While strawberries are delicious, don’t hesitate to experiment! Try adding a hint of almond extract or a splash of orange zest to the filling for a unique twist.
Check Your Oven Temperature: Ovens can vary in temperature. Use an oven thermometer to ensure your cheesecake bakes at the correct temperature. This helps prevent overbaking or underbaking.
Let It Rest: After baking, let your cheesecake rest in the oven with the door slightly ajar. This gradual cooling helps prevent cracks and keeps the texture creamy.
Use a Sharp Knife: When slicing your cheesecake, use a sharp knife dipped in hot water. Wipe the knife clean between cuts for neat, beautiful slices.
Top with Fresh Ingredients: For the best presentation, top your cheesecake with fresh strawberries just before serving. This keeps them vibrant and juicy, adding a fresh touch to each slice.
By following these tips, you’ll be well on your way to mastering the art of making a delicious strawberry cheesecake. Each step is important in creating a dessert that not only looks stunning but also tastes incredible. So, gather your ingredients and get ready to impress everyone with your baking skills!
Breakdown of Time for Strawberry Cheesecake Recipe
strawberry cheesecake recipe is essential for planning. This way, you can ensure everything runs smoothly and your dessert is ready when you want it. Here’s a breakdown of the time involved in making this delightful cheesecake:
Prep Time
The prep time for your strawberry cheesecake is approximately 30 minutes. This includes gathering all your ingredients, preparing the crust, and mixing the cheesecake filling. Make sure to have everything ready before you start, as this will make the process much easier and more enjoyable!
Cooking Time
Once you’ve prepped your ingredients, the cooking time is about 60-70 minutes. This includes baking the crust for 10 minutes and then baking the cheesecake for 50-60 minutes. Remember, the cheesecake should be slightly jiggly in the center when you take it out of the oven. This ensures a creamy texture once it cools.
Total Time
In total, you should plan for about 4 hours and 30 minutes to complete your strawberry cheesecake. This includes the prep time, cooking time, and the minimum chilling time of 4 hours. If you can, letting it chill overnight will enhance the flavors even more. So, be patient and enjoy the anticipation of your delicious creation!
Nutritional Information for Strawberry Cheesecake Recipe
strawberry cheesecake recipe is important, especially if you’re mindful of your diet. This delicious dessert can be enjoyed in moderation, and knowing its nutritional content can help you make informed choices. Here’s a breakdown of the key nutritional components per serving:
Calories
Each serving of this delightful strawberry cheesecake contains approximately 350 calories. This calorie count includes the rich ingredients like cream cheese and heavy whipping cream, which contribute to its creamy texture and delicious flavor. While it’s a treat, enjoying it in moderation is key to maintaining a balanced diet.
Protein
In terms of protein, each slice provides about 6 grams. The protein comes mainly from the cream cheese and sour cream used in the filling. Protein is essential for your body, helping with muscle repair and growth, making this cheesecake not just a sweet indulgence but also a source of beneficial nutrients.
Sodium
The sodium content in each serving is approximately 250 milligrams. This amount is relatively moderate, but if you’re watching your sodium intake, it’s good to be aware. Most of the sodium comes from the cream cheese and butter used in the recipe. Pairing this cheesecake with fresh fruits can help balance out the flavors and add more nutrients to your dessert.
By keeping these nutritional facts in mind, you can enjoy your strawberry cheesecake while being aware of its impact on your diet. Remember, it’s all about balance and enjoying treats in moderation!
FAQs about Strawberry Cheesecake Recipe
Can I use frozen strawberries for the topping?
strawberry cheesecake recipe. However, keep in mind that frozen strawberries may release more moisture when thawed. To prevent a soggy topping, drain any excess liquid before using them. You can also consider cooking the frozen strawberries briefly to create a compote, which adds a delicious flavor and helps thicken the topping.
How do I store leftover strawberry cheesecake?
To store leftover strawberry cheesecake, cover it tightly with plastic wrap or aluminum foil. You can also place it in an airtight container. Store it in the refrigerator for up to 5 days. If you want to keep it longer, consider freezing it. Wrap individual slices in plastic wrap and then place them in a freezer-safe container. This way, you can enjoy a slice whenever you crave it!
Can I make strawberry cheesecake ahead of time?
strawberry cheesecake recipe ahead of time is a great idea. It allows the flavors to meld together and improves the texture. You can prepare the cheesecake a day or two in advance. Just remember to chill it in the refrigerator for at least 4 hours or overnight before serving. This will ensure it’s perfectly set and ready to impress your guests!
What can I substitute for cream cheese in the recipe?
If you’re looking for a substitute for cream cheese, there are a few options you can try. For a lighter version, you can use Greek yogurt or mascarpone cheese. Both will provide a creamy texture, though the flavor may vary slightly. If you need a dairy-free option, consider using cashew cream or a store-bought vegan cream cheese. Just keep in mind that the taste and texture may differ from the traditional cheesecake.
Conclusion on Strawberry Cheesecake Recipe
strawberry cheesecake recipe is a delightful dessert that brings together the best of creamy and fruity flavors. Whether you’re celebrating a special occasion or simply treating yourself, this cheesecake is sure to impress. With its buttery graham cracker crust, smooth cream cheese filling, and fresh strawberry topping, each bite is a taste of heaven.
Throughout this article, we’ve explored the ingredients, preparation steps, and even some fun variations to suit different tastes. From the classic baked version to no-bake and gluten-free options, there’s a strawberry cheesecake for everyone. Plus, with the helpful tips and serving suggestions provided, you can elevate your dessert to new heights.
Remember, the key to a perfect cheesecake lies in the quality of your ingredients and the patience you show during the chilling process. Allowing your cheesecake to set properly will ensure a creamy texture and rich flavor that everyone will love. So, gather your ingredients, follow the steps, and get ready to enjoy a slice of this delicious treat!
We hope you feel inspired to try making your own strawberry cheesecake. It’s a rewarding experience that not only fills your kitchen with delightful aromas but also creates sweet memories with family and friends. Happy baking!
Paul
Strawberry Cheesecake Recipe: A Delightful Dessert Guide
This Strawberry Cheesecake is the perfect fusion of creamy, tangy filling and a sweet, buttery biscuit crust, swirled with fresh strawberries and finished with a vibrant strawberry sauce. Elegant yet easy, it’s a fruity twist on a classic dessert that’s sure to impress.
Preheat oven to 180°C (356°F), using top and bottom heat.
Prepare the crust: Crush the butter biscuits until fine. Mix with melted butter and ground almonds. Press into the base of a greased 26 cm (10-inch) springform pan. Pre-bake the crust for 10 minutes.
Make the filling: In a large bowl, beat together cream cheese, quark (or Greek yogurt), sugar, and cornstarch until smooth. Add cream and lemon juice, and stir until well incorporated. Fold in the egg last.
Create the swirl: Puree 100 grams of strawberries. Pour the cheesecake filling over the pre-baked crust. Drop spoonfuls of strawberry puree over the surface and use a skewer or knife to gently swirl for a marbled effect.
Bake the cheesecake: Lower the oven temperature to 160°C (320°F) and bake for 50 minutes. After baking, turn off the oven and let the cheesecake sit inside for 15 minutes. Crack the oven door slightly and allow it to cool gradually.
Finish with sauce: Puree an additional 100 grams of strawberries. Once the cheesecake is completely cooled, pour the strawberry sauce over the top just before serving.
Notes
No quark? Substitute with full-fat Greek yogurt or mascarpone for a similar texture.
Swirl technique tip: Avoid over-mixing the puree into the filling for a clear marble effect.
Room temp ingredients: Ensure cream cheese and egg are at room temperature for a smooth filling.
Make ahead: Best made a day in advance for easier slicing and flavor development.
Serving idea: Top with fresh strawberries or mint for added flair.
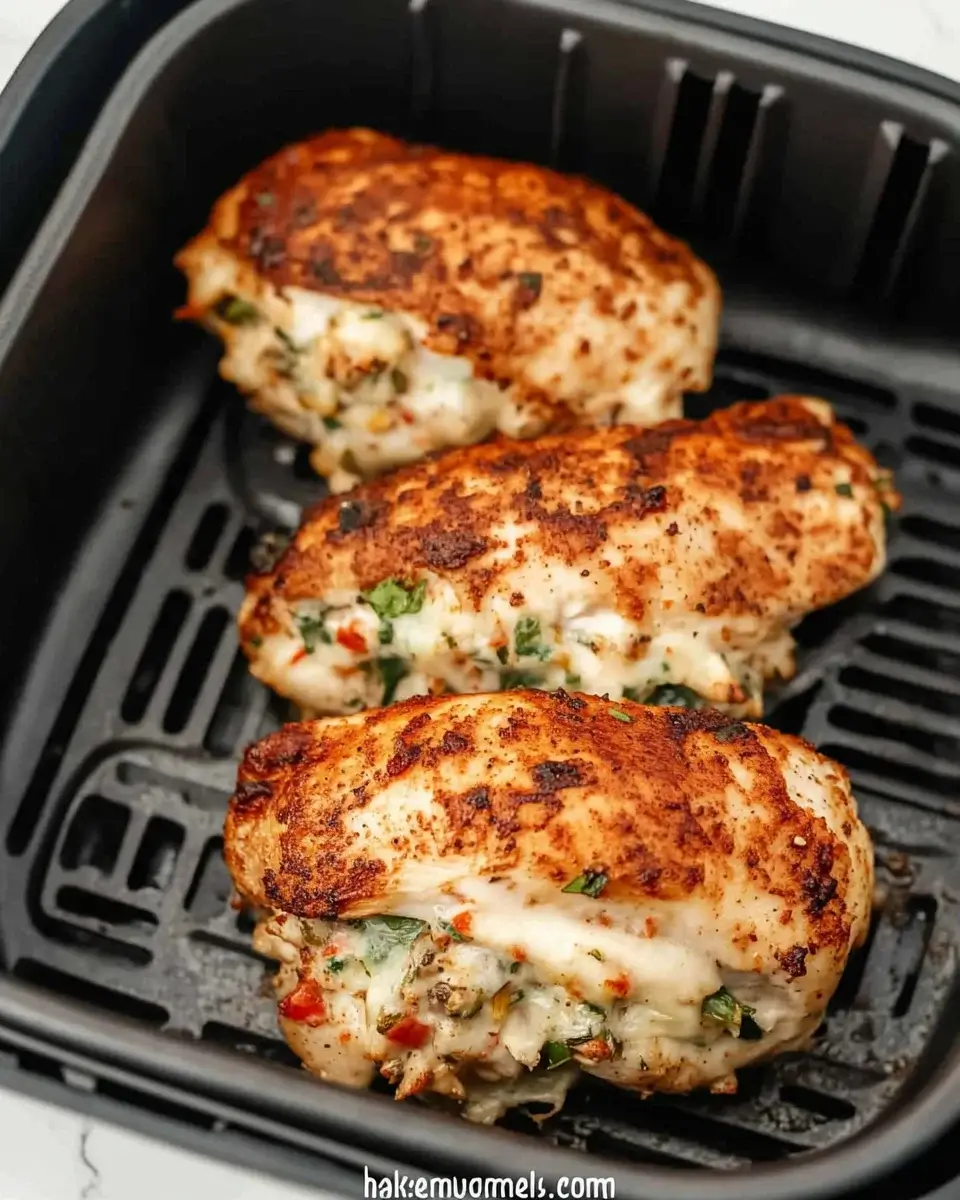
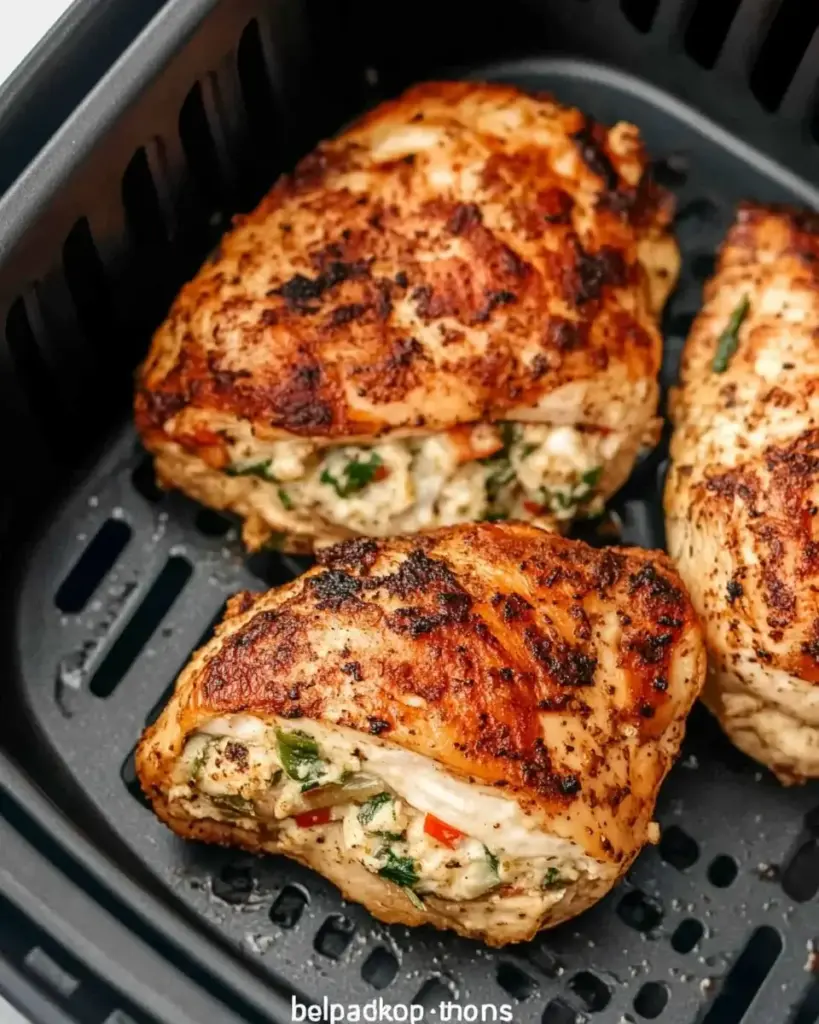
Are you looking for a quick and delicious meal that the whole family will love? Look no further! Mini Chicken Tostadas on a Sheet Pan are the perfect solution. These tasty bites combine the flavors of seasoned chicken, creamy refried beans, and melty cheese, all piled high on crispy corn tortillas. Plus, they’re easy to make and require minimal cleanup, making them ideal for busy weeknights.
Imagine a colorful platter of mini tostadas, each one bursting with flavor and topped with fresh ingredients. Not only are they visually appealing, but they also pack a punch in terms of taste. The combination of spices used to season the chicken creates a savory base that pairs perfectly with the toppings. Whether you’re hosting a casual get-together or simply enjoying a family dinner, these tostadas are sure to impress.
What’s more, this recipe is versatile! You can easily customize it to suit your taste preferences. Want to add a little heat? Toss in some jalapeños. Prefer a vegetarian option? Swap the chicken for black beans or grilled veggies. The possibilities are endless!
In this article, we’ll guide you through the ingredients, preparation steps, and even some variations to try. So, roll up your sleeves and get ready to create a delightful dish that everyone will rave about. Let’s dive into the world of Mini Chicken Tostadas on a Sheet Pan!
Ingredients for Mini Chicken Tostadas on a Sheet Pan
To create your delicious Mini Chicken Tostadas on a Sheet Pan, you’ll need a few simple ingredients. Each component plays a vital role in building flavor and texture. Here’s what you’ll need:
1 pound boneless, skinless chicken breasts: This is the star of the dish! Chicken breasts are lean and cook quickly, making them perfect for this recipe.
1 tablespoon olive oil: Olive oil helps to keep the chicken moist and adds a rich flavor.
1 teaspoon chili powder: This spice gives the chicken a warm, smoky flavor.
1 teaspoon cumin: Cumin adds an earthy taste that complements the other spices.
1/2 teaspoon onion powder: This adds a subtle sweetness and depth to the dish.
1/2 teaspoon salt: Salt is essential for bringing out the flavors in the chicken.
1/4 teaspoon black pepper: A little black pepper adds a hint of heat.
8 small corn tortillas: These serve as the base for your tostadas, providing a crispy texture.
1 cup refried beans: Creamy refried beans add richness and help hold the toppings in place.
1 cup shredded cheese: Choose cheddar or a Mexican blend for that gooey, melty goodness.
1 cup diced tomatoes: Fresh tomatoes add a burst of color and freshness.
1/2 cup sliced black olives: Olives provide a briny contrast to the other flavors.
1 avocado, diced: Creamy avocado adds a delightful texture and flavor.
1/4 cup fresh cilantro, chopped: Cilantro brings a fresh, herbal note to the dish.
Lime wedges for serving: A squeeze of lime brightens up the flavors.
With these ingredients on hand, you’re ready to create a mouthwatering meal that’s sure to please everyone at the table. Let’s move on to the preparation steps to bring these Mini Chicken Tostadas on a Sheet Pan to life!
Preparation of Mini Chicken Tostadas on a Sheet Pan
Now that you have all your ingredients ready, it’s time to prepare your Mini Chicken Tostadas on a Sheet Pan. This process is straightforward and fun! Follow these steps to create a delicious meal that everyone will enjoy.
Step 1: Preheat the Oven
First things first, preheat your oven to 400°F. This temperature is perfect for cooking the chicken and crisping up the tortillas. While the oven heats up, you can move on to the next step.
Step 2: Prepare the Chicken
In a medium bowl, combine the olive oil, chili powder, cumin, garlic powder, onion powder, salt, and black pepper. This spice mixture is what makes the chicken so flavorful! Next, add the boneless, skinless chicken breasts to the bowl. Make sure to coat them evenly with the spice mixture. This step is crucial for ensuring that every bite is packed with flavor.
Once the chicken is well-coated, place it on a lined baking sheet. This will make cleanup easier later on. Bake the chicken for 20-25 minutes, or until it reaches an internal temperature of 165°F. After baking, let the chicken rest for about 5 minutes before shredding it. This resting time helps keep the chicken juicy.
Step 3: Assemble the Tostadas
While the chicken is resting, it’s time to warm the corn tortillas. Heat a dry skillet over medium heat and warm each tortilla for about 30 seconds on each side. This will make them pliable and easier to work with.
Now, it’s time to assemble your tostadas! Spread a layer of refried beans on each tortilla. Then, top them with the shredded chicken, followed by a generous sprinkle of shredded cheese, diced tomatoes, and sliced black olives. Make sure to distribute the toppings evenly for a balanced flavor in every bite.
Step 4: Bake the Tostadas
Once your tostadas are assembled, return them to the oven. Bake for an additional 5-7 minutes, or until the cheese is melted and bubbly. This step is where the magic happens! The cheese will become gooey, and the tortillas will get a nice crisp.
Step 5: Add Toppings
After baking, remove the tostadas from the oven. Now comes the fun part—adding the fresh toppings! Top each tostada with diced avocado and a sprinkle of fresh cilantro. These toppings add a burst of freshness and flavor that perfectly complements the warm, cheesy base. Serve with lime wedges on the side for an extra zing!
And there you have it! Your Mini Chicken Tostadas on a Sheet Pan are ready to be enjoyed. They’re perfect for sharing or for a cozy family dinner. Let’s explore some variations to keep things exciting!
Variation of Mini Chicken Tostadas on a Sheet Pan
One of the best things about Mini Chicken Tostadas on a Sheet Pan is their versatility. You can easily switch up the ingredients to cater to different tastes and dietary preferences. Here are a couple of exciting variations to try!
Vegetarian Option
If you’re looking for a meat-free alternative, consider making a vegetarian version of these tasty tostadas. Instead of chicken, you can use black beans or pinto beans as the base protein. Simply mash the beans with a fork and season them with cumin, garlic powder, and a pinch of salt for added flavor.
Next, layer the mashed beans on the corn tortillas just like you would with the refried beans. Top them with your favorite vegetables, such as sautéed bell peppers, zucchini, or corn. Don’t forget to add the shredded cheese, diced tomatoes, and black olives. Bake as directed, and finish with avocado and cilantro. This vegetarian option is not only delicious but also packed with nutrients!
Spicy Twist
If you love a little heat, why not add a spicy twist to your Mini Chicken Tostadas on a Sheet Pan? Start by mixing sliced jalapeños into the spice mixture for the chicken. This will infuse the chicken with a delightful kick. You can also sprinkle some crushed red pepper flakes over the assembled tostadas before baking.
For an extra layer of spice, consider using pepper jack cheese instead of regular cheddar or Mexican blend cheese. This cheese melts beautifully and adds a creamy, spicy flavor. After baking, top your tostadas with a drizzle of hot sauce or a dollop of spicy salsa. This variation is sure to satisfy those who crave a bit of heat in their meals!
With these variations, you can enjoy Mini Chicken Tostadas on a Sheet Pan in new and exciting ways. Whether you choose the vegetarian option or the spicy twist, you’re in for a treat that’s bursting with flavor!
Cooking Note for Mini Chicken Tostadas on a Sheet Pan
When preparing Mini Chicken Tostadas on a Sheet Pan, there are a few cooking notes to keep in mind. These tips will help ensure that your tostadas turn out perfectly every time. Let’s dive into some essential points to consider!
First, always check the freshness of your ingredients. Fresh chicken, vegetables, and tortillas will enhance the overall flavor of your dish. If possible, opt for organic or locally sourced ingredients. This not only supports local farmers but also ensures you’re using the best quality products.
Next, when seasoning the chicken, feel free to adjust the spice levels to suit your taste. If you prefer a milder flavor, reduce the amount of chili powder or cumin. Conversely, if you love bold flavors, don’t hesitate to add more spices or even a pinch of cayenne pepper for an extra kick.
Another important note is to keep an eye on the cooking time. Ovens can vary, so it’s wise to check the chicken a few minutes before the suggested cooking time. Use a meat thermometer to ensure the chicken reaches an internal temperature of 165°F. This guarantees that the chicken is safe to eat and perfectly cooked.
When assembling the tostadas, make sure not to overload them with toppings. While it’s tempting to pile on all the delicious ingredients, too many toppings can make the tortillas soggy. Aim for a balanced layer of beans, chicken, and cheese to maintain that delightful crunch.
Lastly, let your tostadas cool for a minute or two after baking. This brief resting period allows the cheese to set slightly, making them easier to serve and eat. Plus, it helps prevent burns from hot cheese and toppings!
By keeping these cooking notes in mind, you’ll be well on your way to creating Mini Chicken Tostadas on a Sheet Pan that are not only delicious but also visually appealing. Happy cooking!
Serving Suggestions for Mini Chicken Tostadas on a Sheet Pan
Once your Mini Chicken Tostadas on a Sheet Pan are ready, it’s time to think about how to serve them. Presentation can elevate your meal, making it even more enjoyable. Here are some delightful serving suggestions to consider:
Family Style: Serve the tostadas on a large platter, allowing everyone to help themselves. This creates a fun, communal dining experience.
Individual Plates: For a more formal setting, plate each tostada individually. Add a side of lime wedges and a small bowl of salsa for dipping.
Garnish: Enhance the visual appeal by garnishing with extra cilantro or a sprinkle of queso fresco. This adds a pop of color and flavor.
Side Dishes: Pair your tostadas with a fresh salad, such as a simple green salad or a corn and black bean salad. This adds a refreshing contrast to the warm, cheesy tostadas.
Drinks: Complement your meal with refreshing beverages. Consider serving iced tea, lemonade, or even a light beer for adults. These drinks balance the flavors of the tostadas.
These serving suggestions will not only enhance the dining experience but also make your Mini Chicken Tostadas on a Sheet Pan a hit at any gathering. Enjoy the delicious flavors and the smiles they bring to your table!
Tips for Perfect Mini Chicken Tostadas on a Sheet Pan
To ensure your Mini Chicken Tostadas on a Sheet Pan turn out perfectly every time, consider these helpful tips. They will enhance both the flavor and presentation of your dish, making it a delightful experience for everyone at the table.
Use Fresh Ingredients: Fresh ingredients make a big difference in flavor. Choose high-quality chicken, fresh vegetables, and soft tortillas for the best results.
Don’t Overcrowd the Baking Sheet: Give each tostada enough space on the baking sheet. This allows for even cooking and helps the tortillas stay crispy.
Experiment with Cheese: While cheddar and Mexican blend cheese are great, try using different cheeses like Monterey Jack or queso fresco for a unique twist.
Adjust Spice Levels: If you prefer milder flavors, reduce the amount of chili powder or cumin. For those who love heat, add more spices or fresh jalapeños.
Let Them Cool Slightly: After baking, let the tostadas cool for a minute. This helps the cheese set and makes them easier to handle.
Serve with Dipping Sauces: Offer a variety of dipping sauces, such as salsa, guacamole, or sour cream. This adds extra flavor and fun to the meal.
By following these tips, you’ll create Mini Chicken Tostadas on a Sheet Pan that are not only delicious but also visually appealing. Enjoy the process and the tasty results!
Breakdown of Time for Mini Chicken Tostadas on a Sheet Pan
When preparing Mini Chicken Tostadas on a Sheet Pan, it’s helpful to know how much time each step will take. This way, you can plan your cooking efficiently and enjoy your meal sooner. Here’s a breakdown of the time needed for each part of the process:
Prep Time
Getting everything ready is the first step. This includes gathering your ingredients, seasoning the chicken, and warming the tortillas. Expect to spend about 15-20 minutes on prep. This time allows you to chop, measure, and mix everything without feeling rushed.
Cooking Time
Cooking the chicken and baking the assembled tostadas takes a bit longer. The chicken will need 20-25 minutes in the oven. After that, the assembled tostadas will bake for an additional 5-7 minutes. In total, you should plan for about 30-35 minutes of cooking time.
Total Time
When you combine both prep and cooking times, you’re looking at a total of around 45-55 minutes from start to finish. This makes Mini Chicken Tostadas on a Sheet Pan a quick and satisfying meal option for busy weeknights or casual gatherings.
With this time breakdown, you can easily fit this delicious dish into your schedule. Now that you know how to manage your time, let’s move on to the nutritional information for these tasty tostadas!
Breakdown of Time for Mini Chicken Tostadas on a Sheet Pan
When preparing Mini Chicken Tostadas on a Sheet Pan, it’s helpful to know how much time each step will take. This way, you can plan your cooking efficiently and enjoy your meal sooner. Here’s a breakdown of the time needed for each part of the process:
Prep Time
Getting everything ready is the first step. This includes gathering your ingredients, seasoning the chicken, and warming the tortillas. Expect to spend about 15-20 minutes on prep. This time allows you to chop, measure, and mix everything without feeling rushed. Having everything organized will make the cooking process smoother and more enjoyable.
Cooking Time
Cooking the chicken and baking the assembled tostadas takes a bit longer. The chicken will need 20-25 minutes in the oven. After that, the assembled tostadas will bake for an additional 5-7 minutes. In total, you should plan for about 30-35 minutes of cooking time. This ensures that the chicken is perfectly cooked and the cheese is melted to perfection.
Total Time
When you combine both prep and cooking times, you’re looking at a total of around 45-55 minutes from start to finish. This makes Mini Chicken Tostadas on a Sheet Pan a quick and satisfying meal option for busy weeknights or casual gatherings. With this time breakdown, you can easily fit this delicious dish into your schedule. Now that you know how to manage your time, let’s move on to the nutritional information for these tasty tostadas!
Nutritional Information for Mini Chicken Tostadas on a Sheet Pan
Understanding the nutritional content of your meals is essential for maintaining a balanced diet. Mini Chicken Tostadas on a Sheet Pan not only taste great but also provide a good mix of nutrients. Here’s a closer look at the nutritional information for this delicious dish:
Calories
Each serving of Mini Chicken Tostadas on a Sheet Pan contains approximately 420 calories. This makes it a satisfying meal option without being overly heavy. The combination of chicken, beans, and cheese provides a hearty base that keeps you feeling full and energized.
Protein
Protein is vital for muscle repair and overall health. Each serving offers about 30 grams of protein. The chicken and refried beans contribute significantly to this protein content, making these tostadas a great choice for those looking to increase their protein intake.
Sodium
While enjoying your Mini Chicken Tostadas, it’s important to be mindful of sodium intake. Each serving contains around 800 milligrams of sodium. This amount is reasonable for a flavorful dish, but if you’re watching your sodium levels, consider using low-sodium beans and cheese. This small adjustment can help you enjoy the same great taste while keeping your sodium in check.
By being aware of the nutritional information, you can make informed choices about your meals. Mini Chicken Tostadas on a Sheet Pan are not only delicious but also provide a balanced mix of calories, protein, and sodium, making them a fantastic option for any meal!
FAQs about Mini Chicken Tostadas on a Sheet Pan
Can I use a different protein for Mini Chicken Tostadas on a Sheet Pan?
Absolutely! If chicken isn’t your thing, you can easily swap it out for other proteins. Shredded rotisserie chicken is a fantastic option for a quicker meal. You can also use ground turkey, beef, or even shrimp. For a vegetarian twist, consider using black beans, pinto beans, or grilled vegetables. Each protein brings its own unique flavor, so feel free to experiment!
How do I store leftovers of Mini Chicken Tostadas on a Sheet Pan?
Storing leftovers is simple! Allow the tostadas to cool completely before placing them in an airtight container. They can be stored in the refrigerator for up to 3 days. When you’re ready to enjoy them again, reheat in the oven at 350°F for about 10-15 minutes, or until heated through. This will help maintain the crispiness of the tortillas and the melty cheese.
Can I make Mini Chicken Tostadas on a Sheet Pan ahead of time?
Yes, you can prepare some components ahead of time! You can season and cook the chicken a day in advance. Just store it in the refrigerator until you’re ready to assemble the tostadas. You can also warm the tortillas and prepare the toppings ahead of time. When you’re ready to eat, simply assemble and bake them for a quick and delicious meal!
Conclusion on Mini Chicken Tostadas on a Sheet Pan
In conclusion, Mini Chicken Tostadas on a Sheet Pan are a delightful and versatile dish that brings joy to any meal. With their crispy tortillas, flavorful chicken, and fresh toppings, they are sure to please everyone at the table. Whether you’re preparing a quick weeknight dinner or hosting a casual gathering, these tostadas are a fantastic choice.
Not only are they easy to make, but they also allow for endless customization. You can adjust the spices, swap proteins, or even create vegetarian versions to suit your preferences. The combination of textures and flavors makes each bite a delicious experience. Plus, the minimal cleanup required makes them even more appealing!
As you explore this recipe, remember to have fun with it. Cooking is all about creativity and enjoying the process. So, gather your ingredients, invite your loved ones, and dive into the world of Mini Chicken Tostadas on a Sheet Pan. You’ll be amazed at how something so simple can bring so much happiness to your dining table.
We hope you enjoy making and sharing this dish as much as we do. Happy cooking!
Paul
Mini Chicken Sheet Pan Tostadas are a family favorite!
These crispy, cheesy Mini Chicken Tostadas are the perfect bite-sized Tex-Mex treat! Baked, not fried, and piled high with refried beans, rotisserie chicken, and melty cheese, they’re a fun and flavorful option for dinner, parties, or game-day snacking—customizable with all your favorite toppings.
116 oz can traditional refried beans (use just shy of the full can)
2cupsshredded rotisserie chicken breast
2cupsshredded cheesesharp cheddar and Monterey Jack blend recommended
Optional Garnishes:
⅓cupsour cream
¼cupfinely diced red onion
¼cupchopped or torn fresh cilantro
6cherry or grape tomatoeschopped small
Hot saucesuch as Cholula
Optional extras: guacamolesalsa, pico de gallo
Method
Preheat oven to 450°F (232°C). Line a large baking sheet with foil for easy cleanup.
Bake tortillas: Lightly brush both sides of the corn tortillas with oil and arrange them snugly on the baking sheet. Bake for 9 to 10 minutes, until the tortillas are firm but not browned. Let cool for about 5 minutes.
Flip and layer: Flip tortillas over and spread each with refried beans. Add shredded rotisserie chicken and top with shredded cheese.
Return to oven: Bake again for 5 to 6 minutes, until the cheese is melted and everything is heated through.
Add toppings: Garnish each tostada with your choice of sour cream, red onion, cilantro, tomatoes, hot sauce, and any other favorite toppings. Serve immediately.
Notes
Use leftover chicken: Rotisserie chicken makes this recipe super quick, but any cooked and shredded chicken works.
Make it vegetarian: Skip the chicken and load up on seasoned beans and veggies instead.
Batch-friendly: This recipe easily doubles or triples for parties and gatherings.
Customize toppings: Add shredded lettuce, jalapeños, avocado slices, or a drizzle of lime crema for variety.
Reheating tip: For best results, reheat leftovers in the oven or air fryer to maintain crispiness.
Ritz Chicken Rice Casserole. This casserole is not just a meal; it’s a warm hug on a plate. Perfect for busy weeknights or family gatherings, it combines tender chicken, creamy goodness, and a crunchy topping that everyone loves.
Imagine coming home after a long day, and the aroma of a bubbling casserole fills your kitchen. The Ritz Chicken Rice Casserole is easy to prepare, making it a go-to recipe for both novice cooks and seasoned chefs. With just a few simple ingredients, you can create a dish that is both satisfying and delicious.
This casserole is versatile, too! You can customize it with your favorite vegetables or add extra ingredients like bacon for a savory twist. Plus, it’s a great way to use up leftover chicken, making it a practical choice for any household.
In this article, we will guide you through the ingredients, preparation steps, and even some tips to make your casserole shine. So, let’s dive into the wonderful world of Ritz Chicken Rice Casserole and discover how to make this delightful dish that will surely become a family favorite!
Ingredients for Ritz Chicken Rice Casserole
Ritz Chicken Rice Casserole, you’ll need a handful of simple ingredients. Each component plays a vital role in bringing flavor and texture to this comforting dish. Here’s what you’ll need:
3 cups cooked chicken, shredded
1 cup long-grain white rice, uncooked
1 can (10.5 oz) cream of chicken soup
1 can (10.5 oz) chicken broth
1 cup sour cream
1 cup frozen mixed vegetables (peas, carrots, corn)
1 teaspoon garlic powder
1 teaspoon onion powder
1/2 teaspoon black pepper
1/2 teaspoon salt
1 1/2 cups crushed Ritz crackers
1/2 cup shredded cheddar cheese
1/4 cup butter, melted
These ingredients come together to create a creamy, savory base, topped with a crunchy layer of Ritz crackers. The combination of chicken, rice, and vegetables makes this casserole not only hearty but also nutritious. Feel free to adjust the ingredients based on your preferences or what you have on hand. For instance, you can swap out the mixed vegetables for your favorites, or even add some cooked bacon for an extra flavor boost!
Now that you have your ingredients ready, let’s move on to the preparation steps to bring this delightful dish to life!
Preparation of Ritz Chicken Rice Casserole
Ritz Chicken Rice Casserole. This process is straightforward and fun! Follow these steps to create a delicious meal that your family will love.
Step 1: Preheat the Oven
First things first, preheat your oven to 350°F (175°C). This ensures that your casserole cooks evenly and comes out perfectly golden brown. While the oven heats up, you can focus on the other steps.
Step 2: Prepare the Chicken
If you haven’t done so already, shred your cooked chicken. You can use leftover chicken or rotisserie chicken for convenience. Shredding the chicken into bite-sized pieces helps it mix well with the other ingredients, making every bite flavorful.
Step 3: Cook the Rice
Next, you’ll need to measure out one cup of long-grain white rice. Since this rice will cook in the oven, there’s no need to pre-cook it. Just make sure it’s ready to go into the casserole dish!
Step 4: Mix the Ingredients
In a large mixing bowl, combine the shredded chicken, uncooked rice, cream of chicken soup, chicken broth, sour cream, and frozen mixed vegetables. Add the garlic powder, onion powder, black pepper, and salt. Mix everything together until well combined. This creamy mixture is the heart of your casserole!
Step 5: Assemble the Casserole
Now, pour the chicken and rice mixture into your greased 9×13-inch baking dish. Spread it evenly across the bottom of the dish. This ensures that every part of the casserole cooks evenly and absorbs all the delicious flavors.
Step 6: Top with Ritz Crackers
In a separate bowl, combine the crushed Ritz crackers, shredded cheddar cheese, and melted butter. Mix until the crackers are well coated. This mixture will create a crunchy topping that contrasts beautifully with the creamy filling. Sprinkle it evenly over the top of the casserole.
Step 7: Bake the Casserole
Cover the baking dish with aluminum foil and place it in the preheated oven. Bake for 30 minutes. After that, remove the foil and bake for an additional 15-20 minutes. You want the top to be golden brown and the casserole to be bubbly. Once done, take it out and let it cool for about 5 minutes before serving.
Ritz Chicken Rice Casserole is ready to be enjoyed. This dish is not only easy to make but also a crowd-pleaser. Let’s move on to some variations you can try to make this recipe even more exciting!
Variation of Ritz Chicken Rice Casserole
Ritz Chicken Rice Casserole is a hit on its own, there are many ways to switch things up! Whether you want to try different ingredients or explore various cooking methods, these variations will keep your meals exciting and flavorful.
Alternative Ingredients
One of the best things about casseroles is their versatility. You can easily swap out ingredients to suit your taste or what you have on hand. Here are some alternative ingredients you might consider:
Protein Options: Instead of chicken, you can use turkey, cooked ham, or even tofu for a vegetarian option.
Vegetable Choices: Feel free to replace the mixed vegetables with fresh or frozen options like broccoli, green beans, or bell peppers. Each will add a unique flavor and texture.
Cheese Varieties: While cheddar cheese is delicious, you can experiment with mozzarella, pepper jack, or even a blend of cheeses for a different taste.
Soup Alternatives: If you want to change the flavor profile, try using cream of mushroom soup or a cheese soup instead of cream of chicken.
These alternative ingredients can help you create a new twist on the classic casserole, making it a fun dish to prepare time and again!
Different Cooking Methods
Ritz Chicken Rice Casserole. Here are a couple of options:
Slow Cooker: For a hands-off approach, you can make this casserole in a slow cooker. Combine all the ingredients in the slow cooker and cook on low for 4-6 hours. Just be sure to add the Ritz cracker topping during the last 30 minutes of cooking.
Instant Pot: If you’re short on time, the Instant Pot is a great option. Use the sauté function to cook the chicken and vegetables first, then add the rice and liquids. Seal the lid and cook on high pressure for 10 minutes. After releasing the pressure, top with crushed crackers and cheese, then use the broil function to crisp the top.
Ritz Chicken Rice Casserole in different ways. So, whether you’re in a hurry or want to take it slow, there’s a method for you!
Cooking Note for Ritz Chicken Rice Casserole
Ritz Chicken Rice Casserole, there are a few important cooking notes to keep in mind. These tips will help ensure that your casserole turns out perfectly every time, making it a delightful dish for any occasion.
First, it’s essential to use cooked chicken. You can use leftover chicken, rotisserie chicken, or even poach your chicken before shredding it. This not only saves time but also adds flavor to your casserole. If you opt for raw chicken, be sure to cook it thoroughly before mixing it with the other ingredients.
Next, the rice in this recipe is uncooked when added to the casserole. It will absorb the liquid from the soup and broth as it bakes, cooking perfectly in the process. However, make sure to use long-grain white rice, as other types may not yield the same results. Brown rice, for example, requires a longer cooking time and may not cook through in the casserole.
Another important note is to keep an eye on the baking time. Ovens can vary, so it’s wise to check your casserole a few minutes before the suggested time. You want the top to be golden brown and the casserole to be bubbly. If the top browns too quickly, you can cover it with foil to prevent burning while the inside continues to cook.
Lastly, let the casserole cool for about 5 minutes before serving. This allows the flavors to meld together and makes it easier to serve. Plus, it helps prevent anyone from burning their mouth on the hot filling!
Ritz Chicken Rice Casserole that is sure to impress your family and friends. Enjoy the process and the wonderful aromas that fill your kitchen as you bake this comforting dish!
Serving Suggestions for Ritz Chicken Rice Casserole
Ritz Chicken Rice Casserole is baked to perfection, it’s time to serve it up! This dish is not only delicious but also versatile, making it a great centerpiece for any meal. Here are some serving suggestions to enhance your dining experience:
Garnish with Fresh Herbs: A sprinkle of fresh parsley or chives on top of the casserole adds a pop of color and a burst of flavor. Fresh herbs can elevate the dish and make it look even more appetizing.
Pair with a Side Salad: Serve your casserole alongside a crisp green salad. A simple mix of lettuce, tomatoes, and cucumbers with a light vinaigrette complements the richness of the casserole beautifully.
Include Bread Rolls: Soft dinner rolls or garlic bread are perfect for soaking up the creamy sauce. They add a comforting touch and make the meal feel more complete.
Offer a Variety of Condiments: Consider providing condiments like hot sauce or a tangy barbecue sauce on the side. This allows guests to customize their plates according to their taste preferences.
Serve with Steamed Vegetables: For a well-rounded meal, add a side of steamed vegetables. Broccoli, green beans, or carrots can provide a nutritious balance to the rich casserole.
Ritz Chicken Rice Casserole but also create a delightful dining experience for you and your guests. Whether it’s a family dinner or a gathering with friends, this dish is sure to be a hit!
Tips for Making the Perfect Ritz Chicken Rice Casserole
Ritz Chicken Rice Casserole is all about attention to detail and a few helpful tips. With these suggestions, you can elevate your casserole to new heights, ensuring it’s a hit every time you serve it!
Use Quality Ingredients: Start with fresh, high-quality ingredients. Fresh chicken, good-quality cream of chicken soup, and flavorful broth will make a noticeable difference in taste.
Don’t Skip the Seasoning: Seasoning is key! Make sure to add enough garlic powder, onion powder, salt, and pepper. You can also experiment with herbs like thyme or rosemary for added flavor.
Mix Thoroughly: When combining the ingredients, mix them well. This ensures that every bite is packed with flavor and that the rice cooks evenly throughout the casserole.
Check for Doneness: Ovens can vary, so keep an eye on your casserole as it bakes. The top should be golden brown, and the filling should be bubbly. If it’s not quite there, give it a few extra minutes.
Let It Rest: After baking, let the casserole sit for about 5 minutes before serving. This resting time allows the flavors to meld and makes it easier to serve.
Customize to Your Taste: Feel free to add your favorite ingredients! Whether it’s extra veggies, different cheeses, or even spices, customizing the casserole can make it uniquely yours.
Store Leftovers Properly: If you have leftovers, store them in an airtight container in the fridge. They can last for up to 3-4 days. Reheat in the oven or microwave for a quick meal!
Ritz Chicken Rice Casserole that your family and friends will love. Enjoy the process and the wonderful flavors that come together in this comforting dish!
Breakdown of Time for Ritz Chicken Rice Casserole
Ritz Chicken Rice Casserole can help you plan your meal better. Here’s a simple breakdown of the time involved in making this delicious dish.
Prep Time
Ritz Chicken Rice Casserole is approximately 15-20 minutes. This includes gathering your ingredients, shredding the chicken, measuring the rice, and mixing everything together. If you have leftover chicken ready to go, this time can be even shorter!
Cooking Time
Once your casserole is assembled, the cooking time is about 45-50 minutes. You’ll bake it covered for the first 30 minutes, allowing the rice to absorb the flavors. Then, you’ll uncover it for an additional 15-20 minutes to achieve that golden, crispy topping.
Total Time
In total, you can expect to spend about 1 hour to 1 hour and 10 minutes from start to finish. This includes both prep and cooking time. It’s a manageable timeframe for a comforting meal that serves six people, making it perfect for family dinners or gatherings!
Ritz Chicken Rice Casserole into your busy schedule. Enjoy the process and the delicious results!
Nutritional Information for Ritz Chicken Rice Casserole
Ritz Chicken Rice Casserole is not only delicious but also provides a good mix of nutrients. Here’s a closer look at the nutritional information per serving:
Calories
Ritz Chicken Rice Casserole contains approximately 350 calories. This makes it a hearty option for dinner without being overly heavy. The combination of chicken, rice, and vegetables contributes to a satisfying meal that can keep you full for hours.
Protein
With about 22 grams of protein per serving, this casserole is a great source of this essential nutrient. The shredded chicken is the primary contributor, providing the building blocks your body needs for muscle repair and growth. Including protein in your meals can help you feel fuller longer, making it a smart choice for those watching their appetite.
Sodium
Each serving contains around 800 mg of sodium. While sodium is necessary for bodily functions, it’s important to monitor your intake. If you’re watching your sodium levels, consider using low-sodium chicken broth and soup. This small adjustment can help reduce the overall sodium content while still keeping the casserole flavorful.
Ritz Chicken Rice Casserole offers a balanced mix of calories, protein, and sodium, making it a nutritious option for family meals. By being mindful of ingredient choices, you can further enhance its health benefits while enjoying this comforting dish!
FAQs about Ritz Chicken Rice Casserole
Can I use leftover chicken for Ritz Chicken Rice Casserole?
Ritz Chicken Rice Casserole even more convenient to prepare!
What can I substitute for rice in Ritz Chicken Rice Casserole?
Ritz Chicken Rice Casserole a unique twist!
How long can I store Ritz Chicken Rice Casserole in the fridge?
Ritz Chicken Rice Casserole can be stored in the fridge for up to 3-4 days. Make sure to place it in an airtight container to keep it fresh. When you’re ready to enjoy it again, simply reheat in the oven or microwave until warmed through. This makes it a great option for meal prep or leftovers!
Can I freeze Ritz Chicken Rice Casserole?
Ritz Chicken Rice Casserole for later enjoyment! To do this, let it cool completely, then cover it tightly with plastic wrap and aluminum foil. It can be stored in the freezer for up to 2-3 months. When you’re ready to eat it, thaw it in the fridge overnight and reheat in the oven until hot. This makes for a quick and easy meal on busy days!
Conclusion on Ritz Chicken Rice Casserole
Ritz Chicken Rice Casserole is a delightful dish that brings comfort and satisfaction to any meal. Its creamy texture, combined with the crunch of Ritz crackers, creates a perfect harmony of flavors and textures. This casserole is not only easy to prepare but also versatile, allowing you to customize it to your taste and dietary needs.
Whether you’re using leftover chicken, experimenting with different vegetables, or trying out various cooking methods, this recipe offers endless possibilities. It’s a fantastic option for busy weeknights, family gatherings, or even potlucks. Plus, with its balanced nutritional profile, you can feel good about serving it to your loved ones.
Ritz Chicken Rice Casserole, remember to enjoy the process. Cooking is not just about the end result; it’s about the love and care you put into each dish. So gather your ingredients, follow the steps, and savor the delicious aroma that fills your kitchen.
Ritz Chicken Rice Casserole is sure to become a staple in your home. Happy cooking!
Paul
Ritz Chicken Rice Casserole is a family favorite dish.
This Ritz Chicken and Rice Casserole is creamy, comforting, and crowned with a buttery Ritz cracker crunch that’s downright irresistible. It’s a cozy, crowd-pleasing dish that comes together fast using pantry staples and rotisserie chicken—perfect for busy weeknights or family gatherings.
16.9 oz box Chicken Rice-A-Roni, prepared according to package directions
1cupsour cream
110.5 oz can cream of chicken soup
½teaspoongarlic powder
1teaspoononion powder
1teaspoonsalt
¼teaspoonblack pepper
For the Topping:
6tablespoonsbuttermelted
1sleeve Ritz crackerscrushed
1cupshredded cheddar cheese
Method
Preheat the oven to 350°F (175°C). Lightly grease a 9×13-inch baking dish with non-stick spray.
Prepare the rice: Cook the Chicken Rice-A-Roni as directed on the box. Set aside.
Make the filling: In a large mixing bowl, whisk together the sour cream, cream of chicken soup, garlic powder, onion powder, salt, and pepper until smooth. Stir in the cooked chicken and prepared rice.
Assemble the casserole: Spread the chicken and rice mixture evenly into the prepared baking dish.
Make the topping: In a small bowl, combine the melted butter and crushed Ritz crackers. Stir in the shredded cheddar cheese. Sprinkle the mixture evenly over the casserole.
Bake: Bake for 25 minutes, then broil for 2–3 minutes until the top is golden and crispy.
Serve: Let cool slightly before serving. Enjoy the creamy filling with a crunchy topping in every bite.
Notes
Time-saver tip: Use rotisserie chicken to cut down on prep time.
Rice swap: You can use plain cooked rice with added seasoning if you don’t have Rice-A-Roni.
Make it ahead: Assemble the casserole in advance, refrigerate, and bake when ready (add 5–10 extra minutes of bake time).
Freezer-friendly: This dish freezes well—just thaw overnight and bake as usual.
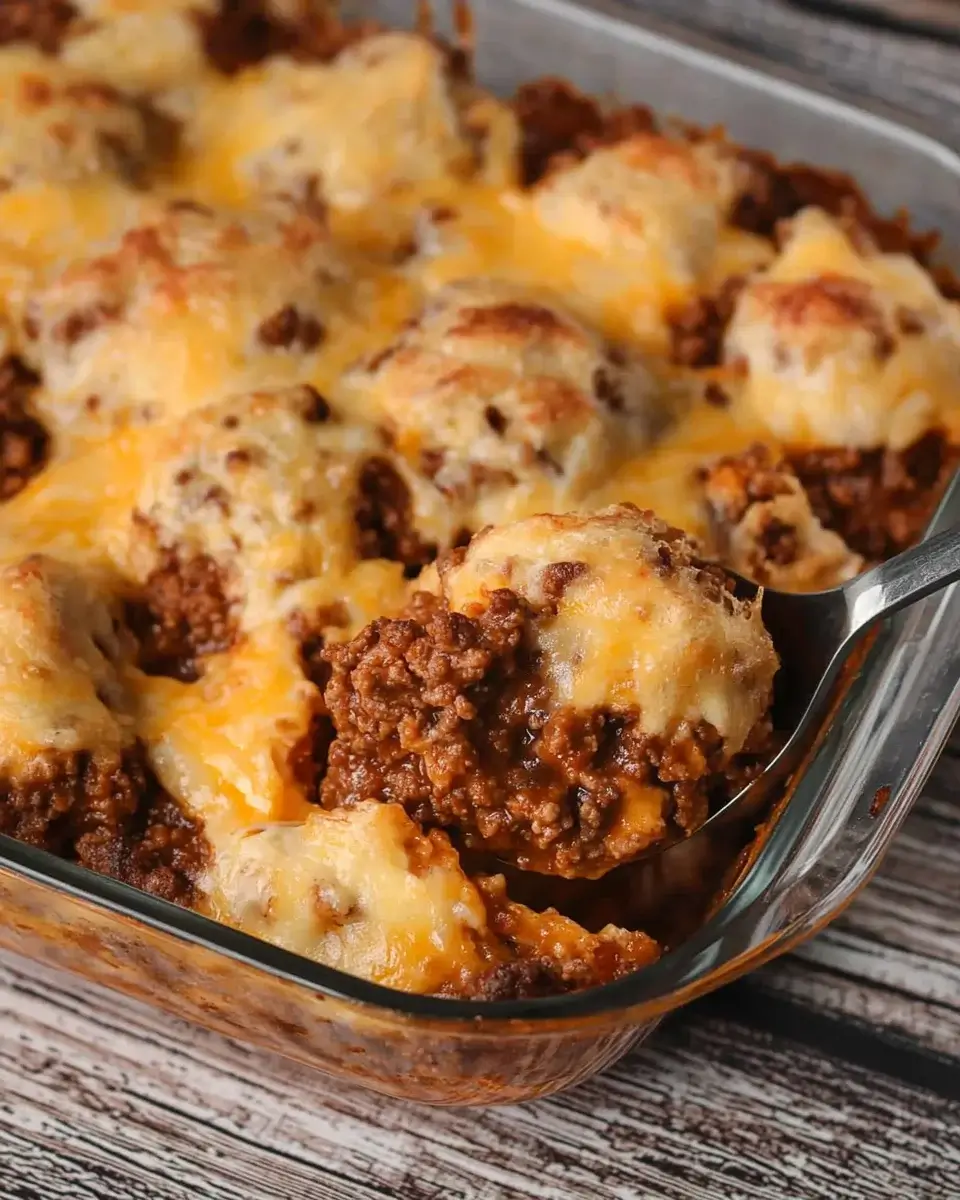
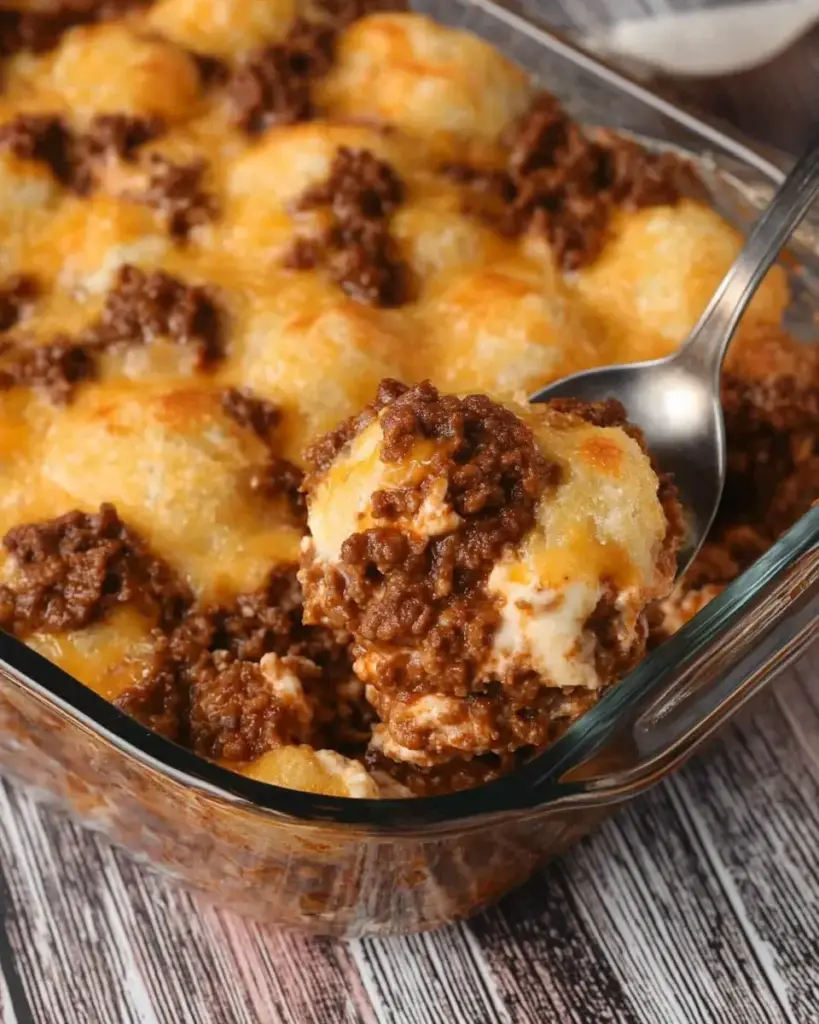
A Sloppy Joe Casserole is a delightful twist on the classic Sloppy Joe sandwich. It combines the savory flavors of ground beef, tangy sloppy joe sauce, and fluffy biscuit dough into a hearty, comforting dish. This casserole is baked until golden brown, creating a deliciously satisfying meal that is perfect for family dinners or gatherings. The best part? It’s easy to prepare and can be ready in no time, making it a go-to recipe for busy weeknights.
Why You Should Try This Sloppy Joe Casserole Recipe
There are many reasons to give this Sloppy Joe Casserole Recipe a try. First, it’s incredibly simple to make, requiring just a few ingredients that you likely already have in your pantry. Second, it’s a crowd-pleaser! The combination of flavors and textures appeals to both kids and adults alike. Plus, it’s versatile; you can easily customize it to suit your taste preferences. Whether you want to add extra veggies or spice it up with some hot sauce, the options are endless. Lastly, this casserole is perfect for meal prep. You can make it ahead of time and reheat it for a quick and delicious meal. So, gather your ingredients and get ready to enjoy a comforting dish that will warm your heart and satisfy your taste buds!
Ingredients for Sloppy Joe Casserole Recipe
To create a mouthwatering Sloppy Joe Casserole, you’ll need a few simple ingredients. Here’s what you’ll need:
1 pound ground beef
1 small onion, diced
1 can (15 ounces) sloppy joe sauce
1 can (16 ounces) refrigerated biscuit dough
1 cup shredded cheddar cheese
1 teaspoon garlic powder
1 teaspoon Worcestershire sauce
Salt and pepper to taste
Fresh parsley, chopped (for garnish)
These ingredients come together to create a deliciously hearty meal. The ground beef provides protein, while the biscuit dough adds a fluffy texture. The sloppy joe sauce brings a tangy flavor that ties everything together. Don’t forget the cheese! It melts beautifully on top, creating a golden crust that everyone will love. You can also customize this recipe by adding your favorite vegetables or spices. So, gather these ingredients and get ready to whip up a delightful Sloppy Joe Casserole!
Step-by-Step Preparation of Sloppy Joe Casserole Recipe
Step 1: Prepping the Ingredients
Before you start cooking, it’s important to prep your ingredients. First, gather all the items you need. This includes the ground beef, diced onion, sloppy joe sauce, biscuit dough, shredded cheddar cheese, garlic powder, Worcestershire sauce, salt, and pepper. Having everything ready will make the cooking process smoother.
Next, take a moment to dice the onion. A small, sharp knife works best for this task. Aim for small, even pieces so they cook quickly and blend well with the beef. If you want to add extra veggies, chop them now too. Bell peppers or mushrooms are great options!
Step 2: Cooking the Meat Mixture
Now it’s time to cook the meat mixture. Heat a large skillet over medium heat. Once hot, add the ground beef and diced onion. Cook them together for about 5-7 minutes. Stir occasionally to break up the beef and ensure it cooks evenly. You’ll know it’s done when the beef is browned and the onion is soft.
After cooking, drain any excess fat from the skillet. This step is important to keep your casserole from being greasy. Then, stir in the sloppy joe sauce, garlic powder, Worcestershire sauce, salt, and pepper. Let this mixture cook for another 2-3 minutes until everything is heated through. The aroma will be mouthwatering!
Step 3: Assembling the Casserole
With the meat mixture ready, it’s time to assemble your casserole. Open the can of biscuit dough and cut each biscuit into quarters. This will help them mix well with the meat. In a large mixing bowl, combine the biscuit pieces with the sloppy joe mixture. Gently stir to coat the biscuits evenly. Be careful not to mash them!
Next, pour the entire mixture into a greased 9×13-inch baking dish. Spread it out evenly. This ensures that every bite is filled with delicious flavors. Finally, sprinkle the shredded cheddar cheese over the top. This will create a cheesy, golden crust as it bakes.
Step 4: Baking the Casserole
Now that your casserole is assembled, it’s time to bake! Place the baking dish in the preheated oven at 350°F. Bake for 25-30 minutes. Keep an eye on it as it cooks. You want the biscuits to be golden brown and fully cooked. The cheese should be melted and bubbly, adding to the deliciousness of the dish.
Once done, remove the casserole from the oven and let it cool for a few minutes. This will make it easier to serve. Before serving, garnish with chopped fresh parsley for a pop of color and flavor. Now, you’re ready to enjoy your Sloppy Joe Casserole!
Variations of Sloppy Joe Casserole Recipe
Vegetarian Sloppy Joe Casserole
If you’re looking for a meatless option, a Vegetarian Sloppy Joe Casserole is a fantastic choice! You can easily swap out the ground beef for a plant-based alternative. Consider using lentils, black beans, or even crumbled tofu. These ingredients provide a hearty texture and are packed with protein.
To make the vegetarian version, start by sautéing diced onions and bell peppers in a skillet. Then, add your choice of beans or lentils along with the sloppy joe sauce, garlic powder, Worcestershire sauce, salt, and pepper. Mix everything well and let it simmer for a few minutes. Follow the same steps for assembling and baking the casserole as in the original recipe. The result is a delicious, satisfying dish that everyone can enjoy!
Gluten-Free Sloppy Joe Casserole
For those who need a gluten-free option, you can easily adapt the Sloppy Joe Casserole Recipe. Start by using gluten-free biscuit dough, which is widely available in stores. You can also make your own using gluten-free flour and baking powder.
When preparing the meat mixture, ensure that the sloppy joe sauce is gluten-free. Many brands offer gluten-free options, so check the label. Follow the same cooking and assembly steps as the original recipe. This gluten-free version will still deliver all the comforting flavors of the classic dish, making it a hit for everyone at the table!
Cooking Note for Sloppy Joe Casserole Recipe
When preparing your Sloppy Joe Casserole, there are a few important cooking notes to keep in mind. First, always ensure that your ground beef is cooked thoroughly. This not only enhances the flavor but also ensures food safety. Use a meat thermometer to check that the internal temperature reaches 160°F.
Next, consider the texture of your biscuit dough. If you prefer a softer biscuit, you can slightly underbake the casserole. On the other hand, if you like a crunchier texture, bake it a little longer. Just keep an eye on it to prevent burning.
Additionally, feel free to experiment with the spices. Adding a pinch of cayenne pepper or smoked paprika can elevate the flavor profile. If you enjoy a bit of sweetness, a tablespoon of brown sugar can balance the tanginess of the sloppy joe sauce.
Lastly, remember that leftovers can be just as delicious! Store any uneaten casserole in an airtight container in the refrigerator. Reheat it in the oven or microwave for a quick meal that tastes just as good as the first time. Enjoy your cooking adventure with this Sloppy Joe Casserole Recipe!
Serving Suggestions for Sloppy Joe Casserole Recipe
When it comes to serving your Sloppy Joe Casserole, there are plenty of delicious options to enhance the meal. This hearty dish is versatile and pairs well with various sides and toppings. Here are some serving suggestions to consider:
Fresh Salad: A crisp green salad is a perfect complement to the rich flavors of the casserole. Consider a simple garden salad with lettuce, tomatoes, cucumbers, and a light vinaigrette. The freshness of the salad balances the hearty casserole.
Coleslaw: A tangy coleslaw adds a crunchy texture and a refreshing taste. The coolness of the slaw contrasts nicely with the warm, savory casserole. You can make a classic coleslaw or try a vinegar-based version for a lighter option.
Garlic Bread: Serve your casserole with warm garlic bread for a comforting touch. The buttery, garlicky flavor of the bread pairs wonderfully with the Sloppy Joe Casserole, making it even more satisfying.
Pickles: Adding pickles on the side can provide a nice crunch and a tangy flavor that cuts through the richness of the dish. Dill pickles or bread-and-butter pickles are both great choices.
Hot Sauce: For those who enjoy a bit of heat, offer hot sauce on the side. A few dashes can elevate the flavors and add an exciting kick to each bite.
Cheese Toppings: Consider serving extra shredded cheese on top of the casserole. This allows guests to customize their servings with more melty goodness.
These serving suggestions not only enhance the meal but also make it more enjoyable for everyone at the table. Feel free to mix and match based on your preferences and what you have on hand. With these ideas, your Sloppy Joe Casserole will be a hit at any gathering!
Tips for Perfecting Your Sloppy Joe Casserole Recipe
To make your Sloppy Joe Casserole truly shine, consider these helpful tips. They will ensure that every bite is packed with flavor and that your dish turns out perfectly every time.
Choose Quality Ingredients: Start with fresh ground beef and high-quality sloppy joe sauce. The better the ingredients, the tastier your casserole will be. If you can, opt for homemade sauce for a personal touch.
Don’t Skip the Seasoning: Season your meat mixture well. Salt and pepper are essential, but don’t hesitate to add other spices like onion powder or paprika. These will enhance the overall flavor.
Mix Gently: When combining the biscuit pieces with the meat mixture, stir gently. You want the biscuits to be coated without breaking them apart. This keeps the texture fluffy and enjoyable.
Check for Doneness: Keep an eye on your casserole while it bakes. The biscuits should be golden brown, and the cheese should be bubbly. If you notice the top browning too quickly, cover it with aluminum foil to prevent burning.
Let It Rest: After baking, allow the casserole to cool for a few minutes before serving. This helps the layers set, making it easier to cut and serve. Plus, it allows the flavors to meld together beautifully.
Experiment with Toppings: Feel free to get creative with toppings! Consider adding sliced green onions, jalapeños, or even a dollop of sour cream for extra flavor. These additions can elevate your dish to the next level.
Make It Ahead: If you’re short on time, prepare the casserole ahead of time. Assemble it, cover it tightly, and store it in the fridge. When you’re ready to bake, just pop it in the oven. This is a great way to save time on busy nights!
By following these tips, you’ll be well on your way to creating a Sloppy Joe Casserole that everyone will love. Enjoy the process and have fun experimenting with flavors!
Breakdown of Time for Sloppy Joe Casserole Recipe
Prep Time
The prep time for your Sloppy Joe Casserole is quite manageable. You can expect to spend about 10-15 minutes gathering and preparing your ingredients. This includes dicing the onion, cutting the biscuit dough, and measuring out your spices. Having everything ready will make the cooking process smoother and more enjoyable.
Cooking Time
Once you start cooking, the actual cooking time will take around 15-20 minutes. This includes browning the ground beef and onions, mixing in the sloppy joe sauce, and allowing it to heat through. After that, you’ll bake the casserole for 25-30 minutes in the oven. During this time, the biscuits will rise and become golden brown, while the cheese melts beautifully on top.
Total Time
In total, you can expect the entire process to take about 50-65 minutes from start to finish. This includes both prep and cooking time. With such a quick turnaround, this Sloppy Joe Casserole Recipe is perfect for busy weeknights or last-minute gatherings. You’ll have a delicious, hearty meal ready in no time!
Nutritional Information for Sloppy Joe Casserole Recipe
Calories
When it comes to enjoying a hearty meal, knowing the calorie content can help you make informed choices. Each serving of this Sloppy Joe Casserole contains approximately 350 calories. This makes it a satisfying option for dinner without going overboard on calories. The combination of ground beef, biscuit dough, and cheese contributes to the overall calorie count, providing a filling meal that is sure to please.
Protein
Protein is an essential nutrient that helps build and repair tissues in our bodies. This Sloppy Joe Casserole is a great source of protein, offering about 20 grams per serving. The ground beef is the primary contributor to this protein content, making it a nutritious choice for those looking to increase their protein intake. Pairing this casserole with a side salad can further enhance your meal’s nutritional value.
Sodium
Sodium is another important factor to consider when evaluating the nutritional profile of a dish. Each serving of the Sloppy Joe Casserole contains around 800 milligrams of sodium. While this is a reasonable amount for a flavorful dish, it’s wise to be mindful of your overall sodium intake throughout the day. If you’re watching your sodium levels, consider using low-sodium sloppy joe sauce or reducing the added salt in the recipe.
FAQs about Sloppy Joe Casserole Recipe
Can I make Sloppy Joe Casserole ahead of time?
Absolutely! Making Sloppy Joe Casserole ahead of time is a great idea. You can prepare the entire casserole, cover it tightly, and store it in the refrigerator for up to 24 hours before baking. This is perfect for busy weeknights or when you have guests coming over. When you’re ready to bake, simply preheat your oven and pop it in. You may need to add a few extra minutes to the baking time since it will be cold from the fridge.
What can I serve with Sloppy Joe Casserole?
There are many delicious options to serve alongside your Sloppy Joe Casserole. A fresh garden salad is a great choice, as it adds a light and crunchy contrast to the rich flavors of the casserole. You can also serve coleslaw for a tangy crunch or garlic bread for a comforting touch. Pickles or hot sauce on the side can enhance the meal, giving it an extra kick. Feel free to mix and match based on your preferences!
How do I store leftovers of Sloppy Joe Casserole?
Storing leftovers of your Sloppy Joe Casserole is easy! Allow the casserole to cool completely before transferring it to an airtight container. You can keep it in the refrigerator for up to 3-4 days. When you’re ready to enjoy it again, simply reheat individual portions in the microwave or warm it up in the oven. If you want to store it for a longer period, consider freezing it. Just make sure to use a freezer-safe container, and it can last for up to 3 months. Reheat thoroughly before serving!
Conclusion on Sloppy Joe Casserole Recipe
In conclusion, the Sloppy Joe Casserole Recipe is a delightful and easy dish that brings comfort and satisfaction to any meal. With its rich flavors and simple preparation, it’s perfect for busy families or anyone looking for a quick yet hearty dinner option. The combination of ground beef, tangy sloppy joe sauce, and fluffy biscuit dough creates a unique twist on the classic Sloppy Joe sandwich that everyone will love.
This casserole not only offers a delicious taste but also provides versatility. You can easily customize it to fit your dietary needs or personal preferences. Whether you choose to make a vegetarian or gluten-free version, the essence of this dish remains intact, ensuring that no one misses out on the fun. Plus, with the option to prepare it ahead of time, you can enjoy a homemade meal without the stress of last-minute cooking.
As you gather around the table with family and friends, this Sloppy Joe Casserole will surely be a hit. Its warm, cheesy goodness and comforting flavors will create lasting memories and happy moments. So, don’t hesitate to try this recipe and make it a regular part of your meal rotation. Happy cooking!
Paul
Sloppy Joe Casserole Recipe is a must-try dish!
This Sloppy Joe Biscuit Casserole is cozy, cheesy, and downright comforting! With savory saucy beef, golden biscuit pieces, and melty cheddar cheese baked into one irresistible dish, it’s a family-friendly weeknight favorite you’ll make on repeat.
112 oz can Pillsbury biscuits (Grands Jr’s preferred), cut into quarters
1cupshredded cheddar cheese
Method
Preheat oven to 350°F (175°C). Lightly grease a 9×13-inch baking dish with cooking spray.
Cook the meat: In a skillet over medium heat, cook the ground beef (or turkey) until no longer pink. Drain excess fat.
Make the sauce: Stir in ketchup, water, brown sugar, Worcestershire sauce, mustard, garlic powder, onion powder, and salt. Let the mixture simmer for 5 minutes to meld flavors.
Mix in biscuits: Transfer the meat mixture to a large bowl. Add the quartered biscuit pieces and gently toss to coat them evenly.
Assemble the casserole: Spread the biscuit-meat mixture evenly into the prepared baking dish.
Top with cheese: Sprinkle shredded cheddar cheese evenly over the top.
Bake: Place in the oven and bake for 28 to 30 minutes, or until the biscuits are golden brown and cooked through.
Serve hot: Let cool slightly before serving, then dig into this cheesy, bubbly goodness!
Notes
Don’t overmix the biscuits: Gently folding the biscuit pieces prevents them from becoming soggy or tearing.
Add veggies: You can sneak in finely chopped bell peppers or onions while cooking the beef for added flavor and nutrition.
Spice it up: A dash of chili powder or hot sauce in the sauce mixture adds a flavorful kick if you like heat.
Freezer tip: Assemble the casserole ahead and freeze unbaked. Thaw overnight in the fridge and bake as directed.
Are you looking for a delicious and easy dinner idea? Stuffed chicken breasts in the air fryer might just be the perfect solution! This dish combines juicy chicken with a creamy, flavorful filling, making it a hit for family dinners or special occasions. The air fryer cooks the chicken to perfection, giving it a crispy exterior while keeping the inside moist and tender.
Using an air fryer not only saves time but also reduces the amount of oil needed for cooking. This means you can enjoy a healthier version of your favorite stuffed chicken without sacrificing taste. Plus, the air fryer is incredibly easy to use, making it a great option for both novice and experienced cooks.
In this article, we will guide you through the ingredients, preparation steps, and cooking methods for making stuffed chicken breasts in the air fryer. You’ll also discover variations and tips to elevate your dish. So, let’s dive into the world of stuffed chicken breasts and explore how to create a meal that’s sure to impress!
Ingredients for Stuffed Chicken Breasts in the Air Fryer
To create mouthwatering stuffed chicken breasts in the air fryer, you’ll need a few simple ingredients. Each component plays a vital role in delivering flavor and texture. Here’s what you’ll need:
1 pound boneless, skinless chicken breasts: This typically amounts to about four chicken breasts. Choose fresh, high-quality chicken for the best results.
1 cup fresh spinach, chopped: Spinach adds a nutritious touch and a lovely green color to your stuffing.
1/2 cup cream cheese, softened: Cream cheese provides a rich, creamy base for the stuffing, making it deliciously smooth.
1/2 cup shredded mozzarella cheese: This cheese melts beautifully, adding a gooey texture that complements the other ingredients.
1/4 cup grated Parmesan cheese: Parmesan brings a sharp, nutty flavor that enhances the overall taste of the dish.
2 cloves garlic, minced: Garlic adds a wonderful aroma and depth of flavor to the stuffing.
1 teaspoon Italian seasoning: This blend of herbs elevates the dish with a classic Italian flavor profile.
Salt and pepper to taste: Seasoning is key! Adjust these to your preference for the best flavor.
1 tablespoon olive oil: Olive oil helps to crisp the chicken’s exterior while adding a touch of healthy fat.
These ingredients come together to create a delightful filling that pairs perfectly with the chicken. Feel free to get creative! You can add sun-dried tomatoes, artichokes, or even different herbs to customize your stuffed chicken breasts in the air fryer.
Preparation of Stuffed Chicken Breasts in the Air Fryer
Now that you have gathered all your ingredients, it’s time to prepare your stuffed chicken breasts in the air fryer. This process is straightforward and fun! Follow these steps to create a delicious meal that your family will love.
Step 1: Preparing the Chicken Breasts
Start by rinsing the chicken breasts under cold water. Pat them dry with paper towels. This helps to remove any excess moisture, ensuring a better sear. Next, take a sharp knife and carefully slice each chicken breast horizontally. Create a pocket, but be cautious not to cut all the way through. This pocket will hold your tasty stuffing!
Step 2: Making the Stuffing
In a mixing bowl, combine the chopped spinach, softened cream cheese, shredded mozzarella, grated Parmesan, minced garlic, and Italian seasoning. Mix everything together until it’s well combined. The mixture should be creamy and thick, making it easy to stuff into the chicken. Don’t forget to season with salt and pepper to enhance the flavors!
Step 3: Stuffing the Chicken Breasts
Now comes the fun part! Take a spoonful of the stuffing mixture and carefully fill each chicken breast pocket. Make sure to pack it in gently, so it doesn’t spill out. If needed, use toothpicks to secure the opening of the chicken breasts. This will keep the stuffing inside while cooking, ensuring every bite is full of flavor.
Step 4: Prepping the Air Fryer
Before cooking, preheat your air fryer to 375°F. This step is crucial as it helps the chicken cook evenly and achieve that golden-brown exterior. While the air fryer is heating up, brush the outside of each stuffed chicken breast with olive oil. This will help create a crispy texture. Season the outside with a little more salt and pepper for added flavor.
Step 5: Cooking the Stuffed Chicken Breasts
Once the air fryer is preheated, place the stuffed chicken breasts in the basket in a single layer. Avoid overcrowding to ensure even cooking. Cook for 18-20 minutes, flipping them halfway through. The chicken is done when it reaches an internal temperature of 165°F and has a beautiful golden color. After cooking, let the chicken rest for about 5 minutes before serving. This allows the juices to redistribute, making each bite juicy and tender!
Variation of Stuffed Chicken Breasts in the Air Fryer
While the classic spinach and cheese stuffing is delicious, there are many ways to customize your stuffed chicken breasts in the air fryer. Exploring different stuffing options can add variety to your meals and keep things exciting. Let’s look at some tasty alternatives!
Different Stuffing Options
Get creative with your stuffing! Here are some delightful ideas to try:
Sun-Dried Tomatoes and Feta: Combine chopped sun-dried tomatoes with crumbled feta cheese for a Mediterranean twist. This combination adds a tangy flavor that pairs beautifully with chicken.
Artichoke and Spinach: Mix chopped artichokes with spinach and cream cheese for a rich, creamy filling. This classic combination is sure to impress!
Mushroom and Swiss: Sauté mushrooms and mix them with Swiss cheese for a savory stuffing. This option is perfect for mushroom lovers!
Broccoli and Cheddar: Steam some broccoli and mix it with sharp cheddar cheese. This stuffing is not only tasty but also adds a pop of color to your dish.
Buffalo Chicken: For a spicy kick, mix shredded cooked chicken with buffalo sauce and cream cheese. This option is great for those who love bold flavors!
Feel free to mix and match ingredients based on your preferences. The possibilities are endless, and you can create a unique dish every time!
Alternative Cooking Methods
If you don’t have an air fryer, don’t worry! You can still enjoy stuffed chicken breasts using other cooking methods. Here are a couple of alternatives:
Oven Baking: Preheat your oven to 375°F. Place the stuffed chicken breasts in a baking dish and cover with foil. Bake for about 25-30 minutes, removing the foil for the last 10 minutes to allow the chicken to brown.
Grilling: Preheat your grill to medium heat. Grill the stuffed chicken breasts for about 6-8 minutes on each side, or until the internal temperature reaches 165°F. This method adds a lovely smoky flavor!
These alternative cooking methods can yield delicious results, so feel free to experiment and find your favorite way to prepare stuffed chicken breasts!
Cooking Note for Stuffed Chicken Breasts in the Air Fryer
Cooking stuffed chicken breasts in the air fryer is a fantastic way to achieve a crispy exterior while keeping the inside juicy and flavorful. However, there are a few important notes to keep in mind to ensure your dish turns out perfectly every time.
First, always check the size of your chicken breasts. If they are particularly thick, you may need to adjust the cooking time. Thicker breasts will require a longer cooking time to reach the safe internal temperature of 165°F. Using a meat thermometer is the best way to ensure your chicken is cooked through without overcooking it.
Next, consider the stuffing. If you choose to add ingredients that release moisture, like tomatoes or mushrooms, be mindful of how this affects the cooking time. These ingredients can make the stuffing wetter, which may require a slight adjustment in cooking time to ensure the chicken cooks evenly.
Additionally, avoid overcrowding the air fryer basket. Cooking in batches may be necessary if you are preparing multiple stuffed chicken breasts. This allows hot air to circulate freely around each piece, ensuring even cooking and browning.
Lastly, let the stuffed chicken breasts rest for a few minutes after cooking. This resting period allows the juices to redistribute throughout the meat, resulting in a more tender and flavorful dish. Cutting into the chicken too soon can cause the juices to run out, leaving you with dry meat.
By following these cooking notes, you can enjoy perfectly cooked stuffed chicken breasts in the air fryer every time. Happy cooking!
Serving Suggestions for Stuffed Chicken Breasts in the Air Fryer
Once your stuffed chicken breasts in the air fryer are cooked to perfection, it’s time to think about how to serve them. Presentation and pairing can elevate your meal, making it even more enjoyable. Here are some delightful serving suggestions to consider:
Fresh Salad: Serve your stuffed chicken breasts alongside a crisp salad. A mix of greens, cherry tomatoes, cucumbers, and a light vinaigrette can provide a refreshing contrast to the rich filling.
Roasted Vegetables: Pair the chicken with a side of roasted vegetables. Carrots, bell peppers, and zucchini drizzled with olive oil and herbs make a colorful and nutritious addition to your plate.
Quinoa or Rice: For a heartier meal, serve the stuffed chicken over a bed of quinoa or rice. These grains absorb the flavors from the chicken and stuffing, creating a delicious combination.
Pasta: A light pasta dish tossed with olive oil, garlic, and herbs can complement the stuffed chicken beautifully. Consider adding a sprinkle of Parmesan cheese for extra flavor.
Garlic Bread: If you’re in the mood for something comforting, serve your chicken with warm garlic bread. The crispy bread is perfect for soaking up any juices from the chicken.
Don’t forget to garnish your stuffed chicken breasts with fresh herbs like parsley or basil before serving. This adds a pop of color and enhances the dish’s aroma. You can also drizzle a bit of balsamic glaze or a squeeze of lemon juice over the top for an extra burst of flavor.
With these serving suggestions, your stuffed chicken breasts in the air fryer will not only taste amazing but also look appealing on the plate. Enjoy your meal with family and friends, and watch them be impressed by your culinary skills!
Tips for Perfect Stuffed Chicken Breasts in the Air Fryer
Creating perfect stuffed chicken breasts in the air fryer is all about attention to detail. With a few helpful tips, you can ensure that your dish turns out delicious every time. Here are some essential tips to keep in mind:
Choose the Right Chicken Breasts: Opt for chicken breasts that are uniform in size. This helps them cook evenly. If you have larger breasts, consider butterflying them for quicker cooking.
Don’t Overstuff: While it’s tempting to pack in a lot of stuffing, overstuffing can lead to spillage during cooking. Aim for a generous but manageable amount of filling in each pocket.
Use a Meat Thermometer: To ensure your chicken is cooked perfectly, use a meat thermometer. The internal temperature should reach 165°F. This guarantees that your chicken is safe to eat and juicy.
Let the Chicken Rest: After cooking, allow the stuffed chicken breasts to rest for about 5 minutes. This resting time helps the juices redistribute, making the chicken more tender and flavorful.
Experiment with Seasonings: Don’t hesitate to get creative with your seasonings. Adding spices or herbs to the chicken’s exterior can enhance the overall flavor. Consider using paprika, cumin, or fresh herbs for a unique twist.
Keep the Air Fryer Clean: Regularly clean your air fryer to prevent any lingering flavors from previous meals. A clean air fryer ensures that your stuffed chicken breasts taste fresh and delicious.
Cook in Batches if Necessary: If you’re making multiple stuffed chicken breasts, cook them in batches. Overcrowding the air fryer can lead to uneven cooking and less crispy results.
Pair with Dipping Sauces: Consider serving your stuffed chicken breasts with a dipping sauce. A creamy ranch or zesty marinara can add an extra layer of flavor and make the meal more enjoyable.
By following these tips, you’ll be well on your way to mastering stuffed chicken breasts in the air fryer. Each bite will be bursting with flavor, and your family will be asking for seconds!
Breakdown of Time for Stuffed Chicken Breasts in the Air Fryer
Understanding the time required for preparing and cooking stuffed chicken breasts in the air fryer is essential for planning your meal. Here’s a simple breakdown to help you manage your time effectively.
Prep Time
The prep time for stuffed chicken breasts in the air fryer is approximately 15-20 minutes. This includes gathering your ingredients, preparing the chicken, and making the stuffing. Here’s a quick overview of what you’ll do during this time:
Rinse and dry the chicken breasts.
Slice the chicken to create pockets.
Mix the stuffing ingredients in a bowl.
Stuff the chicken breasts and secure them if needed.
With a little organization, you can have everything ready to go in no time!
Cooking Time
The cooking time for stuffed chicken breasts in the air fryer is about 18-20 minutes. During this time, the air fryer will cook the chicken evenly, giving it a crispy exterior while keeping the inside juicy. Here’s what to keep in mind:
Preheat the air fryer to 375°F before cooking.
Cook the stuffed chicken breasts for 18-20 minutes, flipping them halfway through.
Always check the internal temperature to ensure it reaches 165°F.
This cooking method is quick and efficient, making it perfect for busy weeknights!
Total Time
In total, you can expect to spend about 35-40 minutes from start to finish when making stuffed chicken breasts in the air fryer. This includes both prep and cooking time. Here’s a quick summary:
Prep Time: 15-20 minutes
Cooking Time: 18-20 minutes
Total Time: 35-40 minutes
This makes stuffed chicken breasts in the air fryer a fantastic option for a delicious meal that doesn’t take all evening to prepare. Enjoy your cooking!
Nutritional Information for Stuffed Chicken Breasts in the Air Fryer
When it comes to enjoying stuffed chicken breasts in the air fryer, knowing the nutritional information can help you make informed choices. This dish is not only delicious but also packed with nutrients. Let’s break down the key nutritional components of this meal.
Calories
Each serving of stuffed chicken breasts in the air fryer contains approximately 350 calories. This makes it a satisfying option for dinner without being overly heavy. The combination of chicken and cheese provides a good balance of energy, making it a great choice for a fulfilling meal.
Protein
One of the standout features of this dish is its high protein content. Each serving offers about 40 grams of protein. Chicken is an excellent source of lean protein, which is essential for muscle repair and growth. This makes stuffed chicken breasts a fantastic option for those looking to increase their protein intake while enjoying a tasty meal.
Sodium
The sodium content in each serving is approximately 600 milligrams. While this is a reasonable amount for a flavorful dish, it’s always a good idea to monitor your sodium intake, especially if you are watching your salt consumption. You can reduce the sodium by using low-sodium cheese or seasoning your chicken with herbs instead of salt.
Overall, stuffed chicken breasts in the air fryer provide a nutritious meal option that is rich in protein and relatively low in calories. By being mindful of the ingredients you choose, you can enjoy a delicious dish that fits well into a balanced diet. Whether you’re cooking for yourself or for family, this meal is sure to please!
FAQs about Stuffed Chicken Breasts in the Air Fryer
Can I use frozen chicken breasts for this recipe?
Yes, you can use frozen chicken breasts for stuffed chicken breasts in the air fryer! However, it’s important to note that you will need to adjust the cooking time. Start by cooking the frozen chicken breasts for about 10-15 minutes longer than the usual cooking time. Make sure to check the internal temperature to ensure it reaches 165°F. To make stuffing easier, consider thawing the chicken breasts in the refrigerator overnight before preparing your dish.
What are the best stuffing ingredients for stuffed chicken breasts?
The best stuffing ingredients for stuffed chicken breasts are those that complement the chicken while adding flavor and texture. Some popular options include:
Cheeses: Cream cheese, mozzarella, and feta are great choices.
Vegetables: Spinach, sun-dried tomatoes, and artichokes add freshness.
Herbs: Fresh herbs like basil, parsley, or Italian seasoning enhance the flavor.
Grains: Cooked quinoa or rice can add heartiness to the stuffing.
Feel free to mix and match these ingredients to create a stuffing that suits your taste!
How do I know when the stuffed chicken breasts are done?
The best way to know when your stuffed chicken breasts are done is to use a meat thermometer. Insert the thermometer into the thickest part of the chicken breast. It should read 165°F for safe consumption. Additionally, the chicken should be golden brown on the outside, and the juices should run clear when you cut into it. If you don’t have a thermometer, you can also check for firmness; the chicken should feel firm to the touch.
Can I make stuffed chicken breasts in advance?
Absolutely! You can prepare stuffed chicken breasts in advance. After stuffing the chicken, cover them tightly with plastic wrap or place them in an airtight container. Store them in the refrigerator for up to 24 hours before cooking. This allows the flavors to meld together beautifully. When you’re ready to cook, simply follow the air fryer instructions. If they are cold from the fridge, you may need to add a few extra minutes to the cooking time.
Conclusion on Stuffed Chicken Breasts in the Air Fryer
In conclusion, stuffed chicken breasts in the air fryer are a fantastic way to enjoy a delicious and nutritious meal with minimal effort. This recipe not only highlights the versatility of chicken but also allows for endless creativity with stuffing options. Whether you prefer classic flavors or want to experiment with new ingredients, the air fryer makes it easy to achieve perfectly cooked chicken every time.
By following the steps outlined in this article, you can create a dish that is sure to impress your family and friends. The combination of juicy chicken and flavorful stuffing is a winning recipe for any occasion. Plus, the air fryer ensures that your meal is healthier without sacrificing taste.
Remember to keep the tips and variations in mind as you prepare your stuffed chicken breasts. With a little practice, you’ll master this dish and make it a regular part of your dinner rotation. So, gather your ingredients, fire up the air fryer, and enjoy a delightful meal that brings joy to your table!
Happy cooking, and may your stuffed chicken breasts be as delicious as they are satisfying!
Paul
Stuffed chicken breasts in the air fryer are easy to make.
These Air Fryer Stuffed Chicken Breasts are crispy on the outside, juicy on the inside, and packed with creamy, savory goodness. With a flavorful mix of cream cheese, spinach, sun-dried tomatoes, and herbs inside, this quick air fryer recipe is perfect for an impressive yet easy dinner.
4bonelessskinless chicken breasts (5 to 6 ounces each)
1tablespoonolive oil
¼teaspoonpaprika
¼teaspoongarlic powder
¼teaspoonsalt
¼teaspoonblack pepper
For the Filling:
4ouncescream cheesesoftened
2tablespoonsparmesan cheese
1clovegarlicminced
1cupfresh spinachfinely chopped
3tablespoonschopped sun-dried tomatoes
½teaspoonItalian seasoning
Method
Preheat the air fryer to 360°F (182°C).
Make the filling: In a medium bowl, combine the cream cheese, parmesan cheese, minced garlic, chopped spinach, sun-dried tomatoes, and Italian seasoning. Mix until well blended.
Prepare the chicken: Slice each chicken breast horizontally to form a pocket (be careful not to slice all the way through).
Stuff the chicken: Divide the filling evenly and stuff it into each chicken breast. Use toothpicks to secure the edges if needed.
Season: Rub each stuffed breast with olive oil, then season both sides with paprika, garlic powder, salt, and black pepper.
Air fry: Place the stuffed chicken breasts in the air fryer basket in a single layer. Cook for 18 to 22 minutes, or until the internal temperature reaches 165°F (74°C).
Rest and serve: Let the chicken rest for a few minutes before slicing or serving.
Notes
Room-temperature cream cheese makes mixing much easier and ensures a smooth filling.
Fresh vs. frozen spinach: You can use frozen spinach, just make sure to thaw and squeeze out excess moisture with paper towels to avoid a watery filling.
Secure well: Toothpicks help keep the filling inside and prevent it from leaking during cooking.
Cheese swap: Mozzarella or feta can be substituted for a different flavor twist.
There’s a certain warmth that fills the home when you’re cooking a meal that has been passed down from generation to generation. The scent of something familiar in the kitchen can trigger memories of family gatherings, childhood days, and the love that was put into every dish. Chicken meatballs are one of those dishes that bring people together—simple yet comforting, with flavors that feel like home.
Growing up, my grandmother would make chicken meatballs every Sunday for the family. They were always a part of the weekly tradition, a dish that was perfect for large gatherings or cozy family dinners. She would make them with care, adding just the right amount of seasoning and always making sure the meatballs stayed tender on the inside, crispy on the outside. As children, we would gather around the dinner table, eagerly waiting for those golden-brown meatballs to be served with our favorite sides. There was something magical about how those meatballs always seemed to bring the family closer.
Now, as an adult, I carry on the tradition, passing down the same recipe to my children. It’s not just about the food; it’s about the feeling of connection that a home-cooked meal can bring. Chicken meatballs have become more than just a dish—they are a reminder of the importance of family, tradition, and the love that goes into every meal. They serve as a reminder that the simplest dishes often hold the most meaning.
Why Chicken Meatballs Are a Timeless Classic
There’s a reason why meatballs have been a staple in many cuisines for centuries. They are a perfect balance of flavors, texture, and comfort. Chicken meatballs, in particular, offer a lighter alternative to the traditional beef or pork meatballs without sacrificing taste or satisfaction. Here’s why chicken meatballs are a timeless favorite:
1. Versatility in Flavor
One of the greatest aspects of chicken meatballs is their ability to absorb and pair well with various herbs, spices, and seasonings. From the classic garlic and onion combination to the more adventurous additions of cumin, paprika, or even a hint of Parmesan, the flavor possibilities are endless. Whether you’re serving them with a tangy tomato sauce, creamy gravy, or even in a sandwich, chicken meatballs are a versatile dish that can be tailored to any palate or cuisine.
2. Healthier Alternative Without Compromising Taste
Chicken is a leaner protein compared to beef or pork, which makes chicken meatballs a healthier option without sacrificing the satisfying, savory taste that people love. By using lean chicken breast or ground chicken thigh, you get a protein-packed dish that’s lower in fat and calories. Plus, you can easily modify the recipe to be lower in sodium or use organic chicken for a more wholesome meal.
3. Family-Friendly and Kid-Approved
For busy families, chicken meatballs offer a great way to get a delicious, nutritious meal on the table that everyone will enjoy. Whether served with pasta, mashed potatoes, or as part of a salad, meatballs are loved by both children and adults alike. The small size of the meatballs also makes them easy for little hands to grab, making them a great finger food option for younger kids. In fact, they’re so adaptable that they can even be served as appetizers at family gatherings or parties.
4. Simple, Yet Delicious Comfort Food
There’s something undeniably comforting about meatballs. Their round shape, crispy exterior, and tender interior evoke memories of simpler times. It’s a dish that makes you feel at ease, like a warm hug from a loved one. Chicken meatballs are no exception. They are easy to prepare and cook, but they provide a sense of satisfaction that goes beyond their simplicity. The joy of biting into a meatball that’s just the right amount of crispy on the outside and juicy on the inside is a feeling that’s hard to beat.
Ingredients
Ingredient
Amount
Minced chicken
700 g
Breadcrumbs
2 tsp
Eggs
2
Garlic cloves, minced
2
Cheese, grated
150 g
Onion, finely chopped
1
Butter (for frying onions)
1 tbsp
Salt
To taste
Black pepper
To taste
Parsley, chopped
To taste
Vegetable oil (for frying)
As needed
Directions:
Prepare the Onion and Garlic: In a pan, heat the butter over medium heat. Add the finely chopped onion and sauté until it becomes soft and translucent, about 4-5 minutes. Add the minced garlic and cook for another minute until fragrant. Set aside to cool.
Mix the Meatball Ingredients: In a large mixing bowl, combine the minced chicken, breadcrumbs, eggs, grated cheese, sautéed onions and garlic, parsley, salt, and black pepper. Mix everything thoroughly until the ingredients are well combined. If the mixture feels too loose, add a little more breadcrumbs to help bind it.
Shape the Meatballs: Wet your hands slightly and shape the mixture into small meatballs, about the size of a golf ball, ensuring they are evenly packed.
Fry the Meatballs: Heat vegetable oil in a large skillet over medium-high heat. Carefully add the meatballs to the skillet, ensuring they are not overcrowded. Fry them for about 6-7 minutes on each side, turning occasionally to ensure they are browned and cooked through.
Serve: Once the meatballs are golden and cooked to perfection, transfer them to a paper towel-lined plate to drain any excess oil. Serve hot with your favorite side or sauce.
Nutritional Information (per serving):
Nutrient
Amount
Calories
350 kcal
Protein
30 g
Fat
22 g
Carbohydrates
7 g
Fiber
1 g
Sugar
1 g
Sodium
350 mg
Potassium
400 mg
Frequently Asked Questions (FAQs)
1. Can I use ground turkey instead of chicken for these meatballs? Absolutely! Ground turkey is a great substitute for chicken in this recipe. It has a similar texture and flavor, and the cooking method remains the same. Ground turkey may be a little leaner, so you may want to add a tablespoon of olive oil to the mixture to keep the meatballs moist.
2. Can I make the meatballs ahead of time? Yes, you can make these meatballs ahead of time! Prepare them, then place them on a baking sheet and freeze them for up to 3 months. When you’re ready to cook them, simply heat them from frozen, either by baking or frying them until golden and cooked through. They’re great for meal prep and can be served quickly for a weeknight dinner.
3. How can I ensure the meatballs stay moist? To keep the meatballs tender and juicy, make sure you don’t overwork the meat mixture. Overmixing can lead to dense meatballs. Additionally, using a mix of chicken breast and chicken thighs helps retain moisture. Adding cheese also helps with moisture, giving the meatballs a rich, tender texture.
4. What should I serve with these chicken meatballs? These chicken meatballs pair wonderfully with a variety of sides. For a classic comfort meal, serve them with spaghetti and marinara sauce, mashed potatoes, or a side of steamed vegetables. You can also serve them with a simple salad, rice, or in a sandwich with some fresh greens and your favorite sauce.
5. Can I bake the meatballs instead of frying them? Yes, you can bake the meatballs! Preheat your oven to 375°F (190°C) and arrange the meatballs on a baking sheet lined with parchment paper. Bake for 20-25 minutes, or until they are golden and cooked through. Baking is a healthier option since it reduces the amount of oil needed.
6. How do I know when the meatballs are fully cooked? The best way to check if meatballs are fully cooked is to use a meat thermometer. The internal temperature should reach 165°F (74°C). If you don’t have a thermometer, cut one meatball in half to ensure it’s no longer pink in the center.
7. Can I make these meatballs gluten-free? Yes, you can make these chicken meatballs gluten-free by substituting the breadcrumbs with gluten-free breadcrumbs or even using ground almonds or oat flour as a binder. You may need to adjust the consistency of the mixture by adding a little more liquid if it becomes too dry.
Conclusion: A Dish That Brings People Together
Chicken meatballs are more than just a dish—they are a connection to our past and a promise of nourishment for the future. Whether you’re cooking them for a family dinner, a special occasion, or simply as a quick and satisfying meal, these meatballs are guaranteed to bring comfort, flavor, and joy to your table.
As I continue to make chicken meatballs for my own family, I find that the memories attached to this simple dish only grow deeper with time. Just as my grandmother passed down the recipe, I now share it with my children, hoping to instill in them the same values of home-cooked meals, family bonds, and the joy of gathering around the table.
Chicken meatballs are the epitome of comfort food: simple, nutritious, and deeply satisfying. They have the power to turn a regular meal into something special, and no matter how much time passes, they will always be a dish that brings us closer together.
Amal
Chicken Meatballs: A Simple Comfort That Feels Like Home
These juicy chicken meatballs are a simple yet flavorful dish that’s perfect for any meal. Whether served with pasta, as a snack, or alongside your favorite sides, they are sure to impress.
Prepare the Onion and Garlic: In a skillet, heat the butter over medium heat. Add the finely chopped onion and sauté until soft and translucent, about 4-5 minutes. Add the minced garlic and cook for another minute. Remove from heat and set aside to cool.
Mix the Meatball Ingredients: In a large mixing bowl, combine the minced chicken, breadcrumbs, eggs, grated cheese, sautéed onions and garlic, salt, black pepper, and parsley. Mix everything together until it’s well combined. Make sure not to overmix, as this could result in tough meatballs.
Shape the Meatballs: Wet your hands slightly to prevent sticking, then shape the mixture into small meatballs, about 1-1.5 inches in diameter.
Fry the Meatballs: Heat vegetable oil in a large skillet over medium-high heat. Carefully add the meatballs to the pan in batches. Fry for about 6-7 minutes on each side, turning them gently to brown evenly on all sides. Once cooked, transfer to a plate lined with paper towels to drain excess oil.
Serve: Serve the meatballs hot with your favorite sauce, pasta, or sides. Garnish with freshly chopped parsley for an added burst of flavor.
Notes
Freezing Instructions: You can make these meatballs ahead of time and freeze them. After shaping the meatballs, place them on a baking sheet and freeze them for up to 3 months. When ready to cook, fry them directly from the freezer, adjusting the cooking time slightly.
Baking Option: If you prefer a healthier option, you can bake the meatballs in a preheated oven at 375°F (190°C) for about 20 minutes, flipping halfway through.
Flavor Variations: You can add different herbs and spices to customize the flavor, such as dried oregano, thyme, or a pinch of red pepper flakes for a little heat.
There’s something special about the way mornings unfold when a meal is crafted with both care and simplicity. Growing up, mornings in my household were often a rushed affair. Between getting ready for school and preparing for work, the breakfast table was often filled with quick fixes. But there was one exception — my grandmother’s banana oatmeal.
She would wake up earlier than the rest of us, and when we came downstairs, the sweet aroma of mashed bananas and oats greeted us. It wasn’t just a breakfast; it was a small ritual that held within it so much more than food. The warmth of the oatmeal, the natural sweetness of the ripe bananas, and the sense of security it offered were far beyond a meal — it was a comforting embrace that reminded us that no matter how busy life got, there was always time for love and nourishment.
Those mornings spent around that simple dish shaped my approach to food. It taught me that nourishment doesn’t have to be complicated or time-consuming to be meaningful. This banana oatmeal recipe became a foundation for a healthier start to the day, and it is something I carry with me in my own kitchen today. As I now make this meal for my own family, I realize how powerful this seemingly simple breakfast is: it’s the perfect balance of nutrition, comfort, and nostalgia.
Why Banana Oatmeal? A Perfectly Balanced Start to the Day
Banana oatmeal is more than just a quick breakfast. It’s a complete meal in a bowl, offering a perfect balance of macronutrients, vitamins, and minerals. Let’s explore why this recipe has stood the test of time and why it’s so beneficial.
1. Naturally Sweetened by Bananas
One of the standout features of this recipe is the natural sweetness brought by ripe bananas. Instead of reaching for processed sugars or sweeteners, the bananas provide a delightful sweetness without any added sugars. This makes banana oatmeal a healthier alternative to many store-bought breakfast options, which are often laden with refined sugars that can cause energy crashes later in the day.
In addition to sweetness, bananas are rich in potassium, an essential mineral that supports heart health and muscle function. The presence of potassium in this oatmeal helps you start the day with a steady, sustained energy release.
2. Full of Nutrients with Oats
Oats are often praised for their health benefits, and for good reason. Oats are an excellent source of dietary fiber, which plays a critical role in maintaining digestive health. They help to regulate blood sugar levels, reduce cholesterol, and promote feelings of fullness, making them a great option for those looking to manage weight or improve their overall health. The fiber content in oats also promotes gut health by feeding beneficial bacteria in the stomach, which helps in digestion.
Furthermore, oats are packed with essential minerals such as magnesium, phosphorus, and iron. These minerals support overall bodily functions, from energy production to maintaining healthy bones and muscles.
3. Quick and Easy to Prepare
The beauty of banana oatmeal lies in its simplicity and speed. In just under 10 minutes, you can have a filling, nutritious breakfast ready to go. For busy mornings, this recipe offers the perfect solution for individuals and families alike. It’s something that can be prepared in a flash, ensuring that you never have to sacrifice health for convenience.
4. Customizable for Every Taste
Banana oatmeal is versatile. You can adjust it to suit your preferences, whether that means adding toppings or incorporating additional ingredients. The recipe serves as a blank canvas — you can mix in seeds, nuts, berries, or even a dollop of nut butter for added texture and flavor. Whether you want to add some protein or introduce a touch of cinnamon or vanilla, this oatmeal will easily adapt to whatever you need.
Ingredients
Ingredient
Amount
Quick oats
1 cup (100g)
Milk
2/3 cup (158ml)
Ripe banana
2
Directions:
Prepare the Oats: In a medium-sized pot, combine the quick oats and milk. Bring to a gentle simmer over medium heat, stirring occasionally. Let the oats cook for about 5 minutes until they soften and absorb the milk.
Mash the Bananas: While the oats are cooking, peel the ripe bananas and mash them in a bowl with a fork until smooth, or leave some chunks if you prefer more texture.
Combine: Once the oats are cooked, stir in the mashed bananas. Mix well until the bananas are fully incorporated and the oatmeal reaches a creamy consistency.
Serve: Remove from heat and transfer to bowls. You can top the oatmeal with additional banana slices, nuts, or a drizzle of honey for extra flavor.
Nutritional Information (per serving):
Nutrient
Amount
Calories
250 kcal
Protein
6 g
Fat
5 g
Carbohydrates
48 g
Fiber
6 g
Sugar
14 g
Sodium
70 mg
Potassium
450 mg
Frequently Asked Questions (FAQs)
1. Can I use a different type of milk for this recipe? Yes! While the recipe calls for regular milk, feel free to substitute it with any plant-based milk, such as almond milk, soy milk, or oat milk. This makes the recipe versatile for those following a dairy-free or vegan lifestyle.
2. How ripe should the bananas be? The riper the bananas, the sweeter they’ll be. For the best results, use bananas that are fully ripe, with brown spots on the peel. These bananas have the highest sugar content and will naturally sweeten your oatmeal, reducing the need for additional sweeteners.
3. Can I make this recipe ahead of time? Banana oatmeal is best enjoyed fresh, but you can make it ahead and store it in the refrigerator for up to 2 days. If you plan to meal prep, simply cook the oatmeal and store it in an airtight container. Reheat it in the microwave or on the stovetop, adding a little extra milk to restore the creamy texture.
4. Is this recipe suitable for children? Absolutely! This banana oatmeal is a great meal for kids. It’s soft, easy to eat, and full of essential nutrients. Plus, since it’s naturally sweetened by bananas, kids will love the taste without the need for refined sugars.
5. How can I make this more filling? To make the oatmeal more filling, you can add protein-rich ingredients like chia seeds, flaxseeds, or a scoop of your favorite protein powder. Adding nuts such as almonds or walnuts also adds healthy fats, which will keep you feeling fuller longer.
6. Can I use frozen bananas instead of fresh? Yes, you can use frozen bananas if fresh bananas aren’t available. Just be sure to thaw them before mashing, as frozen bananas tend to be a bit mushier. Using frozen bananas can also add a thicker consistency to the oatmeal, which some people enjoy.
7. Can I add other fruits to this oatmeal? Definitely! You can add other fruits like strawberries, blueberries, or raspberries for a burst of flavor and additional vitamins. Fresh or frozen fruit both work well, and they can be added right after cooking or stirred in during the last few minutes of simmering.
The Health Benefits of Banana Oatmeal: A Deeper Look
Banana oatmeal isn’t just a delicious breakfast, but it’s also a powerhouse of nutrients. Oats provide a slow-burning source of energy, preventing those mid-morning energy crashes. The fiber in both the oats and bananas helps to keep your digestive system moving smoothly, ensuring that your body gets the most from your food.
Bananas are also packed with vitamin B6, which plays a role in brain health and can help improve mood. They are rich in antioxidants, which fight oxidative stress in the body. Furthermore, the potassium in bananas helps regulate fluid balance, which is important for maintaining healthy blood pressure levels.
On the other hand, oats are high in beta-glucan, a soluble fiber that’s been shown to lower cholesterol. Regular consumption of oats has been linked to improved heart health, which makes this breakfast not only good for the soul but also for the body.
Conclusion: A Simple Meal with Lasting Impact
As we rush through our busy lives, it’s easy to overlook the importance of simple, nourishing meals. But recipes like banana oatmeal remind us that a wholesome, balanced breakfast can be achieved without complexity or time-consuming effort. What makes this dish so beautiful is its ability to bring comfort, warmth, and nutrients into our lives in under 10 minutes.
Banana oatmeal isn’t just about feeding the body; it’s about giving ourselves the care we deserve each morning. It’s a reminder that nourishing our bodies doesn’t have to come at the expense of taste or convenience. As we savor each bite, we can reflect on the small, meaningful moments that connect us to our past, our family, and our own sense of well-being.
So, the next time you’re in the kitchen and looking for a simple, heartwarming start to your day, remember that sometimes the best meals are the ones that are built on love, memories, and the simplest of ingredients.
Amal
Banana Oatmeal Delight: A Breakfast That Warms the Heart
This Banana Oatmeal Delight is the perfect way to kick-start your morning with a healthy and delicious breakfast. Made with simple ingredients like ripe bananas and quick oats, it offers a perfect balance of natural sweetness, fiber, and energy.
Prepare the Oats: In a medium-sized pot, combine the quick oats and milk. Bring to a gentle simmer over medium heat, stirring occasionally. Cook for about 5 minutes until the oats are soft and have absorbed most of the milk.
Mash the Bananas: While the oats are cooking, peel the ripe bananas and mash them in a bowl with a fork until smooth. You can also leave some small chunks for added texture if you prefer.
Combine the Oats and Bananas: Once the oats are cooked and creamy, stir in the mashed bananas. Mix well to combine the flavors.
Serve: Remove the pot from the heat, and serve the banana oatmeal in bowls. For extra flavor, add toppings such as extra banana slices, a sprinkle of cinnamon, or a drizzle of honey.
Notes
Storage: If you have leftovers, store them in an airtight container in the refrigerator for up to 2 days. To reheat, add a splash of milk and warm it on the stovetop or in the microwave.
Add-Ins: Customize your banana oatmeal by adding nuts, seeds, or dried fruits for extra texture and nutrients. Chia seeds, walnuts, or a dollop of almond butter make excellent additions.
Sweetness Level: If you prefer a sweeter oatmeal, feel free to add a touch of honey or maple syrup. The bananas provide natural sweetness, but additional sweeteners can be added based on your preference.
Vegan Version: Use plant-based milk such as almond, oat, or coconut milk to make this dish completely dairy-free and vegan.
As a child, I was often the one who would sneak a bite from the dinner table when my parents weren’t looking. I have vivid memories of my grandmother in the kitchen, always working her magic with simple ingredients. There was a sense of calm and nostalgia that filled the air when she prepared dishes like cabbage and eggs, a meal that, to me, symbolized warmth, love, and home.
I grew up in a family where meat was often the star of the meal, but I always found myself drawn to the dishes that were lighter and simpler. Cabbage and eggs were always a comfort food that stood out—a dish that tasted even better than some of the meat-based meals we often had. It wasn’t just about the flavors, but the feeling it gave me: the satisfaction of a home-cooked meal that didn’t rely on expensive ingredients or lengthy preparation. The simplicity of cabbage combined with eggs was enough to make me feel grounded and content.
As time passed, I found myself recreating this dish in my own kitchen. The joy of chopping, mixing, and cooking these humble ingredients became a ritual—a way to connect with my roots and remind myself of the power of simplicity. Over the years, I’ve come to realize that cabbage and eggs, though unassuming, are more than just a dish; they represent the beauty of nourishment without the need for excess.
Why Cabbage and Eggs? A Perfect Balance of Flavors and Textures
When most people think of cabbage, they often think of a hearty, somewhat tough vegetable. However, when prepared right, cabbage becomes tender and full of flavor, making it a perfect base for a variety of dishes. The addition of eggs brings a creamy richness that binds everything together, creating a meal that is both satisfying and comforting.
Here are a few reasons why this dish is a must-try:
1. Nutritional Powerhouse
Cabbage is often overlooked as a nutritional powerhouse, but it is packed with vitamins, fiber, and antioxidants. It’s an excellent source of Vitamin C, which supports immune function, and is rich in fiber, making it great for digestion. Paired with the protein and healthy fats from the eggs, this dish provides a balanced meal that nourishes the body.
2. Versatility
One of the best aspects of cabbage and eggs is its versatility. While the basic recipe calls for simple seasonings, the dish can be modified to fit any flavor profile. You can add spices, herbs, or even cheeses to suit your taste. It can be served for breakfast, lunch, or dinner and pairs wonderfully with a variety of sides, from fresh salads to crusty bread.
3. Quick and Easy
In today’s fast-paced world, we all look for meals that are easy to make without compromising on taste or nutrition. Cabbage and eggs is one of those recipes that doesn’t require hours of preparation or cooking. With just a few minutes on the stove, you can have a delicious, healthy meal ready to enjoy. It’s the perfect solution for busy days when you need something filling but don’t have the time for a complicated recipe.
4. Budget-Friendly
Cabbage and eggs is an affordable meal. Unlike many dishes that require expensive cuts of meat or specialty ingredients, cabbage and eggs use basic pantry staples that are easy to find and inexpensive. Whether you’re cooking for one or a family, this recipe is a great way to create a hearty meal without breaking the bank.
5. Comfort Food
There’s something incredibly comforting about cabbage and eggs. It’s a dish that feels like a warm hug, offering a sense of nostalgia and comfort with every bite. Whether you’re enjoying it on a rainy day or after a long week, this meal is sure to bring a sense of calm and contentment.
Ingredients
Ingredient
Amount
Small cabbage, shredded
1
Eggs
5
Broccoli, cut into florets
1
Carrot, grated
1
Salt
To taste
Black pepper
To taste
Milk
60 ml
Flour
5 tablespoons
Baking powder
1 teaspoon
Olive oil
2 tablespoons
Onions, chopped
2
Fresh dill, chopped
To taste
Fresh parsley, chopped
To taste
Directions:
Prepare the Veggies: Start by shredding the cabbage, grating the carrot, and cutting the broccoli into small florets. Set aside.
Cook the Onions: Heat the olive oil in a large skillet over medium heat. Add the chopped onions and sauté until they become soft and translucent, about 5 minutes.
Cook the Broccoli and Cabbage: Add the shredded cabbage and broccoli florets to the skillet with the onions. Sauté for about 7-10 minutes, stirring occasionally, until the vegetables are tender but still crisp. Season with salt and black pepper to taste.
Prepare the Egg Mixture: In a separate bowl, crack the eggs and whisk them together with the milk, flour, and baking powder. Season with salt and pepper.
Combine and Cook: Pour the egg mixture over the cooked vegetables. Stir gently to ensure the egg mixture is evenly distributed. Lower the heat and cook for another 5-7 minutes, allowing the eggs to set. If needed, you can cover the skillet to help cook the top of the eggs.
Garnish and Serve: Once the eggs are fully set, sprinkle freshly chopped dill and parsley on top for a burst of freshness and flavor. Serve hot and enjoy!
Nutritional Information (per serving):
Nutrient
Amount
Calories
220 kcal
Protein
12 g
Fat
16 g
Carbohydrates
12 g
Fiber
4 g
Sodium
280 mg
Vitamin C
50% of daily value
Iron
10% of daily value
Frequently Asked Questions (FAQs)
1. Can I use other vegetables in this recipe? Yes, absolutely! Cabbage and eggs are the base of this dish, but you can easily incorporate other vegetables such as spinach, bell peppers, or zucchini. Just make sure to adjust the cooking time for the added vegetables to ensure they are tender and cooked through.
2. Can I add cheese to the dish? Yes, adding cheese to this dish is a great idea! A sprinkle of grated cheese, such as cheddar, feta, or Parmesan, can bring an extra layer of flavor and creaminess. You can stir the cheese into the eggs for a creamy texture or sprinkle it on top for a bit of a savory crunch.
3. Is this recipe suitable for vegetarians? Yes, this recipe is vegetarian-friendly as long as you use vegetarian-friendly ingredients like eggs and olive oil. It’s a great option for vegetarians looking for a satisfying and wholesome meal that’s both easy to make and full of flavor.
4. Can I make this dish in advance? While this dish is best enjoyed fresh, you can store leftovers in the fridge for up to two days. Reheat it gently in a skillet or microwave to avoid overcooking the eggs. However, keep in mind that the texture may change slightly upon reheating.
5. Can I make this recipe dairy-free? Yes, to make this recipe dairy-free, simply omit the cheese (if added) and opt for plant-based oils or dairy alternatives if desired. The richness from the eggs and olive oil will still create a satisfying texture without the need for dairy.
6. Can I add meat to this dish? While cabbage and eggs are delicious on their own, you can add meat if you prefer. Cooked sausage, bacon, or ham would complement the flavors beautifully. Just be sure to adjust the seasonings accordingly to balance out the flavors.
Conclusion: A Simple Yet Satisfying Meal for Every Occasion
Cabbage and eggs are more than just a humble dish; they are a reminder of the joy that can be found in simple, nourishing meals. It’s easy to get caught up in the complexity of fancy recipes or extravagant ingredients, but sometimes, the most satisfying meals are the ones that rely on simplicity and a few basic, wholesome ingredients.
This recipe has stood the test of time in many kitchens and continues to be a beloved comfort food for all the right reasons. Whether you’re looking for a quick dinner after a long day or a nutritious lunch that won’t break the bank, cabbage and eggs provide the perfect solution. It’s a meal that brings you closer to your roots, to a sense of home, and to the timeless joy of sharing good food with the ones you love.
So, the next time you’re in need of a comforting, filling dish, remember this simple yet flavorful cabbage and eggs recipe. It’s easy, satisfying, and will always taste better than meat.
Amal
Cabbage and Eggs: A Comforting Dish Beyond Meat
Looking for a meal that’s simple, nutritious, and incredibly satisfying? Cabbage and eggs come together in this hearty dish that is bursting with flavor. Packed with vegetables and protein, it’s the perfect option for a quick breakfast, lunch, or dinner. With the richness of eggs and the earthiness of cabbage, this dish tastes even better than some meat-based meals.
Prepare the Veggies: Start by shredding the cabbage, grating the carrot, and cutting the broccoli into small florets. Set these vegetables aside for later use.
Cook the Onions: Heat the olive oil in a large skillet over medium heat. Add the chopped onions and cook until they become soft and translucent, about 5 minutes.
Sauté the Cabbage and Broccoli: Add the shredded cabbage and broccoli florets to the skillet. Cook for about 7-10 minutes, stirring occasionally, until the vegetables are tender but still retain some crispness. Season with salt and black pepper to taste.
Prepare the Egg Mixture: In a bowl, crack the eggs and whisk them together with the milk, flour, and baking powder. Season with a pinch of salt and black pepper.
Combine and Cook: Pour the egg mixture over the sautéed vegetables in the skillet. Stir gently to ensure that the egg mixture is evenly distributed. Reduce the heat to low and cook for another 5-7 minutes, allowing the eggs to set.
Garnish and Serve: Once the eggs are fully set, sprinkle freshly chopped dill and parsley on top to add a burst of fresh flavor. Serve hot and enjoy!
Notes
Storage: Leftovers can be stored in the refrigerator for up to 3 days. Reheat in a skillet or microwave, though it’s best served fresh to maintain its texture.
Flavor Variations: Feel free to add extra seasonings such as garlic, smoked paprika, or a dash of hot sauce to elevate the flavor. You can also incorporate other vegetables such as spinach, zucchini, or bell peppers to vary the taste.
Dairy-Free Option: To make this recipe dairy-free, simply use a plant-based milk and omit any cheese or dairy ingredients. The dish will still have great flavor with the richness from the eggs and olive oil.
Customizing the Dish: Add a sprinkle of cheese on top, such as cheddar or feta, to make this dish extra creamy. You can also serve it with a side of crusty bread or a light salad for a more balanced meal.
I remember the first time I made cheese at home—it wasn’t out of necessity but rather curiosity. I had always been intimidated by the idea of making cheese, thinking it required elaborate techniques and expensive equipment. But one afternoon, on a whim, I decided to give it a try. I had a liter of whole milk in my fridge, and instead of using it for the usual cup of coffee or a bowl of cereal, I thought, “Why not try to make cheese?” It sounded impossible, but after following a simple recipe, the result was incredible—rich, creamy, and just the right amount of tangy. I was hooked.
Making cheese at home was a game-changer. I felt empowered, knowing I could turn something as simple as milk into something far more complex and delicious. It was no longer a mystery; it was within my reach. The best part? It took only a few minutes, and the ingredients were ones I already had in my kitchen. No fancy equipment, no complicated steps, just patience and a bit of curiosity. Since then, I’ve made cheese countless times, and every time I do, it takes me back to that first joyful experience.
Why Make Your Own Cheese?
Homemade cheese, although often associated with complex processes, is far simpler than most people think. With just a few ingredients and a little patience, you can create a delicious product that far surpasses many store-bought options in terms of flavor and texture. Here are just a few reasons why making your own cheese is worth it:
1. Control Over Ingredients
One of the main reasons I decided to start making cheese at home was to have control over the ingredients. Store-bought cheeses often contain preservatives, stabilizers, and added chemicals. When you make your cheese, you know exactly what goes into it. You can even decide whether to use organic milk, add your preferred seasoning, or avoid preservatives altogether.
2. Taste and Freshness
The taste of homemade cheese is incomparable. It’s incredibly fresh and can be customized to your preferences. Whether you prefer a mild or a stronger flavor, you can adjust the amount of acid or seasoning to achieve the exact taste you want. There is something deeply satisfying about enjoying cheese that was made in your own kitchen just hours before.
3. Cost-Effective
Store-bought cheese can be expensive, especially when you’re looking for high-quality options. Making your own cheese can save you a significant amount of money in the long run. A liter of milk will yield a good amount of cheese, which can be a fraction of the cost of store-bought varieties. For those who use cheese frequently, this can add up to substantial savings over time.
4. Simple and Quick Process
This recipe, in particular, is quick and easy. Many traditional cheese-making processes can be time-consuming and require specialized equipment, but this one cuts through the complexity and gives you fresh cheese in a matter of minutes. All you need are a few basic ingredients—milk, acid (lemon juice or vinegar), and a pinch of salt—and you’ll have cheese in less than half an hour.
5. A Fun and Rewarding Experience
Making cheese at home is incredibly satisfying. It allows you to take something as humble as milk and transform it into a flavorful, versatile ingredient that can be used in a variety of dishes. Whether you’re a beginner or an experienced cook, there’s something deeply rewarding about making your own food from scratch, and cheese-making offers that rewarding experience in a short amount of time.
Ingredients
Ingredient
Amount
Whole milk
1 liter (4 cups)
Lemon juice (or white vinegar)
2 tablespoons
Salt
1/2 teaspoon
Butter (optional, for creaminess)
10 g
Herbs or spices (optional, for flavoring)
To taste
Directions:
Heat the Milk: Pour the whole milk into a large pot and heat it over medium heat. Stir occasionally to prevent it from burning. Heat until the milk reaches a temperature of about 85°C (185°F), just below boiling.
Add Acid: Once the milk is hot, add the lemon juice (or white vinegar) and stir gently. You’ll see the milk begin to curdle as the acid reacts with the milk. Continue stirring gently for 1-2 minutes.
Let the Curd Form: Allow the milk to sit undisturbed for about 5 minutes. You’ll notice the curds (solid) separating from the whey (liquid).
Strain the Curds: Using a fine-mesh strainer or cheesecloth, strain the curds from the whey. Gently press the curds to remove excess whey. You can save the whey for other uses like smoothies or baking.
Optional Butter & Flavoring: Transfer the curds back into the pot and add butter if desired for creaminess. At this point, you can also mix in any herbs or spices of your choice to infuse additional flavor into the cheese.
Chill and Serve: Let the cheese cool to room temperature, then refrigerate it for about 30 minutes to firm up. Your fresh, homemade cheese is now ready to enjoy!
Nutritional Information (per serving):
Nutrient
Amount
Calories
150
Fat
8 g
Carbohydrates
6 g
Protein
10 g
Sodium
150 mg
Frequently Asked Questions (FAQs)
1. Can I use any type of milk to make cheese? Yes, but for the best results, whole milk is recommended. It has a higher fat content, which gives the cheese a richer, creamier texture. However, you can also use low-fat or skim milk, though the final product will be less creamy. For a dairy-free alternative, consider using plant-based milks such as almond or soy milk, but be aware that the texture may differ slightly.
2. What can I do with the leftover whey? Whey is the liquid byproduct that remains after curdling the milk. Don’t throw it away! It’s packed with nutrients and can be used in a variety of ways. You can use it as a base for smoothies, in baking recipes to replace some of the liquid, or even as a cooking liquid for soups and stews. It’s a great way to make sure nothing goes to waste.
3. How long does homemade cheese last? Homemade cheese will last about 3-4 days in the refrigerator, depending on the conditions and how fresh the milk was when you made it. If you add butter or other flavorings to the cheese, it may last a bit longer. It’s best enjoyed fresh but can be kept in an airtight container in the fridge for a few days.
4. Can I add herbs or spices to the cheese? Absolutely! This recipe is a blank canvas, and you can add various herbs or spices to create different flavors. Fresh herbs like rosemary, thyme, or basil can be incorporated for a savory cheese, while a dash of chili flakes or garlic powder will add a bit of heat and flavor. You can experiment with different combinations to suit your taste.
5. Can I make this recipe dairy-free? While this recipe relies on dairy (milk and butter), you can use dairy-free milk alternatives, such as almond or soy milk. The texture and flavor will differ, but you can still achieve a similar result. If you’re looking for a completely dairy-free cheese, consider trying nut-based cheeses or vegan cheese recipes, which require a different process.
6. What’s the best way to use homemade cheese? This homemade cheese can be used in a variety of dishes. Enjoy it as a topping for salads, spread it on crackers or toast, or add it to pasta dishes for a rich, creamy texture. You can also enjoy it on its own, drizzled with a little olive oil and sprinkled with salt and pepper for a simple, satisfying snack.
The Versatility of Homemade Cheese
What’s remarkable about this recipe is its versatility. While you can enjoy the cheese on its own, it can also be incorporated into a variety of dishes. From pasta to pizza, salads to sandwiches, this cheese can add a delightful touch to almost any meal. Here are just a few ideas:
Pasta Dishes: Add this homemade cheese to your favorite pasta for extra creaminess. Whether you’re making a carbonara or a simple pasta with olive oil and garlic, this cheese will melt beautifully and add a rich flavor.
Salads: Crumbled or shaved over a fresh salad, this cheese makes a wonderful addition. Its mild flavor pairs well with a variety of greens and dressings.
Sandwiches: Spread this cheese on sandwiches or wraps, where its creamy texture complements other fillings such as vegetables, meats, or spreads.
Baked Goods: This cheese can be used in baking, adding a subtle richness to savory pastries, muffins, or bread.
Conclusion: A Newfound Skill You’ll Cherish
Making cheese at home is more than just a cooking skill—it’s an experience that connects you to the food you eat and offers a sense of accomplishment. It’s something simple yet deeply satisfying. From the moment I made that first batch of cheese, I’ve never looked back. Each time I make cheese now, I feel a sense of pride knowing that I’ve created something wholesome and delicious with my own hands. It’s a skill I’ll always cherish, and it’s one I encourage you to try as well. You’ll be amazed at how something as simple as milk can turn into a product that’s rich, creamy, and infinitely customizable. So, the next time you find yourself with a liter of milk, don’t hesitate—make cheese. It’s one of the easiest and most rewarding experiences you’ll have in the kitchen.
Amal
From Milk to Cheese: A Simple, Life-Changing Recipe
Say goodbye to store-bought cheese and make your own fresh, creamy cheese in just minutes. This simple recipe uses only four ingredients—milk, lemon juice, salt, and butter—and is perfect for those who love homemade, flavorful cheeses. Whether you’re new to cheese-making or an experienced home cook, this recipe will show you just how easy it is to create a delicious product in no time.
Heat the Milk: Pour the whole milk into a pot and heat over medium heat. Stir occasionally to prevent burning. Heat the milk until it reaches about 85°C (185°F), just before it begins to boil.
Add the Acid: Once the milk is heated, add the lemon juice (or vinegar) and stir gently. The milk should begin to curdle immediately, separating into curds and whey.
Let It Sit: Allow the milk to sit undisturbed for 5 minutes. This will give the curds time to form fully.
Strain the Curds: Using a fine mesh strainer or cheesecloth, strain the curds from the whey. Press gently to remove any excess liquid.
Optional Additions: Return the curds to the pot, then add the butter for creaminess, and stir. If you’d like, you can add herbs or spices to flavor the cheese. Mix well to incorporate.
Cool and Serve: Allow the cheese to cool to room temperature, then refrigerate for about 30 minutes to firm up. Your fresh homemade cheese is now ready to be enjoyed.
Notes
Milk Choices: Whole milk is ideal for a rich, creamy cheese, but you can substitute with low-fat or skim milk for a lighter version.
Storing: Homemade cheese is best consumed fresh but can be stored in the refrigerator for 3-4 days. Keep it in an airtight container to preserve its texture and flavor.
Freezing: You can freeze the cheese if necessary. Wrap it tightly in plastic wrap and store it in a freezer bag for up to a month. Thaw it in the fridge when ready to use.
Flavor Variations: Add a pinch of garlic powder, dried herbs, or chili flakes to the curds for a more flavorful, customized cheese.