Crispy Potato Bites: The Snack That Brings People Together

There’s something truly special about the smell of crispy fried food filling your kitchen. It evokes a sense of comfort, warmth, and nostalgia. For me, these crispy potato bites have always been a reminder of family gatherings and special occasions. I can still recall the moments when my friends and I would gather in the kitchen, eagerly awaiting the sound of sizzling oil and the promise of delicious food. It was one of those recipes that everyone could agree on, regardless of age or taste preference. The golden, crispy potato bites were always the first to disappear from the table, and I couldn’t help but feel a sense of pride every time I served them.

This recipe, simple as it may be, holds a special place in my heart. It is one of those timeless snacks that brings people together, whether you’re hosting a dinner party or preparing a cozy meal for yourself. These crispy potato bites are not only easy to make but also incredibly versatile, making them perfect for any occasion.

Let’s dive into the story behind this recipe, explore its origins, and address some frequently asked questions so that you can make these irresistible potato bites in your kitchen.

The Secret Behind the Simplicity

Potatoes are a staple in nearly every household around the world. They are affordable, widely available, and incredibly versatile. From mashed potatoes to baked fries, potatoes are used in countless dishes, and they always seem to hit the spot. But this particular recipe stands out because of its simplicity and the way it allows the natural flavors of the potato to shine.

When I was first introduced to this recipe by my grandmother, I couldn’t believe how a few basic ingredients could turn into something so satisfying. The crispy exterior combined with the tender potato filling creates a perfect balance of textures that keeps you coming back for more.

One of the best things about this recipe is that you don’t need a long list of ingredients or fancy techniques. All you need are some potatoes, onions, a few basic seasonings, and oil for frying. It’s a perfect dish for both beginners and experienced home cooks alike, and it doesn’t require any special tools or equipment.

Crispy Potato Bites are the ultimate comfort snack, with the perfect combination of crunchy texture and savory flavors. Simple to make and absolutely delicious, these bites are perfect for any occasion, from casual gatherings to festive dinners. Every time I make them, they disappear faster than I can say “crispy!” This snack will surely become a favorite in your home.

FAQs: Everything You Need to Know About Crispy Potato Bites

1. Can I make these crispy potato bites in the oven instead of frying them?

Absolutely! While frying gives the potato bites their signature crispiness, you can bake them in the oven if you prefer a healthier alternative. Preheat your oven to 400°F (200°C), place the formed potato bites on a baking sheet lined with parchment paper, and bake them for 20-25 minutes, flipping halfway through. This method will give you a slightly less crispy texture but still delicious results.

2. Can I use sweet potatoes instead of regular potatoes?

Yes! Sweet potatoes will work well in this recipe. They have a natural sweetness that adds a unique twist to the flavor of the potato bites. Keep in mind that sweet potatoes might take a little longer to cook than regular potatoes, so make sure to cook them thoroughly before frying.

3. What are some great dipping sauces to serve with crispy potato bites?

There are many dipping sauces that pair beautifully with these crispy potato bites. Some popular options include:

  • Sour Cream and Chive Dip: A classic, creamy dip that complements the savory flavor of the potato bites.
  • Ketchup: A timeless favorite, especially for kids and casual gatherings.
  • Spicy Mayo: If you like a little kick, mix mayonnaise with a dash of hot sauce for a creamy, spicy dip.
  • Garlic Aioli: For a more sophisticated flavor, garlic aioli offers a rich and tangy option.

4. How do I make sure the potato bites stay crispy?

To ensure the perfect crispy texture, there are a few key tips:

  • Squeeze out excess moisture from the potatoes: This step is crucial! After grating the potatoes, make sure to remove as much water as possible. Excess moisture can prevent the potato bites from becoming crispy.
  • Fry at the right temperature: The oil should be hot enough for frying, but not smoking. If the oil is too cool, the potato bites will absorb too much oil and become soggy. If the oil is too hot, they may burn on the outside before fully cooking on the inside.
  • Don’t overcrowd the pan: Fry the potato bites in batches to avoid overcrowding. This ensures even cooking and helps maintain the crispy texture.

5. Can I make these ahead of time?

Yes, you can! If you want to prepare these crispy potato bites ahead of time, you can form the patties and refrigerate them for a few hours before frying. This will help them hold their shape during cooking. If you want to make them even further in advance, you can freeze the uncooked potato bites. Place them on a baking sheet in a single layer and freeze for 1-2 hours before transferring them to a freezer bag. When you’re ready to serve, fry them directly from the freezer, but you may need to add a couple of extra minutes to the cooking time.

The Perfect Snack for Any Occasion

The beauty of these crispy potato bites is their versatility. They can be served as an appetizer at a dinner party, a side dish alongside your main course, or even as a simple snack to enjoy with a cold drink while watching your favorite show. They also make great additions to a holiday or festive table, adding a savory, golden touch to any spread.

I remember one holiday season when I made a big batch of these crispy potato bites for a family dinner. Everyone was in high spirits, enjoying each other’s company, and as the potato bites made their way around the table, I noticed that no one could stop eating them. The dish was such a hit that it became a tradition—each year, it was expected that these crispy bites would be served at our holiday feast. What started as a simple recipe passed down from my grandmother became a beloved family tradition that brought joy and connection to each gathering.

Conclusion: A Recipe to Cherish

Crispy potato bites are more than just a snack; they are a celebration of simplicity, flavor, and tradition. This humble recipe has the power to bring people together, evoking memories of laughter, good food, and shared moments. Whether you’re serving them at a festive table or enjoying them with your loved ones at home, these potato bites are sure to become a favorite in your kitchen.

So, next time you’re craving a snack that’s both satisfying and full of flavor, remember this recipe. It’s easy, delicious, and most importantly, it’s a recipe that can create lasting memories—just like the ones I’ve made over the years.

Amal

Crispy Potato Bites: The Snack That Brings People Together

Crispy Potato Bites are the ultimate comfort snack, with the perfect combination of crunchy texture and savory flavors. Simple to make and absolutely delicious, these bites are perfect for any occasion, from casual gatherings to festive dinners. Every time I make them, they disappear faster than I can say “crispy!” This snack will surely become a favorite in your home.
Prep Time 15 minutes
Cook Time 15 minutes
Total Time 30 minutes
Servings: 15 -20 bites
Course: Snack
Cuisine: American Comfort Food

Ingredients
  

  • 14 oz 400 g potatoes
  • 2 oz 50 g onion, finely chopped
  • 2 tablespoons all-purpose flour
  • 1 egg
  • ¼ teaspoon red chili flakes optional, for a spicy kick
  • teaspoon ground black pepper
  • teaspoon salt
  • 3 fl oz 80 ml vegetable oil, for frying

Method
 

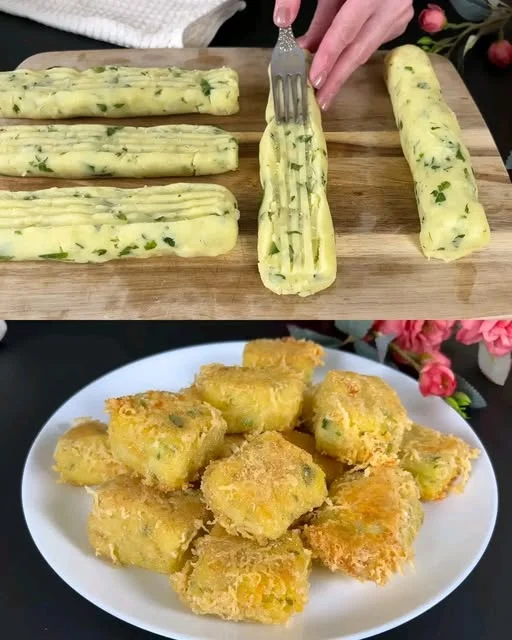
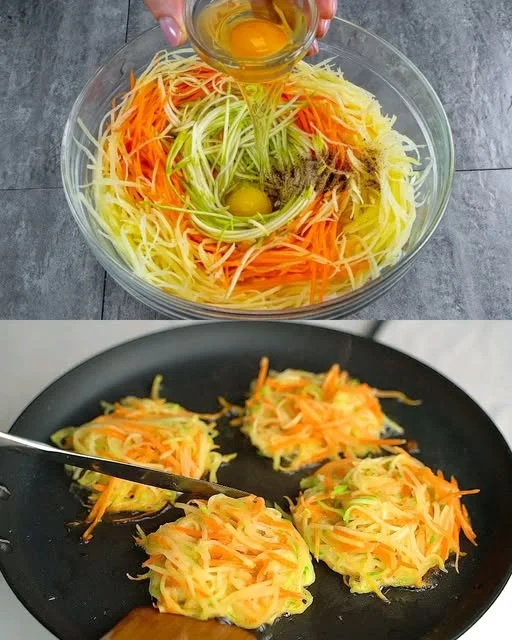
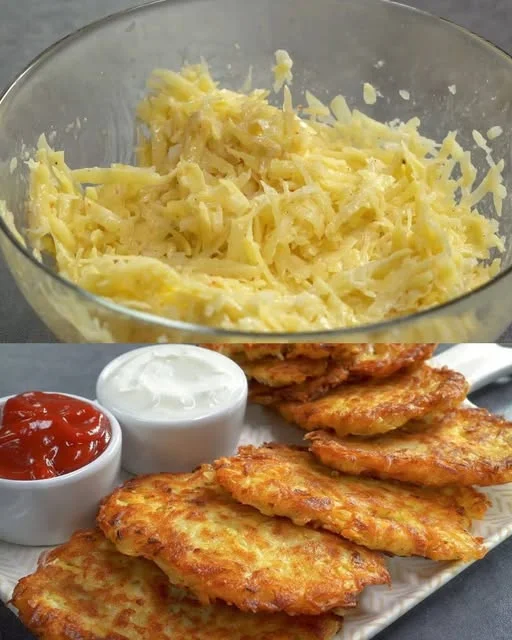
  1. Prepare the Potatoes: Peel the potatoes and grate them using a coarse grater. After grating, transfer the potatoes to a clean kitchen towel or cheesecloth. Squeeze out any excess moisture from the grated potatoes to prevent the bites from becoming soggy.
  2. Mix the Ingredients: In a large mixing bowl, combine the grated potatoes and finely chopped onion. Add the all-purpose flour, egg, red chili flakes, ground black pepper, and salt. Mix everything well until the ingredients are fully incorporated and form a slightly sticky mixture.
  3. Shape the Bites: With your hands, take small portions of the mixture and shape them into bite-sized patties or balls, depending on your preference. Make sure the bites are compact so that they hold together during frying.
  4. Heat the Oil: In a large frying pan, heat the vegetable oil over medium heat. Once the oil is hot, carefully place the potato patties into the pan. Ensure that there is enough space between the patties to avoid overcrowding the pan.
  5. Fry to Perfection: Fry the potato bites for 3-4 minutes on each side or until golden brown and crispy. Flip them carefully using tongs or a spatula to ensure an even crisp on both sides.
  6. Drain and Serve: After frying, remove the potato bites from the pan and place them on paper towels to drain any excess oil. Serve hot, and enjoy with your favorite dipping sauce.

Notes

  • Customization: If you like your bites with a little more heat, feel free to increase the amount of red chili flakes or add a touch of cayenne pepper for a spicier kick.
  • Frying Tip: To avoid soggy bites, make sure to squeeze out as much moisture as possible from the grated potatoes before mixing them with the other ingredients.
  • Make-Ahead: These potato bites can be prepped ahead of time. Shape them into patties and store them in the fridge for up to 2 hours before frying.
  • Serving Suggestions: Serve these crispy potato bites with a dipping sauce such as sour cream, ketchup, or a tangy yogurt-based dip. They also pair well with a side of fresh salad.

The Secret Behind Perfect Restaurant-Style Potatoes

Potatoes are often seen as a humble food, a staple that graces our plates in many forms—baked, mashed, or, most famously, fried. Yet, there’s something about a perfectly fried potato patty, golden and crisp on the outside, soft and fluffy on the inside, that elevates this vegetable from a basic side dish to a gourmet experience. It’s the kind of dish that transforms a simple meal into a memorable moment. For many of us, it’s the comfort food we turn to when we need a little indulgence, a nostalgic bite that reminds us of home, family, and simpler times.

I remember the first time I had a version of these potatoes at a restaurant. The crispy golden crust, the creamy interior bursting with flavor—it was like biting into a piece of heaven. I was instantly hooked, but I also thought, “Why don’t I have this at home?” With that thought in mind, I set out to recreate the recipe. After several trials and tweaks, I arrived at a version that, in my opinion, not only lived up to but exceeded the restaurant version. These potatoes are better than French fries, with a unique flavor profile and a satisfying crunch that makes them the perfect accompaniment to any dish.

But beyond just the taste, there’s a deeper story tied to these crispy, cheesy potato patties. Food has a way of bringing people together, of creating lasting memories. These potatoes became a family favorite in my home, something we all enjoyed making together. It became tradition to prepare these on special occasions, during holiday gatherings, or simply when we wanted to share a meal that was comforting yet elevated.

What Makes These Potatoes So Special?

At first glance, you may think, “What’s so special about potatoes? Aren’t they just a basic vegetable?” While it’s true that potatoes are versatile and widely loved, it’s the technique and the ingredients that make this recipe stand out. The key here is achieving the right balance of flavors and textures.

Unlike regular French fries, which can sometimes be greasy and heavy, these crispy potato patties are perfectly crisp on the outside while maintaining a soft, almost fluffy texture inside. The combination of fresh parsley, green onions, and paprika adds depth and complexity to each bite, while the cheese creates a richness that is just irresistible. By using breadcrumbs to coat the patties before frying, we get that golden crust that creates the perfect contrast to the tender potato interior.

Moreover, these potato patties are incredibly versatile. You can serve them as a side dish to virtually any meal, pair them with a creamy dip, or even have them as a snack. They are comforting yet sophisticated, making them perfect for casual family dinners or more formal gatherings.

Ingredients

IngredientAmount
Potatoes17.6 oz (500 g)
Egg1
BreadcrumbsTo taste
SaltTo taste
PaprikaTo taste
Cheese (grated)3.5 oz (100 g)
Fresh parsleyTo taste
Cornstarch2 tablespoons
Fresh green onionsTo taste

Directions

  1. Prepare the potatoes: Start by peeling the potatoes and cutting them into bite-sized cubes. Boil them in salted water until they are soft and easily pierced with a fork. Drain the potatoes well and let them cool slightly.
  2. Mash the potatoes: Once the potatoes have cooled enough to handle, mash them using a potato masher or fork until smooth. The consistency should be firm but slightly creamy.
  3. Add the egg and seasonings: Crack the egg into the mashed potatoes and mix it in thoroughly. Then, season the mixture with salt, paprika, and cornstarch. Stir in the grated cheese, chopped parsley, and fresh green onions for extra flavor.
  4. Form the potato patties: Using your hands, form the mashed potato mixture into small patties or discs. Make sure they are uniform in size for even cooking.
  5. Coat in breadcrumbs: Lightly dip each patty into breadcrumbs, ensuring that all sides are evenly coated.
  6. Cook the patties: Heat a large skillet over medium heat and add a generous amount of oil. Once the oil is hot, carefully place the patties into the pan and fry them until they are golden brown and crispy on both sides, about 3-4 minutes per side.
  7. Drain and serve: Remove the patties from the skillet and place them on a plate lined with paper towels to drain excess oil. Garnish with fresh parsley and serve warm.

Nutritional Information

NutrientAmount per Serving
Calories250 kcal
Carbohydrates35 g
Protein6 g
Fat12 g
Fiber4 g
Sodium450 mg

Frequently Asked Questions

1. Can I make these potatoes ahead of time?
Yes! These crispy potato patties can be prepared in advance. After forming the patties, you can refrigerate them for up to a day before frying. This helps the patties hold their shape and flavors meld together even more. Alternatively, you can freeze them for later use. To freeze, arrange the patties on a baking sheet in a single layer and place them in the freezer. Once frozen, transfer them to an airtight container or freezer bag for long-term storage. When you’re ready to cook them, simply fry them from frozen, adding an extra minute or two to the cooking time.

2. Can I use a different type of cheese?
Absolutely! While I recommend a mild cheese like mozzarella for that perfect melt and flavor, you can experiment with other cheeses like cheddar, gouda, or even parmesan. The cheese choice will impact the flavor, so feel free to adjust according to your preferences.

3. Are these potatoes gluten-free?
Yes, they are! If you use gluten-free breadcrumbs, this recipe becomes entirely gluten-free. For those with dietary restrictions, this is a great alternative to regular French fries or other breaded potato options.

4. Can I bake these instead of frying them?
While frying gives the patties their signature crispy texture, you can absolutely bake them if you prefer a healthier option. Preheat the oven to 400°F (200°C), place the patties on a baking sheet lined with parchment paper, and bake for about 25 minutes, flipping halfway through. They may not be as crispy as the fried version, but they will still be delicious.

5. How can I make these potatoes spicier?
If you love a little heat, feel free to add chili flakes, cayenne pepper, or even a splash of hot sauce to the mixture. The paprika already gives the dish a subtle smoky flavor, but a little kick will definitely spice things up!

How to Serve These Crispy Potato Patties

One of the best things about these crispy potato patties is their versatility. Here are some ideas on how to serve them:

  • As a side dish: These potatoes pair wonderfully with almost any main course. Whether you’re serving grilled meats, pasta, or a veggie-heavy salad, these potato patties make a perfect accompaniment.
  • As a snack or appetizer: Serve them with a dip like sour cream, ketchup, or even a tangy tzatziki sauce. They’re the ideal snack to munch on while enjoying a glass of wine or watching a movie.
  • As a breakfast item: Top these crispy potato patties with a poached egg and some avocado for a delicious and satisfying breakfast.
  • In a sandwich: For a fun twist, use these crispy potato patties as the base for a sandwich. Add some leafy greens, tomatoes, and your favorite sauce for a tasty meal.

The Emotional Connection to Food

Food has always been a part of the fabric that binds my family together. I can’t recall a single holiday or gathering where food wasn’t the centerpiece. And these crispy potato patties, which started as a simple attempt to recreate a restaurant recipe, have become a symbol of tradition and togetherness in my family.

There’s something magical about gathering around the table, sharing a meal that’s been prepared with love and care. Food is a reflection of our memories, our cultures, and our values. The act of cooking is a way of expressing our creativity, and the shared experience of enjoying that food is what makes it all meaningful.

Conclusion: Why This Recipe Will Become a Family Favorite

These crispy, cheesy potato patties have earned their place in my kitchen and my heart. They’re the perfect blend of simplicity and indulgence, making them ideal for any occasion. Whether you’re cooking for your family or hosting friends, these potato patties will always be a crowd-pleaser.

In the end, what makes this recipe truly special isn’t just the crispy golden crust or the savory cheese and herbs. It’s the love and the memories that go into preparing and sharing it with those we care about. And just like that first restaurant experience, these crispy potato patties are more than just food—they’re a way to create moments that last a lifetime.

FAQs Recap

  • Can these potatoes be made ahead of time? Yes, they can be refrigerated or frozen for later.
  • Can I use a different type of cheese? Yes, feel free to experiment with other cheeses.
  • Are these potatoes gluten-free? Yes, with gluten-free breadcrumbs.
  • Can I bake these instead of frying? Yes, baking is a healthier alternative.
  • How can I make them spicier? Add chili flakes or cayenne pepper to the mixture.

Final Thoughts

So, the next time you’re craving something crispy, comforting, and full of flavor, give these crispy potato patties a try. Not only will you impress your family and friends, but you’ll also be making a dish that will surely become a beloved tradition in your home, just like it has in mine.

Amal

The Secret Behind Perfect Restaurant-Style Potatoes

These golden, crispy potato patties are the perfect balance of soft, creamy insides and a crunchy, flavorful crust. Coated in breadcrumbs, cheese, and fresh herbs, these potatoes are a cut above traditional French fries. Perfect for a side dish or a snack, they will leave everyone asking for more!
Prep Time 15 minutes
Cook Time 15 minutes
Total Time 30 minutes
Servings: 4 –6 servings
Course: Snack
Cuisine: American Comfort Food

Ingredients
  

  • 17.6 oz 500 g potatoes
  • 1 egg
  • Breadcrumbs to coat
  • Salt to taste
  • Paprika to taste
  • 3.5 oz 100 g cheese (grated)
  • Fresh parsley to taste
  • 2 tablespoons cornstarch
  • Fresh green onions to taste

Method
 

  1. Prepare the Potatoes: Peel and cut the potatoes into bite-sized cubes. Boil them in salted water until soft and easily pierced with a fork. Drain and let cool slightly.
  2. Mash the Potatoes: Once cooled, mash the potatoes until smooth, keeping the texture slightly firm but creamy.
  3. Mix Ingredients: Add 1 egg, salt, paprika, cornstarch, grated cheese, chopped parsley, and green onions to the mashed potatoes. Mix well until everything is fully incorporated.
  4. Form Patties: Shape the potato mixture into small patties or discs.
  5. Coat with Breadcrumbs: Dip each patty into breadcrumbs, ensuring it is evenly coated.
  6. Fry the Patties: Heat oil in a large skillet over medium heat. Fry the patties until golden and crispy on both sides, about 3-4 minutes per side.
  7. Drain and Serve: Once fried, place the patties on paper towels to drain excess oil. Garnish with more fresh parsley and serve warm.

Notes

  • Make-Ahead Option: You can form the patties in advance and refrigerate them for up to 24 hours before frying. This helps them hold their shape better during cooking.
  • Freezing: Freeze the formed patties on a baking sheet, then store them in an airtight container. Fry from frozen when you’re ready to cook them.
  • Cheese Variations: Experiment with different cheeses like cheddar, gouda, or mozzarella for a unique twist.

Crispy and Tasty Eggplants: The Perfect Snack for Any Occasion

The smell of freshly baked eggplant always reminds me of family gatherings. As a child, my grandmother would prepare this simple yet irresistible dish, and our kitchen would be filled with the delicious scent of herbs, spices, and the warm comfort of home. I can still see her in the kitchen, carefully slicing the eggplant, seasoning it with love, and placing it into the oven to crisp up. Each piece would come out perfectly golden, tender on the inside, and crispy on the outside. This recipe has been passed down from generation to generation, a testament to the enduring power of simple, wholesome food.

Every time I prepare this crispy eggplant dish, I’m reminded of those family moments. It’s not just the dish itself that brings comfort, but the memories associated with it. In our busy world, where complex recipes often take center stage, there is something truly magical about a simple, uncomplicated dish like crispy eggplant. It serves as a reminder that food doesn’t need to be fancy to be extraordinary. Sometimes, the simplest recipes are the ones that hold the most meaning, offering both nourishment and a connection to the past.

A Simple Dish with Endless Possibilities

Crispy and tasty eggplant may seem like a straightforward recipe, but it offers a lot of flexibility and potential for creativity. The beauty of this dish lies in its simplicity: eggplant, olive oil, and a handful of seasonings are all it takes to create a crispy, savory snack or side dish that pairs well with almost anything. But don’t let the simplicity fool you—this dish is packed with flavor and texture.

When I first learned how to make crispy eggplant, I was surprised by how something so easy to prepare could have such a profound effect on the taste buds. Eggplant, often overlooked in favor of other vegetables, has a unique ability to absorb flavors while maintaining its structure when cooked correctly. The key is to slice the eggplant evenly, season it with the right combination of spices, and cook it at the right temperature to achieve that perfect crispness.

This recipe isn’t just for those who are fans of eggplant. It’s for anyone who loves a good, crunchy snack or needs a side dish that complements their main course without overpowering it. Whether served as an appetizer, paired with a refreshing salad, or added to your favorite sandwich or wrap, crispy eggplant is versatile enough to be included in a variety of meals.

Ingredients

IngredientAmount
Eggplant1 medium
SaltTo taste
Olive oil2 tablespoons
PepperTo taste
Oregano1 teaspoon
Paprika1 teaspoon
Garlic (minced)1 clove

Directions

  1. Preheat the Oven:
    Preheat your oven to 400°F (200°C). Line a baking sheet with parchment paper or lightly grease it.
  2. Prepare the Eggplant:
    Slice the eggplant into 1/2-inch thick rounds or wedges, depending on your preference. Lightly sprinkle with salt and let them sit for about 10 minutes to draw out excess moisture. Then, pat the slices dry with a paper towel.
  3. Season the Eggplant:
    In a small bowl, mix together olive oil, pepper, oregano, paprika, and minced garlic. Brush this seasoning mixture over both sides of the eggplant slices.
  4. Bake:
    Arrange the seasoned eggplant slices on the prepared baking sheet in a single layer. Bake in the preheated oven for about 20-25 minutes or until golden brown and crispy, flipping halfway through the cooking time.
  5. Serve:
    Once crispy and tender, remove from the oven and serve warm.

Nutritional Information

NutrientAmount per serving
Calories90 kcal
Protein1.5 g
Fat7 g
Carbohydrates10 g
Fiber3 g
Sodium150 mg
Sugars3 g

Why Eggplant? The Benefits You Didn’t Know About

Eggplant, also known as aubergine, is a vegetable that has long been cherished in cuisines around the world. It is a member of the nightshade family and is closely related to tomatoes and potatoes. Beyond its delicious taste, eggplant offers several health benefits that make it a fantastic addition to your diet.

Rich in Antioxidants:
Eggplant is loaded with antioxidants, especially nasunin, a powerful compound found in the skin of the eggplant. This antioxidant helps protect the cells in the body from oxidative damage caused by free radicals. Consuming antioxidants is key in maintaining good health and preventing chronic diseases.

Low in Calories, High in Fiber:
Eggplant is naturally low in calories, making it an excellent choice for those who are looking to maintain or lose weight. At the same time, it is high in fiber, which aids in digestion and helps keep you feeling fuller for longer. The fiber in eggplant also helps regulate blood sugar levels, making it a great food choice for those managing diabetes.

Packed with Nutrients:
Eggplant is a great source of vitamins and minerals, including vitamin C, vitamin K, and folate. It also contains potassium and magnesium, which are essential for heart health and muscle function. By including eggplant in your diet, you’re adding a nutrient-dense food that supports overall health.

FAQs: Everything You Need to Know About Crispy Eggplant

1. Can I make this recipe vegan?
Yes! The recipe is already vegan-friendly. You don’t need to use any dairy products to create a delicious crispy eggplant. The olive oil and seasonings provide all the flavor you need.

2. How can I make the eggplant extra crispy?
To get extra crispy eggplant, you can sprinkle the slices with a little bit of flour or breadcrumbs before baking. This will create an even crispier exterior. Make sure to bake at a high temperature (around 400°F/200°C) for the best results. You can also flip the eggplant halfway through the cooking process for even browning on both sides.

3. Can I fry the eggplant instead of baking it?
Yes, frying is another option if you prefer a richer, more indulgent result. To fry, heat oil in a large pan over medium heat and cook the eggplant slices until golden brown on both sides. However, baking the eggplant is a healthier alternative, giving you the same crispy texture with less oil.

4. How do I know when the eggplant is cooked perfectly?
Perfectly cooked eggplant should be golden brown and crispy on the outside, with a tender, melt-in-your-mouth interior. You can check doneness by gently pressing on the eggplant slice—if it feels soft on the inside and the edges are crisp, it’s ready to serve.

5. Can I use other spices besides oregano and paprika?
Absolutely! Feel free to experiment with different spices based on your personal preferences. Garlic powder, thyme, cumin, or even chili flakes can add an exciting twist to the flavor profile. Customize the recipe to suit your tastes!

6. Can I make these ahead of time?
Yes, you can make these crispy eggplant slices in advance. Once baked, let them cool and store them in an airtight container in the refrigerator for up to 2-3 days. For the best texture, reheat them in the oven to regain their crispiness.

Serving Suggestions: More Ways to Enjoy Your Crispy Eggplant

While crispy eggplant is fantastic on its own, there are many ways to incorporate it into your meals. Here are some ideas:

As a Side Dish:
Pair crispy eggplant with a hearty main course like roasted chicken or grilled lamb. The light, crispy texture complements rich and savory dishes beautifully.

In Sandwiches or Wraps:
Crispy eggplant can easily be added to sandwiches or wraps. Its crunchy texture adds a satisfying element, while the earthy flavor pairs well with fresh greens, tomatoes, and hummus.

As an Appetizer:
Serve crispy eggplant slices with a tangy dipping sauce like tzatziki, tomato salsa, or a spicy aioli. It’s the perfect snack to serve at parties or as a starter to a larger meal.

In a Salad:
Top your favorite salad with crispy eggplant for an added burst of flavor and crunch. It goes especially well with Mediterranean-style salads that feature ingredients like feta cheese, olives, and cherry tomatoes.

Conclusion: A Simple Yet Flavorful Dish to Bring People Together

Crispy eggplant is a testament to the power of simplicity in the kitchen. With just a few ingredients, you can transform an ordinary vegetable into something extraordinary. This recipe is a reminder that the best dishes often don’t require complex techniques or hard-to-find ingredients—just quality produce, simple seasonings, and a little love.

As I prepare this dish and serve it to my family and friends, I’m reminded that food has a way of bringing people together. Whether it’s the crunch of the eggplant, the aroma of fresh herbs, or the joy of sharing a meal with loved ones, this crispy eggplant recipe is more than just food—it’s a tradition, a connection to the past, and a way to create new memories.

So the next time you’re looking for a simple yet satisfying snack or side dish, give this crispy eggplant recipe a try. With its delightful texture, rich flavor, and versatility, it’s sure to become a favorite in your home too.

Amal

Crispy and Tasty Eggplants: The Perfect Snack for Any Occasion

Crispy and Tasty Eggplants are the perfect blend of golden crispiness on the outside with a tender, savory interior. Simple to prepare with just a few ingredients, this dish makes for a great snack or side dish that pairs well with a variety of meals. Whether you serve it alongside your favorite pasta, as a topping for salads, or as a stand-alone snack, this dish is sure to impress.
Prep Time 10 minutes
Cook Time 25 minutes
Total Time 35 minutes
Servings: 4 –6 servings
Course: Snack
Cuisine: Mediterranean-Inspired

Ingredients
  

  • 1 eggplant
  • Salt to taste
  • 2 tablespoons olive oil
  • Pepper to taste
  • 1 teaspoon oregano
  • 1 teaspoon paprika
  • 1 clove garlic minced

Method
 

  1. Preheat the oven: Preheat your oven to 400°F (200°C). Line a baking sheet with parchment paper or lightly grease it for easy cleanup.
  2. Prepare the eggplant: Slice the eggplant into 1/2-inch thick rounds or wedges, based on your preference. Sprinkle lightly with salt and allow them to rest for 10 minutes to draw out excess moisture. Afterward, gently pat the slices dry using a paper towel to remove any water.
  3. Season the eggplant: In a small bowl, mix olive oil, pepper, oregano, paprika, and minced garlic. Brush the seasoning mixture evenly onto both sides of each eggplant slice.
  4. Bake the eggplant: Arrange the seasoned eggplant slices on the prepared baking sheet in a single layer. Bake for 20-25 minutes, flipping the slices halfway through to ensure they become golden and crispy on both sides.
  5. Serve: Once the eggplant is golden and crispy, remove it from the oven. Serve warm as a snack, side dish, or topping for other dishes.

Notes

  • Storage: Leftover crispy eggplants can be stored in an airtight container in the refrigerator for up to 2 days. Reheat in the oven for a few minutes to restore their crispiness.
  • Variations: Feel free to experiment with other spices like cumin, thyme, or chili powder to give the eggplant a unique flavor profile.
  • Vegan-friendly: This recipe is naturally vegan and gluten-free.
  • Serving ideas: Serve crispy eggplant with a drizzle of balsamic glaze, a side of marinara sauce for dipping, or top a salad with these crispy bites for added texture.

A Heartwarming Tradition: The Cheese and Herb Bites That Bring Everyone Together

The holiday season is often filled with the warmth of family and friends, the scent of delicious foods wafting through the house, and the joy of gathering around the table. Some of my most cherished memories involve food—especially the festive table laden with dishes that have been passed down through generations. Among all the rich feasts and intricate recipes, one dish has become a tradition in my home. It’s not the main course or the sweet desserts that everyone anticipates the most—it’s these simple yet unforgettable cheese and herb bites.

It all started several years ago, during one of the first holiday dinners I hosted after moving into my own place. I was nervous, unsure of how to pull off a festive spread while juggling work, personal life, and the inevitable chaos that comes with hosting. But one thing I knew for sure: I wanted my guests to feel welcomed, nourished, and most importantly, comfortable. So, I searched for a snack that was easy to make, had great flavor, and would satisfy even the pickiest of eaters.

The answer came to me in a moment of nostalgia—my grandmother’s cheese biscuits, a dish she used to make whenever the family gathered. While I didn’t have her exact recipe, I remembered the deliciously crispy bites of cheese and herbs that she always served as appetizers. I decided to make my own version, and that’s when the recipe for these cheese and herb bites was born.

Little did I know, these little bites would become a family favorite, one that everyone looks forward to every year. As I perfected the recipe over time, I realized that there was something deeply symbolic about these bites. They were simple, wholesome, and comforting—much like the gatherings we cherish. They’re a reminder that sometimes the simplest things are the most meaningful.

The Allure of Cheese and Herbs: Why These Bites Are So Special

What makes these cheese and herb bites stand out is the balance between two essential elements: the cheese and the herbs. Cheese, particularly cheddar, brings richness, flavor, and a slight sharpness that contrasts beautifully with the delicate freshness of parsley and dill. Together, they create a harmonious blend of savory flavors that are satisfying but not overwhelming.

Cheddar cheese, often associated with comfort and warmth, is a key ingredient in these bites. It brings a creamy texture to the bite, melting perfectly into the dough as it bakes, while adding a deep, nutty flavor. For those who love bold, strong flavors, cheddar is the perfect cheese choice. And the herbs? Parsley and dill, both aromatic and fresh, elevate the bites, providing a refreshing contrast to the richness of the cheese.

Ingredients:

IngredientAmount
240 grams Flour2 cups
1 teaspoon Salt
1 teaspoon Baking Powder
100 grams Butter, chilled and cubed1/2 cup
150 grams Cheddar Cheese, grated1 1/2 cups
1/4 cup Fresh Parsley, chopped2 tbsp
1/4 cup Fresh Dill, chopped2 tbsp
1 egg
1/4 cup Milk60 ml

Directions:

  1. Preheat and Prep: Preheat the oven to 375°F (190°C). Line a baking sheet with parchment paper or lightly grease it.
  2. Mix Dry Ingredients: In a large mixing bowl, combine the flour, salt, and baking powder. Stir in the grated cheddar cheese, parsley, and dill.
  3. Cut in the Butter: Add the cubed butter into the dry ingredients. Using your fingers or a pastry cutter, mix until the butter is incorporated, and the mixture resembles coarse crumbs.
  4. Add Wet Ingredients: In a separate small bowl, whisk together the egg and milk. Pour this into the flour mixture and stir until just combined. The dough will be slightly sticky but should come together when pressed.
  5. Form the Bites: Take small spoonfuls of dough and roll them into balls or shape them into small disks. Arrange them on the prepared baking sheet, leaving space between each one.
  6. Bake: Bake for 15-18 minutes, or until golden brown and firm to the touch.
  7. Cool and Serve: Allow the bites to cool slightly on a wire rack before serving. These cheese and herb bites are best enjoyed warm but can also be stored in an airtight container for up to 2 days.

Nutrients (Per Serving):

NutrientAmount
Calories140 kcal
Protein5 g
Carbohydrates16 g
Fat8 g
Fiber1 g
Sodium300 mg

Perfect for Any Occasion: Versatility at Its Best

One of the things I love most about these cheese and herb bites is their versatility. Whether it’s the holiday season, a casual family dinner, or a small gathering of friends, these bites fit into any occasion. They’re small enough to serve as appetizers at a large party but also substantial enough to be enjoyed as a snack or light meal.

You can serve them on their own or pair them with a variety of dips and spreads—creamy ranch, tangy mustard, or even a savory garlic butter sauce. These bites are also great alongside soups or salads, making them a perfect accompaniment to many types of meals.

Because the recipe is so flexible, it can also be adjusted based on dietary needs. For example, if you’re looking to make a gluten-free version, simply swap out the regular flour for a gluten-free alternative. The recipe can easily be modified to accommodate vegan or dairy-free preferences by using plant-based cheese and non-dairy milk options. These small adaptations make the recipe accessible to a wide range of people while still maintaining its irresistible taste.

Why These Bites Are a Great Addition to Your Holiday Table

No matter how extravagant the holiday meal, it’s often the simplest bites that leave a lasting impression. These cheese and herb bites are the perfect example of that. They’re easy to make, yet pack so much flavor that your guests won’t be able to stop at just one. Whether you’re hosting a grand holiday feast or a more intimate gathering, these bites will always be a crowd-pleaser.

What’s more, these cheese and herb bites can be made ahead of time, which makes holiday prep a breeze. You can prepare them in advance and simply pop them in the oven just before guests arrive. The warm, cheesy aroma will fill your home, creating a welcoming atmosphere and setting the tone for a wonderful celebration.

As I reflect on the years of holiday meals, laughter, and shared memories, I realize that food, in many ways, is the foundation of tradition. It’s what brings us together, allows us to reconnect, and helps us create memories that will last a lifetime. These cheese and herb bites may seem simple, but they hold so much more than just ingredients—they hold stories, love, and the joy of being together.

Frequently Asked Questions

1. Can I make these bites ahead of time? Yes, these cheese and herb bites can be made in advance. Prepare them, shape them into the desired size, and refrigerate them until you’re ready to bake. This can save you time on the day of your gathering, making them a great option for meal prepping.

2. Can I use a different type of cheese? Absolutely! While cheddar is the star of this recipe, you can experiment with other cheeses such as mozzarella, gouda, or parmesan. Just be mindful of the texture and flavor of the cheese you choose, as it will impact the final result.

3. How do I store leftover cheese and herb bites? Leftovers can be stored in an airtight container at room temperature for up to two days. For longer storage, keep them in the fridge for up to a week. Reheat them in the oven for a few minutes to bring back their crispness.

4. Can I make these bites gluten-free? Yes, you can make these bites gluten-free by using a gluten-free all-purpose flour blend. Make sure to check that your baking powder is also gluten-free.

5. How can I adjust the recipe for dietary restrictions? For a dairy-free or vegan version, you can substitute the cheese with plant-based cheese and use a non-dairy milk, such as almond or oat milk. You can also replace the butter with vegan margarine or coconut oil.

6. Can I freeze these cheese and herb bites? Yes, these bites freeze well. After baking, let them cool completely before freezing. Store them in an airtight container or freezer bag for up to 3 months. To reheat, bake them in the oven at 350°F (175°C) for 10–15 minutes.

Conclusion: A Bite of Tradition

These cheese and herb bites aren’t just a recipe—they’re a tradition that has been passed down, modified, and perfected over time. They embody the spirit of togetherness and the simple pleasures of sharing a meal with loved ones. As you prepare them for your own gatherings, remember that the real magic lies in the moments they create—shared smiles, laughter, and the warmth of family and friends. Each bite is more than just a tasty snack; it’s a reminder that the simplest things in life often bring the most joy.

Amal

A Heartwarming Tradition: The Cheese and Herb Bites That Bring Everyone Together

These cheese and herb bites are a simple yet flavorful snack that’s perfect for any occasion. With a golden, crispy exterior and a cheesy, herby interior, they make a delightful appetizer or side dish. Easy to prepare and sure to impress, they’re the perfect blend of comfort and flavor for your next gathering.
Prep Time 10 minutes
Cook Time 20 minutes
Total Time 30 minutes
Servings: 20 –24 bites
Course: Snack
Cuisine: Comfort Food

Ingredients
  

  • 240 grams 2 cups Flour
  • 1 teaspoon Salt
  • 1 teaspoon Baking Powder
  • 100 grams 1/2 cup Butter, chilled and cubed
  • 150 grams 1 1/2 cups Cheddar Cheese, grated
  • 1/4 cup Fresh Parsley chopped
  • 1/4 cup Fresh Dill chopped
  • 1 Egg
  • 1/4 cup 60 ml Milk

Method
 

  1. Preheat the Oven: Preheat your oven to 375°F (190°C). Line a baking sheet with parchment paper or lightly grease it to prevent the bites from sticking.
  2. Prepare Dry Ingredients: In a large mixing bowl, combine the flour, salt, and baking powder. Stir in the grated cheddar cheese, fresh parsley, and dill.
  3. Cut in the Butter: Add the cubed butter to the dry ingredients. Using your fingers or a pastry cutter, work the butter into the flour mixture until it resembles coarse crumbs.
  4. Add Wet Ingredients: In a separate small bowl, whisk together the egg and milk. Pour this mixture into the flour and butter mixture. Stir until just combined, forming a dough. It should be slightly sticky but easy to handle.
  5. Shape the Bites: Take spoonfuls of the dough and shape them into small balls or discs, placing them on the prepared baking sheet. Leave some space between each bite to allow them to expand as they bake.
  6. Bake: Bake in the preheated oven for 15-18 minutes or until golden brown and firm to the touch.
  7. Cool and Serve: Let the bites cool on a wire rack for a few minutes before serving. Enjoy warm, or store them in an airtight container for up to 2 days.

Notes

  • Storage: These cheese and herb bites can be stored in an airtight container for up to 2 days at room temperature. For longer storage, refrigerate them, and reheat before serving.
  • Add-ins: Feel free to experiment with different herbs or cheeses. You can swap cheddar for mozzarella or gouda, or try adding garlic powder for extra flavor.
  • Vegan Version: To make these bites vegan, you can replace the butter with a dairy-free butter substitute and use plant-based cheese. For the egg, try using a flaxseed meal mixture (1 tablespoon of ground flaxseed mixed with 3 tablespoons of water).
  • Serving Suggestions: These bites are great on their own or served with dipping sauces like garlic butter, spicy mustard, or even a creamy ranch dip.

The Comfort of Oatmeal Greek Yogurt Breakfast Bake: A Heartwarming Journey

There’s something deeply comforting about the smell of baked goods in the morning—the soft warmth filling your kitchen, with aromas that promise both nourishment and a moment of joy. For many of us, the start of the day holds a certain magic. A warm breakfast, something simple but satisfying, can turn a hectic morning into a peaceful moment. For me, this oatmeal Greek yogurt breakfast bake is not just a meal; it’s a reminder of the power of simple ingredients and the joys of homemade cooking.

I still remember the mornings spent with my grandmother, watching her prepare meals with such ease and grace. No matter how busy the day ahead was, she always made time for a nourishing breakfast. It was during one of these mornings that I learned how much love can go into something as simple as oats, yogurt, and eggs. The idea for this bake came from those moments. A mixture of creamy Greek yogurt, hearty oatmeal, and a touch of sweetness was one of those childhood flavors that became synonymous with love and comfort. It was no surprise that years later, this bake would come to represent the simplicity of life and the joy of starting the day on a wholesome note.

This oatmeal Greek yogurt breakfast bake is perfect for those days when you need something filling and energizing, yet don’t have much time. It’s a sweet and wholesome alternative to more processed breakfast options and has the flexibility to be enjoyed as both breakfast and dessert. Whether you’re starting your day or winding it down with a healthy snack, this recipe offers not just flavor but also a sense of nostalgia and comfort.

Why Oatmeal and Greek Yogurt? A Nutritional Powerhouse

The combination of oatmeal and Greek yogurt isn’t just delicious—it’s also packed with nutrients that fuel your body and keep you feeling full longer. Oatmeal, rich in fiber, has long been celebrated for its heart-healthy benefits. It’s an excellent source of soluble fiber, which helps reduce cholesterol and stabilizes blood sugar levels. This makes it an ideal breakfast for maintaining steady energy throughout the day.

Greek yogurt, on the other hand, adds a creamy texture while providing a substantial amount of protein and probiotics. The probiotics in Greek yogurt can support digestion and enhance gut health, which is crucial for overall wellness. Combined with the wholesome oatmeal, this breakfast bake offers a perfect balance of carbohydrates, healthy fats, and protein—ensuring that you stay satisfied and energized.

Ingredients:

IngredientAmount
Oatmeal1 cup (100 g)
Milk of your choice1 cup (240 ml)
Eggs2
Greek yogurt1/3 cup (100 g)
Sweetener of your choiceTo taste
Baking powder1 teaspoon
SaltA pinch

Directions:

  1. Preheat the Oven:
    Preheat your oven to 350°F (175°C) and lightly grease a baking dish or line it with parchment paper.
  2. Prepare the Batter:
    In a medium bowl, whisk together the milk, eggs, Greek yogurt, sweetener, and salt until smooth. Add the oatmeal and baking powder, stirring until everything is well combined.
  3. Bake the Mixture:
    Pour the oatmeal mixture into the prepared baking dish. Bake for about 25–30 minutes, or until the top is golden and a toothpick inserted into the center comes out clean.
  4. Serve and Enjoy:
    Allow the bake to cool for a few minutes before slicing. Serve as-is or top with fresh fruit, a sprinkle of nuts, or a drizzle of honey for extra sweetness.

Nutritional Information (per serving):

NutrientAmount
Calories180 kcal
Protein9g
Carbohydrates20g
Fats8g
Fiber4g
Sugar5g

The Versatility of Sweeteners: How to Personalize Your Bake

One of the best things about this oatmeal Greek yogurt breakfast bake is its versatility. The recipe allows you to adjust the sweetness level to your liking, depending on the type of sweetener you prefer. Whether you’re aiming for a low-sugar version or a slightly sweeter treat, the choice is yours.

If you’re looking to keep things healthier, natural sweeteners like honey or maple syrup work wonderfully. These alternatives provide added nutrients and a more complex flavor compared to refined sugar. On the other hand, if you’re cutting back on sugar or following a low-carb diet, stevia or monk fruit sweetener might be better options. Both are calorie-free and offer sweetness without spiking blood sugar levels.

For those who enjoy the flavor of brown sugar, it can also be used in place of regular sugar to add a rich, molasses-like taste. The choice of sweetener gives you full control over the flavor and makes this dish suitable for a wide range of dietary preferences.

Meal Prep and Storage: A Week’s Worth of Breakfast in One Go

One of the standout features of this oatmeal Greek yogurt breakfast bake is how perfect it is for meal prep. If you’re someone who tends to be short on time in the mornings, making this dish ahead of time is a great option. This recipe can be baked in advance, and stored in the fridge for up to three days. Simply slice a portion of the bake in the morning, warm it up in the microwave, and you’ve got a wholesome, no-fuss breakfast ready to go.

Additionally, you can even freeze individual slices of the bake for up to one month. When you’re ready to enjoy it, simply thaw overnight in the fridge and reheat. This makes it the ideal solution for busy individuals who still want to eat something homemade and nutritious without spending time every morning in the kitchen.

Health Benefits Beyond the Breakfast Table

Although this recipe is perfect for breakfast, it can easily be transformed into a light dessert or snack. The healthy fats and protein from Greek yogurt, combined with the fiber from oatmeal, create a satisfying treat that won’t leave you feeling overly full or sluggish, unlike traditional sugary desserts.

If you’re someone who likes to keep a balanced diet but still craves something sweet, this oatmeal Greek yogurt breakfast bake fits perfectly into a healthy lifestyle. Whether you enjoy it after a meal or as an afternoon snack, you can feel good about indulging without the guilt.

Frequently Asked Questions

Can I use plant-based milk for this recipe?

Yes! You can absolutely use any plant-based milk of your choice, such as almond milk, soy milk, or oat milk. The recipe is flexible and will work with most milk substitutes without compromising flavor or texture.

Can I make this bake vegan?

Yes, you can! To make this oatmeal Greek yogurt breakfast bake vegan, substitute the eggs with flax eggs (1 tablespoon of ground flaxseed mixed with 3 tablespoons of water, allowed to sit for 5 minutes). For the Greek yogurt, opt for a dairy-free version made from coconut or almond milk.

What type of sweetener is best for this recipe?

The type of sweetener depends on your preference and dietary needs. Honey or maple syrup provides a natural sweetness and adds depth to the flavor. If you’re following a low-sugar or keto diet, stevia or monk fruit sweetener are excellent options, as they don’t raise blood sugar levels. You can also use traditional sugar or brown sugar for a more classic taste.

Can I add extra ingredients to this recipe?

Absolutely! This recipe is incredibly versatile, and you can easily add your favorite ingredients to make it more exciting. Consider incorporating fresh fruit like berries, sliced apples, or bananas into the mix. You could also add nuts, such as almonds or walnuts, for a bit of crunch. If you prefer more spice, a pinch of cinnamon or vanilla extract would be a lovely addition.

Conclusion: A Simple, Wholesome Breakfast Option

The oatmeal Greek yogurt breakfast bake is a reminder of the beauty of simplicity. In a world filled with complicated recipes and expensive ingredients, sometimes all it takes is a few basic items—like oatmeal, Greek yogurt, and eggs—to create something extraordinary. This dish not only provides nourishment but also evokes memories of comfort, warmth, and family.

Perfect for busy mornings or as a healthy dessert, this oatmeal Greek yogurt bake is an easy, customizable recipe that suits any lifestyle. It’s a delightful way to start your day on a wholesome note or indulge in a sweet, nutritious treat. No matter how you enjoy it, this recipe is bound to become a go-to in your home for years to come.

By making a simple change in your morning routine, you can transform the way you approach breakfast, making it both healthy and satisfying. It’s a small step, but one that might just make all the difference in how you feel each day. Enjoy your bake, and remember—sometimes, the simplest things bring the greatest joy.

Amal

The Comfort of Oatmeal Greek Yogurt Breakfast Bake: A Heartwarming Journey

This oatmeal Greek yogurt breakfast bake is a nourishing and delicious way to start your day. It combines the wholesome goodness of oats with the creamy richness of Greek yogurt, making it a filling, protein-packed option for breakfast or even a light dessert.
Prep Time 10 minutes
Cook Time 30 minutes
Total Time 40 minutes
Servings: 4 –6 servings
Course: Dessert
Cuisine: Comfort Food

Ingredients
  

  • 1 cup 100 g Oatmeal
  • 1 cup 240 ml Milk of your choice (almond, oat, dairy, etc.)
  • 2 Eggs
  • 1/3 cup 100 g Greek Yogurt
  • Sweetener of your choice maple syrup, honey, stevia, etc.
  • 1 teaspoon Baking Powder
  • A pinch of Salt

Method
 

  1. Preheat the Oven: Preheat your oven to 350°F (175°C) and grease or line a baking dish.
  2. Mix the Wet Ingredients: In a medium bowl, whisk together the milk, eggs, Greek yogurt, sweetener, and salt until smooth.
  3. Add Dry Ingredients: Stir in the oatmeal and baking powder, ensuring everything is well combined.
  4. Bake: Pour the mixture into the prepared baking dish and bake for 25–30 minutes, or until the top is golden and a toothpick inserted in the center comes out clean.
  5. Cool and Serve: Allow the bake to cool for a few minutes before slicing. Serve warm, or refrigerate to serve chilled. Enjoy as-is or add toppings like fresh fruit, nuts, or a drizzle of honey.

Notes

  • Milk Options: You can use any type of milk—almond, oat, or cow’s milk. The recipe is flexible, so feel free to choose what works best for you.
  • Sweetener Choices: Depending on your dietary needs, you can adjust the sweetener to taste. If you’re reducing sugar intake, you can opt for stevia or monk fruit sweetener.
  • Vegan Option: For a vegan version, substitute the eggs with flaxseed meal (1 tbsp flaxseed mixed with 3 tbsp water, set for 5 minutes to gel).
  • Storage: This recipe can be stored in the fridge for up to 2 days, making it perfect for meal prepping.
  • Add-ins: Feel free to add extra flavor by mixing in berries, nuts, or even a bit of cinnamon for extra warmth.

A Family Tradition: The Lemon Mousse That Brings Us Together

There are certain dishes that have the power to evoke memories and emotions, dishes that remind us of family gatherings, quiet afternoons, and the simple joys of life. For me, one such dish is my grandmother’s Lemon Mousse. It’s not just a dessert—it’s a part of my family’s story, a treat that has been passed down through generations and holds a special place in our hearts. I can still remember the first time I tasted it, sitting in my grandmother’s kitchen as the sweet aroma of citrus filled the air. She always made this dessert when we had family over, and the tradition was as much about the shared experience as it was about the mousse itself.

Over the years, the Lemon Mousse has become more than just a dessert. It represents family, love, and connection. It was the dessert that brought my family together during both celebrations and quiet moments. As a child, I remember how my grandmother would carefully prepare it, her hands working with the same grace and skill she used for all of her dishes. And as the mousse set in the fridge, I knew that soon we would all be gathered around the table, savoring not just the flavors but the memories that came with it.

Now, whenever I make Lemon Mousse for my own family, I feel the connection to those memories. It’s the kind of dish that transcends time, uniting generations through shared love for good food. And the best part? It’s incredibly simple to make, requiring just a handful of ingredients and a little patience while it chills in the fridge. This dessert reminds me that it’s the simple things in life—whether it’s a homemade dish or a quiet moment spent with loved ones—that are often the most memorable.

Why Lemon Mousse?

Lemon Mousse is not just a delicious dessert; it’s a dessert that tells a story. The beauty of this mousse lies in its simplicity. With just a few ingredients—biscuits, milk, cornstarch, yogurt, lemon juice, and a touch of sugar—you can create something that feels both indulgent and refreshing. The mousse is light and airy, yet creamy and satisfying, with the bright zing of lemon cutting through the richness of the milk filling. It’s the perfect balance of sweetness and tartness, making it the ideal choice for any occasion.

What makes this dessert so special is its versatility. It can be made for birthdays, holidays, or simply as a treat for a quiet afternoon. It’s a crowd-pleaser, one that will impress your guests without requiring hours of complicated preparation. The process itself is therapeutic—mixing the ingredients, layering the mousse, and patiently waiting as it chills in the fridge. And once it’s ready, there’s the moment of joy when you finally get to taste it. The smooth, creamy texture of the mousse combined with the fresh, tangy lemon flavor is like nothing else. It’s a simple dessert, but it has the power to elevate any occasion.

Lemon Mousse Ingredients:

IngredientAmount
Biscuits200g
Melted Butter6 tablespoons (80g)
Milk4 cups (950 ml)
Sugar3/4 cup (170g)
Cornstarch5 tablespoons (45g)
Plain Yogurt1/2 cup (120g)
Cake Mold (8×11 inch or 18×28 cm)1
Lemon Juice1/3 cup (100 ml)
Water1 1/4 cups (300 ml)
Cornstarch3 tablespoons (25g)
Turmeric or Food Coloring1/2 teaspoon
Sugar1/4 cup (50g)
Melted White Chocolate (for decoration)As needed

Directions:

  1. Prepare the Biscuit Base:
    In a mixing bowl, crush the biscuits into fine crumbs. Add the melted butter and mix until the crumbs are evenly coated. Press the mixture into the base of an 8×11 inch cake mold (18×28 cm). Keep the mold in the fridge for 30 minutes to firm up.
  2. Make the Milk Filling:
    In a large saucepan, combine the milk, sugar, and cornstarch. Cook over medium heat, stirring constantly until the mixture thickens to a creamy consistency. Once thickened, remove from the heat and stir in the plain yogurt. Pour the mixture over the chilled biscuit base in the mold. Chill in the fridge for 30 minutes.
  3. Prepare the Lemon Syrup:
    In a small saucepan, combine lemon juice, water, cornstarch, turmeric (or food coloring), and sugar. Bring to a gentle simmer while stirring until it thickens and forms a syrup. Remove from heat and allow it to cool.
  4. Assemble the Mousse:
    Once the milk filling has chilled and set, pour the lemon syrup over the top. Smooth it out evenly with a spatula and let it cool in the fridge for 1 hour.
  5. Decorate:
    Before serving, decorate the top of the mousse with melted white chocolate for an elegant touch.

Nutritional Information (per serving):

NutrientAmount
Calories250 kcal
Protein4g
Carbohydrates32g
Fats12g
Fiber1g
Sugar18g

Simplicity at Its Best

In a world where cooking can sometimes feel overwhelming, it’s refreshing to know that there are still dishes that are both simple and satisfying. Lemon Mousse is one of those dishes. It doesn’t require fancy techniques or hard-to-find ingredients. It’s a dessert that anyone can make, no matter their cooking experience. The key to its success lies in using fresh ingredients and taking the time to let each layer set properly. The mousse comes together effortlessly, allowing you to focus on what really matters: the experience of sharing it with others.

The simplicity of the recipe also means that it’s easy to make variations. If you’re looking to add a twist, you could experiment with different citrus fruits, such as lime or orange, or add a bit of zest for an extra burst of flavor. But even in its most basic form, this lemon mousse is a winner. It’s a timeless dessert that can be enjoyed by anyone, regardless of their skill in the kitchen.

The Healing Power of Food

What truly makes this lemon mousse so memorable is not just the taste but the emotions it evokes. Food has always had a way of bringing people together. It’s a universal language that transcends barriers and connects us in ways that words cannot. Every time I make this lemon mousse, I am reminded of the countless family gatherings I’ve shared with my loved ones. There’s something about sitting around the table, enjoying a meal together, that creates bonds and strengthens relationships.

This dessert, in particular, holds a special place because it’s been passed down through generations. It’s more than just a recipe; it’s a piece of our family history. When I make it for my children, I feel a sense of pride, knowing that I’m continuing a tradition that my grandmother started. And when my children ask me to make it for their birthday or special occasions, I am reminded of the joy that food can bring into our lives.

The Lemon Mousse isn’t just a treat for the taste buds—it’s a treat for the soul. It’s a reminder that food can be an expression of love, of care, and of family. It’s the kind of dish that you make not just because it’s delicious, but because it’s a way of sharing a piece of yourself with those you love.

Frequently Asked Questions

1. Can I make the lemon mousse ahead of time?
Yes, lemon mousse is a perfect make-ahead dessert. In fact, it needs to chill for at least an hour to set properly, so making it a day in advance is ideal. Simply cover it and store it in the fridge until you’re ready to serve.

2. Can I substitute the biscuits for a gluten-free option?
Absolutely! You can substitute the biscuits with gluten-free cookies or crackers. There are plenty of gluten-free options available, and they will work perfectly in this recipe.

3. How do I get the mousse to set properly?
The key to achieving the perfect mousse is to make sure that each layer has enough time to chill and set. The biscuit base needs to firm up in the fridge for 30 minutes, and the milk filling should chill for 30 minutes as well. The lemon syrup should be allowed to cool before being poured over the mousse.

4. Can I add more lemon flavor?
Yes, if you want a stronger lemon flavor, you can add lemon zest to the milk filling or increase the amount of lemon juice in the syrup. Just be careful not to overpower the dessert with too much acidity.

5. How long can I store the lemon mousse?
The mousse will stay fresh in the fridge for up to 2 days. After that, the texture may begin to change, so it’s best to enjoy it within that time frame.

Conclusion: A Dessert for All Seasons

Lemon mousse is more than just a dessert—it’s a tradition, a connection to the past, and a simple yet elegant treat that has the power to bring people together. Its easy preparation and refreshing flavor make it the perfect addition to any gathering, and its creamy, tangy taste will always leave a lasting impression. Whether you’re making it for a holiday, a birthday, or simply as a sweet treat after dinner, this lemon mousse will never fail to delight.

As I sit with my family, sharing this dessert, I’m reminded of the power of food to create memories. It’s a reminder that the best moments in life are often the simplest ones—like enjoying a homemade dessert with those you love. So, the next time you find yourself in the kitchen, take a moment to make this Lemon Mousse, and share it with the people who matter most. It’s a dessert that will not only satisfy your sweet tooth but will also bring you closer to the ones you cherish.

The Final Touch: Sharing Love in Every Bite

Making lemon mousse is more than just following a recipe—it’s about creating something that will be remembered long after the last bite is finished. It’s about the love, the memories, and the connections that are made while preparing and sharing it. It’s these moments that make the effort worth it. And with each spoonful of creamy, lemony goodness, we find joy not just in the dessert itself, but in the shared experience of creating something special together.

Amal

A Family Tradition: The Lemon Mousse That Brings Us Together

Lemon Mousse is a light, creamy dessert with a perfect balance of tart lemon and smooth, silky texture. It’s an effortless yet elegant treat that can be made in just under two hours, providing a refreshing end to any meal. With a biscuit base and a luscious, lemon-flavored mousse on top, this dessert is both simple and sophisticated.
Prep Time 10 minutes
Cook Time 15 minutes
Total Time 1 hour 55 minutes
Servings: 6 –8 servings
Course: Dessert
Cuisine: American

Ingredients
  

  • 200 g Biscuits
  • 6 tablespoons Melted Butter 80g
  • 4 cups Milk 950 ml
  • 3/4 cup Sugar 170g
  • 5 tablespoons Cornstarch 45g
  • 1/2 cup Plain Yogurt 120g
  • 1/3 cup Lemon Juice 100 ml
  • 1 1/4 cups Water 300 ml
  • 3 tablespoons Cornstarch 25g
  • 1/2 teaspoon Turmeric or Food Coloring
  • 1/4 cup Sugar 50g
  • Melted White Chocolate for decoration

Method
 

  1. Prepare the Biscuit Base: In a mixing bowl, crush the biscuits into fine crumbs. Add the melted butter and mix until well combined. Press the mixture into the base of an 8×11-inch cake mold (18×28 cm). Refrigerate for 30 minutes to set.
  2. Make the Milk Filling: In a saucepan, combine the milk, sugar, and cornstarch. Heat over medium, whisking constantly until the mixture thickens to a creamy consistency. Remove from heat and stir in the plain yogurt. Pour the mixture over the chilled biscuit base. Chill for 30 minutes in the fridge.
  3. Prepare the Lemon Syrup: In a small saucepan, combine lemon juice, water, cornstarch, turmeric (or food coloring), and sugar. Stir and bring to a simmer over low heat, thickening until it forms a syrup. Remove from heat and allow it to cool.
  4. Assemble the Mousse: Once the milk filling has set, pour the cooled lemon syrup over the top. Use a spatula to spread it evenly. Refrigerate for 1 hour to allow the layers to firm up.
  5. Decorate: Before serving, drizzle melted white chocolate on top to add a delicate touch of sweetness and elegance.

Notes

  • You can use any type of biscuits for the base, but digestive or graham crackers work well.
  • To make the mousse more citrusy, add lemon zest to the milk filling before chilling.
  • This recipe can be made a day ahead. Store in the fridge for up to 2 days.

The Heartwarming Tradition of Grandma’s Veggie Fritters

There are certain dishes in life that carry with them not just flavor but a wealth of memories, emotions, and stories. For me, one of those dishes is my grandma’s veggie fritters. I remember the warm, cozy evenings in her kitchen, the scent of freshly cooked fritters filling the air as the sun set on the horizon. It was always around dinner time when these golden, crispy treats appeared on the table, served with a side of yogurt or a fresh herb sauce, perfectly paired with the chatter and laughter that surrounded our family meals.

The simplicity of the ingredients—zucchini, carrots, potatoes, eggs, and flour—wasn’t just about ease in the kitchen, it was about making do with what you had and creating something nourishing and satisfying. What made these fritters so special wasn’t just the taste; it was the love that went into making them. They were the kind of dish that didn’t need a recipe or exact measurements—just a handful of fresh ingredients, a pinch of salt, and a lot of care.

It’s funny how, as children, we don’t realize the weight of the moments we’re living through. Now, as an adult, those memories come flooding back every time I make these fritters. They bring me back to simpler times, when the kitchen was the heart of the home, where every meal was a chance to reconnect with family and with traditions.

When I first started cooking on my own, I made a decision to revisit the foods that had shaped my childhood. It was in those moments that I rediscovered my grandma’s veggie fritters, a humble yet satisfying meal that, to this day, I believe encapsulates everything a good dish should be—comforting, nutritious, and full of heart.

Why These Veggie Fritters Are More Than Just a Meal

At first glance, these veggie fritters may seem like just another vegetable dish, but they hold so much more. They’re not just a mix of vegetables bound together with eggs and flour; they represent a story of resourcefulness, simplicity, and love. My grandma’s approach to cooking was never about fancy ingredients or complicated methods. Instead, it was about making the most of what you had on hand and turning it into something beautiful. These fritters are a testament to that approach, offering a nourishing meal using basic, wholesome ingredients.

What makes these fritters truly remarkable is their versatility. You can prepare them with just a few simple vegetables, but there’s room to experiment and add your own personal touch. Some days, I’ll add a bit of garlic or onion for extra flavor, or a handful of fresh herbs to brighten the dish. Other times, I’ll sprinkle in some cheese for a more savory twist. The beauty of these fritters lies in their adaptability—they can be a quick dinner or a light snack, a side dish for a main meal, or even a breakfast treat if you’re feeling adventurous.

But beyond the convenience, there’s a deeper, more meaningful reason to embrace this dish: it’s a chance to reconnect with the values of simplicity and self-sufficiency. In a world where everything feels rushed, processed, and overcomplicated, these veggie fritters are a reminder that some of the best meals are born from the most humble ingredients. They teach us that wholesome, nutritious food doesn’t need to be complicated or expensive. Sometimes, the simplest ingredients are the ones that nourish us the most.

Ingredients

IngredientQuantity
Zucchini1
Carrot1
Potato1
Eggs2
Salt1 teaspoon
Flour2 tablespoons

Directions

  1. Prepare the Vegetables
    Grate the zucchini, carrot, and potato. Use a clean kitchen towel or cheesecloth to squeeze out the excess moisture from the vegetables to avoid the fritter mixture becoming too wet.
  2. Make the Batter
    In a large mixing bowl, whisk together the eggs and salt. Add the grated vegetables to the bowl, then stir in the flour until well combined, forming a thick batter.
  3. Form the Fritters
    Heat a little oil in a skillet over medium heat. Scoop spoonfuls of the vegetable mixture and shape them into small patties with your hands. Carefully place each patty into the hot skillet.
  4. Fry the Fritters
    Fry the fritters on each side for about 3-4 minutes, or until they turn golden and crispy. Once cooked, transfer them to a plate lined with paper towels to remove excess oil.
  5. Serve
    Serve the fritters warm with a side of yogurt, sour cream, or a simple dipping sauce for added flavor. They make a perfect light dinner or snack.

Nutrients

NutrientPer Serving (1 fritter)
Calories90 kcal
Protein3g
Carbohydrates12g
Fats3g
Fiber2g
Sugar2g
Sodium200mg

The Nutritional Benefits of Veggie Fritters

One of the most appealing aspects of these fritters is their balance of nutrients. They’re made primarily with vegetables—zucchini, carrots, and potatoes—which are rich in vitamins, minerals, and fiber. Zucchini is a low-calorie vegetable that provides a good source of vitamin C and potassium, while carrots are packed with beta-carotene, an antioxidant that’s good for eye health. Potatoes, though often considered a simple starchy vegetable, provide a solid source of energy and essential nutrients like vitamin C, potassium, and fiber.

Eggs, a key component of the fritter batter, are an excellent source of high-quality protein, as well as several essential nutrients, including B vitamins, vitamin D, and selenium. The addition of a small amount of flour helps to bind the fritters together without overwhelming the dish with too many carbohydrates, keeping the focus on the vegetables.

What’s especially nice about these fritters is their ability to provide a balance of macronutrients—healthy fats, proteins, and carbohydrates—in a single meal. The vegetables deliver plenty of fiber to support digestion, while the eggs provide protein to keep you feeling full and satisfied. They’re a complete meal on their own, or they can easily be paired with a salad or yogurt for added nutrients and flavors.

For those following specific dietary restrictions, these fritters are easily customizable. You can swap the flour for gluten-free flour to make them suitable for those with gluten sensitivities, or add different vegetables, such as spinach, corn, or bell peppers, to adjust the flavor and texture to your liking. Whether you’re looking for a healthy meal for dinner or a snack to enjoy with family, these fritters are a versatile and nutritious option.

Common FAQs About Veggie Fritters

1. Can I make these fritters ahead of time?

Yes! These fritters can easily be made ahead of time and stored in the refrigerator for up to two days. To reheat, simply warm them in a skillet for a few minutes on each side until they’re crispy again. You can also freeze them for longer storage; just make sure to place parchment paper between the fritters to prevent them from sticking together.

2. Can I use different vegetables in this recipe?

Absolutely! The beauty of veggie fritters is their adaptability. You can swap out the zucchini, carrots, and potatoes for other vegetables, such as sweet potatoes, parsnips, or even grated cauliflower. The key is to grate the vegetables finely and squeeze out any excess moisture before mixing them into the batter.

3. Are these fritters gluten-free?

Traditional veggie fritters are made with flour, but you can easily make them gluten-free by using a gluten-free flour substitute, such as almond flour, chickpea flour, or rice flour. Just be sure to adjust the consistency of the batter as needed.

4. How can I make these fritters more flavorful?

Feel free to add spices, herbs, or seasonings to suit your taste. A little garlic, onion powder, or smoked paprika can elevate the flavor profile. Fresh herbs like parsley, dill, or thyme can add a burst of freshness. Don’t be afraid to experiment and make the fritters your own!

5. Can I bake these instead of frying them?

Yes, if you prefer to avoid frying, you can bake these fritters in the oven. Preheat your oven to 375°F (190°C), and place the fritters on a baking sheet lined with parchment paper. Bake for 20-25 minutes, flipping halfway through, until they are golden brown and crispy.

Conclusion: A Dish That Brings Us Home

As I sit at my kitchen table, enjoying a plate of these veggie fritters, I can’t help but think of my grandma. I think about how simple ingredients can create something so special, something that binds us to our past, to our traditions, and to the people we love. These fritters aren’t just food—they’re a bridge to memories, a connection to a time when life was slower, and meals were made with intention and care.

Whether you’re making these fritters for the first time or revisiting a family favorite, I hope they bring you as much comfort and joy as they’ve brought me over the years. There’s a beauty in simplicity, and with every bite of these crispy, golden fritters, I’m reminded that some of the best things in life are the simplest. So, take your time, savor each bite, and enjoy the nourishment—both physical and emotional—that comes with making something with your own two hands.

Amal

The Heartwarming Tradition of Grandma’s Veggie Fritters

These veggie fritters, inspired by my grandmother’s comforting recipe, are the perfect combination of crunchy and soft, savory and satisfying. Made with fresh zucchini, carrots, and potatoes, they are easy to prepare and versatile enough to be enjoyed for dinner, as a snack, or even breakfast.
Prep Time 10 minutes
Cook Time 15 minutes
Total Time 25 minutes
Servings: 8 fritters
Course: Dinner
Cuisine: Comfort Food

Ingredients
  

  • 1 zucchini grated
  • 1 carrot grated
  • 1 potato peeled and grated
  • 2 eggs
  • 1 teaspoon salt
  • 2 tablespoons flour

Method
 

  1. Prepare the Vegetables: Grate the zucchini, carrot, and potato using a box grater or food processor. Once grated, use a clean kitchen towel to squeeze out any excess moisture from the vegetables to ensure the fritters hold together well during cooking.
  2. Make the Batter: In a large mixing bowl, whisk together the eggs and salt. Add the grated vegetables to the mixture, followed by the flour. Stir everything together until a thick batter forms.
  3. Shape the Fritters: Heat a small amount of oil in a skillet over medium heat. Using your hands or a spoon, shape the batter into small patties and place them into the hot skillet, pressing gently to flatten them.
  4. Cook the Fritters: Fry the fritters for about 3-4 minutes on each side, or until they are golden brown and crispy. Once cooked, remove the fritters from the pan and place them on a paper towel-lined plate to absorb any excess oil.
  5. Serve: Serve the fritters warm with a side of yogurt, sour cream, or a light herb dipping sauce. Enjoy them as a light dinner, a satisfying snack, or even as a breakfast item.

Notes

  • Customize the Fritters: Feel free to add herbs like parsley, dill, or thyme to the batter for added flavor. You can also experiment by adding a small amount of grated cheese for a richer taste.
  • Gluten-Free Option: For a gluten-free version, substitute the flour with a gluten-free flour blend or chickpea flour.
  • Storage: Leftover fritters can be stored in an airtight container in the refrigerator for up to 3 days. Reheat them in a skillet or in the oven to maintain their crispiness.
  • Serving Ideas: These fritters are delicious on their own, but they can also be paired with a simple salad or served as a side to roasted meats.

Flourless Oatmeal Bread: A Journey Back to Healthful Simplicity

Growing up, my grandmother always said that the best meals are those that come from simplicity. It wasn’t about fancy techniques or expensive ingredients, but about using what you had in the kitchen to create something wholesome, nourishing, and satisfying. One of my most cherished memories is sitting at the kitchen table, fresh bread cooling on the counter, a gentle warmth still filling the air as the rich, nutty aroma of oats made its way to the heart of our home. This flourless oatmeal bread was a constant in her kitchen, and it became something more than just food—it was a symbol of care, comfort, and tradition.

As life sped up and the demands of adulthood crept in, I found myself turning to complex recipes, quick fixes, and convenience foods. But after years of feeling sluggish and unsatisfied with the processed foods I relied on, I realized that what I truly craved was simplicity again. So, I returned to the basics: wholesome, natural ingredients that come together in perfect harmony. It was then that I rediscovered this flourless oatmeal bread—a bread that, like my grandmother’s, needed no tricks or fluff, just honest, nutritious ingredients that made you feel good inside and out.

This recipe is about more than just bread. It’s about reconnecting with a time when food wasn’t complicated, when everything we put on the table was made with love and with ingredients that supported our health. Flourless oatmeal bread is not just a breakfast option; it’s a reminder that some of the simplest foods are the best, and they are the ones that nourish our bodies and our souls.

Why Choose Flourless Oatmeal Bread? A Nutritious Alternative to Traditional Breads

In today’s world, with so many dietary preferences and food sensitivities, finding a bread that everyone can enjoy can feel overwhelming. From gluten-free to low-carb, from vegan to keto, the options are endless—and yet many of them are filled with processed ingredients and preservatives. Flourless oatmeal bread, however, offers a simple and wholesome alternative.

Oats are one of the most versatile and nutritious grains available, known for their high fiber content, heart-healthy benefits, and ability to support stable blood sugar levels. This bread harnesses all the goodness of oats without the need for traditional flour. The result is a soft, hearty loaf that’s both satisfying and gentle on your digestive system. By using oats as the base ingredient, you’re making a healthier choice without sacrificing flavor or texture.

In addition to the health benefits of oats, this bread is also a great source of protein and healthy fats, thanks to the seeds mixed into the dough. The combination of seeds adds texture and crunch, while boosting the nutritional profile with essential fatty acids, vitamins, and minerals.

Flourless oatmeal bread is also incredibly versatile. It can be enjoyed on its own, paired with a light spread of butter or jam, or used as a base for savory toppings like avocado or cheese. Whether you’re looking for a quick breakfast or a nutrient-packed snack, this bread can do it all. And because it’s free from gluten, it’s an excellent option for those with dietary restrictions or sensitivities.

Ingredients

IngredientQuantity
Oat flakes90 g
SaltA pinch
Baking soda1 teaspoon
Mixed seeds2 tablespoons

Directions

  1. Prepare the Oats
    In a large bowl, combine the oat flakes, salt, and baking soda. If you want to use gluten-free oats, make sure to check the label for certified gluten-free oats. Stir the dry ingredients together to ensure they are evenly mixed.
  2. Add the Seeds
    Stir in the mixed seeds. You can use any combination of seeds you prefer, such as sunflower seeds, chia seeds, or pumpkin seeds, for added nutrition and texture.
  3. Combine with Liquid
    Gradually add water to the dry mixture, stirring to form a thick batter. Add just enough water to bring everything together, but not too much—it should have a dough-like consistency.
  4. Form the Dough
    Transfer the dough into a greased or parchment-lined loaf pan. Spread it out evenly with a spatula, making sure to smooth the top.
  5. Bake
    Preheat the oven to 180°C (350°F). Bake the bread for about 25-30 minutes, or until the top is golden and firm to the touch. A toothpick inserted into the center should come out clean.
  6. Cool and Serve
    Allow the bread to cool in the pan for 10 minutes before transferring it to a wire rack to cool completely. Slice and serve for a nutritious and hearty breakfast.

Nutrients

NutrientPer Serving (1 slice)
Calories150 kcal
Protein5g
Carbohydrates20g
Fats7g
Fiber4g
Sugar1g
Sodium150mg

The Benefits of Oats: Why They’re a Superfood for Your Body

Oats are often hailed as a superfood, and for good reason. They are rich in soluble fiber, specifically beta-glucan, which has been shown to help lower cholesterol levels, improve heart health, and regulate blood sugar. This makes oatmeal-based recipes, like this flourless oatmeal bread, a smart choice for anyone looking to maintain a healthy heart and keep blood sugar levels stable throughout the day.

In addition to heart health, oats are a good source of protein, with approximately 6 grams of protein per cup of cooked oats. This makes oats a great option for those looking to add more plant-based protein to their diets. Furthermore, oats contain essential vitamins and minerals, including iron, magnesium, zinc, and B vitamins, all of which are important for overall health.

But perhaps one of the most appealing benefits of oats is their ability to promote digestive health. The high fiber content in oats helps to regulate bowel movements and support healthy gut bacteria. This makes flourless oatmeal bread an ideal choice for anyone looking to improve their digestion or maintain a healthy gut.

A Simple Recipe for a Busy Lifestyle: No Fuss, Just Flavor

One of the main reasons I love this flourless oatmeal bread is its simplicity. In a world where we’re constantly bombarded with complex recipes and time-consuming cooking processes, this bread offers a breath of fresh air. It’s quick to make, requires minimal ingredients, and doesn’t involve complicated steps or special equipment.

For busy mornings, this bread is a game-changer. You can prepare it the night before and have a nourishing, healthy breakfast ready to go when you wake up. It’s perfect for those who don’t have the time or energy to make a big breakfast but still want to start their day with something that will fuel them and keep them satisfied until lunch. The bread keeps well for several days, so you can enjoy it throughout the week, whether you’re grabbing a slice on your way out the door or enjoying it with a cup of coffee.

Perfect for Customization: Make It Your Own

Another great thing about this flourless oatmeal bread is its versatility when it comes to customization. While the recipe as written is delicious on its own, you can easily tweak it to suit your tastes. For instance, you could add dried fruits like raisins or cranberries for a touch of sweetness. Or, if you prefer a savory version, you could incorporate garlic powder, onion powder, or even a sprinkle of cheese for added flavor.

The beauty of this recipe is that it allows you to get creative while still sticking to the simplicity of wholesome ingredients. You can experiment with different types of seeds, such as sunflower, chia, or flax, depending on what you have on hand or what flavor profile you’re going for. The options are endless, making this bread a truly personalized experience.

Common FAQs About Flourless Oatmeal Bread

  1. Can I use quick oats instead of rolled oats?
    While rolled oats are typically used in this recipe for their texture, quick oats can be used as a substitute. However, the bread may have a slightly different texture and may be softer.
  2. Can I make this bread without seeds?
    Yes! While the seeds add a delightful crunch and nutritional boost, you can certainly make this bread without them. The bread will still be delicious and nutritious without the seeds.
  3. How do I store flourless oatmeal bread?
    Store this bread in an airtight container at room temperature for up to three days. If you want to keep it longer, it can be frozen for up to a month. Simply slice and store it in a freezer-safe bag.
  4. Can I add sweeteners to the bread?
    While this recipe is designed to be savory, you can add a touch of honey or maple syrup to the dough if you prefer a slightly sweet flavor. Just keep in mind that it may alter the texture slightly.
  5. Is this bread gluten-free?
    Yes, as long as you use certified gluten-free oats, this bread is naturally gluten-free, making it a great option for those with gluten sensitivities.

Conclusion: Embracing Simplicity for Better Health

Flourless oatmeal bread is more than just a healthy alternative to traditional bread; it’s a return to simplicity, to the idea that good food doesn’t have to be complicated to be delicious and nourishing. By embracing wholesome, natural ingredients like oats and seeds, we can create something that not only tastes great but also supports our health and well-being.

In a world that often overcomplicates food, this bread reminds us that sometimes, the simplest recipes are the ones that have the most heart. Whether you’re looking to fuel your body with a healthy breakfast or simply enjoy a comforting snack, this flourless oatmeal bread is the perfect choice. Easy to make, versatile, and packed with nutrients, it’s a recipe that brings both joy and nourishment to your kitchen.

Amal

Flourless Oatmeal Bread: A Journey Back to Healthful Simplicity

This flourless oatmeal bread is the perfect healthy alternative to traditional bread. Made with wholesome oats, mixed seeds, and a touch of baking soda, it’s a nutrient-packed choice for a quick breakfast or snack. Enjoy its soft texture and subtle nutty flavor, all while boosting your fiber intake and keeping things simple in the kitchen.
Prep Time 10 minutes
Cook Time 30 minutes
Total Time 40 minutes
Servings: 6 –8 servings
Course: Breakfast
Cuisine: Healthy

Ingredients
  

  • 90 g oat flakes use gluten-free if needed
  • A pinch of salt
  • 1 teaspoon baking soda
  • 2 tablespoons mixed seeds sunflower, pumpkin, chia, etc.

Method
 

  1. In a large mixing bowl, combine the oat flakes, salt, and baking soda. Stir to combine.
  2. Gradually add water to the dry mixture, a little at a time, until you get a dough-like consistency. Be sure not to add too much water—aim for a thick batter.
  3. Stir in the mixed seeds and make sure they’re evenly distributed throughout the dough.
  4. Transfer the dough to a loaf pan lined with parchment paper or lightly greased.
  5. Preheat the oven to 180°C (350°F) and bake for 25-30 minutes, or until the top is golden and the bread is firm to the touch.
  6. Once done, let the bread cool in the pan for 10 minutes before transferring it to a wire rack to cool completely. Slice and serve.

Notes

  • Feel free to customize the bread with additional ingredients such as dried fruit, nuts, or spices like cinnamon for a unique twist.
  • To make the bread vegan, simply replace the water with plant-based milk like almond or oat milk.
  • Store any leftover bread in an airtight container at room temperature for up to 3 days or in the refrigerator for up to a week.

Cheese Bread Baked in a Frying Pan: A Slice of Comfort and Tradition

There’s something universally comforting about the smell of freshly baked bread. For many of us, bread evokes memories of simpler times—of family kitchens filled with warmth and laughter, of soft loaves emerging from the oven with a golden crust that’s irresistible. As a child, my fondest memories revolve around the kitchen, watching my mother and grandmother prepare meals, where every dish had a story, and every ingredient carried years of tradition. The act of making bread, in particular, was always special. The rhythm of kneading dough, the rise of the bread as it rested, the anticipation as it baked—all of it felt like a ritual, a way to connect with the past while creating something for the future.

One of the simplest but most beloved recipes in our family was a variation of cheese bread that my grandmother would prepare in a frying pan. It wasn’t fancy, but it was magic. The savory scent of melting cheese mingled with fresh herbs, and the warmth of the bread was a comfort like no other. This bread was more than just food; it was a symbol of home, of love, and of the way food can bring people together.

Over the years, I’ve come to realize that the simplest recipes are often the most special. While other breads may be adorned with elaborate fillings or garnishes, this cheese bread stands out for its pure simplicity. The combination of cheddar cheese, fresh herbs, and a crispy golden crust made it a family favorite, and it was always the first to disappear from the table. Whether served as a side dish, a snack, or the main attraction, it was the kind of bread that made everyone feel at home.

This recipe, which brings back so many warm memories, is one that anyone can make at home. With just a few simple ingredients, you can create a savory, herb-infused cheese bread in a frying pan, perfect for any occasion. No need for an oven or elaborate techniques—just the joy of cooking something from scratch that will make your house smell amazing and your taste buds dance.

The Beauty of Simplicity: Why This Cheese Bread Works

In a world where complex recipes and over-the-top ingredients often steal the spotlight, there’s something refreshing about a dish that doesn’t try too hard. This cheese bread is the embodiment of that idea. It’s a humble creation, made from basic pantry staples like flour, butter, and cheese. What makes it extraordinary is how those ingredients come together. The dough is simple, but it’s elevated by the sharpness of cheddar cheese and the fresh, aromatic herbs like parsley and dill. As the bread cooks in the frying pan, the butter creates a golden, crispy crust, while the cheese melts into every crevice, ensuring that each bite is packed with flavor.

The true beauty of this bread lies in its versatility. You don’t need a formal occasion to enjoy it. It can be whipped up in minutes and served hot from the pan. It pairs well with a variety of meals, from a light soup or salad to a hearty dinner. But it’s also a comforting snack all on its own. Whether you’re cooking for family, friends, or just yourself, this bread will always deliver a sense of warmth and satisfaction. It’s an easy recipe that doesn’t require advanced skills in the kitchen, yet it’s impressive in its ability to delight everyone at the table.

Ingredients

IngredientQuantity
Salt1 tsp
All-purpose flour240 grams (1 1/2 cups)
Warm milk150 ml (3/5 cup)
Parsley, chopped1 bunch
Cheddar cheese, grated150 grams
Dill, choppedSmall bunch
Butter, melted60 grams

Directions

  1. Prepare the Dough
    In a large mixing bowl, combine the flour and salt. Gradually add the warm milk and melted butter, stirring continuously. Once the mixture starts coming together, knead the dough gently until smooth and elastic.
  2. Incorporate Herbs and Cheese
    Add the chopped parsley, dill, and grated cheddar cheese into the dough. Continue kneading until the cheese and herbs are evenly distributed throughout.
  3. Shape the Dough
    On a lightly floured surface, roll out the dough into a circle approximately 1/2 inch thick. Make sure it will fit comfortably in your frying pan.
  4. Cook the Bread in the Frying Pan
    Heat a non-stick frying pan over medium heat and add a small amount of butter. Once the pan is hot, place the dough inside and cook for 5-7 minutes on one side, or until it turns golden brown and crispy. Flip the bread over and cook for another 5-7 minutes on the other side until the bread is fully cooked and both sides are golden.
  5. Serve
    Once the bread is crispy and golden on both sides, remove it from the pan. Let it cool slightly before slicing into wedges. Serve hot, either on its own or with a side salad for a delightful meal.

Nutrients

NutrientPer Serving (1 slice)
Calories220 kcal
Protein6g
Carbohydrates28g
Fats10g
Fiber1g
Sugar2g
Sodium400mg

Why Frying Pan Bread? The Joy of Pan Cooking

In many parts of the world, frying pan breads have been a staple for centuries. Unlike traditional oven-baked loaves, frying pan bread is quick to prepare and offers a different kind of texture—crispy on the outside and soft on the inside. For those who may not have an oven or who are looking for a quicker alternative, pan-fried bread provides a perfect solution.

Frying pan bread, especially when cooked over medium heat with a bit of butter, creates a beautiful golden crust that is hard to replicate in an oven. The direct contact with the pan gives the bread an extra layer of flavor, as the butter caramelizes and adds a slight nutty richness to the exterior. The inside of the bread, meanwhile, remains soft and fluffy, with the melted cheese adding richness that perfectly complements the herbed dough. It’s a texture and flavor combination that makes this bread irresistible, and the best part is, you don’t need to wait hours for it to rise or bake.

This method of cooking also makes the recipe more approachable for beginner bakers or those who want a quick, satisfying homemade bread without the need for specialized equipment. A basic frying pan, a bit of patience, and a love for good food is all you need to make this delicious cheese bread.

Perfect for Any Occasion: How to Serve Your Cheese Bread

The versatility of this cheese bread means that it can easily adapt to whatever meal you are preparing. Whether you’re looking for a simple snack, a hearty side dish, or something to serve at a family gathering, this bread fits the bill.

  • As a Snack: It’s perfect for a light snack, especially when paired with fresh vegetables or a cup of soup. Imagine enjoying a warm slice of cheese bread alongside a comforting bowl of tomato soup. The crispy exterior and cheesy interior are a match made in heaven.
  • As a Side Dish: Serve it alongside a salad or a savory stew. The bread’s richness pairs wonderfully with something light and fresh, or with a hearty, warming dish. Its slightly salty, cheesy flavor complements nearly any meal, making it a fantastic addition to your dinner table.
  • For a Casual Gathering: If you’re hosting a casual gathering, this cheese bread is a great choice. It’s simple to prepare in large batches and doesn’t require much attention while cooking. You can slice it into wedges for easy sharing, and it’s bound to be a crowd-pleaser.
  • For Breakfast: Why not enjoy this bread in the morning with a steaming cup of coffee or tea? The savory, comforting nature of the bread makes it an ideal breakfast companion. Add a spread of butter or a dollop of jam for extra flavor.

No matter how you serve it, this cheese bread is a delicious, easy-to-make treat that will leave everyone satisfied.

Frequently Asked Questions (FAQs)

1. Can I use different types of cheese in this bread?
Yes, you can absolutely experiment with different cheeses. While cheddar is a classic choice, other cheeses like mozzarella, gouda, or even parmesan would work beautifully in this recipe. Just keep in mind that softer cheeses like mozzarella may melt more easily, while harder cheeses like parmesan will give a sharper, more pronounced flavor.

2. Can I make this bread ahead of time?
Although this bread is best enjoyed fresh, you can make it ahead of time and reheat it. Simply wrap it in foil and store it in the fridge for up to two days. To reheat, place it in a warm frying pan for a few minutes to crisp it back up.

3. Can I make this bread gluten-free?
Yes, you can use a gluten-free flour blend to make this recipe gluten-free. Be sure to choose a good-quality gluten-free flour and add a bit of xanthan gum if it’s not already included in your flour blend. The texture might be slightly different, but it should still be delicious.

4. Can I add other ingredients like garlic or onions?
Absolutely! Garlic and onions can be wonderful additions to this bread. If you’d like to add garlic, try sautéing it in the butter before mixing it into the dough. Chopped onions or scallions also work well. Just be sure not to overpower the cheese and herbs with too many additional ingredients.

5. Is this recipe suitable for beginners?
Yes, this is a beginner-friendly recipe. It requires no special skills and is simple enough for anyone to try. The ingredients are easy to find, and the cooking method is straightforward, making it an excellent choice for someone who’s new to baking or cooking in general.

Conclusion: A Slice of Home in Every Bite

In today’s fast-paced world, we often find ourselves looking for ways to reconnect with the comforting traditions of the past. This cheese bread, baked in a frying pan, is a delicious way to do just that. It’s a recipe rooted in simplicity, but one that brings immense satisfaction and joy with each bite. Whether you’re sharing it with family or enjoying it alone, this bread reminds us that sometimes the best things in life are the simplest.

From the crispy golden crust to the melted cheese and fresh herbs, this cheese bread is more than just a recipe—it’s a reminder of the power of homemade food. It’s a slice of home, tradition, and comfort in every bite, and once you try it, you’ll understand why it has the ability to make you forget all kinds of cakes and breads.

Amal

Cheese Bread Baked in a Frying Pan: A Slice of Comfort and Tradition

This warm, savory cheese bread is crispy on the outside and soft on the inside, making it the perfect snack or side dish. Infused with fresh herbs and gooey cheddar cheese, this simple recipe is cooked in a frying pan, delivering a delightful combination of textures and flavors in every bite. It’s an easy-to-make, comforting bread that will leave you craving more.
Prep Time 15 minutes
Cook Time 15 minutes
Total Time 30 minutes
Servings: 6 –8 servings
Course: Snack
Cuisine: American Comfort Food

Ingredients
  

  • 1 tsp salt
  • 240 grams flour 1 1/2 cups
  • 150 ml warm milk 3/5 cup
  • Bunch of parsley chopped
  • 150 grams cheddar cheese grated
  • Small bunch of dill chopped
  • 60 grams butter melted

Method
 

  1. Prepare the Dough: In a large mixing bowl, combine the flour and salt. Gradually add the warm milk and melted butter, stirring until the dough starts to come together. Knead gently until smooth and elastic.
  2. Add Herbs and Cheese: Fold in the chopped parsley, dill, and grated cheddar cheese until evenly distributed throughout the dough.
  3. Shape the Dough: Roll the dough out on a lightly floured surface to about 1/2 inch thickness, ensuring it fits the size of your frying pan.
  4. Cook in the Frying Pan: Heat a non-stick frying pan over medium heat and add a small amount of butter. Once the pan is hot, place the dough in and cook for 5-7 minutes until golden and crispy on one side. Flip and cook the other side for another 5-7 minutes until fully cooked and golden brown.
  5. Serve: Once cooked, remove from the pan, slice into wedges, and serve hot. Enjoy on its own or paired with a fresh salad or soup.

Notes

  • For a softer texture, replace some of the flour with whole wheat or gluten-free flour.
  • You can also try adding garlic or chili flakes to give the bread a little extra kick.
  • To make it extra cheesy, consider adding more cheddar or even mixing in some mozzarella.
  • If you prefer a lighter version, opt for low-fat cheese and butter substitutes.

With This Cake, You Will Forget All Kinds of Cakes: A Slice of Nostalgia and Comfort

There’s something magical about the scent of a freshly baked cake. For me, that scent takes me straight back to my childhood, to my grandmother’s kitchen, where the warm, sweet aroma filled the air. I can still picture her carefully measuring ingredients, her hands steady as she mixed the batter, while the sound of a whisk against a mixing bowl echoed in the cozy space. She would smile as the cake baked, often telling stories of how the cake had been passed down through generations, a treasured family recipe. I didn’t know it at the time, but these moments would become some of the most cherished memories of my life.

One particular cake always stood out. It wasn’t fancy or elaborate, but it had the ability to bring everyone to the table. The secret was in its simplicity—soft, moist, and perfectly balanced in flavor. Every bite felt like a hug, comforting and familiar. That cake was the one that made us forget all other cakes. No other dessert, no matter how decadent, could compare. I never realized until later in life that the joy we felt around that cake wasn’t just about the taste—it was the connection, the tradition, and the love that went into every part of the process.

This cake is that same creation, a simple but unforgettable dessert that can turn an ordinary moment into something special. With its delicate crumb, the rich buttery flavor, and the subtle sweetness, it is a dessert that will make you forget all kinds of cakes you’ve ever had before. Whether you are making it for a special occasion or just because, it has the power to transform any moment into something magical.

Why This Cake Will Always Be Your Favorite

It’s easy to be drawn to intricate cakes with layers of frosting and elaborate decorations. And while those cakes have their place, there’s something timeless about a simple, no-frills cake that feels like home. This cake is the epitome of that tradition. It’s a cake that doesn’t need any extravagant layers or overly complicated techniques to make it special. What it offers instead is something far more valuable: a taste that feels comforting, familiar, and undeniably satisfying.

The beauty of this cake lies in its balance. The buttery richness, paired with just the right amount of sweetness, makes it irresistible. There’s no overpowering flavor; every bite is smooth, tender, and comforting. It doesn’t require fancy fillings or toppings because it’s perfect on its own. And yet, it’s versatile enough to be dressed up however you like—whether with a simple dusting of powdered sugar or a dollop of whipped cream. But even if you enjoy it plain, it’s never lacking in flavor.

This cake is designed to make a lasting impression, not through complexity or extravagant ingredients, but through its incredible simplicity. When people try it, they remember the experience. They won’t soon forget the moment they take that first bite and are instantly reminded of the cakes of their own childhood, of the cakes that made them feel loved and connected. The truth is, this cake doesn’t just fill your stomach—it fills your soul, too.

Ingredients

IngredientQuantity
All-purpose flour200 grams
Granulated sugar150 grams
Baking powder1 teaspoon
Baking soda1/2 teaspoon
Salt1/4 teaspoon
Unsalted butter, softened100 grams
Large eggs2
Vanilla extract1 teaspoon
Whole milk100 milliliters
Sour cream50 grams
Dark chocolate, melted (optional)50 grams

Directions

  1. Preheat the Oven and Prepare the Pan
    Begin by preheating your oven to 180°C (350°F). Prepare an 8-inch round cake pan by greasing and flouring it, or lining it with parchment paper to ensure easy removal once baked.
  2. Mix the Dry Ingredients
    In a medium-sized bowl, whisk together the all-purpose flour, granulated sugar, baking powder, baking soda, and salt. This mixture should be well combined before setting it aside.
  3. Cream the Butter and Eggs
    In a large mixing bowl, beat the softened butter using an electric mixer on medium speed until it’s light and fluffy. Add the eggs, one at a time, mixing thoroughly after each addition. Stir in the vanilla extract to infuse the batter with a fragrant depth.
  4. Combine the Wet and Dry Ingredients
    Gradually add the dry ingredients to the butter and egg mixture, alternating with the whole milk and sour cream. Start and end with the dry ingredients. Mix just until combined—avoid over-mixing to keep the batter light and airy.
  5. Optional: Add Melted Chocolate
    If you choose to incorporate chocolate for added richness, gently fold the melted dark chocolate into the batter, ensuring it’s evenly mixed without deflating the batter.
  6. Bake the Cake
    Pour the batter into the prepared cake pan and spread it out evenly. Bake in the preheated oven for 25-30 minutes or until a toothpick inserted into the center comes out clean. Once done, let the cake cool in the pan for about 10 minutes, then remove it and allow it to cool completely on a wire rack.
  7. Serve and Enjoy
    After the cake has cooled, slice and serve. You can enjoy it plain, or elevate it with whipped cream, fresh berries, or a dusting of powdered sugar for added elegance.

Nutrients

NutrientPer Serving (1 Slice)
Calories250 kcal
Protein3g
Carbohydrates35g
Fats12g
Fiber1g
Sugar18g
Sodium180mg

A Cake That Brings People Together

There’s a unique charm in the way certain foods have the ability to bring people together. They transcend boundaries—whether cultural, generational, or geographical—and create a sense of unity. This cake is one of those foods. It has an incredible ability to spark conversation, inspire nostalgia, and unite people in a shared moment of enjoyment.

I’ve seen it happen countless times—guests gathered around the table, savoring the cake, and sharing stories. What starts as a simple dessert becomes a catalyst for connection. For some, it’s the memories of their own mothers or grandmothers baking in the kitchen. For others, it’s the joy of trying something so simple and yet so deeply satisfying. Regardless of the background, this cake creates a moment where people can share, laugh, and indulge in a little bit of sweetness, both literally and figuratively.

There’s a profound comfort in food that evokes memories, and this cake does just that. It’s the kind of dessert that encourages conversation, laughter, and the kind of connection that only happens when we share something meaningful. The act of gathering around the table to enjoy this cake becomes more than just eating—it becomes a celebration of life’s small moments. The conversations flow, and the atmosphere becomes one of warmth and camaraderie.

What Makes This Cake Stand Out

At first glance, this cake may seem like just another simple dessert. However, there are a few key elements that elevate it beyond the ordinary. It’s all in the balance of the ingredients, the perfect texture, and the consistency of the flavor. Many cakes can be dry or overly sweet, but this one strikes the ideal harmony. The butter creates a rich, moist crumb, while the sugar adds just the right amount of sweetness to make every bite satisfying but not overwhelming. The addition of sour cream lends a subtle tanginess, which helps keep the cake moist and adds complexity to the flavor.

Another aspect that sets this cake apart is its versatility. You can enjoy it on its own, as a simple but indulgent treat, or you can dress it up with your favorite toppings. Some might enjoy it with fresh berries, others with a dusting of powdered sugar or a drizzle of rich chocolate ganache. It’s the kind of cake that invites creativity without taking away from its own charm. It’s a canvas for whatever you feel like adding, but even in its plainest form, it’s a showstopper.

Frequently Asked Questions (FAQs)

1. How do I know when the cake is fully baked?

To ensure the cake is baked through, insert a toothpick or cake tester into the center. If it comes out clean or with a few moist crumbs (but not wet batter), the cake is done. Be careful not to overbake it, as this can result in a dry texture.

2. Can I use a different type of flour for this recipe?

While all-purpose flour works best for this cake, you can experiment with other types of flour. If you prefer a gluten-free option, consider using a gluten-free all-purpose flour blend. Keep in mind that the texture may vary slightly, but the cake will still be delicious.

3. Can I make this cake ahead of time?

Yes, this cake stores well. After baking, allow it to cool completely, then cover it with plastic wrap or store it in an airtight container at room temperature for up to 3 days. You can also refrigerate it for longer storage. If you’re preparing it ahead of a special occasion, this is a great way to save time.

4. Can I add flavorings to this cake?

Absolutely! If you want to infuse extra flavor, try adding a teaspoon of almond extract, lemon zest, or cinnamon to the batter. These subtle flavors will complement the cake without overpowering its simple goodness.

5. Can I freeze this cake?

Yes, this cake can be frozen for up to 2 months. Once it’s fully cooled, wrap it tightly in plastic wrap and place it in an airtight container or freezer bag. To thaw, leave it at room temperature for several hours before serving.

Conclusion: A Cake Worth Remembering

As with many of life’s best things, this cake is both simple and extraordinary. It doesn’t need to be fancy to make an impact. It’s the kind of dessert that brings comfort, nostalgia, and warmth into every bite. Whether you’re sharing it with friends, family, or simply enjoying it on your own, it will make you forget about all other cakes. It’s a reminder that sometimes the simplest things are the ones that leave the most lasting impressions.

This cake, with its buttery richness and tender crumb, will always have a special place in my heart. It’s a recipe that’s more than just ingredients; it’s a piece of my family’s tradition, a symbol of the love and connection we share. And I hope it brings that same sense of joy to you and your loved ones. So go ahead—make this cake, share it, and allow yourself to be transported to a time and place where simple pleasures bring the greatest happiness.

Amal

With This Cake, You Will Forget All Kinds of Cakes: A Slice of Nostalgia and Comfort

This moist, buttery cake is simple but unforgettable. With its delicate crumb and perfect balance of sweetness, it’s the kind of dessert that makes you forget all other cakes you’ve had before. Whether served plain or with a light dusting of powdered sugar, this cake brings warmth, nostalgia, and comfort with every bite. A timeless classic that will never go out of style.
Prep Time 20 minutes
Cook Time 30 minutes
Total Time 50 minutes
Servings: 8 -10 servings
Course: Dessert
Cuisine: American

Ingredients
  

  • 200 grams all-purpose flour
  • 150 grams granulated sugar
  • 1 teaspoon baking powder
  • 1/2 teaspoon baking soda
  • 1/4 teaspoon salt
  • 100 grams unsalted butter softened
  • 2 large eggs
  • 1 teaspoon vanilla extract
  • 100 milliliters whole milk
  • 50 grams sour cream
  • 50 grams dark chocolate melted (optional for added richness)

Method
 

  1. Preheat the Oven and Prepare the Pan: Preheat the oven to 180°C (350°F). Grease and flour an 8-inch round cake pan, or line it with parchment paper for easy removal.
  2. Mix the Dry Ingredients: In a medium-sized bowl, whisk together the all-purpose flour, granulated sugar, baking powder, baking soda, and salt. Set aside.
  3. Cream the Butter and Eggs: In a large bowl, beat the softened butter with an electric mixer on medium speed until light and fluffy. Add the eggs one at a time, mixing well after each addition. Stir in the vanilla extract.
  4. Combine Wet and Dry Ingredients: Gradually add the dry ingredients to the butter-egg mixture, alternating with the milk and sour cream. Start and end with the dry ingredients. Mix until just combined.
  5. Optional: Add Melted Chocolate: If using melted chocolate, gently fold it into the batter. This step will add extra richness to the cake.
  6. Bake the Cake: Pour the batter into the prepared cake pan and spread it out evenly. Bake for 25-30 minutes, or until a toothpick inserted into the center comes out clean. Let the cake cool in the pan for 10 minutes before removing it and transferring to a wire rack to cool completely.
  7. Serve and Enjoy: Once the cake has cooled, slice and enjoy! You can serve it as is or with a dusting of powdered sugar or whipped cream for added indulgence.

Notes

  • Ensure the butter is softened before starting to mix for smooth incorporation into the batter.
  • For a richer taste, you can substitute sour cream with Greek yogurt.
  • You can add a little cinnamon or nutmeg to the dry ingredients for a warm, spiced twist.
  • If you use melted chocolate, be sure it’s not too hot when added to the batter, as it could alter the cake’s texture.

Stay Connected

Get recipes via email: