My Italian Mom’s Eggplant Delight That Conquered the World

There are certain dishes that go beyond simple sustenance. They hold memories, tell stories, and evoke emotions with every bite. This eggplant-based dish is one of them.

I still remember the first time I saw my mother prepare it. The kitchen was filled with the aroma of sautéed onions and garlic, mingling with the sweet earthiness of roasted eggplant. I was just a child, sitting on a wooden stool, watching her work with precision and love. She always cooked with a sense of purpose—each slice, stir, and sprinkle of salt felt like a ritual passed down through generations.

This recipe wasn’t just about creating a meal; it was about gathering our family around the table, sharing laughter, and savoring the comfort of home-cooked food. Even as years passed and I moved away, I found myself returning to this dish, recreating it in my own kitchen whenever I missed home. It was my way of keeping my mother close, no matter how many miles separated us.

Now, I share this beloved dish with you, hoping it becomes a part of your story as well. Whether you’re making it for family, friends, or just for yourself, know that each bite carries warmth, tradition, and the power to bring people together.

Why This Eggplant Recipe Stands Out

This is no ordinary eggplant dish. Unlike heavier, cheese-laden casseroles, this recipe strikes a perfect balance between rich, savory flavors and light, wholesome ingredients. The combination of eggplant, mushrooms, ham, and a delicate egg custard creates a texture that is both hearty and satisfying without being overwhelming.

Here’s why you’ll love it:

  • Perfect for Any Occasion – Serve it as a main course, a side dish, or even as part of a brunch spread.
  • Nutrient-Packed – Eggplant is rich in fiber and antioxidants, while eggs provide protein to keep you full and energized.
  • Simple Ingredients, Big Flavor – The beauty of this dish lies in its simplicity. No fancy ingredients—just honest, delicious flavors.
  • Make-Ahead Friendly – Prepare it in advance, and it tastes even better the next day as the flavors meld together.

Ingredients

IngredientQuantity
Eggplants2
Bell pepper1
Onion1
Garlic1 clove
Cooked ham120 g (4 ½ oz)
Eggs4
Mushrooms150 g (5 oz)
Kefir or milk100 ml (½ cup)
Parmesan cheese30 g (1 oz)
ButterAs needed
BreadcrumbsAs needed
Salt, pepperTo taste

Directions

  1. Prepare the Ingredients:
    • Dice the eggplants, bell pepper, onion, mushrooms, and cooked ham.
    • Mince the garlic finely.
  2. Sauté the Vegetables:
    • In a large pan, melt a bit of butter over medium heat.
    • Add the onion and garlic, sautéing until fragrant.
    • Stir in the bell pepper, eggplants, and mushrooms. Cook until softened.
  3. Add the Ham & Seasoning:
    • Toss in the diced ham and cook for a few more minutes.
    • Season with salt and pepper to taste.
  4. Prepare the Egg Mixture:
    • In a bowl, beat the eggs with kefir (or milk) and grated Parmesan cheese.
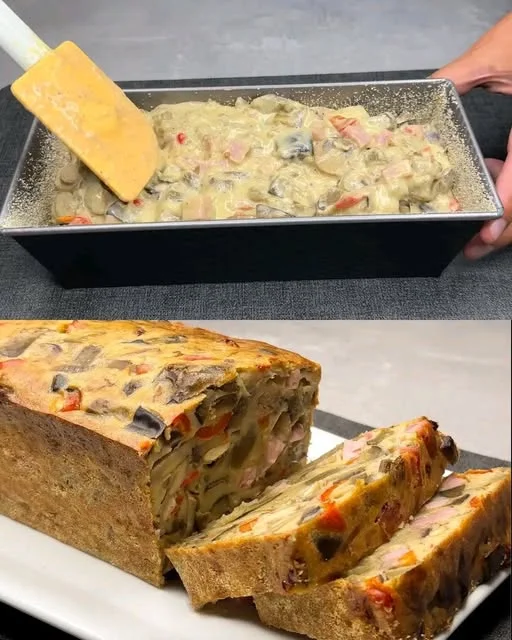
  5. Combine & Bake:
    • Preheat the oven to 180°C (350°F).
    • Grease a baking dish with butter and coat it lightly with breadcrumbs.
    • Transfer the sautéed mixture to the dish and pour the egg mixture over it.
    • Bake for about 25-30 minutes, or until golden and set.
  6. Serve & Enjoy:
    • Let it cool slightly before slicing.
    • Enjoy warm as a satisfying main dish or a hearty side!

Nutritional Information (Per Serving)

NutrientAmount (Approx.)
Calories250-300 kcal
Protein15 g
Carbohydrates15 g
Fats15 g
Fiber4 g

The Secret to Elevating This Dish

While this recipe is already packed with flavor, a few small adjustments can make it even more special:

1. Roast the Eggplant First

Instead of just sautéing the eggplant, try roasting it in the oven for 20 minutes before adding it to the dish. This brings out a deeper, slightly smoky flavor that enhances the overall taste.

2. Experiment with Cheese

Parmesan gives the dish a rich umami boost, but if you want a creamier texture, try adding a touch of ricotta or mozzarella. For a sharper bite, pecorino works beautifully.

3. Add Fresh Herbs

A sprinkle of fresh basil or oregano can add brightness to the dish, making it feel even more vibrant.

4. Use Smoked Ham for Depth

Instead of regular cooked ham, try using smoked ham or pancetta for an extra layer of savory goodness.

5. Try Different Breadcrumbs

If you’re feeling adventurous, swap traditional breadcrumbs for panko, crushed nuts, or even a mix of ground almonds and herbs for a crunchy, unique topping.

Serving Suggestions: Pairing This Dish Like an Italian

In Italy, food is rarely eaten in isolation. It’s always part of a bigger experience. Here’s how to turn this dish into a well-rounded meal:

  • Pair it with a Fresh Salad – A simple arugula and cherry tomato salad with a lemon-olive oil dressing provides a refreshing contrast.
  • Serve with Crusty Bread – A slice of warm, rustic bread is perfect for soaking up every bit of the flavorful egg custard.
  • Enjoy with a Glass of Wine – A light, dry white wine like Pinot Grigio or a medium-bodied red like Chianti pairs wonderfully with this dish.
  • Round It Off with a Light Dessert – End your meal with something simple yet classic, like fresh berries with mascarpone or a scoop of gelato.

FAQs: Everything You Need to Know

1. Can I Make This Dish Vegetarian?

Absolutely! Simply omit the ham or replace it with sautéed spinach, sun-dried tomatoes, or even roasted red peppers for added flavor.

2. How Do I Store Leftovers?

Once cooled, store leftovers in an airtight container in the refrigerator for up to three days. Reheat in the oven at 180°C (350°F) for best results.

3. Can I Freeze It?

Yes! This dish freezes well. Let it cool completely, then wrap it tightly in plastic wrap and aluminum foil before freezing. To reheat, thaw overnight in the fridge and warm it in the oven.

4. What Can I Substitute for Kefir?

If you don’t have kefir, you can use milk, Greek yogurt, or even a splash of heavy cream for a richer texture.

5. Can I Make This Recipe Without Eggs?

If you prefer an egg-free version, you can create a custard-like texture using a mixture of blended silken tofu, plant-based milk, and a bit of cornstarch.

6. How Can I Make This Dish Lower in Calories?

Use lean turkey or omit the meat altogether, reduce the amount of cheese, and opt for baking spray instead of butter.

7. Can I Add More Vegetables?

Of course! Zucchini, spinach, or roasted bell peppers make great additions without compromising the integrity of the dish.

Conclusion: A Dish That Feels Like Home

Food is more than just nourishment—it’s a connection to the past, a celebration of the present, and a gift to those we share it with. This eggplant recipe is proof of that. Whether you’re making it to relive childhood memories, impress dinner guests, or simply enjoy a wholesome homemade meal, know that you’re creating something special.

Like all great recipes, this one invites you to make it your own. Maybe you’ll add a personal twist, swap out ingredients, or serve it in a new way. However you choose to prepare it, I hope it brings as much warmth and joy to your table as it has to mine.

So go ahead—gather your ingredients, turn on some Italian music, and let the magic happen in your kitchen. Because some recipes aren’t just about taste. They’re about love, tradition, and the stories we create with every meal.

Amal

My Italian Mom’s Eggplant Delight That Conquered the World

This hearty and flavorful eggplant dish is a true family favorite, inspired by my Italian mother’s kitchen. Combining tender eggplant, savory ham, mushrooms, and a rich egg custard, it’s the perfect balance of comforting and nutritious. Whether served as a main course or a side, this dish is simple to prepare and bursting with classic Mediterranean flavors.
Prep Time 15 minutes
Cook Time 30 minutes
Total Time 45 minutes
Servings: 4 –6 servings
Course: Main Dish
Cuisine: Italian-inspired

Ingredients
  

  • 2 eggplants
  • 1 bell pepper
  • 1 onion
  • 1 clove of garlic
  • 120 g 4 ½ oz cooked ham, diced
  • 4 eggs
  • 150 g 5 oz mushrooms, sliced
  • 100 ml ½ cup kefir or milk
  • 30 g 1 oz Parmesan cheese, grated
  • Butter for greasing
  • Breadcrumbs for coating
  • Salt and pepper to taste

Method
 

Prepare the Vegetables:
  1. Dice the eggplants, bell pepper, onion, and mushrooms.
  2. Mince the garlic.
Sauté the Ingredients:
  1. Heat a bit of butter in a large pan over medium heat.
  2. Add the onion and garlic, cooking until softened and fragrant.
  3. Stir in the bell pepper, eggplants, and mushrooms. Cook until tender.
Add the Ham and Seasoning:
  1. Mix in the diced ham and cook for another few minutes.
  2. Season with salt and pepper to taste.
Prepare the Egg Mixture:
  1. In a bowl, whisk the eggs with kefir (or milk) and grated Parmesan.
Assemble and Bake:
  1. Preheat the oven to 180°C (350°F).
  2. Grease a baking dish with butter and coat it lightly with breadcrumbs.
  3. Spread the sautéed mixture evenly in the dish.
  4. Pour the egg mixture over the top.
  5. Bake for 25-30 minutes, or until golden brown and set.
Serve and Enjoy:
  1. Let it cool slightly before slicing. Serve warm as a main dish or a delicious side.

Notes

  • Make it vegetarian: Simply omit the ham or replace it with roasted red peppers or spinach.
  • Cheese variations: Try adding ricotta or mozzarella for a creamier texture, or pecorino for extra sharpness.
  • Storage tips: Leftovers can be stored in an airtight container in the fridge for up to 3 days. Reheat in the oven for the best texture.
  • Freezing: This dish freezes well! Cool completely, wrap tightly, and store for up to 2 months.

Crispy Potato & Savory Ground Beef Delight – A Comforting, Hearty Classic

Some dishes have a way of bringing people together, filling the kitchen with warmth, nostalgia, and the irresistible aroma of home-cooked goodness. This Crispy Potato & Savory Ground Beef Delight is one of those recipes. I remember the first time I had it—sitting in my grandmother’s kitchen, watching her grate potatoes with ease, mixing them with just the right amount of seasoning, and pan-frying them to golden perfection.

The sizzle of the potatoes hitting the hot pan was almost as comforting as the dish itself. She would cook the ground beef with onions, layering it between crispy potato layers, creating a dish that was both simple and deeply satisfying. It wasn’t just food; it was an experience—a meal that felt like a hug on a plate.

Now, I make this recipe when I need something comforting yet quick, when I want to serve my family something hearty and filling without spending hours in the kitchen. It’s budget-friendly, easy to prepare, and packed with flavor, making it perfect for busy weeknights or cozy weekends.

Whether you’re making this for a family dinner, a casual get-together, or just for yourself, this dish will never disappoint. It’s crispy, golden, and full of rich, savory goodness—a true comfort food classic.

What Makes This Dish So Special?

This recipe is a perfect balance of textures and flavors, with crispy potatoes and savory, seasoned beef coming together in a dish that’s simple yet deeply satisfying.

1. Crispy & Golden Perfection

The grated potatoes cook into a crispy, golden crust, creating a delicious contrast with the juicy beef filling inside.

2. A Hearty, Protein-Packed Meal

With ground beef and potatoes, this dish is not only delicious but also filling, making it a great meal for the whole family.

3. Quick & Easy to Prepare

You don’t need fancy ingredients or complicated steps—just a few pantry staples, some basic prep, and a hot pan to create something amazing in under 30 minutes.

4. Budget-Friendly & Made with Simple Ingredients

This recipe uses affordable, everyday ingredients, making it a great option for home cooks looking for a satisfying meal without breaking the bank.

5. Versatile & Customizable

You can adjust the flavors, add extra ingredients, or switch up the seasonings to make this dish your own.

Ingredients

IngredientQuantity
Medium potatoes4-5 (600-750g / 21-26 oz), peeled and grated
Cornstarch2 tablespoons (16g)
Salt & PepperTo taste
Sunflower oil2 tablespoons
Ground beef½ pound (225g)
Onion1 medium (150g), diced

Directions

  1. Prepare the Potatoes: Squeeze excess moisture from the grated potatoes, then mix with cornstarch, salt, and pepper.
  2. Cook the Ground Beef: Heat 1 tablespoon of oil in a pan, sauté the diced onion until soft, then add the ground beef. Cook until browned and season with salt and pepper.
  3. Form the Potato Mixture: In a separate pan, heat the remaining oil. Spread half of the grated potato mixture in the pan, press it down, then add the cooked beef mixture on top. Cover with the remaining potatoes.
  4. Pan-Fry Until Golden: Cook on medium heat for 6-8 minutes per side, until crispy and golden brown.
  5. Serve & Enjoy: Let cool slightly before slicing. Serve warm with sour cream or your favorite dipping sauce.

Nutritional Information (Per Serving, Approximate)

NutrientValue
Calories320-350 kcal
Protein15g
Carbohydrates35g
Fat12g
Fiber4g
Sugar2g

Ways to Customize Your Potato & Ground Beef Delight

One of the best things about this dish is its versatility—you can easily tweak it to suit your taste preferences!

1. Add More Flavor

  • Sprinkle paprika or smoked paprika for a deeper, smoky taste.
  • Mix in garlic powder, thyme, or rosemary for added aroma.
  • Use grated Parmesan or cheddar cheese in the potato mixture for extra richness.

2. Make It Extra Crispy

  • Squeeze out as much moisture as possible from the grated potatoes before cooking to help them crisp up.
  • Cook over medium heat to achieve a perfect golden crust without burning.
  • Try air-frying or baking instead of pan-frying for a lighter version.

3. Turn It Into a Casserole

  • Instead of cooking in a pan, layer the potatoes and beef in a baking dish and bake at 200°C (400°F) for 25-30 minutes for a crispy oven-baked version.

4. Swap the Protein

  • Replace ground beef with ground turkey, chicken, or lamb for a different twist.
  • Try a vegetarian version using mushrooms or lentils instead of meat.

5. Serve It in Different Ways

  • Top with sour cream or Greek yogurt for a creamy contrast.
  • Serve with a side of fresh salad to balance the richness.
  • Drizzle with hot sauce or ketchup for an extra kick.

FAQs – Everything You Need to Know

1. How do I keep the potatoes crispy?

To get the best crispy texture:

  • Squeeze out excess moisture from the grated potatoes using a kitchen towel.
  • Use enough oil—but not too much—to get that perfect golden crust.
  • Cook on medium heat to prevent burning while allowing the potatoes to crisp up properly.

2. Can I use mashed potatoes instead of grated potatoes?

Yes! You can replace the grated potatoes with mashed potatoes and create a potato and beef patty or a layered potato casserole instead.

3. Can I make this ahead of time?

Yes! You can:

  • Prepare the potato and beef mixture and store it separately in the fridge for up to 24 hours before cooking.
  • Cook and store leftovers in an airtight container for up to 3 days. Reheat in a pan or oven to restore crispiness.

4. Can I freeze this dish?

While it’s best enjoyed fresh, you can freeze leftovers:

  • Let it cool completely, then store in an airtight container for up to 2 months.
  • Reheat in a skillet or oven for the best texture—avoid microwaving, as it may make the potatoes soggy.

5. What can I serve with this dish?

  • A fresh green salad for a lighter contrast.
  • A fried or poached egg on top for a delicious breakfast-style meal.
  • Steamed vegetables or roasted bell peppers for added nutrition.

6. Can I bake this instead of frying?

Absolutely! You can layer everything in a greased baking dish and bake at 200°C (400°F) for 25-30 minutes until golden and crispy.

7. What’s the best type of potato to use?

Russet potatoes or Yukon Golds work best because they have the right balance of starch and moisture to get crispy.

Final Thoughts – A Dish That Feels Like Home

There’s something truly special about simple, home-cooked meals that bring comfort and joy. This Crispy Potato & Savory Ground Beef Delight is one of those dishes—it’s hearty, satisfying, and packed with flavor, yet easy enough to make any night of the week.

With its golden, crispy potatoes and perfectly seasoned beef, this dish is sure to become a go-to favorite in your home. Whether you’re cooking for family, meal-prepping for the week, or just craving something crispy, hearty, and delicious, this recipe will never fail you.

So grab some potatoes, heat up the skillet, and enjoy the simple pleasure of a warm, homemade meal that always hits the spot!

Amal

Crispy Potato & Savory Ground Beef Delight – A Comforting, Hearty Classic

This Crispy Potato & Savory Ground Beef Delight is a flavor-packed dish that brings together golden, crispy grated potatoes and seasoned ground beef for a meal that is both hearty and satisfying. Perfect as a main course or a side dish, this recipe is easy to make and perfect for busy weeknights. Serve it warm with your favorite sauce or a dollop of sour cream for extra indulgence!
Prep Time 15 minutes
Cook Time 20 minutes
Total Time 35 minutes
Servings: 4 servings
Course: Main Dish
Cuisine: International

Ingredients
  

  • 4-5 medium potatoes 600-750g / 21-26 oz, peeled and grated
  • 2 tablespoons cornstarch 16g
  • Salt and pepper to taste
  • 2 tablespoons sunflower oil
  • ½ pound ground beef 225g
  • 1 medium onion 150g, diced

Method
 

  1. Prepare the Potatoes: Grate the potatoes and squeeze out excess moisture using a clean kitchen towel. Mix with cornstarch, salt, and pepper.
  2. Cook the Beef: In a pan, heat 1 tablespoon of oil and sauté the diced onion until soft. Add the ground beef and cook until browned. Season with salt and pepper.
  3. Assemble the Dish: In another pan, heat the remaining oil. Spread half of the grated potato mixture in the pan, pressing it down. Add the cooked beef mixture on top, then cover with the remaining potatoes.
  4. Pan-Fry to Perfection: Cook over medium heat for 6-8 minutes per side until golden brown and crispy.
  5. Serve & Enjoy: Let cool slightly before slicing. Serve warm with sour cream, ketchup, or a side of fresh salad.

Notes

  • For extra crispiness, let the grated potatoes sit for 5 minutes before squeezing out moisture.
  • Try different seasonings, such as smoked paprika or garlic powder, for a flavor twist.
  • Make it cheesy by adding a layer of shredded cheddar or mozzarella between the potatoes and beef.
  • For a healthier option, bake in the oven at 200°C (400°F) for 25-30 minutes instead of pan-frying.

Festive Apple Puff Pastry Delight – A Simple Yet Elegant Dessert

Some desserts bring back memories of warmth, laughter, and togetherness, and for me, this Festive Apple Puff Pastry Delight is one of them. I remember the first time I made it for a family gathering—it was a crisp autumn evening, the scent of cinnamon filling the air, and the sound of laughter echoing through the house. As I pulled the golden, flaky pastry from the oven, everyone gathered around, eager to take that first bite.

This recipe reminds me of the simple joys of baking, where a few basic ingredients transform into something delightful and comforting. There’s something special about the way the buttery, crispy layers of puff pastry contrast with the soft, spiced apples, making each bite feel like a warm embrace. It’s a dessert that looks elegant, tastes indulgent, yet is effortless to make—perfect for any occasion, from holiday celebrations to a cozy evening at home.

If you love easy desserts with rich flavors, this Festive Apple Puff Pastry Delight is a must-try. It’s light, flaky, and beautifully infused with cinnamon, making it the perfect treat to share with family and friends.

Why You’ll Love This Recipe

This dessert is a celebration of simplicity—minimal effort, maximum flavor. Here’s why it deserves a spot in your baking rotation:

1. Buttery, Flaky Perfection

Puff pastry bakes into crisp, golden layers, providing the perfect contrast to the tender apple filling.

2. Naturally Sweet & Spiced

With the warmth of cinnamon and the natural sweetness of apples, this recipe delivers rich flavors without needing excessive sugar.

3. Quick and Easy to Make

With just a few ingredients and minimal prep, you can have this dessert ready in under 30 minutes—perfect for last-minute guests or weeknight indulgence.

4. Versatile and Customizable

This pastry can be shaped, filled, and flavored in different ways, making it a recipe that never gets boring.

5. A Beautiful Dessert for Any Occasion

Whether you serve it as a breakfast treat, a holiday dessert, or an elegant dinner party finale, this puff pastry delight always impresses.

Ingredients

IngredientQuantity
Puff Pastry400g (1 sheet)
Cinnamon1 teaspoon
Egg1 large, beaten (for brushing)
Apples2 medium (peeled, cored, thinly sliced)
Icing Sugar2 tablespoons (for sprinkling)

Directions

  1. Preheat the Oven: Set to 200°C (400°F) and line a baking sheet with parchment paper.
  2. Prepare the Apples: In a bowl, toss the sliced apples with cinnamon.
  3. Roll Out the Pastry: Lightly flour your surface and roll out the puff pastry sheet.
  4. Assemble the Pastry: Arrange the apple slices in the center of the pastry, leaving space around the edges.
  5. Seal and Brush: Fold or cut the pastry into a decorative shape, then brush with the beaten egg for a golden finish.
  6. Bake Until Golden: Place in the oven and bake for 18-22 minutes, or until puffed and golden brown.
  7. Cool & Serve: Let cool slightly, dust with icing sugar, and enjoy warm!

Nutritional Information (Per Serving, Approximate)

NutrientValue
Calories220-250 kcal
Protein4g
Carbohydrates30g
Fat10g
Fiber2g
Sugar8g

Ways to Customize Your Apple Puff Pastry Delight

While this recipe is delicious as is, you can make it even more special with these creative twists:

1. Add a Nutty Crunch

Sprinkle chopped walnuts, pecans, or almonds over the apple filling before baking for extra texture and richness.

2. Make It Extra Decadent

Drizzle caramel sauce or honey over the baked pastry for a touch of indulgence.

3. Play with Different Spices

Cinnamon is classic, but you can also experiment with:

  • Nutmeg for warmth.
  • Cardamom for a slightly exotic touch.
  • Ginger for a subtle spice kick.

4. Try a Different Fruit Filling

Swap apples for:

  • Pears for a softer, milder sweetness.
  • Berries for a tangy contrast.
  • Peaches for a summer twist.

5. Serve It in Unique Ways

  • Dust with powdered sugar for a light finish.
  • Serve with vanilla ice cream or whipped cream for extra creaminess.
  • Pair with coffee or mulled wine for a cozy experience.

FAQs – Everything You Need to Know

1. Can I use store-bought puff pastry?

Yes! Store-bought puff pastry works perfectly and makes this recipe incredibly easy. Just be sure to thaw it properly before use.

2. What type of apples work best?

Firm, slightly tart apples like Granny Smith, Honeycrisp, or Pink Lady work best. They hold their shape well and balance the sweetness of the pastry.

3. Can I make this dessert ahead of time?

Yes! You can:

  • Prepare the pastry and apples in advance, then assemble and bake when ready.
  • Store baked pastries in an airtight container at room temperature for up to 2 days.

4. How do I reheat leftovers?

For best results, reheat in the oven at 180°C (350°F) for 5-10 minutes to restore crispiness. Avoid microwaving, as it can make the pastry soft.

5. Can I freeze this dessert?

Yes! To freeze:

  • Assemble the pastry and freeze before baking.
  • When ready to bake, place frozen pastry in a preheated oven and add a few extra minutes to the baking time.

6. Do I need to peel the apples?

Peeling is recommended for a smoother texture, but if you enjoy the extra fiber and texture, you can leave the peels on.

7. How can I prevent my pastry from getting soggy?

  • Ensure your apples are not overly juicy—pat them dry if needed.
  • Avoid overfilling the pastry to prevent excess moisture.
  • Bake at the right temperature to crisp up the pastry properly.

Final Thoughts – A Dessert That Feels Like a Celebration

There’s something undeniably joyful and comforting about a flaky, golden apple pastry. It’s the kind of dessert that feels festive yet effortless, making it perfect for both special occasions and everyday treats.

With buttery, crisp layers, warm cinnamon apples, and a light dusting of sugar, every bite is a balance of texture and flavor that keeps you coming back for more. Whether you’re sharing it with loved ones or treating yourself to something special, this Festive Apple Puff Pastry Delight is a recipe worth making again and again.

So why wait? Preheat your oven, roll out that puff pastry, and experience the magic of homemade pastry goodness today!

Amal

Festive Apple Puff Pastry Delight – A Simple Yet Elegant Dessert

This Festive Apple Puff Pastry Delight is a flaky, golden pastry filled with sweet, spiced apples and finished with a dusting of icing sugar. With its crispy layers and warm cinnamon aroma, this easy yet elegant dessert is perfect for holidays, cozy evenings, or a quick indulgence. Serve it warm with ice cream or alongside your favorite coffee for a treat that’s sure to impress!
Prep Time 10 minutes
Cook Time 20 minutes
Total Time 30 minutes
Servings: 4 –6 servings
Course: Dessert
Cuisine: European-inspired

Ingredients
  

  • 400 g 1 sheet puff pastry
  • 2 medium apples peeled, cored, and thinly sliced
  • 1 teaspoon cinnamon
  • 1 large egg beaten (for brushing)
  • 2 tablespoons icing sugar for sprinkling

Method
 

  1. Preheat the Oven: Set to 200°C (400°F) and line a baking sheet with parchment paper.
  2. Prepare the Apples: In a bowl, toss the sliced apples with cinnamon.
  3. Roll Out the Pastry: Lightly flour your surface and roll out the puff pastry sheet.
  4. Assemble the Pastry: Arrange the apple slices in the center of the pastry, leaving space around the edges.
  5. Seal and Brush: Fold or shape the pastry as desired, then brush with the beaten egg for a golden finish.
  6. Bake Until Golden: Place in the oven and bake for 18-22 minutes, or until puffed and golden brown.
  7. Cool & Serve: Let cool slightly, dust with icing sugar, and enjoy warm!

Notes

  • For extra crunch, add chopped walnuts or almonds before baking.
  • For a richer flavor, drizzle with caramel sauce before serving.
  • Store leftovers in an airtight container at room temperature for up to 2 days.
  • To reheat, bake at 180°C (350°F) for 5-10 minutes to restore crispiness.

Homemade Fresh Cheese – A Simple Tradition Worth Keeping

There is something deeply satisfying about making your own fresh cheese at home. It’s a simple process, but it connects you to an age-old tradition—one that has been passed down through generations. My first experience with homemade cheese happened in my grandmother’s kitchen. She grew up in a small village where store-bought dairy products were rare, so making cheese from scratch was an essential skill.

I remember watching her carefully heat the milk, gently stirring as she added yogurt and eggs. The transformation was almost magical—milk turning into soft, delicate curds, filling the kitchen with a warm, comforting aroma. She would wrap the curds in cheesecloth, press them under a weight, and by the time dinner rolled around, there was a fresh, creamy cheese ready to be enjoyed with warm bread and herbs.

It wasn’t just about the cheese itself—it was about the process. The simplicity, the patience, the feeling of creating something with your own hands. Now, whenever I make fresh cheese at home, I am reminded of those quiet moments in my grandmother’s kitchen. And the best part? This cheese tastes far better than anything you can buy at the store—pure, fresh, and free from additives.

If you’ve never tried making homemade cheese before, now is the perfect time to start. It requires just a few basic ingredients, and the result is a creamy, delicious cheese that can be used in countless ways.

Why Homemade Cheese is a Must-Try

Making your own fresh cheese isn’t just about the end product—it’s about the experience, the quality, and the ability to control what goes into your food. Here’s why you should give it a try:

1. No Artificial Preservatives or Additives

Unlike many store-bought cheeses, homemade cheese contains only natural ingredients. No artificial preservatives, no chemicals—just pure, wholesome dairy.

2. Simple and Cost-Effective

Fresh cheese requires just four ingredients—milk, salt, eggs, and yogurt. It’s an incredibly affordable way to enjoy high-quality cheese without spending a fortune on specialty brands.

3. Freshness You Can Taste

There is nothing quite like the taste of freshly made cheese. It has a light, creamy texture with a mild, slightly tangy flavor. Whether you enjoy it plain, with a sprinkle of herbs, or drizzled with honey, it’s always delicious.

4. Easy to Customize

One of the best things about making your own cheese is that you can experiment with different flavors. Try adding:

  • Fresh herbs like thyme, basil, or rosemary for a savory twist.
  • A drizzle of honey or fruit preserves for a sweet variation.
  • A pinch of chili flakes or black pepper for a bit of heat.

5. Versatile for Any Meal

Homemade fresh cheese can be used in so many ways:

  • Spread on warm bread or toast.
  • Crumbled over salads or pasta dishes.
  • Served with olives, nuts, and fruit for a simple appetizer.
  • Used as a filling for savory pastries or sandwiches.

Ingredients

IngredientQuantity
Milk2 liters (8.5 cups), store-bought
Salt1 tablespoon
Eggs4 large
Yogurt200 grams (7 oz)

Directions

  1. Heat the Milk: In a large pot, heat the milk over medium heat until it is just about to boil. Stir occasionally to prevent burning.
  2. Add the Ingredients: Reduce the heat to low, then add salt, beaten eggs, and yogurt. Stir gently and cook for a few minutes until the mixture begins to curdle.
  3. Separate the Curd: Once curds have formed, remove from heat and strain through a cheesecloth or fine sieve.
  4. Press & Drain: Gather the cheesecloth, twist to remove excess liquid, and place the cheese under a light weight to drain for 1-2 hours.
  5. Serve & Enjoy: Unwrap the cheese, slice or crumble as desired, and enjoy fresh!

Nutritional Information (Per 100g, Approximate)

NutrientValue
Calories180-200 kcal
Protein15g
Carbohydrates3g
Fat12g
CalciumHigh

Frequently Asked Questions (FAQs)

1. What type of milk is best for making homemade cheese?

Use full-fat milk for the best texture and flavor. Store-bought milk works well, but avoid ultra-pasteurized milk, as it may not form curds properly.

2. Can I make this cheese without eggs?

Yes! Eggs help create a firmer texture, but you can omit them if you prefer a softer, more spreadable cheese.

3. How do I store homemade cheese?

Store your cheese in an airtight container in the refrigerator. It will stay fresh for up to 5 days.

4. Can I freeze homemade cheese?

Freezing is not recommended, as it may change the texture and make the cheese crumbly. It’s best to enjoy fresh within a few days.

5. How do I make my cheese creamier?

For a softer, creamier cheese, try adding:

  • A little extra yogurt to the mixture.
  • A splash of cream for a richer texture.
  • Less draining time to retain more moisture.

6. Can I use plant-based milk to make dairy-free cheese?

This particular recipe works best with dairy milk, but you can make a dairy-free version using almond, cashew, or soy milk, along with a plant-based yogurt and a natural coagulant like lemon juice.

7. What can I do with the leftover whey?

When making fresh cheese, you’ll be left with a liquid called whey. Don’t throw it away! You can:

  • Use it in smoothies or soups for added protein.
  • Add it to bread or pancake batter instead of water.
  • Feed it to plants as a natural fertilizer.

Final Thoughts – The Joy of Homemade Cheese

Making fresh cheese at home is more than just a cooking project—it’s a return to simple, wholesome food. In just a short amount of time, you can transform basic ingredients into something delicious, versatile, and full of natural goodness.

Whether you enjoy it with herbs, a drizzle of honey, or simply as it is, this creamy homemade cheese is a true delight. Once you try it, you may never go back to store-bought cheese again.

So take a moment, gather your ingredients, and experience the joy of creating something from scratch. Your taste buds will thank you!

Amal

Homemade Fresh Cheese – A Simple Tradition Worth Keeping

This homemade fresh cheese is soft, creamy, and incredibly easy to make! With just four simple ingredients, you can create a rich, flavorful cheese that’s perfect for spreading on toast, adding to salads, or enjoying on its own. Say goodbye to store-bought cheese and experience the joy of making your own at home!
Prep Time 5 minutes
Cook Time 15 minutes
Total Time 2 hours 20 minutes
Servings: 4 –6 servings
Course: Snack
Cuisine: Homemade

Ingredients
  

  • 2 liters 8.5 cups milk (store-bought)
  • 1 tablespoon salt
  • 4 large eggs
  • 200 grams 7 oz yogurt

Method
 

  1. Heat the Milk: In a large pot, warm the milk over medium heat until just before it reaches a boil. Stir occasionally to prevent burning.
  2. Add the Ingredients: Lower the heat and add the salt, beaten eggs, and yogurt. Stir gently to combine.
  3. Form the Curds: Continue cooking for a few minutes until the mixture starts to separate into curds and whey.
  4. Strain the Cheese: Pour the mixture through a cheesecloth-lined sieve to separate the curds from the liquid whey.
  5. Drain and Shape: Gather the cheesecloth, twist gently to remove excess moisture, and press under a light weight for 1-2 hours.
  6. Serve & Enjoy: Once firm, unwrap the cheese and enjoy it fresh!

Notes

  • For a creamier texture, reduce the draining time.
  • For a firmer cheese, press for longer under a heavier weight.
  • Store in the fridge in an airtight container for up to 5 days.
  • Use leftover whey in soups, smoothies, or baking instead of water.

Hearty Chickpea Soup – A Simple, Comforting Classic

There are certain dishes that instantly bring back memories of home, and for me, chickpea soup is one of them. Growing up, my grandmother always had a way of turning simple, everyday ingredients into something magical. Whenever the temperatures dropped, she would pull out her biggest pot, fill it with chickpeas, fresh vegetables, and warm spices, and let it simmer for hours.

I can still remember the smell of onions and olive oil sizzling in the pot, the sweetness of carrots blending with the earthiness of chickpeas, and the way the whole house felt warmer as the soup slowly cooked. We’d gather around the table, each with a steaming bowl in front of us, savoring every spoonful.

Now, as an adult, I make chickpea soup not just because it’s delicious, but because it reminds me of those moments—of family, tradition, and the comfort of home-cooked meals. This recipe is a tribute to those memories. It’s simple, nutritious, and incredibly satisfying, perfect for any time you need a warm, nourishing dish.

Why This Chickpea Soup is a Must-Try

This hearty, protein-packed soup is not only delicious but also filled with nutritional benefits. Whether you’re looking for a quick, budget-friendly meal or something wholesome and nourishing, this recipe has you covered.

1. Packed with Plant-Based Protein

Chickpeas are a great source of protein and fiber, making this soup both filling and nutritious. It’s perfect for vegetarians, those following a healthy diet, or anyone wanting a satisfying meal without relying on meat.

2. Rich, Deep Flavor

This soup may use simple ingredients, but the combination of sautéed onions, celery, carrots, and chickpeas simmered in broth creates a deep, comforting flavor. The pepperoni adds a smoky, slightly spicy touch that makes every bite even more delicious.

3. Budget-Friendly and Easy to Make

With just a handful of pantry staples, you can create a rich, nourishing soup without spending much. Whether you’re using dried chickpeas or canned ones, this dish comes together easily and is great for meal prep.

4. Perfect for Any Season

While chickpea soup is often enjoyed in colder months, it’s light enough to be eaten year-round. Serve it with crusty bread in the winter or pair it with a fresh salad in the summer for a well-balanced meal.

5. A Great Make-Ahead Meal

This soup actually tastes better the next day, as the flavors continue to develop overnight. Make a big batch, store it in the fridge, and enjoy it throughout the week.

Ingredients

IngredientQuantity
Chickpeas100g
Water1.5 liters (7 glasses)
Onion1, diced
Olive oilAs needed
Celery stalk1, chopped
Pepperoni1, sliced
Carrot1, diced

Directions

  1. Prepare the Chickpeas: If using dried chickpeas, soak them overnight, then drain and rinse.
  2. Sauté the Aromatics: In a large pot, heat olive oil and sauté the onion, celery, and carrot until softened.
  3. Add Chickpeas & Water: Stir in the chickpeas, water, and sliced pepperoni. Bring to a boil.
  4. Simmer Until Tender: Reduce heat and let simmer for 45-60 minutes until chickpeas are soft and flavors are well combined.
  5. Serve & Enjoy: Adjust seasoning if needed, drizzle with extra olive oil, and serve warm.

Nutritional Information (Per Serving, Approximate)

NutrientValue
Calories180-220 kcal
Protein8g
Carbohydrates30g
Fat5g
Fiber7g
Sugar5g

How to Customize Your Chickpea Soup

One of the best things about chickpea soup is how adaptable it is. Whether you want to add more protein, adjust the spice level, or make it completely plant-based, here are some ways to customize it:

1. Make it Vegan or Vegetarian

If you want a vegan version, simply leave out the pepperoni. The soup will still have a rich flavor, thanks to the vegetables and chickpeas. You can also:

  • Use vegetable broth instead of water.
  • Add a dash of smoked paprika to replace the smoky flavor of the pepperoni.
  • Stir in some nutritional yeast for an umami boost.

2. Add More Vegetables

While carrots, onions, and celery are classic, you can enhance the soup by adding:

  • Bell peppers for extra sweetness.
  • Tomatoes for a slightly tangy depth.
  • Spinach or kale for a nutrient boost.

3. Spice It Up

If you like a little heat, try:

  • Adding red pepper flakes while cooking.
  • Stirring in a spoonful of harissa or chili paste for a bold kick.
  • Serving with a squeeze of fresh lemon juice to brighten the flavors.

4. Make It Creamy

For a thicker, creamier consistency, you can:

  • Blend half of the soup and mix it back in.
  • Stir in a spoonful of Greek yogurt or coconut milk before serving.

5. Add Protein for a Heartier Meal

If you want to make this soup even more filling, consider adding:

  • Shredded chicken or turkey.
  • Crumbled sausage for extra spice.
  • Lentils or quinoa to keep it plant-based while increasing protein.

FAQs – Everything You Need to Know

1. Can I use canned chickpeas instead of dried?

Yes! If using canned chickpeas, drain and rinse them well before adding them to the soup. Since they are already cooked, you can reduce the simmering time to about 20 minutes.

2. How long does chickpea soup last in the fridge?

Store your soup in an airtight container in the fridge for up to 4 days. The flavors actually deepen over time, making leftovers even better!

3. Can I freeze chickpea soup?

Absolutely! Let the soup cool completely, then freeze in portion-sized containers for up to 3 months. To reheat, thaw overnight in the fridge and warm on the stove.

4. What’s the best way to serve this soup?

This soup is delicious on its own, but you can serve it with:

  • Crusty bread for dipping.
  • A side of rice or quinoa for a more filling meal.
  • A drizzle of olive oil and fresh herbs for extra flavor.

5. Can I make this soup in a slow cooker?

Yes! Simply add all ingredients to a slow cooker and cook on low for 6-8 hours or until chickpeas are tender.

6. How do I thicken the soup if I want a creamier texture?

You can:

  • Blend a portion of the soup and mix it back in.
  • Mash some of the chickpeas with a spoon before serving.
  • Stir in a small amount of flour or cornstarch slurry to thicken it slightly.

Final Thoughts – Why This Soup Deserves a Place at Your Table

There’s something truly special about a simple, homemade bowl of soup. This Hearty Chickpea Soup is not only delicious and comforting, but it also proves that you don’t need fancy ingredients to create something nourishing and satisfying.

Whether you’re making it for a cozy dinner, meal prepping for the week, or looking for a budget-friendly option, this soup is a perfect choice. It’s flavorful, filling, and packed with wholesome goodness.

So next time you’re craving something warm, hearty, and homemade, give this chickpea soup a try. One spoonful, and you’ll understand why it has stood the test of time as a true comfort classic.

Amal

Hearty Chickpea Soup – A Simple, Comforting Classic

This Hearty Chickpea Soup is a warm, comforting dish packed with protein-rich chickpeas, fresh vegetables, and aromatic flavors. Simple yet deeply satisfying, this soup is perfect for a nutritious weeknight dinner or a make-ahead meal. Whether enjoyed on its own or paired with crusty bread, this recipe is a must-try for anyone who loves wholesome, homemade soups.
Prep Time 10 minutes
Cook Time 1 hour
Total Time 1 hour 10 minutes
Servings: 4 servings
Course: Soup
Cuisine: Mediterranean

Ingredients
  

  • 100 g chickpeas dried or canned
  • 1.5 liters 7 glasses water
  • 1 onion diced
  • 1 celery stalk chopped
  • 1 carrot diced
  • 1 pepperoni sliced
  • Olive oil as needed

Method
 

  1. Prepare the Chickpeas: If using dried chickpeas, soak them overnight, then drain and rinse before cooking.
  2. Sauté the Vegetables: In a large pot, heat olive oil over medium heat. Add the diced onion, celery, and carrot, and cook until softened.
  3. Simmer the Soup: Add chickpeas, water, and sliced pepperoni. Bring to a boil, then reduce the heat and let it simmer for 45-60 minutes, or until the chickpeas are tender.
  4. Adjust the Seasoning: Taste the soup and adjust with salt, pepper, or additional olive oil if needed.
  5. Serve & Enjoy: Ladle into bowls and serve hot with crusty bread or a drizzle of extra virgin olive oil.

Notes

  • For a vegetarian version, omit the pepperoni and use vegetable broth instead of water.
  • To save time, use canned chickpeas and reduce the cooking time to 20 minutes.
  • For a thicker consistency, mash some of the chickpeas with a spoon before serving.
  • Store leftovers in the fridge for up to 4 days, or freeze for later.

Savory Cabbage & Carrot Bake – A Wholesome and Cheesy Delight

Some recipes remind you of family meals, warm kitchens, and simple joys. For me, this Cabbage & Carrot Bake is one of those dishes. I remember watching my grandmother chop fresh vegetables, her hands moving with practiced ease, filling the kitchen with the earthy aroma of cabbage and sweet carrots.

She never believed in wasting food, and this dish was her way of transforming simple, everyday ingredients into something comforting, nutritious, and delicious. It wasn’t fancy, but it was wholesome, hearty, and always satisfying. I’d sit by the table, waiting for that first slice, enjoying the golden, cheesy crust that stretched with every bite.

Now, this recipe has become a go-to meal in my own home. It’s easy to make, packed with nutrients, and a great way to enjoy vegetables without feeling like you’re eating “just a salad.” Whether I make it for breakfast, lunch, or a light dinner, it always brings that same sense of home-cooked comfort.

Why You’ll Love This Recipe

This Cabbage & Carrot Bake is more than just a simple dish—it’s a nutritious, flavorful, and versatile meal that fits into any lifestyle. Here’s why you’ll want to make it again and again:

1. Packed with Nutrients

Cabbage and carrots are loaded with fiber, vitamins, and antioxidants, making this dish a great way to nourish your body while enjoying a comforting meal.

2. A Cheesy, Golden Crust

The combination of shredded mozzarella and sesame seeds creates a golden, slightly crispy top layer, giving every bite a satisfying crunch.

3. Quick and Easy to Prepare

With minimal prep work and a simple one-bowl mixing process, this dish is perfect for busy days when you want something delicious without spending hours in the kitchen.

4. A Great Way to Use Leftover Vegetables

This recipe is perfect for reducing food waste—you can swap in any vegetables you have on hand, making it both budget-friendly and sustainable.

5. Perfect for Meal Prep

It stores well in the fridge and tastes just as good the next day, making it an excellent choice for meal prepping lunches or quick dinners.

Ingredients

IngredientQuantity
Cabbage1/2 (500g), chopped (approx. 4 cups)
Carrots2, peeled and grated (approx. 1 cup)
Onion1, diced (approx. 1 cup)
Eggs4
Black Pepper1/2 teaspoon
Oregano1 teaspoon
Salt1 teaspoon
Olive Oil1 tablespoon
Flour5 tablespoons (approx. 30g) (whole wheat or gluten-free)
Sesame Seeds1 tablespoon (or sunflower seeds/flaxseeds)
Mozzarella Cheese100g (approx. 1 cup), shredded (or alternative cheese)

Directions

  1. Preheat the Oven: Set the oven to 180°C (350°F) and grease a baking dish with olive oil.
  2. Prepare the Vegetables: In a large bowl, combine the chopped cabbage, grated carrots, and diced onion.
  3. Mix the Batter: In a separate bowl, whisk the eggs, then add black pepper, oregano, salt, and flour. Mix well until smooth.
  4. Combine Everything: Pour the egg mixture over the vegetables and stir to coat evenly. Add shredded mozzarella and mix again.
  5. Transfer to Baking Dish: Spread the mixture evenly in the greased baking dish and sprinkle sesame seeds on top.
  6. Bake Until Golden: Bake for 30-35 minutes, or until the top is golden brown and the bake is firm to the touch.
  7. Serve & Enjoy: Let cool for a few minutes before slicing. Serve warm as a main dish or side.

Nutritional Information (Per Serving, Approximate)

NutrientValue
Calories180-200 kcal
Protein10g
Carbohydrates15g
Fat9g
Fiber4g
Sugar4g

Ways to Customize Your Cabbage & Carrot Bake

One of the best things about this dish is its versatility. You can adjust it to your taste, making it even more delicious and personalized.

1. Add More Protein

  • Mix in cooked chicken, turkey, or ground beef for a heartier version.
  • Try adding cottage cheese or ricotta for extra creaminess and protein.

2. Experiment with Different Cheeses

  • Swap mozzarella for cheddar, feta, or parmesan for a bolder flavor.
  • Use vegan cheese for a dairy-free alternative.

3. Make It Gluten-Free

  • Use gluten-free flour to keep this dish completely wheat-free.
  • Substitute almond flour or chickpea flour for added nutrition.

4. Spice It Up

  • Add a pinch of chili flakes or smoked paprika for a slight kick.
  • Try garlic powder or cumin for a more aromatic twist.

5. Make It Even More Nutritious

  • Add chopped spinach or kale for extra greens.
  • Mix in grated zucchini or bell peppers for more texture and color.

Frequently Asked Questions (FAQs)

1. Can I Make This Recipe Vegan?

Yes! To make this dish vegan, replace:

  • Eggs with flax eggs (1 tablespoon ground flaxseed + 3 tablespoons water per egg).
  • Cheese with vegan cheese or nutritional yeast for a cheesy flavor.

2. Can I Make This in Advance?

Absolutely! This bake can be:

  • Stored in the fridge for up to 3 days and reheated when needed.
  • Frozen for up to a month—just thaw and warm in the oven before serving.

3. What’s the Best Way to Serve This Dish?

This Cabbage & Carrot Bake can be enjoyed:

  • As a main dish with a side of salad or roasted vegetables.
  • As a side dish to grilled meats or seafood.
  • For breakfast or brunch alongside eggs or avocado toast.

4. Can I Use Red Cabbage Instead of Green?

Yes! Red cabbage works just as well and adds a beautiful pop of color to the dish.

5. What Can I Use Instead of Sesame Seeds?

You can substitute sesame seeds with:

  • Sunflower seeds or flaxseeds for a similar crunch.
  • Pumpkin seeds or chopped nuts for a nutty twist.

6. Can I Use Pre-Shredded Cabbage and Carrots?

Yes! Using pre-shredded cabbage and carrots can save time and make the process even quicker.

Final Thoughts – A Dish That’s Simple, Satisfying, and Nutritious

Sometimes, the best meals are made with the simplest ingredients, and this Cabbage & Carrot Bake is proof of that. It’s a dish that brings together flavor, texture, and nutrition in a way that feels both comforting and wholesome.

Whether you’re looking for an easy weeknight dinner, a meal-prep friendly dish, or a healthy way to enjoy vegetables, this recipe has you covered.

Try it once, and it might just become a regular part of your kitchen routine—just like it has in mine.

Amal

Savory Cabbage & Carrot Bake – A Wholesome and Cheesy Delight

This Savory Cabbage & Carrot Bake is a delicious and healthy dish packed with fresh vegetables, eggs, and cheese for a perfectly balanced meal. With a crispy golden top and a soft, flavorful inside, this bake is great for breakfast, lunch, or a light dinner. Simple to make and packed with nutrients, it’s a great way to enjoy vegetables in a comforting and satisfying way.
Prep Time 10 minutes
Cook Time 35 minutes
Total Time 45 minutes
Servings: 4 –6 servings
Course: Main Dish
Cuisine: International

Ingredients
  

  • 1/2 head cabbage 500g, chopped (approx. 4 cups)
  • 2 carrots peeled and grated (approx. 1 cup)
  • 1 onion diced (approx. 1 cup)
  • 4 eggs
  • 1/2 teaspoon black pepper
  • 1 teaspoon oregano
  • 1 teaspoon salt
  • 1 tablespoon olive oil
  • 5 tablespoons flour approx. 30g, whole wheat or gluten-free
  • 1 tablespoon sesame seeds or sunflower seeds/flaxseeds
  • 100 g approx. 1 cup shredded mozzarella cheese (or alternative cheese)

Method
 

  1. Preheat the Oven: Set the oven to 180°C (350°F) and grease a baking dish with olive oil.
  2. Prepare the Vegetables: In a large mixing bowl, combine the chopped cabbage, grated carrots, and diced onion.
  3. Make the Batter: In another bowl, whisk the eggs, then mix in the black pepper, oregano, salt, and flour. Stir well.
  4. Combine Everything: Pour the egg mixture over the vegetables, add shredded cheese, and mix until evenly coated.
  5. Transfer to Baking Dish: Spread the mixture evenly in the greased baking dish and sprinkle sesame seeds on top.
  6. Bake Until Golden: Bake for 30-35 minutes, or until the top is golden brown and the bake is firm to the touch.
  7. Serve & Enjoy: Let cool for a few minutes before slicing. Serve warm as a main dish or a side.

Notes

  • For extra crunch, top with breadcrumbs before baking.
  • To make it dairy-free, use plant-based cheese or nutritional yeast.
  • For a protein boost, add shredded chicken or cooked lentils.
  • Great for meal prep—store in the fridge for up to 3 days or freeze for later.

The Perfect Baked Potato – Crispy, Fluffy, and Irresistible

Sometimes, the simplest recipes are the most satisfying. For me, the baked potato is one of those timeless dishes that never fails to bring comfort. It reminds me of family dinners, chilly evenings, and the smell of something warm and hearty coming out of the oven.

Growing up, baked potatoes were a staple in my home. My mother would make them alongside roasted meats, but my favorite nights were when they were the main event, loaded with cheese, sour cream, and crispy bacon. I remember standing by the oven, impatiently waiting for the timer to go off, knowing that in just a few minutes, I’d be cutting into a potato that was perfectly crispy on the outside and fluffy on the inside.

Now, I make them whenever I need a quick, satisfying meal. Whether paired with a steak dinner, topped with shredded chicken, or simply enjoyed with a pat of butter, a baked potato never disappoints.

If you’ve ever struggled with achieving that crispy skin and tender inside, this guide will help you make the perfect baked potato every single time.

Why This Baked Potato Recipe Works

A good baked potato is all about texture and simplicity. This recipe focuses on four key elements to ensure you get a crispy, golden exterior and a light, fluffy interior every time.

1. The Right Type of Potato

Not all potatoes are created equal. Russet potatoes are the best choice because they have a high starch content, which results in a light, fluffy texture inside while maintaining a crispy skin when baked.

2. The Secret to Crispy Skin

Many people skip rubbing the potato with oil and salt, but this is what gives it that golden, crispy exterior. The oil helps conduct heat, while the salt enhances the flavor and texture.

3. Baking at the Right Temperature

The ideal baking temperature is 200°C (400°F). This allows the skin to crisp up without burning and ensures the inside cooks evenly.

4. Letting the Steam Escape

Piercing the potatoes with a fork allows steam to escape, preventing them from becoming soggy or exploding in the oven.

Ingredients

IngredientQuantity
Russet potatoes2 large
Olive oil1 tablespoon
Salt1 teaspoon
Black pepper½ teaspoon

Directions

  1. Preheat the Oven: Set the oven to 200°C (400°F) and line a baking sheet with parchment paper.
  2. Prepare the Potatoes: Scrub the potatoes clean and pat them dry.
  3. Season & Pierce: Rub each potato with olive oil, then sprinkle evenly with salt and black pepper. Pierce a few times with a fork to allow steam to escape.
  4. Bake Until Tender: Place the potatoes directly on the oven rack or a baking sheet. Bake for 50-60 minutes, or until the skin is crisp and the inside is soft.
  5. Serve & Enjoy: Slice open, fluff with a fork, and top with butter, sour cream, cheese, or your favorite toppings.

Nutritional Information (Per Serving, Approximate)

NutrientValue
Calories180-200 kcal
Protein4g
Carbohydrates37g
Fat4g
Fiber4g
Sugar2g

How to Elevate Your Baked Potato

A baked potato is a blank canvas. Here are some creative ways to turn a simple potato into a gourmet meal.

1. Classic Loaded Baked Potato

Top with:

  • Sour cream
  • Shredded cheddar cheese
  • Crispy bacon bits
  • Chopped chives

2. Herb Butter Baked Potato

Mix softened butter with:

  • Fresh garlic
  • Chopped parsley
  • A pinch of sea salt

3. Cheesy Broccoli Baked Potato

Steam some broccoli and mix it with:

  • Melted cheddar cheese
  • A drizzle of cream
  • A sprinkle of black pepper

4. Tex-Mex Style Baked Potato

Top with:

  • Spicy black beans
  • Salsa
  • Sliced avocado
  • A squeeze of lime

5. Protein-Packed Chicken Baked Potato

Load it up with:

  • Shredded rotisserie chicken
  • Greek yogurt instead of sour cream
  • A sprinkle of smoked paprika

Frequently Asked Questions (FAQs)

1. How can I make my baked potato extra crispy?

For the crispiest skin, bake directly on the oven rack instead of a baking sheet. Also, avoid wrapping it in foil, as this traps moisture and softens the skin.

2. Can I make baked potatoes in an air fryer?

Yes! Bake at 200°C (400°F) for about 40 minutes, turning halfway through for even crispiness.

3. Can I microwave a baked potato?

You can, but the texture won’t be the same. If you’re short on time, microwave it for 5-7 minutes, then finish in the oven for 10 minutes to crisp up the skin.

4. Should I poke holes in the potato before baking?

Yes! Piercing the potato with a fork allows steam to escape, preventing it from bursting while baking.

5. How do I store and reheat leftovers?

Store leftover baked potatoes in the refrigerator for up to 4 days. To reheat, bake at 180°C (350°F) for 15 minutes or microwave for 2-3 minutes.

6. Can I freeze baked potatoes?

Yes! Wrap them tightly in foil and freeze for up to 3 months. To reheat, bake from frozen at 200°C (400°F) for 30-40 minutes.

Final Thoughts – A Simple Dish That Never Fails

The baked potato is one of the most humble yet satisfying dishes you can make. It’s easy, affordable, and endlessly versatile, making it a perfect addition to any meal. Whether you enjoy it plain with butter or fully loaded with toppings, it’s a dish that delivers pure comfort in every bite.

So next time you’re wondering what to make for dinner, remember that the perfect baked potato is always a great choice. Simple ingredients, effortless preparation, and delicious results every single time.

Amal

The Perfect Baked Potato – Crispy, Fluffy, and Irresistible

Achieve the perfect baked potato with a crispy, golden-brown skin and a light, fluffy interior. This simple yet delicious recipe is perfect as a side dish, snack, or a hearty meal when topped with your favorite ingredients. Whether you love it classic with butter and sour cream or fully loaded with cheese and bacon, this baked potato will never disappoint!
Prep Time 5 minutes
Cook Time 1 hour
Total Time 1 hour 5 minutes
Servings: 2 servings
Course: Side Dish
Cuisine: American

Ingredients
  

  • 2 large russet potatoes
  • 1 tablespoon olive oil
  • 1 teaspoon salt
  • ½ teaspoon black pepper

Method
 

  1. Preheat the Oven: Set the oven to 200°C (400°F).
  2. Prepare the Potatoes: Wash and dry the potatoes thoroughly.
  3. Season & Pierce: Rub each potato with olive oil, then sprinkle evenly with salt and black pepper. Pierce a few times with a fork to allow steam to escape.
  4. Bake Until Tender: Place the potatoes directly on the oven rack or a baking sheet. Bake for 50-60 minutes, or until the skin is crispy and the inside is soft when pierced with a fork.
  5. Serve & Enjoy: Slice open, fluff with a fork, and add butter, sour cream, cheese, chives, or your favorite toppings.

Notes

  • For extra crispiness, bake the potatoes directly on the oven rack instead of a baking sheet.
  • Avoid wrapping in foil, as it traps moisture and prevents crispy skin.
  • To speed up cooking, microwave the potato for 5 minutes before baking.
  • Store leftovers in the fridge for up to 4 days. Reheat in the oven at 180°C (350°F) for the best texture.

Creamy Corn Chowder with Bacon and Potatoes – A Hug in a Bowl

Some recipes have a way of transporting you back in time, wrapping you in the kind of warmth that only food made with love can provide. For me, corn chowder is one of those dishes.

Growing up, I spent summers at my grandparents’ house, where sweet corn was always in abundance. My grandmother, a firm believer in simple, hearty cooking, would turn that fresh corn into the most comforting chowder I had ever tasted. I’d watch her carefully slice the kernels off the cob, using the cobs to infuse the broth with an extra layer of flavor. The kitchen would fill with the aroma of sizzling bacon, buttery onions, and sweet corn, signaling that something special was simmering on the stove.

We would sit around the table, ladling generous portions of steaming chowder into bowls, topping it with crispy bacon and freshly chopped chives. No matter how hot the summer days were, that bowl of chowder felt like a hug from the inside out.

Now, I make this Creamy Corn Chowder with Bacon and Potatoes for my own family. It’s become a tradition—something we turn to on rainy days, cozy weekends, and whenever we need a little extra comfort. It’s hearty, rich, and filled with layers of flavor that make every bite unforgettable.

If you’ve never made homemade corn chowder before, you’re in for a treat. This recipe is simple, satisfying, and guaranteed to become a favorite in your home.

Why This Corn Chowder is a Must-Try

Corn chowder is a timeless dish for good reason. It’s the perfect balance of creamy, savory, and slightly sweet, with a texture that’s both smooth and hearty. Here’s why this particular version stands out:

1. Rich and Creamy, Yet Light

Unlike heavy cream-based soups, this chowder achieves its silky texture with whole milk, making it lighter while still indulgently creamy. The potatoes add natural thickness, eliminating the need for extra thickeners.

2. The Perfect Blend of Sweet and Savory

The natural sweetness of corn balances beautifully with the saltiness of bacon and the earthy depth of thyme and black pepper. Every bite delivers a well-rounded, satisfying flavor.

3. Packed with Hearty Ingredients

With tender potatoes, crispy bacon, and fresh vegetables, this chowder is a nutrient-dense, wholesome meal that feels like comfort food but is still full of good-for-you ingredients.

4. Easy to Make and Perfect for Meal Prep

This chowder comes together in about 30 minutes, making it ideal for weeknight dinners or meal prepping. It stores beautifully and tastes even better the next day as the flavors continue to meld.

5. A Dish That Feels Like Home

There’s something special about homemade chowder—it’s warm, inviting, and made to be shared. Whether you’re cooking for family, friends, or just yourself, this recipe will always deliver that feeling of home-cooked comfort.

Ingredients

IngredientQuantity
Bacon4 slices, chopped
Unsalted Butter1 tablespoon
Yellow Onion1, diced
Celery2 stalks, diced
Carrot1 large, diced
Garlic Cloves3, minced
Corn Kernels3 cups (482g), cobs reserved if using fresh
Yukon Gold Potatoes2 medium, peeled and diced (369g)
Chicken Broth3 cups (720mL)
Whole Milk2 cups (480mL)
Salt2 teaspoons
Chopped Thyme1½ teaspoons
Ground Black Pepper½ teaspoon
Chopped ChivesFor garnish

Directions

  1. Cook the Bacon: In a large pot over medium heat, cook the chopped bacon until crispy. Remove and set aside, leaving the bacon fat in the pot.
  2. Sauté the Vegetables: Add butter, then stir in the onion, celery, and carrot. Cook for about 5 minutes until softened. Add garlic and cook for another 30 seconds until fragrant.
  3. Simmer the Chowder: Stir in the corn, potatoes, chicken broth, salt, thyme, and black pepper. Bring to a boil, then reduce heat and let simmer for 15 minutes, until the potatoes are tender.
  4. Add the Creaminess: Pour in the whole milk and stir. Simmer for another 5 minutes without boiling.
  5. Blend for a Creamy Texture (Optional): Use an immersion blender to partially blend the chowder for a thicker consistency, leaving some chunks for texture.
  6. Serve & Garnish: Ladle into bowls, top with crispy bacon and fresh chives, and enjoy warm!

Nutritional Information (Per Serving, Approximate)

NutrientValue
Calories320-350 kcal
Protein12g
Carbohydrates40g
Fat14g
Fiber5g
Sugar8g

Ways to Customize Your Corn Chowder

One of the best things about corn chowder is its versatility. Here are a few ways you can personalize this recipe to suit your taste:

1. Add More Protein

For a heartier meal, try adding:

  • Shredded rotisserie chicken for extra protein.
  • Diced ham or smoked sausage for a different take on the classic bacon flavor.
  • Pan-seared shrimp for a seafood-inspired chowder.

2. Make It Extra Creamy

If you love a super rich and creamy chowder, you can:

  • Replace half of the milk with heavy cream for a silkier texture.
  • Blend a portion of the soup using an immersion blender to create a smoother consistency while keeping some chunky bits for texture.

3. Try Different Herbs & Spices

To change up the flavor profile, consider adding:

  • A pinch of smoked paprika for a subtle smokiness.
  • A bay leaf while simmering for a more complex depth of flavor.
  • Fresh basil or parsley instead of thyme for a different herbal note.

4. Make It Vegetarian

For a meat-free version, simply omit the bacon and use:

  • Vegetable broth instead of chicken broth.
  • Extra vegetables like red bell peppers or zucchini for more texture.
  • A little smoked paprika to replace the smoky flavor of bacon.

5. Give It a Spicy Kick

If you love spicy food, try adding:

  • Diced jalapeños or a pinch of cayenne pepper.
  • A few dashes of hot sauce stirred in before serving.
  • Spicy chorizo instead of bacon for an extra flavorful twist.

Frequently Asked Questions (FAQs)

1. Can I use frozen or canned corn instead of fresh?

Yes! While fresh corn gives the best flavor, frozen or canned corn works perfectly. If using canned corn, be sure to drain and rinse it before adding it to the chowder.

2. What type of potatoes work best in this recipe?

Yukon Gold potatoes are ideal because they have a creamy texture and hold their shape well. If you prefer a chunkier chowder, you can use Russet potatoes, but they will break down more and make the soup thicker.

3. How can I thicken my chowder?

This chowder is naturally thickened by the starch from the potatoes, but if you prefer an even thicker texture, try:

  • Blending a portion of the soup and stirring it back in.
  • Adding a cornstarch slurry (1 tablespoon cornstarch mixed with 2 tablespoons water).

4. How long does corn chowder last in the fridge?

Store in an airtight container in the refrigerator for up to 4 days. Reheat on the stove over low heat, stirring occasionally.

5. Can I freeze corn chowder?

Yes, but without the milk. If you plan to freeze it, make the chowder without adding the milk, then freeze for up to 3 months. When ready to eat, reheat and stir in the milk just before serving.

6. What can I serve with corn chowder?

This chowder is a meal on its own, but it pairs beautifully with:

  • Crusty bread or biscuits to soak up the creamy broth.
  • A side salad for a fresh contrast.
  • Grilled cheese sandwiches for the ultimate comfort meal.

Final Thoughts – Why This Chowder Deserves a Spot on Your Table

There’s something deeply satisfying about a warm bowl of homemade corn chowder. It’s rich, creamy, loaded with comforting flavors, and brings back memories of family dinners, cozy nights, and the simple joy of a home-cooked meal.

This Creamy Corn Chowder with Bacon and Potatoes is easy to make, incredibly delicious, and endlessly customizable. Whether you enjoy it on a cold evening, as a weekend treat, or as part of a family gathering, it’s the kind of dish that always brings comfort and joy.

So grab a spoon, take that first warm bite, and experience the perfect balance of sweet, smoky, and savory goodness. Once you try this chowder, you’ll want to make it again and again!

Amal

Creamy Corn Chowder with Bacon and Potatoes – A Hug in a Bowl

This Creamy Corn Chowder with Bacon and Potatoes is the ultimate comfort food! Made with sweet corn, crispy bacon, hearty potatoes, and a rich, velvety broth, this chowder is packed with flavor and warmth. Whether you’re enjoying it on a chilly evening or as a satisfying meal any time of year, this dish is easy to make and incredibly delicious.
Prep Time 15 minutes
Cook Time 25 minutes
Total Time 40 minutes
Servings: 4 –6 servings
Course: Soup
Cuisine: American

Ingredients
  

  • 4 slices bacon chopped
  • 1 tablespoon unsalted butter
  • 1 yellow onion diced
  • 2 stalks celery diced
  • 1 large carrot diced
  • 3 garlic cloves minced
  • 3 cups 482g corn kernels (cobs reserved if using fresh)
  • 2 medium Yukon Gold potatoes peeled and diced (369g)
  • 3 cups 720mL chicken broth
  • 2 cups 480mL whole milk
  • 2 teaspoons salt
  • teaspoons chopped thyme
  • ½ teaspoon ground black pepper
  • Chopped chives for garnish

Method
 

  1. Cook the Bacon: In a large pot over medium heat, cook the chopped bacon until crispy. Remove with a slotted spoon and set aside, leaving the bacon fat in the pot.
  2. Sauté the Vegetables: Add butter to the pot, then stir in the onion, celery, and carrot. Cook for about 5 minutes until softened. Add garlic and cook for another 30 seconds.
  3. Simmer the Chowder: Stir in the corn, potatoes, chicken broth, salt, thyme, and black pepper. Bring to a boil, then reduce heat and let simmer for 15 minutes until the potatoes are tender.
  4. Add the Milk: Pour in the whole milk and stir well. Simmer for another 5 minutes, making sure not to boil.
  5. Blend for a Creamier Texture (Optional): Use an immersion blender to partially blend the chowder, leaving some chunks for texture.
  6. Serve & Garnish: Ladle into bowls, top with crispy bacon and fresh chives, and enjoy warm!

Notes

  • For extra creaminess, substitute half of the milk with heavy cream.
  • To make it vegetarian, omit the bacon and use vegetable broth instead of chicken broth.
  • For a thicker consistency, blend a portion of the soup or add a cornstarch slurry.
  • Store leftovers in an airtight container in the refrigerator for up to 4 days.

The Ultimate Crispy Ham & Cheese Melt – A Comfort Food Classic

There are some recipes that never fail to bring back memories, and for me, grilled cheese is at the top of that list. It was the first thing I ever “cooked” by myself, standing on a stool in my grandmother’s kitchen, pressing the bread into the pan with a spatula, impatiently waiting for the cheese to melt.

Back then, my grilled cheese sandwiches were basic but delicious—just bread, cheese, and butter. But as I grew older, I started experimenting, trying to perfect the ultimate grilled cheese experience. I discovered that by dipping the sandwich in an egg and milk mixture, it created a crispy, golden crust that was almost like French toast but still savory. Add some ham to the mix, and suddenly, a childhood favorite became a next-level comfort food.

Now, this Crispy Ham & Cheese Melt is my go-to recipe whenever I need something quick, satisfying, and packed with flavor. It’s perfect for a lazy weekend breakfast, a speedy lunch, or even a midnight snack when I’m craving something indulgent. It’s simple, nostalgic, and downright delicious—and once you try it, you’ll never go back to plain grilled cheese again.

What Makes This Grilled Cheese the Best?

There are a million ways to make grilled cheese, but this recipe stands out because it combines crispy, cheesy, and savory elements into one perfect sandwich. Here’s why it’s a must-try:

1. Extra Crispy Coating

Most grilled cheese sandwiches are soft and buttery, but dipping the bread in an egg and milk mixture before grilling gives it an amazing crispy crust. Think of it as French toast meets grilled cheese, but without the sweetness.

2. Gooey, Melty Cheese

The best part of any grilled cheese is that stretchy, melted cheese pull when you take a bite. This recipe uses three slices of cheese, ensuring every bite is creamy, rich, and indulgent.

3. Savory Ham for Extra Flavor

Adding thinly sliced cooked ham gives this sandwich a salty, smoky kick that pairs perfectly with the creamy cheese. It turns a simple grilled cheese into a heartier, more satisfying meal.

4. Quick & Easy to Make

With just a handful of ingredients, this sandwich comes together in under 10 minutes. It’s perfect for those busy days when you need something filling but don’t want to spend a lot of time cooking.

5. Great for Any Time of Day

While grilled cheese is often thought of as a lunch or snack, this version is hearty enough for breakfast, lunch, or dinner. Pair it with a bowl of tomato soup, and you’ve got the ultimate comfort meal.

Ingredients

IngredientQuantity
Bread2 slices
Cheese3 slices
Cooked ham1-2 slices
Egg1
Milk1 tbsp

Directions

  1. Assemble the Sandwich: Place the cheese slices and ham between the two slices of bread.
  2. Prepare the Coating: In a shallow bowl, whisk the egg and milk together.
  3. Dip & Coat: Dip the sandwich into the egg mixture, ensuring both sides are well coated.
  4. Cook Until Golden: Heat a pan over medium heat and lightly butter it. Cook the sandwich for 2-3 minutes per side until golden brown and crispy.
  5. Serve & Enjoy: Slice and serve hot with your favorite dipping sauce or soup!

Nutritional Information (Per Serving, Approximate)

NutrientValue
Calories350-400 kcal
Protein20g
Carbohydrates30g
Fat18g
Sugar2g
Fiber2g

How to Customize Your Grilled Cheese

One of the best things about this sandwich is how easily customizable it is. Here are a few ways to make it your own:

1. Different Cheeses for Unique Flavors

While classic American cheese melts beautifully, you can experiment with:

  • Cheddar for a sharp, tangy flavor
  • Mozzarella for a super stretchy, mild taste
  • Swiss or Gruyère for a nutty, more complex taste
  • Pepper Jack for a spicy kick

2. Try Different Breads

Swap out the regular sandwich bread for:

  • Sourdough for a slightly tangy taste
  • Brioche for a softer, buttery texture
  • Whole wheat for a nuttier, heartier bite

3. Add More Fillings for Extra Flavor

Want to take it up a notch? Try adding:

  • Tomato slices for a fresh contrast
  • Caramelized onions for a sweet-savory balance
  • Bacon for extra crunch and smoky flavor
  • Spinach or arugula for a slight peppery bite

4. Make It Spicy

If you like a little heat, add:

  • A few dashes of hot sauce before grilling
  • Thinly sliced jalapeños inside the sandwich
  • A sprinkle of red pepper flakes in the egg mixture

5. Turn It into a Deluxe Sandwich

Make it even more decadent by spreading garlic butter or herb butter on the outside before grilling for an extra rich, flavorful crust.

FAQs: Everything You Need to Know About This Recipe

1. How Do I Get the Bread Extra Crispy?

The key to a crispy exterior is:

  • Dipping it fully in the egg mixture so the bread absorbs just enough moisture to crisp up.
  • Cooking on medium heat so it gets golden brown without burning.
  • Using a cast-iron skillet or non-stick pan for even browning.

2. Can I Use a Different Protein Instead of Ham?

Absolutely! Try replacing ham with:

  • Turkey for a lighter option
  • Crispy bacon for extra crunch
  • Grilled chicken for a more filling meal

3. Can I Make This Without an Egg?

Yes! If you prefer a traditional grilled cheese, simply skip the egg and milk dip. You’ll still get a delicious, buttery sandwich, just without the extra crispy texture.

4. What’s the Best Way to Reheat Leftovers?

If you have leftovers, reheat them in:

  • A skillet over low heat to maintain crispiness
  • An air fryer at 180°C (350°F) for a few minutes
  • An oven at 190°C (375°F) for about 5 minutes

Avoid microwaving, as it can make the sandwich soggy.

5. Can I Make This in a Panini Press?

Yes! A panini press will give you an even crispier texture with beautiful grill marks. Just be sure to dip the sandwich in the egg mixture before pressing.

Final Thoughts: The Grilled Cheese You Need to Try

There’s something deeply satisfying about a perfectly crispy, cheesy sandwich, and this Crispy Ham & Cheese Melt is one of the best versions you’ll ever make. It’s simple yet indulgent, quick yet incredibly flavorful.

Whether you’re making it for a lazy weekend breakfast, a comforting lunch, or a midnight snack, this upgraded grilled cheese will never disappoint. Once you try the crispy egg-dipped crust, the gooey melted cheese, and the savory ham, you’ll never go back to plain grilled cheese again.

So next time you’re craving comfort food done right, make this sandwich. One bite, and you’ll understand why it’s the best grilled cheese you’ll ever have!

Amal

The Ultimate Crispy Ham & Cheese Melt – A Comfort Food Classic

This Crispy Ham & Cheese Melt is the ultimate grilled cheese upgrade! With gooey melted cheese, savory ham, and a golden, crispy crust, this sandwich is the perfect comfort food. Dipped in an egg and milk mixture before grilling, it delivers an extra crunchy texture that takes it to the next level. Perfect for breakfast, lunch, or a quick snack!
Prep Time 5 minutes
Cook Time 5 minutes
Total Time 10 minutes
Servings: 1 sandwich
Course: Snack
Cuisine: American

Ingredients
  

  • 2 slices of bread
  • 3 slices of cheese cheddar, mozzarella, or Swiss
  • 1-2 slices of cooked ham
  • 1 egg
  • 1 tbsp milk

Method
 

  1. Assemble the Sandwich: Place the cheese slices and ham between the two slices of bread.
  2. Prepare the Egg Mixture: In a shallow bowl, whisk together the egg and milk.
  3. Dip & Coat: Dip the sandwich into the egg mixture, ensuring both sides are fully coated.
  4. Cook Until Golden: Heat a pan over medium heat and lightly butter it. Cook the sandwich for 2-3 minutes per side until golden brown and crispy.
  5. Serve & Enjoy: Slice in half and serve hot with your favorite dipping sauce or a bowl of soup.

Notes

  • For extra crispiness, add a light dusting of breadcrumbs before frying.
  • Use different cheeses like Gruyère, Monterey Jack, or pepper jack for unique flavors.
  • Try a buttery spread like garlic butter on the outside of the bread for an even richer taste.
  • For a spicy twist, add a pinch of red pepper flakes or drizzle with hot sauce.

Crispy Fried Mozzarella Nuggets – The Ultimate Cheesy Snack for Kids and Adults

Some foods have a way of bringing back the best childhood memories. For me, it was anything cheesy—cheese sandwiches, cheese toast, cheese dips, and most of all, fried mozzarella nuggets. I still remember the excitement of biting into a hot, crispy nugget, watching the melted cheese stretch in a gooey, irresistible pull.

Whenever my mother made them, the kitchen was filled with the comforting aroma of crispy, golden-brown crust and warm, melty cheese. My siblings and I would gather around, impatiently waiting for them to cool just enough so we could take that first glorious bite. They weren’t just a snack—they were a moment of pure happiness.

Now, I make these fried mozzarella nuggets for my own family, and the joy is the same. My kids love them just as much as I did, and honestly, they’re just as exciting for adults. Whether you’re making them as a quick snack, a party appetizer, or a fun treat for the little ones, these crispy cheese nuggets are guaranteed to be a hit!

Why Fried Mozzarella Nuggets Are the Perfect Snack

There are endless reasons why these mozzarella nuggets are loved by kids and adults alike. Here’s what makes them so special:

1. The Ultimate Cheese Pull

What’s better than stretchy, melty cheese? These nuggets are crispy on the outside and gooey on the inside, creating the perfect contrast of textures. Every bite is filled with warm, cheesy goodness that keeps you coming back for more.

2. Super Simple and Quick to Make

With just four basic ingredients, this recipe is as easy as it gets. You don’t need to prepare a batter, breadcrumbs, or any complicated coatings—just cheese, cornstarch, egg, and oil.

3. A Hit With Kids

Kids love anything crispy and cheesy, and these nuggets are no exception! They’re perfect for after-school snacks, weekend treats, or even picky eaters who refuse other foods but can’t resist cheese.

4. Great for Parties and Gatherings

Planning a party? These mozzarella nuggets make the perfect finger food. They’re bite-sized, easy to eat, and pair well with different dipping sauces like marinara, ketchup, or ranch. They disappear fast, so make a big batch!

5. Budget-Friendly and Customizable

Unlike restaurant mozzarella sticks, this homemade version is cheaper and fresher. Plus, you can customize them by adding different seasonings, using different cheeses, or even making them spicy for an extra kick.

Ingredients

IngredientQuantity
Mozzarella cheese300 grams
Cornstarch powder3 tablespoons
Egg1
Oil for fryingAs needed

Directions

  1. Prepare the Cheese: Cut the mozzarella into bite-sized cubes.
  2. Coat with Cornstarch: Roll each cheese cube in cornstarch, ensuring an even coating.
  3. Dip in Egg: Beat the egg in a bowl, then dip the coated mozzarella cubes into the egg mixture.
  4. Fry Until Golden: Heat oil in a pan over medium heat. Fry the mozzarella nuggets in small batches until golden brown and crispy.
  5. Drain & Serve: Remove from oil and place on paper towels to absorb excess oil. Serve hot with your favorite dipping sauce!

Nutritional Information (Per Serving, Approximate)

NutrientValue
Calories200-250 kcal
Protein10g
Carbohydrates8g
Fat15g
Sugar1g
Fiber0g

Ways to Customize Your Mozzarella Nuggets

If you love experimenting in the kitchen, here are some fun ways to change up the flavor of your fried mozzarella nuggets:

1. Herb-Infused Nuggets

Add a pinch of dried oregano, basil, or Italian seasoning to the cornstarch for a herby, aromatic twist.

2. Spicy Cheese Bites

Mix in paprika, chili powder, or cayenne pepper for a spicy kick. If you like extra heat, serve them with a spicy sriracha mayo dip.

3. Garlic Parmesan Nuggets

Toss the hot nuggets in a mix of grated Parmesan and garlic powder for an extra flavorful bite.

4. Different Cheese Options

Mozzarella is classic, but you can also try:

  • Cheddar for a sharper, more intense cheese flavor.
  • Gouda for a rich and slightly smoky taste.
  • Monterey Jack for a smooth, creamy texture.

5. Double-Coated for Extra Crunch

If you love an ultra-crispy coating, dip the nuggets in cornstarch, then egg, then back into cornstarch before frying. This gives them a thicker, crunchier crust.

FAQs: Everything You Need to Know About Mozzarella Nuggets

1. How Do I Prevent the Cheese from Melting Too Much While Frying?

To keep the mozzarella from melting too quickly and losing its shape:

  • Freeze the coated cheese cubes for 15-20 minutes before frying.
  • Fry at the right temperature (around 180°C/350°F) to create a crispy crust before the cheese fully melts.

2. Can I Use Regular Flour Instead of Cornstarch?

Yes, but cornstarch gives the nuggets a lighter, crispier coating. If using flour, mix it with a little baking powder to keep the crust from becoming too dense.

3. What’s the Best Oil for Frying?

Use neutral oils with a high smoke point, such as:

  • Vegetable oil
  • Canola oil
  • Sunflower oil
  • Peanut oil (for extra crispiness)

Avoid olive oil, as it has a lower smoke point and may burn quickly.

4. Can I Make These Without Frying?

Yes! If you prefer a healthier option, try baking or air frying:

  • Air Fryer: Cook at 200°C (400°F) for about 8-10 minutes, flipping halfway.
  • Oven: Bake at 220°C (425°F) for 12-15 minutes, turning once for even crispness.

5. How Do I Store and Reheat Leftovers?

  • Refrigerate: Store in an airtight container for up to 2 days.
  • Reheat: Bake in the oven at 180°C (350°F) or air-fry for 3-5 minutes to restore crispiness.

Avoid microwaving, as it will make the nuggets soft instead of crispy.

6. Can I Make These in Advance?

Yes! You can prepare the coated mozzarella nuggets and freeze them uncooked. When ready to eat, fry them directly from frozen—just add an extra minute or two to the cooking time.

Final Thoughts: Why You Need to Try These Mozzarella Nuggets

There’s a reason why fried cheese is loved worldwide—it’s the perfect comfort food, crispy on the outside, gooey on the inside, and bursting with rich, creamy flavor.

Whether you’re making these for kids, as a party snack, or just for yourself, these fried mozzarella nuggets will quickly become a household favorite. They’re simple to make, easy to customize, and absolutely addictive.

So, if you’ve been looking for the perfect cheesy snack, give this recipe a try. One bite, and you’ll see why they’re so hard to resist!

Amal

Crispy Fried Mozzarella Nuggets – The Ultimate Cheesy Snack for Kids and Adults

These crispy fried mozzarella nuggets are the perfect combination of crunchy on the outside and gooey on the inside! Made with just a few simple ingredients, they are an irresistible snack for kids and adults alike. Whether you’re serving them at a party, as an appetizer, or as a quick treat, these cheese nuggets will disappear in minutes!
Prep Time 10 minutes
Cook Time 5 minutes
Total Time 15 minutes
Servings: 4 servings
Course: Snack
Cuisine: American

Ingredients
  

  • 300 grams mozzarella cheese
  • 3 tablespoons cornstarch powder
  • 1 egg
  • Oil for frying

Method
 

  1. Prepare the Cheese: Cut the mozzarella into bite-sized cubes.
  2. Coat with Cornstarch: Roll each cheese cube in cornstarch to ensure an even coating.
  3. Dip in Egg: Beat the egg in a bowl, then dip the cornstarch-coated mozzarella cubes into the egg mixture.
  4. Fry Until Golden: Heat oil in a deep pan over medium heat. Fry the mozzarella nuggets in small batches until they are golden brown and crispy.
  5. Drain & Serve: Remove from the oil and place on paper towels to absorb excess oil. Serve hot with your favorite dipping sauce, such as marinara, ketchup, or garlic aioli.

Notes

  • For extra crispiness, freeze the coated cheese cubes for 15 minutes before frying.
  • Use a thermometer to ensure the oil stays at 180°C (350°F) for the best results.
  • Try different cheeses! While mozzarella is classic, cheddar, gouda, or Monterey Jack also work great.
  • For a baked version, place the coated cheese cubes on a baking sheet and bake at 220°C (425°F) for 12-15 minutes.