No One Will Guess How You Cooked It! Quick Appetizer with Minced Meat

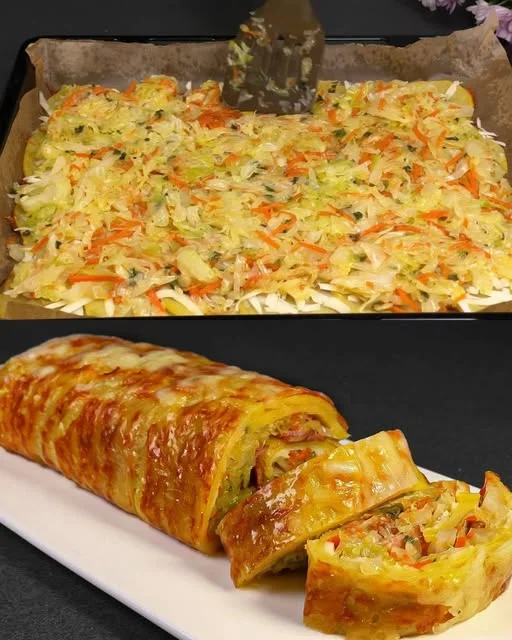
I love recipes that look fancy but require minimal effort. There’s something incredibly satisfying about making a dish that leaves everyone at the table wondering, “How did you make this?” That’s exactly what happened the first time I served these flaky, golden pastries filled with a rich, savory minced meat and cheese mixture.

It was a last-minute gathering, and I needed something quick but impressive. I had puff pastry in the fridge, some minced meat, and just a few basic ingredients. With no time for complicated cooking, I threw everything together, baked it, and hoped for the best.

When I pulled them out of the oven, they were perfectly golden brown, flaky, and oozing with melted cheese. I served them with a creamy garlic yogurt sauce, and within minutes, they were gone. My guests kept asking for the recipe, but I just smiled and said, “It’s a secret.”

Now, this has become my go-to appetizer whenever I need a dish that looks like it took hours but actually comes together in no time. Whether you’re hosting a party, preparing a quick family snack, or just craving something delicious, this recipe is a winner.

Why You’ll Love This Recipe

1. Quick and Easy

Using store-bought puff pastry saves time while still delivering a flaky, buttery texture. The filling takes just minutes to prepare, and the whole dish is ready in under 30 minutes.

2. Crispy on the Outside, Juicy on the Inside

The contrast between the crispy puff pastry and the rich, flavorful minced meat filling makes this appetizer irresistible. The cheddar cheese melts beautifully, adding a creamy touch to every bite.

3. Perfect for Any Occasion

These appetizers work for everything—family dinners, holiday gatherings, game nights, or just a quick snack. They’re easy to grab and eat, making them a great party food.

4. Delicious Hot or Cold

While they’re best enjoyed fresh out of the oven, they also taste great at room temperature, making them perfect for picnics or packed lunches.

5. Versatile and Customizable

You can switch up the ingredients based on what you have at home. Try adding herbs, spices, or different cheeses for a unique twist.

Ingredients

IngredientQuantity
Puff pastry600g (21 oz)
Minced meat600g (21 oz)
Salt10g (0.4 oz)
Black pepper2g (0.1 oz)
Onion1
Water20ml (0.7 fl oz)
Cheddar cheese100g (3.5 oz)
Egg1
Greek yogurt250g (8.8 oz)
Garlic15g (0.5 oz)
Parsley10g (0.4 oz)
Olive oil25ml (0.8 fl oz)
Salt (for sauce)3g (0.1 oz)

Directions

  1. Prepare the Filling:
    • Finely chop the onion and mix it with the minced meat, salt, black pepper, and water. Stir well until combined.
  2. Assemble the Pastry:
    • Roll out the puff pastry and cut it into squares or rectangles.
    • Place a spoonful of the meat mixture in the center of each piece.
    • Sprinkle with grated cheddar cheese.
    • Fold or seal the pastry as desired—into rolls, pockets, or turnovers.
  3. Bake the Appetizers:
    • Preheat the oven to 200°C (400°F).
    • Brush the pastry with a beaten egg for a golden crust.
    • Bake for 20–25 minutes until puffed and golden brown.
  4. Make the Garlic Yogurt Sauce:
    • In a bowl, mix Greek yogurt, minced garlic, parsley, olive oil, and salt. Stir until smooth.
  5. Serve and Enjoy:
    • Serve the warm appetizers with the garlic yogurt sauce on the side for dipping.

Nutritional Information (Per Serving, Approximate)

NutrientAmount per Serving
Calories~320 kcal
Protein~18 g
Carbohydrates~22 g
Fats~18 g
Fiber~2 g

Frequently Asked Questions

Can I Use a Different Type of Meat?

Yes! This recipe works well with ground beef, lamb, turkey, or chicken. If using a leaner meat like chicken or turkey, consider adding a little olive oil to keep the filling moist.

What Can I Use Instead of Puff Pastry?

If you don’t have puff pastry, you can use phyllo dough for a flakier, more delicate texture. Just brush each layer with a bit of melted butter or olive oil before baking.

Can I Make These in Advance?

Absolutely! You can prepare the pastries ahead of time and store them in the fridge before baking. When you’re ready to serve, just pop them in the oven.

How Do I Store Leftovers?

Store any leftovers in an airtight container in the refrigerator for up to 3 days. Reheat them in the oven at 350°F (175°C) for about 10 minutes to regain their crispiness.

Can I Freeze These for Later?

Yes! Once baked, let them cool completely, then freeze them in a single layer. When you’re ready to eat, reheat them in the oven at 375°F (190°C) until warm and crispy.

What’s the Best Way to Serve These Pastries?

They pair wonderfully with a creamy garlic yogurt sauce, a spicy tomato dip, or even a simple side salad for a lighter meal.

How Can I Make Them Healthier?

For a lighter version, you can:

  • Use whole wheat puff pastry (if available).
  • Swap out half of the minced meat for finely chopped mushrooms or grated zucchini.
  • Reduce the cheese or opt for a lower-fat variety.

Can I Make This Recipe Without Cheese?

Yes! The cheese adds creaminess, but you can leave it out or replace it with a dairy-free alternative. The filling will still be flavorful and delicious.

Tips for the Best Minced Meat Puff Pastries

1. Let the Puff Pastry Thaw Properly

If your puff pastry is frozen, let it thaw in the fridge overnight or at room temperature for about 30 minutes. This prevents cracking when rolling it out.

2. Don’t Overfill the Pastries

Adding too much filling can make it harder to seal the pastries and may cause them to burst open while baking. Use just enough to get a good balance of pastry and filling.

3. Seal the Edges Well

For a professional look, crimp the edges with a fork to ensure the filling stays inside.

4. Brush with Egg Wash for a Golden Finish

A simple egg wash (beaten egg mixed with a little water or milk) brushed over the pastries before baking gives them a beautiful golden-brown color.

5. Serve with a Delicious Sauce

The garlic yogurt sauce adds a fresh, tangy contrast to the rich, savory pastries. Simply mix Greek yogurt with minced garlic, olive oil, chopped parsley, and a pinch of salt for a quick and flavorful dip.

Serving Ideas – How to Make It a Complete Meal

1. As a Party Appetizer

Serve these pastries on a platter with different dipping sauces, like garlic yogurt, spicy tomato sauce, or hummus.

2. Paired with a Light Salad

Balance out the richness by serving them with a fresh cucumber and tomato salad drizzled with lemon juice.

3. Alongside Soup for a Cozy Meal

Enjoy these pastries with a warm bowl of tomato soup, lentil soup, or a creamy mushroom soup for a comforting lunch or dinner.

4. Breakfast or Brunch Option

These pastries also make a great breakfast! Pair them with scrambled eggs and a cup of tea for a filling start to the day.

Conclusion – A Recipe That Will Keep Everyone Guessing

There’s something magical about creating a dish that looks complicated but is actually effortless. These puff pastry appetizers with minced meat are exactly that—a crispy, cheesy, savory bite that impresses with minimal effort.

Whether you’re making them for a casual meal, a special gathering, or simply because you’re craving something delicious, they’re a guaranteed hit. The best part? You can experiment with fillings and flavors to make them your own.

So the next time you want to surprise your guests with a dish that looks like it came from a bakery but was made right in your kitchen, give this recipe a try. Just be prepared for everyone to ask, “How did you make this?” And you can decide whether to share the secret or keep them guessing!

Amal

No One Will Guess How You Cooked It! Quick Appetizer with Minced Meat

This crispy, golden puff pastry appetizer filled with savory minced meat and melted cheddar cheese is the perfect crowd-pleaser. Flaky on the outside and juicy on the inside, these delicious bites are quick to prepare and packed with flavor. Served with a creamy garlic yogurt sauce, they make an irresistible snack, party dish, or even a light dinner. No one will believe how easy they are to make!
Prep Time 15 minutes
Cook Time 25 minutes
Total Time 40 minutes
Servings: 6 –8 servings
Course: Snack
Cuisine: European

Ingredients
  

  • 600 g 21 oz puff pastry
  • 600 g 21 oz minced meat
  • 10 g 0.4 oz salt
  • 2 g 0.1 oz black pepper
  • 1 onion finely chopped
  • 20 ml 0.7 fl oz water
  • 100 g 3.5 oz cheddar cheese, grated
  • 1 egg for brushing
  • 250 g 8.8 oz Greek yogurt
  • 15 g 0.5 oz garlic, minced
  • 10 g 0.4 oz parsley, chopped
  • 25 ml 0.8 fl oz olive oil
  • 3 g 0.1 oz salt (for sauce)

Method
 

  1. Preheat the oven to 200°C (400°F).
  2. In a bowl, mix the minced meat, chopped onion, salt, black pepper, and water until well combined.
  3. Roll out the puff pastry and cut it into squares or rectangles.
  4. Place a spoonful of the meat mixture onto each pastry piece and top with grated cheddar cheese.
  5. Fold the pastry over the filling, sealing the edges by pressing with a fork.
  6. Brush the tops with a beaten egg for a golden finish.
  7. Bake for 20–25 minutes, or until the pastries are puffed and golden brown.
  8. While baking, prepare the garlic yogurt sauce by mixing Greek yogurt, minced garlic, parsley, olive oil, and salt.
  9. Serve the pastries warm with the garlic yogurt sauce for dipping. Enjoy!

Notes

  • If using frozen puff pastry, let it thaw at room temperature before rolling.
  • Try adding smoked paprika or chili flakes for extra flavor in the filling.
  • For a vegetarian version, swap minced meat for sautéed mushrooms or spinach and feta cheese.
  • Store leftovers in an airtight container in the fridge for up to 3 days and reheat in the oven for crispiness.
  • These pastries can be frozen before baking—just bake directly from frozen, adding a few extra minutes to the cooking time.

Potatoes and Meat? Try This New Delicious Recipe for Dinner or Lunch!

Growing up, dinner was always the most anticipated meal of the day. It wasn’t just about eating—it was about gathering around the table, sharing stories, and enjoying home-cooked meals that filled the house with warmth. My mother had a way of turning simple ingredients into dishes that felt special, and one of my favorites was anything that combined potatoes, cheese, and meat.

One evening, she surprised us with something new—crispy potato fritters loaded with bacon, cabbage, and melted mozzarella. It was a mix of all my favorite ingredients, perfectly balanced between crispy edges, a soft, cheesy center, and the smoky richness of bacon. The smell alone was enough to bring everyone into the kitchen before she even called us to the table.

Since then, this recipe has become a family favorite. It’s quick, filling, and made with ingredients that are easy to find. Whether you need a comforting lunch or a satisfying dinner, this dish delivers every time. And the best part? It’s incredibly versatile—you can tweak it based on what you have in your kitchen, making it a great go-to meal whenever you’re craving something hearty and delicious.

Why You’ll Love This Recipe

1. Hearty and Satisfying

With a combination of crispy potatoes, melted cheese, and savory bacon, this dish is guaranteed to fill you up while delivering a burst of flavor in every bite.

2. Simple, Everyday Ingredients

No need for fancy or hard-to-find ingredients. Everything in this recipe is likely already in your kitchen, making it an easy meal to prepare on short notice.

3. Crispy on the Outside, Cheesy on the Inside

The magic of this recipe lies in the texture—golden, crispy edges with a soft, cheesy, and flavorful center. The combination of mozzarella and bacon takes it to another level of deliciousness.

4. Perfect for Any Meal

Enjoy these potato and meat fritters for lunch, dinner, or even as a snack. They pair beautifully with a fresh salad, a bowl of soup, or your favorite dipping sauce.

5. Great for Leftovers

If you have extra potatoes, bacon, or cabbage in your fridge, this recipe is a fantastic way to use them up. Plus, the fritters reheat well, so you can enjoy them the next day without losing their crunch.

Ingredients

IngredientQuantity
Hard mozzarella cheese200 g
Potatoes3 large
Vegetable oilAs needed
SaltTo taste
Onion1
Carrot1
Spring onionsA bunch
Cabbage1/2 head
Bacon150 g

Directions

  1. Prepare the Vegetables:
    • Peel and grate the potatoes. Squeeze out excess moisture using a clean kitchen towel.
    • Finely chop the onion and spring onions.
    • Grate the carrot and shred the cabbage.
  2. Cook the Bacon and Vegetables:
    • Heat a pan over medium heat and cook the bacon until crispy. Remove and set aside.
    • In the same pan, sauté the onion, carrot, and cabbage until soft. Season with salt to taste.
  3. Mix the Ingredients:
    • In a bowl, combine the grated potatoes, sautéed vegetables, crumbled bacon, and shredded mozzarella cheese. Mix well.
  4. Shape and Cook:
    • Heat vegetable oil in a pan.
    • Form small patties or fritters from the mixture and fry for about 3–4 minutes per side until golden brown and crispy.
  5. Serve and Enjoy:
    • Remove from the pan and place on a paper towel to absorb excess oil.
    • Garnish with extra spring onions and serve warm.

Nutritional Information (Per Serving, Approximate)

NutrientAmount per Serving
Calories~280 kcal
Protein~12 g
Carbohydrates~25 g
Fats~15 g
Fiber~3 g

Frequently Asked Questions

Can I Use a Different Type of Cheese?

Yes! While mozzarella gives a mild and creamy melt, you can substitute it with cheddar for a sharper taste, gouda for extra smokiness, or feta for a tangy twist.

What If I Don’t Eat Pork?

No problem! You can swap the bacon for turkey bacon, smoked chicken, or even mushrooms for a vegetarian alternative.

Do I Have to Cook the Vegetables Before Mixing Them?

Sautéing the onions, carrots, and cabbage before mixing them into the potato batter enhances their sweetness and removes excess moisture, which helps the fritters crisp up better. However, if you prefer a more textured bite, you can mix them in raw.

Can I Bake These Instead of Frying?

Yes! While frying gives them the best crispy texture, you can bake them in a preheated oven at 375°F (190°C) for about 20–25 minutes, flipping them halfway through. Lightly brushing them with oil before baking will help achieve a golden crust.

How Do I Make These Even Crispier?

For the crispiest fritters:

  • Make sure to squeeze out as much moisture as possible from the grated potatoes.
  • Use a hot pan and avoid overcrowding to ensure even frying.
  • Let the cooked fritters rest on a wire rack instead of a paper towel to maintain crispiness.

Can I Make the Batter in Advance?

It’s best to cook the fritters immediately after preparing the batter to keep the potatoes from turning brown. However, you can store the prepared batter in an airtight container in the fridge for up to 6 hours before frying.

What Can I Serve With These Fritters?

These fritters are delicious on their own but can be served with:

  • Sour cream or garlic yogurt sauce
  • A side of fresh cucumber and tomato salad
  • A warm bowl of soup for a complete meal
  • A drizzle of spicy mayo or honey mustard for a modern twist

Can I Freeze These for Later?

Yes! To freeze, cook the fritters as usual, let them cool completely, and then place them in a single layer on a baking sheet. Once frozen, transfer them to a freezer bag. To reheat, bake them in an oven at 350°F (175°C) for about 10 minutes or reheat them in a dry pan over low heat.

Tips for Perfect Potato and Meat Fritters

1. Choose the Right Potatoes

Starchy potatoes like Russets work best because they hold their shape and crisp up beautifully. If using waxy potatoes, make sure to squeeze out excess moisture.

2. Shred the Cheese Fresh

Pre-shredded cheese contains anti-caking agents that can affect the texture of the fritters. Grating your own mozzarella ensures a smoother, meltier result.

3. Don’t Skip the Seasoning

Salt, pepper, and Italian herbs add depth to the fritters. Feel free to customize with garlic powder, smoked paprika, or a pinch of chili flakes for extra flavor.

4. Cook in Batches

Overcrowding the pan lowers the oil temperature, making the fritters soggy instead of crispy. Cook them in small batches for the best results.

5. Serve Immediately for the Best Texture

While these fritters reheat well, they are best enjoyed fresh off the pan when they are at their crispiest.

Serving Ideas – Make It a Full Meal

1. Classic Home-Style Dinner

Pair these fritters with a side of coleslaw or roasted vegetables for a balanced meal.

2. Light and Fresh Lunch

Serve them with a refreshing yogurt dip and a simple salad for a lighter option.

3. Party Snack or Appetizer

Make smaller fritters and serve them with multiple dipping sauces for a fun appetizer at gatherings.

4. Breakfast Twist

Top them with a fried egg and avocado slices for a hearty breakfast.

Conclusion – A Dish That Will Keep Everyone Coming Back for More

There’s something special about meals that combine crispy potatoes, melted cheese, and smoky bacon. This recipe isn’t just about great taste—it’s about the comfort of homemade food, the joy of gathering around the table, and the simplicity of turning humble ingredients into something extraordinary.

Every time I make these fritters, they disappear within minutes. They are the kind of meal that brings people together, sparks conversations, and leaves everyone asking for seconds.

So if you’re looking for a dish that is both satisfying and easy to make, give this recipe a try. Whether for lunch, dinner, or a casual snack, these potato and meat fritters are guaranteed to become a favorite in your home—just like they did in mine.

Amal

Potatoes and Meat? Try This New Delicious Recipe for Dinner or Lunch!

This crispy, cheesy potato and meat dish is the perfect combination of flavor and texture. Featuring golden-brown potatoes, melted mozzarella, smoky bacon, and sautéed vegetables, this dish is hearty, satisfying, and packed with savory goodness. Whether served as a main course or a side dish, it’s a simple yet delicious meal that will keep everyone coming back for more.
Prep Time 15 minutes
Cook Time 20 minutes
Total Time 35 minutes
Servings: 4 servings
Course: Main Dish
Cuisine: European

Ingredients
  

  • 200 g hard mozzarella cheese
  • 3 large potatoes
  • Vegetable oil for frying
  • Salt to taste
  • 1 onion
  • 1 carrot
  • A bunch of spring onions
  • 1/2 head of cabbage
  • 150 g bacon

Method
 

  1. Peel and grate the potatoes, then squeeze out excess moisture using a clean kitchen towel.
  2. Finely chop the onion and spring onions. Grate the carrot and shred the cabbage.
  3. In a pan, cook the bacon over medium heat until crispy. Remove and set aside.
  4. In the same pan, sauté the onion, carrot, and cabbage until soft. Season with salt to taste.
  5. In a large bowl, combine the grated potatoes, sautéed vegetables, crumbled bacon, and shredded mozzarella. Mix well.
  6. Heat vegetable oil in a frying pan. Form small patties or fritters from the mixture and place them in the hot oil.
  7. Fry for about 3–4 minutes per side until golden brown and crispy.
  8. Transfer to a paper towel-lined plate to drain excess oil.
  9. Serve warm with fresh spring onions or your favorite dipping sauce. Enjoy!

Notes

  • To make the fritters extra crispy, remove as much moisture as possible from the potatoes before mixing.
  • If the mixture feels too wet, add a tablespoon of flour to help bind the ingredients.
  • For a spicy twist, add a pinch of chili flakes or smoked paprika.
  • Store leftovers in an airtight container in the fridge for up to 3 days. Reheat in a pan or oven to restore crispiness.

Golden & Crispy Potato Pancakes – A Comfort Food Classic

There are some dishes that instantly transport you back to childhood, filling your home with familiar scents and warmth. For me, crispy potato pancakes are one of those meals. As a child, I would sit in the kitchen, watching my grandmother expertly mix the batter, shape the pancakes, and drop them into the sizzling pan. The golden edges, the irresistible crunch, and the comforting aroma were enough to make anyone impatient.

She never needed a recipe—just a few simple ingredients and her intuition. She always said, “The secret isn’t just in the ingredients; it’s in making them with love.” I would eagerly wait for the first batch, knowing they would be perfectly crispy on the outside and tender on the inside. A dollop of sour cream or applesauce was all they needed.

Now, as I make these potato pancakes in my own kitchen, I realize that some recipes never lose their charm. They bring families together, create nostalgia, and remind us that the simplest ingredients can make the most memorable meals. Whether you’re making them for breakfast, lunch, or a quick snack, these crispy potato pancakes will always bring a little bit of warmth and happiness to your table.

Why These Potato Pancakes Are a Must-Try

1. Simple Ingredients, Big Flavor

With just potatoes, onions, an egg, and a few seasonings, you can create a dish that is both delicious and satisfying. These pancakes prove that the best comfort foods don’t require complicated ingredients.

2. Crispy on the Outside, Tender on the Inside

The perfect potato pancake has a crisp golden crust and a soft, flavorful interior. The key is squeezing out excess moisture from the potatoes to ensure they fry up perfectly.

3. Quick and Easy to Make

You don’t need to be a professional chef to make these pancakes. They come together in just minutes, making them an ideal choice for busy mornings or a last-minute meal.

4. Versatile and Customizable

You can serve them with sour cream, applesauce, cheese, or even smoked salmon for a gourmet twist. Want to add a kick? Sprinkle in some chili flakes or garlic powder.

5. A Great Way to Use Up Leftover Potatoes

If you ever find yourself with extra potatoes that need to be used, this recipe is a perfect solution. It turns simple pantry staples into a meal everyone will love.

Ingredients

IngredientQuantity
Potatoes3 (medium-sized)
Onion1 (small)
Egg1
SaltTo taste
Italian herbsTo taste
PepperTo taste
Flour2 tablespoons
Vegetable oilFor frying

Directions

  1. Prepare the Ingredients:
    • Peel and grate the potatoes. Squeeze out excess moisture using a clean kitchen towel.
    • Finely chop or grate the onion.
  2. Mix the Batter:
    • In a bowl, combine the grated potatoes, onion, egg, flour, salt, pepper, and Italian herbs. Mix well until everything is evenly incorporated.
  3. Heat the Oil:
    • Heat a generous amount of vegetable oil in a pan over medium heat.
  4. Form and Fry the Pancakes:
    • Take small portions of the mixture and flatten them into pancake shapes.
    • Fry for about 3–4 minutes per side or until golden brown and crispy.
  5. Drain and Serve:
    • Remove the pancakes from the pan and place them on a paper towel to drain excess oil.
    • Serve hot with sour cream, yogurt, or your favorite dip.

Nutritional Information (Per Serving, Approximate)

NutrientAmount per Serving
Calories~180 kcal
Protein~4 g
Carbohydrates~25 g
Fats~7 g
Fiber~2 g

Frequently Asked Questions

Can I Use Any Type of Potato?

Yes! While starchy potatoes like Russets give the crispiest results, you can also use Yukon Gold or red potatoes for a slightly softer texture. Avoid waxy potatoes, as they retain too much moisture.

Do I Have to Peel the Potatoes?

Not necessarily. If you like a more rustic texture, you can leave the skins on. Just be sure to wash them well before grating.

How Do I Get the Crispiest Potato Pancakes?

The key to extra crispy pancakes is squeezing out as much moisture as possible from the grated potatoes. You can use a clean kitchen towel or cheesecloth to wring out the excess liquid before mixing them with the other ingredients.

Can I Make These Without Eggs?

Yes! If you prefer an egg-free version, you can replace the egg with a flaxseed or chia seed mixture (1 tablespoon of ground flaxseeds or chia seeds mixed with 3 tablespoons of water). Another option is to use a small amount of mashed potatoes as a natural binder.

Can I Bake These Instead of Frying?

Absolutely. While frying gives them the best crispy texture, you can bake them at 400°F (200°C) for about 20–25 minutes, flipping them halfway through. For extra crispiness, brush them with a little oil before baking.

What Are the Best Dipping Sauces for Potato Pancakes?

These pancakes pair well with a variety of dips, including:

  • Sour cream or Greek yogurt
  • Applesauce for a sweet contrast
  • Garlic aioli or ranch dressing
  • Spicy ketchup or hot sauce for an extra kick

Can I Make the Batter Ahead of Time?

It’s best to cook the pancakes immediately after preparing the batter to prevent the potatoes from turning brown. However, you can keep the grated potatoes in cold water for a few hours, then drain and mix them with the other ingredients just before cooking.

How Do I Store and Reheat Leftovers?

Leftover potato pancakes can be stored in an airtight container in the fridge for up to 3 days. To reheat, place them in a dry pan over low heat or bake them in the oven at 350°F (175°C) for 10 minutes to restore their crispiness.

Can I Freeze Potato Pancakes?

Yes! Cook the pancakes, let them cool completely, then place them in a single layer on a baking sheet. Freeze until solid, then transfer them to a freezer bag. When ready to eat, reheat them in a pan or oven without thawing for best results.

Tips for the Best Potato Pancakes

1. Use the Right Grater

A coarse grater works best for potato pancakes, as it creates the perfect texture. If the shreds are too fine, the pancakes may become mushy instead of crispy.

2. Don’t Skip the Salt Step

After grating the potatoes, mix them with a little salt and let them sit for a few minutes. This helps draw out excess water, making them crispier when fried.

3. Fry in the Right Oil

Use a neutral oil with a high smoke point, such as vegetable oil, sunflower oil, or canola oil. Avoid olive oil, as it can burn quickly at high temperatures.

4. Keep the Heat at Medium

If the heat is too low, the pancakes will absorb too much oil and become greasy. If it’s too high, they will burn on the outside before cooking through. Medium heat is the best balance for golden, crispy results.

5. Don’t Overcrowd the Pan

Cook the pancakes in small batches to prevent steaming. If you overcrowd the pan, they won’t crisp up properly.

Serving Ideas – Make It a Full Meal

Classic Comfort Food Pairing

Serve these potato pancakes with eggs and bacon for a hearty breakfast or brunch.

Light and Fresh Option

Pair them with a fresh green salad, avocado slices, and a lemony yogurt dressing.

Savory Twist

Top them with smoked salmon, cream cheese, and fresh dill for a gourmet appetizer.

Sweet and Savory Combination

Enjoy them with applesauce and cinnamon for a comforting, slightly sweet variation.

Conclusion – A Recipe You’ll Want to Make Again and Again

Crispy potato pancakes are more than just a dish—they’re a tradition, a memory, and a comforting meal that never fails to bring joy. Whether you’re making them for a cozy breakfast, a satisfying snack, or a quick dinner, they always hit the spot.

Their simplicity, versatility, and incredible flavor make them a timeless favorite. And the best part? They’re so easy to make that once you try them, you’ll find yourself coming back to this recipe again and again.

So grab a pan, grate some potatoes, and enjoy the magic of crispy, golden potato pancakes. Because sometimes, the best meals are the simplest ones!

Amal

Golden & Crispy Potato Pancakes – A Comfort Food Classic

These crispy potato pancakes are golden brown on the outside and tender on the inside, making them the ultimate comfort food. Made with simple ingredients like grated potatoes, onion, and a touch of seasoning, they are easy to prepare and absolutely delicious. Whether served with sour cream, applesauce, or your favorite dipping sauce, these pancakes are a guaranteed crowd-pleaser. Perfect for breakfast, a snack, or a side dish!
Prep Time 10 minutes
Cook Time 15 minutes
Total Time 25 minutes
Servings: 4 servings
Course: Breakfast
Cuisine: European-inspired

Ingredients
  

  • 3 potatoes
  • 1 onion
  • 1 egg
  • Salt to taste
  • Italian herbs to taste
  • Pepper to taste
  • 2 tablespoons flour
  • Vegetable oil for frying

Method
 

  1. Peel and grate the potatoes. Place them in a clean kitchen towel and squeeze out any excess moisture.
  2. Finely chop or grate the onion and mix it with the grated potatoes in a bowl.
  3. Add the egg, salt, pepper, Italian herbs, and flour. Stir well until the mixture is evenly combined.
  4. Heat vegetable oil in a frying pan over medium heat.
  5. Take a spoonful of the potato mixture and flatten it into a pancake shape. Place it in the pan and repeat with the remaining mixture.
  6. Fry for about 3–4 minutes on each side, or until golden brown and crispy.
  7. Transfer the pancakes to a paper towel-lined plate to drain excess oil.
  8. Serve warm with sour cream, applesauce, or your favorite dip.

Notes

  • For extra crispiness, make sure to remove as much moisture as possible from the grated potatoes before mixing.
  • If the batter is too wet, add a little more flour to help bind the ingredients.
  • Experiment with seasonings—try adding garlic powder, smoked paprika, or even a pinch of chili flakes for extra flavor.
  • Leftovers can be stored in an airtight container in the fridge for up to 3 days and reheated in a pan or oven to restore crispiness.

Turkish Flatbread with Parsley and Olive Oil – A Taste of Tradition

Bread has always been more than just food in my home—it’s a tradition, a connection to the past, and a symbol of warmth and togetherness. I still remember the first time I made Turkish flatbread with my grandmother. She never used a strict recipe, relying instead on instinct and years of experience to create something magical out of simple ingredients.

The smell of fresh dough, the sound of it sizzling in a hot pan, and the golden-brown spots forming as it puffed up—these small moments turned bread-making into an experience rather than just a task. And when she brushed the warm flatbread with olive oil and sprinkled it with fresh parsley, I realized how something so simple could taste so rich.

This Turkish flatbread, also known as bazlama or gözleme, is soft, chewy, and infused with the earthy aroma of olive oil. Unlike store-bought bread, it doesn’t require an oven, making it quick and accessible for anyone. Whether you’re pairing it with dips, using it for sandwiches, or enjoying it plain, this flatbread will make any meal feel special.

Why You’ll Love This Flatbread

1. No Oven Required – Just a Pan!

Not everyone has access to an oven, and sometimes you just don’t want to turn it on. This flatbread is made entirely on the stovetop, making it perfect for quick meals, summer days when you don’t want to heat up the kitchen, or anyone with limited baking equipment.

2. Soft, Fluffy, and Flavorful

The combination of yeast and olive oil gives this bread a soft, pillowy texture with just the right amount of chew. The parsley adds a fresh, herby touch that elevates its taste.

3. Simple Ingredients, Big Flavor

With just flour, water, yeast, olive oil, and a few seasonings, you can create an incredibly flavorful bread that rivals any bakery version. No preservatives, no unnecessary additives—just pure, wholesome ingredients.

4. Pairs Well with Everything

This flatbread is incredibly versatile. Enjoy it warm with butter, dip it into hummus, use it as a wrap for grilled meats, or serve it alongside soups and stews. It also makes an excellent base for Mediterranean-inspired sandwiches.

5. Easy to Make, Even for Beginners

If you’re new to making bread, this is a great place to start. The dough is forgiving, doesn’t require hours of kneading, and doesn’t need a baking stone or complex techniques.

Ingredients

IngredientQuantity
Dry yeast2 teaspoons (10 g)
Sugar2 teaspoons (10 g)
Warm water2/3 cup (165 ml)
All-purpose flour2 ½ cups (300 g)
Olive oil2 tablespoons
Salt1 teaspoon
Fresh parsley, chopped2 tablespoons
Additional olive oil (for brushing)As needed

Directions

  1. Activate the Yeast:
    • In a small bowl, mix the dry yeast, sugar, and warm water. Stir gently and let it sit for 5–10 minutes until foamy.
  2. Prepare the Dough:
    • In a large mixing bowl, combine the flour and salt.
    • Add the yeast mixture and olive oil, then knead the dough for about 8–10 minutes until it becomes smooth and elastic.
    • Cover the dough with a clean kitchen towel and let it rest for 1 hour, or until doubled in size.
  3. Shape the Flatbreads:
    • Once the dough has risen, divide it into 4 equal portions.
    • Roll each portion into a round or oval shape, about ¼ inch thick.
    • Sprinkle chopped parsley on top and gently press it into the dough.
  4. Cook the Flatbreads:
    • Heat a pan over medium heat.
    • Cook each flatbread for about 2–3 minutes on one side until bubbles form, then flip and cook for another 2 minutes.
    • Brush with olive oil while warm for extra flavor.
  5. Serve and Enjoy:
    • Best served fresh with dips, grilled meats, or alongside soups and salads.

Nutritional Information (Per Serving, Approximate)

NutrientAmount per Serving
Calories~220 kcal
Protein~5 g
Carbohydrates~40 g
Fats~5 g
Fiber~2 g

Frequently Asked Questions

How is Turkish Flatbread Different from Other Breads?

Unlike typical yeast breads that are baked in an oven, this Turkish flatbread is cooked in a dry pan, similar to naan or pita. It has a soft and chewy texture with a slightly crispy exterior, and the addition of olive oil gives it a rich, authentic Mediterranean flavor.

Do I Need a Special Pan to Make This Flatbread?

No, any non-stick or cast-iron pan will work. Cast iron is preferred because it holds heat well and creates a beautifully charred surface, but a simple frying pan will do the job just fine.

Can I Make This Flatbread Without Yeast?

Yes! While yeast gives it a fluffier texture, you can replace it with baking powder if you’re in a hurry. The result will be slightly denser but still delicious. Use about 2 teaspoons of baking powder instead of yeast, and let the dough rest for 30 minutes before rolling it out.

Can I Use Whole Wheat Flour Instead of All-Purpose Flour?

Yes, but whole wheat flour will make the bread slightly denser. To keep it soft, use a mix of 50% whole wheat flour and 50% all-purpose flour. You may need to add a little more water to compensate for the extra absorbency of whole wheat flour.

How Long Does This Flatbread Stay Fresh?

It’s best eaten fresh, but you can store leftovers in an airtight container at room temperature for up to 2 days. To reheat, warm them in a dry pan over low heat or briefly microwave them.

Can I Freeze This Flatbread?

Yes! Once cooked and cooled, stack the flatbreads with parchment paper between each one and freeze in a sealed bag for up to 2 months. Reheat directly from frozen in a pan or oven.

What’s the Best Way to Serve This Bread?

  • With Dips: Serve alongside hummus, tzatziki, baba ganoush, or a simple olive oil and balsamic dip.
  • As a Wrap: Fill with grilled chicken, lamb, or falafel for a Mediterranean-style wrap.
  • Breakfast Option: Spread with butter, honey, or jam for a simple yet delicious morning treat.
  • Side Dish: Serve with soups, stews, or roasted vegetables.

The Secret to Perfect Turkish Flatbread

1. Let the Dough Rest

The longer the dough rests, the better the texture. If you have time, allow the dough to rise for at least an hour for maximum softness.

2. Use Warm Water for the Yeast

Make sure the water is warm (not hot) to activate the yeast properly. If the water is too hot, it can kill the yeast; if it’s too cold, the dough won’t rise as well.

3. Don’t Overwork the Dough

Knead just until the dough is smooth and elastic. Over-kneading can make the bread tough rather than soft and fluffy.

4. Cook on Medium Heat

Too high a heat can burn the outside while leaving the inside undercooked. Medium heat ensures an even golden-brown surface with a soft, fully cooked interior.

5. Brush with Olive Oil While Warm

Brushing the flatbreads with olive oil right after cooking keeps them soft and adds extra flavor. Sprinkle with fresh parsley or sea salt for a finishing touch.

Why This Bread is More Than Just a Recipe

Bread is one of the oldest and most universal foods in the world, but every culture has its own unique take on it. Turkish flatbread is a perfect example of how something simple—flour, water, yeast—can become something special.

It’s a reminder that the best foods don’t have to be complicated. Whether you’re making this for a family dinner, a gathering with friends, or just for yourself, there’s something deeply satisfying about creating your own bread from scratch.

As you roll out the dough and watch it puff up in the pan, you’ll feel the same joy that people have felt for centuries while making bread. And when you take that first warm, soft bite, you’ll understand why this recipe is one you’ll want to make again and again.

So go ahead—try it, share it, and enjoy the simple magic of homemade Turkish flatbread.

Amal

Turkish Flatbread with Parsley and Olive Oil – A Taste of Tradition

This Turkish flatbread is soft, chewy, and full of flavor. Made with simple ingredients like flour, olive oil, and parsley, this stovetop bread is quick and easy to prepare. No oven is required—just mix the dough, let it rise, and cook it in a pan for a golden-brown, fluffy flatbread. Brushed with olive oil and sprinkled with fresh parsley, it pairs perfectly with dips, soups, or grilled meats. Enjoy this traditional bread fresh off the pan for the best taste!
Prep Time 10 minutes
Cook Time 15 minutes
Total Time 25 minutes
Servings: 4 flatbreads
Course: Side Dish
Cuisine: Mediterranean

Ingredients
  

  • 2 teaspoons dry yeast 10 g
  • 2 teaspoons sugar 10 g
  • 2/3 cup warm water 165 ml
  • 2 ½ cups all-purpose flour 300 g
  • 2 tablespoons olive oil
  • 1 teaspoon salt
  • 2 tablespoons fresh parsley chopped
  • Additional olive oil for brushing

Method
 

  1. In a small bowl, mix the dry yeast, sugar, and warm water. Stir and let it sit for 5–10 minutes until foamy.
  2. In a large mixing bowl, combine the flour and salt. Add the yeast mixture and olive oil, then knead for about 8–10 minutes until smooth and elastic.
  3. Cover the dough and let it rest for 1 hour, or until doubled in size.
  4. Divide the dough into 4 equal portions. Roll each portion into a round shape, about ¼ inch thick. Sprinkle with chopped parsley and gently press it into the dough.
  5. Heat a dry pan over medium heat. Cook each flatbread for about 2–3 minutes on one side until bubbles form, then flip and cook for another 2 minutes until golden brown.
  6. Remove from the pan and brush with olive oil while warm. Serve fresh and enjoy!

Notes

  • If using whole wheat flour, mix it with all-purpose flour for a softer texture.
  • Flatbreads can be frozen and reheated in a dry pan or oven.
  • To add extra flavor, sprinkle sesame seeds or garlic powder before cooking.
  • Serve with hummus, tzatziki, or use it as a wrap for grilled meats and veggies.

This Cucumber Salad Burns Fat While You Sleep! Have Dinner and Lose Weight at Night!

I still remember the first time I made this cucumber salad. It was late at night, and I wanted something light yet satisfying. I wasn’t in the mood for anything heavy, but I also didn’t want to go to bed hungry. That’s when I threw together a few simple ingredients—crisp cucumbers, a touch of soy sauce, a sprinkle of sesame seeds, and a splash of vinegar.

The result was refreshing, flavorful, and surprisingly filling. But what truly amazed me was how light I felt the next morning. No bloating, no sluggishness—just a sense of energy and balance. I started making this salad regularly, and over time, I noticed a difference in my digestion, my cravings, and even my waistline.

Now, this has become my go-to evening meal when I want something delicious that won’t weigh me down. It’s proof that healthy eating doesn’t have to be boring, and that the right ingredients can work with your body—even while you sleep.

Why This Cucumber Salad is a Game Changer

1. Low-Calorie but Satisfying

Cucumbers are made up of over 95% water, making them incredibly hydrating while being naturally low in calories. This salad keeps you full without excess calories, making it perfect for weight management.

2. Boosts Digestion and Reduces Bloating

The combination of fiber from cucumbers and carrots, along with the gentle acidity of vinegar, helps digestion by promoting gut health and reducing bloating. If you’ve ever woken up feeling sluggish after a heavy meal, this salad is a refreshing alternative.

3. Rich in Nutrients and Antioxidants

While light, this salad is packed with vitamins and minerals. Cucumbers provide vitamin K and antioxidants, carrots are rich in beta-carotene, and sesame seeds add healthy fats and calcium. Every bite nourishes your body while keeping things simple.

4. Helps Regulate Blood Sugar and Metabolism

The balance of fiber, healthy fats, and natural acidity in this salad helps slow the absorption of sugars, preventing blood sugar spikes at night. This makes it a great option for those looking to maintain steady energy levels and prevent late-night cravings.

5. Quick, Easy, and Requires No Cooking

Sometimes, the last thing you want to do after a long day is cook. This salad requires no stove, no oven, and no complicated steps. Just chop, mix, and enjoy!

Ingredients

IngredientQuantity
CucumbersAs needed
Salt1 tablespoon
Carrot1 medium
Green onion2 stalks
Olive oil40 ml
Sugar20 grams
Soy sauce20 ml
Paprika15 grams
Sesame seeds20 grams
Apple or rice vinegar10 ml

Directions

  1. Prepare the Vegetables:
    • Slice the cucumbers into thin rounds or strips.
    • Sprinkle with salt, mix well, and let them sit for 10 minutes to draw out excess water.
    • Rinse under cold water and drain.
  2. Shred and Chop:
    • Peel and grate the carrot.
    • Finely chop the green onion.
  3. Make the Dressing:
    • In a small bowl, mix olive oil, sugar, soy sauce, paprika, sesame seeds, and vinegar until well combined.
  4. Assemble the Salad:
    • In a large bowl, combine the cucumbers, carrots, and green onions.
    • Pour the dressing over the salad and toss until evenly coated.
  5. Serve and Enjoy:
    • Let the salad sit for 5–10 minutes to allow the flavors to blend.
    • Serve fresh and enjoy a light, nutritious dish!

Nutritional Information (Per Serving, Approximate)

NutrientAmount per Serving
Calories~120 kcal
Protein~2 g
Carbohydrates~10 g
Sugars~4 g
Fats~8 g
Fiber~2 g

Frequently Asked Questions

Can I Eat This Salad Every Night?

Absolutely! Since it’s light, hydrating, and packed with nutrients, this salad is a great addition to your daily routine. Just be sure to pair it with a balanced diet for overall health.

Does This Salad Actually Help with Weight Loss?

While no single food can “burn fat,” this salad supports weight loss by keeping you full, reducing cravings, and aiding digestion. When eaten as part of a balanced diet, it can be a great tool for maintaining a healthy weight.

Can I Prepare This Salad in Advance?

Yes! You can make this salad a few hours ahead and store it in the fridge. However, for the freshest texture, it’s best eaten within 24 hours. If storing longer, keep the dressing separate and mix just before serving.

What Can I Add to Make It More Filling?

If you want a more substantial meal, try adding:

  • Sliced avocado for healthy fats
  • Grilled chicken or tofu for protein
  • Cooked quinoa or chickpeas for extra fiber
  • A handful of nuts for crunch and energy

Is This Salad Good for Digestion?

Yes! Cucumbers, carrots, and vinegar all support gut health by aiding digestion and reducing bloating. The fiber content also helps regulate bowel movements, making it a great choice for those with digestive concerns.

Can I Use a Different Type of Vinegar?

Yes! Apple cider vinegar and rice vinegar both work well in this salad. Apple cider vinegar is known for its potential health benefits, while rice vinegar gives a slightly milder, sweeter flavor.

How Can I Make It Spicier?

If you love a bit of heat, add:

  • A pinch of red pepper flakes
  • A drizzle of chili oil
  • Freshly chopped chili peppers

What Can I Serve This Salad With?

This salad pairs beautifully with a variety of dishes, such as:

  • Grilled fish or chicken for a protein-packed meal
  • A side of brown rice or quinoa for added fiber
  • As a topping for a fresh green salad

The Science Behind This Salad’s Weight Loss Benefits

Hydration is Key

Staying hydrated is one of the most overlooked aspects of weight management. Since cucumbers are over 95% water, they help keep your body hydrated, flush out excess sodium, and reduce water retention.

Vinegar’s Metabolism-Boosting Effects

Studies suggest that vinegar may help regulate blood sugar levels and improve metabolism. A small amount before bedtime can aid digestion and support fat-burning processes overnight.

Fiber for Satiety and Digestion

The fiber from cucumbers and carrots slows digestion, keeping you full longer and preventing unnecessary snacking late at night. This simple addition to your diet can help regulate appetite and promote gut health.

Tips for the Best Cucumber Salad

  • Choose Fresh, Crisp Cucumbers: Soft cucumbers will make the salad watery. Pick firm, bright green ones for the best texture.
  • Let the Flavors Marinate: Letting the salad sit for 5–10 minutes before eating allows the dressing to absorb into the vegetables, enhancing the taste.
  • Use a Sharp Knife or Mandoline: Thinly sliced cucumbers absorb flavors better and have the best crunch.
  • Toast the Sesame Seeds: Lightly toasting sesame seeds before adding them to the salad enhances their nutty flavor.
  • Adjust Sweetness and Acidity to Taste: If you prefer a tangier salad, add an extra splash of vinegar. If you like it slightly sweeter, increase the sugar by a teaspoon.

Conclusion – A Simple Salad That Works Wonders

Some of the best meals aren’t just about taste—they’re about how they make you feel. This cucumber salad is more than just a refreshing side dish; it’s a tool for better digestion, improved hydration, and mindful eating.

Whether you’re looking for a light dinner, a healthy snack, or a way to curb late-night cravings, this salad delivers. It’s proof that weight-friendly meals don’t have to be bland or boring—they can be delicious, satisfying, and incredibly easy to make.

So the next time you’re wondering what to eat at night without feeling heavy the next morning, try this salad. It just might become your new favorite evening ritual!

Amal

This Cucumber Salad Burns Fat While You Sleep! Have Dinner and Lose Weight at Night!

This light and refreshing cucumber salad is the perfect evening meal when you want something nutritious, hydrating, and satisfying. Packed with fresh cucumbers, crunchy carrots, and a flavorful dressing made with olive oil, soy sauce, and vinegar, this salad is low in calories but high in flavor. The combination of fiber and healthy fats helps with digestion, reduces bloating, and keeps you feeling full without weighing you down. Enjoy this quick and easy salad as a side dish or a light meal before bed!
Prep Time 10 minutes
Total Time 10 minutes
Servings: 2 -3 servings
Course: Salad
Cuisine: Asian-inspired

Ingredients
  

  • Cucumbers
  • 1 tablespoon salt
  • 1 medium carrot
  • 2 stalks green onion
  • 40 ml olive oil
  • 20 grams sugar
  • 20 ml soy sauce
  • 15 grams paprika
  • 20 grams sesame seeds
  • 10 ml apple or rice vinegar

Method
 

  1. Slice the cucumbers into thin rounds or strips. Sprinkle with salt and let them sit for 10 minutes to draw out excess moisture. Rinse and drain well.
  2. Peel and shred the carrot. Finely chop the green onions.
  3. In a small bowl, whisk together the olive oil, sugar, soy sauce, paprika, sesame seeds, and vinegar to make the dressing.
  4. In a large bowl, combine the cucumbers, carrots, and green onions. Pour the dressing over the salad and toss well to coat.
  5. Let the salad sit for 5–10 minutes to allow the flavors to blend. Serve fresh and enjoy!

Notes

  • For extra crunch, add chopped nuts or toasted sesame seeds.
  • Adjust the sweetness and acidity by adding more or less sugar and vinegar.
  • Best eaten fresh but can be stored in the fridge for up to 24 hours.
  • For a spicy version, add chili flakes or a drizzle of chili oil.

Everyone Runs to Me When I Cook Like This – My Husband Asks for It Every Day!

There are some recipes that simply have a way of gathering people around the table before you even call them. The sizzle in the pan, the irresistible aroma filling the kitchen, and that first bite that melts in your mouth—this is one of those dishes.

The first time I made these cheesy chicken fritters, I wasn’t expecting them to become a family favorite. It was just a regular evening, and I wanted to make something quick but satisfying. I threw together some diced chicken, cheese, and a few simple ingredients, then pan-fried them until golden brown. The result? A plate of crispy, juicy, and cheesy chicken bites that disappeared within minutes.

My husband took one bite, looked at me, and said, “You need to make these every day.” My kids, usually picky eaters, kept coming back for more. Now, every time I cook them, I don’t even have to announce that dinner is ready—everyone just follows the smell into the kitchen.

This recipe is more than just another way to cook chicken. It’s a dish that brings people together, creates conversations around the dinner table, and turns an ordinary meal into something special.

Why You’ll Love This Recipe

1. Simple, Quick, and Delicious

If you want a meal that’s ready in under 30 minutes but tastes like something you spent hours perfecting, this is it. The ingredients are basic, the process is straightforward, and the result is absolutely mouthwatering.

2. Juicy and Packed with Flavor

The combination of sour cream, eggs, and shredded mozzarella keeps the chicken incredibly moist and flavorful. The slight crispiness from frying adds a perfect contrast to the soft, cheesy interior.

3. No Fancy Ingredients Needed

Most of these ingredients are pantry staples. Chicken, cheese, eggs, and a few spices—nothing complicated, just everyday ingredients transformed into something amazing.

4. Versatile and Customizable

These fritters can be adapted to suit your taste. Want more spice? Add chili flakes. Prefer a different cheese? Swap mozzarella for cheddar or parmesan. You can even add finely chopped vegetables like bell peppers or zucchini for extra nutrition.

5. Perfect for Any Occasion

Serve them as a main dish with a salad, as a snack with a dipping sauce, or even as party appetizers. No matter the occasion, they’re always a hit.

Ingredients

IngredientQuantity
Green onions, finely chopped30g (1/4 cup)
Chicken breast, finely diced or ground500g (1 lb)
Sour cream2 tablespoons
Large eggs2
Fresh parsley, chopped2 tablespoons
Mozzarella cheese, shredded80g (3/4 cup)
All-purpose flour2 tablespoons
Salt and pepperTo taste
Dry garlic powder1/2 teaspoon
Paprika1/2 teaspoon
Oil for fryingAs needed

Directions

  1. Prepare the Mixture:
    • In a large mixing bowl, combine the finely diced or ground chicken breast with the chopped green onions, parsley, and shredded mozzarella cheese.
    • Add the sour cream, eggs, and all-purpose flour.
    • Season with salt, pepper, garlic powder, and paprika. Mix everything well until you get a thick, uniform consistency.
  2. Heat the Pan:
    • In a large frying pan, heat a few tablespoons of oil over medium heat.
  3. Cook the Patties:
    • Using a spoon or your hands, form small patties or fritters from the chicken mixture.
    • Place them in the hot pan and cook for about 3–4 minutes on each side, or until golden brown and fully cooked through.
  4. Serve and Enjoy:
    • Remove from the pan and drain on a paper towel to absorb excess oil.
    • Serve warm with a side of sour cream, fresh salad, or your favorite dipping sauce.

Nutritional Information (Per Serving, Approximate)

NutrientAmount per Serving
Calories~230 kcal
Protein~25 g
Carbohydrates~5 g
Fats~12 g
Fiber~0.5 g

Frequently Asked Questions

Can I Use Ground Chicken Instead of Diced Chicken?

Yes! While diced chicken gives a chunkier, more textured fritter, ground chicken works just as well for a smoother, more uniform consistency.

How Do I Ensure the Chicken Stays Juicy?

The sour cream and eggs help keep the chicken moist, but it’s important not to overcook the fritters. Keep the heat at medium and cook them just until they are golden brown and cooked through.

Can I Make These Fritters in the Oven Instead of Frying?

Absolutely! If you prefer a healthier option, you can bake them at 375°F (190°C) for about 20 minutes, flipping halfway through. They won’t be as crispy as the fried version, but they’ll still be delicious.

What Can I Serve with These Chicken Fritters?

These go well with just about anything. Serve them with:

  • A fresh green salad for a light meal
  • Mashed potatoes or rice for a hearty dinner
  • A side of garlic yogurt sauce, ranch dressing, or spicy mayo for dipping

How Can I Make This Recipe Gluten-Free?

Simply replace the all-purpose flour with a gluten-free alternative like almond flour or cornstarch. This won’t affect the texture too much, and you’ll still get the same delicious results.

Can I Prepare the Mixture in Advance?

Yes! You can mix all the ingredients together and store the batter in the fridge for up to 12 hours before cooking. This makes meal prep even easier.

How Do I Store and Reheat Leftovers?

If you have any leftovers (which is rare!), store them in an airtight container in the fridge for up to three days. To reheat, warm them in a pan over low heat or bake them at 350°F (175°C) for about 5 minutes to keep them crispy.

Can These Fritters Be Frozen?

Yes, you can freeze them! Once cooked and cooled, place them in a single layer on a baking sheet and freeze until solid. Then transfer them to a freezer-safe bag and store them for up to two months. To reheat, bake them straight from frozen at 375°F (190°C) for about 10 minutes.

Tips for Perfect Chicken Fritters

  • Dice the chicken finely – The smaller the pieces, the better the fritters hold together. If using ground chicken, the texture will be softer but just as delicious.
  • Use freshly shredded cheese – Pre-shredded cheese has anti-caking agents that can affect the texture. Freshly grated mozzarella melts better and blends seamlessly into the batter.
  • Don’t overcrowd the pan – Cook the fritters in batches so they fry evenly and develop a nice golden crust.
  • Let the batter rest – If you have time, letting the mixture sit for 10 minutes before frying allows the flavors to meld together beautifully.

Serving Ideas – Make It a Full Meal!

1. Classic Dinner Plate

Pair the fritters with mashed potatoes and steamed vegetables for a comforting, hearty meal.

2. Low-Carb Option

Serve them alongside a fresh cucumber and tomato salad with a drizzle of olive oil.

3. Party-Ready Appetizers

Make smaller fritters and serve them on a platter with dipping sauces like ranch, garlic aioli, or sweet chili sauce.

4. In a Wrap or Sandwich

Place them inside a warm tortilla or sandwich bun with lettuce, tomatoes, and a creamy sauce for a delicious chicken sandwich alternative.

Conclusion – The Dish That Everyone Loves

Some recipes come and go, but others become family traditions. These cheesy chicken fritters have found a permanent place in my kitchen, not just because they’re easy to make but because they bring joy to the table.

Every time I make them, I see the same reaction—the excitement as they cook, the eager faces waiting for the first bite, and the inevitable requests for seconds. It’s a meal that’s not just about food; it’s about creating moments, sharing laughter, and making memories over something truly delicious.

So, if you’re looking for a dish that’s guaranteed to impress, try these chicken fritters. I promise, once you make them, they’ll become a regular request in your household—just like they did in mine.

Amal

Everyone Runs to Me When I Cook Like This – My Husband Asks for It Every Day!

These cheesy chicken fritters are juicy, flavorful, and incredibly easy to make. Made with finely diced or ground chicken, mozzarella cheese, fresh herbs, and a touch of sour cream, they are crispy on the outside and tender on the inside. Perfect for a quick family dinner, a party appetizer, or even meal prep, this dish will have everyone running to the kitchen! Serve them with your favorite dipping sauce or alongside a fresh salad for a complete meal.
Prep Time 10 minutes
Cook Time 15 minutes
Total Time 25 minutes
Servings: 4 servings
Course: Main Dish
Cuisine: Comfort Food

Ingredients
  

  • 30 grams 1/4 cup green onions, finely chopped
  • 500 grams 1 lb chicken breast, finely diced or ground
  • 2 tablespoons sour cream
  • 2 large eggs
  • 2 tablespoons fresh parsley chopped
  • 80 grams 3/4 cup mozzarella cheese, shredded
  • 2 tablespoons all-purpose flour
  • Salt and pepper to taste
  • 1/2 teaspoon dry garlic powder
  • 1/2 teaspoon paprika
  • Oil for frying

Method
 

  1. In a large bowl, mix the diced or ground chicken with the green onions, parsley, and shredded mozzarella cheese.
  2. Add the sour cream, eggs, and flour, stirring until everything is well combined.
  3. Season the mixture with salt, pepper, garlic powder, and paprika. Mix again until you get a thick, uniform consistency.
  4. Heat a few tablespoons of oil in a non-stick pan over medium heat.
  5. Scoop small portions of the chicken mixture into the pan, forming patties. Cook for 3–4 minutes on each side until golden brown and cooked through.
  6. Transfer to a plate lined with paper towels to absorb excess oil.
  7. Serve warm with sour cream, garlic sauce, or your favorite dip. Enjoy!

Notes

  • If using ground chicken instead of diced, the texture will be softer, but still delicious.
  • You can bake these fritters at 375°F (190°C) for 20 minutes if you prefer a healthier version.
  • Leftovers can be stored in the fridge for up to 3 days and reheated in a pan or oven.
  • For a gluten-free version, replace all-purpose flour with almond flour or cornstarch.

Quick and Easy No-Oven Yogurt Pancakes – A Fluffy Delight in Minutes

Some of my favorite childhood memories revolve around the kitchen, especially in the early mornings when the house was filled with the scent of something warm and sweet cooking on the stove. My mother had a way of making breakfast feel like a special occasion, even on the most ordinary days.

On weekends, she would wake up before everyone else and start preparing something quick but comforting. Instead of turning on the oven or spending hours on complicated dishes, she would make the simplest yet most delicious pancakes—soft, golden, and lightly sweet with just a hint of vanilla.

There was no rush, no stress—just the soothing rhythm of batter being poured into the pan, the gentle sizzle as it cooked, and the joy of watching fluffy pancakes stack up on a plate. These pancakes didn’t need maple syrup or fancy toppings; just a sprinkle of sugar and a warm cup of tea made them perfect.

Now, I find myself making these same pancakes whenever I need a moment of comfort. Whether it’s a lazy weekend or a quick weekday breakfast, these no-oven yogurt pancakes bring back the warmth and simplicity of those mornings. They remind me that the best meals are often the easiest to make and the most cherished to share.

Why These Yogurt Pancakes Will Become Your Favorite

1. Quick and No-Fuss

This recipe is perfect for when you want something homemade but don’t have the time or patience for complex preparations. No need to preheat an oven or measure out a long list of ingredients. Just mix, cook, and enjoy!

2. No Oven Needed

Unlike traditional baked pancakes or oven-baked treats, these are made entirely on the stovetop. This makes them ideal for hot summer mornings when turning on the oven feels unbearable or for those with limited kitchen appliances.

3. Extra Fluffy with a Hint of Tanginess

The addition of yogurt gives these pancakes a light, airy texture while adding a subtle tang that balances out the sweetness. The result is pancakes that are not just soft but also full of flavor.

4. Minimal Ingredients, Maximum Flavor

You probably already have everything you need in your kitchen—flour, eggs, yogurt, sugar, and a few other basics. Despite the simplicity, the end result is satisfying, proving that sometimes, less is more.

5. Customizable to Your Taste

These pancakes are a blank canvas. Want them sweeter? Add a drizzle of honey. Craving something indulgent? Spread on some Nutella or peanut butter. Love fruit? Top them with berries or bananas.

Ingredients

IngredientQuantity
Egg1
Sugar3 tablespoons
Vanilla Sugar8 g
Oil (plus extra for cooking)2 tablespoons
Yogurt125 g
Milk80 ml
Flour180 g
Baking Powder10 g
Caster Sugar (for sprinkling)As needed

Directions

  1. Prepare the Batter:
    • In a mixing bowl, whisk the egg with sugar and vanilla sugar until light and slightly frothy.
    • Add the oil, yogurt, and milk, mixing until well combined.
    • Sift in the flour and baking powder, then stir until a smooth, lump-free batter forms.
  2. Cook the Pancakes:
    • Heat a non-stick pan over medium heat and lightly grease with oil.
    • Pour small portions of batter into the pan, forming pancakes.
    • Cook for about 2 minutes until bubbles form on the surface, then flip and cook for another minute until golden brown.
  3. Serve and Enjoy:
    • Transfer to a plate and sprinkle with caster sugar while still warm.
    • Serve as is, or pair with honey, jam, or fresh fruits for extra flavor.

Nutritional Information (Per Serving, Approximate)

NutrientAmount per Serving
Calories~220 kcal
Protein~6 g
Carbohydrates~35 g
Sugars~12 g
Fats~7 g
Fiber~1 g

Frequently Asked Questions

Can I Use Any Type of Yogurt?

Yes! While plain yogurt is ideal, you can experiment with Greek yogurt for a thicker batter or flavored yogurt for an extra hint of sweetness. If using Greek yogurt, you may need to add a little extra milk to loosen the batter.

Can I Make These Pancakes Without Eggs?

Absolutely. Replace the egg with a flaxseed or chia seed substitute (1 tablespoon of ground flaxseeds or chia seeds mixed with 3 tablespoons of water). You can also try using mashed bananas for a naturally sweet and egg-free version.

What’s the Best Way to Cook These Pancakes Evenly?

To get evenly cooked, fluffy pancakes, keep the heat at medium. If the pan is too hot, the outside will cook too quickly while the inside remains underdone. A non-stick pan works best, and using a little oil between batches prevents sticking.

How Can I Make These Pancakes Healthier?

You can swap white flour for whole wheat flour for more fiber and nutrients. Reducing the sugar or using natural sweeteners like honey or maple syrup can also make them a healthier option.

How Do I Store and Reheat These Pancakes?

If you have leftovers (which is rare!), store them in an airtight container in the refrigerator for up to three days. To reheat, warm them in a dry pan over low heat or pop them in the microwave for 10-15 seconds.

Can I Freeze These Pancakes?

Yes! Once cooled, place them in a freezer-safe bag with parchment paper between each pancake. They’ll stay fresh for up to two months. To reheat, just warm them in a pan or microwave.

Do These Pancakes Taste Like Yogurt?

Not strongly! The yogurt enhances the texture more than the flavor. It makes the pancakes extra tender and fluffy without an overpowering yogurt taste.

The Secret to Fluffy Pancakes Without an Oven

The key to making perfect no-oven pancakes is in the balance of ingredients. The yogurt provides moisture and structure, while the baking powder ensures a good rise. Using room-temperature milk and yogurt also helps the batter blend smoothly, preventing lumps.

Another tip? Don’t overmix the batter. Stir just until the flour is incorporated—overmixing can make pancakes dense instead of airy. Finally, letting the batter rest for a few minutes before cooking allows the baking powder to activate, resulting in a better rise.

How to Serve These Pancakes

One of the best things about this recipe is how versatile it is. Here are some serving ideas:

  • Classic: Just a sprinkle of caster sugar while they’re warm.
  • Sweet & Fruity: Top with fresh berries, sliced bananas, or a drizzle of honey.
  • Indulgent: Spread with Nutella, peanut butter, or a dollop of whipped cream.
  • Savory: Skip the sugar and add a pinch of salt. Serve with cheese or smoked salmon for a creative twist.

These pancakes are light enough for breakfast, satisfying enough for a snack, and sweet enough for dessert. No matter how you enjoy them, they’ll always be a comforting treat.

Conclusion: A Pancake Recipe to Keep Forever

Sometimes, the best recipes are the simplest ones—the ones you don’t have to think too much about, the ones you can make on a whim with whatever you have in your kitchen. These no-oven yogurt pancakes are exactly that.

They’re quick, comforting, and incredibly easy to make. Whether you’re whipping up a batch for a slow weekend morning or throwing something together for a last-minute craving, this recipe delivers every time.

And the best part? Every bite brings a little warmth, a little nostalgia, and a reminder that good food doesn’t have to be complicated. So grab a pan, mix up some batter, and enjoy the simple joy of homemade pancakes.

Amal

Quick and Easy No-Oven Yogurt Pancakes – A Fluffy Delight in Minutes

These soft and fluffy no-oven yogurt pancakes are the perfect breakfast or snack when you want something quick and delicious. Made with simple ingredients like yogurt, eggs, and a touch of vanilla, they have a light texture and a slightly tangy flavor. Cooked in a pan instead of baked, these pancakes are effortless and ready in minutes. Serve them with a sprinkle of sugar, fresh fruit, or your favorite topping for a delightful treat!
Prep Time 5 minutes
Cook Time 10 minutes
Total Time 15 minutes
Servings: 6 pancakes
Course: Breakfast
Cuisine: Comfort Food

Ingredients
  

  • 1 egg
  • 3 tablespoons sugar
  • 8 g vanilla sugar
  • 2 tablespoons oil plus extra for cooking
  • 125 g yogurt
  • 80 ml milk
  • 180 g flour
  • 10 g baking powder
  • Caster sugar for sprinkling

Method
 

  1. In a large mixing bowl, whisk the egg, sugar, and vanilla sugar until the mixture is light and slightly frothy.
  2. Add the oil, yogurt, and milk, stirring until well combined.
  3. Sift in the flour and baking powder, then gently mix until a smooth batter forms. Avoid overmixing to keep the pancakes fluffy.
  4. Heat a non-stick pan over medium heat and lightly grease it with oil.
  5. Pour small amounts of batter into the pan, forming pancakes. Cook for about 2 minutes until bubbles appear on the surface.
  6. Flip the pancakes and cook for another minute until golden brown.
  7. Remove from the pan and sprinkle with caster sugar while still warm.
  8. Serve as is or with honey, fruit, or your favorite spread.

Notes

  • Use plain yogurt for a subtle tangy flavor, or try flavored yogurt for a hint of sweetness.
  • If using Greek yogurt, add a little extra milk to keep the batter smooth.
  • Adjust the sugar according to your preference or replace it with honey for a natural sweetness.
  • Leftover pancakes can be stored in the refrigerator for up to 3 days and reheated in a pan or microwave.
  • For a healthier version, swap white flour with whole wheat flour.

Lots and Lots of Apples! The Easiest Apple Pie That Melts in Your Mouth

There’s something magical about the scent of apples baking in the oven—warm, spiced, and nostalgic. It’s the kind of aroma that transports you back to childhood, to a cozy kitchen where a pie is baking on a crisp autumn afternoon.

For me, apple pie has always been more than just a dessert. It’s a memory of my grandmother, who never measured ingredients but always knew exactly how much of everything to add. She believed that a good apple pie wasn’t about perfection; it was about generosity—lots of apples, a soft and airy batter, and a touch of vanilla that lingered in the air long after the pie was gone.

She would often say, “The best apple pies are the ones that don’t last until the next day.” And she was right. No matter how many times she made it, there were never leftovers. This recipe follows her philosophy—simple ingredients, an easy method, and a result so delicious that it disappears within hours. Whether you’re baking for family, friends, or just yourself, this is the kind of apple pie that feels like a warm hug with every bite.

Why This Apple Pie is a Must-Try

1. Simplicity at Its Best

This is one of the easiest apple pie recipes you’ll ever find. No rolling out dough, no complicated techniques—just slice, mix, and bake. The batter is light and fluffy, wrapping around the apples like a soft, sweet embrace.

2. Packed with Apples

Unlike traditional apple pies that rely on a thick crust, this recipe is all about the fruit. The apples are the star of the show, giving the pie a naturally sweet and juicy texture. If you love the taste of baked apples, this pie will be your new favorite.

3. A Budget-Friendly Treat

Apple pie doesn’t have to be an expensive indulgence. This recipe uses simple, everyday ingredients—apples, flour, eggs, and sugar—making it an affordable way to enjoy a homemade dessert.

4. No Special Equipment Needed

You don’t need a fancy mixer, a food processor, or special baking tools. Just a bowl, a whisk, and a baking form are enough to make this pie. It’s perfect for beginners or anyone looking for a hassle-free baking experience.

5. Perfect for Any Occasion

This apple pie is versatile. Serve it as a comforting dessert after dinner, enjoy it with a cup of tea in the afternoon, or even have a slice for breakfast (it has apples, after all!). It’s the kind of treat that fits any moment of the day.

Ingredients

IngredientQuantity
Apples (sliced)4
Butter (for greasing the form)As needed
Eggs2
Sugar100 g
Milk (room temperature)100 ml
Wheat Flour200 g
Baking Powder10 g
Vanilla Extract (or vanillin for aroma)A splash (to taste)

Directions

  1. Preheat and Prepare:
    • Preheat your oven to 180°C (350°F).
    • Generously grease a pie form with butter to ensure a non-stick finish.
  2. Mix the Wet Ingredients:
    • In a large bowl, beat the eggs with the sugar until the mixture becomes smooth and slightly frothy.
    • Add the room-temperature milk and a splash of vanilla extract, mixing well.
  3. Combine Dry Ingredients:
    • Sift the wheat flour and baking powder together to avoid lumps.
    • Gradually fold the dry ingredients into the wet mixture until a uniform batter is achieved.
  4. Layer the Apples:
    • Arrange the sliced apples evenly in the greased pie form.
    • Pour the prepared batter over the apples, ensuring they are well covered.
  5. Bake to Perfection:
    • Place the pie in the preheated oven and bake for approximately 35–40 minutes or until the top is golden and a toothpick inserted into the center comes out clean.
  6. Cool and Serve:
    • Allow the apple pie to cool in the form for about 10 minutes before transferring it to a serving plate.
    • Enjoy warm or at room temperature for a melt-in-your-mouth experience.

Nutritional Information (Approximate Per Serving)

NutrientAmount per Serving (Estimated)
Calories~280 kcal
Protein~6 g
Carbohydrates~45 g
Sugars~25 g
Fats~8 g
Fiber~3 g

Frequently Asked Questions About This Apple Pie

What Kind of Apples Work Best for This Recipe?

You can use any apples you have on hand, but for the best flavor, a mix of sweet and tart apples works wonders. Granny Smith apples bring a nice tartness, while Honeycrisp or Fuji apples add natural sweetness. If you prefer a softer texture, Golden Delicious is a great choice.

Can I Add Cinnamon or Other Spices?

Absolutely! While the original recipe focuses on a light vanilla aroma, adding cinnamon, nutmeg, or even a pinch of cardamom can enhance the flavor. If you love warm spices, a teaspoon of cinnamon mixed into the batter will give the pie a cozy, autumnal feel.

How Do I Make This Recipe Dairy-Free?

You can easily substitute the milk with almond milk, oat milk, or any other plant-based alternative. Instead of butter for greasing the form, use a light coating of oil or a dairy-free margarine.

Can I Reduce the Sugar?

Yes! If you prefer a less sweet pie, you can reduce the sugar by 20-30% without affecting the texture too much. Since apples already have natural sweetness, this pie still tastes great with less sugar. You can also experiment with natural sweeteners like honey or maple syrup.

How Do I Store Leftovers?

If you happen to have any leftovers (which is rare with this pie!), store them in an airtight container at room temperature for up to 2 days. If you want to keep it longer, refrigerate it for up to 5 days. Warm it up slightly before serving to bring back the soft texture.

Can I Freeze This Apple Pie?

Yes, you can! Once baked and cooled, wrap the pie tightly in plastic wrap and aluminum foil, then freeze it for up to 3 months. To serve, let it thaw at room temperature or reheat it in the oven at 300°F (150°C) until warm.

Can I Turn This Into Muffins or Cupcakes?

Definitely! Instead of baking the batter in a single pie form, divide it into muffin tins for individual portions. Reduce the baking time to about 20-25 minutes and check for doneness with a toothpick.

Health Benefits of This Apple Pie

While apple pie is often seen as an indulgent treat, this recipe actually has some great nutritional benefits:

  • Apples: Packed with fiber, vitamin C, and antioxidants, apples help with digestion and boost your immune system.
  • Eggs: A great source of protein, vitamins, and healthy fats.
  • Whole Wheat Flour (if substituted for regular flour): Adds extra fiber and nutrients, making the pie more filling and nutritious.
  • Lower Sugar Option: By reducing sugar or using natural sweeteners, you can make this pie even healthier without sacrificing flavor.

If you’re looking for a way to enjoy a classic dessert without guilt, this apple pie is a great choice.

The Joy of Baking: Why This Apple Pie Is More Than Just a Dessert

Baking is more than just following a recipe. It’s about creating something with your own hands, filling your home with warmth, and sharing something special with the people you love.

This apple pie, with its simple ingredients and effortless method, is a reminder that delicious food doesn’t have to be complicated. Whether you’re baking it on a rainy afternoon, bringing it to a family gathering, or simply making it because you crave something sweet, this recipe is one that you’ll want to keep coming back to.

Every time I bake this pie, I think of my grandmother, her gentle hands slicing apples, her kitchen filled with the scent of vanilla and butter. I hope this recipe brings you the same sense of comfort and joy that it has brought me.

So, preheat that oven, grab your apples, and let the magic begin. Because the best kind of apple pie isn’t the one that looks perfect—it’s the one that disappears the fastest.

Amal

Lots and Lots of Apples! The Easiest Apple Pie That Melts in Your Mouth

This easy apple pie is soft, fluffy, and packed with fresh apple slices, making it the perfect comfort dessert. With no need for rolling dough or complicated steps, this recipe is beginner-friendly and comes together in just a few simple steps. Lightly sweetened with a touch of vanilla, it lets the apples shine, creating a naturally delicious and aromatic treat. Whether served warm or at room temperature, this pie is sure to disappear quickly!
Prep Time 10 minutes
Cook Time 40 minutes
Total Time 50 minutes
Servings: 6 servings
Course: Dessert
Cuisine: Comfort Food

Ingredients
  

  • 4 apples sliced
  • Butter for greasing the form
  • 2 eggs
  • 100 g sugar
  • 100 ml milk room temperature
  • 200 g wheat flour
  • 10 g baking powder
  • A splash of vanilla extract or vanillin for aroma

Method
 

  1. Preheat the oven to 180°C (350°F) and grease a pie form with butter to prevent sticking.
  2. In a large bowl, whisk the eggs and sugar together until light and fluffy.
  3. Add the milk and a splash of vanilla extract, mixing until well combined.
  4. Sift in the flour and baking powder, stirring until a smooth batter forms.
  5. Arrange the sliced apples evenly in the greased pie form.
  6. Pour the batter over the apples, ensuring they are fully covered.
  7. Bake for 35–40 minutes, or until golden brown and a toothpick inserted in the center comes out clean.
  8. Let the pie cool slightly before serving. Enjoy warm or at room temperature.

Notes

  • Use a mix of sweet and tart apples for a more balanced flavor.
  • Reduce the sugar slightly if you prefer a less sweet pie.
  • Add a teaspoon of cinnamon for a warm, spiced version.
  • Store leftovers in an airtight container for up to 3 days or freeze for up to 3 months.
  • Serve with whipped cream, ice cream, or a dusting of powdered sugar for extra indulgence.

Easier Than Pizza! Just Grate 3 Potatoes – A Budget-Friendly Comfort Dish

There’s something incredibly comforting about the scent of potatoes sizzling in a pan. It reminds me of childhood mornings when my grandmother would whip up something magical with whatever ingredients she had on hand. She didn’t follow strict recipes—she simply cooked with love, intuition, and whatever was available in the kitchen.

One of my favorite memories is waking up to the sound of a grater scraping against a wooden cutting board. That meant something delicious was on its way. The dish she made wasn’t fancy, but it had everything a perfect meal needed—crispy edges, soft and hearty insides, and a flavor that lingered long after the last bite.

This recipe follows that same philosophy: simple ingredients, minimal effort, and a satisfying result. It’s cheaper than ordering pizza, easier than making dough, and flexible enough to suit different tastes. Whether you’re a student looking for an affordable meal, a busy parent needing a quick dinner, or just someone craving comfort food, this dish delivers.

Why You’ll Love This Recipe

1. Budget-Friendly and Accessible

With only a handful of inexpensive ingredients, this dish is proof that great food doesn’t have to cost a fortune. Potatoes, onions, and carrots are pantry staples in many homes, making this a perfect recipe for those moments when you need something delicious but don’t want to make an extra trip to the store.

2. Quick and Easy to Prepare

Forget waiting for dough to rise or kneading endlessly. The beauty of this recipe lies in its simplicity—just grate, mix, and cook. Within 30 minutes, you’ll have a golden, crispy dish that rivals anything you’d order from a restaurant.

3. Versatile and Customizable

This dish is like a blank canvas—you can add whatever flavors you like. Throw in cheese for extra richness, swap out the chives for parsley, or even add a pinch of chili flakes for a bit of heat. You can make it gluten-free by using a different type of flour or even turn it into a protein-packed meal by adding shredded chicken or beans.

4. Perfect for Any Occasion

Whether you’re making a quick breakfast, a side dish for dinner, or even a midnight snack, this recipe fits the bill. It’s hearty enough to stand alone but also pairs beautifully with soups, salads, or grilled meats.

Ingredients

IngredientQuantity
Potatoes (grated)3 large
Onion (finely chopped)1
Carrot (grated)1
Pepper (chopped)1
SaltTo taste
Chives (chopped)As desired
Eggs3
Milk300 ml
Wholemeal Flour200 g
Baking Powder2 tsp

Directions

  1. Prepare the Vegetables:
    • Grate the potatoes and carrot, then squeeze out excess liquid.
    • Finely chop the onion and pepper.
  2. Mix the Dry Ingredients:
    • In a bowl, combine wholemeal flour, baking powder, and salt.
  3. Combine Wet Ingredients:
    • In a separate bowl, beat the eggs and mix with the milk.
  4. Create the Batter:
    • Add the grated vegetables and chives to the egg-milk mixture.
    • Gradually stir in the dry ingredients until well combined.
  5. Cook to Perfection:
    • Heat a pan with a little oil.
    • Pour the batter into small portions and cook on medium heat until golden brown on both sides.
  6. Serve and Enjoy:
    • Best served warm with sour cream, yogurt, or your favorite dip!

Nutritional Information

NutrientAmount per Serving
Calories~250 kcal
Protein~9 g
Carbohydrates~40 g
Fats~6 g
Fiber~5 g

Common Questions About This Recipe

Can I Prepare This Dish in Advance?

Yes! You can prepare the batter ahead of time and store it in the refrigerator for up to 24 hours. Just give it a good stir before cooking, as the ingredients may settle. If you have leftovers, they can be stored in an airtight container and reheated in a pan or oven for the best texture.

Can I Make This Recipe Gluten-Free?

Absolutely. Swap out the wholemeal flour for a gluten-free alternative like rice flour, oat flour, or a gluten-free blend. The texture might be slightly different, but the flavor remains just as delicious.

What Can I Use Instead of Eggs?

If you’re looking for an egg-free version, you can substitute eggs with a flaxseed or chia seed mixture (1 tablespoon of ground flaxseed or chia seeds mixed with 3 tablespoons of water per egg). Mashed potatoes or yogurt can also help bind the ingredients together.

Can I Bake This Instead of Frying?

Yes, for a healthier alternative, you can bake the mixture in a greased muffin tin or spread it onto a baking sheet and bake at 375°F (190°C) for about 20-25 minutes until golden brown.

What Are the Best Toppings or Side Dishes?

This dish pairs well with a variety of toppings and sides. Some favorites include:

  • Sour Cream or Greek Yogurt – Adds a creamy contrast to the crispy texture.
  • Fresh Herbs – Chopped parsley, dill, or cilantro enhance the flavor.
  • Cheese – A sprinkle of grated cheese makes it even more indulgent.
  • Avocado or Guacamole – Adds creaminess and a fresh twist.
  • Soup or Salad – Serve as a side for a complete meal.

Nutritional Benefits of This Recipe

While this dish is undeniably delicious, it also has several health benefits:

  • Potatoes: A great source of fiber, vitamin C, and potassium. Contrary to popular belief, when prepared healthily, potatoes can be a nutritious part of any diet.
  • Carrots: Packed with beta-carotene, which supports eye health and immunity.
  • Onions: Contain antioxidants and compounds that promote heart health.
  • Wholemeal Flour: Offers more fiber than refined flour, keeping you full for longer.
  • Eggs: Provide protein and essential nutrients like choline and vitamin B12.

If you want to make it even healthier, consider swapping out some of the flour for ground oats or adding spinach for extra nutrients.

The Magic of ASMR Cooking

Cooking is not just about making food—it’s an experience. The sound of the grater scraping against the potatoes, the soft whisking of eggs and milk, the gentle sizzle as the batter hits the pan—these small details create a sensory experience that can be surprisingly soothing.

ASMR (Autonomous Sensory Meridian Response) cooking videos have gained popularity for this exact reason. The calming sounds of chopping, mixing, and sizzling can be therapeutic, making cooking feel less like a chore and more like a moment of mindfulness. So, the next time you make this dish, take a moment to enjoy the process—the sounds, the textures, and the transformation of simple ingredients into something delicious.

Conclusion: A Dish to Keep in Your Back Pocket

This recipe is proof that you don’t need fancy ingredients or complicated techniques to make a satisfying meal. Whether you’re making it for yourself, your family, or even guests, it’s a dish that never disappoints.

More than just food, it’s a reminder that some of the best meals come from simple, humble beginnings. Just like my grandmother’s cooking, it’s about resourcefulness, creativity, and most importantly, the joy of sharing something made with love.

So, the next time you’re wondering what to cook, skip the pizza delivery and grate those three potatoes instead. You might just discover a new favorite.

Amal

Easier Than Pizza! Just Grate 3 Potatoes – A Budget-Friendly Comfort Dish

This easy and budget-friendly potato-based dish is crispy on the outside, soft on the inside, and packed with flavor. With simple ingredients like grated potatoes, onions, and eggs, you can whip up a satisfying meal in no time. It’s cheaper than pizza, requires no dough-making, and is perfect for breakfast, lunch, or dinner. Customize it with your favorite herbs and spices, and enjoy a hearty homemade dish that’s both nutritious and delicious!
Prep Time 10 minutes
Cook Time 20 minutes
Total Time 30 minutes
Servings: 4 servings
Course: Main Dish
Cuisine: Comfort Food

Ingredients
  

  • 3 large potatoes grated
  • 1 onion finely chopped
  • 1 carrot grated
  • 1 pepper chopped
  • Salt to taste
  • Chives chopped (optional)
  • 3 eggs
  • 300 ml milk
  • 200 g wholemeal flour
  • 2 teaspoons baking powder
  • Oil for frying

Method
 

  1. Prepare the Vegetables: Grate the potatoes and carrot, then squeeze out excess moisture using a clean kitchen towel. Chop the onion and pepper finely.
  2. Mix the Batter: In a large bowl, whisk the eggs and milk together. Stir in the grated vegetables, chopped chives, salt, and any additional seasonings.
  3. Incorporate Dry Ingredients: Gradually add the wholemeal flour and baking powder to the mixture, stirring until well combined. The batter should be slightly thick but pourable.
  4. Cook the Patties: Heat a pan over medium heat and add a small amount of oil. Spoon the batter onto the pan, forming small rounds. Cook for about 3–4 minutes on each side, or until golden brown and crispy.
  5. Serve and Enjoy: Remove from the pan and let them rest on a paper towel to absorb excess oil. Serve warm with sour cream, yogurt, or your favorite dipping sauce.

Notes

  • Texture Tip: Removing excess moisture from the potatoes helps achieve a crispier result.
  • Storage: Leftovers can be stored in an airtight container in the fridge for up to 3 days. Reheat in a pan or oven for the best texture.
  • Customization: Feel free to add cheese, herbs, or even cooked meat for extra flavor.
  • Baking Alternative: If you prefer a healthier option, bake at 375°F (190°C) for 20-25 minutes until golden brown.

Cheesy Zucchini Oatmeal Fritters – A Healthy and Irresistible Meal

Some of the best meals are created from simple, wholesome ingredients. Growing up, homemade meals were always a special part of the day, bringing everyone together to enjoy food made with care. Among the many recipes passed down in my family, one dish always stood out—crispy zucchini oatmeal fritters.

At first, they seemed too simple to be extraordinary, but once I tasted them, I understood why they were a favorite. The combination of fresh zucchini, hearty oatmeal, and melted cheese created a balance of flavors and textures that was impossible to resist. The crispy edges, the soft and cheesy center, and the subtle garlic and onion flavors made each bite more satisfying than the last.

Now, this recipe has become a staple in my own kitchen. It is easy to make, packed with nutrients, and incredibly versatile. Whether served as a light meal, a side dish, or even as a snack, these fritters always disappear quickly. They are a great alternative to traditional comfort foods, offering the same satisfying experience with healthier ingredients.

If you are looking for a meal that is both nourishing and delicious, these zucchini oatmeal fritters are an excellent choice.

Why This Recipe Stands Out

These fritters are not only flavorful but also packed with nutrients that make them a great addition to a balanced diet.

  • Crisp on the outside and soft on the inside, they offer the perfect texture.
  • They are made with simple, affordable ingredients.
  • Oatmeal replaces traditional flour, making them higher in fiber and more filling.
  • They are a great way to include more vegetables in your meals.
  • The recipe can be easily customized with different herbs, cheeses, or seasonings.
  • They can be made in under 30 minutes, making them perfect for busy days.

For those who want a healthier alternative to processed snacks or fast food, this dish is a satisfying option that does not compromise on taste.

Ingredients

Main Dish:

IngredientQuantity
Zucchini1
SaltTo taste
Carrot1
Oatmeal5 tbsp
Eggs2
Green onion, choppedTo taste
Garlic cloves, minced2
Cheese, shredded100g
Olive oil, for cookingAs needed

Sauce:

(Customize as per your preference – yogurt, sour cream, or tomato-based sauces work well!)

Directions

  1. Prepare the zucchini – Grate the zucchini, sprinkle with salt, and let sit for 10 minutes. Squeeze out excess liquid.
  2. Grate the carrot – Add it to a bowl with the zucchini.
  3. Make the batter – Mix in oatmeal, eggs, green onions, garlic, shredded cheese, and salt. Stir well.
  4. Heat the oil – In a pan, heat olive oil over medium heat.
  5. Cook the fritters – Shape the mixture into small patties and cook for 3–4 minutes per side until golden brown.
  6. Serve with sauce – Enjoy warm with your favorite dip or sauce.

Nutritional Information (Per Serving, Approx.)

NutrientAmount
Calories180–220 kcal
Protein8–10 g
Fat10–12 g
Carbohydrates15–18 g
Fiber3–4 g
Sodium250–300 mg

The Nutritional Benefits of Zucchini Oatmeal Fritters

This dish is packed with essential nutrients that contribute to overall health.

Zucchini – A Low-Calorie, High-Nutrient Ingredient

  • High in fiber, which supports digestion and promotes a feeling of fullness.
  • Rich in vitamins A and C, which help support the immune system.
  • Contains antioxidants that reduce inflammation.

Oatmeal – A Healthy Alternative to Flour

  • Provides slow-releasing carbohydrates for sustained energy.
  • High in fiber, which helps with digestion and gut health.
  • Naturally gluten-free when using certified gluten-free oats.

Eggs – A Source of High-Quality Protein

  • Contain essential vitamins and minerals that support brain function and energy levels.
  • Help bind the ingredients together for a perfect texture.

Cheese – A Flavorful and Nutritious Addition

  • Adds calcium for strong bones.
  • Provides healthy fats that promote satiety.
  • Enhances the overall flavor and texture of the fritters.

Garlic and Green Onions – Natural Flavor Boosters

  • Have anti-inflammatory and immune-boosting properties.
  • Add depth and richness to the taste.

By combining these ingredients, this dish provides a satisfying meal that supports overall well-being.

How to Enhance the Flavor

While these fritters are already delicious, a few simple additions can make them even better.

Add More Cheese

For those who enjoy a richer taste, increasing the amount of shredded cheese will make the fritters even more flavorful and gooey inside.

Experiment with Spices

A pinch of paprika, cumin, or red pepper flakes can add an extra layer of flavor.

Include Fresh Herbs

Dill, parsley, or basil can bring a fresh and aromatic element to the dish.

Serve with a Dipping Sauce

Pairing the fritters with a complementary sauce enhances the overall experience. Some great options include:

  • Greek yogurt mixed with garlic and lemon juice.
  • A spicy sriracha or chili mayo for those who enjoy heat.
  • A classic marinara sauce for a familiar and comforting flavor.

By making small adjustments, it is possible to create different variations that suit personal preferences.

Common Questions About Zucchini Oatmeal Fritters

Can These Fritters Be Made Gluten-Free?

Yes. Oatmeal is naturally gluten-free, but those with sensitivities should use certified gluten-free oats to avoid cross-contamination.

Can They Be Baked Instead of Fried?

Yes. To bake them, preheat the oven to 400°F (200°C) and place the fritters on a lined baking sheet. Lightly brush with olive oil and bake for 20–25 minutes, flipping halfway through. While baking will not achieve the same level of crispiness as frying, it is a great alternative for a lower-fat option.

How Should They Be Stored and Reheated?

  • Store leftovers in an airtight container in the refrigerator for up to four days.
  • To freeze, place parchment paper between the fritters to prevent them from sticking together. They can be frozen for up to three months.
  • Reheat in a skillet, air fryer, or oven for the best texture. Avoid microwaving, as it may make them soft.

Can This Recipe Be Made Dairy-Free?

Yes. Simply omit the cheese or use a plant-based alternative.

What Can They Be Served With?

  • A fresh salad for a lighter meal.
  • Grilled chicken or fish for added protein.
  • Quinoa or brown rice for a more filling dish.

These fritters are versatile and pair well with a variety of sides.

A Recipe Worth Making Again and Again

Cheesy zucchini oatmeal fritters are a perfect example of how simple ingredients can create something truly special. They are crispy, flavorful, and packed with nutrients, making them a great addition to any meal plan. Whether served as a main dish, a snack, or a side, they offer a delicious way to enjoy vegetables in a new and exciting way.

For anyone looking for a satisfying meal that is easy to prepare, this recipe is an excellent choice. The next time there is a craving for something cheesy and crispy, these fritters are the perfect solution. They bring together the best of both worlds—comfort and nutrition—making them a dish that will quickly become a household favorite.

Amal

Cheesy Zucchini Oatmeal Fritters – A Healthy and Irresistible Meal

These Cheesy Zucchini Oatmeal Fritters are the perfect balance of crispy, cheesy, and nutritious. Made with fresh zucchini, wholesome oats, and melted cheese, they offer a delicious way to enjoy a healthy meal. Whether served as a light lunch, a side dish, or a quick snack, these fritters are easy to prepare and packed with flavor. A simple, budget-friendly dish that the whole family will love!
Prep Time 10 minutes
Cook Time 15 minutes
Total Time 25 minutes
Servings: 10 –12 fritters
Course: Snack
Cuisine: International

Ingredients
  

Main Dish:
  • 1 zucchini grated
  • Salt to taste
  • 1 carrot grated
  • 5 tbsp oatmeal
  • 2 eggs
  • Green onion chopped
  • 2 garlic cloves minced
  • 100 g cheese shredded
  • Olive oil for cooking
Sauce (Optional):
  • Greek yogurt or sour cream
  • Lemon juice
  • Garlic minced
  • Fresh herbs such as dill or parsley

Method
 

  1. Prepare the zucchini – Grate the zucchini, sprinkle with salt, and let it sit for 10 minutes. Squeeze out excess moisture using a clean kitchen towel.
  2. Combine ingredients – In a mixing bowl, add the zucchini, grated carrot, oatmeal, eggs, green onions, minced garlic, and shredded cheese. Stir well to combine.
  3. Heat the oil – In a large skillet, heat olive oil over medium heat.
  4. Cook the fritters – Scoop small portions of the mixture into the pan, flatten slightly, and cook for 3–4 minutes per side until golden brown.
  5. Drain and serve – Remove from the pan and place on a paper towel to absorb excess oil. Serve warm with your preferred sauce.

Notes

  • Squeeze out as much water as possible from the zucchini for crispier fritters.
  • Use gluten-free oats for a gluten-free version.
  • For added flavor, mix in paprika, cumin, or dried herbs.
  • Store in the refrigerator for up to 4 days, or freeze for up to 3 months. Reheat in a skillet or oven for the best texture.