Golden Potato & Tomato Skillet – A Quick and Comforting Dinner

Some of the best meals in life are the ones you stumble upon by accident. This golden potato and tomato skillet was one of those discoveries for me.

I remember the night I first made it. It was one of those evenings where I stood in front of my fridge, too tired to cook something elaborate but too hungry to settle for something bland. I had a few potatoes, some tomatoes, eggs, and cheese—nothing fancy, but enough to work with. Without following a recipe, I started chopping, frying, and layering flavors. The result? A warm, cheesy, and hearty meal that felt like a hug on a plate.

That first bite was all I needed to know—I had just created something special. The crispy edges of the potatoes, the richness of the eggs, the burst of sweetness from the tomatoes, and the melted mozzarella all came together in perfect harmony.

Since then, this dish has become a go-to recipe in my home. It’s quick, uses pantry staples, and can be easily adjusted based on what’s available. But what I love most is how it turns simple ingredients into something incredibly satisfying.

If you’re looking for a fast, one-pan dinner that doesn’t compromise on flavor, this skillet is about to become your new favorite.

Why You’ll Love This Recipe

There’s a reason this potato and tomato skillet has become a household staple. It’s:

  • Fast and Easy – Ready in under 30 minutes, making it perfect for busy nights.
  • Budget-Friendly – Made with affordable, everyday ingredients you likely already have.
  • Packed with Flavor – The combination of crispy potatoes, juicy tomatoes, melted cheese, and eggs creates a rich, satisfying dish.
  • One-Pan Wonder – Minimal dishes, maximum convenience!
  • Customizable – Add different cheeses, herbs, or proteins to switch things up.

This dish proves that you don’t need fancy ingredients to create an amazing meal.

Ingredients

IngredientQuantity
Potatoes2 medium-sized
Onion1 medium
Tomatoes2 large
Vegetable oilFor cooking
Chives, choppedTo taste
Eggs4
SaltTo taste
Small tomatoes5
Sour cream200 g
Mozzarella cheese, shredded100 g (or to taste)
OreganoTo taste

Directions

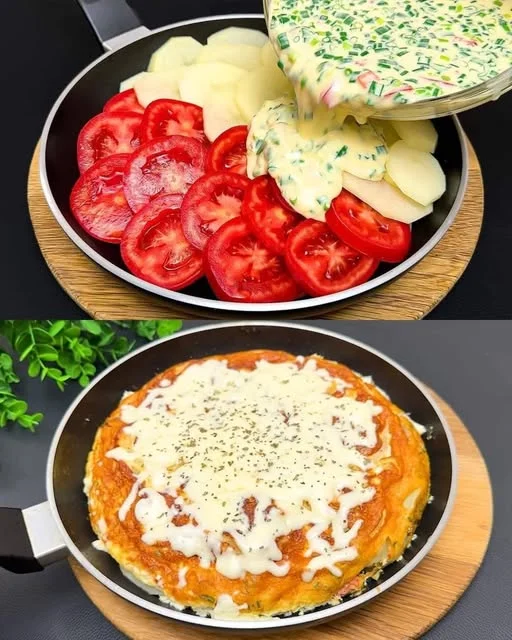
  1. Prepare the ingredients – Peel and dice the potatoes, chop the onion, and dice the large tomatoes.
  2. Sauté the potatoes – Heat vegetable oil in a skillet over medium heat. Add the potatoes and cook until golden brown, about 7–10 minutes.
  3. Add the onions and tomatoes – Stir in the chopped onion and diced tomatoes, cooking until the onions turn soft and translucent.
  4. Create wells for the eggs – Using a spoon, make small indentations in the mixture and crack an egg into each.
  5. Season and cook – Sprinkle with salt, oregano, and chopped chives. Cover the skillet and cook until the eggs are set to your desired doneness.
  6. Add cheese and finishing touches – Top with shredded mozzarella and small tomatoes. Let the cheese melt before removing from heat.
  7. Serve with sour cream – Plate the dish and enjoy with a generous spoonful of sour cream.

Nutritional Information (Per Serving, Approx.)

NutrientAmount
Calories300–350 kcal
Protein12–15 g
Fat18–22 g
Carbohydrates25–30 g
Fiber4–5 g
Sodium300–400 mg

Secrets to Making the Best Potato & Tomato Skillet

Even though this recipe is simple, a few key techniques will help you make it even more delicious.

1. Use the Right Potatoes

For the crispiest, most flavorful potatoes, use waxy varieties like Yukon Gold or red potatoes. They hold their shape well and develop a golden, crispy texture when fried.

2. Get the Potatoes Crispy Before Adding Other Ingredients

If you rush this step, you’ll end up with soft, mushy potatoes instead of golden, crispy ones. Let them cook in the pan until they develop a golden crust before adding the onions and tomatoes.

3. Let the Eggs Cook Just Right

For runny yolks, cover the skillet and cook until the whites are set but the yolks are still soft. If you prefer firmer eggs, let them cook a little longer.

4. Don’t Skip the Cheese

Mozzarella melts beautifully into the dish, creating a creamy, gooey layer. But if you want a stronger flavor, try cheddar, feta, or Parmesan.

5. Season Generously

A little extra oregano, black pepper, and salt can make all the difference. You can also add smoked paprika, garlic powder, or red pepper flakes for extra depth.

Tasty Variations to Try

One of the best things about this dish is how easy it is to customize. Here are some variations to keep it fresh and exciting:

1. Spicy Kick

  • Add chopped jalapeños or red pepper flakes for a little heat.
  • Drizzle with hot sauce or sriracha before serving.

2. Protein Boost

  • Toss in cooked bacon, ham, or chorizo for an extra savory twist.
  • Add black beans or chickpeas to make it more filling.

3. Mediterranean Style

  • Swap mozzarella for crumbled feta and add olives and fresh basil for a Mediterranean-inspired dish.

4. Extra Veggies

  • Mix in bell peppers, mushrooms, or spinach for added nutrition.
  • Roast some zucchini or eggplant and layer it on top before serving.

The possibilities are endless, making this a dish you can make over and over again without getting bored.

Best Ways to Serve This Dish

This skillet is hearty enough to stand alone, but it pairs beautifully with a few simple sides:

  • Crusty Bread – Perfect for soaking up the creamy egg yolks and melted cheese.
  • Simple Salad – A fresh green salad with a lemony dressing balances out the richness.
  • Avocado Slices – The creaminess of avocado complements the crispy potatoes perfectly.

It’s also delicious for any meal—whether it’s breakfast, lunch, or dinner!

Storage & Reheating Tips

If you have leftovers, here’s how to keep them fresh:

Refrigeration

  • Store in an airtight container in the fridge for up to 3 days.

Reheating

  • Stovetop: Heat in a pan over low heat with a little oil for a crispy texture.
  • Oven: Bake at 350°F (175°C) for 10 minutes until warmed through.
  • Microwave: Not recommended, as it can make the potatoes soggy.

This dish is best enjoyed fresh, but reheating on the stovetop helps bring back its crispiness.

FAQs About This Recipe

1. Can I use sweet potatoes instead of regular potatoes?

Yes! Sweet potatoes add a natural sweetness and extra fiber. Just keep in mind they cook faster than regular potatoes.

2. Can I make this dish in the oven instead of on the stovetop?

Absolutely. Roast the potatoes first at 400°F (200°C) for 20 minutes, then add the other ingredients and bake for another 10 minutes.

3. What other cheeses work well in this dish?

Mozzarella is a great choice, but you can also use cheddar, feta, Parmesan, or Gouda for different flavors.

4. Can I make this dish dairy-free?

Yes! Simply omit the cheese or use a dairy-free cheese alternative.

5. What’s the best way to keep the eggs from overcooking?

Turn off the heat when the egg whites are almost set, then cover the skillet for a few minutes. The residual heat will gently cook the yolks without making them too firm.

Final Thoughts – The Ultimate Quick & Satisfying Dinner

If you’re looking for a simple, flavorful, and satisfying meal, this golden potato & tomato skillet is exactly what you need. It’s easy to make, packed with wholesome ingredients, and can be customized to suit your taste.

This dish is proof that you don’t need fancy ingredients or hours in the kitchen to create something truly delicious. Sometimes, all it takes is a few pantry staples and a little creativity to make a meal that feels comforting and special.

So the next time you’re short on time but still want something warm, cheesy, and delicious, give this recipe a try. It just might become your new go-to dinner!

Amal

Golden Potato & Tomato Skillet – A Quick and Comforting Dinner

This Golden Potato & Tomato Skillet is the ultimate quick and satisfying meal. Crispy potatoes, juicy tomatoes, and perfectly cooked eggs come together with melted mozzarella for a deliciously comforting dish. Ready in just 30 minutes, it’s a one-pan wonder that’s perfect for breakfast, lunch, or dinner. Simple ingredients, big flavors, and minimal effort—this might just become your new favorite meal!
Prep Time 10 minutes
Cook Time 20 minutes
Total Time 30 minutes
Servings: 2 -3 servings
Course: Main Dish
Cuisine: Mediterranean

Ingredients
  

  • 2 medium potatoes diced
  • 1 medium onion finely chopped
  • 2 large tomatoes diced
  • Vegetable oil for cooking
  • Chives chopped (for garnish)
  • 4 eggs
  • Salt to taste
  • 5 small tomatoes halved
  • 200 grams sour cream
  • 100 grams shredded mozzarella cheese or to taste
  • Oregano to taste

Method
 

  1. Heat a generous amount of vegetable oil in a skillet over medium heat.
  2. Add the diced potatoes and cook for about 7–10 minutes, stirring occasionally, until golden and crispy.
  3. Stir in the chopped onion and diced large tomatoes. Cook for another 5 minutes until the onions soften.
  4. Make small wells in the mixture and carefully crack the eggs into them.
  5. Sprinkle with salt, oregano, and chopped chives. Cover the skillet and cook until the eggs reach your desired doneness.
  6. Add the halved small tomatoes and top with shredded mozzarella. Let the cheese melt for a minute before removing from heat.
  7. Serve warm with a generous spoonful of sour cream on the side.

Notes

  • Use Yukon Gold or red potatoes for the best texture.
  • For a spicier version, add red pepper flakes or diced jalapeños.
  • Substitute feta or cheddar cheese for a different flavor.
  • Leftovers can be stored in an airtight container in the fridge for up to 3 days.
  • Reheat in a skillet over low heat to keep the potatoes crispy.

Healthy Oatmeal Cookies – A Sweet Treat Without the Guilt

There was a time when I believed that “healthy” and “dessert” could never belong in the same sentence. Cookies, to me, were always associated with indulgence—loads of sugar, butter, and a guilty conscience after eating one too many. But everything changed the day I discovered these healthy oatmeal cookies.

It all started when I was looking for a snack that my family could enjoy without the sugar crash that comes with traditional desserts. My little one had just started asking for “cookies” every afternoon, and I knew I had to come up with a better alternative to store-bought treats. I wanted something naturally sweet, full of good ingredients, and still delicious enough to feel like a treat.

After experimenting with different recipes, I found the perfect balance—oats, banana, a touch of honey, and warm cinnamon. The result? Soft, chewy cookies that satisfied sweet cravings without refined sugar or butter. They were so good that even my picky eaters didn’t suspect they were eating something healthy!

Now, these cookies are a weekly staple in my home. They’re quick to make, easy to customize, and perfect for those moments when you want something sweet without straying from a balanced diet. If you’re looking for a healthy dessert that doesn’t compromise on flavor, these oatmeal cookies might just become your new favorite, too.

Why You’ll Love These Healthy Oatmeal Cookies

These cookies are proof that healthier treats can still taste amazing. Here’s why they deserve a spot in your kitchen:

  • Naturally Sweetened – No refined sugar, just natural sweetness from banana and a touch of honey or maple syrup.
  • Butter-Free – Unlike traditional cookies, these use wholesome, natural ingredients without relying on butter for richness.
  • Quick & Easy – With just a handful of ingredients and no special equipment needed, these cookies come together in minutes.
  • Great for Meal Prep – Make a batch, store them, and have a healthy snack ready throughout the week.
  • Kid-Approved – Soft, chewy, and just sweet enough, these cookies are loved by both kids and adults.

If you’re searching for a healthy cookie recipe that actually tastes good, you’ve just found it!

Ingredients

CategoryIngredientQuantity
Dry IngredientsRolled oats150 g / 5.2 oz
Baking powder1/2 tsp
SaltPinch
CinnamonTo taste
Wet IngredientsRipe banana, mashed1
Egg1
Honey or maple syrup2 tbsp
Vanilla extract1 tsp
Optional Add-InsRaisins, chopped nuts, or dark chocolate chips2 tbsp

Directions

  1. Preheat the oven to 350°F (175°C) and line a baking sheet with parchment paper.
  2. In a large bowl, mix the dry ingredients—oats, baking powder, salt, and cinnamon.
  3. In a separate bowl, mash the banana, then whisk in the egg, honey (or maple syrup), and vanilla extract until well combined.
  4. Combine wet and dry ingredients, stirring until a thick dough forms. If using add-ins, fold them in.
  5. Scoop portions of dough onto the prepared baking sheet, flattening them slightly.
  6. Bake for 12–15 minutes, or until the cookies are golden brown and firm.
  7. Let cool for a few minutes before serving.

Nutritional Information (Per Cookie, Approx.)

NutrientAmount
Calories70–90 kcal
Protein2–3 g
Fat2–4 g
Carbohydrates12–15 g
Fiber1–2 g
Sugar4–6 g

Secrets to the Perfect Healthy Oatmeal Cookies

Even though these cookies are simple to make, a few key techniques can make them even better:

1. Use Ripe Bananas for Natural Sweetness

The riper the banana, the sweeter your cookies will be. If your bananas have brown spots, they’re perfect!

2. Don’t Overmix the Dough

Overmixing can make the cookies dense instead of soft and chewy. Mix just until the ingredients are combined.

3. Customize with Add-Ins

These cookies are a blank canvas—add dark chocolate chips, chopped nuts, shredded coconut, or dried fruit to make them even more flavorful.

4. Flatten the Cookies Before Baking

Since these cookies don’t contain butter or a lot of fat, they won’t spread much in the oven. Lightly flatten them before baking for the best shape.

5. Let Them Cool for the Best Texture

They may seem soft when fresh out of the oven, but as they cool, they firm up and become perfectly chewy.

Variations to Try

One of the best things about these cookies is how versatile they are. You can adjust them to suit your dietary needs and personal taste.

1. Chocolate Lover’s Version

Add dark chocolate chips or cacao nibs for a guilt-free chocolate fix.

2. Nutty & Crunchy

Mix in chopped almonds, walnuts, or pecans for a delicious crunch and extra healthy fats.

3. Coconut Oatmeal Cookies

Stir in unsweetened shredded coconut for a tropical twist.

4. Vegan-Friendly Option

Replace the egg with a flax egg (1 tablespoon ground flaxseed + 3 tablespoons water, mixed and left to thicken for 5 minutes).

5. High-Protein Boost

Add 1–2 tablespoons of protein powder to the batter for a protein-packed snack.

How to Store & Keep Them Fresh

These cookies stay fresh for days, making them a great make-ahead snack.

Storing at Room Temperature

  • Keep them in an airtight container for up to 3 days.

Refrigerating for Longer Freshness

  • Store in an airtight container in the fridge for up to a week.

Freezing for Later

  • Freeze the cookies in a single layer on a baking sheet before transferring them to a freezer-safe bag.
  • They’ll last up to 2 months in the freezer.
  • To enjoy, simply thaw at room temperature or pop them in the microwave for 10–15 seconds.

FAQs About Healthy Oatmeal Cookies

1. Can I make these cookies gluten-free?

Yes! Use certified gluten-free oats and swap the regular baking powder for a gluten-free version.

2. Can I use quick oats instead of rolled oats?

You can, but the texture will be slightly different. Quick oats make the cookies softer, while rolled oats give a chewier bite.

3. Are these cookies crunchy or soft?

These are soft and chewy. If you prefer a crunchier texture, bake them for an extra 2–3 minutes.

4. Can I skip the sweetener?

If your bananas are extra ripe, you can omit the honey or maple syrup for a lower-sugar option.

5. What’s the best way to make them crispier?

For crispier cookies, bake them longer at a slightly lower temperature (325°F instead of 350°F) and allow them to cool completely before storing.

Final Thoughts – A Healthier Way to Enjoy Cookies

The idea that healthy desserts have to be bland or boring is a myth, and these Healthy Oatmeal Cookies prove it. They’re naturally sweet, easy to make, and perfect for satisfying cravings without any guilt.

Whether you’re making them for a quick breakfast, a snack on the go, or a post-dinner treat, these cookies are a wholesome way to enjoy something sweet. They’re loved by kids, great for meal prep, and completely customizable to suit your taste.

So next time you’re craving something sweet, skip the store-bought cookies and make these instead. They’re proof that simple, real ingredients can create something truly delicious!

Amal

Healthy Oatmeal Cookies – A Sweet Treat Without the Guilt

These Healthy Oatmeal Cookies are naturally sweet, soft, and chewy—made with simple, wholesome ingredients. With no refined sugar or butter, they are the perfect guilt-free treat for breakfast, snacking, or dessert. Quick to make and packed with fiber, they’re a delicious way to satisfy your sweet cravings without compromising on nutrition!
Prep Time 10 minutes
Cook Time 15 minutes
Total Time 25 minutes
Servings: 10 –12 cookies
Course: Dessert
Cuisine: American

Ingredients
  

  • 150 g / 5.2 oz rolled oats
  • 1/2 tsp baking powder
  • Pinch of salt
  • Cinnamon to taste
  • 1 ripe banana mashed
  • 1 egg
  • 2 tbsp honey or maple syrup
  • 1 tsp vanilla extract
  • 2 tbsp raisins chopped nuts, or dark chocolate chips (optional)

Method
 

  1. Preheat the oven to 350°F (175°C) and line a baking sheet with parchment paper.
  2. In a large bowl, mix the rolled oats, baking powder, salt, and cinnamon.
  3. In a separate bowl, mash the banana and whisk in the egg, honey (or maple syrup), and vanilla extract until smooth.
  4. Combine the wet and dry ingredients, stirring until a thick dough forms. Fold in any optional add-ins.
  5. Scoop small portions onto the baking sheet, flattening them slightly.
  6. Bake for 12–15 minutes, or until golden brown.
  7. Let cool for a few minutes before serving.

Notes

  • Use ripe bananas for natural sweetness.
  • To make these vegan, replace the egg with a flax egg (1 tbsp ground flaxseed + 3 tbsp water).
  • For extra crunch, add chopped nuts like almonds or walnuts.
  • Store in an airtight container at room temperature for up to 3 days, or refrigerate for up to a week.
  • Freeze for up to 2 months and reheat in the microwave for 10–15 seconds.

Crispy Cabbage Pancakes – A Simple Recipe That Feels Like Home

Growing up, cabbage was a humble staple in our household. It was inexpensive, always available, and stretched a meal when times were tough. My grandmother had a way of turning the simplest ingredients into something spectacular. She never wasted a thing—especially cabbage.

One cold winter evening, I remember coming home to the comforting aroma of something frying in the kitchen. Expecting meat or potatoes, I was surprised to see golden pancakes sizzling in the pan. “Just cabbage and onions,” my grandmother said with a smile, flipping them effortlessly. At first, I was skeptical. How could something so simple be so satisfying?

But after the first bite—crispy on the outside, tender on the inside, with a deep, savory flavor—I was hooked. Those pancakes became a family tradition, and every time I make them now, I feel like I’m preserving a little piece of that warm, bustling kitchen from my childhood.

This recipe is more than just food—it’s a reminder that the best meals don’t have to be complicated or expensive. Sometimes, all it takes is a few fresh ingredients, a little creativity, and the magic of a hot pan.

Why You’ll Love These Cabbage Pancakes

If you’ve never considered cabbage as the star of a dish, these pancakes might just change your mind. They are:

  • Crispy & Flavorful – The natural sweetness of cabbage caramelizes as it cooks, giving each pancake a rich, deep flavor.
  • Budget-Friendly – Made with simple, affordable ingredients, this is a meal that stretches your grocery budget without compromising taste.
  • Healthy & Nutritious – Packed with fiber, vitamins, and probiotics (if using kefir), these pancakes are a great way to eat more vegetables.
  • Quick & Easy – Ready in under 30 minutes, making them perfect for busy weeknights.
  • Versatile – Enjoy them as a side dish, snack, or even a light main course.

If you’re looking for a meatless dish that’s both satisfying and packed with flavor, these cabbage pancakes are exactly what you need.

Ingredients

IngredientQuantity
Cabbage, finely shredded1/2 head
Onion, finely chopped1 medium
Carrot, grated1 medium
Eggs3
Kefir or thick yogurt500 ml (17 oz)
Flour300 g (10.6 oz)
Baking soda or baking powder1 teaspoon
SaltTo taste
Black pepperTo taste
Vegetable oilFor frying

Directions

  1. Prepare the vegetables – Finely shred the cabbage, chop the onion, and grate the carrot. Set them aside.
  2. Whisk the wet ingredients – In a large mixing bowl, beat the eggs and combine them with the kefir (or yogurt) until well blended.
  3. Incorporate dry ingredients – Gradually add the flour, baking soda (or baking powder), salt, and black pepper to the wet mixture. Stir until a smooth, lump-free batter forms.
  4. Combine everything – Fold in the cabbage, onion, and carrot, ensuring they are evenly coated with the batter.
  5. Heat the oil – Pour a generous amount of vegetable oil into a frying pan and heat over medium heat.
  6. Cook the pancakes – Scoop spoonfuls of batter into the pan, flattening slightly. Fry each pancake for 3–4 minutes per side, or until golden brown and crispy.
  7. Drain and serve – Remove pancakes from the pan and place them on a paper towel to absorb excess oil. Serve warm with sour cream, yogurt, or your favorite dipping sauce.

Nutritional Information (Per Serving, Approx.)

NutrientAmount
Calories180–220 kcal
Protein6–8 g
Fat8–10 g
Carbohydrates20–25 g
Fiber3–4 g
Sodium250–300 mg

Tips for Perfect Cabbage Pancakes

Although this recipe is easy, a few tricks will help you achieve the best texture and flavor.

1. Shred the Cabbage Finely

The finer the cabbage, the better it incorporates into the batter. A food processor or mandoline slicer can make the process quicker and ensure a delicate texture.

2. Let the Batter Rest

Allowing the batter to sit for 5–10 minutes helps the flour absorb moisture, making the pancakes hold their shape better during frying.

3. Use the Right Oil

A neutral oil with a high smoke point, such as sunflower or canola oil, ensures the pancakes fry evenly without burning.

4. Don’t Overcrowd the Pan

Fry in small batches to ensure even cooking and crispiness. Overcrowding can lead to steaming rather than frying, making them soggy.

5. Adjust the Seasoning

Taste the batter before frying. If you prefer a bolder flavor, try adding garlic powder, smoked paprika, or a pinch of cayenne pepper.

Delicious Variations

One of the best things about these pancakes is how adaptable they are. You can tweak the recipe based on what you have on hand or your dietary preferences.

1. Cheesy Cabbage Pancakes

Add ½ cup of grated cheese (cheddar, Parmesan, or feta) to the batter for extra richness and flavor.

2. Spicy Cabbage Pancakes

Mix in chopped jalapeños or a pinch of red pepper flakes for a little heat.

3. Herb-Infused Pancakes

Fresh herbs like dill, parsley, or chives add brightness and balance out the savory flavors.

4. Protein-Packed Pancakes

For a more filling meal, stir in some cooked shredded chicken, crumbled tofu, or chickpea flour for extra protein.

5. Gluten-Free Version

Swap the regular flour for chickpea flour or a gluten-free flour blend to make this recipe suitable for gluten-sensitive diets.

How to Serve Cabbage Pancakes

These crispy pancakes are incredibly versatile and pair well with a variety of toppings and sides.

  • Classic Style: Serve with a dollop of sour cream, Greek yogurt, or crème fraîche.
  • Savory Upgrade: Try a drizzle of garlic yogurt sauce or spicy sriracha mayo.
  • Light Meal: Pair with a simple green salad or a fresh cucumber and tomato salad.
  • Side Dish: Serve alongside roasted meats or grilled fish for a complete meal.

They’re delicious warm or at room temperature, making them great for meal prep and packed lunches.

Storage & Reheating Tips

Cabbage pancakes store well, so you can enjoy them for days.

Refrigerating

  • Store in an airtight container in the fridge for up to 4 days.
  • Reheat in a pan over low heat for a few minutes to restore crispiness.

Freezing

  • Let pancakes cool completely, then stack them with parchment paper between each one.
  • Store in a freezer-safe bag for up to 2 months.
  • To reheat, bake at 350°F (175°C) for 10 minutes, or pan-fry until crispy again.

FAQs About Cabbage Pancakes

1. Can I make these without eggs?

Yes! Replace the eggs with flaxseed or chia seed eggs (1 tablespoon ground flax or chia + 3 tablespoons water per egg).

2. Can I use milk instead of kefir?

Yes, but kefir or yogurt gives a tangy flavor and extra fluffiness. If using milk, add a teaspoon of vinegar or lemon juice to mimic the acidity.

3. Why are my pancakes falling apart?

Make sure your batter isn’t too dry. If needed, add a splash of kefir or yogurt to bind the ingredients better.

4. Can I bake these instead of frying?

Yes! Bake at 375°F (190°C) for about 20–25 minutes, flipping halfway through for even browning. They won’t be as crispy but will still be delicious.

5. How can I make these lower in carbs?

Use almond flour or coconut flour instead of regular flour for a lower-carb version.

Final Thoughts – A Simple Dish with Big Flavor

Cabbage pancakes may not be the first thing that comes to mind when you think of comfort food, but one bite will change your mind. They’re crispy, savory, and packed with flavor—all while being easy to make and budget-friendly.

This recipe is proof that simple ingredients can create something truly special. Whether you’re looking for a quick lunch, a satisfying side dish, or a new way to enjoy cabbage, these pancakes are sure to become a favorite in your kitchen.

So next time you find yourself with half a cabbage in the fridge and no idea what to do with it, give these crispy pancakes a try. You might just discover a new go-to recipe that feels like home.

Amal

Crispy Cabbage Pancakes – A Simple Recipe That Feels Like Home

These Crispy Cabbage Pancakes are a perfect combination of simplicity and flavor. Made with shredded cabbage, onions, carrots, and a fluffy batter, they are golden brown, crispy on the outside, and tender on the inside. This budget-friendly dish is easy to prepare and works as a main course, side dish, or even a quick snack. Serve them with sour cream, yogurt, or a spicy dipping sauce for a truly satisfying meal.
Prep Time 10 minutes
Cook Time 20 minutes
Total Time 30 minutes
Servings: 12 pancakes
Course: Snack
Cuisine: Eastern European

Ingredients
  

  • 1/2 cabbage finely shredded
  • 1 medium onion finely chopped
  • 1 medium carrot grated
  • 3 eggs
  • 500 ml kefir or thick yogurt 17 oz
  • 300 grams flour 10.6 oz
  • 1 teaspoon baking soda or baking powder
  • Salt to taste
  • Black pepper to taste
  • Vegetable oil for frying

Method
 

  1. Prepare the vegetables by finely shredding the cabbage, chopping the onion, and grating the carrot.
  2. Whisk the eggs and kefir (or yogurt) in a large mixing bowl until well combined.
  3. Add the dry ingredients—flour, baking soda (or baking powder), salt, and black pepper—into the egg mixture. Stir until a smooth batter forms.
  4. Fold in the vegetables, ensuring they are evenly coated in the batter. Let the mixture rest for 5–10 minutes.
  5. Heat vegetable oil in a large pan over medium heat.
  6. Spoon portions of the batter into the hot pan, flattening them slightly. Cook for 3–4 minutes per side, until golden brown and crispy.
  7. Transfer to a plate lined with paper towels to remove excess oil.
  8. Serve warm with sour cream, yogurt, or your favorite dipping sauce.

Notes

  • For a cheesier version, add 1/2 cup grated cheese to the batter.
  • To make it spicy, mix in chopped jalapeños or a pinch of red pepper flakes.
  • For a gluten-free option, substitute flour with a gluten-free blend or chickpea flour.
  • To store, refrigerate in an airtight container for up to 4 days or freeze for up to 2 months.
  • Reheat in a skillet or oven for best crispiness.

Fluffy Sunrise Egg Muffins – A Breakfast Game Changer

Mornings in my house used to be a whirlwind of chaos—alarms blaring, kids scrambling to find their socks, and me, coffee in hand, wondering if I had time to cook a decent breakfast. More often than not, we’d end up grabbing something processed and unsatisfying, just to keep moving.

Then, I stumbled upon the beauty of egg muffins—a meal that was nutritious, filling, and, most importantly, easy to prepare ahead of time. The first time I made them, I remember watching my kids devour them before I could even sit down. No complaints, no leftovers—just happy, full bellies and a smoother start to the day.

That’s when I knew this wasn’t just another breakfast idea; it was a lifesaver.

Why You’ll Love These Egg Muffins

Egg muffins aren’t just a quick breakfast solution; they’re a game-changer for anyone with a busy lifestyle. Here’s why they deserve a permanent spot in your morning routine:

  • Meal-Prep Friendly – Make a batch at the beginning of the week, and you have breakfast ready in seconds.
  • High-Protein & Low-Carb – A great option for those looking to fuel their mornings without a sugar crash.
  • Fully Customizable – Swap in your favorite veggies, proteins, and cheeses to suit your taste.
  • Kid-Approved – Even picky eaters love these, especially when packed with cheese and bacon.

If you’ve been struggling to find a breakfast that’s healthy, delicious, and actually convenient, these egg muffins might just be the solution you didn’t know you needed.

Ingredients

IngredientQuantity
Eggs6
Shredded cheese (cheddar or your choice)1 cup
Salt1/2 teaspoon
Black pepper1/2 teaspoon
Paprika1/2 teaspoon
Garlic powder1/2 teaspoon
Bell peppers, diced1/2 cup
Spinach, chopped1/2 cup
Bacon, cooked and crumbled4 strips
Green onions, chopped1/4 cup

Directions

  1. Preheat the oven to 375°F (190°C) and lightly grease a muffin tin.
  2. Whisk the eggs in a large bowl, then add cheese, salt, black pepper, paprika, and garlic powder. Mix well.
  3. Stir in the diced bell peppers, chopped spinach, crumbled bacon, and green onions.
  4. Pour the mixture evenly into the muffin tin, filling each cup about 3/4 full.
  5. Bake for 18–20 minutes, or until the egg muffins are set and slightly golden on top.
  6. Let cool for a few minutes before removing from the tin.
  7. Serve warm and enjoy, or store in the refrigerator for a quick grab-and-go breakfast.

Nutritional Information (Per Serving, Approx.)

NutrientAmount
Calories120–150 kcal
Protein10–12 g
Fat8–10 g
Carbohydrates2–3 g
Fiber0.5–1 g
Sodium250–300 mg

The Secret to Perfect Egg Muffins

Even though this recipe is simple, a few key techniques can take your egg muffins from good to great.

1. Grease Your Muffin Tin Well

Eggs tend to stick to metal surfaces, so don’t skip this step. Use a non-stick spray, butter, or even silicone muffin liners to ensure easy removal.

2. Whisk the Eggs Properly

A light, fluffy texture comes from whisking the eggs well before baking. This incorporates air into the mixture, making the muffins less dense.

3. Don’t Overfill the Muffin Cups

Egg muffins expand as they bake, so only fill the cups about 3/4 full to prevent spillage.

4. Use Pre-Cooked Meats and Vegetables

Raw vegetables release moisture as they cook, which can make the muffins watery. To avoid this, lightly sauté ingredients like bell peppers, onions, or mushrooms before adding them to the mixture.

5. Let Them Cool Before Removing

Egg muffins are delicate when hot. Allow them to cool for a few minutes in the pan before using a knife or spatula to gently loosen the edges.

Variations and Customization Ideas

One of the best things about egg muffins is their versatility. You can create endless variations based on your dietary needs or flavor preferences.

Protein-Packed Options

  • Turkey & Cheddar – Use diced turkey breast with sharp cheddar for a lean yet flavorful option.
  • Ham & Swiss – Classic and slightly smoky, perfect for a protein boost.
  • Chicken & Feta – A Mediterranean twist with crumbled feta and shredded chicken.

Vegetarian Choices

  • Spinach & Feta – A simple, nutrient-packed combo.
  • Mushroom & Swiss – Earthy mushrooms with creamy Swiss cheese.
  • Tomato & Basil – Fresh, light, and bursting with flavor.

Spicy Kicks

  • Jalapeño & Pepper Jack – For those who love a little heat in the morning.
  • Chorizo & Cheddar – A bold, smoky option with Mexican flavors.
  • Buffalo Chicken – Add shredded buffalo chicken and blue cheese crumbles for a tangy twist.

The possibilities are endless, making it easy to switch things up so breakfast never gets boring.

Storage and Reheating Tips

One of the biggest perks of these muffins is that they store incredibly well, making them ideal for meal prepping.

Storing in the Refrigerator

  • Once cooled, place the egg muffins in an airtight container.
  • They’ll stay fresh for up to 5 days.

Freezing for Long-Term Storage

  • Wrap each muffin in plastic wrap or place them in a freezer-safe bag.
  • They can be frozen for up to 3 months.

How to Reheat

  • From the fridge: Microwave for 20-30 seconds.
  • From frozen: Microwave for 50-60 seconds, or let them thaw overnight in the fridge for a quicker reheat.

These muffins are designed to be grab-and-go, making breakfast effortless, no matter how hectic your mornings get.

FAQs About Egg Muffins

1. Can I make these without dairy?

Yes! Simply omit the cheese or replace it with a dairy-free alternative. You can also add extra veggies or nutritional yeast for a bit of flavor.

2. Why did my egg muffins collapse after baking?

Egg muffins naturally deflate slightly as they cool, but if they collapse completely, it’s usually due to over-whisking or too much added liquid from vegetables. Try lightly sautéing veggies before adding them.

3. Can I make these in advance?

Absolutely! They are one of the best meal-prep breakfast options. Store them in the fridge for up to 5 days or freeze them for up to 3 months.

4. Can I use egg whites instead of whole eggs?

Yes, you can use egg whites only for a lower-fat version. Replace each whole egg with two egg whites for best results.

5. What’s the best way to add extra flavor?

Try mixing in herbs and spices like oregano, chives, or smoked paprika. A dash of hot sauce or a sprinkle of Parmesan can also enhance the flavor.

Final Thoughts – A Simple Breakfast That Changes Everything

When I first started making these egg muffins, I thought they were just another quick meal option. But over time, they became a staple—not just for me, but for my entire family.

There’s something comforting about knowing that a healthy, homemade breakfast is always within reach, even on the busiest mornings. Whether you’re a parent juggling school drop-offs, a professional rushing out the door, or someone just trying to eat better without the hassle, these egg muffins offer a solution that actually works.

So go ahead—make a batch, customize them to your heart’s content, and enjoy the kind of stress-free mornings you deserve.

Amal

Fluffy Sunrise Egg Muffins – A Breakfast Game Changer

These Fluffy Sunrise Egg Muffins are the ultimate grab-and-go breakfast! Packed with protein, cheese, crispy bacon, and vibrant veggies, they are easy to make, customizable, and perfect for meal prep. Whether you’re looking for a low-carb, high-protein start to your day or just need a quick and delicious breakfast, these egg muffins are a game-changer.
Prep Time 10 minutes
Cook Time 20 minutes
Total Time 30 minutes
Servings: 12 egg muffins
Course: Breakfast
Cuisine: American

Ingredients
  

  • 6 large eggs
  • 1 cup shredded cheese cheddar or your choice
  • 1/2 teaspoon salt
  • 1/2 teaspoon black pepper
  • 1/2 teaspoon paprika
  • 1/2 teaspoon garlic powder
  • 1/2 cup bell peppers diced
  • 1/2 cup spinach chopped
  • 4 strips bacon cooked and crumbled
  • 1/4 cup green onions chopped

Method
 

  1. Preheat the oven to 375°F (190°C). Lightly grease a 12-cup muffin tin or use silicone muffin liners.
  2. Whisk the eggs in a large bowl. Add cheese, salt, black pepper, paprika, and garlic powder. Mix well.
  3. Stir in the diced bell peppers, spinach, crumbled bacon, and green onions until evenly combined.
  4. Divide the mixture evenly into the prepared muffin tin, filling each cup about 3/4 full.
  5. Bake for 18–20 minutes or until the egg muffins are set and slightly golden on top.
  6. Let them cool for a few minutes before carefully removing them from the tin.
  7. Serve immediately, or store in the refrigerator for up to 5 days. You can also freeze them for up to 3 months.

Notes

  • For a dairy-free option, skip the cheese or use a plant-based alternative.
  • Make it vegetarian by omitting the bacon and adding extra veggies like mushrooms or tomatoes.
  • Egg muffins can be stored in the fridge for up to 5 days and reheated in the microwave for 20–30 seconds.
  • To freeze, wrap each muffin individually and reheat directly from frozen for about 50–60 seconds in the microwave.
  • Want extra fluffiness? Add 1–2 tablespoons of milk or heavy cream to the egg mixture before baking.

Silky Chocolate Hazelnut Delight: A 3-Ingredient No-Bake Dessert

There’s something magical about chocolate. As a child, I remember sneaking into the kitchen, hoping to find a hidden stash of chocolate bars in the cupboard. My mother always had a way of turning simple ingredients into something extraordinary, and one day, she introduced me to a chocolate dessert that required no baking, no fancy tools, and barely any effort. It was silky, rich, and melted in my mouth like pure bliss.

At the time, I didn’t understand how a few ingredients—chocolate, milk, and something to hold it all together—could create such a perfect dessert. But now, every time I make this silky chocolate hazelnut delight, I’m reminded that sometimes, the best recipes are the simplest ones.

This dessert is a modern take on that childhood memory. It’s creamy, smooth, and deeply chocolatey, with the added crunch of hazelnuts. It feels indulgent but is surprisingly light, making it the perfect treat for any time of the day. Whether you’re serving it at a gathering or enjoying a quiet moment with a spoonful of pure chocolate heaven, this recipe is proof that you don’t need complicated steps or added sugar to create something extraordinary.

Why You’ll Love This Recipe

1. Only 3 Simple Ingredients

You don’t need eggs, cream, or sugar—just milk, chocolate, and a setting agent (gelatin agar). The combination of dark chocolate and hazelnut chocolate gives it the perfect balance of richness and crunch.

2. No Baking, No Sugar, No Hassle

This dessert requires no oven, no precise baking techniques, and no added sugar. The natural sweetness from the chocolate makes it rich yet not overwhelming.

3. A Creamy, Silky Texture

Thanks to the combination of milk and gelatin agar, this dessert has a pudding-like consistency that is smooth and melts in your mouth with every bite.

4. Perfect for Any Occasion

Serve it in elegant molds for a dinner party, cut it into squares for a snack, or enjoy a chilled spoonful straight from the fridge. It’s versatile and always satisfying.

5. A Healthier Indulgence

Since this dessert contains no added sugar, it’s a better option for those looking for a naturally sweet treat. Plus, dark chocolate is packed with antioxidants and hazelnuts offer healthy fats.

Ingredients

IngredientQuantity
Milk900ml (3 ¾ cups)
Gelatin agar1 tbsp (15g)
Chocolate (dark + hazelnut)500g (17.6 oz) (200g dark chocolate, 300g finely chopped hazelnut chocolate)
Oil3 tbsp (45ml)

Directions

  1. Prepare the milk mixture: In a saucepan over medium heat, warm the milk without boiling it. Sprinkle the gelatin agar evenly and whisk continuously until fully dissolved.
  2. Melt the chocolate: Chop the dark chocolate and hazelnut chocolate into small pieces. Add them to the milk mixture and stir until completely melted and smooth.
  3. Incorporate the oil: Stir in the oil to create a silky texture and enhance the chocolate’s richness.
  4. Pour and set: Pour the mixture into a mold or serving glasses. Let it cool slightly before transferring to the refrigerator. Chill for at least 3-4 hours until firm.
  5. Serve and enjoy: Once set, slice or scoop out portions and enjoy this creamy, chocolatey dessert!

Nutritional Information (Per Serving, Approximate)

NutrientAmount
Calories320 kcal
Carbohydrates25 g
Protein6 g
Fat22 g
Fiber4 g
Calcium15% DV
Iron10% DV

The Health Benefits of Chocolate and Hazelnuts

Dark Chocolate: A Superfood in Disguise

Many people think of chocolate as just a sweet indulgence, but dark chocolate has numerous health benefits:

  • Rich in antioxidants, which help fight inflammation and support heart health.
  • Boosts brain function, improving memory and focus.
  • Contains minerals like magnesium and iron, essential for energy and overall well-being.
  • May improve mood, thanks to compounds that stimulate serotonin production.

Hazelnuts: A Nutrient-Packed Crunch

Hazelnuts not only add texture but also offer a boost of nutrition:

  • A great source of healthy fats, which promote heart health.
  • Rich in vitamin E, known for its skin-protecting and anti-aging properties.
  • Supports brain health, thanks to its high content of folate and antioxidants.
  • Good for digestion, providing fiber that supports gut health.

When combined, chocolate and hazelnuts create a dessert that is not just delicious but also beneficial in moderation.

FAQs About This 3-Ingredient Chocolate Dessert

1. What type of chocolate should I use?

For the best results, use a combination of dark chocolate (70% cocoa or higher) and chocolate with finely chopped hazelnuts. The dark chocolate provides depth, while the hazelnut chocolate adds a bit of sweetness and crunch.

2. Can I make this dessert without gelatin agar?

Yes! You can substitute regular gelatin (use about 7g for the same setting effect) or cornstarch (about 2 tablespoons dissolved in a little milk before adding to the mixture). Keep in mind that cornstarch will give it a more pudding-like texture.

3. How long does it take for this dessert to set?

It usually needs 3-4 hours in the refrigerator to firm up completely. For the best texture, let it chill overnight.

4. Can I make this dairy-free?

Absolutely! Swap the milk for almond milk, coconut milk, or oat milk. Keep in mind that using plant-based milk may slightly alter the texture, but it will still be delicious.

5. What’s the best way to serve this dessert?

  • In small glasses or ramekins, for an elegant pudding-style dessert.
  • Cut into squares or bars, for a firmer, chocolate fudge-like texture.
  • With a drizzle of melted chocolate or a dusting of cocoa powder for extra indulgence.
  • Topped with fresh berries or chopped nuts to balance the richness.

6. How do I store leftovers?

Store this dessert in an airtight container in the refrigerator for up to 5 days. It maintains its texture well and actually tastes even better the next day!

7. Can I freeze this dessert?

Yes! To freeze, cut into portions and wrap each piece in plastic wrap. Store in a freezer-safe container for up to 2 months. To enjoy, thaw in the fridge overnight before serving.

8. Can I add extra flavors?

Definitely! Consider adding:

  • A teaspoon of vanilla extract for a subtle sweetness.
  • A pinch of sea salt to enhance the chocolate flavor.
  • A dash of espresso powder for a deeper chocolate taste.
  • A sprinkle of cinnamon or nutmeg for a warm twist.

9. Is this dessert suitable for people with dietary restrictions?

  • Gluten-free – Yes, as long as your chocolate is certified gluten-free.
  • Dairy-free – Use plant-based milk instead of regular milk.
  • Sugar-free – Since the recipe doesn’t include added sugar, choosing a low-sugar or unsweetened chocolate makes it even healthier.

10. Can I make this dessert firmer or softer?

If you prefer a firmer, more solid texture, increase the amount of gelatin agar slightly (by 1-2 grams). For a softer, pudding-like consistency, reduce the gelatin agar slightly and allow the dessert to chill longer.

A Dessert That Feels Like Luxury Without the Effort

Some desserts require hours of preparation, multiple ingredients, and perfect techniques. But this silky chocolate hazelnut delight proves that you don’t need complexity to create something rich, smooth, and indulgent.

With just three simple ingredients and a few minutes of preparation, you can enjoy a luxurious chocolate dessert that tastes like it came from a high-end patisserie. Whether you’re making it for yourself, serving it to guests, or treating your family, this no-bake chocolate delight is guaranteed to impress.

So the next time you’re craving something sweet but don’t want to spend hours in the kitchen, remember this recipe. It’s simple, elegant, and absolutely irresistible—just the way dessert should be.

Amal

Silky Chocolate Hazelnut Delight: A 3-Ingredient No-Bake Dessert

This 3-ingredient no-bake chocolate dessert is smooth, rich, and melts in your mouth. Made with just milk, chocolate, and gelatin agar, it sets into a silky, pudding-like treat with a hint of crunch from hazelnuts. Perfect for chocolate lovers, this dessert is easy to make, contains no added sugar, and requires minimal effort. Whether served in elegant glasses or sliced into bars, it’s an indulgent yet simple treat you’ll want to make again and again!
Prep Time 5 minutes
Cook Time 10 minutes
Total Time 15 minutes
Servings: 6 –8 servings
Course: Dessert
Cuisine: International

Ingredients
  

  • 900 ml 3 ¾ cups milk
  • 1 tbsp 15g gelatin agar
  • 500 g 17.6 oz chocolate (200g dark chocolate, 300g chocolate with finely chopped hazelnuts)
  • 3 tbsp 45ml oil

Method
 

  1. In a saucepan, heat the milk over medium heat until warm (do not boil). Sprinkle in the gelatin agar while whisking continuously until fully dissolved.
  2. Chop the chocolate into small pieces and add it to the milk mixture. Stir until completely melted and smooth.
  3. Stir in the oil for a silky texture and enhanced richness.
  4. Pour the mixture into a mold or serving glasses and let it cool slightly before transferring to the refrigerator.
  5. Chill for at least 3-4 hours, or until firm. Serve chilled and enjoy!

Notes

  • For a dairy-free version, use almond, oat, or coconut milk.
  • If you prefer a firmer texture, increase the gelatin agar slightly.
  • Let the dessert chill overnight for the best consistency.
  • Serve with fresh berries, chopped nuts, or a dusting of cocoa powder for extra flavor.
  • Store leftovers in the fridge for up to 5 days or freeze for longer storage.

3-Ingredient Greek Yogurt Cake – Light, Fluffy, and Incredibly Easy

There’s something special about recipes that require just a few ingredients yet deliver incredible results. This 3-ingredient Greek yogurt cake is one of those magical creations—light, airy, and full of delicate flavor. It reminds me of the simple desserts my grandmother used to make, the ones where she’d mix a few pantry staples with effortless grace and somehow create something that felt like a treat from a high-end bakery.

I remember watching her whisk eggs by hand, her movements steady and confident, as she turned everyday ingredients into something extraordinary. No complicated steps, no fancy equipment—just love, patience, and a deep understanding of how food brings people together. When I first tried making this Greek yogurt cake, I was transported back to those childhood moments. The cake came out beautifully golden, soft to the touch, and slightly tangy from the yogurt. It was a reminder that simplicity is often the key to the best recipes.

Now, this cake is a staple in my kitchen. Whether I need a quick dessert, a light afternoon treat, or something to enjoy with my coffee in the morning, this recipe never fails me. It’s proof that you don’t need a long list of ingredients to create something absolutely delicious.

Why You’ll Love This Recipe

1. Only 3 Ingredients

This cake is made with just Greek yogurt, eggs, and cornstarch—no flour, butter, or sugar needed if you use sweetened yogurt. It’s proof that baking can be simple yet delicious.

2. Light and Fluffy Texture

The combination of whisked eggs and yogurt creates an airy, soufflé-like cake that practically melts in your mouth. It’s soft, tender, and slightly creamy.

3. Naturally Sweet and Healthier

Greek yogurt gives the cake a natural sweetness and a subtle tangy flavor while providing protein and probiotics. It’s a healthier alternative to traditional cakes, making it great for breakfast or a guilt-free dessert.

4. No Special Equipment Needed

You don’t need an electric mixer or fancy baking tools—just a whisk, a bowl, and an oven. The simplicity makes it perfect for beginner bakers or anyone who wants a fuss-free dessert.

5. Versatile and Easy to Customize

This cake is a fantastic base for other flavors. Add lemon zest, vanilla extract, or a drizzle of honey for extra depth. You can also top it with fruit, nuts, or powdered sugar to enhance its presentation and taste.

Ingredients

IngredientQuantity
Greek yogurt (with sugar)400 g (1 ¾ cups)
Eggs4 large
Cornstarch4 tablespoons (40 g)

Directions

1. Prepare the Batter

  • Preheat the oven to 170°C (340°F).
  • In a mixing bowl, whisk the eggs until light and frothy.
  • Add the Greek yogurt and mix until smooth.
  • Sift in the cornstarch and gently fold until fully incorporated.

2. Bake the Cake

  • Line a baking pan with parchment paper and pour in the batter.
  • Tap the pan lightly to remove air bubbles.
  • Bake for 35–40 minutes until the cake is set and lightly golden on top.

3. Cool and Serve

  • Let the cake cool in the oven with the door slightly open for 10 minutes.
  • Transfer to a wire rack and allow it to cool completely before slicing.
  • Serve as is or with powdered sugar, fresh berries, or honey.

Nutritional Information (Per Serving, Approximate)

NutrientAmount
Calories120–140 kcal
Protein6–8 g
Fat4–6 g
Carbohydrates12–15 g
Fiber0 g

FAQs: Everything You Need to Know About This Greek Yogurt Cake

What Type of Greek Yogurt Should I Use?

For best results, use sweetened Greek yogurt with a thick consistency. If using plain Greek yogurt, you can add 2–3 tablespoons of sugar, honey, or maple syrup to adjust the sweetness to your liking.

Can I Use Regular Yogurt Instead of Greek Yogurt?

Greek yogurt works best because of its thicker texture, which helps bind the ingredients together. If using regular yogurt, strain it through a cheesecloth for an hour to remove excess liquid and achieve a similar consistency.

Why Does This Cake Contain No Flour?

Cornstarch acts as the stabilizing ingredient in this cake, giving it structure without the need for flour. This makes it a fantastic gluten-free dessert option while keeping the cake incredibly light.

How Do I Make the Cake More Flavorful?

While delicious on its own, you can enhance the flavor by adding:

  • Vanilla extract for warmth and sweetness
  • Lemon zest for a fresh citrusy touch
  • A pinch of cinnamon for a cozy feel
  • A drizzle of honey or maple syrup for extra richness

Can I Add Toppings or Fillings?

Absolutely! This cake pairs beautifully with various toppings, including:

  • Fresh berries (strawberries, blueberries, raspberries)
  • Powdered sugar for a delicate sweetness
  • Whipped cream or Greek yogurt drizzle for a creamy contrast
  • Nuts or coconut flakes for extra texture

What Size Pan Should I Use?

A 6–7 inch round cake pan works best for this recipe. Using a larger pan will result in a thinner cake, while a smaller pan may require a slightly longer baking time.

Why Did My Cake Collapse After Baking?

This cake is soufflé-like, meaning it will naturally deflate a little after baking. However, to minimize sinking:

  • Let it cool gradually by turning off the oven and leaving the door slightly open for 10 minutes before removing the cake.
  • Avoid overmixing the batter, as too much air can cause it to deflate more rapidly.
  • Bake it fully—undercooking can cause it to collapse once removed from the oven.

Can I Make This Cake Dairy-Free?

Yes! You can replace the Greek yogurt with dairy-free alternatives such as coconut yogurt or almond-based yogurt. Just make sure it’s thick and slightly sweetened for the best results.

Can I Store and Reheat This Cake?

This cake is best enjoyed fresh but can be stored in an airtight container in the refrigerator for up to 3 days. If you prefer it warm, reheat slices in the microwave for 10–15 seconds.

Can I Freeze This Cake?

Yes! Wrap individual slices in plastic wrap and store them in an airtight container in the freezer for up to 2 months. Thaw in the fridge overnight before serving.

What Can I Serve This Cake With?

  • A cup of coffee or tea for a light breakfast
  • A scoop of vanilla ice cream for an indulgent dessert
  • A drizzle of honey and a handful of granola for a wholesome snack

The Simplicity of Baking, the Magic of Flavor

This 3-ingredient Greek yogurt cake is proof that baking doesn’t have to be complicated. With just a few simple ingredients, you can create a dessert that’s soft, light, and satisfying. It’s the perfect treat for those who love delicate flavors, airy textures, and easy-to-make recipes.

What makes this cake truly special is its versatility—you can enjoy it plain, add toppings, or even turn it into a layered dessert with fruit and cream. Whether you’re making it for a quick afternoon treat, a healthy snack, or a light dessert after dinner, this cake is bound to impress with its simplicity and elegance.

So, why not give it a try? With just three ingredients and minimal effort, you can bake a cake that feels like a little slice of heaven. Once you taste it, you’ll find yourself making it again and again!

Would you like ideas for variations or different ways to serve this cake? Let me know how you customize your Greek yogurt cake!

Amal

3-Ingredient Greek Yogurt Cake – Light, Fluffy, and Incredibly Easy

This 3-ingredient Greek yogurt cake is the perfect quick and easy dessert! It’s incredibly light, slightly tangy, and naturally sweet thanks to the yogurt. With no flour or butter, it’s a great gluten-free option that still delivers a soft and airy texture. Whether you enjoy it plain or top it with fresh fruit, this simple cake is guaranteed to impress.
Prep Time 10 minutes
Cook Time 40 minutes
Total Time 50 minutes
Servings: 6 –8 servings
Course: Dessert
Cuisine: International

Ingredients
  

  • 400 grams 1 ¾ cups Greek yogurt with sugar (about 3 small cups of yogurt)
  • 4 large eggs
  • 4 tablespoons 40 grams cornstarch

Method
 

Prepare the Batter:
  1. Preheat the oven to 170°C (340°F).
  2. In a mixing bowl, whisk the eggs until frothy.
  3. Add the Greek yogurt and mix until smooth.
  4. Sift in the cornstarch and gently fold until fully combined.
Bake the Cake:
  1. Line a baking pan with parchment paper and pour in the batter.
  2. Tap the pan lightly on the counter to remove any air bubbles.
  3. Bake for 35–40 minutes until the cake is set and lightly golden on top.
Cool and Serve:
  1. Let the cake cool in the oven with the door slightly open for 10 minutes.
  2. Transfer to a wire rack and allow it to cool completely before slicing.
  3. Serve as is or with powdered sugar, honey, or fresh fruit.

Notes

  • If using plain Greek yogurt, add 2–3 tablespoons of sugar or honey for extra sweetness.
  • For a more intense flavor, mix in a little vanilla extract or lemon zest.
  • Store leftovers in an airtight container in the fridge for up to 3 days.
  • This cake is naturally gluten-free, but check your cornstarch to ensure it is certified gluten-free if needed.

4 Ingredients Only! The Easiest Homemade Bread Anyone Can Make

There’s something truly magical about baking your own bread. The smell of freshly baked dough filling your kitchen, the anticipation of slicing into a warm, golden loaf, and the satisfaction of knowing you made it from scratch—it’s an experience that never gets old.

For me, baking bread started as a challenge. I always thought making bread was complicated, requiring special equipment, fancy ingredients, and years of experience. But one day, I came across a simple recipe—just four ingredients—and decided to give it a try. To my surprise, it worked! The bread had a crispy crust, a soft interior, and a flavor that was far better than anything I could buy at the store.

From that moment, I was hooked. This four-ingredient homemade bread became a staple in my kitchen. It’s a recipe I turn to when I want something simple, delicious, and rewarding. Whether you’re a beginner or a seasoned baker, this recipe proves that anyone can make bread at home. No kneading, no complicated steps—just a few basic ingredients and a little patience.

Why You’ll Love This Recipe

1. No Fancy Ingredients or Equipment Needed

This bread is made with pantry staples: flour, water, salt, and yeast. There’s no need for expensive bread flour, eggs, butter, or sugar. You don’t even need a stand mixer—just a bowl, a spoon, and your hands.

2. Beginner-Friendly and Foolproof

Even if you’ve never baked before, this recipe is nearly impossible to mess up. There’s no kneading required—just mix, let it rise, and bake. The yeast does all the work, creating a beautifully soft and airy loaf.

3. Crispy on the Outside, Soft on the Inside

This bread has the perfect texture—crunchy crust with a soft, chewy inside. It’s great for sandwiches, toast, or simply enjoying with butter and jam.

4. Cheaper and Healthier Than Store-Bought Bread

Homemade bread costs just a fraction of what you’d pay at the store, and it’s free from preservatives and additives. You know exactly what’s going into your bread, making it a healthier option for you and your family.

5. Customizable to Your Taste

This basic recipe serves as a great foundation. You can experiment by adding seeds, herbs, cheese, or even garlic to create different flavors.

Ingredients

IngredientQuantity
All-purpose flour500 g (4 cups)
Warm water350 ml (1 ½ cups)
Salt1 ½ teaspoons
Dry yeast1 teaspoon

Directions

1. Prepare the Dough

  • In a large bowl, mix the flour, salt, and dry yeast.
  • Gradually add warm water while stirring with a spoon or your hands until a sticky dough forms.

2. Let It Rise

  • Cover the bowl with a clean towel and let the dough rise in a warm place for 1–2 hours, or until it doubles in size.

3. Shape and Proof

  • Lightly flour a surface and gently shape the dough into a round or loaf shape.
  • Place it on a parchment-lined baking tray and let it rest for another 30 minutes.

4. Bake to Perfection

  • Preheat the oven to 220°C (430°F).
  • Place the dough in the oven and bake for 25–30 minutes, or until golden brown with a crispy crust.
  • Let it cool before slicing and enjoying!

Nutritional Information (Per Serving, Approximate)

NutrientAmount
Calories180–200 kcal
Protein5–6 g
Fat0.5–1 g
Carbohydrates40–45 g
Fiber2–3 g

FAQs: Everything You Need to Know About Making Homemade Bread

What Type of Flour Works Best for This Recipe?

All-purpose flour works perfectly for this bread, but if you want a chewier texture, you can use bread flour. Whole wheat flour can also be used, but it will produce a denser loaf.

Do I Have to Knead the Dough?

No! This is a no-knead bread, meaning the gluten develops naturally during the resting period. This makes it perfect for beginners who don’t want to deal with complicated techniques.

How Do I Get a Crispy Crust?

Baking at a high temperature helps create a crispy crust. For an even better result, place a small oven-safe dish filled with water on the bottom rack of the oven while baking. The steam will enhance the crust’s texture.

Can I Use Instant Yeast Instead of Dry Yeast?

Yes! Instant yeast can be used in the same quantity as dry yeast. The only difference is that instant yeast doesn’t need to be dissolved in water first—you can mix it directly into the flour.

What If My Dough Doesn’t Rise?

If your dough isn’t rising, check these factors:

  • Water Temperature: If the water is too hot, it can kill the yeast. If it’s too cold, the yeast won’t activate. Aim for warm water, around 40°C (100°F).
  • Freshness of Yeast: If your yeast is old or expired, it may no longer be active.
  • Room Temperature: If your kitchen is too cold, the dough may take longer to rise. Try placing the bowl in a warmer area, like near the stove or inside an oven with the light on.

Can I Make This Bread Gluten-Free?

You can try using gluten-free flour, but the texture will be different. A blend of gluten-free flour with xanthan gum tends to work best for achieving a good rise.

Can I Add Other Ingredients to the Dough?

Absolutely! This recipe is a blank canvas for creativity. Try adding:

  • Seeds: Sunflower, sesame, or flaxseeds for added crunch.
  • Herbs: Rosemary, thyme, or garlic powder for extra flavor.
  • Cheese: Grated cheddar or parmesan mixed into the dough.
  • Sweet Additions: A touch of honey or cinnamon for a sweeter version.

How Do I Store Homemade Bread?

Homemade bread doesn’t have preservatives, so it won’t last as long as store-bought bread. Here’s how to keep it fresh:

  • Store at room temperature in a paper bag or wrapped in a clean kitchen towel for up to 3 days.
  • Avoid plastic bags, as they trap moisture and make the crust soggy.
  • For longer storage, slice the bread and freeze it in an airtight container for up to 3 months.

Can I Use a Bread Machine?

Yes! Simply follow your bread machine’s instructions, adding the ingredients in the recommended order. This recipe works well in most standard bread machines.

How Can I Tell If My Bread Is Fully Baked?

Tap the bottom of the loaf—it should sound hollow. If you’re unsure, use a food thermometer. The internal temperature should be around 90°C (195°F) when fully baked.

What’s the Best Way to Serve This Bread?

  • For Breakfast: Toasted with butter and jam.
  • For Lunch: As a sandwich base with your favorite fillings.
  • For Dinner: As a side with soup, salad, or pasta.
  • For Snacking: With cheese, hummus, or olive oil and balsamic vinegar.

A Loaf That Brings Joy to Every Kitchen

Baking your own bread is one of the most rewarding experiences in the kitchen. There’s a sense of accomplishment in watching the dough rise, hearing the crust crackle as it cools, and finally enjoying a warm slice fresh from the oven.

This four-ingredient bread proves that homemade baking doesn’t have to be complicated. Anyone—no matter their skill level—can make a perfect loaf with minimal effort. Whether you’re looking to cut down on store-bought bread, try something new, or simply enjoy the process of baking, this recipe is a must-try.

So, why not give it a go? With just a few simple ingredients and a little patience, you’ll have a fresh, homemade loaf that tastes better than anything from the grocery store. And once you taste it, you might just find yourself making it again and again!

Would you like more variations or tips for different types of bread? Let me know how your homemade loaf turns out!

Amal

4 Ingredients Only! The Easiest Homemade Bread Anyone Can Make

Making fresh, homemade bread has never been this easy! With just four simple ingredients, you can create a soft and fluffy loaf with a perfectly crisp crust—no special equipment or kneading required. Whether you’re a beginner or an experienced baker, this foolproof recipe delivers delicious results every time. Perfect for sandwiches, toast, or simply enjoying with butter, this homemade bread will quickly become a household favorite.
Prep Time 10 minutes
Cook Time 30 minutes
Total Time 2 hours 40 minutes
Servings: 1 loaf
Course: Bread
Cuisine: International

Ingredients
  

  • 500 g 4 cups all-purpose flour
  • 350 ml 1 ½ cups warm water
  • 1 ½ teaspoons salt
  • 1 teaspoon dry yeast

Method
 

Prepare the Dough:
  1. In a large bowl, combine the flour, salt, and dry yeast.
  2. Gradually pour in the warm water while stirring until a sticky dough forms.
Let It Rise:
  1. Cover the bowl with a clean towel and let the dough rest in a warm place for 1–2 hours until it doubles in size.
Shape and Proof:
  1. Lightly flour a surface and gently shape the dough into a round or loaf shape.
  2. Place it on a parchment-lined baking tray and let it rest for another 30 minutes.
Bake to Perfection:
  1. Preheat the oven to 220°C (430°F).
  2. Bake the bread for 25–30 minutes until golden brown and crispy on the outside.
  3. Let it cool slightly before slicing and serving.

Notes

  • If you prefer a softer crust, place a bowl of water in the oven while baking to create steam.
  • You can add seeds, herbs, or cheese to customize the flavor.
  • Store the bread in a paper bag or wrapped in a clean towel to keep it fresh for up to 3 days.

So Delicious, I Make Them Almost Every Day! The Easiest Crispy Potato and Meat Fritters

There’s something special about recipes that remind us of home. For me, these crispy potato and meat fritters take me straight back to my grandmother’s kitchen. She used to make them whenever we had leftover minced meat, turning simple ingredients into something that felt like a feast. The smell of sizzling potatoes and onions filled the house, making it impossible to wait until dinner.

I remember standing by the stove, watching her shape the mixture with practiced hands. She never measured anything—just a pinch of this, a handful of that—but they always came out perfect. Crispy on the outside, soft and flavorful on the inside, they were the ultimate comfort food. We’d eat them straight from the pan, barely giving them time to cool, dipping them into sour cream or homemade tomato sauce.

Now, I make them for my own family, and every time I do, I’m reminded that the best recipes are the ones that bring people together. These fritters are easy to make, packed with flavor, and incredibly satisfying. Whether you’re cooking for a family meal or looking for a quick snack, this dish is a guaranteed winner.

Why You’ll Love This Recipe

1. Crispy, Juicy, and Packed with Flavor

The combination of potatoes, minced meat, and mushrooms creates a perfect balance of textures. The potatoes crisp up beautifully while the meat stays juicy inside. Seasoned with nutmeg, salt, and black pepper, these fritters are simple yet full of deep, rich flavor.

2. Quick and Easy to Prepare

With just a handful of basic ingredients, this recipe comes together in no time. There’s no need for fancy equipment—just mix, shape, and fry. Perfect for busy weeknights when you want something satisfying without spending hours in the kitchen.

3. Budget-Friendly and Made with Everyday Ingredients

This dish is a great way to use up staple ingredients like potatoes, onions, and flour. It’s also an excellent way to stretch a small amount of minced meat into a hearty meal, making it ideal for families on a budget.

4. Versatile and Customizable

One of the best things about this recipe is how easy it is to adapt. You can switch up the seasonings, add different vegetables, or experiment with different meats to create new variations.

5. Perfect for Any Meal

These fritters aren’t just for dinner! They make a fantastic breakfast, a filling lunch, or even a quick snack. Pair them with a fresh salad, dip them in your favorite sauce, or enjoy them on their own.

Ingredients

IngredientQuantity
Potatoes1 kg (2 lb 3 oz)
Onion1
Minced meat350 g
Mushrooms10-12
SaltTo taste
Black pepperTo taste
NutmegA pinch
Egg1
Flour2-4 tablespoons
Vegetable oilFor frying

Directions

1. Prepare the Ingredients

  • Peel and grate the potatoes into a large bowl. Squeeze out excess moisture using a clean kitchen towel.
  • Finely chop the onion and mushrooms.

2. Mix the Batter

  • In a bowl, combine the grated potatoes, chopped onion, minced meat, and mushrooms.
  • Add salt, black pepper, nutmeg, and the egg. Mix well.
  • Gradually add flour, mixing until the batter holds together.

3. Fry the Fritters

  • Heat vegetable oil in a pan over medium heat.
  • Scoop a portion of the mixture and flatten it into a patty.
  • Fry for 3–4 minutes per side until golden brown and crispy.
  • Transfer to a paper towel-lined plate to drain excess oil.

4. Serve and Enjoy

  • Serve hot with sour cream, yogurt, or a dipping sauce of your choice.

Nutritional Information (Per Serving, Approximate)

NutrientAmount
Calories280–320 kcal
Protein12–15 g
Fat15–18 g
Carbohydrates30–35 g
Fiber4–5 g

FAQs: Everything You Need to Know About These Potato and Meat Fritters

What Type of Potatoes Work Best?

For the crispiest fritters, use starchy potatoes like Russet, Yukon Gold, or Maris Piper. They have a higher starch content, which helps bind the mixture together and creates a better texture. Waxy potatoes, like red or new potatoes, hold too much moisture and may make the fritters too soft.

Do I Have to Use Mushrooms?

No! Mushrooms add a delicious depth of flavor, but if you don’t like them, you can leave them out or replace them with another vegetable, like grated zucchini or carrots.

How Can I Make Them Extra Crispy?

  • Drain Excess Moisture: After grating the potatoes, squeeze out as much liquid as possible using a clean kitchen towel. This helps them crisp up better when fried.
  • Use the Right Pan: A cast-iron skillet or a non-stick pan ensures even browning and prevents sticking.
  • Fry in Small Batches: Overcrowding the pan lowers the oil temperature and results in soggy fritters. Fry in batches for the best texture.
  • Let Them Rest on a Wire Rack: Instead of placing them on paper towels, let them cool on a wire rack to keep them crispy.

Can I Bake These Instead of Frying?

Yes! If you prefer a healthier option, you can bake them at 200°C (400°F) for 25–30 minutes, flipping halfway through. Brush them lightly with oil before baking to help achieve a crispy crust.

Can I Make These in an Air Fryer?

Absolutely! Air fry at 190°C (375°F) for 15–18 minutes, flipping once halfway through. This method uses less oil while still keeping them crispy and golden.

Can I Prepare the Mixture in Advance?

Yes! You can prepare the potato and meat mixture in advance and store it in the fridge for up to 24 hours. When you’re ready to cook, simply shape and fry the fritters.

Can I Freeze These Fritters?

Yes! To freeze, place the cooked fritters in a single layer on a tray and freeze until solid. Then transfer them to a freezer bag or container. When ready to eat, reheat them in the oven at 180°C (350°F) for about 15 minutes, or until crispy again.

What Dipping Sauces Pair Well With These Fritters?

These fritters are delicious on their own but even better with a great dipping sauce. Here are some tasty options:

  • Sour Cream & Garlic: A classic creamy dip that complements the crispy fritters.
  • Spicy Sriracha Mayo: A creamy dip with a little heat.
  • Honey Mustard: A sweet and tangy contrast to the savory fritters.
  • Tzatziki: A cool and refreshing yogurt-based dip.
  • Homemade Tomato Sauce: A rich, tangy sauce that pairs beautifully with the crispy exterior.

Can I Use a Different Type of Meat?

Yes! While minced beef or pork works best for this recipe, you can experiment with different options like:

  • Chicken or turkey mince for a lighter version.
  • A mix of beef and pork for extra juiciness.
  • Vegetarian option: Replace the meat with mashed chickpeas or lentils for a plant-based alternative.

What Can I Serve With These Fritters?

These fritters are incredibly versatile and can be served with:

  • A fresh salad for a balanced meal.
  • Mashed potatoes or rice for a hearty dinner.
  • A side of roasted vegetables for extra nutrients.
  • Grilled meats or fish if you want a more filling meal.

The Perfect Comfort Food for Any Occasion

There’s something undeniably comforting about biting into a crispy, golden fritter. The crunchy edges, the juicy meat filling, and the subtle hint of nutmeg come together in a way that feels both nostalgic and deeply satisfying.

This recipe is proof that the simplest ingredients—potatoes, onions, a bit of meat—can create something truly special. Whether you’re making these for a cozy family dinner, a casual snack, or even meal prepping for the week, these fritters are guaranteed to be a hit.

And the best part? They’re endlessly adaptable. You can tweak the seasoning, swap out the ingredients, or try different dipping sauces to keep things exciting.

So next time you’re looking for an easy, delicious meal that brings warmth and comfort, give these potato and meat fritters a try. One bite, and you’ll understand why I make them almost every day!

Would you like more ideas for variations or side dishes? Let me know how you like to enjoy your fritters!

Amal

So Delicious, I Make Them Almost Every Day! The Easiest Crispy Potato and Meat Fritters

These crispy potato and meat fritters are the perfect combination of crunchy on the outside and juicy on the inside. Made with grated potatoes, seasoned minced meat, and a touch of nutmeg, they come together quickly and make a fantastic meal or snack. Whether you serve them with sour cream, a spicy dip, or enjoy them on their own, they’re guaranteed to be a family favorite.
Prep Time 20 minutes
Cook Time 15 minutes
Total Time 35 minutes
Servings: 4 servings
Course: Main Dish
Cuisine: International

Ingredients
  

  • 1 kg 2 lb 3 oz potatoes
  • 1 onion finely chopped
  • 350 g minced meat beef, pork, or a mix
  • 10-12 mushrooms finely chopped
  • Salt to taste
  • Black pepper to taste
  • Pinch of nutmeg
  • 1 egg
  • 2-4 tablespoons flour
  • Vegetable oil for frying

Method
 

Prepare the Ingredients:
  1. Peel and grate the potatoes. Squeeze out excess moisture using a clean kitchen towel.
  2. Finely chop the onion and mushrooms.
Make the Mixture:
  1. In a large bowl, combine the grated potatoes, chopped onion, minced meat, and mushrooms.
  2. Add salt, black pepper, nutmeg, and the egg. Mix well.
  3. Gradually add flour until the mixture holds together.
Cook the Fritters:
  1. Heat vegetable oil in a pan over medium heat.
  2. Scoop a portion of the mixture, shape it into a small patty, and flatten it slightly.
  3. Fry for about 3–4 minutes per side until golden brown and crispy.
  4. Transfer to a plate lined with paper towels to absorb excess oil.
Serve and Enjoy:
  1. Serve warm with sour cream, yogurt, or your favorite dipping sauce.

Notes

  • To make the fritters extra crispy, drain as much moisture as possible from the grated potatoes before mixing.
  • If baking instead of frying, preheat the oven to 200°C (400°F) and bake for 25–30 minutes, flipping halfway.
  • Store leftovers in an airtight container in the fridge for up to 2 days. Reheat in the oven for best results.

The Ultimate Crunchy Potato Snack – Crispy, Cheesy, and Irresistible!

There’s something incredibly nostalgic about the smell of sizzling potatoes in a pan. It takes me back to childhood afternoons spent in my grandmother’s kitchen, watching her turn the simplest ingredients into something magical. She never followed a recipe, yet every dish was perfect. And when she made crispy potato snacks, the whole house smelled like warmth and comfort.

She would grate the potatoes by hand, mixing them with just a few seasonings before frying them to golden perfection. No fancy techniques—just an old skillet, some patience, and an instinct for knowing exactly when to flip them. We’d sit at the table, dipping them into whatever sauce we could find, savoring the crispy edges and soft, flavorful centers.

Years later, I found myself craving that same crispy, savory goodness but wanted to add a little something extra. That’s how this recipe was born—a crunchy potato snack with the perfect balance of crispiness and cheesiness, paired with a rich garlic cheese sauce that takes it to another level. It’s simple, comforting, and absolutely irresistible.

Why You’ll Love This Recipe

1. Crispy Perfection Without Deep Frying

One of the best things about this snack is that you get the crispy, golden texture without having to deep fry. The combination of potato starch and pan-frying gives the potatoes a perfectly crunchy exterior while keeping the inside soft and tender.

2. The Cheese Sauce Makes It Even Better

Crunchy potatoes are great on their own, but when paired with a creamy, garlicky cheese sauce, they become next-level delicious. The sauce is rich, smooth, and packed with flavor, making it the ultimate dip for these crispy bites.

3. Simple Ingredients, Big Flavor

This recipe uses pantry staples like potatoes, spices, and cheese, yet the result is a dish that tastes gourmet. It’s proof that you don’t need complicated ingredients to create something absolutely delicious.

4. Perfect for Any Occasion

Whether you’re looking for a satisfying snack, a fun party appetizer, or a side dish that steals the show, these crunchy potato bites fit the bill. They’re great for casual gatherings, game nights, or just treating yourself to something comforting.

Ingredients

IngredientQuantity
Potatoes3 large (900 g / 31.74 oz)
SaltTo taste
Potato starch7 tablespoons
Paprika1 teaspoon
Marjoram1 teaspoon
Butter25 g (0.88 oz)
Garlic5 cloves, minced
Flour1 teaspoon
Milk100 ml (3.4 fl. oz)
Cheese4 slices
Sunflower oilFor frying

Directions

1. Prepare the Potato Mixture

  • Peel and grate the potatoes into a bowl. Squeeze out excess moisture using a clean kitchen towel.
  • Add salt, potato starch, paprika, and marjoram, then mix until well combined.

2. Form and Fry the Potato Snacks

  • Heat sunflower oil in a pan over medium heat.
  • Shape the potato mixture into small, flat rounds or desired snack shapes.
  • Fry until golden and crispy on both sides, about 3–4 minutes per side. Remove and drain on paper towels.

3. Make the Garlic Cheese Sauce

  • In a separate pan, melt the butter over low heat. Add the minced garlic and sauté until fragrant.
  • Stir in the flour, then slowly pour in the milk, whisking continuously to create a smooth sauce.
  • Add cheese slices and stir until fully melted and creamy.

4. Serve and Enjoy

  • Arrange the crispy potato snacks on a plate and drizzle with the garlic cheese sauce.
  • Garnish with fresh herbs or extra paprika for added flavor.

Nutritional Information (Per Serving, Approximate)

NutrientAmount
Calories280–320 kcal
Protein6–8 g
Fat15–18 g
Carbohydrates35–40 g
Fiber3–5 g

FAQs: Everything You Need to Know About This Crunchy Potato Snack

What Type of Potatoes Work Best?

For the crispiest texture, starchy potatoes like Russet, Yukon Gold, or Maris Piper work best. They have the right balance of starch and moisture, ensuring a crispy exterior and a fluffy interior. Avoid waxy potatoes like red or new potatoes, as they don’t crisp up as well.

Why Use Potato Starch Instead of Flour?

Potato starch is the secret ingredient that makes these snacks extra crispy. Unlike regular flour, potato starch absorbs less oil and creates a light, crunchy coating. If you don’t have potato starch, cornstarch is a good alternative.

How Can I Make Them Extra Crispy?

  • Drain Excess Moisture: After grating the potatoes, squeeze out as much liquid as possible using a clean kitchen towel. Less moisture means crispier results.
  • Use the Right Pan: A cast-iron skillet or a non-stick pan ensures even browning and prevents sticking.
  • Don’t Overcrowd the Pan: Fry in batches so each piece gets enough space to crisp up properly.
  • Let Them Rest on a Wire Rack: Instead of placing them on paper towels, let them cool on a wire rack to keep them crispy.

Can I Bake These Instead of Frying?

Yes! While frying gives the best texture, you can bake them at 200°C (400°F) for 25–30 minutes, flipping halfway through. Brush them lightly with oil before baking to help them crisp up.

Can I Make These in an Air Fryer?

Absolutely! Air fry at 190°C (375°F) for 15–18 minutes, flipping once halfway through. This method uses less oil while still keeping them crunchy.

Can I Make These Ahead of Time?

Yes! You can prepare the potato mixture and shape the snacks in advance. Store them in the fridge for up to 24 hours before frying. If you want to freeze them, place them on a tray in the freezer until solid, then transfer them to a freezer bag. Cook from frozen, adding a few extra minutes to the cooking time.

What Other Seasonings Can I Use?

While paprika and marjoram add a delicious flavor, you can experiment with different seasonings:

  • Spicy Kick: Add cayenne pepper or chili flakes for heat.
  • Herb Infusion: Mix in thyme, oregano, or rosemary for a fragrant twist.
  • Cheesy Upgrade: Mix in grated Parmesan or sharp cheddar for extra cheesiness.

What Can I Serve With These Potato Snacks?

These crunchy bites pair well with a variety of dips and sides, including:

  • Classic Ketchup: A simple but always satisfying choice.
  • Spicy Sriracha Mayo: A creamy dip with a kick.
  • Garlic Aioli: A rich, garlicky alternative to the cheese sauce.
  • Tzatziki: A fresh and tangy Greek yogurt dip.
  • Side of Greens: Serve with a fresh salad for a balanced meal.

The Perfect Balance of Crunch, Flavor, and Comfort

There’s something so satisfying about biting into a crispy, golden potato snack. The crunch, the warmth, the cheesy richness of the garlic sauce—it’s a combination that just works. It’s the kind of dish that feels indulgent yet simple, comforting yet exciting.

Whether you’re making these for a cozy night in, a family gathering, or just because you love potatoes (who doesn’t?), this recipe delivers. It’s easy to make, endlessly customizable, and guaranteed to disappear within minutes.

So next time you’re craving something crispy and satisfying, skip the chips and fries—make these crunchy potato snacks instead. Once you try them, they’ll become a regular on your snack list.

Would you like additional seasoning ideas or dip variations? Let me know how you make this recipe your own!

Amal

The Ultimate Crunchy Potato Snack – Crispy, Cheesy, and Irresistible!

These crispy potato snacks are the perfect combination of crunch and flavor. With a light, golden exterior and a cheesy, garlicky center, they are an irresistible treat for any occasion. Whether served as a snack, side dish, or party appetizer, this easy-to-make recipe will become a favorite in no time. Pair them with the creamy garlic cheese sauce for the ultimate indulgence!
Prep Time 20 minutes
Cook Time 15 minutes
Total Time 35 minutes
Servings: 4 servings
Course: Snack
Cuisine: International

Ingredients
  

For the Potato Snacks:
  • 3 large potatoes 900 g / 31.74 oz
  • Salt to taste
  • 7 tablespoons potato starch
  • 1 teaspoon paprika
  • 1 teaspoon marjoram
  • Sunflower oil for frying
For the Garlic Cheese Sauce:
  • 25 g 0.88 oz butter
  • 5 cloves garlic minced
  • 1 teaspoon flour
  • 100 ml 3.4 fl. oz milk
  • 4 slices cheese

Method
 

Prepare the Potato Mixture:
  1. Peel and grate the potatoes into a bowl. Squeeze out excess moisture using a clean kitchen towel.
  2. Season with salt, paprika, and marjoram. Add potato starch and mix until combined.
Shape and Fry the Potato Snacks:
  1. Heat sunflower oil in a pan over medium heat.
  2. Shape the potato mixture into small, flat rounds or desired snack shapes.
  3. Fry until golden and crispy on both sides, about 3–4 minutes per side. Remove and drain on paper towels.
Make the Garlic Cheese Sauce:
  1. In a small saucepan, melt the butter over low heat. Add the minced garlic and sauté until fragrant.
  2. Stir in the flour, then slowly pour in the milk, whisking continuously until smooth.
  3. Add cheese slices and stir until fully melted and creamy.
Serve and Enjoy:
  1. Arrange the crispy potato snacks on a plate and drizzle with the garlic cheese sauce.
  2. Serve immediately for the best texture and flavor.

Notes

  • To make them extra crispy, chill the shaped potato mixture before frying.
  • If baking instead of frying, preheat the oven to 200°C (400°F) and bake for 25–30 minutes, flipping halfway.
  • The garlic cheese sauce can be made ahead of time and reheated when ready to serve.

Golden Crispy Potato Cakes with Creamy Garlic Sauce – The Ultimate Comfort Food

Growing up, my grandmother always had a way of turning simple ingredients into something magical. I remember coming home on chilly afternoons to the smell of sizzling potatoes in her kitchen. She would take leftover boiled potatoes, mash them with a bit of flour, and shape them into crispy little patties that she pan-fried until golden brown. There was no extravagant recipe, just an instinctive mix of warmth, love, and pantry staples.

Her potato cakes were never fancy, but they were always perfect. Crisp on the outside, soft and creamy on the inside, and just the right amount of seasoning to make them irresistible. She would serve them with a simple sour cream dip, sometimes adding fresh herbs from her garden. As a child, I thought they were the best thing ever, and honestly, I still do.

Years later, I found myself craving that same nostalgic comfort but with a little extra twist. That’s how this recipe was born—still simple, still comforting, but with a richer garlic sauce that takes the whole experience to another level. These crispy potato cakes are proof that you don’t need fancy ingredients to create a dish that feels gourmet. They’re budget-friendly, easy to make, and perfect for any occasion.

Why You’ll Love This Recipe

1. Crispy, Golden Perfection

Potato cakes are all about texture. The key is achieving that perfect contrast—crispy and golden on the outside, while still soft and tender on the inside. The light coating of cornstarch helps achieve that signature crunch without deep frying.

2. A Flavorful and Creamy Garlic Sauce

Potato dishes are always better with a great dipping sauce. This garlic sauce is rich, tangy, and slightly smoky thanks to the blend of sour cream, mayonnaise, paprika, and a hint of soy sauce. The garlic adds boldness, while the fresh dill gives it a refreshing finish.

3. A Great Way to Use Leftover Potatoes

If you ever have boiled potatoes sitting in your fridge with no plan for them, this is the best way to transform them into something delicious. It’s an easy way to reduce food waste while making a satisfying meal or snack.

4. Simple Ingredients, Big Flavor

This recipe requires only a handful of basic ingredients—potatoes, cornstarch, olive oil, and seasonings—yet delivers incredible results. The magic is in the technique and the perfect balance of flavors.

5. Perfect for Any Meal

These potato cakes are incredibly versatile. Serve them as an appetizer, a side dish, or even a light meal. They pair wonderfully with eggs for breakfast, make a great snack on their own, or can even replace traditional burger buns for a unique twist.

Ingredients

For the Potato Cakes:

IngredientQuantity
Potatoes3 medium (900 g / 2 lbs), peeled and boiled
SaltTo taste
Black pepperTo taste
Cornstarch150 g (3.5 oz)
Olive oil1 teaspoon
Fresh parsley (optional)Chopped

For the Garlic Sauce:

IngredientQuantity
Sour cream2 tablespoons
Garlic2 cloves, minced
Paprika1 teaspoon
Soy sauce1 tablespoon
Sweet chili sauce1 tablespoon
Mayonnaise1 tablespoon
Fresh dill (optional)Chopped

Directions

1. Prepare the Potato Mixture

  • Mash the boiled potatoes in a large bowl until smooth.
  • Season with salt and black pepper to taste.
  • Add cornstarch and olive oil, then mix until a smooth dough-like consistency forms.
  • Stir in fresh parsley if using.

2. Shape and Cook the Potato Cakes

  • Divide the mixture into equal portions and shape into round, flat cakes.
  • Heat a non-stick pan over medium heat with a small amount of oil.
  • Cook the potato cakes for 3–4 minutes per side, or until golden brown and crispy.
  • Transfer to a plate lined with paper towels to remove excess oil.

3. Make the Garlic Sauce

  • In a small bowl, mix sour cream, minced garlic, paprika, soy sauce, sweet chili sauce, and mayonnaise until smooth.
  • Add fresh dill for extra flavor if desired.

4. Serve and Enjoy

  • Serve the crispy potato cakes warm with the garlic sauce on the side for dipping.
  • Garnish with extra parsley or dill for a fresh touch.

Nutritional Information (Per Serving, Approximate)

NutrientAmount
Calories220–260 kcal
Protein4–6 g
Fat8–12 g
Carbohydrates35–40 g
Fiber3–5 g

FAQs: Everything You Need to Know About Potato Cakes

What Type of Potatoes Work Best?

Starchy potatoes like Russet, Yukon Gold, or Maris Piper work best for potato cakes because they mash well and hold their shape. Waxy potatoes, like red potatoes, contain more moisture and may result in a denser texture.

Why Use Cornstarch Instead of Flour?

Cornstarch helps create an ultra-crispy texture without making the potato cakes heavy. It forms a light, crispy crust that enhances the crunch factor. If you prefer, you can substitute it with an equal amount of all-purpose flour.

How Can I Make These Even Crispier?

For extra crispiness:

  • Chill the mixture before shaping the cakes. This helps them firm up and hold their shape better during cooking.
  • Cook over medium-high heat so they develop a golden crust without absorbing too much oil.
  • Use a non-stick pan or cast-iron skillet for even heat distribution.

Can I Bake These Instead of Frying?

Yes! While pan-frying gives the best texture, you can bake them at 200°C (400°F) for about 25–30 minutes, flipping halfway through. Brushing them lightly with olive oil before baking will help achieve a crispier result.

Can I Make These in an Air Fryer?

Absolutely! Air fry at 190°C (375°F) for 15–18 minutes, flipping them once halfway through. This method reduces oil while still keeping them crispy.

Can I Make the Potato Cakes Ahead of Time?

Yes! You can prepare the potato mixture in advance and store it in the refrigerator for up to 24 hours before shaping and frying the cakes. If you want to freeze them, shape the cakes and place them on a parchment-lined tray in the freezer. Once frozen solid, transfer them to a freezer bag. When ready to cook, thaw in the fridge and pan-fry as usual.

What Other Dipping Sauces Can I Serve With These?

While the garlic sauce is a perfect match, here are some other great options:

  • Spicy Sriracha Mayo: A mix of mayonnaise and sriracha for heat lovers.
  • Classic Sour Cream & Chives: A simple, creamy dip with fresh chives.
  • Honey Mustard: A sweet and tangy contrast to the savory potato cakes.
  • Tzatziki: A Greek yogurt-based dip with cucumber and garlic.

Can I Add Other Ingredients to the Potato Cakes?

Definitely! These potato cakes are a great base for creativity. Some variations include:

  • Cheesy Potato Cakes: Mix in shredded cheddar or Parmesan for extra richness.
  • Spiced Potato Cakes: Add cumin, smoked paprika, or chili flakes for a more flavorful twist.
  • Herb-Infused Cakes: Mix in fresh thyme, oregano, or scallions for added depth.

What Can I Serve These With?

These potato cakes work well with:

  • Grilled meats or fish as a crispy side.
  • Poached or fried eggs for a hearty breakfast.
  • A fresh salad for a balanced meal.
  • Roasted vegetables for a delicious vegetarian platter.

A Dish That Feels Like Home

There’s something truly special about simple comfort food. These crispy potato cakes may be made from humble ingredients, but they deliver an incredible depth of flavor and texture. Whether you’re making them as a quick snack, a crowd-pleasing appetizer, or a nostalgic meal, they are sure to bring warmth and satisfaction to your table.

The creamy garlic sauce ties everything together, adding just the right amount of richness and zest. And the best part? This dish is so easy to customize, allowing you to get creative with flavors and toppings.

So the next time you find yourself with some leftover potatoes, don’t just mash them—turn them into golden, crispy potato cakes that everyone will love. One bite, and you’ll understand why this dish has been passed down through generations as a true comfort food classic.

Would you like additional seasoning ideas or meal pairings? Let me know how you’d customize your potato cakes!

Amal

Golden Crispy Potato Cakes with Creamy Garlic Sauce – The Ultimate Comfort Food

These crispy potato cakes are the ultimate comfort food—golden brown on the outside, soft and fluffy on the inside, and packed with flavor. Made with simple ingredients, they are easy to prepare and pair perfectly with a rich and creamy garlic sauce. Whether served as a snack, appetizer, or side dish, they are sure to be a crowd favorite!
Prep Time 20 minutes
Cook Time 15 minutes
Total Time 35 minutes
Servings: 4 servings
Course: Side Dish
Cuisine: International

Ingredients
  

For the Potato Cakes:
  • 3 medium potatoes 900 g / 2 lbs, peeled and boiled
  • Salt to taste
  • Black pepper to taste
  • 150 g 3.5 oz cornstarch
  • 1 teaspoon olive oil
  • Fresh parsley chopped (optional)
For the Garlic Sauce:
  • 2 tablespoons sour cream
  • 2 cloves garlic minced
  • 1 teaspoon paprika
  • 1 tablespoon soy sauce
  • 1 tablespoon sweet chili sauce
  • 1 tablespoon mayonnaise
  • Fresh dill chopped (optional)

Method
 

Prepare the Potato Mixture:
  1. Mash the boiled potatoes in a bowl until smooth.
  2. Season with salt and black pepper.
  3. Add cornstarch and olive oil, mixing until the mixture forms a dough-like consistency.
  4. Stir in chopped parsley if using.
Shape and Cook the Potato Cakes:
  1. Divide the mixture into equal portions and shape them into round, flat cakes.
  2. Heat a non-stick pan over medium heat with a small amount of oil.
  3. Cook the potato cakes for 3–4 minutes per side until golden brown and crispy.
  4. Transfer to a plate lined with paper towels to absorb excess oil.
Prepare the Garlic Sauce:
  1. In a small bowl, mix sour cream, minced garlic, paprika, soy sauce, sweet chili sauce, and mayonnaise.
  2. Stir well until smooth.
  3. Add fresh dill for extra flavor if desired.
Serve and Enjoy:
  1. Serve the crispy potato cakes warm with the garlic sauce on the side for dipping.
  2. Garnish with extra parsley or dill for a fresh touch.

Notes

  • For an extra crispy texture, chill the potato mixture before shaping and frying.
  • To bake instead of frying, place on a parchment-lined tray and bake at 200°C (400°F) for 25–30 minutes, flipping halfway.
  • Store leftovers in an airtight container in the fridge for up to 2 days and reheat in the oven for best results.