Crisp Cabbage & Apple Salad with Zesty Lemon Dressing

Some recipes are more than just food—they bring back memories, traditions, and moments of warmth. This Cabbage and Apple Salad is one of those dishes for me. It reminds me of late summer afternoons at my grandmother’s house, where she would prepare fresh salads using whatever seasonal produce she had on hand. Her salads were always simple yet full of flavor, combining crisp vegetables, a touch of sweetness, and a bright dressing that made every bite refreshing.

She always believed that a great salad should be more than just a side dish—it should be a perfect balance of textures and flavors. The crunch of cabbage, the natural sweetness of apples and carrots, the refreshing bite of cucumber, and the zesty tang of lemon dressing all come together in this recipe. It’s a dish that proves that healthy food can be incredibly delicious and satisfying.

Whenever I make this salad, I feel like I’m carrying on a tradition of celebrating fresh ingredients in their purest form. It’s a salad that’s perfect for any occasion—whether served at a summer picnic, alongside a hearty dinner, or as a light, refreshing meal on its own.

Why You’ll Love This Recipe

1. Fresh, Light, and Full of Flavor

This salad is incredibly refreshing with its crunchy vegetables, crisp apples, and tangy lemon dressing. Every bite is a burst of brightness.

2. Packed with Nutrients

Cabbage is rich in fiber, vitamin C, and antioxidants, while apples add natural sweetness and extra vitamins. Carrots provide beta-carotene, and the lemon dressing enhances digestion and boosts immunity.

3. Quick and Easy to Make

With just a few ingredients and minimal prep time, this salad comes together in under 10 minutes—perfect for busy days or last-minute meal prep.

4. Versatile and Customizable

This salad is delicious on its own, but you can easily customize it with additional ingredients like nuts, dried fruit, or different dressings to suit your taste.

5. A Perfect Side Dish or Standalone Meal

Pair it with grilled chicken, fish, or a hearty grain like quinoa for a complete meal, or enjoy it as a refreshing side dish with any main course.

Ingredients

IngredientQuantity
Cabbage, shredded1/3 portion
Carrot, julienned or grated1 large
Cucumber, julienned or thinly sliced1
Apple, julienned or thinly sliced1
Lemon juice2 tablespoons
Olive oil1 tablespoon
Honey (or maple syrup)1 teaspoon
SaltTo taste
Black pepperTo taste
Fresh parsley, chopped (optional)1 tablespoon

Directions

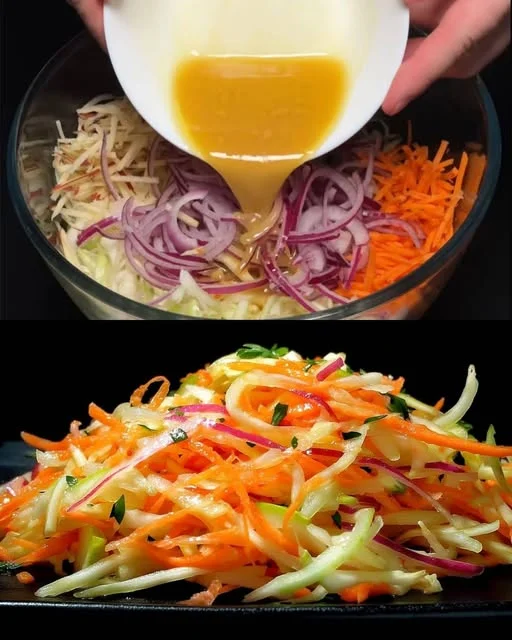
  1. Prepare the Vegetables – Shred the cabbage, julienne or grate the carrot, and thinly slice the cucumber and apple.
  2. Make the Dressing – In a small bowl, whisk together lemon juice, olive oil, honey, salt, and black pepper.
  3. Toss Everything Together – Combine all the ingredients in a large bowl, drizzle with the dressing, and toss until evenly coated.
  4. Serve & Enjoy – Garnish with fresh parsley if desired and serve immediately for a crisp and refreshing salad.

Nutritional Information (Per Serving – Approx. 1 Cup)

NutrientAmount
Calories80 kcal
Carbohydrates12 g
Protein1.5 g
Fat3.5 g
Fiber3 g
Sugar7 g
Sodium80 mg

Tips for the Best Cabbage and Apple Salad

1. Use Fresh, Crisp Ingredients

For the best texture, choose fresh, firm cabbage, crunchy apples, and crisp cucumbers. Avoid wilted cabbage or overly soft apples.

2. Slice Everything Evenly

Thin, uniform slices ensure that every bite has the perfect balance of flavors and textures. A sharp knife or mandoline slicer works best.

3. Let the Salad Sit for a Few Minutes

Allowing the salad to rest for 5–10 minutes after mixing helps the flavors meld together while keeping everything crisp.

4. Adjust the Sweetness and Acidity to Your Liking

If you prefer a sweeter salad, add a drizzle of honey or a handful of raisins. If you like it tangier, increase the lemon juice or add a splash of apple cider vinegar.

5. Add a Crunchy Element

For extra texture, toss in toasted almonds, walnuts, or sunflower seeds just before serving.

Delicious Variations & Additions

1. Creamy Cabbage and Apple Salad

Mix in Greek yogurt or mayonnaise with the dressing for a richer, creamier texture.

2. Spiced Autumn Version

Add a pinch of cinnamon and nutmeg, along with dried cranberries and pecans, for a fall-inspired salad.

3. Asian-Inspired Twist

Swap lemon juice for rice vinegar, add sesame seeds, and toss in shredded red cabbage and a drizzle of sesame oil for an Asian-style slaw.

4. Protein-Packed Option

Make it a complete meal by adding grilled chicken, chickpeas, or crumbled feta cheese.

5. Avocado and Herb Infusion

Mix in sliced avocado and fresh herbs like mint or cilantro for a creamy, herbaceous variation.

What to Serve with This Salad

This light and crisp salad pairs well with a variety of dishes:

1. Grilled Proteins

Serve alongside grilled chicken, fish, or shrimp for a healthy, balanced meal.

2. Sandwiches or Wraps

This salad makes a great companion to sandwiches, wraps, or burgers for added freshness.

3. Soups or Stews

Pair it with hearty soups like lentil, minestrone, or butternut squash soup for a contrast of textures.

4. Grain Bowls

Mix it into a quinoa or farro bowl with nuts and seeds for an extra-filling dish.

5. Holiday or BBQ Side

This salad is a perfect side dish for holiday feasts or summer barbecues, bringing a refreshing contrast to rich mains.

FAQs: Everything You Need to Know

Q: Can I make this salad ahead of time?

Yes! This salad stays fresh in the fridge for up to 24 hours. Store it in an airtight container and toss it again before serving to refresh the flavors.

Q: What type of apple works best?

Crisp, slightly tart apples like Granny Smith, Honeycrisp, or Pink Lady work best, as they hold their texture and balance the sweetness.

Q: Can I use red cabbage instead of green?

Absolutely! Red cabbage adds a pop of color and a slightly stronger flavor, making the salad even more vibrant.

Q: What if I don’t have honey?

You can substitute honey with maple syrup, agave, or even a teaspoon of sugar for a touch of sweetness.

Q: Can I make this salad vegan?

Yes! This salad is naturally vegan. Just ensure your dressing ingredients, like honey, are plant-based or replace it with maple syrup or agave.

Q: How do I keep apples from browning?

Toss the sliced apples with a bit of lemon juice before adding them to the salad. This helps preserve their color and freshness.

Q: Can I add cheese to this salad?

Yes! Crumbled feta, goat cheese, or shredded parmesan complement the flavors beautifully.

Q: How can I make it more filling?

Adding chickpeas, avocado, or cooked quinoa will turn this salad into a more substantial meal.

Why This Salad is a Must-Try

This Crisp Cabbage & Apple Salad with Zesty Lemon Dressing is a dish that proves healthy food doesn’t have to be boring. With its perfect blend of crunch, sweetness, and tangy citrus, it’s a salad that refreshes, nourishes, and satisfies.

Quick and easy to make
Naturally healthy, vegan, and gluten-free
Full of vitamins, fiber, and antioxidants
Perfect as a light meal or a side dish
Easily customizable to fit any season or occasion

So the next time you’re looking for a vibrant, flavorful, and nutritious salad, give this recipe a try. Whether you serve it as a side, a meal, or a refreshing snack, this salad will bring a burst of freshness to your table.

Amal

Crisp Cabbage & Apple Salad with Zesty Lemon Dressing

This Crisp Cabbage & Apple Salad is a refreshing mix of crunchy cabbage, sweet apples, and a tangy lemon dressing. It’s light, healthy, and bursting with fresh flavors, making it the perfect side dish or standalone salad. Whether paired with grilled meats or enjoyed on its own, this salad is a delicious way to add color and nutrients to your meal.
Prep Time 10 minutes
Total Time 10 minutes
Servings: 4 servings
Course: Salad
Cuisine: International

Ingredients
  

For the Salad:
  • 1/3 portion cabbage shredded
  • 1 large carrot julienned or grated
  • 1 cucumber julienned or thinly sliced
  • 1 apple julienned or thinly sliced
For the Lemon Dressing:
  • 2 tablespoons lemon juice
  • 1 tablespoon olive oil
  • 1 teaspoon honey or maple syrup
  • Salt to taste
  • Black pepper to taste
  • 1 tablespoon fresh parsley chopped (optional)

Method
 

  1. Prepare the Salad – Shred the cabbage, julienne or grate the carrot, and slice the cucumber and apple.
  2. Make the Dressing – In a small bowl, whisk together lemon juice, olive oil, honey, salt, and black pepper.
  3. Toss & Serve – In a large bowl, combine all the salad ingredients, drizzle with the dressing, and toss until evenly coated.
  4. Garnish & Enjoy – Sprinkle with fresh parsley if desired and serve immediately.

Notes

  • For extra crunch, add chopped nuts like walnuts or almonds.
  • To prevent apples from browning, toss them in a little lemon juice before adding to the salad.
  • Make it heartier by adding feta cheese or chickpeas.
  • Store leftovers in an airtight container for up to 24 hours in the fridge.

Gourmet Stuffed Chicken Legs with Melted Cheese & Pineapple Glaze

There is something deeply satisfying about taking a humble ingredient like chicken legs and turning it into a dish that feels indulgent and sophisticated. I still remember the first time I made stuffed chicken legs—it was an experiment, inspired by a dish I had at a small bistro that specialized in elevating classic comfort foods.

The moment I sliced into the perfectly golden chicken, revealing the gooey melted cheese inside, I knew I had stumbled upon something special. The combination of juicy chicken, creamy cheese, and the slight crispness from pan-searing made it rich and satisfying, yet still balanced. But what truly made the dish unforgettable was the sweet and tangy pineapple glaze drizzled over the top. The hint of natural sweetness from the fruit, combined with a touch of soy sauce and honey, created an irresistible contrast to the savory, smoky chicken.

Since then, this Gourmet Stuffed Chicken Legs Recipe has become a go-to for special dinners—whether it’s a cozy meal at home or an occasion where I want to impress guests without spending hours in the kitchen. The best part? It looks elegant but is surprisingly easy to make.

Why You’ll Love This Recipe

1. A Perfect Balance of Flavors

This dish brings together savory, smoky, sweet, and creamy elements. The cheese-stuffed chicken is hearty and rich, while the pineapple glaze adds a burst of freshness and contrast.

2. Elevates Simple Ingredients

Chicken legs are affordable and packed with flavor, but stuffing them with cheese and finishing with a glaze transforms them into a gourmet dish that looks and tastes restaurant-worthy.

3. Crispy Outside, Juicy Inside

Pan-searing before baking gives the chicken a beautiful golden crust, while the cheese inside keeps the meat moist and tender.

4. Ideal for Special Occasions or Weeknight Dinners

This dish is fancy enough for a dinner party yet simple enough for a family meal when you want something more exciting than plain baked chicken.

5. Pairs Well with a Variety of Sides

From roasted vegetables and mashed potatoes to fresh salads and rice, these stuffed chicken legs go with almost anything, making it a versatile addition to your cooking repertoire.

Ingredients

For the Chicken Legs

IngredientQuantity
Chicken legs, deboned4 large
Cheese (mozzarella, gouda, or cheddar), shredded150g (5 oz)
Garlic, minced2 cloves
Salt1 teaspoon
Black pepper½ teaspoon
Smoked paprika1 teaspoon
Olive oil1 tablespoon

For the Pineapple Sauce

IngredientQuantity
Pineapple juice1 cup
Honey2 tablespoons
Soy sauce1 tablespoon
Dijon mustard1 teaspoon
Chili flakes (optional)½ teaspoon
Cornstarch (mixed with 1 tablespoon water)1 teaspoon

Directions

  1. Season the Chicken – Rub the deboned chicken legs with salt, pepper, paprika, and minced garlic.
  2. Stuff with Cheese – Place shredded cheese inside each chicken leg and fold or roll tightly. Secure with toothpicks or kitchen twine.
  3. Sear for a Golden Crust – Heat olive oil in a pan over medium heat. Sear the stuffed chicken legs on all sides until golden brown.
  4. Bake to Perfection – Transfer the chicken to a preheated oven at 375°F (190°C) and bake for 20–25 minutes until cooked through.
  5. Prepare the Pineapple Sauce – In a saucepan, combine pineapple juice, honey, soy sauce, Dijon mustard, and chili flakes. Simmer for a few minutes, then add cornstarch slurry and stir until thickened.
  6. Glaze & Serve – Brush the baked chicken with the pineapple sauce and serve warm with extra sauce on the side.

Nutritional Information (Per Serving – Approx. 1 Stuffed Chicken Leg)

NutrientAmount
Calories320 kcal
Carbohydrates10 g
Protein35 g
Fat15 g
Saturated Fat6 g
Fiber1 g
Sugar8 g
Sodium480 mg

Tips for Perfectly Stuffed Chicken Legs

1. Choose the Right Cheese

A cheese that melts well, such as mozzarella, gouda, or cheddar, works best for stuffing. Mozzarella gives a classic stretch, gouda adds a hint of smokiness, and cheddar brings sharpness.

2. Debone Carefully for Easy Stuffing

If your butcher hasn’t deboned the chicken legs for you, take your time removing the bone while keeping the meat intact. A small sharp knife helps make precise cuts.

3. Secure the Chicken Properly

To prevent the cheese from leaking out while cooking, use toothpicks or kitchen twine to seal the stuffed chicken legs tightly.

4. Sear for Extra Flavor

Pan-searing before baking locks in moisture and adds a crispy outer layer, giving the chicken a rich golden-brown color.

5. Simmer the Pineapple Glaze for Depth

Reducing the glaze for a few minutes intensifies the flavors, ensuring that the sweet and tangy notes complement the savory chicken perfectly.

Best Side Dishes to Serve with Stuffed Chicken Legs

1. Garlic Butter Mashed Potatoes

The creamy, buttery texture of mashed potatoes balances the richness of the cheese-stuffed chicken and absorbs the delicious pineapple glaze.

2. Roasted Vegetables

A side of roasted asparagus, carrots, or Brussels sprouts adds earthiness and a touch of caramelization that pairs well with the dish.

3. Coconut Rice

For a tropical-inspired meal, coconut-infused rice brings out the pineapple flavors while adding a mild sweetness.

4. Fresh Green Salad

A light arugula or spinach salad with a lemon vinaigrette helps cut through the richness of the dish, making for a well-balanced meal.

5. Crusty Bread

Use freshly baked bread to soak up the extra sauce, ensuring that none of the delicious glaze goes to waste.

FAQs: Everything You Need to Know

Q: Can I use chicken breasts instead of chicken legs?

Yes! While chicken legs have more flavor and remain juicier, boneless chicken breasts can also be stuffed using the same technique. Simply butterfly them, stuff with cheese, and secure the edges before cooking.

Q: Can I make this dish ahead of time?

Yes! You can stuff and season the chicken legs up to a day in advance. Store them in the fridge and sear/bake when ready to serve. The pineapple glaze can also be made ahead and reheated before serving.

Q: What if I don’t have fresh pineapple juice?

You can substitute with canned pineapple juice, but try to use an unsweetened variety to control the sweetness of the glaze.

Q: How do I know when the chicken is fully cooked?

Use a meat thermometer to check that the internal temperature of the chicken reaches 165°F (75°C). If you don’t have a thermometer, the juices should run clear when pierced with a knife.

Q: Can I make this dish spicier?

Yes! Add extra chili flakes, cayenne pepper, or a dash of hot sauce to the pineapple glaze for a spicier kick.

Q: What’s the best way to reheat leftovers?

For the best texture, reheat the chicken in an oven at 350°F (175°C) for 10–15 minutes. Microwaving can make the cheese filling less creamy.

Q: Can I grill instead of baking?

Yes! Grill over medium heat for about 20 minutes, turning occasionally, until the chicken is fully cooked and the skin is crisp. Brush with the pineapple glaze during the last few minutes of grilling.

Why This Dish Deserves a Spot on Your Dinner Table

Few dishes strike the perfect balance between comfort and elegance the way these Gourmet Stuffed Chicken Legs do. The combination of tender chicken, rich melted cheese, and a bright, tangy pineapple glaze creates a dish that is both indulgent and well-balanced.

A creative way to elevate simple chicken legs
A perfect balance of savory, sweet, and smoky flavors
Crispy on the outside, juicy and cheesy inside
Impressive enough for a dinner party, easy enough for a weeknight meal

Whether you’re treating yourself to a gourmet meal at home or cooking for guests, this recipe guarantees bold flavors and an unforgettable dining experience.

So go ahead—slice into that golden chicken leg, watch the melted cheese ooze out, and savor the sweet, tangy glaze. This dish proves that simple ingredients can create something truly spectacular.

Amal

Gourmet Stuffed Chicken Legs with Melted Cheese & Pineapple Glaze

These Gourmet Stuffed Chicken Legs are packed with creamy melted cheese, seared to golden perfection, and glazed with a sweet and tangy pineapple sauce. Juicy on the inside, crispy on the outside, and bursting with flavor, this dish is perfect for an elegant dinner or a special family meal.
Prep Time 15 minutes
Cook Time 25 minutes
Total Time 40 minutes
Servings: 4 servings
Course: Main Dish
Cuisine: International

Ingredients
  

For the Chicken Legs:
  • 4 large chicken legs deboned
  • 150 g 5 oz shredded cheese (mozzarella, gouda, or cheddar)
  • 2 cloves garlic minced
  • 1 teaspoon salt
  • ½ teaspoon black pepper
  • 1 teaspoon smoked paprika
  • 1 tablespoon olive oil
For the Pineapple Sauce:
  • 1 cup pineapple juice
  • 2 tablespoons honey
  • 1 tablespoon soy sauce
  • 1 teaspoon Dijon mustard
  • ½ teaspoon chili flakes optional
  • 1 teaspoon cornstarch mixed with 1 tablespoon water

Method
 

  1. Season the Chicken – Rub the deboned chicken legs with salt, pepper, paprika, and minced garlic.
  2. Stuff with Cheese – Place shredded cheese inside each chicken leg, fold or roll tightly, and secure with toothpicks or kitchen twine.
  3. Sear to Perfection – Heat olive oil in a pan over medium heat. Sear the stuffed chicken legs until golden brown on all sides.
  4. Bake Until Juicy – Transfer to a preheated oven at 375°F (190°C) and bake for 20–25 minutes until fully cooked.
  5. Prepare the Pineapple Sauce – In a saucepan, combine pineapple juice, honey, soy sauce, Dijon mustard, and chili flakes. Simmer until slightly thickened, then stir in the cornstarch slurry.
  6. Glaze & Serve – Brush the baked chicken with the pineapple sauce and serve with extra sauce on the side.

Notes

  • For extra crispiness, broil the chicken for the last 3 minutes of baking.
  • Use a meat thermometer to check for doneness—the internal temperature should reach 165°F (75°C).
  • Let the chicken rest for 5 minutes before slicing to keep the juices inside.
  • Serve with roasted vegetables, mashed potatoes, or coconut rice for a complete meal.

Golden Sunshine Orange Coconut Cake – A Perfect Blend of Citrus and Sweetness

There’s something magical about the aroma of freshly baked cake filling the kitchen. It creates a sense of warmth, comfort, and nostalgia, reminding us of the simple joys of homemade treats. For me, this Moist Orange Coconut Cake holds a special place in my heart.

Growing up, my grandmother had a small orange tree in her backyard. Every winter, the branches would be heavy with bright, juicy oranges, and she would always save the ripest ones for baking. I remember sitting at the kitchen counter, watching her zest the oranges, the tiny curls of fragrant peel falling into the bowl. She would mix the batter effortlessly, humming as she worked, and in no time, the cake would be in the oven, filling the house with its irresistible citrusy sweetness.

Her secret ingredient? Coconut. It added a subtle nuttiness and a touch of tropical warmth, making every bite more special. The combination of fresh orange zest, coconut, and a perfectly soft crumb created a cake that was light yet indulgent, simple yet full of flavor.

Now, every time I bake this cake, it takes me back to those cozy afternoons, waiting impatiently for the cake to cool so I could have the first slice. Whether enjoyed with a cup of tea, as an afternoon snack, or as a sweet ending to a meal, this Golden Sunshine Orange Coconut Cake is more than just a recipe—it’s a taste of home.

Why You’ll Love This Recipe

1. Bursting with Fresh Citrus Flavor

The combination of orange zest and juice gives this cake a naturally bright and refreshing taste, perfectly balanced with the sweetness of coconut.

2. Moist and Tender Texture

Thanks to the oil, milk, and coconut, this cake stays wonderfully moist and fluffy for days. No dry cake here!

3. Easy to Make with Simple Ingredients

You don’t need any fancy ingredients—just oranges, flour, sugar, eggs, and coconut—making this cake perfect for an everyday treat or a last-minute bake.

4. No Mixer Required

This is a simple, one-bowl cake that comes together easily with just a whisk. Perfect for both beginner and experienced bakers.

5. Versatile and Customizable

You can serve this cake plain, with a dusting of powdered sugar, or drizzled with a sweet orange glaze. It’s also delicious with whipped cream or fresh fruit.

Ingredients

IngredientQuantity
Medium orange (zest & juice)1
Sugar1 cup (200g)
Medium eggs2
All-purpose flour1 ½ cups (190g)
Desiccated coconut½ cup (50g)
Baking powder1 ½ teaspoons
Salt¼ teaspoon
Vegetable oil½ cup (120ml)
Milk¼ cup (60ml)
Vanilla extract1 teaspoon

Directions

  1. Prepare the Batter – In a bowl, whisk together sugar, eggs, and orange zest until light and fluffy. Add orange juice, vegetable oil, milk, and vanilla extract, mixing until smooth.
  2. Combine Dry Ingredients – Sift in flour, baking powder, and salt. Gently fold in the desiccated coconut, stirring until just combined.
  3. Bake the Cake – Pour the batter into a greased cake pan and bake in a preheated oven at 350°F (175°C) for 30–35 minutes, or until a toothpick inserted in the center comes out clean.
  4. Cool & Serve – Let the cake cool for 10 minutes before removing from the pan. Dust with powdered sugar or drizzle with an orange glaze for extra flavor.

Nutritional Information (Per Serving – Approx. 1 Slice)

NutrientAmount
Calories230 kcal
Carbohydrates32 g
Protein4 g
Fat10 g
Saturated Fat3 g
Fiber2 g
Sugar18 g
Sodium120 mg

Baking Tips for the Best Orange Coconut Cake

1. Use Fresh Orange Juice and Zest

For the best flavor, always use freshly squeezed orange juice and zest instead of bottled juice. The zest contains natural oils that enhance the citrus aroma and taste.

2. Don’t Overmix the Batter

To keep the cake soft and airy, mix the batter just until the ingredients are combined. Overmixing can make the cake dense instead of light and fluffy.

3. Use Desiccated Coconut for a More Intense Flavor

Desiccated coconut gives the cake a delicate coconut taste and slight texture without making it too heavy. If you want an even stronger coconut flavor, try toasting the coconut before adding it to the batter.

4. Bake Until Just Done

Overbaking can dry out the cake. Check for doneness by inserting a toothpick into the center—if it comes out with a few moist crumbs, it’s ready.

5. Enhance the Flavor with an Orange Glaze

A simple glaze made from powdered sugar and orange juice adds an extra burst of citrus and makes the cake even more delicious.

Ways to Enjoy This Cake

This orange coconut cake is incredibly versatile, making it perfect for any occasion. Here are some ideas for serving it:

1. Classic and Simple

Serve it plain or with a dusting of powdered sugar for a light, elegant treat.

2. With a Drizzle of Orange Glaze

Mix powdered sugar and fresh orange juice for a tangy-sweet glaze that complements the cake perfectly.

3. With Whipped Cream and Berries

Top with whipped cream and fresh berries for a light and refreshing dessert.

4. As a Layer Cake

Slice the cake in half and fill it with cream cheese frosting, orange curd, or coconut cream for an extra indulgent version.

5. Toasted and Served with Ice Cream

Toast a slice lightly in a pan and serve with a scoop of vanilla or coconut ice cream for a warm, comforting treat.

FAQs: Everything You Need to Know

Q: Can I use store-bought orange juice instead of fresh juice?

Freshly squeezed orange juice is always best for flavor, but if you’re in a pinch, you can use store-bought juice. Just make sure it’s 100% juice without added sugar.

Q: Can I make this cake without coconut?

Yes! Simply omit the coconut, and the cake will still be deliciously moist with a bright citrus flavor.

Q: Can I use coconut milk instead of regular milk?

Absolutely! Coconut milk will enhance the coconut flavor and add a slight richness to the cake.

Q: How do I store this cake?

Store the cake in an airtight container at room temperature for up to 3 days. For longer storage, refrigerate for up to 5 days or freeze for up to 2 months.

Q: Can I make this cake gluten-free?

Yes! Replace the all-purpose flour with a 1:1 gluten-free flour blend, and the cake will turn out just as moist and delicious.

Q: Can I use this recipe for cupcakes?

Yes! Pour the batter into a lined muffin tin and bake at 350°F (175°C) for 18–20 minutes until a toothpick comes out clean.

Q: What’s the best way to reheat leftover cake?

For a fresh-out-of-the-oven taste, warm a slice in the microwave for 10–15 seconds or toast it lightly in a pan.

Why This Cake Will Become a New Favorite

This Moist Orange Coconut Cake is proof that simple ingredients can create something truly special. It’s a cake that brings comfort, warmth, and a burst of sunshine to any occasion. Whether you bake it for a weekend treat, a family gathering, or just because you’re craving something sweet, this cake will always deliver.

Moist, fluffy, and full of citrus flavor
Easy to make with simple ingredients
No mixer required—just one bowl and a whisk
Versatile and perfect for any occasion
A nostalgic, homemade treat that tastes like sunshine

So next time you have a few oranges on hand, give this recipe a try. With every bite, you’ll taste the love, tradition, and joy that homemade baking brings. Enjoy!

Amal

Golden Sunshine Orange Coconut Cake – A Perfect Blend of Citrus and Sweetness

This Moist Orange Coconut Cake is the perfect balance of bright citrus flavor and sweet coconut goodness. Made with fresh orange juice, zest, and desiccated coconut, this cake is incredibly soft, fluffy, and bursting with natural sweetness. Whether enjoyed as a tea-time treat or a light dessert, every bite is packed with sunshine and warmth!
Prep Time 15 minutes
Cook Time 35 minutes
Total Time 50 minutes
Servings: 8 –10 slices
Course: Dessert
Cuisine: International

Ingredients
  

  • 1 medium orange for zest and juice
  • 1 cup sugar 200g
  • 2 medium eggs
  • 1 ½ cups all-purpose flour 190g
  • ½ cup desiccated coconut 50g
  • 1 ½ teaspoons baking powder
  • ¼ teaspoon salt
  • ½ cup vegetable oil 120ml
  • ¼ cup milk 60ml
  • 1 teaspoon vanilla extract

Method
 

  1. Prepare the Batter – In a bowl, whisk together sugar, eggs, and orange zest until light and fluffy. Add orange juice, vegetable oil, milk, and vanilla extract, mixing until smooth.
  2. Combine Dry Ingredients – Sift in flour, baking powder, and salt. Fold in the desiccated coconut and stir gently until just combined.
  3. Bake the Cake – Pour the batter into a greased cake pan and bake in a preheated oven at 350°F (175°C) for 30–35 minutes, or until a toothpick inserted in the center comes out clean.
  4. Cool & Serve – Let the cake cool for 10 minutes before removing from the pan. Dust with powdered sugar or drizzle with an orange glaze for extra flavor.

Notes

  • For a stronger citrus flavor, add extra orange zest or a splash of orange extract.
  • Don’t overmix the batter—stir just until combined for a soft, fluffy texture.
  • This cake is delicious on its own, but you can also serve it with whipped cream or fresh fruit.
  • Store in an airtight container at room temperature for up to 3 days or refrigerate for longer freshness.

Fluffy Cloud Chiffon Cake – No Baking Powder Needed!

There is something truly magical about chiffon cake. It’s the kind of dessert that brings warmth and nostalgia, filling the kitchen with a delicate aroma as it bakes. The first time I tasted chiffon cake, I was amazed at how it seemed to melt on my tongue—a texture so soft and airy that it felt almost weightless.

My grandmother used to make chiffon cake for special occasions. She never used baking powder, relying only on the power of whipped egg whites to give the cake its beautiful rise. I remember standing beside her, watching in awe as she gently folded the fluffy meringue into the batter, being careful not to deflate the air. The anticipation of waiting for it to cool was almost unbearable, but the first bite was always worth it—a delicate balance of sweetness, lightness, and just the right amount of vanilla.

This Basic Chiffon Cake follows the same principles—no artificial leavening agents, just simple ingredients and a technique that has stood the test of time. The result? A cake that is light, soft, and subtly sweet, perfect for any occasion. Whether enjoyed plain, with fresh fruit, or with a dollop of whipped cream, this cake is a testament to the beauty of simplicity.

If you’ve never made chiffon cake before, this recipe is a great place to start. It’s easy to follow, and once you master the technique, you’ll find yourself coming back to it again and again.

What Makes This Chiffon Cake Special?

1. No Baking Powder Needed

This chiffon cake gets its height and fluffiness from whipped egg whites rather than baking powder, making it incredibly light and airy without any artificial leavening agents.

2. Soft, Moist, and Light as Air

The combination of whipped egg whites and just the right amount of oil gives this cake its signature cloud-like texture—soft, moist, and incredibly delicate.

3. Made with Simple Ingredients

You don’t need anything fancy—flour, eggs, sugar, milk, and oil are all you need to create this elegant cake.

4. Perfect for Any Occasion

Whether you serve it plain, dusted with powdered sugar, or paired with fresh fruit and whipped cream, this cake is versatile and always a crowd-pleaser.

5. A Classic Technique Worth Mastering

Learning how to make a chiffon cake is a great baking skill, teaching you how to properly whip egg whites and fold them into batter without deflating their airiness.

Ingredients

IngredientQuantity
Milk50g
Vegetable oil50g
Eggs, separated5
Sugar (divided)20g + 50g
Cake flour84g
Salt2g
Lemon juice2ml
Vanilla extract1 teaspoon

Directions

  1. Prepare the Batter – In a bowl, whisk together milk, vegetable oil, egg yolks, 20g sugar, and vanilla extract until smooth. Sift in cake flour and salt, then mix until well combined.
  2. Whip the Egg Whites – In a clean bowl, beat egg whites with lemon juice until frothy. Gradually add 50g sugar and continue beating until stiff peaks form.
  3. Fold Gently – Carefully fold the egg whites into the batter in three additions, using a spatula to maintain the airy texture.
  4. Bake to Perfection – Pour the batter into an ungreased chiffon cake pan. Bake in a preheated oven at 320°F (160°C) for 35–40 minutes until golden brown.
  5. Cool Upside Down – Invert the pan immediately and let the cake cool completely before removing. This helps retain its structure and fluffiness.

Nutritional Information (Per Slice – Approx. 1 of 8 Servings)

NutrientAmount
Calories180 kcal
Carbohydrates22 g
Protein4 g
Fat8 g
Saturated Fat1 g
Fiber0.5 g
Sugar10 g
Sodium100 mg

Secrets to a Perfect Chiffon Cake

1. Whip the Egg Whites to Stiff Peaks

Since this recipe doesn’t use baking powder, the egg whites are the key to the cake’s rise. Whip them until they form stiff peaks—this means that when you lift the beaters, the peaks should hold their shape without collapsing.

2. Fold Gently but Thoroughly

When incorporating the whipped egg whites into the batter, use a gentle folding motion. A spatula works best—scoop from the bottom and fold over, being careful not to deflate the air. If you mix too aggressively, the cake will be dense instead of fluffy.

3. Use Cake Flour for the Best Texture

Cake flour has a lower protein content than all-purpose flour, resulting in a lighter, softer crumb. If you don’t have cake flour, you can make your own by replacing 2 tablespoons of flour per cup with cornstarch.

4. Bake in an Un-Greased Pan

Chiffon cakes need to cling to the sides of the pan as they bake to rise properly. Never grease your pan—this allows the batter to “climb” and develop its airy structure.

5. Cool the Cake Upside Down

Immediately after baking, invert the cake and let it cool upside down in the pan. This prevents it from collapsing and helps maintain its light and fluffy texture.

Ways to Enjoy This Classic Chiffon Cake

This chiffon cake is delicious on its own, but you can easily customize it to suit your preferences. Here are a few ideas to elevate your cake:

1. With a Dusting of Powdered Sugar

A light sprinkle of powdered sugar adds just the right amount of sweetness and gives the cake a simple, elegant finish.

2. Topped with Fresh Fruit

Pair the cake with fresh strawberries, blueberries, or raspberries for a refreshing, naturally sweet topping.

3. Served with Whipped Cream

A dollop of lightly sweetened whipped cream enhances the cake’s delicate flavor and adds a touch of richness.

4. With a Drizzle of Lemon Glaze

For a citrusy twist, mix powdered sugar with fresh lemon juice and drizzle it over the cake for a bright, zesty flavor.

5. As a Layer Cake

Slice the cake in half and fill it with pastry cream, lemon curd, or a light frosting to turn it into a beautiful celebration cake.

FAQs: Everything You Need to Know

Q: Can I make this cake ahead of time?

Yes! Chiffon cake stays fresh for up to 3 days at room temperature when stored in an airtight container. For longer storage, refrigerate it for up to 5 days.

Q: Can I freeze chiffon cake?

Yes! Wrap the cooled cake tightly in plastic wrap and freeze for up to 2 months. Thaw at room temperature before serving.

Q: Why did my chiffon cake collapse?

  • The egg whites may not have been whipped to stiff peaks.
  • The batter may have been overmixed, causing it to lose its air.
  • The cake may not have been cooled upside down, leading to shrinkage.

Q: Can I use all-purpose flour instead of cake flour?

Yes, but for the best texture, replace 2 tablespoons of flour per cup with cornstarch to mimic the lower protein content of cake flour.

Q: Can I use a different type of oil?

Yes! Neutral oils like canola, vegetable, or sunflower oil work best. Avoid strongly flavored oils like olive oil, which can overpower the cake’s delicate flavor.

Q: What’s the best way to serve chiffon cake?

It’s delicious on its own, but you can serve it with fresh fruit, whipped cream, or a simple glaze for added flavor.

Why You Should Try This Recipe

Baking chiffon cake is more than just following a recipe—it’s about understanding the delicate balance of air, structure, and texture. This cake is proof that with just a few simple ingredients and the right technique, you can create something light, fluffy, and incredibly satisfying.

No baking powder—just whipped egg whites for a natural rise
Amazingly soft, moist, and airy
Made with simple pantry ingredients
Perfect for any occasion—tea time, birthdays, or a light dessert
A fun and rewarding baking project

Whether you’re making it for a special gathering or simply as a treat for yourself, this Fluffy Cloud Chiffon Cake is sure to impress. The first bite is like tasting a piece of air—delicate, light, and utterly irresistible.

So grab your ingredients, whip those egg whites, and enjoy the magic of a perfectly fluffy chiffon cake!

Amal

Fluffy Cloud Chiffon Cake – No Baking Powder Needed!

This Basic Chiffon Cake is incredibly light, airy, and soft—fluffy as a cloud! Made without baking powder, it relies on perfectly whipped egg whites for its delicate rise, resulting in a melt-in-your-mouth texture. A timeless classic, this cake is perfect on its own or paired with fruit, whipped cream, or a dusting of powdered sugar.
Prep Time 15 minutes
Cook Time 40 minutes
Total Time 55 minutes
Servings: 8 servings
Course: Dessert
Cuisine: International

Ingredients
  

  • 50 g milk
  • 50 g vegetable oil
  • 5 eggs separated
  • 20 g + 50g sugar divided
  • 84 g cake flour
  • 2 g salt
  • 2 ml lemon juice
  • 1 teaspoon vanilla extract

Method
 

  1. Prepare the Batter – In a bowl, whisk together milk, vegetable oil, egg yolks, 20g sugar, vanilla extract, and salt until smooth. Sift in the cake flour and mix until combined.
  2. Whip the Egg Whites – In a separate clean bowl, beat egg whites with lemon juice until frothy. Gradually add 50g sugar and beat until stiff peaks form.
  3. Fold Gently – Using a spatula, carefully fold the whipped egg whites into the batter in three additions, making sure not to deflate the air.
  4. Bake the Cake – Pour the batter into an ungreased chiffon cake pan and tap gently to remove air bubbles. Bake in a preheated oven at 320°F (160°C) for 35–40 minutes until golden.
  5. Cool Upside Down – Immediately invert the pan and let the cake cool completely before removing it from the pan to retain its structure and fluffiness.

Notes

  • Ensure the egg whites are whipped to stiff peaks for the best texture and rise.
  • Fold the egg whites into the batter gently to avoid deflating the airiness.
  • Do not grease the cake pan—this helps the cake climb and rise properly.
  • Let the cake cool completely upside down to prevent shrinking.
  • Serve with fresh fruit, whipped cream, or a light dusting of powdered sugar for extra flavor.

Melt-in-Your-Mouth Lemon Cake – A Classic German Delight

There are certain recipes that feel like a warm embrace, bringing a sense of comfort and nostalgia with every bite. For me, lemon cake is one of them. It’s a recipe that has been passed down in my family, from my grandmother’s old handwritten cookbook to my mother’s weekend baking sessions. The scent of fresh lemons filling the kitchen was a signal that something special was being made—something that would bring everyone together over tea, conversation, and shared laughter.

Lemon cake has always been a staple in German baking, often served at Sunday gatherings or as an afternoon treat. Unlike heavier cakes, German lemon cake is known for its light, buttery texture and delicate citrus flavor. It’s the perfect balance of sweet and tangy, with a melt-in-your-mouth softness that makes every bite irresistible.

I remember the first time I made this cake on my own. I was nervous—would it turn out as perfectly as my mother’s? But as soon as I pulled it from the oven, golden and fragrant, I knew I had captured the magic. The first bite transported me straight back to childhood, to cozy afternoons spent in my grandmother’s kitchen.

Now, every time I make this Melt-in-Your-Mouth Lemon Cake, I’m reminded that baking isn’t just about following a recipe—it’s about preserving traditions, creating memories, and sharing something truly special with the people you love.

Why This Lemon Cake is So Special

1. A Classic German Recipe

This cake is inspired by traditional German baking, known for its light, buttery crumb and bright citrus flavor. It’s the perfect dessert to enjoy with coffee or tea.

2. Made with Simple Ingredients

You don’t need anything fancy—just flour, sugar, eggs, and fresh lemons to create a cake that’s rich in flavor yet beautifully simple.

3. Light, Fluffy, and Moist

Thanks to Greek yogurt (or sour cream) and a touch of butter, this cake stays soft and moist, while the lemon zest and juice add the perfect tangy balance.

4. Quick and Easy to Prepare

With just 15 minutes of prep time, this cake is ideal for when you want something homemade but don’t want to spend hours in the kitchen.

5. Versatile and Customizable

This lemon cake is delicious on its own, but it can also be glazed, dusted with powdered sugar, or served with fresh berries for an extra special touch.

Ingredients

IngredientQuantity
All-purpose flour3 ½ cups (450g)
Warm water1 cup (250ml)
Dry yeast2 tsp (7g)
Sugar1 tbsp
Salt1 tsp
Vegetable oil or olive oil2 tbsp
Greek yogurt (optional)2 tbsp (for extra softness)
Butter or olive oil (for brushing)2 tbsp

Directions

  1. Activate the Yeast – In a bowl, mix warm water, yeast, and sugar. Let sit for 5–10 minutes until foamy.
  2. Mix the Dough – In a large mixing bowl, combine flour, salt, and Greek yogurt (if using). Add the yeast mixture and oil. Stir until a soft dough forms.
  3. Knead & Rest – Knead the dough for about 5 minutes until smooth. Cover with a towel and let it rise for 1 hour until doubled in size.
  4. Shape & Bake – Roll out the dough, shape as desired, and place it on a parchment-lined baking sheet. Let it rest for another 15 minutes.
  5. Bake & Finish – Bake at 375°F (190°C) for 20–25 minutes, or until golden. Brush with melted butter or olive oil and serve warm.

Nutritional Information (Per Serving – Approx. 1 Slice)

NutrientAmount
Calories250 kcal
Carbohydrates45 g
Protein6 g
Fat6 g
Saturated Fat1 g
Fiber2 g
Sugar2 g
Sodium180 mg

Tips for the Perfect Lemon Cake

1. Use Fresh Lemons for Maximum Flavor

While bottled lemon juice may seem convenient, fresh lemons make all the difference. The zest and juice add a bright, natural citrus flavor that enhances the cake.

2. Don’t Overmix the Batter

For a light, fluffy texture, mix the batter just until combined. Overmixing can make the cake dense instead of soft and airy.

3. Greek Yogurt for Extra Softness

Adding a little Greek yogurt or sour cream keeps the cake moist and tender. It also adds a slight tang that complements the lemon flavor.

4. Bake at the Right Temperature

Too high a temperature can cause the cake to brown too quickly on the outside while staying undercooked inside. Bake at 350°F (175°C) for even cooking.

5. Let the Cake Cool Before Adding Any Toppings

If you plan to glaze or dust the cake with powdered sugar, let it cool completely first to prevent the toppings from melting or becoming runny.

Ways to Enjoy This German Lemon Cake

This cake is incredibly versatile and pairs beautifully with different flavors and toppings. Here are a few ideas:

1. Classic with Powdered Sugar

A light dusting of powdered sugar adds a touch of sweetness without overpowering the lemon flavor.

2. With a Lemon Glaze

For extra citrus flavor, whisk together lemon juice and powdered sugar to make a tangy glaze. Drizzle it over the cake once cooled.

3. Topped with Whipped Cream and Berries

Fresh strawberries, raspberries, or blueberries add a pop of color and freshness, making the cake feel extra special.

4. Served with Vanilla Ice Cream

A warm slice of lemon cake with a scoop of vanilla ice cream creates the perfect balance of warm and cold, tangy and sweet.

5. Paired with Tea or Coffee

This cake is a perfect afternoon treat, served with a hot cup of tea or coffee for a moment of relaxation.

FAQs: Everything You Need to Know

Q: Can I make this cake ahead of time?

Yes! This lemon cake actually tastes even better the next day as the flavors develop. Store it covered at room temperature for up to 3 days.

Q: Can I freeze this cake?

Absolutely! Let the cake cool completely, then wrap it tightly in plastic wrap and freeze for up to 3 months. Thaw at room temperature before serving.

Q: What can I use instead of Greek yogurt?

You can substitute sour cream or buttermilk for the same moist texture.

Q: How do I know when the cake is done?

Insert a toothpick into the center—if it comes out clean or with just a few crumbs, the cake is ready.

Q: Can I use a different type of citrus?

Yes! You can swap lemon for orange or lime to create different variations of this cake.

Q: Can I make this cake gluten-free?

Yes! Use a 1:1 gluten-free flour blend, and add an extra tablespoon of Greek yogurt to ensure moisture.

Q: Can I make cupcakes with this batter?

Yes! Pour the batter into a lined muffin tin and bake for 18–20 minutes for delicious lemon cupcakes.

Why This Lemon Cake Will Become Your New Favorite

This Melt-in-Your-Mouth Lemon Cake isn’t just a dessert—it’s a taste of tradition, a burst of sunshine, and a reminder of the simple joys of homemade baking.

Light, fluffy, and incredibly moist
Made with simple, wholesome ingredients
Perfectly balanced with sweet and tangy flavors
Quick and easy to prepare in just 15 minutes
Versatile and great for any occasion

Whether you’re making it for a family gathering, a weekend treat, or just because you’re craving something sweet, this lemon cake is guaranteed to delight everyone who takes a bite.

So go ahead, bake this classic German lemon cake, take a moment to enjoy its citrusy goodness, and share the joy of homemade baking with the ones you love.

Amal

Melt-in-Your-Mouth Lemon Cake – A Classic German Delight

This German Lemon Cake is unbelievably soft, moist, and full of bright citrus flavor. With a delicate, buttery texture and a hint of tangy lemon, it melts in your mouth with every bite. Best of all, it’s incredibly quick and easy to make—just 15 minutes of prep! Perfect for tea time, celebrations, or a simple treat to brighten your day.
Prep Time 15 minutes
Cook Time 25 minutes
Total Time 40 minutes
Servings: 8 –10 slices
Course: Dessert
Cuisine: German

Ingredients
  

  • 3 ½ cups 450g all-purpose flour
  • 1 cup 250ml warm water
  • 2 tsp 7g dry yeast
  • 1 tbsp sugar
  • 1 tsp salt
  • 2 tbsp vegetable oil or olive oil
  • 2 tbsp Greek yogurt optional, for extra softness
  • 2 tbsp butter or olive oil for brushing

Method
 

  1. Prepare the Yeast Mixture – In a bowl, mix warm water, yeast, and sugar. Let sit for 5–10 minutes until foamy.
  2. Mix the Batter – In a large bowl, combine flour, salt, Greek yogurt (if using), and the yeast mixture. Stir until a smooth batter forms.
  3. Rest & Bake – Pour the batter into a greased cake pan and let it rest for 15 minutes. Preheat the oven to 375°F (190°C).
  4. Bake Until Golden – Bake for 20–25 minutes, or until a toothpick inserted in the center comes out clean.
  5. Finish with Butter – Brush with melted butter or olive oil while warm for an extra-soft texture. Let cool slightly before serving.

Notes

  • For extra lemon flavor, add 1 tablespoon of lemon zest to the batter.
  • A light dusting of powdered sugar makes a beautiful finishing touch.
  • Serve with whipped cream, fresh berries, or a drizzle of honey for added indulgence.
  • Store in an airtight container at room temperature for up to 3 days.

Creamy Homemade Fresh Cheese – A Simple, Rewarding Tradition

There’s something magical about transforming a few basic ingredients into something as satisfying as fresh homemade cheese. For me, the process of making cheese is more than just cooking—it’s a connection to tradition, a reminder of simpler times, and a way to slow down and appreciate the beauty of homemade food.

Growing up, my grandmother would always have fresh cheese in her kitchen. She never bought it from the store—she made it herself. I remember standing beside her as she heated the milk, watching curds form like tiny clouds in the pot. She would strain it carefully, press it gently, and season it just enough to enhance the natural flavors. Every time she handed me a piece, still slightly warm, I knew it was made with love.

Now, whenever I make homemade cheese, I think of those moments. It reminds me that good food doesn’t have to be complicated—it just has to be made with care. This Homemade Fresh Cheese Recipe is simple, requiring just milk, eggs, and yogurt. No special equipment, no complicated techniques—just a pot, a strainer, and a little patience. The result? A creamy, mild cheese that you can use in countless ways.

Whether you spread it on toast, crumble it over a salad, or enjoy it with fresh fruit and honey, this cheese is a celebration of simple ingredients turned into something special.

Why You’ll Love This Recipe

1. Made with Just Three Ingredients

This recipe only requires milk, eggs, and yogurt—staples that you likely already have in your kitchen.

2. No Special Equipment Needed

Unlike traditional cheesemaking, which often requires rennet, thermometers, or cheese molds, this recipe keeps it simple. All you need is a pot, a whisk, and a strainer with cheesecloth or a fine sieve.

3. Creamy, Mild, and Versatile

This fresh cheese has a light, creamy texture with a delicate flavor that can be enjoyed on its own or enhanced with herbs, spices, or a drizzle of honey.

4. Healthier and Fresher than Store-Bought Cheese

When you make cheese at home, you control the ingredients—no preservatives, additives, or unnecessary fillers. Just pure, fresh dairy goodness.

5. A Fun, Satisfying Kitchen Project

There’s a special kind of satisfaction in making cheese from scratch. It’s a hands-on, rewarding process that fills your kitchen with warmth and nostalgia.

Ingredients

IngredientQuantity
Milk1.5 liters (6 cups)
Eggs4 large
Natural yogurt240g (1 cup)
Salt (optional)To taste

Directions

  1. Heat the Milk – In a large pot, warm the milk over medium heat until it reaches a gentle simmer. Do not let it boil.
  2. Add the Eggs and Yogurt – Whisk the eggs in a separate bowl. Stir the yogurt into the milk, then gradually add the beaten eggs while stirring continuously.
  3. Curd Formation – Continue stirring until curds begin to separate from the liquid (whey). This process usually takes 5–7 minutes.
  4. Strain the Cheese – Pour the mixture through a cheesecloth-lined strainer or sieve to drain the whey. Let it sit for about 15–20 minutes until most of the liquid is removed.
  5. Shape & Cool – Gather the cheesecloth and gently press out excess moisture. Transfer the cheese to a bowl or mold, then refrigerate for at least an hour before serving.

Nutritional Information (Per Serving – Approx. 50g of Cheese)

NutrientAmount
Calories90 kcal
Carbohydrates2 g
Protein8 g
Fat6 g
Saturated Fat3 g
Sugar1 g
Sodium50 mg

How to Use Your Homemade Cheese

Once you’ve made this creamy homemade cheese, the possibilities are endless! Here are some delicious ways to enjoy it:

1. Spread on Toast

Mix your fresh cheese with a pinch of salt and spread it on a slice of warm, crusty bread. Add a drizzle of honey for a sweet touch or a sprinkle of black pepper for a savory kick.

2. Crumbled Over Salads

This cheese adds a creamy texture to salads. Try it over a Greek salad, roasted vegetable salad, or even a fresh arugula and cherry tomato mix.

3. Stuffed in Pastries or Dough

Use it as a filling for homemade cheese-filled pastries, empanadas, or even stuffed flatbreads.

4. Paired with Fruit and Nuts

Serve it alongside fresh figs, grapes, or apple slices with a handful of almonds or walnuts for a delicious and balanced snack.

5. Mixed into Scrambled Eggs or Omelets

Stir some of the cheese into scrambled eggs or fold it into an omelet with spinach and mushrooms for a creamy, flavorful breakfast.

6. Blended into Creamy Dips

Mix the cheese with a bit of olive oil, garlic, and herbs to create a smooth dip for vegetables, crackers, or pita bread.

7. Used as a Ricotta Substitute

This cheese works well in recipes that call for ricotta, such as lasagna, stuffed shells, or even cheesecake.

FAQs: Everything You Need to Know About Homemade Cheese

Q: What type of milk is best for this recipe?

Use whole milk for the creamiest texture. Low-fat milk will work, but the cheese will be less rich. Avoid ultra-pasteurized milk, as it doesn’t curdle as well.

Q: Can I use plant-based milk to make a dairy-free version?

No, this recipe relies on the natural proteins in dairy milk to form curds. Plant-based alternatives like almond or soy milk do not have the same properties needed for cheesemaking.

Q: How long does homemade cheese last?

Store your fresh cheese in an airtight container in the refrigerator for up to 5 days. Since it doesn’t contain preservatives, it’s best enjoyed fresh.

Q: Can I add flavorings to the cheese?

Absolutely! You can mix in:

  • Fresh herbs like parsley, basil, or chives
  • Garlic powder or roasted garlic for a savory twist
  • Crushed red pepper flakes for a hint of heat
  • Lemon zest for a fresh, citrusy note

Q: How can I make the cheese firmer?

If you prefer a firmer cheese, let it drain longer—up to an hour—and press it gently with a spoon to remove excess moisture.

Q: Can I freeze homemade cheese?

Freezing is not recommended, as it can change the texture, making it crumbly and grainy. It’s best to enjoy it fresh.

Q: What can I do with the leftover whey?

Don’t throw it away! The whey (the liquid left after straining the cheese) is full of nutrients and can be used in:

  • Smoothies or soups for an extra protein boost
  • Baking (replace water or milk in bread or pancake recipes)
  • Cooking grains like rice or quinoa for added flavor

Why This Recipe Belongs in Your Kitchen

Making your own homemade cheese is about more than just cooking—it’s about creating something from scratch, connecting with tradition, and appreciating simple ingredients in their purest form.

This recipe is:
Easy and beginner-friendly
Made with just 3 ingredients
Customizable with different flavors and seasonings
A healthier alternative to store-bought cheese
A fun and rewarding kitchen project

Whether you’re making it for yourself, your family, or to impress guests with your cheesemaking skills, this recipe is one you’ll want to keep. So the next time you have a few extra cups of milk, some eggs, and a bit of yogurt, take a moment to slow down, stir the pot, and watch as something simple and beautiful comes to life.

With every creamy, homemade bite, you’ll know—it’s always worth making it yourself.

Amal

Creamy Homemade Fresh Cheese – A Simple, Rewarding Tradition

This Homemade Fresh Cheese is creamy, mild, and incredibly easy to make with just three simple ingredients. No special equipment or complicated steps—just a pot, a strainer, and a little patience. Enjoy it spread on toast, crumbled over salads, or as a delicious addition to your favorite dishes!
Prep Time 10 minutes
Cook Time 10 minutes
Total Time 20 minutes
Servings: 6 –8 servings
Course: Appetizer
Cuisine: International

Ingredients
  

  • 1.5 liters 6 cups milk
  • 4 large eggs
  • 240 g 1 cup natural yogurt
  • Salt optional, to taste

Method
 

  1. Heat the milk in a pot over medium heat until it reaches a gentle simmer. Do not boil.
  2. In a separate bowl, whisk the eggs. Stir the yogurt into the milk, then gradually add the beaten eggs, stirring continuously.
  3. Keep stirring until curds begin to form and separate from the liquid (whey). This usually takes 5–7 minutes.
  4. Strain the mixture through a cheesecloth-lined strainer to remove excess whey. Let it drain for 15–20 minutes.
  5. Press the cheese gently into a mold or bowl and refrigerate for at least an hour before serving.

Notes

  • For a firmer cheese, let it drain longer and press it gently to remove excess moisture.
  • Enhance the flavor with fresh herbs, garlic, or a drizzle of olive oil.
  • Store in an airtight container in the fridge for up to 5 days.

Crispy Spicy Cabbage & Rice Fritters – A Simple Yet Flavorful Delight

Growing up, my family had a rule: nothing goes to waste in the kitchen. Leftover rice from last night’s dinner? It became the base for something new. Vegetables nearing their final days in the fridge? They were transformed into something delicious. These Crispy Spicy Cabbage & Rice Fritters are one of those dishes—born from simple, humble ingredients but packed with warmth, comfort, and bold flavors.

I remember my grandmother making something similar whenever she had leftover rice. She would mix it with finely chopped vegetables, season it generously, and pan-fry small patties until golden and crispy. The sound of sizzling oil, the smell of garlic and sesame, and the slight crunch when taking the first bite—it all felt like home.

Now, whenever I make these fritters, I think of those moments. They remind me that great food doesn’t have to be complicated. Sometimes, the best meals come from what you already have in your kitchen, waiting to be turned into something special.

These fritters are the perfect balance of crispy, tender, and spicy. The shredded cabbage adds texture, the rice gives them heartiness, and the seasonings bring just the right amount of heat and depth. Whether you enjoy them as a snack, a side dish, or even a light meal, they are sure to become a favorite in your home too.

Why You’ll Love This Recipe

1. Made with Simple, Pantry Ingredients

These fritters are proof that you don’t need fancy ingredients to create something delicious. Everything in this recipe is affordable, easy to find, and likely already in your kitchen.

2. A Great Way to Use Leftover Rice

If you’ve ever found yourself with leftover rice and no idea what to do with it, this recipe is the answer! The rice helps bind the fritters together while giving them a hearty texture.

3. Crispy and Flavorful with a Spicy Kick

The combination of soy sauce, sesame oil, garlic, and red pepper flakes creates a bold, umami-packed flavor that makes these fritters completely addictive.

4. Versatile and Customizable

You can easily adjust the spice level, add different vegetables, or even swap out ingredients based on what you have available.

5. Quick and Easy to Make

With minimal prep time and just a few minutes of cooking, you can have a batch of hot, crispy fritters ready to serve in no time.

Ingredients

IngredientQuantity
Cabbage, shredded170 g
Salt (for marinating cabbage)1/3 tsp
Green onion, chopped15 g
Cooked rice1 cup
Egg1
Flour3 tbsp
Garlic, minced1 clove
Red pepper flakes1/2 tsp
Soy sauce1 tbsp
Sesame oil1 tsp
Black pepperTo taste
Vegetable oil (for frying)As needed

Directions

  1. Marinate the Cabbage – Toss shredded cabbage with salt and let it sit for 10 minutes. Squeeze out excess moisture.
  2. Prepare the Batter – In a bowl, mix cabbage, green onion, cooked rice, egg, flour, garlic, red pepper flakes, soy sauce, sesame oil, and black pepper. Stir until well combined.
  3. Shape and Fry – Heat vegetable oil in a pan over medium heat. Scoop spoonfuls of the mixture and flatten them into small patties. Fry for 3–4 minutes per side until golden brown and crispy.
  4. Serve and Enjoy – Drain on paper towels and serve warm with your favorite dipping sauce.

Nutritional Information (Per Serving – Approx. 1 Fritter)

NutrientAmount
Calories120 kcal
Carbohydrates18 g
Protein4 g
Fat4 g
Saturated Fat1 g
Fiber2 g
Sugar1 g
Sodium220 mg

Tips for Making the Perfect Cabbage & Rice Fritters

1. Properly Drain the Cabbage

Cabbage holds a lot of moisture, which can make the fritters too soft. After shredding the cabbage, toss it with salt and let it sit for 10 minutes. Then, squeeze out as much liquid as possible before mixing it with the other ingredients.

2. Use Cooked and Cooled Rice

Freshly cooked rice tends to be too soft and sticky. Using leftover rice that has been chilled gives the fritters a firmer texture, making them easier to shape and fry.

3. Don’t Skip the Seasonings

The soy sauce, sesame oil, garlic, and red pepper flakes add layers of flavor that make these fritters truly delicious. If you prefer a milder taste, you can reduce the red pepper flakes, but don’t leave them out entirely!

4. Cook Over Medium Heat

Cooking the fritters over medium heat ensures they get a crispy, golden-brown crust while staying soft and tender inside. Cooking over high heat might burn the outside before the inside is fully cooked.

5. Make Them Extra Crispy

For even crispier fritters, add a tablespoon of cornstarch or rice flour to the mixture. This helps create a crunchier crust when fried.

Serving Suggestions

These fritters are incredibly versatile and pair well with a variety of sides and sauces. Here are some great ways to serve them:

1. With a Dipping Sauce

Pair the fritters with a delicious dip, such as:

  • Spicy Sriracha Mayo – Mix mayo with a dash of sriracha and lemon juice.
  • Soy Garlic Dipping Sauce – Combine soy sauce, rice vinegar, garlic, and a touch of honey.
  • Yogurt Herb Dip – A cooling dip made with yogurt, lemon, and fresh herbs.

2. As a Side Dish

These fritters are great as a side to grilled meats, stir-fried vegetables, or even a warm bowl of soup.

3. In a Wrap or Sandwich

Use the fritters as a filling for a sandwich or wrap with lettuce, cucumber, and a drizzle of spicy mayo for a satisfying meal.

4. Over a Fresh Salad

Crumble the fritters over a bowl of mixed greens, avocado, and crunchy vegetables for a hearty salad with a crispy twist.

5. As a Breakfast Option

Serve them with a fried egg and a side of avocado for a unique, protein-packed breakfast.

FAQs: Your Questions Answered

Q: Can I make these fritters ahead of time?

Yes! You can prepare the mixture ahead of time and store it in the fridge for up to 24 hours. When ready to eat, just shape and fry the fritters.

Q: Can I freeze these fritters?

Absolutely! Cook the fritters, let them cool completely, and store them in an airtight container in the freezer for up to 2 months. Reheat them in a skillet or oven until crispy again.

Q: Can I bake them instead of frying?

Yes! While frying gives the best crispy texture, you can bake the fritters at 200°C (400°F) for about 20–25 minutes, flipping halfway through.

Q: What other vegetables can I use?

Feel free to get creative! Some great additions include:

  • Grated carrots for extra sweetness and color
  • Chopped bell peppers for a crunchy bite
  • Shredded zucchini (just be sure to squeeze out excess moisture)

Q: How do I store leftovers?

Store any leftover fritters in the fridge for up to 3 days. Reheat them in a skillet to bring back the crispiness.

Q: Can I make these gluten-free?

Yes! Simply swap out the flour for rice flour or cornstarch, and use tamari instead of soy sauce for a gluten-free version.

Q: Can I make these without eggs?

Yes! Replace the egg with a flax egg (1 tbsp ground flaxseed mixed with 2.5 tbsp water, let sit for 5 minutes) or a bit of mashed potato to help bind the mixture.

Why These Fritters Belong in Your Recipe Collection

These Crispy Spicy Cabbage & Rice Fritters prove that you don’t need complicated ingredients to create something absolutely delicious and satisfying.

Crispy, flavorful, and slightly spicy
Easy to make with basic ingredients
Great for meal prep and using up leftovers
Perfect as a snack, side dish, or light meal
Customizable with endless variations

Sometimes, the best meals are the ones that come from simple ingredients, turned into something extraordinary with a little creativity. Whether you’re looking for a quick bite or a unique way to enjoy cabbage and rice, these fritters will quickly become a favorite in your kitchen.

So go ahead—make a batch, take that first crispy bite, and enjoy the comforting flavors of home-cooked goodness!

Amal

Crispy Spicy Cabbage & Rice Fritters – A Simple Yet Flavorful Delight

Turn simple ingredients into something delicious with these Crispy Spicy Cabbage & Rice Fritters! Made with shredded cabbage, cooked rice, and bold seasonings, these fritters are pan-fried to golden perfection. They are crispy on the outside, tender on the inside, and full of flavor. Perfect as a snack, appetizer, or side dish!
Prep Time 15 minutes
Cook Time 10 minutes
Total Time 25 minutes
Servings: 6 –8 fritters
Course: Snack
Cuisine: Asian-inspired

Ingredients
  

  • 170 g shredded cabbage
  • 1/3 teaspoon salt for marinating cabbage
  • 15 g chopped green onion
  • 1 cup cooked rice
  • 1 egg
  • 3 tablespoons flour
  • 1 clove garlic minced
  • 1/2 teaspoon red pepper flakes
  • 1 tablespoon soy sauce
  • 1 teaspoon sesame oil
  • Black pepper to taste
  • Vegetable oil for frying

Method
 

  1. Toss the shredded cabbage with salt and let it sit for 10 minutes. Squeeze out excess moisture.
  2. In a bowl, combine the cabbage, green onion, cooked rice, egg, flour, garlic, red pepper flakes, soy sauce, sesame oil, and black pepper. Mix until well combined.
  3. Heat vegetable oil in a pan over medium heat. Scoop spoonfuls of the mixture and flatten them into small patties.
  4. Fry for 3–4 minutes per side until golden brown and crispy.
  5. Drain on paper towels and serve warm with your favorite dipping sauce.

Notes

  • For extra crispiness, add 1 tablespoon of cornstarch or rice flour to the batter.
  • If you want a milder version, reduce or omit the red pepper flakes.
  • Serve with a dipping sauce like spicy mayo, garlic yogurt sauce, or soy dipping sauce.
  • Leftover fritters can be stored in the fridge for up to 3 days and reheated in a skillet.

Crispy Golden Potato Cakes with Ham & Cheese – A Comforting Classic

There’s something incredibly comforting about a simple potato dish. Potatoes have a way of turning even the most ordinary ingredients into something warm, filling, and deeply satisfying. Growing up, I remember my grandmother making potato cakes whenever we had leftover mashed potatoes. She never needed a recipe—just a pinch of this, a handful of that, and somehow, they always came out crispy on the outside, soft on the inside, and perfectly golden brown.

She would serve them straight from the pan, steam rising, the cheese inside still melting. We would gather around the kitchen table, eager to take that first bite. Sometimes, she would add ham or mortadella for extra flavor, other times she’d sneak in fresh herbs from the garden. No matter how she made them, they always tasted like home.

Now, every time I make these Crispy Golden Potato Cakes, I’m transported back to those moments—simple, happy, and filled with the warmth of home-cooked meals. Whether you’re making them for a quick lunch, a satisfying snack, or a side dish for dinner, these potato cakes are proof that the best meals are often the simplest.

Why You’ll Love This Recipe

1. Made with Simple, Everyday Ingredients

No fancy ingredients here! Just potatoes, flour, ham, and cheese, with a few seasonings to bring it all together.

2. Quick and Easy to Make

These potato cakes come together in under 30 minutes and cook quickly in a pan—perfect for busy days.

3. Crispy on the Outside, Soft and Cheesy Inside

The combination of golden-brown crust and gooey melted cheese inside makes every bite irresistible.

4. Perfect for Any Meal of the Day

Enjoy them for breakfast, lunch, dinner, or even as a snack. They pair wonderfully with fresh greens, a fried egg, or a dollop of sour cream.

5. Customizable to Your Taste

You can easily swap out ingredients to make them vegetarian, add different cheeses, or spice them up with herbs and seasonings.

Ingredients

IngredientQuantity
Medium-sized potatoes, diced3 (about 4 cups)
Mortadella or ham, chopped100–150g (3.5–5 oz)
Egg1
Flour150g (1.2 cups)
PepperA pinch
Vegetable oil1 tablespoon
Cheese slicesAs desired
Fresh greens (for serving)As desired

Directions

  1. Boil and Mash the Potatoes – Cook the diced potatoes in salted water until tender. Drain and mash until smooth.
  2. Prepare the Batter – In a bowl, mix the mashed potatoes with chopped mortadella or ham, flour, egg, and pepper until a dough-like consistency forms.
  3. Shape the Cakes – Divide the mixture into portions and shape them into round patties. Place a slice of cheese between two patties and seal the edges.
  4. Pan-Fry to Perfection – Heat vegetable oil in a pan over medium heat. Cook the potato cakes for 3–4 minutes per side until golden brown and crispy.
  5. Serve and Enjoy – Garnish with fresh greens and serve warm.

Nutritional Information (Per Serving – Approx. 1 Potato Cake)

NutrientAmount
Calories250 kcal
Carbohydrates35 g
Protein8 g
Fat9 g
Saturated Fat3.5 g
Fiber3 g
Sugar1 g
Sodium320 mg

Tips for the Best Potato Cakes

1. Choose the Right Potatoes

For the best texture, use starchy potatoes like Russets or Yukon Golds. They mash well and hold their shape when cooked.

2. Make Sure the Potatoes Are Completely Drained

If there’s too much moisture in the mashed potatoes, the mixture can become too soft and difficult to shape. Let them cool slightly before mixing in the other ingredients.

3. Don’t Overwork the Dough

Mix just until everything is combined. Over-mixing can make the potato cakes dense rather than light and fluffy.

4. Use the Right Amount of Flour

Flour helps bind the potato mixture, but too much can make them dry. Start with the recommended amount and add more if needed.

5. Get That Perfect Golden Crust

Pan-fry the potato cakes over medium heat to get a crispy exterior without burning them. A non-stick pan or cast iron skillet works best.

6. Experiment with Different Fillings

While ham and cheese are a classic combination, try switching things up with:

  • Crispy bacon or smoked turkey instead of ham
  • Cheddar, gouda, or pepper jack cheese for a different flavor
  • Chopped green onions or parsley for a fresh touch

Serving Suggestions

1. With a Side of Sour Cream or Yogurt

The creamy tang of sour cream pairs beautifully with the crispy texture of the potato cakes. Add a sprinkle of chopped chives or green onions for extra flavor.

2. As a Breakfast Dish

Serve with a fried or poached egg on top for a hearty breakfast. Add a side of fresh greens or sliced avocado for balance.

3. With a Light Salad

Pair these potato cakes with a simple arugula or mixed greens salad dressed with lemon juice and olive oil for a refreshing contrast.

4. As a Side for Soup

A warm bowl of tomato soup, creamy mushroom soup, or even a rich broth-based soup makes the perfect pairing.

5. As a Sandwich Alternative

Use the potato cakes as a base for an open-faced sandwich, topping them with smoked salmon, cream cheese, or roasted vegetables.

FAQs: Your Questions Answered

Q: Can I make these potato cakes ahead of time?

Yes! You can shape the patties and store them in the fridge for up to 24 hours before cooking. If needed, dust them lightly with flour before frying to help them hold their shape.

Q: Can I freeze them?

Absolutely! Arrange the uncooked patties in a single layer on a baking sheet, freeze until solid, then transfer to a freezer bag. Cook directly from frozen, adding a few extra minutes to the frying time.

Q: Can I bake them instead of frying?

Yes! While frying gives them the crispiest texture, you can bake them at 200°C (400°F) for about 20–25 minutes, flipping halfway through. Brush them with a little oil before baking for better color and crunch.

Q: How do I keep them from falling apart?

  • Make sure the mashed potatoes are not too wet—drain them well.
  • Don’t skip the flour and egg, as they help bind the mixture.
  • If the mixture feels too soft, chill it in the fridge for 15–20 minutes before shaping.

Q: What can I use instead of ham or mortadella?

For a vegetarian version, try:

  • Sautéed mushrooms and onions
  • Chopped spinach or kale
  • Sun-dried tomatoes and feta cheese

Q: Can I use sweet potatoes instead?

Yes! Sweet potatoes will make the cakes slightly softer and sweeter. If using sweet potatoes, reduce the flour slightly and consider adding a touch of cinnamon or nutmeg for a warm flavor.

Q: What dipping sauces go well with these potato cakes?

  • Garlic yogurt sauce
  • Homemade ranch dressing
  • Spicy sriracha mayo
  • Classic ketchup or mustard

Why This Recipe is a Must-Try

The best recipes are the ones that bring comfort, joy, and a sense of home, and these Crispy Golden Potato Cakes with Ham & Cheese do exactly that.

They’re:
Quick and easy to make
Crispy on the outside, soft on the inside
Versatile and customizable
Made with simple, everyday ingredients
Perfect for any time of day

Whether you’re looking for a hearty breakfast, a satisfying lunch, or a quick snack, these potato cakes are guaranteed to hit the spot. One bite, and you’ll understand why crispy, cheesy potatoes will always be a favorite comfort food.

So go ahead, grab those three potatoes and an egg, and create a dish that’s as simple as it is delicious. You won’t be disappointed!

Amal

Crispy Golden Potato Cakes with Ham & Cheese – A Comforting Classic

Turn simple ingredients into a hearty and delicious dish with these Crispy Golden Potato Cakes with Ham & Cheese! Made with mashed potatoes, flour, ham, and gooey melted cheese, these cakes are pan-fried to golden perfection. Perfect for breakfast, lunch, or a quick snack, they’re crispy on the outside and soft and cheesy on the inside—a guaranteed crowd-pleaser!
Prep Time 15 minutes
Cook Time 10 minutes
Total Time 25 minutes
Servings: 6 –8 potato cakes
Course: Snack
Cuisine: International

Ingredients
  

For the Potato Cakes:
  • 3 medium-sized potatoes about 4 cups diced
  • 100 to 150 grams 3.5 to 5 oz mortadella or ham, chopped
  • 1 egg
  • 150 grams 1.2 cups flour
  • A pinch of pepper
  • 1 tablespoon vegetable oil
  • Cheese slices as desired
  • Fresh greens for serving

Method
 

  1. Boil and Mash the Potatoes – Peel and dice the potatoes, then boil them in salted water until tender. Drain and mash until smooth.
  2. Mix the Ingredients – In a bowl, combine the mashed potatoes with chopped ham, flour, egg, and pepper. Stir until a dough forms.
  3. Shape the Cakes – Take a portion of the mixture, flatten it into a patty, place a cheese slice in the center, and seal with another layer of potato mixture.
  4. Pan-Fry to Perfection – Heat vegetable oil in a skillet over medium heat. Fry the potato cakes for 3–4 minutes per side until golden and crispy.
  5. Serve and Enjoy – Garnish with fresh greens and serve warm with your favorite dipping sauce.

Notes

  • For extra crispiness, fry the potato cakes in butter and oil combined.
  • If the mixture feels too soft, chill it in the fridge for 15–20 minutes before shaping.
  • These can be baked instead of fried—bake at 200°C (400°F) for 20–25 minutes, flipping halfway through.
  • Try adding herbs like parsley or green onions for extra flavor.

Velvety Lemon Dream Cheesecake – No-Bake & Irresistible

There’s something about lemon desserts that brings an instant feeling of warmth and happiness. Maybe it’s the way the bright citrusy aroma fills the kitchen or how that first creamy bite delivers the perfect balance of tangy and sweet. For me, lemon cheesecake has always been more than just a dessert—it’s a memory, a feeling, a moment of indulgence that never fails to brighten my day.

I remember the first time I had a slice of no-bake lemon cheesecake. It wasn’t at a fancy bakery or a special occasion—it was in my grandmother’s cozy kitchen. She had a way of turning simple ingredients into something magical. No oven, no stress—just a smooth, velvety cheesecake that melted in my mouth. She always said, “A good dessert should make you smile before you even take a bite.”

Now, every time I make this cheesecake, I think of those afternoons spent watching her effortlessly mix and layer ingredients, humming a tune as she worked. It’s the kind of dessert that makes you slow down and appreciate the simple pleasures in life. Whether you’re making it for a gathering, a special celebration, or just a well-deserved treat for yourself, this Creamy No-Bake Lemon Cheesecake is guaranteed to bring joy to every bite.


Why You’ll Love This Recipe

1. No Oven Needed

This cheesecake is completely no-bake, which means no worrying about water baths, cracking, or complicated baking techniques. Just mix, chill, and enjoy!

2. Perfectly Creamy with a Buttery Crunch

The velvety lemon cheesecake filling is light yet indulgent, sitting on a buttery Lotus biscuit base that adds just the right amount of crunch.

3. Bursting with Fresh Lemon Flavor

Lemon juice and zest add a refreshing tang that balances the richness of the cream cheese, creating a dessert that’s bright and satisfying.

4. Foolproof and Beginner-Friendly

If you’ve never made cheesecake before, this is the perfect place to start. It requires no special skills, just a few simple steps to create a stunning dessert.

5. A Crowd-Pleaser for Any Occasion

Whether it’s a summer barbecue, a holiday gathering, or a quiet evening at home, this cheesecake is always a hit. It looks beautiful, tastes amazing, and can be made ahead of time.

Ingredients

For the Base:

IngredientQuantity
Lotus biscuits, crushed250g (2 cups)
Melted butter100g (½ cup)
Milk40ml (2 ½ tbsp)

For the Filling:

IngredientQuantity
Cream cheese400g (14 oz)
Heavy cream250ml (1 cup)
Powdered sugar100g (¾ cup)
Lemon juice60ml (¼ cup)
Lemon zest1 tbsp
Vanilla extract1 tsp
Gelatin powder (optional)1 tsp dissolved in 2 tbsp hot water

For the Topping (Optional):

IngredientQuantity
Whipped cream½ cup
Lemon slicesFor garnish
Lotus biscuit crumbsFor garnish

Directions

  1. Prepare the Base – Mix the crushed Lotus biscuits with melted butter and milk until well combined. Press into the bottom of a springform pan, then refrigerate for 15–20 minutes.
  2. Make the Filling – In a large bowl, beat the cream cheese and powdered sugar until smooth. Add lemon juice, lemon zest, and vanilla extract, mixing well.
  3. Whip the Cream – In a separate bowl, whip the heavy cream until soft peaks form, then fold it gently into the cream cheese mixture. If using gelatin, mix it in at this stage.
  4. Assemble & Chill – Pour the filling over the chilled base, smoothing the top. Cover and refrigerate for at least 4 hours or overnight for best results.
  5. Garnish & Serve – Before serving, top with whipped cream, lemon slices, and Lotus biscuit crumbs. Slice and enjoy!

Nutritional Information (Per Slice – Approx. 1 of 10 Slices)

NutrientAmount
Calories320 kcal
Carbohydrates28 g
Protein5 g
Fat22 g
Saturated Fat13 g
Fiber1 g
Sugar18 g
Sodium180 mg

Tips for Making the Perfect No-Bake Lemon Cheesecake

1. Use Full-Fat Cream Cheese for the Best Texture

For a truly smooth and creamy cheesecake, use full-fat cream cheese. Low-fat versions can be too watery and may not set as well.

2. Chill for the Right Amount of Time

Patience is key! Let the cheesecake set in the refrigerator for at least 4 hours, or overnight for the best results. This helps the flavors meld together and gives it the perfect consistency.

3. Crush the Biscuits Finely for a Sturdy Base

A fine crumb ensures that the base holds together well and provides a firm, buttery foundation for the cheesecake. Use a food processor or crush the biscuits with a rolling pin.

4. Add Gelatin for Extra Stability (Optional)

If you want your cheesecake to hold its shape perfectly, dissolve a small amount of gelatin in warm water and mix it into the filling. This step is optional but helpful for warm climates.

5. Enhance the Flavor with Vanilla Extract

A touch of vanilla complements the lemon beautifully and adds an extra layer of warmth to the cheesecake.

Creative Ways to Serve and Garnish Your Cheesecake

This no-bake lemon cheesecake is already delightful on its own, but you can easily elevate it with a few simple additions:

1. Whipped Cream and Lemon Zest

A swirl of light, airy whipped cream and a sprinkle of fresh lemon zest makes the cheesecake look even more inviting.

2. Lotus Biscuit Crumble

For extra crunch, crush a few Lotus biscuits and sprinkle them on top before serving.

3. Fresh Berries

Raspberries, blueberries, or strawberries add a burst of color and natural sweetness that pairs beautifully with the lemon flavor.

4. Lemon Curd Drizzle

For an extra zingy punch, drizzle homemade or store-bought lemon curd over the cheesecake before serving.

5. White Chocolate Shavings

A delicate touch of white chocolate enhances the creamy texture and adds a hint of extra sweetness.

FAQs: Your Cheesecake Questions Answered

Q: Can I make this cheesecake ahead of time?

Yes! This cheesecake is best when made ahead of time. You can prepare it up to 2 days in advance, keeping it covered in the fridge until ready to serve.

Q: How do I store leftovers?

Store leftover cheesecake in an airtight container in the refrigerator for up to 4 days. If you need to keep it longer, you can freeze individual slices wrapped tightly in plastic wrap for up to 2 months.

Q: Can I use a different type of biscuit for the base?

Absolutely! While Lotus biscuits add a lovely caramelized flavor, you can use graham crackers, digestive biscuits, or even shortbread as a substitute.

Q: What can I use instead of heavy cream?

If you don’t have heavy cream, you can use whipping cream with at least 35% fat content. Avoid using low-fat cream, as it may not set properly.

Q: Can I make this recipe without gelatin?

Yes! The cheesecake sets well without gelatin if chilled properly. However, if you want extra firmness, dissolve 1 teaspoon of gelatin in warm water and mix it into the filling.

Q: How can I make this cheesecake vegan?

For a vegan-friendly version, use dairy-free cream cheese, coconut cream instead of heavy cream, and a plant-based butter substitute for the base. Make sure to use gelatin-free stabilizers like agar-agar if needed.

Why This Cheesecake is a Must-Try

A dessert should be more than just sweet—it should be an experience, something that brings comfort, happiness, and a moment to slow down and enjoy life. This Creamy No-Bake Lemon Cheesecake does just that.

It’s:
Effortless yet elegant
Bright, refreshing, and perfectly creamy
Versatile and easy to customize
Perfect for any occasion

From the first spoonful to the last, every bite is a delicate balance of tangy lemon, velvety cream, and buttery crunch. Whether you’re sharing it with family, impressing guests, or simply treating yourself, this cheesecake is bound to become a favorite in your dessert collection.

So go ahead—slice into a little piece of sunshine and savor the moment!

Amal

Velvety Lemon Dream Cheesecake – No-Bake & Irresistible

This No-Bake Lemon Cheesecake is the perfect balance of zesty citrus, creamy texture, and a buttery biscuit base. Made with fresh lemon juice, velvety cream cheese, and a caramelized Lotus biscuit crust, this cheesecake is light, refreshing, and effortlessly delicious—without the need for an oven!
Prep Time 20 minutes
Cook Time 4 hours
Total Time 4 hours 20 minutes
Servings: 8 –10 slices
Course: Dessert
Cuisine: International

Ingredients
  

For the Base:
  • 250 g 2 cups Lotus biscuits, crushed
  • 100 g ½ cup melted butter
  • 40 ml 2 ½ tablespoons milk
For the Filling:
  • 400 g 14 oz cream cheese
  • 250 ml 1 cup heavy cream
  • 100 g ¾ cup powdered sugar
  • 60 ml ¼ cup fresh lemon juice
  • 1 tablespoon lemon zest
  • 1 teaspoon vanilla extract
  • 1 teaspoon gelatin powder optional, dissolved in 2 tablespoons hot water
For the Topping (Optional):
  • ½ cup whipped cream
  • Lemon slices for garnish
  • Lotus biscuit crumbs for garnish

Method
 

  1. Prepare the Base – In a bowl, mix the crushed Lotus biscuits with melted butter and milk. Press into the bottom of a springform pan and refrigerate for 15–20 minutes.
  2. Make the Filling – Beat the cream cheese and powdered sugar until smooth. Add lemon juice, lemon zest, and vanilla extract, mixing well.
  3. Whip the Cream – In a separate bowl, whip the heavy cream until soft peaks form. Fold it gently into the cream cheese mixture. If using gelatin, mix it in at this stage.
  4. Assemble & Chill – Pour the filling over the chilled base, smoothing the top. Cover and refrigerate for at least 4 hours or overnight for the best results.
  5. Garnish & Serve – Before serving, top with whipped cream, lemon slices, and biscuit crumbs. Slice and enjoy!

Notes

  • For a firmer texture, use gelatin, especially if serving in warm weather.
  • Let the cheesecake chill overnight for the best flavor and consistency.
  • Swap Lotus biscuits for graham crackers or digestive biscuits if desired.
  • Serve with a drizzle of lemon curd for extra citrus flavor.

Crispy Parmesan Chicken & Veggie Patties – A Flavor-Packed Comfort Food

There’s something incredibly comforting about a crispy, golden-brown patty fresh out of the pan. Whether it’s a childhood favorite or a new kitchen experiment, patties have a way of bringing people together.

For me, these Crispy Parmesan Chicken & Veggie Patties remind me of family dinners when my mother would turn simple ingredients into something extraordinary. She didn’t need fancy recipes—just fresh vegetables, ground chicken, and a little cheese. The aroma of sizzling patties filled the kitchen, and by the time they hit the table, they were gone within minutes.

What made them special was their balance of flavors and textures—crispy on the outside, soft and cheesy on the inside, and packed with the goodness of vegetables. Over the years, I’ve adapted the recipe to include Parmesan, fresh herbs, and a touch of paprika, adding depth to the flavor while keeping that same crispy, juicy bite.

Whether you’re looking for a protein-packed lunch, a quick dinner, or an easy meal prep idea, these patties are the perfect choice. They’re crispy, cheesy, and full of vegetables, making them not just delicious but also a wholesome meal option.

Why You’ll Love This Recipe

1. Crispy, Cheesy, and Full of Flavor

The combination of Parmesan, mozzarella, and fresh herbs creates a rich, savory flavor, while the crispy golden crust gives each bite a satisfying crunch.

2. Packed with Protein and Vegetables

These patties are made with lean ground chicken and include zucchini, carrots, and fresh parsley, making them a great way to sneak in extra nutrients.

3. Quick and Easy to Make

With just a few simple ingredients, you can have these patties ready in under 30 minutes—perfect for busy weeknights or meal prepping.

4. Versatile and Customizable

These patties can be enjoyed in so many ways—served on their own, in a sandwich, or paired with a fresh salad. Plus, you can easily customize them with different cheeses, spices, or vegetables.

5. Great for Meal Prep

They store and reheat beautifully, making them perfect for meal prepping. Make a batch at the start of the week, and you’ll have a quick, delicious meal ready anytime.

Ingredients

For the Patties

IngredientQuantity
Eggs3
SaltTo taste
Black pepperTo taste
Mayonnaise2 tablespoons
Flour4 tablespoons
Olive oilFor frying

For the Filling

IngredientQuantity
Ground chicken400 g (14 oz)
Parmesan cheese, grated1/2 cup
Mozzarella cheese, shredded1/2 cup
Zucchini, grated and squeezed dry1 small
Carrot, grated1 small
Parsley, chopped2 tablespoons
Garlic cloves, minced2
Paprika1 teaspoon
Dried oregano1/2 teaspoon

Directions

  1. Prepare the Filling – In a bowl, mix ground chicken, Parmesan, mozzarella, zucchini, carrot, parsley, garlic, paprika, oregano, salt, and black pepper until well combined.
  2. Make the Batter – In a separate bowl, whisk the eggs, mayonnaise, and flour until smooth. Add the chicken mixture and stir thoroughly.
  3. Shape and Fry – Heat olive oil in a skillet over medium heat. Scoop a spoonful of the mixture, shape it into a patty, and carefully place it in the pan. Cook for 3–4 minutes per side until golden brown and fully cooked.
  4. Drain and Serve – Transfer the patties to a paper towel-lined plate to remove excess oil. Serve warm with your favorite dipping sauce.

Nutritional Information (Per Patty – Approx. 1 Serving)

NutrientAmount
Calories220 kcal
Carbohydrates8 g
Protein18 g
Fat12 g
Saturated Fat4 g
Fiber1 g
Sugar1 g
Sodium320 mg

Ways to Enjoy These Chicken & Veggie Patties

1. Classic with a Side of Dip

Enjoy these patties with your favorite dipping sauce, such as garlic yogurt, spicy aioli, or a creamy ranch dressing.

2. In a Sandwich or Burger

Turn them into a delicious sandwich by placing them in a toasted bun with lettuce, tomato, and a drizzle of sauce. Add avocado for extra creaminess.

3. Over a Fresh Salad

For a lighter meal, serve these patties over a bed of mixed greens with cherry tomatoes, cucumbers, and a light vinaigrette.

4. With Roasted Vegetables or Rice

Pair them with a side of roasted potatoes, steamed rice, or quinoa for a satisfying and balanced meal.

5. As a Meal Prep Option

Make a batch ahead of time and store them in the fridge for up to 3 days. They also freeze well, making them perfect for a grab-and-go meal.

FAQs: Everything You Need to Know

Q: Can I make these patties ahead of time?

Yes! You can prepare the patties and store them in an airtight container in the fridge for up to 3 days. Just reheat in a skillet or oven for a crispy texture.

Q: Can I freeze these patties?

Absolutely! To freeze, place uncooked or cooked patties in a single layer on a baking sheet and freeze until solid. Then, transfer them to a freezer bag and store for up to 3 months. When ready to eat, cook from frozen or thaw overnight in the fridge.

Q: Can I bake these instead of frying them?

Yes! For a healthier option, bake them at 200°C (400°F) for 20–25 minutes, flipping halfway through. They won’t be as crispy as pan-fried but will still be delicious.

Q: What’s the best way to reheat these patties?

  • Skillet: Heat in a pan over medium heat for 2–3 minutes per side until crispy.
  • Oven: Reheat at 180°C (350°F) for 10 minutes.
  • Air Fryer: Cook at 180°C (350°F) for 5 minutes.
  • Microwave: Use a microwave for 30 seconds, but note that they may not be as crispy.

Q: Can I use a different type of meat?

Yes! You can swap ground chicken for ground turkey, beef, or even plant-based alternatives like chickpeas or lentils for a vegetarian version.

Q: Can I make this recipe gluten-free?

Yes! Simply replace the flour with almond flour, oat flour, or gluten-free breadcrumbs to make them gluten-free.

Q: What other vegetables can I add?

These patties work well with:

  • Grated sweet potato or butternut squash for a touch of sweetness
  • Finely chopped spinach or kale for extra greens
  • Chopped mushrooms for an earthy flavor

Why This Recipe is a Must-Try

Homemade food has a way of bringing comfort and joy, and these Crispy Parmesan Chicken & Veggie Patties are no exception. They’re simple to make, packed with nutrients, and bursting with rich, cheesy goodness.

Whether you’re making them for a family dinner, meal prepping for the week, or looking for a satisfying snack, these patties are a versatile, wholesome option that fits any meal.

There’s a reason crispy patties like these are loved worldwide—they’re easy, delicious, and endlessly adaptable. Once you make them, they’re sure to become a regular favorite in your kitchen.

So grab your ingredients, heat up your skillet, and enjoy the perfect bite of crispy, cheesy, and flavorful goodness!

Amal

Crispy Parmesan Chicken & Veggie Patties – A Flavor-Packed Comfort Food

These Crispy Parmesan Chicken & Veggie Patties are the perfect balance of juicy, cheesy, and crispy goodness. Packed with protein-rich ground chicken, fresh vegetables, and flavorful Parmesan, they make a delicious meal or snack. Serve them on their own, in a sandwich, or with a side of your favorite dip for an easy and satisfying dish!
Prep Time 15 minutes
Cook Time 10 minutes
Total Time 25 minutes
Servings: 8 patties
Course: Main Dish
Cuisine: International

Ingredients
  

For the Patties:
  • 3 eggs
  • Salt to taste
  • Black pepper to taste
  • 2 tablespoons mayonnaise
  • 4 tablespoons flour
  • Olive oil for frying
For the Filling:
  • 400 g 14 oz ground chicken
  • 1/2 cup grated Parmesan cheese
  • 1/2 cup shredded mozzarella cheese
  • 1 small zucchini grated and squeezed dry
  • 1 small carrot grated
  • 2 tablespoons chopped parsley
  • 2 garlic cloves minced
  • 1 teaspoon paprika
  • 1/2 teaspoon dried oregano

Method
 

  1. In a large bowl, combine the ground chicken, Parmesan, mozzarella, zucchini, carrot, parsley, garlic, paprika, oregano, salt, and black pepper. Mix well.
  2. In a separate bowl, whisk the eggs, mayonnaise, and flour until smooth. Add this mixture to the chicken filling and stir until fully combined.
  3. Heat olive oil in a skillet over medium heat.
  4. Scoop a spoonful of the mixture and shape it into a patty. Carefully place it in the skillet.
  5. Cook each patty for about 3–4 minutes per side until golden brown and fully cooked through.
  6. Transfer to a paper towel-lined plate to remove excess oil. Serve warm with your favorite dipping sauce.

Notes

  • To bake instead of frying, place the patties on a lined baking sheet and bake at 200°C (400°F) for 20–25 minutes, flipping halfway through.
  • These patties can be stored in the fridge for up to 3 days or frozen for up to 3 months. Reheat in the oven or a skillet for the best texture.
  • Serve with garlic yogurt sauce, spicy aioli, or a fresh salad for a complete meal.