Crispy Cheesy Poppy Seed Crackers – A Homemade Delight

Some recipes carry more than just flavors—they bring back memories, warmth, and a sense of home. These Crispy Cheesy Poppy Seed Crackers remind me of my grandmother’s kitchen, where a batch of freshly baked crackers would always be cooling on the counter.

She never believed in store-bought snacks. Instead, she’d roll out simple dough, sprinkle it with seeds or cheese, and bake until golden. The smell alone was enough to bring the whole family into the kitchen. We would sit around the table, nibbling on warm, crunchy crackers, dipping them into soups, or pairing them with homemade cheese spreads.

Now, whenever I make these crackers, I feel that same warmth. They are incredibly easy to prepare, require minimal ingredients, and are far better than anything you’d find in a package. Whether you’re making them for yourself, your family, or guests, they deliver that perfect crunch with every bite.

Why You’ll Love This Recipe

1. Simple Ingredients, Big Flavor

With just flour, yeast, water, and a handful of pantry staples, these crackers come together effortlessly.

2. The Perfect Crunch

Baking at the right temperature ensures a crisp, golden texture—light and airy but sturdy enough for dipping.

3. Great for Snacking and Entertaining

  • Serve with cheese and charcuterie.
  • Pair with hummus, guacamole, or salsa.
  • Enjoy with soups and salads for extra crunch.

4. Easy to Customize

You can switch up the toppings, experiment with different cheeses, or even add herbs for a unique twist.

Ingredients

IngredientAmount
Lukewarm water100 ml (½ cup)
Dry yeast5 g (1 tsp)
Sugar1 tsp
All-purpose flour250 g (2 cups)
Baking powder1 tsp
Salt (for dough)½ tsp
Vegetable oil1 tbsp
Poppy seeds1–2 tbsp
Grated cheese (optional)½ cup

Directions

  1. Activate the Yeast: In a small bowl, combine lukewarm water, dry yeast, and sugar. Let it sit for 5–10 minutes until foamy.
  2. Prepare the Dough: In a large bowl, mix flour, baking powder, and salt. Add the yeast mixture, vegetable oil, and knead until a smooth dough forms.
  3. Rest the Dough: Cover the dough and let it rest for 30 minutes.
  4. Roll & Shape: Roll the dough out thinly on a floured surface. Sprinkle poppy seeds and cheese (if using), pressing them gently into the dough. Cut into desired shapes.
  5. Bake: Preheat the oven to 375°F (190°C). Transfer crackers onto a lined baking sheet and bake for 12–15 minutes until golden and crisp.
  6. Cool & Serve: Let the crackers cool completely before enjoying them as a snack or with dips.

Nutritional Information

NutrientAmount per Serving
Calories140 kcal
Carbohydrates22 g
Protein4 g
Fat5 g
Fiber1 g
Sodium150 mg

The Secret to the Best Homemade Crackers

1. Thin, Even Dough for the Perfect Crunch

Rolling the dough out evenly ensures the crackers bake uniformly. If the dough is too thick, the crackers will be chewy rather than crispy.

2. Resting the Dough Enhances Flavor

Letting the dough rest for a short time allows the yeast to work, giving the crackers a slight depth of flavor and light crispiness.

3. Poppy Seeds for a Nutty Finish

Poppy seeds not only add a subtle crunch but also bring a rich, nutty aroma that pairs beautifully with cheese.

4. Cheese Adds Depth

While these crackers are delicious on their own, adding cheese makes them even more flavorful. Parmesan or aged cheddar works best, creating a slightly salty, umami-rich taste.

5. Brushing with Oil for Extra Crispiness

A light brush of oil before baking enhances the golden color and crisp texture, making these crackers bakery-worthy.

Best Ways to Serve These Crackers

1. Classic Snack with Cheese and Spreads

Pair them with soft cheeses like brie or creamy ricotta, or go bold with aged gouda or blue cheese.

2. Soup’s Best Friend

Crumble a few crackers over tomato soup, minestrone, or creamy butternut squash soup for an added crunch.

3. Charcuterie Board Essential

Stack them alongside cured meats, olives, nuts, and fruits for a beautiful appetizer platter.

4. A Healthy Alternative to Store-Bought Chips

These crackers contain no preservatives or artificial flavors, making them a guilt-free option for snacking.

5. The Ultimate Dipping Companion

Try them with homemade hummus, tzatziki, or even a spicy salsa. Their crisp texture holds up well to thick dips.

Frequently Asked Questions (FAQs)

1. Can I Make These Crackers Without Yeast?

Yes! If you want a quicker version, you can omit the yeast and increase the baking powder slightly. The texture will be more like a crisp biscuit rather than a light cracker.

2. How Can I Store These Crackers?

  • At Room Temperature: Store in an airtight container for up to one week to maintain their crunch.
  • Freezing: If making a large batch, freeze the unbaked dough, roll it out when needed, and bake fresh.

3. What’s the Best Cheese to Use?

  • Parmesan: For a sharp, salty bite.
  • Cheddar: Adds a rich, nutty flavor.
  • Gouda: Creates a slightly smoky taste.

4. Can I Use Whole Wheat Flour Instead of All-Purpose?

Yes! Whole wheat flour will give the crackers a heartier texture and slightly nutty flavor. Just note that they may be a bit denser.

5. Why Didn’t My Crackers Get Crispy?

  • Dough was too thick – Roll it out thinner.
  • Oven temperature was too low – Bake at 375°F (190°C) or higher.
  • Didn’t bake long enough – Check for a golden brown color before removing from the oven.

6. Can I Add Other Toppings?

Absolutely! Try these options for a fun twist:

  • Sesame seeds for extra crunch.
  • Rosemary or thyme for an herby touch.
  • Chili flakes for a spicy kick.

7. Can I Make These Crackers Gluten-Free?

Yes! Substitute all-purpose flour with gluten-free flour blend, but add an extra tablespoon of water if the dough feels too dry.

Tips for the Best Crackers Every Time

1. Roll the Dough Evenly

Use a rolling pin to achieve a consistent thickness—about 1/8 inch (3 mm) thick works best.

2. Don’t Overwork the Dough

Over-kneading can make the crackers too tough. Mix until just combined.

3. Cut Even Shapes for Uniform Baking

A pizza cutter or sharp knife makes it easy to slice the dough into squares or rectangles.

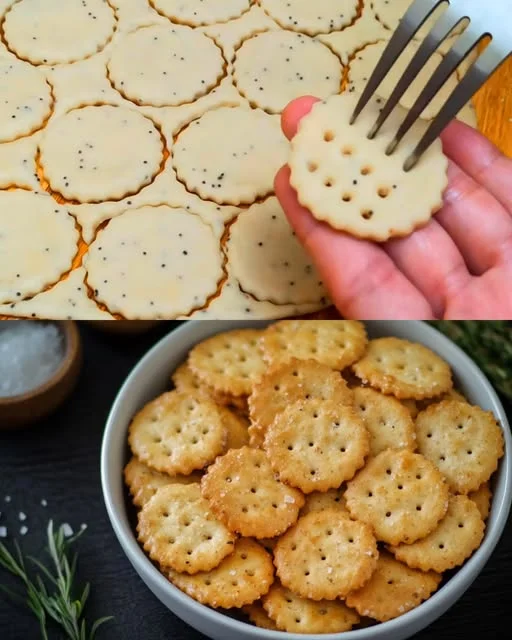
4. Poke Holes for an Extra Crisp Finish

Use a fork to create tiny holes in each cracker—this helps them bake evenly and prevents air bubbles.

5. Let Them Cool Completely

Crackers continue to crisp up as they cool, so resist the temptation to eat them right out of the oven.

Conclusion – A Homemade Snack Worth the Effort

Homemade crackers might sound intimidating, but once you make them, you’ll never go back to store-bought again. These Crispy Cheesy Poppy Seed Crackers are simple, delicious, and endlessly customizable. They bring the perfect crunch, a hint of nuttiness, and just the right amount of cheesiness.

What makes them even better? The joy of sharing them with family and friends. Whether you’re enjoying them on a lazy afternoon, packing them for a picnic, or serving them at a party, these crackers always disappear fast.

So, the next time you reach for a box of crackers at the store, why not make them from scratch instead? You’ll taste the difference, and there’s nothing better than a homemade snack made with love.

Amal

Crispy Cheesy Poppy Seed Crackers – A Homemade Delight

These Crispy Cheesy Poppy Seed Crackers are light, crunchy, and packed with flavor. Made with simple pantry ingredients, they are the perfect snack for dipping, serving with cheese boards, or enjoying on their own. With a touch of cheese and the nutty crunch of poppy seeds, these homemade crackers are a delicious alternative to store-bought ones!
Prep Time 15 minutes
Cook Time 15 minutes
Total Time 30 minutes
Servings: 20 –25 crackers
Course: Snack
Cuisine: International

Ingredients
  

  • 100 ml ½ cup lukewarm water
  • 5 g 1 tsp dry yeast
  • 1 tsp sugar
  • 250 g 2 cups all-purpose flour
  • 1 tsp baking powder
  • ½ tsp salt for dough
  • 1 tbsp vegetable oil
  • 1 –2 tbsp poppy seeds
  • ½ cup grated cheese optional, for extra flavor

Method
 

  1. Activate the Yeast: In a small bowl, mix lukewarm water, dry yeast, and sugar. Let it sit for 5–10 minutes until foamy.
  2. Prepare the Dough: In a large bowl, combine flour, baking powder, and salt. Add the yeast mixture and vegetable oil, mixing until a smooth dough forms.
  3. Let It Rest: Cover the dough and let it rest for 30 minutes to allow the flavors to develop.
  4. Roll & Shape: Roll out the dough thinly on a floured surface. Sprinkle poppy seeds and cheese (if using), pressing them gently into the dough. Cut into squares or desired shapes.
  5. Bake: Preheat the oven to 375°F (190°C). Transfer crackers onto a lined baking sheet and bake for 12–15 minutes until golden brown and crisp.
  6. Cool & Serve: Let the crackers cool completely before enjoying. Serve with dips, cheese, or on their own!

Notes

  • For Extra Crispiness: Roll the dough as thin as possible before baking.
  • Cheese Options: Use Parmesan, cheddar, or gouda for extra flavor.
  • Storage: Keep in an airtight container at room temperature for up to 1 week.
  • Customize It: Add sesame seeds, dried herbs, or chili flakes for a unique twist.

Effortless Cheesy Potato Puff Pastry – A Lazy Morning Delight

Some of the best recipes aren’t planned—they happen in moments of hunger, creativity, and, let’s be honest, a little laziness. This Cheesy Potato Puff Pastry is the result of one of those moments.

One cold morning, I woke up craving something warm, cheesy, and comforting. I had some leftover mashed potatoes, a roll of puff pastry, and a few slices of ham sitting in the fridge. Instead of spending too much time making breakfast from scratch, I layered everything together, popped it in the oven, and hoped for the best.

What came out was a golden, crispy, and cheesy masterpiece—a combination of soft, creamy potatoes, gooey melted cheese, and flaky puff pastry that was so satisfying, it instantly became a staple in my kitchen. The best part? It takes minimal effort but tastes like something you’d order at a bakery.

If you’re looking for a lazy breakfast that feels fancy, this recipe is for you.

Why You’ll Love This Recipe

1. Quick and Easy to Make

No need to knead dough or spend hours in the kitchen—just mix, layer, and bake. Perfect for busy mornings or when you just don’t feel like cooking.

2. Crispy, Cheesy, and Irresistibly Good

The combination of flaky puff pastry, creamy potato filling, and gooey cheese creates a perfect balance of textures and flavors.

3. Great for Using Leftovers

Got extra mashed potatoes? A few slices of ham or cheese that need to be used? This recipe turns them into something delicious.

4. Perfect for Any Occasion

  • Breakfast or brunch with coffee or tea
  • A quick snack in the afternoon
  • A party appetizer that guests will love
  • Lunch on the go when paired with a salad

5. Highly Customizable

You can switch up the ingredients based on what you have at home—different cheeses, extra veggies, or even a meat-free version.

Ingredients

IngredientAmount
Potatoes350 g (12 oz), peeled
Soft Cheese (Stracchino, Cream Cheese, or Ricotta)150 g (5 oz)
Grated Parmesan Cheese30 g (1 oz) + extra for topping
Puff Pastry Sheet1
Cooked Ham100 g (3.5 oz), sliced
Mozzarella Cheese½ cup, shredded
Egg Wash (1 egg + 1 tbsp milk)For brushing
Black PepperTo taste
SaltTo taste

Directions

  1. Prepare the Potatoes: Boil the peeled potatoes in salted water until soft. Drain and mash them in a bowl.
  2. Make the Filling: Mix the mashed potatoes with soft cheese, grated Parmesan, salt, and black pepper until creamy.
  3. Assemble the Pastry: Roll out the puff pastry on a baking sheet. Spread the potato mixture evenly over half of the pastry. Layer the cooked ham and shredded mozzarella on top.
  4. Fold & Seal: Fold the other half of the pastry over the filling. Seal the edges by pressing them down with a fork.
  5. Apply Egg Wash: Brush the top with the egg wash and sprinkle extra Parmesan cheese for a golden, crispy finish.
  6. Bake: Preheat the oven to 375°F (190°C). Bake for 20–25 minutes or until golden brown and puffed.
  7. Cool & Serve: Let it rest for a few minutes before slicing. Serve warm and enjoy!

Nutritional Information

NutrientAmount per Serving
Calories280 kcal
Carbohydrates32 g
Protein10 g
Fat12 g
Fiber2 g
Sodium350 mg

What Makes This Filling So Good?

1. Mashed Potatoes for Creamy Texture

The mashed potatoes give the filling a smooth, velvety texture that contrasts perfectly with the crispy puff pastry. Adding soft cheese like Stracchino, cream cheese, or ricotta makes it even more luscious.

2. The Perfect Cheese Blend

Using three types of cheese ensures maximum flavor:

  • Soft Cheese (Stracchino, Cream Cheese, or Ricotta) – Adds creaminess
  • Mozzarella – Melts beautifully for that gooey, stretchy effect
  • Parmesan – Provides a salty, nutty depth of flavor

3. The Secret to Extra Flavor

A pinch of black pepper and salt enhances the richness, while an optional sprinkle of nutmeg or garlic powder can add even more depth.

4. Puff Pastry – The Effortless Magic Ingredient

Puff pastry is a time-saver that delivers perfectly flaky, golden layers without any extra work. Let it thaw slightly before using to make rolling and folding easier.

How to Serve This Cheesy Puff Pastry

1. The Classic Way – Straight Out of the Oven

This pastry is best enjoyed warm, fresh from the oven when the cheese is still melting inside.

2. With a Side of Dipping Sauce

A simple dipping sauce can elevate this dish. Try it with:

  • Marinara sauce for a pizza-like flavor
  • Sour cream or yogurt-based dips for a tangy contrast
  • Honey mustard for a sweet-savory combination

3. As a Light Meal

Pair it with a fresh green salad or a bowl of soup for a complete, satisfying meal.

4. As a Party Appetizer

Cut into smaller bite-sized squares and serve as finger food at gatherings.

Frequently Asked Questions (FAQs)

1. Can I Use Store-Bought Mashed Potatoes?

Yes! If you have leftover mashed potatoes or store-bought ones, they work just as well. Just make sure they’re not too runny.

2. What Can I Use Instead of Puff Pastry?

If you don’t have puff pastry, try:

  • Pie crust (for a more pie-like texture)
  • Phyllo dough (for extra crisp layers)
  • Crescent roll dough (for a fluffier version)

3. Can I Make This Ahead of Time?

Absolutely! You can:

  • Assemble and refrigerate for up to 24 hours before baking.
  • Freeze before baking and bake straight from frozen (add a few extra minutes to the bake time).
  • Reheat leftovers in the oven at 350°F (175°C) for 5–7 minutes to crisp up again.

4. Can I Make It Without Ham for a Vegetarian Version?

Yes! Skip the ham and add ingredients like:

  • Sautéed mushrooms
  • Caramelized onions
  • Spinach or kale
  • Sun-dried tomatoes

5. Can I Use a Different Cheese?

Definitely! Instead of mozzarella, try:

  • Cheddar for a sharper taste
  • Feta for a tangy, salty kick
  • Gouda for a smoky flavor

6. How Do I Prevent the Pastry from Getting Soggy?

To keep it crispy:

  • Make sure your potatoes aren’t too watery.
  • Don’t overload the filling—too much moisture can affect the pastry.
  • Preheat your oven properly before baking.

Pro Tips for the Perfect Puff Pastry Bake

1. Keep the Puff Pastry Cold

If the pastry gets too warm, it can become sticky and hard to handle. If needed, chill it in the fridge for 10 minutes before rolling and filling.

2. Use an Egg Wash for a Golden Finish

Brushing the pastry with a beaten egg and milk before baking creates that perfect golden-brown crust.

3. Seal the Edges Well

Press the edges together firmly with a fork to prevent the filling from oozing out during baking.

4. Don’t Overload the Filling

A little goes a long way! Too much filling can make the pastry difficult to fold and cause it to burst open while baking.

5. Bake Until Deep Golden Brown

For the best texture, bake until the top is fully golden and crisp—undercooking can leave the pastry doughy.

Conclusion – The Perfect Recipe for Any Lazy Morning

Some mornings, you want an impressive breakfast without putting in too much effort—and that’s exactly what this Cheesy Potato Puff Pastry delivers. Simple ingredients, minimal prep, and a deliciously satisfying result.

With its crispy, golden crust and creamy, cheesy filling, this dish is a guaranteed crowd-pleaser. Whether you’re making it for yourself, your family, or even guests, it’s the kind of recipe that feels special without requiring much work.

So next time you’re in the mood for something warm and comforting but don’t want to spend all morning in the kitchen, grab some puff pastry, some cheese, and let the oven do the work!

Amal

Effortless Cheesy Potato Puff Pastry – A Lazy Morning Delight

This Cheesy Potato Puff Pastry is the perfect blend of crispy, golden pastry and a creamy, cheesy filling. Made with soft mashed potatoes, ricotta or cream cheese, and layers of melted mozzarella and Parmesan, this dish is effortlessly delicious. Whether for breakfast, a snack, or a quick meal, it’s easy to make and impossible to resist!
Prep Time 15 minutes
Cook Time 25 minutes
Total Time 40 minutes
Servings: 4 servings
Course: Breakfast
Cuisine: European

Ingredients
  

  • 350 g 12 oz potatoes, peeled
  • 150 g 5 oz soft cheese (Stracchino, cream cheese, or ricotta)
  • 30 g 1 oz grated Parmesan cheese + extra for topping
  • 1 puff pastry sheet
  • 100 g 3.5 oz cooked ham, sliced
  • ½ cup shredded mozzarella cheese
  • 1 egg beaten with 1 tbsp milk (for egg wash)
  • Black pepper to taste
  • Salt to taste

Method
 

  1. Boil the Potatoes: Cook the peeled potatoes in salted water until soft. Drain and mash them in a bowl.
  2. Make the Filling: Mix the mashed potatoes with soft cheese, grated Parmesan, salt, and black pepper until creamy.
  3. Assemble the Pastry: Roll out the puff pastry on a baking sheet. Spread the potato mixture evenly over half of the pastry. Layer the cooked ham and shredded mozzarella on top.
  4. Fold & Seal: Fold the other half of the pastry over the filling and seal the edges by pressing with a fork.
  5. Apply Egg Wash: Brush the top with the egg wash and sprinkle extra Parmesan cheese for a golden, crispy finish.
  6. Bake: Preheat the oven to 375°F (190°C). Bake for 20–25 minutes or until golden brown and puffed.
  7. Cool & Serve: Let it rest for a few minutes before slicing. Serve warm and enjoy!

Notes

  • Cheese Substitutes: Swap mozzarella with cheddar, gouda, or feta for a different flavor.
  • Vegetarian Option: Skip the ham and add sautéed mushrooms, spinach, or sun-dried tomatoes.
  • Make-Ahead Tip: Assemble the pastry and refrigerate before baking, or freeze it and bake directly from frozen.
  • Storage: Keep leftovers in an airtight container in the fridge for up to 3 days. Reheat in the oven for a crispy texture.

Flaky Spinach & Cheese Puff Pastry Rolls – The Perfect Savory Treat

There’s something special about a recipe that fills your kitchen with warmth—the kind that makes everyone gather around, eagerly waiting for the first bite. For me, that recipe has always been these Flaky Spinach & Cheese Puff Pastry Rolls.

I remember the first time I made them. It was a crisp autumn evening, and I wanted to surprise my family with something comforting but effortless. I had some fresh spinach, leftover cheeses in the fridge, and a frozen puff pastry sheet just waiting to be used. I threw everything together, hoping for the best, and what came out of the oven was nothing short of magic. The buttery, golden pastry was crisp and flaky, while the filling was creamy, cheesy, and perfectly seasoned.

From that day on, these rolls became a staple in my kitchen. They’re the kind of recipe that looks fancy but is incredibly simple to make. Whether it’s for a family gathering, a brunch spread, or just a cozy evening snack, these spinach and cheese rolls always disappear in minutes.

Why You’ll Love This Recipe

1. Quick and Easy to Prepare

With the help of store-bought puff pastry, this recipe comes together in under 30 minutes. No complicated dough-making, no special equipment—just simple ingredients and a bit of oven magic.

2. Crispy, Buttery, and Cheesy

The combination of flaky puff pastry and a rich, cheesy spinach filling creates the perfect contrast of textures. Every bite is crisp on the outside and creamy on the inside.

3. Perfect for Any Occasion

  • Serve them as a warm appetizer at parties
  • Enjoy them as a light lunch with a side salad
  • Pack them in lunchboxes for a delicious midday treat
  • Pair them with soup for a cozy meal

4. A Great Way to Use Up Ingredients

This recipe is highly customizable. Have extra feta or goat cheese? Toss it in. Want a bit of spice? Add red pepper flakes. The filling is adaptable, making it great for using up leftovers.

Ingredients

IngredientAmount
Fresh spinach300g
Olive oil3 tbsp
Garlic (minced)3 cloves
Egg (for filling)1
SaltTo taste
Black pepper½ tsp, freshly ground
Ricotta cheese250g
Mozzarella cheese½ cup, shredded
Parmesan cheese½ cup, grated
Puff pastry sheet1
Egg wash (1 egg + 1 tbsp milk)Beaten together
Sesame seedsOptional, for sprinkling

Directions

  1. Prepare the Spinach: Heat olive oil in a pan over medium heat. Add minced garlic and sauté until fragrant. Add spinach, cook until wilted, and remove excess moisture by squeezing with a kitchen towel.
  2. Make the Filling: In a bowl, combine the spinach, ricotta, mozzarella, Parmesan, egg, salt, and black pepper. Mix until smooth.
  3. Prepare the Pastry: Roll out the puff pastry sheet on a lightly floured surface. Spread the spinach mixture evenly over the pastry, leaving a small border at the edges.
  4. Roll & Cut: Roll the pastry tightly into a log and slice into 6–8 pieces.
  5. Apply Egg Wash: Brush each roll with the beaten egg and milk mixture. Sprinkle sesame seeds on top if desired.
  6. Bake: Preheat the oven to 375°F (190°C) and place the rolls on a lined baking sheet. Bake for 20–25 minutes or until golden brown and flaky.
  7. Cool & Serve: Let the rolls cool for a few minutes before serving warm.

Nutritional Information

NutrientAmount per Roll
Calories220 kcal
Carbohydrates18 g
Protein9 g
Fat14 g
Fiber2 g
Sodium240 mg

What Makes the Perfect Spinach & Cheese Filling?

1. The Right Cheese Combination

The beauty of this filling lies in the combination of three cheeses:

  • Ricotta – Adds a creamy texture and mild flavor.
  • Mozzarella – Melts beautifully, giving that irresistible gooey stretch.
  • Parmesan – Brings in a sharp, salty depth that balances the filling.

If you prefer a tangy twist, you can substitute ricotta with feta cheese, which pairs exceptionally well with spinach.

2. Fresh or Frozen Spinach?

Both work well, but fresh spinach provides a vibrant flavor. If using frozen spinach, make sure to drain it thoroughly to avoid excess moisture in the filling.

3. Seasoning Is Key

A little garlic, salt, and freshly ground black pepper elevate the flavor. You can also add:

  • Nutmeg – A classic pairing with spinach for a warm, slightly sweet note.
  • Red Pepper Flakes – For a mild kick.
  • Dill or Oregano – To add a touch of freshness.

Serving and Pairing Ideas

1. As an Appetizer

These puff pastry rolls are perfect for parties, holiday gatherings, or casual get-togethers. Arrange them on a platter with a side of yogurt dip or marinara sauce for dipping.

2. As a Light Meal

Pair them with a fresh green salad drizzled with lemon vinaigrette for a simple, balanced meal.

3. With a Bowl of Soup

Serve these rolls alongside a warm tomato soup, butternut squash soup, or classic lentil soup for the ultimate comfort meal.

4. Brunch or Breakfast Treat

They make a fantastic brunch option, served alongside scrambled eggs and fresh fruit.

Frequently Asked Questions (FAQs)

1. Can I Make These Puff Pastry Rolls Ahead of Time?

Yes! You can assemble the rolls a few hours in advance and keep them covered in the refrigerator until ready to bake. You can also freeze them unbaked and bake straight from frozen, adding a few extra minutes to the cooking time.

2. Can I Use Frozen Spinach Instead of Fresh?

Yes, but make sure to thaw it completely and squeeze out excess water. Too much moisture can make the filling runny and cause the pastry to become soggy.

3. Can I Make These Without Eggs?

Yes! The egg in the filling helps bind the mixture, but you can leave it out or replace it with an extra spoonful of ricotta cheese.

4. How Do I Keep Puff Pastry Crispy?

  • Bake at the right temperature (375°F/190°C) to ensure even crisping.
  • Don’t overfill the pastry—too much moisture can prevent it from crisping properly.
  • Let the rolls cool slightly before serving, but avoid covering them while still warm, as trapped steam can soften the crust.

5. Can I Use Different Cheeses?

Absolutely! Some great alternatives include:

  • Feta cheese for a saltier, tangy flavor.
  • Goat cheese for a rich, creamy taste.
  • Cheddar cheese for a sharper bite.

6. How Do I Store Leftovers?

Store in an airtight container in the refrigerator for up to 3 days. Reheat in an oven or air fryer at 350°F (175°C) for 5–7 minutes to crisp them back up.

7. Can I Freeze These Puff Pastry Rolls?

Yes! After baking, let them cool completely and freeze in an airtight container for up to 2 months. Reheat in the oven before serving.

Tips for the Best Spinach & Cheese Puff Pastry Rolls

1. Keep the Puff Pastry Cold

Puff pastry works best when cold. If it gets too soft, place it back in the fridge for 10–15 minutes before rolling.

2. Don’t Overload the Filling

Too much filling can cause the rolls to burst open while baking. Spread it evenly and leave a small border around the edges.

3. Use a Sharp Knife to Slice the Rolls

A clean, sharp cut will help keep their shape intact. You can also chill the rolled-up log for 10 minutes before slicing to make it easier.

4. Egg Wash for a Golden Finish

Brushing the rolls with a mixture of egg and milk before baking gives them a beautiful golden color and adds a slight crispness to the crust.

5. Let Them Rest Before Serving

Puff pastry is best enjoyed slightly cooled, allowing the layers to set and the filling to firm up.

Conclusion – A Crowd-Pleasing Savory Delight

Few things are as satisfying as biting into a flaky, buttery pastry filled with warm, cheesy spinach goodness. These Spinach & Cheese Puff Pastry Rolls are the kind of dish that makes any occasion feel special—whether you’re serving them for brunch, as an appetizer, or as a comforting snack.

The combination of creamy ricotta, stretchy mozzarella, and nutty Parmesan creates a rich, savory filling that pairs perfectly with the crisp, golden layers of puff pastry. Best of all, they’re easy to make, incredibly versatile, and freezer-friendly, so you can always have a batch ready to bake whenever the craving strikes.

So go ahead—make these, share them, and watch them disappear within minutes. Because some recipes aren’t just about food—they’re about creating moments, bringing people together, and enjoying the simple pleasure of a homemade treat.

Amal

Flaky Spinach & Cheese Puff Pastry Rolls – The Perfect Savory Treat

These Flaky Spinach & Cheese Puff Pastry Rolls are the perfect balance of crispy, buttery pastry and a rich, cheesy spinach filling. Made with ricotta, mozzarella, and Parmesan, these rolls are irresistibly creamy inside with a golden, flaky crust. Whether served as an appetizer, snack, or light meal, they are easy to prepare and guaranteed to impress!
Prep Time 15 minutes
Cook Time 25 minutes
Total Time 40 minutes
Servings: 6 –8 rolls
Course: Snack
Cuisine: Mediterranean

Ingredients
  

  • 300 g fresh spinach
  • 3 tbsp olive oil
  • 3 cloves garlic minced
  • 1 egg for filling
  • Salt to taste
  • ½ tsp black pepper freshly ground
  • 250 g ricotta cheese
  • ½ cup mozzarella cheese shredded
  • ½ cup Parmesan cheese grated
  • 1 puff pastry sheet
  • 1 egg beaten with 1 tbsp milk (for egg wash)
  • Sesame seeds optional, for sprinkling

Method
 

  1. Prepare the Spinach: Heat olive oil in a pan over medium heat. Sauté the garlic until fragrant, then add spinach and cook until wilted. Remove excess moisture by squeezing with a kitchen towel.
  2. Make the Filling: In a bowl, mix the spinach, ricotta, mozzarella, Parmesan, egg, salt, and black pepper until well combined.
  3. Prepare the Puff Pastry: Roll out the puff pastry on a lightly floured surface. Spread the spinach filling evenly, leaving a small border.
  4. Roll & Cut: Roll the pastry tightly into a log and slice into 6–8 pieces.
  5. Apply Egg Wash: Brush the tops with the beaten egg and milk mixture. Sprinkle with sesame seeds if desired.
  6. Bake: Preheat the oven to 375°F (190°C). Arrange the rolls on a lined baking sheet and bake for 20–25 minutes, or until golden and flaky.
  7. Cool & Serve: Let the rolls cool for a few minutes before serving warm.

Notes

  • Frozen Spinach Option: If using frozen spinach, make sure to thaw and drain excess liquid before adding it to the filling.
  • Make Ahead: Assemble the rolls, freeze unbaked, and bake directly from frozen, adding a few extra minutes to the baking time.
  • Customization: Add feta for a tangy twist or red pepper flakes for a little heat.
  • Storage: Store leftovers in an airtight container in the fridge for up to 3 days. Reheat in the oven for best texture.

Silky Smooth Vanilla Egg Custard – A Timeless Comfort Dessert

There are certain desserts that have the power to bring back memories—ones that transport you to childhood, to a grandmother’s kitchen, or to cozy evenings spent with family. For me, that dessert is homemade vanilla egg custard.

I remember the first time I watched my grandmother make it. She didn’t need a recipe, just a few simple ingredients—milk, eggs, sugar, and vanilla—yet the result was always pure magic. As the custard baked, the warm aroma of vanilla filled the house, making it impossible to wait until it was properly chilled.

The best part was the first spoonful—smooth, creamy, and delicately sweet, melting on my tongue like silk. It was the kind of dessert that made you close your eyes and savor every bite.

Now, I make this classic egg custard whenever I need a little comfort, a reminder of home, or a dessert that brings a sense of warmth and nostalgia. Whether you’re making it for your own family, for a special occasion, or simply as a treat for yourself, this Silky Smooth Vanilla Egg Custard is guaranteed to be a favorite.

What Makes This Egg Custard Special?

1. A Simple and Elegant Classic

Despite its minimal ingredients, this custard has a rich, velvety texture that feels indulgent without being overly heavy. It’s the kind of dessert that can be served at a formal dinner or enjoyed on a quiet night at home.

2. Naturally Sweetened and Light

Unlike store-bought puddings filled with artificial ingredients, this custard is made from wholesome, natural ingredients. The delicate sweetness comes from just a small amount of sugar, making it a lighter alternative to many desserts.

3. Versatile and Customizable

Egg custard is a perfect base for creative variations. You can add different flavors, mix in fruit, or top it with caramel for a crème caramel twist.

4. Perfectly Balanced Texture

When made right, this custard is smooth, creamy, and just the right amount of firm—soft enough to melt in your mouth, yet sturdy enough to hold its shape when spooned.

Ingredients

IngredientAmount
Eggs3
Sugar1/3 cup
Salt1/4 teaspoon
Milk1 cup
Vanilla Essence1 teaspoon
OilFor greasing the mold

Directions

  1. Preheat & Prepare: Preheat the oven to 325°F (160°C). Lightly grease the custard mold or ramekins with oil.
  2. Whisk the Mixture: In a bowl, whisk together the eggs, sugar, and salt until well combined.
  3. Heat the Milk: Warm the milk over low heat until slightly hot but not boiling. Slowly pour it into the egg mixture while whisking continuously to prevent curdling.
  4. Add Vanilla: Stir in the vanilla essence for a rich, aromatic flavor.
  5. Strain for Smoothness: Strain the mixture through a fine sieve to remove any lumps and achieve a silky texture.
  6. Bake in a Water Bath: Pour the mixture into the prepared mold or ramekins. Place them in a larger baking dish and add hot water until it reaches halfway up the sides of the molds.
  7. Bake: Transfer to the oven and bake for 40–45 minutes or until the custard is set but still slightly jiggly in the center.
  8. Cool & Serve: Let the custard cool before refrigerating for at least 2 hours. Serve chilled or at room temperature.

Nutritional Information

NutrientAmount per Serving
Calories150 kcal
Carbohydrates20 g
Protein6 g
Fat5 g
Sugar18 g
Sodium100 mg

Serving and Pairing Suggestions

1. Enjoy It Plain or with a Garnish

This custard is delicious on its own, but adding a sprinkle of nutmeg or a drizzle of honey can elevate the flavor even further.

2. Serve with Fresh Fruit

Pairing the custard with fresh berries, sliced mango, or caramelized bananas adds a refreshing contrast to its creamy richness.

3. Make It a Decadent Dessert

For a more indulgent version, serve it with a dollop of whipped cream or a caramel sauce drizzle.

4. Pair with Coffee or Tea

The light, creamy texture of egg custard makes it a perfect companion to a strong cup of coffee or a soothing herbal tea.

Frequently Asked Questions (FAQs)

1. Why Is My Custard Not Setting?

If your custard is still too liquid after baking, it may need more time in the oven. Make sure the oven temperature is accurate and that the water bath is deep enough to cook the custard evenly. The custard should be slightly jiggly in the center when removed from the oven—it will firm up as it cools.

2. Can I Make This Custard Without an Oven?

Yes! You can steam the custard instead of baking it. Pour the mixture into ramekins, cover them with foil, and steam for about 20 minutes over low heat until set.

3. Can I Use a Different Sweetener?

Absolutely! You can replace the sugar with honey, maple syrup, or a sugar substitute like stevia. Keep in mind that liquid sweeteners may slightly alter the texture.

4. How Do I Prevent a Grainy Custard?

A grainy texture can happen if the eggs cook too quickly. To avoid this:

  • Heat the milk gently before adding it to the eggs.
  • Whisk continuously while combining ingredients.
  • Bake in a water bath to ensure even, gentle cooking.

5. How Long Can I Store Homemade Custard?

Egg custard should be stored in the refrigerator and consumed within 2-3 days for the best texture and flavor. Keep it covered to prevent it from absorbing other flavors in the fridge.

6. Can I Make This Custard Dairy-Free?

Yes! Substitute regular milk with almond, coconut, or oat milk. Coconut milk, in particular, gives a rich, slightly tropical flavor that pairs beautifully with vanilla.

7. What If I Don’t Have Vanilla Essence?

If you’re out of vanilla extract, you can use:

  • A vanilla bean (scrape out the seeds for a richer taste).
  • Almond extract (for a nutty twist).
  • A splash of rum or brandy for added depth.

8. Can I Turn This Into a Caramel Custard?

Yes! Simply add a layer of caramel to the bottom of your mold before pouring in the custard mixture. Once baked and chilled, invert the custard onto a plate to reveal a golden caramel topping.

Health Benefits of Egg Custard

Egg custard isn’t just a delicious dessert—it also offers several health benefits:

  • Rich in Protein – Eggs provide a good source of high-quality protein, essential for muscle repair and overall health.
  • Calcium for Strong Bones – Milk is packed with calcium and vitamin D, both crucial for maintaining bone health.
  • Low in Processed Ingredients – Unlike commercial puddings, homemade custard contains no preservatives or artificial additives.
  • Naturally Low in Gluten – Since it’s made with simple ingredients, it’s a great dessert option for those avoiding gluten.

Tips for the Perfect Egg Custard

1. Use Fresh, High-Quality Ingredients

Since this recipe relies on just a few key ingredients, using fresh eggs, good-quality vanilla, and whole milk will make a big difference in flavor.

2. Strain the Mixture Before Baking

This removes any bits of egg that didn’t fully mix, ensuring a silky-smooth texture.

3. Bake in a Water Bath (Bain-Marie)

Placing the custard mold in a water bath helps cook the custard gently and evenly, preventing it from curdling.

4. Don’t Overbake

The custard should still have a slight jiggle in the center when removed from the oven. Overbaking can cause it to become rubbery instead of creamy.

5. Let It Cool Before Serving

Custard firms up as it cools, so it’s best to refrigerate it for a few hours before serving for the perfect texture.

Conclusion – A Dessert That Stands the Test of Time

There’s a reason classic vanilla egg custard has been loved for generations—it’s simple, elegant, and incredibly satisfying. With its smooth, creamy texture and delicate sweetness, it’s a dessert that brings comfort in every spoonful.

Whether you’re making it for a special occasion or just craving something nostalgic, this custard is a foolproof recipe that never disappoints. So gather your ingredients, take a little time to whisk and bake, and enjoy the rich, timeless taste of homemade vanilla egg custard.

Amal

Silky Smooth Vanilla Egg Custard – A Timeless Comfort Dessert

This Silky Smooth Vanilla Egg Custard is a classic, comforting dessert made with simple ingredients like eggs, milk, sugar, and vanilla. It has a creamy, delicate texture that melts in your mouth, making it the perfect treat for any occasion. Lightly sweetened and naturally rich, this custard is easy to prepare and a timeless favorite for all ages!
Prep Time 10 minutes
Cook Time 45 minutes
Total Time 3 hours
Servings: 4 servings
Course: Dessert
Cuisine: International

Ingredients
  

  • 3 large eggs
  • 1/3 cup sugar
  • 1/4 teaspoon salt
  • 1 cup milk
  • 1 teaspoon vanilla essence
  • Oil for greasing the mold

Method
 

  1. Preheat & Prepare: Preheat the oven to 325°F (160°C). Lightly grease the custard mold or ramekins with oil.
  2. Whisk the Mixture: In a bowl, whisk together the eggs, sugar, and salt until smooth.
  3. Heat the Milk: Warm the milk over low heat until slightly hot but not boiling. Slowly pour it into the egg mixture while whisking continuously to prevent curdling.
  4. Add Vanilla: Stir in the vanilla essence for extra flavor.
  5. Strain for a Smooth Texture: Pour the mixture through a fine sieve to remove any lumps.
  6. Bake in a Water Bath: Pour the custard into the prepared mold or ramekins. Place them in a larger baking dish and fill with hot water until it reaches halfway up the sides of the molds.
  7. Bake: Bake for 40–45 minutes or until the custard is set but still slightly jiggly in the center.
  8. Cool & Serve: Let the custard cool before refrigerating for at least 2 hours. Serve chilled or at room temperature.

Notes

  • For Extra Smoothness: Always strain the custard mixture before baking to remove any tiny egg solids.
  • Dairy-Free Option: Substitute regular milk with almond, coconut, or oat milk for a dairy-free version.
  • Sweetness Adjustment: Adjust the sugar based on your preference or replace it with honey or maple syrup.
  • Storage: Store in the refrigerator for up to 3 days. Best enjoyed chilled!

Classic Soft & Chewy Sugar Cookies – A Timeless Treat

There’s something magical about the smell of freshly baked sugar cookies filling the house. It’s a scent that brings back childhood memories—standing on my tiptoes, peeking over the kitchen counter, watching as my grandmother skillfully rolled out the dough, and carefully cutting out each cookie with her collection of well-worn cutters.

Baking sugar cookies wasn’t just about making a sweet treat; it was a cherished ritual. She always believed that the simplest ingredients—flour, sugar, eggs, and a touch of vanilla—held the power to bring people together. Whether it was for holidays, birthdays, or just a cozy Sunday afternoon, sugar cookies were always on the menu.

Now, as I bake these cookies in my own kitchen, I feel that same warmth. I watch my own family gather around, eagerly waiting for the first batch to come out of the oven. These Classic Soft & Chewy Sugar Cookies are a perfect blend of tradition and simplicity, with a light crispness on the outside and a soft, melt-in-your-mouth texture inside.

No fancy equipment, no hard-to-find ingredients—just pure, homemade goodness.

Why These Sugar Cookies Are a Must-Try

1. Soft, Chewy, and Perfectly Sweet

Unlike store-bought sugar cookies that can be overly dry or too crisp, these cookies strike the perfect balance—lightly golden on the edges, soft in the center, and just the right amount of sweetness.

2. Made with Simple Pantry Staples

This recipe uses only a handful of basic ingredients that you likely already have at home—flour, eggs, sugar, and baking powder. No butter is needed, as vegetable oil keeps the cookies light and soft.

3. Quick and Easy to Make

No chilling time, no complicated steps—these cookies come together in under 30 minutes, making them perfect for last-minute cravings or surprise guests.

4. Customizable for Any Occasion

Whether you love them plain, sprinkled with sugar, or decorated with icing, these sugar cookies are a blank canvas for creativity. They can be shaped into festive designs for holidays or enjoyed as simple rounds with a dusting of sugar for an everyday treat.

5. Healthier Alternative to Butter-Based Cookies

Thanks to the use of yogurt (or kefir) and vegetable oil, these cookies are lighter than traditional butter-heavy sugar cookies. They have a soft texture without feeling greasy or overly rich.

Ingredients

IngredientAmount
Egg1 large
Yogurt (or Kefir)150 ml (½ cup + 2 tbsp)
Sugar2 tbsp + extra for sprinkling
Vegetable Oil70 ml (5 tbsp)
Vanilla1 tsp
SaltTo taste
Baking Powder1 tsp
Flour300–320 g (2½ cups)

Directions

  1. Prepare the Dough: In a mixing bowl, whisk together the egg, sugar, and salt until well combined. Add the yogurt (or kefir), vegetable oil, and vanilla, then mix until smooth.
  2. Incorporate Dry Ingredients: Gradually add the flour and baking powder, stirring continuously. Knead gently until a soft, non-sticky dough forms.
  3. Shape the Cookies: Roll the dough out on a floured surface to about ½-inch thickness. Cut into desired shapes using cookie cutters.
  4. Sprinkle with Sugar: Lightly brush the tops with water and sprinkle with extra sugar for a sweet, crispy finish.
  5. Bake: Preheat the oven to 350°F (175°C). Arrange cookies on a parchment-lined baking sheet and bake for 12–15 minutes, or until the edges are lightly golden.
  6. Cool & Serve: Let cookies cool on a wire rack before enjoying.

Nutritional Information

NutrientAmount per Cookie
Calories90 kcal
Carbohydrates14 g
Protein2 g
Fat3 g
Sugar3 g
Sodium50 mg

How to Enjoy These Sugar Cookies

1. Classic with a Cup of Tea or Coffee

There’s nothing better than pairing a warm sugar cookie with a steaming cup of coffee or tea. The light sweetness complements the bitterness of coffee perfectly.

2. Decorate for Special Occasions

  • For the holidays, top them with icing and festive sprinkles.
  • For birthdays, add colorful sugar crystals or drizzle them with chocolate.
  • For a romantic treat, shape them into hearts and dust with powdered sugar.

3. Serve with Ice Cream

Use two cookies to make an ice cream sandwich—a delicious and simple way to enjoy these cookies in the summer.

4. Gift-Worthy Treats

Package these cookies in a beautiful tin or a simple ribbon-tied bag for a homemade gift that anyone would love.

Frequently Asked Questions (FAQs)

1. Can I Use Butter Instead of Vegetable Oil?

Yes! While vegetable oil keeps these cookies soft and moist, you can replace it with melted butter for a slightly richer flavor. Use the same amount as the oil in the recipe.

2. What’s the Difference Between Yogurt and Kefir? Can I Use Either?

Both yogurt and kefir add moisture and tenderness to the cookies. Kefir is slightly thinner and tangier, while yogurt is thicker and creamier. You can use either, but if using Greek yogurt, add a tablespoon of milk to thin it slightly.

3. How Do I Store These Cookies?

  • At Room Temperature: Store in an airtight container for up to 5 days.
  • In the Refrigerator: They last up to a week, but may become firmer.
  • In the Freezer: Freeze baked cookies for up to 3 months in a sealed bag. Defrost at room temperature before serving.

4. Can I Make the Dough in Advance?

Yes! You can make the dough, wrap it tightly in plastic wrap, and store it in the refrigerator for up to 24 hours before baking. Let it sit at room temperature for 10 minutes before rolling out and shaping.

5. Why Didn’t My Cookies Spread Properly?

There are a few reasons this might happen:

  • Too much flour can make the dough too stiff. Try using the lower end of the flour measurement.
  • The baking powder might be old and inactive. Always check the expiration date!
  • If the dough is too cold, it may not spread properly in the oven. Let it rest at room temperature before baking.

6. Can I Add Flavor Variations?

Absolutely! Try these variations for a different twist:

  • Lemon Sugar Cookies: Add 1 tsp of lemon zest for a bright citrusy note.
  • Almond Sugar Cookies: Replace the vanilla with almond extract for a nutty flavor.
  • Spiced Sugar Cookies: Add ¼ tsp of nutmeg or cardamom for a warm spice flavor.

7. How Can I Make These Cookies Extra Chewy?

For a chewier texture, slightly underbake the cookies by removing them from the oven just as the edges turn golden. Let them finish setting on the baking sheet.

Tips for Perfect Sugar Cookies Every Time

1. Don’t Overmix the Dough

Overmixing can make the cookies tough instead of soft. Stir just until the ingredients are combined.

2. Roll Dough Evenly for Uniform Baking

Use a rolling pin to flatten the dough evenly to about ½-inch thickness to ensure even baking.

3. Sprinkle Sugar for a Slight Crunch

A light sprinkle of sugar before baking gives the cookies a slightly crisp top while keeping the inside soft.

4. Use Parchment Paper for Easy Cleanup

Lining your baking sheet with parchment paper prevents sticking and makes cleanup a breeze.

5. Let Cookies Cool on the Baking Sheet First

Allow cookies to cool for at least 5 minutes on the baking sheet before transferring to a wire rack. This helps them set properly.

Conclusion – A Simple Recipe That Feels Like Home

There’s a reason why classic sugar cookies have stood the test of time. They are simple, comforting, and perfect for any occasion. Whether you enjoy them plain, dusted with sugar, or decorated for a special event, they bring a sense of warmth and nostalgia with every bite.

Baking these cookies isn’t just about making a dessert—it’s about creating memories, sharing joy, and embracing the simple pleasures of homemade treats. So the next time you crave something sweet, skip the store-bought cookies and make these Classic Soft & Chewy Sugar Cookies from scratch. You won’t regret it!

Amal

Classic Soft & Chewy Sugar Cookies – A Timeless Treat

These Classic Soft & Chewy Sugar Cookies are light, buttery, and perfectly sweet with a soft texture that melts in your mouth. Made with simple pantry ingredients, they are incredibly easy to whip up for any occasion. Whether you’re looking for a comforting treat with tea or a fun cookie to decorate, this recipe delivers the perfect sugar cookie every time!
Prep Time 10 minutes
Cook Time 15 minutes
Total Time 25 minutes
Servings: 12 –15 cookies
Course: Dessert
Cuisine: International

Ingredients
  

  • 1 large egg
  • 150 ml ½ cup + 2 tbsp yogurt (or kefir)
  • 2 tbsp sugar + extra for sprinkling
  • 70 ml 5 tbsp vegetable oil
  • 1 tsp vanilla extract
  • A pinch of salt
  • 1 tsp baking powder
  • 300 –320 g 2½ cups all-purpose flour

Method
 

  1. Prepare the Dough: In a large mixing bowl, whisk together the egg, sugar, and salt until smooth. Add the yogurt (or kefir), vegetable oil, and vanilla extract. Mix well.
  2. Incorporate Dry Ingredients: Gradually add the flour and baking powder, stirring until a soft, slightly sticky dough forms.
  3. Shape the Cookies: Roll the dough out on a lightly floured surface to about ½-inch thickness. Use cookie cutters or shape small rounds by hand.
  4. Sprinkle with Sugar: Lightly brush the tops with water and sprinkle with extra sugar for a crispy, caramelized finish.
  5. Bake: Preheat the oven to 350°F (175°C) and place the cookies on a lined baking sheet. Bake for 12–15 minutes, or until the edges are lightly golden.
  6. Cool & Serve: Let the cookies cool on a wire rack before serving. Enjoy as is or decorate with icing for a festive touch!

Notes

  • For Extra Softness: Use kefir instead of yogurt for a slightly tangier, more tender texture.
  • Storage: Keep in an airtight container at room temperature for up to 5 days.
  • Make It Fancy: Add lemon zest or almond extract for a twist on the classic flavor.
  • Dairy-Free Option: Swap yogurt for unsweetened applesauce for a dairy-free version.

The ULTIMATE Banana Carrot Muffins – A Perfect Blend of Health and Flavor

Some of the best recipes come from moments of necessity—when you open your pantry, see a few ripe bananas that need to be used, and decide to get creative. That’s how these Banana Carrot Muffins became a staple in my kitchen.

Growing up, my mother believed that homemade treats were always better than store-bought snacks. Every Sunday, she would bake muffins filled with wholesome ingredients—carrots from the garden, bananas that had ripened on the counter, and just a touch of warm cinnamon to bring everything together. I would sit on the counter, watching her measure and mix, sneaking a taste of the batter when she wasn’t looking.

Now, I carry on that tradition with my own family. These muffins are my go-to for busy mornings, packed lunches, and mid-afternoon cravings. They are naturally sweet, incredibly moist, and filled with nutrient-dense ingredients that make them both delicious and healthy. Whether you’re making them for kids, meal-prepping for the week, or just treating yourself, these muffins are sure to become a household favorite.

Why These Muffins Are the Perfect Treat

1. The Best of Both Worlds – Sweet & Nutritious

Bananas bring natural sweetness, while carrots add moisture and a hint of earthiness. Together, they create a muffin that feels indulgent but is filled with vitamins, fiber, and antioxidants.

2. Soft, Moist, and Perfectly Spiced

Thanks to the combination of mashed bananas, yogurt, and a little oil, these muffins are ultra-moist without being greasy. The addition of cinnamon enhances the flavor and gives them a warm, comforting aroma.

3. No Refined White Sugar

Instead of refined white sugar, this recipe uses brown sugar, which not only provides sweetness but also adds a deep caramel-like flavor. If you prefer an even healthier version, you can swap it for coconut sugar or maple syrup.

4. A Versatile and Customizable Recipe

These muffins are incredibly adaptable—you can add nuts, swap the flour, or even make them dairy-free. Whether you love walnuts, pecans, or raisins, this recipe is a great base for any mix-ins you enjoy.

5. Perfect for Any Occasion

  • A quick grab-and-go breakfast for busy mornings
  • A healthy school snack for kids
  • A post-workout snack packed with energy-boosting ingredients
  • A light dessert that satisfies sweet cravings without guilt

Ingredients

IngredientAmount
All-Purpose Flour1 ¼ cups (163 g)
Brown Sugar½ cup, lightly packed
Baking Powder1 tsp
Ground Cinnamon1 tsp
Baking Soda¾ tsp
Ripe Bananas2, mashed
Carrots¾ cup, finely grated
Eggs2
Vegetable Oil¼ cup (60 ml)
Vanilla Extract1 tsp
Greek Yogurt¼ cup (60 g)
Salt¼ tsp
Walnuts (optional)½ cup, chopped

Directions

  1. Preheat the Oven: Set your oven to 350°F (175°C) and line a muffin tin with paper liners or lightly grease it.
  2. Mix the Dry Ingredients: In a large bowl, whisk together the flour, brown sugar, baking powder, baking soda, cinnamon, and salt.
  3. Combine the Wet Ingredients: In another bowl, whisk the eggs, mashed bananas, oil, vanilla extract, and Greek yogurt until smooth.
  4. Incorporate the Carrots: Fold the grated carrots into the wet mixture.
  5. Make the Batter: Gradually add the dry ingredients to the wet ingredients, stirring gently until just combined. If using walnuts, fold them in at this stage.
  6. Fill the Muffin Cups: Spoon the batter evenly into the prepared muffin tin, filling each cup about ¾ full.
  7. Bake: Place in the oven and bake for 18–22 minutes, or until a toothpick inserted in the center comes out clean.
  8. Cool & Serve: Let the muffins cool in the pan for 5 minutes, then transfer them to a wire rack. Enjoy warm or at room temperature!

Nutritional Information

NutrientAmount per Muffin
Calories180 kcal
Carbohydrates28 g
Protein4 g
Fat6 g
Fiber2 g
Sugar10 g
Sodium150 mg

Health Benefits of Banana Carrot Muffins

These muffins aren’t just delicious—they’re packed with nutrients that support a healthy lifestyle.

1. High in Fiber for Digestion

Both bananas and carrots are excellent sources of fiber, which helps keep digestion smooth and supports gut health. Fiber also helps you feel fuller for longer, making these muffins a satisfying snack.

2. Rich in Vitamins and Antioxidants

  • Carrots are loaded with beta-carotene, which converts to vitamin A and is great for eye health.
  • Bananas are rich in potassium, which helps maintain proper muscle and nerve function.
  • Cinnamon is known for its anti-inflammatory properties and may help regulate blood sugar.

3. Healthy Fats and Protein

If you add walnuts or another type of nut, you’ll get a dose of healthy fats and protein, which help keep energy levels steady throughout the day. The eggs and yogurt also add a boost of protein to each bite.

How to Enjoy These Muffins

1. Warm and Fresh from the Oven

There’s nothing better than a freshly baked muffin, slightly warm, with the scent of banana and cinnamon filling the air.

2. With a Spread of Nut Butter

For an extra dose of protein and flavor, try spreading almond butter, peanut butter, or even cream cheese on your muffin.

3. As a Dessert with Yogurt and Honey

Turn your muffin into a healthy dessert by serving it with a dollop of Greek yogurt and a drizzle of honey.

4. Paired with Coffee or Tea

These muffins make the perfect afternoon snack, especially with a hot cup of coffee, chai, or herbal tea.

Frequently Asked Questions (FAQs)

1. Can I Make These Muffins Gluten-Free?

Yes! Simply substitute the all-purpose flour with gluten-free flour blend or almond flour for a gluten-free version. Keep in mind that almond flour will make the muffins slightly denser.

2. Can I Use Whole Wheat Flour Instead of All-Purpose Flour?

Absolutely! Whole wheat flour adds extra fiber and nutrients. If using whole wheat, the muffins may be slightly denser, so you can try using half whole wheat and half all-purpose flour for a balanced texture.

3. How Do I Store These Muffins?

  • At Room Temperature: Store in an airtight container for up to 2 days.
  • Refrigerated: Keep them in the fridge for up to 5 days to maintain freshness.
  • Frozen: These muffins freeze beautifully! Store them in a freezer bag for up to 3 months. To reheat, microwave for 20–30 seconds.

4. Can I Reduce the Sugar?

Yes! You can reduce the brown sugar to ¼ cup or swap it for honey, maple syrup, or coconut sugar. The bananas already provide natural sweetness, so reducing sugar won’t affect the taste too much.

5. What Can I Add for Extra Flavor and Texture?

  • Chopped nuts (walnuts, pecans, or almonds) for crunch
  • Raisins or dried cranberries for a chewy texture
  • Chocolate chips for an extra treat
  • Shredded coconut for a tropical twist

6. Can I Make These Muffins Vegan?

Yes! Replace the eggs with flax eggs (1 tablespoon flaxseed meal + 3 tablespoons water per egg) and use a plant-based yogurt.

7. Can I Turn This Recipe Into a Loaf Cake Instead of Muffins?

Definitely! Pour the batter into a greased 9×5-inch loaf pan and bake at 350°F (175°C) for 40–45 minutes, or until a toothpick inserted in the center comes out clean.

Baking Tips for the Best Muffins

1. Use Overripe Bananas

The riper the bananas, the sweeter and more flavorful the muffins will be. Bananas with brown spots work best.

2. Don’t Overmix the Batter

Overmixing can make muffins dense and tough. Stir just until the dry ingredients are incorporated into the wet ingredients.

3. Fill Muffin Cups Properly

For perfectly domed muffins, fill each cup about ¾ full.

4. Let Muffins Cool Before Storing

Allow muffins to cool completely before placing them in an airtight container. Trapping heat can cause them to become soggy.

5. Use Fresh Baking Soda and Baking Powder

Expired leavening agents won’t give the muffins the proper rise, so always check their freshness before baking.

Conclusion – A Muffin for Every Occasion

These Banana Carrot Muffins are more than just a healthy treat—they are a reminder that simple ingredients can create something truly special. With their soft texture, warm flavors, and wholesome goodness, they’re a perfect addition to your breakfast table, snack rotation, or even a guilt-free dessert option.

Whether you’re baking for your family, prepping for the week, or just treating yourself, this recipe is one you’ll come back to again and again. Try them once, and they might just become your new favorite muffin recipe!

Amal

The ULTIMATE Banana Carrot Muffins – A Perfect Blend of Health and Flavor

These Banana Carrot Muffins are the perfect combination of moist, naturally sweet, and nutritious. Made with ripe bananas, freshly grated carrots, warm cinnamon, and a touch of brown sugar, they are a wholesome treat that’s great for breakfast, snacks, or even dessert. Packed with fiber and healthy ingredients, these muffins are soft, flavorful, and incredibly easy to make!
Prep Time 10 minutes
Cook Time 25 minutes
Total Time 35 minutes
Servings: 12 muffins
Course: Breakfast
Cuisine: American

Ingredients
  

  • 1 ¼ cups 163 g all-purpose flour
  • ½ cup brown sugar lightly packed
  • 1 tsp baking powder
  • ¾ tsp baking soda
  • 1 tsp ground cinnamon
  • ¼ tsp salt
  • 2 ripe bananas mashed
  • ¾ cup finely grated carrots
  • 2 large eggs
  • ¼ cup 60 ml vegetable oil
  • 1 tsp vanilla extract
  • ¼ cup 60 g Greek yogurt
  • ½ cup chopped walnuts optional

Method
 

  1. Preheat the Oven: Set your oven to 350°F (175°C) and line a muffin tin with paper liners or lightly grease it.
  2. Prepare the Dry Ingredients: In a large bowl, whisk together the flour, brown sugar, baking powder, baking soda, cinnamon, and salt.
  3. Mix the Wet Ingredients: In another bowl, whisk the eggs, mashed bananas, oil, vanilla extract, and Greek yogurt until smooth.
  4. Combine Everything: Add the grated carrots to the wet ingredients, then gently fold the dry ingredients into the wet mixture. Stir just until combined. If using walnuts, fold them in at the end.
  5. Fill the Muffin Cups: Divide the batter evenly into the muffin tin, filling each cup about ¾ full.
  6. Bake: Place in the oven and bake for 18–22 minutes, or until a toothpick inserted into the center comes out clean.
  7. Cool & Serve: Let the muffins cool in the pan for 5 minutes before transferring them to a wire rack. Enjoy warm or at room temperature!

Notes

  • Make it Healthier: Swap half the all-purpose flour for whole wheat flour for extra fiber.
  • Storage: Store at room temperature in an airtight container for up to 2 days, in the refrigerator for up to 5 days, or freeze for up to 3 months.
  • Customization: Add raisins, chocolate chips, or shredded coconut for extra flavor.
  • Dairy-Free Option: Substitute Greek yogurt with unsweetened applesauce or a dairy-free yogurt.

Golden Potato & Cheese Wrap – A Nutritious and Comforting Breakfast

Mornings in my childhood home were always filled with the comforting aroma of something delicious cooking in the kitchen. My mother had a way of turning simple ingredients into something magical—no fancy recipes, no complicated steps, just warmth and nourishment served on a plate.

One of my favorite breakfasts was her potato and cheese wraps. They were crispy on the outside, creamy on the inside, and packed with flavors that felt like a warm hug. She would mash the potatoes just right, mix in fresh green onions, and always sneak in some extra cheese because she knew I loved it that way. As soon as the tortillas hit the pan, the cheese would start melting, and the golden crust would form—the perfect combination of crunch and creaminess.

Now, I make these wraps for my own family, and every time I take a bite, I’m transported back to those cozy mornings. What I love most about this recipe is its simplicity. It requires only a handful of ingredients, takes little time to prepare, and is incredibly versatile. Whether you’re making it for kids before school, serving it for a weekend brunch, or just need something quick and filling, this Golden Potato & Cheese Wrap is always a winner.

Why You’ll Love This Recipe

  • Quick and Easy: This recipe comes together in less than 30 minutes, making it ideal for busy mornings.
  • Healthy and Nutritious: Packed with fiber, protein, and vitamins from potatoes, peas, and cheese.
  • Customizable: You can add your favorite veggies, different cheeses, or even a protein for variety.
  • Kid-Friendly: Even picky eaters will love the creamy potato and melted cheese filling.
  • Perfect for Any Time of Day: While it makes a great breakfast, it’s also perfect as a snack, lunch, or light dinner.

Ingredients

IngredientAmount
Potatoes2 medium, peeled and diced
WaterEnough to boil the potatoes
Green Onions2-3 stalks, chopped
Frozen Green Peas1 cup (about 150 g)
Mozzarella Cheese100 g (about 3.5 oz), grated
Tortillas2 large
SaltTo taste
Black PepperTo taste

Directions

  1. Boil the Potatoes: In a saucepan, add the diced potatoes and enough water to cover them. Boil until they are soft and easily mashable. Drain the water.
  2. Prepare the Filling: In a bowl, mash the potatoes slightly, then mix in the chopped green onions, green peas, salt, and black pepper. Stir well.
  3. Add Cheese: While the mixture is still warm, fold in the grated mozzarella cheese and mix until evenly combined.
  4. Assemble the Wraps: Lay a tortilla flat and spread half of the potato-cheese filling evenly across one side. Fold the tortilla over to create a half-moon shape. Repeat with the second tortilla.
  5. Cook the Wraps: Heat a non-stick pan over medium heat. Place the filled tortillas in the pan and cook for 2–3 minutes on each side, or until golden brown and crispy.
  6. Serve Hot: Slice into halves or quarters and enjoy while warm!

Nutritional Information

NutrientAmount per Serving (1 Wrap)
Calories320 kcal
Carbohydrates45 g
Protein12 g
Fat10 g
Fiber4 g
Sodium300 mg

The Key Ingredients and Their Benefits

Potatoes – The Heart of the Recipe

Potatoes are a staple in many households for a good reason. They are rich in fiber, vitamins C and B6, and provide long-lasting energy. Their creamy texture when mashed makes them the perfect filling for this wrap.

Mozzarella Cheese – The Melty Goodness

Mozzarella cheese is mild, creamy, and melts beautifully, making the wrap extra delicious. You can also use other cheeses like cheddar, gouda, or feta for different flavor profiles.

Green Peas – A Pop of Sweetness

Peas are loaded with fiber, plant-based protein, and vitamins. They add a subtle sweetness that complements the savory potatoes and cheese.

Green Onions – Fresh and Aromatic

Green onions bring a mild onion flavor without overpowering the dish. They also add a bit of freshness, making the filling more flavorful.

Tortillas – The Perfect Wrapper

Soft tortillas hold everything together and turn golden brown when pan-fried, adding a satisfying crunch. Whole wheat or gluten-free tortillas can be used for a healthier twist.

Serving and Pairing Suggestions

This wrap is versatile and pairs well with a variety of sides and condiments. Here are some ideas:

Best Ways to Serve the Wrap

  • With a Side of Yogurt or Sour Cream: The tanginess balances out the creaminess of the potatoes.
  • Drizzled with Hot Sauce or Salsa: Adds a little kick for those who love spice.
  • Paired with Fresh Salad: A light cucumber and tomato salad complements the warm, crispy wrap.
  • Alongside a Smoothie or Fresh Juice: For a wholesome breakfast, serve it with a fruit smoothie or freshly squeezed orange juice.

Make It a Complete Meal

If you want to make this more filling, try adding:

  • Scrambled eggs for extra protein.
  • Grilled chicken or turkey slices for a heartier version.
  • Avocado slices for a creamy, healthy fat addition.

Frequently Asked Questions

1. Can I Make This Wrap Ahead of Time?

Yes! You can prepare the filling the night before and store it in the fridge. When you’re ready to eat, just assemble the wrap and cook it for a quick meal.

2. How Do I Store Leftovers?

If you have leftover wraps, store them in an airtight container in the refrigerator for up to 2 days. Reheat them in a pan over medium heat for a few minutes until crispy. Avoid microwaving, as it can make the tortillas soggy.

3. Can I Freeze These Wraps?

Absolutely! Assemble the wraps and freeze them before cooking. When ready to eat, cook them directly from frozen, adding a few extra minutes to the cooking time.

4. Can I Use Sweet Potatoes Instead of Regular Potatoes?

Yes! Sweet potatoes will add a slightly sweeter flavor and more fiber, making it an even healthier option.

5. What Can I Use Instead of Mozzarella Cheese?

You can swap mozzarella with:

  • Cheddar for a sharper taste
  • Feta for a tangy twist
  • Gouda for a smoky flavor

6. Can I Make This Gluten-Free?

Yes! Just use gluten-free tortillas or swap them for lettuce wraps for a low-carb version.

Health Benefits of This Recipe

This Golden Potato & Cheese Wrap is not just delicious but also packed with nutrients:

  • Good Source of Fiber – Thanks to potatoes and peas, this meal supports digestion.
  • High in Protein – The cheese provides protein, making the meal more satisfying.
  • Rich in Vitamins and Minerals – Potatoes and peas contain essential nutrients like vitamin C, potassium, and iron.
  • Low in Processed Ingredients – Unlike store-bought breakfast options, this homemade wrap has no preservatives.

For a healthier version, use whole wheat tortillas and reduce the cheese slightly. You can also swap out the potatoes for mashed cauliflower for a lower-carb alternative.

Tips for the Perfect Wrap

1. Mash the Potatoes Well

Leaving small chunks of potatoes adds texture, but make sure they’re soft enough to spread easily inside the tortilla.

2. Don’t Overfill the Wrap

Too much filling can make the wrap hard to fold and may cause it to break while cooking.

3. Cook on Medium Heat

Cooking on too high of a heat can burn the tortilla before the cheese fully melts. Medium heat ensures a crispy, golden-brown crust.

4. Use a Non-Stick Pan

A good non-stick pan or a well-seasoned cast iron skillet will prevent sticking and help get that perfect crispy texture.

5. Let It Rest Before Cutting

After cooking, let the wrap sit for a minute or two before slicing. This helps the cheese set and prevents it from oozing out too much.

A Breakfast That Feels Like Home

There’s something special about simple, home-cooked meals that bring comfort and joy. This Golden Potato & Cheese Wrap is one of those recipes that doesn’t require much effort but delivers big on taste and satisfaction.

Whether you’re making it for yourself, your kids, or a family brunch, this dish is sure to be a favorite. The combination of crispy tortillas, creamy potatoes, and gooey cheese is pure perfection.

So, next time you’re looking for a quick, healthy, and delicious breakfast, try this wrap. It’s easy, customizable, and guaranteed to brighten your morning!

Amal

Golden Potato & Cheese Wrap – A Nutritious and Comforting Breakfast

This Golden Potato & Cheese Wrap is a delicious, quick, and healthy breakfast option for the whole family. Creamy mashed potatoes, melted mozzarella cheese, and sweet green peas come together inside a crispy tortilla, making every bite satisfying. Ready in just 30 minutes, this easy-to-make dish is perfect for busy mornings or a light meal any time of the day!
Prep Time 10 minutes
Cook Time 15 minutes
Total Time 25 minutes
Servings: 4 servings
Course: Breakfast
Cuisine: International

Ingredients
  

  • Potatoes: 2 medium peeled and diced
  • Water: Enough to boil the potatoes
  • Green Onions: 2-3 stalks chopped
  • Frozen Green Peas: 1 cup about 150 g
  • Mozzarella Cheese: 100 g about 3.5 oz, grated
  • Tortillas: 2 large
  • Salt: to taste
  • Black Pepper: to taste

Method
 

  1. Boil the Potatoes: Add the diced potatoes to a pot of boiling water and cook until they are soft and easily mashable. Drain and transfer to a bowl.
  2. Prepare the Filling: Mash the potatoes slightly, then mix in the chopped green onions, green peas, salt, and black pepper. Stir well.
  3. Add the Cheese: While the mixture is still warm, fold in the grated mozzarella cheese until evenly combined.
  4. Assemble the Wraps: Place a tortilla on a flat surface and spread half of the potato mixture evenly over one side. Fold the tortilla in half to form a wrap. Repeat with the second tortilla.
  5. Cook the Wraps: Heat a non-stick pan over medium heat. Place the wraps in the pan and cook for 2–3 minutes per side, until golden brown and crispy.
  6. Serve Hot: Slice the wraps into halves or quarters and enjoy while warm!

Notes

  • Cheese Variations: Swap mozzarella with cheddar, gouda, or feta for different flavors.
  • Storage: Store leftover wraps in an airtight container in the fridge for up to 2 days. Reheat in a pan for best texture.
  • Add-Ons: Try adding scrambled eggs, cooked chicken, or avocado for extra protein and flavor.
  • Gluten-Free Option: Use gluten-free tortillas for a gluten-free version.

Heavenly Vanilla Almond Cake – A Melt-in-Your-Mouth Delight

The scent of warm vanilla and almonds always brings me back to my childhood. Growing up, my grandmother would make the softest, creamiest cakes without using complicated ingredients. There was something so comforting about watching her in the kitchen, whisking eggs and folding flour with the kind of patience only years of baking can teach.

She never believed in using shortcuts like condensed milk. Instead, she swore by simple ingredients—fresh eggs, sugar, and milk—to create the richest flavors. Every bite of her cakes was pure nostalgia, a soft, pillowy texture that melted in your mouth, leaving behind a delicate sweetness.

Now, I find myself recreating those moments, baking this Vanilla Almond Cake for my own family. It’s quick, simple, and requires no fancy techniques. Just a handful of pantry staples transform into a golden, custard-filled masterpiece. This cake isn’t just dessert—it’s warmth, tradition, and love, all in one bite.

What Makes This Cake Special?

This cake stands out because of its perfect balance of flavors and textures. It combines the light, airy crumb of a classic sponge cake with the rich, creamy texture of homemade vanilla custard. The addition of ground almonds enhances the softness and gives it a slightly nutty undertone.

Unlike many modern recipes that rely on condensed milk for creaminess, this one keeps things simple and pure. The result? A dessert that feels indulgent without being overly sweet or heavy.

Ingredients

Vanilla Custard Filling

IngredientAmount
Medium egg1
Granulated sugar¼ cup (50 g)
Vanilla sugar (or vanilla extract)8 g (or 1 teaspoon)
Cornstarch2 tablespoons (15 g)
Milk1 cup (250 ml)

Cake Batter

IngredientAmount
Large eggs2
SaltA pinch
Granulated sugar½ cup (100 g)
Milk½ cup (100 ml)
Vegetable oil (added gradually)¼ cup (50 ml)
Ground almonds½ cup (50 g)
All-purpose flour1 ½ cups (180 g)
Baking powder½ tablespoon (8 g)

Directions

  1. Prepare the Custard Filling: In a saucepan, whisk together the egg, granulated sugar, vanilla sugar (or extract), and cornstarch. Gradually add the milk while stirring to prevent lumps.
  2. Cook the Custard: Place the saucepan over medium heat and stir continuously until the mixture thickens into a smooth custard. Remove from heat and let it cool.
  3. Make the Cake Batter: In a mixing bowl, beat the eggs with a pinch of salt. Add the granulated sugar and continue whisking until the mixture becomes pale and fluffy.
  4. Incorporate Liquids: Pour in the milk and gradually add the vegetable oil while mixing.
  5. Add Dry Ingredients: Fold in the ground almonds, all-purpose flour, and baking powder until a smooth batter forms.
  6. Assemble the Cake: Pour half of the batter into a greased cake pan. Evenly spread the cooled vanilla custard over the batter, then top with the remaining cake batter.
  7. Bake: Preheat the oven to 350°F (175°C) and bake for 25–30 minutes or until golden brown and a toothpick inserted in the center comes out clean.
  8. Cool & Serve: Let the cake cool before slicing. Enjoy this soft, creamy, and flavorful dessert!

Nutritional Information

NutrientAmount per Serving (1 Slice)
Calories220 kcal
Carbohydrates35 g
Protein5 g
Fat8 g
Fiber1 g
Sugar18 g
Sodium50 mg

The Role of Vanilla and Almonds in Baking

Vanilla: The Heart of the Cake

Vanilla is often seen as a supporting ingredient, but in this cake, it shines as the main flavor. Using high-quality vanilla extract or vanilla sugar enhances the depth of sweetness and pairs beautifully with the creaminess of the custard.

If you want an even more intense flavor, try using vanilla bean paste—it adds a natural richness with tiny specks of real vanilla.

Why Almonds Make a Difference

Ground almonds add more than just a subtle nutty flavor. They help create a delicate texture, making the cake softer and more moist than a traditional flour-based sponge. Almonds also have a natural sweetness that enhances the overall taste without the need for extra sugar.

For a deeper almond flavor, you can add a drop of almond extract, but the natural nuttiness from the ground almonds is often enough.

How to Serve and Enjoy This Cake

This Vanilla Almond Cake is incredibly versatile, making it perfect for different occasions:

Serving Suggestions

  • Warm with a Dusting of Powdered Sugar – A simple and elegant way to highlight its natural flavors.
  • Topped with Fresh Berries – The tartness of raspberries or strawberries balances the sweetness.
  • With a Side of Whipped Cream or Ice Cream – For a more indulgent dessert experience.
  • Drizzled with Honey or Caramel Sauce – Adds extra richness without overpowering the cake.

Best Occasions for This Cake

  • Afternoon Tea – Light, soft, and perfect with a cup of tea or coffee.
  • Family Gatherings – A crowd-pleaser that isn’t overly rich.
  • Celebrations – Whether it’s a birthday or holiday, this cake fits any occasion.
  • Quick Weeknight Dessert – Comes together easily and doesn’t require hours in the kitchen.

Frequently Asked Questions

1. Can I Use Whole Wheat Flour Instead of All-Purpose Flour?

Yes, but keep in mind that whole wheat flour will make the cake denser and slightly grainy. If you want a healthier twist while maintaining a light texture, try using half whole wheat flour and half all-purpose flour.

2. How Do I Store This Cake?

  • Room Temperature: Store in an airtight container for up to 2 days.
  • Refrigerator: Since it contains custard, refrigeration is best if storing for more than a day. Keep it covered to prevent drying out.
  • Freezing: You can freeze the cake (without custard) for up to a month. Wrap it well and thaw before serving.

3. Can I Make This Cake Without the Custard Filling?

Absolutely! If you’re in a hurry or prefer a simpler cake, you can skip the custard and bake just the vanilla almond sponge. It will still be incredibly soft and flavorful.

4. What Can I Use Instead of Ground Almonds?

If you don’t have ground almonds, try using:

  • Finely ground hazelnuts for a similar texture but a slightly different flavor.
  • An equal amount of flour, though this will slightly change the texture.

5. Why Didn’t My Cake Rise Properly?

There are a few common reasons:

  • Expired Baking Powder: Always check the freshness of your leavening agents.
  • Overmixing the Batter: This can deflate the air bubbles, making the cake dense.
  • Oven Temperature Issues: Always preheat your oven and use an oven thermometer if possible.

Health Benefits of This Cake

While this cake is a treat, it has some surprising nutritional benefits:

  • No Condensed Milk or Heavy Cream – A lighter alternative to many rich desserts.
  • Contains Almonds – A good source of healthy fats, fiber, and vitamin E.
  • Lower Sugar Than Traditional Cakes – Just enough sweetness without being overly indulgent.
  • Protein from Eggs and Almonds – Helps balance the carbohydrate content.

For a healthier version, you can reduce the sugar slightly or use a sugar alternative like honey or coconut sugar.

Baking Tips for the Perfect Cake

1. Use Room Temperature Ingredients

Cold eggs or milk can affect how the batter comes together. Let all ingredients sit at room temperature for 20–30 minutes before baking.

2. Don’t Overmix the Batter

Once you add the dry ingredients, mix just until combined. Overmixing can make the cake dense instead of light and airy.

3. Let the Custard Cool Completely

If the custard is too hot when added to the batter, it can cause the layers to mix instead of forming a distinct filling.

4. Test for Doneness

Use a toothpick to check if the cake is fully baked. If it comes out clean or with a few dry crumbs, it’s ready.

A Cake That Brings People Together

There’s something magical about homemade cake—it’s not just about satisfying a sweet tooth, but about creating moments, sharing warmth, and making memories. Whether you’re baking for your family, a special occasion, or just to treat yourself, this Vanilla Almond Cake is the kind of dessert that feels like a hug in every bite.

The best recipes are the ones that don’t just taste good but make you feel something. This cake, with its soft sponge and creamy custard, is exactly that—a simple yet unforgettable dessert that brings comfort and joy to any table.

So go ahead, bake a loaf, slice it up, and share it with the people you love. Because the best desserts are the ones we enjoy together.

Amal

Heavenly Vanilla Almond Cake – A Melt-in-Your-Mouth Delight

This Heavenly Vanilla Almond Cake is the perfect combination of a soft, fluffy sponge and a rich vanilla custard filling. Made with simple, wholesome ingredients and without condensed milk, this cake melts in your mouth with every bite. Whether for a family dessert, afternoon tea, or a special occasion, this easy-to-make cake is sure to impress!
Prep Time 15 minutes
Cook Time 30 minutes
Total Time 45 minutes
Servings: 8 –10 slices
Course: Dessert
Cuisine: Mediterranean

Ingredients
  

Vanilla Custard Filling:
  • 1 medium egg
  • ¼ cup 50 g granulated sugar
  • 8 g vanilla sugar or 1 teaspoon vanilla extract
  • 2 tablespoons 15 g cornstarch
  • 1 cup 250 ml milk
Cake Batter:
  • 2 large eggs
  • A pinch of salt
  • ½ cup 100 g granulated sugar
  • ½ cup 100 ml milk
  • ¼ cup 50 ml vegetable oil (added gradually)
  • ½ cup 50 g ground almonds
  • 1 ½ cups 180 g all-purpose flour
  • ½ tablespoon 8 g baking powder

Method
 

  1. Prepare the Custard: In a saucepan, whisk together the egg, granulated sugar, vanilla sugar (or extract), and cornstarch. Gradually add the milk while stirring continuously.
  2. Cook the Custard: Place the saucepan over medium heat, stirring constantly until the mixture thickens into a smooth custard. Remove from heat and let it cool.
  3. Make the Cake Batter: In a large mixing bowl, beat the eggs with a pinch of salt until slightly frothy. Add the granulated sugar and whisk until the mixture becomes pale and fluffy.
  4. Incorporate Liquids: Pour in the milk and gradually add the vegetable oil while mixing.
  5. Add Dry Ingredients: Gently fold in the ground almonds, all-purpose flour, and baking powder until you achieve a smooth batter.
  6. Assemble the Cake: Pour half of the batter into a greased cake pan. Evenly spread the cooled vanilla custard over the batter, then top with the remaining cake batter.
  7. Bake: Preheat the oven to 350°F (175°C) and bake for 25–30 minutes, or until the top is golden brown and a toothpick inserted into the center comes out clean.
  8. Cool & Serve: Let the cake cool before slicing. Serve as is or with a light dusting of powdered sugar for an elegant touch.

Notes

  • Flour Variations: If you prefer a slightly healthier version, substitute half of the all-purpose flour with whole wheat flour for a nuttier taste.
  • Storage: Keep the cake at room temperature in an airtight container for up to 2 days, or refrigerate for up to 4 days. For longer storage, wrap and freeze for up to 2 months.
  • Customizations: Enhance the flavor by adding a teaspoon of almond extract for an extra nutty aroma.
  • Serving Tip: Pairs beautifully with a cup of tea, coffee, or a scoop of vanilla ice cream.

Rustic Mediterranean Olive Bread – A Taste of Tradition

The scent of freshly baked bread filled my grandmother’s kitchen every Sunday. She would wake before dawn, kneading the dough with weathered hands that had perfected the art over decades. The warm aroma of olives, herbs, and golden crust wrapped around the house like a comforting embrace.

Her kitchen was more than a place to cook; it was where stories unfolded—where laughter mixed with the rhythmic sound of dough hitting the wooden counter. As a child, I would watch in awe, waiting eagerly for the first warm slice, drizzled with olive oil and dusted with sea salt.

That bread was more than food—it was a connection to generations past, a reminder of Mediterranean summers, and a testament to the beauty of simple, natural ingredients. Today, every time I bake a loaf of Rustic Mediterranean Olive Bread, I feel that same warmth, that same love, and I hope you do too.

What Makes Mediterranean Olive Bread Special?

This bread isn’t just about flour and yeast—it tells a story of sun-drenched olive groves, ancient baking traditions, and the unhurried lifestyle of the Mediterranean. The combination of briny olives, aromatic olive oil, and rustic texture makes it a staple in Greek, Italian, and Spanish cuisines.

The Role of Olives in Mediterranean Cuisine

Olives have been a cornerstone of Mediterranean diets for thousands of years. They add depth, a slight tang, and an earthy richness to bread. Their saltiness balances perfectly with the mild sweetness of the dough, creating an irresistible contrast of flavors.

There are many varieties of olives that can be used in this bread, including:

  • Kalamata Olives – Deep purple, meaty, and slightly fruity
  • Castelvetrano Olives – Mild, buttery, and less salty
  • Manzanilla Olives – Briny with a classic green olive taste

Each variety brings something different, allowing for customization based on personal preference.

Why Olive Oil is the Secret Ingredient

Olive oil is more than just a fat—it’s liquid gold in Mediterranean cooking. It keeps the bread soft, enhances flavor, and provides health benefits. Extra virgin olive oil, with its slight peppery finish, is the best choice for a truly authentic taste.

Ingredients

IngredientAmount
Olive oil4 tablespoons (60 ml)
Dry yeast1 tablespoon (10 g)
Salt1 teaspoon
Warm water1 1/3 cups (320 ml)
Plain flour4 3/4 cups (570 g)
Mixed olives (pitted & chopped)1 cup (150 g)
Sugar1 teaspoon
Dried oregano (optional)1 teaspoon

Directions

  1. Activate the Yeast: In a small bowl, mix warm water, sugar, and dry yeast. Let it sit for about 5–10 minutes until it becomes frothy.
  2. Prepare the Dough: In a large mixing bowl, combine the flour and salt. Add the yeast mixture and olive oil, then mix until a dough forms.
  3. Knead the Dough: Transfer the dough to a floured surface and knead for about 10 minutes until smooth and elastic.
  4. Incorporate the Olives: Gently knead the chopped olives and oregano (if using) into the dough until evenly distributed.
  5. First Rise: Place the dough in a lightly oiled bowl, cover it with a damp cloth, and let it rise in a warm place for about 1–1.5 hours or until doubled in size.
  6. Shape the Bread: Punch down the dough and shape it into a round or oval loaf. Place it on a parchment-lined baking sheet.
  7. Second Rise: Cover the dough and let it rest for another 30 minutes. Meanwhile, preheat the oven to 400°F (200°C).
  8. Bake: Bake for 25–30 minutes or until the crust is golden brown and sounds hollow when tapped.
  9. Cool & Serve: Let the bread cool on a wire rack before slicing. Enjoy with olive oil or your favorite Mediterranean spread!

Nutritional Information

NutrientAmount per Serving (1 Slice)
Calories180 kcal
Carbohydrates30 g
Protein5 g
Fat5 g
Fiber2 g
Sodium200 mg

Serving and Pairing Suggestions

How to Enjoy This Bread

Mediterranean Olive Bread is incredibly versatile. It can be enjoyed in countless ways:

  • Dipped in Olive Oil & Balsamic Vinegar – A simple yet elegant appetizer
  • Paired with Cheese and Meats – Complements feta, manchego, prosciutto, or salami
  • Alongside Soups and Stews – Perfect for soaking up broths and sauces
  • As a Sandwich Base – Ideal for Mediterranean-inspired sandwiches with roasted vegetables, hummus, and goat cheese

Best Dishes to Pair With

This bread shines when served with classic Mediterranean dishes such as:

  • Greek Salad – The salty olives in the bread enhance the fresh flavors of tomatoes and cucumbers
  • Shakshuka – Perfect for dipping into the rich tomato and egg sauce
  • Lentil Soup – The hearty texture of the bread makes it a great complement to this comforting dish

Frequently Asked Questions

1. Can I Use Whole Wheat Flour Instead of White Flour?

Yes, but it will change the texture. Whole wheat flour makes the bread denser and gives it a nuttier flavor. If using whole wheat, consider mixing it with some all-purpose flour for a lighter loaf.

2. How Do I Store Mediterranean Olive Bread?

Store the bread in an airtight container at room temperature for up to 3 days. For longer storage, wrap it tightly and freeze for up to 2 months. To refresh, warm it in the oven at 350°F (175°C) for 10 minutes.

3. Can I Make This Bread Without a Stand Mixer?

Absolutely! Traditional Mediterranean bread is often made by hand. Kneading by hand takes a little more effort but results in a beautifully textured loaf.

4. Can I Add Other Ingredients?

Yes! This bread is highly adaptable. Try adding:

  • Sun-Dried Tomatoes – For a tangy sweetness
  • Feta Cheese – To create a richer, saltier flavor
  • Rosemary or Thyme – To enhance the aroma

5. Why Didn’t My Bread Rise Properly?

There are a few possible reasons:

  • The yeast may be expired or inactive
  • The water used was too hot or too cold, affecting yeast activation
  • The dough was not given enough time to rise in a warm environment

Health Benefits of Mediterranean Olive Bread

This bread isn’t just delicious—it’s also packed with nutrients.

  • Rich in Healthy Fats – Thanks to olive oil and olives, this bread contains monounsaturated fats, which support heart health.
  • Good Source of Fiber – Especially when made with whole grain flour, it helps with digestion.
  • No Artificial Preservatives – Unlike store-bought bread, homemade olive bread is free of unnecessary additives.

If you want a healthier version, consider reducing the salt or replacing some of the flour with whole wheat.

Tips for the Perfect Loaf

  1. Use High-Quality Olives – Fresh, briny olives make all the difference.
  2. Don’t Rush the Rising Time – Letting the dough rise fully develops flavor and texture.
  3. Score the Dough Before Baking – This allows steam to escape and prevents cracking.
  4. Use a Pizza Stone for a Crusty Finish – Baking on a hot stone mimics traditional brick ovens.
  5. Experiment with Herbs and Spices – A touch of garlic powder, basil, or za’atar can elevate the flavor.

The Final Slice – A Bread Worth Sharing

There’s something deeply comforting about baking bread. It connects us to history, to family, and to the simple pleasure of creating something from scratch. Rustic Mediterranean Olive Bread is more than a recipe; it’s a celebration of flavors, traditions, and the joy of sharing food with loved ones.

Whether served at a family dinner, given as a heartfelt gift, or simply enjoyed with a quiet cup of coffee in the morning, this bread carries a warmth that goes beyond its ingredients. It’s a taste of the Mediterranean—one slice at a time.

Amal

Rustic Mediterranean Olive Bread – A Taste of Tradition

This Rustic Mediterranean Olive Bread is a flavorful, homemade loaf infused with briny olives, aromatic olive oil, and a golden crust. With a chewy texture and rich Mediterranean essence, it’s perfect for dipping in olive oil, serving with cheese, or enjoying on its own. Whether you’re a seasoned baker or a beginner, this recipe is simple, rewarding, and packed with traditional flavors.
Prep Time 15 minutes
Cook Time 30 minutes
Total Time 2 hours 45 minutes
Servings: 8 –10 slices
Course: Bread
Cuisine: Mediterranean

Ingredients
  

  • 4 tablespoons 60 ml olive oil
  • 1 tablespoon 10 g dry yeast
  • 1 teaspoon sugar
  • 1 1/3 cups 320 ml warm water
  • 4 3/4 cups 570 g plain flour
  • 1 teaspoon salt
  • 1 cup 150 g mixed olives, pitted and chopped
  • 1 teaspoon dried oregano optional

Method
 

  1. Activate the Yeast: In a small bowl, combine warm water, sugar, and yeast. Let it sit for 5–10 minutes until foamy.
  2. Prepare the Dough: In a large mixing bowl, mix flour and salt. Add the yeast mixture and olive oil. Stir until a rough dough forms.
  3. Knead the Dough: Transfer the dough to a floured surface and knead for 8–10 minutes until smooth and elastic.
  4. Incorporate the Olives: Gently knead the chopped olives and oregano (if using) into the dough until evenly distributed.
  5. First Rise: Place the dough in a lightly greased bowl, cover with a damp towel, and let it rise in a warm spot for 1–1.5 hours until doubled in size.
  6. Shape the Loaf: Punch down the dough, shape it into a round or oval loaf, and place it on a parchment-lined baking sheet.
  7. Second Rise: Cover and let the dough rest for another 30 minutes. Meanwhile, preheat the oven to 400°F (200°C).
  8. Bake: Bake for 25–30 minutes or until golden brown and hollow-sounding when tapped.
  9. Cool & Serve: Let the bread cool on a wire rack before slicing. Enjoy!

Notes

  • Flour Variations: Substitute half the plain flour with whole wheat for a nuttier taste.
  • Storage: Keep at room temperature in an airtight container for up to 3 days. Freeze for up to 2 months.
  • Olive Choices: Try Kalamata, Castelvetrano, or Manzanilla olives for different flavor profiles.
  • Serving Tip: Drizzle with extra virgin olive oil and a sprinkle of sea salt for an authentic Mediterranean touch.

Soft Lemon Biscuits That Melt in Your Mouth

There’s something truly special about the aroma of freshly baked biscuits wafting through the kitchen, filling the air with warmth and anticipation. For me, lemon biscuits bring back cherished childhood memories of lazy Sunday afternoons at my grandmother’s house. She had a way of turning simple ingredients into something extraordinary, and her lemon biscuits were no exception.

I remember sitting on a wooden stool beside her, watching as she carefully zested a lemon, the citrusy perfume mingling with the sweet scent of sugar. She always said that the secret to the perfect biscuit was not just in the ingredients but in the love and patience put into each step. She would hand me a piece of dough to roll, letting me shape my own tiny biscuits. When they finally emerged from the oven, golden and slightly crisp on the edges, I would take a bite, feeling the delicate crumb melt in my mouth—sweet, tangy, and utterly comforting.

Even now, every time I bake a batch of these soft lemon biscuits, I am transported back to those moments. It’s more than just a recipe; it’s a tradition, a connection to the past, and a reminder of how food has the power to bring people together. Whether you’re making them for a special occasion or just to brighten up an ordinary day, these biscuits are bound to become a household favorite.


Why You’ll Love These Soft Lemon Biscuits

These biscuits are the perfect balance of sweet and tangy, with a light, tender texture that practically dissolves on your tongue. Unlike store-bought cookies that can be overly crisp or dense, these homemade treats have a soft, almost cake-like consistency, making them ideal for pairing with tea, coffee, or even a glass of cold milk.

Here’s why this recipe stands out:

  • Simple, Everyday Ingredients: You likely already have most of the ingredients in your pantry. No fancy or hard-to-find items are required.
  • Quick and Easy to Make: From start to finish, you can have a batch ready in under 30 minutes.
  • Perfectly Balanced Flavors: The citrus zest and juice add a refreshing tang, complementing the subtle sweetness of the biscuits.
  • Soft, Melt-in-Your-Mouth Texture: Unlike traditional crunchy biscuits, these are light and airy with just the right amount of chew.
  • Versatile and Customizable: You can add a dusting of powdered sugar, a drizzle of glaze, or even a handful of poppy seeds for an extra twist.

Whether you enjoy them fresh out of the oven or save them for an afternoon treat, these biscuits are a little piece of sunshine in every bite.

Ingredients

IngredientQuantity
Eggs2
Sugar100 g (1/2 cup)
Sunflower oil80 ml (1/3 cup)
Lemon zestFrom 1 lemon
Lemon juice50 ml (3 tablespoons)
All-purpose flour380 g (3 cups)
Baking powder12 g (2 1/2 teaspoons)

Step-by-Step: The Perfect Lemon Biscuit

1. Mix the Essentials

In a large mixing bowl, whisk together the eggs and sugar until the mixture becomes light and slightly frothy. Add the sunflower oil, lemon zest, and lemon juice. Stir well to combine.

2. Incorporate the Dry Ingredients

Gradually sift in the all-purpose flour and baking powder, stirring continuously until a soft dough forms. The dough should be smooth and slightly sticky but manageable.

3. Shape & Prep for Baking

Preheat your oven to 180°C (350°F). Line a baking sheet with parchment paper. Take small portions of dough and roll them into balls, placing them on the prepared baking sheet with some space in between.

4. Bake to Perfection

Bake for about 12–15 minutes or until the biscuits turn lightly golden. Remove from the oven and let them cool slightly before serving.

Nutritional Breakdown (Per Biscuit, Approximate Values)

NutrientAmount
Calories140 kcal
Carbohydrates22 g
Protein2.5 g
Fat5 g
Sugars7 g
Fiber0.5 g

Tips for Making the Best Lemon Biscuits

Even though this is a simple recipe, a few key tips can help you achieve the best results:

1. Use Fresh Lemons for Maximum Flavor

Bottled lemon juice won’t give you the same bright, fresh taste as freshly squeezed lemon juice. The zest is just as important—it holds essential oils that enhance the flavor of the biscuits.

2. Don’t Overwork the Dough

Mixing the dough just until the ingredients are combined ensures a light and tender texture. Overmixing can lead to tough biscuits.

3. Use Room Temperature Ingredients

Eggs and other ingredients mix more smoothly when they’re at room temperature, resulting in a more uniform dough.

4. Adjust the Sweetness to Your Liking

If you prefer a sweeter biscuit, you can increase the sugar slightly. Alternatively, if you enjoy a more pronounced lemon tang, consider adding an extra teaspoon of zest.

5. Experiment with Toppings and Additions

  • A light dusting of powdered sugar gives the biscuits a delicate, bakery-style finish.
  • A simple lemon glaze made with powdered sugar and lemon juice can add a touch of elegance.
  • Adding poppy seeds, shredded coconut, or even white chocolate chips can elevate the flavor profile.

Storage and Serving Suggestions

How to Store Lemon Biscuits

These biscuits stay fresh for about 3–4 days when stored in an airtight container at room temperature. If you want to keep them soft, consider placing a small piece of bread in the container—the moisture from the bread helps maintain their texture.

For longer storage, you can freeze the biscuits for up to 2 months. Place them in a single layer on a baking sheet to freeze individually, then transfer them to a resealable freezer bag. Thaw at room temperature before serving.

Best Ways to Enjoy Lemon Biscuits

  • With Tea or Coffee: The light citrus notes pair wonderfully with black tea, green tea, or even a frothy cappuccino.
  • As a Dessert: Serve with a scoop of vanilla ice cream for a refreshing treat.
  • With a Touch of Honey or Jam: A drizzle of honey or a spoonful of raspberry jam can add an extra layer of flavor.
  • For Breakfast or Brunch: These biscuits make a lovely addition to a breakfast spread alongside fresh fruit and yogurt.

Frequently Asked Questions (FAQs)

1. Can I Make These Biscuits Gluten-Free?

Yes! You can substitute the all-purpose flour with a 1:1 gluten-free flour blend. Keep in mind that the texture may be slightly different, so you might need to adjust the amount of flour slightly if the dough feels too dry or too wet.

2. Can I Use a Different Type of Oil?

Sunflower oil gives these biscuits a light, neutral flavor, but you can substitute it with vegetable oil, canola oil, or even melted butter for a slightly richer taste.

3. What’s the Best Way to Get More Lemon Flavor?

For a stronger lemon flavor, you can:

  • Add an extra teaspoon of lemon zest.
  • Use a splash of lemon extract (about 1/2 teaspoon) for an intensified citrus taste.
  • Drizzle a lemon glaze over the biscuits after baking.

4. Can I Make These in Advance?

Yes! You can prepare the dough in advance and refrigerate it for up to 24 hours before baking. When ready to bake, let the dough sit at room temperature for a few minutes before shaping and baking.

5. Can I Add Other Flavors?

Absolutely! You can customize the recipe by adding:

  • Vanilla extract for a hint of warmth.
  • Lavender for a floral touch.
  • Coconut flakes for a tropical twist.
  • White chocolate chips for extra sweetness.

Conclusion: A Biscuit Worth Sharing

Baking is more than just following a recipe—it’s about creating moments, sharing joy, and making memories that last a lifetime. These soft lemon biscuits are a perfect example of how something simple can bring so much comfort and happiness. Whether you’re baking them for a special occasion, a family gathering, or just because you crave something sweet and citrusy, they’re sure to become a favorite in your home.

So, the next time you find yourself in the kitchen with a few lemons on hand, give this recipe a try. Let the aroma fill your home, take a bite, and savor the soft, melt-in-your-mouth texture. And maybe, just maybe, these biscuits will become a cherished part of your own traditions, just like they have in mine.

Amal

Soft Lemon Biscuits That Melt in Your Mouth

These soft lemon biscuits are light, citrusy, and perfectly sweet with a melt-in-your-mouth texture. Made with fresh lemon zest and juice, they have a refreshing flavor that pairs wonderfully with tea or coffee. Quick to prepare and requiring only a handful of ingredients, they’re a delightful treat for any occasion.
Prep Time 10 minutes
Cook Time 15 minutes
Total Time 25 minutes
Servings: 20 biscuits
Course: Dessert
Cuisine: International

Ingredients
  

  • 2 eggs
  • 100 g 1/2 cup sugar
  • 80 ml 1/3 cup sunflower oil
  • Zest of 1 lemon
  • 50 ml 3 tablespoons lemon juice
  • 380 g 3 cups all-purpose flour
  • 12 g 2 1/2 teaspoons baking powder

Method
 

  1. Preheat the oven to 180°C (350°F) and line a baking sheet with parchment paper.
  2. In a large bowl, whisk together the eggs and sugar until light and slightly frothy.
  3. Add the sunflower oil, lemon zest, and lemon juice. Mix until well combined.
  4. Gradually sift in the flour and baking powder, stirring until a soft dough forms. Avoid overmixing.
  5. Roll small portions of dough into balls and place them on the prepared baking sheet, leaving space between each biscuit.
  6. Bake for 12–15 minutes, or until the biscuits are lightly golden on the edges.
  7. Let them cool slightly before serving. Enjoy warm or at room temperature!

Notes

  • If you prefer a stronger lemon flavor, add an extra teaspoon of zest or a dash of lemon extract.
  • Store in an airtight container at room temperature for up to 3–4 days.
  • For a decorative touch, dust with powdered sugar or drizzle with a light lemon glaze.
  • The dough can be made in advance and refrigerated for up to 24 hours before baking.