Golden Cabbage Fritters – A Crispy and Flavorful Delight

There are some recipes that surprise you. They start as simple experiments in the kitchen, something you throw together with ingredients you already have. Then, after one bite, you realize you’ve discovered something truly special.

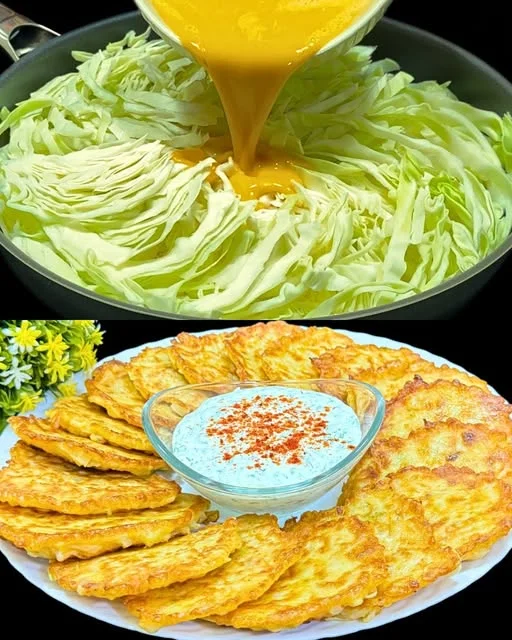
That’s exactly how these golden cabbage fritters became a staple in my home. It started one evening when I was looking for a way to use up a head of cabbage sitting in my fridge. I didn’t feel like making a traditional coleslaw or stir-fry, so I thought—why not try fritters? I combined cabbage with eggs, a few simple seasonings, and whatever else I had on hand. I fried them until golden brown and crispy, then took my first bite.

They were incredible. Crunchy on the outside, tender on the inside, packed with flavor from the herbs and seasonings. But the best part? My family devoured them. Even my kids, who usually turn up their noses at cabbage, asked for seconds. That was the moment I knew I had found a recipe worth repeating.

Now, I make these fritters all the time. They’re perfect as a quick lunch, a light dinner, or even a snack. They’re easy to prepare, made with everyday ingredients, and so delicious that once you try them, you’ll want to cook them constantly—just like I do.

Why You’ll Love This Recipe

Crispy, Savory, and Satisfying

These fritters are the perfect balance of crunchy and soft. The exterior crisps up beautifully in the pan, while the inside remains tender and full of flavor. The combination of cabbage, eggs, and herbs creates a wonderfully satisfying texture.

A Healthy and Nutritious Meal

Cabbage is packed with vitamins and antioxidants, while eggs provide protein and healthy fats. The addition of oats gives these fritters extra fiber, making them a nutritious choice for any meal.

Quick and Easy to Make

You don’t need any fancy ingredients or special techniques—just mix, shape, and fry. The entire process takes under 30 minutes, making this a great go-to recipe for busy days.

Budget-Friendly and Versatile

Cabbage is one of the most affordable vegetables, and the rest of the ingredients are pantry staples. This is a meal that’s easy on the wallet but big on flavor. Plus, you can adjust the ingredients based on what you have at home.

Ingredients

IngredientQuantity
Cabbage700 g
Eggs5
SaltTo taste
Oats3 tablespoons
Flour2 tablespoons
Onion1, finely chopped
Olive oilFor frying
Carrot1, grated
Potato1, grated
Italian herbsTo taste
Dill1 sprig, chopped
Mayonnaise2 tablespoons
Greek yogurt2 tablespoons
Soy sauceTo taste
Black pepperTo taste
Garlic1 clove, minced

Directions

1. Prepare the Vegetables

  • Finely chop the cabbage and place it in a large bowl.
  • Sprinkle with salt and let it sit for 10 minutes to soften.
  • Squeeze out excess moisture.
  • Add the grated carrot, grated potato, and chopped onion.

2. Make the Batter

  • In a separate bowl, beat the eggs and mix in oats, flour, Italian herbs, black pepper, and minced garlic.
  • Stir in the Greek yogurt, mayonnaise, and soy sauce.

3. Combine and Shape

  • Pour the egg mixture over the vegetables and mix until fully combined.
  • Form small patties with your hands.

4. Fry to Perfection

  • Heat olive oil in a frying pan over medium heat.
  • Cook the fritters for 3-4 minutes per side until golden brown and crispy.

5. Serve and Enjoy

  • Garnish with fresh dill and serve warm.
  • These fritters pair perfectly with a side of sour cream or a light salad.

Nutritional Information (Per Serving – Approximate)

NutrientAmount per Serving
Calories~220 kcal
Protein~8 g
Carbohydrates~18 g
Fats~12 g
Fiber~4 g
Calcium~60 mg

Frequently Asked Questions

1. Can I Bake These Instead of Frying?

Yes! If you want a healthier version, you can bake the fritters in the oven at 200°C (400°F) for about 20-25 minutes, flipping them halfway through. You won’t get the same level of crispiness as frying, but they’ll still be delicious.

2. How Do I Prevent the Fritters from Falling Apart?

To make sure your fritters hold their shape:

  • Drain excess moisture: Cabbage and potatoes release water, so be sure to squeeze them well before mixing with the other ingredients.
  • Use enough binding agents: Eggs, flour, and oats help hold everything together. If your mixture feels too wet, add a little more flour.

3. What Can I Serve with These Fritters?

These fritters are incredibly versatile and pair well with:

  • Dipping sauces: Sour cream, garlic yogurt sauce, or a spicy mayo dip.
  • Salads: A fresh cucumber or tomato salad adds a refreshing contrast.
  • Grains: Serve alongside quinoa or rice for a more filling meal.

4. Can I Make the Batter Ahead of Time?

Yes! You can prepare the batter and store it in the fridge for up to 24 hours. When ready to cook, simply shape the fritters and fry them fresh.

5. Can I Freeze These Fritters?

Absolutely! Cook the fritters as usual, let them cool completely, then freeze them in an airtight container with parchment paper between layers. To reheat, bake them in the oven at 180°C (350°F) until warmed through.

6. Can I Use Different Herbs and Spices?

Definitely! While Italian herbs work great in this recipe, feel free to experiment with different seasonings:

  • For a Mediterranean twist: Add feta cheese and fresh parsley.
  • For an Indian-inspired flavor: Use cumin, coriander, and a pinch of turmeric.
  • For a spicy kick: Mix in some chili flakes or smoked paprika.

7. How Do I Store Leftovers?

Store leftover fritters in an airtight container in the refrigerator for up to 3 days. Reheat them in a pan or oven for the best texture. Microwaving is an option, but it may make them softer.

Conclusion: A Recipe You’ll Want to Make Again and Again

Some recipes surprise you, not just because they taste good, but because they become an instant favorite. These cabbage fritters are one of those dishes. They’re easy, budget-friendly, packed with flavor, and endlessly versatile.

If you’re looking for a way to make vegetables exciting, this is it. Whether you’re serving them as a main dish, a side, or even a snack, these crispy fritters will have everyone asking for more.

So the next time you have a head of cabbage in your kitchen, don’t just make a salad—make these delicious fritters instead. You won’t regret it!

Amal

Golden Cabbage Fritters – A Crispy and Flavorful Delight

These golden cabbage fritters are a perfect combination of crispy edges and a tender, flavorful center. Packed with fresh cabbage, carrots, potatoes, and aromatic herbs, they are a budget-friendly and nutritious meal that’s easy to prepare. Serve them as a main dish, snack, or side with your favorite dip or sauce.
Prep Time 15 minutes
Cook Time 20 minutes
Total Time 35 minutes
Servings: 6 servings
Course: Main Dish
Cuisine: European

Ingredients
  

  • 700 g cabbage finely chopped
  • 5 eggs
  • Salt to taste
  • 3 tablespoons oats
  • 2 tablespoons flour
  • 1 onion finely chopped
  • Olive oil for frying
  • 1 carrot grated
  • 1 potato grated
  • Italian herbs to taste
  • A sprig of dill chopped
  • 2 tablespoons mayonnaise
  • 2 tablespoons Greek yogurt
  • Soy sauce to taste
  • Black pepper to taste
  • 1 clove of garlic minced

Method
 

  1. Prepare the Vegetables
  2. Finely chop the cabbage and place it in a large bowl.
  3. Sprinkle with salt and let it sit for 10 minutes, then squeeze out excess moisture.
  4. Add grated carrot, grated potato, and chopped onion.
  5. Make the Batter
  6. In a separate bowl, whisk the eggs.
  7. Mix in the oats, flour, mayonnaise, Greek yogurt, soy sauce, black pepper, minced garlic, and Italian herbs.
  8. Combine Everything
  9. Pour the batter over the cabbage mixture and stir until fully combined.
  10. Shape the mixture into small fritters with your hands.
  11. Cook the Fritters
  12. Heat olive oil in a frying pan over medium heat.
  13. Fry each fritter for about 3-4 minutes per side until golden brown and crispy.
  14. Serve and Enjoy
  15. Garnish with fresh dill and serve warm with your favorite dipping sauce or yogurt.

Notes

  • Extra Crispiness: If you prefer crispier fritters, add an extra tablespoon of flour or fry them in a mix of butter and olive oil.
  • Baking Option: For a healthier version, bake the fritters at 200°C (400°F) for 20-25 minutes, flipping halfway through.
  • Storage: Store leftovers in an airtight container in the fridge for up to 3 days. Reheat in a pan or oven to retain crispiness.
  • Freezing: Freeze cooked fritters in a single layer, then reheat in the oven when ready to eat.

Irresistible Cheesy Potato & Zucchini Bake – A Family Favorite

Some recipes have a way of sticking with us, becoming a part of our family traditions without us even realizing it. This cheesy potato and zucchini bake is one of those dishes. It started as a simple meal from an old magazine my grandmother kept in her kitchen, tucked away among handwritten notes and clippings of recipes she had collected over the years.

I remember watching her make it as a child, fascinated by how effortlessly she combined the ingredients. She never measured anything precisely, yet it always turned out perfect—golden, crispy on the outside, and wonderfully creamy on the inside. The smell of baking cheese would fill the house, luring us into the kitchen long before dinner was ready.

Years later, when I first attempted the recipe myself, I followed every step carefully, trying to recreate the same magic. As soon as I took my first bite, it transported me right back to my grandmother’s kitchen, where the warmth of home and the joy of good food went hand in hand.

Now, this dish has become a favorite in my own home. It’s the kind of meal that brings everyone to the table without hesitation. My kids love it, my friends always ask for the recipe, and every time I make it, I feel like I’m continuing a small but meaningful tradition.

If you’re looking for a simple yet deeply satisfying dish, this cheesy potato and zucchini bake is exactly what you need.

Why This Recipe Is a Must-Try

The Perfect Balance of Crispy and Creamy

The combination of grated potatoes and zucchini creates a wonderfully textured dish. The potatoes provide a hearty base, while the zucchini adds moisture and a subtle sweetness. As it bakes, the edges become irresistibly crispy while the center remains soft and cheesy.

A Comfort Food Classic

This dish is a cross between a potato gratin and a casserole, making it a cozy and satisfying meal. The Emmental cheese melts beautifully, adding a nutty richness that pairs perfectly with the seasoning.

Quick and Easy to Make

With just a handful of ingredients and minimal prep time, this recipe is perfect for busy weeknights or lazy weekends. It requires no fancy techniques—just mix, bake, and enjoy.

Kid-Approved and Family-Friendly

One of the best things about this recipe is how much kids love it. Even picky eaters who usually turn their noses up at vegetables will happily devour this dish. The cheese and seasoning mask the zucchini enough that they don’t even realize they’re eating something healthy.

Versatile and Adaptable

While the classic version is already delicious, you can easily customize it based on what you have on hand. Want more protein? Add some cooked bacon or shredded chicken. Prefer a different cheese? Try mozzarella, cheddar, or gouda. Need a gluten-free option? Swap out the flour for a gluten-free alternative.

Ingredients

IngredientQuantity
Potatoes5 medium
Eggs4
Salt1 teaspoon
Black Pepper1 teaspoon
Oregano1 teaspoon
Cream100 ml (3 fluid oz)
Flour3 tablespoons
Emmental Cheese150 g (5 oz)
Zucchini1

Directions

1. Prepare the Ingredients

  • Peel and grate the potatoes and zucchini.
  • Squeeze out excess moisture from the grated vegetables using a clean kitchen towel.

2. Mix the Batter

  • In a large bowl, beat the eggs and add salt, black pepper, and oregano.
  • Pour in the cream and mix well.
  • Stir in the flour until fully incorporated.

3. Combine Everything

  • Add the grated potatoes and zucchini to the egg mixture.
  • Grate the Emmental cheese and mix half into the batter, reserving the rest for topping.

4. Bake to Perfection

  • Preheat the oven to 180°C (350°F).
  • Grease a baking dish and pour in the mixture, spreading it evenly.
  • Sprinkle the remaining cheese on top.
  • Bake for 35-40 minutes or until golden and crispy on top.

5. Serve and Enjoy

  • Let it cool slightly before slicing.
  • Serve warm and enjoy the cheesy, crispy delight!

Nutritional Information (Per Serving – Approximate)

NutrientAmount per Serving
Calories~280 kcal
Protein~12 g
Carbohydrates~25 g
Fats~14 g
Fiber~3 g
Calcium~180 mg

Frequently Asked Questions

1. Can I Use a Different Type of Cheese?

Yes! While Emmental provides a wonderful nutty flavor, you can substitute it with cheddar, mozzarella, or even gouda. If you prefer a stronger cheese flavor, Gruyère is also an excellent choice.

2. How Do I Prevent the Bake from Being Too Watery?

Zucchini contains a lot of water, which can sometimes make the dish soggy. To avoid this, squeeze out excess moisture from the grated zucchini before mixing it into the batter. A clean kitchen towel works best for this.

3. Can I Make This Recipe Ahead of Time?

Absolutely! You can prepare the mixture in advance and store it in the refrigerator for a few hours before baking. If you want to make it a day ahead, bake it partially, then reheat it in the oven before serving.

4. What Can I Serve with This Dish?

This bake pairs beautifully with a fresh green salad, roasted vegetables, or even a simple bowl of soup. It can be served as a main dish or as a hearty side to complement grilled meats or fish.

5. Is This Recipe Gluten-Free?

The only ingredient that contains gluten is the flour. You can easily replace it with a gluten-free flour blend or cornstarch without affecting the texture of the bake.

6. Can I Freeze Leftovers?

Yes, this dish freezes well. Allow it to cool completely before slicing it into portions. Wrap each portion tightly in plastic wrap or place them in an airtight container. To reheat, bake at 180°C (350°F) until warmed through.

7. Can I Add More Vegetables?

Definitely! While zucchini and potatoes are the base, you can add grated carrots, bell peppers, or spinach for extra nutrition. Just make sure to remove excess moisture from any added vegetables to keep the bake from becoming too wet.

8. How Do I Store Leftovers?

Store leftovers in an airtight container in the refrigerator for up to 3 days. Reheat in the oven to maintain its crispy texture, or in a pan over low heat. Microwaving is an option, but it may soften the crispy edges.

Conclusion: A Dish That Brings Everyone to the Table

Some recipes become favorites not just because they taste good, but because they hold memories. This cheesy potato and zucchini bake is one of those special dishes—simple yet incredibly satisfying, easy to make yet filled with rich flavors.

It’s the kind of meal that brings comfort after a long day, that disappears quickly when placed on the dinner table, and that even kids beg to have again and again. Whether you’re making it for a casual family dinner or a gathering with friends, it’s a dish that will never disappoint.

So the next time you have potatoes and zucchini on hand, don’t hesitate to make this recipe. Who knows? It might just become a new tradition in your home, just like it did in mine.

Amal

Irresistible Cheesy Potato & Zucchini Bake – A Family Favorite

This cheesy potato and zucchini bake is the ultimate comfort food—crispy on the outside, soft and cheesy on the inside. Made with simple ingredients like grated potatoes, zucchini, Emmental cheese, and a touch of cream, it’s an easy and satisfying dish that even picky eaters will love. Perfect as a main course or a hearty side dish, this recipe is a must-try for any home cook.
Prep Time 15 minutes
Cook Time 40 minutes
Total Time 55 minutes
Servings: 6 servings
Course: Main Dish
Cuisine: European

Ingredients
  

  • 5 medium potatoes
  • 4 eggs
  • 1 teaspoon salt
  • 1 teaspoon black pepper
  • 1 teaspoon oregano
  • 100 ml 3 fluid oz cream
  • 3 tablespoons flour
  • 150 g 5 oz Emmental cheese, grated
  • 1 zucchini

Method
 

  1. Prepare the Ingredients
  2. Peel and grate the potatoes.
  3. Grate the zucchini and squeeze out excess moisture using a clean kitchen towel.
  4. In a bowl, beat the eggs, then add salt, black pepper, and oregano.
  5. Make the Batter
  6. Stir the cream into the egg mixture.
  7. Gradually add the flour, mixing well to prevent lumps.
  8. Combine Everything
  9. Add the grated potatoes and zucchini to the batter.
  10. Mix in half of the grated Emmental cheese, saving the rest for topping.
  11. Bake the Dish
  12. Preheat the oven to 180°C (350°F).
  13. Grease a baking dish and pour in the mixture, spreading it evenly.
  14. Sprinkle the remaining cheese on top.
  15. Bake for 35-40 minutes or until the top is golden brown and crispy.
  16. Serve and Enjoy
  17. Let it cool slightly before slicing.
  18. Serve warm as a main dish or a side.

Notes

  • Extra Crispy Texture: For a crunchier top, broil for the last 5 minutes of baking.
  • Cheese Variations: Swap Emmental with mozzarella, cheddar, or gouda for a different flavor.
  • Add Protein: For a heartier dish, mix in cooked bacon, ham, or shredded chicken.
  • Storage: Leftovers can be stored in an airtight container in the fridge for up to 3 days. Reheat in the oven to retain crispiness.

Heavenly Apple Pie with Meringue – A Dessert to Remember

There are some desserts that do more than satisfy a sweet craving—they evoke memories, bring families together, and create moments that stay with us forever. This apple pie with meringue is one of those recipes.

I remember the first time I made it. It was a cold autumn afternoon, the kind where the wind carries the scent of fallen leaves and the kitchen becomes the coziest place in the house. My grandmother had always been the one to bake, but that day, she handed me the responsibility. With a knowing smile, she placed a basket of apples in front of me and said, “A good apple pie doesn’t need to be complicated—it just needs love.”

At that moment, I didn’t fully understand what she meant. I was focused on following the steps carefully, measuring ingredients precisely, and making sure I didn’t burn the crust. But when I pulled the pie out of the oven, golden and fragrant, and topped it with the lightest, fluffiest meringue I had ever seen, I finally understood.

Baking is about more than just ingredients and techniques. It’s about warmth, nostalgia, and the joy of sharing something delicious with the people you love. This apple pie has since become a tradition in my family, and every time I make it, I feel a connection to the past—one filled with laughter, stories, and the comforting aroma of baked apples and vanilla.

Now, I’m sharing this special recipe with you, so you can create your own memories with every bite.

Why This Apple Pie Is Unforgettable

A Perfect Harmony of Textures

The magic of this pie lies in its layers. The base is a crisp, buttery dough that holds its shape beautifully, providing the perfect foundation for the soft and caramelized apple filling. The roasted walnuts add a slight crunch, enhancing the contrast of textures. But the real star is the meringue—a cloud-like topping that’s airy, delicate, and lightly golden, adding just the right amount of sweetness to balance the tartness of the apples.

A Delightful Flavor Combination

This isn’t just any apple pie. The addition of honey in the filling enhances the natural sweetness of the apples, while the roasted walnuts introduce a nutty depth. The vanilla in the dough gives it a subtle warmth, and the meringue, with its light sweetness, creates a stunning contrast to the rich apple layer below. Every bite is a perfect blend of comforting and sophisticated flavors.

A Recipe That Feels Like Home

Whether you’re baking this for a special occasion, a weekend treat, or just because you need a little comfort food, this pie has a way of making any moment feel special. It’s the kind of dessert that fills the kitchen with the scent of nostalgia, drawing people in before it even reaches the table.

Ingredients

For the Dough:

IngredientQuantity
Flour300g (2 cups)
Sugar30g (2 tablespoons)
Baking Powder1 teaspoon
Vanilla Sugar8g (1 teaspoon)
Cold Butter150g (2/3 cup), cubed
Egg1

For the Filling:

IngredientQuantity
Apples5 medium (850-900g), cored and cubed
Sugar120g (1/2 cup + 1 tablespoon)
Honey2 tablespoons
Butter35g (1.5 tablespoons)
Roasted Walnuts50g, chopped

For the Meringue:

IngredientQuantity
Egg Whites4
SaltA pinch
Sugar170g (3/4 cup + 1 tablespoon)

Directions

1. Prepare the Dough

  • In a large bowl, combine the flour, sugar, baking powder, and vanilla sugar.
  • Add the cold butter and work it into the dry ingredients until the mixture resembles coarse crumbs.
  • Add the egg and knead until a smooth dough forms. Wrap in plastic wrap and refrigerate for 30 minutes.

2. Make the Apple Filling

  • In a saucepan over medium heat, melt the butter.
  • Add the cubed apples, sugar, and honey. Stir well and cook for 5-7 minutes until the apples soften and their juices release.
  • Stir in the roasted walnuts and let the mixture cool to room temperature.

3. Assemble the Pie

  • Preheat the oven to 180°C (350°F).
  • Roll out the chilled dough and press it into a greased baking pan, ensuring an even layer.
  • Spread the apple filling evenly over the dough.
  • Bake for 25-30 minutes, or until the crust is golden brown.

4. Whip the Meringue

  • While the pie is baking, beat the egg whites with a pinch of salt until foamy.
  • Gradually add the sugar while continuing to beat until stiff peaks form. The meringue should be glossy and hold its shape.

5. Bake with Meringue

  • Remove the pie from the oven and carefully spread the meringue over the apple filling.
  • Return to the oven and bake for another 10-15 minutes until the meringue turns lightly golden on top.

6. Cool and Serve

  • Let the pie cool completely before slicing to allow the layers to set.
  • Serve and enjoy the perfect balance of crisp crust, tender apples, and cloud-like meringue.

Nutritional Information (Per Serving – Approximate)

NutrientAmount per Serving
Calories~320 kcal
Protein~5g
Carbohydrates~45g
Fats~14g
Fiber~3g
Calcium~40mg

Frequently Asked Questions

1. What Type of Apples Work Best for This Pie?

The best apples for this recipe are those that hold their shape and provide a balance of sweetness and tartness. Granny Smith apples are a great choice for a slightly tangy flavor, while Honeycrisp or Golden Delicious add a natural sweetness. A mix of different apples can also create a more complex and well-rounded taste.

2. How Do I Prevent the Dough from Becoming Too Hard?

Cold butter is the key to achieving a tender, flaky crust. Make sure to work the butter into the flour quickly so it doesn’t melt from the warmth of your hands. Chilling the dough before rolling it out also helps maintain its texture.

3. Can I Make This Pie in Advance?

Yes! This pie can be prepared in stages to save time. The dough can be made a day ahead and stored in the refrigerator. The apple filling can also be prepped in advance and kept in an airtight container. When ready to bake, simply assemble and proceed with the recipe.

4. How Do I Get a Perfectly Glossy and Stable Meringue?

For the best meringue, ensure your egg whites are at room temperature before whipping. Adding sugar gradually helps stabilize the mixture, and beating until stiff peaks form will ensure the meringue holds its shape. Baking the meringue at a lower temperature for a short period helps it set without browning too quickly.

5. Can I Use a Different Type of Nut Instead of Walnuts?

Absolutely. While walnuts provide a lovely roasted flavor, pecans or almonds can be great substitutes. If you prefer a nut-free version, you can simply omit the nuts without compromising the deliciousness of the pie.

6. How Should I Store Leftovers?

Leftover apple pie should be stored in an airtight container in the refrigerator. It stays fresh for up to three days. To enjoy it warm, simply reheat slices in the oven for a few minutes at 150°C (300°F).

7. Can I Freeze This Pie?

Yes, this pie freezes well. For best results, allow it to cool completely before wrapping it tightly in plastic wrap and aluminum foil. Freeze for up to two months. When ready to enjoy, thaw it in the refrigerator overnight and reheat in the oven for a freshly baked taste.

8. What Can I Serve with This Apple Pie?

This pie is perfect on its own, but for an extra indulgent treat, serve it with a scoop of vanilla ice cream or a drizzle of caramel sauce. A dollop of lightly sweetened whipped cream also complements the meringue beautifully.

Conclusion: A Dessert Worth Sharing

Some recipes are made once and forgotten. Others become traditions, woven into the fabric of family gatherings and cherished moments. This apple pie with meringue belongs in the latter category.

It’s a dessert that tells a story—one of warmth, love, and the simple pleasure of baking from scratch. From the first bite, you’ll taste the perfect harmony of crisp crust, soft spiced apples, and airy meringue. More than just a sweet treat, it’s an experience—one that brings people together, makes a house feel like home, and reminds us of the power of a well-loved recipe.

So the next time you find yourself with a basket of fresh apples, take the time to bake this pie. Share it with friends, family, or even enjoy a slice all to yourself with a warm cup of tea. Because some desserts aren’t just about taste—they’re about the memories they create.

Amal

Heavenly Apple Pie with Meringue – A Dessert to Remember

This apple pie with meringue is the perfect blend of textures and flavors. A buttery, crisp crust holds a luscious apple filling sweetened with honey and enriched with roasted walnuts. Topped with a light, airy meringue that melts in your mouth, this dessert is both comforting and elegant. Whether for a special occasion or a cozy afternoon treat, this pie will quickly become a favorite.
Prep Time 20 minutes
Cook Time 45 minutes
Total Time 1 hour 5 minutes
Servings: 6 –8 servings
Course: Dessert
Cuisine: European

Ingredients
  

For the Dough:
  • 300 g 2 cups flour
  • 30 g 2 tablespoons sugar
  • 1 teaspoon baking powder
  • 8 g 1 teaspoon vanilla sugar
  • 150 g 2/3 cup cold butter, cubed
  • 1 egg
For the Filling:
  • 5 medium-sized apples 850-900g, cored and cubed
  • 120 g 1/2 cup + 1 tablespoon sugar
  • 2 tablespoons honey
  • 35 g 1.5 tablespoons butter
  • 50 g roasted walnuts chopped
For the Meringue:
  • 4 egg whites
  • A pinch of salt
  • 170 g 3/4 cup + 1 tablespoon sugar

Method
 

Prepare the Dough:
  1. In a mixing bowl, combine the flour, sugar, baking powder, and vanilla sugar.
  2. Add the cold butter and mix until the texture resembles coarse crumbs.
  3. Incorporate the egg and knead until a smooth dough forms. Wrap in plastic wrap and chill for 30 minutes.
Make the Apple Filling:
  1. In a pan over medium heat, melt the butter.
  2. Add the apples, sugar, and honey. Cook for 5-7 minutes until the apples soften and release their juices.
  3. Stir in the roasted walnuts and set the mixture aside to cool.
Assemble the Pie:
  1. Preheat the oven to 180°C (350°F).
  2. Roll out the chilled dough and press it into a greased baking pan, forming an even base.
  3. Spread the apple filling over the dough and bake for 25-30 minutes until the crust turns golden.
Prepare the Meringue:
  1. While the pie is baking, beat the egg whites with a pinch of salt until foamy.
  2. Gradually add the sugar and continue beating until stiff peaks form.
Add the Meringue and Bake Again:
  1. Remove the pie from the oven and spread the meringue evenly on top.
  2. Return to the oven and bake for another 10-15 minutes until the meringue is lightly golden.
Cool and Serve:
  1. Let the pie cool before slicing to allow the layers to set.
  2. Serve and enjoy the airy meringue, tender apples, and crisp buttery crust.

Notes

  • Apple Variety: Use a mix of sweet and tart apples for a well-balanced flavor.
  • Dough Handling: Keep the butter cold for a flaky crust.
  • Perfect Meringue: Add sugar gradually to stabilize the meringue and achieve a glossy texture.
  • Storage: Store leftovers in an airtight container in the fridge for up to 3 days.

If You Have Zucchini, You Must Try This! The Most Delicious Recipe Ever

I still remember the first time I made this zucchini recipe. It was a warm summer afternoon, and my grandmother was visiting. She always had a way of turning simple ingredients into magic, and that day, she handed me a few fresh zucchinis from her garden with a knowing smile.

“Make something delicious,” she said, as if she already knew I would.

At the time, I wasn’t sure what to do. I had eaten zucchini in many ways—grilled, sautéed, in pasta—but I wanted something different. Something comforting, yet packed with flavor. I started experimenting, adding a little of this and a little of that until the kitchen filled with the irresistible aroma of baked cheese and golden zucchini.

When I pulled the dish out of the oven, I knew I had created something special. The crust was perfectly crisp, the inside soft and cheesy, and every bite was a blend of textures and flavors that made you crave more. My grandmother took one bite, nodded approvingly, and simply said, “Now, this is how you cook with love.”

Since then, this recipe has become a staple in my kitchen. Whether for a casual family dinner, a weekend brunch, or even a quick snack, it never fails to impress. If you have zucchini, you must try this recipe—it might just become a favorite in your home too.

Why This Zucchini Recipe Stands Out

With so many ways to cook zucchini, you might wonder what makes this dish different. Here’s why this recipe deserves a spot in your kitchen:

A Perfect Balance of Texture

One of the biggest challenges when cooking zucchini is its water content. Too much moisture, and you end up with a soggy dish. Too little, and it can be dry and flavorless. This recipe finds the perfect middle ground by incorporating grated potato and baking it to golden perfection. The result? A crispy, cheesy crust with a soft, flavorful interior.

Simple Ingredients, Maximum Flavor

This dish doesn’t rely on complex seasonings or hard-to-find ingredients. It takes humble staples—zucchini, potatoes, eggs, cheese—and turns them into something extraordinary. The natural sweetness of zucchini pairs beautifully with the saltiness of Parmesan, while fresh cheese adds a creamy depth.

A Versatile Crowd-Pleaser

Whether served as a main dish, a side, or even an appetizer, this recipe fits any occasion. It’s satisfying enough to stand alone but pairs beautifully with a fresh salad or a bowl of soup. Plus, it’s a great way to sneak more vegetables into your diet without sacrificing taste.

A Nutrient-Packed Dish

Zucchini is rich in vitamins A and C, potassium, and fiber, making it an excellent choice for a healthy meal. The addition of eggs and cheese provides protein and calcium, making this dish both nourishing and delicious.

Ingredients

IngredientQuantity
Courgettes (zucchini), grated2
SaltTo taste
Black pepperTo taste
Extra virgin olive oilAs needed
Eggs4
Sugar1 tablespoon
Milk100 ml (about 1/2 cup)
Extra virgin olive oil60 ml (about 1/4 cup)
Flour120 g (about 1 cup)
Baking powder11 g (about 1 tablespoon)
Potato, grated1 medium
Onion, chopped1 small
Parmesan cheese, grated30 g (about 1/4 cup)
Spreadable fresh cheese50 g (about 1/4 cup)
Parmesan cheese, grated50 g (about 1/2 cup)

Directions

  1. Prepare the Vegetables
    • Grate the zucchini and potato. Sprinkle with salt and let sit for 10 minutes. Squeeze out excess moisture.
    • Chop the onion finely.
  2. Mix the Wet Ingredients
    • In a large bowl, whisk the eggs with sugar, milk, and 60 ml of olive oil until well combined.
  3. Incorporate the Dry Ingredients
    • Gradually add flour and baking powder, mixing until smooth.
  4. Combine Everything
    • Fold in the grated zucchini, potato, and chopped onion.
    • Add Parmesan cheese and spreadable fresh cheese. Season with black pepper and additional salt if needed.
  5. Bake to Perfection
    • Preheat oven to 180°C (350°F). Grease a baking dish with olive oil.
    • Pour the mixture into the dish and sprinkle the remaining Parmesan on top.
    • Bake for 35–40 minutes or until golden brown and set.
  6. Serve and Enjoy
    • Let it cool slightly before slicing. Serve warm for the best flavor!

Nutritional Information (Per Serving – Approximate)

NutrientAmount per Serving
Calories~250 kcal
Protein~10 g
Carbohydrates~20 g
Fats~14 g
Fiber~2 g
Calcium~150 mg

Frequently Asked Questions

Can I Use a Different Type of Cheese?

Absolutely. While Parmesan and fresh spreadable cheese bring a delicious balance of sharpness and creaminess, you can experiment with other cheeses. Mozzarella will give you a gooey texture, feta will add a tangy twist, and cheddar will introduce a richer, bolder flavor.

How Do I Prevent the Zucchini from Making the Dish Too Watery?

Zucchini has a high water content, so it’s important to remove excess moisture before using it. After grating the zucchini, sprinkle it with salt and let it sit for about 10 minutes. Then, squeeze out as much liquid as possible using a clean kitchen towel or paper towels. This step ensures a firmer, more flavorful texture in the final dish.

Can I Make This Recipe Gluten-Free?

Yes. If you want a gluten-free version, substitute the regular flour with a gluten-free all-purpose flour blend. Almond flour can also work, though it may slightly change the texture.

What Can I Serve with This Dish?

This zucchini bake is delicious on its own but pairs wonderfully with other dishes. Try serving it with a crisp green salad, a side of roasted vegetables, or a bowl of creamy tomato soup. If you’re looking for a heartier meal, it goes well with grilled chicken or fish.

Can I Make This Ahead of Time?

Yes, and it actually tastes even better the next day. You can prepare the mixture ahead of time and store it in the refrigerator until you’re ready to bake. Alternatively, bake it in advance, let it cool, and reheat it in the oven when needed. This makes it a great option for meal prep or hosting guests.

Can I Freeze It?

Yes, this dish freezes well. Once baked, let it cool completely, then slice it into portions. Wrap each portion tightly in plastic wrap or aluminum foil and store in an airtight container in the freezer. When ready to eat, reheat in the oven at 180°C (350°F) until warmed through.

Can I Add More Vegetables?

Definitely. While zucchini is the star, you can customize the dish by adding finely chopped bell peppers, carrots, spinach, or mushrooms. Just be mindful of their water content—sautéing certain vegetables beforehand can help prevent excess moisture.

How Do I Store Leftovers?

Leftovers can be stored in an airtight container in the refrigerator for up to 3 days. Reheat in the oven or a pan over low heat to maintain its crispy texture. Avoid microwaving if possible, as it can make the dish soggy.

Conclusion: A Recipe You’ll Keep Coming Back To

There are some recipes you make once and forget about. Then there are those that become part of your kitchen traditions—passed down, perfected, and made with love. This zucchini dish is one of those recipes.

It’s simple yet full of flavor. It’s healthy yet indulgent. It’s the kind of meal that brings people together, whether for a quick weekday dinner or a special gathering.

So, if you have zucchini in your kitchen, don’t let it go to waste. Try this recipe, share it with your loved ones, and create your own tradition. Because sometimes, the most delicious meals come from the simplest ingredients—just like my grandmother taught me.

Amal

If You Have Zucchini, You Must Try This! The Most Delicious Recipe Ever

This Cheesy Zucchini & Potato Bake is a delicious, savory dish that perfectly balances crispy edges with a soft, cheesy interior. Packed with fresh zucchini, grated potato, Parmesan, and creamy spreadable cheese, it’s an easy-to-make recipe that’s both nutritious and comforting. Serve it as a side, snack, or even a light main course.
Prep Time 15 minutes
Cook Time 40 minutes
Total Time 55 minutes
Servings: 6 servings
Course: Snack
Cuisine: Mediterranean

Ingredients
  

  • 2 courgettes zucchini, grated
  • Salt to taste
  • Black pepper to taste
  • Extra virgin olive oil as needed
  • 4 eggs
  • 1 tablespoon sugar
  • 100 ml milk about 1/2 cup
  • 60 ml extra virgin olive oil about 1/4 cup
  • 120 g flour about 1 cup
  • 11 g baking powder about 1 tablespoon
  • 1 medium potato grated
  • 1 small onion chopped
  • 30 g Parmesan cheese grated (about 1/4 cup)
  • 50 g spreadable fresh cheese about 1/4 cup
  • 50 g Parmesan cheese grated (about 1/2 cup)

Method
 

  1. Prep the Vegetables
  2. Grate the zucchini and potato, sprinkle with salt, and let sit for 10 minutes.
  3. Squeeze out excess moisture using a clean kitchen towel or paper towels.
  4. Finely chop the onion.
  5. Prepare the Batter
  6. In a large mixing bowl, whisk together the eggs, sugar, milk, and olive oil.
  7. Slowly add the flour and baking powder, stirring until you have a smooth batter.
  8. Combine Everything
  9. Stir in the grated zucchini, potato, and chopped onion.
  10. Fold in the Parmesan cheese and spreadable fresh cheese. Season with black pepper and additional salt if needed.
  11. Bake the Dish
  12. Preheat the oven to 180°C (350°F). Grease a baking dish with olive oil.
  13. Pour the mixture into the dish and spread it evenly. Sprinkle the remaining Parmesan cheese on top.
  14. Bake for 35–40 minutes, or until golden brown and set.
  15. Serve & Enjoy
  16. Let it cool for a few minutes before slicing. Serve warm and enjoy its cheesy, crispy goodness.

Notes

  • Zucchini Tip: Removing excess moisture is crucial for the perfect texture. Don’t skip this step.
  • Cheese Variations: Try mozzarella for a gooier texture or feta for a tangy twist.
  • Make Ahead: You can prepare the batter in advance and refrigerate it for a few hours before baking.
  • Storage: Store leftovers in the fridge for up to 3 days or freeze for longer shelf life.

Zesty Lemon Cream Cake – A Burst of Sunshine in Every Bite

There is something about the flavor of lemon that feels like pure happiness. It’s bright, fresh, and instantly lifts your mood. For me, lemon desserts have always been special because they remind me of my childhood summers spent in my grandmother’s kitchen. She had a lemon tree in her backyard, and whenever the fruits ripened, the whole house would be filled with their citrusy aroma.

One of the first cakes I ever learned to bake was a simple lemon sponge, but over the years, I wanted to create something even better—something that captured the essence of those childhood memories while adding a creamy, indulgent twist. That’s how this Zesty Lemon Cream Cake was born.

This cake is soft, rich, and bursting with fresh lemon flavor. The cake itself is moist and tender, thanks to sour cream and vegetable oil, while the homemade lemon cream filling adds a velvety texture and a tangy brightness that balances the sweetness. It’s the kind of cake that makes you pause after the first bite, savoring the perfect combination of flavors.

Whether you’re making it for a special occasion or simply because you crave something light yet decadent, this cake will not disappoint. It’s like a bite of sunshine on a plate.

Why This Lemon Cake is Special

  • Perfectly Moist and Fluffy: The combination of sour cream and vegetable oil ensures a soft, delicate texture.
  • A Creamy, Luscious Filling: Unlike traditional lemon cakes, this one has a silky lemon cream layer that melts in your mouth.
  • Balanced Sweetness: The tartness of fresh lemon juice and zest keeps the cake from being overly sweet.
  • Easy Yet Impressive: While it looks elegant, the recipe is simple enough for both beginners and experienced bakers.
  • Versatile and Customizable: Serve it plain, dusted with powdered sugar, or with a drizzle of lemon glaze.

Ingredients

For the Lemon Cream:

IngredientQuantity
Egg1
Sugar50g (¼ cup)
Starch20g (2 tablespoons)
Milk200g (¾ cup + 1 tablespoon)
Lemon ZestFrom 1 lemon
Lemon JuiceFrom ½ lemon
Butter20g (1 ½ tablespoons)

For the Cake:

IngredientQuantity
Eggs3
SaltA pinch
Sugar120g (½ cup + 2 tablespoons)
Sour Cream50g (3 ½ tablespoons)
Vegetable Oil100g (7 tablespoons)
Flour200g (1 ½ cups + 1 tablespoon)

Step-by-Step Directions

  1. Prepare the Lemon Cream:
    • In a saucepan, whisk together the egg, sugar, starch, and milk.
    • Heat over low heat, stirring constantly until thickened.
    • Remove from heat and stir in the lemon zest, lemon juice, and butter. Let it cool.
  2. Prepare the Cake Batter:
    • In a mixing bowl, beat the eggs, salt, and sugar until light and fluffy.
    • Add sour cream and vegetable oil, mixing until smooth.
    • Gradually fold in the flour until fully combined.
  3. Assemble & Bake:
    • Pour half of the cake batter into a greased baking pan.
    • Gently spread the lemon cream over the batter.
    • Pour the remaining cake batter on top, smoothing it out.
    • Bake in a preheated oven at 350°F (175°C) for 30–35 minutes or until golden brown.
  4. Cool & Serve:
    • Allow the cake to cool before slicing. Enjoy as is or dust with powdered sugar for an extra touch!

Nutritional Breakdown (Per Serving)

NutrientApproximate Value
Calories280 kcal
Protein5g
Carbohydrates35g
Fiber1g
Fats13g
Sugar15g

Tips for the Perfect Lemon Cream Cake

1. Use Fresh Lemons for Maximum Flavor

Bottled lemon juice won’t give you the same brightness and aroma as fresh lemons. Use freshly squeezed lemon juice and finely grated zest for the best flavor.

2. Don’t Skip the Sour Cream

Sour cream adds richness and moisture to the cake, preventing it from drying out. If you don’t have sour cream, Greek yogurt is a great substitute.

3. Whisk the Eggs Well for a Light Texture

Beating the eggs with sugar until fluffy incorporates air into the batter, making the cake lighter.

4. Cook the Lemon Cream Slowly

When making the lemon cream, stir constantly over low heat to prevent lumps and ensure a smooth, silky consistency.

5. Let the Cake Cool Before Assembling

For clean layers and the best texture, allow the cake to cool completely before adding the lemon cream. This prevents the cream from becoming runny.

6. Store It Properly for the Best Flavor

Lemon cakes taste even better the next day, as the flavors have time to meld. Keep it refrigerated for an extra refreshing treat.

Health Benefits of Lemon Cake

While this is an indulgent dessert, it does have some surprising health benefits!

1. Lemons Are Full of Antioxidants

Lemon zest and juice are rich in vitamin C and flavonoids, which help boost immunity and promote healthy skin.

2. No Butter in the Cake

Since this recipe uses vegetable oil instead of butter, it has a lighter texture and is easier to digest.

3. Eggs Provide Protein and Healthy Fats

Eggs contribute protein and essential fatty acids, making this cake a satisfying treat.

4. A Natural Mood Booster

Lemon has been shown to have uplifting and stress-reducing effects, making this cake perfect for brightening your day.

Serving Suggestions

This cake is delicious on its own, but here are some ideas to make it even more irresistible:

  • Dusted with Powdered Sugar: A simple way to enhance the look and taste.
  • Drizzled with a Lemon Glaze: Mix lemon juice and powdered sugar for an extra tangy finish.
  • Topped with Whipped Cream: Light and airy, it complements the creamy lemon filling.
  • With Fresh Berries: Blueberries, raspberries, or strawberries add color and freshness.
  • As a Layered Cake: Double the recipe and stack the cake with extra lemon cream between the layers.

Frequently Asked Questions (FAQs)

1. Can I Make This Cake Without the Lemon Cream?

Yes! The cake itself is moist and flavorful enough to be served on its own. You can also replace the lemon cream with a simple lemon glaze.

2. Can I Use Greek Yogurt Instead of Sour Cream?

Absolutely! Greek yogurt works well as a substitute and adds a slight tang to complement the lemon flavor.

3. How Do I Store This Cake?

  • Room Temperature: If serving the same day, keep it covered at room temperature for a few hours.
  • Refrigerator: Store in an airtight container for up to 4 days.
  • Freezer: Wrap slices in plastic wrap and freeze for up to 2 months. Thaw overnight before serving.

4. Can I Make This Cake Gluten-Free?

Yes! Substitute the flour with a 1:1 gluten-free baking mix for a gluten-free version.

5. Can I Use a Different Citrus Fruit?

Yes! You can swap lemon for orange, lime, or even grapefruit to create different citrus variations.

6. How Can I Make the Cake More Moist?

For an extra moist cake, add an additional tablespoon of sour cream or a drizzle of lemon syrup after baking.

7. Why Did My Cake Sink in the Middle?

A sunken cake can be caused by:

  • Overmixing the batter, which removes air.
  • Opening the oven door too soon.
  • Not baking it long enough.

Make sure to follow the recipe carefully to achieve a perfect rise.

Conclusion: A Cake Worth Baking Again and Again

There’s something magical about homemade lemon cake—it’s fresh, fragrant, and bursting with flavor. This Zesty Lemon Cream Cake brings together the richness of a soft, moist cake with the tangy brightness of lemon cream, creating a dessert that feels light yet indulgent at the same time.

Whether you’re baking for a celebration, a weekend treat, or just because you love lemon-flavored desserts, this cake is a must-try. Its simple ingredients, easy preparation, and irresistible flavor make it a favorite that you’ll want to bake over and over again.

So the next time you crave something sweet but not too heavy, let this lemon cake bring a little sunshine to your day. Once you take the first bite, you’ll understand why this is the perfect balance of citrusy freshness and creamy indulgence!

Amal

Zesty Lemon Cream Cake – A Burst of Sunshine in Every Bite

This Zesty Lemon Cream Cake is a light, moist, and citrusy dessert that melts in your mouth! The fluffy cake is perfectly balanced with a rich, silky lemon cream filling, making every bite a delightful mix of sweetness and tang. Whether for a special occasion or an everyday treat, this cake is sure to impress with its fresh, vibrant flavors and soft texture.
Prep Time 10 minutes
Cook Time 35 minutes
Total Time 45 minutes
Servings: 8 servings
Course: Dessert
Cuisine: European

Ingredients
  

For the Lemon Cream:
  • 1 egg
  • 50 g 1/4 cup sugar
  • 20 g 2 tablespoons starch
  • 200 g 3/4 cup + 1 tablespoon milk
  • Zest from 1 lemon
  • Juice from 1/2 lemon
  • 20 g 1 1/2 tablespoons butter
For the Cake:
  • 3 eggs
  • A pinch of salt
  • 120 g 1/2 cup + 2 tablespoons sugar
  • 50 g 3 1/2 tablespoons sour cream
  • 100 g 7 tablespoons vegetable oil
  • 200 g 1 1/2 cups + 1 tablespoon flour

Method
 

Prepare the Lemon Cream:
  1. In a saucepan, whisk together the egg, sugar, starch, and milk.
  2. Heat over low heat, stirring continuously until thickened.
  3. Remove from heat, then stir in the lemon zest, lemon juice, and butter. Set aside to cool.
Make the Cake Batter:
  1. In a mixing bowl, beat the eggs, salt, and sugar until light and fluffy.
  2. Add the sour cream and vegetable oil, mixing until smooth.
  3. Gradually fold in the flour until fully combined.
Assemble & Bake:
  1. Pour half of the cake batter into a greased baking pan.
  2. Spread the cooled lemon cream evenly over the batter.
  3. Pour the remaining cake batter on top and smooth it out.
  4. Bake at 350°F (175°C) for 30–35 minutes, or until golden brown.
Cool & Serve:
  1. Allow the cake to cool before slicing. Enjoy as is, or dust with powdered sugar for an extra touch!

Notes

  • For Extra Moisture: Use full-fat sour cream for a richer texture.
  • Storage Tips: Keep in the fridge for up to 4 days; serve chilled for an extra refreshing treat.
  • Flavor Boost: Add a few drops of vanilla extract or swap lemon for orange zest for a twist.

6-Pot Yogurt & Chocolate Chip Cake – The Foolproof Recipe That Will Melt in Your Mouth

Some of the best recipes are the ones that require the least effort but bring the most joy. The 6-Pot Yogurt & Chocolate Chip Cake is exactly that—simple, delicious, and almost impossible to mess up.

I first learned about this cake from my grandmother. She wasn’t one to measure ingredients precisely; she cooked and baked by instinct, using whatever she had on hand. One afternoon, I watched her make a cake using nothing but a single yogurt pot as a measuring tool. She poured, mixed, and baked with ease, never looking at a recipe but somehow knowing it would turn out perfectly. When the cake came out of the oven, golden and fluffy, the whole house smelled like vanilla and warm chocolate.

That first bite was unforgettable—light, moist, and bursting with little pockets of melted chocolate. It was the kind of cake that made you close your eyes and savor every bite. No fancy equipment, no complicated techniques—just a humble cake that tasted like home.

Now, every time I make this 6-Pot Cake, I think of that afternoon, standing beside my grandmother, learning that baking isn’t just about following instructions. It’s about creating something with love, sharing it with others, and making memories that last a lifetime.

Why This Cake Is the Best You’ll Ever Make

  • No Measuring Cups Needed: All ingredients are measured using a yogurt pot, making it incredibly easy to follow.
  • Perfectly Moist & Fluffy: Thanks to the yogurt and oil, this cake stays soft for days.
  • Quick & Simple: No complicated steps—just mix, pour, and bake.
  • Endlessly Versatile: You can customize it with nuts, dried fruits, or even a drizzle of chocolate glaze.
  • Perfect for Any Occasion: Whether it’s for a quick snack, a birthday, or an afternoon tea, this cake never fails to impress.

Ingredients

IngredientQuantity
Yogurt (1 pot)125-150g
Vanilla extract1 teaspoon
Sugar (1 pot)125-150g
Vegetable oil (1 pot)125-150ml
Flour (3 pots)375g
Baking powder1 tablespoon
Chocolate chips100g

Step-by-Step Directions

  1. Preheat the Oven: Set to 350°F (175°C) and grease a cake pan.
  2. Mix Wet Ingredients: In a bowl, whisk together the yogurt, vanilla extract, sugar, and vegetable oil until smooth.
  3. Add Dry Ingredients: Gradually mix in the flour, baking powder, and chocolate chips until fully combined.
  4. Pour & Bake: Pour the batter into a prepared cake pan and bake for 30–35 minutes, or until a toothpick inserted in the center comes out clean.
  5. Cool & Serve: Let the cake cool before slicing. Enjoy warm or at room temperature!

Nutritional Breakdown (Per Serving)

NutrientApproximate Value
Calories280 kcal
Protein4g
Carbohydrates38g
Fiber1g
Fats12g
Sugar20g

Tips for Making the Perfect 6-Pot Cake

1. Use Full-Fat Yogurt for the Best Texture

Yogurt adds moisture and richness to the cake. Using full-fat yogurt ensures a soft, fluffy texture. If using low-fat yogurt, consider adding an extra tablespoon of oil to maintain the cake’s moisture.

2. Don’t Overmix the Batter

Overmixing the batter can lead to a dense cake. Stir just until the ingredients are combined to keep the cake light and airy.

3. Coat the Chocolate Chips with Flour

To prevent the chocolate chips from sinking to the bottom, toss them in a little flour before adding them to the batter. This ensures they stay evenly distributed.

4. Grease & Flour Your Baking Pan

This cake has a soft texture, so greasing and lightly flouring the baking pan will help it release easily without sticking.

5. Let It Cool Before Slicing

As tempting as it is to slice into the cake immediately, letting it cool for 15–20 minutes allows it to set properly and enhances the flavor.

Healthier Variations of the 6-Pot Cake

If you want to enjoy this cake while keeping it a little healthier, here are a few modifications you can try:

  • Reduce the Sugar: Instead of one full pot of sugar, use ¾ of a pot or replace half of it with honey or maple syrup.
  • Use Whole Wheat Flour: Swap one of the three pots of flour for whole wheat flour to increase fiber.
  • Choose Dark Chocolate Chips: Use 70% dark chocolate chips for a richer flavor with less sugar.
  • Use Greek Yogurt: Greek yogurt adds extra protein and a slightly tangy taste.

How to Serve This Cake

While this cake is delicious on its own, here are a few ways to elevate it:

  • With a Dusting of Powdered Sugar: A light sprinkle makes it look even more inviting.
  • Drizzled with Chocolate Sauce: Melted dark chocolate or a simple ganache takes this cake to another level.
  • With Fresh Berries: Strawberries, raspberries, or blueberries add a fresh, fruity contrast.
  • As a Breakfast Treat: Serve with a dollop of Greek yogurt and a drizzle of honey for a satisfying morning bite.
  • With Ice Cream: A warm slice paired with a scoop of vanilla ice cream is pure perfection.

Frequently Asked Questions (FAQs)

1. Can I Use a Different Type of Yogurt?

Yes! While plain sweetened yogurt is ideal, you can also use:

  • Vanilla yogurt for extra flavor.
  • Greek yogurt for a denser, protein-rich cake.
  • Coconut yogurt for a dairy-free version.

2. Can I Make This Cake Without Chocolate Chips?

Absolutely! This cake is delicious on its own, but you can replace the chocolate chips with:

  • Chopped nuts (almonds, walnuts, or hazelnuts).
  • Dried fruits (raisins, cranberries, or chopped dates).
  • A handful of shredded coconut for extra texture.

3. How Do I Store This Cake?

  • Room Temperature: Store in an airtight container for up to 3 days.
  • Refrigerator: Keep in the fridge for up to 5 days. Bring to room temperature before serving.
  • Freezer: Wrap slices in plastic wrap and freeze for up to 2 months. Thaw overnight before eating.

4. Can I Make This Cake Gluten-Free?

Yes! Simply substitute the flour with a gluten-free flour blend that contains xanthan gum for structure.

5. What Can I Use Instead of Vegetable Oil?

If you prefer to avoid vegetable oil, try these substitutes:

  • Melted coconut oil for a subtle coconut flavor.
  • Olive oil for a richer taste.
  • Unsweetened applesauce for a lighter version.

6. Can I Make This Cake Vegan?

Yes! Try these adjustments:

  • Use dairy-free yogurt.
  • Replace eggs with flax eggs (1 tbsp ground flaxseed + 3 tbsp water per egg).
  • Use vegan chocolate chips.

7. How Do I Know When the Cake is Done?

The cake is ready when:

  • The top is golden brown.
  • A toothpick inserted in the center comes out clean.
  • The edges start pulling away from the pan.

Conclusion: A Cake So Easy, You’ll Make It Again & Again

This 6-Pot Yogurt & Chocolate Chip Cake is more than just a recipe—it’s a celebration of simplicity and flavor. With no need for measuring cups, it’s perfect for beginner bakers and experienced cooks alike. Whether you’re making it for a family gathering, a quick dessert, or just because you’re craving something sweet, this cake never disappoints.

Its fluffy texture, rich chocolate chips, and delicate vanilla aroma make it a timeless classic that everyone will love. And the best part? You can customize it endlessly, making it your own every time you bake it.

So, the next time you want a cake that’s easy, quick, and absolutely delicious, grab a pot of yogurt and start baking—you’ll understand why this is called the best cake in the world!

Amal

6-Pot Yogurt & Chocolate Chip Cake – The Foolproof Recipe That Will Melt in Your Mouth

This 6-Pot Yogurt & Chocolate Chip Cake is the easiest, fluffiest, and most delicious cake you’ll ever make! Using a simple yogurt pot as a measuring guide, this foolproof recipe comes together in minutes with no need for scales or measuring cups. The result? A perfectly moist cake, lightly sweetened with vanilla and packed with melty chocolate chips. Perfect for breakfast, dessert, or a quick snack, this cake will melt in your mouth!
Prep Time 5 minutes
Cook Time 30 minutes
Total Time 35 minutes
Servings: 8 servings
Course: Dessert
Cuisine: European

Ingredients
  

  • 1 pot of yogurt about 125-150 g
  • 1 teaspoon vanilla extract
  • 1 pot of sugar about 125-150 g
  • 1 pot of vegetable oil about 125-150 ml
  • 3 pots of flour about 375 g
  • 1 tablespoon baking powder
  • 100 g chocolate chips

Method
 

  1. Preheat the Oven: Set to 350°F (175°C) and grease a cake pan.
  2. Mix Wet Ingredients: In a bowl, whisk together the yogurt, vanilla extract, sugar, and vegetable oil until smooth.
  3. Add Dry Ingredients: Gradually mix in the flour, baking powder, and chocolate chips until fully combined.
  4. Pour & Bake: Pour the batter into a prepared cake pan and bake for 30–35 minutes, or until a toothpick inserted in the center comes out clean.
  5. Cool & Serve: Let the cake cool before slicing. Enjoy warm or at room temperature!

Notes

  • For Extra Moisture: Use full-fat yogurt for the best texture.
  • Chocolate Variation: Swap chocolate chips for nuts, dried fruit, or white chocolate chunks.
  • Storage Tips: Keep in an airtight container at room temperature for 3 days or refrigerate for up to 5 days.
  • Freezing: Slice and freeze for up to 2 months. Thaw overnight before serving.

Fluffy 3-Ingredient Yogurt Cake – A Simple Delight That Feels Like Magic

I’ve always loved baking, but I used to believe that a good cake required a long list of ingredients—flour, sugar, butter, baking powder, and all the extras that make traditional cakes so rich and indulgent. That was until I discovered this incredibly simple yogurt cake that uses just three basic ingredients: yogurt, eggs, and cornstarch.

It all started one afternoon when I was craving something sweet but didn’t feel like measuring out a dozen ingredients. I wanted something light, healthy, and easy to prepare. That’s when I stumbled upon a recipe that seemed too good to be true—a flourless, sugar-free yogurt cake that could be made in just a few minutes. I was skeptical at first, but after whisking together the eggs, yogurt, and cornstarch, pouring the batter into the pan, and waiting patiently as it baked, I knew I had found something special.

The result? A cake that was soft, airy, and slightly tangy from the yogurt, with a texture somewhere between cheesecake and a soufflé. It felt light but satisfying, sweet but not overpowering. Best of all, it required almost no effort, making it the perfect guilt-free treat for busy days or last-minute dessert cravings.

Now, this 3-ingredient yogurt cake has become one of my go-to recipes whenever I want something simple, wholesome, and delicious. If you love effortless baking, this cake is going to be your new favorite!

Why This Yogurt Cake is a Must-Try

  • Only 3 Ingredients: No flour, no sugar, no butter—just yogurt, eggs, and cornstarch.
  • Naturally Sweet & Light: The sweetness comes from the yogurt, making it a healthier alternative to traditional cakes.
  • Quick & Easy: Just 5 minutes of prep, and the oven does the rest.
  • Perfect Texture: Soft, slightly creamy, and almost soufflé-like.
  • Gluten-Free: Since it contains no flour, it’s a great option for those avoiding gluten.
  • Great for Any Occasion: Enjoy it plain or dress it up with fruit, honey, or powdered sugar.

Ingredients

IngredientQuantity
Sweetened yogurt400g (~1 2/3 cup)
Eggs4
Cornstarch40g (~4 tbsp)
Round baking pan16 cm (6.2 inch)
Parchment paperAs needed

Step-by-Step Directions

  1. Preheat the Oven: Set to 350°F (175°C) and line the baking pan with parchment paper.
  2. Whisk the Eggs: In a large bowl, beat the eggs until smooth and slightly frothy.
  3. Mix Ingredients: Add the sweetened yogurt and cornstarch to the eggs. Whisk until fully combined with no lumps.
  4. Pour & Bake: Pour the batter into the prepared baking pan and smooth the top. Bake for 35–40 minutes or until the cake is set and slightly golden.
  5. Cool & Serve: Let the cake cool completely before slicing. Enjoy as is, or dust with powdered sugar or fresh fruit for extra flavor.

Nutritional Breakdown (Per Serving)

NutrientApproximate Value
Calories120 kcal
Protein5g
Carbohydrates15g
Fiber0g
Fats4g
Sugar10g

Tips for the Perfect Yogurt Cake

1. Choose the Right Yogurt

  • Use sweetened yogurt to keep the cake naturally sweet without adding sugar.
  • Greek yogurt works well for a creamier, denser texture, while regular yogurt makes it lighter and fluffier.
  • If using unsweetened yogurt, consider adding a tablespoon of honey or maple syrup for extra sweetness.

2. Whisk the Eggs Well

  • Beating the eggs thoroughly incorporates air, which helps the cake rise and creates a lighter texture.
  • For an even fluffier cake, separate the eggs and beat the whites until soft peaks form before folding them into the batter.

3. Sift the Cornstarch

  • Cornstarch can clump, so sift it before adding it to the mixture to ensure a smooth batter.

4. Use a Small Baking Pan

  • A 16 cm (6.2-inch) pan is ideal for this recipe. If using a larger pan, the cake will be thinner and may bake faster, so keep an eye on it.

5. Let It Cool Completely

  • This cake is delicate and needs time to set. Let it cool in the pan before slicing for the best texture.
  • For a firmer, cheesecake-like consistency, refrigerate it for a few hours before serving.

Health Benefits of This Yogurt Cake

This cake isn’t just delicious—it’s also a healthier alternative to traditional cakes. Here’s why:

1. High in Protein

  • With eggs and yogurt as the main ingredients, this cake is naturally rich in protein, making it a satisfying snack.

2. Low in Calories & Sugar

  • Since the sweetness comes from yogurt, it contains less sugar than most desserts.
  • Using low-fat or fat-free yogurt makes it an even lighter option.

3. Gluten-Free & Easy to Digest

  • Made without flour, this cake is perfect for those with gluten sensitivities or anyone looking for a lighter treat.

4. Good for Gut Health

  • Yogurt is full of probiotics, which support a healthy digestive system.

Ways to Serve This Yogurt Cake

This cake is delicious on its own, but you can customize it in so many ways!

  • With Fresh Fruit: Top with berries, sliced bananas, or a drizzle of citrus zest.
  • Drizzled with Honey or Maple Syrup: For a touch of extra sweetness.
  • Dusted with Powdered Sugar: A simple and elegant way to enhance the flavor.
  • With a Dollop of Whipped Cream or Greek Yogurt: Adds extra creaminess.
  • Topped with Nuts or Granola: For a bit of crunch.

Frequently Asked Questions (FAQs)

1. Can I Use Unsweetened Yogurt?

Yes! If you prefer less sweetness, use unsweetened yogurt, or add 1–2 tablespoons of honey, maple syrup, or a sugar substitute to the batter.

2. How Do I Store This Cake?

  • Refrigerator: Store in an airtight container for up to 4 days.
  • Freezer: Wrap slices in plastic wrap and freeze for up to 2 months. Thaw before serving.

3. Can I Make It Dairy-Free?

Yes! Substitute the yogurt with coconut yogurt or almond-based yogurt for a dairy-free version.

4. Can I Add Flavorings?

Absolutely! Try mixing in:

  • Vanilla extract for a hint of sweetness.
  • Lemon or orange zest for a fresh citrus twist.
  • Cinnamon or nutmeg for warmth and spice.

5. Can I Make This in a Larger Pan?

Yes, but the cake will be thinner and may bake faster. Adjust the baking time accordingly.

6. How Do I Know When It’s Done Baking?

  • The cake should be slightly golden on top and set in the center.
  • A toothpick inserted in the middle should come out clean.

7. Can I Serve This Cake Warm or Cold?

  • It’s delicious both ways! Warm, it’s light and fluffy—cold, it has a cheesecake-like texture.

Conclusion: A Cake So Easy, You’ll Make It Again and Again

This 3-ingredient yogurt cake is a reminder that baking doesn’t have to be complicated. With just yogurt, eggs, and cornstarch, you can create a dessert that’s soft, fluffy, and naturally sweet.

Whether you’re looking for a healthier cake alternative, a quick dessert for unexpected guests, or a light treat to enjoy with your morning coffee, this cake is a perfect choice. It’s proof that sometimes, the simplest recipes are the most magical.

So the next time you want to bake something easy, delicious, and guilt-free, give this yogurt cake a try—you won’t believe how good it is!

Amal

Fluffy 3-Ingredient Yogurt Cake – A Simple Delight That Feels Like Magic

This fluffy 3-ingredient yogurt cake is the ultimate easy dessert! Made with just yogurt, eggs, and cornstarch, this cake is naturally light, slightly sweet, and has a soft, soufflé-like texture. With no flour, no added sugar, and just five minutes of prep, it’s the perfect guilt-free treat for any occasion. Enjoy it plain or with fresh fruit for an extra touch of flavor!
Prep Time 5 minutes
Cook Time 35 minutes
Total Time 40 minutes
Servings: 4 –6 servings
Course: Dessert
Cuisine: Healthy

Ingredients
  

  • 400 g sweetened yogurt ~1 2/3 cup
  • 4 eggs
  • 40 g cornstarch ~4 tablespoons
  • 16 cm 6.2 inch round baking pan
  • Parchment paper

Method
 

  1. Preheat the Oven: Set to 350°F (175°C) and line the baking pan with parchment paper.
  2. Whisk the Eggs: In a mixing bowl, beat the eggs until smooth and slightly frothy.
  3. Combine Ingredients: Add the sweetened yogurt and cornstarch, whisking until fully incorporated and lump-free.
  4. Pour & Bake: Pour the batter into the prepared baking pan and smooth the top. Bake for 35–40 minutes, or until set and slightly golden.
  5. Cool & Serve: Let the cake cool completely before removing from the pan. Enjoy plain, or top with fresh fruit, honey, or powdered sugar.

Notes

  • For Extra Flavor: Add vanilla extract, citrus zest, or cinnamon to the batter.
  • Unsweetened Yogurt Option: If using unsweetened yogurt, mix in 1–2 tablespoons of honey or maple syrup.
  • Storage: Store in the fridge for up to 4 days. Serve chilled for a cheesecake-like texture.
  • Serving Ideas: Delicious with berries, nuts, or a drizzle of chocolate.

Creamy Cauliflower & Cheddar Soup – A Comforting and Nutritious Delight

There are certain recipes that become part of your routine, not because they are complicated or extravagant, but because they bring warmth, comfort, and nourishment with every bite. This creamy cauliflower and cheddar soup is one of those recipes for me.

I first discovered this soup on a chilly autumn evening when I was craving something warm, satisfying, and simple to make. I had a head of cauliflower in my fridge, a few basic ingredients in my pantry, and a strong desire for something creamy and cheesy. Instead of following a complex recipe, I decided to experiment. I simmered the vegetables, made a roux to thicken the soup, and finished it off with a generous amount of cheddar cheese. The result? A silky, flavorful soup that instantly became a favorite.

From that day forward, this soup has become a regular part of my meals. It’s quick to make, packed with nutrients, and incredibly delicious. Whether I’m making a big pot to enjoy throughout the week or serving it as a starter for a family dinner, this dish never fails to impress.

If you’re looking for a healthy, creamy, and cheesy soup that you can whip up in no time, this recipe is a must-try.

Why You’ll Love This Cauliflower Soup

  • Ultra-Creamy & Satisfying – The combination of cauliflower, milk, and cheddar cheese creates a rich and velvety texture.
  • Packed with Nutrients – Loaded with vitamins from cauliflower, carrots, and celery, plus the protein and calcium from cheese.
  • Quick & Easy – Made in less than 30 minutes, perfect for a busy weeknight meal.
  • Lighter Alternative to Cream-Based Soups – Unlike traditional creamy soups, this recipe uses milk instead of heavy cream, keeping it rich without being overly heavy.
  • Family-Friendly – Even picky eaters love this soup, thanks to the mild cauliflower flavor and cheesy goodness.

Ingredients

IngredientQuantity
Cauliflower, broken into florets1 medium head
Carrot, shredded1
Celery, chopped¼ cup
Water2 ½ cups
Chicken bouillon2 teaspoons
Butter3 tablespoons
All-purpose flour3 tablespoons
Salt¾ teaspoon
Black pepper⅛ teaspoon
Milk2 cups
Shredded cheddar cheese1 cup

Step-by-Step Directions

  1. Cook the Vegetables: In a large pot, combine cauliflower, shredded carrot, celery, water, and chicken bouillon. Bring to a boil, then reduce heat and simmer for 10–12 minutes until vegetables are tender.
  2. Prepare the Roux: In a separate saucepan, melt butter over medium heat. Stir in flour, salt, and black pepper, whisking constantly for 1–2 minutes to create a smooth paste.
  3. Add the Milk: Gradually whisk in the milk, stirring continuously until thickened.
  4. Combine Everything: Pour the milk mixture into the pot with the cooked vegetables. Stir well and bring to a gentle simmer.
  5. Add the Cheese: Remove from heat and stir in the shredded cheddar cheese until fully melted and creamy.
  6. Serve & Enjoy: Ladle into bowls and serve warm. Garnish with extra cheese or fresh herbs if desired.

Nutritional Breakdown (Per Serving)

NutrientApproximate Value
Calories220 kcal
Protein9g
Carbohydrates18g
Fiber3g
Fats13g
Sugar6g

Tips for Making the Best Cauliflower Soup

1. Cut the Cauliflower into Small Florets

Smaller pieces cook faster and blend more smoothly, ensuring a perfectly creamy texture without large chunks.

2. Sauté the Vegetables for Extra Flavor

Before simmering the vegetables, lightly sauté the onions, garlic, carrots, and celery in butter. This step enhances the depth of flavor.

3. Use a Roux for a Creamier Texture

A roux (a mixture of butter and flour) thickens the soup, giving it that smooth, silky consistency without the need for heavy cream.

4. Choose a Sharp Cheddar Cheese

Aged cheddar adds a bold, rich flavor that balances the mild taste of cauliflower. Avoid pre-shredded cheese, as it contains anti-caking agents that can make the soup grainy.

5. Blend for Extra Smoothness

For a velvety finish, use an immersion blender to puree the soup directly in the pot. If you prefer a chunkier texture, mash the cauliflower lightly with a fork instead.

6. Add a Touch of Spice

A dash of cayenne pepper or smoked paprika can elevate the flavor and give the soup a subtle warmth.

Health Benefits of Cauliflower Soup

This creamy cauliflower and cheddar soup is not just delicious—it’s also highly nutritious. Here’s why you’ll feel good about enjoying it:

1. Rich in Vitamins & Antioxidants

Cauliflower is packed with vitamin C, vitamin K, and antioxidants, which support immune function and overall health.

2. High in Fiber for Digestion

With fiber from cauliflower, carrots, and celery, this soup promotes gut health and digestion while keeping you full longer.

3. Good Source of Calcium & Protein

Cheddar cheese and milk provide calcium and protein, essential for strong bones and muscles.

4. Low in Carbs, Perfect for Light Meals

Since cauliflower is a great low-carb vegetable, this soup is an excellent choice for those looking for a healthier, low-carb meal without sacrificing flavor.

Best Ways to Serve This Soup

This soup is delicious on its own, but you can elevate it even further with these serving ideas:

  • With Crusty Bread – A slice of warm, toasted bread is perfect for dipping.
  • Topped with Crispy Bacon – Sprinkle crispy bacon bits on top for extra flavor and texture.
  • With Fresh Herbs – Garnish with fresh parsley, chives, or thyme for a bright finish.
  • Served with a Side Salad – Pair with a fresh green salad for a balanced meal.
  • With a Grilled Cheese Sandwich – For the ultimate comfort meal, serve alongside a gooey grilled cheese sandwich.

Frequently Asked Questions (FAQs)

1. Can I Make This Soup Ahead of Time?

Yes! This soup stores well and tastes even better the next day. Keep it in an airtight container in the refrigerator for up to 4 days.

2. Can I Freeze This Soup?

Absolutely! Let the soup cool completely, then store it in freezer-safe containers for up to 3 months. When ready to serve, thaw overnight in the refrigerator and reheat on the stovetop.

3. Can I Use a Different Cheese?

Yes! While cheddar gives the soup a classic taste, you can also try:

  • Gruyère – Adds a nutty, slightly sweet flavor.
  • Parmesan – For a sharper, salty kick.
  • Gouda – Creates a creamier, milder soup.

4. Can I Make This Soup Dairy-Free?

Yes! Substitute:

  • Olive oil instead of butter.
  • Unsweetened almond milk or coconut milk instead of dairy milk.
  • Nutritional yeast or dairy-free cheese for a cheesy flavor.

5. How Do I Make This Soup Thicker?

For a thicker soup, you can:

  • Reduce the amount of milk slightly.
  • Add an extra tablespoon of flour to the roux.
  • Blend half of the soup and leave the rest chunky for a creamy yet textured finish.

6. Can I Add Other Vegetables?

Definitely! Some great additions include:

  • Broccoli – Pairs beautifully with cauliflower.
  • Potatoes – Makes the soup extra hearty.
  • Leeks – Adds a mild onion-like sweetness.

7. What If I Don’t Have Chicken Bouillon?

You can use vegetable broth or homemade chicken stock instead for an equally flavorful result.

Conclusion: A Soup You’ll Want to Make Again and Again

This creamy cauliflower and cheddar soup is proof that simple ingredients can create something truly comforting and delicious. With its silky texture, cheesy flavor, and wholesome ingredients, it’s the kind of soup that warms you from the inside out.

Whether you’re making it for a cozy weeknight dinner, meal prepping for the week, or serving it as a starter for a gathering, this soup is guaranteed to please. Plus, it’s easy to customize, quick to prepare, and full of nourishing goodness.

So the next time you’re craving a bowl of warmth and comfort, skip the canned soup and make this homemade cauliflower soup instead. Once you try it, you’ll understand why I make it almost every day!

Amal

Creamy Cauliflower & Cheddar Soup – A Comforting and Nutritious Delight

This Creamy Cauliflower & Cheddar Soup is the ultimate bowl of comfort—warm, rich, and packed with flavor! Made with tender cauliflower, shredded carrots, and a smooth, cheesy broth, this soup is both nourishing and satisfying. It’s easy to make, requires simple ingredients, and is perfect for a cozy dinner or meal prep. Whether you’re looking for a healthy, low-carb option or just craving a delicious homemade soup, this recipe is a must-try!
Prep Time 10 minutes
Cook Time 20 minutes
Total Time 30 minutes
Servings: 4 servings
Course: Soup
Cuisine: American

Ingredients
  

  • 1 medium head cauliflower broken into florets
  • 1 carrot shredded
  • 1/4 cup celery chopped into small pieces
  • 2 1/2 cups water
  • 2 teaspoons chicken bouillon
  • 3 tablespoons butter
  • 3 tablespoons all-purpose flour
  • 3/4 teaspoon salt
  • 1/8 teaspoon pepper
  • 2 cups milk
  • 1 cup shredded cheddar cheese

Method
 

  1. Cook the Vegetables: In a large pot, combine cauliflower, shredded carrot, celery, water, and chicken bouillon. Bring to a boil, then reduce heat and simmer for 10–12 minutes until vegetables are tender.
  2. Prepare the Roux: In a separate saucepan, melt butter over medium heat. Stir in flour, salt, and black pepper, whisking constantly for 1–2 minutes until smooth.
  3. Add the Milk: Slowly whisk in the milk, stirring continuously until thickened.
  4. Combine Everything: Pour the milk mixture into the pot with the cooked vegetables. Stir well and bring to a gentle simmer.
  5. Melt the Cheese: Remove from heat and stir in the shredded cheddar cheese until fully melted and creamy.
  6. Serve & Enjoy: Ladle into bowls and serve warm. Garnish with extra cheese or fresh herbs if desired.

Notes

  • For Extra Creaminess: Blend half of the soup for a smoother texture while leaving some chunks.
  • Make It Dairy-Free: Use unsweetened almond or coconut milk and a plant-based cheese alternative.
  • Storage: Keep leftovers in an airtight container in the fridge for up to 4 days. Reheat gently on the stovetop.
  • Freezing Tip: Freeze in individual portions for up to 3 months. Thaw overnight and warm up before serving.

Creamy Spinach & Mushroom Lasagna – A Comforting Classic with a Delicious Twist

Lasagna has always been a dish that brings people together. In my family, it was the centerpiece of every special occasion—layered with rich sauces, gooey cheese, and the unmistakable aroma that filled the house as it baked. But for the longest time, I only knew lasagna in its classic form: layers of pasta, meat sauce, and ricotta.

That changed one evening when I was craving something warm and comforting but wanted a break from the usual tomato-based lasagna. I had fresh spinach and mushrooms on hand, along with a can of condensed mushroom soup, and an idea started forming. What if I replaced the tomato sauce with a creamy, herb-infused mushroom sauce?

The result was nothing short of incredible. The lasagna turned out rich, velvety, and full of deep, earthy flavors. The spinach added a fresh contrast to the creamy sauce, while the mushrooms brought a meaty texture that made the dish hearty and satisfying. With layers of ricotta, mozzarella, and Parmesan, it had all the indulgence of a traditional lasagna but with a completely new and exciting flavor profile.

Since then, this creamy spinach & mushroom lasagna has become a staple in my kitchen. It’s a dish that feels both comforting and elegant, making it perfect for weeknight dinners, family gatherings, or even special occasions. If you’re looking for a vegetarian lasagna that’s packed with flavor, rich in texture, and incredibly satisfying, this recipe is for you.

Why You’ll Love This Spinach & Mushroom Lasagna

  • Rich & Creamy Texture: The combination of ricotta, mozzarella, and cream of mushroom soup creates a luxurious sauce that coats every bite.
  • Earthy, Savory Flavor: Mushrooms add a depth of flavor, while spinach provides freshness and balance.
  • No-Cook Noodles for Convenience: Using oven-ready lasagna noodles saves time and effort without sacrificing quality.
  • Vegetarian & Satisfying: This dish proves that you don’t need meat to make a hearty, filling lasagna.
  • Perfect for Meal Prep: The flavors develop even more overnight, making it great for leftovers.

Ingredients

IngredientQuantity
Lasagna noodles (no-cook)12
Olive oil2 tbsp
Onion, finely chopped1
Garlic, minced3 cloves
Sliced mushrooms2 cups
Fresh spinach, chopped (or frozen)2 cups
Campbell’s condensed cream of mushroom soup1 can (10.5 oz)
Milk1 cup
Ricotta cheese1 cup
Shredded mozzarella cheese2 cups
Grated Parmesan cheese1 cup
Dried basil (or Italian herbs)1 tsp
Dried oregano1 tsp
Salt and pepperTo taste
Fresh parsley, chopped (for garnish)To taste

Step-by-Step Directions

  1. Preheat the Oven: Set to 375°F (190°C) and grease a baking dish.
  2. Sauté the Vegetables: Heat olive oil in a pan. Sauté onions and garlic until fragrant, then add mushrooms and spinach. Cook until softened.
  3. Make the Sauce: In a bowl, whisk together mushroom soup, milk, dried basil, oregano, salt, and pepper.
  4. Assemble the Lasagna: Spread a layer of sauce at the bottom of the dish. Add a layer of noodles, then ricotta cheese, sautéed vegetables, mozzarella, and Parmesan. Repeat layers until ingredients are used, finishing with cheese on top.
  5. Bake Until Golden: Cover with foil and bake for 25 minutes. Uncover and bake for another 15 minutes until golden and bubbly.
  6. Garnish & Serve: Let cool for a few minutes, then top with fresh parsley and serve warm.

Nutritional Breakdown (Per Serving)

NutrientApproximate Value
Calories450 kcal
Protein20g
Carbohydrates45g
Fiber5g
Fats20g
Sugar6g

Tips for the Best Spinach & Mushroom Lasagna

1. Sauté the Vegetables Properly

To bring out the full flavor of the mushrooms and spinach, sauté them in olive oil until they release their moisture and become golden brown. This prevents the lasagna from becoming watery and enhances the depth of flavor.

2. Use a Creamy, Well-Seasoned Sauce

The condensed mushroom soup mixed with milk creates a smooth and creamy base. To add extra flavor, season it well with dried basil, oregano, salt, and pepper. A touch of nutmeg can also enhance the creaminess.

3. Layer the Ingredients Evenly

For the perfect lasagna, spread each layer evenly to ensure every bite has the right balance of pasta, filling, and cheese. Start with a thin layer of sauce at the bottom to prevent sticking.

4. Cover While Baking for Even Cooking

Covering the lasagna with foil for the first 25 minutes helps it cook evenly and retain moisture. Removing the foil in the last 15 minutes allows the top to become golden and slightly crisp.

5. Let It Rest Before Serving

Allowing the lasagna to sit for about 10 minutes after baking makes it easier to slice and helps the flavors settle.

Health Benefits of This Vegetarian Lasagna

1. Packed with Nutrients from Spinach

Spinach is an excellent source of vitamins A, C, and K, as well as iron and fiber. It adds not only flavor but also essential nutrients to the dish.

2. High in Protein & Calcium

Thanks to ricotta, mozzarella, and Parmesan, this lasagna provides a good amount of protein and calcium, which support muscle health and strong bones.

3. Good Source of Fiber

Mushrooms, spinach, and whole-wheat lasagna noodles (if you choose them) add fiber, which promotes digestion and keeps you full longer.

4. A Balanced Vegetarian Meal

This lasagna is hearty and well-rounded, providing a good balance of carbohydrates, protein, and healthy fats.

Best Ways to Serve This Lasagna

  • With a Crisp Green Salad: A light side salad with lemon dressing balances the richness of the dish.
  • Garlic Bread or Baguette: Perfect for soaking up the creamy sauce.
  • A Glass of White Wine: A crisp Chardonnay or Sauvignon Blanc pairs beautifully with the creamy flavors.
  • Roasted Vegetables: Serve alongside roasted zucchini, bell peppers, or asparagus for extra color and nutrition.

Frequently Asked Questions (FAQs)

1. Can I Make This Lasagna Ahead of Time?

Yes! You can assemble the lasagna a day in advance and refrigerate it before baking. When ready to cook, let it sit at room temperature for 30 minutes before placing it in the oven.

2. Can I Freeze This Lasagna?

Absolutely! To freeze:

  • Before Baking: Assemble the lasagna, wrap it tightly in foil, and freeze for up to 3 months. Bake from frozen at 375°F (190°C) for about 1 hour, covering with foil for the first 40 minutes.
  • After Baking: Let the lasagna cool completely, then freeze individual portions in airtight containers.

3. Can I Use Fresh Spinach Instead of Frozen?

Yes! If using fresh spinach, chop it and sauté it lightly before adding it to the mixture. You’ll need about 4 cups of fresh spinach to replace the 2 cups of frozen.

4. Can I Make This Gluten-Free?

Yes! Just swap the regular lasagna noodles for gluten-free lasagna sheets and ensure that the cream of mushroom soup is gluten-free.

5. What Other Cheeses Can I Use?

  • Feta or Goat Cheese – Adds a tangy contrast to the creamy flavors.
  • Provolone or Gruyère – For a slightly stronger, nuttier taste.
  • Vegan Cheese – Use dairy-free alternatives for a fully plant-based version.

6. How Do I Store and Reheat Leftovers?

  • Refrigerator: Store in an airtight container for up to 4 days.
  • Reheating: Warm in the oven at 350°F (175°C) for 15 minutes, or microwave in short intervals, adding a splash of milk to keep it creamy.

7. Can I Add More Vegetables?

Absolutely! Some great additions include:

  • Zucchini or Eggplant: Sliced and layered for extra heartiness.
  • Bell Peppers: Adds sweetness and color.
  • Carrots or Peas: For a slight crunch and sweetness.

Conclusion: A Dish That Will Keep You Coming Back for More

This creamy spinach & mushroom lasagna is a recipe you’ll want to keep in your rotation. It’s rich, flavorful, and packed with nutrients, proving that a meatless dish can be just as satisfying as its traditional counterpart.

Whether you’re making it for a special occasion or just craving a warm, comforting meal, this lasagna is a crowd-pleaser that never disappoints. It’s easy to make ahead, stores well, and tastes even better the next day.

So, if you’re looking for a deliciously creamy, cheesy, and hearty vegetarian lasagna, this is the recipe to try. Once you taste it, you’ll understand why it has become a household favorite!

Amal

Creamy Spinach & Mushroom Lasagna – A Comforting Classic with a Delicious Twist

This Creamy Spinach & Mushroom Lasagna is a rich, cheesy, and satisfying dish that brings comfort to every bite. Layered with tender lasagna noodles, a creamy mushroom sauce, fresh spinach, and a blend of ricotta, mozzarella, and Parmesan, this vegetarian lasagna is both hearty and delicious. Perfect for a family dinner, meal prep, or a cozy gathering, this recipe is easy to make and packed with flavor!
Prep Time 15 minutes
Cook Time 40 minutes
Total Time 55 minutes
Servings: 6 servings
Course: Main Dish
Cuisine: Italian-inspired

Ingredients
  

  • 12 lasagna noodles no-cook
  • 2 tbsp olive oil
  • 1 onion finely chopped
  • 3 cloves garlic minced
  • 2 cups sliced mushrooms
  • 2 cups fresh spinach chopped (or frozen, thawed, and drained)
  • 1 can 10.5 oz Campbell’s condensed cream of mushroom soup
  • 1 cup milk
  • 1 cup ricotta cheese
  • 2 cups shredded mozzarella cheese
  • 1 cup grated Parmesan cheese
  • 1 tsp dried basil or Italian herbs
  • 1 tsp dried oregano
  • Salt and pepper to taste
  • Fresh parsley chopped (for garnish)

Method
 

  1. Preheat the Oven: Set to 375°F (190°C) and lightly grease a baking dish.
  2. Sauté the Vegetables: Heat olive oil in a skillet over medium heat. Add chopped onions and garlic, cooking until softened. Stir in mushrooms and spinach, cooking until tender. Season with salt and pepper.
  3. Prepare the Sauce: In a bowl, whisk together cream of mushroom soup, milk, dried basil, and oregano.
  4. Assemble the Lasagna: Spread a thin layer of sauce at the bottom of the dish. Add a layer of lasagna noodles, followed by ricotta cheese, sautéed vegetables, mozzarella, and Parmesan. Repeat layers until all ingredients are used, finishing with a layer of cheese on top.
  5. Bake Until Golden: Cover with foil and bake for 25 minutes. Remove the foil and bake for another 15 minutes until the cheese is golden and bubbling.
  6. Rest & Serve: Let the lasagna cool for 10 minutes before slicing. Garnish with fresh parsley and serve warm.

Notes

  • For Extra Creaminess: Mix an additional ¼ cup of heavy cream into the sauce.
  • Make It Gluten-Free: Use gluten-free lasagna noodles and a gluten-free mushroom soup.
  • Storage & Reheating: Store in an airtight container in the fridge for up to 4 days. Reheat in the oven at 350°F (175°C) until warmed through.
  • Freezing Option: Freeze assembled lasagna before baking for up to 3 months. Bake from frozen at 375°F (190°C) for about 1 hour.

Baked Zucchini & Ricotta Frittata – A Light and Flavorful Delight

Growing up, zucchini was always cooked the same way in my house—sliced and fried in a pan with a little olive oil and salt. While it was delicious, it never felt particularly special. It was just a simple side dish, something to complement a main course rather than stand out on its own.

That all changed when I visited my aunt one summer. She had a way of transforming the most basic ingredients into something extraordinary. One morning, instead of frying the zucchini, she grated it, mixed it with eggs, cheese, and fresh herbs, and baked it into a light, fluffy frittata. The moment I took my first bite, I was hooked. It was creamy yet airy, packed with flavor, and far more satisfying than any fried zucchini I had ever eaten.

Since then, this baked zucchini and ricotta frittata has become one of my go-to recipes. It’s easy to make, incredibly versatile, and a healthier alternative to fried zucchini dishes. Whether served for breakfast, brunch, or a light dinner, this dish is always a hit.

If you’ve only ever fried your zucchini, give this recipe a try—you might never go back!

Why You’ll Love This Baked Zucchini & Ricotta Frittata

This recipe is simple but packed with flavor and texture. Here’s why it’s worth making:

  • Light & Airy: The combination of eggs and ricotta creates a creamy, fluffy texture that melts in your mouth.
  • Healthier Alternative: Unlike fried zucchini, this baked dish requires little oil, making it a nutrient-rich, low-calorie option.
  • Full of Flavor: Fresh garlic, dill, and black pepper enhance the natural sweetness of zucchini while adding depth.
  • Great for Any Meal: Serve it hot for breakfast, warm for brunch, or as a light dinner with a side salad.
  • Make-Ahead Friendly: You can prepare it in advance and reheat it later, making it perfect for meal prep.

Ingredients

IngredientQuantity
Zucchini2 (1 grated, 1 sliced into thin rings)
Eggs6
SaltTo taste
Black pepperTo taste
Ricotta cheese250g
Garlic cloves3, minced
Fresh dillFinely chopped

Step-by-Step Directions

  1. Preheat the Oven: Set the oven to 375°F (190°C) and grease a baking dish.
  2. Prepare the Zucchini: Grate one zucchini and thinly slice the other into rings. Squeeze out excess moisture from the grated zucchini.
  3. Mix the Batter: In a large bowl, whisk the eggs, then add ricotta cheese, minced garlic, fresh dill, salt, and black pepper. Stir well.
  4. Combine Ingredients: Fold in the grated zucchini and mix until evenly distributed.
  5. Assemble the Dish: Pour the mixture into the prepared baking dish and arrange the zucchini rings on top for a decorative finish.
  6. Bake Until Set: Place in the oven and bake for 25–30 minutes until the frittata is golden and firm in the center.
  7. Serve & Enjoy: Let cool slightly before slicing. Serve warm or at room temperature.

Nutritional Breakdown (Per Serving)

NutrientApproximate Value
Calories220 kcal
Protein14g
Carbohydrates6g
Fiber1.5g
Fats15g
Sugar3g

Tips for Making the Perfect Baked Zucchini & Ricotta Frittata

1. Grate & Drain the Zucchini Properly

Zucchini holds a lot of moisture, which can make the frittata soggy. To prevent this:

  • After grating the zucchini, place it in a clean kitchen towel and squeeze out as much liquid as possible before mixing it with the eggs.
  • If you have time, let the grated zucchini sit for 10 minutes with a pinch of salt, then squeeze again.

2. Use High-Quality Ricotta Cheese

Ricotta cheese adds a rich, creamy texture to the frittata. For the best results:

  • Use full-fat ricotta for extra creaminess.
  • If the ricotta is too watery, strain it through a fine sieve for 15 minutes before adding it to the mixture.

3. Don’t Overmix the Eggs

Whisk the eggs just until combined. Overbeating them can create too much air, leading to a dense rather than fluffy frittata.

4. Bake Until Just Set

To keep the frittata soft and creamy, bake it until the center is just set but still slightly jiggly. It will continue to cook as it cools.

5. Let It Cool Before Slicing

Allowing the frittata to cool for 5–10 minutes after baking makes it easier to slice and helps the flavors develop.

Health Benefits of This Zucchini & Ricotta Frittata

This frittata is more than just delicious—it’s packed with nutrients that make it a great choice for a balanced meal.

1. High in Protein

Eggs and ricotta cheese provide high-quality protein, which helps with muscle growth, keeps you full longer, and supports overall health.

2. Low in Carbohydrates

This dish is naturally low in carbs, making it a great option for those following a low-carb or keto-friendly diet.

3. Rich in Vitamins & Antioxidants

  • Zucchini is loaded with vitamin C, potassium, and fiber, all of which contribute to a healthy immune system and digestion.
  • Garlic has powerful antioxidant properties that support heart health and reduce inflammation.
  • Dill is packed with vitamins A and C, offering additional immune-boosting benefits.

4. Gut-Friendly and Easy to Digest

Unlike heavy fried foods, this frittata is easy on the stomach while still being satisfying and nutrient-dense.

Best Ways to Serve This Baked Zucchini & Ricotta Frittata

This dish is incredibly versatile. Here are some delicious ways to enjoy it:

  • For Breakfast: Serve with a slice of whole-grain toast and fresh fruit.
  • For Brunch: Pair with a fresh salad, roasted potatoes, or smoked salmon.
  • For Dinner: Serve alongside roasted vegetables, a light soup, or grilled chicken.
  • As a Snack: Cut into small squares and enjoy cold or warm as a quick protein-packed snack.

Frequently Asked Questions (FAQs)

1. Can I Use a Different Cheese Instead of Ricotta?

Yes! If you don’t have ricotta, you can substitute:

  • Cottage cheese for a similar texture.
  • Feta cheese for a saltier, tangier taste.
  • Goat cheese for a creamy, slightly tangy variation.

2. Can I Make This Recipe Dairy-Free?

Absolutely! Use dairy-free alternatives such as:

  • Vegan ricotta (made from cashews or tofu).
  • Coconut cream instead of ricotta for a richer flavor.

3. How Do I Store Leftovers?

  • Refrigerator: Store in an airtight container for up to 3 days.
  • Freezer: Freeze individual slices for up to 2 months. Reheat in the oven at 325°F (160°C) until warm.

4. Can I Add Other Vegetables?

Yes! This recipe is flexible. Try adding:

  • Spinach or kale for extra greens.
  • Mushrooms or bell peppers for a more savory taste.
  • Cherry tomatoes for a burst of sweetness.

5. How Do I Prevent the Frittata from Being Watery?

  • Make sure to drain the grated zucchini well.
  • Use full-fat ricotta cheese instead of low-fat versions, which contain more moisture.
  • Bake at the right temperature (375°F/190°C) to allow proper evaporation.

6. Can I Make This Recipe Ahead of Time?

Yes! You can prepare the frittata batter ahead and refrigerate it overnight. Simply bake it fresh when you’re ready to eat.

Conclusion: A Must-Try Recipe for Every Zucchini Lover

This baked zucchini & ricotta frittata is more than just a dish—it’s a healthier, tastier way to enjoy zucchini without frying. It’s light, creamy, and bursting with fresh flavors, making it perfect for any meal of the day.

Whether you’re looking for a new way to cook zucchini, a high-protein meal, or an easy dish to prepare in advance, this frittata is a fantastic choice. Once you try it, you’ll understand why I stopped frying zucchini and started baking it instead.

So, the next time you’re in the kitchen, skip the frying pan and make this frittata instead—you won’t regret it!

Amal

Baked Zucchini & Ricotta Frittata – A Light and Flavorful Delight

This Baked Zucchini & Ricotta Frittata is a light, fluffy, and flavorful dish that transforms simple ingredients into something extraordinary. The combination of tender zucchini, creamy ricotta, and aromatic garlic makes this dish perfect for breakfast, brunch, or even a light dinner. Baked to golden perfection, this frittata is a healthier alternative to fried zucchini, and once you try it, you’ll never go back!
Prep Time 10 minutes
Cook Time 30 minutes
Total Time 40 minutes
Servings: 4 servings
Course: Breakfast
Cuisine: Mediterranean

Ingredients
  

  • 2 zucchini 1 grated, 1 sliced into thin rings
  • 6 eggs
  • Salt to taste
  • Black pepper to taste
  • 250 g ricotta cheese
  • 3 cloves garlic minced
  • Fresh dill finely chopped

Method
 

  1. Preheat the Oven: Set to 375°F (190°C) and grease a baking dish.
  2. Prepare the Zucchini: Grate one zucchini, then squeeze out excess moisture. Slice the other zucchini into thin rings.
  3. Whisk the Eggs: In a bowl, beat the eggs, then mix in ricotta cheese, garlic, fresh dill, salt, and black pepper.
  4. Combine Ingredients: Fold in the grated zucchini and mix well.
  5. Assemble the Frittata: Pour the mixture into the prepared baking dish, then arrange the zucchini rings on top.
  6. Bake Until Golden: Bake for 25–30 minutes or until the center is set and the top is slightly golden.
  7. Cool & Serve: Let it cool for a few minutes before slicing. Serve warm or at room temperature.

Notes

  • Drain the zucchini well to avoid excess moisture in the frittata.
  • For extra flavor, add a sprinkle of Parmesan or feta cheese before baking.
  • Make it dairy-free by swapping ricotta with coconut cream or a plant-based alternative.
  • Store leftovers in the fridge for up to 3 days; reheat gently in the oven or microwave.