Soft & Gooey Cinnamon Rolls – A Sweet Tradition Worth Keeping

There’s something magical about the smell of cinnamon rolls baking in the oven. It’s a scent that fills the house with warmth, comfort, and nostalgia. For me, cinnamon rolls have always been more than just a sweet treat—they represent memories, traditions, and the joy of baking for loved ones.

I still remember the first time I made cinnamon rolls from scratch. It was a chilly Sunday morning, and I wanted to surprise my family with a homemade breakfast. I had always loved the idea of making cinnamon rolls, but the process seemed intimidating. Would the dough rise? Would they turn out soft and fluffy? Would the filling be just the right balance of sweetness and spice?

With a little patience and a lot of excitement, I carefully mixed the dough, rolled it out, and spread the buttery cinnamon filling. The moment they started baking, I knew I had created something special. As they came out of the oven, golden and fragrant, I drizzled them with a smooth cream cheese frosting and watched as my family eagerly gathered around. One bite, and I knew—it was worth every minute of effort.

Since then, these soft and gooey cinnamon rolls have become a tradition in my home. Whether it’s a cozy weekend morning, a holiday gathering, or just a day when we need a little extra sweetness, these rolls bring joy with every bite. And now, I’m sharing this recipe so you can experience that same magic in your own kitchen.

Why These Cinnamon Rolls Are Special

Not all cinnamon rolls are created equal. Some are too dry, some are overly sweet, and others lack that perfect fluffy texture. This recipe, however, delivers the ultimate cinnamon roll experience. Here’s what makes them so irresistible:

  • Soft & Fluffy Dough: The perfect balance of ingredients ensures the rolls are light, airy, and melt-in-your-mouth tender.
  • Rich Cinnamon Filling: A buttery cinnamon-sugar mixture, combined with crushed walnuts, adds depth and crunch to every bite.
  • Perfectly Balanced Sweetness: These rolls are sweet, but not overwhelmingly so, making them enjoyable for any time of day.
  • Creamy, Smooth Frosting: The cream cheese frosting adds the perfect tangy contrast to the warm cinnamon rolls.
  • They Stay Fresh & Soft: Unlike store-bought rolls that dry out quickly, these stay moist and fluffy for days—if they last that long!

Ingredients

For the Dough:

IngredientQuantity
Sugar7 tbsp (80g)
Dry yeast1 tsp (4g)
Lukewarm milk1 cup (250ml)
Egg1
Vegetable oil2 tbsp
Flour4 cups (500g)
Salt1 tsp (4g)

For the Filling:

IngredientQuantity
Butter⅓ cup (80g)
Sugar½ cup (80g)
CinnamonTo taste
Crushed walnuts½ cup (100g)

For the Cream Cheese Frosting:

IngredientQuantity
Cream cheese1 ¼ cups (300g)
Milk3 tbsp

Step-by-Step Directions

  1. Prepare the Dough: In a large bowl, mix lukewarm milk, sugar, and yeast. Let it sit for 5–10 minutes until foamy.
  2. Add Wet & Dry Ingredients: Stir in the egg, vegetable oil, flour, and salt. Knead until a smooth, elastic dough forms.
  3. First Rise: Cover and let the dough rise for 1–1.5 hours until doubled in size.
  4. Prepare the Filling: Mix softened butter, sugar, cinnamon, and crushed walnuts in a bowl.
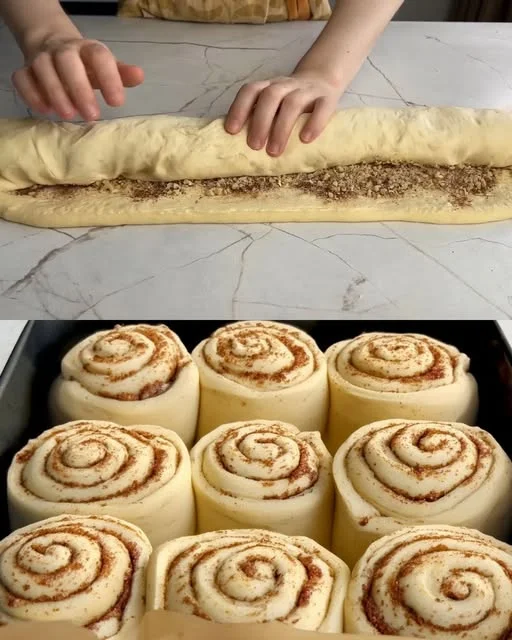
  5. Roll & Spread: Roll out the dough into a rectangle and spread the filling evenly over it.
  6. Shape the Rolls: Roll the dough tightly, slice into even rolls, and place them in a baking dish.
  7. Second Rise: Let the rolls rise for 30 minutes before baking.
  8. Bake to Perfection: Preheat the oven to 350°F (175°C) and bake for 20–25 minutes until golden brown.
  9. Make the Frosting: Whisk together cream cheese and milk until smooth.
  10. Frost & Serve: Spread the cream cheese frosting over warm rolls and enjoy!

Nutritional Breakdown (Per Serving)

NutrientApproximate Value
Calories320 kcal
Protein6g
Carbohydrates45g
Fiber2g
Fats12g
Sugar18g

Tips for the Best Homemade Cinnamon Rolls

1. Use Lukewarm Milk for the Dough

Warm milk helps activate the yeast, allowing the dough to rise properly. If the milk is too hot, it can kill the yeast; too cold, and the dough won’t rise well.

2. Let the Dough Rise Twice

Patience is key! The first rise develops structure and flavor, while the second rise ensures light and airy rolls. Don’t rush the process.

3. Roll the Dough Evenly

For uniform rolls, roll the dough into an even rectangle and spread the filling evenly to ensure every bite is packed with cinnamon goodness.

4. Slice the Rolls with a Sharp Knife or Floss

A dull knife can press down on the rolls and distort their shape. A sharp knife or unflavored dental floss makes clean, precise cuts.

5. Bake Until Just Golden

Overbaking can dry out the rolls. Once they are golden brown and slightly firm to the touch, they’re ready.

6. Frost While Warm

For that classic melt-in-your-mouth texture, spread the frosting while the rolls are still warm, allowing it to seep into every swirl.

Healthier Alternatives for Cinnamon Rolls

While these cinnamon rolls are undeniably indulgent, you can make a few swaps for a slightly healthier version:

  • Use Whole Wheat Flour: Swap half of the all-purpose flour with whole wheat flour for added fiber.
  • Reduce the Sugar: Cut back slightly on the sugar in both the dough and filling without compromising flavor.
  • Use Coconut Sugar or Maple Syrup: A more natural sweetener alternative to white sugar.
  • Lighten the Frosting: Use Greek yogurt instead of cream cheese for a tangy yet lighter topping.

Best Ways to Serve Cinnamon Rolls

These homemade cinnamon rolls are perfect on their own, but here are some creative serving ideas:

  • With Coffee or Tea: The warm spices of cinnamon pair beautifully with a cup of freshly brewed coffee or tea.
  • Topped with Nuts & Caramel: Drizzle caramel sauce and sprinkle extra crushed walnuts or pecans for a gourmet twist.
  • With Fresh Fruit: Serve alongside sliced strawberries, bananas, or blueberries for a fresh balance.
  • As a Dessert: Warm up a roll and top it with a scoop of vanilla ice cream for an extra indulgent treat.

Frequently Asked Questions (FAQs)

1. Can I Make These Cinnamon Rolls Ahead of Time?

Yes! You can prepare the dough, shape the rolls, and let them rise overnight in the fridge. In the morning, bring them to room temperature for about 30 minutes before baking.

2. Can I Freeze Cinnamon Rolls?

Absolutely!

  • Before Baking: Freeze unbaked rolls in a pan, then let them thaw and rise before baking.
  • After Baking: Freeze baked rolls without frosting, then warm them in the oven and add frosting before serving.

3. How Do I Store Leftover Cinnamon Rolls?

  • Room Temperature: Store in an airtight container for up to 2 days.
  • Refrigerator: Keep in the fridge for up to 5 days. Reheat before serving.
  • Freezer: Freeze for up to 3 months.

4. Can I Make These Rolls Without Nuts?

Yes! The walnuts add texture, but you can leave them out or substitute them with pecans, almonds, or even chocolate chips.

5. Why Didn’t My Rolls Rise?

If your cinnamon rolls didn’t rise properly, check these common mistakes:

  • The yeast was expired or not activated.
  • The dough was placed in a cold area.
  • The milk was too hot or too cold when activating the yeast.

6. Can I Make These Rolls Vegan?

Yes! Substitute:

  • Plant-based milk for dairy milk.
  • Vegan butter for regular butter.
  • A flax egg (1 tbsp ground flaxseed + 3 tbsp water) instead of an egg.

7. What’s the Best Way to Reheat Cinnamon Rolls?

  • Oven: Wrap rolls in foil and bake at 300°F (150°C) for 5–10 minutes.
  • Microwave: Heat for 20–30 seconds with a damp paper towel over them.

Conclusion: A Treat Worth Baking Again & Again

There’s something truly special about making homemade cinnamon rolls. From the moment the dough comes together to the final drizzle of frosting, it’s a process filled with love, patience, and anticipation.

These rolls aren’t just about satisfying a sweet tooth—they bring people together, create memories, and fill homes with warmth and joy. Whether you’re baking them for a cozy weekend breakfast, a holiday tradition, or simply because you crave something delicious, they never fail to deliver.

Once you try this soft, gooey, and perfectly spiced cinnamon roll recipe, you’ll never go back to store-bought again. So go ahead, bake a batch, share with loved ones, and enjoy the sweet, buttery goodness!

Amal

Soft & Gooey Cinnamon Rolls – A Sweet Tradition Worth Keeping

These soft and gooey cinnamon rolls are the perfect balance of fluffy dough, sweet cinnamon filling, and rich cream cheese frosting. Each bite is packed with warm, buttery flavors and just the right amount of sweetness. Whether you’re making them for a special breakfast, brunch, or a cozy treat, this homemade recipe is guaranteed to impress. With simple ingredients and easy steps, these cinnamon rolls will become a favorite in your kitchen!
Prep Time 20 minutes
Cook Time 25 minutes
Total Time 2 hours
Servings: 12 rolls
Course: Dessert
Cuisine: American

Ingredients
  

For the Dough:
  • 7 tbsp 80g sugar
  • 1 tsp 4g dry yeast
  • 1 cup 250ml lukewarm milk
  • 1 egg
  • 2 tbsp vegetable oil
  • 4 cups 500g flour
  • 1 tsp 4g salt
For the Filling:
  • cup 80g butter, softened
  • ½ cup 80g sugar
  • Cinnamon to taste
  • ½ cup 100g crushed walnuts
For the Cream Cheese Frosting:
  • 1 ¼ cups 300g cream cheese
  • 3 tbsp milk

Method
 

  1. Activate the Yeast: In a bowl, mix lukewarm milk, sugar, and yeast. Let sit for 5–10 minutes until foamy.
  2. Prepare the Dough: Add egg, vegetable oil, flour, and salt to the yeast mixture. Knead until smooth and elastic.
  3. First Rise: Cover the dough and let it rise in a warm place for 1–1.5 hours or until doubled in size.
  4. Make the Filling: Mix softened butter, sugar, cinnamon, and crushed walnuts in a bowl.
  5. Roll & Fill: Roll out the dough into a rectangle, spread the filling evenly, and roll it into a log.
  6. Cut & Arrange: Slice into even rolls and place them in a greased baking dish.
  7. Second Rise: Cover and let the rolls rise for another 30 minutes.
  8. Bake: Preheat oven to 350°F (175°C) and bake for 20–25 minutes until golden brown.
  9. Prepare the Frosting: Whisk cream cheese and milk together until smooth.
  10. Frost & Serve: Spread the frosting over warm cinnamon rolls and enjoy!

Notes

  • Overnight Prep: Prepare the rolls the night before, refrigerate, and bake fresh in the morning.
  • Nut-Free Option: Skip the walnuts for a smoother filling.
  • Make-Ahead: Store baked rolls in an airtight container and reheat before serving.
  • Flavor Variations: Add raisins, chocolate chips, or orange zest for a unique twist.

Perfectly Seared Salmon with a Buttery Finish – A Quick & Healthy Delight

I still remember the first time I cooked salmon on my own. I was in college, living on my own for the first time, and determined to eat healthier without sacrificing flavor. Growing up, salmon was always a special-occasion dish in my family—something my mother would prepare with care, making sure every bite was perfectly flaky, buttery, and seasoned just right.

One evening, craving a taste of home but lacking my mother’s expertise, I decided to attempt it myself. With only a handful of ingredients—olive oil, butter, salt, and pepper—I cautiously placed the salmon fillets in a hot pan, hoping I wouldn’t overcook them. To my surprise, within minutes, the fillets developed a golden, crispy crust, while the inside remained tender and juicy. The aroma of butter melting into the fish filled my tiny apartment, instantly making it feel more like home.

Since that day, this quick and easy salmon recipe has been a staple in my kitchen. It’s proof that simple cooking can be just as delicious as an elaborate meal. Whether you’re a beginner in the kitchen or an experienced cook looking for a fast and nutritious dish, this seared salmon recipe is healthy, flavorful, and ready in under 10 minutes.

Why You’ll Love This Recipe

Salmon is already one of the most flavorful and nutritious proteins you can eat, but this method elevates it to another level. Here’s why this recipe stands out:

  • Quick & Easy: Ready in less than 10 minutes, making it perfect for busy weeknights.
  • Minimal Ingredients: You only need a few kitchen staples—olive oil, butter, salt, and pepper—to create a restaurant-quality dish.
  • Crispy & Buttery: The combination of olive oil and butter creates a golden crust while keeping the inside moist and flaky.
  • Healthy & Nutritious: Packed with omega-3 fatty acids, high-quality protein, and essential vitamins, this salmon is as good for your body as it is for your taste buds.
  • Versatile Pairing: Serve it with roasted vegetables, a light salad, or over quinoa for a balanced meal.

Ingredients

For the Salmon:

IngredientQuantity
Olive oil½ tbsp
Butter1 tbsp
Skinless salmon fillets2
SaltTo taste
Freshly ground black pepperTo taste

Step-by-Step Directions

  1. Heat the Pan: In a skillet over medium-high heat, add olive oil and butter. Let the butter melt and sizzle.
  2. Season the Salmon: Pat the salmon fillets dry with a paper towel and season both sides with salt and black pepper.
  3. Sear the Salmon: Place the fillets in the pan, flesh side down. Sear for 3–4 minutes until golden brown and crispy.
  4. Flip & Finish Cooking: Carefully flip the fillets and cook for another 2–3 minutes until the salmon is opaque and flakes easily with a fork.
  5. Serve & Enjoy: Remove from heat, drizzle any remaining butter from the pan over the salmon, and serve immediately.

Nutritional Breakdown (Per Serving)

NutrientApproximate Value
Calories280 kcal
Protein25g
Carbohydrates0g
Fiber0g
Fats20g
Omega-3sHigh

Tips for Cooking the Perfect Seared Salmon

1. Pat the Salmon Dry Before Cooking

Excess moisture on the surface of the salmon can prevent it from getting that perfect golden crust. Use a paper towel to pat the fillets dry before seasoning them.

2. Use the Right Pan

A cast iron skillet or stainless steel pan works best for searing salmon, as they retain heat well and create an even crust. A nonstick pan will also work if you’re concerned about sticking.

3. Don’t Overcrowd the Pan

Giving the fillets enough space ensures they sear properly instead of steaming. If cooking multiple fillets, work in batches if needed.

4. High Heat is Key

Start with a hot pan. This helps create the crispy outer layer without overcooking the inside. The butter will brown slightly, adding a nutty, rich flavor to the salmon.

5. Don’t Flip Too Soon

Let the salmon cook undisturbed for at least 3–4 minutes before flipping. If it sticks, it’s not ready yet—wait a little longer, and it will release naturally.

6. Finish with Butter for Extra Flavor

The final touch of melted butter spooned over the salmon enhances its richness and keeps it moist. This is what gives restaurant-quality salmon its signature taste.

Health Benefits of Salmon

Salmon isn’t just delicious—it’s one of the most nutrient-dense foods you can eat. Here are some reasons why it should be a regular part of your diet:

1. High in Omega-3 Fatty Acids

Salmon is rich in DHA and EPA, two types of omega-3s that support heart health, brain function, and reduce inflammation. These healthy fats are essential for overall well-being.

2. Excellent Source of Protein

A single serving of salmon provides over 20 grams of high-quality protein, helping with muscle growth, repair, and keeping you full for longer.

3. Packed with Vitamins & Minerals

Salmon is an excellent source of B vitamins, potassium, and selenium, all of which contribute to a strong immune system, better energy levels, and overall health.

4. Good for Skin & Hair

Thanks to its healthy fats and vitamin E content, salmon helps improve skin elasticity, promote hydration, and support strong, shiny hair.

Serving Suggestions & Pairings

This buttery seared salmon pairs well with a variety of side dishes. Here are some ideas:

  • Light & Fresh: Serve with a crisp arugula salad dressed with lemon vinaigrette.
  • Comforting & Hearty: Pair with creamy mashed potatoes or roasted sweet potatoes.
  • Grain-Based: Serve over quinoa, brown rice, or couscous for a complete meal.
  • Veggie-Packed: Roasted Brussels sprouts, asparagus, or sautéed spinach complement the richness of the salmon.
  • Zesty & Bright: A squeeze of fresh lemon juice or a spoonful of chimichurri sauce adds a burst of flavor.

Frequently Asked Questions (FAQs)

1. Can I Use Frozen Salmon?

Yes! Just make sure to thaw it completely before cooking. Pat it dry well to remove excess moisture for a crispy sear.

2. How Do I Know When the Salmon is Cooked?

The best way to check doneness is:

  • Internal temperature: Should be 125–130°F (52–54°C) for medium-rare and 140°F (60°C) for well-done.
  • Flakiness: The salmon should easily flake apart with a fork.

3. Can I Make This Without Butter?

Yes! While butter adds flavor and richness, you can use just olive oil for a lighter version. Alternatively, ghee or avocado oil works well.

4. What’s the Best Way to Store & Reheat Leftovers?

  • Storage: Keep leftover salmon in an airtight container in the fridge for up to 3 days.
  • Reheating: Warm gently in a pan over low heat or in the oven at 300°F (150°C) for 5–7 minutes. Avoid microwaving, as it can dry out the fish.

5. Can I Bake This Instead?

Yes! If you prefer baking:

  • Preheat the oven to 400°F (200°C).
  • Place the salmon on a lined baking sheet, season, and bake for 12–15 minutes.
  • For extra flavor, broil for the last 2 minutes to get a golden crust.

6. What Other Seasonings Can I Use?

  • Garlic powder & lemon zest for a bright, fresh flavor.
  • Smoked paprika & cayenne pepper for a smoky, spicy kick.
  • Soy sauce & honey for a sweet-savory glaze.

Conclusion: A Recipe That Belongs in Your Weekly Rotation

This quick and easy seared salmon recipe proves that healthy eating doesn’t have to be complicated. With just a handful of ingredients and a few simple techniques, you can create a dish that’s restaurant-worthy yet incredibly easy to make at home.

Whether you’re cooking for yourself, your family, or guests, this salmon is a guaranteed hit. The crispy golden crust, the buttery melt-in-your-mouth texture, and the rich flavors make it a meal you’ll want to cook again and again.

So the next time you need a quick, nutritious, and absolutely delicious meal, give this salmon a try—you won’t regret it!

Amal

Perfectly Seared Salmon with a Buttery Finish – A Quick & Healthy Delight

This Perfectly Seared Salmon is crispy on the outside, tender and flaky on the inside, and bursting with rich, buttery flavor. It’s an easy, restaurant-quality dish that comes together in just 10 minutes! With only a handful of ingredients, this salmon is perfect for a quick and healthy weeknight meal. Serve it with your favorite sides for a complete and satisfying dish!
Prep Time 5 minutes
Cook Time 5 minutes
Total Time 10 minutes
Servings: 2 servings
Course: Main Dish
Cuisine: American

Ingredients
  

  • ½ tbsp olive oil
  • 1 tbsp butter
  • 2 skinless salmon fillets
  • Salt to taste
  • Freshly ground black pepper to taste

Method
 

  1. Heat the Pan: Place a skillet over medium-high heat and add the olive oil and butter. Let the butter melt and start to sizzle.
  2. Season the Salmon: Pat the salmon fillets dry with a paper towel. Season both sides with salt and freshly ground black pepper.
  3. Sear the Salmon: Place the salmon fillets in the pan, flesh side down. Sear for 3–4 minutes until golden and crispy.
  4. Flip & Finish Cooking: Carefully flip the fillets and cook for another 2–3 minutes until the salmon is opaque and flakes easily with a fork.
  5. Serve & Enjoy: Remove from heat and drizzle any remaining butter from the pan over the salmon. Serve immediately with your favorite sides.

Notes

  • For Extra Flavor: Add garlic, lemon juice, or fresh herbs to the pan for additional depth.
  • Cooking Tip: Let the salmon cook undisturbed to get a perfect crispy crust.
  • Storage & Reheating: Store leftovers in an airtight container in the fridge for up to 3 days. Reheat in a pan over low heat or in the oven at 300°F (150°C) for 5–7 minutes.
  • Serving Suggestions: Pair with roasted vegetables, quinoa, mashed potatoes, or a fresh salad for a complete meal.

Fluffy French-Inspired Butter Rolls – A Recipe Passed Down from a Master Baker

There’s something truly special about a perfectly baked butter roll—golden on the outside, soft and airy on the inside, with delicate layers of richness from the butter. While I have always loved fresh bread, I never truly understood the art of making it until I spent time in a small French bakery, watching a master baker work his magic.

During a trip to France, I found myself in a charming boulangerie, mesmerized by the aroma of freshly baked pastries. The baker, an elderly man who had been making bread for over 40 years, noticed my fascination and invited me to watch him work. He didn’t use complicated tools or secret ingredients—just flour, butter, yeast, and patience.

As I stood there, observing him knead the dough with effortless precision, he shared his philosophy: “Good bread doesn’t need to be rushed. Give it time, treat it well, and it will reward you.” I took his advice to heart, and when I returned home, I tried recreating his soft, buttery rolls. After a few trials (and a few failed attempts), I finally got it right. The result? Buttery, fluffy, golden rolls that melt in your mouth.

Now, these rolls have become a staple in my kitchen. Whether served for breakfast, alongside a warm soup, or simply enjoyed with a pat of butter, they never fail to impress. If you love soft, bakery-style bread, this recipe will quickly become one of your favorites, just like it has for me.

Why These Butter Rolls Are Special

Not all bread rolls are created equal. These fluffy, buttery rolls stand out because of their:

  • Soft, airy texture: Thanks to the yeast and proper kneading, these rolls rise beautifully, creating a light and delicate crumb.
  • Rich, buttery layers: By incorporating butter into the dough and layering it, these rolls have a subtly flaky, melt-in-your-mouth quality.
  • Perfect balance of sweetness and salt: They are just slightly sweet but not overpowering, making them ideal for both savory and sweet pairings.
  • Golden, glossy finish: The egg wash gives them a beautiful, bakery-style sheen, making them look just as good as they taste.

Ingredients

IngredientQuantity
Lukewarm Milk250 ml
Sugar4 tbsp (50g)
Instant Yeast1 tbsp (9g)
Melted Butter3 tbsp (40g)
Egg1
Vegetable Oil4 tbsp (60g)
Flour550-580g
Salt1 tsp (4g)
Butter (for layers)120g
Egg Yolk1
Milk (for brushing)1 tbsp

Step-by-Step Directions

  1. Prepare the Dough: In a large bowl, mix lukewarm milk, sugar, and instant yeast. Let it sit for 5-10 minutes until foamy.
  2. Add Wet Ingredients: Stir in melted butter, egg, and vegetable oil. Mix well.
  3. Incorporate Dry Ingredients: Gradually add flour and salt, kneading until a soft, slightly sticky dough forms.
  4. Let It Rise: Cover and let the dough rest in a warm place for about 1–1.5 hours until doubled in size.
  5. Roll and Layer with Butter: Roll out the dough, spread softened butter over it, and fold it over. Repeat for a flaky texture.
  6. Shape the Rolls: Divide the dough into portions, shape into rolls, and place them on a baking sheet.
  7. Second Rise: Cover and let the rolls rise for another 30 minutes.
  8. Egg Wash & Bake: Brush the rolls with egg yolk mixed with milk. Bake in a preheated oven at 375°F (190°C) for 20–25 minutes until golden brown.
  9. Serve & Enjoy: Let the butter rolls cool slightly before serving warm.

Nutritional Breakdown (Per Serving)

NutrientApproximate Value
Calories250 kcal
Protein6g
Carbohydrates35g
Fiber2g
Fats10g
Sugar5g

Tips for Perfect Butter Rolls

1. Use Lukewarm Milk for the Yeast

Yeast is temperature-sensitive. If the milk is too hot, it will kill the yeast; too cold, and the yeast won’t activate. The ideal temperature is between 100°F and 110°F (37°C–43°C)—warm to the touch but not hot.

2. Knead the Dough Until Smooth and Elastic

Proper kneading develops gluten, which gives the rolls their signature softness. Knead for at least 8–10 minutes until the dough is smooth, stretchy, and slightly tacky.

3. Let the Dough Rise Twice

Patience is key. The first rise allows the dough to develop structure and flavor, while the second rise ensures the rolls are light and airy.

4. Layer Butter for Extra Flakiness

For an extra rich and tender texture, fold softened butter into the dough before shaping the rolls. This adds layers and makes them even softer.

5. Brush with Egg Wash for a Golden Finish

A mix of egg yolk and milk creates a shiny, golden crust. This step is optional but gives the rolls a beautiful, professional look.

How to Serve These Butter Rolls

These rolls are versatile and can be enjoyed in many ways:

  • For Breakfast: Spread with butter and jam or drizzle with honey.
  • As a Side Dish: Serve warm with soups, stews, or roasted meats.
  • For Sandwiches: Slice them open and fill with ham, cheese, or smoked salmon.
  • For a Sweet Treat: Sprinkle with cinnamon sugar or dip in melted chocolate.

Frequently Asked Questions (FAQs)

1. Can I Make These Rolls Ahead of Time?

Yes! You can prepare the dough in advance and let it rise in the refrigerator overnight. This actually enhances the flavor and texture. When ready to bake, let the dough come to room temperature, shape the rolls, and proceed as usual.

2. Can I Use Active Dry Yeast Instead of Instant Yeast?

Absolutely! If using active dry yeast, dissolve it in warm milk with a teaspoon of sugar and let it sit for 5–10 minutes until foamy before adding it to the dough.

3. How Do I Store These Rolls?

  • At Room Temperature: Store in an airtight container for 2–3 days.
  • In the Refrigerator: Keep in an airtight bag for up to 1 week. Warm them slightly before serving.
  • In the Freezer: Freeze in a sealed bag for up to 3 months. Thaw at room temperature and reheat in the oven for a freshly baked taste.

4. Can I Make These Rolls Without Eggs?

Yes! While eggs add richness, you can substitute 1/4 cup (60ml) of milk or unsweetened applesauce for a softer, egg-free version.

5. Can I Use Whole Wheat Flour Instead?

You can substitute up to 50% of the flour with whole wheat flour, but keep in mind that the rolls will be slightly denser. Adding an extra tablespoon of milk can help keep them soft.

6. Why Didn’t My Rolls Rise?

If your rolls didn’t rise properly, check these common mistakes:

  • Yeast was expired or killed by hot liquid.
  • Dough was kneaded too little or too much.
  • The rising environment was too cold. Place the dough in a warm spot to encourage fermentation.

7. Can I Add Fillings to the Rolls?

Yes! Try these delicious variations:

  • Cheese Rolls: Add shredded cheese between layers before rolling.
  • Garlic Butter Rolls: Brush with garlic butter before baking.
  • Chocolate Rolls: Spread melted chocolate inside for a sweet version.

Conclusion: A Recipe Worth Mastering

Baking is more than just mixing ingredients—it’s about patience, passion, and the joy of creating something from scratch. These fluffy French-inspired butter rolls are a perfect example of how a simple recipe can become a beloved tradition.

From the moment the dough rises to the golden-brown finish, there’s something deeply satisfying about making your own bread. Whether you enjoy them warm with butter, pair them with your favorite meal, or share them with loved ones, these rolls will bring comfort and happiness to your table.

So, take the time to knead, rise, and bake—because nothing beats the taste of fresh, homemade bread. Once you try these, you’ll never go back to store-bought rolls again!

Amal

Fluffy French-Inspired Butter Rolls – A Recipe Passed Down from a Master Baker

These Fluffy French-Inspired Butter Rolls are soft, buttery, and irresistibly delicious! Light and airy on the inside with a perfectly golden crust, they are the ultimate homemade bread rolls. Inspired by classic French baking techniques, these rolls are perfect for breakfast, alongside soups, or simply enjoyed with a spread of butter and jam. Easy to make and even easier to love!
Prep Time 15 minutes
Cook Time 25 minutes
Total Time 1 hour 40 minutes
Servings: 12 rolls
Course: Breakfast
Cuisine: French-inspired

Ingredients
  

  • 250 ml lukewarm milk
  • 4 tbsp 50g sugar
  • 1 tbsp 9g instant yeast
  • 3 tbsp 40g melted butter
  • 1 egg
  • 4 tbsp 60g vegetable oil
  • 550-580 g flour
  • 1 tsp 4g salt
  • 120 g butter for layering
  • 1 egg yolk + 1 tbsp milk for brushing

Method
 

  1. Activate the Yeast: In a bowl, mix lukewarm milk, sugar, and yeast. Let it sit for 5–10 minutes until foamy.
  2. Mix the Dough: Add melted butter, egg, and vegetable oil to the yeast mixture. Gradually incorporate flour and salt, kneading until a smooth dough forms.
  3. First Rise: Cover and let the dough rest in a warm place for 1–1.5 hours or until doubled in size.
  4. Layer with Butter: Roll out the dough and spread softened butter over it. Fold and repeat for extra flakiness.
  5. Shape the Rolls: Divide the dough into portions, roll into balls, and place them on a lined baking sheet.
  6. Second Rise: Let the rolls rise for another 30 minutes.
  7. Egg Wash & Bake: Brush with an egg yolk and milk mixture. Bake at 375°F (190°C) for 20–25 minutes until golden brown.
  8. Cool & Serve: Allow the rolls to cool slightly before serving warm.

Notes

  • Make-Ahead Option: Prepare the dough and refrigerate overnight for enhanced flavor.
  • Freezing: Freeze baked rolls and reheat at 350°F (175°C) for 5–7 minutes.
  • Serving Ideas: Enjoy with butter and jam, alongside soups, or as sandwich buns.
  • Flour Variations: Substitute part of the flour with whole wheat for a heartier version.

Savory Potato, Sausage, and Bacon Skillet – The Perfect Weekend Breakfast

Some of my best childhood memories are tied to weekend mornings spent in the kitchen. The smell of sizzling bacon, the sound of potatoes frying in the pan, and the warmth of family gathered around the table made those moments truly special. My family always believed that breakfast wasn’t just a meal—it was an event, a time to slow down and enjoy good food together.

This hearty potato, sausage, and bacon skillet is one of those recipes that brings everyone to the table, eager for the first bite. My grandmother used to make a similar dish, throwing together whatever was left in the kitchen—potatoes from last night’s dinner, leftover sausage, and a generous handful of cheese. She never measured anything; she just cooked with love, and it always turned out amazing.

Over the years, I’ve recreated and refined the dish, adding just the right balance of seasoning and creamy richness to make it even more satisfying. Now, it’s a weekend tradition in my home, something I cook for my family when we all have time to sit down and enjoy a meal together. It’s crispy, cheesy, smoky, and absolutely irresistible.

If you’re looking for a one-pan breakfast that’s easy, filling, and packed with flavor, this skillet is the answer.

Why You’ll Love This Recipe

This skillet breakfast is everything you need to start your day right. Here’s why it’s a must-try:

  • Incredibly Flavorful: The combination of crispy potatoes, smoky bacon, hearty sausage, and melted cheese creates a rich, savory dish that’s completely satisfying.
  • One-Pan Wonder: No need to dirty multiple dishes—everything cooks in a single skillet, making cleanup a breeze.
  • Perfect for Sharing: Whether it’s a family breakfast or a brunch with friends, this dish is meant to be enjoyed together.
  • Customizable: Add your favorite spices, extra vegetables, or swap out the meats to make it your own.
  • Great for Any Time of Day: While it’s a fantastic breakfast, this skillet works just as well for a comforting lunch or dinner.

Ingredients

IngredientQuantity
Potatoes400g, peeled and sliced
Vegetable oilAs needed for frying
SaltTo taste
PaprikaTo taste
Onion1, chopped
Garlic cloves2, minced
Hunting sausages2, sliced
Bacon100g, chopped
Tomatoes2, sliced
Cream (20% fat)100ml
Mozzarella cheese100g, shredded

Step-by-Step Directions

  1. Fry the Potatoes: Heat vegetable oil in a skillet over medium heat. Add the sliced potatoes, season with salt and paprika, and fry until golden and crispy. Remove and set aside.
  2. Cook the Aromatics: In the same skillet, sauté the chopped onion and minced garlic until soft and fragrant.
  3. Add the Meats: Toss in the sliced sausages and chopped bacon, cooking until browned and slightly crispy.
  4. Layer the Ingredients: Return the fried potatoes to the skillet, mixing everything together. Arrange the sliced tomatoes on top.
  5. Add the Cream & Cheese: Pour in the cream evenly, then sprinkle the shredded mozzarella over the top.
  6. Melt & Serve: Cover the skillet and cook on low heat for a few minutes until the cheese is melted and bubbly. Serve warm and enjoy!

Nutritional Breakdown (Per Serving)

NutrientApproximate Value
Calories450 kcal
Protein18g
Carbohydrates35g
Fiber4g
Fats28g
Sugar5g

Secrets to the Perfect Skillet Breakfast

1. Use the Right Potatoes

For the best texture, choose starchy potatoes like Russets for a crispy finish or waxy potatoes like Yukon Gold for a creamier bite.

2. Cook the Ingredients in Stages

To ensure each component is cooked perfectly, start with the potatoes, then remove them before cooking the meats and aromatics. This prevents anything from becoming overcooked or greasy.

3. Season as You Go

Layering the seasoning throughout the cooking process ensures that every bite is flavorful. Salt, paprika, and a hint of black pepper bring out the best in the ingredients.

4. Use Quality Sausages and Bacon

The smokier and more flavorful your sausage and bacon, the better your skillet will taste. Hunting sausages, smoked sausage, or even chorizo can add depth to the dish.

5. Let the Cheese Melt Slowly

Covering the skillet for a few minutes after adding the cheese allows it to melt evenly, creating a creamy, gooey topping.

Health Benefits of This Dish

While this skillet is an indulgent comfort food, it also packs a lot of nutritional value:

1. Protein-Packed and Satisfying

Thanks to the sausages, bacon, and cheese, this dish provides a great source of protein, keeping you full and energized for hours.

2. Rich in Vitamins and Minerals

  • Potatoes provide potassium, vitamin C, and fiber.
  • Tomatoes are packed with antioxidants like lycopene, which support heart health.
  • Garlic and onions help boost immunity and reduce inflammation.

3. Balanced Carbs and Fats

While the potatoes provide slow-digesting carbohydrates, the bacon and cream add a satisfying richness, making this a well-rounded meal when eaten in moderation.

Best Ways to Serve This Skillet Dish

This dish is delicious on its own, but you can take it to the next level with these serving ideas:

  • With Toast or Crusty Bread: The creamy sauce pairs perfectly with a slice of fresh bread to soak up all the flavors.
  • Topped with a Fried Egg: Adding a sunny-side-up egg on top makes it even more indulgent.
  • With a Side of Fresh Greens: A light salad with lemon vinaigrette balances out the richness of the dish.
  • With Hot Sauce or Chili Flakes: If you love a bit of heat, a drizzle of hot sauce or a sprinkle of red pepper flakes adds an extra kick.

Frequently Asked Questions (FAQs)

1. Can I Make This Dish Ahead of Time?

Yes! You can prep the ingredients in advance by frying the potatoes and cooking the bacon and sausage. Store them separately in the fridge, then reheat everything in a skillet before serving.

2. Can I Use a Different Type of Sausage?

Absolutely! You can substitute hunting sausages with:

  • Chorizo for a spicier kick
  • Breakfast sausage for a milder flavor
  • Turkey or chicken sausage for a leaner option

3. Can I Make This Dish Healthier?

Yes! Here are a few ways to lighten it up:

  • Use turkey bacon instead of regular bacon.
  • Reduce the cream and add a splash of milk or Greek yogurt for creaminess.
  • Bake instead of frying the potatoes to cut down on oil.

4. How Do I Store and Reheat Leftovers?

  • Refrigerator: Store in an airtight container for up to 3 days.
  • Reheat in a Skillet: Heat over medium heat until warmed through.
  • Oven Method: Bake at 350°F (175°C) for 10 minutes.
  • Microwave: Use short intervals, stirring occasionally, to avoid uneven heating.

5. Can I Freeze This Skillet Dish?

It’s best enjoyed fresh, but you can freeze portions in airtight containers for up to 1 month. Reheat in a skillet for the best texture.

6. What Other Cheeses Work Well?

Mozzarella gives a nice melt, but you can also use:

  • Cheddar for a sharper taste
  • Gruyère for a nutty, rich flavor
  • Parmesan for a salty, umami boost

7. Can I Add More Vegetables?

Absolutely! Try adding:

  • Bell peppers for sweetness
  • Spinach for extra nutrients
  • Mushrooms for an earthy depth of flavor

Conclusion: A Breakfast Worth Waking Up For

This savory potato, sausage, and bacon skillet is more than just a breakfast—it’s a meal that brings people together. Whether you’re making it for a slow weekend morning or a brunch gathering, it’s guaranteed to impress.

With its crispy potatoes, smoky sausage, creamy cheese, and rich seasoning, every bite is pure comfort. Plus, it’s easy to make, customizable, and perfect for feeding a hungry crowd.

So why not start your weekend with something hearty and delicious? Once you try this skillet, it just might become your new favorite breakfast tradition!

Amal

Savory Potato, Sausage, and Bacon Skillet – The Perfect Weekend Breakfast

This Savory Potato, Sausage, and Bacon Skillet is the ultimate comfort breakfast! Crispy golden potatoes, smoky sausages, and crispy bacon come together in one pan, topped with creamy sauce and gooey melted cheese. It’s a hearty, satisfying dish that’s perfect for weekend mornings or even a quick and filling dinner. Easy to make and bursting with flavor, this will become a staple in your kitchen!
Prep Time 10 minutes
Cook Time 25 minutes
Total Time 35 minutes
Servings: 4 servings
Course: Breakfast
Cuisine: European

Ingredients
  

For the Skillet:
  • 400 g potatoes peeled and sliced
  • Vegetable oil for frying
  • Salt to taste
  • Paprika to taste
  • 1 onion chopped
  • 2 garlic cloves minced
  • 2 hunting sausages sliced
  • 100 g bacon chopped
  • 2 tomatoes sliced
  • 100 ml cream 20% fat
  • 100 g mozzarella cheese shredded

Method
 

  1. Fry the Potatoes: Heat vegetable oil in a skillet over medium heat. Add the sliced potatoes, season with salt and paprika, and fry until golden brown and crispy. Remove from the pan and set aside.
  2. Cook the Onion & Garlic: In the same skillet, sauté the chopped onion and minced garlic until fragrant and softened.
  3. Add the Sausage and Bacon: Toss in the sliced sausages and chopped bacon, cooking until browned and slightly crispy.
  4. Return the Potatoes & Add Tomatoes: Add the fried potatoes back into the skillet and layer the sliced tomatoes on top.
  5. Pour the Cream & Add Cheese: Pour the cream evenly over the mixture, then sprinkle the shredded mozzarella cheese on top.
  6. Let It Melt & Serve: Cover the skillet and let it cook on low heat for a few minutes until the cheese is melted and bubbly. Serve hot and enjoy!

Notes

  • Baking Option: Instead of frying, bake the potatoes at 400°F (200°C) for 20 minutes before adding them to the skillet.
  • Spice It Up: Add chili flakes or black pepper for an extra kick.
  • Make It Healthier: Use turkey sausage and low-fat cheese for a lighter version.
  • Storage & Reheating: Store leftovers in an airtight container in the fridge for up to 3 days. Reheat in a skillet or microwave before serving.

Golden Cauliflower Delight: A Crispy, Nutritious Treat

There’s something magical about transforming simple, everyday ingredients into a dish that surprises the senses. I still remember the first time I experimented with cauliflower in a way beyond the usual steaming or roasting. It was a chilly evening, and I was craving something crispy and satisfying—something that felt indulgent yet nourishing.

Growing up, fried foods were a rare treat in my household. My mother, a firm believer in wholesome cooking, always found creative ways to make vegetables the star of our meals. She had a way of making even the simplest ingredients feel special, and cauliflower was one of her favorites. Whether it was lightly charred in the oven with fragrant spices or blended into a creamy soup, she knew how to bring out its best.

As I started developing my own recipes, I wanted to create something that honored my love for crispy textures while staying true to my roots in healthy eating. That’s when I stumbled upon the idea of using ground almonds and psyllium husk to bind the cauliflower into golden, crisp bites. With the addition of garlic and green onions for extra depth, this dish quickly became a staple in my kitchen.

Now, every time I make these cauliflower fritters, I’m reminded of those childhood moments—watching my mother turn simple ingredients into something extraordinary. This recipe is my way of continuing that tradition while adding my own creative spin.

Why This Recipe Works

This Golden Cauliflower Delight is more than just a tasty dish; it’s a balance of flavors and textures that make it truly satisfying. Here’s why it’s worth adding to your recipe collection:

  • Crunchy Yet Tender: The combination of ground almonds and psyllium husk creates a crisp, golden crust while keeping the inside soft and flavorful.
  • Packed with Nutrients: Cauliflower is rich in vitamins C and K, fiber, and antioxidants, while almonds add healthy fats and protein.
  • Low-Carb and Gluten-Free: Unlike traditional fritters that use flour, this recipe relies on natural, wholesome ingredients, making it perfect for those following a gluten-free or low-carb lifestyle.
  • Versatile and Customizable: You can tweak the seasoning to match your taste preferences or pair it with different dips for an extra layer of flavor.

Ingredients

IngredientQuantity
Cauliflower (head)1
Psyllium husk2 tbsp
Ground almonds100g
SaltTo taste
Black pepperTo taste
Green onions3, finely chopped
Garlic cloves2, minced
Oil for fryingAs needed

Step-by-Step Directions

  1. Prepare the Cauliflower: Chop the cauliflower into florets and steam or boil until tender. Drain well and mash into a coarse texture.
  2. Mix the Ingredients: In a bowl, combine mashed cauliflower, psyllium husk, ground almonds, green onions, garlic, salt, and black pepper. Mix thoroughly until well incorporated.
  3. Form the Patties: Shape the mixture into small patties or fritters. If the mixture feels too wet, let it sit for a few minutes to absorb moisture.
  4. Heat the Oil: In a frying pan, heat oil over medium heat. Once hot, carefully place the patties in the pan.
  5. Fry to Perfection: Cook for about 3–4 minutes on each side until golden brown and crispy.
  6. Serve & Enjoy: Remove from heat and place on a paper towel to absorb excess oil. Serve hot with your favorite dip or sauce.

Nutritional Breakdown (Per Serving)

NutrientApproximate Value
Calories180 kcal
Protein6g
Carbohydrates8g
Fiber4g
Fats14g
Sugar2g

Health Benefits of Cauliflower and Almonds

The Power of Cauliflower

Cauliflower is often considered one of the most versatile vegetables in the kitchen. It is:

  • Rich in Fiber: Helps with digestion and promotes gut health.
  • High in Antioxidants: Protects against inflammation and oxidative stress.
  • Low in Calories: Perfect for those looking for a nutrient-dense yet low-calorie food.
  • A Great Source of Choline: Supports brain function and metabolism.

The Goodness of Almonds

Almonds aren’t just for snacking—they bring incredible benefits to this recipe:

  • Loaded with Healthy Fats: Helps keep you full and satisfied.
  • Packed with Vitamin E: Supports skin health and immunity.
  • A Natural Protein Source: Helps in muscle recovery and overall strength.

Serving Suggestions and Pairings

One of the best things about these cauliflower fritters is how well they pair with different accompaniments. Here are some ways to elevate your meal:

  • Dipping Sauces: Try them with a garlic yogurt sauce, spicy sriracha mayo, or a classic tahini dressing for extra flavor.
  • Fresh Salad: Pair with a crisp cucumber and tomato salad with lemon dressing for a refreshing contrast.
  • Wrapped in a Pita: Turn these fritters into a satisfying wrap with lettuce, hummus, and pickled onions.
  • Breakfast Twist: Serve them with poached eggs and avocado for a nourishing start to the day.

Common Questions About This Recipe

1. Can I Bake Instead of Frying?

Absolutely! If you prefer a lower-fat option, bake the fritters at 375°F (190°C) for 20-25 minutes, flipping halfway through until golden and crisp. You can also air-fry them at 375°F for about 12-15 minutes for a similar effect.

2. Can I Use a Different Binder Instead of Psyllium Husk?

Yes! While psyllium husk helps with texture and binding, you can substitute it with ground flaxseeds or chia seeds mixed with water. Eggs can also work if you don’t need the recipe to be vegan.

3. How Do I Store and Reheat Leftovers?

Store leftovers in an airtight container in the fridge for up to 3 days. To reheat, warm them in a pan over low heat or bake at 350°F (175°C) for 10 minutes to bring back the crispiness. Avoid microwaving, as it can make them soggy.

4. Can I Freeze These Fritters?

Yes! Freeze them in a single layer on a baking sheet before transferring them to a freezer bag. When ready to eat, bake or pan-fry directly from frozen—no need to thaw!

5. Can I Add Other Vegetables?

Of course! Finely chopped spinach, grated zucchini (with excess water squeezed out), or even shredded carrots can add color and extra nutrition to the mix.

6. What Other Spices Can I Use?

Feel free to experiment! Smoked paprika, cumin, or a pinch of cayenne pepper can add more depth and warmth to the flavor profile.

Conclusion: A Recipe to Savor and Share

Cooking is more than just following a set of instructions—it’s about creating moments, sharing flavors, and making something that brings comfort and joy. This Golden Cauliflower Delight is not just a delicious meal; it’s a reminder of how simple ingredients can be transformed into something truly special.

Whether you’re making it as a light snack, a side dish, or a main course, this recipe is sure to impress. With its crispy texture, rich flavors, and nourishing ingredients, it’s the perfect way to enjoy a wholesome meal without compromising on taste.

So next time you find yourself with a head of cauliflower and a craving for something crispy, give this recipe a try. Who knows? It might just become a new favorite in your kitchen, just like it did in mine.

Amal

Golden Cauliflower Delight: A Crispy, Nutritious Treat

These crispy cauliflower fritters are packed with flavor, easy to make, and completely gluten-free. With a crunchy golden exterior and a tender, savory center, they’re perfect as a snack, appetizer, or light meal. Made with wholesome ingredients like ground almonds, psyllium husk, and fresh herbs, this recipe delivers a deliciously nutritious twist on classic comfort food. Serve them with your favorite dip for an irresistible treat!
Prep Time 15 minutes
Cook Time 10 minutes
Total Time 25 minutes
Servings: 4 servings
Course: Snack
Cuisine: Gluten-Free

Ingredients
  

  • 1 head of cauliflower chopped into florets
  • 2 tbsp psyllium husk
  • 100 g 1 cup ground almonds
  • 3 green onions finely chopped
  • 2 garlic cloves minced
  • Salt and black pepper to taste
  • Oil for frying

Method
 

  1. Prepare the Cauliflower: Steam or boil the cauliflower florets until tender. Drain well and mash until it reaches a coarse texture.
  2. Mix the Ingredients: In a mixing bowl, combine mashed cauliflower, psyllium husk, ground almonds, green onions, garlic, salt, and black pepper. Stir until well combined.
  3. Shape the Fritters: Form the mixture into small patties. If the mixture is too wet, let it sit for a few minutes to absorb excess moisture.
  4. Fry the Fritters: Heat oil in a frying pan over medium heat. Once hot, add the fritters and cook for 3–4 minutes on each side until golden brown and crispy.
  5. Serve & Enjoy: Remove from the pan and drain on a paper towel. Serve hot with your favorite dip or as a side dish.

Notes

  • Baking Option: For a lower-fat version, bake at 375°F (190°C) for 20–25 minutes, flipping halfway through.
  • Air Fryer Option: Cook at 375°F for 12–15 minutes, shaking the basket halfway through.
  • Storage: Keep leftovers in an airtight container in the fridge for up to 3 days. Reheat in the oven or pan-fry to restore crispiness.
  • Freezing: Freeze in a single layer before transferring to a freezer-safe bag. Reheat straight from frozen in the oven or frying pan.
  • Customization: Feel free to add grated zucchini (squeeze out excess water), chopped spinach, or different seasonings like smoked paprika or cumin for extra flavor.

Creamy Chicken Pasta Bake – The Ultimate Comfort Food

Some of the best meals aren’t the ones made with fancy ingredients or complicated techniques—they’re the ones that bring people together. Growing up, casseroles were a staple in my household. My mother always believed in meals that were simple to prepare but filled the kitchen with warmth and delicious aromas.

One dish that always stood out was her creamy chicken pasta bake. It wasn’t just about the taste—it was about the experience. I remember coming home after school, the scent of bubbling cheese and baked pasta filling the air, and knowing that dinner was going to be something special. My mother would scoop out steaming portions onto our plates, and no matter how many times she made it, we were always excited to dig in.

Years later, I’ve recreated this dish with my own twist. It’s creamy, cheesy, and packed with flavors from aromatic herbs, tender chicken, and a silky sauce that coats every bite of pasta. It’s the kind of meal that makes you feel at home, whether you’re making it for a busy weeknight dinner or sharing it with guests at a gathering.

If you’re looking for a simple, satisfying, and affordable dish that delivers on both comfort and flavor, this creamy chicken pasta bake is the answer.

Why You’ll Love This Recipe

This dish isn’t just another pasta recipe—it’s a one-pan wonder that combines rich, hearty flavors with a perfectly balanced creamy texture. Here’s why it deserves a place in your weekly rotation:

  • Ultra-Creamy and Cheesy: The combination of cream, cheese, and a hint of flour creates a luscious sauce that clings to every noodle.
  • Loaded with Flavor: Sautéed onions, garlic, paprika, and oregano bring warmth and depth to the dish, while cherry tomatoes add a hint of sweetness.
  • Protein-Packed and Satisfying: Chicken mince makes this dish hearty and filling without being too heavy.
  • Family-Friendly: Even picky eaters love this recipe—it’s comforting, familiar, and packed with cheesy goodness.
  • Easy to Make Ahead: Perfect for meal prep! Make it in advance and reheat for a quick and satisfying meal.

Ingredients

IngredientQuantity
Small noodles250g
Chicken mince400g
Onion1, finely chopped
Garlic cloves2, minced
Paprika1, diced
Celery sticks2, chopped
Tomato paste200g
Cherry tomatoes8, halved
Oregano1 tsp
Ground pepper½ tsp
SaltTo taste
Fresh parsleyTo taste
Cream (12% fat)500g
Flour20g
Olive oil2 tbsp
Cheese (grated)100g

Step-by-Step Directions

  1. Cook the Pasta: Boil the small noodles according to package instructions until al dente. Drain and set aside.
  2. Sauté the Aromatics: Heat olive oil in a pan over medium heat. Add chopped onion, minced garlic, diced paprika, and celery. Cook for 3–4 minutes until softened.
  3. Cook the Chicken: Add the chicken mince to the pan, season with salt, ground pepper, and oregano. Cook until the chicken is browned.
  4. Add Tomatoes and Sauce: Stir in tomato paste, cherry tomatoes, and cook for 5 minutes until the sauce thickens slightly.
  5. Prepare the Cream Sauce: In a separate pan, heat a little olive oil, add flour, and stir for a minute. Slowly add the cream while stirring continuously to prevent lumps. Simmer until thickened.
  6. Combine Everything: Mix the cooked pasta, chicken mixture, and cream sauce in a baking dish. Stir well to combine.
  7. Top with Cheese & Bake: Sprinkle grated cheese evenly over the top. Bake in a preheated oven at 375°F (190°C) for 15–20 minutes until the cheese is golden and bubbly.
  8. Garnish & Serve: Remove from the oven, let it cool slightly, and garnish with fresh parsley before serving.

Nutritional Breakdown (Per Serving)

NutrientApproximate Value
Calories450 kcal
Protein30g
Carbohydrates40g
Fiber4g
Fats20g
Sugar6g

The Secret to a Perfect Pasta Bake

1. Choose the Right Pasta

Small noodles work best for this dish because they hold the creamy sauce well without getting too heavy. If you don’t have small noodles, try penne, fusilli, or macaroni.

2. Cook the Pasta Al Dente

Since the pasta will continue cooking in the oven, undercook it slightly when boiling. This prevents it from becoming mushy.

3. Season Every Layer

Don’t just season the chicken—season the pasta water, the sauce, and even the final bake to ensure balanced flavors throughout the dish.

4. Use Fresh Ingredients for the Sauce

Fresh garlic, onions, and herbs elevate the dish and give it an aromatic depth that pre-made sauces just can’t match.

5. Add Cheese at the Right Time

Mixing some cheese into the pasta before baking ensures a rich, cheesy flavor throughout. Then, adding a layer of grated cheese on top creates a beautifully golden, bubbly crust.

Health Benefits of This Dish

While creamy pasta dishes are often seen as indulgent, this chicken pasta bake also has some great nutritional benefits:

1. High in Protein

The chicken mince provides a great source of lean protein, which helps keep you full and supports muscle growth.

2. Rich in Calcium

Thanks to the cheese and cream, this dish is packed with calcium, which is essential for bone health.

3. Loaded with Vegetables

With onions, garlic, celery, cherry tomatoes, and paprika, this dish contains a variety of vitamins, fiber, and antioxidants.

4. Energy-Boosting Carbohydrates

Pasta provides long-lasting energy, making this dish a great option for fueling your day.

How to Serve Creamy Chicken Pasta Bake

This dish is incredibly versatile, and there are so many ways to enjoy it:

  • With a Side Salad: A crisp green salad with a tangy vinaigrette balances out the creaminess of the pasta.
  • With Garlic Bread: A slice of warm, crusty garlic bread is perfect for soaking up the delicious sauce.
  • With Roasted Vegetables: Serve it alongside roasted zucchini, bell peppers, or carrots for extra nutrients.
  • As a Standalone Dish: This casserole is hearty enough to be the main attraction at the dinner table.

Frequently Asked Questions (FAQs)

1. Can I Use a Different Type of Meat?

Yes! While chicken mince is great for this recipe, you can also use:

  • Ground turkey for a leaner option.
  • Ground beef for a heartier, richer flavor.
  • Shredded rotisserie chicken for a quick and easy alternative.

2. Can I Make This Dish Ahead of Time?

Definitely! Prepare the pasta bake, cover it with foil, and store it in the fridge for up to 2 days before baking. If baking straight from the fridge, add an extra 5–10 minutes to the cook time.

3. Can I Freeze This Pasta Bake?

Yes! Let the casserole cool completely, then wrap it tightly in plastic wrap and aluminum foil. Freeze for up to 3 months. To reheat, bake at 375°F (190°C) for 25–30 minutes until heated through.

4. How Do I Make This Recipe Gluten-Free?

To make this dish gluten-free, use:

  • Gluten-free pasta
  • Gluten-free flour (such as almond or rice flour)
  • Gluten-free breadcrumbs or omit them entirely

5. What Other Cheeses Can I Use?

While Parmesan and cheddar work great, feel free to experiment with:

  • Mozzarella for a gooier, melty texture.
  • Gouda for a slightly smoky flavor.
  • Feta for a tangy, salty kick.

6. How Do I Reheat Leftovers?

  • Oven: Bake at 350°F (175°C) for 10–15 minutes until warm.
  • Microwave: Heat in short intervals, stirring occasionally, to prevent uneven heating.
  • Stovetop: Add a splash of cream or milk and heat gently while stirring.

7. Can I Add More Vegetables?

Of course! Some great additions include:

  • Spinach (stirred in before baking)
  • Mushrooms (sautéed with the onions)
  • Bell Peppers (for extra sweetness and crunch)

Conclusion: A Dish Everyone Will Love

This creamy chicken pasta bake is the kind of meal that never fails to impress. Whether you’re cooking for your family, meal prepping for the week, or hosting a casual dinner, this dish delivers comfort, flavor, and satisfaction every time.

With its creamy sauce, tender pasta, and golden cheesy topping, it’s a recipe that feels indulgent but is surprisingly easy to make. The best part? It’s completely customizable—swap the meat, add more veggies, or try different cheeses to make it your own.

So the next time you’re looking for a quick, hearty, and delicious meal, give this chicken casserole a try. Who knows? It might just become your new favorite comfort food!

Amal

Creamy Chicken Pasta Bake – The Ultimate Comfort Food

This Creamy Chicken Pasta Bake is the perfect combination of comfort and flavor! Juicy chicken mince, tender pasta, and a rich, cheesy cream sauce come together to create a dish that’s satisfying and easy to make. Baked to golden perfection, this casserole is a family-friendly meal that’s great for weeknights or meal prep. Serve it with a side salad or garlic bread for a complete and delicious dinner!
Prep Time 15 minutes
Cook Time 20 minutes
Total Time 35 minutes
Servings: 4 servings
Course: Main Dish
Cuisine: Mediterranean

Ingredients
  

For the Pasta Bake:
  • 250 g small noodles
  • 400 g chicken mince
  • 1 onion finely chopped
  • 2 garlic cloves minced
  • 1 paprika diced
  • 2 celery sticks chopped
  • 200 g tomato paste
  • 8 cherry tomatoes halved
  • 1 tsp oregano
  • ½ tsp ground black pepper
  • Salt to taste
  • Fresh parsley to taste
  • 500 g cream 12% fat
  • 20 g flour
  • 2 tbsp olive oil
  • 100 g grated cheese

Method
 

  1. Cook the Pasta: Boil the noodles according to package instructions until al dente. Drain and set aside.
  2. Sauté the Vegetables: Heat olive oil in a pan over medium heat. Add chopped onion, garlic, paprika, and celery. Cook for 3–4 minutes until softened.
  3. Cook the Chicken: Add the chicken mince, oregano, salt, and black pepper. Stir well and cook until browned.
  4. Add Tomato Sauce: Stir in the tomato paste and cherry tomatoes. Cook for another 5 minutes until the sauce thickens slightly.
  5. Make the Cream Sauce: In a separate pan, heat olive oil and whisk in the flour. Slowly pour in the cream, stirring constantly until smooth and slightly thickened.
  6. Combine Everything: In a baking dish, mix the pasta, chicken mixture, and cream sauce. Stir well to combine.
  7. Top with Cheese & Bake: Sprinkle grated cheese over the top. Bake in a preheated oven at 375°F (190°C) for 15–20 minutes until golden and bubbly.
  8. Serve & Enjoy: Let the casserole cool for a few minutes, garnish with fresh parsley, and serve warm.

Notes

  • Pasta Choice: Small noodles work best, but you can use penne, fusilli, or macaroni.
  • Make Ahead: Assemble the dish and refrigerate for up to 24 hours before baking.
  • Freezing: Freeze before baking and cook from frozen at 375°F (190°C) for 30–35 minutes.
  • Vegetable Additions: Try adding spinach, mushrooms, or bell peppers for extra nutrients.
  • Cheese Variations: Swap Parmesan, mozzarella, or cheddar for a different flavor.

Crispy Cheesy Eggplant Bites – A Delicious Twist on a Classic

Eggplant has always been a controversial vegetable in my family. Some love it, some avoid it at all costs, but I’ve always been fascinated by its ability to absorb flavors and transform into something extraordinary. My first real appreciation for eggplant came from my grandmother’s kitchen.

She had a way of making vegetables taste indulgent, and her crispy eggplant slices were no exception. I still remember the sound of sizzling oil, the golden crust forming, and the comforting aroma filling the house. Every time she placed a plate of crispy eggplant in front of us, it disappeared within minutes—no complaints, no picky eaters, just pure enjoyment.

As I grew older and started experimenting in my own kitchen, I realized how simple yet genius her technique was. With just a few pantry staples—breadcrumbs, cheese, and a handful of spices—she turned a humble vegetable into a dish that rivaled any expensive appetizer. Over the years, I’ve refined the recipe, adjusting the seasonings and exploring different cooking methods, but the essence remains the same: crispy on the outside, tender on the inside, and packed with cheesy goodness.

Now, every time I make these Crispy Cheesy Eggplant Bites, I’m transported back to those childhood afternoons. Whether you’re an eggplant skeptic or a long-time fan, this recipe is sure to surprise you. It’s quick, inexpensive, and utterly delicious—perfect for a weeknight snack, a party appetizer, or even a side dish to your favorite meal.

Why You’ll Love This Recipe

Eggplant can be tricky to cook—sometimes it turns out soggy, sometimes it’s bland—but this recipe guarantees crispy, flavorful perfection every time. Here’s why it’s worth trying:

  • Crispy and Golden: The combination of breadcrumbs and Parmesan cheese creates a crunchy, flavorful crust that makes these bites irresistible.
  • Soft and Tender Inside: The eggplant becomes perfectly soft while still holding its shape, giving each bite a satisfying texture.
  • Simple Ingredients, Big Flavor: With just a handful of common pantry staples, you can create something that tastes restaurant-worthy.
  • Budget-Friendly and Filling: Eggplant is an affordable vegetable, making this dish a great option for feeding a crowd without breaking the bank.
  • Perfect for Any Occasion: Serve them as a side, a snack, or even a vegetarian alternative to classic fried appetizers.

Ingredients

For the Eggplant:

IngredientQuantity
Eggplants2 medium
Eggs2 large
Parmesan cheese100g, grated
Breadcrumbs100g
Flour50g
Salt1 tsp
Black pepper½ tsp
Garlic powder1 tsp
Paprika1 tsp
Olive oil1 tbsp
Vegetable oilAs needed for frying

For the Sauce (Optional):

IngredientQuantity
Tomato sauce200g
Garlic clove1, minced
Olive oil1 tsp
Dried oregano½ tsp
SaltTo taste
Black pepperTo taste

Directions

  1. Prepare the Eggplant: Wash and slice the eggplants into even rounds, about ½ inch thick. Sprinkle them with salt and let them sit for 15 minutes to draw out moisture. Pat them dry with a paper towel.
  2. Set Up the Breading Stations: Arrange three bowls—one with flour, another with beaten eggs, and the third with a mixture of breadcrumbs, Parmesan cheese, garlic powder, black pepper, and paprika.
  3. Bread the Eggplant Slices: Dip each eggplant slice into the flour, then into the eggs, and finally into the breadcrumb mixture, pressing gently for an even coating.
  4. Fry Until Crispy: Heat vegetable oil in a pan over medium heat. Fry each breaded eggplant slice for about 2–3 minutes per side until golden brown and crispy. Remove and drain on paper towels.
  5. Make the Sauce (Optional): Heat olive oil in a pan and sauté the minced garlic for 30 seconds. Add tomato sauce, oregano, salt, and black pepper. Simmer for 5 minutes.
  6. Serve & Enjoy: Serve the crispy eggplant slices hot, either on their own or with the tomato sauce for dipping.

Nutritional Breakdown (Per Serving)

NutrientApproximate Value
Calories250 kcal
Protein9g
Carbohydrates22g
Fiber5g
Fats14g
Sugar4g

The Secret to Perfectly Crispy Eggplant

One of the biggest complaints about eggplant is that it can turn out soggy. Here’s how to avoid that and achieve the perfect crispy texture:

  1. Salt the Eggplant First: Sprinkling the slices with salt and letting them sit for 15 minutes helps draw out excess moisture. This prevents the eggplant from becoming mushy when cooked.
  2. Use a Triple Coating Method: The combination of flour, egg, and a Parmesan-breadcrumb mix ensures a firm, crispy crust that sticks to the eggplant.
  3. Fry at the Right Temperature: Too low, and the eggplant will absorb too much oil; too high, and it will burn before the inside cooks. Medium heat is ideal.
  4. Don’t Overcrowd the Pan: Giving each slice enough space while frying ensures even browning and crispiness.

Health Benefits of Eggplant and Parmesan

This dish isn’t just delicious—it’s packed with nutrients!

Why Eggplant is a Superfood

Eggplant is more than just a tasty vegetable. It’s full of health benefits, including:

  • Rich in Antioxidants: Helps protect cells from damage and supports overall health.
  • High in Fiber: Aids digestion and promotes gut health.
  • Low in Calories: A great option for those looking for a light yet satisfying dish.
  • Heart-Healthy: Contains compounds that may help lower cholesterol and improve circulation.

The Nutritional Power of Parmesan Cheese

Parmesan adds more than just flavor to this dish. It also:

  • Provides High-Quality Protein: Helps with muscle repair and overall strength.
  • Is a Great Source of Calcium: Supports bone health.
  • Is Naturally Low in Lactose: Easier to digest for those with lactose sensitivity.

Serving Suggestions and Pairings

These Crispy Cheesy Eggplant Bites are incredibly versatile. Here’s how to enjoy them:

  • With a Classic Marinara Dip: The tangy acidity of tomato sauce balances the richness of the cheese and breadcrumbs.
  • Topped with Fresh Herbs: A sprinkle of basil or parsley adds freshness.
  • As a Side Dish: Serve alongside grilled chicken, pasta, or a fresh salad.
  • In a Sandwich or Wrap: Layer them in a sandwich with lettuce, tomatoes, and a garlic-yogurt sauce for a delicious twist.
  • With Spicy Mayo or Aioli: For a creamy, flavorful dipping option.

Frequently Asked Questions (FAQs)

1. Can I Bake These Instead of Frying?

Yes! If you prefer a lighter version, bake them at 400°F (200°C) for 20–25 minutes, flipping halfway through until golden and crispy.

2. Can I Make This Recipe in an Air Fryer?

Absolutely! Air fry at 375°F (190°C) for 12–15 minutes, shaking the basket halfway through for even cooking.

3. How Do I Prevent the Eggplant from Becoming Soggy?

Salting the eggplant before cooking and using a proper coating method will help keep them crispy. Also, avoid overcrowding the pan when frying.

4. Can I Use a Different Cheese?

Yes! While Parmesan works best, you can try:

  • Pecorino Romano for a saltier, sharper taste.
  • Mozzarella for a gooier, melty texture.
  • Cheddar for a richer, bolder flavor.

5. How Do I Store and Reheat Leftovers?

Store leftovers in an airtight container in the fridge for up to 3 days. To reheat, bake at 375°F (190°C) for 10 minutes or air-fry for 5 minutes to restore crispiness.

6. Can I Freeze These?

Yes! Freeze them after breading (before frying). When ready to cook, fry or bake straight from frozen, adding a few extra minutes to the cooking time.

7. What Other Seasonings Can I Use?

Customize the flavor with:

  • Smoked Paprika for a smoky kick.
  • Italian Seasoning for a classic herb blend.
  • Cayenne Pepper for a bit of heat.

Conclusion: A Dish That Everyone Will Love

This Crispy Cheesy Eggplant Bites recipe is proof that simple ingredients can create something extraordinary. Whether you’re making it as a snack, a side, or a vegetarian alternative to traditional fried appetizers, it’s guaranteed to be a crowd-pleaser.

With its crunchy texture, rich flavor, and endless serving possibilities, this dish is perfect for any occasion. Plus, it’s budget-friendly and easy to make! Even those who claim they don’t like eggplant will be asking for seconds.

So the next time you’re looking for a quick, delicious, and satisfying dish, give this recipe a try. You might just discover a new family favorite—just like I did.

Amal

Crispy Cheesy Eggplant Bites – A Delicious Twist on a Classic

These Crispy Cheesy Eggplant Bites are the ultimate way to enjoy eggplant! Golden and crunchy on the outside with a soft, flavorful center, they’re packed with Parmesan and seasoned breadcrumbs for the perfect bite. Whether served as a snack, appetizer, or side dish, they’re a delicious and budget-friendly way to transform a humble vegetable into something extraordinary. Pair them with marinara sauce or your favorite dip for a mouthwatering experience!
Prep Time 15 minutes
Cook Time 10 minutes
Total Time 25 minutes
Servings: 4 servings
Course: Snack
Cuisine: Mediterranean

Ingredients
  

For the Eggplant Bites:
  • 2 medium eggplants
  • 2 eggs
  • 100 g Parmesan cheese grated
  • 100 g breadcrumbs
  • 50 g flour
  • 1 tsp salt
  • ½ tsp black pepper
  • 1 tsp garlic powder
  • 1 tsp paprika
  • 1 tbsp olive oil
  • Vegetable oil for frying
For the Dipping Sauce (Optional):
  • 200 g tomato sauce
  • 1 garlic clove minced
  • 1 tsp olive oil
  • ½ tsp dried oregano
  • Salt and black pepper to taste

Method
 

  1. Prepare the Eggplant: Wash and slice the eggplants into ½-inch thick rounds. Sprinkle them with salt and let sit for 15 minutes to remove excess moisture. Pat dry with a paper towel.
  2. Set Up the Breading Stations: Place flour in one bowl, whisked eggs in another, and a mixture of breadcrumbs, Parmesan cheese, garlic powder, black pepper, and paprika in a third.
  3. Coat the Eggplant: Dip each slice into the flour, then the beaten eggs, and finally into the breadcrumb-Parmesan mixture, pressing gently to coat evenly.
  4. Fry Until Golden: Heat vegetable oil in a frying pan over medium heat. Fry the breaded eggplant slices for 2–3 minutes per side until crispy and golden brown. Drain on paper towels.
  5. Make the Dipping Sauce (Optional): Heat olive oil in a pan and sauté the minced garlic for 30 seconds. Add tomato sauce, oregano, salt, and black pepper. Simmer for 5 minutes.
  6. Serve & Enjoy: Serve the crispy eggplant bites hot with your favorite dip, marinara sauce, or as a side dish.

Notes

  • Baking Alternative: For a healthier version, bake at 400°F (200°C) for 20–25 minutes, flipping halfway through.
  • Air Fryer Option: Air-fry at 375°F (190°C) for 12–15 minutes, shaking the basket halfway through.
  • Storage: Store leftovers in an airtight container in the fridge for up to 3 days. Reheat in the oven for crispiness.
  • Freezing: Bread the eggplant slices and freeze before frying. Cook directly from frozen, adding a few extra minutes.
  • Customization: Try different cheeses like Pecorino Romano or Mozzarella, or add chili flakes for a spicy kick.

Golden Pumpkin Cheese Rolls: A New Comfort Food Classic

Some of my fondest memories revolve around the kitchen—watching my grandmother work her magic with simple, humble ingredients. She never followed strict recipes but instead relied on intuition, tradition, and the belief that food should be both nourishing and comforting.

Pumpkin was a staple in our home, especially during the cooler months. While others saw it as just another vegetable, my grandmother turned it into something special—soups, pies, and even savory pastries. One of her best-kept secrets was a pumpkin-based roll that had the perfect balance of sweetness, warmth, and savory depth. It wasn’t overly rich or complicated, just pure comfort wrapped in golden goodness.

Years later, inspired by those childhood flavors, I created my own version—Golden Pumpkin Cheese Rolls with Rosemary. This recipe takes the essence of my grandmother’s cooking and gives it a modern, nutritious twist. It’s simple, packed with flavor, and pairs perfectly with a refreshing garlic-yogurt sauce. And the best part? Even those who aren’t fans of pumpkin can’t resist its crispy-on-the-outside, soft-on-the-inside texture.

If you’re looking for a unique yet easy-to-make dish that brings warmth to any table, this pumpkin cheese roll will quickly become your new favorite.

What Makes This Recipe Special?

Pumpkin cheese rolls may sound unusual, but this combination is pure magic. Here’s why this dish deserves a spot in your kitchen:

  • Incredibly Soft & Crispy: The pumpkin puree creates a soft, melt-in-your-mouth texture, while the sesame coating adds a delicate crunch.
  • Packed with Flavor: A blend of garlic, paprika, and rosemary enhances the natural sweetness of the pumpkin, giving it a perfectly balanced taste.
  • Nutritious & Light: Pumpkin is rich in vitamins, fiber, and antioxidants, making these rolls a healthy alternative to traditional bread or snacks.
  • Perfect for Any Occasion: Whether served as a side dish, appetizer, or even a light meal, these rolls pair beautifully with different dips and main courses.
  • Easy to Customize: You can adjust the seasonings, add cheese for extra richness, or experiment with different herbs to match your taste preferences.

Ingredients

For the Rolls:

IngredientQuantity
Pumpkin500–600g
Dried garlic½ tsp
Black pepper½ tsp
Paprika1 tsp
Flour20g
SaltTo taste
Olive oil1 tbsp
Sesame seeds2 tbsp

For the Sauce:

IngredientQuantity
Greek yogurt200g
Garlic1 clove, minced
Olive oil1 tsp
DillTo taste
SaltTo taste

Step-by-Step Directions

  1. Prepare the Pumpkin: Peel and chop the pumpkin into small cubes.
  2. Roast for Flavor: Preheat the oven to 375°F (190°C). Toss the pumpkin cubes with olive oil, dried garlic, black pepper, paprika, and salt. Spread them on a baking sheet and roast for about 25–30 minutes until soft.
  3. Mash & Mix: Once roasted, mash the pumpkin into a smooth puree. Add the flour and mix until a soft dough forms.
  4. Shape the Rolls: Take small portions of the dough, shape them into rolls, and coat them with sesame seeds.
  5. Bake Until Golden: Place the rolls on a lined baking sheet and bake at 375°F (190°C) for 15–20 minutes until golden and firm.
  6. Make the Sauce: In a bowl, combine Greek yogurt, minced garlic, olive oil, dill, and salt. Mix well.
  7. Serve & Enjoy: Let the pumpkin cheese rolls cool slightly, then serve with the yogurt sauce for dipping.

Nutritional Breakdown (Per Serving)

NutrientApproximate Value
Calories180 kcal
Protein6g
Carbohydrates22g
Fiber4g
Fats7g
Sugar5g

The Health Benefits of Pumpkin & Sesame

Why Pumpkin is a Nutritional Powerhouse

Pumpkin is more than just a fall favorite—it’s one of the most nutrient-dense vegetables you can include in your diet. Here’s why:

  • Rich in Vitamins A & C: Supports a strong immune system and promotes healthy skin.
  • High in Fiber: Aids digestion and helps maintain gut health.
  • Low in Calories, High in Nutrients: Perfect for those looking for a light yet satisfying dish.
  • Full of Antioxidants: Helps protect the body from inflammation and oxidative stress.

The Benefits of Sesame Seeds

Sesame seeds aren’t just for garnish—they add both texture and nutrition to these rolls:

  • Packed with Healthy Fats & Protein: Provides long-lasting energy.
  • Good Source of Calcium & Magnesium: Supports bone health.
  • Rich in Antioxidants: Contributes to overall well-being and heart health.

Serving Suggestions & Pairings

Golden pumpkin cheese rolls are incredibly versatile. Here’s how you can serve them:

  • As an Appetizer: Pair them with different dipping sauces like hummus, tzatziki, or a spicy tomato salsa.
  • With a Hearty Soup: Serve alongside a warm bowl of tomato, lentil, or butternut squash soup for a comforting meal.
  • As a Side Dish: These rolls complement roasted meats, grilled vegetables, or even a light salad.
  • For a Healthy Snack: Enjoy them on their own as a nutritious alternative to chips or crackers.

Frequently Asked Questions (FAQs)

1. Can I Make These Pumpkin Cheese Rolls Ahead of Time?

Yes! You can prepare the dough and shape the rolls in advance. Store them in the refrigerator for up to 24 hours before baking. When ready, simply bake them fresh for the best texture and flavor.

2. Can I Use Fresh Garlic Instead of Dried Garlic?

Absolutely! Fresh minced garlic will add a stronger, more aromatic flavor to the dough. Use about one small clove as a substitute for dried garlic.

3. What Other Herbs Can I Use Instead of Rosemary?

While rosemary complements the pumpkin beautifully, you can experiment with:

  • Thyme for a slightly earthy flavor.
  • Oregano for a Mediterranean touch.
  • Sage for a warm, comforting aroma.

4. Can I Make These Rolls Without Sesame Seeds?

Yes! If you’re not a fan of sesame, you can substitute it with:

  • Crushed nuts (like almonds or walnuts) for a crunchy topping.
  • Grated Parmesan for a cheesy, golden crust.
  • Poppy seeds for a different flavor twist.

5. Can I Freeze These Rolls?

Definitely! To freeze, bake the rolls first and let them cool completely. Store them in an airtight container and freeze for up to 2 months. When ready to eat, reheat in the oven at 350°F (175°C) for 10 minutes until warmed through.

6. What’s the Best Way to Store Leftovers?

Store any leftover rolls in an airtight container in the refrigerator for up to 3 days. Reheat them in the oven or air fryer for a few minutes to restore their crispy texture.

7. Can I Make These Gluten-Free?

Yes! Simply swap the regular flour for a gluten-free alternative like almond flour or chickpea flour. This will slightly change the texture but will still result in delicious, crispy rolls.

8. Can I Make This Recipe Vegan?

The base recipe is already dairy-free, but if you want a richer, cheesier taste without dairy, you can:

  • Add nutritional yeast to the dough for a cheesy flavor.
  • Use plant-based Greek yogurt for the dipping sauce.

Conclusion: A New Favorite for Every Occasion

Golden Pumpkin Cheese Rolls with Rosemary aren’t just another recipe—they’re a comforting experience, a perfect blend of nostalgia and modern flavors. Whether you’re serving them as an appetizer, a side dish, or a healthy snack, they’re guaranteed to impress.

The combination of soft, spiced pumpkin, crispy sesame seeds, and a tangy yogurt dip makes this dish one of those “I can’t believe this is so easy to make” moments in the kitchen. Plus, with their nutritional benefits and versatility, these rolls are perfect for any season—not just fall.

So next time you’re looking for a unique, healthy, and absolutely delicious recipe, give these pumpkin cheese rolls a try. Who knows? They might just become your new favorite too.

Amal

Golden Pumpkin Cheese Rolls: A New Comfort Food Classic

These Golden Pumpkin Cheese Rolls are soft, flavorful, and packed with warm, savory goodness. With a crispy sesame coating and a creamy garlic-yogurt dip, they are the perfect balance of comfort and nutrition. Light, airy, and bursting with rosemary-infused flavor, these rolls make for a fantastic appetizer, snack, or side dish. Simple, healthy, and irresistibly delicious!
Prep Time 15 minutes
Cook Time 20 minutes
Total Time 35 minutes
Servings: 4 servings
Course: Snack
Cuisine: Mediterranean

Ingredients
  

For the Rolls:
  • 500 –600g pumpkin peeled and cubed
  • ½ tsp dried garlic
  • ½ tsp black pepper
  • 1 tsp paprika
  • 20 g flour
  • Salt to taste
  • 1 tbsp olive oil
  • 2 tbsp sesame seeds
For the Sauce:
  • 200 g Greek yogurt
  • 1 garlic clove minced
  • 1 tsp olive oil
  • Dill to taste
  • Salt to taste

Method
 

  1. Prepare the Pumpkin: Peel and cut the pumpkin into cubes. Roast in a preheated oven at 375°F (190°C) for 25–30 minutes until tender.
  2. Mash & Mix: Mash the roasted pumpkin and mix it with flour, dried garlic, black pepper, paprika, and salt until a soft dough forms.
  3. Shape the Rolls: Form small rolls from the mixture and coat them with sesame seeds.
  4. Bake the Rolls: Place them on a lined baking sheet and bake at 375°F (190°C) for 15–20 minutes until golden and firm.
  5. Prepare the Sauce: In a bowl, combine Greek yogurt, minced garlic, olive oil, dill, and salt. Mix well.
  6. Serve & Enjoy: Let the pumpkin cheese rolls cool slightly, then serve warm with the garlic-yogurt sauce.

Notes

  • Roasting Alternative: If short on time, steam the pumpkin instead of roasting, but roasting enhances the flavor.
  • Baking Tip: Flip the rolls halfway through baking for even crispiness.
  • Storage: Keep leftovers in an airtight container in the fridge for up to 3 days.
  • Freezing: Freeze before baking, then bake directly from frozen at 375°F (190°C) for 20–25 minutes.
  • Customization: Add grated cheese for extra richness or sprinkle with fresh rosemary for more aroma.

The Ultimate Crispy Zucchini Bites: A Dish No One Believes Is This Easy

Growing up, zucchini was never my first choice when it came to vegetables. As a child, I always associated it with bland, watery dishes that lacked excitement. My grandmother, however, had a way of turning the simplest ingredients into something extraordinary. She never tried to convince us to eat our vegetables—she simply cooked them in a way that made us want to eat them.

One summer, I remember watching her in the kitchen as she prepared a plate of what looked like golden, crispy nuggets. The aroma of cheese, herbs, and sizzling breadcrumbs filled the air. When she placed the dish in front of me, I was sure it was some kind of meat-based cutlet. But after taking a bite, I was completely shocked—it was zucchini! The crispy crust, the tender inside, and the perfect balance of spices made it irresistible.

That moment changed the way I saw vegetables forever. Since then, I’ve recreated and refined this recipe, tweaking the seasonings and ratios to get the perfect crunch and flavor. Now, every time I make these crispy zucchini bites, they disappear from the table within minutes. No one believes how simple they are to prepare, and most of all, no one misses the meat.

Why This Zucchini Recipe Is a Game-Changer

This dish isn’t just another way to cook zucchini—it’s a transformation. Here’s what makes this recipe stand out:

  • A Crispy, Irresistible Texture: The combination of Parmesan cheese and breadcrumbs creates a golden crust that’s crunchy on the outside while keeping the zucchini soft and flavorful inside.
  • Packed with Flavor: A mix of Provençal herbs, paprika, salt, and black pepper enhances the natural taste of zucchini, making it anything but bland.
  • Healthier Alternative to Fried Snacks: While these zucchini bites feel indulgent, they are packed with nutrients and lighter than traditional fried foods.
  • Quick and Easy to Make: With just a few basic ingredients and simple steps, this dish comes together in no time.
  • Perfect for Any Occasion: Serve them as a side dish, an appetizer, or even as a meat alternative in a main meal.

Ingredients

IngredientQuantity
Eggs5
Parmesan cheese100g
Flour70g
Breadcrumbs100g
Zucchini2
Vegetable oilAs needed
SaltTo taste
Black pepperTo taste
PaprikaTo taste
Provençal herbsTo taste

Step-by-Step Directions

  1. Prepare the Zucchini: Wash and slice the zucchini into even rounds or strips, depending on your preference.
  2. Season and Coat: Sprinkle the zucchini slices with salt, black pepper, paprika, and Provençal herbs for extra flavor.
  3. Set Up Breading Stations: In separate bowls, place flour in one, whisked eggs in another, and a mix of breadcrumbs and grated Parmesan cheese in the last.
  4. Bread the Zucchini: Dip each zucchini slice first into the flour, then into the eggs, and finally into the breadcrumb-Parmesan mixture, pressing gently to coat evenly.
  5. Heat the Oil: In a frying pan, heat vegetable oil over medium heat until hot.
  6. Fry to Perfection: Place the breaded zucchini slices into the pan and cook for about 2–3 minutes per side until golden brown and crispy.
  7. Drain & Serve: Remove from the pan and place on paper towels to absorb excess oil. Serve warm with your favorite dip or as a side dish.

Nutritional Breakdown (Per Serving)

NutrientApproximate Value
Calories250 kcal
Protein10g
Carbohydrates18g
Fiber2g
Fats15g
Sugar3g

Health Benefits of Zucchini and Parmesan

Why Zucchini Deserves More Attention

Zucchini is often overlooked, but it’s a powerhouse of nutrition:

  • Low in Calories: A great option for those looking to enjoy a satisfying meal without excess calories.
  • Rich in Antioxidants: Helps fight inflammation and supports overall health.
  • High in Fiber: Aids digestion and promotes gut health.
  • Hydrating and Refreshing: With a high water content, zucchini keeps you hydrated and feeling light.

Parmesan: More Than Just a Topping

Parmesan cheese isn’t just there for flavor—it also brings nutritional benefits:

  • Packed with Protein: Supports muscle health and keeps you full longer.
  • Rich in Calcium: Essential for strong bones and teeth.
  • Aged and Low in Lactose: Easier to digest for those sensitive to dairy.

Best Ways to Serve Crispy Zucchini Bites

These zucchini bites are incredibly versatile. Here are some creative ways to serve them:

  • As a Snack or Appetizer: Serve them hot with a dipping sauce like garlic aioli, marinara, or a tangy yogurt dip.
  • In a Sandwich or Wrap: Use them as a filling for a crispy, flavorful veggie sandwich with fresh lettuce, tomatoes, and a creamy dressing.
  • Alongside a Fresh Salad: Pair them with a simple green salad for a balanced, nutritious meal.
  • As a Side Dish: Serve them alongside grilled meats, pasta, or rice for a complete meal.
  • Topped with Extra Parmesan: Sprinkle more cheese on top right after frying for an extra cheesy finish.

Frequently Asked Questions (FAQs)

1. Can I Bake These Instead of Frying?

Yes! For a healthier alternative, bake them at 375°F (190°C) for 20–25 minutes, flipping halfway through, until they are crispy and golden brown.

2. Can I Air-Fry Them?

Absolutely! Place the breaded zucchini slices in an air fryer at 375°F (190°C) for 12–15 minutes, shaking the basket halfway through for even cooking.

3. How Do I Prevent the Zucchini From Becoming Soggy?

Zucchini naturally contains a lot of water. To prevent sogginess:

  • Pat dry the slices with a paper towel before breading.
  • Salt them lightly and let them sit for 10 minutes, then wipe away excess moisture.
  • Do not overcrowd the frying pan—cook in batches if necessary.

4. Can I Make These Ahead of Time?

Yes! You can prepare the breaded zucchini slices and store them in the refrigerator for a few hours before frying. Alternatively, fry them and reheat in the oven at 350°F (175°C) for 10 minutes to restore crispiness.

5. Can I Use a Different Cheese?

While Parmesan works best due to its texture and saltiness, you can experiment with:

  • Pecorino Romano for a sharper flavor.
  • Cheddar for a more melty, richer taste.
  • Mozzarella for a milder, gooier texture.

6. Can I Freeze These Zucchini Bites?

Yes! Freeze them in a single layer on a baking sheet, then transfer them to a freezer bag. When ready to eat, bake or air-fry them directly from frozen at 375°F (190°C) for 15–20 minutes.

7. What Other Seasonings Can I Use?

Feel free to customize the flavor with:

  • Smoked paprika for a smoky taste.
  • Garlic powder for an extra savory kick.
  • Chili flakes for a spicy twist.

Conclusion: A Dish That Surprises Everyone

There’s something special about a dish that surprises people—one that makes them question what they’re eating because it’s just that good. These crispy zucchini bites are exactly that. Even those who claim they don’t like zucchini find themselves reaching for seconds.

This recipe takes a humble vegetable and turns it into something exciting, flavorful, and satisfying. Whether you’re making them as a snack, a side, or a meat alternative, they will impress anyone who takes a bite. The best part? They are so easy to make that once you try them, they’ll quickly become a staple in your kitchen.

So the next time you have zucchini on hand, give this recipe a try. Who knows? It might just become your new favorite dish—just like it did for me.

Amal

The Ultimate Crispy Zucchini Bites: A Dish No One Believes Is This Easy

These crispy Parmesan zucchini bites are a game-changer! They have a perfectly golden crust with a tender, flavorful center, making them a delicious and healthy alternative to fried snacks. Seasoned with Provençal herbs, paprika, and Parmesan cheese, they’re bursting with flavor and crunch. Serve them as a snack, appetizer, or side dish with your favorite dipping sauce.
Prep Time 15 minutes
Cook Time 10 minutes
Total Time 25 minutes
Servings: 4 servings
Course: Snack
Cuisine: Mediterranean

Ingredients
  

  • 2 zucchinis
  • 5 eggs
  • 100 g Parmesan cheese grated
  • 70 g flour
  • 100 g breadcrumbs
  • Vegetable oil for frying
  • Salt to taste
  • Black pepper to taste
  • Paprika to taste
  • Provençal herbs to taste

Method
 

  1. Prepare the Zucchini: Wash the zucchinis and cut them into even rounds or strips.
  2. Season the Slices: Sprinkle zucchini with salt, black pepper, paprika, and Provençal herbs for extra flavor.
  3. Set Up Breading Stations: In three separate bowls, place flour in one, whisked eggs in another, and a mixture of breadcrumbs and grated Parmesan cheese in the third.
  4. Coat the Zucchini: Dip each zucchini piece into the flour, then the eggs, and finally coat it with the Parmesan-breadcrumb mixture.
  5. Heat the Oil: In a frying pan, heat vegetable oil over medium heat.
  6. Fry Until Golden: Place the breaded zucchini slices in the pan and cook for 2–3 minutes per side until golden brown and crispy.
  7. Drain & Serve: Remove from the oil and place on paper towels to absorb excess oil. Serve warm with your favorite dip.

Notes

  • Baking Option: For a healthier version, bake at 375°F (190°C) for 20–25 minutes, flipping halfway through.
  • Air Fryer Option: Air-fry at 375°F (190°C) for 12–15 minutes, shaking halfway through.
  • Storage: Store leftovers in an airtight container in the fridge for up to 3 days. Reheat in the oven for crispiness.
  • Freezing: Freeze uncooked breaded zucchini slices on a baking sheet, then transfer them to a freezer bag. Cook from frozen when needed.
  • Customization: Add smoked paprika, garlic powder, or chili flakes for a different flavor twist.

Creamy Baked Egg & Potato Casserole – A Comforting and Satisfying Meal

If you’re looking for a simple yet flavorful dish that works for breakfast, lunch, or dinner, this Creamy Baked Egg & Potato Casserole is the perfect choice. Combining tender potatoes, rich eggs, savory vegetables, and melted cheese, this dish is both nourishing and indulgent. It’s a meal that requires minimal effort but delivers big flavors, making it ideal for busy weeknights or leisurely weekend brunches.

With its golden, crispy top and creamy, cheesy layers, this casserole offers a perfect balance of textures and flavors. Whether you’re preparing a family meal or looking for something hearty and satisfying, this dish is sure to become a favorite in your kitchen.

Why You’ll Love This Recipe

This baked egg and potato casserole is a perfect combination of protein, carbs, and healthy fats, making it a well-balanced meal that keeps you full and energized. Here’s why this dish should be on your regular meal rotation:

1. Simple Ingredients, Incredible Flavor

This recipe uses everyday ingredients like eggs, potatoes, cheese, and vegetables, proving that you don’t need fancy ingredients to make a delicious meal. The combination of buttery potatoes, creamy cheese, and the rich taste of eggs makes this dish incredibly satisfying and full of flavor.

2. Perfect for Any Meal of the Day

One of the best things about this recipe is its versatility. You can enjoy it as a:

  • Hearty breakfast to start your day with protein and energy
  • Quick and easy lunch that requires minimal prep
  • Satisfying dinner served with a side salad or fresh bread

3. Great for Meal Prep

This egg and potato casserole stores well, making it a great option for meal prepping. You can bake it ahead of time and simply reheat it when needed, saving time while still enjoying a homemade, wholesome meal.

4. Nutrient-Rich and Filling

  • Eggs provide protein, essential vitamins, and healthy fats, keeping you full for hours.
  • Potatoes offer fiber and slow-digesting carbohydrates, making this dish a great source of energy.
  • Cheese and milk add calcium and richness, enhancing both the flavor and the texture.
  • Vegetables like carrots, onions, and tomatoes provide vitamins, antioxidants, and natural sweetness.

5. Easy to Customize

This dish is highly customizable, allowing you to adapt it to your preferences. You can:

  • Add more vegetables like mushrooms, spinach, or bell peppers.
  • Use different cheeses like gouda, cheddar, or feta for a unique twist.
  • Include proteins like bacon, ham, or smoked salmon for extra flavor.
  • Make it spicy by adding chili flakes or a dash of hot sauce.

Ingredients

IngredientQuantity
Eggs4
Potatoes500 g (17.6 oz)
ParsleyTo taste
ButterAs needed
Spring onionsTo taste
Tomato1, sliced
Cheese (any type)100 g (3.5 oz), grated
Milk400 ml
Wheat flourAs needed (for thickening)
Garlic3 cloves, minced
Onion1, finely chopped
Carrot1, grated
SaltTo taste
SugarA pinch
Herbs (your choice)To taste
Semmelbrösel (breadcrumbs)As needed

Directions

  1. Prepare the Potatoes:
    • Peel and slice the potatoes into thin rounds. Boil them in salted water for 5–7 minutes until slightly tender. Drain and set aside.
  2. Sauté the Vegetables:
    • In a pan, melt butter and sauté the chopped onion, garlic, and grated carrot until soft and fragrant.
  3. Prepare the Creamy Sauce:
    • In a saucepan, warm the milk and whisk in a small amount of wheat flour to thicken. Stir in salt, sugar, and your choice of herbs. Cook for 3–5 minutes until slightly thickened.
  4. Assemble the Casserole:
    • Grease a baking dish with butter.
    • Layer the boiled potatoes, sautéed vegetables, sliced tomatoes, and chopped spring onions.
    • Pour the creamy sauce over the layers.
  5. Add the Eggs & Cheese:
    • Crack the eggs over the top and sprinkle with grated cheese.
    • Finish with breadcrumbs (Semmelbrösel) for a crispy topping.
  6. Bake to Perfection:
    • Preheat the oven to 180°C (350°F) and bake for 20–25 minutes, or until the eggs are set and the cheese is melted and golden.
  7. Garnish & Serve:
    • Sprinkle with fresh parsley and serve hot!

Nutritional Information (Per Serving, Approximate)

NutrientAmount
Calories380 kcal
Protein18 g
Carbohydrates40 g
Fiber5 g
Fats15 g
Calcium~20% DV

Secrets to Making the Perfect Baked Egg & Potato Casserole

1. Choose the Right Potatoes

For the best texture, use starchy potatoes like Russet or Yukon Gold, which hold their shape while remaining soft and creamy. Waxy potatoes like red potatoes can be used, but they won’t be as tender.

2. Precook the Potatoes for the Best Texture

Boiling the potatoes before baking ensures they cook evenly and become soft and fluffy inside, while still developing a crispy, golden exterior when baked.

3. Use Fresh Herbs for Maximum Flavor

Adding fresh parsley, thyme, or chives enhances the dish’s aroma and gives it a bright, fresh taste. Dried herbs work well too, but fresh herbs elevate the dish to another level.

4. Don’t Skip the Cheese

Cheese plays a key role in making this dish rich, creamy, and flavorful. Hard cheeses like mozzarella, cheddar, or gouda provide a great melt, while Parmesan or feta add a sharp, salty contrast.

5. Bake Until Golden and Crispy

To get a beautifully golden top, bake the casserole until the cheese is bubbling and slightly crisp. You can also broil it for the last 2–3 minutes for extra crispiness.

Best Ways to Serve This Dish

1. Classic with a Side of Salad

Pairing the casserole with a fresh, crisp salad balances its richness. Try a simple green salad with lemon vinaigrette or a tomato and cucumber salad for a refreshing contrast.

2. Served with Toasted Bread

A slice of crusty bread or garlic toast is perfect for scooping up the creamy, cheesy layers.

3. Topped with Avocado or Sour Cream

Adding sliced avocado or a dollop of sour cream gives the dish extra creaminess and freshness.

4. With a Side of Roasted Vegetables

For a heartier meal, serve it with roasted asparagus, zucchini, or mushrooms.

5. Breakfast Sandwich Option

Use the baked egg and potato mixture as a filling in a sandwich or wrap for a delicious on-the-go meal.

FAQs – Everything You Need to Know

1. Can I Make This Casserole Ahead of Time?

Yes! You can prepare the entire dish ahead of time and store it in the refrigerator for up to 3 days. Simply reheat in the oven or microwave before serving.

2. Can I Freeze This Dish?

Yes! Let the casserole cool completely, then store it in an airtight container in the freezer for up to 2 months. Thaw in the fridge overnight before reheating.

3. Can I Use Different Types of Cheese?

Absolutely! While mozzarella and cheddar are great choices, you can also try:

  • Gouda for a nutty, creamy flavor
  • Feta for a tangy, salty contrast
  • Swiss cheese for a mild, buttery taste

4. Can I Make It Dairy-Free?

Yes! Use plant-based milk (such as almond or oat milk) and a dairy-free cheese alternative to make this dish lactose-free.

5. How Do I Make It Extra Crispy?

For an extra crispy topping, sprinkle a mix of breadcrumbs and grated Parmesan over the casserole before baking.

6. Can I Add Meat to This Dish?

Yes! Bacon, ham, sausage, or shredded chicken all work well in this casserole, adding more protein and flavor.

7. How Can I Prevent the Casserole from Becoming Too Watery?

If your casserole turns out watery, it may be due to excess moisture from the potatoes or vegetables. To fix this:

  • Drain the potatoes well after boiling.
  • Sauté vegetables like tomatoes and onions before adding them to remove excess water.

Final Thoughts – A Must-Try Comfort Food Recipe

This Creamy Baked Egg & Potato Casserole is a dish that delivers big flavors with minimal effort. With its creamy texture, golden crispy top, and layers of hearty ingredients, it’s the perfect meal for any time of the day.

What makes this recipe truly special is its versatility—whether you enjoy it for breakfast, lunch, or dinner, it always satisfies. Plus, it’s easy to customize, prepare ahead, and store for later, making it a practical and delicious option for any home cook.

Try this rich, cheesy, and satisfying dish, and you’ll soon find yourself making it again and again!

Amal

Creamy Baked Egg & Potato Casserole – A Comforting and Satisfying Meal

This Creamy Baked Egg & Potato Casserole is the perfect comfort food that’s simple, flavorful, and satisfying. With tender potatoes, rich eggs, sautéed vegetables, and gooey melted cheese, this dish is wholesome and hearty—perfect for breakfast, lunch, or dinner. Baked to golden perfection with a crispy, cheesy topping, it’s a meal you’ll want to make again and again!
Prep Time 10 minutes
Cook Time 30 minutes
Total Time 40 minutes
Servings: 4 servings
Course: Breakfast
Cuisine: European

Ingredients
  

  • 4 eggs
  • 500 g 17.6 oz potatoes, peeled and sliced
  • 2 tbsp butter
  • 1 onion finely chopped
  • 1 carrot grated
  • 3 cloves garlic minced
  • 400 ml milk
  • 2 tbsp wheat flour
  • 100 g 3.5 oz cheese (cheddar, mozzarella, or your choice)
  • 1 tomato sliced
  • 1/2 head cabbage shredded
  • A bunch of spring onions chopped
  • 2 tbsp breadcrumbs Semmelbrösel
  • Salt to taste
  • A pinch of sugar
  • Herbs parsley, thyme, or your choice

Method
 

Prepare the Potatoes:
  1. Boil the sliced potatoes in salted water for 5–7 minutes until slightly tender. Drain and set aside.
Sauté the Vegetables:
  1. In a pan, melt the butter and sauté the onion, carrot, and garlic until soft.
  2. Stir in the shredded cabbage and cook for another 5 minutes until tender.
Make the Creamy Sauce:
  1. Heat the milk in a saucepan and whisk in the flour until thickened.
  2. Add salt, sugar, and herbs, stirring for 3–5 minutes until smooth.
Assemble the Casserole:
  1. Grease a baking dish with butter.
  2. Layer the potatoes, sautéed vegetables, sliced tomatoes, and spring onions.
  3. Pour the creamy sauce over the layers.
Add the Eggs & Cheese:
  1. Crack the eggs on top and sprinkle with grated cheese.
  2. Finish with breadcrumbs for a crispy topping.
Bake to Perfection:
  1. Preheat the oven to 180°C (350°F) and bake for 20–25 minutes until the cheese is melted and golden.
Garnish & Serve:
  1. Sprinkle with fresh parsley and serve warm!

Notes

  • For extra crispiness, broil for the last 2–3 minutes until golden brown.
  • Make it vegetarian-friendly by skipping the eggs and adding more cheese and veggies.
  • Spice it up with paprika or chili flakes for a kick.
  • Leftovers store well in the fridge for up to 3 days—just reheat in the oven or microwave.
  • Perfect with a side salad or served with crusty bread for a complete meal.