Marry Me No-Bake Raspberry Chocolate Mousse Cups Delight!

Introduction to Marry Me No-Bake Raspberry Chocolate Mousse Cups

Picture this: it’s a Friday night, and you want to impress someone special without spending hours in the kitchen. Enter the Marry Me No-Bake Raspberry Chocolate Mousse Cups! These delightful treats are not just easy to whip up; they’re a guaranteed crowd-pleaser. With rich chocolate and tangy raspberries, they strike the perfect balance between indulgence and freshness. Plus, they require no baking, making them a quick solution for a busy day or a romantic evening. Trust me, these mousse cups will have your loved ones swooning and asking for seconds!

Why You’ll Love This Marry Me No-Bake Raspberry Chocolate Mousse Cups

Let’s be honest: life can get hectic, and finding time to create a stunning dessert can feel impossible. That’s where these Marry Me No-Bake Raspberry Chocolate Mousse Cups shine! They’re quick to prepare, requiring just 20 minutes of your time. The combination of creamy chocolate and vibrant raspberries is a flavor explosion that will leave everyone raving. Plus, they’re a no-bake wonder, so you can focus on what really matters—enjoying the moment!

Ingredients for Marry Me No-Bake Raspberry Chocolate Mousse Cups

Gathering the right ingredients is the first step to creating these luscious Marry Me No-Bake Raspberry Chocolate Mousse Cups. Here’s what you’ll need:

  • Heavy cream: This is the star of the show, providing that rich, velvety texture we all love in mousse.
  • Semi-sweet chocolate chips: They melt beautifully and add a perfect balance of sweetness and depth to the mousse.
  • Vanilla extract: A splash of this aromatic essence enhances the chocolate flavor, making it even more irresistible.
  • Fresh raspberries: These little gems bring a burst of tartness that cuts through the richness of the chocolate.
  • Powdered sugar: This sweetener helps to create a lovely raspberry sauce that complements the mousse.
  • Crushed graham crackers (optional): For a delightful crunch on top, these add a fun texture contrast.
  • Fresh mint leaves (for garnish, optional): A pop of green that not only looks great but adds a refreshing hint of flavor.

Feel free to get creative! If you want a richer flavor, swap the semi-sweet chocolate for dark chocolate chips. And if raspberries aren’t your jam, strawberries or blueberries can easily step in for a fruity twist. For exact measurements, check the bottom of the article where you can find everything available for printing.

How to Make Marry Me No-Bake Raspberry Chocolate Mousse Cups

Now that you have all your ingredients ready, let’s dive into the fun part—making these Marry Me No-Bake Raspberry Chocolate Mousse Cups! Follow these simple steps, and you’ll be on your way to dessert bliss.

Step 1: Heat the Cream and Melt the Chocolate

Start by pouring the heavy cream into a medium saucepan. Heat it over medium heat until it just begins to simmer. You want to see tiny bubbles forming around the edges, but don’t let it boil! Once it’s hot, remove it from the heat and add the semi-sweet chocolate chips. Let them sit for about 2-3 minutes. This waiting time allows the chocolate to melt perfectly. After that, whisk the mixture until it’s smooth and fully combined. The result should be a luscious chocolate sauce that’s simply irresistible!

Step 2: Whip the Chocolate Mixture

Next, let the chocolate mixture cool to room temperature. This step is crucial because if it’s too hot, it won’t whip properly. Once cooled, grab your electric mixer and whip the mixture on medium speed. In about 3-4 minutes, you’ll notice it thickening and forming soft peaks. This is the magic moment! You want it to be fluffy but not too stiff. If you over-whip, it can turn grainy, so keep an eye on it!

Step 3: Prepare the Raspberry Sauce

While the chocolate is whipping, it’s time to prepare the raspberry sauce. In a separate bowl, take half of the fresh raspberries and gently mash them with the powdered sugar. You’re aiming for a chunky sauce that still has some whole raspberry pieces. Once you’ve achieved that, fold this delightful raspberry mixture into the whipped chocolate mousse. The vibrant color and flavor will make your mousse even more tempting!

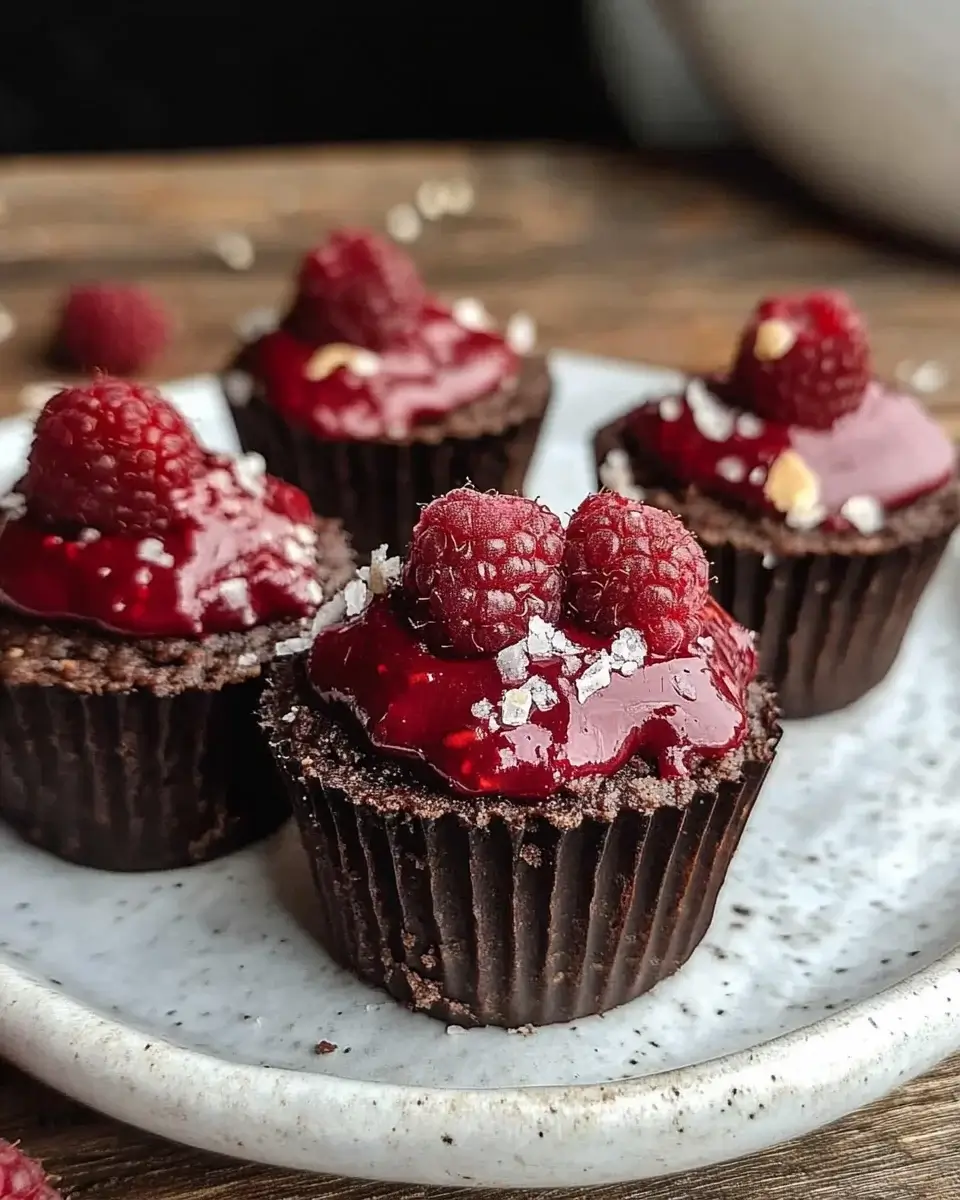
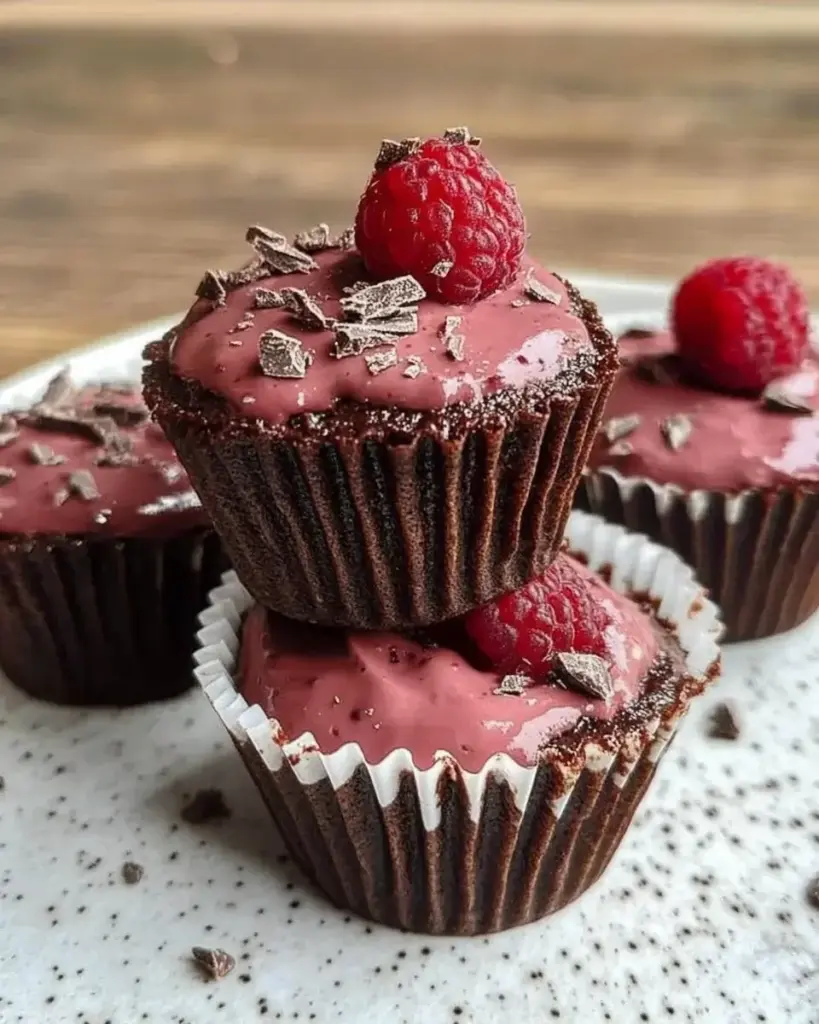
Step 4: Assemble the Mousse Cups

Now comes the fun part—assembling your mousse cups! Grab your individual serving cups and spoon the mousse into each one, filling them about three-quarters full. This leaves room for toppings! Top each cup with the remaining whole raspberries and, if you like, a sprinkle of crushed graham crackers for that extra crunch. Presentation is key, so don’t be shy about making them look beautiful!

Step 5: Chill and Serve

Finally, it’s time to let your mousse cups chill. Place them in the refrigerator for at least 2 hours to set. This step is essential for achieving that perfect mousse texture. When you’re ready to serve, take them out and garnish with fresh mint leaves if you want to impress even more. Trust me, the combination of flavors and textures will have everyone asking for your secret recipe!

Tips for Success

  • Make sure your heavy cream is cold for better whipping results.
  • Use high-quality chocolate chips for a richer flavor in your mousse.
  • Don’t rush the cooling process; it’s key for achieving the right texture.
  • Experiment with different fruits to find your favorite flavor combination.
  • For a fun twist, add a splash of liqueur to the chocolate mixture!

Equipment Needed

  • Medium saucepan: A regular pot works just fine if you don’t have one.
  • Electric mixer: A hand whisk can do the job, but it’ll take longer.
  • Mixing bowls: Any size will do; just make sure they’re sturdy.
  • Spoon or spatula: For folding and serving the mousse.
  • Serving cups: Use any small cups or glasses you have on hand.

Variations

  • Dark Chocolate Delight: Swap semi-sweet chocolate chips for dark chocolate chips for a richer, more intense flavor.
  • Berry Medley: Mix in a combination of fresh berries like strawberries, blueberries, or blackberries for a colorful twist.
  • Nutty Crunch: Add chopped nuts like almonds or hazelnuts to the mousse for an extra layer of texture and flavor.
  • Vegan Option: Use coconut cream instead of heavy cream and dairy-free chocolate chips for a plant-based version.
  • Mint Chocolate: Incorporate a few drops of peppermint extract into the chocolate mixture for a refreshing minty flavor.

Serving Suggestions

  • Pair with a light, sparkling wine or a refreshing iced tea for a delightful contrast.
  • Serve alongside buttery shortbread cookies for a crunchy complement.
  • Garnish with additional fresh raspberries and a dusting of cocoa powder for an elegant touch.
  • Consider a scoop of vanilla ice cream on the side for extra indulgence.

FAQs about Marry Me No-Bake Raspberry Chocolate Mousse Cups

Can I make these mousse cups ahead of time?

Absolutely! These Marry Me No-Bake Raspberry Chocolate Mousse Cups can be made a day in advance. Just keep them covered in the fridge until you’re ready to serve. This actually allows the flavors to meld beautifully!

What can I substitute for heavy cream?

If you’re looking for a lighter option, you can use coconut cream or a dairy-free alternative. Just make sure it’s chilled for the best whipping results. Your mousse will still be delicious!

How long do these mousse cups last in the fridge?

These mousse cups are best enjoyed within 3 days. After that, the texture may start to change, but they’ll still taste great!

Can I use frozen raspberries instead of fresh?

Yes, you can! Just thaw them and drain any excess liquid before mashing. Fresh raspberries do add a nice texture, but frozen ones work in a pinch.

What’s the best way to serve these mousse cups?

For a stunning presentation, serve them in clear cups to showcase the beautiful layers. Garnish with fresh mint leaves and a few whole raspberries on top for that wow factor!

Final Thoughts

Creating these Marry Me No-Bake Raspberry Chocolate Mousse Cups is more than just whipping up a dessert; it’s about crafting a moment of joy. The rich chocolate mingling with the tart raspberries creates a symphony of flavors that dances on your palate. Whether you’re celebrating a special occasion or simply treating yourself, these mousse cups are sure to impress. Plus, the no-bake aspect means you can focus on what truly matters—sharing delicious moments with loved ones. So, roll up your sleeves, dive into this delightful recipe, and watch as smiles light up the room!

“`

Paul

Marry Me No-Bake Raspberry Chocolate Mousse Cups Delight!

Delicious no-bake raspberry chocolate mousse cups that are easy to make and perfect for any occasion.
Prep Time 20 minutes
Total Time 2 hours 20 minutes
Servings: 6 servings
Course: Dessert
Cuisine: American
Calories: 250

Ingredients
  

  • 1 cup heavy cream
  • 1 cup semi-sweet chocolate chips
  • 1 teaspoon vanilla extract
  • 1 cup fresh raspberries
  • 2 tablespoons powdered sugar
  • 1/4 cup crushed graham crackers optional for garnish
  • Fresh mint leaves for garnish, optional

Method
 

  1. In a medium saucepan, heat the heavy cream over medium heat until it just begins to simmer. Remove from heat and add the semi-sweet chocolate chips. Let sit for 2-3 minutes to melt the chocolate, then whisk until smooth and fully combined. Stir in the vanilla extract.
  2. Allow the chocolate mixture to cool to room temperature. Once cooled, use an electric mixer to whip the mixture until it thickens and forms soft peaks, about 3-4 minutes.
  3. In a separate bowl, gently mash half of the fresh raspberries with the powdered sugar until you achieve a chunky sauce. Fold the raspberry mixture into the chocolate mousse until well combined.
  4. Spoon the mousse into individual serving cups, filling them about three-quarters full. Top with the remaining whole raspberries and a sprinkle of crushed graham crackers if desired.
  5. Refrigerate the mousse cups for at least 2 hours to set. Serve chilled, garnished with fresh mint leaves if desired.

Notes

  • For a richer flavor, use dark chocolate chips instead of semi-sweet.
  • Substitute the raspberries with strawberries or blueberries for a different fruit twist.

Thai Peanut Curry: Discover This Delicious Recipe!

Introduction to Thai Peanut Curry

Picture this: it’s a busy weeknight, and you’re staring at the clock, wondering how to whip up something delicious without spending hours in the kitchen. Enter Thai Peanut Curry! This creamy, flavorful dish is not just a meal; it’s a comforting hug in a bowl. With its vibrant colors and rich taste, it’s perfect for impressing your loved ones or simply treating yourself after a long day. Plus, it’s quick and easy to make, so you can savor every bite without the stress. Let’s dive into this delightful recipe that’s sure to become a favorite!

Why You’ll Love This Thai Peanut Curry

This Thai Peanut Curry is a game-changer for your weeknight dinners. It’s not just about the incredible taste; it’s about the ease and speed of preparation. In just 35 minutes, you can create a dish that’s bursting with flavor and nutrition. The creamy coconut milk and rich peanut butter blend beautifully, making every bite a delight. Plus, it’s versatile enough to please even the pickiest eaters in your family!

Ingredients for Thai Peanut Curry

Gathering the right ingredients is the first step to creating a mouthwatering Thai Peanut Curry. Here’s what you’ll need:

  • Vegetable oil: This is your base for sautéing. It helps to bring out the flavors of the aromatics.
  • Onion: Diced onion adds sweetness and depth to the dish, making it more flavorful.
  • Garlic: Minced garlic brings a punch of flavor that’s hard to resist.
  • Fresh ginger: Grated ginger adds a warm, spicy note that complements the curry beautifully.
  • Red bell pepper: Sliced red bell pepper adds a pop of color and sweetness, balancing the dish.
  • Broccoli florets: These add a nice crunch and are packed with nutrients. Feel free to swap them for snap peas or carrots!
  • Coconut milk: This creamy base is essential for that rich, velvety texture that makes the curry so comforting.
  • Creamy peanut butter: The star of the show! It gives the curry its signature flavor and creaminess.
  • Soy sauce: This adds umami and saltiness, enhancing the overall taste.
  • Brown sugar: A touch of sweetness balances the flavors and rounds out the dish.
  • Red curry paste: This is where you can adjust the spice level. It’s packed with flavor, so use it according to your taste.
  • Vegetable broth: This helps to create a lovely sauce consistency. You can use chicken broth if you prefer.
  • Lime juice: A splash of lime juice at the end brightens the dish and adds a refreshing zing.
  • Salt and pepper: Essential for seasoning to taste.
  • Fresh cilantro: This is for garnish, adding a fresh, herbal note that elevates the dish.
  • Cooked rice or quinoa: Serve this curry over rice or quinoa for a complete meal.

For those looking to add protein, consider tossing in cooked chicken, tofu, or chickpeas. And remember, you can customize the vegetables based on what you have on hand. The exact quantities for each ingredient are available at the bottom of the article for easy printing!

How to Make Thai Peanut Curry

Now that you have all your ingredients ready, let’s get cooking! Making Thai Peanut Curry is a straightforward process that will fill your kitchen with mouthwatering aromas. Follow these simple steps, and you’ll have a delicious meal in no time.

Step 1: Sauté the Aromatics

Start by heating the vegetable oil in a large skillet or saucepan over medium heat. Once the oil is shimmering, toss in the diced onion. Sauté it for about 3-4 minutes until it becomes translucent. This step is crucial as it builds the foundation of flavor. Next, add the minced garlic and grated ginger. Cook for another 1-2 minutes until fragrant. Trust me, your kitchen will smell heavenly!

Step 2: Add the Vegetables

Now it’s time to bring in the color! Add the sliced red bell pepper and broccoli florets to the skillet. Stir them around and cook for about 5 minutes. You want them to be tender-crisp, so they still have a bit of bite. This not only adds texture but also keeps the veggies vibrant and fresh.

Step 3: Combine the Sauce Ingredients

Pour in the coconut milk, creamy peanut butter, soy sauce, brown sugar, red curry paste, and vegetable broth. Stir everything together until you have a smooth mixture. This is where the magic happens! The peanut butter will melt into the coconut milk, creating a rich and creamy sauce that’s simply irresistible.

Step 4: Simmer the Curry

Bring the mixture to a gentle simmer. This is the time to let the flavors meld together beautifully. Allow it to cook for about 10-15 minutes, stirring occasionally. You’ll notice the sauce thickening slightly, which is exactly what you want. The longer it simmers, the more intense the flavors will become!

Step 5: Finish with Lime Juice

Once your curry has thickened, remove it from the heat. Stir in the lime juice, which adds a bright, zesty finish. Don’t forget to season with salt and pepper to taste. This final touch elevates the dish, making it truly unforgettable. Now, it’s ready to serve!

Tips for Success

  • Prep all your ingredients before starting to cook. It makes the process smoother!
  • Adjust the spice level by adding more or less red curry paste to suit your taste.
  • For a creamier texture, use full-fat coconut milk.
  • Don’t skip the lime juice; it brightens the flavors beautifully.
  • Experiment with different vegetables based on what’s in season or what you have on hand.

Equipment Needed

  • Large skillet or saucepan: A non-stick option works well for easy cleanup.
  • Wooden spoon or spatula: Perfect for stirring and mixing ingredients.
  • Measuring cups and spoons: Essential for accurate ingredient portions.
  • Cutting board and knife: For chopping vegetables with ease.

Variations

  • Protein Boost: Add cooked chicken, shrimp, or tofu for a heartier meal.
  • Vegetable Swap: Substitute broccoli with snap peas, carrots, or spinach for different textures and flavors.
  • Spice it Up: Incorporate sliced jalapeños or a dash of chili flakes for an extra kick.
  • Nut-Free Option: Use sunflower seed butter instead of peanut butter for a nut-free alternative.
  • Low-Carb Version: Serve over cauliflower rice instead of traditional rice or quinoa for a lighter dish.

Serving Suggestions

  • Serve the Thai Peanut Curry over fluffy jasmine rice or quinoa for a hearty meal.
  • Pair it with a refreshing cucumber salad to balance the richness of the curry.
  • A chilled Thai iced tea complements the flavors beautifully.
  • Garnish with extra cilantro and lime wedges for a vibrant presentation.

FAQs about Thai Peanut Curry

As you embark on your culinary adventure with Thai Peanut Curry, you might have a few questions. Here are some common queries that can help you navigate this delicious dish:

Can I make Thai Peanut Curry ahead of time?

Absolutely! This curry actually tastes better the next day as the flavors meld together. Just store it in an airtight container in the fridge and reheat when you’re ready to enjoy.

Is Thai Peanut Curry spicy?

The spice level depends on the amount of red curry paste you use. If you prefer a milder flavor, start with less and adjust to your taste. You can always add more heat later!

Can I freeze Thai Peanut Curry?

Yes, you can freeze it! Just make sure to let it cool completely before transferring it to a freezer-safe container. It can last up to three months in the freezer.

What can I serve with Thai Peanut Curry?

This curry pairs wonderfully with jasmine rice, quinoa, or even cauliflower rice for a low-carb option. A side of fresh cucumber salad or spring rolls can also complement the meal nicely.

Can I customize the vegetables in the curry?

Definitely! Feel free to use any vegetables you have on hand. Snap peas, carrots, or even zucchini work great in this dish. The key is to keep them tender-crisp for the best texture.

Final Thoughts

Cooking Thai Peanut Curry is more than just preparing a meal; it’s about creating a moment of joy in your kitchen. The rich, creamy sauce envelops fresh vegetables, making every bite a delightful experience. Whether you’re sharing it with family or enjoying a quiet night in, this dish brings warmth and comfort. Plus, the ease of preparation means you can focus on what truly matters—savoring the flavors and the company around you. So, roll up your sleeves, embrace the aromas, and let this Thai Peanut Curry become a cherished part of your culinary repertoire!

“`

Paul

Thai Peanut Curry: Discover This Delicious Recipe!

A delicious and creamy Thai Peanut Curry that combines fresh vegetables and rich flavors, perfect for a comforting meal.
Prep Time 10 minutes
Cook Time 25 minutes
Total Time 35 minutes
Servings: 4 servings
Course: Main Course
Cuisine: Thai
Calories: 350

Ingredients
  

  • 1 tablespoon vegetable oil
  • 1 medium onion diced
  • 2 cloves garlic minced
  • 1 tablespoon fresh ginger grated
  • 1 red bell pepper sliced
  • 1 cup broccoli florets
  • 1 can 14 ounces coconut milk
  • 1/2 cup creamy peanut butter
  • 2 tablespoons soy sauce
  • 1 tablespoon brown sugar
  • 1 tablespoon red curry paste adjust for spice preference
  • 1 cup vegetable broth
  • 1 tablespoon lime juice
  • Salt and pepper to taste
  • Fresh cilantro for garnish
  • Cooked rice or quinoa for serving

Method
 

  1. In a large skillet or saucepan, heat the vegetable oil over medium heat. Add the diced onion and sauté until translucent, about 3-4 minutes.
  2. Stir in the minced garlic and grated ginger, cooking for an additional 1-2 minutes until fragrant.
  3. Add the sliced red bell pepper and broccoli florets to the skillet. Cook for about 5 minutes, stirring occasionally, until the vegetables are tender-crisp.
  4. Pour in the coconut milk, peanut butter, soy sauce, brown sugar, red curry paste, and vegetable broth. Stir well to combine all ingredients.
  5. Bring the mixture to a gentle simmer and let it cook for 10-15 minutes, stirring occasionally, until the sauce thickens slightly.
  6. Remove from heat and stir in the lime juice. Season with salt and pepper to taste.
  7. Serve the curry over cooked rice or quinoa, garnished with fresh cilantro.

Notes

  • For added protein, consider adding cooked chicken, tofu, or chickpeas to the curry.
  • Feel free to customize the vegetables based on what you have on hand, such as snap peas, carrots, or spinach.

Shrimp and Vegetable Stir-Fry: A Quick, Healthy Delight

Introduction to Shrimp and Vegetable Stir-Fry

Picture this: it’s a hectic weeknight, and you’re staring at the clock, wondering how to whip up something delicious in under 30 minutes. Enter the Shrimp and Vegetable Stir-Fry—your new best friend in the kitchen! This dish is not just quick; it’s a vibrant explosion of flavors and colors that will impress your family or friends. With fresh veggies and succulent shrimp, it’s a healthy option that doesn’t skimp on taste. Trust me, this recipe is a lifesaver for busy days, and it’s bound to become a staple in your culinary repertoire!

Why You’ll Love This Shrimp and Vegetable Stir-Fry

This Shrimp and Vegetable Stir-Fry is a game-changer for anyone juggling a busy schedule. It’s not just quick to make; it’s also packed with nutrients and flavor. In just 25 minutes, you can serve a colorful, satisfying meal that pleases even the pickiest eaters. Plus, the versatility of this dish means you can easily swap in your favorite veggies or proteins, making it a go-to for any night of the week!

Ingredients for Shrimp and Vegetable Stir-Fry

Gathering the right ingredients is half the fun of cooking! For this Shrimp and Vegetable Stir-Fry, you’ll need a mix of fresh produce and flavorful staples. Here’s what you’ll need:

  • Shrimp: Large, peeled, and deveined shrimp are the star of the show. They cook quickly and add a delightful sweetness.
  • Vegetable Oil: This is your go-to for stir-frying. It has a high smoke point, making it perfect for high-heat cooking.
  • Red and Yellow Bell Peppers: These colorful veggies add crunch and sweetness. Feel free to mix in green peppers for a different flavor.
  • Broccoli Florets: Packed with vitamins, broccoli adds a nice texture and a pop of green to your dish.
  • Snap Peas: These sweet, crisp peas bring a fresh taste and vibrant color. They’re a great addition for crunch!
  • Garlic: Minced garlic adds a robust flavor that’s hard to resist. It’s a must-have in any stir-fry.
  • Fresh Ginger: A little ginger goes a long way in adding warmth and spice. It complements the shrimp beautifully.
  • Soy Sauce: This salty, umami-rich sauce is essential for flavor. Opt for low-sodium if you’re watching your salt intake.
  • Honey: A touch of sweetness balances the savory elements. You can substitute with maple syrup for a different twist.
  • Sesame Oil: Just a drizzle adds a nutty flavor that elevates the dish. It’s a secret weapon in Asian cooking!
  • Cornstarch: Mixed with water, it helps thicken the sauce, giving it a glossy finish.
  • Salt and Pepper: Simple seasonings that enhance all the flavors. Adjust to your taste!
  • Cooked Rice or Noodles: Serve your stir-fry over rice or noodles for a complete meal. Brown rice or whole grain noodles are great healthy options.

For those looking to mix things up, you can easily swap shrimp for chicken or tofu. And if you want to kick up the heat, consider adding red pepper flakes or a splash of sriracha. The exact quantities for each ingredient are listed at the bottom of the article for your convenience!

How to Make Shrimp and Vegetable Stir-Fry

Now that you have all your ingredients ready, let’s dive into the cooking process! Making this Shrimp and Vegetable Stir-Fry is as easy as pie, and I promise you’ll feel like a culinary rock star in no time. Follow these simple steps, and you’ll have a delicious meal on the table in just 25 minutes!

Step 1: Cook the Shrimp

Start by heating 1 tablespoon of vegetable oil in a large skillet or wok over medium-high heat. Once the oil is shimmering, add the shrimp. Cook them for about 2-3 minutes until they turn pink and opaque. This is where the magic happens! Once cooked, remove the shrimp from the skillet and set them aside. Don’t worry; they’ll be back soon!

Step 2: Stir-Fry the Vegetables

In the same skillet, add the remaining tablespoon of vegetable oil. Toss in the sliced red and yellow bell peppers, broccoli florets, and snap peas. Stir-fry these vibrant veggies for about 5 minutes until they’re tender-crisp. You want them to retain that delightful crunch! Keep the heat up, and don’t forget to stir frequently.

Step 3: Add Garlic and Ginger

Now it’s time to amp up the flavor! Add the minced garlic and ginger to the skillet. Stir constantly for about 30 seconds until they become fragrant. This step is crucial; the aroma will make your kitchen smell heavenly! Just be careful not to burn the garlic, as it can turn bitter.

Step 4: Combine Sauce Ingredients

Pour in the soy sauce, honey, and sesame oil, stirring to combine everything. This sauce is the heart of your shrimp and vegetable stir-fry. It brings all the flavors together, creating a deliciously sticky coating for your ingredients. Make sure to mix well so every piece gets that tasty goodness!

Step 5: Return Shrimp and Thicken Sauce

Now, it’s time to bring back the shrimp! Return them to the skillet and add the cornstarch mixture. Stir well to coat everything evenly. Cook for an additional 2-3 minutes until the sauce thickens slightly. This is where you can adjust the seasoning with salt and pepper to taste. Trust me, you’ll want to taste it to ensure it’s just right!

Step 6: Serve Over Rice or Noodles

Finally, it’s time to serve your masterpiece! Spoon the stir-fry over cooked rice or noodles. I love using brown rice for a healthier option, but any type will do. Garnish with sesame seeds or green onions if you’re feeling fancy. Enjoy your delicious Shrimp and Vegetable Stir-Fry and bask in the compliments!

Tips for Success

  • Prep all your ingredients before you start cooking. It makes the process smoother!
  • Use a high heat to achieve that perfect stir-fry texture—crispy veggies and tender shrimp.
  • Don’t overcrowd the pan; cook in batches if necessary to maintain that sizzle.
  • Taste as you go! Adjust the seasoning to suit your palate.
  • For extra flavor, add a splash of lime juice just before serving.

Equipment Needed

  • Large Skillet or Wok: A non-stick skillet works well too if you don’t have a wok.
  • Spatula: A wooden or silicone spatula is perfect for stirring without scratching your pan.
  • Measuring Cups and Spoons: Essential for accuracy, but you can eyeball it if you’re feeling adventurous!
  • Cutting Board and Knife: For chopping your veggies and shrimp.

Variations

  • Protein Swaps: Substitute shrimp with chicken, beef, or tofu for a different protein experience.
  • Vegetable Mix: Experiment with other vegetables like carrots, zucchini, or mushrooms to keep things fresh and exciting.
  • Spicy Kick: Add red pepper flakes, sriracha, or a dash of chili oil for a fiery twist.
  • Gluten-Free Option: Use tamari instead of soy sauce to make this dish gluten-free.
  • Low-Carb Version: Serve over cauliflower rice or skip the rice altogether for a lighter meal.

Serving Suggestions

  • Rice or Noodles: Serve your stir-fry over fluffy white rice, brown rice, or whole grain noodles for a hearty meal.
  • Fresh Herbs: Garnish with chopped cilantro or green onions for a burst of freshness.
  • Drink Pairing: Enjoy with a chilled glass of white wine or iced green tea.
  • Presentation: Use a colorful plate to showcase the vibrant colors of your stir-fry.

FAQs about Shrimp and Vegetable Stir-Fry

Can I use frozen shrimp for this stir-fry?

Absolutely! Frozen shrimp can be a convenient option. Just make sure to thaw them completely before cooking. This will help them cook evenly and maintain that juicy texture.

What vegetables can I add to my shrimp and vegetable stir-fry?

The beauty of this shrimp and vegetable stir-fry is its versatility! You can add vegetables like carrots, zucchini, or even baby corn. Feel free to get creative with whatever you have on hand!

How can I make this dish spicier?

If you’re looking for a spicy kick, consider adding red pepper flakes or a splash of sriracha to the sauce. You can also toss in some sliced jalapeños for an extra layer of heat!

Can I meal prep this stir-fry?

Definitely! This stir-fry is perfect for meal prep. Just store the cooked stir-fry in airtight containers in the fridge. It will stay fresh for up to three days, making it a great option for quick lunches or dinners.

Is this shrimp and vegetable stir-fry healthy?

Yes! This dish is low in calories and packed with protein and vegetables. It’s a great choice for a healthy weeknight dinner, especially when served over brown rice or whole grain noodles.

Final Thoughts

Cooking this Shrimp and Vegetable Stir-Fry is more than just preparing a meal; it’s about creating a moment of joy in your kitchen. The vibrant colors and enticing aromas fill your home, making it feel warm and inviting. Plus, the satisfaction of whipping up a healthy dish in just 25 minutes is unbeatable! Whether you’re impressing guests or enjoying a cozy dinner with family, this recipe brings everyone together. So, roll up your sleeves, embrace the sizzle, and let this stir-fry become a cherished part of your culinary adventures!

“`

Paul

Shrimp and Vegetable Stir-Fry: A Quick, Healthy Delight

A quick and healthy shrimp and vegetable stir-fry that is perfect for a weeknight dinner.
Prep Time 10 minutes
Cook Time 15 minutes
Total Time 25 minutes
Servings: 4 servings
Course: Main Course
Cuisine: Asian
Calories: 280

Ingredients
  

  • 1 pound large shrimp peeled and deveined
  • 2 tablespoons vegetable oil
  • 1 red bell pepper sliced
  • 1 yellow bell pepper sliced
  • 1 cup broccoli florets
  • 1 cup snap peas
  • 3 cloves garlic minced
  • 1 tablespoon fresh ginger minced
  • 1/4 cup soy sauce
  • 1 tablespoon honey
  • 1 teaspoon sesame oil
  • 1 tablespoon cornstarch mixed with 2 tablespoons water
  • Salt and pepper to taste
  • Cooked rice or noodles for serving

Method
 

  1. Heat 1 tablespoon of vegetable oil in a large skillet or wok over medium-high heat. Add the shrimp and cook for 2-3 minutes until they turn pink and opaque. Remove the shrimp from the skillet and set aside.
  2. In the same skillet, add the remaining tablespoon of vegetable oil. Add the sliced bell peppers, broccoli, and snap peas. Stir-fry for about 5 minutes until the vegetables are tender-crisp.
  3. Add the minced garlic and ginger to the skillet, stirring constantly for about 30 seconds until fragrant.
  4. Pour in the soy sauce, honey, and sesame oil, stirring to combine.
  5. Return the cooked shrimp to the skillet. Add the cornstarch mixture and stir well to coat everything. Cook for an additional 2-3 minutes until the sauce thickens slightly. Season with salt and pepper to taste.
  6. Serve the stir-fry over cooked rice or noodles.

Notes

  • For a spicier kick, add red pepper flakes or sriracha to the sauce.
  • You can also substitute the shrimp with chicken or tofu for a different protein option.

Spicy Jalapeño Chicken Skillet: A Flavorful Meal Idea!

Introduction to Spicy Jalapeño Chicken Skillet

Picture this: it’s a hectic weeknight, and you’re staring blankly at the fridge, wondering what to whip up for dinner. Enter the Spicy Jalapeño Chicken Skillet—your new go-to solution! This dish is not just a meal; it’s a burst of flavor that comes together in a flash. With tender chicken, vibrant veggies, and a kick of jalapeño, it’s perfect for impressing your family or simply treating yourself after a long day. Trust me, once you try this recipe, you’ll be counting down the days until you can make it again!

Why You’ll Love This Spicy Jalapeño Chicken Skillet

This Spicy Jalapeño Chicken Skillet is a culinary dream come true for busy folks like us. It’s quick to prepare, taking just 25 minutes from start to finish. The vibrant flavors will dance on your taste buds, making every bite a delight. Plus, it’s a one-pan wonder, which means less cleanup and more time to kick back and enjoy your meal. What’s not to love?

Ingredients for Spicy Jalapeño Chicken Skillet

Let’s gather our ingredients for this mouthwatering Spicy Jalapeño Chicken Skillet. Each component plays a vital role in creating that perfect balance of flavor and texture.

  • Olive oil: This is your cooking base, adding richness and helping to brown the chicken beautifully.
  • Boneless, skinless chicken breasts: The star of the show! They’re lean, protein-packed, and cook quickly.
  • Salt and black pepper: Essential seasonings that enhance the natural flavors of the chicken and veggies.
  • Garlic powder and onion powder: These add depth and a savory kick without the fuss of chopping.
  • Smoked paprika: This brings a subtle smokiness that elevates the dish to new heights.
  • Cayenne pepper: For those who love heat, adjust this to your taste for a spicy punch!
  • Fresh jalapeños: The namesake of the dish! Sliced and ready to add that signature spice.
  • Bell peppers: Any color will do! They add sweetness and a pop of color to the skillet.
  • Onion: Sliced onions provide a sweet and savory flavor that complements the other ingredients.
  • Corn: Whether frozen or canned, corn adds a touch of sweetness and texture.
  • Diced tomatoes: Fresh or canned, they bring juiciness and acidity to balance the dish.
  • Shredded cheddar cheese: This melty goodness on top is the icing on the cake, adding creaminess.
  • Fresh cilantro: Optional, but it adds a refreshing finish that brightens the dish.

For exact measurements, check the bottom of the article where you can find everything listed for easy printing. Now, let’s get cooking!

How to Make Spicy Jalapeño Chicken Skillet

Now that we have our ingredients ready, let’s dive into the cooking process for this Spicy Jalapeño Chicken Skillet. Follow these simple steps, and you’ll have a delicious meal on the table in no time!

Step 1: Prepare the Chicken

Start by heating 2 tablespoons of olive oil in a large skillet over medium-high heat. Once the oil is shimmering, add 1 pound of bite-sized chicken pieces. Season them with 1 teaspoon of salt, ½ teaspoon of black pepper, 1 teaspoon of garlic powder, 1 teaspoon of onion powder, 1 teaspoon of smoked paprika, and ½ teaspoon of cayenne pepper. Cook for about 5-7 minutes, stirring occasionally, until the chicken is browned and cooked through. This step sets the flavor foundation!

Step 2: Sauté the Vegetables

Next, it’s time to add some color and crunch! Toss in 1 cup of sliced fresh jalapeños, 1 cup of sliced bell peppers, and 1 medium sliced onion into the skillet. Sauté these vibrant veggies for about 5 minutes, stirring frequently. You want them tender but still crisp. The aroma will be irresistible, and your kitchen will start to feel like a fiesta!

Step 3: Combine Ingredients

Now, let’s bring everything together. Stir in 1 cup of corn and 1 cup of diced tomatoes, whether fresh or canned. Cook for another 2-3 minutes until everything is heated through. This is where the magic happens, as the flavors meld together beautifully. You’ll see the colors pop, making it as pleasing to the eye as it is to the palate!

Step 4: Melt the Cheese

It’s time for the grand finale! Sprinkle ½ cup of shredded cheddar cheese over the top of your skillet masterpiece. Cover the skillet with a lid and let it sit for about 2 minutes. This allows the cheese to melt into gooey perfection. The melted cheese adds a creamy richness that ties all the flavors together, making each bite a delight!

Step 5: Garnish and Serve

Finally, remove the skillet from heat and garnish with fresh cilantro if desired. Serve your Spicy Jalapeño Chicken Skillet hot, right from the pan. This dish is perfect for sharing, so gather your loved ones around the table and enjoy the vibrant flavors together. Trust me, they’ll be asking for seconds!

Tips for Success

  • Prep your ingredients ahead of time to streamline the cooking process.
  • Adjust the amount of jalapeños based on your heat preference.
  • For extra flavor, marinate the chicken in spices for 30 minutes before cooking.
  • Use a non-stick skillet to prevent sticking and make cleanup easier.
  • Don’t skip the cilantro; it adds a fresh touch that brightens the dish!

Equipment Needed

  • Large skillet: A non-stick skillet works best, but any large pan will do.
  • Spatula: A wooden or silicone spatula is perfect for stirring without scratching.
  • Measuring spoons: Essential for accurate seasoning.
  • Knife and cutting board: For chopping your veggies and chicken.

Variations

  • Vegetarian Option: Substitute the chicken with chickpeas or tofu for a hearty plant-based meal.
  • Spicy Twist: Add diced serrano peppers or a splash of hot sauce for an extra kick.
  • Low-Carb Version: Replace corn with zucchini or cauliflower rice to keep it low-carb.
  • Cheesy Delight: Experiment with different cheeses like pepper jack or Monterey Jack for a unique flavor.
  • Herb Infusion: Add fresh herbs like oregano or thyme for an aromatic twist.

Serving Suggestions

  • Serve with rice: Fluffy white or brown rice complements the spicy flavors perfectly.
  • Pair with tortillas: Warm corn or flour tortillas make for great scooping tools.
  • Drink options: A cold beer or a refreshing margarita balances the heat.
  • Presentation: Serve in the skillet for a rustic look, garnished with extra cilantro.

FAQs about Spicy Jalapeño Chicken Skillet

Can I make this Spicy Jalapeño Chicken Skillet ahead of time?

Absolutely! You can prepare the chicken and veggies in advance, storing them in the fridge. When you’re ready to eat, just heat everything up in the skillet and add the cheese. It’s a great way to save time on busy nights!

What can I serve with this dish?

This Spicy Jalapeño Chicken Skillet pairs wonderfully with rice, tortillas, or even a fresh salad. You can also enjoy it with a side of guacamole or sour cream to cool down the heat!

How can I adjust the spice level?

If you prefer a milder dish, simply reduce the amount of jalapeños or use sweet bell peppers instead. You can also remove the seeds from the jalapeños, as they hold most of the heat. Adjust the cayenne pepper to your liking for a custom spice level!

Can I freeze leftovers?

Yes, you can freeze leftovers of this spicy chicken recipe. Just let it cool completely, then store it in an airtight container. When you’re ready to enjoy it again, thaw it in the fridge and reheat on the stove.

What other proteins can I use?

Feel free to swap the chicken for shrimp, turkey, or even beef. Just adjust the cooking time accordingly to ensure everything is cooked through. This recipe is versatile and can adapt to your favorite proteins!

Final Thoughts

Cooking the Spicy Jalapeño Chicken Skillet is more than just preparing a meal; it’s about creating a moment of joy in your kitchen. The vibrant colors and bold flavors come together to make a dish that’s not only satisfying but also a feast for the senses. Whether you’re sharing it with family or enjoying it solo, each bite is a reminder of the simple pleasures in life. So, roll up your sleeves, embrace the heat, and let this skillet dish bring a little excitement to your dinner table. You won’t regret it!

“`

Paul

Spicy Jalapeño Chicken Skillet: A Flavorful Meal Idea!

A flavorful and spicy chicken skillet dish featuring jalapeños and a variety of colorful vegetables.
Prep Time 10 minutes
Cook Time 15 minutes
Total Time 25 minutes
Servings: 4 servings
Course: Main Course
Cuisine: Mexican
Calories: 350

Ingredients
  

  • 2 tablespoons olive oil
  • 1 pound boneless skinless chicken breasts, cut into bite-sized pieces
  • 1 teaspoon salt
  • 1/2 teaspoon black pepper
  • 1 teaspoon garlic powder
  • 1 teaspoon onion powder
  • 1 teaspoon smoked paprika
  • 1/2 teaspoon cayenne pepper adjust to taste
  • 1 cup fresh jalapeños sliced (seeds removed for less heat)
  • 1 cup bell peppers sliced (any color)
  • 1 medium onion sliced
  • 1 cup corn frozen or canned, drained
  • 1 cup diced tomatoes canned or fresh
  • 1/2 cup shredded cheddar cheese
  • Fresh cilantro for garnish optional

Method
 

  1. In a large skillet, heat the olive oil over medium-high heat. Add the chicken pieces and season with salt, black pepper, garlic powder, onion powder, smoked paprika, and cayenne pepper. Cook for about 5-7 minutes, stirring occasionally, until the chicken is browned and cooked through.
  2. Add the sliced jalapeños, bell peppers, and onion to the skillet. Sauté for an additional 5 minutes until the vegetables are tender.
  3. Stir in the corn and diced tomatoes, cooking for another 2-3 minutes until heated through.
  4. Sprinkle the shredded cheddar cheese over the top and cover the skillet. Allow the cheese to melt for about 2 minutes.
  5. Remove from heat and garnish with fresh cilantro if desired. Serve hot.

Notes

  • For a milder version, use fewer jalapeños or substitute with sweet bell peppers.
  • Add a splash of lime juice before serving for an extra burst of flavor.

Mexican Barbecue Chicken Tacos: Unlock Flavorful Recipes!

Introduction to Mexican Barbecue Chicken Tacos

Picture this: it’s a busy weeknight, and you’re staring at the clock, wondering how to whip up something delicious without spending hours in the kitchen. Enter Mexican Barbecue Chicken Tacos! These tacos are not just a meal; they’re a celebration of flavor and simplicity. With tender chicken thighs coated in smoky barbecue sauce, they’re sure to impress your family or friends. Plus, they come together in just 30 minutes! Trust me, this recipe is your new go-to for quick dinners or casual gatherings. Let’s dive into the deliciousness!

Why You’ll Love This Mexican Barbecue Chicken Tacos

These Mexican Barbecue Chicken Tacos are a game-changer for any home cook. They’re incredibly easy to make, taking just 30 minutes from start to finish. The combination of smoky barbecue sauce and tender chicken thighs creates a flavor explosion that will have everyone coming back for seconds. Plus, you can customize the toppings to suit your taste, making them perfect for picky eaters or adventurous foodies alike!

Ingredients for Mexican Barbecue Chicken Tacos

Let’s gather our ingredients for these mouthwatering Mexican Barbecue Chicken Tacos! Each component plays a vital role in creating that perfect bite. Here’s what you’ll need:

  • Boneless, skinless chicken thighs: These are juicy and flavorful, making them ideal for grilling. You can swap them for chicken breasts if you prefer a leaner option.
  • Olive oil: A splash of this helps the spices stick to the chicken and adds a touch of richness.
  • Garlic powder: This brings a savory depth to the dish without the hassle of chopping fresh garlic.
  • Onion powder: A great way to add sweetness and flavor without the tears!
  • Smoked paprika: This gives a lovely smoky flavor that complements the barbecue sauce perfectly.
  • Ground cumin: A warm spice that adds an earthy note to the chicken.
  • Chili powder: For a hint of heat and a touch of color.
  • Salt and black pepper: Essential for enhancing all the flavors in your tacos.
  • Barbecue sauce: Choose a smoky variety for that authentic taste. You can also make your own if you’re feeling adventurous!
  • Tortillas: Small corn or flour tortillas are perfect for wrapping up all that delicious filling.
  • Shredded lettuce: Adds a refreshing crunch to your tacos.
  • Diced tomatoes: Juicy and vibrant, they brighten up the dish.
  • Diced red onion: For a bit of sharpness and color.
  • Queso fresco or shredded cheese: This creamy element ties everything together beautifully.
  • Fresh cilantro: A sprinkle of this herb adds a burst of freshness.
  • Lime wedges: A squeeze of lime elevates the flavors and adds a zesty kick.

For those who like it spicy, consider adding diced jalapeños or a dash of hot sauce to the chicken mixture. You can find the exact quantities for each ingredient at the bottom of the article, ready for printing!

How to Make Mexican Barbecue Chicken Tacos

Step 1: Prepare the Chicken

Start by grabbing a large bowl. In it, combine olive oil, garlic powder, onion powder, smoked paprika, ground cumin, chili powder, salt, and black pepper. This spice mixture is where the magic begins! Toss in the boneless, skinless chicken thighs, ensuring they’re evenly coated. The spices will cling to the chicken, infusing it with flavor as it cooks. Trust me, this step sets the stage for delicious Mexican Barbecue Chicken Tacos!

Step 2: Grill the Chicken

Now, it’s time to fire up the grill or grill pan! Preheat it over medium-high heat. Once hot, place the seasoned chicken thighs on the grill. Cook them for about 6-7 minutes on each side. You’ll know they’re done when the internal temperature hits 165°F. This ensures juicy, tender chicken that’s perfect for your tacos. Keep an eye on them; nobody likes overcooked chicken!

Step 3: Shred the Chicken

After grilling, remove the chicken from the heat and let it rest for about 5 minutes. This resting period allows the juices to redistribute, keeping the chicken moist. Once rested, use two forks to shred the chicken into bite-sized pieces. It’s a satisfying process, and you’ll be amazed at how tender it is!

Step 4: Combine with Barbecue Sauce

In a saucepan, heat your smoky barbecue sauce over low heat until it’s warmed through. Then, add the shredded chicken to the sauce, stirring to combine. This step is where the flavors meld together, creating a deliciously sticky mixture that will coat your tacos perfectly. The aroma will have your mouth watering!

Step 5: Warm the Tortillas

To enhance the texture of your tacos, warm the tortillas. You can do this on the grill or in a skillet for about 30 seconds on each side. This makes them pliable and ready to hold all that delicious filling. A warm tortilla is the perfect canvas for your barbecue chicken!

Step 6: Assemble the Tacos

Now comes the fun part—assembling your tacos! Take a warm tortilla and place a generous portion of the barbecue chicken mixture in the center. Top it off with shredded lettuce, diced tomatoes, red onion, and crumbled queso fresco. Don’t forget a sprinkle of fresh cilantro for that burst of flavor! Serve immediately with lime wedges on the side for an extra zing.

Tips for Success

  • Marinate the chicken for at least 30 minutes for deeper flavor.
  • Use a meat thermometer to ensure perfect doneness.
  • Experiment with different barbecue sauces for unique tastes.
  • Warm tortillas in a dry skillet for a few seconds for extra flavor.
  • Don’t overload the tacos; keep it balanced for easy eating!

Equipment Needed

  • Grill or Grill Pan: Essential for that smoky flavor. A stovetop grill pan works just as well.
  • Large Bowl: For mixing the chicken and spices. Any mixing bowl will do!
  • Meat Thermometer: To check chicken doneness. A simple knife can also help.
  • Two Forks: Perfect for shredding the chicken. You can use your hands if you prefer!
  • Saucepan: For warming the barbecue sauce. A small pot will work just fine.

Variations

  • Spicy Kick: Add diced jalapeños or a splash of hot sauce to the chicken mixture for an extra layer of heat.
  • Vegetarian Option: Substitute chicken with grilled portobello mushrooms or jackfruit for a delicious plant-based taco.
  • BBQ Sauce Swap: Experiment with different barbecue sauces, like honey mustard or teriyaki, for a unique twist.
  • Low-Carb Version: Use lettuce wraps instead of tortillas for a lighter, low-carb alternative.
  • Herb Infusion: Mix in fresh herbs like oregano or thyme with the spice blend for added flavor complexity.

Serving Suggestions

  • Side Dishes: Pair your tacos with Mexican street corn or a fresh avocado salad for a delightful contrast.
  • Drinks: Serve with a cold cerveza or a refreshing limeade to complement the flavors.
  • Presentation: Arrange tacos on a colorful platter, garnished with lime wedges and cilantro for a vibrant look.

FAQs about Mexican Barbecue Chicken Tacos

Can I use chicken breasts instead of thighs for these tacos?
Absolutely! While I love the juiciness of chicken thighs, boneless, skinless chicken breasts work just as well. Just keep an eye on the cooking time, as they may cook a bit faster.

What type of barbecue sauce is best for Mexican Barbecue Chicken Tacos?
I recommend using a smoky barbecue sauce to enhance the flavor of the chicken. However, feel free to experiment with your favorite varieties, like sweet or spicy, to find your perfect match!

Can I make these tacos ahead of time?
Yes! You can prepare the chicken and barbecue sauce in advance. Just store them separately in the fridge. When you’re ready to serve, warm them up and assemble your tacos for a quick meal.

What toppings can I add to my tacos?
The sky’s the limit! Besides the basics like lettuce and tomatoes, consider adding avocado, jalapeños, or even a drizzle of sour cream for extra creaminess. Customize them to your heart’s content!

Are these tacos gluten-free?
Yes! As long as you use corn tortillas, these Mexican Barbecue Chicken Tacos are gluten-free. Just double-check the labels on your barbecue sauce to ensure it meets your dietary needs.

Final Thoughts

Making Mexican Barbecue Chicken Tacos is more than just cooking; it’s about creating moments. The aroma of grilled chicken mingling with smoky barbecue sauce fills your kitchen, inviting everyone to gather around the table. Each bite bursts with flavor, and the customizable toppings let you express your culinary creativity. Whether it’s a casual weeknight dinner or a festive gathering, these tacos bring joy and satisfaction. So, roll up your sleeves, fire up that grill, and enjoy the deliciousness that awaits. Trust me, once you try these tacos, they’ll become a staple in your home!

“`

Paul

Mexican Barbecue Chicken Tacos: Unlock Flavorful Recipes!

Delicious Mexican Barbecue Chicken Tacos made with tender chicken thighs, smoky barbecue sauce, and fresh toppings.
Prep Time 15 minutes
Cook Time 15 minutes
Total Time 30 minutes
Servings: 4 servings
Course: Main Dish
Cuisine: Mexican
Calories: 450

Ingredients
  

  • 2 lbs boneless skinless chicken thighs
  • 1 tablespoon olive oil
  • 1 teaspoon garlic powder
  • 1 teaspoon onion powder
  • 1 teaspoon smoked paprika
  • 1 teaspoon ground cumin
  • 1 teaspoon chili powder
  • 1/2 teaspoon salt
  • 1/4 teaspoon black pepper
  • 1 cup barbecue sauce preferably a smoky variety
  • 8 small corn or flour tortillas
  • 1 cup shredded lettuce
  • 1 cup diced tomatoes
  • 1/2 cup diced red onion
  • 1/2 cup crumbled queso fresco or shredded cheese
  • 1/4 cup fresh cilantro chopped
  • Lime wedges for serving

Method
 

  1. In a large bowl, combine the olive oil, garlic powder, onion powder, smoked paprika, ground cumin, chili powder, salt, and black pepper. Add the chicken thighs and toss to coat evenly with the spice mixture.
  2. Preheat your grill or grill pan over medium-high heat. Once hot, add the chicken thighs and cook for about 6-7 minutes on each side, or until the internal temperature reaches 165°F.
  3. Remove the chicken from the grill and let it rest for 5 minutes. Then, shred the chicken using two forks or chop it into bite-sized pieces.
  4. In a saucepan, heat the barbecue sauce over low heat until warmed through. Add the shredded chicken to the sauce and stir to combine.
  5. Warm the tortillas on the grill or in a skillet for about 30 seconds on each side until pliable.
  6. To assemble the tacos, place a generous portion of the barbecue chicken mixture onto each tortilla. Top with shredded lettuce, diced tomatoes, red onion, queso fresco, and fresh cilantro.
  7. Serve immediately with lime wedges on the side for squeezing over the tacos.

Notes

  • For a spicier kick, add diced jalapeños or a dash of hot sauce to the chicken mixture.
  • Substitute the chicken thighs with boneless, skinless chicken breasts for a leaner option, adjusting the cooking time as needed.

Mango Shrimp Ceviche: Discover This Refreshing Recipe!

This refreshing dish is not only a feast for the eyes but also a delightful treat for the taste buds. Imagine succulent shrimp marinated in zesty lime juice, mingling with sweet mango and crisp veggies. It’s perfect for a light meal or an impressive appetizer at your next gathering. Trust me, this recipe will become your go-to for those days when you want to serve something special without spending hours in the kitchen.

Why You’ll Love This Mango Shrimp Ceviche

This Mango Shrimp Ceviche is a game-changer for busy days. It’s incredibly easy to prepare, taking just 15 minutes of active time. The vibrant flavors burst in your mouth, making it a crowd-pleaser at any gathering. Plus, it’s a light, healthy option that won’t weigh you down. Whether you’re serving it as an appetizer or a light meal, it’s sure to impress your family and friends!

Ingredients for Mango Shrimp Ceviche

Gathering the right ingredients is key to making a delicious Mango Shrimp Ceviche. Here’s what you’ll need:

  • Raw shrimp: Fresh, peeled, and deveined shrimp are essential. They soak up the lime juice beautifully, transforming into a tender delight.
  • Fresh lime juice: This zesty juice is the star of the show! It not only cooks the shrimp but also adds a refreshing tang.
  • Red onion: Finely chopped, it brings a mild sweetness and a pop of color to the dish.
  • Cucumber: Diced cucumber adds a crisp texture and balances the flavors with its coolness.
  • Ripe mango: Sweet and juicy, mango elevates the ceviche with its tropical flair. Make sure it’s perfectly ripe for the best taste!
  • Jalapeño pepper: Minced for a hint of heat, this pepper can be adjusted based on your spice preference.
  • Fresh cilantro: Chopped cilantro adds a burst of freshness and a lovely herbal note.
  • Salt and pepper: Simple seasonings that enhance all the vibrant flavors in the ceviche.
  • Tortilla chips: Perfect for scooping up the ceviche, they add a satisfying crunch.

For those who like a little extra kick, consider leaving some seeds in the jalapeño or adding a dash of hot sauce. If you’re feeling adventurous, you can swap the mango for diced avocado for a creamier texture. You can find the exact quantities for each ingredient at the bottom of the article, ready for printing!

How to Make Mango Shrimp Ceviche

Making Mango Shrimp Ceviche is a breeze! Follow these simple steps, and you’ll have a vibrant dish ready to impress. Let’s dive in!

Step 1: Marinate the Shrimp

Start by placing the raw shrimp in a medium bowl. Pour in the fresh lime juice, ensuring the shrimp are fully submerged. This is where the magic happens! The acidity of the lime juice will “cook” the shrimp, turning them pink and opaque. Cover the bowl and refrigerate for 2-3 hours. While you wait, you can daydream about how delicious this ceviche will be!

Step 2: Prepare the Vegetables

While the shrimp is marinating, it’s time to chop up the veggies. Finely dice the red onion and cucumber, and get that ripe mango ready by cutting it into small cubes. Don’t forget to mince the jalapeño! If you prefer a milder flavor, remove the seeds. This step is crucial for balancing the heat in your Mango Shrimp Ceviche.

Step 3: Combine Ingredients

Once the shrimp are ready, drain a little of the lime juice, but keep some for flavor. Add the chopped red onion, cucumber, mango, jalapeño, and fresh cilantro to the shrimp. Gently toss everything together. The colors will be stunning, and the aroma will make your mouth water!

Step 4: Season and Serve

Now it’s time to season your ceviche! Sprinkle in salt and pepper to taste. If you want a little more zing, adjust the lime juice to your liking. Serve your Mango Shrimp Ceviche immediately with crispy tortilla chips. Trust me, your family and friends will be raving about this dish!

Tips for Success

  • Use the freshest shrimp you can find for the best flavor and texture.
  • Don’t skip the marinating time; it’s essential for the shrimp to “cook” properly.
  • Adjust the lime juice and jalapeño to suit your taste preferences.
  • For a colorful presentation, serve in a clear bowl to showcase the vibrant ingredients.
  • Make it ahead of time; it tastes even better after the flavors meld!

Equipment Needed

  • Medium bowl: A glass or ceramic bowl works best for marinating the shrimp.
  • Knife and cutting board: Essential for chopping veggies and mango.
  • Measuring cups: Handy for measuring lime juice and other ingredients.
  • Refrigerator: Necessary for marinating the shrimp to perfection.

Variations

  • Avocado Twist: Swap out the mango for diced avocado for a creamy texture that pairs beautifully with the shrimp.
  • Fruit Fusion: Add diced pineapple or papaya for a tropical twist that enhances the sweetness of the ceviche.
  • Herb Medley: Experiment with different herbs like mint or basil for a unique flavor profile.
  • Spicy Kick: For those who love heat, add diced habanero or a splash of your favorite hot sauce.
  • Vegan Option: Replace shrimp with diced hearts of palm or marinated tofu for a plant-based version.

Serving Suggestions

  • Pair your Mango Shrimp Ceviche with crispy tortilla chips for a delightful crunch.
  • Serve alongside a refreshing cucumber salad to complement the flavors.
  • For drinks, consider a chilled white wine or a zesty margarita.
  • Garnish with extra cilantro and lime wedges for a beautiful presentation.

FAQs about Mango Shrimp Ceviche

Can I use frozen shrimp for this recipe?

Absolutely! Just make sure to thaw the shrimp completely before marinating. Fresh shrimp is ideal, but frozen can work just as well if you’re in a pinch.

How long can I store leftover Mango Shrimp Ceviche?

Leftovers can be stored in an airtight container in the refrigerator for up to 2 days. However, the shrimp may lose some of their texture, so it’s best enjoyed fresh!

Is Mango Shrimp Ceviche safe to eat?

Yes! The lime juice “cooks” the shrimp, making it safe to eat. Just ensure you use fresh, high-quality shrimp to minimize any risks.

Can I make this ceviche ahead of time?

Yes! You can prepare the ceviche a few hours in advance. Just keep it refrigerated until you’re ready to serve. The flavors will meld beautifully!

What can I serve with Mango Shrimp Ceviche?

This ceviche pairs wonderfully with tortilla chips, but you can also serve it with fresh veggies, avocado slices, or even on top of a bed of greens for a light meal.

Final Thoughts

Making Mango Shrimp Ceviche is more than just preparing a dish; it’s about creating a moment of joy. The vibrant colors and fresh flavors bring a burst of sunshine to any table. Whether you’re enjoying it on a busy weeknight or serving it at a gathering, this recipe is sure to spark smiles and compliments. I love how it effortlessly combines simplicity with elegance, making it a favorite among family and friends. So, roll up your sleeves, dive into this culinary adventure, and let the delightful taste of Mango Shrimp Ceviche brighten your day!

“`

Paul

Mango Shrimp Ceviche: Discover This Refreshing Recipe!

A refreshing and zesty Mango Shrimp Ceviche recipe that combines fresh shrimp, mango, and vegetables, perfect for a light meal or appetizer.
Prep Time 15 minutes
Course: Appetizer
Cuisine: Mexican
Calories: 180

Ingredients
  

  • 1 pound raw shrimp peeled and deveined
  • 1 cup fresh lime juice about 8-10 limes
  • 1 medium red onion finely chopped
  • 1 medium cucumber diced
  • 1 ripe mango diced
  • 1 jalapeño pepper seeded and minced
  • 1/4 cup fresh cilantro chopped
  • Salt and pepper to taste
  • Tortilla chips for serving

Method
 

  1. In a medium bowl, combine the shrimp and lime juice. Make sure the shrimp are fully submerged in the juice. Cover and refrigerate for 2-3 hours, or until the shrimp turn pink and opaque.
  2. Once the shrimp are ready, drain a little of the lime juice, leaving some for flavor.
  3. Add the red onion, cucumber, mango, jalapeño, and cilantro to the shrimp. Gently toss to combine.
  4. Season with salt and pepper to taste. Adjust lime juice if needed for acidity.
  5. Serve immediately with tortilla chips.

Notes

  • For a spicier kick, leave some seeds in the jalapeño or add a dash of hot sauce.
  • Substitute the mango with diced avocado for a creamier texture.

Cottage Cheese Blueberry Cloud Bread: A Delicious Treat!

This delightful treat is not only light and fluffy but also packed with protein and flavor. Imagine starting your day with a quick, nutritious breakfast that feels like a special indulgence. Whether you’re looking for a healthy snack or a sweet addition to your brunch table, this recipe is sure to impress your loved ones and keep you fueled for the day ahead!

Why You’ll Love This Cottage Cheese Blueberry Cloud Bread

This Cottage Cheese Blueberry Cloud Bread is a game-changer for busy days! It’s incredibly easy to make, taking just 10 minutes of prep time. The fluffy texture and burst of fresh blueberries make it a delightful treat that feels indulgent without the guilt. Plus, it’s low in calories, so you can enjoy it any time of day. Trust me, your taste buds will thank you!

Ingredients for Cottage Cheese Blueberry Cloud Bread

Gathering the right ingredients is key to making the perfect Cottage Cheese Blueberry Cloud Bread. Here’s what you’ll need:

  • Cottage Cheese: This creamy base adds protein and moisture, making the bread light and fluffy.
  • Large Eggs: They act as a binding agent, helping to create that cloud-like texture we all love.
  • Baking Powder: A must for leavening, it gives the bread its airy lift.
  • Vanilla Extract: This adds a lovely sweetness and depth of flavor, making each bite delightful.
  • Almond Flour: A low-carb alternative to regular flour, it keeps the bread light while adding a nutty flavor.
  • Fresh Blueberries: Bursting with flavor, these little gems provide a sweet and tangy contrast to the bread.
  • Salt: Just a pinch enhances all the flavors, making them pop!
  • Sweetener (optional): If you prefer a sweeter bread, consider using erythritol or stevia. Adjust to your taste!

For those who might want to switch things up, feel free to substitute the blueberries with other berries like raspberries or strawberries. The exact measurements for these ingredients can be found at the bottom of the article, ready for you to print out and take to the kitchen!

How to Make Cottage Cheese Blueberry Cloud Bread

Now that you have all your ingredients ready, let’s dive into the fun part—making your Cottage Cheese Blueberry Cloud Bread! Follow these simple steps, and you’ll have a delightful treat in no time.

Step 1: Preheat the Oven

First things first, preheat your oven to 350°F (175°C). This ensures that your cloud bread bakes evenly. While the oven warms up, line a baking sheet with parchment paper. This will prevent sticking and make cleanup a breeze!

Step 2: Mix the Base Ingredients

In a large mixing bowl, combine the cottage cheese, eggs, baking powder, vanilla extract, and salt. Use a whisk or a fork to mix until everything is smooth and well combined. This creamy mixture is the heart of your cloud bread, so make sure it’s blended nicely!

Step 3: Incorporate the Almond Flour

Next, gradually fold in the almond flour. I like to do this in batches to ensure it’s fully incorporated without overmixing. The almond flour adds a lovely nutty flavor and keeps the bread light. Just be gentle; we want to keep that airy texture!

Step 4: Add the Blueberries

Now comes the fun part—adding the fresh blueberries! Gently fold them into the batter, being careful not to crush them. Each blueberry is like a little burst of sunshine in your cloud bread, so treat them with care!

Step 5: Shape the Cloud Bread

Using a spoon or a cookie scoop, drop dollops of the mixture onto your prepared baking sheet. Make sure to leave some space between each dollop, as they will spread a bit while baking. Think of them as little clouds waiting to rise!

Step 6: Bake to Perfection

Pop the baking sheet into your preheated oven and bake for 20-25 minutes. Keep an eye on them! You’ll know they’re ready when the tops are golden brown and a toothpick inserted in the center comes out clean. The aroma will be heavenly!

Step 7: Cool and Enjoy

Once baked, allow the cloud bread to cool on the baking sheet for about 5 minutes. Then, transfer them to a wire rack to cool completely. This step is crucial; it helps them set up perfectly. Now, you’re ready to enjoy your Cottage Cheese Blueberry Cloud Bread!

Tips for Success

  • Make sure your cottage cheese is well-blended for a smoother texture.
  • Use fresh blueberries for the best flavor; frozen ones can make the batter watery.
  • Don’t overmix the batter after adding the almond flour; gentle folding is key!
  • Experiment with spices like cinnamon for an extra flavor boost.
  • Store leftovers in an airtight container to keep them fresh longer.

Equipment Needed

  • Mixing Bowl: A large bowl for combining ingredients. A sturdy glass or ceramic bowl works well.
  • Whisk or Fork: For mixing the batter. A hand mixer can speed things up!
  • Baking Sheet: A standard baking sheet lined with parchment paper.
  • Spoon or Cookie Scoop: For shaping the cloud bread dollops.
  • Wire Rack: To cool the bread after baking; a plate can work in a pinch.

Variations

  • Berry Medley: Swap out blueberries for a mix of raspberries, strawberries, or blackberries for a colorful twist.
  • Chocolate Chip Delight: Add a handful of dark chocolate chips for a sweet treat that satisfies your chocolate cravings.
  • Nutty Flavor: Incorporate chopped nuts like walnuts or pecans for added crunch and healthy fats.
  • Herb Infusion: For a savory version, try adding fresh herbs like rosemary or thyme instead of sweeteners.
  • Gluten-Free Option: Ensure your almond flour is certified gluten-free for a safe treat for those with gluten sensitivities.

Serving Suggestions

  • Pair your Cottage Cheese Blueberry Cloud Bread with a dollop of Greek yogurt for added creaminess.
  • Enjoy it alongside a fresh fruit salad for a colorful and nutritious breakfast.
  • Drizzle with honey or maple syrup for a touch of sweetness.
  • Serve with a cup of herbal tea or coffee for a cozy afternoon snack.

FAQs about Cottage Cheese Blueberry Cloud Bread

Can I use low-fat cottage cheese for this recipe?

Absolutely! Low-fat cottage cheese works just as well. It will still provide that creamy texture and protein boost without the extra calories.

How do I store leftover cloud bread?

Store any leftover Cottage Cheese Blueberry Cloud Bread in an airtight container in the fridge. It should stay fresh for about 3-4 days. You can also freeze them for longer storage!

Can I make this recipe dairy-free?

Yes! You can substitute the cottage cheese with a dairy-free alternative, like almond or soy yogurt. Just ensure it has a similar consistency for the best results.

What can I serve with Cottage Cheese Blueberry Cloud Bread?

This cloud bread pairs wonderfully with Greek yogurt, fresh fruit, or a drizzle of honey. It’s versatile enough to be enjoyed as a snack or a light breakfast!

Is this recipe suitable for a low-carb diet?

Yes! With almond flour and minimal sugar, Cottage Cheese Blueberry Cloud Bread is a great option for those following a low-carb or keto diet. Enjoy guilt-free!

Final Thoughts

Making Cottage Cheese Blueberry Cloud Bread is more than just a cooking experience; it’s a joyful journey that fills your kitchen with warmth and delightful aromas. Each fluffy bite is a reminder that healthy eating can be both satisfying and delicious. Whether you’re enjoying it for breakfast or as a snack, this recipe brings a sense of accomplishment and happiness. I love sharing it with my family, watching their faces light up with every bite. So, roll up your sleeves, gather your ingredients, and let this cloud bread bring a little sunshine to your day!

“`

Paul

Cottage Cheese Blueberry Cloud Bread: A Delicious Treat!

Cottage Cheese Blueberry Cloud Bread is a light and fluffy treat made with cottage cheese and fresh blueberries, perfect for a healthy snack or breakfast.
Prep Time 10 minutes
Cook Time 25 minutes
Total Time 35 minutes
Servings: 6 servings
Course: Baked Goods
Cuisine: American
Calories: 90

Ingredients
  

  • 1 cup cottage cheese
  • 4 large eggs
  • 1 teaspoon baking powder
  • 1 teaspoon vanilla extract
  • 1/2 cup almond flour
  • 1/2 cup fresh blueberries
  • 1/4 teaspoon salt
  • 1 tablespoon sweetener like erythritol or stevia, optional

Method
 

  1. Preheat your oven to 350°F (175°C) and line a baking sheet with parchment paper.
  2. In a large mixing bowl, combine the cottage cheese, eggs, baking powder, vanilla extract, and salt. Mix until smooth and well combined.
  3. Gradually fold in the almond flour until fully incorporated.
  4. Gently fold in the fresh blueberries, being careful not to crush them.
  5. Using a spoon or cookie scoop, drop dollops of the mixture onto the prepared baking sheet, leaving space between each dollop.
  6. Bake in the preheated oven for 20-25 minutes, or until the tops are golden brown and a toothpick inserted in the center comes out clean.
  7. Allow the cloud bread to cool on the baking sheet for 5 minutes before transferring to a wire rack to cool completely.

Notes

  • For a sweeter cloud bread, increase the sweetener to taste or add a sprinkle of cinnamon.
  • Substitute the blueberries with other berries like raspberries or strawberries for a different flavor profile.

Strawberry Matcha Sago: A Refreshing Dessert Recipe!

Introduction to Strawberry Matcha Sago

This refreshing dessert combines the vibrant flavors of strawberries and matcha with the fun texture of tapioca pearls. Perfect for those warm afternoons or as a sweet treat after dinner, this Strawberry Matcha Sago recipe is not only quick to prepare but also a showstopper that will impress your loved ones. Trust me, once you try it, you’ll want to make it again and again!

Why You’ll Love This Strawberry Matcha Sago

This Strawberry Matcha Sago is a delightful blend of flavors that’s as easy to make as it is delicious. In just under an hour, you can create a dessert that feels fancy but requires minimal effort. The combination of creamy coconut milk, earthy matcha, and sweet strawberries is simply irresistible. Plus, it’s a vegan treat that everyone can enjoy, making it perfect for family gatherings or a cozy night in!

Ingredients for Strawberry Matcha Sago

Gathering the right ingredients is key to making a delicious Strawberry Matcha Sago. Here’s what you’ll need:

  • Small tapioca pearls: These little gems provide that delightful chewy texture. You can find them in most grocery stores or Asian markets.
  • Water: Essential for cooking the tapioca pearls. It’s the base for this refreshing dessert.
  • Coconut milk: This creamy ingredient adds richness and a hint of tropical flavor. You can use full-fat or light coconut milk based on your preference.
  • Matcha powder: The star of the show! This finely ground green tea powder brings a unique earthy flavor and vibrant color. Look for high-quality matcha for the best taste.
  • Honey or maple syrup: A touch of sweetness to balance the flavors. Adjust the amount to suit your taste; both options work beautifully.
  • Fresh strawberries: These juicy fruits add a burst of sweetness and color. Feel free to swap them with other berries if you prefer!
  • Vanilla extract: Just a hint enhances the overall flavor profile, making it even more delightful.
  • Pinch of salt: This little addition helps to elevate all the flavors, making them pop.

For exact measurements, check the bottom of the article where you can find everything listed for easy printing. Happy cooking!

How to Make Strawberry Matcha Sago

Now that you have all your ingredients ready, let’s dive into the fun part—making your Strawberry Matcha Sago! Follow these simple steps, and you’ll have a delightful dessert in no time.

Step 1: Cook the Tapioca Pearls

Start by bringing 2 cups of water to a rolling boil in a medium saucepan. Once the water is bubbling, gently add the small tapioca pearls. Stir them lightly to prevent sticking. Reduce the heat to medium and let them cook for about 15 minutes. You’ll know they’re ready when they turn translucent, resembling little pearls of joy!

Step 2: Rinse the Pearls

After cooking, remove the saucepan from heat and let the pearls sit in the hot water for an additional 10 minutes. This step is crucial! It allows the pearls to finish cooking. Once that’s done, drain them and rinse under cold water. This stops the cooking process and keeps them from becoming gummy. Trust me, rinsing is key to achieving that perfect chewy texture!

Step 3: Prepare the Matcha Coconut Mixture

In a separate saucepan, combine the creamy coconut milk, matcha powder, honey (or maple syrup), vanilla extract, and a pinch of salt. Whisk everything together until it’s smooth and well combined. Heat this mixture over low heat, stirring gently. Be careful not to let it boil; we want to keep that lovely green color and flavor intact!

Step 4: Combine Ingredients

Once your matcha coconut mixture is warm, it’s time to add the cooked tapioca pearls. Stir them in gently, ensuring they’re well coated with the matcha goodness. Allow this delightful mixture to cool to room temperature. The flavors will meld beautifully as it cools!

Step 5: Serve and Chill

Now comes the fun part! Divide the Strawberry Matcha Sago into serving bowls or glasses. Top each serving with those luscious sliced strawberries. For the best experience, chill them in the refrigerator for at least 30 minutes before serving. This will make your dessert even more refreshing and enjoyable!

Tips for Success

  • Make sure to stir the tapioca pearls gently while cooking to prevent them from sticking together.
  • Adjust the sweetness of your Strawberry Matcha Sago by tasting the matcha mixture before adding the pearls.
  • For a creamier texture, let the dessert sit in the fridge longer before serving.
  • Experiment with different fruits like mango or kiwi for a fun twist!
  • Use high-quality matcha for the best flavor and vibrant color.

Equipment Needed

  • Medium saucepan: Essential for cooking the tapioca pearls and matcha mixture. A large pot works too!
  • Whisk: Perfect for blending the matcha and coconut milk. A fork can do the job in a pinch.
  • Measuring cups: Handy for accurate ingredient measurements. You can use any cup for rough estimates.
  • Colander: Useful for rinsing the tapioca pearls. A fine mesh strainer works well too.

Variations

  • Fruit Medley: Mix in other fruits like mango, kiwi, or blueberries for a colorful twist.
  • Nutty Delight: Add a sprinkle of toasted coconut or chopped nuts for extra crunch and flavor.
  • Chocolate Lovers: Drizzle some melted dark chocolate on top for a decadent touch.
  • Matcha-Free Option: If matcha isn’t your thing, simply omit it and enjoy a creamy coconut and strawberry dessert.
  • Sweetener Swap: Use agave syrup or stevia for a sugar-free version that still tastes amazing!

Serving Suggestions

  • Pair your Strawberry Matcha Sago with a light herbal tea for a refreshing afternoon treat.
  • Serve it alongside a slice of lemon cake for a delightful dessert duo.
  • Garnish with fresh mint leaves for a pop of color and added freshness.
  • Use clear glasses to showcase the beautiful layers of this dessert.

FAQs about Strawberry Matcha Sago

Can I make Strawberry Matcha Sago ahead of time?

Absolutely! This dessert can be made a day in advance. Just store it in the refrigerator, and it will be ready to impress your guests when you need it. The flavors will meld beautifully overnight!

Is Strawberry Matcha Sago gluten-free?

Yes, this delightful dessert is naturally gluten-free! The main ingredients, tapioca pearls, coconut milk, and strawberries, are all gluten-free, making it a safe choice for those with gluten sensitivities.

Can I use frozen strawberries instead of fresh?

Definitely! Frozen strawberries work well in this recipe. Just thaw them before slicing and topping your Strawberry Matcha Sago. They’ll add a lovely sweetness and vibrant color!

How do I store leftovers?

Store any leftovers in an airtight container in the refrigerator. They should stay fresh for up to three days. Just give it a gentle stir before serving again!

What can I substitute for coconut milk?

If you’re not a fan of coconut milk, you can use almond milk or oat milk as a substitute. Just keep in mind that the flavor will change slightly, but it will still be delicious!

Final Thoughts

Creating this Strawberry Matcha Sago has been a delightful journey for me, and I hope it brings you as much joy as it has brought to my family. The vibrant colors and refreshing flavors make it a perfect dessert for any occasion, whether it’s a casual family dinner or a special gathering with friends. Plus, the ease of preparation means you can whip it up even on your busiest days. So, gather your ingredients, embrace the process, and enjoy every spoonful of this delightful treat. Trust me, your taste buds will thank you!

“`

Paul

Strawberry Matcha Sago: A Refreshing Dessert Recipe!

A refreshing dessert combining the flavors of strawberry and matcha with tapioca pearls.
Prep Time 10 minutes
Cook Time 15 minutes
Total Time 55 minutes
Servings: 4 servings
Course: Dessert
Cuisine: Asian Fusion
Calories: 220

Ingredients
  

  • 1 cup small tapioca pearls
  • 2 cups water
  • 1 cup coconut milk
  • 1 tablespoon matcha powder
  • 1/4 cup honey or maple syrup adjust to taste
  • 1 cup fresh strawberries hulled and sliced
  • 1/2 teaspoon vanilla extract
  • Pinch of salt

Method
 

  1. In a medium saucepan, bring 2 cups of water to a boil. Add the tapioca pearls and stir gently. Reduce the heat to medium and cook for about 15 minutes, stirring occasionally, until the pearls become translucent.
  2. Remove the saucepan from heat and let the pearls sit in the hot water for an additional 10 minutes. Drain the pearls and rinse them under cold water to stop the cooking process.
  3. In a separate saucepan, combine the coconut milk, matcha powder, honey (or maple syrup), vanilla extract, and a pinch of salt. Whisk until smooth and well combined. Heat over low heat until warm, but do not boil.
  4. Add the cooked tapioca pearls to the matcha coconut mixture and stir to combine. Allow it to cool to room temperature.
  5. Once cooled, divide the mixture into serving bowls or glasses. Top with sliced strawberries.
  6. Chill in the refrigerator for at least 30 minutes before serving for a refreshing treat.

Notes

  • For added texture, consider mixing in other fruits like mango or kiwi.
  • Adjust the sweetness by adding more or less honey/maple syrup based on your preference.

Ricotta Meatballs in Marinara Sauce: A Delicious Treat!

I absolutely adore making Ricotta Meatballs in Marinara Sauce. This dish is not only a comforting classic but also a quick solution for those hectic weeknights. The tender meatballs, infused with creamy ricotta, simmer beautifully in a rich marinara sauce, creating a symphony of flavors that warms the heart. Whether you’re looking to impress your loved ones or simply want a satisfying meal, this recipe is sure to become a family favorite!

Why You’ll Love This Ricotta Meatballs in Marinara Sauce

This recipe is a lifesaver for busy days! It’s quick to prepare, taking just 45 minutes from start to finish. The combination of ricotta and ground beef creates meatballs that are incredibly tender and flavorful. Plus, the marinara sauce adds a rich, comforting touch that everyone will love. It’s a dish that not only satisfies hunger but also brings smiles to the dinner table!

Ingredients for Ricotta Meatballs in Marinara Sauce

Gathering the right ingredients is the first step to creating these delightful Ricotta Meatballs in Marinara Sauce. Here’s what you’ll need:

  • Ground beef: This is the base of your meatballs, providing rich flavor and protein. You can also use ground turkey or chicken for a leaner option.
  • Ricotta cheese: This creamy cheese adds moisture and a delightful texture to the meatballs, making them tender and flavorful.
  • Grated Parmesan cheese: A sprinkle of this cheese enhances the savory taste of the meatballs, giving them a lovely depth of flavor.
  • Breadcrumbs: These help bind the meatball mixture together while keeping them light and fluffy. You can use gluten-free breadcrumbs if needed.
  • Egg: This acts as a binder, helping to hold the meatballs together during cooking.
  • Garlic: Freshly minced garlic adds a wonderful aroma and flavor that elevates the dish.
  • Dried oregano: This herb brings a classic Italian flavor to the meatballs, making them taste authentic and delicious.
  • Salt and black pepper: Essential seasonings that enhance all the other flavors in the dish.
  • Fresh parsley: Chopped parsley adds a pop of color and freshness, brightening up the meatballs.
  • Marinara sauce: The heart of this dish! A rich, flavorful sauce that envelops the meatballs, creating a comforting meal.
  • Olive oil: A drizzle of olive oil helps to brown the meatballs in the oven, adding a nice texture.
  • Fresh basil leaves (optional): These make a lovely garnish, adding a burst of color and fresh flavor to your dish.

For exact measurements, check the bottom of the article where you can find everything listed for easy printing!

How to Make Ricotta Meatballs in Marinara Sauce

Now that you have all your ingredients ready, let’s dive into the steps for making these delightful Ricotta Meatballs in Marinara Sauce. Each step is simple, and I promise you’ll feel like a culinary rockstar by the end!

Step 1: Preheat the Oven

First things first, preheat your oven to 400°F. This step is crucial for even cooking. A hot oven ensures that your meatballs will brown nicely on the outside while staying juicy on the inside. Trust me, you want that perfect texture!

Step 2: Prepare the Meatball Mixture

In a large mixing bowl, combine the ground beef, ricotta cheese, Parmesan cheese, breadcrumbs, egg, minced garlic, oregano, salt, black pepper, and parsley. Mix gently until everything is just combined. Overmixing can lead to tough meatballs, and we want them tender and fluffy. Think of it as a gentle hug for your ingredients!

Step 3: Form the Meatballs

Now, it’s time to shape your meatballs! Using your hands, scoop out a portion of the mixture and roll it into a ball about 1.5 inches in diameter. Make sure they’re uniform in size for even cooking. If you find the mixture sticking to your hands, a little water can help. It’s like giving your meatballs a spa day!

Step 4: Bake the Meatballs

Place the meatballs on a baking sheet lined with parchment paper. Drizzle a bit of olive oil over them to help with browning. Bake in the preheated oven for 20-25 minutes. To check for doneness, cut one open; it should be cooked through and no longer pink inside. The aroma wafting through your kitchen will be heavenly!

Step 5: Simmer in Marinara Sauce

While the meatballs are baking, heat your marinara sauce in a large skillet over medium heat. Once the meatballs are done, carefully transfer them to the skillet. Let them simmer in the sauce for an additional 5-10 minutes. This step is essential for flavor integration. The meatballs soak up the rich marinara, making each bite a burst of deliciousness!

Step 6: Serve and Garnish

Finally, it’s time to serve! Plate the meatballs with a generous ladle of marinara sauce. For a beautiful presentation, garnish with fresh basil leaves. Not only does it look stunning, but it also adds a fresh flavor that complements the dish perfectly. Enjoy your culinary masterpiece!

Tips for Success

  • Use room temperature ingredients for better mixing and texture.
  • Don’t overmix the meatball mixture; it keeps them tender.
  • Wet your hands when forming meatballs to prevent sticking.
  • For extra flavor, let the meatballs rest in the marinara sauce longer.
  • Experiment with herbs like basil or thyme for a unique twist.

Equipment Needed

  • Mixing bowl: A large bowl for combining ingredients. A sturdy pot can work in a pinch.
  • Baking sheet: Use a rimmed baking sheet to catch any drips. A casserole dish is a good alternative.
  • Parchment paper: For easy cleanup. Aluminum foil can be used if you don’t have parchment.
  • Skillet: A large skillet for simmering the sauce. A saucepan will do just fine.

Variations

  • Spicy Ricotta Meatballs: Add red pepper flakes to the meatball mixture or marinara sauce for a kick of heat.
  • Vegetarian Option: Substitute the ground beef with a mix of finely chopped mushrooms, lentils, and walnuts for a hearty, meat-free version.
  • Cheesy Surprise: Insert a small cube of mozzarella cheese in the center of each meatball for a gooey, cheesy surprise when you bite in.
  • Herb-Infused: Experiment with fresh herbs like basil, thyme, or rosemary to elevate the flavor profile of your meatballs.
  • Gluten-Free: Use gluten-free breadcrumbs and ensure your marinara sauce is free from gluten-containing ingredients.

Serving Suggestions

  • Pasta: Serve your Ricotta Meatballs over a bed of spaghetti or zoodles for a delightful meal.
  • Garlic Bread: Pair with warm, crusty garlic bread to soak up that delicious marinara sauce.
  • Salad: A fresh green salad with a light vinaigrette complements the richness of the meatballs.
  • Wine: Enjoy with a glass of red wine, like Chianti, for a classic Italian experience.
  • Presentation: Garnish with extra parsley or basil for a pop of color and freshness.

FAQs about Ricotta Meatballs in Marinara Sauce

Can I make Ricotta Meatballs in Marinara Sauce ahead of time?

Absolutely! You can prepare the meatballs and marinara sauce in advance. Just store them separately in the fridge for up to 2 days. When you’re ready to serve, simply reheat the sauce and meatballs together for a quick meal.

Can I freeze Ricotta Meatballs?

Yes, these meatballs freeze beautifully! After baking, let them cool completely, then place them in an airtight container or freezer bag. They can be frozen for up to 3 months. Just thaw and reheat in marinara sauce when you’re ready to enjoy them.

What can I serve with Ricotta Meatballs in Marinara Sauce?

These meatballs pair wonderfully with spaghetti, garlic bread, or a fresh salad. You can also serve them in a sub roll for a delicious meatball sandwich!

Can I use a different type of cheese?

Of course! While ricotta is traditional, you can experiment with cottage cheese or even cream cheese for a different flavor and texture. Just keep in mind that it may alter the overall taste of the meatballs.

How do I know when the meatballs are done cooking?

The best way to check is by cutting one open. It should be cooked through with no pink inside. Alternatively, you can use a meat thermometer; the internal temperature should reach 160°F for ground beef.

Final Thoughts

Making Ricotta Meatballs in Marinara Sauce is more than just cooking; it’s about creating memories around the dinner table. The joy of watching my family savor each bite fills my heart with warmth. This dish is a comforting hug on a plate, perfect for busy nights or special gatherings. With its rich flavors and tender meatballs, it’s a recipe that brings everyone together. I hope you find as much joy in making and sharing this meal as I do. So roll up your sleeves, and let’s create some delicious moments together!

“`

Paul

Ricotta Meatballs in Marinara Sauce: A Delicious Treat!

Ricotta Meatballs in Marinara Sauce is a delicious and hearty dish that combines tender meatballs made with ricotta cheese and ground beef, simmered in a rich marinara sauce.
Prep Time 15 minutes
Cook Time 30 minutes
Total Time 45 minutes
Servings: 4 servings
Course: Main Course
Cuisine: Italian
Calories: 350

Ingredients
  

  • 1 pound ground beef
  • 1 cup ricotta cheese
  • 1/2 cup grated Parmesan cheese
  • 1/2 cup breadcrumbs
  • 1 large egg
  • 2 cloves garlic minced
  • 1 teaspoon dried oregano
  • 1 teaspoon salt
  • 1/2 teaspoon black pepper
  • 1/4 cup fresh parsley chopped
  • 2 cups marinara sauce
  • 1 tablespoon olive oil
  • Fresh basil leaves for garnish optional

Method
 

  1. Preheat your oven to 400°F.
  2. In a large mixing bowl, combine the ground beef, ricotta cheese, Parmesan cheese, breadcrumbs, egg, garlic, oregano, salt, black pepper, and parsley. Mix until just combined; do not overmix.
  3. Using your hands, form the mixture into meatballs, about 1.5 inches in diameter. Place the meatballs on a baking sheet lined with parchment paper.
  4. Drizzle the olive oil over the meatballs and bake in the preheated oven for 20-25 minutes, or until cooked through and browned.
  5. While the meatballs are baking, heat the marinara sauce in a large skillet over medium heat. Once the meatballs are done, transfer them to the skillet with the marinara sauce and simmer for an additional 5-10 minutes to allow the flavors to meld.
  6. Serve the meatballs hot, garnished with fresh basil leaves if desired.

Notes

  • For a spicier kick, add red pepper flakes to the meatball mixture or the marinara sauce.
  • You can substitute ground turkey or chicken for a leaner option. Adjust cooking times as necessary.

Old-Fashioned Banana Bread: Discover the Perfect Recipe!

There’s something incredibly comforting about the smell of Old-Fashioned Banana Bread wafting through the kitchen. It takes me back to my childhood, where my mom would whip up a loaf whenever we had ripe bananas lying around. This recipe is not just a quick solution for a busy day; it’s a delightful way to impress your loved ones with minimal effort. With just a handful of ingredients, you can create a moist, delicious treat that’s perfect for breakfast, snacks, or even dessert. Trust me, once you try this classic recipe, it will become a staple in your home!

Why You’ll Love This Old-Fashioned Banana Bread

This Old-Fashioned Banana Bread is a lifesaver for busy moms and professionals alike. It’s incredibly easy to make, requiring just one bowl and minimal cleanup. The delightful aroma fills your home, making it feel warm and inviting. Plus, the taste is simply divine! Each slice is moist and flavorful, making it a perfect treat for breakfast or an afternoon snack. You’ll find yourself reaching for seconds, and maybe even thirds!

Ingredients for Old-Fashioned Banana Bread

Gathering the right ingredients is the first step to baking a delicious loaf of Old-Fashioned Banana Bread. Here’s what you’ll need:

  • Ripe Bananas: The star of the show! Look for bananas that are brown and spotty for maximum sweetness.
  • Melted Butter: This adds richness and moisture. You can use unsalted butter for better control over the saltiness.
  • Baking Soda: This is your leavening agent, helping the bread rise and become fluffy.
  • Salt: Just a pinch enhances the flavors and balances the sweetness of the bananas.
  • Sugar: Granulated sugar is traditional, but you can experiment with brown sugar for a deeper flavor.
  • Large Egg: This binds the ingredients together and adds moisture. If you prefer a vegan option, a flax egg works well!
  • Vanilla Extract: A splash of vanilla adds warmth and depth to the flavor profile.
  • All-Purpose Flour: The base of your bread. For a healthier twist, consider using whole wheat flour instead.

For those who like to get creative, you can also mix in optional ingredients like:

  • Chopped Walnuts: They add a delightful crunch and nutty flavor.
  • Chocolate Chips: Perfect for a sweet treat that kids will love!

Exact measurements for these ingredients can be found at the bottom of the article, ready for you to print and take to the kitchen!

How to Make Old-Fashioned Banana Bread

Now that you have all your ingredients ready, let’s dive into the delightful process of making Old-Fashioned Banana Bread. Follow these simple steps, and you’ll have a warm loaf ready to enjoy in no time!

Step 1: Preheat the Oven

First things first, preheat your oven to 350°F (175°C). This ensures that your bread bakes evenly. While the oven warms up, grease a 4×8-inch loaf pan. You can use butter or non-stick spray to make sure your bread slides out easily later.

Step 2: Mash the Bananas

In a mixing bowl, take those ripe bananas and mash them with a fork until they’re nice and smooth. The more mashed they are, the better! Stir in the melted butter until it’s well combined. This step adds richness and flavor to your Old-Fashioned Banana Bread.

Step 3: Combine Dry Ingredients

Next, mix in the baking soda and a pinch of salt. These ingredients are essential for giving your bread that perfect rise and flavor. Just a quick stir will do; you want to keep it simple!

Step 4: Add Sugar and Egg

Now it’s time to sweeten things up! Add the sugar, beaten egg, and vanilla extract to the banana mixture. Mix everything together until it’s well combined. The vanilla will add a lovely aroma that fills your kitchen!

Step 5: Incorporate Flour

Gently stir in the all-purpose flour until just incorporated. Be careful not to overmix; a few lumps are perfectly fine. Overmixing can lead to a dense loaf, and we want it light and fluffy!

Step 6: Pour and Bake

Pour the batter into your prepared loaf pan. Make sure it’s evenly spread out. Now, pop it into the oven and bake for 60-65 minutes. You’ll know it’s done when a toothpick inserted into the center comes out clean. The anticipation will be worth it!

Step 7: Cool the Bread

Once baked, let the bread cool in the pan for about 10 minutes. This helps it set. After that, carefully transfer it to a wire rack to cool completely. The aroma will be irresistible, and you might find it hard to wait!

Tips for Success

  • Use overripe bananas for the best flavor and sweetness.
  • Don’t skip the cooling step; it helps the bread set properly.
  • For a moist loaf, avoid overmixing the batter.
  • Store leftover banana bread in an airtight container to keep it fresh.
  • Feel free to experiment with spices like cinnamon for an extra kick!

Equipment Needed

  • Mixing Bowl: A large bowl for combining ingredients. A sturdy glass or ceramic bowl works well.
  • Loaf Pan: A 4×8-inch pan is ideal. If you don’t have one, a round cake pan can work in a pinch.
  • Fork: Perfect for mashing bananas. A potato masher can also do the trick!
  • Measuring Cups and Spoons: Essential for accuracy. If you’re in a hurry, eyeballing can work for dry ingredients.

Variations

  • Nutty Delight: Add 1/2 cup of chopped walnuts or pecans for a crunchy texture and nutty flavor.
  • Chocolate Lovers: Mix in 1/2 cup of chocolate chips for a sweet twist that kids will adore.
  • Spiced Banana Bread: Incorporate 1 teaspoon of cinnamon or nutmeg for a warm, spiced flavor that’s perfect for fall.
  • Healthier Option: Substitute half of the all-purpose flour with whole wheat flour for added fiber and nutrients.
  • Fruit Fusion: Toss in 1/2 cup of dried cranberries or raisins for a fruity burst in every bite.

Serving Suggestions

  • With Butter: Spread a pat of butter on a warm slice for extra richness.
  • Pair with Coffee: Enjoy a slice with your morning coffee or afternoon tea.
  • Top with Yogurt: Serve with a dollop of Greek yogurt for a creamy contrast.
  • Presentation: Slice and arrange on a pretty platter for a delightful brunch treat.

FAQs about Old-Fashioned Banana Bread

As you embark on your baking journey with Old-Fashioned Banana Bread, you might have a few questions. Here are some common queries that can help you along the way:

Can I use frozen bananas for this recipe?

Absolutely! Frozen bananas work wonderfully in this recipe. Just thaw them and mash them up. They’ll be just as sweet and flavorful!

How do I know when my banana bread is done baking?

The best way to check is by inserting a toothpick into the center. If it comes out clean or with a few crumbs, your Old-Fashioned Banana Bread is ready to come out of the oven!

Can I make this banana bread gluten-free?

Yes, you can! Substitute the all-purpose flour with a gluten-free flour blend. Just make sure it’s a 1:1 ratio for the best results.

How should I store leftover banana bread?

Store your banana bread in an airtight container at room temperature for up to three days. For longer storage, wrap it tightly and freeze it for up to three months!

Can I add other fruits to the banana bread?

Definitely! Feel free to mix in some blueberries, chopped apples, or even shredded zucchini for a fun twist on the classic Old-Fashioned Banana Bread.

Final Thoughts

Baking Old-Fashioned Banana Bread is more than just a recipe; it’s a heartwarming experience that fills your home with love and nostalgia. Each slice brings back memories of family gatherings and cozy mornings. The joy of sharing this delicious treat with loved ones is truly priceless. Whether you enjoy it fresh out of the oven or toasted with a bit of butter, this banana bread is sure to become a cherished favorite in your kitchen. So, roll up your sleeves, gather those ripe bananas, and let the magic of baking unfold. You won’t regret it!

“`

Paul

Old-Fashioned Banana Bread: Discover the Perfect Recipe!

A classic recipe for moist and delicious banana bread made with ripe bananas.
Prep Time 15 minutes
Servings: 8 servings
Course: Dessert
Cuisine: American
Calories: 180

Ingredients
  

  • 3 ripe bananas mashed
  • 1/3 cup melted butter
  • 1 teaspoon baking soda
  • Pinch of salt
  • 3/4 cup sugar
  • 1 large egg beaten
  • 1 teaspoon vanilla extract
  • 1 1/2 cups all-purpose flour

Method
 

  1. Preheat your oven to 350°F (175°C). Grease a 4×8-inch loaf pan.
  2. In a mixing bowl, mash the ripe bananas with a fork until smooth. Stir in the melted butter.
  3. Mix in the baking soda and salt.
  4. Add the sugar, beaten egg, and vanilla extract, and mix until well combined.
  5. Stir in the flour until just incorporated. Do not overmix.
  6. Pour the batter into the prepared loaf pan.
  7. Bake for 60-65 minutes, or until a toothpick inserted into the center comes out clean.
  8. Let the bread cool in the pan for about 10 minutes, then transfer to a wire rack to cool completely.

Notes

  • For added flavor, mix in 1/2 cup of chopped walnuts or chocolate chips.
  • To make it healthier, substitute half of the all-purpose flour with whole wheat flour.