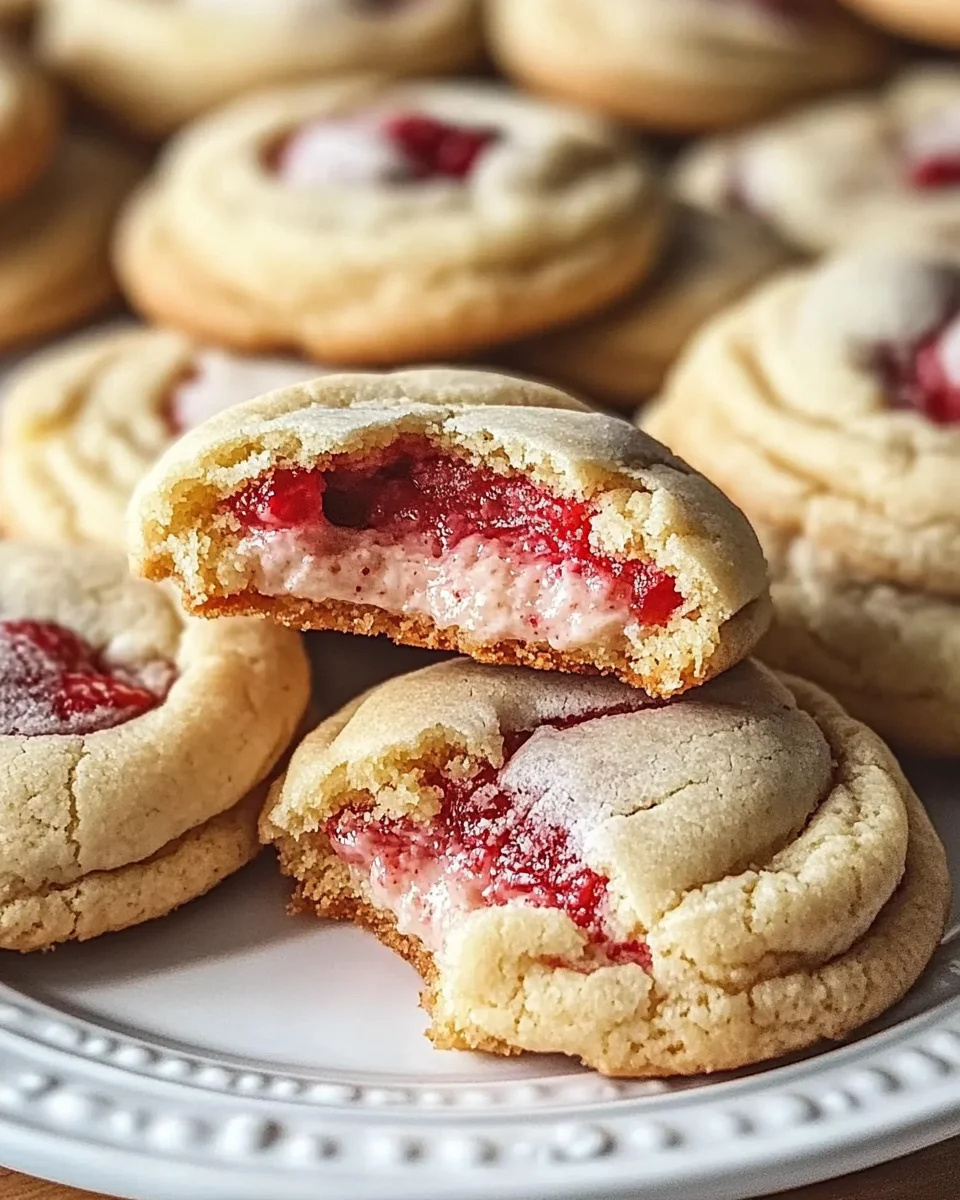
The Ultimate Guide to Strawberry Cheesecake Stuffed Cookies

If you’re a fan of cookies and cheesecake, why not combine them into one irresistible treat? Strawberry cheesecake stuffed cookies offer the best of both worlds—soft, buttery cookie dough infused with strawberries and a rich, creamy cheesecake filling at the center. These cookies are not only visually stunning but also packed with flavor, making them perfect for any occasion.

In this guide, we’ll cover everything you need to know about making the best strawberry cheesecake stuffed cookies, including expert baking tips, creative variations, and answers to frequently asked questions.

Why You’ll Love These Cookies

Strawberry cheesecake stuffed cookies take classic cookies to a whole new level. Here’s why they deserve a spot in your baking rotation:

1. A Perfect Balance of Flavors

The combination of sweet strawberries, rich cheesecake filling, and buttery cookie dough creates a balanced flavor profile. Each bite is the perfect mix of fruity, creamy, and indulgent.

2. A Decadent Surprise in Every Bite

Unlike regular cookies, these are filled with a smooth cheesecake center that adds a layer of richness. The contrast between the soft cookie exterior and the creamy filling makes them incredibly satisfying.

3. Visually Stunning and Impressive

With their golden-brown exterior and vibrant strawberry-studded dough, these cookies look as good as they taste. They’re perfect for parties, special occasions, or simply treating yourself.

4. Customizable to Your Taste

Whether you want to switch up the filling, try different fruit flavors, or add a crunchy topping, these cookies are easily customizable. There’s no limit to the variations you can create.

Tips for Making the Perfect Strawberry Cheesecake Stuffed Cookies

Achieving bakery-quality cookies at home is easy with the right techniques. Here are some expert tips to ensure your cookies turn out perfectly every time:

1. Use Freeze-Dried Strawberries for Maximum Flavor

Unlike fresh strawberries, freeze-dried strawberries don’t add extra moisture to the dough, ensuring the cookies remain soft yet stable. They also provide a concentrated strawberry flavor, enhancing the overall taste.

2. Chill the Cheesecake Filling Before Stuffing

Refrigerating the cheesecake filling before assembling the cookies makes it easier to handle and prevents it from spreading too much while baking. This helps maintain a well-defined, creamy center.

3. Keep the Dough Cold for Better Structure

Chilling the cookie dough before baking prevents the cookies from spreading too much in the oven. It also allows the flavors to develop, leading to a richer, more flavorful cookie.

4. Seal the Edges Well to Prevent Leaking

When assembling the cookies, make sure the cheesecake filling is fully enclosed by the dough. Any gaps or weak spots can cause the filling to seep out during baking.

5. Don’t Overbake

These cookies should be removed from the oven when they are just golden around the edges. Overbaking can cause the cheesecake filling to lose its creamy texture. Let them rest on the baking sheet for a few minutes before transferring them to a cooling rack.

6. Reheat for a Freshly-Baked Experience

For the ultimate soft and gooey center, warm the cookies in the microwave for a few seconds before serving. This makes the cheesecake filling extra creamy and brings back that fresh-out-of-the-oven taste.

Creative Variations to Try

Once you’ve mastered the classic version, get creative with these delicious variations:

1. Chocolate-Dipped Strawberry Cheesecake Cookies

After the cookies have cooled, dip half of each one into melted dark or white chocolate for a decadent twist. Add a drizzle of extra strawberry jam on top for an elegant finish.

2. Lemon Strawberry Cheesecake Cookies

For a refreshing citrus burst, add lemon zest to the cookie dough and a splash of lemon juice to the cheesecake filling. This variation enhances the fruity notes while balancing the richness of the cheesecake.

3. Oreo Strawberry Cheesecake Cookies

Crush a few Oreo cookies and mix them into the cookie dough for a cookies-and-cream flavor with a strawberry twist.

4. Nutty Strawberry Cheesecake Cookies

For extra texture and flavor, add finely chopped almonds, pecans, or walnuts to the dough. The nuttiness pairs beautifully with the creamy filling.

5. Gluten-Free or Keto-Friendly Option

Substitute all-purpose flour with almond flour or a gluten-free baking blend for a gluten-free version. Use a low-carb sweetener and a keto-friendly cheesecake filling for a diet-friendly treat.

The Best Ways to Serve Strawberry Cheesecake Stuffed Cookies

These cookies are delicious on their own, but here are some ways to elevate the experience:

1. With a Scoop of Ice Cream

Pair warm cookies with a scoop of vanilla or strawberry ice cream for an indulgent dessert. The contrast between warm cookies and cold ice cream is irresistible.

2. Drizzled with Extra Strawberry Sauce

Enhance the strawberry flavor by drizzling the cookies with a homemade or store-bought strawberry sauce.

3. As a Party Treat

Arrange the cookies on a dessert platter with other strawberry-themed treats like strawberry cupcakes, macarons, or chocolate-covered strawberries.

4. Paired with Coffee or Tea

Enjoy these cookies as an afternoon treat with a hot cup of coffee or tea. The richness of the cheesecake pairs perfectly with a strong espresso or a light floral tea.

Ingredients: A Perfect Blend of Sweet and Creamy

For the Cookies:

  • Unsalted butter, softened
  • Granulated sugar
  • Brown sugar
  • Egg
  • Vanilla extract
  • All-purpose flour
  • Baking soda
  • Baking powder
  • Salt
  • Freeze-dried strawberries, crushed

For the Cheesecake Filling:

  • Cream cheese, softened
  • Granulated sugar
  • Vanilla extract
  • Strawberry jam or puree

Directions: Baking the Ultimate Dessert

Step 1: Prepare the Cheesecake Filling

  • Beat cream cheese, sugar, vanilla extract, and strawberry jam until smooth.
  • Refrigerate the mixture while preparing the cookie dough.

Step 2: Make the Cookie Dough

  • Cream together butter, granulated sugar, and brown sugar until fluffy.
  • Mix in the egg and vanilla extract.
  • In a separate bowl, whisk flour, baking soda, baking powder, and salt.
  • Gradually combine with the wet ingredients, then fold in crushed freeze-dried strawberries.
  • Chill the dough for 30 minutes for easier handling.

Step 3: Assemble the Cookies

  • Preheat oven to 350°F and line a baking sheet with parchment paper.
  • Flatten a tablespoon of cookie dough, add a small scoop of cheesecake filling in the center, and top with another piece of flattened dough.
  • Seal the edges and roll into a smooth ball.

Step 4: Bake to Perfection

  • Place cookies on the baking sheet and bake for 12–15 minutes until golden brown around the edges.
  • Let cool slightly before transferring to a wire rack.

Nutritional Information: A Guilt-Worthy Indulgence

(Per Cookie – Approximate)

  • Calories: 180-220
  • Carbohydrates: 24g
  • Protein: 2g
  • Fat: 9g
  • Sugar: 14g

Enjoy these rich and creamy strawberry cheesecake stuffed cookies with a warm cup of tea or a scoop of vanilla ice cream!

Frequently Asked Questions

1. Can I Use Fresh Strawberries Instead of Freeze-Dried?

Fresh strawberries contain a lot of moisture, which can affect the texture of the dough. Freeze-dried strawberries are preferred because they add flavor without making the dough too wet.

2. Can I Make the Dough Ahead of Time?

Yes! The dough can be made in advance and stored in the refrigerator for up to 24 hours before baking. This makes it easier to handle and enhances the flavors.

3. How Do I Store These Cookies?

Because of the cheesecake filling, these cookies should be stored in an airtight container in the refrigerator. They stay fresh for up to 5 days.

4. Can I Freeze the Cookies?

Yes! Freeze the baked cookies in a single layer on a baking sheet, then transfer them to a freezer-safe bag. They can be stored for up to 2 months. Thaw in the fridge or enjoy them slightly chilled.

5. Can I Make These Cookies Without a Mixer?

While a hand or stand mixer makes the process easier, you can mix the dough and filling by hand using a sturdy whisk and a spatula. Just be sure to cream the butter and sugar thoroughly for a smooth texture.

6. How Do I Keep the Cheesecake Filling from Melting Out?

Make sure the filling is well-chilled before stuffing the cookies. Also, when sealing the dough around the filling, ensure there are no cracks where the cheesecake can escape during baking.

7. Can I Use a Different Type of Cheese for the Filling?

Yes! While cream cheese is traditional, you can experiment with mascarpone for a richer taste or ricotta for a lighter texture.

8. Are These Cookies Best Served Warm or Cold?

These cookies taste amazing both ways. Warm cookies have a gooey cheesecake center, while chilled cookies have a firmer, creamy filling. Try both to see which you prefer!

Conclusion: A Cookie Worth Baking Again and Again

Strawberry cheesecake stuffed cookies are more than just a dessert—they’re an experience. With their soft, strawberry-infused cookie dough and rich cheesecake center, these cookies offer a delightful contrast of flavors and textures that will keep you coming back for more.

Whether you enjoy them warm, chilled, or paired with your favorite beverage, these cookies are sure to be a favorite in your recipe collection. Plus, with so many ways to customize them, you can get creative and put your own spin on this indulgent treat.

So, the next time you’re looking for a dessert that’s both beautiful and delicious, whip up a batch of these strawberry cheesecake stuffed cookies. Your taste buds—and anyone lucky enough to try them—will thank you!
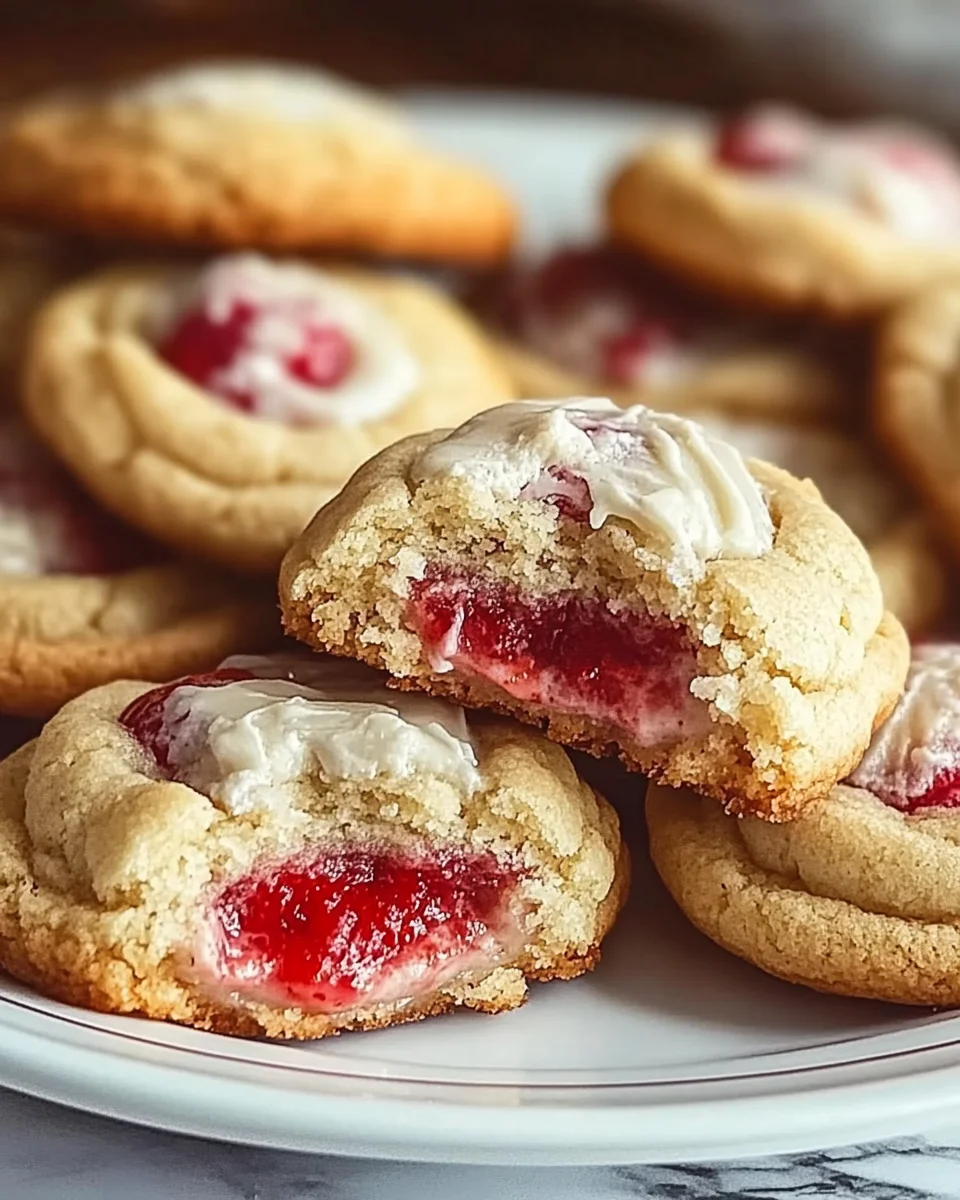
aiting

The Ultimate Guide to Strawberry Cheesecake Stuffed Cookies

Indulge in these decadent strawberry cheesecake stuffed cookies, combining the rich, creamy goodness of cheesecake filling with the sweetness of fresh cookies. The subtle crunch of freeze-dried strawberries and the velvety texture of the cream cheese filling make these cookies an irresistible treat for any occasion!
Prep Time 30 minutes
Total Time 45 minutes
Servings: 12 -15 cookies
Course: Dessert
Cuisine: American

Ingredients
  

For the Cookies:
  • Unsalted butter softened
  • Granulated sugar
  • Brown sugar
  • Egg
  • Vanilla extract
  • All-purpose flour
  • Baking soda
  • Baking powder
  • Salt
  • Freeze-dried strawberries crushed
For the Cheesecake Filling:
  • Cream cheese softened
  • Granulated sugar
  • Vanilla extract
  • Strawberry jam or puree

Method
 

Prepare the Cheesecake Filling:
  1. Beat together cream cheese, sugar, vanilla extract, and strawberry jam until smooth and creamy.
  2. Refrigerate the filling while preparing the cookie dough to allow it to firm up.
Make the Cookie Dough:
  1. Cream together butter, granulated sugar, and brown sugar until light and fluffy.
  2. Mix in the egg and vanilla extract until well combined.
  3. In a separate bowl, whisk together the flour, baking soda, baking powder, and salt.
  4. Gradually add the dry ingredients to the wet ingredients, then fold in the crushed freeze-dried strawberries.
  5. Chill the dough for 30 minutes to make it easier to handle.
Assemble the Cookies:
  1. Preheat the oven to 350°F and line a baking sheet with parchment paper.
  2. Flatten a tablespoon of cookie dough, add a small scoop of cheesecake filling in the center, and top with another piece of flattened dough.
  3. Seal the edges and roll the dough into a smooth ball.
Bake to Perfection:
  1. Place the assembled cookies on the baking sheet and bake for 12-15 minutes until golden brown around the edges.
  2. Let the cookies cool slightly before transferring them to a wire rack.

Notes

  • If the dough is too sticky to handle, chill it for a little longer.
  • These cookies are delicious with a scoop of vanilla ice cream or a warm cup of tea.
  • Feel free to substitute strawberry jam with fresh strawberry puree for a more intense fruit flavor.

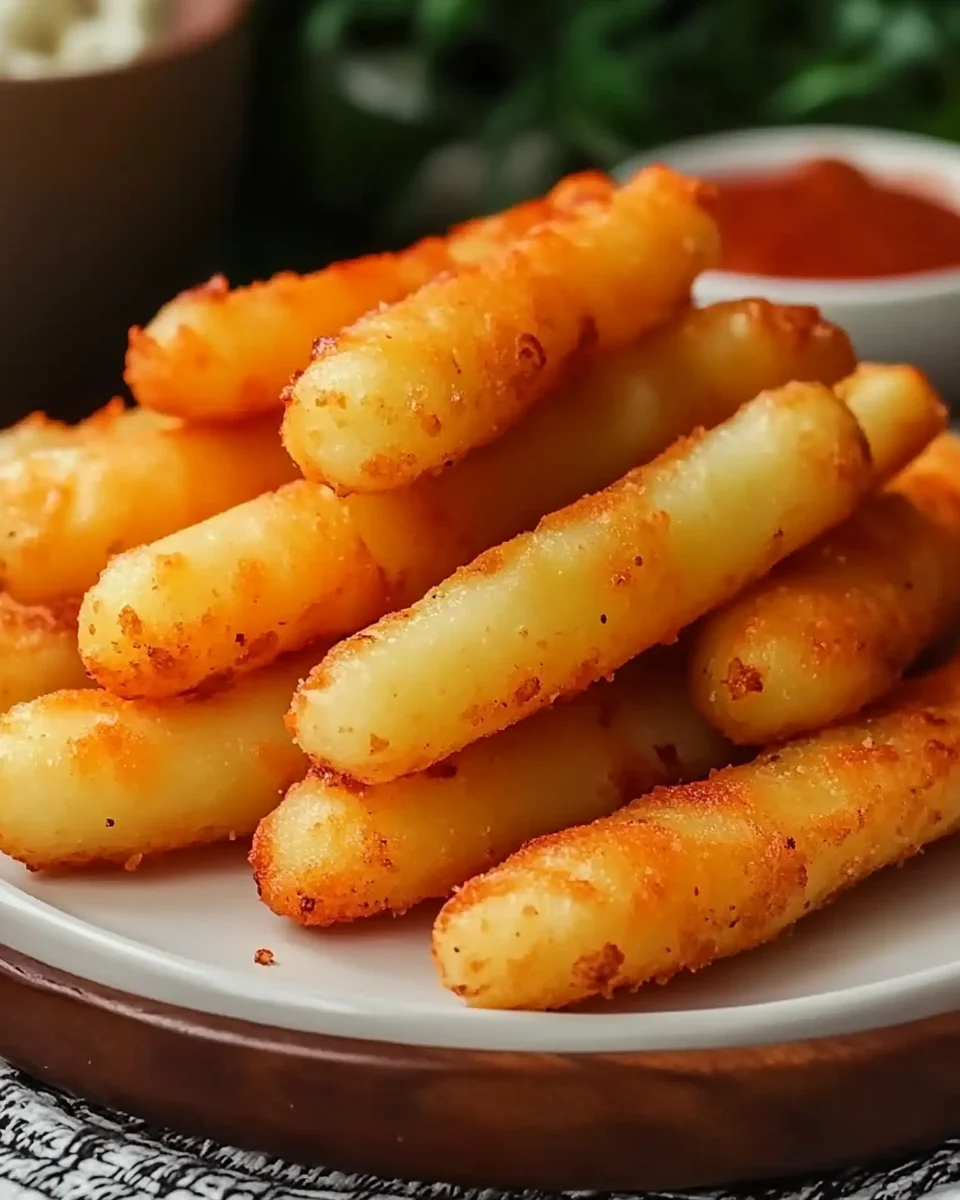
The Ultimate Guide to Crispy Potato Cheese Sticks

Few snacks are as satisfying as the combination of crispy potatoes and gooey melted cheese. Potato cheese sticks bring these two elements together in the most delicious way possible—golden brown on the outside, warm and cheesy on the inside. Whether served as a party appetizer, a game-day treat, or a comforting snack, these crunchy delights are sure to impress.

In this guide, we’ll explore everything you need to know about making the perfect potato cheese sticks, from expert tips and variations to frequently asked questions and serving suggestions.

Why You’ll Love Potato Cheese Sticks

Potato cheese sticks are the ultimate comfort food. Here’s why they deserve a spot on your snack menu:

1. The Perfect Balance of Crispy and Cheesy

The beauty of this recipe lies in its texture. The exterior is perfectly crisp thanks to the Panko breadcrumb coating, while the inside is filled with creamy mashed potatoes and gooey melted cheese. Every bite is a satisfying contrast of crunch and softness.

2. Easy to Make with Simple Ingredients

With just a handful of pantry staples like potatoes, cheese, and breadcrumbs, you can create a gourmet-level snack at home. Plus, the process is straightforward, making it a fun dish to prepare with family or friends.

3. Versatile and Customizable

While cheddar cheese and russet potatoes create a classic flavor, there are endless ways to customize this recipe. You can experiment with different cheeses, add herbs and spices to the potato mixture, or even swap the coating for an extra crispy twist.

4. A Crowd-Pleasing Snack for Any Occasion

Whether you’re hosting a party, preparing a game-day spread, or looking for a fun addition to brunch, potato cheese sticks are always a hit. Serve them with dipping sauces for an extra layer of flavor.

Expert Tips for Perfect Potato Cheese Sticks

Achieving restaurant-quality potato cheese sticks at home requires attention to detail. Follow these tips for the best results:

1. Use Cold Mashed Potatoes

For a firm dough that holds its shape, use mashed potatoes that have been chilled in the refrigerator. This prevents the sticks from falling apart while frying or baking.

2. Choose the Right Cheese

Cheddar cheese is a popular choice because of its sharp flavor and excellent melting quality, but other cheeses like mozzarella, gouda, or pepper jack work just as well. If you want that iconic cheese pull, mozzarella is your best bet.

3. Double-Coat for Extra Crispiness

For an extra crunchy exterior, consider double-coating the sticks. After the first layer of flour, egg, and breadcrumbs, repeat the process a second time before frying or baking.

4. Chill Before Cooking

Once the sticks are assembled, refrigerate them for about 30 minutes before frying. This helps them hold their shape and prevents the cheese from leaking out too quickly.

5. Fry at the Right Temperature

If frying, ensure your oil is heated to 350°F. If the oil is too hot, the outside will burn before the inside cooks. If it’s too cool, the sticks will absorb excess oil and become greasy.

6. Baking Alternative for a Healthier Option

If you prefer a lighter version, bake the potato cheese sticks in a preheated oven at 400°F. Drizzle them with a little olive oil for a crispy finish.

7. Don’t Skip the Seasoning

Seasoning the potato mixture well is key to enhancing the overall flavor. A little garlic powder, paprika, or even cayenne pepper can elevate the taste.

Creative Variations to Try

Once you’ve mastered the classic version, try these fun variations to switch things up:

1. Mozzarella-Stuffed Potato Sticks

For an ultimate cheese pull effect, swap out the cheddar for mozzarella sticks. The result? A stretchy, melty center that cheese lovers will adore.

2. Bacon & Chive Potato Sticks

Crispy bacon bits and finely chopped chives add a smoky, savory twist to the filling.

3. Spicy Jalapeño Potato Cheese Sticks

Diced jalapeños or a dash of cayenne pepper bring a spicy kick that pairs perfectly with creamy cheese.

4. Parmesan-Herb Coating

Mix grated parmesan and Italian herbs into the Panko breadcrumbs for an extra layer of flavor in the crispy coating.

5. Gluten-Free Version

Replace the all-purpose flour with a gluten-free alternative and use gluten-free breadcrumbs for a celiac-friendly option.

Best Dipping Sauces for Potato Cheese Sticks

Pairing these crunchy snacks with the right dipping sauce takes them to another level. Here are some great options:

  • Marinara Sauce: A classic pairing that complements the cheesy filling.
  • Garlic Aioli: A creamy, garlicky dip that enhances the flavors.
  • Ranch Dressing: Perfect for a cool and tangy contrast.
  • Spicy Sriracha Mayo: A mix of sriracha and mayo for a bold, spicy kick.
  • Honey Mustard: A sweet and tangy dip that pairs well with the savory potato and cheese.

Ingredients: The Perfect Blend of Crunch and Flavor

  • For the Potato Dough:
    • Russet potatoes, cooked and cubed
    • Sour cream
    • Green onions, diced
    • Bacon, diced
    • Salt and pepper
  • For the Filling:
    • Cheddar cheese, cut into strips
  • For the Coating:
    • Flour
    • Egg, beaten
    • Cornstarch
    • Panko breadcrumbs
  • For Frying:
    • Vegetable, canola, or peanut oil
  • For Garnish:
    • Additional salt or fresh herbs (optional)

Directions: Achieve the Ultimate Crispy Bite

Step 1: Prepare the Potato Dough

  • Mash the cooked potatoes with sour cream, green onions, bacon, salt, and pepper.

Step 2: Shape and Fill

  • Take a spoonful of the mixture, flatten it in your palm, and wrap it around a strip of cheddar cheese, forming a stick shape.

Step 3: Coat for Maximum Crispiness

  • Roll each stick in flour, dip it into beaten egg, and coat it with a mix of cornstarch and Panko breadcrumbs.

Step 4: Fry to Golden Perfection

  • Heat oil to 350°F and deep fry until crispy and golden brown.
  • Transfer to a paper towel-lined plate and season immediately.

Baking Option for a Healthier Twist

  • Preheat oven to 400°F, place coated sticks on a baking sheet, and bake for 15 minutes until golden and crispy.

Nutritional Information: A Satisfying Treat

(Per Serving – Approximate)

  • Calories: 65 kcal
  • Carbohydrates: 7g
  • Protein: 1g
  • Fat: 3g
  • Sodium: Moderate (adjust to taste)

Enjoy these crispy potato cheese sticks as a game-day snack, party appetizer, or movie-night treat!

Frequently Asked Questions

1. Can I Make These Ahead of Time?

Yes! You can prepare the potato cheese sticks up to a day in advance and store them in the refrigerator before frying or baking. If freezing, arrange them on a baking sheet until solid, then transfer them to a freezer bag.

2. Can I Air Fry Potato Cheese Sticks?

Absolutely! Preheat your air fryer to 375°F and cook the sticks for about 10-12 minutes, flipping halfway through, until crispy and golden brown.

3. How Do I Keep the Cheese from Leaking Out?

To prevent cheese from oozing out while frying, make sure the potato layer fully encases the cheese. Chilling the sticks before cooking also helps.

4. Can I Use Leftover Mashed Potatoes?

Yes! Leftover mashed potatoes work well as long as they aren’t too runny. If they feel too soft, add a bit of cornstarch to firm up the mixture.

5. How Long Do They Stay Crispy?

Potato cheese sticks are best enjoyed immediately after frying. However, if you need to store leftovers, reheat them in an oven at 375°F for about 10 minutes to restore their crispiness.

6. Can I Use Different Types of Potatoes?

Russet potatoes are the best choice due to their high starch content, which helps create a firm and fluffy texture. However, Yukon Gold potatoes also work well for a slightly creamier consistency.

7. What’s the Best Way to Store Leftovers?

Store leftover potato cheese sticks in an airtight container in the refrigerator for up to 2 days. Reheat them in an oven or air fryer to maintain their crispy texture.

8. Can I Use Sweet Potatoes Instead?

Yes! Sweet potatoes can be used for a slightly sweeter, more nutrient-dense alternative. They pair especially well with spicy seasonings.

Conclusion: A Snack Worth Making Again and Again

Potato cheese sticks are more than just a snack—they’re a guaranteed crowd-pleaser that delivers on both flavor and texture. Whether deep-fried for the ultimate crunch or baked for a healthier option, these crispy sticks with their gooey cheese center are simply irresistible.

With endless ways to customize the filling, seasoning, and coating, you can make this recipe uniquely yours. Serve them with your favorite dipping sauce, experiment with different cheeses, and enjoy a homemade treat that’s bound to become a favorite in your kitchen.

So, roll up your sleeves, get your ingredients ready, and indulge in the crispy, cheesy goodness of potato cheese sticks. Once you make them, you’ll find yourself coming back to this recipe time and time again!

aiting

The Ultimate Guide to Crispy Potato Cheese Sticks

These crunchy & cheesy potato sticks combine creamy mashed potatoes with savory bacon and green onions, all wrapped around a gooey cheddar cheese center. Coated with crispy breadcrumbs and deep-fried to perfection, they make a delicious snack or appetizer that will be a hit at any gathering.
Prep Time 20 minutes
Servings: 4 servings
Course: Appetizer, Snack
Cuisine: American

Ingredients
  

For the Potato Dough:
  • Russet potatoes cooked and cubed
  • Sour cream
  • Green onions diced
  • Bacon diced
  • Salt and pepper
For the Filling:
  • Cheddar cheese cut into strips
For the Coating:
  • Flour
  • Egg beaten
  • Cornstarch
  • Panko breadcrumbs
For Frying:
  • Vegetable canola, or peanut oil
For Garnish:
  • Additional salt or fresh herbs optional

Method
 

For the Potato Dough:
  1. Russet potatoes, cooked and cubed
  2. Sour cream
  3. Green onions, diced
  4. Bacon, diced
  5. Salt and pepper
For the Filling:
  1. Cheddar cheese, cut into strips
For the Coating:
  1. Flour
  2. Egg, beaten
  3. Cornstarch
  4. Panko breadcrumbs
For Frying:
  1. Vegetable, canola, or peanut oil
For Garnish:
  1. Additional salt or fresh herbs (optional)

Notes

  • For a fun variation, you can add jalapeños or other favorite herbs to the potato dough for extra flavor.
  • If you prefer a healthier version, baking the sticks instead of frying will reduce the fat content.

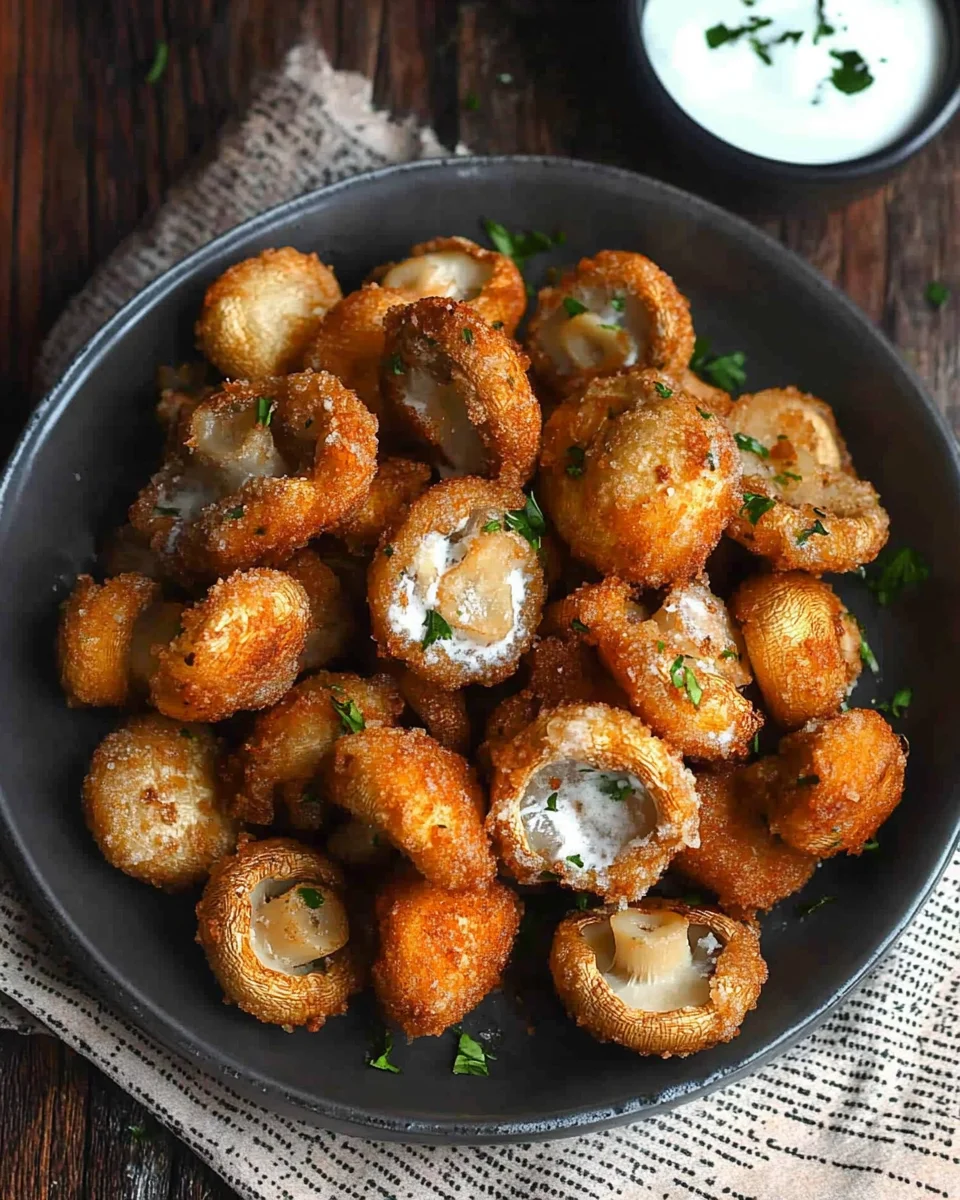
The Ultimate Guide to Crispy Fried Mushrooms

Few things are as satisfying as biting into a golden, crispy fried mushroom. The contrast between the crunchy exterior and the juicy, earthy mushroom inside creates the perfect balance of texture and flavor. Whether served as a snack, appetizer, or side dish, fried mushrooms are always a hit.

This guide will walk you through everything you need to know about making the best fried mushrooms—from the secret to achieving the perfect crunch to creative variations and frequently asked questions.

Why Fried Mushrooms Are a Must-Try

Fried mushrooms have been a classic appetizer for years, and for good reason. Here’s why you need to try this recipe:

1. Crispy Perfection with a Light Coating

Unlike some deep-fried foods that feel overly greasy, this recipe uses Panko breadcrumbs to create a light, flaky crust that stays crisp without weighing the mushrooms down.

2. A Gourmet Treat That’s Easy to Make

Despite their restaurant-quality appeal, fried mushrooms are surprisingly simple to prepare at home. With a few basic ingredients and the right frying technique, you can achieve perfectly crispy results in minutes.

3. Versatile and Crowd-Pleasing

Whether you’re serving them as an appetizer, pairing them with a dipping sauce, or using them as a crunchy topping for burgers and salads, fried mushrooms fit into almost any meal.

4. A Fun Way to Enjoy Mushrooms

Even those who aren’t huge fans of mushrooms will love them in this crispy, seasoned form. The batter enhances their umami flavor while keeping them juicy inside.

Tips for Achieving the Perfect Crispy Fried Mushrooms

Mastering the perfect batch of fried mushrooms requires more than just following a recipe. Here are the key factors to ensure success:

1. Choose the Right Mushrooms

White button mushrooms, cremini, or other firm varieties work best. Avoid overly soft mushrooms like portobello or shiitake, as they may become too watery during frying.

2. Do Not Soak the Mushrooms

Mushrooms absorb water easily, and excess moisture can lead to a soggy crust. Instead of rinsing them under running water, wipe them clean with a paper towel or use a damp cloth.

3. Use Carbonated Liquid for a Lighter Batter

A secret trick to ultra-crispy batter is using soda water or beer in the wet mix. The carbonation creates air pockets, giving the mushrooms an irresistibly crispy texture.

4. Layer the Coating for Maximum Crunch

A well-executed layering technique is key to a crispy crust. Toss the mushrooms in seasoned flour first before dipping them in the wet batter. This helps the batter adhere properly. Then, dredge them in Panko breadcrumbs to create an extra crunchy exterior.

5. Maintain the Right Oil Temperature

The ideal frying temperature is 350°F (175°C). If the oil is too hot, the outside will burn before the inside cooks. If it’s too cool, the mushrooms will absorb excess oil and become greasy.

6. Fry in Batches

Overcrowding the pan lowers the oil temperature, leading to uneven frying. Always fry in small batches, giving each mushroom enough space to cook evenly.

7. Drain on Paper Towels

After frying, place the mushrooms on a paper towel-lined plate to absorb any excess oil. This keeps them light and crispy.

Creative Variations to Try

Once you’ve mastered the basic recipe, experiment with different flavors and coatings to customize your fried mushrooms:

1. Spicy Cajun Fried Mushrooms

Add a kick to your mushrooms by mixing Cajun seasoning into the flour and batter. Serve with a creamy ranch or aioli dipping sauce.

2. Parmesan Garlic Mushrooms

After frying, toss the mushrooms in a blend of grated parmesan and minced garlic for an extra savory bite.

3. Beer-Battered Mushrooms

Instead of soda water, use your favorite beer in the batter for a deeper flavor and richer coating.

4. Buffalo-Style Mushrooms

Coat the fried mushrooms in buffalo sauce and serve with blue cheese dressing for a vegetarian take on buffalo wings.

5. Panko-Crusted Truffle Mushrooms

For a gourmet twist, drizzle the fried mushrooms with truffle oil and sprinkle with flaky sea salt before serving.

Dipping Sauces to Elevate the Flavor

While fried mushrooms are delicious on their own, pairing them with the right dipping sauce takes them to the next level. Here are some great options:

  • Garlic Aioli: A creamy blend of mayonnaise, garlic, and lemon juice.
  • Spicy Sriracha Mayo: A mix of mayo, sriracha, and a touch of honey for balance.
  • Honey Mustard: A tangy-sweet classic that complements the crispy coating.
  • Ranch Dressing: A cooling, herby dip perfect for spicy variations.
  • Marinara Sauce: A great choice for an Italian-inspired twist.

Ingredients: The Ultimate Crunch Factor

  • Mushrooms – 16 oz (white button, cremini, or other firm varieties)
  • Flour Mix:
    • 1.5 cups all-purpose flour
    • ½ tbsp salt
    • ½ tsp garlic powder
    • ½ tsp onion powder
    • ½ tsp sweet paprika
    • ½ tsp black pepper
  • Wet Batter:
    • 1 cup soda water or beer
    • ½ cup buttermilk (or milk + lemon juice/vinegar)
    • 1 egg
  • Breading:
    • 1 cup Panko breadcrumbs
  • For Frying:
    • 4-6 cups vegetable or canola oil
  • Garnish:
    • Fresh parsley (optional)

Directions: Achieve the Perfect Crisp

Step 1: Prep the Mushrooms

  • Wipe mushrooms clean with a dry paper towel or damp sponge.
  • Trim any woody stems and cut larger mushrooms into halves or quarters.

Step 2: Create the Batter and Coating

  • In a bowl, mix flour with seasonings. Toss mushrooms with ¼ of this flour mix.
  • In another bowl, whisk together soda water, buttermilk, and egg. Sift in remaining flour mix, stirring until smooth.
  • Set up a breading station with a bowl of Panko breadcrumbs.

Step 3: Heat the Oil

  • Pour oil into a deep pan or fryer, heating to 350°F.
  • Test readiness by dipping a wooden spoon in the oil—if bubbles form immediately, it’s ready.

Step 4: Dredge and Fry

  • Dip mushrooms in the batter, letting excess drip off.
  • Coat evenly in Panko breadcrumbs.
  • Fry in batches for 3-5 minutes until golden brown, stirring occasionally.

Step 5: Serve and Enjoy

  • Transfer mushrooms to a paper towel-lined tray to absorb excess oil.
  • Garnish with parsley and serve hot with your favorite dipping sauce.

Nutritional Snapshot: A Light and Crispy Delight

(Per Serving – Approximate)

  • Calories: 197 kcal
  • Carbohydrates: 36g
  • Protein: 9g
  • Fat: 3g
  • Sodium: 709mg
  • Fiber: 2g
  • Iron: 3mg

Enjoy these perfectly crispy fried mushrooms as a snack, appetizer, or side dish!

Frequently Asked Questions

1. Can I Make Fried Mushrooms Without a Deep Fryer?

Yes! You can use a large saucepan or skillet filled with about 3-4 inches of oil. Just ensure the oil reaches 350°F before frying.

2. How Do I Keep Fried Mushrooms Crispy?

To maintain crispiness, serve them immediately after frying. If you need to keep them warm, place them on a wire rack in a low-temperature oven (200°F) instead of stacking them on a plate.

3. Can I Air Fry These Instead of Deep Frying?

Yes! To make air-fried mushrooms, spray them lightly with oil and cook at 375°F for 12-15 minutes, flipping halfway through. While the texture may not be as crunchy as deep frying, they are still delicious.

4. What’s the Best Way to Store Leftovers?

Store leftover fried mushrooms in an airtight container in the refrigerator for up to 2 days.

5. How Do I Reheat Fried Mushrooms Without Losing Their Crispiness?

To maintain crispiness, reheat them in an oven at 375°F for about 10 minutes or in an air fryer at 350°F for 5 minutes. Avoid microwaving, as this makes them soggy.

6. Can I Make These Mushrooms Gluten-Free?

Yes! Substitute the all-purpose flour with a gluten-free flour blend and use gluten-free breadcrumbs instead of Panko.

7. What Are the Best Mushrooms for Frying?

Firm mushrooms like white button, cremini, and chestnut mushrooms hold up best during frying. Avoid delicate mushrooms like portobello slices or shiitake, as they tend to get mushy.

8. Can I Prepare the Mushrooms Ahead of Time?

You can prep the mushrooms by cleaning and coating them a few hours in advance. However, wait to fry them until just before serving for the best texture.

Conclusion: A Crispy, Irresistible Treat

Fried mushrooms are a simple yet incredibly flavorful dish that can be enjoyed in countless ways. Whether you’re serving them as a party appetizer, a side dish, or a snack, their crispy coating and juicy interior make them an irresistible treat.

By following the right techniques—choosing firm mushrooms, using a light batter, and frying at the correct temperature—you can achieve perfect fried mushrooms every time. Pair them with your favorite dipping sauce, experiment with different seasonings, and enjoy a crispy, golden bite that’s always a crowd-pleaser.

So next time you’re craving something crunchy and satisfying, try making a batch of these fried mushrooms. They’re guaranteed to disappear as soon as they hit the table!

aiting

The Ultimate Guide to Crispy Fried Mushrooms

These crispy golden fried mushrooms are a crunchy, savory snack or side dish that everyone will love. With a perfectly seasoned batter, a golden Panko breadcrumb coating, and a satisfying crunch, they make an irresistible appetizer or side dish to pair with any meal.
Prep Time 15 minutes
Cook Time 10 minutes
Total Time 25 minutes
Servings: 4 servings
Course: Appetizer, Snack
Cuisine: American

Ingredients
  

  • Mushrooms – 16 oz white button, cremini, or other firm varieties
Flour Mix:
  • 1.5 cups all-purpose flour
  • ½ tbsp salt
  • ½ tsp garlic powder
  • ½ tsp onion powder
  • ½ tsp sweet paprika
  • ½ tsp black pepper
Wet Batter:
  • 1 cup soda water or beer
  • ½ cup buttermilk or milk + lemon juice/vinegar
  • 1 egg
Breading:
  • 1 cup Panko breadcrumbs
For Frying:
  • 4-6 cups vegetable or canola oil
Garnish:
  • Fresh parsley optional

Method
 

Prep the Mushrooms:
  1. Wipe mushrooms clean with a dry paper towel or damp sponge.
  2. Trim any woody stems and cut larger mushrooms into halves or quarters.
Create the Batter and Coating:
  1. In a bowl, mix flour with seasonings. Toss mushrooms with ¼ of this flour mix.
  2. In another bowl, whisk together soda water, buttermilk, and egg. Sift in remaining flour mix, stirring until smooth.
  3. Set up a breading station with a bowl of Panko breadcrumbs.
Heat the Oil:
  1. Pour oil into a deep pan or fryer, heating to 350°F.
  2. Test readiness by dipping a wooden spoon in the oil—if bubbles form immediately, it’s ready.
Dredge and Fry:
  1. Dip mushrooms in the batter, letting excess drip off.
  2. Coat evenly in Panko breadcrumbs.
  3. Fry in batches for 3-5 minutes until golden brown, stirring occasionally.
Serve and Enjoy:
  1. Transfer mushrooms to a paper towel-lined tray to absorb excess oil.
  2. Garnish with parsley and serve hot with your favorite dipping sauce.

Notes

  • If you’d like a thicker coating, you can double-dip the mushrooms in the batter and breadcrumbs.
  • Be sure not to overcrowd the pan while frying to maintain the crispy texture.

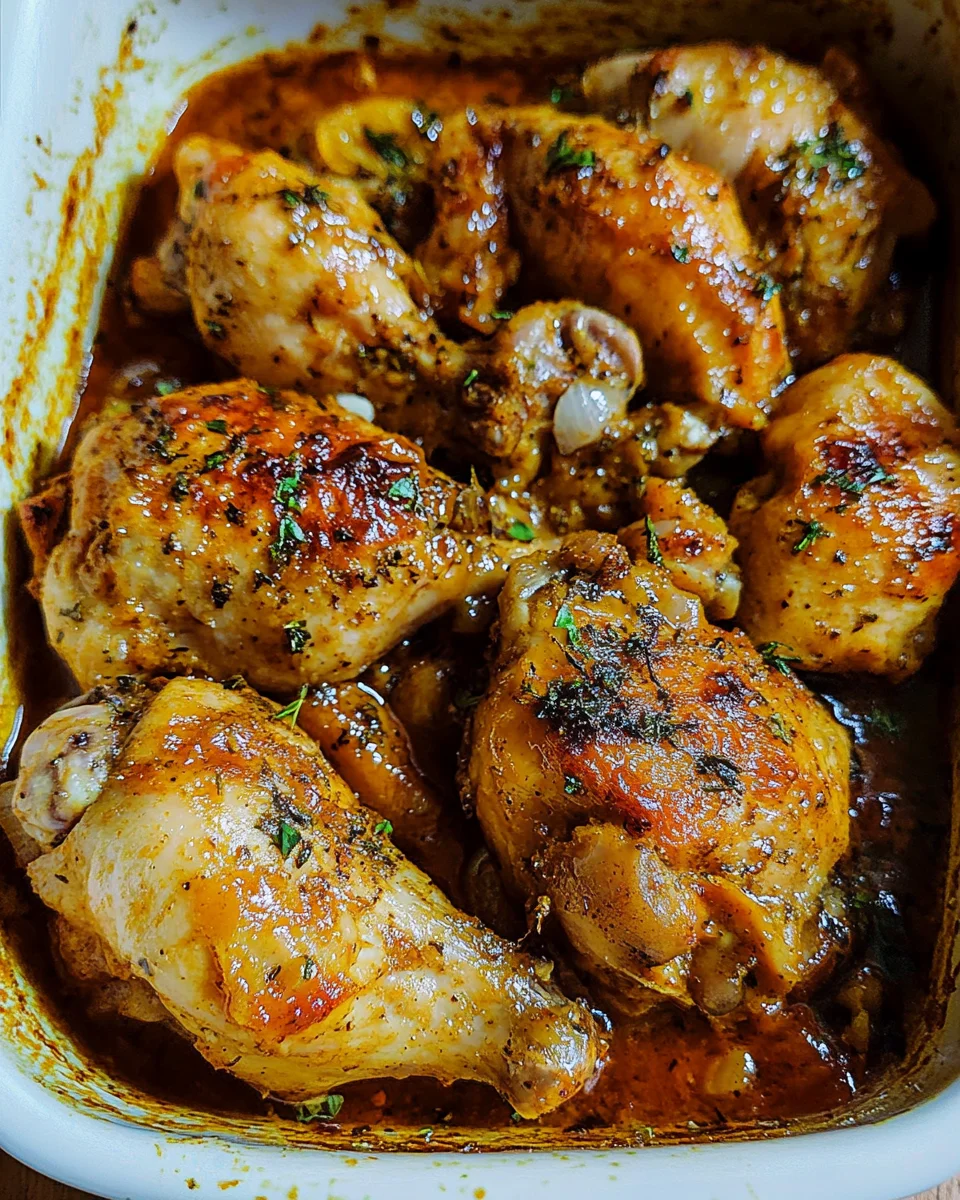
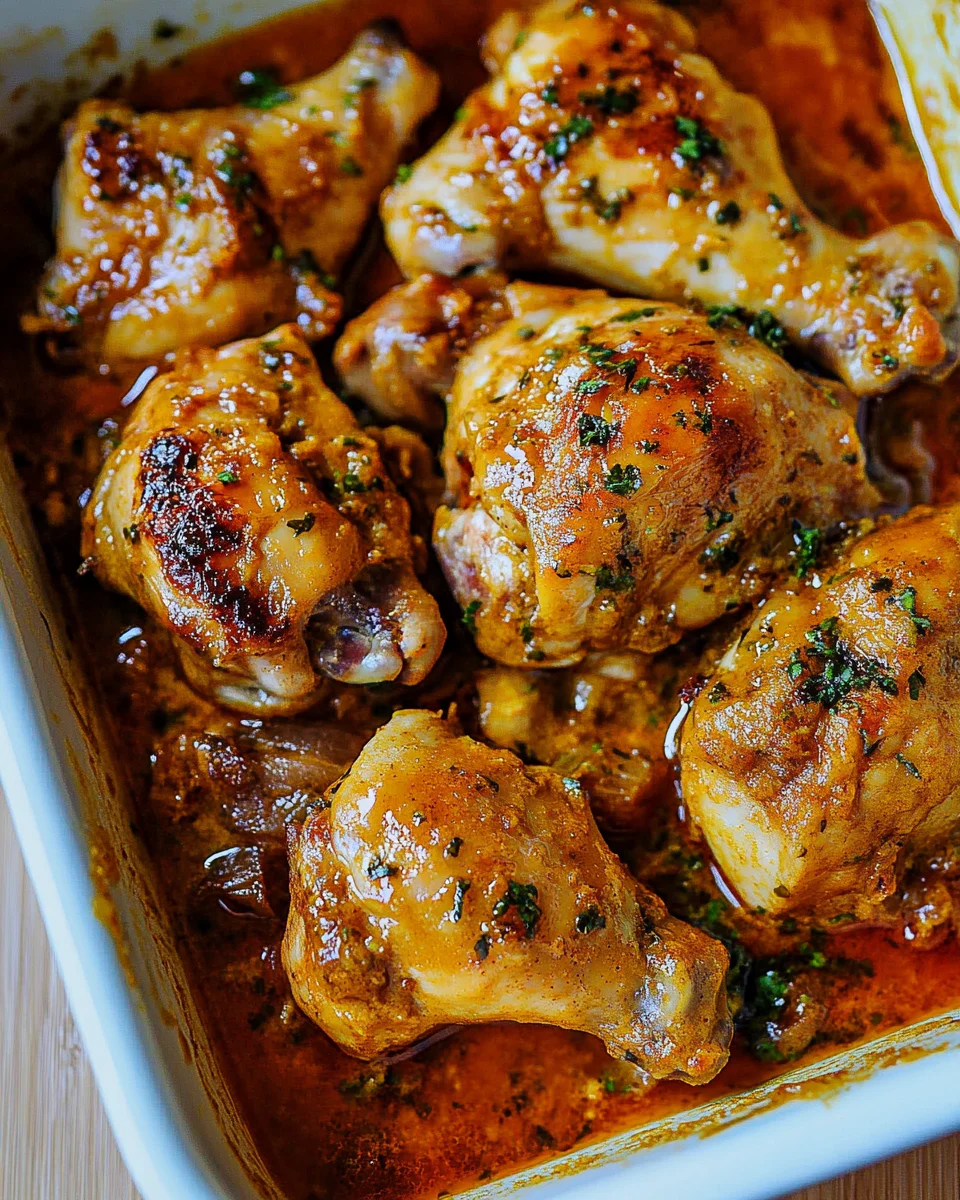
Baked Lemon Butter Chicken: A Flavor-Packed Comfort Dish

There’s something truly magical about a dish that delivers bold flavors, requires minimal effort, and turns an ordinary meal into a special occasion. Enter Baked Lemon Butter Chicken—a dish that balances the richness of butter, the zesty brightness of lemon, and the aromatic essence of garlic and herbs. Whether you’re looking for the perfect Sunday dinner, a crowd-pleasing dish for a gathering, or simply a comforting homemade meal, this recipe checks all the boxes.

With a set-it-and-forget-it oven method, this dish allows you to enjoy the cooking process without the stress of constant monitoring. By the time it’s done, your kitchen will be filled with an irresistible aroma, and your plate will be graced with tender, fall-off-the-bone chicken bathed in a creamy, buttery sauce.

In this article, we’ll dive into everything you need to know about Baked Lemon Butter Chicken, including expert tips, common mistakes to avoid, serving suggestions, FAQs, and a conclusion to tie it all together.

Why This Recipe Works

1. The Perfect Balance of Flavors

The combination of rich butter, tangy lemon juice, fragrant garlic, and Parmesan cheese creates a well-rounded, restaurant-quality sauce. The butter adds depth, the lemon provides a refreshing acidity, and the Parmesan brings umami richness.

2. Dark Meat for Ultimate Tenderness

While chicken breasts often get the spotlight, this dish embraces dark meat cuts like drumsticks and thighs. Dark meat is naturally more flavorful, juicier, and forgiving, meaning even if you slightly overcook it, it remains tender and delicious.

3. Hands-Off Cooking with an Oven-Baked Method

Instead of standing over a stove, this recipe allows you to marinate, bake, and relax. The oven does most of the work, slowly rendering the chicken tender while the sauce infuses it with bold flavors.

4. A One-Pan Marvel

Minimal cleanup is always a win. Everything is prepared and cooked in one oven-safe baking dish or skillet, reducing the hassle of washing multiple pots and pans.

Expert Tips for Success

Use Room-Temperature Chicken for Even Cooking

If your chicken is straight from the fridge, it will take longer to cook and may not absorb flavors as well. Let it sit at room temperature for at least 30 minutes before baking.

Don’t Skip the Broiling Step

Broiling at the end gives the chicken a crispy, golden-brown finish, enhancing both texture and presentation. Keep a close eye to avoid burning.

Season the Chicken Generously

The best way to ensure deep, rich flavor is by properly seasoning the chicken before adding the sauce. Smoked paprika, kosher salt, and a good chicken seasoning blend (like Montreal chicken seasoning or bouillon) work wonders.

Allow the Sauce to Cool Slightly Before Baking

If you pour a boiling-hot sauce over raw chicken, it may partially cook the surface before it even hits the oven, leading to uneven cooking. Letting it cool for a minute or two ensures a smooth, creamy consistency throughout the dish.

Common Mistakes to Avoid

1. Using Cold Butter Instead of Melted Butter

Melted butter allows the ingredients to mix more evenly, ensuring that the sauce is smooth and coats the chicken properly.

2. Skipping the Midway Flip

Flipping the chicken halfway through baking ensures that every side gets an equal share of sauce and heat, preventing dry spots.

3. Not Adjusting the Cooking Time for Chicken Size

Chicken pieces vary in size, so cooking time isn’t always exact. Larger cuts take longer, while smaller cuts cook faster. Always check for doneness by ensuring the juices run clear and the meat reaches 175°F for dark meat.

4. Overcrowding the Baking Dish

If the chicken is too tightly packed, it will steam rather than roast, leading to less caramelization and a thinner sauce. Arrange the pieces in a single layer with some space between them.

What to Serve with Baked Lemon Butter Chicken

1. Creamy Mashed Potatoes

The rich, buttery sauce pairs beautifully with a creamy, velvety side of mashed potatoes, soaking up every delicious drop.

2. Garlic Butter Rice

A simple buttery, garlicky rice dish is the perfect pairing to balance out the citrusy zing of the sauce.

3. Roasted Vegetables

For a healthier side, consider oven-roasted asparagus, Brussels sprouts, or carrots to add color and crunch.

4. Crusty Bread

A warm, crusty baguette is perfect for sopping up the leftover sauce.

Ingredients: A Symphony of Flavors

  • 10 dark meat chicken pieces (drumsticks and thighs, trimmed of excess fat)
  • 2 tsp kosher salt
  • 1 tbsp smoked paprika
  • 1 tbsp Montreal chicken seasoning (or any preferred chicken seasoning, including bouillon)
  • 2 tbsp butter
  • 1/2 cup red onion, minced
  • 1/2 cup flat-leaf parsley, chopped
  • 1 tbsp garlic, minced
  • 1/2 tsp red pepper flakes
  • 1 cup chicken stock
  • 1 tbsp fresh lemon juice
  • 1 cup freshly grated Parmesan cheese
  • 1/3 cup heavy whipping cream

Directions: The Magic in the Oven

  1. Preheat the oven to 375°F.
  2. In a skillet, melt butter over medium heat.
  3. Add minced onions and sauté until fragrant (about 2 minutes).
  4. Stir in chopped parsley and garlic, mixing well.
  5. Add lemon juice and red pepper flakes, followed by chicken stock.
  6. Stir in Parmesan cheese and heavy cream, letting it simmer for a minute. Turn off the heat and allow the sauce to cool slightly.
  7. While the sauce cools, season the chicken with salt, smoked paprika, and chicken seasoning. Toss to coat evenly.
  8. Place the seasoned chicken in a baking dish and pour the prepared sauce over it.
  9. Bake uncovered for 1 hour and 45 minutes, flipping halfway through.
  10. Broil on the skin side until golden brown.
  11. Baste the chicken in its sauce before serving.

Quick Tip: If you’re in a hurry, increase the oven temperature to 400°F and roast for 1 hour and 10 minutes, or until the chicken is tender and juices run clear.

Nutritional Highlights (Per Serving, Approximate)

  • Calories: ~400-450 kcal
  • Protein: ~35g
  • Fat: ~28g
  • Carbohydrates: ~5g
  • Fiber: ~1g
  • Sodium: ~900mg

Serving Suggestion: This dish pairs beautifully with rice or creamy mashed potatoes to soak up the rich, buttery sauce.

Enjoy your stress-free, flavor-packed Sunday dinner!

Frequently Asked Questions (FAQs)

Can I use chicken breasts instead of thighs and drumsticks?

Yes, but keep in mind that chicken breasts cook faster and can dry out more easily. If using breasts, reduce the cooking time to about 35-45 minutes at 375°F and check for doneness with a thermometer (165°F internal temperature).

What if I don’t have heavy cream?

You can substitute heavy cream with half-and-half, coconut milk, or even Greek yogurt for a lighter version. However, the sauce will be less rich and creamy.

Can I make this recipe dairy-free?

Absolutely! Swap the butter for olive oil and replace the Parmesan cheese with nutritional yeast or a dairy-free alternative. Use coconut cream instead of heavy cream for a dairy-free twist.

How do I store and reheat leftovers?

  • Refrigeration: Store in an airtight container for up to 4 days.
  • Reheating: Reheat in the oven at 350°F for about 10-15 minutes or in the microwave in 30-second increments until warm.

Can I freeze this dish?

Yes! Place the cooled chicken and sauce in an airtight freezer-safe container and freeze for up to 3 months. Thaw overnight in the refrigerator before reheating.

How do I make the sauce thicker?

If you want a thicker, creamier sauce, mix 1 teaspoon of cornstarch with 2 tablespoons of water, then stir it into the sauce before baking.

Conclusion: A Sunday Dinner Worth Repeating

Baked Lemon Butter Chicken is more than just a recipe—it’s an experience of flavors and comfort that transforms a simple meal into something special. With its rich, buttery sauce, tender chicken, and zesty lemon undertones, it’s a dish that satisfies every craving.

Whether you’re hosting a family dinner, meal prepping for the week, or simply treating yourself to a restaurant-quality meal at home, this recipe is a must-try. Its easy preparation, minimal cleanup, and guaranteed crowd-pleasing flavors make it a go-to dish that deserves a permanent spot in your meal rotation.

So next time you’re wondering what to make for dinner, let Baked Lemon Butter Chicken be the answer. Gather your ingredients, let your oven do the work, and enjoy a meal that’s sure to become a new favorite. Happy cooking!

aiting

Baked Lemon Butter Chicken: A Flavor-Packed Comfort Dish

Indulge in the rich and tangy flavors of this Golden Lemon Butter Chicken Bliss—a perfect harmony of juicy, well-seasoned chicken bathed in a creamy, buttery, and zesty sauce. With hints of garlic, smoked paprika, and fresh parsley, this oven-baked delight delivers restaurant-quality flavor right from your home kitchen.
Prep Time 15 minutes
Cook Time 1 hour 45 minutes
Total Time 2 hours
Servings: 4 -6 servings
Course: Main Dish
Cuisine: American, Comfort Food

Ingredients
  

  • 10 dark meat chicken pieces drumsticks and thighs, trimmed of excess fat
  • 2 tsp kosher salt
  • 1 tbsp smoked paprika
  • 1 tbsp Montreal chicken seasoning or any preferred chicken seasoning, including bouillon
  • 2 tbsp butter
  • 1/2 cup red onion minced
  • 1/2 cup flat-leaf parsley chopped
  • 1 tbsp garlic minced
  • 1/2 tsp red pepper flakes
  • 1 cup chicken stock
  • 1 tbsp fresh lemon juice
  • 1 cup freshly grated Parmesan cheese
  • 1/3 cup heavy whipping cream

Method
 

  1. Preheat the oven to 375°F.
  2. Melt butter in a skillet over medium heat.
  3. Add minced onions and sauté until fragrant (about 2 minutes).
  4. Stir in chopped parsley and garlic, mixing well.
  5. Add lemon juice and red pepper flakes, followed by chicken stock.
  6. Stir in Parmesan cheese and heavy cream, letting it simmer for a minute. Turn off the heat and allow the sauce to cool slightly.
  7. While the sauce cools, season the chicken with salt, smoked paprika, and chicken seasoning. Toss to coat evenly.
  8. Place the seasoned chicken in a baking dish and pour the prepared sauce over it.
  9. Bake uncovered for 1 hour and 45 minutes, flipping halfway through.
  10. Broil on the skin side until golden brown.
  11. Baste the chicken in its sauce before serving.
  12.  

Notes

  • This dish pairs well with rice or creamy mashed potatoes to soak up the rich, buttery sauce.
  • Adjust the spice level by increasing or decreasing the red pepper flakes.
  • For a deeper lemon flavor, zest the lemon before juicing and add it to the sauce.

Easter Basket Sugar Cookie Cups: A Festive Springtime Delight

Easter is the perfect time to bring bright colors, fun decorations, and delicious treats to the table. One dessert that checks all the boxes is Easter Basket Sugar Cookie Cups—a simple yet festive creation that combines the crispness of sugar cookies, the creaminess of vanilla buttercream, and the playful touch of chocolate eggs.

These adorable cookie cups mimic the look of tiny Easter baskets, making them a standout addition to any dessert spread. Whether you’re baking with kids, preparing treats for an Easter gathering, or just looking for a fun and easy holiday dessert, these cookie cups are guaranteed to bring smiles.

Why Easter Basket Sugar Cookie Cups Are a Must-Try

1. A Fun Twist on Classic Sugar Cookies

Traditional sugar cookies are always a hit, but these bite-sized cookie cups take things up a notch. Instead of rolling and cutting out dough, you simply press it into a muffin tin, creating the perfect basket shape to hold a swirl of frosting and festive candies.

2. A Perfect Balance of Textures

These cookie cups offer a delightful contrast in every bite:

  • Crisp, buttery sugar cookie base that holds its shape.
  • Smooth and creamy vanilla frosting, adding richness.
  • A crunchy topping of chocolate eggs, creating the perfect bite.

3. Kid-Friendly and Easy to Make

Baking with kids can sometimes be messy, but this recipe is simple enough for little hands to help. Kids can:
Press the dough into the muffin tin
Help mix and color the frosting
Decorate the tops with sprinkles and chocolate eggs

It’s a great way to get the whole family involved in making Easter treats!

4. A Beautiful Addition to Any Easter Table

With vibrant colors, cute basket-like shapes, and playful decorations, these cookie cups bring instant cheer to any dessert spread. Whether served at an Easter brunch, a school party, or as a special weekend treat, they’re guaranteed to be a crowd favorite.

Creative Ways to Customize These Cookie Cups

1. Change Up the Frosting Color

The classic green frosting gives the illusion of grass, but why stop there? Try:

  • Pastel pink for a springtime floral look
  • Light blue for a sky-inspired effect
  • Lavender for a soft and elegant touch

2. Experiment with Different Toppings

While chocolate eggs are a popular choice, you can switch up the toppings for a different flavor profile:

  • Jelly beans for a fruity pop of color.
  • Mini marshmallows for a soft, fluffy contrast.
  • Reese’s Peanut Butter Eggs for a nutty surprise.
  • Pastel sprinkles to add extra sparkle.

3. Add a Fun “Basket Handle”

To make these cookie cups look even more like Easter baskets, add a small curved licorice rope, pretzel stick, or Pocky stick as a handle before serving.

4. Make It Chocolate-Themed

If you’re a chocolate lover, turn this into a chocolate Easter basket treat by:

  • Using chocolate cookie dough instead of sugar cookie dough.
  • Swapping vanilla frosting for chocolate buttercream or Nutella frosting.
  • Adding chocolate sprinkles or crushed Oreo crumbs on top.

Pro Tips for Perfect Cookie Cups

1. Avoid Overbaking for the Perfect Texture

The cookie base should be light golden brown when removed from the oven. If overbaked, they may become too dry and crumbly, making them harder to remove from the pan.

2. Let the Cookie Cups Cool Completely Before Frosting

Frosting warm cookies can lead to melting and messiness. Make sure the cookie cups have fully cooled before piping in the frosting.

3. Use a Muffin Tin for Uniform Shape

A muffin tin helps shape the cookie dough into perfect baskets. If you want mini baskets, use a mini muffin tin instead for bite-sized treats.

4. Spray the Muffin Tin Well

Since sugar cookie dough can be sticky, it’s important to grease the muffin tin generously to ensure easy removal.

5. Use a Small Cup or Spoon to Create the Basket Shape

Right after baking, use the bottom of a shot glass, spice jar, or small measuring cup to gently press into the center of each cookie to form the basket shape.

The Key Ingredients for Sweet Success

A Sturdy Yet Soft Sugar Cookie Base

  • Pre-made sugar cookie dough creates a crispy yet tender base that forms the perfect “basket.”
  • The cookie cups are baked in a muffin tin, making them easy to shape and serve.

A Smooth and Creamy Vanilla Buttercream Filling

  • A blend of butter, powdered sugar, and heavy cream creates a silky, rich frosting.
  • Green food coloring gives it a fun, grass-like appearance, mimicking the look of an Easter basket.

Toppings That Bring It All Together

  • Hershey’s Egg Candies or Mini Cadbury Eggs add a pop of color and crunch.
  • Jelly beans, Reese’s eggs, or even pastel M&M’s can be used for a variety of fun flavor options.

Step-by-Step Guide to Creating These Adorable Easter Treats

  1. Bake the Cookie Cups – Pre-made sugar cookie dough is pressed into a muffin tin and baked until golden.
  2. Shape the Baskets – While the cookies are still warm, an indentation is pressed into the center to form the basket shape.
  3. Whip Up the Buttercream – Butter, powdered sugar, heavy cream, and vanilla are beaten into a smooth, pipeable frosting.
  4. Decorate and Assemble – The frosting is piped into each cookie cup, then topped with chocolate eggs and festive sprinkles.

Nutritional Breakdown (Per Serving)

  • Calories: 213 kcal
  • Carbohydrates: 27g
  • Protein: 1g
  • Fat: 12g
  • Sugar: 22g

Why These Easter Basket Cookie Cups Are a Must-Try

Easy to Make – Uses pre-made cookie dough for quick and effortless preparation.
Kid-Friendly – A great baking project for children who love decorating.
Customizable – Use different candies and frosting colors for a variety of looks.
Perfect for Easter Gatherings – A fun and festive treat that looks amazing on any dessert table.

These Easter Basket Sugar Cookie Cups bring together simplicity, creativity, and delightful flavors, making them a must-have treat for your Easter celebrations!

Frequently Asked Questions (FAQs)

1. Can I Make These Cookie Cups in Advance?

Yes! The cookie cups can be made up to a week in advance and stored in an airtight container at room temperature. For best results, wait to frost and decorate them until just before serving.

2. How Do I Store Leftovers?

  • Unfrosted cookie cups can be stored at room temperature for up to a week.
  • Frosted and decorated cookie cups should be kept in an airtight container for up to 3 days.
  • For longer storage, freeze the cookie cups without frosting for up to 3 months.

3. Can I Use Store-Bought Frosting Instead of Homemade?

Absolutely! While homemade buttercream adds a richer flavor, store-bought frosting works well for convenience. Just stir in a few drops of green food coloring before piping.

4. What’s the Best Way to Pipe the Frosting?

For a beautiful “grass” effect, use a large star tip (Wilton 1A or 2A) in a piping bag. If you don’t have a piping bag, a Ziploc bag with the corner snipped off works too.

5. Can I Make These Cookie Cups Gluten-Free?

Yes! To make a gluten-free version:

  • Use gluten-free sugar cookie dough.
  • Ensure the food coloring and toppings are gluten-free.

6. What If I Don’t Have a Muffin Tin?

If you don’t have a muffin tin, you can:

  • Roll the cookie dough into balls, place them on a baking sheet, and gently press down before baking.
  • Once baked, use your fingers or a spoon to press a small well into the center for the frosting.

7. What Other Holidays Can I Make These For?

These cookie cups can easily be adapted for other holidays!

  • Christmas: Use red and green frosting with holiday-themed sprinkles.
  • Halloween: Add orange and black frosting with candy pumpkins.
  • Valentine’s Day: Use pink frosting with heart-shaped candies.

Conclusion: A Festive Treat That’s Fun to Make and Eat

These Easter Basket Sugar Cookie Cups bring together everything you love about Easter treats—fun, color, and delicious flavors. They’re easy to make, customizable, and perfect for any Easter celebration.

With a crisp yet tender sugar cookie base, creamy vanilla frosting, and colorful chocolate eggs, these treats look just like miniature Easter baskets and taste just as delightful as they appear. Whether you’re making them with family, sharing them at a party, or simply indulging in a sweet Easter tradition, these cookie cups are a guaranteed hit.

So grab your baking essentials, let your creativity shine, and enjoy making and sharing these adorable Easter treats!

aiting

Easter Basket Sugar Cookie Cups: A Festive Springtime Delight

These Easter Basket Sugar Cookie Cups are the ultimate treat to bring joy and deliciousness to your Easter celebrations. Made with buttery sugar cookie dough, rich vanilla buttercream, and colorful chocolate eggs, these miniature baskets are as adorable as they are tasty! Perfect for kids and adults alike, they offer a delightful mix of crisp, creamy, and crunchy textures in every bite.
Prep Time 15 minutes
Cook Time 12 minutes
Total Time 27 minutes
Servings: 12 cookie cups
Course: Dessert
Cuisine: American

Ingredients
  

  • For the Sugar Cookie Cups
  • 1 roll pre-made sugar cookie dough or homemade
  • Non-stick cooking spray
For the Vanilla Buttercream
  • 1/2 cup unsalted butter softened
  • 2 cups powdered sugar
  • 2 tablespoons heavy cream
  • 1 teaspoon vanilla extract
  • Green food coloring
For Toppings
  • Hershey’s Egg Candies or Mini Cadbury Eggs
  • Jelly beans Reese’s eggs, or pastel M&M’s (optional)
  • Festive sprinkles

Method
 

  1. Prepare and Bake the Cookie Cups
  2. Preheat oven to 350°F (175°C) and grease a mini muffin tin with non-stick spray.
  3. Roll the sugar cookie dough into small balls and press them into the muffin tin cavities, shaping them into cup-like forms.
  4. Bake for 10-12 minutes or until lightly golden.
  5. Remove from the oven and, while still warm, gently press the centers with a spoon to create a basket shape. Allow to cool completely.
2. Make the Vanilla Buttercream
  1. In a bowl, beat butter until smooth and creamy.
  2. Gradually add powdered sugar, mixing well.
  3. Pour in heavy cream and vanilla extract, beating until light and fluffy.
  4. Add green food coloring and mix until evenly tinted.
3. Decorate the Cookie Cups
  1. Pipe the green buttercream into each cooled cookie cup to resemble grass.
  2. Place a few chocolate eggs on top of the frosting.
  3. Sprinkle with festive decorations for extra flair.

Notes

Prepare and Bake the Cookie Cups

  1. Preheat oven to 350°F (175°C) and grease a mini muffin tin with non-stick spray.
  2. Roll the sugar cookie dough into small balls and press them into the muffin tin cavities, shaping them into cup-like forms.
  3. Bake for 10-12 minutes or until lightly golden.
  4. Remove from the oven and, while still warm, gently press the centers with a spoon to create a basket shape. Allow to cool completely.

2. Make the Vanilla Buttercream

  1. In a bowl, beat butter until smooth and creamy.
  2. Gradually add powdered sugar, mixing well.
  3. Pour in heavy cream and vanilla extract, beating until light and fluffy.
  4. Add green food coloring and mix until evenly tinted.

3. Decorate the Cookie Cups

  1. Pipe the green buttercream into each cooled cookie cup to resemble grass.
  2. Place a few chocolate eggs on top of the frosting.
  3. Sprinkle with festive decorations for extra flair.

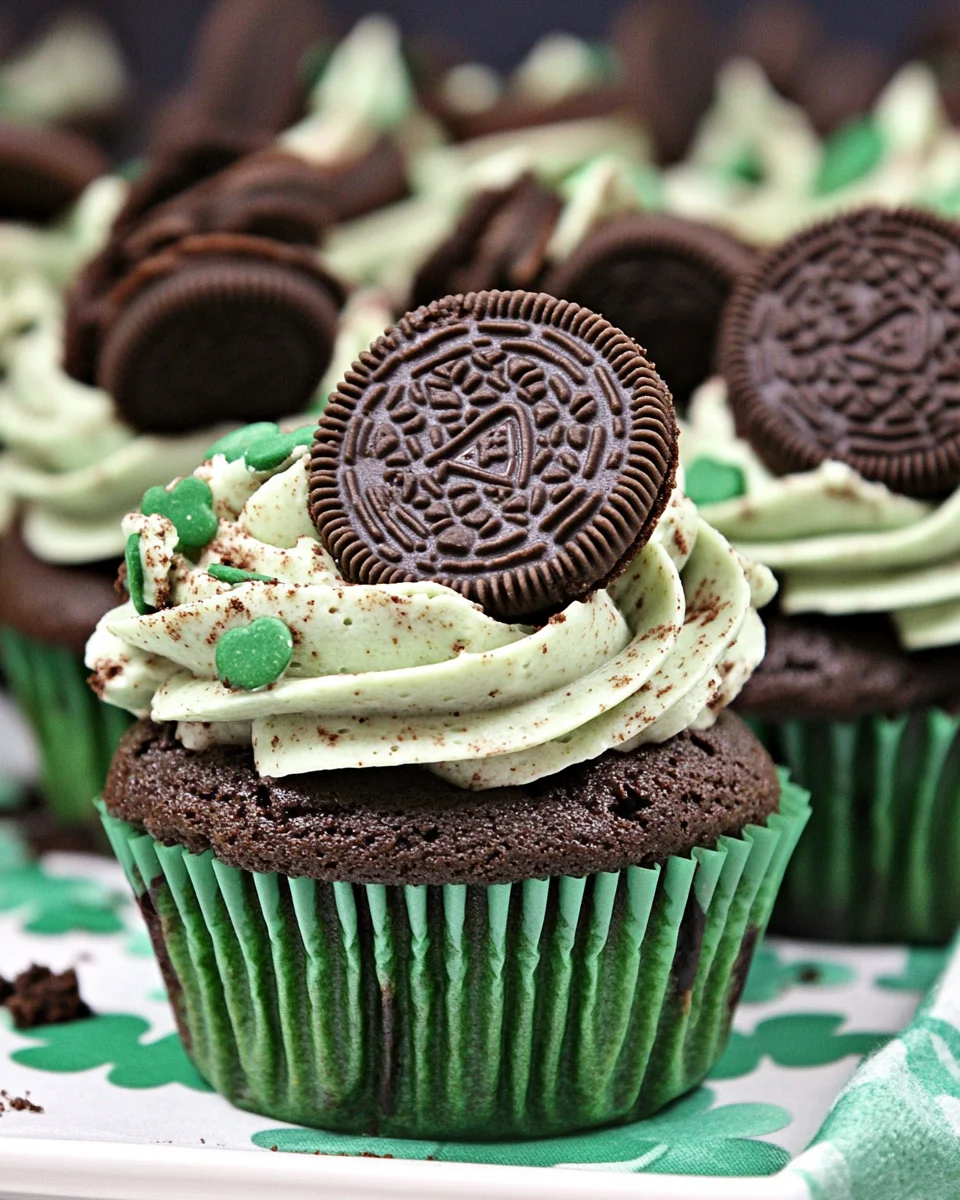
Andes Mint Oreo Chocolate Cupcakes: A Decadent Mint-Chocolate Delight

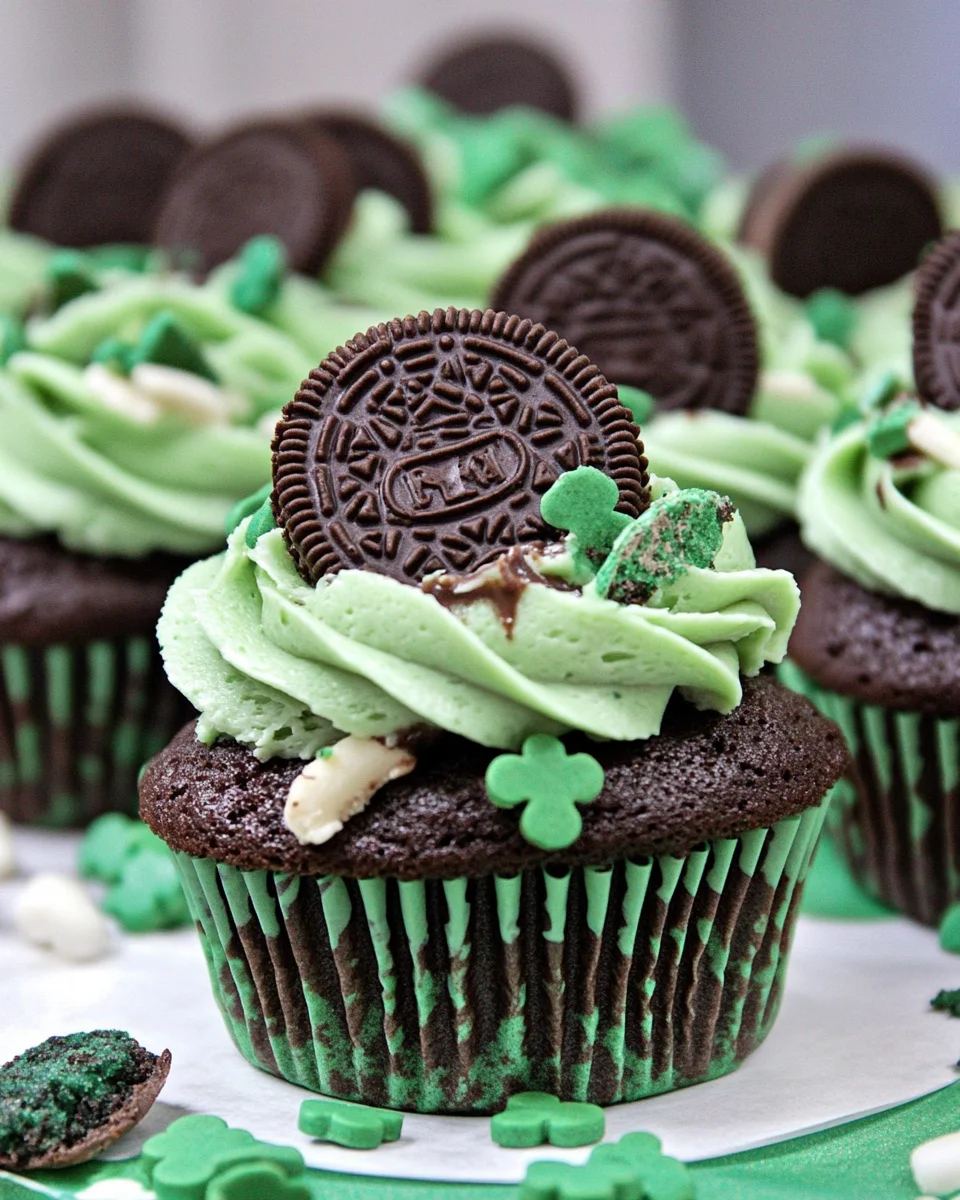
When it comes to celebrating St. Patrick’s Day, few flavors are as fitting as mint and chocolate. These Andes Mint Oreo Chocolate Cupcakes bring together the richness of chocolate cake, the coolness of mint frosting, and the crunch of Oreos and Andes Mints for a dessert that is as visually stunning as it is delicious.

Perfect for holiday parties, festive gatherings, or simply treating yourself, these cupcakes elevate traditional chocolate cupcakes with bold flavors and irresistible texture. Whether you’re a fan of mint desserts or just love a well-balanced cupcake, this recipe is sure to impress.

In this guide, we’ll explore what makes these cupcakes special, customization ideas, expert baking tips, FAQs, and serving suggestions to help you achieve the perfect batch every time.

Why These Andes Mint Oreo Chocolate Cupcakes Are a Must-Try

1. A Flavor Combination That Always Wins

Mint and chocolate have long been a classic pairing, offering a refreshing yet indulgent contrast. The deep, cocoa-rich cupcake base is balanced by the cool, creamy mint frosting, creating a flavor profile that is bold yet refreshing.

2. A Fun and Festive Appearance

With vibrant green frosting, crushed Andes Mints, and a Mint Oreo garnish, these cupcakes aren’t just delicious—they’re visually stunning. Whether you’re celebrating St. Patrick’s Day or simply want a fun, colorful treat, these cupcakes bring a playful and festive touch to any dessert table.

3. A Perfectly Moist and Tender Cupcake

The use of buttermilk in the batter ensures that these cupcakes remain moist, soft, and flavorful. Buttermilk’s acidity breaks down gluten strands, resulting in a tender crumb that pairs perfectly with the luscious frosting.

4. Oreo and Andes Mint Garnishes for Extra Crunch

Each cupcake is topped with chopped Andes Mints and a halved Mint Oreo, adding layers of texture and extra mint-chocolate flavor. The slight crunch from the toppings contrasts beautifully with the soft cupcake and creamy frosting.

5. Completely Made from Scratch

Unlike many shortcut cupcake recipes, these Andes Mint Oreo Chocolate Cupcakes are 100% homemade. From the rich chocolate base to the fluffy mint frosting, every component is made from scratch for an authentic, bakery-quality taste.

Creative Ways to Customize These Cupcakes

1. Make Them Extra Chocolaty

If you want to amp up the chocolate flavor, try:

  • Adding chocolate chips to the batter for melty chocolate pockets.
  • Drizzling melted dark chocolate over the frosting.
  • Using a chocolate buttercream swirl alongside the mint frosting for a duo-tone effect.

2. Change Up the Mint Flavor

For a fun twist, experiment with different mint variations:

  • Peppermint extract for a candy cane-inspired flavor.
  • Spearmint extract for a milder, herbal mint taste.
  • Adding matcha powder to the frosting for a natural green hue and earthy depth.

3. Try a Different Cookie Base

While Mint Oreos work beautifully in this recipe, you can also try:

  • Thin Mints for a Girl Scout-inspired cupcake.
  • Chocolate graham crackers crushed into the frosting for a richer chocolate-mint combo.
  • Chocolate wafer cookies for a crisp, delicate garnish.

4. Create a Layered Cupcake Experience

To take these cupcakes to the next level, try:

  • Filling them with mint chocolate ganache for an extra burst of flavor.
  • Adding a hidden Andes Mint inside the cupcake before baking.
  • Swirling two frosting colors together—one mint green and one chocolate—for a two-tone effect.

Expert Tips for Perfect Mint Chocolate Cupcakes

1. Use High-Quality Cocoa Powder

The chocolate flavor in these cupcakes comes largely from unsweetened cocoa powder. Using a high-quality, Dutch-processed cocoa will give the cupcakes a deeper, richer taste.

2. Don’t Overmix the Batter

Overmixing can lead to dense, tough cupcakes instead of a light, fluffy crumb. Mix the ingredients until just combined to ensure a tender, moist texture.

3. Use Room Temperature Ingredients

For the best results, ensure that your eggs, buttermilk, and butter are at room temperature before mixing. This helps create a smooth batter and a silky frosting.

4. Chill the Frosting Before Piping

Since this frosting contains butter and heavy cream, it’s best to chill it slightly before piping to help it hold its shape better on the cupcakes.

5. Decorate Just Before Serving for Maximum Crunch

To keep the Andes Mints and Oreo garnish crisp, add them right before serving so they don’t absorb too much moisture from the frosting.

Ingredients That Bring the Magic Together

Moist Chocolate Cupcakes

  • A blend of cocoa powder and brown sugar for deep chocolate richness.
  • Buttermilk for tenderness, ensuring a soft, moist crumb.

Creamy Mint Cookie Frosting

  • Butter and powdered sugar, whipped to perfection for a fluffy texture.
  • Ground mint Oreos for an extra hint of chocolate and crunch.
  • Mint extract and green food coloring to give it a signature fresh flavor and festive hue.

Toppings That Steal the Show

  • Andes Mint baking chips, adding a cool, chocolatey crunch.
  • Halved Mint Oreos, creating a fun, eye-catching garnish.

How to Make These Decadent Cupcakes

  1. Bake the Perfect Chocolate Cupcakes – A mix of dry and wet ingredients forms a smooth batter that bakes into rich, moist cupcakes.
  2. Whip Up the Frosting – Butter, sugar, heavy cream, and mint extract come together for a silky-smooth frosting with a hint of Oreo crunch.
  3. Decorate Like a Pro – Pipe the frosting high, roll the edges in Andes Mint chips, and place a Mint Oreo on top for the perfect finishing touch.

Nutritional Breakdown (Per Cupcake)

  • Calories: ~380 kcal
  • Carbohydrates: ~45g
  • Protein: ~4g
  • Fat: ~18g
  • Sugar: ~30g

Why These Cupcakes Are a Must-Try

A Perfect Mint-Chocolate Balance – The coolness of mint complements the richness of the chocolate.
Visually Stunning – The bright green frosting and cookie garnish make them eye-catching and festive.
Made Entirely from Scratch – No shortcuts, just pure homemade goodness.

These Andes Mint Oreo Chocolate Cupcakes are the perfect celebration treat for St. Patrick’s Day or any occasion where you want to impress with bold flavors and a stunning presentation!

Frequently Asked Questions (FAQs)

1. Can I Make These Cupcakes Ahead of Time?

Yes! You can:

  • Bake the cupcakes a day in advance and store them at room temperature in an airtight container.
  • Prepare the frosting ahead of time and refrigerate it, then bring it to room temperature before piping.

2. How Do I Store These Cupcakes?

  • Room Temperature: Keep them in an airtight container for up to 2 days.
  • Refrigerator: Store for up to 5 days, but bring them to room temperature before serving for the best texture.
  • Freezer: You can freeze unfrosted cupcakes for up to 3 months, then frost them after thawing.

3. Can I Make These Gluten-Free?

Yes! Simply substitute the all-purpose flour with a high-quality gluten-free baking flour that contains xanthan gum for structure. Also, ensure your Oreos and Andes Mints are gluten-free versions.

4. Can I Use a Different Frosting?

Absolutely! While mint frosting is the star here, you can also try:

  • Chocolate buttercream for a double-chocolate mint effect.
  • Whipped cream frosting for a lighter, less sweet alternative.
  • Cream cheese frosting for a slightly tangy balance to the sweetness.

5. What Can I Serve With These Cupcakes?

These cupcakes pair beautifully with:

  • A cup of hot cocoa or a mint mocha latte.
  • A scoop of mint chocolate chip ice cream.
  • A drizzle of chocolate syrup on top for extra indulgence.

Conclusion: A Showstopping Cupcake Worth Celebrating

These Andes Mint Oreo Chocolate Cupcakes aren’t just a dessert—they’re a festive, flavor-packed experience. The combination of rich chocolate, refreshing mint, and crunchy toppings makes them an absolute must-try for St. Patrick’s Day, special occasions, or any time you crave something extra indulgent.

With endless ways to customize them, these cupcakes can be as simple or as elaborate as you like. Whether you stick to the classic recipe or add your own creative twist, one thing is certain—these cupcakes will disappear fast!

So grab your ingredients, get baking, and enjoy the perfect blend of chocolate and mint in every single bite!

aiting

Andes Mint Oreo Chocolate Cupcakes: A Decadent Mint-Chocolate Delight

These Andes Mint Oreo Chocolate Cupcakes combine the richness of moist chocolate cupcakes with a creamy, minty cookie frosting. Topped with Andes Mint chips and a halved Mint Oreo, these cupcakes are a visually stunning and deliciously festive treat perfect for St. Patrick’s Day or any special occasion.
Prep Time 20 minutes
Cook Time 18 minutes
Total Time 28 minutes
Servings: 12 cupcakes
Course: Dessert
Cuisine: American

Ingredients
  

  • Cocoa powder
  • Brown sugar
  • Buttermilk
  • Butter
  • Powdered sugar
  • Heavy cream
  • Mint extract
  • Green food coloring
  • Ground Mint Oreos
  • Andes Mint baking chips
  • Halved Mint Oreos

Method
 

  1. Bake the Perfect Chocolate Cupcakes: Mix dry and wet ingredients to form a smooth batter, then bake until rich and moist.
  2. Whip Up the Frosting: Beat butter, powdered sugar, heavy cream, and mint extract until fluffy. Fold in ground Mint Oreos for extra crunch.
  3. Decorate Like a Pro: Pipe frosting onto cupcakes, roll edges in Andes Mint chips, and top with a halved Mint Oreo for a beautiful finish.

Notes

  • Use high-quality cocoa powder for the best chocolate flavor.
  • Adjust the amount of mint extract based on your taste preference.
  • For an extra festive touch, sprinkle additional Andes Mint chips on top.

Blackberry Pistachio Dream Bars: A Luxurious Dessert with a Perfect Balance of Flavors

An Elegant Treat for Any Occasion

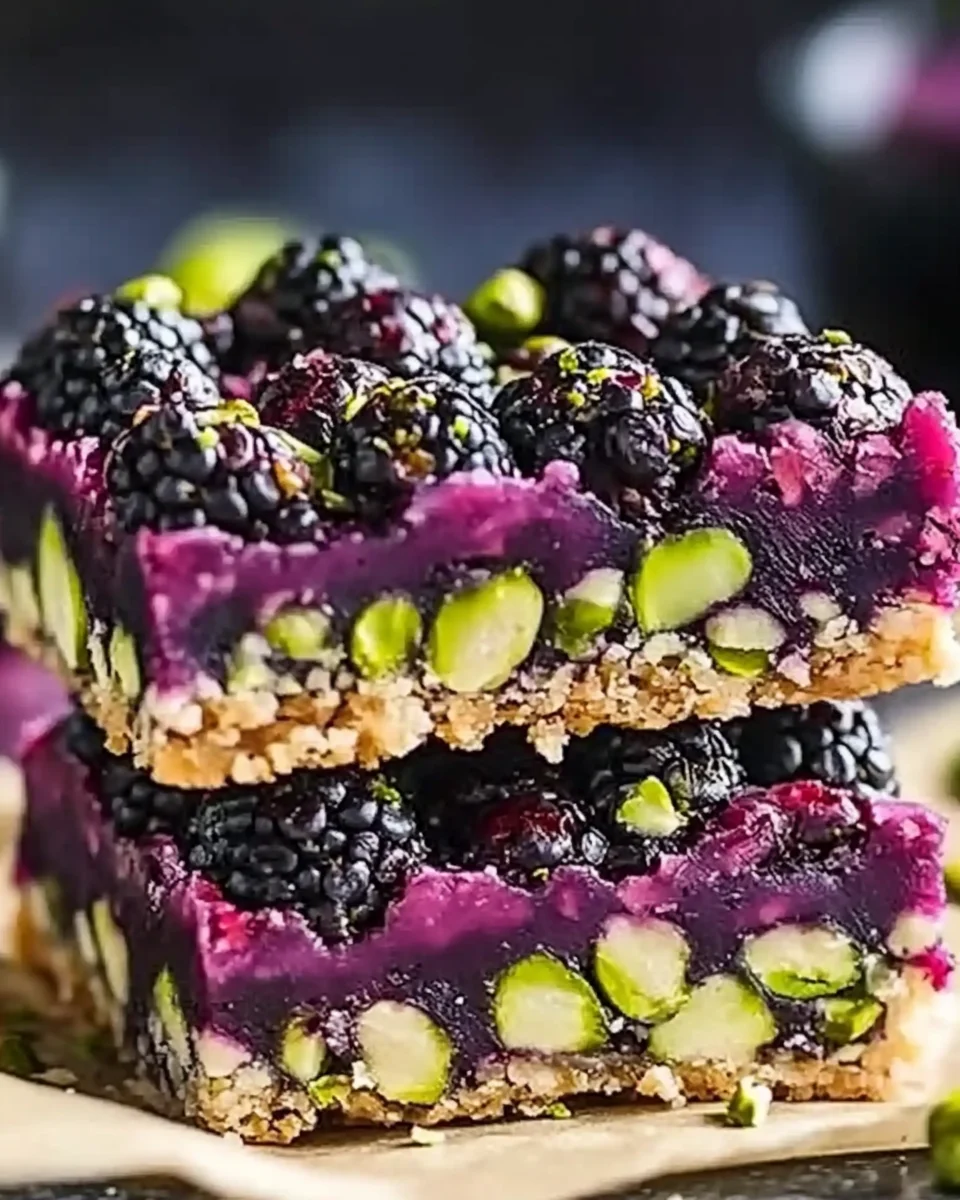
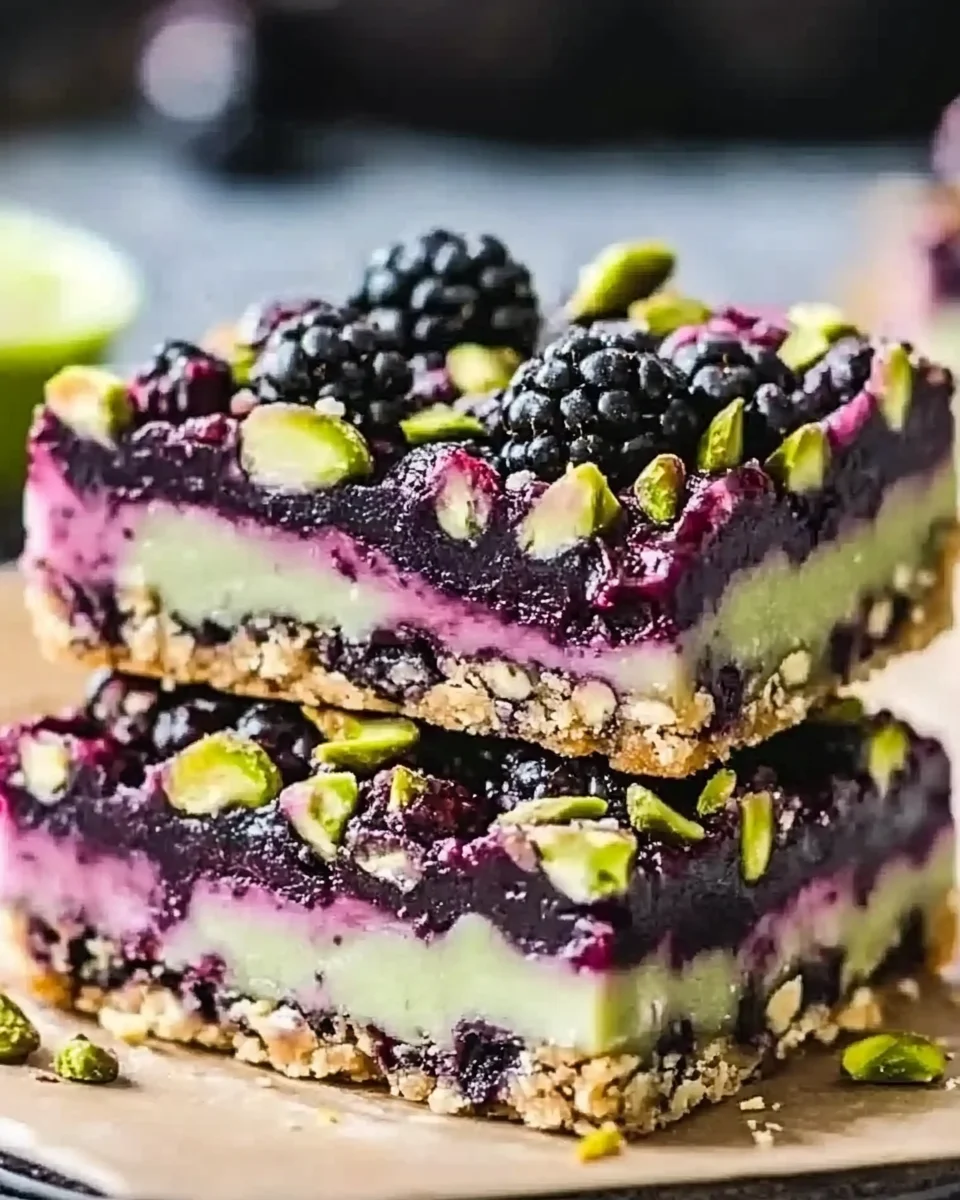
There’s something undeniably special about a layered dessert that brings together a harmonious blend of flavors and textures. The Blackberry Pistachio Dream Bars do exactly that—offering a rich, nutty crunch from pistachios, a creamy and tangy cheesecake layer, and a sweet yet slightly tart blackberry topping. Each bite is an experience, combining crunch, smoothness, and a burst of fresh berry flavor.

Whether you’re preparing these for a special gathering, a weekend indulgence, or simply want to impress with a unique dessert, these bars are a showstopper. Their vibrant colors and decadent layers make them just as visually stunning as they are delicious.

This guide will walk you through what makes these bars extraordinary, how to customize them, expert tips for perfection, and frequently asked questions to ensure your dessert turns out flawless every time.

Why These Blackberry Pistachio Dream Bars Stand Out

1. A Symphony of Textures

The best desserts have a contrast of textures, and these bars excel in that department. The crumbly, buttery crust forms a solid base, followed by a rich pistachio layer, a velvety cream cheese filling, and a smooth, glossy blackberry topping. The final touch of chopped pistachios on top adds a delightful crunch, making every bite irresistible.

2. The Perfect Sweet and Tart Balance

The combination of pistachios and blackberries is both unexpected and deeply satisfying. Pistachios bring a naturally sweet, nutty depth, while blackberries add a refreshing tartness that balances the richness of the other layers. The slight acidity of lemon juice in the blackberry topping enhances its natural flavor, creating a perfect contrast to the creamy layers below.

3. Visually Stunning and Impressive

These bars aren’t just delicious—they’re gorgeous. The deep purple blackberry layer against the green pistachio filling creates an eye-catching dessert that looks as impressive as it tastes. Whether served on a platter or in individual portions, these bars elevate any dessert table.

4. A Unique Twist on Classic Cheesecake Bars

While cheesecake bars are always a hit, this version takes things to the next level by incorporating pistachios for a nutty richness and swapping a traditional fruit topping for a fresh blackberry compote. The result is a sophisticated take on a beloved dessert, with flavors that complement each other beautifully.

5. Ideal for Make-Ahead Convenience

Since these bars require chilling to properly set, they are perfect for making ahead of time. Whether you’re preparing them for a dinner party, a special event, or simply want a ready-to-go dessert in your fridge, these bars hold up beautifully and taste even better the next day.

Creative Ways to Customize This Recipe

1. Switch Up the Nuts

Pistachios bring a delicate, slightly sweet nuttiness, but you can experiment with:

  • Almonds – For a mild, buttery crunch.
  • Hazelnuts – To add a richer, more intense nut flavor.
  • Cashews – For an ultra-creamy, slightly sweet taste.

2. Try a Different Fruit Topping

While blackberries add a bold, tart contrast, you can swap them for:

  • Raspberries – For a slightly sweeter but still tangy topping.
  • Blueberries – To create a deeper, sweeter fruit layer.
  • Cherries – For a more decadent, dessert-like flavor.

3. Make It Gluten-Free

To create a gluten-free version, replace the biscuit crust with a nut-based alternative, using a mix of ground pistachios, almond flour, and melted butter to hold it together.

4. Add Chocolate for an Extra Indulgence

If you love the combination of chocolate and nuts, drizzle melted dark chocolate over the top before serving, or mix a small amount of cocoa powder into the pistachio layer for a rich, nutty-chocolate flavor.

5. Turn It Into a No-Bake Dessert

Instead of baking the crust, you can firmly press it into the pan and freeze it for 20-30 minutes before adding the layers. This makes it even easier to prepare on warm days when you don’t want to turn on the oven.

Expert Tips for Perfect Blackberry Pistachio Dream Bars

1. Chill Between Layers for Clean and Defined Lines

Since these bars have multiple layers, it’s essential to let each layer firm up before adding the next. This helps prevent the layers from blending together, ensuring a sharp, professional-looking presentation.

2. Use Fresh, High-Quality Ingredients

  • Fresh blackberries provide the best flavor, but if using frozen ones, make sure to thaw and drain them first to prevent excess moisture.
  • Use real vanilla extract for a richer, deeper flavor in the cream cheese layer.
  • Choose high-quality pistachios for the best texture and taste—avoid salted ones to keep the flavors balanced.

3. Don’t Overmix the Cream Cheese Layer

Overmixing can introduce too much air, leading to a grainy or overly soft texture. Beat until just combined for a smooth and creamy consistency.

4. Let the Blackberry Topping Cool Before Spreading

If the blackberry mixture is too hot, it can melt the cream cheese layer, ruining the texture. Let it cool slightly before pouring it over the bars.

5. Use a Sharp Knife for Clean Slices

For neat and even slices, run a sharp knife under hot water, wipe it dry, and then slice. Repeat this process between each cut for perfectly defined layers.

Ingredients That Make This Dessert Shine

A Perfectly Balanced Four-Layer Creation

  • Biscuit Crust – A buttery, crumbly base made with crushed digestive biscuits.
  • Pistachio Layer – A nutty, subtly sweet layer blended with sugar and cream for richness.
  • Cream Cheese Layer – A smooth and creamy middle that adds depth to the dessert.
  • Blackberry Topping – A vibrant, tangy fruit layer that balances out the richness of the lower layers.

Each component contributes to the harmonious combination of textures and flavors, making every bite an experience to remember.

How to Create These Dreamy Dessert Bars

  1. Prepare the Crust – Combine crushed biscuits with melted butter and press into a pan. Chill to set.
  2. Create the Pistachio Layer – Blend ground pistachios, sugar, and heavy cream until smooth, then spread over the crust.
  3. Mix the Cream Cheese Filling – Beat cream cheese, sugar, and vanilla, then spread over the pistachio layer.
  4. Make the Blackberry Topping – Cook blackberries with sugar, lemon juice, and cornstarch until thickened. Cool and spread over the cream cheese layer.
  5. Chill & Garnish – Let the bars set in the refrigerator, then sprinkle with chopped pistachios and fresh blackberries before serving.

Nutritional Breakdown (Per Serving)

  • Calories: 380 kcal
  • Carbohydrates: 34g
  • Protein: 6g
  • Fat: 25g
  • Saturated Fat: 10g
  • Fiber: 3g
  • Sugar: 22g
  • Vitamin C: 8mg
  • Calcium: 60mg

These bars deliver both indulgence and nutrition, with healthy fats from pistachios, antioxidants from blackberries, and protein from cream cheese.

Frequently Asked Questions (FAQs)

1. Can I Use Frozen Blackberries Instead of Fresh?

Yes! Frozen blackberries work well—just thaw them completely and drain any excess liquid before cooking them down for the topping.

2. How Long Do These Bars Last?

These bars can be stored in the refrigerator for up to 5 days in an airtight container. They also freeze well for up to 3 months—just thaw in the fridge before serving.

3. Can I Make These Bars Dairy-Free?

Absolutely! Swap:

  • Dairy-free butter or coconut oil for the biscuit crust.
  • Vegan cream cheese for the traditional version.
  • Coconut cream for the heavy cream in the pistachio layer.

4. What Can I Serve with These Bars?

These bars pair beautifully with:

  • A hot espresso or cappuccino.
  • A light dessert wine like Moscato.
  • A scoop of vanilla or pistachio ice cream for extra indulgence.

5. How Do I Know When the Blackberry Layer is Ready?

The blackberry topping should thicken enough to coat the back of a spoon. If it’s too runny, cook it a little longer to reduce moisture before letting it cool and spreading it over the bars.

Conclusion: A Dessert Worth Savoring

The Blackberry Pistachio Dream Bars are more than just a dessert—they’re a celebration of textures and flavors, bringing together nutty richness, creamy smoothness, and a burst of fresh berry tartness.

Perfect for entertaining, meal prep, or special occasions, these bars offer elegance with every bite. Whether you stick to the original recipe or experiment with your own twists, one thing is certain: this dessert will leave a lasting impression.

So, gather your ingredients, enjoy the process, and treat yourself to a slice of pure indulgence!

aiting

Blackberry Pistachio Dream Bars: A Luxurious Dessert with a Perfect Balance of Flavors

These Pistachio Blackberry Dessert Bars offer a perfectly balanced four-layer experience. With a buttery biscuit crust, a nutty pistachio layer, a creamy cream cheese filling, and a vibrant blackberry topping, each bite delivers a delightful mix of textures and flavors. This indulgent yet nutritious dessert is perfect for any occasion.
Prep Time 20 minutes
Cook Time 2 hours
Total Time 2 hours 20 minutes
Servings: 12 servings
Course: Dessert
Cuisine: Fusion

Ingredients
  

  • Crushed digestive biscuits
  • Melted butter
  • Ground pistachios
  • Sugar
  • Heavy cream
  • Cream cheese
  • Vanilla extract
  • Blackberries
  • Lemon juice
  • Cornstarch
  • Chopped pistachios for garnish
  • Fresh blackberries for garnish

Method
 

  1. Prepare the Crust: Combine crushed biscuits with melted butter and press into a pan. Chill to set.
  2. Create the Pistachio Layer: Blend ground pistachios, sugar, and heavy cream until smooth, then spread over the crust.
  3. Mix the Cream Cheese Filling: Beat cream cheese, sugar, and vanilla, then spread over the pistachio layer.
  4. Make the Blackberry Topping: Cook blackberries with sugar, lemon juice, and cornstarch until thickened. Cool and spread over the cream cheese layer.
  5. Chill & Garnish: Let the bars set in the refrigerator, then sprinkle with chopped pistachios and fresh blackberries before serving.

Notes

  • Use roasted pistachios for a deeper flavor.
  • Ensure the blackberry topping cools before layering to prevent melting the cream cheese.
  • Serve chilled for the best texture and flavor.

Crunchy & Creamy Broccoli Salad: The Ultimate Side Dish

Broccoli salad is the perfect combination of fresh, crunchy, sweet, and savory—a side dish that holds its own at barbecues, potlucks, and family gatherings. Unlike leafy green salads that wilt under dressing, broccoli salad maintains its crisp texture while absorbing the flavors of its creamy, tangy dressing.

This dish has been a staple at backyard cookouts for years, and for good reason. It’s refreshing, easy to prepare, and bursting with bold flavors. Whether you’re making it ahead for meal prep, serving it as a side to grilled meats, or enjoying it on its own for a light lunch, this salad delivers every time.

In this guide, we’ll break down why broccoli salad is a must-have dish, customization ideas, expert tips, frequently asked questions, and serving suggestions.

Why Broccoli Salad is a Crowd-Pleasing Classic

Broccoli salad isn’t just any side dish—it’s a flavor-packed favorite that brings together a variety of textures and tastes. Here’s why it remains a go-to recipe for so many home cooks:

1. The Perfect Balance of Flavors

This salad offers a little bit of everything:

  • Crunchy broccoli and nuts
  • Smoky, crispy bacon
  • Sweet dried cranberries or raisins
  • A creamy, tangy dressing that ties everything together

Each bite brings a satisfying mix of textures and contrasts, making it hard to resist.

2. It’s Make-Ahead Friendly

Unlike delicate salads that become soggy over time, broccoli salad actually gets better the longer it sits. The broccoli softens slightly as it absorbs the dressing, making it even more flavorful. This makes it a perfect dish to prepare the night before a big event.

3. A Nutrient-Packed Dish

Broccoli is one of the most nutritious vegetables, loaded with fiber, vitamin C, and antioxidants. By pairing it with protein-rich nuts and a creamy dressing, you’re creating a well-rounded dish that satisfies cravings while still being packed with nutrients.

4. It’s Easy to Customize

One of the best things about broccoli salad is that it’s endlessly adaptable. Whether you’re catering to dietary preferences or want to try new flavors, this salad can be modified in countless ways.

Fun Ways to Customize Broccoli Salad

1. Lighten It Up

If you love the creaminess of the dressing but want a healthier alternative, try swapping:

  • Greek yogurt for mayonnaise
  • Honey for sugar
  • Turkey bacon for regular bacon

This keeps the salad rich and flavorful without being too heavy.

2. Add Extra Crunch

For an extra layer of texture, try adding:

  • Toasted sunflower seeds
  • Sliced almonds
  • Chopped pecans

These enhance the crunch factor while adding healthy fats and protein.

3. Give It a Spicy Kick

If you prefer a little heat, consider:

  • Adding red pepper flakes to the dressing
  • Dicing fresh jalapeños into the salad
  • Using spicy candied nuts for an unexpected twist

4. Make It Vegetarian or Vegan

Skip the bacon and cheese and try:

  • Smoked paprika for a hint of smoky flavor
  • Toasted coconut flakes for a crunchy, savory bite
  • A vegan mayo-based dressing

This ensures the salad remains plant-based without sacrificing flavor.

Pro Tips for the Best Broccoli Salad

1. Blanch the Broccoli for a Softer Texture

If you prefer a slightly more tender bite, blanch the broccoli for 30 seconds in boiling water and then transfer it to an ice bath. This keeps the bright green color while making the texture a bit more delicate.

2. Let It Sit for Maximum Flavor

Broccoli salad is best when it has time to chill in the refrigerator for at least an hour (or overnight, if possible). This allows the dressing to meld with the ingredients, making every bite more flavorful.

3. Use Fresh Ingredients

Since this salad is all about texture, make sure your ingredients are as fresh as possible. Crisp broccoli, crunchy nuts, and freshly cooked bacon make all the difference.

4. Balance the Dressing

A great broccoli salad dressing should be:

  • Creamy, but not too thick
  • Tangy, with just enough sweetness
  • Well-seasoned to bring out the flavors

Adjust the ingredients to your taste—a little extra vinegar or a pinch of salt can transform the entire dish.

Since I couldn’t extract the full recipe details, I’ll create a well-structured version of a classic broccoli salad with creative headlines and an engaging format. If you have specific ingredients or instructions from the original recipe, feel free to share them, and I’ll refine it accordingly!

Garden-Fresh Ingredients for Maximum Flavor

The Salad Base

  • Fresh Broccoli Florets – The star of the dish, providing a crisp, fresh crunch.
  • Red Onion – Adds a slight bite and a touch of color.
  • Bacon Crumbles – Smoky, crispy, and irresistible.
  • Sunflower Seeds or Sliced Almonds – For extra crunch and nuttiness.
  • Dried Cranberries or Raisins – A pop of sweetness to balance the flavors.
  • Shredded Cheddar Cheese (Optional) – For a creamy, savory addition.

The Creamy Dressing

  • Mayonnaise or Greek Yogurt – The creamy base that ties everything together.
  • Apple Cider Vinegar – Adds a tangy kick for balance.
  • Honey or Sugar – A hint of sweetness to complement the acidity.
  • Salt & Black Pepper – To enhance and bring out the flavors.

Step-by-Step: How to Make the Ultimate Broccoli Salad

  1. Prep the Ingredients – Wash and chop the broccoli into bite-sized florets. Dice the onion, cook and crumble the bacon, and gather the remaining ingredients.
  2. Mix the Dressing – In a small bowl, whisk together the mayonnaise (or Greek yogurt), apple cider vinegar, honey (or sugar), salt, and pepper.
  3. Combine Everything – In a large mixing bowl, toss the broccoli, onion, bacon, nuts, cranberries, and cheese together. Pour the dressing over and mix well.
  4. Chill and Serve – Let the salad sit in the refrigerator for at least an hour to allow the flavors to meld. Serve cold and enjoy!

Nutritional Breakdown (Per Serving)

  • Calories: ~220-280 kcal
  • Protein: ~7-10g
  • Carbohydrates: ~15-20g
  • Fats: ~14-18g
  • Fiber: ~3-5g

Why This Salad Stands Out

Crunchy and Creamy Texture – The perfect balance of crisp veggies and a smooth dressing.
Sweet and Savory Combination – The smoky bacon and tangy dressing complement the natural sweetness of the cranberries.
Make-Ahead Friendly – It tastes even better after a few hours in the fridge.
Packed with Nutrients – Broccoli is high in fiber, vitamins, and antioxidants.

Frequently Asked Questions (FAQs)

1. Can I Make Broccoli Salad in Advance?

Yes! In fact, broccoli salad tastes even better the next day. The flavors have time to blend, and the broccoli absorbs the dressing without getting soggy.

2. How Long Does Broccoli Salad Last?

When stored in an airtight container in the refrigerator, broccoli salad stays fresh for up to 3-4 days.

3. Can I Use Frozen Broccoli?

Fresh broccoli is highly recommended for the best texture. If you must use frozen broccoli, thaw and drain it thoroughly, then pat it dry before using to prevent a watery salad.

4. What Can I Serve With Broccoli Salad?

This salad pairs well with:

  • Grilled chicken or steak
  • Burgers and sandwiches
  • BBQ ribs or pulled pork
  • Baked salmon

5. Is Broccoli Salad Gluten-Free?

Yes! As long as the dressing ingredients are gluten-free, this salad is naturally gluten-free. Just check the labels on store-bought condiments to be sure.

6. Can I Make It Dairy-Free?

Absolutely! Just skip the cheese or use a dairy-free alternative in the dressing.

7. How Do I Keep My Salad Crunchy?

To maintain the crunch, add nuts and seeds just before serving and make sure the broccoli is completely dry before adding the dressing.

Conclusion: A Must-Try Salad for Any Occasion

Broccoli salad is more than just a side dish—it’s a fresh, flavorful, and satisfying addition to any meal. With its vibrant colors, bold flavors, and delightful crunch, it’s a dish that everyone will go back for seconds.

Whether you’re making it for a summer BBQ, a holiday feast, or meal prep for the week, this versatile and easy-to-customize salad will become a staple in your kitchen.

So, grab your freshest broccoli, whip up a creamy dressing, and enjoy a crunchy, creamy, and delicious broccoli salad that’s guaranteed to impress!

aiting

Crunchy & Creamy Broccoli Salad: The Ultimate Side Dish

When it comes to potlucks, summer barbecues, or simple weeknight meals, few side dishes can compete with the bold flavors and satisfying crunch of a classic broccoli salad. This dish is a perfect balance of crisp, fresh broccoli, smoky bacon, sweet cranberries, and a creamy, tangy dressing. Unlike leafy salads that wilt quickly, this broccoli salad stays crisp for hours, making it an ideal make-ahead dish. Whether you serve it at a family gathering or meal prep it for the week, it’s packed with nutrients and bursting with flavor.
Prep Time 15 minutes
Cook Time 1 hour
Total Time 1 hour 15 minutes
Servings: 6 servings
Course: Main Dish
Cuisine: American

Ingredients
  

  • Fresh broccoli florets
  • Red onion
  • Bacon crumbles
  • Sunflower seeds or sliced almonds
  • Dried cranberries or raisins
  • Shredded cheddar cheese optional
  • Mayonnaise or Greek yogurt
  • Apple cider vinegar
  • Honey or sugar
  • Salt & black pepper

Method
 

  1. Prep the Ingredients: Wash and chop the broccoli into bite-sized florets. Dice the onion, cook and crumble the bacon, and gather the remaining ingredients.
  2. Mix the Dressing: In a small bowl, whisk together the mayonnaise (or Greek yogurt), apple cider vinegar, honey (or sugar), salt, and pepper.
  3. Combine Everything: In a large mixing bowl, toss the broccoli, onion, bacon, nuts, cranberries, and cheese together. Pour the dressing over and mix well.
  4. Chill and Serve: Let the salad sit in the refrigerator for at least an hour to allow the flavors to meld. Serve cold and enjoy!

Notes

  • For a lighter version, use Greek yogurt instead of mayonnaise.
  • Omit the cheese or use dairy-free alternatives for a dairy-free option.
  • Add a dash of cayenne pepper or diced jalapeños for a spicy kick.
  • Make it a meal by adding grilled chicken or chickpeas for extra protein.

Orange Creamsicle Cake: A Nostalgic Dessert with a Citrus Twist

There’s something undeniably magical about the combination of creamy vanilla and bright citrusy orange—a duo that instantly brings back memories of enjoying a refreshing creamsicle on a hot summer day. Now, that same nostalgic flavor has been transformed into a moist, flavorful cake that’s perfect for any occasion.

The Orange Creamsicle Cake is a light, citrus-infused dessert featuring a soft vanilla base soaked with orange JELLO, giving it a burst of flavor and beautiful marbled effect. It’s then topped with a fluffy mandarin orange frosting, creating a creamy, dreamy texture that perfectly balances the tangy sweetness of the cake. Whether you’re making it for a summer picnic, a birthday celebration, or just because, this cake is bound to become a family favorite.

Why You’ll Love This Cake

1. Inspired by a Classic Summer Treat

The Orange Creamsicle is a beloved frozen dessert that combines smooth vanilla ice cream with a refreshing orange shell. This cake captures that iconic flavor combination in a way that’s rich, satisfying, and easy to enjoy year-round.

2. The Perfect Balance of Flavors

The citrusy brightness of fresh orange juice and zest complements the warm, comforting notes of vanilla, creating a cake that’s both refreshing and indulgent. The JELLO infusion keeps the cake extra moist, while the light, creamy frosting adds just the right amount of sweetness.

3. Visually Stunning with a Vibrant Pop of Color

Poke cakes are known for their beautiful streaks of color, and this one is no exception. The orange JELLO not only adds flavor but also creates bright orange streaks throughout the cake, making it just as pretty as it is delicious.

4. A Light and Refreshing Dessert

Unlike dense cakes with heavy frostings, this cake is fluffy, light, and refreshing, making it a great choice for warmer months. The whipped topping in the frosting keeps it airy and smooth, while the citrus elements make each bite feel fresh and vibrant.

5. Simple and Quick to Prepare

This cake comes together with minimal effort, making it an excellent choice for both beginners and experienced bakers. Using a cake mix as the base speeds up the process, while the orange JELLO and creamy frosting elevate it into something truly special.

Creative Variations and Serving Ideas

1. Add a Chocolate Twist

If you love the combination of orange and chocolate, consider adding a chocolate drizzle on top or folding mini chocolate chips into the batter for a delightful chocolate-orange fusion.

2. Make It Extra Fruity

Enhance the cake’s citrus flavor by adding fresh orange slices or candied orange peel as a garnish. For an even fruitier twist, try adding crushed pineapple or mango to the frosting for a tropical flair.

3. Turn It into a Layered Cake

Instead of making a poke cake, bake the cake batter in two round pans, slice each layer in half, and stack them with the creamy mandarin frosting between each layer. This creates an elegant, bakery-style presentation perfect for special occasions.

4. Serve It Chilled for a Summer Treat

This cake tastes even better when served cold. Refrigerate it for a few hours before slicing, and enjoy a cool, refreshing dessert that’s perfect for warm days.

5. Pair It with a Complementary Beverage

To enhance the experience, serve this cake with a glass of fresh orange juice, a vanilla milkshake, or even a citrus-infused iced tea. The pairing will elevate the flavors and make your dessert feel even more indulgent.

Ingredients – A Burst of Citrus and Creamy Delight

  • For the Vanilla Cake Base
    • Vanilla cake mix
    • Eggs
    • Milk or vanilla almond milk
    • Vegetable oil
    • Orange zest
    • Orange JELLO
    • Boiling water
    • Fresh orange juice
  • For the Mandarin Orange Frosting
    • Canned mandarin oranges
    • Vanilla instant pudding mix
    • Cool Whip or whipped cream

Directions – Transforming Simple Ingredients into a Showstopper

  1. Bake the Vanilla Cake
    Prepare the cake batter with vanilla almond milk and orange zest for extra flavor. Bake according to package instructions and let it cool slightly.
  2. Infuse with Orange JELLO
    Use a skewer to poke holes throughout the cake. Dissolve the orange JELLO in boiling water, mix in fresh orange juice, and pour it over the cake. Refrigerate for at least 3 hours.
  3. Prepare the Fluffy Citrus Frosting
    Beat mandarin oranges with vanilla pudding mix, then gently fold in Cool Whip until smooth and fluffy.
  4. Assemble and Serve
    Spread the frosting evenly over the chilled cake. Refrigerate for at least 30 minutes before slicing and serving.

Nutritional Snapshot – A Sweet and Tangy Indulgence

  • Calories: 172 per serving
  • Carbohydrates: 27g
  • Protein: 2g
  • Fat: 6g
  • Saturated Fat: 5g
  • Cholesterol: 22mg
  • Sodium: 198mg
  • Fiber: 1g
  • Sugar: 18g
  • Vitamin C: 6.8mg

This Orange Creamsicle Cake captures the classic flavors of a childhood favorite in a delightful, easy-to-make dessert that’s perfect for any occasion!

Frequently Asked Questions (FAQs)

1. What Makes This Cake So Moist?

The secret to this cake’s incredibly moist texture is the combination of orange JELLO and fresh orange juice, which soak into the cake after baking. This allows the flavors to fully absorb while ensuring every bite is soft and tender.

2. Can I Use Fresh Oranges Instead of JELLO?

While the JELLO adds both color and flavor, you can substitute it with freshly squeezed orange juice mixed with a bit of sugar and cornstarch to create a natural soaking syrup. However, the color may not be as vibrant as the JELLO version.

3. Can I Make This Cake in Advance?

Yes! This cake actually tastes even better the next day, as it allows the orange JELLO to fully absorb into the cake. You can bake the cake a day ahead, store it in the refrigerator, and frost it just before serving.

4. How Should I Store Leftovers?

To keep the cake fresh:

  • Store it in an airtight container in the refrigerator for up to 3 days.
  • If you need to store it longer, freeze it (without the frosting) for up to 2 months. Let it thaw in the refrigerator before adding the frosting.

5. Can I Use a Different Cake Mix?

Yes! While vanilla cake mix is ideal for recreating the classic creamsicle flavor, you can experiment with:

  • White cake mix (adds a lighter vanilla taste)
  • Orange cake mix (for an extra citrus boost)
  • Yellow cake mix (creates a richer, buttery base)

6. Can I Make This Cake Dairy-Free?

Absolutely! Simply substitute regular milk with vanilla almond milk or coconut milk, and use dairy-free whipped topping in the frosting.

7. How Can I Make This Cake More Decadent?

For a richer dessert, consider adding:

  • A layer of cream cheese frosting beneath the mandarin frosting
  • A drizzle of white chocolate over the top
  • A scoop of vanilla ice cream on the side

Final Thoughts: A Cake That’s as Fun as It Is Delicious

The Orange Creamsicle Cake is more than just a dessert—it’s a nostalgic, flavorful experience that brings back memories of childhood summers and refreshing frozen treats. The bright citrusy notes, combined with the smooth vanilla frosting, make this cake an irresistible choice for any occasion.

Whether you’re serving it at a summer barbecue, a birthday party, or just a casual weekend gathering, this cake is guaranteed to be a crowd-pleaser. Its vibrant color, refreshing flavor, and fluffy texture make it a standout dessert that’s both easy to make and incredibly satisfying.

So, the next time you’re craving something light, refreshing, and packed with citrusy goodness, give this Orange Creamsicle Cake a try—you won’t regret it!

aiting

Orange Creamsicle Cake: A Nostalgic Dessert with a Citrus Twist

This Orange Creamsicle Cake brings the beloved flavors of a childhood favorite to life with a moist vanilla cake, infused with citrusy orange JELLO, and topped with a fluffy mandarin orange frosting. A delightful dessert perfect for any occasion!
Prep Time 15 minutes
Cook Time 25 minutes
Total Time 40 minutes
Servings: 12 servings
Course: Dessert
Cuisine: American

Ingredients
  

  • For the Vanilla Cake Base
  • Vanilla cake mix
  • Eggs
  • Milk or vanilla almond milk
  • Vegetable oil
  • Orange zest
  • Orange JELLO
  • Boiling water
  • Fresh orange juice
For the Mandarin Orange Frosting
  • Canned mandarin oranges
  • Vanilla instant pudding mix
  • Cool Whip or whipped cream

Method
 

  1. Bake the Vanilla Cake: Prepare the cake batter using vanilla almond milk and orange zest for extra flavor. Bake according to package instructions and let it cool slightly.
  2. Infuse with Orange JELLO: Use a skewer to poke holes throughout the cake. Dissolve the orange JELLO in boiling water, mix in fresh orange juice, and pour it over the cake. Refrigerate for at least 3 hours.
  3. Prepare the Fluffy Citrus Frosting: Beat mandarin oranges with vanilla pudding mix, then gently fold in Cool Whip until smooth and fluffy.
  4. Assemble and Serve: Spread the frosting evenly over the chilled cake. Refrigerate for at least 30 minutes before slicing and serving.

Notes

  • Extra Citrus Kick: Add more orange zest to the cake batter for an intense orange flavor.
  • Make-Ahead Friendly: This cake tastes even better the next day after the flavors have melded together.
  • Lighter Option: Use Greek yogurt in place of Cool Whip for a tangy twist.

Shamrock Shake Whoopie Pies: A St. Patrick’s Day Dessert Worth Celebrating

St. Patrick’s Day is a time for fun, festivity, and of course, delicious treats that bring a pop of green to the table. While classic desserts like Irish soda bread and minty milkshakes often take center stage, Shamrock Shake Whoopie Pies offer a unique twist on traditional holiday sweets. These vibrant green sandwich cookies combine soft, cake-like vanilla cookies with a cool, creamy mint filling, making them the perfect handheld dessert for the occasion.

If you’re looking for a treat that’s easy to make, visually stunning, and bursting with flavor, these whoopie pies will not disappoint. Whether you’re baking for a family gathering, a classroom party, or simply indulging in the spirit of the holiday, this dessert is guaranteed to be a hit.

Why You’ll Love These Shamrock Shake Whoopie Pies

1. Inspired by the Iconic Shamrock Shake

McDonald’s Shamrock Shake is a beloved seasonal favorite, known for its creamy vanilla-mint flavor and signature green hue. These whoopie pies capture that same nostalgic taste in a soft and chewy form, bringing a bakery-style upgrade to the classic milkshake experience.

2. A Fun and Festive Dessert

The bright green color of these whoopie pies instantly makes them the centerpiece of any dessert table. Whether you’re hosting a St. Patrick’s Day party or just looking to surprise your family with a themed treat, these cookies deliver both visual appeal and irresistible flavor.

3. A Perfect Balance of Flavors

Mint and vanilla are a match made in dessert heaven. The vanilla cookies provide a sweet, buttery base, while the mint-infused filling adds a refreshing contrast that isn’t overpowering. Together, they create a balanced bite that is light, creamy, and utterly satisfying.

4. Easy to Make with Simple Ingredients

These whoopie pies come together with minimal effort, using basic pantry staples. The cookies are made with a boxed cake mix, which simplifies the baking process while still delivering soft, bakery-style results. The filling is a fluffy blend of butter, marshmallow cream, and mint extract—easy to whip up but incredibly luscious in texture.

5. A Kid-Friendly and Crowd-Pleasing Treat

Both kids and adults will love these Shamrock Shake Whoopie Pies. The fun green color and sweet, minty flavor make them a hit with younger audiences, while the light texture and nostalgic taste ensure that adults enjoy them just as much.

Creative Ways to Customize These Whoopie Pies

1. Add Chocolate for a Classic Combination

If you love the mix of mint and chocolate, try incorporating chocolate into these whoopie pies for an extra layer of indulgence:

  • Chocolate Drizzle: Dip half of each cookie into melted dark or white chocolate for a striking contrast.
  • Chocolate Chips: Fold mini chocolate chips into the mint filling for added texture and sweetness.
  • Chocolate Cookies: Swap the vanilla cookies for chocolate cake mix to create a mint-chocolate whoopie pie.

2. Give Them a Peppermint Twist

While mint extract is used to mimic the Shamrock Shake flavor, you can also use peppermint extract for a sharper, more traditional minty taste. Adding a sprinkle of crushed peppermint candies on the edges of the filling can also create a fun and festive crunch.

3. Decorate with St. Patrick’s Day Sprinkles

For extra holiday flair, roll the edges of the whoopie pies in gold and green sprinkles. You can also dust the tops with edible glitter or sanding sugar to make them sparkle like a pot of gold at the end of a rainbow.

4. Turn Them into Ice Cream Sandwiches

For a frozen treat, place a scoop of mint chocolate chip or vanilla ice cream between two cookies instead of the traditional filling. Wrap them in plastic wrap and freeze for at least an hour before serving for a refreshing spin on the classic whoopie pie.

Ingredients – A Festive Fusion of Flavor

  • For the Vanilla Cookies
    • White or Funfetti cake mix
    • Softened butter
    • Eggs
    • Vanilla extract
    • Green food coloring
  • For the Mint Filling
    • Softened butter
    • Marshmallow cream
    • Vanilla extract
    • Mint extract
    • Powdered sugar
    • Milk

Directions – From Dough to Delight

  1. Create the Cookie Dough
    Mix softened butter, eggs, vanilla extract, and cake mix until a soft dough forms. Add green food coloring to achieve the perfect festive shade.
  2. Bake to Perfection
    Scoop the dough onto a parchment-lined baking sheet and bake at 350°F for 8-10 minutes. Allow cookies to cool before assembling.
  3. Whip Up the Mint Filling
    Beat butter and marshmallow cream together, then add vanilla and mint extracts. Slowly mix in powdered sugar and milk until smooth.
  4. Assemble the Whoopie Pies
    Pipe the mint filling onto the bottom of one cookie, then sandwich it with another. Repeat with remaining cookies.

Nutritional Snapshot – A Sweet Indulgence

  • Calories: 279 per cookie
  • Total Fat: 11g
  • Saturated Fat: 6g
  • Cholesterol: 43mg
  • Sodium: 281mg
  • Carbohydrates: 45g
  • Sugar: 32g
  • Protein: 2g

These soft, minty, and festive whoopie pies are the ultimate St. Patrick’s Day dessert, bringing a touch of fun and indulgence to your celebration!

Frequently Asked Questions (FAQs)

1. Can I Make These Whoopie Pies in Advance?

Yes! These whoopie pies can be made a day or two ahead of time and stored in an airtight container at room temperature for up to 3 days. If you need to store them longer, refrigerate them, but allow them to sit at room temperature for 10–15 minutes before serving so the filling softens.

2. Can I Freeze Whoopie Pies?

Absolutely! To freeze, place the assembled whoopie pies in a single layer on a baking sheet and freeze for about 30 minutes until firm. Then, transfer them to an airtight container or freezer bag. They can be stored in the freezer for up to 2 months. When ready to eat, simply let them thaw at room temperature for 20–30 minutes.

3. What Type of Food Coloring Works Best for These Cookies?

For a vibrant green color, gel food coloring is the best option because it provides intense color without thinning the dough. Liquid food coloring can be used, but you may need to add extra to achieve the desired shade.

4. Can I Use a Different Cake Mix Flavor?

Yes! While white or Funfetti cake mix works best for achieving a bright green color, you can experiment with other flavors:

  • Chocolate cake mix for a mint-chocolate version
  • Lemon cake mix for a refreshing citrus-mint combo
  • Vanilla or yellow cake mix for a slightly richer flavor

5. What’s the Best Way to Pipe the Filling?

Using a piping bag with a round tip gives you the best control when adding the filling to the cookies. If you don’t have a piping bag, a ziplock bag with the tip cut off works as a great alternative.

6. Can I Make These Whoopie Pies Gluten-Free?

Yes! Simply use a gluten-free cake mix in place of the standard one. Be sure to check that your marshmallow cream and any additional decorations are also gluten-free.

7. How Can I Make a Lighter Version of These Whoopie Pies?

For a lighter alternative, try these swaps:

  • Use Greek yogurt instead of butter in the cookie dough for extra moisture with fewer calories.
  • Substitute light whipped topping for half of the butter in the filling.
  • Reduce the powdered sugar slightly for a less sweet, fluffier filling.

Final Thoughts: A Dessert That Brings Luck and Flavor

Shamrock Shake Whoopie Pies are the perfect combination of festive fun and delicious indulgence. With their soft, cake-like cookies and creamy mint filling, they capture the magic of St. Patrick’s Day in every bite. Whether you make them for a party, a special family dessert, or just to treat yourself, they’re guaranteed to bring a little extra luck and sweetness to your celebration.

With endless ways to customize them, from adding chocolate to turning them into ice cream sandwiches, these whoopie pies offer something for everyone. Best of all, they’re simple to make and packed with flavor, making them a go-to dessert for any St. Patrick’s Day tradition.

So grab your green food coloring, whip up a batch, and enjoy a treat that’s as lucky as it is delicious!

aiting

Shamrock Shake Whoopie Pies: A St. Patrick’s Day Dessert Worth Celebrating

These soft and festive Shamrock Shake Whoopie Pies bring a delightful blend of vanilla and mint flavors, making them the perfect St. Patrick’s Day dessert. With fluffy cookies and a creamy mint filling, they’re an indulgent way to celebrate!
Prep Time 15 minutes
Cook Time 10 minutes
Total Time 25 minutes
Servings: 12 whoopie pies
Course: Dessert
Cuisine: American

Ingredients
  

  • For the Vanilla Cookies
  • White or Funfetti cake mix
  • Softened butter
  • Eggs
  • Vanilla extract
  • Green food coloring
For the Mint Filling
  • Softened butter
  • Marshmallow cream
  • Vanilla extract
  • Mint extract
  • Powdered sugar
  • Milk

Method
 

  1. Create the Cookie Dough: Mix softened butter, eggs, vanilla extract, and cake mix until a soft dough forms. Add green food coloring to achieve the perfect festive shade.
  2. Bake to Perfection: Scoop the dough onto a parchment-lined baking sheet and bake at 350°F for 8-10 minutes. Allow cookies to cool before assembling.
  3. Whip Up the Mint Filling: Beat butter and marshmallow cream together, then add vanilla and mint extracts. Slowly mix in powdered sugar and milk until smooth.
  4. Assemble the Whoopie Pies: Pipe the mint filling onto the bottom of one cookie, then sandwich it with another. Repeat with remaining cookies.

Notes

  • Storage Tip: Store in an airtight container at room temperature for up to 3 days or refrigerate for longer freshness.
  • Customization: Adjust the amount of mint extract to suit your taste preferences.
  • Decoration Ideas: Roll the edges in festive sprinkles for extra flair.