Breakfast has always been my favorite meal of the day. There’s something about starting the morning with a warm, comforting dish that makes everything feel right. But for the longest time, I struggled to find a healthy option that was both satisfying and easy to prepare.
Like many, I grew up eating traditional pancakes—fluffy, golden, and drenched in syrup. They were delicious, but they left me feeling sluggish and hungry just a couple of hours later. I wanted something healthier, something that would give me lasting energy without the sugar crash.
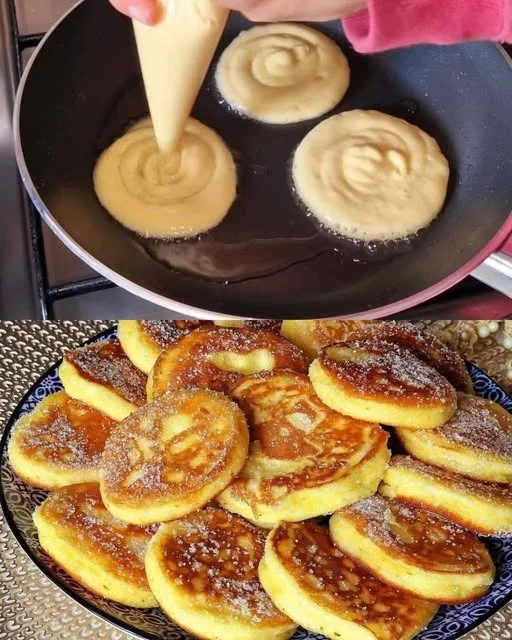
That’s when I discovered oat pancakes. The first time I made them, I wasn’t expecting much. With just three simple ingredients—oats, eggs, and salt—it seemed too easy. But after blending the batter and cooking the first batch, I realized I had found something special. These pancakes were soft yet hearty, with a naturally nutty flavor from the oats. They didn’t need sugar or flour because they were already perfect in their simplicity.
Since that day, I’ve made them countless times. They’ve become my go-to breakfast when I need something quick, filling, and nutritious. Whether I eat them plain, topped with fresh fruit, or with a dollop of Greek yogurt, they always leave me feeling satisfied and ready to take on the day.
If you’re looking for a healthy breakfast that’s easy to make and packed with nutrients, these oat pancakes might just become your new favorite, too.
Why These Oat Pancakes Are a Game-Changer
1. Quick and Easy to Make
With just three basic ingredients and a blender, you can have these pancakes ready in under five minutes. No complicated steps, no long list of ingredients—just mix, cook, and enjoy.
2. No Sugar, No Flour—100% Clean Eating
Unlike traditional pancakes that rely on refined flour and sugar, these oat pancakes are naturally nutritious. They’re made with whole oats, which provide fiber, protein, and essential nutrients to keep you full longer.
3. A Great Source of Protein and Fiber
Each serving is packed with protein from the eggs and fiber from the oats, making this a balanced meal that supports digestion and sustained energy levels.
4. Naturally Gluten-Free and Diet-Friendly
If you use certified gluten-free oats, this recipe is completely gluten-free. It’s also great for those following a clean eating, low-carb, or high-protein diet.
5. Perfect for Meal Prep
Make a batch ahead of time and store them in the fridge or freezer for a quick grab-and-go breakfast. Simply reheat in a pan or microwave, and they’re just as good as fresh!
Ingredients
| Ingredient | Quantity |
|---|---|
| Oatmeal | 2 cups (220g) |
| Salt | 1/2 tsp (3g) |
| Eggs | 4 |
Directions
- Blend the Batter:
- In a blender, combine the oatmeal, eggs, and salt. Blend until smooth.
- Preheat the Pan:
- Heat a non-stick pan over medium heat and lightly grease with oil if needed.
- Cook the Pancakes:
- Pour small portions of the batter into the pan, forming pancakes.
- Cook for 2–3 minutes until bubbles form on the surface, then flip and cook for another 1–2 minutes until golden brown.
- Serve and Enjoy:
- Serve warm with fresh fruit, Greek yogurt, or a drizzle of honey for natural sweetness.
Nutritional Information (Per Serving, Approximate)
| Nutrient | Amount per Serving |
|---|---|
| Calories | ~150 kcal |
| Protein | ~8 g |
| Carbohydrates | ~18 g |
| Fats | ~5 g |
| Fiber | ~3 g |
Frequently Asked Questions
Can I Use Instant Oats Instead of Rolled Oats?
Yes! Both rolled oats and instant oats work well in this recipe. However, rolled oats will give a slightly better texture, while instant oats will blend more smoothly.
Do I Need a Blender?
A blender or food processor makes the batter smoother, but if you don’t have one, you can mix everything by hand. Just use oat flour instead of whole oats and whisk the eggs thoroughly before combining.
Can I Add Other Ingredients to the Batter?
Absolutely! This recipe is a great base that you can customize. Here are some ideas:
- For extra flavor: Add a teaspoon of cinnamon or vanilla extract.
- For sweetness: Blend in half a banana or a tablespoon of honey.
- For added nutrition: Stir in chia seeds, flaxseeds, or protein powder.
How Do I Make These Pancakes Extra Fluffy?
For a fluffier texture, let the batter sit for a few minutes before cooking. This allows the oats to absorb the liquid, resulting in thicker pancakes.
Can I Use Egg Substitutes?
Yes! If you want an egg-free version, you can replace each egg with:
- 1 tablespoon of flaxseed meal mixed with 3 tablespoons of water (let it sit for 5 minutes to form a gel).
- ¼ cup of mashed banana or unsweetened applesauce.
What’s the Best Way to Cook These Pancakes?
Use a non-stick pan or lightly grease a regular pan with coconut oil or butter. Cook them over medium heat to prevent burning while ensuring they cook through.
How Should I Store Leftovers?
These pancakes keep well in the fridge for up to 3 days. Just store them in an airtight container. You can also freeze them for up to a month. To reheat, simply microwave for 30 seconds or warm in a pan.
Can I Make These Pancakes Without Salt?
Yes! The salt enhances the flavor, but you can leave it out if you’re watching your sodium intake.
Tips for the Best Oat Pancakes
1. Use a High-Speed Blender for the Smoothest Batter
Blending the oats with eggs ensures a smooth, uniform texture, making the pancakes more enjoyable to eat.
2. Cook on Medium Heat
Low heat won’t give them enough color, while high heat may burn them before they cook through. Medium heat is perfect for golden-brown pancakes.
3. Make Them in Batches for Meal Prep
Since these pancakes store well, make a double batch and freeze some for busy mornings. Just pop them in the toaster or microwave when needed.
4. Experiment with Toppings
While these pancakes are delicious on their own, they pair wonderfully with a variety of toppings. Try:
- Fresh fruit like berries, banana slices, or apples
- Greek yogurt for extra creaminess
- A drizzle of nut butter or honey
- Crushed nuts for crunch
5. Turn Them Into Waffles
If you have a waffle maker, this batter works great for making healthy oat waffles! Just cook them according to your waffle maker’s instructions.
Serving Ideas – How to Enjoy These Pancakes
1. Classic and Simple
Top with Greek yogurt and a handful of fresh berries for a balanced breakfast.
2. Sweet and Nutty
Drizzle with almond butter and sprinkle with chopped nuts for a protein-packed meal.
3. Warm and Comforting
Serve with warm cinnamon apples and a dash of maple syrup for a cozy treat.
4. High-Protein Boost
Pair with scrambled eggs and avocado slices for an extra protein-packed breakfast.
5. Post-Workout Recovery Meal
Blend in some protein powder into the batter and top with peanut butter for a muscle-repairing meal after exercise.
Conclusion – A Healthy Breakfast That’s Here to Stay
It’s rare to find a pancake recipe that is as easy, nutritious, and delicious as this one. These oat pancakes prove that you don’t need sugar or flour to create a satisfying breakfast.
They’re packed with protein, fiber, and essential nutrients, making them an excellent choice for anyone looking to eat healthier without sacrificing flavor. Whether you enjoy them fresh, make them in advance for busy mornings, or experiment with different toppings, this recipe will quickly become a staple in your kitchen.
So the next time you’re craving pancakes but want to keep things light and wholesome, try these healthy oat pancakes. You’ll love how easy they are to make—and how great they make you feel!
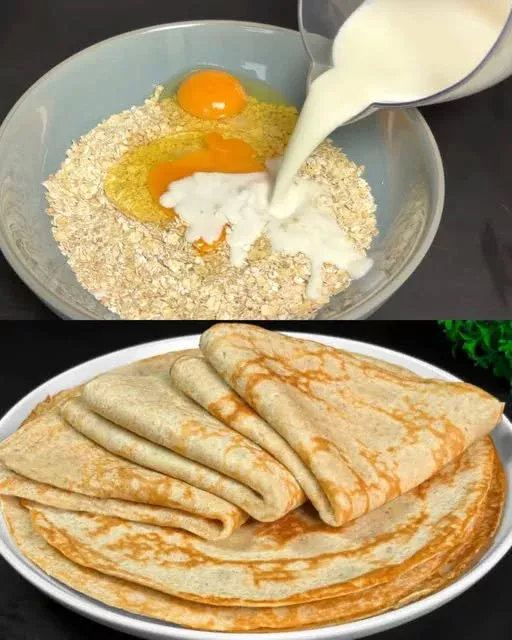
Healthy Oat Pancake Recipe in 5 Minutes! No Sugar, No Flour
Ingredients
Method
- Add the oatmeal, eggs, and salt to a blender and blend until smooth.
- Heat a non-stick pan over medium heat and lightly grease if needed.
- Pour small portions of the batter onto the pan, forming pancakes.
- Cook for about 2–3 minutes until bubbles form on the surface, then flip and cook for another 1–2 minutes until golden brown.
- Remove from the pan and serve warm with your favorite toppings like fresh fruit, Greek yogurt, or nut butter.
Notes
- For a fluffier texture, let the batter sit for 5 minutes before cooking.
- Add a teaspoon of cinnamon or vanilla extract for extra flavor.
- These pancakes store well in the fridge for up to 3 days and can be reheated in a pan or microwave.
- You can freeze them for up to a month and toast them when ready to eat.