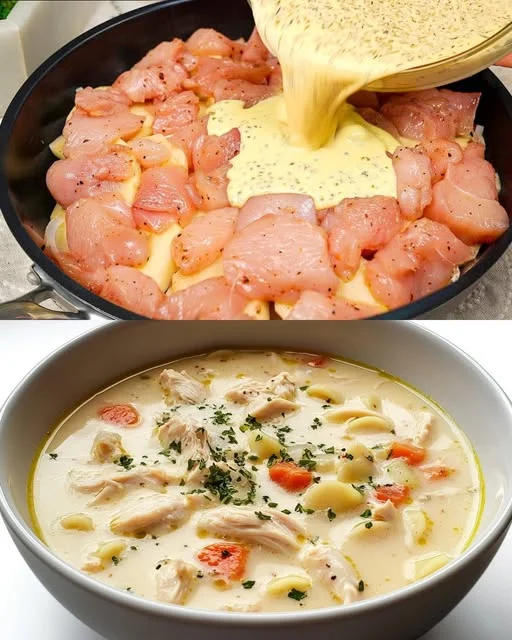
Golden Harvest Creamy Chicken Soup: A Comforting Classic

Nothing quite compares to the warmth of a bowl of homemade soup, especially on a chilly day. Our Golden Harvest Creamy Chicken Soup is the perfect balance of hearty and wholesome, packed with tender chicken, fresh vegetables, and a luscious, velvety broth. This dish is more than just a meal—it’s a hug in a bowl, a nostalgic reminder of home-cooked comfort, and a staple for cozy nights.

Unlike store-bought canned soups, this homemade version is free from preservatives and excessive sodium, making it a healthier and more nourishing choice. It’s an ideal dish for meal prep, family dinners, or simply indulging in a bowl of warmth when the weather calls for something comforting.

In this article, we’ll explore why this soup is a must-try, the benefits of its wholesome ingredients, and answer some commonly asked questions to help you perfect the recipe.

Why You’ll Love This Creamy Chicken Soup

1. A Perfect Balance of Comfort and Nutrition

While creamy soups are often considered indulgent, this recipe strikes the perfect balance between rich flavors and wholesome nutrition. The combination of protein-packed chicken, fiber-rich vegetables, and calcium-loaded milk or cream makes this dish both satisfying and nourishing.

2. Simple, Affordable Ingredients

One of the best things about this soup is its accessibility. Most of the ingredients—chicken, potatoes, carrots, celery, and broth—are common kitchen staples. Unlike complicated gourmet recipes, this soup doesn’t require any fancy ingredients, making it an easy and budget-friendly option for home cooks.

3. Ideal for Meal Prep and Leftovers

This soup tastes even better the next day as the flavors continue to meld. It stores well in the refrigerator and can be frozen for future meals, making it a practical choice for batch cooking. Whether you prepare it for a weeknight dinner or make extra to store for later, this soup remains a reliable option for quick, homemade comfort food.

4. Customizable to Your Taste and Dietary Needs

This recipe serves as a fantastic base that can be customized in countless ways. Want to make it dairy-free? Use coconut milk instead of cream. Looking for a low-carb version? Swap the potatoes for cauliflower. You can also experiment with different herbs and spices to suit your preferences.

Ingredients

IngredientQuantity
Butter2 tablespoons
Olive oil1 tablespoon
Onion (finely chopped)1 medium
Garlic (minced)2 cloves
Carrots (diced)2 medium
Celery stalks (diced)2
Potatoes (diced)2 medium
Chicken broth3 cups (720ml)
Milk or cream2 cups (480ml)
Cooked chicken (shredded or diced)2 cups (300g)
Frozen peas1/2 cup (60g)
All-purpose flour1/4 cup (30g)
Dried thyme1/4 teaspoon
Dried parsley1/4 teaspoon
SaltTo taste
Black pepperTo taste

Directions

Step 1: Sauté the Aromatics

  1. In a large pot over medium heat, melt butter and add olive oil.
  2. Sauté the onions for 2–3 minutes until translucent.
  3. Add the garlic, carrots, and celery; cook for another 3 minutes until fragrant.

Step 2: Add the Vegetables & Broth

  1. Stir in the potatoes, then pour in the chicken broth.
  2. Bring to a gentle boil, then reduce heat and simmer for 10–12 minutes, or until potatoes are tender.

Step 3: Make it Creamy

  1. In a small bowl, whisk together flour with 1/2 cup of milk or cream to make a smooth paste.
  2. Gradually stir this mixture into the soup to thicken it.

Step 4: Add Chicken & Peas

  1. Stir in the cooked chicken and frozen peas.
  2. Pour in the remaining milk or cream and season with thyme, parsley, salt, and black pepper.

Step 5: Simmer & Serve

  1. Let the soup simmer for another 5–7 minutes, stirring occasionally until thick and creamy.
  2. Serve hot with crusty bread or crackers for the ultimate cozy meal!

Nutritional Information (Per Serving)

NutrientAmount (Approx.)
Calories350 kcal
Protein25g
Carbohydrates30g
Fat15g
Fiber4g
Sugar6g
Sodium600mg

The Nutritional Benefits of Key Ingredients

This creamy chicken soup is not just about taste—it’s packed with essential nutrients that contribute to overall health. Let’s take a closer look at the benefits of its core ingredients.

Chicken: A High-Quality Protein Source

Chicken is an excellent source of lean protein, which is essential for muscle repair, immune function, and overall body strength. It also contains important vitamins and minerals, including B vitamins, which support energy production and brain function.

Vegetables: A Boost of Fiber and Antioxidants

This soup includes a variety of vegetables like carrots, celery, and potatoes, each offering its own set of nutritional benefits:

  • Carrots provide beta-carotene, which is essential for eye health and immune support.
  • Celery is rich in antioxidants and contains compounds that support digestion and reduce inflammation.
  • Potatoes are a great source of potassium, an essential mineral for heart health and proper muscle function.

Milk or Cream: A Source of Healthy Fats and Calcium

While cream adds richness to the soup, it also provides healthy fats and calcium, which are important for strong bones and overall well-being. For a lighter option, using milk instead of heavy cream can help reduce the calorie content while still maintaining a smooth texture.

Broth: Hydration and Immune Support

Chicken broth not only adds depth of flavor but also contains minerals like potassium, magnesium, and phosphorus. If you use homemade broth, you’ll also benefit from collagen and amino acids that support joint health and digestion.

FAQs: Everything You Need to Know About This Creamy Chicken Soup

1. Can I Use Leftover or Rotisserie Chicken for This Recipe?

Absolutely! Leftover cooked chicken or rotisserie chicken works wonderfully in this recipe. It saves time and adds extra flavor. Simply shred or dice the chicken and add it during the final simmering stage.

2. How Can I Make This Soup Dairy-Free?

To make a dairy-free version, swap out the milk or cream for coconut milk or almond milk. You can also use cashew cream for a similar richness without the dairy.

3. What Are Some Ways to Make This Soup Thicker?

If you prefer an extra-thick soup, you can increase the amount of flour in the recipe or add a slurry made from cornstarch and water. Another option is to puree a portion of the soup and stir it back in for a naturally creamy consistency.

4. Can I Freeze This Soup?

Yes! This soup freezes well, but keep in mind that dairy-based soups may slightly change in texture after thawing. To freeze, let the soup cool completely, then store it in an airtight container for up to three months. When reheating, warm it slowly over low heat while stirring to maintain its creamy consistency.

5. What Are the Best Side Dishes to Serve with This Soup?

This soup pairs beautifully with crusty bread, homemade biscuits, or a side salad. For a heartier meal, serve it with grilled cheese sandwiches or a simple roasted vegetable dish.

6. Can I Make This in a Slow Cooker or Instant Pot?

Yes! To make it in a slow cooker, add all ingredients except milk and flour, and cook on low for 6–8 hours. Stir in the milk and flour mixture during the last 30 minutes of cooking. For an Instant Pot, use the sauté function for the aromatics, then pressure cook everything for 10 minutes before stirring in the dairy and thickening agent.

7. How Can I Add More Flavor to the Soup?

For extra depth of flavor, consider adding a splash of white wine, a squeeze of lemon juice, or a sprinkle of Parmesan cheese before serving. Fresh herbs like rosemary, sage, or basil can also elevate the taste.

Conclusion: A Soup Worth Savoring

Golden Harvest Creamy Chicken Soup is more than just a meal—it’s a timeless comfort dish that brings warmth, nourishment, and satisfaction with every spoonful. Whether you’re making it as a cozy dinner for the family, meal-prepping for the week, or simply indulging in a nostalgic bowl of homemade goodness, this soup is sure to become a staple in your kitchen.

With its creamy texture, wholesome ingredients, and endless customization options, this recipe proves that comfort food doesn’t have to be complicated. Try it today and experience the joy of a truly heartwarming, homemade soup.
Amal

Golden Harvest Creamy Chicken Soup: A Comforting Classic

Warm, rich, and bursting with flavor, this Golden Harvest Creamy Chicken Soup is the ultimate comfort food. Packed with tender chicken, hearty vegetables, and a velvety broth, this soup is both nourishing and satisfying. Perfect for chilly nights, family dinners, or meal prepping, it’s a dish that will keep you coming back for more!
Prep Time 15 minutes
Cook Time 25 minutes
Total Time 40 minutes
Servings: 4 –6 servings
Course: Soup
Cuisine: American

Ingredients
  

  • 2 tablespoons butter
  • 1 tablespoon olive oil
  • 1 medium onion finely chopped
  • 2 garlic cloves minced
  • 2 medium carrots diced
  • 2 celery stalks diced
  • 2 medium potatoes diced
  • 3 cups 720ml chicken broth
  • 2 cups 480ml milk or cream
  • 2 cups 300g cooked chicken, shredded or diced
  • 1/2 cup 60g frozen peas
  • 1/4 cup 30g all-purpose flour
  • 1/4 teaspoon dried thyme
  • 1/4 teaspoon dried parsley
  • Salt and black pepper to taste

Method
 

  1. 1. Sauté the Aromatics
  2. In a large pot over medium heat, melt the butter and add the olive oil.
  3. Add the chopped onion and cook for 2–3 minutes until softened.
  4. Stir in the minced garlic, diced carrots, and celery. Cook for another 3 minutes until fragrant.
  5. 2. Cook the Vegetables
  6. Add the diced potatoes and pour in the chicken broth.
  7. Bring the mixture to a gentle boil, then reduce heat and let it simmer for 10–12 minutes until the potatoes are tender.
  8. 3. Thicken the Soup
  9. In a small bowl, whisk the flour with 1/2 cup of milk or cream until smooth.
  10. Gradually stir this mixture into the soup to help thicken the broth.
  11. 4. Add Chicken and Peas
  12. Stir in the cooked chicken and frozen peas.
  13. Pour in the remaining milk or cream and season with dried thyme, parsley, salt, and black pepper.
  14. 5. Simmer and Serve
  15. Let the soup simmer for another 5–7 minutes, stirring occasionally, until thick and creamy.
  16. Serve hot with crusty bread or crackers for a delicious and satisfying meal.

Notes

  • Make it Dairy-Free: Swap the milk or cream for coconut milk or almond milk.
  • Low-Carb Option: Replace potatoes with cauliflower for a lighter version.
  • Extra Flavor Boost: Add a splash of lemon juice or grated Parmesan before serving.
  • Storage: Store leftovers in an airtight container in the refrigerator for up to 4 days or freeze for up to 3 months.
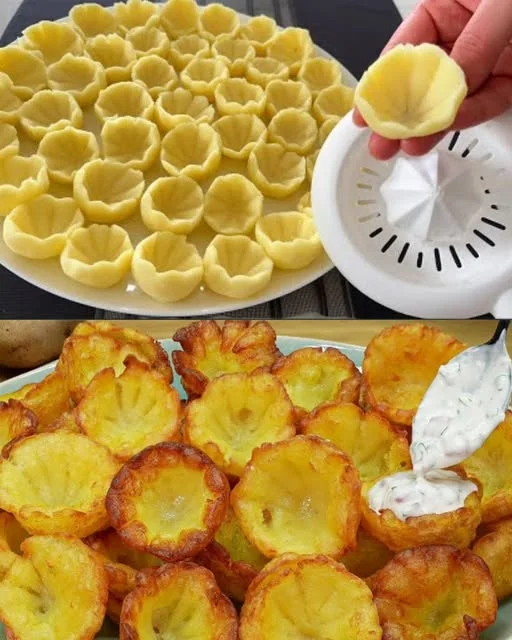
Crispy Garlic Cheese Potatoes with Creamy Cheese Sauce – The Ultimate Comfort Food

Potatoes are a universally loved ingredient, and when combined with garlic, cheese, and a crispy texture, they become an irresistible dish. These Crispy Garlic Cheese Potatoes are the perfect combination of golden, crunchy potatoes and a rich, creamy cheese sauce that takes them to the next level. Whether served as a side dish, an appetizer, or even a snack, this recipe is a guaranteed crowd-pleaser.

Unlike traditional fried potatoes, this version is baked to crispy perfection, making it healthier while maintaining the satisfying crunch everyone loves. The roasted garlic-infused potatoes are tossed with olive oil and a blend of seasonings, then baked until golden and crispy. To elevate the experience, a silky, homemade cheese sauce is drizzled over the top or served on the side for dipping.

If you’re looking for a delicious, easy-to-make potato dish, this recipe is the answer.

Why These Crispy Garlic Cheese Potatoes Are a Must-Try

1. The Perfect Balance of Crunchy and Creamy

The potatoes are baked at a high temperature to achieve a crisp, golden-brown exterior while remaining soft and fluffy inside. The rich, velvety cheese sauce complements this texture perfectly, creating a satisfying contrast in every bite.

2. A Flavor Explosion

Garlic and potatoes are a classic combination, but adding cheese takes the dish to another level. The garlic enhances the savory depth of the potatoes, while the cheese sauce adds creaminess and a touch of indulgence. A sprinkle of Parmesan and fresh parsley adds even more flavor.

3. Healthier Than Fried Potatoes

By baking instead of frying, you get the same crispy texture without excess oil or deep-frying. Olive oil helps achieve that golden crust while keeping the dish lighter and healthier.

4. A Versatile Dish for Any Occasion

These crispy garlic cheese potatoes can be served as:

  • A side dish for grilled meats, roasted chicken, or steak.
  • A snack or appetizer for game nights, parties, or gatherings.
  • A comforting meal on its own, especially when paired with a side salad.

5. Easy to Make with Simple Ingredients

There are no complicated steps or hard-to-find ingredients. Everything needed for this recipe is likely already in your kitchen, making it a go-to dish when you need something satisfying and quick.

Ingredients

For the Potatoes:

IngredientQuantity
Potatoes (Russet or Yukon Gold)4 medium (about 800g)
Olive oil2 tablespoons
Garlic (minced)3 cloves
Salt1 teaspoon
Black pepper½ teaspoon
Paprika (optional)½ teaspoon
Parmesan cheese (grated)¼ cup (25g)
Fresh parsley (chopped)1 tablespoon (for garnish)

For the Cheese Sauce:

IngredientQuantity
Butter2 tablespoons
All-purpose flour1 tablespoon
Milk1 cup (250ml)
Cheddar cheese (shredded)1 cup (100g)
Garlic powder½ teaspoon
SaltTo taste
Black pepperTo taste

Directions

1. Prepare the Potatoes

  • Preheat oven to 400°F (200°C).
  • Cut potatoes into wedges or cubes and toss with olive oil, minced garlic, salt, black pepper, and paprika.
  • Spread evenly on a baking sheet and bake for 35–40 minutes, flipping halfway through, until crispy and golden brown.
  • Sprinkle with grated Parmesan and fresh parsley before serving.

2. Make the Cheese Sauce

  • In a saucepan over medium heat, melt butter and stir in flour. Cook for 1 minute.
  • Slowly add milk, whisking continuously until smooth and thickened.
  • Stir in shredded cheddar, garlic powder, salt, and black pepper. Cook until cheese is melted and sauce is creamy.

3. Serve and Enjoy

  • Drizzle the warm cheese sauce over the crispy potatoes or serve it on the side for dipping.

Nutritional Information (Per Serving – Approximate, 1 Portion)

NutrientAmount (Approx.)
Calories~320 kcal
Protein~10g
Carbohydrates~35g
Fat~16g
Fiber~4g
Calcium~15% DV

Tips for Making the Crispiest Potatoes

1. Choose the Right Potatoes

For the best texture, use starchy potatoes like Russet or Yukon Gold. They crisp up beautifully while remaining fluffy inside. Avoid waxy potatoes like red potatoes, as they don’t achieve the same crunch.

2. Cut Evenly for Even Cooking

To ensure every piece gets crispy, cut the potatoes into uniform wedges or cubes. This allows them to cook at the same rate, preventing some from becoming overcooked while others remain underdone.

3. Don’t Skip the Soaking Step

For extra crispiness, soak the cut potatoes in cold water for at least 30 minutes before baking. This removes excess starch, which helps them crisp up more in the oven. Be sure to pat them dry completely before adding oil and seasonings.

4. Use High Heat

Bake at 400°F (200°C) or higher for the best crispy texture. A lower temperature can cause the potatoes to steam instead of crisp.

5. Don’t Overcrowd the Pan

Arrange the potatoes in a single layer on the baking sheet, ensuring they don’t overlap. Overcrowding traps steam, preventing them from crisping properly.

6. Flip Halfway Through

To get even crispiness on all sides, flip the potatoes halfway through the baking time.

7. Season Immediately After Baking

For the best flavor, sprinkle Parmesan cheese and chopped parsley on the potatoes right after they come out of the oven while they’re still hot. This helps the seasonings stick better.

The Secret to a Perfect Cheese Sauce

1. Use Freshly Shredded Cheese

Pre-shredded cheese contains anti-caking agents that prevent smooth melting. Always grate cheese from a block for the best results.

2. Cook Over Low Heat

Cheese can become grainy or separate if heated too quickly. Melt it over low heat and stir constantly to keep the sauce smooth.

3. Add Milk Gradually

Slowly adding milk while whisking prevents lumps and creates a silky texture.

4. Customize the Flavor

Enhance the sauce by adding a pinch of garlic powder, mustard, or smoked paprika for extra depth.

What to Serve with Crispy Garlic Cheese Potatoes

These potatoes pair well with a variety of dishes. Here are some serving suggestions:

1. As a Side Dish

  • Grilled steak or chicken – The creamy cheese sauce and crispy potatoes make a perfect complement to juicy meats.
  • Roasted vegetables – Serve alongside roasted carrots, Brussels sprouts, or asparagus for a balanced meal.
  • Burgers or sandwiches – A great alternative to fries, offering a more indulgent side.

2. As an Appetizer or Snack

  • Dipping options – Serve with extra cheese sauce, sour cream, or ranch dressing.
  • Topped with extras – Add crispy bacon, caramelized onions, or jalapeños for even more flavor.

3. With Eggs for Breakfast or Brunch

  • These potatoes work wonderfully alongside scrambled eggs, omelets, or fried eggs for a hearty breakfast.

Recipe Variations and Customizations

1. Spicy Garlic Cheese Potatoes

Add a pinch of cayenne pepper, red pepper flakes, or chopped jalapeños for a spicy kick.

2. Herb & Garlic Butter Potatoes

Instead of olive oil, toss the potatoes in melted garlic butter for an extra indulgent flavor.

3. Cheesy Loaded Potatoes

Top with bacon bits, green onions, and extra cheese for a fully loaded version.

4. Vegan Garlic Cheese Potatoes

Use plant-based butter, dairy-free cheese, and almond or oat milk for a vegan-friendly version.

5. Air Fryer Version

For an even crispier and faster version, cook the potatoes in an air fryer at 400°F (200°C) for 20–25 minutes, shaking the basket halfway through.

FAQs About Crispy Garlic Cheese Potatoes

1. Can I Make This Dish Ahead of Time?

Yes! You can bake the potatoes in advance and reheat them in the oven at 375°F (190°C) for 10 minutes to restore crispiness.

2. How Do I Store Leftovers?

Store leftovers in an airtight container in the refrigerator for up to 3 days.

3. Can I Freeze These Potatoes?

While fresh is best, you can freeze cooked potatoes in a single layer on a baking sheet, then transfer to a freezer bag. Reheat in the oven at 400°F (200°C) until crispy again.

4. How Do I Prevent My Cheese Sauce from Becoming Grainy?

Avoid overheating the cheese and use low heat while stirring constantly. Freshly shredded cheese also helps keep it smooth.

5. Can I Use Different Types of Cheese?

Yes! Cheddar, mozzarella, gouda, or even blue cheese can be used depending on your taste preference.

Final Thoughts

Crispy Garlic Cheese Potatoes with creamy cheese sauce are a perfectly balanced dish—crispy, cheesy, and full of flavor. Whether served as a side or a standalone meal, this recipe is guaranteed to become a favorite.

With simple ingredients, easy techniques, and plenty of customization options, this dish can be adapted to suit any taste. Try it today and enjoy a mouthwatering, comforting, and satisfying potato dish like never before!

Amal

Crispy Garlic Cheese Potatoes with Creamy Cheese Sauce – The Ultimate Comfort Food

Golden, crispy potatoes infused with garlic and topped with a rich, velvety cheese sauce—this dish is the ultimate comfort food. Whether served as a side, appetizer, or snack, these cheesy garlic potatoes will leave everyone craving more. Perfectly seasoned, oven-baked for a healthier twist, and finished with a decadent cheese drizzle, this recipe is easy to make and incredibly satisfying.
Prep Time 10 minutes
Cook Time 40 minutes
Total Time 50 minutes
Servings: 4 servings
Course: Snack
Cuisine: International

Ingredients
  

For the Potatoes:
  • 4 medium potatoes Russet or Yukon Gold
  • 2 tablespoons olive oil
  • 3 cloves garlic minced
  • 1 teaspoon salt
  • ½ teaspoon black pepper
  • ½ teaspoon paprika optional
  • ¼ cup Parmesan cheese grated
  • 1 tablespoon fresh parsley chopped, for garnish
For the Cheese Sauce:
  • 2 tablespoons butter
  • 1 tablespoon all-purpose flour
  • 1 cup milk
  • 1 cup cheddar cheese shredded
  • ½ teaspoon garlic powder
  • Salt and black pepper to taste

Method
 

  1. 1. Prepare the Potatoes
  2. Preheat oven to 400°F (200°C). Cut the potatoes into wedges or cubes and toss them with olive oil, minced garlic, salt, black pepper, and paprika. Spread evenly on a baking sheet and bake for 35–40 minutes, flipping halfway through, until crispy and golden brown.
  3. 2. Make the Cheese Sauce
  4. In a saucepan over medium heat, melt the butter and stir in the flour. Cook for 1 minute, then gradually whisk in the milk until smooth. Add shredded cheddar, garlic powder, salt, and black pepper, stirring until the cheese is fully melted and the sauce is creamy.
  5. 3. Serve and Enjoy
  6. Drizzle the warm cheese sauce over the crispy potatoes or serve it on the side for dipping. Garnish with grated Parmesan and fresh parsley for extra flavor.

Notes

  • For extra crispiness, soak the cut potatoes in cold water for 30 minutes before baking, then pat them dry.
  • Try adding a pinch of cayenne pepper or smoked paprika for a spicy twist.
  • Leftovers can be stored in an airtight container in the refrigerator for up to 3 days. Reheat in the oven at 375°F (190°C) to restore crispiness.
  • Cheese sauce can be made ahead of time and reheated over low heat, adding a splash of milk to maintain its creamy texture.
  • To make this recipe even more indulgent, top with crispy bacon bits or caramelized onions.

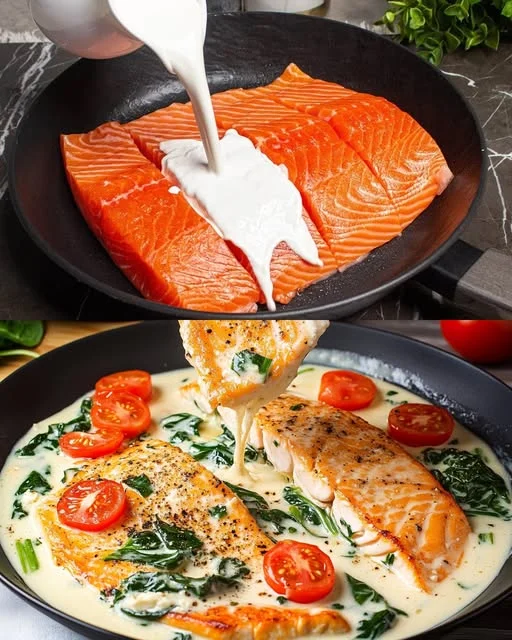
Healthy & Delicious Baked Salmon – A New Way to Enjoy This Superfood

Salmon is one of the most nutritious and versatile proteins you can include in your diet. Not only is it packed with heart-healthy omega-3 fatty acids, but it’s also an excellent source of protein, vitamins, and minerals. This baked salmon recipe takes the natural richness of the fish and enhances it with a simple yet flavorful marinade that highlights its delicate taste without overpowering it.

This recipe is designed to be quick, healthy, and incredibly delicious—perfect for a weeknight dinner or a special occasion. With a balance of tangy lemon, aromatic garlic, a hint of sweetness, and the umami depth of soy sauce and Dijon mustard, every bite is bursting with flavor.

If you’re looking for an easy way to prepare salmon while keeping it moist and tender, this method ensures the best results every time.

Why This Baked Salmon Recipe Stands Out

1. Nutrient-Rich and Heart-Healthy

Salmon is a superfood that’s naturally rich in omega-3 fatty acids, which support heart health, brain function, and overall well-being. This recipe allows you to enjoy all these benefits without unnecessary fats or processed ingredients.

2. Bursting with Fresh and Balanced Flavors

The combination of lemon, garlic, honey (or maple syrup), and Dijon mustard creates a well-balanced taste that complements the natural richness of the fish. The touch of soy sauce adds a depth of umami, making this dish both light and satisfying.

3. Quick and Effortless Cooking

With only 5 minutes of prep time and less than 15 minutes of cooking, this is one of the easiest ways to get a healthy meal on the table. Whether you’re a beginner or an experienced cook, this method guarantees success every time.

4. Perfectly Moist and Flaky Texture

Baking salmon at the right temperature ensures that it remains juicy and tender. Overcooking can dry out the fish, but this recipe provides the perfect balance—cooked through while still maintaining a melt-in-your-mouth texture.

5. Minimal Ingredients, Maximum Impact

You don’t need a long list of fancy ingredients to make salmon taste incredible. This recipe uses pantry staples to elevate the natural flavors of the fish, making it a go-to meal that requires minimal effort but delivers impressive results.

Ingredients

IngredientQuantity
Fresh salmon fillets2 (about 6 oz each)
Olive oil1 tablespoon
Lemon juice1 tablespoon
Garlic (minced)2 cloves
Honey or maple syrup1 teaspoon
Dijon mustard1 teaspoon
Soy sauce (low sodium)1 teaspoon
Black pepper½ teaspoon
SaltTo taste
Paprika (optional)¼ teaspoon
Fresh parsley (chopped)1 tablespoon (for garnish)

Directions

1. Prepare the Marinade

In a small bowl, mix olive oil, lemon juice, minced garlic, honey (or maple syrup), Dijon mustard, soy sauce, black pepper, salt, and paprika (if using).

2. Marinate the Salmon

Place the salmon fillets in a shallow dish and pour the marinade over them. Let them sit for at least 15 minutes to absorb the flavors.

3. Bake to Perfection

Preheat oven to 400°F (200°C). Place the marinated salmon on a lined baking sheet. Bake for 12–15 minutes, or until the fish flakes easily with a fork.

4. Garnish & Serve

Remove from the oven, sprinkle with fresh parsley, and serve immediately with your favorite side dishes.

Nutritional Information (Per Serving – Approximate, 1 Fillet)

NutrientAmount (Approx.)
Calories~250 kcal
Protein~25g
Carbohydrates~3g
Fat~15g
Omega-3 Fatty AcidsHigh
Vitamin D~20% DV

Tips for Making the Best Baked Salmon

1. Choose High-Quality Salmon

For the best results, use fresh, wild-caught salmon if possible. Wild salmon has a richer flavor and a firmer texture compared to farmed varieties. However, high-quality farmed salmon can also be delicious if sourced responsibly.

2. Let the Marinade Work Its Magic

While salmon doesn’t require a long marinating time, allowing it to sit for at least 15 minutes before baking enhances the flavors. The marinade helps tenderize the fish and infuse it with the right balance of acidity and sweetness.

3. Bake at the Right Temperature

A temperature of 400°F (200°C) is ideal for baking salmon. It allows the fish to cook through while developing a slight crust on the outside. 12–15 minutes is the perfect time frame for moist and flaky salmon.

4. Use a Baking Sheet with Parchment Paper

Lining your baking sheet with parchment paper prevents the salmon from sticking and makes cleanup a breeze. It also helps retain moisture while the fish cooks.

5. Don’t Overcook the Salmon

Salmon is best when it’s slightly pink in the center and flakes easily with a fork. If you’re unsure, use a food thermometer—salmon is done when it reaches an internal temperature of 125–130°F (52–55°C) for medium or 135–140°F (57–60°C) for well done.

6. Garnish for Extra Freshness

A sprinkle of freshly chopped parsley or dill adds color and enhances the overall presentation and taste. Serve with extra lemon wedges for an added citrusy kick.

Best Side Dishes to Serve with Baked Salmon

This baked salmon pairs well with a variety of side dishes. Whether you prefer light and refreshing options or hearty accompaniments, here are some great ideas:

1. Roasted or Steamed Vegetables

Pair salmon with roasted asparagus, Brussels sprouts, or steamed broccoli for a nutrient-packed meal.

2. Quinoa or Brown Rice

A serving of quinoa or brown rice adds fiber and makes this dish more filling. Try seasoning with lemon zest and herbs for extra flavor.

3. Mashed or Roasted Sweet Potatoes

The natural sweetness of sweet potatoes complements the tangy flavors of the salmon beautifully.

4. Green Salad with a Light Dressing

A fresh salad with arugula, spinach, or mixed greens tossed in a lemon vinaigrette is a perfect side to balance the richness of the salmon.

5. Garlic Butter Pasta

For a more indulgent option, serve the salmon over a bed of garlic butter pasta with fresh herbs.

Recipe Variations and Customizations

1. Add a Spicy Kick

If you love spice, add a pinch of red pepper flakes or a drizzle of sriracha to the marinade for a bit of heat.

2. Try a Herb-Crusted Version

For a more herbaceous flavor, coat the salmon with a mix of finely chopped rosemary, thyme, and oregano before baking.

3. Make It Dairy-Free

This recipe is naturally dairy-free, but if using butter instead of olive oil, simply swap it for a plant-based alternative.

4. Swap the Sweetener

If you prefer a different type of sweetness, substitute the honey with brown sugar, agave nectar, or even a splash of balsamic glaze.

5. Turn It into a Foil Packet Meal

For extra moisture and easy cleanup, wrap the salmon and marinade in foil and bake it as a packet. This method locks in steam and keeps the fish ultra-juicy.

FAQs About Baked Salmon

1. Can I Use Frozen Salmon?

Yes! If using frozen salmon, make sure to thaw it completely before marinating and baking. Pat it dry with paper towels to remove excess moisture.

2. How Do I Know When Salmon Is Done?

Salmon is done when it flakes easily with a fork. If using a thermometer, aim for 125–130°F (52–55°C) for medium or 135–140°F (57–60°C) for well done.

3. Can I Make This Recipe Ahead of Time?

Yes! You can marinate the salmon ahead of time and refrigerate it for up to 24 hours before baking.

4. How Do I Store Leftovers?

Store leftover salmon in an airtight container in the refrigerator for up to 3 days. Reheat gently in the oven at 300°F (150°C) for 10 minutes or in a skillet over low heat.

5. Can I Grill This Recipe Instead?

Absolutely! Grill the marinated salmon over medium heat for 4–5 minutes per side or until cooked through.

Final Thoughts

Baked salmon is one of the easiest and healthiest ways to enjoy seafood without sacrificing flavor. This simple yet flavorful recipe brings out the best in the fish while keeping it light, fresh, and packed with nutrients.

Whether you’re looking for a quick dinner, meal prep idea, or an impressive dish for guests, this recipe delivers every time. The balance of garlic, lemon, and a touch of sweetness makes it irresistibly delicious while remaining wholesome and nutritious.

Try this recipe today and discover how simple and satisfying healthy eating can be!

Amal

Healthy & Delicious Baked Salmon – A New Way to Enjoy This Superfood

This baked salmon recipe is the perfect combination of simplicity, nutrition, and incredible flavor. With a zesty garlic-lemon marinade and a touch of sweetness, the salmon stays moist, tender, and flaky. It’s an easy, healthy meal that’s ready in under 30 minutes—ideal for busy weeknights or elegant dinners.
Prep Time 10 minutes
Cook Time 15 minutes
Total Time 25 minutes
Servings: 2 servings
Course: Main Dish
Cuisine: International

Ingredients
  

  • Fresh salmon fillets – 2 about 6 oz each
  • Olive oil – 1 tablespoon
  • Lemon juice – 1 tablespoon
  • Garlic minced – 2 cloves
  • Honey or maple syrup – 1 teaspoon
  • Dijon mustard – 1 teaspoon
  • Soy sauce low sodium – 1 teaspoon
  • Black pepper – ½ teaspoon
  • Salt – To taste
  • Paprika optional – ¼ teaspoon
  • Fresh parsley chopped – 1 tablespoon (for garnish)

Method
 

  1. 1. Prepare the Marinade
  2. In a small bowl, whisk together olive oil, lemon juice, minced garlic, honey (or maple syrup), Dijon mustard, soy sauce, black pepper, salt, and paprika (if using).
  3. 2. Marinate the Salmon
  4. Place the salmon fillets in a shallow dish and pour the marinade over them. Let them sit for at least 15 minutes to absorb the flavors.
  5. 3. Bake the Salmon
  6. Preheat the oven to 400°F (200°C). Line a baking sheet with parchment paper and place the marinated salmon on it. Bake for 12–15 minutes, or until the fish flakes easily with a fork.
  7. 4. Garnish and Serve
  8. Remove from the oven, sprinkle with fresh parsley, and serve immediately with your favorite side dishes.

Notes

  • For extra crispiness, broil the salmon for the last 2 minutes of baking.
  • Pair it with healthy sides like roasted vegetables, quinoa, or a fresh salad.
  • Leftovers can be stored in an airtight container in the refrigerator for up to 3 days. Reheat gently in the oven at 300°F (150°C) or in a skillet over low heat.
  • For a smoky flavor, add a pinch of smoked paprika or grill the salmon instead of baking.
  • If using frozen salmon, thaw it completely and pat dry before marinating to ensure even cooking.

Cheese & Potato Pie – A Classic Comfort Food That Never Fails

Cheese and potato pie is the ultimate comfort dish, combining a soft, golden crust with a creamy, cheesy potato filling. It’s simple, satisfying, and made with ingredients that are easy to find. This pie is perfect for family dinners, cozy weekends, or whenever you need a hearty, homemade meal.

Unlike traditional pies with a flaky crust, this version uses a soft, yeasted dough that bakes into a beautifully golden, slightly chewy bread-like exterior. The inside, however, is what makes this dish truly special—a rich, velvety blend of mashed potatoes and melted cheese, seasoned just right to bring out its full depth of flavor. Whether eaten warm right out of the oven or reheated the next day, this dish is a must-try for anyone who loves simple, homemade meals.

Why This Cheese & Potato Pie is So Special

1. A Perfect Balance of Flavors and Textures

The contrast between the fluffy, cheesy mashed potato filling and the soft, slightly chewy crust makes every bite deeply satisfying. The butter and cheese create a rich, creamy texture, while black pepper and a hint of garlic enhance the overall flavor.

2. Easy to Make with Simple Ingredients

This recipe requires just a handful of pantry staples—potatoes, flour, cheese, and yeast. There’s no need for fancy equipment or hard-to-find ingredients. Everything comes together effortlessly, making this pie a great choice for home cooks of all levels.

3. Great for Any Occasion

Cheese and potato pie is versatile enough to be served as a main dish, a side, or even as part of a larger feast. It pairs well with soups, salads, and roasted meats, making it a great addition to any meal.

4. A Budget-Friendly Meal

Potatoes and cheese are inexpensive yet satisfying, making this a fantastic meal option for families or anyone looking to cook delicious food without spending too much.

5. A Make-Ahead Friendly Recipe

This pie can be made in advance and stored for later. It reheats beautifully, so you can bake it once and enjoy it throughout the week.

Ingredients

For the Dough:

IngredientQuantity
Yeast½ teaspoon (3g)
Sugar1 teaspoon (5g)
Warm Milk2 cups (400ml)
All-Purpose Flour5 cups (530g) (adjust as needed)
Salt1 teaspoon (6g)

For the Filling:

IngredientQuantity
Potatoes (boiled, mashed)3 medium (about 500g)
Shredded Cheese (cheddar, mozzarella, or mix)1 ½ cups (150g)
Butter2 tablespoons (30g)
Black Pepper½ teaspoon
SaltTo taste
Garlic Powder (optional)½ teaspoon

For Brushing:

IngredientQuantity
Egg Yolk1
Milk1 tablespoon (15ml)

Directions

1. Prepare the Dough

  1. In a bowl, combine yeast, sugar, and warm milk. Let sit for 5–10 minutes until frothy.
  2. Add flour and salt, then knead until a soft, elastic dough forms.
  3. Cover and let it rise in a warm place for 1 hour, or until doubled in size.

2. Make the Filling

  1. Mash the boiled potatoes while warm.
  2. Mix in shredded cheese, butter, black pepper, salt, and garlic powder (if using). Stir until smooth and creamy.

3. Assemble the Pie

  1. Preheat oven to 375°F (190°C).
  2. Divide the dough into two equal portions. Roll out one half and place it in a greased baking dish.
  3. Spread the potato-cheese filling evenly over the dough.
  4. Roll out the second dough portion and place it over the filling. Seal the edges.
  5. Brush the top with egg yolk and milk mixture for a golden crust.

4. Bake to Perfection

  1. Bake for 30–35 minutes, or until golden brown.
  2. Let cool slightly before slicing and serving.

Nutritional Information (Per Serving – Approximate, 1 Slice)

NutrientAmount (Approx.)
Calories~280 kcal
Protein~9g
Carbohydrates~38g
Fat~10g
Fiber~2g
Calcium~12% DV

Tips for Making the Best Cheese & Potato Pie

1. Choose the Right Potatoes

For the creamiest filling, use starchy potatoes like Russet or Yukon Gold. These varieties mash well and create a smooth, buttery texture.

2. Let the Dough Rise Properly

Since this recipe uses a yeasted dough, allowing enough time for rising is essential. A properly risen dough will be soft, pliable, and easy to roll out, giving the final crust a light and airy texture.

3. Don’t Overload the Filling

While it’s tempting to add extra cheese or potatoes, too much filling can make the pie difficult to bake evenly. Stick to a balanced ratio for the perfect consistency.

4. Brush the Crust for a Golden Finish

Brushing the top with an egg yolk and milk mixture before baking gives the crust a beautiful, shiny golden-brown color. It also adds a slight crispness that contrasts nicely with the soft interior.

5. Let the Pie Rest Before Slicing

Once out of the oven, let the pie sit for a few minutes before cutting. This helps the filling set slightly, making it easier to slice and serve.

Serving Suggestions

1. Serve as a Main Dish

This pie is hearty enough to be the centerpiece of a meal. Pair it with a light side salad and a bowl of soup for a balanced, comforting dinner.

2. As a Side Dish

Cheese and potato pie works wonderfully as a side for roasted meats, grilled chicken, or even fish. The creamy filling complements savory proteins beautifully.

3. Add a Dipping Sauce

For an extra burst of flavor, serve the pie with a dipping sauce such as:

  • Garlic yogurt sauce – A mix of Greek yogurt, garlic, and lemon juice.
  • Spicy tomato relish – A simple blend of diced tomatoes, chili flakes, and olive oil.
  • Herb butter – Melted butter infused with fresh herbs like parsley and thyme.

4. Enjoy for Breakfast or Brunch

A slice of this cheese and potato pie makes a fantastic breakfast or brunch option, especially when paired with eggs and fresh fruit.

Variations and Customizations

1. Add More Cheese for Extra Flavor

While cheddar and mozzarella work well, you can experiment with other cheeses for a different taste. Some great options include:

  • Feta cheese – Adds a tangy, slightly salty contrast.
  • Parmesan cheese – Boosts umami flavor and adds a bit of sharpness.
  • Gruyère or Swiss cheese – Melts beautifully and has a rich, nutty taste.

2. Include Herbs and Spices

To enhance the flavor, try adding fresh herbs like chives, parsley, or thyme to the filling. A pinch of smoked paprika or cayenne pepper can also add a subtle warmth.

3. Make it Spicy

If you love a little heat, mix in chopped jalapeños or red pepper flakes for a spicy twist.

4. Add a Protein for a Heartier Pie

For a more filling version, you can add cooked protein to the mashed potatoes. Some great options include:

  • Cooked bacon or ham – Adds a smoky, salty depth.
  • Ground beef or sausage – Creates a more substantial, dinner-worthy pie.
  • Shredded chicken – A lighter protein option that pairs well with cheese and potatoes.

5. Try a Whole Wheat Dough for a Healthier Version

For added fiber and nutrients, swap half of the all-purpose flour with whole wheat flour. This gives the crust a slightly denser, nuttier taste.

FAQs About Cheese & Potato Pie

1. Can I Make Cheese & Potato Pie in Advance?

Yes! You can prepare the pie ahead of time and store it in the refrigerator before baking. When ready to eat, simply bake as directed.

2. How Do I Store Leftovers?

Leftovers can be stored in an airtight container in the refrigerator for up to 3 days. To reheat, warm slices in the oven at 350°F (175°C) for about 10 minutes to restore crispiness.

3. Can I Freeze Cheese & Potato Pie?

Absolutely! Once baked, let the pie cool completely, then wrap it tightly in plastic wrap and aluminum foil. Freeze for up to 2 months. Reheat in the oven at 375°F (190°C) until warmed through.

4. Can I Make This Recipe Gluten-Free?

Yes! Replace the all-purpose flour with a gluten-free flour blend. Make sure the blend contains xanthan gum for elasticity.

5. What’s the Best Way to Cut This Pie?

For clean, even slices, use a sharp knife and let the pie cool slightly before cutting. A serrated knife can help cut through the crust without compressing the filling.

6. Can I Use a Different Type of Dough?

If you don’t have time to make yeasted dough, you can use store-bought puff pastry for a flakier, lighter version of the pie.

Final Thoughts

Cheese and potato pie is the definition of comfort food—simple, hearty, and absolutely delicious. With its golden, slightly chewy crust and rich, cheesy filling, it’s a dish that never fails to impress.

Whether you’re making it for a cozy family dinner, a special occasion, or simply to enjoy throughout the week, this pie is guaranteed to become a favorite. Plus, with so many customization options, you can make it your own by adding different cheeses, herbs, or proteins.

Give this recipe a try and experience the joy of homemade cheese and potato pie—crispy, cheesy, and incredibly satisfying!

Amal

Cheese & Potato Pie – A Classic Comfort Food That Never Fails

This cheese and potato pie is the perfect combination of soft, fluffy dough and a rich, cheesy mashed potato filling. The golden-brown crust encases a creamy, flavorful interior, making it an irresistible dish for any meal. Whether served as a hearty snack, a side dish, or a comforting main course, this pie is guaranteed to be a family favorite!
Prep Time 15 minutes
Cook Time 35 minutes
Total Time 1 hour 30 minutes
Servings: 6 –8 servings
Course: Snack
Cuisine: International

Ingredients
  

For the Dough:
  • ½ teaspoon 3g yeast
  • 1 teaspoon 5g sugar
  • 2 cups 400ml warm milk
  • 5 cups 530g all-purpose flour (adjust as needed)
  • 1 teaspoon 6g salt
For the Filling:
  • 3 medium potatoes boiled and mashed
  • 1 ½ cups 150g shredded cheese (cheddar, mozzarella, or a mix)
  • 2 tablespoons 30g butter
  • ½ teaspoon black pepper
  • Salt to taste
  • ½ teaspoon garlic powder optional
For Brushing:
  • 1 egg yolk
  • 1 tablespoon 15ml milk

Method
 

  1. 1. Prepare the Dough: In a bowl, combine yeast, sugar, and warm milk. Let it sit for 5–10 minutes until foamy. Add flour and salt, then knead until a soft dough forms. Cover and let rise for 1 hour, or until doubled in size.
  2. 2. Make the Filling: Mash the boiled potatoes while still warm. Mix in shredded cheese, butter, black pepper, salt, and garlic powder (if using). Stir until smooth and creamy.
  3. 3. Assemble the Pie: Preheat oven to 375°F (190°C). Divide the dough into two equal portions. Roll out one half and place it in a greased baking dish. Spread the potato-cheese filling evenly over the dough. Roll out the second dough portion and place it over the filling. Seal the edges and brush with the egg yolk and milk mixture.
  4. 4. Bake to Perfection: Bake for 30–35 minutes or until golden brown. Let it cool slightly before slicing and serving.

Notes

  • Use Russet or Yukon Gold potatoes for a creamier filling.
  • To make the dough extra soft, knead it well and allow proper rising time.
  • Add a pinch of paprika or cayenne pepper for a hint of spice.
  • Leftovers can be stored in the refrigerator for up to 3 days. Reheat in the oven at 350°F (175°C) for 10 minutes.
  • For a flakier version, substitute the yeasted dough with puff pastry.
  • To freeze, wrap the baked pie in foil and store for up to 2 months. Reheat at 375°F (190°C) until warmed through.

Crispy Baked Potato Delight – A Simple, Budget-Friendly Comfort Food

Baked potato dishes have always been a staple in many kitchens worldwide, but this particular recipe takes things to a whole new level. It’s crispy on the outside, soft and flavorful on the inside, and packed with fresh vegetables for a satisfying, hearty meal. Best of all, it’s made from simple, affordable ingredients that are likely already in your pantry.

This dish is an excellent alternative to pizza, offering a crispy, golden texture without the need for a complicated dough. The combination of grated potatoes, eggs, vegetables, and a touch of seasoning creates a beautifully structured, slightly chewy, and perfectly seasoned baked dish. Whether you’re looking for a quick dinner, a side dish, or even a healthy snack, this recipe will not disappoint.

Why This Baked Potato Recipe is So Popular

1. A Budget-Friendly Dish

Potatoes, eggs, and vegetables are among the most affordable ingredients you can find. This recipe allows you to create a hearty meal without breaking the bank. Even with simple ingredients, the flavors are rich, and the texture is incredibly satisfying.

2. Perfect Balance of Crispiness and Softness

By baking the grated potatoes and vegetables, you get a dish that’s crispy on the edges while remaining tender and moist inside. It has all the comforting elements of a hash brown, but with a more structured and filling texture.

3. A Healthy Alternative to Pizza

For those who love pizza but are looking for a lighter option, this baked potato dish is an excellent substitute. It delivers a similar crispy, savory bite without the refined carbs of traditional pizza dough. Plus, the added vegetables contribute extra nutrients and fiber.

4. Quick and Easy to Prepare

Unlike traditional baking recipes that require extensive kneading, proofing, or complicated steps, this dish comes together in just a few simple steps. The ingredients are grated, mixed, and baked, making it an excellent choice for a last-minute meal.

5. Naturally Gluten-Free

If you’re avoiding gluten, this recipe is a fantastic alternative to flour-based dishes. With potatoes serving as the base, there’s no need for wheat flour, making it accessible for those with gluten sensitivities or dietary restrictions.

Ingredients

IngredientQuantity
Large potatoes3 (750g / 25 oz)
Carrot1
Green onions5 oz (150g)
Salt1 teaspoon
Black pepperTo taste
Red peppers2
Eggs3
Water1 cup (250ml)
Baking powder1 teaspoon

Directions

1. Prepare the Ingredients

  • Peel and grate the potatoes and carrot into a large mixing bowl.
  • Chop the green onions and red peppers, then add them to the bowl.

2. Mix the Batter

  • Add the eggs, water, salt, black pepper, and baking powder.
  • Stir everything together until well combined into a thick batter.

3. Bake the Potato Mixture

  • Preheat the oven to 375°F (190°C).
  • Grease a baking dish and pour the potato mixture evenly into it.
  • Bake for 40–45 minutes, or until golden brown and crispy on the edges.

4. Serve and Enjoy

  • Let it cool slightly before slicing. Serve warm as a main dish or side!

Nutritional Information (Per Serving – Approximate, 1 Slice)

NutrientAmount (Approx.)
Calories~180 kcal
Protein~6g
Carbohydrates~28g
Fat~4g
Fiber~3g
Vitamin C~20% DV

Tips for Making the Best Baked Potato Dish

1. Use the Right Potatoes

For the best texture, opt for starchy potatoes like Russet or Yukon Gold. These varieties have a higher starch content, which helps bind the ingredients together and creates a fluffy interior with a crispy exterior.

2. Grate the Potatoes Properly

Using a box grater or a food processor with a grating attachment will help achieve the perfect texture. Once grated, gently squeeze out excess moisture with a clean kitchen towel to prevent sogginess.

3. Season Generously

While potatoes naturally have a mild taste, they absorb flavors well. Adding salt, black pepper, and a touch of paprika or garlic powder enhances the overall taste.

4. Don’t Skip the Baking Powder

Baking powder plays a key role in giving the dish a slightly airy texture. It helps lift the batter just enough to create a lighter structure without making it dense.

5. Bake at the Right Temperature

A preheated oven set at around 375°F (190°C) ensures the potatoes cook evenly and develop a beautiful golden crust. Cooking at a lower temperature may leave the inside undercooked, while a higher temperature may cause burning before the center is done.

6. Let It Cool Slightly Before Serving

After baking, allow the dish to cool for a few minutes. This helps the structure firm up slightly, making it easier to cut into slices without falling apart.

Serving Suggestions

This crispy baked potato dish is incredibly versatile and can be enjoyed in many ways:

1. As a Main Course

Serve it with a simple green salad or a bowl of soup for a light yet filling meal. The balance of crispy potatoes, eggs, and vegetables makes it satisfying enough on its own.

2. As a Side Dish

Pair this with roasted meats, grilled chicken, or fish for a complete dinner. The crispy texture makes it a fantastic alternative to traditional mashed or roasted potatoes.

3. With a Dipping Sauce

Enhance the flavors by serving it with a flavorful dip, such as:

  • Garlic yogurt sauce – Greek yogurt mixed with garlic and lemon.
  • Spicy ketchup – A mix of ketchup and a dash of chili flakes.
  • Cheesy sour cream dip – Sour cream with shredded cheese and a sprinkle of black pepper.

4. For Breakfast or Brunch

This dish works beautifully as a breakfast option. Serve it with fried or poached eggs and a side of avocado for a balanced morning meal.

Recipe Variations and Customizations

1. Add Cheese for Extra Flavor

If you’re looking for an even more indulgent version, sprinkle shredded cheese (such as cheddar, mozzarella, or feta) on top before baking. This creates a deliciously melty and slightly crispy cheesy layer.

2. Make It Spicy

For those who enjoy heat, add finely chopped red chili peppers or a sprinkle of cayenne pepper to the batter. This gives the dish a nice kick without overpowering the other flavors.

3. Incorporate More Vegetables

While the recipe already includes carrots, red peppers, and green onions, you can add even more variety by mixing in grated zucchini, mushrooms, or spinach. Just be sure to squeeze out excess moisture from watery vegetables to maintain the crispiness.

4. Swap the Potatoes

Instead of using regular potatoes, try using sweet potatoes for a slightly sweeter and more nutrient-dense alternative. The natural sweetness pairs beautifully with the savory flavors.

5. Make it Vegan

For a vegan-friendly version, replace the eggs with a flaxseed mixture (1 tablespoon of flaxseed meal + 3 tablespoons of water per egg) and use plant-based milk or water.

FAQs About This Baked Potato Recipe

1. Can I Prepare the Mixture in Advance?

Yes, you can prepare the batter up to 4 hours in advance and store it in the refrigerator. Just give it a quick stir before baking.

2. How Do I Store Leftovers?

Leftovers can be stored in an airtight container in the refrigerator for up to 3 days. To reheat, place slices in an oven at 350°F (175°C) for about 10 minutes to maintain crispiness.

3. Can I Freeze This Dish?

Yes, you can freeze the baked potato dish. Let it cool completely, then wrap individual slices in plastic wrap and store them in a freezer-safe container. To reheat, bake at 375°F (190°C) for 15–20 minutes straight from the freezer.

4. Can I Use a Different Type of Flour?

If you want a gluten-free option, you can replace regular flour with chickpea flour or almond flour. However, the texture may vary slightly.

5. What’s the Best Way to Cut This Dish?

For clean, even slices, use a sharp knife and let the dish cool slightly before cutting. A pizza cutter also works well for quick, uniform portions.

Final Thoughts

This crispy baked potato dish is the perfect blend of convenience, affordability, and deliciousness. It offers a unique twist on traditional potato recipes, making it a great alternative to pizza or classic baked potatoes. With its simple preparation and endless customization options, it’s a fantastic recipe to have in your rotation.

Whether you enjoy it for breakfast, lunch, dinner, or a snack, this baked potato dish will impress with its crispy edges, soft interior, and incredible flavor. Give it a try today and discover a new favorite way to enjoy potatoes!

Amal

Crispy Baked Potato Delight – A Simple, Budget-Friendly Comfort Food

This crispy baked potato dish is packed with flavor, combining grated potatoes, fresh vegetables, and a simple batter to create a golden, crunchy texture. It’s an easy and affordable recipe that can be served as a main course, side dish, or even a snack. With minimal ingredients and a quick baking process, this dish is perfect for busy days when you want something delicious without much effort.
Prep Time 15 minutes
Cook Time 40 minutes
Total Time 55 minutes
Servings: 4 –6 servings
Course: Snack
Cuisine: International

Ingredients
  

  • 3 large potatoes about 25 ounces / 750 grams
  • 1 carrot
  • 5 ounces 150 grams green onions
  • 1 teaspoon salt
  • Black pepper to taste
  • 2 red peppers
  • 3 eggs
  • 1 cup 250 milliliters water
  • 1 teaspoon baking powder

Method
 

  1. 1. Prepare the Ingredients: Peel and grate the potatoes and carrot into a large mixing bowl. Chop the green onions and red peppers, then add them to the bowl.
  2. 2. Make the Batter: Add the eggs, water, salt, black pepper, and baking powder. Stir well until all ingredients are fully combined into a thick, even batter.
  3. 3. Bake the Potato Mixture: Preheat the oven to 375°F (190°C). Grease a baking dish and pour in the potato mixture, spreading it evenly. Bake for 40–45 minutes or until golden brown and crispy on the edges.
  4. 4. Serve and Enjoy: Let it cool slightly before slicing. Serve warm as a main dish, side, or snack with your favorite dipping sauce.

Notes

  • Drain excess moisture from the grated potatoes before mixing to prevent sogginess.
  • Add cheese for a richer flavor—mozzarella, cheddar, or feta all work well.
  • Customize with spices like paprika, garlic powder, or chili flakes for extra flavor.
  • Store leftovers in the refrigerator for up to 3 days. Reheat in the oven at 350°F (175°C) for 10 minutes to maintain crispiness.
  • Freeze for later: Allow to cool completely, then freeze slices in an airtight container. Reheat at 375°F (190°C) for 15–20 minutes.

Cheese Garlic Potato Pide – A Flavorful, Cheesy Turkish Flatbread

Cheese Garlic Potato Pide is a rich and satisfying Turkish-inspired flatbread, combining a soft, airy crust with a flavorful, garlicky mashed potato filling and melty mozzarella cheese. The golden, crispy edges paired with the gooey, cheesy center make this dish irresistible.

This savory bread is an excellent alternative to pizza, offering a unique shape, texture, and taste. Its boat-like structure holds the creamy, garlicky filling perfectly, while the crispy crust provides the perfect contrast. Whether served as an appetizer, snack, or main dish, Cheese Garlic Potato Pide is bound to impress.

What Makes This Pide So Special?

1. The Perfect Balance of Flavors

The combination of garlic-infused potatoes, rich melted mozzarella, and a light, crispy crust creates a balance of flavors that’s both comforting and indulgent. The subtle warmth of garlic enhances the creamy potatoes, while mozzarella adds just the right amount of stretch and richness.

2. A Crispy Yet Soft Dough

Unlike traditional pizza dough, pide dough is slightly softer and more pliable, making it easier to shape into the signature boat-like form. The golden crust, brushed with egg yolk before baking, gives it a beautiful shine and crisp texture that pairs perfectly with the creamy filling.

3. A Dish Inspired by Turkish Cuisine

Pide is a staple of Turkish cuisine, often filled with meats, vegetables, or cheeses. This version focuses on simple yet bold flavors, taking inspiration from classic cheese pide but adding a unique twist with garlic and potatoes.

4. Easy to Customize

This recipe serves as a fantastic base for customization. You can experiment with different cheeses, spices, or even add proteins like spiced ground beef, crumbled feta, or caramelized onions for extra flavor.

Ingredients

For the Dough:

IngredientQuantity
Active dry yeast1 ½ teaspoons
Sugar1 teaspoon
Warm water125ml (½ cup)
All-purpose or bread flour250g (2 cups)
Salt1 teaspoon
Garlic powder1 teaspoon

For the Filling:

IngredientQuantity
Potatoes (boiled & mashed)2 medium
Mozzarella cheese (shredded)1 cup (100g)
Butter (melted)2 tablespoons
Garlic (minced)2 cloves
Black pepper½ teaspoon
SaltTo taste
Fresh parsley (chopped)2 tablespoons (optional)

For Topping:

IngredientQuantity
Egg yolk (for brushing)1
Sesame or nigella seeds1 teaspoon (optional)

Directions

1. Prepare the Dough

  • In a small bowl, dissolve yeast and sugar in warm water. Let it sit for 5–10 minutes until frothy.
  • In a large bowl, mix flour, salt, and garlic powder. Add the yeast mixture and knead until a soft dough forms.
  • Cover and let it rise for 1 hour or until doubled in size.

2. Prepare the Filling

  • In a bowl, mix mashed potatoes, shredded mozzarella, melted butter, minced garlic, salt, and black pepper. Add fresh parsley if using.

3. Shape the Pide

  • Preheat oven to 400°F (200°C).
  • Roll out the dough into an oval shape. Spread the potato-cheese filling in the center, leaving a border.
  • Fold and pinch the edges to create a boat-like shape.

4. Bake to Perfection

  • Brush the edges with egg yolk and sprinkle sesame/nigella seeds if desired.
  • Bake for 18–20 minutes, or until golden brown and crispy.

5. Serve and Enjoy

  • Let it cool slightly before slicing. Serve warm for the ultimate cheese pull!

Nutritional Information (Per Serving – Approximate, 1 Slice)

NutrientAmount (Approx.)
Calories~250 kcal
Protein~9g
Carbohydrates~35g
Fat~8g
Fiber~2g
Calcium~15% DV

The Secret to the Best Cheese Garlic Potato Pide

1. Use Quality Ingredients

Since this dish relies on simple ingredients, using high-quality flour, fresh garlic, and a good brand of mozzarella will elevate the overall taste. Opt for Yukon Gold or Russet potatoes for the filling, as they have a naturally creamy texture when mashed.

2. Allow the Dough to Rise Properly

A well-risen dough ensures a soft and airy texture. Give it enough time to double in size before shaping, and avoid over-kneading, as this can result in a denser crust.

3. Don’t Overload the Filling

While it’s tempting to add extra cheese or potatoes, too much filling can make the pide difficult to bake evenly. A balanced amount of filling ensures that the dough crisps up beautifully while holding its shape.

4. Bake at the Right Temperature

A high oven temperature helps achieve that perfect golden crust without drying out the filling. For the best results, preheat the oven properly before baking and use a pizza stone or a preheated baking tray for an extra crispy base.

Serving Suggestions for Cheese Garlic Potato Pide

1. As a Main Course

This pide is filling enough to be served as a main dish, especially when paired with a simple side salad or a bowl of soup.

2. As an Appetizer

Cut into smaller slices, this cheesy garlic pide makes a great appetizer for dinner parties, game nights, or casual get-togethers.

3. With a Side of Dips

Pide pairs wonderfully with dips such as:

  • Garlic yogurt sauce – A mix of Greek yogurt, garlic, and lemon juice.
  • Hummus – A creamy and slightly tangy chickpea dip.
  • Spicy tomato sauce – A Turkish-style dip made with tomatoes, chili, and olive oil.

4. Alongside Grilled Meats

For a heartier meal, serve pide with grilled lamb, chicken skewers, or even a Mediterranean-style mixed grill.

Variations and Additions to Try

1. Add More Cheese

While mozzarella is the classic choice, mixing in other cheeses can enhance the flavor. Try:

  • Feta cheese for a tangy contrast.
  • Cheddar cheese for a sharper taste.
  • Gruyère for a nutty depth of flavor.

2. Make It Spicy

If you enjoy a bit of heat, add red pepper flakes or finely chopped chili peppers to the mashed potato mixture. You can also sprinkle Aleppo pepper or smoked paprika on top before baking.

3. Introduce Caramelized Onions

Caramelized onions add a hint of sweetness that pairs beautifully with garlic and potatoes. Simply sauté onions until golden brown and mix them into the filling.

4. Try a Whole Wheat Dough

For a more rustic version, replace half of the all-purpose flour with whole wheat flour. This gives the pide a slightly nuttier taste and an extra boost of fiber.

5. Add Protein for a Hearty Meal

To turn this dish into a complete meal, consider adding:

  • Cooked ground beef or lamb with Middle Eastern spices.
  • Sliced sausage or pepperoni for a more pizza-like version.
  • Crumbled tofu or tempeh for a plant-based protein option.

FAQs About Cheese Garlic Potato Pide

1. Can I Make the Dough Ahead of Time?

Yes! You can prepare the dough in advance and store it in the refrigerator for up to 24 hours. Just let it come to room temperature before rolling it out.

2. How Do I Store Leftover Pide?

Leftovers can be stored in an airtight container in the refrigerator for up to 3 days. To reheat, warm it in the oven at 350°F (175°C) for about 10 minutes to restore its crispness.

3. Can I Freeze Pide?

Yes, you can freeze the baked pide. Wrap it tightly in plastic wrap and aluminum foil, then freeze for up to 2 months. Reheat in the oven straight from the freezer at 375°F (190°C) until warmed through.

4. Is There a Gluten-Free Option?

You can make a gluten-free version by using a gluten-free flour blend instead of all-purpose flour. Ensure that the blend contains xanthan gum for elasticity.

5. Can I Make This Recipe Vegan?

Absolutely! Simply replace the cheese with dairy-free mozzarella and use a flaxseed or chia seed egg substitute for the dough. You can also use olive oil instead of butter.

6. What’s the Difference Between Pide and Pizza?

While both are baked dough-based dishes, pide has a softer, airier crust and is traditionally shaped like a boat. It also tends to have fewer toppings compared to pizza, focusing more on simple, high-quality ingredients.

Final Thoughts

Cheese Garlic Potato Pide is a must-try recipe for anyone who loves cheesy, garlicky bread with a crispy crust and a soft, flavorful filling. Inspired by Turkish cuisine, this dish is incredibly versatile and can be customized to suit your taste preferences.

Whether you enjoy it as a snack, appetizer, or main meal, this pide delivers bold flavors and a satisfying texture that will make it a favorite in your kitchen. With its easy preparation, simple ingredients, and endless variations, there’s no reason not to give it a try.

So, roll up your sleeves, bake this cheesy, garlicky delight, and enjoy every bite!

Amal

Cheese Garlic Potato Pide – A Flavorful, Cheesy Turkish Flatbread

A crispy, golden pide filled with creamy garlic-infused potatoes and gooey mozzarella cheese. This Turkish-style flatbread is the perfect combination of soft, airy dough and a rich, savory filling. Whether served as an appetizer, snack, or main dish, it’s an irresistible treat that’s surprisingly easy to make!

Prep Time 15 minutes
Cook Time 20 minutes
Total Time 1 hour 35 minutes
Servings: 2 large pide
Course: Snack
Cuisine: Mediterranean

Ingredients
  

For the Dough:
  • 1 ½ teaspoons active dry yeast
  • 1 teaspoon sugar
  • ½ cup 125ml warm water
  • 2 cups 250g all-purpose or bread flour
  • 1 teaspoon salt
  • 1 teaspoon garlic powder
For the Filling:
  • 2 medium potatoes boiled and mashed
  • 1 cup 100g shredded mozzarella cheese
  • 2 tablespoons melted butter
  • 2 cloves garlic minced
  • ½ teaspoon black pepper
  • Salt to taste
  • 2 tablespoons chopped fresh parsley optional
For Topping:
  • 1 egg yolk for brushing
  • 1 teaspoon sesame or nigella seeds optional

Method
 

  1. 1. Prepare the Dough
  2. In a small bowl, dissolve the yeast and sugar in warm water. Let it sit for 5–10 minutes until frothy.
  3. In a large mixing bowl, combine flour, salt, and garlic powder. Add the yeast mixture and knead until a soft dough forms.
  4. Cover and let the dough rest for 1 hour, or until it doubles in size.
  5. 2. Prepare the Filling
  6. In a bowl, mix the mashed potatoes, shredded mozzarella, melted butter, minced garlic, salt, and black pepper.
  7. Stir well to combine, ensuring the potatoes are creamy and well-seasoned.
  8. 3. Shape the Pide
  9. Preheat the oven to 400°F (200°C).
  10. Roll out the dough into an oval shape on a floured surface.
  11. Spread the potato-cheese filling in the center, leaving about 1 inch of space along the edges.
  12. Fold the edges inward, pinching the ends to create a boat-like shape.
  13. 4. Bake to Perfection
  14. Brush the edges of the pide with egg yolk and sprinkle sesame or nigella seeds if using.
  15. Transfer to a parchment-lined baking sheet and bake for 18–20 minutes, or until golden brown and crispy.
  16. 5. Serve and Enjoy
  17. Let it cool slightly before slicing. Serve warm for the ultimate cheese pull!

Notes

  • Dough Consistency: If the dough is too dry, add a tablespoon of water at a time until smooth. If too sticky, sprinkle with a little extra flour while kneading.
  • Make It Spicy: Add chili flakes or a pinch of smoked paprika to the potato mixture for a subtle heat.
  • Alternative Cheeses: Try feta, cheddar, or a mix of mozzarella and Parmesan for extra depth of flavor.
  • Storage: Leftovers can be stored in an airtight container in the refrigerator for up to 3 days. Reheat in the oven for the best texture.
  • Freezing Option: You can freeze baked pide. Wrap tightly and freeze for up to 2 months. Reheat in the oven at 375°F (190°C) until warm.

Crispy Savory Cabbage Pancakes – A Delicious and Easy Recipe

Cabbage pancakes are a fantastic way to turn simple, everyday ingredients into a crispy, flavorful dish that is both nutritious and satisfying. These golden, pan-fried pancakes are light yet filling, offering a delightful crunch with every bite. Whether you’re looking for a quick breakfast, a savory snack, or a creative way to enjoy more vegetables, cabbage pancakes are the perfect solution.

This recipe is inspired by various global cuisines, from Japanese Okonomiyaki to Korean Pajeon, while remaining simple enough to prepare with ingredients you likely already have in your kitchen. The combination of shredded cabbage, eggs, and flour creates a beautifully textured pancake that is crispy on the outside and tender on the inside.

If you’re looking for a new way to enjoy cabbage, this recipe will surprise you with its versatility and deliciousness.

Why You’ll Love These Cabbage Pancakes

1. Budget-Friendly and Simple Ingredients

Cabbage is one of the most affordable vegetables available, making this recipe perfect for anyone looking for an inexpensive yet delicious meal. Combined with eggs, flour, and seasonings, these pancakes come together quickly with minimal effort.

2. Quick and Easy to Make

With a prep time of under 10 minutes and a short cooking time, these pancakes are perfect for busy days. You don’t need any special equipment—just a mixing bowl, a frying pan, and a spatula.

3. Crispy and Flavorful

The crispiness of these pancakes, combined with the savory flavors of garlic, green onions, and optional paprika, makes them incredibly satisfying. They’re light yet packed with a delicious umami taste that keeps you coming back for more.

4. A Healthy and Nutritious Option

Cabbage is loaded with fiber, vitamins C and K, and antioxidants, making these pancakes a great way to include more vegetables in your diet. The eggs add protein, while the flour provides structure, making this dish balanced and wholesome.

5. Versatile and Customizable

One of the best things about cabbage pancakes is how easy they are to customize. Whether you want to add more vegetables, incorporate proteins like shrimp or bacon, or adjust the spices to your liking, this recipe can be tailored to suit your taste.

Ingredients

IngredientQuantity
Shredded cabbage2 cups (200 g)
Eggs2
All-purpose flour½ cup (60 g)
Milk or water¼ cup (60 ml)
Green onions (chopped) (optional)2
Garlic (minced)1 clove
Salt½ teaspoon (adjust to taste)
Black pepper¼ teaspoon
Paprika (optional)¼ teaspoon
Vegetable oil (for frying)2 tablespoons

Step-by-step Instructions

1. Prepare the Batter

  • In a mixing bowl, combine the shredded cabbage, eggs, flour, milk (or water), green onions, minced garlic, salt, black pepper, and paprika (if using).
  • Stir well until all ingredients are evenly combined. The batter should be slightly thick but not too dry.

2. Heat the Pan

  • Heat 1 tablespoon of vegetable oil in a non-stick pan over medium heat.

3. Cook the Pancakes

  • Scoop about ¼ cup of the batter and place it into the pan, spreading it slightly to form a pancake shape.
  • Cook for 3–4 minutes per side, or until golden brown and crispy.
  • Repeat with the remaining batter, adding more oil as needed.

4. Serve and Enjoy

  • Remove from the pan and drain excess oil on a paper towel.
  • Serve hot with your favorite dipping sauce, such as soy sauce, sour cream, or a spicy mayo.

Nutritional Information (Per Serving – Approximate, 1 Pancake)

NutrientAmount (Approx.)
Calories~120 kcal
Protein~5g
Carbohydrates~12g
Fat~6g
Fiber~2g
Calcium~6% DV

Tips for Making the Perfect Cabbage Pancakes

1. Shred the Cabbage Finely

Finely shredded cabbage ensures that the pancakes cook evenly and develop a crispy texture. You can use a knife, a box grater, or a food processor to get the right consistency.

2. Let the Batter Rest

Allowing the batter to sit for a few minutes before cooking helps the flour absorb the moisture, resulting in a better texture. This step also allows the flavors to meld together.

3. Use the Right Amount of Oil

For the crispiest pancakes, make sure the pan is well-heated before adding the batter. Using a moderate amount of oil helps achieve a golden-brown crust while preventing the pancakes from becoming greasy.

4. Don’t Overcrowd the Pan

Cook the pancakes in batches if needed, ensuring enough space in the pan for even cooking. Overcrowding can cause steaming instead of frying, leading to softer pancakes rather than crispy ones.

5. Adjust Seasonings to Taste

While this recipe has a balanced flavor profile, feel free to adjust the salt, pepper, or spices to suit your preferences. Adding a dash of soy sauce, sesame oil, or chili flakes can enhance the overall taste.

Variations and Additions

1. Make Them Spicier

For a bit of heat, add chili flakes, sriracha, or finely chopped fresh chilies to the batter.

2. Add Cheese for Extra Flavor

A sprinkle of shredded cheddar, mozzarella, or Parmesan in the batter or on top of the pancakes gives them a rich, cheesy taste.

3. Include Protein for a Complete Meal

Enhance these pancakes with protein-rich ingredients such as diced ham, cooked bacon, shredded chicken, or small shrimp for a heartier dish.

4. Try Different Flours for a Unique Twist

While all-purpose flour works perfectly, you can experiment with other types of flour like chickpea flour, whole wheat flour, or rice flour for different textures and flavors.

5. Make It Vegan

To make a vegan version, replace the eggs with a flaxseed or chia seed mixture (1 tablespoon of flaxseed or chia seeds mixed with 3 tablespoons of water per egg) and use plant-based milk or water.

Best Dipping Sauces for Cabbage Pancakes

These crispy pancakes pair beautifully with a variety of dipping sauces. Here are some great options:

  • Soy Sauce & Vinegar Dip – A simple mixture of soy sauce, rice vinegar, and a touch of sesame oil for an Asian-inspired flavor.
  • Garlic Yogurt Sauce – Greek yogurt mixed with minced garlic, lemon juice, and herbs for a creamy contrast.
  • Spicy Mayo – A blend of mayonnaise and sriracha for a creamy and spicy kick.
  • Sweet Chili Sauce – A slightly sweet and mildly spicy sauce that enhances the pancake’s flavor.
  • Herbed Sour Cream – Sour cream mixed with fresh herbs like dill or parsley for a refreshing taste.

What to Serve with Cabbage Pancakes

While cabbage pancakes can be enjoyed on their own, pairing them with complementary dishes makes for a more satisfying meal. Here are some serving ideas:

  • Light Soup – Serve alongside miso soup, vegetable broth, or a light chicken soup for a balanced meal.
  • Fresh Salad – A crisp green salad with a citrus vinaigrette adds freshness to the meal.
  • Grilled Protein – Pair with grilled chicken, fish, or tofu for a well-rounded dish.
  • Steamed Rice – Serve with jasmine or brown rice for a more filling meal.

FAQs About Cabbage Pancakes

1. Can I Make Cabbage Pancakes Ahead of Time?

Yes! You can prepare the batter in advance and store it in the refrigerator for up to 24 hours. Simply stir the batter before cooking, as the ingredients may settle.

2. How Do I Store Leftovers?

Leftover cabbage pancakes can be stored in an airtight container in the refrigerator for up to three days. To reheat, use a pan over medium heat to restore their crispiness or warm them in an oven at 350°F (175°C) for 5–7 minutes.

3. Can I Freeze Cabbage Pancakes?

Yes! Allow the pancakes to cool completely before placing them in a single layer on a baking sheet. Once frozen, transfer them to a freezer-safe bag or container. Reheat directly from frozen in a pan or oven.

4. Can I Make These Pancakes Gluten-Free?

Absolutely! Use gluten-free flour or a blend of rice and chickpea flour to make a gluten-free version. Ensure any additional ingredients, like soy sauce, are also gluten-free.

5. What Other Vegetables Can I Add?

You can enhance the pancakes with grated carrots, zucchini, or bell peppers for added color and texture. Just be mindful of the moisture content, as some vegetables release more water during cooking.

Final Thoughts

Cabbage pancakes are an easy, delicious, and nutritious dish that can be enjoyed at any time of the day. Their crispy edges, soft interior, and savory flavor make them a crowd-pleaser, whether you’re serving them as a quick breakfast, an appetizer, or a light meal.

With their budget-friendly ingredients, quick preparation time, and versatility, these pancakes are a great addition to your recipe collection. Whether you enjoy them plain, customize them with your favorite add-ins, or serve them with a delicious dipping sauce, they are sure to become a favorite.

Try this recipe today and discover how a humble vegetable like cabbage can turn into something truly special!

Amal

Cabbage Pancakes – A Crispy, Savory Delight

Cabbage pancakes are a crispy, savory delight that come together in minutes with just a few simple ingredients. Made with shredded cabbage, eggs, and a light batter, these golden-brown pancakes are packed with flavor and texture. Whether served as a quick breakfast, a side dish, or a satisfying snack, they’re an easy and budget-friendly recipe that you’ll want to make again and again. Enjoy them with your favorite dipping sauce for an extra burst of taste!
Prep Time 10 minutes
Cook Time 10 minutes
Total Time 20 minutes
Servings: 4 servings
Course: Breakfast
Cuisine: Asian-inspired

Ingredients
  

  • 2 cups 200 g shredded cabbage
  • 2 eggs
  • ½ cup 60 g all-purpose flour
  • ¼ cup 60 ml milk or water
  • 2 green onions chopped (optional)
  • 1 garlic clove minced
  • ½ teaspoon salt adjust to taste
  • ¼ teaspoon black pepper
  • ¼ teaspoon paprika optional
  • 2 tablespoons vegetable oil for frying

Method
 

Prepare the Ingredients:
  1. Shred the cabbage finely. Chop the green onions if using, and mince the garlic.
Make the Batter:
  1. In a large mixing bowl, whisk the eggs, flour, milk (or water), salt, black pepper, and paprika until smooth.
  2. Stir in the shredded cabbage, green onions, and minced garlic. Mix well to ensure everything is evenly coated.
Cook the Pancakes:
  1. Heat a large skillet over medium heat and add the vegetable oil.
  2. Spoon about ¼ cup of batter into the pan for each pancake, flattening it slightly.
  3. Cook for 2-3 minutes on each side, or until golden brown and crispy.
Serve and Enjoy:
  1. Transfer the pancakes to a plate and serve hot with soy sauce, sour cream, or your favorite dipping sauce.

Notes

  • Make It Extra Crispy: For extra crunch, press the pancakes down slightly while cooking and let them cook a bit longer on each side.
  • Gluten-Free Option: Swap all-purpose flour with chickpea or rice flour.
  • Spicy Twist: Add a teaspoon of hot sauce or chopped chili peppers to the batter for a spicier version.
  • Storage & Reheating: Store leftovers in an airtight container in the refrigerator for up to 3 days. Reheat in a skillet or oven for best results.
  • Serving Suggestions: Enjoy with soy sauce, spicy mayo, or a light salad for a complete meal.

Cheesy Spinach & Mushroom Stuffed Zucchini Boats – A Healthy and Delicious Delight

Stuffed zucchini boats are the perfect balance of flavor, nutrition, and simplicity. This dish is packed with fresh vegetables, creamy ricotta cheese, and a hint of Parmesan, creating a light yet satisfying meal. Whether you’re looking for a vegetarian main course, a low-carb side dish, or a way to incorporate more greens into your diet, this recipe has you covered.

Why You’ll Love This Recipe

1. Packed with Nutrients

Zucchini is a powerhouse of vitamins and minerals, including vitamin C, potassium, and antioxidants. Combined with nutrient-dense spinach and mushrooms, this dish provides a well-rounded meal that nourishes the body while keeping things light and fresh.

2. A Perfect Low-Carb Alternative

If you’re looking for a way to enjoy a filling meal without the heaviness of pasta or bread, stuffed zucchini boats are the answer. With fewer carbs than traditional stuffed dishes, they make a great option for those following a low-carb or keto-friendly diet.

3. Bursting with Flavor

The combination of sautéed garlic, onions, and mushrooms, along with the creaminess of ricotta cheese and the slight tang of Parmesan, creates a depth of flavor that’s rich yet delicate. The addition of red pepper flakes gives it a slight kick, making every bite even more delicious.

4. Simple Yet Impressive

Despite being an easy dish to prepare, stuffed zucchini boats look elegant and make a great centerpiece for any meal. Whether you’re cooking for a weeknight dinner or entertaining guests, this dish is sure to impress.

5. Customizable to Your Preferences

One of the best things about this recipe is its versatility. You can easily add different proteins, swap out cheeses, or include extra vegetables to suit your taste.

Ingredients

IngredientQuantity
Zucchini (medium)4, halved & scooped out
Olive oil1 tablespoon
Garlic (minced)2 cloves
Onion (small, chopped)1
Mushrooms (chopped)1 cup
Fresh spinach (chopped)2 cups
Ricotta cheese1 cup
Parmesan cheese (grated)1/4 cup
Red pepper flakes (optional)1/4 teaspoon
Salt & pepperTo taste
Fresh basil (for garnish)Optional

Step-by-Step Instructions

1. Prep the Zucchini Boats

Preheat your oven to 375°F (190°C). Slice the zucchini in half lengthwise and scoop out the flesh using a spoon, leaving about 1/4 inch of the zucchini shell. Place the zucchini halves on a lightly greased baking sheet.

2. Cook the Filling

  • Heat olive oil in a skillet over medium heat.
  • Add onions and garlic, sauté for 2–3 minutes until fragrant.
  • Stir in the mushrooms, cooking for another 3 minutes until soft.
  • Add the spinach, stirring until wilted (about 1 minute).
  • Remove from heat and let it cool slightly.

3. Mix the Cheese Filling

In a bowl, mix the ricotta cheese, Parmesan cheese, red pepper flakes, and the cooked vegetable mixture. Season with salt and pepper to taste.

4. Fill the Zucchini Boats

Spoon the mixture evenly into the zucchini shells, pressing it in gently.

5. Bake to Perfection

Bake for 20–25 minutes, or until the zucchini is tender and the filling is slightly golden on top.

6. Garnish and Serve

Sprinkle with fresh basil and serve warm!

Tips for Making the Best Stuffed Zucchini Boats

1. Choose the Right Zucchini

Look for medium-sized zucchini that are firm and free from blemishes. Larger zucchini can be too watery and may not hold their shape as well, while smaller ones may not provide enough space for the filling.

2. Don’t Over-Scoop

When hollowing out the zucchini, leave about ¼ inch of flesh intact to ensure they hold up well during baking. If scooped too thin, they may become too fragile and collapse.

3. Season the Zucchini Before Baking

A light drizzle of olive oil and a sprinkle of salt and pepper before filling will enhance the natural flavors of the zucchini and ensure it roasts beautifully.

4. Drain the Cooked Vegetables

Mushrooms and spinach release a lot of moisture when cooked. Before mixing them with the ricotta, let them drain slightly to prevent the filling from becoming too watery.

5. Let the Flavors Develop

After baking, allow the zucchini boats to rest for a couple of minutes before serving. This lets the flavors meld and helps the filling set slightly.

Nutritional Information (Per Serving – 1 Zucchini Half)

NutrientAmount (Approx.)
Calories~120 kcal
Protein~7g
Carbohydrates~9g
Fat~6g
Fiber~2g
Calcium~15% DV

Variations and Additions

1. Add Protein for a Heartier Meal

If you’d like to add more protein, consider mixing in cooked ground turkey, shredded chicken, or crumbled tofu into the filling. These additions will make the dish even more filling while keeping it healthy.

2. Try Different Cheeses

Ricotta and Parmesan work beautifully together, but you can experiment with other cheeses like feta, mozzarella, or goat cheese for different flavor profiles.

3. Incorporate More Vegetables

Want even more nutrition? Bell peppers, sun-dried tomatoes, or chopped artichokes can be added to the filling for extra texture and taste.

4. Make It Vegan

For a dairy-free version, replace the ricotta with mashed tofu or cashew cheese, and swap out Parmesan for nutritional yeast. This keeps the dish creamy and flavorful while making it completely plant-based.

5. Spice It Up

If you enjoy a bit of heat, increase the amount of red pepper flakes or add diced jalapeños to the filling. A drizzle of hot sauce before serving also works wonders.

What to Serve with Stuffed Zucchini Boats

Stuffed zucchini boats are a great standalone dish, but they also pair well with a variety of sides. Here are some ideas:

  • Light Side Salad: A simple arugula or mixed greens salad with balsamic dressing adds freshness to the meal.
  • Quinoa or Brown Rice: For a more filling meal, serve with a side of whole grains.
  • Garlic Bread: If you’re not strictly low-carb, a piece of crusty garlic bread makes a great accompaniment.
  • Grilled Chicken or Fish: If serving as a side, pair with a protein like grilled salmon or chicken for a balanced plate.

FAQs About Stuffed Zucchini Boats

1. Can I Make Stuffed Zucchini Boats Ahead of Time?

Yes! You can prepare the filling and scoop out the zucchini up to a day in advance. Store them separately in the fridge, then assemble and bake when ready to eat.

2. How Do I Store Leftovers?

Leftover stuffed zucchini boats can be stored in an airtight container in the refrigerator for up to 3 days. Reheat in the oven at 350°F (175°C) for about 10 minutes or until heated through.

3. Can I Freeze Stuffed Zucchini Boats?

While you can freeze them, zucchini tends to release a lot of water when thawed, which may affect the texture. If freezing, do so before baking and thaw in the fridge before reheating in the oven.

4. Can I Use Yellow Squash Instead?

Absolutely! Yellow squash has a similar texture and flavor and can be used as a substitute for zucchini in this recipe.

5. Are Stuffed Zucchini Boats Keto-Friendly?

Yes! This recipe is naturally low in carbohydrates and fits well within a keto-friendly diet. If you want to reduce carbs even further, be mindful of the types of cheese and vegetables you use.

6. How Can I Make This Dish More Filling?

If you need a more substantial meal, consider adding a protein source, pairing with a grain, or serving alongside a hearty soup or salad.

Final Thoughts

Stuffed zucchini boats are the perfect way to enjoy a healthy, flavorful, and satisfying meal without much effort. With a delicious combination of ricotta, spinach, and mushrooms, this dish brings together rich textures and balanced flavors while staying light and nutritious.

Whether you’re looking for a quick vegetarian dinner, a low-carb meal, or a creative way to use up zucchini, this recipe is a fantastic choice. Plus, with endless variations, you can customize it to suit your taste and dietary preferences.

Amal

Stuffed Zucchini Boats! I Have Never Eaten Such a Delicious Zucchini! Healthy and Easy

Stuffed zucchini boats are a delicious, healthy, and easy-to-make meal that’s packed with flavor. Tender zucchini halves are filled with a savory mixture of ricotta cheese, mushrooms, spinach, and Parmesan, then baked to perfection. This low-carb, nutrient-rich dish makes for a perfect light dinner or side dish that’s satisfying and wholesome.
Prep Time 10 minutes
Cook Time 25 minutes
Total Time 35 minutes
Servings: 4 servings
Course: Main Dish
Cuisine: Italian-inspired

Ingredients
  

  • 4 medium zucchini halved lengthwise and scooped out
  • 1 tablespoon olive oil
  • 2 cloves garlic minced
  • 1 small onion finely chopped
  • 1 cup mushrooms chopped
  • 2 cups fresh spinach chopped
  • 1 cup ricotta cheese
  • 1/4 cup Parmesan cheese grated
  • 1/4 teaspoon red pepper flakes optional
  • Salt and pepper to taste
  • Fresh basil optional, for garnish

Method
 

  1. Preheat the oven to 375°F (190°C).
  2. Prepare the zucchini by cutting them in half lengthwise and scooping out the flesh, leaving about 1/4 inch of the shell intact. Chop the scooped-out flesh and set aside.
  3. Heat olive oil in a pan over medium heat. Add the minced garlic and chopped onion, cooking until softened (about 2-3 minutes).
  4. Add the chopped zucchini flesh, mushrooms, and spinach, cooking for another 5 minutes until tender. Remove from heat and let cool slightly.
  5. In a mixing bowl, combine the cooked vegetables, ricotta cheese, Parmesan cheese, red pepper flakes, salt, and pepper. Stir until well combined.
  6. Fill each zucchini half with the prepared mixture and place them on a baking sheet lined with parchment paper.
  7. Bake for 20-25 minutes until the zucchini is tender and the filling is golden brown.
  8. Garnish with fresh basil and serve warm.

Notes

  • Zucchini Size Matters: Choose medium-sized zucchini for the best balance of tenderness and structure. Larger zucchinis may take longer to cook, while smaller ones may not hold enough filling.
  • Make It Ahead: You can prepare the filling up to 24 hours in advance and store it in the refrigerator. When ready to bake, simply stuff the zucchini and pop them in the oven.
  • Customize the Filling: Feel free to add protein like cooked ground turkey, chicken, or sausage for a heartier meal. You can also include quinoa or lentils for a vegetarian protein boost.
  • Cheese Variations: Instead of ricotta, try cottage cheese, goat cheese, or feta for a different flavor profile. Adding shredded mozzarella or cheddar can also make it extra cheesy.

Easter Rice Krispie Nests: A Nostalgic Springtime Treat

A Childhood Memory in Every Bite

Every year, as the first signs of spring would emerge—daffodils blooming and birds chirping—my grandmother would gather us in the kitchen to make Easter treats. Among our favorite traditions was making Rice Krispie Nests. The warm, buttery scent of marshmallows melting on the stove signaled the beginning of something magical. My siblings and I would eagerly mix in the cereal, our small hands sticky with the gooey mixture. The real fun began when we shaped the warm mixture into tiny nests, carefully placing pastel-colored chocolate eggs inside, imagining we were creating little homes for Easter chicks.

Now, as an adult, I continue this tradition with my own children. Watching their eyes light up as they press their tiny fingers into the soft, warm cereal mixture brings back the same joy I felt all those years ago. These Easter Rice Krispie Nests are more than just a festive treat; they are a symbol of childhood nostalgia, family togetherness, and the simple pleasures of holiday baking. Whether you’re making them with little ones or as a fun seasonal dessert, these no-bake nests are guaranteed to bring smiles to faces both young and old.

Why These Easter Nests Are the Ultimate Spring Dessert

1. No Oven, No Hassle

Spring is the perfect time to embrace no-bake desserts, and this recipe makes it easier than ever. Without the need to turn on the oven, you can enjoy the process without heating up your kitchen. This makes it a fantastic choice for families looking for quick, mess-free holiday baking.

2. A Fun and Interactive Recipe for Kids

One of the biggest joys of Easter is getting kids involved in the kitchen. This recipe is perfect for little hands—whether they’re stirring the gooey marshmallow mixture, shaping the nests, or decorating with colorful candies. It’s a great way to introduce young ones to baking without the complications of precise measurements or baking times.

3. Customizable and Versatile

While mini chocolate eggs are the classic filling, there are endless ways to get creative. From jelly beans and peanut butter cups to pastel-colored sprinkles and edible flowers, you can customize these nests to match any Easter theme. You can even add a touch of green food coloring to the icing to resemble grass, creating an even more realistic nest effect.

4. Light Yet Indulgent

Unlike heavy cakes and rich chocolate treats, these Rice Krispie Nests have an airy, crispy texture that keeps them from feeling too rich. They’re sweet enough to satisfy a sugar craving but light enough that you won’t feel overly full after indulging.

Creative Ways to Elevate Your Rice Krispie Nests

1. Make Them Extra Chocolatey

If you want to add a chocolatey twist, mix in a handful of melted white or milk chocolate with the marshmallow mixture. You can also drizzle melted chocolate over the nests before adding the candy eggs for a richer flavor.

2. Add a Nutty Crunch

For those who enjoy a little extra texture, consider mixing in chopped nuts like almonds, hazelnuts, or pecans. This gives the nests a slightly crunchy contrast to the soft marshmallow binding.

3. Experiment with Different Cereals

While Rice Krispies are the classic choice, you can try using Cocoa Krispies for a chocolate version, Fruity Pebbles for a colorful twist, or even cornflakes for a slightly different texture.

4. Turn Them Into Bite-Sized Treats

Instead of using a muffin tin, try shaping smaller nests by hand or using mini cupcake liners. This makes them perfect for party trays, Easter baskets, or quick grab-and-go snacks.

5. Make It Vegan or Allergy-Friendly

For those with dietary restrictions, swap out the butter for a dairy-free alternative and use vegan marshmallows. Double-check that your cereal and decorations are gluten-free if needed, and opt for dairy-free chocolate eggs or jelly beans as a substitute.

Storage and Make-Ahead Tips

Since these nests are made with simple ingredients, they are best enjoyed fresh. However, with proper storage, they can last for a few days.

  • Room Temperature Storage: Keep the nests in an airtight container at room temperature for up to 3 days. Beyond that, they may start to harden.
  • Refrigeration: While not necessary, refrigerating them can help them hold their shape better, especially in warmer climates.
  • Freezing: These treats do not freeze well, as the texture becomes too hard when frozen. It’s best to make them fresh.

If making them ahead of time for a party or event, assemble the nests but wait to add the icing and candies until just before serving to keep them looking and tasting their best.

Ingredients:

For the Nests:

  • 2 tablespoons butter
  • 8 oz (220g) marshmallows (small or chopped large ones)
  • 4 cups (110g) Rice Krispies cereal

For Decorating:

  • 6 tablespoons powdered icing sugar
  • 4 teaspoons water
  • Green food coloring (optional)
  • Mini egg candies
  • Sprinkles

Directions:

  1. Lightly grease a 12-cup muffin tin with oil or non-stick spray.
  2. Melt the butter in a large pan over medium-low heat.
  3. Add the marshmallows and stir until fully melted.
  4. Remove from heat and mix in the Rice Krispies until fully coated.
  5. Spoon the mixture into the muffin tin, pressing down slightly to form a nest shape. Use a lightly buttered teaspoon to create an indentation in the center.
  6. Let the nests cool completely before removing from the tin.

To Decorate:

  1. Prepare a thick icing by mixing powdered sugar with 2 teaspoons of water (adjust as needed for consistency).
  2. Add a few drops of green food coloring to resemble grass (optional).
  3. Spoon a little icing into each nest and place mini eggs inside.
  4. Top with sprinkles and serve!

Nutritional Information (Per Nest):

  • Calories: 128 kcal
  • Carbohydrates: 27g
  • Protein: 1g
  • Fat: 2g
  • Saturated Fat: 1g
  • Trans Fat: 1g
  • Cholesterol: 5mg
  • Sodium: 81mg
  • Potassium: 13mg
  • Fiber: 1g
  • Sugar: 16g
  • Vitamin A: 679 IU
  • Vitamin C: 6mg
  • Calcium: 2mg
  • Iron: 3mg

These adorable, no-bake Easter treats are fun to make and perfect for holiday celebrations!

Frequently Asked Questions

1. What can I use instead of marshmallows to bind the cereal together?

If you prefer not to use marshmallows, you can try using a mixture of honey and almond butter or maple syrup and peanut butter as a sticky, natural alternative.

2. Can I make these without a muffin tin?

Absolutely! While a muffin tin helps create uniform shapes, you can easily shape the nests by hand on a parchment-lined tray. Just coat your hands lightly with butter or oil to prevent sticking.

3. How do I keep the mixture from sticking to my hands?

To avoid sticky hands, lightly grease your hands with butter or spray them with a bit of cooking oil. A buttered spoon also works well for pressing the mixture into the nest shape.

4. Can I make these in advance for an Easter party?

Yes! These nests can be made 1-2 days in advance, but it’s best to store them in an airtight container at room temperature. For the best appearance, decorate them right before serving.

5. What are some fun alternative toppings besides chocolate eggs?

There are so many fun ways to customize your nests! Try filling them with:

  • Jelly beans for a colorful surprise
  • Mini marshmallows for a fluffy look
  • Crushed graham crackers for a nest-like texture
  • Edible flowers for a springtime aesthetic

6. Can I make these in different sizes?

Yes! You can create mini nests using a mini muffin tin or shape them into larger nests using a small bowl instead of a muffin tin. Just adjust the amount of cereal mixture accordingly.

7. How can I make them healthier?

For a slightly healthier version, use brown rice cereal instead of traditional Rice Krispies and opt for dark chocolate eggs or dried fruit instead of candy. You can also reduce the sugar by using unsweetened nut butter as a binding agent.

A Sweet Tradition Worth Keeping

Easter Rice Krispie Nests are more than just a festive dessert—they are a reminder of childhood memories, family traditions, and the joy of simple, creative baking. Whether you make them for an Easter party, as a fun activity with kids, or just to satisfy your own sweet tooth, these no-bake treats will always bring a little extra magic to the season.

So gather your loved ones, melt some marshmallows, and start shaping your own edible nests. Because sometimes, the best memories are made in the kitchen, one sticky hand at a time.

aiting

Easter Rice Krispie Nests: A Nostalgic Springtime Treat

Celebrate the joy of Easter with these adorable, no-bake Rice Krispies nests. They’re sweet, crunchy, and perfectly decorated with mini egg candies and festive sprinkles—a delightful treat that’s as fun to make as it is to eat!
Prep Time 10 minutes
Cook Time 5 minutes
Servings: 12 nests
Course: No-Bake Treats / Desserts
Cuisine: American / Holiday

Ingredients
  

  • For the nests gather: • 2 tablespoons butter• 8 oz (220g) marshmallows (small ones or chopped larger ones work best)• 4 cups (about 110g) Rice Krispies cereal
  • For decorating you’ll need: • 6 tablespoons powdered icing sugar• 4 teaspoons water• A few drops of green food coloring (optional, for that grassy look)• Mini egg candies• Sprinkles

Method
 

  1. Start by lightly greasing a 12-cup muffin tin with oil or non-stick spray to ensure easy release later.
  2. In a large pan over medium-low heat, melt the butter. Once melted, add the marshmallows and stir continuously until they’re fully melted and smooth.
  3. Remove the pan from the heat and immediately mix in the Rice Krispies until every piece is evenly coated with the marshmallow mixture.
  4. Spoon the mixture into each muffin cup, pressing down slightly with a lightly buttered teaspoon to shape them into neat nest forms and create a small indentation in the center for decorating.
  5. Allow the nests to cool completely in the tin before gently removing them.
To Decorate:
  1. In a small bowl, prepare a thick icing by mixing the powdered icing sugar with 2 teaspoons of water (adjust as needed to achieve the desired consistency). If you like, add a few drops of green food coloring to mimic grass.
  2. Spoon a little of the icing into the center of each nest, then place mini egg candies into the indentation.
  3. Top with a light sprinkle of extra festive sprinkles, and your nests are ready to serve!

Notes

• Patience is key—ensure the nests have cooled completely so the candy coating sets firmly.
• For extra fun, try experimenting with different colored icing and decorations for a personalized touch.
• These treats are best enjoyed the day they’re made, but you can store any extras in an airtight container for a couple of days.

Shamrock Chocolate Pretzel M&M Cookies: A Sweet Twist on Tradition

A Nostalgic Bite of Celebration

Holidays are more than just dates on the calendar—they’re moments woven together by traditions, flavors, and memories. For me, St. Patrick’s Day has always been one of those occasions that didn’t require grand plans or elaborate feasts, yet it remained deeply special. Growing up, my mom had a knack for turning even the simplest holidays into something memorable.

St. Patrick’s Day wasn’t about big parades or fancy meals in our house; instead, it was about small but meaningful touches—green pancakes for breakfast, mischievous “leprechaun tricks” left around the house, and, of course, festive treats. One of my fondest childhood memories was helping my mom create little bite-sized sweets for our school parties. The excitement of dipping pretzels in chocolate, choosing the perfect M&M for the center, and sprinkling each piece with just the right amount of sugar was more than just baking—it was a ritual of love, laughter, and togetherness.

These Shamrock Chocolate Pretzel M&M Cookies are a tribute to those cherished moments. They take the classic sweet-and-salty combination and turn it into a festive, no-bake treat that is as fun to make as it is to eat. Whether you’re preparing for a classroom party, a St. Patrick’s Day gathering, or simply want to bring a bit of luck into your home, these little shamrocks are a simple yet special way to celebrate.

Why This Recipe is a Must-Try

No-Bake Simplicity

There’s something truly satisfying about a treat that requires no oven time. These cookies come together with minimal effort, making them perfect for busy parents, last-minute party planners, or anyone who wants a festive snack without the fuss of traditional baking.

Perfect Balance of Sweet and Salty

The combination of crunchy pretzels, creamy candy melts, and chocolatey M&Ms is irresistible. The light saltiness of the pretzels enhances the sweetness, creating an addictive bite that keeps you reaching for more.

A Fun and Interactive Experience

This recipe is more than just a sweet treat—it’s an activity. Kids and adults alike can get involved in the dipping, assembling, and decorating process. It’s the perfect way to turn St. Patrick’s Day into a hands-on celebration.

Endlessly Customizable

While the classic green-and-white theme is perfect for St. Patrick’s Day, this recipe can easily be adapted for other holidays. Swap out the colors for red and pink for Valentine’s Day, or go with red, white, and blue for the Fourth of July. The possibilities are endless.

Creative Variations to Try

One of the best things about this recipe is its versatility. Here are a few ways to switch things up while keeping the charm of the original:

Chocolate Lovers’ Delight

Instead of using green and white candy melts, opt for dark or milk chocolate. The richer flavor pairs beautifully with the salty pretzels, giving the treat a more indulgent feel.

Peanut Butter Perfection

For a nutty twist, drizzle melted peanut butter over the finished shamrocks before they harden. The combination of peanut butter, chocolate, and pretzels is a match made in heaven.

Minty Fresh Upgrade

Since St. Patrick’s Day and mint flavors go hand in hand, consider adding a drop of peppermint extract to the candy melts for a refreshing touch. You can also use mint-flavored M&Ms for an extra burst of coolness.

White Chocolate Elegance

If you prefer a sweeter and creamier taste, use white chocolate instead of candy melts. Pairing it with golden sugar sprinkles adds a touch of sophistication to these fun treats.

Filled Pretzel Shamrocks

For an extra indulgent variation, fill each pretzel with melted chocolate before assembling the shamrock shape. This method takes a little more time but results in a richer bite with a gooey chocolate center.

Ingredients:

  • Mini Pretzel Twists (Snyder’s Itty-Bitty Mini Pretzel Twists work best, but regular mini pretzel twists can be used)
  • Candy Melts (Wilton Bright Green and White Candy Melts)
  • Green M&M’s
  • Green Sugar Sprinkles
  • Wax or Parchment Paper

Directions:

  1. Prepare Your Workspace – Cover your work surface with wax or parchment paper and secure the corners with tape.
  2. Sort Your Pretzels – Divide pretzels into groups of three, discarding any broken pieces.
  3. Melt the Candy – Melt the green and white candy melts separately, following package directions.
  4. Form the Shamrocks – Arrange three pretzels in a triangular shape to resemble a shamrock.
  5. Dip the Pretzels – Using a fork, dip each pretzel in melted candy, gently shake off excess, and place it on the parchment paper to harden.
  6. Assemble the Shamrocks – Place the dipped pretzels together so that their sides touch.
  7. Secure the Center – Add a small dollop of melted candy to the center where the pretzels meet.
  8. Add the M&M Touch – Place a green M&M in the center of each shamrock.
  9. Sprinkle for a Festive Look – Lightly dust the shamrocks with green sugar sprinkles.
  10. Let Them Set – Allow the cookies to dry completely so they harden into one piece.

Optional Variation: For a filled version, first fill each pretzel with melted candy before connecting them to form the shamrock.

Nutritional Highlights:

(Approximate per serving, depending on portion size)

  • Calories: ~100 per shamrock
  • Carbohydrates: 12g
  • Fat: 4g
  • Protein: 1g
  • Sugar: 7g

These adorable no-bake cookies are the perfect mix of salty, sweet, and festive fun! Enjoy them at your St. Patrick’s Day celebration.

Frequently Asked Questions

1. How Long Do These Cookies Last?

If stored properly in an airtight container, these treats will stay fresh for up to a week. The key is keeping them in a cool, dry place to prevent the chocolate from melting or the pretzels from becoming stale.

2. Can I Use Different Types of Pretzels?

Yes! Mini pretzel twists work best for creating the shamrock shape, but if you can’t find them, you can use regular-sized mini pretzels. Just keep in mind that larger pretzels may require more melted chocolate to hold their shape.

3. What’s the Best Way to Melt the Candy Melts?

The easiest method is using a microwave. Heat the candy melts in 20-second intervals, stirring in between to prevent burning. If you prefer a stovetop method, use a double boiler to gently melt the candy without overheating it.

4. Can I Make These in Advance?

Absolutely! These cookies are great for making ahead of time. If you’re preparing them for an event, you can make them a day or two in advance and store them in an airtight container.

5. What Can I Use Instead of Candy Melts?

If you don’t have candy melts on hand, you can use white chocolate chips mixed with a teaspoon of vegetable oil. This helps create a smooth, easy-to-dip consistency.

6. How Can I Prevent the Candy from Hardening Too Quickly?

If you find that the candy melts are hardening before you finish assembling the shamrocks, try working in small batches. You can also keep the melted candy in a warm water bath to maintain its liquid consistency.

7. Can I Add More Decorations?

Of course! These shamrock cookies are a blank canvas for creativity. Try adding gold sugar pearls for a leprechaun treasure effect or drizzling them with melted dark chocolate for extra flair.

Conclusion: A Treat That’s More Than Just a Cookie

At the heart of every holiday treat lies more than just ingredients—it’s about the experience of creating something special, the joy of sharing it with others, and the nostalgia that lingers long after the last bite is gone. These Shamrock Chocolate Pretzel M&M Cookies embody all of that.

They remind us that even the simplest traditions can hold the most meaning. Whether you’re making them with your kids, surprising your coworkers, or simply indulging in a little festive sweetness for yourself, these treats bring a bit of luck and happiness to everyone who enjoys them.

So, as St. Patrick’s Day approaches, take a moment to celebrate not just with green outfits and clover decorations, but with something homemade, heartfelt, and delicious. After all, the best traditions are the ones that taste as good as they feel.

aiting

Shamrock Chocolate Pretzel M&M Cookies: A Sweet Twist on Tradition

Celebrate St. Patrick’s Day in style with these festive, no-bake treats! Combining the perfect crunch of mini pretzel twists with a sweet, colorful candy coating and a pop of green from M&M’s, these shamrock-shaped cookies are a delightful blend of salty and sweet—ideal for parties, snacks, or any day you need a little luck!
Course: No-Bake Cookies / Party Snacks
Cuisine: Festive / American-Inspired

Ingredients
  

  • For this recipe you’ll need mini pretzel twists (Snyder’s Itty-Bitty Mini Pretzel Twists work best, though any mini pretzel twists will do), green and white candy melts (preferably Wilton Bright Green and White), green M&M’s, and green sugar sprinkles. Also, have some wax or parchment paper on hand to set up your workspace.

Method
 

  1. Set Up Your Workspace: Cover your work surface with wax or parchment paper and secure the corners with tape so it stays in place.
  2. Sort the Pretzels: Group the mini pretzel twists into sets of three, discarding any broken pieces for a uniform look.
  3. Melt the Candy: Melt the green and white candy melts separately according to the package directions until they’re smooth and ready for dipping.
  4. Form Your Shamrocks: Arrange each group of three pretzels in a triangular pattern to mimic a shamrock.
  5. Dip Each Pretzel: Using a fork, dip each pretzel into the melted candy. Gently shake off any excess candy before placing them on your prepared paper to harden.
  6. Assemble the Shamrock: Once dipped, bring the pretzels together so their sides touch, forming the shamrock shape.
  7. Seal the Center: Add a small dollop of melted candy at the center where the pretzels meet to secure the shape.
  8. Finish with a Touch of Festivity: Place a green M&M in the very center of each shamrock.
  9. Sprinkle the Fun: Lightly dust the assembled shamrocks with green sugar sprinkles for that extra festive flair.
  10. Let Set: Allow the cookies to dry completely until the candy coating hardens and holds the shamrock together.
  11. Optional Variation: For a delicious twist, try filling each pretzel with a little melted candy before assembling the shamrock for an extra gooey treat.

Notes

• Since these are no-bake cookies, patience is key—make sure they set fully before serving.
• They’re best enjoyed fresh; store any extras in an airtight container to keep them crisp.
• Adjust the dipping and assembly process as needed to create uniformly shaped shamrocks.

Stay Connected

Get recipes via email: