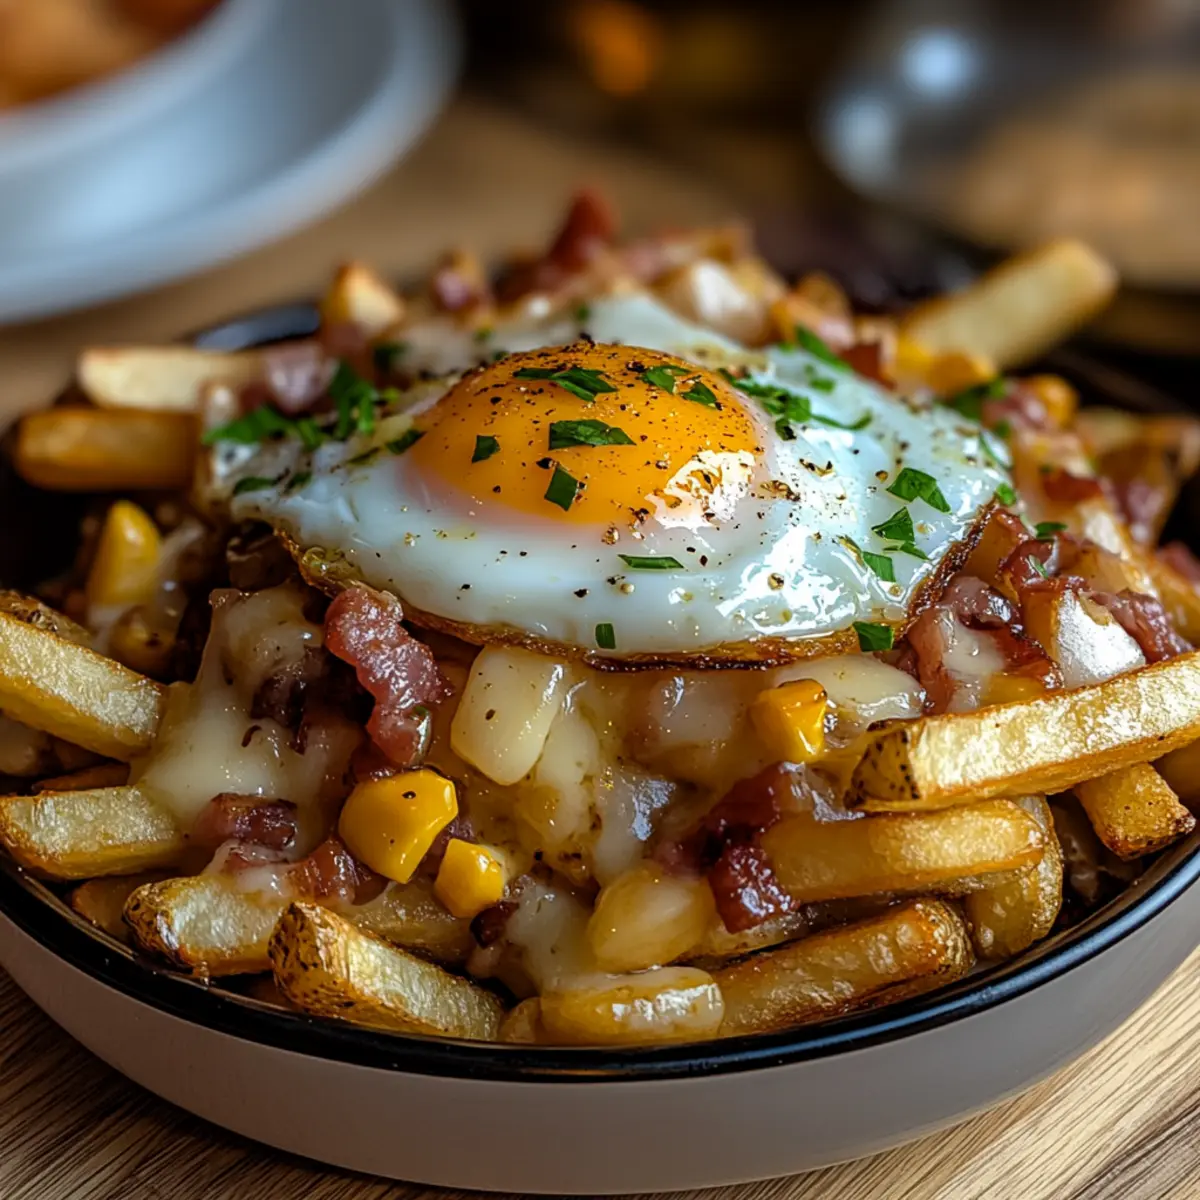
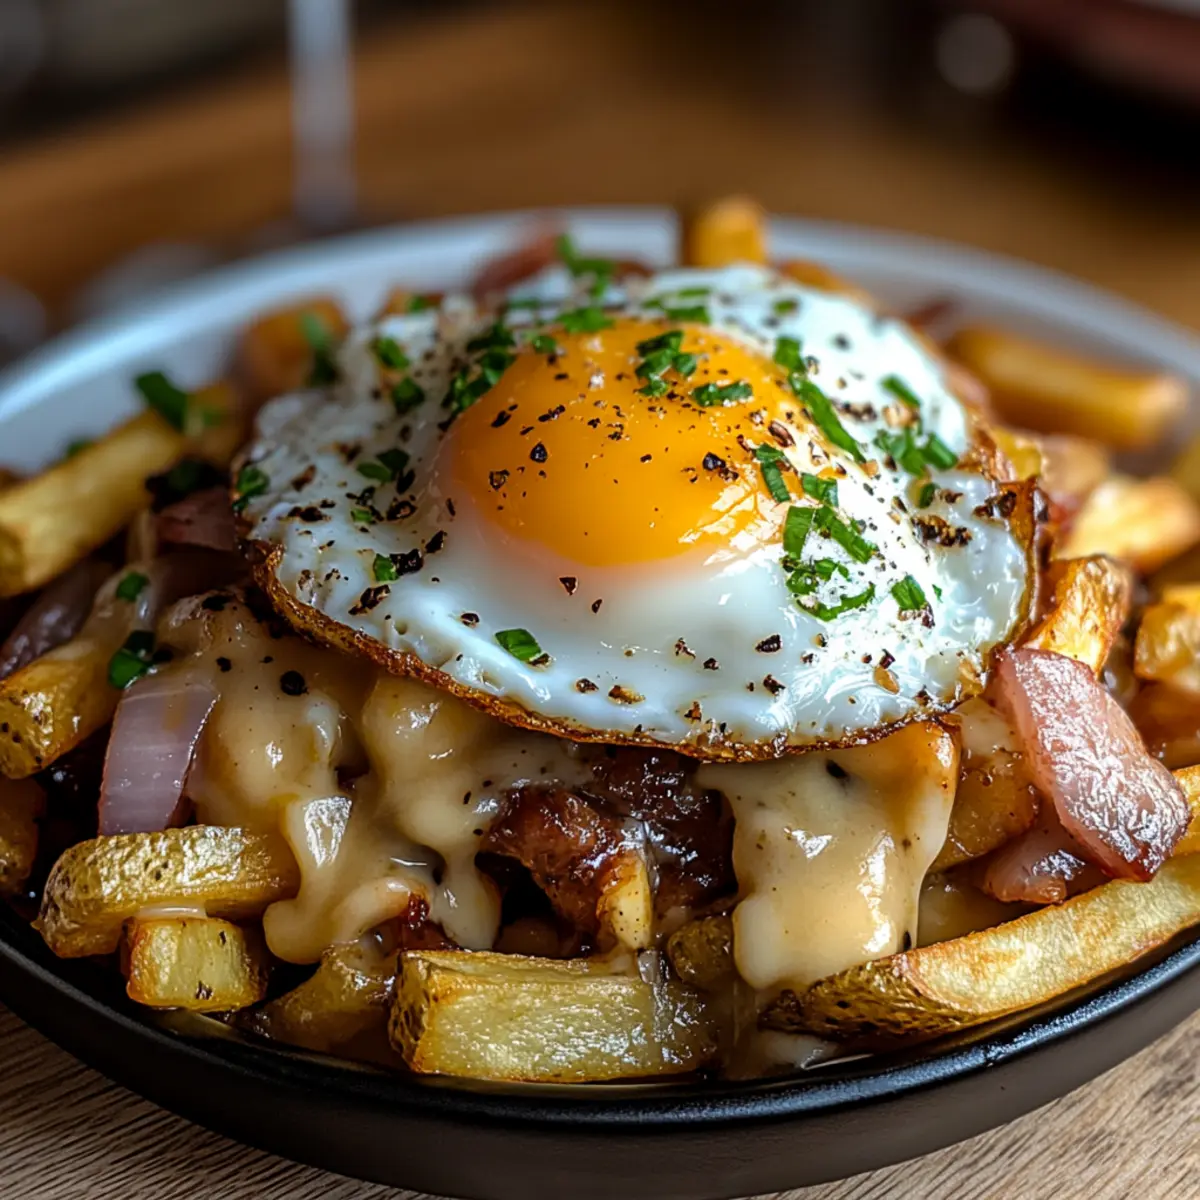
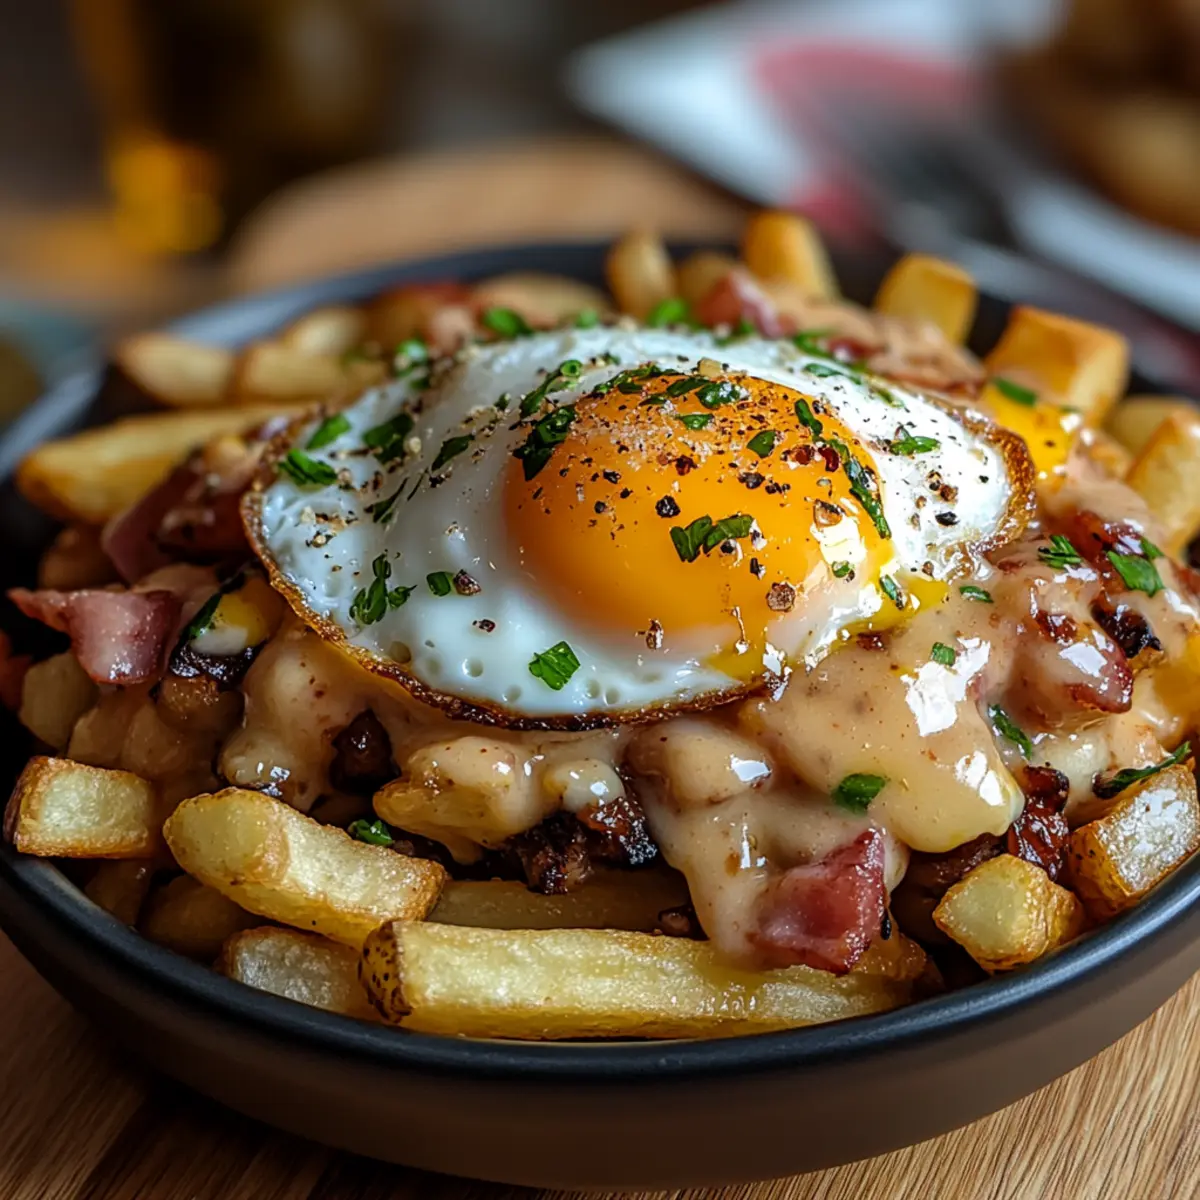
Savory Chicken Croissant Bites that Everyone Will Love!

Introduction to Savory Chicken Croissant Bites

There’s something magical about bite-sized treats that bring people together. Savory Chicken Croissant Bites are just that—delicious, creamy, and oh-so-easy to whip up. Whether you’re hosting a game night or just looking for a quick solution for a busy day, these little pastries are sure to impress. I remember the first time I made them; the aroma filled my kitchen, and my friends couldn’t resist coming back for seconds. With just a handful of ingredients, you can create a dish that feels gourmet without the fuss. Let’s dive into this delightful recipe!

Why You’ll Love This Savory Chicken Croissant Bites

These Savory Chicken Croissant Bites are a game-changer for any gathering. They’re quick to prepare, taking just 35 minutes from start to finish. The flaky croissant exterior pairs perfectly with the creamy, flavorful filling, making each bite a delight. Plus, they’re versatile enough to please even the pickiest eaters. Trust me, once you serve these, they’ll become a staple in your recipe rotation!

Ingredients for Savory Chicken Croissant Bites

Gathering the right ingredients is the first step to creating these delightful Savory Chicken Croissant Bites. Here’s what you’ll need:

  • Croissants: The star of the show! Flaky and buttery, they provide the perfect vessel for our filling.
  • Cooked Chicken: Shredded chicken adds protein and heartiness. You can use rotisserie chicken for convenience.
  • Cream Cheese: This creamy base binds everything together, giving a rich texture.
  • Shredded Cheddar Cheese: Adds a sharp, tangy flavor that complements the chicken beautifully.
  • Ranch Dressing: A zesty kick that enhances the overall taste. Feel free to use homemade ranch for a personal touch.
  • Garlic Powder: A must for that aromatic depth. It’s a simple way to elevate the flavor.
  • Onion Powder: Adds a subtle sweetness and complexity to the filling.
  • Salt and Black Pepper: Essential seasonings that bring all the flavors together.
  • Fresh Chives (optional): For a pop of color and a mild onion flavor. They’re a lovely garnish too!
  • Egg (for egg wash): This gives the croissant bites a beautiful golden finish when baked.

For those looking to mix things up, consider adding diced jalapeños for a spicy kick or substituting chicken with turkey or ham for a different flavor profile. You can find the exact quantities for each ingredient at the bottom of the article, ready for printing!

How to Make Savory Chicken Croissant Bites

Creating these Savory Chicken Croissant Bites is a breeze! Follow these simple steps, and you’ll have a delicious appetizer ready in no time. Let’s get started!

Step 1: Preheat the Oven

First things first, preheat your oven to 375°F (190°C). This is crucial for achieving that perfect golden-brown finish. While the oven heats up, line a baking sheet with parchment paper. This ensures even baking and makes cleanup a snap!

Step 2: Prepare the Chicken Mixture

In a mixing bowl, combine the shredded chicken, cream cheese, cheddar cheese, ranch dressing, garlic powder, onion powder, salt, black pepper, and chives (if using). Mix until everything is well combined. This step is key for flavor, so don’t rush it! You want every bite to be packed with deliciousness.

Step 3: Fill the Croissants

Now, take each croissant quarter and place a generous spoonful of the chicken mixture in the center. Fold the croissant over the filling and pinch the edges to seal. Make sure they’re well-sealed to prevent any leakage during baking. Trust me, no one wants a messy oven!

Step 4: Arrange on Baking Sheet

Place the filled croissant bites on the prepared baking sheet. Brush the tops with the beaten egg for that beautiful golden finish. This little step adds a lovely color and shine that makes them look irresistible!

Step 5: Bake to Perfection

Pop the baking sheet into your preheated oven and bake for 15-20 minutes. Keep an eye on them as they bake. You want them to be golden brown and puffed, but not over-baked. The aroma will be heavenly, and you’ll be counting down the minutes!

Step 6: Cool and Serve

Once they’re out of the oven, let the croissant bites cool for a few minutes. This allows the filling to set slightly, making them easier to handle. Then, serve them warm and watch them disappear!

Tips for Success

  • Use fresh croissants for the best texture and flavor.
  • Don’t overfill the croissants; a spoonful of filling is just right.
  • Experiment with different cheeses for unique flavors.
  • Let the croissant bites cool slightly before serving to avoid burns.
  • For a crispy bottom, place the baking sheet on the lower rack of the oven.

Equipment Needed

  • Baking Sheet: A standard baking sheet works well. If you don’t have one, a large oven-safe dish will do.
  • Parchment Paper: This helps with easy cleanup. Aluminum foil can be a substitute.
  • Mixing Bowl: Any large bowl will suffice for mixing the filling.
  • Whisk or Fork: Use this for beating the egg wash; a fork is perfectly fine!

Variations

  • Spicy Kick: Add diced jalapeños or a splash of hot sauce to the chicken mixture for a fiery twist.
  • Herb Infusion: Mix in fresh herbs like parsley or dill for an aromatic touch that brightens the flavor.
  • Cheesy Delight: Swap out cheddar for pepper jack or mozzarella for a different cheesy experience.
  • Vegetarian Option: Replace chicken with sautéed mushrooms and spinach for a hearty, meat-free version.
  • Gluten-Free: Use gluten-free croissants to make this dish suitable for those with dietary restrictions.

Serving Suggestions

  • Pair with a Salad: A fresh garden salad adds a crisp contrast to the warm croissant bites.
  • Dip Options: Serve with extra ranch dressing or a zesty marinara for dipping.
  • Drink Pairings: A chilled white wine or sparkling lemonade complements the flavors beautifully.
  • Presentation: Arrange on a platter with fresh herbs for a pop of color and elegance.

FAQs about Savory Chicken Croissant Bites

Can I make Savory Chicken Croissant Bites ahead of time?

Absolutely! You can prepare the filling and fill the croissants a few hours in advance. Just cover them and refrigerate until you’re ready to bake. This makes them a perfect option for parties!

What can I substitute for chicken in this recipe?

If you’re looking for alternatives, cooked turkey or ham works wonderfully. For a vegetarian option, sautéed mushrooms and spinach can create a delicious filling that everyone will enjoy.

How do I store leftovers?

Store any leftover Savory Chicken Croissant Bites in an airtight container in the fridge for up to three days. Reheat them in the oven for a few minutes to regain that crispy texture.

Can I freeze these croissant bites?

Yes! You can freeze the unbaked croissant bites. Just assemble them, place them on a baking sheet, and freeze until solid. Then transfer to a freezer bag. Bake from frozen, adding a few extra minutes to the cooking time.

What dipping sauces pair well with these bites?

Ranch dressing is a classic choice, but you can also try a spicy aioli or a tangy barbecue sauce for a fun twist. The options are endless!

Final Thoughts

Creating Savory Chicken Croissant Bites is more than just cooking; it’s about bringing joy to your table. The delightful combination of flaky croissants and creamy filling makes every bite a celebration. Whether you’re sharing them with friends during a game night or enjoying them as a quick snack, these bites are sure to impress. I love how they can be customized to suit any palate, making them a versatile addition to your recipe collection. So, roll up your sleeves, gather your ingredients, and let the aroma of these delicious bites fill your kitchen. Happy cooking!

Paul

Savory Chicken Croissant Bites that Everyone Will Love!

Savory Chicken Croissant Bites are delicious, bite-sized pastries filled with a creamy chicken mixture, perfect for any gathering.
Prep Time 15 minutes
Cook Time 20 minutes
Total Time 35 minutes
Course: Appetizer
Cuisine: American
Calories: 250

Ingredients
  

  • 2 large croissants cut into quarters
  • 1 cup cooked chicken shredded
  • 1/2 cup cream cheese softened
  • 1/4 cup shredded cheddar cheese
  • 1/4 cup ranch dressing
  • 1/4 teaspoon garlic powder
  • 1/4 teaspoon onion powder
  • 1/4 teaspoon salt
  • 1/4 teaspoon black pepper
  • 1 tablespoon fresh chives chopped (optional)
  • 1 egg beaten (for egg wash)

Method
 

  1. Preheat your oven to 375°F (190°C) and line a baking sheet with parchment paper.
  2. In a mixing bowl, combine the shredded chicken, cream cheese, cheddar cheese, ranch dressing, garlic powder, onion powder, salt, black pepper, and chives (if using). Mix until well combined.
  3. Take each croissant quarter and place a spoonful of the chicken mixture in the center. Fold the croissant over the filling and pinch the edges to seal.
  4. Place the filled croissant bites on the prepared baking sheet. Brush the tops with the beaten egg for a golden finish.
  5. Bake in the preheated oven for 15-20 minutes, or until the croissant bites are golden brown and puffed.
  6. Remove from the oven and let cool for a few minutes before serving.

Notes

  • For a spicy kick, add 1-2 tablespoons of diced jalapeños to the chicken mixture.
  • Substitute the chicken with cooked turkey or ham for a different flavor profile.

Mediterranean Spinach and Feta Cheese Crisps: Try This Easy Recipe!

Introduction to Mediterranean Spinach and Feta Cheese Crisps

There’s something magical about the combination of spinach and feta cheese, isn’t there? These Mediterranean Spinach and Feta Cheese Crisps are not just a snack; they’re a delightful way to bring a taste of the Mediterranean to your kitchen. Whether you’re looking for a quick solution for a busy day or a dish to impress your loved ones, this recipe has you covered. With just a handful of ingredients and minimal prep time, you can whip up a batch of these crispy delights that are both healthy and satisfying. Let’s dive into this culinary adventure!

Why You’ll Love This Mediterranean Spinach and Feta Cheese Crisps

These Mediterranean Spinach and Feta Cheese Crisps are a game-changer for anyone craving a quick, healthy snack. They come together in just 30 minutes, making them perfect for busy weeknights or unexpected guests. The crispy texture combined with the rich, savory flavors of feta and spinach will have your taste buds dancing. Plus, they’re gluten-free, so everyone can enjoy them without worry!

Ingredients for Mediterranean Spinach and Feta Cheese Crisps

Gathering the right ingredients is the first step to creating these delicious Mediterranean Spinach and Feta Cheese Crisps. Here’s what you’ll need:

  • Fresh spinach: This leafy green is packed with nutrients and adds a vibrant color to your crisps.
  • Feta cheese: Crumbled feta brings a tangy flavor that perfectly complements the spinach.
  • Shredded mozzarella cheese: This cheese melts beautifully, giving the crisps a gooey texture.
  • Grated Parmesan cheese: Adds a nutty depth and enhances the overall flavor profile.
  • Garlic powder: A must-have for that aromatic kick; it elevates the taste without overpowering.
  • Dried oregano: This herb brings a hint of Mediterranean essence, making every bite feel like a vacation.
  • Black pepper and salt: Essential seasonings that enhance all the flavors in the mixture.
  • Large egg: Acts as a binder, helping to hold everything together for a perfect crisp.
  • Almond flour: A gluten-free alternative that gives the crisps a nice texture while keeping them light.
  • Sun-dried tomatoes (optional): For a burst of sweetness and a pop of color, these can be a delightful addition.
  • Sliced black olives (optional): They add a briny flavor that pairs well with the other ingredients.

For exact measurements, check the bottom of the article where you can find everything listed for easy printing. Enjoy the process of gathering these ingredients; each one plays a vital role in creating a snack that’s not only tasty but also healthy!

How to Make Mediterranean Spinach and Feta Cheese Crisps

Creating these Mediterranean Spinach and Feta Cheese Crisps is a breeze! Follow these simple steps, and you’ll have a delicious snack ready in no time. Let’s get started!

Step 1: Preheat the Oven

First things first, preheat your oven to 375°F (190°C). This step is crucial because it ensures even cooking. While the oven heats up, line a baking sheet with parchment paper. This will prevent the crisps from sticking and make cleanup a snap!

Step 2: Mix the Cheese and Spinach

In a large mixing bowl, combine the chopped spinach, feta cheese, shredded mozzarella, and grated Parmesan. Use a spatula or your hands to mix everything together until well combined. The spinach should be evenly distributed among the cheeses, creating a colorful and flavorful mixture.

Step 3: Add the Egg

Next, crack a large egg into a separate small bowl and beat it lightly. Then, pour the beaten egg into the cheese and spinach mixture. The egg acts as a binder, helping to hold everything together. Stir until the egg is fully incorporated, and the mixture starts to come together.

Step 4: Incorporate Almond Flour

Now, it’s time to add the almond flour. Gradually sprinkle it into the mixture while stirring. This will help achieve the right dough consistency. You want it to be thick enough to hold its shape but not too dry. If it feels too wet, add a little more almond flour until you reach the desired texture.

Step 5: Shape the Crisps

Using a tablespoon, scoop out portions of the mixture and place them onto the prepared baking sheet. Flatten each scoop slightly to form a crisp shape. Make sure to leave some space between each one, as they will spread a bit while baking. This is where you can get creative with the shapes!

Step 6: Bake to Perfection

Pop the baking sheet into the preheated oven and bake for 15-20 minutes. Keep an eye on them! You’re looking for golden brown edges and a firm texture. The aroma of the Mediterranean will fill your kitchen, making it hard to resist sneaking a taste!

Step 7: Cool and Serve

Once baked, remove the crisps from the oven and let them cool for a few minutes on the baking sheet. Then, transfer them to a wire rack to cool completely. This step is essential for achieving that perfect crispiness. Serve them warm or at room temperature, and watch them disappear!

Tips for Success

  • Make sure to chop the spinach finely for even distribution in the mixture.
  • Use fresh feta cheese for the best flavor; crumbled works best.
  • Don’t skip the parchment paper; it’s a lifesaver for easy cleanup.
  • Experiment with different herbs like basil or thyme for a unique twist.
  • Let the crisps cool completely for maximum crunch before serving.

Equipment Needed

  • Baking sheet: A standard baking sheet works well; a stone or cast iron pan can add extra crispiness.
  • Parchment paper: Essential for easy cleanup; aluminum foil can be a substitute.
  • Mixing bowls: Use any size; a large bowl is ideal for mixing.
  • Spatula: A rubber spatula helps combine ingredients smoothly; a wooden spoon is a good alternative.
  • Tablespoon: For portioning the mixture; a cookie scoop can also do the trick.

Variations

  • Spicy Kick: Add a pinch of red pepper flakes to the mixture for a zesty twist.
  • Herb Infusion: Swap out oregano for fresh dill or basil to change up the flavor profile.
  • Cheese Lovers: Mix in some shredded cheddar or pepper jack for an extra cheesy experience.
  • Veggie Boost: Incorporate finely chopped bell peppers or zucchini for added nutrition and texture.
  • Nut-Free Option: Replace almond flour with oat flour or ground sunflower seeds for a nut-free alternative.

Serving Suggestions

  • Pair these Mediterranean Spinach and Feta Cheese Crisps with a refreshing tzatziki sauce for dipping.
  • Serve alongside a crisp green salad drizzled with lemon vinaigrette for a light meal.
  • Complement with a glass of chilled white wine or sparkling water with lemon.
  • For a festive touch, arrange on a colorful platter with olives and cherry tomatoes.

FAQs about Mediterranean Spinach and Feta Cheese Crisps

Can I make these Mediterranean Spinach and Feta Cheese Crisps ahead of time?

Absolutely! You can prepare the mixture and shape the crisps in advance. Just store them in the fridge for up to a day before baking. This makes it super convenient for last-minute gatherings!

What can I substitute for feta cheese?

If feta isn’t your thing, try using goat cheese or ricotta for a different flavor. Both will still give you that creamy texture and delicious taste.

How do I store leftover crisps?

Store any leftover Mediterranean Spinach and Feta Cheese Crisps in an airtight container at room temperature for up to two days. For longer storage, keep them in the fridge, but they may lose some crispiness.

Can I freeze these crisps?

Yes! You can freeze the uncooked mixture in scoops on a baking sheet. Once frozen, transfer them to a freezer bag. Bake from frozen, adding a few extra minutes to the cooking time.

What can I serve with these crisps?

These crisps pair wonderfully with a variety of dips like hummus or tzatziki. You can also serve them alongside a fresh salad or as part of a Mediterranean platter with olives and roasted peppers.

Final Thoughts

Making Mediterranean Spinach and Feta Cheese Crisps is more than just cooking; it’s about creating a moment of joy in your kitchen. The delightful aroma wafting through your home as they bake is enough to make anyone’s mouth water. Each crispy bite is a celebration of flavors, bringing a taste of the Mediterranean right to your table. Whether you’re enjoying them as a snack or serving them at a gathering, these crisps are sure to impress. So roll up your sleeves, gather your ingredients, and let the culinary adventure begin. You won’t regret it!

Paul

Mediterranean Spinach and Feta Cheese Crisps: Try This Easy Recipe!

A delicious and easy recipe for Mediterranean Spinach and Feta Cheese Crisps, perfect for a healthy snack or appetizer.
Prep Time 10 minutes
Cook Time 20 minutes
Total Time 30 minutes
Servings: 6 servings
Course: Appetizer
Cuisine: Mediterranean
Calories: 150

Ingredients
  

  • 1 cup fresh spinach chopped
  • 1 cup feta cheese crumbled
  • 1 cup shredded mozzarella cheese
  • 1/2 cup grated Parmesan cheese
  • 1/2 teaspoon garlic powder
  • 1/2 teaspoon dried oregano
  • 1/4 teaspoon black pepper
  • 1/4 teaspoon salt
  • 1 large egg
  • 1/2 cup almond flour
  • 1/4 cup chopped sun-dried tomatoes optional
  • 1/4 cup sliced black olives optional

Method
 

  1. Preheat your oven to 375°F (190°C) and line a baking sheet with parchment paper.
  2. In a large mixing bowl, combine the chopped spinach, feta cheese, mozzarella cheese, Parmesan cheese, garlic powder, oregano, black pepper, and salt. Mix well.
  3. In a separate small bowl, beat the egg and then add it to the cheese mixture. Stir until fully combined.
  4. Gradually add the almond flour to the mixture, stirring until a thick dough forms. If using, fold in the sun-dried tomatoes and olives.
  5. Using a tablespoon, scoop out portions of the mixture and place them onto the prepared baking sheet, flattening each scoop slightly to form a crisp shape.
  6. Bake in the preheated oven for 15-20 minutes, or until the edges are golden brown and the crisps are firm to the touch.
  7. Remove from the oven and let cool for a few minutes before transferring to a wire rack to cool completely.

Notes

  • For a spicier version, add a pinch of red pepper flakes to the mixture.
  • Substitute the spinach with kale or arugula for a different flavor profile.

Pistachio Cream Delight: A Simple Recipe You’ll Love

Introduction to Pistachio Cream Delight

There’s something magical about desserts that whisk you away to a cozy corner of your childhood. The Pistachio Cream Delight does just that. It’s rich, creamy, and bursting with the nutty flavor of pistachios, making it a perfect treat for any occasion. Whether you’re looking to impress guests or simply indulge after a long day, this dessert is a quick solution that doesn’t skimp on taste. With just a few simple ingredients, you can create a delightful experience that brings smiles and satisfaction to the table. Let’s dive into this creamy adventure!

Why You’ll Love This Pistachio Cream Delight

This Pistachio Cream Delight is not just a dessert; it’s a celebration of flavor and simplicity. You’ll love how easy it is to whip up, taking only about 15 minutes of active time. The creamy texture and nutty taste will have your taste buds dancing. Plus, it’s a versatile treat that can impress guests or satisfy your sweet tooth after a long day. Who wouldn’t love that?

Ingredients for Pistachio Cream Delight

Gathering the right ingredients is the first step to creating your Pistachio Cream Delight. Here’s what you’ll need:

  • Whole Milk: This forms the creamy base of your dessert, providing richness and a smooth texture.
  • Heavy Cream: Adds an indulgent creaminess that elevates the dessert to a whole new level.
  • Granulated Sugar: Sweetens the mixture, balancing the nutty flavors of the pistachios.
  • Cornstarch: Acts as a thickening agent, giving the cream its luscious consistency.
  • Salt: Just a pinch enhances the overall flavor, making the sweetness pop.
  • Egg Yolks: These provide richness and help to create a custard-like texture.
  • Vanilla Extract: A classic flavor that complements the pistachio beautifully.
  • Pistachio Paste: The star of the show! This brings that distinct nutty flavor and vibrant color.
  • Chopped Pistachios (for garnish): Adds a delightful crunch and visual appeal to your dessert.

For those looking to mix things up, consider substituting half of the heavy cream with additional milk for a lighter version. A splash of almond extract can also add an exciting twist to the flavor profile. You can find all the exact measurements at the bottom of the article, ready for printing!

How to Make Pistachio Cream Delight

Creating your own Pistachio Cream Delight is a rewarding experience. Follow these simple steps, and you’ll be on your way to a creamy, nutty dessert that will impress everyone!

Step 1: Heat the Milk and Cream

Start by combining the whole milk and heavy cream in a medium saucepan. Set the heat to medium and stir occasionally. You want the mixture to get hot but not boiling. This gentle heating helps to blend the flavors beautifully.

Step 2: Prepare the Egg Mixture

While the milk and cream are heating, grab a separate bowl. Whisk together the granulated sugar, cornstarch, and salt. Then, add the egg yolks and whisk until the mixture is smooth and creamy. This step is crucial for achieving that rich texture.

Step 3: Temper the Eggs

Now comes the fun part! Gradually pour the hot milk mixture into the egg yolk mixture while whisking constantly. This process, known as tempering, prevents the eggs from scrambling. It’s all about creating a silky custard base for your Pistachio Cream Delight.

Step 4: Cook the Mixture

Return the combined mixture to the saucepan. Cook over medium heat, stirring constantly. You’ll notice it thickening and bubbling, which should take about 5-7 minutes. Keep an eye on it; you want it thick enough to coat the back of a spoon.

Step 5: Add Flavorings

Once thickened, remove the saucepan from the heat. Stir in the vanilla extract and pistachio paste until everything is well combined. The aroma will be heavenly, and you’ll know you’re on the right track!

Step 6: Chill the Cream

Transfer the pistachio cream to a bowl. Cover it with plastic wrap, pressing it directly onto the surface to prevent a skin from forming. Refrigerate for at least 2 hours, or until it’s chilled and ready to serve. Patience is key here!

Step 7: Serve the Delight

Once chilled, give the cream a gentle stir before serving. Spoon it into dessert cups and top with chopped pistachios for that extra crunch. Your Pistachio Cream Delight is now ready to be enjoyed!

Tips for Success

  • Always whisk continuously when tempering the eggs to avoid scrambling.
  • Use a heavy-bottomed saucepan to ensure even heating and prevent burning.
  • For a smoother texture, strain the mixture before chilling.
  • Chill the cream overnight for the best flavor and consistency.
  • Experiment with different toppings like whipped cream or chocolate shavings for variety.

Equipment Needed

  • Medium Saucepan: A heavy-bottomed one works best to prevent scorching.
  • Whisk: Essential for mixing and tempering; a fork can work in a pinch.
  • Mixing Bowl: Any bowl will do, but glass or stainless steel is ideal.
  • Plastic Wrap: To cover the cream; a lid can also suffice.
  • Dessert Cups: Use any small cups or bowls for serving.

Variations

  • Nut-Free Option: Replace pistachio paste with sunflower seed butter for a nut-free alternative.
  • Vegan Version: Use almond milk and coconut cream, and substitute egg yolks with a cornstarch slurry for a plant-based delight.
  • Chocolate Twist: Swirl in some melted dark chocolate for a rich chocolate-pistachio fusion.
  • Fruit Infusion: Add a layer of fresh berries or a fruit compote on top for a refreshing contrast.
  • Spiced Delight: Incorporate a pinch of cardamom or cinnamon for a warm, aromatic flavor.

Serving Suggestions

  • Pair with a light, fruity dessert wine for a sophisticated touch.
  • Serve alongside fresh berries for a burst of color and flavor.
  • Garnish with a sprig of mint for a refreshing contrast.
  • Present in elegant dessert cups for a classy look.
  • Drizzle with honey or chocolate sauce for added sweetness.

FAQs about Pistachio Cream Delight

Can I make Pistachio Cream Delight ahead of time?

Absolutely! This dessert actually benefits from chilling overnight. It allows the flavors to meld beautifully, making it even more delicious when served the next day.

What can I use instead of pistachio paste?

If you can’t find pistachio paste, you can blend roasted pistachios with a bit of oil until smooth. Alternatively, almond paste can work in a pinch, though it will change the flavor profile slightly.

How long will the Pistachio Cream Delight last in the fridge?

This creamy treat can be stored in the refrigerator for up to 3 days. Just make sure to cover it well to keep it fresh!

Can I freeze Pistachio Cream Delight?

While it’s best enjoyed fresh, you can freeze it for up to a month. Just remember to thaw it in the fridge before serving, and give it a good stir to restore its creamy texture.

What are some good toppings for Pistachio Cream Delight?

Chopped pistachios are a classic choice, but you can also try whipped cream, chocolate shavings, or fresh fruit for a delightful twist. Get creative!

Final Thoughts

Creating your own Pistachio Cream Delight is more than just making a dessert; it’s about crafting a moment of joy. Each spoonful is a celebration of flavors that dance on your palate, evoking memories of laughter and shared experiences. Whether you’re serving it at a dinner party or enjoying it solo after a long day, this creamy treat brings a sense of comfort and indulgence. The vibrant green hue and nutty aroma invite you to savor every bite. So, roll up your sleeves and dive into this delightful recipe; happiness is just a whisk away!

Paul

Pistachio Cream Delight: A Simple Recipe You’ll Love

Pistachio Cream Delight is a rich and creamy dessert that combines the flavors of pistachio and vanilla, perfect for any occasion.
Prep Time 15 minutes
Cook Time 10 minutes
Total Time 2 hours 25 minutes
Servings: 4 servings
Course: Dessert
Cuisine: American
Calories: 320

Ingredients
  

  • 1 cup whole milk
  • 1/2 cup heavy cream
  • 1/2 cup granulated sugar
  • 3 tablespoons cornstarch
  • 1/4 teaspoon salt
  • 3 large egg yolks
  • 1 teaspoon vanilla extract
  • 1/2 cup pistachio paste
  • 1/4 cup chopped pistachios for garnish

Method
 

  1. In a medium saucepan, combine the milk and heavy cream over medium heat. Stir occasionally until the mixture is hot but not boiling. Remove from heat.
  2. In a separate bowl, whisk together the sugar, cornstarch, and salt. Add the egg yolks and whisk until smooth.
  3. Gradually pour the hot milk mixture into the egg yolk mixture, whisking constantly to temper the eggs.
  4. Return the mixture to the saucepan and cook over medium heat, stirring constantly until it thickens and begins to bubble, about 5-7 minutes.
  5. Remove from heat and stir in the vanilla extract and pistachio paste until well combined.
  6. Transfer the pistachio cream to a bowl, cover with plastic wrap directly on the surface to prevent a skin from forming, and refrigerate for at least 2 hours or until chilled.
  7. Once chilled, stir the cream gently before serving. Spoon into dessert cups and top with chopped pistachios for garnish.

Notes

  • For a lighter version, substitute half of the heavy cream with additional milk.
  • Try adding a splash of almond extract for an extra layer of flavor.

Quinoa Apple Salad: A Refreshing Twist on Nutrition!

Introduction to Quinoa Apple Salad

There’s something magical about a salad that feels both refreshing and hearty. The Quinoa Apple Salad is just that—a delightful blend of flavors and textures that can brighten up any meal. I remember the first time I made this dish; it was a busy weeknight, and I needed something quick yet satisfying. This salad became my go-to solution. With its crunchy apples, chewy cranberries, and nutty quinoa, it’s perfect for impressing friends or simply enjoying a light dinner. Plus, it’s packed with nutrients, making it a guilt-free indulgence!

Why You’ll Love This Quinoa Apple Salad

This Quinoa Apple Salad is a game-changer for anyone juggling a busy lifestyle. It’s quick to whip up, taking just 25 minutes from start to finish. The combination of sweet apples and tart cranberries creates a flavor explosion that dances on your palate. Plus, it’s versatile enough to serve as a light meal or a vibrant side dish. You’ll love how it satisfies your hunger while keeping things healthy and delicious!

Ingredients for Quinoa Apple Salad

Gathering the right ingredients is the first step to creating a delicious Quinoa Apple Salad. Here’s what you’ll need:

  • Quinoa: This tiny grain is packed with protein and fiber, making it a nutritious base for your salad.
  • Water: Essential for cooking the quinoa to fluffy perfection.
  • Apple: A tart variety like Granny Smith adds a refreshing crunch and sweetness to the mix.
  • Celery: Finely chopped, it brings a satisfying crunch and a hint of earthiness.
  • Dried cranberries: These little gems add a burst of sweetness and a chewy texture.
  • Walnuts: Chopped walnuts contribute a nutty flavor and healthy fats, enhancing the salad’s richness.
  • Feta cheese (optional): Crumbled feta adds a creamy, tangy element that complements the other flavors beautifully.
  • Fresh parsley: Chopped parsley brightens the dish with its fresh flavor and vibrant color.
  • Olive oil: A drizzle of good-quality olive oil ties everything together, adding richness.
  • Apple cider vinegar: This tangy vinegar balances the sweetness of the apples and cranberries.
  • Honey: A touch of honey enhances the sweetness and rounds out the flavors.
  • Salt and pepper: Essential for seasoning, these staples elevate the overall taste.

For those looking to mix things up, consider adding grilled chicken or chickpeas for extra protein. You can also swap the apple for a pear or toss in some citrus segments for a zesty twist. Exact measurements for these ingredients can be found at the bottom of the article, ready for printing!

How to Make Quinoa Apple Salad

Creating this Quinoa Apple Salad is a breeze! Follow these simple steps, and you’ll have a delicious dish ready in no time. Let’s dive in!

Step 1: Cook the Quinoa

Start by rinsing the quinoa under cold water. This removes any bitterness. In a medium saucepan, combine the rinsed quinoa and water. Bring it to a boil over medium-high heat. Once boiling, reduce the heat to low, cover, and let it simmer for about 15 minutes. The quinoa should be fluffy and the water fully absorbed. After cooking, remove it from heat and let it sit covered for 5 minutes. Fluff it with a fork and allow it to cool.

Step 2: Prepare the Salad Ingredients

While the quinoa cools, it’s time to prep the other ingredients. Dice your apple into bite-sized pieces. I prefer a tart apple like Granny Smith for that refreshing crunch. Next, finely chop the celery and set it aside. Then, grab your dried cranberries and walnuts. If you’re using feta cheese, crumble it now. Finally, chop the fresh parsley to add a pop of color and flavor.

Step 3: Make the Dressing

In a small bowl, whisk together the olive oil, apple cider vinegar, honey, salt, and pepper. This dressing is the secret to tying all the flavors together. Make sure it’s well combined. Taste it and adjust the seasoning if needed. A little extra honey can enhance the sweetness if you like.

Step 4: Combine Everything

In a large bowl, combine the cooled quinoa with the diced apple, chopped celery, dried cranberries, walnuts, feta cheese (if using), and parsley. Pour the dressing over the salad and toss gently to combine. Be careful not to mash the ingredients; you want to keep that lovely texture!

Step 5: Serve or Chill

Your Quinoa Apple Salad is ready to enjoy! You can serve it immediately for a fresh crunch, or let it chill in the fridge for about 30 minutes. Chilling allows the flavors to meld beautifully. Either way, you’re in for a treat!

Tips for Success

  • Rinse quinoa thoroughly to remove bitterness and enhance flavor.
  • Let the quinoa cool completely before mixing to prevent wilting the salad.
  • Use a variety of apples for different flavors and textures.
  • Adjust the dressing to your taste; add more honey for sweetness or vinegar for tang.
  • For a heartier salad, consider adding grilled chicken or chickpeas.

Equipment Needed

  • Medium saucepan: Essential for cooking quinoa. A pot works too!
  • Large mixing bowl: Perfect for combining all ingredients. Any large bowl will do.
  • Whisk: Great for mixing the dressing. A fork can work in a pinch.
  • Cutting board and knife: Necessary for chopping fruits and veggies.

Variations

  • For a protein-packed version, add grilled chicken or chickpeas to the salad.
  • Swap the apple for a pear for a sweeter twist, or try citrus segments for a zesty kick.
  • Incorporate different nuts like almonds or pecans for a unique crunch.
  • Experiment with different cheeses, such as goat cheese or blue cheese, for varied flavors.
  • Add a handful of spinach or arugula for extra greens and nutrients.

Serving Suggestions

  • Pair the Quinoa Apple Salad with grilled chicken or fish for a complete meal.
  • Serve it alongside a warm, crusty baguette to soak up the flavors.
  • For drinks, a crisp white wine or sparkling water with lemon complements the salad beautifully.
  • Garnish with extra parsley or apple slices for an appealing presentation.

FAQs about Quinoa Apple Salad

Can I make Quinoa Apple Salad ahead of time?

Absolutely! This salad can be made a day in advance. Just keep it in the fridge, and the flavors will meld beautifully. Just remember to give it a good toss before serving!

Is Quinoa Apple Salad gluten-free?

Yes, quinoa is naturally gluten-free, making this salad a great option for those with gluten sensitivities. Just ensure that all other ingredients, like the dressing, are also gluten-free.

How long does Quinoa Apple Salad last in the fridge?

Stored in an airtight container, this salad can last up to 3 days in the fridge. However, for the best texture, I recommend enjoying it within 1-2 days.

Can I add more protein to the salad?

Definitely! Adding grilled chicken, chickpeas, or even some beans can boost the protein content. It makes for a heartier meal while keeping it nutritious.

What can I substitute for apples in this salad?

If apples aren’t your thing, pears work wonderfully as a substitute. You can also add citrus segments for a refreshing twist. The key is to keep that crunch!

Final Thoughts

Creating this Quinoa Apple Salad is more than just a cooking experience; it’s a celebration of flavors and textures that can brighten any day. Each bite offers a delightful crunch, a hint of sweetness, and a satisfying chew. Whether you’re enjoying it as a light meal or serving it at a gathering, this salad brings joy and nourishment to the table. I love how it effortlessly combines health and taste, making it a staple in my kitchen. So, grab your ingredients and dive into this refreshing dish—it’s sure to become a favorite in your home too!

Paul

Quinoa Apple Salad: A Refreshing Twist on Nutrition!

A refreshing and nutritious quinoa salad featuring apples, cranberries, and walnuts, perfect for a light meal or side dish.
Prep Time 10 minutes
Cook Time 15 minutes
Total Time 25 minutes
Servings: 4 servings
Course: Salad
Cuisine: American
Calories: 250

Ingredients
  

  • 1 cup quinoa rinsed and drained
  • 2 cups water
  • 1 medium apple diced (preferably a tart variety like Granny Smith)
  • 1/2 cup celery finely chopped
  • 1/2 cup dried cranberries
  • 1/4 cup walnuts chopped
  • 1/4 cup feta cheese crumbled (optional)
  • 1/4 cup fresh parsley chopped
  • 1/4 cup olive oil
  • 2 tablespoons apple cider vinegar
  • 1 tablespoon honey
  • Salt and pepper to taste

Method
 

  1. In a medium saucepan, combine the rinsed quinoa and water. Bring to a boil over medium-high heat. Once boiling, reduce the heat to low, cover, and simmer for about 15 minutes or until the quinoa is fluffy and the water is absorbed. Remove from heat and let it sit covered for 5 minutes. Fluff with a fork and allow to cool.
  2. In a large bowl, combine the diced apple, chopped celery, dried cranberries, walnuts, feta cheese (if using), and parsley.
  3. In a small bowl, whisk together the olive oil, apple cider vinegar, honey, salt, and pepper until well combined.
  4. Add the cooled quinoa to the large bowl with the other ingredients. Pour the dressing over the salad and toss gently to combine.
  5. Serve immediately or refrigerate for 30 minutes to allow the flavors to meld.

Notes

  • For a protein boost, add grilled chicken or chickpeas to the salad.
  • Substitute the apple with pear or add citrus segments for a different flavor profile.

Moroccan Fish Tagine: Discover the Secret Recipe!

Introduction to Moroccan Fish Tagine

There’s something magical about the aroma of spices wafting through the kitchen, isn’t there? When I first discovered Moroccan Fish Tagine, it felt like a culinary adventure right at home. This dish is not just a meal; it’s a celebration of flavors that can turn an ordinary weeknight into something special. Perfect for busy days, it comes together quickly, yet it impresses with its vibrant taste. Whether you’re cooking for family or friends, this tagine is sure to leave everyone asking for seconds. Let’s dive into this delightful recipe that’s as comforting as it is delicious!

Why You’ll Love This Moroccan Fish Tagine

This Moroccan Fish Tagine is a game-changer for anyone looking to whip up a delicious meal without spending hours in the kitchen. It’s quick, taking just 40 minutes from start to finish, and the flavors are simply out of this world. The combination of spices and fresh ingredients creates a dish that’s not only healthy but also bursting with taste. Trust me, your taste buds will thank you!

Ingredients for Moroccan Fish Tagine

Gathering the right ingredients is the first step to creating a mouthwatering Moroccan Fish Tagine. Here’s what you’ll need:

  • Olive oil: This is your base for sautéing, adding richness and flavor.
  • Onion: A finely chopped medium onion brings sweetness and depth to the dish.
  • Garlic: Minced garlic adds a punch of flavor that complements the spices beautifully.
  • Ground cumin: This spice offers a warm, earthy note that’s essential in Moroccan cuisine.
  • Ground coriander: It adds a citrusy, slightly sweet flavor that brightens the dish.
  • Smoked paprika: This gives a subtle smokiness, enhancing the overall taste.
  • Ground cinnamon: A pinch of cinnamon adds warmth and complexity to the sauce.
  • Cayenne pepper: Adjust this to your heat preference; it brings a nice kick!
  • Diced tomatoes: Canned tomatoes provide a juicy base for the sauce, adding acidity.
  • Vegetable broth: This adds depth and moisture, making the sauce rich and flavorful.
  • Honey: A touch of sweetness balances the spices and acidity of the tomatoes.
  • Green olives: Sliced olives introduce a briny flavor that complements the fish.
  • Fresh parsley: Chopped parsley adds a fresh, vibrant finish to the dish.
  • White fish fillets: Cod or tilapia works best, providing a flaky texture that absorbs the sauce.
  • Salt and pepper: Essential for seasoning, enhancing all the flavors in the dish.
  • Lemon wedges: For serving, a squeeze of lemon brightens the flavors even more.

For those looking to customize, consider adding chopped bell peppers or zucchini for extra texture. You can find all the exact measurements at the bottom of the article, ready for printing!

How to Make Moroccan Fish Tagine

Now that you have all your ingredients ready, let’s get cooking! Making Moroccan Fish Tagine is a straightforward process that will fill your kitchen with enticing aromas. Follow these simple steps, and you’ll have a delicious meal on the table in no time.

Step 1: Sauté the Aromatics

Start by heating the olive oil in a large skillet or tagine over medium heat. Once the oil is shimmering, toss in the finely chopped onion. Sauté it for about five minutes until it becomes soft and translucent. The smell will be heavenly!

Next, add the minced garlic along with the ground cumin, coriander, smoked paprika, cinnamon, and cayenne pepper. Stir everything together and let it cook for another minute or two. This step is crucial; it’s where the magic happens, and the spices release their full flavor.

Step 2: Create the Sauce

Now it’s time to build the sauce. Add the drained diced tomatoes, vegetable broth, and honey to the skillet. Stir everything together and bring the mixture to a gentle simmer. Let it cook for about ten minutes. This simmering time allows the flavors to meld beautifully, creating a rich and aromatic sauce.

Step 3: Cook the Fish

Once your sauce is bubbling away, it’s time to add the star of the show: the fish! Gently nestle the white fish fillets into the sauce, making sure to spoon some of that delicious sauce over the top. Cover the skillet and let it cook for about eight to ten minutes. The fish is done when it flakes easily with a fork. You’ll know it’s ready when the kitchen smells like a Moroccan bazaar!

Step 4: Finish with Olives and Parsley

To finish off your Moroccan Fish Tagine, stir in the sliced green olives and chopped parsley. This adds a lovely briny flavor and a pop of color. Don’t forget to season with salt and pepper to taste. Give it a final stir, and your dish is ready to serve!

Serve the tagine hot, with lemon wedges on the side for that extra zing. Enjoy the burst of flavors and the warmth of this comforting dish!

Tips for Success

  • Prep all your ingredients before starting to cook. It makes the process smoother.
  • Don’t rush the sautéing; letting the onions and spices cook properly enhances the flavor.
  • Feel free to adjust the spices to suit your taste. More cayenne for heat, or less for a milder dish.
  • Let the tagine rest for a few minutes before serving; it allows the flavors to settle.
  • Pair with couscous or rice to soak up that delicious sauce!

Equipment Needed

  • Large skillet or tagine: A tagine is traditional, but any large skillet works well.
  • Wooden spoon: Perfect for stirring and mixing ingredients.
  • Measuring cups and spoons: Essential for accurate ingredient amounts.
  • Knife and cutting board: For chopping vegetables and fish.

Variations

  • Spicy Twist: Add more cayenne pepper or a splash of harissa for an extra kick.
  • Vegetarian Option: Substitute fish with hearty vegetables like eggplant or chickpeas for a plant-based tagine.
  • Seafood Medley: Mix in shrimp or mussels along with the fish for a delightful seafood combination.
  • Citrus Zest: Incorporate lemon or orange zest into the sauce for a refreshing citrus flavor.
  • Herb Variations: Experiment with fresh herbs like cilantro or mint for a different aromatic profile.

Serving Suggestions

  • Couscous: Serve the tagine over fluffy couscous to soak up the flavorful sauce.
  • Crusty Bread: Pair with warm, crusty bread for dipping and savoring every drop.
  • Fresh Salad: A light cucumber and tomato salad complements the dish perfectly.
  • Wine Pairing: Enjoy with a chilled white wine, like Sauvignon Blanc, for a refreshing contrast.

FAQs about Moroccan Fish Tagine

What type of fish is best for Moroccan Fish Tagine?
I recommend using white fish fillets like cod or tilapia. They have a mild flavor and flaky texture that works beautifully in this dish. You can also experiment with other firm fish varieties if you prefer.

Can I make Moroccan Fish Tagine ahead of time?
Absolutely! This dish can be made ahead and stored in the fridge for up to two days. Just reheat gently on the stovetop before serving. The flavors will deepen, making it even more delicious!

Is Moroccan Fish Tagine gluten-free?
Yes, this Moroccan Fish Tagine is naturally gluten-free! It’s a healthy option for anyone avoiding gluten while still being packed with flavor.

What can I serve with Moroccan Fish Tagine?
Pair it with fluffy couscous, rice, or warm crusty bread to soak up the delicious sauce. A fresh salad on the side adds a nice crunch and balances the meal.

Can I use frozen fish for this recipe?
Yes, you can use frozen fish fillets! Just make sure to thaw them completely before cooking. This will ensure even cooking and the best texture.

Final Thoughts

Cooking Moroccan Fish Tagine is more than just preparing a meal; it’s about creating an experience that warms the heart and delights the senses. The vibrant spices and fresh ingredients come together to form a dish that feels both comforting and exotic. Each bite transports you to the bustling markets of Morocco, where flavors dance and stories unfold. Whether you’re sharing it with loved ones or enjoying a quiet evening at home, this tagine brings joy to the table. So, roll up your sleeves, embrace the process, and savor the delicious journey that awaits you!

Paul

Moroccan Fish Tagine: Discover the Secret Recipe!

A flavorful Moroccan Fish Tagine made with white fish fillets, spices, and olives, perfect for a hearty meal.
Prep Time 10 minutes
Cook Time 30 minutes
Total Time 40 minutes
Servings: 4 servings
Course: Main Course
Cuisine: Moroccan
Calories: 320

Ingredients
  

  • 2 tablespoons olive oil
  • 1 medium onion finely chopped
  • 2 cloves garlic minced
  • 1 teaspoon ground cumin
  • 1 teaspoon ground coriander
  • 1 teaspoon smoked paprika
  • 1/2 teaspoon ground cinnamon
  • 1/4 teaspoon cayenne pepper adjust to taste
  • 1 can 14.5 ounces diced tomatoes, drained
  • 1 cup vegetable broth
  • 1 tablespoon honey
  • 1/2 cup green olives pitted and sliced
  • 1/4 cup fresh parsley chopped
  • 1 1/2 pounds white fish fillets such as cod or tilapia
  • Salt and pepper to taste
  • Lemon wedges for serving

Method
 

  1. In a large skillet or tagine, heat the olive oil over medium heat. Add the chopped onion and sauté until soft and translucent, about 5 minutes.
  2. Stir in the minced garlic, cumin, coriander, smoked paprika, cinnamon, and cayenne pepper. Cook for an additional 1-2 minutes until fragrant.
  3. Add the drained diced tomatoes, vegetable broth, and honey to the skillet. Bring the mixture to a simmer and let it cook for about 10 minutes, allowing the flavors to meld.
  4. Gently nestle the fish fillets into the sauce, spooning some of the sauce over the top. Cover and cook for 8-10 minutes, or until the fish is cooked through and flakes easily with a fork.
  5. Stir in the sliced olives and chopped parsley. Season with salt and pepper to taste.
  6. Serve the tagine hot with lemon wedges on the side for squeezing over the fish.

Notes

  • For added texture, consider adding chopped bell peppers or zucchini to the sauce during the cooking process.
  • Serve the tagine over couscous or rice to soak up the delicious sauce, or pair it with crusty bread for dipping.

Japanese Egg Sandwich: Discover This Creamy Delight!

Introduction to Japanese Egg Sandwich

There’s something undeniably comforting about a sandwich that feels like a warm hug. The Japanese Egg Sandwich is just that—a creamy delight that brings a smile to your face. Perfect for a quick lunch or a snack on the go, this sandwich is a fantastic solution for busy days when you need something satisfying yet simple. With just a handful of ingredients, you can whip up a dish that impresses your loved ones and satisfies your cravings. Trust me, once you try this creamy sandwich, it’ll become a staple in your kitchen!

Why You’ll Love This Japanese Egg Sandwich

This Japanese Egg Sandwich is a game-changer for anyone juggling a busy lifestyle. It’s quick to prepare, taking just 25 minutes from start to finish. The creamy filling is bursting with flavor, making each bite a delightful experience. Plus, it’s versatile enough to suit any palate, whether you’re a fan of classic flavors or looking to spice things up. You’ll find yourself reaching for this recipe time and again!

Ingredients for Japanese Egg Sandwich

Gathering the right ingredients is the first step to creating your delicious Japanese Egg Sandwich. Here’s what you’ll need:

  • Large eggs: The star of the show! Fresh eggs provide the creamy texture and rich flavor.
  • Mayonnaise: This adds a luscious creaminess. You can use regular or light, depending on your preference.
  • Dijon mustard: A touch of tanginess that elevates the flavor profile. Feel free to adjust the amount to your taste.
  • Salt and pepper: Essential for seasoning. A little goes a long way in enhancing the overall taste.
  • Soft white bread: The perfect canvas for your egg filling. It’s soft and fluffy, making each bite delightful.
  • Butter: Softened butter adds richness and helps achieve that golden, crispy exterior when pan-frying.
  • Fresh chives or green onions (optional): These add a pop of color and a mild onion flavor. They’re a great way to customize your sandwich!

For exact measurements, check the bottom of the article where you can find everything listed for easy printing. Feel free to experiment with different types of bread or even add a dollop of cream cheese for an extra creamy texture!

How to Make Japanese Egg Sandwich

Creating a Japanese Egg Sandwich is a straightforward process that yields delicious results. Follow these simple steps, and you’ll have a creamy sandwich that’s sure to impress!

Step 1: Boil the Eggs

Start by bringing a medium saucepan of water to a rolling boil. Carefully add the large eggs, ensuring they’re fully submerged. Boil them for exactly 10 minutes. This timing is crucial for achieving that perfect hard-boiled texture. Once the time is up, transfer the eggs to a bowl filled with ice water. Let them cool for about 5 minutes. This not only stops the cooking process but also makes peeling easier.

Step 2: Prepare the Egg Mixture

Once the eggs are cool, gently tap them on a hard surface to crack the shell, then peel them under running water for easier removal. Chop the eggs into small pieces and place them in a mixing bowl. Add the mayonnaise, Dijon mustard, salt, and pepper. Mix everything together until it’s creamy and well combined. If you’re feeling adventurous, toss in some chopped chives or green onions for an extra flavor boost!

Step 3: Assemble the Sandwich

Now it’s time to bring your sandwich to life! Take the softened butter and spread it generously on one side of each slice of soft white bread. This will create a deliciously crispy exterior when cooked. Lay two slices of bread, buttered side down, on a clean surface. Divide the egg mixture evenly between these slices, spreading it out to the edges. Top with the remaining slices of bread, buttered side up, creating a delightful sandwich.

Step 4: Cook the Sandwich

Heat a skillet over medium heat. Once it’s hot, carefully place the sandwiches in the skillet. Cook for about 3-4 minutes on each side, or until they’re golden brown and crispy. Keep an eye on them to prevent burning. Once cooked, remove the sandwiches from the skillet and let them cool for a minute. Slice them in half, and your Japanese Egg Sandwich is ready to be enjoyed!

Tips for Success

  • Use fresh eggs for the best flavor and texture.
  • Don’t skip the ice bath after boiling; it makes peeling easier.
  • Adjust the amount of Dijon mustard to suit your taste.
  • For a creamier filling, consider adding a tablespoon of cream cheese.
  • Experiment with different breads for unique flavors and textures.

Equipment Needed

  • Medium saucepan: Essential for boiling the eggs. A large pot works too.
  • Mixing bowl: For combining the egg mixture. Any bowl will do!
  • Skillet: A non-stick skillet is ideal for cooking. A regular one works as well.
  • Spatula: To flip the sandwiches easily.

Variations

  • Spicy Kick: Add a dash of sriracha or your favorite hot sauce to the egg mixture for a spicy twist.
  • Herbed Delight: Mix in fresh herbs like dill or parsley for a refreshing flavor boost.
  • Avocado Addition: Spread mashed avocado on the bread before adding the egg mixture for a creamy, nutritious upgrade.
  • Vegan Option: Substitute eggs with mashed chickpeas and use vegan mayo for a plant-based version.
  • Cheesy Goodness: Incorporate shredded cheese into the egg mixture for a rich, cheesy flavor.

Serving Suggestions

  • Fresh Salad: Pair your sandwich with a light green salad for a refreshing contrast.
  • Chips: Serve with crispy potato chips for a satisfying crunch.
  • Iced Tea: A glass of iced tea complements the flavors beautifully.
  • Presentation: Cut the sandwich diagonally and serve on a colorful plate for an appealing look.

FAQs about Japanese Egg Sandwich

Curious about the Japanese Egg Sandwich? Here are some common questions that might pop into your mind:

Can I make the egg mixture ahead of time?

Absolutely! You can prepare the egg mixture a day in advance. Just store it in an airtight container in the fridge. This makes for a quick assembly when you’re ready to enjoy your sandwich.

What type of bread works best for this sandwich?

While soft white bread is traditional, feel free to experiment! Whole grain, sourdough, or even brioche can add unique flavors and textures to your Japanese Egg Sandwich.

Can I add other ingredients to the egg mixture?

Definitely! You can mix in ingredients like diced pickles, celery, or even a splash of hot sauce for a twist. The beauty of this creamy sandwich is its versatility!

Is this sandwich suitable for meal prep?

Yes! The Japanese Egg Sandwich holds up well for meal prep. Just keep the egg mixture and bread separate until you’re ready to eat to maintain freshness.

How can I make this sandwich healthier?

To lighten it up, use light mayonnaise or Greek yogurt instead. You can also add more veggies, like spinach or sliced tomatoes, for added nutrition without sacrificing flavor.

Final Thoughts

Making a Japanese Egg Sandwich is more than just preparing a meal; it’s about creating a moment of joy in your day. The creamy filling, paired with the soft, buttery bread, offers a delightful experience that’s hard to resist. Whether you’re enjoying it for lunch or as a quick snack, this sandwich brings a taste of comfort and satisfaction. Plus, it’s a fantastic way to impress friends or family with minimal effort. So, roll up your sleeves, gather your ingredients, and dive into this creamy delight. You’ll find that every bite is a little piece of happiness!

Paul

Japanese Egg Sandwich: Discover This Creamy Delight!

A creamy and delicious Japanese Egg Sandwich made with boiled eggs, mayonnaise, and Dijon mustard, served on soft white bread.
Prep Time 15 minutes
Cook Time 10 minutes
Total Time 25 minutes
Servings: 2 servings
Course: Sandwich
Cuisine: Japanese
Calories: 450

Ingredients
  

  • 6 large eggs
  • 1/4 cup mayonnaise
  • 1 teaspoon Dijon mustard
  • Salt and pepper to taste
  • 4 slices of soft white bread
  • 1 tablespoon butter softened
  • Fresh chives or green onions chopped (optional)

Method
 

  1. In a medium saucepan, bring water to a boil. Carefully add the eggs and boil for 10 minutes. Remove the eggs and place them in a bowl of ice water to cool for about 5 minutes.
  2. Once cooled, peel the eggs and chop them into small pieces.
  3. In a mixing bowl, combine the chopped eggs, mayonnaise, Dijon mustard, salt, and pepper. Mix until well combined and creamy. If desired, stir in chopped chives or green onions for added flavor.
  4. Spread the softened butter on one side of each slice of bread.
  5. Place two slices of bread, buttered side down, on a clean surface. Divide the egg mixture evenly between the two slices. Top with the remaining slices of bread, buttered side up.
  6. Heat a skillet over medium heat. Once hot, add the sandwiches and cook for about 3-4 minutes on each side, or until golden brown and crispy.
  7. Remove from the skillet and let cool for a minute before slicing in half. Serve immediately.

Notes

  • For a creamier texture, add a tablespoon of cream cheese to the egg mixture.
  • Experiment with different types of bread, such as whole grain or sourdough, for added flavor and nutrition.

Butter Beans with Roasted Cherry Tomatoes: A Flavorful Delight

Introduction to Butter Beans with Roasted Cherry Tomatoes

There’s something magical about a dish that feels both comforting and vibrant, like Butter Beans with Roasted Cherry Tomatoes. This recipe is a delightful blend of creamy butter beans and sweet, caramelized tomatoes, making it a perfect choice for a quick weeknight dinner or a special gathering. I remember the first time I made this dish; the aroma filled my kitchen, and my family couldn’t wait to dig in. It’s not just about the flavors; it’s about creating moments around the table. Whether you’re a seasoned cook or just starting, this recipe is sure to impress.

Why You’ll Love This Butter Beans with Roasted Cherry Tomatoes

This dish is a game-changer for busy weeknights. It comes together in just 35 minutes, making it a quick solution when time is tight. The combination of creamy butter beans and sweet roasted cherry tomatoes creates a flavor explosion that’s hard to resist. Plus, it’s a healthy vegetarian option that even the pickiest eaters will enjoy. Trust me, this recipe will become a staple in your kitchen!

Ingredients for Butter Beans with Roasted Cherry Tomatoes

Gathering the right ingredients is the first step to culinary success. For this vibrant dish, you’ll need:

  • Canned Butter Beans: These creamy legumes are the star of the show, providing a rich texture and protein boost.
  • Cherry Tomatoes: Sweet and juicy, they caramelize beautifully when roasted, adding a burst of flavor.
  • Olive Oil: A drizzle of this liquid gold enhances the dish’s richness and helps with roasting.
  • Garlic: Minced garlic brings a fragrant depth that elevates the overall taste.
  • Dried Oregano: This herb adds a Mediterranean flair, complementing the other ingredients perfectly.
  • Salt: Essential for enhancing flavors, it balances the sweetness of the tomatoes.
  • Black Pepper: A pinch of this spice adds a subtle kick, rounding out the dish.
  • Balsamic Vinegar: A splash of this tangy vinegar adds a delightful acidity that brightens the flavors.
  • Fresh Basil Leaves: For garnish, these aromatic leaves not only look beautiful but also add a fresh finish.

Feel free to get creative! You can substitute butter beans with cannellini beans or chickpeas for a different texture. If you want a spicy kick, consider adding red pepper flakes before serving. For exact measurements, check the bottom of the article where you can find them available for printing.

How to Make Butter Beans with Roasted Cherry Tomatoes

Creating Butter Beans with Roasted Cherry Tomatoes is a straightforward process that yields delicious results. Follow these simple steps, and you’ll have a vibrant dish ready to impress in no time!

Step 1: Preheat the Oven

Start by preheating your oven to 400°F (200°C). This step is crucial for roasting, as it ensures the tomatoes caramelize beautifully. A hot oven helps to lock in flavors and gives that lovely roasted texture. Trust me, you want those tomatoes to blister and burst with sweetness!

Step 2: Prepare the Tomato Mixture

In a large mixing bowl, combine the halved cherry tomatoes, 2 tablespoons of olive oil, minced garlic, oregano, salt, and black pepper. Toss everything together until the tomatoes are evenly coated. This even coating is key; it allows the flavors to meld and ensures every bite is packed with taste. Plus, it makes for a beautiful presentation!

Step 3: Roast the Tomatoes

Spread the tomato mixture evenly on a baking sheet lined with parchment paper. Roast in the preheated oven for 20-25 minutes. Keep an eye on them! You’ll know they’re done when they’re blistered and caramelized, releasing a sweet aroma that fills your kitchen. That’s the moment you know you’re in for a treat!

Step 4: Heat the Butter Beans

While the tomatoes are roasting, heat the remaining tablespoon of olive oil in a medium saucepan over medium heat. Add the drained and rinsed butter beans, stirring occasionally for about 5 minutes until they’re heated through. This step is essential; it brings out the creamy texture of the beans, making them the perfect partner for the roasted tomatoes.

Step 5: Combine and Serve

Once the tomatoes are done, remove them from the oven and add them to the saucepan with the butter beans. Drizzle with balsamic vinegar and gently stir to combine. This final touch elevates the dish, adding a tangy brightness. Serve warm, garnished with fresh basil leaves for that extra pop of color and flavor. Enjoy your culinary creation!

Tips for Success

  • Always rinse canned butter beans to remove excess sodium and improve flavor.
  • Use fresh garlic for a more robust taste; it makes a noticeable difference.
  • Don’t overcrowd the baking sheet; give the tomatoes space to roast evenly.
  • Experiment with herbs like thyme or rosemary for a unique twist.
  • Let the dish sit for a few minutes before serving to enhance the flavors.

Equipment Needed

  • Baking Sheet: A standard baking sheet works well, but a cast-iron skillet can add extra flavor.
  • Parchment Paper: This helps with easy cleanup; aluminum foil is a good alternative.
  • Medium Saucepan: Any saucepan will do, just ensure it has a lid for even heating.
  • Mixing Bowl: A large bowl is ideal; a sturdy plate can work in a pinch.

Variations

  • Spicy Kick: Add red pepper flakes or diced jalapeños for a fiery twist.
  • Herb Infusion: Swap dried oregano for fresh thyme or rosemary to change the flavor profile.
  • Cheesy Delight: Sprinkle crumbled feta or grated Parmesan on top before serving for a creamy finish.
  • Protein Boost: Mix in cooked quinoa or grilled chicken for a heartier meal.
  • Vegan Option: Ensure the balsamic vinegar is vegan-friendly, and you’re all set!

Serving Suggestions

  • Pair with Grains: Serve alongside quinoa or brown rice for a wholesome meal.
  • Fresh Salad: A crisp green salad with a light vinaigrette complements the dish beautifully.
  • Wine Pairing: Enjoy with a chilled white wine, like Sauvignon Blanc, for a refreshing touch.
  • Presentation: Serve in a rustic bowl, garnished with extra basil for a pop of color.

FAQs about Butter Beans with Roasted Cherry Tomatoes

Can I use fresh tomatoes instead of cherry tomatoes?

Absolutely! Fresh tomatoes can work well, but cherry tomatoes tend to caramelize better due to their natural sweetness. If you use larger tomatoes, just chop them into smaller pieces for even roasting.

How do I store leftovers?

Store any leftovers in an airtight container in the fridge for up to three days. Reheat gently on the stove or in the microwave. The flavors will continue to meld, making it even tastier!

Can I make this dish ahead of time?

Yes! You can prepare the tomato mixture and heat the butter beans in advance. Just combine them right before serving for the best texture and flavor. It’s a great way to save time on busy nights!

Is this recipe suitable for meal prep?

Definitely! Butter Beans with Roasted Cherry Tomatoes is perfect for meal prep. Portion it out into containers for easy grab-and-go lunches or dinners throughout the week.

What can I serve with this dish?

This dish pairs wonderfully with grains like quinoa or brown rice, and a fresh salad on the side adds a nice crunch. You can also enjoy it as a hearty side dish alongside grilled meats or fish.

Final Thoughts

Cooking Butter Beans with Roasted Cherry Tomatoes is more than just preparing a meal; it’s about creating a moment of joy. The vibrant colors and rich flavors come together to form a dish that warms the heart and satisfies the soul. Each bite is a reminder of the simple pleasures in life, whether shared with family or enjoyed solo after a long day. I hope this recipe inspires you to gather around the table, savor the flavors, and create your own cherished memories. Trust me, once you try it, you’ll find yourself making it again and again!

Paul

Butter Beans with Roasted Cherry Tomatoes: A Flavorful Delight

A flavorful dish featuring butter beans and roasted cherry tomatoes, perfect for a healthy meal.
Prep Time 10 minutes
Cook Time 25 minutes
Total Time 35 minutes
Course: Main Dish
Cuisine: Mediterranean
Calories: 210

Ingredients
  

  • 2 cups canned butter beans drained and rinsed
  • 2 cups cherry tomatoes halved
  • 3 tablespoons olive oil
  • 3 cloves garlic minced
  • 1 teaspoon dried oregano
  • 1 teaspoon salt
  • 1/2 teaspoon black pepper
  • 1 tablespoon balsamic vinegar
  • Fresh basil leaves for garnish

Method
 

  1. Preheat your oven to 400°F (200°C).
  2. In a large mixing bowl, combine the halved cherry tomatoes, 2 tablespoons of olive oil, minced garlic, oregano, salt, and black pepper. Toss until the tomatoes are well coated.
  3. Spread the tomato mixture evenly on a baking sheet lined with parchment paper. Roast in the preheated oven for 20-25 minutes, or until the tomatoes are blistered and caramelized.
  4. While the tomatoes are roasting, heat the remaining tablespoon of olive oil in a medium saucepan over medium heat. Add the butter beans and cook for about 5 minutes, stirring occasionally, until heated through.
  5. Once the tomatoes are done, remove them from the oven and add them to the saucepan with the butter beans. Drizzle with balsamic vinegar and gently stir to combine.
  6. Serve warm, garnished with fresh basil leaves.

Notes

  • For added flavor, sprinkle some red pepper flakes over the dish before serving for a spicy kick.
  • Substitute butter beans with cannellini beans or chickpeas for a different texture and taste.

Greek Chicken Burgers with Tzatziki Sauce: A Must-Try Recipe!

Introduction to Greek Chicken Burgers with Tzatziki Sauce

There’s something magical about a burger that transports you to a sun-soaked Mediterranean beach. These Greek Chicken Burgers with Tzatziki Sauce do just that! They’re not only delicious but also a quick solution for those busy weeknights when you want to impress your loved ones without spending hours in the kitchen. With juicy ground chicken, tangy feta, and a refreshing tzatziki sauce, this dish is a delightful twist on a classic. Trust me, once you take a bite, you’ll be dreaming of summer barbecues and warm evenings under the stars.

Why You’ll Love This Greek Chicken Burgers with Tzatziki Sauce

These Greek Chicken Burgers are a game-changer for your dinner routine. They’re quick to whip up, taking just 27 minutes from start to finish. The flavors are vibrant and fresh, making each bite a mini-vacation for your taste buds. Plus, they’re a healthier alternative to traditional burgers, packed with protein and flavor. You’ll love how easy it is to impress family and friends with this delicious meal!

Ingredients for Greek Chicken Burgers with Tzatziki Sauce

Gathering the right ingredients is the first step to culinary success. For these Greek Chicken Burgers with Tzatziki Sauce, you’ll need a mix of fresh and flavorful components that come together beautifully. Here’s what you’ll need:

  • Ground chicken: The star of the show! It’s lean, flavorful, and a great source of protein.
  • Feta cheese: This crumbly cheese adds a tangy richness that elevates the burgers.
  • Fresh parsley: A handful of chopped parsley brings a burst of color and freshness.
  • Red onion: Finely chopped, it adds a mild sweetness and crunch.
  • Garlic: Minced garlic infuses the mixture with aromatic goodness.
  • Dried oregano: A classic herb in Greek cuisine, it adds a warm, earthy flavor.
  • Salt and black pepper: Essential for seasoning, enhancing all the flavors.
  • Olive oil: Used for cooking, it adds richness and helps achieve a nice sear.
  • Whole wheat burger buns: A healthier alternative to traditional buns, they provide a hearty base.
  • Baby spinach or mixed greens: These add a fresh crunch and a pop of color to your burger.

For the tzatziki sauce:

  • Plain Greek yogurt: The creamy base of the sauce, it’s thick and tangy.
  • Cucumber: Grated and squeezed to remove excess moisture, it adds a refreshing crunch.
  • Garlic: Another clove for the sauce, enhancing its flavor profile.
  • Fresh dill: This herb brings a unique flavor that pairs perfectly with yogurt.
  • Lemon juice: A splash of acidity brightens the sauce and balances the flavors.
  • Salt and pepper: To taste, ensuring the sauce is perfectly seasoned.

Feel free to get creative! You can mix in chopped sun-dried tomatoes or olives into the chicken mixture for an extra flavor kick. For exact measurements, check the bottom of the article where you can find everything available for printing.

How to Make Greek Chicken Burgers with Tzatziki Sauce

Now that you have all your ingredients ready, it’s time to dive into the fun part: making these delicious Greek Chicken Burgers with Tzatziki Sauce! Follow these simple steps, and you’ll have a meal that’s sure to impress.

Step 1: Prepare the Chicken Mixture

In a large mixing bowl, combine the ground chicken, crumbled feta cheese, chopped parsley, finely chopped red onion, minced garlic, dried oregano, salt, and black pepper. Use your hands or a spoon to mix everything together gently. Be careful not to overwork the meat; you want it to stay tender and juicy.

Step 2: Shape the Patties

Once your mixture is well combined, divide it into four equal portions. Shape each portion into a patty, about 1 inch thick. This thickness helps them cook evenly. If you want, you can make a small indentation in the center of each patty to prevent them from puffing up while cooking.

Step 3: Cook the Patties

Heat a tablespoon of olive oil in a large skillet over medium heat. Once the oil is hot, carefully place the patties in the skillet. Cook them for about 5-6 minutes on each side, or until they reach an internal temperature of 165°F. You’ll know they’re done when they’re golden brown and cooked through.

Step 4: Make the Tzatziki Sauce

While the patties are cooking, it’s the perfect time to whip up the tzatziki sauce. In a separate bowl, mix together the plain Greek yogurt, grated cucumber, minced garlic, chopped dill, lemon juice, salt, and pepper. Stir until everything is well combined. Taste and adjust the seasoning if needed; you want it to be refreshing and flavorful!

Step 5: Assemble the Burgers

If you like a little crunch, toast the whole wheat burger buns in the skillet for a minute or two. Now, it’s time to assemble! Place a cooked patty on each bun, top it with a generous spoonful of tzatziki sauce, and add a handful of baby spinach or mixed greens. Close the bun, and you’re ready to enjoy!

Tips for Success

  • Don’t overmix the chicken mixture; it keeps the burgers tender.
  • Use a meat thermometer to ensure patties reach 165°F for safety.
  • Let the tzatziki sit for a few minutes to enhance the flavors.
  • Experiment with spices like paprika or cumin for a unique twist.
  • Keep the patties in the fridge for 30 minutes before cooking for better shape.

Equipment Needed

  • Mixing bowl: A large bowl for combining ingredients. A sturdy plate works in a pinch.
  • Skillet: A non-stick skillet is ideal, but any frying pan will do.
  • Spatula: For flipping the patties; a wooden spoon can also work.
  • Meat thermometer: To check the internal temperature; a simple knife can help cut into the patty.

Variations

  • Spicy Kick: Add chopped jalapeños or a dash of hot sauce to the chicken mixture for a spicy twist.
  • Herb-Infused: Experiment with different herbs like mint or basil for a unique flavor profile.
  • Gluten-Free Option: Serve the burgers wrapped in lettuce instead of buns for a low-carb alternative.
  • Cheese Lovers: Mix in shredded mozzarella or provolone for an extra cheesy burger experience.
  • Veggie Delight: Incorporate finely chopped bell peppers or zucchini into the chicken mixture for added veggies.

Serving Suggestions

  • Pair your Greek Chicken Burgers with a side of sweet potato fries for a delicious contrast.
  • A fresh Greek salad with tomatoes, cucumbers, and olives complements the flavors perfectly.
  • Serve with a chilled glass of lemonade or a light white wine for a refreshing touch.
  • Garnish with extra dill or parsley for a vibrant presentation.

FAQs about Greek Chicken Burgers with Tzatziki Sauce

Can I use ground turkey instead of ground chicken?

Absolutely! Ground turkey is a great substitute for ground chicken in these Greek Chicken Burgers. It will still provide a delicious flavor and keep the dish healthy.

How can I make the tzatziki sauce ahead of time?

You can prepare the tzatziki sauce a day in advance. Just store it in an airtight container in the fridge. The flavors will meld beautifully overnight, making it even tastier!

What can I serve with Greek Chicken Burgers?

These burgers pair wonderfully with sweet potato fries, a fresh Greek salad, or even a side of roasted vegetables. You can also enjoy them with a light drink like lemonade or a crisp white wine.

Can I freeze the burger patties?

Yes! You can freeze the uncooked patties. Just place them in a single layer on a baking sheet, freeze until solid, then transfer to a freezer bag. They’ll be ready to cook whenever you need a quick meal!

How do I know when the burgers are fully cooked?

The best way to check is by using a meat thermometer. The internal temperature should reach 165°F. If you don’t have one, cut into a patty; it should be no longer pink inside.

Final Thoughts

Cooking these Greek Chicken Burgers with Tzatziki Sauce is more than just preparing a meal; it’s about creating a moment. The vibrant flavors and fresh ingredients come together to make each bite a celebration of taste. Whether you’re enjoying them on a busy weeknight or serving them at a weekend gathering, these burgers are sure to impress. Plus, the joy of sharing a delicious, healthy meal with family and friends is truly rewarding. So, roll up your sleeves, fire up that skillet, and let the Mediterranean magic unfold in your kitchen!

Paul

Greek Chicken Burgers with Tzatziki Sauce: A Must-Try Recipe!

Delicious Greek Chicken Burgers topped with refreshing Tzatziki Sauce, perfect for a healthy meal.
Prep Time 15 minutes
Cook Time 12 minutes
Total Time 27 minutes
Servings: 4 servings
Course: Main Course
Cuisine: Greek
Calories: 350

Ingredients
  

  • 1 pound ground chicken
  • 1/2 cup feta cheese crumbled
  • 1/4 cup fresh parsley chopped
  • 1/4 cup red onion finely chopped
  • 2 cloves garlic minced
  • 1 teaspoon dried oregano
  • 1/2 teaspoon salt
  • 1/4 teaspoon black pepper
  • 1 tablespoon olive oil
  • 4 whole wheat burger buns
  • 1 cup baby spinach or mixed greens
  • 1 cup plain Greek yogurt
  • 1/2 cucumber grated and excess moisture squeezed out
  • 1 clove garlic minced
  • 1 tablespoon fresh dill chopped (or 1 teaspoon dried dill)
  • 1 tablespoon lemon juice
  • Salt and pepper to taste

Method
 

  1. In a mixing bowl, combine the ground chicken, feta cheese, parsley, red onion, garlic, oregano, salt, and pepper. Mix until well combined, but do not overwork the meat.
  2. Divide the mixture into four equal portions and shape each portion into a patty, about 1 inch thick.
  3. Heat the olive oil in a large skillet over medium heat. Cook the patties for about 5-6 minutes on each side, or until they are cooked through and have an internal temperature of 165°F.
  4. While the burgers are cooking, prepare the tzatziki sauce by mixing together the Greek yogurt, grated cucumber, garlic, dill, lemon juice, salt, and pepper in a bowl. Adjust seasoning to taste.
  5. Toast the whole wheat burger buns if desired. Assemble the burgers by placing a patty on each bun, topping with a generous spoonful of tzatziki sauce and a handful of baby spinach or mixed greens.

Notes

  • For added flavor, mix in some chopped sun-dried tomatoes or olives into the chicken mixture.
  • Serve the burgers with a side of sweet potato fries or a Greek salad for a complete meal.

Sweet and Savory Slow Cooker Kielbasa Recipe You’ll Love!

Introduction to Sweet and Savory Slow Cooker Kielbasa

There’s something magical about the aroma of a slow cooker wafting through the house, isn’t there? It’s like a warm hug on a busy day. This Sweet and Savory Slow Cooker Kielbasa recipe is just that—a comforting dish that’s easy to whip up and perfect for impressing family or friends. With just a handful of ingredients, you can create a delightful meal that balances sweet and savory flavors. Whether you’re coming home from a long day or hosting a casual gathering, this dish is sure to become a favorite in your kitchen.

Why You’ll Love This Sweet and Savory Slow Cooker Kielbasa

This Sweet and Savory Slow Cooker Kielbasa is a game-changer for busy weeknights. It’s incredibly easy to prepare, requiring just a few minutes of your time. The slow cooker does all the heavy lifting, allowing the flavors to meld beautifully. Plus, the combination of sweet brown sugar and tangy barbecue sauce creates a taste explosion that will have everyone asking for seconds. It’s comfort food at its finest!

Ingredients for Sweet and Savory Slow Cooker Kielbasa

Gathering the right ingredients is the first step to culinary success. For this Sweet and Savory Slow Cooker Kielbasa, you’ll need:

  • Kielbasa: This flavorful sausage is the star of the dish. You can use traditional pork kielbasa or opt for turkey kielbasa for a lighter twist.
  • Brown Sugar: This adds a rich sweetness that balances the savory notes of the kielbasa. It caramelizes beautifully during cooking.
  • Barbecue Sauce: Choose your favorite brand or homemade version. It brings a tangy depth that complements the sweetness.
  • Honey: A touch of honey enhances the sweetness and adds a lovely gloss to the sauce.
  • Dijon Mustard: This ingredient adds a subtle kick and depth of flavor, making the dish more complex.
  • Garlic Powder: A must-have for that aromatic punch. It’s convenient and blends well with the other flavors.
  • Black Pepper: Just a pinch adds warmth and balances the sweetness.

For those who like a bit of heat, consider adding red pepper flakes to the sauce. If you’re looking for a gluten-free option, check the labels on your barbecue sauce. All ingredient quantities are listed at the bottom of the article for easy reference and printing.

How to Make Sweet and Savory Slow Cooker Kielbasa

Creating this Sweet and Savory Slow Cooker Kielbasa is a breeze. Follow these simple steps, and you’ll have a delicious meal ready to enjoy. Let’s dive in!

Step 1: Prepare the Sauce

Start by grabbing your slow cooker. In it, combine the brown sugar, barbecue sauce, honey, Dijon mustard, garlic powder, and black pepper. Stir everything together until it’s well mixed. The sweet and tangy aroma will already start to fill your kitchen. It’s like a warm invitation to dinner!

Step 2: Add the Kielbasa

Next, take your sliced kielbasa and add it to the sauce mixture. Make sure each piece is well coated. This is where the magic happens! The kielbasa will soak up all those delicious flavors as it cooks. Trust me, you’ll want every bite to be bursting with taste.

Step 3: Cook the Dish

Now, cover the slow cooker and set it to cook. You can choose to go low and slow for 4 hours or crank it up to high for 2 hours. Either way, stir occasionally to ensure even cooking. As it simmers, the sweet and savory scents will wrap around you like a cozy blanket. It’s hard to resist sneaking a taste!

Step 4: Serve and Enjoy

Once the cooking time is up, it’s time to serve. Dish out the kielbasa while it’s warm, and if you like, sprinkle some chopped parsley on top for a pop of color. Pair it with your favorite sides, and watch as everyone digs in. This Sweet and Savory Slow Cooker Kielbasa is sure to be a hit!

Tips for Success

  • Prep your ingredients ahead of time to save on cooking day.
  • For extra flavor, sear the kielbasa in a pan before adding it to the slow cooker.
  • Don’t skip the stirring! It helps the flavors meld beautifully.
  • Adjust the sweetness by adding more or less brown sugar and honey to taste.
  • Serve with crusty bread to soak up the delicious sauce.

Equipment Needed

  • Slow Cooker: The star of the show! Any size will do, but a 4-quart is perfect for this recipe.
  • Mixing Bowl: For combining your sauce ingredients. A large bowl works best.
  • Measuring Cups and Spoons: Essential for accuracy in your ingredients.
  • Wooden Spoon: Great for stirring everything together.

Variations

  • Spicy Kielbasa: Add 1/2 teaspoon of red pepper flakes to the sauce for a kick that’ll wake up your taste buds.
  • Vegetable Medley: Toss in some bell peppers, onions, or even pineapple chunks for added flavor and texture.
  • Honey Mustard Twist: Swap out the barbecue sauce for honey mustard for a different sweet and tangy profile.
  • Low-Carb Option: Use cauliflower rice instead of traditional sides to keep it low-carb while still enjoying the flavors.
  • Vegan Version: Substitute kielbasa with plant-based sausage and ensure your barbecue sauce is vegan-friendly.

Serving Suggestions

  • Crusty Bread: Serve with a loaf of crusty bread to soak up the delicious sauce.
  • Coleslaw: A refreshing coleslaw adds crunch and balances the dish’s sweetness.
  • Beer: Pair with a cold beer or a sweet iced tea for a perfect meal.
  • Garnish: Top with fresh parsley or green onions for a pop of color.

FAQs about Sweet and Savory Slow Cooker Kielbasa

Can I use a different type of sausage? Absolutely! While kielbasa is the star here, you can experiment with other sausages like smoked sausage or turkey kielbasa for a lighter option. Each will bring its own unique flavor to the dish.

How can I make this dish spicier? If you’re looking for a kick, simply add 1/2 teaspoon of red pepper flakes to the sauce mixture. This will elevate the flavor profile and give your Sweet and Savory Slow Cooker Kielbasa a delightful heat.

Can I prepare this dish in advance? Yes! You can prep the sauce and slice the kielbasa a day ahead. Just store them separately in the fridge. When you’re ready to cook, combine them in the slow cooker and let the magic happen!

What sides pair well with this kielbasa? This dish goes wonderfully with crusty bread, coleslaw, or even a simple green salad. The sweetness of the kielbasa complements the crunch of fresh veggies perfectly.

Is this recipe gluten-free? Yes, it can be gluten-free! Just make sure to check the labels on your barbecue sauce and any other ingredients to ensure they meet your dietary needs.

Final Thoughts

Cooking this Sweet and Savory Slow Cooker Kielbasa is more than just preparing a meal; it’s about creating moments. The blend of sweet and tangy flavors brings a sense of comfort that warms the heart. Whether you’re enjoying it on a busy weeknight or serving it at a gathering, this dish has a way of bringing people together. The ease of preparation means you can focus on what truly matters—sharing laughter and stories around the table. So, roll up your sleeves, embrace the deliciousness, and let this kielbasa become a cherished part of your culinary adventures!

Paul

Sweet and Savory Slow Cooker Kielbasa Recipe You’ll Love!

A delicious and easy recipe for Sweet and Savory Slow Cooker Kielbasa that combines the flavors of brown sugar, barbecue sauce, and honey for a delightful dish.
Prep Time 10 minutes
Course: Main Dish
Cuisine: American
Calories: 290

Ingredients
  

  • 1 pound kielbasa sliced into 1-inch pieces
  • 1 cup brown sugar
  • 1/2 cup barbecue sauce
  • 1/4 cup honey
  • 1 tablespoon Dijon mustard
  • 1 teaspoon garlic powder
  • 1/2 teaspoon black pepper

Method
 

  1. In a slow cooker, combine the brown sugar, barbecue sauce, honey, Dijon mustard, garlic powder, and black pepper. Stir until well mixed.
  2. Add the sliced kielbasa to the slow cooker, making sure the pieces are well coated with the sauce.
  3. Cover the slow cooker and cook on low for 4 hours or on high for 2 hours, stirring occasionally.
  4. Once cooked, serve the kielbasa warm, garnished with chopped parsley if desired.

Notes

  • For a spicier kick, add 1/2 teaspoon of red pepper flakes to the sauce mixture.
  • Substitute turkey kielbasa for a lighter option without sacrificing flavor.

Low Carb Spinach Chicken Meatballs: Easy Recipe Inside!

Introduction to Low Carb Spinach Chicken Meatballs

When I think about weeknight dinners, I often recall the chaos of my childhood kitchen. My mom would whip up meals that were both comforting and nutritious, and I’ve carried that spirit into my own cooking. That’s why I’m excited to share this recipe for Low Carb Spinach Chicken Meatballs.

These meatballs are not just a quick solution for a busy day; they’re also a delicious way to sneak in some greens. Perfect for impressing your loved ones or simply treating yourself, they’re packed with flavor and nutrition. Let’s dive into this easy recipe that will make your taste buds dance!

Why You’ll Love This Low Carb Spinach Chicken Meatballs

These Low Carb Spinach Chicken Meatballs are a game changer for anyone juggling a busy lifestyle.

They come together in just 35 minutes, making them perfect for those hectic weeknights.

With a delightful blend of flavors and a healthy twist, they satisfy cravings without the guilt.

Plus, they’re versatile enough to pair with your favorite sauces or sides, ensuring every bite is a winner!

Ingredients for Low Carb Spinach Chicken Meatballs

Creating these Low Carb Spinach Chicken Meatballs is a breeze, thanks to a handful of simple ingredients.

Here’s what you’ll need:

  • Ground chicken: The star of the show! It’s lean, packed with protein, and keeps the meatballs moist.
  • Fresh spinach: Adds a vibrant color and a nutritional boost. You can use frozen spinach, but make sure to thaw and drain it well.
  • Grated Parmesan cheese: This brings a savory depth and a hint of nuttiness. Feel free to swap it with another cheese if you prefer.
  • Almond flour: A low-carb alternative to breadcrumbs, it helps bind the meatballs without adding unnecessary carbs.
  • Egg: Acts as a binder, ensuring your meatballs hold their shape while baking.
  • Garlic: Freshly minced for that aromatic kick. You can use garlic powder in a pinch, but fresh is always best.
  • Onion powder: Adds a subtle sweetness and depth of flavor without the texture of fresh onions.
  • Dried oregano: A classic herb that complements the chicken and spinach beautifully.
  • Salt and black pepper: Essential for seasoning, enhancing all the flavors in your meatballs.

For exact measurements, check the bottom of the article where you can find everything listed for easy printing.

These ingredients come together to create a dish that’s not only healthy but also bursting with flavor!

How to Make Low Carb Spinach Chicken Meatballs

Making Low Carb Spinach Chicken Meatballs is a straightforward process that anyone can master.

With just a few simple steps, you’ll have a delicious meal ready in no time.

Let’s break it down!

Step 1: Preheat the Oven

Start by preheating your oven to 400°F (200°C).

This step is crucial because it ensures even cooking.

While the oven heats up, line a baking sheet with parchment paper.

This not only prevents sticking but also makes cleanup a breeze.

Trust me, your future self will thank you!

Step 2: Combine Ingredients

In a large bowl, combine the ground chicken, chopped spinach, Parmesan cheese, almond flour, egg, minced garlic, onion powder, dried oregano, salt, and black pepper.

Use your hands to mix everything together gently.

It’s important not to overmix; otherwise, your meatballs can turn out tough.

Just blend until everything is well combined, and you’re good to go!

Step 3: Form the Meatballs

Now comes the fun part—shaping the meatballs!

Take a small amount of the mixture and roll it into a ball about 1 inch in diameter.

You should end up with around 16 meatballs.

Place them on the prepared baking sheet, leaving a little space between each one.

This allows them to cook evenly and get that lovely golden color.

And there you have it—simple steps to create mouthwatering Low Carb Spinach Chicken Meatballs!

Tips for Success

  • Use fresh spinach for the best flavor and texture; it really makes a difference!
  • Don’t overmix the meatball mixture; gentle hands create tender meatballs.
  • For extra flavor, let the mixture sit for 10 minutes before shaping.
  • Experiment with spices like red pepper flakes for a kick!
  • Keep your hands wet while forming meatballs to prevent sticking.

Equipment Needed

  • Baking sheet: A standard one works great, but a cast iron skillet can add a nice crust.
  • Parchment paper: Use aluminum foil if you don’t have parchment; just be sure to grease it well.
  • Mixing bowl: Any large bowl will do; a stand mixer can save time.
  • Measuring cups and spoons: Essential for accuracy, but you can eyeball it if you’re feeling adventurous!

Variations

  • Cheesy Spinach Meatballs: Add a bit more grated cheese, like mozzarella, for a gooey, cheesy center.
  • Herb-Infused: Mix in fresh herbs like basil or parsley for an aromatic twist.
  • Spicy Kick: Incorporate red pepper flakes or diced jalapeños for a spicy version that packs a punch.
  • Gluten-Free Option: Substitute almond flour with coconut flour for a different low-carb alternative.
  • Vegetarian Version: Replace ground chicken with a mix of chickpeas and finely chopped vegetables for a plant-based option.

Serving Suggestions

  • Zucchini noodles: Serve the meatballs over a bed of spiralized zucchini for a fresh, low-carb option.
  • Marinara sauce: Drizzle with a homemade or store-bought low-carb marinara for added flavor.
  • Salad: Pair with a crisp green salad for a light, nutritious meal.
  • Wine: Enjoy with a glass of dry red wine to complement the savory flavors.

FAQs about Low Carb Spinach Chicken Meatballs

Can I use ground turkey instead of ground chicken?

Absolutely! Ground turkey is a great substitute and will still keep your meatballs low carb and delicious. Just keep an eye on the cooking time, as turkey can sometimes be a bit leaner.

How do I store leftovers?

Store any leftover Low Carb Spinach Chicken Meatballs in an airtight container in the refrigerator for up to three days. They also freeze well, so feel free to batch cook and save some for later!

What can I serve with these meatballs?

These meatballs pair wonderfully with zucchini noodles, a fresh salad, or even a low-carb marinara sauce. The options are endless, so get creative!

Can I make these meatballs ahead of time?

Yes! You can prepare the meatball mixture a day in advance and store it in the fridge. Just shape and bake them when you’re ready to eat.

Are these meatballs suitable for meal prep?

Definitely! These Low Carb Spinach Chicken Meatballs are perfect for meal prep. They reheat well and can be enjoyed throughout the week, making healthy eating a breeze.

Final Thoughts

Cooking these Low Carb Spinach Chicken Meatballs is more than just preparing a meal; it’s about creating a moment of joy in your kitchen.

The aroma of garlic and herbs fills the air, transporting you to a cozy Italian bistro.

Each bite is a delightful blend of flavors, making it easy to forget you’re enjoying a healthy dish.

Whether you’re sharing them with family or savoring them solo, these meatballs bring a sense of accomplishment.

So roll up your sleeves, embrace the process, and enjoy the delicious rewards of your culinary adventure!

Paul

Low Carb Spinach Chicken Meatballs: Easy Recipe Inside!

A delicious and healthy recipe for low carb spinach chicken meatballs, perfect for a nutritious meal.
Prep Time 15 minutes
Cook Time 20 minutes
Total Time 35 minutes
Servings: 16 meatballs
Course: Main Dish
Cuisine: American
Calories: 90

Ingredients
  

  • 1 lb ground chicken
  • 1 1/2 cups fresh spinach finely chopped
  • 1/2 cup grated Parmesan cheese
  • 1/4 cup almond flour
  • 1 large egg
  • 2 cloves garlic minced
  • 1 tsp onion powder
  • 1 tsp dried oregano
  • 1/2 tsp salt
  • 1/2 tsp black pepper

Method
 

  1. Preheat your oven to 400°F (200°C) and line a baking sheet with parchment paper.
  2. In a large bowl, combine the ground chicken, chopped spinach, Parmesan cheese, almond flour, egg, minced garlic, onion powder, dried oregano, salt, and black pepper.
  3. Use your hands to mix the ingredients together until well combined. It's important not to overmix, as this can make the meatballs tough.
  4. Form the mixture into 1-inch meatballs and place them on the prepared baking sheet. You should end up with about 16 meatballs.

Notes

  • These meatballs can be served with a low carb sauce or on a bed of zucchini noodles.
  • Store leftovers in an airtight container in the refrigerator for up to 3 days.

Stay Connected

Get recipes via email: