Creamy Sausage and Peppers Pasta Recipe is a must-try!

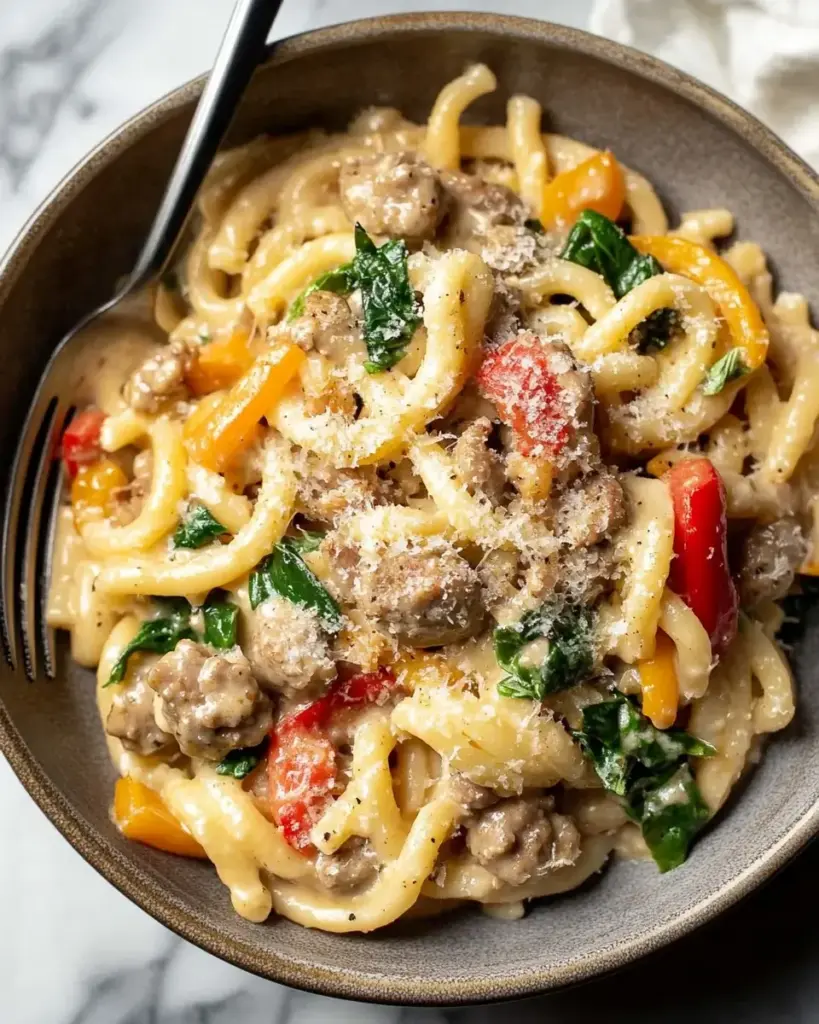
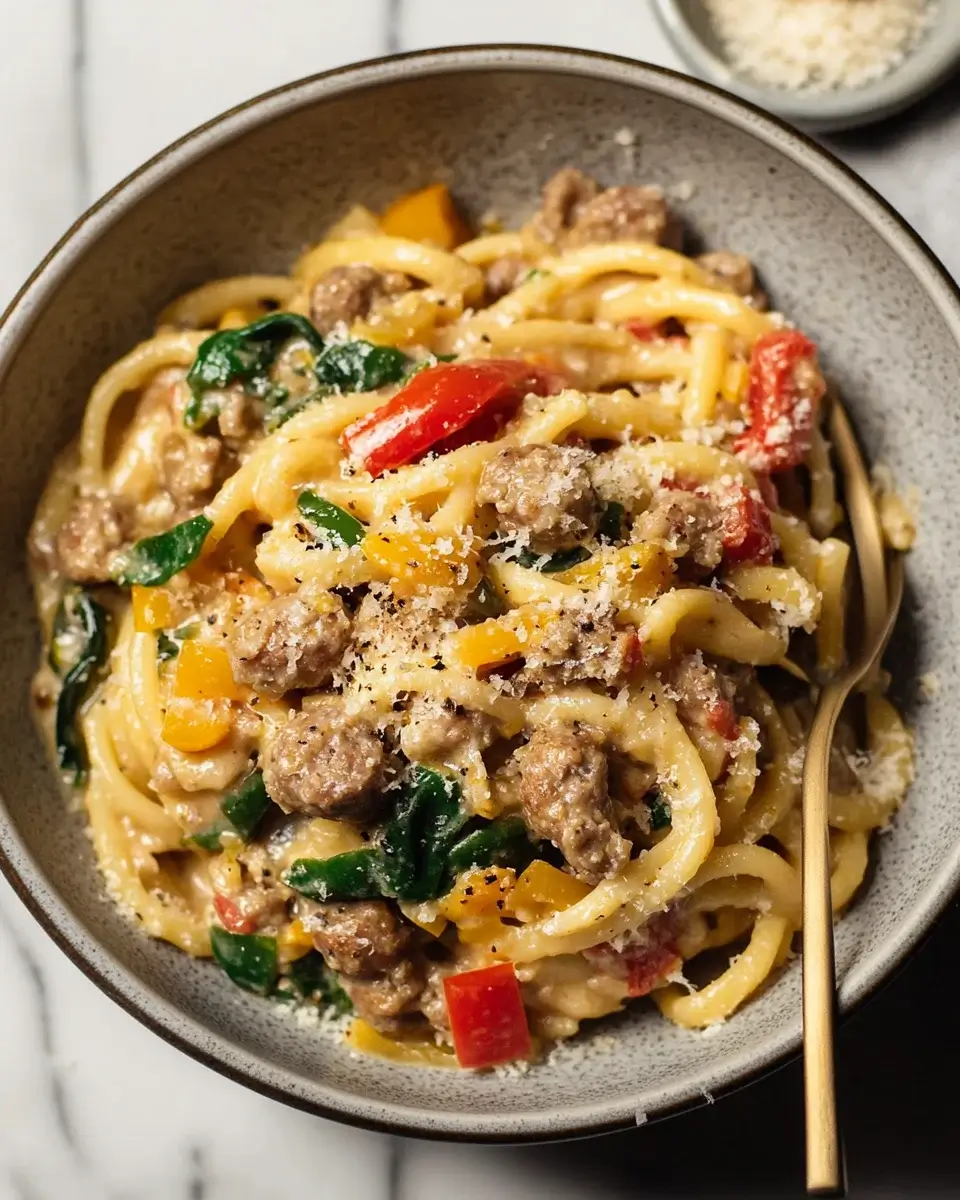
Creamy Sausage and Peppers Pasta Recipe. This dish combines the rich taste of Italian sausage with the sweetness of bell peppers and the creaminess of a luscious sauce. It’s perfect for a family dinner or a cozy night in.

Imagine twirling your fork around perfectly cooked penne pasta, coated in a creamy sauce that clings to every bite. The savory sausage adds a hearty touch, while the colorful peppers bring a vibrant crunch. This recipe is simple enough for a weeknight meal yet impressive enough to serve at gatherings.

What makes this dish even better is its versatility. You can easily adjust the spice level, swap out ingredients, or add in your favorite vegetables. Whether you prefer a mild flavor or a spicy kick, this creamy pasta can be tailored to your taste. Plus, it’s a great way to sneak in some veggies for the kids!

So, roll up your sleeves and get ready to create a delicious meal that will have everyone asking for seconds. Let’s explore the ingredients you’ll need to whip up this creamy delight!

Ingredients for Creamy Sausage and Peppers Pasta Recipe

Creamy Sausage and Peppers Pasta Recipe, you’ll need a handful of simple yet flavorful ingredients. Here’s what you’ll gather:

  • 8 ounces penne pasta: This pasta shape holds the creamy sauce beautifully.
  • 1 tablespoon olive oil: For sautéing the sausage and vegetables.
  • 1 pound Italian sausage: Choose between mild or spicy, depending on your preference.
  • 1 medium onion: Diced to add sweetness and depth to the dish.
  • 1 red bell pepper: Sliced for a pop of color and sweetness.
  • 1 yellow bell pepper: Adds a lovely contrast and flavor.
  • 3 cloves garlic: Minced for that aromatic touch.
  • 1 teaspoon Italian seasoning: A blend of herbs that enhances the dish.
  • 1/2 teaspoon red pepper flakes: Optional, for those who enjoy a bit of heat.
  • 1 cup heavy cream: This is what makes the sauce rich and creamy.
  • 1/2 cup grated Parmesan cheese: For a cheesy finish that ties everything together.
  • Salt and pepper: To taste, ensuring all flavors shine through.
  • Fresh basil: Optional, for garnish and a fresh touch.

With these ingredients on hand, you’re well on your way to creating a delicious meal that everyone will love. Each component plays a vital role in building layers of flavor, making this dish a true crowd-pleaser. Now that you have your ingredients ready, let’s move on to the step-by-step preparation!

Step-by-Step Preparation of Creamy Sausage and Peppers Pasta Recipe

Creamy Sausage and Peppers Pasta Recipe. Each step is designed to ensure that your dish turns out perfectly creamy and flavorful.

Step 1: Gather Your Ingredients

Before you start cooking, make sure you have everything you need within reach. This will make the cooking process smoother and more enjoyable. Gather your penne pasta, olive oil, Italian sausage, onion, bell peppers, garlic, Italian seasoning, red pepper flakes, heavy cream, Parmesan cheese, salt, and pepper. Don’t forget the fresh basil for garnish!

Step 2: Cook the Sausage

Begin by heating the olive oil in a large skillet over medium heat. Once the oil is hot, add the Italian sausage. Use a wooden spoon to break it up into smaller pieces. Cook the sausage for about 5-7 minutes, or until it’s nicely browned. This step is crucial as it adds a rich flavor to your dish.

Step 3: Sauté the Peppers and Onions

Next, it’s time to add the diced onion and sliced bell peppers to the skillet. Sauté these vegetables for about 5-6 minutes. You want them to become tender and slightly caramelized. The sweetness of the onions and peppers will balance the savory sausage beautifully.

Step 4: Combine Ingredients for the Sauce

Once your vegetables are tender, stir in the minced garlic, Italian seasoning, and red pepper flakes (if you’re using them). Cook for an additional 1-2 minutes until the garlic is fragrant. Then, reduce the heat to low and pour in the heavy cream. Stir well to combine, and add the grated Parmesan cheese. Mix until the cheese melts and the sauce becomes creamy.

Step 5: Cook the Pasta

While you’re preparing the sauce, bring a large pot of salted water to a boil. Add the penne pasta and cook according to the package instructions until al dente. This usually takes about 8-10 minutes. Once cooked, drain the pasta, but remember to reserve 1/2 cup of the pasta water for later use.

Step 6: Mix Everything Together

Creamy Sausage and Peppers Pasta Recipe is now ready to be served!

Variation of Creamy Sausage and Peppers Pasta Recipe

Creamy Sausage and Peppers Pasta Recipe is delicious as is, there are many ways to switch things up! Whether you want to cater to dietary preferences or simply try something new, these variations will keep your meals exciting and flavorful.

Alternative Ingredients

One of the best things about this recipe is its flexibility. Here are some alternative ingredients you can use:

  • Protein Options: Instead of Italian sausage, try using chicken sausage or even ground turkey. These options can lighten the dish while still providing great flavor.
  • Vegetable Choices: Feel free to add other vegetables like zucchini, mushrooms, or spinach. These can enhance the nutritional value and add different textures.
  • Cheese Variations: If you want a different cheese flavor, consider using mozzarella or feta cheese. Each will give a unique twist to the creamy sauce.
  • Gluten-Free Pasta: For a gluten-free version, substitute penne pasta with gluten-free pasta. There are many great options available that taste just as good!

These alternative ingredients can help you customize your dish to suit your taste or dietary needs. Experimenting with different flavors can lead to delightful surprises!

Different Cooking Methods

Creamy Sausage and Peppers Pasta Recipe. Here are a few ideas:

  • One-Pot Method: For an easier cleanup, try cooking everything in one pot. Start by browning the sausage, then add the vegetables, followed by the cream and pasta. This method allows the pasta to absorb all the flavors.
  • Oven-Baked Version: After mixing the pasta with the sauce, transfer it to a baking dish. Top with extra cheese and bake at 350°F for about 20 minutes. This creates a deliciously cheesy crust on top!
  • Slow Cooker: If you have more time, consider using a slow cooker. Brown the sausage and sauté the vegetables first, then combine everything in the slow cooker. Cook on low for 4-6 hours for a rich, melded flavor.

Creamy Sausage and Peppers Pasta Recipe is sure to be a hit!

Cooking Note for Creamy Sausage and Peppers Pasta Recipe

Creamy Sausage and Peppers Pasta Recipe, there are a few important cooking notes to keep in mind. These tips will help ensure that your dish turns out perfectly every time, making it a delightful experience for you and your guests.

First, always use a large skillet for cooking the sausage and vegetables. This allows for even cooking and prevents overcrowding, which can lead to steaming instead of browning. Browning the sausage is key, as it adds depth and richness to the overall flavor of the dish.

Next, when sautéing the onions and bell peppers, be patient. Allow them to cook until they are tender and slightly caramelized. This process enhances their natural sweetness and adds a wonderful layer of flavor to your creamy sauce.

Another important note is to keep an eye on the heat when adding the heavy cream. Reducing the heat to low is crucial to prevent the cream from curdling. Stirring continuously will help create a smooth and creamy sauce that clings beautifully to the pasta.

Lastly, don’t forget to taste your dish as you go! Adjust the seasoning with salt and pepper to suit your preference. If you like a bit more heat, feel free to add extra red pepper flakes. This recipe is all about making it your own!

Creamy Sausage and Peppers Pasta Recipe. Enjoy the process, and savor the delicious results!

Serving Suggestions for Creamy Sausage and Peppers Pasta Recipe

Creamy Sausage and Peppers Pasta Recipe is ready, it’s time to think about how to serve it! Presentation can elevate your dish and make it even more enjoyable. Here are some delightful serving suggestions to consider:

  • Garnish with Fresh Herbs: A sprinkle of fresh basil or parsley on top adds a pop of color and freshness. It also enhances the flavor, making each bite even more delicious.
  • Pair with Garlic Bread: Serve your pasta with warm garlic bread on the side. The crispy, buttery bread is perfect for soaking up the creamy sauce.
  • Include a Side Salad: A light side salad with mixed greens, cherry tomatoes, and a simple vinaigrette complements the richness of the pasta. It adds a refreshing crunch to your meal.
  • Offer Grated Cheese: Set out extra grated Parmesan cheese at the table. Guests can sprinkle more cheese on their pasta, adding a cheesy touch to their serving.
  • Wine Pairing: Consider serving a glass of white wine, like Pinot Grigio or Chardonnay. These wines pair beautifully with creamy dishes and enhance the overall dining experience.

Creamy Sausage and Peppers Pasta Recipe a memorable experience for everyone!

Tips for Perfecting Your Creamy Sausage and Peppers Pasta Recipe

Creamy Sausage and Peppers Pasta Recipe, a few tips can make all the difference. These simple yet effective suggestions will help you elevate your dish, ensuring it’s not only delicious but also visually appealing. Let’s dive into some expert tips that will help you perfect this creamy delight!

  • Choose Quality Ingredients: The flavor of your dish starts with the ingredients. Opt for high-quality Italian sausage and fresh vegetables. Fresh ingredients will enhance the overall taste and make your pasta shine.
  • Don’t Overcook the Pasta: When cooking the penne pasta, aim for al dente. This means it should be firm to the bite. Overcooked pasta can become mushy and won’t hold up well in the creamy sauce.
  • Adjust the Creaminess: If you prefer a lighter sauce, feel free to use half-and-half instead of heavy cream. This will still give you a creamy texture without being too rich.
  • Experiment with Seasoning: Taste your sauce as you go! Adjust the seasoning with salt, pepper, and red pepper flakes to suit your palate. Don’t be afraid to add more Italian seasoning for an extra flavor boost.
  • Let It Rest: After mixing everything together, let the pasta sit for a few minutes before serving. This allows the flavors to meld together, making each bite even more delicious.
  • Save Some Pasta Water: The reserved pasta water is your secret weapon! If your sauce is too thick, adding a splash of this starchy water can help achieve the perfect consistency.
  • Garnish Generously: A sprinkle of fresh basil or parsley not only adds color but also enhances the flavor. Don’t skip this step; it makes a big difference!

Creamy Sausage and Peppers Pasta Recipe that impresses everyone at the table. Enjoy the cooking process, and most importantly, savor the delicious results!

Breakdown of Time for Creamy Sausage and Peppers Pasta Recipe

Creamy Sausage and Peppers Pasta Recipe can help you plan your cooking efficiently. Here’s a simple breakdown of the time you’ll need for preparation and cooking.

Prep Time

The prep time for this delicious pasta dish is approximately 15 minutes. During this time, you’ll gather all your ingredients, chop the vegetables, and measure out the necessary items. Having everything ready before you start cooking will make the process smoother and more enjoyable.

Cooking Time

Creamy Sausage and Peppers Pasta Recipe is about 25 minutes. This includes browning the sausage, sautéing the vegetables, and cooking the pasta. Each step is essential for building flavor, so take your time to ensure everything is cooked to perfection.

Total Time

In total, you can expect to spend around 40 minutes from start to finish. This includes both prep and cooking time. With just a little bit of effort, you’ll have a hearty and creamy pasta dish ready to serve!

Creamy Sausage and Peppers Pasta Recipe is a fantastic choice that won’t take too long to prepare.

Nutritional Information for Creamy Sausage and Peppers Pasta Recipe

Creamy Sausage and Peppers Pasta Recipe not only satisfies your taste buds but also provides a good amount of nutrients. Here’s a breakdown of the nutritional information per serving, so you can enjoy this dish while being mindful of your dietary needs.

Calories

Creamy Sausage and Peppers Pasta Recipe contains approximately 550 calories. This calorie count includes the rich flavors from the Italian sausage, creamy sauce, and pasta. While it’s a hearty meal, it’s important to balance it with lighter options throughout the day.

Protein

In terms of protein, this dish offers about 25 grams per serving. The Italian sausage is a significant source of protein, making this pasta not only filling but also a great option for those looking to increase their protein intake. Pairing it with a side salad can further enhance your meal’s nutritional profile.

Sodium

Creamy Sausage and Peppers Pasta Recipe is around 800 milligrams per serving. This amount can vary based on the type of sausage used and how much salt you add during cooking. If you’re watching your sodium intake, consider using low-sodium sausage and adjusting the salt in the recipe accordingly.

Creamy Sausage and Peppers Pasta Recipe while making informed choices about your overall diet. Remember, moderation is key, and this dish can be part of a balanced meal plan!

FAQs about Creamy Sausage and Peppers Pasta Recipe

Can I use different types of sausage in the recipe?

Creamy Sausage and Peppers Pasta Recipe is quite versatile when it comes to sausage choices. You can use chicken sausage for a lighter option or turkey sausage if you prefer a leaner meat. If you enjoy a bit of spice, consider using spicy Italian sausage. Each type will bring its unique flavor to the dish, so feel free to experiment and find your favorite!

What can I substitute for heavy cream?

If you’re looking for a lighter alternative to heavy cream, there are several options available. Half-and-half is a great substitute that will still give you a creamy texture without being too rich. You can also use whole milk, but keep in mind that the sauce may be less creamy. For a dairy-free option, try using coconut cream or cashew cream. These alternatives will still provide a deliciously creamy sauce for your pasta!

How can I make this recipe gluten-free?

Creamy Sausage and Peppers Pasta Recipe gluten-free is simple! Just swap out the penne pasta for a gluten-free pasta variety. There are many options available, such as rice pasta or chickpea pasta, that work well in this recipe. Be sure to check the packaging for cooking instructions, as gluten-free pasta may have different cooking times. With this small change, you can enjoy a delicious gluten-free meal!

Can I prepare this dish in advance?

Creamy Sausage and Peppers Pasta Recipe in advance! To do this, cook the pasta and sauce separately, then combine them just before serving. If you plan to store leftovers, keep the pasta and sauce in separate containers to prevent the pasta from becoming mushy. When you’re ready to eat, simply reheat the sauce and toss it with the pasta. This makes it a convenient option for meal prep or busy weeknights!

Conclusion on Creamy Sausage and Peppers Pasta Recipe

Creamy Sausage and Peppers Pasta Recipe is a delightful dish that brings together rich flavors and comforting textures. It’s a perfect choice for any occasion, whether you’re hosting a dinner party or enjoying a cozy meal at home. The combination of savory Italian sausage, colorful bell peppers, and a creamy sauce creates a satisfying experience that will leave everyone asking for more.

This recipe is not only easy to prepare but also highly adaptable. You can customize it to suit your taste preferences or dietary needs by swapping ingredients or trying different cooking methods. With just a few simple adjustments, you can create a dish that feels fresh and exciting every time you make it.

Creamy Sausage and Peppers Pasta Recipe is a wonderful way to bring family and friends together, creating lasting memories over a delicious meal.

So, roll up your sleeves, gather your ingredients, and get ready to whip up this creamy delight. Enjoy the process, savor each bite, and most importantly, have fun in the kitchen! Happy cooking!

Paul

Creamy Sausage and Peppers Pasta Recipe is a must-try!

This Creamy Sausage and Peppers Pasta is rich, hearty, and packed with bold Italian flavors. With tender pasta, sizzling sausage, sweet bell peppers, and a silky garlic cream sauce, this one-pan meal is weeknight comfort food at its best.
Prep Time 10 minutes
Cook Time 25 minutes
Total Time 35 minutes
Servings: 4 servings
Course: Pasta
Cuisine: Italian-American

Ingredients
  

  • 8 oz uncooked pasta penne or rigatoni recommended1 tablespoon olive oil10 oz Italian sausage (mild or spicy, casing removed)1 small onion, chopped1 red bell pepper, sliced1 yellow bell pepper, sliced3 cloves garlic, minced1/2 cup chicken broth1 cup heavy cream1/2 teaspoon Italian seasoningSalt and pepper, to tasteFresh parsley, chopped (for garnish)Freshly grated Parmesan cheese (optional)

Method
 

  1. Cook the pasta according to package directions. Drain and set aside.
  2. In a large skillet, heat olive oil over medium heat. Add the sausage and cook until browned, breaking it up with a spoon, about 5–6 minutes.
  3. Add the chopped onion and sliced bell peppers. Sauté for 5–7 minutes, or until vegetables are soft and slightly caramelized.
  4. Stir in the garlic and cook for 30 seconds, just until fragrant.
  5. Add the chicken broth, heavy cream, and Italian seasoning. Stir and let the sauce simmer for 5–7 minutes, until slightly thickened.
  6. Return the cooked pasta to the skillet and toss until evenly coated in the sauce. Season with salt and pepper to taste.
  7. Garnish with chopped parsley and optional Parmesan cheese before serving.
  8.  

Notes

  • For a spicier version, use hot Italian sausage or add a pinch of red pepper flakes.
  • You can substitute the heavy cream with half-and-half or coconut cream for a lighter option.
  • Add spinach or kale during the last few minutes of simmering for extra veggies.
  • This dish reheats well—just add a splash of broth or cream when warming up.

Beef Giouvetsi with Orzo Recipe is a must-try dish!

What is Beef Giouvetsi with Orzo?

Beef Giouvetsi with Orzo is a delightful Greek dish that combines tender beef with orzo pasta in a rich, savory sauce. This hearty meal is perfect for family gatherings or cozy dinners. The beef is slow-cooked until it’s melt-in-your-mouth tender, while the orzo absorbs all the delicious flavors from the sauce. With a blend of spices like oregano and cinnamon, this dish offers a unique taste that warms the heart and satisfies the palate.

The Origins of Beef Giouvetsi

The origins of Beef Giouvetsi can be traced back to traditional Greek cuisine, where it has been enjoyed for generations. The word “Giouvetsi” refers to a method of cooking in a clay pot, which helps to enhance the flavors of the ingredients. This dish is often associated with family gatherings and festive occasions, showcasing the importance of sharing meals in Greek culture. Over time, variations have emerged, but the essence of Giouvetsi remains the same: a comforting, flavorful dish that brings people together.

Ingredients for Beef Giouvetsi with Orzo Recipe

To create a delicious Beef Giouvetsi with Orzo, you will need a selection of fresh and flavorful ingredients. Here’s what you’ll need:

  • 2 pounds beef chuck: Cut into 1-inch cubes for even cooking.
  • 2 tablespoons olive oil: This adds richness and helps brown the beef.
  • 1 large onion: Chopped to provide a sweet base flavor.
  • 4 cloves garlic: Minced for a fragrant kick.
  • 1 can (14.5 ounces) diced tomatoes: Undrained to add moisture and acidity.
  • 1 cup beef broth: Enhances the savory depth of the dish.
  • 1 teaspoon dried oregano: A classic herb that complements the beef.
  • 1 teaspoon ground cinnamon: Adds warmth and a hint of sweetness.
  • 1/2 teaspoon salt: To taste, balancing the flavors.
  • 1/4 teaspoon black pepper: For a touch of heat.
  • 1 cup orzo pasta: The star of the dish, soaking up all the flavors.
  • 1/4 cup fresh parsley: Chopped for garnish, adding freshness.
  • Grated Parmesan cheese: Optional, for serving to enhance the dish.

Gathering these ingredients will set you on the right path to making a delightful Beef Giouvetsi with Orzo. Each component plays a vital role in creating a dish that is not only tasty but also comforting and satisfying.

Step-by-Step Preparation of Beef Giouvetsi with Orzo Recipe

Step 1: Preparing the Ingredients

Before you start cooking, it’s essential to prepare all your ingredients. Begin by cutting the beef chuck into 1-inch cubes. This size ensures even cooking and tenderness. Next, chop the onion and mince the garlic. Having everything ready will make the cooking process smoother and more enjoyable. Remember, a well-prepared kitchen is a happy kitchen!

Step 2: Browning the Beef

Now, it’s time to brown the beef. In a large pot or Dutch oven, heat the olive oil over medium-high heat. Once the oil is hot, add the beef cubes. Brown them on all sides for about 5-7 minutes. This step is crucial as it locks in the flavors. After browning, remove the beef from the pot and set it aside. This will help you build layers of flavor in your dish.

Step 3: Sautéing the Vegetables

In the same pot, add the chopped onion. Sauté it until it becomes translucent, which should take about 5 minutes. The aroma will fill your kitchen! Next, add the minced garlic and cook for an additional minute. This step enhances the flavor base of your Beef Giouvetsi with Orzo, making it even more delicious.

Step 4: Combining Ingredients

Return the browned beef to the pot. Stir in the diced tomatoes, including their juice, and the beef broth. Then, add the dried oregano, ground cinnamon, salt, and black pepper. Mix everything well and bring it to a simmer. This combination of ingredients creates a rich sauce that will infuse the beef and orzo with flavor.

Step 5: Cooking the Orzo

Once the mixture is simmering, cover the pot and reduce the heat to low. Let it cook for about 1.5 to 2 hours. This slow cooking allows the beef to become tender and flavorful. Stir occasionally to prevent sticking. After the beef is tender, stir in the orzo pasta. Cover the pot again and cook for an additional 10-12 minutes. The orzo will absorb the delicious sauce, making it a perfect complement to the beef.

Step 6: Finalizing the Dish

After cooking, remove the pot from heat and let it sit for 5 minutes. This resting time allows the flavors to meld together beautifully. Before serving, garnish your Beef Giouvetsi with fresh parsley. If you like, sprinkle some grated Parmesan cheese on top for an extra touch of flavor. Now, your dish is ready to be enjoyed!

Variations of Beef Giouvetsi with Orzo Recipe

Vegetarian Alternatives

If you’re looking for a vegetarian twist on the classic Beef Giouvetsi with Orzo, there are plenty of delicious options. Instead of beef, you can use hearty vegetables like mushrooms, zucchini, and bell peppers. These veggies add a wonderful texture and flavor to the dish. You can also substitute the beef broth with vegetable broth to keep it vegetarian-friendly. For added protein, consider incorporating chickpeas or lentils. They not only enhance the nutritional value but also make the dish more filling. This vegetarian version is just as comforting and satisfying as the original!

Different Types of Meat

While beef is the star of the traditional Giouvetsi, you can easily switch it up with other meats. Chicken thighs are a great alternative, offering a lighter option that cooks faster. Simply adjust the cooking time to about 30-40 minutes for tender chicken. If you’re feeling adventurous, try using lamb for a richer flavor. Lamb pairs beautifully with the spices in this dish, creating a unique taste experience. No matter which meat you choose, the essence of Giouvetsi remains intact, making it a versatile recipe for any meat lover.

Flavor Enhancements

To elevate your Beef Giouvetsi with Orzo, consider adding some flavor enhancements. A splash of red wine can deepen the sauce’s richness, while a pinch of red pepper flakes can add a delightful kick. Fresh herbs like thyme or rosemary can also be included for an aromatic touch. For a hint of sweetness, toss in some diced carrots or a tablespoon of honey. These enhancements will not only boost the flavor but also make your dish stand out. Experimenting with different spices and ingredients can lead to a personalized version of this classic recipe!

Cooking Note for Beef Giouvetsi with Orzo Recipe

When preparing Beef Giouvetsi with Orzo, there are a few important cooking notes to keep in mind. First, the quality of the beef is crucial. Opt for well-marbled beef chuck, as the fat content will enhance the flavor and tenderness of the meat. Additionally, cutting the beef into uniform 1-inch cubes ensures even cooking, which is key for achieving that melt-in-your-mouth texture.

Another essential tip is to allow the beef to brown properly. This step not only locks in the juices but also creates a rich base for your sauce. Don’t rush this process; take your time to achieve a nice golden-brown color on the beef. It’s worth the wait!

While simmering, keep an eye on the pot. Stir occasionally to prevent sticking and ensure that all ingredients are well combined. If you find the mixture getting too thick, feel free to add a splash more beef broth or water. This will help maintain the right consistency for the sauce.

Lastly, remember that letting the dish rest after cooking is important. This short resting period allows the flavors to meld together beautifully, making each bite even more delicious. Following these cooking notes will help you create a Beef Giouvetsi with Orzo that is not only flavorful but also a true crowd-pleaser!

Serving Suggestions for Beef Giouvetsi with Orzo Recipe

Ideal Side Dishes

When serving Beef Giouvetsi with Orzo, choosing the right side dishes can enhance your meal experience. A fresh Greek salad is a perfect companion. The crisp vegetables and tangy feta cheese provide a refreshing contrast to the rich flavors of the Giouvetsi. You can also serve warm, crusty bread on the side. This is great for soaking up the delicious sauce!

Another excellent option is roasted vegetables. Seasonal veggies like zucchini, bell peppers, and carrots can be tossed with olive oil and herbs, then roasted until tender. This adds a colorful and nutritious element to your meal. For a heartier side, consider serving a creamy potato mash. The smooth texture pairs wonderfully with the beef and orzo, making every bite satisfying.

Wine Pairings

Pairing the right wine with your Beef Giouvetsi can elevate the dining experience. A medium-bodied red wine, such as a Merlot or Chianti, complements the rich flavors of the beef and spices beautifully. These wines have enough acidity to balance the dish without overpowering it.

If you prefer white wine, a crisp Sauvignon Blanc can also work well. Its bright acidity and citrus notes can cut through the richness of the dish, providing a refreshing contrast. For a special touch, consider serving a Greek wine, like Agiorgitiko, which pairs perfectly with traditional Greek flavors.

Whichever wine you choose, remember to serve it slightly chilled for the best taste. Enjoying your Beef Giouvetsi with Orzo alongside the right sides and wine will create a memorable meal that everyone will love!

Tips for Perfecting Beef Giouvetsi with Orzo Recipe

To make your Beef Giouvetsi with Orzo truly exceptional, consider these helpful tips. Each suggestion will enhance the flavors and textures of your dish, ensuring a delightful dining experience.

First, marinate the beef for a few hours or overnight. A simple marinade of olive oil, garlic, and herbs can infuse the meat with extra flavor. This step is especially beneficial if you have time to plan ahead.

Next, don’t skip the browning step! Properly browning the beef creates a rich, caramelized flavor that adds depth to your dish. Make sure your pot is hot enough before adding the beef, and avoid overcrowding the pot. If necessary, brown the beef in batches.

When adding the orzo, stir it gently to prevent clumping. This will help ensure that each piece of pasta is coated in the delicious sauce. If you prefer a creamier texture, consider adding a splash of cream or a dollop of sour cream just before serving.

For an extra layer of flavor, try adding a bay leaf or a sprig of fresh thyme during the simmering process. Just remember to remove them before serving! These herbs can elevate the taste profile of your Beef Giouvetsi.

Lastly, taste and adjust the seasoning before serving. Everyone’s palate is different, so feel free to add more salt, pepper, or herbs to suit your taste. A squeeze of fresh lemon juice can also brighten the flavors, making the dish even more vibrant.

By following these tips, you’ll create a Beef Giouvetsi with Orzo that is not only delicious but also a true reflection of your culinary skills. Enjoy the process and the wonderful meal that awaits!

Breakdown of Time for Beef Giouvetsi with Orzo Recipe

Prep Time

Preparing your ingredients is the first step in making Beef Giouvetsi with Orzo. This includes cutting the beef, chopping the onion, and mincing the garlic. Overall, you should set aside about 15-20 minutes for this prep work. Having everything ready will make the cooking process smoother and more enjoyable.

Cooking Time

The cooking time for Beef Giouvetsi is where the magic happens. After browning the beef and sautéing the vegetables, you will need to let the dish simmer for about 1.5 to 2 hours. This slow cooking allows the beef to become tender and flavorful. After that, you’ll add the orzo and cook it for an additional 10-12 minutes. In total, the cooking time is approximately 1 hour and 45 minutes to 2 hours and 12 minutes.

Total Time

When you combine the prep time and cooking time, the total time to make Beef Giouvetsi with Orzo is around 2 hours to 2 hours and 30 minutes. This includes the time spent preparing the ingredients and the slow cooking process. While it may seem like a lengthy endeavor, the end result is a hearty and delicious meal that is well worth the wait!

Nutritional Information for Beef Giouvetsi with Orzo Recipe

Calories

Each serving of Beef Giouvetsi with Orzo contains approximately 450 calories. This makes it a satisfying meal that provides energy without being overly heavy. The combination of beef and orzo ensures that you feel full and content after enjoying this delicious dish. It’s a great option for a hearty dinner that won’t leave you feeling sluggish.

Protein

Protein is an essential nutrient, and this recipe delivers! With about 30 grams of protein per serving, Beef Giouvetsi with Orzo is an excellent choice for those looking to boost their protein intake. The beef chuck is a rich source of high-quality protein, which is vital for muscle repair and overall health. This makes it a great meal for active individuals or anyone needing a nutritious boost.

Sodium

When it comes to sodium, each serving of Beef Giouvetsi with Orzo contains around 600 milligrams. While this is a reasonable amount for a savory dish, it’s always good to be mindful of your sodium intake. If you’re watching your salt consumption, consider using low-sodium beef broth and reducing the added salt in the recipe. This way, you can enjoy the flavors without worrying too much about sodium levels.

FAQs about Beef Giouvetsi with Orzo Recipe

Can I use a different type of pasta in Beef Giouvetsi?

Absolutely! While orzo is the traditional choice for Beef Giouvetsi, you can experiment with other pasta types. Small pasta shapes like ditalini or even rice can work well. Just keep in mind that cooking times may vary. If you choose a different pasta, be sure to adjust the cooking time accordingly to ensure everything is perfectly cooked.

How can I make Beef Giouvetsi with Orzo Recipe gluten-free?

To make a gluten-free version of Beef Giouvetsi with Orzo, simply substitute the orzo pasta with a gluten-free pasta alternative. Many brands offer gluten-free orzo made from rice or corn. Additionally, check the beef broth to ensure it’s gluten-free. With these simple swaps, you can enjoy this delicious dish without gluten!

What is the best way to store leftovers of Beef Giouvetsi?

Storing leftovers of Beef Giouvetsi is easy! Allow the dish to cool completely before transferring it to an airtight container. It can be stored in the refrigerator for up to 3-4 days. If you want to keep it longer, consider freezing it. Just make sure to use a freezer-safe container. When reheating, add a splash of broth or water to maintain moisture and prevent the orzo from becoming too dry.

Can I prepare Beef Giouvetsi with Orzo in advance?

Yes, you can prepare Beef Giouvetsi with Orzo in advance! This dish actually tastes even better the next day as the flavors meld together. You can cook it a day ahead and store it in the refrigerator. When you’re ready to serve, simply reheat it on the stove over low heat, adding a little broth if needed. This makes it a great option for meal prep or entertaining!

Conclusion on Beef Giouvetsi with Orzo Recipe

In conclusion, Beef Giouvetsi with Orzo is a delightful dish that brings together the rich flavors of tender beef and the comforting texture of orzo pasta. This recipe not only showcases the beauty of Greek cuisine but also offers a wonderful way to gather family and friends around the dinner table. With its aromatic spices and hearty ingredients, it’s a meal that warms the heart and satisfies the appetite.

Whether you’re preparing it for a special occasion or a cozy weeknight dinner, this dish is sure to impress. The step-by-step preparation makes it accessible for cooks of all skill levels, while the variations allow for creativity in the kitchen. From vegetarian alternatives to different types of meat, there’s a version of Beef Giouvetsi for everyone.

As you enjoy this flavorful dish, remember the importance of sharing meals with loved ones. Food has a unique way of bringing people together, and Beef Giouvetsi with Orzo is a perfect example of that. So, gather your ingredients, follow the recipe, and savor the delicious results. Happy cooking!

Paul

Beef Giouvetsi with Orzo Recipe is a must-try dish!

This hearty Beef and Orzo Stew is a rustic one-pot wonder inspired by Greek Giouvetsi. Tender chunks of beef simmer in a richly spiced tomato sauce, finished with orzo pasta for a comforting and flavorful dish that’s perfect for any cozy dinner.
Prep Time 15 minutes
Cook Time 2 hours
Total Time 2 hours 15 minutes
Servings: 6 servings
Course: Main Dish
Cuisine: Greek-Inspired

Ingredients
  

  • 2 lbs beef chuck cut into cubes1 onion, finely chopped3 cloves garlic, minced1 (14 oz) can crushed tomatoes2 tablespoons tomato paste1 teaspoon ground cinnamon1/2 teaspoon ground allspice1/2 teaspoon ground clovesSalt and black pepper, to taste1/2 cup red wine3 cups beef broth1 1/2 cups orzo pastaFresh parsley, chopped (for garnish)Grated kefalotyri or parmesan cheese, for topping (optional)

Method
 

  1. Heat a bit of oil in a large Dutch oven or oven-safe pot. Brown beef cubes in batches until seared on all sides. Remove and set aside.
  2. In the same pot, sauté the chopped onion over medium heat until translucent, about 5 minutes. Add garlic and cook for 1 more minute.
  3. Stir in tomato paste and cook for 2 minutes. Add crushed tomatoes, cinnamon, allspice, cloves, salt, and pepper. Deglaze with red wine and simmer for 5 minutes.
  4. Return beef to the pot. Add beef broth and bring to a boil. Reduce heat, cover, and simmer for 1.5 to 2 hours, or until beef is tender.
  5. Stir in the orzo pasta. Continue simmering uncovered for 15–20 minutes, stirring occasionally, until pasta is cooked and the sauce is slightly thickened.
  6. Remove from heat. Garnish with fresh parsley and grated cheese if desired. Serve hot.

Notes

  • For deeper flavor, brown the tomato paste before adding the liquids.
  • You can bake the dish uncovered at 350°F for 20 minutes after adding the orzo to achieve a traditional baked texture.
  • Substitute red wine with more broth if preferred.
  • Excellent as leftovers—the flavors deepen overnight!

Grilled Chicken Margherita Recipe is a must-try dish!

Grilled Chicken Margherita Recipe. This dish combines the classic flavors of Italian cuisine with the simplicity of grilling, making it a perfect choice for any occasion. The juicy chicken breasts are topped with fresh mozzarella, vibrant cherry tomatoes, and fragrant basil, all drizzled with a sweet balsamic glaze. It’s a feast for both the eyes and the taste buds!

Grilling is not just a cooking method; it’s an experience. The smoky flavor from the grill enhances the taste of the chicken, while the fresh ingredients add a burst of color and flavor. Whether you’re hosting a summer barbecue or preparing a cozy dinner at home, this recipe is sure to be a hit. Plus, it’s healthy and packed with protein, making it a great option for those who want to eat well without sacrificing taste.

In this article, we will guide you through the ingredients, preparation steps, and tips to make your Grilled Chicken Margherita a success. So, fire up your grill and get ready to enjoy a meal that’s not only satisfying but also easy to prepare!

Ingredients for Grilled Chicken Margherita Recipe

Grilled Chicken Margherita Recipe, you will need a few simple yet fresh ingredients. Each component plays a vital role in bringing out the flavors of this delightful dish. Here’s what you’ll need:

  • 2 large boneless, skinless chicken breasts
  • 1 teaspoon salt
  • 1/2 teaspoon black pepper
  • 1 tablespoon olive oil
  • 1 cup cherry tomatoes, halved
  • 8 ounces fresh mozzarella cheese, sliced
  • 1/4 cup fresh basil leaves, chopped
  • 1/4 cup balsamic glaze

These ingredients are not only easy to find but also contribute to the overall taste and presentation of the dish. The chicken breasts serve as a hearty base, while the cherry tomatoes add a juicy sweetness. Fresh mozzarella brings a creamy texture, and the basil leaves provide a fragrant aroma. Finally, the balsamic glaze ties everything together with its rich, tangy flavor.

Feel free to adjust the quantities based on your preferences or the number of servings you need. With these ingredients on hand, you’re well on your way to creating a delicious meal that everyone will love!

Step-by-Step Preparation of Grilled Chicken Margherita Recipe

Grilled Chicken Margherita Recipe. This step-by-step guide will help you create a flavorful dish that’s sure to impress. Let’s get started!

Step 1: Marinating the Chicken

To enhance the flavor of the chicken, marinating is a great first step. Start by seasoning the chicken breasts with salt and black pepper. This simple seasoning will bring out the natural taste of the chicken. Next, drizzle a tablespoon of olive oil over the chicken. The oil not only adds flavor but also helps keep the chicken moist while grilling.

For an extra kick, consider marinating the chicken in Italian dressing for about 30 minutes. This will infuse the chicken with even more flavor. After marinating, your chicken will be ready for grilling!

Step 2: Preparing the Toppings

While the chicken is marinating, you can prepare the toppings. Start by washing the cherry tomatoes and cutting them in half. This will make them easier to place on the chicken later. Next, slice the fresh mozzarella cheese into even pieces. Aim for about a quarter-inch thickness to ensure it melts nicely on the grill.

Finally, chop the fresh basil leaves. The basil will add a burst of freshness to your dish. Set all these toppings aside, and you’ll be ready to grill!

Step 3: Grilling the Chicken

Once your chicken is marinated and your toppings are ready, it’s time to fire up the grill! Preheat your grill to medium-high heat. Place the chicken breasts on the grill and cook for about 6-7 minutes on each side. You want the internal temperature to reach 165°F for safe consumption.

During the last few minutes of grilling, it’s time to add the toppings. Place the sliced mozzarella and halved cherry tomatoes on each chicken breast. Close the grill lid to allow the cheese to melt beautifully. The aroma will be irresistible!

Step 4: Assembling the Dish

After grilling, remove the chicken from the grill and let it rest for about 5 minutes. This resting period allows the juices to redistribute, making the chicken even juicier. Once rested, drizzle the balsamic glaze over the chicken. This adds a sweet and tangy flavor that complements the other ingredients perfectly.

Grilled Chicken Margherita Recipe is now ready to serve! Enjoy this delightful dish with family and friends, and watch them savor every bite.

Variations of Grilled Chicken Margherita Recipe

Grilled Chicken Margherita Recipe is a crowd-pleaser, there are many ways to switch things up! Whether you want to try different proteins or explore vegetarian options, these variations will keep your meals exciting and flavorful. Let’s dive into some delicious alternatives!

Alternative Proteins

If you’re looking to change the protein in your dish, there are several tasty options. Here are a few ideas:

  • Turkey Breasts: Turkey is a leaner alternative to chicken. It cooks similarly and absorbs flavors well. Just be sure to adjust the cooking time as turkey breasts may take a bit longer.
  • Pork Chops: Grilled pork chops can add a different flavor profile. Season them with the same salt and pepper, and follow the same grilling steps for a delightful twist.
  • Fish: For a lighter option, try using firm fish like salmon or swordfish. These proteins grill beautifully and pair well with the fresh toppings.

Each of these proteins can be seasoned and grilled just like the chicken, allowing you to enjoy the same delicious flavors in a new way!

Vegetarian Options

If you’re catering to vegetarians or simply want to enjoy a meat-free meal, there are plenty of delicious alternatives. Here are some ideas:

  • Portobello Mushrooms: These large mushrooms make a great substitute for chicken. Marinate them in olive oil, salt, and pepper, then grill until tender. Top with mozzarella and tomatoes for a hearty dish.
  • Eggplant: Slices of eggplant can be grilled to perfection. They have a meaty texture and absorb flavors well. Just season and grill, then add your toppings!
  • Tofu: For a plant-based option, use firm tofu. Press it to remove excess moisture, then marinate and grill. Tofu takes on the flavors of the toppings beautifully.

These vegetarian options not only provide variety but also ensure that everyone at your table can enjoy a delicious meal. Feel free to experiment with different toppings and seasonings to make these variations your own!

Cooking Note for Grilled Chicken Margherita Recipe

Grilled Chicken Margherita Recipe, there are a few important cooking notes to keep in mind. These tips will help ensure that your dish turns out perfectly every time, enhancing both flavor and presentation.

First, always preheat your grill. This step is crucial for achieving those beautiful grill marks and ensuring even cooking. A hot grill helps to sear the chicken, locking in moisture and flavor. If your grill isn’t hot enough, the chicken may cook unevenly and become dry.

Next, consider using a meat thermometer. This handy tool takes the guesswork out of cooking chicken. Insert the thermometer into the thickest part of the chicken breast. When it reads 165°F, your chicken is safe to eat and perfectly cooked. This ensures that your meal is both delicious and safe for everyone.

Another tip is to let the chicken rest after grilling. This resting period allows the juices to redistribute throughout the meat. If you cut into the chicken too soon, those flavorful juices will escape, leaving you with a drier piece of meat. A five-minute rest is all you need for juicy, tender chicken.

Lastly, feel free to get creative with your toppings! While the classic combination of mozzarella, tomatoes, and basil is delightful, you can add other ingredients to suit your taste. Consider adding a sprinkle of red pepper flakes for heat or a drizzle of olive oil for extra richness. The possibilities are endless!

Grilled Chicken Margherita Recipe to new heights. Enjoy the process, and don’t hesitate to make it your own!

Serving Suggestions for Grilled Chicken Margherita Recipe

Grilled Chicken Margherita Recipe, it’s time to think about how to serve it! Presentation can elevate your meal, making it even more enjoyable for you and your guests. Here are some delightful serving suggestions to consider:

  • On a Bed of Greens: Serve the grilled chicken on a bed of fresh arugula or mixed greens. This adds a refreshing crunch and a pop of color to your plate. Drizzle a little olive oil and lemon juice over the greens for extra flavor.
  • With a Side of Pasta: Pair your chicken with a light pasta dish. A simple spaghetti tossed in olive oil, garlic, and fresh herbs complements the flavors of the chicken beautifully. You can also add a sprinkle of Parmesan cheese for a savory touch.
  • Accompanied by Grilled Vegetables: Grilled vegetables like zucchini, bell peppers, and asparagus make a perfect side. Their smoky flavor pairs well with the chicken, creating a balanced meal.
  • With Crusty Bread: Serve slices of crusty Italian bread on the side. This is perfect for soaking up any leftover balsamic glaze or juices from the chicken. It adds a satisfying texture to your meal.
  • As a Sandwich: For a fun twist, slice the grilled chicken and serve it in a toasted bun. Add some fresh basil and a slice of mozzarella for a delicious chicken sandwich. This is great for casual gatherings or picnics!

Grilled Chicken Margherita Recipe will not only taste amazing but also look stunning on the table. Enjoy your meal with family and friends, and watch them rave about your culinary skills!

Tips for Perfecting Your Grilled Chicken Margherita Recipe

Grilled Chicken Margherita Recipe truly shine, consider these helpful tips. They will ensure that your dish is not only delicious but also visually appealing. Let’s explore some expert advice to elevate your grilling game!

  • Choose Quality Ingredients: The freshness of your ingredients can make a big difference. Opt for high-quality chicken breasts, fresh mozzarella, and ripe cherry tomatoes. The better the ingredients, the tastier your dish will be!
  • Don’t Skip the Marinade: Marinating the chicken is key to infusing flavor. Even a short marination time can enhance the taste. If you have more time, let the chicken marinate for a few hours or overnight for maximum flavor.
  • Use a Grill Basket: If you’re worried about the cherry tomatoes falling through the grill grates, consider using a grill basket. This handy tool keeps your toppings secure while allowing them to cook evenly.
  • Monitor the Temperature: Keep an eye on the grill temperature. Too hot can lead to burnt chicken, while too cool can result in undercooked meat. Aim for a steady medium-high heat for the best results.
  • Experiment with Seasonings: While salt and pepper are classic, don’t hesitate to experiment! Add garlic powder, Italian herbs, or lemon zest to the chicken for an extra flavor boost.
  • Let It Rest: After grilling, always let the chicken rest for a few minutes. This step is crucial for juicy chicken. It allows the juices to redistribute, ensuring every bite is tender and flavorful.
  • Garnish Creatively: Presentation matters! Use fresh basil leaves or a sprinkle of Parmesan cheese as a garnish. A drizzle of balsamic glaze can also enhance the visual appeal and flavor.

Grilled Chicken Margherita Recipe. Each step contributes to a dish that’s not only delicious but also a feast for the eyes. Enjoy the process, and don’t be afraid to make it your own!

Breakdown of Time for Grilled Chicken Margherita Recipe

Grilled Chicken Margherita Recipe can help you plan your meal better. Here’s a simple breakdown of the time you’ll need for preparation and cooking. This will ensure that everything runs smoothly and you can enjoy your delicious dish without any rush!

Prep Time

The prep time for this recipe is approximately 15-20 minutes. This includes gathering your ingredients, marinating the chicken, and preparing the toppings. If you choose to marinate the chicken in Italian dressing, you might want to add an extra 30 minutes to this time. However, the actual hands-on time remains around 15-20 minutes.

Cooking Time

Once you’re ready to grill, the cooking time will take about 12-15 minutes. This includes grilling the chicken for 6-7 minutes on each side. During the last few minutes, you’ll add the mozzarella and cherry tomatoes, allowing them to melt and warm up. Keep an eye on the internal temperature to ensure the chicken reaches 165°F for safe consumption.

Total Time

Grilled Chicken Margherita Recipe a quick and easy option for a weeknight dinner or a weekend gathering. With just a little bit of time, you can create a flavorful and impressive meal that everyone will love!

Nutritional Information for Grilled Chicken Margherita Recipe

Grilled Chicken Margherita Recipe not only delights your taste buds but also provides valuable nutrients. Here’s a closer look at the nutritional information for this delicious dish.

Calories

Grilled Chicken Margherita Recipe contains approximately 320 calories. This makes it a satisfying option without being overly heavy. The combination of lean protein from the chicken and healthy fats from the olive oil and mozzarella contributes to a well-rounded meal. Enjoying this dish can fit nicely into a balanced diet, especially when paired with fresh vegetables or a light salad.

Protein

Grilled Chicken Margherita Recipe a great choice for those looking to maintain or build muscle.

Sodium

In terms of sodium, each serving contains around 600 milligrams. While this is a moderate amount, it’s important to be mindful of your overall sodium intake throughout the day. To reduce sodium levels, consider using low-sodium salt or skipping the added salt during preparation. This way, you can enjoy the flavors of the dish without worrying about excess sodium.

Grilled Chicken Margherita Recipe is a nutritious option that provides a good balance of calories, protein, and sodium. It’s a meal that not only tastes great but also supports your health goals. Enjoy this delightful dish knowing that you’re making a wholesome choice for yourself and your loved ones!

FAQs about Grilled Chicken Margherita Recipe

What can I serve with Grilled Chicken Margherita?

Grilled Chicken Margherita Recipe, there are plenty of delicious options to consider. Here are some great pairings:

  • Fresh Salad: A light salad with mixed greens, cucumbers, and a simple vinaigrette complements the flavors of the chicken beautifully.
  • Garlic Bread: Serve warm garlic bread on the side. It’s perfect for soaking up any leftover balsamic glaze.
  • Roasted Vegetables: Roasted or grilled vegetables like zucchini, bell peppers, and asparagus add color and nutrition to your meal.
  • Pasta Salad: A cold pasta salad with Italian dressing can be a refreshing side dish that pairs well with the grilled chicken.
  • Rice or Quinoa: For a heartier option, serve the chicken over a bed of rice or quinoa. This adds a nice texture and makes the meal more filling.

These sides not only enhance the meal but also create a balanced plate that everyone will enjoy!

Can I make Grilled Chicken Margherita ahead of time?

Grilled Chicken Margherita Recipe ahead of time! Here’s how:

  • Marinate the Chicken: You can marinate the chicken breasts a few hours or even a day in advance. Just keep them in the refrigerator until you’re ready to grill.
  • Prepare Toppings: You can wash and chop the cherry tomatoes and basil ahead of time. Store them in airtight containers in the fridge until you’re ready to use them.
  • Grill and Store: If you have leftovers, you can grill the chicken and store it in the fridge for up to three days. Just reheat it gently before serving.

By preparing in advance, you can save time on busy days while still enjoying a delicious meal!

What is the best way to store leftovers of Grilled Chicken Margherita?

Grilled Chicken Margherita Recipe is easy! Follow these steps for the best results:

  • Cool Down: Allow the grilled chicken to cool to room temperature before storing. This helps prevent condensation in the container.
  • Airtight Container: Place the chicken in an airtight container. If you have any toppings left, store them separately to maintain freshness.
  • Refrigerate: Store the container in the refrigerator. The grilled chicken can last for up to three days.
  • Reheat Properly: When you’re ready to enjoy the leftovers, reheat the chicken in the oven or microwave until it’s warmed through. Avoid reheating multiple times to maintain quality.

Grilled Chicken Margherita Recipe even after the initial meal!

Conclusion on Grilled Chicken Margherita Recipe

Grilled Chicken Margherita Recipe is a delightful dish that brings together fresh ingredients and simple cooking techniques. It’s perfect for any occasion, whether you’re hosting a summer barbecue or enjoying a cozy dinner at home. The combination of juicy chicken, creamy mozzarella, sweet cherry tomatoes, and fragrant basil creates a symphony of flavors that is sure to please everyone at the table.

Not only is this recipe easy to prepare, but it also offers a healthy option packed with protein and essential nutrients. With just a few simple steps, you can create a meal that is both satisfying and visually appealing. Plus, the variations and serving suggestions allow you to customize the dish to suit your taste and dietary preferences.

As you embark on your culinary journey with this recipe, remember to have fun and experiment with different ingredients. Whether you choose to stick to the classic version or try out some of the suggested variations, the key is to enjoy the process of cooking and sharing delicious food with loved ones.

Grilled Chicken Margherita Recipe. Happy grilling!

Paul

Grilled Chicken Margherita Recipe is a must-try dish!

Grilled Chicken Margherita is a fresh and flavorful take on Italian-inspired grilling. Juicy chicken breasts are seasoned, flame-grilled, and topped with gooey mozzarella, sweet tomatoes, fragrant basil, and a drizzle of tangy balsamic glaze. Simple, stunning, and satisfying.
Prep Time 10 minutes
Cook Time 15 minutes
Total Time 25 minutes
Servings: 4 servings
Course: Main Course
Cuisine: Italian-American

Ingredients
  

  • 4 boneless skinless chicken breasts2 tablespoons olive oil1 teaspoon Italian seasoningSalt and pepper to taste4 slices fresh mozzarella cheese2 Roma tomatoes, thinly sliced1/4 cup fresh basil leavesBalsamic glaze, for drizzling

Method
 

  1. Pat chicken breasts dry. Brush with olive oil and season both sides with Italian seasoning, salt, and pepper.
  2. Preheat grill to medium-high heat. Grill chicken for 5 to 7 minutes per side, or until cooked through and grill marks appear.
  3. In the last 2 minutes of grilling, top each chicken breast with a slice of mozzarella and tomato slices. Close the lid to allow the cheese to melt.
  4. Remove chicken from the grill. Sprinkle with fresh basil and drizzle with balsamic glaze.
  5. Serve hot with a fresh salad, pasta, or roasted vegetables.

Notes

  • Substitute mozzarella with burrata or provolone for a twist.
  • Add a thin slice of prosciutto under the cheese for extra richness.
  • Balsamic glaze can be made at home by reducing balsamic vinegar with a bit of honey.
  • Pairs beautifully with herbed couscous or grilled zucchini.

Millionaire Peach Salad Recipe is a must-try delight!

A Taste That Brings Back Summers and Smiles

When I was a child, Sunday afternoons in late July meant one thing: grandma’s back porch and bowls of chilled peach salad. The sunlight would slant just right through the lace curtains, and the table would be laden with the colors of the season—deep reds, golden yellows, and soft creams. But the star was always her Millionaire Peach Salad. Despite its grand name, it wasn’t made with expensive ingredients. Instead, it was a treasure trove of memories, made rich by laughter, stories, and the endless hum of cicadas.

The first spoonful would always be magic: soft peaches, sweet and cool, melting into the creamy fluff of whipped topping and pudding. It was the kind of recipe you didn’t just taste—you felt it. You felt it in the smile of a neighbor asking for seconds, in the way your aunt would sneak another spoonful after declaring she was too full, in the sticky fingers of little cousins trying to steal the marshmallows. It was more than dessert. It was a moment captured in flavor.

That’s the magic of Millionaire Peach Salad.

What Is Millionaire Peach Salad?

Despite its luxurious title, Millionaire Peach Salad is a down-home, retro dessert salad that gained popularity during the mid-20th century. A cousin of the equally famous Watergate Salad and Ambrosia, it typically includes canned peaches, whipped topping, instant pudding, and marshmallows. The ingredients are stirred together to form a creamy, fruit-filled bowl of sweetness that’s often served chilled as a potluck favorite or holiday side.

It reflects the era of “salad” dishes that didn’t necessarily involve greens, but rather invoked convenience, comfort, and sweetness. It’s inexpensive, requires no baking, and can be assembled in just minutes—making it perfect for summer picnics, family reunions, or any gathering where comfort food is king.

The Story Behind the Name

Why “Millionaire”? The name is more about the feeling than the cost. This salad, in all its rich textures and layered sweetness, gives a sense of indulgence. Much like millionaire pie (a no-bake, fruity cream pie with similar ingredients), this dessert gives a little nod to the idea of eating like royalty—without spending like it.

It’s an affectionate reminder that luxury doesn’t have to come with a price tag. Sometimes, all it takes is a can of peaches and a memory of good times shared.

Creative Twists on a Southern Classic

Though the traditional version is a tried-and-true crowd-pleaser, creative cooks have been riffing on the formula for decades. Here are a few variations that can elevate or personalize your salad:

  • Tropical Paradise: Add pineapple chunks, shredded coconut, and a splash of lime juice for a tropical spin.
  • Berry Bliss: Mix in fresh strawberries or blueberries for a tart balance to the sweetness.
  • Nutty Crunch: Pecans or walnuts add a delightful texture contrast, especially when lightly toasted.
  • Low-Sugar Option: Use sugar-free pudding and whipped topping, and opt for peaches in natural juice to cut down on sweetness.
  • Holiday Version: Add cinnamon or nutmeg and swap peaches for canned pears or apples for a festive feel.

Frequently Asked Questions

Can I use fresh peaches instead of canned?

Absolutely! Fresh peaches can offer an even juicier, brighter flavor. Just make sure they’re ripe and slightly soft. You may want to toss them in a bit of lemon juice and sugar to replicate the sweetness and syrupy texture of canned.

Can I make this salad ahead of time?

Yes, in fact, it’s better when it has time to chill. Preparing it 4–6 hours in advance—or even the night before—helps the flavors meld beautifully. Just give it a gentle stir before serving.

Does this need to be refrigerated?

Definitely. The whipped topping and pudding require refrigeration. Keep it cold until serving, especially if you’re bringing it to a picnic or potluck.

Can I make it dairy-free or vegan?

Yes! Swap out traditional whipped topping for a plant-based version, and use non-dairy pudding mixes or homemade coconut cream pudding. Be sure to double-check labels for hidden dairy ingredients.

Why is it called a “salad” when it’s more like a dessert?

This naming convention harks back to mid-century America, where Jell-O, fruit, and whipped topping combos were often served as “salads”—a cultural quirk that lives on in Southern and Midwestern potluck traditions.

Tips for Perfect Results Every Time

  • Drain the fruit well: Extra moisture can thin the pudding mix and affect the creamy consistency.
  • Chill thoroughly: At least an hour in the fridge gives the best texture and flavor.
  • Fold gently: Overmixing can break down the fruit and whipped topping, resulting in a mushy salad.
  • Balance the sweetness: If you’re adding more fruit or sweet ingredients, consider using unsweetened or lightly sweetened versions of the whipped topping or pudding.

The Heart of the Dish

At its core, Millionaire Peach Salad isn’t about following a perfect recipe. It’s about evoking a sense of comfort, joy, and community. It’s the dish that shows up when you need something simple, reliable, and soul-satisfying. The kind of thing you can imagine being passed down through recipe cards stained with peach syrup and scribbled in cursive.

You don’t need a holiday or a potluck to enjoy this salad. Make it on a Tuesday. Make it when you’re feeling nostalgic. Make it because you want to remember what joy tastes like.

Conclusion: A Spoonful of Nostalgia

Millionaire Peach Salad is a reminder of simpler times—of the joy found in everyday ingredients and the memories we wrap around food. It’s the kind of dish that doesn’t need explaining once you’ve tasted it. It speaks in creamy spoonfuls and peachy sweetness. And long after the last bite is gone, it leaves behind something even richer: connection.

So dust off that mixing bowl, open up a can of peaches, and make yourself a million-dollar memory.

Paul

Millionaire Peach Salad Recipe is a must-try delight!

This Millionaire Peach Salad is a dreamy, creamy fruit dessert that’s bursting with juicy peaches, fluffy marshmallows, and whipped vanilla pudding. It’s a no-bake, crowd-pleasing classic that brings the flavor of summer to any table.
Prep Time 10 minutes
Total Time 1 hour 10 minutes
Servings: 6 servings
Course: Dessert
Cuisine: American

Ingredients
  

  • 1 can 15 oz sliced peaches in light syrup, drained1 package (3.4 oz) instant vanilla pudding mix1 container (8 oz) whipped topping (like Cool Whip), thawed1 cup mini marshmallows1/2 cup shredded coconut (optional)1/2 cup chopped pecans or walnuts (optional)1 cup fruit cocktail or pineapple tidbits, drained

Method
 

  1. In a large mixing bowl, stir the pudding mix with the reserved juice from the peaches until thickened and smooth.
  2. Fold in the whipped topping until evenly combined.
  3. Gently stir in the drained peaches, fruit cocktail or pineapple, marshmallows, and optional coconut and nuts.
  4. Cover the bowl and refrigerate for at least 1 hour to let the flavors meld.
  5. Serve chilled and enjoy!

Notes

  • For a tropical twist, use mandarin oranges or mango chunks in place of peaches.
  • Add a splash of vanilla extract or almond extract for extra depth.
  • This salad holds well in the fridge and is perfect for potlucks, BBQs, or summer celebrations.
  • Make it a holiday treat by adding red and green maraschino cherries.

Chocolate Peanut Butter Cupcakes Recipe is a must-try!

Introduction to Chocolate Peanut Butter Cupcakes Recipe

Chocolate Peanut Butter Cupcakes Recipe is a perfect blend of rich chocolate and creamy peanut butter. These cupcakes are not just a dessert; they are a celebration of flavors that will make your taste buds dance with joy!

Imagine biting into a soft, moist chocolate cupcake topped with a luscious peanut butter frosting. It’s a match made in heaven! Whether you’re hosting a birthday party, a family gathering, or simply craving something sweet, these cupcakes are sure to impress everyone.

What makes this recipe even better is its simplicity. With just a few ingredients and easy steps, you can whip up a batch of these delicious cupcakes in no time. Plus, they are perfect for bakers of all skill levels. So, whether you’re a seasoned pro or a beginner, you’ll find joy in creating these delightful treats.

Let’s dive into the ingredients and preparation steps to bring this scrumptious recipe to life. Get ready to enjoy the sweet aroma of baking chocolate and peanut butter wafting through your kitchen!

Ingredients for Chocolate Peanut Butter Cupcakes Recipe

Chocolate Peanut Butter Cupcakes Recipe, you’ll need a few simple ingredients. Each component plays a vital role in achieving that perfect balance of flavors and textures. Here’s what you’ll need:

  • 1 ½ cups all-purpose flour
  • 1 cup granulated sugar
  • ½ cup unsweetened cocoa powder
  • 1 teaspoon baking soda
  • ½ teaspoon salt
  • 1 cup buttermilk
  • ½ cup vegetable oil
  • 2 large eggs
  • 2 teaspoons vanilla extract
  • 1 cup boiling water

For the creamy peanut butter frosting, gather the following ingredients:

  • 1 cup creamy peanut butter
  • ½ cup unsalted butter, softened
  • 3 cups powdered sugar
  • ¼ cup heavy cream
  • 1 teaspoon vanilla extract

These ingredients come together to create a delightful cupcake experience. The combination of rich cocoa and creamy peanut butter will leave you wanting more. Make sure to have everything ready before you start baking. This way, you can enjoy the process without any interruptions!

Preparation of Chocolate Peanut Butter Cupcakes Recipe

Chocolate Peanut Butter Cupcakes Recipe to life! Follow these simple steps to create your delicious cupcakes. Each step is designed to ensure that your cupcakes turn out perfectly every time.

Step 1: Preheat the Oven

First things first, preheat your oven to 350°F (175°C). This step is crucial as it ensures that your cupcakes bake evenly. While the oven is heating up, you can prepare your cupcake pan. Line it with paper liners to make removing the cupcakes easy once they’re baked.

Step 2: Prepare the Cupcake Batter

In a large mixing bowl, combine the dry ingredients. Start with 1 ½ cups of all-purpose flour, 1 cup of granulated sugar, ½ cup of unsweetened cocoa powder, 1 teaspoon of baking soda, and ½ teaspoon of salt. Whisk these ingredients together until they are well blended. This step helps to evenly distribute the baking soda and salt, ensuring your cupcakes rise perfectly.

Next, add the wet ingredients. Pour in 1 cup of buttermilk, ½ cup of vegetable oil, 2 large eggs, and 2 teaspoons of vanilla extract. Mix everything on medium speed until the batter is smooth. It’s important to mix well to incorporate air into the batter, which will help your cupcakes rise.

Step 3: Bake the Cupcakes

Now comes the exciting part! Carefully stir in 1 cup of boiling water into the batter. This will make the batter thin, but don’t worry; that’s how it should be! Pour the batter into the prepared cupcake liners, filling each about 2/3 full. This allows room for the cupcakes to rise without overflowing.

Place the cupcake pan in the preheated oven and bake for 18-20 minutes. To check if they are done, insert a toothpick into the center of a cupcake. If it comes out clean, they are ready! Once baked, allow the cupcakes to cool in the pan for 5 minutes before transferring them to a wire rack to cool completely.

Step 4: Make the Peanut Butter Frosting

While your cupcakes are cooling, it’s time to whip up the creamy peanut butter frosting. In a medium bowl, beat together 1 cup of creamy peanut butter and ½ cup of softened unsalted butter until the mixture is creamy and smooth. This step is essential for achieving a light and fluffy frosting.

Gradually add in 3 cups of powdered sugar, alternating with ¼ cup of heavy cream. Mix until everything is well combined and smooth. Finally, stir in 1 teaspoon of vanilla extract for that extra burst of flavor. Your frosting should be rich and creamy, perfect for topping your cupcakes!

Step 5: Frost the Cupcakes

Once the cupcakes are completely cool, it’s time to frost them generously with the peanut butter frosting. Use a spatula or a piping bag to create beautiful swirls on top of each cupcake. Feel free to get creative with your frosting technique! The more frosting, the better, right?

Chocolate Peanut Butter Cupcakes are ready to be enjoyed. They are perfect for any occasion or just as a sweet treat for yourself. Let’s move on to some variations you can try to make these cupcakes even more exciting!

Variation of Chocolate Peanut Butter Cupcakes Recipe

Chocolate Peanut Butter Cupcakes Recipe is already a hit, there are ways to adapt it to suit different dietary needs and preferences. Whether you’re looking for a gluten-free option or a vegan adaptation, you can still enjoy these delightful treats. Let’s explore how to make these variations!

Gluten-Free Option

If you or someone you know is gluten-sensitive, you can easily make these cupcakes gluten-free. Simply replace the all-purpose flour with a gluten-free flour blend. Many brands offer a 1:1 gluten-free flour that works well in baking. Make sure to check the ingredients to ensure it’s suitable for your needs.

Additionally, you can add a teaspoon of xanthan gum to help bind the ingredients together. This will give your cupcakes the right texture and prevent them from crumbling. Follow the same preparation steps as the original recipe, and you’ll have delicious gluten-free chocolate peanut butter cupcakes that everyone can enjoy!

Vegan Adaptation

For those following a vegan diet, you can still indulge in these scrumptious cupcakes! Start by replacing the eggs with flaxseed meal or applesauce. To make a flax egg, mix 1 tablespoon of flaxseed meal with 2.5 tablespoons of water. Let it sit for about 5 minutes until it thickens. This will act as a great egg substitute.

Next, swap the buttermilk with a plant-based milk, like almond or soy milk, mixed with a teaspoon of vinegar or lemon juice. This will create a similar acidity to buttermilk. For the frosting, use a vegan butter substitute instead of regular butter and ensure your peanut butter is free from added sugars or oils.

Chocolate Peanut Butter Cupcakes Recipe that everyone will love. Enjoy the same rich flavors while sticking to your dietary preferences!

Cooking Note for Chocolate Peanut Butter Cupcakes Recipe

Chocolate Peanut Butter Cupcakes Recipe. Here are some important cooking notes to keep in mind as you embark on your baking adventure:

First, always measure your ingredients accurately. Baking is a science, and even a small difference in measurements can affect the outcome. Use measuring cups and spoons for dry ingredients and a liquid measuring cup for wet ingredients. This ensures that your cupcakes rise beautifully and have the right texture.

Next, make sure your ingredients are at room temperature before mixing. This includes eggs, buttermilk, and butter. Room temperature ingredients blend more easily, resulting in a smoother batter. It also helps the cupcakes bake evenly.

Another important note is to avoid overmixing the batter. Once you combine the wet and dry ingredients, mix just until everything is incorporated. Overmixing can lead to dense cupcakes, which is not what we want! A light hand will yield fluffy, tender cupcakes.

When baking, keep an eye on the time. Ovens can vary, so start checking your cupcakes a few minutes before the recommended baking time. Insert a toothpick into the center of a cupcake; if it comes out clean or with a few moist crumbs, they are done. If it has wet batter on it, give them a few more minutes.

Lastly, allow your cupcakes to cool completely before frosting. This prevents the frosting from melting and sliding off. Patience is key here! Once cooled, you can frost them generously and enjoy the delightful combination of chocolate and peanut butter.

Chocolate Peanut Butter Cupcakes that will impress your family and friends. Happy baking!

Serving Suggestions for Chocolate Peanut Butter Cupcakes Recipe

Chocolate Peanut Butter Cupcakes Recipe, it’s time to think about how to serve them! Presentation can elevate your cupcakes from simple treats to show-stopping desserts. Here are some delightful serving suggestions to make your cupcakes even more enjoyable:

  • Garnish with Chocolate Drizzle: A simple drizzle of melted chocolate over the frosted cupcakes adds a touch of elegance. Just melt some semi-sweet chocolate and use a spoon to create a beautiful pattern on top.
  • Top with Crushed Peanuts: For a crunchy texture, sprinkle crushed peanuts on top of the frosting. This not only adds flavor but also gives a nice visual contrast to the creamy frosting.
  • Serve with Ice Cream: Pair your cupcakes with a scoop of vanilla or chocolate ice cream. The cold ice cream complements the warm, rich flavors of the cupcakes, creating a delightful dessert experience.
  • Use Decorative Cupcake Stands: Present your cupcakes on a decorative stand or platter. This makes them look more appealing and is perfect for parties or gatherings.
  • Offer a Variety: If you’re hosting a party, consider making a variety of flavors. Alongside your chocolate peanut butter cupcakes, you could offer vanilla, red velvet, or even a fruity option. This way, there’s something for everyone!
  • Personalized Toppers: Create fun and personalized cupcake toppers for special occasions. Use themed decorations for birthdays, holidays, or celebrations to make your cupcakes stand out.

Chocolate Peanut Butter Cupcakes but also add an extra layer of enjoyment for your guests. Whether it’s a casual family dinner or a festive celebration, these cupcakes are sure to be a hit!

Tips for Perfecting Your Chocolate Peanut Butter Cupcakes Recipe

Chocolate Peanut Butter Cupcakes Recipe is all about attention to detail and a few helpful tips. With these tricks up your sleeve, you can ensure that your cupcakes turn out moist, fluffy, and bursting with flavor every time. Let’s explore some essential tips to elevate your baking game!

First, always use fresh ingredients. Check the expiration dates on your baking powder, baking soda, and cocoa powder. Fresh ingredients will help your cupcakes rise properly and enhance their flavor. Stale ingredients can lead to flat or bland cupcakes, which is not what you want!

Next, consider using high-quality cocoa powder. The type of cocoa powder you choose can significantly impact the taste of your cupcakes. Opt for a Dutch-processed cocoa for a richer flavor, or use natural cocoa for a more intense chocolate taste. Experimenting with different brands can lead to delightful discoveries!

Another tip is to avoid overfilling your cupcake liners. Filling them about 2/3 full is ideal. This allows enough space for the cupcakes to rise without overflowing. If you overfill, you may end up with messy cupcakes that lose their shape.

When it comes to mixing, remember to fold in the boiling water gently. This step is crucial for achieving a thin batter, which results in moist cupcakes. Stir just until combined; overmixing can lead to dense cupcakes. A light touch is key!

For the frosting, consider chilling your peanut butter before mixing. This can help create a thicker frosting that holds its shape better. If your frosting is too soft, add a bit more powdered sugar until you reach your desired consistency.

Lastly, don’t rush the cooling process. Allow your cupcakes to cool completely before frosting. This prevents the frosting from melting and ensures a beautiful presentation. If you’re in a hurry, you can place the cupcakes in the fridge for a few minutes to speed up the cooling process.

Chocolate Peanut Butter Cupcakes Recipe. Each batch will be a delicious success, leaving everyone wanting more. Happy baking!

Breakdown of Time for Chocolate Peanut Butter Cupcakes Recipe

Chocolate Peanut Butter Cupcakes Recipe can help you plan your baking session better. Here’s a detailed breakdown of the time you’ll need for preparation, cooking, and cooling. This way, you can enjoy the process without feeling rushed!

Prep Time

The prep time for this delightful recipe is approximately 20 minutes. During this time, you’ll gather all your ingredients, measure them accurately, and mix the batter. Make sure to have everything ready before you start. This will make the process smoother and more enjoyable!

Cooking Time

Once your cupcakes are in the oven, the cooking time is about 18-20 minutes. Keep an eye on them as they bake. Ovens can vary, so it’s a good idea to check a few minutes before the timer goes off. You want them to be perfectly baked, with a toothpick coming out clean!

Total Time

In total, you can expect to spend around 40-45 minutes from start to finish. This includes prep time, cooking time, and a short cooling period before frosting. Once the cupcakes are out of the oven, allow them to cool for about 5 minutes in the pan before transferring them to a wire rack. After they cool completely, you can frost them and enjoy your delicious creations!

Chocolate Peanut Butter Cupcakes into your day. Whether it’s a weekend treat or a special occasion, you’ll be ready to impress with your baking skills!

Nutritional Information for Chocolate Peanut Butter Cupcakes Recipe

Chocolate Peanut Butter Cupcakes Recipe can help you enjoy these treats while keeping track of your dietary goals. Here’s a breakdown of the key nutritional information per serving, which is one cupcake. This will give you a clearer picture of what you’re indulging in!

Calories

Each cupcake contains approximately 350 calories. This includes the rich chocolate base and the creamy peanut butter frosting. While they are a delightful treat, it’s good to be mindful of portion sizes, especially if you’re watching your calorie intake. Enjoying one cupcake as a special treat can fit nicely into a balanced diet!

Protein

In terms of protein, each cupcake provides about 6 grams. The protein comes from the eggs and peanut butter, which are both excellent sources. Protein is essential for building and repairing tissues, making these cupcakes not just a sweet indulgence but also a source of nourishment!

Sodium

Each cupcake contains roughly 200 milligrams of sodium. This amount is fairly moderate, especially considering that sodium is often found in many baked goods. If you’re watching your sodium intake, it’s a good idea to enjoy these cupcakes in moderation. Pairing them with fresh fruits or a glass of milk can balance out the flavors and nutrients!

Chocolate Peanut Butter Cupcakes while being aware of their impact on your diet. Remember, it’s all about balance and enjoying treats in moderation. Happy baking and indulging!

FAQs about Chocolate Peanut Butter Cupcakes Recipe

Can I make these cupcakes ahead of time?

Chocolate Peanut Butter Cupcakes Recipe ahead of time. In fact, they can be baked a day or two in advance. Just make sure to store them in an airtight container at room temperature. This will keep them fresh and delicious. If you plan to frost them later, it’s best to wait until they are completely cool before adding the peanut butter frosting. This way, the frosting won’t melt and will stay beautifully on top!

How do I store leftover cupcakes?

Storing leftover cupcakes is easy! Place them in an airtight container to keep them fresh. You can store them at room temperature for up to three days. If you want to keep them longer, consider refrigerating them. Just remember to let them come to room temperature before serving. This will help maintain their soft texture. If you have frosted cupcakes, they can also be stored in the fridge, but be sure to cover them well to prevent drying out.

Can I use other nut butters instead of peanut butter?

Yes, you can definitely use other nut butters in this recipe! Almond butter, cashew butter, or even sunflower seed butter can be great alternatives. Just keep in mind that the flavor will change slightly depending on the nut butter you choose. If you’re using a nut butter that is less sweet than peanut butter, you might want to adjust the sugar in the frosting to maintain the right sweetness level. Enjoy experimenting with different flavors!

What can I substitute for eggs in this recipe?

Chocolate Peanut Butter Cupcakes Recipe, there are several options! You can use 1/4 cup of unsweetened applesauce for each egg. Another great option is to mix 1 tablespoon of flaxseed meal with 2.5 tablespoons of water. Let it sit for about 5 minutes until it thickens. This will act as a perfect binding agent in your cupcakes. Both substitutes will help keep your cupcakes moist and delicious!

Conclusion on Chocolate Peanut Butter Cupcakes Recipe

Chocolate Peanut Butter Cupcakes Recipe is a delightful treat that combines the rich flavors of chocolate and the creamy goodness of peanut butter. These cupcakes are not only easy to make but also perfect for any occasion, whether it’s a birthday party, a family gathering, or simply a sweet indulgence for yourself.

With simple ingredients and straightforward steps, you can create a batch of moist, fluffy cupcakes topped with a luscious peanut butter frosting. The variations, such as gluten-free and vegan options, ensure that everyone can enjoy these delicious treats, regardless of dietary preferences.

Remember to follow the cooking notes and tips provided to achieve the best results. From measuring ingredients accurately to allowing your cupcakes to cool completely before frosting, these small details can make a big difference in your baking experience.

As you serve these delightful cupcakes, consider the presentation tips to elevate their appeal. Whether you choose to garnish with chocolate drizzle or serve them alongside ice cream, your cupcakes are sure to impress your guests.

Chocolate Peanut Butter Cupcakes Recipe, you’re not just baking; you’re creating memories and sharing joy with every bite. Happy baking!

Paul

Chocolate Peanut Butter Cupcakes Recipe is a must-try!

These Chocolate Peanut Butter Cupcakes are rich, decadent, and loaded with everyone’s favorite flavor combo. Moist chocolate cake hides a surprise Reese’s center, topped with fluffy peanut butter frosting and finished with a drizzle of chocolate ganache. Whether for birthdays, bake sales, or midnight cravings, these cupcakes steal the spotlight every time.
Prep Time 25 minutes
Cook Time 17 minutes
Total Time 45 minutes
Servings: 24 cupcakes
Course: Dessert
Cuisine: American

Ingredients
  

  • For the Cupcakes2 cups all-purpose flour2 cups granulated sugar¾ cup Dutch process cocoa powder2 teaspoons baking soda1 teaspoon baking powder1 teaspoon salt½ cup vegetable oil1 cup buttermilk room temperature2 large eggs, room temperature1 tablespoon vanilla extract1 cup hot water24 mini Reese’s cups
  • For the Peanut Butter Frosting18 tablespoons salted butter softened¾ cup creamy peanut butter3¾ cups powdered sugar1 tablespoon vanilla extract6 tablespoons heavy cream12 mini Reese’s cups, halved (for garnish)
  • For the Chocolate Ganache⅓ cup heavy cream½ cup chocolate chips

Method
 

  1. Preheat oven to 350°F (175°C). Line two standard 12-cup muffin pans with paper liners.
  2. In a large mixing bowl, whisk together flour, sugar, cocoa powder, baking soda, baking powder, and salt.
  3. In another bowl, combine oil, buttermilk, eggs, and vanilla. Slowly whisk in hot water.
  4. Pour the wet mixture into the dry ingredients and mix until smooth, about 2–3 minutes.
  5. Fill each cupcake liner ⅓ full. Press a mini Reese’s into the center of each. Add more batter until liners are ⅔ full.
  6. Bake for 14–17 minutes, or until a toothpick inserted around the edge comes out clean. Let cool in the pan for 5–10 minutes, then transfer to a wire rack to cool completely.
  7. To make the frosting, beat butter and peanut butter until smooth and creamy. Add powdered sugar, vanilla, and heavy cream. Beat until light and fluffy, about 2–3 minutes.
  8. For the ganache, heat heavy cream in the microwave until just steaming. Add chocolate chips, let sit for 2–3 minutes, then stir until smooth.
  9. Pipe frosting onto cooled cupcakes. Top with a halved mini Reese’s and drizzle ganache over the top.

Notes

You can use unsalted butter in the frosting—just add a pinch of salt.
Cupcakes can be made a day ahead and frosted the next day. Store in an airtight container.
For extra chocolate, add mini chocolate chips to the batter before baking.
Let ganache cool slightly before drizzling for the best consistency.

French Onion Beef Casserole is a comforting delight.

French Onion Beef Casserole. This recipe combines the rich flavors of ground beef, savory onions, and creamy mushroom soup, all topped with gooey Swiss cheese and crispy French fried onions. It’s a dish that brings together the best of French onion soup and a hearty casserole, making it perfect for family dinners or gatherings with friends.

What makes this casserole truly special is its simplicity. With just a handful of ingredients, you can create a meal that feels indulgent yet is easy to prepare. The layers of flavor meld together beautifully, creating a dish that is both satisfying and delicious. Plus, it’s a great way to use up leftover egg noodles, making it a practical choice for busy weeknights.

French Onion Beef Casserole recipe is sure to impress. So, roll up your sleeves and get ready to create a dish that will have everyone asking for seconds!

Ingredients for French Onion Beef Casserole Recipe

French Onion Beef Casserole, you’ll need a selection of simple yet flavorful ingredients. Here’s what you’ll need:

  • 1 pound ground beef
  • 1 large onion, thinly sliced
  • 2 cloves garlic, minced
  • 1 can (10.5 ounces) cream of mushroom soup
  • 1 cup beef broth
  • 1 teaspoon Worcestershire sauce
  • 1 teaspoon dried thyme
  • Salt and pepper to taste
  • 4 cups cooked egg noodles
  • 1 cup shredded Swiss cheese
  • 1 cup French fried onions

These ingredients come together to create a rich and hearty dish. The ground beef provides protein, while the onions and garlic add depth of flavor. The cream of mushroom soup and beef broth create a creamy base, making every bite delightful. The Swiss cheese melts beautifully, adding a gooey texture, and the French fried onions give a satisfying crunch on top.

French Onion Beef Casserole is its versatility, allowing you to make it your own!

Step-by-Step Preparation of French Onion Beef Casserole Recipe

French Onion Beef Casserole. This step-by-step guide will help you create a delicious meal that everyone will love. Let’s get started!

Step 1: Prepping the Ingredients

First things first, you need to prep your ingredients. Start by measuring out all the items listed in the ingredients section. This makes the cooking process smoother. Next, thinly slice the large onion and mince the garlic cloves. Having everything ready will save you time and make cooking more enjoyable.

Step 2: Cooking the Beef

In a large skillet, heat over medium heat. Add the pound of ground beef to the skillet. Cook it until it’s browned, which usually takes about 5-7 minutes. Make sure to break it apart with a spatula as it cooks. Once the beef is browned, drain any excess fat. This step is important to keep your casserole from being greasy.

Step 3: Sautéing the Onions

French Onion Beef Casserole even more delicious.

Step 4: Combining Ingredients

Once the onions are ready, stir in the cream of mushroom soup, beef broth, Worcestershire sauce, dried thyme, salt, and pepper. Mix everything well and let it simmer for about 5 minutes. This allows the flavors to meld together beautifully. After that, take a large mixing bowl and combine the cooked egg noodles with the beef mixture. Stir until everything is well combined.

Step 5: Baking the Casserole

Now, transfer the mixture into a greased 9×13 inch baking dish. Spread it out evenly. Next, sprinkle the shredded Swiss cheese on top, followed by the French fried onions. These toppings will create a delightful crunch and a cheesy layer. Finally, bake the casserole in your preheated oven at 350°F for 25-30 minutes. You’ll know it’s ready when the cheese is melted and bubbly. Let it cool for about 5 minutes before serving.

French Onion Beef Casserole is ready to be enjoyed. This dish is not only easy to make but also packed with flavor. It’s perfect for any occasion!

Variation of French Onion Beef Casserole Recipe

French Onion Beef Casserole is a hit, there are many ways to switch things up! Whether you want to try different flavors or cater to dietary preferences, these variations will keep your meals exciting. Let’s explore some alternative ingredients and a vegetarian option that everyone can enjoy.

Alternative Ingredients to Consider

French Onion Beef Casserole. Here are some ideas:

  • Cheese Variations: Instead of Swiss cheese, try using cheddar, mozzarella, or even pepper jack for a spicy kick.
  • Meat Options: Ground turkey or chicken can be used as a leaner alternative to beef. You can also add cooked sausage for extra flavor.
  • Vegetables: Consider adding bell peppers, mushrooms, or spinach to the beef mixture for added nutrition and flavor.
  • Herbs and Spices: Experiment with fresh herbs like parsley or basil. You can also add a pinch of cayenne pepper for some heat.

These alternative ingredients can enhance the taste and texture of your casserole, making it a fun dish to customize!

Vegetarian Option for French Onion Beef Casserole Recipe

French Onion Beef Casserole, you can easily make some substitutions. Here’s how:

  • Replace the Beef: Use a plant-based ground meat substitute, like lentils or crumbled tofu, to mimic the texture of ground beef.
  • Vegetable Broth: Swap out the beef broth for vegetable broth to keep the flavors rich and savory.
  • Extra Veggies: Add more vegetables like zucchini, carrots, or peas to boost the nutrition and flavor.
  • Cheese Alternatives: Use a dairy-free cheese option if you want to keep it vegan.

French Onion Beef Casserole is just as hearty and satisfying. It’s a great way to enjoy the same comforting flavors while catering to different dietary needs.

Cooking Note for French Onion Beef Casserole Recipe

French Onion Beef Casserole, there are a few cooking notes to keep in mind. These tips will help ensure that your dish turns out perfectly every time. Let’s dive into some important considerations!

First, always use a large skillet for cooking the beef and onions. This allows for even cooking and prevents overcrowding, which can lead to steaming instead of browning. Browning the beef properly adds depth to the flavor, making your casserole even more delicious.

Next, when sautéing the onions, be patient. Cooking them until they are soft and translucent is key. This step enhances their natural sweetness, which is essential for that classic French onion flavor. If you find that the onions are browning too quickly, reduce the heat to avoid burning.

Another important note is to taste your mixture before baking. Adjust the seasoning as needed. A little extra salt or pepper can make a big difference in flavor. If you prefer a creamier texture, consider adding a dollop of sour cream or cream cheese to the mixture before baking. This will give your casserole a rich and velvety consistency.

Lastly, let your casserole cool for a few minutes after baking. This helps the layers set, making it easier to serve. If you cut into it right away, it may fall apart. Allowing it to rest will ensure that each serving holds its shape beautifully.

French Onion Beef Casserole that is not only tasty but also visually appealing. Enjoy the process and the delightful aroma that fills your kitchen as you cook!

Serving Suggestions for French Onion Beef Casserole Recipe

French Onion Beef Casserole is baked to perfection, it’s time to think about how to serve it. This dish is not only delicious but also versatile, making it a great centerpiece for any meal. Here are some serving suggestions to elevate your dining experience!

First, consider pairing your casserole with a fresh salad. A simple green salad with mixed greens, cherry tomatoes, and a light vinaigrette can provide a refreshing contrast to the rich flavors of the casserole. The crispness of the salad balances the creamy texture, making each bite enjoyable.

Another great option is to serve the casserole with crusty bread or dinner rolls. The bread can be used to scoop up the casserole, adding a delightful crunch. You might even want to toast the bread with a bit of garlic butter for an extra flavor boost!

French Onion Beef Casserole.

For a comforting touch, consider serving the casserole with a side of mashed potatoes. The creamy potatoes can soak up the delicious sauce from the casserole, creating a satisfying meal. You can even mix in some garlic or cheese into the mashed potatoes for added flavor.

Lastly, don’t forget about beverages! A glass of red wine pairs beautifully with the rich flavors of the casserole. If you prefer non-alcoholic options, a sparkling water with a slice of lemon can be refreshing and light.

French Onion Beef Casserole will be a hit at the dinner table. Enjoy the delightful combination of flavors and the smiles on your loved ones’ faces as they dig into this comforting dish!

Tips for Perfecting Your French Onion Beef Casserole Recipe

French Onion Beef Casserole truly exceptional, consider these helpful tips. They will guide you in achieving the best flavor and texture, ensuring that every bite is a delight!

First, choose high-quality ground beef. Opt for lean ground beef to reduce excess fat while still keeping the dish flavorful. If you prefer a richer taste, you can use ground chuck, which has a bit more fat content.

Next, don’t rush the onion sautéing process. Cooking the onions slowly allows their natural sugars to caramelize, enhancing their sweetness. This step is crucial for achieving that classic French onion flavor. If you have the time, consider cooking the onions separately until they are golden brown before adding them to the beef.

For added depth, consider deglazing the skillet after cooking the beef. After draining the fat, pour a splash of beef broth into the hot skillet. Scrape up any browned bits from the bottom. This will add extra flavor to your casserole.

When mixing the ingredients, be gentle. Overmixing can lead to a dense casserole. Stir just until everything is combined, allowing the noodles to remain fluffy and light.

For a crispy topping, add the French fried onions during the last 10 minutes of baking. This will keep them crunchy and prevent them from becoming soggy. You can also sprinkle some extra cheese on top for an even cheesier finish!

Lastly, let your casserole rest for a few minutes after baking. This allows the flavors to settle and makes serving easier. You’ll find that the layers hold together better, giving you beautiful slices to serve.

French Onion Beef Casserole will be a standout dish at any meal. Enjoy the process and the delicious results!

Breakdown of Time for French Onion Beef Casserole Recipe

French Onion Beef Casserole can help you plan your cooking better. Here’s a simple breakdown of the time involved in preparing this delicious dish.

Prep Time

French Onion Beef Casserole is approximately 15-20 minutes. This includes gathering all your ingredients, slicing the onion, and mincing the garlic. Having everything ready before you start cooking will make the process smoother and more enjoyable.

Cooking Time

Once you start cooking, the total cooking time is about 30-35 minutes. This includes browning the ground beef, sautéing the onions, and simmering the mixture. After combining everything, you’ll bake the casserole for 25-30 minutes until the cheese is melted and bubbly. It’s a quick and easy process that results in a hearty meal!

Total Time

French Onion Beef Casserole is perfect for busy weeknights or when you want to impress guests without spending all day in the kitchen.

Now that you know the time breakdown, you can easily fit this delightful dish into your schedule. Enjoy the cooking process and the wonderful aroma that fills your kitchen!

Nutritional Information for French Onion Beef Casserole Recipe

French Onion Beef Casserole is not only delicious but also provides a good mix of nutrients. Here’s a closer look at the nutritional information per serving of this hearty dish.

Calories

French Onion Beef Casserole contains approximately 380 calories. This makes it a satisfying option for dinner without being overly heavy. The combination of ground beef, egg noodles, and cheese contributes to the calorie count, providing energy for your evening activities.

Protein

Protein is an essential nutrient for building and repairing tissues. Each serving of this casserole offers about 22 grams of protein. The ground beef and Swiss cheese are excellent sources of protein, making this dish a great choice for those looking to increase their protein intake. It’s perfect for active individuals or anyone needing a protein boost!

Sodium

When it comes to sodium, each serving contains around 800 milligrams. While this is a reasonable amount for a flavorful dish, it’s important to be mindful of your overall sodium intake throughout the day. If you’re watching your sodium levels, consider using low-sodium beef broth and cream of mushroom soup. This simple adjustment can help reduce the sodium content without sacrificing flavor.

French Onion Beef Casserole is a nutritious meal option that provides a good balance of calories, protein, and flavor. By being aware of the nutritional information, you can enjoy this comforting dish while keeping your dietary goals in mind. Happy cooking!

FAQs about French Onion Beef Casserole Recipe

Can I make French Onion Beef Casserole ahead of time?

French Onion Beef Casserole ahead of time. Simply follow the recipe up to the baking step. After combining all the ingredients in the baking dish, cover it tightly with plastic wrap or aluminum foil. You can store it in the refrigerator for up to 24 hours before baking. When you’re ready to bake, just remove the cover and pop it in the oven. You may need to add a few extra minutes to the baking time if it’s cold from the fridge.

What can I serve with French Onion Beef Casserole?

French Onion Beef Casserole. A fresh green salad with a light vinaigrette is a great choice, as it adds a refreshing contrast to the rich flavors of the casserole. You can also serve it with crusty bread or dinner rolls for a hearty meal. Roasted vegetables, like carrots or broccoli, make a nutritious side dish that complements the casserole beautifully. For a comforting touch, consider mashed potatoes to soak up the delicious sauce!

How do I store leftovers of French Onion Beef Casserole?

French Onion Beef Casserole is easy! Allow the casserole to cool completely before transferring it to an airtight container. You can keep it in the refrigerator for up to 3-4 days. When you’re ready to enjoy it again, simply reheat individual portions in the microwave or warm it in the oven at 350°F until heated through. If you want to keep it longer, consider freezing it!

Can I freeze French Onion Beef Casserole?

French Onion Beef Casserole for later enjoyment! To do this, prepare the casserole as directed but do not bake it. Instead, cover the dish tightly with plastic wrap and then aluminum foil to prevent freezer burn. It can be stored in the freezer for up to 2-3 months. When you’re ready to bake it, thaw it in the refrigerator overnight and then bake as usual. This makes for a convenient meal option on busy days!

Conclusion on French Onion Beef Casserole Recipe

French Onion Beef Casserole is a delightful dish that combines comfort and flavor in every bite. With its rich layers of ground beef, sweet onions, and creamy sauce, topped with melted Swiss cheese and crispy fried onions, it’s no wonder this casserole has become a family favorite. Not only is it easy to prepare, but it also offers versatility, allowing you to customize it to suit your taste preferences.

French Onion Beef Casserole fits seamlessly into your meal planning.

As you explore the variations and serving suggestions, you’ll find that this casserole can adapt to any occasion. Whether you’re serving it with a fresh salad, crusty bread, or roasted vegetables, it’s sure to impress your family and friends. So, gather your ingredients, follow the steps, and enjoy the wonderful flavors of this comforting dish.

French Onion Beef Casserole with your loved ones. Happy cooking!

Paul

French Onion Beef Casserole is a comforting delight.

This French Onion Beef Casserole is the ultimate comfort food—savory, creamy, and irresistibly crunchy on top. Tender egg noodles are combined with seasoned ground beef and a rich, flavorful mix of French onion and mushroom soups, all finished with crispy French fried onions for the perfect golden topping. It’s a family favorite that’s easy to whip up for cozy weeknights or casual gatherings.
Prep Time 15 minutes
Cook Time 25 minutes
Total Time 40 minutes
Servings: 6 servings
Course: Main Dish
Cuisine: American

Ingredients
  

  • 12 ounces egg noodles1 pound ground beef1 tablespoon butter1 10.5 ounce can condensed French onion soup1 (10.5 ounce) can cream of mushroom soup1 cup sour cream1 cup French fried onions (plus more for topping)Salt and pepper to taste

Method
 

  1. Preheat your oven to 350°F (175°C).
  2. Cook the egg noodles according to package directions. Drain and set aside.
  3. In a large skillet over medium heat, melt the butter. Add the ground beef and cook until browned and no longer pink. Season with salt and pepper.
  4. Stir in the French onion soup, cream of mushroom soup, and sour cream. Mix well until everything is heated through and combined.
  5. Add the cooked noodles to the skillet mixture and stir in 1 cup of French fried onions.
  6. Transfer the mixture to a greased 9×13-inch baking dish. Spread it evenly and top with additional French fried onions.
  7. Bake for 25 minutes or until the casserole is bubbly and the topping is golden brown.
  8. Let it rest for a few minutes before serving.

Notes

Use freshly grated cheese as an optional mix-in for an extra rich casserole.
Swap sour cream for Greek yogurt for a lighter option.
This casserole can be assembled in advance—just cover and refrigerate, then bake when ready.
Leftovers reheat well and make a perfect lunch the next day.

Crispy Chicken Taquitos Recipe for a Delicious Snack

What Are Taquitos?

Taquitos are a delicious Mexican dish that consists of small rolled tortillas filled with various ingredients. Traditionally, they are made with corn tortillas, which are filled with meat, cheese, or beans, and then fried until crispy. The name “taquito” translates to “small taco,” and they are often served as a snack or appetizer. These tasty treats are perfect for parties, game days, or a cozy family dinner. With their crunchy exterior and flavorful filling, taquitos are sure to please everyone at the table.

Why You’ll Love This Crispy Chicken Taquitos Recipe

This Crispy Chicken Taquitos Recipe is a must-try for several reasons. First, it combines tender, shredded chicken with a blend of savory cheeses and spices, creating a mouthwatering filling. The crispy texture of the fried tortillas adds an irresistible crunch that complements the soft filling perfectly. Plus, they are easy to make and can be customized to suit your taste. Whether you prefer them spicy or mild, you can adjust the seasonings to your liking.

Another reason to love this recipe is its versatility. You can serve these taquitos as a main dish or as a fun appetizer. They pair wonderfully with a variety of dipping sauces, such as sour cream or salsa, making them a hit at any gathering. Additionally, they are a great way to use up leftover chicken, turning it into a delightful meal that everyone will enjoy. So, gather your ingredients and get ready to impress your family and friends with these crispy, flavorful taquitos!

Ingredients for Crispy Chicken Taquitos Recipe

To create the perfect Crispy Chicken Taquitos, you’ll need a few simple ingredients. Each component plays a vital role in delivering that delicious flavor and satisfying crunch. Here’s what you’ll need:

  • 2 cups cooked, shredded chicken
  • 1 cup shredded cheddar cheese
  • 1 cup shredded Monterey Jack cheese
  • 1 teaspoon garlic powder
  • 1 teaspoon onion powder
  • 1 teaspoon cumin
  • 1 teaspoon chili powder
  • 1/2 teaspoon salt
  • 1/4 teaspoon black pepper
  • 12 small corn tortillas
  • 1/4 cup vegetable oil (for frying)
  • Sour cream and salsa (for serving)

These ingredients come together to create a delightful combination of flavors. The shredded chicken provides a hearty base, while the cheeses add creaminess and richness. The spices, including garlic powder, onion powder, cumin, and chili powder, infuse the filling with a warm, savory taste. The corn tortillas are essential for that classic taquito texture, and frying them in vegetable oil gives them that golden, crispy finish.

Feel free to get creative! You can add other ingredients like black beans or corn to enhance the filling. This flexibility allows you to tailor the recipe to your preferences, making it a fun and enjoyable cooking experience. Now that you have your ingredients ready, let’s move on to the preparation steps!

Preparation of Crispy Chicken Taquitos Recipe

Step 1: Preparing the Chicken Filling

To kick off your Crispy Chicken Taquitos Recipe, start by preparing the chicken filling. In a large bowl, combine the cooked, shredded chicken with the shredded cheddar and Monterey Jack cheeses. Next, sprinkle in the garlic powder, onion powder, cumin, chili powder, salt, and black pepper. Mix everything together until well combined. This step is crucial as it ensures that every bite is packed with flavor. The spices will give your filling a delightful kick, while the cheeses will add creaminess. Set this mixture aside while you warm the tortillas.

Step 2: Assembling the Taquitos

Now that your filling is ready, it’s time to assemble the taquitos. Heat a skillet over medium heat and lightly warm the corn tortillas for about 30 seconds on each side. This makes them pliable and easier to roll. Once warmed, take a tortilla and place about 2 tablespoons of the chicken mixture in the center. Roll the tortilla tightly around the filling, ensuring the seam is on the bottom. If needed, secure the taquito with a toothpick to keep it from unrolling. Repeat this process until all the tortillas are filled and rolled. This step is where the fun begins, as you can get creative with how tightly you roll them!

Step 3: Frying the Taquitos

With your taquitos assembled, it’s time to fry them to crispy perfection. In a large frying pan, heat the vegetable oil over medium-high heat. Once the oil is hot, carefully add the taquitos seam side down. Fry them for about 2-3 minutes on each side, or until they turn golden brown and crispy. Be sure to keep an eye on them to prevent burning. Once they are done, use a slotted spoon to remove the taquitos from the oil and place them on a paper towel-lined plate. This will help drain any excess oil, keeping your taquitos crispy and delicious.

Step 4: Serving the Taquitos

Finally, it’s time to serve your Crispy Chicken Taquitos! Arrange them on a serving platter while they are still hot. They are best enjoyed fresh out of the frying pan. Serve with a side of sour cream and salsa for dipping. The coolness of the sour cream pairs perfectly with the warm, crispy taquitos. You can also add some chopped cilantro or sliced jalapeños for an extra touch. Enjoy your homemade taquitos with family and friends, and watch them disappear in no time!

Variation of Crispy Chicken Taquitos Recipe

Vegetarian Options

If you’re looking for a meat-free alternative, these Crispy Chicken Taquitos can easily be transformed into a delicious vegetarian dish. Instead of chicken, consider using a combination of black beans, corn, and sautéed vegetables. You can use bell peppers, onions, and zucchini for a colorful and nutritious filling. Simply mix these ingredients with the same spices used in the original recipe for that flavorful kick.

Another great option is to use mashed sweet potatoes or refried beans as the base. These ingredients not only add a creamy texture but also provide a satisfying taste. Don’t forget to include your favorite cheeses, like cheddar or Monterey Jack, to keep that cheesy goodness intact. With these vegetarian options, you can enjoy the same crispy, crunchy taquitos while catering to different dietary preferences.

Spicy Chicken Taquitos

If you love a bit of heat, why not spice things up with Spicy Chicken Taquitos? To achieve this, simply add some diced jalapeños or chopped green chilies to the chicken filling. This will give your taquitos a delightful kick that spice lovers will appreciate. You can also increase the amount of chili powder or add a dash of cayenne pepper for an extra layer of heat.

For an even bolder flavor, consider using spicy salsa or hot sauce as a dipping option. This will enhance the overall experience and make your taquitos stand out. Remember, the beauty of this recipe lies in its versatility, so feel free to adjust the spice levels according to your taste. Whether you prefer them mild or fiery, these variations will surely satisfy your cravings!

Cooking Note for Crispy Chicken Taquitos Recipe

When preparing your Crispy Chicken Taquitos, there are a few important cooking notes to keep in mind. These tips will help ensure that your taquitos turn out perfectly crispy and delicious every time.

First, make sure your oil is hot enough before adding the taquitos. If the oil isn’t hot, the taquitos may absorb too much oil and become greasy instead of crispy. A good way to test the oil is to drop a small piece of tortilla into it. If it sizzles immediately, the oil is ready for frying.

Next, avoid overcrowding the frying pan. Frying too many taquitos at once can lower the oil temperature, leading to soggy taquitos. Instead, fry them in batches, giving each taquito enough space to cook evenly. This will help achieve that golden-brown color and crunchy texture that everyone loves.

Additionally, if you prefer a healthier option, consider baking your taquitos instead of frying. Preheat your oven to 400°F (200°C) and place the assembled taquitos on a baking sheet. Brush them lightly with oil and bake for 20-25 minutes, or until they are crispy and golden. This method reduces the amount of oil used while still delivering a satisfying crunch.

Lastly, let the taquitos cool for a minute or two after frying. This will help them firm up a bit, making them easier to handle and eat. Enjoy your cooking experience, and remember that practice makes perfect. With these cooking notes, you’ll be well on your way to mastering the art of making Crispy Chicken Taquitos!

Serving Suggestions for Crispy Chicken Taquitos Recipe

Dipping Sauces

When it comes to serving your Crispy Chicken Taquitos, the right dipping sauces can elevate the experience. Here are some delicious options to consider:

  • Sour Cream: A classic choice, sour cream adds a cool and creamy contrast to the crispy taquitos. You can even mix in some lime juice or chopped cilantro for an extra zing.
  • Salsa: Whether you prefer mild or spicy, salsa is a fantastic accompaniment. Fresh tomato salsa, corn salsa, or even a zesty mango salsa can enhance the flavors of your taquitos.
  • Guacamole: This creamy avocado dip is a crowd favorite. Its rich texture pairs beautifully with the crunch of the taquitos, making each bite a delight.
  • Hot Sauce: For those who love heat, a drizzle of your favorite hot sauce can add a fiery kick. Try different varieties to find your perfect match!
  • Chipotle Sauce: A smoky chipotle sauce can add depth and flavor. You can make your own by blending chipotle peppers in adobo sauce with sour cream or mayonnaise.

Feel free to mix and match these sauces to create a dipping station that caters to everyone’s taste. Your guests will love trying different combinations with their taquitos!

Side Dishes

To round out your meal, consider serving some tasty side dishes alongside your Crispy Chicken Taquitos. Here are a few ideas:

  • Mexican Rice: Fluffy, seasoned rice is a perfect complement to taquitos. You can make it with tomatoes, onions, and spices for added flavor.
  • Refried Beans: Creamy refried beans are a hearty side that pairs well with taquitos. You can serve them plain or topped with cheese and jalapeños.
  • Fresh Salad: A light salad with lettuce, tomatoes, and avocado can balance the richness of the taquitos. Drizzle with a lime vinaigrette for a refreshing touch.
  • Grilled Vegetables: Colorful grilled veggies, such as bell peppers and zucchini, add a healthy and flavorful side to your meal.
  • Elote (Mexican Street Corn): This delicious corn dish, topped with cheese, lime, and chili powder, is a fun and tasty addition to your taquito feast.

These side dishes not only enhance the meal but also provide a variety of flavors and textures. Your Crispy Chicken Taquitos will shine even brighter when paired with these delightful accompaniments!

Tips for Perfect Crispy Chicken Taquitos Recipe

Creating the perfect Crispy Chicken Taquitos is all about attention to detail. Here are some helpful tips to ensure your taquitos turn out crispy, flavorful, and utterly delicious every time:

  • Use Fresh Ingredients: Fresh ingredients make a big difference in flavor. Opt for freshly cooked chicken and high-quality cheeses. This will enhance the overall taste of your taquitos.
  • Warm Tortillas: Always warm your corn tortillas before filling them. This step prevents them from cracking while rolling and helps them stay pliable. A quick 30 seconds in a skillet does the trick!
  • Don’t Overfill: When adding the chicken mixture to the tortillas, be careful not to overfill them. About 2 tablespoons is perfect. Overfilling can make it difficult to roll them tightly and may cause them to burst while frying.
  • Maintain Oil Temperature: Keep an eye on the oil temperature while frying. If it’s too hot, the taquitos may burn. If it’s too cool, they will absorb too much oil. Aim for a steady medium-high heat for the best results.
  • Fry in Batches: Fry your taquitos in small batches. This allows each taquito to cook evenly and become crispy without overcrowding the pan. It also helps maintain the oil temperature.
  • Let Them Drain: After frying, place the taquitos on a paper towel-lined plate. This will help absorb excess oil and keep them crispy. Avoid stacking them too soon, as this can make them soggy.
  • Experiment with Fillings: Don’t hesitate to get creative with your fillings! Try adding different spices, vegetables, or even different types of meat. This will keep your taquitos exciting and new every time you make them.
  • Serve Immediately: For the best experience, serve your taquitos right after frying. They are at their crispiest and most delicious when enjoyed fresh out of the pan.

By following these tips, you’ll be well on your way to mastering the art of making Crispy Chicken Taquitos. Each bite will be a delightful combination of crunch and flavor, making your meal a hit with family and friends!

Breakdown of Time for Crispy Chicken Taquitos Recipe

Prep Time

The prep time for your Crispy Chicken Taquitos is quite manageable. You’ll need about 15-20 minutes to gather your ingredients and prepare the chicken filling. This includes shredding the chicken and mixing it with the cheeses and spices. Warming the tortillas will also take a few minutes. Overall, you can expect to spend around 20 minutes on preparation, making it a quick and easy process.

Cooking Time

Once your taquitos are assembled, the cooking time is relatively short. Frying the taquitos will take about 6-8 minutes in total, with 2-3 minutes on each side until they are golden brown and crispy. If you choose to bake them instead, the cooking time will be around 20-25 minutes at 400°F (200°C). This flexibility allows you to decide how you want to cook them based on your preference and time constraints.

Total Time

In total, you can expect the entire process of making Crispy Chicken Taquitos to take about 30-45 minutes. This includes both prep and cooking time. It’s a fantastic option for a weeknight dinner or a fun gathering with friends. With such a quick turnaround, you can enjoy these delicious taquitos in no time!

Nutritional Information for Crispy Chicken Taquitos Recipe

Calories

When it comes to enjoying your Crispy Chicken Taquitos, it’s good to know the calorie content. Each serving contains approximately 320 calories. This makes them a satisfying option for a meal or snack without going overboard on calories. The combination of chicken, cheese, and spices provides a hearty and flavorful experience while keeping the calorie count reasonable. Enjoying these taquitos in moderation can fit well into a balanced diet.

Protein

Protein is an essential nutrient, and these taquitos deliver! Each serving offers about 18 grams of protein. The shredded chicken and cheese contribute significantly to this protein content, making these taquitos a great choice for those looking to boost their protein intake. Protein is vital for muscle repair and growth, making these taquitos not only delicious but also beneficial for your body.

Sodium

It’s important to be mindful of sodium intake, especially for those watching their salt consumption. Each serving of Crispy Chicken Taquitos contains around 600 milligrams of sodium. This amount is typical for many savory dishes, but if you’re concerned about sodium levels, consider using low-sodium chicken or cheese options. Additionally, you can control the amount of salt added to the filling. By making these small adjustments, you can enjoy your taquitos while keeping your sodium intake in check.

FAQs about Crispy Chicken Taquitos Recipe

Can I make Crispy Chicken Taquitos in advance?

Yes, you can prepare Crispy Chicken Taquitos in advance! To do this, assemble the taquitos but do not fry them right away. Instead, place them on a baking sheet lined with parchment paper and cover them with plastic wrap. You can store them in the refrigerator for up to 24 hours. When you’re ready to enjoy them, simply fry or bake them as directed in the recipe. This makes it easy to have a delicious meal ready to go, especially for busy weeknights or gatherings!

What can I use instead of chicken in the taquitos?

If you’re looking for alternatives to chicken, there are plenty of options! You can use shredded beef, pork, or turkey for a different flavor. For a vegetarian option, consider using black beans, refried beans, or sautéed vegetables like bell peppers and zucchini. You can also mix in some cheese for added creaminess. The key is to keep the spices the same to maintain that delicious flavor profile. Feel free to get creative and customize the filling to suit your taste!

How do I store leftover taquitos?

Storing leftover Crispy Chicken Taquitos is simple! Allow them to cool completely, then place them in an airtight container. You can keep them in the refrigerator for up to 3 days. If you want to store them for a longer period, consider freezing them. Wrap each taquito in plastic wrap and place them in a freezer-safe bag. They can be frozen for up to 2 months. When you’re ready to eat them, reheat in the oven or air fryer for the best texture!

Can I bake the taquitos instead of frying them?

Absolutely! Baking is a healthier alternative to frying. To bake your Crispy Chicken Taquitos, preheat your oven to 400°F (200°C). Arrange the assembled taquitos on a baking sheet lined with parchment paper. Lightly brush them with vegetable oil to help them crisp up. Bake for 20-25 minutes, or until they are golden brown and crispy. This method reduces the amount of oil used while still delivering that satisfying crunch. Enjoy your baked taquitos with your favorite dipping sauces!

Conclusion on Crispy Chicken Taquitos Recipe

In conclusion, the Crispy Chicken Taquitos Recipe is a delightful dish that brings together flavor, texture, and versatility. Whether you’re preparing them for a family dinner, a party, or just a cozy night in, these taquitos are sure to impress. With their crunchy exterior and savory filling, they offer a satisfying bite that everyone will love.

Not only are they easy to make, but they also allow for creativity in the kitchen. You can customize the filling to suit your taste, whether you prefer a classic chicken version or a spicy twist. Plus, the option to bake instead of fry makes them a healthier choice without sacrificing flavor. The variety of dipping sauces and side dishes you can serve alongside them only adds to their appeal.

As you gather your ingredients and follow the steps outlined in this recipe, remember that cooking is all about enjoyment. Don’t hesitate to experiment with different flavors and ingredients. The more you make these taquitos, the more you’ll discover your favorite combinations. So, roll up your sleeves, get cooking, and enjoy the deliciousness of homemade Crispy Chicken Taquitos!

We hope this recipe inspires you to create a memorable meal that brings family and friends together. Happy cooking!

Paul

Crispy Chicken Taquitos Recipe for a Delicious Snack

Crispy, cheesy, and packed with flavor, these Beef and Cheese Taquitos are everything you love about comfort food wrapped in a crunchy shell. Filled with juicy slow-cooked shredded beef and melty cheese, then pan-fried, air-fried, or baked to perfection—they’re a crowd-pleasing favorite for parties, snacks, or weeknight dinners.
Prep Time 25 minutes
Servings: 16 taquitos
Course: Appetizer, Main Dish, Snack
Cuisine: Mexican-inspired

Ingredients
  

  • For the Taquitos3 cups Mexican shredded beef1 cup freshly shredded Monterrey Jack cheese1 cup freshly shredded sharp cheddar cheese16 corn tortillas 5–6 inchesVegetable oil or cooking spray (for frying or baking)Toothpicks, for securing taquitos
  • For the Shredded Beef1 3–4 lb boneless chuck roast, trimmed and cut into 7–8 chunks1½ tablespoons vegetable oil
  • Spice Rub1 tablespoon chili powder1 tablespoon ground cumin1 tablespoon kosher salt½ tablespoon garlic powder½ tablespoon onion powder½ tablespoon smoked paprika1 teaspoon black pepper1 teaspoon ground coriander½ to 1½ teaspoons chipotle chili pepper to taste
  • Braising Liquid1 cup reduced-sodium beef broth1 cup salsa mild or medium1 (4 oz) can mild diced green chilies (undrained)2 tablespoons tomato paste2 tablespoons lime juice2 tablespoons brown sugar1 to 3 teaspoons liquid smoke (mesquite or hickory)1 tablespoon granulated beef bouillon or crushed cubes1 tablespoon dried oregano

Method
 

  1. Prepare the Beef: Combine all spice rub ingredients. Pat beef chunks dry, then rub evenly with the spice mix.
  2. Sear the Beef: In a skillet over medium-high heat, warm oil and sear beef chunks on all sides.
  3. Slow Cook: Transfer beef to a slow cooker. Add all braising ingredients. Cook on LOW for 6–8 hours or HIGH for 3½–4½ hours until fork-tender.
  4. Shred and Soak: Shred the cooked beef, discarding excess fat. Return shredded meat to the slow cooker for 20 minutes to soak up flavor.
  5. Warm Tortillas: Microwave tortillas wrapped in damp paper towels to make them pliable.
  6. Assemble Taquitos: Add about 3 tablespoons of shredded beef and 2 tablespoons of cheese to each tortilla. Roll tightly and secure with a toothpick.
Cook the Taquitos:
  1. Pan Fry: Heat ½ inch oil in a skillet to 350°F. Fry seam-side down for 3–4 minutes, rotating until golden.
  2. Air Fry: Spray or brush with oil. Air fry at 400°F for 6–8 minutes, flipping halfway.
  3. Bake: Place taquitos on a rack, brush with oil, and bake at 425°F for 15–20 minutes until crisp.
  4. Serve: Let cool slightly. Remove toothpicks and serve with guacamole, salsa, or sour cream.

Notes

Warming tortillas is key to preventing cracks—don’t skip it!
Use flour tortillas for a softer roll or different texture.
These freeze great—freeze before baking or frying, then cook from frozen.
Make it your own with additional fillings like sautéed peppers, corn, or beans.

Salmon Avocado Lime Cocktail is a refreshing delight.

A Nostalgic Bite into My Childhood

There’s a certain kind of magic in food that doesn’t just feed our stomachs, but wraps itself around our memories and moments. The first time I had a salmon cocktail, I was ten years old, balancing on the edge of my aunt’s velvet dining chair, clutching a miniature crystal cup filled with mysterious layers. It was New Year’s Eve, and everything felt unusually elegant: the grown-ups in wool suits and silk scarves, the sounds of Ella Fitzgerald dancing through the room, and the twinkling glow of candlelight over glossy appetizers. But that cocktail—layered with smoked salmon, crisp lettuce, and a pink-hued sauce that tasted like joy—was my entire world in that moment.

Years later, when I began collecting recipes that made me feel, that salmon cocktail made its way to the top of the list. It wasn’t just the flavor; it was the quiet elegance it brought, the way it fit into any moment from an impromptu brunch to a festive dinner, and the way it reminded me that simple things can be beautifully memorable.

This isn’t just a recipe. It’s an experience—one you can recreate and reinvent.

The Revival of a Retro Classic

Salmon cocktail is more than just an appetizer—it’s a homage to mid-century culinary glam. Once a star of 1960s dinner parties, often served in glass coupe bowls alongside shrimp cocktail, this dish has made a flavorful return in recent years. With the rise of “new nostalgia” in food culture, we’re seeing the resurrection of retro bites that blend timeless appeal with modern-day sophistication.

Warm smoked salmon, which gives this cocktail its signature richness, offers a depth that cold-smoked or raw fish often lacks. Combined with the lightness of crisp greens and the tangy-sweet whisper of a cocktail sauce (yes, with a hint of whiskey), the result is a beautifully balanced dish. Each bite delivers contrast—soft and crunchy, smoky and zesty, creamy and fresh.

What sets this revival apart is its versatility. Modern food lovers are experimenting by swapping out salmon for shrimp, tofu, even rotisserie chicken. It’s a recipe that adapts to your fridge, your crowd, and your imagination.

Why This Dish Belongs in Your Entertaining Arsenal

Elegant, effortless, and endlessly flexible.

That’s how I’d describe this salmon cocktail to anyone wondering whether it’s worth their time. While some appetizers demand precise timing or complex techniques, this one simply requires assembly. No cooking (unless you count boiling an egg), no special gadgets—just fresh ingredients and a little layering love.

What makes this dish particularly magical for entertaining is the visual appeal. Serve it in a cocktail glass, a coupe, or even a small jar and you’ve instantly elevated your table. It gives the impression of effort and sophistication, even if you’ve whipped it up in under ten minutes.

And here’s a secret: guests always remember the first thing they eat. Let this be that thing.

Beyond the Starter: Unexpected Ways to Serve It

The traditional presentation in a glass is undeniably charming, but this salmon cocktail has many lives. Here are a few fun and creative ways to reimagine it:

  • Tartine-Style: Spoon the layered components over a thick slice of toasted sourdough for an open-faced starter.
  • Party Spoons: Use porcelain appetizer spoons to serve bite-sized versions at cocktail parties.
  • Jar it Up: Pack it in small mason jars for picnic-ready appetizers or an upscale lunchbox treat.
  • Wrap it Up: Tuck the components into a butter lettuce leaf for a fresh, hand-held twist.
  • Brunch Board: Serve the ingredients deconstructed on a board with bagel chips, soft-boiled eggs, and capers.

Whether you’re hosting a formal dinner or a cozy brunch with friends, this cocktail can bend and twist to match the tone.


Flavor Profile: The Smoky Heartbeat of the Dish

Let’s talk taste. Warm smoked salmon is the undisputed hero here. Its flaky texture and full-bodied smoky profile anchor the dish, standing in perfect harmony with the creamy, slightly piquant cocktail sauce.

The sauce itself is a riff on the classic Marie Rose or Thousand Island—mayonnaise and ketchup form the base, spiked here with whiskey and a drop of Tabasco for complexity. It’s bold, but not overpowering. Each supporting player (cherry tomatoes, crisp lettuce, hard-boiled egg) brings its own subtle contrast—bright, juicy, crunchy, mellow.

It’s a balance of umami, acid, and richness that makes every bite feel both indulgent and refreshing.

Frequently Asked Questions About Salmon Cocktail

Can I make this ahead of time?

Yes—mostly. You can prep all components in advance (slice tomatoes, boil eggs, mix sauce), but wait to assemble until just before serving to keep the lettuce crisp and vibrant.

What’s the difference between warm and cold smoked salmon?

Warm smoked salmon is smoked at higher temperatures, resulting in a firmer, flakier texture and richer flavor. Cold-smoked salmon is more delicate and often used for bagels and lox. For this dish, warm smoked salmon adds the right kind of texture and depth.

Is the whiskey in the sauce necessary?

Not at all. It adds warmth and a subtle complexity, but you can easily omit it or substitute it with a splash of bourbon, white wine, or even apple cider vinegar for acidity.

What are some good vegetarian substitutes?

Smoked tofu or roasted beetroot work wonderfully here. Cubed avocado or marinated mushrooms also offer a lovely meaty texture and flavor.

How do I store leftovers?

While best served fresh, any leftovers can be stored in the fridge, covered, for up to 1 day. Keep in mind the lettuce may lose its crunch.

Can I use canned salmon?

Technically, yes, though it won’t have the same smoky complexity. If using canned, opt for boneless and skinless versions, and consider adding a dash of liquid smoke or smoked paprika to the sauce.

The Joy of Sharing: Why This Dish Matters

At the heart of it, this salmon cocktail is about more than taste—it’s about shared experiences. It’s the kind of dish that gets passed around with knowing smiles, the kind that sparks conversations about holiday memories and family traditions.

When I serve it, I often retell the story of that childhood New Year’s Eve, of my first taste of elegance, of how a simple dish in a tiny glass became an anchor in my food story. I’ve since served it to friends on summer patios, to neighbors at block parties, and to my own kids on rainy Sunday afternoons when we play “restaurant” at home. It never fails to deliver both flavor and a moment.

A Final Thought: More Than a Recipe

So often, we look for dishes that can do it all—easy to make, beautiful to serve, and unforgettable to taste. The salmon cocktail is one of those rare finds. It straddles generations and occasions. It’s as fitting at a holiday party as it is at a lazy brunch. And with just a few tweaks, it welcomes vegetarians, picky eaters, and adventurous palates alike.

But more than anything, it offers a reminder that sometimes the best dishes aren’t the ones that take hours to prepare, but the ones that come with a story—and leave room for new ones to be written.

Paul

Salmon Avocado Lime Cocktail is a refreshing delight.

This Salmon Cocktail is a refined and refreshing starter layered with crisp lettuce, juicy cherry tomatoes, tender smoked salmon, and a creamy homemade cocktail sauce with a subtle kick. Served elegantly in glasses and garnished with herbs and citrus, it’s the perfect light appetizer for brunches, holidays, or any time you want to impress your guests.
Prep Time 15 minutes
Cook Time 10 minutes
Total Time 25 minutes
Servings: 4 servings
Course: Appetizer
Cuisine: European-inspired

Ingredients
  

  • 7 ounces warm smoked salmon or substitute with poached salmon or gravlax3 ounces lettuce (butterhead, romaine, or iceberg), chopped12 cherry tomatoes, halved1 hard-boiled egg, quartered¼ lemon, cut into small wedgesMicrogreens or parsley, for garnish4 tablespoons mayonnaise2 tablespoons ketchup¼ teaspoon Tabasco (optional)1 tablespoon whiskey (or substitute with bourbon or omit)

Method
 

  1. Chop the lettuce, halve the cherry tomatoes, quarter the hard-boiled egg, and cut the lemon into small pieces.
  2. In a small bowl, whisk together the mayonnaise, ketchup, whiskey, and Tabasco until smooth and creamy to make the cocktail sauce.
  3. In four cocktail glasses, layer the ingredients starting with a base of chopped lettuce.
  4. Add halved cherry tomatoes, then top with pieces of shredded smoked salmon.
  5. Place egg quarters neatly on top.
  6. Drizzle with the prepared cocktail sauce.
  7. Garnish each glass with microgreens and a wedge of lemon.
  8. Serve immediately while fresh and slightly chilled.

Notes

For a lighter version, substitute Greek yogurt for mayonnaise in the sauce.
Make it vegetarian by swapping salmon for avocado or grilled mushrooms.
To prepare ahead, keep ingredients and sauce separate and assemble just before serving to maintain freshness and crunch.

Creamy Garlic Chicken Recipe for a Delicious Dinner

Creamy Garlic Chicken Recipe. This dish is not just a meal; it’s an experience that brings comfort and joy to your dining table. With its rich flavors and creamy texture, it’s perfect for family dinners or special occasions. The combination of tender chicken and a luscious garlic sauce makes it a favorite among many.

What Makes the Creamy Garlic Chicken Recipe Special?

Creamy Garlic Chicken Recipe apart is its simplicity and versatility. First, the use of fresh garlic adds a robust flavor that elevates the dish. Garlic is known for its health benefits, including boosting the immune system and improving heart health. Second, the creamy sauce, made with heavy cream and Parmesan cheese, creates a velvety texture that pairs beautifully with the chicken.

Moreover, this recipe is adaptable. You can easily modify it to suit your taste preferences. Whether you want to add vegetables or switch up the protein, the possibilities are endless. Plus, it’s quick to prepare, making it ideal for busy weeknights or last-minute gatherings.

Creamy Garlic Chicken Recipe is a delightful blend of flavors and textures that promises to satisfy your cravings. So, let’s dive into the ingredients and get started on this culinary adventure!

Ingredients for Creamy Garlic Chicken Recipe

Creamy Garlic Chicken Recipe, you’ll need a few simple yet flavorful ingredients. Each component plays a vital role in bringing this dish to life. Here’s what you’ll need:

  • 2 pounds boneless, skinless chicken breasts: This is the star of the dish, providing a tender and juicy base.
  • 2 tablespoons olive oil: Used for cooking the chicken, it adds a rich flavor and helps achieve a golden crust.
  • 4 cloves garlic, minced: Fresh garlic is essential for that aromatic and savory taste.
  • 1 cup heavy cream: This ingredient gives the sauce its creamy texture and richness.
  • 1 cup chicken broth: It enhances the flavor of the sauce and keeps it moist.
  • 1 teaspoon Italian seasoning: A blend of herbs that adds depth and warmth to the dish.
  • Salt and pepper to taste: Essential for seasoning and bringing out the flavors of the other ingredients.
  • 1 cup grated Parmesan cheese: This cheese melts beautifully, adding a nutty flavor to the sauce.
  • Fresh parsley, chopped (for garnish): A sprinkle of parsley adds a pop of color and freshness to the finished dish.

Creamy Garlic Chicken Recipe.

Step-by-Step Preparation of Creamy Garlic Chicken Recipe

Creamy Garlic Chicken Recipe. This process is straightforward and will guide you to create a delicious meal that’s sure to impress. Let’s get started!

Step 1: Preparing the Chicken

First, take the boneless, skinless chicken breasts and pat them dry with a paper towel. This helps the chicken brown nicely. Next, season both sides of the chicken with salt and pepper. This simple seasoning enhances the chicken’s natural flavor. Once seasoned, set the chicken aside while you prepare the skillet.

Step 2: Making the Creamy Garlic Sauce

In a large skillet, heat the olive oil over medium-high heat. Once the oil is hot, add the minced garlic. Sauté the garlic for about one minute until it becomes fragrant. Be careful not to burn it, as burnt garlic can taste bitter. After the garlic is aromatic, pour in the chicken broth. Bring it to a gentle simmer, scraping up any browned bits from the bottom of the skillet. This adds extra flavor to your sauce!

Next, stir in the heavy cream and Italian seasoning. Allow the mixture to simmer for about 3-4 minutes. This will help the sauce thicken slightly, creating that creamy texture we all love.

Step 3: Cooking the Chicken

Now it’s time to cook the chicken! Carefully add the seasoned chicken breasts to the skillet. Cook them for about 6-7 minutes on each side, or until they are golden brown and cooked through. You can check for doneness by cutting into the thickest part of the chicken; it should be white and juices should run clear. Once cooked, remove the chicken from the skillet and set it aside on a plate.

Step 4: Combining Chicken and Sauce

With the chicken cooked, it’s time to bring everything together. In the same skillet, add the grated Parmesan cheese to the creamy garlic sauce. Stir until the cheese melts and the sauce becomes smooth. Then, return the chicken to the skillet, coating it well in the creamy sauce. Let it simmer for an additional 2-3 minutes to heat through. This step ensures that every bite of chicken is enveloped in that delicious sauce.

Creamy Garlic Chicken Recipe is ready to be served! Garnish with freshly chopped parsley for a touch of color and freshness. Now, let’s explore some variations to make this dish even more exciting!

Variations of Creamy Garlic Chicken Recipe

Creamy Garlic Chicken Recipe is a fantastic base that allows for many delicious variations. Whether you want to add some veggies or switch up the protein, there are plenty of ways to make this dish your own. Let’s explore some exciting options!

Adding Vegetables to the Creamy Garlic Chicken Recipe

Creamy Garlic Chicken Recipe not only enhances the flavor but also boosts the nutritional value. Here are some great options:

  • Spinach: Add fresh spinach to the sauce just before serving. It wilts quickly and adds a lovely color and flavor.
  • Mushrooms: Sauté sliced mushrooms with the garlic for a rich, earthy taste that complements the creaminess.
  • Broccoli: Steam or sauté broccoli florets and mix them into the sauce for a crunchy texture.
  • Bell Peppers: Diced bell peppers can add a sweet crunch. Sauté them along with the garlic for a colorful addition.

These vegetables not only add flavor but also make your meal more colorful and appealing. Feel free to mix and match based on your preferences!

Alternative Proteins for Creamy Garlic Chicken Recipe

Creamy Garlic Chicken Recipe, there are several tasty alternatives. Here are a few ideas:

  • Chicken Thighs: For a juicier option, use boneless, skinless chicken thighs. They have more flavor and stay tender.
  • Turkey: Ground turkey or turkey cutlets can be a leaner choice that works well with the creamy sauce.
  • Pork Chops: Boneless pork chops can be used instead of chicken for a different flavor profile.
  • Tofu: For a vegetarian option, firm tofu can be used. Just make sure to press it to remove excess moisture before cooking.

Creamy Garlic Chicken Recipe, let’s move on to some important cooking notes!

Cooking Note for Creamy Garlic Chicken Recipe

Creamy Garlic Chicken Recipe, there are a few essential cooking notes to keep in mind. These tips will help ensure that your dish turns out perfectly every time. Let’s take a look at some important points to consider:

  • Use Fresh Ingredients: Fresh garlic and high-quality chicken make a significant difference in flavor. Fresh ingredients enhance the overall taste of your dish.
  • Don’t Overcook the Chicken: Overcooking can lead to dry chicken. Use a meat thermometer to check for doneness; the internal temperature should reach 165°F (75°C).
  • Adjust the Sauce Consistency: If the sauce is too thick, add a splash of chicken broth or water to reach your desired consistency. If it’s too thin, let it simmer a bit longer to thicken.
  • Season Gradually: Taste the sauce as you go. Adjust the salt and pepper to your liking, but remember that Parmesan cheese adds saltiness, so be cautious.
  • Let It Rest: After cooking, let the chicken rest for a few minutes before serving. This allows the juices to redistribute, keeping the chicken moist.

Creamy Garlic Chicken Recipe to new heights. Each step is crucial in creating a dish that is not only delicious but also visually appealing. Now that you’re equipped with these tips, let’s explore some serving suggestions to complement your meal!

Serving Suggestions for Creamy Garlic Chicken Recipe

Creamy Garlic Chicken Recipe is ready, it’s time to think about how to serve it. The right sides can enhance the flavors of the dish and create a well-rounded meal. Here are some delightful serving suggestions that pair beautifully with your creamy chicken:

  • Garlic Bread: A classic choice! Serve warm garlic bread on the side to soak up the delicious creamy sauce.
  • Steamed Rice: Fluffy white or brown rice is perfect for balancing the richness of the sauce. It’s a great way to enjoy every last drop!
  • Pasta: Serve the creamy garlic chicken over a bed of pasta, such as fettuccine or penne. The pasta will absorb the sauce, making each bite flavorful.
  • Mashed Potatoes: Creamy mashed potatoes are a comforting side that complements the chicken perfectly. They add a hearty element to the meal.
  • Roasted Vegetables: A mix of seasonal roasted vegetables, like carrots, zucchini, and bell peppers, adds color and nutrition to your plate.
  • Salad: A fresh green salad with a light vinaigrette can provide a refreshing contrast to the rich flavors of the chicken.

Creamy Garlic Chicken Recipe to new heights. Now that you have some ideas for serving, let’s move on to tips for perfecting your dish!

Tips for Perfecting Your Creamy Garlic Chicken Recipe

Creamy Garlic Chicken Recipe, there are several tips and tricks you can follow. These will help you achieve the best flavor and texture, ensuring that your dish is a hit every time. Let’s explore some essential tips for perfecting your creamy chicken!

  • Marinate for Extra Flavor: For a deeper flavor, consider marinating the chicken in lemon juice, garlic, and herbs for a few hours before cooking. This adds a zesty kick and enhances the overall taste.
  • Use a Cast Iron Skillet: If you have one, a cast iron skillet is perfect for this recipe. It retains heat well and gives the chicken a beautiful sear.
  • Experiment with Cheese: While Parmesan is traditional, feel free to experiment with other cheeses like Asiago or Pecorino Romano for a different flavor profile.
  • Adjust the Garlic: If you love garlic, don’t hesitate to add more! You can also roast the garlic beforehand for a sweeter, milder flavor.
  • Finish with Fresh Herbs: Besides parsley, consider adding fresh basil or thyme just before serving. This adds a burst of freshness and elevates the dish.
  • Serve Immediately: For the best experience, serve the Creamy Garlic Chicken Recipe right after cooking. The sauce is creamiest when fresh!

Creamy Garlic Chicken Recipe. Each suggestion is designed to help you create a dish that not only tastes amazing but also impresses your guests. Now that you’re equipped with these tips, let’s break down the time needed for this delicious recipe!

Breakdown of Time for Creamy Garlic Chicken Recipe

Creamy Garlic Chicken Recipe is essential for planning your meal. Knowing how long each step takes can help you manage your kitchen time effectively. Here’s a breakdown of the time needed for this delicious dish:

Prep Time

Creamy Garlic Chicken Recipe is approximately 15 minutes. During this time, you will gather all your ingredients, season the chicken, and prepare the garlic and any vegetables you wish to add. Having everything ready before you start cooking makes the process smoother and more enjoyable.

Cooking Time

The cooking time for this recipe is about 20-25 minutes. This includes cooking the chicken until it’s golden brown and preparing the creamy garlic sauce. The chicken will take around 12-14 minutes to cook through, while the sauce will simmer for about 8-10 minutes to achieve the perfect consistency. This quick cooking time makes it an ideal choice for busy weeknights!

Total Time

Creamy Garlic Chicken Recipe to take around 35-40 minutes from start to finish. This includes both prep and cooking time. With such a short time commitment, you can enjoy a delicious, homemade meal without spending hours in the kitchen. Now that you know how to manage your time, let’s take a look at the nutritional information for this delightful dish!

Nutritional Information for Creamy Garlic Chicken Recipe

Creamy Garlic Chicken Recipe is essential for those who are mindful of their dietary choices. This dish is not only delicious but also packed with nutrients that can fit into a balanced meal plan. Let’s break down the key nutritional components of this creamy delight.

Calories

Creamy Garlic Chicken Recipe contains approximately 550 calories. This calorie count includes the chicken, creamy sauce, and Parmesan cheese. While it may seem high, the calories come from wholesome ingredients that provide energy and satisfaction. Enjoying this dish in moderation can be part of a healthy diet.

Protein

Creamy Garlic Chicken Recipe a great option for those looking to increase their protein intake while enjoying a flavorful meal.

Sodium

Creamy Garlic Chicken Recipe is approximately 800 milligrams per serving. This amount can vary based on the chicken broth and cheese used. If you’re watching your sodium intake, consider using low-sodium chicken broth and adjusting the salt added during cooking. This way, you can enjoy the creamy goodness without compromising your dietary needs.

Creamy Garlic Chicken Recipe offers a balanced mix of calories, protein, and sodium. It’s a satisfying meal that can fit into various dietary plans. Now that you have a clear understanding of the nutritional aspects, let’s move on to some frequently asked questions about this delightful dish!

FAQs about Creamy Garlic Chicken Recipe

Can I use chicken thighs instead of breasts in the Creamy Garlic Chicken Recipe?

Creamy Garlic Chicken Recipe. Chicken thighs are juicier and have a richer flavor, making them a great alternative. Just remember to adjust the cooking time slightly, as thighs may take a few minutes longer to cook through. Always check that the internal temperature reaches 165°F (75°C) for safety.

How can I make the Creamy Garlic Chicken Recipe dairy-free?

Creamy Garlic Chicken Recipe dairy-free, you can substitute the heavy cream with coconut cream or a dairy-free cream alternative. Additionally, use nutritional yeast instead of Parmesan cheese for a cheesy flavor without dairy. Adjust the seasoning to taste, as these alternatives may have different flavor profiles. This way, you can enjoy the creamy goodness without any dairy!

What sides pair well with the Creamy Garlic Chicken Recipe?

Creamy Garlic Chicken Recipe. Here are some popular options:

  • Garlic Bread: Perfect for soaking up the creamy sauce.
  • Steamed Vegetables: Broccoli, green beans, or asparagus add color and nutrition.
  • Rice or Pasta: Fluffy rice or pasta can balance the richness of the dish.
  • Salad: A fresh green salad with a light dressing provides a refreshing contrast.

These sides not only complement the flavors of the chicken but also create a well-rounded meal.

Can I prepare the Creamy Garlic Chicken Recipe in advance?

Creamy Garlic Chicken Recipe in advance! You can cook the chicken and sauce ahead of time, then store them separately in the refrigerator. When you’re ready to serve, simply reheat the chicken and sauce together in a skillet over low heat until warmed through. This makes it a convenient option for meal prep or busy weeknights!

Conclusion on Creamy Garlic Chicken Recipe

Creamy Garlic Chicken Recipe is a delightful dish that combines simplicity with rich flavors. It’s perfect for any occasion, whether you’re hosting a dinner party or enjoying a cozy family meal. The tender chicken, enveloped in a creamy garlic sauce, creates a satisfying experience that will leave everyone asking for seconds.

This recipe is not only easy to prepare but also highly adaptable. You can customize it by adding your favorite vegetables or trying different proteins. The tips and variations provided will help you make this dish your own, ensuring that it remains a staple in your kitchen.

Creamy Garlic Chicken Recipe is sure to please even the pickiest eaters.

So, gather your ingredients, follow the steps, and enjoy the deliciousness of this creamy delight. Whether you serve it with garlic bread, pasta, or a fresh salad, you’re in for a treat. Happy cooking!

Paul

Creamy Garlic Chicken Recipe for a Delicious Dinner

This Creamy Garlic Chicken is the definition of effortless indulgence—tender chicken breasts baked under a rich layer of seasoned cream cheese, Italian cheese, and garlic, then finished with a gooey cheddar topping. It’s simple to prepare, packed with flavor, and perfect for a comforting weeknight dinner.
Prep Time 10 minutes
Cook Time 50 minutes
Total Time 1 hour
Servings: 4 servings
Course: Main Dish
Cuisine: American

Ingredients
  

  • 4 boneless skinless chicken breasts1 cup shredded Italian blend cheese½ cup shredded cheddar cheese1 cup cream cheese (softened for easier mixing, but not required)1 teaspoon minced garlic1 teaspoon Italian seasoning (or ½ teaspoon for a milder flavor)Salt and pepper to tasteNon-stick cooking spray

Method
 

  1. Preheat the oven to 375°F (190°C). Lightly coat a 9×13 inch baking dish with non-stick spray.
  2. In a mixing bowl, combine cream cheese, shredded Italian cheese, garlic, and Italian seasoning. Mix until creamy.
  3. Place the chicken breasts into the prepared baking dish. Season with salt and pepper as desired.
  4. Spread the creamy garlic mixture evenly over each piece of chicken using a spatula.
  5. Cover the dish with foil and bake for about 45 minutes, or until the chicken is fully cooked and no longer pink in the center.
  6. Remove the foil, sprinkle the shredded cheddar cheese over the top of the chicken, and return to the oven uncovered. Bake for another 5 minutes until the cheese is fully melted and bubbly.
  7. Serve hot with your favorite sides like garlic mashed potatoes, roasted veggies, or a crisp green salad.

Notes

Make sure the cream cheese is softened for easy mixing and smoother texture.
For extra flavor, add a pinch of red pepper flakes or chopped fresh herbs like parsley or basil to the cheese mixture.
This dish pairs well with pasta or rice to soak up the creamy sauce.
Store leftovers in an airtight container in the fridge for up to 3 days. Reheat gently to maintain creaminess.

Carrot Cake with Cream Cheese Frosting is a must-try!

The History of Carrot Cake

Carrot cake has a rich and fascinating history that dates back to medieval times. In those days, people used carrots as a sweetener because sugar was scarce and expensive. The sweetness of carrots made them a popular ingredient in various dishes. Over the years, this humble vegetable transformed into the delightful dessert we know today.

In the 20th century, carrot cake gained popularity in the United States, especially during the health food movement. Bakers began to experiment with different ingredients, leading to the creation of the moist and flavorful cake we enjoy now. The addition of spices, nuts, and, of course, cream cheese frosting, made it a favorite for many. Today, carrot cake is often served at birthdays, weddings, and other celebrations, showcasing its timeless appeal.

Why Choose Carrot Cake with Cream Cheese Frosting?

Carrot cake with cream cheese frosting is a delightful choice for several reasons. First, it combines the natural sweetness of carrots with warm spices like cinnamon and nutmeg, creating a comforting flavor profile. The cream cheese frosting adds a rich, tangy contrast that perfectly complements the cake’s sweetness.

Moreover, this cake is incredibly versatile. You can easily customize it by adding nuts, fruits, or even swapping ingredients to suit dietary needs. Whether you’re baking for a special occasion or just to enjoy a slice with your afternoon tea, this recipe is sure to impress. Plus, it’s a great way to sneak in some veggies, making it a slightly healthier dessert option!

In summary, carrot cake with cream cheese frosting is not just a treat for the taste buds; it also carries a rich history and offers endless possibilities for customization. So, let’s dive into the ingredients and get started on this delicious journey!

Ingredients for Carrot Cake with Cream Cheese Frosting Recipe

To create a delicious carrot cake with cream cheese frosting, you’ll need a variety of ingredients. Each component plays a vital role in achieving the perfect flavor and texture. Here’s what you’ll need:

For the Carrot Cake:

  • 2 cups all-purpose flour
  • 2 cups granulated sugar
  • 1 teaspoon baking powder
  • 1 teaspoon baking soda
  • 1 teaspoon ground cinnamon
  • 1/2 teaspoon ground nutmeg
  • 1/2 teaspoon salt
  • 1 cup vegetable oil
  • 4 large eggs
  • 3 cups grated carrots (about 6 medium carrots)
  • 1 cup crushed pineapple, drained
  • 1/2 cup chopped walnuts or pecans (optional)
  • 1 teaspoon vanilla extract

For the Cream Cheese Frosting:

  • 8 ounces cream cheese, softened
  • 1/2 cup unsalted butter, softened
  • 4 cups powdered sugar
  • 1 teaspoon vanilla extract
  • 1-2 tablespoons milk (as needed for consistency)

These ingredients come together to create a moist and flavorful cake that is sure to delight everyone. The combination of grated carrots and crushed pineapple adds natural sweetness and moisture, while the spices enhance the overall flavor. The cream cheese frosting, with its rich and tangy taste, perfectly balances the sweetness of the cake.

Now that you have your ingredients ready, let’s move on to the step-by-step preparation of this delightful carrot cake with cream cheese frosting!

Step-by-Step Preparation of Carrot Cake with Cream Cheese Frosting Recipe

Step 1: Prepping the Ingredients

Before you start baking, it’s essential to prep your ingredients. First, gather all the items listed in the ingredients section. Make sure your eggs are at room temperature, as this helps them mix better. Next, grate the carrots using a box grater or food processor. You want them finely grated for even distribution in the cake. If you’re using nuts, chop them into small pieces. This will add a delightful crunch to your cake.

Step 2: Mixing the Dry Ingredients

In a large mixing bowl, combine the dry ingredients. Start by whisking together the all-purpose flour, granulated sugar, baking powder, baking soda, ground cinnamon, ground nutmeg, and salt. Mixing these ingredients well ensures that the leavening agents are evenly distributed. This step is crucial for achieving a light and fluffy cake. Set this bowl aside while you prepare the wet ingredients.

Step 3: Combining Wet Ingredients

In another bowl, it’s time to mix the wet ingredients. Pour in the vegetable oil and crack in the eggs. Add the grated carrots, crushed pineapple, and vanilla extract. Using a whisk or electric mixer, blend these ingredients until they are well combined. The mixture should be smooth and slightly thick. This is where the magic begins, as the carrots and pineapple will add moisture and flavor to your cake.

Step 4: Incorporating Carrots and Nuts

Now, it’s time to bring the two mixtures together. Gradually add the wet ingredients to the dry ingredients. Stir gently until just combined. Be careful not to overmix, as this can make the cake dense. If you’re using nuts, fold them in at this stage. The nuts will add a lovely texture and flavor to your cake, making each bite delightful.

Step 5: Baking the Cake

Once your batter is ready, it’s time to bake! Divide the batter evenly between the two prepared 9-inch round cake pans. Smooth the tops with a spatula for even baking. Place the pans in the preheated oven and bake for 25-30 minutes. To check if they’re done, insert a toothpick into the center. If it comes out clean, your cakes are ready! Allow them to cool in the pans for about 10 minutes before transferring them to wire racks to cool completely.

Step 6: Preparing the Cream Cheese Frosting

While the cakes are cooling, you can prepare the cream cheese frosting. In a medium bowl, beat the softened cream cheese and unsalted butter together until smooth and creamy. Gradually add the powdered sugar and vanilla extract, mixing until well combined. If the frosting is too thick, add milk one tablespoon at a time until you reach your desired consistency. The frosting should be spreadable but not runny.

Step 7: Frosting the Cake

Once the cakes are completely cool, it’s time to frost! Place one layer of cake on a serving plate. Spread a generous layer of cream cheese frosting on top. Then, carefully place the second layer on top. Frost the top and sides of the cake with the remaining frosting. For a decorative touch, you can sprinkle additional chopped nuts or grated carrots on top. Slice and serve this delicious carrot cake with cream cheese frosting to your eager guests!

Variations of Carrot Cake with Cream Cheese Frosting Recipe

Carrot cake with cream cheese frosting is a classic dessert, but there are many ways to put a unique spin on this beloved recipe. Here are some exciting variations to consider:

Gluten-Free Options

If you or your guests are gluten-sensitive, you can easily make a gluten-free carrot cake. Simply substitute the all-purpose flour with a gluten-free flour blend. Make sure to check that all other ingredients, like baking powder and baking soda, are also gluten-free. This way, everyone can enjoy a slice of this delicious cake!

Vegan Alternatives

For a vegan version of carrot cake, you can replace the eggs with flaxseed meal or applesauce. To make flax eggs, mix one tablespoon of flaxseed meal with three tablespoons of water and let it sit for a few minutes until it thickens. Additionally, use a plant-based butter and dairy-free cream cheese for the frosting. This way, you can enjoy a moist and flavorful cake without any animal products.

Adding Fruits and Nuts

To enhance the flavor and texture of your carrot cake, consider adding fruits and nuts. Raisins or shredded coconut can be mixed into the batter for added sweetness and chewiness. You can also experiment with different nuts, such as pecans or almonds, to give your cake a delightful crunch. These additions not only elevate the taste but also make your cake even more special!

With these variations, you can customize your carrot cake with cream cheese frosting to suit any dietary preference or personal taste. Whether you stick to the classic recipe or try something new, this cake is sure to be a hit!

Cooking Note for Carrot Cake with Cream Cheese Frosting Recipe

When baking a delicious carrot cake with cream cheese frosting, a few cooking notes can help ensure your cake turns out perfectly. First, always preheat your oven before placing the cake inside. This step is crucial for even baking. Additionally, make sure to grease and flour your cake pans well. This will prevent the cake from sticking and make it easier to remove once baked.

Another important tip is to use fresh ingredients. Fresh carrots will provide the best flavor and moisture. If you’re using canned pineapple, ensure it’s well-drained to avoid excess moisture in the batter. Also, remember to let your cakes cool completely before frosting. If the cakes are warm, the frosting may melt and slide off, ruining your beautiful creation.

Lastly, feel free to experiment with the spices. While cinnamon and nutmeg are traditional, you can add a pinch of ginger or allspice for a unique twist. These small adjustments can elevate the flavor profile of your carrot cake, making it even more delightful!

Serving Suggestions for Carrot Cake with Cream Cheese Frosting Recipe

Carrot cake with cream cheese frosting is a versatile dessert that can be served in various ways. Here are some serving suggestions to enhance your experience:

  • Pair with Coffee or Tea: This cake pairs wonderfully with a cup of coffee or tea. The warm flavors of the spices complement the drink perfectly.
  • Garnish with Fresh Fruits: Consider adding fresh fruits like berries or slices of orange on the side. They add a refreshing contrast to the rich cake.
  • Serve with Ice Cream: For an indulgent treat, serve a slice of carrot cake with a scoop of vanilla or cream cheese ice cream. The cold ice cream balances the warm spices beautifully.
  • Make Mini Cakes: For a fun twist, bake the batter in muffin tins to create mini carrot cakes. Frost them individually for a delightful treat at parties.

These serving suggestions can elevate your carrot cake with cream cheese frosting experience, making it even more enjoyable for you and your guests!

Tips for Perfecting Your Carrot Cake with Cream Cheese Frosting Recipe

To ensure your carrot cake with cream cheese frosting turns out perfectly every time, consider these helpful tips:

  • Measure Ingredients Accurately: Use measuring cups and spoons for precise measurements. This helps maintain the right balance of flavors and textures.
  • Don’t Overmix: When combining wet and dry ingredients, mix until just combined. Overmixing can lead to a dense cake.
  • Use Room Temperature Ingredients: Ingredients like eggs and butter should be at room temperature. This helps them blend better and creates a smoother batter.
  • Cool Completely: Allow the cakes to cool completely before frosting. This prevents the frosting from melting and ensures a beautiful finish.
  • Store Properly: If you have leftovers, store the cake in an airtight container in the refrigerator. It can last for several days, maintaining its delicious flavor.

By following these tips, you can perfect your carrot cake with cream cheese frosting and impress everyone with your baking skills!

Cooking Note for Carrot Cake with Cream Cheese Frosting Recipe

When baking a delicious carrot cake with cream cheese frosting, a few cooking notes can help ensure your cake turns out perfectly. First, always preheat your oven before placing the cake inside. This step is crucial for even baking. Additionally, make sure to grease and flour your cake pans well. This will prevent the cake from sticking and make it easier to remove once baked.

Another important tip is to use fresh ingredients. Fresh carrots will provide the best flavor and moisture. If you’re using canned pineapple, ensure it’s well-drained to avoid excess moisture in the batter. Also, remember to let your cakes cool completely before frosting. If the cakes are warm, the frosting may melt and slide off, ruining your beautiful creation.

Lastly, feel free to experiment with the spices. While cinnamon and nutmeg are traditional, you can add a pinch of ginger or allspice for a unique twist. These small adjustments can elevate the flavor profile of your carrot cake, making it even more delightful!

By keeping these cooking notes in mind, you can create a scrumptious carrot cake with cream cheese frosting that will impress your family and friends. Happy baking!

Serving Suggestions for Carrot Cake with Cream Cheese Frosting Recipe

Carrot cake with cream cheese frosting is a delightful dessert that can be enjoyed in many ways. Here are some creative serving suggestions to enhance your experience:

  • Pair with Coffee or Tea: This cake pairs wonderfully with a warm cup of coffee or tea. The spices in the cake complement the flavors of your drink, making for a cozy treat.
  • Garnish with Fresh Fruits: Adding fresh fruits like berries or slices of orange on the side can provide a refreshing contrast to the rich cake. The acidity of the fruits balances the sweetness beautifully.
  • Serve with Ice Cream: For an indulgent twist, serve a slice of carrot cake with a scoop of vanilla or cream cheese ice cream. The cold ice cream melts slightly on the warm cake, creating a delicious combination.
  • Make Mini Cakes: For a fun presentation, bake the batter in muffin tins to create mini carrot cakes. Frost them individually for a delightful treat at parties or gatherings.
  • Top with Whipped Cream: A dollop of freshly whipped cream on top of each slice adds a light and airy texture, enhancing the overall experience.
  • Drizzle with Caramel Sauce: For an extra touch of sweetness, drizzle some caramel sauce over the frosted cake. This adds a rich flavor that pairs well with the cream cheese frosting.

These serving suggestions can elevate your carrot cake with cream cheese frosting experience, making it even more enjoyable for you and your guests. Whether you’re celebrating a special occasion or simply enjoying a slice at home, these ideas will surely impress!

Tips for Perfecting Your Carrot Cake with Cream Cheese Frosting Recipe

To ensure your carrot cake with cream cheese frosting turns out perfectly every time, consider these helpful tips:

  • Measure Ingredients Accurately: Use measuring cups and spoons for precise measurements. This helps maintain the right balance of flavors and textures.
  • Don’t Overmix: When combining wet and dry ingredients, mix until just combined. Overmixing can lead to a dense cake.
  • Use Room Temperature Ingredients: Ingredients like eggs and butter should be at room temperature. This helps them blend better and creates a smoother batter.
  • Cool Completely: Allow the cakes to cool completely before frosting. This prevents the frosting from melting and ensures a beautiful finish.
  • Store Properly: If you have leftovers, store the cake in an airtight container in the refrigerator. It can last for several days, maintaining its delicious flavor.
  • Experiment with Spices: While cinnamon and nutmeg are traditional, feel free to add a pinch of ginger or allspice for a unique twist. These small adjustments can elevate the flavor profile of your carrot cake.
  • Use Fresh Ingredients: Fresh carrots will provide the best flavor and moisture. If you’re using canned pineapple, ensure it’s well-drained to avoid excess moisture in the batter.
  • Test for Doneness: Use a toothpick to check if the cakes are done. Insert it into the center; if it comes out clean, your cakes are ready!

By following these tips, you can perfect your carrot cake with cream cheese frosting and impress everyone with your baking skills! Happy baking!

Breakdown of Time for Carrot Cake with Cream Cheese Frosting Recipe

Prep Time

Preparing your carrot cake with cream cheese frosting is a delightful process that doesn’t take too long. The prep time for this recipe is approximately 20-30 minutes. During this time, you will gather your ingredients, grate the carrots, and mix the wet and dry components. Make sure to have everything ready before you start baking. This will make the process smoother and more enjoyable!

Cooking Time

The cooking time for your carrot cake is about 25-30 minutes. This is when the magic happens! As the cake bakes, your kitchen will fill with the warm, inviting aroma of spices and sweet carrots. To ensure your cake is perfectly baked, check for doneness by inserting a toothpick into the center. If it comes out clean, your cake is ready to cool.

Total Time

In total, you can expect to spend around 1 hour to 1 hour and 15 minutes on this recipe. This includes both prep and cooking time. Once the cakes are baked and cooled, you’ll spend a little extra time frosting them. But trust me, the effort is worth it! You’ll end up with a delicious carrot cake with cream cheese frosting that’s perfect for any occasion.

Nutritional Information for Carrot Cake with Cream Cheese Frosting Recipe

Calories

When indulging in a slice of carrot cake with cream cheese frosting, it’s essential to be aware of its caloric content. Each serving contains approximately 350 calories. This number can vary slightly based on the specific ingredients used and any variations you may choose to incorporate. While this cake is a delightful treat, enjoying it in moderation is key to maintaining a balanced diet.

Protein

In terms of protein, each slice of carrot cake provides about 3 grams. While this may not seem like a lot, it contributes to your daily protein intake, especially when paired with other nutritious foods. The eggs and nuts in the recipe help boost the protein content, making it a more satisfying dessert option.

Sodium

For those monitoring their sodium intake, it’s good to know that each serving of carrot cake with cream cheese frosting contains around 200 milligrams of sodium. This amount is relatively moderate, especially considering that sodium is often found in many processed foods. By making this cake at home, you have control over the ingredients, allowing you to adjust the sodium levels to suit your dietary needs.

Overall, while carrot cake with cream cheese frosting is a delicious dessert, being mindful of its nutritional information can help you enjoy it as part of a balanced diet. Remember, it’s all about moderation and making informed choices!

FAQs about Carrot Cake with Cream Cheese Frosting Recipe

Can I make carrot cake without nuts?

Absolutely! You can make carrot cake without nuts if you prefer a nut-free version. Simply omit the chopped walnuts or pecans from the recipe. The cake will still be delicious and moist thanks to the carrots and pineapple. If you want to add some texture, consider including raisins or shredded coconut instead. This way, you can enjoy a delightful carrot cake that suits your taste!

How do I store leftover carrot cake?

Storing leftover carrot cake is easy! First, make sure the cake is completely cooled. Then, place it in an airtight container to keep it fresh. You can store it in the refrigerator for up to a week. If you want to keep it longer, consider freezing it. Wrap individual slices in plastic wrap and then place them in a freezer-safe bag. This way, you can enjoy a slice of carrot cake whenever you crave it!

Can I use store-bought cream cheese frosting?

Yes, you can use store-bought cream cheese frosting if you’re short on time or prefer convenience. Just make sure to choose a high-quality brand for the best flavor. However, homemade frosting is often creamier and more flavorful. If you decide to go with store-bought, you can still add a personal touch by mixing in a little vanilla extract or a dash of cinnamon for extra flavor!

What can I substitute for eggs in carrot cake?

If you need an egg substitute for your carrot cake, there are several options! You can use 1/4 cup of unsweetened applesauce for each egg. Another great option is to mix one tablespoon of flaxseed meal with three tablespoons of water. Let it sit for a few minutes until it thickens, and then use it as you would an egg. These substitutes will help keep your cake moist and delicious while making it suitable for those with egg allergies or dietary restrictions.

Conclusion on Carrot Cake with Cream Cheese Frosting Recipe

In conclusion, carrot cake with cream cheese frosting is a delightful dessert that brings together the natural sweetness of carrots and the rich, tangy flavor of cream cheese. This recipe not only offers a delicious treat but also allows for creativity and customization. Whether you choose to add nuts, fruits, or even make it gluten-free or vegan, the possibilities are endless!

As you embark on your baking journey, remember the importance of using fresh ingredients and following the steps carefully. With a little patience and practice, you can create a moist and flavorful cake that will impress your family and friends. The warm spices and creamy frosting make this cake perfect for any occasion, from birthdays to casual gatherings.

So, gather your ingredients, preheat your oven, and get ready to enjoy the wonderful aroma of baking carrot cake. Once it’s ready, slice it up, serve it with your favorite beverage, and watch as everyone savors each bite. Happy baking, and may your carrot cake with cream cheese frosting become a cherished recipe in your home!

Paul

Carrot Cake with Cream Cheese Frosting is a must-try!

Jack’s Carrot Cake is a rich and flavorful dessert packed with juicy raisins, grated carrots, pineapple, coconut, and walnuts—layered with tangy cream cheese frosting. Moist, nostalgic, and full of comforting textures, it’s the ultimate showstopper for spring holidays, birthdays, or cozy weekend baking.
Prep Time 30 minutes
Cook Time 40 minutes
Total Time 1 hour 10 minutes
Servings: 12 servings
Course: Dessert
Cuisine: American

Ingredients
  

  • For the Cake1 cup raisins2 tablespoons dark rumButter and flour for preparing pans2 cups all-purpose flour1½ teaspoons baking powder1½ teaspoons baking soda½ teaspoon salt1½ teaspoons ground cinnamon2 cups granulated sugar¼ cup vegetable oil3 whole eggs1 cup unsweetened applesauce1½ teaspoons vanilla extract2 cups grated carrots1 cup crushed pineapple with juice1 cup sweetened shredded coconut plus 2 tablespoons for garnish1 cup chopped walnuts, plus 2 tablespoons for garnish
  • For the Cream Cheese Frosting1 cup unsalted butter softened2 packages cream cheese, 8 oz each, softened2 teaspoons vanilla extract2 pounds powdered sugar

Method
 

  1. Microwave raisins and dark rum for 1 minute, then set aside to soak.Butter and flour two 9-inch round cake pans and line the bottoms with parchment paper.Preheat oven to 350°F (175°C).In a medium bowl, whisk together flour, baking powder, baking soda, salt, and cinnamon.In a stand mixer, cream sugar and vegetable oil on medium speed for 1 minute.Add eggs one at a time, mixing well after each. Add applesauce and vanilla, then mix and scrape down the sides of the bowl.Gradually add dry ingredients to the wet mixture on low speed until just combined.Stir in grated carrots, crushed pineapple (with juice), and shredded coconut.Fold in soaked raisins and chopped walnuts by hand.Divide the batter evenly between the prepared pans.Bake for 35–40 minutes or until a toothpick inserted in the center comes out clean.Cool in pans for 10 minutes, then transfer cakes to wire racks and remove parchment while still warm.To make the frosting, beat softened butter and cream cheese in a large bowl until smooth.Add vanilla, then gradually beat in powdered sugar until frosting is light and creamy.Level the cakes if necessary. Place the first cake layer on a serving plate with a small dab of frosting underneath to keep it steady.Spread a 1/4-inch layer of frosting on top. Add the second cake layer and frost the top and sides.Use a star tip and pastry bag to pipe decorative borders. Sprinkle the remaining coconut and walnuts over the top.Serve immediately or refrigerate until ready to enjoy.

Notes

Soaking the raisins in rum boosts flavor—orange juice works as an alcohol-free substitute.
Make ahead by baking the cake layers one day early and refrigerating them tightly wrapped.
You can freeze unfrosted cake layers for up to one month. Thaw before frosting.
Use a serrated knife or cake leveler for clean layers if they dome slightly during baking.

Stay Connected

Get recipes via email: