Apple Cinnamon Cake – A Timeless Classic That Feels Like Home

There are certain scents that have the power to transport us to another time and place. For me, it’s the unmistakable aroma of apples and cinnamon baking in the oven. It reminds me of crisp autumn afternoons, the sound of leaves crunching underfoot, and the warmth of my grandmother’s kitchen.

She never measured ingredients with precision, yet her apple cinnamon cake was always perfect—soft, fragrant, and just the right balance of sweetness and spice. She believed that baking wasn’t just about following a recipe but about feeling the ingredients, trusting the process, and most importantly, making something with love.

I remember sitting on a wooden stool, watching her peel apples with effortless ease, the curls of skin falling in perfect spirals onto the counter. She’d toss the chunks of fruit with cinnamon and sugar, letting them soak in their own juices before folding them into the batter. The wait was always the hardest part, but when the cake finally emerged, golden and fragrant, it felt like pure magic.

That cake became a symbol of home, of comfort, and of the simple joys that food can bring. Now, every time I bake it, I think of her hands, her patience, and the way she made something so ordinary feel so special. And today, I’m sharing this timeless recipe with you.

Why Apple Cinnamon Cake is a Must-Try

This cake is more than just a dessert—it’s an experience. It’s the kind of cake that fills your kitchen with warmth, the kind that tastes just as good the next day, and the kind that brings people together.

1. The Perfect Balance of Flavors

Apples bring natural sweetness, a slight tartness, and a soft, juicy texture. Cinnamon adds warmth and depth, while sugar caramelizes the fruit just enough to create a hint of richness. Together, they create a comforting, nostalgic flavor that never goes out of style.

2. Soft, Moist, and Irresistible

Unlike dry cakes that crumble apart, this apple cinnamon cake is perfectly moist, thanks to the juicy apples and carefully balanced ingredients. Each bite is tender, filled with bursts of apple, and infused with a hint of spice.

3. Simple Yet Elegant

This cake is proof that the best desserts don’t have to be complicated. With basic pantry staples, fresh apples, and a bit of patience, you can create something that looks beautiful and tastes even better. Whether you’re making it for a casual family treat or serving it at a gathering, it always impresses.

4. A Cake for All Seasons

While apple cinnamon cake is often associated with autumn, it’s a recipe that works all year round. In summer, enjoy it with a scoop of vanilla ice cream. In winter, serve it warm with a drizzle of caramel sauce. In spring, pair it with a cup of tea and a dusting of powdered sugar.

Ingredients

For the Apple FillingQuantity
Apples (peeled and cubed)2–3 medium
Sugar50 g (¼ cup)
Ground cinnamon1 teaspoon

Directions

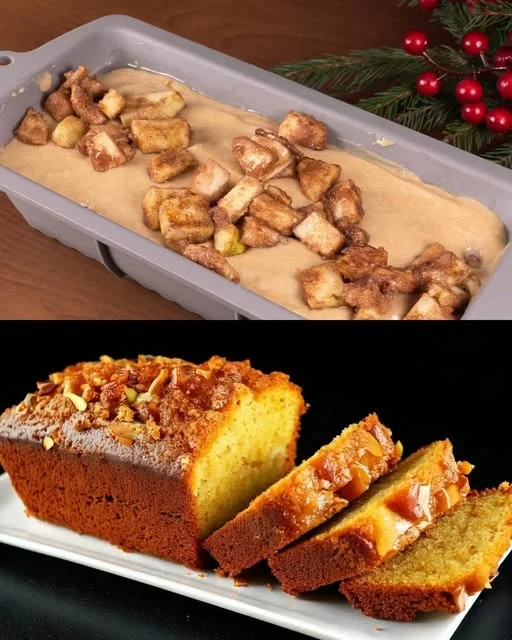
  1. Prepare the Apple Mixture – In a bowl, mix the cubed apples with sugar and cinnamon. Let them sit for 10 minutes to release their natural juices and absorb the flavors.
  2. Incorporate into Cake Batter – Fold the spiced apples into your cake batter or layer them between the batter for an even apple distribution.
  3. Bake to Perfection – Follow your cake recipe’s baking instructions, ensuring the cake is golden brown and fragrant.
  4. Serve & Enjoy – Let the cake cool slightly before slicing. Best served warm with a dusting of powdered sugar or a scoop of vanilla ice cream.

Nutritional Information (Per Serving – Approximate)

NutrientAmount
Calories150–180 kcal
Carbohydrates35–40 g
Sugars20–25 g
Fiber2–3 g
Fats3–5 g
Protein1–2 g

The Magic Behind This Cake’s Texture and Flavor

Baking is often described as a science, but this cake has an element of art to it as well. Here’s what makes it stand out:

The Apple Filling

By tossing apples with cinnamon and sugar before adding them to the cake, they release their juices, creating a naturally sweet and slightly syrupy texture that enhances every bite. The result? A cake that’s soft in the center and bursting with pockets of warm apple flavor.

The Right Type of Apples

Not all apples bake the same. Some turn mushy, while others retain their shape beautifully. If you want a balance of softness and structure, go for apples like:

  • Granny Smith – Slightly tart, keeps its shape well.
  • Honeycrisp – Juicy and naturally sweet, adds a fresh flavor.
  • Fuji or Gala – Soft and sweet, great for a more delicate texture.

Aromatic Spices

Cinnamon is the star here, but you can also enhance the flavor with a pinch of nutmeg or cloves for an even richer, spiced aroma.

Moisture Retention

The combination of apples and a carefully balanced batter ensures that this cake stays moist for days. Some cakes dry out quickly, but this one maintains its softness, making it just as enjoyable the next day (if it lasts that long!).

Ways to Make It Your Own

This apple cinnamon cake is a wonderful base for creativity. Here are some ideas to customize it:

1. Add Nuts for Crunch

Chopped walnuts or pecans add texture and a nutty contrast to the soft apples.

2. Top It with Streusel

A simple mix of butter, brown sugar, and flour creates a crunchy, caramelized topping that adds another layer of indulgence.

3. Drizzle with Caramel

A homemade or store-bought caramel drizzle takes this cake to the next level, adding extra sweetness and richness.

4. Serve with Ice Cream or Whipped Cream

For an extra treat, pair your warm cake with a scoop of vanilla ice cream or freshly whipped cream.

Common Mistakes and How to Avoid Them

Even the simplest recipes have a few key things to keep in mind. Here’s how to avoid common pitfalls when making this cake:

1. Not Choosing the Right Apples

Using apples that are too soft can result in a mushy texture. Stick to firmer apples like Granny Smith or Honeycrisp for the best results.

2. Skipping the Resting Time

Letting the apples sit with cinnamon and sugar for at least 10 minutes allows them to release their juices, enhancing their flavor and softening them slightly.

3. Overmixing the Batter

Mixing too much can make the cake dense instead of tender. Stir just until the ingredients are combined.

4. Baking at the Wrong Temperature

Too high, and the cake can dry out. Too low, and it may sink in the middle. A steady 350°F (175°C) is ideal for even baking.

FAQs About Apple Cinnamon Cake

1. Can I Make This Cake Ahead of Time?

Yes! This cake actually tastes even better the next day as the flavors deepen. Store it in an airtight container at room temperature for up to 3 days.

2. Can I Freeze Apple Cinnamon Cake?

Absolutely! Wrap it tightly and freeze for up to 2 months. Thaw at room temperature before serving.

3. Can I Use Whole Wheat Flour Instead of All-Purpose Flour?

Yes, but keep in mind that whole wheat flour will make the cake slightly denser. You can use half whole wheat and half all-purpose flour for a balance.

4. Can I Make This Cake Without Sugar?

You can reduce the sugar slightly or use a natural sweetener like honey or maple syrup, but it may slightly alter the texture.

5. Can I Make This Cake Vegan?

Yes! Substitute eggs with applesauce or flaxseed eggs, and use plant-based milk and butter.

Conclusion: A Cake Worth Baking Again and Again

There’s a reason Apple Cinnamon Cake remains a classic. It’s simple to make, full of cozy flavors, and always a crowd-pleaser. Whether you’re baking for family, friends, or just yourself, this cake brings warmth, comfort, and a touch of nostalgia to every bite.

It’s more than just a dessert—it’s a memory in the making, a tradition in the oven, and a reminder that sometimes, the simplest things are the most special.

So preheat your oven, peel those apples, and get ready to fill your kitchen with the sweet, spiced aroma of homemade goodness.

Amal

Apple Cinnamon Cake – A Timeless Classic That Feels Like Home

This cozy Apple Cinnamon Cake is the perfect blend of soft, spiced, and sweet. Juicy apple chunks coated in cinnamon sugar are folded into a tender cake batter for a dessert that’s both rustic and irresistible. Whether served warm with a scoop of vanilla ice cream or enjoyed as a morning treat with coffee, this classic cake will fill your kitchen with comfort and your heart with nostalgia.
Prep Time 15 minutes
Cook Time 45 minutes
Total Time 1 hour
Servings: 8 servings
Course: Dessert
Cuisine: American

Ingredients
  

  • 2 –3 medium apples peeled and cut into cubes
  • 50 g ¼ cup sugar
  • 1 teaspoon ground cinnamon
  • Your favorite vanilla or butter-based cake batter homemade or from mix

Method
 

  1. Preheat your oven to 350°F (175°C) and grease a 9-inch round or square cake pan.
  2. In a medium bowl, toss the cubed apples with the sugar and cinnamon. Let sit for 10 minutes to release their natural juices.
  3. Prepare your cake batter and gently fold in the apple mixture, or pour half the batter into the pan, layer with apples, then top with the remaining batter for a layered effect.
  4. Bake for 35–45 minutes, or until a toothpick inserted in the center comes out clean and the top is golden brown.
  5. Let cool slightly before slicing. Serve warm or at room temperature.

Notes

  • Use a mix of tart and sweet apples (like Granny Smith + Honeycrisp) for a more complex flavor.
  • Add a pinch of nutmeg or allspice for extra warmth.
  • Top with powdered sugar, a drizzle of caramel sauce, or serve with whipped cream or ice cream.
  • Cake can be stored in an airtight container at room temperature for up to 3 days or refrigerated for longer freshness.
  • Freezer-friendly: wrap tightly and freeze for up to 2 months.

Once You Try This Trick, You’ll Never Buy Bread Again

The first time I made bread from scratch, it was out of frustration. It was during a weekend when I couldn’t make it to the store, and all I had was a handful of ingredients, a bit of time, and a memory of my grandmother’s hands kneading dough on a wooden table near the kitchen window. I remembered the softness in her expression, the patience in her fingers, and the quiet satisfaction she had as loaves cooled on the counter.

That day, out of necessity, I followed a basic formula—warm water, milk, flour, yeast, and butter. I didn’t expect much. I certainly didn’t expect it to change how I viewed bread forever.

What came out of the oven was golden, soft, aromatic—nothing like the pale, mass-produced slices I had grown used to. It was rich and comforting, with a delicate crumb and just the right amount of chew. As I tore into it, steam rising, butter melting into every crevice, I had a thought I’ve had countless times since:

“Why did I ever buy bread?”

That recipe became a ritual. I bake it on weekends, for family dinners, for friends visiting from out of town. I’ve taught it to my kids. And now, I’m sharing it with you—not just as a recipe, but as a reminder of how the simplest ingredients, when treated with care, can become something truly extraordinary.

Why This Bread Works (And Why You’ll Keep Making It)

This isn’t artisan sourdough or a fancy focaccia with wild toppings. It’s basic, reliable, and incredibly versatile. And it’s that simplicity that makes it magic.

1. The Perfect Balance of Ingredients

The recipe uses warm water and milk—this duo creates a tender, rich crumb. Milk adds fat and flavor, while water lightens the texture. A touch of sugar wakes up the yeast and lends a subtle sweetness. The result is a loaf that’s pillowy soft inside, slightly golden on the outside.

2. Butter Makes Everything Better

Soft butter is added after the dough comes together—a trick often used in enriched breads like brioche. It gives the loaf a richness and softness that lingers. Even without eggs, this bread tastes luxurious.

3. A Blank Canvas for Any Meal

Use it for sandwiches, slice it thick for French toast, tear it into chunks with soup, or toast it and top it with jam or garlic butter. You can even shape it into rolls, baguettes, or mini loaves.

Ingredients

IngredientQuantity
Warm water400 ml (14 fl oz)
Warm milk200 ml (6.8 fl oz)
Vegetable oil30 ml (1 fl oz)
Dried yeast8 g (0.3 oz)
Sugar10 g (0.4 oz)
Flour850 g (30 oz)
Soft butter150 g (5.3 oz)
Salt1.5 teaspoons

Directions

  1. Activate the Yeast
    • In a large bowl, combine the warm water, warm milk, sugar, and yeast. Stir well and let sit for 10–15 minutes until frothy.
  2. Make the Dough
    • Add vegetable oil, salt, and about half of the flour. Mix well until a sticky dough forms. Gradually add the remaining flour, stirring and kneading as you go, until the dough is soft and slightly tacky.
  3. Incorporate the Butter
    • Knead the dough for 8–10 minutes, then gradually add the soft butter in small portions, kneading after each addition until fully absorbed. The dough should become smooth and elastic.
  4. First Rise
    • Cover the dough with a clean towel and let it rise in a warm place for about 1 hour, or until doubled in size.
  5. Shape the Bread
    • Punch down the dough and divide it into loaves or rolls, shaping them as desired. Place in greased loaf pans or on a lined baking tray.
  6. Second Rise
    • Cover and let the dough rise again for 30–40 minutes, until puffy.
  7. Bake to Perfection
    • Preheat the oven to 375°F (190°C). Bake for 25–30 minutes, or until golden brown on top and hollow-sounding when tapped.
  8. Cool & Enjoy
    • Transfer to a wire rack and let cool before slicing. For an extra soft crust, brush with melted butter while still warm.

Nutritional Information (Per Slice – Approximate)

NutrientAmount
Calories190–210 kcal
Protein5–6 g
Carbohydrates30–34 g
Fats6–8 g
Fiber1–2 g
SodiumDepends on salt

Texture, Taste, and Aroma: What to Expect

This bread hits every sensory mark:

  • Texture: Soft and tender, with a light crumb that doesn’t crumble apart. It holds structure beautifully for sandwiches.
  • Taste: Slightly sweet, buttery, and mild. The flavor is delicate enough to accompany anything but delicious enough to eat on its own.
  • Aroma: Warm, yeasty, and comforting—the kind of smell that wraps around your home like a hug.

Tips for Bread-Baking Success

Even though this recipe is forgiving, here are a few helpful tips that elevate your result:

Let the Yeast Work

Yeast isn’t complicated, but it is sensitive. Use warm—not hot—liquid to activate it (about 100–110°F or 37–43°C). If it doesn’t foam within 15 minutes, your yeast might be dead.

Don’t Rush the Rise

Letting the dough rise fully gives the bread a better texture and flavor. The first rise should double the dough’s size, while the second gives it structure.

Use the Windowpane Test

Pull off a small piece of dough and stretch it gently. If it stretches thin enough to see light through it without tearing, you’ve kneaded it enough.

Add Butter Gradually

Incorporate soft butter slowly into your dough, kneading between additions. This helps it absorb properly and enriches the dough without making it greasy.

Cool Before Slicing

As tempting as it is to cut into a hot loaf, waiting at least 20 minutes allows the crumb to set and gives you clean slices.

Creative Variations

This is a foundational recipe, meaning it can evolve with your tastes and creativity.

  • Cheese Bread: Fold in grated cheddar or parmesan before the second rise.
  • Garlic & Herb Loaf: Add minced garlic, dried oregano, or rosemary to the dough.
  • Sweet Rolls: Increase sugar, add cinnamon, and form into spirals. Top with glaze.
  • Seeded Top: Brush with egg wash and sprinkle with sesame, poppy, or flax seeds before baking.
  • Whole Wheat Twist: Replace part of the flour with whole wheat for added fiber and earthiness.

Serving Suggestions

This bread is best enjoyed slightly warm, but it’s just as delicious toasted the next day. Some favorite ways to serve it:

  • With Soup: Tear off pieces and dip into creamy tomato or lentil soups.
  • For Breakfast: Toast and top with butter, honey, or scrambled eggs.
  • For Sandwiches: Slice thick and stack with fresh veggies, meats, or spreads.
  • With Olive Oil: Dip into olive oil and balsamic vinegar for an elegant starter.
  • As Croutons or Stuffing: Cube leftovers and bake into homemade croutons or holiday stuffing.

FAQs: Your Bread Questions Answered

Can I make the dough in advance?

Yes. After the first rise, you can refrigerate the dough overnight. Let it come back to room temperature and rise slightly before shaping and baking.

Can I use instant yeast instead of active dry yeast?

Yes. You can substitute instant yeast 1:1 and skip the activation step, mixing it directly with your dry ingredients.

Can I freeze the bread?

Absolutely. Once baked and fully cooled, wrap the loaf tightly and freeze for up to 2 months. Thaw at room temperature or warm in the oven before serving.

Why is my dough too sticky or too dry?

Bread dough changes based on the humidity in your kitchen or the flour type. If it’s too sticky, add flour 1 tablespoon at a time. If too dry, add a splash of warm water.

How do I know when it’s fully baked?

Tap the bottom of the loaf—it should sound hollow. Or use a thermometer: the internal temperature should read 190–200°F (88–93°C).

Can I make this bread without butter?

Yes, though the texture and flavor will change. You can replace butter with neutral oil, but the result will be slightly denser and less rich.

Conclusion: Bread That’s More Than Just Food

This bread isn’t just something to eat—it’s something to share, to feel proud of, to bake with intention. It’s a connection to tradition, to memory, and to the quiet satisfaction of making something from scratch.

There’s a reason this recipe earns the title: Once you try this trick, you’ll never buy bread again. Because it’s true. Once you feel the dough in your hands, smell the yeasty aroma as it bakes, and slice into that soft, buttery loaf—it’s hard to go back to plastic-wrapped, factory-made bread.

So pull out your bowl, warm some water, and try it for yourself. You’re not just baking bread. You’re building something beautiful, one loaf at a time.

Amal

Once You Try This Trick, You’ll Never Buy Bread Again

Once you try this soft, buttery homemade bread, you’ll never buy a store-bought loaf again. With a rich, tender crumb and golden crust, this recipe transforms simple ingredients into bakery-quality bread right in your kitchen. Perfect for toast, sandwiches, or served warm with a pat of butter, this is the kind of bread you’ll want to bake on repeat.
Prep Time 20 minutes
Cook Time 30 minutes
Total Time 2 hours 20 minutes
Servings: 12 –14 rolls
Course: Bread
Cuisine: International

Ingredients
  

  • 400 ml warm water
  • 200 ml warm milk
  • 30 ml vegetable oil
  • 8 g dried yeast
  • 10 g sugar
  • 850 g all-purpose or bread flour
  • 150 g soft butter
  • 1.5 teaspoons salt

Method
 

  1. In a large bowl, combine warm water, warm milk, sugar, and dried yeast. Stir and let sit for 10–15 minutes until foamy.
  2. Add vegetable oil, salt, and half the flour. Stir until a rough dough forms.
  3. Gradually add the rest of the flour while kneading until the dough becomes soft and only slightly sticky.
  4. Slowly incorporate the soft butter in portions, kneading until fully absorbed and the dough becomes smooth and elastic (about 8–10 minutes).
  5. Cover the dough with a cloth and let it rise in a warm spot for 1 hour or until doubled in size.
  6. Punch down the dough and shape into loaves or rolls as desired. Place into greased loaf pans or on a baking sheet.
  7. Cover again and let rise for 30–40 minutes until puffy.
  8. Preheat oven to 375°F (190°C). Bake for 25–30 minutes or until the tops are golden and the loaves sound hollow when tapped.
  9. Let cool completely on a wire rack before slicing. Optionally, brush the tops with melted butter for a soft, glossy finish.

Notes

  • For a slightly richer flavor, use whole milk instead of low-fat or skim.
  • Bread can be made into rolls, braided loaves, or baked in a Dutch oven for variation.
  • Store in an airtight container for up to 3 days or freeze for up to 2 months.
  • For added flavor, fold in herbs, cheese, or garlic during the final knead.

A Famous Recipe, 1000 Buns Sold Daily – The Ultimate Burger Bread

There’s something magical about the smell of fresh bread rising from the oven. It fills the entire home with warmth, comfort, and the promise of something special. For me, that magic began in a small, unassuming kitchen—my grandmother’s, nestled at the edge of a sleepy little town. She wasn’t a professional baker, but her hands worked dough like an artist.

As a child, I’d sit cross-legged on a stool, chin resting on the counter, watching her knead dough with quiet confidence. “Bread tells its own story,” she used to say. “You just have to listen.” It wasn’t until years later, after she’d passed and I inherited her notebooks, that I found the origin of the bun that would become a staple in my own kitchen—and eventually, one that would find its way into bakeries and burger joints far beyond my hometown.

This burger bun recipe wasn’t flashy. There were no secret ingredients. Just warm milk, yeast, sugar, flour, and care. But something about it—perhaps the balance of softness and structure, the hint of sweetness, the golden, egg-washed crown—made it the perfect vessel for any filling.

And that’s how it began. First, I baked a batch for a backyard burger night with friends. Then I made them for a local food fair. Before long, I was selling dozens, then hundreds, and eventually—along with a small team—thousands. These buns became my signature. But more than that, they became a symbol of how the simplest things can carry the deepest meaning.

Why This Bun Is More Than Just Bread

Burger buns are often overlooked. They’re seen as the silent partner to the patty, the background player. But if you’ve ever bitten into a burger with a stale, dry, or flavorless bun, you understand just how crucial a good one is. A great bun doesn’t just hold everything together—it elevates the entire experience.

This recipe has been tested across thousands of meals, in restaurants and home kitchens alike. It’s soft, slightly sweet, with a tender crumb and just enough chew. It absorbs sauces without falling apart, holds its shape under pressure, and enhances everything it wraps itself around.

Perfect Structure and Softness

The combination of warm milk and yeast creates a light, airy dough that rises into pillowy perfection. The structure is soft enough to bite through without resistance, yet firm enough to cradle a juicy burger without collapsing.

Mildly Sweet Flavor

A touch of sugar doesn’t overpower the taste but adds a warmth that complements savory fillings beautifully. It’s the balance of sweet and salty that makes this bun so versatile.

Glossy Finish for the Classic Look

That shiny, golden top isn’t just for show. The egg or milk wash not only adds visual appeal but also provides a slight crust that contrasts with the softness inside.

Ingredients

IngredientQuantity
Warm milk400 ml
Warm water200 ml
Sugar40 g
Dry yeast11 g (about 1 packet)
Chicken egg1 large
Salt1.5 teaspoons

Directions

  1. Activate the Yeast
    In a large mixing bowl, combine the warm milk, warm water, sugar, and dry yeast. Let the mixture sit for 10–15 minutes until frothy—this means the yeast is active and ready to work.
  2. Build the Dough
    Add the egg and salt into the yeast mixture. Gradually mix in the flour, starting with 2 cups and continuing until a soft, slightly sticky dough forms. Knead for 8–10 minutes by hand or using a dough hook until smooth and elastic.
  3. Let It Rise
    Cover the bowl with a clean towel and let the dough rise in a warm spot for about 1 hour, or until doubled in size.
  4. Shape the Buns
    Once risen, divide the dough into 10–12 equal portions (depending on your preferred bun size). Roll each into a smooth ball and place on a lined baking tray. Gently flatten the tops.
  5. Second Proofing
    Cover the tray and let the buns rise again for 30–40 minutes until puffed and airy.
  6. Bake to Golden Perfection
    Preheat the oven to 375°F (190°C). Brush the tops of the buns with a lightly beaten egg or milk for a glossy finish. Bake for 15–20 minutes until beautifully golden brown on top.
  7. Cool Before Slicing
    Allow the buns to cool completely on a wire rack before slicing. Store in an airtight container for up to 3 days, or freeze for longer storage.

Nutritional Information (Per Bun – Approximate)

NutrientAmount
Calories200–220 kcal
Protein6–8 g
Carbohydrates30–35 g
Fats4–5 g
Fiber1–2 g
SodiumDepends on salt content

A Bun for Every Occasion

While this recipe was designed with burgers in mind, its use doesn’t stop there. These buns are a blank canvas for creativity:

  • Sliders & Mini Bites: Shape smaller portions for appetizer-sized slider buns.
  • Sandwich Rolls: Use them for deli meats, egg salad, or grilled veggies.
  • Breakfast Sandwiches: Toast and stack with eggs, cheese, and bacon for a morning treat.
  • Dinner Rolls: Skip the flattening step and bake them as round, fluffy rolls to serve alongside soups and stews.

The beauty of this dough is its flexibility. It can be sweet or savory, fancy or simple. It’s the kind of bread that adapts to the table it’s served on.

Tips for the Perfect Bake Every Time

Even with a simple recipe, a few thoughtful techniques can elevate the results.

Use the Right Temperature for the Yeast

The milk and water should be warm—not hot. Between 100–110°F (37–43°C) is ideal. Too hot, and you’ll kill the yeast. Too cold, and the dough won’t rise properly.

Be Patient with Proofing

Let the dough double in size both during the first and second rise. Don’t rush it. Yeast doughs need time to develop structure and flavor.

Weigh Your Flour

If possible, use a kitchen scale for accuracy. Too much flour will lead to dense buns; too little, and the dough may be too sticky to work with.

Brush Generously Before Baking

Whether you use an egg wash, milk, or butter, this final step adds flavor, color, and that irresistible glossy finish.

Make It Your Own: Variations to Explore

While the classic recipe is perfect on its own, here are a few ways to make it even more exciting:

Sesame Seed Topping

Before baking, sprinkle sesame seeds, poppy seeds, or everything seasoning on top of the buns for added texture and flavor.

Whole Wheat Twist

Substitute up to half the all-purpose flour with whole wheat flour for a nuttier flavor and added fiber.

Cheesy Surprise

Add shredded cheddar or parmesan into the dough, or tuck a cube of cheese into the center of each bun for a gooey bite.

Herb-Infused Buns

Knead in dried herbs like rosemary, thyme, or oregano for a savory spin.

Sweet Rolls

Add vanilla extract and a bit more sugar, then top with cinnamon sugar for a breakfast-friendly bun.

FAQs: Everything You Want to Know About This Recipe

Can I make the dough ahead of time?

Yes! You can refrigerate the dough after the first rise. Just punch it down, cover tightly, and store for up to 24 hours. Let it come to room temperature and rise again before shaping and baking.

Can I freeze the buns?

Absolutely. Once fully cooled, you can freeze the baked buns in an airtight container or freezer bag for up to 2 months. To reheat, thaw at room temperature and warm in the oven for 5–7 minutes.

Can I use fresh yeast instead of dry yeast?

Yes. Substitute 11g of dry yeast with about 33g of fresh yeast. Dissolve it in the warm milk-water mixture before continuing with the recipe.

Why are my buns dense or flat?

This usually happens due to under-proofing, over-proofing, or using too much flour. Make sure your yeast is active, your dough is soft and elastic, and you allow enough time for rising.

What flour is best for burger buns?

All-purpose flour works wonderfully, but you can also use bread flour for a slightly chewier texture and more rise.

How do I get that golden top?

An egg wash (1 egg beaten with a tablespoon of water or milk) brushed over the buns just before baking gives that rich, bakery-style finish.

Final Thoughts: A Bun That’s Worth the Hype

It’s easy to overlook the bun. When we talk about burgers, most people praise the patty, the cheese, the sauce. But anyone who’s truly passionate about food knows: the bread matters. A lot.

This burger bun recipe isn’t just soft, golden, and reliable—it’s the kind of recipe that turns heads, invites second servings, and builds reputations. Whether you’re baking for your family, selling at a local market, or launching your dream food truck, this is the bun that delivers.

Simple in ingredients, rich in story, and endlessly adaptable, this bun is more than a base. It’s the beginning of something beautiful—bite after bite.

Amal

A Famous Recipe, 1000 Buns Sold Daily – The Ultimate Burger Bread

These legendary burger buns are famous for a reason—soft, fluffy, slightly sweet, and beautifully golden. With a texture that holds up to juicy patties and sauces without falling apart, these buns are the gold standard for homemade burgers. Whether you’re baking for a family dinner or prepping for a cookout, this foolproof recipe delivers bakery-quality results every time.
Prep Time 20 minutes
Cook Time 20 minutes
Total Time 2 hours 15 minutes
Servings: 10 –12 buns
Course: Bread
Cuisine: International

Ingredients
  

  • 400 ml warm milk
  • 200 ml warm water
  • 40 g sugar
  • 11 g dry yeast about 1 packet
  • 1 large egg
  • 1.5 teaspoons salt
  • 600 –700 g all-purpose flour as needed during mixing and kneading
  • Optional: 1 egg or milk for brushing tops before baking

Method
 

  1. In a large mixing bowl, combine the warm milk, warm water, sugar, and dry yeast. Stir and let sit for 10–15 minutes until foamy.
  2. Beat in the egg and add the salt. Gradually add the flour, starting with 2 cups, mixing as you go. Add more flour as needed to form a soft, slightly sticky dough.
  3. Knead the dough by hand or with a mixer for 8–10 minutes, until smooth and elastic.
  4. Cover the dough with a clean towel or plastic wrap and let it rise in a warm place for about 1 hour, or until doubled in size.
  5. Punch down the dough and divide it into 10–12 equal pieces. Shape each piece into a smooth ball and place on a lined baking tray. Gently flatten each one.
  6. Cover again and allow the buns to rise for another 30–40 minutes, until puffy.
  7. Preheat the oven to 375°F (190°C). Brush the tops with a beaten egg or milk for a glossy finish.
  8. Bake for 15–20 minutes, or until golden brown on top.
  9. Cool on a wire rack before slicing and using.

Notes

  • For extra flavor, add a tablespoon of melted butter to the dough.
  • For topping, sprinkle sesame or poppy seeds after brushing with egg wash.
  • These buns freeze well—cool completely and store in airtight bags for up to 2 months.
  • Perfect as burger buns, sandwich rolls, or even served warm with butter.

If You Have Courgettes, You Have to Try This! I’ve Never Tasted Anything So Delicious

Some of the best recipes are born not out of elaborate planning or expensive ingredients, but from necessity, simplicity, and a bit of curiosity. This courgette recipe—soft on the inside, golden on top, and impossibly comforting—is one of those rare dishes that surprised me the first time I made it, and continues to do so every time it hits the table.

I remember the day I stumbled across it. It was one of those slow, sun-drenched afternoons when everything in the fridge seemed uninspiring. I was visiting my mother in the countryside, and we had just come back from the local market with a few handfuls of vegetables, among them a couple of plump, shiny zucchinis. “We’ll make something,” she said casually. “Zucchini’s all you need when you know what to do with it.”

At the time, I didn’t believe her. I had always thought of courgettes (zucchinis) as a filler vegetable—good in a soup, fine in a stir-fry, but never the star of the show. But she grated them, mixed them with eggs, flour, and just a few basic ingredients, and slipped the pan into the oven. What came out was a golden, puffy, slightly crisp, and beautifully savory bake that disappeared within minutes. No leftovers. Just crumbs and compliments.

That afternoon changed how I look at zucchini forever.

Courgette Perfection: A Dish That Balances Simplicity and Depth

There’s a reason why this dish continues to win hearts: it offers everything you want from a comforting bake—light texture, satisfying flavor, and just enough richness to feel indulgent, without being heavy. It’s also ridiculously easy to throw together.

Not Just a Side Dish

This isn’t one of those recipes you serve quietly on the side. With its beautiful, golden surface and hearty interior, this courgette bake stands tall as a main event. You can serve it at brunch with a side salad, pack it into a lunchbox, or pair it with grilled proteins at dinner. It adapts to any time of day or mood.

Great Use of Garden Veggies

If you grow your own vegetables, or simply find yourself overwhelmed with seasonal zucchini, this is one of the best recipes to have on hand. It’s a smart, satisfying way to put those courgettes to good use—especially when they’ve started piling up on your kitchen counter.

Subtly Sophisticated Flavor

Despite the humble ingredients, this dish isn’t boring. Between the creamy base of eggs and milk, the starchiness of the grated potato, and the lift from baking powder, it’s delicate, aromatic, and deeply flavorful. A touch of black pepper, a splash of olive oil, and a hint of sweetness from the zucchini—it all comes together beautifully.

What Makes This Courgette Recipe So Special?

1. Accessible Ingredients

You probably already have most of what you need: zucchini, eggs, flour, milk, oil, and a few basic seasonings. That means no last-minute grocery runs, no exotic pantry items—just kitchen staples doing what they do best.

2. Quick Prep, Minimal Cleanup

All it takes is a bit of grating, mixing, and pouring. One bowl, one dish, one oven. That’s it. This recipe is perfect for those days when you want something home-cooked without turning your kitchen upside down.

3. Kid-Friendly, Parent-Approved

It’s a clever way to get vegetables into picky eaters—especially children who might otherwise turn up their noses at anything green. The zucchini practically disappears into the batter, creating a dish that’s soft, cheesy (if you like), and impossible to resist.

4. Naturally Versatile

This dish can be whatever you want it to be. Vegetarian? It already is. Want to add a protein? Mix in crumbled feta, cooked chicken, or sautéed mushrooms. Craving a stronger flavor? Add grated parmesan, sun-dried tomatoes, or fresh herbs.

Ingredients

IngredientQuantity
Zucchini (courgettes)2 medium-sized
Olive oil2 tablespoons
Salt1 teaspoon (divided)
Black pepper1 teaspoon (divided)
Eggs4
Sugar1 teaspoon
Vegetable oil60 ml (1/4 cup)
Milk100 ml (1/2 cup)
Flour120 g (1 cup)
Baking powder11 g (2 teaspoons)
Potato (peeled and grated)1 medium

Directions

  1. Prep the Veggies – Grate the zucchini and sprinkle with half of the salt. Let it sit for 10 minutes, then squeeze out the excess moisture using a clean kitchen towel. Grate the potato and do the same.
  2. Mix the Wet Ingredients – In a large bowl, whisk the eggs, milk, vegetable oil, sugar, and the remaining salt and pepper until well combined.
  3. Add the Dry Ingredients – Sift in the flour and baking powder. Stir until a thick batter forms.
  4. Combine with Veggies – Fold in the grated zucchini and potato into the batter. Stir until evenly distributed.
  5. Heat and Bake – Preheat the oven to 375°F (190°C). Pour the mixture into a lightly oiled baking dish or oven-safe skillet. Drizzle olive oil over the top.
  6. Bake to Perfection – Bake for 35–40 minutes or until the top is golden and a toothpick comes out clean from the center.
  7. Cool and Serve – Let cool for 5 minutes before slicing. Serve warm with yogurt, sour cream, or a side salad.

Nutritional Information (Per Serving)

NutrientAmount (Approx.)
Calories210–240 kcal
Protein7–9 g
Carbohydrates18–22 g
Fats12–14 g
Fiber2–3 g
SodiumModerate (depends on added salt)

Ideas to Make It Your Own

While the original recipe is perfect as-is, here are a few ways to shake it up:

  • Add Fresh Herbs – Dill, parsley, or chives can bring a pop of freshness.
  • Cheese It Up – Feta, mozzarella, cheddar, or parmesan will make the bake richer and more filling.
  • Go Mediterranean – Add olives, crumbled feta, and a squeeze of lemon juice for a Greek-inspired twist.
  • Make It Spicy – Add chili flakes, diced jalapeños, or even a teaspoon of harissa paste.
  • Sweeten It Slightly – A very small amount of sugar or honey enhances the natural sweetness of zucchini without making it dessert-like.

Serving Suggestions

This courgette bake is excellent warm or at room temperature. Here are some pairing ideas to suit different occasions:

  • For Breakfast or Brunch: Serve with poached eggs and avocado on the side.
  • For Lunch: Add a fresh tomato and cucumber salad with a yogurt-based dressing.
  • For Dinner: Pair with grilled chicken or salmon and a crisp glass of white wine.
  • As a Snack: Cut into squares and dip into tzatziki or garlic aioli.

This dish also travels well, making it perfect for picnics, potlucks, or packed lunches.

Common Mistakes and How to Avoid Them

1. Forgetting to Drain the Zucchini

Zucchini contains a surprising amount of water. If you skip the step of squeezing out the grated zucchini, your bake can end up soggy and undercooked in the middle. A clean towel or cheesecloth works best—just squeeze until no more water drips out.

2. Using Too Much Flour

Adding too much flour makes the bake dense and heavy. Stick to the recommended amount unless you’re significantly increasing the moisture with extra vegetables or cheese.

3. Overbaking or Underbaking

Keep a close eye on the oven. You want the top golden and a toothpick to come out mostly clean (a few crumbs are okay). Overbaking dries it out; underbaking leaves the center gummy.

4. Not Letting It Rest

Let the bake rest for 5–10 minutes before slicing. This helps the texture settle and makes it easier to cut clean pieces.

FAQs About This Courgette Bake

Can I Make This Recipe Ahead of Time?

Yes! You can prepare and bake the dish in advance. It stores well in the refrigerator for up to 3 days and can be gently reheated in the oven or enjoyed cold.

Can I Freeze It?

Yes. Let the bake cool completely, slice it into portions, and store in an airtight container or freezer bag. Reheat in the oven for best results.

Is It Gluten-Free?

Not by default, but you can use a gluten-free all-purpose flour or almond flour for a gluten-free version. Just note that texture might vary slightly.

Can I Make It Dairy-Free?

Absolutely. Use a plant-based milk and skip any optional cheese. The flavor will still be delicious.

Can I Add Meat or Fish?

Yes, you can stir in cooked shredded chicken, diced ham, smoked salmon, or even tuna. Just be mindful not to overfill the batter.

What Kind of Potato Works Best?

A starchy potato like Russet or Yukon Gold works best for this recipe, helping bind the batter and giving structure.

Final Thoughts: A Recipe That Transforms Simplicity into Something Special

This courgette bake isn’t just another vegetable dish—it’s a reminder that flavor doesn’t come from complexity, but from care. It’s a recipe that welcomes creativity, adapts to your lifestyle, and always hits the spot.

In our fast-paced world, where recipes often call for long ingredient lists and complicated techniques, this one invites us to slow down. To appreciate the beauty of basic ingredients. To remember that even the simplest meals can tell stories, evoke memories, and bring people together.

Whether you’re looking to use up extra zucchini, feed your family something nourishing, or just surprise yourself with how good a “vegetable bake” can be—this recipe is for you. Try it once, and you’ll know what I mean when I say, I’ve never eaten anything so delicious.

Amal

If You Have Courgettes, You Have to Try This! I’ve Never Tasted Anything So Delicious

If you have courgettes, you absolutely need to make this! This savory, fluffy courgette and potato bake is a perfect combination of crisp edges, soft interior, and rich, comforting flavor. With just a handful of basic ingredients, this dish transforms everyday vegetables into something truly special—ideal for breakfast, lunch, dinner, or even as a snack.
Prep Time 15 minutes
Cook Time 40 minutes
Total Time 55 minutes
Servings: 4 –6 servings
Course: Snack
Cuisine: Mediterranean

Ingredients
  

  • 2 medium-sized zucchini courgettes, grated
  • 2 tablespoons olive oil
  • 1 teaspoon salt divided
  • 1 teaspoon black pepper divided
  • 4 large eggs
  • 1 teaspoon sugar
  • 60 ml 1/4 cup vegetable oil
  • 100 ml 1/2 cup milk
  • 120 g 1 cup all-purpose flour
  • 11 g 2 teaspoons baking powder
  • 1 medium potato peeled and grated

Method
 

  1. Grate the zucchini and sprinkle with half the salt. Let it sit for 10 minutes, then squeeze out excess moisture using a clean kitchen towel or cheesecloth.
  2. Grate the potato and do the same—removing as much water as possible.
  3. In a large mixing bowl, whisk together the eggs, milk, vegetable oil, sugar, remaining salt and pepper.
  4. Add in the flour and baking powder, stirring until a smooth batter forms.
  5. Fold in the grated zucchini and potato, mixing until evenly combined.
  6. Preheat your oven to 375°F (190°C). Lightly grease a baking dish or ovenproof skillet with olive oil.
  7. Pour the batter into the dish and drizzle the top with remaining olive oil.
  8. Bake for 35–40 minutes, or until the top is golden brown and a toothpick comes out clean.
  9. Let cool for 5 minutes before slicing. Serve warm or at room temperature.

Notes

  • Squeezing out the moisture from the zucchini and potato is key to avoid a soggy bake.
  • You can customize the recipe by adding herbs (like parsley or dill), cheese (like feta or parmesan), or spices (like paprika or garlic powder).
  • This dish is great served with a dollop of Greek yogurt, sour cream, or a fresh green salad.
  • Can be made ahead and stored in the fridge for up to 3 days. Also freezer-friendly!

Cabbage and Eggs: So Delicious, I Cook It Constantly

There are some dishes that don’t just fill your stomach—they warm your heart. This is one of them.

Growing up, my summers were spent in the countryside at my grandmother’s house. She had a little vegetable patch just behind the kitchen, where cabbage grew in neat rows. They weren’t glamorous vegetables—no one ever bragged about cabbage—but to my grandmother, they were gold.

Every morning, she’d wander outside with a woven basket, pick the freshest leaves, and bring them inside with a proud smile. She’d chop them with practiced rhythm, cracking a few eggs, mixing in a handful of oats, onions, and whatever else she had on hand. The smell that filled her kitchen as she fried those fritters in a cast-iron pan is one I’ll never forget: savory, earthy, comforting.

She used to say, “There’s magic in simple food, if you cook it with love.” And she was right.

Today, this humble cabbage and egg fritter recipe lives on in my own kitchen. It’s not fancy. It doesn’t require exotic ingredients. But it’s deeply nourishing, surprisingly flavorful, and endlessly versatile. And every time I make it, I feel like I’m back in that kitchen with her—barefoot on cool tile floors, waiting for the next golden bite.

Why This Dish Works: The Secret Is in the Simplicity

Cabbage and egg fritters may seem unassuming, but their brilliance lies in how effortlessly they bring together texture, taste, and nutrition. It’s the kind of recipe that’s hard to mess up and easy to love. Here’s what makes it such a winner:

1. The Ultimate Budget Meal

With just cabbage, eggs, and pantry staples like oats and flour, you can make a satisfying, hearty meal that costs next to nothing. It’s a perfect solution for anyone looking to stretch their grocery budget without sacrificing taste.

2. High in Nutrition, Low in Fuss

Cabbage is a nutritional powerhouse—rich in fiber, vitamin C, and antioxidants—while eggs pack a punch of protein and healthy fats. Together, they create a well-rounded meal that’s nourishing and energizing.

3. Textural Balance

When done right, these fritters have an irresistible texture—crispy edges from frying, a soft interior from the cabbage and eggs, and the occasional chew from oats or flour. That contrast keeps every bite interesting.

4. No Special Tools Required

You don’t need a food processor, mixer, or any fancy equipment. Just a knife, a bowl, and a pan. That makes it accessible for anyone, whether you’re a college student in a dorm or a parent making dinner after a long day.

Ingredients

IngredientQuantity
Cabbage (shredded)700 g
Eggs5 large
SaltTo taste
Oats3 tbsp
Flour2 tbsp
Onion (finely chopped)1 medium
Olive oil (for frying)As needed
Carrot (grated)1 medium
Potato (grated)1 medium
Italian herbsTo taste
Dill (chopped)1 sprig
Mayonnaise2 tbsp
Greek yogurt2 tbsp
Soy sauceTo taste
Black pepperTo taste
Garlic (minced)1 clove

Directions

  1. Prepare the Ingredients – Finely shred the cabbage, grate the carrot and potato, and finely chop the onion and dill.
  2. Mix Everything Together – In a large bowl, combine the cabbage, carrot, potato, onion, oats, flour, eggs, dill, Italian herbs, salt, black pepper, and minced garlic. Stir well to ensure everything is evenly distributed.
  3. Create a Creamy Base – Add mayonnaise, Greek yogurt, and a splash of soy sauce. Mix until the batter is smooth and well combined.
  4. Heat the Oil – In a large frying pan, heat a generous amount of olive oil over medium heat.
  5. Form the Fritters – Take small portions of the mixture and shape them into round patties.
  6. Cook to Perfection – Place the patties in the pan and cook for about 3-4 minutes on each side, or until golden brown and crispy.
  7. Drain and Serve – Transfer the cooked fritters to a plate lined with paper towels to remove excess oil. Serve warm with your favorite dipping sauce or alongside a fresh salad.

Nutritional Information (Per Serving)

NutrientAmount (Approx.)
Calories200-250 kcal
Protein8-10g
Carbohydrates25-30g
Fats8-10g
Fiber4-5g
SodiumVaries based on seasoning

Creative Twists and Tasty Variations

One of the best things about this recipe is how easily you can customize it. Once you’ve got the base down, you can adapt it to suit your taste or mood:

Add Cheese for Extra Comfort

Mix in a handful of grated cheddar, parmesan, or mozzarella for extra richness. The cheese melts as it cooks, adding gooey pockets of flavor inside each fritter.

Make It Spicy

If you like heat, add some chopped jalapeño, chili flakes, or a dash of cayenne to the mix. You can even add a bit of hot sauce to the batter or serve it on the side.

Go Herbaceous

Italian herbs are a classic addition, but fresh parsley, dill, cilantro, or chives can completely change the flavor profile. Use what you have, and don’t be afraid to mix and match.

Boost the Protein

Want to make it more filling? Stir in some chopped cooked chicken, shredded tuna, or even canned beans.

Veganize It

Substitute flaxseed or chia “eggs” and use plant-based yogurt or mayo. The fritters won’t be as firm, but they’ll still be packed with flavor and plant-based goodness.

Serving Suggestions: What Goes Well With Cabbage Fritters

These fritters are incredibly versatile, and how you serve them can shift the entire experience:

  • As a Snack or Appetizer: Serve with a creamy garlic or herb dip.
  • For Breakfast: Add a fried egg on top and a side of sliced avocado.
  • As a Light Lunch or Dinner: Pair with a fresh green salad and a drizzle of lemon yogurt sauce.
  • For Kids: Shape them into mini patties and serve with ketchup or ranch dressing.
  • As a Sandwich Filler: Use them in pita bread with shredded lettuce, tomatoes, and sauce.

The options are endless—and they’re all delicious.

Common Mistakes to Avoid

Even a simple recipe like this has a few key things to keep in mind:

1. Skipping the Moisture Removal

Cabbage, potato, and carrot can release a lot of water. If you don’t squeeze out some of that moisture, your batter may turn too wet and the fritters will be soggy rather than crispy.

2. Not Heating the Oil Enough

If the oil isn’t hot enough, the fritters will soak it up instead of crisping up on contact. Always test with a small bit of batter first—if it sizzles right away, you’re good to go.

3. Overcrowding the Pan

Give your fritters space. If the pan is too full, the temperature drops and you’ll end up steaming them instead of frying.

4. Underseasoning

Cabbage is mild in flavor and needs a good boost from seasoning. Salt, black pepper, herbs, garlic, and soy sauce all work together to build depth—don’t skimp on them.

FAQs: Everything You Need to Know

Can I make this dish in advance?

Yes! The mixture can be prepared ahead of time and stored in the fridge for up to 24 hours before cooking. You can also cook and refrigerate the fritters, then reheat them in a skillet or oven.

Can I freeze these fritters?

Absolutely. Let them cool completely, layer them between parchment paper, and freeze in an airtight container. Reheat in a pan or oven straight from frozen.

Can I use red cabbage?

You can, but it has a firmer texture and a more bitter flavor. It also bleeds a bit of color. If using red cabbage, consider blanching it briefly first.

What’s the best oil for frying?

Olive oil adds great flavor, but any neutral oil with a medium-high smoke point—like sunflower or canola—also works well.

Can I bake them instead of frying?

Yes! Lightly grease a baking tray, shape the fritters, and bake at 375°F (190°C) for 20-25 minutes, flipping halfway through. They won’t be as crispy but are still delicious.

Conclusion: A Recipe That Brings People Together

This Cabbage and Egg Fritter recipe is more than just a way to use up extra vegetables. It’s a celebration of simplicity, resourcefulness, and warmth. It’s a dish that reminds us that comfort food doesn’t need to be complicated or expensive. It just needs to be made with care.

Whether you’re cooking for your family, hosting friends, or simply feeding yourself after a long day, this recipe offers everything you need: flavor, nutrition, texture, and heart. And the best part? Once you make it once, you’ll understand why so many people—myself included—come back to it again and again.

From my grandmother’s kitchen to yours, this recipe carries a legacy of love, simplicity, and joy in every bite. Try it once, and I promise—it will find a permanent place in your recipe box.

Amal

Cabbage and Eggs: So Delicious, I Cook It Constantly

These golden, crispy cabbage and egg fritters are a simple, wholesome, and flavorful dish you’ll find yourself making again and again. Made with humble ingredients like shredded cabbage, eggs, and oats, they’re versatile enough for breakfast, lunch, or dinner. Whether you serve them hot from the skillet with a dollop of yogurt or tucked into a pita with fresh herbs, they’re sure to become a household favorite.
Prep Time 15 minutes
Cook Time 20 minutes
Total Time 35 minutes
Servings: 12 –15 fritters
Course: Snack
Cuisine: Eastern European

Ingredients
  

  • 700 grams of cabbage finely shredded
  • 5 large eggs
  • Salt to taste
  • 3 tablespoons oats
  • 2 tablespoons flour
  • 1 medium onion finely chopped
  • Olive oil for frying
  • 1 medium carrot grated
  • 1 medium potato grated
  • Italian herbs to taste
  • 1 sprig of dill chopped
  • 2 tablespoons mayonnaise
  • 2 tablespoons Greek yogurt
  • Soy sauce to taste
  • Black pepper to taste
  • 1 clove garlic minced

Method
 

  1. In a large mixing bowl, combine the shredded cabbage, grated carrot, grated potato, chopped onion, and chopped dill.
  2. Add in the oats, flour, and minced garlic. Mix well.
  3. Crack in the eggs and mix until fully incorporated.
  4. Stir in the mayonnaise, Greek yogurt, soy sauce, Italian herbs, salt, and black pepper. Mix until a thick batter forms.
  5. Heat a generous amount of olive oil in a non-stick or cast iron skillet over medium heat.
  6. Using a spoon or your hands, form small patties and place them in the hot oil.
  7. Cook for 3–4 minutes on each side, or until golden brown and crispy.
  8. Transfer to a plate lined with paper towels to drain any excess oil.
  9. Serve warm with yogurt, sour cream, or your favorite dipping sauce.

Notes

  • Make sure to squeeze out excess moisture from the cabbage, potato, and carrot before mixing to prevent sogginess.
  • You can bake these fritters instead of frying: place on a lined baking sheet and bake at 375°F (190°C) for 20–25 minutes, flipping halfway through.
  • Add cheese, chili flakes, or cooked meat to change up the flavor.
  • Perfect for freezing: just cool completely, freeze in layers, and reheat in a skillet or oven.

Better Than Pizza! Why Grated Potato Bake Deserves a Spot on Your Table

Growing up, Sunday mornings in our house were all about the smell of something delicious baking in the oven. My grandmother, a woman with a heart as warm as her kitchen, had a knack for turning the simplest ingredients into something magical. Among her many cherished recipes, one stood out—her crispy, golden, and irresistibly delicious Grated Potato Bake.

I remember sitting at the kitchen table, watching her grate potatoes with a rhythm so natural it felt like a dance. She would mix in a handful of fresh ingredients, pour the batter into a well-seasoned pan, and slide it into the oven with the promise of something special. When it finally emerged—golden and crisp around the edges, tender in the middle—it was an instant family favorite. No fancy ingredients, no complicated steps, just pure, simple goodness.

Years later, as I recreated this dish in my own kitchen, I realized why it had such a hold on my heart. It wasn’t just the taste—it was the warmth, the nostalgia, and the comfort of knowing that even the simplest food can bring people together. Whether you need an easy meal for a busy weeknight or a hearty side dish for a family gathering, this Grated Potato Bake is proof that sometimes, the most humble ingredients make the most unforgettable meals.

Why This Dish is a Must-Try

1. Simple Ingredients, Big Flavor

One of the best things about this recipe is that it uses everyday ingredients that you likely already have in your kitchen. Potatoes, carrots, onions, eggs, and a handful of seasonings come together to create something far greater than the sum of its parts.

2. Crispy Outside, Tender Inside

Unlike traditional potato casseroles that can sometimes turn mushy, this dish strikes the perfect balance. The grated potatoes crisp up beautifully around the edges while staying soft and flavorful in the center.

3. A Healthier Alternative to Fast Food

Craving something satisfying but want to skip the takeout? This Grated Potato Bake is a fantastic alternative to pizza or fries. It’s packed with fiber, vitamins, and protein, making it a healthier option that doesn’t sacrifice taste.

4. Versatile and Customizable

You can easily switch up the ingredients to match your preferences. Add cheese for extra richness, toss in some garlic for a deeper flavor, or experiment with different herbs and spices.

5. Budget-Friendly and Easy to Make

This recipe is proof that you don’t need expensive ingredients to create something delicious. Whether you’re cooking for a family or just for yourself, this dish is a fantastic way to use up pantry staples without breaking the bank.

Ingredients

IngredientQuantity
Potatoes (grated)6 medium-sized
Carrot (grated)1 large
Onion (finely chopped)1 medium
Vegetable oilAs needed for frying
Fresh spring onions (chopped)5-6 stalks
Eggs3 large
Cheese (optional, grated)½ cup
Salt & pepperTo taste
Garlic powder (optional)½ tsp
Paprika (optional)½ tsp

Directions

  1. Prep the Ingredients – Grate the potatoes and carrot. Finely chop the onion and spring onions.
  2. Remove Excess Moisture – Squeeze the grated potatoes in a clean kitchen towel to remove excess water. This ensures a crispy bake.
  3. Mix Everything Together – In a large bowl, combine the grated potatoes, carrot, onion, spring onions, eggs, salt, pepper, and optional seasonings. If using cheese, mix it in as well.
  4. Heat the Oil – Preheat a large ovenproof skillet or baking dish with a drizzle of vegetable oil.
  5. Bake to Perfection – Spread the mixture evenly in the dish and bake at 375°F (190°C) for 30-40 minutes until golden and crispy on top.
  6. Serve & Enjoy – Let it cool for a few minutes before slicing. Serve with sour cream, yogurt, or your favorite dip!

Nutritional Information (Per Serving)

NutrientAmount (Approx.)
Calories250-300 kcal
Protein8-10g
Carbohydrates35-40g
Fats10-12g
Fiber4-5g
SodiumDepends on seasoning

How to Make It Your Own: Delicious Variations

1. Cheesy Potato Bake

For those who love a little indulgence, mix in some shredded cheese before baking. Cheddar, mozzarella, or parmesan work beautifully, adding a rich, gooey texture.

2. Spicy Kick

Add a dash of paprika, cayenne, or chili flakes to give your potato bake a bit of heat. It’s a simple way to bring some extra excitement to the dish.

3. Herb-Infused Delight

Fresh herbs like rosemary, thyme, or parsley can elevate the flavors and add a fragrant touch to your bake.

4. Protein-Packed Version

For a heartier meal, mix in cooked bacon, ham, or even shredded chicken. This turns the dish into a more filling main course.

5. Vegan Twist

Swap out the eggs for a flaxseed or chia seed mixture, and use plant-based cheese for a completely vegan-friendly version.

Serving Suggestions: What to Pair It With

This dish is incredibly versatile, and it pairs well with a variety of accompaniments:

  • With a side salad – A fresh, crisp salad with a light vinaigrette cuts through the richness and balances the flavors.
  • With a dipping sauce – Sour cream, Greek yogurt, or even a simple garlic aioli make fantastic dipping sauces.
  • As a side dish – Serve it alongside grilled chicken, roasted vegetables, or a hearty soup for a complete meal.
  • For breakfast – Top it with a fried or poached egg for a delicious, satisfying breakfast.

Common Mistakes to Avoid

1. Not Squeezing Out the Potatoes

One of the biggest mistakes people make is skipping the step of removing excess moisture from the grated potatoes. Too much water can make the bake soggy instead of crispy. Use a clean kitchen towel or paper towels to squeeze out as much liquid as possible before mixing your ingredients.

2. Overcrowding the Baking Dish

For the crispiest texture, avoid packing the potato mixture too thickly into the pan. A thinner layer will allow the heat to evenly crisp up the edges.

3. Underseasoning

Potatoes absorb flavor, so don’t be shy with the seasoning. Salt, pepper, and any additional herbs or spices will make all the difference.

4. Baking at the Wrong Temperature

A common mistake is baking at too low a temperature, which can lead to a dense and undercooked center. Baking at 375°F (190°C) ensures a golden, crispy finish.

5. Skipping the Resting Time

Let the bake cool for a few minutes after removing it from the oven. This allows the flavors to settle and makes slicing much easier.

FAQs About Grated Potato Bake

1. Can I Make This Ahead of Time?

Absolutely! You can prepare the mixture a day in advance and store it in the refrigerator until you’re ready to bake. Just be sure to mix it again before baking, as the potatoes may release some moisture.

2. How Do I Store Leftovers?

Store any leftovers in an airtight container in the fridge for up to 3 days. To reheat, pop it back in the oven at 350°F (175°C) for about 10-15 minutes to crisp it up again.

3. Can I Freeze This Dish?

Yes! Once baked and cooled, you can freeze portions in an airtight container for up to 2 months. Reheat in the oven for the best texture.

4. Can I Use Sweet Potatoes Instead?

Definitely! Sweet potatoes add a slightly sweeter, earthier flavor and still crisp up beautifully.

5. What If I Don’t Have an Oven?

If you don’t have an oven, you can cook this on a stovetop in a well-oiled skillet over medium heat. Just press the mixture down and cook until crispy on both sides.

Final Thoughts: A Recipe Worth Keeping

This Grated Potato Bake is more than just a dish—it’s a warm, crispy, and nostalgic reminder of how food brings people together. Whether you’re making it for a cozy breakfast, a quick weeknight dinner, or a side dish for a special gathering, this recipe is one you’ll find yourself coming back to again and again.

The best part? You can make it your own, experiment with different flavors, and even turn it into a cherished family tradition—just like my grandmother did. So the next time you find yourself reaching for a frozen pizza or ordering takeout, try this instead. You won’t regret it.

Amal

Better Than Pizza! Why Grated Potato Bake Deserves a Spot on Your Table

Golden, crispy, and packed with flavor, this Grated Potato Bake is the ultimate comfort food. With simple ingredients like potatoes, carrots, and onions, this dish delivers the perfect balance of crispiness on the outside and tenderness inside. Whether served as a side dish, a light meal, or even for breakfast, this recipe is a delicious and satisfying alternative to traditional casseroles or pizza.
Prep Time 15 minutes
Cook Time 40 minutes
Total Time 55 minutes
Servings: 4 –6 servings
Course: Side Dish
Cuisine: International

Ingredients
  

  • 6 medium potatoes grated
  • 1 large carrot grated
  • 1 medium onion finely chopped
  • 5-6 fresh spring onions chopped
  • 3 large eggs
  • 2 tbsp vegetable oil plus extra for greasing
  • ½ cup grated cheese optional, for extra flavor
  • ½ tsp garlic powder optional
  • ½ tsp paprika optional
  • Salt and pepper to taste

Method
 

  1. Preheat the oven to 375°F (190°C). Grease a baking dish or ovenproof skillet with vegetable oil.
  2. Grate the potatoes and carrot, then use a clean kitchen towel or paper towels to squeeze out excess moisture. This ensures a crispy texture.
  3. In a large bowl, mix the grated potatoes, carrot, chopped onion, spring onions, eggs, and optional cheese. Season with salt, pepper, garlic powder, and paprika. Stir well to combine.
  4. Transfer the mixture into the greased baking dish, spreading it evenly. Press it down slightly to help it hold together.
  5. Bake for 30-40 minutes, or until the top is golden brown and crispy.
  6. Let it cool for a few minutes before slicing. Serve warm with your favorite dipping sauce, sour cream, or yogurt.

Notes

  • Crispier Edges: For extra crispiness, brush the top with a little oil before baking.
  • Make It Spicy: Add a pinch of chili flakes or cayenne pepper for a kick.
  • Cheese Lovers: Mix in shredded cheddar, mozzarella, or parmesan for a richer flavor.
  • Make Ahead: You can prepare the mixture in advance and refrigerate it for up to 24 hours before baking.
  • Storing Leftovers: Keep in an airtight container in the fridge for up to 3 days. Reheat in the oven for best results.

No More Store-Bought Bread! The Perfect Quick Bread Recipe

There’s something incredibly satisfying about baking your own bread. I still remember the first time I made a loaf from scratch—it wasn’t perfect, but the smell of fresh bread filling my kitchen was enough to convince me that I’d never go back to store-bought bread again.

Before that moment, bread was just another item on my grocery list, something I grabbed without much thought. But one day, I ran out of bread at home and didn’t feel like running to the store. I had flour, yeast, water, and salt—basic ingredients that seemed too simple to create something as essential as bread. But after mixing, kneading, and waiting patiently, I pulled a beautifully golden loaf out of the oven. It was soft inside, with a perfect crust, and the taste was unlike anything I had ever bought at the store.

Since then, baking bread has become more than just a way to save money—it’s a ritual, a moment of mindfulness in a busy world. The process of kneading dough, watching it rise, and finally slicing into a warm, homemade loaf brings a deep sense of satisfaction. Plus, knowing exactly what’s in my bread—no preservatives, no unnecessary additives—makes it even better.

If you’ve never made your own bread before, this recipe is the perfect place to start. It’s quick, simple, and requires only a few ingredients, yet the results will make you wonder why you ever bought bread in the first place.

Why You’ll Love This Bread Recipe

This quick and easy bread recipe is ideal for anyone looking to make fresh bread at home without the hassle of complex techniques. Here’s why it’s a must-try:

  • Simple Ingredients – Uses only five basic ingredients that you probably already have in your pantry.
  • No Special Equipment Needed – No need for a bread machine; just a bowl, an oven, and your hands.
  • Soft and Fluffy Inside, Crispy Outside – Achieves the perfect texture with minimal effort.
  • Quick Rising Time – Unlike traditional bread recipes that take hours to rise, this one is ready in about an hour.
  • No Artificial Preservatives – Just real, wholesome ingredients.

Ingredients

IngredientQuantity
Bread flour2 ½ cups (320 g)
Water¾ cup + 2 tbsp (210 ml)
Brewer’s yeast1 tsp (3 g) OR dry yeast: ½ tsp (2 g)
Sugar1 tsp
Salt1 tsp

Directions

  1. Activate the Yeast:
    • In a small bowl, mix warm water, sugar, and yeast. Let sit for 5-10 minutes until foamy.
  2. Mix the Dough:
    • In a large bowl, combine flour and salt.
    • Gradually add the yeast mixture, stirring until a dough forms.
  3. Knead & Rest:
    • Knead the dough for about 8-10 minutes until smooth and elastic.
    • Cover and let it rise for 1 hour, or until doubled in size.
  4. Shape & Bake:
    • Preheat the oven to 400°F (200°C).
    • Shape the dough into a loaf and place on a baking sheet.
    • Bake for 25-30 minutes until golden brown.
  5. Cool & Enjoy:
    • Let the bread cool before slicing. Serve warm or store for later!

Nutritional Information (Per Serving, Approx.)

NutrientAmount
Calories140 kcal
Carbohydrates28 g
Protein4 g
Fats0.5 g
Fiber1 g

The Secrets to Perfect Homemade Bread

While this is a straightforward recipe, a few key techniques can make all the difference in achieving the best loaf possible.

1. Using the Right Flour Matters

Bread flour contains more protein than all-purpose flour, which helps create a chewy and structured loaf. If you only have all-purpose flour, you can still make this bread, but the texture may be slightly softer.

2. Activate the Yeast Properly

Yeast is the heart of any bread recipe. To ensure it’s active, mix it with warm (not hot) water and sugar. If the yeast doesn’t foam up within 10 minutes, it may be expired or the water was too hot, killing the yeast.

3. Knead the Dough Until Smooth

Kneading develops the gluten, which gives the bread its structure and chewiness. You’ll know the dough is ready when it’s smooth, elastic, and slightly tacky but not sticky.

4. Let the Dough Rise in a Warm Place

Bread dough rises best in a warm environment, around 75-80°F (24-27°C). If your kitchen is too cold, place the dough in the oven with the light on or near a slightly warm stovetop.

5. Bake at the Right Temperature for the Perfect Crust

A high oven temperature (400°F/200°C) helps the bread develop a crispy crust while keeping the inside soft and airy. If you prefer an even crunchier crust, place a small pan of water in the oven while baking to create steam.

6. Let the Bread Cool Before Slicing

Resisting the urge to cut into fresh bread is hard, but letting it cool for at least 15-20 minutes prevents it from becoming gummy inside.

Ways to Enjoy Homemade Bread

This versatile bread can be used in countless ways:

  • As a Side for Soups & Stews – Nothing pairs better with a warm bowl of soup than a fresh slice of homemade bread.
  • For Sandwiches – Use it to make classic deli sandwiches, grilled cheese, or avocado toast.
  • To Dip in Olive Oil & Herbs – Serve with olive oil, balsamic vinegar, and herbs for a simple appetizer.
  • For Breakfast Toast – Top with jam, honey, or nut butter for a quick and satisfying breakfast.
  • As Garlic Bread – Toast slices with butter, garlic, and parsley for an irresistible side dish.

FAQs: Everything You Need to Know

1. Can I Use Instant Yeast Instead of Brewer’s or Dry Yeast?

Yes! Instant yeast can be added directly to the flour without proofing. Use the same quantity as dry yeast (½ tsp).

2. Can I Make This Bread Without Sugar?

Yes, but sugar helps activate the yeast and adds a subtle depth of flavor. If you prefer, you can replace it with honey or omit it altogether.

3. How Do I Store Homemade Bread?

Store it in a bread box or wrap it in a clean kitchen towel. Avoid plastic bags, as they can make the crust soggy. It will stay fresh for 2-3 days at room temperature.

4. Can I Freeze This Bread?

Yes! Slice it before freezing and store it in a freezer-safe bag. When ready to eat, toast or warm the slices in the oven.

5. Can I Add Other Ingredients to This Bread?

Absolutely! Add herbs, garlic, cheese, or even nuts and seeds for extra flavor and texture.

6. My Bread Didn’t Rise—What Went Wrong?

This could be due to expired yeast, water that was too hot or too cold, or not giving the dough enough time to rise. Always check your yeast before starting.

7. How Can I Make the Crust Softer?

For a softer crust, brush the top with melted butter as soon as it comes out of the oven.

8. Can I Use a Bread Machine for This Recipe?

Yes! Simply follow the instructions for your machine, adding the ingredients in the order recommended by the manufacturer.

9. Can I Make This Bread Gluten-Free?

You can try using a gluten-free bread flour blend, but the texture will be different as gluten-free flours don’t have the same elasticity.

10. What’s the Best Way to Reheat This Bread?

Toast slices in the oven at 350°F (175°C) for 5 minutes or microwave for 10-15 seconds for a softer texture.

Conclusion: A Simple Recipe That Changes the Way You Think About Bread

Making bread at home doesn’t have to be complicated or time-consuming. This recipe proves that with just a few ingredients and a little patience, you can create a fresh, delicious loaf that’s better than anything store-bought.

Once you experience the joy of homemade bread—the crispy crust, the soft and fluffy inside, and the satisfaction of knowing exactly what’s in it—you’ll never look at store-bought bread the same way again.

So next time you’re tempted to pick up a loaf from the grocery store, remember this recipe. With just a little effort, you can have warm, homemade bread that tastes like it came straight from a bakery—right in your own kitchen.

Amal

No More Store-Bought Bread! The Perfect Quick Bread Recipe

This quick and easy homemade bread is soft on the inside with a beautifully crisp crust. Made with just five simple ingredients, it requires minimal effort and delivers bakery-quality results. Whether you’re new to bread making or looking for a foolproof recipe, this is the perfect way to enjoy fresh, homemade bread without any hassle!
Prep Time 10 minutes
Cook Time 30 minutes
Total Time 1 hour 40 minutes
Servings: 6 -8 slices
Course: Bread
Cuisine: International

Ingredients
  

  • 2 ½ cups 320 g bread flour
  • ¾ cup + 2 tbsp 210 ml water
  • 1 tsp 3 g brewer’s yeast or ½ tsp (2 g) dry yeast
  • 1 tsp sugar
  • 1 tsp salt

Method
 

Activate the Yeast:
  1. In a small bowl, mix warm water, sugar, and yeast. Let it sit for 5-10 minutes until it becomes foamy.
Prepare the Dough:
  1. In a large bowl, combine the flour and salt.
  2. Gradually add the yeast mixture, stirring until a rough dough forms.
Knead & Let It Rise:
  1. Knead the dough for about 8-10 minutes until it becomes smooth and elastic.
  2. Cover and let it rise in a warm place for 1 hour or until doubled in size.
Shape & Bake:
  1. Preheat the oven to 400°F (200°C).
  2. Shape the dough into a loaf and place it on a baking sheet.
  3. Bake for 25-30 minutes until golden brown and crusty.
Cool & Serve:
  1. Let the bread cool for at least 15 minutes before slicing. Enjoy warm or store for later use!

Notes

  • For a crunchier crust: Place a small pan of water in the oven while baking to create steam.
  • Flour substitutes: All-purpose flour works, but bread flour gives a better texture.
  • Storage tips: Wrap in a kitchen towel and store at room temperature for up to 3 days.
  • Freezing option: Slice and freeze in an airtight bag for longer storage.

Fluffy Yogurt Pan Cakes – A Soft & Sweet Treat in 5 Minutes!

There’s something magical about transforming a few simple ingredients into a delicious treat. Some of the best recipes aren’t the ones that require fancy equipment or hours in the kitchen—they’re the ones that come together effortlessly, using ingredients you already have at home. This soft and fluffy yogurt pan cake recipe is exactly that.

I remember the first time I made these. It was one of those lazy afternoons when I craved something sweet but didn’t feel like preheating the oven or dealing with complicated steps. I had an egg, yogurt, flour, and a few other basic ingredients. Instead of making traditional pancakes or waiting for a cake to bake, I decided to experiment with a quick batter and cook it in a pan.

What came out of the pan was pure magic—fluffy, golden, and slightly crisp on the outside, yet incredibly soft on the inside. The hint of vanilla blended perfectly with the yogurt, creating a subtly sweet and comforting flavor. It reminded me of the simple treats my grandmother used to make, where love and creativity turned basic pantry staples into something special.

Now, whenever I need a quick dessert or an easy breakfast, I turn to this recipe. Whether you’re making it for yourself, serving it to family, or looking for a last-minute sweet fix, these yogurt pan cakes never disappoint.

Why You’ll Love This Recipe

This recipe is all about simplicity and flavor. Here’s why it’s a must-try:

  • No Oven Required – Perfect for hot days or when you don’t feel like baking.
  • Quick & Easy – Ready in just 5 minutes, making it ideal for busy mornings or late-night cravings.
  • Soft & Fluffy – The yogurt adds moisture, making these cakes incredibly tender.
  • Minimal Ingredients – Uses everyday pantry staples you likely already have.
  • Versatile – Can be enjoyed plain or with your favorite toppings.

Ingredients

IngredientQuantity
Egg1
Sugar3 tbsp (45 g)
Vanilla sugar1 sachet (8 g)
Oil3 tbsp (45 ml)
Yogurt125 g (½ cup)
Milk60 ml (¼ cup)
Flour190 g (1 ½ cups)
Baking powder10 g (2 tsp)

Directions

  1. Prepare the Batter:
    • In a bowl, whisk the egg, sugar, and vanilla sugar until well combined.
    • Add oil, yogurt, and milk, mixing until smooth.
    • Gradually add flour and baking powder, stirring until a thick batter forms.
  2. Cook the Cakes:
    • Heat a non-stick pan over medium-low heat and lightly grease with oil.
    • Pour small portions of batter into the pan, shaping them into mini cakes.
    • Cook for about 2-3 minutes per side, flipping when bubbles form on the surface, until golden brown.
  3. Serve & Enjoy:
    • Let cool slightly and serve warm. Enjoy plain or with honey, jam, or powdered sugar!

Nutritional Information (Per Serving, Approx.)

NutrientAmount
Calories150-180 kcal
Carbohydrates25 g
Protein4 g
Fats5 g
Sugar8 g

The Secret to Extra Soft & Fluffy Cakes

Even though this is an easy recipe, a few key tricks can make a big difference:

1. Use Room Temperature Ingredients

Cold ingredients can prevent the batter from mixing smoothly. Let the egg, yogurt, and milk sit at room temperature for a few minutes before using.

2. Don’t Overmix the Batter

Mix just until the ingredients are combined. Overmixing can make the cakes dense instead of fluffy.

3. Cook on Medium-Low Heat

Cooking at a lower temperature ensures the cakes cook through without burning the outside too quickly.

4. Let the Batter Rest for a Few Minutes

Allowing the batter to sit for 5 minutes before cooking helps the baking powder activate, making the cakes rise beautifully.

5. Use a Non-Stick Pan

A good non-stick pan ensures even cooking and prevents sticking, so you don’t need extra oil.

Ways to Enjoy Your Yogurt Pan Cakes

These soft cakes are delicious on their own, but you can take them to the next level with different toppings and pairings:

  • Drizzle with Honey or Maple Syrup – Adds a natural sweetness without overpowering the flavor.
  • Spread with Nut Butter – Peanut butter, almond butter, or hazelnut spread make a delicious topping.
  • Top with Fresh Fruit – Sliced bananas, strawberries, or blueberries add a refreshing twist.
  • Dust with Powdered Sugar – A simple yet elegant way to enhance their sweetness.
  • Serve with Yogurt or Whipped Cream – A creamy contrast to the fluffy texture.
  • Enjoy with a Cup of Coffee or Tea – A perfect pairing for a relaxing morning or afternoon treat.

FAQs: Everything You Need to Know

1. Can I Make These Without Yogurt?

Yes! You can replace yogurt with sour cream, buttermilk, or even mashed banana for a slightly different flavor and texture.

2. Can I Use Whole Wheat Flour Instead of All-Purpose Flour?

Yes, but the texture will be slightly denser. To keep them soft, you can use half whole wheat and half all-purpose flour.

3. Can I Make This Recipe Vegan?

Yes! Substitute the egg with a flax egg (1 tbsp ground flaxseed + 2.5 tbsp water), use plant-based yogurt, and swap dairy milk for almond, oat, or soy milk.

4. How Do I Store Leftovers?

These cakes taste best fresh, but you can store them in an airtight container in the refrigerator for up to 2 days. Reheat in a pan or microwave before serving.

5. Can I Freeze These?

Yes! Once cooled, place them in a freezer-safe bag with parchment paper between each layer. To reheat, microwave for 30 seconds or warm in a pan.

6. What Can I Use Instead of Vanilla Sugar?

If you don’t have vanilla sugar, use 1 tsp vanilla extract and an extra teaspoon of regular sugar.

7. Can I Make These in the Oven Instead?

Yes! Pour the batter into greased muffin cups and bake at 350°F (175°C) for 12-15 minutes.

8. Why Are My Cakes Not Fluffy?

This could be due to overmixing, using expired baking powder, or cooking at too high a heat. Following the tips above will ensure soft and fluffy cakes.

9. Can I Add Chocolate Chips or Nuts?

Absolutely! Fold in chocolate chips, chopped nuts, or dried fruit for extra texture and flavor.

10. Can I Make a Bigger Batch?

Yes! Simply double or triple the ingredients, and cook in batches to avoid overcrowding the pan.

Conclusion: A 5-Minute Recipe That Feels Like a Special Treat

This yogurt pan cake recipe proves that you don’t need an oven or complicated ingredients to create something delicious. In just a few minutes, with simple pantry staples, you can enjoy soft, fluffy, and slightly sweet cakes that are perfect for any time of the day.

Whether you’re looking for a quick breakfast, a satisfying snack, or an easy dessert, these cakes deliver on flavor, texture, and convenience. They’re proof that sometimes, the best recipes come from the simplest moments—when you mix a few ingredients, cook with love, and enjoy the warm, comforting taste of homemade goodness.

So the next time you have an egg, yogurt, and flour on hand, skip the oven and try this quick recipe. You’ll be amazed at how easy it is to create a delicious treat in just 5 minutes!

Amal

Fluffy Yogurt Pan Cakes – A Soft & Sweet Treat in 5 Minutes!

These soft and fluffy yogurt pan cakes are a quick and delicious treat made with simple pantry ingredients—no oven required! With a tender texture and a lightly sweet flavor, they are perfect for breakfast, a snack, or even dessert. Ready in just 5 minutes, these easy pan-fried cakes will become your new favorite go-to recipe!
Prep Time 5 minutes
Cook Time 5 minutes
Total Time 10 minutes
Servings: 6 -8 small cakes
Course: Breakfast
Cuisine: International

Ingredients
  

  • 1 egg
  • 3 tbsp sugar 45 g
  • 1 sachet 8 g vanilla sugar
  • 3 tbsp oil 45 ml
  • 125 g ½ cup yogurt
  • 60 ml ¼ cup milk
  • 190 g 1 ½ cups flour
  • 10 g 2 tsp baking powder

Method
 

Prepare the Batter:
  1. In a bowl, whisk together the egg, sugar, and vanilla sugar until well combined.
  2. Add the oil, yogurt, and milk, mixing until smooth.
  3. Gradually add the flour and baking powder, stirring gently until a thick batter forms.
Cook the Cakes:
  1. Heat a non-stick pan over medium-low heat and lightly grease with oil.
  2. Pour small portions of batter into the pan, forming round cakes.
  3. Cook for about 2-3 minutes on one side until bubbles form, then flip and cook for another 2 minutes until golden brown.
Serve & Enjoy:
  1. Let cool slightly and serve warm. Enjoy them plain or with honey, jam, or powdered sugar!

Notes

  • For extra softness: Let the batter rest for 5 minutes before cooking.
  • Flavor boost: Add cinnamon, lemon zest, or chocolate chips for variety.
  • Storage: Store leftovers in an airtight container in the fridge for up to 2 days or freeze for longer storage.
  • Reheating: Warm in a pan or microwave before serving.

Crispy Fried Tofu Balls – A Flavorful & Light Delight

Growing up, fried food was always a guilty pleasure. While I loved the crispy texture and deep flavors, I often hesitated to indulge, knowing how heavy and greasy it could be. That changed the day I discovered a way to make light, crispy, and absolutely delicious tofu balls without soaking them in oil.

It all started in my grandmother’s kitchen. She was a master of creating dishes that were both comforting and healthy. One day, I watched her prepare tofu balls—not by deep-frying them in a vat of oil but by using a clever technique to retain crispiness while keeping them light. Instead of submerging them in oil, she lightly pan-fried them with just a thin layer of infused oil, allowing the natural flavors of the tofu, pork, and spices to shine through.

The result? A beautifully crisp exterior with a soft, juicy interior bursting with umami. Each bite was packed with rich, aromatic spices, the warmth of Sichuan peppercorns, and the subtle crunch of breadcrumbs. From that moment on, fried food was no longer a guilty pleasure—it was a dish I could enjoy without the heaviness.

Now, this recipe is a staple in my kitchen, perfect for serving as an appetizer, side dish, or even a protein-packed snack. If you love crispy food but want a lighter, more flavorful alternative to deep-fried dishes, these tofu balls are the perfect solution.

Why You’ll Love These Fried Tofu Balls

If you think fried food always means greasy, heavy meals, this recipe will prove you wrong. These tofu balls are:

  • Crispy Yet Light – Achieves a crunchy exterior with just a small amount of oil.
  • Packed with Flavor – The combination of Sichuan peppercorns, ginger, and soy sauce gives them an irresistible umami depth.
  • High in Protein – Tofu and minced pork create a balanced protein-packed dish.
  • Versatile & Customizable – Perfect as a snack, side dish, or even a main meal with rice.
  • Easy to Make – No deep fryer required, just a pan and a few simple steps.

Ingredients

IngredientQuantity
Old tofu1 pound (450 g)
Eggs2
Ginger1 piece, thinly sliced
Green onions2, chopped
Star anise3-4
Sichuan peppercorns1 small handful
Carrot1 medium, finely diced
Pork belly300 g (10.5 oz), minced
Bread crumbs30 g (2 tbsp)
Crispy meat powder30 g (2 tbsp) (or substitute with more bread crumbs)
Light soy sauce1 tbsp
Salt1 tsp
Pepper½ tsp
Cooking oil30 g (2 tbsp) for frying

Directions

  1. Prepare the Tofu:
    • Drain the tofu and pat dry. Mash it until smooth.
  2. Sauté the Aromatics:
    • Heat a small pan with a bit of oil. Lightly fry the ginger, green onions, star anise, and Sichuan peppercorns to release their fragrance. Remove the spices and keep the flavored oil.
  3. Mix the Filling:
    • In a bowl, combine the mashed tofu, minced pork belly, diced carrot, bread crumbs, crispy meat powder, eggs, soy sauce, salt, and pepper. Mix until well incorporated.
  4. Shape the Balls:
    • With wet hands, roll the mixture into small balls.
  5. Fry to Perfection:
    • Heat the reserved flavored oil in a pan. Fry the tofu balls over medium heat, turning occasionally, until golden brown and crispy.
  6. Serve & Enjoy:
    • Serve hot with a dipping sauce of your choice or alongside steamed rice.

Nutritional Information (Per Serving, Approx.)

NutrientAmount
Calories180-220 kcal
Carbohydrates10 g
Protein12 g
Fats10 g
Fiber2 g

The Secret to Crispy, Oil-Free Tofu Balls

1. Draining the Tofu Properly

Tofu naturally holds a lot of water, which can make the mixture too soft and prevent it from getting crispy. The key is to drain the tofu thoroughly before mashing it. Pressing out the excess liquid ensures that the balls hold their shape and achieve the perfect texture when fried.

2. Using Infused Oil Instead of Deep Frying

Instead of deep-frying, this recipe uses a small amount of oil that has been infused with ginger, star anise, and Sichuan peppercorns. This enhances the flavor while keeping the dish light.

3. The Right Ratio of Ingredients

The combination of mashed tofu, minced pork, and breadcrumbs provides the perfect balance between moisture and structure. If the mixture is too wet, add more breadcrumbs to bind it. If it’s too dry, a little more soy sauce or an extra egg can help.

4. Cooking at Medium Heat for Even Crispiness

Cooking the tofu balls over medium heat allows them to develop a crispy crust without burning. If the heat is too high, the outside will brown too quickly while the inside remains undercooked.

5. Letting the Tofu Balls Rest After Cooking

Resting the cooked tofu balls for a few minutes before serving helps redistribute the juices inside, keeping them moist and flavorful.

How to Serve Fried Tofu Balls

These crispy tofu balls are incredibly versatile. Here are a few delicious ways to enjoy them:

  • As an Appetizer – Serve with a dipping sauce like soy sauce with a splash of vinegar, chili oil, or garlic aioli.
  • With Rice or Noodles – Pair with steamed rice or toss into a noodle bowl for a hearty meal.
  • In a Wrap or Pita – Use them as a protein-packed filling in wraps, adding lettuce, cucumbers, and a drizzle of spicy mayo.
  • Topped with a Sweet & Spicy Glaze – Drizzle with honey sriracha or teriyaki sauce for an extra flavor boost.
  • As a Snack – Enjoy them on their own as a delicious, protein-rich snack.

FAQs: Everything You Need to Know

1. Can I Make These Tofu Balls Without Meat?

Yes! You can replace the minced pork with finely chopped mushrooms or additional tofu for a vegetarian version. Adding extra breadcrumbs or a flaxseed egg (1 tablespoon ground flax + 2.5 tablespoons water) helps with binding.

2. Can I Bake These Instead of Frying?

Absolutely! Bake at 375°F (190°C) for about 20-25 minutes, flipping halfway through, until golden brown and crispy.

3. What Type of Tofu Works Best for This Recipe?

Firm or extra-firm tofu is ideal, as it holds its shape better when mashed. Silken tofu is too soft and will not create the right consistency.

4. How Do I Store and Reheat Leftovers?

Store leftovers in an airtight container in the refrigerator for up to 3 days. Reheat them in a pan over medium heat or in an air fryer at 350°F (175°C) for a few minutes to regain crispiness.

5. Can I Freeze These Tofu Balls?

Yes! After shaping the balls, place them on a baking sheet and freeze until solid. Transfer to a freezer bag and store for up to a month. Cook them straight from frozen, adding a few extra minutes to the cooking time.

6. What Can I Use Instead of Sichuan Peppercorns?

If you don’t have Sichuan peppercorns, you can substitute with black pepper or a pinch of ground cumin for a slightly different but still delicious flavor.

7. Can I Use Another Type of Protein?

Yes! Ground chicken or turkey can replace pork for a leaner option while maintaining great flavor.

8. What’s the Best Dipping Sauce for These Tofu Balls?

Soy sauce with a touch of sesame oil, spicy chili crisp, hoisin sauce, or a garlic yogurt dip all pair wonderfully with these crispy bites.

9. Can I Make the Mixture in Advance?

Yes! You can prepare the tofu mixture a day in advance, store it in the fridge, and shape and cook the balls when ready to serve.

10. Why Are My Tofu Balls Falling Apart?

This usually happens if there’s too much moisture. Ensure the tofu is well-drained and add extra breadcrumbs if needed to bind the mixture together.

Conclusion: The Perfect Balance of Crispy and Light

These crispy fried tofu balls prove that you don’t need deep frying to enjoy an irresistibly crunchy texture. By using infused oil and a clever combination of ingredients, this dish achieves the perfect balance between crispiness and lightness.

Whether you’re looking for a new way to enjoy tofu, a protein-packed snack, or a dish that’s bursting with umami flavors, these tofu balls won’t disappoint. They’re easy to make, incredibly versatile, and guaranteed to become a new favorite in your kitchen.

So, the next time you’re craving something crispy and delicious, skip the deep fryer and try this lighter, flavor-packed alternative—you just might find yourself making them again and again!

Amal

Crispy Fried Tofu Balls – A Flavorful & Light Delight

These crispy fried tofu balls are a perfect balance of crunchy on the outside and tender on the inside. Infused with aromatic spices and packed with protein, they make a delicious snack, appetizer, or main dish. Made with tofu, minced pork, and a blend of flavorful seasonings, these bites are a healthier take on fried food—without the excess oil.
Prep Time 15 minutes
Cook Time 15 minutes
Total Time 30 minutes
Servings: 4 –6 servings
Course: Snack
Cuisine: Asian-inspired

Ingredients
  

  • 1 pound 450 g old tofu, drained and mashed
  • 2 eggs
  • 1 piece ginger thinly sliced
  • 2 green onions chopped
  • 3-4 star anise
  • 1 small handful Sichuan peppercorns
  • 1 medium carrot finely diced
  • 300 g 10.5 oz pork belly, minced
  • 30 g 2 tbsp bread crumbs
  • 30 g 2 tbsp crispy meat powder (or substitute with more bread crumbs)
  • 1 tbsp light soy sauce
  • 1 tsp salt
  • ½ tsp pepper
  • 30 g 2 tbsp cooking oil for frying

Method
 

Prepare the Tofu:
  1. Drain excess water from the tofu and mash it in a bowl until smooth.
Infuse the Oil:
  1. Heat 1 tbsp of oil in a pan and lightly fry ginger, green onions, star anise, and Sichuan peppercorns until fragrant. Remove the spices and keep the infused oil.
Mix the Ingredients:
  1. In a large bowl, combine mashed tofu, minced pork, diced carrot, eggs, bread crumbs, crispy meat powder, soy sauce, salt, and pepper.
  2. Add the infused oil and mix everything well until a thick paste forms.
Shape the Balls:
  1. Using wet hands, form small balls from the mixture and set aside.
Cook the Tofu Balls:
  1. Heat the remaining oil in a pan over medium heat.
  2. Place the tofu balls in the pan and cook, turning occasionally, until golden brown on all sides.
Serve & Enjoy:
  1. Let them rest for a few minutes before serving. Enjoy on their own or with a dipping sauce of choice.

Notes

  • For extra crispiness: Let the tofu balls rest for 5 minutes before serving to retain their crunch.
  • Baking option: Bake at 375°F (190°C) for 20-25 minutes, flipping halfway through.
  • Storage: Store leftovers in an airtight container in the fridge for up to 3 days. Reheat in a pan or oven.
  • Serving suggestion: Serve with soy sauce, chili oil, or a garlic yogurt dip for added flavor.

No-Bake Chocolate Peanut Delights – A Quick and Irresistible Treat

Some of the best recipes aren’t found in fancy cookbooks or passed down from generations—they’re discovered in the simplest moments. I remember the first time I made these no-bake chocolate peanut delights. It was a rushed evening, and I was craving something sweet but didn’t have the time (or patience) to wait for a baked dessert. I rummaged through my pantry, pulled out a few basic ingredients—cookies, cocoa, peanuts, and butter—and within minutes, I had a batch of rich, chocolatey treats that tasted like pure indulgence.

These no-bake chocolate peanut delights have since become a staple in my home. Whether it’s a last-minute treat for unexpected guests, a quick snack for a family movie night, or a nostalgic bite when I need comfort, this recipe never fails. The best part? There’s no need for an oven, and the entire process takes just a few minutes.

If you love desserts that are effortless yet full of flavor, these chocolate peanut delights will soon be your new favorite treat.

Why You’ll Love This Recipe

This no-bake dessert is more than just quick and easy—it’s an absolute crowd-pleaser. Here’s why it’s worth trying:

  • No Oven Needed – Perfect for warm days or when you don’t want to heat up the kitchen.
  • Quick & Easy – Ready in just a few minutes with minimal prep.
  • Crunchy & Chocolatey – The combination of cookies, peanuts, and cocoa gives it the perfect texture.
  • Customizable – Adjust the sweetness, switch up the nuts, or add dried fruit for a personalized touch.
  • Great for Any Occasion – Serve as a snack, dessert, or even a homemade gift.

Ingredients

IngredientQuantity
Cookies (crushed)500 g
Peanuts (chopped)120 g
Sugar120 g
Cocoa powder60 g
Milk250 ml
Butter150 g

Directions

  1. Prepare the Base:
    • In a large bowl, mix the crushed cookies and chopped peanuts.
  2. Make the Chocolate Mixture:
    • In a saucepan over medium heat, combine milk, sugar, cocoa powder, and butter.
    • Stir continuously until the butter melts and the mixture becomes smooth. Remove from heat.
  3. Combine & Shape:
    • Pour the chocolate mixture over the cookie and peanut mixture. Stir until everything is well coated.
    • Shape into small bite-sized balls or press the mixture into a lined baking dish.
  4. Chill & Serve:
    • Refrigerate for at least 30 minutes until firm.
    • Serve as is or dust with cocoa powder or powdered sugar for extra flavor!

Nutritional Information (Per Serving, Approx.)

NutrientAmount
Calories180-220 kcal
Carbohydrates25 g
Protein4 g
Fats10 g
Sugar12 g

The Secret to the Perfect No-Bake Chocolate Peanut Delights

Even though this recipe is incredibly simple, a few key tips can help you achieve the best results.

1. Use Good-Quality Cocoa Powder

Since cocoa is the main flavor, using a high-quality unsweetened cocoa powder makes a huge difference. It enhances the richness and depth of the chocolate taste.

2. Choose the Right Cookies

For the best texture, use crisp cookies that can be crushed into small pieces without becoming powdery. Digestive biscuits, vanilla wafers, or graham crackers work well.

3. Balance the Sweetness

If you prefer a less sweet treat, reduce the sugar slightly or use dark chocolate instead of cocoa powder. The natural saltiness from the peanuts also helps balance out the sweetness.

4. Let Them Set Properly

While you can enjoy these right away, chilling them for at least 30 minutes helps them firm up and develop a better texture.

5. Experiment with Add-Ins

Feel free to get creative with additional ingredients like shredded coconut, raisins, or a drizzle of melted chocolate on top for extra indulgence.

How to Serve and Enjoy These No-Bake Treats

These chocolate peanut delights are versatile and can be enjoyed in different ways:

  • With Coffee or Tea – The perfect sweet treat alongside your favorite warm drink.
  • As a Party Snack – Arrange them on a dessert platter for an easy, crowd-pleasing option.
  • Topped with Ice Cream – Serve with a scoop of vanilla ice cream for an extra decadent dessert.
  • With a Dusting of Powdered Sugar or Cocoa – Adds a touch of elegance to these simple treats.
  • As a Homemade Gift – Pack them in a decorative box for a thoughtful, delicious present.

FAQs: Everything You Need to Know

1. Can I Use a Different Type of Nut?

Yes! While peanuts add a delicious crunch, you can substitute them with almonds, walnuts, hazelnuts, or even cashews.

2. Can I Make This Recipe Vegan?

Absolutely! Simply replace the butter with coconut oil or a plant-based alternative, and use a dairy-free cookie base.

3. How Should I Store These Treats?

Store them in an airtight container in the refrigerator for up to a week. For longer storage, freeze them and thaw when ready to eat.

4. Can I Make This Without Peanuts?

Yes! If you have a nut allergy or prefer a different texture, you can substitute the peanuts with seeds like sunflower or pumpkin seeds.

5. What Can I Use Instead of Sugar?

For a healthier alternative, you can replace white sugar with honey, maple syrup, or a sugar substitute like stevia.

6. Can I Add Chocolate Chips Instead of Cocoa Powder?

Yes! Melted dark chocolate or chocolate chips can be mixed into the cookie-peanut mixture for an even richer flavor.

7. Do These Treats Melt at Room Temperature?

They hold their shape well but can become slightly soft if left out in warm conditions. For best results, keep them refrigerated until serving.

8. Can Kids Help Make These?

Definitely! This is a fun, hands-on recipe that kids can help with since there’s no need for an oven or sharp tools.

9. Can I Make This in a Mold or Pan Instead of Shaping Balls?

Yes! You can press the mixture into a lined baking dish, let it set, and then cut it into squares or bars.

10. How Do I Make This Recipe More Chocolatey?

For a richer chocolate taste, add a tablespoon of melted dark chocolate or an extra teaspoon of cocoa powder to the mix.

Conclusion: A Quick Treat That Never Disappoints

No-bake desserts are a lifesaver when you’re short on time but still want something delicious. These chocolate peanut delights prove that you don’t need fancy techniques or hours of preparation to create something truly satisfying.

With their perfect crunch, rich chocolate flavor, and effortless preparation, they’re ideal for any occasion—whether it’s a solo indulgence, a family snack, or a sweet gift for someone special.

So, the next time you’re craving something sweet, skip the oven and try these no-bake treats. You might just find yourself making them twice a week!

Amal

No-Bake Chocolate Peanut Delights – A Quick and Irresistible Treat

These no-bake chocolate peanut delights are rich, crunchy, and packed with chocolatey goodness. Made with simple pantry staples like cookies, peanuts, cocoa, and butter, they come together in just minutes—no oven required! Perfect for a quick snack, a party treat, or a homemade gift, these chocolate delights will satisfy your sweet tooth in no time.
Prep Time 10 minutes
Cook Time 5 minutes
Total Time 45 minutes
Servings: 12 -15 pieces
Course: Dessert
Cuisine: International

Ingredients
  

  • 500 g cookies crushed
  • 120 g peanuts chopped
  • 120 g sugar
  • 60 g cocoa powder
  • 250 ml milk
  • 150 g butter

Method
 

Prepare the Base:
  1. In a large bowl, mix the crushed cookies and chopped peanuts.
Make the Chocolate Mixture:
  1. In a saucepan over medium heat, combine milk, sugar, cocoa powder, and butter.
  2. Stir continuously until the mixture is smooth and well combined. Remove from heat.
Combine & Shape:
  1. Pour the warm chocolate mixture over the cookie-peanut mixture. Stir until evenly coated.
  2. Shape into small bite-sized balls or press the mixture into a lined baking dish.
Chill & Serve:
  1. Refrigerate for at least 30 minutes until firm.
  2. Serve as is, or dust with cocoa powder or powdered sugar for extra flavor.

Notes

  • For a richer taste: Use dark chocolate or add a splash of vanilla extract.
  • Nut-free option: Substitute peanuts with seeds or crushed pretzels for crunch.
  • Storage: Keep refrigerated in an airtight container for up to a week.
  • Customization: Try adding coconut flakes, dried fruit, or a drizzle of melted chocolate on top.