The Dinner That Conquered the World: Irresistible Tornado Potatoes

I still remember the first time I saw a tornado potato at a street food stall. The golden spirals, perfectly crispy and coated in seasoning, instantly caught my attention. It was mesmerizing—the way the vendor skillfully cut the potato into a perfect swirl, coated it in spices, and deep-fried it to perfection. That first bite? Pure magic. Crispy on the outside, tender on the inside, and packed with just the right amount of seasoning.

That moment stayed with me, and years later, I found myself recreating those same tornado potatoes at home, giving them my own personal twist. Instead of deep-frying, I opted for oven-roasting, creating a healthier yet equally delicious version. By adding Parmesan cheese, garlic, and a crunchy panko coating, I transformed this classic street snack into an irresistible dish that works as both a fun appetizer and a stunning side for any meal.

Tornado potatoes are more than just a viral food trend—they are a celebration of everything we love about potatoes. They are crispy, flavorful, and incredibly fun to eat. Whether you’re making them for a family dinner, a gathering with friends, or just to indulge yourself, this dish is bound to become a favorite.

Why You’ll Love This Recipe

1. The Perfect Balance of Crunch and Flavor

Tornado potatoes are a textural masterpiece. The outside crisps up beautifully thanks to the panko breadcrumbs and Parmesan, while the inside remains soft and fluffy. The combination of garlic, paprika, and black pepper gives them a smoky, slightly spicy kick that enhances their natural flavor.

2. A Fun and Impressive Dish

Let’s be honest—food that looks this cool is always a hit. Whether you’re making them for kids, guests, or just yourself, these potatoes add a playful and visually striking element to the table. The spiral shape ensures even cooking, making every bite as good as the last.

3. Healthier Than Fried Versions

Unlike the classic deep-fried tornado potatoes you see at festivals, this version is baked with olive oil, making it a lighter alternative. You still get that crave-worthy crunch, but without the extra grease.

4. Budget-Friendly and Easy to Make

Potatoes are one of the most affordable ingredients, and this recipe requires only a handful of pantry staples. With minimal effort, you can create a dish that tastes gourmet without breaking the bank.

5. Customizable to Suit Any Taste

The beauty of tornado potatoes is their versatility. You can switch up the seasoning to match different cuisines—think spicy Cajun, Italian herbs, or even a sweet-and-savory version with cinnamon and brown sugar.

Ingredients

IngredientQuantity
Yellow potatoes4
Panko breadcrumbs60g
Salt1 teaspoon
Black pepper1/2 teaspoon
Paprika1 teaspoon
Garlic powder1/2 teaspoon
Parmesan cheese30g
Olive oil50g
Garlic cloves4
Parsley (for garnish)As needed

Directions

1. Prepare the Potatoes

  • Wash and dry the potatoes thoroughly.
  • Insert a wooden skewer through the center of each potato lengthwise.
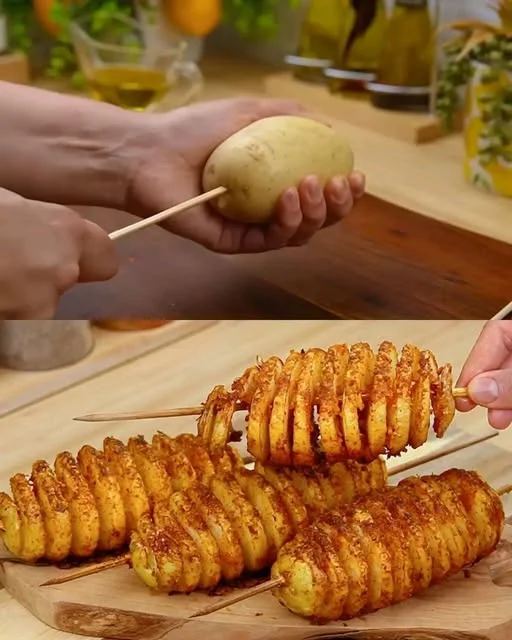
  • Using a sharp knife, carefully slice the potato in a spiral motion while rotating it. Gently pull the layers apart to create the signature tornado effect.

2. Season and Coat

  • In a small bowl, mix the panko breadcrumbs, salt, black pepper, paprika, garlic powder, and grated Parmesan cheese.
  • Brush each potato spiral generously with olive oil, ensuring even coverage.
  • Roll the potatoes in the seasoned breadcrumb mixture, pressing gently to help it stick.

3. Roast to Perfection

  • Preheat your oven to 200°C (400°F).
  • Place the tornado potatoes on a baking tray lined with parchment paper.
  • Smash the garlic cloves and scatter them around the tray for extra flavor.
  • Bake for 30–40 minutes, turning occasionally, until golden brown and crispy.

4. Serve and Enjoy

  • Garnish with freshly chopped parsley for a vibrant finish.
  • Serve hot with your favorite dipping sauce or alongside a main dish.

Nutritional Information (Per Serving, Approximate)

NutrientAmount
Calories280–320 kcal
Protein6–8g
Fat15–18g
Carbohydrates35–40g
Fiber4–5g

FAQs: Everything You Need to Know About Tornado Potatoes

What Type of Potatoes Work Best?

For the best results, use yellow or Yukon Gold potatoes. They have a naturally creamy texture that balances well with the crispy exterior. Russet potatoes can also work, but they tend to be drier, so brushing them generously with olive oil is key.

How Do I Get the Perfect Spiral Shape?

The trick is to insert a wooden skewer lengthwise through the potato and slowly rotate it while slicing at an angle with a sharp knife. If you’re struggling, you can also use a spiralizer for a more uniform shape.

Can I Make These Without Panko Breadcrumbs?

Yes! While panko breadcrumbs add an extra layer of crunch, you can use finely grated Parmesan alone for a cheesier, crispier finish. Alternatively, crushed cornflakes or regular breadcrumbs can be used as substitutes.

What Other Seasoning Options Can I Try?

The classic combination of garlic, paprika, salt, and pepper is always a winner, but here are some variations:

  • Spicy Kick: Add cayenne pepper or chili powder for extra heat.
  • Herb Infused: Mix in dried oregano, thyme, or rosemary for a Mediterranean twist.
  • Cheesy Delight: Use a blend of Parmesan, cheddar, and a touch of smoked gouda for an ultra-cheesy flavor.
  • Sweet & Savory: Try cinnamon and a touch of honey for a unique flavor profile.

How Do I Know When They’re Done?

Tornado potatoes are ready when they are golden brown, crispy on the edges, and tender in the center. This usually takes about 30–40 minutes in the oven at 200°C (400°F).

Can I Make These in an Air Fryer?

Yes! Air frying is a fantastic alternative to baking. Cook at 180°C (360°F) for about 20–25 minutes, turning occasionally for even crispiness.

What’s the Best Way to Serve Tornado Potatoes?

These potatoes are fantastic on their own, but they shine even brighter when paired with the right dipping sauces. Some favorites include:

  • Garlic aioli for a creamy, tangy balance
  • Spicy sriracha mayo for a kick of heat
  • Honey mustard for a sweet and savory combo
  • Classic ketchup or ranch dressing for a familiar favorite

Can I Store and Reheat Leftovers?

While tornado potatoes are best enjoyed fresh, you can store leftovers in an airtight container in the fridge for up to 2 days. To reheat, place them in the oven at 180°C (350°F) for 10–15 minutes to crisp them back up.

The Magic of Potatoes: A Dish That Brings People Together

There’s a reason why potatoes are loved worldwide. They are humble, versatile, and endlessly comforting. Tornado potatoes take this everyday staple and turn it into something truly special—crispy, cheesy, and packed with flavor.

Whether you’re making them for a cozy night in, a weekend gathering, or just to treat yourself to something delicious, this recipe delivers on all fronts. It’s proof that sometimes, the simplest ingredients can create the most unforgettable dishes.

So grab a skewer, twist up some potatoes, and experience the magic of homemade tornado potatoes. One bite, and you’ll see why this dish has conquered hearts (and dinner tables) around the world.

Would you like more creative variations or dipping sauce suggestions? Let me know how you customize your tornado potatoes!

Amal

The Dinner That Conquered the World: Irresistible Tornado Potatoes

These crispy, cheesy tornado potatoes are a game-changer! Coated in a seasoned panko-Parmesan crust and roasted to perfection, they offer the perfect balance of crunch and tenderness. Whether you’re serving them as a fun appetizer, a snack, or a side dish, this easy recipe is sure to impress. No deep frying needed—just pure, golden perfection straight from the oven!
Prep Time 20 minutes
Cook Time 35 minutes
Total Time 55 minutes
Servings: 4 servings
Course: Snack
Cuisine: International

Ingredients
  

  • 4 yellow potatoes
  • 60 g panko breadcrumbs
  • 1 teaspoon salt
  • 1/2 teaspoon black pepper
  • 1 teaspoon paprika
  • 1/2 teaspoon garlic powder
  • 30 g Parmesan cheese grated
  • 50 g olive oil
  • 4 cloves of garlic smashed
  • Parsley for garnish

Method
 

  1. Prepare the Potatoes: Wash and dry the potatoes. Insert a wooden skewer lengthwise through each potato. Using a sharp knife, carefully cut the potato in a spiral motion while slowly rotating it. Gently stretch the layers apart to create the tornado shape.
  2. Make the Coating: In a small bowl, mix the panko breadcrumbs, salt, black pepper, paprika, garlic powder, and Parmesan cheese.
  3. Coat the Potatoes: Brush the potatoes generously with olive oil, ensuring all sides are coated. Roll them in the seasoned breadcrumb mixture, pressing gently so it sticks.
  4. Bake to Crispy Perfection: Preheat the oven to 200°C (400°F). Place the potatoes on a baking sheet lined with parchment paper. Scatter the smashed garlic cloves around the tray for added flavor. Bake for 30–40 minutes, turning occasionally, until golden and crispy.
  5. Garnish and Serve: Remove from the oven, sprinkle with fresh parsley, and serve hot with your favorite dipping sauces.

Notes

  • For an air fryer version, cook at 180°C (360°F) for 20–25 minutes, flipping halfway.
  • For extra crispiness, broil the potatoes for the last 2–3 minutes of baking.
  • Try different seasonings like chili powder for heat or Italian herbs for a Mediterranean twist.

The Ultimate Cheesy Eggplant Bake – A Comforting Twist on a Classic Dish

There’s something about the aroma of eggplants sizzling in olive oil that takes me right back to my grandmother’s kitchen. I can still hear the soft crackle of the frying pan, the scent of garlic warming in the background, and the comforting sight of her carefully layering eggplants with rich tomato sauce and gooey cheese. It wasn’t just about the food—it was about the love poured into every step, the laughter shared over the dinner table, and the way a simple dish could bring everyone together.

Eggplant parmigiana is a classic, but this version takes it to another level. Instead of the traditional breading and frying method, this dish lets the natural creaminess of eggplants shine, complemented by the perfect balance of sweet cherry tomatoes, fragrant basil, and melty cheese. It’s an easy, budget-friendly recipe that doesn’t skimp on flavor, making it ideal for weeknight dinners, special occasions, or those moments when you just need a plate of something warm and comforting.

Why This Recipe Works

1. Simple Ingredients, Big Flavor

One of the best things about this dish is its reliance on fresh, simple ingredients. Eggplants provide a hearty, almost meaty texture, while cherry tomatoes bring natural sweetness. The combination of scamorza cheese and Parmesan creates a deliciously gooey and slightly smoky flavor. Add in olive oil, garlic, and fresh basil, and you’ve got a dish that tastes like it came straight from a rustic Italian kitchen.

2. No Breading, No Problem

Unlike traditional eggplant parmigiana, which involves breading and deep-frying, this recipe skips that step in favor of a lighter approach. The eggplants are simply pan-fried, allowing them to soak up the rich flavors of olive oil without becoming overly heavy. This not only makes the dish easier to prepare but also highlights the natural taste of the ingredients.

3. Perfect for Any Occasion

This cheesy eggplant bake works beautifully as a main course, a side dish, or even a meatless alternative for gatherings. It’s also an excellent way to use up leftover eggplants and cheese, reducing food waste while creating something truly delicious.

Ingredients

IngredientQuantity
Eggplants3
Cherry tomatoes200 g (7 oz)
Fresh basilHandful
Garlic clove1
Olive oilGenerous amount
Scamorza (or other melty cheese)1
Parmesan cheeseTo taste
Salt & pepperTo taste

Instructions

1. Prepare the Eggplants

  • Wash and slice the eggplants into 1 cm thick rounds or strips.
  • Sprinkle them with salt and let them sit for 20–30 minutes to draw out excess moisture and bitterness.
  • Rinse and pat dry with a paper towel.

2. Fry Until Golden

  • Heat a good amount of olive oil in a large pan over medium heat.
  • Fry the eggplant slices until golden brown on both sides.
  • Transfer to a plate lined with paper towels to absorb excess oil.

3. Make the Tomato Sauce

  • In the same pan, add a little more olive oil and sauté the garlic until fragrant.
  • Add the halved cherry tomatoes and cook until soft and slightly caramelized.
  • Season with salt and pepper, then mix in fresh basil for extra flavor.

4. Assemble the Layers

  • Preheat your oven to 200°C (400°F).
  • In a baking dish, layer the fried eggplants, spoonfuls of tomato sauce, slices of scamorza, and a sprinkle of Parmesan.
  • Repeat until all ingredients are used, finishing with a cheese and Parmesan topping.

5. Bake and Serve

  • Bake for 15–20 minutes, or until the cheese is melted and bubbling with a golden crust.
  • Let it rest for a few minutes before serving.

Nutritional Information (Per Serving, Approximate)

NutrientAmount
Calories350–400 kcal
Protein12–15 g
Fat28–32 g
Carbohydrates15–20 g
Fiber5–7 g

FAQs: Everything You Need to Know

What Type of Eggplant Works Best?

For the best texture and flavor, use firm, fresh eggplants with smooth skin. Italian or globe eggplants are ideal, as they have a rich, creamy texture when cooked. If you prefer a milder taste, you can opt for Japanese or Chinese eggplants, which are naturally less bitter.

How Do You Prevent Eggplants from Being Bitter?

Eggplants can sometimes have a slight bitterness, especially if they are larger or slightly overripe. To reduce this, sprinkle salt on the sliced eggplants and let them sit for about 20–30 minutes before cooking. This draws out excess moisture and helps mellow any bitterness. Rinse them under running water and pat dry before using.

Can I Make This Recipe Ahead of Time?

Absolutely! This dish actually tastes even better the next day, as the flavors have more time to meld together. You can prepare it in advance, store it in the refrigerator, and simply reheat it in the oven before serving.

What’s the Best Cheese Substitute for Scamorza?

Scamorza has a mild, slightly smoky flavor and melts beautifully, but if you can’t find it, mozzarella, provolone, or even a mix of cheddar and gouda can work well. For a sharper taste, try fontina or taleggio.

Can I Bake the Eggplants Instead of Frying Them?

Yes! If you prefer a healthier alternative, you can roast the eggplant slices instead of pan-frying them. Simply brush them with olive oil and bake at 200°C (400°F) for about 20 minutes, flipping halfway through, until they are tender and slightly golden.

Is This Dish Freezer-Friendly?

While it’s best enjoyed fresh, you can freeze leftovers for up to a month. To reheat, let the dish thaw in the refrigerator overnight, then warm it up in the oven at 180°C (350°F) until heated through.

What Can I Serve With This Dish?

This eggplant bake pairs beautifully with:

  • Crusty bread to soak up the sauce
  • A fresh green salad for a refreshing contrast
  • Pasta or rice for a heartier meal
  • Grilled meats or fish if you want to add some protein

Health Benefits of Eggplants

Eggplants aren’t just delicious—they’re packed with nutrients and health benefits:

  • Rich in Antioxidants: Eggplants contain anthocyanins, which help protect cells from damage and support heart health.
  • Good for Digestion: High in fiber, eggplants promote gut health and keep digestion running smoothly.
  • Low in Calories, High in Nutrients: This makes them a fantastic choice for those looking to enjoy hearty meals without excessive calories.
  • Supports Heart Health: The combination of fiber, potassium, and antioxidants helps maintain healthy blood pressure levels.

By pairing eggplants with olive oil, tomatoes, and cheese, this recipe creates a well-balanced dish full of essential nutrients while delivering indulgent flavors.

The Magic of Italian Comfort Food

There’s something incredibly comforting about a dish that brings together simple, fresh ingredients in a way that feels both indulgent and nourishing. This cheesy eggplant bake is one of those recipes that can turn an ordinary evening into a special occasion, reminding us of the joy that comes from good food and good company.

Whether you’re making this as a cozy dinner for yourself or sharing it with family and friends, one thing is certain—it will disappear quickly. So pour yourself a glass of wine, grab a fork, and savor every bite.

Would you like to experiment with different cheeses or add a personal twist to the recipe? Let us know how you make this dish your own!

Amal

The Ultimate Cheesy Eggplant Bake – A Comforting Twist on a Classic Dish

This Cheesy Eggplant Bake is a rich and satisfying dish that’s even better than traditional eggplant parmigiana. With layers of pan-fried eggplant, sweet cherry tomatoes, fresh basil, and gooey cheese, this recipe is packed with bold Mediterranean flavors. It’s easy to prepare, requires minimal ingredients, and is perfect for a comforting meal. Whether you’re serving it as a main dish or a side, it’s guaranteed to impress!
Prep Time 30 minutes
Cook Time 30 minutes
Total Time 1 hour
Servings: 4 servings
Course: Main Dish
Cuisine: Italian-inspired

Ingredients
  

  • 3 eggplants
  • 200 g 7 oz cherry tomatoes, halved
  • 1 handful fresh basil leaves
  • 1 clove garlic minced
  • Abundant olive oil for frying
  • 1 scamorza or other melty cheese mozzarella, provolone, or fontina work well, sliced
  • Parmesan cheese to taste
  • Salt and pepper to taste

Method
 

  1. Prepare the Eggplants: Wash and slice the eggplants into 1 cm thick rounds or strips. Sprinkle with salt and let them rest for 20–30 minutes to draw out excess moisture and bitterness. Rinse and pat dry.
  2. Fry the Eggplants: Heat a generous amount of olive oil in a pan over medium heat. Fry the eggplant slices until golden brown on both sides. Transfer them to a paper towel-lined plate to absorb excess oil.
  3. Make the Tomato Sauce: In the same pan, add a little more olive oil and sauté the garlic until fragrant. Add the cherry tomatoes and cook until soft and slightly caramelized. Season with salt and pepper, then mix in fresh basil.
  4. Assemble the Dish: Preheat your oven to 200°C (400°F). In a baking dish, layer the fried eggplants, spoonfuls of the tomato sauce, slices of scamorza cheese, and a sprinkle of Parmesan. Repeat the layers, finishing with a topping of cheese and Parmesan.
  5. Bake: Place the dish in the oven and bake for 15–20 minutes or until the cheese is melted and bubbly with a golden crust.
  6. Serve and Enjoy: Let it rest for a few minutes before serving. Garnish with extra fresh basil and enjoy warm!

Notes

  • If you prefer a lighter version, you can roast the eggplant instead of frying. Brush with olive oil and bake at 200°C (400°F) for about 20 minutes, flipping halfway through.
  • The dish tastes even better the next day, making it perfect for meal prep.
  • Serve with crusty bread, pasta, or a fresh salad for a complete meal.

Soft and Fluffy Homemade Bread – A Timeless Recipe for Every Kitchen

The smell of freshly baked bread wafting through the kitchen is one of the most comforting aromas in the world. It brings back memories of childhood, of watching my grandmother knead dough with practiced hands, humming softly as she worked. I would stand on a stool beside her, eagerly waiting for my turn to shape the dough, feeling the soft elasticity between my fingers.

There was something magical about the process—the transformation of simple ingredients into a golden, crusty loaf that filled the house with warmth. When the bread came out of the oven, we could hardly wait for it to cool before tearing off a piece, steam rising as we spread butter over its soft, pillowy interior.

As I grew older, I realized that making bread is more than just baking—it is an experience, a ritual that connects generations. It is a reminder of how something as basic as flour, water, and yeast can create something so nourishing and satisfying. Now, whenever I bake this bread, I carry those memories with me, and I hope this recipe brings the same warmth to your kitchen.

Why You Should Make Homemade Bread

There are plenty of store-bought breads available, but nothing compares to the taste and texture of homemade bread. Here’s why making your own is worth it:

  • No preservatives or additives – Unlike commercial bread, this recipe uses only natural ingredients.
  • Fresh, warm, and aromatic – Nothing beats the experience of pulling a loaf straight from the oven.
  • Cost-effective – A homemade loaf costs far less than artisanal bread from a bakery.
  • Simple ingredients – Made with pantry staples, this bread is easy to prepare anytime.
  • Better texture and flavor – You control the ingredients, ensuring the perfect balance of softness and chewiness.
  • Versatile – Enjoy it fresh, toasted, as a sandwich, or alongside soups and stews.

Homemade bread is not just food—it is an experience that brings comfort and joy.

Ingredients

IngredientQuantity
Dry active yeast1/2 teaspoon
Warm water1 cup
Sugar1 teaspoon
All-purpose flour3 cups
Salt1 1/2 teaspoons

Directions

  1. Activate the yeast – In a small bowl, dissolve yeast and sugar in warm water. Let it sit for 5–10 minutes until frothy.
  2. Mix the dough – In a large bowl, combine flour and salt. Slowly add the yeast mixture and mix until a dough forms.
  3. Knead – Transfer the dough to a floured surface and knead for 8–10 minutes until smooth and elastic.
  4. First rise – Place the dough in a greased bowl, cover, and let it rise in a warm place for 1–1.5 hours, or until doubled in size.
  5. Shape the dough – Punch down the dough, shape it into a loaf, and place it in a greased loaf pan.
  6. Second rise – Cover and let it rise again for 30–40 minutes.
  7. Bake – Preheat oven to 375°F (190°C). Bake for 25–30 minutes until golden brown and hollow-sounding when tapped.
  8. Cool and serve – Let the bread cool before slicing for the best texture.

Nutritional Information (Per Slice, Approx.)

NutrientAmount
Calories150 kcal
Protein4 g
Fat0.5 g
Carbohydrates30 g
Fiber1 g
Sodium300 mg

Tips for the Best Homemade Bread

Even though this recipe is simple, a few key techniques will ensure your bread turns out perfect every time.

1. Activate the Yeast Properly

Yeast is a living organism, and it needs the right conditions to thrive. Always dissolve it in warm (not hot) water, around 100-110°F (37-43°C). If the water is too hot, it will kill the yeast. Let it sit until it becomes frothy and bubbly—this means the yeast is active and ready to work.

2. Measure Ingredients Accurately

Too much flour can result in dense, dry bread, while too little can make it too sticky. For best results, use a kitchen scale to measure ingredients precisely.

3. Knead the Dough Well

Kneading develops the gluten in the flour, which gives the bread its structure and chewiness. Knead for 8–10 minutes until the dough is smooth and elastic. If you press a finger into the dough and it springs back, it is ready.

4. Give the Dough Enough Time to Rise

Patience is key. The first rise should take about 1 to 1.5 hours, allowing the dough to double in size. This develops the best texture and flavor. If your kitchen is cold, place the dough in a warm spot, such as near the oven or in a slightly warmed microwave.

5. Shape the Dough Correctly

Once risen, punch down the dough gently to release air bubbles, then shape it into a loaf. Be careful not to over-handle the dough, as this can deflate it.

6. Let the Bread Rise Again Before Baking

The second rise is crucial for getting a light, airy loaf. Let the shaped dough rest for 30–40 minutes before baking to ensure a good rise in the oven.

7. Bake at the Right Temperature

A steady 375°F (190°C) creates a golden crust while keeping the inside soft. To check for doneness, tap the bottom of the loaf—it should sound hollow.

8. Let the Bread Cool Before Slicing

As tempting as it is to cut into the bread immediately, allow it to cool for at least 15–20 minutes. This helps set the structure and prevents it from becoming gummy.

How to Customize This Bread

This basic bread recipe is incredibly versatile. Here are some ways to add variety:

1. Herb and Garlic Bread

  • Add 1 teaspoon of dried rosemary, thyme, or oregano to the dough.
  • Mix minced garlic into the dough for extra flavor.

2. Honey Wheat Bread

  • Replace 1 cup of all-purpose flour with whole wheat flour.
  • Add 2 tablespoons of honey for a touch of sweetness.

3. Cheese Bread

  • Mix in 1/2 cup of shredded cheddar or Parmesan for a rich, cheesy loaf.

4. Seeded Bread

  • Sprinkle sesame seeds, sunflower seeds, or flaxseeds on top before baking for extra crunch and nutrition.

5. Cinnamon Swirl Bread

  • Roll the dough with a cinnamon-sugar mixture before shaping for a sweet variation.

With these variations, you can enjoy a different homemade bread every time.

Storing and Freezing Homemade Bread

Room Temperature Storage

  • Store in a bread box or airtight container at room temperature for up to 3 days.
  • Avoid refrigerating, as it can dry out the bread.

Freezing

  • Wrap the loaf tightly in plastic wrap, then place it in a freezer bag.
  • Freeze for up to 3 months.
  • To thaw, leave it at room temperature for a few hours or warm in the oven at 300°F (150°C) for 10 minutes.

Reheating Tips

  • Toast slices for a crispy texture.
  • Warm in the oven at 325°F (165°C) for 5–7 minutes to refresh.

Proper storage ensures your homemade bread stays fresh and delicious.

Frequently Asked Questions

1. Can I use instant yeast instead of active dry yeast?

Yes! Use the same amount of instant yeast, but skip the proofing step and mix it directly with the flour.

2. What if my dough doesn’t rise?

  • Check if your yeast is expired or if the water was too hot or too cold.
  • Let the dough rise in a warm, draft-free spot.

3. How can I make my bread softer?

Adding 1 tablespoon of butter or oil to the dough can help create a softer texture.

4. Can I make this bread without sugar?

Yes, but sugar helps activate the yeast and improve the texture. If omitting sugar, allow extra time for the dough to rise.

5. What is the best way to slice homemade bread?

Use a serrated knife and cut with a gentle sawing motion to avoid squishing the loaf.

Final Thoughts – A Simple Recipe with Endless Possibilities

Homemade bread is more than just a recipe—it is a tradition, a comfort, and a way to bring people together. Whether you are new to bread-making or an experienced baker, this simple recipe delivers soft, fluffy, and perfectly golden loaves every time.

Once you taste the warmth and freshness of a homemade loaf, you may never go back to store-bought bread again. So the next time you crave something wholesome and delicious, take a little time to knead, rise, and bake. The result is always worth it.

Amal

Soft and Fluffy Homemade Bread – A Timeless Recipe for Every Kitchen

This soft and fluffy homemade bread is everything you want in a fresh-baked loaf—light, airy, and full of flavor. With just a few simple ingredients, you can create a golden, perfectly crusty bread that is great for sandwiches, toast, or served warm with butter. Easy to make and even easier to enjoy, this recipe is a must-try for any home baker.
Prep Time 10 minutes
Cook Time 25 minutes
Total Time 2 hours 35 minutes
Servings: 1 loaf
Course: Bread
Cuisine: International

Ingredients
  

  • 1/2 teaspoon dry active yeast
  • 1 cup warm water
  • 1 teaspoon sugar
  • 3 cups all-purpose flour
  • 1 1/2 teaspoons salt

Method
 

  1. In a small bowl, dissolve yeast and sugar in warm water. Let it sit for 5–10 minutes until frothy.
  2. In a large mixing bowl, combine flour and salt. Slowly add the yeast mixture and stir until a dough forms.
  3. Transfer the dough to a floured surface and knead for 8–10 minutes until smooth and elastic.
  4. Place the dough in a greased bowl, cover, and let it rise in a warm place for 1–1.5 hours or until doubled in size.
  5. Punch down the dough, shape it into a loaf, and place it in a greased loaf pan. Cover and let it rise again for 30–40 minutes.
  6. Preheat the oven to 375°F (190°C) and bake for 25–30 minutes until golden brown and hollow-sounding when tapped.
  7. Let the bread cool before slicing.

Notes

  • Use lukewarm water (100–110°F) to properly activate the yeast.
  • For a softer crust, brush the loaf with melted butter after baking.
  • Store in an airtight container for up to 3 days or freeze for up to 3 months.
  • This bread is great for sandwiches, toast, or dipping into soups and stews.

Crispy Cheesy Potato Bites – The Ultimate Comfort Food for Any Occasion

There is something undeniably comforting about potatoes. They are simple, humble, and incredibly versatile. Growing up, potatoes were a staple in my family’s kitchen. Whether mashed, roasted, or fried, they always found their way onto our dinner plates. But among all the variations, one dish stood out—the crispy, cheesy potato bites that my grandmother used to make.

I still remember the warmth of the kitchen as she grated the potatoes by hand, carefully squeezing out every bit of moisture before mixing them with cheese, eggs, and a handful of seasonings. The sizzle of the pan filled the air as the golden bites crisped up, their edges turning beautifully crunchy while the insides remained soft and cheesy. The first bite was always the best—hot, flavorful, and irresistibly crispy.

These potato bites became more than just a meal; they were a tradition. They brought us together on busy weeknights, served as a snack during family gatherings, and even found their way into our Sunday brunch spreads. Now, whenever I make them, they remind me of the simple joys of home-cooked food and the way a single dish can create lasting memories.

This recipe has been perfected over time, and I can confidently say that it is better than fried potatoes. It is quick, easy, and made with everyday ingredients, yet the result is incredibly satisfying. Whether you are making them for a cozy dinner, a side dish, or a quick snack, these crispy cheesy potato bites will always be a hit.

Why These Potato Bites Are a Must-Try

Potatoes are a universal comfort food, but these bites take them to another level. Here is why you will love this recipe:

  • Perfectly Crispy and Cheesy – The combination of crispy edges and melted cheese makes every bite irresistible.
  • Healthier Than Deep-Fried Potatoes – Using a pan-fry method with minimal oil gives you that perfect crunch without excessive grease.
  • Quick and Easy to Make – With just a few simple ingredients and minimal prep time, they come together in no time.
  • A Family-Friendly Favorite – Kids and adults alike will love these golden, cheesy bites.
  • Versatile and Customizable – You can adjust the flavors, add different cheeses, or mix in herbs for a personalized touch.

If you are looking for a simple yet satisfying dish, these potato bites are the answer.

Ingredients

IngredientQuantity
Potatoes, grated4 medium
Eggs2
Cheese, shredded100 g
All-purpose flour3 tbsp
Onion, finely chopped1 small
Salt1 tsp
Black pepper1/2 tsp
Garlic powder1/2 tsp
Olive oil (for cooking)2 tbsp

Directions

  1. Prepare the potatoes – Grate the potatoes and squeeze out excess moisture using a clean kitchen towel.
  2. Mix the batter – In a large bowl, combine grated potatoes, eggs, shredded cheese, flour, onion, salt, black pepper, and garlic powder. Stir until evenly mixed.
  3. Heat the oil – In a large skillet, heat olive oil over medium heat.
  4. Cook the bites – Scoop small portions of the mixture into the pan, flatten slightly, and cook for 3–4 minutes per side until golden and crispy.
  5. Serve and enjoy – Remove from heat and place on a paper towel to absorb excess oil. Serve hot with sour cream, yogurt, or your favorite dipping sauce.

Nutritional Information (Per Serving, Approx.)

NutrientAmount
Calories180–220 kcal
Protein6–8 g
Fat8–10 g
Carbohydrates20–25 g
Fiber2–3 g
Sodium300–400 mg

Secrets to Making the Best Crispy Potato Bites

While this recipe is straightforward, a few tips will ensure you achieve the perfect crispy and flavorful result every time.

1. Remove Excess Moisture from the Potatoes

Grated potatoes contain a lot of water, which can make the bites soggy instead of crispy. After grating, sprinkle with a little salt and let them sit for a few minutes, then squeeze out as much liquid as possible using a clean kitchen towel or paper towels.

2. Use the Right Cheese for Maximum Flavor

Cheese not only adds richness but also helps bind the mixture together. Cheddar, mozzarella, or Parmesan work well, but you can experiment with different cheeses for varied flavors.

3. Avoid Overcrowding the Pan

For the crispiest bites, cook them in batches, ensuring they have enough space to brown evenly. Overcrowding traps steam, making them soft instead of crunchy.

4. Control the Heat for Perfect Cooking

A medium heat is best. Too high, and the outside will burn before the inside cooks through. Too low, and they will not crisp up properly.

5. Let Them Rest Before Serving

Once cooked, let the potato bites rest on a paper towel for a minute to absorb excess oil. This keeps them crispy and prevents them from becoming greasy.

With these simple steps, you will get perfectly crispy and cheesy potato bites every time.

Delicious Variations to Try

One of the best things about this recipe is its versatility. Here are a few creative ways to change things up:

1. Spicy Potato Bites

  • Add 1/2 teaspoon of red pepper flakes or cayenne pepper for a little heat.
  • Serve with a spicy dipping sauce like sriracha mayo.

2. Garlic Herb Potato Bites

  • Mix in chopped fresh parsley, thyme, or rosemary for a fresh and aromatic twist.
  • Add an extra clove of garlic for bold flavor.

3. Loaded Potato Bites

  • Sprinkle with crispy bacon bits and chopped green onions before serving.
  • Serve with a dollop of sour cream for a “loaded baked potato” feel.

4. Parmesan Crusted Potato Bites

  • Use Parmesan cheese instead of cheddar for an extra crispy, cheesy crust.
  • Press the mixture slightly before frying to create a golden crust.

5. Vegan Potato Bites

  • Replace eggs with a flaxseed egg (1 tbsp ground flaxseed + 3 tbsp water).
  • Use dairy-free cheese or nutritional yeast for a cheesy flavor.

With so many ways to customize them, you will never get bored of these crispy potato bites.

How to Store and Reheat Potato Bites

If you have leftovers (which is rare because they disappear quickly), here is how to store and reheat them properly:

Refrigeration

  • Store in an airtight container in the refrigerator for up to 3 days.
  • To keep them crispy, reheat in a skillet over medium heat for 2–3 minutes per side.

Freezing

  • Freeze uncooked potato bites in a single layer on a baking sheet. Once frozen, transfer them to a freezer bag.
  • Cook directly from frozen, adding an extra 2–3 minutes to the cooking time.

Reheating Tips

  • For best results, avoid microwaving as it can make them soft.
  • Use an oven or air fryer at 180°C (350°F) for 5–7 minutes to restore crispiness.

With these storage tips, you can always have crispy, cheesy potato bites ready to enjoy.

Frequently Asked Questions

1. Can I bake these potato bites instead of frying?

Yes! Preheat the oven to 200°C (400°F) and bake on a lined baking sheet for 20–25 minutes, flipping halfway through.

2. What kind of potatoes work best for this recipe?

Starchy potatoes like Russet or Yukon Gold work best because they crisp up nicely. Avoid waxy potatoes, as they retain too much moisture.

3. Can I make these without eggs?

Yes! You can substitute eggs with a flaxseed egg (1 tbsp ground flaxseed + 3 tbsp water) or mashed potatoes to help bind the ingredients together.

4. What dipping sauces pair well with these bites?

Some great options include:

  • Sour cream or Greek yogurt with herbs
  • Garlic aioli
  • Marinara sauce
  • Spicy sriracha mayo

5. Can I make these gluten-free?

Absolutely! Just substitute the flour with almond flour, cornstarch, or gluten-free all-purpose flour.

Final Thoughts – A Recipe Worth Making Again and Again

These crispy cheesy potato bites are everything you could want in a quick and satisfying dish. They are crispy on the outside, soft on the inside, and bursting with rich, cheesy flavor. Whether you are serving them as a quick dinner, a side dish, or an appetizer, they are guaranteed to be a hit.

With their simple ingredients, easy preparation, and endless variations, this is a recipe that belongs in every home cook’s collection. Try them once, and they will quickly become a favorite in your household—better than fried potatoes and just as satisfying!

Amal

Crispy Cheesy Potato Bites – The Ultimate Comfort Food for Any Occasion

These crispy cheesy potato bites are the perfect combination of golden crunch, melted cheese, and rich flavor. Made with grated potatoes, eggs, cheese, and a touch of seasoning, they are a quick and satisfying dish that is better than fried potatoes. Whether you serve them as a main dish, a side, or a snack, they are guaranteed to disappear fast.
Prep Time 10 minutes
Cook Time 15 minutes
Total Time 25 minutes
Servings: 10 –12 potato bites
Course: Snack
Cuisine: International

Ingredients
  

  • 4 medium potatoes grated
  • 2 eggs
  • 100 g cheese shredded
  • 3 tbsp all-purpose flour
  • 1 small onion finely chopped
  • 1 tsp salt
  • 1/2 tsp black pepper
  • 1/2 tsp garlic powder
  • 2 tbsp olive oil for cooking

Method
 

  1. Grate the potatoes, sprinkle with salt, and let them sit for 5 minutes. Squeeze out excess moisture using a clean kitchen towel.
  2. In a large bowl, mix the grated potatoes, eggs, shredded cheese, flour, onion, black pepper, and garlic powder until well combined.
  3. Heat olive oil in a large skillet over medium heat.
  4. Scoop small portions of the mixture into the pan, flatten slightly, and cook for 3–4 minutes per side until golden and crispy.
  5. Remove from the pan and place on a paper towel to drain excess oil.
  6. Serve hot with sour cream, yogurt, or your favorite dipping sauce.

Notes

  • For extra crispiness, make sure to remove as much moisture as possible from the potatoes.
  • Try adding chopped fresh herbs like parsley or dill for added flavor.
  • Use Parmesan instead of cheddar for a richer, nuttier taste.
  • To bake instead of frying, place the bites on a lined baking sheet and bake at 200°C (400°F) for 20–25 minutes, flipping halfway.
  • Leftovers can be stored in the fridge for up to 3 days or frozen for up to 3 months. Reheat in a pan or oven to restore crispiness.

The World’s Best Moist and Delicious Muffins – A Recipe That Melts in Your Mouth

Some of the best recipes are the ones that bring back cherished memories. For me, these muffins do exactly that. I remember waking up to the warm, comforting aroma of freshly baked muffins in my grandmother’s kitchen. She always had a way of making simple ingredients turn into something magical.

I would sit by the counter, watching her whisk eggs and sugar together with such ease. The scent of citrus zest filled the air as she added it to the batter, and I knew something special was about to come out of the oven. Once the muffins were baked to perfection, she would let me sneak a warm one right off the tray. Soft, buttery, and bursting with flavor, each bite melted in my mouth.

Now, every time I bake these muffins, I am reminded of those mornings—of love, comfort, and the simple joy of homemade treats. This recipe has been perfected over the years, and every batch turns out incredibly moist, flavorful, and irresistible. Whether you’re baking for your family, hosting guests, or just treating yourself, these muffins will quickly become your go-to recipe.

What Makes These Muffins the Best?

There are countless muffin recipes out there, but this one stands out for a few key reasons:

  • Perfectly Moist Texture – The combination of butter, oil, and yogurt keeps these muffins incredibly soft and tender.
  • Rich, Buttery Flavor – The balance of butter and vanilla sugar gives them a deep, comforting taste.
  • Light and Fluffy Crumb – Whipping the eggs and sugar together creates an airy, delicate texture.
  • A Hint of Citrus – The lemon or orange zest adds a fresh, fragrant aroma that makes each bite more flavorful.
  • No Complicated Steps – This is a foolproof recipe that comes together quickly and easily.

If you’ve been searching for the ultimate muffin recipe, this is the one you’ll come back to again and again.

Ingredients

IngredientQuantity
Eggs4
White sugar150 g
Cold milk60 ml
Sunflower oil60 ml
Cold melted butter100 g
Unsweetened plain yogurt125 g
Vanilla sugar8 g
All-purpose flour300 g
SaltPinch
Baking powder16 g
Zest of one lemon or orangeTo taste

Directions

  1. Preheat oven to 180°C (350°F) and line a muffin tray with paper liners.
  2. Whisk eggs and sugar – In a large bowl, beat eggs and sugar until light and fluffy.
  3. Add wet ingredients – Mix in cold milk, sunflower oil, melted butter, yogurt, and vanilla sugar until well combined.
  4. Incorporate dry ingredients – Sift flour, baking powder, and salt into the mixture. Gently fold together.
  5. Add citrus zest – Stir in the lemon or orange zest for extra flavor.
  6. Fill the muffin cups – Pour the batter into the lined muffin tray, filling each cup about 3/4 full.
  7. Bake for 18–22 minutes, or until a toothpick inserted in the center comes out clean.
  8. Cool and serve – Let muffins rest for 10 minutes before transferring to a wire rack to cool completely.

Nutritional Information (Per Muffin, Approx.)

NutrientAmount
Calories200–250 kcal
Protein4–6 g
Fat10–12 g
Carbohydrates25–30 g
Sugar10–12 g
Fiber1 g

How to Make the Perfect Muffins Every Time

Even though this recipe is simple, following these tips will ensure your muffins turn out perfectly every single time.

1. Use Room Temperature Ingredients

Cold ingredients can prevent the batter from mixing evenly, leading to dense muffins. Let the eggs, yogurt, and melted butter sit at room temperature before using.

2. Whip the Eggs and Sugar Well

Beating the eggs and sugar together until light and fluffy creates air pockets in the batter, resulting in muffins that are light and airy rather than dense.

3. Do Not Overmix the Batter

Once you add the dry ingredients, mix just until everything is combined. Overmixing develops gluten, which can make the muffins tough instead of tender.

4. Fill Muffin Cups Properly

For perfectly domed muffins, fill each cup about three-quarters full. Too much batter may cause overflow, while too little may result in flat muffins.

5. Bake at the Right Temperature

A steady 180°C (350°F) ensures even baking. If the oven is too hot, the muffins may rise too quickly and collapse.

6. Let Them Cool Before Eating

As tempting as it is to eat them right away, letting the muffins rest allows them to firm up and develop the best texture.

By following these simple tips, you’ll get soft, moist, and perfectly golden muffins every time.

Delicious Variations to Try

One of the best things about this recipe is how versatile it is. Here are a few ways to change it up:

1. Chocolate Chip Muffins

Add ½ cup of chocolate chips to the batter for a sweet, indulgent twist.

2. Blueberry Muffins

Fold in 1 cup of fresh or frozen blueberries for a fruity, refreshing flavor.

3. Cinnamon Sugar Muffins

Mix ½ teaspoon of cinnamon into the batter and sprinkle the tops with a cinnamon-sugar blend before baking.

4. Nutty Muffins

Add ½ cup of chopped walnuts or almonds for extra crunch and richness.

5. Lemon Poppy Seed Muffins

Increase the lemon zest and add 1 tablespoon of poppy seeds for a classic flavor combination.

With so many variations, you can enjoy a new version of these muffins every time you bake them.

How to Store and Reheat Muffins

If you manage to have leftovers (which is rare because they disappear so fast), here’s how to store them properly:

Room Temperature Storage

  • Keep in an airtight container for up to 3 days.
  • To keep them moist, place a paper towel inside the container to absorb excess moisture.

Refrigeration

  • Store in a sealed container in the fridge for up to 5 days.
  • Warm them in the microwave for 10–15 seconds before serving.

Freezing

  • Wrap each muffin individually in plastic wrap and store in a freezer bag for up to 3 months.
  • To reheat, thaw at room temperature or microwave for 30 seconds.

By storing them properly, you can always have a delicious muffin ready to enjoy.

Frequently Asked Questions

1. Can I use whole wheat flour instead of all-purpose flour?

Yes, but whole wheat flour absorbs more moisture, so the muffins may be denser. Try using half whole wheat and half all-purpose flour for the best texture.

2. Can I make these muffins dairy-free?

Absolutely! Use plant-based yogurt and melted coconut oil instead of butter for a dairy-free version.

3. Why did my muffins turn out dry?

This can happen if too much flour is added or if they are overbaked. Always measure flour correctly and check for doneness a few minutes before the suggested baking time ends.

4. Can I reduce the sugar?

Yes! You can reduce the sugar by 20-30%, but keep in mind that sugar also helps with moisture and texture.

5. How do I make these muffins fluffier?

Beating the eggs and sugar well, using fresh baking powder, and not overmixing the batter are key to getting a light and fluffy texture.

Final Thoughts – A Muffin Recipe Worth Baking Again and Again

These moist and delicious muffins are proof that simple ingredients can create something truly special. Whether you enjoy them fresh out of the oven, as an afternoon snack, or with a warm cup of coffee, they are sure to become a favorite.

With their soft, buttery texture, delicate sweetness, and hint of citrus, these muffins are perfect for any occasion. Once you try this recipe, you will never need another muffin recipe again.

So the next time you are craving a homemade treat that is easy to make and absolutely delicious, give these muffins a try. They are guaranteed to become a family favorite that you will want to bake again and again.

Amal

The World’s Best Moist and Delicious Muffins – A Recipe That Melts in Your Mouth

These moist and fluffy muffins are the perfect combination of buttery richness, delicate sweetness, and a hint of citrus. Made with yogurt, butter, and a touch of vanilla, they have an incredibly soft texture that melts in your mouth. Whether enjoyed for breakfast, as a snack, or as a dessert, these muffins are easy to make and absolutely irresistible.
Prep Time 10 minutes
Cook Time 20 minutes
Total Time 30 minutes
Servings: 12 muffins
Course: Dessert
Cuisine: International

Ingredients
  

  • 4 eggs
  • 150 g white sugar
  • 60 ml cold milk
  • 60 ml sunflower oil
  • 100 g cold melted butter
  • 125 g unsweetened plain yogurt
  • 8 g vanilla sugar
  • 300 g all-purpose flour
  • Pinch of salt
  • 16 g baking powder
  • Zest of one lemon or orange

Method
 

  1. Preheat oven to 180°C (350°F) and line a muffin tin with paper liners.
  2. Whisk eggs and sugar – In a large bowl, beat eggs and sugar until light and fluffy.
  3. Add wet ingredients – Mix in milk, oil, melted butter, yogurt, and vanilla sugar. Stir until smooth.
  4. Incorporate dry ingredients – Sift in flour, baking powder, and salt. Gently fold until combined.
  5. Add citrus zest – Stir in lemon or orange zest for extra flavor.
  6. Fill muffin cups – Pour batter into muffin liners, filling each about 3/4 full.
  7. Bake for 18–22 minutes or until a toothpick inserted in the center comes out clean.
  8. Cool and serve – Let muffins rest for 10 minutes before transferring to a wire rack to cool completely.

Notes

  • For extra moisture, replace half the butter with applesauce or mashed banana.
  • Add chocolate chips, nuts, or berries for a fun variation.
  • Store in an airtight container at room temperature for 3 days or refrigerate for up to 5 days.
  • Freeze muffins for up to 3 months and reheat in the oven or microwave.

Italian-Style Baked Pasta with Creamy Meat Sauce: A Recipe to Savor

There’s something special about learning a recipe from a friend—especially when that friend is from Italy. A few years ago, I had the pleasure of visiting an Italian family for dinner. As soon as I stepped into their home, the rich aroma of simmering sauce, garlic, and melting cheese filled the air. I watched as my friend effortlessly prepared a dish that would later become one of the best meals I had ever eaten.

She didn’t follow a strict recipe; she simply cooked with instinct, love, and tradition. She told me that in Italy, pasta is more than just food—it’s a way to bring people together. Every region, and even every family, has its own version of baked pasta. This dish, a comforting combination of pasta, rich meat sauce, and creamy béchamel, was her family’s favorite.

That night, as we sat around the table with plates of baked pasta bubbling with golden cheese, I understood why food in Italy is more than just sustenance. It’s a tradition, a language, and a way of showing love. Since then, this recipe has become one of my go-to meals, bringing a piece of Italy into my kitchen and onto my table.

Now, I’m sharing this recipe with you. It’s creamy, cheesy, and deeply satisfying—a dish you’ll want to make again and again.

Why This Baked Pasta Will Become a Family Favorite

1. Layers of Incredible Flavor

This dish combines al dente pasta, a rich meat sauce, and a silky béchamel sauce, all topped with golden, bubbling mozzarella cheese. Every bite is packed with comforting flavors.

2. Perfect for Any Occasion

Whether it’s a family dinner, a cozy weekend meal, or a gathering with friends, this baked pasta is a guaranteed crowd-pleaser. It’s hearty, filling, and can easily be made ahead of time.

3. A Balance of Creaminess and Savory Goodness

The combination of the meat sauce and the creamy béchamel creates a perfect harmony—neither too dry nor too rich. It’s a beautiful blend of textures and flavors.

4. Customizable and Easy to Adapt

One of the best things about this recipe is its versatility. You can swap the meat, add vegetables, or change up the cheese to suit your taste.

5. Leftovers Taste Even Better

Like many great pasta dishes, this one develops even more flavor as it sits. The next day, the flavors meld together even more, making leftovers just as delicious as the first serving.

Ingredients

IngredientQuantity
Pasta250g
Onion1, finely chopped
Garlic2 cloves, minced
Sweet red pepper1, diced
Minced meat600g
Tomatoes2, chopped
Leek stalk1, thinly sliced
Butter40g
Flour20g
Milk500ml
Hard mozzarella cheese100g, grated

Directions

  1. Cook the pasta according to package instructions until al dente. Drain and set aside.
  2. Prepare the meat sauce by sautéing the onion, garlic, and leek in a pan. Add the minced meat and cook until browned.
  3. Add the red pepper and tomatoes, cooking for a few more minutes until softened. Season with salt and pepper to taste.
  4. Make the creamy sauce by melting butter in a saucepan, adding flour, and whisking until smooth. Gradually add milk, stirring constantly, until thickened.
  5. Combine everything by layering the pasta, meat sauce, and creamy sauce in a baking dish. Top with grated mozzarella.
  6. Bake at 375°F (190°C) for 20-25 minutes until golden and bubbly.
  7. Serve warm and enjoy this rich, comforting Italian-inspired dish!

Nutritional Information (Per Serving, Approximate)

NutrientAmount
Calories550 kcal
Carbohydrates50 g
Protein35 g
Fat22 g
Fiber5 g
Calcium20% DV
Iron15% DV

The Key Ingredients and Their Benefits

Pasta: The Foundation of the Dish

Pasta is the heart of Italian cuisine, and it provides:

  • A great source of energy, thanks to its complex carbohydrates.
  • A satisfying base, that soaks up the flavors of the sauces.
  • Endless possibilities, as different shapes and varieties can change the dish’s texture.

Minced Meat: The Protein Powerhouse

Minced meat brings richness and depth to the dish. Depending on what you use, it can offer:

  • Iron and protein, essential for muscle growth and energy.
  • A variety of flavors, whether using beef, pork, chicken, or even plant-based alternatives.

Tomatoes: The Soul of the Sauce

Tomatoes add a tangy sweetness that balances the richness of the dish. They provide:

  • Lycopene, a powerful antioxidant that promotes heart health.
  • A natural umami flavor, enhancing the depth of the sauce.

Cheese: The Golden, Melty Topping

Mozzarella cheese creates a gooey, melty top layer that makes this dish irresistible. It also:

  • Adds creaminess and richness, completing the dish.
  • Provides calcium, which is essential for strong bones and teeth.

FAQs About Baked Pasta with Creamy Meat Sauce

1. What type of pasta works best for this dish?

Short pasta like penne, rigatoni, or fusilli works best as it holds the sauce well and retains its shape when baked.

2. Can I use a different type of meat?

Yes! While beef is traditional, you can use:

  • Ground turkey or chicken for a leaner option.
  • Italian sausage for extra flavor.
  • Plant-based mince for a vegetarian version.

3. How can I make this dish more flavorful?

  • Sauté the onions and garlic well to bring out their natural sweetness.
  • Let the meat sauce simmer longer for deeper flavor.
  • Use fresh herbs like basil or oregano for an authentic Italian touch.

4. Can I make this dish ahead of time?

Absolutely! Assemble everything up to a day in advance, cover it, and store it in the fridge. When ready to serve, bake as directed.

5. How do I store leftovers?

Store leftovers in an airtight container in the fridge for up to 4 days. Reheat in the oven at 350°F (175°C) for 15 minutes, or in the microwave for a quick meal.

6. Can I freeze baked pasta?

Yes! Let it cool completely, then wrap it tightly in plastic wrap and aluminum foil. Freeze for up to 3 months. To reheat, bake at 375°F (190°C) for 30-40 minutes until hot and bubbly.

7. Can I make a vegetarian version?

Yes! Replace the meat with:

  • Mushrooms, for a meaty texture.
  • Lentils, for a protein-rich option.
  • Spinach and ricotta, for a lighter variation.

8. What cheeses can I use instead of mozzarella?

Try using:

  • Parmesan, for a nutty, salty finish.
  • Cheddar, for a sharper, stronger flavor.
  • Gruyère, for a rich, creamy texture.

9. Can I add extra vegetables?

Definitely! Try adding:

  • Zucchini or eggplant, for a Mediterranean touch.
  • Mushrooms, for an earthy flavor.
  • Bell peppers, for a sweet crunch.

10. What should I serve with baked pasta?

This dish pairs beautifully with:

  • A simple green salad, for freshness.
  • Garlic bread, for extra indulgence.
  • A glass of red wine, for a true Italian experience.

A Dish That Feels Like Home

Food has the power to bring people together, to create memories, and to provide comfort. This baked pasta with creamy meat sauce is more than just a meal—it’s an experience. It’s a dish that fills the kitchen with warmth, invites loved ones to gather, and leaves everyone satisfied.

Whether you’re making it for a special occasion, a family dinner, or simply because you’re craving something rich, creamy, and delicious, this recipe is guaranteed to become a favorite.

So next time you’re looking for a comforting, Italian-inspired meal, give this baked pasta a try. One bite, and you’ll understand why it’s a dish worth sharing—just like my friend from Italy did with me.

Amal

Italian-Style Baked Pasta with Creamy Meat Sauce: A Recipe to Savor

This rich and creamy baked pasta is packed with layers of savory meat sauce, tender pasta, and a velvety béchamel, all topped with golden, bubbling mozzarella cheese. A true Italian-inspired comfort meal, perfect for family dinners or special occasions. Simple ingredients, big flavors—once you try it, you’ll want to make it again and again!
Prep Time 15 minutes
Cook Time 25 minutes
Total Time 40 minutes
Servings: 4 –6 servings
Course: Main Dish
Cuisine: Italian-inspired

Ingredients
  

  • 250 g pasta penne, rigatoni, or fusilli
  • 1 onion finely chopped
  • 2 cloves of garlic minced
  • 1 raw sweet red pepper diced
  • 600 g minced meat beef, pork, or mixed
  • 2 tomatoes chopped
  • 1 leek stalk thinly sliced
  • 40 g butter
  • 20 g flour
  • 500 ml milk
  • 100 g hard mozzarella cheese grated
  • Salt to taste
  • Black pepper to taste

Method
 

  1. Cook the pasta in salted water until al dente. Drain and set aside.
  2. Prepare the meat sauce by sautéing the onion, garlic, and leek in a pan with a little oil. Add the minced meat and cook until browned.
  3. Add the red pepper and tomatoes, season with salt and black pepper, and let simmer for 10 minutes.
  4. Make the béchamel sauce by melting butter in a saucepan, whisking in the flour, then slowly adding milk while stirring until smooth and thick.
  5. Combine everything in a baking dish: layer the pasta, meat sauce, and béchamel, then top with grated mozzarella.
  6. Bake at 375°F (190°C) for 20-25 minutes until golden and bubbling.
  7. Serve warm and enjoy a comforting, cheesy, and hearty Italian-style meal!

Notes

  • For extra depth of flavor, let the meat sauce simmer longer before layering.
  • Swap mozzarella for parmesan or cheddar for a different cheese flavor.
  • To make this vegetarian, replace meat with mushrooms, lentils, or eggplant.
  • Leftovers taste even better! Store in an airtight container and reheat in the oven.
  • Serve with a side salad and garlic bread for a complete meal.

Crispy Cheese-Stuffed Potato Fritters: The Comfort Food You Didn’t Know You Needed

Growing up, potatoes were the heart of many meals in our home. Whether mashed, roasted, or fried, they always found a place on the dinner table. But there was one dish that stood out—the simple yet magical combination of crispy golden potatoes and gooey melted cheese.

I remember coming home after school to the aroma of sizzling potatoes in a pan. My mother would prepare these crispy fritters, stuffing them with cheese so that every bite oozed with creamy, melted goodness. It wasn’t just food—it was a warm hug after a long day. She’d serve them hot, sometimes with a drizzle of butter, other times with a dollop of sour cream or a sprinkle of fresh parsley. No matter how they were presented, they were always irresistible.

Now, I make these crispy cheese-stuffed potato fritters for my own family, and they never fail to bring smiles. The simplicity of the ingredients, the satisfying crunch, and the soft, cheesy center make this dish a timeless comfort food. Whether you’re making them for a quick snack, a side dish, or even a weekend brunch, these fritters are guaranteed to be a hit.

Why You’ll Love This Recipe

1. The Perfect Crispy Texture with a Gooey Center

The combination of grated potatoes and cornstarch creates a beautifully crispy crust, while the melted mozzarella inside adds a creamy, indulgent touch.

2. Simple Ingredients, Big Flavor

With just a handful of pantry staples—potatoes, cheese, cornstarch, and a few seasonings—you can create a dish that tastes like it took hours to prepare.

3. Quick and Easy to Make

There’s no need for fancy equipment or complicated steps. In just a few minutes, you’ll have golden, crispy fritters ready to serve.

4. Customizable to Your Taste

You can switch up the cheese, add spices, or even mix in other ingredients like finely chopped onions, garlic, or bell peppers to create your own unique version.

5. A Crowd-Pleasing Snack for Any Occasion

Whether you’re serving these as a side dish, an appetizer for guests, or even a fun after-school snack, they are guaranteed to disappear quickly!

Ingredients

IngredientQuantity
Potatoes3, grated
Cornstarch4 tablespoons
Mozzarella cheese100g (3.5 oz), grated
Fresh parsleyChopped, to taste
SaltTo taste
Black pepperTo taste
Olive oilFor frying

Directions

  1. Prepare the potatoes: Grate the potatoes and squeeze out excess moisture using a clean kitchen towel.
  2. Mix the ingredients: In a bowl, combine the grated potatoes, cornstarch, salt, black pepper, and chopped parsley. Mix well.
  3. Shape the fritters: Take a portion of the mixture, flatten it in your hands, place a small amount of grated mozzarella in the center, and cover it with more potato mixture to form a patty.
  4. Fry until golden: Heat olive oil in a pan over medium heat. Fry the fritters for 3-4 minutes per side until crispy and golden brown.
  5. Serve hot: Drizzle with melted butter or serve with your favorite dipping sauce.

Nutritional Information (Per Serving, Approximate)

NutrientAmount
Calories220 kcal
Carbohydrates25 g
Protein6 g
Fat10 g
Fiber3 g
Calcium15% DV
Iron8% DV

The Health Benefits of Potatoes, Cheese, and Herbs

Potatoes: More Than Just Comfort Food

Many people think of potatoes as an indulgence, but they’re actually packed with nutrients:

  • Rich in fiber (especially when the skin is left on), which aids digestion.
  • High in potassium, which supports heart health and muscle function.
  • A great source of vitamin C, helping to boost the immune system.

Mozzarella Cheese: A Creamy Protein Boost

Cheese not only makes these fritters delicious but also provides:

  • A good source of calcium, essential for strong bones and teeth.
  • High-quality protein, keeping you full and satisfied.
  • Healthy fats, which add richness and flavor.

Fresh Parsley: A Small Ingredient with Big Benefits

Parsley is often overlooked, but it brings a lot to the table:

  • Loaded with antioxidants, helping to reduce inflammation.
  • A natural source of vitamin K, which supports bone health.
  • Adds a fresh, slightly peppery flavor, balancing the richness of the cheese and potatoes.

FAQs About Cheese-Stuffed Potato Fritters

1. Can I use a different type of cheese?

Absolutely! While mozzarella gives that signature stretch, you can try cheddar for a sharper flavor, gouda for a smoky touch, or even parmesan for extra depth.

2. How do I keep the fritters from falling apart?

Squeezing out excess moisture from the grated potatoes is key. If the mixture still feels too loose, you can add an extra tablespoon of cornstarch to help bind everything together.

3. Can I make these fritters ahead of time?

Yes! You can prepare the fritters and store them in the refrigerator for up to 24 hours before frying. Simply cover them tightly with plastic wrap to prevent them from drying out.

4. Can I bake these instead of frying?

Yes! To bake, preheat the oven to 400°F (200°C), place the fritters on a greased baking sheet, and bake for 20-25 minutes, flipping halfway through, until crispy and golden.

5. How do I reheat leftovers?

To maintain their crispiness, reheat in a pan over medium heat for a few minutes per side or in an oven at 350°F (175°C) for 10 minutes. Avoid microwaving, as it can make them soggy.

6. Can I freeze these fritters?

Yes! Freeze them uncooked in a single layer on a baking sheet. Once frozen, transfer them to a freezer bag. When ready to eat, cook them straight from the freezer—just add a couple of extra minutes to the cooking time.

7. What dipping sauces go well with these fritters?

These fritters are delicious on their own, but they pair wonderfully with:

  • Garlic yogurt sauce (Greek yogurt, minced garlic, lemon juice, and salt).
  • Classic sour cream with chives for a tangy, creamy balance.
  • Spicy aioli (mayonnaise mixed with a bit of hot sauce and garlic powder).
  • Ketchup or marinara sauce for a kid-friendly option.

8. Can I make these gluten-free?

Yes! Swap the cornstarch with potato starch or a gluten-free flour blend to keep the recipe gluten-free.

9. What can I serve with these fritters?

These fritters go well with:

  • A fresh green salad to balance out the richness.
  • A warm bowl of soup, such as tomato or mushroom soup.
  • A protein like grilled chicken or eggs for a complete meal.

10. How can I add more flavor to these fritters?

Try adding:

  • Garlic powder or minced garlic for an extra kick.
  • Smoked paprika or cayenne pepper for a hint of spice.
  • Grated onions for a more savory depth.

Crispy, Cheesy, and Absolutely Irresistible

There’s something magical about the combination of crispy potatoes and gooey cheese. This dish takes simple, everyday ingredients and transforms them into something special—comforting, satisfying, and deliciously addictive.

Whether you’re making these fritters as a snack, a side dish, or even a quick meal, they are guaranteed to impress. And the best part? They are easy to make, quick to prepare, and endlessly customizable.

So the next time you’re craving something crispy, cheesy, and full of flavor, give this recipe a try. One bite, and you’ll understand why this is a recipe worth saving and making again and again.

Amal

Crispy Cheese-Stuffed Potato Fritters: The Comfort Food You Didn’t Know You Needed

These crispy cheese-stuffed potato fritters are golden and crunchy on the outside with a gooey, melty cheese center. Made with just a few simple ingredients, they are perfect as a snack, appetizer, or side dish. Whether served with a drizzle of melted butter or a favorite dipping sauce, these potato fritters are guaranteed to impress!
Prep Time 10 minutes
Cook Time 10 minutes
Total Time 20 minutes
Servings: 6 -8 fritters
Course: Snack
Cuisine: International

Ingredients
  

  • 3 potatoes grated
  • 4 tablespoons cornstarch
  • 100 grams 3.5 oz mozzarella cheese, grated
  • Fresh parsley chopped (to taste)
  • Salt to taste
  • Black pepper to taste
  • Olive oil for frying

Method
 

  1. Grate the potatoes and squeeze out excess moisture using a clean kitchen towel.
  2. In a bowl, mix the grated potatoes with cornstarch, salt, black pepper, and chopped parsley.
  3. Take a portion of the mixture, flatten it in your hands, place some grated mozzarella in the center, and cover with more potato mixture to form a patty.
  4. Heat olive oil in a pan over medium heat. Fry the fritters for 3-4 minutes per side until golden brown and crispy.
  5. Remove from the pan, let them rest for a minute, and serve warm with your favorite dipping sauce.

Notes

  • Make sure to squeeze out excess moisture from the potatoes to prevent soggy fritters.
  • Swap mozzarella for cheddar, gouda, or parmesan for a different flavor.
  • To make them gluten-free, use potato starch instead of cornstarch.
  • For a healthier version, bake at 400°F (200°C) for 20-25 minutes, flipping halfway.
  • Serve with garlic yogurt dip, sour cream, or marinara sauce for extra flavor.

Fluffy Yogurt Flatbreads: A Quick and Easy Bread Alternative

There is something incredibly comforting about the aroma of freshly cooked bread. It fills the kitchen with warmth, promising a meal that is both simple and satisfying. Growing up, I always associated bread with long baking hours and complicated steps, something that required patience and skill. But one day, everything changed when my grandmother introduced me to a flatbread recipe that could be made in minutes.

She never measured ingredients with precision, yet somehow, her flatbreads always turned out perfect—soft, slightly chewy, and warm enough to melt butter the moment it touched the surface. She would knead the dough with practiced hands, roll out each piece with ease, and cook them on a hot pan until golden brown. The result? A bread so light and fluffy that it became a staple in our home.

Now, whenever I make this yogurt flatbread, I am reminded that some of the best recipes are also the simplest. You don’t need an oven, fancy ingredients, or hours of waiting. Just a few basic pantry staples, a warm skillet, and in a matter of minutes, you have freshly made bread that pairs well with almost anything. Whether you enjoy it with a drizzle of honey, wrapped around grilled meats, or served alongside a warm bowl of soup, this quick and easy flatbread is proof that sometimes, the most satisfying meals are the easiest ones to make.

Why You’ll Love This Recipe

1. Soft, Fluffy, and Perfect for Any Meal

Unlike store-bought bread, this yogurt flatbread is light, soft, and incredibly versatile. Whether you’re using it for sandwiches, dipping it into sauces, or simply enjoying it with butter, the texture is always perfect.

2. Quick and Easy—Ready in Minutes

Forget about long hours of proofing and waiting. This recipe is designed for busy days when you need fresh bread but don’t have the time. From start to finish, you’ll have warm, fluffy flatbreads in less than 30 minutes.

3. Made with Just a Few Basic Ingredients

No special flours, no baking powders, and no complicated steps. Just a handful of everyday ingredients that you probably already have in your kitchen.

4. No Oven Required

One of the best things about this recipe is that it requires no oven. A simple pan or skillet is all you need to cook these flatbreads to golden perfection.

5. Healthier and More Nutritious than Store-Bought Bread

With no preservatives or unnecessary additives, this homemade flatbread is a healthier alternative to processed breads. Plus, yogurt adds a boost of protein and probiotics for better digestion.

Ingredients

IngredientQuantity
Warm milk200 ml
Sugar1 tsp
Yeast1 tsp
Flour300g
Salt⅓ tbsp
Yogurt20g
Vegetable oil (optional)10 ml

Directions

  1. Activate the yeast: In a bowl, mix warm milk, sugar, and yeast. Let it sit for 5 minutes until frothy.
  2. Prepare the dough: Add flour, salt, yogurt, and oil (if using) to the yeast mixture. Knead until a soft, smooth dough forms.
  3. Rest the dough: Cover and let it rest for 15-20 minutes.
  4. Shape the flatbreads: Divide the dough into small balls, roll each into a thin round shape.
  5. Cook: Heat a pan over medium heat. Cook each flatbread for 1-2 minutes per side until golden brown and puffed up.
  6. Serve warm: Enjoy plain, with butter, or as a side to your favorite dish!

Nutritional Information (Per Serving, Approximate)

NutrientAmount
Calories150 kcal
Carbohydrates28 g
Protein4 g
Fat2 g
Fiber1 g
Calcium6% DV
Iron8% DV

The Health Benefits of Yogurt Flatbread

Yogurt: The Secret to Soft, Fluffy Bread

Adding yogurt to flatbread dough is a game-changer. It not only enhances the texture, making the bread softer and more pliable, but it also provides several health benefits:

  • Rich in probiotics, which support gut health and digestion.
  • High in protein, making the flatbread more filling and nutritious.
  • Contains calcium, which strengthens bones and teeth.

Milk: A Source of Essential Nutrients

Warm milk not only activates the yeast but also contributes to the tenderness of the bread. Milk is a great source of:

  • Vitamin D, which supports immune health.
  • Protein, which helps in muscle repair and growth.

Flour: The Base of the Bread

Flour provides the structure for the flatbread. Using all-purpose flour results in a soft and slightly chewy texture, while substituting whole wheat flour adds more fiber and nutrients.

FAQs About Yogurt Flatbread

1. Can I make this recipe without yeast?

Yes! If you don’t have yeast, you can substitute it with ½ teaspoon of baking powder. The texture will be slightly different, but the flatbreads will still be soft and delicious.

2. How can I make this recipe gluten-free?

To make gluten-free flatbread, substitute the regular flour with a gluten-free flour blend. Keep in mind that you may need to adjust the liquid content slightly for the right consistency.

3. Can I use water instead of milk?

Yes, but using milk makes the flatbreads softer and richer in flavor. If using water, consider adding a little extra yogurt to maintain a tender texture.

4. Can I prepare the dough ahead of time?

Absolutely! You can prepare the dough and store it in the refrigerator for up to 24 hours. When ready to cook, let it sit at room temperature for 10-15 minutes before rolling and cooking.

5. How do I store leftover flatbreads?

Store the cooked flatbreads in an airtight container at room temperature for up to 2 days. If storing longer, refrigerate them for up to 5 days or freeze them for up to 2 months.

6. How do I reheat the flatbreads?

To restore their soft texture, reheat them in a dry pan for 1-2 minutes per side or microwave them for 10-15 seconds.

7. Can I add herbs or spices to the dough?

Yes! You can mix in garlic powder, dried oregano, cumin, or even fresh herbs to add extra flavor to your flatbreads.

8. What can I serve with yogurt flatbread?

This flatbread is incredibly versatile! Try it with:

  • Dips: Hummus, tzatziki, or guacamole.
  • Soups: Lentil soup, tomato soup, or creamy mushroom soup.
  • Wraps: Fill with grilled chicken, falafel, or roasted vegetables.
  • Breakfast: Spread with butter, jam, or honey for a simple morning treat.

9. Can I cook this flatbread on a grill?

Yes! Cooking on a grill will give the flatbreads a slightly smoky flavor and beautiful char marks. Use medium heat and cook each side for about 1-2 minutes.

10. Can I use whole wheat flour instead of all-purpose flour?

Yes, but whole wheat flour makes the dough slightly denser. To keep the flatbreads soft, try using half whole wheat and half all-purpose flour.

A Bread Alternative That’s Perfect for Any Occasion

Few things are as satisfying as making your own bread, but not everyone has the time for complicated recipes. That’s why this quick and easy yogurt flatbread is such a game-changer. In just a few minutes, with minimal effort, you can have soft, warm flatbreads that are perfect for any meal.

Whether you’re using them as a side, a wrap, or simply enjoying them on their own, these flatbreads prove that homemade is always better than store-bought. They’re healthier, tastier, and incredibly versatile.

So the next time you find yourself reaching for store-bought bread, try making these instead. One bite, and you’ll understand why this simple, delicious, and foolproof recipe is one you’ll keep coming back to!

Amal

Fluffy Yogurt Flatbreads: A Quick and Easy Bread Alternative

These quick and easy yogurt flatbreads are soft, fluffy, and perfect as a bread alternative. With just a few simple ingredients, you can make delicious homemade flatbreads in minutes—no oven required! Whether served warm with butter, used as a wrap, or paired with your favorite dips, this versatile bread is a must-try.
Prep Time 10 minutes
Cook Time 10 minutes
Total Time 20 minutes
Servings: 6 flatbreads
Course: Side Dish
Cuisine: International

Ingredients
  

  • 200 ml warm milk
  • 1 tsp sugar
  • 1 tsp yeast
  • 300 g flour
  • tbsp salt
  • 20 g yogurt
  • 10 ml vegetable oil optional

Method
 

  1. In a bowl, mix warm milk, sugar, and yeast. Let it sit for 5 minutes until foamy.
  2. Add flour, salt, yogurt, and vegetable oil (if using). Knead into a soft dough.
  3. Cover and let the dough rest for 15-20 minutes.
  4. Divide into equal portions and roll out into thin circles.
  5. Heat a pan over medium heat and cook each flatbread for 1-2 minutes per side, until golden brown and puffed.
  6. Serve warm with butter, cheese, or your favorite spread.

Notes

  • If the dough is too dry, add a little more milk; if too sticky, add a bit more flour.
  • To make whole wheat flatbreads, swap half of the all-purpose flour with whole wheat flour.
  • Store leftovers in an airtight container for up to 2 days at room temperature or refrigerate for up to 5 days.
  • Freeze cooked flatbreads by stacking them with parchment paper between each and storing them in a freezer-safe bag.
  • Reheat on a hot pan for 30 seconds per side or in the microwave for 10 seconds.

Mini Veggie Omelette Muffins: A Fun & Healthy Breakfast for Kids

Breakfast has always been an important part of my day, but as a child, it wasn’t just about food—it was about the excitement of opening my lunchbox to see what surprise awaited inside. My mother always made sure to prepare something special, something that was not just nutritious but also fun to eat.

One of my favorite memories was discovering mini omelette muffins tucked neatly in my tiffin box. Unlike the usual fried eggs or plain boiled eggs, these muffins were soft, fluffy, and packed with colorful vegetables. The melted cheese on top was always the best part—it added a creamy, slightly crispy layer that made the first bite extra delicious.

Now that I have kids of my own, I find myself recreating those same omelette muffins. Not only are they incredibly easy to make, but they’re also a fantastic way to sneak in vegetables without any complaints. Whether it’s for a quick breakfast, a school lunch, or a healthy after-school snack, these mini veggie omelette muffins are always a hit. They are proof that simple ingredients can create something comforting, nutritious, and absolutely delicious.

Why You’ll Love This Recipe

1. A Nutritious Start to the Day

Eggs are a great source of protein, while the mixed vegetables provide essential vitamins and fiber. This recipe offers a balanced meal that keeps kids full and energized.

2. Perfect for Busy Mornings

No time for a full breakfast? These mini omelette muffins can be made ahead of time and stored in the fridge or freezer. Just warm them up, and breakfast is ready in seconds.

3. A Fun Way to Get Kids to Eat Vegetables

Children can be picky eaters, but when veggies are baked into these soft, cheesy muffins, they become much more appealing. You can even let kids help choose their favorite vegetables, making them more excited to eat their breakfast.

4. Customizable to Suit Everyone’s Taste

This recipe is incredibly versatile. You can swap out the vegetables, add different cheeses, or include proteins like ham, sausage, or tofu to create a variation that everyone will love.

5. Great for Meal Prep and On-the-Go Snacks

These muffins aren’t just for breakfast—they’re perfect for lunchboxes, road trips, or quick snacks in between meals. Make a big batch, store them in the fridge, and grab one whenever hunger strikes.

Ingredients

IngredientQuantity
Eggs6 medium-sized
Milk or cream4 tbsp
Salt½ tsp
Black pepper½ tsp
Chicken sausage2 tbsp, chopped
Mixed veggies1.5 cups (any vegetables you like)
Cheese½ cup, shredded
Butter1 tbsp, for greasing

Directions

  1. Preheat oven to 375°F (190°C) and grease a muffin tin with butter.
  2. Whisk the eggs in a bowl, then add milk, salt, and black pepper. Mix well.
  3. Prepare the filling by chopping the sausage and vegetables into small pieces.
  4. Fill the muffin cups about halfway with the veggie and sausage mixture.
  5. Pour the egg mixture evenly into each cup, filling about ¾ of the way.
  6. Sprinkle cheese on top of each muffin.
  7. Bake for 18-20 minutes or until the eggs are fully set and slightly golden on top.
  8. Cool for a few minutes, then remove from the muffin tin and serve warm.

Nutritional Information (Per Serving, Approximate)

NutrientAmount
Calories120 kcal
Carbohydrates3 g
Protein9 g
Fat8 g
Fiber1 g
Calcium10% DV
Iron8% DV

Health Benefits of Mini Omelette Muffins

Eggs: A Protein Powerhouse

Eggs are one of the most complete sources of protein and are packed with essential nutrients:

  • High in protein, helping with muscle growth and repair.
  • Rich in choline, which supports brain development and memory.
  • Loaded with healthy fats, keeping kids full and satisfied.
  • Provides essential vitamins, including B12, D, and E.

Vegetables: Nature’s Superfoods

Adding a variety of vegetables to these muffins ensures kids get essential vitamins and minerals:

  • Carrots – High in beta-carotene for good eyesight.
  • Bell peppers – A great source of vitamin C to boost immunity.
  • Spinach – Packed with iron and folate for healthy blood circulation.
  • Tomatoes – Full of antioxidants that protect against disease.

Cheese: A Calcium Boost

Cheese not only adds delicious creaminess but also provides:

  • Calcium for strong bones and teeth.
  • Healthy fats to support growth and development.
  • Protein for sustained energy.

FAQs About Mini Vegetable Omelette Muffins

1. Can I make these muffins dairy-free?

Yes! Simply replace the milk with a plant-based alternative like almond, soy, or oat milk. You can also skip the cheese or use a dairy-free cheese substitute.

2. How do I make them more filling?

If you want to make these muffins heartier, you can add diced cooked potatoes, quinoa, or shredded chicken.

3. What are the best vegetables to use?

You can use any vegetables you like! Popular choices include bell peppers, spinach, mushrooms, zucchini, and cherry tomatoes. Just make sure to chop them finely so they cook evenly.

4. How do I prevent the muffins from sticking to the pan?

Grease the muffin tin well with butter, oil, or non-stick spray. You can also use silicone muffin cups or parchment liners for easy removal.

5. Can I add meat to this recipe?

Absolutely! Cooked and chopped sausage, ham, bacon, or shredded chicken make great additions for extra protein.

6. How do I store these muffins?

Once cooled, store the muffins in an airtight container in the refrigerator for up to 4 days.

7. Can I freeze them?

Yes! Place the muffins in a single layer on a baking sheet and freeze for an hour. Then transfer them to a freezer bag and store for up to 2 months. Reheat in the microwave or oven before serving.

8. Can I make mini versions for toddlers?

Yes! Use a mini muffin tin and reduce the baking time to about 12-15 minutes. These bite-sized versions are perfect for little hands.

9. What can I serve with these muffins?

They go well with toast, fresh fruit, yogurt, or a smoothie for a complete and balanced breakfast.

10. Can I make these muffins in advance?

Yes! Make a batch at the beginning of the week and store them in the fridge or freezer for a quick breakfast option.

A Breakfast That’s Both Fun and Nutritious

These mini vegetable omelette muffins are more than just a breakfast—they’re a fun and nutritious way to start the day. Whether you’re making them for your kids, packing them for school, or preparing them for a busy morning, they’re a simple yet delicious solution for a wholesome meal.

The best part? You can customize them however you like—add your favorite ingredients, experiment with different cheeses, or sneak in extra veggies. It’s a recipe that’s easy to make, easy to store, and guaranteed to be a hit with the whole family.

So the next time you’re looking for a healthy, quick, and kid-friendly breakfast, give these mini omelette muffins a try. One batch, and they might just become a staple in your kitchen!

Amal

Mini Veggie Omelette Muffins: A Fun & Healthy Breakfast for Kids

These mini vegetable omelette muffins are the perfect healthy, protein-packed breakfast for kids and adults alike! Made with fluffy eggs, colorful veggies, and melted cheese, they are easy to prepare, customizable, and great for meal prep. Enjoy them as a quick breakfast, a school lunchbox snack, or an on-the-go bite for busy mornings!
Prep Time 10 minutes
Cook Time 20 minutes
Total Time 30 minutes
Servings: 6 -8 muffins
Course: Breakfast
Cuisine: International

Ingredients
  

  • 6 medium-sized eggs
  • 4 tbsp milk or cream
  • ½ tsp salt
  • ½ tsp black pepper
  • 2 tbsp chopped chicken sausage optional
  • 1.5 cups mixed veggies any type of vegetables you like
  • ½ cup shredded cheese
  • 1 tbsp butter for greasing

Method
 

  1. Preheat the oven to 375°F (190°C) and grease a muffin tin with butter or non-stick spray.
  2. In a bowl, whisk together the eggs, milk, salt, and black pepper until well combined.
  3. Chop the vegetables and chicken sausage into small pieces.
  4. Fill each muffin cup about halfway with the vegetable and sausage mixture.
  5. Pour the egg mixture evenly over the vegetables, filling each cup about ¾ full.
  6. Sprinkle shredded cheese on top of each muffin.
  7. Bake for 18-20 minutes, or until the eggs are set and slightly golden on top.
  8. Let cool for a few minutes before removing from the tin. Serve warm or store for later!

Notes

  • Use any vegetables you like, such as spinach, bell peppers, mushrooms, or tomatoes.
  • Swap chicken sausage for turkey, ham, or keep it vegetarian.
  • Store leftovers in an airtight container in the fridge for up to 4 days or freeze for up to 2 months.
  • Reheat in the microwave for 30 seconds or in the oven at 350°F (175°C) for 5 minutes.
  • Serve with toast, yogurt, or fruit for a complete breakfast.

Golden Baked Cabbage & Cheese Frittata: A Savory Delight

Some of the best meals come from the simplest ingredients. Growing up, I remember my grandmother making the most delicious meals out of whatever she had on hand. She never wasted anything—leftover vegetables, a few eggs, and some pantry staples were all she needed to create a dish that filled the kitchen with warmth.

One of my favorites was her cabbage frittata. She never called it that—it was just “baked cabbage with eggs” to her—but it was always one of the dishes I looked forward to the most. She would chop fresh cabbage from the garden, mix it with eggs, onions, and a handful of flour, and then bake it until golden brown. The result? A fluffy, savory, and slightly crispy dish that we ate straight from the oven. Sometimes she’d add cheese or herbs, and other times she’d leave it as simple as possible. It was always delicious.

As I grew older and started cooking for myself, I found myself craving that same taste of home. This baked cabbage and cheese frittata is my version of her dish. It’s simple, nutritious, and packed with flavor, just like she used to make. Whether you’re looking for a quick breakfast, a light lunch, or a healthy dinner, this recipe is proof that comfort food doesn’t have to be complicated.

Why This Baked Cabbage Frittata Is a Must-Try

1. Light, Fluffy, and Full of Flavor

The combination of eggs, cabbage, and carrots creates a naturally sweet, savory, and hearty dish. The frittata is baked instead of fried, making it lighter but still satisfying.

2. Packed with Nutrients

Cabbage is rich in vitamins C and K, carrots add a boost of vitamin A, and eggs provide high-quality protein. This dish is a great way to enjoy a balanced, wholesome meal.

3. Quick and Easy to Make

With just a few basic ingredients and minimal prep time, this dish is perfect for busy days when you want something nutritious without spending hours in the kitchen.

4. Budget-Friendly and Versatile

Using simple, inexpensive ingredients, this frittata is an affordable meal that can be customized in countless ways. Add cheese, swap out the vegetables, or spice it up to suit your taste.

5. Perfect for Any Meal

Enjoy it hot or cold, for breakfast, lunch, or dinner. It pairs well with a side salad, fresh bread, or a bowl of soup for a complete meal.

Ingredients

IngredientQuantity
Eggs3 large
Salt1 teaspoon
Black pepper½ teaspoon
All-purpose flour2 tablespoons (16g)
Cabbage200g (7 oz), shredded
Carrot100g (1 medium), grated
Onion100g (1 small), finely chopped

Directions

  1. Preheat the oven to 375°F (190°C) and grease a baking dish.
  2. Whisk the eggs in a large bowl, then add salt, black pepper, and flour. Mix well.
  3. Add the vegetables—shredded cabbage, grated carrot, and chopped onion—into the egg mixture. Stir until well combined.
  4. Pour the mixture into the greased baking dish, spreading it evenly.
  5. Bake for 25-30 minutes until the top is golden brown and the frittata is set.
  6. Let it cool slightly, then slice and serve warm.

Nutritional Information (Per Serving, Approximate)

NutrientAmount
Calories150 kcal
Carbohydrates12 g
Protein8 g
Fat7 g
Fiber3 g
Vitamin A45% DV
Vitamin C30% DV

The Health Benefits of Cabbage, Eggs, and Carrots

Cabbage: A Nutrient Powerhouse

Cabbage is one of the most underrated vegetables. It’s low in calories but packed with nutrients that promote overall health:

  • High in fiber, supporting digestion and gut health.
  • Rich in vitamin C, which boosts immunity and skin health.
  • Loaded with antioxidants, helping to reduce inflammation.
  • A great source of vitamin K, essential for bone health.

Eggs: A Perfect Protein Source

Eggs are one of the most versatile and nutritious foods available:

  • Packed with protein, helping to build and repair muscles.
  • Rich in healthy fats, keeping you full longer.
  • Loaded with essential vitamins, including B12, which supports brain function.

Carrots: A Sweet and Nutritious Addition

Carrots add natural sweetness and color to the frittata while providing essential nutrients:

  • High in beta-carotene, which converts to vitamin A for healthy vision.
  • Supports heart health, thanks to antioxidants and fiber.
  • Helps regulate blood sugar, making it a great option for balanced meals.

FAQs About Baked Cabbage and Cheese Frittata

1. Can I add cheese to this recipe?

Absolutely! Adding cheese enhances the flavor and creates a rich, creamy texture. Cheddar, feta, or parmesan work beautifully in this dish.

2. How do I make this frittata dairy-free?

Simply omit the cheese or replace it with a dairy-free alternative like nutritional yeast or plant-based cheese. The frittata will still be delicious and full of flavor.

3. Can I make this ahead of time?

Yes! This frittata stores well in the refrigerator for up to three days. Reheat it in the oven or microwave for a quick and easy meal.

4. What can I serve with this frittata?

It pairs well with fresh bread, a side salad, roasted potatoes, or even a dollop of sour cream or yogurt for extra richness.

5. Can I use different vegetables?

Definitely! You can swap out or add vegetables like spinach, bell peppers, zucchini, or mushrooms. Just be sure to chop them finely so they cook evenly.

6. How do I store and reheat leftovers?

Store leftovers in an airtight container in the fridge. Reheat in the oven at 350°F (175°C) for 10 minutes or microwave for 1-2 minutes until warmed through.

7. Can I freeze this frittata?

Yes! Slice the frittata into portions and freeze them in an airtight container. Reheat in the oven or microwave when ready to eat.

8. How do I make sure my frittata is light and fluffy?

To keep your frittata from becoming dense, avoid overmixing the batter and bake it at a moderate temperature until just set. Overbaking can make it dry.

9. Can I make this recipe gluten-free?

Yes! Simply replace the flour with a gluten-free alternative like almond flour or cornstarch. The texture may be slightly different, but it will still taste great.

10. Can I make mini frittatas instead of one large one?

Yes! Pour the batter into greased muffin tins and bake at 375°F (190°C) for about 15-18 minutes until set. These mini frittatas are perfect for meal prep or on-the-go snacks.

A Simple, Nutritious, and Flavorful Dish for Any Occasion

This baked cabbage and cheese frittata is proof that simple ingredients can create something truly delicious. Whether you’re making it for a family breakfast, a quick lunch, or a light dinner, it’s a dish that’s packed with flavor, nutrition, and comfort.

The best part? It’s incredibly easy to make. With just a handful of ingredients and minimal effort, you can enjoy a homemade meal that feels hearty and satisfying. Plus, it’s versatile—switch up the ingredients, add your favorite seasonings, or enjoy it in different ways throughout the week.

So the next time you have a head of cabbage and a few eggs in your fridge, give this recipe a try. It’s a healthy, delicious, and budget-friendly dish that will quickly become a favorite in your kitchen!

Amal

Golden Baked Cabbage & Cheese Frittata: A Savory Delight

This baked cabbage and cheese frittata is light, fluffy, and packed with flavor. A perfect blend of shredded cabbage, carrots, and onions, combined with eggs and a touch of seasoning, makes this dish a healthy and satisfying meal. It’s quick to prepare, naturally nutritious, and perfect for breakfast, lunch, or dinner. Enjoy it warm, straight from the oven, or pack it for a delicious on-the-go snack!
Prep Time 10 minutes
Cook Time 30 minutes
Total Time 40 minutes
Servings: 4 servings
Course: Lunch
Cuisine: International

Ingredients
  

  • 3 eggs
  • 1 teaspoon salt
  • ½ teaspoon black pepper
  • 2 tablespoons all-purpose flour 16g
  • 200 g 7 oz cabbage, shredded
  • 1 carrot grated (100g)
  • 1 onion finely chopped (100g)

Method
 

  1. Preheat oven to 375°F (190°C) and grease a baking dish.
  2. In a large bowl, whisk the eggs, salt, black pepper, and flour until smooth.
  3. Add the shredded cabbage, grated carrot, and chopped onion. Stir to combine.
  4. Pour the mixture into the prepared baking dish, spreading it evenly.
  5. Bake for 25-30 minutes or until golden brown and set in the center.
  6. Let it cool for a few minutes before slicing. Serve warm and enjoy!

Notes

  • For extra flavor, add grated cheese (cheddar or feta) to the mixture before baking.
  • To make it gluten-free, replace all-purpose flour with almond flour or cornstarch.
  • Store leftovers in an airtight container in the refrigerator for up to 3 days. Reheat in the oven or microwave.
  • You can also freeze individual portions for quick and easy meal prep.
  • Serve with a side salad, yogurt, or fresh bread for a complete meal.