The Pastries That Disappear in Minutes – A Family Favorite

There are some recipes that become instant family traditions. This one is mine. Every time I bake these delicate, golden pastries filled with silky lemon cream, they barely make it to the serving plate before they’re gone. My wife, in particular, adores them—so much so that she asks me to make them at least three times a week.

The first time I made these pastries, it was purely by accident. I had been experimenting with choux pastry, determined to perfect the balance between crispiness and fluffiness. After a few trials, I finally got it right—light, airy, golden shells that were just waiting to be filled. That’s when I decided to add a smooth, citrus-infused cream, and suddenly, the recipe became a staple in our home.

Now, it’s a weekend tradition. The smell of buttery choux pastry baking in the oven, the rich aroma of lemon cream simmering on the stove—it’s pure comfort. These pastries are not only simple to make but also incredibly satisfying. Once you try them, you’ll understand why they vanish so quickly!

What Makes These Pastries So Special?

1. The Perfect Combination of Crisp and Creamy

Choux pastry is famous for its delicate, airy texture. When baked correctly, it becomes light and crisp on the outside, with a hollow center ready to be filled. The rich lemon cream adds a smooth, luscious contrast, making every bite an irresistible blend of textures.

2. A Simple Yet Elegant Dessert

These pastries look and taste like they came from a fancy bakery, but they’re surprisingly easy to make at home. Whether you’re serving them for a special occasion or just indulging in a homemade treat, they never fail to impress.

3. A Burst of Fresh Lemon Flavor

The lemon zest in the cream filling adds a bright, citrusy flavor that balances the sweetness perfectly. It’s refreshing, light, and not overly heavy—making these pastries a perfect dessert after any meal.

4. No Special Equipment Needed

Many bakery-style pastries require complicated techniques or expensive equipment. This recipe, however, is beginner-friendly. You don’t need a mixer, a fancy oven, or any special tools—just a pot, a whisk, and a piping bag (or a spoon if you prefer).

5. Great for Any Occasion

Whether you’re making these for a family gathering, a party, or just a quiet afternoon treat, they always feel special. Serve them as an elegant dessert for guests, or enjoy them with a cup of coffee in the morning.

Ingredients

For the Lemon Cream:

IngredientAmount
Lemon zestFrom 1 lemon
Milk500ml (18 oz)
Eggs2
Sugar120g (4.2 oz)
Vanilla sugar10g (1 teaspoon)
Cornstarch50g (1.7 oz)

For the Choux Pastry:

IngredientAmount
Water100ml (1/2 glass)
Milk100ml (1/2 glass)
Butter80g (6 tablespoons)
Salt1 pinch
Sugar1 teaspoon
All-purpose flour120g (4.2 oz)
Eggs3

Directions

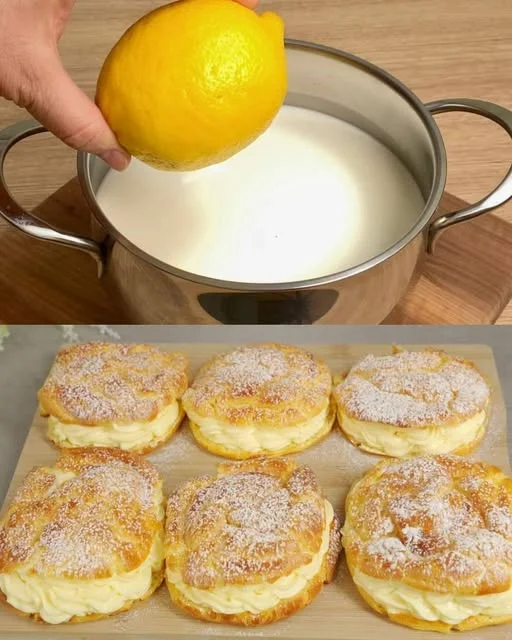
  1. Make the Lemon Cream – Heat the milk with the lemon zest in a saucepan until warm but not boiling. In a separate bowl, whisk together the eggs, sugar, vanilla sugar, and cornstarch until smooth. Slowly pour the warm milk into the egg mixture while whisking. Return the mixture to the saucepan and cook over low heat, stirring constantly, until thickened. Remove from heat and let cool.
  2. Prepare the Choux Pastry – In a pot, combine water, milk, butter, salt, and sugar. Bring to a gentle boil, then remove from heat and stir in the flour until a smooth dough forms. Let it cool slightly, then add eggs one at a time, mixing well after each addition until the dough is smooth and glossy.
  3. Bake the Pastries – Preheat the oven to 375°F (190°C). Transfer the choux pastry to a piping bag and pipe small rounds onto a lined baking sheet. Bake for 20-25 minutes until puffed and golden. Let them cool completely.
  4. Fill the Pastries – Slice each pastry in half or use a piping bag to fill them with the lemon cream.
  5. Enjoy! – Dust with powdered sugar if desired and serve fresh for the best taste.

Nutritional Information (Per Pastry, Approximate)

NutrientAmount
Calories180
Carbohydrates22g
Protein4g
Fat9g
Sugar10g
Fiber1g

Ways to Customize These Pastries

One of the best things about this recipe is how versatile it is. You can easily switch up the flavors and textures to suit your preferences. Here are some ideas:

  • Chocolate Lovers’ Version – Drizzle melted chocolate over the top or add cocoa powder to the cream filling for a rich, decadent twist.
  • Berry Delight – Add fresh raspberries or strawberries inside the pastries along with the lemon cream.
  • Nutty Crunch – Sprinkle crushed almonds or pistachios on top for added texture.
  • Vanilla Dream – Swap the lemon zest for vanilla bean paste for a classic, creamy flavor.
  • Coffee Infused – Add a teaspoon of instant espresso powder to the cream for a bold, aromatic filling.

Frequently Asked Questions

1. Why Didn’t My Choux Pastry Rise?

There are a few common reasons why choux pastry might not rise properly:

  • Too much moisture: If the dough is too wet, the steam won’t create enough air pockets inside.
  • Oven temperature too low: Choux pastry needs a high temperature to puff up. Make sure your oven is properly preheated.
  • Opening the oven too soon: Avoid opening the oven door while baking, as the sudden temperature drop can cause them to deflate.

2. Can I Make the Lemon Cream in Advance?

Yes! The lemon cream can be prepared up to two days in advance and stored in the refrigerator. Just give it a good stir before using it to fill the pastries.

3. Can These Pastries Be Frozen?

The choux pastry shells can be frozen once baked and cooled. Store them in an airtight container for up to three months. When ready to use, crisp them up in the oven for a few minutes before filling. However, the lemon cream is best when made fresh.

4. How Do I Keep My Pastries from Getting Soggy?

To keep your pastries crisp:

  • Allow them to cool completely before filling.
  • Store unfilled pastries in an airtight container at room temperature.
  • Fill them just before serving for the best texture.

5. Can I Use a Different Filling?

Absolutely! While the lemon cream is delicious, you can also try vanilla custard, pastry cream, whipped cream, or even a mascarpone-based filling.

6. How Long Do These Pastries Stay Fresh?

They are best enjoyed the same day they are made. However, if stored properly in the refrigerator, they can last up to 2 days—though the pastry will soften slightly.

Tips for the Best Choux Pastry

  • Use Room Temperature Eggs – This helps the eggs incorporate smoothly into the dough, creating a stable texture.
  • Don’t Overmix the Dough – Once the flour is added, mix just until combined to prevent the dough from becoming too dense.
  • Bake at the Right Temperature – Start baking at a high temperature (375°F/190°C) to help the pastries puff up, then lower the heat slightly to allow them to cook through without burning.
  • Let Them Cool in the Oven – After turning off the oven, leave the pastries inside with the door slightly open. This prevents them from collapsing due to sudden temperature changes.

Conclusion – A Recipe Worth Making Again and Again

Few things in life are as satisfying as biting into a freshly baked, cream-filled pastry. These choux pastries with lemon cream are not just a dessert—they’re a little moment of joy, a reason to slow down and savor something truly special.

I love how this recipe brings people together. Whether I’m making them for my wife, friends, or family, the reaction is always the same—delight, excitement, and the inevitable request for more.

So, if you’re looking for a dessert that’s easy, elegant, and absolutely delicious, give these pastries a try. But be warned: they won’t last long. You might just find yourself making them three times a week too!

Amal

The Pastries That Disappear in Minutes – A Family Favorite

These delicate choux pastries are crispy on the outside, airy on the inside, and filled with a silky lemon cream that melts in your mouth. A perfect balance of citrusy freshness and rich pastry, this simple yet elegant dessert is perfect for any occasion. Whether you’re making them for a family treat or a special gathering, they’ll disappear within minutes!
Prep Time 20 minutes
Cook Time 25 minutes
Total Time 45 minutes
Servings: 12 pastries
Course: Dessert
Cuisine: French

Ingredients
  

For the Lemon Cream:
  • Zest of 1 lemon
  • 500 ml 18 oz milk
  • 2 eggs
  • 120 g 4.2 oz sugar
  • 10 g 1 teaspoon vanilla sugar
  • 50 g 1.7 oz cornstarch
For the Choux Pastry:
  • 100 ml 1/2 glass water
  • 100 ml 1/2 glass milk
  • 80 g 6 tablespoons butter
  • 1 pinch of salt
  • 1 teaspoon sugar
  • 120 g 4.2 oz all-purpose flour
  • 3 eggs

Method
 

  1. Prepare the Lemon Cream: In a saucepan, heat the milk with the lemon zest until warm. In a separate bowl, whisk together eggs, sugar, vanilla sugar, and cornstarch. Slowly add the warm milk while whisking continuously. Return to the saucepan and cook over low heat, stirring until thickened. Let cool.
  2. Make the Choux Pastry: In a pot, heat water, milk, butter, salt, and sugar until just boiling. Remove from heat and quickly stir in the flour until the dough comes together. Let cool slightly, then add eggs one at a time, mixing well until smooth.
  3. Bake the Pastries: Preheat oven to 375°F (190°C). Transfer dough to a piping bag and pipe small rounds onto a baking sheet. Bake for 20-25 minutes until golden and puffed. Let cool completely.
  4. Fill the Pastries: Slice pastries in half or poke a hole in the bottom and pipe in the lemon cream.
  5. Serve & Enjoy: Dust with powdered sugar if desired and serve fresh for the best taste.

Notes

  • Allow pastries to cool completely before filling to prevent sogginess.
  • Store unfilled pastries in an airtight container for up to 2 days.
  • Choux pastry can be frozen after baking—reheat in the oven before filling.
  • Experiment with different fillings like vanilla cream, chocolate custard, or whipped cream.

A Guilt-Free Treat – The Healthiest Carrot Cake You’ll Ever Make

Baking has always been a source of joy and comfort for me. It’s a way to slow down, enjoy the process, and create something delicious to share with family and friends. But as much as I love traditional cakes, I also enjoy experimenting with healthier alternatives—recipes that satisfy my sweet tooth without refined sugar, butter, or flour.

I first came across the idea of making a carrot cake without flour and sugar when I was looking for a wholesome snack that wouldn’t leave me feeling sluggish. At first, I was skeptical. Could a cake without traditional ingredients still be moist, flavorful, and satisfying? The answer was a resounding yes.

The natural sweetness from bananas and dried fruits, the heartiness of oats, and the warm, earthy flavor of carrots create a beautifully textured cake that’s both nourishing and delicious. It’s not just a healthy alternative—it’s a treat that stands on its own, bursting with natural flavors and wholesome goodness.

This recipe has become a favorite in my home, perfect for breakfast, as an afternoon snack with tea, or even as a dessert. I love that it’s packed with nutrients and made from simple, whole ingredients. Best of all, it’s easy to prepare and doesn’t require any fancy equipment or techniques.

Now, I’m sharing it with you so that you, too, can enjoy a guilt-free, naturally sweet carrot cake that will leave you feeling great after every bite.

Why You’ll Love This Carrot Cake

1. Completely Free of Refined Sugar, Flour, and Butter

Unlike traditional carrot cake, which is often loaded with sugar and white flour, this version gets its sweetness from natural sources like bananas and dried fruits. Oats replace the flour, making it a fiber-rich, whole-food option.

2. Perfectly Moist Without Eggs or Dairy

Many healthy cakes tend to be dry, but this one is incredibly moist thanks to the banana, grated carrots, and a touch of milk or juice. There’s no need for eggs or butter—just simple ingredients working together to create the perfect texture.

3. Packed with Nutrients

Every ingredient in this recipe contributes to a nutrient-rich, wholesome treat:

  • Carrots add vitamin A and fiber.
  • Oats provide slow-digesting carbohydrates for sustained energy.
  • Dried fruits bring natural sweetness and essential minerals.
  • Seeds offer healthy fats, protein, and a bit of crunch.

4. Naturally Sweet & Full of Flavor

The combination of bananas, dried fruits, and carrots creates a naturally sweet and rich flavor. There’s no need for added sugar, and yet, every bite is perfectly balanced and satisfying.

5. Easy to Make & Customizable

This recipe comes together in minutes and requires only one mixing bowl. Plus, you can easily tweak it based on your preferences—swap dried fruits, add nuts, or experiment with different spices to create your own version.

Ingredients

IngredientAmount
Banana, mashed160g (about 1 large banana)
Carrots, finely grated110g
Instant rolled oats200g
Dried fruits (raisins, dates, or apricots), chopped150g
Shelled sunflower seeds2 tablespoons
Sesame seeds2 tablespoons
Milk (or water/orange juice for a different flavor)120ml
Baking soda0.5 teaspoon

Directions

  1. Preheat the Oven – Set your oven to 350°F (175°C) and line a baking pan with parchment paper.
  2. Mix the Ingredients – In a large bowl, combine the mashed banana, grated carrots, oats, dried fruits, sunflower seeds, and sesame seeds.
  3. Add Liquid & Baking Soda – Pour in the milk (or your preferred liquid) and mix well. Stir in the baking soda until fully incorporated.
  4. Let the Batter Rest – Allow the mixture to sit for 10 minutes so the oats can absorb the liquid.
  5. Bake to Perfection – Transfer the mixture to the prepared pan and spread evenly. Bake for 25-30 minutes or until firm and lightly golden.
  6. Cool & Serve – Let the cake cool before slicing. Enjoy as is, or top with a drizzle of honey or nut butter!

Nutritional Information (Per Serving, Approximate)

NutrientAmount
Calories180
Carbohydrates32g
Protein5g
Fat5g
Fiber4g
Natural Sugars12g

Creative Ways to Enjoy This Carrot Cake

This cake is delicious on its own, but here are some ideas to make it even more special:

  • With Nut Butter – Spread a thin layer of almond or peanut butter for extra creaminess.
  • Topped with Yogurt – A dollop of Greek yogurt makes a great, tangy contrast.
  • Drizzled with Honey or Maple Syrup – For those who like a little extra sweetness.
  • With a Side of Fresh Fruit – Pair it with sliced apples, pears, or berries for a refreshing combination.
  • Toasted for Extra Crunch – Lightly toast a slice for a warm and crispy treat.

Frequently Asked Questions (FAQs)

1. Can I Make This Recipe Gluten-Free?

Yes! Just be sure to use certified gluten-free oats, and you’ll have a completely gluten-free version of this carrot cake.

2. What’s the Best Liquid to Use?

Milk (dairy or plant-based) works best for a soft texture, but you can also use water or orange juice for a slightly different flavor. Orange juice adds a nice citrusy note that pairs well with the carrots.

3. Can I Add Nuts or Spices?

Absolutely! Chopped walnuts, pecans, or almonds make a great addition for extra crunch. If you love warm spices, add cinnamon, nutmeg, or ginger for a more classic carrot cake flavor.

4. How Long Does This Cake Stay Fresh?

Stored in an airtight container, this cake stays fresh for about 3 days at room temperature or up to a week in the refrigerator. It also freezes well for up to 3 months—just slice it before freezing for easy grab-and-go portions.

5. Can I Make Muffins Instead of a Cake?

Yes! Simply divide the batter into muffin cups and bake for about 15-20 minutes instead of 25-30 minutes. This makes a great portable snack or breakfast option.

6. What Can I Use Instead of Banana?

If you’re not a fan of bananas, you can substitute them with unsweetened applesauce or mashed sweet potato. Both options provide natural sweetness and moisture while keeping the cake soft and tender.

7. Can I Use Fresh Fruit Instead of Dried Fruit?

Dried fruit works best because it provides concentrated sweetness and texture, but you can experiment with finely chopped fresh fruit like apples or pears. Just keep in mind that fresh fruit contains more moisture, so you may need to adjust the liquid slightly.

Tips for the Best Flourless Carrot Cake

  • Use Very Ripe Bananas: The riper the banana, the sweeter the cake will be. Look for bananas with brown spots for the best natural sweetness.
  • Grate the Carrots Finely: This helps them blend seamlessly into the batter, ensuring a soft and even texture.
  • Let the Batter Rest Before Baking: Allowing the oats to absorb the liquid for about 10 minutes before baking results in a more cohesive cake.
  • Bake Until Firm & Golden: Since this cake doesn’t contain traditional flour, it won’t rise like a typical cake. Look for a firm texture and golden color as signs that it’s done.
  • Cool Completely Before Slicing: The cake holds its shape better when cooled, so resist the urge to cut into it right away.

Conclusion – A Healthy Treat You’ll Want to Make Again and Again

There’s something truly rewarding about creating a cake that’s not only delicious but also packed with nourishing ingredients. This flourless, sugar-free, and egg-free carrot cake proves that healthy eating doesn’t mean sacrificing flavor or texture. Every bite is naturally sweet, moist, and satisfying—without the guilt.

Whether you make this for a quick breakfast, a snack on the go, or a wholesome dessert, it’s a recipe you’ll want to keep in your collection. Simple, nutritious, and incredibly delicious, this carrot cake is proof that healthy treats can be just as indulgent as traditional ones.

So, the next time you’re craving something sweet, skip the processed options and give this recipe a try. You’ll be amazed at how a few natural ingredients can come together to create something so satisfying. Enjoy!

Amal

A Guilt-Free Treat – The Healthiest Carrot Cake You’ll Ever Make

This naturally sweet and wholesome carrot cake is soft, moist, and packed with nutritious ingredients. Made without flour, sugar, butter, or eggs, it’s the perfect guilt-free treat for breakfast, snacks, or a light dessert. The natural sweetness from banana and dried fruits, combined with hearty oats and crunchy seeds, makes every bite deliciously satisfying!
Prep Time 10 minutes
Cook Time 30 minutes
Total Time 40 minutes
Servings: 6 –8 servings
Course: Healthy Desserts
Cuisine: International

Ingredients
  

  • 160 g banana about 1 large banana, mashed
  • 110 g carrots finely grated
  • 200 g instant rolled oats
  • 150 g dried fruits such as raisins, dates, or apricots, chopped
  • 2 tablespoons shelled sunflower seeds
  • 2 tablespoons sesame seeds
  • 120 ml milk or water or orange juice for a different flavor
  • 0.5 teaspoon baking soda

Method
 

  1. Preheat the oven to 350°F (175°C) and line a baking pan with parchment paper.
  2. In a large mixing bowl, combine the mashed banana, grated carrots, oats, dried fruits, sunflower seeds, and sesame seeds.
  3. Add the milk (or your preferred liquid) and mix well. Stir in the baking soda and allow the mixture to sit for 10 minutes.
  4. Pour the batter into the prepared baking pan and spread it evenly.
  5. Bake for 25-30 minutes, or until the cake is firm and lightly golden on top.
  6. Remove from the oven and let cool before slicing. Serve as is, or with a drizzle of honey or nut butter for extra flavor.

Notes

  • For a more classic carrot cake flavor, add cinnamon, nutmeg, or a splash of vanilla extract.
  • Swap banana with unsweetened applesauce if desired.
  • Store in an airtight container at room temperature for up to 3 days or refrigerate for up to a week.
  • This cake freezes well—slice before freezing for easy grab-and-go portions.

Homemade Bread in Minutes – The Recipe That Changed Everything

There’s something truly special about the smell of fresh bread baking in the oven. It fills the kitchen with warmth, comfort, and a sense of home. For years, I believed that making bread from scratch required hours of kneading, proofing, and waiting. But everything changed when I discovered this quick and foolproof bread recipe.

I remember the first time I made it. It was a busy evening, and I had forgotten to buy bread at the store. Instead of running out, I decided to try making my own. I didn’t have much time, so I needed a simple recipe—one that wouldn’t require yeast proofing or long rising times. To my surprise, within minutes, I had a soft, airy dough ready for the oven. Just 25 minutes later, I pulled out a golden loaf, brushed it with butter, and took my first bite. It was soft, slightly chewy, and had the perfect homemade flavor.

That was the moment I stopped buying store-bought bread. Since then, I’ve made this recipe countless times, tweaking and perfecting it along the way. Now, it has become a staple in my kitchen, and I can’t wait to share it with you. Whether you’re a beginner or an experienced baker, this is the one bread recipe you’ll want to keep forever.

Why This Bread Recipe is a Game-Changer

1. Quick and Easy

Traditional bread recipes often require hours of rising and kneading. This one, however, comes together in just minutes. There’s no need for long proofing times or complicated steps—just mix, knead briefly, and bake.

2. Simple, Everyday Ingredients

This bread uses basic pantry staples like flour, yeast, sugar, salt, and oil. There’s no need for special ingredients, making it a convenient option for any time you need fresh bread.

3. No Special Equipment Needed

Unlike some bread recipes that require stand mixers, bread machines, or fancy tools, this one can be made with just a mixing bowl and your hands. It’s straightforward, making it perfect for anyone new to baking.

4. Perfect Texture and Flavor

Despite its simplicity, this bread has a wonderful texture—soft on the inside with a slightly crisp crust. The combination of milk brushing before baking and butter brushing afterward creates a rich, golden finish.

5. Versatile for Any Use

This bread isn’t just for slicing and eating plain. It makes the perfect base for sandwiches, toast, bruschetta, and more. You can also use it as a side for soups, salads, or even turn it into homemade croutons.

Ingredients

IngredientAmount
Wheat flour, sifted350g
Sugar1 teaspoon
Salt1 teaspoon
Dry yeast5g
Boiled (but not hot) water210ml
Vegetable oil30g
Additional flourFor dusting
MilkFor brushing
ButterFor brushing

Directions

  1. Prepare the Dough – In a mixing bowl, combine sifted flour, sugar, salt, and dry yeast. Gradually add warm water and vegetable oil, mixing until a dough forms.
  2. Knead & Rest – Knead the dough for about 5 minutes until smooth. Cover and let it rest for 10 minutes.
  3. Shape & Proof – Dust a surface with flour and roll out the dough to your desired shape. Place it on a baking tray, cover, and let it rise for 20-30 minutes.
  4. Bake to Perfection – Preheat the oven to 375°F (190°C). Brush the dough with milk and bake for 20-25 minutes until golden brown.
  5. Final Touch – Remove from the oven and immediately brush with butter for a soft, glossy finish. Let cool slightly before slicing and serving.

Nutritional Information (Per Slice, Approximate)

NutrientAmount
Calories150
Carbohydrates28g
Protein4g
Fat3g
Fiber2g
Sodium200mg

Ways to Enjoy This Quick Bread

Once you make this bread, you’ll find countless ways to enjoy it. Here are some delicious serving ideas:

  • Classic Buttered Toast – Slice it and toast it with butter for a simple yet satisfying breakfast.
  • Sandwich Bread – Use it to make fresh sandwiches with your favorite fillings.
  • Garlic Bread – Brush with garlic butter and toast it in the oven for a crispy, flavorful side.
  • Bruschetta Base – Top with diced tomatoes, basil, and olive oil for an Italian-inspired snack.
  • Dipping Bread – Serve with soups, stews, or dips for a hearty meal.
  • French Toast – Transform it into a sweet breakfast treat by soaking in eggs and milk before frying.

Frequently Asked Questions (FAQs)

1. Can I Use Whole Wheat Flour Instead of White Flour?

Yes, but whole wheat flour absorbs more liquid, which can make the bread denser. If using whole wheat flour, try replacing only half of the all-purpose flour for a softer texture. You may also need to add a little extra water to keep the dough from becoming too dry.

2. Do I Need to Let the Dough Rise?

This recipe is designed to be quick, so the rise time is minimal. The dough rests briefly, but it doesn’t require the long proofing times that traditional bread recipes do. This means you can have fresh bread ready in under an hour.

3. How Do I Store This Bread?

To keep the bread fresh, store it in an airtight container or wrap it in a clean kitchen towel. It will stay soft for up to 2 days at room temperature. If you need to store it longer, refrigerate it for up to a week or freeze it for up to three months.

4. Can I Make This Bread Without Yeast?

Yeast gives the bread its light, airy texture. However, if you want a yeast-free version, you can substitute baking powder for the yeast. The result will be more like a quick bread, with a denser texture.

5. Why Is My Bread Too Dense?

A few factors can cause dense bread:

  • Not kneading the dough enough—kneading helps develop gluten, which gives the bread structure.
  • Using too much flour—measure carefully to avoid making the dough too dry.
  • Overbaking—check the bread a few minutes before the recommended baking time ends to prevent it from drying out.

6. Can I Make This Bread in a Loaf Pan?

Yes! While this bread is often shaped into a free-form loaf, you can also bake it in a standard loaf pan for a more structured shape. Just make sure to adjust the baking time slightly, as loaf pans may require a few extra minutes in the oven.

7. Can I Add Extra Flavors to the Dough?

Absolutely! This bread is a great base for experimentation. Try adding:

  • Herbs & Spices: Rosemary, oregano, garlic powder, or onion powder for an aromatic twist.
  • Cheese: Fold in shredded cheese for a cheesy loaf.
  • Seeds & Nuts: Sprinkle sesame seeds, sunflower seeds, or chopped nuts on top before baking.

Tips for the Best Homemade Bread

  • Use Fresh Yeast: Old yeast may not activate properly, leading to flat bread.
  • Measure Ingredients Accurately: Too much flour or too little liquid can affect the dough’s texture.
  • Don’t Skip the Butter Brushing: Brushing the bread with butter right after baking enhances flavor and keeps the crust from becoming too hard.
  • Let It Cool Before Slicing: Cutting into the bread too soon can make it doughy inside. Let it cool for at least 15 minutes for the best texture.

Conclusion – The Joy of Baking Bread at Home

There’s something deeply satisfying about making your own bread. It’s more than just a recipe—it’s a process that connects you to a long tradition of home baking. This quick and easy bread proves that homemade doesn’t have to mean complicated.

Whether you’re a first-time baker or someone looking for a fast, no-fuss bread recipe, this is the perfect one to try. Once you experience the smell of fresh bread in your kitchen and take that first warm bite, you’ll understand why I stopped buying bread altogether.

So, the next time you find yourself reaching for a loaf at the store, consider making this instead. With just a handful of ingredients and a little time, you can enjoy the satisfaction of homemade bread that’s soft, flavorful, and made with love. Happy baking!

Amal

Homemade Bread in Minutes – The Recipe That Changed Everything

This homemade bread is soft, airy, and incredibly easy to make! With a perfectly golden crust and a light, fluffy interior, it’s the perfect alternative to store-bought bread. No long proofing times, no complicated techniques—just simple ingredients and a foolproof method that guarantees delicious results every time.
Prep Time 10 minutes
Cook Time 25 minutes
Total Time 35 minutes
Servings: 6 -8 slices
Course: Bread
Cuisine: International

Ingredients
  

  • 350 g wheat flour sifted
  • 1 teaspoon sugar
  • 1 teaspoon salt
  • 5 g dry yeast
  • 210 ml boiled but not hot water
  • 30 g vegetable oil
  • Additional flour for dusting
  • Milk for brushing
  • Butter for brushing

Method
 

  1. In a mixing bowl, combine the sifted flour, sugar, salt, and dry yeast.
  2. Gradually add the warm water and vegetable oil, mixing until a soft dough forms.
  3. Knead the dough for about 5 minutes until smooth, then cover and let it rest for 10 minutes.
  4. Lightly flour a surface, shape the dough into a loaf, and place it on a baking tray. Cover and let it rise for 20-30 minutes.
  5. Preheat the oven to 375°F (190°C). Brush the top of the dough with milk and bake for 20-25 minutes, or until golden brown.
  6. Remove from the oven and immediately brush with butter for a soft, glossy crust.
  7. Let cool slightly before slicing and serving.

Notes

  • For a crispier crust, bake at a slightly higher temperature (400°F/200°C) for the last 5 minutes.
  • This bread is best enjoyed fresh but can be stored in an airtight container for up to 2 days.
  • If using whole wheat flour, add an extra tablespoon of water to keep the dough from being too dry.
  • This dough can also be shaped into rolls for individual servings.

The Secret to the Most Irresistible Muffins – Moist, Fluffy, and Absolutely Delicious

There are certain recipes that become a staple in every home, the kind that never fail to bring warmth and comfort. For me, these muffins are one of them. I still remember the first time I baked them—I was in my grandmother’s kitchen, watching her skillfully mix the batter with love and precision. The scent of vanilla and butter filled the air, and when the muffins finally emerged from the oven, golden and fluffy, I knew I had found a recipe to cherish forever.

Over the years, I’ve tweaked and perfected this recipe, making sure each bite is as moist, tender, and flavorful as I remember. These muffins are the perfect balance of light and rich, with a texture so soft that they almost melt in your mouth. Whether you enjoy them for breakfast, as a snack, or as a sweet treat after dinner, they never disappoint.

Now, I’m sharing this beloved recipe with you, hoping that it brings as much joy to your home as it has to mine.

What Makes These Muffins So Special?

1. The Perfect Balance of Moisture and Fluffiness

The secret to these muffins’ irresistibly soft texture lies in the combination of ingredients. Yogurt adds richness and tenderness, while a mix of butter and oil ensures they stay moist for days. Eggs help create a light and airy structure, giving the muffins that bakery-style rise and softness.

2. Simple Ingredients, Big Flavor

One of the best things about this recipe is that it uses everyday ingredients that you likely already have in your kitchen. There’s no need for fancy techniques—just good-quality ingredients and a little patience.

3. Foolproof and Easy to Make

Even if you’re a beginner baker, you can’t go wrong with these muffins. The steps are straightforward, and with just one bowl and a whisk, you’ll have perfect muffins in no time. No complicated equipment or professional skills required!

4. Perfect for Any Occasion

These muffins are incredibly versatile. Serve them warm for breakfast with a cup of coffee, pack them in a lunchbox for a midday treat, or dress them up with toppings for a more indulgent dessert. They are also great for parties, bake sales, and family gatherings—no one can resist a homemade muffin fresh from the oven!

Ingredients

IngredientAmount
Eggs4
White sugar150g
Cold milk60ml
Sunflower oil60ml
Cold melted butter100g
Unsweetened plain yogurt125g
Vanilla sugar8g
All-purpose flour300g
Pinch of saltTo taste

Directions

  1. Preheat the Oven – Set your oven to 350°F (175°C) and line a muffin tray with paper liners.
  2. Whisk the Wet Ingredients – In a large bowl, beat the eggs and sugar until light and fluffy. Add milk, sunflower oil, melted butter, yogurt, and vanilla sugar, mixing until smooth.
  3. Combine with Dry Ingredients – Gradually sift in the flour and salt, gently folding the mixture until just combined. Avoid overmixing for soft, airy muffins.
  4. Fill & Bake – Divide the batter evenly among the muffin cups, filling them about ¾ full. Bake for 18-22 minutes or until a toothpick inserted into the center comes out clean.
  5. Cool & Enjoy – Let the muffins cool for a few minutes before transferring them to a wire rack. Enjoy warm or at room temperature!

Nutritional Information (Per Muffin, Approximate)

NutrientAmount
Calories210
Carbohydrates28g
Protein4g
Fat9g
Sugar12g
Fiber1g

Ways to Customize These Muffins

One of the best things about this recipe is how adaptable it is. With a few simple tweaks, you can create endless variations to suit your cravings.

Sweet Additions:

  • Chocolate Chips – Stir in a handful of chocolate chips for a classic and indulgent twist.
  • Fresh Berries – Blueberries, raspberries, or chopped strawberries add a burst of freshness.
  • Cinnamon & Sugar – A sprinkle of cinnamon sugar on top creates a delightful crunch.
  • Lemon Zest – Add a hint of citrus for a bright and zesty flavor.

Savory Variations:

  • Cheese & Herbs – Swap out some of the sugar for shredded cheese and fresh herbs for a savory muffin.
  • Bacon & Cheddar – Perfect for a hearty breakfast option.
  • Sun-Dried Tomato & Feta – A Mediterranean-inspired version with a rich, tangy flavor.

FAQs About These Muffins

1. Can I Use Whole Wheat Flour Instead of All-Purpose Flour?

Yes! However, whole wheat flour absorbs more moisture, so you may need to add a little extra liquid (milk or yogurt) to keep the muffins from being too dense. A good ratio is half whole wheat and half all-purpose flour for the best balance of flavor and texture.

2. How Do I Store These Muffins?

To keep your muffins fresh, store them in an airtight container at room temperature for up to three days. If you want them to last longer, refrigerate them for up to a week or freeze them for up to three months. Simply reheat in the microwave or oven before serving.

3. Why Are My Muffins Dry?

Dry muffins usually result from overmixing the batter or overbaking. Be sure to mix just until the ingredients are combined, and always check for doneness a few minutes before the suggested baking time ends.

4. Can I Make These Muffins Dairy-Free?

Absolutely! Substitute the butter with coconut oil or a dairy-free margarine, and use a plant-based yogurt alternative such as almond or coconut yogurt. The texture will still be deliciously moist.

5. How Do I Get That Bakery-Style Muffin Top?

To achieve tall, domed muffin tops like the ones from a bakery, fill your muffin cups almost to the top and bake at a slightly higher temperature (375°F/190°C) for the first 5 minutes, then lower the heat to 350°F/175°C for the remaining baking time. This creates a quick rise and a perfectly golden top.

6. Can I Make Mini Muffins Instead?

Yes! To make mini muffins, reduce the baking time to 10-12 minutes, checking for doneness with a toothpick.

7. Can I Add a Streusel Topping?

Absolutely! A simple mixture of butter, sugar, and flour can create a crumbly, delicious topping that adds extra texture and sweetness.

Tips for the Best Muffins Every Time

  • Use Room Temperature Ingredients: Cold ingredients can affect the texture of the muffins. Let your eggs, milk, and yogurt sit out for a bit before mixing.
  • Measure Flour Correctly: Too much flour can make the muffins dense. Spoon the flour into the measuring cup and level it off instead of scooping directly from the bag.
  • Don’t Overmix: Stir just until combined—overmixing leads to tough muffins.
  • Let the Batter Rest: Letting the batter sit for 5-10 minutes before baking allows the ingredients to meld and results in better texture.
  • Test for Doneness: Use a toothpick—if it comes out clean or with a few crumbs, the muffins are done!

Conclusion – A Recipe Worth Making Again and Again

There’s something truly special about baking muffins from scratch. The process of measuring, mixing, and waiting for the oven to work its magic brings a sense of anticipation and joy. And when you finally take that first bite—soft, warm, and bursting with flavor—you realize that homemade is always worth it.

These muffins are more than just a recipe; they are a little piece of comfort, a reminder that the best things in life are often the simplest. Whether you make them for yourself, your family, or friends, they are guaranteed to bring smiles and satisfaction.

So, preheat that oven, gather your ingredients, and get ready to enjoy the most delicious, moist, and fluffy muffins you’ve ever had. Happy baking!

Amal

The Secret to the Most Irresistible Muffins – Moist, Fluffy, and Absolutely Delicious

These muffins are soft, moist, and bursting with flavor, making them the perfect treat for breakfast, dessert, or a snack. With a rich and tender crumb, they practically melt in your mouth. This simple yet delicious recipe uses basic ingredients, making it an easy go-to for any occasion.
Prep Time 10 minutes
Cook Time 20 minutes
Total Time 30 minutes
Servings: 12 muffins
Course: Dessert
Cuisine: International

Ingredients
  

  • 4 eggs
  • 150 g white sugar
  • 60 ml cold milk
  • 60 ml sunflower oil
  • 100 g cold melted butter
  • 125 g unsweetened plain yogurt
  • 8 g vanilla sugar
  • 300 g all-purpose flour
  • Pinch of salt

Method
 

  1. Preheat your oven to 350°F (175°C) and line a muffin tray with paper liners.
  2. In a large bowl, beat the eggs and sugar until light and fluffy.
  3. Add the milk, sunflower oil, melted butter, yogurt, and vanilla sugar, mixing until well combined.
  4. Gradually sift in the flour and salt, folding gently until the batter is smooth. Avoid overmixing.
  5. Divide the batter evenly among the muffin cups, filling them about ¾ full.
  6. Bake for 18-22 minutes, or until a toothpick inserted in the center comes out clean.
  7. Let the muffins cool for a few minutes before transferring to a wire rack. Serve warm or at room temperature.

Notes

  • Do not overmix the batter to keep the muffins light and fluffy.
  • Add chocolate chips, berries, or nuts for extra flavor variations.
  • Store in an airtight container at room temperature for up to 3 days or freeze for up to 3 months.
  • For bakery-style muffin tops, bake at 375°F (190°C) for the first 5 minutes, then reduce to 350°F (175°C) for the remaining time.

A Bowl of Comfort – The Magic of Homemade Vegetable Soup

There’s something deeply comforting about a bowl of warm, homemade soup. It’s more than just food—it’s a memory, a feeling, a hug in a bowl. For me, vegetable soup has always been a reminder of home. I can still picture my grandmother standing by the stove, slowly stirring a pot filled with colorful vegetables, the aroma filling the entire house. She never followed a strict recipe, but she always knew exactly how to balance the flavors.

Whenever the weather turned chilly or one of us felt under the weather, she would say, “Nothing a good soup can’t fix.” And she was right. That first spoonful always brought warmth and comfort, making everything feel just a little bit better.

Now, as I make my own version of this hearty and nourishing soup, I realize that its beauty lies in its simplicity. It’s a dish that welcomes creativity, a way to use up fresh vegetables, and a meal that brings people together. Whether you’re making it for yourself, your family, or friends, this vegetable soup is a reminder that sometimes, the simplest things in life are the most satisfying.

Why This Vegetable Soup Stands Out

1. Packed with Nutrients

Vegetable soup is one of the healthiest meals you can prepare. It’s loaded with vitamins, minerals, fiber, and antioxidants, making it a great way to nourish your body. Each vegetable brings its own unique set of benefits—carrots for beta-carotene, bell peppers for vitamin C, and leeks for digestive health.

2. Budget-Friendly & Versatile

This soup proves that healthy eating doesn’t have to be expensive. Most of the ingredients are pantry staples or fresh vegetables that you likely already have. Plus, you can customize it based on what’s in your fridge—swap out zucchini for green beans, add spinach, or throw in some chickpeas for extra protein.

3. A Perfect Make-Ahead Meal

Vegetable soup tastes even better the next day! The flavors deepen as they sit, making it an ideal dish for meal prep. You can make a large batch, refrigerate it for a few days, or freeze portions for quick, healthy meals when you don’t have time to cook.

4. Naturally Vegan & Gluten-Free

Without any dairy, meat, or gluten, this soup is suitable for almost any diet. It’s a great option for those looking for a plant-based, wholesome meal that doesn’t compromise on taste.

5. Light Yet Satisfying

Unlike heavy cream-based soups, this vegetable soup is light yet filling. The fiber from the vegetables helps keep you full, making it a great option for those who want a nutritious meal without feeling weighed down.

Ingredients

For the Soup:

IngredientAmount
Onion1 medium, finely chopped
Olive oil2 tbsp
Leeks2, sliced
Celery2 stalks, diced
Carrot1 medium, diced
Red bell pepper1, diced
Zucchini1 medium, diced
Potatoes2 medium, diced
Garlic2 cloves, minced
Tomatoes2 large, chopped
Vegetable broth6 cups
Bay leaf1
Dried thyme½ teaspoon
Salt & pepperTo taste
Fresh parsleyFor garnish

Directions

  1. Sauté the Aromatics – Heat olive oil in a large pot over medium heat. Add the chopped onion and sauté until translucent. Stir in the garlic, leeks, celery, and carrot, cooking for another 3 minutes.
  2. Add the Vegetables – Mix in the red bell pepper, zucchini, and potatoes, allowing them to cook for a few minutes to enhance their flavors.
  3. Simmer the Soup – Add the chopped tomatoes, vegetable broth, bay leaf, and thyme. Bring to a boil, then reduce heat and let it simmer for 20-25 minutes, or until the vegetables are tender.
  4. Season & Serve – Remove the bay leaf, adjust seasoning with salt and pepper, and garnish with fresh parsley. Serve hot and enjoy!

Nutritional Information (Per Serving, Approximate)

NutrientAmount
Calories120
Carbohydrates22g
Protein3g
Fat4g
Fiber5g
Vitamin A80% DV
Vitamin C70% DV

Delicious Ways to Serve Vegetable Soup

One of the best things about this soup is its versatility. You can enjoy it in so many different ways, depending on your mood and what you have on hand:

  • With Crusty Bread – A warm slice of sourdough or whole-grain bread is perfect for dipping into the broth.
  • Topped with Cheese – Sprinkle some grated Parmesan or crumbled feta for extra richness.
  • Served with Rice or Quinoa – If you want a heartier meal, add a scoop of cooked rice or quinoa.
  • Drizzled with Olive Oil – A touch of high-quality olive oil enhances the flavors and adds healthy fats.
  • With a Side of Salad – Pair it with a fresh green salad for a light yet satisfying lunch.

Frequently Asked Questions

1. Can I Use Frozen Vegetables?

Yes! Frozen vegetables work just as well as fresh ones. They’re a great option when certain vegetables are out of season or when you need to save time on chopping. Just add them directly to the pot—no need to thaw first.

2. How Do I Store Leftovers?

Store leftover soup in an airtight container in the refrigerator for up to 4 days. If freezing, let the soup cool completely before transferring it to freezer-safe containers. It will keep well for up to 3 months.

3. Can I Add Protein?

Absolutely! You can add cooked beans (like chickpeas, lentils, or white beans) for plant-based protein, or if you’re not vegetarian, shredded chicken or turkey can be a great addition.

4. Why Does My Soup Taste Bland?

Sometimes, vegetable soups need a little boost in flavor. Try these tips:

  • Add a splash of lemon juice or vinegar for brightness.
  • Increase the herbs and spices—thyme, basil, oregano, or a pinch of smoked paprika work well.
  • Let it simmer longer to allow the flavors to meld together.

5. Can I Make This in a Slow Cooker?

Yes! To make this soup in a slow cooker, add all the ingredients to the pot and cook on low for 6-8 hours or on high for 3-4 hours. This method is great if you want to let the flavors develop even more.

6. What Other Vegetables Can I Use?

The beauty of this soup is that you can adapt it to whatever you have on hand. Some great additions include:

  • Green beans
  • Mushrooms
  • Spinach or kale
  • Corn or peas
  • Sweet potatoes

7. Can I Blend This Soup?

Yes! If you prefer a creamy texture, you can blend part or all of the soup using an immersion blender or a regular blender. This will create a thick, velvety soup without needing any dairy.

Tips for the Best Vegetable Soup

  • Use Fresh Ingredients: While frozen veggies work, fresh ingredients will give you the best flavor.
  • Don’t Overcook the Vegetables: To keep some texture, avoid overcooking. The vegetables should be tender but not mushy.
  • Layer the Flavors: Sautéing onions, garlic, and other aromatics in olive oil before adding the broth enhances the depth of flavor.
  • Taste & Adjust Seasoning: Soup flavors develop as they cook, so always taste and adjust seasoning before serving.

Conclusion – A Simple Recipe with Big Rewards

Making a homemade vegetable soup is one of the simplest and most rewarding things you can do in the kitchen. It’s a dish that brings warmth, nourishment, and comfort in every spoonful. Whether you make it for a quiet night in, a family dinner, or to share with loved ones, this soup is proof that healthy eating can be both delicious and satisfying.

So, the next time you’re craving something cozy and nourishing, grab your favorite vegetables, a pot, and a little time. With every simmer and stir, you’ll be creating not just a meal, but a moment of comfort that will bring joy to your table.

Amal

A Bowl of Comfort – The Magic of Homemade Vegetable Soup

This delicious and healthy vegetable soup is packed with fresh, vibrant ingredients that create a rich and comforting meal. It’s naturally vegan, gluten-free, and incredibly easy to make. Perfect as a light lunch, a cozy dinner, or a meal-prep staple, this soup is both satisfying and nourishing.
Prep Time 10 minutes
Cook Time 25 minutes
Total Time 35 minutes
Servings: 6 servings
Course: Soup
Cuisine: International

Ingredients
  

For the soup:
  • 1 medium onion finely chopped
  • 2 tbsp olive oil
  • 2 leeks sliced
  • 2 celery stalks diced
  • 1 medium carrot diced
  • 1 red bell pepper diced
  • 1 medium zucchini diced
  • 2 medium potatoes diced
  • 2 cloves garlic minced
  • 2 large tomatoes chopped
  • 6 cups vegetable broth
  • 1 bay leaf
  • ½ teaspoon dried thyme
  • Salt and black pepper to taste
  • Fresh parsley for garnish

Method
 

  1. Heat olive oil in a large pot over medium heat. Add the onion and sauté until translucent.
  2. Stir in the garlic, leeks, celery, and carrot, cooking for 3 more minutes.
  3. Add the red bell pepper, zucchini, and potatoes, stirring to combine. Let them cook for a few minutes to release their flavors.
  4. Pour in the chopped tomatoes and vegetable broth. Add the bay leaf and thyme. Bring the soup to a boil, then reduce heat and let it simmer for 20-25 minutes, or until the vegetables are tender.
  5. Remove the bay leaf, season with salt and black pepper, and garnish with fresh parsley. Serve hot and enjoy!

Notes

  • This soup tastes even better the next day as the flavors deepen.
  • Feel free to swap or add vegetables based on what you have on hand.
  • Add cooked beans, lentils, or chickpeas for extra protein.
  • Store leftovers in the fridge for up to 4 days or freeze for up to 3 months.

The Joy of Quick Homemade Bread – A Recipe for Simplicity and Comfort

There’s something magical about making bread from scratch. The process of mixing, kneading, and watching it transform into something warm and comforting is deeply satisfying. But let’s be honest—sometimes, we just don’t have the time to wait for dough to rise, proof, and bake for hours. That’s exactly how I stumbled upon this quick skillet bread recipe.

It was one of those busy days when I realized we were out of bread just as I was preparing dinner. I didn’t want to run to the store, and I definitely didn’t have time to make a traditional loaf. So, I started experimenting with simple ingredients I already had—flour, baking powder, a little oil, and water. The result? A beautifully soft, golden-brown bread that cooked in just minutes on the stovetop.

Now, this 10-minute skillet bread has become a household staple. It’s a lifesaver for last-minute meals, an easy way to satisfy carb cravings, and the perfect base for sandwiches, dips, or even sweet toppings. The best part? No yeast, no eggs, and no oven needed—just a simple frying pan and a few pantry staples.

What Makes This Skillet Bread So Special?

1. No Yeast, No Rising Time

Traditional bread-making often requires yeast, which means waiting for the dough to rise. This recipe eliminates that step, using baking powder instead to give the bread its light, airy texture. You can mix the dough and have it on the stovetop within minutes.

2. Quick and Easy

With only a handful of ingredients and a total cooking time of about 10 minutes, this is one of the fastest ways to enjoy homemade bread. Whether you’re making it to go with a meal or as a snack, there’s no long preparation or special equipment needed.

3. Versatile and Customizable

This bread is a blank canvas for endless flavor variations. You can enjoy it plain, brush it with butter, sprinkle it with herbs, or even make it slightly sweet with honey or cinnamon. It pairs beautifully with soups, stews, salads, and dips.

4. Perfect for Any Meal

Need a quick side for breakfast? Serve it warm with butter and jam. Want a hearty lunch? Use it as a base for sandwiches. Looking for a dinner accompaniment? Pair it with grilled meats or roasted vegetables. This bread is truly an all-purpose addition to your kitchen.

Ingredients

IngredientAmount
All-purpose flour200g (1 and 2/3 cups) or (7.05 oz)
Baking powder5g (1 teaspoon) or (0.18 oz)
SaltA pinch
Water120ml (½ cup)
Oil (olive or vegetable)1 tablespoon

Directions

  1. Prepare the Dough – In a mixing bowl, whisk together the flour, baking powder, and salt. Add water and oil, then mix until the dough comes together.
  2. Knead – Transfer the dough to a lightly floured surface and knead for about 1-2 minutes until smooth.
  3. Shape the Bread – Divide the dough into 4 equal portions. Roll each into a ball and flatten into a round, about ¼-inch thick.
  4. Cook on the Stovetop – Heat a non-stick skillet over medium heat. Cook each piece for 2-3 minutes per side until golden brown and puffed up.
  5. Serve & Enjoy – Eat warm with butter, cheese, or your favorite spread!

Nutritional Information (Per Serving, Approximate)

NutrientAmount
Calories120
Carbohydrates22g
Protein3g
Fat2g
Fiber1g
Sodium50mg

Ways to Enjoy Skillet Bread

This simple bread is delicious on its own, but it’s even better when paired with different flavors. Here are some ideas to elevate it:

  • Savory Options: Brush with garlic butter, sprinkle with cheese, or top with fresh herbs like rosemary or thyme.
  • Sweet Variations: Drizzle with honey, spread with Nutella, or sprinkle with cinnamon sugar.
  • Meal Pairings: Serve with hummus, tzatziki, or a warm bowl of soup for a comforting meal.
  • Breakfast Twist: Use it as a base for avocado toast or top it with scrambled eggs and cheese.

Frequently Asked Questions

1. Can I Make This Dough Ahead of Time?

Yes! You can prepare the dough and store it in the fridge for up to 24 hours. When you’re ready to cook, let it sit at room temperature for a few minutes before rolling it out.

2. Can I Freeze This Bread?

Absolutely. Once cooked, let the bread cool completely, then wrap it tightly and freeze for up to three months. To reheat, simply warm it in a dry skillet or toaster.

3. What If I Don’t Have Baking Powder?

If you don’t have baking powder, you can substitute it with ¼ teaspoon of baking soda mixed with ½ teaspoon of lemon juice or vinegar. This will create the same leavening effect.

4. Can I Use Whole Wheat Flour Instead?

Yes, but the texture will be slightly denser. If using whole wheat flour, try mixing it with all-purpose flour for a softer consistency.

5. Why Is My Bread Too Hard or Dry?

Over-kneading the dough or cooking it on too high heat can cause the bread to become tough. To keep it soft, knead gently and cook over medium heat, flipping at the right time to avoid overcooking.

6. Can I Cook This in the Oven Instead?

While this recipe is designed for stovetop cooking, you can bake it in the oven at 375°F (190°C) for about 10-12 minutes. Just make sure to keep an eye on it to prevent over-baking.

Tips for the Best Skillet Bread

  • Use a Non-Stick Pan: This ensures the bread doesn’t stick and helps achieve an even golden crust.
  • Don’t Overwork the Dough: Mixing and kneading too much can make the bread tough. Keep it light and gentle.
  • Adjust the Thickness: If you want thinner, crispier bread, roll it out a bit more. For a thicker, softer bread, keep it slightly thicker.
  • Cover the Pan While Cooking: This helps trap steam, making the bread softer and fluffier.
  • Experiment with Flavors: Try adding garlic powder, dried herbs, or cheese into the dough for a flavorful twist.

Conclusion – The Simplicity of Homemade Comfort

There’s something incredibly rewarding about making bread from scratch, even when it’s as quick and simple as this skillet bread. It’s a reminder that delicious, homemade food doesn’t have to be complicated. With just a few ingredients and a frying pan, you can create something warm, satisfying, and versatile enough to enjoy any time of the day.

So the next time you’re out of bread or just craving something fresh and homemade, give this recipe a try. In just 10 minutes, you’ll have a warm, golden piece of bread that tastes just as good as something baked in the oven. It’s proof that sometimes, the simplest recipes bring the greatest joy.

Amal

The Joy of Quick Homemade Bread – A Recipe for Simplicity and Comfort

This soft and fluffy skillet bread is perfect when you need fresh bread in a hurry. Made with simple pantry staples, it requires no yeast, no eggs, and no oven—just a frying pan! Whether served alongside soups, salads, or as a sandwich base, this bread is incredibly versatile and ready in just 10 minutes.
Prep Time 5 minutes
Cook Time 10 minutes
Total Time 15 minutes
Servings: 4 flatbreads
Course: Bread
Cuisine: International

Ingredients
  

  • 200 grams all-purpose flour 1 and 2/3 cups or (7.05 ounces)
  • 5 grams baking powder 1 teaspoon or (0.18 ounces)
  • A pinch of salt
  • 120 ml water ½ cup
  • 1 tablespoon oil olive oil or vegetable oil

Method
 

  1. In a large bowl, whisk together the flour, baking powder, and salt.
  2. Add water and oil, then mix until a dough forms.
  3. Transfer the dough to a lightly floured surface and knead gently for about 1-2 minutes until smooth.
  4. Divide the dough into 4 equal portions and roll each into a ball. Flatten each ball into a round, about ¼-inch thick.
  5. Heat a non-stick frying pan over medium heat. Cook each piece of bread for 2-3 minutes per side, until golden brown and puffed up.
  6. Remove from the pan and serve warm with butter, cheese, or your favorite spreads.

Notes

  • Avoid over-kneading the dough to keep the bread soft.
  • For extra flavor, brush with garlic butter or sprinkle with herbs before cooking.
  • To store, wrap in a clean kitchen towel to maintain softness or freeze for later use.

A Bite of Comfort – The Scones That Bring My Family Together

Some recipes are more than just a combination of ingredients; they carry memories, traditions, and the warmth of home. These heavenly fluffy scones have been a staple in my family for years. I can still remember the first time I made them with my grandmother on a chilly Sunday morning. The kitchen smelled of butter and flour, and as we kneaded the dough together, she told me stories about how her mother used to bake these same scones when she was a child.

Scones are not just food to me; they are a connection to the past, a reminder of slow mornings spent with loved ones, and a symbol of comfort. No matter how busy life gets, there’s something special about taking a moment to sit down with a warm, freshly baked scone and a cup of tea. Over the years, I have perfected this recipe, making small adjustments to ensure they come out light, fluffy, and just the right amount of crumbly. Today, I’m sharing this beloved recipe so you can create your own moments of warmth and togetherness.

The Secret to the Perfect Scone

Making scones may seem simple, but a few key details can make all the difference between a dense, dry scone and one that is irresistibly tender and airy. Here are a few secrets that will help you achieve perfection every time:

1. Use Cold Butter

One of the most important tips for making light and flaky scones is to use cold butter. When the butter is cold, it creates small pockets in the dough as it melts in the oven, resulting in a soft, layered texture. Some bakers even freeze their butter and grate it into the flour for even distribution.

2. Handle the Dough Gently

Overworking the dough can lead to tough scones. Mix the ingredients just until they come together and avoid excessive kneading. The goal is to keep as much air in the dough as possible for a soft and tender bite.

3. The Right Flour Matters

Using unbleached all-purpose flour helps maintain the structure of the scones without making them too heavy. Some people like to use cake flour for a lighter texture, but this can make the scones too delicate and prone to crumbling.

4. Don’t Skip the Baking Powder

Baking powder is what gives scones their rise and fluffy texture. Be sure to use fresh baking powder, as old or expired baking powder can lead to flat, dense scones.

5. Let the Dough Rest

Allowing the dough to rest for about 10 minutes before baking helps relax the gluten, making the scones more tender. It also helps the butter firm up again, which enhances flakiness.

Ingredients

IngredientAmount
Unbleached all-purpose flour2 cups
Baking powder4 teaspoons
Salt½ teaspoon
Unsalted butter, cold3 tablespoons
Milk⅔ cup

Directions

  1. Preheat & Prepare – Preheat your oven to 425°F (220°C). Line a baking sheet with parchment paper.
  2. Mix Dry Ingredients – In a large bowl, whisk together the flour, baking powder, and salt.
  3. Incorporate Butter – Cut in the cold butter using a pastry cutter or your fingers until the mixture resembles coarse crumbs.
  4. Add Milk – Gradually stir in the milk until a soft dough forms. Avoid overmixing.
  5. Shape & Cut – Transfer the dough to a lightly floured surface, knead briefly, then pat into a ¾-inch thick round. Cut into 8 wedges or use a biscuit cutter.
  6. Bake to Perfection – Place on the baking sheet and bake for 12-15 minutes, or until golden brown.
  7. Serve & Enjoy – Let cool slightly before serving warm with butter, jam, or clotted cream!

Nutritional Information (Per Scone, Approximate)

NutrientAmount
Calories180
Carbohydrates25g
Protein4g
Fat7g
Fiber1g
Sugar1g

Variations to Try

One of the best things about this classic scone recipe is that it serves as a great base for countless variations. Whether you love a touch of sweetness or prefer a savory twist, here are a few ideas to experiment with:

Sweet Scones

  • Berry Delight – Fold in fresh or dried berries such as blueberries, raspberries, or cranberries for a fruity burst.
  • Chocolate Chip Indulgence – Mix in chocolate chips or chunks for a dessert-like treat.
  • Cinnamon Sugar Swirl – Add a sprinkle of cinnamon and sugar for a warm, spiced flavor.

Savory Scones

  • Cheddar & Chive – Add shredded cheddar cheese and chopped chives for a rich, savory scone.
  • Herb & Garlic – Mix in fresh herbs like rosemary, thyme, or basil with a hint of garlic powder.
  • Bacon & Cheese – Crisp up some bacon and fold it into the dough with your favorite cheese for a hearty breakfast scone.

How to Serve Your Scones

Scones are incredibly versatile and can be enjoyed in many ways. Whether you prefer them plain or with a little extra flair, here are some serving suggestions:

  • Traditional Style – Serve warm with butter, clotted cream, and a dollop of jam.
  • Drizzled with Honey – A drizzle of honey adds a subtle sweetness and pairs beautifully with a cup of tea.
  • Paired with Fresh Fruit – A side of fresh berries or citrus slices can brighten up your scone experience.
  • Dipped in Coffee or Tea – If you love dunking, a scone pairs wonderfully with a hot cup of coffee or tea.

Frequently Asked Questions

1. Can I Make These Scones Ahead of Time?

Yes! You can prepare the dough ahead of time and refrigerate it overnight. When you’re ready to bake, simply shape the scones and pop them into the oven. You can also freeze unbaked scones and bake them straight from the freezer with a few extra minutes of baking time.

2. How Do I Store Leftover Scones?

Store scones in an airtight container at room temperature for up to two days. For longer storage, refrigerate them for up to a week or freeze them for up to three months. To reheat, simply warm them in the oven for a few minutes.

3. Can I Use Plant-Based Alternatives?

Absolutely! Swap out butter for cold coconut oil or a plant-based margarine, and use almond, oat, or soy milk instead of dairy milk. Keep in mind that this may slightly alter the texture, but they will still be delicious.

4. Why Are My Scones Too Dry?

If your scones turn out dry, it’s possible that you added too much flour or overmixed the dough. Try using a lighter touch when mixing and make sure to measure your flour properly by spooning it into the measuring cup and leveling it off.

5. How Do I Get a Golden Crust on Top?

For a beautifully golden crust, brush the tops of the scones with a little milk or an egg wash before baking. This adds a slight sheen and enhances the overall presentation.

Conclusion – A Recipe That Feels Like Home

Baking scones is more than just following a recipe; it’s about creating something that brings joy and warmth to your home. Every time I make these scones, I’m reminded of the simple pleasures in life—laughter shared over breakfast, the smell of butter melting into warm dough, and the quiet satisfaction of baking something with love.

Whether you’re making these scones for a special occasion, a cozy weekend morning, or just because, I hope they bring you as much comfort and happiness as they have brought my family. Try them out, make them your own, and most importantly, share them with the people you love.

Amal

A Bite of Comfort – The Scones That Bring My Family Together

These light, buttery scones are melt-in-your-mouth delicious! Perfect for breakfast, tea time, or a quick snack, they come together in just minutes and can be enjoyed plain or with your favorite toppings. Serve them warm with butter, jam, or clotted cream for the ultimate treat!
Prep Time 10 minutes
Cook Time 15 minutes
Total Time 25 minutes
Servings: 8 scones
Course: Breakfast
Cuisine: British

Ingredients
  

  • 2 cups unbleached all-purpose flour
  • 4 teaspoons baking powder
  • ½ teaspoon salt
  • 3 tablespoons unsalted butter cold and cubed
  • cup milk

Method
 

  1. Preheat your oven to 425°F (220°C) and line a baking sheet with parchment paper.
  2. In a large mixing bowl, whisk together the flour, baking powder, and salt.
  3. Add the cold, cubed butter and use a pastry cutter or your fingers to work it into the flour mixture until it resembles coarse crumbs.
  4. Gradually stir in the milk, mixing gently until a soft dough forms. Do not overmix.
  5. Transfer the dough to a lightly floured surface and knead it briefly, just until it comes together.
  6. Pat the dough into a ¾-inch thick round and cut into 8 wedges or use a round cutter for individual scones.
  7. Place the scones on the prepared baking sheet, spacing them slightly apart.
  8. Bake for 12-15 minutes, or until golden brown and puffed up.
  9. Let cool slightly, then serve warm with butter, jam, or clotted cream.

Notes

  • For extra flakiness, freeze the butter before cutting it into the flour.
  • Avoid overworking the dough to keep the scones light and tender.
  • You can brush the tops with milk or an egg wash for a beautiful golden crust.
  • Add-ins like berries, chocolate chips, or cheese can be mixed in for extra flavor variations.

Lentil Bread – A Gluten-Free Protein-Packed Delight

There is something truly comforting about the smell of fresh bread baking in the oven. It fills the kitchen with warmth, signaling that something nourishing and delicious is on its way. For many of us, bread is more than just food—it’s tradition, it’s family, it’s the foundation of so many meals. But what if you could enjoy a loaf that is not only soft and satisfying but also gluten-free, high in protein, and packed with nutrients? That’s where Lentil Bread comes in.

My journey with lentil bread started when I was searching for an alternative to regular bread that could provide more protein and fiber without the need for wheat flour. I grew up in a home where lentils were a staple—my grandmother would cook them into hearty soups, stews, and even patties. But using them in bread? That was something I had never tried.

One day, inspired by the simplicity of whole-food ingredients, I decided to experiment. The result was a beautifully soft, slightly dense, and incredibly flavorful bread that felt as comforting as a traditional loaf but with a rich, earthy depth from the lentils. With the addition of yogurt for moisture, eggs for structure, and feta cheese for a salty, creamy contrast, this bread became an instant favorite.

Now, every time I bake it, I’m reminded that food doesn’t have to be complicated to be nourishing. It’s a bread that celebrates simplicity, health, and tradition—a wholesome staple for anyone looking for something different yet deeply satisfying.

Why You’ll Love This Recipe

1. Naturally Gluten-Free and High in Protein

Unlike traditional bread, this lentil bread is completely flour-free and made from red lentils, which are rich in plant-based protein and fiber.

2. Soft, Moist, and Packed with Flavor

Thanks to yogurt, eggs, and feta cheese, this bread has a soft texture with a slight tanginess and a hint of saltiness from the cheese.

3. Easy to Make with Simple Ingredients

This recipe doesn’t require yeast or kneading, making it a quick and fuss-free alternative to traditional bread.

4. Perfect for a Healthy Diet

Rich in fiber, protein, and complex carbohydrates, this bread is ideal for those looking to stay full longer while maintaining a balanced diet.

5. Versatile and Customizable

You can enjoy this bread plain, toasted, or paired with sweet or savory toppings—and even customize it with herbs, seeds, or different cheeses.

Ingredients

IngredientQuantity
Red lentils2 cups (360g)
Large eggs3
Olive oil50g (3½ tbsp)
Yogurt1 glass (200g)
Feta cheese125g (crumbled or cubed)
Baking powder1 teaspoon
Salt½ teaspoon
Black pepper½ teaspoon
Cumin (optional)½ teaspoon

Directions

  1. Soak & Blend the Lentils – Rinse the red lentils and soak them in water for 2–3 hours. Drain and blend until smooth.
  2. Prepare the Batter – In a bowl, whisk eggs, yogurt, olive oil, baking powder, salt, and spices. Mix in the blended lentils and crumbled feta cheese.
  3. Bake to Perfection – Pour the batter into a greased loaf pan and bake in a preheated oven at 350°F (175°C) for 40–45 minutes, or until golden and firm.
  4. Cool & Serve – Let the bread cool before slicing. Serve warm with butter, hummus, or your favorite spread.

Nutritional Information (Per Slice – Approx. 1 of 10 Servings)

NutrientAmount
Calories190 kcal
Carbohydrates20 g
Protein10 g
Fat8 g
Saturated Fat2.5 g
Fiber4 g
Sugar2 g
Sodium220 mg

Tips for the Perfect Lentil Bread

1. Soak the Lentils for a Smooth Texture

Red lentils need to be soaked for at least 2–3 hours before blending. This makes them soft enough to create a smooth batter and ensures even baking.

2. Use a Blender or Food Processor

A good-quality blender or food processor is essential to break down the soaked lentils into a creamy batter without leaving any grainy texture.

3. Don’t Skip the Yogurt

Yogurt helps keep the bread moist and tender while adding a slight tang that complements the lentils beautifully.

4. Crumble the Feta Evenly

If you want little bursts of salty, creamy cheese throughout the bread, make sure to evenly distribute the feta before baking.

5. Let the Bread Cool Before Slicing

Once baked, allow the bread to cool for at least 15 minutes before slicing to ensure it holds its shape.

How to Enjoy Lentil Bread

This gluten-free lentil bread is incredibly versatile, making it a fantastic addition to any meal. Here are some delicious ways to enjoy it:

1. Toasted with Butter or Olive Oil

Crisp up a slice and spread it with butter or a drizzle of olive oil for a simple yet satisfying snack.

2. Served with Hummus or Avocado

Pair it with hummus or mashed avocado for a high-protein, fiber-rich meal.

3. As a Base for Open-Faced Sandwiches

Top it with smoked salmon, cheese, or fresh vegetables for a healthy, nutrient-dense sandwich.

4. Alongside Soups and Stews

The heartiness of this bread makes it the perfect companion to warm, comforting soups and stews.

5. Sweetened with Honey and Nuts

For a sweet twist, drizzle with honey and top with crushed nuts for a satisfying breakfast or dessert.

Frequently Asked Questions (FAQs)

Q: Can I use green or brown lentils instead of red lentils?

Red lentils are best for this recipe because they cook quickly and blend into a smooth batter. Green or brown lentils may result in a grainier texture.

Q: Do I need to cook the lentils before using them?

No, soaking them is enough! Cooking the lentils would make the batter too wet and affect the texture of the bread.

Q: Can I make this recipe dairy-free?

Yes! Replace the yogurt with a dairy-free yogurt or coconut cream and omit the feta cheese or use a plant-based alternative.

Q: How long does lentil bread last?

Store it in an airtight container at room temperature for up to 2 days or in the fridge for up to 5 days. You can also freeze slices and toast them when needed.

Q: Can I use this bread for sandwiches?

Yes! It holds up well for sandwiches, though it is slightly denser than regular bread. It works especially well for open-faced sandwiches.

Q: Can I add herbs or seeds?

Absolutely! Fresh or dried herbs like rosemary, thyme, or basil add great flavor. You can also mix in seeds like chia, flax, or sunflower seeds for extra texture and nutrients.

Q: Can I make this bread vegan?

Since eggs help bind the ingredients together, you would need a substitute like flax eggs (1 tablespoon ground flaxseed + 3 tablespoons water per egg). However, the texture may be slightly different.

Q: What’s the best way to reheat lentil bread?

For best results, reheat slices in the toaster or oven at 350°F (175°C) for 5 minutes to regain their crispness.

Why This Lentil Bread Deserves a Place in Your Kitchen

Few recipes bring together simplicity, nutrition, and deliciousness the way this Lentil Bread does. It’s a healthy, gluten-free alternative to traditional bread, yet it doesn’t compromise on flavor or texture.

Naturally gluten-free and packed with plant-based protein
Soft, moist, and flavorful with a slight tang from yogurt and feta
No yeast, no kneading, and no complicated techniques
Customizable with different flavors, herbs, or seeds
Perfect for sandwiches, toast, or pairing with soups and dips

If you’re looking for a nutritious homemade bread that’s easy to make and filled with wholesome ingredients, this recipe is for you. Whether you’re following a gluten-free diet or simply looking for a more nourishing way to enjoy bread, this lentil bread will quickly become a favorite in your home.

Soak your lentils, preheat your oven, and get ready to enjoy a slice of hearty, protein-packed goodness!

Amal

Lentil Bread – A Gluten-Free Protein-Packed Delight

This Lentil Bread is a soft, hearty, and naturally gluten-free alternative to traditional bread. Made with protein-rich red lentils, creamy yogurt, and savory feta cheese, it’s packed with nutrients while remaining light and flavorful. Perfect for sandwiches, toast, or served alongside soups and salads, this wholesome, flourless bread is easy to make and incredibly satisfying.
Prep Time 10 minutes
Cook Time 45 minutes
Total Time 55 minutes
Servings: 10 slices
Course: Bread
Cuisine: International

Ingredients
  

For the Lentil Bread:
  • 2 cups 360g red lentils
  • 3 large eggs
  • 50 g 3½ tbsp olive oil
  • 1 glass 200g yogurt
  • 125 g feta cheese crumbled or cubed
  • 1 teaspoon baking powder
  • ½ teaspoon salt
  • ½ teaspoon black pepper
  • ½ teaspoon cumin optional

Method
 

  1. Soak & Blend the Lentils – Rinse the lentils and soak them in water for 2–3 hours. Drain and blend until smooth.
  2. Prepare the Batter – In a large bowl, whisk together eggs, yogurt, olive oil, baking powder, salt, and black pepper. Stir in the blended lentils and crumbled feta.
  3. Bake the Bread – Pour the mixture into a greased loaf pan and bake in a preheated oven at 350°F (175°C) for 40–45 minutes, or until golden brown and firm.
  4. Cool & Serve – Let the bread cool for at least 15 minutes before slicing. Enjoy warm or toasted with your favorite spreads.

Notes

  • For extra flavor, add chopped herbs like rosemary, thyme, or basil to the batter.
  • If you prefer a firmer texture, refrigerate the loaf for a few hours before slicing.
  • Store in an airtight container in the fridge for up to 5 days or freeze for longer storage.
  • Delicious with hummus, avocado, or soft cheese for a satisfying snack.

Golden Puff Pastry Apple Slices – A Flaky and Sweet Delight

Some desserts have a way of transporting us back to cherished moments, reminding us of the warmth of home and the joy of simple pleasures. For me, puff pastry apple slices are one of those comforting treats that never fail to bring back childhood memories.

I remember the aroma of cinnamon and apples filling the kitchen as my grandmother baked her famous apple pastries. She never used complicated recipes—just buttery pastry, fresh apples, and a sprinkle of sugar and spice. The magic happened in the oven, where the puff pastry turned golden and flaky, encasing the tender, caramelized apples inside.

Every time I make this recipe, it brings back those moments of sitting by the kitchen table, eagerly waiting for the pastries to cool just enough to take the first bite. It’s amazing how something so simple can be so deeply satisfying. Whether you’re making these for a holiday gathering, a cozy weekend treat, or just because you’re craving something sweet, these puff pastry apple slices are sure to become a favorite in your home too.

Why You’ll Love This Recipe

1. Quick and Easy to Make

With store-bought puff pastry, there’s no need for hours of preparation. This recipe comes together in just a few simple steps, making it perfect for both beginner and experienced bakers.

2. Classic Flavors with a Warm, Spiced Twist

Crisp, buttery pastry meets the comforting flavors of cinnamon, sugar, and fresh apples, creating a balance of sweetness and warmth in every bite.

3. Flaky, Buttery, and Irresistible

Puff pastry bakes into delicate, golden layers, making the perfect contrast to the soft, juicy apple filling.

4. Versatile for Any Occasion

These pastries work well for breakfast, dessert, or an afternoon snack. Pair them with coffee, tea, or even a scoop of vanilla ice cream for an indulgent treat.

5. Customizable with Endless Variations

This recipe serves as a great base for creativity. Add nuts, caramel, or even a drizzle of honey for extra texture and flavor.

Ingredients

For the Apple Slices

IngredientQuantity
Apples2 to 3 large
Puff pastry2 rolls (approx. 500g / 17.6 oz)
Egg, whisked1
Sugar100g (½ cup)
Cinnamon1 teaspoon (5g)

Optional for Garnish

IngredientQuantity (Optional)
Powdered sugarFor dusting
Caramel sauceFor drizzling
Slivered almondsFor extra crunch

Directions

  1. Prepare the Apples – Peel, core, and slice the apples thinly. Toss them with sugar and cinnamon until well coated.
  2. Roll Out the Pastry – Unroll the puff pastry sheets and cut them into equal rectangles or strips.
  3. Assemble the Pastries – Arrange apple slices on half of the pastry pieces, then place another pastry layer on top. Press the edges together with a fork to seal.
  4. Brush & Bake – Brush the tops with whisked egg for a golden finish. Bake in a preheated oven at 375°F (190°C) for 20–25 minutes, or until golden brown and flaky.
  5. Garnish & Serve – Let the pastries cool slightly before dusting with powdered sugar or drizzling with caramel.

Nutritional Information (Per Serving – Approx. 1 Slice)

NutrientAmount
Calories250 kcal
Carbohydrates35 g
Protein4 g
Fat10 g
Saturated Fat5 g
Fiber2 g
Sugar15 g
Sodium120 mg

Secrets to the Perfect Puff Pastry Apple Slices

1. Choose the Right Apples

The type of apple you use affects the texture and flavor of the final dish. Granny Smith, Honeycrisp, or Pink Lady apples hold up well during baking, offering a balance of tartness and sweetness.

2. Keep the Puff Pastry Cold

For the best results, work with chilled puff pastry. Warm dough becomes sticky and won’t puff up properly in the oven. If needed, refrigerate it for 10 minutes before handling.

3. Thinly Slice the Apples

Thin, even apple slices bake faster and soften perfectly, ensuring every bite has a tender texture inside the crispy pastry.

4. Don’t Overload the Pastry

Too many apples can lead to soggy pastry. A single layer of apples allows the pastry to stay crisp and flaky.

5. Egg Wash for a Golden Crust

Brushing the pastry with a whisked egg before baking enhances its golden color and gives it a bakery-style shine.

6. Let Them Cool Slightly Before Serving

These pastries are best enjoyed warm but not piping hot. Letting them cool for a few minutes allows the filling to settle while keeping the pastry crisp.

Serving Suggestions – How to Elevate Your Apple Pastries

These flaky apple slices are delicious on their own, but here are some ways to make them even more special:

1. Dust with Powdered Sugar

A light dusting of powdered sugar adds a touch of sweetness and enhances the presentation.

2. Drizzle with Caramel or Honey

For extra indulgence, drizzle with homemade caramel sauce or a spoonful of warm honey.

3. Serve with Ice Cream or Whipped Cream

A scoop of vanilla ice cream or a dollop of whipped cream makes these pastries even more decadent.

4. Add Nuts for Extra Crunch

Sprinkle chopped walnuts, pecans, or almonds over the apples before baking for added texture.

5. Pair with Coffee or Tea

Enjoy these puff pastry apple slices with a cup of coffee, chai tea, or spiced cider for a cozy afternoon treat.

Frequently Asked Questions (FAQs)

Q: Can I make these apple pastries ahead of time?

Yes! You can assemble them a few hours in advance, store them in the refrigerator, and bake when ready. They are best served fresh, but leftovers can be reheated in the oven.

Q: Can I use frozen puff pastry?

Absolutely! If using frozen puff pastry, thaw it in the refrigerator for a few hours before rolling it out.

Q: How do I prevent the puff pastry from getting soggy?

  • Use firm apples that don’t release too much juice.
  • Toss apple slices with cinnamon and sugar, then drain any excess liquid before placing them on the pastry.
  • Bake at a high temperature (375°F/190°C) so the pastry crisps up quickly.

Q: Can I use a different type of fruit?

Yes! This recipe works well with pears, peaches, or berries for a different twist on the classic.

Q: How long do these pastries stay fresh?

They are best enjoyed fresh out of the oven, but they can be stored in an airtight container at room temperature for up to 2 days. Reheat in the oven for a few minutes to crisp them up.

Q: Can I freeze the baked pastries?

Yes! Once baked and cooled, place them in an airtight container and freeze for up to 2 months. Reheat in the oven at 350°F (175°C) for 10 minutes before serving.

Q: Can I add a glaze instead of caramel or powdered sugar?

Yes! A simple glaze made from powdered sugar and milk or lemon juice adds a nice finishing touch.

Why These Apple Pastries Deserve a Spot in Your Recipe Collection

These Golden Puff Pastry Apple Slices are the perfect example of how simple ingredients can create something truly special. The combination of flaky, buttery pastry, spiced apples, and a touch of sweetness makes them an instant classic.

Quick and easy with minimal ingredients
Crispy, golden, and bakery-quality
Warm, spiced flavors perfect for any season
Versatile and customizable
A nostalgic, homemade treat that feels like a hug

If you’re looking for an effortless yet impressive dessert that will delight family and friends, this is it. Whether enjoyed fresh from the oven with a hot cup of tea or served at a special gathering, these flaky apple pastries will bring warmth, comfort, and a taste of home to every bite.

So grab your apples and puff pastry, preheat your oven, and enjoy the simple pleasure of homemade baking!

Amal

Golden Puff Pastry Apple Slices – A Flaky and Sweet Delight

These Puff Pastry Apple Slices are a perfect blend of flaky, buttery layers and sweet cinnamon-spiced apples. With just a handful of ingredients, you can create a crispy, golden pastry filled with tender, caramelized apples—ideal for breakfast, dessert, or a cozy afternoon treat. Quick, easy, and absolutely irresistible!
Prep Time 15 minutes
Cook Time 25 minutes
Total Time 40 minutes
Servings: 4 servings
Course: Dessert
Cuisine: International

Ingredients
  

For the Apple Slices:
  • 2 to 3 large apples
  • 2 rolls of puff pastry approx. 500g / 17.6 oz
  • 1 egg whisked
  • 100 g ½ cup sugar
  • 1 teaspoon 5g cinnamon
Optional for Garnish:
  • Powdered sugar for dusting
  • Caramel sauce for drizzling
  • Slivered almonds for crunch

Method
 

  1. Prepare the Apples – Peel, core, and slice the apples thinly. Toss them with sugar and cinnamon.
  2. Roll Out the Puff Pastry – Unroll the puff pastry and cut it into even rectangles or strips.
  3. Assemble the Slices – Place apple slices on half of the pastry pieces, then cover with another pastry layer. Press the edges together with a fork to seal.
  4. Brush & Bake – Brush the tops with whisked egg and bake in a preheated oven at 375°F (190°C) for 20–25 minutes, or until golden brown.
  5. Garnish & Serve – Let cool slightly, then dust with powdered sugar or drizzle with caramel sauce.

Notes

  • For extra crispiness, chill the assembled pastries for 10 minutes before baking.
  • To prevent sogginess, use firm apples like Granny Smith or Honeycrisp that don’t release too much juice.
  • Reheat leftovers in the oven at 350°F (175°C) for a few minutes to restore crispiness.
  • Pair with ice cream or whipped cream for an indulgent twist.

Zesty Lime-Infused Apple Cake – A Refreshing Citrus Delight

Baking has always been a comforting ritual in my family. The smell of apples and warm spices filling the kitchen was a sign that something special was in the oven. But one day, I decided to take a classic apple cake and give it a bright, citrusy twist—and that’s how this Lime-Scented Apple Cake was born.

I first made this cake on a rainy afternoon, looking for a way to bring a little sunshine into the day. Apples and cinnamon were the usual go-to, but I wanted something lighter, fresher, and with a unique flavor profile. Lime seemed like the perfect addition—its vibrant zest and juice balanced the sweetness of the apples and added a fragrant, refreshing touch.

The first bite was everything I hoped for. The cake was moist, tender, and delicately sweet, with just the right amount of citrus tang. The apples softened beautifully while baking, adding bursts of natural sweetness. It quickly became a favorite in my home, requested for weekend brunches, afternoon tea, and even special occasions.

This lime-infused apple cake is proof that small changes can elevate a classic recipe into something extraordinary. Whether you’re baking for yourself, family, or friends, this cake is sure to be a bright and flavorful treat that everyone will love.

Why You’ll Love This Recipe

1. A Unique Twist on a Classic

Apple cakes are a beloved staple, but the addition of lime zest and juice adds an unexpected freshness that makes this recipe stand out.

2. Light, Moist, and Flavorful

With beaten egg whites folded into the batter, this cake has a light and fluffy texture, making it soft yet satisfyingly rich.

3. Easy to Make with Simple Ingredients

You don’t need any fancy ingredients—just flour, eggs, butter, apples, and lime to create a cake that tastes like something from a bakery.

4. Perfect for Any Occasion

Whether served as a breakfast cake, an afternoon snack, or a light dessert, this cake is versatile and always a crowd-pleaser.

5. Naturally Balanced Flavors

The sweetness of apples and the tangy brightness of lime create a perfect harmony, making this cake deliciously refreshing without being overly sweet.

Ingredients

For the Cake Batter:

IngredientQuantity
Egg whites2 (reserved from custard layer)
Eggs2 whole
Sugar2/5 cup (100g)
All-purpose flour1 cup (125g)
Baking powder1 teaspoon
Salt1/4 teaspoon
Unsalted butter, melted1/4 cup (60g)
Lime zest1 teaspoon
Lime juice2 tablespoons
Vanilla extract1 teaspoon
Apples, peeled and sliced2 medium

Directions

  1. Preheat & Prepare – Preheat oven to 350°F (175°C). Grease and line a cake pan with parchment paper.
  2. Whisk the Eggs – In a large bowl, beat the egg whites until soft peaks form. In another bowl, whisk whole eggs with sugar until light and fluffy.
  3. Combine the Ingredients – Fold the beaten egg whites into the egg-sugar mixture. Add melted butter, lime zest, and lime juice. Gently mix in flour, baking powder, and salt.
  4. Assemble the Cake – Pour the batter into the prepared pan and layer the sliced apples evenly on top.
  5. Bake to Perfection – Bake for 30–35 minutes until golden and a toothpick inserted in the center comes out clean.
  6. Cool & Serve – Let the cake cool before slicing. Dust with powdered sugar or drizzle with a lime glaze for extra flavor.

Nutritional Information (Per Slice – Approx. 1 of 8 Servings)

NutrientAmount
Calories210 kcal
Carbohydrates35 g
Protein4 g
Fat7 g
Saturated Fat4 g
Fiber2 g
Sugar18 g
Sodium120 mg

Secrets to a Perfect Lime-Scented Apple Cake

1. Choose the Right Apples

For the best flavor and texture, use firm, slightly tart apples like Granny Smith, Honeycrisp, or Pink Lady. They hold their shape well during baking and balance the sweetness of the cake.

2. Don’t Skip the Lime Zest

Most of the lime’s fragrance and depth of flavor come from its zest, so make sure to use fresh limes and zest them just before adding them to the batter.

3. Whip the Egg Whites Separately

Separating the egg whites and beating them before folding them into the batter creates a light and airy texture, ensuring the cake stays soft.

4. Use Melted Butter for Extra Moisture

Unlike creamed butter, melted butter helps keep the cake extra moist and tender without making it too dense.

5. Let the Cake Cool Before Slicing

Lime juice in the batter adds extra moisture, so letting the cake fully cool before cutting ensures clean slices and the best texture.

How to Serve This Cake

This lime-scented apple cake is delicious on its own, but here are a few ways to make it even more special:

1. With a Dusting of Powdered Sugar

A light dusting of powdered sugar enhances the cake’s sweetness without overpowering the citrus notes.

2. Topped with Whipped Cream or Greek Yogurt

A dollop of lightly sweetened whipped cream or tangy Greek yogurt complements the bright lime flavor.

3. Drizzled with a Simple Lime Glaze

For an extra burst of citrus, mix powdered sugar with fresh lime juice to create a thin glaze to drizzle over the cake.

4. Served with Fresh Berries

Pairing this cake with strawberries, raspberries, or blueberries adds a fresh, fruity contrast.

5. Warmed Up with a Scoop of Ice Cream

For a more indulgent treat, serve warm slices of cake with vanilla or coconut ice cream for a tropical touch.

Frequently Asked Questions (FAQs)

Q: Can I make this cake ahead of time?

Yes! This cake stays fresh for up to 3 days at room temperature when stored in an airtight container. It also tastes even better the next day as the flavors develop.

Q: Can I freeze this cake?

Absolutely! Wrap individual slices or the whole cake tightly in plastic wrap and freeze for up to 2 months. Thaw at room temperature before serving.

Q: Can I use lemons instead of limes?

Yes! Lemons provide a similar citrus brightness, though they have a slightly different tangy profile.

Q: What type of flour works best?

All-purpose flour works perfectly, but for a lighter texture, you can substitute cake flour for a more delicate crumb.

Q: Can I make this cake gluten-free?

Yes! Simply replace the flour with a 1:1 gluten-free flour blend, and the results will be just as delicious.

Q: How do I prevent the apples from sinking?

To keep apple slices evenly distributed, toss them in a tablespoon of flour before folding them into the batter.

Q: Can I add spices like cinnamon or nutmeg?

Definitely! A pinch of cinnamon or nutmeg enhances the apple flavor without overpowering the lime.

Q: Can I use a different type of sweetener?

Yes! You can substitute sugar with coconut sugar, honey, or maple syrup, but keep in mind that liquid sweeteners may slightly alter the texture.

Why This Cake Should Be Your Next Bake

This Zesty Lime-Infused Apple Cake is more than just a dessert—it’s a celebration of fresh, vibrant flavors. The combination of sweet apples and bright citrus makes every bite refreshing, comforting, and unforgettable.

Light, moist, and full of fresh flavors
Simple ingredients, easy-to-follow recipe
Perfect for breakfast, tea time, or dessert
A unique twist on a traditional apple cake
Customizable with different fruits, spices, or toppings

Whether you’re baking for a gathering, a weekend treat, or just because you love citrusy desserts, this cake will quickly become a favorite. It’s proof that with a few simple ingredients and a touch of creativity, you can create something truly special.

So preheat your oven, grab some apples and limes, and enjoy a slice of homemade happiness.

Amal

Zesty Lime-Infused Apple Cake – A Refreshing Citrus Delight

This Lime-Scented Apple Cake is a delightful twist on the classic apple cake, featuring tender apples, a hint of lime zest, and a light, fluffy texture. The citrusy aroma perfectly complements the natural sweetness of the apples, making this cake moist, refreshing, and absolutely irresistible. Perfect for an afternoon tea or a light dessert, this cake is sure to impress!
Prep Time 15 minutes
Cook Time 35 minutes
Total Time 50 minutes
Servings: 8 servings
Course: Dessert
Cuisine: International

Ingredients
  

For the Cake Batter:
  • 2 egg whites reserved from custard layer
  • 2 whole eggs
  • 2/5 cup 100g sugar
  • 1 cup 125g all-purpose flour
  • 1 teaspoon baking powder
  • ¼ teaspoon salt
  • ¼ cup 60g unsalted butter, melted
  • 1 teaspoon lime zest
  • 2 tablespoons lime juice
  • 1 teaspoon vanilla extract
  • 2 medium apples peeled and sliced

Method
 

  1. Preheat & Prepare – Preheat oven to 350°F (175°C) and grease a cake pan with butter or line it with parchment paper.
  2. Whisk the Eggs – In a bowl, beat the egg whites until soft peaks form. In another bowl, whisk the whole eggs with sugar until light and fluffy.
  3. Mix the Batter – Fold the beaten egg whites into the egg-sugar mixture. Add melted butter, lime zest, lime juice, and vanilla extract. Gently mix in the flour, baking powder, and salt.
  4. Assemble & Bake – Pour the batter into the prepared pan and arrange the sliced apples on top. Bake for 30–35 minutes or until a toothpick inserted in the center comes out clean.
  5. Cool & Serve – Let the cake cool before slicing. Dust with powdered sugar or drizzle with a lime glaze for extra flavor.

Notes

  • Use tart apples like Granny Smith or Honeycrisp for the best flavor balance.
  • Toss apple slices with a little flour to prevent them from sinking to the bottom.
  • Store in an airtight container at room temperature for up to 3 days or refrigerate for longer freshness.
  • Serve with whipped cream, Greek yogurt, or a scoop of vanilla ice cream for an extra indulgence.