Cheesy Ham & Cheese Bread Bake: A Comforting Classic

Growing up, weekend mornings were always special in my household. The smell of something warm and cheesy baking in the oven would drift through the air, pulling us out of bed with eager anticipation. My mother had a way of turning simple ingredients into something extraordinary, and one of her best creations was this Cheesy Ham & Cheese Bread Bake. It wasn’t just about the taste—it was about the feeling of togetherness, the comfort of a home-cooked meal, and the joy of sharing food with family.

Now, as an adult, I find myself reaching for this recipe on lazy Sunday mornings or when I need a dish that feels like a warm hug. The crispy edges of the bread, the gooey melted cheese, and the savory ham all come together in a perfect balance, making this a go-to meal for breakfast, brunch, or even a cozy dinner.

If you’re looking for something easy yet indulgent, something that reminds you of home no matter where you are, this Cheesy Ham & Cheese Bread Bake is exactly what you need.

Why You’ll Love This Recipe

This dish isn’t just another ham and cheese sandwich—it’s an elevated version that combines textures, flavors, and a touch of nostalgia. Here’s why it deserves a spot in your kitchen:

1. Quick and Easy to Prepare

With just a handful of simple ingredients and minimal prep time, this recipe is perfect for busy mornings or last-minute brunch plans. You can assemble everything in under 10 minutes and let the oven do the rest of the work.

2. Perfect for Any Time of the Day

Although it’s traditionally a breakfast or brunch dish, this bake works just as well for lunch or dinner. Pair it with a fresh salad for a lighter meal, or serve it with a bowl of soup for a heartier option.

3. A Crowd-Pleaser

Whether you’re hosting guests or feeding a hungry family, this dish is guaranteed to be a hit. The combination of crispy bread, melted cheese, and smoky ham is universally loved.

4. Customizable to Your Taste

One of the best things about this recipe is its flexibility. Want to add more flavor? Throw in some caramelized onions or sautéed mushrooms. Looking for a spicy kick? A dash of hot sauce or a sprinkle of red pepper flakes will do the trick.

5. Great for Using Leftovers

This bake is an excellent way to repurpose leftover bread, cheese, or ham. Instead of letting those ingredients go to waste, transform them into a delicious, satisfying meal.

Ingredients

IngredientQuantity
Bread8 slices
Cheese (sliced)12 slices
Ham8 slices
Eggs2 large
PaprikaTo taste
Sour Cream2 tablespoons
Cheese (grated)100 grams (about 1 cup)

Step-by-Step Directions

  1. Preheat & Prep — Preheat your oven to 375°F (190°C). Lightly grease a baking dish.
  2. Layer the Goodness — Place 4 slices of bread in the dish. Add half of the sliced cheese, followed by all the ham. Layer the remaining bread on top, then cover with the rest of the sliced cheese.
  3. Make the Egg Mixture — In a bowl, whisk the eggs, sour cream, and paprika until smooth.
  4. Pour & Sprinkle — Evenly pour the egg mixture over the layered bread and sprinkle the grated cheese on top.
  5. Bake to Perfection — Bake for 20–25 minutes or until golden brown and the cheese is bubbly.
  6. Serve & Enjoy — Let it cool slightly before slicing and serving.

Nutritional Information (Per Serving)

NutrientAmount
Calories~320 kcal
Protein~18g
Carbohydrates~25g
Fat~18g
Saturated Fat~9g
Fiber~2g
Sodium~620mg

Tips for the Best Cheesy Ham & Cheese Bread Bake

To make this dish truly exceptional, keep these tips in mind:

Choose the Right Bread

While regular sandwich bread works fine, opting for something with more texture—like sourdough, ciabatta, or a rustic country loaf—will enhance the final dish. Slightly stale bread actually works best, as it absorbs the egg mixture without getting too soggy.

Use High-Quality Cheese

Cheese is the star of this dish, so don’t skimp on quality. A mix of cheeses can add depth—try combining cheddar for sharpness, mozzarella for meltiness, and Gruyère for a nutty flavor.

Season Wisely

A pinch of paprika adds a subtle warmth, but you can experiment with other spices like garlic powder, black pepper, or even a hint of Dijon mustard in the egg mixture for extra depth.

Let It Rest Before Serving

Once out of the oven, give the bake a few minutes to rest before slicing. This helps the cheese set slightly and makes it easier to serve.

Common Questions About This Recipe

1. Can I Make This Ahead of Time?

Yes! You can assemble the bake the night before, cover it with plastic wrap, and store it in the refrigerator. When ready to bake, let it sit at room temperature for 10–15 minutes while the oven preheats. This is especially helpful for holiday mornings or when entertaining guests.

2. Can I Use Different Meats?

Absolutely. While ham is a classic choice, you can swap it out for cooked bacon, turkey, or even shredded rotisserie chicken.

3. What If I Don’t Eat Meat?

This dish can easily be made vegetarian by skipping the ham and adding sautéed spinach, mushrooms, roasted red peppers, or even sun-dried tomatoes.

4. How Do I Store Leftovers?

Leftovers can be stored in an airtight container in the refrigerator for up to 3 days. Reheat in the oven at 350°F (175°C) for 10 minutes, or microwave individual portions for about a minute.

5. Can I Freeze It?

Yes, this bake freezes well. Let it cool completely, then wrap individual portions in plastic wrap and place them in a freezer-safe container. Reheat in the oven at 375°F (190°C) until warmed through.

6. What Can I Serve With It?

This dish pairs well with a light side salad, roasted vegetables, or a warm bowl of tomato soup. For breakfast, serve it with fresh fruit or a side of crispy hash browns.

7. How Can I Make It Healthier?

To lighten up this dish, use whole grain bread, reduced-fat cheese, and lean turkey instead of ham. You can also add more veggies for extra nutrients.

Conclusion: A Dish That Feels Like Home

There’s something undeniably comforting about melted cheese, warm bread, and the familiar flavors of a classic ham and cheese combination. This Cheesy Ham & Cheese Bread Bake isn’t just food—it’s a memory in the making, a dish that brings people together, and a meal that satisfies the soul as much as the stomach.

Whether you’re making it for a lazy weekend brunch, a quick dinner, or a special family gathering, this recipe is guaranteed to become a staple in your home. So gather your ingredients, preheat that oven, and get ready to enjoy a dish that’s simple, delicious, and filled with warmth.

Amal

Cheesy Ham & Cheese Bread Bake: A Comforting Classic

This Cheesy Ham & Cheese Bread Bake is a warm, comforting dish perfect for breakfast, brunch, or even dinner. Layers of crispy bread, melted cheese, and savory ham come together in a rich, creamy egg mixture, creating a dish that’s both simple and indulgent. Easy to prepare and guaranteed to satisfy, it’s a family favorite that feels like a hug on a plate.
Prep Time 10 minutes
Cook Time 25 minutes
Total Time 35 minutes
Servings: 4 –6 servings
Course: Breakfast
Cuisine: American

Ingredients
  

  • 8 slices of bread preferably slightly stale or rustic-style
  • 12 slices of cheese cheddar, mozzarella, or your favorite melting cheese
  • 8 slices of ham or turkey, bacon, or a vegetarian alternative
  • 2 large eggs
  • 2 tablespoons sour cream
  • Paprika to taste
  • 100 grams about 1 cup grated cheese (cheddar, Gruyère, or Parmesan)

Method
 

  1. Preheat the oven to 375°F (190°C). Lightly grease a baking dish.
  2. Layer the bread and fillings — Place half of the bread slices at the bottom of the dish, followed by a layer of ham and half of the sliced cheese. Add the remaining bread on top and cover with the rest of the sliced cheese.
  3. Prepare the egg mixture — In a small bowl, whisk together the eggs, sour cream, and paprika until smooth.
  4. Pour and top — Evenly pour the egg mixture over the layered bread, ensuring it soaks in. Sprinkle the grated cheese on top for an extra cheesy crust.
  5. Bake for 20–25 minutes, or until the cheese is melted and bubbly and the top is golden brown.
  6. Let it rest for a few minutes before slicing and serving. Enjoy warm!

Notes

  • For a heartier dish, add cooked bacon, sautéed mushrooms, or caramelized onions between the layers.
  • Slightly stale bread works best as it absorbs the egg mixture without becoming too soggy.
  • Spice it up by adding a pinch of garlic powder, mustard, or red pepper flakes to the egg mixture.
  • Store leftovers in an airtight container in the fridge for up to 3 days. Reheat in the oven for best results.
  • Freezer-friendly: Wrap individual portions and freeze for up to 2 months. Reheat in the oven at 375°F (190°C) until warmed through.

Rainbow Fried Rice – A Healthy, Flavorful, and Colorful Dish

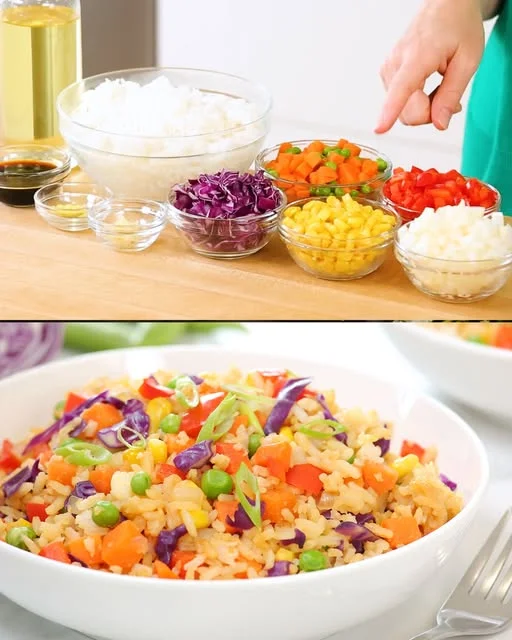
Some meals have the power to instantly brighten your day, and this Rainbow Fried Rice is one of them. The first time I made this dish, I wasn’t even trying to cook something special—I was just using up leftovers in my fridge. But when I plated it, I couldn’t help but smile. The vibrant reds, oranges, greens, yellows, and purples turned a simple dish into something truly beautiful.

It reminded me of when I was a child, sitting in my grandmother’s kitchen, watching her prepare food with such love and care. She always told me that the more colors on your plate, the healthier your meal is. She didn’t use scientific terms like “antioxidants” or “fiber-rich foods,” but she understood that nature’s colors provided nourishment.

Now, whenever I cook Rainbow Fried Rice, I think of her wisdom. It’s not just a meal—it’s a reminder that eating well can be joyful, beautiful, and incredibly satisfying.

Why You’ll Love This Recipe

  1. Bursting with Flavor and Texture – A perfect balance of savory, slightly sweet, and umami flavors with a satisfying crunch.
  2. Packed with Nutrients – Loaded with vitamins, fiber, and antioxidants from a variety of colorful vegetables.
  3. Quick and Easy – A one-pan meal that’s ready in under 20 minutes.
  4. Great for Meal Prep – Stores well and reheats beautifully for a healthy meal anytime.
  5. A Perfect Use for Leftover Rice – No waste, just delicious food!

INGREDIENTS

IngredientAmount
Yellow onion (diced)1
Red bell pepper (diced)1
Frozen peas and carrots1 cup
Frozen corn kernels½ cup
Red cabbage (shredded)½ cup
Garlic cloves (minced)2
Fresh ginger (grated)1 tsp
Cooked rice (chilled)4 cups
Soy sauce¼ cup
Green onions (sliced)2

DIRECTIONS

Step 1: Sauté the Aromatics

  • Heat a pan over medium heat and add a little oil.
  • Sauté the diced yellow onion, garlic, and ginger until fragrant.

Step 2: Cook the Vegetables

  • Add the red bell pepper, peas, carrots, corn, and red cabbage to the pan.
  • Stir-fry for 3-4 minutes until the veggies are slightly tender but still crisp.

Step 3: Add the Rice

  • Add the chilled, cooked rice to the pan and stir well to combine with the vegetables.
  • Pour in the soy sauce and mix until everything is evenly coated.

Step 4: Finish and Serve

  • Stir in the sliced green onions and cook for 1 more minute.
  • Serve hot and enjoy your flavorful, colorful, and healthy fried rice!

NUTRITIONAL INFORMATION (Per Serving, Approximate)

NutrientAmount
Calories320 kcal
Carbohydrates60g
Protein8g
Fat5g
Fiber5g

The Secret to Perfect Fried Rice

Even though fried rice is simple to make, there are a few tricks to elevate the flavor and texture.

1. Always Use Cold, Cooked Rice

Freshly cooked rice is too soft and tends to become mushy when stir-fried. Using chilled rice ensures that every grain stays separate and absorbs flavors perfectly. If you don’t have leftover rice, cook fresh rice and spread it on a baking sheet to cool quickly before using.

2. High Heat is Key

A hot pan helps caramelize the vegetables and rice, giving that delicious, slightly crispy texture. If your pan isn’t hot enough, your rice may become soggy.

3. Layer the Flavors

Instead of dumping everything into the pan at once, sauté aromatics (onions, garlic, ginger) first, then add vegetables, then the rice and seasonings. This builds depth of flavor.

4. Don’t Overdo the Soy Sauce

Too much soy sauce can make fried rice heavy and salty. Start with a little, taste, and adjust as needed. A splash of sesame oil or rice vinegar at the end adds even more depth!

5. Add Protein for a Complete Meal

While this recipe is naturally plant-based, you can easily add protein like:

  • Scrambled eggs
  • Diced tofu
  • Grilled chicken
  • Shrimp or beef slices

The Health Benefits of Eating a Colorful Meal

Each ingredient in this Rainbow Fried Rice isn’t just for color—it brings unique health benefits that make this dish both delicious and nourishing.

1. Red Bell Peppers – Vitamin C Powerhouse

Red bell peppers contain more vitamin C than an orange! They support your immune system and promote healthy skin.

2. Carrots – Eye and Skin Health

Carrots are rich in beta-carotene, which is converted into vitamin A in the body, helping with vision and skin health.

3. Peas – Protein and Fiber

Peas provide plant-based protein and fiber, making this dish more filling and nutritious.

4. Red Cabbage – Antioxidant Boost

The deep purple color comes from anthocyanins, powerful antioxidants that support heart health and reduce inflammation.

5. Garlic and Ginger – Natural Healers

Both garlic and ginger have antibacterial and anti-inflammatory properties, making them a perfect addition for boosting overall health.

6. Rice – Energy and Comfort

Rice provides a good source of carbohydrates, giving you energy while acting as a neutral base that absorbs all the delicious flavors in this dish.

Customizing Your Rainbow Fried Rice

One of the best things about this recipe is how versatile it is. Here are a few ways to switch things up:

1. Make It Spicy

  • Add sriracha or red pepper flakes for a fiery kick.
  • Toss in chopped chili peppers for extra heat.

2. Add More Protein

  • Crack an egg into the pan and scramble it before adding the rice.
  • Stir in cooked chicken, shrimp, beef, or tofu for a heartier meal.

3. Try Different Vegetables

  • Swap red cabbage for broccoli, zucchini, or spinach.
  • Use edamame or chickpeas for added plant-based protein.

4. Go Low-Carb

  • Replace rice with cauliflower rice or quinoa for a lower-carb option.

5. Enhance the Flavor

  • Add a splash of sesame oil at the end for a rich, nutty finish.
  • Sprinkle with crushed peanuts or cashews for extra crunch.

Frequently Asked Questions

1. Can I use freshly cooked rice instead of cold rice?

Yes, but it may become sticky. If you’re using fresh rice, spread it on a baking sheet and let it cool for at least 15 minutes before cooking.

2. How do I store and reheat leftover fried rice?

Store in an airtight container in the fridge for up to 3 days. To reheat, warm it in a pan over medium heat with a splash of water to prevent drying out.

3. Is this dish gluten-free?

The recipe is naturally gluten-free if you use tamari instead of soy sauce.

4. Can I freeze fried rice?

Yes! Let it cool completely, then store in a freezer-safe container for up to 2 months. Reheat in a pan or microwave.

5. What can I serve with this dish?

  • Grilled or roasted meat for a complete meal.
  • A simple miso soup for a light pairing.
  • A fried or poached egg on top for extra richness.

Conclusion – A Dish That Brings Health, Flavor, and Happiness

Rainbow Fried Rice is more than just a meal—it’s a celebration of color, nutrition, and taste. Every bite is packed with flavors, textures, and essential nutrients that make eating healthy effortless and enjoyable.

This recipe is perfect for busy days, yet impressive enough to serve to guests. It’s proof that healthy food can be just as delicious, satisfying, and comforting as any indulgent dish.

So next time you have leftover rice and a handful of veggies, don’t just settle for something ordinary—turn it into this vibrant, nutrient-packed Rainbow Fried Rice. Try it today and discover how a simple dish can bring so much joy to your table!

Amal

Rainbow Fried Rice – A Healthy, Flavorful, and Colorful Dish

This Rainbow Fried Rice is packed with vibrant vegetables, aromatic garlic and ginger, and perfectly seasoned rice. It’s quick, healthy, and bursting with flavor, making it an ideal dish for lunch or dinner. Whether served as a main meal or a side, this colorful fried rice is a delicious way to enjoy a balanced meal in minutes!
Prep Time 10 minutes
Cook Time 15 minutes
Total Time 25 minutes
Servings: 4 servings
Course: Main Dish
Cuisine: Asian-inspired

Ingredients
  

For the Fried Rice:
  • 1 yellow onion diced
  • 1 red bell pepper diced
  • 1 cup frozen peas and carrots
  • ½ cup frozen corn kernels
  • ½ cup red cabbage shredded
  • 2 garlic cloves minced
  • 1 tsp fresh ginger grated
  • 4 cups cooked rice chilled
  • ¼ cup soy sauce
  • 2 green onions sliced

Method
 

  1. Sauté the Aromatics – Heat oil in a large pan over medium heat. Add diced onion, garlic, and ginger. Cook for 2-3 minutes until fragrant.
  2. Cook the Vegetables – Stir in the red bell pepper, peas, carrots, corn, and red cabbage. Sauté for another 3-4 minutes until slightly tender.
  3. Add the Rice – Stir in the chilled, cooked rice and mix well to combine with the vegetables.
  4. Season and Finish – Pour in the soy sauce and stir well. Cook for 2-3 minutes, allowing the rice to absorb the flavors.
  5. Garnish and Serve – Add sliced green onions, give it a final stir, and serve hot!

Notes

  • For best texture, use cold, day-old rice to prevent mushiness.
  • Add protein – Stir in scrambled eggs, tofu, chicken, or shrimp.
  • Make it spicy – Add red pepper flakes or a drizzle of sriracha.
  • For extra flavor, finish with a splash of sesame oil or lime juice.
  • Storage – Keep leftovers in an airtight container in the fridge for up to 3 days.

Oatmeal Pancakes with Fresh Guacamole – A Nutritious Breakfast for Every Day

Some meals have a way of becoming part of your routine without you even realizing it. That’s exactly what happened with these oatmeal pancakes and fresh guacamole.

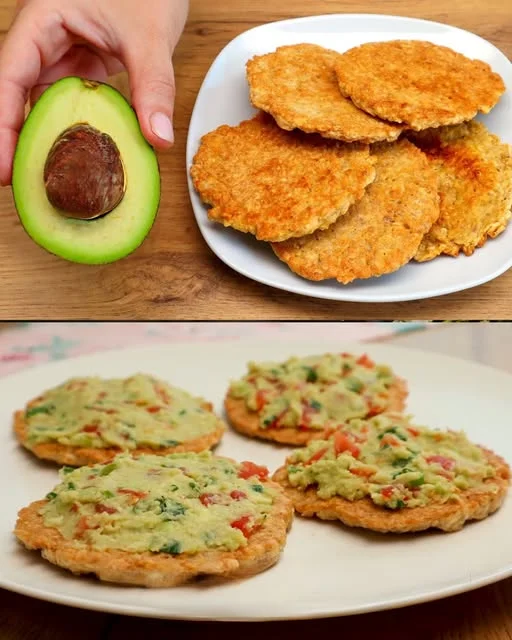
It started on a busy morning when I wanted something quick, healthy, and filling. I had oats, an egg, and an avocado sitting on my counter. Instead of making my usual oatmeal, I blended the oats into a batter, cooked them into pancakes, and mashed up the avocado with some lemon juice and tomatoes. The result? A delicious, nutritious, and incredibly satisfying breakfast that I’ve been making ever since.

What makes this meal special is its balance of flavors and textures—the warm, slightly crispy pancakes pair perfectly with the creamy, tangy guacamole. It’s light but filling, packed with fiber, protein, and healthy fats, making it a great choice for anyone looking for a wholesome way to start the day.

If you’re looking for a simple yet nutritious breakfast you can eat every day, this recipe is for you.

Why This Breakfast Is Perfect for a Healthy Lifestyle

  1. Simple and Quick – Ready in under 15 minutes with minimal ingredients.
  2. Nutrient-Packed – Provides protein, fiber, and healthy fats to keep you full longer.
  3. Naturally Gluten-Free – Made with oats, making it perfect for those avoiding wheat.
  4. Versatile and Customizable – Can be adapted for sweet or savory preferences.
  5. Perfect for Weight Management – High in fiber and protein to prevent unnecessary snacking.

Ingredients

For the Pancakes

IngredientAmount
Oatmeal40g
Egg1
Sunflower oilFor frying

For the Guacamole

IngredientAmount
Avocado1
SaltTo taste
Black pepperTo taste
Lemon juiceFrom ½ lemon
Cherry tomatoes5 (chopped)

Instructions

Step 1: Make the Pancake Batter

  • Blend or mix the oatmeal and egg until smooth. Let sit for 5 minutes to thicken.

Step 2: Cook the Pancakes

  • Heat a pan with a little sunflower oil over medium heat.
  • Pour the batter into small pancakes and cook for 2-3 minutes per side until golden brown.
  • Transfer to a plate and set aside.

Step 3: Prepare the Guacamole

  • Mash the avocado in a bowl.
  • Add salt, black pepper, lemon juice, and chopped cherry tomatoes.
  • Mix until well combined.

Step 4: Serve and Enjoy

  • Spread the guacamole over the pancakes or serve it on the side for dipping. Enjoy immediately!

Nutritional Information (Per Serving, Approximate)

NutrientAmount
Calories250 kcal
Carbohydrates20g
Protein8g
Fat15g
Fiber6g

The Health Benefits of This Meal

1. Oats: A Superfood for Energy and Digestion

Oats are known for their high fiber content, which helps support digestion, regulate blood sugar, and keep you feeling full. They are also a great source of slow-digesting carbohydrates, making them perfect for sustained energy throughout the day.

2. Eggs: A Natural Protein Boost

Eggs are one of the best natural sources of protein, essential for muscle repair, metabolism, and overall health. Including an egg in this recipe ensures that your breakfast is balanced and satisfying.

3. Avocado: A Healthy Fat Powerhouse

Avocados provide heart-healthy monounsaturated fats, which help support brain function, reduce inflammation, and keep you full. They are also rich in potassium and antioxidants, making them a great addition to any meal.

4. Tomatoes and Lemon: A Fresh Flavor Boost

Cherry tomatoes add a natural sweetness, while lemon juice enhances digestion and adds a bright, tangy flavor to the guacamole. Together, they create the perfect contrast to the rich avocado and hearty pancakes.

How to Customize This Recipe to Your Taste

One of the best things about this recipe is its flexibility. Whether you like it savory or slightly sweet, there are plenty of ways to adapt it.

1. Make It Sweeter

  • Add cinnamon and vanilla to the pancake batter.
  • Skip the guacamole and top with Greek yogurt, honey, or berries.
  • Mix in a mashed banana for natural sweetness.

2. Add More Protein

  • Stir chia seeds or flaxseeds into the pancake batter.
  • Serve with a boiled egg or smoked salmon for extra protein.
  • Add a spoonful of Greek yogurt on top.

3. Turn Up the Spice

  • Mix red pepper flakes or cumin into the guacamole.
  • Serve with a side of sriracha or hot sauce.
  • Add finely chopped jalapeños for a little heat.

4. Try Different Textures

  • Add chopped nuts or seeds to the pancakes for crunch.
  • Use coconut flakes or cocoa nibs for an extra flavor twist.
  • Top with grated cheese for a more savory version.

Frequently Asked Questions

1. Can I make these pancakes without blending the oats?

Yes! If you prefer a more textured pancake, simply mix whole oat flakes with the egg instead of blending them into a flour-like consistency.

2. Can I make a big batch and store them?

Absolutely! These pancakes store well in the fridge for up to 3 days. You can also freeze them and reheat in a pan or toaster.

3. Is this meal suitable for a weight-loss diet?

Yes! These oatmeal pancakes and guacamole are high in fiber and protein, which help control hunger and prevent overeating. Plus, the healthy fats from the avocado keep you feeling full longer.

4. What can I use instead of an egg?

If you need an egg-free version, try using a flax egg (1 tablespoon ground flaxseed mixed with 2.5 tablespoons of water) or mashed banana for a slightly sweeter pancake.

5. Can I swap the avocado for something else?

Yes! If you’re out of avocados, try:

  • Hummus for a creamy, protein-rich alternative.
  • Cottage cheese or ricotta for a high-protein, dairy-based option.
  • Mashed sweet potato for a slightly sweet, nutrient-dense alternative.

Conclusion – A Breakfast You Can Enjoy Every Day

This oatmeal pancake and guacamole breakfast is more than just a meal—it’s a healthy habit that fits effortlessly into your routine. Whether you’re looking for a quick and easy breakfast, a weight-friendly meal, or a new way to enjoy oats, this dish checks all the boxes.

The combination of oats, eggs, and avocado provides the perfect balance of fiber, protein, and healthy fats, making it an ideal meal for energy, digestion, and overall well-being. Plus, it’s so easy to customize that you’ll never get bored of it!

If you’ve been searching for a go-to breakfast that is healthy, delicious, and incredibly easy to make, this is it. Try it today and start your morning with a nutritious, satisfying meal that fuels your body the right way.

Amal

Oatmeal Pancakes with Fresh Guacamole – A Nutritious Breakfast for Every Day

This light, nutritious, and satisfying breakfast combines hearty oatmeal pancakes with creamy, flavorful guacamole. Packed with fiber, protein, and healthy fats, this meal is perfect for a balanced start to your day. Quick to make and naturally gluten-free, it’s a delicious breakfast option you can enjoy every day!
Prep Time 5 minutes
Cook Time 10 minutes
Total Time 15 minutes
Servings: 1 serving
Course: Breakfast
Cuisine: Healthy

Ingredients
  

For the Pancakes:
  • 40 g oatmeal
  • 1 egg
  • Sunflower oil for frying
For the Guacamole:
  • 1 avocado
  • Salt to taste
  • Black pepper to taste
  • Juice of ½ lemon
  • 5 cherry tomatoes chopped

Method
 

  1. Prepare the Pancake Batter – Blend or mix the oatmeal and egg until a smooth batter forms. Let it sit for 5 minutes to thicken.
  2. Cook the Pancakes – Heat a pan with a little sunflower oil. Pour the batter into small pancakes and cook for 2-3 minutes per side until golden brown. Set aside.
  3. Make the Guacamole – Mash the avocado in a bowl, then mix in salt, black pepper, lemon juice, and chopped cherry tomatoes. Stir until well combined.
  4. Assemble and Serve – Spread the guacamole over the pancakes or serve it on the side for dipping. Enjoy immediately!

Notes

  • For a gluten-free option, use certified gluten-free oats.
  • To add extra flavor, sprinkle chili flakes or garlic powder into the guacamole.
  • For a sweeter version, swap guacamole for Greek yogurt and honey.
  • Make ahead – Store extra pancakes in the fridge for up to 2 days and reheat in a pan or toaster.

Flourless Oatmeal Bread – A Simple and Wholesome Homemade Loaf

Some recipes are more than just food—they bring a sense of warmth, nourishment, and connection to something greater. That’s exactly how I feel about this flourless oatmeal bread.

I still remember the first time I baked a loaf without traditional flour. I had run out of bread one morning and, instead of heading to the store, I looked at what I had in my pantry. A bag of oat flakes sat there, untouched for weeks, and I wondered: Can I turn this into bread?

I mixed the oats with a few basic ingredients—baking soda, salt, and seeds—and popped the mixture into the oven. The moment the bread came out, golden brown and fragrant, I knew I had stumbled upon something special. The first bite was warm, hearty, and slightly nutty, with a satisfying chewiness that made it perfect for breakfast or a quick snack.

Since then, this recipe has become a go-to in my kitchen. It’s simple, wholesome, and requires just a handful of ingredients. Whether you’re looking for a gluten-free alternative, a nutritious bread option, or just an easy homemade loaf, this flourless oatmeal bread is a must-try.

Why You’ll Love This Recipe

  1. No Flour Needed – Made entirely from oats, this bread is naturally gluten-free and packed with fiber.
  2. Quick and Easy – No yeast, no kneading, and no waiting for the dough to rise.
  3. Healthy and Nourishing – Oats provide slow-digesting carbs, protein, and essential nutrients, making this bread a great option for a balanced diet.
  4. Perfect for Any Occasion – Enjoy it with butter, jam, avocado, or as a base for sandwiches.
  5. Customizable – Add nuts, dried fruits, or spices to create your own unique version.

Ingredients

IngredientAmount
Oat flakes (gluten-free if needed)90 g
SaltA pinch
Baking soda1 teaspoon
Mixed seeds2 tablespoons

Instructions

Step 1: Preheat the Oven

  • Preheat your oven to 350°F (175°C) and line a baking dish with parchment paper.

Step 2: Prepare the Dry Ingredients

  • In a mixing bowl, combine oat flakes, salt, and baking soda.
  • Add the mixed seeds and stir well.

Step 3: Form the Dough

  • Gradually add water (as needed) and mix until a soft dough forms.
  • Let the dough rest for 10 minutes to allow the oats to absorb moisture.

Step 4: Bake the Bread

  • Transfer the dough to the prepared baking dish.
  • Bake for 25-30 minutes, or until the top is golden brown and the bread is firm to the touch.

Step 5: Cool and Serve

  • Let the bread cool completely before slicing.
  • Enjoy as is, toasted, or with your favorite toppings!

Nutritional Information (Per Serving, Approximate)

NutrientAmount
Calories120 kcal
Carbohydrates18g
Protein4g
Fat3g
Fiber3g

The Benefits of Baking with Oats

Oats are often seen as just a breakfast ingredient, but they are so much more. They are a superfood in the world of grains, offering numerous health benefits while being naturally gluten-free, high in fiber, and rich in essential minerals.

1. A Heart-Healthy Choice

Oats contain beta-glucan, a type of soluble fiber known to lower cholesterol and promote heart health. Regular consumption of oats can help reduce the risk of heart disease and support overall cardiovascular health.

2. Keeps You Full for Longer

Unlike white bread, which can cause blood sugar spikes, oat-based bread provides a steady release of energy, keeping you fuller for longer and reducing cravings.

3. Great for Digestion

The fiber in oats aids digestion and promotes gut health, making this bread an excellent option for those who struggle with bloating or digestive issues.

4. Naturally Gluten-Free

For those with gluten sensitivities, oats provide a fantastic alternative to wheat-based bread. Just be sure to use certified gluten-free oats to avoid cross-contamination.

Ways to Customize Your Flourless Oatmeal Bread

One of the best things about this recipe is how easily it can be adapted to suit your taste and dietary preferences.

1. Add Some Sweetness

  • Mix in honey, maple syrup, or mashed bananas for a naturally sweet loaf.
  • Toss in raisins or dried cranberries for a fruity twist.

2. Boost the Protein

  • Stir in chia seeds, hemp seeds, or a scoop of protein powder for an extra protein boost.
  • Add crushed nuts like almonds or walnuts for texture and flavor.

3. Make It Savory

  • Add garlic powder, black pepper, or chopped herbs for a more flavorful, savory loaf.
  • Sprinkle sesame or sunflower seeds on top before baking for extra crunch.

4. Give It a Spiced Kick

  • Add a teaspoon of cinnamon, nutmeg, or cardamom for a warm, spiced version.
  • A pinch of cayenne or chili flakes can give it a subtle heat.

Frequently Asked Questions

1. Can I make this bread without baking soda?

Baking soda helps the bread rise slightly and gives it a light texture. However, you can substitute it with baking powder (1.5 teaspoons) or omit it for a denser loaf.

2. How do I store this bread?

Keep the bread in an airtight container at room temperature for up to 3 days. For longer storage, refrigerate it for up to a week or freeze it for up to 3 months.

3. Can I make this bread vegan?

Yes! This recipe is naturally vegan and dairy-free, as it contains no eggs or butter. Just be sure to check that your oat flakes are certified vegan if needed.

4. How do I get a crispier crust?

To achieve a crispier crust, bake the bread slightly longer and let it cool on a wire rack before slicing. You can also toast individual slices for extra crunch.

5. Can I use oat flour instead of whole oats?

Yes, you can substitute oat flakes with oat flour in the same quantity for a smoother-textured bread. If you don’t have oat flour, simply blend oat flakes into a fine powder using a food processor.

6. What’s the best way to serve this bread?

  • For breakfast – Toast it and top with butter, nut butter, or fruit preserves.
  • For a savory snack – Serve with hummus, avocado, or cream cheese.
  • For a light meal – Use it as a base for open-faced sandwiches or bruschetta.

Conclusion – A Simple Recipe with Endless Possibilities

This flourless oatmeal bread is proof that delicious, homemade bread doesn’t have to be complicated. With just a few basic ingredients, you can create a hearty, wholesome loaf that’s naturally gluten-free, high in fiber, and perfect for any meal.

Whether you’re making it for a quick breakfast, a healthy snack, or as an alternative to traditional bread, this recipe is versatile, nourishing, and easy to make. It’s the kind of bread that feels good to eat—not just because it’s healthy, but because it’s made with simple, real ingredients that you can trust.

So why not give it a try? Your kitchen will be filled with the warm, comforting aroma of freshly baked oats, and your taste buds will thank you for it. And if you find a new way to customize it, I’d love to hear about it! Happy baking!

Amal

Flourless Oatmeal Bread – A Simple and Wholesome Homemade Loaf

This flourless oatmeal bread is the perfect healthy alternative to traditional bread. Made with oats, seeds, and no refined flour, it’s naturally gluten-free, fiber-rich, and incredibly easy to make. Whether you’re looking for a nutritious breakfast, a light snack, or a homemade bread option, this recipe is a must-try!
Prep Time 10 minutes
Cook Time 25 minutes
Total Time 35 minutes
Servings: 1 small loaf
Course: Bread
Cuisine: Healthy

Ingredients
  

  • 90 g oat flakes use gluten-free if needed
  • A pinch of salt
  • 1 teaspoon baking soda
  • 2 tablespoons mixed seeds

Method
 

  1. Preheat the oven to 350°F (175°C) and line a baking dish with parchment paper.
  2. Mix dry ingredients – In a large bowl, combine oat flakes, salt, and baking soda.
  3. Add the seeds – Stir in the mixed seeds for extra crunch and nutrition.
  4. Form the dough – Gradually add water until a soft dough forms. Let it sit for 10 minutes to absorb moisture.
  5. Bake – Transfer the dough to the prepared baking dish and bake for 25-30 minutes, or until golden brown.
  6. Cool and serve – Allow the bread to cool before slicing. Enjoy fresh, toasted, or with your favorite toppings!

Notes

  • Customize with nuts – Add chopped almonds, walnuts, or sunflower seeds for more texture.
  • Make it sweet – Mix in honey, mashed banana, or dried fruits for a slightly sweet version.
  • Storage – Store at room temperature for 2-3 days, or freeze for up to 3 months.
  • Vegan & Dairy-Free – Naturally free of eggs and dairy, making it a great plant-based option.

Cheesy Green Onion Flatbread – A Simple Pleasure from Scratch

Some of the best foods in life are the simplest. I still remember the first time I made flatbread from scratch. It was a cold, rainy evening, and I wanted something warm and comforting but didn’t have the patience for a complicated recipe. I rummaged through my pantry, found some flour, a bit of cheese, and fresh green onions in the fridge, and decided to try making a quick flatbread.

As I mixed the dough, the scent of chopped green onions filled the air, and I knew this was going to be something special. The moment I placed the first flatbread in the hot pan, it sizzled, puffed up slightly, and turned golden brown. I tore off a piece while it was still warm, the melted cheese stretching between my fingers, and took a bite. The crispy edges, the soft and chewy center, the mix of sharp cheese and fresh onions—it was perfect.

Since then, this cheesy green onion flatbread has become a staple in my home. It’s quick to make, requires no yeast, and uses simple ingredients. Whether you eat it on its own, dip it in soup, or use it as a wrap, it’s one of those recipes that feels like a hug in every bite.

Why You’ll Love This Recipe

  1. Simple and Quick – No yeast or long proofing times needed.
  2. Crispy and Chewy – The perfect balance of texture in every bite.
  3. Budget-Friendly – Made with basic pantry staples.
  4. Endlessly Versatile – Serve it as a snack, side, or even a meal.
  5. Perfect for Beginners – Easy to make, even if you’ve never baked before.

Ingredients

IngredientAmount
Water95 ml
Salt1.5 g (0.25 tsp)
Flour150 g (1 cup)
Green onion (chopped)30 g
Baking sodaA pinch
Cheese (grated)50 g
Flour (for dusting)¼ cup
Corn starch¼ cup

Directions

Step 1: Prepare the Dough

  1. In a mixing bowl, combine flour, salt, and baking soda.
  2. Gradually add water, mixing until a dough forms.
  3. Knead for 5-7 minutes until smooth. Cover and let rest for 20 minutes.

Step 2: Add the Fillings

  1. Roll out the dough on a lightly floured surface.
  2. Sprinkle evenly with chopped green onions and grated cheese.
  3. Fold the dough over the filling and knead gently to distribute.

Step 3: Shape and Cook

  1. Divide the dough into equal portions and roll each into a flat circle.
  2. Lightly dust with cornstarch and flour to prevent sticking.
  3. Heat a non-stick pan over medium heat and cook each flatbread for 2-3 minutes per side until golden brown and slightly crispy.

Step 4: Serve and Enjoy

  • Serve warm with butter, yogurt dip, or alongside soups and stews for a comforting meal.

Nutritional Information (Per Serving, Approximate)

NutrientAmount
Calories180 kcal
Carbohydrates28g
Protein6g
Fat5g
Fiber2g

The Secret to the Perfect Flatbread

Making great flatbread isn’t about fancy techniques—it’s about understanding a few key principles that make all the difference.

1. The Right Dough Consistency

Flatbread dough should be soft and pliable but not too sticky. If the dough feels too wet, add a little more flour. If it’s too dry and cracks when rolling, add a few drops of water. Letting it rest for at least 20 minutes helps relax the gluten, making it easier to roll out.

2. The Magic of Green Onions and Cheese

Chopped green onions add a fresh, mild sharpness that pairs beautifully with the rich, melty cheese. The key is to evenly distribute them throughout the dough so that every bite has a little of both.

3. Cooking at the Right Temperature

A hot pan is essential for achieving the golden-brown exterior and soft interior. Cooking on medium heat ensures even cooking—too high, and it burns before cooking through; too low, and it turns dry.

4. Using Cornstarch for Extra Softness

Dusting the dough with a mix of flour and cornstarch helps keep the flatbread soft and prevents it from sticking while rolling. The cornstarch also gives it a delicate crispness without making it too tough.

5. Letting the Cheese Work Its Magic

Grated cheese melts into the dough as it cooks, creating a slightly crispy, golden crust on the outside while keeping the inside soft and cheesy. The result? A perfect blend of textures in every bite.

Ways to Customize Your Flatbread

This flatbread is delicious as is, but you can easily make it your own with these creative variations.

1. Make It Spicy

  • Add chili flakes, black pepper, or finely chopped jalapeños for a little kick.
  • Serve with a side of spicy garlic yogurt dip for extra heat.

2. Add More Herbs and Flavors

  • Mix in chopped parsley, cilantro, or thyme for a fresh, aromatic flavor.
  • A sprinkle of garlic powder or onion powder adds depth to the dough.

3. Try Different Cheeses

  • Swap regular cheese for feta, parmesan, or a mix of mozzarella and cheddar.
  • A little blue cheese or smoked gouda can add a gourmet twist.

4. Turn It Into a Stuffed Flatbread

  • Instead of mixing the cheese into the dough, place a generous layer between two thinly rolled-out pieces, then seal the edges and cook as usual.

5. Gluten-Free Version

  • Substitute the all-purpose flour with gluten-free flour or almond flour for a gluten-free option.

Frequently Asked Questions

1. Can I make this flatbread without cheese?

Yes! You can omit the cheese and add extra green onions or herbs for a lighter version.

2. How do I store leftover flatbread?

Store in an airtight container at room temperature for up to 2 days. For longer storage, refrigerate for up to 5 days or freeze for up to 3 months.

3. How do I reheat flatbread?

  • On the stove – Heat in a dry pan over medium heat for 1-2 minutes per side.
  • In the oven – Wrap in foil and warm at 350°F (175°C) for 5-10 minutes.
  • In the microwave – Heat for 20-30 seconds (though it may lose crispiness).

4. Can I make this dough ahead of time?

Yes! Store the dough in the fridge for up to 24 hours before rolling and cooking. Let it come to room temperature before rolling out.

5. What’s the best way to serve this flatbread?

  • With dips – Try hummus, tzatziki, or garlic butter.
  • As a side – Serve with soups, curries, or stews.
  • As a wrap – Fill with grilled chicken, veggies, or falafel.

Conclusion – A Recipe Worth Making Again and Again

There’s something deeply satisfying about making homemade flatbread. It’s warm, soft, crispy in just the right places, and bursting with flavor from the cheese and green onions. The best part? It’s incredibly easy and quick to make—no long waiting times, no fancy equipment, just a simple dough that comes together beautifully in minutes.

Whether you’re making this for a quick snack, a side for dinner, or even as the base for a delicious wrap, this flatbread will quickly become a favorite in your kitchen.

So, why not try it today? A few ingredients, a little time, and a whole lot of deliciousness await! And if you experiment with different flavors or toppings, I’d love to hear how you make this recipe your own!

Amal

Cheesy Green Onion Flatbread – A Simple Pleasure from Scratch

This cheesy green onion flatbread is the perfect blend of crispy on the outside and soft on the inside, with melty cheese and fragrant green onions in every bite. Made with simple pantry ingredients, it’s quick to prepare and requires no yeast or special equipment. Whether served as a snack, side, or light meal, this flatbread is a guaranteed crowd-pleaser!
Prep Time 10 minutes
Cook Time 15 minutes
Total Time 25 minutes
Servings: 4 flatbreads
Course: Snack
Cuisine: International

Ingredients
  

  • 95 ml water
  • 1.5 g 0.25 tsp salt
  • 150 g 1 cup flour
  • 30 g green onion chopped
  • A pinch of baking soda
  • 50 g cheese grated
  • ¼ cup flour for dusting
  • ¼ cup corn starch

Method
 

  1. Prepare the Dough – In a mixing bowl, combine flour, salt, and baking soda. Gradually add water and mix until a dough forms. Knead for 5-7 minutes until smooth, then cover and let rest for 20 minutes.
  2. Incorporate Fillings – Roll out the dough and sprinkle with chopped green onions and grated cheese. Fold the dough over and knead gently to distribute the ingredients evenly.
  3. Shape and Cook – Divide the dough into equal portions and roll each into a flat circle. Dust lightly with corn starch and flour. Heat a pan over medium heat and cook each flatbread for 2-3 minutes per side until golden brown.
  4. Serve and Enjoy – Serve warm with butter, a yogurt dip, or as a side for soups and stews.

Notes

  • For extra crispiness, brush with olive oil or butter before cooking.
  • To make it dairy-free, omit the cheese or use a plant-based alternative.
  • For a spicier version, add chili flakes or black pepper to the dough.
  • Storage – Keep in an airtight container for up to 3 days or freeze for later.

Homemade Spicy Napa Cabbage – A Flavorful Tradition You Can Make at Home

There’s something truly special about making a dish that has been passed down for generations. Whether it’s a family recipe or a traditional dish from another culture, preparing food with history behind it makes the experience even more meaningful.

I first fell in love with spicy Napa cabbage at a small, family-owned restaurant. The crisp texture, the balance of heat and tanginess, and the way it complemented every bite of rice made it unforgettable. I asked the owner how it was made, and she smiled, saying, “It’s all about patience and fresh ingredients.”

Inspired, I decided to recreate it at home. The process was surprisingly simple but incredibly rewarding. The first time I tasted my homemade version, I couldn’t believe how fresh and flavorful it was—better than anything store-bought. I realized then that making your own spicy cabbage isn’t just about food; it’s about the joy of crafting something from scratch, knowing exactly what goes into it, and sharing it with loved ones.

If you’ve never made it before, you’re in for a treat. This dish is not only delicious and versatile but also packed with health benefits. In this article, we’ll explore what makes this dish so special, how to customize it to your taste, and answer some common questions to ensure your homemade spicy Napa cabbage turns out perfect every time.

Why You’ll Love This Recipe

  1. Bold, Fresh Flavor – The perfect balance of spice, sweetness, and umami makes this dish irresistible.
  2. Easy to Prepare – No fermentation is required, making it a quick and simple version of a classic favorite.
  3. Naturally Healthy – Napa cabbage is rich in vitamins, while garlic and ginger provide powerful antioxidants.
  4. Versatile Side Dish – Enjoy it with rice, grilled meats, noodles, or even on its own.
  5. Customizable Heat Level – Adjust the spice level to suit your taste.

Ingredients

IngredientAmount
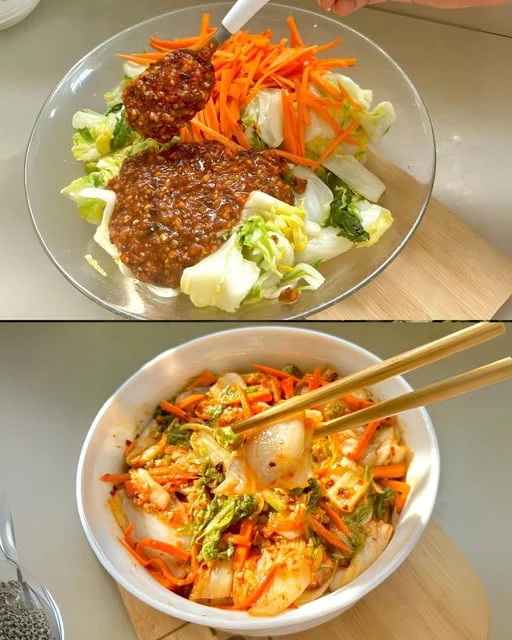
Napa cabbage (sliced)1 head
Gochugaru flakes or fresh red chili2 tablespoons
Grated ginger1 tablespoon
Grated garlic2 cloves
Carrots (sliced)1-2
Patis (fish sauce)2 tablespoons
Brown sugar3 tablespoons
Glutinous rice flour2 tablespoons
Water¼ cup

Directions

Step 1: Prepare the Cabbage

  1. Wash and slice the Napa cabbage into bite-sized pieces.
  2. Place it in a large bowl and set aside.

Step 2: Make the Seasoning Paste

  1. In a small pot, combine glutinous rice flour and water over low heat, stirring constantly until thickened. Let cool.
  2. In a separate bowl, mix gochugaru, grated ginger, garlic, fish sauce, and brown sugar. Add the cooled rice paste and mix well to form a flavorful seasoning paste.

Step 3: Combine Everything

  1. Add the carrots and prepared seasoning paste to the cabbage, tossing everything together until evenly coated.
  2. Let it sit for at least 30 minutes to allow the flavors to develop.

Step 4: Serve and Enjoy

  • Serve immediately as a fresh, crunchy side dish, or store in the fridge for up to 3 days for even deeper flavors.

Nutritional Information (Per Serving, Approximate)

NutrientAmount
Calories70 kcal
Carbohydrates12g
Protein2g
Fat1g
Fiber3g

The Magic of Spicy Napa Cabbage

1. The Perfect Balance of Flavors

What makes this dish stand out is the complex yet harmonious combination of flavors. The gochugaru (Korean red chili flakes) provides a smoky heat, the brown sugar balances it with a touch of sweetness, the fish sauce brings depth and umami, and the garlic and ginger add an aromatic punch. Together, they create a sauce that coats the cabbage and carrots perfectly, allowing every bite to burst with flavor.

2. A Health-Boosting Superfood

Napa cabbage isn’t just delicious—it’s also incredibly nutritious. It’s low in calories but high in fiber, making it a great addition to a balanced diet. The garlic and ginger in this recipe also offer anti-inflammatory and immune-boosting benefits. If you’re looking for a flavorful way to eat healthier, this dish is a great choice.

3. Quick and Easy, No Fermentation Needed

Unlike traditional kimchi, which requires days or even weeks to ferment, this recipe gives you instant gratification. The seasonings absorb into the cabbage quickly, meaning you can enjoy this dish fresh on the same day or store it in the fridge for deeper flavors.

How to Customize Your Spicy Napa Cabbage

One of the best things about this recipe is how easy it is to adjust to your personal taste preferences. Here are a few ways to make it your own:

1. Control the Spice Level

  • Mild – Use only 1 tablespoon of gochugaru and add extra brown sugar to balance the heat.
  • Medium – Stick to 2 tablespoons of gochugaru for a well-rounded kick.
  • Extra Spicy – Add fresh red chili slices or an extra half tablespoon of gochugaru for serious heat.

2. Make It Vegan-Friendly

  • Swap the fish sauce for soy sauce or tamari for a completely plant-based version.
  • A splash of miso paste can also add depth and umami without using seafood-based ingredients.

3. Experiment with Additional Vegetables

  • Add sliced cucumbers or radishes for an extra layer of crunch.
  • Try shredded daikon or green onions for a different texture and flavor.

4. Turn It into a Fermented Version

  • If you love the tanginess of fermented kimchi, store the prepared cabbage in an airtight jar at room temperature for 1-2 days before refrigerating. This allows natural fermentation to take place, developing deeper, more complex flavors.

Frequently Asked Questions

1. How long does homemade spicy Napa cabbage last?

It can be stored in the refrigerator for up to 3 days if eaten fresh or up to 2 weeks if lightly fermented. The flavors actually improve over time!

2. Can I make this recipe without fish sauce?

Yes! Soy sauce or tamari works as a great substitute, or you can add a little extra salt and miso paste for a similar depth of flavor.

3. How do I keep the cabbage crisp?

To maintain a satisfying crunch, avoid over-soaking the cabbage in liquid and make sure to store it in an airtight container in the fridge.

4. Is this dish gluten-free?

If you use glutinous rice flour and ensure your fish sauce (or soy sauce alternative) is gluten-free, then yes—this dish is naturally gluten-free!

5. Can I use regular cabbage instead of Napa cabbage?

Yes, but Napa cabbage has a more delicate texture that absorbs flavors better. If using regular green cabbage, let it marinate longer for the best results.

Conclusion – A Homemade Delight That’s Worth Every Bite

Making your own spicy Napa cabbage at home is a rewarding and delicious experience. It’s fresh, flavorful, and incredibly easy to prepare, proving that you don’t need complex techniques to create something amazing.

The beauty of this dish lies in its versatility—you can enjoy it as a simple side dish, mix it into rice bowls, or even layer it into wraps for an added burst of flavor. Every bite is a celebration of bold spices and crisp textures, making it a dish you’ll come back to again and again.

So why not give it a try? Once you taste the difference of homemade, you’ll never want store-bought again. And if you have any questions or want to experiment with new variations, I’d love to hear about your experience. Let’s bring the tradition of homemade goodness into more kitchens, one bite at a time!

Amal

Homemade Spicy Napa Cabbage – A Flavorful Tradition You Can Make at Home

Now you can enjoy homemade spicy Napa cabbage with this quick and easy recipe! Packed with flavor from garlic, ginger, gochugaru, and a hint of sweetness, this dish is the perfect balance of spicy, savory, and slightly sweet. Whether you serve it as a side dish, a topping for rice bowls, or enjoy it on its own, this fresh and crunchy cabbage will elevate any meal!
Prep Time 15 minutes
Cook Time 5 minutes
Total Time 20 minutes
Servings: 4 servings
Course: Side Dish
Cuisine: Korean-Inspired

Ingredients
  

  • 1 Napa cabbage sliced into preferred size
  • 2 tablespoons gochugaru flakes or fresh red chili
  • 1 tablespoon grated ginger
  • 2 cloves grated garlic
  • 1-2 carrots sliced
  • 2 tablespoons patis fish sauce
  • 3 tablespoons brown sugar
  • 2 tablespoons glutinous rice flour
  • ¼ cup water

Method
 

  1. Prepare the Cabbage – Wash and slice the Napa cabbage. Place it in a large bowl and set aside.
  2. Make the Seasoning Paste – In a small saucepan, mix glutinous rice flour and water over low heat, stirring constantly until thickened. Let cool.
  3. Combine the Ingredients – In a bowl, mix gochugaru, grated ginger, garlic, fish sauce, and brown sugar. Stir in the cooled rice paste to create a thick seasoning sauce.
  4. Mix Everything Together – Add the sliced carrots and the seasoning paste to the Napa cabbage. Toss until evenly coated.
  5. Let It Rest – Allow the cabbage to sit for at least 30 minutes before serving to let the flavors develop.
  6. Serve and Enjoy – Eat fresh or store in an airtight container in the refrigerator for up to 3 days for even deeper flavor.

Notes

  • Adjust the spice level by adding more or less gochugaru to suit your taste.
  • For a vegetarian version, substitute fish sauce with soy sauce or tamari.
  • Want a fermented taste? Store in an airtight container at room temperature for 1-2 days before refrigerating.
  • Perfect Pairing – Serve with rice, grilled meats, or noodle dishes for a complete meal.

Grandma’s Secret Veggie Fritters – The Ultimate Weight-Loss Meal

When I think of comfort food, my mind doesn’t go to rich, heavy dishes. Instead, I think of something simple, light, and packed with flavor—something like my grandmother’s veggie fritters.

I grew up watching my grandma make these fritters almost every evening. She would stand by the kitchen counter, grating vegetables with such ease, humming a tune from her childhood. I never understood why she ate them so often—after all, there were so many other meals she could have made.

But as I got older, I realized she wasn’t just cooking—she was taking care of herself. She had found a meal that was nutritious, filling, and satisfying, yet light enough to help her stay healthy. She didn’t believe in dieting or restricting herself. Instead, she believed in eating whole, nourishing foods that naturally supported her body.

These crispy, golden vegetable fritters are a staple in my kitchen now, just as they were in hers. They are incredibly simple, yet they make you feel good from the inside out. If you’re looking for a meal that is both delicious and naturally weight-loss-friendly, this is it.

In this article, we’ll dive into why these veggie fritters are so effective for weight loss, how to customize them to your taste, and answer common questions to ensure your fritters turn out perfect every time.

Why You Should Try These Veggie Fritters

  1. Low in Calories, High in Nutrients – Packed with fiber-rich vegetables, these fritters keep you full without excess calories.
  2. Naturally Supports Weight Loss – No need for strict diets—this meal is light, filling, and satisfying on its own.
  3. Quick and Easy to Make – Ready in under 30 minutes with just a few simple ingredients.
  4. No Compromises on Flavor – Crispy on the outside, soft and flavorful on the inside.
  5. Customizable for Any Diet – Easily make it gluten-free, dairy-free, or add extra protein for a heartier meal.

Ingredients

IngredientAmount
Zucchini1 (grated)
Carrot1 (grated)
Potato1 (grated)
Eggs2
Salt1 teaspoon
Flour2 tablespoons

Directions

Step 1: Prepare the Vegetables

  1. Grate the zucchini, carrot, and potato into a bowl.
  2. Squeeze out excess moisture using a clean kitchen towel to keep the fritters crispy.

Step 2: Make the Batter

  1. Add the eggs, salt, and flour to the grated vegetables.
  2. Mix well until everything is evenly combined.

Step 3: Cook the Fritters

  1. Heat a non-stick pan over medium heat and lightly grease with a small amount of oil.
  2. Drop spoonfuls of the mixture onto the pan and flatten slightly.
  3. Cook for 3-4 minutes per side, or until golden brown and crispy.
  4. Remove from the pan and place on a paper towel to absorb excess oil.

Step 4: Serve and Enjoy

  • Serve hot with yogurt, a fresh salad, or a light dipping sauce for a wholesome and delicious meal.

Nutritional Information (Per Serving, Approximate)

NutrientAmount
Calories140 kcal
Carbohydrates18g
Protein5g
Fat5g
Fiber3g

How These Fritters Help with Weight Loss

Many people think losing weight means eating bland, unsatisfying meals, but that’s not true. These fritters prove that you can enjoy every bite while still supporting your health goals. Here’s why they work:

1. Low in Calories, High in Fiber

Vegetables like zucchini, carrots, and potatoes are naturally low in calories but high in fiber. Fiber slows digestion, keeping you full for longer and reducing cravings throughout the day.

2. Healthy Carbs for Energy

Unlike processed foods that cause sugar spikes, the natural carbohydrates in potatoes and carrots provide steady energy without the crash. This keeps you full and satisfied without overeating.

3. Protein Keeps You Satisfied

With the addition of eggs, these fritters contain just enough protein to help keep you full while supporting muscle health. If you need more protein, you can easily add extra ingredients (see variations below!).

4. No Heavy Fats or Processed Ingredients

Unlike deep-fried fast food, these fritters are made with whole, fresh ingredients and lightly pan-fried. You control the amount of oil, making them a much healthier alternative to store-bought fried foods.

Creative Ways to Customize Your Fritters

While this classic recipe is already delicious, you can easily switch things up to match your taste preferences or dietary needs.

1. Make Them Gluten-Free

  • Swap regular flour for chickpea flour, almond flour, or oat flour.
  • Chickpea flour adds extra protein, making these fritters even more filling.

2. Add More Protein

  • Mix in grated cheese for a richer, heartier fritter.
  • Stir in some shredded chicken or canned tuna for extra protein.
  • Serve with a side of Greek yogurt dip to boost protein intake.

3. Make Them Spicy

  • Add chili flakes, black pepper, or paprika to the batter for a kick.
  • Serve with a spicy sriracha yogurt dip for extra heat.

4. Try Different Vegetables

  • Swap out potatoes for sweet potatoes for a slightly sweeter, nutrient-packed version.
  • Add grated cauliflower or spinach for extra fiber and vitamins.

5. Bake Instead of Frying

  • Place the fritters on a parchment-lined baking sheet and bake at 375°F (190°C) for 20-25 minutes, flipping halfway through. This reduces oil while keeping them crispy.

Frequently Asked Questions

1. Why are my fritters soggy instead of crispy?

Soggy fritters usually mean the vegetables have too much moisture. The key is to squeeze out excess water from the grated vegetables before mixing them with the other ingredients. A clean kitchen towel works best!

2. Can I make these fritters ahead of time?

Yes! You can prepare the mixture in advance and store it in the fridge for up to 24 hours before cooking. You can also fry the fritters and reheat them in a pan or oven when ready to eat.

3. How do I store leftovers?

Store cooked fritters in an airtight container in the refrigerator for up to 3 days. To reheat, place them in a dry pan over medium heat or warm them in the oven for 10 minutes at 350°F (175°C).

4. Can I freeze these fritters?

Absolutely! Lay the cooked fritters on a baking sheet to freeze individually before transferring them to a freezer-safe bag. They can be stored for up to 3 months. To reheat, bake at 375°F (190°C) until heated through.

5. What are the best dips to serve with these fritters?

  • Garlic Yogurt Sauce – Mix Greek yogurt, minced garlic, and a squeeze of lemon juice.
  • Avocado Dip – Blend avocado, lime juice, and a pinch of salt for a creamy, refreshing dip.
  • Classic Sour Cream – Simple, cool, and pairs perfectly with crispy fritters.
  • Spicy Mayo – Mix mayonnaise with sriracha or hot sauce for a little heat.

Conclusion – A Meal You’ll Want to Eat Every Day

These light, crispy veggie fritters are proof that healthy eating doesn’t have to be boring. They are packed with flavor, nutrients, and satisfying crunch—all while being easy on the calories. Whether you’re looking to lose weight naturally, eat more vegetables, or just enjoy a simple, delicious meal, these fritters are the perfect choice.

The best part? You don’t need to follow a strict diet to see results. Just incorporate more whole foods like these into your routine, and you’ll start feeling the benefits—more energy, less bloating, and better digestion.

So why not try these tonight? Grandma knew best when she made these every day—and now, you can enjoy the same delicious, weight-loss-friendly meal in your own home.

Amal

Grandma’s Secret Veggie Fritters – The Ultimate Weight-Loss Meal

These crispy, golden veggie fritters are the perfect light meal for dinner. Made with fresh zucchini, carrot, and potato, they are low in calories, high in fiber, and incredibly satisfying. Whether you’re looking for a weight-loss-friendly meal or just a delicious way to enjoy vegetables, these fritters are a must-try!
Prep Time 10 minutes
Cook Time 15 minutes
Total Time 25 minutes
Servings: 10 fritters
Course: Dinner
Cuisine: International

Ingredients
  

  • 1 zucchini grated
  • 1 carrot grated
  • 1 potato grated
  • 2 eggs
  • 1 teaspoon salt
  • 2 tablespoons flour

Method
 

  1. Prepare the Vegetables – Grate the zucchini, carrot, and potato. Use a clean kitchen towel to squeeze out excess moisture for crispier fritters.
  2. Mix the Batter – In a large bowl, combine the grated vegetables with eggs, salt, and flour. Mix until well combined.
  3. Cook the Fritters – Heat a non-stick pan over medium heat with a small amount of oil. Drop spoonfuls of the mixture onto the pan and flatten slightly. Cook for 3-4 minutes per side until golden brown.
  4. Serve and Enjoy – Remove from the pan, drain on a paper towel, and serve warm with yogurt, sour cream, or a fresh salad.

Notes

  • For extra crispiness, squeeze out as much water as possible from the grated vegetables before mixing.
  • Make it gluten-free by swapping flour for chickpea or oat flour.
  • For a baked version, place the fritters on a parchment-lined baking sheet and bake at 375°F (190°C) for 20-25 minutes, flipping halfway through.
  • Store leftovers in the fridge for up to 3 days and reheat in a dry pan or oven to maintain crispiness.

Golden Crust Homemade Bread – The Simple Joy of Baking from Scratch

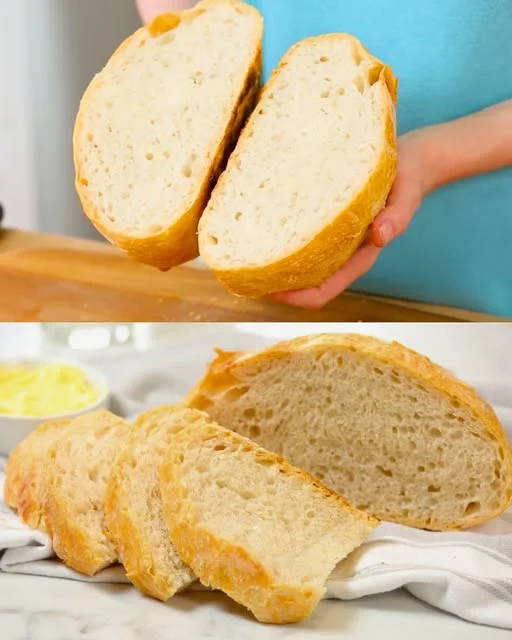
There’s something magical about making homemade bread. It’s not just about the final product—it’s about the process. The gentle kneading, the slow rise, the anticipation as the aroma fills the kitchen. Every loaf tells a story.

I still remember the first time I made my own bread. It was a chilly afternoon, and I had just come across an old, handwritten recipe tucked inside my grandmother’s cookbook. The pages were stained from years of use, and the simple ingredients made it seem so easy.

With hesitant hands, I mixed the dough, unsure if it would rise properly. I watched impatiently as the yeast worked its magic, the dough slowly doubling in size like a small miracle happening right in my kitchen. When I pulled the loaf out of the oven, golden and crackling, I felt an overwhelming sense of accomplishment. The first warm slice, slathered with butter, tasted better than any bread I had ever bought. From that day on, homemade bread became a tradition in my home—one that brings comfort, warmth, and a connection to the past.

If you’ve never made your own bread, this recipe is the perfect place to start. It’s simple, foolproof, and requires only a few basic ingredients. Whether you’re a beginner or an experienced baker, this loaf will fill your kitchen with warmth and your home with the incredible smell of fresh bread.

Why You’ll Love This Recipe

  1. Simple and Beginner-Friendly – No fancy ingredients or equipment required—just a bowl, some flour, and a little patience.
  2. Deliciously Soft with a Golden Crust – The perfect balance of a fluffy interior and a crisp, golden-brown exterior.
  3. Budget-Friendly – With just flour, water, yeast, salt, and sugar, you can make a homemade loaf for a fraction of the store-bought price.
  4. Versatile and Customizable – Add herbs, seeds, or cheese for your own unique twist.
  5. Deeply Satisfying – Few things compare to the feeling of pulling a warm loaf out of the oven, knowing you made it from scratch.

Ingredients

IngredientAmount
Dry active yeast½ teaspoon
Warm water1 cup
Sugar1 teaspoon
All-purpose flour3 cups
Salt1½ teaspoons

Directions

Step 1: Activate the Yeast

  1. In a small bowl, combine warm water, sugar, and dry yeast. Stir gently and let sit for 5-10 minutes until foamy.

Step 2: Make the Dough

  1. In a large mixing bowl, combine flour and salt.
  2. Pour in the activated yeast mixture and mix until a sticky dough forms.

Step 3: Knead and Rise

  1. Transfer the dough onto a floured surface and knead for 8-10 minutes until smooth and elastic.
  2. Place in a greased bowl, cover with a clean towel, and let rise in a warm place for 1-2 hours, or until doubled in size.

Step 4: Shape and Second Rise

  1. Punch down the dough, shape it into a loaf, and place it into a greased bread pan.
  2. Cover and let rise again for 30-45 minutes until puffy.

Step 5: Bake to Perfection

  1. Preheat the oven to 375°F (190°C).
  2. Bake for 30-35 minutes until golden brown and hollow-sounding when tapped.
  3. Let cool before slicing and enjoy!

Nutritional Information (Per Slice, Approximate)

NutrientAmount
Calories120 kcal
Carbohydrates25g
Protein4g
Fat0.5g
Fiber1g

The Secret to Perfect Homemade Bread

While bread-making may seem intimidating at first, it’s actually quite simple when you understand a few key principles.

1. The Importance of Yeast Activation

Yeast is the heart of any good bread. If it doesn’t activate properly, your dough won’t rise, resulting in a dense and tough loaf. The best way to ensure success is to dissolve yeast in warm water (about 110°F or 45°C) with a little sugar and let it sit until foamy. If there are no bubbles after 10 minutes, your yeast may be expired or the water may have been too hot or too cold.

2. Kneading for the Perfect Texture

Kneading is what develops the gluten in the dough, giving the bread its chewy, airy texture. It usually takes 8-10 minutes of kneading to achieve the right consistency. You’ll know it’s ready when the dough is smooth and elastic—if you press it with a finger, it should slowly bounce back.

3. The Magic of Proofing

Proofing (or rising) is when the yeast ferments and creates air pockets, making the bread light and fluffy. Let the dough rise in a warm, draft-free place for 1-2 hours, or until doubled in size. A second, shorter rise after shaping helps develop even more flavor and structure.

4. Baking at the Right Temperature

Bread needs high heat to develop that golden, crispy crust while keeping the inside soft. Baking at 375°F (190°C) for 30-35 minutes is ideal. You’ll know it’s done when the loaf sounds hollow when tapped on the bottom.

5. Cooling for the Best Texture

As tempting as it is to slice into fresh bread straight from the oven, allowing it to cool on a wire rack helps set the crumb and prevents it from becoming gummy. Waiting at least 20-30 minutes makes all the difference.

Fun Variations to Try

Once you’ve mastered the basic recipe, you can experiment with different flavors and add-ins to make the bread your own.

1. Herb and Garlic Bread

Mix in 1 teaspoon of dried oregano, thyme, and rosemary into the dough for a fragrant, flavorful loaf. Brush the crust with garlic butter after baking for an extra boost of flavor.

2. Cheese Bread

Add ½ cup of shredded cheddar or parmesan into the dough before kneading for a cheesy, savory twist.

3. Whole Wheat Variation

For a heartier and healthier loaf, substitute 1 cup of all-purpose flour with whole wheat flour. You may need to add a little extra water to maintain the dough’s softness.

4. Seeded Bread

Roll the dough in a mix of sesame seeds, sunflower seeds, and flaxseeds before baking for a crunchy, nutty crust.

5. Sweet Honey Bread

Replace the sugar with 2 tablespoons of honey for a subtly sweet, slightly softer loaf.

Frequently Asked Questions

1. Why didn’t my bread rise?

  • The yeast may be expired or inactive. Always check for foam during activation.
  • The water may have been too hot or too cold—stick to around 110°F (45°C).
  • The dough may have been placed in a cold or drafty area. Try letting it rise in a warm spot, like inside the oven with the light on.

2. Can I make this bread without kneading?

Yes! You can make no-knead bread by mixing the ingredients and letting the dough rise overnight (8-12 hours). The long fermentation develops the gluten naturally, resulting in a rustic, airy loaf.

3. How do I store homemade bread?

Store in a paper bag or bread box at room temperature for 3-4 days. Avoid plastic bags, as they trap moisture and make the crust soggy. For longer storage, slice and freeze the bread in an airtight container.

4. Can I make this bread gluten-free?

Yes, but it requires a gluten-free flour blend that contains xanthan gum for structure. The texture will be slightly different, but still delicious.

5. How can I get a crispier crust?

  • Bake with a small pan of water in the oven to create steam, which helps develop a crisp crust.
  • Brush the loaf with water or milk before baking for extra crunch.
  • Let the bread cool completely on a wire rack to maintain its crispiness.

Conclusion – A Loaf Worth Baking Again and Again

Homemade bread isn’t just about feeding yourself—it’s about creating something from scratch, slowing down, and enjoying the process. There’s an undeniable joy in kneading dough, watching it rise, and pulling a golden, fragrant loaf out of the oven.

Once you taste your own freshly baked bread, you’ll never look at store-bought bread the same way again. Whether you enjoy it warm with butter, as a sandwich, or toasted with jam, this recipe is a simple pleasure that never gets old.

So why not try it today? Your kitchen will smell incredible, your heart will feel full, and you might just discover a new love for baking.

Amal

Golden Crust Homemade Bread – The Simple Joy of Baking from Scratch

Nothing beats the aroma of freshly baked homemade bread! This easy-to-make loaf is soft on the inside with a golden, crisp crust, perfect for sandwiches, toast, or simply enjoying warm with butter. With just a few simple ingredients, you’ll have a bakery-style loaf straight from your own kitchen.
Prep Time 10 minutes
Cook Time 35 minutes
Total Time 2 hours 45 minutes
Servings: 12 slices
Course: Bread
Cuisine: International

Ingredients
  

  • ½ teaspoon dry active yeast
  • 1 cup warm water
  • 1 teaspoon sugar
  • 3 cups all-purpose flour
  • teaspoons salt

Method
 

  1. Activate the Yeast – In a small bowl, mix warm water, sugar, and yeast. Let sit for 5-10 minutes until foamy.
  2. Make the Dough – In a large mixing bowl, combine flour and salt. Pour in the yeast mixture and stir until a sticky dough forms.
  3. Knead and Let Rise – Transfer the dough to a floured surface and knead for 8-10 minutes until smooth. Place in a greased bowl, cover, and let rise for 1-2 hours or until doubled in size.
  4. Shape and Second Rise – Punch down the dough, shape it into a loaf, and place it in a greased bread pan. Cover and let rise for 30-45 minutes until puffy.
  5. Bake – Preheat oven to 375°F (190°C). Bake for 30-35 minutes until golden brown and hollow-sounding when tapped.
  6. Cool and Serve – Let the bread cool before slicing. Enjoy warm with butter or as the base for your favorite sandwich!

Notes

  • Check your yeast – If it doesn’t foam during activation, it may be expired.
  • Crispy crust tip – Brush with water before baking or place a pan of water in the oven.
  • Storage – Store at room temperature for 3-4 days or freeze for up to 3 months.
  • Make it your own – Add herbs, garlic, or seeds for extra flavor.

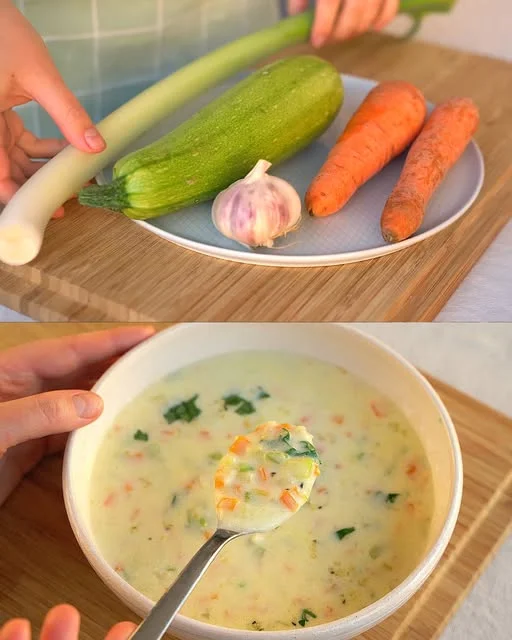
Velvety Slimming Veggie Soup – A Simple, Nourishing Delight

I’ve always loved food—the rich, indulgent kind that makes you want to sit back and savor every bite. But there was a time when I felt sluggish and weighed down, and I knew I needed a change. I wasn’t interested in extreme diets or restrictive eating, so I began searching for meals that were both nourishing and satisfying. That’s when I discovered this velvety slimming veggie soup.

It started as an experiment—just a few simple vegetables, some cream for silkiness, and a sprinkle of hemp seeds for texture. I never imagined that something so effortless and light could be so incredibly delicious. The first time I made it, I ate an entire bowl and felt completely satisfied—no guilt, no heaviness, just pure comfort.

This soup quickly became a staple in my routine, not just because it helped me lose weight naturally but because it made me feel amazing. It’s packed with vitamins, rich in fiber, and has the perfect balance of creaminess and freshness. The best part? It’s unbelievably easy to make. No fancy techniques, no long ingredient lists—just chop, sauté, blend, and enjoy.

Whether you’re looking for a light meal, a nutritious side dish, or a comforting dinner, this soup is the perfect answer. In this article, we’ll dive deeper into why it works, how to customize it, and answer some common questions about making it even better.

Why You’ll Love This Soup

  1. Weight-Loss Friendly – Packed with fiber and nutrients, this soup keeps you full without excess calories.
  2. Easy to Digest – With light, wholesome ingredients, it’s gentle on the stomach and perfect for clean eating.
  3. Quick and Simple – No complicated steps—just a few ingredients, a blender, and 30 minutes of your time.
  4. Customizable – You can easily tweak the flavors, add protein, or swap ingredients to suit your preferences.
  5. Creamy Yet Light – Thanks to a blend of fresh vegetables and a touch of cream, it’s indulgent without being heavy.

Ingredients

IngredientAmount
Carrot (diced)1
Olive oil and a knob of butterAs needed
Leek (sliced)1
Zucchini (diced)1
Flour2 tablespoons
Water800ml
Garlic cloves (minced)3
SaltTo taste
Cream200ml
Hemp seeds (for garnish)As needed
Fresh parsley (chopped, for garnish)As needed

Directions

Step 1: Sauté the Vegetables

  1. In a large pot, heat olive oil and butter over medium heat.
  2. Add the carrot, leek, and zucchini, and cook for 5 minutes, stirring occasionally.
  3. Add the minced garlic and cook for another 30 seconds until fragrant.

Step 2: Thicken the Soup

  1. Sprinkle in the flour and stir well, cooking for 1-2 minutes to remove the raw taste.
  2. Gradually pour in the water, stirring continuously to avoid lumps.
  3. Bring to a simmer and let cook for 15 minutes until vegetables are soft.

Step 3: Blend and Serve

  1. Using a blender or an immersion blender, puree the soup until smooth.
  2. Stir in the cream and season with salt to taste.
  3. Serve hot, garnished with hemp seeds and fresh parsley.

Nutritional Information (Per Serving, Approximate)

NutrientAmount
Calories180 kcal
Carbohydrates15g
Protein4g
Fat12g
Fiber3g

What Makes This Soup So Effective for Weight Loss?

Unlike heavy, calorie-dense meals, this soup is designed to be nutrient-rich and filling while remaining light on calories. Here’s why it works:

1. High in Fiber, Low in Calories

Vegetables like carrots, leeks, and zucchini are naturally high in fiber, which helps you feel full longer. Fiber also aids digestion and prevents unnecessary snacking.

2. Healthy Fats Keep You Satisfied

Olive oil and a small amount of butter add just enough healthy fat to enhance flavor and keep cravings at bay. Healthy fats are essential for absorbing fat-soluble vitamins, so you get the most nutrition from your meal.

3. Creamy Without Excess Calories

A small amount of cream adds richness without making the soup too heavy. You can also substitute with coconut milk or a plant-based alternative for a dairy-free version.

4. Hydration Boost from Water-Based Cooking

Many people mistake thirst for hunger. This soup has a high water content, which keeps you hydrated and prevents unnecessary cravings throughout the day.

5. Naturally Detoxifying Ingredients

Garlic, leeks, and parsley have anti-inflammatory and detoxifying properties, helping your body naturally cleanse itself.

How to Customize This Soup to Your Taste

One of the best things about this recipe is its versatility. Whether you want to change the flavor profile, make it heartier, or boost its nutritional value, here are some easy variations:

1. Dairy-Free & Vegan Version

  • Swap butter for extra olive oil and cream for coconut milk to keep the soup rich and creamy without dairy.

2. Protein-Packed Soup

  • Add a can of white beans or a handful of cooked lentils before blending to increase protein and make the soup even more filling.

3. Spice It Up

  • A touch of cayenne pepper, smoked paprika, or cumin can give the soup a more vibrant, slightly spicy kick.

4. Crunchy Toppings for Texture

  • Garnish with roasted seeds (pumpkin, hemp, or sunflower) for extra crunch and added nutrients.
  • Sprinkle crispy chickpeas on top for a delicious contrast in texture.

5. Extra Veggie Boost

  • Blend in spinach or kale for extra iron and vitamins without altering the soup’s creamy texture.

Frequently Asked Questions

1. Can I make this soup ahead of time?

Absolutely! This soup stores well in the refrigerator for up to 3 days. Just reheat it gently on the stove or in the microwave, adding a splash of water or milk if needed.

2. Can I freeze this soup?

Yes! This soup is freezer-friendly. Store it in airtight containers for up to 3 months. Let it thaw in the fridge overnight before reheating.

3. Will this soup keep me full for long?

Yes! Thanks to the fiber, healthy fats, and creamy texture, this soup is surprisingly satisfying. If you want to make it even more filling, pair it with a small serving of whole-grain bread or a protein-rich side.

4. Can I skip the cream?

Of course! The soup will still be delicious without cream. You can replace it with a splash of almond milk, coconut milk, or even Greek yogurt for a lighter version.

5. What’s the best way to blend this soup?

For the smoothest texture, use an immersion blender directly in the pot. If using a regular blender, allow the soup to cool slightly before blending in batches to avoid spills.

Conclusion – A Bowl of Pure Comfort and Nourishment

This velvety slimming veggie soup is proof that healthy food can still be delicious, satisfying, and incredibly easy to make. Whether you’re trying to lose weight, eat cleaner, or just enjoy a comforting meal, this recipe has you covered.

What makes it so special? It’s the perfect balance of rich creaminess and light, fresh flavors. It’s a dish that feels indulgent while supporting your wellness goals. And the best part? You don’t have to be a chef to make it.

So the next time you’re craving something warm, cozy, and nourishing, try this soup. It might just become your new favorite go-to meal, just like it did for me.

Amal

Velvety Slimming Veggie Soup – A Simple, Nourishing Delight

This creamy vegetable soup is the perfect balance of light, nutritious, and satisfying. Made with fresh vegetables, a hint of garlic, and a touch of cream, it’s incredibly easy to prepare and naturally supports weight loss. Whether you need a quick meal or a comforting dish, this soup is guaranteed to keep you feeling full and energized without weighing you down.
Prep Time 10 minutes
Cook Time 20 minutes
Total Time 30 minutes
Servings: 4 servings
Course: Soup
Cuisine: International

Ingredients
  

  • 1 carrot diced
  • Olive oil and a knob of butter
  • 1 leek sliced
  • 1 zucchini diced
  • 2 tablespoons flour
  • 800 ml water
  • 3 cloves garlic minced
  • Salt to taste
  • 200 ml cream
  • Hemp seeds for garnish
  • Fresh parsley chopped, for garnish

Method
 

  1. Sauté the Vegetables – Heat olive oil and butter in a pot over medium heat. Add the carrot, leek, and zucchini. Cook for 5 minutes until slightly softened. Stir in the minced garlic and cook for 30 seconds.
  2. Thicken the Soup – Sprinkle the flour over the vegetables and stir well. Let it cook for 1-2 minutes before gradually adding the water. Stir constantly to prevent lumps.
  3. Simmer Until Tender – Bring the soup to a gentle boil, then lower the heat and let it simmer for about 15 minutes, until the vegetables are soft.
  4. Blend Until Smooth – Using an immersion blender, blend the soup until smooth and creamy. If using a regular blender, allow the soup to cool slightly before blending in batches.
  5. Add Cream and Season – Stir in the cream and season with salt to taste. Let it warm through for another 2 minutes without boiling.
  6. Serve and Garnish – Pour into bowls and sprinkle with hemp seeds and freshly chopped parsley. Serve hot and enjoy!

Notes

 
  • Dairy-Free Option – Replace the cream with coconut milk or almond milk for a lighter version.
  • Extra Protein – Add cooked white beans or a handful of lentils before blending.
  • Spice It Up – A pinch of cayenne or black pepper enhances the flavor.
  • Storage – Keep in the fridge for up to 3 days or freeze for up to 3 months. Reheat gently on the stove before serving.

Cheesy Broccoli Mac – The Ultimate Comfort Food

There are some meals that instantly bring a sense of comfort and warmth, no matter where you are. For me, that dish has always been mac and cheese. Growing up, it was my go-to meal whenever I needed something cozy after a long day. My mother would make a big pot, creamy and rich, and I would sit by the table, watching the cheese melt into the pasta like magic.

But as I got older, I started experimenting with different ways to elevate this classic. That’s when I discovered the perfect addition—broccoli. Not only did it add a delicious texture and a pop of color, but it also made me feel like I was sneaking something a little healthier into my favorite dish. The combination of gooey cheese, tender pasta, and slightly crisp broccoli turned out to be everything I never knew I needed.

Now, this cheesy broccoli mac is a staple in my home. Whether I’m making it for a weeknight dinner, a potluck, or just as a comforting meal on a rainy day, it never disappoints. And the best part? It’s a crowd-pleaser. Even picky eaters (especially kids!) find it impossible to resist.

In this article, we’ll go beyond the recipe itself and explore what makes this dish so special, how to customize it to your taste, and answer some of the most common questions about making the perfect broccoli mac and cheese.

Why You’ll Love This Recipe

  1. Creamy, Cheesy Perfection – A velvety, rich cheese sauce coats every bite of pasta, making this dish irresistibly delicious.
  2. A Balanced Twist on a Classic – Adding broccoli brings a nutritious element to the dish without compromising flavor.
  3. Quick and Easy to Make – Ready in under 40 minutes, it’s the perfect meal for busy weeknights.
  4. Endless Customization – Change up the cheese, add protein, or bake it for an extra crispy top.
  5. A Family Favorite – Kids and adults alike love this dish, making it a great go-to recipe.

Ingredients

IngredientAmount
Macaroni13 oz (370 g)
Broccoli (cut into florets)1 head
Onion (chopped)1 small-medium
Garlic cloves (crushed)2
Cheddar cheese (shredded)1 cup (115 g)
Gouda cheese (shredded)¾ cup (85 g)
Mozzarella cheese (shredded)¾ cup (85 g)
Flour4 tablespoons (30 g)
Butter4 tablespoons (60 g)
Milk4 cups (1 L)
SaltTo taste
PepperTo taste

Directions

Step 1: Cook the Pasta and Broccoli

  1. Bring a large pot of salted water to a boil.
  2. Add the macaroni and cook according to package instructions until al dente.
  3. In the last 3 minutes of cooking, add the broccoli florets.
  4. Drain and set aside.

Step 2: Prepare the Cheese Sauce

  1. In a large pan over medium heat, melt the butter.
  2. Add the chopped onion and cook until soft and translucent.
  3. Stir in the crushed garlic and cook for another 30 seconds.
  4. Sprinkle in the flour, stirring constantly for 1-2 minutes to remove the raw flour taste.
  5. Gradually pour in the milk, whisking continuously until the mixture thickens.
  6. Reduce heat to low and add the cheddar, gouda, and mozzarella cheeses, stirring until melted and smooth.
  7. Season with salt and pepper to taste.

Step 3: Combine and Serve

  1. Add the cooked macaroni and broccoli to the cheese sauce, stirring gently to coat.
  2. Cook for another 2-3 minutes until everything is well combined and heated through.
  3. Serve hot and enjoy!

Nutritional Information (Per Serving, Approximate)

NutrientAmount
Calories450 kcal
Carbohydrates50g
Protein18g
Fat20g
Fiber4g

The Secret to the Best Broccoli Mac and Cheese

A great mac and cheese isn’t just about tossing pasta and cheese together. There are a few key techniques that can take your dish from good to amazing.

1. Choosing the Right Cheese

The best mac and cheese has a blend of cheeses for the ultimate texture and flavor. Cheddar provides sharpness, gouda adds creaminess, and mozzarella creates a beautifully gooey texture. Avoid pre-shredded cheese because it contains anti-caking agents that prevent it from melting smoothly.

2. Cooking the Broccoli Just Right

Broccoli should be tender but still have a slight bite. Overcooking it can make it mushy and overpower the dish. The best way to cook broccoli for mac and cheese is to add it to the pasta water during the last few minutes of cooking. This way, it softens just enough without losing its texture or bright green color.

3. Creating the Perfect Cheese Sauce

A smooth, creamy cheese sauce is the heart of any good mac and cheese. To prevent graininess or clumping:

  • Use warm milk – Cold milk can cause lumps in the roux (butter and flour mixture).
  • Melt cheese on low heat – High heat can cause cheese to become grainy instead of smooth.
  • Stir constantly – This ensures the sauce stays silky and evenly coats the pasta.

4. The Secret Ingredient: Mustard or Nutmeg

A small amount of Dijon mustard or a pinch of nutmeg enhances the cheese flavor without being overpowering. It adds depth and makes the dish taste more complex.

5. To Bake or Not to Bake?

Traditional stovetop mac and cheese is creamy and indulgent, but if you love a crispy, golden topping, consider baking it. Simply top the dish with breadcrumbs mixed with melted butter and bake at 375°F (190°C) for 10-15 minutes until golden brown.

Creative Variations to Try

While the classic cheesy broccoli mac is amazing on its own, you can always add your own twist to suit your taste.

1. Spicy Broccoli Mac and Cheese

For a little heat, mix in ¼ teaspoon of cayenne pepper or a few dashes of hot sauce into the cheese sauce. You can also add finely chopped jalapeños for extra spice.

2. Protein-Packed Mac and Cheese

Make this dish heartier by adding grilled chicken, crispy bacon, or even shredded rotisserie chicken. These additions provide a delicious contrast to the creamy cheese sauce.

3. Gluten-Free Broccoli Mac and Cheese

Swap out regular pasta for gluten-free macaroni and use a gluten-free flour blend to thicken the cheese sauce. The result is just as creamy and satisfying.

4. Vegan Broccoli Mac and Cheese

For a plant-based version, use cashew cream or a dairy-free cheese blend and substitute butter with olive oil. Nutritional yeast adds a great cheesy flavor without dairy.

5. One-Pot Broccoli Mac and Cheese

Cut down on dishes by making everything in a single pot. Cook the pasta in just enough water, then stir in the cheese sauce directly—less mess, same delicious flavor!

Frequently Asked Questions

1. Why is my cheese sauce grainy?

This usually happens if the cheese is heated too quickly or at too high a temperature. Always melt cheese over low heat and stir constantly to keep the sauce smooth.

2. Can I use frozen broccoli?

Yes! Frozen broccoli works well, but it should be thawed and drained before adding it to the dish to prevent excess water from thinning the sauce.

3. How do I store leftovers?

Store leftovers in an airtight container in the refrigerator for up to 3 days. To reheat, warm it on the stove with a splash of milk to bring back its creamy texture.

4. Can I make this ahead of time?

Yes! You can prepare the mac and cheese ahead, store it in the fridge, and bake it just before serving for the best texture.

5. What’s the best cheese for mac and cheese?

A combination of cheeses works best. Sharp cheddar, gouda, and mozzarella create the perfect balance of flavor and meltability. Monterey Jack, gruyere, or even pepper jack are great alternatives.

Conclusion – A Dish That Never Fails to Impress

Broccoli mac and cheese isn’t just a recipe—it’s a warm hug in a bowl. It brings together the rich, creamy indulgence of mac and cheese with the freshness and nutrition of broccoli, making it a dish you can feel good about eating.

The best part? It’s completely customizable. Whether you like it spicy, meaty, extra cheesy, or baked to golden perfection, you can tweak this recipe to suit your taste. And no matter how you serve it, one thing is certain: it’s always a crowd-pleaser.

So the next time you’re craving comfort food, skip the boxed version and try this homemade cheesy broccoli mac. It’s simple, delicious, and guaranteed to become a favorite in your home—just like it has in mine.

Amal

Cheesy Broccoli Mac – The Ultimate Comfort Food

This cheesy broccoli mac is the ultimate comfort food—creamy, rich, and packed with gooey cheese. The combination of tender macaroni, perfectly cooked broccoli, and a velvety cheese sauce makes this dish an instant favorite. Whether served as a cozy weeknight meal or a side for gatherings, it’s always a crowd-pleaser!
Prep Time 15 minutes
Cook Time 25 minutes
Total Time 40 minutes
Servings: 4 –6 servings
Course: Main Dish
Cuisine: American

Ingredients
  

  • 13 oz 370 g macaroni
  • 1 head broccoli cut into florets
  • 1 small-medium onion chopped
  • 2 garlic cloves crushed
  • 1 cup 115 g Cheddar cheese, shredded
  • ¾ cup 85 g Gouda cheese, shredded
  • ¾ cup 85 g Mozzarella cheese, shredded
  • 4 tablespoons 30 g flour
  • 4 tablespoons 60 g butter
  • 4 cups 1 L milk
  • Salt to taste
  • Pepper to taste

Method
 

  1. Cook the pasta and broccoli – Bring a pot of salted water to a boil. Cook macaroni according to package instructions. In the last 3 minutes of cooking, add the broccoli florets. Drain and set aside.
  2. Make the cheese sauce – In a large pan, melt butter over medium heat. Add chopped onion and cook until soft. Stir in crushed garlic and cook for another 30 seconds.
  3. Thicken the sauce – Sprinkle in flour and stir constantly for 1-2 minutes to cook out the raw flour taste. Slowly pour in milk while whisking until the mixture thickens.
  4. Melt the cheese – Reduce heat to low and stir in Cheddar, Gouda, and Mozzarella until fully melted and smooth. Season with salt and pepper.
  5. Combine everything – Add the cooked macaroni and broccoli to the cheese sauce, stirring to coat evenly. Let cook for another 2-3 minutes until everything is warmed through.
  6. Serve hot – Enjoy as is, or add a crunchy breadcrumb topping and bake for a crispy finish!

Notes

  • For extra crunch, top with buttered breadcrumbs and bake at 375°F (190°C) for 10 minutes until golden brown.
  • Make it spicier by adding a pinch of cayenne or red pepper flakes to the cheese sauce.
  • Store leftovers in an airtight container in the fridge for up to 3 days. Reheat with a splash of milk for creaminess.
  • Want more protein? Add grilled chicken, crispy bacon, or shredded rotisserie chicken for a heartier meal.