Slim & Satisfying: Healthy Apple-Banana Pancakes

There was a time when I believed that healthy eating meant sacrificing flavor and satisfaction. I associated “diet food” with bland oatmeal, dry toast, or smoothies that left me hungry within an hour. But everything changed when I discovered how simple ingredients—like apples, bananas, and Greek yogurt—could transform into something delicious, filling, and nourishing.

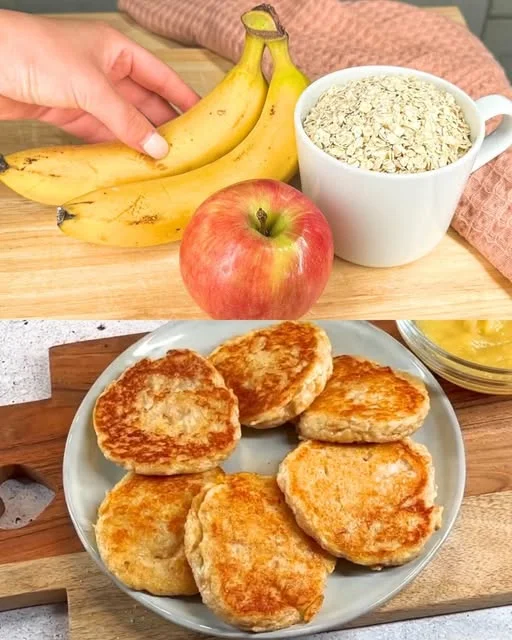
It all started when I was looking for a healthier breakfast alternative to sugary cereals and store-bought pastries. I wanted something warm, comforting, and naturally sweet but without unnecessary additives. One morning, I experimented with what I had in my kitchen: a ripe banana, a grated apple, some wholemeal flour, and creamy Greek yogurt. The result? A stack of fluffy, golden pancakes that tasted like a treat but were filled with nutrients that kept me energized for hours.

Now, these apple-banana pancakes have become a staple in my home. They’re naturally sweet, packed with fiber and protein, and so easy to make. The best part? You can enjoy them guilt-free, knowing they support your health goals while still satisfying your cravings for something indulgent.

Why This Breakfast is Perfect for Weight Loss

This recipe isn’t just delicious—it’s designed to fuel your body in the best way possible. Here’s why it’s an excellent choice for anyone looking to lose weight while still enjoying their meals:

  • High in Fiber – The combination of apple, banana, and wholemeal flour provides plenty of fiber, which helps with digestion and keeps you full for longer.
  • Protein-Packed – Greek yogurt adds a good amount of protein, essential for muscle maintenance and keeping hunger at bay.
  • Naturally Sweet – There’s no need for added sugar! The banana and apple provide natural sweetness, making these pancakes a healthier alternative to traditional versions.
  • Low in Unhealthy Fats – Unlike many pancake recipes that rely on butter or heavy cream, this one uses Greek yogurt for creaminess and a touch of oil for cooking.
  • Easy to Digest – The simple, whole ingredients make these pancakes gentle on the stomach while providing long-lasting energy.

Ingredients

IngredientQuantity
Apple1, peeled and grated (or 100ml applesauce)
Greek Yogurt300ml
Wholemeal Flour80g (about ⅔ cup)
OilFor cooking
Banana1, mashed

Directions

  1. Prepare the Batter:
    • In a bowl, mix the grated apple (or applesauce) with mashed banana and Greek yogurt.
    • Gradually add wholemeal flour, stirring until a smooth batter forms.
  2. Cook the Pancakes:
    • Heat a non-stick pan over medium heat and lightly grease with oil.
    • Pour small portions of the batter onto the pan, cooking for 2-3 minutes per side until golden brown.
  3. Serve & Enjoy:
    • Stack the pancakes and serve warm. Enjoy on their own or with healthy toppings like honey, nuts, or fresh fruit.

Nutritional Information (Per Serving, Approx.)

NutrientAmount
Calories150-180 kcal
Carbohydrates25g
Protein6g
Fats3g
Fiber3g

The Key Ingredients That Make These Pancakes So Nutritious

1. Apples: Nature’s Sweetener & Fiber Booster

Apples are not just delicious—they’re also packed with fiber and antioxidants. Using grated apple or applesauce adds natural sweetness, reducing the need for added sugars while keeping the pancakes moist and soft.

2. Bananas: A Natural Energy Source

Bananas are a powerhouse of nutrients, offering natural sweetness and potassium, which helps with muscle function and hydration. They also contribute to the pancakes’ soft texture.

3. Greek Yogurt: A Protein-Packed Alternative to Butter or Milk

Greek yogurt adds creaminess and a subtle tangy flavor, making the pancakes richer in texture while boosting their protein content. It also contains probiotics, which support gut health.

4. Wholemeal Flour: A Better Choice for Sustained Energy

Unlike refined white flour, wholemeal flour retains its fiber and nutrients, promoting better digestion and preventing sugar crashes. It also makes the pancakes more filling.

5. A Touch of Oil for Cooking

A small amount of healthy oil ensures the pancakes don’t stick to the pan while keeping them light and golden. You can use olive oil, coconut oil, or even a non-stick cooking spray for an even lighter option.

How to Elevate Your Pancakes

These pancakes are delicious on their own, but you can make them even better with a few creative additions:

  • Top with Fresh Berries – Blueberries, raspberries, or sliced strawberries add a burst of color, flavor, and extra antioxidants.
  • Drizzle with a Natural Sweetener – A light drizzle of honey or pure maple syrup enhances the sweetness without overloading on sugar.
  • Add Nuts or Seeds – A sprinkle of chopped almonds, walnuts, or chia seeds adds healthy fats and crunch.
  • Pair with a Protein Source – If you need more protein, serve the pancakes with a side of cottage cheese, eggs, or a protein smoothie.
  • Spice it Up – A dash of cinnamon or nutmeg complements the flavors and adds an extra layer of warmth.

FAQs: Everything You Need to Know

1. Can I Make These Pancakes Ahead of Time?

Yes! You can store leftover pancakes in the refrigerator for up to 3 days. Just reheat them in a pan or microwave before serving.

2. Can I Freeze These Pancakes?

Absolutely! Place the pancakes in a single layer on a baking sheet, freeze for an hour, then transfer them to an airtight container or freezer bag. They can be stored for up to a month. Reheat in a toaster or microwave for a quick breakfast.

3. Can I Use a Different Type of Flour?

Yes! You can use oat flour, almond flour, or a gluten-free flour blend if you have dietary restrictions. The texture may vary slightly, but they will still taste great.

4. What Can I Use Instead of Greek Yogurt?

If you don’t have Greek yogurt, you can substitute it with regular yogurt, cottage cheese, or even unsweetened applesauce for a dairy-free option.

5. Can I Cook These Without Oil?

If you have a high-quality non-stick pan, you can cook these pancakes without oil. Alternatively, use a light spray of cooking oil to keep them from sticking.

6. How Do I Make the Pancakes Fluffier?

For extra fluffy pancakes, let the batter sit for 5-10 minutes before cooking. This allows the ingredients to combine properly and results in a lighter texture.

7. Are These Pancakes Kid-Friendly?

Yes! These pancakes are naturally sweet and packed with nutrients, making them a great option for kids. You can even cut them into fun shapes or serve them with a yogurt dip.

8. Can I Add Protein Powder for Extra Protein?

Yes! If you want a higher protein breakfast, you can mix in a scoop of vanilla or unflavored protein powder. You may need to add a little more liquid to balance the consistency.

9. Can I Make a Vegan Version?

Yes! Use a dairy-free yogurt alternative and replace the egg with a flaxseed egg (1 tablespoon ground flaxseed mixed with 2.5 tablespoons water). The texture may be slightly different, but the pancakes will still be delicious.

10. What’s the Best Way to Serve These Pancakes for Weight Loss?

Pair them with a source of healthy fats (like a small portion of nut butter or avocado) and a side of lean protein to create a balanced meal that keeps you full longer.

Conclusion: A Healthy Breakfast That Tastes Like a Treat

Eating healthy doesn’t mean giving up delicious food—it just means making smarter choices. These apple-banana pancakes prove that a nutritious breakfast can be just as satisfying as any indulgent treat.

With natural sweetness, a light and fluffy texture, and a powerhouse of nutrients, these pancakes are a game-changer for anyone looking to eat well while enjoying every bite. Whether you’re trying to lose weight, maintain a balanced diet, or simply start your day on a wholesome note, this recipe is a perfect addition to your morning routine.

So go ahead, whip up a batch, and savor the flavors of a breakfast that nourishes your body and delights your taste buds. Healthy eating has never been this easy—or this delicious!

Amal

Slim & Satisfying: Healthy Apple-Banana Pancakes

These healthy apple-banana pancakes are naturally sweet, soft, and packed with fiber and protein to keep you full and energized. Made with wholemeal flour, Greek yogurt, and fresh fruit, they are a nutritious way to enjoy a delicious breakfast while staying on track with your health goals. No refined sugar, no guilt—just wholesome ingredients that taste amazing!
Prep Time 5 minutes
Cook Time 10 minutes
Total Time 15 minutes
Servings: 6 -8 pancakes
Course: Breakfast
Cuisine: International

Ingredients
  

  • 1 apple peeled and grated (or 100ml applesauce)
  • 300 ml Greek yogurt
  • 80 g about ⅔ cup wholemeal flour
  • 1 banana mashed
  • Oil for cooking

Method
 

Prepare the Batter:
  1. In a bowl, mix the grated apple (or applesauce) with mashed banana and Greek yogurt.
  2. Add wholemeal flour and stir until you get a smooth batter.
Cook the Pancakes:
  1. Heat a non-stick pan over medium heat and lightly grease it with oil.
  2. Pour small portions of the batter onto the pan.
  3. Cook for 2-3 minutes on one side, then flip and cook for another 2 minutes until golden brown.
Serve & Enjoy:
  1. Stack the pancakes and serve warm with fresh fruit, nuts, or a drizzle of honey.

Notes

  • For extra fluffiness: Let the batter sit for 5-10 minutes before cooking.
  • Sweetness level: The banana and apple provide natural sweetness, so no extra sugar is needed.
  • Storage: Store leftovers in an airtight container in the fridge for up to 3 days or freeze for later.
  • Vegan option: Use dairy-free yogurt and a flaxseed egg (1 tbsp ground flax + 2.5 tbsp water).

Fluffy Yogurt & Milk Bread – A Simple and Delicious Surprise

Some of the best recipes come from simple, everyday ingredients—flour, milk, a little oil, and in this case, yogurt. It might seem like an unusual addition to bread, but once you try it, you’ll never go back.

I still remember the first time I made this bread. I was looking for an easy, no-fuss bread recipe that didn’t require fancy ingredients or hours of kneading. My grandmother, who always had a way of making the simplest foods taste extraordinary, suggested adding yogurt. “It makes the bread softer,” she said, “and gives it a slight richness that makes every bite special.”

Skeptical but curious, I tried it. The result? A perfectly golden loaf with a light, airy texture and a subtle hint of tangy flavor. It was the kind of bread that you could eat straight from the oven, with nothing but a bit of butter melting into its warm, pillowy crumb.

Now, this has become one of my go-to recipes—not just because it’s easy, but because it reminds me of how small changes can lead to the best surprises. Whether you’re a beginner or a seasoned baker, this simple addition of yogurt transforms an everyday loaf into something truly special.

Why You’ll Love This Yogurt & Milk Bread

This bread isn’t just easy to make; it’s incredibly rewarding. Here’s why it deserves a place in your kitchen:

  • Super Soft & Fluffy – The combination of warm milk and yogurt creates a tender crumb with a melt-in-your-mouth texture.
  • No Special Equipment Needed – You don’t need a bread machine or a stand mixer—just a bowl and a little patience.
  • Versatile & Customizable – Use it for sandwiches, toast, or enjoy it fresh with a drizzle of honey.
  • Minimal Ingredients, Maximum Flavor – Simple pantry staples come together to create a bakery-quality loaf.
  • Great for Beginners – With easy-to-follow steps, this recipe is perfect for anyone new to bread baking.

Ingredients

IngredientQuantity
Sugar1 teaspoon (5g)
Salt1 teaspoon (5g)
Vegetable oil1 tablespoon (10ml)
Yogurt1 tablespoon (20g)
Warm milk1 cup (200ml)

Directions

  1. Prepare the Mixture:
    • In a bowl, combine warm milk, sugar, salt, vegetable oil, and yogurt.
    • Stir until well blended and smooth.
  2. Form the Dough:
    • Gradually add flour to the liquid mixture, stirring until a soft dough forms.
    • Knead lightly until smooth and elastic.
  3. Let It Rise:
    • Cover the dough and let it rest in a warm place for about 1 hour, or until doubled in size.
  4. Shape & Bake:
    • Preheat the oven to 180°C (350°F).
    • Shape the dough as desired and place it on a baking tray.
    • Bake for 25-30 minutes, or until golden brown.
  5. Cool & Serve:
    • Let the bread cool slightly before slicing. Enjoy warm with butter, honey, or your favorite spread!

Nutritional Information (Per Serving)

NutrientAmount (Approx.)
Calories120-150 kcal
Carbohydrates20g
Protein4g
Fats3g
Fiber1g

The Science Behind Yogurt in Bread

Adding yogurt to bread dough does more than just enhance flavor—it affects the texture and rise in a way that makes homemade bread even better.

1. Yogurt Helps Create a Softer Crumb

The natural acidity in yogurt interacts with the gluten in flour, breaking down some of its structure and resulting in a softer, more delicate texture.

2. It Enhances Moisture Retention

Yogurt keeps the bread from drying out too quickly, meaning it stays fresh for longer compared to traditional loaves.

3. It Adds a Subtle Tangy Flavor

While the flavor is mild, the slight tang from yogurt gives the bread a depth that makes it more interesting than standard white bread.

4. It Acts as a Natural Dough Conditioner

Many commercial breads use additives to improve texture, but yogurt naturally strengthens the dough and makes it easier to work with.

How to Use This Bread

This soft and fluffy bread is incredibly versatile. Here are some of the best ways to enjoy it:

  • Classic Toast – Slather it with butter, jam, or honey for a simple but satisfying breakfast.
  • Sandwich Bread – Perfect for deli-style sandwiches or grilled cheese.
  • French Toast – Its soft texture makes it ideal for soaking up egg mixture and frying into golden perfection.
  • Bread Rolls – Shape the dough into smaller portions to make fluffy dinner rolls.
  • Garlic Bread – Brush with garlic butter and toast for a flavorful side dish.

FAQs: Everything You Need to Know

1. Can I Use Greek Yogurt Instead of Regular Yogurt?

Yes! Greek yogurt works well, but because it’s thicker, you may need to add a little more milk to maintain the dough’s moisture balance.

2. What Type of Flour Works Best for This Bread?

All-purpose flour is perfect for a soft texture, but you can also use bread flour for a slightly chewier result. Whole wheat flour can be used, but it will make the bread denser.

3. Can I Make This Bread Without Yeast?

This recipe works best with yeast, but if you’re looking for a quicker alternative, you can try baking powder instead. The texture will be more like a quick bread rather than a traditional yeast loaf.

4. How Long Does This Bread Stay Fresh?

Stored at room temperature in an airtight container, this bread stays soft for up to 3 days. For longer storage, freeze it in slices and toast when ready to eat.

5. Can I Add Other Ingredients to This Bread?

Absolutely! Try adding herbs, shredded cheese, or seeds for extra flavor and texture.

6. What Can I Use Instead of Vegetable Oil?

You can substitute vegetable oil with melted butter, coconut oil, or even olive oil for a slightly different taste.

7. How Do I Know When the Dough Has Risen Enough?

The dough should double in size and feel airy when poked gently. If it springs back too quickly, it may need more time to rise.

8. Can I Bake This Bread Without an Oven?

Yes! If you don’t have an oven, you can cook the bread in a covered pan on low heat for about 20-25 minutes per side.

9. Why Didn’t My Bread Rise Properly?

This could be due to expired yeast, milk that was too hot (which kills the yeast), or a cold environment that slows down fermentation.

10. Can I Make This Bread Vegan?

Yes! Replace the yogurt with a plant-based alternative (such as coconut or almond yogurt) and use dairy-free milk.

Conclusion: A Simple Trick for Better Homemade Bread

Sometimes, the best recipes are the ones that take you by surprise. Adding yogurt to bread might not be the first thing that comes to mind, but once you try it, you’ll wonder why you didn’t do it sooner.

This bread is proof that small changes can lead to big results. Soft, flavorful, and incredibly easy to make, it’s a recipe that belongs in every home baker’s collection. Whether you’re a beginner looking for an easy bread recipe or a seasoned baker wanting to try something new, this yogurt and milk bread is sure to become a favorite.

So go ahead—mix, bake, and enjoy the magic of homemade bread. And don’t forget to savor that first warm slice with a little butter—it’s the best part!

Amal

Fluffy Yogurt & Milk Bread – A Simple and Delicious Surprise

This soft and fluffy yogurt and milk bread is incredibly easy to make and requires just a handful of ingredients. The addition of yogurt makes the dough extra tender, giving the bread a light, airy texture with a subtle richness. Perfect for toast, sandwiches, or enjoying warm with butter, this homemade bread is a must-try for any baking enthusiast!
Prep Time 15 minutes
Cook Time 30 minutes
Total Time 2 hours 15 minutes
Servings: 6 –8 servings
Course: Bread
Cuisine: International

Ingredients
  

  • 1 teaspoon sugar 5 grams
  • 1 teaspoon salt 5 grams
  • 1 tablespoon vegetable oil 10 ml
  • 1 tablespoon yogurt 20 grams
  • 1 cup warm milk 200 ml
  • 2 ½ cups all-purpose flour 300 grams
  • 1 teaspoon instant yeast or active dry yeast

Method
 

Prepare the Dough:
  1. In a bowl, combine warm milk, sugar, salt, vegetable oil, and yogurt. Stir until well mixed.
  2. Add the flour and yeast gradually, stirring until a dough forms.
Knead & Rest:
  1. Knead the dough on a lightly floured surface until smooth and elastic (about 8-10 minutes).
  2. Cover and let it rise in a warm place for about 1 hour, or until doubled in size.
Shape & Second Rise:
  1. Shape the dough into a loaf or rolls and place on a baking tray.
  2. Let it rise again for 30 minutes while preheating the oven to 180°C (350°F).
Bake the Bread:
  1. Bake for 25-30 minutes, or until golden brown on top.
  2. Let cool before slicing.
Serve & Enjoy:
  1. Serve warm with butter, jam, or your favorite toppings!

Notes

  • For extra softness: Add an extra tablespoon of yogurt for an even fluffier texture.
  • Flour alternatives: You can use bread flour for a chewier texture or whole wheat flour for a heartier loaf.
  • Storage: Keep in an airtight container at room temperature for up to 3 days, or freeze for longer storage.
  • Flavor variations: Add a pinch of cinnamon, honey, or shredded cheese for a unique twist!

Crispy Crust, Cheesy Center: No-Knead Cheese Bread

Some recipes feel like magic—how a few simple ingredients can transform into something comforting, aromatic, and utterly delicious. No-knead cheese bread is one of those recipes.

Growing up, homemade bread was a weekend tradition in our house. My mother would wake up early to mix the dough, allowing it to rise while the rest of us were still asleep. By midday, the kitchen smelled of warm, yeasty dough, mingling with the rich, savory scent of melted cheese. It was an unspoken rule that the first slice—still hot from the oven—was to be enjoyed with nothing but a smear of butter, melting into every airy pocket of the bread.

Years later, I found myself hesitant to attempt homemade bread. It always seemed too complicated—requiring hours of kneading, careful measurements, and an intimidating amount of patience. Then, I discovered no-knead bread. It felt like a revelation: no fuss, no special equipment, just time doing the work for you. And when I added cheese to the mix? That’s when it truly became a staple in my kitchen.

No-knead cheese bread is the perfect balance of rustic and indulgent. Its crisp golden crust gives way to a soft, airy interior laced with gooey, melted cheese. Whether you’re dipping it into soup, making a next-level grilled cheese, or simply tearing off pieces to enjoy as a snack, this bread never disappoints.

Now, it’s my turn to pass this recipe on to you—a bread that’s both simple and spectacular, one that fills your home with warmth and the irresistible scent of freshly baked goodness.

Why You’ll Love This No-Knead Cheese Bread

This bread is perfect for both beginners and experienced bakers alike. Here’s why it deserves a spot in your baking repertoire:

  • Minimal Effort, Maximum Flavor – The dough practically makes itself while you sleep, developing deep flavor without any kneading.
  • Crispy, Artisan-Style Crust – Baking in a Dutch oven creates a perfectly crisp and golden crust, just like bakery bread.
  • Soft, Cheesy Interior – Every bite is filled with gooey, melted cheese that enhances the rich, savory flavor.
  • Versatile & Customizable – Use your favorite cheeses or add garlic, herbs, or even jalapeños for a unique twist.
  • No Special Equipment Needed – If you don’t have a Dutch oven, you can still bake this in a regular loaf pan with a few adjustments.

Ingredients

IngredientQuantity
All-purpose flour3 cups, plus extra for dusting
Salt1 ½ teaspoons
Instant yeast (or active dry yeast)½ teaspoon
Warm water (95°F – 105°F)1 ¼ cups
Olive oil¼ cup
Shredded cheese (cheddar, mozzarella, parmesan, or a combination)1 – 1 ½ cups

Directions

  1. Mix the Dough:
    • In a large bowl, combine flour, salt, and yeast.
    • Add warm water and olive oil, stirring until a shaggy dough forms.
    • Fold in the shredded cheese until evenly distributed.
  2. Let It Rise:
    • Cover the bowl with plastic wrap or a kitchen towel.
    • Let the dough rise at room temperature for 12-18 hours until doubled in size and bubbly.
  3. Shape the Dough:
    • Lightly flour a clean surface and gently shape the dough into a ball.
    • Let it rest for 30-45 minutes while preheating the oven to 450°F (230°C).
  4. Bake to Perfection:
    • Place a Dutch oven or heavy-lidded pot in the oven for 30 minutes to preheat.
    • Carefully transfer the dough to the preheated pot. Cover and bake for 30 minutes.
    • Remove the lid and bake for another 10-15 minutes until golden brown.
  5. Cool & Serve:
    • Let the bread cool on a wire rack before slicing. Enjoy warm with butter or on its own!

Nutritional Information (Per Slice, Approx.)

NutrientAmount
Calories180-220 kcal
Carbohydrates30g
Protein6g
Fats6g
Fiber1g

Secrets to Making the Best No-Knead Cheese Bread

Even though this recipe is simple, a few key techniques can take your bread from good to extraordinary.

1. Let the Dough Rise Slowly

A long, slow rise is the secret to deep flavor and a light, airy texture. Letting the dough ferment overnight at room temperature allows the yeast to fully develop, giving the bread a slightly tangy, complex taste.

2. Use High-Moisture Cheeses

For the best melt, use cheeses like mozzarella, cheddar, or gouda. Hard cheeses like parmesan add sharpness but won’t create the same gooey pockets inside the bread. A combination of both works beautifully.

3. Preheat the Baking Dish

If using a Dutch oven, preheating it before adding the dough mimics a professional bread oven, giving you a better crust. The trapped steam inside helps create that perfect crunch.

4. Don’t Skip the Resting Time

After shaping the dough, let it rest for about 30-45 minutes before baking. This second rise helps develop a more structured crumb and makes shaping easier.

5. Adjust the Baking Time for Your Desired Texture

For an extra crisp crust, bake uncovered for a longer time. If you prefer a softer texture, you can tent the bread with foil for the last few minutes.

How to Serve & Enjoy Your Homemade Cheese Bread

Once you pull your golden, cheesy loaf out of the oven, the real fun begins. Here are some delicious ways to enjoy it:

  • With Soup or Stew – A thick slice of this bread is perfect for dipping into tomato soup, French onion soup, or a hearty chili.
  • As the Ultimate Grilled Cheese – Slice and toast it with extra cheese inside for the most decadent grilled cheese sandwich.
  • With Butter & Honey – The salty-sweet contrast of butter and honey on warm cheese bread is irresistible.
  • As a Side for Pasta – Pair it with spaghetti, lasagna, or creamy alfredo for a comforting Italian-style meal.
  • Torn & Dipped – Serve it as an appetizer with olive oil, balsamic vinegar, or garlic butter for dipping.

FAQs: Everything You Need to Know

1. Can I Use a Different Type of Flour?

Yes! While all-purpose flour works best for this recipe, you can substitute it with bread flour for a chewier texture. If using whole wheat flour, mix it with all-purpose flour (50/50) to prevent the bread from becoming too dense.

2. Can I Make This Bread Without a Dutch Oven?

Absolutely! You can use a baking sheet or a regular loaf pan. To create steam for a crisp crust, place a small pan of hot water in the oven while the bread bakes.

3. Can I Add Extra Ingredients to the Dough?

Yes! Try adding roasted garlic, chopped herbs (like rosemary or thyme), or even cooked bacon for extra flavor.

4. How Should I Store Leftover Bread?

Store at room temperature in an airtight bag for up to 3 days. To keep it fresh longer, freeze slices in a sealed bag and toast them when ready to eat.

5. Can I Use Active Dry Yeast Instead of Instant Yeast?

Yes! If using active dry yeast, dissolve it in warm water first and let it sit for 5-10 minutes until foamy before adding it to the flour.

6. Why Is My Bread Too Dense?

If your bread turns out dense, it could be due to not letting it rise long enough, using too much flour, or not having enough moisture in the dough. Make sure the dough looks wet and sticky before the first rise.

7. Can I Make This Gluten-Free?

Gluten-free flours don’t behave the same way as regular flour, so you’ll need a gluten-free bread flour blend with added binders like xanthan gum for the best results.

8. Can I Double the Recipe?

Yes! You can double the recipe to make two loaves, but be sure to use a larger Dutch oven or bake them separately to ensure even cooking.

Conclusion: Bread Baking Made Easy & Delicious

Making bread at home can feel intimidating, but no-knead cheese bread proves that you don’t need to be an expert baker to create something incredible. With just a little patience and a handful of ingredients, you can make a rustic, golden loaf that rivals anything from a bakery.

Whether you’re baking for yourself, sharing with family, or impressing guests, this bread is guaranteed to be a hit. Its crispy crust, gooey cheese pockets, and soft, airy crumb make it a versatile and satisfying addition to any meal.

So go ahead—mix the dough, let time do the work, and enjoy the reward of homemade bread that’s both effortless and extraordinary. Because nothing beats the smell (and taste!) of fresh bread straight from your own oven.

Amal

Crispy Crust, Cheesy Center: No-Knead Cheese Bread

This no-knead cheese bread is the perfect blend of crispy crust and soft, cheesy interior. With just a few simple ingredients and minimal effort, you can create a bakery-quality loaf right in your own kitchen. Whether you’re serving it alongside a meal, making an epic grilled cheese, or enjoying it on its own, this bread is guaranteed to impress!
Prep Time 10 minutes
Cook Time 45 minutes
Total Time 19 hours
Servings: 8 -10 slices
Course: Bread
Cuisine: International

Ingredients
  

  • 3 cups all-purpose flour plus extra for dusting
  • 1 ½ teaspoons salt
  • ½ teaspoon instant yeast or active dry yeast
  • 1 ¼ cups warm water around 95°F – 105°F
  • ¼ cup olive oil
  • 1 – 1 ½ cups shredded cheese of your choice cheddar, mozzarella, parmesan, or a combination

Method
 

Mix the Dough:
  1. In a large bowl, combine flour, salt, and yeast.
  2. Add warm water and olive oil, stirring until a shaggy dough forms.
  3. Fold in the shredded cheese until evenly distributed.
Let It Rise:
  1. Cover the bowl with plastic wrap or a kitchen towel.
  2. Let the dough rise at room temperature for 12-18 hours until doubled in size and bubbly.
Shape the Dough:
  1. Lightly flour a clean surface and gently shape the dough into a ball.
  2. Let it rest for 30-45 minutes while preheating the oven to 450°F (230°C).
Bake to Perfection:
  1. Place a Dutch oven or heavy-lidded pot in the oven for 30 minutes to preheat.
  2. Carefully transfer the dough to the preheated pot. Cover and bake for 30 minutes.
  3. Remove the lid and bake for another 10-15 minutes until golden brown.
Cool & Serve:
  1. Let the bread cool on a wire rack before slicing. Enjoy warm with butter or on its own!

Notes

  • Cheese Options: Use a combination of cheddar for sharpness, mozzarella for meltiness, or parmesan for a salty bite.
  • No Dutch Oven? Bake on a regular baking sheet with a pan of hot water in the oven for a crisp crust.
  • Storage: Store at room temperature in an airtight bag for up to 3 days or freeze slices for later use.
  • Enhance the Flavor: Add garlic, fresh herbs, or a sprinkle of red pepper flakes for a unique twist.

The No-Bake 5-Minute Dessert Everyone Is Talking About

Some of the best desserts aren’t the ones that take hours to prepare, but the ones that come together effortlessly, yet taste like they took all day. Growing up, my family always had a love for sweet treats, but with busy schedules, making elaborate desserts wasn’t always an option.

One of my fondest memories is of my mother whipping up a quick, creamy dessert whenever we had unexpected guests or when my siblings and I craved something sweet. She never needed a recipe—just a few pantry staples, a touch of creativity, and within minutes, a rich, indulgent treat was ready. It was the kind of dessert that felt fancy, even though it was made in just a few steps.

Now, every time I make this no-bake 5-minute dessert, it takes me back to those moments. The simplicity of crushed biscuits, smooth cream cheese, and a luscious chocolate topping creates a harmony of textures and flavors that feels both nostalgic and luxurious. It’s proof that you don’t need an oven, gelatin, or fancy techniques to make something truly delightful.

This recipe is perfect for those times when you want a sweet fix without the hassle. Whether you’re making it for yourself, sharing it with family, or impressing last-minute guests, this dessert is a lifesaver.

Why You’ll Love This No-Bake Dessert

There are countless reasons to fall in love with this dessert, but here are just a few:

  • Quick & Easy – Takes just 5 minutes to put together, with no baking required.
  • Minimal Ingredients – Uses simple pantry staples that you likely already have.
  • No Gelatin Needed – Achieves a perfectly creamy texture without any stabilizers.
  • Versatile & Customizable – Can be adapted with different flavors and toppings.
  • Perfect for Any Occasion – Great for last-minute gatherings, meal prepping, or a midnight snack.

Ingredients

IngredientQuantity
Biscuits (crushed)200g
Butter (melted)100g
Cream cheese250g
Heavy cream200ml
Powdered sugar½ cup
Vanilla extract1 teaspoon
Chocolate (melted)100g
Cocoa powder2 tablespoons
Honey1 tablespoon
SaltA pinch

Directions

  1. Prepare the Base:
    • Crush the biscuits into fine crumbs.
    • Mix with melted butter until fully combined.
    • Press the mixture into a serving dish or individual dessert cups to create the base.
  2. Make the Creamy Filling:
    • In a bowl, whisk together the cream cheese, heavy cream, powdered sugar, vanilla extract, and salt until smooth and fluffy.
    • Spread the cream mixture evenly over the biscuit base.
  3. Add the Chocolate Layer:
    • Combine the melted chocolate with cocoa powder and honey, stirring until smooth.
    • Drizzle the chocolate over the creamy layer and spread evenly.
  4. Chill & Serve:
    • Let the dessert chill in the refrigerator for at least 5 minutes.
    • Serve immediately or leave it to set for a firmer texture.

Nutritional Information (Per Serving)

NutrientAmount (Approx.)
Calories300-350 kcal
Carbohydrates35g
Protein4g
Fats18g
Sugar20g

Secrets to Making the Perfect No-Bake Dessert

1. Use High-Quality Ingredients

Because this dessert is made with just a handful of ingredients, their quality makes all the difference. Use real butter, fresh cream cheese, and good-quality chocolate for the best results.

2. Crush the Biscuits Properly

The texture of the base depends on how finely the biscuits are crushed. For a firmer base, process them into fine crumbs. If you prefer a bit of crunch, leave some larger pieces.

3. Adjust the Sweetness to Your Liking

Some like their desserts sweeter, while others prefer a more balanced flavor. You can adjust the amount of powdered sugar in the cream filling or even use a natural sweetener like honey or maple syrup.

4. Let It Chill for the Best Texture

Although this dessert can be enjoyed immediately, letting it sit in the fridge for at least 30 minutes enhances the texture and flavor, making it even more indulgent.

5. Add a Creative Twist

You can elevate this dessert by adding layers of fruit, chopped nuts, or a drizzle of caramel for extra decadence.

Serving Suggestions: Elevate Your Dessert Experience

This no-bake treat is delicious on its own, but you can make it even better with these ideas:

  • Top with Fresh Berries – A handful of strawberries, raspberries, or blueberries adds a fresh contrast to the creamy texture.
  • Drizzle with Caramel or Honey – For an extra layer of sweetness, a light drizzle of caramel or honey works beautifully.
  • Sprinkle with Crushed Nuts – Almonds, walnuts, or hazelnuts add crunch and complement the rich flavors.
  • Pair with Coffee or Tea – Enjoy alongside a cup of espresso, chai, or green tea for a perfectly balanced treat.
  • Serve in Individual Cups – Layering the ingredients in small jars or glasses makes for an elegant presentation.

FAQs: Everything You Need to Know

1. Can I Make This Dessert Ahead of Time?

Yes! This dessert actually gets better with time as the flavors meld together. You can prepare it a day in advance and store it in the fridge until ready to serve.

2. Can I Use a Different Type of Biscuit?

Absolutely. Graham crackers, digestive biscuits, or even chocolate cookies work well in this recipe.

3. How Do I Store Leftovers?

Store leftovers in an airtight container in the refrigerator for up to 3 days. If layering in individual cups, simply cover each one with plastic wrap before storing.

4. Can I Freeze This Dessert?

Yes! You can freeze it for up to a month. Just thaw in the refrigerator before serving.

5. What Can I Use Instead of Cream Cheese?

If you don’t have cream cheese, you can substitute it with mascarpone, ricotta, or Greek yogurt for a slightly different texture.

6. Can I Make a Dairy-Free Version?

Yes! Use dairy-free butter, coconut cream instead of heavy cream, and a plant-based cream cheese alternative.

7. Can I Make This Dessert Less Sweet?

Of course! Reduce the powdered sugar in the cream filling or use dark chocolate instead of milk chocolate for a richer, less sweet flavor.

8. What If I Don’t Have Powdered Sugar?

You can blend regular granulated sugar into a fine powder using a food processor or blender.

9. Can I Add Other Flavors to the Cream Filling?

Yes! A splash of coffee, a bit of orange zest, or even a drop of almond extract can add a unique twist to the flavor.

10. How Do I Make the Chocolate Topping Shinier?

Mix a teaspoon of melted butter or coconut oil into the melted chocolate to give it a glossy finish.

Conclusion: A Dessert You’ll Make Again and Again

In a world where time is precious, finding a dessert that’s quick, easy, and incredibly delicious is a true win. This 5-minute no-bake dessert is proof that you don’t need complicated techniques or fancy equipment to create something indulgent.

With its creamy, velvety layers, crunchy biscuit base, and rich chocolate topping, this treat delivers everything you love about a homemade dessert—without the hassle. Whether you’re making it for a family gathering, a quick weeknight treat, or a special occasion, it’s bound to impress.

So next time you’re craving something sweet, skip the store-bought desserts and whip up this effortless masterpiece. Because sometimes, the simplest recipes bring the greatest joy.

Amal

The No-Bake 5-Minute Dessert Everyone Is Talking About

This no-bake 5-minute dessert is creamy, rich, and irresistibly delicious! Made with simple pantry staples, it requires no gelatin, no baking, and comes together effortlessly. Whether you’re craving a last-minute treat or need a quick dessert for guests, this recipe is the perfect solution. Smooth, chocolatey, and layered with velvety cream, it’s a guaranteed crowd-pleaser!
Prep Time 5 minutes
Total Time 5 minutes
Servings: 4 –6 servings
Course: Dessert
Cuisine: International

Ingredients
  

  • 200 g biscuits crushed
  • 100 g butter melted
  • 250 g cream cheese
  • 200 ml heavy cream
  • ½ cup powdered sugar
  • 1 teaspoon vanilla extract
  • 100 g chocolate melted
  • 2 tablespoons cocoa powder
  • 1 tablespoon honey
  • A pinch of salt

Method
 

Prepare the Base:
  1. Crush the biscuits into fine crumbs and mix with melted butter.
  2. Press the mixture into a serving dish or individual cups to form the base.
Make the Creamy Filling:
  1. In a bowl, whisk together the cream cheese, heavy cream, powdered sugar, vanilla extract, and a pinch of salt until smooth and fluffy.
  2. Spread the cream mixture evenly over the biscuit base.
Add the Chocolate Layer:
  1. Combine the melted chocolate with cocoa powder and honey, stirring until smooth.
  2. Drizzle the chocolate mixture over the creamy layer and spread evenly.
Chill & Serve:
  1. Let the dessert chill in the refrigerator for at least 5 minutes.
  2. Serve immediately for a soft texture or let it set longer for a firmer consistency.

Notes

  • For extra texture: Add chopped nuts, coconut flakes, or fruit layers.
  • Make it less sweet: Reduce the powdered sugar or use dark chocolate.
  • Storage: Keep in the fridge for up to 3 days in an airtight container.
  • Dairy-free option: Use coconut cream and plant-based cream cheese.

Golden Cabbage & Egg Fritters

Some of the best recipes are born out of simplicity—humble ingredients coming together to create something greater than the sum of their parts. This cabbage and egg recipe is a perfect example of that.

Growing up, my grandmother always believed in making the most of what was available in the kitchen. Wasting food was never an option, and she had an incredible ability to transform basic ingredients into delicious, satisfying meals. One of her signature dishes was these crispy cabbage and egg fritters, a recipe she learned from her own mother during times when meat was scarce, and creativity in the kitchen was essential.

I remember watching her chop cabbage with swift, precise movements, mixing it with eggs, a handful of oats, and whatever herbs she had on hand. She never measured anything—she cooked by instinct, by memory, by feel. The kitchen would soon be filled with the irresistible aroma of sizzling fritters, and we would gather around, eagerly waiting to take the first bite.

Though simple, these fritters always felt like a special meal. Crispy on the outside, soft on the inside, and bursting with savory flavors, they were a comforting reminder that good food doesn’t have to be complicated. Now, whenever I make them, I feel a connection to my grandmother and to the generations before her who relied on creativity and resourcefulness to feed their families.

This recipe is a celebration of those traditions, proof that with just a few basic ingredients, you can create something truly delicious.

Why You’ll Love These Cabbage & Egg Fritters

These fritters are more than just a budget-friendly meal—they are packed with flavor, texture, and nutrition. Here’s why they deserve a spot on your table:

  • Simple Ingredients, Big Flavor – Made with pantry staples, yet loaded with savory goodness.
  • Crispy on the Outside, Soft on the Inside – A perfect balance of textures in every bite.
  • Nutritious & Filling – Cabbage is rich in fiber and vitamins, while eggs add a protein boost.
  • Customizable – You can tweak the seasonings and ingredients to suit your taste.
  • Quick & Easy to Make – Ready in under 30 minutes, making it perfect for busy days.
  • Great for Any Meal – Serve as a snack, side dish, or even a light main course.

Ingredients

IngredientQuantity
Cabbage700g
Eggs5
SaltTo taste
Oats3 tablespoons
Flour2 tablespoons
Onion1, finely chopped
Olive oilFor frying
Carrot1, grated
Potato1, grated
Italian herbsTo taste
DillA sprig, chopped
Mayonnaise2 tablespoons
Greek yogurt2 tablespoons
Soy sauceTo taste
Black pepperTo taste
Garlic1 clove, minced

Directions

  1. Prepare the Vegetables:
    • Finely shred the cabbage and sprinkle with salt. Let it sit for 10 minutes, then squeeze out excess moisture.
    • In a large bowl, combine the cabbage, grated carrot, grated potato, chopped onion, and minced garlic.
  2. Mix the Batter:
    • Beat the eggs and add them to the vegetable mixture.
    • Stir in the oats, flour, Italian herbs, and chopped dill. Mix well until everything is combined.
  3. Cook the Fritters:
    • Heat olive oil in a pan over medium heat.
    • Scoop portions of the mixture and flatten them into small patties.
    • Fry for about 3-4 minutes per side, or until golden brown and crispy.
  4. Prepare the Sauce:
    • In a bowl, mix mayonnaise, Greek yogurt, soy sauce, and black pepper to create a creamy dip.
  5. Serve & Enjoy:
    • Serve the fritters hot with the sauce on the side. Garnish with fresh dill for extra flavor.

Nutritional Information (Per Serving)

NutrientAmount (Approx.)
Calories180-220 kcal
Protein7g
Carbohydrates20g
Fats8g
Fiber4g

Secrets to the Best Cabbage & Egg Fritters

While this recipe is straightforward, a few tips can make your fritters even better:

1. Remove Excess Moisture from the Cabbage

Cabbage naturally holds a lot of water, which can make the fritters too soft. After shredding, sprinkle it with salt and let it sit for about 10 minutes, then squeeze out the excess liquid. This will help the fritters hold their shape and achieve a crispier texture.

2. Use a Combination of Binders

Eggs and flour help hold the fritters together, while oats add extra texture. If you want a firmer patty, you can also add a tablespoon of breadcrumbs or grated cheese.

3. Don’t Skip the Herbs and Seasonings

Cabbage has a mild, slightly sweet flavor, so adding Italian herbs, dill, garlic, and black pepper brings depth and balance. Feel free to experiment with spices like cumin or paprika for an extra kick.

4. Cook Over Medium Heat for the Perfect Crisp

If the heat is too high, the outside will brown too quickly while the inside stays raw. Cooking over medium heat ensures even cooking and a crispy, golden crust.

5. Serve with a Flavorful Sauce

A good dipping sauce takes these fritters to the next level. A mix of Greek yogurt, mayonnaise, soy sauce, and garlic creates a creamy, tangy contrast to the crispy fritters. You can also try sour cream, tzatziki, or even a spicy sriracha mayo.

Serving Suggestions: How to Enjoy These Fritters

These cabbage and egg fritters are incredibly versatile. Here are some great ways to serve them:

  • As a Side Dish – Pair them with grilled chicken, fish, or roasted vegetables for a complete meal.
  • In a Wrap or Sandwich – Add them to a tortilla with lettuce, tomatoes, and a drizzle of yogurt sauce for a delicious vegetarian wrap.
  • For Breakfast – Serve with a fried egg on top and a side of avocado for a hearty morning meal.
  • As a Snack or Appetizer – Enjoy them on their own with a dipping sauce or alongside a fresh salad.
  • With a Light Soup – A bowl of tomato soup or vegetable broth pairs wonderfully with these crispy fritters.

FAQs: Everything You Need to Know

1. Can I Make These Fritters Ahead of Time?

Yes! You can prepare the mixture a few hours in advance and store it in the fridge until ready to cook. If you want to freeze them, shape the fritters and freeze them before frying.

2. Can I Bake Instead of Frying?

Absolutely. Preheat your oven to 200°C (400°F) and place the fritters on a parchment-lined baking sheet. Lightly brush with olive oil and bake for about 20-25 minutes, flipping halfway through, until golden and crispy.

3. What Can I Use Instead of Flour?

If you’re looking for a gluten-free alternative, swap the flour for chickpea flour or a gluten-free blend.

4. Can I Add More Vegetables?

Yes! Grated zucchini, bell peppers, or spinach can be added to the mixture for extra nutrition and flavor.

5. What’s the Best Way to Store Leftovers?

Store leftover fritters in an airtight container in the refrigerator for up to 3 days. Reheat them in a pan over low heat or in the oven at 180°C (350°F) for a few minutes to regain crispiness.

6. Can I Make This Recipe Vegan?

Yes! Replace the eggs with a flaxseed mixture (1 tablespoon flaxseed meal + 2.5 tablespoons water per egg) and use a plant-based yogurt instead of Greek yogurt.

7. Can I Fry These in an Air Fryer?

Definitely. Preheat the air fryer to 180°C (350°F), lightly grease the basket, and cook for about 12-15 minutes, flipping halfway through.

Conclusion: A Simple Dish with Endless Possibilities

Cabbage and egg fritters are proof that simple ingredients can create something truly delicious. They’re crispy, satisfying, and packed with flavor, making them a wonderful addition to any meal.

This recipe embodies the beauty of home cooking—using what you have, embracing creativity, and enjoying the process of making something from scratch. Whether you grew up eating cabbage-based dishes or are trying this for the first time, these fritters are sure to become a new favorite in your kitchen.

So go ahead, give them a try, and savor the joy of a homemade meal that’s both nourishing and incredibly delicious.

Amal

Golden Cabbage & Egg Fritters

These golden cabbage and egg fritters are crispy on the outside, tender on the inside, and packed with flavor. Made with simple ingredients like shredded cabbage, eggs, and herbs, they make a perfect side dish, snack, or even a light meal. Serve them with a creamy dipping sauce for an irresistible treat!
Prep Time 15 minutes
Cook Time 20 minutes
Total Time 35 minutes
Servings: 4 –6 servings
Course: Snack
Cuisine: European

Ingredients
  

  • 700 g cabbage finely shredded
  • 5 eggs
  • Salt to taste
  • 3 tablespoons oats
  • 2 tablespoons flour
  • 1 onion finely chopped
  • Olive oil for frying
  • 1 carrot grated
  • 1 potato grated
  • Italian herbs to taste
  • 1 sprig of dill chopped
  • 2 tablespoons mayonnaise
  • 2 tablespoons Greek yogurt
  • Soy sauce to taste
  • Black pepper to taste
  • 1 clove of garlic minced

Method
 

Prepare the Cabbage:
  1. Place the shredded cabbage in a bowl, sprinkle with salt, and let it sit for 10 minutes. Squeeze out excess moisture.
Make the Batter:
  1. In a large bowl, mix the cabbage, grated carrot, grated potato, onion, garlic, eggs, oats, flour, Italian herbs, dill, salt, and black pepper. Stir until well combined.
Cook the Fritters:
  1. Heat olive oil in a frying pan over medium heat.
  2. Scoop a portion of the batter, shape it into a small patty, and place it in the pan.
  3. Fry for 3-4 minutes per side, until golden brown and crispy. Repeat with the remaining batter.
Make the Sauce:
  1. In a small bowl, mix mayonnaise, Greek yogurt, soy sauce, and black pepper.
Serve & Enjoy:
  1. Serve the fritters warm with the dipping sauce on the side. Garnish with fresh dill for extra flavor.

Notes

  • For extra crispiness: Let the cabbage sit with salt before mixing to remove excess water.
  • Baking option: Instead of frying, bake at 200°C (400°F) for 20-25 minutes, flipping halfway through.
  • Storage: Store leftovers in an airtight container in the fridge for up to 3 days. Reheat in a pan or oven.
  • Customization: Add grated zucchini, cheese, or chili flakes for extra flavor.

Zesty Orange Cookies with a Buttery Crumble

There are certain flavors that instantly transport you back in time—orange is one of them for me. Growing up, my grandmother always had a jar of homemade cookies on her kitchen counter. Some were chocolatey, others buttery, but my absolute favorite were her citrus-infused cookies, bursting with the fresh, tangy sweetness of oranges.

She never wrote down her recipe, insisting that great baking was all about intuition. “You have to feel the dough,” she would say, as she kneaded it with practiced hands. I remember watching her zest fresh oranges, the fragrance filling the room as she stirred the bright, juicy filling over the stove. When the cookies were finally ready—golden, crisp, and filled with velvety orange goodness—they tasted like sunshine.

Now, every time I bake a batch of orange cookies, I’m reminded of those warm afternoons in my grandmother’s kitchen, where love was measured in spoonfuls of sugar and the scent of citrus meant something sweet was coming out of the oven.

This recipe brings together the buttery richness of homemade cookies with the fresh, vibrant flavor of oranges. They’re soft yet crisp, sweet yet tangy—the perfect treat for any occasion. Whether you enjoy them with a cup of tea, pack them as a snack, or share them with loved ones, these cookies are sure to brighten your day.

Why You’ll Love These Orange Cookies

These cookies offer the perfect balance of buttery richness and zesty citrus, making them an irresistible treat. Here’s why they deserve a place in your baking repertoire:

  • Bright, Refreshing Flavor – The natural sweetness of oranges adds a refreshing twist to classic buttery cookies.
  • Perfectly Crisp on the Outside, Soft on the Inside – The dough bakes into a delicate texture that melts in your mouth.
  • Easy to Make – No complicated techniques, just simple ingredients that come together beautifully.
  • Naturally Flavored – No artificial flavorings—just fresh oranges that infuse every bite with pure citrus goodness.
  • Great for Any Occasion – Enjoy them as a snack, dessert, or even a homemade gift for loved ones.

Ingredients

For the Cookie Dough:

IngredientQuantity
Flour2½ cups (300g)
SaltA pinch
Baking powder½ tsp
Vanilla sugar1 tsp
Butter5 tbsp (100g)
Sour cream⅔ cup (150g)
Egg1

For the Orange Filling:

IngredientQuantity
Oranges2 (450g)
Sugar½ cup (100g)
Cornstarch2 tbsp (30g)

Directions

  1. Prepare the Dough:
    • In a bowl, mix the flour, salt, baking powder, and vanilla sugar.
    • Add the butter and rub it into the flour mixture until crumbly.
    • Stir in the sour cream and egg, then knead into a soft dough. Cover and refrigerate for 30 minutes.
  2. Make the Orange Filling:
    • Peel and finely chop the oranges, removing any seeds.
    • In a saucepan over medium heat, cook the oranges with sugar until soft.
    • Stir in cornstarch and cook until thickened. Let it cool completely.
  3. Shape the Cookies:
    • Preheat the oven to 180°C (350°F) and line a baking sheet with parchment paper.
    • Roll out the dough and cut into circles or desired shapes.
    • Spoon the orange filling onto half of the circles, then top with another dough circle. Press edges to seal.
  4. Bake to Perfection:
    • Place the cookies on the baking sheet and bake for 15-18 minutes, or until golden brown.
  5. Cool & Serve:
    • Let the cookies cool before serving. Enjoy with tea or coffee!

Nutritional Information (Per Cookie)

NutrientAmount (Approx.)
Calories150-180 kcal
Carbohydrates25g
Protein2g
Fats6g
Sugar10g

Secrets to Making the Best Orange Cookies

A few key techniques can take these cookies from good to extraordinary.

1. Use Fresh, Ripe Oranges

For the best flavor, always use fresh oranges rather than bottled juice. The zest contains essential oils that add an intense citrus aroma, while the juice provides natural sweetness.

2. Chill the Dough

Refrigerating the dough for at least 30 minutes before rolling helps prevent spreading during baking, ensuring a perfect shape and texture.

3. Balance the Sweetness

Since oranges have natural sugars, it’s important to balance the flavors. A pinch of salt and a bit of vanilla sugar enhance the depth of flavor without making the cookies overly sweet.

4. Cook the Orange Filling to Perfection

To achieve a thick, jam-like consistency, cook the orange filling over low heat and stir frequently. The cornstarch helps bind the mixture, so it doesn’t leak out of the cookies during baking.

5. Don’t Overbake

These cookies should be lightly golden, not browned. Overbaking can dry them out, so keep a close eye on the oven.

Serving Suggestions: Enjoying Orange Cookies in Every Way

These cookies are delicious on their own, but you can elevate them by pairing them with complementary flavors and textures.

  • With a Hot Drink – Pair with a cup of tea, coffee, or hot chocolate for a cozy treat.
  • With a Dusting of Powdered Sugar – For an elegant finish, lightly sprinkle powdered sugar over the cooled cookies.
  • With Dark Chocolate Drizzle – The slight bitterness of dark chocolate pairs beautifully with the citrusy sweetness.
  • With a Scoop of Ice Cream – Serve warm cookies with a scoop of vanilla or almond ice cream for an indulgent dessert.
  • As a Gift – Pack them in a decorative tin for a thoughtful homemade present.

FAQs: Everything You Need to Know

1. Can I Make These Cookies Ahead of Time?

Yes! The dough can be made a day in advance and stored in the refrigerator until you’re ready to bake. You can also freeze the shaped dough for up to a month.

2. Can I Use Other Citrus Fruits Instead of Oranges?

Absolutely! You can substitute oranges with lemons, limes, or even tangerines for a different citrus twist.

3. How Do I Store These Cookies?

Store the cookies in an airtight container at room temperature for up to five days. If you want to keep them fresh for longer, store them in the refrigerator for up to a week.

4. Can I Freeze These Cookies?

Yes! Once baked, let them cool completely before placing them in an airtight container. Freeze for up to three months. When ready to eat, let them thaw at room temperature.

5. What Can I Use Instead of Cornstarch?

If you don’t have cornstarch, you can use flour or arrowroot powder as a thickening agent for the orange filling.

6. Can I Make These Cookies Without Eggs?

Yes! Replace the egg with a flaxseed egg (1 tablespoon ground flaxseed mixed with 2.5 tablespoons water) or a commercial egg replacer.

7. Can I Make Them Gluten-Free?

Yes! Use a high-quality gluten-free flour blend in place of regular flour. You may need to add a bit more liquid if the dough feels too dry.

8. Can I Add Nuts or Other Mix-Ins?

Definitely! Walnuts, almonds, or even dried cranberries would make great additions to the dough for added texture and flavor.

Conclusion: A Cookie Worth Savoring

Orange cookies are more than just a sweet treat; they are a celebration of simple ingredients coming together to create something magical. Their bright citrusy notes, buttery texture, and delicate sweetness make them perfect for any time of the year—whether you’re enjoying a quiet afternoon tea, baking for a holiday gathering, or simply craving something homemade and special.

What makes these cookies truly unforgettable is their ability to bring people together. Just like the ones my grandmother used to make, they carry with them a sense of warmth and nostalgia, reminding us that the best moments in life are often the simplest ones.

So go ahead, preheat the oven, zest those oranges, and bake up a batch of these delightful cookies. Because sometimes, the best way to brighten your day is with a little bit of citrus and a lot of love.

Amal

Zesty Orange Cookies with a Buttery Crumble

These zesty orange cookies are a delightful blend of buttery goodness and fresh citrus flavor. Soft, crumbly, and infused with the natural sweetness of oranges, they make the perfect treat for any occasion. Whether enjoyed with a cup of tea or as a midday snack, these cookies bring a refreshing twist to classic homemade baking.
Prep Time 20 minutes
Cook Time 20 minutes
Total Time 40 minutes
Servings: 12 -15 cookies
Course: Dessert
Cuisine: European

Ingredients
  

For the Cookie Dough:
  • cups 300g flour
  • A pinch of salt
  • ½ teaspoon baking powder
  • 1 teaspoon vanilla sugar
  • 5 tablespoons 100g butter, softened
  • cup 150g sour cream
  • 1 egg
For the Orange Filling:
  • 2 oranges 450g, peeled and finely chopped
  • ½ cup 100g sugar
  • 2 tablespoons 30g cornstarch

Method
 

Prepare the Dough:
  1. In a bowl, mix the flour, salt, baking powder, and vanilla sugar.
  2. Add the butter and rub it into the flour until the mixture is crumbly.
  3. Stir in the sour cream and egg, then knead into a smooth dough. Cover and refrigerate for 30 minutes.
Make the Orange Filling:
  1. In a saucepan over medium heat, cook the chopped oranges with sugar until soft.
  2. Stir in the cornstarch and continue cooking until the mixture thickens. Let it cool completely.
Shape the Cookies:
  1. Preheat the oven to 180°C (350°F) and line a baking sheet with parchment paper.
  2. Roll out the dough to about ¼-inch thickness and cut into circles or desired shapes.
  3. Spoon a small amount of the orange filling onto half of the cookies, then top with another cookie and press the edges to seal.
Bake to Perfection:
  1. Place the cookies on the baking sheet and bake for 15-18 minutes, or until golden brown.
Cool & Serve:
  1. Allow the cookies to cool before serving. Enjoy with tea, coffee, or a dusting of powdered sugar!

Notes

  • Chilling the dough: Refrigerating the dough before rolling helps prevent the cookies from spreading too much.
  • Filling variations: You can add a touch of cinnamon or a splash of orange zest for extra flavor.
  • Storage tips: Keep the cookies in an airtight container at room temperature for up to five days.
  • Serving suggestion: These cookies pair perfectly with tea, coffee, or a drizzle of chocolate for an extra indulgent touch.

Soft & Gooey Cinnamon Rolls with Cream Cheese Frosting

There’s something magical about the smell of freshly baked cinnamon rolls. It’s the kind of scent that fills the air with warmth, drawing people to the kitchen with eager anticipation. For me, cinnamon rolls are more than just a sweet treat—they are a piece of my childhood, a tradition wrapped in layers of soft, buttery dough and swirls of cinnamon-sugar goodness.

I still remember the weekends when my grandmother would wake up before dawn to start the dough, letting it rise while the rest of the house was still asleep. By the time we stumbled into the kitchen, rubbing sleep from our eyes, the dough would be ready to roll out, fill, and transform into golden, spiraled perfection. The best part? The final step—spreading the rich, tangy cream cheese frosting over the warm rolls, letting it melt into every crevice.

Cinnamon rolls weren’t just food in our house; they were an experience. A bonding moment between generations. A reason to sit down together, laugh, and savor something made with love. Even now, when I bake them in my own kitchen, I feel the same sense of warmth and nostalgia, and I hope this recipe brings that same joy to your home.

Why You’ll Love These Cinnamon Rolls

If you’ve never made homemade cinnamon rolls before, you’re in for a treat. These rolls are soft, buttery, and packed with the perfect balance of sweetness and spice. Here’s why this recipe is worth trying:

  • Irresistibly Soft & Fluffy – The dough is light, airy, and melts in your mouth with every bite.
  • Perfectly Balanced Sweetness – The filling has just the right amount of sugar and cinnamon without being overpowering.
  • Rich & Creamy Frosting – The cream cheese frosting adds a luscious finish, making these rolls even more indulgent.
  • Make-Ahead Friendly – Prepare them the night before and bake fresh in the morning for an effortless breakfast.
  • Great for Any Occasion – Whether it’s a cozy weekend breakfast, a holiday gathering, or a special treat, these rolls are always a hit.

Ingredients

For the Dough

IngredientQuantity
Sugar7 Tbsp (80g)
Dry yeast1 tsp (4g)
Lukewarm milk1 cup (250ml)
Egg1
Vegetable oil2 Tbsp
Flour4 cups (500g)
Salt1 tsp (4g)

For the Filling

IngredientQuantity
Butter (softened)1/3 cup (80g)
Sugar1/2 cup (80g)
CinnamonTo taste
Crushed walnuts1/2 cup (100g)

For the Cream Cheese Frosting

IngredientQuantity
Cream cheese1 1/4 cups (300g)
Milk3 Tbsp

Directions

  1. Prepare the Dough:
    • In a bowl, mix lukewarm milk, sugar, and dry yeast. Let it sit for 5-10 minutes until foamy.
    • Add the egg, vegetable oil, flour, and salt. Mix until a soft dough forms.
    • Knead for 8-10 minutes until smooth. Cover and let rise for 1-1.5 hours, or until doubled in size.
  2. Prepare the Filling:
    • In a small bowl, combine softened butter, sugar, and cinnamon. Mix until smooth.
  3. Roll Out & Fill the Dough:
    • Roll the dough into a large rectangle (about ¼-inch thick).
    • Spread the cinnamon-sugar butter mixture evenly over the dough.
    • Sprinkle crushed walnuts on top.
  4. Roll & Slice:
    • Tightly roll the dough into a log and cut it into 12 equal slices.
    • Arrange the rolls in a greased baking dish, leaving some space between each.
  5. Second Rise & Bake:
    • Cover and let the rolls rise for another 30-45 minutes.
    • Preheat the oven to 180°C (350°F).
    • Bake for 20-25 minutes, or until golden brown.
  6. Make the Frosting & Serve:
    • In a bowl, whisk together cream cheese and milk until smooth.
    • Spread over warm cinnamon rolls before serving.

Nutritional Information (Per Roll)

NutrientAmount (Approx.)
Calories280-320 kcal
Carbohydrates40g
Protein6g
Fats12g
Sugar18g

Secrets to the Best Cinnamon Rolls

To achieve bakery-quality cinnamon rolls at home, a few key techniques can make all the difference.

1. Use the Right Flour

A high-quality all-purpose flour works well, but for an even softer texture, consider using bread flour. The higher protein content in bread flour helps create a lighter, fluffier dough.

2. Activate the Yeast Properly

Using lukewarm milk (not too hot or too cold) ensures that the yeast activates correctly. If the liquid is too hot, it will kill the yeast; if it’s too cold, the yeast won’t activate properly, resulting in dense rolls.

3. Don’t Rush the Rising Process

Letting the dough rise twice—once after mixing and again after shaping—ensures the best texture. Patience is key; a slow rise allows the dough to develop a richer flavor.

4. Roll the Dough Evenly

When rolling out the dough, aim for an even thickness so that all the rolls bake uniformly. Too thick, and they may not cook through properly; too thin, and they may become dry.

5. Use Room Temperature Butter for the Filling

Softened butter spreads evenly, ensuring every bite is filled with rich, cinnamon-sugar flavor. If the butter is too melted, it may leak out during baking.

6. Slice with a Sharp Knife or Floss

For clean, well-defined rolls, use a sharp knife or unflavored dental floss to slice the dough. This prevents the rolls from being squished during cutting.

7. Bake Until Golden, Not Brown

Overbaking can lead to dry cinnamon rolls. Remove them from the oven when they turn lightly golden and feel soft to the touch.

8. Frost While Warm

Spreading the cream cheese frosting while the rolls are still warm allows it to melt slightly, creating that perfect gooey texture.

Serving Suggestions: Enjoying Cinnamon Rolls to the Fullest

While these cinnamon rolls are perfect on their own, pairing them with complementary flavors can make them even more special.

  • With a Warm Drink – Enjoy with a hot cup of coffee, chai latte, or a glass of cold milk.
  • With Fresh Fruit – Serve alongside sliced strawberries, raspberries, or a fruit salad for a refreshing contrast.
  • With a Drizzle of Caramel or Honey – For an extra indulgent touch, drizzle a little caramel sauce or honey over the rolls before serving.
  • With a Side of Scrambled Eggs or Bacon – If serving for breakfast, balance out the sweetness with a savory side.

FAQs: Everything You Need to Know

1. Can I Make These Cinnamon Rolls Ahead of Time?

Yes! You can prepare the rolls the night before, cover them, and refrigerate overnight. The next morning, let them sit at room temperature for about 30 minutes before baking.

2. Can I Freeze Cinnamon Rolls?

Absolutely. You can freeze them before or after baking:

  • Before Baking: After shaping the rolls, freeze them on a baking sheet, then transfer to an airtight container. When ready to bake, let them thaw and rise before placing them in the oven.
  • After Baking: Let them cool completely, then freeze. Reheat in the oven or microwave when ready to serve.

3. What’s the Best Way to Store Leftovers?

Store cinnamon rolls in an airtight container at room temperature for up to 2 days, or in the fridge for up to 5 days. Warm them in the microwave for a few seconds before eating.

4. Can I Make This Recipe Without a Stand Mixer?

Yes! You can knead the dough by hand, though it will take about 10 minutes of kneading to reach a smooth, elastic consistency.

5. What If My Dough Isn’t Rising?

If your dough isn’t rising, check that your yeast is fresh and that the liquid used wasn’t too hot or too cold. Letting the dough rise in a warm, draft-free area helps.

6. Can I Use a Different Frosting?

Of course! While cream cheese frosting is the classic choice, you can use vanilla glaze, caramel drizzle, or even a simple dusting of powdered sugar.

7. Can I Make a Healthier Version?

For a lighter version, reduce the sugar, swap in whole wheat flour for half of the white flour, or use a lower-fat frosting alternative.

Conclusion: The Perfect Cinnamon Rolls, Every Time

Few things in life compare to the simple joy of biting into a warm, homemade cinnamon roll. The soft, pillowy texture, the rich cinnamon filling, and the creamy frosting all come together in a way that’s pure comfort.

Whether you’re baking these for a holiday morning, a weekend brunch, or just because, this recipe is one you’ll find yourself coming back to again and again. The process is as rewarding as the result—there’s something deeply satisfying about watching the dough rise, filling your kitchen with that irresistible aroma, and finally pulling a tray of golden, spiraled perfection from the oven.

So go ahead, roll up your sleeves, and create something delicious. Because sometimes, the best moments in life are the ones made from scratch.

Amal

Soft & Gooey Cinnamon Rolls with Cream Cheese Frosting

These soft and gooey cinnamon rolls are the ultimate homemade treat, packed with buttery cinnamon-sugar filling and topped with a rich cream cheese frosting. Each bite melts in your mouth, offering the perfect balance of sweetness and spice. Whether you’re making them for a cozy breakfast, a weekend brunch, or a special occasion, these cinnamon rolls are guaranteed to impress!
Prep Time 15 minutes
Cook Time 25 minutes
Total Time 2 hours 10 minutes
Servings: 12 cinnamon rolls
Course: Dessert
Cuisine: American

Ingredients
  

For the Dough:
  • 7 tablespoons 80g sugar
  • 1 teaspoon 4g dry yeast
  • 1 cup 250ml lukewarm milk
  • 1 egg
  • 2 tablespoons vegetable oil
  • 4 cups 500g flour
  • 1 teaspoon 4g salt
For the Filling:
  • 1/3 cup 80g butter, softened
  • 1/2 cup 80g sugar
  • Cinnamon to taste
  • 1/2 cup 100g crushed walnuts
For the Cream Cheese Frosting:
  • 1 1/4 cups 300g cream cheese
  • 3 tablespoons milk

Method
 

Prepare the Dough:
  1. In a bowl, combine lukewarm milk, sugar, and dry yeast. Let it sit for 5-10 minutes until foamy.
  2. Add the egg, vegetable oil, flour, and salt. Mix until a soft dough forms.
  3. Knead the dough for about 8-10 minutes until smooth and elastic.
  4. Cover and let it rise for 1-1.5 hours, or until doubled in size.
Prepare the Filling:
  1. In a small bowl, mix the softened butter, sugar, and cinnamon until smooth.
Roll Out the Dough & Add Filling:
  1. Roll the dough into a large rectangle (about ¼-inch thick).
  2. Spread the cinnamon-sugar butter mixture evenly over the dough.
  3. Sprinkle the crushed walnuts on top.
Shape & Slice:
  1. Tightly roll the dough into a log, then cut it into 12 equal slices.
  2. Arrange the rolls in a greased baking dish, leaving some space between them.
Second Rise & Bake:
  1. Cover the dish and let the rolls rise for another 30-45 minutes.
  2. Preheat the oven to 180°C (350°F).
  3. Bake for 20-25 minutes, or until golden brown and fluffy.
Make the Frosting & Serve:
  1. In a bowl, whisk together the cream cheese and milk until smooth and creamy.
  2. Spread the frosting over warm cinnamon rolls and serve immediately.

Notes

  • Make-Ahead Option: You can prepare the dough and shape the rolls the night before. Cover and refrigerate, then let them come to room temperature before baking.
  • Storage Tips: Store leftover cinnamon rolls in an airtight container at room temperature for up to 2 days, or refrigerate for up to 5 days. Reheat before serving.
  • Customization Ideas: Add raisins, chocolate chips, or swap the walnuts for pecans for a unique twist.
  • Alternative Frosting: If you prefer a lighter glaze, mix powdered sugar with a little milk and vanilla extract instead of using cream cheese frosting.

Baked Chicken & Potato Casserole

There’s something special about a dish that brings people together around the dinner table. For me, that dish has always been a baked casserole. Growing up, casseroles weren’t just meals; they were a symbol of home, warmth, and togetherness. My mother had a way of layering simple ingredients—potatoes, chicken, cheese—into a dish that made the whole house smell inviting.

I remember coming home from school on chilly evenings, greeted by the aroma of baked potatoes and melted cheese wafting from the oven. The golden, bubbly top hinted at the creamy, flavorful layers hidden underneath. My mom would always serve it with a side of fresh salad, reminding us that comfort food didn’t have to be heavy—it could be balanced, nourishing, and deeply satisfying.

Years later, this baked chicken and potato casserole remains one of my go-to recipes whenever I crave something cozy yet practical. It’s the kind of dish that’s easy to make, packed with simple ingredients, and rich in flavor. Whether you’re preparing a weeknight family dinner, hosting friends, or meal-prepping for the week, this recipe is guaranteed to be a hit.

Why You’ll Love This Recipe

This dish is the perfect balance of creamy, cheesy, and hearty, making it a must-try for anyone who enjoys comfort food with a homemade touch. Here’s why it deserves a place on your dinner table:

  • Easy to Prepare – Simple ingredients come together with minimal effort, making it ideal for busy schedules.
  • One-Pan Wonder – No need for multiple dishes—everything bakes beautifully in one casserole dish.
  • Rich & Flavorful – The combination of seasoned chicken, soft potatoes, and a creamy sauce creates an irresistible taste.
  • Great for Leftovers – The flavors deepen overnight, making it just as delicious (if not better) the next day.
  • Customizable – You can add vegetables, swap cheeses, or adjust seasonings to fit your preferences.

Secrets to the Best Baked Chicken & Potato Casserole

Achieving the perfect balance of texture and flavor takes a few simple tricks. Follow these tips to make sure your casserole turns out golden, creamy, and packed with taste.

1. Use the Right Potatoes

Russet potatoes are a great option because they hold their structure while baking and soak up the creamy sauce beautifully. If you prefer a slightly creamier texture, Yukon Golds work well too.

2. Slice Potatoes Evenly

For an evenly cooked casserole, make sure to slice your potatoes uniformly. A thickness of about ¼ inch ensures they cook through without becoming mushy.

3. Pre-Cook the Chicken for More Flavor

While some casseroles use raw chicken, lightly sautéing it beforehand enhances the flavor and keeps it juicy. Seasoning the chicken before layering adds even more depth.

4. Don’t Skip the Sauce

A homemade sauce ties everything together. Whether it’s a simple milk-based sauce or a richer béchamel, ensuring a creamy consistency prevents the casserole from drying out.

5. Bake Until Golden and Bubbly

A good casserole is all about the contrast between the crispy top and the soft, creamy layers underneath. Bake until the cheese is golden brown and slightly crisp at the edges for the best texture.

Serving Suggestions: What to Pair with This Casserole

This casserole is a meal in itself, but pairing it with the right sides can elevate your dining experience. Here are some great options:

  • Fresh Green Salad – A simple arugula or mixed greens salad with a light vinaigrette balances out the richness of the casserole.
  • Steamed or Roasted Vegetables – Broccoli, asparagus, or Brussels sprouts make excellent accompaniments.
  • Garlic Bread or Dinner Rolls – A warm, crusty bread is perfect for scooping up every last bit of creamy sauce.
  • A Refreshing Drink – Serve with a glass of white wine, iced tea, or even a light citrus-infused sparkling water for a complete meal.

FAQs: Everything You Need to Know

1. Can I Make This Recipe Ahead of Time?

Yes! You can prepare the casserole ahead of time and store it in the refrigerator for up to 24 hours before baking. This makes it a perfect dish for meal prep or hosting.

2. Can I Freeze This Casserole?

Absolutely. Assemble the casserole, but don’t bake it yet. Wrap it tightly in plastic wrap and aluminum foil, then freeze for up to 2 months. When ready to eat, thaw overnight in the fridge and bake as usual.

3. What’s the Best Way to Reheat Leftovers?

Leftovers can be stored in the fridge for up to 3 days. To reheat, cover with foil and warm in the oven at 180°C (350°F) for about 15 minutes, or microwave individual portions for a quick meal.

4. Can I Use Different Cheeses?

Of course! While shredded cheese like mozzarella or cheddar works well, you can experiment with gouda, parmesan, or even a mix of cheeses for added depth.

5. How Can I Make This Dish Healthier?

If you want a lighter version:

  • Use Greek yogurt instead of sour cream.
  • Swap some potatoes for cauliflower or zucchini.
  • Reduce the cheese or use a lower-fat alternative.

6. Can I Add More Vegetables?

Definitely! Bell peppers, mushrooms, or spinach are great additions. Simply sauté them with the onions before layering.

7. What Can I Use Instead of Milk for the Sauce?

If you’re dairy-free, you can use almond milk, coconut milk, or even chicken broth to make a lighter sauce.

Conclusion: A Classic Comfort Food Worth Making Again and Again

There’s a reason why casseroles have been a staple in home kitchens for generations. They’re simple, delicious, and filled with love. This baked chicken and potato casserole is no exception—it’s a dish that brings people together, creating memories over hearty, satisfying bites.

Whether you’re preparing a comforting family dinner, meal-prepping for the week, or simply looking for a foolproof recipe to impress guests, this casserole delivers. It’s creamy, cheesy, and filled with wholesome ingredients that make every bite unforgettable.

So the next time you’re craving something cozy and flavorful, give this recipe a try. You’ll find yourself coming back to it again and again—because some dishes just never go out of style.

Amal

Baked Chicken & Potato Casserole

This baked chicken and potato casserole is the ultimate comfort food—creamy, cheesy, and packed with hearty flavors. Tender chicken, perfectly seasoned potatoes, and a rich, savory sauce come together in a dish that’s perfect for family dinners, meal prep, or special gatherings. With minimal effort and simple ingredients, this casserole is guaranteed to be a hit at the table!
Prep Time 15 minutes
Cook Time 40 minutes
Total Time 55 minutes
Servings: 4 –6 servings
Course: Main Dish
Cuisine: Comfort Food

Ingredients
  

  • 1 onion approximately 150g, sliced
  • 2-3 potatoes approximately 400g, thinly sliced
  • 2 chicken fillets approximately 300g, diced
  • 1 tomato approximately 150g, diced
  • 3 eggs
  • Salt to taste
  • Black pepper to taste
  • 1 teaspoon paprika
  • 2-3 tablespoons sour cream approximately 45g
  • 2-3 tablespoons vegetable oil approximately 30g
  • 1 bunch spring onions approximately 50g, chopped
  • 3 cherry tomatoes approximately 45g, halved
  • 70 g shredded cheese
  • 30 g butter
  • 1 tablespoon flour approximately 10g
  • 200 ml milk
  • 1 teaspoon dried parsley

Method
 

Preheat the Oven:
  1. Set the oven to 180°C (350°F). Grease a baking dish with butter.
Prepare the Ingredients:
  1. Thinly slice the potatoes and onion. Dice the chicken fillets and tomato. Chop the spring onions and halve the cherry tomatoes.
Cook the Chicken & Onions:
  1. In a pan, heat the vegetable oil over medium heat. Sauté the onions until golden brown.
  2. Add the diced chicken, season with salt, black pepper, and paprika, and cook until lightly browned.
Layer the Casserole:
  1. Arrange a layer of sliced potatoes at the bottom of the greased baking dish.
  2. Add the sautéed chicken and onions, then spread the diced tomato on top.
Prepare the Sauce:
  1. In a saucepan, melt the butter over low heat. Stir in the flour and cook for 1-2 minutes.
  2. Gradually whisk in the milk until smooth, cooking until the sauce thickens. Season with salt, black pepper, and dried parsley.
Assemble & Bake:
  1. In a bowl, whisk the eggs with sour cream and pour over the layered ingredients.
  2. Sprinkle shredded cheese on top and pour the prepared sauce evenly over the casserole.
  3. Bake for 35-40 minutes, or until golden brown and bubbling.
Garnish & Serve:
  1. Sprinkle with chopped spring onions and cherry tomatoes before serving. Enjoy warm!

Notes

  • Make it ahead: Assemble the casserole up to a day in advance and refrigerate before baking.
  • Customize it: Add bell peppers, mushrooms, or spinach for extra nutrition.
  • Storage tips: Leftovers can be stored in an airtight container in the fridge for up to 3 days. Reheat in the oven for best results.
  • Cheese options: Try mozzarella, cheddar, or gouda for different flavors.

Crispy Oven-Baked Potato Slices

There’s something undeniably comforting about the smell of potatoes baking in the oven. It’s the kind of aroma that fills the kitchen and makes you feel instantly at home.

Growing up, my grandmother had a way of turning the simplest ingredients into something magical. She never believed in wasting food, and whenever we had extra potatoes lying around, she would transform them into a golden, crispy delight—what she called “potato rounds.” They weren’t fried, they weren’t mashed, but somewhere in between, perfectly crisp on the outside and soft on the inside.

I remember sitting at the kitchen counter, watching as she sliced the potatoes with precision, sprinkling just a touch of salt and pepper before sliding them into the oven. There was no fuss, no elaborate seasoning, just the natural goodness of potatoes brought to life with heat and patience.

It wasn’t until years later, when I started cooking on my own, that I realized the genius behind her method. The simplicity of oven-baked potato slices makes them endlessly versatile—perfect as a snack, a side dish, or even the base for creative toppings. Whether served alongside a main course or enjoyed straight from the pan, this dish has a way of bringing people together, just like it did in my grandmother’s kitchen.

Now, I pass this simple yet irresistible recipe on to you, hoping it becomes a staple in your home just as it has in mine.

Why You’ll Love These Baked Potato Slices

This recipe proves that great food doesn’t have to be complicated. Here’s why these crispy baked potato slices will become a favorite in your kitchen:

  • Minimal Ingredients, Maximum Flavor – Just a few basic spices enhance the natural taste of the potatoes.
  • Perfectly Crispy Texture – The right balance of heat and seasoning gives you golden edges with a soft, fluffy interior.
  • Healthy Alternative to Fried Potatoes – No deep frying, just wholesome baked goodness.
  • Pairs Well with Almost Anything – Serve them with grilled meats, salads, or enjoy them as a snack with your favorite dip.
  • Easy to Customize – Add cheese, herbs, or even garlic butter for a unique twist.

Ingredients

IngredientQuantity
Potatoes (Russet recommended)4 medium
Salt¼ tsp
Black Pepper⅛ tsp
Cayenne Pepper⅛ tsp

Directions

  1. Prepare the Potatoes:
    • Preheat the oven to 400°F (200°C).
    • Wash and scrub the potatoes thoroughly.
    • Slice them into ¼-inch thick rounds, ensuring even thickness for uniform baking.
  2. Season the Slices:
    • Place the potato slices in a bowl and toss them with salt, black pepper, and cayenne pepper for a subtle heat.
    • For extra crispiness, you can lightly brush them with olive oil or melted butter (optional).
  3. Bake to Perfection:
    • Arrange the slices in a single layer on a lined baking sheet.
    • Bake for 20-25 minutes, flipping halfway through, until golden brown and crispy on the edges.
  4. Serve & Enjoy:
    • Let them cool for a couple of minutes before serving.
    • Enjoy them as a side dish, snack, or appetizer with your favorite dipping sauce!

Nutritional Information (Per Serving)

NutrientAmount (Approx.)
Calories120 kcal
Carbohydrates27 g
Protein3 g
Fats0.2 g
Fiber3 g

The Secret to Perfectly Crispy Potato Slices

Achieving the perfect crispiness without deep frying can be tricky, but a few simple tricks can make all the difference:

1. Choose the Right Potatoes

Russet potatoes are the best choice for baking because of their high starch content, which results in a crispy exterior and a tender inside. Yukon Golds can also work if you prefer a slightly creamier texture.

2. Slice Evenly

Cutting your potato slices to a uniform thickness (about ¼ inch) ensures they bake evenly. Too thick, and they’ll stay soft; too thin, and they may burn.

3. Soak for Extra Crispiness

For an even crispier texture, soak the potato slices in cold water for 20-30 minutes before baking. This removes excess starch, helping them crisp up better. Be sure to pat them completely dry before seasoning.

4. Don’t Overcrowd the Pan

Arrange the potato slices in a single layer on your baking sheet. Overlapping them will result in steaming rather than crisping. If necessary, use two baking sheets.

5. Flip Halfway Through Baking

Turning the potato slices over halfway through cooking ensures both sides become evenly golden and crisp.

Serving Suggestions: The Perfect Pairings

Baked potato slices are incredibly versatile and pair well with a variety of dishes. Here are some ideas to enjoy them in different ways:

  • As a Side Dish – Serve them alongside grilled chicken, steak, or roasted vegetables.
  • With Dips – Pair with ketchup, garlic aioli, sour cream, or a spicy sriracha mayo for extra flavor.
  • Loaded Potato Slices – Sprinkle shredded cheese on top in the last few minutes of baking, then add bacon bits and green onions for a loaded-style treat.
  • As a Breakfast Addition – Serve them with eggs and avocado for a hearty morning meal.
  • As a Snack or Appetizer – Enjoy them as a crispy, guilt-free alternative to chips!

FAQs: Everything You Need to Know

1. Can I Use Other Types of Potatoes?

Yes! While Russet potatoes yield the crispiest results, Yukon Golds provide a creamier texture, and red potatoes work well if you prefer a slightly firmer bite.

2. How Do I Store and Reheat Leftovers?

Store leftovers in an airtight container in the fridge for up to 3 days. Reheat in the oven at 375°F (190°C) for 5-7 minutes to bring back their crispiness.

3. Can I Make These Ahead of Time?

Yes! You can slice and season the potatoes ahead of time and store them in the fridge until ready to bake. You can also partially bake them and finish crisping them up just before serving.

4. Can I Freeze Baked Potato Slices?

Freezing is possible, but they won’t retain their crispy texture after thawing. If you want to freeze them, bake them halfway, let them cool, then freeze. When ready to eat, bake them straight from frozen until crisp.

5. What Other Seasonings Can I Use?

Feel free to experiment with different flavors! Some great options include:

  • Garlic powder and paprika for a smoky kick
  • Italian seasoning and Parmesan for a cheesy twist
  • Cajun seasoning for a spicy version
  • Rosemary and thyme for an herby aroma

6. Can I Make These Without Oil or Butter?

Yes! While oil helps with crispiness, you can bake them without it for a lighter version. They may not be as crispy but will still be delicious.

7. How Can I Prevent My Potato Slices from Sticking to the Pan?

Make sure to line your baking sheet with parchment paper or lightly grease it with oil to prevent sticking.

Conclusion: A Simple Dish with Endless Possibilities

There’s something so satisfying about a recipe that requires little effort yet delivers incredible flavor. These crispy oven-baked potato slices prove that you don’t need a long list of ingredients or complicated steps to create something truly delicious.

Whether you’re making them as a side dish for a family dinner, a snack for movie night, or a base for creative toppings, this recipe is bound to become a favorite in your household.

So, the next time you’re craving something warm, crispy, and satisfying, grab a few potatoes, slice them up, and let the oven do the work. Because sometimes, the simplest recipes are the ones we come back to again and again.

Amal

Crispy Oven-Baked Potato Slices

These crispy oven-baked potato slices are the perfect combination of golden, crunchy edges and a soft, fluffy interior. With just a few simple ingredients, you can create a delicious side dish or snack that pairs well with almost any meal. Lightly seasoned with salt, pepper, and a hint of cayenne, these potatoes are a healthier alternative to fried versions while still delivering incredible flavor and texture.
Prep Time 10 minutes
Cook Time 25 minutes
Total Time 35 minutes
Servings: 4 servings
Course: Snack
Cuisine: American

Ingredients
  

  • 4 medium Russet potatoes
  • ¼ teaspoon salt
  • teaspoon black pepper
  • teaspoon cayenne pepper

Method
 

Preheat the Oven:
  1. Set the oven to 400°F (200°C) and line a baking sheet with parchment paper or lightly grease it with oil.
Prepare the Potatoes:
  1. Wash and scrub the potatoes thoroughly.
  2. Slice them into ¼-inch thick rounds for even baking.
Season the Slices:
  1. In a bowl, toss the potato slices with salt, black pepper, and cayenne pepper until evenly coated.
Bake to Perfection:
  1. Arrange the slices in a single layer on the baking sheet, ensuring they don’t overlap.
  2. Bake for 20-25 minutes, flipping halfway through, until the edges are golden brown and crispy.
Serve and Enjoy:
  1. Let them cool slightly before serving. Enjoy them as a side dish or a tasty snack with your favorite dipping sauce.

Notes

  • For extra crispiness: Soak the potato slices in cold water for 20-30 minutes before baking to remove excess starch. Pat dry completely before seasoning.
  • Customize the flavors: Add garlic powder, smoked paprika, or Parmesan cheese for a unique twist.
  • Storage tips: Store leftovers in an airtight container in the fridge for up to 3 days. Reheat in the oven for the best texture.
  • Best dipping sauces: Serve with ketchup, sour cream, garlic aioli, or a spicy sriracha mayo for added flavor.

Cheesy Sausage & Egg Breakfast Wrap

Breakfast has always been a sacred part of my day. Growing up, I remember waking up to the sounds of sizzling butter and the rich, savory aroma of sausages frying in the kitchen. My mother always believed that a good breakfast set the tone for the day, and she made sure ours was both nourishing and satisfying.

One of her go-to recipes was a simple yet incredible combination of eggs, cheese, and sausages wrapped in a warm tortilla. It was her version of comfort food—quick to make but packed with flavor. Some days, she’d sneak in a few extra ingredients like tomatoes or herbs, and other times, she’d add a dash of spice to wake up our taste buds. No matter how she made it, that breakfast wrap was always a favorite.

Years later, I find myself making the same dish, tweaking it here and there but always returning to the basics: buttery, golden-browned tortillas, fluffy scrambled eggs, gooey melted mozzarella, and perfectly seasoned sausages. It’s the kind of meal that feels indulgent yet simple, a little taste of nostalgia wrapped up in every bite.

Now, I’m excited to share this recipe with you. Whether you’re looking for a quick morning bite, a satisfying brunch, or even a comforting meal after a long day, this cheesy sausage and egg breakfast wrap is a guaranteed winner.

Why You’ll Love This Recipe

This isn’t just any breakfast wrap—it’s a game-changer. Here’s why:

  • Rich, Savory Flavors – The combination of juicy sausages, melted cheese, and creamy scrambled eggs creates an irresistible taste.
  • Quick & Easy to Make – In less than 20 minutes, you can have a restaurant-worthy breakfast right at home.
  • Perfect for On-the-Go – Wrap it up and take it with you for a breakfast that’s both convenient and delicious.
  • Versatile & Customizable – Swap out ingredients to fit your dietary needs or use up whatever’s in your fridge.
  • Great for Any Meal – While it’s perfect for breakfast, this wrap also makes a fantastic lunch or dinner option.

Ingredients

IngredientQuantity
Sausages3, sliced
Ghee (or butter)1.5 tbsp (for sausages)
Eggs2 large
SaltTo taste
Mixed Peppers (Black, Red, White)To taste
Milk¼ cup
Ghee (or butter)1.5 tbsp (for tortilla)
Tortilla1 large
Mozzarella Cheese½ cup, shredded
Tomato1, thinly sliced

Directions

  1. Cook the Sausages:
    • Heat 1.5 tablespoons of ghee (or butter) in a pan over medium heat.
    • Add the sliced sausages and cook until golden brown and slightly crispy. Remove from heat and set aside.
  2. Prepare the Eggs:
    • In a bowl, whisk the eggs with milk, salt, and mixed peppers.
    • Heat a small amount of ghee or butter in a pan.
    • Pour in the egg mixture and cook, stirring gently, until scrambled and just set. Remove from heat.
  3. Assemble the Wrap:
    • In the same pan, melt 1.5 tablespoons of ghee (or butter) over low heat.
    • Place the tortilla in the pan and sprinkle half of the shredded mozzarella on one side.
    • Layer with scrambled eggs, cooked sausages, and tomato slices.
    • Sprinkle the remaining mozzarella on top.
  4. Fold & Cook:
    • Carefully fold the tortilla in half, pressing it down lightly.
    • Cook until the bottom is golden brown, then flip and cook the other side until the cheese melts and the tortilla is crispy.
  5. Serve & Enjoy:
    • Slice in half and serve warm for a delicious, cheesy, and protein-packed meal!

Nutritional Information (Per Serving)

NutrientAmount (Approx.)
Calories450-500 kcal
Protein25 g
Carbohydrates30 g
Fats28 g
Fiber3 g

How to Elevate Your Breakfast Wrap

Want to take this wrap to the next level? Try these simple tricks:

1. Use High-Quality Sausages

The better the sausage, the better the flavor. Opt for fresh, high-quality sausages rather than pre-cooked ones for the best taste. You can even experiment with different varieties like spicy chorizo, chicken sausage, or herb-infused Italian sausage.

2. Add a Layer of Creaminess

For an extra indulgent bite, spread a thin layer of cream cheese, avocado, or even sour cream on the tortilla before adding the fillings. This adds richness and balances out the flavors.

3. Experiment with Cheese

Mozzarella is wonderfully melty, but you can mix things up with sharp cheddar, gouda, or even a sprinkle of feta for a salty, tangy kick.

4. Toast the Tortilla Just Right

A little extra time in the pan makes all the difference. Cook the wrap on low heat to achieve a golden, crispy exterior while allowing the cheese to melt perfectly inside.

5. Spice It Up

If you like a little heat, add a few dashes of hot sauce, a sprinkle of red pepper flakes, or even some jalapeño slices inside the wrap.

6. Make It a Full Meal

Pair your wrap with a side of roasted potatoes, a fresh fruit salad, or a smoothie for a well-rounded breakfast.

Serving Suggestions & Pairings

While this wrap is satisfying on its own, here are a few ways to enhance your meal:

  • With a Hot Beverage – Pair it with a cup of freshly brewed coffee or a spiced chai latte for a cozy breakfast experience.
  • With a Side of Greens – A simple arugula or spinach salad with a light vinaigrette balances out the richness of the wrap.
  • With a Refreshing Drink – Fresh orange juice, a mango smoothie, or even an iced matcha latte complements the flavors beautifully.
  • With a Dip – Try dipping your wrap in salsa, guacamole, or a tangy yogurt-based sauce for an extra burst of flavor.

FAQs: Everything You Need to Know

1. Can I Make This Wrap Ahead of Time?

Yes! Prepare the wrap as usual, let it cool, then wrap it tightly in foil or parchment paper. Store it in the fridge for up to 2 days. When ready to eat, reheat in a pan over low heat or in the microwave for about 30 seconds.

2. Can I Freeze This Wrap?

Absolutely. Once assembled, wrap it tightly in plastic wrap and store it in a freezer-safe bag. When you’re ready to eat, thaw it overnight in the fridge and warm it up in a skillet or oven.

3. What Are Some Healthier Substitutes?

If you want to make a lighter version of this wrap:

  • Use turkey or chicken sausage instead of pork.
  • Swap the ghee or butter for a small amount of olive oil.
  • Use a whole wheat or low-carb tortilla.
  • Add more vegetables like spinach, bell peppers, or mushrooms.

4. Can I Make This Wrap Without Dairy?

Yes! Simply omit the cheese or use a dairy-free cheese alternative. You can also replace the milk in the eggs with almond or oat milk.

5. What’s the Best Way to Keep the Wrap from Getting Soggy?

To prevent sogginess, make sure your eggs aren’t too runny and let any excess moisture from the sausage evaporate before assembling the wrap. Also, toasting the tortilla before wrapping helps create a barrier that keeps it crisp.

6. Can I Make This Recipe Vegetarian?

Of course! Replace the sausages with sautéed mushrooms, black beans, or even scrambled tofu for a plant-based alternative.

7. How Do I Make This Wrap Extra Crispy?

After assembling, press the wrap lightly with a spatula while cooking to ensure even browning. A little extra time in the pan on low heat will give it that perfect crunch.

Conclusion: A Breakfast Worth Waking Up For

There’s something truly special about a breakfast that combines bold flavors, satisfying textures, and the warmth of a homemade meal. This cheesy sausage and egg wrap is not just food—it’s an experience.

Whether you’re making it as a quick breakfast before heading out the door, preparing it for a cozy weekend brunch, or even enjoying it as a late-night snack, this wrap is sure to hit the spot. It’s the perfect balance of indulgent and nourishing, crispy and melty, simple yet deliciously satisfying.

So go ahead—gather your ingredients, heat up that pan, and treat yourself to a breakfast that’s as comforting as it is flavorful. Once you take your first bite, you’ll understand why this recipe is a keeper.

Amal

Cheesy Sausage & Egg Breakfast Wrap

This cheesy sausage and egg breakfast wrap is a quick, delicious, and satisfying meal that’s perfect for busy mornings or a hearty brunch. With crispy golden tortillas, melted mozzarella, savory sausages, and fluffy scrambled eggs, this wrap is packed with flavor and protein. Whether you’re enjoying it fresh off the pan or taking it on the go, it’s an easy-to-make breakfast that never disappoints!
Prep Time 10 minutes
Cook Time 10 minutes
Total Time 20 minutes
Servings: 1 wrap
Course: Breakfast
Cuisine: American

Ingredients
  

  • 3 sausages sliced
  • 1.5 tablespoons ghee or butter for sausages
  • 2 large eggs
  • Salt to taste
  • Mixed peppers black, red, white, to taste
  • ¼ cup milk
  • 1.5 tablespoons ghee or butter for tortilla
  • 1 large tortilla
  • ½ cup mozzarella cheese shredded
  • 1 tomato thinly sliced

Method
 

Cook the Sausages:
  1. Heat 1.5 tablespoons of ghee (or butter) in a pan over medium heat.
  2. Add the sliced sausages and cook until browned and slightly crispy. Remove from the pan and set aside.
Prepare the Scrambled Eggs:
  1. In a bowl, whisk the eggs with milk, salt, and mixed peppers.
  2. Heat a little ghee (or butter) in the pan, pour in the egg mixture, and scramble until just set. Remove from heat.
Assemble the Wrap:
  1. Melt 1.5 tablespoons of ghee (or butter) in the pan over low heat.
  2. Place the tortilla in the pan and sprinkle half of the mozzarella cheese on one side.
  3. Add the scrambled eggs, cooked sausages, and tomato slices.
  4. Top with the remaining mozzarella cheese.
Fold & Cook:
  1. Fold the tortilla in half over the filling, pressing down lightly.
  2. Cook on low heat until the bottom is golden and crispy, then flip and cook the other side until the cheese melts.
Serve & Enjoy:
  1. Slice in half and serve warm for a delicious, protein-packed meal!

Notes

  • Customize it: Try adding avocado, spinach, or a drizzle of hot sauce for extra flavor.
  • Storage tips: Store in an airtight container in the fridge for up to 2 days. Reheat in a pan or microwave.
  • Make it vegetarian: Replace sausages with sautéed mushrooms or black beans.
  • Freeze for later: Wrap tightly in plastic wrap and store in the freezer. Thaw overnight and reheat before serving.