Homemade Fresh Cheese – A Simple Tradition Worth Keeping

There is something deeply satisfying about making your own fresh cheese at home. It’s a simple process, but it connects you to an age-old tradition—one that has been passed down through generations. My first experience with homemade cheese happened in my grandmother’s kitchen. She grew up in a small village where store-bought dairy products were rare, so making cheese from scratch was an essential skill.

I remember watching her carefully heat the milk, gently stirring as she added yogurt and eggs. The transformation was almost magical—milk turning into soft, delicate curds, filling the kitchen with a warm, comforting aroma. She would wrap the curds in cheesecloth, press them under a weight, and by the time dinner rolled around, there was a fresh, creamy cheese ready to be enjoyed with warm bread and herbs.

It wasn’t just about the cheese itself—it was about the process. The simplicity, the patience, the feeling of creating something with your own hands. Now, whenever I make fresh cheese at home, I am reminded of those quiet moments in my grandmother’s kitchen. And the best part? This cheese tastes far better than anything you can buy at the store—pure, fresh, and free from additives.

If you’ve never tried making homemade cheese before, now is the perfect time to start. It requires just a few basic ingredients, and the result is a creamy, delicious cheese that can be used in countless ways.

Why Homemade Cheese is a Must-Try

Making your own fresh cheese isn’t just about the end product—it’s about the experience, the quality, and the ability to control what goes into your food. Here’s why you should give it a try:

1. No Artificial Preservatives or Additives

Unlike many store-bought cheeses, homemade cheese contains only natural ingredients. No artificial preservatives, no chemicals—just pure, wholesome dairy.

2. Simple and Cost-Effective

Fresh cheese requires just four ingredients—milk, salt, eggs, and yogurt. It’s an incredibly affordable way to enjoy high-quality cheese without spending a fortune on specialty brands.

3. Freshness You Can Taste

There is nothing quite like the taste of freshly made cheese. It has a light, creamy texture with a mild, slightly tangy flavor. Whether you enjoy it plain, with a sprinkle of herbs, or drizzled with honey, it’s always delicious.

4. Easy to Customize

One of the best things about making your own cheese is that you can experiment with different flavors. Try adding:

  • Fresh herbs like thyme, basil, or rosemary for a savory twist.
  • A drizzle of honey or fruit preserves for a sweet variation.
  • A pinch of chili flakes or black pepper for a bit of heat.

5. Versatile for Any Meal

Homemade fresh cheese can be used in so many ways:

  • Spread on warm bread or toast.
  • Crumbled over salads or pasta dishes.
  • Served with olives, nuts, and fruit for a simple appetizer.
  • Used as a filling for savory pastries or sandwiches.

Ingredients

IngredientQuantity
Milk2 liters (8.5 cups), store-bought
Salt1 tablespoon
Eggs4 large
Yogurt200 grams (7 oz)

Directions

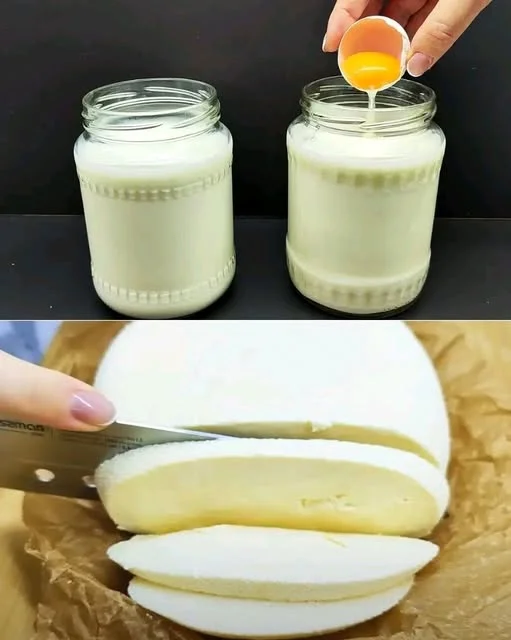
  1. Heat the Milk: In a large pot, heat the milk over medium heat until it is just about to boil. Stir occasionally to prevent burning.
  2. Add the Ingredients: Reduce the heat to low, then add salt, beaten eggs, and yogurt. Stir gently and cook for a few minutes until the mixture begins to curdle.
  3. Separate the Curd: Once curds have formed, remove from heat and strain through a cheesecloth or fine sieve.
  4. Press & Drain: Gather the cheesecloth, twist to remove excess liquid, and place the cheese under a light weight to drain for 1-2 hours.
  5. Serve & Enjoy: Unwrap the cheese, slice or crumble as desired, and enjoy fresh!

Nutritional Information (Per 100g, Approximate)

NutrientValue
Calories180-200 kcal
Protein15g
Carbohydrates3g
Fat12g
CalciumHigh

Frequently Asked Questions (FAQs)

1. What type of milk is best for making homemade cheese?

Use full-fat milk for the best texture and flavor. Store-bought milk works well, but avoid ultra-pasteurized milk, as it may not form curds properly.

2. Can I make this cheese without eggs?

Yes! Eggs help create a firmer texture, but you can omit them if you prefer a softer, more spreadable cheese.

3. How do I store homemade cheese?

Store your cheese in an airtight container in the refrigerator. It will stay fresh for up to 5 days.

4. Can I freeze homemade cheese?

Freezing is not recommended, as it may change the texture and make the cheese crumbly. It’s best to enjoy fresh within a few days.

5. How do I make my cheese creamier?

For a softer, creamier cheese, try adding:

  • A little extra yogurt to the mixture.
  • A splash of cream for a richer texture.
  • Less draining time to retain more moisture.

6. Can I use plant-based milk to make dairy-free cheese?

This particular recipe works best with dairy milk, but you can make a dairy-free version using almond, cashew, or soy milk, along with a plant-based yogurt and a natural coagulant like lemon juice.

7. What can I do with the leftover whey?

When making fresh cheese, you’ll be left with a liquid called whey. Don’t throw it away! You can:

  • Use it in smoothies or soups for added protein.
  • Add it to bread or pancake batter instead of water.
  • Feed it to plants as a natural fertilizer.

Final Thoughts – The Joy of Homemade Cheese

Making fresh cheese at home is more than just a cooking project—it’s a return to simple, wholesome food. In just a short amount of time, you can transform basic ingredients into something delicious, versatile, and full of natural goodness.

Whether you enjoy it with herbs, a drizzle of honey, or simply as it is, this creamy homemade cheese is a true delight. Once you try it, you may never go back to store-bought cheese again.

So take a moment, gather your ingredients, and experience the joy of creating something from scratch. Your taste buds will thank you!

Amal

Homemade Fresh Cheese – A Simple Tradition Worth Keeping

This homemade fresh cheese is soft, creamy, and incredibly easy to make! With just four simple ingredients, you can create a rich, flavorful cheese that’s perfect for spreading on toast, adding to salads, or enjoying on its own. Say goodbye to store-bought cheese and experience the joy of making your own at home!
Prep Time 5 minutes
Cook Time 15 minutes
Total Time 2 hours 20 minutes
Servings: 4 –6 servings
Course: Snack
Cuisine: Homemade

Ingredients
  

  • 2 liters 8.5 cups milk (store-bought)
  • 1 tablespoon salt
  • 4 large eggs
  • 200 grams 7 oz yogurt

Method
 

  1. Heat the Milk: In a large pot, warm the milk over medium heat until just before it reaches a boil. Stir occasionally to prevent burning.
  2. Add the Ingredients: Lower the heat and add the salt, beaten eggs, and yogurt. Stir gently to combine.
  3. Form the Curds: Continue cooking for a few minutes until the mixture starts to separate into curds and whey.
  4. Strain the Cheese: Pour the mixture through a cheesecloth-lined sieve to separate the curds from the liquid whey.
  5. Drain and Shape: Gather the cheesecloth, twist gently to remove excess moisture, and press under a light weight for 1-2 hours.
  6. Serve & Enjoy: Once firm, unwrap the cheese and enjoy it fresh!

Notes

  • For a creamier texture, reduce the draining time.
  • For a firmer cheese, press for longer under a heavier weight.
  • Store in the fridge in an airtight container for up to 5 days.
  • Use leftover whey in soups, smoothies, or baking instead of water.

Hearty Chickpea Soup – A Simple, Comforting Classic

There are certain dishes that instantly bring back memories of home, and for me, chickpea soup is one of them. Growing up, my grandmother always had a way of turning simple, everyday ingredients into something magical. Whenever the temperatures dropped, she would pull out her biggest pot, fill it with chickpeas, fresh vegetables, and warm spices, and let it simmer for hours.

I can still remember the smell of onions and olive oil sizzling in the pot, the sweetness of carrots blending with the earthiness of chickpeas, and the way the whole house felt warmer as the soup slowly cooked. We’d gather around the table, each with a steaming bowl in front of us, savoring every spoonful.

Now, as an adult, I make chickpea soup not just because it’s delicious, but because it reminds me of those moments—of family, tradition, and the comfort of home-cooked meals. This recipe is a tribute to those memories. It’s simple, nutritious, and incredibly satisfying, perfect for any time you need a warm, nourishing dish.

Why This Chickpea Soup is a Must-Try

This hearty, protein-packed soup is not only delicious but also filled with nutritional benefits. Whether you’re looking for a quick, budget-friendly meal or something wholesome and nourishing, this recipe has you covered.

1. Packed with Plant-Based Protein

Chickpeas are a great source of protein and fiber, making this soup both filling and nutritious. It’s perfect for vegetarians, those following a healthy diet, or anyone wanting a satisfying meal without relying on meat.

2. Rich, Deep Flavor

This soup may use simple ingredients, but the combination of sautéed onions, celery, carrots, and chickpeas simmered in broth creates a deep, comforting flavor. The pepperoni adds a smoky, slightly spicy touch that makes every bite even more delicious.

3. Budget-Friendly and Easy to Make

With just a handful of pantry staples, you can create a rich, nourishing soup without spending much. Whether you’re using dried chickpeas or canned ones, this dish comes together easily and is great for meal prep.

4. Perfect for Any Season

While chickpea soup is often enjoyed in colder months, it’s light enough to be eaten year-round. Serve it with crusty bread in the winter or pair it with a fresh salad in the summer for a well-balanced meal.

5. A Great Make-Ahead Meal

This soup actually tastes better the next day, as the flavors continue to develop overnight. Make a big batch, store it in the fridge, and enjoy it throughout the week.

Ingredients

IngredientQuantity
Chickpeas100g
Water1.5 liters (7 glasses)
Onion1, diced
Olive oilAs needed
Celery stalk1, chopped
Pepperoni1, sliced
Carrot1, diced

Directions

  1. Prepare the Chickpeas: If using dried chickpeas, soak them overnight, then drain and rinse.
  2. Sauté the Aromatics: In a large pot, heat olive oil and sauté the onion, celery, and carrot until softened.
  3. Add Chickpeas & Water: Stir in the chickpeas, water, and sliced pepperoni. Bring to a boil.
  4. Simmer Until Tender: Reduce heat and let simmer for 45-60 minutes until chickpeas are soft and flavors are well combined.
  5. Serve & Enjoy: Adjust seasoning if needed, drizzle with extra olive oil, and serve warm.

Nutritional Information (Per Serving, Approximate)

NutrientValue
Calories180-220 kcal
Protein8g
Carbohydrates30g
Fat5g
Fiber7g
Sugar5g

How to Customize Your Chickpea Soup

One of the best things about chickpea soup is how adaptable it is. Whether you want to add more protein, adjust the spice level, or make it completely plant-based, here are some ways to customize it:

1. Make it Vegan or Vegetarian

If you want a vegan version, simply leave out the pepperoni. The soup will still have a rich flavor, thanks to the vegetables and chickpeas. You can also:

  • Use vegetable broth instead of water.
  • Add a dash of smoked paprika to replace the smoky flavor of the pepperoni.
  • Stir in some nutritional yeast for an umami boost.

2. Add More Vegetables

While carrots, onions, and celery are classic, you can enhance the soup by adding:

  • Bell peppers for extra sweetness.
  • Tomatoes for a slightly tangy depth.
  • Spinach or kale for a nutrient boost.

3. Spice It Up

If you like a little heat, try:

  • Adding red pepper flakes while cooking.
  • Stirring in a spoonful of harissa or chili paste for a bold kick.
  • Serving with a squeeze of fresh lemon juice to brighten the flavors.

4. Make It Creamy

For a thicker, creamier consistency, you can:

  • Blend half of the soup and mix it back in.
  • Stir in a spoonful of Greek yogurt or coconut milk before serving.

5. Add Protein for a Heartier Meal

If you want to make this soup even more filling, consider adding:

  • Shredded chicken or turkey.
  • Crumbled sausage for extra spice.
  • Lentils or quinoa to keep it plant-based while increasing protein.

FAQs – Everything You Need to Know

1. Can I use canned chickpeas instead of dried?

Yes! If using canned chickpeas, drain and rinse them well before adding them to the soup. Since they are already cooked, you can reduce the simmering time to about 20 minutes.

2. How long does chickpea soup last in the fridge?

Store your soup in an airtight container in the fridge for up to 4 days. The flavors actually deepen over time, making leftovers even better!

3. Can I freeze chickpea soup?

Absolutely! Let the soup cool completely, then freeze in portion-sized containers for up to 3 months. To reheat, thaw overnight in the fridge and warm on the stove.

4. What’s the best way to serve this soup?

This soup is delicious on its own, but you can serve it with:

  • Crusty bread for dipping.
  • A side of rice or quinoa for a more filling meal.
  • A drizzle of olive oil and fresh herbs for extra flavor.

5. Can I make this soup in a slow cooker?

Yes! Simply add all ingredients to a slow cooker and cook on low for 6-8 hours or until chickpeas are tender.

6. How do I thicken the soup if I want a creamier texture?

You can:

  • Blend a portion of the soup and mix it back in.
  • Mash some of the chickpeas with a spoon before serving.
  • Stir in a small amount of flour or cornstarch slurry to thicken it slightly.

Final Thoughts – Why This Soup Deserves a Place at Your Table

There’s something truly special about a simple, homemade bowl of soup. This Hearty Chickpea Soup is not only delicious and comforting, but it also proves that you don’t need fancy ingredients to create something nourishing and satisfying.

Whether you’re making it for a cozy dinner, meal prepping for the week, or looking for a budget-friendly option, this soup is a perfect choice. It’s flavorful, filling, and packed with wholesome goodness.

So next time you’re craving something warm, hearty, and homemade, give this chickpea soup a try. One spoonful, and you’ll understand why it has stood the test of time as a true comfort classic.

Amal

Hearty Chickpea Soup – A Simple, Comforting Classic

This Hearty Chickpea Soup is a warm, comforting dish packed with protein-rich chickpeas, fresh vegetables, and aromatic flavors. Simple yet deeply satisfying, this soup is perfect for a nutritious weeknight dinner or a make-ahead meal. Whether enjoyed on its own or paired with crusty bread, this recipe is a must-try for anyone who loves wholesome, homemade soups.
Prep Time 10 minutes
Cook Time 1 hour
Total Time 1 hour 10 minutes
Servings: 4 servings
Course: Soup
Cuisine: Mediterranean

Ingredients
  

  • 100 g chickpeas dried or canned
  • 1.5 liters 7 glasses water
  • 1 onion diced
  • 1 celery stalk chopped
  • 1 carrot diced
  • 1 pepperoni sliced
  • Olive oil as needed

Method
 

  1. Prepare the Chickpeas: If using dried chickpeas, soak them overnight, then drain and rinse before cooking.
  2. Sauté the Vegetables: In a large pot, heat olive oil over medium heat. Add the diced onion, celery, and carrot, and cook until softened.
  3. Simmer the Soup: Add chickpeas, water, and sliced pepperoni. Bring to a boil, then reduce the heat and let it simmer for 45-60 minutes, or until the chickpeas are tender.
  4. Adjust the Seasoning: Taste the soup and adjust with salt, pepper, or additional olive oil if needed.
  5. Serve & Enjoy: Ladle into bowls and serve hot with crusty bread or a drizzle of extra virgin olive oil.

Notes

  • For a vegetarian version, omit the pepperoni and use vegetable broth instead of water.
  • To save time, use canned chickpeas and reduce the cooking time to 20 minutes.
  • For a thicker consistency, mash some of the chickpeas with a spoon before serving.
  • Store leftovers in the fridge for up to 4 days, or freeze for later.

Savory Cabbage & Carrot Bake – A Wholesome and Cheesy Delight

Some recipes remind you of family meals, warm kitchens, and simple joys. For me, this Cabbage & Carrot Bake is one of those dishes. I remember watching my grandmother chop fresh vegetables, her hands moving with practiced ease, filling the kitchen with the earthy aroma of cabbage and sweet carrots.

She never believed in wasting food, and this dish was her way of transforming simple, everyday ingredients into something comforting, nutritious, and delicious. It wasn’t fancy, but it was wholesome, hearty, and always satisfying. I’d sit by the table, waiting for that first slice, enjoying the golden, cheesy crust that stretched with every bite.

Now, this recipe has become a go-to meal in my own home. It’s easy to make, packed with nutrients, and a great way to enjoy vegetables without feeling like you’re eating “just a salad.” Whether I make it for breakfast, lunch, or a light dinner, it always brings that same sense of home-cooked comfort.

Why You’ll Love This Recipe

This Cabbage & Carrot Bake is more than just a simple dish—it’s a nutritious, flavorful, and versatile meal that fits into any lifestyle. Here’s why you’ll want to make it again and again:

1. Packed with Nutrients

Cabbage and carrots are loaded with fiber, vitamins, and antioxidants, making this dish a great way to nourish your body while enjoying a comforting meal.

2. A Cheesy, Golden Crust

The combination of shredded mozzarella and sesame seeds creates a golden, slightly crispy top layer, giving every bite a satisfying crunch.

3. Quick and Easy to Prepare

With minimal prep work and a simple one-bowl mixing process, this dish is perfect for busy days when you want something delicious without spending hours in the kitchen.

4. A Great Way to Use Leftover Vegetables

This recipe is perfect for reducing food waste—you can swap in any vegetables you have on hand, making it both budget-friendly and sustainable.

5. Perfect for Meal Prep

It stores well in the fridge and tastes just as good the next day, making it an excellent choice for meal prepping lunches or quick dinners.

Ingredients

IngredientQuantity
Cabbage1/2 (500g), chopped (approx. 4 cups)
Carrots2, peeled and grated (approx. 1 cup)
Onion1, diced (approx. 1 cup)
Eggs4
Black Pepper1/2 teaspoon
Oregano1 teaspoon
Salt1 teaspoon
Olive Oil1 tablespoon
Flour5 tablespoons (approx. 30g) (whole wheat or gluten-free)
Sesame Seeds1 tablespoon (or sunflower seeds/flaxseeds)
Mozzarella Cheese100g (approx. 1 cup), shredded (or alternative cheese)

Directions

  1. Preheat the Oven: Set the oven to 180°C (350°F) and grease a baking dish with olive oil.
  2. Prepare the Vegetables: In a large bowl, combine the chopped cabbage, grated carrots, and diced onion.
  3. Mix the Batter: In a separate bowl, whisk the eggs, then add black pepper, oregano, salt, and flour. Mix well until smooth.
  4. Combine Everything: Pour the egg mixture over the vegetables and stir to coat evenly. Add shredded mozzarella and mix again.
  5. Transfer to Baking Dish: Spread the mixture evenly in the greased baking dish and sprinkle sesame seeds on top.
  6. Bake Until Golden: Bake for 30-35 minutes, or until the top is golden brown and the bake is firm to the touch.
  7. Serve & Enjoy: Let cool for a few minutes before slicing. Serve warm as a main dish or side.

Nutritional Information (Per Serving, Approximate)

NutrientValue
Calories180-200 kcal
Protein10g
Carbohydrates15g
Fat9g
Fiber4g
Sugar4g

Ways to Customize Your Cabbage & Carrot Bake

One of the best things about this dish is its versatility. You can adjust it to your taste, making it even more delicious and personalized.

1. Add More Protein

  • Mix in cooked chicken, turkey, or ground beef for a heartier version.
  • Try adding cottage cheese or ricotta for extra creaminess and protein.

2. Experiment with Different Cheeses

  • Swap mozzarella for cheddar, feta, or parmesan for a bolder flavor.
  • Use vegan cheese for a dairy-free alternative.

3. Make It Gluten-Free

  • Use gluten-free flour to keep this dish completely wheat-free.
  • Substitute almond flour or chickpea flour for added nutrition.

4. Spice It Up

  • Add a pinch of chili flakes or smoked paprika for a slight kick.
  • Try garlic powder or cumin for a more aromatic twist.

5. Make It Even More Nutritious

  • Add chopped spinach or kale for extra greens.
  • Mix in grated zucchini or bell peppers for more texture and color.

Frequently Asked Questions (FAQs)

1. Can I Make This Recipe Vegan?

Yes! To make this dish vegan, replace:

  • Eggs with flax eggs (1 tablespoon ground flaxseed + 3 tablespoons water per egg).
  • Cheese with vegan cheese or nutritional yeast for a cheesy flavor.

2. Can I Make This in Advance?

Absolutely! This bake can be:

  • Stored in the fridge for up to 3 days and reheated when needed.
  • Frozen for up to a month—just thaw and warm in the oven before serving.

3. What’s the Best Way to Serve This Dish?

This Cabbage & Carrot Bake can be enjoyed:

  • As a main dish with a side of salad or roasted vegetables.
  • As a side dish to grilled meats or seafood.
  • For breakfast or brunch alongside eggs or avocado toast.

4. Can I Use Red Cabbage Instead of Green?

Yes! Red cabbage works just as well and adds a beautiful pop of color to the dish.

5. What Can I Use Instead of Sesame Seeds?

You can substitute sesame seeds with:

  • Sunflower seeds or flaxseeds for a similar crunch.
  • Pumpkin seeds or chopped nuts for a nutty twist.

6. Can I Use Pre-Shredded Cabbage and Carrots?

Yes! Using pre-shredded cabbage and carrots can save time and make the process even quicker.

Final Thoughts – A Dish That’s Simple, Satisfying, and Nutritious

Sometimes, the best meals are made with the simplest ingredients, and this Cabbage & Carrot Bake is proof of that. It’s a dish that brings together flavor, texture, and nutrition in a way that feels both comforting and wholesome.

Whether you’re looking for an easy weeknight dinner, a meal-prep friendly dish, or a healthy way to enjoy vegetables, this recipe has you covered.

Try it once, and it might just become a regular part of your kitchen routine—just like it has in mine.

Amal

Savory Cabbage & Carrot Bake – A Wholesome and Cheesy Delight

This Savory Cabbage & Carrot Bake is a delicious and healthy dish packed with fresh vegetables, eggs, and cheese for a perfectly balanced meal. With a crispy golden top and a soft, flavorful inside, this bake is great for breakfast, lunch, or a light dinner. Simple to make and packed with nutrients, it’s a great way to enjoy vegetables in a comforting and satisfying way.
Prep Time 10 minutes
Cook Time 35 minutes
Total Time 45 minutes
Servings: 4 –6 servings
Course: Main Dish
Cuisine: International

Ingredients
  

  • 1/2 head cabbage 500g, chopped (approx. 4 cups)
  • 2 carrots peeled and grated (approx. 1 cup)
  • 1 onion diced (approx. 1 cup)
  • 4 eggs
  • 1/2 teaspoon black pepper
  • 1 teaspoon oregano
  • 1 teaspoon salt
  • 1 tablespoon olive oil
  • 5 tablespoons flour approx. 30g, whole wheat or gluten-free
  • 1 tablespoon sesame seeds or sunflower seeds/flaxseeds
  • 100 g approx. 1 cup shredded mozzarella cheese (or alternative cheese)

Method
 

  1. Preheat the Oven: Set the oven to 180°C (350°F) and grease a baking dish with olive oil.
  2. Prepare the Vegetables: In a large mixing bowl, combine the chopped cabbage, grated carrots, and diced onion.
  3. Make the Batter: In another bowl, whisk the eggs, then mix in the black pepper, oregano, salt, and flour. Stir well.
  4. Combine Everything: Pour the egg mixture over the vegetables, add shredded cheese, and mix until evenly coated.
  5. Transfer to Baking Dish: Spread the mixture evenly in the greased baking dish and sprinkle sesame seeds on top.
  6. Bake Until Golden: Bake for 30-35 minutes, or until the top is golden brown and the bake is firm to the touch.
  7. Serve & Enjoy: Let cool for a few minutes before slicing. Serve warm as a main dish or a side.

Notes

  • For extra crunch, top with breadcrumbs before baking.
  • To make it dairy-free, use plant-based cheese or nutritional yeast.
  • For a protein boost, add shredded chicken or cooked lentils.
  • Great for meal prep—store in the fridge for up to 3 days or freeze for later.

The Perfect Baked Potato – Crispy, Fluffy, and Irresistible

Sometimes, the simplest recipes are the most satisfying. For me, the baked potato is one of those timeless dishes that never fails to bring comfort. It reminds me of family dinners, chilly evenings, and the smell of something warm and hearty coming out of the oven.

Growing up, baked potatoes were a staple in my home. My mother would make them alongside roasted meats, but my favorite nights were when they were the main event, loaded with cheese, sour cream, and crispy bacon. I remember standing by the oven, impatiently waiting for the timer to go off, knowing that in just a few minutes, I’d be cutting into a potato that was perfectly crispy on the outside and fluffy on the inside.

Now, I make them whenever I need a quick, satisfying meal. Whether paired with a steak dinner, topped with shredded chicken, or simply enjoyed with a pat of butter, a baked potato never disappoints.

If you’ve ever struggled with achieving that crispy skin and tender inside, this guide will help you make the perfect baked potato every single time.

Why This Baked Potato Recipe Works

A good baked potato is all about texture and simplicity. This recipe focuses on four key elements to ensure you get a crispy, golden exterior and a light, fluffy interior every time.

1. The Right Type of Potato

Not all potatoes are created equal. Russet potatoes are the best choice because they have a high starch content, which results in a light, fluffy texture inside while maintaining a crispy skin when baked.

2. The Secret to Crispy Skin

Many people skip rubbing the potato with oil and salt, but this is what gives it that golden, crispy exterior. The oil helps conduct heat, while the salt enhances the flavor and texture.

3. Baking at the Right Temperature

The ideal baking temperature is 200°C (400°F). This allows the skin to crisp up without burning and ensures the inside cooks evenly.

4. Letting the Steam Escape

Piercing the potatoes with a fork allows steam to escape, preventing them from becoming soggy or exploding in the oven.

Ingredients

IngredientQuantity
Russet potatoes2 large
Olive oil1 tablespoon
Salt1 teaspoon
Black pepper½ teaspoon

Directions

  1. Preheat the Oven: Set the oven to 200°C (400°F) and line a baking sheet with parchment paper.
  2. Prepare the Potatoes: Scrub the potatoes clean and pat them dry.
  3. Season & Pierce: Rub each potato with olive oil, then sprinkle evenly with salt and black pepper. Pierce a few times with a fork to allow steam to escape.
  4. Bake Until Tender: Place the potatoes directly on the oven rack or a baking sheet. Bake for 50-60 minutes, or until the skin is crisp and the inside is soft.
  5. Serve & Enjoy: Slice open, fluff with a fork, and top with butter, sour cream, cheese, or your favorite toppings.

Nutritional Information (Per Serving, Approximate)

NutrientValue
Calories180-200 kcal
Protein4g
Carbohydrates37g
Fat4g
Fiber4g
Sugar2g

How to Elevate Your Baked Potato

A baked potato is a blank canvas. Here are some creative ways to turn a simple potato into a gourmet meal.

1. Classic Loaded Baked Potato

Top with:

  • Sour cream
  • Shredded cheddar cheese
  • Crispy bacon bits
  • Chopped chives

2. Herb Butter Baked Potato

Mix softened butter with:

  • Fresh garlic
  • Chopped parsley
  • A pinch of sea salt

3. Cheesy Broccoli Baked Potato

Steam some broccoli and mix it with:

  • Melted cheddar cheese
  • A drizzle of cream
  • A sprinkle of black pepper

4. Tex-Mex Style Baked Potato

Top with:

  • Spicy black beans
  • Salsa
  • Sliced avocado
  • A squeeze of lime

5. Protein-Packed Chicken Baked Potato

Load it up with:

  • Shredded rotisserie chicken
  • Greek yogurt instead of sour cream
  • A sprinkle of smoked paprika

Frequently Asked Questions (FAQs)

1. How can I make my baked potato extra crispy?

For the crispiest skin, bake directly on the oven rack instead of a baking sheet. Also, avoid wrapping it in foil, as this traps moisture and softens the skin.

2. Can I make baked potatoes in an air fryer?

Yes! Bake at 200°C (400°F) for about 40 minutes, turning halfway through for even crispiness.

3. Can I microwave a baked potato?

You can, but the texture won’t be the same. If you’re short on time, microwave it for 5-7 minutes, then finish in the oven for 10 minutes to crisp up the skin.

4. Should I poke holes in the potato before baking?

Yes! Piercing the potato with a fork allows steam to escape, preventing it from bursting while baking.

5. How do I store and reheat leftovers?

Store leftover baked potatoes in the refrigerator for up to 4 days. To reheat, bake at 180°C (350°F) for 15 minutes or microwave for 2-3 minutes.

6. Can I freeze baked potatoes?

Yes! Wrap them tightly in foil and freeze for up to 3 months. To reheat, bake from frozen at 200°C (400°F) for 30-40 minutes.

Final Thoughts – A Simple Dish That Never Fails

The baked potato is one of the most humble yet satisfying dishes you can make. It’s easy, affordable, and endlessly versatile, making it a perfect addition to any meal. Whether you enjoy it plain with butter or fully loaded with toppings, it’s a dish that delivers pure comfort in every bite.

So next time you’re wondering what to make for dinner, remember that the perfect baked potato is always a great choice. Simple ingredients, effortless preparation, and delicious results every single time.

Amal

The Perfect Baked Potato – Crispy, Fluffy, and Irresistible

Achieve the perfect baked potato with a crispy, golden-brown skin and a light, fluffy interior. This simple yet delicious recipe is perfect as a side dish, snack, or a hearty meal when topped with your favorite ingredients. Whether you love it classic with butter and sour cream or fully loaded with cheese and bacon, this baked potato will never disappoint!
Prep Time 5 minutes
Cook Time 1 hour
Total Time 1 hour 5 minutes
Servings: 2 servings
Course: Side Dish
Cuisine: American

Ingredients
  

  • 2 large russet potatoes
  • 1 tablespoon olive oil
  • 1 teaspoon salt
  • ½ teaspoon black pepper

Method
 

  1. Preheat the Oven: Set the oven to 200°C (400°F).
  2. Prepare the Potatoes: Wash and dry the potatoes thoroughly.
  3. Season & Pierce: Rub each potato with olive oil, then sprinkle evenly with salt and black pepper. Pierce a few times with a fork to allow steam to escape.
  4. Bake Until Tender: Place the potatoes directly on the oven rack or a baking sheet. Bake for 50-60 minutes, or until the skin is crispy and the inside is soft when pierced with a fork.
  5. Serve & Enjoy: Slice open, fluff with a fork, and add butter, sour cream, cheese, chives, or your favorite toppings.

Notes

  • For extra crispiness, bake the potatoes directly on the oven rack instead of a baking sheet.
  • Avoid wrapping in foil, as it traps moisture and prevents crispy skin.
  • To speed up cooking, microwave the potato for 5 minutes before baking.
  • Store leftovers in the fridge for up to 4 days. Reheat in the oven at 180°C (350°F) for the best texture.

Creamy Corn Chowder with Bacon and Potatoes – A Hug in a Bowl

Some recipes have a way of transporting you back in time, wrapping you in the kind of warmth that only food made with love can provide. For me, corn chowder is one of those dishes.

Growing up, I spent summers at my grandparents’ house, where sweet corn was always in abundance. My grandmother, a firm believer in simple, hearty cooking, would turn that fresh corn into the most comforting chowder I had ever tasted. I’d watch her carefully slice the kernels off the cob, using the cobs to infuse the broth with an extra layer of flavor. The kitchen would fill with the aroma of sizzling bacon, buttery onions, and sweet corn, signaling that something special was simmering on the stove.

We would sit around the table, ladling generous portions of steaming chowder into bowls, topping it with crispy bacon and freshly chopped chives. No matter how hot the summer days were, that bowl of chowder felt like a hug from the inside out.

Now, I make this Creamy Corn Chowder with Bacon and Potatoes for my own family. It’s become a tradition—something we turn to on rainy days, cozy weekends, and whenever we need a little extra comfort. It’s hearty, rich, and filled with layers of flavor that make every bite unforgettable.

If you’ve never made homemade corn chowder before, you’re in for a treat. This recipe is simple, satisfying, and guaranteed to become a favorite in your home.

Why This Corn Chowder is a Must-Try

Corn chowder is a timeless dish for good reason. It’s the perfect balance of creamy, savory, and slightly sweet, with a texture that’s both smooth and hearty. Here’s why this particular version stands out:

1. Rich and Creamy, Yet Light

Unlike heavy cream-based soups, this chowder achieves its silky texture with whole milk, making it lighter while still indulgently creamy. The potatoes add natural thickness, eliminating the need for extra thickeners.

2. The Perfect Blend of Sweet and Savory

The natural sweetness of corn balances beautifully with the saltiness of bacon and the earthy depth of thyme and black pepper. Every bite delivers a well-rounded, satisfying flavor.

3. Packed with Hearty Ingredients

With tender potatoes, crispy bacon, and fresh vegetables, this chowder is a nutrient-dense, wholesome meal that feels like comfort food but is still full of good-for-you ingredients.

4. Easy to Make and Perfect for Meal Prep

This chowder comes together in about 30 minutes, making it ideal for weeknight dinners or meal prepping. It stores beautifully and tastes even better the next day as the flavors continue to meld.

5. A Dish That Feels Like Home

There’s something special about homemade chowder—it’s warm, inviting, and made to be shared. Whether you’re cooking for family, friends, or just yourself, this recipe will always deliver that feeling of home-cooked comfort.

Ingredients

IngredientQuantity
Bacon4 slices, chopped
Unsalted Butter1 tablespoon
Yellow Onion1, diced
Celery2 stalks, diced
Carrot1 large, diced
Garlic Cloves3, minced
Corn Kernels3 cups (482g), cobs reserved if using fresh
Yukon Gold Potatoes2 medium, peeled and diced (369g)
Chicken Broth3 cups (720mL)
Whole Milk2 cups (480mL)
Salt2 teaspoons
Chopped Thyme1½ teaspoons
Ground Black Pepper½ teaspoon
Chopped ChivesFor garnish

Directions

  1. Cook the Bacon: In a large pot over medium heat, cook the chopped bacon until crispy. Remove and set aside, leaving the bacon fat in the pot.
  2. Sauté the Vegetables: Add butter, then stir in the onion, celery, and carrot. Cook for about 5 minutes until softened. Add garlic and cook for another 30 seconds until fragrant.
  3. Simmer the Chowder: Stir in the corn, potatoes, chicken broth, salt, thyme, and black pepper. Bring to a boil, then reduce heat and let simmer for 15 minutes, until the potatoes are tender.
  4. Add the Creaminess: Pour in the whole milk and stir. Simmer for another 5 minutes without boiling.
  5. Blend for a Creamy Texture (Optional): Use an immersion blender to partially blend the chowder for a thicker consistency, leaving some chunks for texture.
  6. Serve & Garnish: Ladle into bowls, top with crispy bacon and fresh chives, and enjoy warm!

Nutritional Information (Per Serving, Approximate)

NutrientValue
Calories320-350 kcal
Protein12g
Carbohydrates40g
Fat14g
Fiber5g
Sugar8g

Ways to Customize Your Corn Chowder

One of the best things about corn chowder is its versatility. Here are a few ways you can personalize this recipe to suit your taste:

1. Add More Protein

For a heartier meal, try adding:

  • Shredded rotisserie chicken for extra protein.
  • Diced ham or smoked sausage for a different take on the classic bacon flavor.
  • Pan-seared shrimp for a seafood-inspired chowder.

2. Make It Extra Creamy

If you love a super rich and creamy chowder, you can:

  • Replace half of the milk with heavy cream for a silkier texture.
  • Blend a portion of the soup using an immersion blender to create a smoother consistency while keeping some chunky bits for texture.

3. Try Different Herbs & Spices

To change up the flavor profile, consider adding:

  • A pinch of smoked paprika for a subtle smokiness.
  • A bay leaf while simmering for a more complex depth of flavor.
  • Fresh basil or parsley instead of thyme for a different herbal note.

4. Make It Vegetarian

For a meat-free version, simply omit the bacon and use:

  • Vegetable broth instead of chicken broth.
  • Extra vegetables like red bell peppers or zucchini for more texture.
  • A little smoked paprika to replace the smoky flavor of bacon.

5. Give It a Spicy Kick

If you love spicy food, try adding:

  • Diced jalapeños or a pinch of cayenne pepper.
  • A few dashes of hot sauce stirred in before serving.
  • Spicy chorizo instead of bacon for an extra flavorful twist.

Frequently Asked Questions (FAQs)

1. Can I use frozen or canned corn instead of fresh?

Yes! While fresh corn gives the best flavor, frozen or canned corn works perfectly. If using canned corn, be sure to drain and rinse it before adding it to the chowder.

2. What type of potatoes work best in this recipe?

Yukon Gold potatoes are ideal because they have a creamy texture and hold their shape well. If you prefer a chunkier chowder, you can use Russet potatoes, but they will break down more and make the soup thicker.

3. How can I thicken my chowder?

This chowder is naturally thickened by the starch from the potatoes, but if you prefer an even thicker texture, try:

  • Blending a portion of the soup and stirring it back in.
  • Adding a cornstarch slurry (1 tablespoon cornstarch mixed with 2 tablespoons water).

4. How long does corn chowder last in the fridge?

Store in an airtight container in the refrigerator for up to 4 days. Reheat on the stove over low heat, stirring occasionally.

5. Can I freeze corn chowder?

Yes, but without the milk. If you plan to freeze it, make the chowder without adding the milk, then freeze for up to 3 months. When ready to eat, reheat and stir in the milk just before serving.

6. What can I serve with corn chowder?

This chowder is a meal on its own, but it pairs beautifully with:

  • Crusty bread or biscuits to soak up the creamy broth.
  • A side salad for a fresh contrast.
  • Grilled cheese sandwiches for the ultimate comfort meal.

Final Thoughts – Why This Chowder Deserves a Spot on Your Table

There’s something deeply satisfying about a warm bowl of homemade corn chowder. It’s rich, creamy, loaded with comforting flavors, and brings back memories of family dinners, cozy nights, and the simple joy of a home-cooked meal.

This Creamy Corn Chowder with Bacon and Potatoes is easy to make, incredibly delicious, and endlessly customizable. Whether you enjoy it on a cold evening, as a weekend treat, or as part of a family gathering, it’s the kind of dish that always brings comfort and joy.

So grab a spoon, take that first warm bite, and experience the perfect balance of sweet, smoky, and savory goodness. Once you try this chowder, you’ll want to make it again and again!

Amal

Creamy Corn Chowder with Bacon and Potatoes – A Hug in a Bowl

This Creamy Corn Chowder with Bacon and Potatoes is the ultimate comfort food! Made with sweet corn, crispy bacon, hearty potatoes, and a rich, velvety broth, this chowder is packed with flavor and warmth. Whether you’re enjoying it on a chilly evening or as a satisfying meal any time of year, this dish is easy to make and incredibly delicious.
Prep Time 15 minutes
Cook Time 25 minutes
Total Time 40 minutes
Servings: 4 –6 servings
Course: Soup
Cuisine: American

Ingredients
  

  • 4 slices bacon chopped
  • 1 tablespoon unsalted butter
  • 1 yellow onion diced
  • 2 stalks celery diced
  • 1 large carrot diced
  • 3 garlic cloves minced
  • 3 cups 482g corn kernels (cobs reserved if using fresh)
  • 2 medium Yukon Gold potatoes peeled and diced (369g)
  • 3 cups 720mL chicken broth
  • 2 cups 480mL whole milk
  • 2 teaspoons salt
  • teaspoons chopped thyme
  • ½ teaspoon ground black pepper
  • Chopped chives for garnish

Method
 

  1. Cook the Bacon: In a large pot over medium heat, cook the chopped bacon until crispy. Remove with a slotted spoon and set aside, leaving the bacon fat in the pot.
  2. Sauté the Vegetables: Add butter to the pot, then stir in the onion, celery, and carrot. Cook for about 5 minutes until softened. Add garlic and cook for another 30 seconds.
  3. Simmer the Chowder: Stir in the corn, potatoes, chicken broth, salt, thyme, and black pepper. Bring to a boil, then reduce heat and let simmer for 15 minutes until the potatoes are tender.
  4. Add the Milk: Pour in the whole milk and stir well. Simmer for another 5 minutes, making sure not to boil.
  5. Blend for a Creamier Texture (Optional): Use an immersion blender to partially blend the chowder, leaving some chunks for texture.
  6. Serve & Garnish: Ladle into bowls, top with crispy bacon and fresh chives, and enjoy warm!

Notes

  • For extra creaminess, substitute half of the milk with heavy cream.
  • To make it vegetarian, omit the bacon and use vegetable broth instead of chicken broth.
  • For a thicker consistency, blend a portion of the soup or add a cornstarch slurry.
  • Store leftovers in an airtight container in the refrigerator for up to 4 days.

The Ultimate Crispy Ham & Cheese Melt – A Comfort Food Classic

There are some recipes that never fail to bring back memories, and for me, grilled cheese is at the top of that list. It was the first thing I ever “cooked” by myself, standing on a stool in my grandmother’s kitchen, pressing the bread into the pan with a spatula, impatiently waiting for the cheese to melt.

Back then, my grilled cheese sandwiches were basic but delicious—just bread, cheese, and butter. But as I grew older, I started experimenting, trying to perfect the ultimate grilled cheese experience. I discovered that by dipping the sandwich in an egg and milk mixture, it created a crispy, golden crust that was almost like French toast but still savory. Add some ham to the mix, and suddenly, a childhood favorite became a next-level comfort food.

Now, this Crispy Ham & Cheese Melt is my go-to recipe whenever I need something quick, satisfying, and packed with flavor. It’s perfect for a lazy weekend breakfast, a speedy lunch, or even a midnight snack when I’m craving something indulgent. It’s simple, nostalgic, and downright delicious—and once you try it, you’ll never go back to plain grilled cheese again.

What Makes This Grilled Cheese the Best?

There are a million ways to make grilled cheese, but this recipe stands out because it combines crispy, cheesy, and savory elements into one perfect sandwich. Here’s why it’s a must-try:

1. Extra Crispy Coating

Most grilled cheese sandwiches are soft and buttery, but dipping the bread in an egg and milk mixture before grilling gives it an amazing crispy crust. Think of it as French toast meets grilled cheese, but without the sweetness.

2. Gooey, Melty Cheese

The best part of any grilled cheese is that stretchy, melted cheese pull when you take a bite. This recipe uses three slices of cheese, ensuring every bite is creamy, rich, and indulgent.

3. Savory Ham for Extra Flavor

Adding thinly sliced cooked ham gives this sandwich a salty, smoky kick that pairs perfectly with the creamy cheese. It turns a simple grilled cheese into a heartier, more satisfying meal.

4. Quick & Easy to Make

With just a handful of ingredients, this sandwich comes together in under 10 minutes. It’s perfect for those busy days when you need something filling but don’t want to spend a lot of time cooking.

5. Great for Any Time of Day

While grilled cheese is often thought of as a lunch or snack, this version is hearty enough for breakfast, lunch, or dinner. Pair it with a bowl of tomato soup, and you’ve got the ultimate comfort meal.

Ingredients

IngredientQuantity
Bread2 slices
Cheese3 slices
Cooked ham1-2 slices
Egg1
Milk1 tbsp

Directions

  1. Assemble the Sandwich: Place the cheese slices and ham between the two slices of bread.
  2. Prepare the Coating: In a shallow bowl, whisk the egg and milk together.
  3. Dip & Coat: Dip the sandwich into the egg mixture, ensuring both sides are well coated.
  4. Cook Until Golden: Heat a pan over medium heat and lightly butter it. Cook the sandwich for 2-3 minutes per side until golden brown and crispy.
  5. Serve & Enjoy: Slice and serve hot with your favorite dipping sauce or soup!

Nutritional Information (Per Serving, Approximate)

NutrientValue
Calories350-400 kcal
Protein20g
Carbohydrates30g
Fat18g
Sugar2g
Fiber2g

How to Customize Your Grilled Cheese

One of the best things about this sandwich is how easily customizable it is. Here are a few ways to make it your own:

1. Different Cheeses for Unique Flavors

While classic American cheese melts beautifully, you can experiment with:

  • Cheddar for a sharp, tangy flavor
  • Mozzarella for a super stretchy, mild taste
  • Swiss or Gruyère for a nutty, more complex taste
  • Pepper Jack for a spicy kick

2. Try Different Breads

Swap out the regular sandwich bread for:

  • Sourdough for a slightly tangy taste
  • Brioche for a softer, buttery texture
  • Whole wheat for a nuttier, heartier bite

3. Add More Fillings for Extra Flavor

Want to take it up a notch? Try adding:

  • Tomato slices for a fresh contrast
  • Caramelized onions for a sweet-savory balance
  • Bacon for extra crunch and smoky flavor
  • Spinach or arugula for a slight peppery bite

4. Make It Spicy

If you like a little heat, add:

  • A few dashes of hot sauce before grilling
  • Thinly sliced jalapeños inside the sandwich
  • A sprinkle of red pepper flakes in the egg mixture

5. Turn It into a Deluxe Sandwich

Make it even more decadent by spreading garlic butter or herb butter on the outside before grilling for an extra rich, flavorful crust.

FAQs: Everything You Need to Know About This Recipe

1. How Do I Get the Bread Extra Crispy?

The key to a crispy exterior is:

  • Dipping it fully in the egg mixture so the bread absorbs just enough moisture to crisp up.
  • Cooking on medium heat so it gets golden brown without burning.
  • Using a cast-iron skillet or non-stick pan for even browning.

2. Can I Use a Different Protein Instead of Ham?

Absolutely! Try replacing ham with:

  • Turkey for a lighter option
  • Crispy bacon for extra crunch
  • Grilled chicken for a more filling meal

3. Can I Make This Without an Egg?

Yes! If you prefer a traditional grilled cheese, simply skip the egg and milk dip. You’ll still get a delicious, buttery sandwich, just without the extra crispy texture.

4. What’s the Best Way to Reheat Leftovers?

If you have leftovers, reheat them in:

  • A skillet over low heat to maintain crispiness
  • An air fryer at 180°C (350°F) for a few minutes
  • An oven at 190°C (375°F) for about 5 minutes

Avoid microwaving, as it can make the sandwich soggy.

5. Can I Make This in a Panini Press?

Yes! A panini press will give you an even crispier texture with beautiful grill marks. Just be sure to dip the sandwich in the egg mixture before pressing.

Final Thoughts: The Grilled Cheese You Need to Try

There’s something deeply satisfying about a perfectly crispy, cheesy sandwich, and this Crispy Ham & Cheese Melt is one of the best versions you’ll ever make. It’s simple yet indulgent, quick yet incredibly flavorful.

Whether you’re making it for a lazy weekend breakfast, a comforting lunch, or a midnight snack, this upgraded grilled cheese will never disappoint. Once you try the crispy egg-dipped crust, the gooey melted cheese, and the savory ham, you’ll never go back to plain grilled cheese again.

So next time you’re craving comfort food done right, make this sandwich. One bite, and you’ll understand why it’s the best grilled cheese you’ll ever have!

Amal

The Ultimate Crispy Ham & Cheese Melt – A Comfort Food Classic

This Crispy Ham & Cheese Melt is the ultimate grilled cheese upgrade! With gooey melted cheese, savory ham, and a golden, crispy crust, this sandwich is the perfect comfort food. Dipped in an egg and milk mixture before grilling, it delivers an extra crunchy texture that takes it to the next level. Perfect for breakfast, lunch, or a quick snack!
Prep Time 5 minutes
Cook Time 5 minutes
Total Time 10 minutes
Servings: 1 sandwich
Course: Snack
Cuisine: American

Ingredients
  

  • 2 slices of bread
  • 3 slices of cheese cheddar, mozzarella, or Swiss
  • 1-2 slices of cooked ham
  • 1 egg
  • 1 tbsp milk

Method
 

  1. Assemble the Sandwich: Place the cheese slices and ham between the two slices of bread.
  2. Prepare the Egg Mixture: In a shallow bowl, whisk together the egg and milk.
  3. Dip & Coat: Dip the sandwich into the egg mixture, ensuring both sides are fully coated.
  4. Cook Until Golden: Heat a pan over medium heat and lightly butter it. Cook the sandwich for 2-3 minutes per side until golden brown and crispy.
  5. Serve & Enjoy: Slice in half and serve hot with your favorite dipping sauce or a bowl of soup.

Notes

  • For extra crispiness, add a light dusting of breadcrumbs before frying.
  • Use different cheeses like Gruyère, Monterey Jack, or pepper jack for unique flavors.
  • Try a buttery spread like garlic butter on the outside of the bread for an even richer taste.
  • For a spicy twist, add a pinch of red pepper flakes or drizzle with hot sauce.

Crispy Fried Mozzarella Nuggets – The Ultimate Cheesy Snack for Kids and Adults

Some foods have a way of bringing back the best childhood memories. For me, it was anything cheesy—cheese sandwiches, cheese toast, cheese dips, and most of all, fried mozzarella nuggets. I still remember the excitement of biting into a hot, crispy nugget, watching the melted cheese stretch in a gooey, irresistible pull.

Whenever my mother made them, the kitchen was filled with the comforting aroma of crispy, golden-brown crust and warm, melty cheese. My siblings and I would gather around, impatiently waiting for them to cool just enough so we could take that first glorious bite. They weren’t just a snack—they were a moment of pure happiness.

Now, I make these fried mozzarella nuggets for my own family, and the joy is the same. My kids love them just as much as I did, and honestly, they’re just as exciting for adults. Whether you’re making them as a quick snack, a party appetizer, or a fun treat for the little ones, these crispy cheese nuggets are guaranteed to be a hit!

Why Fried Mozzarella Nuggets Are the Perfect Snack

There are endless reasons why these mozzarella nuggets are loved by kids and adults alike. Here’s what makes them so special:

1. The Ultimate Cheese Pull

What’s better than stretchy, melty cheese? These nuggets are crispy on the outside and gooey on the inside, creating the perfect contrast of textures. Every bite is filled with warm, cheesy goodness that keeps you coming back for more.

2. Super Simple and Quick to Make

With just four basic ingredients, this recipe is as easy as it gets. You don’t need to prepare a batter, breadcrumbs, or any complicated coatings—just cheese, cornstarch, egg, and oil.

3. A Hit With Kids

Kids love anything crispy and cheesy, and these nuggets are no exception! They’re perfect for after-school snacks, weekend treats, or even picky eaters who refuse other foods but can’t resist cheese.

4. Great for Parties and Gatherings

Planning a party? These mozzarella nuggets make the perfect finger food. They’re bite-sized, easy to eat, and pair well with different dipping sauces like marinara, ketchup, or ranch. They disappear fast, so make a big batch!

5. Budget-Friendly and Customizable

Unlike restaurant mozzarella sticks, this homemade version is cheaper and fresher. Plus, you can customize them by adding different seasonings, using different cheeses, or even making them spicy for an extra kick.

Ingredients

IngredientQuantity
Mozzarella cheese300 grams
Cornstarch powder3 tablespoons
Egg1
Oil for fryingAs needed

Directions

  1. Prepare the Cheese: Cut the mozzarella into bite-sized cubes.
  2. Coat with Cornstarch: Roll each cheese cube in cornstarch, ensuring an even coating.
  3. Dip in Egg: Beat the egg in a bowl, then dip the coated mozzarella cubes into the egg mixture.
  4. Fry Until Golden: Heat oil in a pan over medium heat. Fry the mozzarella nuggets in small batches until golden brown and crispy.
  5. Drain & Serve: Remove from oil and place on paper towels to absorb excess oil. Serve hot with your favorite dipping sauce!

Nutritional Information (Per Serving, Approximate)

NutrientValue
Calories200-250 kcal
Protein10g
Carbohydrates8g
Fat15g
Sugar1g
Fiber0g

Ways to Customize Your Mozzarella Nuggets

If you love experimenting in the kitchen, here are some fun ways to change up the flavor of your fried mozzarella nuggets:

1. Herb-Infused Nuggets

Add a pinch of dried oregano, basil, or Italian seasoning to the cornstarch for a herby, aromatic twist.

2. Spicy Cheese Bites

Mix in paprika, chili powder, or cayenne pepper for a spicy kick. If you like extra heat, serve them with a spicy sriracha mayo dip.

3. Garlic Parmesan Nuggets

Toss the hot nuggets in a mix of grated Parmesan and garlic powder for an extra flavorful bite.

4. Different Cheese Options

Mozzarella is classic, but you can also try:

  • Cheddar for a sharper, more intense cheese flavor.
  • Gouda for a rich and slightly smoky taste.
  • Monterey Jack for a smooth, creamy texture.

5. Double-Coated for Extra Crunch

If you love an ultra-crispy coating, dip the nuggets in cornstarch, then egg, then back into cornstarch before frying. This gives them a thicker, crunchier crust.

FAQs: Everything You Need to Know About Mozzarella Nuggets

1. How Do I Prevent the Cheese from Melting Too Much While Frying?

To keep the mozzarella from melting too quickly and losing its shape:

  • Freeze the coated cheese cubes for 15-20 minutes before frying.
  • Fry at the right temperature (around 180°C/350°F) to create a crispy crust before the cheese fully melts.

2. Can I Use Regular Flour Instead of Cornstarch?

Yes, but cornstarch gives the nuggets a lighter, crispier coating. If using flour, mix it with a little baking powder to keep the crust from becoming too dense.

3. What’s the Best Oil for Frying?

Use neutral oils with a high smoke point, such as:

  • Vegetable oil
  • Canola oil
  • Sunflower oil
  • Peanut oil (for extra crispiness)

Avoid olive oil, as it has a lower smoke point and may burn quickly.

4. Can I Make These Without Frying?

Yes! If you prefer a healthier option, try baking or air frying:

  • Air Fryer: Cook at 200°C (400°F) for about 8-10 minutes, flipping halfway.
  • Oven: Bake at 220°C (425°F) for 12-15 minutes, turning once for even crispness.

5. How Do I Store and Reheat Leftovers?

  • Refrigerate: Store in an airtight container for up to 2 days.
  • Reheat: Bake in the oven at 180°C (350°F) or air-fry for 3-5 minutes to restore crispiness.

Avoid microwaving, as it will make the nuggets soft instead of crispy.

6. Can I Make These in Advance?

Yes! You can prepare the coated mozzarella nuggets and freeze them uncooked. When ready to eat, fry them directly from frozen—just add an extra minute or two to the cooking time.

Final Thoughts: Why You Need to Try These Mozzarella Nuggets

There’s a reason why fried cheese is loved worldwide—it’s the perfect comfort food, crispy on the outside, gooey on the inside, and bursting with rich, creamy flavor.

Whether you’re making these for kids, as a party snack, or just for yourself, these fried mozzarella nuggets will quickly become a household favorite. They’re simple to make, easy to customize, and absolutely addictive.

So, if you’ve been looking for the perfect cheesy snack, give this recipe a try. One bite, and you’ll see why they’re so hard to resist!

Amal

Crispy Fried Mozzarella Nuggets – The Ultimate Cheesy Snack for Kids and Adults

These crispy fried mozzarella nuggets are the perfect combination of crunchy on the outside and gooey on the inside! Made with just a few simple ingredients, they are an irresistible snack for kids and adults alike. Whether you’re serving them at a party, as an appetizer, or as a quick treat, these cheese nuggets will disappear in minutes!
Prep Time 10 minutes
Cook Time 5 minutes
Total Time 15 minutes
Servings: 4 servings
Course: Snack
Cuisine: American

Ingredients
  

  • 300 grams mozzarella cheese
  • 3 tablespoons cornstarch powder
  • 1 egg
  • Oil for frying

Method
 

  1. Prepare the Cheese: Cut the mozzarella into bite-sized cubes.
  2. Coat with Cornstarch: Roll each cheese cube in cornstarch to ensure an even coating.
  3. Dip in Egg: Beat the egg in a bowl, then dip the cornstarch-coated mozzarella cubes into the egg mixture.
  4. Fry Until Golden: Heat oil in a deep pan over medium heat. Fry the mozzarella nuggets in small batches until they are golden brown and crispy.
  5. Drain & Serve: Remove from the oil and place on paper towels to absorb excess oil. Serve hot with your favorite dipping sauce, such as marinara, ketchup, or garlic aioli.

Notes

  • For extra crispiness, freeze the coated cheese cubes for 15 minutes before frying.
  • Use a thermometer to ensure the oil stays at 180°C (350°F) for the best results.
  • Try different cheeses! While mozzarella is classic, cheddar, gouda, or Monterey Jack also work great.
  • For a baked version, place the coated cheese cubes on a baking sheet and bake at 220°C (425°F) for 12-15 minutes.

Golden Cream Puffs – A Classic Pastry That Never Fails to Impress

Some desserts are more than just a sweet treat—they hold memories, emotions, and a sense of nostalgia. For me, cream puffs are one of those desserts. I remember standing in my grandmother’s kitchen as a child, watching her effortlessly pipe delicate choux pastry onto baking trays. The oven door would open, and the once-flat dough would transform into golden, airy puffs, perfectly crisp on the outside and light as air on the inside.

But the real magic happened when she filled them with rich, velvety vanilla pastry cream. One bite and I was hooked—the crisp pastry shell giving way to a smooth, luscious filling that made every bite feel like pure indulgence. It wasn’t just the taste that made them special, but the love and tradition behind every batch.

Years later, as I started baking on my own, I searched for that perfect cream puff recipe—one that captured the lightness of the pastry, the richness of the filling, and the joy of homemade baking. After countless trials, I finally found the one. This recipe is foolproof, delicious, and brings back the same warm, comforting feeling of my childhood.

If you’ve been looking for a classic cream puff recipe, you’ve found it. Whether you’re making them for a celebration, a special dessert, or just because—you’re in for a treat!

Why Cream Puffs Are Loved by Everyone

Cream puffs have been a beloved dessert for generations, and it’s easy to see why. These delicate pastries are the perfect balance of light and rich, crisp and creamy. Here’s why they remain a timeless favorite:

1. Light, Airy Pastry with a Crisp Shell

The magic of cream puffs lies in the choux pastry. It’s a dough that, when baked, puffs up into hollow, golden shells, perfect for filling with anything from classic vanilla cream to chocolate, whipped cream, or even savory fillings.

2. Rich and Creamy Filling

A good cream puff isn’t just about the pastry—it’s about what’s inside. The vanilla pastry cream is smooth, luxuriously thick, and packed with flavor. It contrasts beautifully with the crisp pastry, making every bite a perfect combination of textures.

3. No Special Equipment Required

Unlike other pastries that require fancy tools, cream puffs are made with basic ingredients and simple kitchen tools. If you have a saucepan, a spoon, and an oven, you can make them!

4. Elegant Yet Easy

Despite their delicate and impressive appearance, cream puffs are surprisingly easy to make. Once you master the choux pastry technique, you’ll find yourself making them over and over again.

5. Perfect for Any Occasion

Cream puffs are versatile—they can be served as a light dessert, an afternoon tea treat, or even a showstopper at parties and celebrations. Plus, they can be customized with different fillings and toppings to suit any event.

Ingredients

IngredientQuantity
Puff pastry400 grams (14 oz)
Egg (beaten)1
Ketchup2 tablespoons
Boiled sausage (chopped)100 grams (3.5 oz)
Smoked sausage (chopped)100 grams (3.5 oz)
Pickled cucumbers (sliced)2

Directions

  1. Prepare the Pastry: Preheat the oven to 200°C (392°F). Roll out the puff pastry on a lightly floured surface and cut it into squares or rectangles.
  2. Assemble the Puffs: Spread a thin layer of ketchup over each pastry piece. Evenly distribute the boiled and smoked sausages, along with the pickled cucumbers.
  3. Seal the Edges: Fold the pastry over the filling, pressing the edges down with a fork to seal.
  4. Egg Wash: Brush the tops with beaten egg for a beautifully golden crust.
  5. Bake to Perfection: Place the puffs on a baking sheet lined with parchment paper. Bake for 15-20 minutes, or until golden brown and puffed up.
  6. Serve & Enjoy: Let the puffs cool slightly before serving. Enjoy them warm for the best texture and flavor!

Nutritional Information (Per Serving, Approximate)

NutrientValue
Calories300-350 kcal
Protein10-12g
Carbohydrates25-30g
Fat18-20g
Fiber2g

Ways to Customize Your Cream Puffs

The beauty of cream puffs is that they’re incredibly adaptable. Here are some ways to get creative with your fillings and flavors:

1. Chocolate Lover’s Dream

  • Fill your cream puffs with chocolate pastry cream by adding melted dark chocolate to the vanilla custard.
  • Drizzle melted chocolate over the top for an elegant finishing touch.

2. Whipped Cream Delight

  • Instead of pastry cream, fill them with lightly sweetened whipped cream for a more delicate texture.
  • Add a touch of cocoa powder or cinnamon for a hint of extra flavor.

3. Fresh Fruit Perfection

  • Fill the puffs with pastry cream and fresh berries like strawberries, raspberries, or blueberries.
  • Dust with powdered sugar and serve with a side of fruit compote for a refreshing touch.

4. Caramel or Coffee Infusion

  • Add a swirl of caramel sauce into the pastry cream for a decadent twist.
  • Mix in espresso powder for a delightful coffee-flavored filling.

5. Savory Variations

Cream puffs aren’t just for desserts! You can also make them savory by filling them with:

  • Herbed cream cheese for a light, tangy bite.
  • Smoked salmon and dill for an elegant appetizer.
  • Chicken or tuna salad for a unique twist on classic finger foods.

FAQs: Everything You Need to Know About Cream Puffs

1. Why Didn’t My Cream Puffs Rise?

This usually happens if the oven temperature is too low or if the dough wasn’t cooked properly before adding the eggs. Make sure to:

  • Bake at a high temperature (200°C/392°F) to create steam and allow the puffs to expand.
  • Cook the dough fully before adding eggs to ensure the right texture.

2. Can I Make Cream Puffs in Advance?

Yes! The pastry shells can be baked a day ahead and stored in an airtight container at room temperature. The pastry cream should be made fresh and kept in the fridge until ready to fill.

3. How Do I Store Leftover Cream Puffs?

Filled cream puffs should be stored in the refrigerator and are best eaten within 24 hours to keep their texture crisp. If storing for longer, keep the shells separate from the filling.

4. Can I Freeze Cream Puffs?

Absolutely! Unfilled cream puff shells can be frozen for up to 1 month. Simply bake and cool them completely, then store in a freezer bag. To use, reheat in the oven at 180°C (350°F) for a few minutes to crisp them back up.

5. Can I Make Mini Cream Puffs?

Yes! You can pipe smaller portions of dough to create bite-sized cream puffs. Just reduce the baking time by a few minutes, as they will cook faster.

6. What’s the Best Way to Fill Cream Puffs?

You can fill them in two ways:

  1. Slice them open and spoon the cream inside.
  2. Use a piping bag to inject the filling through a small hole in the pastry shell.

Final Thoughts: Why You Need to Try These Golden Cream Puffs

Few desserts are as delicate, satisfying, and timeless as cream puffs. They are light yet indulgent, crisp yet creamy, and they always make an impression. Whether you’re making them for the first time or you’re a seasoned baker, this classic recipe is one you’ll want to keep forever.

Baking these at home brings a sense of joy and accomplishment—watching the pastries puff up in the oven, filling them with silky cream, and taking that first bite of pure delight. They’re perfect for any occasion, and once you taste them, you’ll understand why people have loved cream puffs for centuries.

So, if you’ve been searching for the perfect cream puff recipe, look no further. Try them today and fall in love with this classic French-inspired dessert!

Amal

Golden Cream Puffs – A Classic Pastry That Never Fails to Impress

These Golden Cream Puffs are the perfect balance of light, crispy choux pastry and rich, velvety vanilla pastry cream. A classic dessert that’s surprisingly easy to make, these delicate pastries are perfect for any occasion—whether as an elegant party treat or a sweet indulgence for yourself. Once you try them, you’ll want to bake them again and again!
Prep Time 15 minutes
Cook Time 25 minutes
Total Time 40 minutes
Servings: 12 -15 cream puffs
Course: Dessert
Cuisine: French-inspired

Ingredients
  

For the Choux Pastry:
  • 100 grams water
  • 100 grams milk
  • A pinch of salt
  • A pinch of sugar
  • 80 grams butter
  • 130 grams flour
  • 3 eggs
For the Vanilla Pastry Cream:
  • 150 grams sugar
  • 30 grams cornstarch
  • 400 grams milk
  • Vanilla extract to taste

Method
 

  1. Prepare the Choux Pastry: In a saucepan, bring water, milk, salt, sugar, and butter to a boil. Stir in the flour all at once and cook until the dough pulls away from the sides. Let cool slightly.
  2. Incorporate the Eggs: Add eggs one at a time, mixing thoroughly after each addition until the dough is smooth and glossy.
  3. Bake the Pastry Shells: Preheat the oven to 200°C (392°F). Pipe or spoon the dough onto a lined baking sheet. Bake for 20-25 minutes until golden and puffed. Let cool completely.
  4. Prepare the Pastry Cream: In a saucepan, whisk together sugar, cornstarch, and milk. Cook over medium heat, stirring constantly until thickened. Remove from heat and stir in vanilla extract. Let cool.
  5. Fill the Cream Puffs: Slice the pastry shells open and fill them with the cooled pastry cream.
  6. Serve & Enjoy: Dust with powdered sugar or drizzle with chocolate for an extra indulgent touch.

Notes

  • For extra crispiness, poke a small hole in each puff after baking to release steam.
  • Customize the filling by adding cocoa powder for a chocolate variation.
  • Store unfilled pastry shells in an airtight container at room temperature for up to 2 days.
  • Refrigerate filled cream puffs and enjoy within 24 hours for the best texture.
  • Freeze unfilled choux pastry shells for up to 1 month and reheat in the oven before using.

Lemon Dream Cheesecake – The No-Bake Dessert That Will Steal the Show

I still remember the first time I tasted a lemon cheesecake. It was at my grandmother’s house on a warm summer afternoon. She always had a knack for creating the most delightful desserts without ever turning on the oven. While other kids craved chocolate cakes and rich pastries, I found myself drawn to the light, tangy, and creamy texture of her lemon cheesecake.

It wasn’t just a dessert—it was an experience. The refreshing citrus flavor, the smooth, velvety consistency, and the way it melted in my mouth made it my go-to treat. It was perfect for hot days when heavy desserts felt too overwhelming, yet it was still indulgent enough to satisfy my sweet tooth.

As I grew older and started experimenting in the kitchen, I wanted to recreate that same magical dessert—but with a simpler, quicker method. That’s when I developed this no-bake Lemon Dream Cheesecake. It has all the creamy, dreamy flavors of my childhood favorite, but with an easy, foolproof recipe that requires minimal effort.

If you’re looking for a refreshing, light, and irresistibly creamy dessert, this lemon cheesecake is exactly what you need.

Why This No-Bake Lemon Cheesecake Is So Popular

This recipe has taken social media by storm, and for good reason! People love it because it’s:

1. No-Bake and Super Easy

Unlike traditional cheesecakes that require oven time, water baths, and careful baking, this one comes together without a single minute of baking. Just mix, chill, and enjoy!

2. Light and Refreshing

The combination of creamy cheese, whipped cream, and lemon juice gives this cheesecake a light, airy texture with a subtle tanginess that makes it incredibly refreshing. It’s not too sweet, which makes it perfect for those who love balanced flavors.

3. Perfect for Warm Weather

There’s nothing better than a cool, creamy dessert on a hot day. This cheesecake is served chilled, making it a fantastic summer treat that won’t weigh you down.

4. No Fancy Ingredients Required

This cheesecake is made with simple, everyday ingredients—spreadable cheese (like cream cheese or ricotta), fresh cream, sugar, lemon juice, and gelatin. No expensive or hard-to-find ingredients!

5. Elegant and Crowd-Pleasing

Despite how easy it is to make, this cheesecake looks and tastes like something from a bakery. Serve it at dinner parties, birthdays, or family gatherings, and it will always impress.

Ingredients

IngredientQuantity
Spreadable cheese (cream cheese or ricotta)200g (¾ cup)
Sugar60g (¼ cup)
Gelatin sheets5g (1 ½ tsp)
Cold water25g (1 ½ tbsp)
Fresh cream (heavy or whipping cream)200g (¾ cup)
Lemon juice5g (1 tsp)

Directions

  1. Prepare the Gelatin: Soak the gelatin sheets in cold water until softened.
  2. Make the Cheesecake Base: In a bowl, mix the spreadable cheese, sugar, and lemon juice until smooth.
  3. Dissolve the Gelatin: Warm the softened gelatin with the cold water until fully dissolved. Stir it into the cheesecake mixture.
  4. Whip the Cream: In a separate bowl, whip the fresh cream until soft peaks form, then gently fold it into the cheesecake mixture.
  5. Chill & Set: Pour the mixture into a cake mold or individual cups. Refrigerate for at least 4 hours, or until fully set.
  6. Serve & Enjoy: Garnish with lemon zest or fresh fruit before serving for an extra touch of flavor!

Nutritional Information (Per Serving, Approximate)

NutrientValue
Calories220-250 kcal
Protein4g
Carbohydrates15g
Fat18g
Sugar10g
Fiber0g

How to Customize This Cheesecake

One of the best things about this recipe is its versatility! You can personalize it in so many ways to suit your taste.

1. Make It Extra Zesty

If you love bold citrus flavors, add a little lemon zest to the cheesecake mixture. It will enhance the aroma and give it even more refreshing tartness.

2. Try Different Citrus Fruits

Not a fan of lemon? No problem! Try substituting with:

  • Lime juice for a tropical, tangy twist.
  • Orange juice for a sweeter, fruitier version.
  • Grapefruit juice for a subtle bitterness that balances the creaminess.

3. Add a Crust for Extra Texture

If you love a classic cheesecake texture, you can add a simple base made from crushed biscuits and melted butter. Press the mixture into the bottom of the mold before adding the cheesecake filling for an extra crunch.

4. Top It Off with Something Special

This cheesecake is delicious on its own, but toppings can take it to the next level! Try:

  • Fresh berries (strawberries, raspberries, or blueberries) for natural sweetness.
  • A drizzle of honey or caramel sauce for extra indulgence.
  • Shredded coconut or white chocolate shavings for a gourmet touch.

5. Make It Vegan or Dairy-Free

If you’re avoiding dairy, you can easily modify this recipe with:

  • Dairy-free cream cheese (made from almonds or cashews).
  • Coconut cream instead of fresh cream for a tropical twist.
  • Agar-agar instead of gelatin to keep it plant-based.

FAQs: Everything You Need to Know About This Cheesecake

1. Can I Make This Cheesecake Without Gelatin?

Yes! If you prefer a softer texture, you can omit the gelatin. However, the cheesecake will be less firm and more mousse-like. If you want a plant-based alternative, agar-agar works well as a substitute.

2. How Long Does This Cheesecake Need to Set?

For best results, let the cheesecake chill for at least 4 hours. If you have time, overnight chilling will give it the best texture and flavor.

3. Can I Freeze This Cheesecake?

Absolutely! You can freeze this cheesecake for up to 1 month. Just wrap it tightly in plastic wrap and store it in an airtight container. Thaw in the fridge before serving.

4. How Do I Prevent My Cheesecake from Being Too Runny?

If your cheesecake turns out too soft, check these tips:

  • Make sure to dissolve the gelatin completely before adding it to the mixture.
  • Whip the fresh cream until soft peaks form before folding it into the cheesecake.
  • Chill the cheesecake long enough to let it fully set.

5. Can I Use Low-Fat Cream Cheese?

Yes, but keep in mind that full-fat cream cheese gives the cheesecake a richer and smoother texture. If using low-fat cheese, the consistency might be slightly less creamy.

Final Thoughts: Why You Should Try This Lemon Dream Cheesecake Today

There’s a reason why this cold lemon cheesecake is driving everyone crazy—it’s easy, delicious, and refreshing. Whether you’re looking for a quick no-bake dessert, a cool treat for summer, or a simple recipe that always impresses, this cheesecake checks all the boxes.

What I love most about this recipe is how effortlessly elegant it is. You don’t need to be a professional baker to make something that looks and tastes like a gourmet dessert. And with so many ways to customize it, you’ll never get bored of this recipe!

So, if you’re craving something light, creamy, and citrusy, it’s time to whip up this Lemon Dream Cheesecake. Try it today, and I promise—it will become a go-to favorite in your dessert collection!

Amal

Lemon Dream Cheesecake – The No-Bake Dessert That Will Steal the Show

This Lemon Dream Cheesecake is a refreshing, creamy, and irresistibly smooth no-bake dessert that comes together effortlessly. With a velvety cheesecake filling infused with lemon and a light, airy texture, this treat is perfect for warm days or when you need a simple yet elegant dessert. No baking required, just mix, chill, and enjoy!
Prep Time 10 minutes
Total Time 4 hours 10 minutes
Servings: 6 servings
Course: Dessert
Cuisine: European-inspired

Ingredients
  

For the Cheesecake Cream:
  • 200 g ¾ cup spreadable cheese (cream cheese or ricotta)
  • 60 g ¼ cup sugar
  • 5 g 1 ½ tsp gelatin sheets
  • 25 g 1 ½ tbsp cold water
  • 200 g ¾ cup fresh cream (heavy or whipping cream)
  • 5 g 1 tsp lemon juice

Method
 

  1. Prepare the Gelatin: Soak the gelatin sheets in cold water until softened.
  2. Make the Cheesecake Base: In a bowl, mix the spreadable cheese, sugar, and lemon juice until smooth.
  3. Dissolve the Gelatin: Heat the softened gelatin with the cold water until fully dissolved, then stir it into the cheesecake mixture.
  4. Whip the Cream: In a separate bowl, whip the fresh cream until soft peaks form, then gently fold it into the cheesecake mixture.
  5. Chill & Set: Pour the mixture into a cake mold or individual cups and refrigerate for at least 4 hours, or until fully set.
  6. Serve & Enjoy: Garnish with lemon zest, fresh fruit, or a drizzle of honey for extra flavor.

Notes

  • For extra lemon flavor, add a teaspoon of grated lemon zest.
  • To make it dairy-free, use coconut cream and dairy-free cream cheese.
  • Store in the fridge for up to 4 days, or freeze for longer storage.
  • For a firmer texture, let it set overnight before serving.

Golden Jam-Filled Cookies – A Sweet Treat You’ll Want Every Day

There’s something about homemade cookies that brings a sense of warmth and nostalgia. Growing up, my grandmother always had a fresh batch of cookies waiting on the kitchen table, filling the house with the sweet aroma of vanilla and baked dough. She didn’t need an occasion to bake—cookies were her way of showing love and bringing people together.

One of my absolute favorites was her jam-filled cookies. They were soft, slightly crumbly, and had just the right amount of sweetness. The center was always bursting with rich apricot jam, while the edges were delicately coated in coconut flakes, adding the perfect touch of texture.

Years later, I found myself craving those same flavors but needed something quick and easy to fit into my busy routine. That’s how I started making these Golden Jam-Filled Cookies—a simple, 5-minute prep recipe that delivers the same melt-in-your-mouth goodness with minimal effort. Whether you’re baking for family, friends, or just yourself, these cookies are a comforting, homemade treat that you’ll want to make again and again.

Why These Jam-Filled Cookies Are a Must-Try

If you love soft, delicate cookies with a sweet and fruity filling, you’ll adore this recipe. Here’s why they stand out:

1. Quick & Effortless – Ready in Minutes

Unlike traditional cookie recipes that require chilling dough, rolling, or cutting shapes, this recipe is incredibly simple and beginner-friendly. You just mix, shape, fill, and bake—no complicated steps, no mess. In under 20 minutes, you’ll have a batch of fresh, bakery-quality cookies.

2. Perfectly Soft & Buttery Texture

These cookies strike the perfect balance between light and delicate while still being rich and satisfying. Thanks to the combination of yogurt, cornstarch, and oil, the dough bakes up into an ultra-soft texture that melts in your mouth.

3. A Flavorful & Sweet Apricot Center

The apricot jam filling adds a fruity, slightly tangy contrast to the soft dough. As the cookies bake, the jam slightly caramelizes, creating a gooey, flavorful center that complements the delicate vanilla-scented dough. You can easily swap in other jams like strawberry, raspberry, or peach to customize the taste.

4. Coconut Flakes for a Delicious Finish

The final touch—rolling the cookies in coconut flakes—adds a subtle nutty sweetness and a hint of crunch. It’s optional, but it truly enhances both the flavor and the presentation, making these cookies feel extra special.

5. Great for Any Occasion

Whether you’re making these for a quick snack, a holiday dessert platter, or a simple treat to enjoy with your afternoon coffee, these cookies are versatile and perfect for any time of year. They store well, making them an ideal make-ahead dessert.

Ingredients

IngredientQuantity
Egg1 pc
SaltA pinch
Vanilla sugar8 grams
Sugar60 grams
Oil50 ml
Cornstarch2 tablespoons
Yogurt2 tablespoons
Baking powder1/2 teaspoon
Flour250 grams
Apricot jam160 grams
Coconut flakes2 tablespoons

Directions

  1. Prepare the Dough: In a bowl, whisk together the egg, salt, vanilla sugar, and regular sugar until well combined. Add the oil, cornstarch, yogurt, and baking powder, mixing well. Gradually incorporate the flour until a soft dough forms.
  2. Shape the Cookies: Roll the dough into small balls and slightly flatten them. Create a small indentation in the center of each cookie.
  3. Fill with Jam: Spoon a small amount of apricot jam into the center of each cookie.
  4. Bake: Place the cookies on a lined baking sheet and bake in a preheated oven at 180°C (350°F) for 12-15 minutes, or until golden.
  5. Coat with Coconut: While still warm, gently roll the edges of the cookies in coconut flakes for extra texture and flavor.
  6. Serve & Enjoy: Let them cool slightly and enjoy with tea, coffee, or as a sweet treat anytime!

Nutritional Information (Per Cookie, Approximate)

NutrientValue
Calories120-140 kcal
Protein2g
Carbohydrates18g
Fat5g
Sugar8g
Fiber1g

Creative Variations to Try

If you love experimenting in the kitchen, here are some fun ways to customize this recipe and make it your own:

1. Chocolate-Dipped Jam Cookies

After baking, let the cookies cool completely, then dip half of each cookie in melted dark or white chocolate. This adds a rich, decadent touch while complementing the fruity jam.

2. Almond or Hazelnut Coating

Instead of coconut flakes, roll the cookies in finely chopped almonds, hazelnuts, or pistachios for a more nutty and crunchy exterior.

3. Citrus Infusion

Add a bit of lemon or orange zest to the dough for a bright, citrusy twist that pairs beautifully with the jam filling.

4. Different Jam Fillings

Apricot jam is classic, but you can switch things up by using strawberry, raspberry, blueberry, or even fig jam. Each variation gives the cookies a unique, delicious flavor.

5. Cinnamon Sugar Dusting

For a warm and cozy flavor, sprinkle the cookies with a mix of cinnamon and powdered sugar before serving.

FAQs: Everything You Need to Know

1. Can I Make These Cookies Without Cornstarch?

Yes! Cornstarch helps create an extra soft texture, but if you don’t have it, simply replace it with an equal amount of flour. The cookies will still be delicious, though slightly firmer.

2. What’s the Best Way to Store These Cookies?

Store these cookies in an airtight container at room temperature for up to 5 days. If you want them to last longer, keep them in the refrigerator for up to 7-10 days, or freeze them for up to 3 months.

3. Can I Use Butter Instead of Oil?

Yes! If you prefer a richer, more buttery taste, substitute melted butter for the oil in a 1:1 ratio. The cookies will have a slightly denser texture but will still be incredibly soft.

4. Can I Make These Cookies Gluten-Free?

Absolutely! Simply substitute gluten-free all-purpose flour for the regular flour, and they’ll turn out just as delicious.

5. How Do I Prevent the Jam from Spilling Over While Baking?

To keep the jam in place:

  • Don’t overfill—a small spoonful is enough.
  • Chill the cookies for 10 minutes before baking to help them hold their shape.
  • Use a thicker jam or fruit preserve rather than a runny one.

6. Can I Make These Cookies Vegan?

Yes! To make a vegan version, replace:

  • The egg with a flax egg (1 tbsp ground flaxseed + 3 tbsp water).
  • The yogurt with dairy-free coconut or almond yogurt.

Final Thoughts: A Cookie Recipe You’ll Want to Make Again and Again

There’s something truly special and nostalgic about baking cookies. Whether you’re making them for yourself, sharing them with loved ones, or gifting them for the holidays, these Golden Jam-Filled Cookies bring joy in every bite.

They’re quick to make, incredibly soft, and bursting with flavor. The combination of buttery dough, fruity jam, and coconut flakes makes them an instant favorite. And the best part? They’re so easy that you’ll find yourself baking them over and over again.

So, why not treat yourself today? Mix up a batch, fill them with your favorite jam, and enjoy a warm, homemade cookie that melts in your mouth!

Amal

Golden Jam-Filled Cookies – A Sweet Treat You’ll Want Every Day

These Golden Jam-Filled Cookies are incredibly soft, buttery, and melt in your mouth with every bite. Filled with sweet apricot jam and finished with a delicate coconut coating, they’re the perfect quick and easy treat for any occasion. With just 5 minutes of prep, you can whip up a batch of these delicious homemade cookies in no time!
Prep Time 5 minutes
Cook Time 15 minutes
Total Time 20 minutes
Servings: 12 -15 cookies
Course: Dessert
Cuisine: European-inspired

Ingredients
  

  • 1 egg
  • A pinch of salt
  • 8 grams vanilla sugar
  • 60 grams sugar
  • 50 ml oil
  • 2 tablespoons cornstarch
  • 2 tablespoons yogurt
  • 1/2 teaspoon baking powder
  • 250 grams flour
  • 160 grams apricot jam
  • 2 tablespoons coconut flakes

Method
 

  1. Prepare the Dough: In a mixing bowl, whisk together the egg, salt, vanilla sugar, and sugar until well combined. Add the oil, cornstarch, yogurt, and baking powder, mixing until smooth. Gradually add the flour and knead until a soft dough forms.
  2. Shape the Cookies: Roll the dough into small balls, then slightly flatten them. Make a small indentation in the center of each cookie for the jam.
  3. Fill with Jam: Spoon a small amount of apricot jam into the center of each cookie.
  4. Bake: Preheat your oven to 180°C (350°F). Place the cookies on a lined baking sheet and bake for 12-15 minutes, or until lightly golden.
  5. Coat with Coconut: While the cookies are still warm, gently roll the edges in coconut flakes for a sweet, textured finish.
  6. Serve & Enjoy: Let them cool slightly before serving. These cookies pair perfectly with coffee, tea, or as a delightful snack anytime!

Notes

  • For extra flavor, try adding a bit of orange or lemon zest to the dough.
  • Swap the jam! Raspberry, strawberry, or fig jam also work beautifully in this recipe.
  • For a crunchier version, bake for an extra 2-3 minutes until golden brown.
  • Store in an airtight container at room temperature for up to 5 days or refrigerate for up to a week.

Stay Connected

Get recipes via email: