Some meals do more than just fill you up — they take you back. Back to your grandmother’s kitchen, to winter nights warmed by casserole dishes, to the simple joy of a cheesy zucchini pancake sizzling on the stove.
For me, these recipes are memories on a plate. Whether it’s the creamy beef stroganoff my mom made on cold evenings, the spiced potato bake we shared every Sunday, or the zucchini pizza that finally made veggies lovable, every dish in this collection holds a story — and a whole lot of comfort.
This post is a tribute to easy, cozy, and satisfying meals — recipes that are rich in flavor but light on stress. From high-protein chicken chow mein for busy weeknights to broccoli mushroom casseroles that bring everyone to the table, these are my go-to dishes when I want something warm, hearty, and soul-soothing.
There was a time when breakfast in my house meant cold cereal and chaos. Between getting the kids ready and rushing out the door, it felt easier to skip it altogether. But everything changed the day I sat down with a warm slice of cinnamon rhubarb bread and realized — a good morning starts with a good meal.
Since then, I’ve been on a mission to find easy, healthy breakfast recipes that actually fit into real life. No complicated steps, no fancy ingredients — just simple, nourishing food that brings comfort and energy to busy mornings.
In this post, I’m sharing 10 breakfast recipes that saved my mornings — from savory lentil bakes to sweet banana muffins, oatmeal pancakes, and even a cheesy stuffed bread that became an instant family favorite. These are the meals that made me fall back in love with breakfast — and they might just do the same for you.
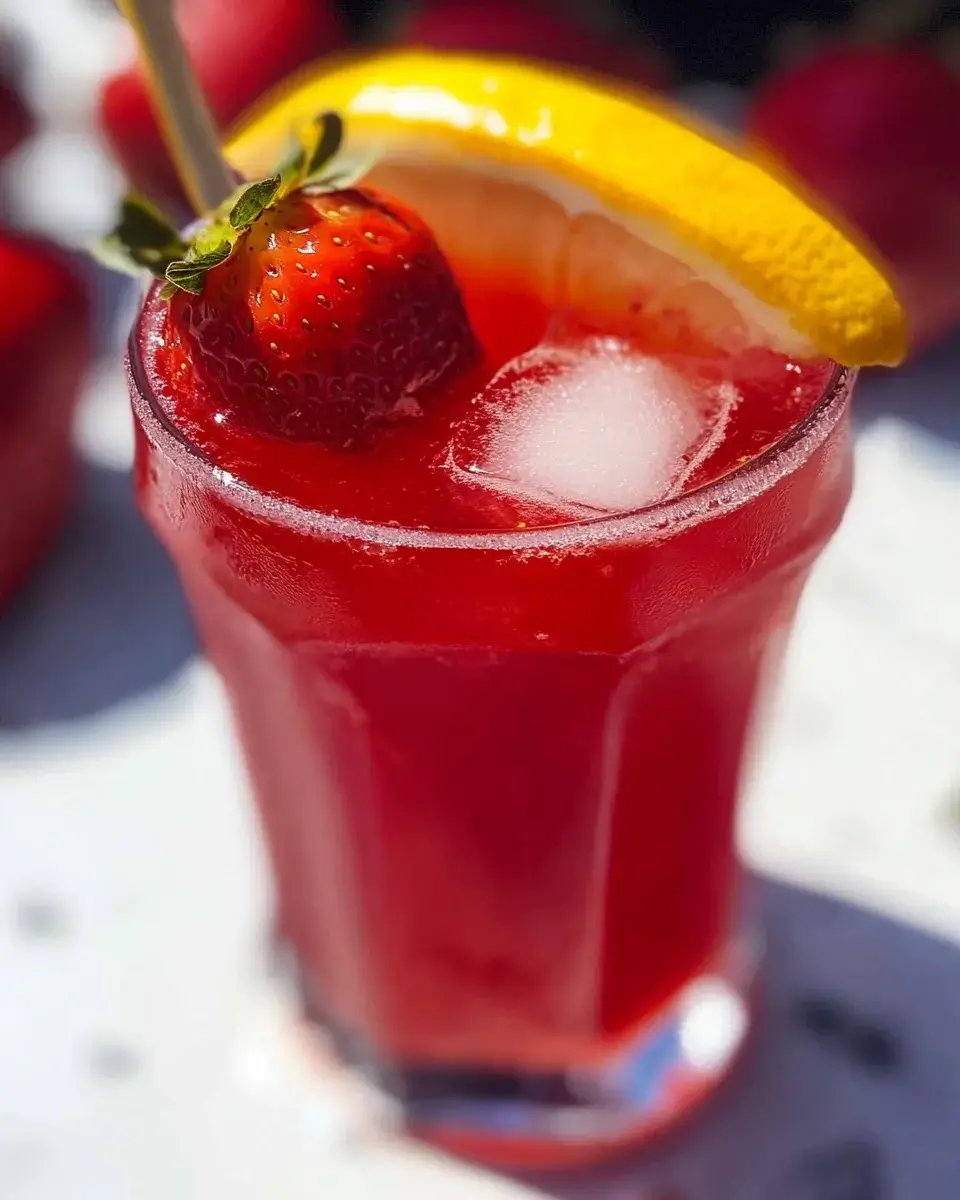
As the summer sun blazes down, I find myself craving something cool and refreshing. That’s where my Hibiscus Strawberry Refresher comes in! This delightful drink is not just a treat for the taste buds; it’s a quick solution for those busy days when you need a little pick-me-up. With vibrant hibiscus flowers and juicy strawberries, it’s like summer in a glass. Plus, it’s easy to whip up, making it perfect for impressing friends or simply enjoying a moment of bliss on your porch. Trust me, this is one sip you won’t forget!
Why You’ll Love This Hibiscus Strawberry Refresher
This Hibiscus Strawberry Refresher is a game-changer for busy moms and professionals alike. It’s incredibly easy to make, taking just a few simple steps. The vibrant flavors of hibiscus and strawberries dance together, creating a taste that’s both refreshing and satisfying. Plus, it’s a guilt-free treat, perfect for those hot summer days. You’ll love how it brightens your day and impresses your loved ones without breaking a sweat!
Ingredients for Hibiscus Strawberry Refresher
Gathering the right ingredients is the first step to creating your Hibiscus Strawberry Refresher. Here’s what you’ll need:
Water: The base of your drink, it helps extract the vibrant flavors from the hibiscus flowers.
Dried hibiscus flowers: These beautiful petals give the drink its stunning color and tart flavor. You can find them at health food stores or online.
Fresh strawberries: Sweet and juicy, they add a delightful contrast to the tartness of hibiscus. Make sure they’re ripe for the best flavor!
Honey or agave syrup: This natural sweetener balances the tartness. Adjust the amount to suit your taste; you can even use maple syrup for a unique twist.
Fresh lime juice: A splash of lime brightens the drink and adds a zesty kick. Freshly squeezed is always best!
Ice cubes: Essential for serving, they keep your refresher chilled and refreshing.
Fresh mint leaves (optional): These add a lovely aroma and a pop of color when garnishing your drink.
For exact measurements, check the bottom of the article where you can find everything listed for easy printing. Feel free to get creative with your ingredients; after all, cooking is all about experimenting!
How to Make Hibiscus Strawberry Refresher
Now that you have your ingredients ready, let’s dive into making this delightful Hibiscus Strawberry Refresher. Follow these simple steps, and you’ll have a refreshing summer drink in no time!
Step 1: Boil the Water
Start by pouring 2 cups of water into a medium saucepan. Place it on the stove and bring it to a rolling boil. This is the first step in unlocking the vibrant flavors of the hibiscus flowers.
Step 2: Steep the Hibiscus Flowers
Once the water is boiling, remove the saucepan from heat. Add in the dried hibiscus flowers and let them steep for about 15 minutes. The longer you steep, the richer the color and flavor will be. It’s like watching a beautiful sunset unfold in your pot!
Step 3: Strain the Tea
After steeping, grab a fine mesh strainer and pour the hibiscus tea into a pitcher. Discard the flowers; they’ve done their job! You’ll be left with a stunning ruby-red liquid that’s just begging to be enjoyed.
Step 4: Sweeten the Mixture
While the tea is still warm, stir in your choice of honey or agave syrup. This is where you can adjust the sweetness to your liking. Just remember, a little goes a long way! Mix until fully dissolved, and let the sweetness dance with the tartness of the hibiscus.
Step 5: Add Strawberries and Lime Juice
Next, toss in the sliced fresh strawberries and pour in the fresh lime juice. The strawberries will infuse their sweetness, while the lime adds a zesty kick. Give it a gentle stir, and let those flavors mingle!
Step 6: Chill the Refresher
Allow the mixture to cool to room temperature. Then, pop it in the refrigerator for at least an hour. This chilling step is crucial for a refreshing sip on a hot day. Trust me, the wait will be worth it!
Step 7: Serve and Garnish
When you’re ready to serve, fill a glass with ice cubes and pour the chilled refresher over the top. For an extra touch, garnish with fresh mint leaves. Not only does it look beautiful, but it also adds a lovely aroma. Cheers to summer!
Tips for Success
Use fresh, ripe strawberries for the best flavor.
Adjust the sweetness to your preference; taste as you go!
For a fun twist, add a splash of sparkling water before serving.
Make a larger batch and store it in the fridge for quick access.
Experiment with other fruits like raspberries or blueberries for variety.
Equipment Needed
Medium saucepan: A regular pot works just fine if you don’t have one.
Fine mesh strainer: A regular colander can be used in a pinch.
Pitcher: Any large container will do for mixing and serving.
Measuring cups: Use any cup you have on hand for approximate measurements.
Variations
Berry Medley: Swap out strawberries for a mix of your favorite berries like blueberries, raspberries, or blackberries for a colorful twist.
Herbal Infusion: Add a few sprigs of fresh basil or rosemary while steeping the hibiscus for an aromatic herbal note.
Spicy Kick: For those who enjoy a bit of heat, add a slice of jalapeño to the mixture before chilling.
Alcoholic Version: Turn this refresher into a cocktail by adding a splash of vodka or rum for a fun summer drink.
Low-Calorie Option: Use a sugar substitute like stevia or monk fruit to reduce calories while still enjoying the sweetness.
Serving Suggestions
Pair your Hibiscus Strawberry Refresher with light summer salads for a refreshing meal.
Serve alongside grilled chicken or fish for a delightful contrast of flavors.
For a festive touch, use mason jars for serving and add colorful straws.
Enjoy with a slice of lemon or lime on the rim for added zest.
FAQs about Hibiscus Strawberry Refresher
Can I make Hibiscus Strawberry Refresher ahead of time?
Absolutely! This refreshing beverage can be made a day in advance. Just store it in the refrigerator, and it will be ready to serve when you need it. The flavors may even deepen overnight, making it even more delicious!
Is Hibiscus Strawberry Refresher suitable for kids?
Yes! This drink is a great option for kids. It’s naturally sweetened and packed with fruity flavors. Just be mindful of the sweetness level, and feel free to adjust it to suit their taste buds.
Can I use fresh hibiscus flowers instead of dried?
While dried hibiscus flowers are typically used for their concentrated flavor, you can use fresh hibiscus if you have access to them. Just remember that the flavor may be milder, so you might need to adjust the steeping time.
How long can I store the Hibiscus Strawberry Refresher?
This delightful drink can be stored in the refrigerator for up to three days. Just make sure to keep it in an airtight container to maintain its freshness. Give it a good stir before serving, as the ingredients may settle.
Can I add other fruits to the Hibiscus Strawberry Refresher?
Definitely! Feel free to experiment with other fruits like raspberries, blueberries, or even citrus slices. Each fruit will bring its unique flavor, making your refresher even more exciting!
Final Thoughts
Creating this Hibiscus Strawberry Refresher is more than just making a drink; it’s about embracing the joy of summer. Each sip transports me to sun-drenched afternoons, where laughter and good company fill the air. The vibrant colors and refreshing flavors bring a smile to my face, reminding me of the simple pleasures in life. Whether you’re hosting a gathering or enjoying a quiet moment, this refresher is sure to brighten your day. So, gather your ingredients, and let this delightful drink become a staple in your summer routine. Cheers to refreshing moments and cherished memories!
ating
Hibiscus Strawberry Refresher: Refresh Your Summer Sip!
A refreshing summer drink made with hibiscus flowers and strawberries, perfect for hot days.
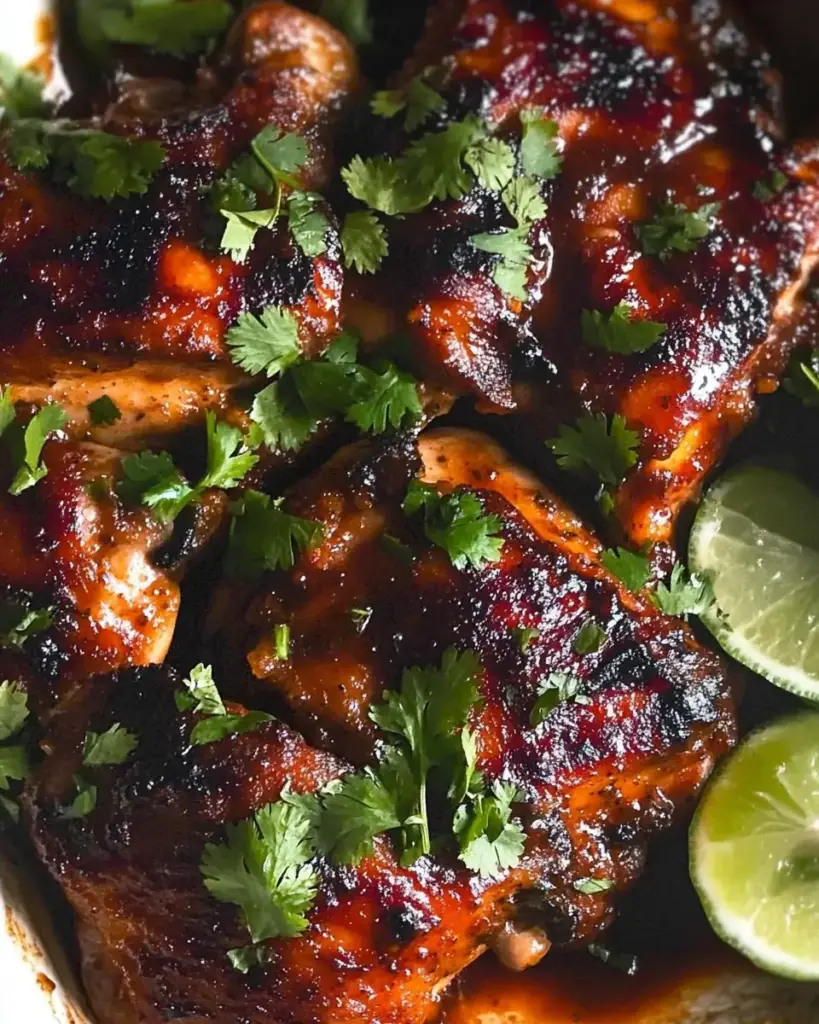
These Sticky Cilantro Lime Chicken Thighs are the perfect balance of tangy, savory, and slightly sweet flavors. Marinated in a zesty cilantro-lime sauce and cooked to perfection, the chicken thighs turn crispy on the outside while remaining tender and juicy on the inside. The sticky glaze creates a mouthwatering finish that will have you coming back for more. Whether you’re serving them with rice, salad, or just on their own, these chicken thighs are sure to steal the show at any meal. Simple to make but full of vibrant, bold flavors—get ready for a dish that’s as satisfying as it is delicious!
Why You’ll Love This Sticky Cilantro Lime Chicken Thighs
This recipe is a game-changer for busy nights! It’s incredibly easy to prepare, requiring just a few simple ingredients that you probably already have in your pantry. The marinade infuses the chicken with a delightful balance of sweet and tangy flavors, making it a hit with both kids and adults. Plus, whether you grill or bake, the cooking time is quick, allowing you to enjoy a delicious meal without the fuss!
Ingredients for Sticky Cilantro Lime Chicken Thighs
Gathering the right ingredients is key to making these Sticky Cilantro Lime Chicken Thighs shine. Here’s what you’ll need:
Bone-in, skin-on chicken thighs: These are juicy and flavorful, perfect for soaking up the marinade.
Fresh lime juice: The star of the show! It adds a zesty brightness that elevates the dish.
Honey: This natural sweetener balances the acidity of the lime, creating that sticky goodness.
Soy sauce: It brings a savory depth to the marinade, enhancing the overall flavor.
Olive oil: Helps to keep the chicken moist while adding richness.
Garlic: Minced garlic adds a punch of flavor that complements the other ingredients beautifully.
Ground cumin: This spice adds warmth and a hint of earthiness to the dish.
Black pepper: A simple seasoning that enhances the overall taste.
Red pepper flakes (optional): For those who like a little heat, these can spice things up!
Fresh cilantro: Chopped cilantro adds a fresh, herbaceous note that brightens the dish.
Lime wedges: For serving, these add an extra burst of freshness when squeezed over the chicken.
For exact measurements, check the bottom of the article where you can find everything listed for easy printing. Feel free to get creative with your ingredients! You can substitute chicken thighs with boneless, skinless chicken breasts for a lighter option, just remember to adjust the cooking time accordingly. Happy cooking!
How to Make Sticky Cilantro Lime Chicken Thighs
Now that you have all your ingredients ready, let’s dive into the steps to create these mouthwatering Sticky Cilantro Lime Chicken Thighs. Follow along, and I promise you’ll have a dish that’s bursting with flavor!
Step 1: Prepare the Marinade
Start by grabbing a large bowl. Whisk together the fresh lime juice, honey, soy sauce, olive oil, minced garlic, ground cumin, black pepper, and red pepper flakes if you’re feeling adventurous. This marinade is the magic potion that will transform your chicken into a sticky, flavorful delight!
Step 2: Marinate the Chicken
Next, add the chicken thighs to the bowl, ensuring they are fully coated in that luscious marinade. Cover the bowl with plastic wrap and pop it in the fridge. Let it marinate for at least an hour, but if you can, aim for four hours. The longer, the better! This allows the flavors to really sink in.
Step 3: Preheat the Grill or Oven
While the chicken is soaking up all that goodness, it’s time to preheat your grill or oven. If you’re grilling, set it to medium-high heat. For baking, preheat your oven to 400°F (200°C). If you’re using a grill, don’t forget to lightly oil the grates to prevent sticking!
Step 4: Cook the Chicken
Once your grill or oven is ready, it’s showtime! Remove the chicken from the marinade, but don’t toss that marinade just yet. If grilling, place the chicken thighs skin-side down and grill for about 6-8 minutes. Flip them over and grill for another 6-8 minutes until they reach an internal temperature of 165°F (75°C). If baking, arrange the chicken on a baking sheet and bake for 35-40 minutes, basting with the reserved marinade halfway through for extra flavor.
Step 5: Rest and Garnish
After cooking, let the chicken rest for about 5 minutes. This helps keep it juicy! Once rested, garnish with freshly chopped cilantro and serve with lime wedges. Squeeze that lime over the chicken for an extra zing. Enjoy your delicious creation!
Tips for Success
Always marinate the chicken for at least an hour; longer is better for flavor.
Use a meat thermometer to ensure your chicken reaches 165°F (75°C) for perfect doneness.
Don’t skip the resting time after cooking; it keeps the chicken juicy.
Feel free to customize the marinade with your favorite herbs or spices.
For a smoky flavor, try adding a dash of smoked paprika to the marinade.
Equipment Needed
Large bowl: For mixing the marinade. A mixing jug works too!
Whisk: To blend the marinade ingredients. A fork can do the trick as well.
Grill or oven: For cooking the chicken. A stovetop grill pan is a great alternative.
Meat thermometer: To check doneness. If you don’t have one, just cut into the chicken to check for clear juices.
Variations
Spicy Cilantro Lime Chicken: Add diced jalapeños to the marinade for an extra kick.
Herb-Infused: Mix in fresh herbs like parsley or basil for a unique twist on flavor.
Honey Mustard Version: Substitute half of the honey with Dijon mustard for a tangy sweetness.
Low-Carb Option: Use a sugar-free honey substitute to keep it keto-friendly.
Vegetarian Delight: Swap chicken for firm tofu or portobello mushrooms, marinating them the same way.
Serving Suggestions
Pair with fluffy jasmine rice or quinoa to soak up the delicious marinade.
Serve alongside a fresh garden salad for a light, refreshing contrast.
Complement with grilled vegetables for a colorful plate.
Enjoy with a chilled glass of white wine or a zesty margarita.
Garnish with extra cilantro and lime wedges for a vibrant presentation.
FAQs about Sticky Cilantro Lime Chicken Thighs
Can I use boneless chicken thighs for this recipe?
Absolutely! Boneless chicken thighs work well, but remember to reduce the cooking time. They usually cook faster, so keep an eye on them to avoid drying out.
How long can I marinate the chicken?
You can marinate the chicken for as little as one hour, but for the best flavor, aim for four hours or even overnight. Just make sure to keep it in the fridge!
What can I serve with Sticky Cilantro Lime Chicken Thighs?
This dish pairs beautifully with jasmine rice, a fresh salad, or grilled veggies. You can also enjoy it in tacos for a fun twist!
Can I make this recipe ahead of time?
Yes! You can marinate the chicken a day in advance. Just cook it when you’re ready to enjoy a delicious meal without the last-minute rush.
Is this recipe gluten-free?
Yes, as long as you use gluten-free soy sauce, this recipe is gluten-free. It’s a great option for those with dietary restrictions!
Final Thoughts
Cooking should be a joyful experience, and my Sticky Cilantro Lime Chicken Thighs recipe embodies that spirit! The vibrant flavors and simple preparation make it a go-to for busy nights or special gatherings. Each bite is a delightful blend of sweet and tangy, sure to bring smiles to your family’s faces. Plus, the versatility of this dish means you can adapt it to suit your tastes. So, gather your loved ones around the table, savor the moment, and enjoy the satisfaction of creating something truly delicious. Happy cooking, friends!
“`
ating
Sticky Cilantro Lime Chicken Thighs: A Flavorful Delight!
Sticky Cilantro Lime Chicken Thighs are a flavorful and juicy dish marinated in a zesty lime and honey sauce, perfect for grilling or baking.
In a large bowl, whisk together lime juice, honey, soy sauce, olive oil, minced garlic, cumin, black pepper, and red pepper flakes (if using) until well combined.
Add the chicken thighs to the marinade, ensuring they are fully coated. Cover and refrigerate for at least 1 hour, or up to 4 hours for more flavor.
Preheat your grill or oven to 400°F (200°C). If using a grill, lightly oil the grates.
Remove the chicken from the marinade, reserving the marinade for later.
Grill the chicken thighs skin-side down for about 6-8 minutes, then flip and grill for another 6-8 minutes until the internal temperature reaches 165°F (75°C). If baking, place the chicken on a baking sheet and bake for 35-40 minutes, basting with the reserved marinade halfway through.
Once cooked, remove the chicken from the grill or oven and let it rest for 5 minutes.
Garnish with chopped cilantro and serve with lime wedges.
Notes
For a spicier kick, add a diced jalapeño to the marinade.
For a lighter option, substitute chicken thighs with boneless, skinless chicken breasts and reduce cooking time accordingly.
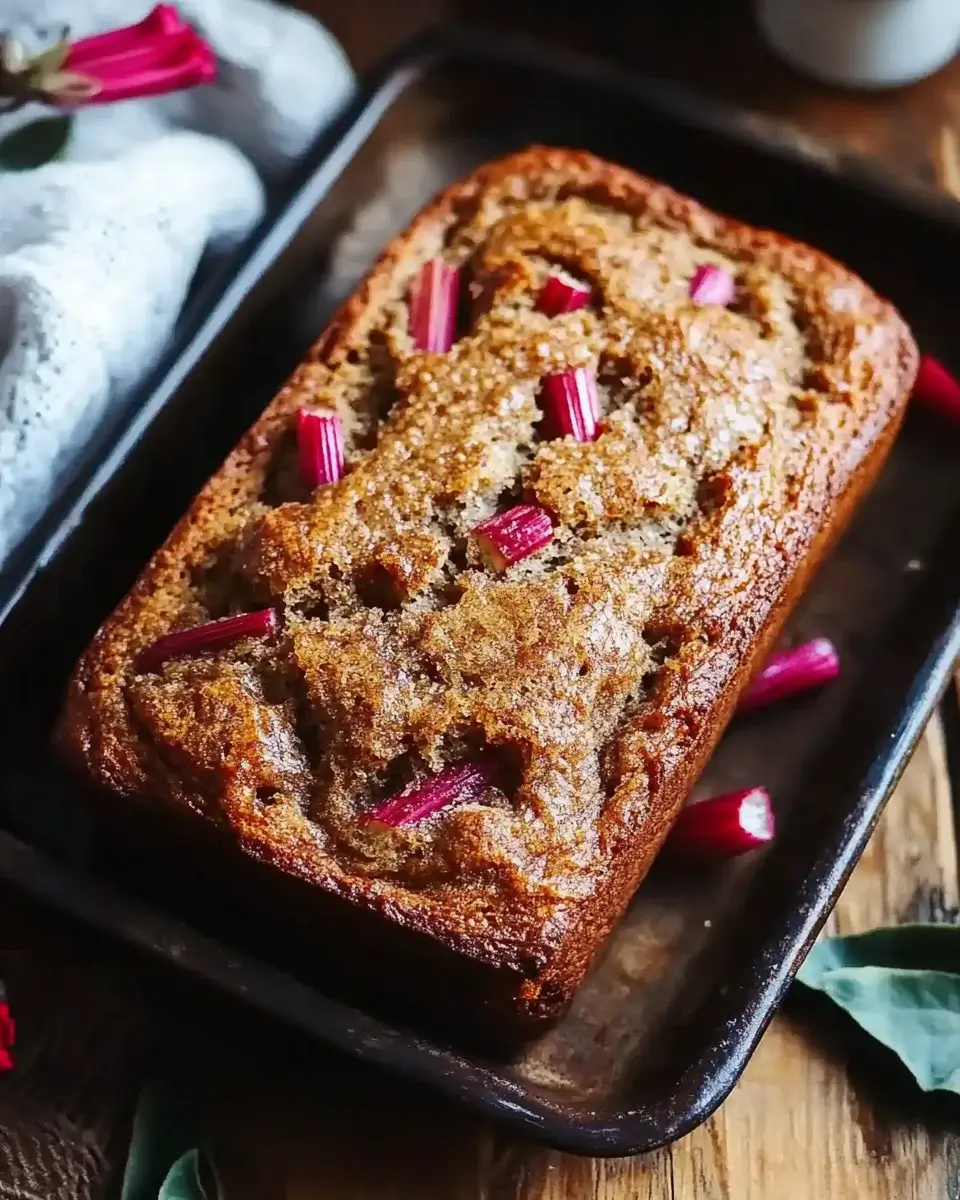
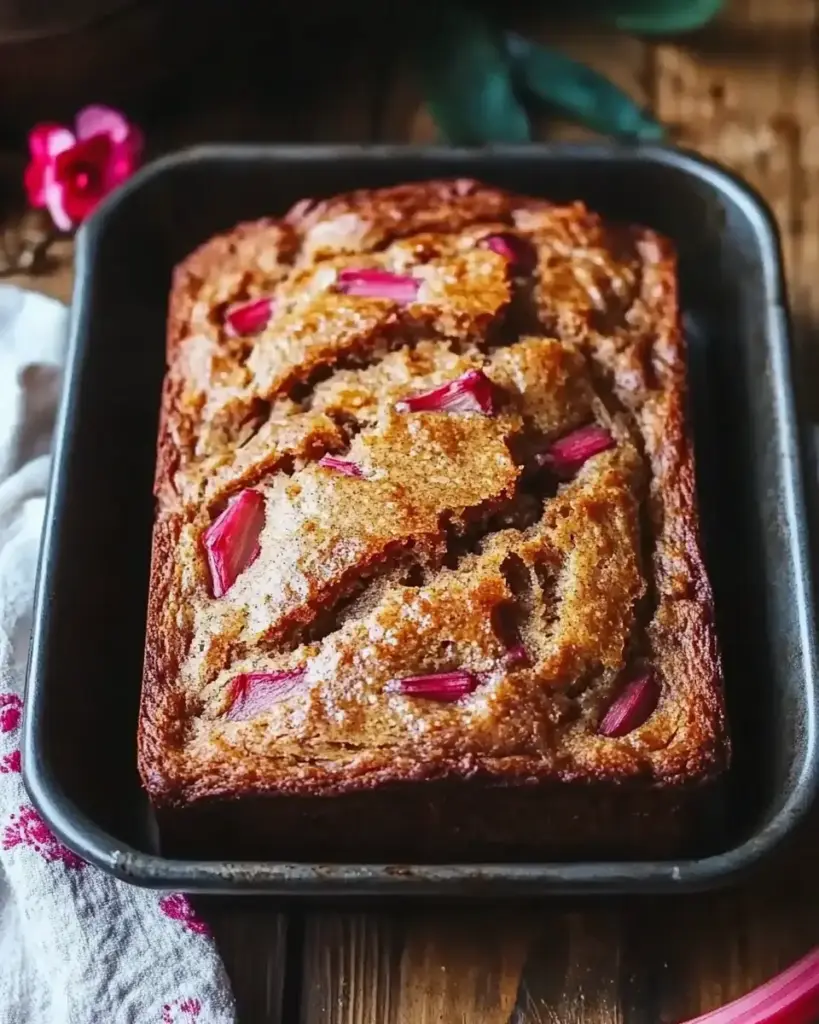
This Cinnamon Rhubarb Bread is the perfect way to celebrate the unique tartness of rhubarb paired with the warmth of cinnamon. The soft, moist bread is swirled with a rich cinnamon-sugar blend, creating an irresistible sweet-spicy aroma as it bakes. With a slightly tangy kick from the rhubarb and a tender crumb, this bread is a cozy treat for breakfast, dessert, or anytime you crave a comforting snack. Whether you enjoy it fresh out of the oven or toasted with a pat of butter, this Cinnamon Rhubarb Bread is sure to become a favorite in your baking repertoire!
Why You’ll Love This Cinnamon Rhubarb Bread
This Cinnamon Rhubarb Bread is not just a treat for your taste buds; it’s a lifesaver for your busy schedule. It comes together quickly, making it perfect for those hectic mornings or last-minute gatherings. The combination of sweet and tart flavors is simply divine, and the warm cinnamon adds a cozy touch. Plus, it’s a fantastic way to sneak in some fruit, making it a guilt-free indulgence!
Ingredients for Cinnamon Rhubarb Bread
Gathering the right ingredients is the first step to creating your Cinnamon Rhubarb Bread. Here’s what you’ll need:
All-purpose flour: This is the base of your bread, providing structure and texture.
Baking powder: A leavening agent that helps the bread rise, making it light and fluffy.
Baking soda: Another leavening agent that works with acidic ingredients like buttermilk.
Salt: Enhances the flavors and balances the sweetness of the bread.
Ground cinnamon: Adds warmth and a delightful aroma, making every bite comforting.
Unsalted butter: Provides richness and moisture; make sure it’s softened for easy mixing.
Granulated sugar: Sweetens the bread and helps create a lovely crust.
Large eggs: Bind the ingredients together and add moisture.
Vanilla extract: A splash of flavor that complements the cinnamon and rhubarb beautifully.
Buttermilk: Adds tanginess and keeps the bread moist; you can substitute with regular milk mixed with a bit of vinegar.
Chopped rhubarb: The star of the show! Its tartness balances the sweetness perfectly.
Chopped walnuts or pecans (optional): For a delightful crunch and added flavor.
Brown sugar and ground cinnamon (for topping): This mixture creates a sweet, crunchy topping that’s simply irresistible.
For exact measurements, check the bottom of the article where you can find everything listed for easy printing. Happy baking!
How to Make Cinnamon Rhubarb Bread
Now that you have your ingredients ready, let’s dive into the fun part: making your Cinnamon Rhubarb Bread. Follow these simple steps, and you’ll have a delicious loaf in no time!
Step 1: Preheat the Oven
First things first, preheat your oven to 350°F (175°C). This ensures your bread bakes evenly. While the oven warms up, prepare your loaf pan by greasing it or lining it with parchment paper. This little step makes for easy removal later!
Step 2: Mix Dry Ingredients
In a medium bowl, whisk together the all-purpose flour, baking powder, baking soda, salt, and ground cinnamon. This mixture is the backbone of your Cinnamon Rhubarb Bread. Set it aside for now; it’ll be ready to join the party soon!
Step 3: Cream Butter and Sugar
In a large mixing bowl, cream together the softened butter and granulated sugar until it’s light and fluffy. This step is crucial as it incorporates air into the mixture, giving your bread a lovely texture. You’ll know it’s ready when it looks pale and fluffy!
Step 4: Add Eggs and Vanilla
Next, beat in the eggs one at a time. Make sure to mix well after each addition. Then, stir in the vanilla extract. The aroma of vanilla combined with butter and sugar is simply heavenly!
Step 5: Combine Ingredients
Now, it’s time to bring everything together. Gradually add the dry ingredients to the butter mixture, alternating with the buttermilk. Start and end with the dry ingredients. Mix until just combined; overmixing can lead to a dense loaf, and we want it light and fluffy!
Step 6: Fold in Rhubarb and Nuts
Gently fold in the chopped rhubarb and nuts, if you’re using them. This is where the magic happens! The tartness of the rhubarb will shine through, balancing the sweetness of the bread.
Step 7: Prepare for Baking
Pour the batter into your prepared loaf pan and smooth the top with a spatula. This helps it bake evenly. You’re almost there!
Step 8: Add Topping
In a small bowl, mix the brown sugar and ground cinnamon for the topping. Sprinkle this mixture evenly over the batter. This will create a sweet, crunchy layer that’s simply irresistible!
Step 9: Bake
Now, pop your loaf pan into the oven and bake for 55-65 minutes. Keep an eye on it! You’ll know it’s done when a toothpick inserted into the center comes out clean. The smell wafting through your kitchen will be worth the wait!
Step 10: Cool
Once baked, allow the bread to cool in the pan for about 10 minutes. Then, transfer it to a wire rack to cool completely. This step is essential for achieving the perfect texture. Plus, it gives you a moment to savor the delightful aroma!
Tips for Success
Make sure your butter is softened for easy mixing; it should be at room temperature.
Don’t skip the cooling step; it helps the bread set and enhances the flavor.
Use fresh rhubarb for the best taste, but frozen works just fine too!
For a fun twist, try adding chocolate chips or a sprinkle of nutmeg.
Store leftovers in an airtight container to keep it fresh longer.
Equipment Needed
9×5-inch loaf pan: Essential for baking your bread; a round cake pan can work in a pinch.
Mixing bowls: Use a large bowl for wet ingredients and a medium one for dry; any size will do.
Whisk: Perfect for mixing dry ingredients; a fork can also get the job done.
Spatula: Great for folding in ingredients; a wooden spoon is a good alternative.
Measuring cups and spoons: Necessary for accuracy; you can use a kitchen scale if you prefer.
Variations
Berry Bliss: Substitute rhubarb with fresh or frozen berries like strawberries or blueberries for a sweeter twist.
Nutty Delight: Add a mix of chopped nuts, such as almonds or pecans, for extra crunch and flavor.
Gluten-Free Option: Use a gluten-free all-purpose flour blend to make this bread suitable for gluten-sensitive friends.
Vegan Version: Replace eggs with flaxseed meal mixed with water and use plant-based butter and milk.
Spiced Up: Add a pinch of nutmeg or ginger for an extra layer of warmth and spice.
Serving Suggestions
Enjoy a warm slice of Cinnamon Rhubarb Bread with a pat of butter for a cozy breakfast.
Pair it with a cup of hot tea or coffee for a delightful afternoon snack.
Serve with fresh fruit or yogurt for a light and refreshing dessert.
For a special touch, dust with powdered sugar before serving.
FAQs about Cinnamon Rhubarb Bread
As you embark on your baking adventure with Cinnamon Rhubarb Bread, you might have a few questions. Here are some common queries I’ve encountered, along with helpful answers to guide you along the way!
Can I use frozen rhubarb in this recipe?
Absolutely! Frozen rhubarb works just as well as fresh. Just make sure to chop it while still frozen to prevent it from becoming mushy.
How do I store leftover Cinnamon Rhubarb Bread?
Store your bread in an airtight container at room temperature for up to three days. For longer storage, wrap it tightly in plastic wrap and freeze it for up to three months.
Can I make this bread ahead of time?
Yes! You can bake it a day in advance. Just let it cool completely before storing it. The flavors will meld beautifully overnight!
What can I substitute for buttermilk?
If you don’t have buttermilk on hand, mix one cup of regular milk with a tablespoon of vinegar or lemon juice. Let it sit for about five minutes, and you’re good to go!
Is this recipe suitable for a gluten-free diet?
Yes! You can easily make a gluten-free version by using a gluten-free all-purpose flour blend. Just ensure it contains xanthan gum for the best texture.
Final Thoughts
There’s something truly special about baking Cinnamon Rhubarb Bread. It’s not just about the delicious flavors; it’s about the memories created in the kitchen. The warm aroma wafting through your home invites everyone to gather around, sharing stories and laughter. Each slice is a reminder that even on the busiest days, we can carve out a moment of joy. Whether you enjoy it fresh from the oven or as a delightful snack later, this bread brings comfort and happiness. So, roll up your sleeves and let this recipe become a cherished part of your family traditions!
“`
ating
Cinnamon Rhubarb Bread: A Deliciously Unique Recipe!
Cinnamon Rhubarb Bread is a deliciously unique recipe that combines the tartness of rhubarb with the warm flavors of cinnamon, creating a delightful loaf perfect for any occasion.
Preheat your oven to 350°F (175°C). Grease a 9×5-inch loaf pan or line it with parchment paper.
In a medium bowl, whisk together the flour, baking powder, baking soda, salt, and ground cinnamon. Set aside.
In a large mixing bowl, cream together the softened butter and granulated sugar until light and fluffy.
Beat in the eggs one at a time, then stir in the vanilla extract.
Gradually add the dry ingredients to the butter mixture, alternating with the buttermilk. Begin and end with the dry ingredients, mixing until just combined.
Gently fold in the chopped rhubarb and nuts, if using.
Pour the batter into the prepared loaf pan and smooth the top.
In a small bowl, mix the brown sugar and ground cinnamon for the topping, then sprinkle it evenly over the batter.
Bake for 55-65 minutes, or until a toothpick inserted into the center comes out clean.
Allow the bread to cool in the pan for about 10 minutes before transferring it to a wire rack to cool completely.
Notes
For a sweeter twist, add 1/2 cup of chocolate chips to the batter.
If rhubarb is not available, substitute it with chopped strawberries or apples for a different flavor profile.
Grilled Mango Chicken Recipe. This delightful meal combines the juicy flavors of grilled chicken with the sweetness of ripe mango, creating a perfect balance that tantalizes your taste buds. Whether you’re hosting a summer barbecue or simply enjoying a weeknight dinner, this recipe is sure to become a favorite.
What Makes Grilled Mango Chicken Recipe Special?
Grilled Mango Chicken Recipe apart is its unique blend of flavors. The marinade, made with fresh lime juice, honey, and spices, infuses the chicken with a zesty kick. The addition of mango not only adds sweetness but also brings a tropical flair to the dish. This recipe is not just about taste; it’s also about health. With lean protein from the chicken and vitamins from the mango, it’s a nutritious choice for any meal.
Moreover, grilling the chicken enhances its natural flavors while giving it a beautiful char. The process is simple and quick, making it perfect for busy weeknights or casual gatherings. Plus, the vibrant colors of the dish make it visually appealing, ensuring it stands out on your dinner table.
Grilled Mango Chicken Recipe is special because it combines health, flavor, and ease of preparation. It’s a dish that brings joy to your palate and warmth to your heart. So, let’s dive into the ingredients and get started on this culinary adventure!
Ingredients for Grilled Mango Chicken Recipe
Grilled Mango Chicken Recipe, you’ll need a few simple yet flavorful ingredients. Each component plays a vital role in enhancing the overall taste of the dish. Here’s what you’ll need:
2 large boneless, skinless chicken breasts (about 1 pound total)
1 ripe mango, peeled and diced
1/4 cup fresh lime juice (about 2 limes)
2 tablespoons honey
2 tablespoons olive oil
2 cloves garlic, minced
1 teaspoon ground cumin
1 teaspoon paprika
Salt and pepper to taste
Fresh cilantro, for garnish (optional)
These ingredients are not only easy to find but also packed with flavor. The chicken breasts provide a lean source of protein, while the mango adds a sweet and tropical twist. Lime juice brings a refreshing acidity, balancing the sweetness of honey. Olive oil helps to keep the chicken moist during grilling, and the spices add depth to the marinade.
Grilled Mango Chicken Recipe lies in its versatility. Now that you have your ingredients ready, let’s move on to the preparation steps!
Step-by-Step Preparation of Grilled Mango Chicken Recipe
Grilled Mango Chicken Recipe. This step-by-step guide will help you create a delicious meal that’s sure to impress. Let’s get started!
Step 1: Marinating the Chicken
Grilled Mango Chicken Recipe is marinating the chicken. This process is crucial as it infuses the chicken with flavor. Begin by placing the chicken breasts in a resealable plastic bag or a shallow dish. Next, pour half of the marinade you prepared earlier over the chicken. Make sure the chicken is well-coated.
Seal the bag or cover the dish tightly. Now, let the chicken marinate in the refrigerator for at least 30 minutes. If you have more time, letting it marinate for up to 2 hours will enhance the flavor even more. While the chicken is soaking up all those delicious flavors, you can move on to the next step!
Step 2: Preparing the Mango Salsa
While the chicken is marinating, you can prepare a fresh mango salsa to serve alongside your grilled chicken. This salsa adds a burst of flavor and freshness to the dish. Start by dicing another ripe mango. You can also add diced red onion, chopped jalapeño, and a sprinkle of salt for extra zest.
Grilled Mango Chicken Recipe to a whole new level!
Step 3: Grilling the Chicken
Once your chicken has marinated, it’s time to fire up the grill! Preheat your grill to medium-high heat. Remove the chicken from the marinade and discard the used marinade. Place the chicken breasts on the grill and cook for about 6-7 minutes on each side. You want the internal temperature to reach 165°F for safe consumption.
During the last few minutes of grilling, brush the reserved marinade over the chicken. This adds an extra layer of flavor and keeps the chicken moist. Once cooked, remove the chicken from the grill and let it rest for about 5 minutes. This resting period allows the juices to redistribute, making the chicken even more tender.
Step 4: Serving the Grilled Mango Chicken
Grilled Mango Chicken Recipe! Slice the grilled chicken into strips and arrange it on a serving platter. Top it with the fresh mango salsa you prepared earlier. For an added touch, garnish with fresh cilantro and extra diced mango if desired.
This dish is not only visually appealing but also bursting with flavor. Serve it alongside rice or quinoa for a complete meal. Your family and friends will be amazed at how delicious and easy this recipe is!
Variations of Grilled Mango Chicken Recipe
Grilled Mango Chicken Recipe is delightful on its own, there are many fun variations you can try. These twists can add new flavors and excitement to your meal. Let’s explore a couple of these tasty options!
Spicy Grilled Mango Chicken Recipe
Grilled Mango Chicken Recipe. To do this, simply add a diced jalapeño to the marinade. This will give your chicken a nice kick without overpowering the sweetness of the mango. You can also sprinkle some red pepper flakes for an extra layer of spice. This variation is perfect for those who love bold flavors!
Grilled Mango Chicken Recipe with Coconut Rice
Grilled Mango Chicken Recipe over coconut rice. To make coconut rice, simply cook your rice in coconut milk instead of water. This adds a creamy texture and a hint of sweetness that pairs beautifully with the grilled chicken. The combination of flavors will transport you to a tropical paradise!
Grilled Mango Chicken Recipe!
Cooking Note for Grilled Mango Chicken Recipe
Grilled Mango Chicken Recipe, there are a few cooking notes to keep in mind. These tips will help ensure that your chicken turns out perfectly every time. First, always preheat your grill. This step is crucial for achieving those beautiful grill marks and ensuring even cooking.
Additionally, consider using a meat thermometer to check the internal temperature of the chicken. This tool takes the guesswork out of cooking and guarantees that your chicken is safe to eat. Remember, the ideal temperature is 165°F. If you don’t have a thermometer, you can cut into the chicken to check that the juices run clear.
Another important note is to let the chicken rest after grilling. This resting period allows the juices to redistribute throughout the meat, making it more tender and juicy. If you slice the chicken too soon, you may lose those delicious juices, resulting in a drier texture.
Grilled Mango Chicken Recipe is versatile, so don’t hesitate to make it your own!
Serving Suggestions for Grilled Mango Chicken Recipe
Grilled Mango Chicken Recipe can be just as fun as preparing it! This dish pairs wonderfully with a variety of sides that complement its tropical flavors. Here are some serving suggestions to elevate your meal:
Rice or Quinoa: Serve the grilled chicken over a bed of fluffy rice or quinoa. Both options absorb the flavors of the marinade beautifully.
Salad: A fresh green salad with mixed greens, cherry tomatoes, and avocado makes a light and healthy side. Drizzle with a lime vinaigrette for added zest.
Grilled Vegetables: Grilled zucchini, bell peppers, or asparagus can add color and nutrition to your plate. The smoky flavor from the grill pairs well with the chicken.
Tortillas: For a fun twist, serve the chicken in warm tortillas with the mango salsa. This creates delicious tacos that are perfect for casual gatherings.
Grilled Mango Chicken Recipe will surely impress your guests and make for a memorable dining experience!
Tips for Perfecting Your Grilled Mango Chicken Recipe
Grilled Mango Chicken Recipe turns out perfectly every time, here are some helpful tips to keep in mind:
Choose the Right Chicken: Opt for fresh, high-quality chicken breasts. Organic or free-range options often have better flavor and texture.
Marinate Longer: If time allows, marinate the chicken for longer than 30 minutes. This will deepen the flavors and make the chicken even more delicious.
Don’t Overcrowd the Grill: Give each piece of chicken enough space on the grill. Overcrowding can lead to uneven cooking and steaming instead of grilling.
Use a Basting Brush: Keep a basting brush handy to apply the reserved marinade during grilling. This adds moisture and flavor to the chicken.
Experiment with Garnishes: Fresh herbs like basil or mint can add a unique touch. Try different garnishes to find your favorite combination!
Grilled Mango Chicken Recipe. Enjoy the process and have fun in the kitchen!
Cooking Note for Grilled Mango Chicken Recipe
Grilled Mango Chicken Recipe, there are a few cooking notes to keep in mind. These tips will help ensure that your chicken turns out perfectly every time. First, always preheat your grill. This step is crucial for achieving those beautiful grill marks and ensuring even cooking.
Additionally, consider using a meat thermometer to check the internal temperature of the chicken. This tool takes the guesswork out of cooking and guarantees that your chicken is safe to eat. Remember, the ideal temperature is 165°F. If you don’t have a thermometer, you can cut into the chicken to check that the juices run clear.
Another important note is to let the chicken rest after grilling. This resting period allows the juices to redistribute throughout the meat, making it more tender and juicy. If you slice the chicken too soon, you may lose those delicious juices, resulting in a drier texture.
Grilled Mango Chicken Recipe is versatile, so don’t hesitate to make it your own!
Serving Suggestions for Grilled Mango Chicken Recipe
Grilled Mango Chicken Recipe can be just as fun as preparing it! This dish pairs wonderfully with a variety of sides that complement its tropical flavors. Here are some serving suggestions to elevate your meal:
Rice or Quinoa: Serve the grilled chicken over a bed of fluffy rice or quinoa. Both options absorb the flavors of the marinade beautifully, making each bite delightful.
Fresh Salad: A crisp green salad with mixed greens, cherry tomatoes, and avocado makes a light and healthy side. Drizzle with a lime vinaigrette for added zest and freshness.
Grilled Vegetables: Grilled zucchini, bell peppers, or asparagus can add color and nutrition to your plate. The smoky flavor from the grill pairs well with the chicken, enhancing the overall taste.
Tortillas: For a fun twist, serve the chicken in warm tortillas with the mango salsa. This creates delicious tacos that are perfect for casual gatherings and family dinners.
Coleslaw: A tangy coleslaw can provide a crunchy contrast to the tender chicken. The creaminess of the slaw balances the sweetness of the mango, making for a delightful combination.
Grilled Mango Chicken Recipe will surely impress your guests and make for a memorable dining experience!
Tips for Perfecting Your Grilled Mango Chicken Recipe
Grilled Mango Chicken Recipe turns out perfectly every time, here are some helpful tips to keep in mind:
Choose the Right Chicken: Opt for fresh, high-quality chicken breasts. Organic or free-range options often have better flavor and texture, making your dish even more delicious.
Marinate Longer: If time allows, marinate the chicken for longer than 30 minutes. This will deepen the flavors and make the chicken even more tender and juicy.
Don’t Overcrowd the Grill: Give each piece of chicken enough space on the grill. Overcrowding can lead to uneven cooking and steaming instead of grilling, which can affect the texture.
Use a Basting Brush: Keep a basting brush handy to apply the reserved marinade during grilling. This adds moisture and flavor to the chicken, enhancing its taste.
Experiment with Garnishes: Fresh herbs like basil or mint can add a unique touch. Try different garnishes to find your favorite combination and elevate the presentation of your dish.
Check for Doneness: Always use a meat thermometer to ensure the chicken reaches an internal temperature of 165°F. This guarantees that your chicken is safe to eat and perfectly cooked.
Let It Rest: After grilling, let the chicken rest for about 5 minutes before slicing. This resting period allows the juices to redistribute, making the chicken more tender and flavorful.
Pair with Fresh Ingredients: Consider serving your grilled chicken with fresh ingredients like avocado or a squeeze of lime. These additions can brighten the dish and enhance the overall flavor.
Grilled Mango Chicken Recipe. Enjoy the process and have fun in the kitchen! Your family and friends will surely appreciate the effort you put into creating this delightful meal.
Breakdown of Time for Grilled Mango Chicken Recipe
Grilled Mango Chicken Recipe can help you plan your meal better. Here’s a simple breakdown of the time you’ll need for preparation and cooking.
Prep Time
Grilled Mango Chicken Recipe is approximately 15-20 minutes. This includes gathering your ingredients, marinating the chicken, and preparing the mango salsa. If you choose to marinate the chicken for longer, you can adjust this time accordingly. Remember, the longer you marinate, the more flavorful your chicken will be!
Cooking Time
Once your chicken is marinated, the cooking time is about 12-15 minutes. This includes grilling the chicken for 6-7 minutes on each side. Make sure to check the internal temperature to ensure it reaches 165°F for safe consumption. During the last few minutes, you can brush on the reserved marinade for added flavor.
Total Time
Grilled Mango Chicken Recipe to take around 45 minutes to 2 hours, depending on how long you choose to marinate the chicken. If you opt for the minimum marinating time of 30 minutes, your total time will be closer to 45 minutes. However, if you let it marinate for 2 hours, the total time will be about 2 hours and 15 minutes. This flexibility allows you to fit the recipe into your schedule easily!
With this time breakdown, you can efficiently plan your cooking and enjoy a delicious meal without any rush. Happy cooking!
Nutritional Information for Grilled Mango Chicken Recipe
Grilled Mango Chicken Recipe is essential for those who are health-conscious or following specific dietary plans. This dish not only tastes great but also provides a balanced meal with lean protein and essential nutrients. Here’s a closer look at the nutritional information per serving:
Calories
Grilled Mango Chicken Recipe contains approximately 250 calories. This makes it a light yet satisfying option for lunch or dinner. The combination of chicken and mango provides a good source of energy without excessive calories, making it a great choice for those watching their intake.
Protein
One of the standout features of this recipe is its protein content. Each serving offers about 30 grams of protein. This high protein content is beneficial for muscle repair and growth, making it an excellent meal for active individuals or anyone looking to maintain a healthy diet. The lean chicken breasts are a fantastic source of protein, helping you feel full and satisfied.
Sodium
Grilled Mango Chicken Recipe is relatively low, making it a heart-healthy option. Each serving contains around 300 milligrams of sodium, depending on how much salt you add during preparation. This allows you to enjoy flavorful chicken without worrying about excessive sodium intake, which is important for maintaining healthy blood pressure levels.
Grilled Mango Chicken Recipe is not only delicious but also nutritious. With a good balance of calories, protein, and low sodium, it’s a meal that supports a healthy lifestyle. Enjoy this dish knowing you’re making a smart choice for your health!
FAQs about Grilled Mango Chicken Recipe
Can I use frozen chicken for the Grilled Mango Chicken Recipe?
Grilled Mango Chicken Recipe. However, it’s important to thaw the chicken completely before marinating. You can do this by placing the chicken in the refrigerator overnight or using the defrost setting on your microwave. Once thawed, follow the marinating and cooking instructions as usual. Just remember that cooking times may vary slightly, so always check the internal temperature to ensure it reaches 165°F.
What can I serve with Grilled Mango Chicken Recipe?
Grilled Mango Chicken Recipe pairs well with a variety of sides. You can serve it over rice or quinoa for a hearty meal. Fresh salads, grilled vegetables, or even warm tortillas with mango salsa are great options too. For a tropical twist, consider coconut rice or a refreshing coleslaw. These sides not only complement the chicken but also enhance the overall dining experience.
How do I store leftovers of Grilled Mango Chicken Recipe?
Grilled Mango Chicken Recipe, let the chicken cool completely before placing it in an airtight container. You can keep it in the refrigerator for up to 3-4 days. If you want to store it for a longer period, consider freezing the chicken. Wrap it tightly in plastic wrap or aluminum foil, then place it in a freezer-safe bag. It can last in the freezer for up to 3 months. When ready to eat, thaw it in the refrigerator and reheat thoroughly before serving.
Can I make the Grilled Mango Chicken Recipe ahead of time?
Grilled Mango Chicken Recipe can be made ahead of time. You can marinate the chicken a day in advance and store it in the refrigerator. This allows the flavors to develop even more. Additionally, you can grill the chicken ahead of time and store it in the fridge. Just reheat it gently before serving. This makes it a convenient option for meal prep or when hosting guests!
Conclusion on Grilled Mango Chicken Recipe
Grilled Mango Chicken Recipe is a delightful dish that brings together the best of both worlds: flavor and nutrition. With its vibrant ingredients and simple preparation, this recipe is perfect for any occasion, whether it’s a casual family dinner or a festive gathering with friends. The combination of juicy grilled chicken and sweet mango creates a mouthwatering experience that is sure to impress.
Grilled Mango Chicken Recipe means you can adapt it to suit your taste preferences or dietary needs.
Moreover, the nutritional benefits of this recipe make it a smart choice for those looking to maintain a healthy lifestyle. With its high protein content and low calories, it supports your health goals while satisfying your taste buds. So, whether you’re grilling for a crowd or just for yourself, this recipe is bound to become a staple in your kitchen.
Grilled Mango Chicken Recipe is not just a meal; it’s an experience that brings joy and flavor to your dining table. Happy grilling!
Paul
Grilled Mango Chicken is a must-try summer dish!
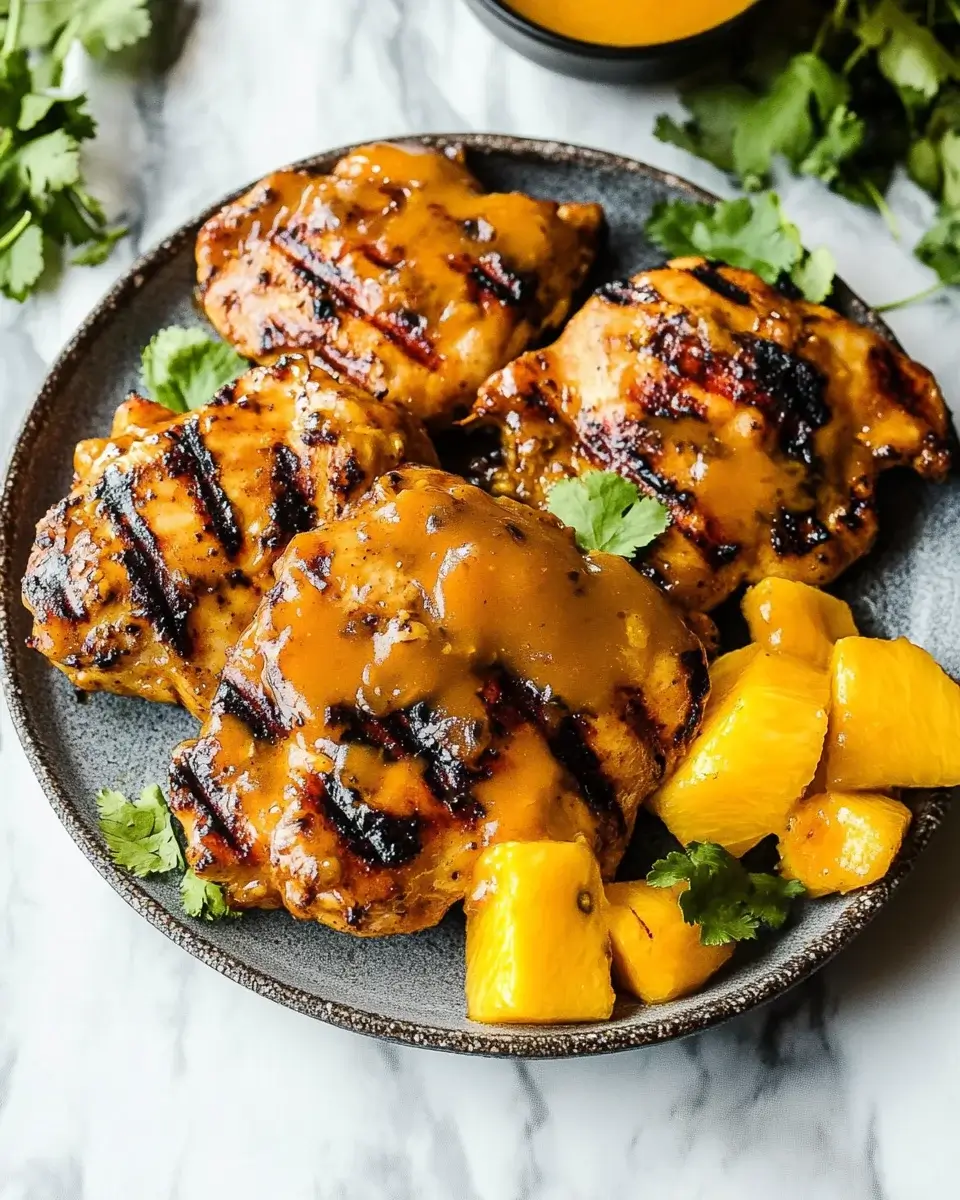
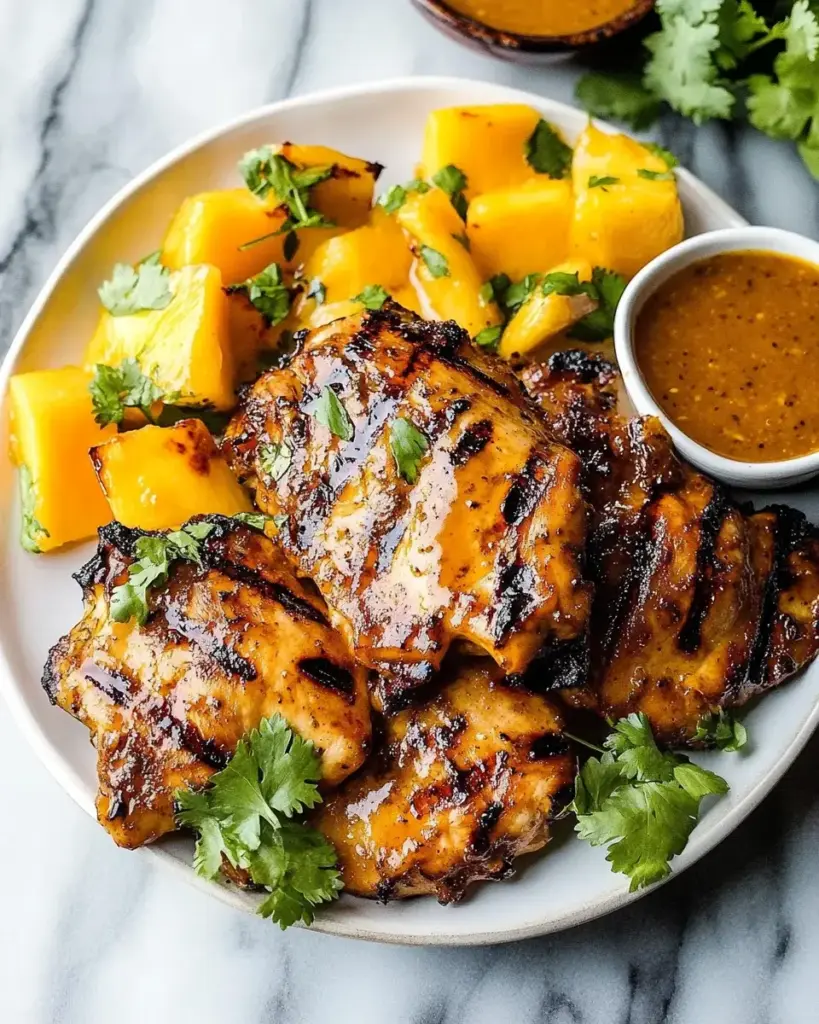
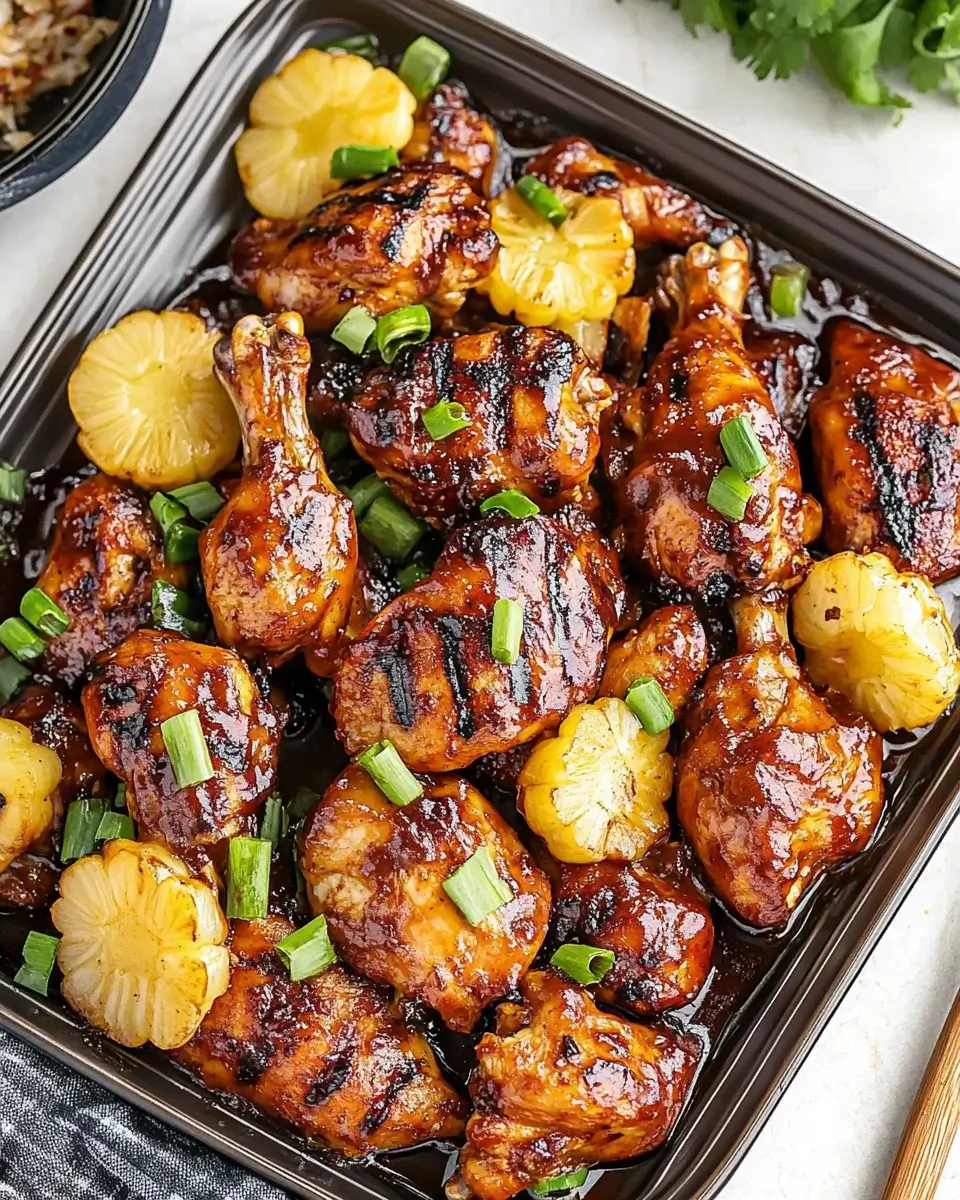
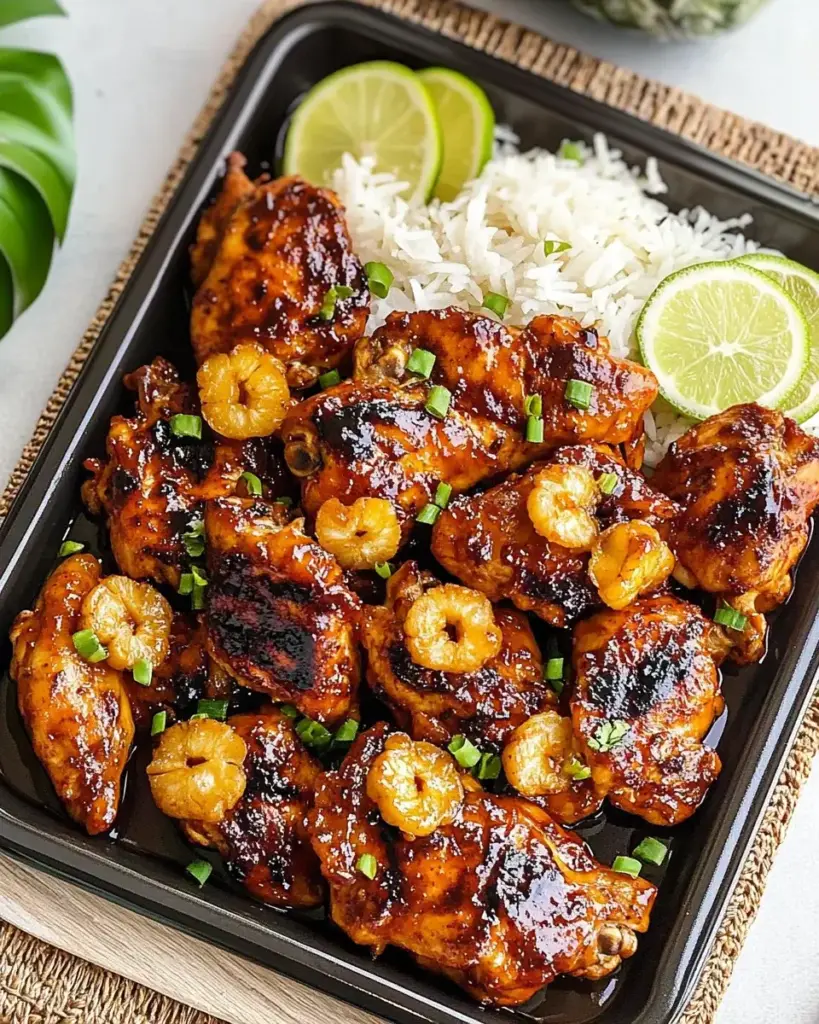
This Grilled Mango Chicken is bursting with tropical flavor, combining juicy chicken thighs with a sweet and savory mango marinade. It’s the perfect warm-weather dish for your next BBQ or summer dinner. The tender meat is infused with mango, garlic, soy sauce, and a hint of ginger—then grilled to smoky perfection and topped with a bright cilantro finish.
2poundsbonelessskinless chicken thighs1/2 cup soy sauce (or tamari for gluten-free)2 ripe mangos, peeled and chopped (or thawed if using frozen)3 garlic cloves, peeled1/2 teaspoon grated fresh ginger2 tablespoons water (add more if needed)Fresh cilantro, chopped (optional, for garnish)
Method
In a blender or food processor, combine soy sauce, chopped mangos, garlic, ginger, and water. Blend until smooth to create the marinade.
Place chicken thighs in a large resealable bag or baking dish. Pour all but 1/4 cup of the marinade over the chicken. Seal and refrigerate for at least 2 hours or overnight for best results.
Preheat your grill to 400°F. Remove the chicken from the marinade, letting the excess drip off.
Grill the chicken for 6–7 minutes per side, or until charred and cooked through with an internal temperature of 165°F.
Remove from grill, plate the chicken, and brush with the reserved 1/4 cup of marinade. Garnish with chopped cilantro if desired. Serve warm.
Notes
This recipe also works well with chicken breasts, but thighs yield juicier results. To make this dish indoors, use a grill pan or cast-iron skillet. Leftovers are great in wraps or salads. For extra tropical flavor, serve with coconut rice or grilled pineapple.
Introduction to Marinated Cheese and Salami Appetizer Recipe
Marinated Cheese and Salami Appetizer Recipe is the perfect choice for any gathering. This dish combines the creamy goodness of mozzarella and cheddar cheese with the savory taste of salami, all enhanced by a zesty marinade. It’s a crowd-pleaser that will have your guests coming back for more!
Whether you’re hosting a party, enjoying a family get-together, or simply want a tasty snack, this appetizer fits the bill. The combination of fresh ingredients like cherry tomatoes and green olives adds a refreshing touch. Plus, the marinade infuses the cheese and salami with rich flavors, making every bite a delightful experience.
What’s great about this recipe is its versatility. You can easily customize it to suit your taste preferences. Want a little heat? Add some jalapeños! Prefer a different cheese? Go ahead and swap it out! The possibilities are endless, and that’s what makes this appetizer so special.
In this article, we’ll guide you through the ingredients, preparation steps, and even some tips for perfecting your marinated cheese and salami appetizer. So, roll up your sleeves and get ready to impress your friends and family with this delicious dish!
Ingredients for Marinated Cheese and Salami Appetizer Recipe
Marinated Cheese and Salami Appetizer Recipe, you’ll need a selection of fresh and flavorful ingredients. Here’s what you’ll need:
8 ounces of mozzarella cheese, cubed
8 ounces of cheddar cheese, cubed
4 ounces of salami, sliced into strips
1 cup of cherry tomatoes, halved
1/2 cup of green olives, pitted and halved
1/2 cup of olive oil
1 tablespoon of red wine vinegar
1 teaspoon of dried oregano
1 teaspoon of garlic powder
1/2 teaspoon of crushed red pepper flakes
Salt and black pepper to taste
Fresh basil leaves for garnish
These ingredients come together to create a delightful mix of textures and flavors. The creamy mozzarella and sharp cheddar provide a wonderful base, while the salami adds a savory touch. The cherry tomatoes and olives bring freshness, and the marinade ties everything together with a zesty kick.
Feel free to adjust the quantities based on your preferences or the number of guests you’re serving. This recipe is designed to be flexible, allowing you to make it your own!
Step-by-Step Preparation of Marinated Cheese and Salami Appetizer Recipe
Marinated Cheese and Salami Appetizer Recipe. Follow these simple steps to create a delicious dish that will impress everyone!
Step 1: Gather Your Ingredients
Before you start cooking, make sure you have everything you need. Gather the mozzarella cheese, cheddar cheese, salami, cherry tomatoes, green olives, olive oil, red wine vinegar, dried oregano, garlic powder, crushed red pepper flakes, salt, and black pepper. Having everything in one place makes the process smoother and more enjoyable!
Step 2: Prepare the Marinade
In a separate bowl, it’s time to whip up the marinade. Start by pouring in the olive oil and red wine vinegar. Then, add the dried oregano, garlic powder, crushed red pepper flakes, salt, and black pepper. Whisk these ingredients together until they are well combined. This marinade is what will give your appetizer its amazing flavor!
Step 3: Cut the Cheese and Salami
Next, take your mozzarella and cheddar cheese and cut them into bite-sized cubes. The smaller the pieces, the easier they will be to eat. Then, slice the salami into strips. This will help the salami mix well with the cheese and other ingredients. Remember, uniform sizes make for a better presentation!
Step 4: Combine Ingredients in a Jar
Now, it’s time to bring everything together. In a large mixing bowl, combine the cubed mozzarella, cubed cheddar, sliced salami, halved cherry tomatoes, and halved green olives. Pour the prepared marinade over the top. Make sure everything is well coated with the marinade. This step is crucial for ensuring that every bite is packed with flavor!
Step 5: Marinate the Mixture
Once everything is combined, cover the bowl with plastic wrap. Place it in the refrigerator and let it marinate for at least 2 hours. For the best results, let it sit overnight. This allows the flavors to meld beautifully, creating a delicious appetizer that your guests will love!
After marinating, give the mixture a gentle stir before serving. This will help redistribute the marinade and flavors. Now, you’re ready to enjoy your tasty creation!
Variation of Marinated Cheese and Salami Appetizer Recipe
Marinated Cheese and Salami Appetizer Recipe is its flexibility. You can easily switch up the ingredients to create a unique flavor profile that suits your taste. Let’s explore some alternative cheeses and different types of salami you can use to make this appetizer even more exciting!
Alternative Cheeses to Use
If you want to mix things up, consider using different types of cheese. Here are some tasty alternatives:
Feta Cheese: This crumbly cheese adds a tangy flavor that pairs well with the salami and olives.
Pepper Jack Cheese: For a spicy kick, try pepper jack. It brings a creamy texture and a hint of heat.
Gouda Cheese: This cheese has a rich, buttery flavor that complements the other ingredients beautifully.
Provolone Cheese: With its mild taste, provolone is a great option that blends well with the salami.
Feel free to mix and match these cheeses to find your perfect combination. Each cheese will bring its own unique flavor, making your appetizer stand out!
Different Types of Salami
Salami comes in various styles, each offering a distinct taste. Here are some options to consider:
Genoa Salami: This type is known for its rich flavor and is made with pork and spices. It’s a classic choice!
Hard Salami: With a firmer texture, hard salami has a robust flavor that adds depth to your appetizer.
Spicy Salami: If you love heat, opt for spicy salami. It will give your dish an extra kick!
Turkey Salami: For a lighter option, turkey salami is a great alternative that still packs a punch in flavor.
Marinated Cheese and Salami Appetizer Recipe to new heights. Each variety brings its own character, making your dish even more enjoyable!
Cooking Note for Marinated Cheese and Salami Appetizer Recipe
Marinated Cheese and Salami Appetizer Recipe, there are a few important cooking notes to keep in mind. These tips will help ensure that your appetizer turns out perfectly every time!
First, always use fresh ingredients. Fresh mozzarella and cheddar cheese will provide the best flavor and texture. Similarly, opt for high-quality salami. The better the ingredients, the tastier your dish will be!
Next, consider the marinating time. While you can marinate the mixture for as little as 2 hours, letting it sit overnight is ideal. This longer marination allows the flavors to meld together beautifully, resulting in a more flavorful appetizer.
Additionally, when mixing the ingredients, be gentle. You want to combine everything without breaking the cheese cubes. A light hand will help maintain the integrity of the ingredients, making for a more appealing presentation.
Lastly, remember to taste the marinade before pouring it over the cheese and salami. Adjust the seasoning if needed. If you prefer a bit more acidity, add a splash more vinegar. If you like it spicier, increase the crushed red pepper flakes. Tailoring the marinade to your taste will make the appetizer even more enjoyable!
Marinated Cheese and Salami Appetizer Recipe that’s sure to impress your guests. Happy cooking!
Serving Suggestions for Marinated Cheese and Salami Appetizer Recipe
Marinated Cheese and Salami Appetizer Recipe, it’s time to think about how to serve it. Presentation can elevate your dish and make it even more appealing to your guests. Here are some creative serving suggestions to consider:
First, consider using a large, decorative platter. Arrange the marinated cheese and salami mixture in the center, allowing the vibrant colors of the cherry tomatoes and green olives to shine. This not only looks beautiful but also invites guests to dig in!
For a more casual approach, serve the appetizer in individual cups or small bowls. This makes it easy for guests to grab a portion without needing utensils. Plus, it adds a fun touch to your presentation!
Another great idea is to pair the marinated cheese and salami with an assortment of crackers or breadsticks. Place these around the platter or in a separate basket. The crunchy texture of the crackers complements the creamy cheese and savory salami perfectly.
If you want to add a touch of elegance, consider garnishing the dish with fresh basil leaves or a sprinkle of extra oregano. This not only enhances the visual appeal but also adds a fresh aroma that will entice your guests.
Lastly, don’t forget about the beverages! Pair your appetizer with a nice wine, such as a crisp white or a light red. This will enhance the flavors of the dish and create a delightful dining experience.
Marinated Cheese and Salami Appetizer Recipe will be a hit at any gathering. Enjoy the compliments from your guests as they savor every bite!
Tips for Perfecting Your Marinated Cheese and Salami Appetizer Recipe
Marinated Cheese and Salami Appetizer Recipe, consider these helpful tips. They will ensure that your dish is not only delicious but also visually appealing and enjoyable for everyone!
First, always taste your marinade before adding it to the cheese and salami. This step is crucial! Adjust the seasoning to your liking. If you prefer a tangier flavor, add a bit more vinegar. For those who enjoy a spicy kick, increase the crushed red pepper flakes. Tailoring the marinade to your taste will make a big difference!
Next, let’s talk about marinating time. While 2 hours is the minimum, letting the mixture sit overnight is best. This allows the flavors to meld beautifully, creating a more robust taste. The longer the marination, the more flavorful your appetizer will be!
When combining the ingredients, be gentle. You want to mix everything without breaking the cheese cubes. A light touch will help maintain the integrity of the ingredients, making for a more appealing presentation. Remember, we eat with our eyes first!
Another tip is to use high-quality ingredients. Fresh mozzarella and cheddar cheese will provide the best flavor and texture. Similarly, opt for a good-quality salami. The better the ingredients, the tastier your dish will be!
Consider adding a variety of textures to your appetizer. For example, you can include crunchy vegetables like bell peppers or cucumbers. This will not only enhance the flavor but also add a delightful crunch to each bite.
Lastly, don’t forget about garnishing! Fresh basil leaves or a sprinkle of extra oregano can add a pop of color and freshness. A beautiful garnish can make your appetizer look even more inviting and appetizing.
Marinated Cheese and Salami Appetizer Recipe that will impress your guests. Enjoy the process and happy cooking!
Breakdown of Time for Marinated Cheese and Salami Appetizer Recipe
Marinated Cheese and Salami Appetizer Recipe is essential for planning your gathering. Here’s a simple breakdown of the time you’ll need to prepare this delicious dish.
Prep Time
The prep time for this appetizer is quite manageable. You’ll need about 20 to 30 minutes to gather your ingredients, prepare the marinade, and cut the cheese and salami. This quick preparation makes it easy to fit into your schedule, even on busy days!
Cooking Time
Interestingly, there’s no actual cooking involved in this recipe. Instead, the magic happens during the marinating process. After you combine all the ingredients, you’ll need to let them marinate in the refrigerator. This step takes at least 2 hours, but for the best flavor, aim for overnight marination. This allows the flavors to meld beautifully, creating a truly delightful appetizer.
Total Time
Marinated Cheese and Salami Appetizer Recipe will be approximately 2 hours and 30 minutes if you choose the minimum marinating time. However, if you opt for the overnight marination, the total time will extend to about 24 hours, including the prep time. This makes it a great make-ahead option for parties and gatherings!
By planning ahead and allowing enough time for marination, you’ll ensure that your appetizer is bursting with flavor and ready to impress your guests!
Nutritional Information for Marinated Cheese and Salami Appetizer Recipe
Marinated Cheese and Salami Appetizer Recipe is important, especially if you’re mindful of your diet. This appetizer is not only delicious but also provides a good balance of nutrients. Here’s a breakdown of the key nutritional information per serving:
Calories
Marinated Cheese and Salami Appetizer Recipe contains approximately 320 calories. This makes it a satisfying option for a snack or appetizer without being overly heavy. The combination of cheese and salami provides a rich flavor that can keep you feeling full and satisfied.
Protein
In terms of protein, this appetizer packs a punch with about 15 grams per serving. The mozzarella and cheddar cheese, along with the salami, contribute to this protein content. Protein is essential for building and repairing tissues, making this appetizer a great choice for those looking to boost their protein intake.
Sodium
When it comes to sodium, each serving contains around 800 milligrams. While this is something to be aware of, it’s important to remember that the sodium content comes from the salami and the added seasonings. If you’re watching your sodium intake, consider using low-sodium salami or adjusting the amount of salt in the marinade.
Marinated Cheese and Salami Appetizer Recipe offers a tasty and nutritious option for gatherings. With its balance of calories, protein, and flavor, it’s sure to be a hit among your guests!
FAQs about Marinated Cheese and Salami Appetizer Recipe
Can I use different types of cheese in the Marinated Cheese and Salami Appetizer Recipe?
Marinated Cheese and Salami Appetizer Recipe is its versatility. You can easily swap out the mozzarella and cheddar for other cheeses. Feta, pepper jack, gouda, or provolone are all excellent choices. Each cheese will bring its own unique flavor and texture, allowing you to customize the dish to your liking. So, feel free to experiment and find your favorite combination!
How long should I marinate the cheese and salami?
For the best flavor, it’s recommended to marinate the cheese and salami for at least 2 hours. However, if you have the time, letting it sit overnight is ideal. This longer marination allows the flavors to meld beautifully, resulting in a more delicious appetizer. Just remember to cover the bowl with plastic wrap and keep it in the refrigerator during this time!
What are some good pairings for the Marinated Cheese and Salami Appetizer Recipe?
Marinated Cheese and Salami Appetizer Recipe with the right accompaniments can enhance the overall experience. Consider serving it with an assortment of crackers or breadsticks for a delightful crunch. Fresh vegetables like bell peppers or cucumber slices also make great additions. For beverages, a crisp white wine or a light red wine pairs wonderfully with the flavors of the dish. These pairings will elevate your appetizer and impress your guests!
Can I make the Marinated Cheese and Salami Appetizer Recipe ahead of time?
Marinated Cheese and Salami Appetizer Recipe ahead of time is a great idea. The flavors develop even more as it sits in the refrigerator. You can prepare it a day in advance and let it marinate overnight. Just remember to give it a gentle stir before serving to redistribute the marinade. This make-ahead option is perfect for parties and gatherings, allowing you to enjoy the event without last-minute preparations!
Conclusion on Marinated Cheese and Salami Appetizer Recipe
Marinated Cheese and Salami Appetizer Recipe is a fantastic choice for anyone looking to impress their guests with minimal effort. This dish combines the rich flavors of cheese and salami with a zesty marinade, creating a delightful experience for your taste buds. Whether you’re hosting a party, enjoying a family gathering, or simply craving a tasty snack, this appetizer fits perfectly into any occasion.
With its easy preparation and flexibility, you can customize the ingredients to suit your preferences. From choosing different cheeses to adding a spicy kick with jalapeños, the options are endless. Plus, the vibrant colors of the cherry tomatoes and green olives make for an eye-catching presentation that will surely draw attention.
Remember, the key to a successful marinated cheese and salami appetizer lies in the quality of your ingredients and the marinating time. Allowing the flavors to meld overnight will elevate your dish to new heights. So, don’t rush the process—let the ingredients work their magic!
Marinated Cheese and Salami Appetizer Recipe is not just a dish; it’s an experience that brings people together. So, gather your loved ones, share this delightful creation, and make lasting memories around the table. Happy cooking!
Paul
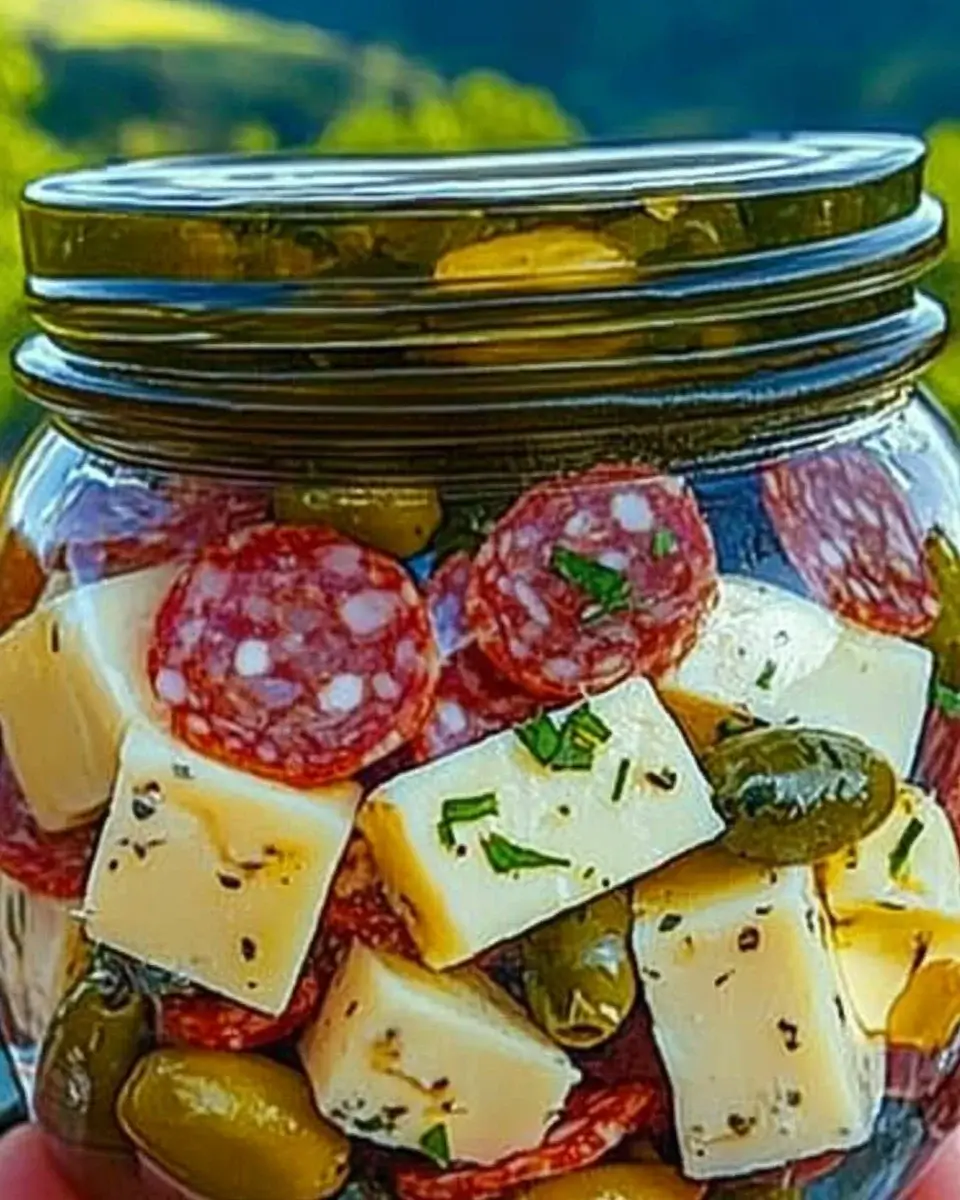
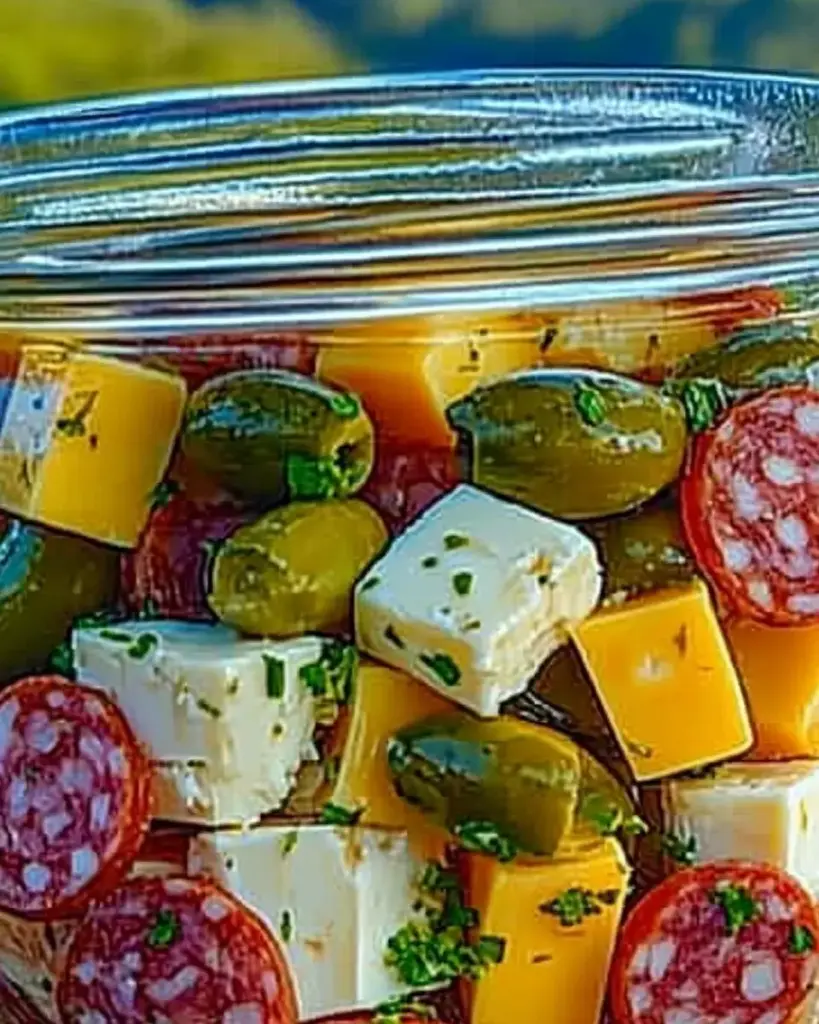
Marinated Cheese and Salami Appetizer Recipe is easy!
This savory and zesty marinated cheese and charcuterie jar is the ultimate no-cook appetizer for gatherings, picnics, or snack boards. With layers of cheese cubes, salami, crunchy pickles, and bell peppers soaked in a flavorful herb vinaigrette, every bite bursts with bold flavor. Serve it in a jar or on a platter—either way, it’s an effortless crowd-pleaser.
2cupssemi-firm cheese cubescheddar, Gouda, or Havarti1 cup thick-sliced salami rounds (mild or spicy)1 cup mini pickles (cornichons or dill pickles)1/2 cup diced red, yellow, or orange bell peppers1/4 cup chopped fresh herbs (parsley or dill)1/3 cup extra virgin olive oil2 tablespoons white wine vinegar or apple cider vinegar1 clove garlic, minced1/2 teaspoon black pepper1/4 teaspoon red pepper flakes (optional)
Method
Cube the cheese, slice the salami, chop the bell peppers, and halve or quarter any large pickles.
In a large jar or airtight container, layer the cheese, salami, pickles, and peppers to ensure a balanced mix.
In a small bowl, whisk together olive oil, vinegar, minced garlic, black pepper, and red pepper flakes. Stir in the chopped herbs.
Pour the marinade over the layered ingredients in the jar, pressing gently so everything is coated.
Seal the jar and refrigerate for at least 2 hours, preferably overnight, to allow the flavors to blend.
Serve directly from the jar with toothpicks or pour onto a platter and serve with crackers or crusty bread.
Notes
Use a variety of cheeses and meats to customize this jar to your taste. Great for prepping ahead—flavor deepens the longer it marinates. Store in the fridge for up to 4 days. Make it vegetarian by omitting the salami and adding marinated artichokes or olives.
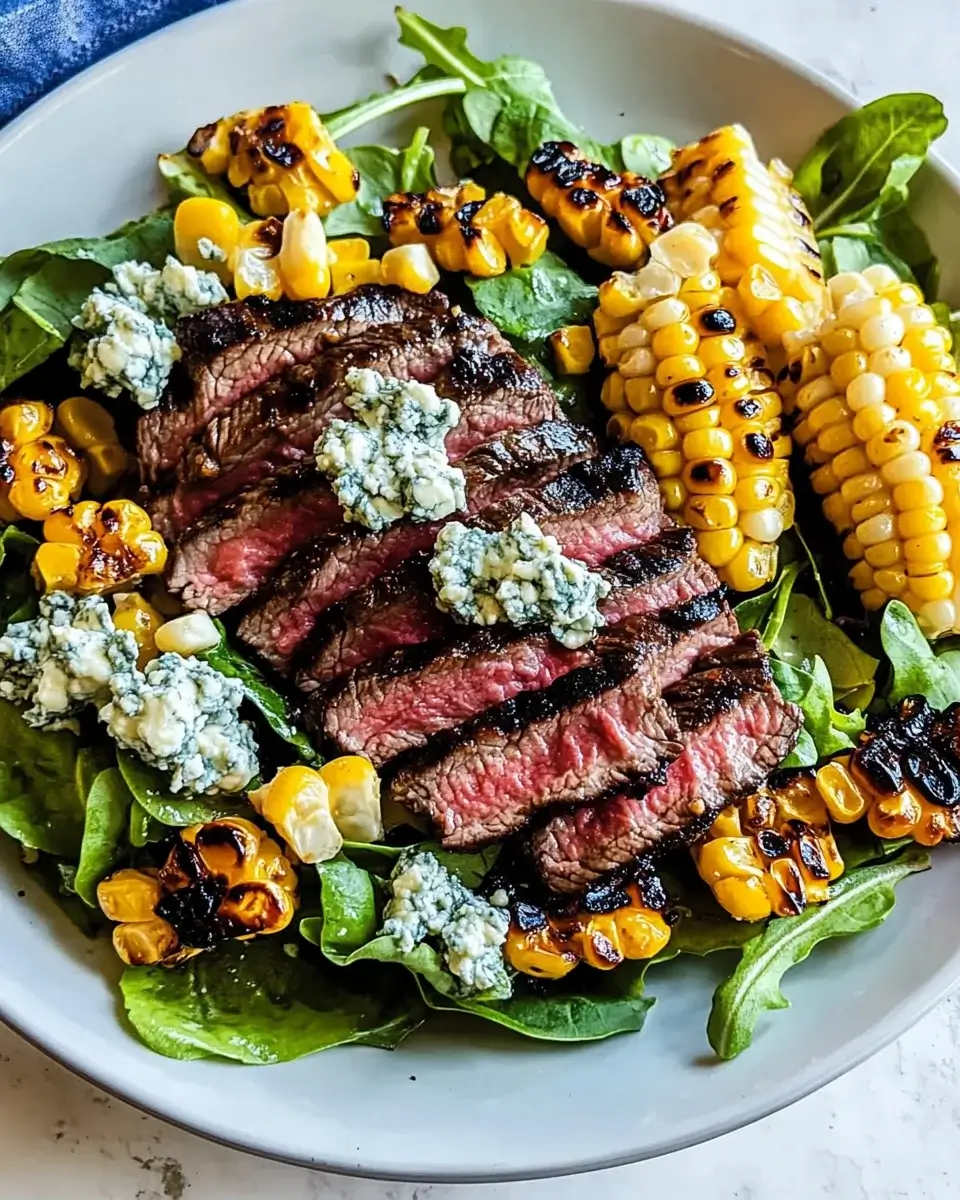
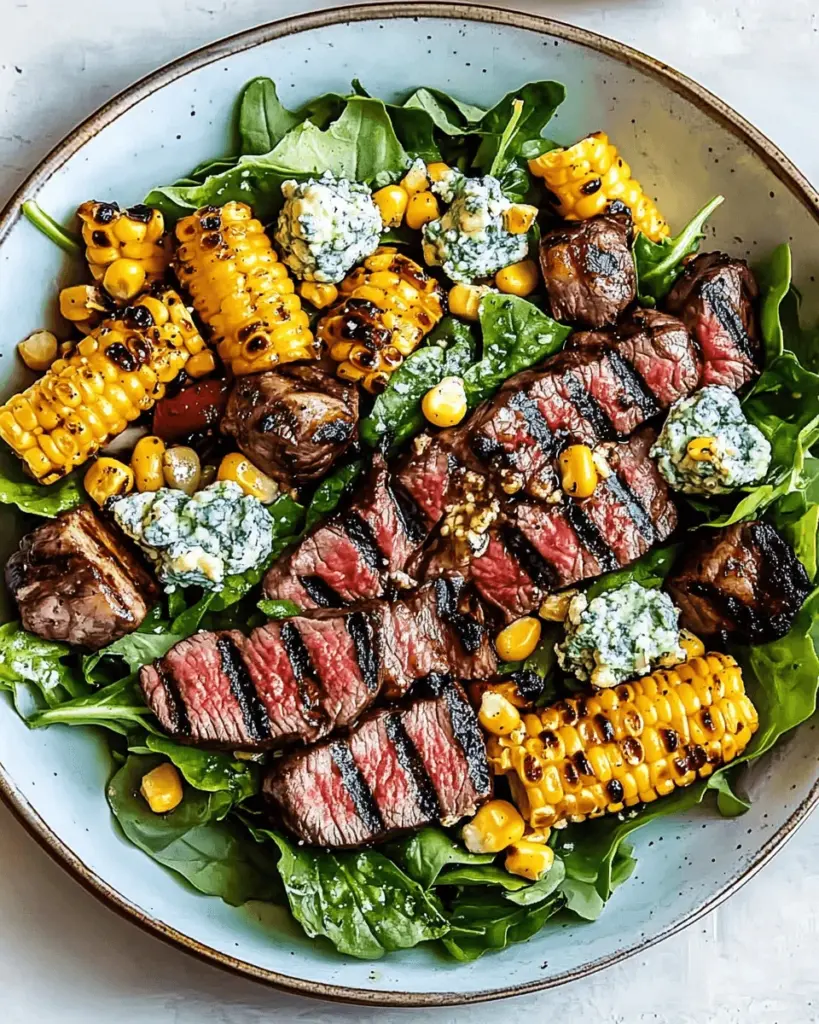
Balsamic Steak Gorgonzola Salad. This delightful dish is not only visually appealing but also packed with nutrients. It’s perfect for a light lunch or a hearty dinner. The combination of grilled steak, creamy Gorgonzola cheese, and vibrant vegetables creates a symphony of flavors that will tantalize your taste buds.
What Makes Balsamic Steak Gorgonzola Salad Special?
Balsamic Steak Gorgonzola Salad apart is its unique blend of textures and tastes. The juicy flank steak provides a rich, meaty flavor, while the Gorgonzola cheese adds a creamy, tangy element. The fresh salad greens and sweet cherry tomatoes bring a refreshing crunch, making each bite a delightful experience.
Moreover, the homemade balsamic dressing ties everything together beautifully. With just a few simple ingredients, you can create a dressing that enhances the salad without overpowering it. The sweetness of honey and the sharpness of Dijon mustard balance perfectly with the acidity of balsamic vinegar.
This salad is not just about taste; it’s also about nutrition. Packed with protein from the steak and healthy fats from the olive oil and cheese, it’s a well-rounded meal. Plus, the addition of corn adds fiber and sweetness, making it even more satisfying.
Balsamic Steak Gorgonzola Salad is sure to impress. It’s a dish that celebrates the beauty of fresh ingredients and the joy of cooking. So, let’s dive into the ingredients and preparation steps to create this culinary masterpiece!
Ingredients for Balsamic Steak Gorgonzola Salad
Balsamic Steak Gorgonzola Salad, you’ll need a selection of fresh and flavorful ingredients. Each component plays a vital role in building the salad’s unique taste and texture. Here’s what you’ll need:
1 pound flank steak: This cut of meat is perfect for grilling and adds a rich flavor to the salad.
1 teaspoon salt: Essential for seasoning the steak and enhancing its natural flavors.
1 teaspoon black pepper: Adds a bit of spice and depth to the dish.
2 tablespoons olive oil: Used to rub on the steak before grilling, it helps to keep the meat juicy.
2 cups mixed salad greens: A colorful mix of greens provides a fresh base for the salad.
1 cup cherry tomatoes, halved: These sweet tomatoes add a burst of flavor and color.
1 cup corn kernels: You can use fresh or frozen corn; it adds sweetness and crunch.
4 ounces Gorgonzola cheese, crumbled: This creamy cheese brings a tangy richness to the salad.
1/4 cup balsamic vinegar: The star of the dressing, it adds a sweet and tangy flavor.
1 tablespoon honey: Balances the acidity of the vinegar with a touch of sweetness.
1 teaspoon Dijon mustard: Adds a slight kick and depth to the dressing.
1/4 cup extra virgin olive oil: This oil is used in the dressing, providing healthy fats and flavor.
Balsamic Steak Gorgonzola Salad. Each item contributes to the overall taste, making it a delightful dish for any occasion. Now that you have everything ready, let’s move on to the preparation steps!
Step-by-Step Preparation of Balsamic Steak Gorgonzola Salad
Balsamic Steak Gorgonzola Salad. This step-by-step guide will help you create a delicious and visually appealing dish that’s sure to impress. Let’s get started!
Step 1: Marinating the Steak
First, you’ll want to marinate the flank steak to enhance its flavor. Start by seasoning the steak with salt and black pepper. This simple seasoning will bring out the natural taste of the meat. Next, rub the steak with 2 tablespoons of olive oil. This not only adds flavor but also helps keep the steak juicy while grilling. Allow the steak to marinate for at least 15 minutes. If you have more time, letting it sit for up to an hour will deepen the flavors even more.
Step 2: Cooking the Steak
Once your steak is marinated, it’s time to cook it! Preheat your grill to medium-high heat. Place the steak on the grill and cook for about 5-7 minutes on each side. The cooking time may vary depending on how well-done you like your steak. For medium-rare, aim for an internal temperature of 130°F. After grilling, remove the steak from the grill and let it rest for 10 minutes. This resting period allows the juices to redistribute, ensuring a tender and flavorful bite.
Step 3: Preparing the Salad Base
While the steak is resting, you can prepare the salad base. If you’re using fresh corn, grill it on the cob for about 10-12 minutes, turning occasionally until it’s nicely charred. If you’re using frozen corn, simply sauté it in a skillet over medium heat until it’s heated through and slightly browned. In a large bowl, combine the mixed salad greens, halved cherry tomatoes, and the grilled corn. Toss these ingredients together to create a colorful and fresh salad base.
Step 4: Assembling the Balsamic Steak Gorgonzola Salad
Balsamic Steak Gorgonzola Salad! Start by whisking together the balsamic vinegar, honey, Dijon mustard, and extra virgin olive oil in a small bowl. This dressing will tie all the flavors together beautifully. Drizzle the dressing over the salad base and toss until everything is well coated. Next, slice the rested steak thinly against the grain and arrange it on top of the salad. Finally, sprinkle the crumbled Gorgonzola cheese over the top for that creamy, tangy finish. Your salad is now ready to serve!
Variations of Balsamic Steak Gorgonzola Salad
Balsamic Steak Gorgonzola Salad is a versatile dish that can be easily customized to suit your taste preferences. Whether you want to switch up the protein or try a different cheese, there are plenty of variations to explore. Let’s take a look at some exciting alternatives!
Alternative Proteins for Balsamic Steak Gorgonzola Salad
If you’re not in the mood for steak, there are several delicious alternatives you can use. Grilled chicken is a popular choice, offering a lighter flavor while still providing plenty of protein. Simply season and grill the chicken breasts in the same way as the steak for a tasty substitution.
Another great option is shrimp. Grilled shrimp adds a delightful seafood twist to the salad. Just marinate the shrimp in olive oil, salt, and pepper, then grill them for a few minutes until they turn pink and opaque.
For a vegetarian option, consider using grilled portobello mushrooms. These meaty mushrooms can be marinated and grilled, providing a hearty texture that complements the salad beautifully. You can also try chickpeas for a plant-based protein that adds a nice crunch.
Different Cheese Options for Balsamic Steak Gorgonzola Salad
While Gorgonzola cheese is a standout ingredient in this salad, you can easily switch it up if you prefer something different. Feta cheese is a fantastic alternative, offering a salty and tangy flavor that pairs well with the other ingredients.
Another option is goat cheese, which adds a creamy texture and a mild flavor. It’s a great choice for those who enjoy a softer cheese. If you want a sharper taste, try blue cheese instead. It has a stronger flavor that can elevate the salad even further.
Balsamic Steak Gorgonzola Salad. Each alternative brings its own unique flavor and texture, making this dish endlessly customizable!
Cooking Note for Balsamic Steak Gorgonzola Salad
Balsamic Steak Gorgonzola Salad, there are a few cooking notes to keep in mind to ensure your dish turns out perfectly every time. These tips will help you achieve the best flavor and texture, making your salad a standout meal.
First, always choose high-quality ingredients. Fresh, organic vegetables and good-quality steak will significantly enhance the overall taste of your salad. Look for flank steak that has a nice marbling of fat, as this will keep the meat juicy and flavorful when grilled.
Next, pay attention to the grilling process. Preheating your grill is crucial. A hot grill will sear the steak quickly, locking in the juices and creating a delicious crust. If you’re using a grill pan, make sure it’s hot before placing the steak on it. This will help achieve those beautiful grill marks and a nice char.
Don’t forget to let the steak rest after grilling. This step is essential for juicy meat. If you cut into the steak right away, the juices will run out, leaving you with a dry piece of meat. Allowing it to rest for about 10 minutes will keep it tender and flavorful.
When it comes to the salad dressing, whisking the ingredients together thoroughly is key. This ensures that the honey dissolves completely and the flavors meld together. Taste the dressing before adding it to the salad. You can adjust the sweetness or acidity by adding more honey or balsamic vinegar, depending on your preference.
Lastly, serve the salad immediately after assembling. This will keep the greens crisp and fresh. If you need to prepare it ahead of time, consider keeping the dressing separate until you’re ready to serve. This way, your salad will maintain its vibrant texture and flavor.
Balsamic Steak Gorgonzola Salad that will impress your family and friends. Enjoy the process and savor every bite!
Serving Suggestions for Balsamic Steak Gorgonzola Salad
Balsamic Steak Gorgonzola Salad, presentation and pairing can elevate your dining experience. Here are some delightful serving suggestions to consider:
First, consider the plate you use. A large, shallow bowl or a wide platter can showcase the vibrant colors of the salad beautifully. Arrange the salad greens as a base, then artfully layer the sliced steak on top. Sprinkle the crumbled Gorgonzola cheese generously over the salad for a visually appealing finish.
For added flair, garnish the salad with fresh herbs like basil or parsley. These herbs not only enhance the look but also add a burst of fresh flavor. A few slices of avocado can also complement the dish, providing creaminess that pairs well with the tangy cheese.
As for beverages, a crisp white wine, such as Sauvignon Blanc, pairs wonderfully with the salad. The wine’s acidity balances the richness of the steak and cheese. If you prefer non-alcoholic options, a sparkling water with a slice of lemon or lime can refresh your palate.
For a complete meal, consider serving the salad alongside a warm, crusty bread or garlic bread. This addition can soak up any leftover dressing and adds a comforting element to the meal. Alternatively, a light soup, like a tomato basil or a vegetable broth, can serve as a perfect starter before the salad.
Balsamic Steak Gorgonzola Salad a part of a buffet-style meal. Pair it with grilled vegetables, roasted potatoes, or a selection of cheeses and charcuterie. This way, guests can enjoy a variety of flavors while still savoring the deliciousness of your salad.
Balsamic Steak Gorgonzola Salad will not only taste amazing but also look stunning on the table. Enjoy the compliments from your family and friends as they dig into this delightful dish!
Tips for Perfecting Balsamic Steak Gorgonzola Salad
Balsamic Steak Gorgonzola Salad is all about attention to detail. With a few simple tips, you can elevate your dish to new heights. Here are some helpful suggestions to ensure your salad is a hit every time:
First, always use fresh ingredients. Fresh salad greens, ripe cherry tomatoes, and high-quality flank steak will make a noticeable difference in flavor. When shopping, look for vibrant colors and firm textures. This will ensure your salad is not only tasty but also visually appealing.
Next, consider the temperature of your ingredients. For the best experience, serve the salad chilled. You can refrigerate the salad greens and tomatoes before assembling. This will keep the salad crisp and refreshing, especially on warm days.
When it comes to grilling the steak, don’t rush the process. Allow the grill to reach the right temperature before placing the meat on it. A hot grill will create a nice sear, locking in the juices. Remember to flip the steak only once to achieve those beautiful grill marks.
Another tip is to slice the steak against the grain. This technique will ensure that each bite is tender and easy to chew. Take a moment to observe the direction of the muscle fibers in the steak, and cut perpendicular to them for the best results.
For the dressing, whisk it thoroughly to combine all the flavors. If you prefer a creamier dressing, consider adding a dollop of Greek yogurt or sour cream. This will add richness and a tangy flavor that complements the Gorgonzola cheese beautifully.
Balsamic Steak Gorgonzola Salad is versatile, and you can adjust the ingredients to suit your taste. Try adding nuts for crunch, or fruits like pears or apples for sweetness. Each variation can bring a new twist to this classic dish.
Balsamic Steak Gorgonzola Salad. Enjoy the process of creating this delightful meal, and savor the delicious results!
Breakdown of Time for Balsamic Steak Gorgonzola Salad
Balsamic Steak Gorgonzola Salad can help you plan your meal better. Here’s a simple breakdown of the time needed for each step, ensuring you can enjoy this delicious dish without any rush.
Prep Time
Balsamic Steak Gorgonzola Salad is approximately 20 minutes. This includes gathering all your ingredients, marinating the steak, and preparing the salad base. If you choose to let the steak marinate longer, you can adjust this time accordingly. However, a quick 15-minute marination will still yield great flavor!
Cooking Time
Cooking the steak and corn will take about 15-20 minutes. The steak needs around 10-14 minutes on the grill, depending on your desired doneness. Meanwhile, grilling the corn will take about 10-12 minutes. If you opt for frozen corn, sautéing it will only take about 5-7 minutes. So, you can multitask during this time to maximize efficiency!
Total Time
Balsamic Steak Gorgonzola Salad to take about 35-40 minutes from start to finish. This includes both prep and cooking time. It’s a quick and easy meal that’s perfect for busy weeknights or a delightful weekend dinner. With this time breakdown, you can easily fit this delicious salad into your schedule!
Nutritional Information for Balsamic Steak Gorgonzola Salad
Balsamic Steak Gorgonzola Salad can help you make informed choices about your meals. This salad is not only delicious but also packed with essential nutrients. Here’s a closer look at the nutritional information per serving:
Calories
Balsamic Steak Gorgonzola Salad contains approximately 450 calories. This makes it a satisfying meal option that won’t leave you feeling overly stuffed. The balance of protein, fats, and carbohydrates ensures that you get a well-rounded meal without excessive calories.
Protein
With about 30 grams of protein per serving, this salad is an excellent source of this essential nutrient. The flank steak provides a hearty protein boost, which is vital for muscle repair and overall health. Including protein in your meals can help keep you feeling full and satisfied for longer periods.
Sodium
Balsamic Steak Gorgonzola Salad is approximately 800 milligrams per serving. While this is a moderate amount, it’s important to be mindful of your overall sodium intake, especially if you are watching your salt consumption. You can reduce sodium by using low-sodium soy sauce or skipping added salt in the dressing if desired.
Balsamic Steak Gorgonzola Salad is a nutritious choice that offers a good balance of calories, protein, and other essential nutrients. Enjoying this salad as part of a balanced diet can contribute to your health and well-being!
FAQs about Balsamic Steak Gorgonzola Salad
Can I make Balsamic Steak Gorgonzola Salad ahead of time?
Balsamic Steak Gorgonzola Salad ahead of time, but there are a few tips to keep in mind. You can grill the steak and corn in advance and store them in the refrigerator. Just make sure to let the steak cool before slicing it. The salad base, including the mixed greens and cherry tomatoes, can also be prepped ahead. However, it’s best to wait until just before serving to add the dressing. This will keep the greens crisp and fresh. If you want to prepare the dressing ahead, store it in a sealed container in the fridge. Just give it a good shake before using!
What can I substitute for Gorgonzola cheese in Balsamic Steak Gorgonzola Salad?
Balsamic Steak Gorgonzola Salad, so feel free to experiment!
Is Balsamic Steak Gorgonzola Salad gluten-free?
Balsamic Steak Gorgonzola Salad is naturally gluten-free! The main ingredients, including steak, salad greens, tomatoes, corn, and cheese, do not contain gluten. However, if you are using any packaged ingredients, such as dressings or marinades, be sure to check the labels for gluten-containing additives. Making your own dressing, as outlined in the recipe, ensures that your salad remains gluten-free and delicious!
How can I make Balsamic Steak Gorgonzola Salad vegetarian?
Balsamic Steak Gorgonzola Salad vegetarian, simply replace the flank steak with a plant-based protein. Grilled portobello mushrooms are a fantastic option, as they provide a hearty texture and rich flavor. You can also use grilled tofu or tempeh, marinated in your favorite seasonings for added taste. Additionally, chickpeas or black beans can be added for a protein boost. With these substitutions, you can enjoy a satisfying vegetarian version of this delightful salad!
Conclusion on Balsamic Steak Gorgonzola Salad
Balsamic Steak Gorgonzola Salad is a delightful dish that brings together a variety of flavors and textures. From the juicy flank steak to the creamy Gorgonzola cheese, every bite is a celebration of fresh ingredients. This salad is not only visually appealing but also packed with nutrients, making it a perfect choice for any meal.
Whether you’re preparing it for a casual lunch or a special dinner, this salad is sure to impress your family and friends. The versatility of the recipe allows you to customize it to your liking, whether by changing the protein or experimenting with different cheeses. Plus, the homemade balsamic dressing adds a personal touch that elevates the dish even further.
Balsamic Steak Gorgonzola Salad, remember that cooking is about creativity and joy. Don’t hesitate to make it your own by adding your favorite ingredients or trying out new variations. With its rich flavors and satisfying components, this salad is bound to become a favorite in your recipe collection.
So, gather your ingredients, fire up the grill, and get ready to savor a delicious meal that’s both healthy and indulgent. Enjoy the process of making this salad, and most importantly, enjoy every bite!
Paul
Balsamic Steak Gorgonzola Salad is a must-try dish!
This bold and vibrant steak salad is layered with juicy grilled steak, charred sweet corn, tangy Gorgonzola, crisp greens, and a rich balsamic vinaigrette. Perfect for summer grilling or a hearty lunch, this salad blends savory and sweet notes in every bite and finishes with satisfying textures from crunchy walnuts and creamy avocado.
For the Steak:1 pound flank steakor ribeye, sirloin1 tablespoon olive oil1 tablespoon balsamic vinegar1 teaspoon salt1/2 teaspoon black pepper1/2 teaspoon garlic powder1/2 teaspoon smoked paprika
For the Salad:6 cups mixed greensarugula, spinach, or romaine1 ear corn, grilled and kernels removed1/2 cup cherry tomatoes, halved1/4 red onion, thinly sliced1/3 cup crumbled Gorgonzola cheese1/4 cup toasted walnuts or pecans1 avocado, sliced (optional)
For the Balsamic Dressing:1/4 cup balsamic vinegar2 tablespoons olive oil1 tablespoon Dijon mustard1 tablespoon honey or maple syrup1 clove garlicminced1/4 teaspoon salt1/4 teaspoon black pepper
Method
In a small bowl, mix olive oil, balsamic vinegar, salt, pepper, garlic powder, and smoked paprika. Rub mixture onto steak and let sit at room temperature for 15–20 minutes.
Preheat grill or skillet to medium-high. Grill the steak for 4–5 minutes per side for medium-rare to medium. Remove from heat and rest for 5 minutes, then slice thinly against the grain.
Brush the ear of corn with a bit of olive oil and grill for 8–10 minutes, turning until evenly charred. Let cool, then cut kernels off the cob.
In a small bowl, whisk together balsamic vinegar, olive oil, mustard, honey, garlic, salt, and pepper until smooth.
In a large serving bowl, combine mixed greens, cherry tomatoes, red onion, grilled corn, and toasted nuts. Top with sliced steak and crumbled Gorgonzola.
Drizzle with balsamic dressing and toss gently. Garnish with avocado slices if using. Serve immediately.
Notes
For best results, use a meat thermometer and remove steak from the grill at 130–135°F for medium-rare. This salad can be prepped in parts ahead of time, but assemble just before serving for freshness. Substitute blue cheese or feta if Gorgonzola isn’t available.
Pineapple Cucumber Salad Recipe. This vibrant salad combines the sweetness of fresh pineapple with the crispness of cucumber, creating a delightful contrast that’s perfect for any occasion. Whether you’re hosting a summer barbecue or simply want a light lunch, this salad is sure to impress.
The bright colors and zesty flavors make this salad not only a feast for the taste buds but also a visual treat. Imagine the golden yellow of pineapple mingling with the cool green of cucumber and the deep red of onion. It’s a dish that invites you to dig in! Plus, it’s packed with nutrients, making it a healthy choice for anyone looking to eat well.
What’s more, this salad is incredibly easy to prepare. With just a few simple ingredients, you can whip up a dish that’s bursting with flavor. The combination of lime juice and honey adds a tangy sweetness that elevates the salad to a whole new level. And if you’re feeling adventurous, you can customize it with your favorite ingredients.
Pineapple Cucumber Salad Recipe truly shine. Get ready to enjoy a refreshing dish that’s as fun to make as it is to eat!
Ingredients for Pineapple Cucumber Salad Recipe
Pineapple Cucumber Salad Recipe, you’ll need a handful of fresh ingredients. Each component plays a vital role in delivering the vibrant flavors and textures that make this salad so appealing. Here’s what you’ll need:
2 cups fresh pineapple, diced
1 large cucumber, peeled and diced
1/2 red onion, thinly sliced
1/4 cup fresh cilantro, chopped
1/4 cup lime juice (about 2 limes)
1 tablespoon honey
1/2 teaspoon salt
1/4 teaspoon black pepper
1/4 teaspoon red pepper flakes (optional)
These ingredients come together to create a salad that’s not only refreshing but also packed with nutrients. The pineapple adds a sweet and juicy element, while the cucumber provides a satisfying crunch. The red onion brings a slight sharpness, and the cilantro adds a burst of freshness. The dressing, made from lime juice and honey, ties everything together beautifully.
Pineapple Cucumber Salad Recipe lies in its versatility. So gather your ingredients and get ready to create a dish that’s sure to impress!
Step-by-Step Preparation of Pineapple Cucumber Salad Recipe
Pineapple Cucumber Salad Recipe. Follow these simple steps to create a refreshing dish that will delight your taste buds.
Step 1: Preparing the Pineapple
First, let’s tackle the pineapple. Start by cutting off the top and bottom of the pineapple. This will give you a stable base to work with. Next, stand the pineapple upright and carefully slice off the skin, following the curve of the fruit. Make sure to remove any brown “eyes” left behind. Once peeled, cut the pineapple into quarters and remove the core. Finally, dice the pineapple into bite-sized pieces. This juicy fruit will add a sweet burst to your salad!
Step 2: Slicing the Cucumbers
Next up is the cucumber. Begin by peeling the cucumber to remove the skin, which can be tough. After peeling, slice the cucumber in half lengthwise. Then, take each half and cut it into small, even pieces. Aim for a size that matches the pineapple for a uniform look. The cucumber will provide a refreshing crunch that balances the sweetness of the pineapple.
Step 3: Combining Ingredients
Pineapple Cucumber Salad Recipe.
Step 4: Making the Dressing
Let’s whip up the dressing! In a separate small bowl, whisk together the lime juice, honey, salt, black pepper, and red pepper flakes (if you’re using them). The lime juice adds a zesty kick, while the honey brings a touch of sweetness. Whisk until the mixture is well combined and smooth. This dressing will elevate your salad and tie all the flavors together beautifully.
Step 5: Tossing the Salad
Finally, pour the dressing over the pineapple and cucumber mixture. Toss gently to coat all the ingredients evenly. Be careful not to mash the pineapple or cucumber; you want to keep that delightful texture! After tossing, add the chopped cilantro and give it another gentle mix. Cover the salad and refrigerate for at least 30 minutes. This allows the flavors to meld together, making each bite even more delicious!
Pineapple Cucumber Salad Recipe is now ready to shine. Enjoy the refreshing taste and vibrant colors of this delightful dish!
Variation of Pineapple Cucumber Salad Recipe
Pineapple Cucumber Salad Recipe is delicious on its own, there are many ways to customize it. Adding different ingredients can enhance the flavors and make it even more satisfying. Let’s explore some exciting variations!
Adding Protein to Your Salad
If you want to turn your salad into a more filling meal, consider adding protein. Grilled chicken or shrimp can be excellent choices. Simply cook the protein of your choice and slice it into bite-sized pieces. Then, mix it into your salad just before serving. This addition not only boosts the nutritional value but also adds a savory element that complements the sweetness of the pineapple.
For a vegetarian option, try adding chickpeas or black beans. These legumes are packed with protein and fiber, making your salad hearty and satisfying. Just rinse and drain the beans before mixing them in. You’ll enjoy a delightful combination of flavors and textures!
Alternative Dressings for Pineapple Cucumber Salad
While the lime and honey dressing is a classic, you can experiment with different dressings to suit your taste. For a creamy twist, consider using a yogurt-based dressing. Simply mix plain yogurt with lime juice, a bit of honey, and a pinch of salt. This will give your salad a rich and tangy flavor.
If you prefer a more Asian-inspired taste, try a sesame dressing. Combine soy sauce, sesame oil, and a splash of rice vinegar for a unique flavor profile. This dressing pairs wonderfully with the pineapple and cucumber, adding a delightful umami taste.
Pineapple Cucumber Salad Recipe is its versatility. You can mix and match ingredients and dressings to create a salad that’s uniquely yours. Enjoy the process of experimenting and discovering new flavors!
Cooking Note for Pineapple Cucumber Salad Recipe
Pineapple Cucumber Salad Recipe, there are a few cooking notes to keep in mind to ensure the best results. These tips will help you achieve a salad that’s not only delicious but also visually appealing.
First, always use fresh ingredients. Fresh pineapple and cucumber will provide the best flavor and texture. If possible, choose ripe pineapple, as it will be sweeter and juicier. A ripe pineapple should have a sweet aroma and yield slightly when pressed. For cucumbers, look for firm ones with smooth skin. Avoid any that have soft spots or wrinkles.
Next, consider the size of your diced ingredients. Aim for uniform pieces to create a balanced look and ensure even flavor distribution. This will make each bite enjoyable, as you’ll experience the delightful combination of flavors in every mouthful.
Additionally, don’t skip the chilling step! Allowing the salad to sit in the refrigerator for at least 30 minutes helps the flavors meld together. This resting time enhances the overall taste, making it even more refreshing when served cold.
Pineapple Cucumber Salad Recipe for the best texture and flavor.
By following these cooking notes, you’ll create a vibrant and tasty salad that’s sure to impress your family and friends. Enjoy the process and the delicious results!
Serving Suggestions for Pineapple Cucumber Salad Recipe
Pineapple Cucumber Salad Recipe, it’s time to think about how to serve it! This salad is not only delicious but also versatile, making it a great addition to various meals and occasions. Here are some serving suggestions to help you enjoy this refreshing dish to the fullest.
First, consider serving the salad as a side dish at your next barbecue or picnic. Its bright colors and refreshing flavors will complement grilled meats beautifully. Imagine pairing it with juicy burgers or tender chicken skewers. The sweetness of the pineapple will balance the savory notes of the grilled dishes, creating a delightful dining experience.
Another great option is to serve the salad as a light lunch. You can enjoy it on its own or pair it with whole-grain crackers or pita bread for a satisfying meal. If you want to make it even heartier, add a scoop of quinoa or brown rice to the salad. This will provide extra fiber and nutrients, making it a well-rounded lunch option.
For a fun twist, consider using the salad as a topping for tacos or burritos. The fresh flavors of the pineapple and cucumber will add a zesty kick to your favorite Mexican dishes. Just spoon some of the salad on top of your tacos for a burst of color and flavor that will elevate your meal.
Pineapple Cucumber Salad Recipe in a beautiful bowl or on a colorful platter. Garnish it with extra cilantro or lime wedges for an eye-catching touch. A well-presented salad not only looks appealing but also makes the dining experience more enjoyable.
Pineapple Cucumber Salad Recipe in various ways. Whether as a side dish, a light lunch, or a topping for your favorite meals, this salad is sure to impress and satisfy!
Tips for Perfecting Your Pineapple Cucumber Salad Recipe
Pineapple Cucumber Salad Recipe truly shine, consider these helpful tips. They will enhance the flavors and textures, ensuring that every bite is delightful. Let’s dive into some expert advice!
First, always choose ripe ingredients. A sweet, juicy pineapple is key to a delicious salad. Look for one that has a sweet aroma and gives slightly when pressed. For cucumbers, select firm ones with smooth skin. This will ensure a satisfying crunch in your salad.
Next, balance the flavors. If you find the salad too sweet, add a bit more lime juice or salt. This will help to enhance the overall taste. On the other hand, if you prefer a sweeter salad, feel free to increase the honey. Taste as you go to find the perfect balance!
Another tip is to chop your ingredients uniformly. This not only makes the salad look appealing but also ensures that each bite has a mix of flavors. Aim for similar sizes when dicing the pineapple and cucumber. This will create a harmonious blend of textures.
Don’t forget about the chilling time! Allowing the salad to sit in the refrigerator for at least 30 minutes helps the flavors meld together. This resting period makes the salad even more refreshing when served cold. It’s worth the wait!
If you want to add a bit of heat, consider including jalapeños or a dash of hot sauce. This can elevate the flavor profile and add an exciting kick. Just be cautious with the amount, as you want to enhance, not overpower, the salad’s natural sweetness.
Pineapple Cucumber Salad Recipe is versatile. Try adding different herbs like mint or basil for a unique twist. You can also mix in fruits like mango or strawberries for added sweetness. The possibilities are endless!
Pineapple Cucumber Salad Recipe that’s not only delicious but also visually stunning. Enjoy the process of perfecting your salad and delight in the refreshing flavors it brings!
Breakdown of Time for Pineapple Cucumber Salad Recipe
Pineapple Cucumber Salad Recipe can help you plan better. Here’s a simple breakdown of the time involved in making this refreshing dish.
Prep Time
The prep time for this salad is quite short. You’ll need about 15 to 20 minutes to gather your ingredients and prepare them. This includes peeling and dicing the pineapple and cucumber, slicing the red onion, and chopping the cilantro. With a little organization, you can have everything ready in no time!
Cooking Time
Pineapple Cucumber Salad Recipe. Instead, the focus is on combining fresh ingredients. The only time you’ll need to consider is the time it takes to make the dressing, which is just a few minutes. So, you can enjoy a no-cook dish that’s quick and easy!
Total Time
Pineapple Cucumber Salad Recipe is approximately 30 to 40 minutes. This includes the 30 minutes of chilling time in the refrigerator. Chilling is essential as it allows the flavors to meld beautifully, making the salad even more delicious when served. So, while the active preparation time is short, the chilling time is crucial for the best taste!
In summary, you can whip up this delightful salad in under an hour, making it a perfect choice for a quick side dish or a light lunch. Enjoy the refreshing flavors and the ease of preparation!
Nutritional Information for Pineapple Cucumber Salad Recipe
Pineapple Cucumber Salad Recipe is essential for making informed choices about your meals. This salad is not only delicious but also packed with nutrients that can benefit your health. Let’s break down the key nutritional components of this refreshing dish.
Calories
Pineapple Cucumber Salad Recipe contains approximately 80 calories. This makes it a light and guilt-free option for those looking to maintain a healthy diet. The low-calorie count allows you to enjoy this salad without worrying about overindulging. It’s perfect for a side dish or a light lunch!
Protein
In terms of protein, this salad offers about 1 gram per serving. While it may not be a significant source of protein on its own, it can be easily enhanced by adding protein-rich ingredients like grilled chicken, shrimp, or legumes. This way, you can create a more balanced meal that keeps you feeling full and satisfied.
Sodium
Pineapple Cucumber Salad Recipe is around 200 milligrams per serving. This is relatively low, making it a heart-healthy choice. However, if you’re watching your sodium intake, you can adjust the amount of salt in the dressing to suit your dietary needs. Remember, fresh ingredients naturally contain less sodium, which is another reason to enjoy this salad!
Pineapple Cucumber Salad Recipe is a nutritious option that can fit well into various dietary plans. With its low calories, minimal sodium, and the potential for added protein, it’s a versatile dish that promotes healthy eating. Enjoy this refreshing salad as part of a balanced diet!
FAQs about Pineapple Cucumber Salad Recipe
Can I make Pineapple Cucumber Salad ahead of time?
Pineapple Cucumber Salad Recipe is perfect for making ahead of time. In fact, preparing it a few hours in advance allows the flavors to meld beautifully. Just follow the recipe as usual, and once you’ve tossed the salad, cover it and refrigerate. This chilling time enhances the taste, making it even more refreshing when served. However, if you plan to store it for more than a day, consider keeping the dressing separate until just before serving. This will help maintain the crispness of the ingredients.
What other ingredients can I add to Pineapple Cucumber Salad?
Pineapple Cucumber Salad Recipe lies in its versatility! You can easily customize it with various ingredients. For added crunch, consider including diced bell peppers, radishes, or even jicama. If you want to boost the protein content, grilled chicken, shrimp, or chickpeas are excellent choices. You can also mix in other fruits like mango, strawberries, or avocado for a unique twist. Fresh herbs like mint or basil can add an exciting flavor profile. Feel free to experiment and make the salad your own!
How long does Pineapple Cucumber Salad last in the fridge?
Pineapple Cucumber Salad Recipe can last in the fridge for about 2 to 3 days. Make sure to keep it in an airtight container to maintain freshness. However, the texture may change slightly over time, especially if the dressing is mixed in. If you notice the salad becoming too soggy, it’s best to enjoy it sooner rather than later. For optimal taste and texture, try to consume it within the first couple of days after preparation.
Conclusion on Pineapple Cucumber Salad Recipe
Pineapple Cucumber Salad Recipe is a delightful dish that brings together the best of both worlds: refreshing flavors and vibrant colors. This salad is not only easy to prepare but also offers a healthy option for any meal. With its combination of sweet pineapple, crisp cucumber, and zesty dressing, it’s sure to be a hit at your next gathering or as a light lunch.
As you’ve seen, the versatility of this salad allows for endless customization. Whether you choose to add protein, experiment with different dressings, or incorporate additional ingredients, the possibilities are truly exciting. Each variation can create a unique flavor profile that suits your taste preferences.
Moreover, the nutritional benefits of this salad make it a smart choice for those looking to maintain a balanced diet. With low calories and the potential for added protein, it’s a dish that can fit seamlessly into various dietary plans. Plus, the fresh ingredients provide essential vitamins and minerals that contribute to overall health.
Pineapple Cucumber Salad Recipe a try? Gather your ingredients, follow the simple steps, and enjoy the refreshing taste of this delightful dish. Whether you serve it as a side, a light lunch, or a topping for your favorite meals, it’s bound to impress. Happy cooking!
Paul
Pineapple Cucumber Salad Recipe is a refreshing delight.
This Pineapple Cucumber Salad is a refreshing tropical side dish that balances juicy sweetness with a tangy lime dressing and optional spicy kick. Crisp cucumbers, vibrant pineapple, red onion, and cilantro come together in just minutes—perfect for BBQs, potlucks, or light summer lunches.
For the Salad:2 cups diced fresh pineapple1 large English cucumberor 2 Persian cucumbers, diced1/4 small red onion, thinly sliced1/4 cup chopped fresh cilantro1 small jalapeño, thinly sliced (optional)1/4 cup crumbled feta cheese (optional)
For the Zesty Lime Dressing:2 tablespoons fresh lime juice1 tablespoon honey or maple syrup1 tablespoon olive oil1/2 teaspoon salt1/4 teaspoon black pepper1/2 teaspoon red pepper flakesoptional
Method
Dice the pineapple and cucumber into bite-sized pieces. Thinly slice the red onion and jalapeño. Chop the cilantro and crumble the feta cheese if using.
In a small bowl, whisk together lime juice, honey or maple syrup, olive oil, salt, pepper, and red pepper flakes until combined.
In a large mixing bowl, combine pineapple, cucumber, red onion, cilantro, and jalapeño.
Drizzle the dressing over the salad and gently toss to coat.
Sprinkle crumbled feta on top if desired.
Serve immediately or chill for 15–30 minutes for enhanced flavor. Garnish with extra cilantro or lime wedges if desired.
Notes
This salad is best served fresh but can be made a few hours ahead. For a vegan option, omit the feta or use a plant-based alternative. Add grilled shrimp or chicken for a heartier version.
Huli Huli Chicken is a delicious Hawaiian dish that features marinated chicken grilled to perfection. The name “Huli Huli” means “turn, turn” in Hawaiian, which refers to the way the chicken is cooked on the grill. This recipe combines sweet and savory flavors, making it a favorite for family gatherings and summer barbecues. The marinade includes ingredients like soy sauce, brown sugar, and pineapple juice, which give the chicken its unique taste. When grilled, the chicken becomes juicy and tender, with a slightly caramelized exterior that is simply irresistible.
The Origins of Huli Huli Chicken
The origins of Huli Huli Chicken trace back to the islands of Hawaii. It was first popularized in the 1950s by a local chef named Ernest Morgado. He created this dish for a fundraiser, and it quickly gained popularity among locals and tourists alike. The recipe reflects the rich culinary traditions of Hawaii, blending Asian and American flavors. Today, Huli Huli Chicken is often served at luaus, picnics, and other festive occasions. Its vibrant taste and easy preparation make it a go-to dish for many home cooks. Whether you’re enjoying it at a beach party or a backyard barbecue, Huli Huli Chicken brings a taste of the islands to your table.
Ingredients for Huli Huli Chicken Recipe
To create a mouthwatering Huli Huli Chicken, you’ll need a variety of ingredients that come together to form a delicious marinade. Here’s what you’ll need:
2 pounds bone-in, skin-on chicken thighs
1/2 cup soy sauce
1/4 cup brown sugar
1/4 cup ketchup
1/4 cup pineapple juice
2 tablespoons rice vinegar
2 tablespoons sesame oil
4 cloves garlic, minced
1 tablespoon fresh ginger, grated
1 teaspoon black pepper
1/2 teaspoon red pepper flakes (optional)
1/4 cup green onions, chopped (for garnish)
Pineapple slices (for grilling, optional)
These ingredients are not only easy to find but also work together to create a flavorful dish. The combination of soy sauce and brown sugar provides a savory-sweet base, while the pineapple juice adds a tropical twist. Garlic and ginger bring depth to the flavor, making each bite a delightful experience. If you enjoy a bit of heat, feel free to add red pepper flakes to the mix. This recipe serves four, making it perfect for family dinners or gatherings with friends.
Step-by-Step Preparation of Huli Huli Chicken Recipe
Step 1: Marinating the Chicken
Marinating the chicken is the first and most crucial step in making Huli Huli Chicken. Start by gathering all your ingredients. In a large bowl, whisk together the soy sauce, brown sugar, ketchup, pineapple juice, rice vinegar, sesame oil, minced garlic, grated ginger, black pepper, and red pepper flakes. This mixture creates a flavorful marinade that will soak into the chicken.
Next, add the bone-in, skin-on chicken thighs to the bowl. Make sure each piece is fully coated with the marinade. Cover the bowl with plastic wrap or a lid and place it in the refrigerator. For the best flavor, let the chicken marinate for at least one hour. However, if you have time, marinating overnight will enhance the taste even more.
Step 2: Preparing the Grill
While the chicken is marinating, it’s time to prepare your grill. Preheat your grill to medium-high heat. This temperature is perfect for achieving that delicious char on the chicken. If you’re using a charcoal grill, allow the coals to turn white before cooking. For gas grills, simply turn on the burners and let them heat up.
If you plan to grill pineapple slices, brush them lightly with oil to prevent sticking. Set them aside for later. A well-prepared grill ensures even cooking and helps lock in the flavors of the chicken.
Step 3: Cooking the Chicken
Once your grill is hot, it’s time to cook the chicken. Remove the chicken thighs from the marinade, allowing any excess marinade to drip off. Discard the leftover marinade to avoid contamination. Place the chicken thighs skin-side down on the grill. Cook them for about 6-8 minutes. This will help the skin become crispy and golden.
After the first side is cooked, flip the chicken and grill for another 6-8 minutes. Use a meat thermometer to check the internal temperature. It should reach 165°F for safe consumption. If you’re grilling pineapple slices, add them to the grill during the last few minutes of cooking. Grill them for about 2-3 minutes on each side until they are caramelized and have nice grill marks.
Step 4: Basting and Finishing Touches
As the chicken cooks, you can baste it with some of the marinade for extra flavor. Just be sure to use a clean brush or spoon to avoid cross-contamination. Once the chicken is fully cooked, remove it from the grill and let it rest for about 5 minutes. This resting period allows the juices to redistribute, making the chicken even juicier.
Before serving, garnish the chicken with chopped green onions for a fresh touch. If you grilled pineapple, serve it alongside the chicken for a delightful combination of flavors. Now, your Huli Huli Chicken is ready to be enjoyed!
Variations of Huli Huli Chicken Recipe
Alternative Ingredients
While the classic Huli Huli Chicken recipe is delicious, you can easily customize it to suit your taste. Here are some alternative ingredients you might consider:
Chicken Breasts: If you prefer leaner meat, use boneless, skinless chicken breasts. They will cook faster, so adjust the grilling time accordingly.
Different Sweeteners: Instead of brown sugar, try honey or maple syrup for a different sweetness. These options can add unique flavors to the marinade.
Fruit Juices: Swap pineapple juice for orange or mango juice. This change will give the chicken a different fruity twist.
Herbs and Spices: Experiment with fresh herbs like cilantro or basil. You can also add spices like cumin or paprika for an extra kick.
Vegetables: Add bell peppers or zucchini to the grill alongside the chicken. They will soak up the marinade flavors and make a colorful side dish.
These alternative ingredients can help you create a Huli Huli Chicken that fits your preferences. Feel free to mix and match to find your perfect combination!
Cooking Methods Variations
Besides grilling, there are several other cooking methods you can use to prepare Huli Huli Chicken. Each method offers a unique taste and texture:
Baking: Preheat your oven to 400°F. Place the marinated chicken on a baking sheet lined with parchment paper. Bake for 30-35 minutes, or until the internal temperature reaches 165°F. This method keeps the chicken moist and tender.
Slow Cooking: For a hands-off approach, use a slow cooker. Place the marinated chicken in the slow cooker and cook on low for 6-8 hours. The chicken will become incredibly tender and flavorful.
Stovetop Searing: Heat a skillet over medium-high heat and add a little oil. Sear the chicken thighs for 5-7 minutes on each side. Then, cover and reduce the heat to low, cooking for an additional 10-15 minutes until done.
Air Frying: Preheat your air fryer to 375°F. Place the marinated chicken in the basket and cook for 25-30 minutes, flipping halfway through. This method gives you crispy skin without the need for a grill.
These cooking methods allow you to enjoy Huli Huli Chicken in various ways. Choose the one that best fits your cooking style and enjoy this delightful dish!
Cooking Note for Huli Huli Chicken Recipe
When preparing Huli Huli Chicken, there are a few important cooking notes to keep in mind. These tips will help ensure that your chicken turns out perfectly every time.
First, always use a meat thermometer to check the internal temperature of the chicken. This is crucial for food safety. The chicken should reach an internal temperature of 165°F. This ensures that it is fully cooked and safe to eat.
Next, consider the thickness of the chicken thighs. If they are particularly thick, you may need to adjust the cooking time. Thicker pieces will take longer to cook through, while thinner pieces will cook faster. Keep an eye on them to avoid overcooking.
Another tip is to let the chicken rest after grilling. This resting period allows the juices to redistribute throughout the meat. If you cut into the chicken too soon, the juices will run out, leaving you with dry meat. A 5-minute rest is usually sufficient.
Lastly, if you want to enhance the flavor even more, consider basting the chicken with the marinade during the last few minutes of cooking. Just remember to use a clean brush or spoon to avoid contamination. This will add an extra layer of flavor and keep the chicken moist.
By following these cooking notes, you can achieve a delicious and juicy Huli Huli Chicken that will impress your family and friends!
Serving Suggestions for Huli Huli Chicken Recipe
Side Dishes to Pair with Huli Huli Chicken
When serving Huli Huli Chicken, choosing the right side dishes can elevate your meal. Here are some delightful options that complement the flavors of the chicken:
Coconut Rice: This sweet and creamy rice pairs perfectly with the savory chicken. The coconut flavor enhances the tropical vibe of the dish.
Grilled Vegetables: Bell peppers, zucchini, and asparagus make for colorful and healthy sides. Simply toss them in olive oil, salt, and pepper before grilling.
Coleslaw: A refreshing coleslaw adds crunch and a tangy contrast to the sweet chicken. You can use a simple vinegar-based dressing for a lighter option.
Macaroni Salad: This classic Hawaiian side dish is creamy and satisfying. It balances the flavors of the chicken beautifully.
Pineapple Salsa: A fresh salsa made with diced pineapple, red onion, cilantro, and lime juice adds a zesty kick. It’s a great way to use up any leftover pineapple!
These side dishes not only enhance the meal but also create a colorful and inviting plate. Feel free to mix and match based on your preferences and what you have on hand!
Presentation Tips
Presentation plays a key role in making your Huli Huli Chicken appealing. Here are some tips to make your dish look as good as it tastes:
Use a Colorful Platter: Serve the chicken on a vibrant platter to make the colors pop. A white plate can also work well to highlight the dish.
Garnish Generously: Sprinkle chopped green onions and fresh herbs over the chicken for a burst of color. You can also add lime wedges for a fresh touch.
Arrange Neatly: Place the chicken thighs in a single layer, slightly overlapping them for a neat look. Add grilled pineapple slices around the chicken for a tropical flair.
Serve with Sides: Arrange your chosen side dishes around the chicken. This creates a beautiful spread that invites everyone to dig in.
Use Fresh Ingredients: Fresh herbs and colorful vegetables not only enhance the flavor but also add visual appeal. Always opt for the freshest ingredients available.
By following these presentation tips, you can create a stunning meal that will impress your guests. Enjoy your Huli Huli Chicken with pride!
Tips for Perfecting Your Huli Huli Chicken Recipe
To make your Huli Huli Chicken truly unforgettable, consider these helpful tips. They will guide you in achieving the best flavor and texture, ensuring your dish stands out at any gathering.
First, always marinate the chicken for at least one hour, but overnight is best. This allows the flavors to penetrate deeply into the meat. The longer the chicken sits in the marinade, the more flavorful it will be.
Next, when grilling, make sure your grill is preheated properly. A hot grill helps to sear the chicken, locking in juices and creating a delicious crust. If you’re using a charcoal grill, wait until the coals are glowing white. For gas grills, let it heat for about 10-15 minutes.
Another tip is to avoid flipping the chicken too often. Let it cook undisturbed for the first few minutes. This helps develop a nice char and prevents sticking. Flip only once to ensure even cooking.
Consider using a meat thermometer to check for doneness. This is the best way to ensure your chicken is cooked perfectly. Aim for an internal temperature of 165°F. This guarantees that the chicken is safe to eat while remaining juicy.
If you want to add extra flavor, baste the chicken with the marinade during the last few minutes of grilling. This adds moisture and enhances the taste. Just remember to use a clean brush to avoid contamination.
Lastly, let the chicken rest for about 5 minutes after grilling. This resting time allows the juices to redistribute throughout the meat, making it more tender and juicy. Cutting into it too soon can result in dry chicken.
By following these tips, you’ll create a Huli Huli Chicken that is bursting with flavor and sure to impress your family and friends!
Breakdown of Time for Huli Huli Chicken Recipe
Prep Time
The prep time for Huli Huli Chicken is quite manageable. You will need about 15-20 minutes to gather your ingredients and prepare the marinade. This includes whisking together the soy sauce, brown sugar, ketchup, pineapple juice, rice vinegar, sesame oil, garlic, ginger, black pepper, and optional red pepper flakes. After mixing, you will also need a few minutes to coat the chicken thighs in the marinade. Once everything is ready, cover the bowl and place it in the refrigerator. If you can, let the chicken marinate overnight for the best flavor.
Cooking Time
When it comes to cooking, the grilling time for Huli Huli Chicken is approximately 12-16 minutes. Start by grilling the chicken thighs skin-side down for about 6-8 minutes. Then, flip them over and cook for another 6-8 minutes. Always check the internal temperature to ensure it reaches 165°F. If you are grilling pineapple slices, add them during the last few minutes of cooking. They will need about 2-3 minutes on each side to caramelize nicely.
Total Time
In total, you can expect the entire process of making Huli Huli Chicken to take around 1 hour and 35 minutes, including marinating time. If you choose to marinate overnight, the active cooking time remains about 30-40 minutes. This makes it a great option for a weekend family dinner or a special gathering with friends. With a little planning, you can enjoy this delicious dish with minimal fuss!
Nutritional Information for Huli Huli Chicken Recipe
Calories
350 calories. This makes it a satisfying option for a meal without being overly heavy. The balance of flavors and ingredients ensures that you can enjoy a delicious dinner while keeping your calorie intake in check.
Protein
25 grams of protein. This protein content comes primarily from the chicken thighs, making it a great choice for those looking to increase their protein intake. Protein is essential for muscle repair and growth, making this dish a perfect post-workout meal.
Sodium
800 milligrams of sodium. This sodium content mainly comes from the soy sauce used in the marinade. If you are watching your sodium intake, consider using low-sodium soy sauce as a substitute. This small change can help reduce the overall sodium content while still maintaining the delicious flavor of the dish.
FAQs about Huli Huli Chicken Recipe
Can I use other types of meat for Huli Huli Chicken?
Absolutely! While the traditional recipe uses chicken, you can easily substitute other meats. Pork, for example, works wonderfully with the marinade. You can use pork chops or tenderloin for a delicious twist. Additionally, you can try using boneless chicken breasts if you prefer leaner meat. Just remember to adjust the cooking time, as different meats may require different grilling durations. Feel free to experiment and find your favorite version of Huli Huli!
How long should I marinate the chicken?
For the best flavor, marinate the chicken for at least one hour. However, if you have the time, letting it sit overnight is ideal. This longer marinating time allows the flavors to penetrate deeply into the meat, resulting in a more flavorful dish. If you’re short on time, even a quick 30-minute marinade can still enhance the taste, but overnight is always recommended for maximum flavor.
What can I substitute for soy sauce in the recipe?
If you’re looking for a soy sauce substitute, there are several options available. You can use tamari, which is a gluten-free alternative. Coconut aminos is another great choice, offering a similar flavor profile with less sodium. If you prefer a homemade option, mix equal parts of balsamic vinegar and water with a pinch of salt. This will give you a similar taste without using soy sauce. Choose the substitute that best fits your dietary needs!
Is Huli Huli Chicken spicy?
Huli Huli Chicken is not inherently spicy, but it can be adjusted to your taste. The recipe includes red pepper flakes, which add a mild heat. If you enjoy spicier dishes, feel free to increase the amount of red pepper flakes or add a dash of hot sauce to the marinade. On the other hand, if you prefer a milder flavor, you can simply omit the red pepper flakes altogether. This dish is versatile and can be tailored to suit your spice preference!
Conclusion on Huli Huli Chicken Recipe
In conclusion, the Huli Huli Chicken recipe is a delightful way to bring a taste of Hawaii to your dining table. With its sweet and savory marinade, this dish is not only easy to prepare but also incredibly satisfying. Whether you’re hosting a summer barbecue or enjoying a cozy family dinner, Huli Huli Chicken is sure to impress your guests and loved ones.
By following the steps outlined in this article, you can create a flavorful meal that highlights the unique blend of ingredients. The versatility of this recipe allows you to experiment with different meats, cooking methods, and side dishes, making it a perfect fit for any occasion. Plus, with its nutritional benefits, you can enjoy a delicious meal without compromising on health.
So, gather your ingredients, fire up the grill, and get ready to savor the mouthwatering flavors of Huli Huli Chicken. Don’t forget to share your culinary creations with family and friends, as this dish is best enjoyed together. Happy cooking!
Paul
Huli Huli Chicken Recipe is a must-try for everyone!
This Huli Huli Chicken is a Hawaiian-inspired grilled masterpiece, featuring juicy chicken marinated in a sweet, tangy, and smoky pineapple-soy glaze. Perfect for cookouts, weeknight grilling, or when you want to bring tropical flavors to your table.
For the marinade and sauce:1 cup pineapple juice½ cup soy sauce½ cup brown sugar¼ cup ketchup¼ cup chicken broth1 tablespoon grated fresh ginger2 garlic clovesminced1 tablespoon rice vinegar2 tablespoons Worcestershire sauce1 teaspoon sesame oil
For the chicken:2½ to 3 pounds bonelessskinless chicken thighs or breastsSalt and pepper to taste
Method
In a large bowl or measuring cup, whisk together pineapple juice, soy sauce, brown sugar, ketchup, chicken broth, ginger, garlic, rice vinegar, Worcestershire sauce, and sesame oil until sugar is mostly dissolved.
Place chicken in a large zip-top bag or container. Pour half of the marinade over the chicken, seal, and refrigerate for at least 2 hours or up to overnight. Reserve the other half of the marinade for basting.
Pour the reserved marinade into a small saucepan. Bring to a boil, then reduce heat and simmer for 15–20 minutes until thickened into a glaze.
Preheat the grill to medium heat. Remove chicken from the marinade and season lightly with salt and pepper. Grill for 5–6 minutes per side, brushing with thickened glaze during the last few minutes, until internal temperature reaches 165°F.
Let chicken rest for 5 minutes before slicing. Serve hot with extra sauce drizzled on top.
Notes
Thighs provide juicier results, but breasts can be used for a leaner option. For oven-baking, roast marinated chicken at 400°F for 25–30 minutes, basting halfway. Delicious served with rice, grilled pineapple, or a side of coleslaw.