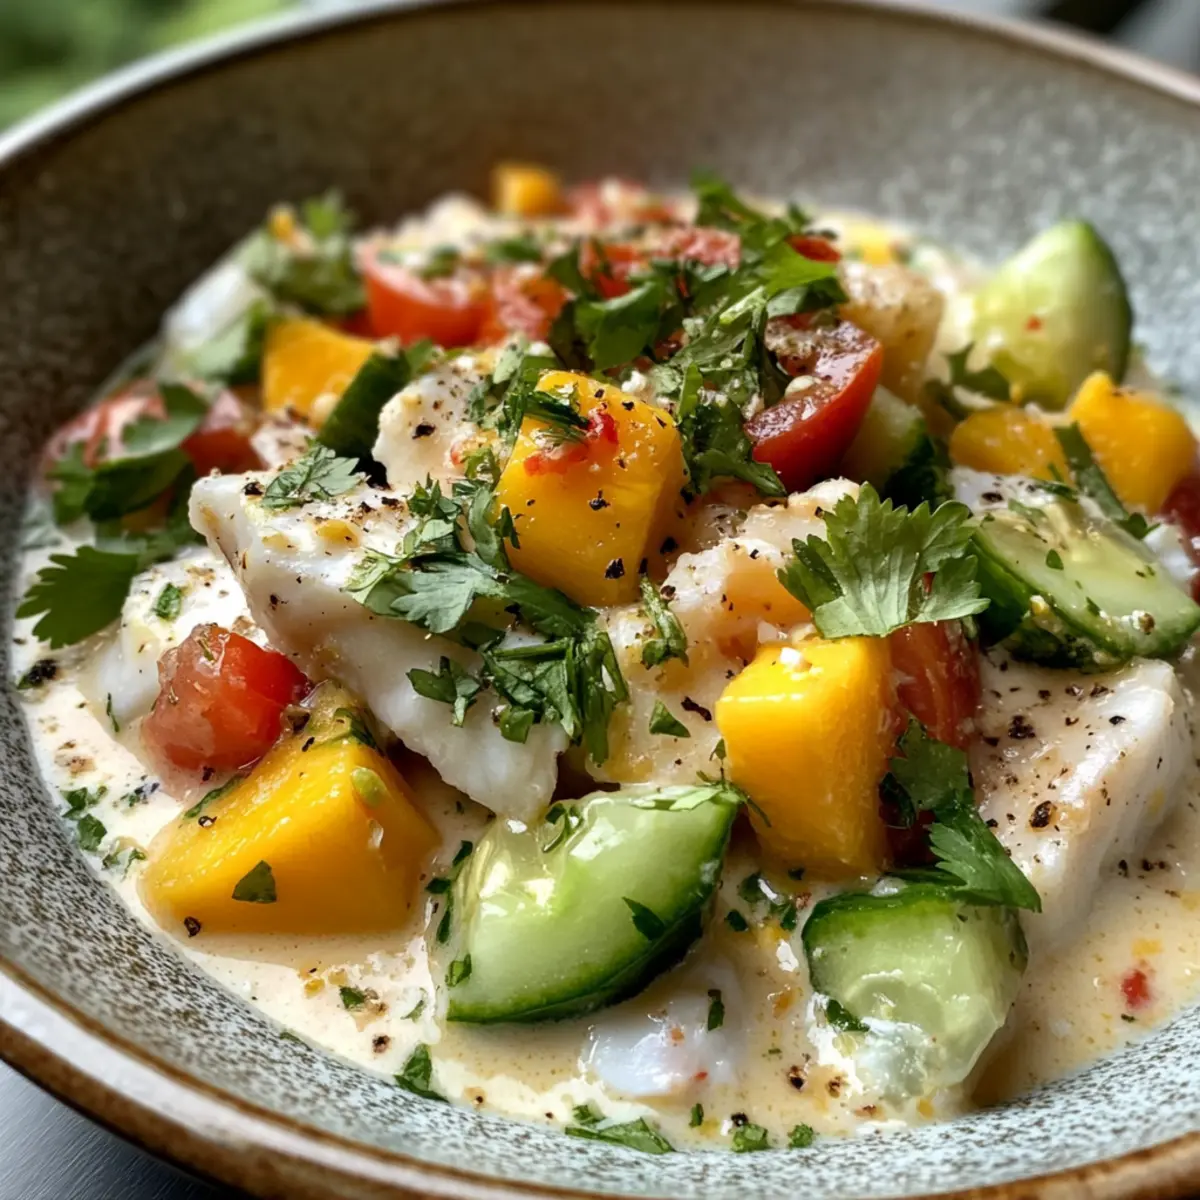
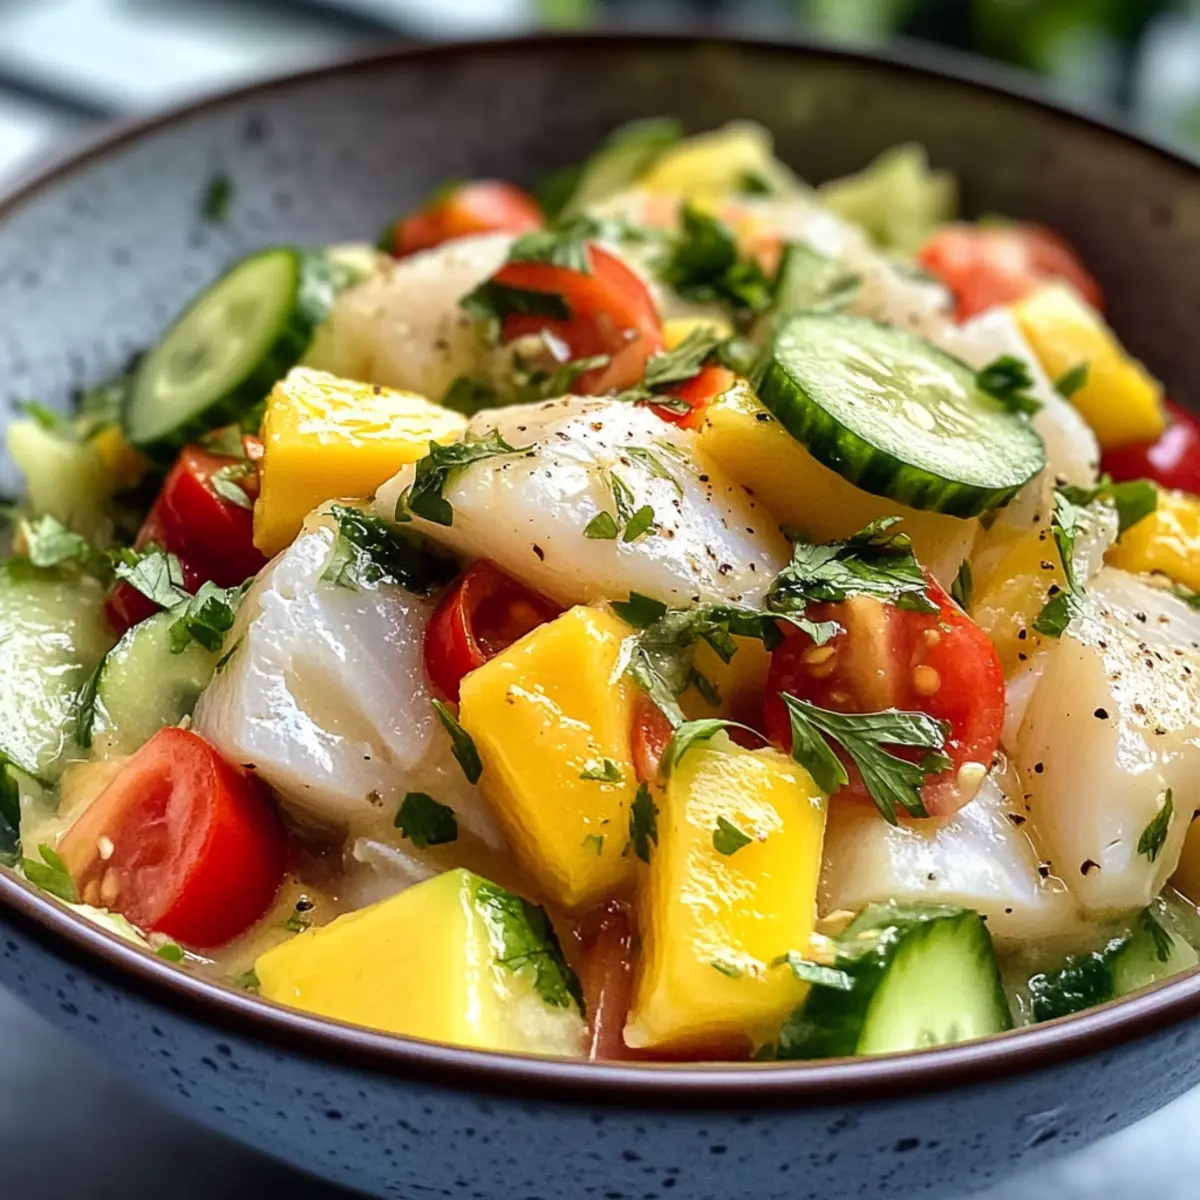
The moment I first tasted tropical coconut milk ceviche, I was whisked away to sun-soaked beaches, where the ocean breeze dances with the scent of citrus. This delicious dish marries the creaminess of coconut milk with succulent white fish, creating a refreshing tapestry of flavors that’s perfect for any occasion. Best of all, this Tropical Coconut Milk Ceviche comes together in under 20 minutes, making it an ideal choice for last-minute gatherings or an impressive appetizer that doubles as a light lunch. It’s gluten-free and dairy-free, catering to various dietary preferences while delivering vibrant tastes that everyone will love. Are you ready to stir up some island vibes in your kitchen?
What makes this ceviche a must-try?
Quick and Easy: This recipe comes together in just 20 minutes, perfect for those busy days when you want something refreshing without the fuss.
Tropical Flavor Explosion: The unique combination of creamy coconut milk, zesty lime, and fresh ingredients ensures every bite transports you to a sunny paradise.
Healthy and Satisfying: Being both gluten-free and dairy-free, it’s a guilt-free indulgence that doesn’t compromise on taste and offers nutritious benefits.
Versatile Delight: Enjoy it as a light appetizer or pair it with some crispy tortilla chips for a fun twist. You can also explore variations like adding avocado or experimenting with different seafood.
Crowd-Pleasing: Impress your family and friends at gatherings with this visually stunning dish that tantalizes the taste buds, leaving everyone wanting more! Whether you serve it alongside a refreshing Tropical Chicken Pineapple or set the stage with Milky Coconut Cheese for dessert, this ceviche is sure to shine.
Tropical Coconut Milk Ceviche Ingredients
• Perfect for a quick tropical meal!
For the Ceviche
- White firm flesh fish – Use snapper, mahi mahi, or sea bass for a delicious protein boost.
- ½ small cucumber – Adds a refreshing crunch; dice finely for better distribution.
- 3 cherry tomatoes – Contributes juiciness and vibrant color; regular diced tomatoes work too.
- ½ small firm mango – Provides natural sweetness and tropical flair; ensure it’s ripe!
- ¼ purple onion – Delivers depth of flavor; opt for red onion for a milder taste.
- Juice of ½ lime – Essential for “cooking” the fish; adjust to taste for optimal tang.
- ⅛ cup coconut milk or cream – Adds a rich creaminess; substitute coconut cream for a thicker texture.
- Salt – Enhances all flavors; customize according to your preference.
- Ground pepper – Brings a hint of spice; use freshly ground for the best flavor.
- Fresh coriander – A lovely garnish that brightens the dish; optional but highly recommended.
Step‑by‑Step Instructions for Tropical Coconut Milk Ceviche
Step 1: Marinate the Fish
Begin by cutting the white firm flesh fish—such as snapper or mahi mahi—into small, bite-sized chunks. Season the fish with salt and freshly ground pepper, then drizzle with the juice of half a lime. Place the fish in a bowl, covering it securely with plastic wrap, and allow it to marinate in the refrigerator for 15-20 minutes until the fish turns opaque.
Step 2: Prepare the Salsa
While the fish is marinating, take this time to prepare the refreshing salsa. Finely dice half a small cucumber, three cherry tomatoes, and a quarter of a purple onion, ensuring you create vibrant, colorful pieces. Also, peel and dice half a small firm mango to add sweetness. Set all the diced ingredients aside in a bowl, ready to combine later.
Step 3: Combine Ingredients
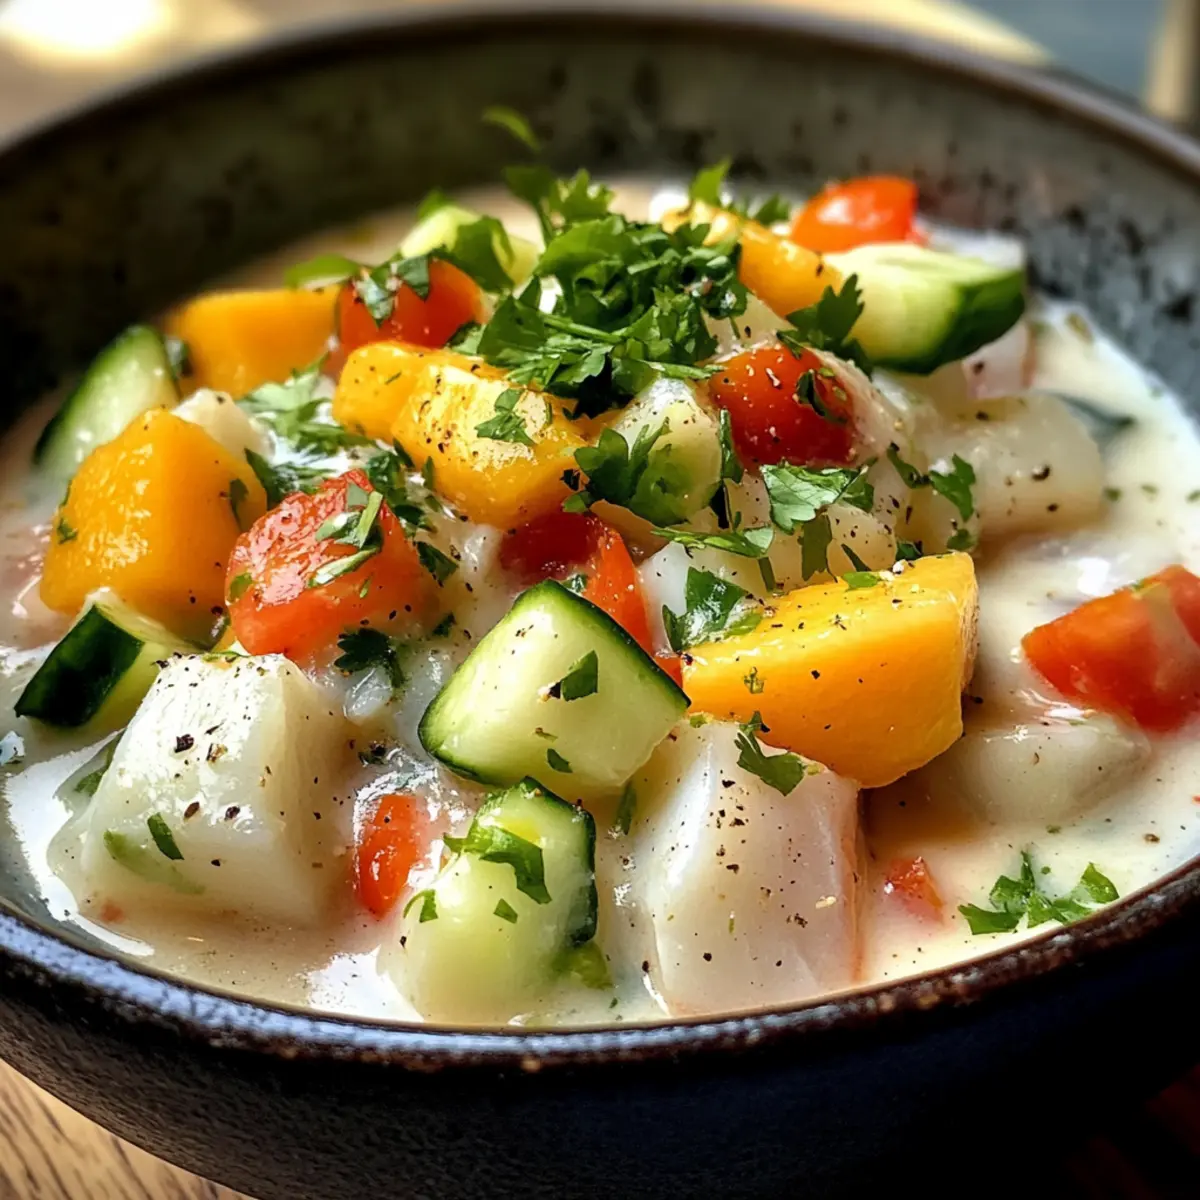
After the fish has marinated and is now ready, remove it from the refrigerator. In a mixing bowl, gently combine the marinated fish with the chopped cucumber, mango, onion, and tomatoes. Pour in an eighth of a cup of coconut milk, stirring gently to ensure all ingredients are well coated and mixed together. This will create a creamy base that enhances the tropical flavor of your ceviche.
Step 4: Garnish and Serve
Finally, before serving your Tropical Coconut Milk Ceviche, sprinkle with fresh coriander for added flair and flavor. Serve chilled in small bowls or on thin taco shells for a delightful twist. This dish makes for an impressive appetizer or a light meal, showcasing its vibrant colors and exciting textures!

Expert Tips for Tropical Coconut Milk Ceviche
- Fresh Fish Required: Ensure your white firm flesh fish is super fresh for the best flavor and texture. Avoid frozen fish if possible.
- Balancing Lime Juice: Start with less lime juice; you can always add more for acidity if needed. This step helps prevent overpowering the other flavors.
- Chill is Key: Chill your serving bowls before serving to keep the ceviche cool and refreshing. A cold dish is crucial for that tropical experience!
- Storage Savvy: Ceviche can be stored in the fridge for up to two days; however, consume it sooner for the best texture and flavor.
- Garnish to Impress: Don’t skip the fresh coriander—it’s the final touch that adds a pop of freshness to your Tropical Coconut Milk Ceviche!
What to Serve with Tropical Coconut Milk Ceviche
Elevate your meal with delightful accompaniments that bring the flavors of the tropics to life.
-
Crunchy Tortilla Chips: These provide a perfect crunchy contrast, ideal for scooping up the ceviche and enhancing its tropical flavors.
-
Arugula Salad: A peppery arugula salad with a light citrus vinaigrette complements the ceviche beautifully, adding a fresh and vibrant touch.
-
Spicy Mango Salsa: This invigorating salsa adds a fruity kick to your meal with a blend of sweetness and heat, making each bite exciting.
-
Quinoa Salad: A fluffy quinoa salad mixed with diced vegetables and a squeeze of lime offers a nutty flavor and a healthy, filling side.
-
Coconut Rice: Creamy coconut rice perfectly mirrors the flavors of the ceviche, bringing a subtle sweetness and texture that enhances your dining experience.
-
Frozen Fruit Sorbet: End your meal on a refreshing note with a scoop of sorbet to cleanse the palate, echoing the ceviche’s tropical essence.
How to Store and Freeze Tropical Coconut Milk Ceviche
Fridge: Store in an airtight container and keep in the refrigerator for up to 2 days. For best texture and flavor, consume it within the first day.
Freezer: Freezing is not recommended for tropical coconut milk ceviche, as it can negatively affect the texture of the fish and vegetables once thawed.
Reheating: This dish is best served cold and doesn’t require reheating. Enjoy it straight from the fridge for a refreshing bite!
Serving Suggestion: If you do have leftovers, serve them cold as a topping for crispy tortilla chips or mix into fresh salads for a quick meal!
Tropical Coconut Milk Ceviche Variations
Feel free to explore these exciting twists that will make your ceviche experience even more delightful!
-
Citrus Swap: Replace lime juice with lemon juice for a different zingy flavor. The refreshing twist can make your ceviche feel like a whole new dish!
-
Avocado Boost: Add diced avocado for a creamy texture. This not only enhances the richness but pairs perfectly with the tropical flavors.
-
Spicy Kick: Toss in some diced jalapeños for heat. Just a little can elevate the flavor profile and give your ceviche a tantalizing kick!
-
Different Seafood: Try shrimp, scallops, or even octopus for a fun seafood twist. Each seafood type brings its own unique flavor, making every version exciting.
-
Herb Variations: Switch out fresh coriander with parsley or mint. These herbs provide a fresh note that complements the ceviche beautifully and adds a unique flavor.
-
Fruit Surprise: Incorporate diced pineapple or papaya for an added layer of sweetness. These tropical fruits will give your ceviche an even more fruity flavor profile.
-
Coconut Creamy: For an extra indulgent treat, swap coconut milk with rich coconut cream. This will give your ceviche a delightful extra creaminess!
-
Topping Twirls: Serve the ceviche on crispy tortilla chips or lettuce leaves. This adds a satisfying crunch and visually appealing element, making it an even more enticing appetizer.
No matter how you choose to customize your Tropical Coconut Milk Ceviche, each version offers a new adventure in taste! Pair it with Coconut Chocolate Rolls for dessert or share it alongside Tropical Pineapple Soft to round out a delicious meal. Enjoy your culinary journey!
Make Ahead Options
These Tropical Coconut Milk Ceviche ingredients are a fantastic option for meal prep, allowing you to save time on busy days. You can dice the cucumber, mango, onion, and tomatoes up to 24 hours in advance and store them in airtight containers in the refrigerator to maintain their freshness. The fish can also be marinated ahead, but it’s best to do this no more than 2 hours before serving to prevent it from becoming too firm. When you’re ready to serve, simply combine the prepped ingredients with the marinated fish and coconut milk for a deliciously refreshing dish that tastes just as vibrant as when freshly made. Enjoy the time-saving benefits while impressing your guests with this quick, tropical delight!
Tropical Coconut Milk Ceviche Recipe FAQs
How do I choose the best fish for ceviche?
Absolutely! For the best flavor and texture, choose white, firm flesh fish like snapper, mahi mahi, or sea bass. The fish should have a clean, ocean-like smell and appear moist and shiny. Look for bright, clear eyes and firm flesh without any dark spots, which indicate freshness. If possible, shop at a reputable fish market for the freshest options available.
How should I store leftovers of the ceviche?
Very! Store any leftover Tropical Coconut Milk Ceviche in an airtight container in the refrigerator. It can stay fresh for up to 2 days. However, for the best texture and taste, it’s wise to consume it within the first day. Keep in mind, the fish might become softer, so eating fresh is ideal!
Can I freeze Tropical Coconut Milk Ceviche?
Unfortunately, freezing is not recommended. The texture of both the fish and the vegetables will suffer once thawed, making it mushy and unappetizing. Instead, consider using any leftovers within a day for the best experience, or serve them cold over crispy tortilla chips for a delightful snack!
What if I don’t have fresh lime juice?
No worries! You can substitute lime juice with lemon juice or apple cider vinegar as alternative acidic components. If you’re using lemon juice, start with a little to avoid overpowering the dish, adjusting to taste as you combine the ingredients. This can give your ceviche a nice twist while maintaining the essential “cooking” effect on the fish!
Is this ceviche safe for my pet?
I recommend caution! While the ingredients in Tropical Coconut Milk Ceviche are generally safe for humans, they may not be suitable for pets. Fish is usually fine for dogs, but lime juice and onions can be harmful. Always consult your veterinarian before sharing any new food with your pets to ensure their safety and well-being.
Are there any common mistakes to avoid when making ceviche?
Absolutely! One of the most common mistakes is using frozen fish or fish that isn’t fresh; this can lead to off-flavors. Another slip-up is over-marinating the fish, which can make it rubbery. Marinate it for about 15-20 minutes or until it becomes opaque. Also, be cautious with lime juice—start with less, as you can always add more later!
Tropical Coconut Milk Ceviche: A Quick, Refreshing Delight
Ingredients
Equipment
Method
- Cut the white firm flesh fish into small, bite-sized chunks, season with salt and pepper, drizzle with lime juice, and marinate in the refrigerator for 15-20 minutes until opaque.
- Finely dice cucumber, cherry tomatoes, and purple onion. Peel and dice mango. Set aside in a bowl.
- Combine marinated fish with chopped cucumber, mango, onion, and tomatoes. Stir in coconut milk gently to coat.
- Garnish with fresh coriander and serve chilled in bowls or on taco shells.