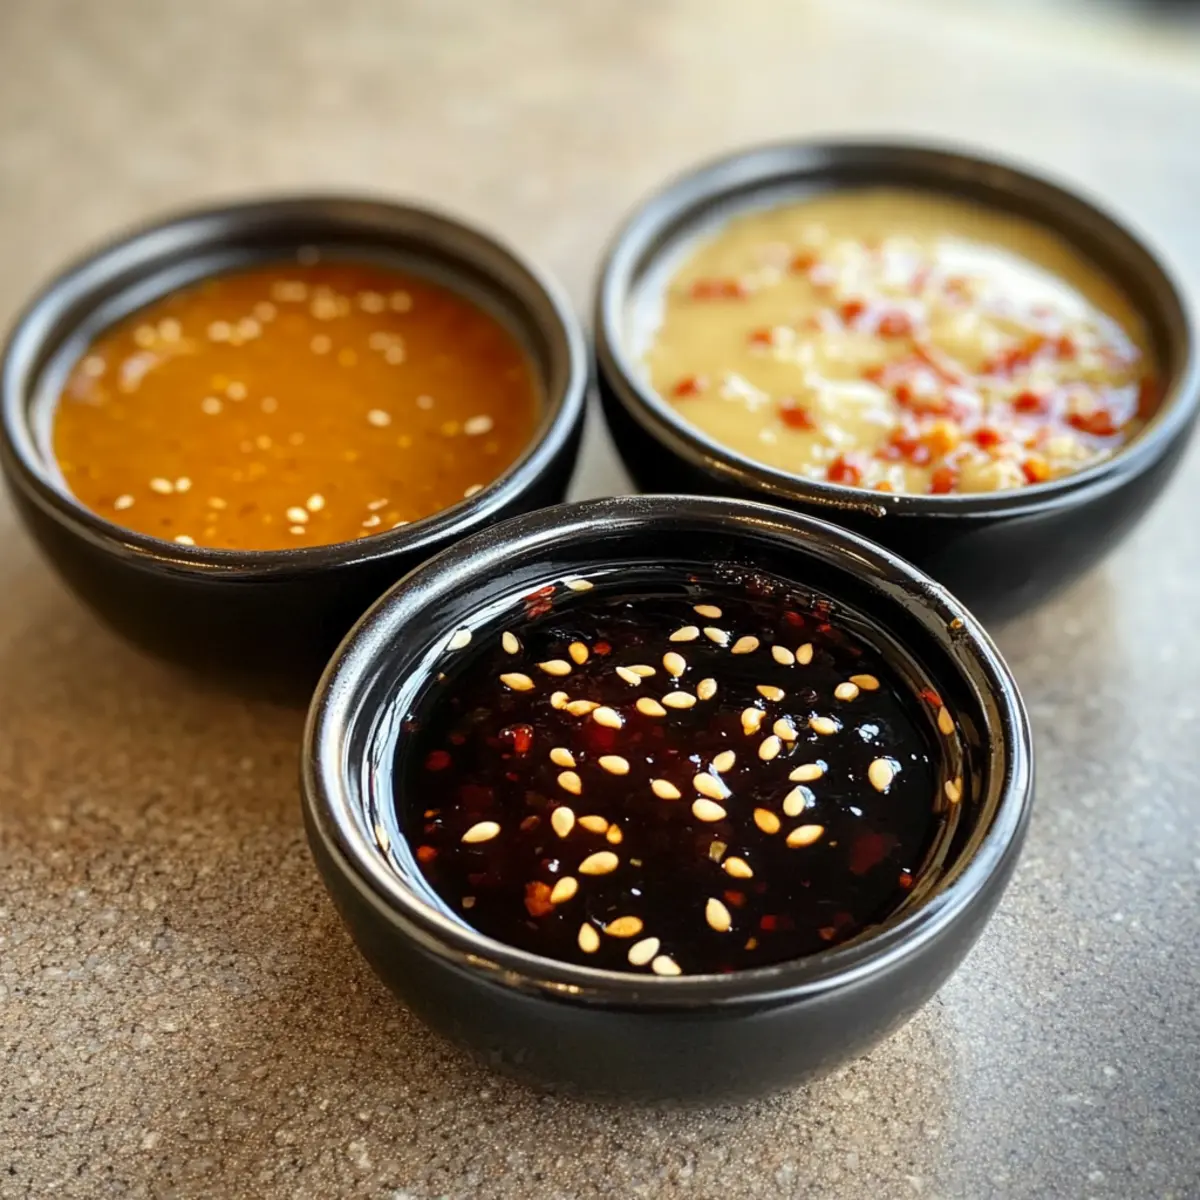
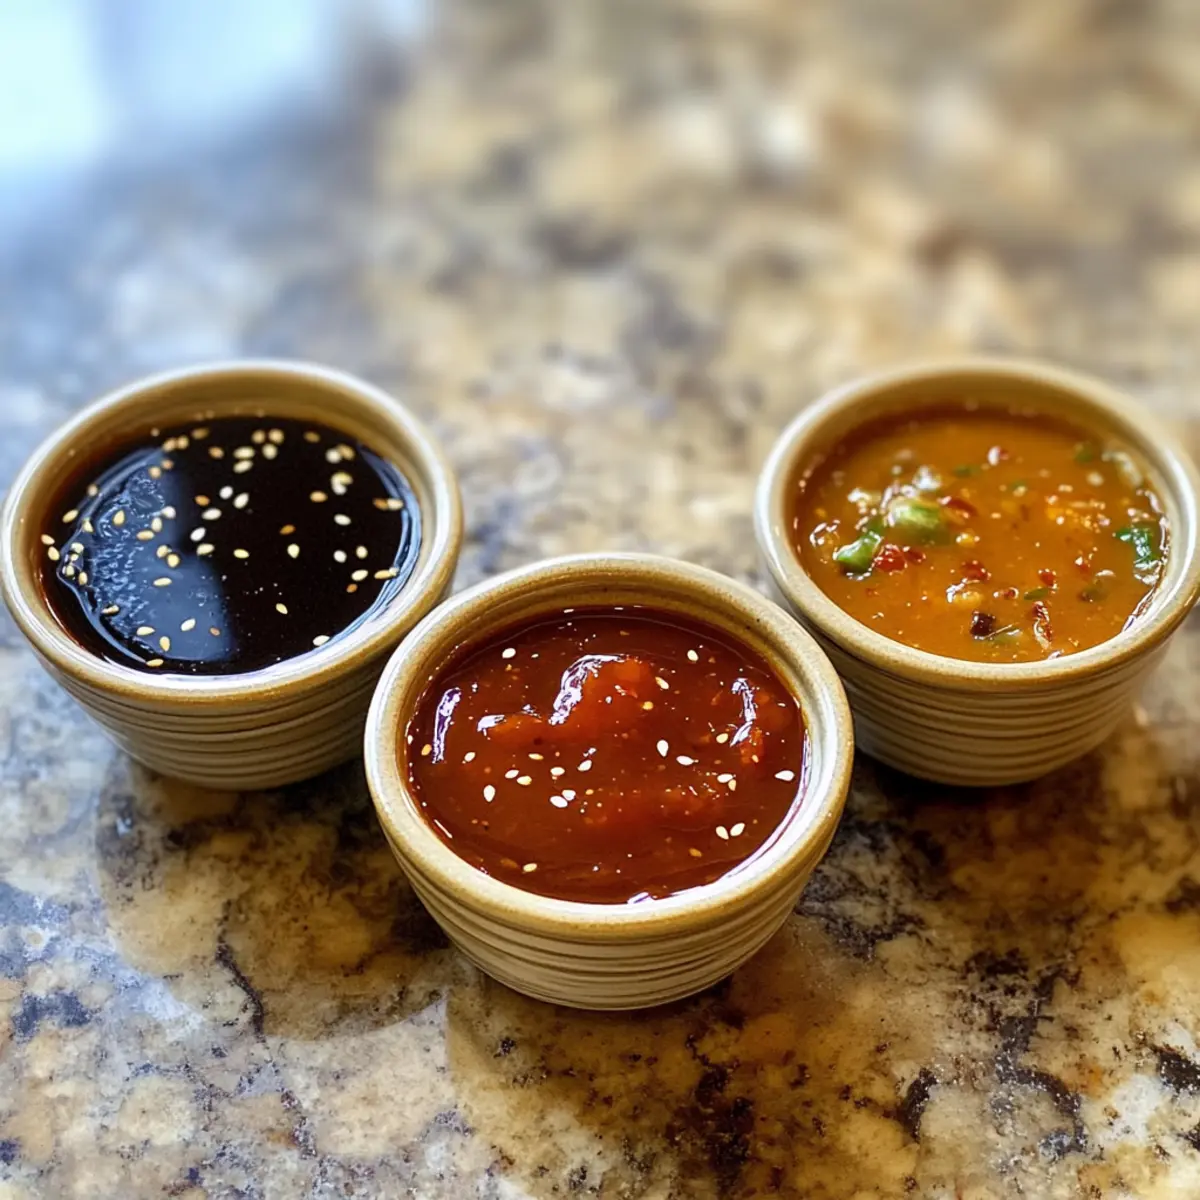
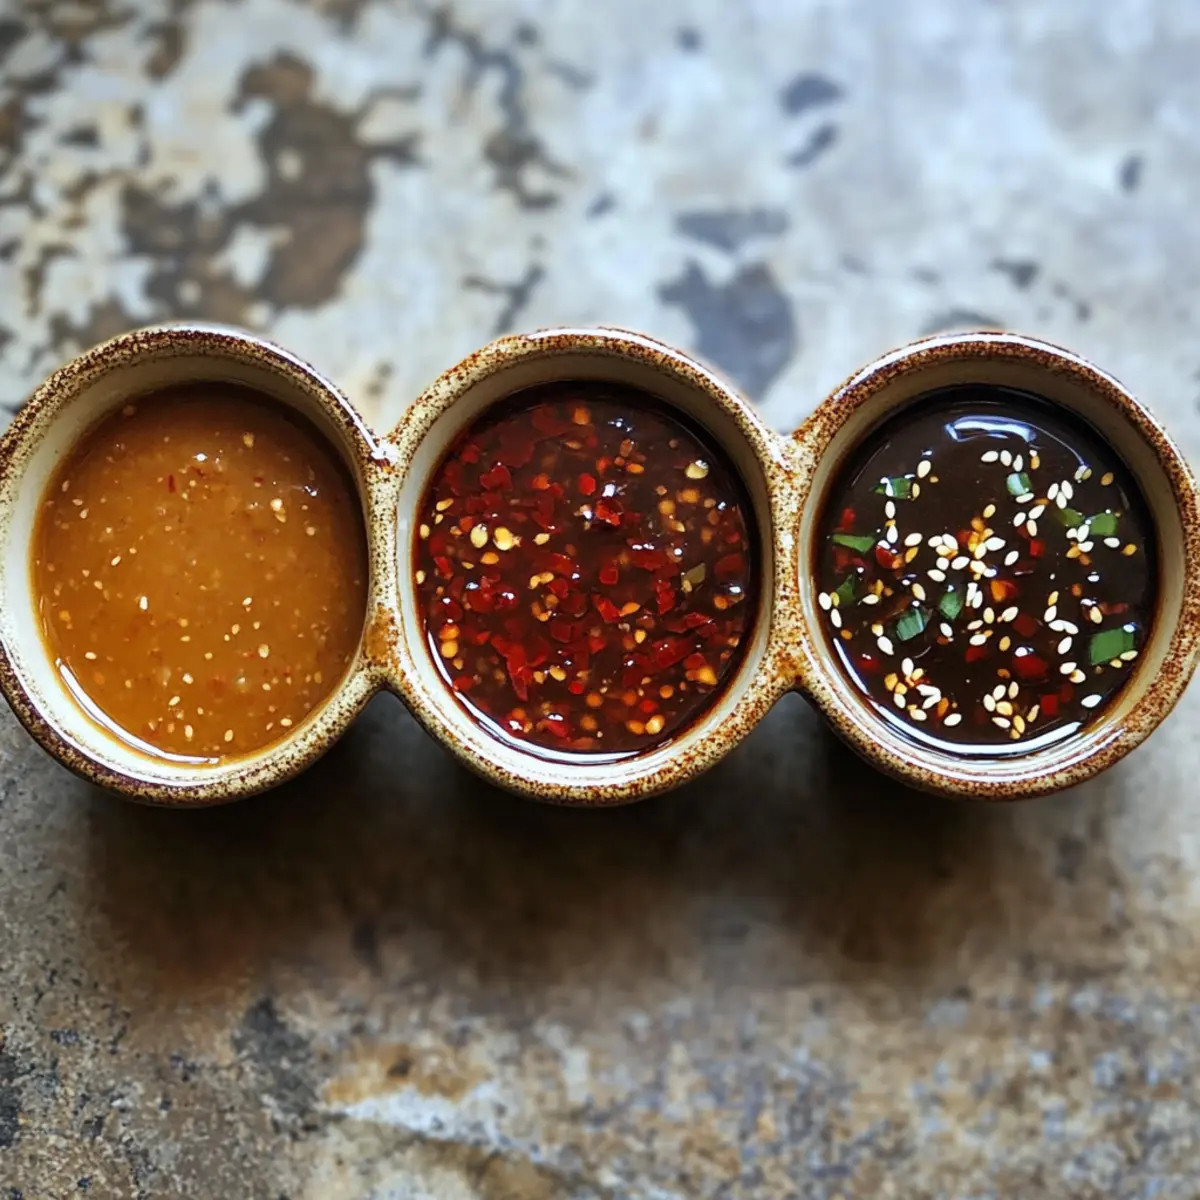
Thai Ground Beef Lettuce Wraps for a Flavorful Weeknight Meal

The first bite is like a mini vacation to the vibrant streets of Thailand. These Spicy Thai Ground Beef Lettuce Wraps not only transport you to a world of exceptional flavors but also come together in just 20 minutes, making them perfect for a quick dinner or a health-savvy snack. With their gluten-free and low-carb perks, they’re a guilt-free delight that suits a variety of diets. Picture crisp, refreshing lettuce leaves cradling a savory filling of seasoned ground beef, brightened with zesty lime and a hint of heat. As you roll these wraps up, you’ll see just how easy it is to bring a taste of authentic Thai cuisine into your home. Are you ready to wrap your hands around this deliciousness?

Why are These Lettuce Wraps a Must-Try?

Quick and Easy: Ready in just 20 minutes, these wraps are ideal for busy weeknights when you crave something fresh yet satisfying.

Gluten-Free Goodness: Perfect for those mindful of their diet, simplifying meal prep without sacrificing flavor.

Customizable Flavors: Whether you use beef, chicken, or even tofu, the choice is yours! The flexibility of ingredients makes it a delightful surprise every time.

Fresh Textures: Enjoy the crisp crunch of lettuce paired with the savory, juicy ground beef, enhanced by zesty lime and fresh herbs—pure bliss in every bite!

Family-Friendly Fun: Let everyone assemble their own wraps at the table for a fun, interactive dining experience that even picky eaters will love!

Pair them with some delicious Savory Beef Bacon for a complete meal or serve with Mini Beef Pies for a savory treat!

Thai Ground Beef Lettuce Wrap Ingredients

For the Filling

  • Ground Beef – This is the main protein source; you can substitute with chicken, turkey, or even shrimp for varied flavors.
  • Water – A small amount keeps the beef moist while cooking; adjust based on your preferred texture.
  • Toasted Rice Powder – Adds a unique nutty flavor; ground almonds can easily replace it if desired.
  • Chili Flakes – For that perfect heat; adjust the amount based on your spice preference or omit entirely.
  • Lime Juice – Provides a bright, tangy balance; lemon juice works if you’re in a pinch.
  • Fish Sauce – Infuses umami; make sure to choose gluten-free options for dietary needs.
  • White Sugar – Helps to balance the savory flavors; brown sugar can add a deeper taste.

For Freshness

  • Cilantro – This herb brightens the dish; parsley is a fine substitute if you’re not a cilantro fan.
  • Green Onions – Adds a lovely crunch; chives can be used instead for a milder flavor.
  • Shallots – Offers sweetness and depth; finely chopped onions can work in a pinch.

For the Wrap

  • Lettuce – The vessel for your delicious filling; sturdy varieties like romaine or butter lettuce are best for wrapping.

These Thai Ground Beef Lettuce Wraps are a culinary escape packed with flavor and made from easily accessible ingredients. Enjoy crafting this delightful dish!

Step‑by‑Step Instructions for Thai Ground Beef Lettuce Wraps

Step 1: Cook Ground Beef
In a large skillet over medium heat, add the ground beef and a splash of water. Cook for about 5 to 7 minutes, stirring frequently, until the beef is browned and fully cooked, with no pink remaining. As you stir, ensure the meat breaks into small pieces for an even texture, creating a juicy base for your Thai Ground Beef Lettuce Wraps.

Step 2: Season Beef
Once the ground beef is cooked, remove it from heat and transfer it to a mixing bowl. Add toasted rice powder, chili flakes, lime juice, fish sauce, and white sugar. Toss everything together until the mixture is well-coated and fragrant, about 1 to 2 minutes. The seasoning will enhance the beef’s flavor, making your Thai Ground Beef Lettuce Wraps truly delicious.

Step 3: Add Fresh Herbs
Gently fold chopped cilantro, sliced green onions, and diced shallots into the seasoned beef mixture. Mix well, so the herbs are evenly distributed throughout the filling. Take care not to over-mix, as the fresh herbs should add vibrancy and texture to your Thai Ground Beef Lettuce Wraps, creating a refreshing bite with every wrap.

Step 4: Assemble Wraps
Prepare your lettuce leaves by gently washing and drying them. Take one sturdy leaf (like romaine or butter lettuce) and place it on a plate. Spoon a generous amount of the beef mixture into the center of the leaf. Fold the sides of the lettuce over the filling and serve immediately for the best flavor and crunch, pairing with optional dipping sauces for an extra kick.

How to Store and Freeze Thai Ground Beef Lettuce Wraps

Fridge: Store leftover beef filling in an airtight container in the fridge for up to 3 days. Make sure it’s completely cooled before sealing to maintain freshness.

Freezer: Freeze the beef mixture in a freezer-safe bag or container for up to 3 months. When ready to enjoy, thaw it in the fridge overnight before reheating.

Reheating: Reheat the filling in a skillet over medium heat until warmed through. Avoid using the microwave, as it can make the ground beef rubbery.

Lettuce Storage: Keep lettuce leaves wrapped in a damp paper towel in the fridge for up to 2 days. Prepare your wraps just before serving to retain their crunch.

Thai Ground Beef Lettuce Wraps Variations

Feel free to let your creativity shine as you customize these wraps for your taste and dietary needs!

  • Vegan Option: Replace ground beef with crumbled tofu and use a vegan fish sauce alternative for a delicious plant-based twist. You won’t sacrifice flavor, and it opens a fresh avenue of taste.

  • Crunchy Veggies: Add diced bell peppers or shredded carrots to the beef mixture for an extra crunch and vibrant color. These colorful additions not only enhance the texture but lend a delightful fresh flavor.

  • Spice It Up: For those who crave a kick, try incorporating fresh diced chili peppers or sriracha into the filling. Adjust according to your heat tolerance for an exciting and fiery experience!

  • Different Proteins: Swap out the ground beef for ground chicken, turkey, or even shrimp. Each alternative brings a unique flavor profile, keeping mealtime exciting and new.

  • Nuts and Seeds: Toss in crushed peanuts or sesame seeds for additional texture and a nutty flavor. This will add an interesting crunch that elevates the simple lettuce wrap into something extra special.

  • Herb Variety: Instead of just cilantro, mix in fresh basil or mint for a refreshing twist. These aromatic herbs will enhance the flavor and transport you to a fragrant Thai market!

  • Sweet Heat Ensemble: Combine the fish sauce with a touch of honey or agave to create a sweet-salty balance, perfect for those who enjoy a hint of sweetness in savory dishes.

  • Asian Slaw Filling: Swap the meat for a mixture of shredded cabbage and carrots with some sesame dressing for a lighter, flavorful slaw that captures the essence of Asian cuisine. This refreshing mix is a crunchy delight!

For more inventive ways to enjoy ground beef, consider trying our Heirloom Beef Pancakes or get creative with Savory Beef Bacon for a unique snack!

What to Serve with Spicy Thai Ground Beef Lettuce Wraps?

Imagine transforming a simple meal into a vibrant feast by complementing these delicious wraps with delightful side dishes and drinks.

  • Steamed Jasmine Rice: A fragrant side that balances the spicy flavors of the wraps, providing a comforting touch to your meal.

  • Thai Cucumber Salad: Refreshing and light, this salad adds a crunchy texture and a hint of sweetness that beautifully contrasts the spice of the filling.

  • Grilled Pineapple Skewers: The caramelized sweetness of grilled pineapple serves as a perfect palate cleanser, enhancing the tropical essence of the Thai cuisine.

  • Coconut Milk Smoothie: Creamy and indulgent, this drink offers a sweet, mild complement that contrasts the heat of the wraps, creating a well-rounded dining experience.

  • Peanut Sauce Dipping Sauce: Rich and nutty, this sauce elevates your wraps with an additional layer of flavor, enriching every bite.

  • Thai Iced Tea: A sweet, creamy beverage with hints of spice that cools your palate while echoing the Thai theme of the meal.

  • Roasted Sweet Potato Wedges: Crispy on the outside and soft within, these wedges add a subtle sweetness, contrasting nicely to the savory beef.

  • Mini Spring Rolls: Crispy and filled with vegetables, these provide a delightful crunch and balance beautifully with the freshness of the wraps.

  • Lemongrass Infused Water: A refreshing, aromatic drink that cleanses the palate and complements the fragrant flavors of the Thai Ground Beef Lettuce Wraps.

Expert Tips for Thai Ground Beef Lettuce Wraps

  • Don’t Overcook: Ensuring the ground beef stays juicy is key; remove it from heat as soon as it’s cooked through to avoid dryness.

  • Mix It Up: Encourage creativity by letting everyone choose their filling ingredients, making these Thai Ground Beef Lettuce Wraps customizable for all taste preferences.

  • Dipping Sauces: Enhance the flavor by offering a variety of dipping sauces like sweet chili or peanut sauce; they’ll elevate your wraps to a whole new level.

  • Check Labels: If you’re catering to gluten-free individuals, always inspect fish sauce labels to confirm they’re free from gluten.

  • Choose the Right Lettuce: Opt for sturdy leaves such as romaine or butter lettuce to hold the filling better and provide a satisfying crunch with every bite.

Make Ahead Options

These Spicy Thai Ground Beef Lettuce Wraps are a fantastic choice for meal prep, allowing you to enjoy bold flavors with minimal effort. You can prepare the beef filling up to 3 days in advance—simply cook and season the ground beef as directed, then store it in an airtight container in the refrigerator. To maintain its savory goodness, ensure the mixture is completely cooled before sealing. On the day you plan to serve them, simply reheat the beef mixture in a skillet over medium heat until warmed through. Assemble your wraps with fresh lettuce right before serving for that perfect crunch, proving that satisfying meals can indeed be made ahead of time!

Thai Ground Beef Lettuce Wraps Recipe FAQs

What type of lettuce is best for wraps?
For these Thai Ground Beef Lettuce Wraps, I recommend using sturdy varieties like romaine or butter lettuce. These types are strong enough to hold the filling without tearing, ensuring a delightful crunch with each bite.

How long can I store leftover beef filling?
You can store the leftover beef filling in an airtight container in the fridge for up to 3 days. Be sure to let it cool completely before sealing to maintain its freshness and prevent bacteria growth.

Can I freeze the beef mixture?
Absolutely! You can freeze the beef mixture in a freezer-safe bag or container for up to 3 months. When you’re ready to enjoy it again, simply thaw it in the fridge overnight. To reheat, place it in a skillet over medium heat until warmed through, which helps to maintain the beef’s juicy texture.

What if I have leftovers after making the wraps?
If you have leftover lettuce after making the wraps, store the leaves wrapped in a damp paper towel in the fridge for up to 2 days. This method helps keep the lettuce crisp and fresh for your next meal. Just assemble your wraps just before serving to enjoy that perfect crunch!

What are some common substitutions for the ingredients?
You have plenty of options! If you’re looking for alternatives, ground beef can easily be replaced with chicken, turkey, pork, or shrimp. For a vegetarian version, crumbled tofu is a great substitute for beef. Additionally, if you’re not a fan of cilantro, parsley works beautifully. Customize based on your preferences to make these Thai Ground Beef Lettuce Wraps your very own!

Is this dish suitable for gluten-free diets?
Yes, these spicy Thai Ground Beef Lettuce Wraps can easily be made gluten-free. Just make sure to choose a gluten-free version of fish sauce, and check any other sauces you use to confirm they meet your dietary needs. Enjoy the vibrant flavors without any worries!

Thai Ground Beef Lettuce Wraps

Thai Ground Beef Lettuce Wraps for a Flavorful Weeknight Meal

Discover a delightful Thai Ground Beef Lettuce Wraps recipe that’s quick, gluten-free, and full of flavor—perfect for any weeknight meal.
Prep Time 10 minutes
Cook Time 10 minutes
Total Time 20 minutes
Servings: 4 wraps
Course: Dinner
Cuisine: Thai
Calories: 250

Ingredients
  

For the Filling
  • 1 pound ground beef can substitute with chicken, turkey, or shrimp
  • 2 tablespoons water adjust based on texture preference
  • 2 tablespoons toasted rice powder can substitute with ground almonds
  • 1 teaspoon chili flakes adjust based on spice preference
  • 2 tablespoons lime juice lemon juice works in a pinch
  • 1 tablespoon fish sauce choose gluten-free options
  • 1 teaspoon white sugar brown sugar can add deeper taste
For Freshness
  • 1/4 cup cilantro can substitute with parsley
  • 2 medium green onions can substitute with chives
  • 2 medium shallots finely chopped onions can work in a pinch
For the Wrap
  • 1 head lettuce sturdy varieties like romaine or butter lettuce are best

Equipment

  • large skillet

Method
 

Step-by-Step Instructions
  1. In a large skillet over medium heat, add the ground beef and a splash of water. Cook for about 5 to 7 minutes, stirring frequently, until the beef is browned and fully cooked.
  2. Once the ground beef is cooked, remove it from heat and transfer it to a mixing bowl. Add toasted rice powder, chili flakes, lime juice, fish sauce, and white sugar. Toss everything together until well-coated.
  3. Gently fold chopped cilantro, sliced green onions, and diced shallots into the seasoned beef mixture. Mix well without over-mixing.
  4. Prepare your lettuce leaves by gently washing and drying them. Take one leaf and place a generous amount of the beef mixture into the center. Fold the sides over the filling and serve immediately.

Notes

Store leftover beef filling in an airtight container in the fridge for up to 3 days. Freeze for up to 3 months. Reheat in a skillet for best results.

Cotton Candy Sushi: A Fun & Sweet No-Bake Delight

“Can you believe this whimsical dessert exists?” I recently stumbled upon a colorful delight that’s about to take your gatherings to the next level: Cotton Candy Sushi. Instead of the usual fish and rice, this playful no-bake treat swaps in fluffy cotton candy as a sweet wrap, stuffed with chewy marshmallows, vibrant gummy candies, and fresh fruit. It’s as delightful to behold as it is to eat, making it a guaranteed hit at kids’ parties, themed events, or any occasion where you want to impress. Plus, it’s incredibly quick to whip up, so you can spend less time fussing in the kitchen and more time enjoying the festivities. Who wouldn’t want to create a fun twist on dessert that’s just as lovable as it is delicious? Let’s dive into this colorful creation together, shall we?

Why is Cotton Candy Sushi So Fun?

Playful, Eye-Catching Presentation: This dessert is as visually appealing as it is tasty, making it perfect for impressing guests.

Easy No-Bake Preparation: With simple steps and no cooking required, anyone can master this fun treat in no time.

Sweet Flavor Combinations: The blend of cotton candy, fruity filling, and chewy textures creates a burst of deliciousness in every bite.

Adaptable to Personal Tastes: Customize your sushi with different candies and fruits, turning it into a unique creation every time!

Crowd-Pleaser for All Ages: Kids and adults alike will adore this whimsical dessert, adding a spark of joy to any celebration!

This delightful take on sushi offers a new way to experience sweets, ideal for your next gathering or to elevate a simple snack. And if you’re feeling adventurous, make sure to check out other dessert recipes for more inspiration!

Cotton Candy Sushi Ingredients

To create your whimsical Cotton Candy Sushi, gather these delightful ingredients!

For the Wrap

  • Cotton Candy – Serves as the outer wrap, providing sweetness and color; using freshly spun cotton candy offers the best texture.

For the Filling

  • Marshmallows – Adds a chewy texture and extra sweetness; if desired, substitute with marshmallow fluff for a creamier consistency.
  • Gummy Candies – Provides varied textures and flavors; popular choices include gummy bears and sour gummies for an extra zing!
  • Fresh Fruit (e.g., strawberries, bananas) – Adds natural sweetness and a refreshing crunch; ensure they are finely chopped to easily fit within rolls.

Step‑by‑Step Instructions for Cotton Candy Sushi

Step 1: Prepare Your Work Area
Begin by setting up a clean, cool, and dry work area to ensure your Cotton Candy Sushi can be made without any moisture interference. Gather your ingredients and have a large, flat surface ready, such as a cutting board. Lay out a parchment paper or silicone mat to prevent sticking while rolling.

Step 2: Shape the Cotton Candy
Take a generous handful of freshly spun cotton candy and gently pull and stretch it into a flat, rectangular sheet about ½ inch thick. Aim for a smooth, even surface that can easily hold the fillings. Ensure the cotton candy retains its light, airy texture, which is crucial for achieving the right balance in your sushi.

Step 3: Add the Fillings
On one edge of the cotton candy sheet, layer your choice of chopped marshmallows, colorful gummy candies, and finely diced fresh fruit. Be generous but ensure the fillings don’t spill over the edges. The vibrant colors and varied textures will create a visually appealing and delicious Cotton Candy Sushi, so arrange them in a fun and inviting way.

Step 4: Roll the Sushi
Carefully lift the edge of the cotton candy with the fillings and begin to roll it towards the opposite edge, gently tucking it in as you go to form your sushi roll. Roll tightly but not so tight that the cotton candy compresses. Watch for the fillings as you roll; they should be encapsulated within, creating a perfect dessert sushi.

Step 5: Slice the Roll
Using a sharp, serrated knife, slice the Cotton Candy Sushi roll into bite-sized pieces, approximately 1–2 inches thick. Press down gently while slicing to ensure the shapes hold together without squishing the cotton candy. Each piece should be colorful and filled with the delightful textures of your chosen fillings.

Step 6: Serve Immediately
To enjoy the best texture and flavor, serve your Cotton Candy Sushi immediately after slicing. Arrange the mini rolls on a beautiful platter for a stunning presentation that will delight your guests. The cotton candy’s melt-in-your-mouth quality combined with the sweet fillings makes this playful dessert irresistible—perfect for any gathering!

What to Serve with Cotton Candy Sushi

Treat your guests to an unforgettable experience by pairing vibrant flavors and textures alongside your delightful dessert.

  • Fruit Skewers: Fresh fruit on skewers not only adds a refreshing crunch, but complements the sweetness of the cotton candy beautifully. Choose colorful fruits for a visually appealing display.

  • Chocolate Dipping Sauce: A rich chocolate dip brings a decadent contrast to the sugary sushi. Its warmth and creamy texture will enhance each sweet bite.

  • Vanilla Ice Cream: Creamy vanilla ice cream balances the sweet flavors of the Cotton Candy Sushi, providing a cool, luscious treat. The scoop adds an element of indulgence to your dessert platter!

  • Popcorn Mix: Sweet and salty popcorn offers a fun textural contrast, adding a playful crunch to your dessert table. Consider mixing in some M&Ms for an extra candy-coated kick!

  • Lemonade: A refreshing glass of lemonade brightens the sweetness of the sushi rolls while offering a tangy touch that balances flavors. Opt for a sparkling version for fun bubbles!

  • Mini Cheesecake Bites: Light and creamy cheesecake bites are the perfect contrasting flavor to the sugary sushi. Top them with fruit or caramel for an extra layer of indulgence.

  • Sparkling Water: Infuse your sparkling water with fresh fruit or herbs for a sophisticated touch. This light drink will cleanse the palate between bites of the Cotton Candy Sushi.

  • Cotton Candy Pops: For those who adore cotton candy, consider serving light and airy cotton candy pops. They keep the theme consistent while providing an unexpected treat!

Create a whimsical dessert experience that tantalizes the taste buds and delights the eyes!

How to Store and Freeze Cotton Candy Sushi

Room Temperature: Keep leftover Cotton Candy Sushi in an airtight container at room temperature for up to 2 hours to maintain its texture and sweetness.

Fridge: If needed, store in an airtight container in the fridge for up to 1 day; however, the cotton candy may lose some of its fluffiness.

Freezer: It’s not recommended to freeze Cotton Candy Sushi, as the texture will change significantly when thawed; enjoy it fresh for the best experience.

Reheating: There’s no need to reheat; serve your Cotton Candy Sushi immediately after preparation for the ultimate sugary delight!

Cotton Candy Sushi Variations & Substitutions

Feel free to get creative and customize your Cotton Candy Sushi to match your taste and preferences!

  • Flavored Cotton Candy: Choose different cotton candy flavors, like grape or strawberry, to add a unique twist and surprise element to your dessert. Each flavor brings its own delightful essence!

  • Dairy-Free Options: Swap marshmallows for vegan marshmallows or use fruit-flavored gummy snacks for a completely dairy-free experience. It’s a simple hack that keeps the treat accessible for more guests.

  • Chocolate Crunch: Add chocolate chips or crushed cookies as a filling to introduce a rich, crunchy texture. Chocolate works wonders with cotton candy, making for an indulgent surprise.

  • Exotic Fruits: Try using seasonal or exotic fruits like kiwi, pineapple, or mango for a refreshing flavor upgrade. The vibrant colors and tastes can transform your sushi into a tropical paradise.

  • Spicy Heat: For a daring twist, incorporate spicy candies like chili mango gummies for a touch of heat that contrasts beautifully with the sweet cotton candy. It’s a bold way to elevate your dessert!

  • Nutty Delight: Introduce crushed nuts into your filling for added crunch and a nutty flavor that complements the sweetness of the cotton candy. Think almonds or pistachios for a sophisticated touch.

  • Zesty Citrus: Add a sprinkle of lemon or lime zest to the fillings for a zesty kick that awakens the palate. This brightness really enhances the overall flavor profile of your sushi.

  • Mini Sushi Rolls: For a fun presentation, create mini rolls with tiny cotton candy wraps and smaller portions of filling. Perfect for a bite-sized treat at parties, these little sushi delights can be a hit among your guests.

As you explore these variations, don’t forget to check out other delightful dessert recipes for more ideas on how to sweeten up your culinary adventures!

Expert Tips for Cotton Candy Sushi

  • Freshness is Key: Serve your Cotton Candy Sushi immediately after preparation to enjoy the best texture. Cotton candy dissolves quickly when exposed to air.

  • Roll Gently: When rolling your cotton candy, do so gently to prevent tearing. A light touch keeps the airy texture intact.

  • Avoid Moisture: Ensure your hands and work surface are dry. Moisture can cause the cotton candy to stick or lose shape.

  • Creative Fillings: Feel free to be adventurous with your fillings! Experiment with various fruits and candies to create your unique Cotton Candy Sushi each time.

  • Slice Carefully: Use a sharp serrated knife to cut the rolls, applying gentle pressure to maintain the integrity of the cotton candy and fillings.

Make Ahead Options

These playful Cotton Candy Sushi rolls are perfect for busy home cooks looking to save time during party preparations! You can prep the fillings, including chopped marshmallows, gummy candies, and fresh fruit, up to 24 hours in advance. Simply store them in airtight containers in the refrigerator to maintain their freshness. However, it’s best to keep the cotton candy separate and only roll it just before serving to prevent it from dissolving. When you’re ready to impress your guests, quickly shape the cotton candy, add your prepped fillings, roll, and slice into delightful pieces. With this make-ahead strategy, you’ll enjoy a stress-free dessert preparation that tastes just as delicious!

Cotton Candy Sushi Recipe FAQs

What type of cotton candy is best for this recipe?
Absolutely! For the best results, I recommend using freshly spun cotton candy. Look for vibrant colors and avoid any that have dark spots or are overly sticky, as they may indicate age or moisture.

How should I store leftover Cotton Candy Sushi?
To maintain its fluffy texture, store leftover Cotton Candy Sushi in an airtight container at room temperature for up to 2 hours. If you need to store it longer, you can refrigerate it, but be aware that it may lose some of its delightful fluffiness. In the fridge, it’s best consumed within 1 day.

Can I freeze Cotton Candy Sushi?
Not really! I never recommend freezing Cotton Candy Sushi, as the texture changes drastically upon thawing. The cotton candy will lose its airy quality and might become soggy, ruining the delightful experience. Enjoy it fresh for the best flavor!

What if my cotton candy tears while rolling?
No worries, it happens! If your cotton candy tears while rolling, just use small pieces to patch the area. Alternatively, you can create a “Sushi Bowl” by layering your fillings in a bowl and topping it with cotton candy, allowing for a fun deconstructed version.

Are there any dietary considerations for Cotton Candy Sushi?
Definitely! If you’re catering to dietary restrictions, ensure that the marshmallows and gummy candies are gluten-free, as some brands may use wheat-based products. For a fun twist, consider using vegan marshmallows if you’re aiming for a plant-based treat!

Cotton Candy Sushi

Cotton Candy Sushi: A Fun & Sweet No-Bake Delight

Experience the whimsical Cotton Candy Sushi, a fun dessert that’s colorful, easy to make, and perfectly sweet.
Prep Time 15 minutes
Total Time 15 minutes
Servings: 8 pieces
Course: Dessert
Calories: 120

Ingredients
  

For the Wrap
  • 1 large handful Cotton Candy Freshly spun for best texture
For the Filling
  • 1 cup Marshmallows Substitute with marshmallow fluff if desired
  • 1 cup Gummy Candies Varieties like gummy bears and sour gummies recommended
  • 1 cup Fresh Fruit Finely chopped (e.g., strawberries, bananas)

Equipment

  • Cutting Board
  • sharp serrated knife
  • parchment paper or silicone mat

Method
 

Step-by-Step Instructions for Cotton Candy Sushi
  1. Begin by setting up a clean, cool, and dry work area. Gather your ingredients and have a large, flat surface ready.
  2. Take a generous handful of freshly spun cotton candy and gently pull and stretch it into a flat, rectangular sheet about ½ inch thick.
  3. On one edge of the cotton candy sheet, layer your choice of chopped marshmallows, colorful gummy candies, and finely diced fresh fruit.
  4. Carefully lift the edge of the cotton candy with the fillings and begin to roll it towards the opposite edge, gently tucking it in as you roll.
  5. Using a sharp, serrated knife, slice the Cotton Candy Sushi roll into bite-sized pieces, approximately 1–2 inches thick.
  6. Serve your Cotton Candy Sushi immediately after slicing for the best texture and flavor.

Notes

Serve immediately for the best texture; cotton candy dissolves quickly when exposed to air.

Green Papaya Salad: Refreshing Crunch with Tangy Twist

Standing in the kitchen, the vibrant hues of fresh green papaya catch my eye—a quick reminder of summer days spent enjoying fresh salads. Today, I’m excited to whip up my Crunchy Green Papaya Salad with Tangy Lime Dressing, a dish that embodies brightness and flavor. With its crisp, refreshing texture, this gluten-free and low-calorie salad is perfect for those warm afternoons when you crave something light yet satisfying. It’s not just quick to prepare, taking only 20 minutes, but it also offers endless customization options, whether you prefer a kick of spice or a sweeter profile. How will you make it your own?

Why is this Green Papaya Salad a Must-Try?

Vibrant Colors: The stunning presentation of bright green papaya and colorful herbs makes this salad a feast for the eyes and a sure crowd-pleaser.

Customizable Flavors: You can easily adjust the heat level or add proteins like grilled shrimp or tofu, ensuring there’s something for every palate.

Quick to Prepare: In just 20 minutes, you can whip up this refreshing dish, making it ideal for busy weeknights or last-minute gatherings.

Healthy & Delicious: This salad is loaded with vitamins and lowest in calories, perfect for those looking for a guilt-free dining experience.

Get ready to enjoy a delightful light meal or a side dish alongside your favorite grilled meats! For more fresh flavor ideas, check out my Crisp Cabbage and Apple Salad or try a Refreshing Cucumber and Carrot Salad with a Twist.

Green Papaya Salad Ingredients

• Get ready to create a vibrant dish!

For the Salad

  • Green Papaya – Provides a crisp texture and serves as the salad’s base; substitute with green mango or kohlrabi if unavailable.
  • Carrots – Contributes sweetness and color; feel free to omit if preferred.
  • Fresh Herbs (e.g., cilantro, mint) – Adds freshness and flavor; customize according to personal preference.
  • Scallions – Provides crunch and a mild onion flavor; may substitute with red onion for a stronger taste.
  • Chili – Adds heat; adjust to taste or omit for a milder salad.

For the Dressing

  • Lime Juice – Adds tanginess to enhance flavor; adjust amount for desired acidity.
  • Fish Sauce – Develops a umami character; for a vegan option, substitute with soy sauce or coconut aminos.
  • Maple Syrup – Balances the saltiness of fish sauce with sweetness; can replace with honey or agave syrup for a vegan-friendly choice.
  • Garlic – Adds aromatic depth; minced shallots can be used as an alternative.

For the Topping

  • Roasted Peanuts – Offers crunch and richness; swap for sesame seeds or omit for a nut-free option.

Step‑by‑Step Instructions for Green Papaya Salad

Step 1: Prepare the Papaya
Start by peeling and seeding the green papaya. Using a julienne peeler, mandoline, or grater, shred it into thin strips, which should resemble noodle-like textures. To maintain its crispness, soak the shredded papaya in a bowl of cold water for approximately 10 minutes. This simple preparation ensures that your Green Papaya Salad has that perfect crunch!

Step 2: Make the Dressing
In a small mixing bowl, whisk together fresh lime juice, fish sauce, maple syrup, minced garlic, and if desired, a splash of vinegar for extra tang. Let the dressing sit for about 5 minutes to allow the flavors to meld. Taste and adjust the acidity or sweetness based on your preferences—this step is key to a well-balanced Green Papaya Salad!

Step 3: Combine the Vegetables
Drain the soaked papaya and gently pat it dry with a clean kitchen towel to remove excess water. In a large mixing bowl, combine the shredded papaya with finely shredded carrots, chopped fresh herbs, sliced scallions, and diced chili for that spicy kick. Toss everything together lightly, ensuring a colorful and inviting medley.

Step 4: Dress the Salad
Pour the prepared dressing over the combined vegetables in the large bowl. Toss everything gently but thoroughly, ensuring the shredded papaya and other vegetables are evenly coated in the tangy dressing. This step is vital for the flavors to penetrate each layer of the Green Papaya Salad, resulting in a harmonious taste.

Step 5: Serve the Salad
Transfer the vibrant salad onto a serving platter or individual bowls. Finish by garnishing with a sprinkle of roasted peanuts for an extra crunch. For the best experience, serve immediately, or let the salad sit in the refrigerator for about 10 minutes to further meld the flavors. Your refreshing Green Papaya Salad is now ready to delight your taste buds!

Expert Tips for Green Papaya Salad

  • Choose the Right Papaya: Ensure your green papaya is firm and not too ripe; a good texture is crucial for a satisfying crunch in your salad.

  • Adjusting Acidity: Start with less lime juice when making the dressing; you can always add more to fit your taste for the Green Papaya Salad.

  • Soak for Crispness: Don’t skip soaking the shredded papaya in cold water to maintain its crunch. This will enhance your salad’s texture.

  • Customizable Heat: Add chili gradually; taste as you go to achieve your desired spice level for this refreshing dish.

  • Flavor Marination: If time permits, refrigerate the salad for 10 minutes before serving to let the flavors meld beautifully.

  • Nut-Free Variation: For a nut-free version, simply omit the roasted peanuts or substitute with toasted sunflower seeds for added crunch.

Make Ahead Options

These Green Papaya Salad components are perfect for meal prep, making your busy weeknights a little easier! You can shred the green papaya, carrots, and herbs up to 24 hours in advance; just store them in separate airtight containers in the refrigerator to maintain their freshness and prevent wilting. The dressing can be prepared ahead as well—mix all ingredients, then refrigerate in a sealed jar for up to 3 days. When you’re ready to serve, simply combine the prepped veggies, toss with the dressing, and finish with roasted peanuts for that delightful crunch. This way, you can enjoy a delicious, homemade Green Papaya Salad with minimal effort at mealtime!

How to Store and Freeze Green Papaya Salad

Fridge: Store the salad in an airtight container for up to 2 days, but keep the dressing separate to maintain the crunch of the papaya.

Freezer: Freezing is not recommended due to the salad’s texture; the papaya will become mushy upon thawing, affecting the overall quality.

Preparation: For optimal freshness, prepare the components separately and combine right before serving to keep the salad crisp and delightful.

Reheating: This dish is best served cold and should not be reheated, as the salad’s refreshing qualities shine when fresh.

What to Serve with Crunchy Green Papaya Salad?

This delightful Green Papaya Salad is the perfect start to a meal or a vibrant side dish to accompany your main course.

  • Grilled Shrimp: The smoky, charred flavor from grilled shrimp pairs beautifully with the tangy dressing, adding a satisfying protein component.

  • Crispy Spring Rolls: These light, crunchy rolls bring a contrasting texture to the salad, making each bite a delightful adventure. Served with a sweet dipping sauce, they perfectly complement the zesty flavors.

  • Tangy Quinoa Salad: A side of hearty quinoa tossed with citrus vinaigrette maintains the freshness and adds a nutty flavor, enhancing the overall dining experience.

  • Spicy Tofu Skewers: Marinated and grilled, these skewers add a touch of heat, creating a perfect balance with the refreshing crunch of the papaya salad.

  • Vietnamese Pho: This aromatic noodle soup’s warmth and rich flavors contrast the salad’s cool brightness, allowing for a rich culinary experience.

  • Mango Sorbet: A refreshing dessert that mirrors the sweet notes in the salad, mango sorbet concludes the meal on a light and uplifting note.

  • Herbal Iced Tea: Cool herbal iced tea serves as a refreshing drink complement, enhancing the salad’s refreshing taste without overwhelming flavors.

Green Papaya Salad Variations

Feel free to unleash your creativity and personalize your salad experience with these delicious ideas!

  • Protein Boost: Add grilled shrimp, tofu, or shredded chicken for a heartier meal. A little extra protein transforms this fresh dish into a satisfying main course.
  • Vegan Delight: To make this salad vegan, simply replace fish sauce with soy sauce or coconut aminos. This swap retains great flavor while honoring plant-based preferences.
  • Crispy Add-Ons: Introduce crispy shallots or fried garlic to enhance the texture and flavor. They bring a delightful crunch that elevates the entire dish with every bite!
  • Flavorful Dressing Twists: Try using lime-infused olive oil instead of regular olive oil for a zesty twist in your dressing. You’ll love the extra zing it adds to the salad!
  • Nut-Free Option: For those with nut allergies, swap roasted peanuts for toasted sunflower seeds or omit them altogether while still providing a crunchy texture.
  • Hearty Grains: Mix in cooked quinoa or brown rice for a wholesome base. Combining grains with fresh veggies creates a filling, nutritious meal that is truly satisfying.
  • Herb Variations: Experiment with different fresh herbs—like basil or parsley—instead of cilantro or mint. These swaps can lead to exciting new aroma and flavor combinations.
  • Adjustable Heat Levels: If you prefer milder or spicier flavors, vary the amount of chili pepper or switch to a milder pepper like bell pepper for a completely different taste.

For more salad inspiration, consider trying my Crunch Cucumber Salad or a vibrant Garden Harvest Salad as delicious accompaniments!

Green Papaya Salad Recipe FAQs

What kind of papaya should I use for this salad?
Absolutely! Look for green papaya that is firm and unripe for the best texture in your salad. A ripe papaya can be too soft and sweet, which isn’t ideal here. If you can’t find green papaya, feel free to substitute it with green mango or kohlrabi, both of which will provide a similar crunch and flavor profile.

How should I store leftover Green Papaya Salad?
For sure! Store the salad in an airtight container in the refrigerator for up to 2 days. To maintain the crunchy texture, keep the dressing separate and only mix it with the salad right before serving. This way, your salad will stay fresh and vibrant!

Can I freeze Green Papaya Salad?
Very important question! Freezing is not recommended because the texture of the papaya will turn mushy once thawed, compromising the delightful crunch of your salad. Instead, prepare the ingredients separately and combine them just before serving for the best experience.

What if I want to reduce the spice level?
No worries! If you prefer a milder Green Papaya Salad, simply adjust the amount of chili used. Start with just a tiny pinch of chili flakes and taste as you go. You can always add more but it’s hard to take it out once it’s in! Alternatively, you can omit the chili altogether for a refreshing salad with no heat at all.

Is this dish safe for my food allergies?
Absolutely, you can customize this recipe! The primary concern would be the fish sauce, which contains seafood. If anyone in your household has seafood allergies, simply substitute fish sauce with soy sauce or coconut aminos for a vegan-friendly and allergy-safe option. Be sure to check the labels of any additional ingredients for potential allergens, too!

How long will the salad stay fresh if prepared ahead of time?
Great question! If you make the salad in advance, it should ideally be eaten within 2 days for optimum freshness. Remember to store the dressing separately to avoid soggy papaya. If possible, refrigerate the salad for about 10 minutes before serving to let all the flavors meld beautifully without compromising the crispiness.

Green Papaya Salad

Green Papaya Salad: Refreshing Crunch with Tangy Twist

This Green Papaya Salad offers a refreshing crunch and tangy twist, perfect for warm afternoons.
Prep Time 20 minutes
Chill Time 10 minutes
Total Time 30 minutes
Servings: 4 servings
Course: Lunch
Cuisine: Asian
Calories: 120

Ingredients
  

For the Salad
  • 1 medium green papaya substitute with green mango or kohlrabi if unavailable
  • 2 medium carrots feel free to omit if preferred
  • 1 cup fresh herbs (e.g., cilantro, mint) customize according to personal preference
  • 2 stalks scallions may substitute with red onion for a stronger taste
  • 1 medium chili add to taste or omit for a milder salad
For the Dressing
  • 2 tablespoons lime juice adjust for desired acidity
  • 1 tablespoon fish sauce substitute with soy sauce or coconut aminos for vegan option
  • 1 tablespoon maple syrup replace with honey or agave syrup for vegan-friendly choice
  • 1 clove garlic minced shallots can be used as an alternative
For the Topping
  • 1/4 cup roasted peanuts swap for sesame seeds or omit for nut-free option

Equipment

  • julienne peeler
  • mixing bowl
  • mandoline
  • grater
  • whisk

Method
 

Step-by-Step Instructions
  1. Start by peeling and seeding the green papaya. Using a julienne peeler, mandoline, or grater, shred it into thin strips. Soak in cold water for 10 minutes for crispness.
  2. In a small mixing bowl, whisk together lime juice, fish sauce, maple syrup, minced garlic, and optional vinegar. Let the dressing sit for 5 minutes to meld.
  3. Drain the soaked papaya and pat it dry. In a large bowl, combine shredded papaya with carrots, herbs, scallions, and chili. Toss lightly.
  4. Pour the dressing over the vegetables and toss gently to coat evenly.
  5. Transfer the salad to a serving platter or bowls, garnish with roasted peanuts, and serve immediately or let chill for 10 minutes.

Notes

Store salad in an airtight container for up to 2 days, keeping dressing separate to maintain crunch. Freezing is not recommended.

Cozy Gingerbread Pancakes that Spark Holiday Joy

The scent of cinnamon and ginger swirling through the kitchen instantly transports me back to warm holiday mornings, where everything felt just right. These Gingerbread Pancakes are my go-to recipe when I want to wrap my family in the comforting embrace of cozy flavors and festive spirit. Made fluffy with buttermilk and enriched with the rich, deep taste of molasses, these pancakes are not just delicious—they bring a joyful energy to any breakfast table. Perfect for a Christmas morning feast or any chilly day that calls for a little indulgence, this recipe is both quick to whip up and crowd-pleasing. Trust me, once you serve these to loved ones, they’ll be begging for seconds! What cozy memories will you create with each stack?

Why Are Gingerbread Pancakes So Special?

Irresistible flavor: These pancakes are bursting with warm spices like cinnamon and ginger, elevating breakfast to a whole new level.
Quick and easy: With simple steps and common ingredients, you’ll have them on your table in no time, ready for those busy holiday mornings.
Versatile toppings: Top them with whipped gingerbread butter or drench them in maple syrup—your family can customize their pancakes!
Crowd-pleaser: Perfect for family gatherings or cozy brunches, these Gingerbread Pancakes will delight everyone.
Moist and fluffy: The buttermilk and molasses ensure each bite is light yet rich, making them truly memorable.
Imagine surprising your loved ones with a festive breakfast that feels like a warm hug; they’ll be asking for these sweet treats from now on! For more pancake inspiration, check out our Savory Vegetable Cheese Pancakes for a delicious twist!

Gingerbread Pancakes Ingredients

• Delight in these warm, festive flavors!

For the Pancakes

  • All-Purpose Flour – Essential for structure; can be swapped with gluten-free flour for a gluten-free treat.
  • Granulated Sugar – Balances flavors; try brown sugar for added moisture and a richer taste.
  • Baking Powder – This leavening agent makes the pancakes fluffy; ensure it’s fresh for the best rise.
  • Ground Cinnamon – Adds warmth and a signature gingerbread essence; pumpkin pie spice can be a delightful alternative.
  • Ground Ginger – Intensifies the gingerbread profile; fresh ginger can be used for a robust flavor boost.
  • Kosher Salt – Essential for balancing sweetness and enhancing overall flavor.
  • Buttermilk – Adds moisture and tenderness; a mixture of milk and lemon juice can be used in a pinch.
  • Large Egg – Acts as a binding agent; a flax egg can be substituted for a vegan version.
  • Unsalted Butter – Provides richness and flavor; vegetable oil can be a dairy-free option.
  • Molasses – This is key to achieving that distinct gingerbread flavor; consider blackstrap molasses for a deeper richness.

For Serving

  • Maple Syrup – The classic topping that enhances flavor; feel free to explore other syrup options for variety.

With these ingredients at the ready, you’re one step closer to crafting your delicious Gingerbread Pancakes!

Step‑by‑Step Instructions for Gingerbread Pancakes

Step 1: Mix Dry Ingredients
In a large bowl, whisk together 1 ½ cups of all-purpose flour, 2 tablespoons of granulated sugar, 1 tablespoon of baking powder, 2 teaspoons of ground cinnamon, 1 teaspoon of ground ginger, and ½ teaspoon of kosher salt until well combined. The mixture should be free of lumps, and the spices should be evenly distributed—this is the base for your flavorful Gingerbread Pancakes.

Step 2: Combine Wet Ingredients
In a separate bowl, blend together 1 ¼ cups of buttermilk, 1 large egg, ¼ cup of melted unsalted butter, and ¼ cup of molasses until smooth and cohesive. Ensure your butter isn’t too hot to avoid cooking the egg. The mixture should appear glossy and well-mixed, adding both richness and moisture to your Gingerbread Pancakes.

Step 3: Mix Wet and Dry Ingredients
Carefully pour the wet ingredients into the bowl containing the dry ingredients. Gently stir with a spatula until just combined, making sure to leave a few lumps for a fluffy texture. If the batter appears too thick, add a splash of buttermilk to adjust consistency. Avoid overmixing to ensure your Gingerbread Pancakes turn out light and airy.

Step 4: Preheat and Prepare Skillet
Heat a nonstick skillet or griddle over medium heat until a drop of water sizzles upon contact. Lightly spray the surface with cooking spray to prevent sticking, ensuring an even cook for your pancakes. This step is crucial for achieving that perfect golden-brown exterior on each fluffy Gingerbread Pancake.

Step 5: Cook Pancakes
Pour about ⅓ cup of batter onto the skillet for each pancake, leaving space in between. Cook for about 3-4 minutes, or until bubbles form on the surface and the edges look set. The pancakes should be golden underneath before flipping; this visual cue indicates they are ready to turn.

Step 6: Flip and Finish Cooking
Carefully flip each pancake using a spatula, cooking for another 3-4 minutes until they are beautifully golden brown on both sides. Check for doneness by gently pressing the center; it should spring back. If they’re not done, give them a bit more time on the skillet to achieve that perfect fluffy texture.

Step 7: Continue Cooking Remaining Batter
Wipe down the skillet with a paper towel between batches if needed to maintain an even cooking surface. Repeat the pouring and cooking process until all the batter is used, ensuring each pancake receives its fair share of delicious gingerbread flavor.

Step 8: Serve and Enjoy
Once all pancakes are cooked, serve them warm with a drizzle of maple syrup or your favorite toppings. These Gingerbread Pancakes are perfect for cozy winter mornings, bringing the festive spirit to your breakfast table with every bite!

How to Store and Freeze Gingerbread Pancakes

  • Room Temperature: Store leftover Gingerbread Pancakes on a plate, covered with foil, for up to 2 hours for freshness.

  • Fridge: Place cooled pancakes in an airtight container in the refrigerator for up to 5 days to maintain their delightful flavor and texture.

  • Freezer: Freeze individual pancakes separated by parchment paper in a freezer-safe bag for up to 2 months. Thaw overnight in the fridge when ready to enjoy.

  • Reheating: Reheat pancakes in the microwave for about 30-60 seconds or in a preheated skillet for a couple of minutes on each side until warm throughout.

Expert Tips for Gingerbread Pancakes

  • Batter Resting: Letting the batter sit for 5-10 minutes before cooking allows the gluten to relax, resulting in fluffier Gingerbread Pancakes.

  • Correct Mixing: Avoid overmixing; a few lumps are fine. Overmixing can lead to dense pancakes instead of the light, airy texture you desire.

  • Skillet Temperature: Make sure your skillet is properly heated—medium heat works best. A test drop of water should sizzle upon contact to ensure even cooking.

  • Measuring Flour: Be gentle when measuring flour; too much can lead to dry pancakes. Spoon it into the measuring cup and level it off with a knife for accuracy.

  • Adapting for Dogs: For a delicious variation, try adding finely chopped nuts or chocolate chips to the batter for extra texture and flavor in your Gingerbread Pancakes.

  • Substitutions: Experiment with swapping out molasses for honey for a different sweetness, or mix in some pumpkin puree for a festive twist!

Make Ahead Options

These Gingerbread Pancakes are perfect for busy home cooks looking to save time during the holidays! You can easily prepare the batter ahead of time and refrigerate it for up to 24 hours. Simply mix your dry ingredients and wet ingredients separately, store them in airtight containers, then combine them right before cooking to maintain that fluffy texture. Additionally, any leftover pancakes can be refrigerated for up to 5 days or frozen for up to 2 months. When you’re ready to serve, simply reheat them in a toaster or microwave for a quick breakfast that tastes just as delightful as the day they were made!

What to Serve with Gingerbread Pancakes

These delightful pancakes create the perfect holiday breakfast experience that will leave everyone feeling warm and cherished.

  • Whipped Gingerbread Butter: This creamy, spiced butter adds an irresistible richness that perfectly complements the pancakes’ warm flavors.

  • Crispy Bacon Strips: The salty crunch of bacon balances the sweetness of the pancakes, creating a delightful contrast that’s hard to resist.

  • Sautéed Apples with Cinnamon: Tender, caramelized apples introduce a fresh, fruity element that elevates the pancakes to a whole new level of deliciousness.

  • Spiced Chai Tea: The aromatic blend of spices in chai tea pairs beautifully with the pancake’s gingerbread essence, making for a cozy beverage option.

  • Fresh Berry Medley: A burst of tangy berries adds a refreshing touch, cutting through the pancake’s sweetness while brightening up the plate.

  • Maple Syrup Drizzle: A classic choice—traditional maple syrup enhances the pancakes with its smooth texture and rich, sweet flavor.

  • Vanilla Yogurt: Add a dollop of creamy vanilla yogurt for a tangy contrast and a boost of protein to start the day right.

  • Chocolate Chip Cookies: For a festive twist, serve with chocolate chip cookies for dessert-like fun that will delight both kids and adults alike.

Your holiday breakfast table will be complete with these incredible pairings, ensuring your loved ones feel pampered and satisfied!

Gingerbread Pancakes Variations & Substitutions

Feel free to make these Gingerbread Pancakes your own, customizing them with delightful twists that suit your taste!

  • Dairy-Free: Substitute buttermilk with almond milk combined with a tablespoon of vinegar for a creamy, dairy-free version.
    For a cozy dairy-free pancake, use coconut oil instead of butter. They’ll still taste rich and festive!

  • Gluten-Free: Swap all-purpose flour with a gluten-free flour blend to create a gluten-free delight everyone can enjoy.
    It’s a great way to share the joy, ensuring your gluten-sensitive friends don’t miss out on this festive treat!

  • Pumpkin Spice: Replace ground ginger with more cinnamon and add ½ cup of pumpkin puree for a pumpkin gingerbread flavor.
    This twist captures autumn’s essence and gives a warm, moist texture you’ll love!

  • Choco-Lovers: Mix in ½ cup of chocolate chips into the batter for a rich, sweet surprise in each bite.
    Chocolate brings a delightful contrast to the spices, making mornings even sweeter!

  • Nutty Add-In: Stir in ¼ cup of chopped nuts, like pecans or walnuts, for a delightful crunch and added texture.
    The nutty flavor pairs beautifully with the spices, enhancing the overall experience!

  • Molasses Alternative: Use honey or agave syrup instead of molasses for a lighter sweetness and a unique flavor profile.
    This makes for a different, yet still scrumptious pancake that’s oh-so-good!

  • Spiced Up: Add a pinch of cayenne or a splash of vanilla extract to the batter for a subtle heat or depth of sweetness.
    It’s a simple way to add an unexpected zing that sparks even more joy at the breakfast table!

  • Savory Twist: Consider swapping out traditional toppings for a savory option like crispy bacon or a dollop of cream cheese.
    This elevates your pancakes for brunch and brings a unique perspective to the classic recipe!

Enjoy exploring these variations, and don’t hesitate to check out our Savory Zucchini Pancakes with Fresh Herbs for an utterly delicious change of pace!

Gingerbread Pancakes Recipe FAQs

What type of flour should I use for Gingerbread Pancakes?
For the best texture, I recommend using all-purpose flour, which gives the pancakes structure and fluffiness. If you need a gluten-free option, feel free to substitute with a gluten-free flour blend. Just ensure the blend contains xanthum gum for optimal results!

How can I store leftover Gingerbread Pancakes?
Leftover Gingerbread Pancakes can be stored in the refrigerator for up to 5 days! Just place them in an airtight container to maintain their delicious flavor and texture. If you’re planning to keep them longer, consider freezing them instead.

Can I freeze Gingerbread Pancakes?
Absolutely! To freeze, lay your pancakes flat on a baking sheet in a single layer first so they don’t stick together. Once they’re completely frozen, stack them with parchment paper between each pancake, then place them in a freezer-safe bag. They can be frozen for up to 2 months. Simply thaw overnight in the fridge before reheating!

What should I do if my pancake batter is too thick?
If you find your batter is too thick, don’t worry! Just add a splash of buttermilk and stir gently until you reach your desired consistency. Remember, it’s better to have a slightly thicker batter than an overly runny one, as thicker batter leads to fluffier pancakes.

Are Gingerbread Pancakes safe for pets?
Generally, it’s best to avoid sharing Gingerbread Pancakes with your furry friends, especially if they have spices like ginger and cinnamon. While the pancakes themselves aren’t toxic, always be cautious with herbs and spices as they can upset pets’ stomachs. Consult your vet if you’re unsure!

Can I make the pancake batter in advance?
Yes! You can prepare the batter and store it in the refrigerator for up to 24 hours before cooking. Just give it a little stir before pouring onto the skillet, as it may thicken slightly while chilling. This is a great way to save time on busy mornings!

Gingerbread Pancakes

Cozy Gingerbread Pancakes that Spark Holiday Joy

Delicious Gingerbread Pancakes infused with warm spices for a festive breakfast experience.
Prep Time 10 minutes
Cook Time 20 minutes
Batter Resting Time 5 minutes
Total Time 35 minutes
Servings: 4 pancakes
Course: Breakfast
Cuisine: American
Calories: 180

Ingredients
  

For the Pancakes
  • 1.5 cups All-Purpose Flour Can be swapped with gluten-free flour.
  • 2 tablespoons Granulated Sugar Brown sugar can be used for added moisture.
  • 1 tablespoon Baking Powder Ensure it's fresh for the best rise.
  • 2 teaspoons Ground Cinnamon Pumpkin pie spice is a delightful alternative.
  • 1 teaspoon Ground Ginger Fresh ginger can be used for a robust flavor.
  • 0.5 teaspoon Kosher Salt Essential for balancing sweetness.
  • 1.25 cups Buttermilk Milk and lemon juice can be used in a pinch.
  • 1 large Egg A flax egg can be substituted for a vegan version.
  • 0.25 cups Unsalted Butter Vegetable oil can be a dairy-free option.
  • 0.25 cups Molasses Consider blackstrap molasses for deeper richness.
For Serving
  • to taste Maple Syrup Feel free to explore other syrup options for variety.

Equipment

  • large bowl
  • whisk
  • nonstick skillet
  • spatula
  • Measuring cups
  • Measuring spoons

Method
 

Step-by-Step Instructions
  1. Mix dry ingredients: In a large bowl, whisk together flour, sugar, baking powder, cinnamon, ginger, and salt until combined.
  2. Combine wet ingredients: In a separate bowl, blend buttermilk, egg, melted butter, and molasses until smooth.
  3. Mix wet and dry ingredients: Pour wet ingredients into dry ingredients and stir until just combined.
  4. Preheat and prepare skillet: Heat a nonstick skillet over medium heat, lightly spray with cooking spray.
  5. Cook pancakes: Pour about ⅓ cup of batter onto the skillet, cook for about 3-4 minutes until bubbles form.
  6. Flip and finish cooking: Flip each pancake and cook for another 3-4 minutes until golden brown.
  7. Continue cooking remaining batter: Repeat the pouring and cooking process until all batter is used.
  8. Serve and enjoy: Serve warm with maple syrup or toppings of choice.

Notes

Letting the batter sit for 5-10 minutes before cooking allows for fluffier pancakes. A few lumps in the batter are okay to avoid dense pancakes.

Delicious French Macarons: Your Easy Guide to Baking Joy

As I stood in my kitchen, the sweet scent of almond flour wafting through the air, I couldn’t help but smile at the colorful array of French macarons I had just finished. These delightful little cookies aren’t just beautiful; they’re surprisingly simple to make and perfect for any occasion. This recipe for french macarons is all about creating those light, airy shells with customizable fillings that can transform an ordinary dessert into an extraordinary one. Not only does this treat impress friends and family, but the process of making them can be a joyful escape from the daily grind. Whether you’re serving them for tea or surprising a loved one, these beginner-friendly macarons will surely elevate your dessert game. So, are you ready to master the art of macaron-making? Let’s dive in!

Why Are French Macarons So Special?

Delicate Texture: The outside is crisp, while the inside remains chewy, creating a delightful contrast that melts in your mouth.

Customizable Fillings: With options ranging from luscious chocolate ganache to fruity jams, these macarons can be tailored to suit any palate.

Beginner-Friendly: This recipe takes you step-by-step through the process, making it easy even for novice bakers to achieve a stunning result.

Impressive Treat: Presenting these elegant cookies at gatherings will showcase your baking skills and charm your guests.

Fun to Make: The process can be a creative outlet—watching the batter transform into perfect little circles is truly rewarding.

For even more delightful variations, check out my Homemade French Fries recipe to pair with your sweet treats or try a savory twist with Garlic Butter French Fries.

French Macaron Ingredients

• Let’s gather the essentials to create delightful French macarons.

For the Shells

  • Almond Flour – This is the star ingredient, providing the signature flavor and texture of the macarons, so opt for fine almond flour for the best results.
  • Powdered Sugar – Sweetens and helps create that smooth, glossy finish essential for a perfect macaron shell.
  • Egg Whites – Vital for building structure; let them sit at room temperature to enhance their stability.
  • Granulated Sugar – Boosts sweetness and helps stabilize the whipped egg whites, resulting in a sturdier meringue.
  • Cream of Tartar (optional) – A helpful stabilizer that can prevent the egg whites from collapsing, especially for beginners.

For the Filling

  • Butter – The base for your buttercream filling; feel free to get creative by adding vanilla, chocolate, or fruity flavorings to suit your taste.

Now you’re ready to take the plunge into the world of French macarons, where the journey is as delightful as the destination!

Step‑by‑Step Instructions for Beginner-Friendly French Macarons

Step 1: Prepare the Dry Ingredients
Start by sifting 120g of almond flour and 230g of powdered sugar together in a bowl. This removes clumps and ensures a silky smooth batter for your French macarons. Take a moment to enjoy the lovely aroma of the almond flour as you work. Set aside when well combined.

Step 2: Whisk Egg Whites
In a clean, dry mixing bowl, add 100g of room-temperature egg whites. Begin whipping at medium speed until they become frothy, approximately 2 minutes. Gradually add 30g of granulated sugar and a pinch of cream of tartar. Continue whisking until stiff peaks form, taking around 5-7 minutes. The meringue should hold its shape and be shiny.

Step 3: Combine Mixtures
Gently fold the sifted dry ingredients into the whipped egg whites using a spatula. Aim for a smooth, glossy batter with a lava-like consistency. Be careful not to deflate the meringue; this step is crucial for achieving the perfect texture in your French macarons. The mixture should flow easily off the spatula.

Step 4: Pipe Shells
Transfer the macaron batter into a piping bag fitted with a round tip. On a parchment-lined baking sheet, pipe uniform circles, about 1.5 inches in diameter, leaving space between each. This step is essential for the iconic shape of your French macarons. Tap the baking sheet gently on the counter to release air bubbles.

Step 5: Rest
Allow the piped shells to rest at room temperature for 30 to 60 minutes. You’ll know they’re ready when the surface is dry to the touch and no longer sticky. This resting period helps form the skin, which is key to achieving the classic foot of your macarons. Enjoy the anticipation while they dry!

Step 6: Bake
Preheat your oven to 300°F (150°C). Once resting is complete, place the macarons in the oven and bake for 12-16 minutes. The shells should rise slightly and have a smooth surface with a foot. Keep a close eye on them, and rotate the baking sheet halfway through for even baking.

Step 7: Cool and Fill
After baking, remove the macaron shells from the oven and let them cool completely on the baking sheet for about 10 minutes. Once cooled, gently lift the shells off the parchment paper. Pair them up and fill each with your choice of buttercream filling, then let the filled macarons rest in the fridge for at least 30 minutes before serving to enhance their flavor and texture.

French Macarons: Fun Variations

Feel free to personalize your French macarons to suit your unique tastes and dietary needs, adding delightful twists to every batch!

  • Nut-Free: Substitute almond flour with sunflower seed flour for nut-free macarons without sacrificing flavor.

  • Colorful Shells: Add gel food coloring to the batter to create vibrant shells that match any occasion’s theme.

  • Chocolate Lovers: Incorporate cocoa powder into the dry ingredients for a rich chocolate base and pair with a decadent chocolate ganache filling.

  • Fruity Twist: Swap the buttercream for homemade fruit jams like raspberry or lemon curd, adding a tangy delight to each bite.

  • Spice it Up: For unexpected warmth, mix in a dash of cinnamon or cardamom into the batter for a fragrant kick reminiscent of cozy treats.

  • Savory Blend: Experiment with savory elements such as cheese or herbs in your filling, offering a unique take on the traditional sweet macaron.

  • Classic Vanilla: Add vanilla bean paste to the batter and filling for a timeless recipe upgrade that enhances the overall flavor beautifully.

For even more delightful bites, why not check out my tips for making a delectable Garlic Butter French Fries side or try a savory twist on fries to balance the sweetness of your macarons with my Homemade French Fries recipe?

Expert Tips for French Macarons

  • Use Fine Almond Flour: Choose fine almond flour instead of almond meal for a smoother batter and a more appealing texture in your French macarons.

  • Room Temperature Eggs: Always use room-temperature egg whites as they whip better, resulting in a more stable meringue and ultimately perfect macaron shells.

  • Patience is Key: Allow the piped macarons to rest until their surface is dry before baking. This step prevents cracking and ensures that they form the iconic foot.

  • Check Oven Temperature: An oven thermometer is your best friend! Accurate temperatures are crucial; even slight variations can cause cracks or hollow shells.

  • Gentle Folding Technique: When combining dry ingredients with whipped egg whites, fold gently to maintain the airiness. Over-mixing can lead to flat macarons.

  • Cool Completely: Allow the shells to cool completely before filling. This prevents the buttercream from melting and ensures a better flavor melding in each delightful French macaron.

Make Ahead Options

These French macarons are a fantastic option for meal prep enthusiasts! You can prep the macaron shells up to 24 hours in advance. Simply prepare the batter, pipe the shells onto your baking sheet, and store them in the refrigerator uncovered. Once you’re ready to bake, allow the shells to rest for 30-60 minutes at room temperature before popping them into the oven. For the filling, you can make your buttercream up to 3 days ahead and store it in an airtight container in the fridge. When it’s time to indulge, simply fill your cool macaron shells with the buttercream, let them rest in the fridge for an additional 30 minutes to meld the flavors, and enjoy your delightful treats that are just as delicious as freshly made!

How to Store and Freeze French Macarons

Fridge: Store filled French macarons in an airtight container in the refrigerator for up to 1 week. This helps retain their texture while allowing flavors to meld beautifully.

Freezer: For longer storage, freeze unfilled macaron shells in a single layer, then transfer to an airtight container for up to 3 months. Thaw at room temperature before filling.

Airtight Container: Always ensure the macaron container is airtight to prevent moisture loss, which can lead to a chewy texture instead of the desired crisp bite.

Reheating: If you’ve frozen filled macarons, allow them to thaw in the fridge and serve cold for an enhanced taste experience.

What to Serve with Beginner-Friendly French Macarons?

Enjoying your exquisite French macarons can be even more delightful when you pair them with the perfect accompaniments.

  • Earl Grey Tea: The floral notes and hints of bergamot in Earl Grey beautifully complement the sweetness of the macarons, providing a sophisticated touch.
  • Fresh Berries: Juicy strawberries or raspberries offer a tart contrast to the sweetness, enhancing the overall flavor experience. Just imagine the lively burst of flavor with each bite!
  • Light Lemonade: A refreshing glass of homemade lemonade can cleanse the palate and balance the sweetness, making each macaron even more enjoyable.
  • Chocolate Ganache Dip: Adding a rich chocolate ganache dip creates a gourmet twist, allowing for a creamy and indulgent experience. This simple addition makes every bite more decadent.
  • Vanilla Ice Cream: Serve a scoop of velvety vanilla ice cream alongside your macarons for a delightful dessert contrast that’s both creamy and sweet.
  • Sparkling Wine: A glass of bubbly adds a celebratory feel, enhancing your treat and making any occasion feel special. The effervescence lifts the sweetness beautifully!
  • Chocolate-Covered Strawberries: Pairing your macarons with these luscious treats elevates any dessert platter, pleasing both the eyes and the palate.
  • Fruit Sorbet: Dive into a refreshing scoop of fruit sorbet; its ice-cold texture is a perfect contrast to the chewy consistency of the macarons.
  • Mocha Coffee: A warm cup of mocha brings a lovely chocolatey flavor that harmonizes perfectly with the sweet and nutty profile of the macarons.
  • Pastry Cream: A dollop of creamy pastry filling offers a delightful addition, making every macaron taste even more luxurious!

These pairings will surely elevate your dessert experience and create beautiful memories with each bite!

French Macarons Recipe FAQs

What type of almond flour should I use for French macarons?
Absolutely! Use fine almond flour instead of almond meal for the best results. Fine almond flour has a smoother texture, which helps create the light, airy macaron shells we all adore. Avoid almond meal, as it can yield a coarser batter that may not rise as beautifully.

How should I store my French macarons?
You should store filled French macarons in an airtight container in the refrigerator for up to 1 week. This maintains their lovely texture while allowing the flavors to meld together beautifully. Make sure the lid seals tightly to keep moisture at bay, ensuring every bite remains delightful!

Can I freeze French macarons, and if so, how?
Yes, you can! To freeze unfilled macaron shells, place them in a single layer on a baking sheet and freeze them for about 1-2 hours. Once frozen solid, transfer them to an airtight container, separating the layers with parchment paper, and they can last for up to 3 months. When ready to enjoy, simply thaw at room temperature before filling!

What can I do if my macaron shells crack while baking?
If you encounter cracked shells, it’s often due to two factors: under-mixing the batter or not allowing the piped macarons to rest long enough before baking. Make sure to fold the dry ingredients into the egg whites gently until just combined to retain airiness. Additionally, ensure that your piped shells rest at room temperature for 30-60 minutes until their surfaces are dry to the touch; this helps form the necessary skin to prevent cracking.

Are French macarons suitable for individuals with nut allergies?
No, French macarons contain almond flour, which is derived from nuts, so they are not safe for those with nut allergies. However, if you’re looking for a nut-free alternative, you might try using ground sunflower seeds as a substitute for almond flour, but the texture and flavor will vary. Always check for cross-contamination if allergies are a concern!

French Macarons

Delicious French Macarons: Your Easy Guide to Baking Joy

Learn to create delightful French macarons with this easy guide; perfect for any occasion.
Prep Time 45 minutes
Cook Time 15 minutes
Resting Time 1 hour
Total Time 2 hours
Servings: 12 macarons
Course: Dessert
Cuisine: French
Calories: 90

Ingredients
  

For the Shells
  • 120 g Almond Flour Opt for fine almond flour for best results.
  • 230 g Powdered Sugar Essential for a smooth finish.
  • 100 g Egg Whites Let sit at room temperature for stability.
  • 30 g Granulated Sugar Stabilizes the whipped egg whites.
  • 1/4 tsp Cream of Tartar Optional stabilizer.
For the Filling
  • 100 g Butter Base for your buttercream filling.

Equipment

  • mixing bowl
  • whisk
  • Piping bag
  • Round piping tip
  • baking sheet
  • parchment paper

Method
 

Step-by-Step Instructions
  1. Sift the almond flour and powdered sugar together in a bowl and set aside.
  2. Whisk the egg whites in a mixing bowl until frothy. Gradually add granulated sugar and cream of tartar, whisking until stiff peaks form.
  3. Gently fold the sifted dry ingredients into the egg whites until the mixture flows easily off the spatula.
  4. Pipe uniform circles on a parchment-lined baking sheet and tap the baking sheet to release air bubbles.
  5. Let the piped shells rest for 30 to 60 minutes until the surface is dry to the touch.
  6. Preheat the oven to 300°F (150°C) and bake the macarons for 12-16 minutes.
  7. Cool the shells on the baking sheet for 10 minutes before filling them with your choice of buttercream.

Notes

Store filled macarons in an airtight container in the fridge for up to 1 week. Freeze unfilled shells for up to 3 months.

Get Ready to Indulge in Irresistible Purple Crinkle Cookies

As I pulled the cookies from the oven, an enchanting aroma filled my kitchen, wrapping me in a warm embrace. these Purple Crinkle Cookies are not just visually stunning with their vibrant hue; they deliver a delightful twist of flavor thanks to the unique essence of ube, or purple yam. Perfect for both festive gatherings and cozy afternoons at home, these cookies offer a quick way to impress your friends and family, all while satisfying that craving for homemade comfort. With a soft and airy texture, each bite reveals the moist, sweet crumble that begs to be shared (or savored solo!). Ready to explore the secrets behind this delightful recipe? Let’s dive in!

Why are Purple Crinkle Cookies a must-try?

Irresistible Color: With their stunning purple hue, these cookies are sure to grab attention and spark conversations at any gathering.

Unique Flavor Twist: The ube essence provides a delightful twist, setting these cookies apart from regular treats.

Simple Steps: With a straightforward recipe and minimal ingredients, even beginner bakers can master these delicious bites.

Crowd-Pleasing Appeal: Perfect for parties, they pair beautifully with coffee or tea, making them a hit with friends and family.

Versatile Variations: Feel free to experiment by adding chocolate chips or substituting ube for grape flavoring for a refreshing change. For more cookie inspiration, don’t miss my Nutty Apricot Cookies or Chocolate Date Cookies.

Baking these Purple Crinkle Cookies promises a delightful and satisfying experience that you’ll love to share!

Purple Crinkle Cookies Ingredients

• For those eager to bake these vibrant treats, here’s what you need!

For the Dough

  • All-Purpose Flour (2 cups/250g) – Provides structure and body; can substitute with gluten-free flour blends.
  • Baking Powder (1 ½ tsp) – Acts as a leavening agent to achieve the perfect light texture; ensure freshness for the best results.
  • Salt (¼ tsp) – Enhances the flavor balance, crucial even in sweet recipes.
  • Unsalted Butter (½ cup/115g, softened) – Contributes moisture and richness; use margarine or coconut oil for a dairy-free option.
  • Granulated Sugar (1 cup/200g) – Adds sweetness and affects cookie texture; brown sugar can be used for a deeper flavor.
  • Large Eggs (2) – Binds ingredients and adds richness, no substitutes suggested.
  • Vanilla Extract (1 tsp) – Adds aromatic sweetness; opt for pure extract for the best flavor.
  • Ube Extract (1 ½ tsp) or Purple Food Coloring + Flavoring – Provides the unique color and subtle sweetness that make these cookies special.
  • Whole Milk (½ cup/120ml) – Ensures a rich, creamy dough; lower-fat options are acceptable in small amounts.

For Dusting

  • Powdered Sugar (½ cup/60g) – Finishing coating for a sweet, snowy exterior; adjust the quantity to achieve your desired thickness.
  • Cornstarch (2 tbsp, optional) – For a thicker coating if desired; omit for a lighter finish.

Gather these ingredients and get ready to create your enchanting Purple Crinkle Cookies that will add color and joy to any occasion!

Step‑by‑Step Instructions for Purple Crinkle Cookies

Step 1: Prepare Dough
In a medium bowl, whisk together 2 cups of all-purpose flour, 1 ½ teaspoons of baking powder, and ¼ teaspoon of salt until well-combined. In a separate large bowl, cream together ½ cup of softened unsalted butter and 1 cup of granulated sugar until light and fluffy, about 3-4 minutes. Add 2 large eggs, one at a time, mixing well after each addition, then incorporate 1 teaspoon of vanilla extract and 1 ½ teaspoons of ube extract. Gradually mix in the dry ingredients along with ½ cup of whole milk until a soft dough forms.

Step 2: Chill Dough
Next, cover the dough tightly with plastic wrap, ensuring no air pockets remain. Refrigerate for at least 2 hours, or overnight if you have the time, which helps the Purple Crinkle Cookies maintain their shape while baking. When the dough is firm to the touch and easily holds its shape, it’s ready to be rolled into cookie balls.

Step 3: Preheat & Shape
Preheat your oven to 350°F (175°C) and line your baking sheets with parchment paper, ensuring easy release later. Once your dough is chilled, scoop out portions into tablespoon-sized balls. Roll each ball between your palms, then coat generously in a mixture of ½ cup powdered sugar and 2 tablespoons of cornstarch for that signature snowy exterior.

Step 4: Bake Cookies
Arrange the coated dough balls on the prepared baking sheets, spacing them about 2 inches apart to allow room for spreading. Bake in the preheated oven for 12-14 minutes, or until the tops start to crack and the edges are set. Be careful not to overbake; you want the centers to remain soft for that delightful chewy texture.

Step 5: Cool Cookies
Once baked, allow the cookies to cool on the baking sheets for about 5 minutes. You’ll notice the cracks have deepened, enhancing the visual charm of your Purple Crinkle Cookies. After they’ve cooled slightly, transfer them gently to wire racks to cool completely and allow the flavors to develop further.

Expert Tips for Purple Crinkle Cookies

  • Chill the Dough: Refrigerating the dough is essential to prevent spreading during baking, ensuring the cookies hold their beautiful shape.

  • Monitor Baking Time: Remove the cookies from the oven when edges are set but centers are still soft; this guarantees that melt-in-your-mouth texture.

  • Proper Coating: Don’t skimp on the powdered sugar and cornstarch mixture—an ample coating results in that iconic crackled finish and sweet exterior.

  • Ingredient Freshness: Always ensure your baking powder is fresh for optimal rise; stale ingredients can lead to dense cookies instead of light and airy.

  • Flavor Adjustments: If opting for grape flavoring instead of ube extract, start with a little and adjust gradually to avoid overpowering the cookie’s sweetness.

Baking these Purple Crinkle Cookies is not only a visual treat but also a delicious one!

What to Serve with Purple Crinkle Cookies

As you indulge in these vibrant treats, imagine the delightful flavors they could be paired with to create a memorable meal experience.

  • Rich Coffee: The bold flavors of a dark roast coffee perfectly complement the sweet, tender bite of the cookies, enhancing their ube essence.

  • Vanilla Ice Cream: A scoop of creamy vanilla ice cream adds a cooling contrast that makes the warm, soft cookies even more enjoyable. Blissful!

  • Fruit Salad: A refreshing mix of seasonal fruits brings a bright, fresh balance to the rich cookies, harmonizing textures and flavors beautifully.

  • Chocolate Milk: The sweet, chocolaty drink offers a comforting retro feel and heightens the sweetness of the cookies, making them irresistible for all ages.

  • Coconut Whipped Cream: Adding lightness and a hint of tropical flavor, this luscious cream amplifies the cookies’ unique twist and makes them feel even more special.

  • Chai Tea: The warm spices in chai tea provide a lovely contrast to the sweetness of the cookies, creating a comforting and inviting pairing perfect for cozy evenings.

  • Ice-Cold Lemonade: A zesty, refreshing glass of lemonade cuts through the sweetness and perfectly balances the richness of the cookies, making it a delightful duo.

  • Chocolate Dipped Strawberries: Juicy berries dipped in rich chocolate bring a sweet yet tart freshness, creating a stunning visual and taste pairing with the cookies.

  • Milkshake: A thick, creamy milkshake adds indulgence and is a nostalgic treat that will remind you of childhood, bringing back memories with every bite.

Step outside the ordinary and explore these delightful pairings to elevate your Purple Crinkle Cookie experience!

How to Store and Freeze Purple Crinkle Cookies

Room Temperature: Store cookies in an airtight container at room temperature for up to 3 days to maintain their softness and flavor.

Fridge: If you prefer, keep the cookies in the fridge for up to a week, but be sure to let them sit at room temperature before serving for the best texture.

Freezer: To freeze, place the cookies in a single layer on a baking sheet until firm, then transfer to a freezer-safe bag or container. They can be frozen for up to 3 months.

Reheating: For a warm treat, reheat frozen cookies in the microwave for about 15 seconds, or bake them from frozen at 350°F (175°C) for 5-7 minutes. Enjoy your delightful Purple Crinkle Cookies!

Purple Crinkle Cookies Variations & Substitutions

Feel free to let your creativity shine by customizing these enchanting cookies to match your taste preferences and pantry staples!

  • Dairy-Free: Substitute the unsalted butter with coconut oil or margarine for a delightful dairy-free version. The coconut adds a lovely hint of tropical flavor.

  • Gluten-Free: Use a gluten-free all-purpose flour blend in place of traditional flour. Many blends work beautifully, keeping the cookies just as soft and satisfying.

  • Less Sugar: For a lighter treat, reduce granulated sugar by ¼ cup and substitute with applesauce or mashed bananas, offering natural sweetness and added moisture.

  • Flavor Burst: Swap ube extract with grape flavoring for a fruity twist. This gives your cookies a refreshing new taste that’s just as vibrant.

  • Chewy Chocolate: Add in ½ cup of chocolate chips for a delightful chocolatey surprise that perfectly complements the purple hue.

  • Textural Twist: Mix in ½ cup of shredded coconut for a tropical texture that adds a fun chewiness to each bite.

  • Icing Drizzle: Once cooled, drizzle a simple glaze made from powdered sugar and lemon juice over the cookies for a zesty contrast to the sweetness.

  • Condensed Milk Cookies: Replace half of the milk with condensed milk for a richer, denser cookie with a caramel-like sweetness.

These Purple Crinkle Cookies are a delightful canvas for inspiration! Whether you’re in the mood for something tropical or indulgently sweet, these variations let you create something unique for every occasion. For more cookie ideas, check out my delicious German Style Cookies and Banana Seed Cookies. Happy baking!

Make Ahead Options

These Purple Crinkle Cookies are a dream for meal prep enthusiasts! You can prepare the cookie dough up to 24 hours in advance by following all the steps right up to chilling. Simply cover the dough tightly with plastic wrap, ensuring there are no air pockets to prevent drying out. When you’re ready to bake, preheat the oven and roll the chilled dough into balls just before coating them in the powdered sugar and cornstarch mixture. This method not only saves you time on busy days but also preserves the cookies’ delightful texture and vibrant color, making them just as delicious as when freshly baked. Enjoy the ease of popping these colorful treats in the oven with minimal last-minute effort!

Purple Crinkle Cookies Recipe FAQs

What type of ube extract should I use?
I recommend using pure ube extract for the best flavor and color in your Purple Crinkle Cookies. If ube extract isn’t available, you can also use purple food coloring combined with a grape flavoring, just be sure to start with a small amount and adjust to taste!

How do I store purple crinkle cookies to keep them fresh?
To maintain their delightful softness, store your cookies in an airtight container at room temperature for up to 3 days. If you’d like, you can also refrigerate them for up to a week, but be sure to let them sit out for a few minutes before enjoying to bring back their cozy texture.

Can I freeze purple crinkle cookies?
Absolutely! To freeze your cookies, first place them in a single layer on a baking sheet and freeze until solid. Then, transfer the cookies to a freezer-safe bag or container. They will keep well for up to 3 months. When you’re ready to enjoy them, simply reheat in the microwave for about 15 seconds or bake from frozen at 350°F (175°C) for 5-7 minutes.

What should I do if my dough is too sticky?
If you find your dough is too sticky to handle, it’s perfectly normal! You can chill it for an additional 30 minutes to 1 hour to help firm it up. You may also sprinkle a little flour on your hands while rolling the dough balls to prevent sticking. Remember, the dough should be soft but manageable!

Can I change any ingredients for dietary preferences?
Certainly! If you’re looking for a dairy-free option, you can substitute the unsalted butter with margarine or coconut oil. Additionally, if you need a gluten-free version, simply use a gluten-free flour blend. The flavor may change slightly, but they’ll still be delicious!

Purple Crinkle Cookies

Get Ready to Indulge in Irresistible Purple Crinkle Cookies

These Purple Crinkle Cookies are visually stunning and deliver a delightful twist of flavor thanks to the unique essence of ube.
Prep Time 30 minutes
Cook Time 14 minutes
Chilling Time 2 hours
Total Time 2 hours 44 minutes
Servings: 24 cookies
Course: Dessert
Cuisine: Filipino
Calories: 120

Ingredients
  

For the Dough
  • 2 cups All-Purpose Flour can substitute with gluten-free flour blends
  • 1.5 tsp Baking Powder ensure freshness for the best results
  • 0.25 tsp Salt enhances flavor balance
  • 0.5 cup Unsalted Butter use margarine or coconut oil for a dairy-free option
  • 1 cup Granulated Sugar brown sugar can be used for deeper flavor
  • 2 Large Eggs no substitutes suggested
  • 1 tsp Vanilla Extract opt for pure extract for best flavor
  • 1.5 tsp Ube Extract or Purple Food Coloring + Flavoring
  • 0.5 cup Whole Milk lower-fat options are acceptable
For Dusting
  • 0.5 cup Powdered Sugar adjust to achieve desired thickness
  • 2 tbsp Cornstarch optional for thicker coating

Equipment

  • mixing bowls
  • whisk
  • Baking sheets
  • parchment paper
  • plastic wrap
  • oven

Method
 

Step-by-Step Instructions
  1. In a medium bowl, whisk together the flour, baking powder, and salt until well-combined. In a separate large bowl, cream together the butter and sugar until light and fluffy, about 3-4 minutes. Add the eggs one at a time, mixing well after each addition. Incorporate the vanilla and ube extracts, then gradually mix in the dry ingredients and milk until a soft dough forms.
  2. Cover the dough tightly with plastic wrap, refrigerate for at least 2 hours, or overnight if possible.
  3. Preheat your oven to 350°F (175°C) and line baking sheets with parchment paper. Scoop portions of chilled dough into tablespoon-sized balls, roll them in a mixture of powdered sugar and cornstarch.
  4. Arrange the coated dough balls on the prepared baking sheets, spacing them about 2 inches apart. Bake for 12-14 minutes, until the tops start to crack and edges are set.
  5. Allow the cookies to cool on the baking sheets for about 5 minutes before transferring to wire racks to cool completely.

Notes

Refrigerating the dough is key to prevent spreading. Remove from oven when edges are set but centers are still soft for chewiness.

Cranberry Turkey Grilled Cheese: The Ultimate Comfort Bite

As I stood at the kitchen counter, the aroma of roasted turkey mingled with the sweet tang of cranberry sauce wafting from last week’s Thanksgiving feast filled the air, tugging at my heart. What could be better than transforming those beloved leftovers into a delightful treat? Enter the Cranberry Turkey Grilled Cheese—a sandwich that takes comfort food to a whole new level. This recipe isn’t just about repurposing what you have; it’s a quick, irresistible way to create a warm, gooey masterpiece that your loved ones will beg for. With its golden-brown exterior and savory sweetness, it’s perfect for busy weeknights or a cozy lunch. Curious about how to whip up this delectable delight? Let’s dive right in!

Why is this sandwich a must-try?

Ultimate Comfort Food: The Cranberry Turkey Grilled Cheese epitomizes comfort, blending savory turkey and tangy cranberries into a cozy masterpiece.
Quick and Easy: Perfect for busy weeknights, this recipe comes together in just minutes, making it ideal for a scrumptious lunch or dinner.
Crowd-Pleasing: It’s a guaranteed hit, appealing to everyone’s taste buds while creatively using Thanksgiving leftovers.
Versatile Additions: Feel free to mix in some spinach or swap cheeses—each variation offers a new twist, just like our Savory Vegetable Cheese Pancakes that make the most out of simple ingredients.
Irresistibly Gooey: With a meltingly delicious provolone that adds creaminess, every bite is an indulgent experience you won’t forget!

Dive into a sandwich that’s not just food, but a warm hug on a plate!

Cranberry Turkey Grilled Cheese Ingredients

Here’s everything you need to create this irresistible, comfort-filled sandwich.

For the Bread

  • Bread – Use freshly baked French or sourdough for the best flavor and texture.

For the Filling

  • Turkey – Leftover roasted turkey adds delicious protein and depth to each bite.
  • Cranberries – Use leftover cranberry sauce for a sweet and tangy kick, or fresh cranberries cooked down.
  • Provolone Cheese – Melting beautifully, this cheese adds creaminess; consider mozzarella or gouda as alternatives if desired.

For Grilling

  • Butter or Mayo – Ensures a golden, crispy exterior; try mayonnaise for an extra layer of flavor.

Transform your Thanksgiving leftovers with this cranberry turkey grilled cheese that promises to delight every palate!

Step‑by‑Step Instructions for cranberry turkey grilled cheese

Step 1: Prepare Ingredients
Start by gathering your ingredients: leftover roasted turkey, cranberry sauce, provolone cheese, and freshly baked French or sourdough bread. Lay everything out on your countertop for easy access as you create this delicious cranberry turkey grilled cheese. Having all your ingredients at hand ensures a smooth and enjoyable cooking process, making it easier to refashion those delightful Thanksgiving leftovers.

Step 2: Assemble Sandwich
Begin layering your sandwich by placing a generous slice of provolone cheese on one piece of bread. Next, add a hearty portion of turkey followed by a spread of cranberry sauce. Top it all off with another slice of provolone cheese for that melty goodness before covering with the second slice of bread. Push down gently to ensure the ingredients stick together, creating a solid foundation for grilling.

Step 3: Grill Sandwich
Heat a non-stick skillet over medium heat and add a teaspoon of butter or mayo. Once the skillet is warm, place the assembled cranberry turkey grilled cheese in the pan. Grill each side for 3-4 minutes until the bread turns golden brown and crispy, and the cheese begins to melt. Keep a close eye to prevent burning, adjusting the heat as necessary for a perfect grill.

Step 4: Serve
Once both sides of your sandwich are beautifully golden and the cheese is gooey, gently remove it from the skillet. Place it on a cutting board and let it rest for a minute before slicing it in half. This cranberry turkey grilled cheese sandwich is now ready to be served warm, showcasing the perfect blend of savory turkey and sweet cranberries that’s sure to delight your taste buds!

Expert Tips for Cranberry Turkey Grilled Cheese

  • Quality Ingredients: Choose high-quality block provolone cheese over pre-sliced for better flavor and melt. Freshly baked bread also enhances taste.
  • Avoid Burning: Keep the skillet on medium heat. Watch closely to prevent burning while ensuring the cheese melts perfectly inside your cranberry turkey grilled cheese.
  • Customize Wisely: Feel free to add spinach or apple slices for a crunch, but ensure they complement rather than overpower the turkey and cranberry balance.
  • Perfectly Grilled: Lightly spread butter or mayo on the outer sides of the bread for a crispy crust, but avoid overloading to keep the sandwich from getting greasy.
  • Use Leftovers Creatively: Don’t hesitate to use any leftover turkey and cranberry sauce; they contribute to that cozy, comforting vibe this sandwich is all about!

Cranberry Turkey Grilled Cheese Variations

Feel free to get creative and personalize your sandwich with these delightful twists to enhance your cranberry turkey grilled cheese experience!

  • Sweet Apple Slices: Add thin slices of apple for a refreshing crunch and natural sweetness that complements the turkey and cranberries.

  • Cheese Swap: Use sharp cheddar instead of provolone for a bolder, more robust flavor that pairs beautifully with the sweet tartness of the cranberries. The sharper bite will excite your taste buds!

  • Greens Galore: Sneak in some baby spinach or arugula for an extra layer of fresh flavor and a pop of color. This not only adds nutrition but also brings a delightful texture to each bite.

  • Herbed Butter: Instead of plain butter, mix in some garlic powder or fresh herbs like rosemary before grilling your sandwich for an aromatic twist that elevates the entire dish.

  • Spicy Kick: Add a splash of your favorite hot sauce or sliced jalapeños for a zesty heat that contrasts with the sweetness of the cranberry. This unexpected layer of flavor will delight adventurous palates!

  • Savory Mushroom: Incorporate sautéed mushrooms to deepen the umami flavor of your sandwich. Their earthy taste pairs so well with turkey and cheese, creating a rich, satisfying bite.

  • Creamy Spin: Try adding a layer of cream cheese or goat cheese to enhance creaminess and offer a tangy twist. This will make your grilled cheese even more indulgent!

Enhance your sandwich journey further with our delicious ideas like the Savory Cheese Egg or savor the unique flavors in our Vegetable Bake with Cheese and Cream that show just how fun cooking can be!

Make Ahead Options

These Cranberry Turkey Grilled Cheese sandwiches are perfect for meal prep, saving you valuable time on busy weeknights! You can assemble the sandwiches and refrigerate them for up to 24 hours. To maintain quality, layer your turkey, cranberry sauce, and provolone cheese between two slices of bread, then wrap them tightly in plastic wrap or place them in an airtight container. Just before serving, preheat your skillet over medium heat, spread butter or mayo on the outside, and grill each sandwich for about 3-4 minutes per side until golden brown and the cheese is gooey. This way, you’ll enjoy a delicious, homemade cranberry turkey grilled cheese with minimal effort right when hunger strikes!

How to Store and Freeze Cranberry Turkey Grilled Cheese

Fridge: Store leftovers in an airtight container for up to 2 days. Reheat on a skillet to regain that delightful crispiness.

Freezer: For longer storage, wrap the sandwich tightly in plastic wrap and then in aluminum foil before freezing for up to 1 month.

Reheating: When ready to enjoy, thaw in the fridge overnight, then reheat on a skillet for 4-5 minutes per side until heated through and crispy.

Tip: To maintain the best texture, avoid microwaving, as it may lead to a soggy sandwich; the cranberry turkey grilled cheese deserves that perfect crisp!

What to Serve with Cranberry Turkey Grilled Cheese

Elevate your meal with sides that perfectly complement the warm, gooey goodness of your sandwich.

  • Tomato Basil Soup: The classic pairing! Its tangy flavor and creamy texture balance the sweetness of the cranberries wonderfully.
  • Mixed Greens Salad: A light and fresh salad adds a crunchy contrast, enhancing the sandwich’s richness with vibrant vegetables and a zesty vinaigrette.
  • Sweet Potato Fries: Crispy and slightly sweet, they provide a delightful crunch that pairs beautifully with the savory turkey and creamy cheese.
  • Cranberry Sauce Dip: For those who love a sweet and tangy touch, a small bowl of warm cranberry sauce enhances the experience without overpowering the flavors.
  • Pickle Platter: The bright acidity of dill pickles offers a refreshing contrast, cutting through the richness of the cheese and turkey in every bite.
  • Chilled White Wine: A glass of Chardonnay or Sauvignon Blanc brings a refreshing acidity that works well with the savory flavors of the sandwich.
  • Apple Slices: Crunchy, juicy slices of apple offer an extra sweet and crisp element that pairs excellently with the turkey and cranberries.
  • Pumpkin Spice Latte: For a cozy vibe, this warm fall favorite provides a comforting sip that harmonizes with the holiday flavors in your meal.
  • Butternut Squash Soup: Creamy and slightly sweet, this seasonal soup serves as a warm, comforting companion that perfectly complements the grilled cheese.
  • Chocolate Chip Cookies: Finish your meal on a sweet note with these warm, gooey delights—an unforgettable dessert contrast to the savory sandwich.

Cranberry Turkey Grilled Cheese Recipe FAQs

What type of bread is best for this sandwich?
Absolutely! For the best flavor and texture, I recommend using freshly baked breads like French or sourdough. They provide a sturdy foundation for the fillings and create a delightful crisp when grilled. Plus, their subtle flavors perfectly complement the savory turkey and sweet cranberries.

How should I store leftover cranberry turkey grilled cheese?
Very good question! Store any leftover sandwiches in an airtight container in the refrigerator for up to 2 days. When you’re ready to enjoy them again, reheat them on a skillet to restore that delicious crunch on the outside.

Can I freeze cranberry turkey grilled cheese?
Yes, you can freeze your sandwiches! To do so, wrap the assembled sandwich tightly in plastic wrap, then in aluminum foil to prevent freezer burn. It can be frozen for up to 1 month. When you want to enjoy it, let it thaw in the refrigerator overnight, and then reheat in a skillet over medium heat for about 4-5 minutes per side until heated through and crispy.

What do I do if my cheese isn’t melting properly?
If your cheese isn’t melting well, ensure that your skillet is at medium heat, not high. You might also want to cover the skillet with a lid while grilling to trap heat and aid in melting the cheese. Sometimes, using freshly grated cheese instead of pre-sliced can make a big difference in melt quality!

Can I use turkey that isn’t leftover?
Absolutely! While leftover turkey is perfect for this sandwich, you can certainly use freshly cooked turkey or even deli-sliced turkey. Just be sure to season it well for that desired depth of flavor that will meld beautifully with the cranberries and cheese.

What should I know about seasoning for dietary restrictions?
If you or someone around you has allergies, it’s a great idea to check for any ingredient sensitivities. For a gluten-free option, use gluten-free bread; and for dairy-free preferences, you can substitute the provolone cheese with a dairy-free cheese alternative. Always feel free to customize to suit your dietary needs while enjoying this comforting cranberry turkey grilled cheese!

cranberry turkey grilled cheese

Cranberry Turkey Grilled Cheese: The Ultimate Comfort Bite

Transform Thanksgiving leftovers into a delicious cranberry turkey grilled cheese that’s quick and irresistible.
Prep Time 10 minutes
Cook Time 8 minutes
Resting Time 1 minute
Total Time 19 minutes
Servings: 2 sandwiches
Course: Lunch
Cuisine: American
Calories: 400

Ingredients
  

For the Bread
  • 2 slices French or sourdough bread Use freshly baked for best flavor and texture
For the Filling
  • 4 oz leftover roasted turkey Adds delicious protein
  • 2 tbsp cranberry sauce For a sweet and tangy kick
  • 2 slices provolone cheese Consider mozzarella or gouda as alternatives
For Grilling
  • 1 tbsp butter or mayo Ensures a golden, crispy exterior

Equipment

  • Non-Stick Skillet

Method
 

Step-by-Step Instructions
  1. Start by gathering your ingredients: turkey, cranberry sauce, provolone cheese, and bread. Lay them out for easy access.
  2. Layer the sandwich by placing provolone on one slice of bread, followed by turkey and cranberry sauce. Add another slice of provolone and top with the second slice of bread.
  3. Heat a skillet over medium heat and add butter or mayo. Place the sandwich in the pan and grill each side for 3-4 minutes until golden brown and the cheese melts.
  4. Remove from the skillet, let it rest for a minute, and then slice in half before serving.

Notes

Use high-quality ingredients and watch the heat to avoid burning while ensuring the cheese melts perfectly.

Grilled Baby Octopus with Nuoc Cham for a Flavorful Twist

As I stood by the grill, the tantalizing scent of smoky goodness wafted through the air, mingling with the fresh marinade clinging to the baby octopus. This Grilled Baby Octopus with Nuoc Cham is not just an appetizer; it’s a culinary adventure that transports you straight to the vibrant streets of Vietnam. Perfectly tender and infused with the zesty essence of the spicy dipping sauce, it promises a delightful experience for seafood lovers. The best part? It’s incredibly easy to prepare, making it an impressive addition to your next gathering without the usual stress of complex dishes. Ready to wow your guests with a taste of adventure? Let’s dive into this delightful recipe!

Why Try Grilled Baby Octopus?

Unforgettable Flavor: The smoky aroma and zesty Nuoc Cham create a tantalizing fusion that your taste buds will crave.

Easy Preparation: With just a few simple steps, you can impress your guests without the fuss—perfect for home chefs at any level.

Texture Delight: Enjoy the balance of tender octopus with a charred exterior, making each bite a savory experience.

Versatile Dipping Sauce: The Nuoc Cham isn’t just for octopus. Use it on grilled meats, veggies, or even as a salad dressing for added zing!

Crowd-Pleasing Appetizer: This dish is a guaranteed hit for parties, appealing to adventurous eaters and classic palates alike.

Don’t forget to explore our refreshing cucumber and carrot salad for a perfect sidekick to your grilled octopus!

Grilled Baby Octopus with Nuoc Cham Ingredients

For the Octopus
Baby Octopus – Fresh seafood element; ensure they’re cleaned and heads discarded for the best results.
Lemon Juice – Adds acidity and brightness; use fresh lemon for the most vibrant flavor.
Garlic – Provides aromatic depth; minced garlic gives an intense flavor punch.
Olive Oil – Essential for marinating and grilling; enhances both flavor and moisture.
Red Pepper Flakes – Introduces the perfect amount of heat; adjust based on your spice tolerance.
Kosher Salt & Pepper – Basic seasoning to enhance all flavors; fine sea salt is a good substitute.

For the Nuoc Cham Sauce
Fish Sauce – Salty umami base; crucial for authentic flavor, so don’t skip this ingredient.
Sugar – Balances the saltiness of fish sauce; using brown sugar adds a richer taste.
Water – Dilutes the sauce; warm water helps dissolve the sugar effectively.
Lime Juice – Brings additional acidity and freshness; lemon can serve as a good substitute.
Chili Pepper – Adds heat and flavor; fresh Thai chilies are highly recommended for authenticity.

Step‑by‑Step Instructions for Grilled Baby Octopus with Nuoc Cham

Step 1: Prepare the Octopus
Start by bringing a pot of salted water to a boil. Add the baby octopus and cook for just 1 minute; this quick blanching will tenderize them beautifully. Once done, remove the octopus with a slotted spoon and let them drain well. This initial step is crucial for achieving the tender texture in your Grilled Baby Octopus with Nuoc Cham.

Step 2: Marinate the Octopus
In a large mixing bowl, combine the drained octopus with fresh lemon juice, minced garlic, olive oil, red pepper flakes, kosher salt, and pepper. Toss everything together thoroughly to coat each piece evenly. Cover the bowl with plastic wrap and refrigerate the mixture for at least 2 hours; this marinade process infuses the octopus with vibrant flavors, enhancing your grilled dish.

Step 3: Prepare the Nuoc Cham Sauce
While the octopus marinates, whip up the Nuoc Cham sauce. In a bowl, whisk together fish sauce, sugar, warm water, fresh lime juice, and sliced chili pepper. Adjust the seasoning to your taste, balancing the saltiness and sweetness. This versatile dipping sauce will perfectly complement the smoky grilled baby octopus, so set it aside to let the flavors meld.

Step 4: Preheat the Grill
As the marinating time nears its end, preheat your grill to medium-high heat. Ensure the grates are clean and lightly oiled to prevent sticking. This step helps achieve those beautiful char marks on your Grilled Baby Octopus, enhancing both flavor and presentation.

Step 5: Grill the Octopus
Once the grill is hot, place the marinated octopus on the grates. Grill them for about 3-4 minutes, turning occasionally for even cooking, until they develop a slight char and are heated through. You’ll know they’re ready when they are tender to the touch and beautifully caramelized, elevating your dish.

Step 6: Serve with Nuoc Cham
After grilling, remove the octopus from the grill and transfer them to a serving platter. Drizzle generously with the freshly prepared Nuoc Cham sauce. This final touch not only enhances the flavors but also adds a vibrant presentation, making your Grilled Baby Octopus with Nuoc Cham an eye-catching and delicious appetizer for any gathering.

How to Store and Freeze Grilled Baby Octopus

Fridge: Keep the marinated baby octopus in an airtight container for up to 2 days before grilling. It’s best enjoyed fresh, but these tips help maintain its flavor.

Freezer: If you’ve grilled the baby octopus and have leftovers, they can be frozen for up to 2 months. Make sure to cool them completely before sealing in a freezer-safe bag to prevent freezer burn.

Nuoc Cham Storage: The Nuoc Cham can be stored in the refrigerator for up to 3 weeks. Keep it in an airtight container, and give it a good shake before using, as the ingredients may settle.

Reheating: Reheat grilled baby octopus gently in a skillet over low heat or in the microwave briefly, ensuring not to overcook it. Pair it with fresh Nuoc Cham for maximum impact!

Make Ahead Options

These Grilled Baby Octopus with Nuoc Cham are perfect for busy weeknights or entertaining! You can marinate the octopus up to 24 hours in advance; just follow the marinating instructions and store them in an airtight container in the refrigerator to keep them tender and flavorful. Additionally, the Nuoc Cham sauce can be made ahead and refrigerated for up to 3 weeks, allowing the flavors to develop even more. When you’re ready to serve, simply grill the marinated octopus for a quick 3-4 minutes until beautifully charred. This strategic prep allows you to enjoy deliciously grilled octopus with minimal effort, making dinner a breeze!

Grilled Baby Octopus with Nuoc Cham Variations

Feel free to get creative with this dish and customize it to your taste buds’ delight!

  • Calamari Swap: Replace baby octopus with calamari for a different texture. Tender calamari can provide a wonderful twist while maintaining the delicious flavor.
  • Herbed Nuoc Cham: Add fresh herbs like cilantro or mint to the Nuoc Cham for a refreshing lift. This twist introduces a vibrant green color and enhances the sauce’s aromatic profile.
  • Spicy Kick: For adventurous eaters, throw in extra chili flakes or fresh Thai chilies into the marinade. This will raise the heat level and make those flavor profiles pop even more!
  • Citrus Twist: Swap lime juice for orange juice in the Nuoc Cham. The sweet citrusy notes add a unique freshness that pairs beautifully with grilled seafood.
  • Crunchy Toppings: Top the finished dish with toasted peanuts or sesame seeds for an added crunch. This texture contrast complements the tender octopus perfectly!
  • Grilled Accompaniments: Serve alongside grilled veggies or a fresh salad, like a refreshing cucumber and carrot salad, to elevate your meal further.
  • Saturated Sauce: Experiment with adding extra sugar to the Nuoc Cham for a sweeter version that can balance better with high acidity seafood. Adjust to your liking for that perfect match!
  • Bready Delight: Pair this dish with crusty artisanal bread, perfect for dipping in the flavorful Nuoc Cham, and to soak up every delicious drop of that spicy sauce.

These variations and substitutions allow you to explore different flavor profiles and enhance your culinary experience with this delightful seafood dish! Don’t hesitate to make it your own!

Expert Tips for Grilled Baby Octopus

  • Cooking Time: Keep an eye on the grilling time; overcooking can lead to a rubbery texture. Aim for 3-4 minutes to achieve tenderness.
  • Fresh Ingredients: Always opt for fresh baby octopus and use freshly squeezed lemon juice for the best flavor in your grilled baby octopus with Nuoc Cham.
  • Marination Magic: Allow a minimum of 2 hours for marination; this is key to infusing flavors thoroughly. Overnight marination yields even better results!
  • Heat Control: Preheat your grill properly to medium-high; this ensures a good sear while cooking the octopus evenly.
  • Flavor Adjustments: Taste your Nuoc Cham after mixing and adjust sweetness or spice levels according to your preference; every palate is different!

What to Serve with Grilled Baby Octopus with Nuoc Cham

Pair the smoky, tender octopus with delightful sides that elevate your meal experience.

  • Crispy Rice Cakes: Crunchy on the outside, these cakes offer a delightful contrast to the tender octopus, enhancing each bite.

  • Asian Slaw: A vibrant mix of cabbage and carrots, drizzled with a sesame dressing adds freshness and a crisp texture, balancing the rich flavors of the octopus.

  • Grilled Vegetable Skewers: Seasonal vegetables like zucchini, bell peppers, and cherry tomatoes, grilled to perfection complement the smoky notes while bringing out natural sweetness.

  • Coconut Jasmine Rice: Creamy and aromatic, the rice serves as a perfect base to soak up the Nuoc Cham, making every bite a flavorful affair.

  • Thai Basil Lemonade: Refreshing and slightly sweet, this vibrant beverage contrasts beautifully with the spicy octopus, quenching your thirst while enhancing the meal’s overall experience.

  • Mango Sticky Rice: This sweet dessert perfectly rounds out the meal, blending tropical sweetness with creamy coconut that washes away any heat from the main dish.

Grilled Baby Octopus with Nuoc Cham Recipe FAQs

How do I select fresh baby octopus?
When choosing baby octopus, look for those that are shiny and firm with a vibrant color. Avoid any with dark spots or a slimy texture, which may indicate they are past their prime. Freshness is crucial for achieving that tender, delectable bite in your Grilled Baby Octopus with Nuoc Cham.

What’s the best way to store leftover grilled octopus?
Store any leftover grilled baby octopus in an airtight container in the refrigerator. It will stay fresh for up to 2 days. If you plan to keep it longer, consider freezing it instead. Just ensure it cools completely before transferring it to a freezer-safe bag, allowing for maximum preservation without freezer burn.

Can I freeze marinated baby octopus?
Absolutely! If you have marinated baby octopus and want to store it for later, you can freeze it. Place the marinated octopus in a freezer-safe bag, remove as much air as possible, and freeze for up to 2 months. When you’re ready to cook, thaw it in the refrigerator overnight before grilling.

What should I do if my octopus is rubbery?
If your grilled octopus turns out rubbery, it may be due to overcooking. Octopus needs just a few minutes on the grill—typically 3-4 minutes—to become tender and lightly charred. Next time, closely monitor the cooking time to ensure a perfect texture.

Is Nuoc Cham safe for people with seafood allergies?
Nuoc Cham contains fish sauce, which can pose issues for those with seafood allergies. If you’re serving guests with allergies, consider making a vegetarian or different dipping sauce tailored to their needs, like a zesty lime vinaigrette without any fish products.

Grilled Baby Octopus with Nuoc Cham

Grilled Baby Octopus with Nuoc Cham for a Flavorful Twist

Grilled Baby Octopus with Nuoc Cham is a flavorful adventure that brings the taste of Vietnam to your table, perfect for seafood lovers.
Prep Time 15 minutes
Cook Time 10 minutes
Marination Time 2 hours
Total Time 2 hours 25 minutes
Servings: 4 servings
Course: Dinner
Cuisine: Vietnamese
Calories: 200

Ingredients
  

For the Octopus
  • 1 lb Baby Octopus Fresh seafood element; ensure they're cleaned and heads discarded for the best results.
  • 2 tbsp Lemon Juice Adds acidity and brightness; use fresh lemon for the most vibrant flavor.
  • 3 cloves Garlic Provides aromatic depth; minced garlic gives an intense flavor punch.
  • 2 tbsp Olive Oil Essential for marinating and grilling; enhances both flavor and moisture.
  • 1 tsp Red Pepper Flakes Introduces the perfect amount of heat; adjust based on your spice tolerance.
  • 1 tsp Kosher Salt Basic seasoning to enhance all flavors; fine sea salt is a good substitute.
  • 1 tsp Pepper Basic seasoning to enhance all flavors.
For the Nuoc Cham Sauce
  • 3 tbsp Fish Sauce Salty umami base; crucial for authentic flavor.
  • 1 tbsp Sugar Balances the saltiness of fish sauce; brown sugar adds a richer taste.
  • 3 tbsp Water Dilutes the sauce; warm water helps dissolve the sugar.
  • 2 tbsp Lime Juice Brings additional acidity and freshness; lemon can serve as a substitute.
  • 1 medium Chili Pepper Adds heat and flavor; fresh Thai chilies are recommended.

Equipment

  • grill
  • mixing bowl
  • pot
  • slotted spoon

Method
 

Step-by-Step Instructions
  1. Start by bringing a pot of salted water to a boil. Add the baby octopus and cook for just 1 minute; this quick blanching will tenderize them beautifully. Once done, remove the octopus with a slotted spoon and let them drain well.
  2. In a large mixing bowl, combine the drained octopus with fresh lemon juice, minced garlic, olive oil, red pepper flakes, kosher salt, and pepper. Toss everything together thoroughly to coat each piece evenly. Cover the bowl with plastic wrap and refrigerate for at least 2 hours.
  3. While the octopus marinates, prepare the Nuoc Cham sauce by whisking together fish sauce, sugar, warm water, fresh lime juice, and sliced chili pepper. Adjust seasoning to taste.
  4. Preheat your grill to medium-high heat and ensure the grates are clean and lightly oiled.
  5. Once the grill is hot, place the marinated octopus on the grates. Grill them for about 3-4 minutes, turning occasionally until they develop a slight char and are heated through.
  6. After grilling, remove the octopus from the grill and transfer to a serving platter. Drizzle with the Nuoc Cham sauce.

Notes

Ensure to marinate the octopus for at least 2 hours for the best flavor infusion. Grill carefully to avoid overcooking, which can lead to rubbery texture.

Magical Butterbeer Cookies That Will Enchant Your Taste Buds

Just the other day, I overheard my neighbor excitedly chatting about a magical feast inspired by the Wizarding World, and it sparked a sweet idea! I couldn’t resist the urge to whip up a batch of Butterbeer Cookies, which transport you straight to the cozy warmth of the Three Broomsticks. These delightful treats are not only incredibly easy to make, but they also boast a soft, chewy texture that melts in your mouth. Topped with a luscious butterscotch frosting, these cookies truly embody the nostalgic essence of butterbeer, making them perfect for any gathering. Whether you’re a Harry Potter enthusiast or simply a dessert lover, these Butterbeer Cookies promise to enchant your taste buds! Ready to make your kitchen a little more magical?

Why are Butterbeer Cookies so special?

Irresistible Flavor: These cookies deliver a delightful blend of sweet butterscotch and butteriness that will have you reminiscing about the Wizarding World. Simple Steps: With straightforward instructions, you’ll whip up a batch without any fuss, making them perfect for bakers of all skill levels. Festive Delight: Ideal for themed gatherings, they add a sprinkle of magic to any event. Customizable Options: Want to switch things up? You can easily incorporate nuts or chocolate chips for added flair. Perfect for Sharing: Great for parties or simply a sweet treat to enjoy at home, they’ll disappear in no time! If you love cookies that are both enchanting and delicious, don’t miss out on these Butterbeer Cookies—your friends will be asking for the recipe!

Butterbeer Cookies Ingredients

For the Cookies
Butter – Softened. Provides moisture and richness to the cookie base.
Granulated Sugar – Sweetness. Enhances the cookie base flavor.
Brown Sugar – Adds moisture and depth of flavor.
Egg – Binds ingredients and contributes to the cookie structure.
Vanilla Extract – Flavor enhancer. Adds a sweet aroma.
All-Purpose Flour – Main structure component.
Salt – Balances sweetness and enhances flavor.
Baking Powder – Leavens the cookies for a soft texture.

For the Butterscotch Frosting
Powdered Sugar – For frosting consistency and sweetness.
Butterscotch Syrup – Key flavoring for frosting.
Heavy Cream – Adjusts frosting consistency.

For the Decorative Touch
Harry Potter-Inspired Sprinkles – Decorative element that adds a fun touch.

Let the magic of these Butterbeer Cookies fill your home with sweet aromas and delightful flavors!

Step‑by‑Step Instructions for Butterbeer Cookies

Step 1: Preheat the Oven
Begin by preheating your oven to 350°F (175°C). While the oven warms up, prepare a baking sheet by lining it with parchment paper, which will prevent the Butterbeer Cookies from sticking and help them bake evenly. Ensure everything is ready, as a properly heated oven is key to achieving that golden edge around your cookies.

Step 2: Create Cookie Dough
In a large mixing bowl, cream together the softened butter, granulated sugar, and brown sugar using a hand mixer or stand mixer on medium speed until the mixture is light and fluffy. This should take about 2 minutes. Next, beat in one egg and the vanilla extract until fully incorporated, creating a smooth and luscious base for your Butterbeer Cookies.

Step 3: Combine Dry Ingredients
In a separate bowl, whisk together the all-purpose flour, baking powder, and a pinch of salt until well mixed. Gradually add this dry mixture to your wet ingredients, mixing on low speed until just combined. Be careful not to overmix—as soon as the flour disappears, you’re good to go! This will keep your cookies delightfully soft and chewy.

Step 4: Scoop Dough
Using a large cookie scoop, portion out 7-8 balls of cookie dough and place them onto your prepared baking sheet. Roll each ball gently and then flatten to about ¾ inch thickness. Make sure to leave enough space between the cookies, as they will spread while baking, resulting in perfectly sized Butterbeer Cookies that are soft in the center and slightly crisp on the edges.

Step 5: Bake
Place your baking sheet in the preheated oven and bake the cookies for 12-13 minutes. Keep an eye on them; they’re ready when the edges are lightly golden and the centers look set but still soft. When you take them out, they may seem a little underbaked, but they will firm up as they cool, enhancing that chewy texture you desire.

Step 6: Cool
Allow the Butterbeer Cookies to sit on the baking sheet for about 10 minutes after baking. This resting period is crucial as it lets them finish cooking and sets their shape. Afterward, transfer the cookies to a cooling rack to cool completely. This step is your moment to breathe in the warm, aromatic scents wafting from your freshly baked cookies.

Step 7: Prepare Frosting
While your Butterbeer Cookies cool, you can prepare the butterscotch frosting. In a mixing bowl, beat together softened butter, powdered sugar, heavy cream, and butterscotch syrup until fluffy and well combined. This should take about 3-4 minutes on medium speed. The frosting should be smooth and creamy, ready to spread or pipe onto your cookies for that magical touch.

Step 8: Decorate
Once your cookies are completely cool, it’s time to frost! Either pipe the butterscotch frosting onto each cookie or spread it using a knife for a thicker layer. For an extra festive flair, immediately sprinkle some Harry Potter-inspired sprinkles atop the frosting. This final touch not only adds sweetness but also brings a burst of color and fun to your delicious Butterbeer Cookies.

What to Serve with Magical Butterbeer Cookies

Transport your loved ones to the enchanting world of Harry Potter with delicious pairings that will complete your magical dessert experience.

  • Hot Cocoa: The rich, velvety texture and sweetness of hot cocoa match brilliantly with the Butterscotch frosting, creating a cozy pairing. Imagine sipping on warm cocoa while savoring each bite of your cookies!

  • Vanilla Ice Cream: The creamy, cold vanilla ice cream complements the warm cookies perfectly, offering a delightful contrast that enhances the overall flavor experience. Drizzle a touch of caramel sauce over the top for that extra indulgence!

  • Spiced Apple Cider: This seasonal favorite brings warmth and a hint of spice that echoes the cozy atmosphere of the Three Broomsticks, making it the perfect drink for sipping alongside your cookies.

  • Chocolate Milk: The creamy sweetness of chocolate milk balances the butterscotch flavor and adds an enjoyable nostalgia that pairs beautifully with dessert. This duo is sure to delight both kids and adults!

  • Pumpkin Pie: For a festive touch, serve slices of spiced pumpkin pie. Their warm, spiced notes create a wonderful flavor harmony with the sweet richness of your Butterbeer Cookies, pulling together a magical meal.

  • Butterscotch Pudding: With a similar flavor profile, rich butterscotch pudding adds a luxurious creaminess that complements the cookies beautifully. Serve it in small cups for a fun and indulgent dessert complement!

  • Festive Fruit Salad: Fresh fruit adds a light and refreshing contrast to the sweeter treats, enhancing the dessert experience with bursts of vibrant flavor and color. Keep it simple with a mix of berries or tropical fruits for a delightful twist.

  • Milkshakes: Try a luscious butterscotch milkshake for a truly decadent dessert experience. The combination of creaminess and sweetness from both the milkshake and cookies will leave everyone returning for seconds!

Butterbeer Cookies Variations & Substitutions

Feel free to sprinkle a little magic and customize your Butterbeer Cookies!

  • Vegan Delight: Replace butter with dairy-free margarine and use a flax egg for a plant-based version. Enjoy the same soft texture without losing flavor!

  • Gluten-Free Option: Swap all-purpose flour for a gluten-free flour blend to create a similar soft and chewy cookie. Host a magical gathering without dietary worries!

  • Mini Treats: Make mini cookies by scooping smaller portions of dough. Adjust baking time to 8-10 minutes for bite-sized bliss that everyone will love.

  • Nutty Twist: Add ½ cup of chopped pecans or walnuts to the dough for a delightful crunch. This variation also enhances the cookie’s richness, providing a fantastic texture contrast.

  • Chocolate Chips: Fold in a cup of butterscotch or chocolate chips for an extra sweet, decadent treat. They will melt just right, creating puddles of joy in every bite.

  • Spiced Variation: Add a pinch of cinnamon or nutmeg for a cozy autumn flavor. This twist resonates with those lovely seasonal vibes, making your cookies even more enchanting.

  • Rummy Flair: Substitute vanilla extract with rum extract to mimic the warm essence of butterbeer. It’s a delightful change that will transport you straight to the Three Broomsticks!

Consider partnering these delicious Butterbeer Cookies with a warm cup of hot cocoa or even some festive Nutty Apricot Cookies for a delightful cookie platter that everyone will adore!

Storage Tips for Butterbeer Cookies

  • Room Temperature: Store cookies in an airtight container at room temperature for up to 3 days to maintain freshness and chewiness. This way, you can easily enjoy your magical Butterbeer Cookies while they last!

  • Freezer: If you want to enjoy these cookies later, freeze unbaked dough for up to 2 months. Just scoop and freeze the dough balls on a baking sheet, then transfer them to an airtight container once frozen.

  • Baked Cookies Freezing: Fully baked Butterbeer Cookies can be frozen for up to 1 month. Make sure to wrap them tightly in plastic wrap or aluminum foil before placing them in a freezer bag to prevent freezer burn.

  • Reheating: When ready to enjoy, let frozen cookies thaw in the fridge overnight, then reheat in the oven at 350°F (175°C) for 5-7 minutes to restore that soft, chewy texture.

Expert Tips for Butterbeer Cookies

  • Watch Your Bake Time: Keep an eye on the cookies during the last few minutes; they can overbake quickly. Pull them when edges are golden for soft-center Butterbeer Cookies.

  • Thick Frosting Hack: For thicker frosting, gradually add more powdered sugar or reduce heavy cream. It adds a luscious texture that everyone will love!

  • Chill the Dough: Refrigerating dough balls for about 30 minutes before baking enhances chewiness. Don’t skip this step if you want that perfect consistency!

  • Use Quality Ingredients: High-quality vanilla extract and fresh butter make a noticeable difference in flavor, elevating your Butterbeer Cookies to the next level.

  • Experiment with Flavors: Try adding a dash of rum extract to the cookie dough for an extra twist, capturing that rich, festive flavor of your favorite magical drink.

Make Ahead Options

These delightful Butterbeer Cookies are perfect for meal prep, allowing you to enjoy their magical flavors with minimal fuss! You can prepare the cookie dough up to 24 hours in advance by mixing all the ingredients and storing the dough balls in an airtight container in the refrigerator. Alternatively, you can freeze the unbaked dough for up to 2 months; just roll the dough into balls and flash freeze them on a baking sheet before transferring to a freezer bag. When you’re ready to bake, simply place the chilled or frozen dough on a baking sheet and add a couple of extra minutes to the baking time. This ensures that your Butterbeer Cookies come out just as delicious, soft, and chewy as if they were made fresh!

Butterbeer Cookies Recipe FAQs

What type of butter should I use for Butterbeer Cookies?
Absolutely! You’ll want to use softened, unsalted butter for the best flavor and consistency. This provides moisture and richness to the cookie base. If you’re looking for a dairy-free option, feel free to substitute with a dairy-free margarine.

How should I store leftover Butterbeer Cookies?
Very! To maintain their delightful chewiness, store cookies in an airtight container at room temperature for up to 3 days. If you have leftovers, consider freezing them for later enjoyment; they’ll stay fresh for up to 1 month when properly wrapped.

Can I freeze the dough for Butterbeer Cookies?
Of course! To freeze unbaked dough, scoop the dough balls onto a baking sheet and freeze until solid. Transfer them to an airtight container or freezer bag for up to 2 months. When you’re ready to bake, simply pop them in the oven straight from the freezer, adding a couple extra minutes to the baking time.

What if my Butterbeer Cookies spread too much during baking?
Don’t worry! If your cookies spread excessively, it might be due to warm dough or a lack of flour. Make sure the dough is chilled for about 30 minutes before baking and accurately measure your flour. If needed, add an extra tablespoon or two of flour to achieve a thicker consistency.

Are Butterbeer Cookies suitable for people with nut allergies?
Yes! The basic recipe for Butterbeer Cookies itself is nut-free, as it doesn’t call for nuts. However, always ensure any alternate flours or additives you use are also nut-free, especially if you adapt the recipe for different flavors or include mix-ins.

Butterbeer Cookies

Magical Butterbeer Cookies That Will Enchant Your Taste Buds

Delicious Butterbeer Cookies that transport you to the Wizarding World with soft, chewy textures and butterscotch frosting.
Prep Time 20 minutes
Cook Time 13 minutes
Cooling Time 10 minutes
Total Time 43 minutes
Servings: 24 cookies
Course: Dessert
Cuisine: Magic
Calories: 150

Ingredients
  

For the Cookies
  • 1 cup Butter Softened
  • 3/4 cup Granulated Sugar
  • 3/4 cup Brown Sugar
  • 1 large Egg
  • 1 teaspoon Vanilla Extract
  • 2 1/4 cups All-Purpose Flour
  • 1/2 teaspoon Salt
  • 1 teaspoon Baking Powder
For the Butterscotch Frosting
  • 2 cups Powdered Sugar
  • 1/2 cup Butterscotch Syrup
  • 2 tablespoons Heavy Cream
For the Decorative Touch
  • 1 cup Harry Potter-Inspired Sprinkles

Equipment

  • mixing bowl
  • baking sheet
  • parchment paper
  • hand mixer
  • Cookie scoop

Method
 

Step-by-Step Instructions for Butterbeer Cookies
  1. Preheat your oven to 350°F (175°C) and line a baking sheet with parchment paper.
  2. Cream together softened butter, granulated sugar, and brown sugar until light and fluffy.
  3. Beat in one egg and vanilla extract until fully incorporated.
  4. In a separate bowl, whisk together flour, baking powder, and salt. Gradually add to wet ingredients.
  5. Scoop 7-8 balls of dough onto the baking sheet, flattening to about ¾ inch thick.
  6. Bake for 12-13 minutes until edges are lightly golden and centers look set.
  7. Cool on the baking sheet for 10 minutes before transferring to a cooling rack.
  8. Prepare the frosting by beating together butter, powdered sugar, heavy cream, and butterscotch syrup.
  9. Frost cookies and decorate with sprinkles once fully cooled.

Notes

Store cookies in an airtight container at room temperature for up to 3 days. Freeze unbaked dough for up to 2 months.

Fried Soft Shell Crabs: Crisp Perfection for Home Cooking

The aroma of sizzling seafood fills the air as I prepare a plate of Crispy Fried Soft Shell Crabs, a true delight that transforms any meal into a celebration. This easy recipe not only allows me to enjoy restaurant-quality flavors at home but also offers a palate-teasing crunch that’s perfect for any occasion. Whether it’s Mardi Gras or simply a cozy dinner night, these delightful crabs are an economical choice, promising satisfaction without breaking the bank. With each bite, you’ll savor both the satisfying crunch and the tender meat inside, making it a fun twist on your regular seafood fare. Curious about how to achieve that golden perfection in your kitchen? Let’s dive into this tasty adventure!

Why are Fried Soft Shell Crabs a Must?

Crunchy Delight: Each bite offers a crispy, golden coating that elevates your dining experience.
Flavorful Twist: The seasoned fish fry mix makes a perfect harmony with tender crab meat, creating a truly delectable dish.
Easy Preparation: Even novice cooks will appreciate the straightforward cooking method, ensuring success with minimal effort!
Versatile Side Pairings: They pair beautifully with creamy coleslaw or classic Cajun red potatoes, giving you endless meal options. For an added culinary kick, try serving them with a drizzle of Crawfish Sauce!
Affordable Gourmet: Enjoy restaurant-quality seafood at home without the expensive price tag—perfect for any budget-conscious food lover.

Fried Soft Shell Crabs Ingredients

For the Crabs
Soft Shell Crabs – Fresh or thawed crabs are essential for the best texture and flavor.
Eggs – Helps create a milk bath for the crabs; substitute with a vegan option if needed.
Mustard – Adds a delicious tang to the eggs; prepared yellow mustard works best for convenience.
Milk – Provides moisture and a smooth consistency in the milk bath; plant-based milk can be used as a substitute.

For the Coating
Flour – Forms the base of the crispy coating; all-purpose or gluten-free flour both work well.
Fish Fry Mix – Enhances flavor; I recommend the Slap Ya Mama mix for a Cajun kick, but any seasoned mix will do!

For Frying
Oil (for frying) – High smoke point oil like vegetable or canola oil is necessary for the deep-frying process.

Try this recipe for Fried Soft Shell Crabs and enjoy a tasty seafood treat that matches any restaurant experience!

Step-by-Step Instructions for Fried Soft Shell Crabs

Step 1: Thaw and Clean the Crabs
If your soft shell crabs are frozen, allow them to thaw completely in the refrigerator for several hours or overnight. Once thawed, gently rinse each crab under cold water, removing any debris. Pat them dry with a paper towel to ensure they are clean and ready for the cooking process.

Step 2: Prepare the Milk Bath
In a medium bowl, whisk together 2 eggs, 2 tablespoons of yellow mustard, and 1 cup of milk until smooth and well combined. This milk bath will add moisture and flavor to the crabs. Set your bowl aside, as it will be vital for coating your soft shell crabs before frying.

Step 3: Coat the Crabs
Take each cleaned crab and dip it into the milk bath, ensuring it is well-coated. Then, transfer the crab to a plate filled with a mixture of flour and fish fry mix, pressing gently to ensure an even coating. This crispy layer will create that irresistible crunch when you fry the soft shell crabs.

Step 4: Preheat the Oil
In a deep fryer or a large skillet, pour enough vegetable oil to reach about two inches deep. Heat the oil to 350°F (175°C). Use a thermometer to ensure the proper temperature, as this will help achieve that golden brown color and delicious crispiness in your fried soft shell crabs.

Step 5: Fry the Crabs
Once the oil is hot, carefully add the crabs to the fryer or skillet, legs first, to prevent splattering. Fry the crabs for about 2-3 minutes on each side or until they become a beautiful golden brown. Turn them gently to ensure even cooking, and keep a close eye to avoid burning.

Step 6: Drain Excess Oil
Using a slotted spoon, carefully remove the fried soft shell crabs from the oil and place them on a wire rack set over a baking sheet to drain excess oil. This method helps maintain their crispiness, ensuring that they don’t become soggy. Let them rest for a few minutes before serving.

Step 7: Serve with Dipping Sauce
Once drained, arrange your crispy fried soft shell crabs on a serving platter. Consider pairing them with a homemade dipping sauce, such as remoulade or the suggested Crawfish Sauce for a flavorful experience. Enjoy your homemade Fried Soft Shell Crabs with a side of creamy coleslaw or fries for a complete meal.

Storage Tips for Fried Soft Shell Crabs

Room Temperature: Best enjoyed fresh, but if needed, store crabs uncovered for up to 1 hour at room temperature; otherwise, refrigerate promptly.

Fridge: Keep leftover Fried Soft Shell Crabs in an airtight container for up to 1 day; they lose their crunch quickly, so consume as soon as possible.

Reheating: To restore crispiness, reheat in an oven at 350°F (175°C) for about 10 minutes, avoiding the microwave to prevent sogginess.

Freezer: Fried crabs can be frozen, but they are best enjoyed fresh; if freezing, wrap tightly and store for up to 1 month, then reheat from frozen in the oven.

What to Serve with Crispy Fried Soft Shell Crabs

The joy of enjoying soft shell crabs is only amplified by selecting delightful accompaniments that enhance their crunch and flavor.

  • Creamy Coleslaw: Balanced with tangy dressing, this cool side adds a refreshing crunch that pairs wonderfully with the crispy crabs.

  • Cajun Red Potatoes: These seasoned potatoes bring a hearty, flavorful element to the meal, complementing the seafood beautifully and adding a comforting touch.

  • Fries: Golden, crispy fries are a classic choice that complements the soft shell crabs perfectly. Their salty crunch makes for a delectable combination.

  • Homemade Remoulade: A zesty dip brings an exciting flavor dimension to your soft shell crabs. This silky sauce enhances each bite and adds a Cajun flair!

  • Grilled Asparagus: Lightly charred asparagus offers a fresh and vibrant pop of color on your plate, making for an appealing contrast to the fried crabs.

  • Chilled White Wine: A crisp, cool Riesling or Sauvignon Blanc elevates the dining experience, balancing the richness of the fried crabs with refreshing acidity.

  • Corn on the Cob: Sweet, buttery corn provides delightful juiciness and a fun texture variation, enhancing the overall meal experience.

  • Lemon Wedges: A simple squeeze of lemon brightens the flavors of the fried soft shell crabs, adding a touch of brightness that perfectly cuts through the richness.

Make Ahead Options

These Fried Soft Shell Crabs are perfect for busy cooks wanting to save time! You can prepare the milk bath (eggs, mustard, and milk) and clean the crabs up to 24 hours in advance. Simply store the milk bath in an airtight container in the refrigerator and keep the cleaned crabs wrapped in paper towels in the fridge to maintain freshness. When you’re ready to fry, dip the crabs in the milk bath, coat with the flour and fish fry mix, and fry immediately to achieve that crispy, golden perfection. By prepping this way, you’ll enjoy a hassle-free cooking experience while still savoring those delightful Fried Soft Shell Crabs!

Fried Soft Shell Crabs: Tasty Twists Await

Don’t be afraid to make this dish your own with delightful variations that will surprise your palate!

  • Pan-Fried Option: For a lighter twist, pan-fry the crabs using just enough oil to coat the bottom of the skillet. You’ll still have that enjoyable crunch!
  • Gluten-Free: Substitute all-purpose flour with a gluten-free flour blend for a crispy coating that everyone can enjoy without worries.
  • Fish Fry Mix Variations: Enhance flavors by experimenting with different fish fry mixes like Cajun or spicy blends! Each brings a unique kick to the dish.
  • Flavor Infusion: Add fresh herbs like parsley or dill to your fish fry mix to elevate the flavor profile that complements the sweetness of the crab meat.
  • Dipping Sauce Alternatives: Shake things up by serving with a homemade tartar sauce or spicy aioli, giving your bites a flavorful twist with every dip.
  • Cajun Red Potatoes: Serve your crabs alongside Cajun red potatoes for a full-bodied meal that pairs well with the seafood delight!
  • Baked Option: For a healthier alternative, try baking the coated crabs at 400°F (200°C) for 15-20 minutes until golden and crispy; you won’t lose the crunch!
  • Sizzling Spice: Incorporate Cajun seasoning into your milk bath for an added zing that packs a flavorful punch in every bite!

So dive in and make this recipe your own, creating your own culinary adventure with each new variation!

Expert Tips for Fried Soft Shell Crabs

  • Oil Temperature: Always check the oil temperature with a thermometer to achieve that perfect crispy texture; too hot can burn, and too cold will make them greasy.
  • Thawing Method: For the best results, thaw your crabs overnight in the fridge rather than using a microwave, which can affect the texture.
  • Coat Generously: Ensure a thorough coating of the milk bath and fish fry mix; this enhances the fried soft shell crabs’ crunch and flavor.
  • Slow Frying: Add crabs to the hot oil slowly and legs-first to prevent splatter and ensure even cooking; this keeps you safe and makes frying easier.
  • Drain Properly: Use a wire rack for draining instead of paper towels to keep them crispy; moisture from the towels can make the coating soggy.

Fried Soft Shell Crabs Recipe FAQs

How do I choose the best soft shell crabs?
Absolutely! Look for soft shell crabs that are lively and have a clean, ocean-fresh smell. The shells should feel soft to the touch without dark spots or blemishes, indicating freshness. If you can, purchase them from a trusted seafood market or fishmonger.

How should I store leftover fried soft shell crabs?
Fried crabs are best enjoyed right after cooking, but if you have leftovers, place them in an airtight container and refrigerate. They will stay fresh for up to 1 day. To reheat, simply place them in an oven at 350°F (175°C) for about 10 minutes, which helps restore some of that crispy texture.

Can fried soft shell crabs be frozen?
Definitely! If you want to freeze them, allow the fried crabs to cool completely, then wrap each crab tightly in plastic wrap and place them in an airtight freezer bag. They can be stored for up to 1 month. When ready to enjoy, reheat them directly from the freezer in the oven at 350°F (175°C) for around 15 minutes to ensure they’re heated through and crispy.

What if my fried soft shell crabs come out soggy?
Very! If your crabs end up soggy, it could be due to the oil temperature being too low during frying. Ensure your oil is at 350°F (175°C) before adding the crabs to achieve that golden, crispy texture. Also, make sure to drain them on a wire rack to allow excess oil to escape after frying.

Are there any dietary concerns when preparing soft shell crabs?
For sure! If serving to guests, it’s important to check for allergies, as shellfish can be a common allergen. Also, if anyone is vegan or vegetarian, consider offering an alternative dish, as these crabs are not suitable for those diets. If your audience has specific dietary restrictions, you might want to explore plant-based seafood options available on the market.

How can I enhance the flavor of my fried soft shell crabs?
You can absolutely boost the flavor! Consider adding spices to your fish fry mix or even including a touch of Old Bay seasoning to the flour. Additionally, serving them with a zesty sauce like homemade remoulade or a drizzled Crawfish Sauce can elevate the dish even further, turning your fried soft shell crabs into a culinary celebration!

Fried Soft Shell Crabs

Fried Soft Shell Crabs: Crisp Perfection for Home Cooking

Fried Soft Shell Crabs offer a crispy, golden coating that transforms any meal into a celebration.
Prep Time 15 minutes
Cook Time 10 minutes
Resting Time 5 minutes
Total Time 30 minutes
Servings: 4 crabs
Course: Dinner
Cuisine: Seafood
Calories: 200

Ingredients
  

For the Crabs
  • 4 pieces Soft Shell Crabs Fresh or thawed
  • 2 large Eggs Can be substituted with a vegan option
  • 2 tablespoons Mustard Prepared yellow mustard works best
  • 1 cup Milk Plant-based milk can be used as a substitute
For the Coating
  • 1 cup Flour All-purpose or gluten-free flour both work
  • 1 cup Fish Fry Mix Slap Ya Mama mix recommended for Cajun flavor
For Frying
  • 2 cups Oil (for frying) High smoke point oil like vegetable or canola

Equipment

  • deep fryer
  • Medium bowl
  • Wire rack
  • slotted spoon

Method
 

Step-by-Step Instructions
  1. Thaw and clean the crabs by rinsing them under cold water and patting them dry.
  2. Prepare the milk bath by whisking together eggs, mustard, and milk until smooth.
  3. Coat the crabs in the milk bath then dredge in the mixture of flour and fish fry mix.
  4. Preheat oil in a deep fryer or skillet to 350°F (175°C).
  5. Fry the crabs for 2-3 minutes on each side until golden brown.
  6. Drain excess oil on a wire rack set over a baking sheet.
  7. Serve with dipping sauce and enjoy with sides like creamy coleslaw.

Notes

Best served fresh, but leftovers can be stored in an airtight container for up to 1 day.