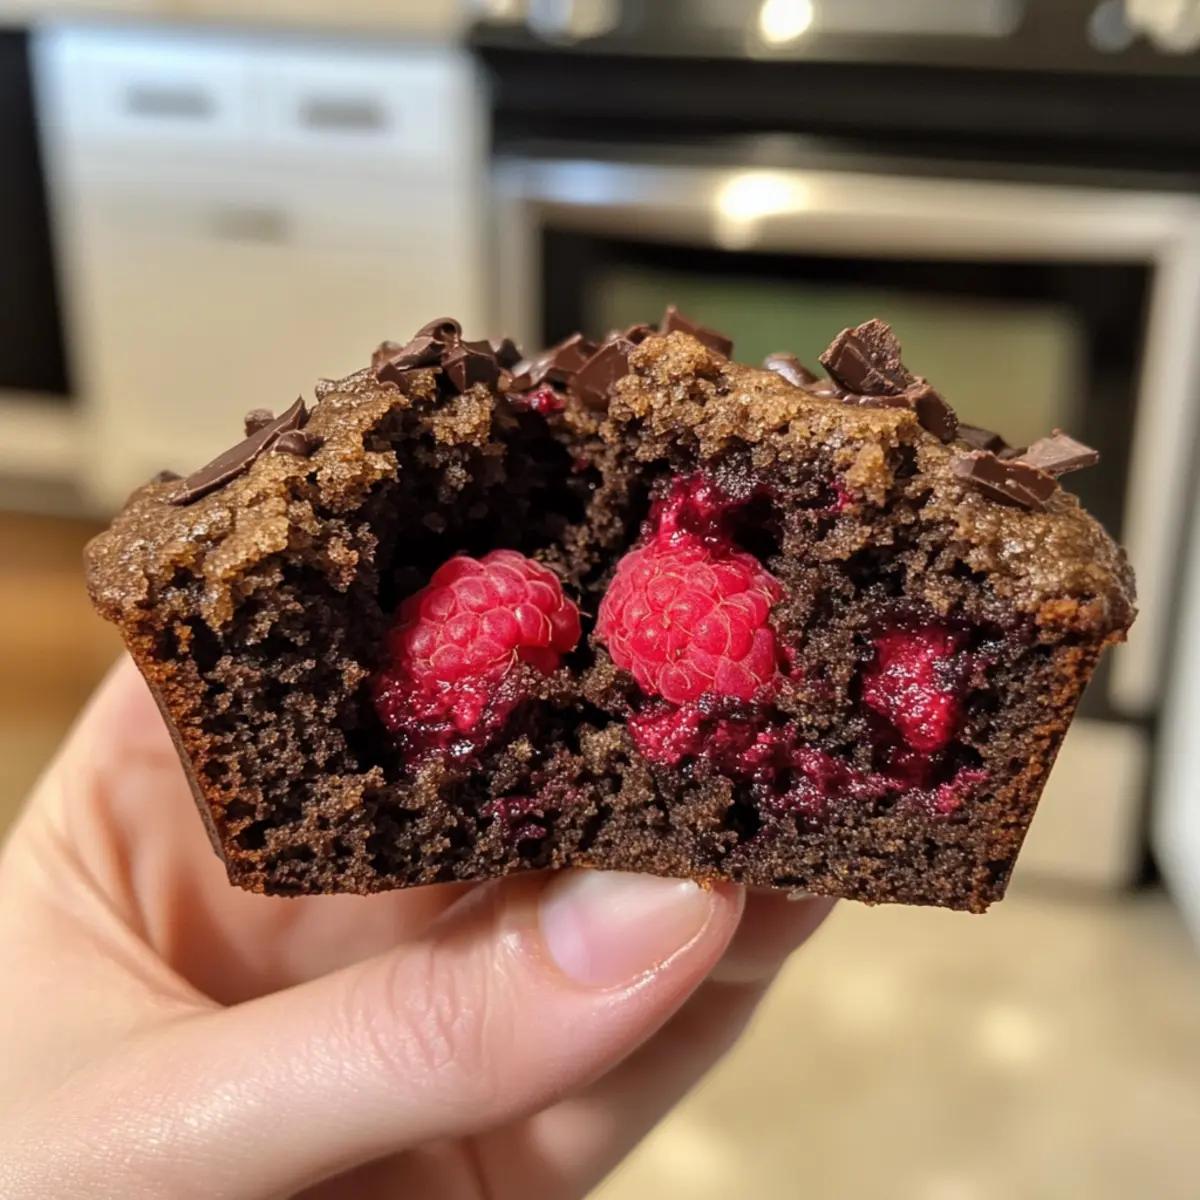
A whiff of cocoa mixed with sweet, juicy raspberries instantly transports me to a cozy kitchen where warm memories are made. That’s exactly how I felt when I first crafted these fluffy Dark Chocolate Raspberry Muffins. Packed with rich dark chocolate and tart raspberries, this recipe strikes the perfect balance of indulgence and comfort. Not only are they a breeze to whip up—perfect for those busy mornings—but they also make for a delightful treat to share with loved ones, especially on Valentine’s Day. Trust me, once you taste these muffins, you’ll wonder how you ever settled for store-bought options. Ready to dive into this mouthwatering experience? Let’s get baking!
Why Are These Muffins So Irresistible?
Irresistible Flavor: The combination of rich dark chocolate and tart raspberries creates a delightful burst of taste that elevates your typical muffin to gourmet status.
Easy to Make: With simple, everyday ingredients, these muffins are perfect for novice bakers and kitchen pros alike.
Perfect for Sharing: They make a fabulous treat for gatherings, ensuring smiles and praise from family and friends.
Versatile Swaps: Feeling adventurous? You can easily substitute raspberries with blueberries or add nuts for extra crunch, making every batch uniquely yours!
Quick to Bake: Ready in just under 30 minutes, they fit into even the busiest schedules—perfect for those rainy afternoons!
Better than Store-Bought: Once you’ve tried these, you won’t want to settle for any mediocre muffin again! Want more delightful treats? Check out these Homemade Bake Chocolate Oat Bites or Coffee Chocolate Truffles for indulgent inspirations!
Dark Chocolate Raspberry Muffin Ingredients
For the Batter
• All-Purpose Flour – Provides the necessary structure; feel free to use gluten-free flour for a delicious alternative.
• Baking Powder – This leavening agent helps your muffins rise beautifully.
• Salt – Enhances the flavors and balances the sweetness.
• Brown Sugar – Adds moisture and a hint of caramel flavor, giving richness to each bite.
• Granulated Sugar – Contributes sweetness and helps with browning without overwhelming the other flavors.
• Egg (large, room temperature) – Binds the ingredients together and adds richness; make sure it’s at room temperature for easier mixing.
• Buttermilk – Keeps those muffins tender and moist; if you don’t have any, mix 1 tbsp of lemon juice with 1 cup of milk as a quick substitute.
• Canola Oil – Keeps the texture soft and moist; don’t skip this for the best results!
• Vanilla Extract – Enhances the overall flavor profile beautifully.
For the Mix-ins
• Raspberries (fresh or frozen) – These add a juicy, fruity sweetness; if using frozen, add them directly without thawing for the best texture.
• Dark Chocolate (roughly chopped or chips) – Provides rich flavor; for a slightly sweeter taste, feel free to swap with semi-sweet chocolate.
These Dark Chocolate Raspberry Muffins are a delightful treat that will surely impress everyone! Happy baking!
Step‑by‑Step Instructions for Dark Chocolate Raspberry Muffins
Step 1: Preheat and Prepare
Begin by preheating your oven to 400°F (200°C). While your oven warms up, grab a muffin pan and either spray it with non-stick cooking spray or line it with muffin liners. This will ensure your irresistibly fluffy Dark Chocolate Raspberry Muffins release easily after baking, giving you that perfect muffin shape.
Step 2: Combine Dry Ingredients
In a large mixing bowl, whisk together 2 cups of all-purpose flour, 1 tablespoon of baking powder, and ½ teaspoon of salt for about 20-30 seconds until they are evenly mixed. This step is crucial for aerating the flour and ensuring your muffins rise beautifully in the oven. Set this bowl aside while you work on the wet ingredients.
Step 3: Whisk Wet Ingredients
In a separate medium bowl, mix ½ cup of brown sugar, ½ cup of granulated sugar, and 1 large egg until fully blended. Afterward, add 1 cup of buttermilk, ⅓ cup of canola oil, and 1 teaspoon of vanilla extract. Whisk everything together until the mixture is smooth and creamy, ensuring that no lumps remain; this will infuse moisture into your Dark Chocolate Raspberry Muffins.
Step 4: Combine Wet and Dry Mixtures
Gradually fold the wet mixture into the bowl of dry ingredients using a wooden spoon or rubber spatula. Mix gently just until combined—keep it lumpy! Over-mixing will lead to dense muffins, and we want them light and fluffy. Your batter will look thick and slightly uneven, which is perfectly fine.
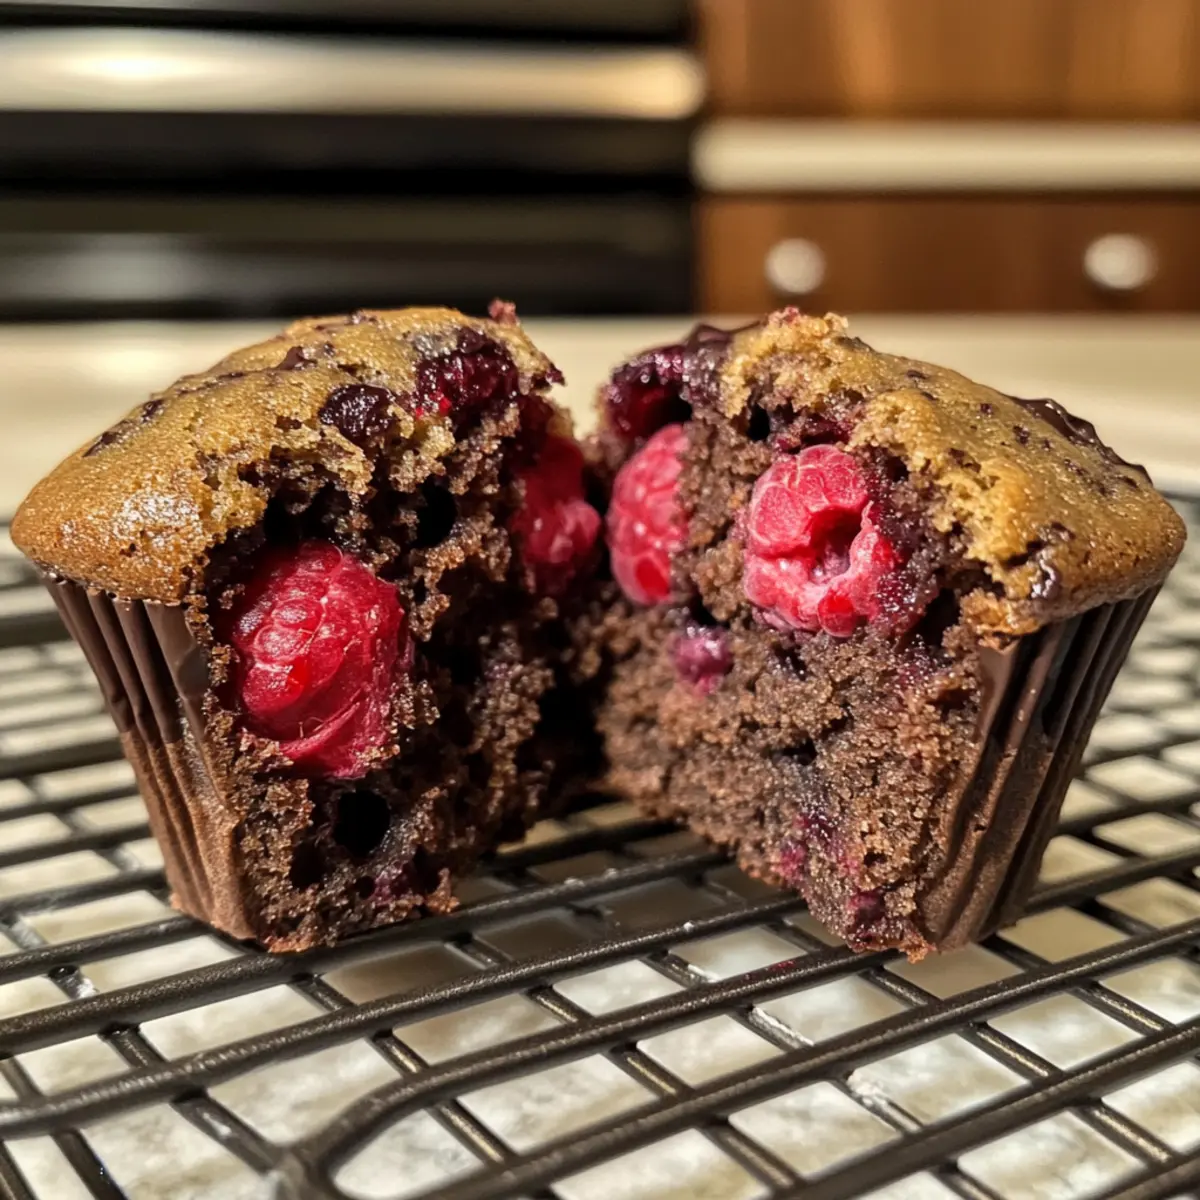
Step 5: Add Raspberries and Chocolate
Now, it’s time to gently stir in 1 cup of fresh or frozen raspberries along with 1 cup of roughly chopped dark chocolate or chocolate chips into the batter. Be careful not to over-mix! You want all the flavors to meld together while still keeping that lovely lumpy texture that makes these Dark Chocolate Raspberry Muffins so delightful.
Step 6: Fill the Muffin Tins
Using a large spoon or a cookie scoop, spoon the batter into the prepared muffin tins, filling each cup all the way to the top. This will ensure that your muffins rise beautifully and develop that bakery-style dome. The generous filling yields scrumptious muffins that everyone will love.
Step 7: Bake to Perfection
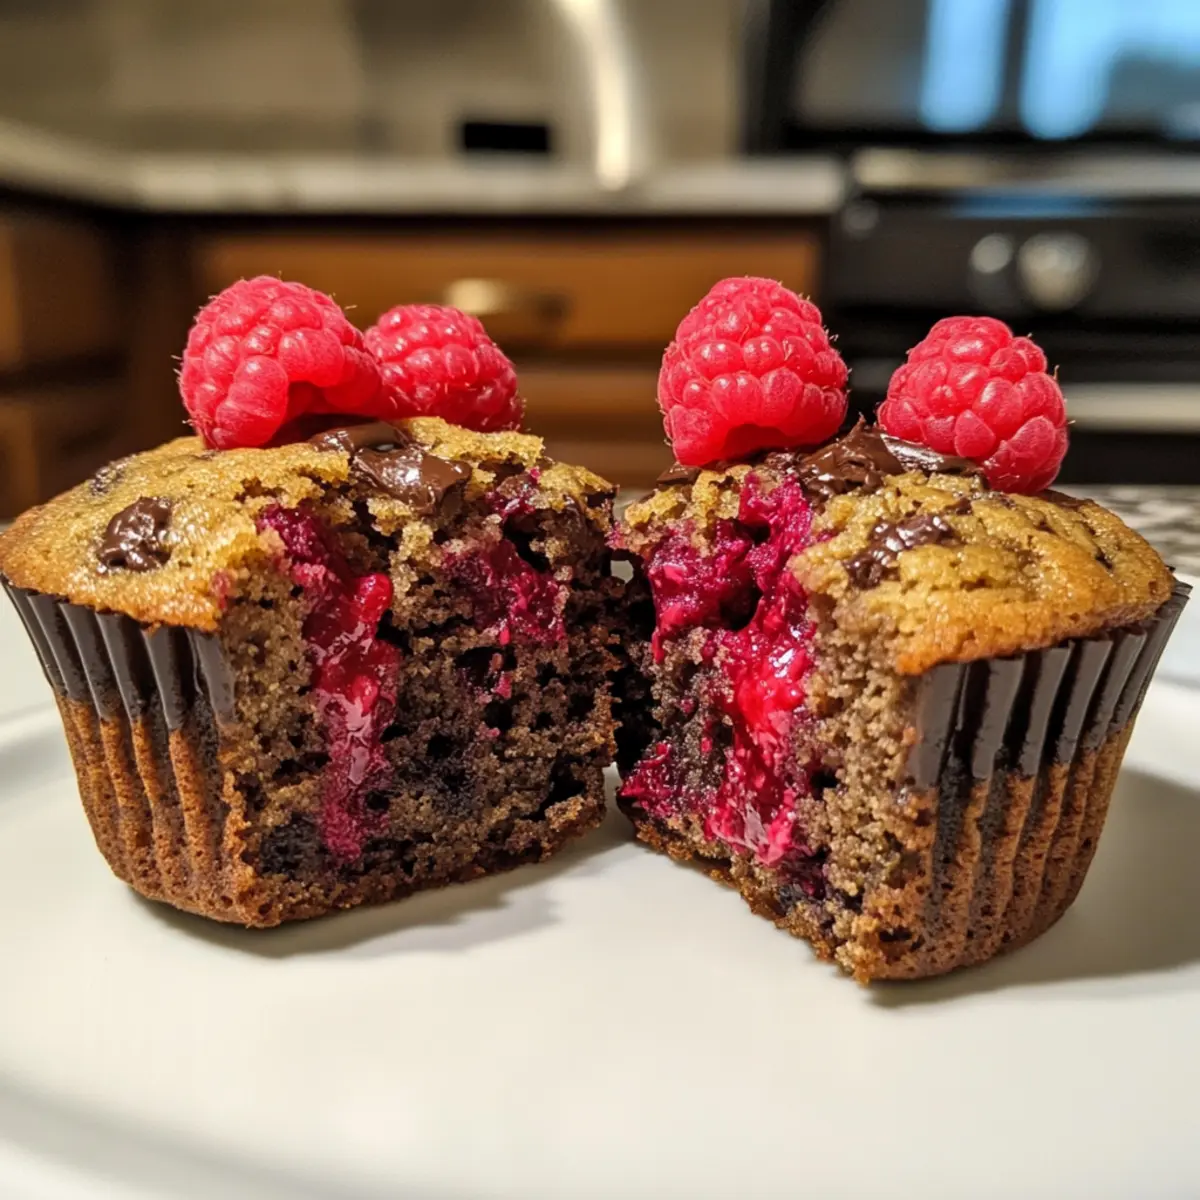
Place the muffin pan in the preheated oven and bake for 25 minutes, or until a toothpick inserted into the center comes out clean. Keep an eye on them; they should be puffy and golden brown on top. The aroma of dark chocolate and raspberries will fill your kitchen, making it hard to wait!
Step 8: Cool and Enjoy
Once baked, remove the muffins from the oven and allow them to cool in the pan for about 10-15 minutes. After this, transfer them to a wire rack to cool completely. Once cooled, these Dark Chocolate Raspberry Muffins can be stored in an airtight container for up to 5 days—if they last that long!
Make Ahead Options
These Dark Chocolate Raspberry Muffins are perfect for meal prep enthusiasts! You can prepare the dry ingredients (all-purpose flour, baking powder, and salt) and refrigerate them up to 3 days in advance to save time during your busy mornings. Additionally, you can whisk together the wet ingredients (sugars, egg, buttermilk, oil, and vanilla) and store them in the fridge for up to 24 hours. Just before you’re ready to bake, combine the prepped components, gently fold in the raspberries and chopped dark chocolate, and bake as directed. To maintain their soft, fluffy texture, ensure you avoid over-mixing the batter. With these make-ahead tips, you’ll have delightful muffins ready to enjoy in no time!
What to Serve with Fluffy Dark Chocolate Raspberry Muffins?
Treat your taste buds to a delightful meal experience by pairing these muffins with tasty and complementary dishes that enhance their rich flavors.
- Fresh Fruit Salad: Bright and colorful, a mix of seasonal fruits adds a refreshing balance to the sweetness of the muffins.
- Greek Yogurt Parfait: Layer tangy Greek yogurt with honey and nuts for a creamy contrast that beautifully offsets the chocolate.
- Espresso or Coffee: A warm cup of coffee or espresso heightens the flavors and enriches your morning or afternoon indulgence.
- Whipped Cream: A dollop of softly whipped cream elevates these muffins, offering a light and airy touch alongside the rich chocolate.
- Vanilla Ice Cream: Serve warm muffins with a scoop of vanilla ice cream for a delightful dessert twist, creating a heavenly chocolate-raspberry experience.
- Homemade Berry Jam: Spread a bit of homemade jam on a warm muffin for a touch of fruity sweetness that perfectly marries with the tart raspberries.
- Chocolate Drizzle: Add an extra layer of decadence with a simple melted chocolate drizzle on top, perfect for those serious chocolate lovers!
- Cheese Plate: A selection of mild cheeses with crackers provides a savory counterpart, making for a unique brunch spread that delights the palate.
Dark Chocolate Raspberry Muffins Variations
Feel free to customize your baking experience with these delightful twists!
-
Berries Galore: Swap raspberries for blueberries or strawberries for a fruity change! The vibrant colors and flavors bring a fresh take to your muffins.
-
Whole Wheat Flour: Substitute half of the all-purpose flour with whole wheat flour for added nutrition. This not only boosts fiber but also adds a pleasant nutty flavor!
-
Nuts Added: Toss in a handful of chopped walnuts or pecans for some extra crunch. The added texture will elevate each bite and enhance the flavor profile.
-
Vegan Option: Replace the egg with a flaxseed meal mixture (1 tablespoon flaxseed mixed with 2.5 tablespoons water) and use non-dairy milk instead of buttermilk for a vegan-friendly treat. These muffins will stay soft and delectable!
-
Spice It Up: Add a pinch of cinnamon or a dash of nutmeg to the dry ingredients for a warm, aromatic twist. These spices beautifully complement the chocolate and berries!
-
Chocolate Lovers: If you adore chocolate, increase the amount of dark chocolate to 1.5 cups. The gooey pockets of chocolate will make your muffins decadent treats!
-
Zesty Lemon: Grate some lemon zest into your batter for a zesty kick. The citrus will brighten the flavors, cutting through the richness of the chocolate.
-
Chili Heat: For spice lovers, mix in a pinch of cayenne pepper or chili powder. This unexpected heat creates a tantalizing contrast with the sweetness of the chocolate and raspberries.
Whichever variation you choose, your Dark Chocolate Raspberry Muffins will surely be a hit! And don’t forget, if you’re looking for more delightful treats, check out these irresistible Coconut Chocolate Rolls or try creating some decadent Nutty Chocolate Date cookies!
Expert Tips for Dark Chocolate Raspberry Muffins
-
Don’t Over-Mix: Keep the batter lumpy to ensure your muffins remain fluffy. Over-mixing can lead to dense results that are far from this delightful recipe.
-
Use Room Temperature Ingredients: Bring your egg and buttermilk to room temperature before mixing. This helps everything blend smoothly, creating an airy texture in your muffins.
-
Watch the Baking Time: Keep an eye on your muffins during baking. Every oven is different—start checking around the 20-minute mark to prevent over-baking.
-
Choose Quality Chocolate: Using high-quality dark chocolate makes a significant difference in flavor. Look for chocolate with at least 70% cocoa for the richest taste.
-
Add More Fruit: Feel free to add an extra handful of raspberries for a more fruity bite. Just remember not to overcrowd your batter, as it can affect texture.
-
Store Properly: Keep your muffins in an airtight container to maintain their moisture and freshness. For longer storage, consider freezing them for up to 3 months!
Storage Tips for Dark Chocolate Raspberry Muffins
Room Temperature: Store your muffins in an airtight container at room temperature for up to 5 days to prevent them from becoming dry.
Freezer: For longer storage, freeze your Dark Chocolate Raspberry Muffins in an airtight bag for up to 3 months. Label the bag with the date so you can keep track.
Thawing: To enjoy a muffin from the freezer, simply take it out and let it thaw at room temperature for about 30 minutes or microwave for 10-15 seconds for a warm treat.
Reheating: If you prefer a warm muffin, gently reheat in the microwave for about 10 seconds, or place in a preheated oven at 350°F (175°C) for 5-7 minutes.

Dark Chocolate Raspberry Muffins Recipe FAQs
What type of raspberries should I use?
You can use either fresh or frozen raspberries in this recipe! If you choose frozen raspberries, there’s no need to thaw them before adding them to the batter. This will help maintain the muffins’ great texture while also keeping the fruit burst fresh and juicy.
How should I store my muffins?
To keep your Dark Chocolate Raspberry Muffins deliciously moist, store them in an airtight container at room temperature for up to 5 days. If you’re looking to keep them longer, freeze them in an airtight bag for up to 3 months. Just be sure to label the bag with the date to stay organized!
Can I substitute ingredients for dietary needs?
Absolutely! If you need a gluten-free option, replace the all-purpose flour with a gluten-free baking blend. You can also substitute the egg with a flax egg (1 tablespoon of ground flaxseed mixed with 3 tablespoons of water) to make this recipe vegan. Feel free to adjust the sugar levels to cater to your dietary preferences, as well.
What should I do if my muffins turn out dense?
If you find your muffins a bit denser than expected, it may be due to over-mixing the batter. Remember, keeping the batter lumpy is key! Another common issue could stem from flour measuring; using the spoon-and-level method ensures you’re not adding too much flour, which can weigh your muffins down.
How do I freeze these muffins properly?
Freezing muffins is quite simple! First, let them cool completely. Then, wrap each muffin individually in plastic wrap or foil to prevent freezer burn. Place the wrapped muffins in an airtight bag or container, making sure to squeeze out as much air as possible. When you’re ready to enjoy one, just thaw it on the counter for about 30 minutes or warm it up in the microwave for a delicious, quick treat!
How long can I keep the muffins in the freezer?
You can keep your Dark Chocolate Raspberry Muffins in the freezer for up to 3 months. Just ensure they’re well-wrapped and stored in an airtight container to protect them from freezer burn and preserve their taste and texture!
Irresistibly Fluffy Dark Chocolate Raspberry Muffins Everyone Loves
Ingredients
Equipment
Method
- Preheat your oven to 400°F (200°C) and prepare the muffin pan.
- In a large mixing bowl, mix together the flour, baking powder, and salt.
- In another bowl, whisk the sugars with the egg, then add buttermilk, oil, and vanilla.
- Fold the wet mixture into the dry ingredients gently.
- Stir in the raspberries and dark chocolate gently.
- Fill the muffin tins to the top with batter.
- Bake for 25 minutes or until a toothpick comes out clean.
- Cool in the pan for 10-15 minutes before transferring to a wire rack.