Delicious No-Bake Lemon Poppyseed Protein Balls for Energizing Snacking

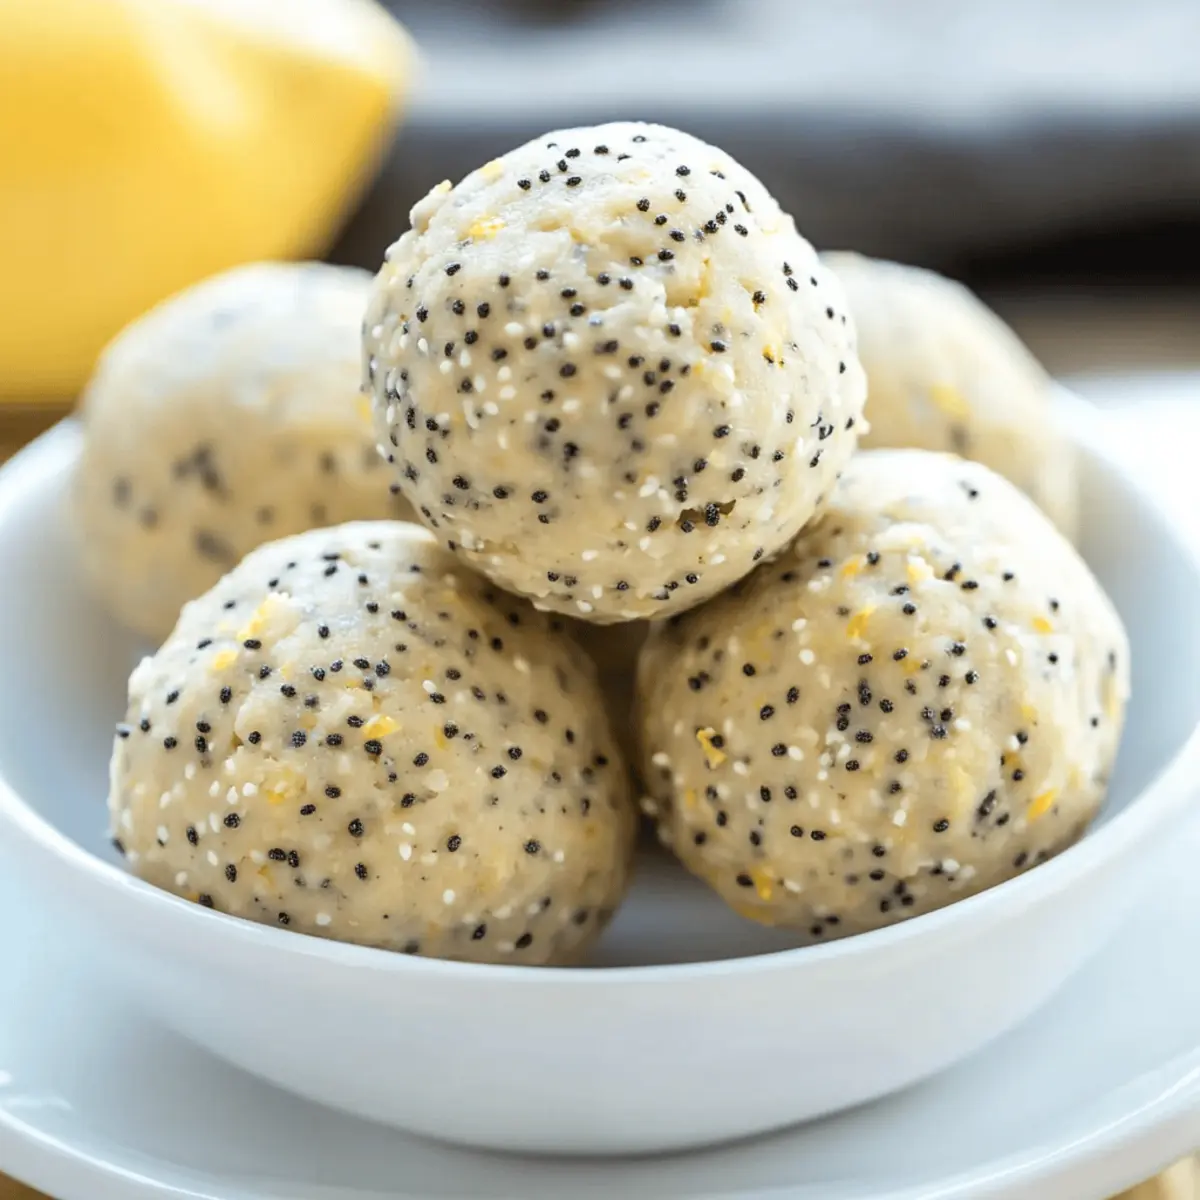
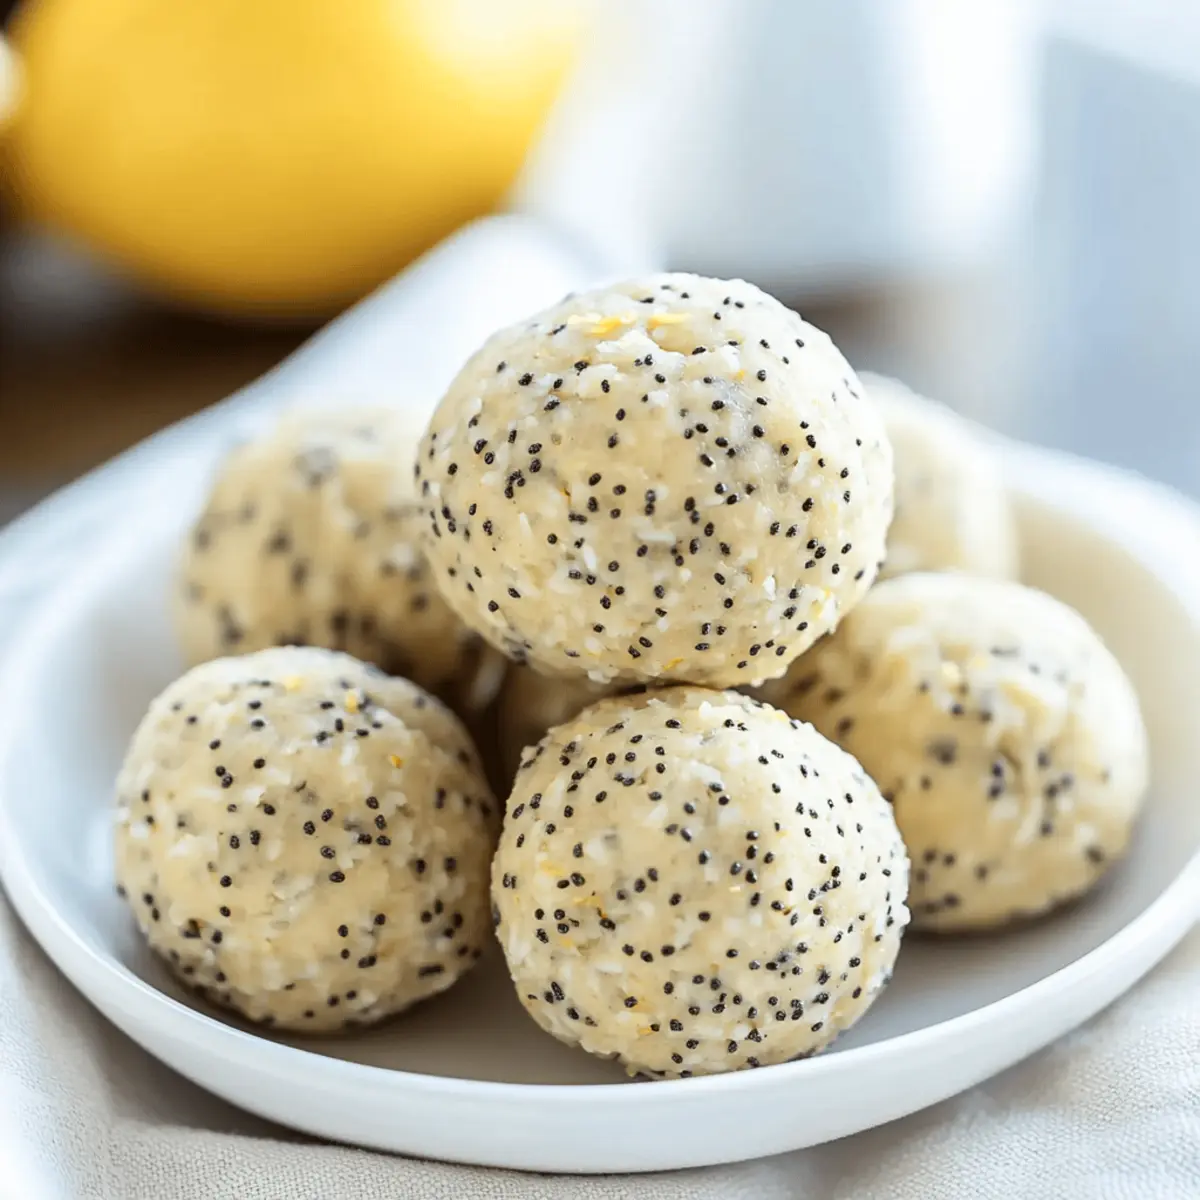
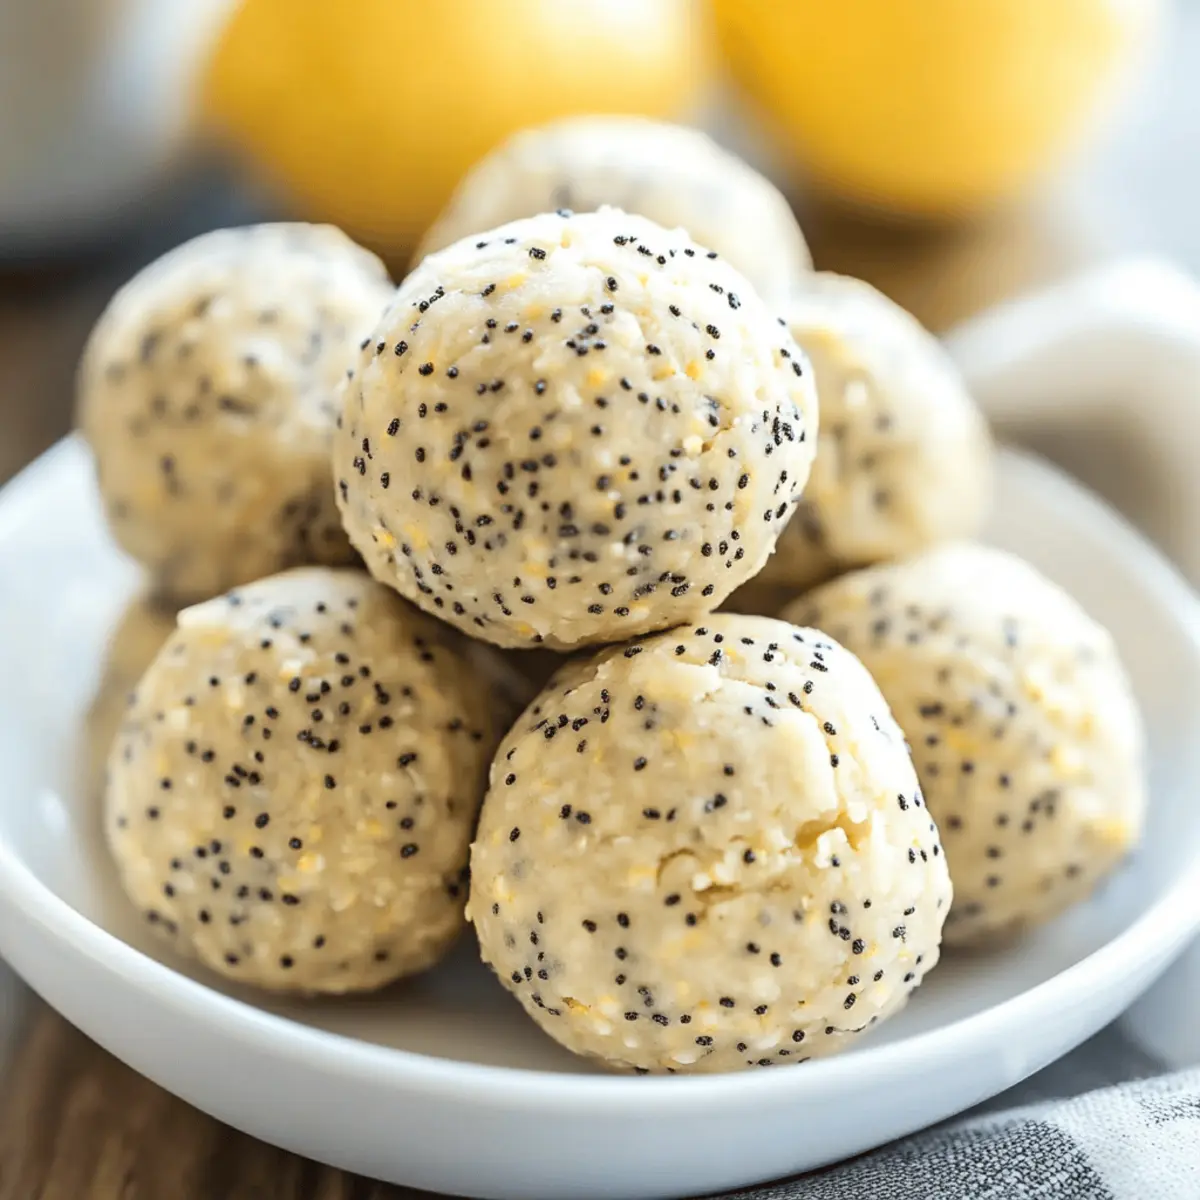
As I reached for a lemon in my kitchen, the bright yellow hue instantly uplifted my mood, sparking a wave of inspiration. It was time to turn that citrus sunshine into something nourishing and delicious—enter the No-Bake Lemon Poppyseed Protein Balls! These delightful bites marry creamy oats with a hint of sweetness, enhanced by the satisfying crunch of poppy seeds. Not only are they super quick to whip up, making them perfect for your busy schedule, but they also pack a powerful protein punch—ideal for those post-workout cravings or an afternoon pick-me-up. So, if you’re ready to tantalize your taste buds while keeping your snacking guilt-free, let’s dive into the world of these vibrant protein balls! What exciting twists will you add to your batch?

Why are No-Bake Protein Balls Amazing?

Unmatched Simplicity: These No-Bake Lemon Poppyseed Protein Balls require minimal effort, making them perfect for anyone, from busy parents to seasoned chefs.

Burst of Flavor: The zesty lemon paired with the nutty crunch of poppy seeds creates a refreshing taste that’s hard to resist.

Healthy Snacking Made Easy: Say goodbye to fast food! These bites provide nourishing protein without the hassle, ideal for health-conscious individuals.

Meal Prep Appeal: Perfect for preparing in advance, these scrumptious protein balls can be kept in your fridge for a quick, energizing snack throughout the week.

Customizable Goodness: Feel free to explore variations! Use different protein powders or substitute with nuts for a personalized twist—similar to other fan-favorites like Grandma’s Homemade Bites or a Heavenly No-Bake Cake.

Crowd-Pleasing Treat: Ideal for gatherings, these protein balls are sure to impress everyone, from kids to fitness enthusiasts alike!

No-Bake Lemon Poppyseed Protein Balls Ingredients

For the Protein Base

  • Vanilla Whey Protein Powder – This boosts protein content and adds a lovely richness; choose a brand that dissolves easily for optimal texture.
  • Oats – Essential for structure and fiber; rolled oats ensure the right consistency in your protein balls.

For Flavor and Sweetness

  • Poppy Seeds – They provide a delightful crunch and a nutty flavor; chia seeds can be used as a swap for a unique texture.
  • Truvia – A natural sweetener that balances the overall flavors; adjust the quantity based on how sweet your protein powder is.
  • Lemon Zest – It brings an aromatic freshness; always opt for fresh lemon rather than bottled juice to avoid bitterness.
  • Lemon Juice – This adds acidity and binds the ingredients together; fresh lemon juice is preferred for best results.
  • Water – Gradually added to achieve the right consistency; add just enough until the mixture forms a moldable dough.

These No-Bake Lemon Poppyseed Protein Balls not only make snacking healthy but also deliver a bright burst of flavor to brighten your day!

Step‑by‑Step Instructions for No-Bake Lemon Poppyseed Protein Balls

Step 1: Combine Dry Ingredients
In a large mixing bowl, add the vanilla whey protein powder, rolled oats, poppy seeds, Truvia, and lemon zest. Use a spatula to mix these dry ingredients together thoroughly for about 1-2 minutes until well distributed. This step sets the flavor foundation for your No-Bake Lemon Poppyseed Protein Balls, so ensure everything is evenly blended.

Step 2: Add Wet Ingredients
Gradually pour in the fresh lemon juice while stirring the mixture. Follow this by adding water, a little at a time, until it becomes cohesive. Continue stirring for about 1-3 minutes, watching as the ingredients transform into a moldable dough. The mixture should be sticky but hold together well, perfect for shaping into balls.

Step 3: Shape the Protein Balls
Using your hands, scoop out portions of the dough and roll them into evenly-sized balls, about the size of a golf ball, ensuring you get 28 for this recipe. Take your time with this step for a uniform look in your No-Bake Lemon Poppyseed Protein Balls. The finished balls should feel firm and hold their shape without falling apart.

Step 4: Chill to Set
Place the formed protein balls in an airtight container and refrigerate them for at least 30 minutes. This chilling time is crucial for helping them firm up and develop their flavors. You’ll know they’re ready when they slightly harden, making them easier to grab for a quick snack later.

Step 5: Enjoy and Store
Once chilled, your No-Bake Lemon Poppyseed Protein Balls are ready to enjoy! Serve them fresh, or store them in the fridge in an airtight container for up to a week. For longer storage, freeze them in a freezer-safe container separated by parchment paper—a great way to have a healthy snack ready whenever you need a boost!

What to Serve with No-Bake Lemon Poppyseed Protein Balls

Brighten your experience by complementing these tasty protein bites with delightful sides, making for a wholesome, energizing meal.

  • Greek Yogurt: Creamy and rich, Greek yogurt pairs perfectly, adding a tangy balance to the zesty lemon flavor of your protein balls.

  • Fresh Fruit Salad: A vibrant mix of seasonal fruits enhances the freshness of the protein balls while adding natural sweetness and texture.

  • Nut Butter Dip: Serve with a side of almond or peanut butter. This adds a nutty richness that contrasts beautifully with the lemon zing.

  • Smoothie Bowl: Blend your favorite fruits with yogurt to create a smoothie bowl, providing a nutrient-packed base to enjoy alongside the protein balls.

  • Veggies and Hummus: Crisp, fresh veggies like carrot sticks or cucumber slices with hummus create a satisfying crunch and keep your snacking healthy!

  • Chia Seed Pudding: The creamy, nutritious pudding adds a delightful texture while echoing the lemony flavor with some added natural sweetness.

Elevate your snack time by mixing and matching these pairs for a fulfilling, wholesome day!

No-Bake Lemon Poppyseed Protein Balls Variations

Feel free to get creative and customize your No-Bake Lemon Poppyseed Protein Balls to suit your taste and dietary needs!

  • Vegan Option: Substitute vanilla whey protein with plant-based protein powder, like pea or brown rice, for a vegan-friendly treat. Be aware that plant-based protein might slightly change the texture but will still be delicious!

  • Nutty Delight: Add chopped almonds or walnuts for a satisfying crunch that complements the lemon flavor perfectly. Not only do these nuts enhance the texture, but they also boost the protein content even further.

  • Citrus Twist: Swap out lemon zest and juice for orange zest and juice to give your protein balls a new citrusy flair. The sweet, fragrant notes of orange will make for a delightful variation that’s equally refreshing.

  • Coconut Lovers: Mix in unsweetened shredded coconut for a tropical twist that pairs well with lemon. Coconut adds a chewy texture and a hint of sweetness, elevating your protein balls to a whole new level.

  • Chocolate Lovers: Incorporate cocoa powder or mini dark chocolate chips into the mix for a decadent touch that complements the zesty lemon flavor. The rich chocolate adds a delightful contrast, making these protein balls even more irresistible.

  • Extra Sweetness: If you have a sweet tooth, consider adding more Truvia or a drizzle of honey to enhance the sweetness. This will make each bite a little more indulgent while still keeping it healthy.

  • Texture Variation: Try replacing poppy seeds with chia seeds. They’ll provide a similar crunch while also adding omega-3 fatty acids, which offer a great nutritional boost.

  • Spicy Kick: For those who enjoy a little heat, add a pinch of cayenne pepper or ginger powder. This surprising twist will give your protein balls an extra dimension of flavor!

Feel free to pair your No-Bake Lemon Poppyseed Protein Balls with some yogurt or fresh fruit for a fully balanced snack, much like the lovely Cabbage Cucumber Salad that can brighten your meal prep! Experiment with these variations to find your perfect combination!

Make Ahead Options

These No-Bake Lemon Poppyseed Protein Balls are perfect for meal prep enthusiasts! You can prepare the mixture up to 24 hours in advance by following the initial steps and shaping them into balls. Simply store them in an airtight container in the refrigerator to maintain their freshness. To ensure the best texture, avoid adding water until you’re ready to mix the ingredients, which can be done just before serving or snacking. When ready to enjoy, simply chill them for 30 minutes to set and you’re good to go! This time-saving strategy ensures you always have a healthy, delightful snack ready, making your busy days just a little bit easier.

Expert Tips for No-Bake Lemon Poppyseed Protein Balls

  • Water Control: Add water slowly to avoid a mixture that’s too sticky or dry; start with less than needed and increase gradually until you achieve the right consistency.

  • Chill Time Matters: Be patient during the chilling process! Let them sit in the fridge for at least 30 minutes to ensure they set properly and develop their delightful flavors.

  • Scoop Smartly: Use level scoops when measuring protein powder; this avoids overly dry or chalky balls, ensuring your No-Bake Lemon Poppyseed Protein Balls have the perfect texture.

  • Freshness Is Key: Always opt for fresh lemon juice and zest to enhance the brightness of flavors—bottled alternatives can lead to a bitter taste.

  • Mix Thoroughly: Ensure all dry ingredients are well combined before adding wet ones. A thorough mix helps distribute flavors evenly, making every bite delicious!

How to Store and Freeze No-Bake Lemon Poppyseed Protein Balls

  • Fridge: Store your protein balls in an airtight container for up to 1 week. Keeping them chilled helps maintain their freshness and texture for delicious snacking throughout the week.
  • Freezer: For longer storage, freeze your No-Bake Lemon Poppyseed Protein Balls in a freezer-safe container, stacked with parchment paper in between, for up to 3 months. This allows you to enjoy them anytime!
  • Thawing: When ready to enjoy, simply transfer the desired amount from the freezer to the fridge and let them thaw overnight. They’ll be just as delightful and refreshing!
  • Reheating: There’s no need to heat these protein balls—enjoy them straight from the fridge or freezer for a cool, energizing snack!

No-Bake Lemon Poppyseed Protein Balls Recipe FAQs

What is the best way to choose ripe lemons for this recipe?
Absolutely! Look for lemons that are firm and heavy for their size. The skin should be smooth and bright yellow with no dark spots. A ripe lemon will yield slightly when gently pressed, indicating juiciness. For the best flavor, opt for fresh lemons over bottled juice to avoid bitterness.

How long can I store No-Bake Lemon Poppyseed Protein Balls in the fridge?
You can store these delicious protein balls in an airtight container in the refrigerator for up to 1 week. Make sure they are properly sealed to keep them fresh and tasty, ensuring you have a nutritious snack ready whenever you need a pick-me-up!

Can I freeze No-Bake Lemon Poppyseed Protein Balls, and how should I do it?
Yes, definitely! To freeze, place your protein balls in a freezer-safe container, separating each layer with parchment paper to prevent sticking. They can be stored in the freezer for up to 3 months. When you’re ready to enjoy them, simply transfer the desired amount from the freezer to the fridge and let them thaw overnight.

What should I do if my protein ball mixture is too dry?
If your mixture feels crumbly and dry, don’t worry! Gradually add a little more water or lemon juice (1 teaspoon at a time). Stir well after each addition until the mixture is cohesive and moldable, which should take roughly 1-3 minutes. Keep in mind, you want it sticky but not overly wet for the perfect consistency!

Are there any dietary considerations for pets or allergies?
Yes, be cautious! While the individual ingredients in No-Bake Lemon Poppyseed Protein Balls are generally safe for humans, they may be harmful to pets. Always keep these snacks out of reach. Additionally, if you or anyone in your household has allergies to nuts, seeds, or dairy, be sure to check for compatible alternatives, especially if customizing the recipe.

No-Bake Lemon Poppyseed Protein Balls

Delicious No-Bake Lemon Poppyseed Protein Balls for Energizing Snacking

These No-Bake Lemon Poppyseed Protein Balls are a refreshing and nutritious snack, perfect for energizing your day!
Prep Time 15 minutes
Chilling Time 30 minutes
Total Time 45 minutes
Servings: 28 balls
Course: Breakfast
Calories: 100

Ingredients
  

For the Protein Base
  • 1 cup Vanilla Whey Protein Powder choose a brand that dissolves easily
  • 1 cup Oats rolled oats for the right consistency
For Flavor and Sweetness
  • 2 tablespoons Poppy Seeds can substitute with chia seeds
  • 2 tablespoons Truvia adjust based on sweetness
  • 1 tablespoon Lemon Zest use fresh lemon for best flavor
  • 2 tablespoons Lemon Juice fresh juice preferred
  • 1-2 tablespoons Water to achieve the right consistency

Equipment

  • mixing bowl
  • spatula
  • airtight container

Method
 

Step-by-Step Instructions
  1. In a large mixing bowl, combine the vanilla whey protein powder, rolled oats, poppy seeds, Truvia, and lemon zest. Mix thoroughly for about 1-2 minutes.
  2. Gradually pour in fresh lemon juice while stirring. Add water a little at a time until the mixture becomes cohesive. Stir for about 1-3 minutes.
  3. Using your hands, scoop out portions of the dough and roll them into golf-ball-sized balls, ensuring you get 28.
  4. Place the protein balls in an airtight container and refrigerate for at least 30 minutes to firm up.
  5. Serve fresh or store in the fridge for up to a week, or freeze for up to 3 months.

Notes

Perfect for meal prep and customizable to suit your taste preferences. Experiment with different protein powders or add additional mix-ins!

Turkey Cranberry Crescent Ring: A Fun and Festive Treat

As I unroll that cool crescent dough, a comforting aroma fills the kitchen, hinting at the deliciousness to come. Enter the Turkey Cranberry Crescent Ring: a delightful fusion of savory turkey, zesty cranberry sauce, and melty cheese, all snuggled in a flaky pastry that practically begs to be shared. This easy-to-make dish is not only a mouthwatering way to use up Thanksgiving leftovers, but it also transforms any gathering—be it brunch with friends or a cozy weeknight dinner—into a festive occasion in less than 30 minutes. With its customizable fillings and impressive presentation, your family and friends will be asking for seconds! Ready to elevate your next meal? Let’s dive into this scrumptious recipe!

Why is this Turkey Cranberry Crescent Ring special?

Festive Presentation: This show-stopping ring not only tastes amazing but also adds a lovely visual appeal to your table. Fast Preparation: Whip it up in less than 30 minutes — perfect for those busy days! Customizable Fillings: Tailor it to your taste by swapping in different proteins or cheeses, ensuring every member of the family enjoys. Perfect for Leftovers: Transform Thanksgiving leftovers into a brand-new meal that everyone will rave about. And if you’re looking for a complementary dish, why not try serving it alongside a fresh salad? You won’t regret it!

Turkey Cranberry Crescent Ring Ingredients

For the Dough
Crescent Dough – Provides the flaky crust; keep it slightly chilled before unrolling to prevent tearing.

For the Filling
Cooked Turkey – Adds protein and heartiness; alternatives include cooked chicken or ham.
Cranberry Sauce – Contributes tanginess and sweetness; use homemade or store-bought for convenience.
Shredded Cheese (e.g., cheddar) – Offers creaminess and depth of flavor; can substitute with mozzarella for a milder taste.

For the Topping
Melted Butter – Brush on top of the dough before baking to enhance flavor and help sesame seeds adhere.
Sesame Seeds – Adds flavor and texture; these can be omitted or replaced with poppy seeds if desired.

With these simple ingredients, your Turkey Cranberry Crescent Ring will surely impress and satisfy!

Step‑by‑Step Instructions for Turkey Cranberry Crescent Ring

Step 1: Preheat the Oven
Preheat your oven to the temperature specified on the crescent dough packaging, usually around 375°F (190°C). While the oven heats up, prepare your baking sheet by lightly greasing it or lining it with parchment paper. This will ensure your Turkey Cranberry Crescent Ring comes out perfectly golden and doesn’t stick to the surface.

Step 2: Prepare the Dough
Unroll the chilled crescent dough onto your prepared baking sheet, arranging it in a circular shape. Make sure to overlap the edges slightly, creating a solid base for your filling. This arrangement is crucial for the overall structure of your Turkey Cranberry Crescent Ring, ensuring all those savory flavors are encased beautifully.

Step 3: Assemble the Filling
Layer the cooked turkey evenly over the crescent dough, followed by a generous spread of cranberry sauce. Sprinkle shredded cheese on top to add a delightful creaminess to the filling. Take care to distribute these ingredients evenly, as this will enhance the flavor in each bite of your Turkey Cranberry Crescent Ring.

Step 4: Fold the Dough
Gently fold the pointed tips of the crescent dough over the filling, sealing the edges to form a ring shape. Press down firm enough to ensure a good seal, but be cautious not to tear the dough. This step is vital to keep all that tasty filling secure within your Turkey Cranberry Crescent Ring as it bakes.

Step 5: Brush with Butter
Melt some butter and brush it generously over the top of the dough. This adds rich flavor and helps the sesame seeds adhere beautifully to the surface. Make sure to cover all areas, enhancing the shine and golden color of the final baked Turkey Cranberry Crescent Ring.

Step 6: Add Toppings
Sprinkle sesame seeds over the brushed dough for added texture and flavor. Feel free to customize with other seeds or omit them based on your preference. This finishing touch elevates the visual appeal and taste of your Turkey Cranberry Crescent Ring, making it look as festive as it tastes.

Step 7: Bake
Carefully place the baking sheet into the preheated oven and bake according to the crescent dough package instructions, usually about 12-15 minutes. Keep an eye on the ring, removing it once it turns a lovely golden brown. Your kitchen will be filled with mouthwatering aromas as it bakes!

Step 8: Cool and Serve
After baking, allow the Turkey Cranberry Crescent Ring to cool for a few minutes on the baking sheet. This helps the filling set slightly, making it easier to slice. Once cool, slice into wedges and serve warm for a delightful addition to your meal or gathering!

Expert Tips for Turkey Cranberry Crescent Ring

  • Chill the Dough: Keep your crescent dough slightly chilled before using to prevent it from tearing when unrolling. A little chill goes a long way!

  • Sharp Knife for Slicing: Use a sharp knife to slice your finished crescent ring for a clean and beautiful presentation. It makes all the difference in how it looks on the table!

  • Assemble Ahead of Time: If you’re short on time, assemble the Turkey Cranberry Crescent Ring and refrigerate it unbaked for up to 8 hours. Just pop it in the oven when you’re ready to serve!

  • Reheat for Leftovers: Wrap leftover slices tightly in foil and freeze for up to a month. Reheat in the oven for the best texture and flavor, giving them a second life.

  • Experiment with Fillings: Don’t hesitate to mix it up! Swap turkey for chicken or ham, and explore different cheeses to customize your Turkey Cranberry Crescent Ring to everyone’s taste.

Turkey Cranberry Crescent Ring Variations

Feel free to get creative with your Turkey Cranberry Crescent Ring and make it uniquely yours!

  • Chicken Substitute: Replace turkey with cooked chicken for a lighter twist. It retains the same comforting flavors while changing up the protein.

  • Ham Delight: Swap in leftover ham for a sweet and smoky profile. This variation works beautifully, especially during holiday seasons!

  • Cheese Variation: Use pepper jack cheese for a spicy kick or Swiss cheese for a nutty flavor. Each option transforms every bite into a delicious surprise!

  • Veggie Boost: Add sautéed spinach or mushrooms for added nutrition and texture. These greens elevate the dish, creating a delightful blend of flavors!

  • Nutty Crunch: Sprinkle chopped walnuts or pecans for an unexpected crunch. The nuts bring extra texture and richness to every mouthful, making it even more enjoyable.

  • Herb Infusion: Incorporate fresh herbs like rosemary or thyme into the filling. The aromatic touch uplifts this dish and creates a fresh burst of flavor.

  • Spicy Kick: Add jalapeños or hot sauce to amp up the heat. If you crave a little fire in your feast, this variation is guaranteed to excite your taste buds!

  • Sweet Spin: Drizzle honey or add a layer of apple slices for a sweet contrast to the savory elements. This sweet twist adds a lovely surprise that everyone will adore!

For those eager to explore, don’t forget to look into options like dairy-free alternatives or use store-bought options to save time. With these variations, your Turkey Cranberry Crescent Ring can be a fresh delight each time you make it!

Make Ahead Options

These Turkey Cranberry Crescent Rings are perfect for busy home cooks looking to save time during the week! You can fully assemble the crescent ring up to 8 hours in advance and store it in the refrigerator, covering it tightly to prevent the dough from drying out. If you’re planning further ahead, consider preparing the ingredients separately—like dicing the cooked turkey and mixing the cranberry sauce—then refrigerate for up to 3 days. When you’re ready to enjoy, simply bake it directly from the fridge for a quick and delightful meal that’s just as delicious as if you had made it fresh!

What to Serve with Turkey Cranberry Crescent Ring?

As you savor each bite of this delectable dish, consider enhancing your meal with delightful pairings that perfectly complement its savory and sweet flavors.

  • Fresh Garden Salad: A crisp salad with mixed greens and a light vinaigrette adds brightness and freshness to balance the richness of the crescent ring.
  • Roasted Vegetables: Seasonal roasted veggies like carrots and Brussels sprouts add a sweet, caramelized touch that harmonizes beautifully with the turkey and cranberry. Toss in a little olive oil and herbs before roasting for extra flavor!
  • Mashed Sweet Potatoes: The creamy sweetness of mashed sweet potatoes pairs deliciously, adding a comforting, warm element to your meal. Their vibrant color also makes the plate more visually appealing.
  • Stuffing Balls: Serve homemade or store-bought stuffing balls for a nostalgic touch. Their savory notes echo the Thanksgiving theme, making them a wonderful complement.
  • Creamy Dipping Sauce: A creamy ranch or garlic aioli can elevate the dish further, giving a rich, tangy flavor that brings out the best in the Turkey Cranberry Crescent Ring.
  • Apple Cider: A chilled glass of apple cider, with its slight sweetness and spice, complements the dish beautifully, enhancing the overall flavors of your meal.
  • Pumpkin Pie: For dessert, a slice of pumpkin pie adds a classic touch to your festive gathering. Its smooth texture and spice notes will leave everyone satisfied.

Mix and match these delightful options to create a memorable meal that captivates your family or guests!

Storage Tips for Turkey Cranberry Crescent Ring

  • Room Temperature: Serve the Turkey Cranberry Crescent Ring warm for the best flavor, but if you have leftovers, they can be kept at room temperature for up to 2 hours before needing refrigeration.
  • Fridge: Store any leftover slices in an airtight container in the fridge for up to 3 days. Reheat them gently in the oven to maintain the flaky texture.
  • Freezer: Wrap leftover slices tightly in foil or plastic wrap and freeze for up to 1 month. When ready to enjoy, reheat from frozen in the oven for optimal results.
  • Reheating: For best flavor and texture, reheat in the oven at 350°F (175°C) for about 10-15 minutes, or until heated through, to revive the Turkey Cranberry Crescent Ring’s deliciousness.

Turkey Cranberry Crescent Ring Recipe FAQs

What type of turkey should I use for the Turkey Cranberry Crescent Ring?
You can use any cooked turkey for this recipe, whether it’s leftover roast turkey from Thanksgiving or store-bought rotisserie turkey. If you don’t have turkey on hand, feel free to substitute with cooked chicken or ham for a different flavor profile.

How should I store leftover Turkey Cranberry Crescent Ring?
If you have leftovers, store them in an airtight container in the fridge for up to 3 days. Make sure to reheat them gently in the oven to maintain that delicious flaky texture—about 10-15 minutes at 350°F (175°C) should do the trick!

Can I freeze the Turkey Cranberry Crescent Ring, and how?
Absolutely! After baking and cooling, wrap any leftover slices tightly in foil or plastic wrap and place them in the freezer for up to 1 month. When you’re ready to enjoy, simply reheat them from frozen in the oven at 350°F (175°C) for about 15-20 minutes until heated through.

How do I ensure the crescent dough doesn’t tear when unrolling?
A great tip is to keep the crescent dough slightly chilled before handling—this helps prevent tearing. If it’s too warm, it becomes more pliable and likely to tear. Also, gently unroll it and handle it carefully to avoid any mishaps!

Can pets eat the Turkey Cranberry Crescent Ring?
It’s best to keep the Turkey Cranberry Crescent Ring away from pets. Ingredients like cheese and sodium in the turkey and sauces may not be suitable for them. Always check with your vet before sharing any human food with your furry friends.

What can I do if my crescent dough doesn’t seal properly?
If you find that the crescent dough doesn’t seal well, simply sprinkle a little more cheese or turkey over the spot and gently press the edges together again. If that fails, don’t worry! It’ll still taste great, even if there’s a little spillage during baking.

Turkey Cranberry Crescent Ring

Turkey Cranberry Crescent Ring: A Fun and Festive Treat

This Turkey Cranberry Crescent Ring is a quick, festive dish perfect for using Thanksgiving leftovers.
Prep Time 15 minutes
Cook Time 15 minutes
Total Time 30 minutes
Servings: 6 slices
Course: Lunch
Cuisine: American
Calories: 300

Ingredients
  

Dough
  • 1 package Crescent Dough Keep it slightly chilled before unrolling.
Filling
  • 2 cups Cooked Turkey Can substitute with chicken or ham.
  • 1 cup Cranberry Sauce Use homemade or store-bought.
  • 1 cup Shredded Cheese Cheddar or mozzarella can be used.
Topping
  • 2 tablespoons Melted Butter Brush on top before baking.
  • 2 tablespoons Sesame Seeds Can be omitted or replaced with poppy seeds.

Equipment

  • oven
  • baking sheet
  • parchment paper
  • sharp knife

Method
 

Preparation
  1. Preheat your oven to 375°F (190°C) and prepare the baking sheet.
  2. Unroll the chilled crescent dough onto the prepared baking sheet in a circular shape, overlapping edges.
  3. Layer the cooked turkey, followed by cranberry sauce, and then shredded cheese evenly over the dough.
  4. Fold the pointed tips of the crescent dough over the filling to form a ring, sealing the edges.
  5. Brush melted butter over the top of the dough.
  6. Sprinkle sesame seeds over the brushed dough.
  7. Bake in the preheated oven according to package instructions, about 12-15 minutes until golden brown.
  8. Allow the ring to cool for a few minutes before slicing and serving warm.

Notes

Keep crescent dough chilled to prevent tearing. Customize fillings as desired for personal taste.

Delicious Shaved Ham Snacks with Cucumber Cream Cheese Delight

As I stood in my kitchen, the aroma of fresh ingredients mingled with excitement—these Shaved Ham Snacks with Cucumber Cream Cheese were destined to impress! The delightful combo of creamy whipped cheese and crunchy cucumber makes this appetizer an absolute crowd-pleaser. Not only are they easy to whip up, but they also bring a refreshing twist to your next gathering. Imagine serving these delicious bites at your next party, where they’ll vanish faster than you can say “snack time.” So, are you ready to elevate your appetizer game with a recipe that’s as effortless as it is scrumptious?

Why Are These Snacks So Irresistible?

Easy Preparation: You’ll be amazed at how simple it is to throw these together! With just a few fresh ingredients, you’ll have a stunning appetizer ready in minutes.

Flavor Explosion: The creamy whipped cream cheese pairs perfectly with zesty cucumber, while the shaved ham adds savory notes, creating a well-balanced bite!

Versatile Ingredients: Feel free to switch things up! Whether it’s using turkey instead of ham or opting for pumpernickel bread, the possibilities are endless.

Perfect for Any Event: From casual gatherings to elegant parties, these snacks steal the show every time. Serve them chilled, and watch them disappear!

Make-Ahead Magic: Prep these beauties up to six hours in advance, allowing the flavors to meld beautifully—perfect for stress-free entertaining.

For more delicious ideas, try pairing them with a Refreshing Cucumber Carrot salad or explore some Savory Zucchini Cheese mini pancakes to round out your spread!

Shaved Ham Snacks with Cucumber Cream Cheese Ingredients

For the Snacks
Shaved Ham – The star ingredient, providing a burst of savory goodness; try Krakus Polish Ham for a mild flavor.
Rye Bread – A sturdy base that holds everything together; cut it into mini squares or triangles for easy snacking.
Whipped Cream Cheese – Essential for that creamy richness; the perfect spread for your base.
Seedless Cucumber – Adds a refreshing crunch; grate half for the cream cheese mixture and slice the other half for topping.
Chives – A mild onion flavor that enhances the overall taste; perfect for garnish.
Dried Dill – A burst of zesty seasoning; it brightens up the flavor profile wonderfully.
Celery Salt – Key for seasoning both the cucumber and the cream cheese; it deepens the taste and adds a nice savory touch.

For Serving
Extra Chives – A sprinkle for an elegant garnish; elevates the presentation and flavor.
Additional Dill – To sprinkle on top, adding that final touch of flavor and aesthetics.

These Shaved Ham Snacks with Cucumber Cream Cheese are not only simple to make but also a guaranteed hit at any gathering!

Step‑by‑Step Instructions for Shaved Ham Snacks with Cucumber Cream Cheese

Step 1: Prepare the Cucumber
Wash a seedless cucumber thoroughly under cool water and cut it in half lengthwise. Slice one-half into thin half-moon shapes for topping, ensuring they are visually appealing and consistent. Set these aside on a plate. The other half will be grated for your cream cheese mixture, adding a refreshing crunch to the Shaved Ham Snacks.

Step 2: Grate and Season the Cucumber
Using a box grater, grate the remaining half of the cucumber into a mixing bowl. Sprinkle a pinch of celery salt over the grated cucumber and let it sit for about 5–10 minutes. This process enhances the cucumber’s flavor, and allows excess moisture to escape, keeping your Shaved Ham Snacks from becoming soggy.

Step 3: Mix Cream Cheese and Chives
In a separate mixing bowl, combine whipped cream cheese with thinly sliced chives, along with another pinch of celery salt for seasoning. Use a hand mixer or a sturdy spatula to beat the mixture until creamy and smooth, about 2-3 minutes. The chives will add a delightful oniony flavor, enriching the creamy spread for your snacks.

Step 4: Combine Cucumber with Cream Cheese
After allowing the grated cucumber to rest, drain any excess liquid, and gently fold it into the cream cheese mixture. Stir until everything is well incorporated, creating a vibrant and flavorful spread. This creamy cucumber mixture is the heart of your Shaved Ham Snacks, so ensure it’s evenly blended.

Step 5: Prepare the Bread Base
Take your rye bread and cut it into mini squares or triangles, depending on your preference. Arrange the bread pieces on a serving platter or a clean cutting board. This will serve as the delightful base for your Shaved Ham Snacks, ready to be topped with the creamy mixture and savory ham.

Step 6: Chop the Ham
Mince your shaved ham into smaller, bite-size pieces for easy topping. A sharp knife will make this quick and efficient. By cutting the ham into smaller bits, each snack will be perfectly balanced with the creamy cheese mixture, ensuring every bite is flavorful and satisfying.

Step 7: Assemble the Snacks
Spread a generous layer of the cream cheese and cucumber mixture over each piece of rye bread, making sure to cover the surface evenly. This is the fun part—let yourself be creative! Aim for a nice, thick layer to support the toppings of ham and cucumber that will follow.

Step 8: Top with Shaved Ham
Add the minced shaved ham directly on top of each cream cheese-covered bread slice, ensuring it sticks while adding a savory bite. Take your time here—you’re building layers of flavor with these Shaved Ham Snacks, and the ham is the star of the show!

Step 9: Garnish with Cucumber Slices
Place the cucumber slices you set aside on top of the ham for each snack, gently pressing them into the cream cheese mixture. This not only adds visual appeal but also adds a refreshing crunch to every bite. Arrange them neatly so the presentation looks delightful for your guests.

Step 10: Final Touches and Chill
Sprinkle additional chives and dried dill on top of each assembled snack, adding vibrant color and enhancing the flavor. Cover the platter with plastic wrap and refrigerate for up to six hours before serving. This allows the flavors to meld beautifully, making your Shaved Ham Snacks absolutely irresistible!

How to Store and Freeze Shaved Ham Snacks with Cucumber Cream Cheese

Fridge: Keep assembled snacks covered in an airtight container in the fridge for up to 6 hours. This maintains freshness and flavor before serving.

Make-Ahead: Pre-assemble the snacks and refrigerate them for stress-free entertaining, just be sure to wait on garnishing with fresh herbs until serving time.

Freezer: While it’s best not to freeze fully assembled snacks, you can freeze components like ham and cream cheese mixture in separate containers for up to 3 months. Thaw in the fridge before assembling.

Reheating: Serve chilled for the best flavor and texture, as these snacks are designed to be a refreshing appetizer.

Make Ahead Options

These Shaved Ham Snacks with Cucumber Cream Cheese are perfect for meal prep enthusiasts! You can prepare the cream cheese and grated cucumber mixture up to 24 hours in advance for maximum flavor infusion. Simply mix the whipped cream cheese, chives, and grated cucumber, then store it in an airtight container in the refrigerator. You can also slice the cucumbers and mince the ham ahead of time, keeping them separate until you’re ready to assemble. When it’s time to serve, spread the cream cheese mixture on the rye bread, top with the minced ham and cucumber slices, and enjoy this delightful appetizer that feels fresh and flavorful, ready to impress your guests without the last-minute scramble!

Shaved Ham Snacks with Cucumber Cream Cheese Variations

Customize your Shaved Ham Snacks with delightful twists that can surprise and satisfy every palate!

  • Turkey Swap: Substitute shaved ham with turkey for a lighter, leaner option. The turkey’s mild flavor will still pair well with creamy cheese.
  • Flavored Cream Cheese: Choose herb or garlic-flavored cream cheese for an extra kick. This variation adds depth and richness to the spread, tantalizing your taste buds.
  • Gluten-Free Bread: Use gluten-free bread to cater to dietary needs without sacrificing flavor or texture. Look for sturdy options that can still hold up your delicious toppings.
  • Pumpernickel Bread: Swap rye for pumpernickel for a deeper, richer taste. This twist offers an exciting contrast to the freshness of cucumber.
  • Spicy Kick: Add diced jalapeños or a sprinkle of cayenne to the cream cheese mixture for a spicy flavor boost. Perfect for those who love a bit of heat in their appetizers.
  • Herb Garnish: Toss chopped fresh dill or parsley into the ham mixture for added freshness and color. It will brighten each bite and enhance the overall flavor.
  • Creamy Avocado: For a healthful twist, mix mashed avocado into the cream cheese spread. It adds a lovely creaminess while incorporating healthy fats.
  • Cucumber Variations: Instead of cucumber, try thinly sliced radishes for an extra crunch and a peppery kick. This will change the flavor profile beautifully while still being refreshing.

With these variations, your Shaved Ham Snacks will always be a hit! For even more ideas, consider pairing them with a Refreshing Cucumber Carrot salad or serving some delightful Savory Zucchini Cheese mini pancakes alongside them. Enjoy the creativity!

What to Serve with Shaved Ham Snacks with Cucumber Cream Cheese

Elevate your appetizer experience with delightful pairings that complement the creamy, zesty flavors of these easy-to-make snacks.

  • Crispy Potato Chips: The salty crunch of potato chips provides a satisfying contrast to the creamy texture, making them a classic pairing.

  • Cheesy Garlic Bread: Offering a warm, savory element, cheesy garlic bread adds an indulgent touch that balances the refreshing cucumber.

  • Melon Medley Salad: A light and fruity salad featuring watermelon and cantaloupe brightens the palate, bringing a refreshing sweetness to each bite.

  • Chilled White Wine: A crisp Chardonnay or Sauvignon Blanc enhances the flavors, making your gathering feel vibrant and elegant.

  • Savory Vegetable Platter: Include an array of fresh veggies with a herb dip for a crunchy, healthy option that contrasts with the rich snacks.

  • Mini Quiches: Their flaky crust and savory filling provide a hearty option that rounds out the meal while still being bite-sized.

  • Sweet Fruit Skewers: Combine strawberries, pineapple, and grapes for a colorful and refreshing dessert that lightens the overall feel of your spread.

  • Sparkling Water with Lime: Refreshing and light, this drink offers a bubbly cleanse between bites to keep taste buds eager for more.

  • Homemade Chocolate Truffles: For a touch of decadence, these creamy bites provide a delightful sweet finish that complements your savory snacks wonderfully.

Expert Tips for Shaved Ham Snacks

Cucumber Handling: Use chilled cucumbers for extra crunch. A warm cucumber can lead to a soggy topping, ruining your Shaved Ham Snacks.

Cream Cheese Technique: For a smooth spread, beat cream cheese at room temperature. Cold cream cheese can be difficult to spread evenly on the bread.

Layering Right: Spread the cream cheese mixture thickly to support the toppings. This will keep your snacks from getting top-heavy and falling apart.

Garnish Wisely: Use fresh herbs as a garnish right before serving. Adding them too early can wilt them, impacting both flavor and presentation.

Make-Ahead Tip: Allow at least 30 minutes for the assembled Shaved Ham Snacks to chill in the fridge to let flavors meld. This will make them taste even better!

Shaved Ham Snacks with Cucumber Cream Cheese Recipe FAQs

How do I choose the right cucumber?
Absolutely! Select firm, seedless cucumbers that are bright green and free of dark spots or blemishes. These indicators ensure a fresh and crunchy texture for your Shaved Ham Snacks. If the cucumber feels soft or has dark spots all over, it’s best to skip it in favor of a crisp option.

What’s the best way to store leftover snacks?
Very handy to know! Store the assembled Shaved Ham Snacks in an airtight container in the fridge for up to 6 hours. This approach preserves their freshness. If you have leftover components, like the cream cheese mixture or shaved ham, keep them in separate containers, refrigerating for up to 3 to 4 days.

Can I freeze Shaved Ham Snacks?
While I don’t recommend freezing the fully assembled snacks, you can freeze the ham and cream cheese mixture separately. Store them in airtight containers for up to 3 months. When you’re ready to use them, thaw in the fridge overnight and then assemble for fresh, mini bites.

What should I do if my cream cheese isn’t spreading easily?
No worries at all! If your cream cheese is too stiff, allow it to come to room temperature, which will make it more spreadable. You can beat it with a mixer or a spatula for 2-3 minutes to get a creamy consistency. I often find that warming it slightly in a microwave for 10-15 seconds helps, too!

Are there any allergy considerations for this recipe?
Absolutely! This recipe does contain common allergens like dairy (from cream cheese) and gluten (from rye bread). For gluten-free options, you can substitute the rye bread with gluten-free varieties. If you’re cooking for someone with a dairy allergy, consider using a vegan cream cheese alternative to keep it delicious and inclusive.

How can I make these snacks dairy-free?
For dairy-free Shaved Ham Snacks, substitute the whipped cream cheese with a dairy-free cream cheese alternative, such as those made from cashews or almond milk. Make sure to check that your ham choice is also free from any dairy preservatives, and you’ll have a delightful snack that’s suitable for those avoiding dairy!

Shaved Ham Snacks with Cucumber Cream Cheese

Delicious Shaved Ham Snacks with Cucumber Cream Cheese Delight

A quick and delightful appetizer featuring shaved ham and cucumber cream cheese, perfect for any gathering.
Prep Time 20 minutes
Chilling Time 30 minutes
Total Time 50 minutes
Servings: 10 snacks
Course: Lunch
Cuisine: American
Calories: 150

Ingredients
  

For the Snacks
  • 8 slices Shaved Ham Try Krakus Polish Ham for a mild flavor.
  • 4 slices Rye Bread Cut into mini squares or triangles.
  • 8 oz Whipped Cream Cheese Essential for creamy richness.
  • 1 whole Seedless Cucumber Grate half for mixture, slice other half for topping.
  • 2 tbsp Chives For enhancing overall taste.
  • 1 tsp Dried Dill Brightens up flavor profile.
  • 1 tsp Celery Salt Key for seasoning cucumber and cream cheese.
For Serving
  • 2 tbsp Extra Chives For garnish.
  • 1 tsp Additional Dill Final touch for flavor and aesthetics.

Equipment

  • mixing bowl
  • box grater
  • spatula
  • Knife
  • Platter

Method
 

Step‑by‑Step Instructions
  1. Wash a seedless cucumber thoroughly and cut in half lengthwise. Slice one-half into thin half-moon shapes for topping and set aside.
  2. Grate the remaining half of the cucumber into a mixing bowl. Sprinkle a pinch of celery salt and let it sit for about 5-10 minutes.
  3. In another mixing bowl, combine whipped cream cheese with chives and celery salt. Beat until creamy, about 2-3 minutes.
  4. Drain any excess liquid from the grated cucumber and fold into the cream cheese mixture until well incorporated.
  5. Cut rye bread into mini squares or triangles and arrange on a platter.
  6. Mince the shaved ham into smaller pieces for easy topping.
  7. Spread a generous layer of the cream cheese mixture over each piece of rye bread.
  8. Add minced shaved ham on top of the cream cheese-covered bread slices.
  9. Top with cucumber slices and gently press into the cream cheese mixture.
  10. Sprinkle extra chives and dill on top, cover with plastic wrap, and refrigerate for up to six hours before serving.

Notes

Serve chilled for the best flavor and texture. Ideal for gatherings and quick preparation.

Creamy Cheddar Sour Cream Macaroni Salad You’ll Love

In the middle of a bustling summer picnic, the vibrant colors of fresh vegetables and creamy textures danced against the warm sun. That’s when I discovered my love for Cheddar Sour Cream Macaroni Salad—a delightful deli-style dish that’s as easy to prepare as it is customizable. Bursting with tender ziti pasta, sharp cheddar, and a spirited mix of crunchy veggies, this salad is not just a side; it’s a star. It pulls double duty, whether you’re pairing it with grilled burgers or prepping it for weekday lunches. With its rich, tangy dressing that only gets better with time, you’ll find it transforms into a crowd-pleaser that everyone will be raving about. Ready to make your own version of this creamy delight? Let’s dive in!

Why is this salad a crowd favorite?

Creamy Delight: The perfect balance of mayonnaise and sour cream creates a rich texture that makes this Cheddar Sour Cream Macaroni Salad irresistibly creamy.

Customization Galore: Easily swap in your favorite veggies or even cheeses, such as Gouda or Monterey Jack, making it uniquely yours!

Quick Prep: With only a few simple steps, you can whip this up in no time. It’s a time-saver for busy cooks who still want delicious homemade meals.

Make-Ahead Magic: This salad’s flavors meld beautifully over time, making it an ideal option for meal prep or picnics; just let it chill in the fridge!

Crowd-Pleaser: Serve it up at barbecues or family gatherings, and watch as it becomes the star of the spread, rivaling even dishes like Garden Harvest Salad.

Cheddar Sour Cream Macaroni Salad Ingredients

• Get ready to create a creamy masterpiece!

For the Salad

  • Ziti Pasta – Provides structure; elbow macaroni is a great substitute if you prefer.
  • Mayonnaise – Adds rich creaminess; Greek yogurt can lighten it up nicely.
  • Sour Cream – Brings the tang; feel free to switch with regular yogurt for a twist.
  • Red Bell Pepper – Adds sweetness and vibrant color; any bell pepper makes a perfect alternative.
  • Red Onion – Contributes a sharp flavor; try yellow or green onions if you prefer.
  • Fresh Parsley (optional) – Offers a fresh herbal note; omit or use dill for a different flavor.
  • Carrot – Gives a crunchy sweetness; grate it finely for a balanced texture.
  • Celery – Adds crunch with a mild flavor; jicama is a fun substitute for a different bite.
  • Celery Salt & Celery Seed – Enhances the overall flavor; adjust to your liking or leave it out.
  • Diced Pimientos – Adds a tangy twist; feel free to modify the amount to suit your taste.
  • Cheddar Cheese – Enhances creaminess and flavor; Gouda or Monterey Jack make fantastic substitutes.
  • White Sugar – Balances the flavors beautifully; optional based on your preference.

Enjoy mixing these ingredients to create your very own Cheddar Sour Cream Macaroni Salad!

Step‑by‑Step Instructions for Cheddar Sour Cream Macaroni Salad

Step 1: Boil the Pasta
Start by bringing a large pot of salted water to a rolling boil. Add 8 ounces of ziti pasta and cook until al dente, about 8 to 10 minutes. Once done, drain the pasta in a colander and rinse it under cold water to stop cooking. Set aside to cool completely while you prepare the vegetables for the Cheddar Sour Cream Macaroni Salad.

Step 2: Chop the Vegetables
Finely dice one red bell pepper, half a red onion, and one cup of celery. In a large mixing bowl, combine these chopped vegetables, adding a sprinkle of celery salt and celery seed for flavor. The vibrant colors and the crunch of these veggies will bring texture to your Cheddar Sour Cream Macaroni Salad.

Step 3: Add the Carrots
Next, grate one medium carrot using a fine grater. Add the grated carrot to the mixing bowl with the vegetables. This addition will enhance the sweetness and add a delightful crunch to your salad. Stir the mixture well to ensure all flavors start mingling beautifully.

Step 4: Mix the Dressing
In a separate bowl, whisk together one cup of sour cream, half a cup of mayonnaise, and one tablespoon of white sugar. This tangy dressing ties the salad together, so mix until smooth and creamy, ensuring there are no lumps. The combination of sour cream and mayo will give your Cheddar Sour Cream Macaroni Salad its signature richness.

Step 5: Incorporate the Parsley
If you choose to use it, chop a handful of fresh parsley and add it to the vegetable mixture. This step is optional but adds a fresh herbal note that lightens the dish. Stir the parsley in gently but thoroughly, ensuring it is evenly distributed amongst the salad.

Step 6: Combine Everything
Let the vegetable mixture sit for about 15 minutes to develop flavors. After that, toss the vegetable mix with the creamy dressing. Then, gently fold in the cooled ziti pasta until everything is evenly coated in the dressing, creating a harmonious blend of flavors for your Cheddar Sour Cream Macaroni Salad.

Step 7: Add the Cheese
Finely dice one cup of cheddar cheese, and fold it into the salad mixture. This step will add a delicious creaminess and enhance the salad’s flavor profile. Make sure the cheddar is well incorporated, so every bite is packed with cheesy goodness.

Step 8: Chill the Salad
Cover your mixing bowl tightly with plastic wrap or transfer the salad to an airtight container. Chill in the refrigerator for at least 4 to 6 hours, or overnight if possible. This chilling time allows the flavors to meld beautifully, making your Cheddar Sour Cream Macaroni Salad even tastier when served cold.

Step 9: Serve and Enjoy
Once chilled, give the salad a gentle stir before serving to redistribute the dressing. Spoon the creamy Cheddar Sour Cream Macaroni Salad into a serving bowl and enjoy it straight away as a side for grilled meats, at picnics, or as a delightful lunch option.

Make Ahead Options

These Cheddar Sour Cream Macaroni Salad is perfect for savvy meal prep enthusiasts looking to save time during busy weekdays! You can prepare all the vegetables and cook the pasta up to 24 hours in advance; simply store them separately in airtight containers. For the dressing, mix together the sour cream, mayonnaise, and sugar, keeping this chilled until you’re ready to finalize the dish. When it’s time to serve, just combine the chilled ingredients, gently fold in the diced cheddar cheese, and let the salad sit in the refrigerator for another 30 minutes to meld the flavors together. Rest assured, it will be just as delicious and creamy, with each bite bursting with freshness!

Cheddar Sour Cream Macaroni Salad Variations

Feel free to explore exciting twists on this classic dish to make it your own!

  • Dairy-Free: Substitute the sour cream and mayonnaise with cashew cream or a dairy-free alternative for a creamy texture.

  • Protein Boost: Add diced grilled chicken or ham for a hearty main dish; it transforms the salad into a filling meal that still tastes light and refreshing.

  • Spicy Kick: Toss in some diced jalapeños or sriracha to liven things up! This adds a delightful heat that complements the creamy dressing.

  • Crunchy Twist: Replace celery with crunchy jicama for a sweeter, firmer bite that will surprise your taste buds. Its freshness really stands out in this salad.

  • Herb Fusion: Swap in fresh dill or cilantro in place of parsley for a unique flavor profile. Herbs can take this dish to unexpected heights!

  • Extra Veggies: Boost your vegetable intake by adding peas or corn for added sweetness and color. Even a handful of spinach can bring a pop of green!

  • Zesty Addition: Stir in some chopped olives or capers for a tangy depth that tantalizes the palate. These little pops of flavor will have everyone asking for more!

  • Vegan: Use vegan mayo and coconut yogurt to keep the creaminess while keeping it entirely plant-based. Perfect for those with dietary restrictions!

As an extra tip, if you’re in the mood for something equally delightful but with a different flair, you might enjoy making a batch of Cabbage Apple Salad or a refreshing Crunch Cucumber Salad. Cooking should always feel creative, so go ahead and tailor this salad to your heart’s content!

How to Store and Freeze Cheddar Sour Cream Macaroni Salad

Fridge: Store your Cheddar Sour Cream Macaroni Salad in an airtight container for up to 5 days. The flavors will meld beautifully, making each bite even more delicious.

Freezer: While it’s best enjoyed fresh, you can freeze the salad for up to 2 months. Keep in mind that the texture may slightly change upon thawing, so it’s best to eat it fresh when possible.

Reheating: If you must reheat, do so gently in the microwave or on the stovetop, adding a splash of sour cream or mayonnaise to revive its creaminess. However, this dish is best served chilled.

Make Ahead: For meal prep, feel free to make the salad a day in advance; just remember it tastes even better after it has chilled for a few hours!

Expert Tips for Cheddar Sour Cream Macaroni Salad

  • Finely Chop Veggies: Ensure all vegetables are chopped very finely; this allows for better texture and ensures each bite is flavorful in your Cheddar Sour Cream Macaroni Salad.

  • Taste as You Go: Always taste and adjust seasoning levels to your preference. A little salt or pepper can make a significant difference!

  • Chill Time Matters: Refrigerate the salad for several hours before serving. This chilling time helps the flavors meld beautifully and enhances overall taste.

  • Select Your Pasta: Choose pasta that holds up well; ziti is perfect, but don’t hesitate to swap with elbow macaroni for a more traditional look.

  • Customize Wisely: Feel free to substitute ingredients based on your preference, but keep in mind that some combinations can alter the original flavor profile you love in this Cheddar Sour Cream Macaroni Salad.

What to Serve With Cheddar Sour Cream Macaroni Salad

Looking to elevate your meal with delightful pairings that harmonize perfectly with creamy pasta?

  • Grilled BBQ Chicken: Juicy, smoky chicken complements the salad’s creamy texture beautifully, creating a satisfying contrast in both flavor and texture.
  • Fresh Garden Salad: A light salad adds a refreshing crunch, balancing the richness of the macaroni salad and bringing in vibrant colors.
  • Veggie Skewers: Colorful, grilled vegetables bring a smoky char that pairs wonderfully with the creamy notes of the pasta, enhancing the summer vibe.
  • Potato Salad: A classic pairing that can never go wrong! This offers an indulgent twist and is perfect for those who love hearty picnic spreads.
  • Coleslaw: Crunchy and tangy coleslaw adds a nice contrast and balances the richness of the Cheddar Sour Cream Macaroni Salad perfectly.
  • Fruit Salad: Bright, fresh fruits provide a sweet note, cleansing the palate and making for a lively finish to your meal.
  • Homemade Lemonade: Refreshing lemonade is a delightful drink option, providing a zesty match that complements the flavors of the creamy salad.
  • Chocolate Chip Cookies: Finish off with a sweet treat that delights; the soft, chewy texture of cookies plays nicely against the crispness of your meal.
  • Grilled Shrimp: Tender, grilled shrimp add a touch of elegance while enhancing the overall dining experience with their delightful flavor and buttery texture.
  • Chilled White Wine: A glass of crisp white wine elevates the experience, perfectly balancing the rich flavors with its light and refreshing profile.

Cheddar Sour Cream Macaroni Salad Recipe FAQs

How do I choose the right pasta for this salad?
Absolutely! For the best results, opt for ziti pasta, which holds its shape and captures the dressing beautifully. If you can’t find ziti, elbow macaroni or shell pasta are excellent substitutes that work well within this Cheddar Sour Cream Macaroni Salad.

How long can I store the salad in the fridge?
Very! Your Cheddar Sour Cream Macaroni Salad will stay fresh in an airtight container for up to 5 days. The flavors will continue to meld, making it taste even better with each passing day!

Can I freeze Cheddar Sour Cream Macaroni Salad?
Yes, you can freeze it! Transfer your prepared salad into an airtight container or freezer bag, removing as much air as possible. It should keep well for up to 2 months. However, be aware that while the flavors will still be delicious upon thawing, the texture may change slightly, so it’s best enjoyed fresh.

What should I do if my salad seems too dry?
If your salad feels a bit dry, don’t worry! Simply add a splash of sour cream or mayonnaise to revive its creamy texture. Toss gently until everything is well coated again. Adjust seasoning as needed, and you’ll have it back to its delicious, creamy state in no time.

Are there any common allergens in this recipe?
Yes, while this recipe is incredibly versatile, it does contain dairy products such as cheese, sour cream, and mayonnaise, which can be allergens for some. If you’re serving guests with dairy allergies, consider using dairy-free alternatives, like vegan mayo or cashew cheese, which can help everyone enjoy this tasty Cheddar Sour Cream Macaroni Salad.

Cheddar Sour Cream Macaroni Salad

Creamy Cheddar Sour Cream Macaroni Salad You'll Love

This Cheddar Sour Cream Macaroni Salad is a delightful deli-style dish perfect for summer picnics and meal prep.
Prep Time 15 minutes
Cook Time 10 minutes
Chill Time 6 hours
Total Time 6 hours 25 minutes
Servings: 6 servings
Course: Lunch
Cuisine: American
Calories: 400

Ingredients
  

For the Salad
  • 8 ounces Ziti Pasta Elbow macaroni is a great substitute.
  • 1/2 cup Mayonnaise Greek yogurt can lighten it up nicely.
  • 1 cup Sour Cream Feel free to switch with regular yogurt for a twist.
  • 1 medium Red Bell Pepper Any bell pepper makes a perfect alternative.
  • 1/2 medium Red Onion Try yellow or green onions if you prefer.
  • 1 cup Celery Jicama is a fun substitute.
  • 1 medium Carrot Grate it finely for balanced texture.
  • 1 teaspoon Celery Salt Adjust to your liking or leave it out.
  • 1 teaspoon Celery Seed Enhances the overall flavor.
  • 1/2 cup Diced Pimientos Modify the amount to suit your taste.
  • 1 cup Cheddar Cheese Gouda or Monterey Jack are great substitutes.
  • 1 tablespoon White Sugar Optional based on your preference.

Equipment

  • Large pot
  • Colander
  • mixing bowl
  • whisk
  • grater

Method
 

Step-by-Step Instructions
  1. Boil a large pot of salted water. Add 8 ounces of ziti pasta and cook until al dente, about 8 to 10 minutes. Drain and rinse under cold water. Set aside to cool.
  2. Finely dice one red bell pepper, half a red onion, and one cup of celery. Combine in a large mixing bowl, adding celery salt and celery seed.
  3. Grate one medium carrot and add it to the vegetable mixture, stirring well.
  4. In a separate bowl, whisk together one cup of sour cream, half a cup of mayonnaise, and one tablespoon of white sugar until smooth.
  5. Chop a handful of fresh parsley (optional) and add to the vegetable mixture, stirring gently.
  6. Let the vegetable mixture sit for about 15 minutes. Toss with the creamy dressing, then fold in the cooled ziti pasta.
  7. Finely dice one cup of cheddar cheese and fold it into the salad mixture until well incorporated.
  8. Cover the bowl tightly and chill in the refrigerator for at least 4 to 6 hours, or overnight if possible.
  9. Once chilled, stir gently before serving and enjoy as a side for grilled meats or as a lunch option.

Notes

Finely chop vegetables and taste as you go for seasoning. Chill time enhances flavor.

Delectable Shrimp & Crab Garlic Bombs for Flavor Lovers

As I stood in my kitchen, the tantalizing aroma of garlic began to dance through the air, beckoning my taste buds to come alive. That’s when I decided to whip up a batch of Shrimp & Crab Garlic Bombs—an appetizer that has quickly become a favorite in my household. These flavorful bites, with tender shrimp mingling harmoniously with sweet crab meat, are not only easy to prepare but also make an impressive dish for any gathering. In just 35 minutes, you can create a crowd-pleasing sensation that’s perfect for any occasion, from lively parties to cozy nights spent with loved ones. The best part? They’re make-ahead-friendly, so you can prep them in advance and enjoy the festivities without scrambling in the kitchen. Ready to elevate your appetizer game? Let’s dive in!

Why are Shrimp Crab Garlic Bombs a Must-Try?

Flavor Explosion: Each bite boasts a vibrant mix of shrimp, crab, and garlic that will have your taste buds singing.

Quick Recipe: With just 35 minutes to whipping these up, you’ll have a show-stopping appetizer ready in no time.

Make Ahead: Perfect for parties! Prep ahead and bake right before serving, letting you enjoy the company without stress.

Crowd-Pleaser: Serve them at your next gathering, and watch as everyone reaches for seconds—pair with our delicious Garlic Butter French Fries for an irresistible combo!

Versatile Options: Feel free to switch it up with spices or different seafood to suit your guests’ tastes.

Elevate your dining experience and be the hero of your next event with these Shrimp Crab Garlic Bombs!

Shrimp Crab Garlic Bombs Ingredients

• Here’s everything you need to create these scrumptious bites!

For the Bombs

  • Raw shrimp – Provides the primary protein and texture; make sure to use peeled and deveined shrimp for ease.
  • Lump crab meat – Adds sweetness and richness; ensure it’s well-drained to avoid excess moisture.
  • Minced garlic – Infuses the bombs with robust flavor; in a pinch, you can substitute with garlic powder.
  • Breadcrumbs – Acts as a binding agent; use panko for extra crunch if desired.
  • Grated Parmesan cheese – Enhances flavor and adds richness; substitute with another hard cheese if you prefer.
  • Egg – Binds the mixture together; consider using a flax egg for a vegan alternative.
  • Fresh parsley – Adds freshness and brightens flavor; replace with other herbs like dill or chives if needed.
  • Smoked paprika – Provides depth of flavor; regular paprika can be used as well.
  • Salt and black pepper – Essential for seasoning; adjust to taste as you mix.
  • Olive oil – Used for frying; for a richer flavor, substitute with butter instead.

For Serving

  • Lemon wedges – Adds a bright note to finish this delightful dish; perfect for squeezing over the bombs right before enjoying!

With these ingredients in hand, you’re on your way to preparing the ultimate Shrimp Crab Garlic Bombs that will impress family and friends alike!

Step‑by‑Step Instructions for Shrimp & Crab Garlic Bombs

Step 1: Prep Shrimp
Start by placing your peeled and deveined shrimp into a food processor. Pulse the shrimp until finely chopped, ensuring you avoid pureeing them—aim for a chunky texture. This process should only take about 20 seconds. You want that perfect blend to create a delightful filling for your Shrimp & Crab Garlic Bombs.

Step 2: Combine Ingredients
In a large mixing bowl, combine the processed shrimp with lump crab meat, minced garlic, breadcrumbs, grated Parmesan cheese, beaten egg, fresh parsley, smoked paprika, salt, and black pepper. Mix everything gently but thoroughly, ensuring the ingredients are evenly distributed while preserving the texture of the crab. This should take about 2-3 minutes, and the aroma should be inviting!

Step 3: Shape Bombs
Using your hands, take small portions of the mixture and roll them into golf ball-sized balls. Aim for uniformity in size so they cook evenly. Place each shaped bomb on a parchment-lined baking sheet, ensuring they are spaced apart. This step should be done swiftly, ideally in around 5-7 minutes, to maintain the mixture’s moisture.

Step 4: Chill
Once shaped, cover the baking sheet with plastic wrap and refrigerate the bombs for about 30 minutes. Chilling the Shrimp & Crab Garlic Bombs will help firm them up, making them easier to handle when cooking. This crucial step ensures they hold their shape during baking, providing a perfect bite when served.

Step 5: Preheat Oven
While the bombs are chilling, preheat your oven to 375°F (190°C). This temperature will ensure your Shrimp & Crab Garlic Bombs bake to a delightful golden brown. It’s a great time to prepare any serving dishes or dips you might want to offer alongside, enhancing the dining experience.

Step 6: Bake
After chilling, drizzle melted butter over each bomb to add richness and help them crisp up beautifully. Bake in the preheated oven for 20-25 minutes. Keep an eye on them; they should turn golden and the edges should get nice and crisp. This is when the delicious aromas will fill your kitchen!

Step 7: Serve
Once baked, allow the bombs to cool for just a couple of minutes. Serve your crispy, flavorful Shrimp & Crab Garlic Bombs on a platter, garnished with fresh parsley and accompanied by lemon wedges. This final touch adds a zesty brightness that perfectly complements the rich seafood flavors. Enjoy this crowd-pleasing appetizer!

What to Serve with Shrimp Crab Garlic Bombs

Delight your guests with an enticing spread that perfectly complements the savory, seafood-filled bites.

  • Fresh Green Salad: A light, crisp salad with mixed greens and a tangy vinaigrette balances the richness of the bombs, refreshing each bite.
  • Garlic Butter French Fries: These crispy, golden fries are the ultimate indulgence, perfect for dipping and soaking up any leftover flavors.
  • Chilled White Wine: A glass of crisp Sauvignon Blanc or a zesty Pinot Grigio enhances the seafood elements, adding a sophisticated touch to your gathering.
  • Creamy Coleslaw: The crunchy, creamy textures of coleslaw provide a delightful contrast, rounding out the dish’s flavor profile beautifully.
  • Citrusy Dipping Sauce: Offer a refreshing lemon aioli or zesty cocktail sauce that brightens each bite, making them even more irresistible.
  • Roasted Vegetables: Colorful, seasoned veggies like zucchini or bell peppers elevate your meal with their earthy flavors and appealing textures.
  • Sesame-Ginger Noodles: Soft noodles tossed with sesame oil and ginger provide a comforting, flavorful side that complements the shrimp and crab.
  • Lemon Sorbet: Finish off your meal with a light, citrusy sorbet that cleanses the palate after the rich seafood experience.

Offer these pairing ideas to create a memorable meal that elevates your Shrimp Crab Garlic Bombs!

Make Ahead Options

These Shrimp Crab Garlic Bombs are ideal for meal prep, saving you valuable time on busy weeknights or when entertaining guests! You can shape the bombs up to 24 hours ahead of time. Simply follow the recipe to combine your ingredients, roll them into balls, and place them on a parchment-lined baking sheet. Cover tightly with plastic wrap and refrigerate to maintain their freshness. When you’re ready to serve, preheat your oven and bake them directly from the fridge for about 20-25 minutes, ensuring they stay just as delicious as when freshly made. This way, you can enjoy the company of your friends and family without the last-minute kitchen rush!

How to Store and Freeze Shrimp Crab Garlic Bombs

Fridge: Store leftover Shrimp Crab Garlic Bombs in an airtight container for up to 3 days. Ensure they are completely cooled before sealing to prevent moisture buildup.

Freezer: For longer storage, freeze uncooked bombs on a baking sheet first, then transfer to a freezer-safe bag. They can be kept for up to 3 months.

Reheating: Bake frozen bombs directly from the freezer at 375°F (190°C) for about 25-30 minutes, or until heated through and crisp.

Make-Ahead Option: Prepare the bombs in advance, store them in the fridge, and bake right before serving for a seamless dining experience!

Expert Tips for Shrimp Crab Garlic Bombs

  • Chill for Success: Chilling the shaped bombs for at least 30 minutes helps maintain their form during baking, preventing any messy spills.

  • Do Not Overmix: Gently combine your ingredients to keep the crab meat’s texture intact. Overmixing can lead to a mushy consistency in your Shrimp Crab Garlic Bombs.

  • Well-Drained Crab: Make sure your lump crab meat is well-drained before mixing. Excess moisture can make the filling too wet and impact the frying and baking process.

  • Spice It Up: For an extra kick, try adding Old Bay or Cajun seasoning into the mixture. It pairs wonderfully with the sweetness of the seafood.

  • Customize Dips: Serve your bombs with a variety of dipping sauces, like cocktail sauce or a creamy garlic aioli, to elevate the overall flavor experience.

Shrimp Crab Garlic Bombs: Variations & Substitutions

Feel free to explore these delightful options and elevate the flavors of your Shrimp Crab Garlic Bombs!

  • Seafood Swap: Replace shrimp with chopped scallops for a sweet, tender alternative that maintains the dish’s wonderful seafood flair.

  • Spicy Kick: Add Old Bay or Cajun seasoning to the mixture for a bold twist. The spices will enhance the overall flavor and add an exciting heat.

  • Veggie Boost: Incorporate diced bell peppers or jalapeños to introduce a crunchy texture and vibrant color, making every bite more interesting.

  • Dairy-Free Delight: Swap out the Parmesan cheese for nutritional yeast or a vegan cheese alternative, allowing for a deliciously creamy experience without the dairy.

  • Gluten-Free Option: Use gluten-free breadcrumbs instead of traditional ones to accommodate those with gluten sensitivities and still enjoy a crispy exterior.

  • Zesty Infusion: Mix in lemon zest along with the lemon wedges served on the side for a refreshing zing that brightens the whole dish.

  • Herb Variations: Replace fresh parsley with fresh dill or chives for a different herbaceous twist that complements the seafood beautifully.

  • Baked Version: For a lighter option, bake them without frying. Simply brush with olive oil and place directly on a baking sheet, baking them until golden.

With these fun variations and substitutions, you can tailor your Shrimp Crab Garlic Bombs to match your taste or dietary needs. Speaking of delightful pairings, consider serving them alongside our Garlic Butter French Fries for a truly indulgent experience!

Shrimp Crab Garlic Bombs Recipe FAQs

How do I choose the best shrimp for this recipe?
Absolutely! For the best flavor and texture, opt for raw, peeled, and deveined shrimp. When purchasing, look for shrimp that are firm and have a mild, fresh scent—avoid any with dark spots or a strong fishy smell.

What’s the best way to store leftover Shrimp Crab Garlic Bombs?
Very easy! Store any leftover Shrimp Crab Garlic Bombs in an airtight container in the refrigerator for up to 3 days. Make sure they are cooled completely before sealing to avoid moisture buildup, which can make them soggy.

Can I freeze Shrimp Crab Garlic Bombs? How do I do it?
Of course! To freeze the uncooked bombs, first arrange them on a baking sheet and freeze until solid, about 1 to 2 hours. Then, transfer them into a freezer-safe bag, ensuring to label it with the date. They can be stored for up to 3 months. When you’re ready to enjoy, bake them directly from frozen at 375°F (190°C) for approximately 25-30 minutes, until crispy and heated through.

What can I do if my bombs fall apart during baking?
If your Shrimp Crab Garlic Bombs are falling apart, it may be due to not chilling them long enough or overmixing the ingredients, which can lead to a mushy consistency. To troubleshoot, try chilling them for a longer period—up to an hour—and handle the mixture gently when combining ingredients to keep the textures intact.

Are Shrimp Crab Garlic Bombs safe for people with shellfish allergies?
Unfortunately, Shrimp Crab Garlic Bombs contain both shrimp and crab, making them unsuitable for anyone with shellfish allergies. If you’re looking for alternatives, consider using a blend of vegetables and legumes instead for a seafood-free version that still packs a punch in flavor. Always check with your guests for dietary restrictions before serving!

Shrimp & Crab Garlic Bombs

Delectable Shrimp & Crab Garlic Bombs for Flavor Lovers

These Shrimp & Crab Garlic Bombs are a must-try appetizer that combines shrimp, crab, and garlic into a flavorful explosion.
Prep Time 35 minutes
Cook Time 25 minutes
Chilling Time 30 minutes
Total Time 1 hour 30 minutes
Servings: 4 bombs
Course: Dinner
Cuisine: Seafood
Calories: 220

Ingredients
  

For the Bombs
  • 1 pound Raw shrimp Peeled and deveined
  • 1 cup Lump crab meat Well-drained
  • 4 cloves Minced garlic Substitute with garlic powder if needed
  • 1 cup Breadcrumbs Panko preferred for extra crunch
  • 1/2 cup Grated Parmesan cheese Substitute with another hard cheese if preferred
  • 1 large Egg Beaten, substitute with a flax egg for vegan option
  • 2 tablespoons Fresh parsley Chopped, can replace with dill or chives
  • 1 teaspoon Smoked paprika Regular paprika can be used
  • 1 teaspoon Salt Adjust to taste
  • 1 teaspoon Black pepper Adjust to taste
  • 2 tablespoons Olive oil Can substitute with butter
For Serving
  • 1 lemon Lemon wedges For squeezing over the bombs

Equipment

  • Food Processor
  • mixing bowl
  • baking sheet
  • plastic wrap
  • oven

Method
 

Step-by-Step Instructions
  1. Step 1: Prep Shrimp - Place peeled and deveined shrimp into a food processor, pulse until finely chopped.
  2. Step 2: Combine Ingredients - In a large mixing bowl, mix processed shrimp with crab, garlic, breadcrumbs, Parmesan, egg, parsley, paprika, salt, and pepper.
  3. Step 3: Shape Bombs - Roll small portions of the mixture into golf ball-sized balls and space them on a parchment-lined baking sheet.
  4. Step 4: Chill - Cover with plastic wrap and refrigerate for about 30 minutes.
  5. Step 5: Preheat Oven - Preheat oven to 375°F (190°C).
  6. Step 6: Bake - Drizzle melted butter over bombs and bake for 20-25 minutes until golden and crisp.
  7. Step 7: Serve - Allow to cool briefly, serve garnished with parsley and lemon wedges.

Notes

Chill the bombs for at least 30 minutes to maintain shape during baking. Customize dips to enhance flavor experience.

Moist Vanilla Pudding Pumpkin Bread for Cozy Fall Mornings

As the leaves turn and the crisp autumn air rolls in, the warm, inviting scent of baking fills my kitchen, signaling that it’s time to whip up something special. This Moist Vanilla Pudding Pumpkin Bread blends the sweet richness of pumpkin puree with the comforting warmth of fall spices, creating a delightful fusion that is hard to resist. What’s more, this no-knead recipe means you’ll spend less time fussing in the kitchen and more time enjoying cozy moments with family and friends. Perfect for breakfast, an afternoon snack, or a sweet treat after dinner, this quick bread is bound to be your new autumn favorite. Are you ready to capture the essence of the season with every slice?

Why is Vanilla Pudding Pumpkin Bread a Must-Try?

Irresistible Flavor: The combination of sweet pumpkin puree and warm pumpkin spice creates a comforting aroma that fills your kitchen with autumn bliss.

Effortless Preparation: With a no-knead method, this recipe allows even novice bakers to create a delicious loaf without the fuss.

Moist Texture: The addition of vanilla pudding mix guarantees a moist and tender crumb that rivals your favorite cake.

Versatile Treat: Enjoy it warm for breakfast, as a cozy snack, or even as a delightful dessert paired with a dollop of cream cheese.

Make-Ahead Option: Great for preparing in advance—this quick bread can be made and stored for on-the-go breakfasts, making life a little easier during busy fall mornings.

Try serving this alongside your favorite Nutty Vanilla Cake for a delightful fall spread!

Vanilla Pudding Pumpkin Bread Ingredients

For the Batter
Vanilla Instant Pudding Mix – Adds sweetness and extra moisture; feel free to swap it with chocolate pudding for a unique twist.
Pumpkin Puree – Provides that rich, autumnal flavor and moistness; ensure you pick canned pumpkin puree (not pie filling) or make your own.
All-Purpose Flour – Acts as the foundation for your bread; if gluten-free is needed, a gluten-free blend works as a substitute.
Baking Powder – Key for achieving a soft, risen texture; always check its freshness to ensure your bread rises perfectly.
Pumpkin Spice – This essential mix of spices captures the essence of fall; one tablespoon gives a robust flavor that warms the heart.
Baking Soda – Works with the pumpkin puree to help the bread rise; don’t skip this!
Oil – Keeps your bread moist and delightful; options include canola, vegetable, or sunflower oil.
Eggs – Contributes richness and binds the ingredients together for a perfect loaf.
Granulated Sugar – Sweetens the bread beautifully; consider alternatives like coconut sugar or your favorite sweetener for a different flair.

This Vanilla Pudding Pumpkin Bread is more than just a dish; it’s a cozy reminder of the beautiful flavors of autumn! Enjoy every slice!

Step‑by‑Step Instructions for Vanilla Pudding Pumpkin Bread

Step 1: Preheat the Oven
Begin by preheating your oven to 350°F (175°C). This step is essential for achieving that lovely golden crust on your Vanilla Pudding Pumpkin Bread. While the oven heats up, gather your baking equipment, including a mixing bowl, a loaf pan, and measuring cups.

Step 2: Combine Wet Ingredients
In a medium mixing bowl, whisk together 2 eggs and ½ cup of oil until well combined. You’ll want the mixture to be smooth and slightly frothy. Then, gently fold in 1 cup of pumpkin puree and 1 cup of granulated sugar, ensuring everything is fully mixed before moving on to the dry ingredients.

Step 3: Mix Dry Ingredients
In a separate bowl, combine 1 ½ cups of all-purpose flour, 1 tablespoon of pumpkin spice, 1 teaspoon of baking powder, ½ teaspoon of baking soda, and 1 package of vanilla instant pudding mix. Blend these dry ingredients thoroughly, making sure there are no lumps. This mix will add flavor and moisture to your Vanilla Pudding Pumpkin Bread.

Step 4: Combine Wet and Dry Mixtures
Pour the dry ingredients into the bowl with the pumpkin mixture. Stir gently until just combined; be careful not to overmix, as this can lead to denser bread. You should get a thick batter with some lumps still visible—this is perfect!

Step 5: Prepare the Loaf Pan
Lightly grease your loaf pan with cooking spray or butter, making sure to cover all sides to prevent sticking. Once greased, carefully transfer the thick batter into the loaf pan, smoothing the top with a spatula for an even finish.

Step 6: Bake the Bread
Bake the batter in your preheated oven for approximately 60 minutes, or until a toothpick inserted into the center comes out clean. You want the top to be a delightful golden brown color. The rich aroma of pumpkin and warm spices will fill your kitchen, creating a cozy atmosphere.

Step 7: Cool Before Slicing
Once baked, remove the Vanilla Pudding Pumpkin Bread from the oven and let it cool in the pan for about 15-30 minutes. This allows the bread to set, making it easier to slice without crumbling. Remember, patience is key for that perfect slice!

Step 8: Enjoy Your Bread
After the cooling time, carefully remove the bread from the loaf pan and transfer it to a wire rack to cool completely. Once cool, slice and serve your flavorful Vanilla Pudding Pumpkin Bread as a delightful autumn treat!

Make Ahead Options

Preparing Vanilla Pudding Pumpkin Bread in advance is a fantastic way to save time during busy autumn mornings! You can mix the wet and dry ingredients separately and refrigerate them for up to 24 hours. This ensures everything is ready when you’re set to bake. Just let the mixtures come to room temperature before combining them, which helps maintain moisture and flavor. If you’d like, you can also bake the bread ahead of time and store it at room temperature for up to 3 days. For optimal freshness, wrap the baked bread tightly in plastic wrap or aluminum foil. When you’re ready to enjoy, simply slice and serve, relishing the luscious taste of homemade Vanilla Pudding Pumpkin Bread without any fuss!

Vanilla Pudding Pumpkin Bread Variations

Feel free to make this delightful creation your own by exploring these tasty twists and substitutions!

  • Gluten-Free: Use a gluten-free flour blend to enjoy this bread without the wheat.
  • Nuts Galore: Stir in ½ cup of chopped walnuts or pecans for a crunchy texture that complements the moistness beautifully.
  • Chocolate Lover’s Twist: Substitute vanilla pudding with chocolate pudding mix for a rich and decadent flavor.
  • Spiced Up: Increase the pumpkin spice by an extra teaspoon for those who crave an even bolder autumn flavor.
  • Dairy-Free Option: Swap eggs with flaxseed meal (1 tablespoon mixed with 3 tablespoons water) and use almond or coconut milk in place of regular milk.
  • Fruit Fun: Add 1 cup of dried cranberries or another dried fruit to the batter for a sweet surprise in every bite.
  • Zesty Touch: Incorporate a teaspoon of orange zest for a refreshing citrusy flavor that pairs beautifully with pumpkin.
  • Serving Suggestions: Try serving slices warm with a smear of butter or cream cheese, making it a perfect addition to your Savory Chicken Bread meal prep!

This Vanilla Pudding Pumpkin Bread is just waiting for your personal touch; get creative and make it your own!

What to Serve with Vanilla Pudding Pumpkin Bread

As the rich, fragrant aromas of baked pumpkin bread fill your home, complementing dishes can elevate your cozy fall experience to the next level.

  • Creamy Mashed Potatoes: Enriched with butter and cream, these fluffy potatoes provide a comforting texture that pairs beautifully with the soft, sweet bread.

  • Maple Glazed Roasted Carrots: Their natural sweetness and colorful presentation add a fresh crunch that contrasts nicely with the moist loaf.

  • Apple Pie Smoothie: This delightful drink combines the essence of autumn flavors, perfect for a cozy breakfast alongside your Vanilla Pudding Pumpkin Bread.

Indulging in a warm slice of pumpkin bread while savoring the sweet and tangy notes of a cranberry salad will create a memorable meal.

  • Spiced Hot Cider: This warm beverage not only complements the sweet notes of the bread but also fills your home with delightful seasonal aromas.

  • Walnut Topping: Sprinkle some toasted walnuts on top for a crunchy contrast to the soft texture of the bread, enhancing each bite.

  • Cinnamon Coffee: A steaming cup of this flavored brew unites your senses, making your cozy moments even more delightful and fulfilling.

Expert Tips for Vanilla Pudding Pumpkin Bread

Avoid Overmixing: Mix just until ingredients are combined to maintain a light texture; too much mixing leads to dense bread.

Ingredient Freshness: Ensure your baking powder is fresh for optimal rise; stale ingredients can result in flat, unappetizing bread.

Proper Cooling: Always cool the bread completely before slicing to keep it moist; warm bread is prone to crumbling.

Storage Matters: Store leftover Vanilla Pudding Pumpkin Bread in an airtight container at room temperature for ideal freshness.

Flavor Variations: Don’t hesitate to add nuts or chocolate chips for a delightful twist in flavor and texture, elevating your bread experience.

Storage Tips for Vanilla Pudding Pumpkin Bread

Room Temperature: Store the bread in an airtight container at room temperature for up to 3 days to maintain its moist texture and flavor.

Freezer: For longer storage, wrap the bread tightly in plastic wrap and then in foil, freezing for up to 3 months. This preserves its freshness and flavor.

Reheating: When ready to enjoy, thaw at room temperature, then reheat in a 350°F oven for 5-7 minutes to restore its delicious, soft texture.

Slicing Guidance: Allow the Vanilla Pudding Pumpkin Bread to cool completely before slicing to prevent it from crumbling and to retain moisture.

Vanilla Pudding Pumpkin Bread Recipe FAQs

What type of pumpkin puree should I use?
I recommend using canned pumpkin puree, ensuring it’s not pie filling, as that contains added sugars and spices. Alternatively, you can make your own by steaming or roasting pumpkin flesh and puréeing it until smooth. This will give your Vanilla Pudding Pumpkin Bread that fresh autumn flavor!

How should I store my Vanilla Pudding Pumpkin Bread?
Store your Vanilla Pudding Pumpkin Bread in an airtight container at room temperature for up to 3 days. This method keeps it moist and delicious. If you want to keep it longer, wrap it tightly in plastic wrap, then foil, and freeze it for up to 3 months. When you’re ready to enjoy it, thaw at room temperature and reheat in a 350°F oven for 5-7 minutes to bring back its perfect texture.

Can I freeze the batter for Vanilla Pudding Pumpkin Bread?
Absolutely! You can freeze the batter before baking for up to 3 months. To do this, pour the batter into a greased loaf pan, cover tightly with plastic wrap, and freeze. When you’re ready to bake, simply thaw in the refrigerator overnight and bake as instructed. Your bread will come out just as delicious!

What should I do if my bread comes out dense?
If your Vanilla Pudding Pumpkin Bread turns out dense, it might be due to overmixing the batter or using expired baking powder. Be sure to mix the batter just until combined; some lumps are okay! Always check the freshness of your leavening agents to ensure proper rise and texture.

Can I make this recipe gluten-free?
Yes, you can! Just substitute the all-purpose flour with a gluten-free flour blend. However, please make sure to use a blend that specifically indicates it can be substituted 1:1 with regular flour. This makes it perfect for those with dietary restrictions while still enjoying a lovely loaf of Vanilla Pudding Pumpkin Bread.

Is this recipe safe for pets?
While pumpkin itself is safe for dogs, this recipe contains sugar and other ingredients that aren’t suitable for pets. It’s best to keep your Vanilla Pudding Pumpkin Bread as a delightful treat for humans only. Always be cautious with what you share with your furry friends!

Vanilla pudding pumpkin bread

Moist Vanilla Pudding Pumpkin Bread for Cozy Fall Mornings

This Moist Vanilla Pudding Pumpkin Bread is a must-try autumn dessert that captures the essence of fall with sweet flavors.
Prep Time 15 minutes
Cook Time 1 hour
Cooling Time 30 minutes
Total Time 1 hour 45 minutes
Servings: 8 slices
Course: Dessert
Cuisine: American
Calories: 200

Ingredients
  

For the Batter
  • 1 package Vanilla Instant Pudding Mix Can be swapped with chocolate pudding for variation.
  • 1 cup Pumpkin Puree Canned pumpkin puree, not pie filling.
  • 1.5 cups All-Purpose Flour Use a gluten-free blend if needed.
  • 1 tablespoon Baking Powder Ensure freshness for best results.
  • 1 tablespoon Pumpkin Spice
  • 0.5 teaspoon Baking Soda
  • 0.5 cup Oil Canola, vegetable, or sunflower oil.
  • 2 large Eggs
  • 1 cup Granulated Sugar Alternative sweeteners can be used.

Equipment

  • mixing bowl
  • Loaf pan
  • Measuring cups
  • whisk

Method
 

Step-by-Step Instructions for Vanilla Pudding Pumpkin Bread
  1. Preheat your oven to 350°F (175°C) and gather your baking equipment.
  2. In a mixing bowl, whisk together the eggs and oil until smooth, then fold in pumpkin puree and sugar.
  3. Combine the flour, pumpkin spice, baking powder, baking soda, and pudding mix in a separate bowl, ensuring no lumps.
  4. Pour the dry ingredients into the pumpkin mixture and stir gently until just combined.
  5. Grease your loaf pan and transfer the batter, smoothing the top.
  6. Bake in the preheated oven for approximately 60 minutes or until a toothpick comes out clean.
  7. Let the bread cool in the pan for 15-30 minutes before transferring to a wire rack.
  8. Once cooled, slice and serve as a delightful autumn treat.

Notes

Store leftovers in an airtight container at room temperature for up to 3 days. Can freeze for up to 3 months. Allow to cool completely before slicing to avoid crumbling.

Delicious Garden Vegetable Bread with Cheese for Summer Bites

As I pulled the golden loaf from the oven, the rich aroma of melting cheddar and fresh basil instantly transported me to a sun-drenched summer garden. This Savory Summer Garden Vegetable Bread with Cheese is not just a delightful way to incorporate delicious, seasonal produce; it’s also a comforting, quick bread that’s perfect for any meal. With tender bites of zucchini, juicy tomatoes, and the savory punch of garlic nestled within, each slice promises a fantastic flavor experience—whether paired with your favorite pasta dish or enjoyed simply with a smear of butter. Plus, it’s an effortless recipe that makes use of that glorious bounty from your garden or local farmer’s market. Are you ready to taste the essence of summer in every bite?

Why is This Bread a Must-Try?

Unforgettable Flavor: Each slice bursts with savory richness from the cheddar and the freshness of garden veggies, making it irresistibly delicious.

Quick and Easy: With only a few simple steps, this recipe is perfect for home cooks of all skill levels.

Seasonal Delight: Make the most of summer produce like zucchini and tomatoes while they’re at their freshest.

Versatile Serving: Whether as a delightful side for pasta or as breakfast toast with butter, it fits effortlessly into any meal.

Healthier Indulgence: This bread offers a great balance of nutrients, making it a smart daily indulgence—especially if you pair it with fresh sides like Savory Vegetable Cheese Pancakes.

With this Garden Vegetable Bread with Cheese, you’re sure to impress family and friends!

Garden Vegetable Bread with Cheese Ingredients

For the Batter

  • Milk – Provides moisture and richness; any kind of milk can be used based on your preference.
  • Eggs – Acts as a binder, contributing to the bread’s delightful structure and texture.
  • Extra Virgin Olive Oil – Adds moisture and richness; feel free to substitute it with melted butter for a different flavor.
  • All-Purpose Flour – Serves as the main structural component; you can switch to whole wheat flour if you prefer a denser texture.
  • Baking Powder – A leavening agent that helps the bread rise beautifully.
  • Baking Soda – Acts as an additional leavening to ensure a light and fluffy texture.
  • Salt – Enhances flavor; adjust according to your dietary needs and preferences.

For the Vegetables and Cheese

  • Shredded Sharp Cheddar Cheese – Key flavoring ingredient that offers savory richness; any preferred cheese can be substituted as desired.
  • Grated Zucchini – Adds moisture and valuable nutrition to the bread; no need to squeeze out excess water.
  • Diced Fresh Tomatoes – Contributes juiciness and a delicious tomato flavor; use any type, removing seeds and pulp for best results.
  • Thinly Sliced Green Onions – Adds a mild onion flavor and delightful texture to each slice.
  • Chopped Fresh Basil – Imparts fresh, aromatic flavor; perfect for capturing that summer garden essence.
  • Minced Garlic – Provides a robust, savory undertone that elevates the overall flavor profile.
  • Shredded Parmesan Cheese – Used for topping; adds a crispy, cheesy crust that makes the bread extra special.

Make sure to gather these ingredients and prepare to experience the wonderful flavors of this Garden Vegetable Bread with Cheese!

Step‑by‑Step Instructions for Garden Vegetable Bread with Cheese

Step 1: Preheat and Prep
Preheat your oven to 350°F (177°C) and generously grease a 9-inch loaf pan with olive oil or cooking spray. This step ensures that your Garden Vegetable Bread with Cheese releases easily once baked. As it heats, gather all your ingredients for a smooth cooking experience and set out mixing bowls and a whisk.

Step 2: Mix Wet Ingredients
In a large mixing bowl, whisk together 2 eggs, 1 cup of milk, and 1/4 cup of extra virgin olive oil until well combined. The mixture should appear smooth and slightly frothy. This foundational step ensures your bread has enough moisture and a rich flavor in every bite. Set aside your wet mixture for the next step.

Step 3: Combine Dry Ingredients
In another bowl, sift together 2 cups of all-purpose flour, 1 tablespoon of baking powder, 1/2 teaspoon of baking soda, and 1 teaspoon of salt. Mixing these dry ingredients ensures an even distribution of the leavening agents, which is crucial for the perfect rise in your Garden Vegetable Bread with Cheese. Prepare to combine the wet and dry mixtures for delicious results.

Step 4: Combine Mixtures
Pour the dry ingredient mixture into the bowl with the wet ingredients. Stir gently with a wooden spoon or spatula until the two mixtures are just combined. Be careful not to overmix; a few lumps are fine, as they will help retain moisture and create a tender crumb in the bread.

Step 5: Add Vegetables and Cheese
Now, fold in 1 cup of shredded sharp cheddar cheese, 1 cup of grated zucchini, 1 cup of diced fresh tomatoes (seeds and pulp removed), 1/4 cup of thinly sliced green onions, 1/4 cup of chopped fresh basil, and 2 minced garlic cloves. Ensure even distribution, as each ingredient will enhance the overall flavor of your Garden Vegetable Bread with Cheese.

Step 6: Transfer to Pan
Carefully pour the bread batter into the prepared loaf pan, smoothing the top with a spatula for even baking. To add an extra layer of flavor and texture, sprinkle 1/4 cup of shredded parmesan cheese over the top of the batter. This cheesy crust will develop a delightful golden hue as it bakes.

Step 7: Bake to Perfection
Place the loaf pan in the preheated oven and bake for 50-60 minutes. Keep an eye out; the bread is done when it turns golden brown and a toothpick inserted into the center comes out clean or with a few crumbs (avoid testing in cheese pockets). This timing ensures the center cooks through while keeping the bread moist.

Step 8: Cool and Serve
After baking, remove the loaf pan from the oven and let it cool for 20 minutes. This footstep is vital for easy removal and helps settle the flavors. Once slightly cooled, gently invert the bread onto a cooling rack to cool completely before slicing. Each slice promises a delightful taste of summer with your Garden Vegetable Bread with Cheese.

Make Ahead Options

These delicious Garden Vegetable Bread with Cheese are perfect for busy meal preppers! You can prepare the batter up to 24 hours in advance by mixing the wet and dry ingredients separately and storing them in the refrigerator. Simply combine them shortly before baking. Additionally, you can grate the zucchini and dice the tomatoes up to 3 days ahead, storing them in an airtight container in the fridge to maintain freshness without losing flavor. When you’re ready to bake, just fold in the cheese, vegetables, and seasonings, and pour the batter into the pan. Bake as directed for fresh, savory bread that tastes just as delicious as if it were made on the spot!

Variations of Garden Vegetable Bread with Cheese

Customize this delightful bread to suit your tastes and dietary needs—each option enhances the flavor while keeping that lovely garden essence intact!

  • Whole Wheat Flour: Swap all-purpose flour for whole wheat to add a nutty depth and more fiber.

  • Alternate Cheeses: Use mozzarella for a creamier texture or feta for a tangy twist, giving your bread a flavor leap!

  • Fresh Herb Swap: Substitute basil with fresh thyme or oregano to spice things up—the aromatic herbs can transform the entire profile!

  • Add Vegetables: Toss in 1 cup of chopped bell peppers or spinach for extra nutrition and color, turning your loaf into a vibrant feast.

  • Heat It Up: Spice things up with a pinch of crushed red pepper flakes or diced jalapeños for a delightful kick.

  • Olive Addition: Incorporate sliced olives or sun-dried tomatoes for a Mediterranean flair that will leave your taste buds singing!

  • Sweet Twist: Mix in a sprinkle of grated parmesan with a hint of honey for a touch of sweetness to balance the savory ingredients.

  • Nutty Crunch: Fold in a handful of chopped nuts, such as walnuts or pecans, for added texture that pairs perfectly with the softer elements.

Feel free to dive into these variations and create your perfect version of this garden treasure! For more cheesy delight, consider trying the Savory Zucchini Cheese Pancakes, too!

Storage Tips for Garden Vegetable Bread with Cheese

Room Temperature: Store the Garden Vegetable Bread with Cheese in an airtight container at room temperature away from direct sunlight for up to 5 days for optimal freshness.

Fridge: For extended lifespan, place the bread in the refrigerator, where it will stay good for up to 1 week. Ensure it is well-wrapped to maintain moisture.

Freezer: Wrap the bread tightly in plastic wrap and then in aluminum foil or a freezer-safe bag to prevent freezer burn. It can be frozen for up to 6 months for future enjoyment.

Reheating: To reheat, thaw if frozen, then warm slices in a toaster or oven until heated through. This helps refresh the bread’s texture and flavors perfectly!

What to Serve with Savory Summer Garden Vegetable Bread with Cheese

Savor the symphony of flavors by pairing this delightful bread with fresh and vibrant sides that complement its savory goodness.

  • Creamy Tomato Soup: The rich, velvety texture pairs beautifully with the crunchy crust of the bread, creating a comforting experience. An ideal companion, it’s perfect for those cooler summer evenings.

  • Crisp Green Salad: A light, refreshing salad of mixed greens, cucumbers, and a tangy vinaigrette balances the hearty bread. The crunch of fresh veggies contrasts wonderfully with each slice.

  • Grilled Vegetable Skewers: Smoky, charred veggies enhance the garden-fresh taste of the bread, making it a satisfying, wholesome meal. Ideal for summer barbecues, this pairing resonates with the essence of summer.

  • Garlic Butter Sauteed Spinach: The robust flavor of garlic alongside tender spinach brings a delightful contrast to the cheesy loaf, adding a healthful touch to your dining experience.

  • Deviled Eggs: These creamy, savory bites bring a touch of sophistication to your meal and are a delicious finger food complement. Their rich flavors harmonize with the bread’s cheesy notes.

  • Herbed Yogurt Dip: A refreshing herbed yogurt dip creates a beautiful contrast, allowing you to slather on rich flavors while enjoying the bread’s natural warmth. It’s a fun twist on spreads!

  • Sparkling Lemonade: A chilled glass of lemonade, with its zesty brightness, cleanses the palate and enhances the flavors of this savory bread, making it a perfect summer drink choice.

Dive into this wonderful array of pairings to enrich your dining experience and celebrate the essence of seasonal flavors!

Expert Tips for Garden Vegetable Bread

  • Grease Well: Ensure to generously grease the loaf pan. This prevents sticking and makes for an easier release of your delicious Garden Vegetable Bread with Cheese.

  • Avoid Overmixing: Mix the wet and dry ingredients only until incorporated. Overmixing can lead to a dense loaf instead of the light, tender texture you want.

  • Check for Doneness: When testing with a toothpick, insert it into different areas of the bread. Avoid areas with cheese, as they may give you a false reading of doneness.

  • Cool Before Slicing: Allow the bread to cool in the pan for 20 minutes before moving it to a cooling rack. This prevents sogginess and ensures clean, beautiful slices.

  • Customize with Ease: Feel free to experiment with different cheeses or add vegetables such as sun-dried tomatoes or olives to personalize your Garden Vegetable Bread with Cheese further!

Garden Vegetable Bread with Cheese Recipe FAQs

How do I select the best vegetables for this bread?
Absolutely! Choose fresh, vibrant vegetables. Look for zucchini without dark spots or blemishes and tomatoes that are firm and ripe but not overripe. Fresh basil should be aromatic with bright green leaves. This ensures your Garden Vegetable Bread with Cheese has maximum flavor!

What’s the best way to store the Garden Vegetable Bread with Cheese?
For optimal freshness, store the bread in an airtight container at room temperature away from light for up to 5 days. If you wish to store it longer, you can place it in the refrigerator for up to a week. Always make sure it’s well-wrapped to maintain moisture!

Can I freeze Garden Vegetable Bread with Cheese?
Yes, you can! To freeze, wrap the cooled loaf tightly in plastic wrap and then in aluminum foil or place it in a freezer-safe bag. This helps prevent freezer burn. It can be frozen for up to 6 months. When you’re ready to enjoy it, simply thaw and reheat!

How can I troubleshoot dense or undercooked bread?
If your bread turns out dense, the culprit might be overmixing the batter; this can develop too much gluten, leading to a heavy loaf. Also, make sure to check your baking powder’s freshness! If it’s undercooked, ensure your oven’s temperature is accurate and bake it a little longer, checking doneness in multiple spots to avoid hitting cheese.

Is this bread suitable for those with dietary restrictions?
Very! This Garden Vegetable Bread with Cheese is vegetarian, and you can easily make it gluten-free by using a gluten-free flour blend. Be mindful of cheese choices for lactose intolerance; you can opt for dairy-free cheeses that still melt well. Always double-check seasoning for salt levels if you’re watching your sodium intake.

Garden Vegetable Bread with Cheese

Delicious Garden Vegetable Bread with Cheese for Summer Bites

This Garden Vegetable Bread with Cheese combines savory cheddar with fresh summer veggies for a delightful, quick bread perfect for any meal.
Prep Time 15 minutes
Cook Time 1 hour
Cooling Time 20 minutes
Total Time 1 hour 35 minutes
Servings: 8 slices
Course: Lunch
Cuisine: American
Calories: 220

Ingredients
  

For the Batter
  • 1 cup Milk any kind of milk based on preference
  • 2 large Eggs acts as a binder
  • 1/4 cup Extra Virgin Olive Oil can be substituted with melted butter
  • 2 cups All-Purpose Flour can switch to whole wheat flour
  • 1 tablespoon Baking Powder for leavening
  • 1/2 teaspoon Baking Soda additional leavening agent
  • 1 teaspoon Salt adjust according to dietary needs
For the Vegetables and Cheese
  • 1 cup Shredded Sharp Cheddar Cheese key flavoring ingredient
  • 1 cup Grated Zucchini no need to squeeze
  • 1 cup Diced Fresh Tomatoes seeds and pulp removed
  • 1/4 cup Thinly Sliced Green Onions
  • 1/4 cup Chopped Fresh Basil for aromatic flavor
  • 2 cloves Minced Garlic for robust flavor
  • 1/4 cup Shredded Parmesan Cheese for topping

Equipment

  • 9-inch loaf pan
  • mixing bowls
  • whisk
  • Wooden Spoon

Method
 

Step‑by‑Step Instructions
  1. Preheat your oven to 350°F (177°C) and grease a 9-inch loaf pan with olive oil.
  2. Whisk together 2 eggs, 1 cup of milk and 1/4 cup of olive oil until smooth.
  3. Sift together 2 cups of flour, 1 tablespoon of baking powder, 1/2 teaspoon of baking soda, and 1 teaspoon of salt in another bowl.
  4. Pour the dry mixture into the wet mixture and stir gently until just combined.
  5. Fold in 1 cup of cheddar cheese, 1 cup of grated zucchini, 1 cup of diced tomatoes, 1/4 cup of green onions, 1/4 cup of basil, and 2 minced garlic cloves.
  6. Pour the batter into the greased pan and sprinkle 1/4 cup of parmesan cheese on top.
  7. Bake for 50-60 minutes until golden brown and a toothpick comes out clean.
  8. Cool in the pan for 20 minutes before transferring to a rack to cool completely.

Notes

Grease well, avoid overmixing, check for doneness in multiple areas, and cool before slicing. Customize with different cheeses or additional vegetables as desired.

Irresistible Date Snickers Recipe: Guilt-Free Chocolate Bliss

As I scoured my pantry for a quick snack, I stumbled upon a bag of Medjool dates, and suddenly, inspiration struck! Enter my 4-Ingredient Date Snickers Recipe—a delightful twist on the beloved classic that doesn’t compromise on taste or nutrition. Made with the naturally sweet medjool dates, smooth peanut butter, crunchy salted peanuts, and rich dark chocolate, this no-bake dessert is a guilt-free treat your taste buds will adore. Not only is it incredibly quick to whip up, but it’s also gluten-free and vegan, making it a versatile addition to any foodie’s repertoire. Imagine indulging in a treat that satisfies your sweet tooth without the processed sugars! Are you ready to transform those pantry staples into something utterly irresistible?

Why Choose This Date Snickers Recipe?

Simplicity at Its Best: With just four ingredients, this recipe is streamlined and requires minimal effort for maximum satisfaction.

Healthy Indulgence: Enjoy a rich chocolate treat without the guilt—these Date Snickers are free of processed sugars and full of wholesome ingredients.

Versatile Snacking: Perfect as a post-workout energy boost, afternoon snack, or crowd-pleasing dessert for gatherings.

Unique Flavor: The blend of chewy dates, creamy peanut butter, and crunchy peanuts wrapped in dark chocolate creates an irresistible flavor explosion.

Quick Preparation: No baking required! Just mix, mold, and freeze for a delicious dessert ready in no time.

Once you try these, you’ll be hooked and might even want to explore other delightful recipes like Nutty Chocolate Date or Banana Bread Brownies. Enjoy the guilt-free sweetness!

Date Snickers Recipe Ingredients

For the Base
Medjool Dates – These luscious fruits are packed with natural sweetness and a chewy texture; for the best results, opt for Palestinian Medjool dates.
Smooth Peanut Butter – Adds a creamy, protein-rich element; feel free to swap it for crunchy peanut butter, just omit the additional peanuts.

For the Topping
Salted Peanuts – These provide a crunchy texture that contrasts beautifully with the soft filling; unsalted peanuts can be used for a milder flavor.
Dark Chocolate (70%+) – This rich chocolate coating brings a delicious depth of flavor, balancing the sweetness of the dates perfectly.

Transform these simple ingredients into your favorite Date Snickers Recipe and enjoy a sweet treat that’s both indulgent and nourishing!

Step‑by‑Step Instructions for Date Snickers Recipe

Step 1: Prepare the Dates
Begin by pitting the Medjool dates; carefully slice each date lengthwise and remove the pit. Once pitted, gently press the dates into round cupcake silicone molds, shaping them to create a small cup for the filling. Aim for about 12 molds, ensuring the dates hold their shape, and set them aside for a moment while you prepare the filling.

Step 2: Add Peanut Butter and Peanuts
Next, take smooth peanut butter and fill each date cup with approximately a teaspoon, ensuring it’s spread evenly for a creamy texture. Then, sprinkle a few salted peanuts over the peanut butter, adding a delightful crunch that complements the Date Snickers’ flavor. This combination of creamy and crunchy will create the perfect filling for your treats.

Step 3: Melt the Dark Chocolate
In a microwave-safe bowl or double boiler, melt the dark chocolate over low heat, stirring gently until completely smooth. Be sure to stir frequently to avoid scorching the chocolate; it should become glossy and fluid. Once melted, remove it from the heat and let it cool for a minute while you prepare to coat the filled dates.

Step 4: Coat the Filled Dates
Using a spoon, drizzle the melted dark chocolate over each filled date, ensuring they are generously coated. Allow the chocolate to flow down the sides, creating a beautiful finish reminiscent of classic Snickers bars. After coating, tap the mold lightly on the counter to settle the chocolate and eliminate any air bubbles trapped underneath.

Step 5: Freeze to Set
Carefully transfer the molds to the freezer and let them chill for about one hour. This step is crucial as it allows the dark chocolate to firm up, creating a satisfying snap with every bite. Keep an eye on them; once the chocolate has hardened, your Date Snickers will be ready to come out!

Step 6: Remove and Serve
Once the Date Snickers have set, gently pull them from the silicone molds. If they stick, lightly press the bottom of the mold to release them. This is the moment to admire your handiwork! Serve your delectable Date Snickers as a delightful snack or dessert, relishing the blend of flavors in each bite.

Make Ahead Options

These 4-Ingredient Date Snickers are perfect for meal prep enthusiasts! You can prepare the filled date cups, including the smooth peanut butter and salted peanuts, up to 24 hours in advance by simply assembling them in the molds and refrigerating. After that, just drizzle with melted dark chocolate before serving. This tip helps maintain their chewy texture and ensures optimal flavor, while the easy assembly saves you valuable time during busy weekdays. For the best quality, store them in an airtight container in the fridge and freeze any that won’t be consumed within a few days. Trust me, they will be just as delicious when you’re ready to enjoy your treats!

How to Store and Freeze Date Snickers

  • Room Temperature: Store your Date Snickers at room temperature for up to 2 days in a cool, dry place; make sure they’re in an airtight container to maintain freshness.

  • Fridge: For longer storage, place the Date Snickers in an airtight container in the fridge where they’ll stay fresh for up to 1 week; the cool environment enhances the chocolate’s texture.

  • Freezer: Freeze your Date Snickers for extended preservation; wrap each piece in plastic wrap and place them in a freezer-safe container or bag, ensuring they can last up to 3 months.

  • Reheating: Enjoy them frozen or allow them to thaw at room temperature for 15-20 minutes before indulging. This Date Snickers recipe makes it easy to have a healthy, chocolatey treat ready whenever you crave!

Expert Tips for Date Snickers Recipe

  • Quality Counts: Use fresh Medjool dates for the best flavor and texture; stale dates can result in a less enjoyable snack.

  • Gentle Chocolate Melting: Always melt chocolate slowly to prevent scorching; a microwave at low intervals or a double boiler works wonders.

  • Balanced Filling: Be mindful not to overfill with peanuts; too many will disrupt the texture of your Date Snickers and can make them messy.

  • Molding Matters: Ensure your silicone molds are clean and adequately shaped; this helps to maintain the structure of your snacks when removing them.

  • Perfect Portioning: If you’re unsure about portion sizes, consider using a kitchen scale to weigh the melted chocolate for an even coating on each Date Snickers.

Date Snickers Recipe Variations

Feel free to let your creativity shine with these delightful adaptations that will elevate your Date Snickers experience!

  • Nut-Free Option: Substitute smooth peanut butter with sunflower seed butter for a delicious nut-free alternative. These little bites will still pack a flavor punch!

  • Chocolate Lovers: Add a sprinkle of cocoa powder mix to the peanut butter filling for an extra chocolatey experience. This variation allows you to embrace the rich cocoa flavor in every bite.

  • Coconut Bliss: Drizzle melted coconut oil on top instead of chocolate, and add shredded coconut for a tropical twist. Imagine indulging in this sweet, chewy treat while feeling the sun on your face!

  • Fruit Surprise: Stuff the dates with dried cranberries or raisins along with the peanut butter and peanuts. Each bite becomes a delightful blend of sweetness with a chewy fruit layer.

  • Spiced Delight: Incorporate a pinch of cinnamon or a dash of sea salt into the peanut butter filling for a warm flavor boost. This little addition can transform your Date Snickers into a cozy dessert experience.

  • Nutty Medley: Swap in a variety of nuts, such as almonds or hazelnuts, for a crunchy texture. Mixing it up keeps your snacks exciting and rich in nutrients.

  • Heat It Up: Add a sprinkle of cayenne pepper to the chocolate drizzle for a surprising kick. This fiery twist brings an unexpected flavor dimension that heat lovers will adore.

  • Healthy Sweetener: Sweeten the peanut butter with a touch of maple syrup or agave nectar for added sweetness without refined sugars. This variation brings a whole new level of sweetness while keeping it healthy!

These variations are just the beginning of your adventure with Date Snickers. For inspiration to complement this recipe, check out my Homemade Chicken Pot or perhaps create something equally satisfying with Cabbage Carrot Patties. Enjoy your tasty journey!

What to Serve with 4-Ingredient Date Snickers?

Elevate your snacking experience with delightful pairings that balance sweetness and texture for a satisfying treat.

  • Fresh Berries: Their tartness complements the sweetness of the Date Snickers while adding a refreshing burst of flavor. Perfect for balancing indulgence!
  • Coconut Yogurt: The creaminess and hint of coconut add a tropical flair, enhancing the overall flavor profile of your snacks. It’s a lovely contrast!
  • Nutty Granola: For added crunch, serve with a handful of nutty granola that mirrors the snickers’ texture while introducing wholesome grains.
  • Almond Milk: Smooth and nutty, this dairy-free drink pairs beautifully with the richness of the Date Snickers for a light, refreshing sip.
  • Dark Chocolate-Covered Pretzels: For an addictive mix of sweet and savory, these delightful bites elevate your dessert spread superbly.
  • Chia Seed Pudding: Topped with fruits, it’s a healthy, pudding-like dessert that enhances your experience with intriguing textures and flavors.

These pairings are sure to create a harmonious and satisfying spread, perfect for any occasion or simply enjoying at home!

4-Ingredient Date Snickers Recipe FAQs

How do I choose the best Medjool dates for this recipe?
Absolutely! Look for plump, soft Medjool dates with no dark spots or dryness, as fresh dates will provide the best flavor and texture. Palestinian Medjool dates are often recommended because they are more fudgy and luxurious, enhancing the overall experience of your Date Snickers.

How should I store the Date Snickers?
To maintain the freshness of your Date Snickers, store them in an airtight container. At room temperature, they’ll stay good for about 2 days. If you want them to last longer, pop them in the fridge where they’ll keep for up to a week. This also improves the texture of the chocolate!

Can I freeze Date Snickers, and if so, how?
Very! To freeze your Date Snickers, first wrap each piece individually in plastic wrap to prevent them from sticking together. Place the wrapped pieces in a freezer-safe container or resealable bag, ensuring no air is trapped inside. They can be safely frozen for up to 3 months. When ready to enjoy, simply thaw them at room temperature for about 15-20 minutes.

What if my dates are too firm to stuff?
No worries! If your Medjool dates are on the firmer side, soak them in warm water for about 10-15 minutes to soften them up. After soaking, drain and pat them dry before using. This will make them easier to pit and fill, ensuring a smooth and creamy filling for your Date Snickers.

Are there any dietary considerations for allergies?
Certainly! This Date Snickers recipe is gluten-free and vegan, making it suitable for many dietary preferences. However, if you’re making them for someone with nut allergies, be sure to substitute the peanut butter with sunflower seed butter and omit any peanuts. Always check ingredient labels to ensure they’re allergen-free!

Can I add other ingredients to my Date Snickers?
Absolutely! Feel free to get creative! You can incorporate a variety of ingredients like chopped dried fruits or use different nuts in the filling. Additionally, a sprinkle of sea salt or a drizzle of melted coconut oil on top can add delightful flavors. Enjoy experimenting with your Date Snickers recipe!

Date Snickers Recipe

Irresistible Date Snickers Recipe: Guilt-Free Chocolate Bliss

Try this Date Snickers Recipe for a delicious, guilt-free dessert made with Medjool dates and dark chocolate.
Prep Time 15 minutes
Freezing Time 1 hour
Total Time 1 hour 15 minutes
Servings: 12 pieces
Course: Dessert
Cuisine: Gluten-Free, Vegan
Calories: 120

Ingredients
  

For the Base
  • 12 pieces Medjool Dates Pitted
  • 1 cup Smooth Peanut Butter Can substitute with crunchy peanut butter
For the Topping
  • 1/2 cup Salted Peanuts Can substitute with unsalted peanuts
  • 1 cup Dark Chocolate (70%+)

Equipment

  • Silicone molds
  • Microwave or double boiler

Method
 

Step-by-Step Instructions
  1. Begin by pitting the Medjool dates; slice each date lengthwise and remove the pit. Shape them into small cups in silicone molds.
  2. Fill each date cup with approximately a teaspoon of smooth peanut butter. Sprinkle a few salted peanuts over the peanut butter.
  3. Melt the dark chocolate in a microwave-safe bowl or double boiler over low heat, stirring until smooth.
  4. Drizzle the melted chocolate over each filled date, ensuring they are generously coated. Tap the mold lightly on the counter.
  5. Transfer the molds to the freezer and let them chill for about one hour until the chocolate has hardened.
  6. Gently pull the Date Snickers from the silicone molds and serve as a delightful snack or dessert.

Notes

For best results, use fresh Medjool dates. Store at room temperature for up to 2 days or in the fridge for up to 1 week.

Hot Honey Pepperoni Ricotta Pizza for Flavorful Nights

As a warm summer breeze stirs the air, my kitchen fills with the inviting aroma of sizzling pepperoni and melted cheese. This isn’t just any pizza night; I’m whipping up a Hot Honey Pepperoni Ricotta Pizza that perfectly balances savory and sweet. The blend of spicy, crispy pepperoni, rich dollops of creamy ricotta, and the unexpected drizzle of hot honey is bound to elevate your dinner and satisfy even the pickiest eaters. Not only is this recipe a crowd-pleaser, but it’s also remarkably quick to prepare, making it perfect for those impromptu gatherings or casual family meals. Trust me—once you try this delicious twist on a classic, you’ll find yourself craving pizza like never before. Are you ready to transform your pizza night?

Why Is This Pizza So Special?

Elevated Flavor Profile: The sweet and spicy combination of hot honey with crispy pepperoni elevates this pizza beyond the ordinary.

Quick and Easy: You’ll find this recipe simple to prepare, ensuring that even on busy evenings, you can serve a gourmet meal without stress.

Crowd-Pleaser: Whether it’s a family dinner or friends over for game night, this pizza will please every palate—it’s a guaranteed hit!

Texture Harmony: The crunchy crust pairs perfectly with the gooey cheese and creamy ricotta, making every bite a delightful experience.

Endless Customization: Feel free to mix things up! Swap pepperoni for salami or veggies, or try different cheeses to fit your cravings perfectly. This recipe can become the base for endless variations.

Explore another delight like the Honey Chili Chicken or give a cozy twist to pizza with Zucchini Oatmeal Bake.

Hot Honey Pepperoni Ricotta Pizza Ingredients

For the Pizza Base
Pizza Dough – Use either store-bought or homemade for a fresh taste.
Flour or Cornmeal – Dust your surface to prevent sticking when rolling out the dough.

For the Sauce and Cheese
Tomato Sauce – Adds essential moisture and flavor; marinara or pizza sauce are lovely alternatives.
Shredded Mozzarella Cheese – Melts beautifully, providing a savory layer; feel free to substitute with provolone if desired.
Whole Milk Ricotta Cheese – Offers rich creaminess; dollop it on instead of spreading to keep texture intact.

For the Toppings
Pepperoni – Infuses the dish with its iconic spicy flavor; adjust the amount to your preference.
Hot Honey – A must-have for that sweet and spicy kick; easily homemade by mixing honey with chili flakes.
Fresh Basil Leaves (optional) – Use for garnish to introduce a lovely fresh aroma.
Red Pepper Flakes (optional) – Add extra heat if you’re feeling adventurous; omit if you prefer a milder flavor.

Step‑by‑Step Instructions for Hot Honey Pepperoni Ricotta Pizza

Step 1: Preheat the Oven
Begin by preheating your oven to a blistering 500°F (260°C). Place a pizza stone or a baking sheet inside the oven to heat up for about 30 minutes. This ensures that your Hot Honey Pepperoni Ricotta Pizza will have a perfectly crispy crust when it’s time to bake.

Step 2: Prepare the Dough
On a lightly floured surface, roll out your pizza dough until it forms a 12-inch round. Aim for a thickness of about ¼ inch to achieve that delightful balance of chewy and crispy. Use flour or cornmeal to dust the surface to avoid sticking while rolling out the dough easily.

Step 3: Assemble the Pizza
Transfer the rolled-out dough onto a parchment-lined pizza peel or directly onto the preheated baking sheet. Spread an even layer of tomato sauce across the dough, leaving a ½-inch border around the edges. Next, generously sprinkle shredded mozzarella cheese over the sauce, followed by an arrangement of pepperoni slices, and finish with dollops of ricotta for that luxurious creaminess.

Step 4: Bake the Pizza
Carefully slide your assembled Hot Honey Pepperoni Ricotta Pizza onto the preheated pizza stone or baking sheet in the oven. Bake for about 8–12 minutes, keeping an eye on it until the crust turns golden brown and the cheese is bubbling and slightly browned. This high temperature will ensure that you get a perfectly cooked pizza in no time!

Step 5: Add the Finishing Touches
Once your pizza is beautifully baked, remove it from the oven and immediately drizzle hot honey over the top for that delightful sweet and spicy kick. If you like, garnish with fresh basil leaves and a sprinkle of red pepper flakes for an extra punch of flavor. Slice up your Hot Honey Pepperoni Ricotta Pizza and get ready to savor every delicious bite.

Hot Honey Pepperoni Ricotta Pizza Variations

Unleash your culinary creativity and customize this pizza to suit your palate with these delightful twists!

  • Spicy Twist: Add jalapeños or banana peppers for a punch of heat that kicks the flavor up a notch.
  • Veggie Delight: Swap out pepperoni for a mix of roasted vegetables like bell peppers, zucchini, and mushrooms for a hearty vegetarian option. The sweet hot honey complements the earthy veggies beautifully!
  • Cheese Lovers: Mix in gorgonzola or feta cheese for an unexpected tang amid the classic ricotta and mozzarella blend, turning every bite into a creamy dream.
  • Savory Swap: Use salami or grilled chicken instead of pepperoni for varying levels of savory flavors that align perfectly with the sweetness of hot honey.
  • Gluten-Free Alternative: Opt for gluten-free pizza dough to ensure everyone can enjoy this delicious haven without the gluten.
  • Grilled Goodness: Before adding your toppings, briefly grill your pizza dough for a smoky flavor that pairs wonderfully with the sweet and spicy elements.
  • Herbed Enhancement: Incorporate some fresh rosemary or thyme sprinkled on top, which brings an aromatic freshness that elevates the pizza’s profile.
  • Sweet Peach Twist: Experiment by adding bite-sized pieces of fresh peaches or figs alongside the ricotta; the fruity sweetness contrasts beautifully with the heat of the honey.

These variations not only add depth but also open the door to countless flavor combinations. For more satisfying options, don’t miss the Honey Garlic Slow Cooked Ribs for another delicious meal or try the comforting Bread Pizza for a quick treat!

Expert Tips for Hot Honey Pepperoni Ricotta Pizza

Crispy Crust Secret: Pre-bake the pizza stone or baking sheet to ensure a perfectly crispy crust that holds all the delightful toppings.

Ricotta Delight: Avoid overbaking the ricotta. This keeps it creamy and distinct, adding that luxurious touch to your Hot Honey Pepperoni Ricotta Pizza.

Homemade Hot Honey: For an extra kick, consider making your own hot honey. Simply mix honey with chili flakes and let it steep for intensity.

Easy Transfer: Use parchment paper on your pizza peel or baking sheet for seamless transfer to and from the oven, reducing any sticky situations!

Customize Your Toppings: Feel free to swap out pepperoni for your favorite proteins like salami or chicken, or experiment with roasted vegetables for a vegetarian twist.

How to Store and Freeze Hot Honey Pepperoni Ricotta Pizza

Fridge: Store leftover slices in an airtight container for up to 3 days. Make sure they’re cooled before sealing to maintain freshness.

Freezer: Wrap individual slices in plastic wrap and then foil, storing them in the freezer for up to 2 months. This preserves the flavors of the Hot Honey Pepperoni Ricotta Pizza for later enjoyment.

Reheating: For the best results, reheat in a preheated oven at 350°F (175°C) for about 10-15 minutes or until heated through, restoring that delightful crispy crust.

Make-Ahead: You can prepare the pizza ahead by assembling it and freezing it uncooked. When you’re ready, just bake directly from frozen, adding a few extra minutes to the cooking time.

What to Serve with Hot Honey Pepperoni Ricotta Pizza

To create a delightful dining experience that pairs beautifully with the comforting flavors of this pizza, consider these complementary offerings.

  • Mixed Green Salad:
    A crisp salad adds freshness and crunch, balancing the rich flavors of the pizza. Toss in a light vinaigrette for a zesty contrast.

  • Grilled Vegetables:
    Offering smoky charred notes, grilled veggies like zucchini, bell peppers, and eggplant provide a satisfying textural counterpoint to the cheesy goodness of the pizza.

  • Garlic Knots:
    These buttery, garlicky bites are a must-have side. Their chewy exterior and soft inside are perfect for soaking up extra pizza sauce and hot honey.

  • Marinated Olives:
    A bowl of marinated olives brings salty depth that cuts through the richness of the ricotta and pepperoni while adding a touch of Mediterranean flair.

  • Spicy Pickles:
    For a tangy kick, serve spicy pickles alongside your pizza. They provide a refreshing crunch that complements the sweetness and heat of the hot honey.

  • Red Wine:
    A smooth red wine, like Chianti or a light-bodied Merlot, complements the savory notes of the pizza beautifully, enhancing your dining experience.

  • Chocolate Chip Cookies:
    End your meal on a sweet note with warm chocolate chip cookies. Their gooey centers provide a comforting finish after the savory pizza.

  • Lemon Sorbet:
    For a light and refreshing dessert, lemon sorbet cleanses the palate and brings a bright sweetness to finish the meal on a delightful note.

Make Ahead Options

These Hot Honey Pepperoni Ricotta Pizzas are perfect for meal prep enthusiasts! You can prepare the pizza dough up to 24 hours in advance and keep it in the refrigerator, covered with plastic wrap to prevent drying out. Additionally, you can pre-chop the toppings and store them in airtight containers for up to 3 days. When you’re ready to serve, simply roll out the dough, assemble the pizza with sauce, cheese, and toppings, then bake it in the preheated oven for 8-12 minutes. This way, you’ll enjoy a freshly baked pizza that’s just as delicious, saving precious time on busy weeknights or for impromptu gatherings!

Hot Honey Pepperoni Ricotta Pizza Recipe FAQs

How do I select ripe ingredients for my Hot Honey Pepperoni Ricotta Pizza?
Choosing ripe ingredients is key to enhancing your pizza’s flavor. Look for a vibrant, deep red color in the tomato sauce and ensure your ricotta has a creamy texture without any graininess. For toppings, select pepperoni that looks fresh and aromatic, ideally with a shiny, deep red hue. When picking fresh basil, choose brightly colored leaves without any dark spots or wilting.

What’s the best way to store leftovers?
Absolutely! Store your leftover Hot Honey Pepperoni Ricotta Pizza in an airtight container in the fridge for up to 3 days. It’s best to let the pizza cool completely before sealing to maintain its flavor and texture. If stored properly, it will still taste great upon reheating!

Can I freeze Hot Honey Pepperoni Ricotta Pizza?
For sure! To freeze your pizza, wrap individual slices tightly in plastic wrap, then in aluminum foil, and store them in the freezer for up to 2 months. When you’re ready to enjoy, simply reheat from frozen in a preheated oven at 350°F (175°C) for about 10-15 minutes, or until heated through and the crust regains its crunch.

What should I do if my pizza crust isn’t crispy?
If your crust doesn’t turn out crispy, it could be due to the oven temperature being too low or not preheating your pizza stone long enough. Ensure your oven reaches 500°F (260°C) and preheat your stone for at least 30 minutes. You could also try rolling your dough thinner or baking the pizza without the toppings for a few minutes before adding them, allowing more moisture to evaporate.

Are there any dietary considerations I should keep in mind when making this pizza?
Very! If you have dietary restrictions or allergies, consider using gluten-free pizza dough for a gluten-free option. The ricotta is dairy-based, so for a dairy-free alternative, you could substitute with cashew cream or a dairy-free ricotta cheese. Always double-check the ingredient packaging for any allergens, especially with pre-packaged items like pepperoni or sauces.

Can I make this pizza ahead of time?
Yes, you can prepare your Hot Honey Pepperoni Ricotta Pizza ahead of time! You can roll out the dough and assemble the pizza without baking it. Wrap it tightly in plastic wrap and refrigerate it for up to 24 hours. When you’re ready to bake, simply pop it in the oven straight from the fridge, adding a few extra minutes of baking time if needed. This way, you can have a fresh, delicious pizza ready with minimal effort!

Hot Honey Pepperoni Ricotta Pizza

Hot Honey Pepperoni Ricotta Pizza for Flavorful Nights

Enjoy a delicious Hot Honey Pepperoni Ricotta Pizza that perfectly balances savory and sweet flavors, perfect for any dinner gathering.
Prep Time 15 minutes
Cook Time 12 minutes
Preheating Time 30 minutes
Total Time 57 minutes
Servings: 4 slices
Course: Dinner
Cuisine: Italian
Calories: 300

Ingredients
  

For the Pizza Base
  • 1 package Pizza Dough store-bought or homemade
  • as needed Flour or Cornmeal for dusting
For the Sauce and Cheese
  • 1 cup Tomato Sauce marinara or pizza sauce
  • 2 cups Shredded Mozzarella Cheese can substitute with provolone
  • 1 cup Whole Milk Ricotta Cheese dollop instead of spreading
For the Toppings
  • 1 cup Pepperoni adjust amount to preference
  • 1/4 cup Hot Honey homemade by mixing honey with chili flakes
  • as needed Fresh Basil Leaves optional for garnish
  • as needed Red Pepper Flakes optional for extra heat

Equipment

  • oven
  • Pizza Stone
  • Pizza Peel
  • baking sheet

Method
 

Step-by-Step Instructions
  1. Preheat your oven to 500°F (260°C) and place a pizza stone or baking sheet inside for 30 minutes.
  2. Roll out pizza dough on a floured surface to a 12-inch round with a ¼ inch thickness.
  3. Transfer rolled dough onto a parchment-lined pizza peel. Spread tomato sauce leaving a ½-inch border, then add mozzarella, pepperoni, and dollops of ricotta.
  4. Slide the assembled pizza onto the pizza stone or baking sheet in the oven and bake for 8-12 minutes until the crust is golden brown and cheese is bubbling.
  5. Remove from oven, drizzle hot honey on top, and garnish with basil and red pepper flakes if desired. Slice and enjoy!

Notes

For a crispy crust, pre-bake the pizza stone or baking sheet. Store leftovers in an airtight container for up to 3 days.

Irresistible Peanut Butter Ice Box Cake for Ultimate Indulgence

As I rummaged through my pantry one sunny afternoon, the sight of Nutter Butter cookies sparked an idea that felt both nostalgic and thrilling. This is how my No-Bake Peanut Butter Ice Box Cake was born—a delightful creation that effortlessly combines layers of creamy peanut butter goodness with the crunchy essence of those beloved cookies. Perfect for anyone tired of soggy fast-food desserts, this treat is not only incredibly easy to whip up but also a true crowd-pleaser at summer gatherings. Just imagine indulging in this creamy, dreamy confection on a warm evening, all without turning on the oven! Ready to dive into a dessert that will transform your peanut butter cravings into something spectacular? Let’s get started!

Why is this dessert a must-try?

No-Bake Convenience: This Peanut Butter Ice Box Cake is incredibly easy to prepare, requiring no baking and minimal effort. Perfect for anyone looking to create a show-stopping dessert without any fuss!

Decadent Flavor: The rich, creamy peanut butter filling layered with crunchy Nutter Butter cookies creates a heavenly flavor experience that peanut butter lovers will cherish.

Versatile Delight: Feel free to experiment! Use different cookies or toppings to personalize your creation, whether it’s adding a drizzle of chocolate or swapping in fresh strawberries to elevate the dish.

Chill Factor: Serve this cake chilled for a refreshing treat during warm weather, making it an ideal choice for picnics and BBQs.

Crowd-Pleasing Treat: Its unique combination of textures and flavors ensures this dessert will be the highlight of any gathering. Just wait for the compliments to roll in!

Peanut Butter Ice Box Cake Ingredients

• Here’s everything you need for this delightful treat!

For the Cake Base

  • Nutter Butter cookies – These provide a crunchy, peanut-flavored base; feel free to substitute with Oreos for a chocolate twist.

For the Cream Filling

  • Cream cheese – This adds a creamy texture and tang; remember to use it at room temperature for easy mixing.
  • Peanut butter – The star of the show; opt for creamy peanut butter, or choose chunky for a fun texture change.
  • Frozen whipped topping – This gives the filling a light and airy quality; just ensure it’s thawed before adding.

For the Topping

  • Crushed Nutter Butter cookies – Sprinkle these on top for a beautiful finishing touch and extra crunch. Adjust the amount to fit your taste preference.

Get ready to create an unforgettable Peanut Butter Ice Box Cake that will surely impress!

Step‑by‑Step Instructions for Peanut Butter Ice Box Cake

Step 1: Prepare the Base Layer
Begin by arranging a single layer of Nutter Butter cookies in a 9×13 casserole dish. Make sure the cookies are tightly packed, covering the bottom completely. This will serve as the crunchy foundation for your Peanut Butter Ice Box Cake. Depending on your dish, this step should only take about 5 minutes.

Step 2: Mix the Cream Filling
In a large mixing bowl, combine 8 ounces of room-temperature cream cheese and 1 cup of creamy peanut butter. Beat with an electric mixer on medium speed until the mixture is smooth and well-blended, which should take about 2 minutes. You’ll want a creamy consistency without lumps, so take your time with this crucial step.

Step 3: Incorporate the Whipped Topping
Add half of the thawed 8-ounce container of frozen whipped topping to the peanut butter mixture. Gently fold it in using a spatula, ensuring the mixture remains airy and fluffy. This step will take about 1-2 minutes, and you should see it lighten in color and texture, becoming a beautiful creamy filling.

Step 4: Final Mixing
Once the first half of the whipped topping is fully incorporated, add the remaining whipped topping to the bowl. Again, gently fold to keep the texture light. Your filling will be a velvety blend of peanut butter deliciousness, perfect for spreading over the cookie layer. This blending should also take about 1-2 minutes.

Step 5: Layer the Cream Filling
Spread approximately one-third of the peanut butter cream mixture over the layer of Nutter Butter cookies. Use a spatula to evenly distribute it, making sure to cover the cookies completely. Repeat this layering process twice more—first layer of cookies, then another layer of cream—until you have used all components and finish with a cream layer on top.

Step 6: Garnish and Chill
Sprinkle crushed Nutter Butter cookies on top of the final layer of cream for added texture and visual appeal. Cover the dish with plastic wrap or a lid, ensuring it’s airtight. Refrigerate the Peanut Butter Ice Box Cake for at least 4 hours, but overnight chilling is recommended for the best flavor and set texture.

Step 7: Serve and Enjoy
When you’re ready to serve, remove the cake from the refrigerator and slice into squares. The creamy filling will be perfectly set, contrasting beautifully with the crunchy cookie layers. Present it chilled, and watch your friends and family devour this delightful dessert!

Expert Tips for Peanut Butter Ice Box Cake

  • Room Temperature Cream Cheese: Ensure your cream cheese is at room temperature for smooth blending, preventing lumps in your filling.

  • Gentle Folding: When incorporating the whipped topping, use a gentle folding technique to maintain the light and airy texture essential for a delightful Peanut Butter Ice Box Cake.

  • Chilling Time: For the best flavor and texture, allow your cake to chill overnight. Patience rewards with a richer, more developed taste!

  • Layering Mastery: Spread your layers evenly for a balanced dessert experience; uneven layers can lead to a messy presentation and imbalanced taste.

  • Crunchy Finish: Adjust the amount of crushed Nutter Butter cookies on top to enhance visual appeal and add an extra crunch to every bite.

How to Store and Freeze Peanut Butter Ice Box Cake

Fridge: Store leftovers in an airtight container in the refrigerator for up to 3 days. If the cake is whole, cover it with plastic wrap to maintain freshness.

Freezer: For longer storage, this delightful Peanut Butter Ice Box Cake can be frozen for up to 2 months. Wrap in plastic wrap, followed by aluminum foil to prevent freezer burn.

Thawing: To enjoy, thaw in the refrigerator overnight before serving. Allow it to come to room temperature for the best texture.

Reheating: This dessert is best enjoyed chilled, so no reheating is recommended. Just slice and serve straight from the fridge for a refreshing treat!

Make Ahead Options

These delightful Peanut Butter Ice Box Cakes are perfect for making ahead of time, saving you precious moments during busy weekdays! You can prepare the cream filling and layer it with the Nutter Butter cookies up to 24 hours in advance. Simply complete steps one through five of the instructions, then cover the dish tightly with plastic wrap or a lid before refrigerating. This not only preserves the flavors but ensures the cookies maintain their crunch. When you’re ready to serve, just top with crushed Nutter Butter cookies and let it chill for an additional hour if needed. Enjoy the ease of having a delicious dessert ready to impress at a moment’s notice!

Peanut Butter Ice Box Cake Variations

Let your creativity soar as you customize this delightful dessert to suit your taste buds!

  • Cookie Swap: Substitute Nutter Butter cookies with chocolate chip or graham crackers for a unique flavor base. It’s all about reinventing that crunch!

  • Nut-Free: Use sun butter or almond butter for a nut-free alternative that still delivers creamy goodness. Feel free to get nutty in your own way!

  • Chunky Delight: Opt for chunky peanut butter instead of smooth for a more textured filling. The delightful crunch of peanuts adds a lovely surprise in every bite.

  • Flavor Infusion: Mix in a splash of vanilla extract or a sprinkle of cinnamon into the cream filling for extra depth. These little twist can transport your taste buds to new heights!

  • Chocolate Lovers: Drizzle melted chocolate over each layer of cream, or fold chocolate chips into the filling for a divine chocolate-peanut butter fusion. This is a sure way to please any chocoholic in the room!

  • Berry Freshness: Top the cake with fresh strawberries or sliced bananas before serving to add a fruity pop! A little color and freshness makes this dessert look even more enticing.

  • Caramel Drizzle: Enhance your cake with a luscious caramel drizzle on top. That sweet touch brings an indulgent finish to this creamy creation!

  • Spicy Twist: If you like heat, consider adding a dash of cayenne pepper to your peanut butter mixture for a playful spicy kick. It sounds unusual, but you won’t regret it!

These variations can elevate your Peanut Butter Ice Box Cake, and be sure to check out how these changes can enhance recipes like my Matcha Sponge Cake or drizzle some caramel over the Garlic Butter French experience. Enjoy experimenting!

What to Serve with Peanut Butter Ice Box Cake

Indulging in a creamy, refreshing dessert can set the scene for a cozy gathering or a delightful family dinner.

  • Fresh Berries: Bright, juicy strawberries or raspberries add a refreshing tartness that beautifully balances the richness of the cake.
  • Whipped Cream: A dollop of lightly sweetened whipped cream on the side enhances the cake’s fluffiness while adding a touch of elegance.
  • Chocolate Drizzle: A simple drizzle of melted chocolate elevates the dessert visually and adds a rich flavor contrast that peanut butter enthusiasts adore.
  • Coffee or Espresso: A warm, bitter cup of coffee pairs perfectly with the sweet creaminess of the cake, making each bite a heavenly experience.
  • Mint Leaves: Garnishing with fresh mint not only adds a pop of color but also a refreshing herbal note that complements the dessert’s sweetness.
  • Vanilla Ice Cream: A scoop of vanilla bean ice cream alongside the cake creates a delightful temperature contrast that is simply irresistible on a warm day.
  • Nutty Granola: Adding a sprinkle of nutty granola on top provides a crunchy texture and highlights the peanut flavor, making every forkful exciting.
  • Chocolate Milkshake: For a nostalgic twist, serving the cake with a chocolate milkshake can take your dessert experience to new heights!

Peanut Butter Ice Box Cake Recipe FAQs

What type of Nutter Butter cookies should I use?
Absolutely, using the classic Nutter Butter cookies is the best choice as they provide the perfect crunch and peanut flavor. However, if you’re looking to switch things up, you can try Oreos for a fun chocolatey twist or any similar cookie that complements peanut butter.

How should I store leftover Peanut Butter Ice Box Cake?
Leftovers can be stored in an airtight container in the refrigerator for up to 3 days. If you leave the cake whole, be sure to cover it with plastic wrap to keep it fresh and prevent it from absorbing other odors from the fridge.

Can I freeze this Peanut Butter Ice Box Cake?
Yes! You can freeze this delightful dessert for up to 2 months. Wrap it tightly in plastic wrap, then cover it with aluminum foil to prevent freezer burn. When you’re ready to enjoy it, simply thaw it in the refrigerator overnight.

What should I do if my cream filling is too thick?
If your cream filling turns out thicker than desired, don’t worry! Simply add a tablespoon of milk and mix gently until you reach a smoother consistency. Be sure to fold in the liquid gradually to maintain that light and airy texture while achieving the desired creaminess.

Is this recipe suitable for individuals with nut allergies?
Unfortunately, this Peanut Butter Ice Box Cake is not suitable for those with nut allergies due to the peanut butter component. However, you could experiment with sunflower seed butter as a nut-free alternative; just make sure to check the labels to avoid cross-contamination, especially if you’re serving it to someone with an allergy.

How long should I chill the cake before serving?
For the best flavor and texture, refrigerate the Peanut Butter Ice Box Cake for at least 4 hours, but overnight chilling is even better! This allows the layers to set beautifully and enhances the overall taste, making it a true crowd-pleaser.

Peanut Butter Ice Box Cake

Irresistible Peanut Butter Ice Box Cake for Ultimate Indulgence

Enjoy this delicious Peanut Butter Ice Box Cake that combines layers of creamy peanut butter goodness with crunchy Nutter Butter cookies.
Prep Time 15 minutes
Chilling Time 4 hours
Total Time 4 hours 15 minutes
Servings: 8 slices
Course: Dessert
Cuisine: American
Calories: 250

Ingredients
  

For the Cake Base
  • 36 cookies Nutter Butter cookies or substitute with Oreos for a chocolate twist
For the Cream Filling
  • 8 ounces cream cheese use at room temperature
  • 1 cup creamy peanut butter or choose chunky for texture
  • 8 ounces frozen whipped topping thawed before adding
For the Topping
  • 1 cup crushed Nutter Butter cookies adjust to fit taste preference

Equipment

  • 9x13 casserole dish
  • electric mixer
  • spatula
  • mixing bowl

Method
 

Step-by-Step Instructions
  1. Arrange a single layer of Nutter Butter cookies in a 9x13 casserole dish, tightly packed.
  2. Combine 8 ounces of room-temperature cream cheese and 1 cup of creamy peanut butter in a bowl, and beat until smooth.
  3. Add half of the thawed 8-ounce container of whipped topping and gently fold it in to keep the mixture airy.
  4. Incorporate the remaining whipped topping with gentle folding for a light mixture.
  5. Spread one-third of the cream mixture over the cookies and layer twice more, finishing with a cream layer.
  6. Sprinkle crushed cookies on top, cover tightly, and refrigerate for at least 4 hours, preferably overnight.
  7. Slice and serve chilled, enjoying the contrast of creamy filling and crunchy layers.

Notes

Ensure cream cheese is at room temperature and use gentle folding techniques for a light and airy texture. Allow the cake to chill overnight for best flavor.